Clay handprint keepsakes are one of my favorite ways to freeze a tiny moment in time and turn it into something you can actually display. Whether you’re using air-dry clay, ceramic clay, or a homemade dough-style clay, these ideas make that sweet little print feel extra special.
Heart-Framed Handprint Keepsake Plaque
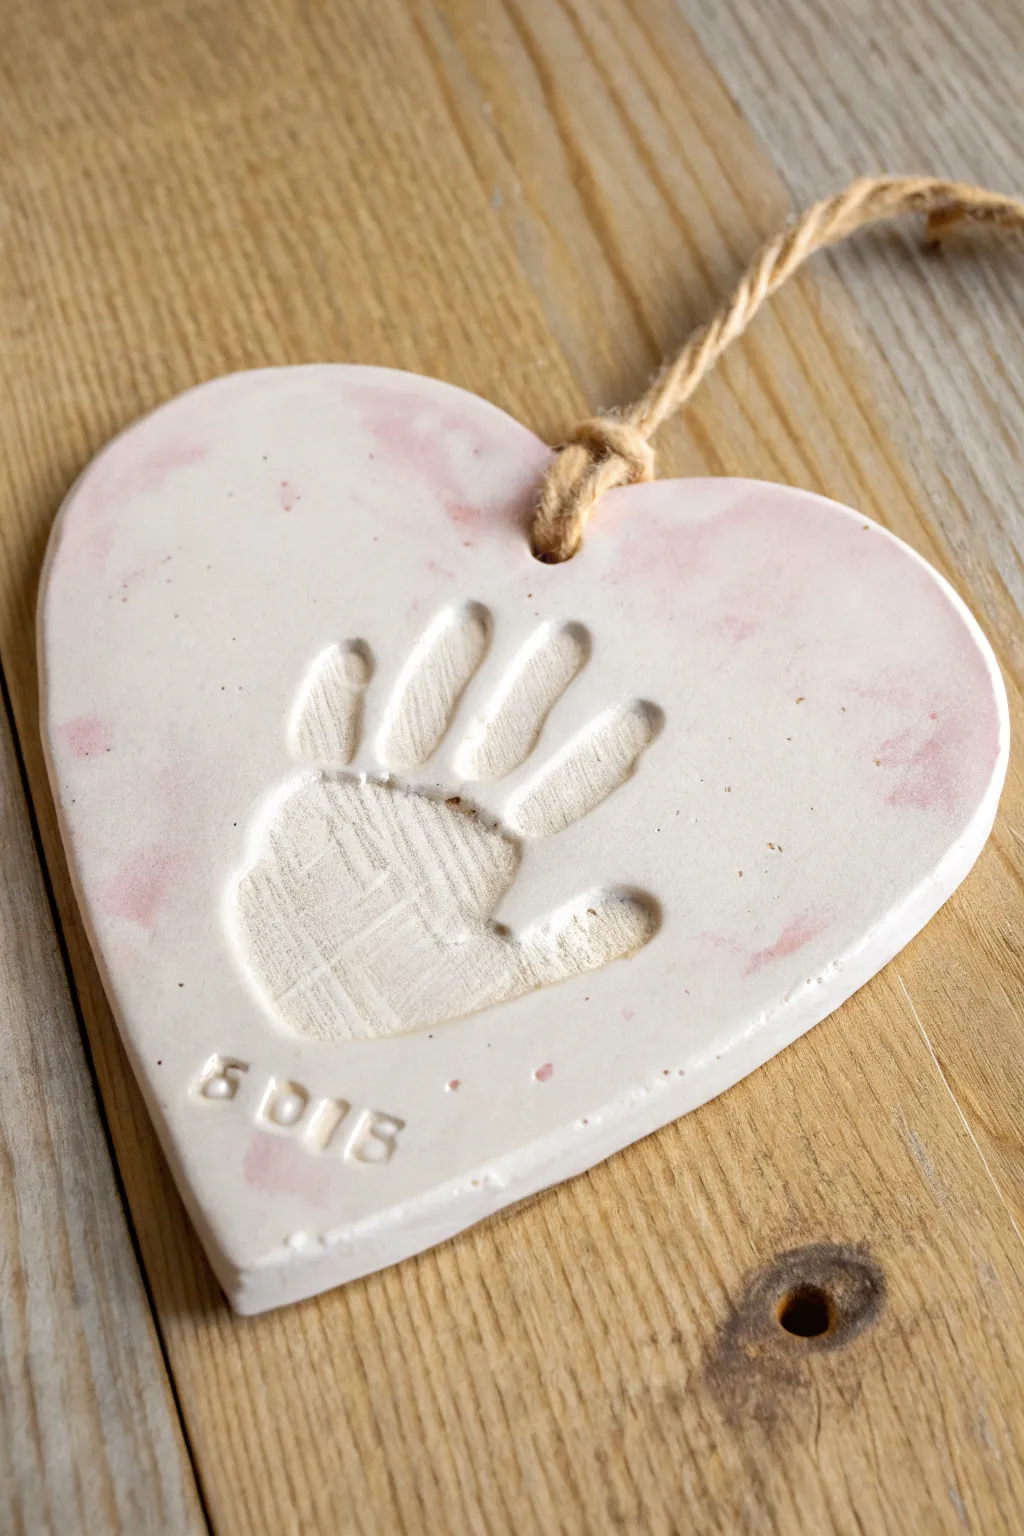
Capture a moment in time with this sweet, heart-shaped keepsake featuring a delicate pink marbled effect. The rustic jute tie and stamped date add a timeless, homemade charm that makes it perfect for gifting or hanging on your own wall.
How-To Guide
Materials
- White air-dry clay (or polymer clay)
- Pink food coloring or acrylic paint
- Rolling pin
- Heart-shaped cookie cutter (large enough for the hand)
- Drinking straw or skewer
- Jute twine
- Alphabet/number stamps
- Smooth work surface or silicone mat
- Fine-grit sandpaper (optional)
- Clear matte varnish (optional)
Step 1: Preparing the Marbled Clay
-
Portion the clay:
Start by grabbing a large handful of white air-dry clay. You want enough to comfortably fit the child’s hand with about an inch of border space. Knead it in your hands until it is soft, pliable, and free of cracks. -
Add color:
Flatten the ball slightly and add just a tiny drop of pink food coloring or a dab of pink acrylic paint into the center. Fold the clay over the color to trap it inside. -
Marbling technique:
Twist and fold the clay repeatedly. Stop mixing before the color is fully blended; you want distinct streaks of pink and white swirling through the dough rather than a solid pink color. -
Roll it out:
Place your marbled clay on a smooth surface or silicone mat. Use a rolling pin to flatten the clay to an even thickness of about 1/4 to 1/2 inch. I find that going too thin makes the final piece fragile, so keep it sturdy.
Cracking Clay?
If small cracks appear while drying, mix a tiny bit of fresh clay with water to make a paste (slip). Smooth this paste into the cracks with your finger and let it dry again.
Step 2: Creating the Impression
-
Position the hand:
Help the child place their open palm onto the center of the rolled-out clay. Spread their fingers slightly so each digit is distinct. -
Press firmly:
Press down gently but firmly on the palm and each individual finger to ensure a deep, clear impression. You want to see the texture of the skin if possible. -
Release:
Lift the hand straight up to avoid smudging the edges of the print. If the print isn’t clear, simply ball up the clay and re-roll it to try again. -
Cut the shape:
Center your large heart-shaped cookie cutter over the handprint. Press down firmly to cut the shape, then careful peel away the excess clay from the outside. -
Smooth the edges:
Dip your finger in a little bit of water and run it along the cut edge of the heart to smooth out any roughness or jagged bits left by the cutter.
Level Up: Gold Detail
After the clay is completely dry, use a fine-tip brush and liquid gold leaf or gold paint to carefully fill in the stamped date for a touch of elegance.
Step 3: Finishing Touches
-
Add the hole:
Use a drinking straw or a skewer to poke a hole near the top center of the heart. Make sure it goes all the way through and is perfectly round. -
Stamp the date:
Using your small number stamps, gently press the date (or a name) into the clay near the bottom point of the heart. Don’t press too hard, just enough to leave a mark. -
Check texture:
Take a close look at the surface. If you want a textured look inside the print (like tiny checkered lines), you can gently press a piece of textured fabric into the bottom of the handprint depression before drying. -
Drying process:
Place the heart on a wire cooling rack to air dry. This ensures air circulates underneath, preventing warping. Let it dry for 24-48 hours, flipping it over halfway through. -
Sand edges:
Once fully hard and dry, inspect the edges. If there are any sharp spots, very lightly sand them down with fine-grit sandpaper. -
Seal (Optional):
To protect the piece from moisture and give it a finished look, you can brush on a thin layer of clear matte varnish or Mod Podge. -
Add the hanger:
Cut a length of rustic jute twine. Thread one end through the hole at the top of the heart. -
Tie and hang:
Bring the ends of the twine together and tie a secure knot. Your personalized keepsake is now ready to display.
Hang this lovely memento in a sunny spot or give it to a grandparent as a cherished gift that freezes time for just a moment


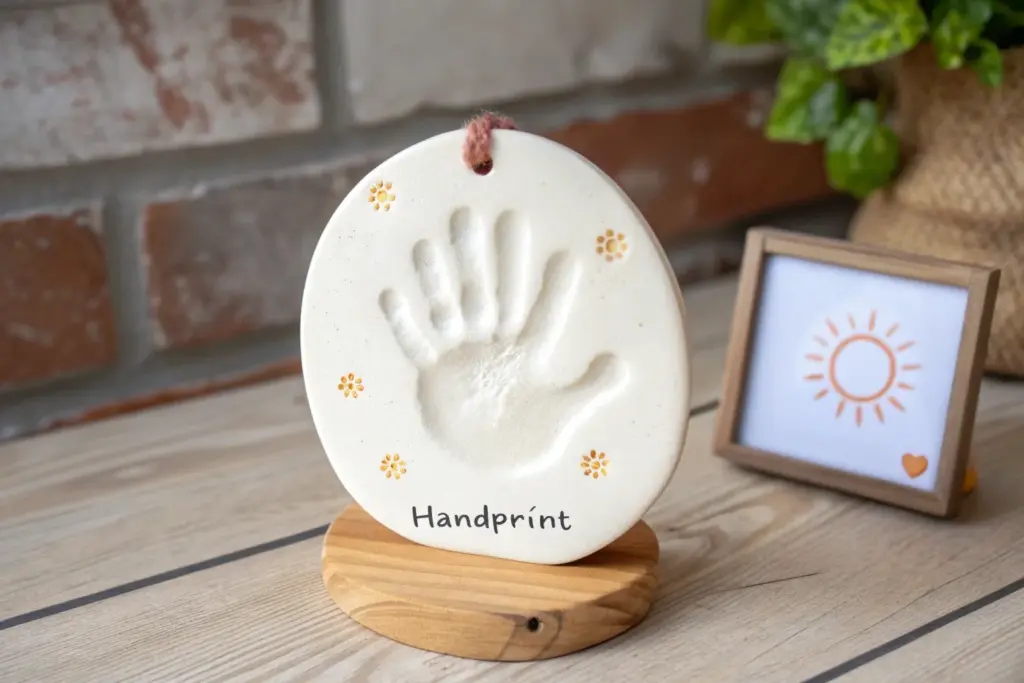
Handprint Cutout Ornament (Hand Shape)
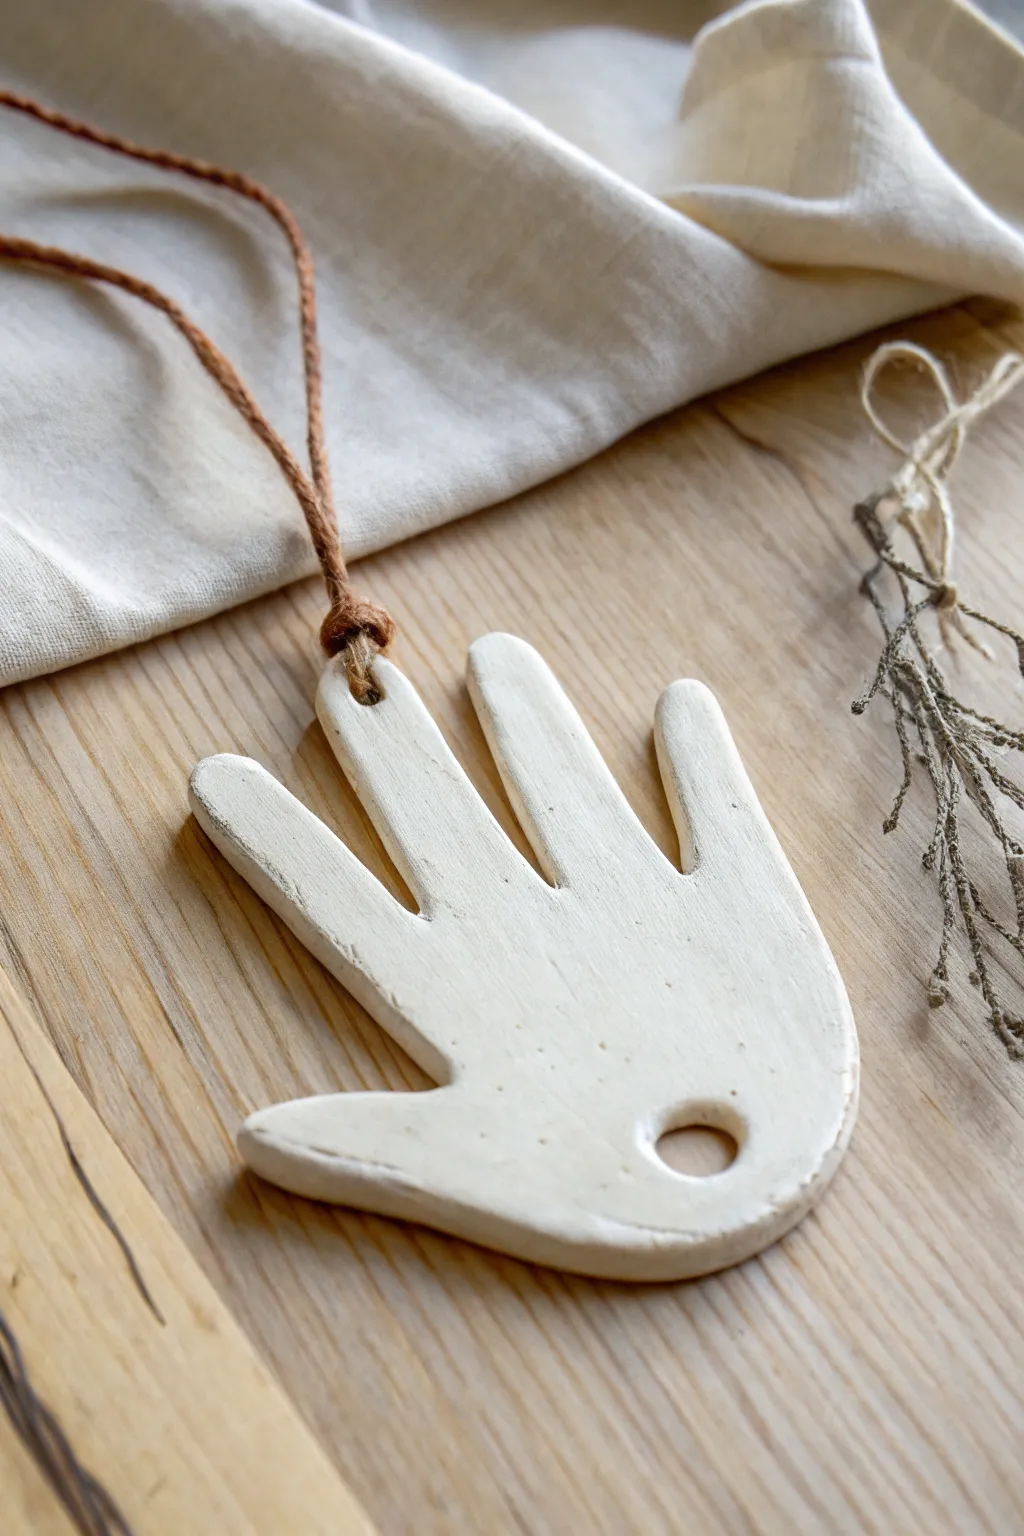
Capture the fleeting size of a loved one’s hand with this rustic, minimalist hanging ornament. Instead of an impression, this project creates a silhouette shape that highlights the unique contours of the fingers in a clean, modern way.
Step-by-Step
Materials
- Air-dry clay (white) or salt dough
- Rolling pin
- Parchment paper or craft mat
- Paper and pencil (for template)
- Scissors
- Craft knife or clay needle tool
- Plastic straw or large skewer
- Fine-grit sandpaper
- White acrylic paint (matte finish)
- Small paintbrush
- Brown jute twin or hemp cord
Step 1: Preparation and Template
-
Create the template:
Begin by tracing the hand you want to capture onto a piece of plain paper. Keep the fingers slightly spread to ensure a distinct shape later. -
Refine the shape:
Cut out the paper hand trace with scissors. You might want to smooth out any jagged pencil lines from the tracing process to create a pleasing, rounded silhouette. -
Prepare the workspace:
Lay down a sheet of parchment paper or a non-stick craft mat to prevent sticking. This makes it much easier to move the clay later. -
Roll the clay:
Take a handful of air-dry clay and knead it briefly until pliable. Roll it out into an even slab, aiming for a thickness of about 1/4 inch (6mm). If it’s too thin, the fingers might break; too thick, and it will be heavy.
Step 2: Shaping the Clay
-
Position the template:
Place your paper hand cutout lightly onto the rolled clay slab. Smooth it down gently so it doesn’t shift while you work. -
Trace and cut:
Using a craft knife or a needle tool, carefully cut around the paper template. Hold the blade vertical to get clean, straight edges rather than beveled ones. -
Remove excess clay:
Peel away the excess clay from the outside of the shape first, then gently lift the paper template off. -
Smooth the edges:
Dip your finger in a tiny bit of water and run it along the cut edges of the clay hand. This softens the sharp cuts and removes any little burrs from the knife. -
Create the palm hole:
To make the decorative hole seen in the palm area, use a plastic straw. Press it firmly into the lower center of the palm and twist slightly to lift out a clean circle of clay. -
Create the hanging hole:
Use the same straw technique or a skewer to create a hole at the top of the middle finger (or whichever finger is highest) for the hanging cord.
Smooth Operator
To fix minor cracks during drying, make a paste of clay and water (called slip) and brush it into the cracks, then sand smooth once dry.
Step 3: Finishing Touches
-
Dry the piece:
Let the clay dry completely according to the package instructions. I find flipping the hand over halfway through the drying process helps keep the fingers from curling up. -
Sand for smoothness:
Once fully rigid and dry, take a piece of fine-grit sandpaper and lightly buff the surface and edges. This gives it that professional, finished look. -
Apply the base coat:
Paint the entire front and sides with white matte acrylic paint. This unifies the color and covers any greyish tones from the raw clay. -
Add texture (optional):
For the rustic, speckled look seen in the photo, you can flick a toothbrush with slightly watered-down grey or brown paint over the dried white surface. -
Seal the piece:
Apply a clear matte varnish or sealer to protect the paint, especially if you plan to hang this in a high-traffic area. -
Attach the cord:
Cut a length of brown jute twine. Fold it in half to create a loop. -
Secure the hanger:
Feed the loop through the hole in the finger. Thread the loose ends through the loop and pull tight to create a ‘larks head’ knot, exactly like the reference image.
Double Sided Memory
Before the clay dries, stamp the date or the child’s name into the back of the hand using small letter stamps so the memory is preserved forever.
Now you have a timeless keepsake that freezes a moment in time with elegant simplicity


Santa Handprint Ornament
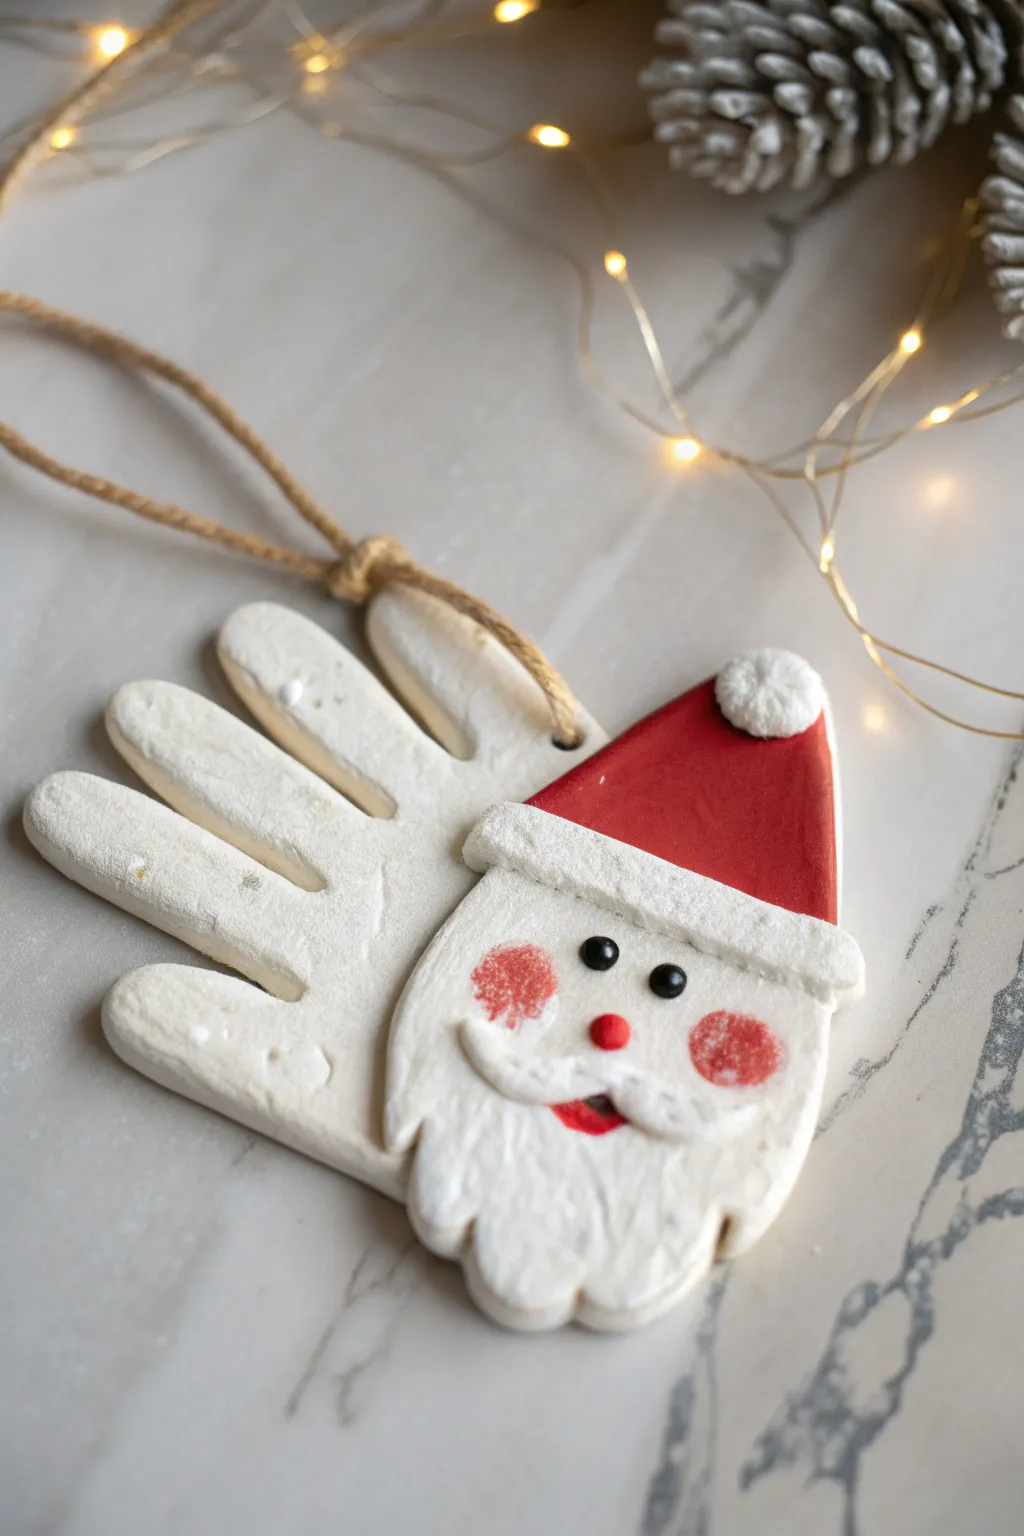
Turn a simple handprint into a jolly Santa Claus ornament that captures a moment in time forever. With textured details and blushing cheeks, this ceramic-style keepsake is perfect for gifting or hanging on your own tree.
Step-by-Step
Materials
- Air-dry clay or white salt dough
- Rolling pin
- Baking sheet
- Parchment paper
- Knife or clay cutting tool
- Straw or skewer (for the hole)
- Red acrylic paint
- White acrylic paint
- Black acrylic paint
- Small flat paintbrush
- Fine detail paintbrush
- Sponge dabber or cut sponge
- Jute twine for hanging
- Clear matte sealant (optional)
Step 1: Shaping the Clay
-
Prepare the workspace:
Lay down a sheet of parchment paper on a flat surface or directly onto your baking tray to prevent sticking. This makes it easier to move the project later without distorting the shape. -
Roll out the clay:
Take a large ball of air-dry clay or salt dough and roll it out until it is roughly ¼ to ½ inch thick. It needs to be thick enough to be sturdy, but thin enough to not take forever to dry. -
Make the impression:
Have the child spread their fingers slightly—especially the thumb—and press their hand firmly into the center of the clay. Ensure the palm creates a deep impression, as this will become Santa’s face. -
Cut out the hand:
Using a knife or clay tool, carefully trace around the perimeter of the handprint, leaving a small, smooth border around the fingers and palm. Remove the excess clay. -
Smooth the edges:
Dip your finger in a tiny bit of water and run it along the cut edges of the clay to smooth out any roughness or jagged bits for a polished look. -
Add texture:
Before the clay dries, gently prick the finger areas (Santa’s beard) and the cuff of the hat with a tool or toothbrush to create a rough, hair-like texture, contrasting with the smooth palm area. -
Create the hanging hole:
Use a drinking straw to punch a clean hole at the top of the palm, near the wrist area (which is now the top of the hat). Twist the straw and pull it out to remove the clay plug. -
Dry the ornament:
Allow the clay to dry completely according to package instructions. For salt dough, bake at a low temperature (200°F) for several hours; for air-dry clay, let it sit for 24-48 hours, flipping halfway through.
Fixing Cracks
If you notice small cracks during drying, mix a tiny bit of fresh clay with water to make a paste and smooth it into the fissures before painting.
Step 2: Painting Santa
-
Base coat the white:
Once fully dry, paint the four fingers (the beard) and the ‘ball’ of the hat (the tip of the thumb) with solid white acrylic paint. You may need two coats for full coverage. -
Paint the hat:
Paint the wrist area bright red to create Santa’s hat. Use a flat brush to create a clean line where the red hat meets the white brim area. -
Create the hat brim:
Paint a thick white band across the top of the palm, separating the red hat from the face area. I like to dab this paint on thickly to mimic fluffy fur. -
Add the face details:
Leaving the center of the palm natural (or painting it a very pale flesh tone if your clay isn’t white), use a detail brush to add two small black dots for eyes. -
Paint the nose and mouth:
Add a small red circle for the nose just below the eyes. Paint a small red mouth below that, perhaps slightly open for a surprised or singing expression. -
Sculpt the mustache:
Using thick white paint or a small roll of leftover clay glued on, create a curved mustache shape right above the mouth. -
Add rosy cheeks:
Dip a sponge dabber or a textured cloth lightly into red paint, wipe most of it off, and gently stamp rosy circle cheeks on either side of the nose. -
Finishing touches:
Thread a piece of jute twine through the hole you made earlier and tie it securely. If desired, coat the entire ornament with a matte sealant to protect the paint.
Textured Snow Effect
Mix white glitter or baking soda into your white paint for the hat brim and pom-pom. This adds a sparkly, snowy texture that looks magical on the tree.
Now hang your charming handcrafted Santa on the tree and enjoy the memory of those little hands every holiday season


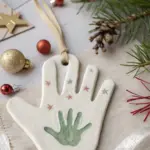
Reindeer Handprint Ornament
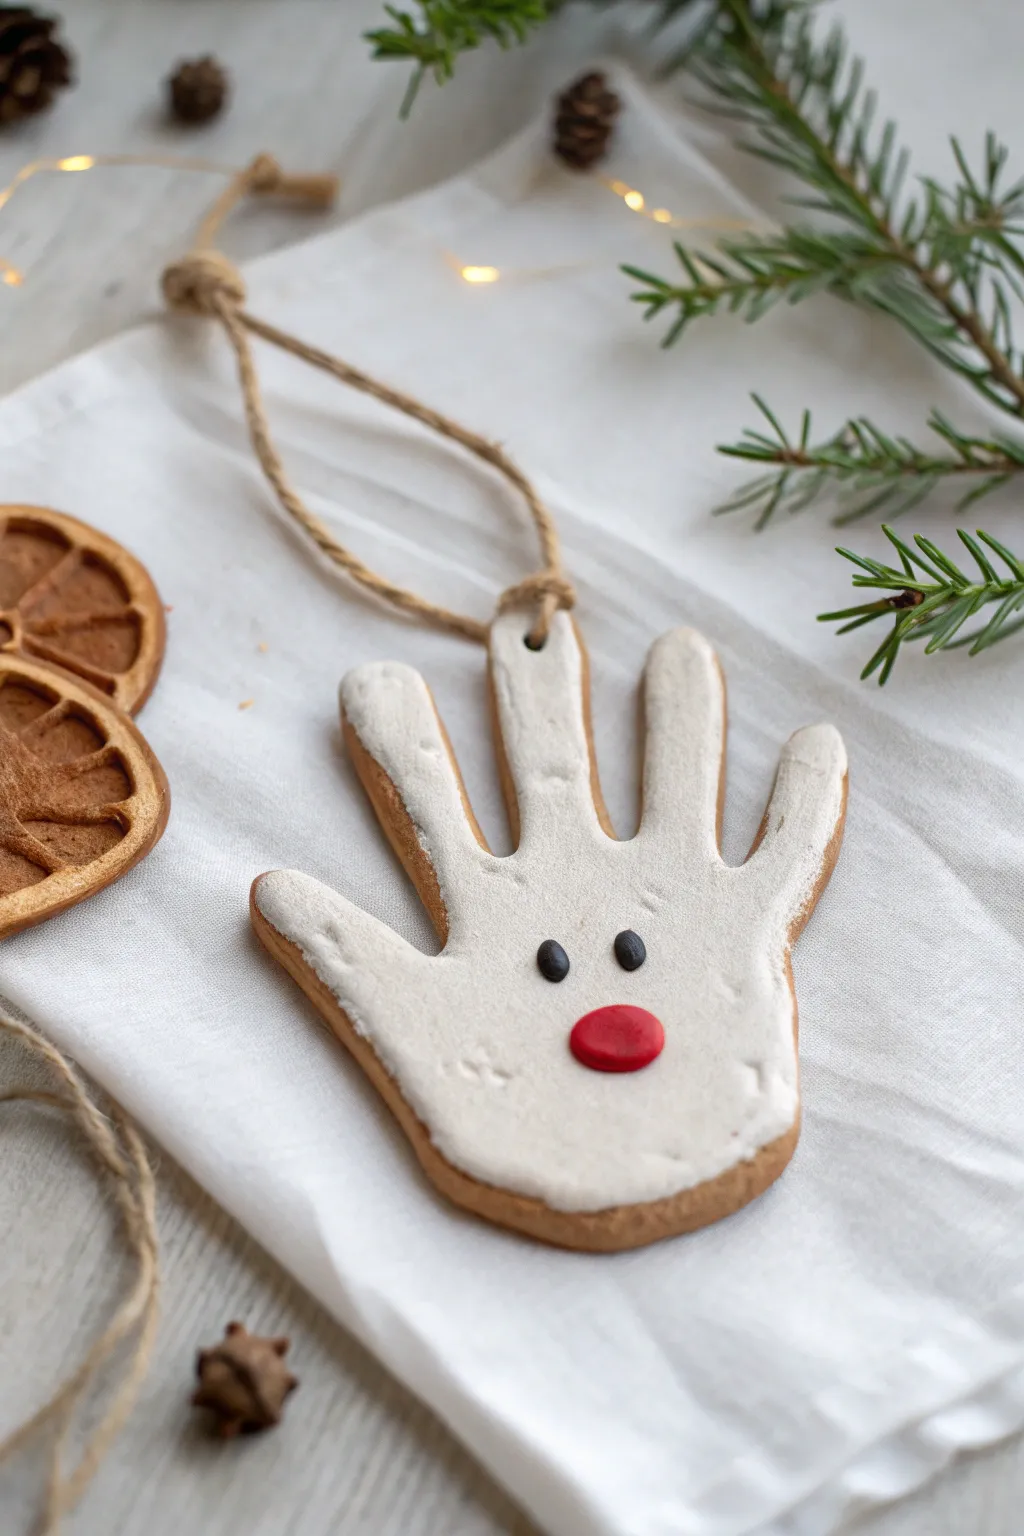
Preserve a moment in time with this adorable reindeer ornament crafted from your child’s handprint. The classic white finish with simple facial features gives it a clean, modern look while keeping the whimsical holiday spirit alive.
How-To Guide
Materials
- Salt dough ingredients (flour, salt, water) or air-dry clay
- Rolling pin
- Parchment paper
- Knife or clay tool
- Straw or skewer (for the hole)
- White acrylic paint
- Black acrylic paint
- Red polymer clay or red paint/bead for the nose
- Paintbrushes (flat wide brush and fine detail brush)
- Jute twine or ribbon
- Clear sealant (optional)
Step 1: Shaping the Dough
-
Prepare your surface:
Lay down a sheet of parchment paper on a flat surface. This prevents sticking and makes it easier to move the project later. -
Roll out the clay:
Take a ball of your prepared salt dough or air-dry clay and roll it out until it is about 1/4 to 1/2 inch thick. You want it sturdy enough not to crack, but not too heavy. -
Capture the print:
Have the child press their hand firmly into the center of the rolled clay. Gently press down on each finger and the palm to ensure a clear, deep impression. -
Cut the shape:
Using a knife or a clay tool, carefully cut around the outline of the handprint. Leave a small border around the fingers and palm to give the ornament a clean, defined edge. -
Create the hanging hole:
Before the clay hardens, use a straw or a skewer to poke a hole near the base of the palm (which will become the top of the reindeer’s head). Make sure the hole goes all the way through. -
Dry the ornament:
If using salt dough, bake according to your recipe (usually at a low temperature around 200°F/95°C for several hours). If using air-dry clay, let it sit undisturbed for 24-48 hours until completely hard.
Smooth Operator
Before baking or drying, dip your finger in a little water and smooth out any rough edges on the clay where you cut the outline for a polished look.
Step 2: Decorating the Reindeer
-
Base coat application:
Once the ornament is fully dry and cool, paint the entire front surface with white acrylic paint. I usually apply two thin coats rather than one thick one for smoother coverage. -
Create the distressed look:
To mimic the image, leave the very edges unpainted so the natural brown color of the baked dough shows through, creating a lovely frame. -
Add the eyes:
Dip the handle end of a paintbrush into black acrylic paint. Dot two eyes onto the palm area, spacing them slightly apart. -
Form the nose:
For a 3D effect like the photo, roll a tiny ball of red polymer clay or air-dry clay painted red. Glue this centered below the eyes. Alternatively, you can simply paint a red nose directly onto the surface. -
Let it cure:
Allow all paint and glue to dry completely. If you want extra durability, apply a coat of matte clear sealant over the painted areas. -
Attach the hanger:
Cut a length of jute twine. Thread it through the hole you made earlier. -
Secure the loop:
Tie the ends of the twine securely in a knot to create a hanging loop.
Puffy Dough?
If your salt dough puffs up too much while baking, it creates an uneven surface. Bake at a lower temp for longer to keep it flat.
Now you have a timeless keepsake that captures a tiny hand for holidays to come

The Complete Guide to Pottery Troubleshooting
Uncover the most common ceramic mistakes—from cracking clay to failed glazes—and learn how to fix them fast.
Mitten Handprint Holiday Keepsake
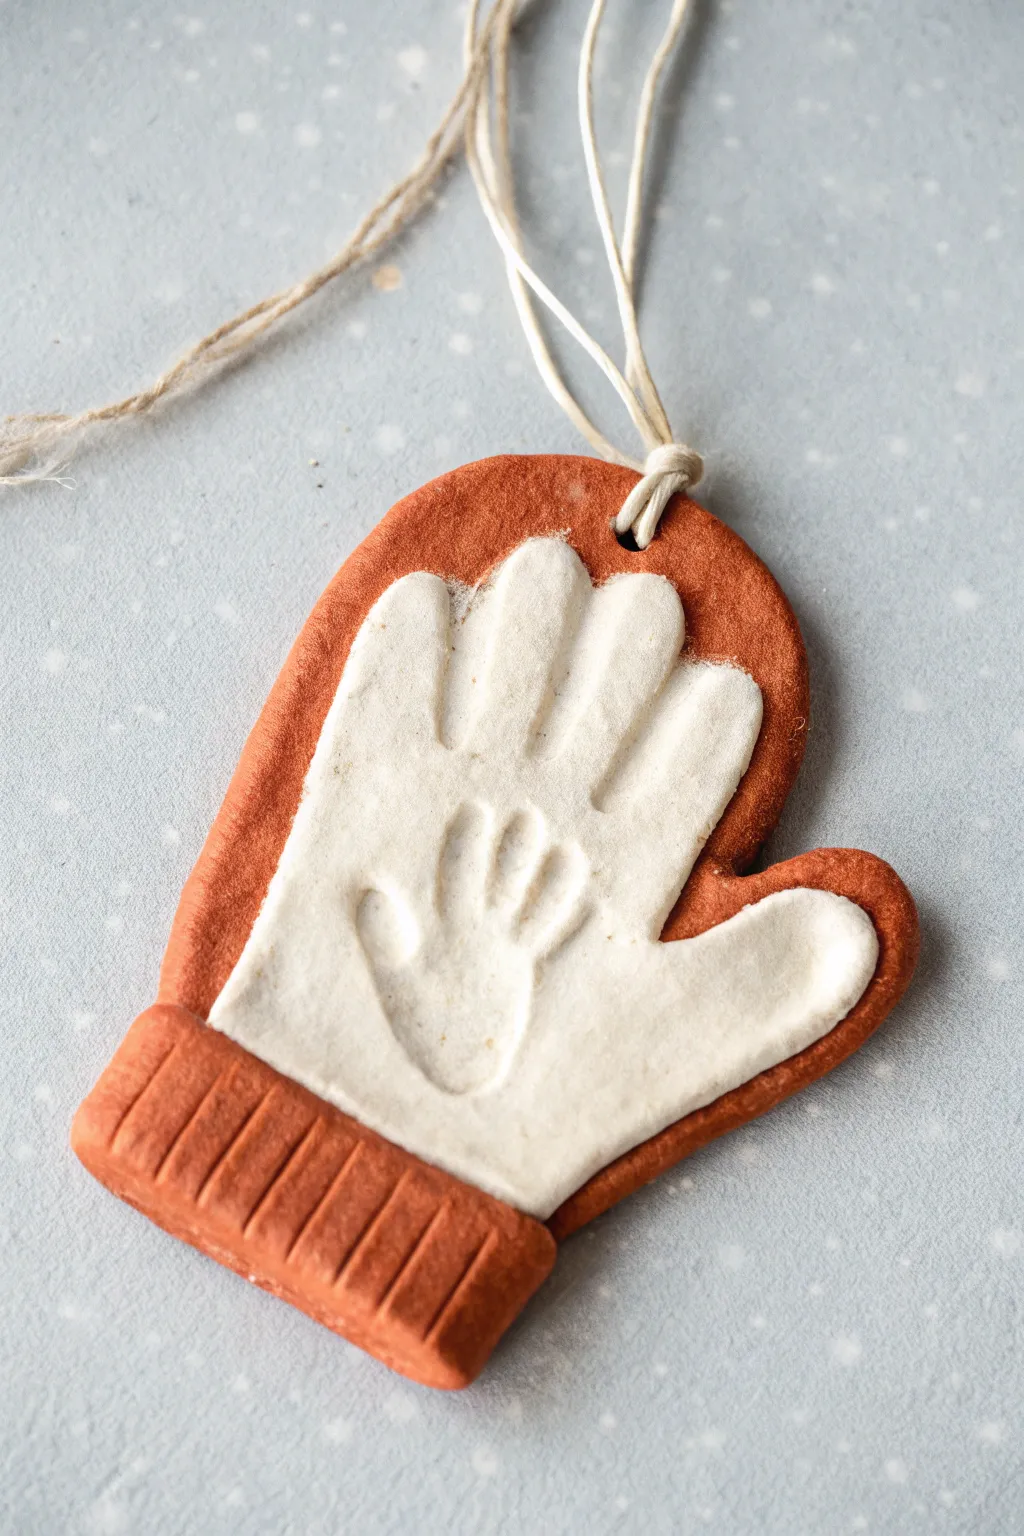
Capture a moment in time with this adorable layered keepsake that combines the cozy look of a winter mitten with a precious handprint impression. The contrast between the terracotta-colored base and the white clay palm creates a striking, modern rustic finish perfect for the holiday tree.
Step-by-Step Tutorial
Materials
- White air-dry clay (or salt dough)
- Terracotta colored air-dry clay (or white clay tinted with brown/red acrylic)
- Rolling pin
- Parchment paper or craft mat
- Sharp crafting knife or clay tool
- Water in a small cup
- Ruler
- Drinking straw or skewer
- Twine or rustic yarn
- An older child or adult’s hand (for the template)
- A small child’s hand (for the impression)
- Fine-grit sandpaper (optional)
Step 1: Shaping the Mitten Base
-
Prepare the colored clay:
Start with a large ball of terracotta-colored clay. If you can’t find pre-colored clay, knead burnt orange and brown acrylic paint into white clay until the color is uniform. -
Roll the slab:
Roll the clay out onto parchment paper until it is an even thickness, roughly 1/4 inch thick. Aim for a slab large enough to accommodate an adult hand size. -
Create the hand outline:
Place the older child or adult’s hand gently onto the rolled clay with fingers close together and thumb out to the side, mimicking a mitten shape. -
Cut the mitten shape:
Use a craft knife to trace loosely around the hand, leaving about a half-inch margin to create that classic rounded mitten silhouette. Don’t trace individual fingers; just cut one big curve over the four fingers and a separate section for the thumb. -
Smooth the edges:
Dip your finger in a little water and run it along the cut edges of the mitten to smooth out any roughness or stray clay bits. -
Create the hanging hole:
Using a straw or skewer, punch a hole near the wrist area or the top curve of the mitten. Make sure the hole is not too close to the edge so the clay doesn’t crack later.
Step 2: Adding the White Layer
-
Roll the white clay:
Roll out a smaller portion of white air-dry clay. You want this layer to be slightly thinner than the base, perhaps closer to 1/8 inch. -
Cut the inner hand shape:
This time, you want a shape that looks more like a glove or a hand silhouette. You can lightly trace the same hand used before, but cut slightly inside the lines so this white layer is smaller than the terracotta background. -
Adjust the fit:
Place the white cutout onto the terracotta mitten to check the size. There should be a nice border of red showing all around the edges. -
Adhere the layers:
Score the back of the white hand and the center of the mitten lightly with your knife (making hatch marks). Dab a little water on the scored areas and press the white clay firmly onto the terracotta base.
Smooth Seams
To prevent the white layer from peeling off later, blend the very edges of the white clay down into the terracotta base using a damp sculpting tool for a seamless bond.
Step 3: The Impression & Details
-
Make the handprint:
Take the small child’s hand and press it firmly into the center of the white clay layer. Ensure you press the palm and each fingertip down individually to get a deep, clear impression. -
Clean up the print:
If the edges of the print look rough, smooth them very gently with a damp fingertip or a soft, damp paintbrush. -
Add the cuff detail:
Roll a small rectangular strip of the terracotta clay. It should be the same width as the mitten’s wrist area. -
Attach the cuff:
Score and wet the bottom edge of the mitten, then press the rectangular strip on top, slightly overlapping the white clay at the wrist. -
Texture the cuff:
Use the edge of your ruler or the back of a knife to press vertical indentations across the cuff strip, creating a ‘ribbed’ knit effect. -
Dry thoroughly:
Allow the project to dry flat in a cool, dry place. I find flipping it over carefully after the first 24 hours helps the back dry evenly. Total drying time may take 2-3 days depending on humidity. -
Final assembly:
Once fully hard, thread a piece of natural twine or rustic yarn through the hole and tie a secure knot to complete the hanger.
Date It
Before the clay dries, use a toothpick or small letter stamps to gently impress the current year or the child’s initials into the back of the terracotta base.
Hang this warm little mitten on your tree and enjoy the memory of just how small those hands once were
Handprint Wreath Ornament
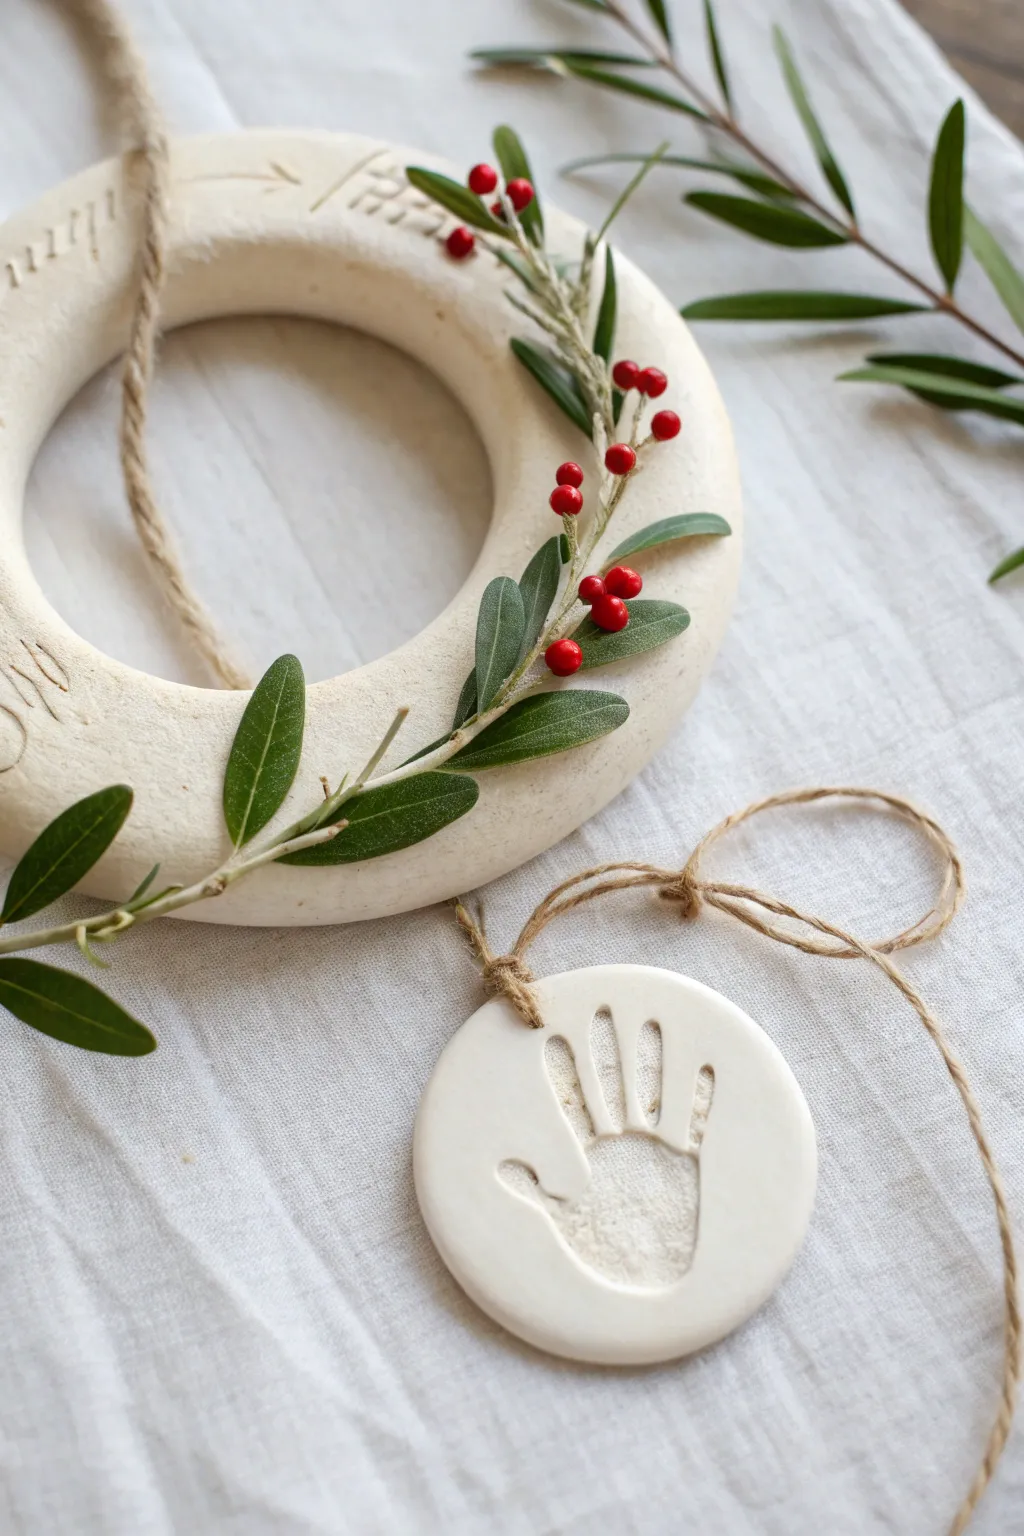
Create a timeless keepsake duo featuring a rustic olive branch wreath and a delicate handprint impression ornament. This project uses white air-dry clay to capture precious memories in a clean, natural style that looks effortless on any tree.
How-To Guide
Materials
- White air-dry clay or polymer clay
- Rolling pin
- Parchment paper
- Round cookie cutters (one large, one medium, one small)
- Small straw or skewer (for holes)
- Jute twine
- Fresh olive branches or greenery
- Artificial red berries on wire
- Modeling tool or toothpick
- Sandpaper (fine grit)
- Scissors
- Craft glue or hot glue gun
Step 1: Shaping the Clay Bases
-
Prepare your workspace:
Lay down a sheet of parchment paper to prevent sticking. Take a large ball of white clay and knead it until it’s smooth and pliable, warming it up with your hands to remove any cracks. -
Roll the clay flat:
Using your rolling pin, flatten the clay to an even thickness of about 1/4 inch (6mm). You want it thick enough to be sturdy but not so heavy it weighs down a branch. -
Cut the wreath shape:
For the wreath ornament, use your largest round cutter to create the outer circle. Then, place a medium-sized cutter in the exact center to remove the middle, creating a donut ring shape. -
Cut the handprint base:
Re-roll the excess clay if needed. Use a medium-to-large round cutter (depending on the size of the hand) to cut a solid circle for the handprint ornament.
Cracking Clay?
If small cracks appear while drying, mix a tiny bit of fresh clay with water to make a paste. Fill the cracks, smooth it out with a finger, and let it dry again.
Step 2: Adding Details & Impressions
-
Create the handprint:
Gently press the hand into the center of the solid clay circle. Apply steady, even pressure on the palm and each finger to get a clear impression, then lift the hand straight up to avoid smudging. -
Add inscription details:
On the wreath ring, use a modeling tool or toothpick to gently carve a name, year, or festive word (like ‘Joy’ or ‘Noel’) onto the left side of the ring. Keep the pressure light for a subtle, engraved look. -
Create punch holes:
Use a straw or skewer to poke a hole at the top of the handprint circle for hanging. Do the same for the wreath if you plan to hang it vertically, though you can also loop string through the center later. -
Smooth the edges:
Dip your finger in a tiny bit of water and run it along the cut edges of both ornaments to smooth out any roughness or stray clay bits before drying.
Pro Tip: Clear Impression
If the hand tends to stick to the clay, lightly dust the palm with cornstarch or baby powder before pressing it down. This ensures a clean release.
Step 3: Drying and Assembly
-
Let it dry completely:
Place both clay pieces on a wire rack or flat surface to dry. This typically takes 24-48 hours depending on humidity. Flip them over halfway through to ensure even drying. -
Sand for perfection:
Once fully hard, inspect the edges. I like to use a small piece of fine-grit sandpaper to gently buff away any remaining sharp spots or irregularities for a professional finish. -
Attach the greenery:
Take a sprig of fresh or faux olive branch. Arrange it to curve along the right side of the wreath ring. Secure it in place using a strong ample dab of craft glue or hot glue on the back of the stem. -
Add the berries:
Snip small clusters of red berries. Tuck them into the greenery at intervals, gluing them down so they look like they are naturally growing from the branch. -
Thread the twine:
Cut a length of jute twine. Thread it through the hole of the handprint ornament and tie a secure knot. -
Create the wreath hanger:
For the wreath, loop a long piece of jute twine through the center hole (or the punched hole if you made one) and tie it off, leaving enough length to hang easily on a tree branch.
Hang your beautiful new ornaments together on the tree to cherish these small moments for years to come


What Really Happens Inside the Kiln
Learn how time and temperature work together inside the kiln to transform clay into durable ceramic.
Glitter-Dipped Handprint Edge Finish
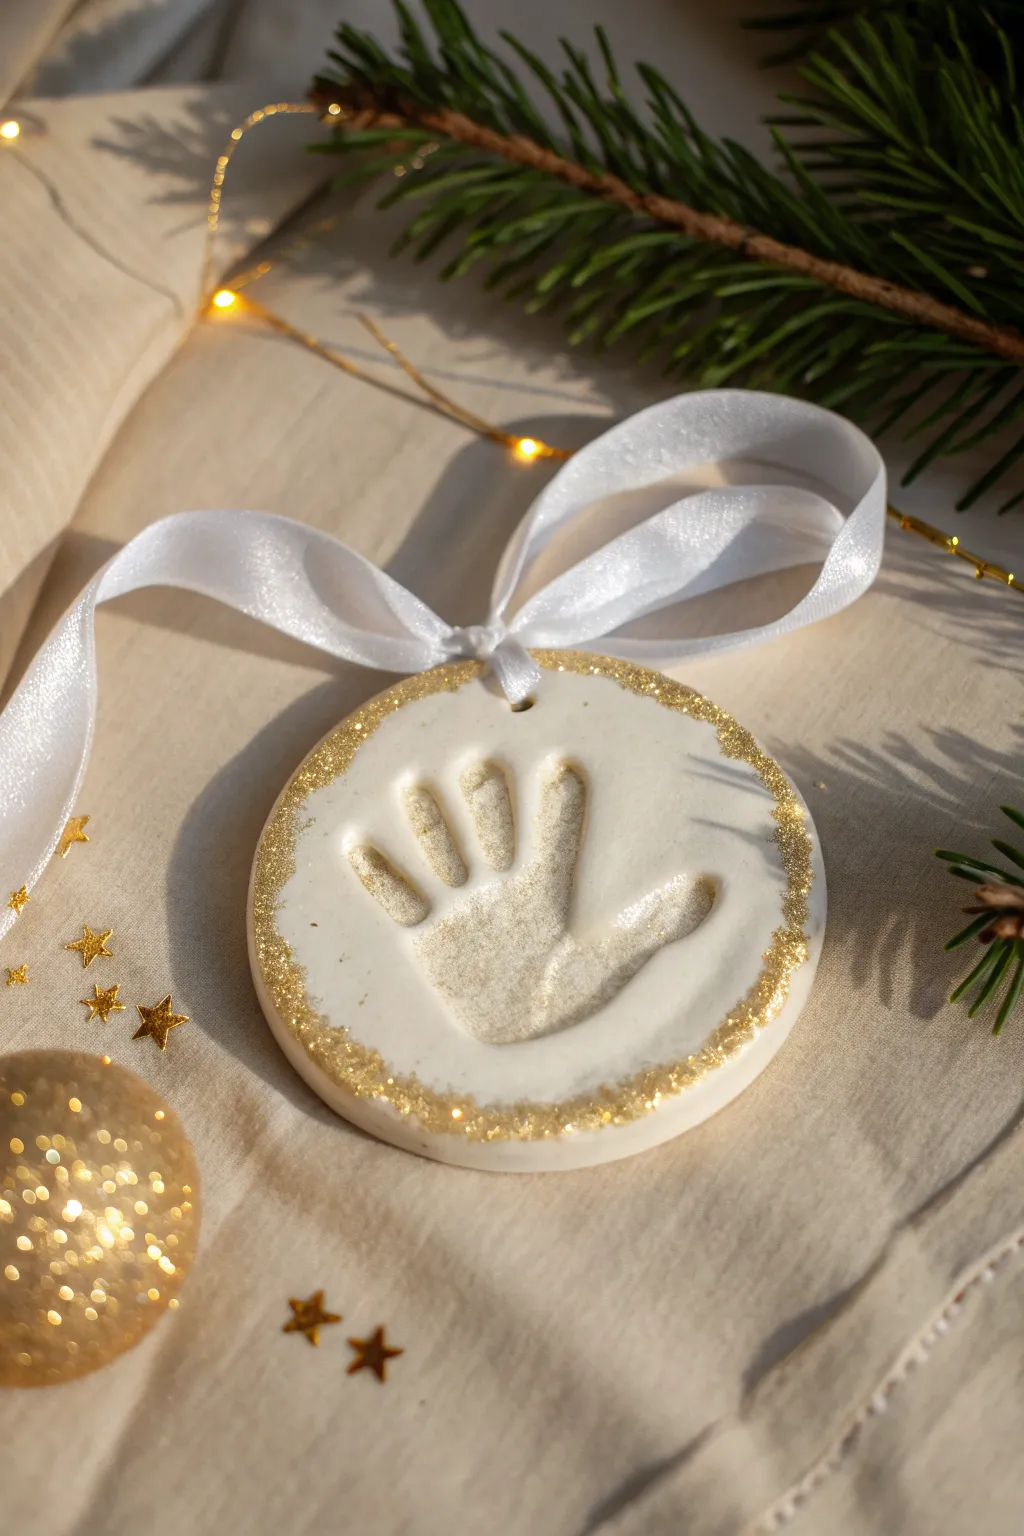
Capture a moment in time with this elegant white clay ornament, featuring a sweet handprint impression. The rim is delicately encrusted with gold glitter to catch the holiday lights, hanging from a soft satin ribbon.
Step-by-Step Guide
Materials
- Air-dry clay (white)
- Round cookie cutter (large enough for the hand)
- Rolling pin
- Parchment paper
- Fine grit sandpaper
- Craft glue or Mod Podge (gloss finish)
- Fine gold glitter
- Small paintbrush
- White satin ribbon (1/2 inch width)
- Straw or skewer (for hole punching)
- Small bowl for glitter
Step 1: Shaping the Clay Base
-
Prepare the workspace:
Lay down a sheet of parchment paper on a flat surface to prevent the clay from sticking. Tape the corners down if necessary to keep it steady. -
Condition the clay:
Take a handful of white air-dry clay and knead it in your hands for a minute until it feels soft, warm, and pliable. This helps prevent cracks later. -
Roll it out:
Use your rolling pin to flatten the clay into an even slab. Aim for a thickness of about 1/4 inch to ensure the ornament is sturdy but not too heavy. -
Check surface quality:
Look closely at the surface of the clay. If you see any air bubbles or wrinkles, gently smooth them out with a little water on your fingertip. -
Cut the circle:
Press your large interactive round cookie cutter firmly into the clay. Give it a tiny wiggle to separate the shape, then remove the excess clay from around the outside.
Cracking Clay?
If small cracks appear while drying, mix a tiny bit of fresh clay with water to make a paste and smooth it into the cracks with your finger.
Step 2: Creating the Impression
-
Position the hand:
Carefully guide the child’s hand over the center of the clay circle. Make sure their fingers are slightly spread apart for a clear print. -
Press firmly:
Press down firmly on the palm and each individual finger. I always double-check the thumb area, as it tends to be lighter. -
Lift carefully:
Lift the hand straight up and away from the clay to avoid smudging the edges of the print. If it looks messy, just ball up the clay and roll it out again. -
Create the hanging hole:
Using a plastic straw or a skewer, poke a hole near the top edge of the circle. Make sure it goes all the way through and is large enough for your ribbon. -
Allow to dry:
Let the ornament dry completely on the parchment paper. This usually takes 24-48 hours depending on humidity; turn it over carefully halfway through.
Pro Tip: Clean Prints
Apply a very light layer of lotion to the child’s hand before pressing it into the clay to prevent sticking and ensure a smoother release.
Step 3: The Glitter Finish
-
Sand the edges:
Once fully dry and hard, use fine-grit sandpaper to gently smooth any rough spots on the outer rim of the circle. -
Apply adhesive:
Pour some craft glue or Mod Podge onto a palette. Using a small paintbrush, apply a generous layer of glue specifically around the outer rim on the front face of the ornament. -
Create the irregular edge:
Feather the glue slightly inward towards the center in a few spots to create that organic, ‘dipped’ look rather than a perfect line. -
Add the glitter:
Hold the ornament over a small bowl or paper plate. Sprinkle the fine gold glitter generously over the wet glue until the rim is fully coated. -
Shake off excess:
Gently tap the ornament to knock off any loose glitter. Let the glue set for at least an hour. -
Seal the glitter (optional):
If you are worried about shedding, you can carefully dab a thin top coat of Mod Podge over the glittered areas once the first layer is dry. -
Thread the ribbon:
Cut a length of white satin ribbon. Thread it through the hole at the top and tie it into a secure bow or knot for hanging.
Hang your beautiful keepsake on the tree or wrap it carefully as a heartfelt gift for grandparents
Handprint Photo Frame Corner Accent
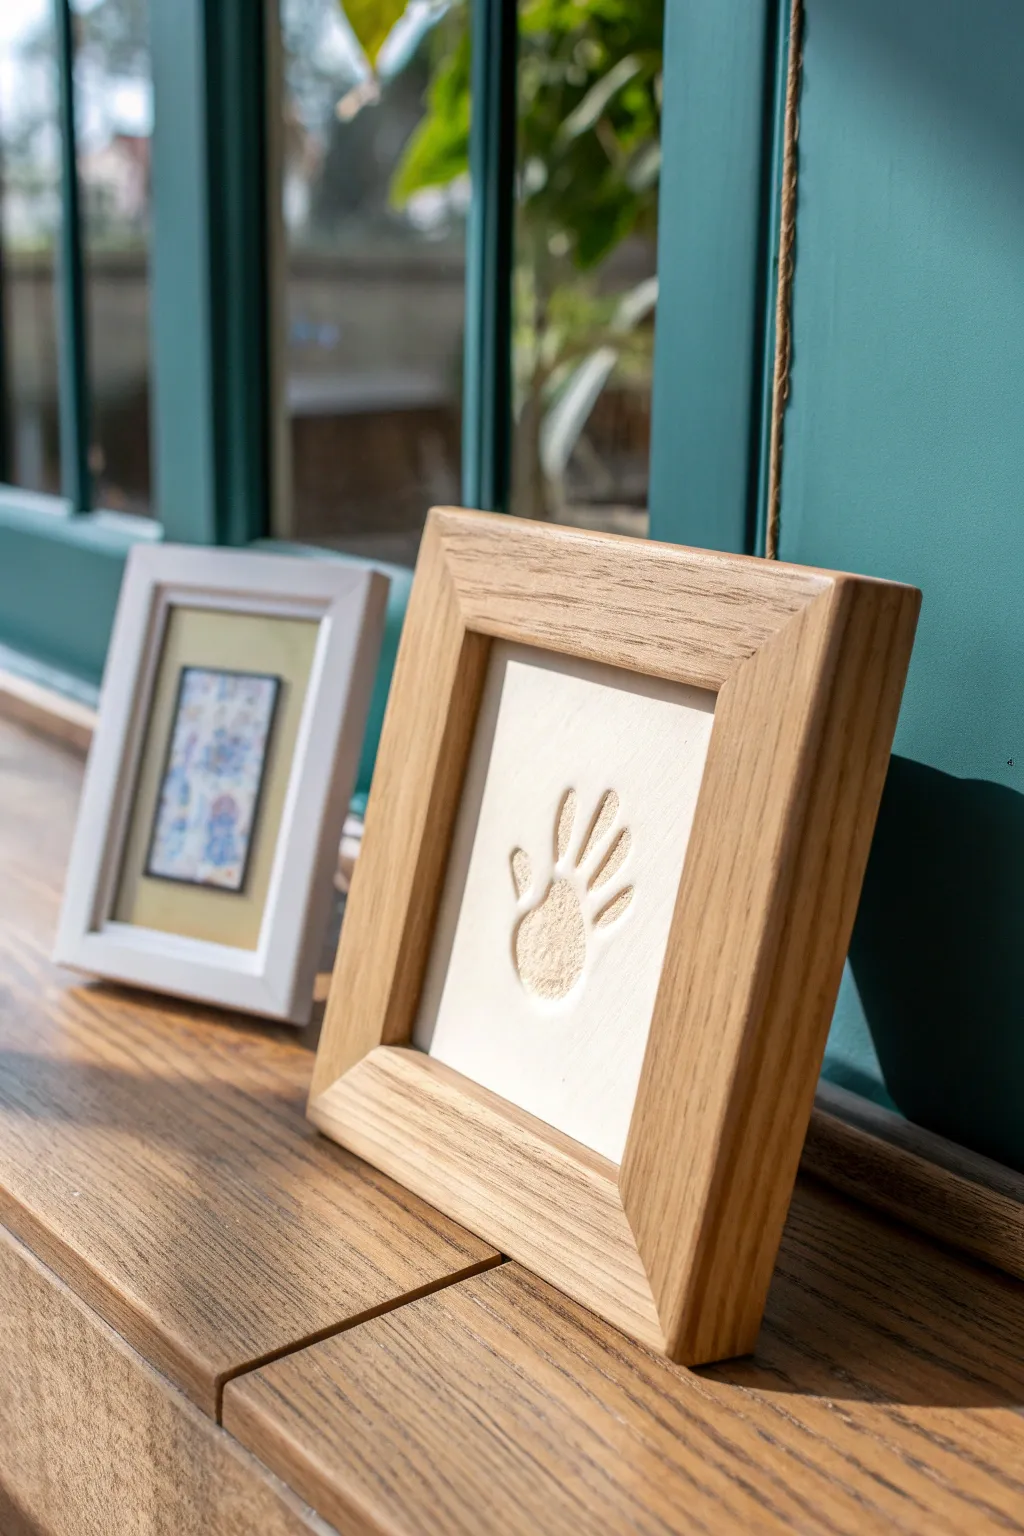
Capture a tiny hand in a timeless, gallery-worthy display with this minimalist shadow box project. The natural oak frame complements the warm white clay, creating a serene keepsake that looks stunning on a windowsill or bookshelf.
Step-by-Step Guide
Materials
- White air-dry clay (smooth texture)
- Rolling pin
- Deep shadow box frame (oak or light wood finish)
- Hardboard or stiff cardboard backing (cut to frame size)
- Strong craft adhesive or hot glue gun
- Measuring tape
- Butter knife or clay cutting tool
- Fine-grit sandpaper (400 grit)
- Parchment paper
- Matte sealant spray or matte Mod Podge
- Small soft brush
Step 1: Preparing the Clay Base
-
Knead the clay:
Begin by taking a handful of smooth, white air-dry clay. Knead it thoroughly in your hands for about 3-5 minutes until it is warm, pliable, and free of any air pockets. -
Roll out the slab:
Place a sheet of parchment paper on a flat work surface. Roll the clay out into a uniform slab approximately 1/4 to 1/2 inch thick. -
Smooth the surface:
Dip your finger in a tiny bit of water and gently glide it over the surface of the clay to smooth out any rolling pin textures or tiny cracks. You want a pristine, slate-like finish. -
Measure and cut:
Measure the inside dimensions of your shadow box frame opening. Using a ruler and a clay knife, trim your clay slab into a square that is slightly smaller than the frame’s opening to allow for a ‘floating’ look, or cut it to fit exactly if preferred.
Step 2: Creating the Impression
-
Position the hand:
Gently guide the child’s hand to the center of the clay square. Spread the fingers slightly to create a nice, open composition. -
Press firmly:
Press the hand down firmly and evenly. Start with the palm, then press each finger and thumb individually to ensure a deep, clear definition. I find it helps to hold their wrist steady with one hand while pressing with the other. -
Lift carefully:
Peel the hand away from the clay slowly, starting from the wrist and lifting upwards to avoid distorting the print. -
Refine the edges:
If the pressure caused the edges of the square to bulge slightly, gently tap them back into a straight line with a ruler or your finger.
Fixing Cracks
If hairline cracks appear while drying, make a paste of clay and water (slurry) and fill them in with a small brush, then sand smooth once dry.
Step 3: Drying and Finishing
-
Allow to dry:
Leave the clay on the parchment paper in a cool, dry place. Let it dry for at least 24-48 hours. Turn the slab over halfway through the drying process to prevent curling. -
Test for dryness:
The clay should feel room temperature to the touch, not cold. If it’s cold, it still holds moisture inside. -
Sand for perfection:
Once fully dry, take your fine-grit sandpaper and very gently buff the edges and flat surfaces of the clay to remove any fingerprints or roughness. Be careful not to sand away the details of the handprint itself. -
Seal the piece:
Apply a thin layer of matte sealant spray or brush on a matte Mod Podge. This protects the clay from dust and yellowing over time without adding an unnatural shine.
Adding Contrast
Before sealing, lightly dust the inside of the handprint with a darker pastel chalk or diluted watercolor to make the impression pop visually.
Step 4: Assembly
-
Prepare the backing frame:
Remove the glass and backing from your shadow box frame. Ensure the backing board is clean and dry. -
Center the artwork:
Apply a generous amount of strong craft adhesive to the back of your dried clay slab. Center it carefully onto the frame’s backing board. -
Let adhesive verify:
Allow the glue to cure completely according to the manufacturer’s instructions before holding it upright. -
Final framing:
Reassemble the frame. You can choose to leave the glass off for a tactile, textural look as shown in the photo, or include it behind the clay for protection.
Place your finished frame near a window to let natural light highlight the beautiful texture of the print

TRACK YOUR CERAMIC JOURNEY
Capture glaze tests, firing details, and creative progress—all in one simple printable. Make your projects easier to repeat and improve.
Handprint Wall Hanging With Stamped Letters
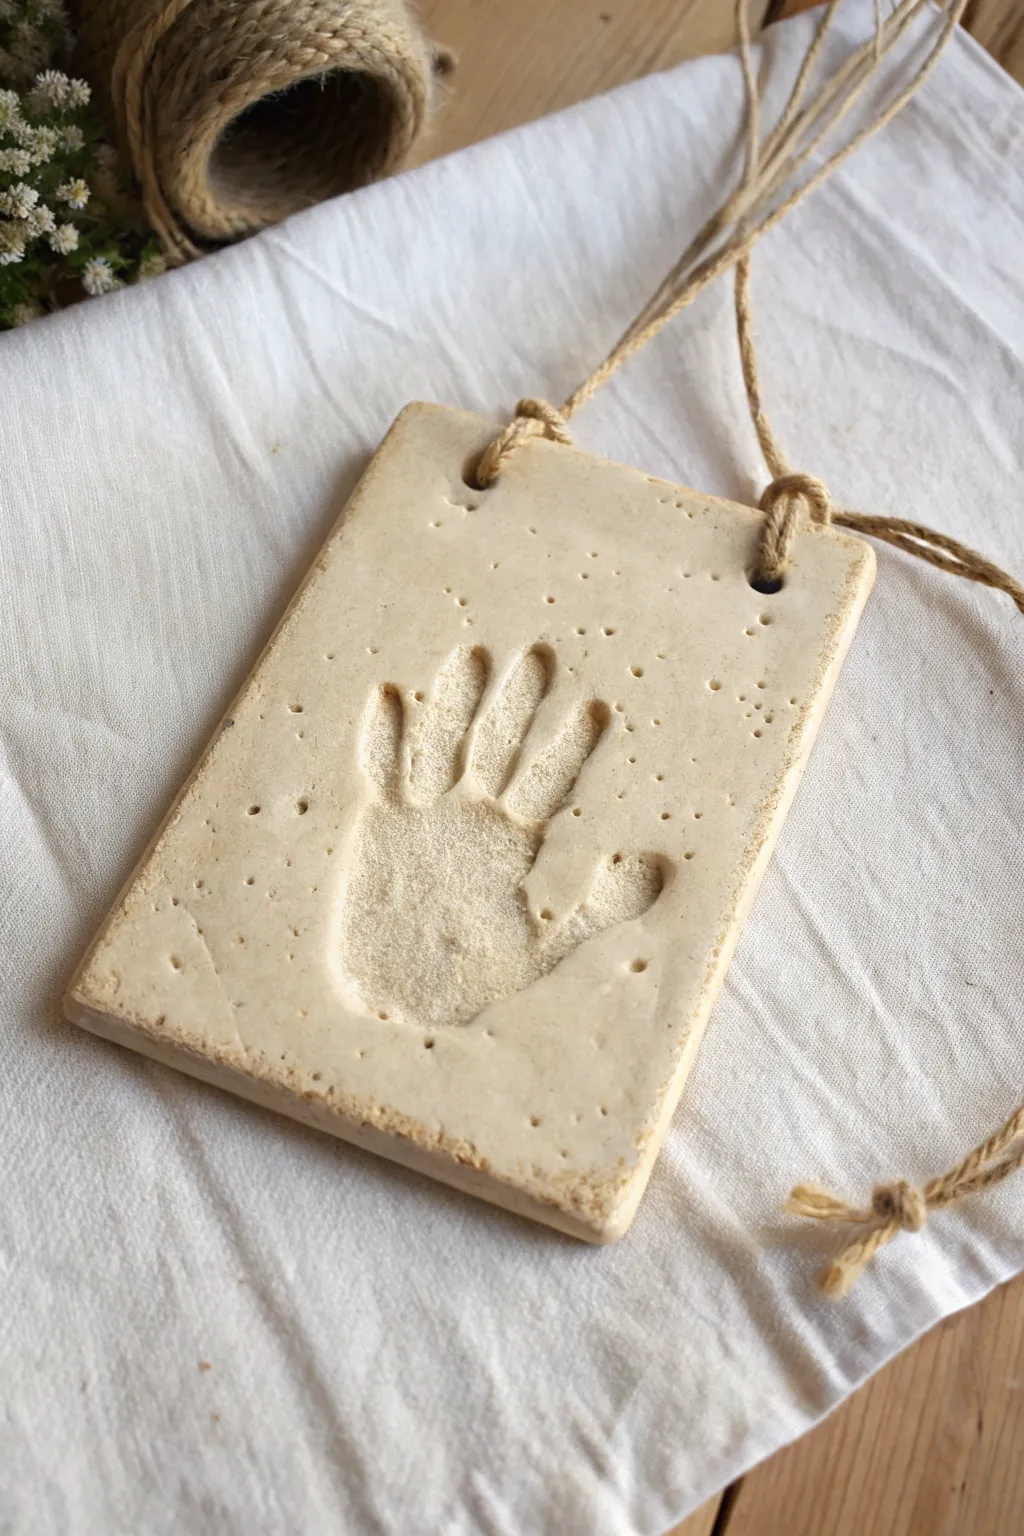
Capture a moment in time with this charming, rustic wall hanging that turns a simple handprint into a piece of decor. The natural clay tone and jute twine give it a timeless, organic look perfect for any nursery or gallery wall.
How-To Guide
Materials
- Air-dry clay (white or natural earth tone)
- Rolling pin
- Parchment paper or canvas mat
- Sharp knife or clay cutting tool
- Drinking straw or chopstick
- Jute twine or hemp cord
- Sandpaper (fine grit)
- Clear matte sealant spray (optional)
- Ruler
Step 1: Preparing the Clay Base
-
Knead the Clay:
Begin by taking a substantial chunk of air-dry clay and kneading it in your hands to warm it up. This removes air pockets and makes the material more pliable for rolling. -
Roll It Out:
Place your clay onto a sheet of parchment paper or a canvas mat. Using a rolling pin, flatten the clay to an even thickness of about 1/2 inch. You want it thick enough to take a deep impression without cracking. -
Measure the Shape:
Using a ruler as a guide, lightly score a rectangle shape onto the clay surface. Ensure it is large enough to accommodate the handprint with a comfortable border on all sides. -
Cut the Slab:
Use a sharp knife or a dedicated clay cutting tool to slice along your scored lines. Remove the excess clay scraps, leaving a clean rectangular slab. -
Smooth the Edges:
Dip your finger in a little water and run it along the cut edges of the rectangle. This softens the sharp corners and creates a more finished look.
Clean Prints
Apply a very thin layer of lotion to the child’s hand before pressing. This prevents the clay from sticking to their skin and ensures a crisp, clean release.
Step 2: Creating the Impression
-
Position the Hand:
Guide the child’s hand to the center of the clay slab. Spread their fingers slightly so the print takes up a good amount of visual space. -
Press Firmly:
Press down firmly on the palm and each individual finger. I find it helpful to gently press on the knuckles to ensure the deepest parts of the hand leave a clear mark. -
Lift Away:
Carefully lift the hand straight up to avoid smudging the edges of the print. If the print is too faint, you can simply re-roll the clay and try again. -
Add Texture Details:
To mimic the organic look in the photo, take a toothbrush or a crumpled ball of foil and lightly tap the surface of the clay around the handprint to add subtle texture. -
Create Hanging Holes:
Use a drinking straw or a chopstick to punch two holes near the top corners of the rectangle. Twist the tool slightly as you pull it out to keep the hole clean.
Antique Wash
Mix a tiny amount of brown acrylic paint with water. Brush it over the dried clay and wipe it off immediately with a rag to darken the crevices and add age.
Step 3: Finishing Touches
-
Initial Drying:
Let the clay dry flat in a cool, dry place. Avoid direct sunlight, which can cause cracking. Flip the slab over gently halfway through the drying process (after about 24 hours) to ensure even drying. -
Check for Dryness:
Wait until the clay is completely hard and turns a lighter color, which usually takes 48 to 72 hours depending on humidity. -
Sand the Edges:
Once fully dry, use fine-grit sandpaper to gently smooth any rough spots on the edges or surface. Be careful not to sand away the details of the handprint. -
Seal the Project (Optional):
For longevity, spray the piece with a clear matte sealant. This protects the clay from moisture and dust without changing the natural look. -
Cut the Twine:
Cut a length of jute twine roughly 18 inches long, or adjust depending on how low you want the ornament to hang. -
Thread the Holes:
Feed one end of the twine through the front of the left hole and tie a secure knot at the front. Repeat on the right side so the rustic knots are visible on the face of the ornament.
Hang your beautiful keepsake in a spot where you can admire those tiny fingers for years to come
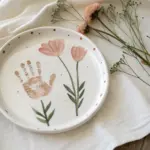
Handprint Garden Marker Plaque
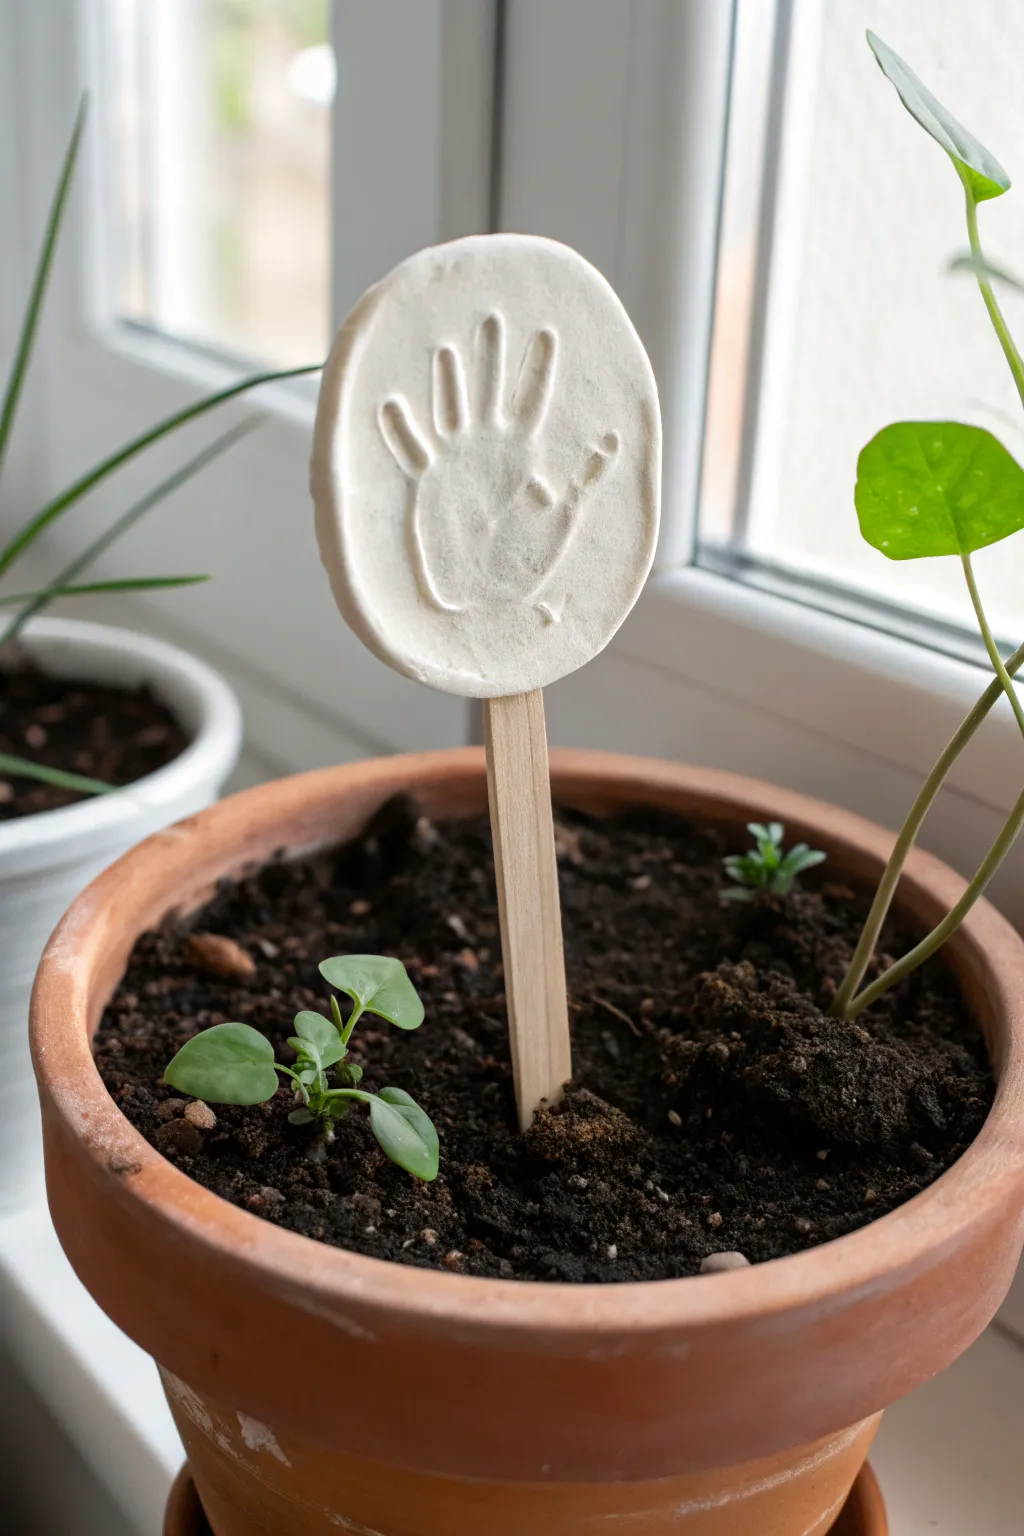
Immortalize a tiny handprint with this charming garden marker that adds a personal touch to your potted plants. This simple white clay disc serves as a sweet keepsake while labeling your growing herbs or flowers with a rustic, handmade feel.
Step-by-Step
Materials
- White air-dry clay or polymer clay
- Rolling pin
- Round cookie cutter (approx. 3-4 inches diameter)
- Parchment paper or silicone mat
- Wooden craft stick (large popsicle stick size)
- Strong craft glue or epoxy
- Sandpaper (fine grit)
- Clear acrylic sealant spray (waterproof)
Step 1: Shaping the Clay Disc
-
Prepare your workspace:
Lay down a sheet of parchment paper or a silicone mat on a flat surface to prevent the clay from sticking while you work. -
Condition the clay:
Take a handful of white clay and knead it in your hands until it becomes soft, pliable, and free of cracks. -
Roll it out:
Using your rolling pin, flatten the clay into an even slab. Aim for a thickness of about 1/4 to 1/2 inch so it’s sturdy enough for the garden. -
Cut the circle:
Press a round cookie cutter firmly into the rolled clay to create a perfect circle. Remove the excess clay from around the cutter before lifting. -
Smooth the edges:
Dip your finger in a tiny bit of water and gently run it along the cut edge of the circle to smooth out any sharpness or roughness.
Clean Impressions
If the clay is sticky, lightly dust the child’s hand with cornstarch before pressing. This ensures the hand lifts cleanly without pulling up the clay surface.
Step 2: Creating the Impression
-
Position the hand:
Place the child’s hand gently in the center of the clay circle. Make sure the fingers are spread comfortably. -
Press firmly:
Press down on the palm and each individual finger to ensure a deep, clear impression. Don’t press so hard that you go through the clay, but enough to create distinct ridges. -
Check the details:
Carefully lift the hand straight up. Inspect the print to make sure the palm lines and fingertips are visible. -
Insert the stick slot:
Flip the disc over gently. At the bottom edge, press the end of your wooden craft stick slightly into the clay to create an indentation where it will later be glued. This helps it sit flush. -
Dry the clay:
Allow the clay to dry completely according to the package instructions. If using air-dry clay, I like to flip it over halfway through the drying process to prevent curling.
Step 3: Finishing and Assembly
-
Sand imperfections:
Once fully dry (and hardened if baked), use fine-grit sandpaper to lightly buff away any rough spots on the rim or surface. -
Seal the front:
Apply a coat of waterproof clear acrylic sealant to the front of the disc. This is crucial for protecting the marker from moisture in the soil. -
Seal the back:
Let the front dry, then flip and seal the back as well. Ensure the edges are well-coated. -
Prepare the stick:
Apply a generous amount of strong craft glue or epoxy to the top inch of the wooden craft stick. -
Attach the marker:
Press the glued portion of the stick into the indentation you made earlier on the back of the disc. Hold it firmly for a minute to set. -
Final cure:
Let the glue cure completely for the time recommended on the glue bottle before placing it in the soil.
Add a Name
Before drying, use tiny alphabet stamps to press the child’s name or the date along the curve of the circle for an extra layer of personalization.
Now your potted plant has a sweet, personalized guardian watching over its growth
Handprint “High-Five” Pair Keepsake
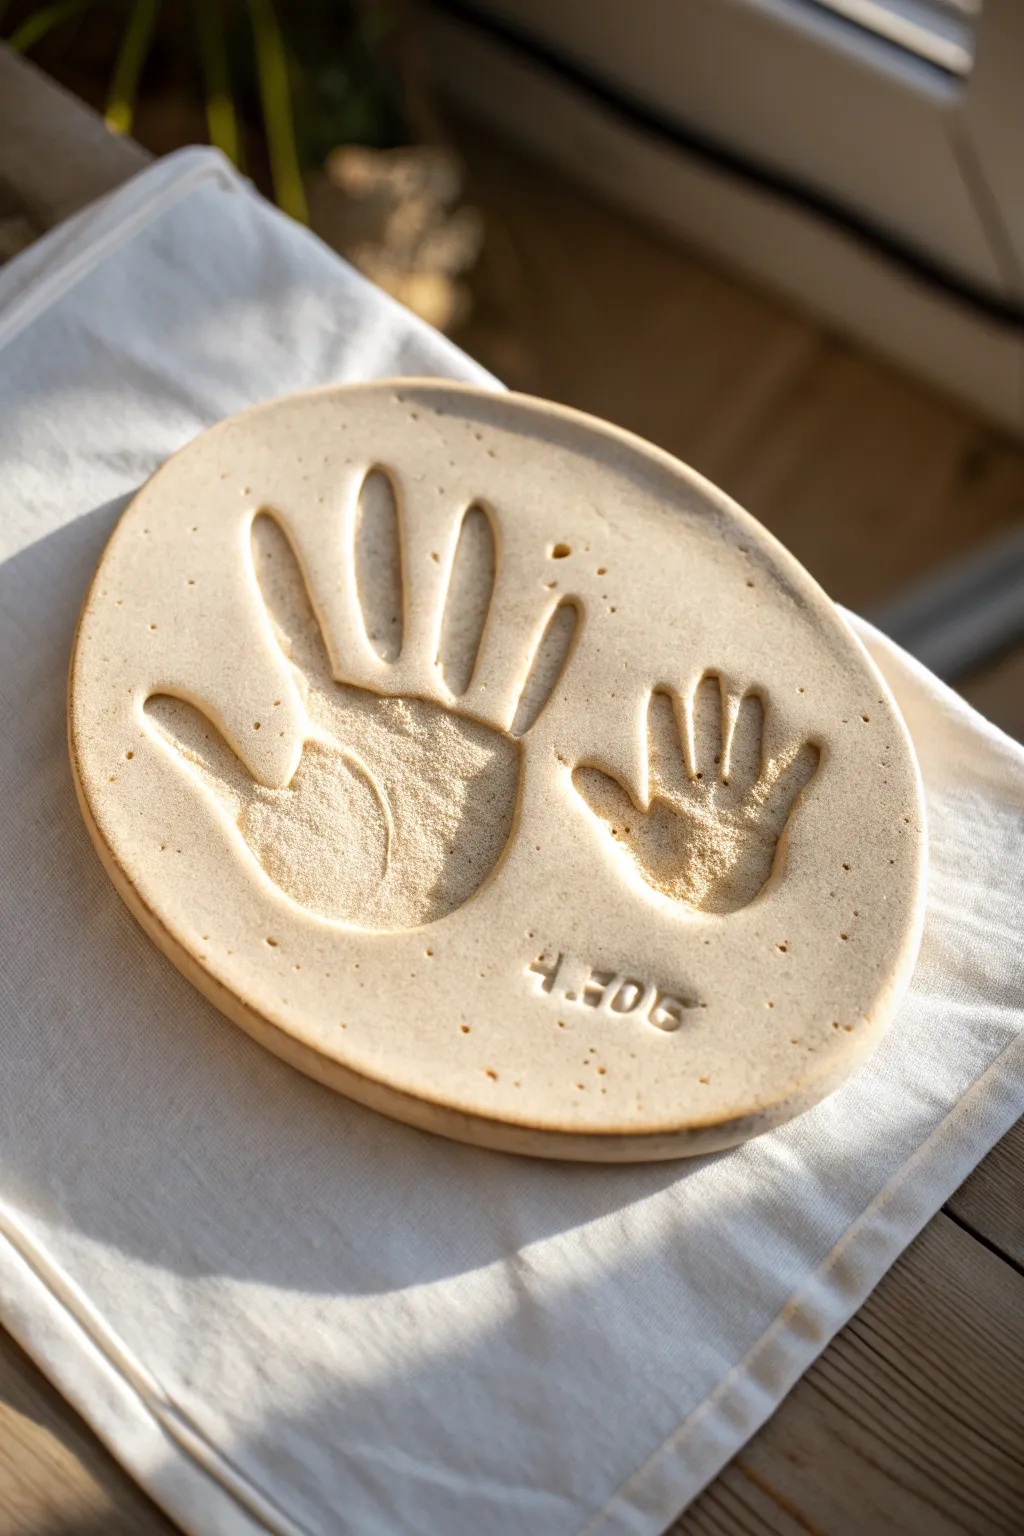
Capture a fleeting moment in time with this beautiful, minimalist ceramic keepsake featuring two handprints side-by-side. The natural, unglazed finish highlights the texture of the skin and the deep impressions, creating a tactile memory you can cherish forever.
Detailed Instructions
Materials
- Air-dry clay (white or cream) or low-fire earthenware clay
- Rolling pin
- Two smooth wooden slats (approx. 1/4 inch thick) for thickness guides
- Canvas mat or heavy cloth (to roll clay on)
- Needle tool or sharp knife
- Bowl of water and a sponge
- Number stamps (for the date)
- Fine-grit sandpaper
- Matte clear sealant (optional, for air-dry clay)
Step 1: Preparation & Rolling
-
Prepare the workspace:
Lay down your canvas mat on a flat, stable surface. This prevents the clay from sticking to your table and absorbing the texture of the surface underneath. -
Condition the clay:
Take a large handful of clay and knead it briefly to remove air bubbles and ensure it is pliable. If you are using air-dry clay, work quickly so it doesn’t dry out. -
Set up guides:
Place the two wooden slats on either side of your clay ball. These will act as rails for the rolling pin to perform the rolling. -
Roll the slab:
Roll the clay out into a large, smooth oval shape. Roll the pin along the wooden slats to ensure the clay is a perfectly even thickness across the entire surface. -
Smooth the surface:
Dampen your sponge slightly and gently wipe the surface of the clay slab. This removes the canvas texture and any tiny imperfections, creating a pristine canvas for the prints.
Fixing Shallow Prints
If a print is too light, don’t try to re-align the hand. Instead, ball up the clay, re-roll the slab, and start fresh. It’s faster than fixing a blurry double-print.
Step 2: Making Impressions
-
Position the first hand:
Guide the larger hand (the adult or older sibling) to the left side of the oval. Ensure fingers are spread comfortably apart. -
Press firmly:
Press the hand down into the clay. Apply firm, even pressure on the palm and each individual finger. I find it helps to gently press on the knuckles to get a deep impression. -
Lift carefully:
Lift the hand straight up to avoid smudging the edges of the print. If the clay pulls up slightly, just encourage it back down gently. -
Add the second hand:
Position the smaller hand on the right side of the oval. Repeat the pressing process, ensuring the smaller fingers engage deeply with the clay. -
Refine the impressions:
Check the prints for any jagged edges or fingernail marks. Use a slightly damp finger to smooth these little imperfections away while the clay is still wet.
Step 3: Shaping & Detailing
-
Cut the shape:
Using a needle tool, cut a clean oval shape around the two handprints. Leave a generous border of about 1-2 inches around the prints to frame them nicely. -
Smooth the edges:
Dip your finger in water and run it along the cut edge of the oval to round it off. This removes sharp corners and gives the piece a professional, finished look. -
Add the date:
Locate a spot near the bottom of the slab, centered or slightly to the right. Use your number stamps to deeply impress the date into the clay. -
Initial drying:
Let the clay sit uncovered for about an hour until it is leather-hard. This prevents warping during the longer drying phase. -
Slow drying:
Cover the piece loosely with plastic wrap to slow down the drying process. Let it dry completely for 24-48 hours. Turn it over periodically so both sides dry evenly.
Pro Tip: Release Agent
Lightly dust the hands with cornstarch before pressing them into the clay. This acts as a release agent and prevents the sticky clay from lifting up when you remove the hand.
Step 4: Finishing Touches
-
Sand the surface:
Once bone dry, take fine-grit sandpaper and gently sand the edges and the flat surface of the clay to remove any lingering roughness. -
Clean dust:
Wipe the piece with a barely damp cloth or a dry brush to remove all sanding dust from the crevices of the handprints. -
Seal (Air-dry only):
If using air-dry clay, apply a coat of matte clear sealant to protect the piece from moisture and humidity. -
Fire (Ceramic clay only):
If using ceramic clay, fire the piece in a kiln to bisque temperature. You can leave it unglazed for that raw, organic look shown in the photo, or apply a clear matte glaze.
Now you have a permanent tactile memory of how small those hands once were to display in your home
Handprint Animal With Finger “Spikes” or “Feathers”
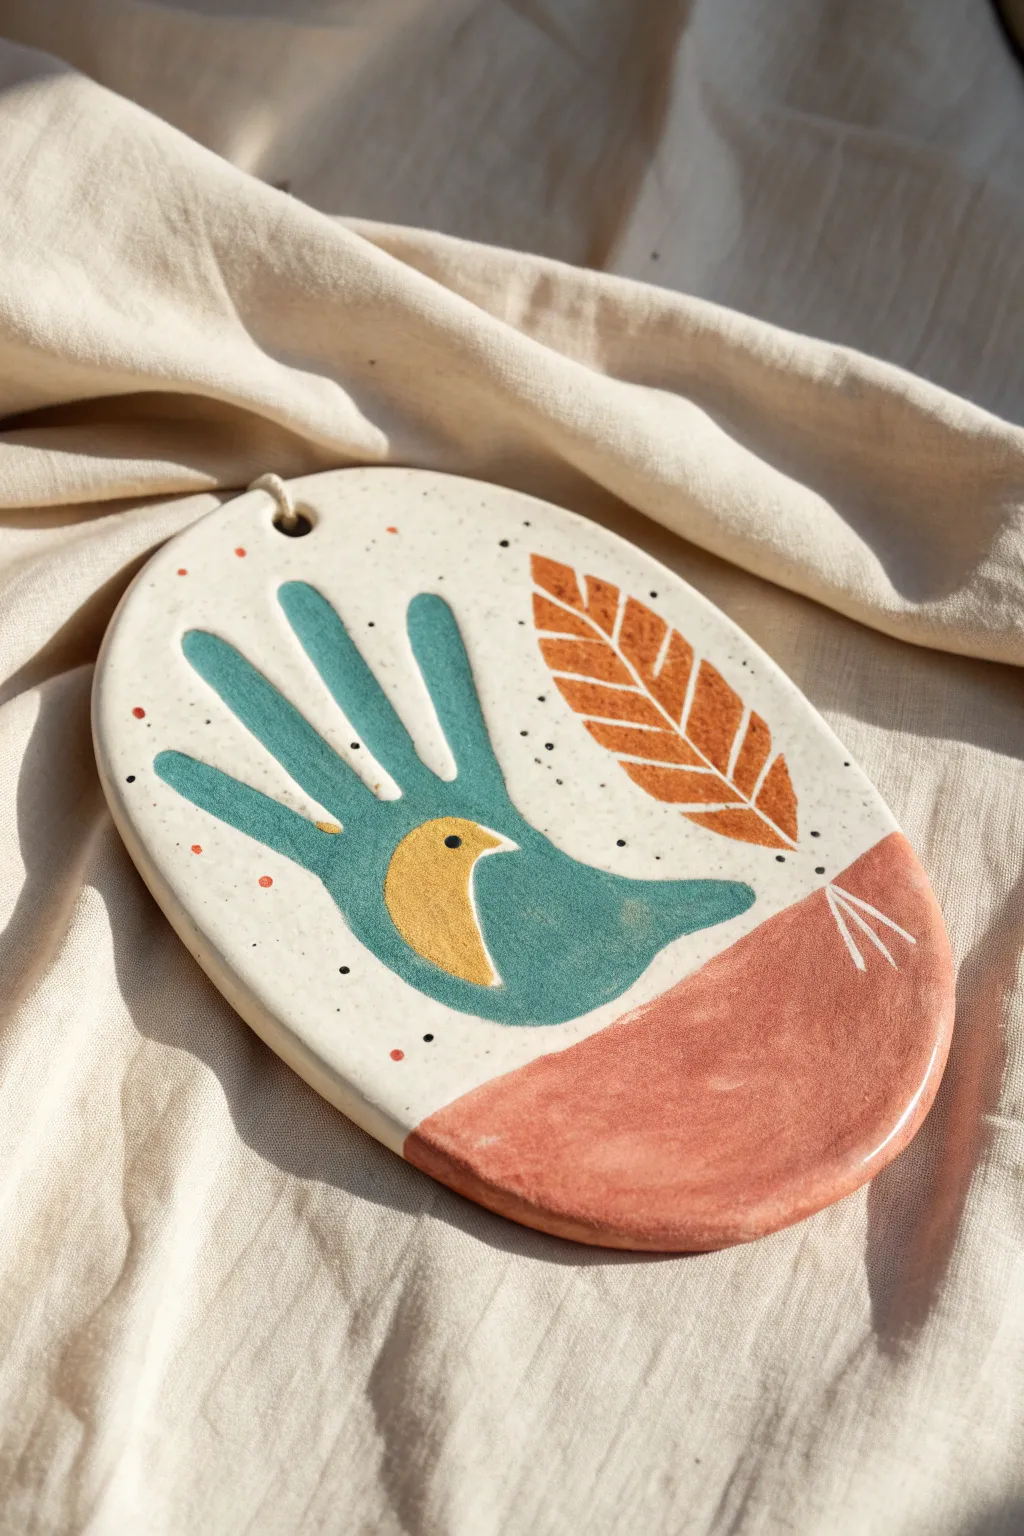
Transform a simple handprint into a stunning piece of ceramic art where fingers become elegant tail feathers. This oval wall hanging features earthy tones of teal, mustard, and terracotta on a speckled cream background, making it a sophisticated keepsake.
Step-by-Step Guide
Materials
- Air-dry clay or white earthenware clay
- Oval rolling template or cookie cutter (approx. 6-8 inches)
- Small rolling pin
- Clay carving tools or a pin tool
- Acrylic paints (Teal, Mustard Yellow, Burnt Orange, Terracotta/Pink)
- Small detail paintbrushes
- Sponge or sandpaper
- Clear acrylic sealant (matte or gloss)
- Straw or small circular cutter (for the hanging hole)
- Twine or ribbon
Step 1: Shaping the Clay Canvas
-
Roll out the slab:
Start by taking a ball of air-dry or earthenware clay and rolling it out on a smooth surface to a consistent thickness of about 1/4 inch. -
Cut the oval shape:
Using a paper template or a large oval cutter, slice through the clay to create your base shape. Smooth the edges with a slightly damp finger or sponge to remove any roughness. -
Create the hanging hole:
While the clay is still wet, use a straw or a small circular tool to punch a clean hole near the top center for hanging later.
Fixing curling edges
If your clay slab starts curling up while drying, gently weigh down the edges with small books or tiles. flipping the piece every few hours also helps keep it flat.
Step 2: Imprinting and Carving
-
Trace the hand:
Place a hand gently on the clay. Instead of pressing deeply, use a pin tool or dull pencil to very lightly trace the outline of just the four fingers and the palm area, angling it so the fingers point upward and to the left. -
Define the bird shape:
Refine your traced line into a bird silhouette. Connect the fingers (now tail feathers) to a rounded body shape, omitting the thumb to keep the design sleek. -
Sketch the leaf:
To the right of the bird, lightly etch a long leaf shape with a central vein. Don’t carve too deep; you just want guidelines for painting. -
Mark the bottom section:
Draw a curved line across the bottom third of the oval to separate the textured base area from the main scene. -
Dry the piece:
Allow the clay to dry completely according to the package instructions. This usually takes 24-48 hours. I like to flip it halfway through to ensure it dries flat.
Leaf texture trick
Before the clay dries, gently press a real leaf into the surface instead of drawing one. It leaves authentic vein impressions that are easy to paint later.
Step 3: Painting the Design
-
Base coat:
Once dry, paint the entire surface (except the bottom section) with a creamy off-white acrylic paint. Let this layer dry. -
Add speckles:
To mimic the ceramic look, load an old toothbrush with diluted black or brown paint and flick tiny speckles across the cream background. -
Paint the bird:
Fill in the bird silhouette with a solid teal or turquoise color. Use a steady hand and a small flat brush for clean edges. -
Add the wing detail:
Paint a mustard yellow crescent shape on the bird’s body to represent a wing. Once dry, add a tiny black dot for the eye and a small beak. -
Fill the leaf:
Paint the leaf shape to the right in a burnt orange tone. Leave thin unpainted lines (or paint them cream later) to show the leaf veins. -
Color the base:
Paint the bottom separated section in a soft terracotta or dusty pink shade. -
Add artistic details:
Using a very fine brush or paint pen, add small dots and a few red accents around the bird to balance the composition. Add white scratch-marks on the terracotta section for texture.
Step 4: Finishing Touches
-
Seal the artwork:
Apply a coat of clear acrylic sealant or varnish over the entire front of the piece. This protects the paint and gives it that finished ceramic glaze look. -
Attach the hanger:
Thread a piece of natural twine or leather cord through the top hole and tie a secure knot.
Hang your beautiful faux-ceramic keepsake in a sunny spot to enjoy the modern earthy colors
Handprint Tealight Holder Base
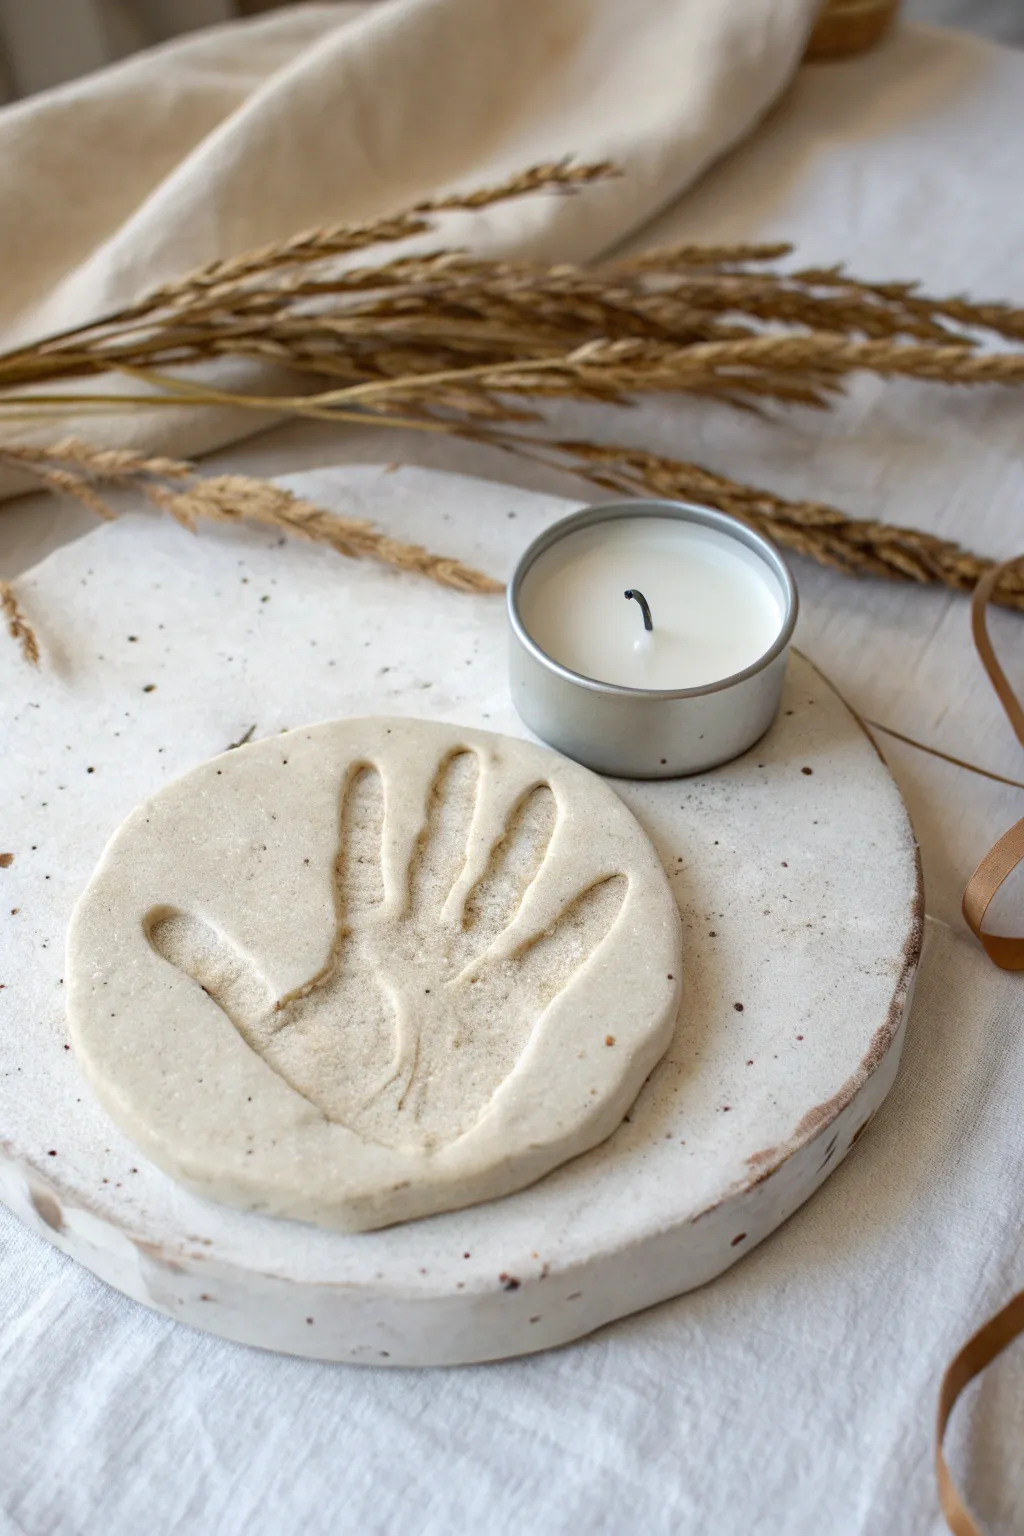
Capture a moment in time with this serene and natural clay project. The result is a smooth, circular medallion featuring a detailed hand impression, perfectly sized to accompany a tealight for a gentle, commemorative display.
How-To Guide
Materials
- White air-dry clay (or salt dough: flour, salt, water)
- Rolling pin
- Parchment paper or non-stick silicone mat
- Round cookie cutter or a bowl (approx. 4-6 inches in diameter)
- Fine-grit sandpaper (optional)
- Small bowl of water
- Butter knife or clay tool
Step 1: Preparing the Clay
-
Knead the clay:
Start by taking a generous handful of white air-dry clay. Knead it thoroughly in your hands to warm it up and remove any air bubbles, ensuring the texture becomes smooth and pliable. -
Prepare your surface:
Lay down a sheet of parchment paper or a silicone mat. This prevents sticking and makes it much easier to move the project later without distorting the shape. -
Roll it out:
Place the clay ball in the center of your mat. Using a rolling pin, flatten the clay until it is an even slab, approximately 1/2 inch to 3/4 inch thick. You want it substantial enough to take a deep impression without cracking.
Clean Edges Trick
Before cutting your circle, lay a piece of plastic wrap loosely over the clay. Press the cutter down *over* the plastic; this creates a lovely, rounded soft edge instead of a sharp cut.
Step 2: Making the Handprint
-
Position the hand:
Gently guide the child’s (or your own) hand over the center of the rolled clay. Ensure the fingers are spread comfortably apart to create a distinct silhouette. -
Press downfirmly:
Press the hand into the clay with steady, even pressure. Start with the palm, then press gently on each finger and the thumb ensure a deep, clear imprint. -
Lift carefully:
Swiftly but carefully lift the hand straight up and away from the clay. Avoid dragging it sideways, as this can smudge the fine details of the print. -
Inspect the print:
Check the impression. If it’s too shallow or smeared, simply roll the clay back into a ball and start the rolling process again. Clay is very forgiving while wet.
Step 3: Cutting and Refining
-
Cut the circle:
Center your round cutter or bowl over the handprint. Press straight down to cut a clean circle, framing the handprint nicely within the borders. -
Remove excess clay:
Peel away the scrap clay from the outside of the circle. You can save this for another project or a test piece. -
Smooth the edges:
Dip your finger into a small bowl of water. Run your damp finger along the cut edge of the circle to smooth out any sharpness or roughness left by the cutter. -
Refine the surface:
If there are any unintentional fingernail marks or bumps on the surface around the handprint, gently buff them out with a little water on your fingertip.
Add Subtle Texture
Before drying, gently flick a toothbrush with watered-down brown paint or tea over the wet clay to create the natural, speckled ‘stone’ look seen in the background base.
Step 4: Drying and Finishing
-
Begin drying:
Leave the clay on the parchment paper in a cool, dry place. Avoid direct sunlight or heat sources initially, as drying too fast can cause curling or cracking. -
Flip the piece:
After about 24 hours (or when the top feels dry/leathery), carefully flip the circle over to allow the bottom to dry evenly. -
Check for dryness:
Wait another 24-48 hours. The clay should turn a lighter white color and feel room temperature rather than cool to the touch when fully dry. -
Sand the imperfections:
Once fully cured, use fine-grit sandpaper to lightly sand the edges or any rough spots on the surface for a professional, stone-like finish. -
Optional sealing:
For longevity, you can apply a matte varnish, though leaving it raw maintains that beautiful, earthy texture seen in the photo. -
Display setup:
Place your finished impression on a decorative plate or stone slab alongside a simple tea light to complete the serene vignette.
This simple keepsake preserves a fleeting moment in a timeless, tactile way that looks beautiful on any mantle.