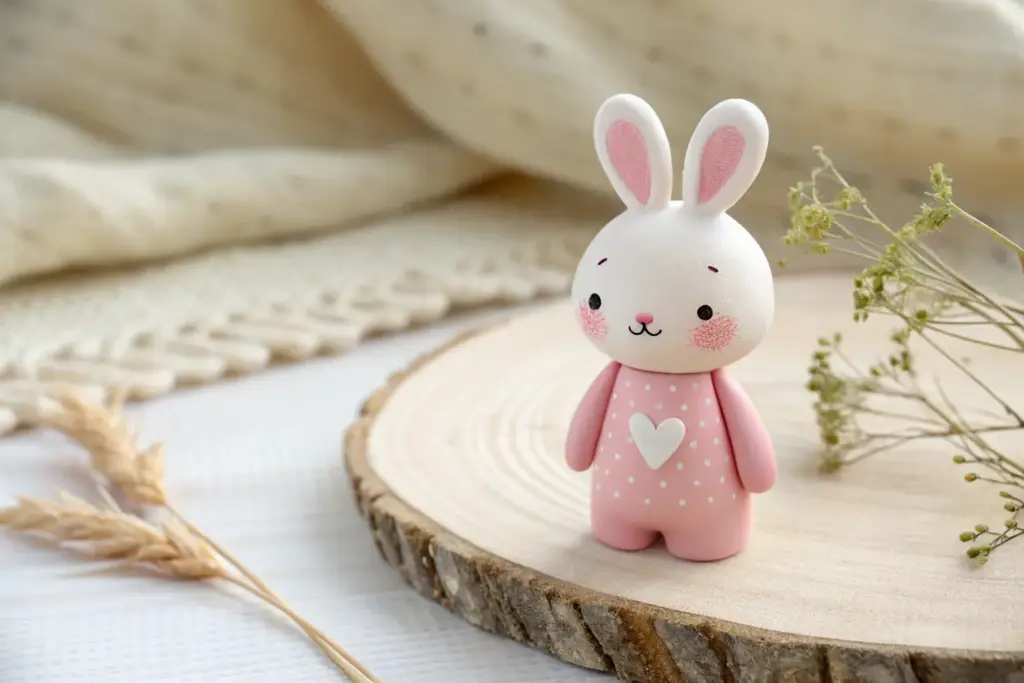
When I’m brainstorming clay ideas for girls, I always start with projects that feel cute, personal, and totally giftable. Think sweet little accessories, dreamy room decor, and tiny characters you can make look like you (or your besties).
Heart Trinket Dishes
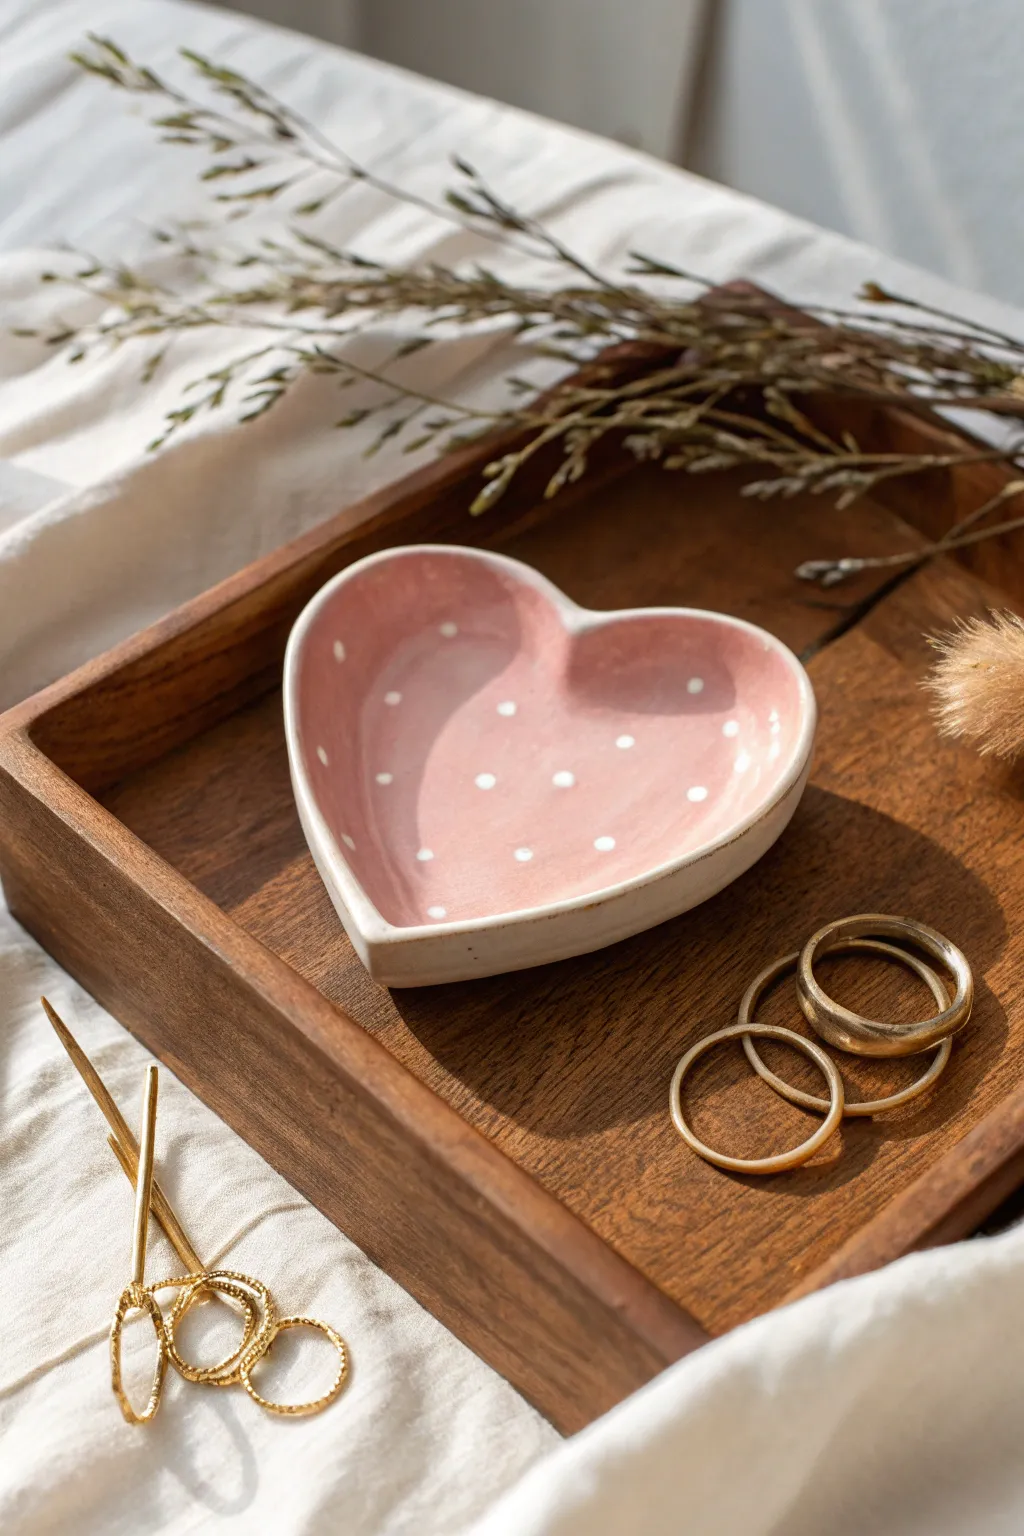
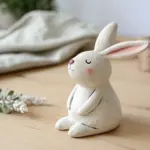
This sweet, hand-shaped trinket dish captures a lovely rustic charm with its soft pink glaze and cheerful white polka dots. It creates the perfect little spot for holding your favorite rings or dainty jewelry while adding a touch of romance to your vanity.
Step-by-Step Tutorial
Materials
- Air-dry clay or polymer clay (white)
- Rolling pin
- Heart-shaped cookie cutter (medium size)
- Small bowl of water
- Sponge or smoothing tool
- Craft knife
- Pink acrylic paint (soft pastel shade)
- White acrylic paint
- High-gloss varnish or sealant
- Fine-tipped paintbrush
- Dotting tool or toothpick
- Sandpaper (fine grit)
Step 1: Shaping the Clay
-
Prepare your workspace:
Whatever clay you choose to use, start by laying down parchment paper or a silicone mat to prevent sticking. Knead a ball of clay in your hands until it feels warm, pliable, and free of any air bubbles. -
Roll out the slab:
Use your rolling pin to flatten the clay ball into an even slab. Aim for a thickness of about 1/4 inch—not too thin, or it might crack, and not too thick, or it will look chunky. -
Cut the heart shape:
Press your heart-shaped cookie cutter firmly into the clay slab. If you don’t have a cutter, you can sketch a heart on paper, cut it out, lay it on the clay, and trace around it with a craft knife. -
Form the rim:
Gently lift the edges of the heart upwards with your fingers to create a curved rim. I like to pinch the clay slightly while lifting to give it that organic, hand-built look seen in the photo. -
Smooth the edges:
Dip your finger or a small sponge into a little water and run it along the rim and the surface of the dish. This eliminates any sharp edges or crumbles left by the cutting tool. -
Refine the shape:
Look at the dish from all angles. Gently push and pull the clay to ensure the heart shape remains distinct and the walls are generally the same height all around.
Smooth Operator
Use a slightly damp makeup sponge to apply the varnish. This helps eliminate brush strokes, giving you that super-glossy, kiln-fired ceramic appearance without any streaks.
Step 2: Drying and Refining
-
Let it dry completely:
Place your creation in a safe, dry spot. For air-dry clay, this usually takes 24-48 hours. If using polymer clay, bake it according to the manufacturer’s instructions on the package. -
Sand for smoothness:
Once fully cured or dried, check for any rough spots. Use a fine-grit sandpaper to gently buff the rim and the outside edges until they feel completely smooth to the touch. -
Wipe away dust:
Use a slightly damp cloth or a dry brush to remove all sanding dust. You need a clean surface for the paint to adhere properly.
Step 3: Painting and Glazing
-
Applying the base color:
Paint the interior of the heart with your soft pink acrylic paint. You may need two or three thin coats to get that solid, opaque look. Let each layer dry fully before adding the next. -
Leave the rim exposed:
To mimic the style in the photo, you can leave the very top edge of the rim unpainted or paint it a neutral cream color to create a subtle contrast with the pink interior. -
Adding the polka dots:
Dip a dotting tool, the handle end of a paintbrush, or even a toothpick into white acrylic paint. Carefully press dots onto the dried pink surface in a random, scattered pattern. -
Cleaning up mistakes:
If a dot smudges or looks odd, quickly wipe it away with a damp Q-tip before it dries, or wait for it to dry and touch it up with a tiny dab of pink paint. -
Seal for shine and protection:
Wait until the paint is bone dry. Then, apply a generous coat of high-gloss varnish. This replicates the shiny, ceramic-glaze finish shown in the image and protects your dish from scratches. -
Final drying time:
Allow the varnish to cure completely according to the bottle’s instructions before placing any jewelry inside.
Metallic Edge
For a luxe upgrade, paint the very top rim of the heart with liquid gold leaf or metallic gold paint instead of leaving it plain. It creates a stunning border.
Enjoy styling your new handmade dish with your favorite gold rings or trinkets


Cute Clay Charm Bracelets

Capture the sweetness of spring with this soft and sugary polymer clay charm bracelet. Featuring handmade pastel beads, dainty stars, and floral accents, this piece is strung on a rustic cord for a charmingly handcrafted look.
Step-by-Step Guide
Materials
- Polymer clay in pastel pink, lavender, mint green, butter yellow, and white
- Waxed cotton cord or hemp cord (thin, beige/natural color)
- Jewelry headpins and jump rings (silver or gold tone)
- Lobster clasp and extension chain
- Small clay cutters (star, heart, flower shapes)
- Detailing tools or a toothpick
- Needle tool or bead reamer
- Oven for baking
- Gloss glaze (optional)
- Jewelry pliers (round nose and flat nose)
- Acrylic rolling pin
Step 1: Crafting the Charms
-
Condition the clay:
Begin by warming up small amounts of your pastel polymer clay colors in your hands until soft and pliable. I like to mix a tiny bit of white into each color to ensure they have that milky, candy-like finish. -
Roll out slabs:
Using your acrylic rolling pin, roll each color into a flat sheet about 3mm thick. Ensure the thickness is even so all your charms bake consistently. -
Cut the shapes:
Use your mini cutters to punch out varied shapes: a yellow star, a pink heart, a mint green flower, a lavender star, and a pink flower. Aim for about 5-7 large feature charms. -
Add details:
On the mint flower, gently press a small yellow clay ball into the center. Use a needle tool to scratch tiny lines radiating outward for texture. For the pink flower, use a small tool or toothpick to indent the petal centers. -
Create charm holes:
Before the clay hardens or is baked, carefully pierce a hole at the top of each charm using your needle tool. Make sure the hole is wide enough for a jump ring to pass through later.
Step 2: Making the Beads
-
Roll round beads:
Pinch off pea-sized amounts of the pink, lavender, and mint clay. Roll these briskly between your palms to create smooth, perfectly round spheres. You will need about 10-14 of these depending on wrist size. -
Create disc spacers:
Take small bits of yellow and lavender clay and shape them into tiny balls, then flatten them slightly into thick discs or ‘marshmallow’ shapes. These will act as colorful spacers between the round beads. -
Pierce the beads:
Gently twist your needle tool through the center of each round bead and disc. Rotate the bead as you pierce it to keep the hole centered and prevent the shape from distorting. -
Bake everything:
Arrange all your charms and beads on a parchment-lined baking sheet. Bake according to your brand of clay’s instructions (typically 275°F/135°C for 15-30 minutes). Let them cool completely before handling.
Fixing Wonky Holes
If your bead holes shrank during baking and the cord won’t fit, use a small hand drill or a bead reamer to gently widen the channel without cracking the clay.
Step 3: Assembly
-
Prepare the cord:
Cut a length of joining cord about 10 inches long. Tie one end securely onto one half of your jewelry clasp (or a jump ring attached to the clasp). -
Begin stringing:
Thread your beads onto the cord. Create a random but balanced pattern, such as: lavender round bead, yellow disc, mint round bead. Continue until you have a short section of beads. -
Attach the charms:
Using your pliers, open a jump ring and loop it through the hole of a baked charm—for example, the yellow star. Close the jump ring around the cord itself, between two beads, so it dangles freely. -
Continue the pattern:
Resume threading beads, pausing every inch or so to add another charm via a jump ring. Alternate charm shapes so a heart isn’t right next to another heart. -
Secure the end:
Once the beaded section is long enough to cover the top of the wrist, finish threading beads. Tie the end of the cord securely to the other half of the clasp or extension chain. -
Trim and finish:
Trim any excess cord close to the knots. For extra security, you can place a tiny dab of superglue on the final knots to prevent them from slipping. -
Optional glaze:
If you prefer a shiny finish, brush a thin coat of polymer clay gloss glaze over the charms and beads. Let it dry fully before wearing.
Add Sparkle
Before baking, press tiny flat-back rhinestones into the center of the flower charms or add a dusting of mica powder to the hearts for a subtle shimmer.
Now you have a delightfully sweet accessory ready to wear or gift to a friend


Best Friends Figurines Sitting Together
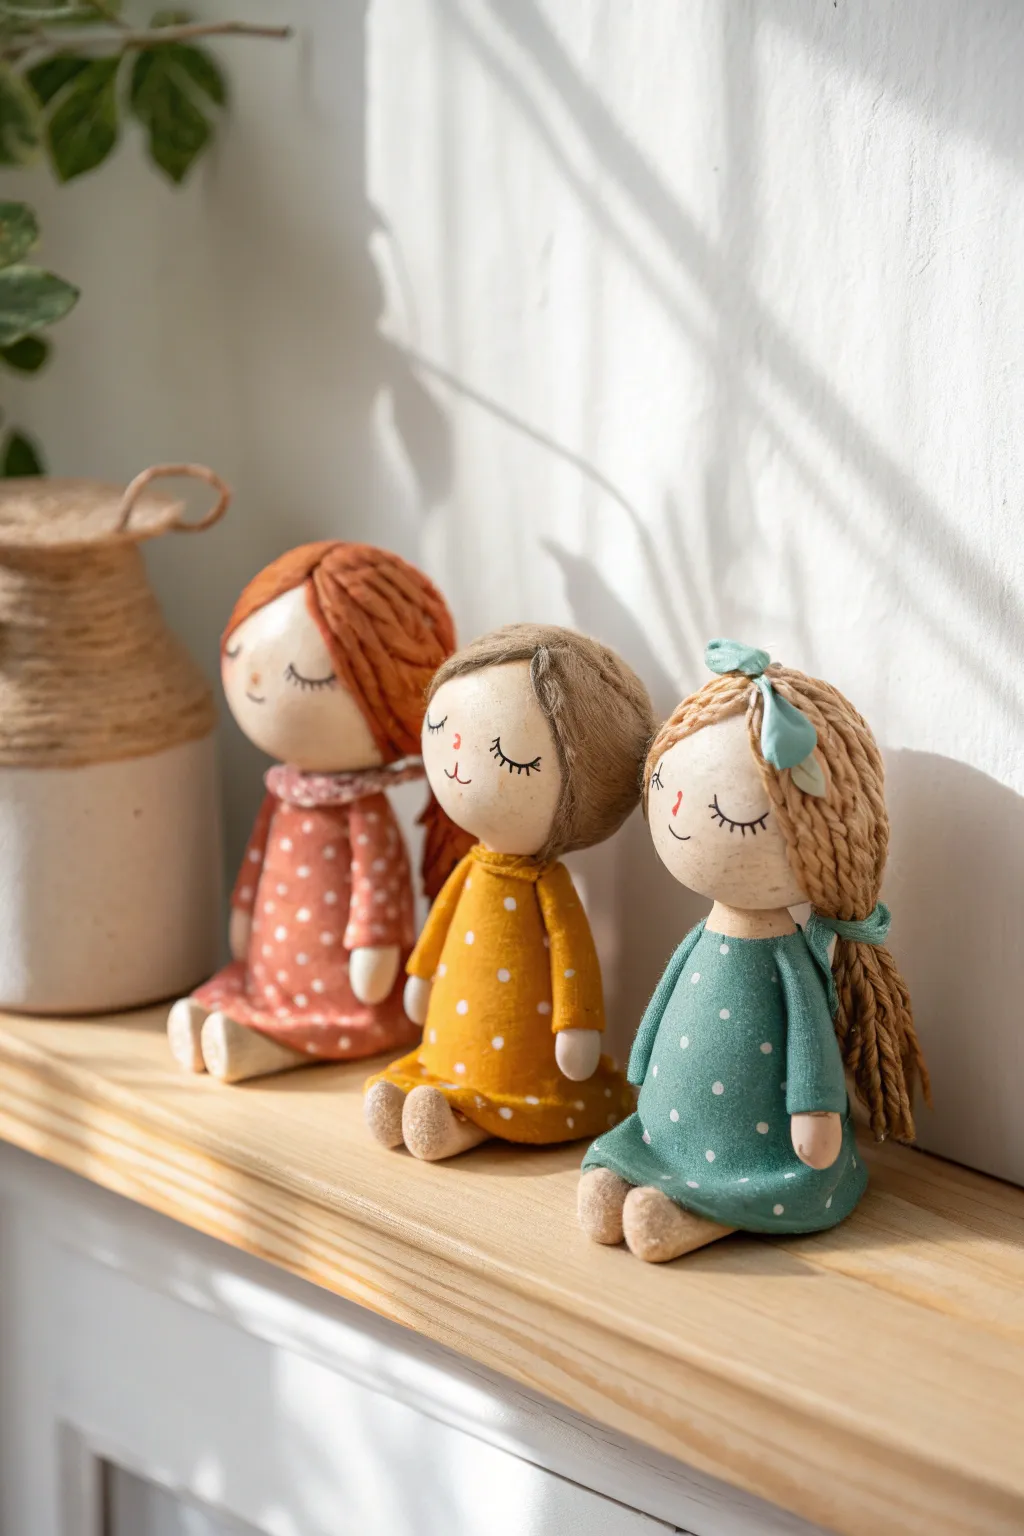
These charming sitting figurines feature smooth, rounded clay heads paired with soft fabric bodies in complementary earth tones. With their eyes gently closed and cozy polka-dot dresses, they radiate a sense of calm companionship perfect for shelf decor.
Step-by-Step Tutorial
Materials
- Air-dry clay (white or skin tone) or polymer clay
- Aluminum foil (for armature)
- Wooden dowels or toothpicks
- Heavyweight cotton or linen fabric (terracotta, mustard, teal)
- Yarn (rust, light brown, sandy blonde)
- Acrylic paints (black, pink, white)
- Fine detail paintbrush
- Fabric glue or hot glue gun
- Scissors and needle/thread
- Small ribbon (teal)
- Fine-grit sandpaper
Step 1: Sculpting the Head & Form
-
Create the core:
Start by scrunching a small ball of aluminum foil into a sphere about the size of a ping-pong ball. This saves clay and keeps the head lightweight. -
Cover with clay:
Roll out a sheet of your clay and wrap it smoothly around the foil ball. Roll it firmly between your palms until it is perfectly spherical and smooth. -
Shape the neck:
While the clay is soft, insert a wooden dowel or toothpick into the bottom of the head to act as a neck and key for the body later. Leave about an inch protruding. -
Form the feet:
Sculpt two small, oval-shaped feet for each doll using the same clay. Flatten the bottoms slightly so they can sit flat. -
Refine the surface:
Smoothing is crucial here. Use a tiny bit of water on your finger to buff out any fingerprints. Let all clay parts dry completely (24-48 hours usually).
Cracked Clay?
If you see hairline cracks as the clay dries, mix a tiny bit of fresh clay with water to make a paste (slip) and fill the cracks, then sand smooth once dry.
Step 2: Painting the Features
-
Sand for perfection:
Once fully bone-dry, lightly sand the heads with fine-grit sandpaper to remove any remaining bumps or dust. -
Sketch the face:
Lightly mark the center of the face with a pencil. Draw simple U-shapes for closed eyes and a tiny curve for the nose. -
Paint the details:
Using your finest brush and black paint, carefully trace over your pencil lines. Add tiny vertical ticks for eyelashes. -
Add blush:
Mix a very watery pink paint or use a dry-brush technique with minimal pigment to create soft, rosy circular cheeks.
Make it Sparkle
Add a coat of matte varnish to the clay parts for durability, or try a satin gloss on just the cheeks and lips to make the features pop.
Step 3: Creating the Body & Hair
-
Sew the body tubes:
Cut rectangles of your fabric (about 4×6 inches). Fold them in half and sew up the side and bottom to create a simple tube/sack shape. -
Stuff and assemble:
Stuff the fabric sack firmly with fiberfill. Insert the dowel of the clay head into the top opening, gather the fabric around the neck, and glue or tie it securely closed. -
Attaching the feet:
Glue the clay feet to the bottom front of the fabric body so they poke out slightly, giving the impression of sitting. -
Paint the polka dots:
Using the handle end of a paintbrush dipped in white paint, stamp small, random dots all over the dresses. -
Create hair bundles:
Wrap yarn around a piece of cardboard (about 3 inches wide) roughly 20-30 times. Cut one end to create individual strands. -
Style the red hair:
For the left doll, glue the center of the yarn strands to the top center of the head. Sweep the hair back and glue it down low at the nape of the neck. -
Style the brown bob:
For the middle doll, glue the yarn part-line slightly to the side. Trim the ends to create a shorter, bob-like cut that frames the face. -
Style the blonde braid:
For the right doll, glue the hair on, pull it to one side, and braid it loosely. Tie the end with a small piece of yarn. -
Final accessories:
Tie a small teal ribbon bow and glue it onto the blonde doll’s hair. You can add a small fabric scarf for the others if desired.
Now you have a trio of sweet handmade friends ready to brighten up any corner of your home
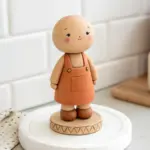

Mini-Me Girl Doll With Custom Hair
Create a charming figurine that captures the warmth and texture of carved wood using polymer clay. This project features a sweet character with a textured bun, closed eyes, and a minimalist dress, perfect for a personalized desk decoration.
Step-by-Step
Materials
- Polymer clay (Tan/Beige specifically for ‘wood’ look)
- White acrylic paint
- Fine-point stylus or needle tool
- Ball tool
- Acrylic roller
- Wire armature or toothpicks
- Black fine-liner pen or acrylic paint
- Pink soft pastel chalk (for blush)
- Small paintbrush
- Matte varnish
- Texturing sponge or sandpaper
Step 1: Sculpting the Head and Body
-
Form the core shapes:
Start by conditioning your tan clay until it is pliable. Roll a smooth sphere for the head and a slightly elongated teardrop shape for the body. The head should be relatively large compared to the body for that cute, cartoonish proportion. -
Connect the pieces:
Insert a toothpick or wire into the top of the body teardrop and carefully press the head onto it. Smooth the seam at the neck gently, although the dress will cover most of this area. -
Add the face shape:
Slightly flatten the front of the sphere to create a face plane. Use your thumb to softly press where the eye line will be, giving the cheeks a subtle prominence.
Wood Grain Hack
To enhance the wooden toy effect, lightly sand the baked tan clay with coarse sandpaper before painting. The scratches mimic grain wonderfully.
Step 2: Clothing the Figure
-
Create the dress form:
Roll out a thin sheet of the same tan clay. Cut a cone shape or a trapezoid that fits around the teardrop body. Wrap this around the body to create the dress silhouette, smoothing the back seam completely. -
Add the arms:
Roll two small sausage shapes for arms. Taper one end of each slightly for the hands. Attach them to the sides of the body, letting them hang naturally or rest slightly forward. -
Sculpt the legs:
Flip the figure over gently. Attach two short, stout logs of clay for legs underneath the dress. These should be sturdy enough to support the figure. -
Add the feet:
Shape two simple oval mounds for feet and attach them to the legs. Then, create a round flat disc for the base and press the feet firmly onto it so the doll stands independently.
Fixing Wobbly Heads
If the head keeps tilting while you work, bake the body and internal wire first for 15 minutes. Add raw clay for the head onto the baked post.
Step 3: Hair and Details
-
Form the hair base:
Roll a sheet of tan clay and drape it over the back and top of the head to form the main hair mass. Shape the front into bangs that sweep to the side. -
Create the bun:
Roll a separate ball of clay and attach it to the very top of the head. -
Texture the hair:
This is the most crucial step for the ‘wood’ look. Use your needle tool to carve deep, flowing lines into the hair and bun. Follow the natural direction of hair growth—sweeping sideways for the bangs and curving around the bun. -
Detail the ears:
Add tiny circles of clay on the sides of the head for ears. Press a small indentation into the center of each.
Step 4: Painting and Finishing
-
Add dress texture:
Before baking (or after, depending on your preference), use a needle tool to scratch vertical lines into the bottom hem of the dress to mimic pleats or wood grain. -
Paint the dress:
Once the clay is baked according to package instructions and cooled, paint the dress area with white acrylic paint. Apply it somewhat unevenly or sponge it slightly to keep a rustic, textured look. -
Add dress details:
Using a very fine brush and brown paint, add small vertical tick marks along the hem of the white dress and a dotted necklace pattern near the neckline. -
Draw the face:
Using a fine-liner pen or a tiny brush with black paint, draw two downward-curving crescents for sleeping eyes. Add a tiny curved line for a smile. -
Apply blush:
Grate a little pink pastel chalk into a powder. I like to use a dry, soft brush to gently dust this onto the cheeks for a soft, airbrushed glow. -
Seal the piece:
Finish by coating the entire figure with a matte varnish. This protects the paint and unifies the sheen, making the clay look even more like carved wood.
Place your finished mini figure on your desk for a calming, handcrafted companion.

The Complete Guide to Pottery Troubleshooting
Uncover the most common ceramic mistakes—from cracking clay to failed glazes—and learn how to fix them fast.
Flower Coasters With Girly Colors

Bring a touch of springtime to your coffee table with these charming flower-shaped coasters in soft pastel hues. The subtle speckled texture mimics terrazzo, giving them a modern, artisanal feel that looks store-bought but is surprisingly simple to make at home.
Step-by-Step Tutorial
Materials
- White air-dry clay or polymer clay
- Pastel acrylic paints (lavender, mint, pale pink, butter yellow)
- Speckled granite spray paint or fine glitter/sand (optional for texture)
- Small rolling pin
- Flower-shaped cookie cutter (approx. 3.5-4 inches)
- Fine-grit sandpaper
- Parchment paper or silicone baking mat
- Clear matte varnish or sealant
- Small paintbrush or toothpick
Step 1: Preparing the Clay Base
-
Color the clay:
Start by dividing your white clay into four equal balls. Add a pea-sized drop of different pastel acrylic paint to each ball and knead thoroughly until the color is uniform and streak-free. -
Add texture (Method A):
If you want the speckled look embedded in the clay, mix in a pinch of fine colored sand, dried tea leaves, or tiny flecks of contrasting dry clay into the ball before rolling. -
Roll it out:
Place a ball of colored clay between two sheets of parchment paper or directly on a silicone mat. Roll it out to a consistent thickness of about 1/4 inch (6mm). -
Check thickness:
Ensure the slab is even; too thin and the coaster might crack, too thick and it will take ages to dry. Use guides or dowels on either side of your rolling pin for precision.
Step 2: Shaping and Refining
-
Cut the shapes:
Press your flower-shaped cookie cutter firmly into the rolled clay. Wiggle it slightly to ensure a clean cut all the way through. -
Release the shape:
Gently lift away the excess clay from around the cutter first, then carefully push the flower shape out onto your drying surface. -
Smooth the edges:
Dip your finger in a little water and run it along the cut edges of the flower to smooth out any harsh lines or jagged bits left by the cutter. -
Add surface detail:
For that porous, stone-like texture seen in the photo, gently tap the surface with a stiff-bristled toothbrush or a crumpled ball of aluminum foil. Don’t press too hard. -
Create indentations (Optional):
If you want the subtle pinhole texture shown in the pink coaster, use a toothpick to poke shallow, random dots across the surface.
Keep it Flat
To prevent curling edges during drying, place a lightweight book on top of the coasters once they are ‘leather hard’ (dry to touch but not fully cured).
Step 3: Drying and Finishing
-
Let it dry:
Allow the coasters to air dry on a flat surface for 24-48 hours. I find flipping them over halfway through the drying process helps prevent warping. -
Sand for perfection:
Once fully cured and hard, take your fine-grit sandpaper and gently buff the edges and flat surfaces to remove any fingerprints or imperfections. -
Apply speckles (Method B):
If you didn’t mix texture into the clay earlier, you can now lightly mist the dried coasters with a granite-effect spray paint or flick diluted dark paint onto them with an old toothbrush. -
Seal the deal:
Apply a coat of clear matte varnish or waterproof sealant. This is crucial as it protects the clay from condensation when you place a cold drink on it. -
Add a backing:
For extra furniture protection, glue a piece of felt or thin cork cut to the same flower shape onto the bottom of each coaster.
Mix & Match Marble
Instead of solid colors, stop kneading the paint in early to create a beautiful marbled effect, swirling white and pastel clay together.
Enjoy your lovely new set of coasters that are ready to protect your surfaces in style.
Bow Wall Hooks for Bedroom Decor
Transform simple polymer clay into charming, vintage-inspired bow wall hooks that add a touch of whimsy to any bedroom. These dusty rose bows feature a subtle sparkle and realistic fabric folds, making them sturdy enough to hold light accessories or stand alone as sweet wall decor.
Detailed Instructions
Materials
- Polymer clay (terracotta or dusty rose color)
- Fine glitter (silver or iridescent)
- Texture sheet or fine grit sandpaper (optional)
- Clay roller or pasta machine
- Flexible clay blade or craft knife
- Liquid polymer clay or bake-and-bond
- Brass or gold finish wall hooks (J-shape)
- Strong epoxy adhesive (E6000)
- Gloss or satin glaze (optional)
- Oven and baking sheet
Step 1: Preparing the Clay
-
Condition and Sparkle:
Begin by conditioning your polymer clay until it is soft and pliable. Flatten it out slightly and sprinkle a generous amount of fine glitter onto the surface. Fold the clay over to trap the glitter and knead thoroughly until the sparkles are evenly distributed throughout the block. -
Roll out Sheets:
Using a clay roller or pasta machine on a medium setting (approx. 3mm thick), roll the clay into a long, even sheet. Ensure the thickness is uniform to prevent cracking later. -
Add Texture:
For a realistic fabric look, gently press a piece of fine-grit sandpaper or a fabric texture sponge onto the clay surface. This removes fingerprints and mimics the grain of heavy cloth.
Step 2: Forming the Bows
-
Cut the Strips:
Cut a long rectangular strip for the main bow loops (about 6 inches by 1.5 inches) and a smaller, shorter strip for the center knot (about 1.5 inches by 0.5 inches). -
Create the Loops:
Take the long strip and fold both ends toward the center so they meet in the middle, creating a basic loop shape. Don’t press the fold flat; keep the loops rounded and dimensional. -
Pinch the Center:
Gently pinch the center where the ends meet, creating an accordion-fold effect. This naturally flares out the sides, making them look like fabric gathered together. -
Secure the Knot:
Take the smaller strip of clay and wrap it vertically around the pinched center. Overlap the ends at the back and trim any excess clay. Use a sculpting tool to tuck the edges in neatly. -
Shape the Folds:
Use your fingers or a ball tool to manipulate the loops, creating soft indents and folds. I like to pull the corners slightly outward to give the bow a perky, finished shape rather than a flat, lifeless one. -
Smoothing:
Check the back of the bow to ensure all seams are blended. Smooth out any fingerprints using a tiny bit of baby oil or cornstarch.
Drooping Loops?
If the clay is too soft and the loops flatten, ball up small pieces of tissue paper or parchment and stuff them inside the loops while baking to hold the shape.
Step 3: Baking and Assembly
-
Bake the Pieces:
Place your finished clay bows onto a baking sheet lined with parchment paper. Bake according to the manufacturer’s instructions for your specific brand of clay—usually 275°F (135°C) for 15-30 minutes. -
Cool Down:
Allow the clay pieces to cool completely inside the oven or on a wire rack. Sudden temperature changes can cause brittle clay. -
Prepare the Hooks:
Take your brass J-hooks and lightly sand the flat back surface where it will attach to the wall or the clay. This helps the glue adhere better. -
Attach the Clay:
If you want the bow to sit *on* a hook (like the lower examples), apply a strong epoxy to the front of the hook’s mounting plate and press the clay bow onto it. Creating a mechanical bond by scratching the back of the clay first helps. -
Mounting Option B:
If mounting the bow directly to the wall (like the top examples), glue a flat thumbtack or a sawtooth picture hanger securely to the back of the bake bow using heavy-duty epoxy. -
Final Cure:
Let the epoxy adhesive cure for a full 24 hours before hanging anything on the hooks to ensure maximum strength.
Metallic Accent
Before baking, brush a tiny amount of gold mica powder onto the edges of the bow folds to catch the light and match the brass hardware perfectly.
Hang these darling hooks in a cluster to create a functional art installation that organizes jewelry and treasures.


What Really Happens Inside the Kiln
Learn how time and temperature work together inside the kiln to transform clay into durable ceramic.
Pastel Cute Animal Desk Buddies
This adorable little desk companion brings instant cheer with its soft, rounded form and sweet expression. The project uses a speckled clay body to create a natural, earthy finish that looks professional yet handmade.
Step-by-Step Guide
Materials
- Speckled air-dry clay or polymer clay (w/ granite effect)
- Small rolling pin
- Modeling tools (ball stylus, needle tool)
- Acrylic paint (black, soft pink)
- Fine detail paintbrush
- Matte varnish (optional)
- Small bowl of water
- Sandpaper (fine grit)
Step 1: Shaping the Base Body
-
Condition the clay:
Begin by taking a handful of your speckled clay. Knead it thoroughly in your hands until it becomes warm, pliable, and free of cracks. -
Form the main sphere:
Roll the clay into a smooth ball between your palms. It should be roughly the size of a tangerine. -
Create the gumdrop shape:
Gently tap the bottom of the ball against your work surface to flatten it so it sits stable. Then, subtly smooth the sides upward to create a rounded, slightly tapered dome shape, similar to a chubbier gumdrop. -
Smooth the surface:
Dip your finger in a tiny bit of water and rub it over the entire surface to erase any fingerprints or minor seams. The goal is a seamless, stone-like texture.
Step 2: Adding Ears and Feet
-
Make the ears:
Pinch off two very small, equal-sized pieces of clay. Roll them into tiny balls, then flatten them slightly into triangles. -
Attach the ears:
Score the bottom of the triangles and the top of the cat’s head with a needle tool. Add a dab of water (or slip) and press the ears firmly onto the head, spaced widely apart. -
Blend the seams:
Use a modeling tool or your finger to smooth the clay from the back of the ear down onto the head so they become one solid unit. Keep the front face of the ears distinct. -
Indent the ears:
Use a small ball stylus or the rounded end of a paintbrush to gently press into the center of each ear triangle, creating a soft depression for the inner ear. -
Create the feet:
Flip the cat over gently. Form two tiny, flat ovals of clay for the front paws. -
Attach the feet:
Press these little nubs onto the bottom front edge of the body so they just peek out. Blend the back edges into the base so they don’t fall off.
Cracks Appearing?
If you see hairline cracks while drying, mix a tiny bit of fresh clay with water to make a paste (slip). Fill the cracks, smooth it over, and let it dry again.
Step 3: Drying and Decorating
-
Let it dry completely:
Place your cat in a safe, dry spot away from direct sunlight. Depending on the clay brand and thickness, this usually takes 24-48 hours. It will turn lighter in color when fully dry. -
Sand imperfections:
Once bone dry, take a piece of fine-grit sandpaper and very gently buff away any rough spots, fingerprints, or sharp edges on the ears. -
Paint the inner ears:
Mix a very soft, pastel pink acrylic paint. Using your smallest brush, carefully fill in the indented areas of the ears. -
Add the nose:
Using the same soft pink, paint a tiny, inverted triangle or oval right in the center of the face for the nose. -
Paint the eyes:
Switch to black acrylic paint. Dip the handle end of a paintbrush or a dotting tool into the paint and stamp two small, solid black circles for eyes, spaced widely apart. -
Draw whiskers:
I prefer to use a super fine liner brush for this step. With thinned black paint, lightly flick three thin lines outward from each cheek area. Keep the lines delicate and tapering at the ends. -
Seal the piece:
To protect the paint without losing that natural stone look, apply a thin coat of matte varnish over the painted areas or the whole figurine.
Make it a Planter
Before drying, press a large hole into the top center of the head. Once dry and sealed, you can tuck a tiny air plant inside for a grassy hairstyle.
Place your new speckled friend on your desk to keep you company while you work
Tiny Dinosaur With a Sweet Face
This adorable dinosaur figurine brings a touch of whimsy to any desk or shelf with its soft mint green color and friendly smile. With a gently textured finish that almost looks like felt, this project is perfect for sculptors of any skill level.
How-To Guide
Materials
- Air-dry clay or polymer clay (white)
- Acrylic paints: Mint green, pastel pink, lavender purple, black
- Sculpting tools: Ball stylus, smoothing tool
- Small paintbrush
- Old toothbrush or stiff bristle brush (for texture)
- Water (for smoothing)
- Matte varnish (optional)
Step 1: Sculpting the Body
-
Form the Base:
Start with a generous handful of clay and roll it into a large, smooth egg shape. This will become the combined body and head of your dinosaur. -
Define the Head:
Gently pinch and pull the narrower top part of the egg forward to create a snout. Use your thumbs to press a slight indentation where the neck should be, distinguishing the head from the rounded belly. -
Create the Legs:
Roll two short, thick sausages of clay for the legs. Attach them to the bottom of the body, blending the seams upward so they look like part of the main form rather than stuck-on pieces. -
Attach the Tail:
Form a cone shape for the tail. Press the wider end onto the lower back of the dinosaur and smooth the clay seams completely so the tail flows naturally from the body. -
Add Tiny Arms:
Roll two small teardrop shapes for the arms. Press them onto the upper chest area, curving them slightly inward as if the dino is holding its belly. -
Smooth and Texture:
Dip your finger in a little water to smooth out any fingerprints. Once smooth, take an old toothbrush or stiff brush and gently tap it all over the surface to create a pitted, stone-like texture.
Step 2: Adding Details
-
Make the Spikes:
Roll out a small snake of clay and cut it into small triangular segments. You’ll need about 6-8 pieces depending on the size of your dino. -
Attach the Spines:
Starting at the top of the head and working down to the tail, attach the triangles in a row. Blend the bottom edge of each spike into the back for a secure hold. -
Refine the Shape:
Check the dinosaur’s balance to ensure it stands upright on its own. Create flat surfaces on the bottom of the feet if it’s tipping over. -
Dry Time:
Let your sculpture dry completely. If using air-dry clay, this might take 24-48 hours; for polymer clay, bake according to package instructions.
Texturing Secret
Don’t skip the toothbrush step! That subtle stippling creates a ‘stone’ or ‘felt’ look that hides imperfections better than a perfectly smooth surface.
Step 3: Painting & Finishing
-
Base Coat:
Paint the entire body (avoiding the spikes if possible, though you can paint over them) with a soft mint green acrylic paint. You may need two coats for full coverage. -
Paint the Spikes:
Carefully paint the dorsal spikes with a pastel lavender or soft purple paint. -
Add Pink Details:
Dip a small round brush or a cotton swab into pastel pink paint. Dab small, random spots onto the dino’s body and faint cheek blushes. -
Draw the Face:
Using a very fine liner brush and black paint, draw a curved line for the smiling mouth. Add a small ‘u’ shape for the winking eye and a simple dot for the other eye. -
Add Highlights:
Place a tiny white dot inside the open black eye to give it a spark of life. -
Seal It Up:
Once the paint is fully dry, apply a coat of matte varnish to protect your work without making it too shiny.
Project Falling Over?
If the head is too heavy, insert a crumpled ball of aluminum foil into the center of the body while sculpting to reduce weight and save clay.
Now you have a charming prehistoric friend ready to brighten up your workspace

TRACK YOUR CERAMIC JOURNEY
Capture glaze tests, firing details, and creative progress—all in one simple printable. Make your projects easier to repeat and improve.
Mermaid Girl Figurine
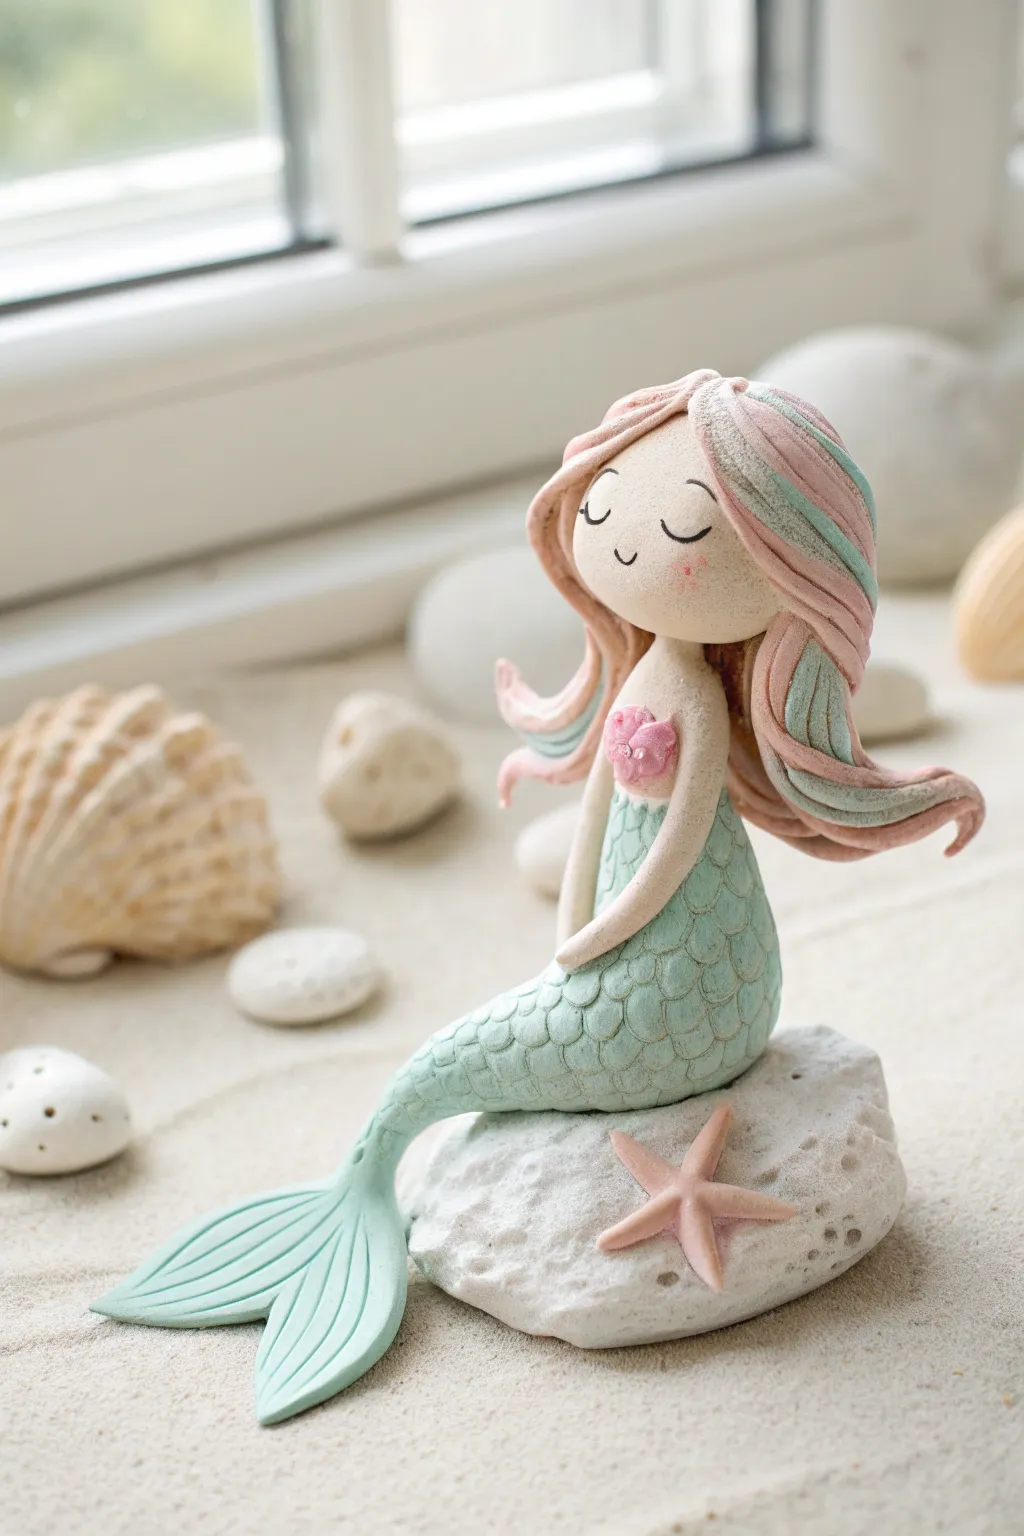
Bring a touch of underwater magic to your shelf with this adorable polymer clay mermaid figurine. Featuring soft pastel hair, a shimmering scaled tail, and a peaceful expression, she sits elegantly on her very own sea rock.
Detailed Instructions
Materials
- Polymer clay (white, peach/skin tone, mint green, baby pink)
- Aluminum foil
- Basic sculpting tools (needle tool, ball stylus)
- Clay roller or pasta machine
- Small scallop tool or a straw cut in half (for scales)
- Textured sponge or toothbrush (for stone texture)
- Pink mica powder or pastel chalk
- Soft brush
- Wire armature (optional but recommended for neck support)
- Oven
Step 1: Sculpting the Base and Body
-
Form the rock base:
Start by creating a crumpled core of aluminum foil roughly the size of a tangerine to save clay. Cover this core with a thick sheet of white clay, smoothing the seams. -
Texture the stone:
Press a textured sponge, a crumpled ball of foil, or an old toothbrush all over the white clay rock to give it a realistic, porous coral look. Gently press the base flat so it sits securely on your work surface. -
Create the tail core:
Roll a log of mint green clay. Taper one end to a point for the fin and keep the other end thicker for the waist. Curve it gently so it looks like she is sitting, and press the thicker end firmly onto the rock base. -
Add the scales:
Starting from the bottom of the tail near the fin area and working upward, use a small U-shaped tool (or a straw cut in half) to imprint a scale pattern. Offset each row slightly for a natural look. -
Sculpt the tail fin:
Flatten a piece of mint green clay into a fan shape and cut a deep V-notch in the center. Use a needle tool to score long, curved lines radiating from the center to mimic fin texture, then attach this to the pointed end of the tail. -
Form the torso:
Roll a smooth cylinder of skin-tone clay for the upper body. Attach it securely to the top of the mint green tail, blending the clay downwards slightly to ensure a strong bond.
Step 2: Adding Details and Features
-
Attach the head:
Roll a larger ball of skin-tone clay for the head. Insert a small piece of wire into the neck to keep the head stable, then press the head onto the torso. -
Create the face:
Using a needle tool, very lightly scribe two shallow U-shapes for closed, sleeping eyes and a tiny curve for a smile. The expression should be peaceful and serene. -
Apply blush:
Before baking, use a soft brush to dust a tiny amount of pink pastel chalk or mica powder onto her cheeks for a rosy glow. I find this creates a much softer look than painting it on later. -
Make the bodice:
Create a tiny, textured shell shape using pink clay. Press this onto the center of her chest. -
Sculpt the arms:
Roll two thin snakes of skin-tone clay for arms. Attach them at the shoulders and curve them gracefully so her hands rest gently in her lap.
Clean Clay Pro Tip
Keep baby wipes nearby! When switching between mint green and white clay, clean hands thoroughly. Dark lint or colors love to stick to light clay.
Step 3: Hair and Finishing Touches
-
Prepare hair strands:
Roll several long, tapered snakes of clay in both baby pink and mint green. Flatten them slightly to make ribbons of hair. -
Layer the hair:
Begin placing the hair strands at the back of the head, layering them over one another. Alternate pink and green tones to create a highlighted effect. -
Frame the face:
Place pieces of hair around the face, sweeping them back to look like they are floating underwater. Add a slight curl to the ends of the strands using your fingers. -
Detail the hair:
Use a needle tool to draw long, flowing lines down the length of the hair strands to simulate individual hairs and add texture. -
Add a starfish:
Create a tiny starfish using pink clay by pulling out five small points from a central ball. Texture it with a needle tool and press it onto the rock base near the tail. -
Final inspection:
Check the figurine from all angles to ensure she is balanced and the seams are smooth. use a bit of baby oil on your finger to smooth out any fingerprints. -
Bake:
Bake the figurine according to your clay manufacturer’s instructions (usually 275°F/135°C for about 30 minutes per 1/4 inch of thickness).
Level Up: Shimmer
After baking, lightly brush a pearl white acrylic paint or iridescent varnish over the tail scales and hair strands to give them a wet, magical sheen.
Once cooled, your serene mermaid is ready to bring a splash of calm to your desk or bookshelf
Princess-Style Girl Figurines
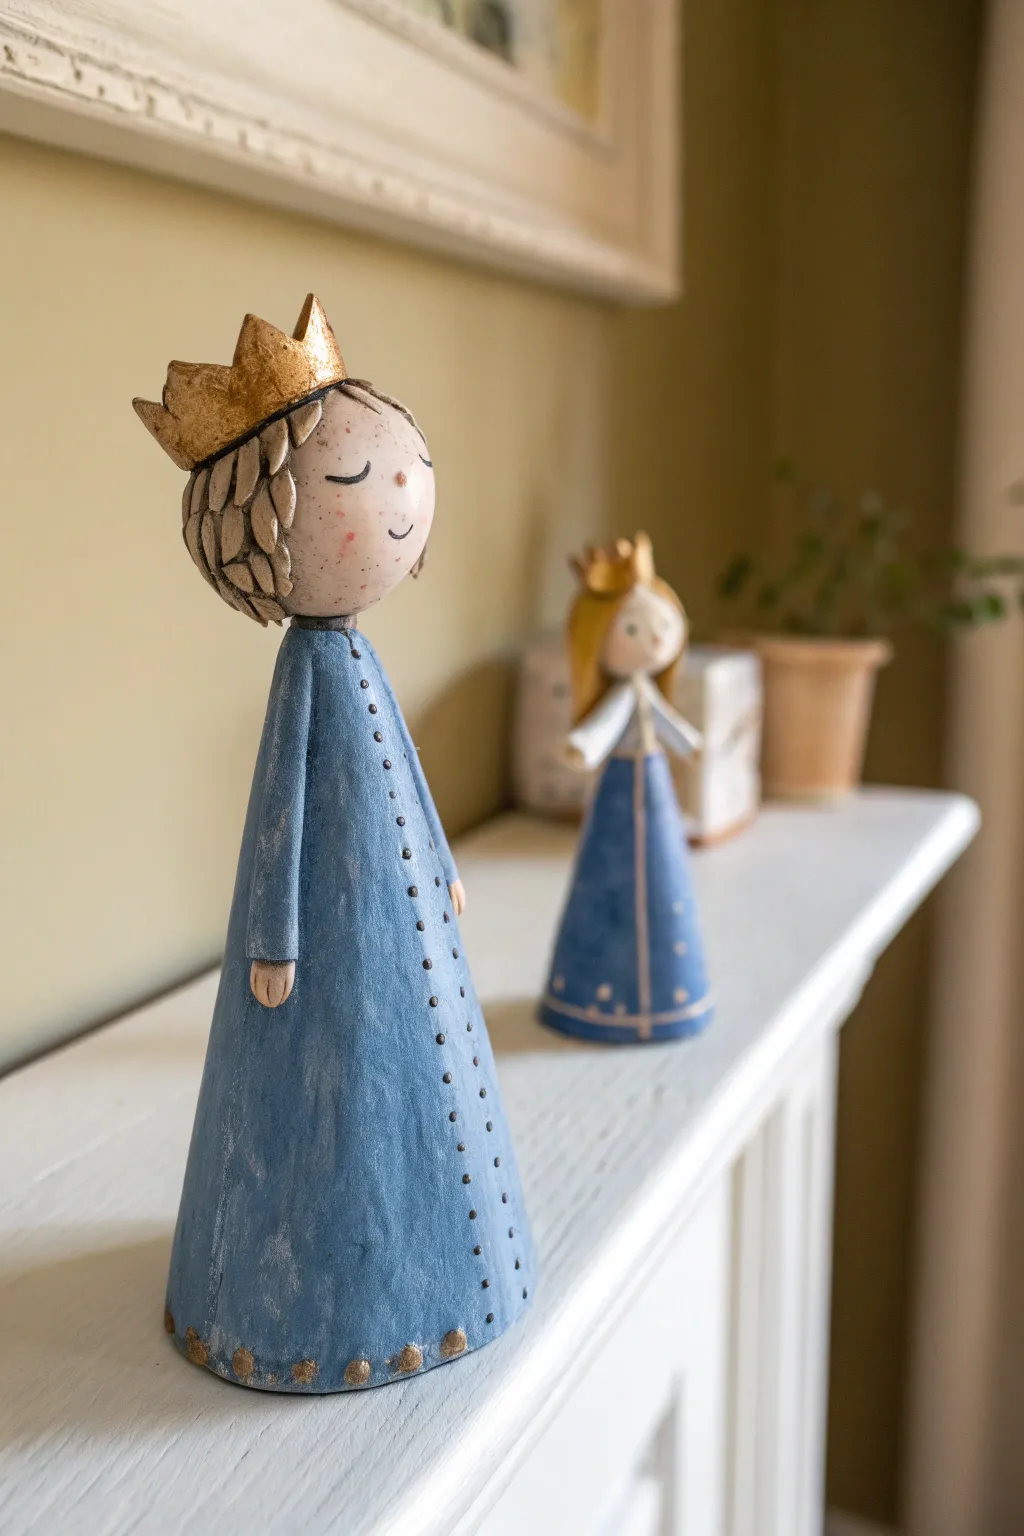
Create a charming, elongated princess figurine with a serene expression and a regal golden crown. This stylized clay sculpture features a textured blue gown and a simple but elegant face, perfect for a shelf or mantel display.
Step-by-Step
Materials
- Air-dry clay or polymer clay (white or light grey)
- Acrylic paints (dusty blue, gold, flesh tone, black, pink)
- Fine grit sandpaper
- Small paintbrush and fine detail brush
- Sculpting tools (needle tool, ball stylus)
- Aluminum foil (for armature)
- Rolling pin
- Matte varnish/sealer
Step 1: Forming the Body and Head
-
Build the armature:
Crumple aluminum foil into a tall, sturdy cone shape for the body and a separate sphere for the head. This saves clay and reduces weight. -
Cover the body:
Roll out a sheet of clay to about 1/4 inch thickness. Wrap it smoothly around the foil cone to create the dress, blending the seam at the back. -
Shape the dress:
Gently gently taper the clay upwards to create a narrow neck area, keeping the base wide and flat so it stands securely. -
Create the head:
Cover the foil sphere with a smooth layer of clay. Attach this to the top of the dress cone. I find scoring the clay surfaces and adding a dab of water helps them bond securely. -
Sculpt simple arms:
Roll two thin snakes of clay for the arms. Attach them vertically along the sides of the dress so they blend seamlessly into the fabric, leaving just the cuff area distinct. -
Add tiny hands:
Shape two very small ovals for hands and tuck them just under the ends of the sleeves.
Clay Consistency
If your air-dry clay feels cracked or dry while working, keep a small bowl of water nearby to constantly moisten your fingertips as you smooth.
Step 2: Adding Details and Hair
-
Sculpt the hair texture:
Apply a thicker layer of clay cap-style over the back and sides of the head. Use a needle tool to carve deep, jagged overlapping lines to mimic stylized, chunky layers of hair. -
Form the crown:
Cut a strip of clay and cut jagged triangles out of the top edge. Wrap this around the top of the head, blending the bottom edge slightly into the hair. -
Smooth the face:
Use a damp finger or sponge to ensure the face area is perfectly smooth before setting the piece aside to dry completely (24-48 hours for air-dry clay). -
Refine the surface:
Once fully dry, lightly sand any unintentional bumps on the dress or face with fine-grit sandpaper.
Metallic Accents
Add a tiny bit of gold leaf or metallic wax to the tips of the crown points after painting for an extra regal shimmer that catches the light.
Step 3: Painting and Finishing
-
Base coat the dress:
Paint the entire dress body with a dusty blue acrylic paint. You may need two coats for opaque coverage. Let the brush strokes be slightly visible for a textured look. -
Paint the skin:
Paint the face and the tiny visible hands with a pale flesh tone. Keep the application smooth. -
Detail the hair and crown:
Paint the sculpted hair a light beige or grey-brown. Paint the crown a metallic gold. -
Highlight with dry-brushing:
Using a very dry brush and a tiny amount of white paint, lightly sweep over the blue dress to highlight the texture. Do the same with gold paint on the hair tips. -
Add dress embellishments:
Dip the back end of a paintbrush into dark grey paint and dot a vertical line of buttons down the front of the dress. Use gold paint to add dots along the bottom hem. -
Paint facial features:
With your finest brush, paint two simple curved arches for closed eyes and a tiny curve for a smile. Add faint pink circles for rosy cheeks. -
Seal the figurine:
Protect your work with a coat of matte varnish.
Place your finished princess on a shelf where the light can catch the gold details on her crown
Sister Pair Keepsake Figurines
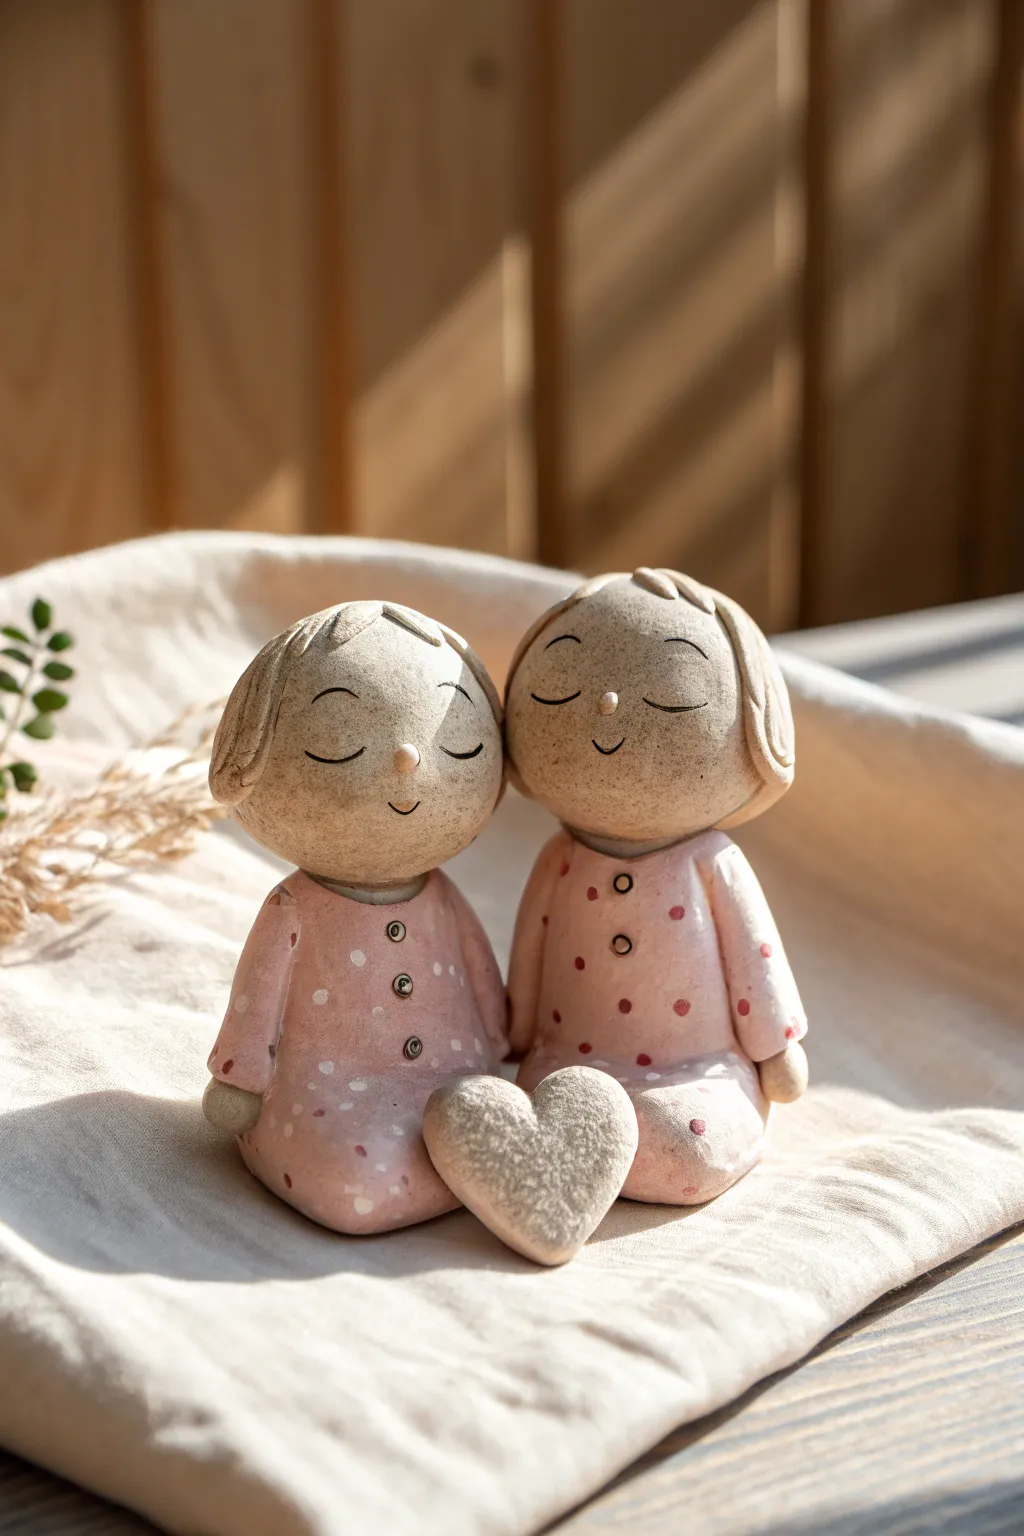
These charming clay figurines capture the bond between sisters or best friends with their peaceful expressions and matching pajamas. The textured, speckled clay finish gives them a timeless, handcrafted warmth perfect for a shelf or mantel.
How-To Guide
Materials
- Speckled stoneware clay or polymer clay (granite or sandstone effect)
- Pink acrylic paint or underglaze (soft pastel shade)
- White and dark red acrylic paint
- Small round paintbrushes
- Pointed sculpting tool or needle tool
- Small ball tool
- Smooth work surface
- Water and sponge (for smoothing)
Step 1: Shaping the Bodies
-
Prepare the base:
Start with two evenly sized balls of speckled clay, each about the size of a tangerine. Roll them until they are smooth. -
Form the torsos:
Gently shape each ball into a rounded cone form. Flatten the bottom so they sit stably on your work surface, ensuring they are slightly tilted forward as they will be in a seated position. -
Create the legs:
For the seated look, mold two small sausage shapes for each figure. Attach them to the bottom front of the torso, bending them slightly so the ‘feet’ touch in the center, creating that cross-legged or tucked-under appearance. -
Add the arms:
Roll two thin coils for arms for each figure. Attach them at the shoulders and curve them down so the hands rest gently near the lap or knees. Blend the seams at the shoulders for a seamless connection. -
Smooth the surfaces:
Use a slightly damp sponge or your finger to smooth out any fingerprints or joining lines. The goal is a soft, rounded silhouette without sharp edges.
Smooth Seams
Use a barely damp paintbrush to smooth the neck and shoulder seams. This tool reaches tight crevices better than fingers.
Step 2: Sculpting the Heads
-
Shape the heads:
Roll two slightly flattened spheres for the heads. They should be large enough to look endearing—slightly oversized relative to the bodies adds cuteness. -
Attach heads to bodies:
Score the top of the neck area and the bottom of the head slightly. Add a dab of slip (clay water) or liquid clay and press the heads firmly onto the bodies. I like to tilt them slightly toward each other to emphasize their connection. -
Sculpt the hair:
Roll a flat sheet of clay and drape it over the head for hair. For the figure on the left, use a rounded bob shape. For the right figure, create a slightly straighter cut. Use a sculpting tool to etch gentle lines for hair texture. -
Refine the bangs:
Add small, separate pieces for bangs sweeping across their foreheads. Press them gently to integrate them with the rest of the hair. -
Add facial features:
Roll tiny, tiny balls of clay for the noses and press them onto the precise center of the faces. Use a needle tool to carve two simple, U-shaped curves for closed smiling eyes and a tiny curve for the mouth.
Step 3: The Heart and Details
-
Create the heart:
Form a small heart shape from the same speckled clay. It needs to be sized to fit snugly between the two figures’ knees. -
Create texture:
Use an old toothbrush or stiff bristle brush to tap texture onto the heart and the hair of the figures, enhancing the natural stone look. -
Add buttons:
Press three tiny indentations down the front center of each pajama top. Roll tiny balls of clay and insert them into these divots for buttons. -
Drying or firing:
If using air-dry clay, let the piece dry for 24-48 hours. If using polymer, bake according to package instructions. For ceramic clay, fire to bisque temperature.
Head Stability
If the heads are heavy and tilting too much, insert a short piece of toothpick or wire between the head and body for internal support.
Step 4: Painting and Finishing
-
Apply base color:
Dilute pink paint with water to create a wash. Paint the pajamas, allowing some of the speckled clay texture to show through. This creates that soft, milky pink look. -
Paint the dots:
Using a fine-tipped brush, paint small white polka dots on the left figure’s pajamas and dark red/maroon dots on the right figure’s pajamas. -
Detail the buttons:
Carefully paint the buttons with a dark brown or black outline to make them pop against the pink fabric. -
Highlight the heart:
Lightly dry-brush the heart with a pale cream color to accentuate its texture without fully covering the stone color. -
Final touches:
Use a very fine liner brush to darken the eye and mouth lines with a soft brown paint if the carving isn’t distinctive enough.
Place your lovely duo in a spot with soft lighting to enjoy their peaceful presence
Cute Couple Figurines for a Memory Shelf
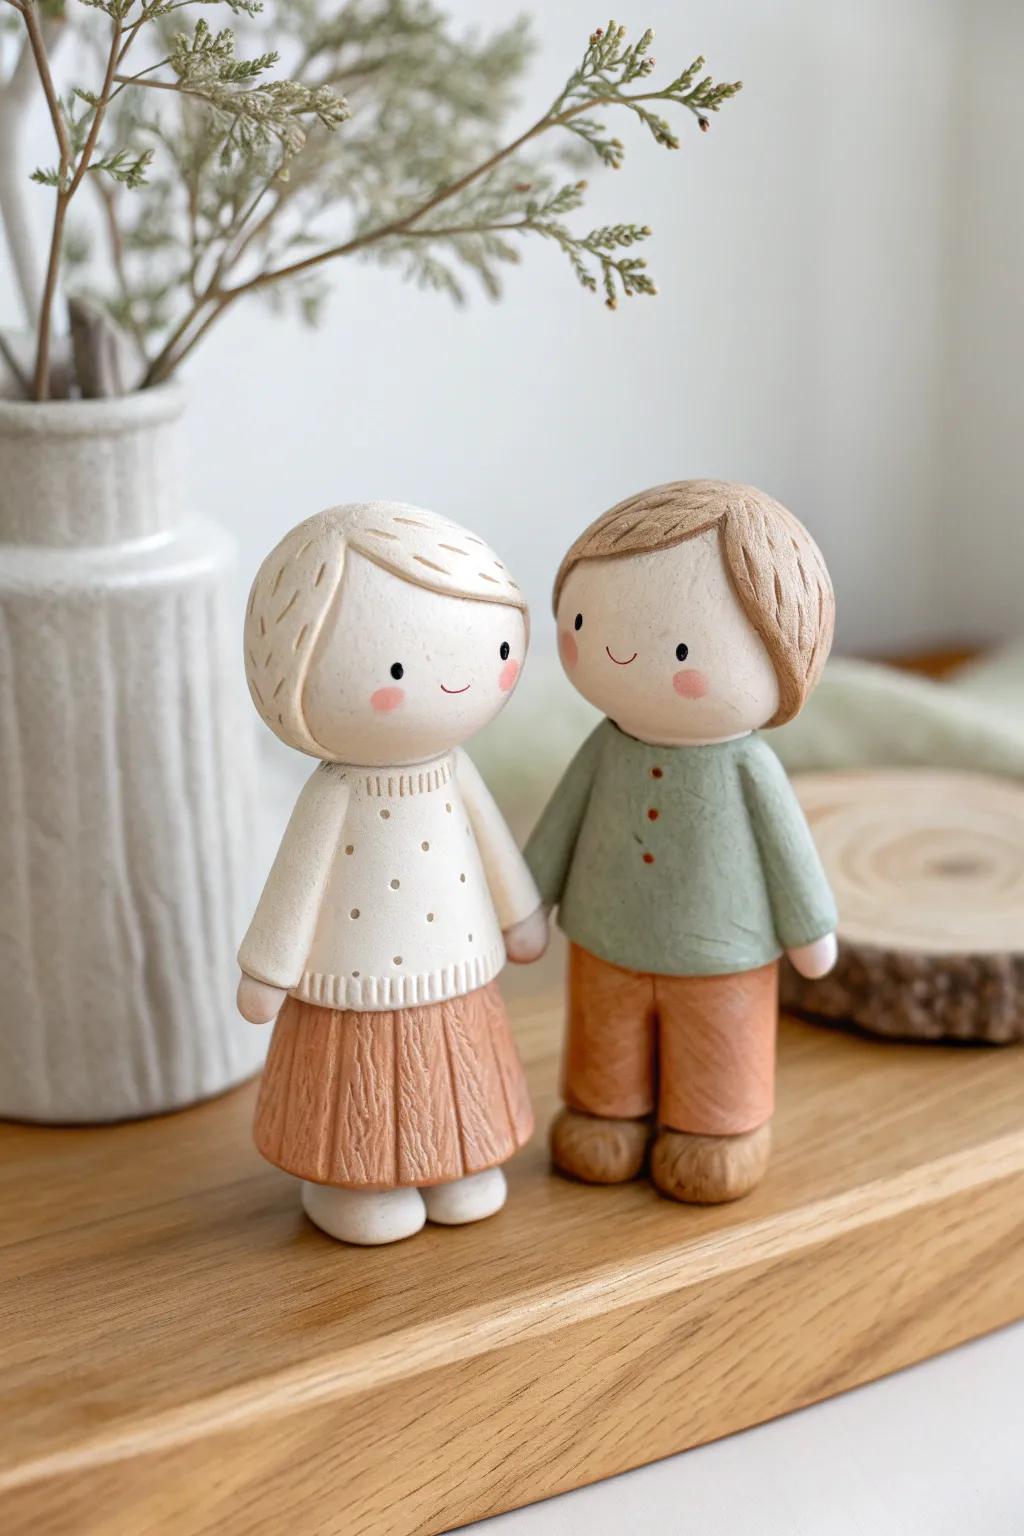
These charming, miniature clay dolls capture a sense of sweetness and friendship perfect for any memory shelf. With their minimalist features, textured clothing, and soft pastel palette, creating this duo is a relaxing exercise in shaping and detailing.
Step-by-Step
Materials
- Polymer clay in beige/skin tone, white, muted orange, sage green, and light brown
- Basic sculpting tools (needle tool, ball stylus)
- Acrylic rolling pin
- Aluminum foil (for core)
- Toothpicks or wire (for structural support)
- Black and pink acrylic paint (for face details)
- Fine detail paintbrush
- Matte varnish (optional)
- Craft knife
Step 1: Forming the Base Structure
-
Create the armatures:
Start by scrunching two small balls of aluminum foil into rough oval shapes for the heads to save clay and reduce baking time. Insert a toothpick or short piece of wire into each foil ball to connect the head to the body later. -
Cover the heads:
Roll out a sheet of your skin-tone clay. Wrap it smoothly around the foil cores, gently rolling between your palms to smooth out any seams or fingerprints until you have two perfect, slightly flattened spheres. -
Shape the torsos:
For the bodies, form two tapering cylinders from scrap clay or foil. These won’t be visible, so they don’t need to be perfect, but they should be sized to fit under the sweater and shirt.
Step 2: Dressing the Girl Figurine
-
Form the pleated skirt:
Take the muted orange clay and flatten it into a thick strip. Wrap this around the lower half of the girl’s torso form. Use a needle tool or knife to deeply score vertical lines all around the skirt to mimic heavy pleating texture. -
Add the sweater:
Shape a rounded cone of white clay for the upper body and place it over the top of the skirt. Create two small tubes for arms and attach them to the sides. -
Detail the knitwear:
I like to use a needle tool to press tiny ribbing lines into the sweater’s bottom hem and collar area. Next, use a small ball stylus to press indented dots all over the sweater for a polka-dot effect. -
Attach the head and hair:
Slide the head onto the body’s toothpick support. Flatten a pancake of skin-tone clay (or very light yellow) for hair, drape it over the head, and use a knife to carve in hair strands, sweeping them to the side. -
Finish with shoes:
Add two small, flattened white ovals at the bottom of the skirt for her simple shoes.
Clean Clay Tip
Work with the lightest colors first (white, skin tone) and dark colors last. Keep baby wipes nearby to clean your hands between colors so the white sweater stays pristine.
Step 3: Dressing the Boy Figurine
-
Create the trousers:
Roll two thick logs of muted orange clay for legs and join them at the top. Attach them to the bottom of his torso armature. -
Add the shirt:
Form a sage green cylinder for the shirt and place it over the trousers. Smooth the transition slightly, but leave a slight overhang to show the shirt is untucked. -
Attach arms and hands:
Roll green sleeves and attach them. Add tiny balls of skin-tone clay at the ends for hands. Position one of his hands to gently touch the girl’s hand if you want them connected. -
Sculpt the hair:
Attach his head. Using light brown clay, create a ‘helmet’ of hair. Use a sculpting tool to carve deep, parting lines to create texture and a side-swept look. -
Add shoes:
Form two brown, loaf-shaped blobs for shoes and attach them firmly to the bottom of the trouser legs.
Level Up: Texture
Before baking, gently press a clean piece of denim or linen fabric against the boy’s shirt and the girl’s skirt to imprint a realistic woven fabric texture onto the clay.
Step 4: Final Details and Baking
-
Bake carefully:
Bake the figurines according to your clay package instructions. Keep the temperature consistent to avoid scorching the light colors. -
Paint the faces:
Once cool, use the finest brush you have (or a toothpick tip) to dot on tiny wide-set black eyes. Add a barely-there curved line for a smile. -
Add blush:
Dilute pink acrylic paint very heavily with water, or use chalk pastel shavings. Gently dab pink circle cheeks onto both faces for a rosy glow. -
Detail the clothing:
Paint three tiny orange buttons down the front of the boy’s green shirt. -
Seal:
Apply a thin coat of matte varnish if desired to protect the paint and give the clay a finished, professional look.
Now you have a heartwarming keepsake pair ready to decorate your space
Initial Letter Magnets With Pretty Patterns
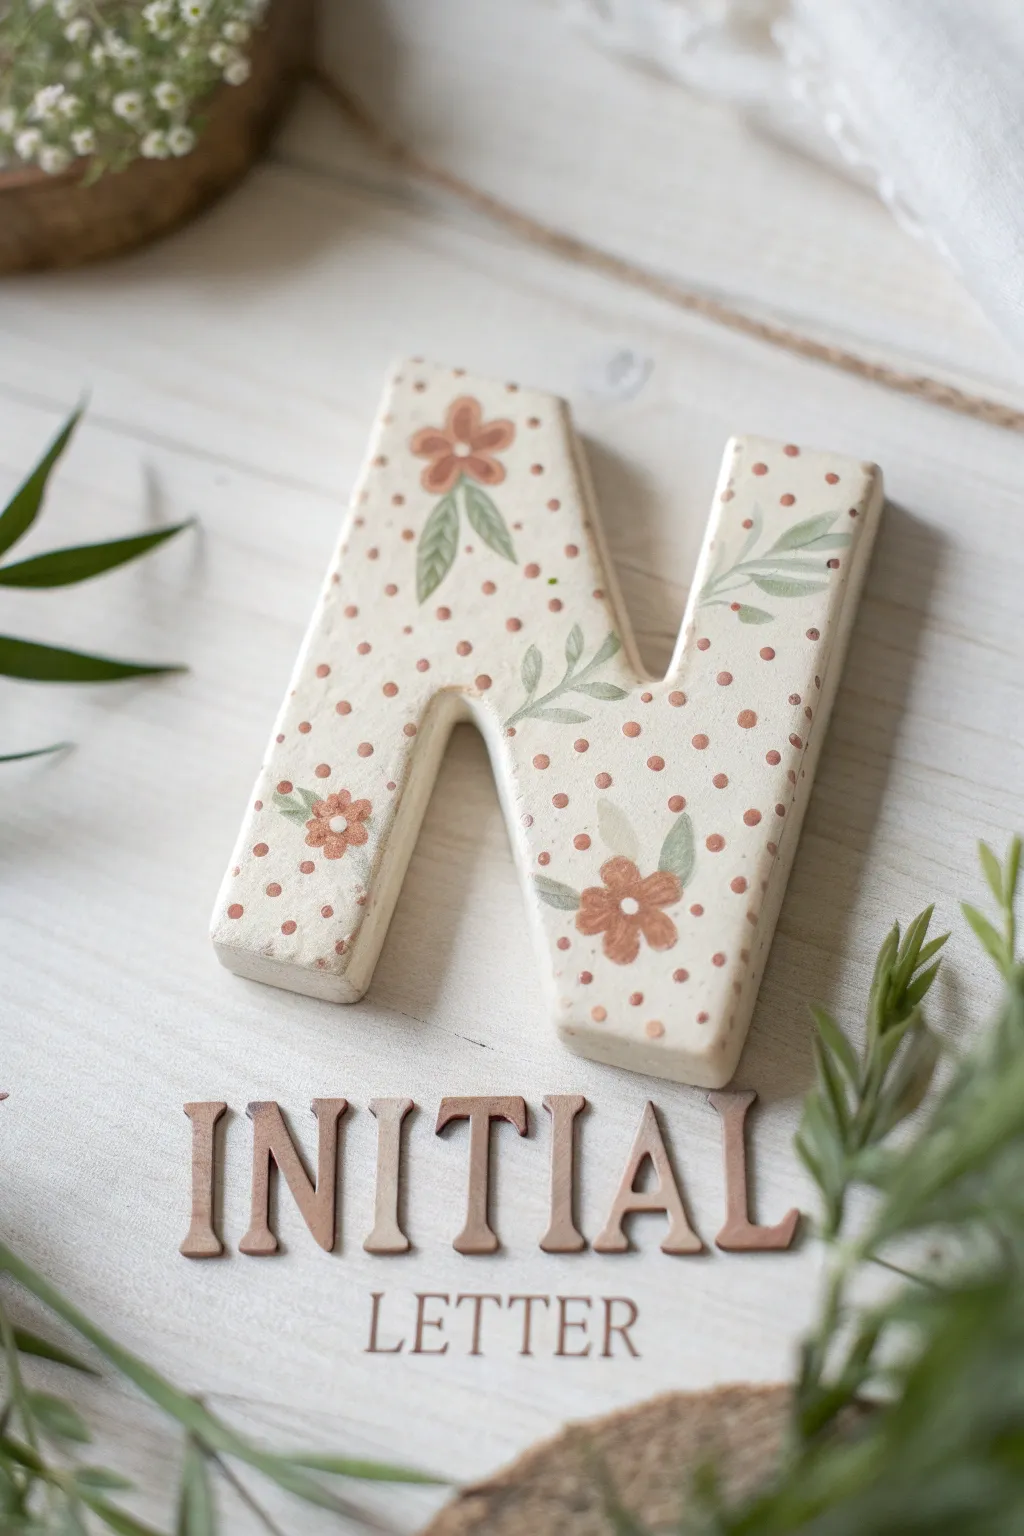
Personalize your fridge or magnetic board with this sweet, cottagecore-inspired initial letter. It features a soft cream base adorned with delicate hand-painted reddish-brown flowers, sage green leaves, and a whimsical polka dot background.
Step-by-Step Guide
Materials
- White polymer clay (optionally mixed with a tiny bit of beige for a cream tone)
- Acrylic rolling pin
- Printed letter template (font of choice)
- X-acto knife or clay blade
- Fine grit sandpaper (400-600 grit)
- Acrylic paints (burnt sienna/terracotta, sage green, cream/off-white)
- Fine detail paintbrushes (size 0 and 00)
- Dotting tool or toothpick
- Matte or satin polymer clay varnish
- Strong round magnet
- Superglue (cyanoacrylate)
Step 1: Sculpting the Base
-
Prepare the Clay:
Condition your white polymer clay by kneading it in your hands until it becomes soft and pliable. If you want that vintage creamy look shown in the photo, mix in a tiny speck of beige or translucent clay. -
Roll the Slab:
Using your acrylic rolling pin, roll the clay out into a smooth, even slab. Aim for a thickness of about 1/4 inch (6mm) to ensure the magnet is sturdy but not too heavy. -
Trace and Cut:
Place your printed paper letter template gently onto the clay surface. Use a sharp X-acto knife to carefully cut around the outline. Keep the blade perpendicular to the mat for clean, straight edges. -
Smooth the Edges:
Once the letter is cut, gently lift it. Use your finger or a soft sculpting tool to smooth down any sharp ridges or rough cuts along the sides. A drop of baby oil on your finger can help buff away fingerprints. -
Baking:
Place your clay letter on a ceramic tile or baking sheet lined with parchment paper. Bake according to the manufacturer’s instructions for your specific brand of clay (usually around 275°F/130°C for 15-30 minutes). Let it cool completely.
Step 2: Painting the Design
-
Base Coat (Optional):
If your clay isn’t the perfect shade of cream, apply two thin coats of cream acrylic paint to the front and sides. Allow the first coat to dry fully before applying the second to avoid streaks. -
Sanding:
Once the clay (or base paint) is dry, lightly sand the edges if there are any remaining sharp points. Wipe away dust with a slightly damp cloth. -
Painting Flowers:
Using a size 0 brush and your terracotta or burnt sienna paint, create small five-petal flowers. I place about three main focal flowers on the letter—one near the top, bottom, and middle—leaving space for leaves. -
Adding Leaves:
Mix a soft sage green. With your finest brush, paint elongated oval leaves extending from the flowers. Add a central vein line in a slightly darker green or brown for extra detail. -
Leaf Vines:
To fill empty spaces, paint a few standalone vines with smaller leaves, letting them curve naturally to mimic organic growth. -
Flower Centers:
Dip the tip of a toothpick or a small dotting tool into cream or white paint. Add a single dot to the center of each terracotta flower. -
Polka Dot Background:
Using the same terracotta color as the flowers, add small dots all around the floral elements. Use a small dotting tool for uniform size, spacing them consistently to cover the background without crowding the flowers.
Smooth Surface Secret
Before baking, wipe the raw clay with a brush dipped in rubbing alcohol or baby oil. This literally melts away fingerprints and dust for a flawless finish.
Step 3: Finishing Touches
-
Sealing:
Once the paint is thoroughly dry (give it at least an hour), apply a thin layer of matte or satin varnish. This protects the acrylic paint from scratching and gives the piece a professional, finished look. -
Attaching the Magnet:
Flip the letter over. Apply a small drop of superglue to the center of the back. Press your magnet firmly into the glue and hold for 30 seconds to bond.
Add Dimension
Instead of painting, try using tiny cutters or hand-rolling small clay balls to create 3D applique flowers and leaves on top of the base letter before baking.
Now you have a charming custom magnet ready to hold up your favorite photos or notes
Moon and Stars Wall Hanging
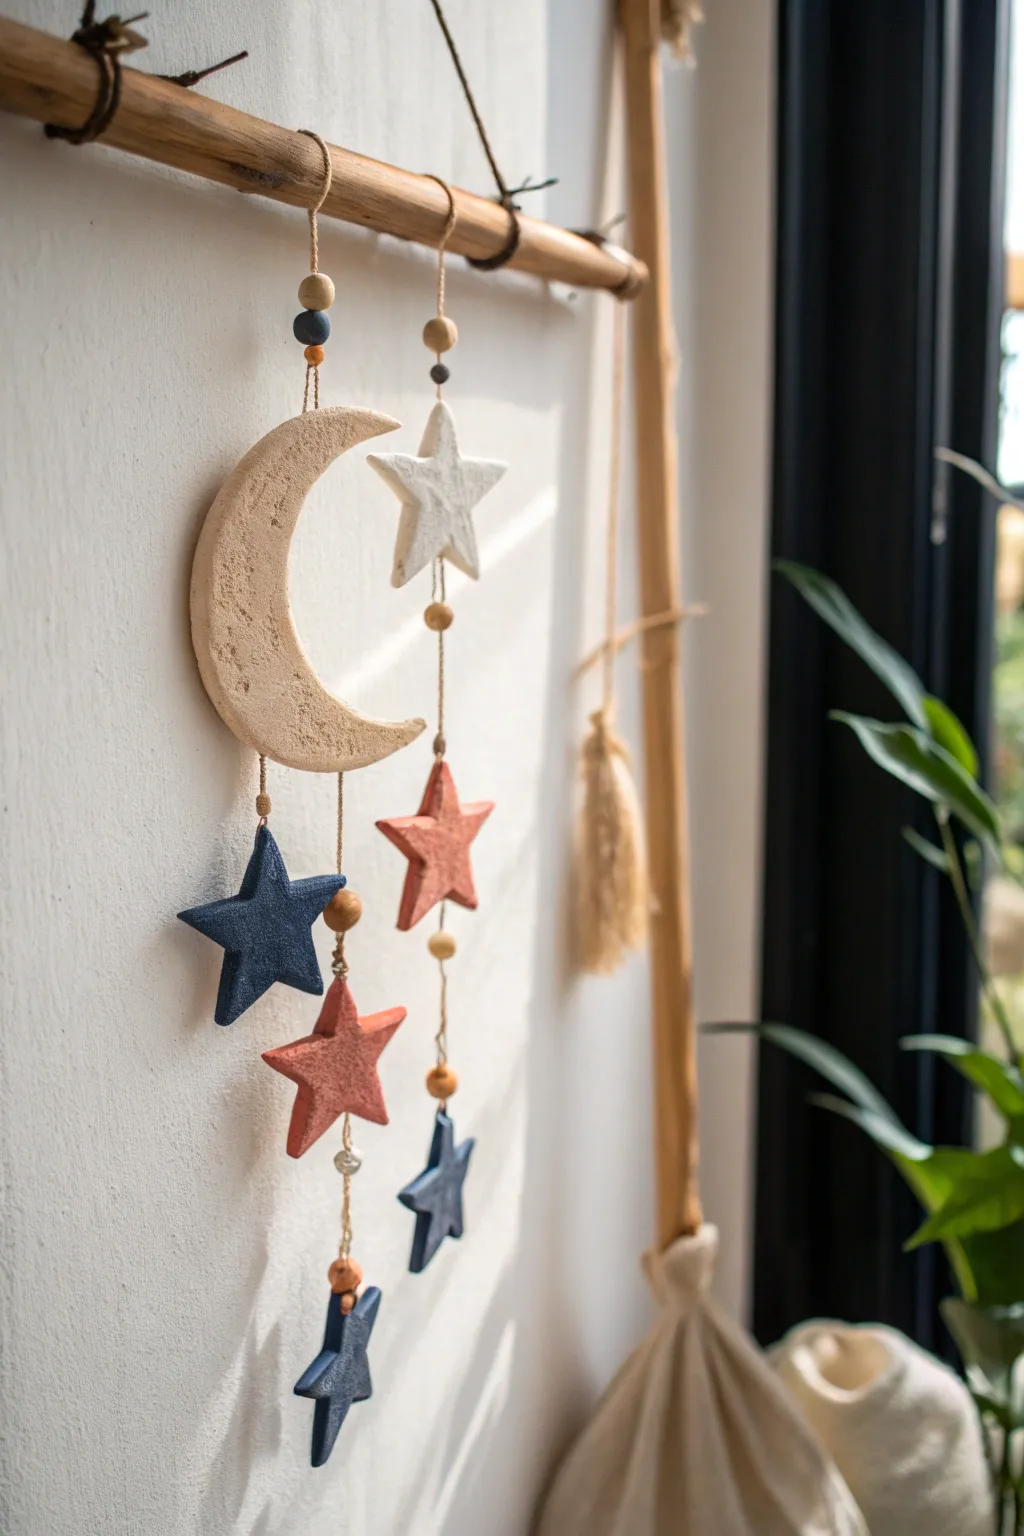
Bring the night sky indoors with this charming mobile featuring a rustic moon and cascading stars. The textured air-dry clay and muted color palette create a dreamy, organic aesthetic perfect for a cozy bedroom corner.
Step-by-Step Tutorial
Materials
- Air-dry clay (white or natural)
- Rolling pin
- Parchment paper or craft mat
- Cookie cutters (large moon, various star sizes)
- Sandpaper (fine grit)
- Acrylic paints (Cream, Terracotta, Navy Blue)
- Paintbrushes (flat and detail)
- Driftwood stick or wooden dowel (approx. 12-15 inches)
- Jute twine or natural hemp cord
- Wooden beads (assorted sizes)
- Straw or toothpick (for making holes)
- Scissors
Step 1: Shaping the Celestial Bodies
-
Prepare your workspace:
Lay down parchment paper or a craft mat on a flat surface to prevent sticking. Take a large chunk of air-dry clay and knead it until it’s pliable and smooth. -
Roll out the clay:
Using a rolling pin, flatten the clay to an even thickness of about 1/4 inch. If you want that textured look seen in the photo, don’t smooth the surface perfectly—leave a little natural unevenness. -
Cut the shapes:
Use a large moon cookie cutter or a paper template to cut out your main crescent moon shape. Then, cut out roughly 5-6 stars in varying sizes using star cutters. -
Create hanging holes:
While the clay is still wet, use a straw or a toothpick to poke holes in the pieces. The moon needs two holes: one at the top tip for hanging and one at the bottom tip for attaching stars. Each star needs a hole at the top and bottom, except for the bottom-most stars which only need a top hole. -
Smooth the edges:
Dip your finger in a little water and gently run it along the cut edges of your shapes to smooth out any sharp ridges or crumbs left by the cutters. -
Allow to dry:
Place all your clay pieces on a wire rack or leave them on the parchment paper to air dry. This typically takes 24-48 hours. I like to flip them over halfway through to ensure they dry evenly without warping.
Cracked Clay?
If hairline cracks appear while drying, don’t panic. Mix a tiny bit of fresh clay with water to make a paste (slip) and fill the cracks, then smooth over.
Step 2: Painting and Finishing
-
Sand for texture:
Once fully dry, lightly sand any rough spots. For this project, a slightly rustic finish is desirable, so you don’t need to sand them perfectly smooth. -
Paint the moon:
Paint the crescent moon with a cream or off-white acrylic paint. You may need two coats for opaque coverage. Let it dry completely between layers. -
Paint the stars:
Divide your stars into groups. Paint some in the Navy Blue shade, others in the Terracotta (rosy red), and perhaps leave one white or cream to match the moon. This color variety adds visual interest. -
Add texture detail:
To mimic the stone-like texture in the photo, you can dab a dry sponge lightly over the wet paint, or mix a tiny bit of baking soda into your paint before applying.
Pro Tip: Balanced Weight
Before tying the final knots on the driftwood, hold it up to check the balance. Slide the strings left or right along the wood until the mobile hangs straight.
Step 3: Assembling the Mobile
-
Prep the driftwood:
Cut a piece of jute twine about 2 feet long. Tie each end securely to the driftwood or dowel to create the main hanger for the wall. -
Attach the moon:
Cut a piece of twine and thread it through the top hole of the moon. Slide a few wooden beads onto the twine above the moon, then tie the twine to the center of the driftwood branch. -
Thread the first star strand:
Cut a long length of twine (about 18 inches) and tie it to the bottom hole of the moon. Thread the twine through a blue star, securing it with a knot underneath or looping it through the bead if the hole is large enough. -
Add spacers and more stars:
Slide a wooden bead onto the string before adding the next star (a pink one). Tie a knot to hold the bead and star in place at your desired height. -
Create the secondary strand:
Create a separate hanging strand for the right side. Tie a piece of twine directly to the driftwood branch, add a white star near the top, and continue adding beads and stars (pink and blue) cascading down. -
Secure all knots:
Double-check every knot. You can add a tiny dot of clear craft glue to the knots to ensure they don’t slip over time. -
Trim excess twine:
Snip off any loose tail ends of twine close to the knots for a clean, professional finish.
Hang your new celestial artwork near a window or above a bed to enjoy the peaceful atmosphere it creates
Tiny Makeup Brush or Pencil Holder With a Face
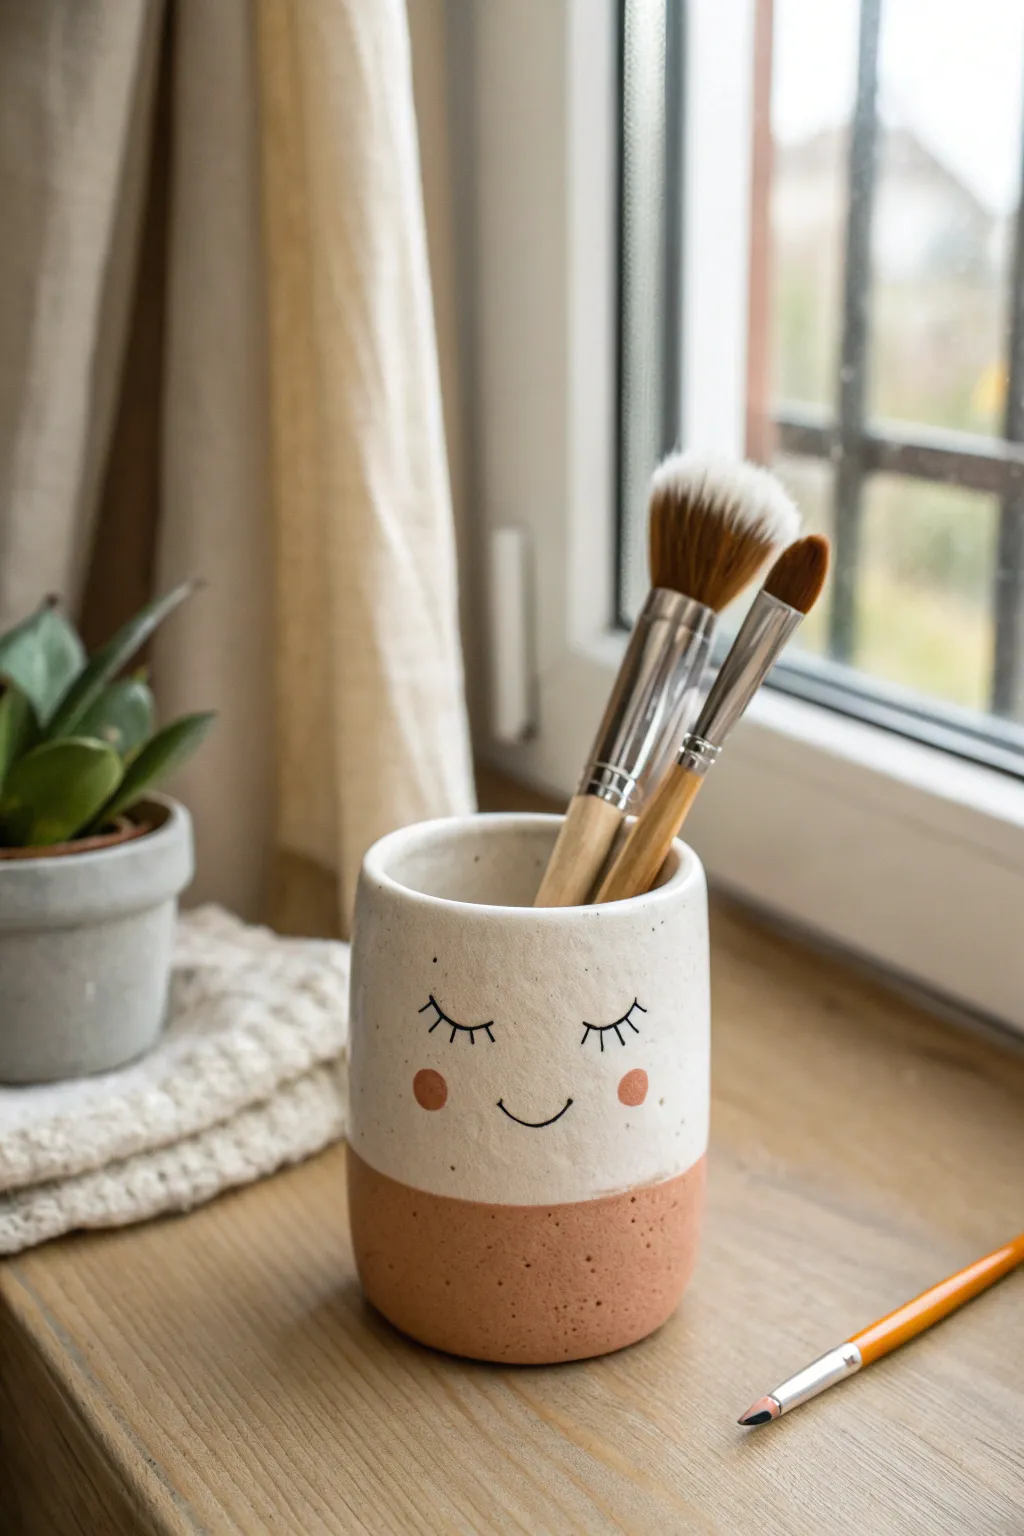
This adorable storage idea combines the rustic charm of exposed terracotta with clean, minimal glazing. It features a sleepy, smiling face that brings personality to your vanity while keeping makeup brushes or pencils neatly organized.
Step-by-Step
Materials
- Terracotta air-dry clay or polymer clay (oven-bake)
- Rolling pin
- Clay knife or craft blade
- Cylindrical mold (like a jar or can) roughly 3-4 inches wide
- Small bowl of water (for smoothing)
- White acrylic paint (matte or satin finish)
- Black permanent marker or fine-tip paint pen
- Terracotta or peach acrylic paint (for cheeks)
- Small round paintbrush
- Fine-grit sandpaper
- Matte varnish or sealant
Step 1: Shaping the Cup
-
Roll out the base slab:
Begin by conditioning your terracotta clay until it is pliable. Roll it out on a flat surface to an even thickness of about 1/4 inch. Creating a consistent thickness ensures the cup stands straight. -
Cut the clay components:
Using your cylindrical mold as a guide, cut a circle for the base. Then, measure the circumference of your mold and cut a long rectangular strip that will wrap around it to form the walls. Make the strip slightly longer than needed for overlap. -
Wrap the walls:
Wrap the rectangular strip around your mold or simply form it into a circle on top of the base piece. If using a mold inside, wrap loosely enough to remove it later. -
Score and slip:
To join the ends of the wall and the wall to the base, score the meeting edges with your knife (make hatch marks) and add a little water. Press them firmly together. -
Blend the seams:
Use your finger or a clay tool dipped in water to smooth the vertical seam and the bottom seam until they are invisible. If I want a truly seamless look, I spend extra time here smoothing the clay upward from the base. -
Shape the rim:
Check the top rim of the cup. If it’s uneven, trim it carefully with your blade. Soften the sharp edge with a wet finger to create a comfortable, rounded lip. -
Dry or bake:
If using air-dry clay, let the piece dry for 24-48 hours until completely hard and light in color. If using polymer clay, bake according to the package instructions and let it cool.
Cracked Clay?
Mix a small amount of fresh clay with water to create a thick paste. Fill the crack, smooth it over, and let it dry again before sanding.
Step 2: Decorating the Face
-
Sand imperfections:
Once fully dry or cured, gently use fine-grit sandpaper to remove any rough bumps or fingerprints, especially around the rim and the vertical seam. -
Paint the top section:
Dip your brush in white acrylic paint. Paint the top two-thirds of the cup, leaving the bottom third exposed to show the natural terracotta color. -
Refine the paint line:
You don’t need tape for this; a slightly organic, hand-painted line looks charming. Apply a second or third coat of white if needed for solid opacity, allowing drying time between layers. -
Plan the face:
Lightly pencil in the facial features on the white section. Place the eyes wide apart and the smile low for that classic ‘kawaii’ look. -
Draw the details:
Using a black fine-tip paint pen or permanent marker, carefully trace over your pencil lines to create the sleeping eyelids, eyelashes, and small smile. -
Add rosy cheeks:
Dip the end of a paintbrush handle or a dotting tool into terracotta or pink paint. Press two rosy circles onto the cheeks, just outside the smile line. -
Add speckles (optional):
To mimic the speckled pottery look in the photo, dilute a tiny bit of brown or black paint. Flick the bristles of an old toothbrush or stiff brush to lightly spatter the white area with tiny dots. -
Seal the piece:
Once all paint is completely dry, apply a coat of matte varnish over the entire piece (including the inside and bottom) to protect the clay and paint from moisture.
Make it a set
Create 3 cups of varying heights to hold different items: tall for brushes, medium for eyeliners, and a shallow dish for beauty blenders or rings.
Place your brushes inside and enjoy your charming new desk companion
Mini Bedroom Diorama With Girly Details
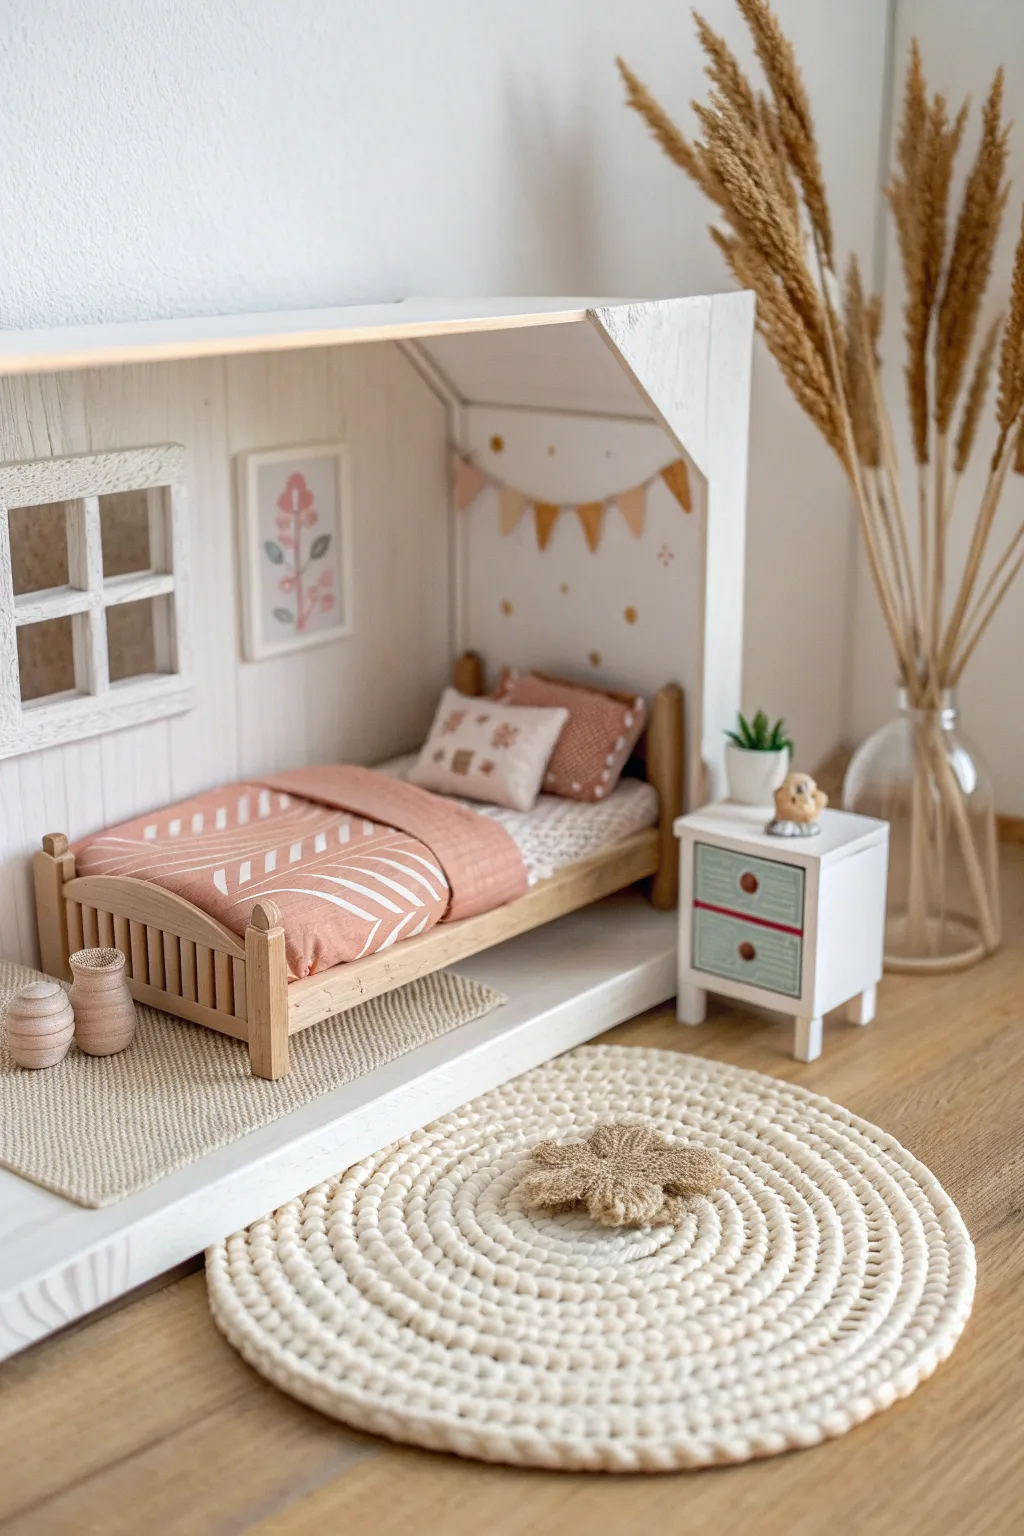
Create a charmingly detailed miniature bedroom scene complete with a wooden bed frame, textured bedding, and delicate clay accessories. This diorama captures a warm, Scandinavian-inspired aesthetic perfect for display.
Detailed Instructions
Materials
- Polymer clay (terracotta/pink, white, brown, green)
- Balsa wood sheets and strips
- Wooden craft sticks
- White acrylic paint
- Mint green acrylic paint
- Fabric scraps (patterned pink, white)
- Cotton batting or stuffing
- Thick cotton yarn or macrame cord
- Cardboard or foam board (for the room structure)
- Wood glue
- Tacky glue or hot glue
- Sandpaper
- Exacto knife or craft knife
- Fine liner brush
- Miniature dried flowers (optional)
Step 1: Building the Room Box
-
Cut the walls:
Cut three pieces of foam board or sturdy cardboard to create the floor and two walls. For the angled roofline shown, cut the top edge of the side wall at a 45-degree angle. -
Create the plank effect:
Before assembling, use a ruler and the back of your craft knife to score vertical lines into the back wall panel. This mimics wood paneling. -
Paint the walls:
Paint the walls white. While the paint is wet, wipe it back slightly with a paper towel to let the texture show through for a whitewashed look. -
Add a window frame:
Cut four thin strips of balsa wood to form a square frame, plus two intersecting strips for the panes. Glue them together, paint white, and attach to the side wall. -
Assemble the structure:
Glue the walls to the floor and to each other. Reinforce the corners with masking tape on the outside if needed.
Scaling Tip
Use a standard 1:12 scale ruler or a real-life object (like a coin) placed in the scene while building to keep all furniture proportions consistent.
Step 2: Crafting the Furniture
-
Construct the bed frame:
Cut a rectangle of balsa wood for the mattress base. Glue small dowels or square wood strips to the corners for legs, extending them up to form the headboard and footboard posts. -
Add bed slats:
Glue thin vertical strips of wood between the headboard posts and footboard posts to create the classic slat design. -
Build the nightstand:
Cut small squares of balsa wood to form a box shape. Glue square legs to the bottom corners so it stands off the ground. -
Paint the nightstand:
Paint the main body of the nightstand white. Paint the drawer fronts a soft mint green and add tiny beads or clay dots for handles.
Step 3: Textiles and Clay Details
-
Make the mattress:
Wrap a rectangular piece of foam or folded batting in white fabric and glue the seams on the bottom. Place it on the bed frame. -
Create the bedding:
Sew or glue a small pillow using patterned fabric and stuffing. Fold a piece of contrasting pink fabric to create the duvet cover shown at the foot of the bed. -
Coil the rug:
Take your thick cotton yarn and coil it into a tight circle, gluing it flat as you go. Continue until the rug is proportionate to the room. -
Sculpt the accessories:
Using polymer clay, shape two small bulbous vases and a tiny bird figurine. Bake according to package instructions. -
Make the wall art:
Cut a tiny rectangle of paper and paint a simple flower design. Create a frame using thin slivers of balsa wood. -
Make the bunting:
Cut tiny triangles from beige paper or fabric. Glue them to a piece of thread and drape across the back wall. -
Final assembly:
Arrange the furniture in the room. Place the clay pots on the floor and the bird on the nightstand to complete the cozy scene.
Level Up: Lighting
Drill a tiny hole in the ceiling corner and thread a warm white LED fairy light through to create a functional lamp or ambient room lighting.
Now you have a serene little retreat ready for display on your shelf