Whenever I’m making something in clay for Mom, I aim for that sweet spot: sentimental enough to feel like a hug, but practical enough to live on her dresser or in her kitchen. Here are my favorite clay ideas for mom that look special without being fussy, so you can actually finish them and gift them with confidence.
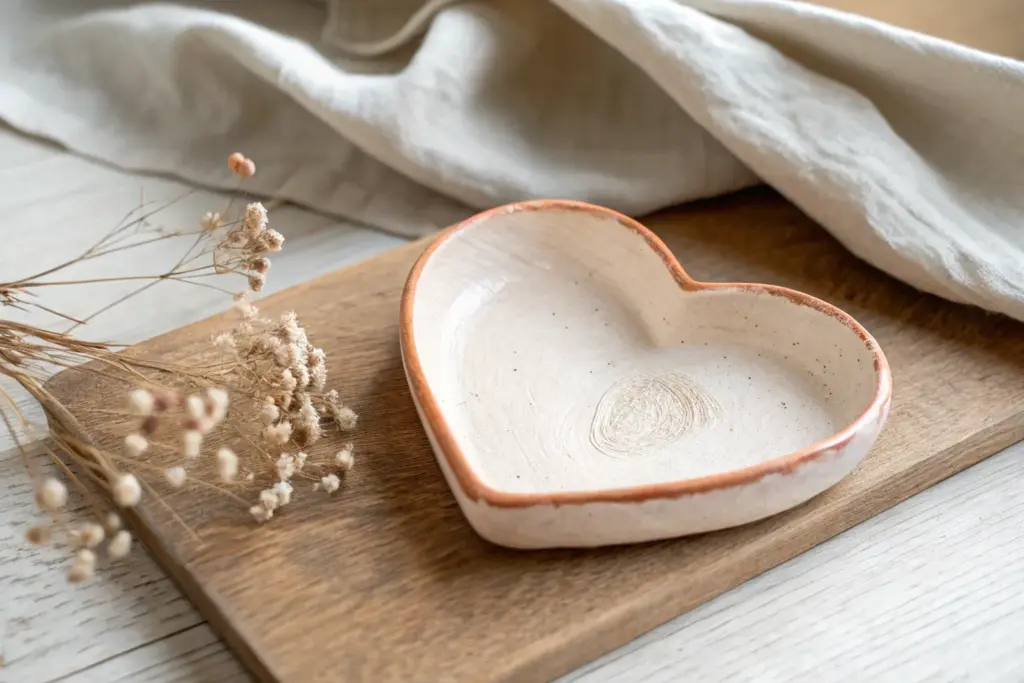
Heart Ring Dish for Mom
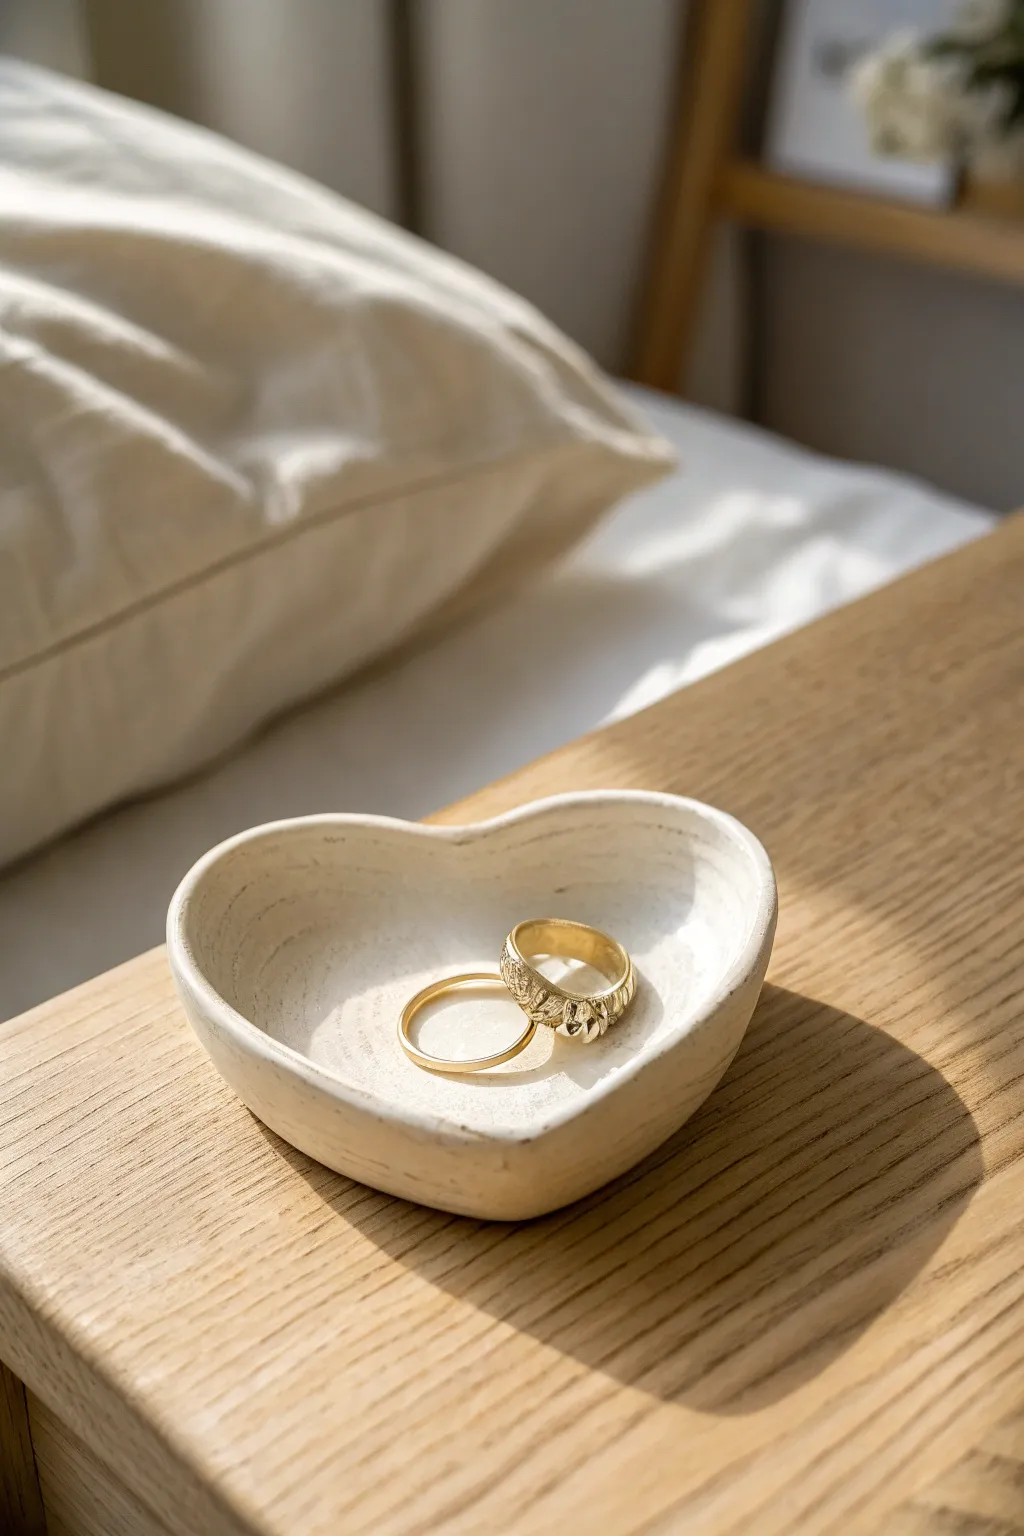
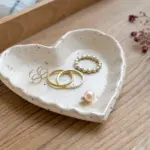
This delicate heart-shaped dish features a lovely organic texture and a creamy, matte stone finish that feels modern yet handmade. It is the perfect size for keeping Mom’s favorite rings safe on her bedside table or vanity.
Step-by-Step
Materials
- Air-dry clay (white or cream)
- Small rolling pin
- Parchment paper or craft mat
- Heart-shaped cookie cutter (approx. 3-4 inches)
- Small bowl of water
- Sponge or smoothing tool
- Fine-grit sandpaper
- Acrylic paint (cream, beige, or white)
- Matte varnish or sealant
- Soft paintbrush
- Palette or small dish for mixing
Step 1: Shaping the Clay
-
Condition the Clay:
Begin by taking a handful of air-dry clay and kneading it in your hands for a minute. The warmth from your palms will soften it, making it pliable and easier to work with without cracking. -
Roll it Out:
Place the clay onto a sheet of parchment paper. Using your rolling pin, flatten the clay to an even thickness of about 1/4 inch. Try not to go too thin, or the dish might be fragile. -
Cut the Shape:
Press your heart-shaped cookie cutter firmly into the rolled clay. Wiggle it slightly to ensure a clean cut all the way through, then lift the cutter away. -
Clean the Edges:
Peel away the excess scrap clay surrounding the heart. If the cut edges look a little ragged, dip your finger in water and gently run it along the rim to smooth them down.
Stone Effect Tip
Mix a pinch of baking soda into your acrylic paint before applying. This adds a subtle grit that mimics real pottery or unglazed ceramic perfectly.
Step 2: Forming the Dish
-
Lift the Edges:
With the clay heart still flat, gently begin to curl the edges upward with your fingertips. You are aiming for a shallow curve rather than a sharp 90-degree wall. -
Smooth the Form:
As you lift the sides, cup the heart in your palm. Use your thumb to smooth the inside curve, erasing any fingerprints or sharp angles. -
Refine the V-shape:
Pay special attention to the dip at the top of the heart. Use the side of your pinky finger or a modeling tool to ensure this indentation remains defined as you raise the walls. -
Adding Texture:
For that organic, stone-like look seen in the photo, don’t over-smooth the surface perfectly. I like to lightly dab the surface with a damp sponge or even crumpled foil to create minute imperfections.
Bottom Flattening
If your dish rocks or won’t sit flat, tape a sheet of sandpaper to a table and gently rub the dried base of the dish against it in a circular motion.
Step 3: Drying and Finishing
-
Air Dry:
Set the dish aside in a safe, dry spot on a piece of parchment paper. Let it dry completely for 24-48 hours. Flip it over halfway through so the bottom dries evenly. -
Sand Imperfections:
Once fully hardened, take your fine-grit sandpaper and very gently sand the rim to remove any sharp burrs. Keep the main surface texture intact. -
Mix the Paint:
To achieve the limestone color, mix a tiny drop of brown or beige into white acrylic paint. You want a very pale, warm cream color. -
Apply the Base Coat:
Paint the entire dish, including the underside. Use long, smooth strokes to avoid thick globs of paint. -
Create Texture:
While the paint is tacky, you can stipple it slightly with a nearly dry brush to enhance that matte, earthenware appearance. -
Let Paint Dry:
Allow the paint layer to dry completely for about an hour. -
Seal the Project:
Apply a coat of matte varnish. This is crucial for protecting the dish from tarnishing metal or moisture while maintaining that natural, non-glossy finish.
Now you have a timeless, handcrafted piece ready to be gift-wrapped for Mom
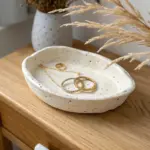
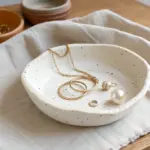
Handprint Jewelry Dish for Mom
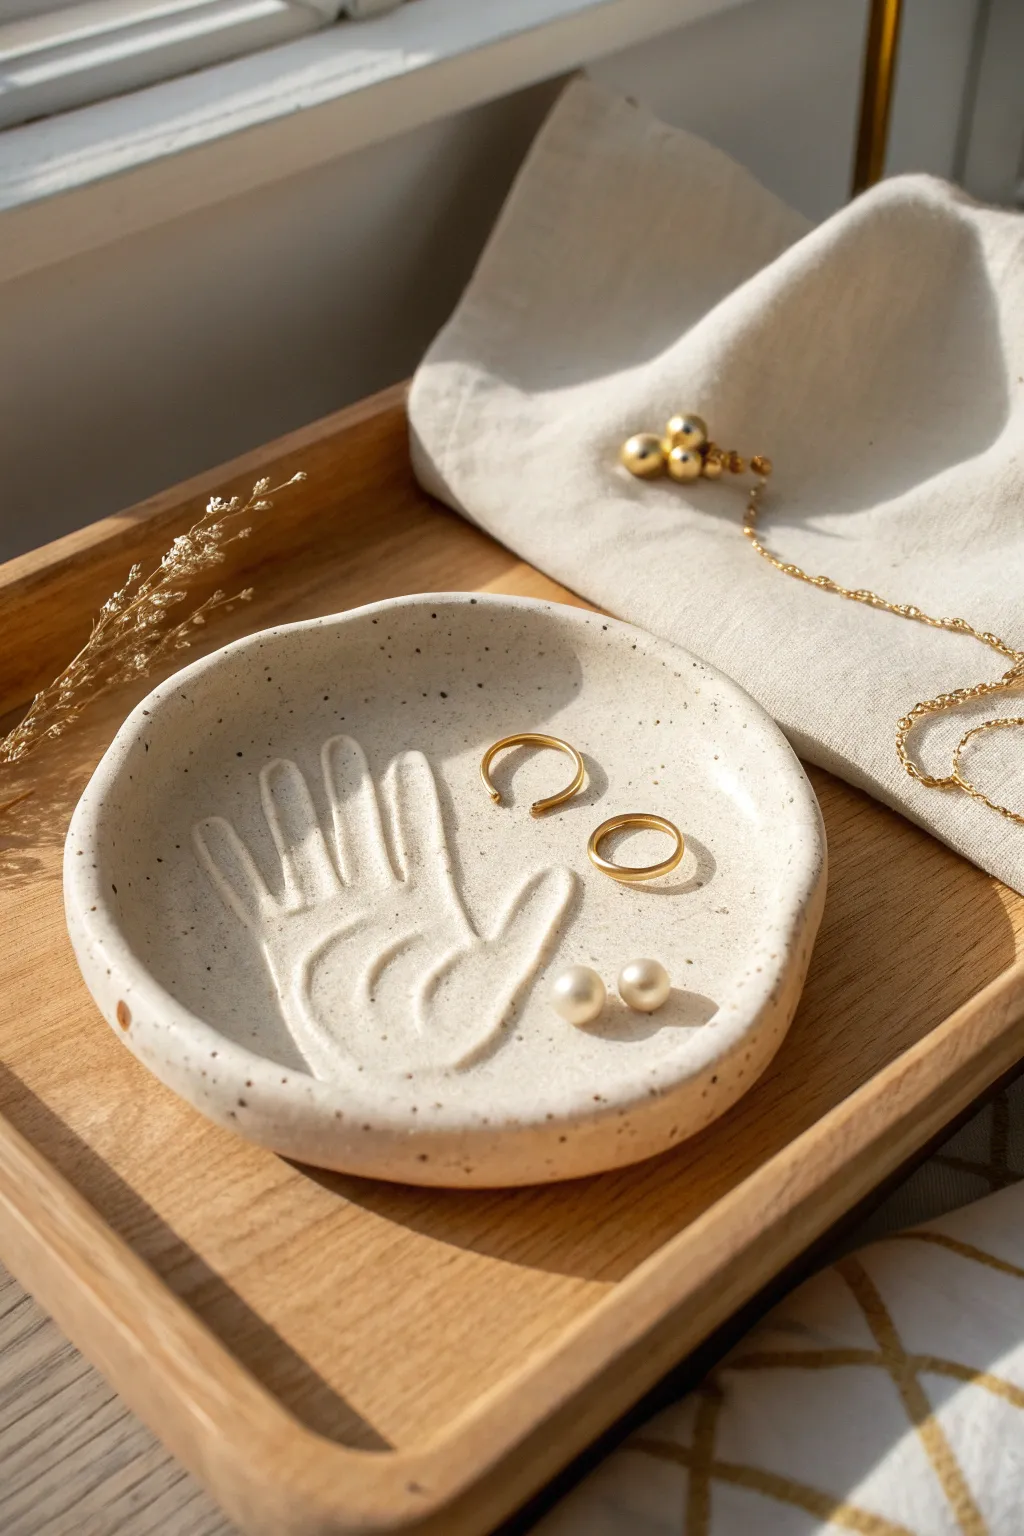
Create a sentimental yet sophisticated landing spot for Mom’s favorite jewelry with this lovely speckled clay dish. The design features a subtle, embossed handprint within a gently curved bowl, perfect for holding rings and studs.
Step-by-Step Tutorial
Materials
- White air-dry clay or polymer clay
- Rolling pin
- Round cookie cutter or bowl (approx. 4-5 inches diameter)
- Small shallow bowl (for drying)
- Sandpaper (fine grit)
- Brown and black acrylic paint
- Old toothbrush
- Clear gloss varnish or sealant
- Modeling tool or dull pencil
- Water
Step 1: Shaping the Dish
-
Condition the Clay:
Start by taking a handful of white clay and kneading it in your hands until it becomes soft, pliable, and free of cracks. -
Roll it Out:
Using a rolling pin, flatten the clay to an even thickness of about 1/4 inch. If the clay sticks, you can roll it out on a piece of parchment paper or canvas. -
Cut the Circle:
Place your round cookie cutter or an upside-down bowl onto the rolled clay and press down firmly to cut out a perfect circle. Remove the excess clay from around the edges. -
Smooth the Edges:
Dip your finger in a little bit of water and run it along the cut edge of the circle to smooth out any roughness or sharp angles. -
Create the Hand Design:
To mimic the stylized design in the photo, you won’t press a real hand into the clay. Instead, use a modeling tool or a dull pencil to gently draw or carve the outline of a hand into the center of the circle. -
Deepen the Impression:
Go over your drawn lines again, pressing slightly deeper to create a grooved channel that looks like an embossed impression. I like to smooth the bottom of these grooves with a slightly damp brush to soften the look. -
Form the Curve:
Lift your clay circle and gently place it inside your shallow drying bowl. Press it down lightly so the clay takes on the concave shape of the bowl. -
Shape the Rim:
Use your fingers to gently pinch and wave the rim slightly to give it that organic, handmade feel shown in the reference image.
Smoother carving
When carving the hand channels, lay a piece of plastic wrap over the clay first. Drawing through the plastic creates softer, rounded edges rather than sharp cuts.
Step 2: Finishing Touches
-
Allow to Dry:
Let the dish dry completely in the bowl. For air-dry clay, this usually takes 24-48 hours. If using polymer clay, bake according to the package instructions while it’s still in an oven-safe forming bowl. -
Sand Imperfections:
Once fully cured and hard, remove the dish from the mold. Use fine-grit sandpaper to gently buff the rim and any rough spots on the surface until it feels smooth to the touch. -
Prepare the Speckle Paint:
Mix a tiny amount of black and brown acrylic paint with water until it is very runny and resembles an ink wash. -
Apply the Speckles:
Dip an old toothbrush into the watered-down paint. Hold it over the dish and run your thumb across the bristles to flick tiny droplets onto the surface. Practice on a paper towel first to control the spray. -
Let Paint Dry:
Allow the speckles to dry completely. This should only take about 10-15 minutes since the paint is thin. -
Seal the Dish:
Apply a coat of clear gloss varnish or sealant to the entire dish. This protects the clay and gives it a finished, ceramic-like sheen. -
Second Coat:
For extra durability, apply a second coat of varnish once the first is dry, paying special attention to the embossed handprint grooves.
Edges curling up?
If the edges of your clay curl inward too much while drying, place a light weight (like a bean bag or a bag of rice) in the center to hold it down gently.
Wrap this darling dish in tissue paper for a gift she will treasure every day


Footprint Keepsake Bowl for Mom
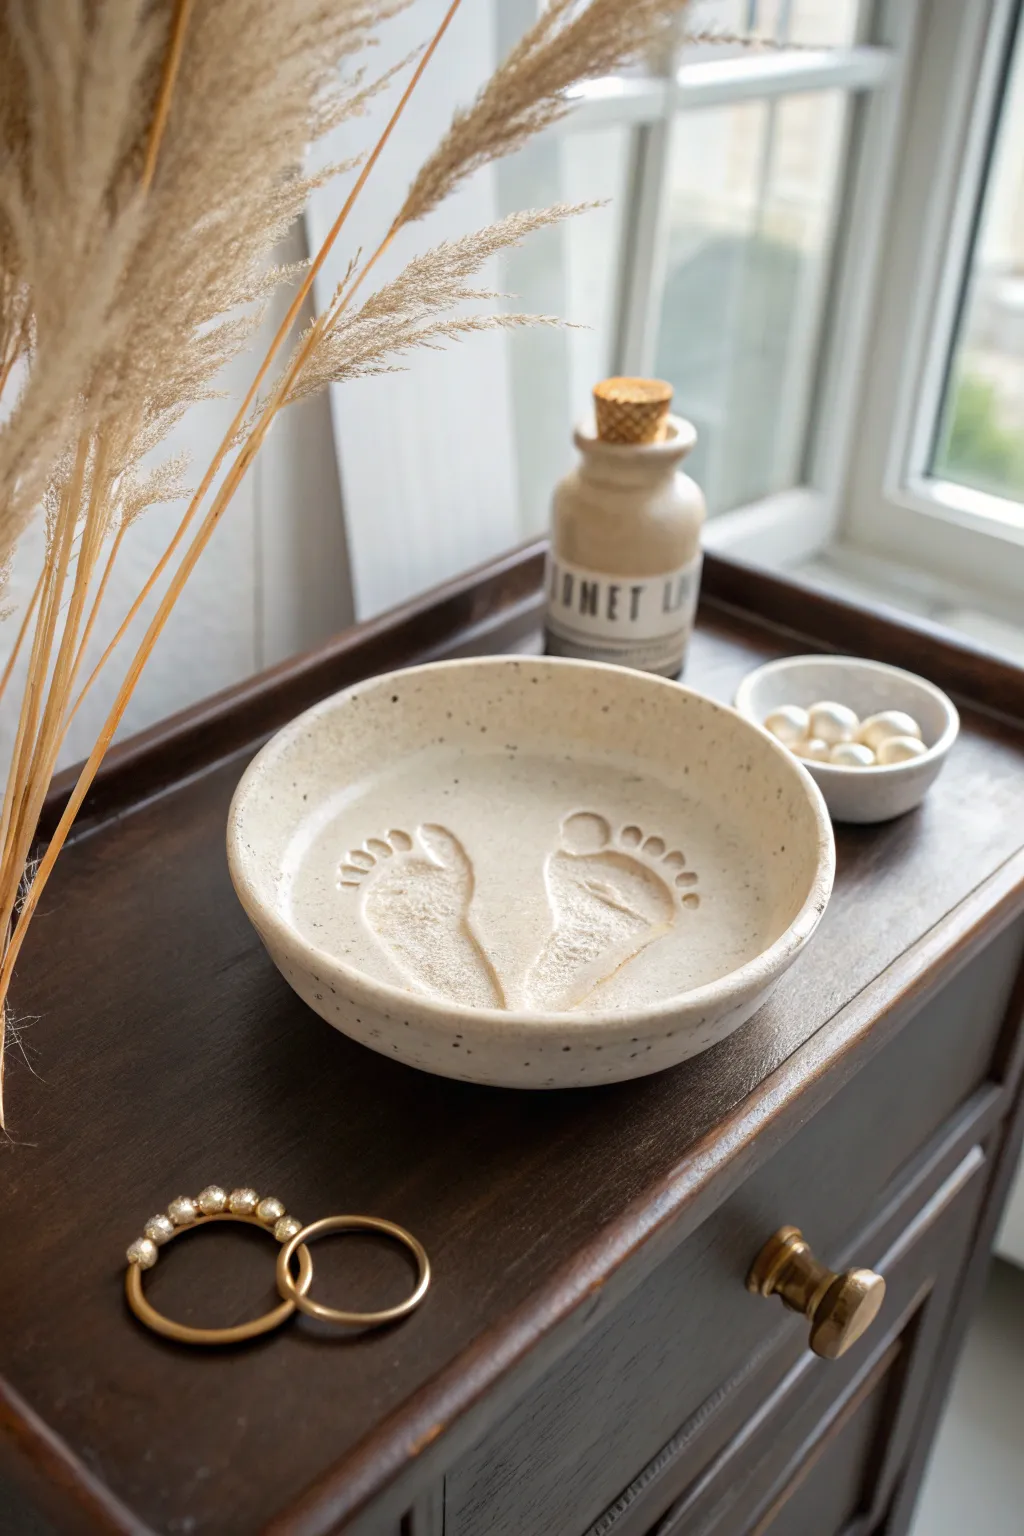
This minimalist keepsake bowl captures precious baby footprints in a lasting, functional piece of décor. With its organic shape and speckled cream finish, this project transforms a simple clay slab into a treasured family heirloom that Mom will cherish forever.
Detailed Instructions
Materials
- White or cream air-dry clay (or polymer clay)
- Small rolling pin
- Large round bowl (to use as a cutting template)
- Smaller bowl (for shaping)
- Craft knife
- Sponge or soft paintbrush
- Cup of water
- Sandpaper (fine grit)
- Sealant (matte varnish or Mod Podge)
- Optional: Brown or black acrylic paint (for speckling)
- Optional: Toothbrush (for speckling effect)
Step 1: Preparation & Shaping
-
Roll the slab:
Begin by kneading your clay until it is soft and pliable, which helps prevent future cracking. Roll it out on a clean, flat surface to an even thickness of about 1/4 inch. -
Cut the circle:
Place your larger template bowl upside down onto the rolled clay. Using your craft knife, trace around the rim to cut out a perfect circle, then remove the excess clay scraps. -
Smooth the edges:
Dip your finger into a little water and gently run it along the cut edge of the circle. This rounds off the sharp cuts and gives the bowl a more professional, finished look. -
Imprint the footprints:
This is the crucial step. Carefully press the baby’s feet into the center of the flat clay circle. Press firmly enough to capture the toes and heel detail, but support the clay underneath so it doesn’t thin out too much. -
Clean up the impressions:
If the clay shifted slightly during the impression, use a damp soft paintbrush to gently smooth any jagged edges inside the footprints without erasing the details. -
Form the bowl shape:
Lift your clay circle and gently place it inside your smaller shaping bowl. Let the clay slump naturally into the curve. Gravity will do most of the work here to create that nice cupped shape. -
Refine the rim:
While the clay is in the mold, check the rim again. I like to gently press the rim downward slightly to ensure it isn’t warping unevenly as it dries.
Cracked Clay Fix
If hairline cracks appear while drying, mix a tiny bit of fresh clay with water to make a paste (slip). Fill the cracks, smooth it over, and let it dry again.
Step 2: Drying & Finishing
-
Initial dry:
Allow the clay to dry inside the bowl for at least 24 hours. Keep it away from direct sunlight or heat sources to ensure it dries evenly and doesn’t crack. -
Remove and flip:
Once the clay is firm enough to hold its shape but perhaps not fully cured, carefully remove it from the mold. Flip it over carefully to let the bottom dry exposed to the air for another 24 hours. -
Sand for perfection:
When the bowl is bone dry and completely hard, take your fine-grit sandpaper and gently buff the entire surface. Focus on the rim and any rough spots to get that smooth, stonewear feel. -
Create the speckles:
To achieve the look in the photo, mix a tiny amount of brown or black acrylic paint with water until it’s very runny. Dip an old toothbrush into the mixture. -
Apply the effect:
Hold the toothbrush over the bowl and run your thumb across the bristles to flick tiny speckles onto the surface. Practice on a paper towel first to control the density. -
Seal the piece:
Apply a coat of matte sealant or varnish to the entire bowl. This protects the clay from moisture and gives it a finished sheen without being too glossy. -
Final cure:
Let the sealant dry completely according to the manufacturer’s instructions before gifting or displaying.
Date Stamp Detail
Before the clay dries, use small letter stamps to press the baby’s name or the date into the clay near the rim or on the underside for extra personalization.
Now you have a timeless, handcrafted vessel that beautifully preserves a fleeting moment in time


Botanical Coasters for Mom
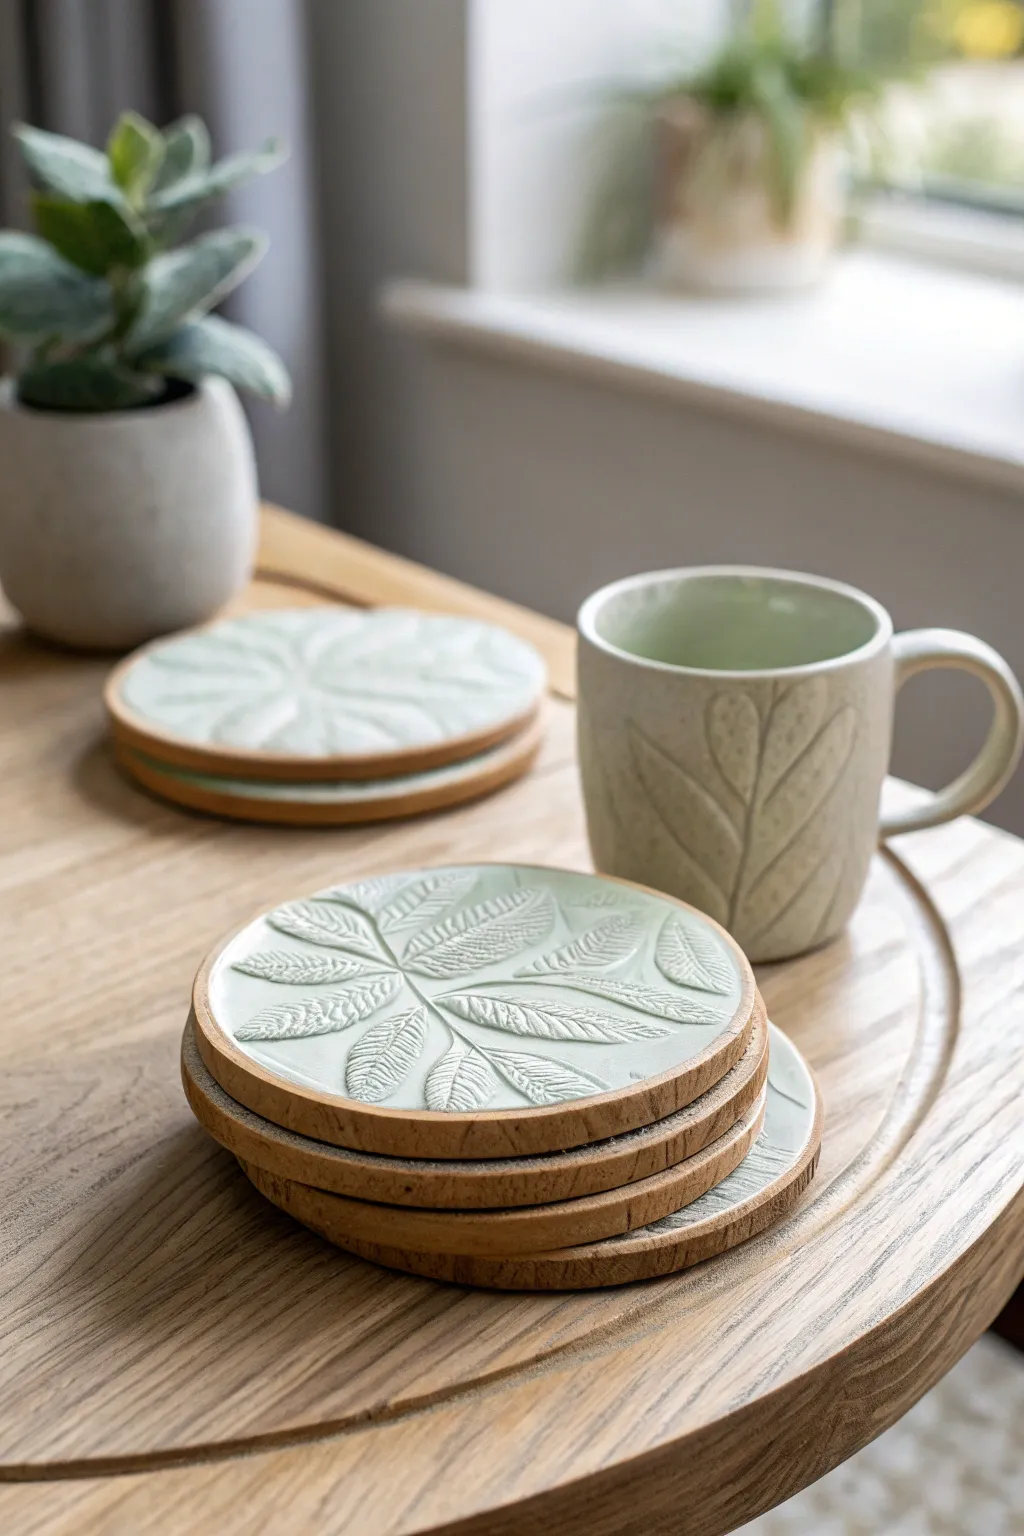
Bring the calming essence of nature indoors with these elegant, embossed clay coasters featuring delicate leaf textures. The combination of warm, natural wood rims and cool sage green clay creates a sophisticated, boutique-quality gift mom will cherish with her morning coffee.
Detailed Instructions
Materials
- Air-dry clay (white)
- Wooden coaster blanks (round with raised rim, approx. 4 inches)
- Acrylic paint (sage green and white)
- Matte sealant or varnish (waterproof)
- Real leaves (with prominent veins) or rubber leaf stamps
- Rolling pin
- Circle cutter or craft knife
- Fine-grit sandpaper
- Strong craft glue (e.g., E6000)
- Small paintbrush
- Paper towels or sponge
Step 1: Preparing the Clay Base
-
Measure your base:
Before touching the clay, measure the inner diameter of your wooden coaster blanks precisely. This measurement will be the target size for your clay inserts. -
Condition the clay:
Take a handful of white air-dry clay and knead it until it is soft, pliable, and free of cracks. If it feels too dry, add a tiny drop of water. -
Roll it out:
Using a rolling pin, flatten the clay on a smooth, non-stick surface until it is about 1/4 inch thick. Aim for an even thickness throughout to prevent warping. -
Imprint the texture:
Lay your real leaves (vein side down) or position your rubber stamps onto the flattened clay. Press them firmly and evenly with the rolling pin to create a deep impression. -
Reveal the design:
Carefully peel back the leaves or stamps. You should see a crisp, detailed relief of the veins and stems left behind in the clay.
Warping Worries?
If clay edges curl up while drying, lay a damp cloth over them for an hour to re-hydrate slightly, then press flat under a heavy book for the final dry.
Step 2: Cutting and Drying
-
Cut the circles:
Using a circle cutter set to your measured diameter or a craft knife with a template, cut out the circles over the imprinted designs. To ensure a good fit, I usually cut them just a hair smaller than the measured space to account for the glue later. -
Smooth the edges:
Dip your finger in a little water and gently run it along the cut edges of the clay circles to round them off and remove any sharp burrs. -
Initial drying:
Place the clay discs on a wire rack or between two sheets of parchment paper with a light weight on top to keep them perfectly flat as they dry. -
Flip and wait:
Let the clay dry for 24-48 hours. Flip the discs occasionally to ensure air reaches both sides. They are ready when they feel room temperature to the touch, not cool. -
Sand for perfection:
Once fully cured, use fine-grit sandpaper to buff away any remaining roughness on the edges or surface.
Pro Tip: Depth Check
Use leaves with thick, woody stems and protruding veins (like hydrangea or mint) rather than flat leaves to get the deepest, most visible impression.
Step 3: Painting and Assembly
-
Mix the color:
Mix sage green acrylic paint with a touch of white to achieve that soft, pastel botanical hue seen in the reference photo. -
Apply the wash:
Paint the entire surface of the clay disc. While the paint is still wet, gently wipe the raised areas with a damp paper towel. This leaves more pigment in the deep vein crevices and highlights the texture. -
Seal the clay:
Apply 2-3 coats of a matte, waterproof varnish to the clay discs. This step is crucial to protect the coasters from condensation and spills. -
Prepare the wood:
While the varnish dries, check your wooden coaster blanks. If they need a refresh, give them a quick sanding or a light coat of natural wood oil. -
Glue in place:
Apply a generous amount of strong craft glue to the center of the wooden coaster blank. -
Final press:
Press the finished clay disc firmly into the wooden recess. Place a heavy book on top of the stack (with parchment paper in between) while the glue sets to ensure a tight bond.
Wrap these in twine for a gift that feels both rustic and refined

The Complete Guide to Pottery Troubleshooting
Uncover the most common ceramic mistakes—from cracking clay to failed glazes—and learn how to fix them fast.
Flower Ring Dish for Mom
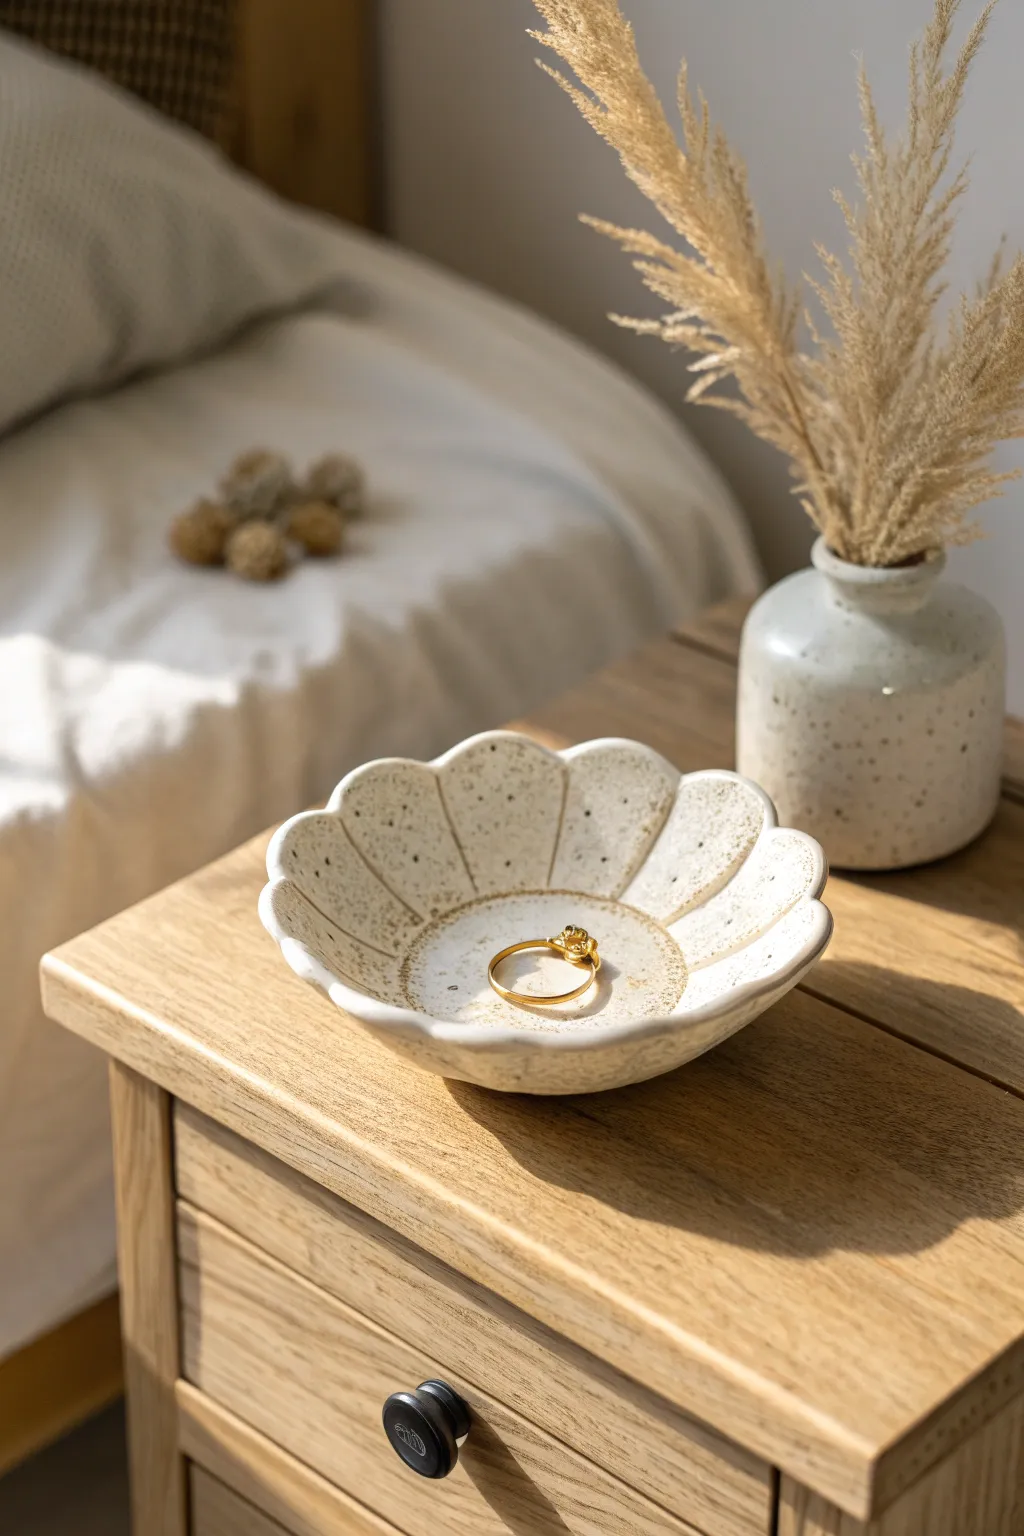
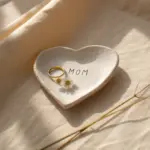
This elegant ceramic dish features soft, scalloped petals and a beautiful speckled glaze that adds an earthy, organic feel to any nightstand. It is the perfect size for holding Mom’s favorite rings or earrings and makes a timeless handmade gift that she’ll cherish every day.
Step-by-Step
Materials
- Air-dry clay or polymer clay (white or cream)
- Rolling pin
- Small bowl or round cookie cutter (approx. 4-5 inches)
- Craft knife or clay needle tool
- Clean sponge
- Sandpaper (fine grit)
- Acrylic paints (cream/off-white and brown)
- Old toothbrush (for speckling)
- Gold leaf liquid or gold acrylic paint
- High-gloss varnish or dimensional glaze sealer
- Small paintbrush
- Small bowl (for shaping)
Step 1: Shaping the Flower
-
Condition the Clay:
Begin by kneading a ball of white or cream clay in your hands until it becomes soft, pliable, and free of any cracks. -
Roll it Out:
On a clean, flat surface, roll the clay out to an even thickness of about 1/4 inch. If you are using air-dry clay, keeping a damp sponge nearby helps to smooth out any surface dryness. -
Cut the Circle:
Place your round cutter or a small bowl upside down on the clay and cut out a perfect circle to serve as the base form. -
Create the Petals:
Using a needle tool or craft knife, gently mark the circle into 6 or 8 equal sections, just like slicing a pizza, but don’t cut all the way through yet. -
Scallop the Edges:
Depending on your preference, use your fingers or the round end of a tool to gently press indentations at the edge of each section to create the curved, scalloped petal shape.
Cracked Clay Fix
If hairline cracks appear while air-dry clay is drying, mix a tiny bit of fresh clay with water to make a paste and fill the gaps, then sand smooth once dry.
Step 2: Adding Texture & Drying
-
Define the Lines:
Use a modeling tool to deepen the lines between the petals, starting from the center and pulling outward to give the flower dimension. -
Smooth the Form:
Dip your finger in a little water (for air-dry clay) or baby oil (for polymer) and run it along the rim to smooth any sharp edges created by cutting. -
Shape the Curve:
Gently lift the clay circle and place it inside a small bowl to dry. This will give the dish its curved, cupped shape so it can hold jewelry securely. -
Dry or Bake:
Allow the clay to dry according to package instructions—usually 24-48 hours for air-dry clay, or bake it in the oven if using polymer clay. -
Sand until Smooth:
Once fully cured and hard, remove the dish from the bowl and lightly sand any rough spots or uneven edges with fine-grit sandpaper.
Step 3: Painting & Glazing
-
Base Coat:
Paint the entire dish with a creamy off-white acrylic paint. You may need two coats for full coverage; let it dry completely between layers. -
Create the Speckles:
Mix a small amount of dark brown paint with a drop of water. Dip an old toothbrush into the mix, point it at the dish, and run your thumb across the bristles to flick tiny speckles over the surface. -
Let Speckles Set:
Allow the speckled paint effect to dry completely before moving on to the next step so the dots don’t smear. -
Gild the Rim:
Dip a fine detail brush into liquid gold leaf or metallic gold paint and carefully trace the very edge of the scalloped rim for a luxurious finish. -
Add the Center Detail:
Paint a thin circle or accent in the center of the dish with the gold, or gently darken the center with a dilute brown wash for depth. -
Seal for Shine:
Finish the piece by applying a thick coat of high-gloss varnish or dimensional glaze. This mimics the look of fired ceramic and protects the paint.
Make It Personal
Before drying, stamp Mom’s initials or a short date into the underside of the dish for a hidden sentimental touch she will discover later.
Wrap this delicate dish in tissue paper and present it to Mom for a gift that is both beautiful and functional
Pinch Pot Catchall for Mom
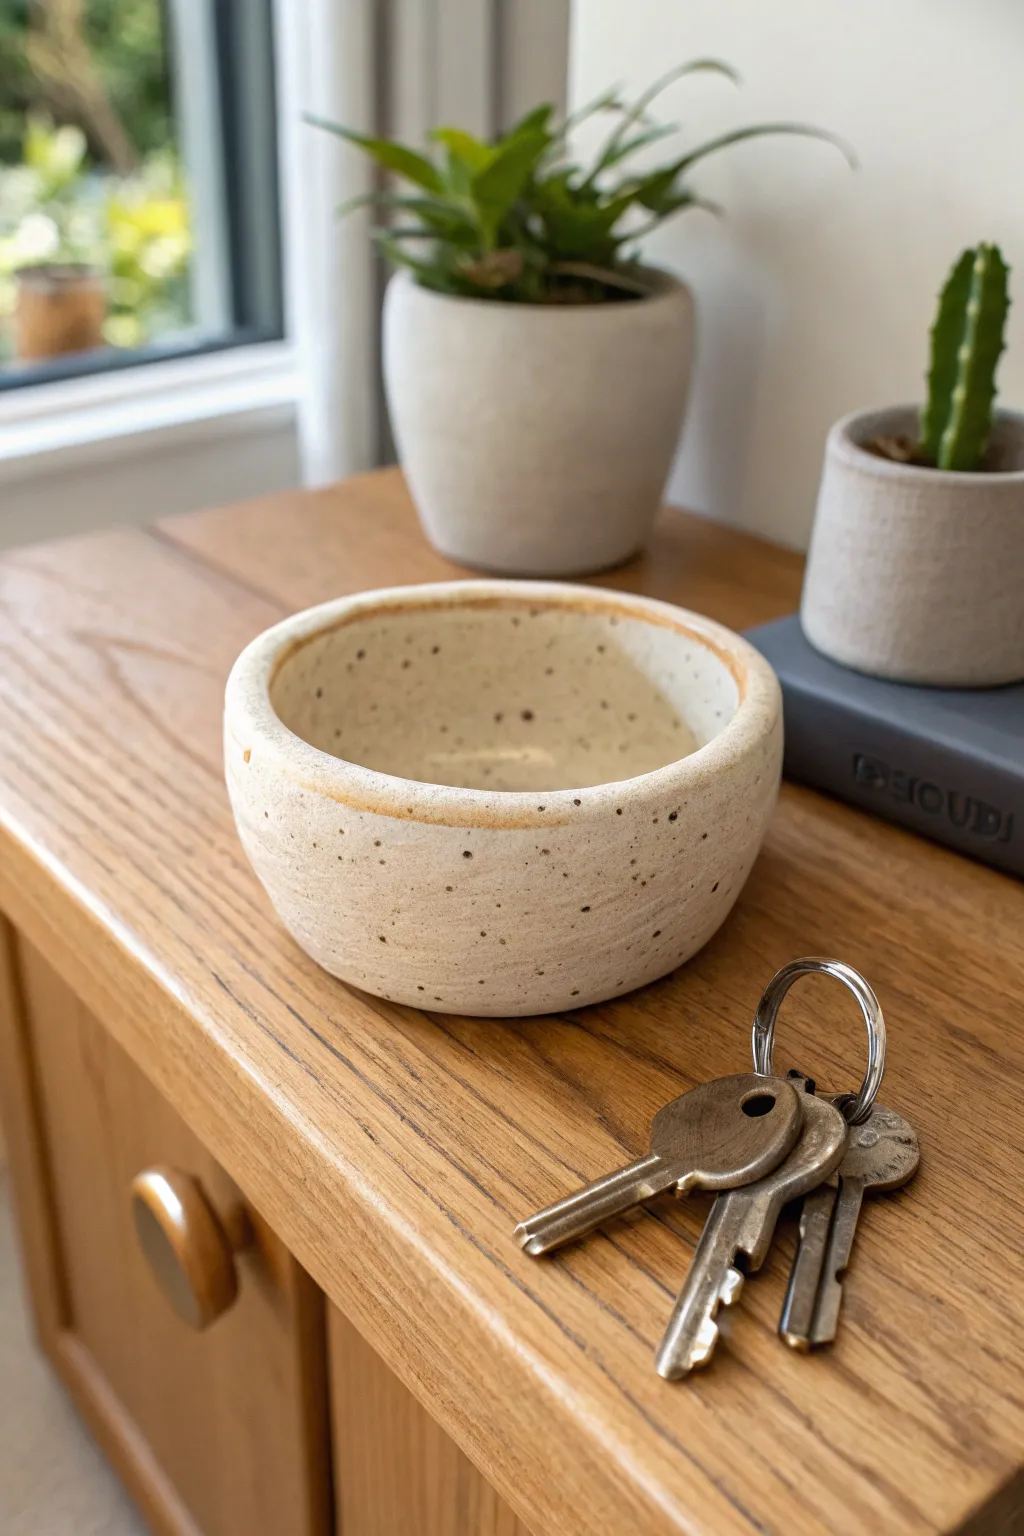
This charming, rustic bowl is the perfect handmade gift for Mom to keep her keys or jewelry safe. Featuring natural speckles and a wabi-sabi aesthetic, it celebrates the beauty of imperfection in a functional everyday object.
How-To Guide
Materials
- Speckled stoneware clay (or white clay with added grog)
- Pottery wheel (optional, but instructions focus on hand-building)
- Sponge
- Bowl of water
- Wooden modeling tool or old credit card
- Clear glaze (food safe)
- Iron oxide wash or brown underglaze (optional for rim)
- Kiln access (or air-dry clay alternative/sealant if not firing)
Step 1: Forming the Pinch Pot
-
Prepare your clay:
Start with a ball of clay roughly the size of a large orange. Pat it between your hands to ensure it is round and compact. -
Open the form:
Hold the ball in your non-dominant hand. Push your thumb into the center of the ball, stopping about half an inch from the bottom to create the base. -
Pinch the walls:
Using your thumb on the inside and fingers on the outside, gently pinch the clay while rotating the ball in your hand. Work from the bottom up. -
Even out the thickness:
Continue rotating and pinching until the walls are an even thickness, aiming for about 1/4 inch thick. Don’t worry if the rim is slightly uneven; that adds character. -
Shape the bottom:
Gently tap the pot’s base against your work surface to flatten it slightly so the bowl sits stable and doesn’t wobble.
Rim Cracking?
If the rim starts cracking while you pinch, your clay is too dry. Dab a little water on the cracks and compress the rim by running a finger along it.
Step 2: Refining and Smoothing
-
Smooth the exterior:
Use a damp sponge or your wooden rib tool to smooth out significant fingerprints on the outside, but leave some texture if you want that rustic look. -
Refine the interior:
Take a slightly damp sponge and wipe the inside of the bowl to create a smooth surface for keys or coins to slide against. -
Rim detail:
Run your finger or a piece of chamois leather over the rim to compress the clay, preventing future cracks. Keep the edge rounded rather than sharp. -
Drying phase:
Cover the bowl loosely with plastic and let it dry slowly to the ‘leather hard’ stage, usually overnight.
Step 3: Finishing and Firing
-
Bisque fire:
Once fully bone dry, fire the piece in a kiln to cone 04 (or according to your clay’s instructions) to prepare it for glazing. -
Clean surface:
Wipe the bisque-fired bowl with a damp sponge to remove any dust that might prevent the glaze from adhering properly. -
Accent the rim:
Dip a small brush into iron oxide wash or a diluted brown underglaze. Gently run it along the very edge of the rim for that subtle toasted look seen in the photo. -
Glaze application:
Pour clear glaze inside the bowl, swirl it around to coat the interior, and pour out the excess. Choose a matte or satin clear glaze for the best match. -
Exterior glazing:
Dip the exterior into the clear glaze or brush it on. If you want the natural clay texture to shine, you can leave the exterior unglazed, just be sure the clay body is fully vitrified. -
Wipe the foot:
Use a wet sponge to wipe glaze off the very bottom of the pot so it won’t fuse to the kiln shelf. -
Final fire:
Fire the piece again to the maturity temperature of your clay (likely cone 5 or 6 for stoneware).
Stamp It
Before the clay dries, impress a lace doily or stamp a personalized message for Mom into the bottom of the bowl for a hidden custom detail.
Wrap this special catchall in tissue paper and present it to Mom as a beautiful organizer for her daily treasures


What Really Happens Inside the Kiln
Learn how time and temperature work together inside the kiln to transform clay into durable ceramic.
Mini Bud Vase for Mom
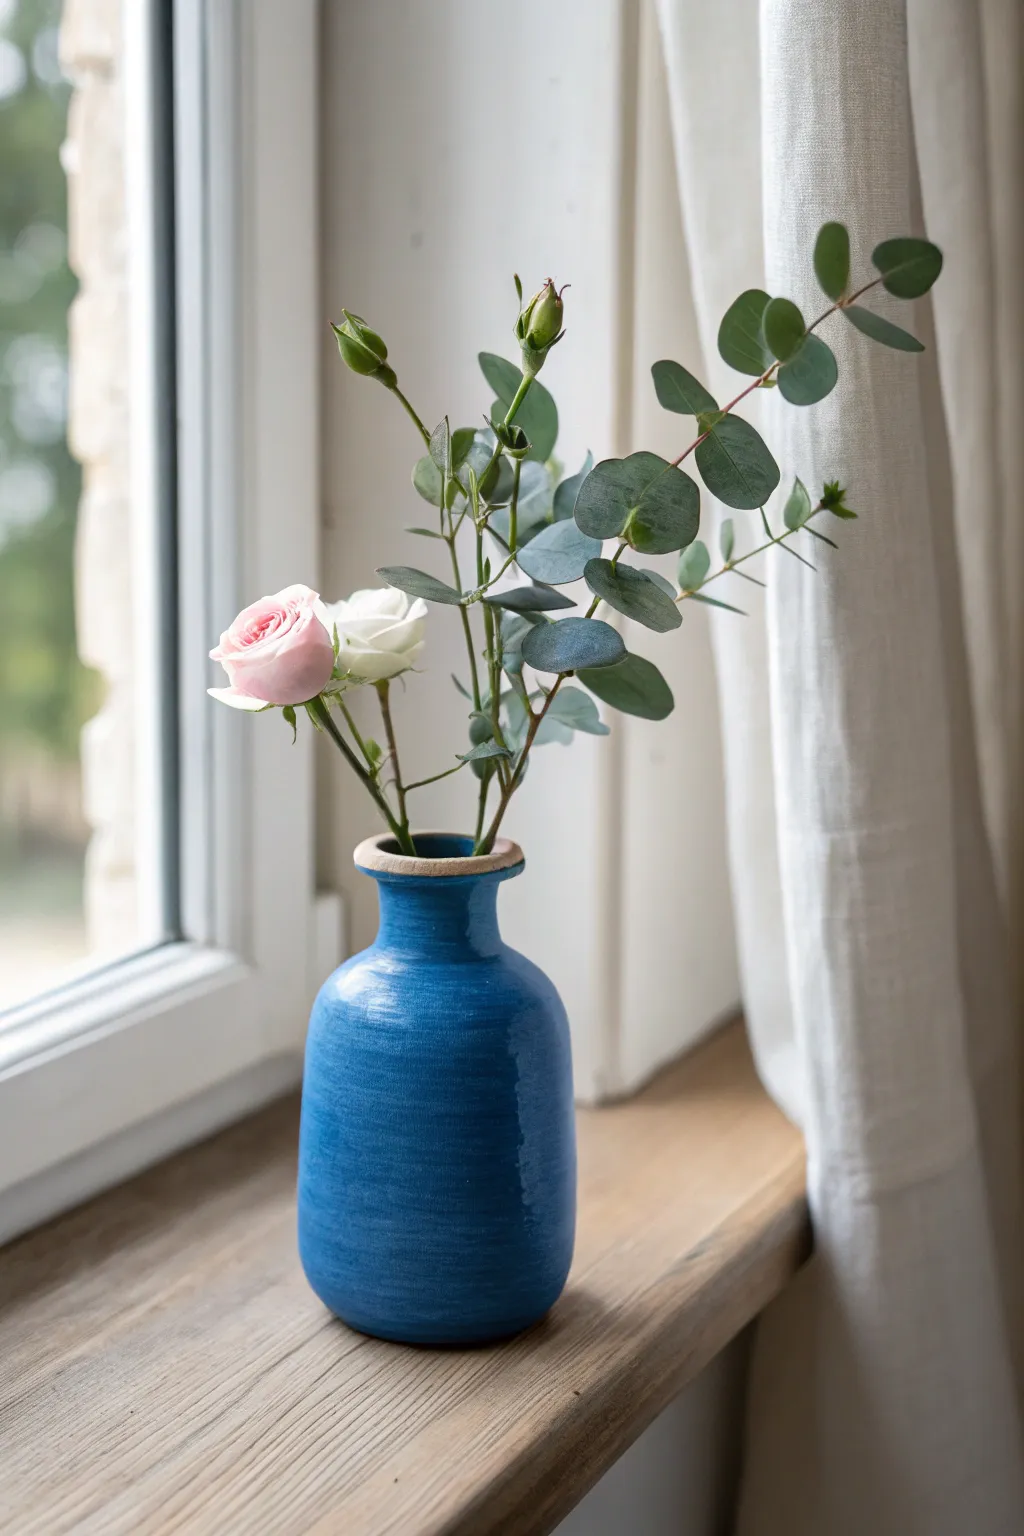
This charming, handmade bud vase features a rich cobalt blue glaze and a subtle hand-turned texture that gives it an authentic, artisanal feel. Its gentle curves and contrasting raw clay rim make it the perfect vessel for showcasing a few special stems from the garden.
Detailed Instructions
Materials
- Pottery wheel (or hand-building tools for coil method)
- Stoneware clay (white or buff)
- Small sponge
- Wire cutter
- Wooden modeling tool
- Needle tool
- Rib tool (metal or rubber)
- Cobalt blue ceramic glaze
- Clear glaze (optional)
- Small paintbrush
- Kiln access
Step 1: Throwing the Form
-
Center the clay:
Start with a manageable ball of clay, roughly 1-1.5 pounds. Throw it onto the center of your wheel head, wet your hands, and cone the clay up and down until it is perfectly centered and running smooth. -
Open the vessel:
Press your thumbs into the center of the spinning clay to create the opening, leaving about a quarter-inch of thickness at the base for trimming later. -
Pull the walls:
Begin pulling up the walls of your cylinder. Aim for a height of about 5-6 inches. Keep your pulls steady and even to ensure the walls have a consistent thickness from bottom to top. -
Shape the belly:
Using your inside hand to push out gently and your outside hand to support, belly out the bottom two-thirds of the cylinder to create that soft, rounded volume shown in the photo. -
Collar the neck:
Gently squeeze the top third of the clay inward with wet hands (collaring) to narrow the neck. Do this gradually to prevent the clay from buckling. -
Refine the rim:
Use a chamois or a small sponge to smooth the very top edge. Compress slightly and flair it out just a tiny bit to create that distinct, slightly flattened lip.
Uneven Glaze?
If your glaze looks too thick or runny, the texture lines will disappear. Thin your glaze slightly with water or use a dipping method rather than brushing for a more even, texture-hugging coat.
Step 2: Adding Texture & Trimming
-
Create the texture:
While the wheel is spinning slowly, take a semi-dry sponge or a wooden tool and drag it gently up the side of the pot. This creates the subtle horizontal striations visible in the blue glaze. -
Cut from the wheel:
Run your wire cutter under the base of the vase and carefully lift it off the wheel head. Set it aside to dry to a leather-hard state. -
Trim the foot:
Once leather-hard, center the vase upside down on the wheel. Use a trimming tool to clean up the bottom and define a small foot ring. -
Smooth imperfections:
I like to take this moment to run a slightly damp sponge over any sharp edges, but avoid smoothing over your texture lines too much. -
Bisque fire:
Let the vase dry completely (bone dry) before loading it into the kiln for the first firing (bisque fire), usually to cone 04 or 06.
Make It a Set
Create a trio of these bud vase gifts by varying the heights. Make one tall and slender, one stout and round, and one medium-sized to create a visually interesting centerpiece collection.
Step 3: Glazing & Finishing
-
Wax the rim:
To achieve the contrasting rim shown in the image, apply a wax resist to the very top lip of the vase. This prevents the glaze from sticking to that specific area. -
Wax the foot:
Apply wax resist to the bottom foot ring as well so the pot doesn’t stick to the kiln shelf. -
Apply the blue glaze:
Dip the vase into a bucket of cobalt blue glaze, or brush on three even coats. The texture you added earlier will create lovely variations in the color depth. -
Clean the rim:
Even with wax, beads of glaze can remain. Use a damp sponge to wipe the rim clean, revealing the raw clay body underneath. -
Glaze fire:
Load the vase into the kiln for the final glaze firing. Follow the temperature guidelines for your specific clay and glaze combination (typically cone 5 or 6 for stoneware).
Once cooled, fill this striking blue vessel with fresh cuttings to brighten up any windowsill
Candle Holder for Mom
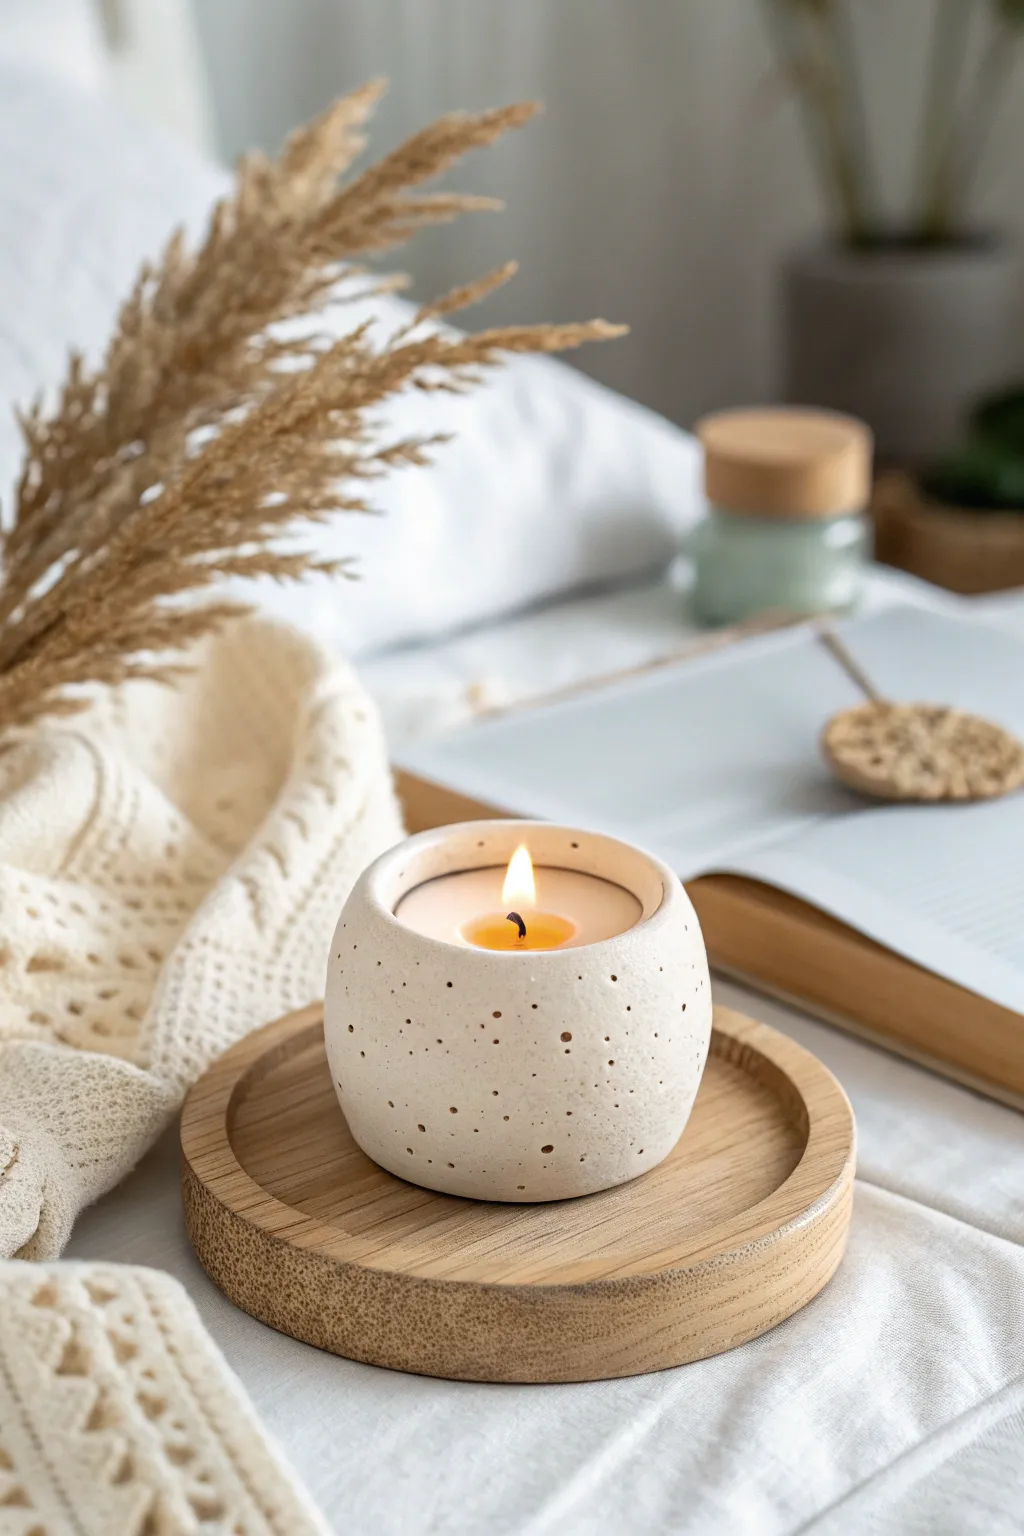
Create a serene spa experience for Mom with this textured, sphere-shaped candle holder that resembles natural stone. The minimalist design features a unique speckled finish made with a toothbrush splatter technique, resting beautifully on a wooden coaster.
Step-by-Step
Materials
- Air-dry clay or polymer clay (white or light beige)
- Wooden round coaster (about 4-5 inches diameter)
- Tealight candle or votive
- Rolling pin
- Small bowl or sphere mold (for shaping)
- Sandpaper (fine grit)
- Acrylic paint (brown or taupe)
- Old toothbrush
- Matte sealant spray or varnish
- Modeling tools or a spoon
Step 1: Shaping the Sphere
-
Conditioning the Clay:
Begin by taking a generous handful of white or light beige clay. Knead it thoroughly in your hands until it becomes soft, pliable, and free of any air bubbles. -
Forming the Ball:
Roll the clay between your palms or on your work surface to create a smooth, solid ball. Aim for a size slightly larger than a tennis ball, ensuring it feels dense and substantial. -
Creating the Opening:
Gently press your thumb into the center of the ball to start the opening. Carefully pinch and rotate the clay to widen this hole, maintaining a thick, rounded wall. -
Inserting the Candle Placeholder:
Place your actual tealight or votive candle into the opening to check the fit. Press it down gently to create a flat internal base, ensuring the candle sits flush or slightly below the rim. -
Refining the Shape:
With the candle removed, smooth the exterior walls. Cup your hands around the form to curve the sides inward at the top, creating that cozy, enclosed sphere look rather than a straight-sided bowl. -
Flattening the Base:
Tap the bottom of the sphere gently on your work surface. This creates a small, flat area so the holder won’t roll away when placed on the wooden coaster. -
Smooth the Rim:
Dip your finger in a little water (if using air-dry clay) and run it along the top rim to smooth out any cracks or sharp edges. The rim should look soft and rounded.
Uneven Splatter?
If the paint blobs are too big, blot them immediately with a damp paper towel. Use a piece of scrap paper to test your toothbrush flicking distance before spraying the pot.
Step 2: Texturing and Drying
-
Adding Pits and Texture:
Use a small, round modeling tool or the end of a paintbrush handle to gently press random indentations into the exterior. Vary the pressure to create shallow, stone-like pits rather than deep holes. -
Drying Phase:
Allow the piece to dry completely according to your clay package instructions. I like to let this dry away from direct sunlight to prevent cracking. -
Sanding:
Once fully cured, use fine-grit sandpaper to buff the surface. Focus on smoothing any fingerprints, but leave the intentional texture pits rough for character. -
Applying the Base Effect:
If your clay dried too white, you can apply a very thin wash of beige paint and wipe it off immediately with a rag, leaving pigment only in the recessed textures.
Step 3: Finishing Touches
-
Mixing the Speckle Paint:
Dilute a small amount of brown or taupe acrylic paint with water until it reaches an inky consistency. -
The Splatter Technique:
Dip the bristles of an old toothbrush into the diluted paint. aim the brush at the candle holder and run your thumb across the bristles to flick tiny specks onto the surface. -
Building Layers:
Rotate the sphere and continue splattering until you have an even distribution of small and medium dots. Let some areas be denser than others for a natural stone look. -
Creating Larger Craters:
Dip a toothpick into undiluted brown paint and carefully place a few larger dots into the pre-made indentations to emphasize the porous texture. -
Sealing:
Once the paint is dry, spray the entire piece with a matte sealant. This protects the finish and makes it easier to clean later. -
Assembly:
Place the finished clay sphere onto the wooden coaster. Insert a fresh candle, light it, and enjoy the warm glow.
Make it Scented
Instead of a tealight, pour melted soy wax and a wick directly into the sealed clay vessel. Add lavender essential oil for a truly relaxing gift.
Wrap this handmade gem in tissue paper for a gift Mom will cherish during her quiet moments

TRACK YOUR CERAMIC JOURNEY
Capture glaze tests, firing details, and creative progress—all in one simple printable. Make your projects easier to repeat and improve.
Incense Holder for Mom
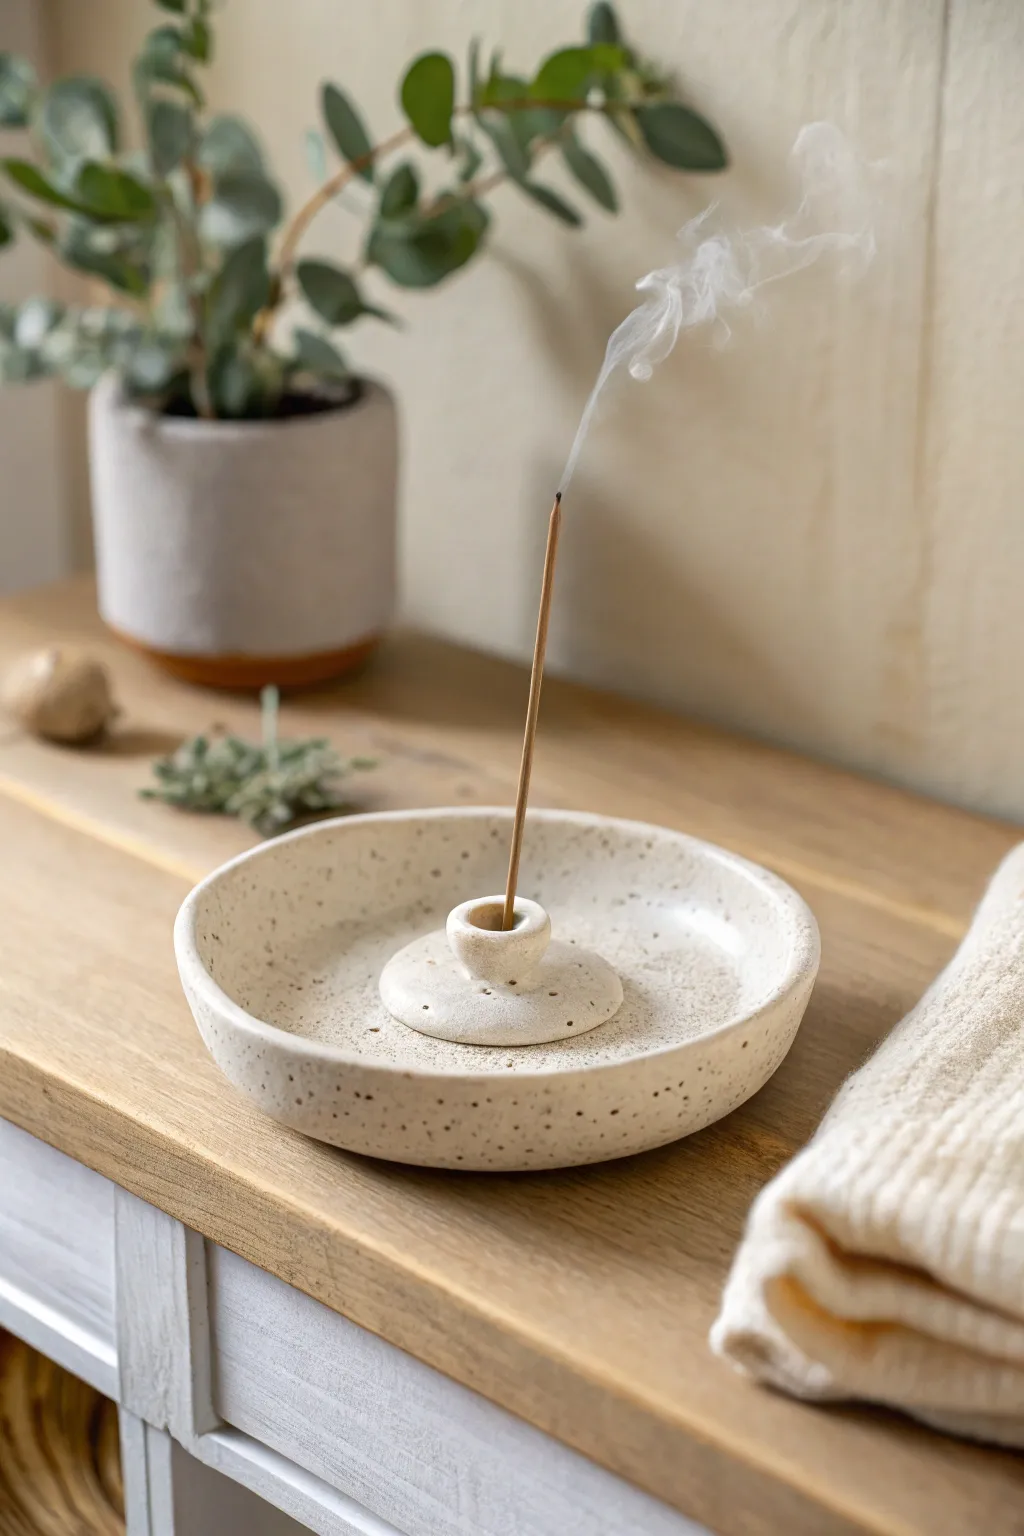
This minimalist incense holder features a wide, shallow basin to catch falling ash and a central raised mount to keep your incense stick secure. Its speckled clay body and soft, rounded edges give it a calming, organic look perfect for any relaxation space.
Detailed Instructions
Materials
- Speckled stoneware clay (approximately 1 lb)
- Pottery wheel (or can be hand-built)
- Needle tool
- Loop trimming tool
- Sponge
- Cutting wire
- Wooden modeling tool
- Rib tool (rigid)
- Clear or matte white glaze
- Incense stick (for sizing)
Step 1: Throwing the Basin
-
Center the clay:
Start by wedging your speckled clay to remove air bubbles. Place the ball of clay firmly onto the wheel head and center it using steady pressure and water. -
Open the form:
Press your thumbs into the center of the clay to open it up, leaving a floor thickness of about 1/4 to 1/2 inch. You want a decent thickness here because we will be carving into the center later for the holder. -
Establish the floor width:
Pull the clay outward to create a flat, wide floor. This will be the catch basin for the ash. Aim for a diameter of about 5-6 inches. -
Raise the rim:
Gently pull up a short wall at the perimeter, about 1 inch high. Keep the rim slightly thick and rounded for a soft, durable edge. -
Refine the curve:
Use a rib tool on the inside of the rim to smooth the transition from the floor to the wall, creating a gentle, upward curve rather than a sharp 90-degree angle.
Hole Size Warning
Make the incense hole 15-20% larger than your incense sticks. Clay shrinks during both drying and firing, and a hole that fits perfectly wet will be too small once fired.
Step 2: Forming the Center Holder
-
Locate the center:
If you threw this with a thick floor, you can leave a small mound of clay in the very center when you open it. Alternatively, if throw flat, score and slip a small ball of clay into the exact center of the basin now. -
Shape the mound:
Using your fingers or a small wooden tool while the wheel spins slowly, shape the central mound into a smooth, flattened dome, roughly 2 inches wide. -
Create the stack:
From the center of that mound, pinch or model a small, upright cylinder—like a tiny chimney. This should be about half an inch tall. -
Smooth the transition:
Use a damp sponge to smooth the connection point where the little chimney meets the mound. It should look like one continuous, flowing piece of clay. -
Pierce the holder:
Take your needle tool or a specialized hole cutter. While the wheel is still or moving very slowly, carefully poke a hole into the top of the central cylinder. Don’t go all the way through to the table; just deep enough to hold a stick securely. -
Check the fit:
I always test this with an actual incense stick (the wooden end) to ensure the hole is slightly larger than the stick to account for clay shrinkage during partial drying.
Speckle Pop
If you don’t have speckled clay, mix 2-3% granular manganese or ilmenite into plain white clay. Wear a mask while mixing powders to safe.
Step 3: Trimming and Finishing
-
Dry to leather hard:
Cut the piece from the wheel with your wire tool and set it aside until it reaches a leather-hard state. -
Trim the foot:
Flip the piece over and center it on the wheel again. Use a loop tool to trim away excess weight from the bottom and carve a neat foot ring, mirroring the curve of the basin inside. -
Smooth edges:
Run a damp sponge over the rim and the central holder one last time to remove any sharp burrs or rough texture. -
First firing:
Allow the piece to dry completely (bone dry) before bisque firing it in the kiln according to your clay’s specific temperature guide. -
Glazing:
Dip or brush a clear or semi-matte white glaze over the entire piece. The key here is transparency or a light coat so the natural speckles of the clay body show through. -
Glaze firing:
Wipe the foot ring clean to prevent sticking to the shelf, then fire the piece again for the glaze cycle.
Once cooled, place it on a shelf and enjoy the serene atmosphere created by your handmade piece
Heart Keychain for Mom
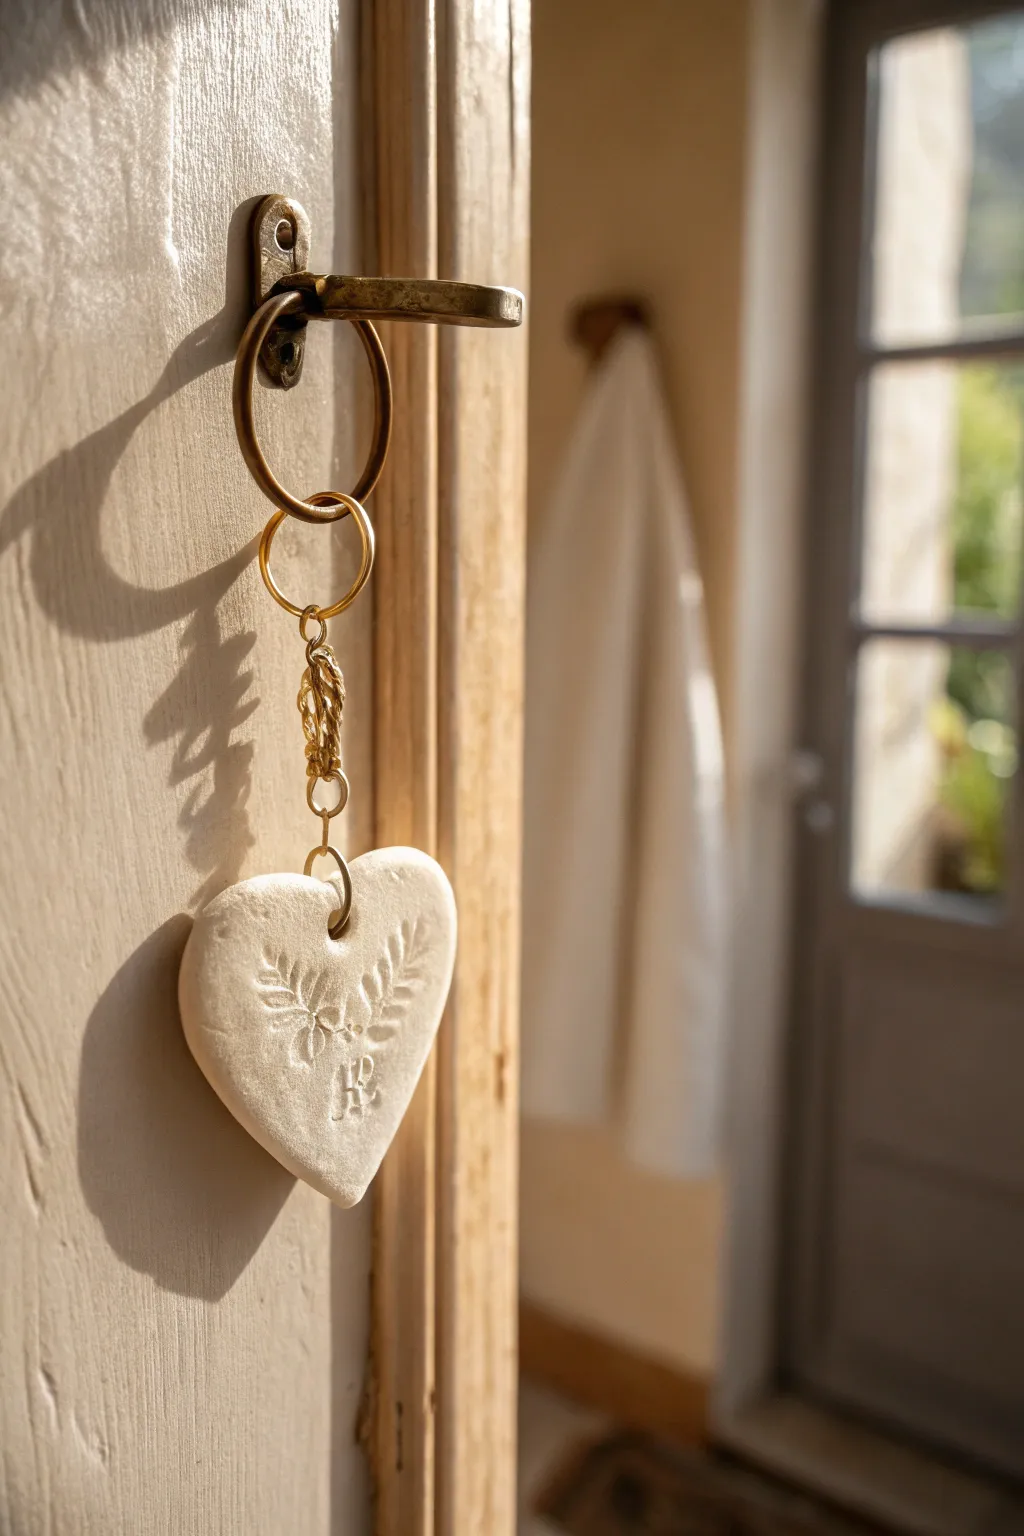
This elegant keychain project combines the organic warmth of white clay with delicate botanical impressions, making a perfect heartfelt gift. Its simple, rustic finish and golden hardware create a sophisticated keepsake that looks beautiful hanging anywhere.
Detailed Instructions
Materials
- White polymer clay or air-dry clay
- Rolling pin or acrylic roller
- Heart-shaped cookie cutter (approx. 2-3 inches)
- Fresh ferns, lavender, or small leaves
- Small alphabet stamps (optional)
- Small straw or toothpick
- Fine-grit sandpaper
- Gold jump rings (various sizes)
- Gold decorative chain links
- Pliers (chain nose and round nose)
- Parchment paper
Step 1: Shaping the Clay Base
-
Condition the clay:
Begin by kneading a ball of white clay in your hands until it becomes soft, pliable, and free of cracks. If you are using polymer clay, the warmth of your hands will help condition it quickly. -
Roll the slab:
Place the clay on a sheet of parchment paper to prevent sticking. Use your rolling pin to flatten the clay into a smooth, even slab that is roughly 1/4 inch thick. Aim for a consistent thickness so the final piece is durable. -
Cut the shape:
Position your heart-shaped cutter over the smoothest area of the clay setup. Press down firmly and evenly to cut the shape, then gently wiggle the cutter slightly to ensure the edges are clean before lifting it away. -
Smooth the edges:
Carefully remove the excess clay from around the heart. Dip your fingertip in a tiny bit of water (for air-dry clay) or baby oil (for polymer clay) and gently run it along the cut edges to smooth out any sharpness or burrs.
Fixing Cracks
If small cracks appear as the clay dries, mix a tiny bit of fresh clay with water to make a paste and smooth it into the cracks with a brush.
Step 2: Creating the Design
-
Position foliage:
Select two small pieces of fern or leaves. Arrange them on the clay heart in a pleasing V-shape or symmetrical pattern, slightly off-center to leave room for initials if desired. -
Imprint the texture:
Use the rolling pin to gently roll over the fresh leaves. Apply firm, even pressure just once—don’t roll back and forth, or the image might blur. You want the leaves to embed slightly into the surface. -
Reveal the pattern:
Using tweezers or a fingernail, extremely carefully lift the plant material out of the clay. Pull straight up to avoid dragging the texture and ruining the crisp impression lines. -
Add personalization:
If adding initials like ‘VR’ or ‘MOM’, lightly press your small alphabet stamps into the clay below the leaf design. I find a gentle touch works best here to keep the text subtle and elegant. -
Create the hole:
Use a small straw or a toothpick to punch a clean hole near the top center of the heart. Ensure the hole is not too close to the edge to prevent cracking later.
Gilded Edges
For a luxe upgrade, paint the outer rim of the heart or the inside of the imprinted leaves with liquid gold leaf paint after the clay is dry.
Step 3: Finishing and Assembly
-
Dry or bake:
Follow the specific instructions for your clay type. For polymer clay, bake on parchment paper at the manufacturer’s recommended temperature. For air-dry clay, let it sit in a dry spot for 24-48 hours, flipping occasionally. -
Sand for smoothness:
Once fully cured and cooled, use fine-grit sandpaper to buff the edges and surface. This gives the piece that professional, stone-like matte finish evident in the photo. -
Open the jump ring:
Take a medium-sized gold jump ring and use two pairs of pliers to twist it open sideways. Never pull the ends apart; always twist to maintain the circle’s shape. -
Attach the charm:
Slide the open jump ring through the hole in your clay heart. Before closing it, thread on your decorative gold chain links or braided connector. -
Secure the closure:
Twist the jump ring closed until the ends meet perfectly flush. You can hear a tiny ‘click’ usually when they align correctly. -
Add the main ring:
Attach a larger keyring or split ring to the top of your chain assembly, ensuring the heart hangs freely and faces forward.
Now you have a charming, handcrafted token of affection ready to brighten someone’s day
Essential Oil Diffuser Charm for Mom
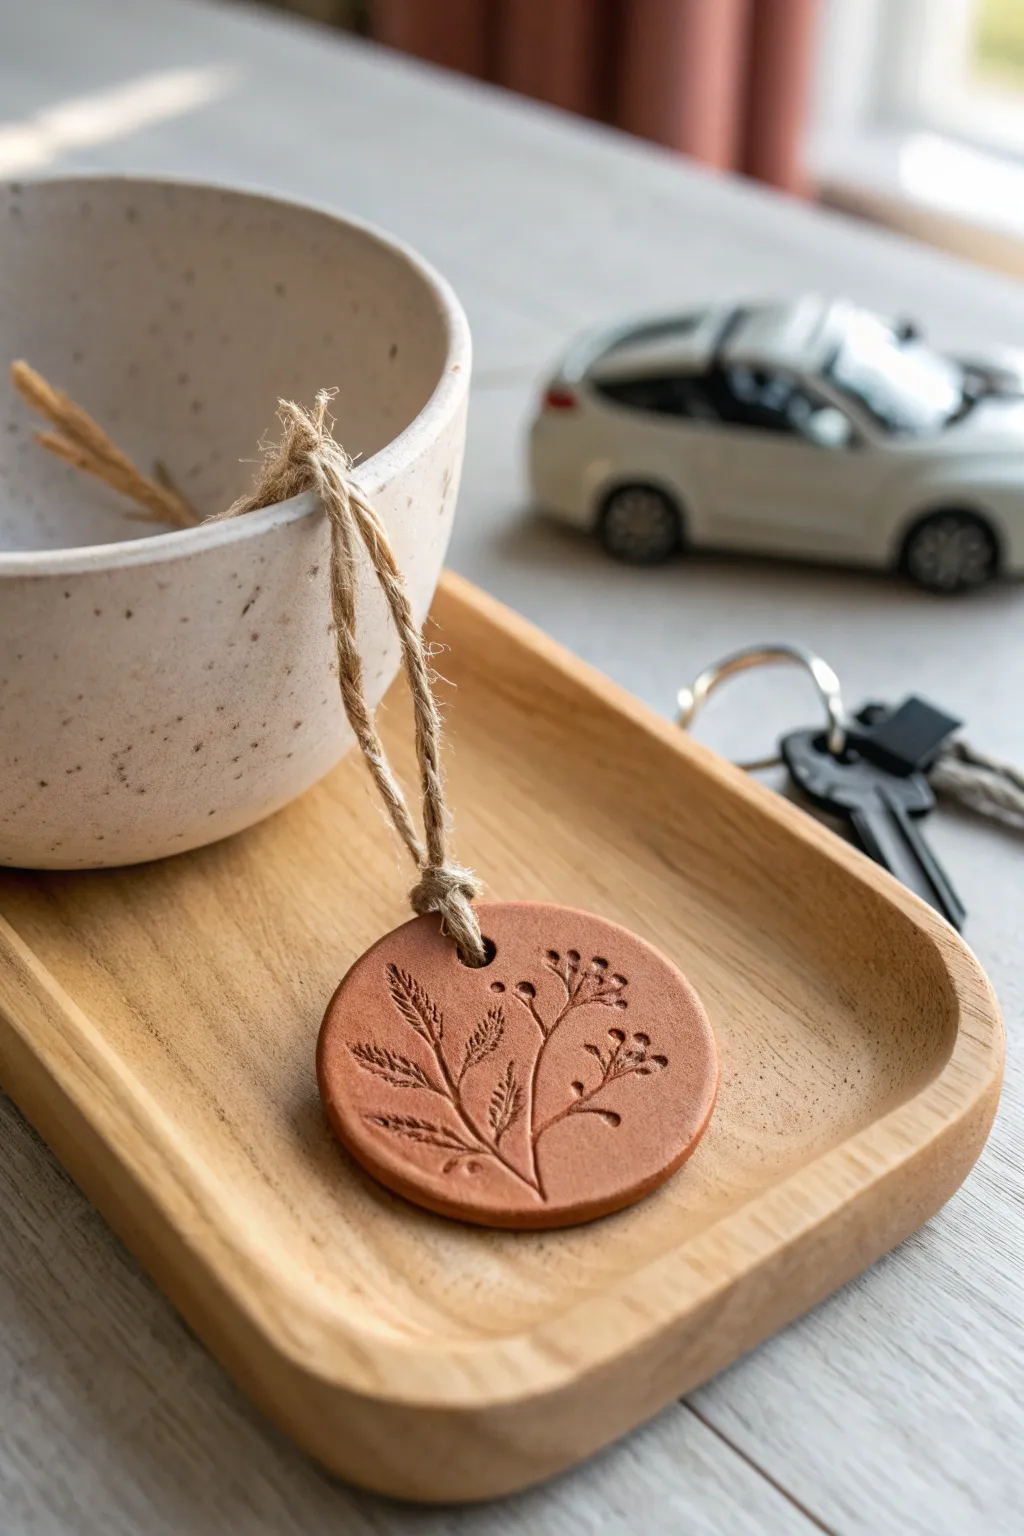
Treat Mom to a touch of aromatherapy with this rustic terracotta charm, featuring delicate botanical impressions pressed directly into the clay. Its porous nature makes it the perfect vessel for her favorite essential oils, turning a simple car ride or closet corner into a spa-like experience.
Step-by-Step
Materials
- Terracotta air-dry clay (or polymer clay if baking enabled)
- Rolling pin or smooth glass jar
- Round cookie cutter (approx. 2-2.5 inches)
- Fresh or dried delicate sprigs (wildflowers, ferns, or herbs)
- Straw or small dowel (for the hole)
- Fine grit sandpaper (optional)
- Jute twine or hemp cord
- Scissors
Step 1: Preparation and Rolling
-
Prepare your workspace:
Lay down a non-stick surface like a silicone mat or a piece of parchment paper to prevent the clay from sticking. Ensure your hands are clean and dry. -
Condition the clay:
Take a walnut-sized ball of terracotta air-dry clay and knead it well. You want it warm and pliable to avoid cracks appearing later. -
Form a ball:
Roll the kneaded clay into a smooth sphere between your palms, smoothing out any visible seams. -
Flatten the clay:
Place the ball on your mat and gently press it down with your palm to start the flattening process. -
Roll to thickness:
Using your rolling pin, roll the clay out until it is an even slab, roughly 1/4 inch thick. Don’t go too thin, or the charm might become brittle.
Step 2: Creating the Design
-
Select your botanical:
Choose a sprig that has defined details but isn’t too thick. The image shows a fern-like leaf and a small budding branch, which work beautifully together. -
Position the plants:
Gently lay your chosen botanicals onto the clay slab. Arrange them exactly how you want the final impression to look, perhaps angling them slightly for a natural flow. -
Press the impression:
Take your rolling pin and roll firmly over the plant material once. Use enough pressure to embed the stems into the clay, but not so much that you distort the slab’s thickness entirely. -
reveal the pattern:
Carefully lift the plant stems away from the clay using tweezers or your fingernail. If a piece gets stuck, I find using a needle tool helps to gently pry it out without damaging the print.
Sticky Situation?
If the clay sticks to your cutter, dust the cutter rim with a little cornstarch or water before pressing down for a clean release.
Step 3: Shaping and Refining
-
Cut the circle:
Center your round cookie cutter over the floral impression. Press straight down firmly to cut the shape, then wiggle slightly to release. -
Remove excess clay:
Peel away the scrap clay from the outside of the ring. You can save this for another project. -
Create the hanging hole:
Use a straw to punch a clean hole near the top edge of the circle. Make sure not to get too close to the edge to prevent tearing. -
Smooth the edges:
Dip your finger in a tiny bit of water and run it along the cut edge of the circle to smooth out any roughness left by the cutter.
Scent Boost
Make it a gift set by including a small vial of lavender or citrus oil. Instruct Mom to apply 1-2 drops directly to the unsealed back of the charm.
Step 4: Finishing Touches
-
Allow to dry:
Place your charm on a clean, flat surface to dry. Air-dry clay typically takes 24-48 hours depending on humidity; flip it halfway through for even drying. -
Sand imperfections:
Once fully cured and hard, you can lightly sand the edges with fine-grit sandpaper if you want a cleaner look, though the rustic texture is charming on its own. -
Cut the twine:
Cut a length of jute twine, approximately 8-10 inches long. -
Thread the loop:
Fold the twine in half. Push the folded loop end through the hole in the clay from front to back. -
Secure the knot:
Pull the loose ends of the twine through the loop you just created and tighten it gently to secure the charm with a lark’s head knot.
Wrap this lovely little piece in tissue paper and it is ready to freshen up Mom’s day
Floral Earrings for Mom
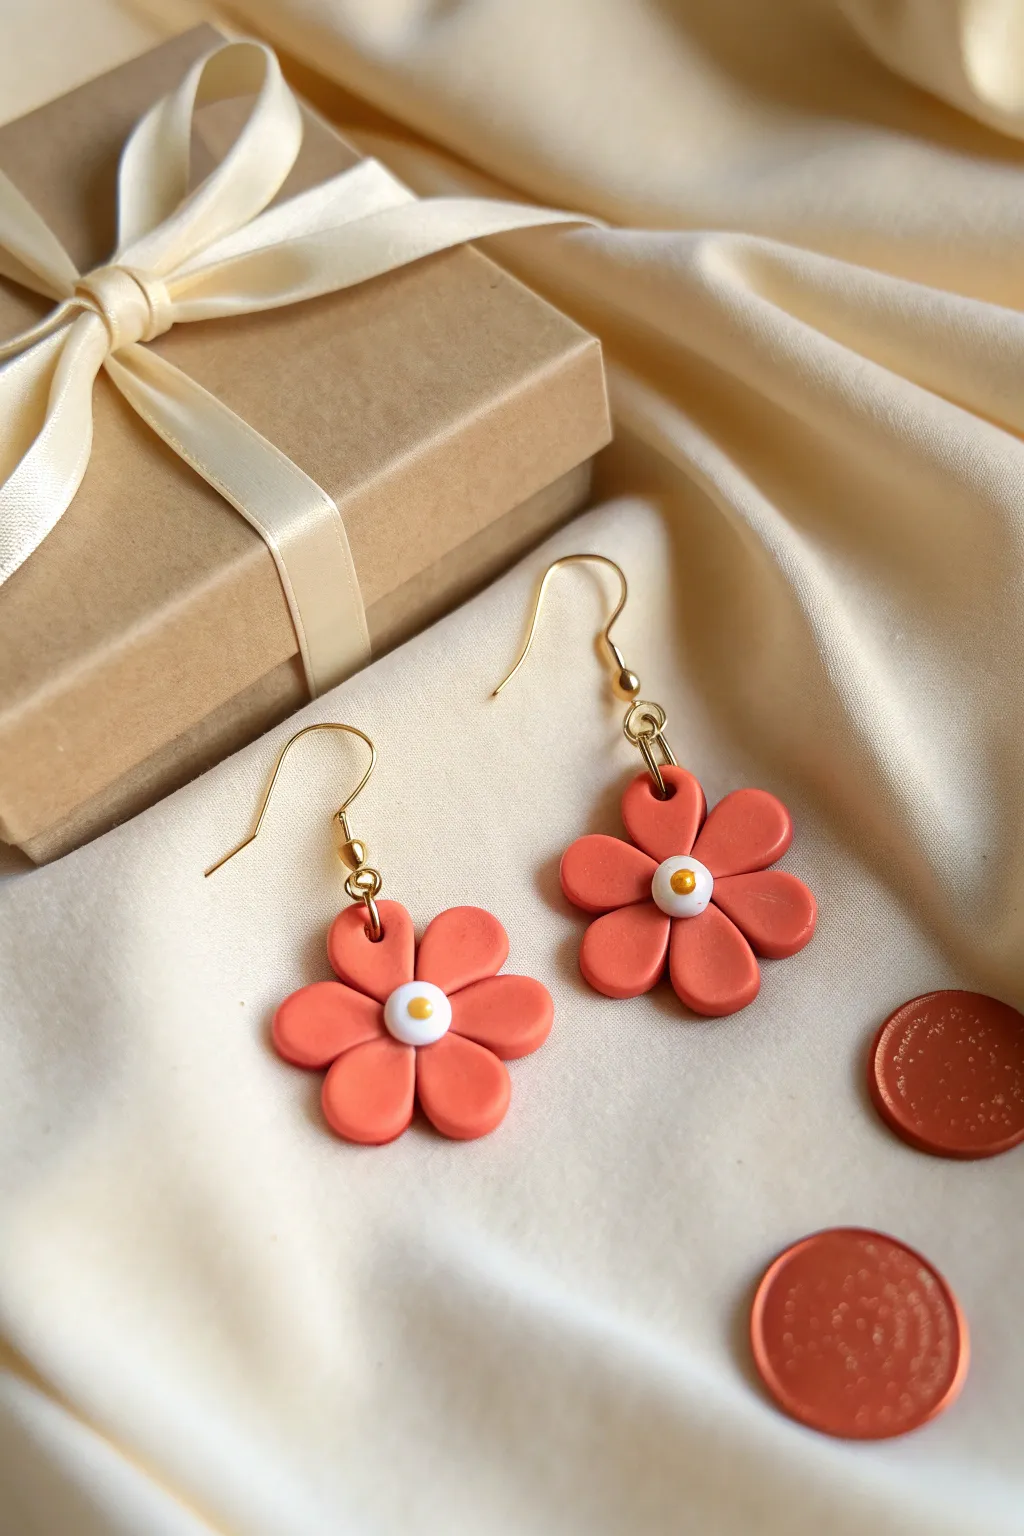
These charming five-petal flower earrings feature a warm terracotta hue that feels both retro and fresh. With their simple, clean lines and delicate white-and-gold centers, they make a lovely handmade gift that looks professionally crafted.
How-To Guide
Materials
- Polymer clay in terracotta/coral
- Polymer clay in white
- Polymer clay in mustard yellow or gold acrylic paint
- Acrylic rolling pin
- Small flower petal cutter (teardrop shape) or X-Acto knife
- Small circular cutter (approx. 5mm)
- Tiny dotting tool or toothpick
- Gold jump rings (4mm or 6mm)
- Gold earring hooks (French hook style)
- Jewelry pliers
- Hand drill or needle tool for piercing
- Parchment paper or ceramic tile for baking
Step 1: Shaping the Petals
-
Condition the clay:
Start by thoroughly conditioning your terracotta polymer clay until it is soft and pliable. Warm clay is less prone to cracking during baking. -
Roll out the slab:
Using your acrylic rolling pin, roll the clay out to a uniform thickness, roughly 3mm or 1/8 inch. You can use depth guides or playing cards on either side to ensure it’s even. -
Cut the petals:
You will need five petals for each earring. If you have a small teardrop cutter, punch out 10 shapes. If cutting by hand, use a needle tool to trace and cut 10 identical teardrop shapes. -
Refine the edges:
Gently smooth the cut edges of each petal with your fingertip to remove any harsh lines or clay burrs.
Smooth Operator
Before baking, lightly brush the clay surface with a little cornstarch or baby oil on your finger. This buffs away fingerprints for a flawless matte finish.
Step 2: Assembling the Flower
-
Arrange the base:
On your working tile or parchment paper, arrange five petals in a circle with the pointed ends meeting in the center. Press them gently together so they fuse at the middle contact points. -
Secure the join:
Use a ball tool or the handle of a paintbrush to gently press down in the very center where the points meet, ensuring a strong bond without distorting the outer petal shapes. -
Create the white centers:
Condition a small amount of white clay. Roll it into a thin sheet and use your small circular cutter to punch out two circles. -
Attach the center:
Place one white circle directly over the center of each flower, covering the join where the petals meet. Press down lightly to adhere it. -
Add the gold detail:
Take a tiny pinch of mustard yellow clay and roll it into a very small ball. Press this into the center of the white circle. Alternatively, you can bake the piece first and add a dot of gold paint later. -
Pierce the hole:
Using a needle tool, carefully poke a hole through the top of one petal on each flower. Ensure the hole is large enough for your jump ring but not too close to the edge to prevent tearing.
Step 3: Baking and Assembly
-
Bake the pieces:
Preheat your oven according to the clay manufacturer’s instructions (usually around 275°F or 130°C). Bake your flowers on a tile or parchment-lined tray for 15-30 minutes. -
Cool down:
Allow the clay flowers to cool completely inside the oven or on a wire rack before handling them, as warm clay is still fragile. -
Open the jump rings:
Use two pairs of jewelry pliers to twist open your gold jump rings. Always twist the ends away from each other (front to back) rather than pulling them apart, to maintain the circle shape. -
Attach the hook:
Thread the open jump ring through the hole in the clay flower petal. Add the earring hook onto the jump ring before closing it. -
Close the ring:
Using the pliers, twist the jump ring ends back together until they meet flush. Repeat for the second earring.
Texture Twist
Before assembling, gently press a piece of coarse sandpaper or sponge onto the petal surfaces to give the flowers a realistic, organic texture.
Wrap these beauties in a small kraft box tied with a ribbon for the ultimate handmade gift presentation
Initial Bead Necklace for Mom
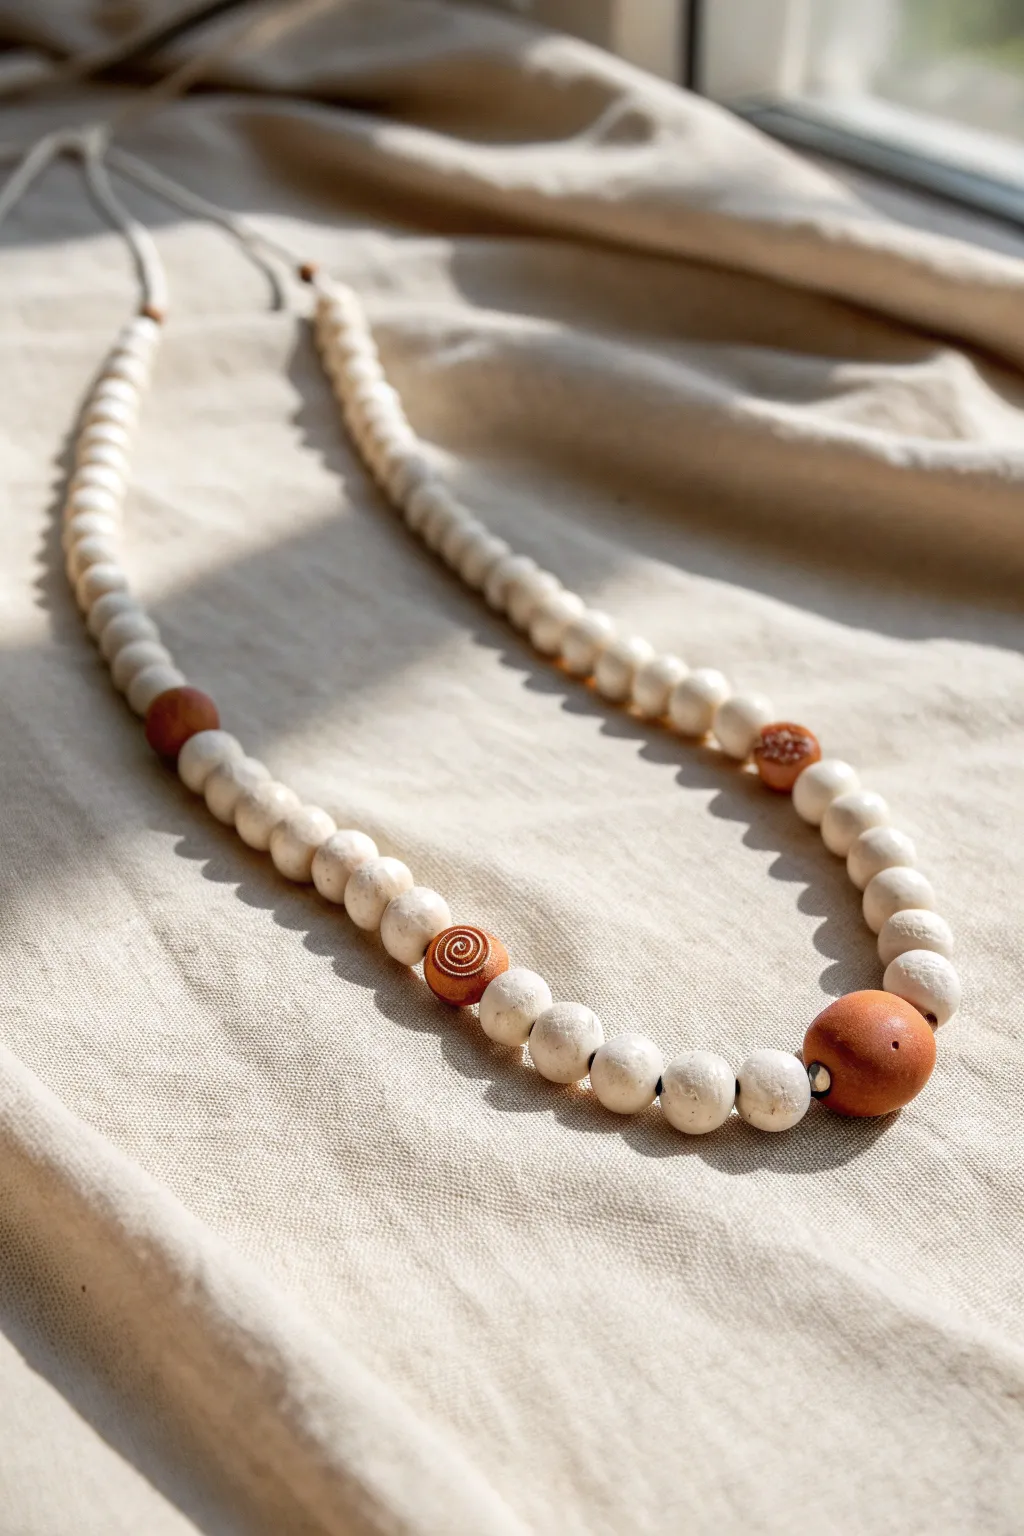
Create a timeless statement piece with this beautifully textured necklace featuring handmade clay beads in soothing cream and terracotta tones. The varied sizes and etched details give it an antiqued, organic look that makes a perfect personalized gift for Mom.
Step-by-Step Tutorial
Materials
- Polymer clay or air-dry clay (Cream/Bone colored)
- Polymer clay or air-dry clay (Terracotta/Rust colored)
- Acrylic roller or glass jar
- Toothpick or needle tool
- Small bead reamer or skewer (for piercing holes)
- Sandpaper (fine grit)
- Waxed cotton cord or hemp twine (natural color)
- Clean work surface (tile or clay mat)
- Oven (if using polymer clay)
Step 1: Shaping the Cream Beads
-
Condition the white clay:
Start by kneading your cream-colored clay until it is soft and pliable. If the clay feels too sticky, you can dust your hands lightly with cornstarch. -
Portion out small spheres:
Pinch off small pieces of clay and roll them between your palms to create spheres. You will need approximately 50-60 small beads, roughly 8-10mm in diameter. -
Create medium spheres:
Make about 6 slightly larger cream beads, roughly 12mm in diameter, to serve as transition pieces near the focal point. -
Add texture:
Instead of smoothing them perfectly, gently roll the beads over a piece of textured fabric or simply leave your fingerprints on them slightly. This mimics the rough, stone-like texture seen in the photo. -
Pierce the holes:
Using your skewer or needle tool, carefully pierce a hole through the center of each bead. Rotate the tool as you push through to prevent the bead from squashing.
Uneven Holes?
If bead holes close up during baking, use a small hand drill or bead reamer to widen them carefully after the clay has fully hardened.
Step 2: Creating the Terracotta Accents
-
Form the focal bead:
Take a larger chunk of terracotta clay and roll a bead that is approximately 20-25mm in diameter. This will anchor the center of the necklace. -
Make the side accents:
Create 4 smaller terracotta beads, sized similarly to your medium cream beads (about 12mm). -
Etch the spiral design:
Select two of your side accent beads. With the tip of a needle tool or toothpick, gently scratch a spiral design into the surface. I find it easier to hold the tool steady and rotate the bead itself. -
Add floral details (optional):
On the other two accent beads, press small dots or dashes to create a simple floral or starburst pattern. -
Pierce the accent beads:
create holes in all the terracotta beads, ensuring the hole in the large focal bead is wide enough for your cord.
Make it Personal
Instead of spirals, etch the initial of each family member into the terracotta accent beads for a sentimental touch Mom will cherish.
Step 3: Baking and Assembly
-
Bake or dry the beads:
Follow the manufacturer’s instructions for your specific clay. If using polymer, bake on a foil-lined sheet. For air-dry clay, let them sit for 24-48 hours until fully hardened. -
Sand for a matte finish:
Once cool or dry, lightly scuff the beads with fine-grit sandpaper. This enhances the rustic, earthen aesthetic and removes any sharp edges around the holes. -
Prepare the cord:
Cut a length of cord about 30 inches long, or longer if you prefer a longer drop. -
String the center focal bead:
Thread the large plain terracotta bead onto the center of the cord. -
add the metallic spacer (optional):
If you have a small silver or brass spacer bead, slide it on next to the focal bead for a tiny glint of contrast. -
Create the pattern:
Working outwards from the center on both sides, thread 2-3 medium cream beads, followed by your patterned terracotta accent beads. -
Complete the strand:
Continue stringing the remaining small cream beads up both sides of the cord until you reach your desired length. -
Knot and finish:
Tie a secure overhand knot at the very end of the bead strand on both sides to keep them in place, then tie the two ends of the cord together to close the necklace loops.
Wrap this earthy necklace in tissue paper for a heartfelt handmade gift she can wear every day
Spoon Rest for Mom’s Kitchen
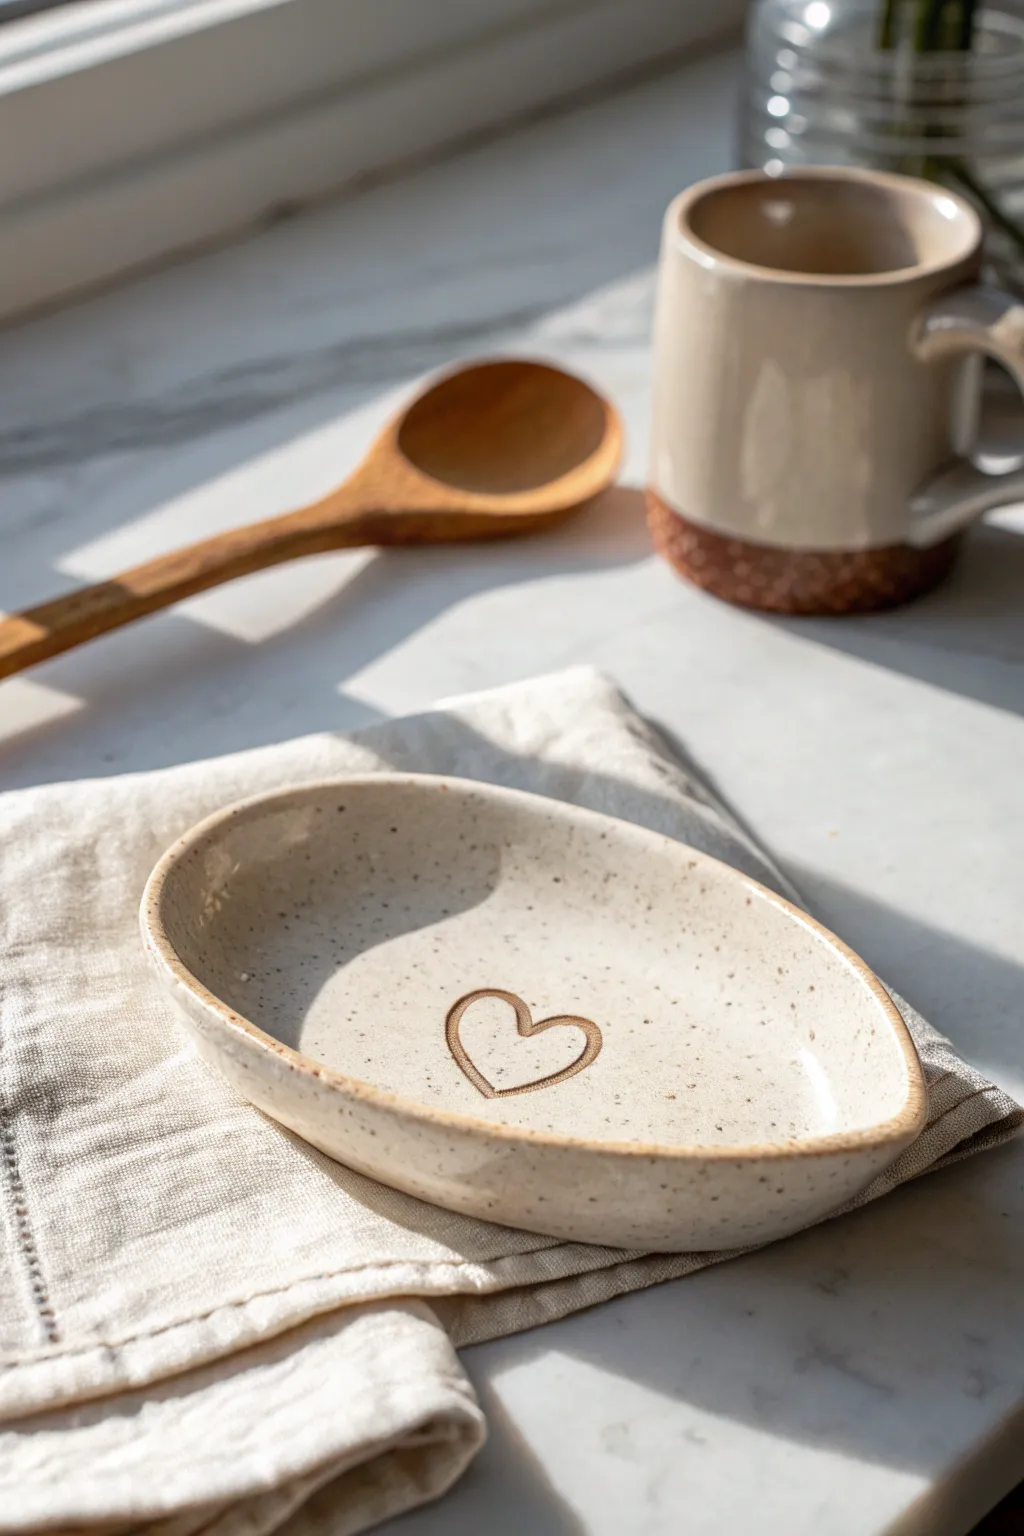
This charming, low-profile spoon rest combines functionality with a sweet, understated design perfect for Mom’s kitchen counter. Made from speckled clay with a milky white glaze, it features a hand-carved heart at the center that reveals the raw texture of the earth beneath.
How-To Guide
Materials
- Speckled stoneware clay (approx. 1 lb)
- Rolling pin
- Canvas mat or cloth for rolling
- Rib tool (kidney shaped, rubber or metal)
- Needle tool or fettling knife
- Oval template (paper or cardstock)
- Small carving loop tool
- Sponge
- Glossy white or clear glaze
- Small paintbrush
- Kiln access
Step 1: Forming the Base
-
Prepare the Clay:
Begin by wedging your speckled stoneware clay thoroughly to remove air bubbles and ensure an even consistency. -
Roll the Slab:
On your canvas mat, flatten the clay ball slightly with your palm. Use the rolling pin to roll out a slab that looks to be about 1/4 inch thick. Rotate the clay frequently to keep the thickness uniform. -
Smooth the Surface:
Take your rib tool and gently compress the surface of the slab. This aligns the clay particles to prevent warping and creates that professional, smooth finish we want for the final piece. -
Cut the Shape:
Place your oval template onto the slab. Using a needle tool or fettling knife held vertically, carefully trace around the template to cut out your spoon rest shape. -
Review the Edges:
Remove the excess clay. Run your finger or a slightly damp sponge along the cut edge to soften the sharp angle left by the knife.
Smooth Moves
Use a barely damp chamois strip on the rim while the wheel spins (or by hand) for the absolute smoothest, most professional finish.
Step 2: Shaping and Carving
-
Create the Curve:
Gently lift the edges of the oval slab with your fingers to curve them upward. You aren’t building a wall, but rather creating a shallow bowl shape that will cradle a messy spoon. -
Refine the Rim:
Use a damp sponge to smooth the rim again, ensuring the transition from the base to the lifted edge is seamless and rounded. -
Dry to Leather Hard:
Set the piece aside to dry until it reaches the leather-hard stage. It should be firm enough to handle without deforming but still cold to the touch and carveable. -
Outline the Heart:
Find the center of the spoon rest. Using a needle tool with very light pressure, sketch the outline of a simple heart. -
Carve the Detail:
Using a small loop tool, carve out the heart outline. I prefer to use short, shallow strokes to create a slightly rustic, etched groove rather than a deep trench. -
Clean Up Burrs:
Once the carving is done, wait a few minutes for the crumbs to dry slightly, then brush them away with a soft brush or smooth imperfections with a finger.
Make it Match
Create a matching mug by using the same speckled clay and leaving the bottom third unglazed to coordinate with the spoon rest’s raw rim.
Step 3: Glazing and Finishing
-
Bisque Fire:
Allow the piece to dry completely until bone dry, then load it into the kiln for a bisque firing (usually to Cone 04 or 06, depending on your clay body). -
Wax the Heart:
Apply a liquid wax resist carefully into the carved heart groove. This prevents glaze from adhering there, allowing the raw speckled clay to show through as the outline. -
Apply Glaze:
Dip the spoon rest into a glossy white glaze, or brush it on if you prefer. Ensure an even coat covers the entire top surface. -
Wipe the Rim:
Take a damp sponge and wipe the glaze off the very top edge of the rim. This exposes a thin line of raw clay that frames the piece beautifully, matching the heart. -
Clean the Heart:
If any glaze beadlets are sitting on top of the wax in the heart design, gently dab them away with a damp sponge. -
Wipe the Bottom:
Flip the piece over and ensure the bottom is completely free of glaze so it doesn’t stick to the kiln shelf. -
Glaze Fire:
Fire the piece again to the maturation temperature of your clay and glaze (typically Cone 5 or 6 for stoneware).
This simple, heartfelt piece is ready to keep counters clean and remind Mom of your love every time she cooks
Phone Stand for Mom’s Desk
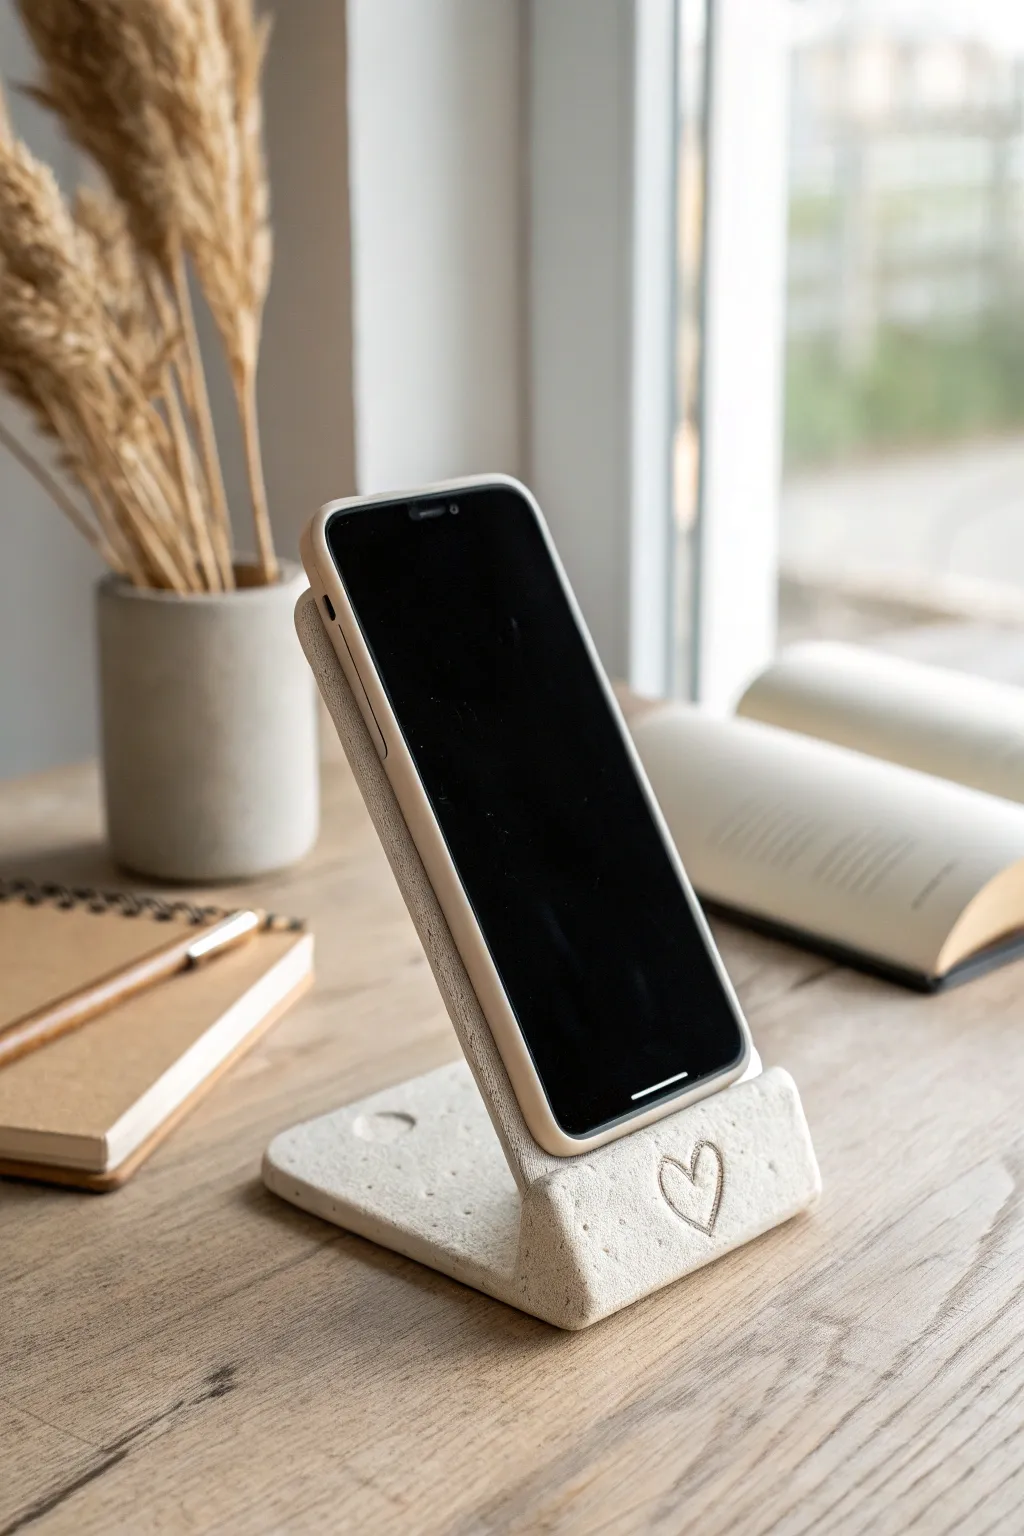
This chic and functional phone stand features a speckled stone look that brings a modern, organic touch to any desk. With its sturdy angled back and sweet heart detail, it’s a thoughtful handmade gift that Mom will actually use every day.
Step-by-Step
Materials
- Air-dry clay (stone effect or white)
- Flecking medium (optional: black sand or dried coffee grounds)
- Rolling pin
- Craft knife or clay slicer
- Ruler
- Cardboard (for templates)
- Small heart stamp or carving tool
- Water and sponge/brush for smoothing
- Fine-grit sandpaper
- Matte sealant or varnish
Step 1: Preparation & Templates
-
Create templates:
Before touching the clay, cut two cardboard rectangles to guide your sizing. You’ll need a base piece (approx. 3.5″ x 4.5″) and a back support piece (approx. 3.5″ x 6″). -
Condition the clay:
Knead your air-dry clay until it’s soft and pliable. If you want that speckled stone look shown in the photo but only have white clay, knead in a pinch of black sand or dried coffee grounds now. -
Roll out the slab:
Roll the clay out into a large, even slab. Aim for a thickness of about 1/4 inch (6-7mm) to ensure the stand is sturdy enough to hold a phone without bending.
Sagging Clay?
If the back keeps drooping, don’t force it. Crumple a ball of aluminum foil and wedge it behind the stand as a prop. Let it dry in place until the clay is leather-hard.
Step 2: Construction
-
Cut the main components:
Using your cardboard templates and a craft knife, cut out the two rectangular strips. Keep your edges as straight and clean as possible. -
Form the front lip:
Take the longer strip (the back support) and gently bend up the bottom .75 inches of it to create a ‘J’ shape. This small lip is what will physically cradle the phone. -
Create the base:
Lay the base rectangular piece flat on your work surface. You can use a textured roller or just keep it smooth depending on your preference. -
Attach the back:
Score (scratch) the clay where the back piece will meet the base. Apply a little water or slip to the scored areas. Press the angled back piece firmly onto the base. -
Support the angle:
Prop up the back piece with a household object (like a mug or block) so it dries at the correct reclining angle—about 60 degrees usually works perfectly. -
Add side supports (optional):
For extra durability, you can blend a small coil of clay into the inner seam where the back meets the base, smoothing it completely so it’s invisible.
Step 3: Details & Drying
-
Add the heart:
On the front-facing lip of the stand, use a small heart stamp to press a design into the center. If you don’t have a stamp, I find using a needle tool to gently carve the outline works just as well. -
Smooth the edges:
Dip your finger or a sponge in water and run it over all cut edges. This softens the sharp angles and gives the piece that professional, finished ceramic look. -
Slow dry:
Let the piece dry slowly away from direct heat or sunlight. This usually takes 24-48 hours. Turn it occasionally once it starts to firm up to let air reach the bottom. -
Sand imperfections:
Once fully cured and bone dry, take fine-grit sandpaper and gently buff away any rough spots, fingerprints, or uneven edges. -
Seal the piece:
Finish with a coat of matte varnish or sealant. This protects the clay from moisture and gives the speckled texture a nice finished quality.
Speckle Hack
No speckled clay? No problem. Mix coarse black pepper or dry tea leaves into white clay. It mimics the stone aesthetic perfectly without buying special supplies.
Wrap this sturdy little stand in tissue paper for a gift that combines modern style with practical utility