When I’m setting up clay play for a toddler, I always aim for that squish-and-smile kind of success—simple, colorful, and totally doable. These ideas lean on easy shapes, imprints, and cute little keepsakes so your kiddo can feel like a real maker right away.
Handprint Keepsake Plaques
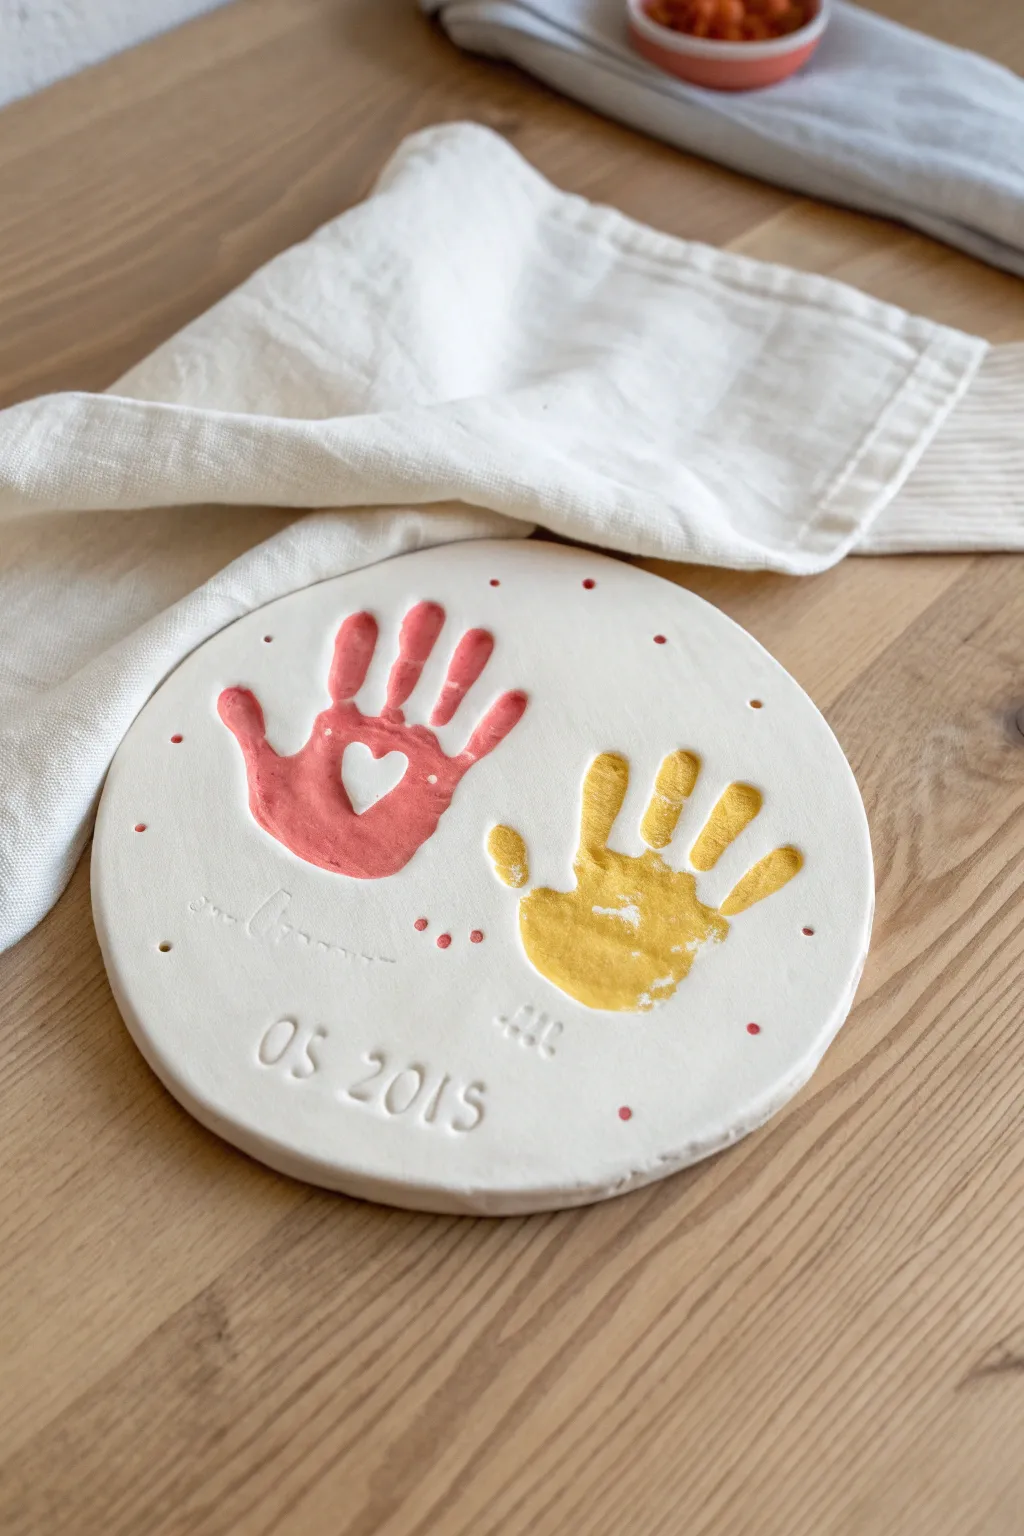
Capture a moment in time with this adorable circular keepsake featuring two colorful handprints side-by-side. The sweet addition of a heart cutout in the center of one palm makes this plaque extra special for gifting or display.
Detailed Instructions
Materials
- Air-dry clay or polymer clay (white)
- Rolling pin
- Parchment paper or canvas mat
- Circular cutter or a bowl (approx. 8-10 inches)
- Small heart-shaped cutter
- Number and letter stamps
- Acrylic paints (coral pink and sunny yellow)
- Fine-tip paintbrush
- Small round tool or toothpick (for dots)
- Sealant or varnish (optional)
- Sandpaper (fine grit)
Step 1: Preparing the Base
-
Roll the Clay:
Begin by kneading your white clay until it is soft and pliable. Roll it out on parchment paper to a uniform thickness of about 1/4 inch to ensure it’s sturdy enough to hold the impressions. -
Cut the Circle:
Place a large bowl or circular template upside down on the clay. Carefully cut around it with a knife or clay tool to create a perfect round disc. Remove the excess clay from the edges. -
Smooth the Edges:
Dip your finger in a little bit of water and run it along the cut edge of the circle. This smooths out any roughness or sharp corners before you start the impressions.
Clean Impressions
If the clay is too sticky, light dust the toddler’s hand with cornstarch before pressing. This ensures the hand releases cleanly without pulling up the clay.
Step 2: Creating Impressions
-
Position the First Hand:
Gently guide your toddler’s hand onto the left side of the plaque. Press firmly on each finger and the palm to get a deep, clear impression. Lift the hand straight up to avoid smudging the edges. -
Add the Cutout Detail:
While the clay is still wet, take your small heart-shaped cutter. Center it inside the palm area of the first handprint and press down to remove the heart shape, revealing the surface beneath or creating a window. -
Position the Second Hand:
Repeat the impression process with the second hand (or a sibling’s hand) on the right side of the plaque, angling it slightly so the fingers fan out pleasingly. -
Stamp the Date:
Using your number stamps, press the date (e.g., month and year) into the clay near the bottom edge. Ensure you apply even pressure so the numbers are legible but not too deep.
Cracking Clay?
Small cracks during drying can be fixed by mixing a tiny bit of fresh clay with water to make a paste. Fill the cracks, smooth it out, and let it dry again.
Step 3: Drying and Finishing
-
Allow to Dry:
Let the plaque dry completely according to your clay’s package instructions. For air-dry clay, turning it over halfway through the drying process helps prevent curling. -
Sand Imperfections:
Once fully hard, inspect the edges and surface. Use fine-grit sandpaper to gently buff away any rough spots or fingerprints left on the white space. -
Paint the Prints:
Dip a medium brush into coral pink acrylic paint. Carefully fill in the impression of the left handprint, getting into the grooves but keeping the top surface clean. I find a stiff brush helps control where the paint goes. -
Paint the Second Print:
Switch to a clean brush and use sunny yellow acrylic paint to fill in the right handprint, using the same careful technique to keep the paint strictly inside the impression. -
Add Decorative Dots:
Dip the end of a paintbrush handle or a dotting tool into the coral pink paint. Gently dab small dots around the outer rim of the plaque for a playful border. -
Seal the Work:
To protect the paint and clay from moisture, apply a thin coat of matte or satin varnish over the entire front surface once the paint is fully dry.
Now you have a timeless and tactile memory of those tiny hands to cherish for years come


Tiny Pinch Pots for Treasures
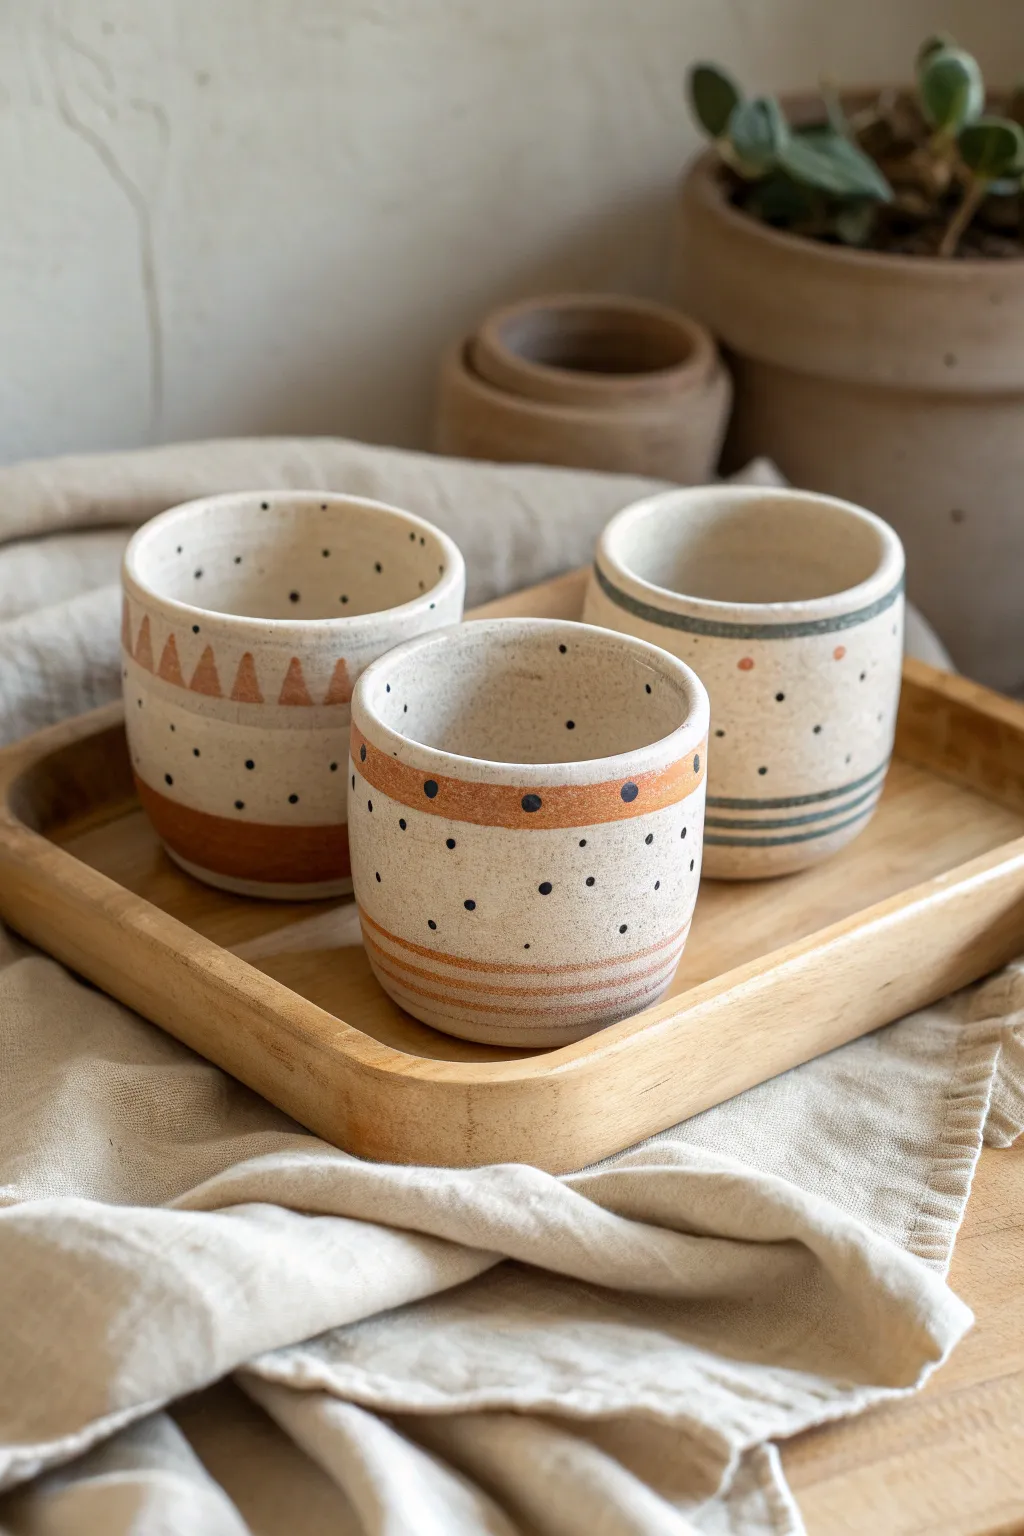
These charming little vessels blend rustic texture with playful geometric designs, creating perfect homes for tiny treasures. Using simple hand-building techniques and a speckled clay body, you can create a set that feels both modern and handmade.
How-To Guide
Materials
- Speckled buff stoneware clay (or air-dry clay with added speckles)
- Small bowl of water
- Pottery sponge
- Rib tool or old credit card
- Underglazes or acrylic paints (Rust, Teal/Sage, Black)
- Fine detail paintbrush
- Clear matte glaze (if firing) or matte varnish sealant
- Wooden sculpting tool or popsicle stick
Step 1: Forming the Pots
-
Prepare the clay:
Start by wedging a baseball-sized amount of clay to remove air bubbles. Divide this easily into three equal balls, rolling them until they are smooth and round in your palms. -
Open the center:
Hold a clay ball in one hand. Press your thumb gently into the center, pushing down until you are about a half-inch from the bottom. Be careful not to push all the way through. -
Pinch the walls:
Using your thumb on the inside and fingers on the outside, gently pinch and rotate the clay. Work your way from the bottom up to thin out the walls evenly. -
Shape the cylinder:
Aim for a straight-sided cylinder shape rather than a wide bowl. Gently tap the base on your table to flatten it so the pot stands stable. -
Smooth the surfaces:
Dip your sponge lightly in water and run it over the rim and walls to smooth out cracks or fingerprints. I find that smoothing the rim now saves a lot of sanding time later. -
Refine the walls:
Use a rib tool or an old credit card to gently scrape the exterior walls while rotating the pot. This removes the lumpy finger marks and creates a canvas-like surface for painting.
Clean Lines Hack
For super straight painted bands, wrap a rubber band around the pot as a guide. Paint along the edge, let dry, and remove the band.
Step 2: Designing the Patterns
-
Let it firm up:
Allow the pots to dry to a ‘leather hard’ state. They should be firm strictly to the touch but still cold and slightly pliable. -
Band the rust pot:
For the first pot, paint a thick band of rust-colored underglaze around the middle section. Add thin stripes near the bottom using the same color. -
Add dots to the rust pot:
Once the band is dry to the touch, use the tip of a small brush or a toothpick to dab small black dots over the rust band and scattered across the bare clay areas. -
Detail the teal pot:
For the second pot, paint thin, horizontal teal rings around the base and one near the rim. Keep your hand steady by bracing your pinky finger against the table. -
Add floating dots:
On the teal-striped pot, add small black speckles in the open space between the lines. Mix in a few larger rust-colored dots for variety. -
Create the triangle pot:
On the third pot, paint a repeating row of small rust-colored triangles around the middle. Fill them in solid for a bold look. -
Finish the triangle design:
Paint a thick solid band of rust at the very bottom of this pot. Add tiny black dots specifically between the triangle peaks to tie the set together.
Make it a Planter
Poke a clumsy hole in the bottom with a straw before drying. Now your treasure pot is a functional mini-planter for succulents.
Step 3: Finishing Touches
-
Drying completely:
Let the pots dry slowly over 24-48 hours. Cover them loosely with plastic if the air in your room is very dry to prevent warping. -
Firing or sealing:
If using kiln-fire clay, bisque fire now. If using air-dry clay, ensure it is bone dry before sealing. -
Glazing:
Apply a clear matte glaze to the interior and exterior to make the colors pop while keeping that natural stone look. Avoid glossy glazes to maintain the earthy aesthetic. -
Final cure:
Fire the glaze according to your clay’s instructions, or apply your acrylic varnish if working with air-dry materials.
Group your finished trio together on a shelf or tray to show off their coordinating patterns


Animal Pinch Pots
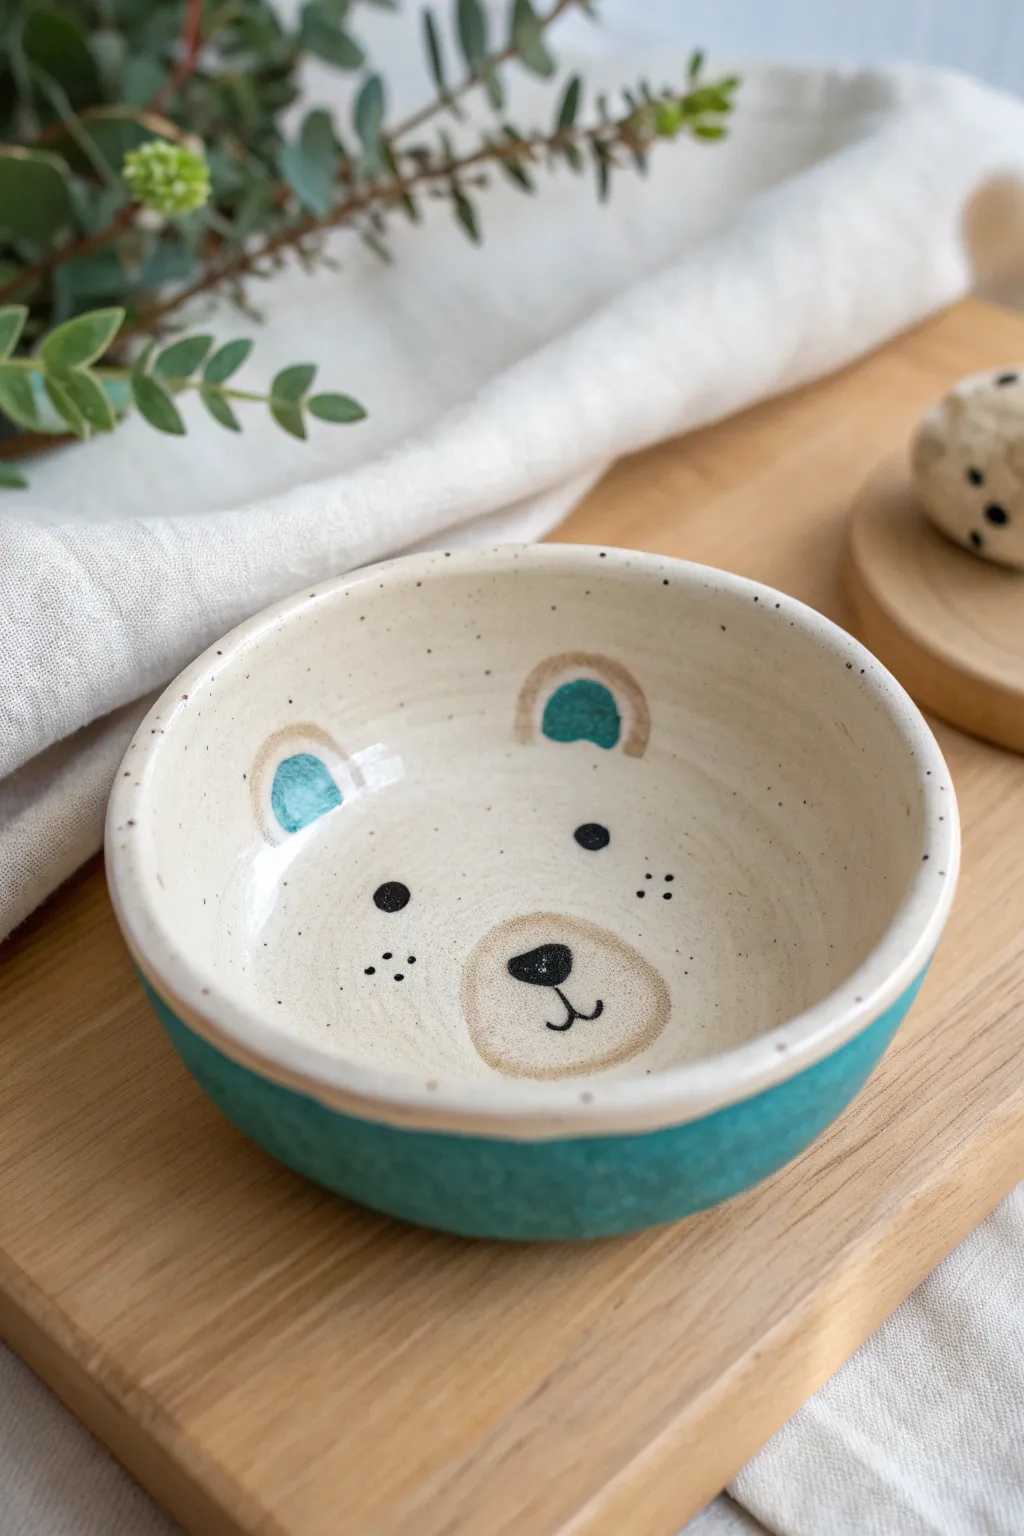
This adorable bear-themed bowl combines the simplicity of a pinch pot with charming hand-painted details. With its speckled cream interior and vibrant teal base, it makes for a delightful keepsake or a functional snack dish.
Detailed Instructions
Materials
- White stoneware clay with speckles (or standard white clay)
- Pottery tools (sponge, needle tool, rib)
- Underglazes: Black, Beige/Tan, Teal
- Clear food-safe glaze
- Teal dipping glaze or brush-on glaze
- Small detail brushes
- Kiln access
Step 1: Forming the Base
-
wedge the clay:
Start with a ball of clay roughly the size of a tennis ball. Wedge it thoroughly to remove air bubbles and ensure an even consistency. -
Create the pinch pot:
Push your thumb into the center of the ball, stopping about a half-inch from the bottom. Gently pinch and turn the clay between your thumb and fingers to open up the bowl shape. -
Even out the walls:
Work your way around the bowl, aiming for a consistent wall thickness of about 1/4 inch. Keep the rim slightly thick and rounded for durability. -
Smooth the surface:
Use a damp sponge or a rubber rib tool to smooth out any fingerprints or cracks on both the inside and outside of the bowl. -
Dry to leather hard:
Set the bowl aside until it reaches the leather-hard stage, where it’s firm but still cool to the touch.
Wobbly Bowl?
If the bowl rocks on the table, gently tap the bottom against a flat surface while the clay is still soft to create a stable, flat foot.
Step 2: Decorating the Face
-
Clean the surface:
Wipe the interior gently with a slightly damp sponge to remove any dust before painting. -
Outline the ears:
Using a small brush and beige underglaze, paint two small arches just below the inner rim to define the outer ears. -
Fill the inner ears:
Paint smaller, solid teal semi-circles inside the beige arches to create the inner ear details. -
Paint the muzzle:
Create a soft oval shape near the bottom center of the bowl using the beige underglaze. This will be the bear’s snout. -
Add the nose:
With black underglaze and a fine-point brush, paint an upside-down triangle inside the beige snout area. -
Draw the mouth:
Paint a small vertical line down from the nose, connecting to a shallow ‘w’ shape for the smiling mouth. -
Add eyes and freckles:
Dot two solid black circles for eyes midway up the bowl. Add three tiny dots on each cheek area for whiskers or freckles. -
First firing:
Allow the underglaze to dry completely, then bisque fire the piece in a kiln according to your clay’s specifications.
Step 3: Glazing and Finishing
-
Wax resist application:
Apply wax resist over your painted bear face and the entire interior if you want to keep the raw clay look, or prepare to cover it with clear glaze. -
Glaze the interior:
Pour a food-safe clear glaze (or a semi-transparent speckled white) into the bowl, swirl it to coat the inside, and pour out the excess. -
Clean the rim:
Wipe any interior glaze drips off the very top rim so the exterior transition remains clean. -
Glaze the exterior:
Dip the bottom half of the bowl into a teal glaze. I tend to hold it at a slight angle to get a nice organic line, but a straight dip works too. -
Check the foot:
Ensure the very bottom of the bowl is free of glaze so it doesn’t stick to the kiln shelf. Wipe it with a sponge if necessary. -
Final firing:
Load the bowl into the kiln for the final glaze firing. Once cool, your bear bowl is ready for use.
Add 3D Ears
Instead of painting ears, score and slip two small balls of clay onto the rim before drying to create pop-up 3D ears.
Now your little one has a friendly bear face greeting them at snack time


Ladybug Thumbprint Stones
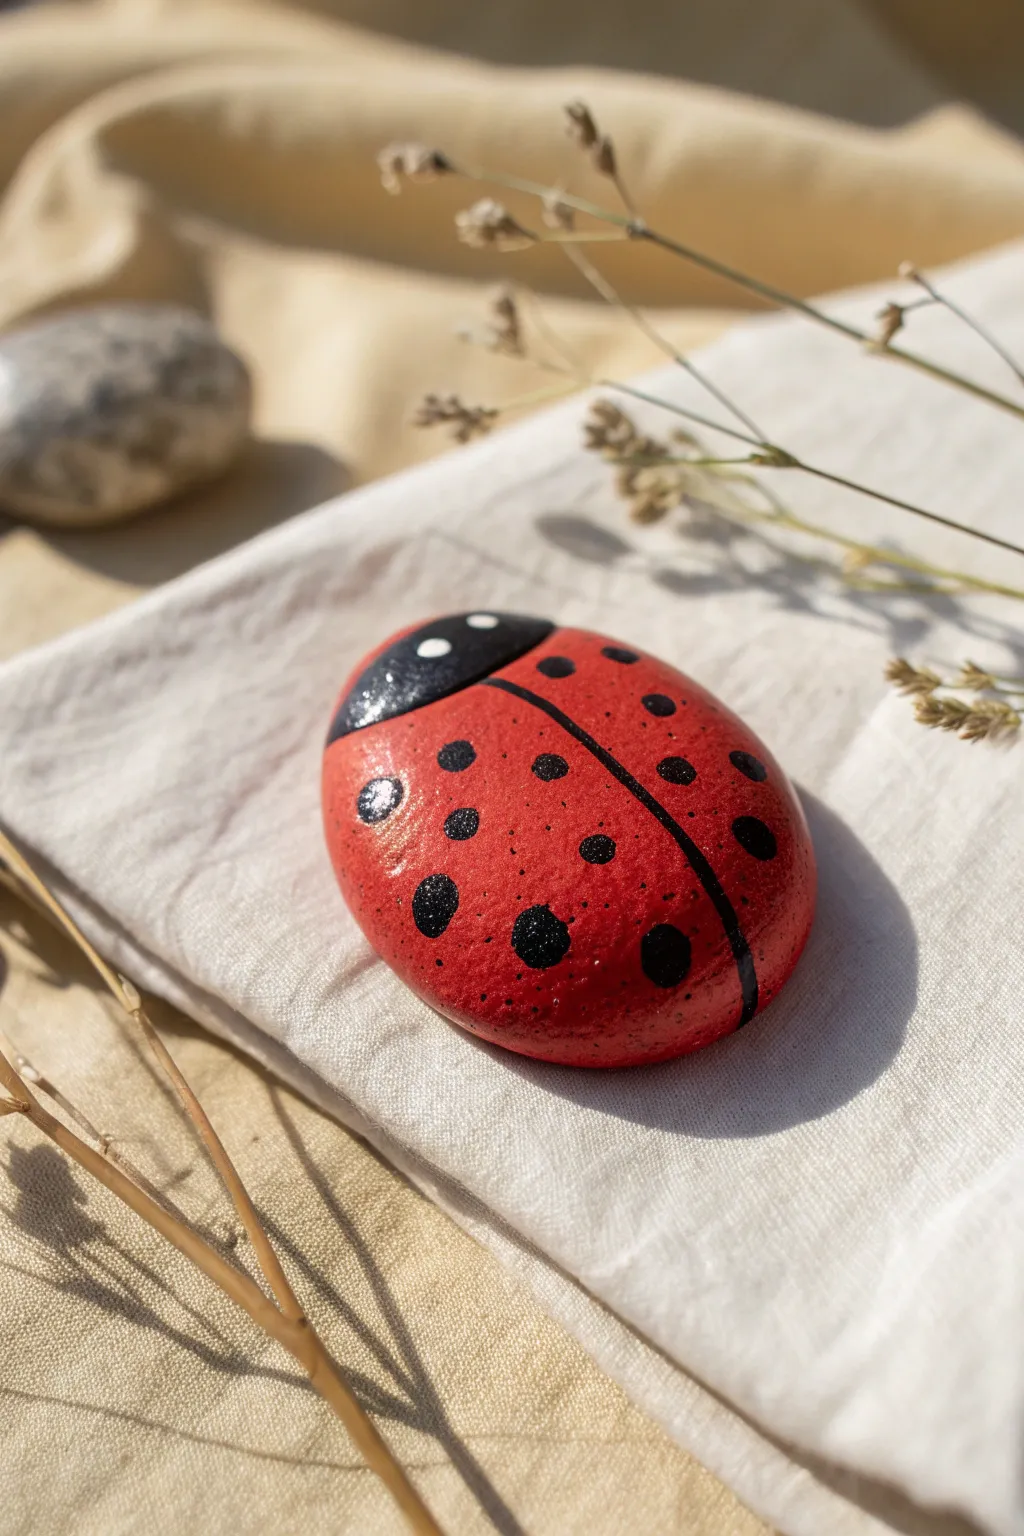
Transform a simple garden stone into a charming, vibrant ladybug that fits right in your pocket. This glossy, tactile craft is perfect for little hands to hold and makes for a delightful garden decoration or paperweight.
Step-by-Step Tutorial
Materials
- Smooth, oval-shaped river rock or stone
- Red acrylic paint (bright cherry red)
- Black acrylic paint
- White acrylic paint
- Medium flat paintbrush
- Fine detail paintbrush or toothpick
- Dotting tool or pencil eraser
- Clear high-gloss varnish or sealant
- Water cup and paper towels
Step 1: Preparing the Base
-
Selection and cleaning:
Start by finding a stone that is relatively flat and oval-shaped, mimicking the natural body of a ladybug. Wash the stone thoroughly with soap and water to remove any dirt or oily residue, then let it dry completely. -
Base coat application:
Using your medium flat brush, apply a generous coat of bright red acrylic paint over the entire top surface of the stone. Don’t worry about the bottom just yet. -
Second coat for opacity:
Allow the first layer to dry until it’s no longer tacky. Apply a second coat of red if the rock’s natural color is still showing through, ensuring a rich, solid background. -
Define the head:
Once the red base is fully dry, visualize where the ladybug’s head should be. Paint a semi-circle or crescent shape in black on one end of the stone, covering about a quarter of the red surface.
Stone Selection Tip
Does your rock have bumps? Use them! A bump on the surface can naturally become the ladybug’s head or a raised wing section for a 3D effect.
Step 2: Adding Details
-
Draw the dividing line:
Take your fine detail brush loaded with black paint. Carefully paint a single line starting from the center of the black head section down to the opposite end of the stone to create the wing separation. -
Create the spots:
Dip a dotting tool, the handle end of a paintbrush, or even a Q-tip into black paint. Press gently onto the red wings to create round polka dots. -
Vary spot sizes:
I like to vary the pressure or use different sized tools here to make some dots larger and some smaller for a more organic look. Aim for symmetry, but it doesn’t have to be perfect. -
Paint the eyes:
Clean your dotting tool or use a fresh toothpick. Dip it into white paint and place two distinct dots on the black head section for the eyes. -
Add tiny glints:
If you want extra detail, wait for black dots to dry and add a microscopic speck of white to them for a ‘shiny’ effect, though this is optional.
Uneven Dots?
If your painted dots look messy or smeared, wait for them to dry fully, then paint over the mistake with red and try again. Acrylic is forgiving!
Step 3: Finishing Touches
-
Full drying time:
Set the stone aside in a safe place. It is crucial to let all the paint layers dry completely before moving to the next step to prevent smearing. -
Varnishing:
Apply a coat of clear high-gloss varnish or sealant over the entire painted surface. This gives the ladybug that wet, beetle-shell shine seen in the photo. -
Final cure:
Let the varnish cure according to the bottle instructions. Once hard, your stone is ready for handling.
Enjoy hiding your shiny new friend in a flower pot or using it as a colorful paperweight

The Complete Guide to Pottery Troubleshooting
Uncover the most common ceramic mistakes—from cracking clay to failed glazes—and learn how to fix them fast.
Texture Tiles with Simple Stamps
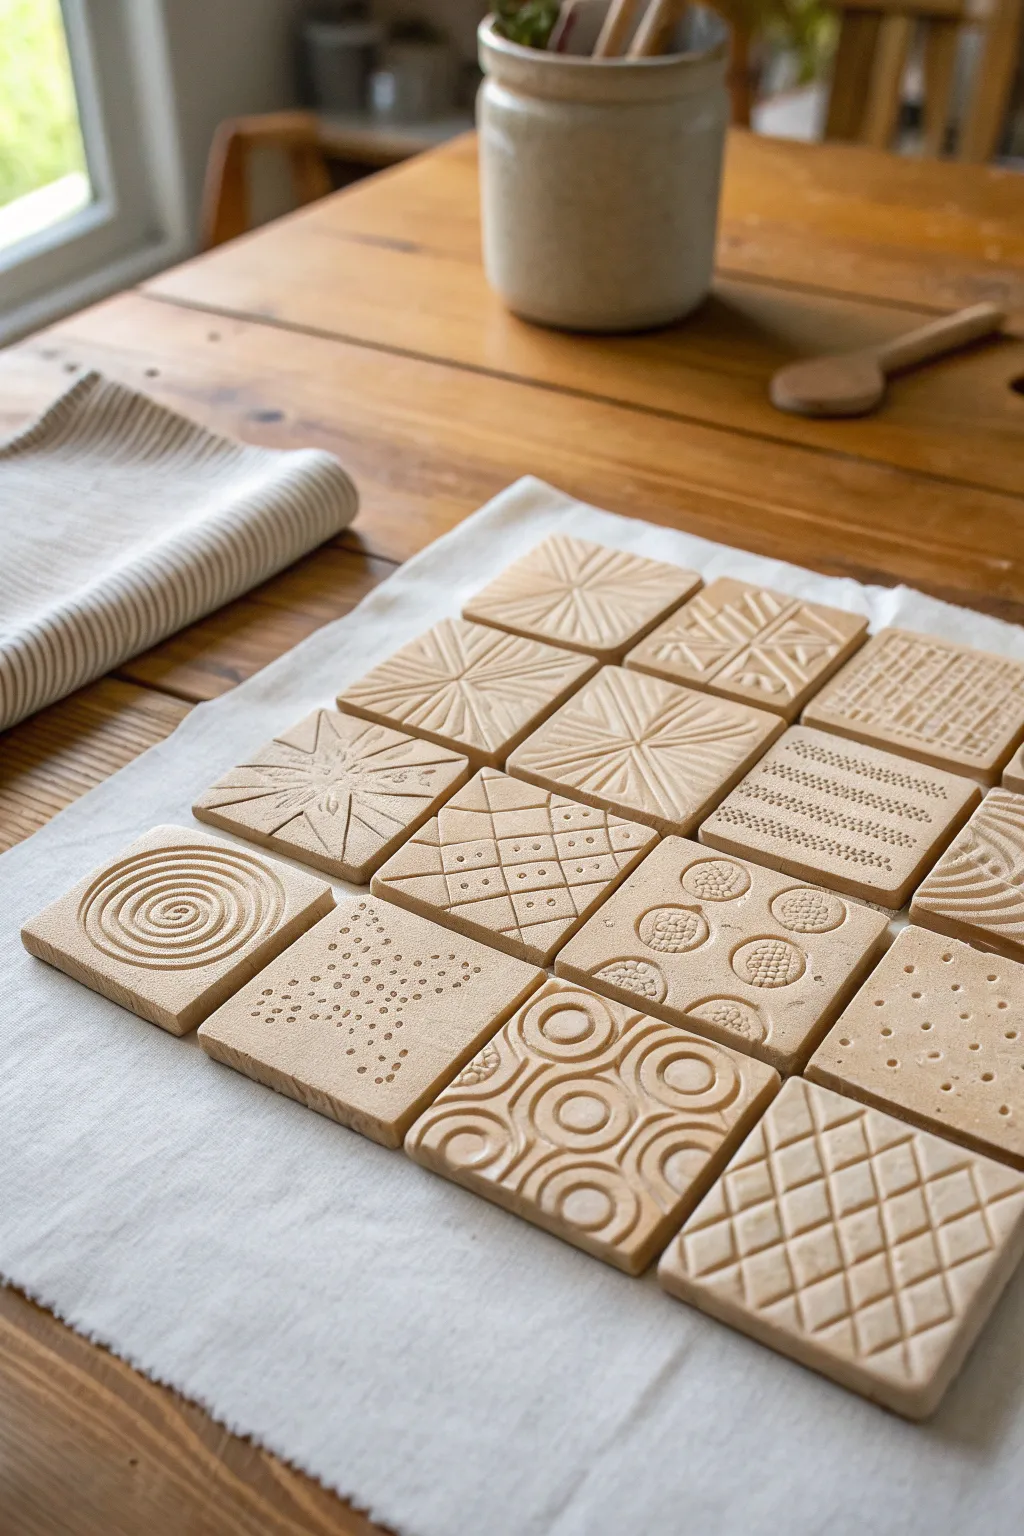
These charming clay squares act as a permanent library of textures, perfect for little hands to explore. By using simple household objects as stamps, you can create a beautiful grid of patterns that serve as both a sensory toy and a minimalist display piece.
How-To Guide
Materials
- White or beige air-dry clay (or polymer clay)
- Rolling pin
- Square cookie cutter (approx. 2-3 inches)
- Clean, smooth work surface
- Cotton canvas or cloth (for drying)
- Wooden skewer or toothpick
- Fork
- Drinking straw
- Bottle caps
- Toy car wheels
- Textured fabric scraps
- Buttons
- Sandpaper (fine grit)
Step 1: Preparation and Cutting
-
Prepare your surface:
Set up a clean, flat workspace. Lay down a piece of canvas or a silicone mat to prevent the clay from sticking to your table. If working with toddlers, tape the edges of the mat down so it doesn’t slide. -
Roll out the slab:
Take a large chunk of air-dry clay and knead it briefly to make it pliable. Roll it out into a large, even slab. You are aiming for a thickness of about 1/4 inch—too thin and they might crack, too thick and they take forever to dry. -
Cut the squares:
Using your square cookie cutter, press firmly into the clay slab to cut out as many tiles as you can fit. I find it helpful to wiggle the cutter slightly before lifting to ensure clean edges. -
Remove excess clay:
Peel away the scrap clay from between the squares first, leaving the squares undisturbed on the mat. This prevents them from warping when you try to move them. -
Smooth the edges:
Dip your clean fingertip in a tiny bit of water and gently run it along the cut edges of each square to remove any sharpness or burrs.
Step 2: Stamping and Texturing
-
Create the spiral tile:
For the spiral design shown in the image, take a blunt tool or the back of a skewer. Start in the center and gently drag the tool in a widening circle, pressing deep enough to leave a groove but not cut through. -
Make sunrays:
To mimic the sunburst patterns, press the side of a toothpick or skewer into the clay, radiating outward from a central point. Vary the pressure to create depth. -
Try grid patterns:
Use the edge of a credit card or a ruler to press straight lines horizontally, then vertically, creating a checkerboard grid. For the diamond grid shown in the photo, simply press the lines diagonally. -
Use circular stamps:
Press bottle caps, marker lids, or the end of a straw into the clay to create perfect circles and rings. Overlap them slightly for the geometric circle design. -
Dotting technique:
For the stippled texture, take a blunt pencil point or skewer and poke small holes repeatedly. You can arrange these in shapes, like the star pattern, or fill a whole section. -
Household object hunt:
Look for interesting textures around the house perfectly suited for this step. The intricate floral-looking circles in the image can be made by pressing large, textured buttons into the soft clay. -
Linear textures:
To recreate the striped tiles with dotted lines, press a fork handle or a comb into the clay surface. Alternate using the tines of the fork for rows of tiny holes.
Keep it Flat
To prevent curling while drying, place a piece of parchment paper over the drying tiles and rest a lightweight book on top once they are semi-dry.
Step 3: Drying and Finishing
-
Transfer to drying area:
Carefully lift the textured tiles with a spatula and place them on a clean, dry cloth or a wire rack. The cloth helps wick moisture from the bottom. -
Initial drying:
Let the tiles sit undisturbed for 24 hours. Keep them away from direct heat sources like radiators, as uneven drying causes curling. -
Flip the tiles:
After the first day, gently flip each tile over. This ensures the bottom dries as evenly as the top. -
Check for dryness:
Wait another 24 to 48 hours. The clay should turn a lighter color and feel hard and room temperature to the touch, not cool or damp. -
Sand the edges:
Once fully dry, use a fine-grit sandpaper to give the edges a final polish. This is especially important for sensory play to ensure there are no sharp bits. -
Seal (Optional):
If these will be handled often by sticky toddler fingers, apply a matte spray varnish or a coat of diluted PVA glue to protect the surface.
Make it a Game
Create matching pairs of each texture. Once dry, place them inside a fabric bag and have your toddler try to find the matching pair by feel alone.
Once dry, these tactile squares are ready for endless sensory exploration or display in a modern nursery
Leaf and Flower Fossil Prints
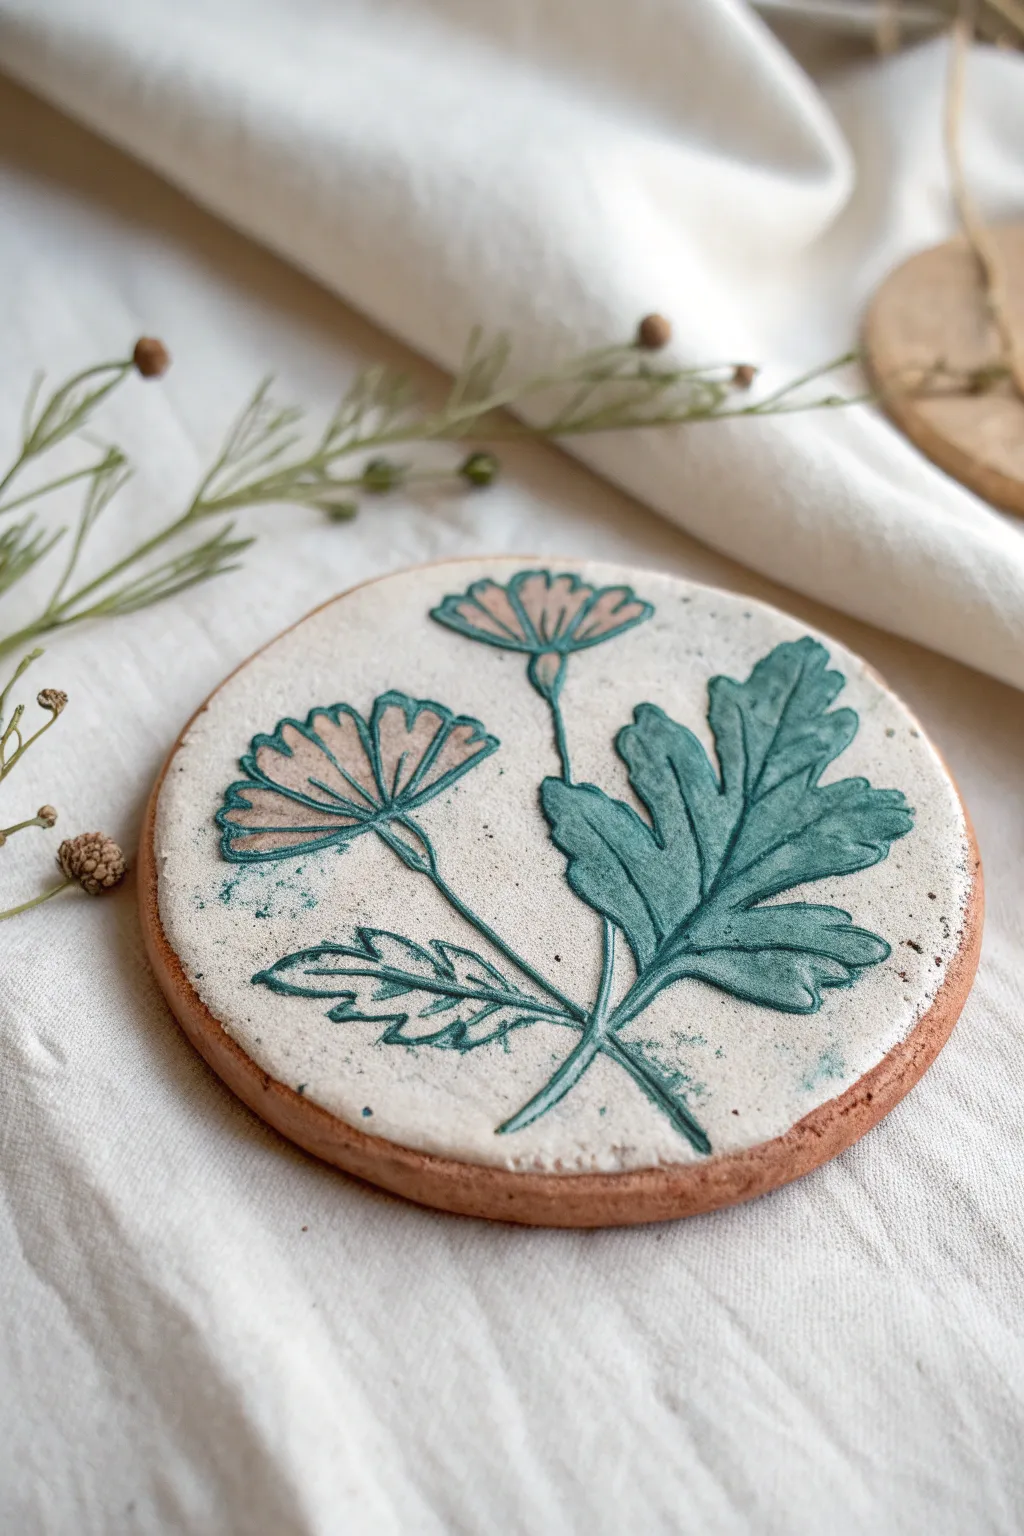
This project combines the tactile joy of clay with the satisfying technique of sgraffito to create a beautiful botanical relief. The result is a lovely two-tone coaster or wall hanging featuring raised green leaves and delicate etched flowers against a creamy white background.
Step-by-Step
Materials
- Red earthenware or terracotta air-dry clay
- Cream or white acrylic paint (matte finish)
- Small rolling pin
- Round cookie cutter (approx. 4-5 inches) or a bowl to trace
- Carving tools (needle tool, small loop tool, or a toothpick)
- Fine-grit sandpaper
- Dark green acrylic paint
- Soft round paintbrush
- Small piece of sponge
- Clear matte varnish (optional)
Step 1: Base Preparation
-
Condition the Clay:
Start by taking a handful of red earthenware air-dry clay. Knead it in your hands until it is warm, pliable, and free of cracks. -
Roll the Slab:
Using a small rolling pin, roll the clay out into an even slab. You want it to be roughly 1/4 inch thick—sturdy enough to handle but not too chunky. -
Cut the Circle:
Press your round cookie cutter firmly into the slab to cut out a perfect circle. If you don’t have a cutter large enough, place a bowl upside down and trace around it with a needle tool. -
Smooth the Edges:
Dip your finger in a tiny bit of water and run it along the cut edge of the circle. This smooths out any harsh lines or crumbs left by the cutter.
Paint Peeling?
If the white paint peels off in rubbery strips when carving, the paint layer is too thick or not fully dry. Apply thinner coats and wait longer before scratching.
Step 2: Creating the Surface
-
Initial Drying:
Let the clay disc dry until it is leather-hard. This means it is stiff enough to hold its shape perfectly but still cool to the touch and slightly damp. -
Apply the Base Coat:
Paint the top surface of the disc with the cream or white acrylic paint. You want a relatively thick, opaque layer that covers the red clay completely. -
Let the Paint Set:
Allow the paint to dry completely. Since we will be painting over it again, I like to ensure this base layer is rock solid so colors don’t muddy. -
Sketch the Design:
Lightly sketch your botanical design directly onto the white paint with a pencil. Draw two taller flower stems on the left and a large, multi-lobed leaf on the right.
Step 3: Carving & Painting
-
Paint the Leaf:
Using the dark green acrylic paint and a small brush, carefully fill in the large leaf shape and the main stems. Don’t worry about the internal veins yet. -
Paint the Flower Details:
Add subtle touches of green to the base of the flower heads and the stems leading up to them. Leave the petals unpainted for now. -
Carve the Outlines:
Once the green paint is dry, take your needle tool or a sharp toothpick. Firmly scratch through the paint layers to reveal the raw clay underneath. Outline the entire green leaf and the flower petals. -
Scrape the Petals:
For the flower petals, use a slightly wider tool or the side of your needle tool to scrape away the white paint inside the petal shapes. You want the raw reddish clay to show through as the petal color. -
Add Veins:
Carve deep lines into the green painted leaf to create the veins. Scratching through the green paint to reveal the white or clay layer underneath adds wonderful dimension. -
Refine the Edges:
Go back over your outlines to ensure they are crisp. The contrast between the carved ‘trench’ and the raised painted areas is what makes this fossil style pop.
Hang It Up
Poke a small hole near the top edge with a straw while the clay is still wet to turn this coaster into a beautiful wall ornament or gift tag.
Step 4: Finishing Touches
-
Distress the Background:
To give it an aged look, take a slightly damp sponge with a tiny dot of green or darker beige paint. Lightly dab and smudge it around the empty white spaces to create a speckled, weathered texture. -
Final Dry:
Let the entire piece dry completely. For air-dry clay, this usually takes 24-48 hours depending on humidity. -
Seal (Optional):
If you plan to use this as a coaster, apply a coat of clear matte varnish to protect the paint and clay from moisture.
Now you have a stunning botanical relief that looks like a vintage ceramic find.


What Really Happens Inside the Kiln
Learn how time and temperature work together inside the kiln to transform clay into durable ceramic.
Cookie-Cutter Shape Garland
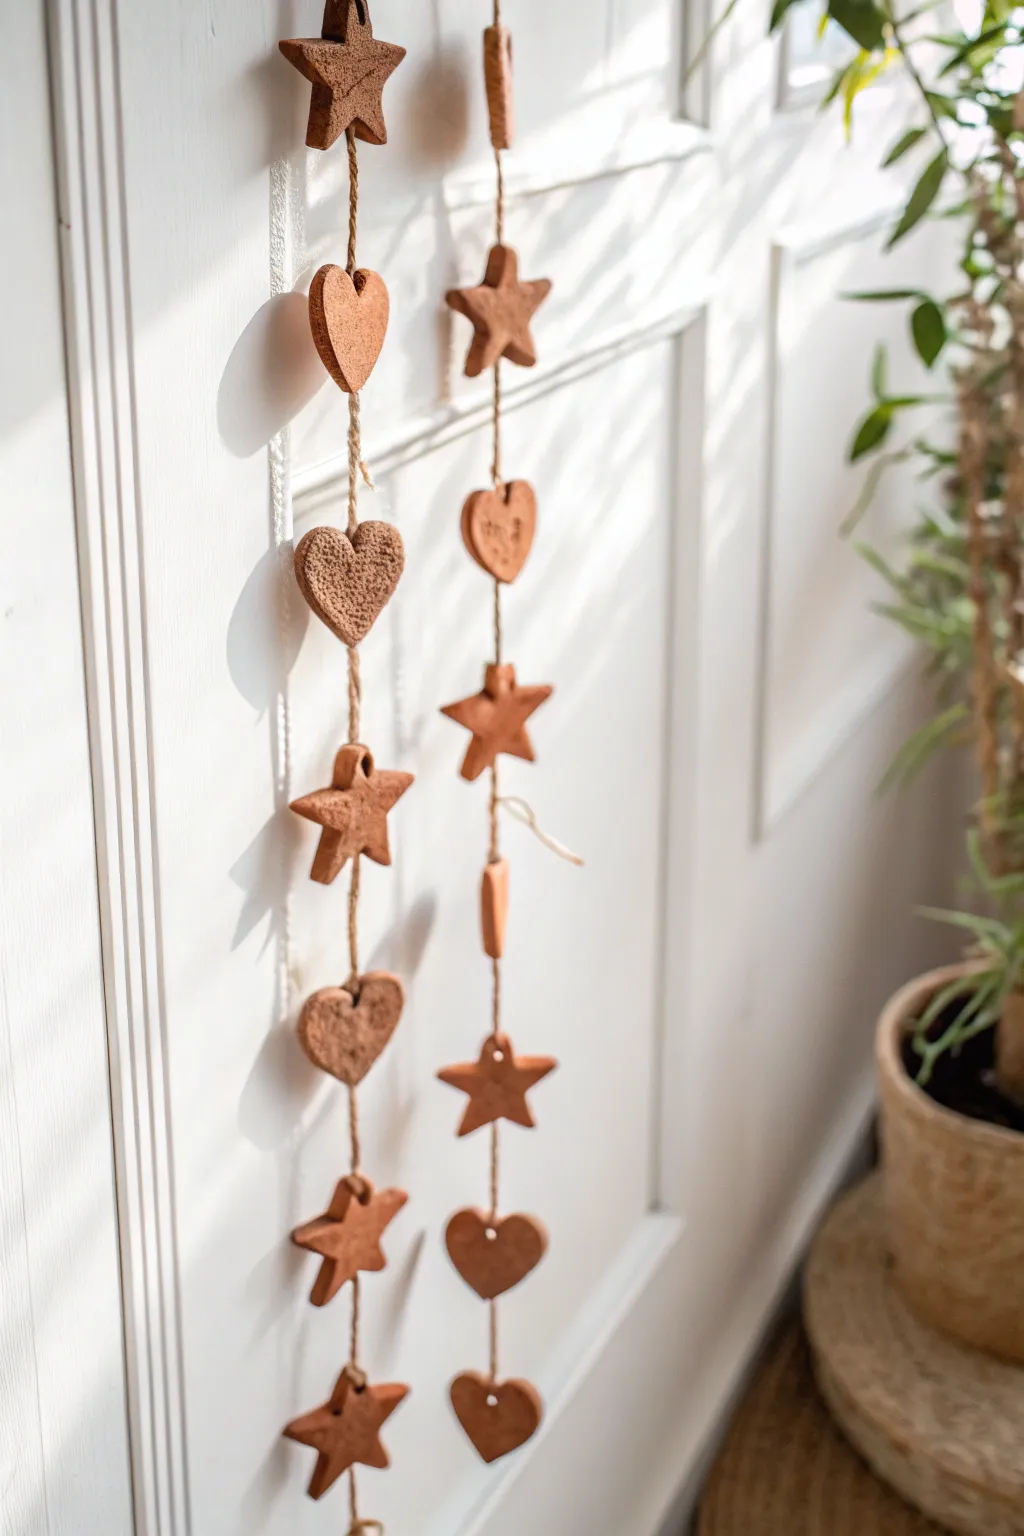
Create a warm, natural decoration by crafting these simple hanging garlands made from textured clay shapes. Alternating between stars and hearts in earthy terracotta tones, this project adds a beautiful handmade touch to any door, mantle, or window.
Step-by-Step Tutorial
Materials
- Air-dry clay (terracotta color)
- Heart and star cookie cutters (small to medium)
- Small straw or bamboo skewer
- Jute twine or hemp string
- Rolling pin
- Parchment paper or canvas mat
- Sandpaper (fine grit)
- Textured object (optional, like a rough sponge or coarse fabric)
- Scissors
Step 1: Shaping the Clay Ornaments
-
Prepare the workspace:
Lay down parchment paper or a canvas mat to prevent sticking and provide an easy cleanup surface for the toddlers. -
Roll out the clay:
Take a generous handful of terracotta air-dry clay and knead it until soft. Use the rolling pin to flatten it into an even sheet, approximately 1/4 inch thick. Aim for a consistent thickness so pieces dry at the same rate. -
Add texture (optional):
If you want the rugged finish seen in the heart shapes, gently press a coarse sponge or a piece of rough fabric onto the clay surface before cutting. Lightly rolling over it once ensures the texture imprints well. -
Cut out shapes:
Use your cookie cutters to punch out an equal number of hearts and stars. You will want about 6-8 shapes per garland strand. -
Create holes for hanging:
While the clay is still wet, carefully poke a hole through the top center of each shape using a straw or skewer. Ensure the hole is wide enough for your twine to pass through later. I find twisting the straw as I pull it out helps keep the hole clean. -
Smooth the edges:
Dip your finger in a tiny bit of water and gently run it along the cut edges of the shapes to soften any sharp ridges or loose clay burrs.
Step 2: Drying and Finishing
-
Let them dry:
Place the shapes flat on a clean sheet of parchment paper. Allow them to air dry for 24-48 hours. Turn them over halfway through the process to ensure the backs dry evenly and prevent curling. -
Light sanding:
Once fully hardened, inspect the edges. If there are any rough spots, use fine-grit sandpaper to briefly smooth them down. -
Measure the twine:
Cut a length of jute twine roughly 3 to 4 feet long, depending on how tall you want your final garland to be. -
Create the top loop:
Tie a secure loop at the very top of your twine to serve as the hanger.
Clean Hole Tip
If using a straw to punch holes, blow through the straw periodically to clear out the little clay plugs so it doesn’t get clogged.
Step 3: Assembling the Garland
-
Thread the first shape:
Thread your twine through the hole of your first shape (starting from the top). Slide it up to your desired starting height, leaving a few inches of twine below the top loop. -
Secure the shape:
Tie a simple overhand knot directly underneath the shape’s hole. This knot will act as a ‘stopper’ so the shape rests on it and doesn’t slide down. -
Space out the next piece:
Measure about 3-4 inches down the twine from your first shape. Tie a pre-emptive knot at this spot. -
Thread and rest:
Thread the second shape onto the twine and let it slide down until it rests on the knot you just created. -
Repeat the pattern:
Continue this pattern—tie a knot, thread a shape, let it rest—alternating between hearts and stars until you reach the bottom of your string. -
Finish the end:
After the final shape is in place, tie a double knot at the very bottom end of the twine and trim off any excess string.
Scented Clay
Mix cinnamon or clove powder into the clay before rolling. The garland will smell amazing and have a fun speckled look.
Hang your earthy garland in a sunny window or against a white door to let those clay textures really stand out
Alphabet Press Letter Tiles

These charming, tactile letter tiles are perfect for helping little ones learn their ABCs while exploring textures and colors. Crafted from earthy, muted tones of clay, they feature clean, impressed letters that are both visually striking and fun to touch.
Step-by-Step Guide
Materials
- Air-dry clay (in white, terracotta, and soft orange tones)
- Acrylic rolling pin
- Square cookie cutter (approx. 3-4 inches with rounded corners)
- Letter stamps or wooden block letters (large, sans-serif font)
- Fine-grit sandpaper (optional)
- Small bowl of water
- Parchment paper or canvas work mat
- Black acrylic paint
- Fine detail paintbrush
- Damp sponge or cloth
- Matte spray sealant (non-toxic)
Step 1: Shaping the Base
-
Prepare your workspace:
Lay down parchment paper or a canvas mat to prevent sticking. This ensures you can easily lift your tiles later without warping them. -
Condition the clay:
Take a handful of your first clay color (like the speckled cream or terracotta). Knead it well in your hands until it becomes warm, soft, and pliable, which helps prevent cracks later. -
Roll out the slab:
Using the acrylic rolling pin, roll the clay out into an even slab. Aim for a generous thickness, about 1/4 to 1/2 inch, to give the tiles a substantial, durable feel. -
Cut the shape:
Press your square cookie cutter firmly into the clay. Give it a tiny wiggle to ensure a clean cut, then lift the cutter away. -
Refine the edges:
Dip your finger in a little water and gently run it along the cut edges of the square. This smooths out any sharpness and creates that lovely soft, rounded look seen in the photo. -
Repeat for other colors:
Do this process again with your different clay colors so you have a variety of bases for your alphabet set.
Cracked Clay Fix
If you see hairline cracks while drying, make a ‘slurry’ paste of clay and water. Rub it into the cracks with your finger, smooth it out, and let it dry again.
Step 2: Impressing and Drying
-
Position the stamp:
Center your letter stamp or wooden block over the clay square. Take a moment to eye-ball the alignment carefully so it sits right in the middle. -
Make the impression:
Press the stamp straight down with firm, even pressure. You want a deep impression, but be careful not to push all the way through the tile. -
Remove the stamp:
Lift the stamp straight up. If the edges of the letter look a bit jagged, you can gently tap them smooth with a damp fingertip or a soft brush. -
Initial drying:
Place your tiles on a flat surface to air dry. I like to flip them over gently after the first few hours so the bottom gets air exposure too. -
Review and refine:
Once fully dry (usually 24-48 hours), check for any rough spots. A quick pass with fine-grit sandpaper can smooth out the corners if needed.
Sharper Lettering
Dust your letter stamp lightly with cornstarch before pressing it into the clay. This prevents sticking and ensures the stamp lifts away cleanly.
Step 3: Defining the Letters
-
Fill the impression:
Dip a fine detail brush into black acrylic paint. Carefully paint inside the recessed letter, ensuring you get into all the corners. -
Don’t worry about messy edges:
It’s okay if you get a little paint on the surface around the letter—we will clean that up in the next step. -
Wipe away excess:
While the paint is still slightly tacky but not wet, take a barely damp sponge or cloth and lightly swipe across the top surface of the tile. -
Reveal the clean lines:
This wiping action removes any surface paint, leaving the black pigment only deep inside the letter grooves for a crisp, high-contrast look. -
Final seal:
Once the paint is totally dry, finish with a light coat of matte spray sealant to protect the surface from toddler hands and moisture.
Now you have a beautiful set of custom learning tiles ready for play

TRACK YOUR CERAMIC JOURNEY
Capture glaze tests, firing details, and creative progress—all in one simple printable. Make your projects easier to repeat and improve.
Number Dot Counting Pebbles
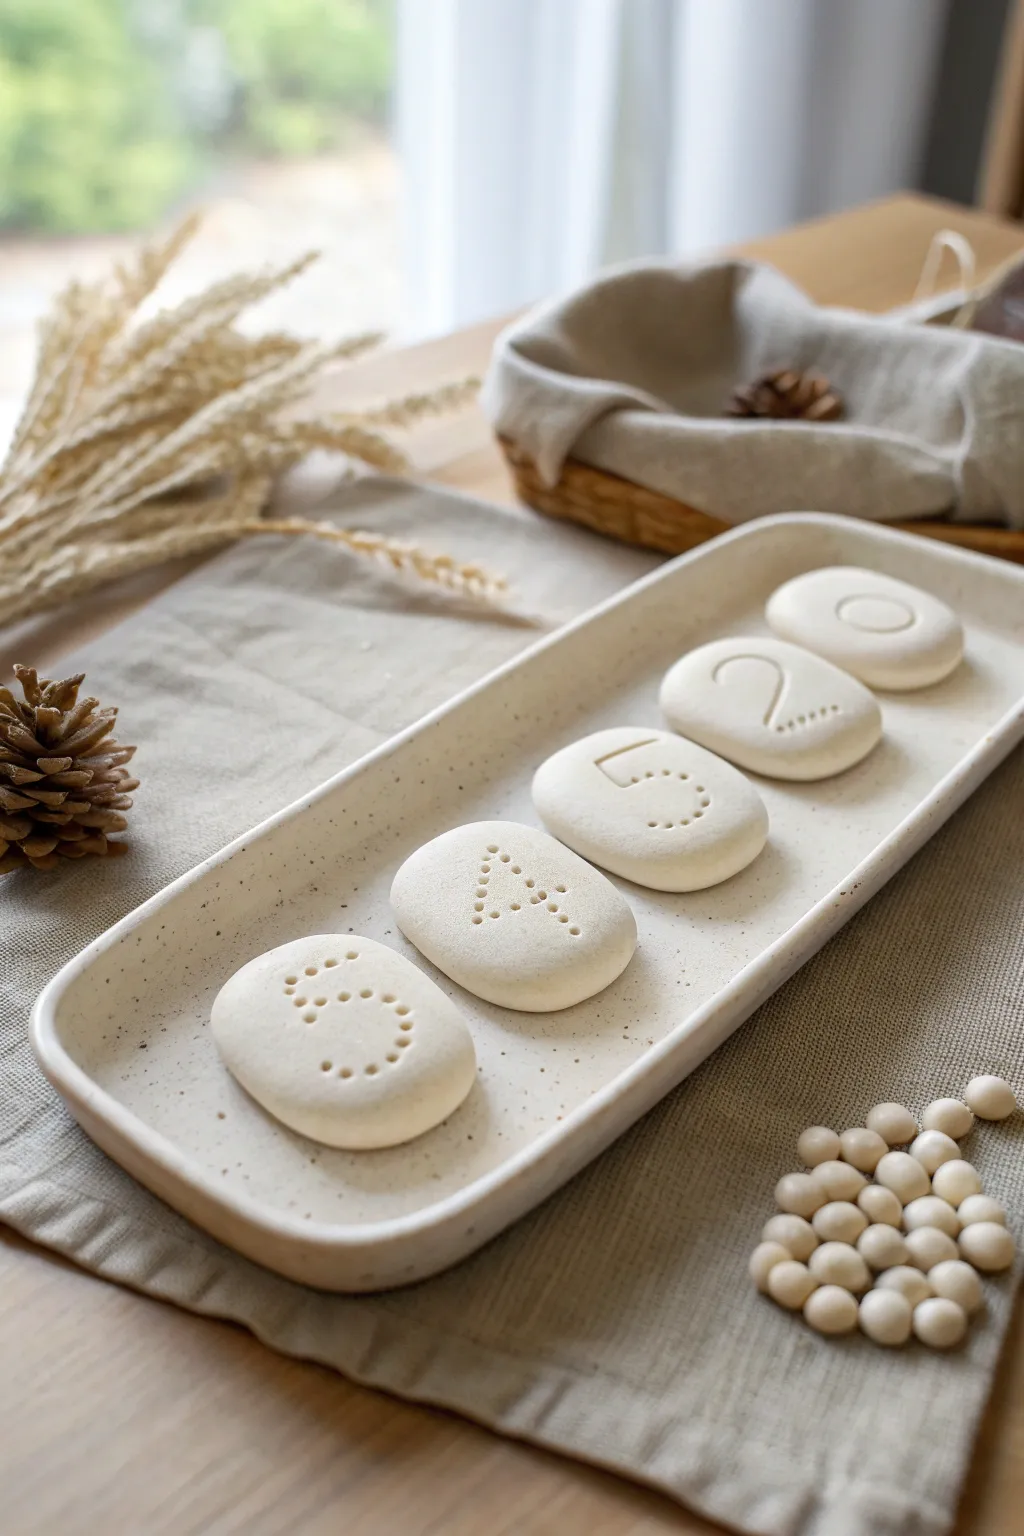
These soothing number stones combine visual learning with sensory play, featuring impressed digits and matching dot counts. Their smooth, organic finish and soft off-white color make them a beautiful natural addition to any Montessori-style shelf.
How-To Guide
Materials
- white air-dry clay (or polymer clay)
- smooth rolling pin
- parchment paper or craft mat
- small wooden skewer or dotting tool
- fine grit sandpaper
- bowl of water (for smoothing)
- clear matte varnish (optional)
Step 1: Preparation & Forming
-
Portion the Clay:
Begin by slicing your block of air-dry clay into five equal portions. You want each finished stone to be roughly palm-sized for a toddler. -
Knead and Condition:
Take the first portion and knead it thoroughly in your hands until it warms up and becomes pliable. This prevents cracks later on. -
Roll a Sphere:
Roll the conditioned clay between your palms to form a tight, smooth ball. Try to eliminate any fold lines during this rolling process. -
Flatten the Shape:
Place the ball on your parchment paper and gently press straight down with your palm. Aim for a distinct oval shape rather than a perfect circle. -
Smooth the Edges:
Dip your finger lightly into the bowl of water and run it along the perimeter of the oval. Rub away any tiny hairline cracks until the edge is perfectly seamless. -
Repeat for All Stones:
Repeat this process for the remaining four portions of clay, ensuring all five stones are roughly uniform in thickness.
Cracks Appearing?
If you see tiny cracks while drying, mix a small amount of fresh clay with water to make a paste (slip). Rub this into the cracks and smooth over with a finger.
Step 2: Creating the Numbers
-
Outline the Digit:
Using the blunt end of a skewer or a modeling tool, very lightly sketch the outline of the number (e.g., ‘5’) onto the center of the wet clay. Don’t press deep yet; just make a guide. -
Deepen the Impression:
Go back over your guide lines with more pressure. I find dragging the tool slowly creates a cleaner channel than trying to carve it out. -
Create the Dot Pattern:
To make the dotted effect shown in the number ‘5’ or ‘4’, press the tip of a small round tool or skewers directly into the clay along the path of the number. -
Add Counting Dots:
For numbers like the ‘5’ shown on the left, you can also add a decorative border of dots, or simplify by putting five distinct dots on the back for counting practice. -
Wait and Refine:
Let the stones sit for about 15 minutes to firm up slightly. Then, check the grooves. If the clay has puffed back up, gently re-trace the numbers.
Make it a Game
Before the clay dries, press small items like dry beans or beads into the number dots to add extra texture, or paint the grooves with watercolors after drying.
Step 3: Finishing Touches
-
Initial Drying:
Leave the stones on the parchment paper in a cool, dry place. Do not put them in direct sunlight, or they may crack from drying too fast. -
Flip the Stones:
After about 12 hours, flip the stones over so the underside can dry evenly. This prevents warping. -
Full Cure:
Allow 24-48 hours for the stones to become bone dry. They will turn a chalky white and feel lighter. -
Sanding:
Once fully dry, take a piece of fine-grit sandpaper and gently buff the edges and surface. Focus on smoothing any jagged bits inside the number grooves. -
Seal (Optional):
To protect against dirty toddler hands, apply a thin coat of matte varnish. This keeps the natural stone look while sealing the surface.
Once dry, these tactile stones are ready to help little hands explore counting in a hands-on way
Blob Monsters with Craft Eyes
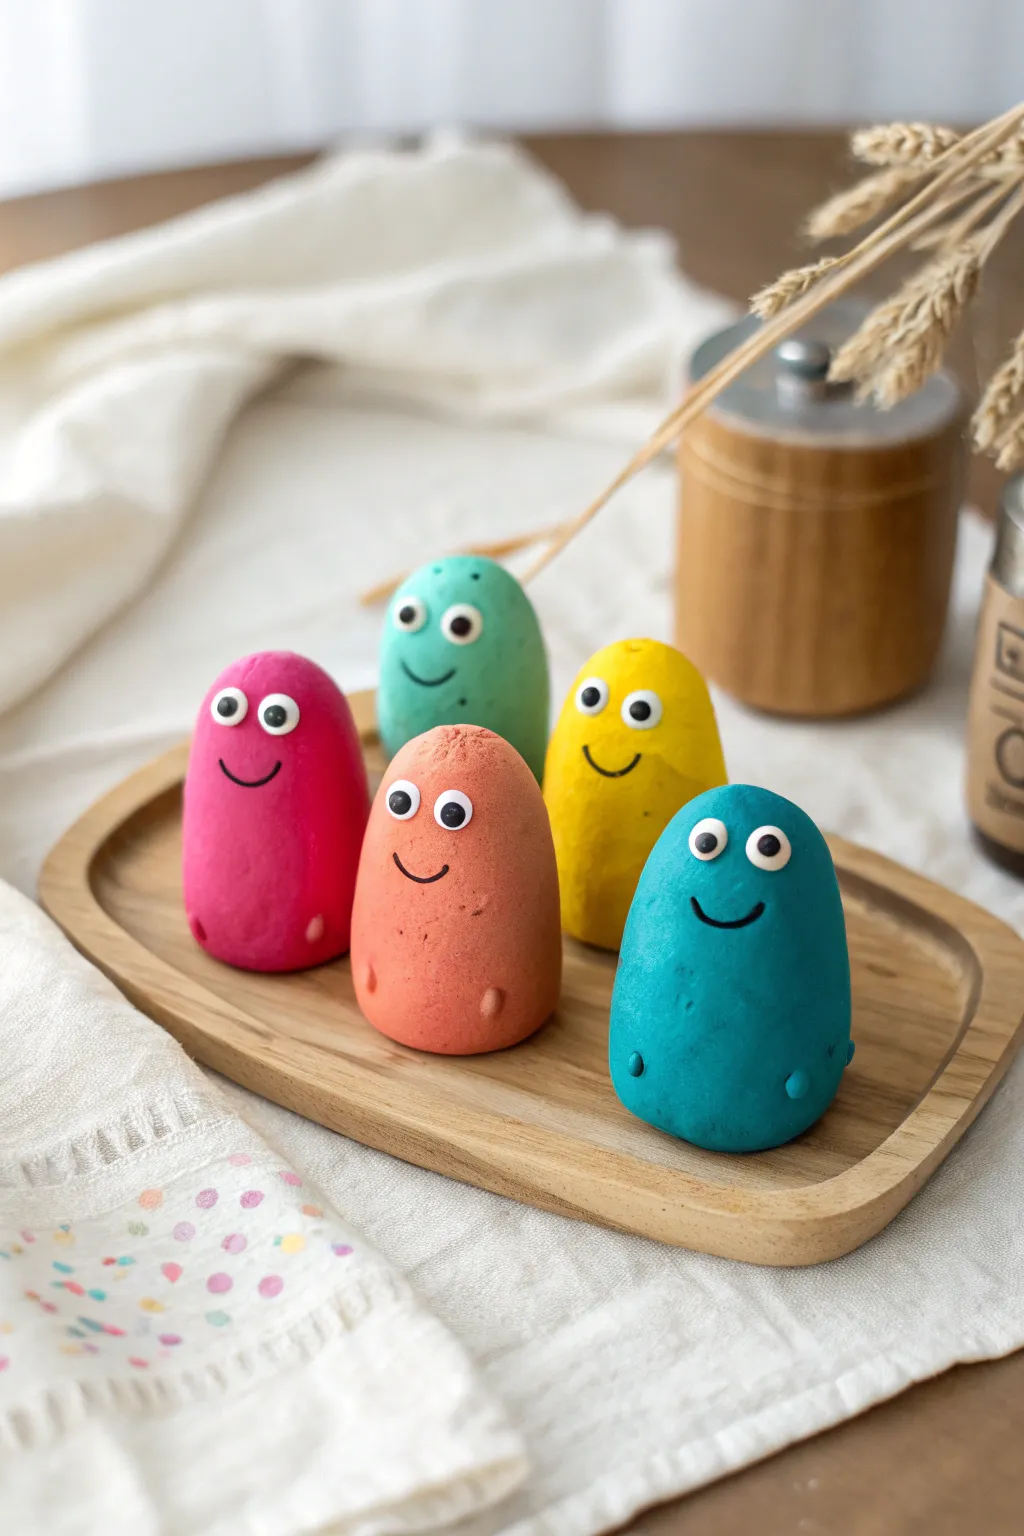
These charming, pebble-shaped monsters are a delightful sensory project perfect for little hands to shape and mold. With their bright, matte colors and expressive googly eyes, they create a friendly family of creatures that sit happily on any shelf.
Detailed Instructions
Materials
- Air-dry clay (or homemade playdough)
- Non-toxic acrylic paints (magenta, peach, yellow, teal, light blue)
- Googly eyes (assorted sizes)
- Black fine-point marker or black clay for mouths
- Clear matte varnish (optional)
- Small rolling pin (optional)
- Craft glue
- Toothpick or modeling tool
Step 1: Shaping the base forms
-
Prepare your clay:
Start by dividing your clay into five equal portions, each roughly the size of a lemon. -
Condition the clay:
Knead each ball of clay in your hands for a minute or two until it is warm, pliable, and free of large cracks. -
Roll spheres:
Roll each portion between your palms or on a table surface to create a smooth, round ball. -
Create the blob shape:
Gently gently roll the ball back and forth while applying slightly more pressure to the top half to elongate it slightly. -
Flatten the bottom:
Tap the wider bottom end of your clay shape firmly onto your work surface so it stands upright securely without wobbling. -
Smooth the surface:
Dip your finger in a tiny drop of water and smooth out any fingerprints or seams on the clay surface. -
Add arm details:
For the little nubby arms seen on the bottom, pinch tiny bits of clay from the base or attach very small balls of clay near the bottom edge.
Step 2: Adding Color and Personality
-
Painting the base:
Once dry (or if using white dough), paint each blob a different solid color: magenta, peach, yellow, teal, and blue. -
Alternative: Pre-colored clay:
I actually prefer mixing food coloring or paint directly into the wet clay before shaping for a more uniform, matte finish like the example. -
Applying eyes:
Select two googly eyes for each monster; place them slightly high on the face, centered but with a little variation for character. -
Pressing the eyes:
Gently press the eyes into the clay while it’s still soft so they sit flush, or glue them on securely if the clay has already dried. -
Drawing the smile:
Use a toothpick to gently etch a simple, curved smile into the soft clay below the eyes. -
Darkening the smile:
Fill the etched line with a tiny thread of black clay, or trace over it with a black marker once the paint is fully dry. -
Clean up details:
Check for any smudges or uneven paint spots and touch them up with a small brush. -
Final drying:
Let your monsters sit undisturbed in a dry area for at least 24 hours to ensure they harden completely.
Cracks Appearing?
If small cracks appear while drying, mix a tiny bit of fresh clay with water to make a paste and smooth it over the crack.
Make ‘Em Fuzzy
Before the clay dries, gently press a textured cloth or toothbrush against the surface to give your monsters a fuzzy skin texture.
Now you have a colorful crew of friendly monsters ready for playtime or display
Play Food Mini Pizzas
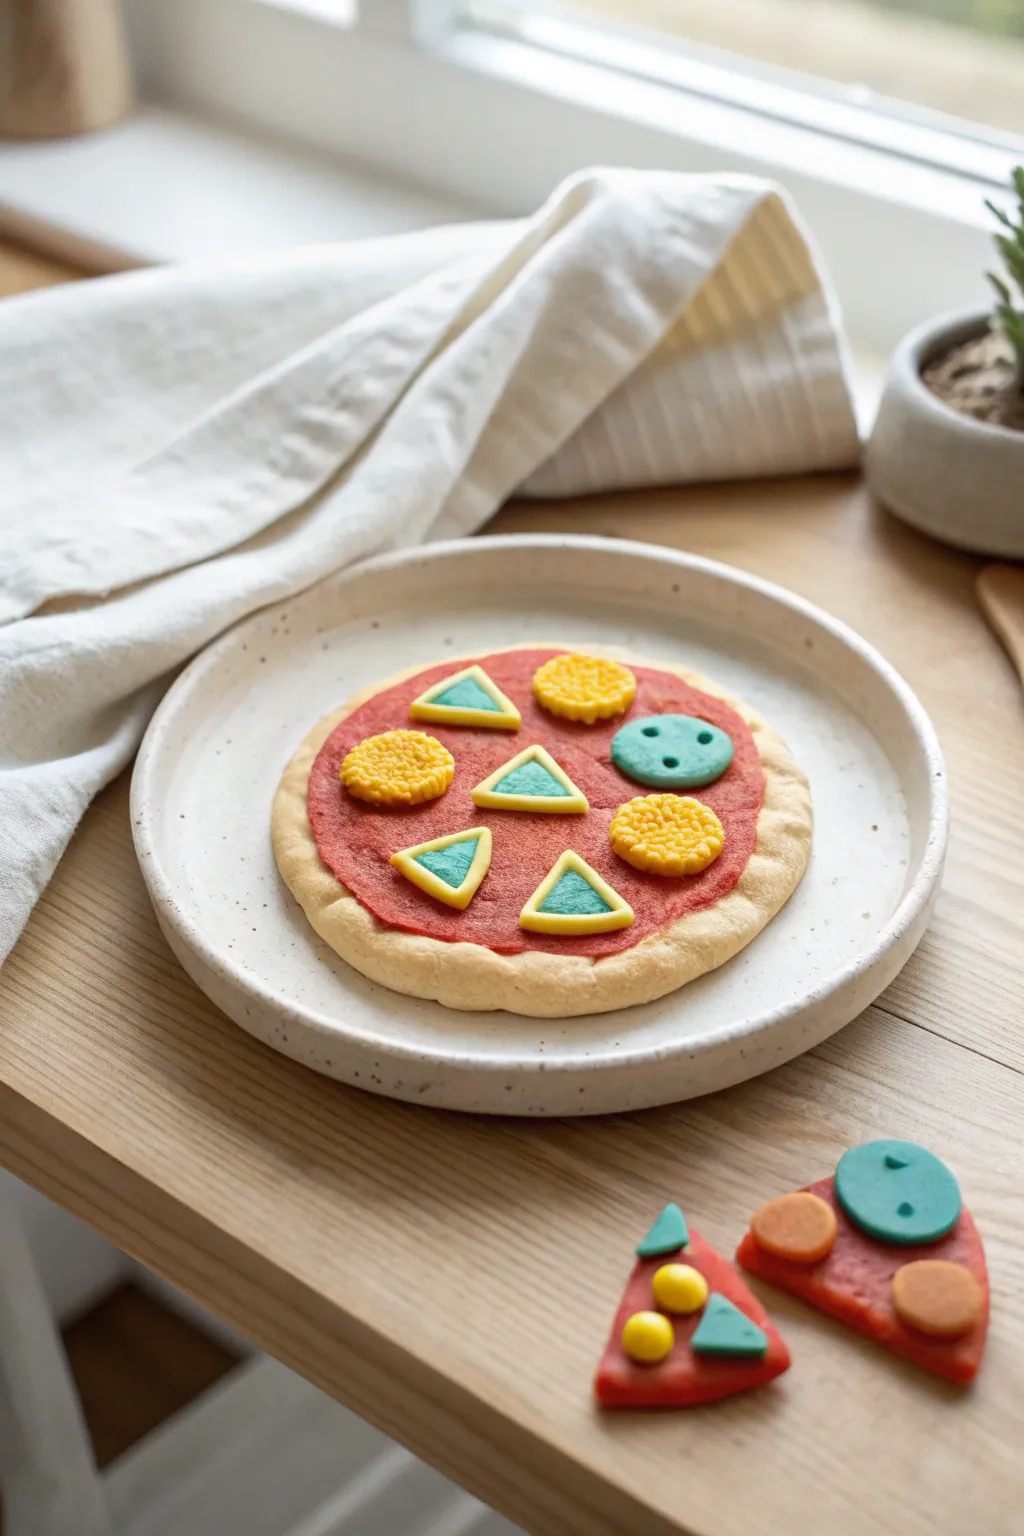
Transform simple balls of dough into a delightful miniature feast with this colorful clay pizza project. It features a realistic-looking crust, bright geometric toppings, and endless opportunities for imaginative play.
Step-by-Step Tutorial
Materials
- Beige or light tan modeling clay (or play dough)
- Red modeling clay
- Yellow modeling clay
- Turquoise or light blue modeling clay
- Orange modeling clay (for the slices)
- Small rolling pin
- Plastic knife or clay tool
- Small circular cutter (or bottle cap)
- Pointed tool or toothpick (for texturing)
- Small triangle cutter (optional)
Step 1: Creating the Base
-
Form the crust ball:
Start by taking a generous amount of beige clay and rolling it into a smooth, crack-free ball between your palms. -
Flatten the dough:
Press the ball down onto your work surface and use a small rolling pin to flatten it into a thick circle, about 4 inches in diameter. -
Create the crust rim:
Using your thumbs, gently press around the outer edge of the circle to create a slightly raised rim, mimicking a real pizza crust. -
Prepare the sauce:
Roll a smaller ball of red clay and flatten it until it is quite thin. -
Apply the sauce:
Lay the red circle onto the beige crust, gently pressing it down so it adheres to the center without covering the raised rim. -
Add texture:
To make the sauce look more realistic, lightly tap the red surface with your fingertips or a flat tool to roughen it slightly.
Dough Too Sticky?
If the clay is sticking to your fingers or the table, lightly dust your hands and work surface with a tiny bit of flour or cornstarch to keep things smooth.
Step 2: Making the Toppings
-
Shape triangular cheese:
Roll out a small sheet of yellow clay. Use a plastic knife or triangle cutter to cut out four small triangles. -
Add green centers:
Roll tiny bits of turquoise clay and flatten them into smaller triangles. Press one into the center of each yellow triangle. -
Create textured circles:
Form small balls of yellow clay and flatten them into thick discs. Use a toothpick or a rough fabric to press a stippled pattern into the top for a ‘cheesy’ texture. -
Make veggie buttons:
Roll small pieces of turquoise clay into balls and flatten them slightly. Use a toothpick to poke two or three small holes in the center of each, resembling a button mushroom or veggie slice.
Serve It Up
Make a miniature pizza box out of cardstock or construction paper to store the finished pizza, adding an extra layer of realism to the play experience.
Step 3: Assembly and Separate Slices
-
Arrange the toppings:
Place your prepared toppings onto the red sauce area. I like to alternate between the triangles and circles to create a balanced pattern. -
Press to secure:
Gently tap each topping piece to ensure it sticks firmly to the red clay base. -
Form individual slices:
To make the separate slice accessories, take red clay and shape it into two thick triangles. -
Decorate the slices:
Add smaller, simpler toppings to these slices, such as flat circles of orange and yellow clay. -
Final slice details:
For the separate slices, add a tiny strip of turquoise clay cut into a triangle shape to mimic the toppings on the main pizza.
Now your little chef is ready to serve up a fresh batch of imaginative play
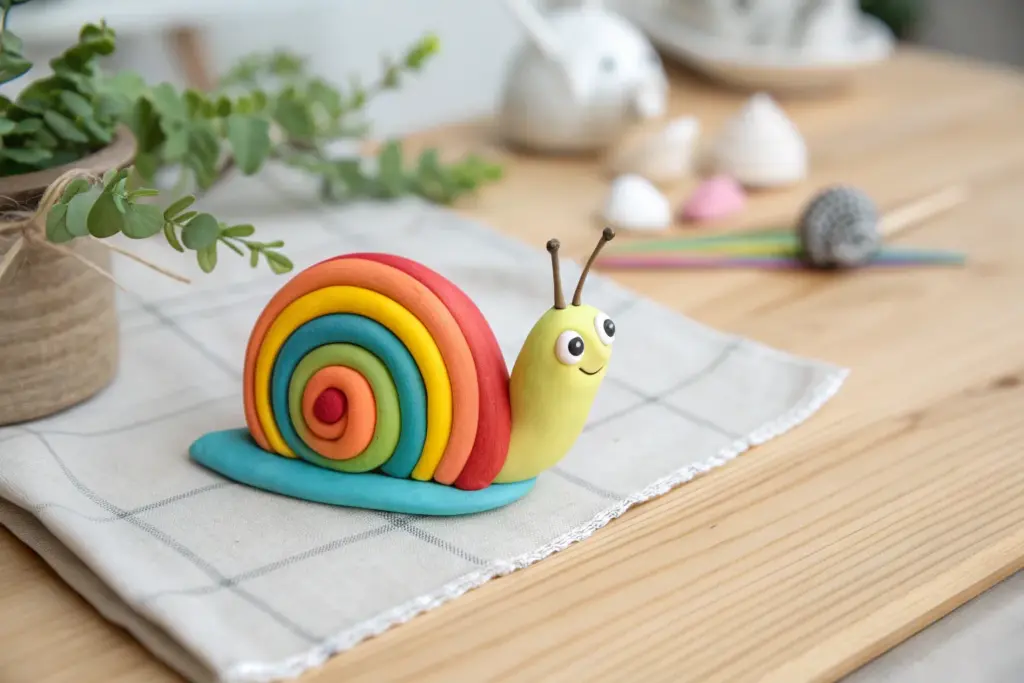
Rainbow Bead Poke Discs
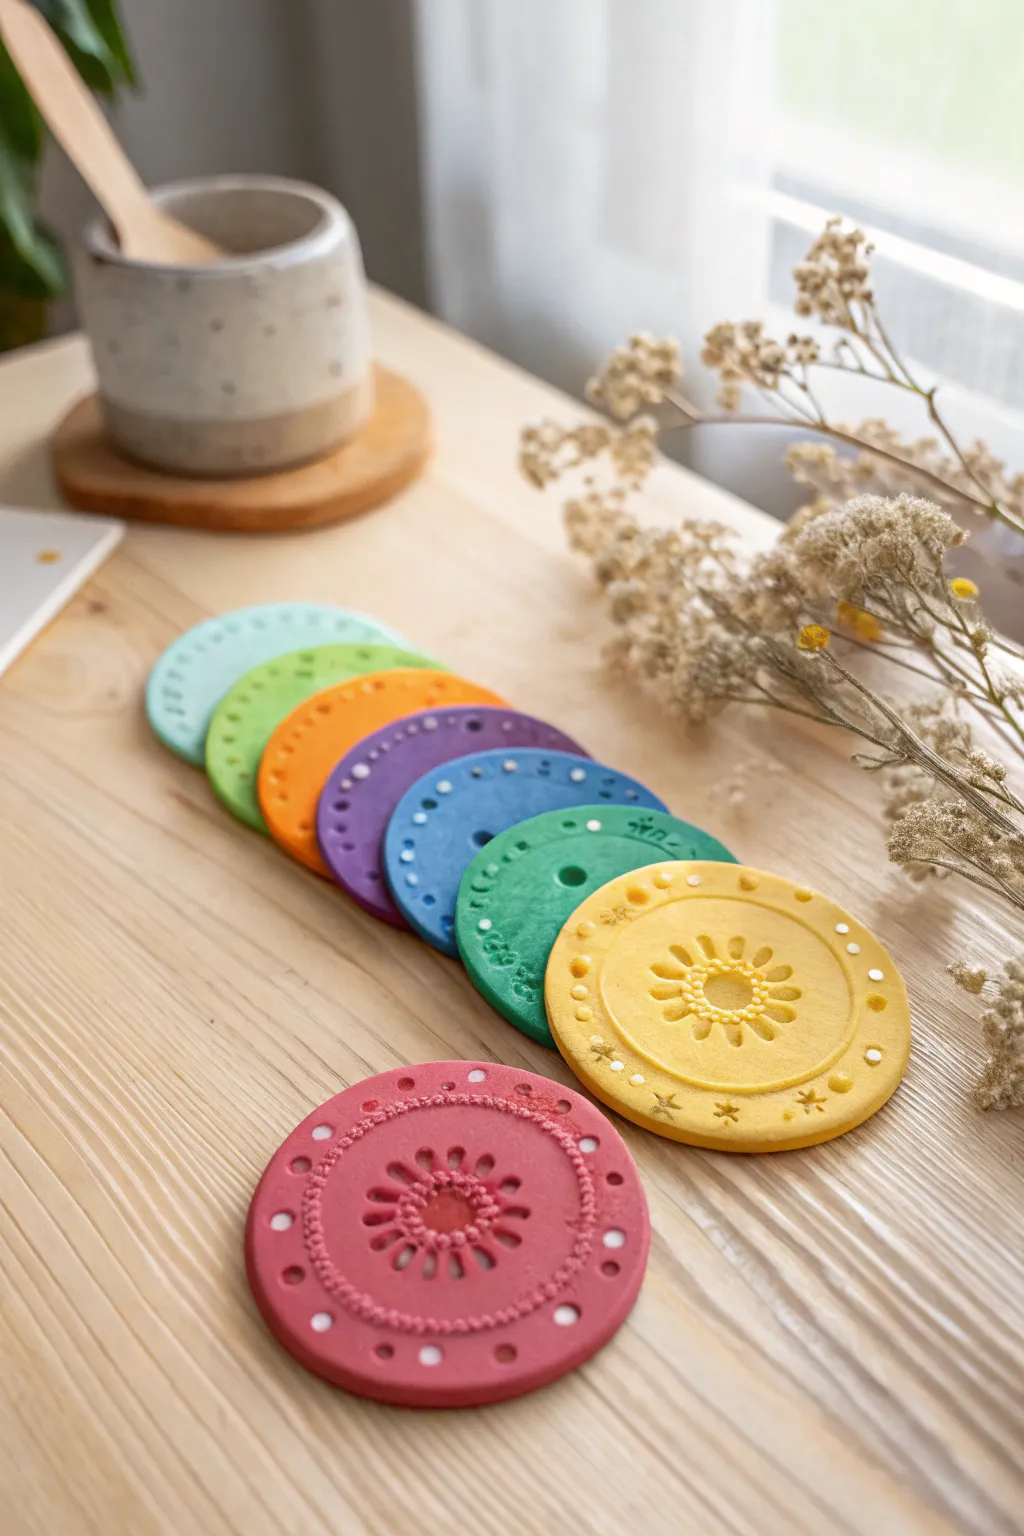
These vibrant, textured discs are a wonderful sensory toy and a brilliant way to teach colors and patterns. With their soft matte finish and intricate poked designs, they look beautiful displayed on a shelf or used as loose parts for open-ended play.
How-To Guide
Materials
- Air-dry clay or polymer clay (white)
- Acrylic paints (pastel rainbow palette)
- Round cookie cutter (approx. 3-inch diameter)
- Rolling pin
- Parchment paper or silicone mat
- Various poking tools: coffee stirrers, toothpicks, skewers, or dead ballpoint pens
- Patterned stamps or textured buttons (optional)
- White paint pen or fine brush
- Matter varnish or sealant (optional)
Step 1: Shaping the Base
-
Prepare your workspace:
Lay down your silicone mat or parchment paper on a flat surface to prevent sticking. -
Condition the clay:
Take a large chunk of your white clay and knead it in your hands until it is soft, warm, and pliable. This helps prevent cracks later. -
Roll it out:
Use the rolling pin to flatten the clay to an even thickness, aiming for about 1/4 inch. You want them sturdy enough to handle but not too chunky. -
Cut the circles:
Press your round cookie cutter firmly into the clay to create your discs. Make at least 7-8 discs to create a full rainbow set. -
Smooth the edges:
Dip your finger in a little water (if using air-dry clay) and gently run it around the rim of each circle to smooth out any rough cutting marks.
Step 2: Texturing and Design
-
Plan your patterns:
Decide on a different texture for each disc. Some can have radial flower patterns, others just simple concentric circles of dots. -
Create the central motif:
For the more intricate discs (like the yellow and pink ones), press a textured tool or stamp gently into the exact center to create a flower or sunburst impression. -
Poke the borders:
Using a blunt tool like a coffee stirrer, press small indentations around the perimeter of the disc. Start at the 12, 3, 6, and 9 o’clock positions to keep your spacing even. -
Add detail dots:
Switch to a smaller tool, like a toothpick or skewer, to make finer dots between your larger impressions. Varying the size of your holes adds visual interest. -
Dry the clay:
Place the finished discs on a clean sheet of parchment paper. If using air-dry clay, let them sit for 24-48 hours, flipping halfway through. If using polymer, bake according to package directions.
Uneven Drying?
If your air-dry clay discs start curling up at the edges while drying, gently weigh them down with a heavy book placed over a piece of parchment paper.
Step 3: Adding Color
-
Mix your palette:
While the clay dries, mix your acrylic paints. You want a soft, milky rainbow palette: mint green, pastel yellow, soft violet, cornflower blue, and muted pink. -
Base coat:
Paint the entire surface of each disc in a single solid color. Use a soft brush to get the paint deep into the textured grooves you created. -
Check for gaps:
Look closely at the poked holes; sometimes air bubbles get trapped. Dab your brush vertically into the holes to ensure full coverage. -
Let it dry:
Allow the base coat to dry completely. This usually takes about 20-30 minutes for acrylics.
Tool Tip
Look in your kitchen drawer for texture tools! The end of a chopstick, a citrus reamer, or even pasta noodles can create amazing unique imprints in clay.
Step 4: Finishing Touches
-
Highlight the texture:
To make the patterns pop like in the photo, take a white paint pen or a very fine brush with white paint. -
Dot the details:
Carefully add a tiny dot of white paint inside select indentations. You don’t need to fill every hole—just highlight a ring or a specific pattern to create contrast. -
Clean up:
If you accidentally get white outside the hole, quickly wipe it away with a damp cotton bud before it sets. -
Seal (Optional):
I prefer to finish these with a matte spray varnish to protect the paint from chipping during play without making them slippery or shiny.
Once they are dry and sealed, these tactile discs are ready for stacking, sorting, and imaginative play
Straw-Poked Polka-Dot Trinket Plates
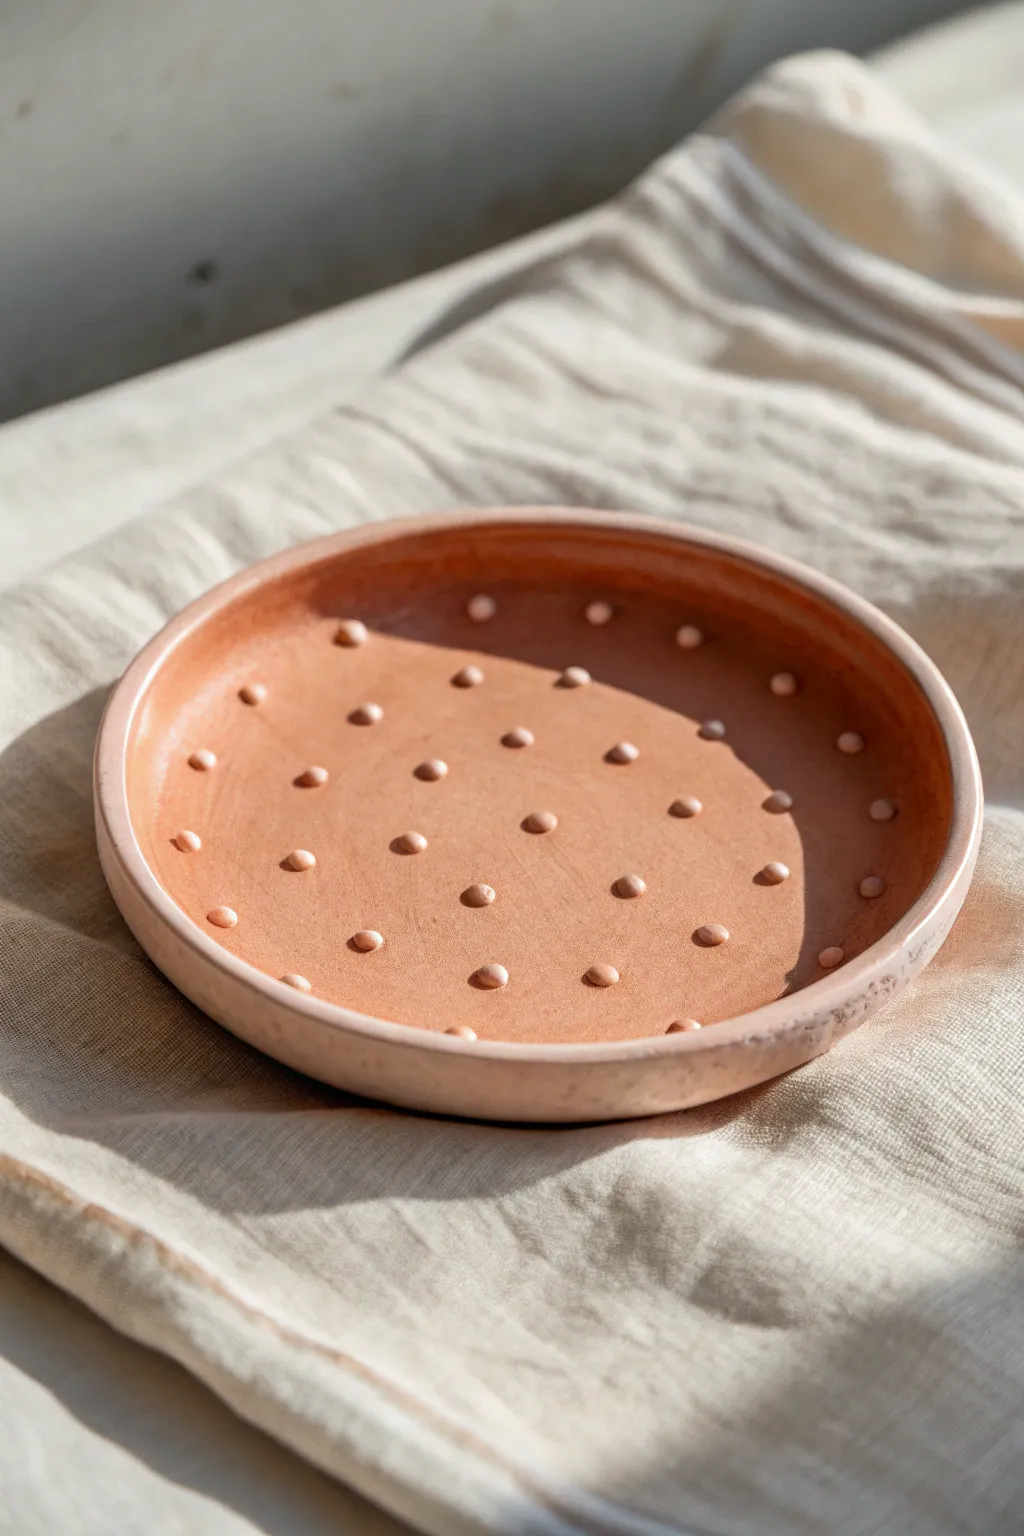
Create a charmingly rustic spot for tiny treasures with this textured trinket dish. Using simple tools, toddlers can practice their fine motor skills while making a functional piece of decor that mimics the warmth of terra cotta pottery.
Step-by-Step
Materials
- Terra cotta colored air-dry clay
- Rolling pin
- Circle cutter or small bowl (appx. 4-5 inches diameter)
- Plastic drinking straw
- Small cup of water
- Potter’s sponge or smooth cloth
- Sandpaper (fine grit)
- Matte sealant or varnish (optional)
Step 1: Shaping the Base
-
Prepare your clay:
Start with a ball of terra cotta air-dry clay about the size of a tennis ball. Knead it in your hands for a minute to warm it up and make it pliable for rolling. -
Roll it out:
Place the clay on a clean, flat surface. Use a rolling pin to flatten the ball into a pancake shape. Aim for an even thickness of about 1/4 inch so the dish feels substantial but not too heavy. -
Cut the circle:
Press your circle cutter or an overturned bowl firmly into the rolled clay to cut out a perfect round shape. Peel away the excess clay scraps and set them aside for later steps. -
Smooth the edges:
Dip your finger in a little bit of water and run it gently along the cut edge of the circle. This removes any sharpness or crumbly bits left by the cutter. -
Create the rim:
Gently pinch and lift the outer edge of the circle upwards to create a raised rim. You can also place the clay circle inside a slightly curved bowl to help it hold a dish shape while you work.
Fix Cracks
If tiny cracks appear while drying, make a ‘slip’ paste of clay and water. Fill cracks with the paste, smooth over, and let dry again.
Step 2: Adding the Dots
-
Punch out clay dots:
Take the excess clay scraps you set aside earlier and roll them flat again, slightly thinner than the base plate. Use the end of a plastic drinking straw to punch out many small circles. -
Release the dots:
If the clay dots get stuck inside the straw, simply blow through the other end or use a toothpick to gently push them out onto your work surface. -
Prepare the surface:
Lightly score the surface of your main dish where you want the dots to go using a toothpick or an old toothbrush. This rough texture helps the clay join securely. -
Attach the dots:
Dab a tiny drop of water onto the scored spot, then place a clay dot on top. Press down very gently to secure it without squashing the dot flat. -
Create a pattern:
Continue adding dots in a random or spiral pattern across the interior of the plate. Leave some space between them so the texture really stands out. -
Smooth the connections:
Use a damp paintbrush or finger to smooth just the very bottom edge of each dot where it meets the plate, ensuring they are fused well.
Level Up: Glossy Dots
After sealing with matte varnish, paint ONLY the raised dots with a high-gloss glaze to make the texture pop against the matte background.
Step 3: Finishing Touches
-
Final smoothing:
Check the rim of your plate one last time. If the handling has warped it, gently reshape it into a nice circle. Dip a sponge in water and wring it out almost completely, then wipe the rim for a professional finish. -
Let it dry:
Place the dish in a safe, dry spot away from direct sunlight. Let it air dry for at least 24 to 48 hours. I find flipping it over halfway through the drying process helps the bottom dry evenly. -
Sand imperfections:
Once the clay is completely bone dry and hard, use a piece of fine-grit sandpaper to gently buff away any rough spots on the rim or exterior. -
Dust off:
Wipe the dish with a dry cloth to remove any clay dust from sanding. -
Seal the piece:
Apply a coat of matte varnish or sealant to protect the clay from moisture and give it a finished look without making it too shiny.
Now you have a sweet, handmade vessel ready to hold rings, keys, or collected pebbles
Toy Car Track Texture Slabs
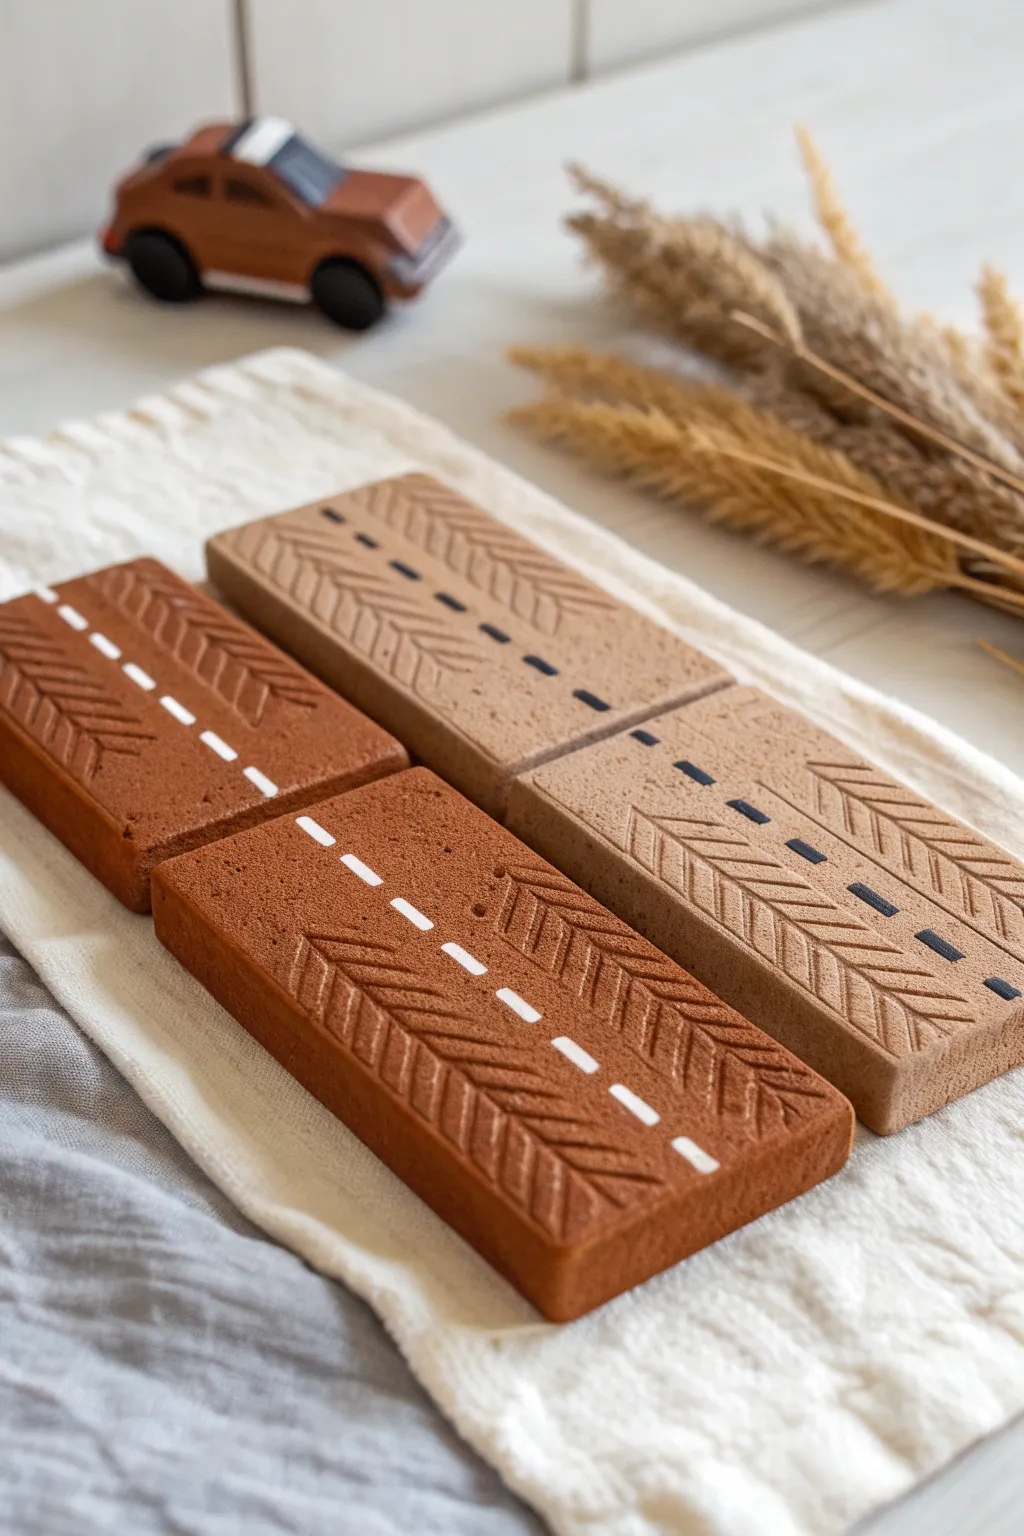
Create a tactile play experience with these durable, textured road tiles made from polymer or air-dry clay. Featuring realistic tire tread patterns and dashed lane markers, these modular slabs let little ones build their own highways.
How-To Guide
Materials
- Polymer clay or air-dry clay (terracotta and beige colors)
- Rolling pin or clay machine
- Rectangle clay cutter or craft knife
- Ruler
- Wooden sculpting tool or dull pencil
- White acrylic paint
- Black or dark blue acrylic paint
- Fine detail paintbrush
- Sandpaper (fine grit)
- Matte varnish or sealant
Step 1: Shaping the Slabs
-
Condition the Clay:
Begin by kneading your chosen clay until it is soft and pliable. If using polymer clay, this prevents cracking; for air-dry clay, ensure it’s moist but not sticky. -
Roll Out the Base:
Roll the clay into a flat, even sheet. Aim for a thickness of about 1/2 inch (1.2 cm) to ensure the slabs are sturdy enough for play. -
Cut Rectangles:
Using a rectangle cutter or a ruler and craft knife, cut out uniform blocks. A size of roughly 2×4 inches works well for most toy cars. -
Smooth the Edges:
Gently rub the cut edges with your finger or a little water (if using air-dry clay) to remove any sharp corners or burrs.
Step 2: Adding Texture
-
Mark the Center Line:
Lightly score a very faint line down the exact center of the slab with your ruler to serve as a guide for the road markings. -
Create the Tire Treads:
Using a pointed wooden tool or dull pencil, press diagonal lines into the clay on the left and right sides of the slab. Angle them downward towards the center. -
Mirror the Pattern:
Create a herringbone effect by pressing a second set of diagonal lines that meet the first set, forming ‘V’ shapes along the outer edges. -
Refine the Texture:
Go back over the lines to ensure they are deep enough to be felt but not so deep that they distort the rectangular shape of the slab. -
Surface Smoothing:
Lightly tap the textured surface with a flat object to knock down any raised clay ridges created by the tooling.
Uneven Drying?
If air-dry clay curls while drying, flip the slabs over halfway through the drying process. Weighting them down gently with a heavy book helps keep them flat.
Step 3: Finishing and Painting
-
Drying or Baking:
If using polymer clay, bake according to the package instructions. For air-dry clay, let the slabs sit for 24-48 hours until completely hard. -
Sand the Imperfections:
Once fully cured or dry, use fine-grit sandpaper to gently smooth the bottom and sides of the slabs so they sit perfectly flat. -
Paint the Center Lines:
Dip a fine detail brush into white acrylic paint. Carefully paint small, evenly spaced dashes down the center of the terracotta-colored slabs. -
Apply Contrast Lines:
For the beige slabs, switch to black or dark blue paint for the center dashes to create visual contrast. -
Allow Paint to Dry:
Let the painted lines dry completely before handling the slabs again to avoid smudging. -
Seal the Project:
Apply a coat of matte varnish or sealant over the entire slab. This protects the clay from grimy toddler hands and prevents the paint from chipping.
Texture Hack
Instead of carving lines individually, roll a real toy car with clean, aggressive tires over the wet clay to create an instant, realistic tread pattern.
Now you have a custom set of road tiles ready for endless traffic adventures
Finger-Groove Calm-Down Stones
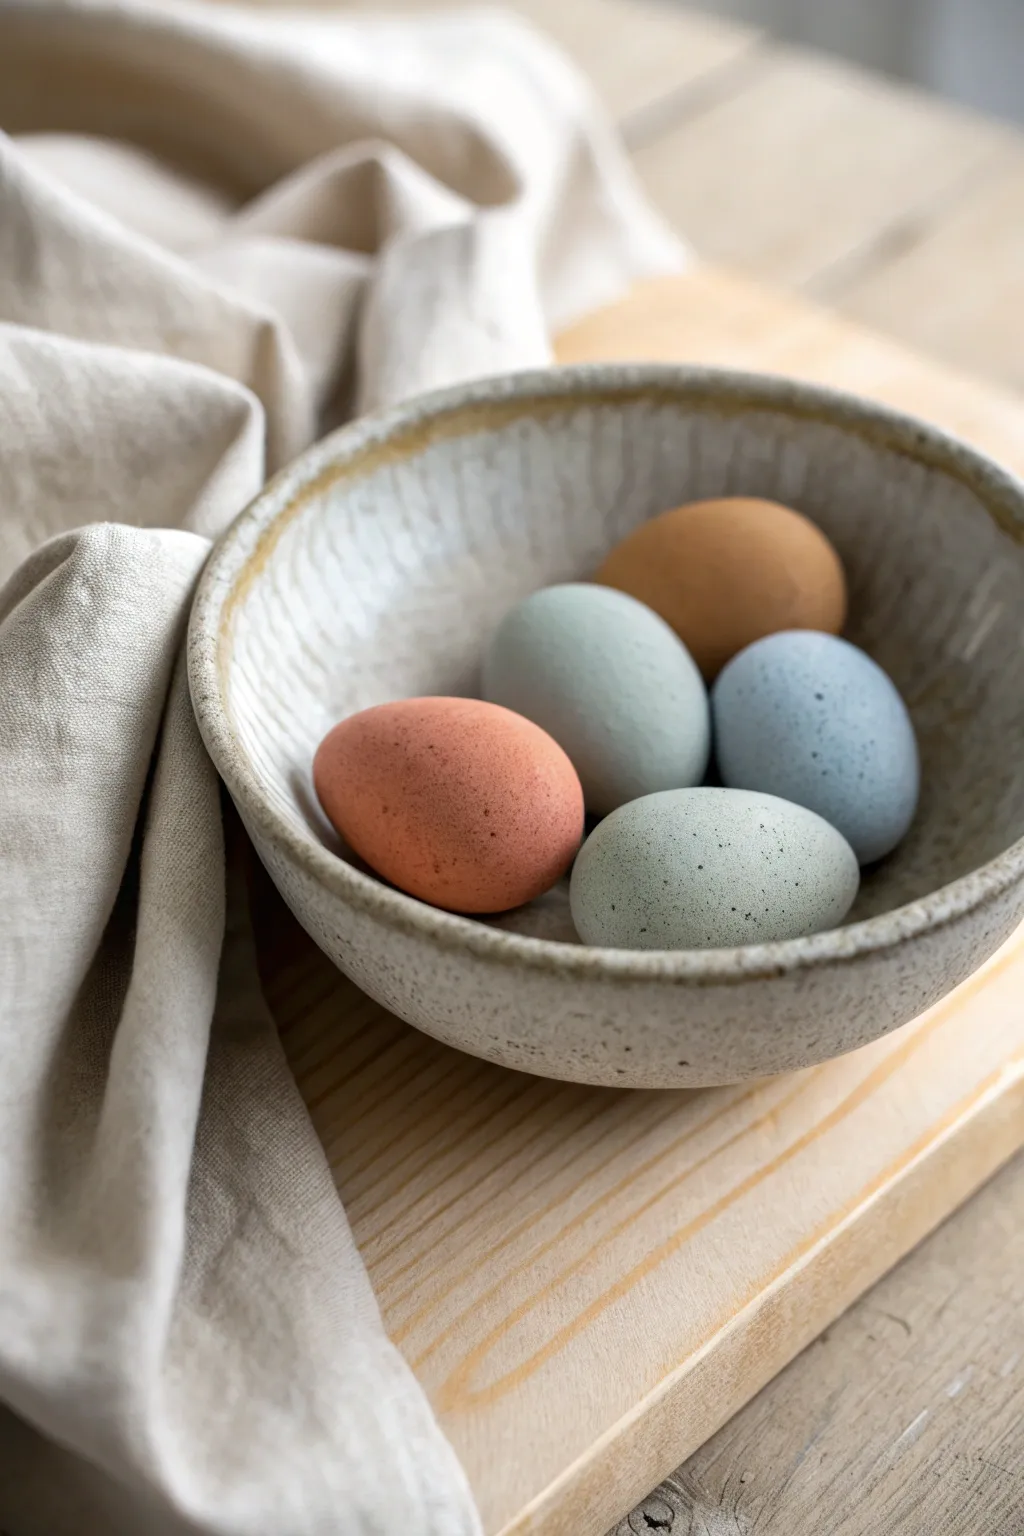
These smooth, palm-sized clay eggs are perfect tactile objects for little hands, featuring a harmonious palette of earthy tones and gentle speckles. They double as lovely decor for a nursery or kitchen, bringing a grounded, natural feel to any space.
Step-by-Step
Materials
- Air-dry clay (white)
- Acrylic paints (terracotta, slate blue, sage green, tan, white)
- Fine-grit sandpaper
- Old toothbrush or stiffness bristle brush
- Matte sealant or varnish
- Water based glaze (optional)
- Smoothing sponge
- Small bowl relative to egg size
Step 1: Shaping the Base
-
Portion the clay:
Start by grabbing a handful of air-dry clay roughly the size of a standard chicken egg. Squeeze it thoroughly in your hands to warm it up and remove air pockets. -
Roll a sphere:
Roll the clay firmly between your palms to create a smooth, tight ball. You want to eliminate distinct cracks at this stage. -
Form the tapered end:
Focus pressure on one side of the sphere, gently rolling back and forth to elongate it slightly. This creates the classic tapered egg shape. -
Smooth the surface:
Dip your finger in a tiny bit of water and rub it over the clay surface to melt away any fingerprints or small imperfections. -
Check symmetry:
Rotate the egg in your hand, looking at it from all angles to ensure the curve is continuous and natural. Repeat these steps for as many stones as you wish to make—five makes a lovely set. -
Dry thoroughly:
Place the eggs on a wire rack or clean cloth to dry. Rotate them every few hours to prevent flat spots from forming on the bottom. Allow 24-48 hours for full drying.
Step 2: Creating the Palette
-
Sand for perfection:
Once fully dry, lightly sand the surface with fine-grit sandpaper. This polishes the ‘stone’ and prepares it for a smooth paint application. -
Mix earthy tones:
Prepare your palette. You’ll need muted shades: a soft terracotta, a slate blue-grey, a warm tan, and a pale sage green. Mix white into your standard acrylics to soften them into pastel earth tones. -
Paint the first coat:
Apply a thin, even layer of base color to each egg. Don’t worry if it looks streak—opacity comes with layers. -
Apply the second coat:
After the first coat is dry to the touch, apply a second coat for full, rich coverage. I find holding the egg by the very tips helps keep fingers out of the paint. -
Create the lightest stone:
For the speckled white/grey stone, mix a tiny drop of green into a large amount of white paint for an almost-white sage tint.
Keep it Round
To prevent flat spots while drying, rest your damp clay eggs on a thick piece of soft foam or a crumpled washcloth rather than a hard table surface.
Step 3: Speckling and Finishing
-
Prepare splatter paint:
Dilute a small amount of dark brown or black acrylic paint with water until it is runny and inky. -
Test the splatter:
Dip an old toothbrush into the watery paint. Run your thumb across the bristles over a piece of scrap paper to test the spray pattern. -
Apply speckles:
Holding the toothbrush about 6 inches from the eggs, flick the bristles to create fine, random speckles across the surfaces. Use varying pressure for different dot sizes. -
Add dimension:
For added realism, repeat the splatter process with a diluted white paint on the darker eggs. -
Seal the work:
Once the paint is completely dry, apply a coat of matte varnish. This protects the finish and gives them a tactile, stone-like feel without being too glossy. -
Final cure:
Let the varnish cure according to the bottle instructions before handing them over for play or display.
Weighted Core
Wrap a small, smooth rock in the center of your clay ball before shaping. This adds a realistic heaviness that feels very grounding to hold.
Arranging these in a textured ceramic bowl creates a serene invitation to play
Simple Symbol Story Tiles
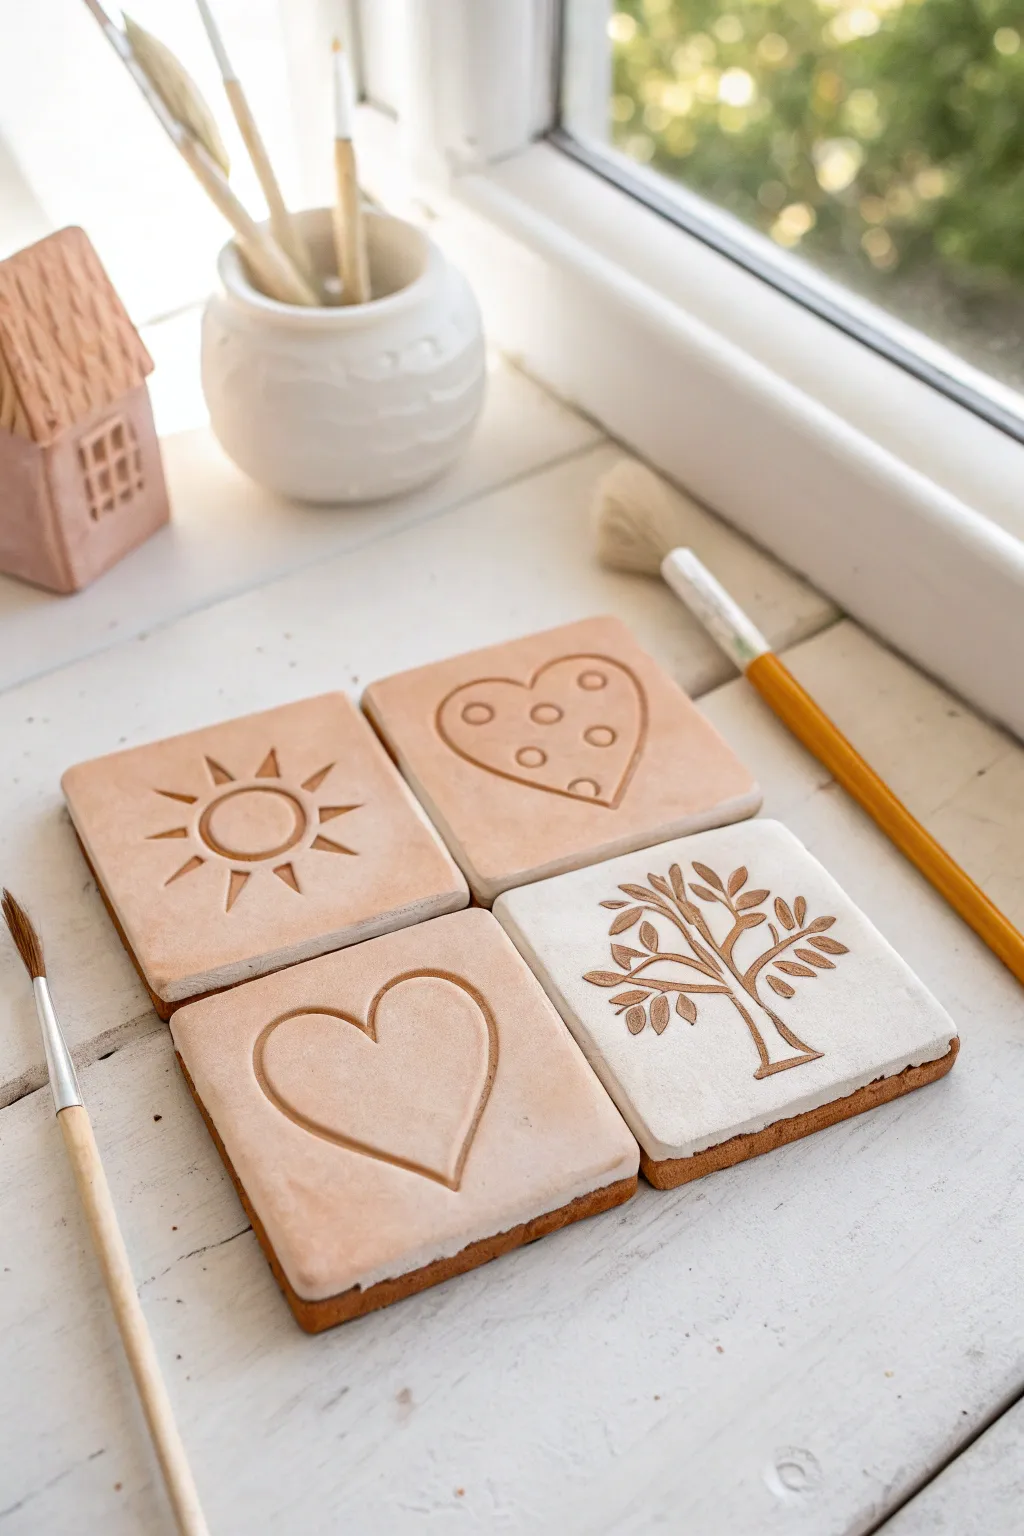
These charming, rustic clay tiles feature timeless symbols like hearts, suns, and trees, perfect for little hands to explore texture and storytelling. With their soft, natural finish and debossed designs, they make lovely coasters, memory game pieces, or simple decorative art.
Step-by-Step Guide
Materials
- Air-dry clay (white or terracotta)
- Rolling pin
- Square cookie cutter (approx. 3-4 inches) or ruler and knife
- Carving tools (ribbon tool, knitting needle, or wooden skewer)
- Small circular object for stamping (like a marker cap)
- Fine-grit sandpaper
- Brown acrylic paint (for antiquing)
- White acrylic paint (optional)
- Soft paintbrushes
- Paper towels or sponge
- Clear matte varnish (optional)
Step 1: Shaping the Canvas
-
Prepare the clay:
Begin by taking a handful of air-dry clay and kneading it briefly until it is warm and pliable. This helps prevent cracking later on. -
Roll it out:
Using a rolling pin, flatten the clay to an even thickness of about 1/4 to 1/2 inch. You can place wooden dowels on either side of the clay to ensure a perfectly uniform slab. -
Cut the shapes:
Use a square cookie cutter to punch out four identical squares. If you don’t have a cutter, measure a square template with a ruler and carefully slice around it with a craft knife. -
Smooth the edges:
Dip your finger in a little water and gently run it along the cut edges of each tile to soften any sharp corners or rough spots.
Cracks happen!
If small cracks appear while drying, mix a tiny bit of fresh clay with water to make a paste (slip) and fill them in with a finger.
Step 2: Designing the Symbols
-
Plan your icons:
Decide on four simple symbols. The example uses a sun, a plain heart, a polka-dot heart, and a tree, but feel free to let your toddler choose their favorites. -
Carve the sun:
For the first tile, gently press a small circular object into the center to make the sun’s face. Use a carving tool or skewer to etch radiating triangles around the circle. -
Create the polka-dot heart:
Lightly sketch a heart outline on the second tile. Use the back of a paintbrush or a marker cap to stamp small circles inside the shape for a textured look. -
Etch the plain heart:
Trace a large, bold heart on the third tile. Go over the line a second time with your tool, pressing slightly deeper to create a wide, clear groove. -
Sculpt the tree:
For the final tile, draw a vertical trunk that branches out. Press small almond shapes into the ends of the branches to represent leaves. -
Clean up crumbs:
Use a soft, dry brush to sweep away any little bits of clay crumbs created during the carving process.
Step 3: Finishing Touches
-
Let them dry:
Place the tiles on a wire rack or a flat board lined with parchment paper. Allow them to dry completely for 24-48 hours, turning them over halfway through so they dry evenly. -
Sand imperfections:
Once fully dry and hard, take fine-grit sandpaper and lightly buff the edges and surface to remove any remaining rough burrs. -
Apply a base (Optional):
If you want a two-tone look like the tree tile shown, paint the top surface white, being careful to keep paint out of the deep grooves. Let this layer dry. -
Antique the grooves:
Dilute a small mount of brown acrylic paint with water create a wash. Brush this freely over the entire tile, ensuring it sinks into the carved lines. -
Wipe back:
Immediately take a damp paper towel or sponge and wipe the surface of the tile. This removes the paint from the high points but leaves the brown color settled in the recessed design. -
Seal the work:
To protect your finished tiles, apply a thin coat of clear matte varnish or sealant. I find this especially helpful if these will be used as coasters.
Make it a game
Make 12 tiles total with 6 matching pairs of symbols to create a durable, nature-inspired memory matching game for your toddler.
Enjoy displaying these sweet, handmade pieces or using them to spark storytelling time with your little one