I love clay medallions because they’re basically tiny canvases you can texture, stamp, and finish in a single sitting. If you’re craving that satisfying raised relief look (without fussy metalwork), these ideas will keep your pendants looking bold, handmade, and totally you.
Classic Stamped Texture Medallions
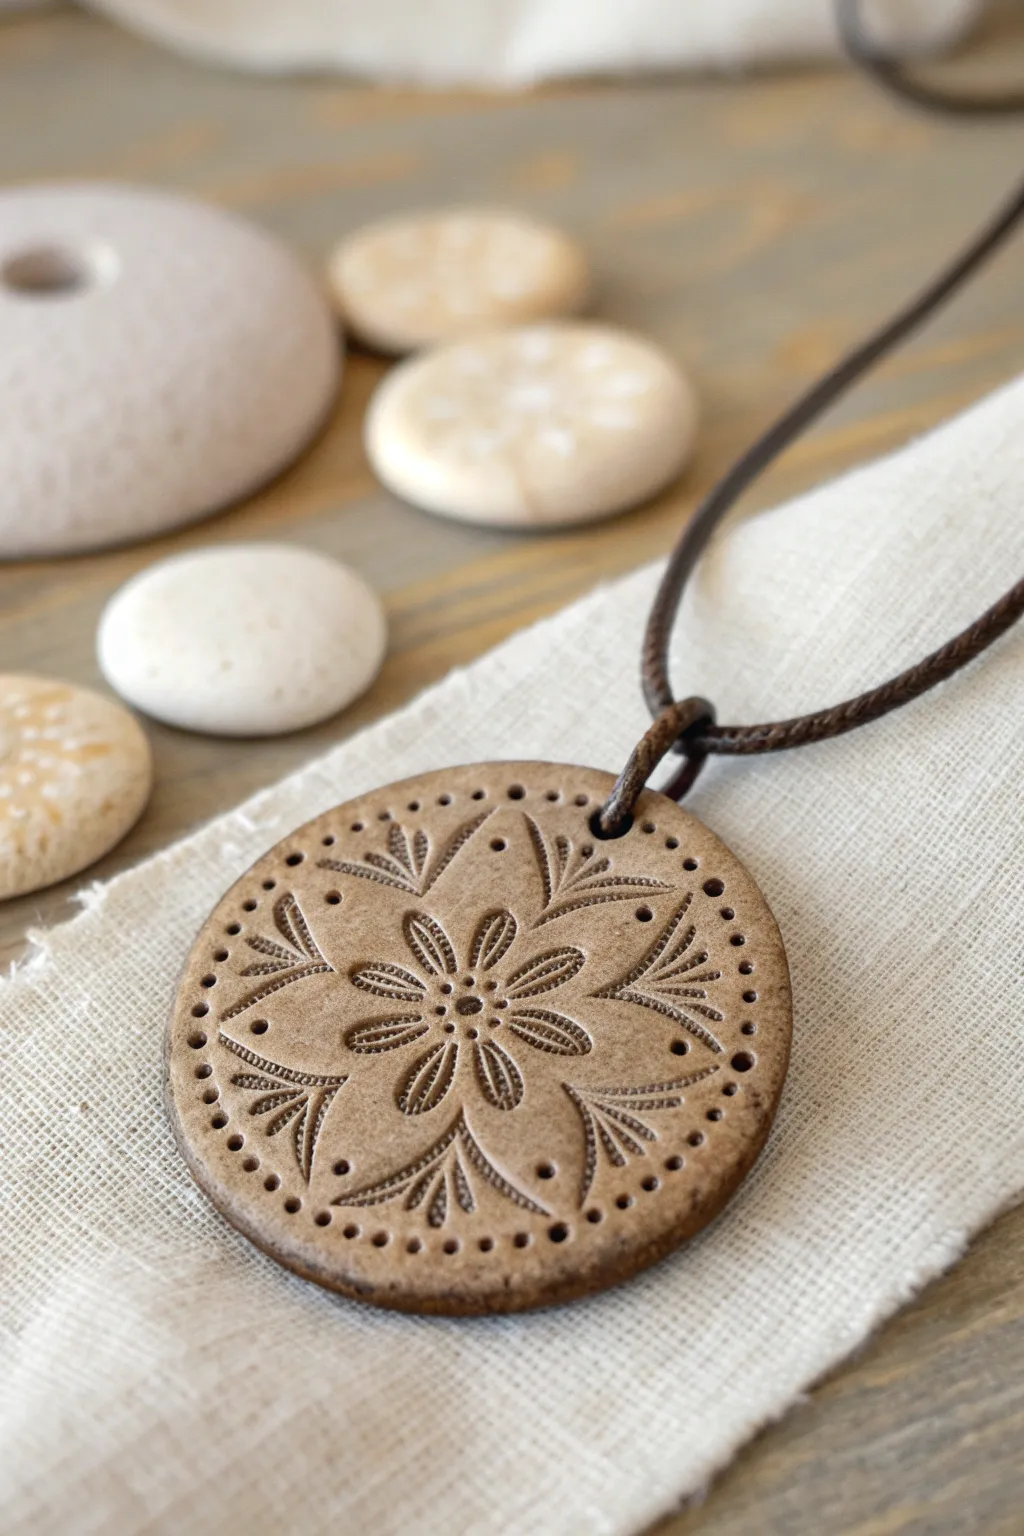
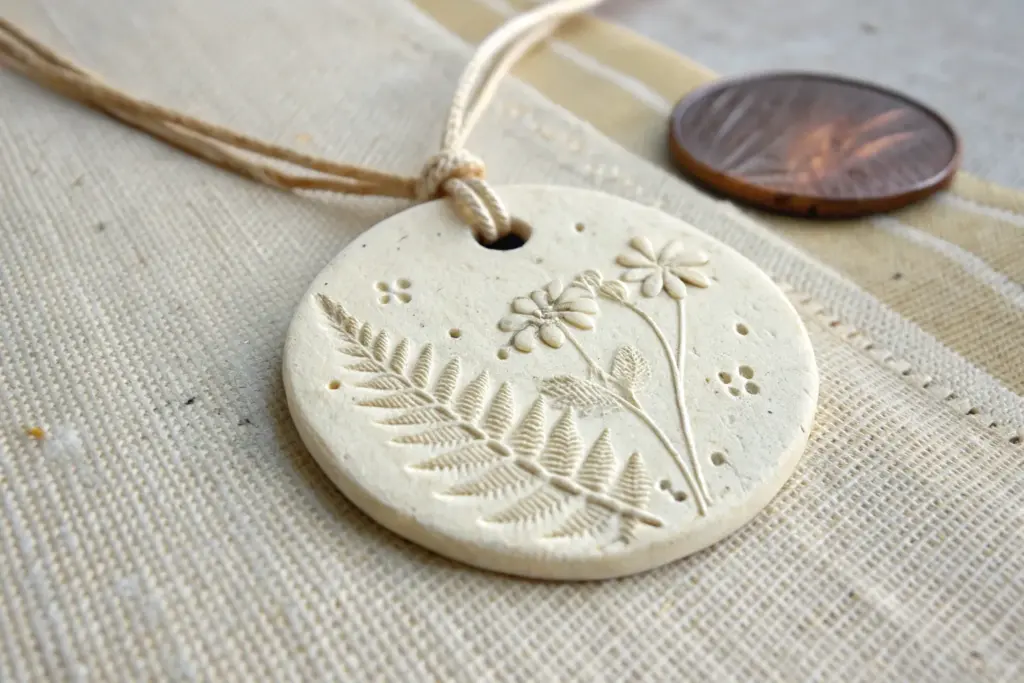
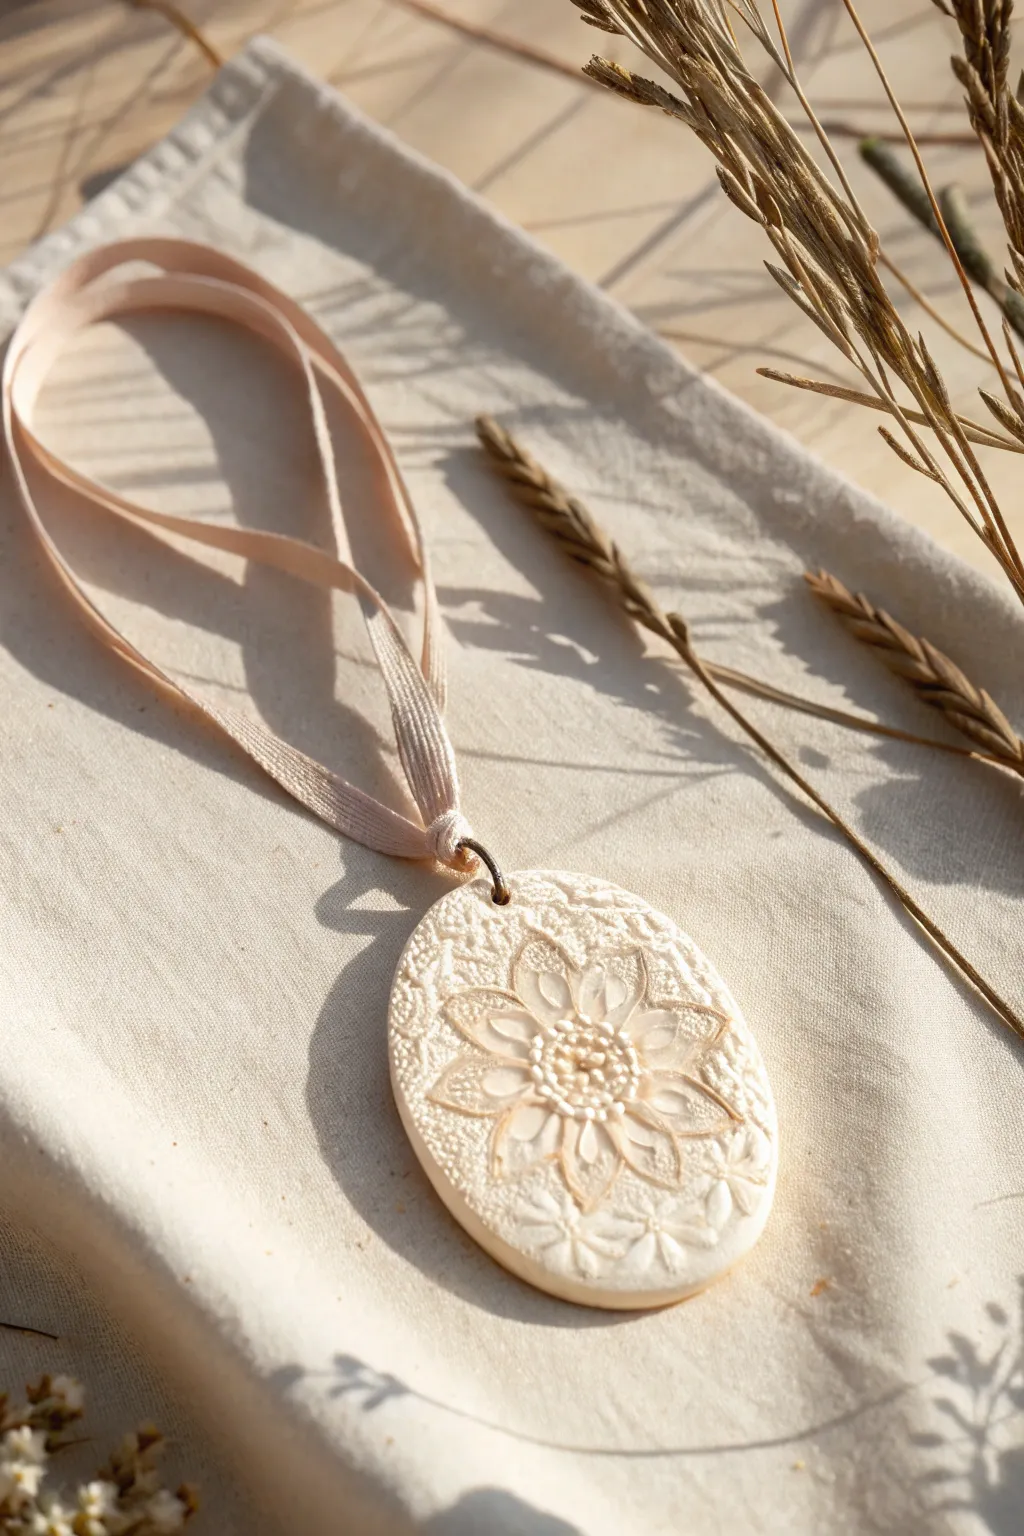
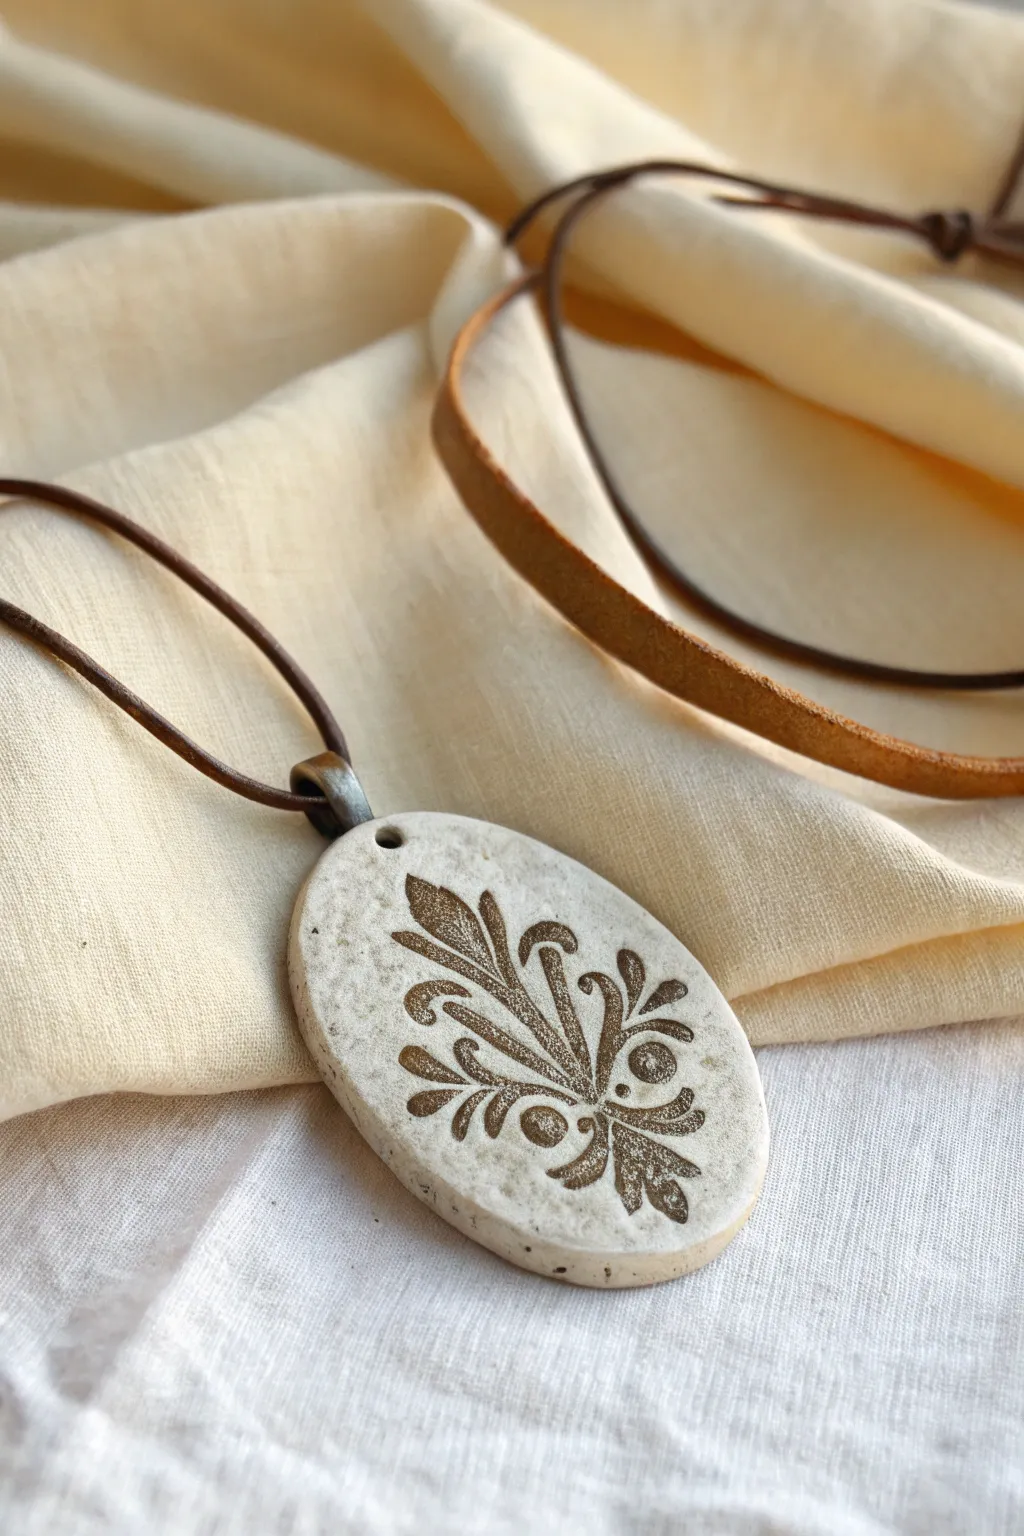
Embrace the natural beauty of unfinished ceramics with this textured pendant, featuring a delicate floral mandala design. The raw, sandy finish and deep brown cord give it a wonderfully organic and rustic charm.
How-To Guide
Materials
- Light brown or speckled stoneware clay (or air-dry clay)
- Rolling pin
- Circle cookie cutter (approx. 2-3 inches)
- Floral mandala rubber stamp (deep groove)
- Small straw or specialized hole punch tool
- Fine-grit sandpaper (400 grit or higher)
- Dark brown waxed cotton cord or leather cord
- Canvas or cloth mat for rolling
- Sponge and water
- Matte spray sealant (optional for air-dry clay)
Step 1: Preparation and Base
-
Condition the Clay:
Start by kneading a small ball of your stoneware or air-dry clay. You want it warm, pliable, and free of any air bubbles that could cause cracking later. -
Roll the Slab:
Place your clay on a canvas or cloth mat to prevent sticking. Using the rolling pin, roll the clay out evenly to a thickness of about 1/4 inch. It needs to be thick enough to take a deep impression without becoming fragile. -
Smooth the Surface:
Before stamping, take a slightly damp sponge and gently wipe the surface of the clay slab. This removes canvas textures and creates a pristine canvas for your design.
Stamp Stuck?
If your stamp sticks to the clay, lightly dust the clay surface with cornstarch (for air-dry) or bisque powder (for ceramic) before stamping. It acts as a release agent.
Step 2: Creating the Design
-
Apply the Stamp:
Position your floral mandala stamp over the clay. Press down firmly and evenly. I like to stand up and use my body weight to ensure the center detail transfers just as clearly as the edges. -
Release the Stamp:
Gently peel the stamp away from the clay. Do this slowly to avoid pulling up the clay surface or distorting the fresh design. -
Cut the Circle:
Center your round cookie cutter over the stamped impression. Press down sharply to cut the medallion shape, then remove the excess clay from around the edges before lifting the cutter. -
Create the Hanging Hole:
Using a small straw or a hole punch tool, create a clean hole near the top edge of the medallion. Ensure it is at least 3-4mm away from the edge so the clay doesn’t break under the weight of the cord later. -
Add Decorative Dots:
Looking closely at the original piece, notice the border of dots. Take a needle tool or the tip of a small paintbrush handle and gently press a ring of small indentations around the very outer perimeter of the design.
Step 3: Refining and Finishing
-
Smooth the Edges:
Dip your finger in a little water and run it along the cut edge of the circle to soften the sharp corner left by the cutter. This makes the finished jewelry more comfortable to wear. -
Drying Phase:
Place the medallion on a flat surface to dry. If using kiln-fire clay, follow your specific firing schedule. If using air-dry clay, let it dry for 24-48 hours, flipping it occasionally to prevent warping. -
Sanding:
Once fully dry (and fired, if applicable), use fine-grit sandpaper to buff the edges and the back. Be very gentle near the front face to avoid scratching the stamped pattern. -
Enhancing Contrast (Optional):
If you want the pattern to pop more, you can brush a diluted brown acrylic paint or oxide wash into the grooves and wipe the surface clean with a damp cloth, leaving the color only in the recesses. -
Sealing:
For air-dry clay, apply a light coat of matte spray sealant to protect it from moisture. Leave it raw if you are using fired stoneware for that authentic earthy feel. -
Attaching the Cord:
Cut a length of dark brown waxed cotton cord. Fold it in half to create a loop. -
Lark’s Head Knot:
Push the folded loop through the hole in the medallion from front to back. Then, thread the loose ends of the cord through that loop and pull tight to secure the pendant. -
Final Adjustments:
Check that the knot is sitting cleanly at the top of the pendant and tie the ends of the necklace cord to your desired length to complete the piece.
Make it Shine
Add a touch of gold leaf or metallic wax to just the raised center petals after sealing. This adds a hint of luxury to the rustic, natural texture.
Now you have a timeless, handcrafted accessory that celebrates natural textures

Lace-Impressed Medallion Pendants
Capture the timeless elegance of vintage lace by pressing detailed patterns into soft, air-dry clay. This simple technique creates a stunning, lightweight medallion with intricate floral relief that looks like fine ceramic.
Step-by-Step
Materials
- White polymer clay or air-dry clay (e.g., DAS)
- Small rolling pin
- Piece of textured lace or a lace doily with a flower motif
- Oval cookie cutter (approx. 2 inches long)
- Fine-grit sandpaper
- Small metal jump ring or eye pin
- Pale pink or cream satin ribbon
- Awl or toothpick
- Wax paper or craft mat
Step 1: Preparation and Impression
-
Condition the Clay:
Begin by taking a chunk of your white clay and kneading it thoroughly in your hands until it becomes warm, pliable, and free of cracks. -
Roll the Base:
Place the clay onto a piece of wax paper or a craft mat. Using your rolling pin, flatten the clay into an even slab that is approximately 1/4 inch thick. -
Position the Texture:
Lay your chosen piece of lace directly onto the clay slab. If you are aiming for the specific look in the image, center a flower motif from the lace right in the middle of where you plan to cut. -
Create the Impression:
Roll your rolling pin firmly over the lace once or twice. Use enough pressure to embed the fabric pattern deeply into the clay, but not so much that you distort the slab’s thickness entirely. -
Reveal the Pattern:
Carefully peel back the lace from one corner to reveal the imprinted design. Do this slowly to ensure clean lines in the floral relief.
Step 2: Shaping and Finishing
-
Cut the Shape:
Position your oval cookie cutter over the impressed floral design. I like to double-check that the flower is perfectly centered before pressing down firmly to cut the shape. -
Remove Excess:
Pull away the excess clay from around the cutter first, then gently lift the cutter to release the oval medallion. -
Smooth the Edges:
Dip your finger in a tiny bit of water and run it lightly along the raw edges of the oval to smooth out any roughness or fraying from the cut. -
Create the Hole:
Using an awl or a toothpick, pierce a small hole at the very top of the oval, centered between the edges. Move the tool in a tiny circular motion to ensure the hole is large enough for your hardware later. -
Drying Phase:
Place the medallion on a clean, flat surface to dry. If using air-dry clay, let it sit for 24-48 hours until completely hard and white. If using polymer clay, bake according to the package instructions. -
Refine with Sanding:
Once fully cured or dried, use fine-grit sandpaper to gently buff the edges and back of the pendant for a professional, smooth finish. -
Add Hardware:
Open a small metal jump ring using pliers and thread it through the hole you created at the top. Close the ring securely.
Clean Release Secret
Dust the lace lightly with cornstarch or baby powder before pressing it into the clay. This acts as a release agent and prevents sticky clay from getting trapped in the delicate fabric mesh.
Step 3: Assembly
-
Measure the Ribbon:
Cut a length of pale pink satin ribbon, about 30 inches long, or adjusted to your preferred hanging length. -
Thread the Pendant:
Fold the ribbon in half to find the center point. Push this folded loop through the jump ring on the medallion. -
Secure the Knot:
Take the loose ends of the ribbon and pass them through the ribbon loop you just pushed through the ring. Pull tight to create a lark’s head knot that secures the pendant in place. -
Final Adjustments:
Trim the ends of the ribbon if needed and tie a simple knot at the top to complete the necklace.
Vintage Wash Effect
After baking/drying, apply a diluted wash of brown acrylic paint over the texture. Wipe the surface quickly with a damp cloth, leaving paint only in the deep crevices to highlight the floral details.
Wear your lovely handmade medallion as a simple statement piece or wrap it up as a thoughtful gift


Botanical Leaf Fossil Medallions
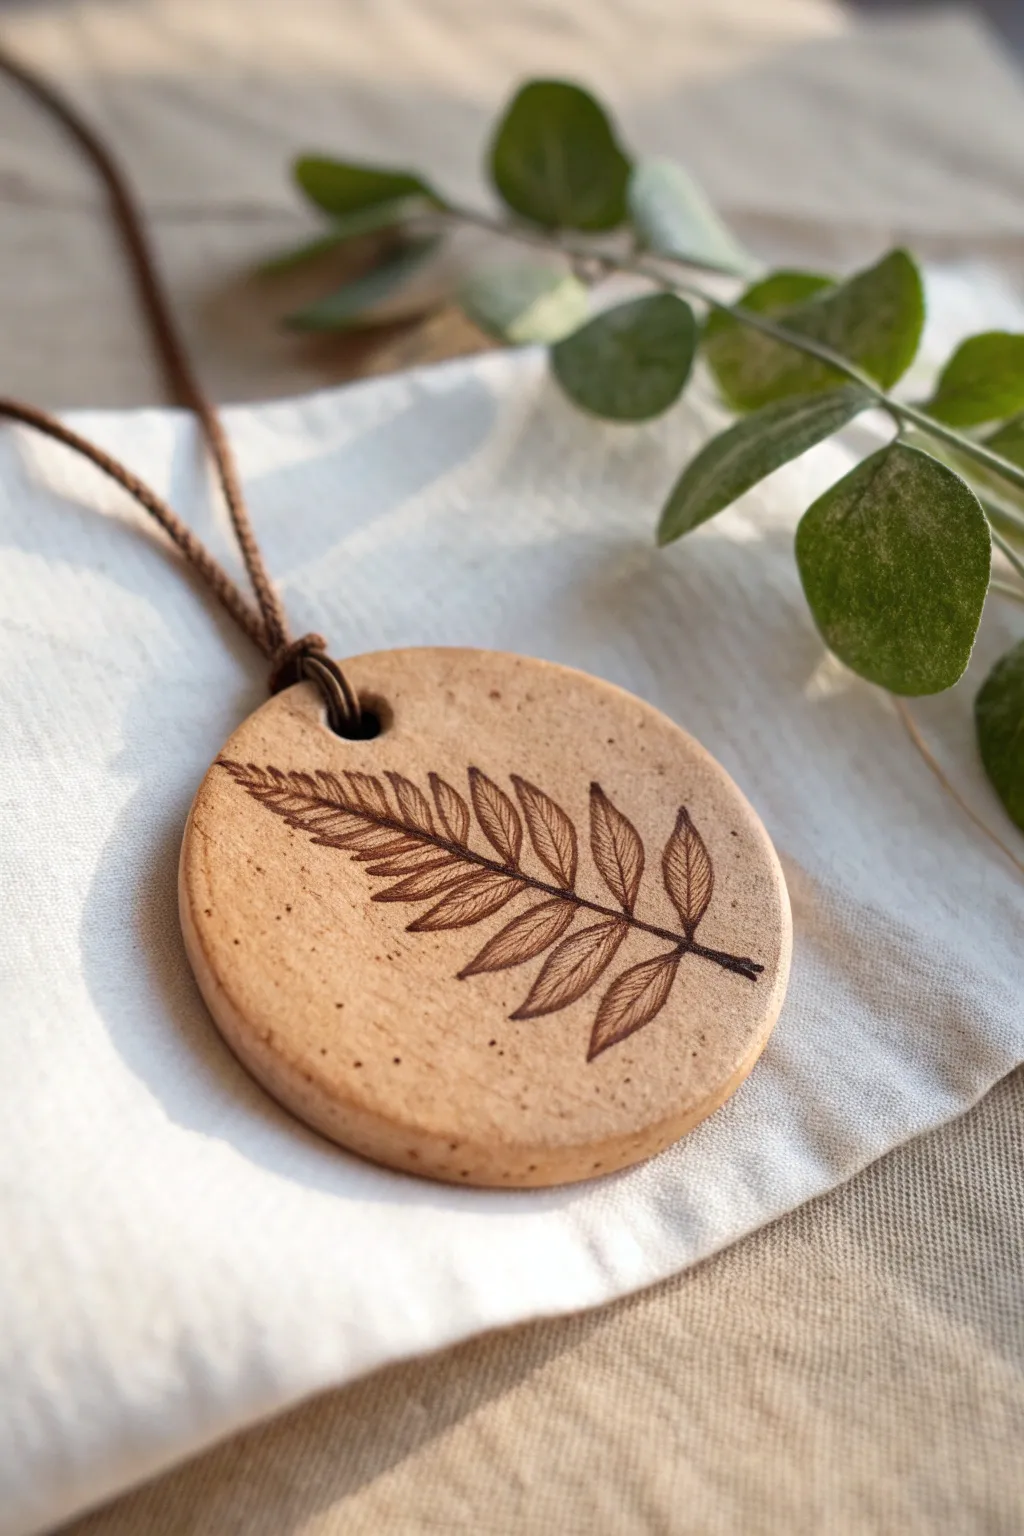
Capture the delicate beauty of a fern frond on a rustic, biscuit-colored clay canvas. This project mimics the look of a botanical fossil illustration using fine line work on a smooth, speckled surface.
Step-by-Step Tutorial
Materials
- Air-dry clay (stone or biscuit color)
- Round cookie cutter (approx. 2-3 inches)
- Rolling pin
- Fine-grit sandpaper (400 grit)
- Fine-tip permanent artisan pen (dark brown or sepia)
- Parchment paper or craft mat
- Straw or small cleaning tool (for the hole)
- Waxed cotton cord (dark brown)
- Matte spray varnish or Mod Podge (optional)
- Water and a small sponge
Step 1: Shaping the Canvas
-
Condition the Clay:
Begin by taking a handful of air-dry clay and kneading it until it is soft and pliable. If the clay feels dry or cracks, dampen your fingers slightly to introduce moisture. -
Roll the Slab:
Place the clay on parchment paper to prevent sticking. Use a rolling pin to flatten the clay into an even slab, aiming for a thickness of about 1/4 inch (6mm). -
Cut the Shape:
Press your round cookie cutter firmly into the clay slab. Give it a tiny wiggle to ensure a clean cut, then lift the cutter away. -
Smooth the Edges:
Dip your finger in a little water and gently run it around the circumference of the circle to smooth out any sharp ridges left by the cutter. -
Create the Suspension Hole:
Use a straw or a small circular tool to punch a hole near the top edge. Ensure the hole is large enough for your cord to pass through later, keeping in mind clay shrinks slightly as it dries. -
Drying Phase:
Set the clay disc aside on a flat surface to dry completely. This usually takes 24-48 hours depending on humidity. Flip it halfway through to prevent curling.
Ink Bleeding?
If the ink feathers or bleeds into the clay, the surface is too porous. Seal the clay with a thin layer of matte Mod Podge and let it dry fully before drawing.
Step 2: Illustrating the Fern
-
Sand for Smoothness:
Once bone dry, lightly sand the surface with fine-grit sandpaper. This creates a perfect, paper-like surface for drawing. -
Clean the Surface:
Wipe away all clay dust with a slightly damp cloth or dry brush. The surface must be dust-free for the ink to adhere properly. -
Outline the Stem:
Using your fine-tip sepia pen, draw a gentle, slightly curved line diagonally across the lower half of the circle to serve as the main stem. -
Drafting Leaf Pairs:
Draw the outlines of the leaflets branching off the stem. Start larger at the bottom and make them progressively smaller as you reach the tip. -
Adding Vein Details:
Draw a central vein through each small leaflet. Keep your hand light; these lines should be delicate. -
Shading Texture:
Add tiny hatching lines inside each leaf, angling them from the central vein outward. I find that quick, confident flicks of the pen create the most natural texture here. -
Final Ink Touches:
Darken the main stem slightly and add a few tiny dots around the background to mimic the speckled look of natural stone or paper.
Drawing Confidence
Nervous about freehand drawing? Sketch your design lightly with a soft graphite pencil first. You can gently erase mistakes before committing to ink.
Step 3: Finishing and Assembly
-
Sealing the Artwork:
To protect your drawing from moisture, apply a very light coat of matte spray varnish. Let it dry completely. -
Prepare the Cord:
Cut a length of dark brown waxed cotton cord (about 30 inches or to your preferred length). -
Larks Head Knot:
Fold the cord in half. Push the folded loop through the clay hole, then pull the loose ends of the cord through that loop to secure the pendant. -
Secure the End:
Tie the two loose ends of the cord together with a simple overhand knot or a sliding knot if you prefer the length to be adjustable.
Now you have a timeless piece of botanical jewelry that celebrates the simple elegance of nature


Simple Geometric Grid Medallions
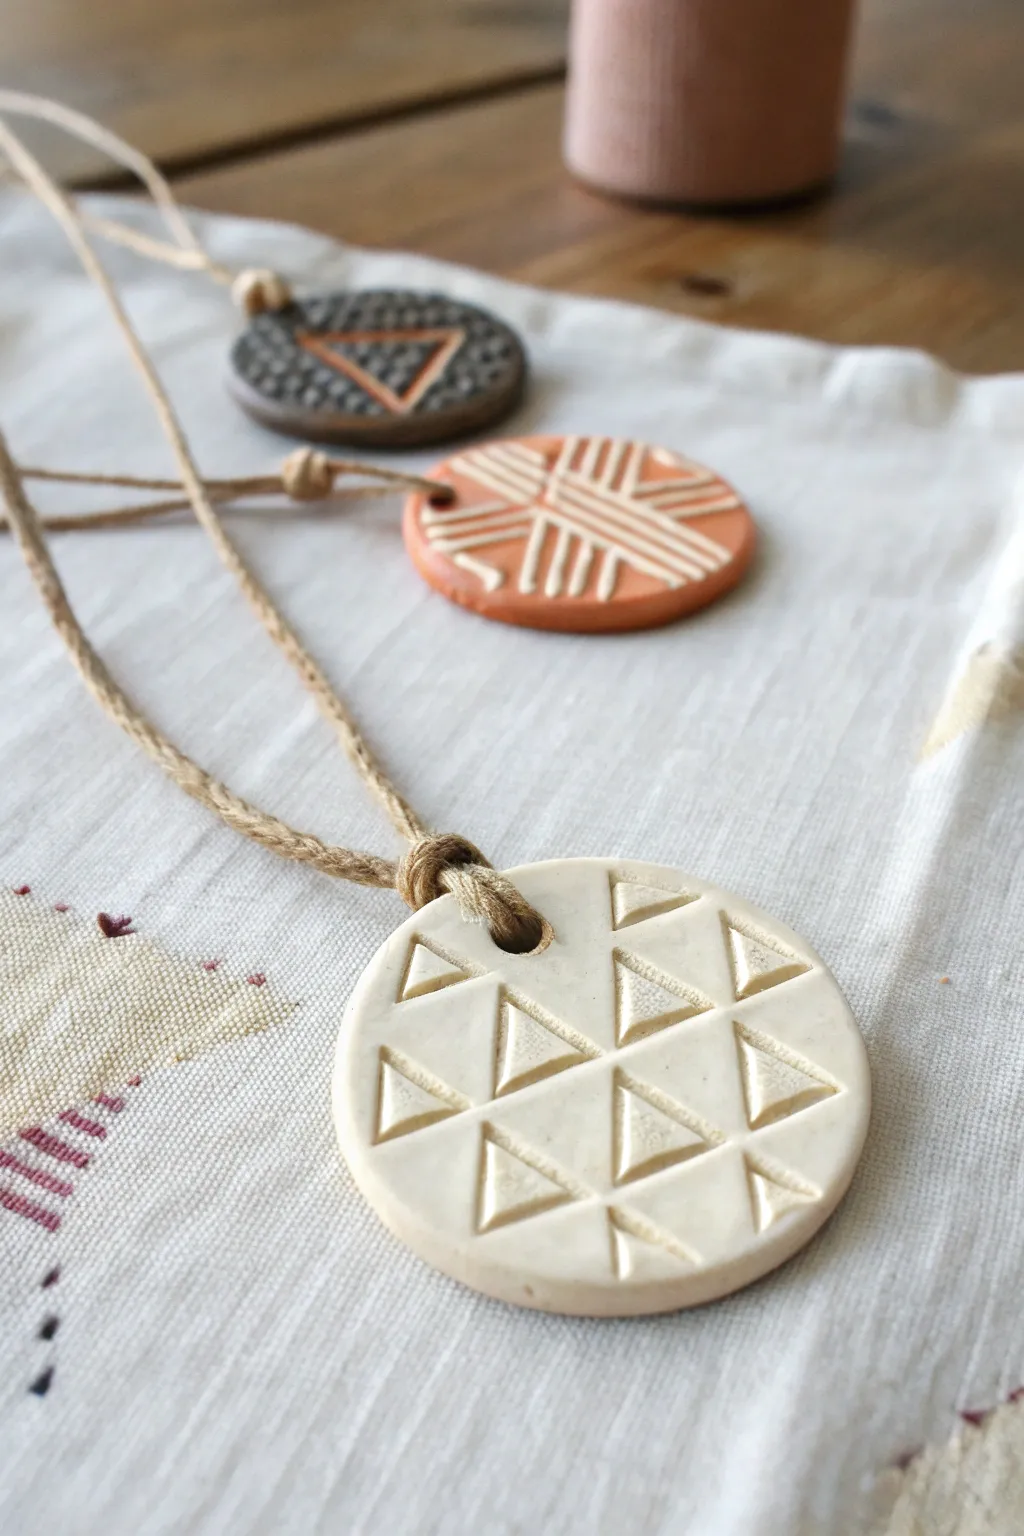
Embrace the beauty of simplicity with this cream-colored clay medallion featuring a repeating triangle relief. The clean lines and raw ceramic texture create a modern, minimalist accessory that looks great with any outfit.
Step-by-Step Guide
Materials
- Air-dry clay or polymer clay (cream/white color)
- Rolling pin
- Circle cookie cutter (approx. 2-3 inches)
- Small straw or drinking stick (for the hole)
- Sculpting tool with a small triangular tip or a linoleum cutter
- Fine-grit sandpaper
- Hemp cord or jute twine
- Wax paper or parchment map
Step 1: Shaping the Base
-
Prepare workspace:
Lay down a sheet of wax paper or a silicone mat to prevent the clay from sticking to your table. Clean hands are essential here to keep the white clay pristine. -
Condition the clay:
Take a handful of clay and knead it until it is soft, pliable, and free of cracks. If using polymer clay, the warmth of your hands will make this easier. -
Roll it out:
Use your rolling pin to flatten the clay into an even slab. Aim for a thickness of about 1/4 inch (6mm) to ensure the pendant feels substantial but not too heavy. -
Cut the circle:
Press your circle cutter firmly into the clay slab. Wiggle it slightly to ensure a clean cut, then lift the cutter away. Remove the excess clay from around the circle. -
Smooth the edges:
Dip your finger in a tiny bit of water (for air-dry clay) or baby oil (for polymer) and run it gently around the rim of the circle to soften any sharp cutting lines.
Sticky Situation?
If your carving tool sticks and pulls up the clay rather than cutting cleanly, let the clay slab dry for about 15 minutes before carving. It needs to be slightly firmer.
Step 2: Carving the Design
-
Create the hanging hole:
Use a straw to punch a hole near the top edge of the circle.center it carefully so the pendant hangs straight. -
Plan the grid:
Lightly etch a very faint horizontal line across the center used the back of a knife or a ruler as a guide. This will help keep your triangles level. -
Carve the first row:
Using your linoleum cutter or triangular tool, press the tip into the clay along your guide line. Push down and scoop slightly to remove a small triangle of clay. Repeat this to create a horizontal row. -
Stagger the pattern:
Move directly below your first row. Carve the next set of triangles so the peak of the new triangle sits centered between the two triangles above it. -
Complete the grid:
Continue carving rows above and below the center line until the face of the pendant is filled. I find it helpful to rotate the piece occasionally to ensure the depth is consistent. -
Clean up debris:
Small crumbs of clay will appear as you carve. Very gently brush these away with a soft, dry paintbrush so you don’t smudge the surface.
Step 3: Finishing Touches
-
Dry or bake:
If using air-dry clay, leave the piece in a dry spot for 24-48 hours, flipping halfway through. If using polymer clay, bake according to the package instructions (usually 275°F for 15-30 minutes). -
Check for roughness:
Once fully hardened, inspect the edges and the carved areas. Rub a fine-grit sandpaper gently over the rim if there are any sharp spots. -
Dust off:
Wipe the pendant with a barely damp cloth to remove any sanding dust. -
Prepare the cord:
Cut a length of hemp cord or jute twine long enough to slip over your head comfortably, usually about 24-30 inches. -
Attach the cord:
Fold the cord in half. Push the folded loop through the hole in the pendant from front to back. -
Secure the loop:
Thread the loose ends of the cord through the loop and pull tight to create a lark’s head knot directly on the pendant. -
Tie the ends:
Tie the two loose ends of the cord together with a simple overhand knot or a sliding knot if you want the length to be adjustable.
Pro Tip: Depth Control
Add a strip of masking tape to your carving tool to mark your desired depth. Stop pushing when the tape hits the clay surface for perfectly uniform triangles.
Now you have a striking, handcrafted piece ready to wear or gift.

The Complete Guide to Pottery Troubleshooting
Uncover the most common ceramic mistakes—from cracking clay to failed glazes—and learn how to fix them fast.
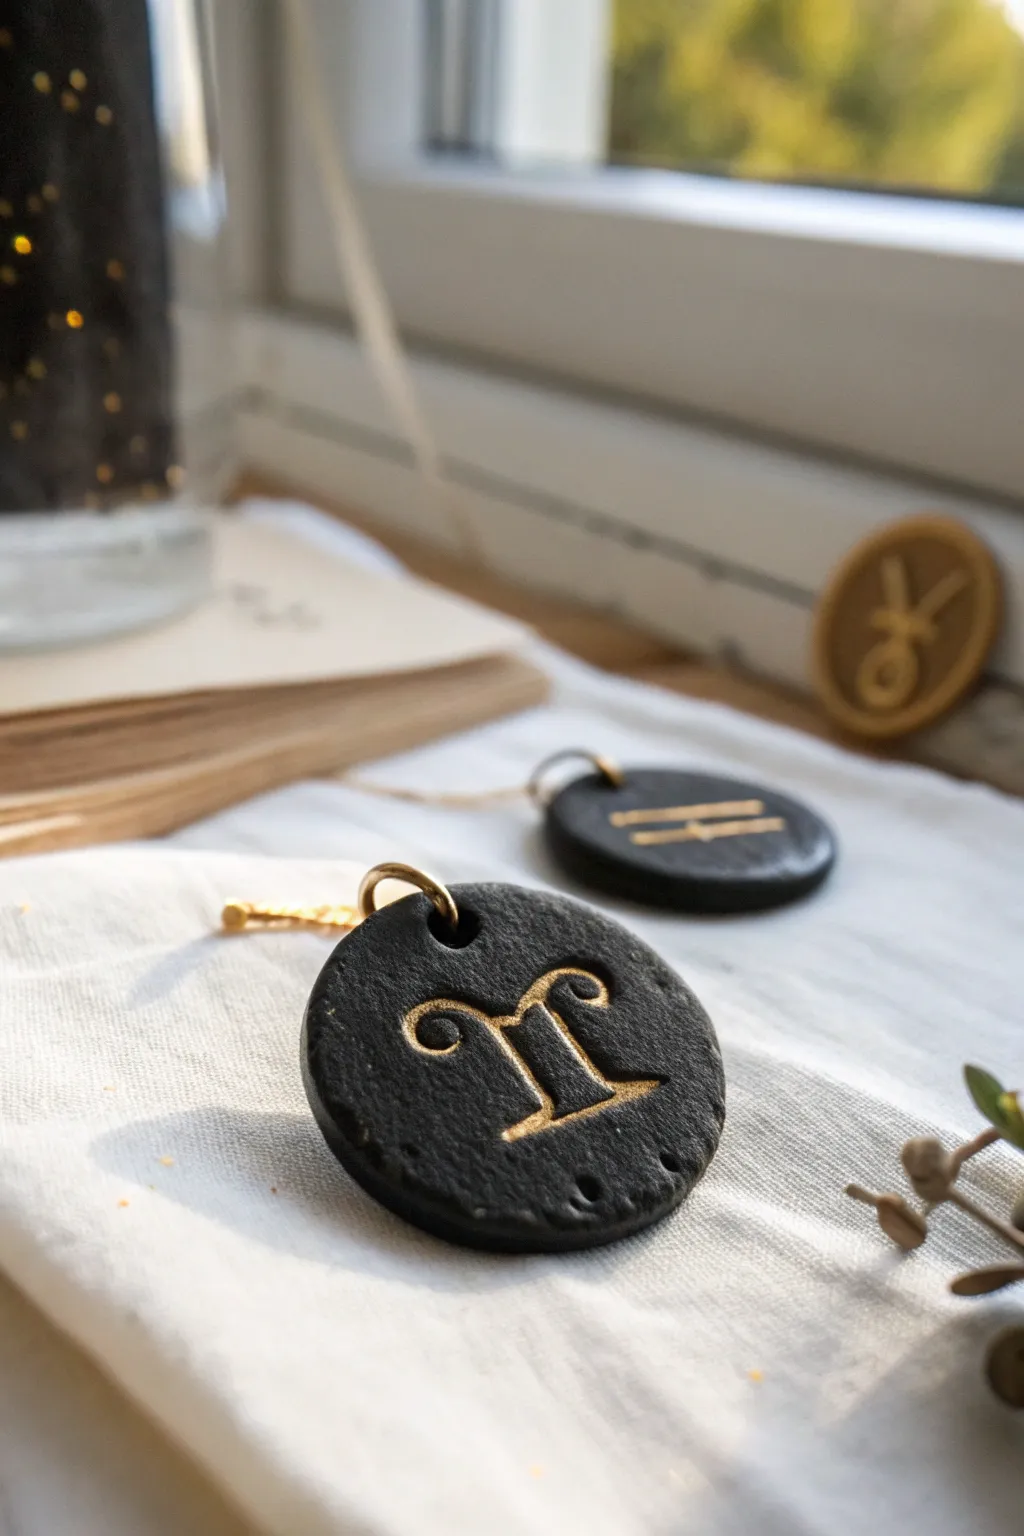
Monogram Initial Medallions
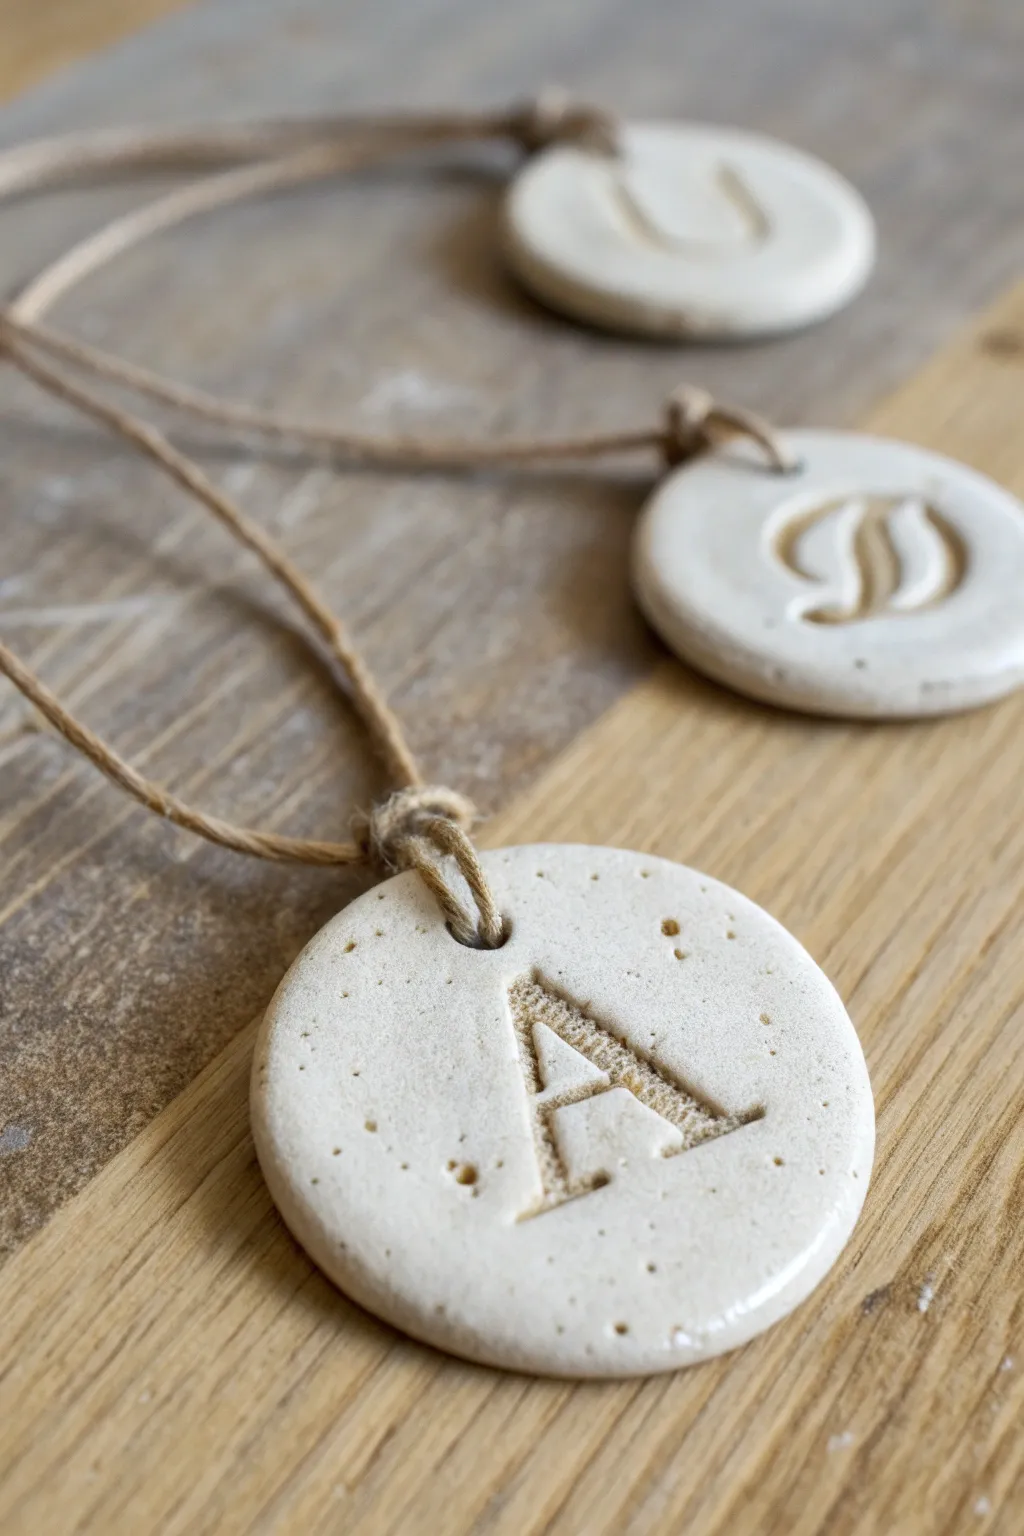
These charming, rustic medallions add a personal touch to any gift or decoration with their classic monogram impression. Using simple air-dry clay or polymer clay, you can achieve a polished, ceramic-like finish that highlights the raw texture of the imprinted letter.
Detailed Instructions
Materials
- White or cream air-dry clay (or polymer clay)
- Circular cookie cutter (approx. 2-3 inches)
- Letter stamps or imprinting set
- Rolling pin
- Parchment paper or craft mat
- Small straw or cocktail stick for hole punching
- Fine-grit sandpaper
- Clear matte varnish or sealant (optional)
- Jute twine or rustic string
Step 1: Shaping the Clay Base
-
Prepare your workspace:
Lay down a sheet of parchment paper or work on a clean craft mat to prevent the clay from sticking to your table. Take a handful of clay and knead it gently until it is pliable and smooth. -
Roll out the clay:
Using your rolling pin, flatten the clay to an even thickness of about 1/4 inch (6mm). Try to keep the thickness consistent so the medallions dry evenly and feel substantial. -
Inspect the surface:
Look closely at your rolled clay for any large air bubbles or unwanted debris. Smooth them out gently with your finger or re-roll if necessary to get a clean canvas. -
Cut the circles:
Press your circular cookie cutter firmly into the clay. Give it a slight wiggle before lifting it up to ensure a clean cut. Repeat this for as many medallions as you wish to make. -
Clean the edges:
After removing the excess clay from around your circles, you might notice slightly rough edges. Dip your finger in a tiny bit of water and run it along the perimeter to smooth away any jagged bits.
Clean Impressions
Dust your letter stamp lightly with cornstarch or cornflour before pressing. This acts as a release agent and creates a cleaner impression.
Step 2: Imprinting the Monogram
-
Position the stamp:
Select your desired letter stamp. Hover it over the center of the clay circle to visualize the alignment before you commit. -
Press evenly:
Press the stamp straight down into the center of the circle. Apply firm, even pressure ensuring the entire letter design sinks into the clay, but be careful not to push all the way through to the table. -
Remove the stamp:
Lift the stamp straight up to avoid dragging the clay or distorting the impression. If the edges of the letter look a bit pulled up, you can gently tap them down with a flat tool or your finger. -
Create the hanging hole:
Using a small straw or a cocktail stick, poke a hole near the top edge of the medallion. Ensure the hole is centered above the letter and large enough for your twine to pass through later.
Step 3: Finishing Touches
-
Dry the medallions:
Allow the clay to dry according to the package instructions. For air-dry clay, this usually takes 24-48 hours. I like to flip them over halfway through the drying process to prevent curling. -
Check for dryness:
The clay should look lighter in colour and feel hard to the touch when fully cured. -
Sand for perfection:
Once completely dry, use fine-grit sandpaper to gently buff the edges and surface. This removes any fingerprints or rough spots left from handling. -
Seal the surface (optional):
For longevity, brush on a coat of clear matte varnish. This protects the clay from moisture and gives it a finished look without making it too shiny. -
Add the twine:
Cut a length of jute twine. Fold it in half and feed the loop end through the hole from front to back. -
Secure the loop:
Pull the loose ends of the twine through the loop and tug gently to create a lark’s head knot, securing the string to the medallion.
Rustic Speckle Effect
Mix dried coffee grounds or black pepper into your white clay before rolling. This creates a speckled, stone-like texture mimicking ceramic glaze.
These custom medallions make effortless gift tags that can double as keepsake ornaments for years to come
Zodiac Symbol Medallions
Capture the magic of the cosmos with these striking black clay medallions featuring hand-carved, gold-filled zodiac symbols. The contrast between the deep, matte charcoal clay and the shimmering metallic paint creates a sophisticated, ancient-artifact aesthetic perfect for personalized jewelry.
Step-by-Step
Materials
- Black polymer clay (or air-dry clay)
- Small rolling pin or acrylic roller
- Round cookie cutter (approx. 1-1.5 inch diameter)
- Needle tool or toothpick
- Small metal jump rings
- Gold acrylic paint or gold leafing pen
- Fine detail paintbrush (size 0 or 00)
- Parchment paper or baking tile
- Sandpaper (fine grit)
- Matte varnish (optional)
Step 1: Shaping the Base
-
Condition the clay:
Start by taking a chunk of black polymer clay and kneading it thoroughly in your hands until it becomes soft and pliable. This warmth makes it easier to work with and prevents cracking. -
Roll out the slab:
Place the conditioned clay on parchment paper or a clean work surface. Use your roller to flatten it into an even sheet, aiming for a thickness of about 4mm to 5mm so they have a nice weight. -
Cut the circles:
Press your round cookie cutter firmly into the clay slab to create clean circle shapes. Gently push the clay out of the cutter if it sticks. If edges are rough, smooth them lightly with your fingertip. -
Texture the surface (optional):
To mimic the slightly rustic, stone-like texture seen in the photo, lightly tap the surface with a piece of crumpled aluminum foil or coarse sandpaper before carving.
Step 2: Carving and Baking
-
Draft the symbol:
Using a needle tool, very lightly scratch the outline of your chosen zodiac sign onto the clay surface. Don’t go deep yet; just make a faint guide to ensure your placement is centered. -
Carve the design:
Press the needle tool deeper into your guide lines to carve out the symbol. I like to widen the lines slightly by moving the tool back and forth, creating a distinct channel for the gold paint to sit in later. -
Add a hanging hole:
Use the needle tool or a small straw to pierce a hole near the top edge of the medallion. Make sure the hole is large enough to fit your jump ring comfortably. -
Final smoothing:
Inspect the edges of your carving. If there are little burs or crumbs of clay sticking up, gently smooth them down or brush them away with a soft, dry brush. -
Bake the clay:
Place your medallions on a baking tile or parchment-lined tray. Bake according to the manufacturer’s instructions on your specific package of clay (usually 275°F/135°C for 15-30 minutes). -
Cool down:
Once baking is complete, remove the tray from the oven and let the clay cool completely before moving to the painting stage.
Fixing Mistakes
Messy paint job? Wait for the acrylic to fully dry, then gently sand the surface of the medallion with fine-grit sandpaper. This removes surface paint while leaving the gold inside the grooves intact.
Step 3: The Golden Touch
-
Prime the paint:
Shake your gold acrylic paint or prime your gold leafing pen to ensure the metallic pigment is well-mixed. -
Fill the grooves:
Dip a fine detail brush into the gold paint and carefully trace inside the carved grooves of the zodiac symbol. Don’t worry if a little paint gets on the surface; we can fix that. -
Clean up edges:
If paint spilled over the edges of the carving, wait for it to dry slightly, then gently scrape the excess off the surface with a craft knife or use a damp cotton swab for precise cleanup. -
Seal the piece:
For longevity, apply a thin coat of matte varnish over the entire piece, or just seal the gold painted areas with a tiny bit of gloss to make them shine. -
Attach hardware:
Use pliers to open a gold jump ring. Thread it through the hole you created earlier and close it securely.
Constellation Variation
Instead of carving the glyph symbol, use a needle tool to poke small holes in the pattern of the star constellation. Fill these tiny dots with gold paint for a subtle, starry-night effect.
Your personalized zodiac talisman is now ready to be strung onto a necklace or gifted to a friend


What Really Happens Inside the Kiln
Learn how time and temperature work together inside the kiln to transform clay into durable ceramic.
Mandala Relief Medallions
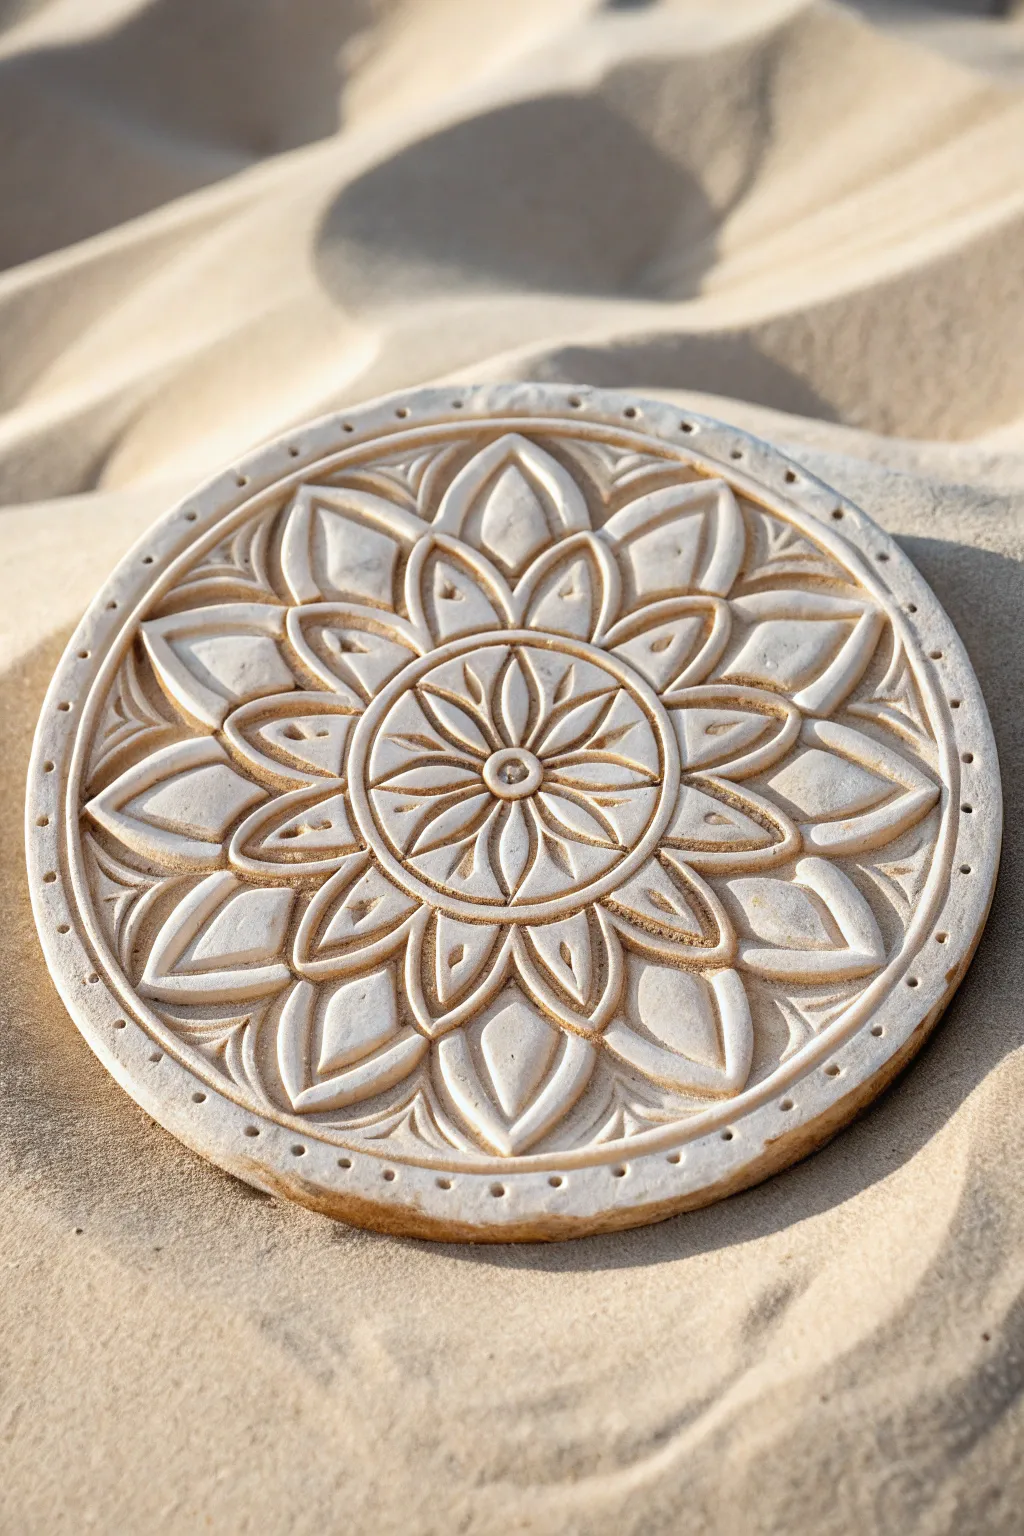
This detailed relief medallion captures the serene geometry of a mandala in warm, sand-toned clay. With a repeating floral motif and deep, clean carving lines, this piece creates a striking interplay of light and shadow.
How-To Guide
Materials
- White or beige polymer clay (or air-dry modeling clay)
- Rolling pin or pasta machine
- Round cookie cutter (approx. 4-5 inches)
- Needle tool
- Small ball stylus tool
- Rubber-tipped clay shaper (angle chisel)
- Small loop carving tool
- Ruler
- Compass (optional)
- Fine sandpaper
- Soft brush
- Cornstarch or baby powder (for release)
Step 1: Base Preparation
-
Condition the Clay:
Begin by thoroughly conditioning your clay until it is pliable and smooth. If you are using polymer clay, make sure there are no air bubbles trapped inside. -
Roll the Slab:
Roll the clay out into an even slab, approximately 1/4 inch thick. You want it substantial enough to handle deep carving without becoming fragile. -
Cut the Circle:
Dust your round cookie cutter with a little cornstarch to prevent sticking, then press firmly into the slab to cut out your perfect circle. -
Smooth the Edges:
Gently run your finger dipped in a tiny bit of water (for air-dry) or baby oil (for polymer) around the rim to soften the sharp cut edge.
Step 2: Mapping the Geometry
-
Find the Center:
Use your ruler to find the exact center of the circle and mark it lightly with a needle tool. -
Mark Concentric Rings:
Lightly etch three concentric circles radiating from the center. I find using a compass with a very light touch works best here to keep everything symmetrical. -
Divide into Sections:
Divide the circle into eight equal ‘pie’ slices using light guide lines. These will help you align the petals perfectly.
Uneven Petals?
Make a paper template first! Fold a paper circle into eighths, cut your petal shape, unfold it, and use it to lightly trace the design onto the clay before carving.
Step 3: Sculpting the Relief
-
Create the Center Button:
Press a small ball of clay into the center point and flatten it slightly to form the central hub. -
Outline Inner Petals:
Using the smallest concentric ring as a guide, use your needle tool to carve the outline of eight small, pointed petals radiating from the center. -
Carve Inner Petal Depth:
Use a small loop tool or a triangular sculpting tool to remove a thin layer of clay from the background *inside* the petals, leaving a raised ridge down the center of each one. -
Outline Middle Layer:
Move to the next guide ring. Carve the outlines for the second tier of larger, wider petals that sit between the points of the inner star. -
Sculpt Middle Petals:
Use your rubber-tipped shaper to press down the clay around these new petals, creating a beveled effect that makes them appear to overlap the inner layer. -
Define the Outer Ring:
Carve the final, largest set of petals reaching nearly to the edge of the disc. Ensure the tips are sharp and the curves are symmetrical. -
Deepen the Separations:
Go back over all main outline cuts with the needle tool, holding it vertically to create deep, dark separation lines that define the relief. -
Add Texture Details:
Inside the largest petals, use a small carving tool to create a recessed teardrop shape, adding complexity to the negative space. -
Border Work:
Use a ruler or steady hand to carve a clean, consistent border line about 1/8 inch from the medallion’s edge. -
Stipple the Rim:
Using the small ball stylus, press evenly spaced dots all around the rim between the outer edge and the border line you just carved. -
Final Smoothing:
Before curing or drying, use a soft brush and a little solvent (or water) to smooth out any rough tool marks or clay crumb crumbs.
Ancient Stone Effect
After baking, apply a diluted wash of browned umber acrylic paint. Wipe it off the surface immediately, leaving the dark paint trapped only in the carved crevices.
Step 4: Finishing
-
Cure or Dry:
Bake according to your polymer clay package instructions or let your air-dry clay set for at least 24-48 hours. -
Sanding:
Once fully hardened, lightly sand the surface with fine-grit sandpaper to remove any sharp burrs and give the piece a stone-like matte finish.
Place your finished medallion on a shelf or mount it in a shadow box to admire the interplay of light on your carving work
Marbled Stone-Look Medallions
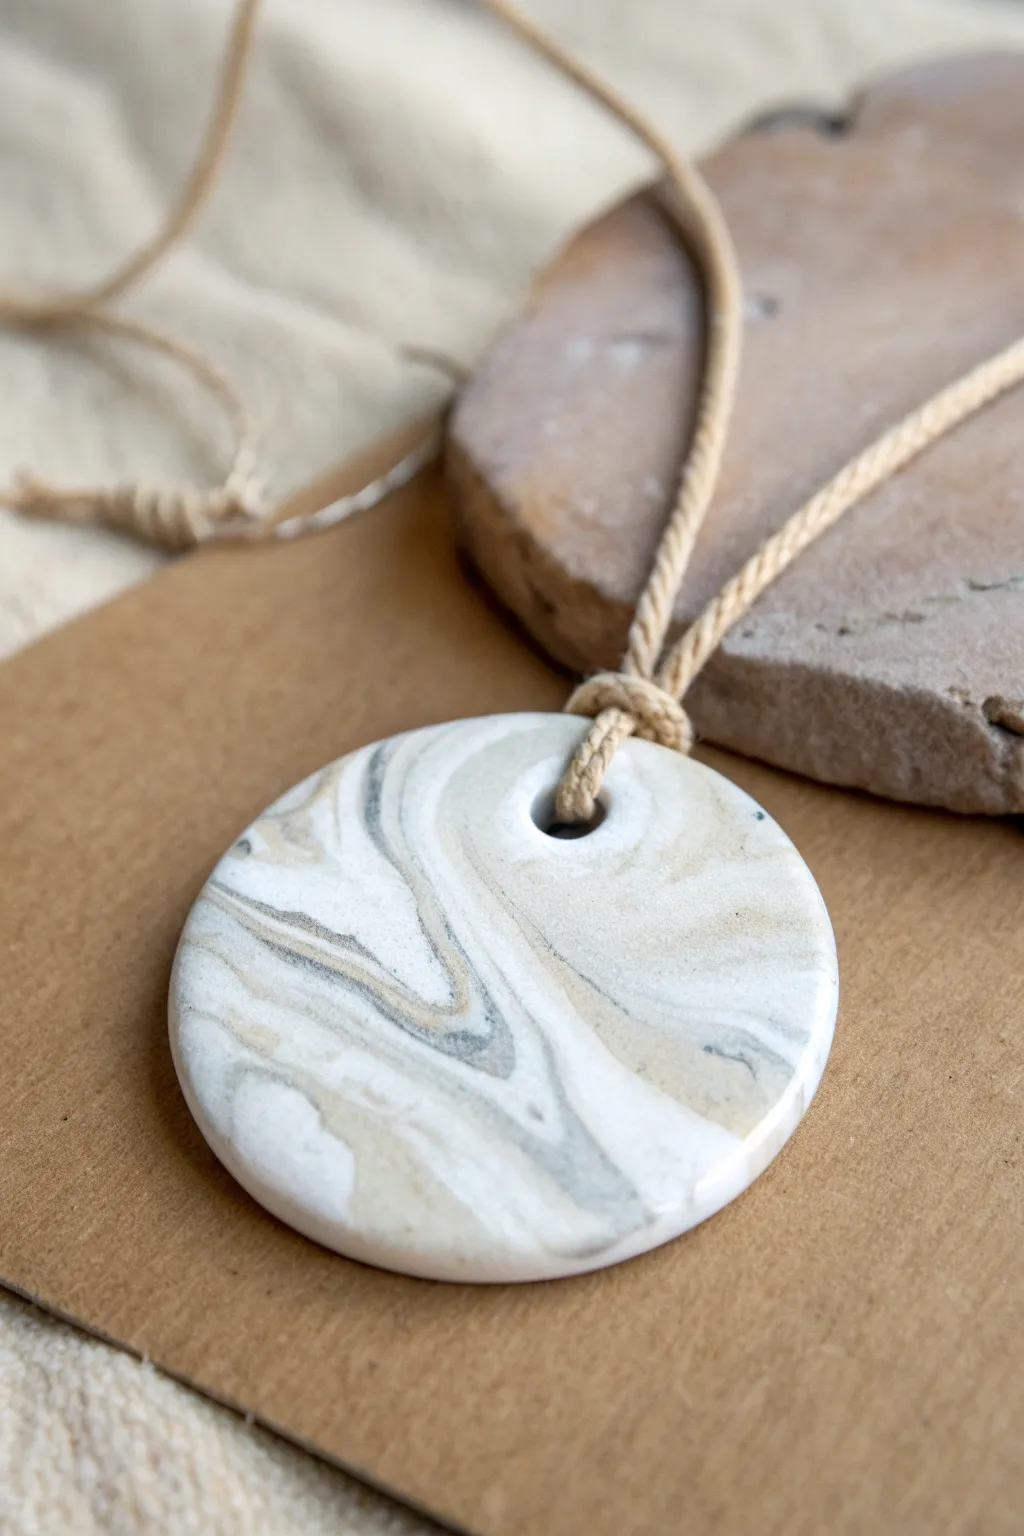
Achieve a sophisticated, earthy aesthetic with this marbled polymer clay pendant that mimics the look of natural agate or sandstone. This project uses simple mixing techniques to create swirls of white, beige, and grey that are one-of-a-kind, resulting in a lightweight but substantial piece of wearable art.
Step-by-Step
Materials
- White polymer clay
- Beige or tan polymer clay
- Translucent or grey polymer clay
- Acrylic rolling pin or clay machine
- Round circle cutter (approx. 2-3 inches)
- Small straw or circular cutter (for the hole)
- Fine-grit sandpaper (400, 600, 1000 grit)
- Gloss or satin polymer clay varnish (optional)
- Soft paintbrush
- Ceramic tile or glass work surface
- Beige twisted cotton cord
Step 1: Prepping and Marbling
-
Condition the clay:
Start by warming up small amounts of your white, beige, and grey clays in your hands. Knead them individually until they are soft and pliable, which prevents cracking later. -
Form clay ropes:
Roll each color into distinct snakes or ropes of varying thickness. For this specific look, use about 60% white clay, 30% beige, and just a hint of grey. -
Twist the colors:
Gather your ropes together and twist them into one large candy-cane shape. Fold this large rope in half and twist it again. -
Roll and fold:
Roll the twisted rope into a smooth log. Lengthen it by rolling on your work surface, then fold it over on itself again. Repeat this stopping point just before the colors fully blend into a muddy uniform shade. -
Create a ball:
Once you see nice distinct striations, roll the clay into a tight ball. This helps randomize the internal pattern.
Clean Cuts
To avoid fingerprints or distortion when cutting your circle, place a piece of plastic wrap over the clay before pressing your cutter down. This creates a lovely domed edge.
Step 2: Shaping and Cutting
-
Flatten the slab:
Using your acrylic roller, flatten the ball into a slab. Aim for a thickness of about 1/4 inch (6mm) to give the pendant a stone-like weight and durability. -
Check the pattern:
Inspect your slab. I usually check both sides at this stage because the pattern on the bottom might actually be prettier than the top. -
Cut the primary circle:
Place your large circle cutter over the most attractive section of the marbling. Press down firmly to cut the shape, then lift away the excess clay. -
Smooth the edges:
Gently run your finger around the perimeter of the cut circle to soften the sharp edge left by the cutter. -
Create the suspension hole:
Use a small straw or a mini circle cutter to punch a hole near the top edge. Ensure the hole is large enough for your thick cotton cord to pass through easily.
Step 3: Baking and Finishing
-
Bake the pendant:
Place the clay piece on a ceramic tile or baking sheet lined with parchment paper. Bake according to the manufacturer’s instructions for your specific brand of clay (usually 275°F/135°C for 30 minutes). -
Cool down:
Allow the medallion to cool completely in the oven with the door cracked open to prevent thermal shock. -
Sand for stone texture:
Once cool, wet-sand the piece under running water. Start with 400 grit to smooth edges, move to 600, and finish with 1000 grit for a silky, stone-smooth feel. -
Seal the surface:
For a polished stone look, apply a very thin layer of satin or gloss varnish with a soft brush. Let it dry completely. -
Attach the cord:
Fold a long length of beige twisted cord in half. Insert the looped end through the pendant’s hole from front to back. -
Secure with a lark’s head knot:
Pull the loose ends of the cord through the loop you just pushed through the hole. Tighten the knot so it sits snugly against the top of the medallion. -
Final adjustment:
Tie the ends of the cord at your desired necklace length to complete the assembly.
Add Sparkle
Mix a pinch of fine gold leaf or glitter into the white clay before marbling. It will create subtle veins of shimmer that look like fool’s gold deposits.
Wear your new piece proudly or gift it as a handmade treasure that looks delightfully high-end

TRACK YOUR CERAMIC JOURNEY
Capture glaze tests, firing details, and creative progress—all in one simple printable. Make your projects easier to repeat and improve.
Metallic Rubbed Medallions
Create these effortlessly chic necklaces that combine the raw, organic texture of speckled clay with sophisticated metallic accents. The impressed designs are highlighted with gold rub-on wax or paint, giving each piece a subtle, antique glow that perfectly complements the natural cord.
Step-by-Step Tutorial
Materials
- White or granite-effect air-dry clay (or polymer clay)
- Small rolling pin
- Circular clay cutter (approx. 2 inches)
- Botanical stamps or actual dried flowers/leaves for impression
- Drinking straw or small circular tool (for the hole)
- Sandpaper (fine grit)
- Gold leaf rub-on paste or metallic acrylic paint
- Small detail paintbrush or cotton swab
- Sealant (spray varnish or Mod Podge)
- Leather or faux suede cord
Step 1: Shaping the Clay Base
-
Prepare the workspace:
Lay down a clean, flat surface like a silicone mat or parchment paper to prevent the clay from sticking. This ensures a smooth back for your medallions. -
Condition the clay:
Take a handful of your chosen clay. If you want that lovely speckled granite look shown in the darker pendant, you can mix a pinch of used coffee grounds or cracked pepper into white clay, kneading until evenly distributed. -
Roll it out:
Roll the clay into a slab that is roughly 1/4 inch thick. You want it substantial enough to hold the imprint without cracking but light enough to wear comfortably. -
Cut the shapes:
Using your circular cutter, press firmly into the clay slab to create clean discs. If you don’t have a cutter, a small glass rim works perfectly. -
Smooth the edges:
Dip your finger in a little water and gently run it along the cut edges of each circle to soften any sharp ridges or loose bits of clay.
Paint Residue Issues?
If the gold paint stains the top surface too much, lightly sand the surface again after the paint dries. This removes the top layer of pigment.
Step 2: Impressing the Design
-
Choose your focal point:
Select your stamps or dried botanical elements. Simple leaf sprigs, wheat stalks, or geometric flower bursts work best for this scale. -
Make the impression:
Place the stamp or plant material onto the center of a clay disc. Press down firmly and evenly. I find using a small acrylic block to press helps get an even depth without distorting the circle shape. -
Check the depth:
Carefully peel back the stamp. The indentation needs to be deep enough to hold the gold pigment later, but not so deep it cuts through the medallion. -
Create the hanging hole:
Use a drinking straw or a small circular cutter to punch a hole near the top edge. Ensure there is at least a few millimeters of clay above the hole for strength. -
Dry completely:
Set the medallions aside to dry. If using air-dry clay, this usually takes 24-48 hours. Flip them occasionally to ensure even drying and prevent warping.
Depth Trick
Dust your stamp or botanicals with cornstarch before pressing into the clay. This acts as a release agent and prevents the clay from sticking.
Step 3: Finishing and Assembly
-
Sand for smoothness:
Once fully cured, use fine-grit sandpaper to buff the edges and surface. Focus on the rim to make sure it feels comfortable against the skin. -
Apply the metallic accent:
Dip a small detail brush or your fingertip into gold rub-on paste or metallic paint. Gently rub it into the recessed grooves of your stamped design. -
Wipe the surface:
Before the paint dries, wipe the surface of the medallion with a slightly damp cloth or paper towel. This removes the gold from the raised ‘top’ surface while leaving it trapped in the deep grooves of the pattern. -
Seal the piece:
To protect the clay and the metallic finish from moisture, apply a thin coat of matte sealant or spray varnish. -
Prepare the cord:
Cut a length of leather or suede cord to your desired necklace length. A simple long strand usually looks best with these rustic pendants. -
Attach the pendant:
Fold the cord in half to create a loop. Push this loop through the hole in the pendant from front to back. -
Secure with a lark’s head knot:
Pull the loose ends of the cord through the loop you just pushed through the hole. Pull tight to secure the pendant firmly against the cord.
Wear your handcrafted botanical necklace with pride tailored to your favorite natural aesthetic
Antiqued Wash Texture Medallions
This project transforms simple air-dry or polymer clay into an heirloom-quality piece using an antiquing wash technique. The final result combines a matte, bone-like finish with a deeply contrasted floral impression that brings out every delicate detail.
Step-by-Step
Materials
- White polymer clay or air-dry clay (e.g., DAS or Sculpey)
- Oval shaped clay cutter
- Floral or botanical rubber stamp
- Rolling pin or pasta machine
- Brown acrylic paint
- Antique glazing medium (optional)
- Small paintbrush
- Paper towels or soft cloth
- Fine grit sandpaper (400-600 grit)
- Leather cord (1.5mm or 2mm)
- Jump ring and jewelry pliers
- Drill bit or toothpick for hole making
- Matte spray varnish
Step 1: Shaping the Base
-
Prepare the Clay:
Begin by conditioning your white clay until it is soft and pliable. If using polymer clay, knead it thoroughly in your hands to activate the plasticizers. -
Roll to Thickness:
Roll the clay out onto a smooth workspace or silicone mat. Aim for a distinct thickness of about 4-5mm; you want the pendant to have a substantial, stone-like feel rather than being fragile and thin. -
Cut the Shape:
Press your oval cutter firmly into the clay. Lift the cutter and gently remove the excess clay from around the shape before lifting the oval itself to prevent distortion. -
Smooth the Edges:
Dip your finger in a little bit of water (for air-dry clay) or baby oil (for polymer) and gently run it along the cut edge to soften any sharp ridges left by the cutter.
Step 2: Creating the Design
-
Ink the Stamp:
Instead of stamping directly into dry clay, lightly dust your rubber stamp with cornstarch or brush it with a tiny amount of oil. This acts as a release agent so the intricate floral lines don’t get stuck. -
Press the Design:
Position the stamp over the center of the oval. Press down firmly and evenly, ensuring you rock your hand slightly to catch the edge details, but be careful not to push the stamp all the way through the clay. -
Create the Hanging Hole:
Use a toothpick or a small straw to pierce a hole near the top of the oval. Make sure the hole is large enough to accommodate your jump ring later, keeping in mind clay shrinks slightly when drying. -
Add Texture (Optional):
For that weathered stone look seen in the photo, gently tap the blank areas around the floral design with an old toothbrush or a piece of crumpled aluminum foil.
Paint sticking?
If the acrylic paint is drying too fast while wiping back, keep your paper towel quite wet. This re-activates the paint on the surface, allowing you to clean the high points effectively.
Step 3: Curing and Antiquing
-
Cure the Piece:
Bake your polymer clay according to the package instructions, or let your air-dry clay sit for 24-48 hours until fully hardened and white. -
Sand for Finish:
Once hard, take your fine-grit sandpaper and lightly buff the surface and edges. This removes fingerprints and creates a slightly porous surface that grabs the paint better. -
Prepare the Wash:
Mix a small amount of dark brown acrylic paint with water (about a 1:1 ratio). I usually add a drop of glazing medium here to help the paint flow into the crevices without drying too fast. -
Apply the Paint:
Generously slather the paint mixture over the entire front of the pendant, ensuring it sinks deep into the stamped floral grooves. -
Wipe Back:
Immediately take a damp paper towel and wipe the surface. Use a flat, sweeping motion to remove the paint from the raised areas while leaving it trapped in the recessed design. -
Refine the Look:
If too much paint remains on the high points, use a slightly cleaner part of the towel. If you removed too much, simply re-apply and wipe again until the contrast is sharp. -
Seal the Surface:
Allow the paint to dry completely. To protect the wash and giving it a finished feel, spray the piece with a light coat of matte varnish.
Try a faux-stone look
Mix some used coffee grounds or cracked pepper into the clay before rolling it out. This adds internal speckling that mimics real granite or limestone.
Step 4: Final Assembly
-
Attach Hardware:
Open a sturdy jump ring using your jewelry pliers and thread it through the hole you created earlier. Close the ring securely. -
Thread the Cord:
Pass your leather cord through the jump ring. You can tie simple sliding knots at the ends of the leather to make the necklace adjustable.
Enjoy wearing your new handcrafted artifact that looks like it was discovered in an ancient treasure trove
Framed Cameo-Style Medallions
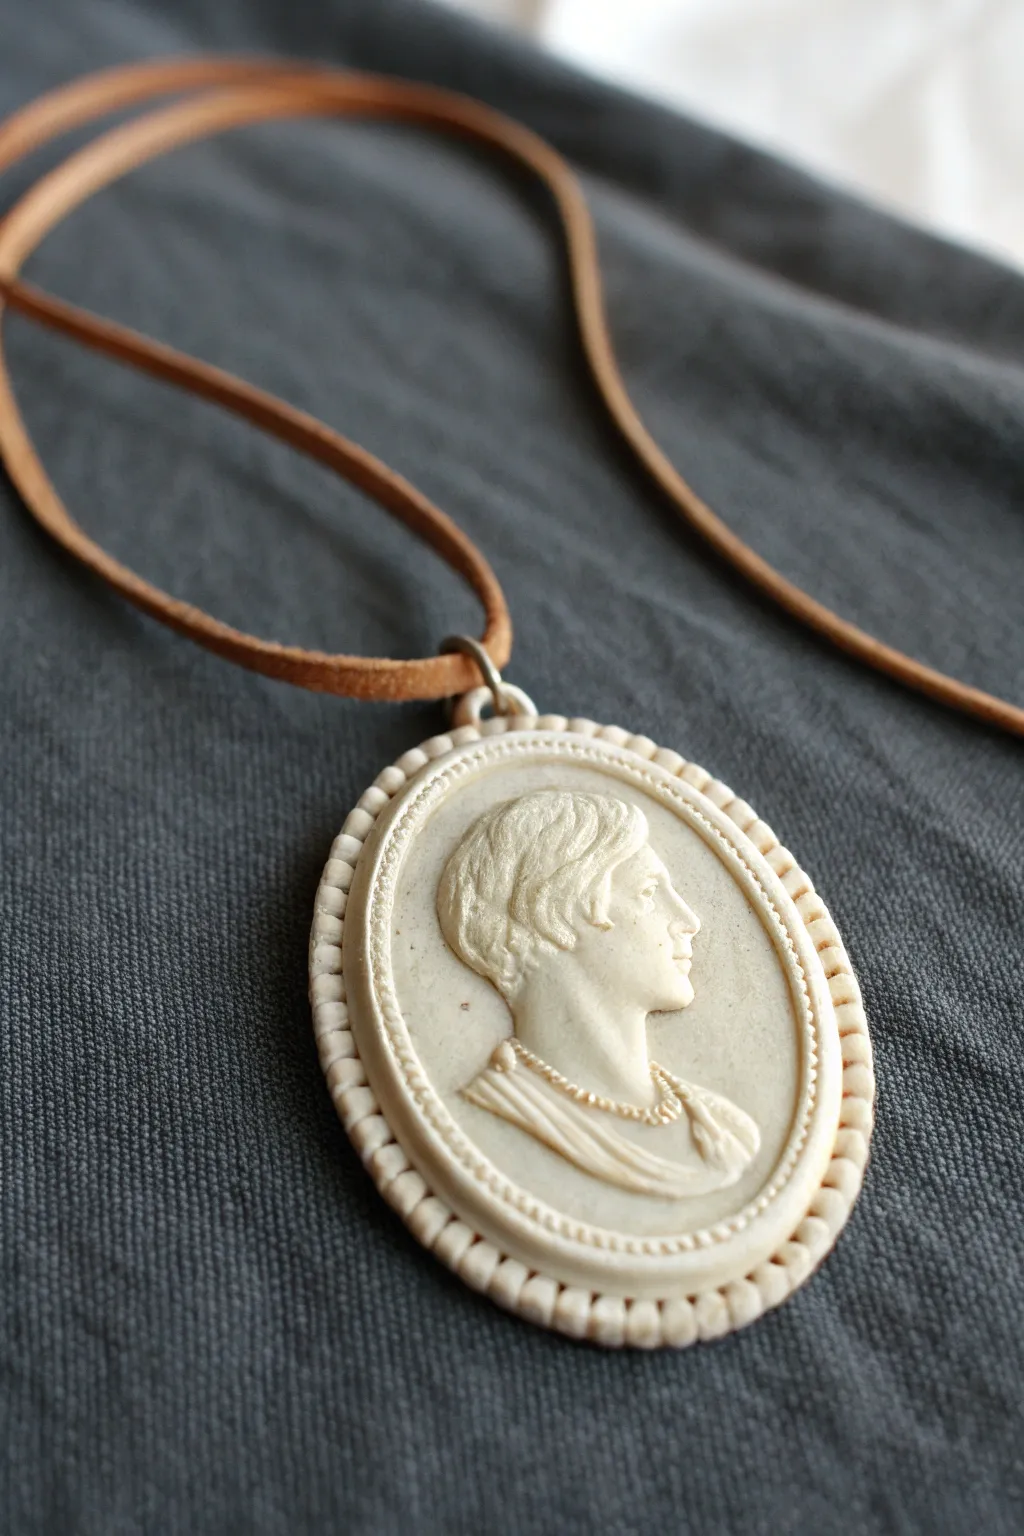
Capture the elegance of vintage ivory carving with this sophisticated polymer clay medallion. The creamy, monochromatic finish highlights the delicate profile and beaded border without needing complex painting techniques.
Step-by-Step Tutorial
Materials
- Off-white or translucent white polymer clay
- Cameo mold (silicone or hard plastic)
- Cornstarch or baby powder (release agent)
- Oval clay cutter (sized to fit your cameo)
- Small ball stylus tool
- Straight blade or craft knife
- Eye pin
- Brown leather cord
- Oven for baking
- Fine-grit sandpaper (400-800 grit)
- Matte varnish (optional)
Step 1: Molding the Centerpiece
-
Condition the Clay:
Begin by thoroughly conditioning your off-white polymer clay. You want it warm and pliable. I find mixing a tiny bit of translucent clay into plain white creates a more realistic ‘bone’ or ‘ivory’ look than just opaque white. -
Prepare the Mold:
Dust your cameo mold lightly with cornstarch or baby powder. Tap out any excess. This ensures the clay releases easily without destroying fine details like the hair or necklace. -
Press and Fill:
Press a small ball of conditioned clay firmly into the deepest part of the mold first (usually the face). Add more clay until the mold is slightly overfilled, pushing hard to capture every crevice. -
Trim the Back:
Use your straight blade to slice off the excess clay flush with the back of the mold. This creates a flat surface for your medallion. -
Release the Cameo:
Gently flex the mold to pop out the cameo. Lay it on your baking tile or parchment paper.
Distorted Face?
If the cameo warps when removing it from the mold, try popping the clay-filled mold in the freezer for 5-10 minutes. The clay will stiffen and release perfectly.
Step 2: Creating the Setting
-
Cut the Base:
Roll out a sheet of the same clay to about 1/4 inch thickness. Place your molded cameo in the center to measure, then use an oval cutter that is slightly larger than the cameo to cut the base shape. -
Attach the Cameo:
Apply a tiny dab of liquid clay or translucent sculpey to the back of your molded cameo and press it gently onto the oval base. Smooth the edges where they meet if necessary, or leave them distinct for a framed look. -
Create the Beaded Rim:
Roll a very thin snake of clay. Wrap this snake around the recessed area where the cameo meets the raised border, or place it around the very outer edge of the oval base. -
Texture the Rim:
Using a small ball stylus or a dull needle tool, press regular indentations into that clay snake to create a faux-beaded or rope effect. Keep your spacing consistent for a professional finish. -
Add Exterior Detail:
If your cutter left a wide margin (as seen in the photo), urge the clay gently with a modeling tool to create vertical grooves along the outer edge, mimicking a carved stone setting. -
Insert Hardware:
Carefully push an eye pin into the top center of the oval. You may need to trim the pin if it’s too long. Secure it with a dot of liquid clay to ensure it bonds during baking.
Antique It
After baking, rub a little brown acrylic paint over the piece and wipe it off immediately with a damp cloth. The paint will stay in the crevices for an aged look.
Step 3: Finishing Touches
-
Bake:
Bake the piece according to your clay manufacturer’s instructions. Usually, this is around 275°F (130°C) for 15-30 minutes per 1/4 inch of thickness. -
Cool and Sand:
Allow the pendant to cool completely. Use fine-grit sandpaper to gently smooth the back and any rough edges on the rim, being careful not to scratch the face. -
Seal (Optional):
To protect against dirt, apply a very thin coat of matte varnish. Avoid glossy finishes if you want to maintain the natural bone appearance. -
String It Up:
Thread a simple brown leather cord through the eye pin loop. Tie a knot at the ends to complete the rustic, vintage necklace.
Now you have a timeless accessory that looks like a treasured heirloom
Cutout Window Medallions
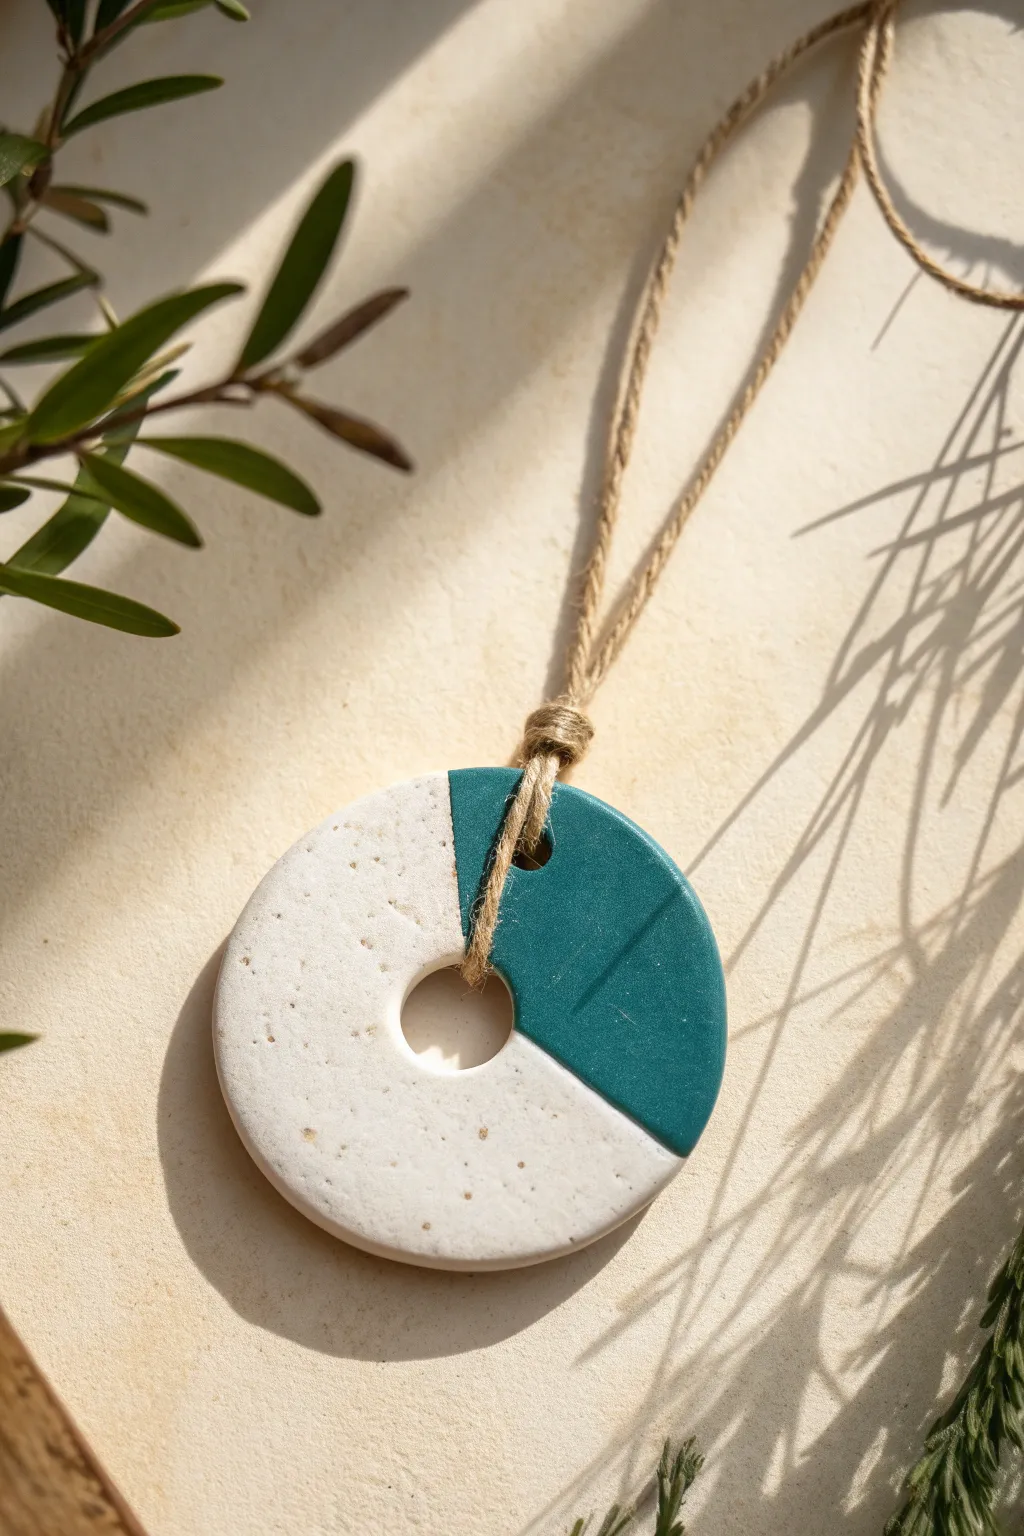
This minimalist clay pendant combines raw, speckled texture with a crisp pop of teal glaze. Its simple donut shape and asymmetrical color blocking make it a modern piece that feels organic and grounded.
How-To Guide
Materials
- Speckled white stoneware clay (or polymer clay with speckled effect)
- Rolling pin
- Circle cutters (one large approx. 2.5″, one small approx. 0.5″)
- Deep teal ceramic glaze (if using kiln-fire clay) or acrylic paint (if using air-dry/polymer)
- Needle tool or toothpick
- Small paintbrush
- Jute twine or hemp cord
- Sandpaper (fine grit)
- Sponge
- Masking tape or painter’s tape
Step 1: Shaping the Medallion
-
Prepare the clay:
Begin by wedging a small ball of speckled clay to remove air bubbles. Flatten it onto your work surface with your palm. -
Roll it out:
Use a rolling pin to create an even slab. Aim for a thickness of about 1/4 inch (6mm). If you want perfect uniformity, place wooden slats on either side of the clay as guides while you roll. -
Cut the outer circle:
Press your larger circle cutter firmly into the clay slab and twist slightly to release. Lift the cutter and peel away the excess clay from the outside. -
Create the center window:
Take the smaller circle cutter and position it in the exact center of your clay round. Press down to punch out the ‘donut’ hole, removing the inner plug of clay. -
Punch the hanging hole:
Using a needle tool or a straw, punch a small hole near the top edge of the medallion specifically for the cord. Make sure it isn’t too close to the edge to prevent cracking. -
Smooth the edges:
Dip your finger or a sponge lightly in water and run it around both the outer rim and the inner cutout to soften any sharp cutting lines.
Clean Lines Tip
If you struggle with glaze bleeding under the tape, seal the tape edge with a thin layer of wax resist or liquid latex before brushing on your teal color.
Step 2: Firing and Glazing
-
First drying phase:
Allow the clay piece to dry slowly until it reaches the leather-hard stage, then let it dry completely to bone dry. This usually takes a few days. -
Bisque fire:
Fire the piece in a kiln to bisque temperature (usually cone 04). If using air-dry or polymer clay, follow the specific curing or drying instructions on your package instead. -
Sand for smoothness:
Once cool, lightly sand any rough spots on the surface or edges with fine-grit sandpaper. Wipe away all dust with a damp sponge. -
Mask the design:
To get that crisp diagonal line, apply a piece of masking tape or painter’s tape across the face of the medallion. Press the edge of the tape down firmly to prevent bleed-under. -
Apply color:
Paint the exposed half of the medallion with your deep teal glaze. I usually apply three even coats, letting each one dry slightly in appeal to ensure solid, opaque coverage. -
Remove tape:
Carefully peel back the tape while the last coat is still slightly damp to keep the edge sharp. Clean up any smudges immediately with a damp tool. -
Glaze fire:
Return the piece to the kiln for the glaze firing (temperature depends on your specific glaze). If using paint on non-fired clay, seal the paint with a glossy varnish instead.
Texture Twist
Before firing, press dried herbs or a piece of lace into the unglazed/white half of the clay. The glaze will stay smooth, creating a beautiful contrast.
Step 3: Assembly
-
Prepare the cord:
Cut a long length of jute twine, doubling the length you want the final necklace to hang at, plus a few extra inches for knotting. -
Lark’s head knot:
Fold the twine in half. Push the folded loop through the small punched hole at the top of the medallion from front to back. -
Secure the pendant:
Pull the loose tails of the twine through the loop and tighten gently so the knot sits snugly against the top of the clay piece. -
Add a decorative knot:
Tie a simple overhand knot with both strands together, positioning it directly above the Lark’s head knot to add a little rustic bulk to the connection point.
Your modern, geometric pendant is now ready to wear or gift to a friend
Embedded Bead Center Medallions

Capture the warmth of the sun in this rustic, earthy pendant that features a mesmerizing amber-colored bead nestled at its heart. The design uses simple carving techniques to create a tribal-inspired ray pattern, perfectly complementing the smooth, raised bezel in the center.
Detailed Instructions
Materials
- Beige or biscuit-colored polymer clay (or air-dry clay)
- Large flat oval cabochon or glass bead (amber or carnelian color)
- Circle clay cutter (approx. 2-2.5 inches)
- Small circle cutter (slightly larger than your bead)
- Needle tool or toothpick
- Carving tool or linoleum cutter
- Straw or small tube for the bail loop
- Leather cord or suede lace
- Wooden bead (large hole)
- Jump ring (antiqued bronze or copper finish)
- Rolling pin
- Sandpaper (fine grit)
Step 1: Base Construction
-
Prepare the clay:
Condition your beige clay until it is soft and pliable. Roll it out into a uniform sheet about 1/4 inch thick. You want it substantial enough to hold the weight of the central stone without bending. -
Cut the main shape:
Use your large circle cutter to punch out the main disk of the medallion. Peel away the excess clay and smooth the edges with your fingertip to remove any harsh lines left by the cutter. -
Create the bezel setting:
Roll a small snake of clay and flatten it slightly, or cut a smaller circle that is just larger than your stone. Place this directly in the center of your large disk to act as a platform for the bead. -
Embed the stone:
Press your chosen amber stone firmly into the center of the smaller clay platform. Push it down until the clay rises slightly around the edges of the stone to secure it. -
Form the decorative rim:
Roll a very thin, consistent snake of clay. Wrap this around the base of the stone, covering the seam where the stone meets the clay platform. Press it gently to adhere. -
Texture the rim:
Using a dull knife or a needle tool, make small, evenly spaced vertical indentations all around the thin clay snake you just applied. This creates a rope-like or cog-like texture that frames the gem beautifully.
Step 2: Detailing and Finishing
-
Add the sun rays:
With a V-gouge carving tool or the tip of a detailing knife, carve small triangular notches around the outer perimeter of the main disk. Aim for the points of the triangles to face inward towards the center stone. -
Attach the bail:
Roll a small loop or ‘snake’ of clay to create a sturdy bail. Attach this to the very top edge of the medallion, blending the clay at the back so it is seamless and strong. -
Pierce the bail:
While the bail clay is still soft, use a straw or a tool handle to create a hole large enough for your jump ring to pass through easily. -
Refine the surface:
Check the entire piece for fingerprints. I like to lightly brush the surface with a tiny bit of baby oil or water (depending on your clay type) to smooth everything out before curing. -
Cure the piece:
Bake the polymer clay according to the manufacturer’s package instructions. If using air-dry clay, allow it to dry completely for 24-48 hours until hard. -
Sand and buff:
Once cooled or fully dry, lightly sand the edges and the back with fine-grit sandpaper for a professional finish. Wipe away any dust with a damp cloth. -
Add hardware:
Open your antiqued bronze jump ring with pliers and thread it through the clay bail loop, then close it securely. -
Prepare the cord:
Thread a wooden bead onto your leather cord. This adds a rustic touch and helps the medallion hang nicely. -
Assemble the necklace:
Pass the leather cord through the jump ring and tie the ends of the cord with a secure knot, adjusting to your preferred wearing length.
Stone Security Tip
Apply a tiny dab of liquid clay or strong craft glue (like E6000) under the stone before pressing it in to ensure it never pops out after baking.
Uneven Carving?
Mark the 12, 3, 6, and 9 o’clock positions lightly first. This acts as a guide to keep your triangle spacing even all the way around the rim.
Now you have a timeless, sun-inspired talisman ready to wear with your favorite outfits
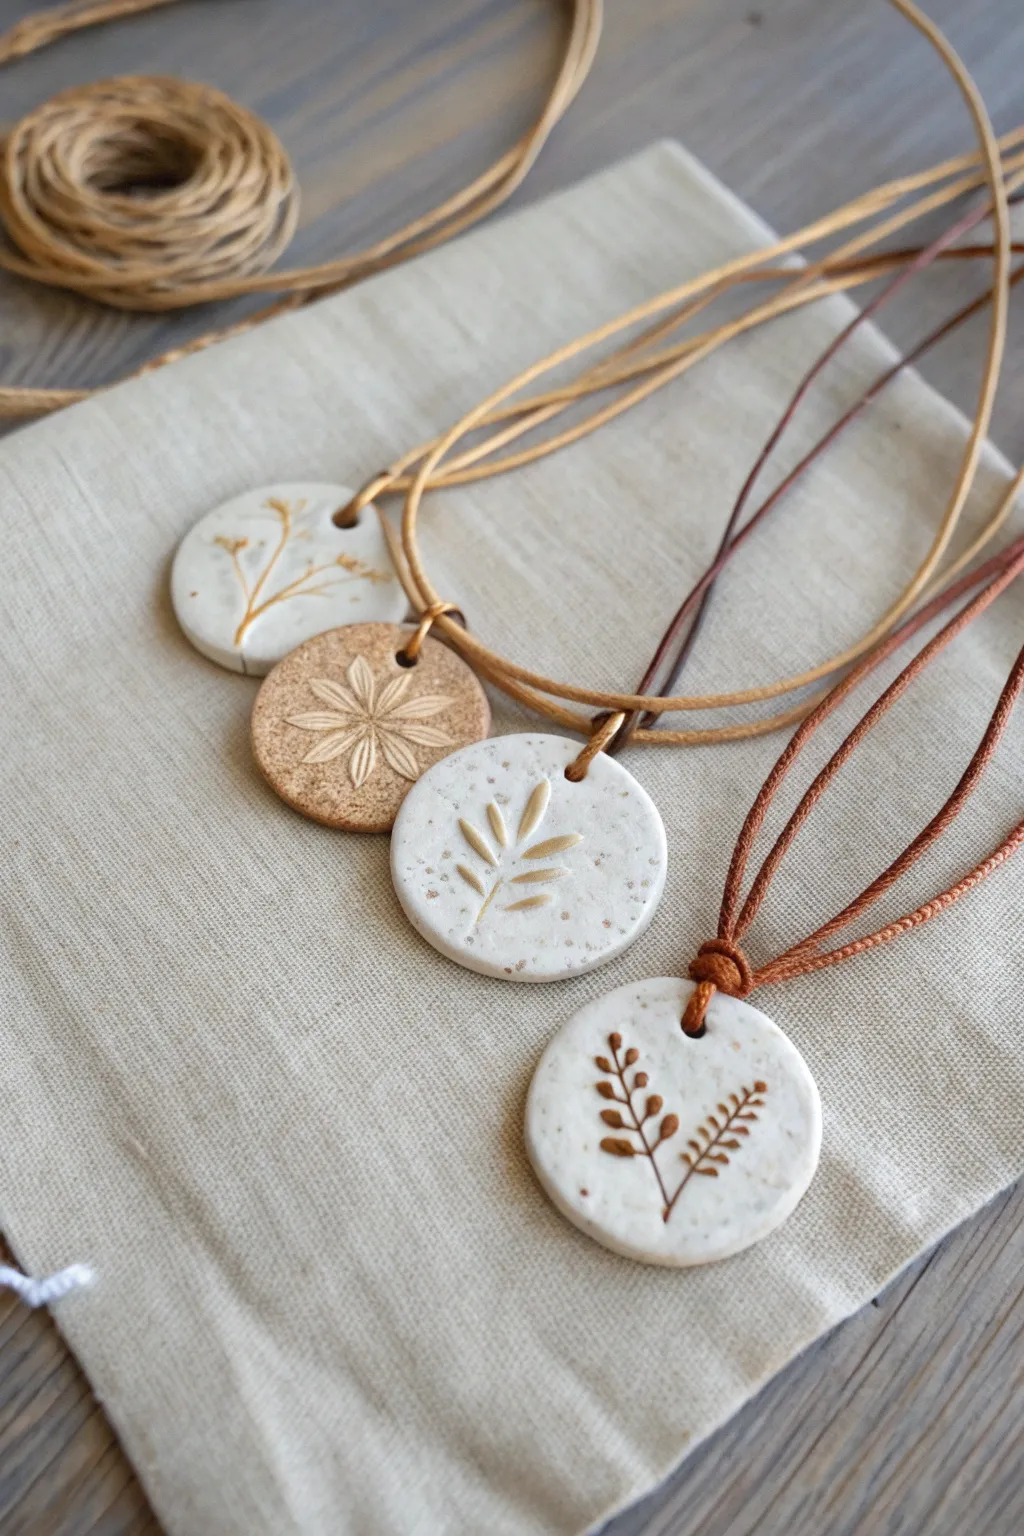
Raised Floral Cluster Medallions
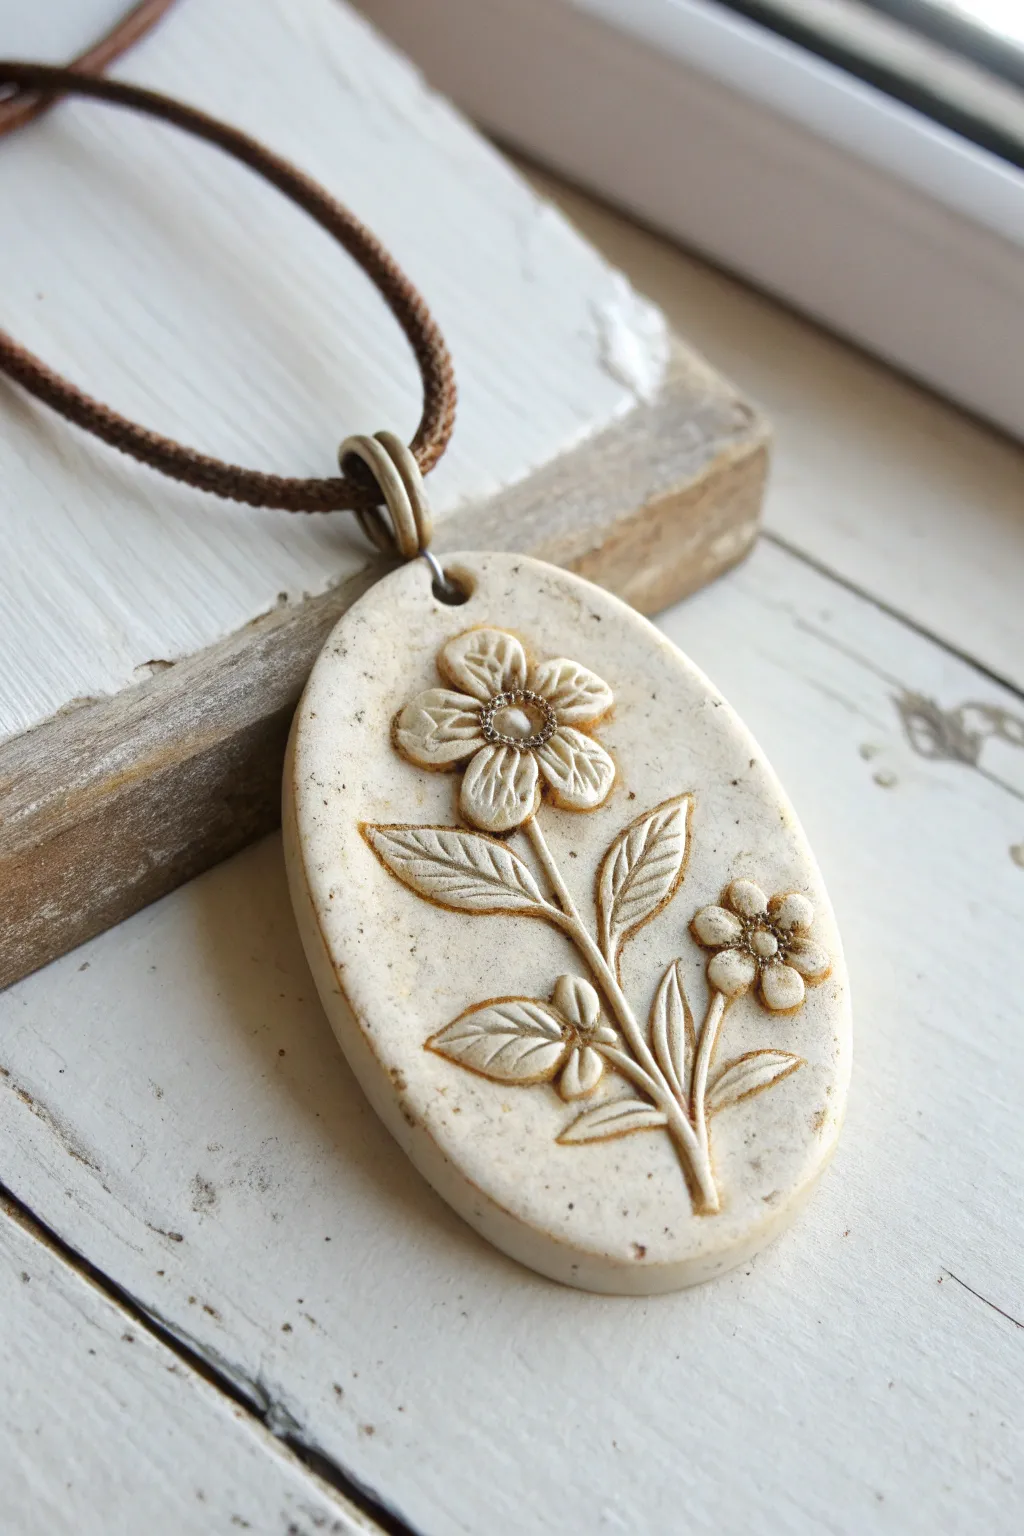
This charming oval pendant captures the beauty of a wildflower meadow with its raised floral motif and natural speckled finish. The antiqued detailing brings out every petal and leaf, creating a timeless accessory that looks like handcrafted ceramic.
Step-by-Step Guide
Materials
- Polymer clay (granite, sand, or speckled beige effect)
- Oval clay cutter
- Floral relief mold or texture mat
- Acrylic paint (burnt umber or sepia)
- Paper towels or sponge
- Small round paintbrush
- Needle tool or toothpick
- Sandpaper (fine grit)
- Jump ring (antique brass finish)
- Brown waxed cotton cord
- Pliers
- Fimo varnish (optional matt or satin)
Step 1: Shaping the Base
-
Condition the clay:
Start by kneading your speckled polymer clay until it is soft, pliable, and free of cracks. The warmth of your hands is essential here. -
Roll out a slab:
Using a rolling pin or pasta machine, flatten the clay to a uniform thickness of about 4mm to 5mm. You want it substantial enough to hold the design but not too heavy. -
Cut the shape:
Press your oval cutter firmly into the clay slab to create a clean shape. If you don’t have a cutter, you can trace an oval template with a craft knife. -
Smooth the edges:
Gently run your finger around the cut edge of the oval to soften any sharp corners created by the cutter.
Clean Edges Trick
Place a sheet of cling film over the clay before pressing down your oval cutter. This creates a beautifully rounded, ‘domed’ edge instantly, saving you sanding time later.
Step 2: Creating the Relief
-
Select your mold:
Choose a silicone mold that features a stemmed flower design. If your mold is sticky, lightly dust it with cornstarch. -
Mold the motif:
Press a small amount of fresh clay firmly into the floral mold. Ensure you push into all the deep crevices to capture the stamens and leaf veins. -
Trim the excess:
Use a flexible blade to slice off any clay that extends above the flat surface of the mold, ensuring the back of your flower appliqué is perfectly flat. -
Release the shape:
Gently flex the mold to pop out your clay flower sprig. Handle it carefully so you don’t distort the stem. -
Attach the design:
Place the molded flower onto the center of your oval base. Press it down very gently to fuse the clays without smashing the details. I sometimes use a tiny drop of liquid clay here for a stronger bond. -
Refine the connection:
Use a silicone styling tool or a needle tool to gently smooth the very edges of the stem where it meets the background, making it look like one cohesive piece. -
Pierce the hole:
Use a needle tool or a small straw to punch a hole at the very top of the oval for the jump ring.
Step 3: Baking and Antiquing
-
Bake the piece:
Place your pendant on a ceramic tile or baking sheet. Bake according to the clay manufacturer’s instructions (usually 230°F – 275°F for 15-30 minutes). Let it cool completely. -
Apply the wash:
Mix a small amount of burnt umber acrylic paint with water to create a thin wash. Brush this liberally over the entire surface, ensuring it gets into the crevices of the flower petals and leaves. -
Wipe back:
Before the paint dries completely, take a slightly damp paper towel or sponge and wipe across the surface. This removes paint from the high points while leaving dark shadows in the recesses. -
Sand edges:
Once dry, use fine-grit sandpaper to smooth the outer rim of the oval if needed. -
Seal (Optional):
If you want extra protection, apply a thin coat of matte varnish, though the natural matte look of the clay is often beautiful on its own.
Add Metallic Glint
After the antiquing wash is dry, lightly rub a tiny amount of gold wax or metallic pigment powder just on the very centers of the flowers for a subtle, elegant shimmer.
Step 4: Final Assembly
-
Open the jump ring:
Using two pairs of pliers, twist the antique brass jump ring open laterally. -
Attach hardware:
Thread the jump ring through the hole in the pendant and twist it closed securely. -
Add the cord:
String the waxed cotton cord through the jump ring and tie the ends with a sliding knot or add a clasp of your choice.
Wear your beautiful nature-inspired medallion with pride or gift it to a flower-loving friend
Tiny Mushroom Relief Medallions
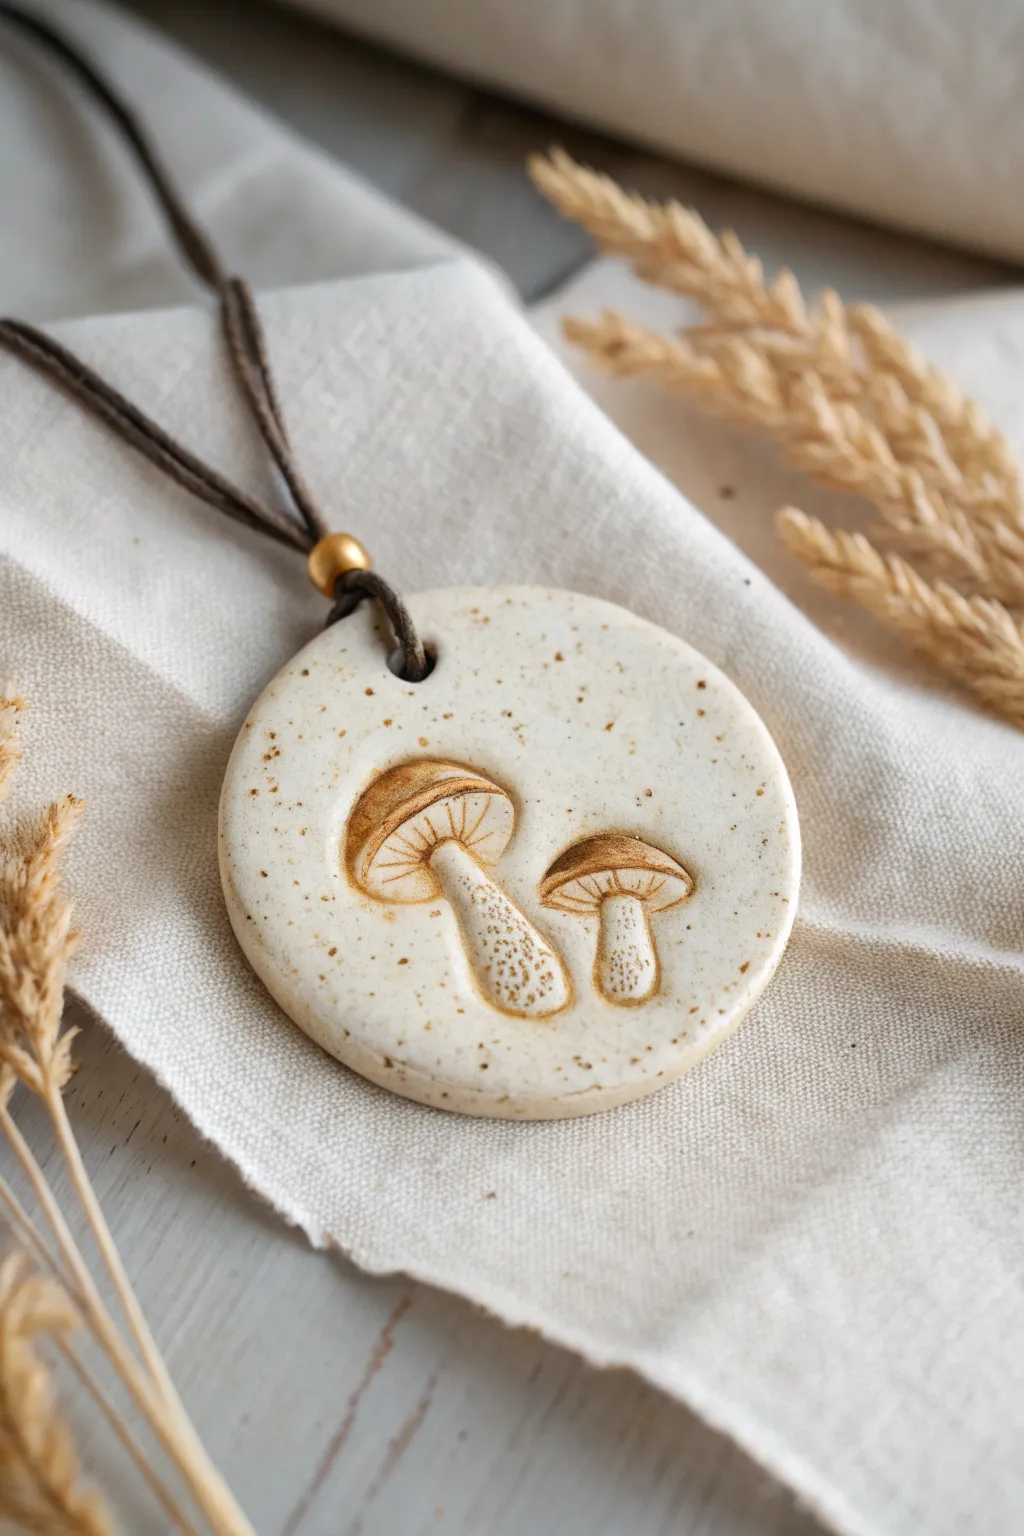
This rustic medallion captures the charm of the forest floor with its subtle speckling and relief mushroom designs. It makes for a beautiful, earthy necklace that feels both handcrafted and timeless.
Step-by-Step Tutorial
Materials
- White or cream polymer clay (or air-dry clay)
- Faux granite/speckle mix-in (dried tea leaves, black pepper, or specialized polymer clay specs)
- Small round clay cutter (approx. 2 inches)
- Sculpting needle tool or toothpick
- Ball stylus tool
- Small rolling pin
- Brown acrylic paints (raw umber, burnt sienna)
- Fine detail paintbrush
- Water for washing/thinning paint
- Straw or small tube for hole punching
- Baking sheet/oven (if using polymer) or drying rack
- Brown suede or leather cord
- Gold tone bead with large hole
Step 1: Preparing the Base
-
Mix your clay:
Start with a ball of white or cream clay. To achieve that organic, speckled look seen in the photo, need in a tiny pinch of dried tea leaves, coarse black pepper, or pre-made ‘granite’ effect clay. -
Roll it out:
Use your rolling pin to flatten the clay to a consistent thickness of about 1/4 inch. Avoid making it too thin, as you need depth for the relief carving. -
Cut the shape:
Press your round cookie cutter firmly into the clay to create a perfect circle. Peel away the excess clay and smooth the edges of the circle with your fingertip to remove any harsh cut lines. -
Punch the hole:
Using a straw or a small metal tube, punch a hole near the top edge for the cord. Make sure not to get too close to the very edge to prevent breakage later.
Spicing It Up
Real ground spices like nutmeg or cinnamon mixed into translucent clay create incredibly realistic speckles that won’t burn at standard baking temps.
Step 2: Sculpting the Relief
-
Outline the mushrooms:
Lightly sketch two mushroom shapes onto the clay surface using a needle tool. Place one taller mushroom on the left leaning slightly right, and a shorter, smaller one on the right. -
Press the relief:
Instead of adding clay, we are pressing in. Use a small ball stylus or the back of a tool to gently compress the clay *inside* your mushroom outlines. This creates a recessed area. -
Refine the caps:
Press deeper into the top ‘cap’ sections to make them distinct from the stems. Smooth the bottom of the recessed area so it is relatively flat. -
Detail the gills:
Using your needle tool, carefully score fine, vertical lines underneath the mushroom caps to represent the gills. These should fan out slightly. -
Detail the stems:
Use the very tip of your needle tool to poke tiny stippling dots onto the stems, giving them a porous, natural texture. -
Clean up edges:
If the pressing caused the main circle to distort, gently reshape it now. Brush away any little crumbs of clay.
Glaze It Good
After baking, apply a high-gloss UV resin or glaze ONLY to the mushroom caps. This makes them look wet and slimy, contrasting with the matte stone background.
Step 3: Finishing and Assembly
-
Cure the clay:
Bake your polymer clay according to package instructions (usually 275°F for 15-30 mins). If using air-dry clay, allow it to dry fully for 24-48 hours. -
Cool down:
Let the piece cool completely before attempting to paint. -
Apply the wash:
Mix a small amount of dark brown acrylic paint with water to create a thin wash. Paint this over the entire recessed mushroom area, ensuring it gets into the gill lines and stem dots. -
Wipe back:
Immediately use a damp paper towel or cloth to wipe the surface. The paint will stay in the deep crevices (gills and outlines) but wipe off the high points, highlighting the texture wonderfully. -
Add warmth:
I like to take a tiny bit of burnt sienna (red-brown) and gently glaze just the tops of the mushroom caps to give them a warmer, toasted look. -
Seal (optional):
If desired, apply a matte varnish to protect the paint, though leaving it raw preserves the stone-like texture. -
Attach the cord:
Fold your suede cord in half. Thread the looped end through the hole from front to back, then pull the loose ends through the loop to create a lark’s head knot. -
Add the bead:
Thread a gold-tone bead onto both strands of the cord and slide it down until it sits snugly against the knot on top of the medallion.
This simple technique results in a sophisticated piece of wearable art that looks like a relic found on a woodland walk
Animal Silhouette Medallions
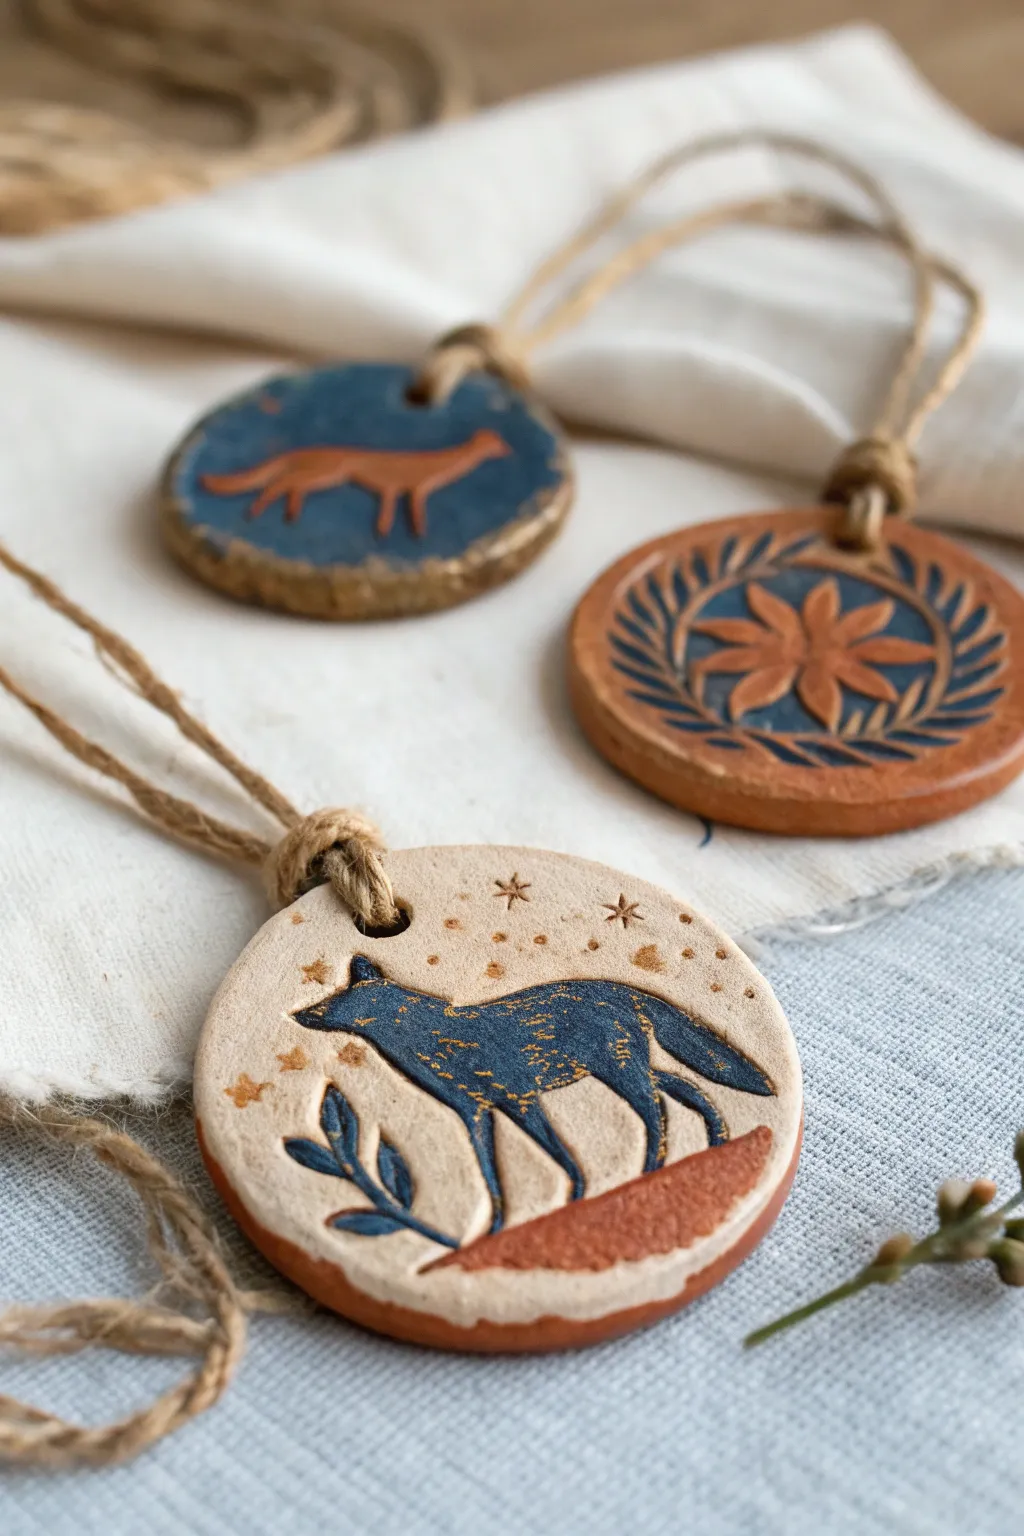
Capture the magic of a woodland tale with these charming clay ornaments featuring hand-painted animal silhouettes. The combination of earthy terracotta tones, deep midnight blues, and celestial gold accents creates a rustic yet sophisticated piece perfect for gifting or hanging.
Step-by-Step
Materials
- Air-dry clay (white or light terracotta)
- Circle cookie cutter or glass rim (approx. 3-inch diameter)
- Rolling pin
- Parchment paper or canvas mat
- Fine-grit sandpaper
- Acrylic paints: Navy Blue, Burnt Sienna/Terracotta, Cream/Off-White
- Gold metallic paint or paint pen
- Detail paintbrushes (sizes 0 and 2)
- Wooden skewer or toothpick
- Jute twine
- Matte spray sealant or Mod Podge
Step 1: Shaping the Canvas
-
Roll out the clay:
Begin by kneading a ball of air-dry clay until it is pliable and smooth. Roll it out on a piece of parchment paper to an even thickness of about 1/4 inch, ensuring there are no air bubbles trapped inside. -
Cut the circles:
Use your circular cutter to stamp out your medallion shapes. If edges are ragged, dip your finger in a little water and gently smooth them down while the clay is still wet. -
Create the hanging hole:
Before the clay hardens, use a wooden skewer or a straw to punch a hole near the top edge. Wiggle it slightly to ensure the opening is wide enough for your jute twine. -
Dry completely:
Allow the medallions to dry on a flat surface for 24-48 hours. Flip them occasionally to prevent curling. Once bone dry, lightly sand any rough edges for a professional finish.
Step 2: Designing the Scene
-
Base coat application:
Paint the entire front surface with a creamy off-white color. This mimics the look of raw ceramic glaze and provides a clean background for your silhouette. Let this dry thoroughly. -
Sketch the terrain:
Lightly pencil in a curved hill shape at the bottom of the circle. Paint this area with Burnt Sienna or Terracotta paint to ground your design. -
Outline the fox:
Using a very faint pencil line, sketch the silhouette of a fox standing on the hill. Keep the shape simple—focusing on the pointed ears, snout, and bushy tail. -
Fill the silhouette:
Load a size 2 brush with Navy Blue paint. Carefully fill in your fox shape. Depending on the opacity of your paint, I usually find a second coat is needed here for a rich, solid color. -
Add botanical details:
While you have the blue paint out, use the tip of a smaller brush to paint simple leafy sprigs emerging from the terracotta hill, framing the animal.
Smoother Surfaces
Before painting, wipe the dried clay with a slightly damp sponge. This removes dust and creates a smoother surface that accepts acrylic paint much better than raw, chalky clay.
Step 3: Celestial Details & Assembly
-
Add golden texture:
Once the blue fox is dry, dip an old, stiff brush into a tiny amount of gold paint. Dab off the excess (dry brush technique) and lightly stipple texture onto the fox’s body to imply fur. -
Paint the stars:
Using the tip of a toothpick or a very fine brush dipped in gold, dot tiny stars and asterisks in the empty sky space above the fox. -
Rim the edges:
For a cohesive look, paint the side edge of the clay disc with the Terracotta color to match the hill. -
Seal the artwork:
protect your handiwork with a coat of matte spray sealant. This prevents the paint from scratching and gives the clay a finished feel. -
Attach the twine:
Cut a 10-inch length of jute twine. Fold it in half, push the loop through the hole, and pull the tails through the loop (lark’s head knot) to secure it.
Carved Inlay Effect
Try lightly carving the fox outline into the wet clay with a needle tool before drying. When you paint later, the recessed lines will guide your brush for crisp edges.
Hang your new collection on a branch or use them as unique gift tags for a truly handmade touch
Moon Phase Medallion Set
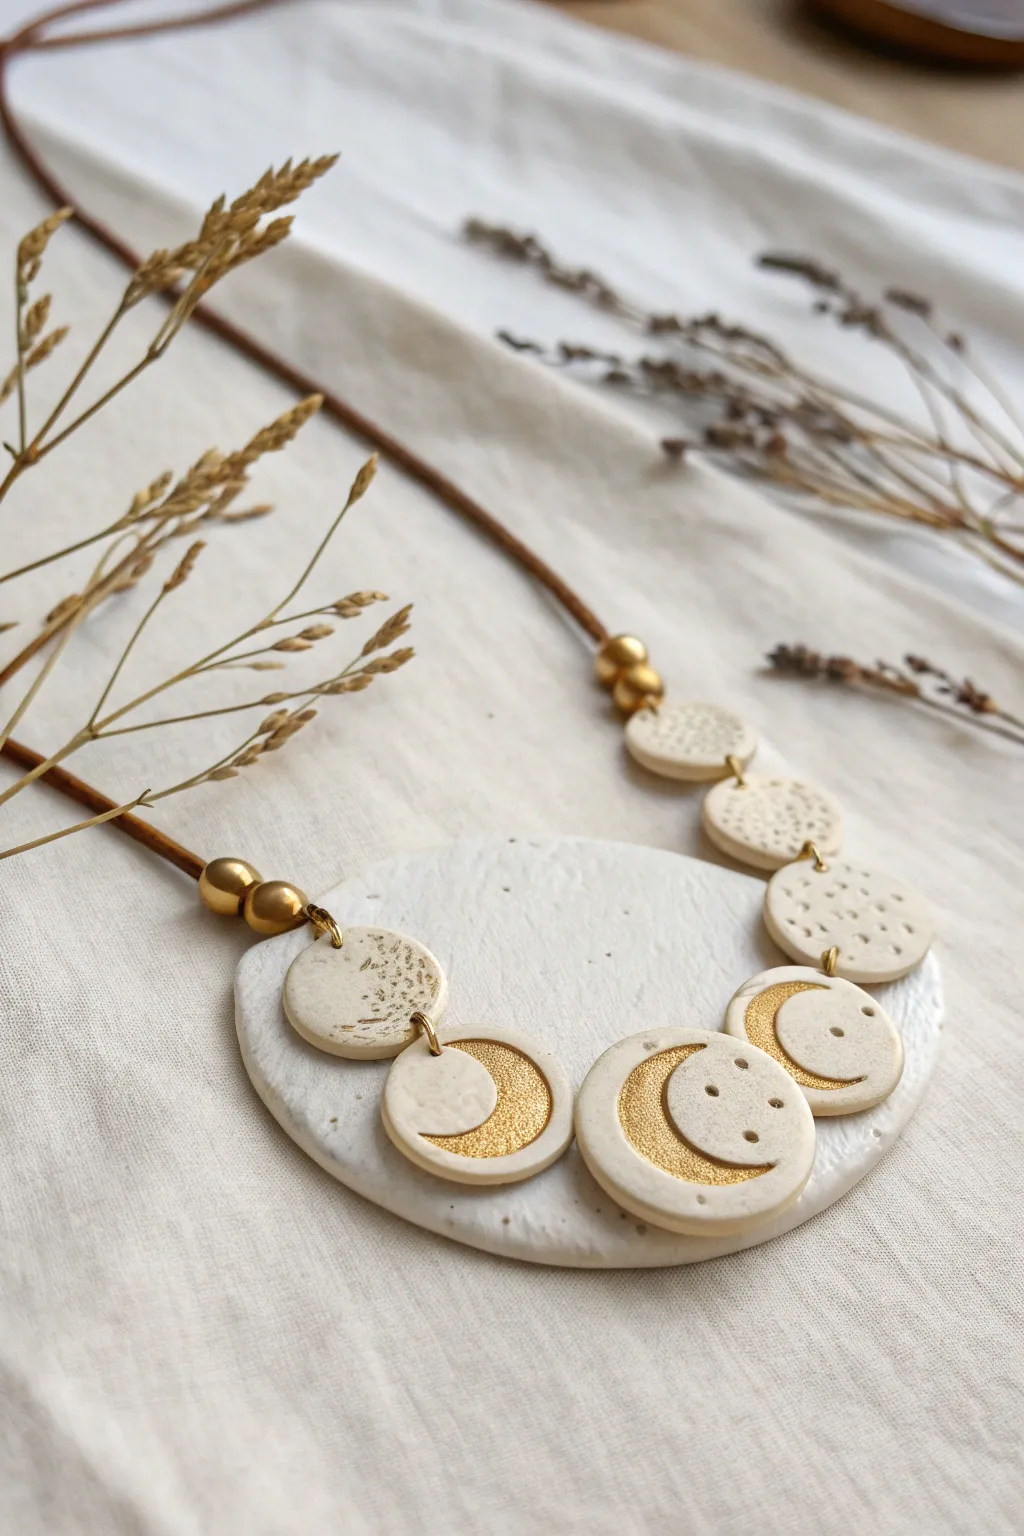
Capture the magic of the night sky with this elegant polymer clay necklace featuring a graduated moon phase design. The creamy white clay is beautifully accented with metallic gold details and rustic textures, resulting in a piece that feels both modern and bohemian.
Step-by-Step Guide
Materials
- White or cream polymer clay (e.g., Sculpey Premo or Fimo Soft)
- Metallic gold acrylic paint
- Small circular clay cutters (approx. 1-inch diameter)
- Needle tool or toothpick
- Rolling pin or pasta machine
- Brown leather or faux leather cord
- Gold finish jump rings (6mm)
- Gold finish spacer beads (large hole)
- Fine-point paintbrush
- Texture tools (sandpaper, toothbrush, or sponge)
- Gloss varnish (optional)
Step 1: Base Preparation
-
Condition the clay:
Begin by warming the white polymer clay in your hands until it becomes soft and pliable. This prevents cracking later on. -
Roll out the slab:
Roll the clay out to a uniform thickness of about 3mm or 1/8th of an inch. Using a pasta machine ensures perfectly even sheets, but a rolling pin works well too. -
Cut the circles:
Use your circular cutter to punch out seven separate discs. These will become the individual moon phase charms. -
Smooth the edges:
Gently rub the edges of each cut circle with your fingertip to soften the harsh cut lines and give the clay a more organic, ceramic-like finish.
Clean Edges Pro-Tip
Before baking, use a bit of cornstarch on your finger to smooth any fingerprints. It acts as a gentle buffer and burns off in the oven leaving no trace.
Step 2: Texturing & Detailing
-
Create the central craters:
For the two largest central moons (waxing and waning gibbous shapes), use a smaller round object or needle tool to gently imprint crescent shapes or stylized crater marks. -
Select the crater zones:
On the two moons adjacent to the center, gently press a smaller circular object off-center to mark the crescent boundary where the gold will eventually go. -
Add texture:
Lightly tap the surface of the outer discs with sandpaper or a clean toothbrush. This subtle pitting mimics the surface of the moon and adds visual interest. -
Pierce the holes:
Using a needle tool, poke two holes on opposite sides of each disc (at the 3 o’clock and 9 o’clock positions) to allow for connecting jump rings later. Make sure the holes are large enough for your jump rings.
Level Up: Galaxy Effect
Mix a tiny amount of translucent clay with blue and purple glitters before rolling. This creates a subtle ‘starry night’ effect within the white clay body.
Step 3: Baking & Painting
-
Bake the pieces:
Arrange the discs on a baking sheet lined with parchment paper. Bake according to your customized clay package instructions—usually around 275°F (135°C) for 15-30 minutes. -
Cool down:
Allow the clay pieces to cool completely before moving to the painting stage. They will harden fully as they cool. -
Apply gold accents:
Using a fine paintbrush, fill in the crescent indentations and stippled textures with metallic gold acrylic paint. I like to dab the paint into the texture and then lightly wipe the surface for an antique look. -
Paint the crescents:
For the crescent moons specifically, paint the recessed crescent area entirely gold to make the shape pop against the cream clay. -
Seal (optional):
If desired, apply a thin coat of gloss varnish over the gold areas to protect the paint and add a ceramic shine.
Step 4: Assembly
-
Open jump rings:
Using two pairs of pliers, twist your gold jump rings open sideways (never pull them apart outward). -
Connect the phases:
Link the seven clay discs together in order using the jump rings. Ensure the moon phases are oriented correctly to show the cycle from waxing to waning. -
Prepare the cord ends:
Thread two large gold spacer beads onto your leather cord. These will sit just above the clay section. -
Attach to cord:
Connect the final jump rings on the far left and right discs directly to the leather cord, securing the spacer beads just above the connection points to hide the knots or crimps.
Wear your celestial creation over a simple linen tunic or sweater to let the golden moons shine
Hidden Message Locket Medallions
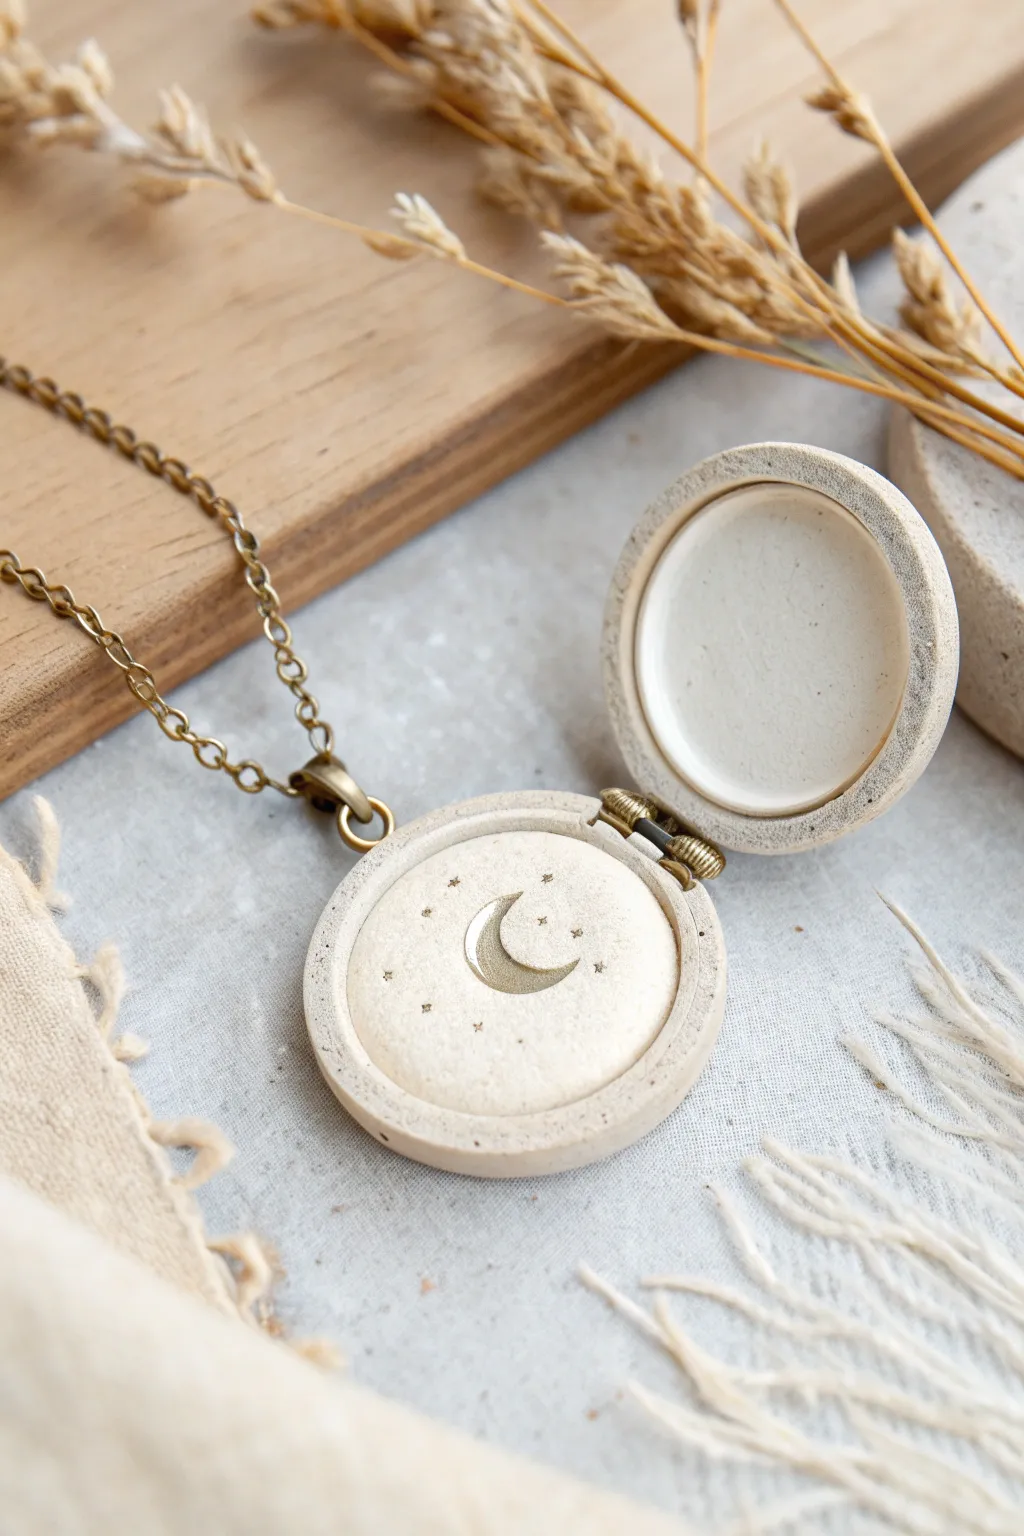
Create a magical hiding spot for your tiniest treasures with this charming hinged locket. Crafted to resemble smooth, speckled limestone, this clay piece features a golden crescent moon inside and opens to reveal a secret compartment.
Step-by-Step Tutorial
Materials
- Polymer clay (white or beige granite/stone effect)
- Round clay cutters (two sizes, one slightly smaller than the other)
- Small roller or pasta machine
- Metal locket hinge set (tiny size)
- Superglue or strong jewelry adhesive
- Gold acrylic paint or metallic gold leaf pen
- Needle tool or toothpick
- Fine grit sandpaper
- Small eye pin (bronze or antique gold)
- Jump rings and necklace chain (bronze or antique gold)
- Oven for baking
- Small paint brush (00 size)
Step 1: Shaping the Locket Shells
-
Condition the clay:
Begin by thoroughly conditioning your stone-effect polymer clay until it is soft and malleable. Warm clay is essential to prevent cracking later. -
Roll out the base:
Roll the clay into a sheet approximately 4-5mm thick. You want it sturdy enough to hold the hinge but not too heavy. -
Cut the circles:
Use your larger round cutter to punch out two identical circles. These will form the front and back of your locket. -
Create the rims:
Roll a second sheet of clay slightly thinner (about 3mm). Cut two more circles with the large cutter, then use the slightly smaller cutter inside those circles to create two ring shapes. -
Assemble the halves:
Place one ring onto each of the solid base circles. Press them together gently to fuse the seams, smoothing the outer edges with your finger so they look like a single solid piece. -
Smooth the interior:
Use a modeling tool or your fingertip to smooth the inside seam where the ring meets the base, creating a clean, recessed cup shape.
Step 2: Detailing and Baking
-
Create the moon insert:
Roll a small ball of clay and flatten it into a disc that fits snugly inside the front half of the locket. It should sit slightly raised like a cameo. -
Carve the celestial design:
While the clay is still soft, gently press a small crescent moon shape into the center of the insert. I find a small round piping tip works well to stamp the curve. -
Add starry details:
Using a needle tool, prick tiny star points and small dots around the moon to create a constellation effect. -
Attach the hardware mount:
Insert the eye pin into the top edge of the back locket half. Bake it into the clay or create a hole to glue it in later. -
Bake the pieces:
Place all clay components on a ceramic tile or baking sheet. Bake according to your clay package instructions (usually 275°F/135°C for 15-30 minutes). -
Cool and refine:
Let the pieces cool completely. Use fine-grit sandpaper to smooth the outer edges and ensure the two halves sit flush against each other.
Clean Edges Pro-Tip
Before baking, wrap a piece of cling film over the clay before cutting your circles. This creates a beautifully rounded, ‘domed’ edge rather than a sharp cut, making sanding much easier.
Step 3: Assembly and Finishing
-
Paint the details:
Using a very fine brush and gold paint, carefully fill in the recessed moon shape and the tiny star dots. Wipe away any excess on the surface immediately. -
Install the hinge:
Apply a tiny amount of superglue to the hinge tabs. Carefully attach the hinge to the bottom edges of both locket halves, ensuring they align perfectly. -
Secure the clasp mechanism:
If your hinge set includes a clasp, glue it to the top. Alternatively, you can use small magnets embedded in the rim (this requires drilling post-bake) to keep it shut. -
Add final finish:
If you want a sealer, apply a matte varnish to protect the surface, though leaving the stone texture raw often looks more authentic. -
Chain assembly:
Open a jump ring and thread it through the eye pin at the top of the locket. Attach your bronze chain and close the ring securely.
Magnetic Magic
Embed tiny neodymium magnets into the clay rims before baking. Cover them with a thin layer of liquid clay so they are invisible but still snap the locket shut securely.
Wear your new celestial locket close to your heart as a beautiful handmade keepsake
Crackle Texture Artifact Medallions
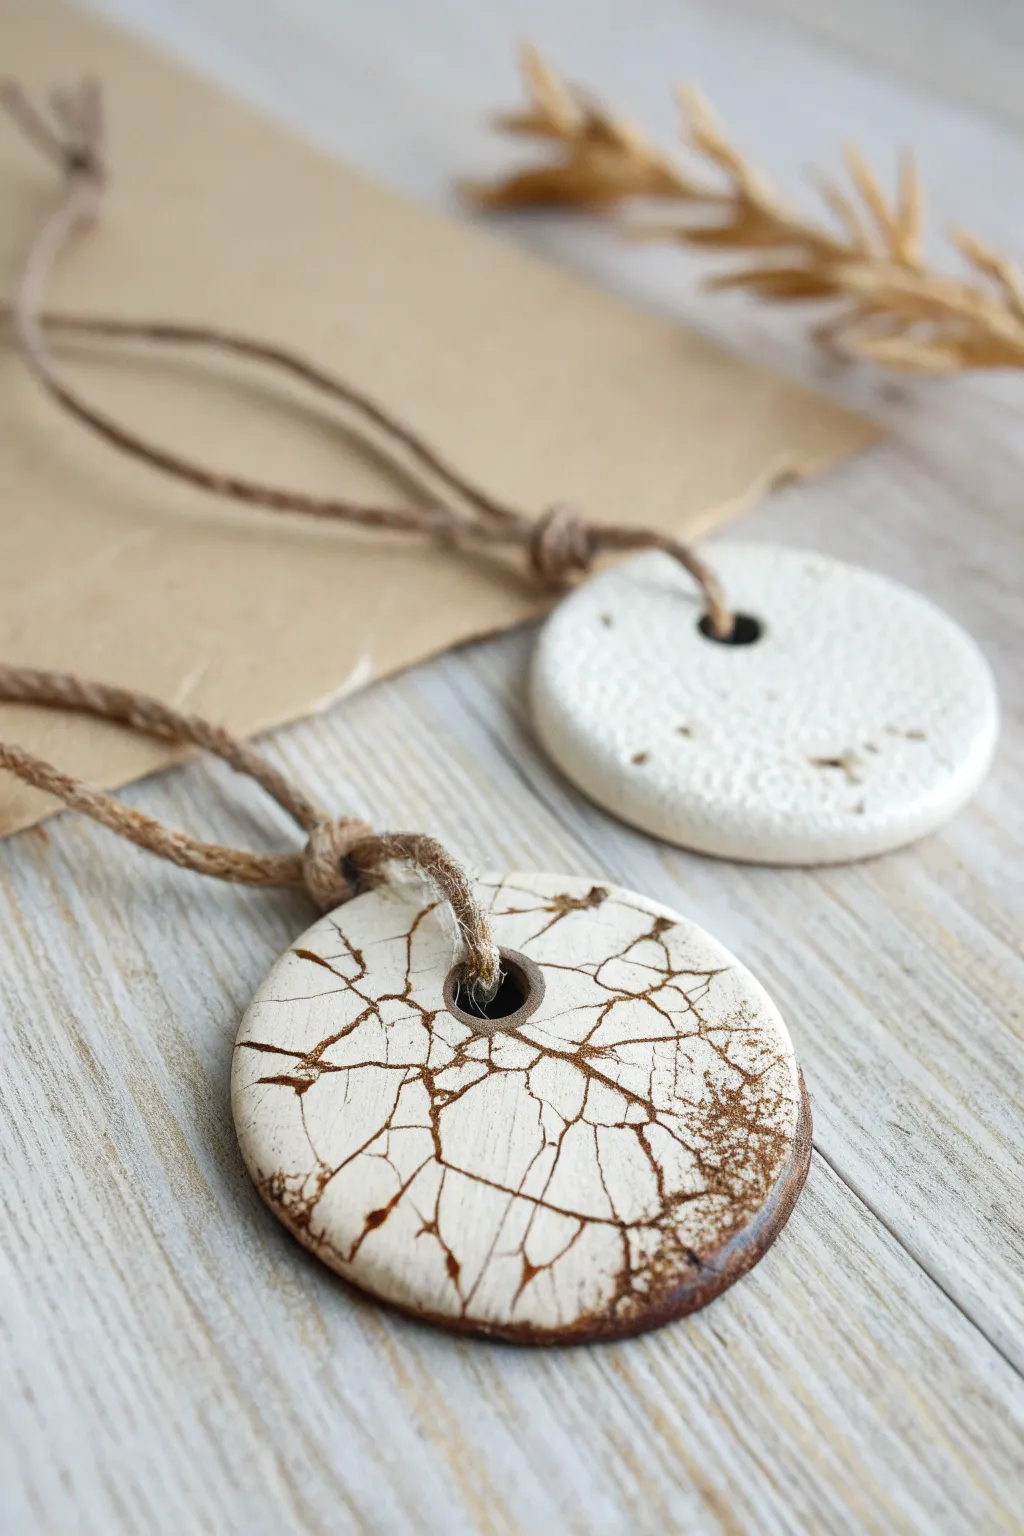
Capture the charm of ancient artifacts with these beautifully textured clay medallions. The distinct crackle finish allows dark pigment to settle into the fissures, creating a sophisticated, aged look that contrasts perfectly with the smooth, creamy surface.
Step-by-Step Guide
Materials
- Air-dry clay (white or cream)
- Circular cookie cutter (approx. 2-3 inches)
- Small straw or pen cap (for the hole)
- Rolling pin
- Parchment paper or canvas mat
- Sandpaper (fine grit)
- Acrylic paint (dark brown or burnt umber)
- Crackle medium (or PVA glue for a DIY version)
- White or cream acrylic paint (top coat)
- Matte varnish or sealant
- Jute twine or leather cord
- Paper towels or soft cloth
- Small paintbrush
- Sponge applicator
Step 1: Shaping the Base
-
Prepare the Clay:
Begin by conditioning your air-dry clay. Knead a small handful until it becomes warm and pliable, eliminating any internal air bubbles that could cause cracking later. -
Roll it Out:
Place the clay on a sheet of parchment paper or a canvas mat. Use your rolling pin to flatten the clay to an even thickness of about 1/4 inch. -
Cut the Circles:
Press your circular cookie cutter firmly into the clay. Give it a tiny wiggle to ensure a clean cut, then lift the cutter away. Remove the excess clay from around the circle. -
Create the Hole:
Using a straw or a small pen cap, punch a hole near the top edge of the circle (or in the center, if you prefer that look). Make sure the hole is big enough for your twine to pass through. -
Soften Edges:
Dip your finger in a little water and gently run it around the cut edges of the clay medallion to smooth out any harsh lines or burrs. -
Initial Drying:
Let the clay dry completely according to the package instructions. This usually takes 24-48 hours. I like to flip them over halfway through so the bottom dries evenly.
Crack Size Control
Thicker layers of crackle medium create larger, wider cracks. For fine, hairline fractures like eggshells, use a very thin layer of medium.
Step 2: Creating the Crackle Effect
-
Sand for Smoothness:
Once bone dry, lightly sand the surface and edges with fine-grit sandpaper to ensure a professional, smooth finish. Wipe away any dust with a damp cloth. -
Base Color Application:
Paint the entire medallion, including the edges, with your dark brown or burnt umber acrylic paint. This dark layer will be what shows through the cracks later. -
Dry the Base:
Allow the dark base coat to dry completely. It must be dry to the touch before proceeding. -
Apply Crackle Medium:
Brush a generous interaction of crackle medium over the dark paint. Alternatively, a thick layer of PVA glue can work in a pinch. The thickness of this layer influences the size of your cracks. -
Wait briefly:
Let the medium or glue become tacky but not fully dry. This is the crucial window for the next step. -
Top Coat Application:
Load a soft brush with cream or white acrylic paint. Apply it over the tacky medium in single, confident strokes. Do not brush back and forth over the same spot, as this will disturb the crackling process. -
Watch it Crackle:
As the top coat dries, fissures will begin to appear, revealing the dark brown base underneath. Let this dry undisturbed for several hours.
Stamped Texture
Before drying the raw clay, press dried herbs or lace into the surface. The crackle effect over a physical texture adds incredible depth.
Step 3: Finishing Touches
-
Antiquing the Edges:
To enhance the artifact look, sponge a tiny bit of dark brown paint onto the very edges of the medallion, feathered slightly inward. This frames the crackle effect beautifully. -
Seal the Work:
Once fully cured, apply a coat of matte varnish. This protects the paint and gives the piece a finished, ceramic-like quality without too much shine. -
Add Cord:
Cut a length of jute twine or leather cord. Fold it in half, push the loop through the medallion’s hole, and pull the loose ends through the loop to create a lark’s head knot.
Now you have a stunning, time-worn pendant perfect for wearing or gifting