When I’m teaching kids in my studio, I lean hard into simple shapes—balls, coils, and slabs—because they turn into adorable clay projects fast. Here are my go-to clay molding ideas for kids that feel playful, colorful, and totally doable, even for little hands.
Classic Pinch-Pot Treasure Bowl
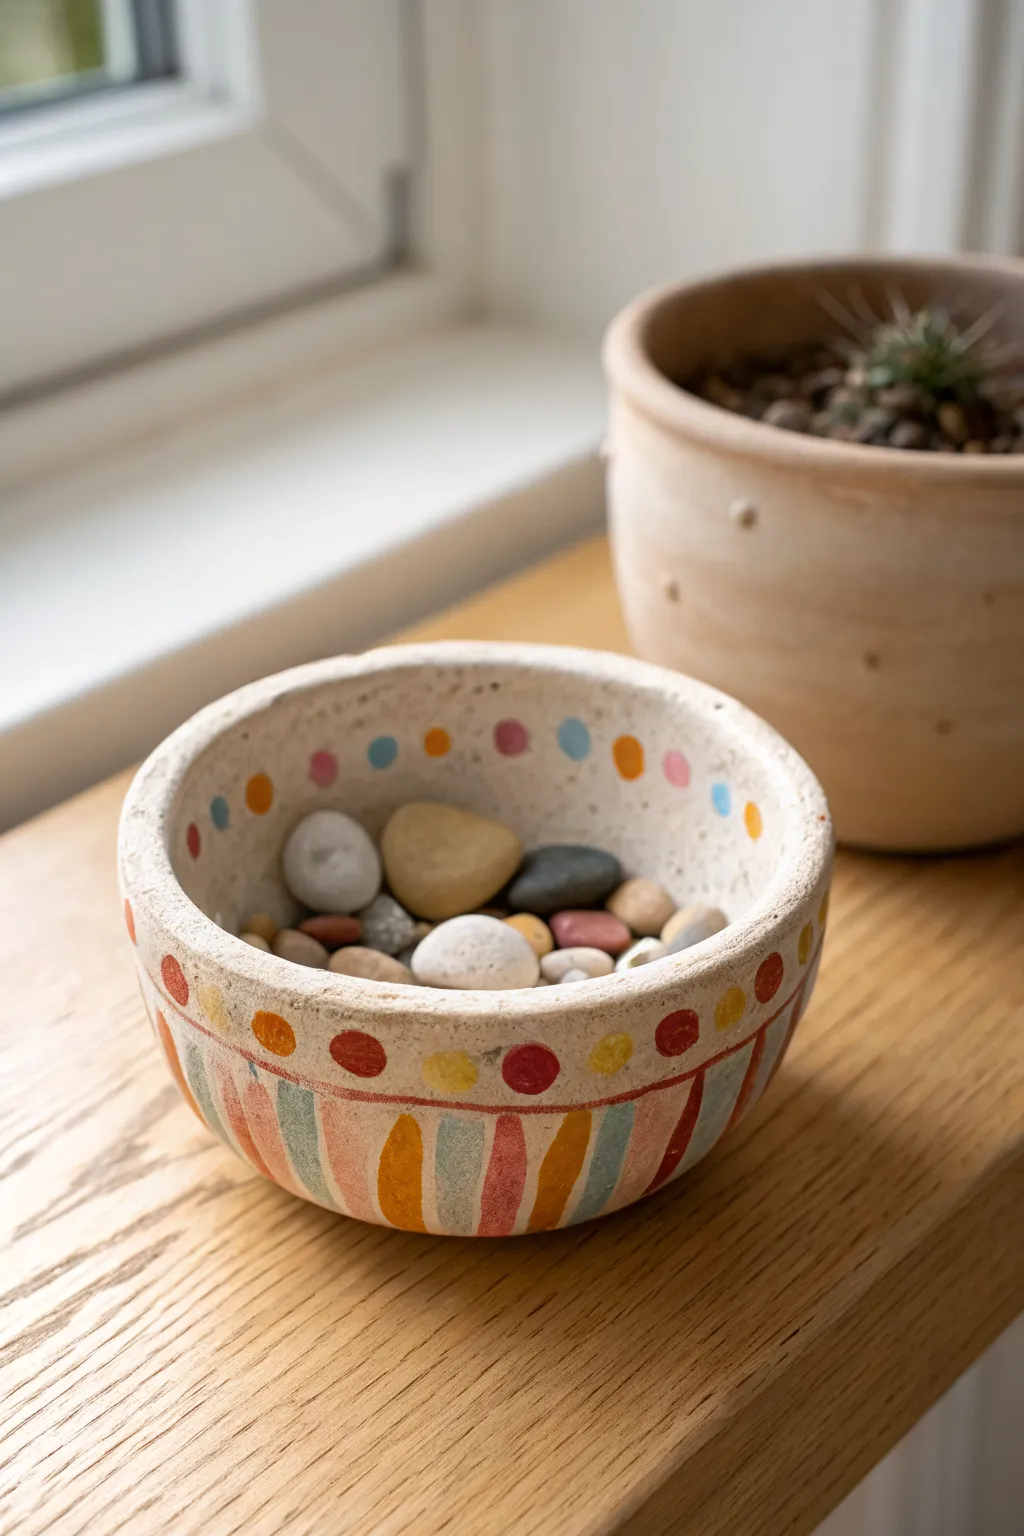
This charming project revisits the foundational pinch-pot technique but elevates it with a delightful folk-art-inspired paint job. The finished bowl features a gently textured beige surface decorated with cheerful polka dots and stripes, perfect for holding small pebbles, beads, or other childhood treasures.
Step-by-Step Guide
Materials
- Air-dry clay (white or light beige)
- Small bowl of water
- Acrylic paints (red, yellow, orange, blue, teal/green, beige/cream)
- Fine-grit sandpaper
- Small round paintbrush (size 2 or 4)
- Flat shader brush (size 6 or 8)
- Matte spray varnish or Mod Podge (optional)
Step 1: Shaping the Clay
-
Form the base ball:
Start with a lump of air-dry clay roughly the size of a tennis ball. Roll it firmly between your palms until you have a smooth, round sphere without deep cracks. -
Start the pinch:
Hold the ball in one hand and gently press your thumb into the center, going about three-quarters of the way down. Be careful not to push all the way through the bottom. -
Widen the walls:
Using a pinching motion with your thumb on the inside and fingers on the outside, slowly rotate the ball while pressing. Work your way from the bottom up to the rim. -
Even it out:
Aim for a wall thickness of about a quarter-inch all around. If the rim gets too thin or jagged, tap it gently upside down on your table to flatten and strengthen it. -
Smooth the surface:
Dip your finger in a tiny bit of water and rub away any harsh cracks or fingerprints. The goal is a mostly smooth surface, though a little handmade texture adds character. -
Let it dry completely:
Set your bowl in a warm, dry spot. Depending on humidity, this can take 24 to 48 hours. The clay must be bone dry before you begin painting.
Cracks Appearing?
If tiny cracks appear while drying, mix a small amount of fresh clay with water to make a ‘slip’ paste, and fill the cracks like spackle before sanding.
Step 2: Painting the Design
-
Sand for texture:
Once dry, gently rub the surface with fine-grit sandpaper to remove any sharp uneven spots, then wipe away the dust with a barely damp cloth. -
Apply the base coat:
Mix a creamy beige color to mimic natural stone or earthenware. Paint the entire bowl, inside and out, perhaps doing two thin coats for opaque coverage. -
Paint the interior dots:
Using your small round brush, dab a row of colorful dots just below the inner rim. Alternate warm colors like pink, orange, and red with cooler blues and teals. -
Create the exterior rim band:
Paint a thin red or orange horizontal line that circles the entire outside of the bowl, about half an inch down from the top rim. -
Add exterior polka dots:
Just above that red line, paint a series of larger, alternating colored dots (red, yellow, orange) that sit in the space between the line and the rim. -
Paint the vertical stripes:
Below the red band, paint vertical stripes down to the base. I like using a flat brush for this to get consistent width. Alternate muted teal, orange, red, and yellow stripes. -
Refine the stripes:
Don’t worry about measuring perfectly; the slightly wobbly, hand-painted look gives this bowl its specific charm. Let the paint dry fully. -
Seal the piece:
To protect your paint job, apply a coat of matte varnish or Mod Podge. This will keep the colors bright and prevent chipping.
Add a Lid
Before drying, trace your bowl’s rim onto a flat slab of clay to cut a matching lid. Add a small clay knob on top for a true treasure jar.
Now your bowl is ready to safeguard your collection of shiny pebbles or special trinkets
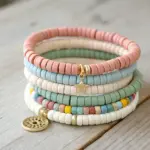
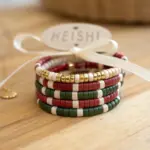


Easy Clay Bead Necklaces
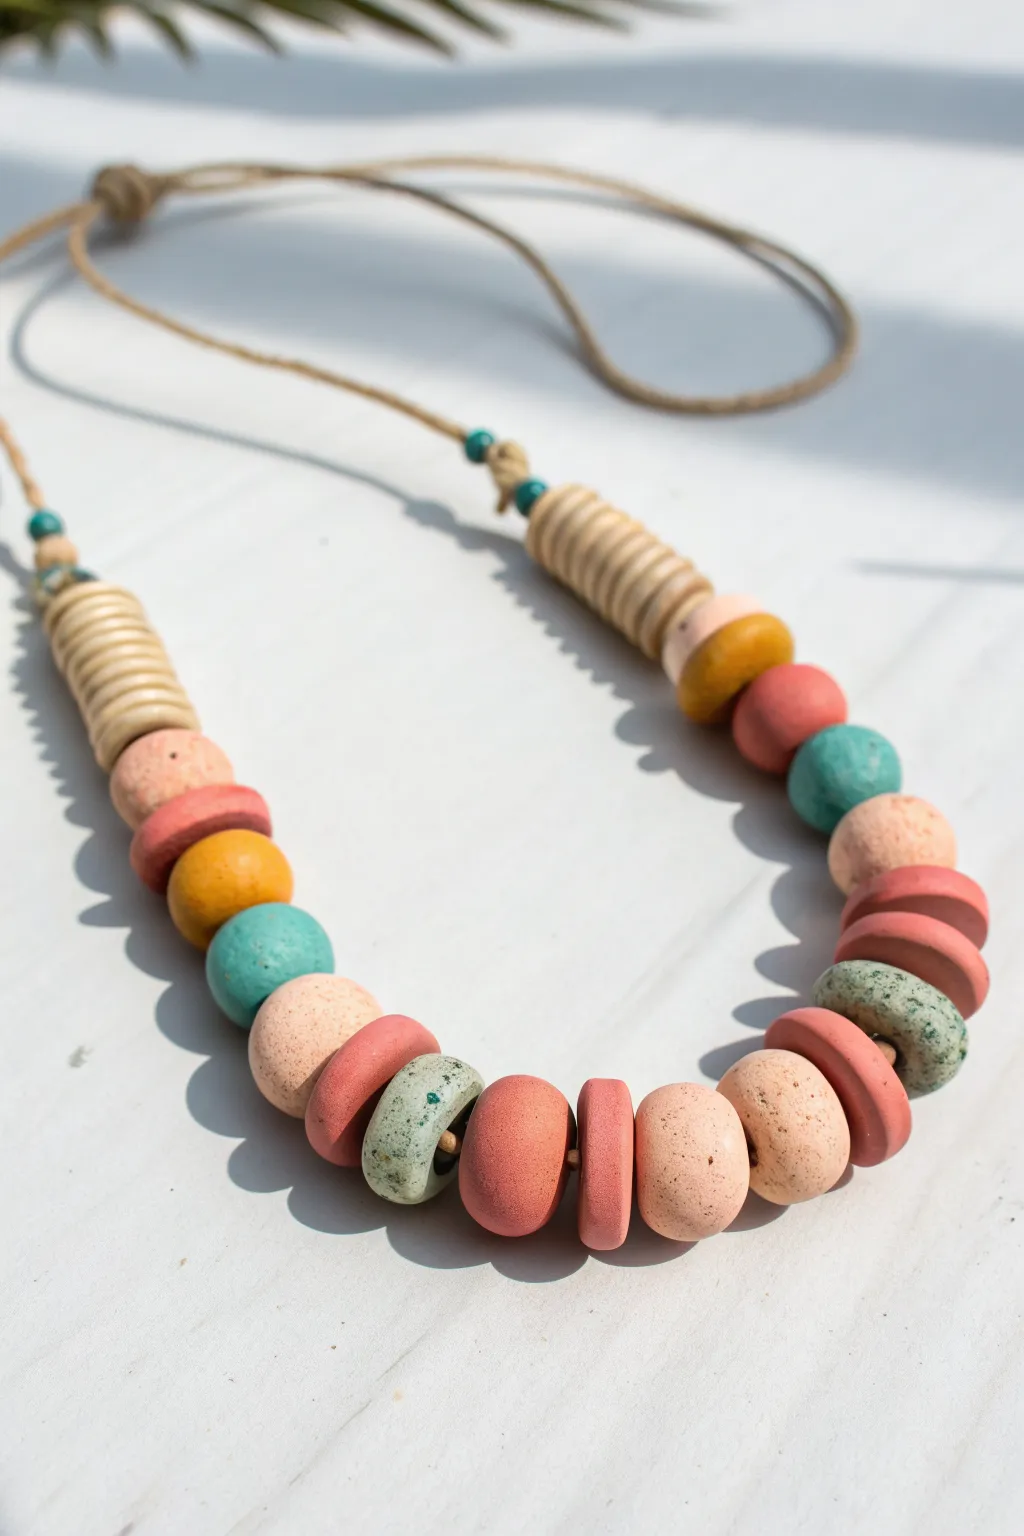
This charming project combines earthy tones and playful shapes to create a stylish, wearable piece of art. The mix of textured beads and smooth, colorful discs gives it a sophisticated look that is deceptively simple to achieve.
Step-by-Step
Materials
- Air-dry clay or polymer clay (white, terracotta, and soft pink)
- Acrylic paints (teal, mustard yellow, coral, cream)
- Wooden skewers or toothpicks
- Jute twine or hemp cord
- Rolling pin
- Small round cookie cutters (various sizes) or bottle caps
- Sandpaper (fine grit)
- Clear matte varnish (optional)
- Small paintbrush
- Old toothbrush (for speckling)
- 2 small turquoise seed beads (optional)
Step 1: Shaping the Clay Components
-
Roll the base beads:
Start by rolling large chunks of clay into varying sizes of spheres. Aim for organic, imperfectly round shapes about the size of large marbles or gumballs. -
Create disc shapes:
For the flat spacer beads, roll out a small slab of clay to about 1/4 inch thickness. Use small cutters or simply slice a log of clay into coins to create flat, disc-shaped beads. -
Form the ribbed tubes:
To mimic the coiled wooden beads at the top, maximize tactile fun by rolling two long, thin snakes of clay. Coil them tightly around a thick skewer to form a spring shape, then gently press the coils together so they fuse into a single ribbed tube. -
Pierce the holes:
While the clay is still soft, carefully push a skewer through the center of every bead. Wiggle it slightly to ensure the hole is wide enough for your jute cord to pass through later. -
Texture the surface:
Before drying, you can roll a few of the round beads on a textured surface or gently tap them with a toothbrush to create a stone-like pitted effect. -
Let them dry:
Allow all your clay pieces to dry completely according to the package instructions. Air-dry clay usually needs 24-48 hours, while polymer clay will need baking.
Pro Tip: Hole Size
Make your bead holes slightly larger than you think you need. Clay shrinks as it dries, and a tight hole makes threading fray-prone jute twine very difficult.
Step 2: Painting and Finishing
-
Sand for smoothness:
Once fully cured, use fine-grit sandpaper to smooth out any rough edges or fingerprints, particularly on the flat disc beads. -
Apply base colors:
Paint the beads in a varied palette. Use mustard yellow, soft coral, and deep teal for the accents. Leave some beads in their natural clay color or paint them a soft cream for contrast. -
Add speckled details:
To achieve the stone look on the teal and cream beads, dip an old toothbrush in slightly watered-down dark paint. Run your thumb over the bristles to flick tiny speckles onto the beads. -
Paint the ribbed tubes:
Paint the coiled tube beads in a light beige or cream color to resemble natural wood or bone. -
Seal the beads:
I like to apply a coat of matte varnish at this stage to protect the paint and give the beads a professional, finished sheen.
Level Up: Scent it!
Add a drop of essential oil to the unpainted, porous clay beads before wearing. The clay acts as a natural diffuser, carrying a gentle scent with you all day.
Step 3: Assembly
-
Prepare the cord:
Cut a length of jute twine or hemp cord, making sure it is long enough to slip over the head comfortably with some extra length for knots. -
Tie the starting knot:
Thread a small turquoise seed bead onto the cord and tie a knot about 4 inches from the end to act as a stopper for your main bead arrangement. -
String the pattern:
Begin threading your beads. Start with the ribbed tube, then alternate between round spheres and flat discs. Follow the symmetry shown in the image, placing the largest, flattest beads near the center. -
Secure the end:
Once all beads are strung, thread a second turquoise seed bead and tie a sturdy knot against the final ribbed tube to keep everything tight and in place. -
Create the closure:
Bring the two loose ends of the twine together. You can either tie them in a permanent bow or create a sliding knot mechanism if you want the length to be adjustable.
This beautiful necklace is now ready to wear or gift to a friend who loves unique accessories


Mini Play-Food Donuts

Transform simple polymer clay into an adorable assortment of miniature donuts that look good enough to eat. These pint-sized treats feature realistic textures, pastel glazes, and tiny detailing that make for perfect play food or charming decorations.
Step-by-Step Guide
Materials
- Polymer clay (beige/tan for dough, plus pink, white, green, brown)
- Small round clay cutter (about 1 inch diameter)
- Small straw or metal piping tip (for the donut hole)
- Liquid polymer clay (translucent or white)
- Chalk pastels (orange, brown, yellow)
- Paintbrush (soft bristles)
- Toothbrush or crumpled foil (for texture)
- Needle tool or toothpick
- Gloss glaze or varnish
- Baking sheet and oven (per clay instructions)
Step 1: Shaping the Dough base
-
Condition the clay:
Start by taking your beige or tan polymer clay and warming it up in your hands. Knead it thoroughly until it is soft, pliable, and free of any cracks. -
Roll spheres:
Break off small, marble-sized chunks of the beige clay. Roll each one between your palms to create smooth, even spheres. Aim for about 1 inch in diameter for realistic mini donuts. -
Initial flattening:
Place a sphere on your work surface and gently press it down with your palm. You want a thick, chubby disc shape—don’t flatten it like a pancake. -
Create the hole:
Use a small straw or the narrow end of a piping tip to press directly into the center of the disc. Twist gently as you push through to remove the center core cleanly. -
Soften edges:
Use your fingertip to gently tap and round off the sharp edges where the hole was made and around the perimeter of the donut. Real donuts puff up when fried, so these should look rounded, not blocky. -
Add texture:
Take a clean toothbrush or a ball of crumpled foil and gently tap it all over the surface of the clay. This creates a realistic bread-like texture rather than smooth plastic.
Sticky Icing Fix
If your liquid clay glaze is too runny and dripping off the donut entirely, mix in a tiny bit of solid clay or cornstarch to thicken it up before applying.
Step 2: Golden Brown Perfection
-
Shave pastels:
Using a craft knife, scrape some yellow, orange, and brown chalk pastels into fine powder piles. -
Apply shading:
Dip a dry paintbrush into the chalk powder. Start with yellow/orange and lightly dust the donut. I prefer to add the darker brown just on the top curves to mimic a perfectly fried crust. -
Avoid the center:
Try to keep the heavy shading away from the very center ‘pale’ line that real donuts often have around their equator.
Make Them Magnets
Before baking, press a small, strong neodymium magnet into the back of each donut. Bake as usual to create an adorable set of fridge magnets.
Step 3: Glazing and Decorating
-
Mix the glazes:
For the icing, mix liquid polymer clay with tiny amounts of colored clay (pink, green, white, brown) in separate small cups. Stir until you have a consistency like thick heavy cream. -
Apply the icing:
Use a needle tool or toothpick to dab the colored liquid clay onto the top of the donuts. Let it pool naturally and nudge it slightly over the sides so it looks like it’s dripping. -
Create the powdered donut:
For the plain white donut, use solid white clay rolled very thin. Drape it over the beige base and smooth the edges down to look like thick royal icing. -
Make sprinkles:
Roll extremely thin snakes of various colored clays. Bake these snakes separately for 5 minutes, let them cool, and then chop them into tiny bits with a blade. -
Add toppings:
While the liquid clay ‘icing’ is still wet, sprinkle your pre-baked clay bits on top. For the sesame seed donut, roll tiny teardrops of cream clay and press them individually onto the unglazed surface. -
Chocolate glaze detail:
For the chocolate donut, ensure the brown liquid clay is thick enough to hold the weight of larger sprinkles or gold beads without them sinking entirely.
Step 4: Baking and Finishing
-
Bake carefully:
Arrange your donuts on a baking tile or sheet. Follow your clay manufacturer’s instructions for temperature and time (usually around 275°F for 15-20 minutes). -
Cool down:
Let the donuts cool completely before handling them. They are fragile while warm. -
Optional gloss:
If you want a ‘wet glaze’ look, paint a thin layer of gloss varnish just over the icing parts, leaving the bread sections matte.
Arrange your sweet collection on a miniature plate and enjoy your guilt-free bakery treats


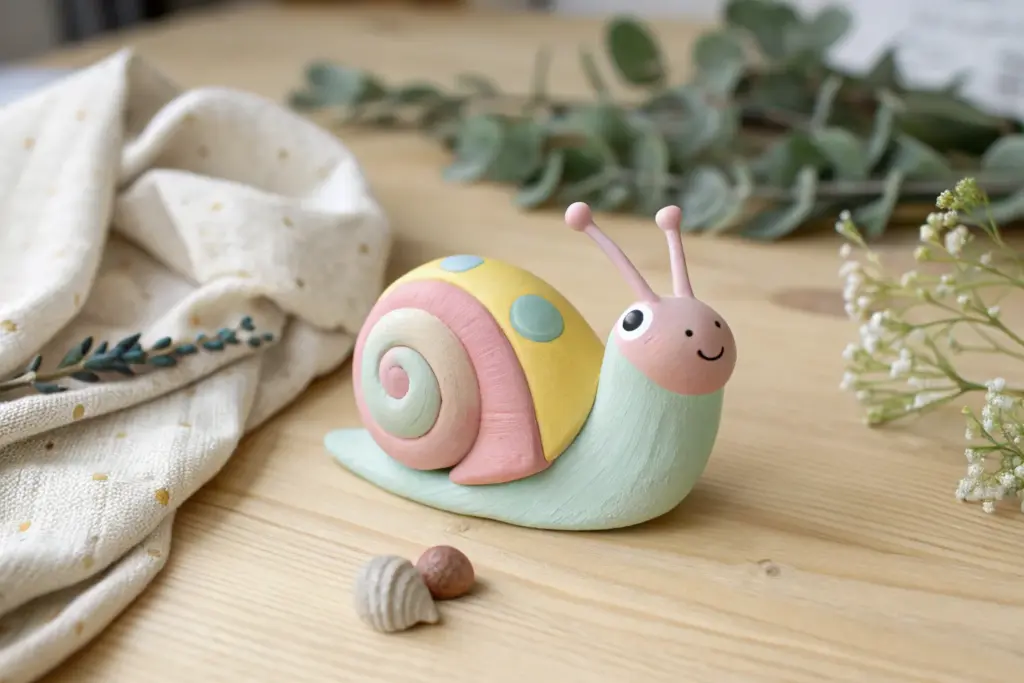
Silly One-Eyed Monsters
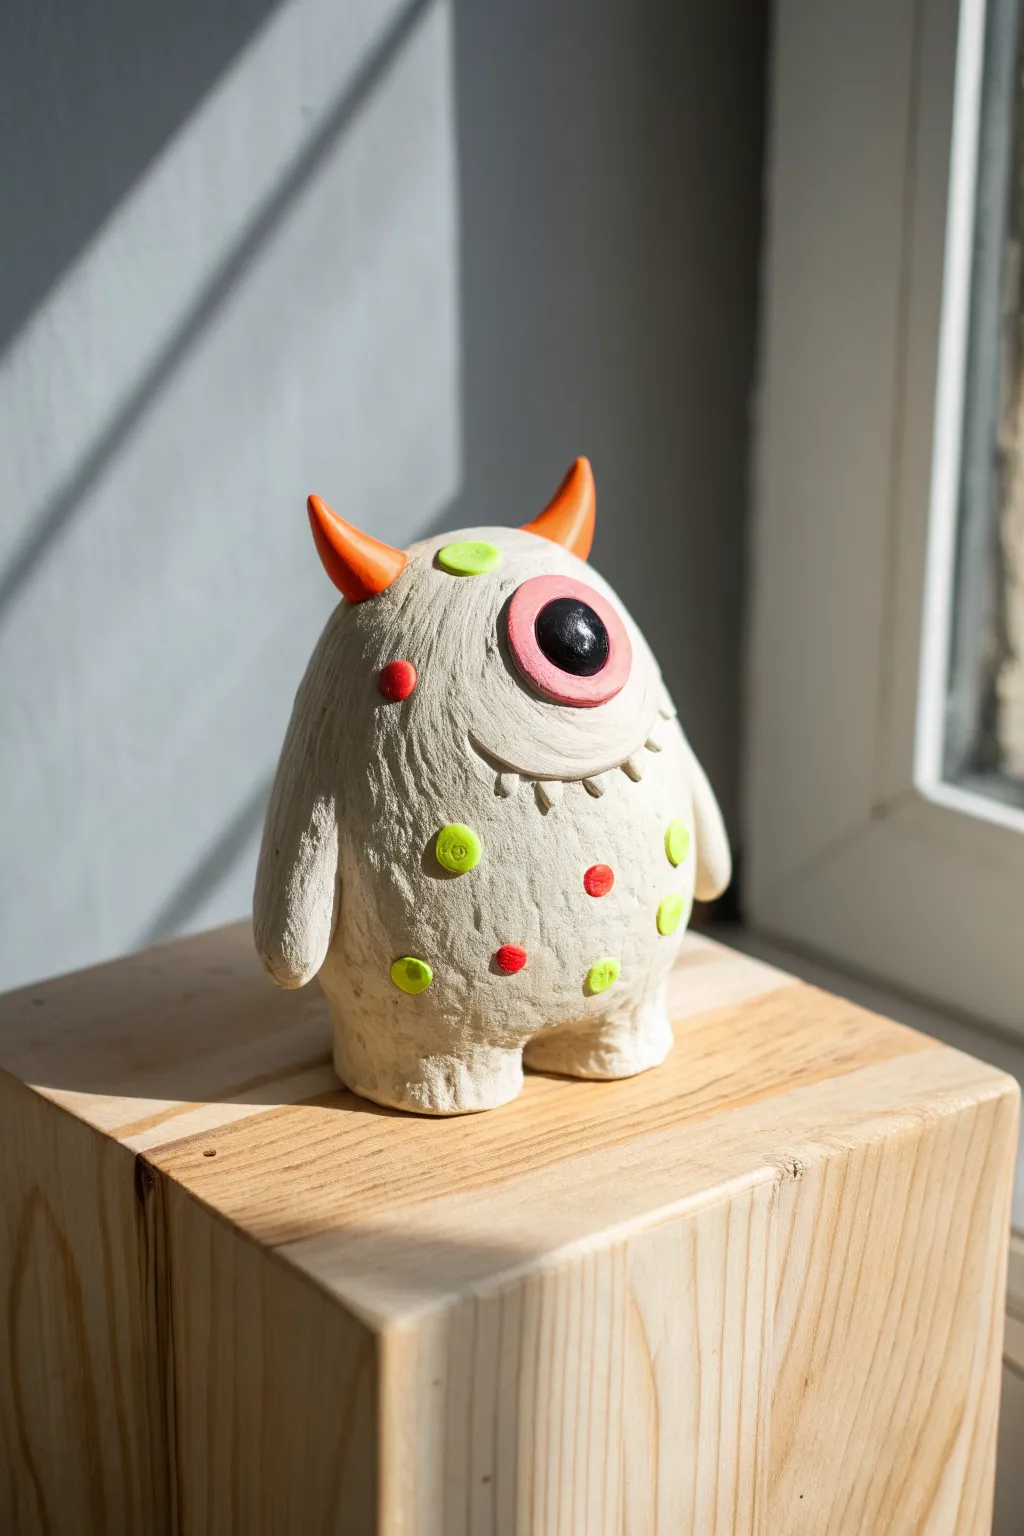
This friendly little monster with a single big eye and bright orange horns is ready to sit on your shelf. With its textured skin and colorful polka dots, it’s a perfect project for practicing simple shapes and surface details.
How-To Guide
Materials
- White modeling clay (air-dry or polymer, depending on preference)
- Acrylic paints (orange, neon green, red, pink, black, white)
- Small paintbrush
- Pointed sculpting tool or toothpick
- Ball stylus tool (optional but helpful)
- Small bowl of water (for smoothing)
- Clear varnish (optional)
Step 1: Shaping the Body
-
Create the base:
Start with a large ball of white clay about the size of an orange. Roll it between your palms until it is smooth and round. -
Form the torso:
Gently gently flatten the bottom of the ball against your work surface so it stands up on its own. Use your hands to slightly taper the top, creating a rounded pear shape. -
Pull out the legs:
Instead of attaching separate legs, use your thumbs to push and pinch the clay at the bottom into two short, stubby legs. They should look like little stumps keeping the monster sturdy. -
Add texture:
Take a sculpting tool or an old stiff toothbrush and scratch the entire surface of the body. You want rough, short strokes to make the clay look like furry monster skin. -
Attach the arms:
Roll two sausage shapes for the arms. Press them firmly onto the sides of the body, blending the clay at the shoulder joint so they don’t fall off. Let the hands hang down naturally.
Texturing Trick
Use a ball of aluminum foil to press texture into the clay skin before it dries. It creates an organic, bumpy surface perfectly.
Step 2: Sculpting the Face
-
Create the eye socket:
Press a thumb into the upper center of the face to create a shallow indentation where the eye will go. -
Make the eyeball:
Roll a white ball of clay, slightly flattening it, and press it firmly into the socket you just made. It should bulge out a little. -
Add the eyelid:
Roll a thin snake of clay and wrap it around the top edge of the eyeball to make an eyelid. Blend the top edge of this snake into the forehead. -
Carve the mouth:
Use your sculpting tool to carve a curved, smiling line below the eye. It can be a little crooked for extra character. -
Add tiny teeth:
Roll tiny little triangles or cones of clay. Press them gently onto the bottom lip of the smile you just carved. -
Attach the horns:
Shape two cone-shaped horns. Score (scratch) the bottom of the horns and the top of the head, then press them firmly together to attach.
Step 3: Painting and Details
-
Dry the clay:
If using air-dry clay, let the monster sit for 24-48 hours until completely hard. If using polymer, bake according to package instructions and let cool. -
Paint the horns:
Paint the two horns a bright, vibrant orange. You might need two coats to get a solid color. -
Color the eye:
Paint the eyelid pink. For the pupil, paint a large black circle in the center of the white eye, leaving a tiny white dot for a highlight. -
Add the spots:
Using a small brush or the back of a paintbrush handle, dot on spots of green and red all over the monster’s body. -
Detail the spots:
For a 3D effect on the green spots, I like to mix a slightly lighter green and add a tiny dab in the center of each one. -
Seal the work:
Once all the paint is dry, you can brush on a layer of clear varnish to protect your monster and give the eye a shiny look.
Loose Limbs?
If arms or horns keep falling off, use a small piece of toothpick inserted into both pieces like a bone to hold them together securely.
Now you have a fun desk buddy to keep you company during homework time

The Complete Guide to Pottery Troubleshooting
Uncover the most common ceramic mistakes—from cracking clay to failed glazes—and learn how to fix them fast.
Leaf and Flower Print Tiles
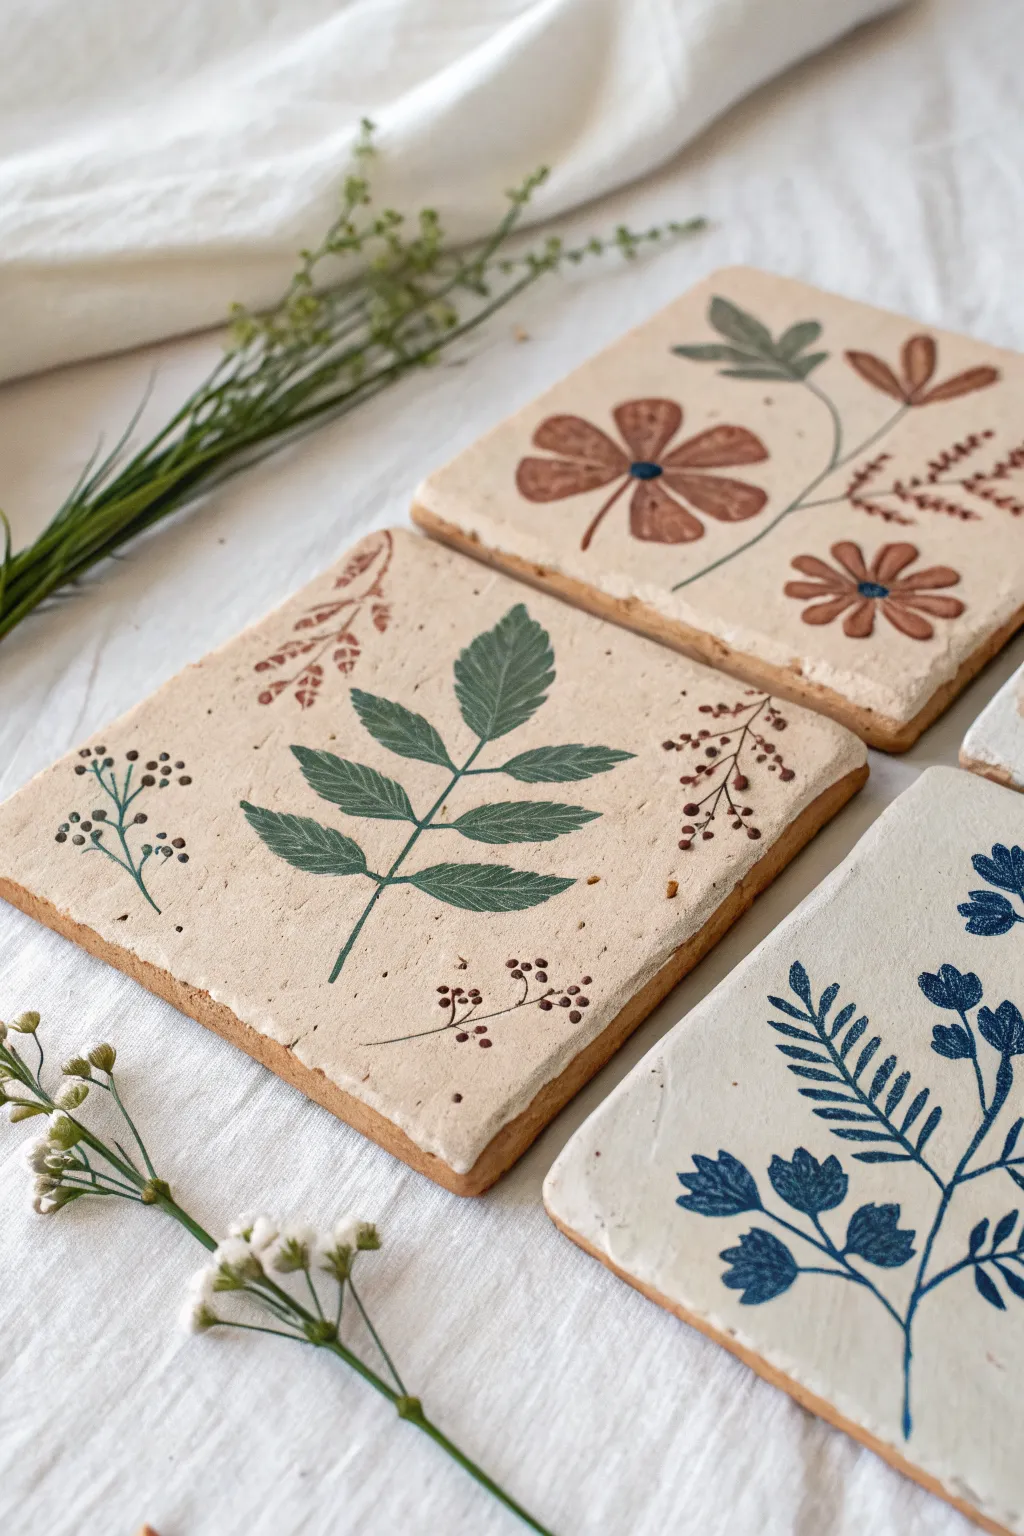
Capture the beauty of nature with these charming square clay tiles, featuring delicate botanical prints and hand-painted details. The smooth, parchment-colored base provides the perfect canvas for showcasing lovely leaf shapes and wildflower motifs in earthy, muted tones.
Detailed Instructions
Materials
- Air-dry clay (white or terracotta)
- Rolling pin
- Square cookie cutter (or ruler and knife)
- Real leaves and flowers (fresh but dry to the touch)
- Acrylic paints (cream/beige, sap green, rust red, deep blue)
- Fine detail paintbrushes (size 0 and 1)
- Medium flat paintbrush
- Matte mod podge or acrylic sealer
- Sandpaper (fine grit)
- Parchment paper or baking mat
Step 1: Shaping the Canvas
-
Prepare your workspace:
Lay down a sheet of parchment paper or a silicone mat to prevent the clay from sticking to your table. Take a substantial chunk of air-dry clay and knead it briefly to warm it up and remove air bubbles. -
Roll out the clay:
Using your rolling pin, flatten the clay into an even slab. Aim for a thickness of about 1/4 to 1/2 inch. You want it thick enough to be sturdy but thin enough to dry evenly. -
Cut the shapes:
Press your square cookie cutter firmly into the clay. If you don’t have a cutter large enough, measure out 4×4 inch squares with a ruler and slice them cleanly with a craft knife or plastic sculpting tool. -
Smooth the edges:
Dip your finger in a tiny bit of water and gently run it along the cut edges of your squares to soften any sharp corners or roughness. -
Create the texture base:
To mimic the slightly rustic, stone-like surface seen in the photo, you can gently pat the surface with a crumpled ball of aluminum foil or a stiff bristle brush. Don’t press too hard; you just want a subtle texture.
Step 2: Making Impressions
-
Select your botanicals:
Choose leaves with prominent veins, like the center leaf shown in the image. Ferns or small wildflowers also work beautifully. -
Press the leaves:
Lay your chosen leaf vein-side down onto the center of a clay square. Gently roll over it with your rolling pin once to press it into the surface. -
Remove the botanical:
carefully peel the leaf away using tweezers or a fingernail. It should leave a clear, indented impression of the stem and veins. -
Dry the tiles:
Set the tiles aside on a flat surface to dry completely. Depending on your humidity and clay thicknes, this usually takes 24 to 48 hours. Flip them over halfway through to ensure the bottom dries evenly. -
Sand for smoothness:
Once fully hard, inspect the edges. I find that a quick pass with fine-grit sandpaper makes the final product look much more professional by removing any little burrs.
Vein-Side Down
Always place leaves with the raised vein side facing down into the clay. The back of the leaf has much more texture than the smooth front, giving you a crisper print.
Step 3: Painting the Design
-
Apply the base coat:
Mix a warm cream or light beige acrylic paint. Apply a solid coat over the top and sides of the tile. This creates that lovely, uniform pottery look and covers the raw clay color. -
Let the base dry:
Ensure the beige base coat is completely dry to the touch before moving on to the detailed work. -
Fill the main impression:
Using a fine brush and sap green paint (or rust/blue for other variations), carefully paint inside the indented leaf impression. The indentation acts as a guide, making it easier to stay in the lines. -
Add detail to the veins:
If your impression is deep, the paint will naturally pool in the veins. If it’s shallow, use a darker shade of your green (or blue) to hand-paint thin lines over the vein indentations for contrast. -
Freehand the accents:
Looking at the reference image, paint small decorative sprigs around the main leaf using the tip of your size 0 brush. Use contrasting earth tones like rust red or charcoal grey for these small dots and stems. -
Paint the floral variations:
For tiles without leaf impressions, sketch a simple flower shape lightly with a pencil first. Use rust red for petals and a deep blue dot for the center, keeping the style loose and folk-art inspired. -
Seal the artwork:
Once all paint is bone dry, apply a thin layer of matte Mod Podge or acrylic sealer. This protects the paint from chipping and gives the tile a finished, cohesive sheen.
Curling Edges?
If your tile corners curl up while drying, gently weigh them down with a heavy board or book (with parchment paper in between) once they are semi-dry but still slightly pliable.
These beautiful tiles make wonderful coasters or decorative wall art when displayed in a group.
Coil-Heart Ornaments
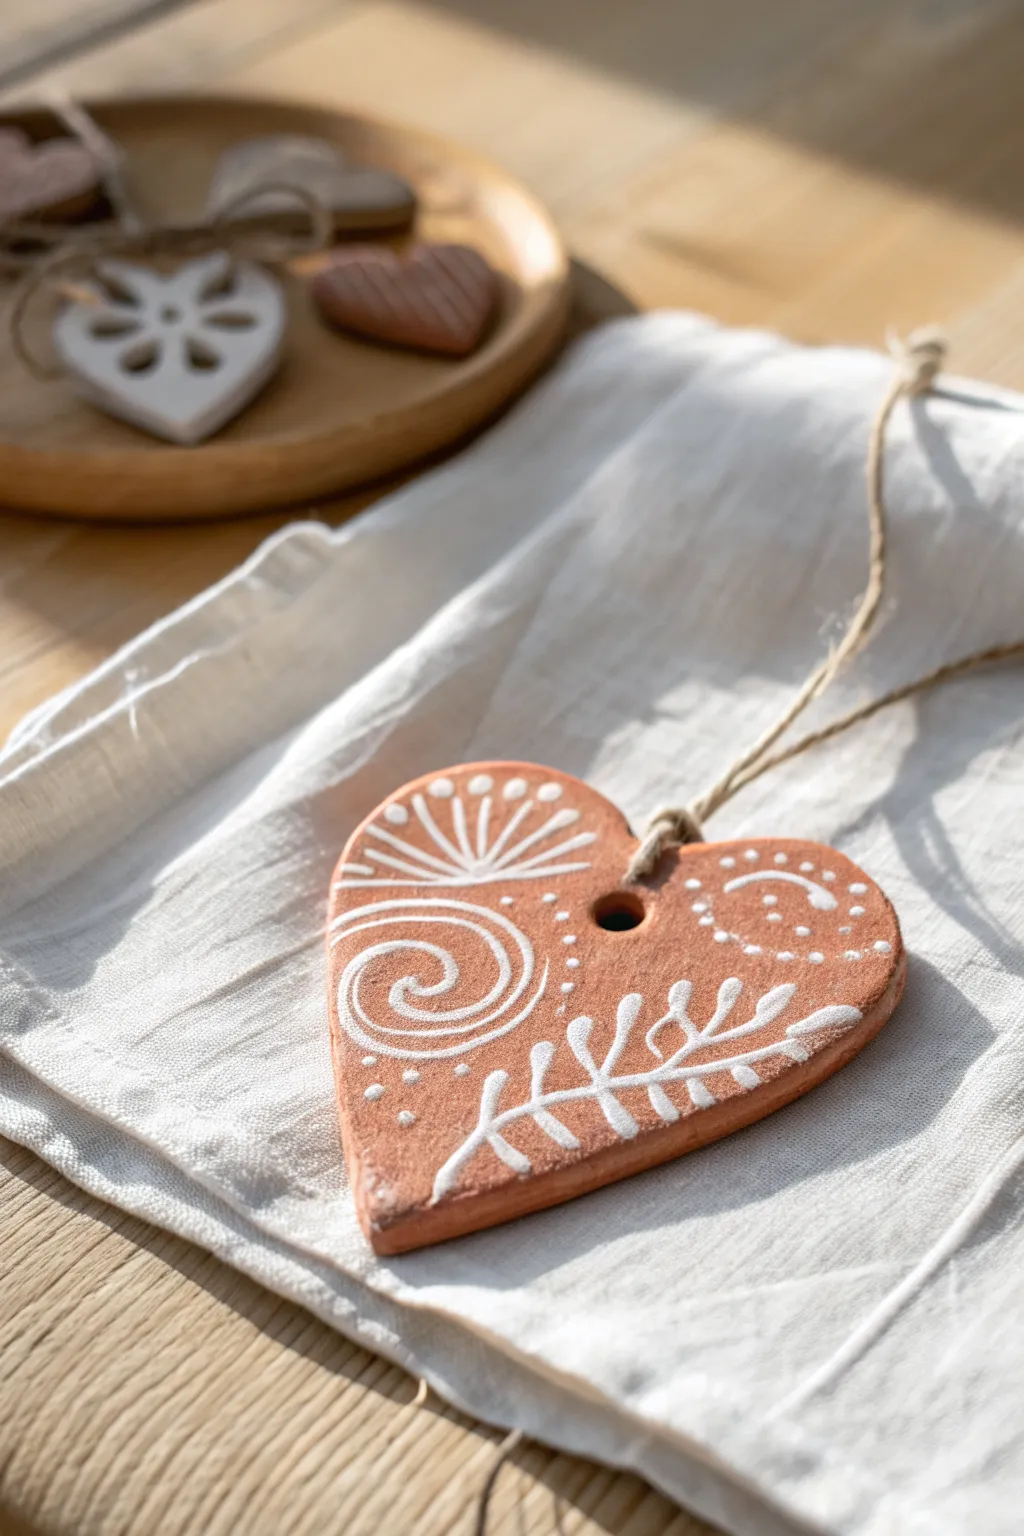
These charming, rustic heart ornaments bring a touch of warmth to any occasion with their earthy terracotta tone and delicate white designs. Simple enough for beginners but elegant in their finish, they make perfect hanging decorations or thoughtful handmade gifts.
Step-by-Step Tutorial
Materials
- Terracotta air-dry clay (or oven-bake polymer clay)
- Heart-shaped cookie cutter (medium size)
- Rolling pin
- Parchment paper or canvas mat
- Straw or small circular tool
- Fine-grit sandpaper (optional)
- White acrylic paint or specialized pottery paint pen
- Fine detail paintbrush (size 0 or 00)
- Jute twine or rustic string
- Clear matte varnish (optional)
Step 1: Shaping the Hearts
-
Prepare your workspace:
Lay down a sheet of parchment paper or a canvas mat to prevent the clay from sticking to your table. Take a handful of terracotta clay and knead it in your hands until it feels soft, warm, and pliable. -
Roll the slab:
Place the clay ball on your mat and flatten it slightly with your palm. Use the rolling pin to roll it out into an even slab, aiming for a consistent thickness of about 1/4 inch (6mm) so it’s sturdy but not too heavy. -
Cut the shape:
Position your heart-shaped cookie cutter on the clay slab. Press down firmly and evenly to cut through the clay. Wiggle it very slightly before lifting to ensure a clean cut. -
Create the hanging hole:
While the clay is still wet, take a plastic straw or a small circular tool and press it through the top center of the heart, leaving enough space from the edge so it won’t crack later. Twist the straw gently as you pull it out to remove the clay plug cleanly. -
Smooth the edges:
Dip your finger in a tiny bit of water and gently run it along the cut edges of the heart to soften any sharp ridges left by the cutter. This makes the final piece look much more professional.
Step 2: Drying and Refining
-
Let it dry:
Place the clay heart on a flat, dry surface away from direct heat. If using air-dry clay, let it sit for 24-48 hours, flipping it over halfway through to ensure even drying. If using polymer clay, bake according to the package instructions. -
Check for rough spots:
Once completely dry (and cool, if baked), inspect the surface. If there are any bumpy areas or rough edges, I like to lightly buff them with fine-grit sandpaper until the surface feels smooth to the touch. -
Wipe clean:
Use a barely damp cloth or a dry soft brush to remove any clay dust from the sanding process. A clean surface is crucial for the paint to adhere properly.
Uneven Clay Surface?
If your slab isn’t rolling flat, place two wooden rulers on either side of the clay as you roll. The rolling pin will rest on the rulers, ensuring a perfectly even thickness.
Step 3: Painting the Design
-
Plan the swirl:
Load your fine detail brush with white acrylic paint. Start on the left side of the heart and paint a large, confident spiral. Keep the lines relatively thin for a delicate look. -
Add the botanical details:
From the bottom center, paint a curved line extending toward the right edge. Add small, leaf-like offshoots to this line to create a simple fern or branch pattern. -
Paint the sunburst:
Near the top left curve of the heart, paint several short lines radiating outward from a central point, like a stylized half-flower or sunburst pattern. Top each line with a tiny dot. -
Decorate the right lobe:
On the top right curve, paint a few curved lines or scalloped shapes. Fill the empty space inside these curves with small stippled dots. -
Fill the gaps:
Look for empty spaces in your composition. Add tiny white dots or small clusters of three dots throughout the background to balance the design and add texture. -
Let the paint set:
Allow the white paint to dry completely. Since these are fine lines, this usually only takes about 15-20 minutes.
Crisper Paint Lines
Struggling with brush control? Use a white acrylic paint pen instead of a brush. It works just like a marker and gives you much more stability for drawing swirls and dots.
Step 4: Finishing Touches
-
Protect the artwork:
For longevity, brush a thin coat of clear matte varnish over the entire front of the heart. This seals the clay and protects your white paint from scratching off. -
Add the hanger:
Cut a piece of jute twine about 8 inches long. Thread one end through the hole you made earlier. -
Secure the loop:
Fold the twine in half and tie a simple overhand knot near the ends to create a loop. Pull the knot tight and your rustic ornament is ready to hang.
Hang your beautiful creations in a sunny window or bundle them as heartfelt gifts for friends


What Really Happens Inside the Kiln
Learn how time and temperature work together inside the kiln to transform clay into durable ceramic.
Tiny Fairy Houses

These adorable miniature dwellings look like they were plucked straight from an enchanted forest floor. With their pastel roofs and tiny arched doors, they make the perfect magical addition to any bedroom shelf or fairy garden.
Detailed Instructions
Materials
- Air-dry clay (white or terracotta)
- Acrylic paints (pastel pistachio green, dusty rose pink, cream/off-white, brown)
- Fine grit sandpaper
- Small rolling pin
- Clay carving tools or a wooden skewer
- Small paintbrush
- Water in a cup
- A small circular cookie cutter or a jar lid (approx. 2 inches diameter)
- Matte varnish or sealant (optional)
Step 1: Shaping the Base Structures
-
Roll the cylinders:
Begin by taking a golf-ball-sized lump of clay. Roll it into a smooth ball, then gently roll it back and forth on your work surface to create a thick cylinder shape. This will be the main body of the house. -
Flatten the base:
Tap one flat end of the cylinder gently on the table to create a stable base so the house stands upright without wobbling. -
Form the roofs:
Take a slightly smaller piece of clay and roll it into a ball. Pinch and pull one side gently to create a cone shape, like a Hershey’s kiss. Press the bottom of the cone onto a flat surface to widen it until it’s slightly wider than your house cylinder. -
Hollow comfortably:
If your clay pieces are very thick (over an inch), I prefer to gently press my thumb into the bottom of the roof and the cylinder to hollow them out slightly. This helps them dry evenly and prevents cracking, though solid pieces work fine for smaller houses. -
Attach the roofs:
Score the top of the cylinder and the bottom of the roof cone with a needle tool or toothpick (make hatch marks). Dab a little water on the scored areas and press the roof firmly onto the base. Smooth the seam with your finger or a clay tool if you want them fully joined, or leave them as separate pieces to be glued later if you want a removable lid.
Step 2: Adding Details & Texture
-
Carve the doors:
Roll a small, flat oval of clay and press it onto the front for a door, or simply use a carving tool to outline an arch shape directly into the wet clay. -
Add wood grain:
Using a needle tool or toothpick, gently drag vertical lines down the door area to mimic wooden planks. Press a tiny ball of clay on one side to act as the doorknob. -
Cut out windows:
Use a small square cutter or your knife tool to cut out a small window. For the green house, shape a tiny arch frame around it using a thin snake of clay. You can add a cross shape inside the window for panes. -
Texture the walls:
Take a toothbrush or a stiff bristle brush and gently tap it all over the cylinder walls. This gives the ‘stucco’ or stone texture seen in the photo. -
Create the mini mushrooms:
Use leftover scraps to form three or four tiny cone shapes for the accent pieces shown in the foreground. -
Let it dry:
Set your creations aside in a dry, cool place. Allow them to dry completely for at least 24-48 hours. The clay will turn white and feel lighter when ready.
Crack Control
If you see tiny cracks forming as the clay dries, don’t panic. Mix a tiny bit of fresh clay with water to make a paste and smooth it over the crack.
Step 3: Painting the Magic
-
Base coat the walls:
Paint the cylinder base with a creamy off-white color. You might need two layers to get solid coverage. -
Paint the roofs:
Paint one roof with the pastel pistachio green and the other with dusty rose pink. Use a smooth, soft brush to avoid streak marks. -
Detail the doors:
Mix a light brown shade (or use the pastel colors like in the example) to paint the doors. Use a darker brown for the tiny doorknob to make it pop. -
Add roof dots:
Dip the back end of a paintbrush handle into acrylic paint. For the pink house, use white paint; for the green house, use a soft peach or pink. Dot the paint randomly over the roof cones. -
Paint the window accents:
Carefully paint the inside of the windows with a dark brown or black to simulate depth. -
Finish the scatter pieces:
Paint the tiny mushroom accents in coordinating pastel shades of pink, green, and orange.
Glow Up
Before the clay dries, poke a hole in the bottom large enough for an LED tealight. When finished, the windows will glow with warm light.
Place your finished fairy cottages near a window or potted plant to welcome your tiny magical guests
Rainbow Cloud Charms
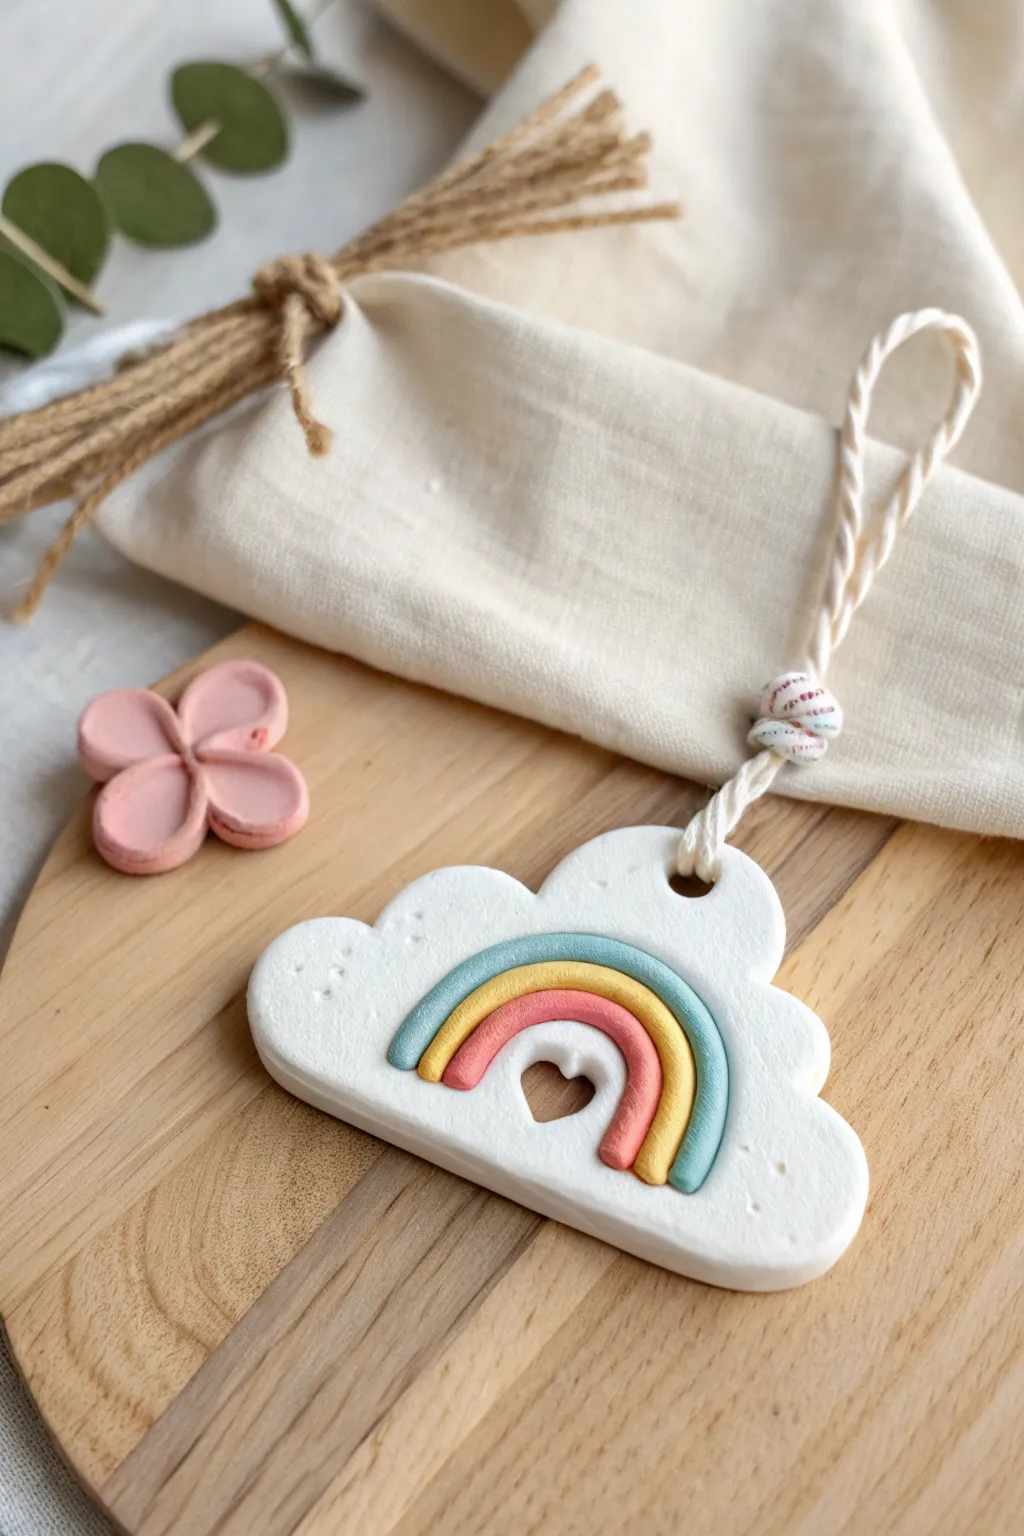
This sweet, dreamy charm features a puffy white cloud adorned with delicate pastel rainbow arches and a heart cutout at its center. It’s perfect for adding a touch of whimsy to a backpack or hanging as a decoration in a nursery.
Step-by-Step
Materials
- White polymer clay (or air-dry clay)
- Small amounts of pastel blue, yellow, and coral pink clay
- Rolling pin or acrylic roller
- Cloud-shaped cookie cutter (approx. 3-4 inches wide)
- Tiny heart-shaped cutter
- Small straw or cocktail stick (for the hanging hole)
- Baking sheet with parchment paper
- Liquid clay or ‘bake and bond’ adhesive (optional)
- Twisted cotton twine or macramé cord
- Oven (if using polymer clay)
Step 1: Shaping the Cloud Base
-
Condition the white clay:
Start by kneading a generous chunk of white clay in your hands until it is soft, warm, and pliable. This prevents cracks later on. -
Roll out the slab:
Using your rolling pin, flatten the white clay into an even slab. Aim for a thickness of about 1/4 inch (6mm) so the charm feels substantial and sturdy. -
Cut the cloud shape:
Press your cloud-shaped cookie cutter firmly into the clay slab. Wiggle it slightly to ensure a clean cut, then gently remove the excess clay from around the edges. -
Smooth the edges:
Take a moment to run your finger lightly along the cut edges of the cloud to soften any sharp corners left by the cutter. -
Create the heart cutout:
Position your tiny heart cutter in the lower center of the cloud. Press down to remove the heart shape, creating a cute window in the clay. -
Add the hanging hole:
Use a straw or a tool to poke a clean hole near the top center of the cloud. Make sure the hole is wide enough for your twine to pass through later. -
Add texture (optional):
If you like a subtle speckled look, you can gently tap the surface with a tool or sprinkle tiny bits of glitter, though the example is mostly smooth.
Step 2: Creating the Rainbow Arches
-
Roll the colored snakes:
Take small pinches of your pastel blue, yellow, and pink clay. Roll each one into a thin, even snake or ‘noodle’ on your work surface. -
Check thickness:
Ensure all three colored snakes are roughly the same thickness for a neat, uniform look. -
Arch the first color:
Take the pink strand (the smallest arch) and curve it directly over the top of the heart cutout. Press it very gently so it adheres to the white base. -
Add the yellow layer:
Place the yellow strand snugly against the top of the pink arch. Trim the ends so they align perfectly with the pink strand’s ends. -
Finish with blue:
Add the blue strand as the final, largest arch on top of the yellow. I find it helpful to use a craft knife or blade to trim all the ends flush at the bottom of the rainbow so they look tidy. -
Secure the rainbow:
If using air-dry clay, dab a tiny bit of water to stick them down. For polymer clay, a dot of liquid clay helps, though firm pressure often works well enough.
Clean Edges Trick
If your clay has fingerprints, dip your finger in a tiny bit of rubbing alcohol (for polymer clay) or water (for air-dry) and lightly buff them away before drying.
Step 3: Finishing Touches
-
Bake or dry:
Place the charm on a parchment-lined baking sheet. Bake according to your polymer clay package instructions (usually 275°F/135°C for 15-30 minutes). If using air-dry clay, let it sit for 24-48 hours. -
Cool down:
Let the piece cool completely before handling, as warm clay can be fragile. -
Prepare the twine:
Cut a length of twisted cotton twine, about 8-10 inches long. -
Attach the hanger:
Fold the twine in half and push the loop through the hole in the cloud from front to back. Pull the tails through the loop to create a lark’s head knot, or simply tie it off securely at the top. -
Add a decorative bead (optional):
For extra flair, you can slide a bead onto the twine right above the knot before tying off the loop.
Level Up: Texture
Before baking, use an old toothbrush to gently tap the white cloud surface. This creates a realistic, fluffy stone texture that contrasts nicely with the smooth rainbow.
Hang your finished charm in a sunny window or gift it to a friend to brighten their day

TRACK YOUR CERAMIC JOURNEY
Capture glaze tests, firing details, and creative progress—all in one simple printable. Make your projects easier to repeat and improve.
Mosaic Frame With Mixed Bits
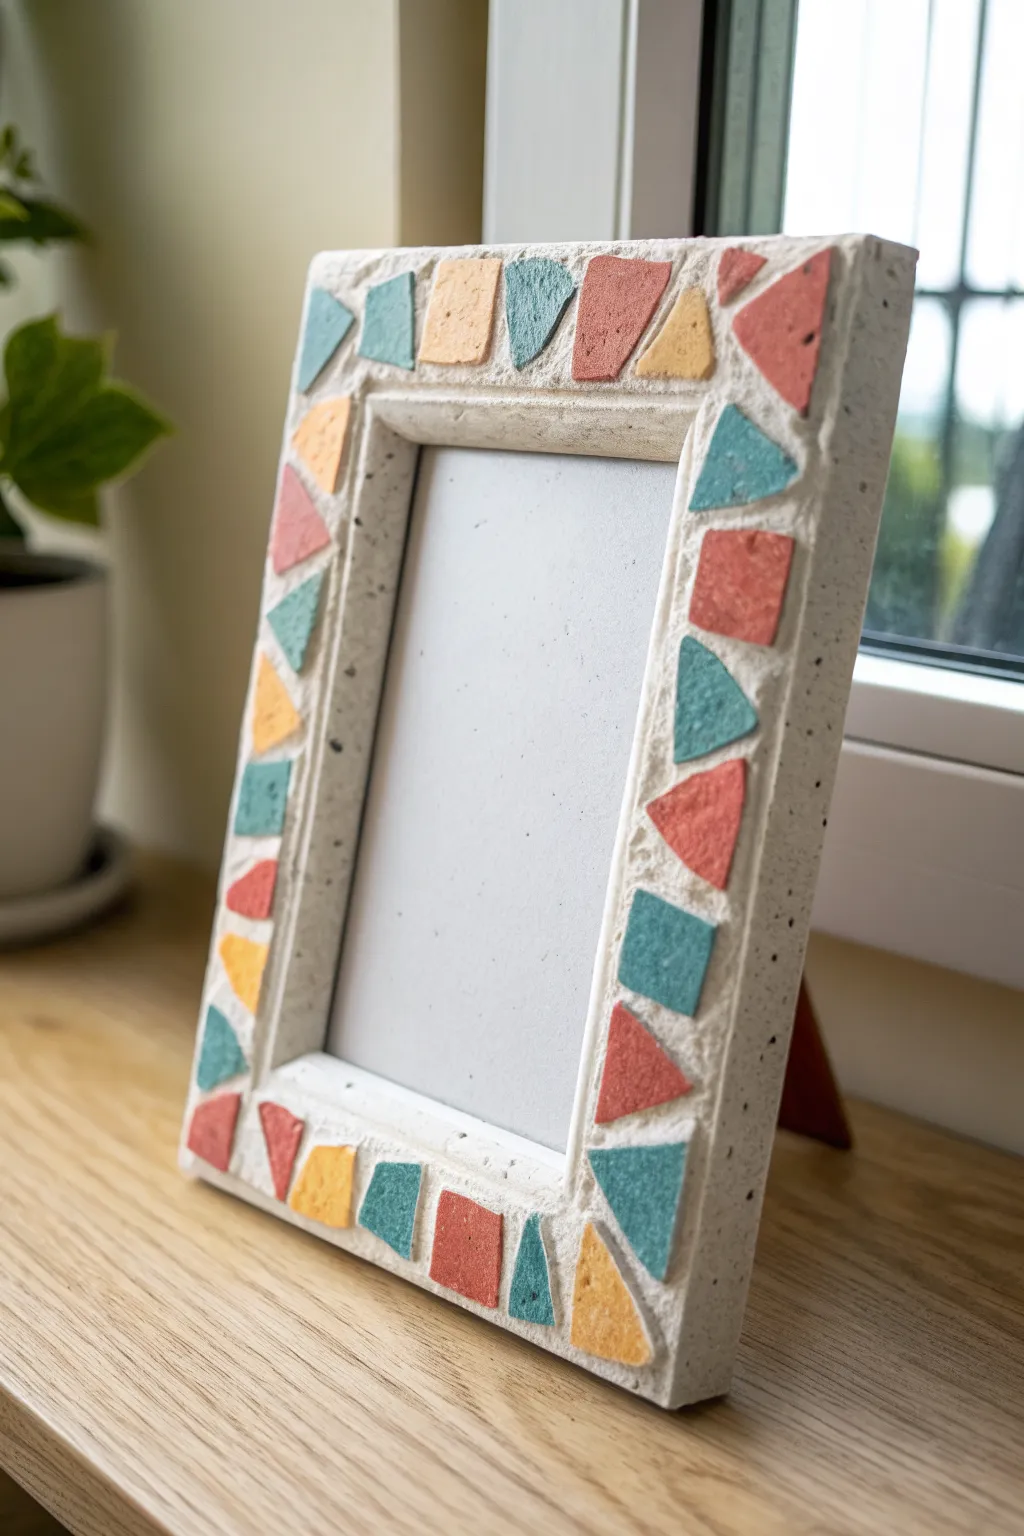
Transform simple air-dry clay into a sophisticated, faux-stone creation that looks like colorful terrazzo. This project combines the fun of making custom clay tiles with the satisfaction of assembling a unique, chunky mosaic frame.
Step-by-Step
Materials
- White air-dry clay (for the base)
- Colored air-dry clay (terracotta, mustard yellow, teal)
- Plain wooden picture frame (flat profile preferred)
- Wide craft sticks or rolling pin
- Plastic knife or clay cutter
- Craft glue or strong PVA glue
- Sealant (matte or satin varnish)
- Fine-grit sandpaper
- Old toothbrush (for texture)
Step 1: Creating the Mosaic Tiles
-
Roll out colors:
Take your colored clays—terracotta, mustard yellow, and teal—and roll them out individually into thin slabs, about 1/8 inch thick. Try to keep the thickness consistent across all colors. -
Cut geometric shapes:
While the clay is still wet, use a plastic knife to cut random geometric shapes. Focus on triangles, trapezoids, and uneven squares. They don’t need to be perfect; irregular ‘shards’ look best. -
Texture the shards:
For an organic look, gently tap the surface of your cut shapes with an old toothbrush or a crumpled ball of foil to add a subtle stone-like texture. -
Let them dry:
Set all your little colored bits aside on a flat surface to dry completely. This usually takes 24 hours, depending on humidity.
Clean Cuts
If your colored shards warp while drying, place a heavy book on top of them (with parchment paper in between) during the drying phase to keep them perfectly flat.
Step 2: Preparing the Base
-
Prep the frame:
Take your plain wooden frame and remove the glass and backing so you don’t accidentally get clay on them. -
Apply base glue:
Brush a layer of craft glue onto the front face of the wooden frame. This helps the white clay adhere firmly to the wood. -
Cover with white clay:
Roll out ropes of white air-dry clay and press them onto the glued frame. Flatten and smooth the clay with your fingers until the wood is completely covered with a thick, even layer. -
Add stone texture:
Before the white base dries, tap it all over with an old toothbrush. This creates a pitted, concrete-like effect that mimics real stone.
Step 3: Assembling the Mosaic
-
Press in the tiles:
While the white clay base is still soft and receptive, take your dried colored shards and press them firmly into the surface. -
Arrange the pattern:
I like to space the colors out so no two identical shades are touching. Leave a little bit of the white ‘grout’ showing between each piece. -
Level the surface:
Once all pieces are placed, gently roll a craft stick over the top of the frame to ensure the colored shards are flush with the white clay, embedding them securely. -
Clean the edges:
Use a damp finger to smooth out the inner and outer edges of the frame, blending the white clay so it looks like a solid block of stone. -
Final drying:
Let the entire frame dry undisturbed for at least 24 to 48 hours. The white clay is thick, so patience is key here.
Faux Speckle
Mix some black pepper or dried tea leaves into the white base clay before applying it to the frame for an even more realistic, speckled granite look.
Step 4: Finishing Touches
-
Sand lightly:
Once bone dry, take fine-grit sandpaper and very gently sand over the top. This removes any sharp clay burrs and reveals the clean, flat surface of your mosaic bits. -
Dust off:
Wipe the frame down with a dry cloth or soft brush to remove all the sanding dust from the textured crevices. -
Seal the work:
Apply a coat of matte varnish. This brings out the richness of the colored clay and protects the white ‘grout’ from getting dirty over time. -
Reassemble:
Once the varnish is dry, put the glass and backing back into the frame, ready for your favorite photo.
Your trendy, handmade picture frame is now ready to display a cherished memory.
Mini Coral Reef Scene Tile
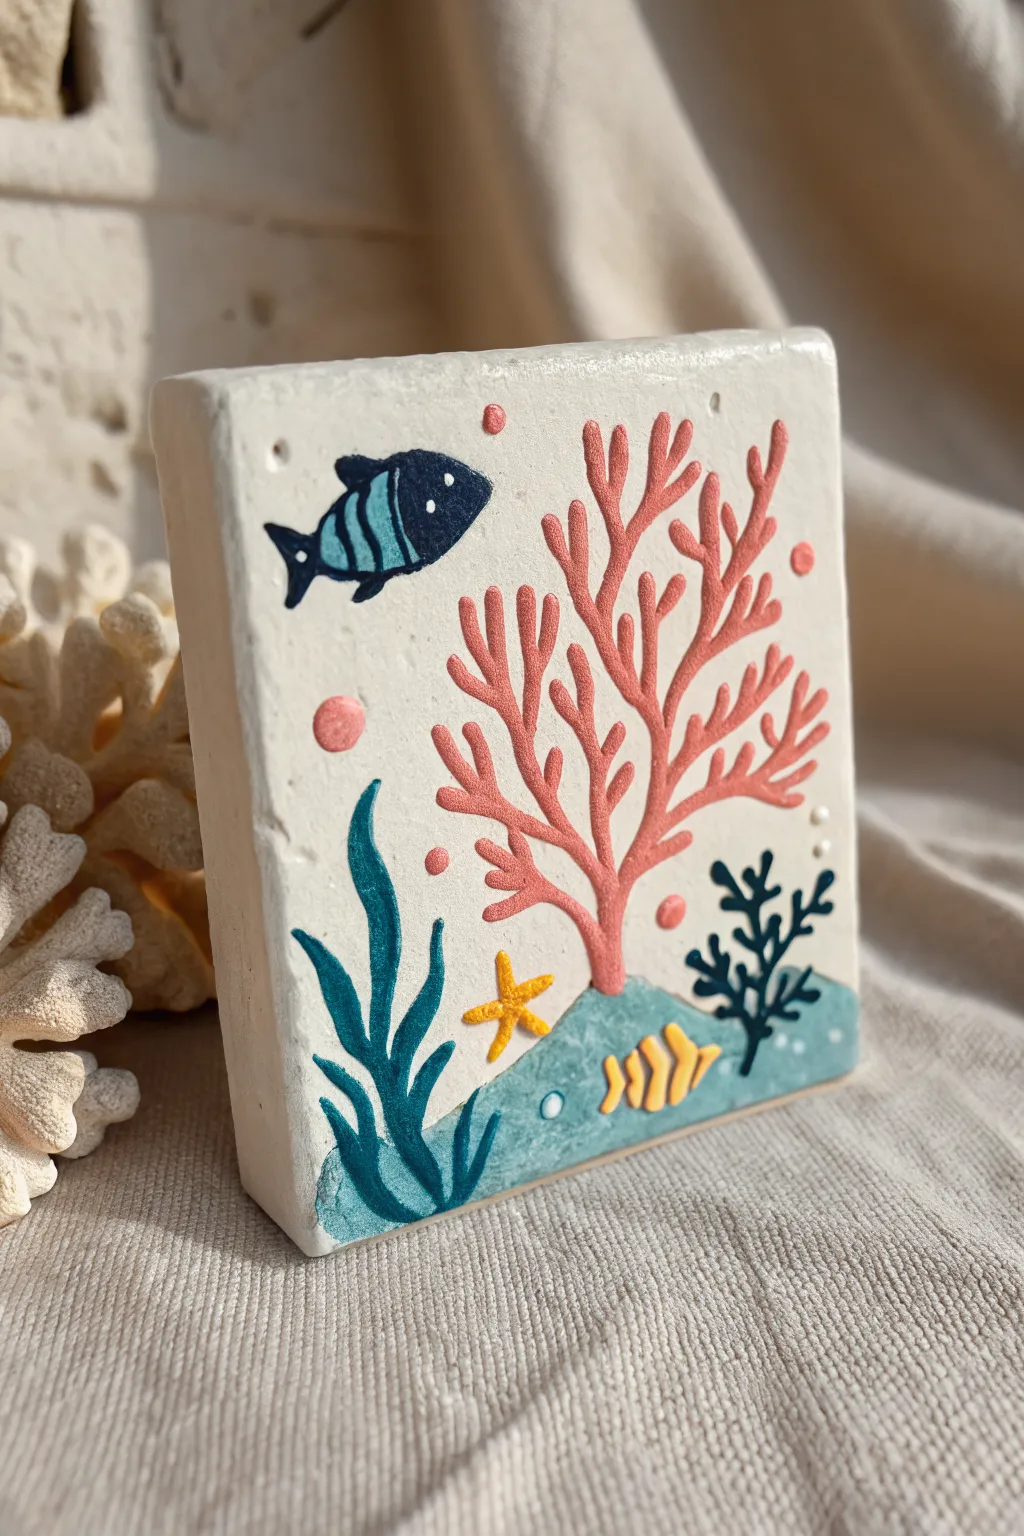
Bring the ocean to life with this charming clay tile featuring raised details and vibrant sea creatures. This project combines simple slab building with delicate relief work to create a textured, 3D underwater snapshot.
Detailed Instructions
Materials
- Air-dry clay (white)
- Rolling pin
- Square cookie cutter or knife
- Clay sculpting tools (needle tool, small ball stylus)
- Acrylic paints (pastel pink, teal, navy blue, yellow, white, black)
- Fine detail paintbrushes
- Clear varnish (matte or satin)
- Cup of water
- Sandpaper (fine grit)
Step 1: Base Construction
-
Roll the slab:
Begin by conditioning a chunk of white air-dry clay until it is smooth and pliable. Roll it out into an even slab that is roughly 1/2 to 3/4 inch thick. You want it substantial enough to stand on its edge. -
Cut the square:
Using a square cookie cutter or a ruler and knife, cut out a perfect square shape. Smooth the edges with a bit of water on your fingertip to remove any sharp ridges. -
Texture the background:
Gently tap the surface of the clay with a stiff bristle brush or a crumpled ball of foil to add a subtle, sandy texture to the entire face of the tile.
Slip & Score Secret
Even for tiny add-ons like the fish, always scratch the back and add a drop of water (slip) before attaching to ensure they don’t pop off when drying.
Step 2: Sculpting the Reef
-
Sketch the layout:
Lightly trace your design onto the wet clay using a needle tool. Mark out the wavy sand bottom, the large central coral, the seaweed on the left, and the fish placements. -
Sculpt the seabed:
Roll a small snake of clay and flatten it against the bottom section of your tile to create a slightly raised seabed. Use a modeling tool to smooth the seams so it blends flawlessly into the background tile. -
Add the pink coral:
For the main coral, roll very thin coils of clay. carefully press them onto the tile following your tree-like branch design. Use a small ball stylus to gently stipple the surface of these branches for a distinct coral texture. -
Create the fish:
Roll tiny balls of clay and flatten them into teardrop shapes for the fish bodies. Press them onto the tile—one near the top left and one near the seabed. Use a knife tool to impress mouth and tail details. -
Form the seaweed:
Roll tapered coils for the seaweed on the left. Press them onto the tile in wavy, vertical motions to look like they are swaying in the current. -
Add tiny details:
Form a tiny star for the starfish and press it onto the seabed. Roll miniscule balls of clay for scattered bubbles and the textured dots around the coral. -
Dry the tile:
Let the tile sit in a dry, cool place for at least 24-48 hours. I find turning it over halfway through helps prevent the thick slab from warping.
Step 3: Painting & Finishing
-
Base coat:
Once bone dry, inspect for rough spots and sand lightly if needed. Paint the background (sky/water area) a creamy off-white if your clay isn’t naturally that color. -
Paint the seabed:
Mix a soft teal color and paint the raised seabed area at the bottom. -
Detail the coral:
Paint the raised coral branches in a soft salmon pink. Use the very tip of your brush to ensure clean edges against the background. -
Color the vegetation:
Paint the seaweed on the left a deep teal-green. Use a dark navy or black to paint the silhouette of the smaller coral bush on the bottom right. -
Bring fish to life:
Paint the top fish navy blue with light blue stripes and a white eye. Paint the bottom fish bright yellow. -
Add final accents:
Paint the floating bubbles pink and the starfish golden yellow. Add tiny white dots for highlights in the fish eyes and bubbles. -
Seal the work:
Finish by applying a coat of matte or satin varnish to protect the paint and give the tile a finished, ceramic look.
Fixing Cracks
If tiny hairline cracks appear as the thick tile dries, mix a small amount of fresh clay with water to make a paste and fill them in before painting.
Display your mini ocean masterpiece on a small easel or shelf to add a splash of coastal charm to your room
Cardboard-Core Rocket Sculpture
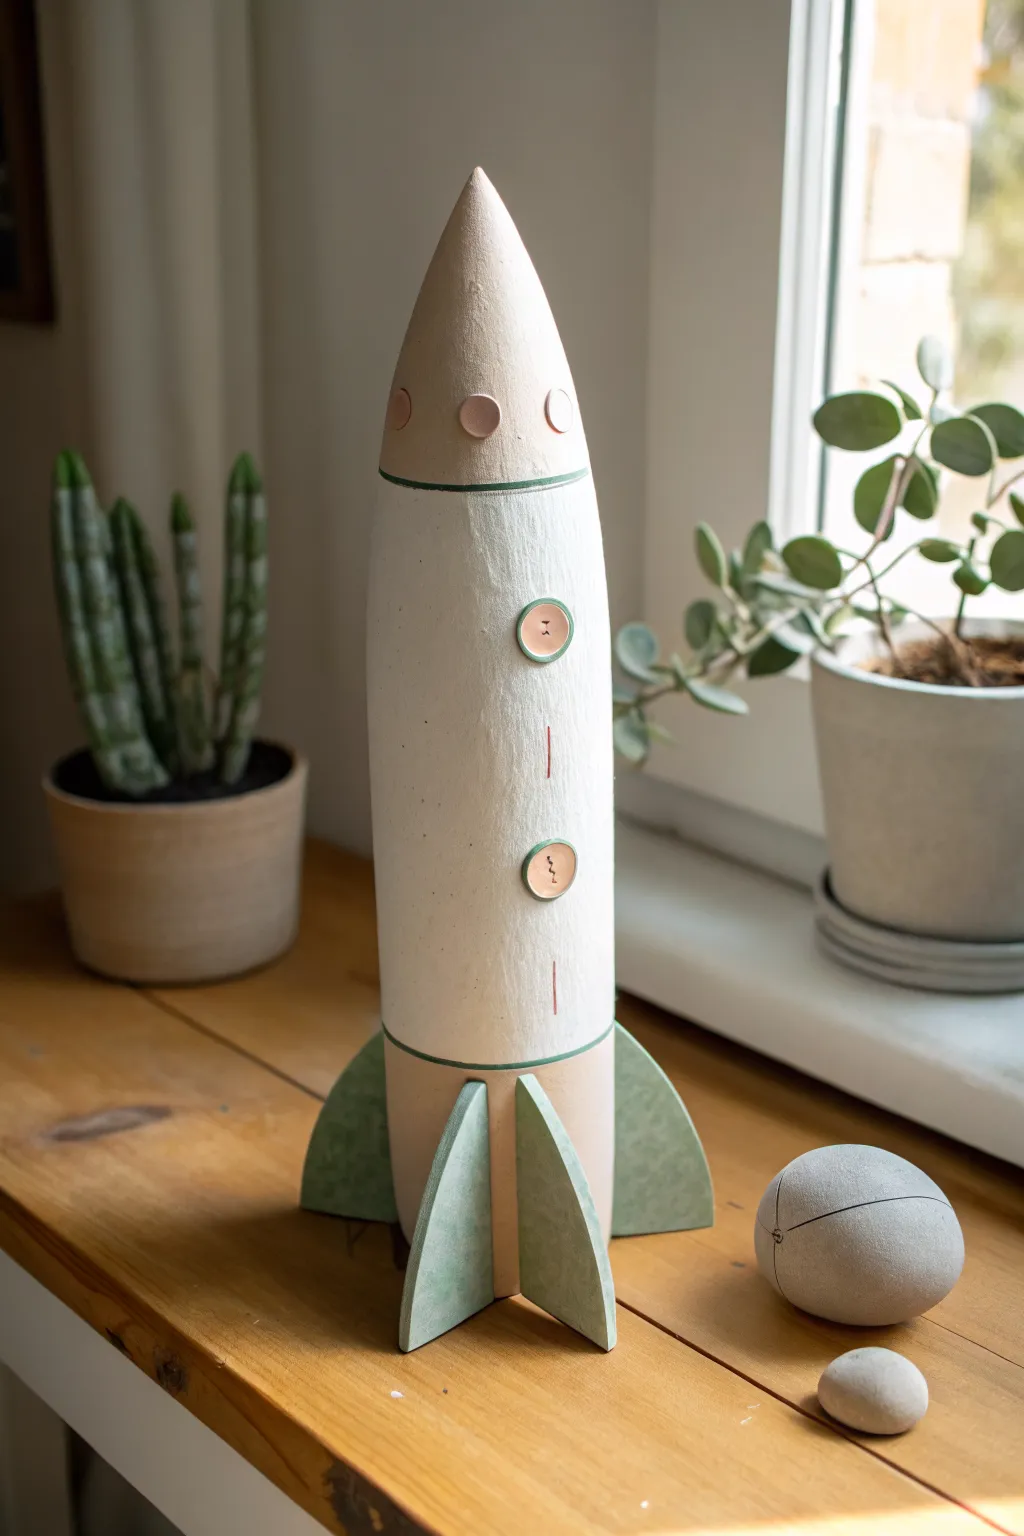
Blast off with this charming, vintage-style rocket sculpture that combines structural engineering with clay modeling. Its soft matte finish, achieved with air-dry clay over a sturdy cardboard core, makes it a beautiful decor piece for a nursery or playroom.
How-To Guide
Materials
- Paper towel roll (or poster mailing tube for a larger rocket)
- Thin cardboard (cereal box style)
- White PVA glue
- Masking tape
- Air-dry creative clay (white or terracotta)
- Rolling pin
- Sandpaper (fine grit)
- Acrylic paints (pastel sage green, cream/off-white, soft pink/terracotta)
- Small round buttons (optional/imprinted)
- Fine detail paintbrush
- Matte sealant spray
Step 1: Building the Armature
-
Form the fuselage:
Start with your paper towel roll as the main body. If it feels flimsy, stuff it tightly with newspaper to give it rigidity, then tape over the ends. -
Create the nose cone:
Cut a circle from your thin cardboard, approximately 4 inches in diameter. Cut a slit from the edge to the center, overlap the edges to form a cone, and tape it securely. Attaching this to the top of your tube with masking tape is crucial; use plenty of tape to smooth the transition. -
Cut the fins:
Cut three or four identical fin shapes from the remaining cardboard. They should look like rounded triangles. I prefer to cut slits into the bottom of the tube to slide these fins in, rather than just gluing them to the surface, for better stability. -
Secure the fins:
Once the fins are positioned, use generous amounts of masking tape to secure them to the body. Don’t worry about how it looks now; the clay will hide all the tape.
Cracked Clay?
Mix a tiny amount of fresh clay with water to create a thick paste (slip). Fill any drying cracks with this paste, let dry, and sand smooth before painting.
Step 2: Applying the Clay Skin
-
Roll out your clay:
Roll your air-dry clay into a thin, even sheet, about 1/8th of an inch thick. You may need to do this in sections. -
Wrap the body:
Apply the clay sheet to the rocket body first. Smooth the seams with a little water on your finger. Wrap the nose cone separately and blend the clay downward into the body section. -
Cover the fins:
Covering the fins requires patience. Sandwich each cardboard fin between two smaller slabs of clay and pinch the edges together to seal them. Smooth out any fingerprints. -
Detail the portholes:
While the clay is still wet, press small buttons or bottle caps into the side to create the indented portholes. You can leave the buttons in or remove them to just leave an impression. -
Add surface texture:
Use a needle tool or toothpick to gently score a horizon line around the nose cone and near the base where the fins meet the body. -
First drying phase:
Let the rocket stand upright to dry. Air-dry clay shrinks slightly, so keep it away from direct heat sources to prevent cracking. This usually takes 24-48 hours.
Seamless Finish
Dip your finger in water and smooth the clay constantly as you work. The smoother it is when wet, the less sanding you’ll have to do later.
Step 3: Finishing Touches
-
Sand for smoothness:
Once bone dry, gently sand the surface. Focus on the nose cone tip and the edges of the fins to get that clean, aerodynamical look seen in the photo. -
Base coat:
Paint the middle section of the rocket with a creamy off-white acrylic paint. You might need two coats for opaque coverage. -
Color blocking:
Paint the nose cone and the very bottom section (between the fins) in a soft, dusty pink or terracotta color. Use masking tape for a crisp line if you have a steady hand. -
Green accents:
Paint the fins and the thin distinct stripes separating the sections in a pastel sage green. A very fine liner brush helps with those thin divider lines. -
Button details:
If you removed the buttons earlier, paint the indented circles now. Add two tiny dots or stitch marks in the center of the circles to mimic buttons. -
Vertical details:
Paint small vertical dashed lines connecting the portholes to add visual interest to the main fuselage. -
Seal the work:
Finish with a matte spray sealant to protect the paint and give it that soft, ceramic-like sheen.
Now you have a timeless space explorer ready for launch on your bookshelf
Hanging Clay Mobile Shapes

Transform a simple bamboo hoop into a dreamy nursery decoration with this handmade clay mobile. Featuring rustic terracotta and pastel tones, these textured hanging shapes create a calming celestial display perfect for swaying in a gentle breeze.
Step-by-Step
Materials
- Air-dry clay (white and terracotta/brown colors)
- Bamboo embroidery hoop (inner ring only, approx. 6-8 inches)
- Acrylic paints (mustard yellow, teal blue, peach/coral, cream)
- Cookie cutters (stars in various sizes, moon shapes, simple drop/leaf shape)
- Wooden beads (various sizes, natural and painted)
- Cotton or hemp twine (natural color)
- Rolling pin
- Parchment paper or craft mat
- Toothpick or skewer (for making holes)
- Fine-grit sandpaper
- Scissors and ruler
- Hot glue gun (optional, for securing knots)
Step 1: Shaping the Celestial Bodies
-
Prepare the Clay:
Start by kneading your air-dry clay until it is soft and pliable. If you want colored clay from the start, you can mix a drop of acrylic paint into white clay, but for this project, painting later gives a better matte finish. -
Roll It Out:
Roll the clay onto parchment paper to a uniform thickness of about 1/4 inch. Avoid making it too thin, as the shapes need to be sturdy enough to hang. -
Cut Out the Shapes:
Using your cookie cutters, press out a variety of shapes. You will need roughly 3 large stars, 3-4 small stars, 3 crescent moons, and a few teardrop or leaf shapes for the bottom weights. -
Create Texture:
Before the clay dries, gently press a piece of rough fabric, sandpaper, or an old toothbrush onto the surface of a few shapes (like the yellow moon) to give them that lovely stone-like texture seen in the photo. -
Pierce Hanging Holes:
Use a toothpick to poke a hole through the top of every shape. For pieces that will hang in the middle of a strand (like the terracotta star), poke a hole through the bottom as well so the string can continue downward. -
Dry Completely:
Lay all shapes flat on parchment paper to dry. Flip them over after a few hours to ensure even drying. Depending on humidity, this usually takes 24-48 hours.
Texturing Trick
For the sponge-like texture seen on the yellow moon, gently press a piece of actual natural sponge into the wet clay before cutting the shape out.
Step 2: Adding Color & Detail
-
Sand the Edges:
Once fully dry, lightly sand any rough edges with fine-grit sandpaper to give the pieces a polished, professional look. -
Paint the Shapes:
Paint the clay shapes using matte acrylics. Replicate the image by using mustard yellow for a moon and star, teal for the bottom stars, coral/peach for the middle accents, and leaving some white shapes natural or speckled with brown paint. -
Speckle Effect:
To get the speckled look on the white moon, dip an old toothbrush in watered-down brown paint and flick the bristles over the dried clay. -
Paint the Beads:
While the shapes dry, paint a few wooden beads to match your color palette (mustard, teal, coral). Leave the majority of the small beads natural wood.
Step 3: Assembly
-
Prepare the Hoop:
Take your bamboo embroidery hoop ring. Cut four long pieces of twine (about 20 inches each) and tie them equidistantly around the hoop. Gather the tops together and knot them into a hanging loop. -
String the Strands:
Cut five lengths of twine for the decorations—one for the center and four for the outer ring. Start stringing your components. -
Knotting Technique:
Thread the twine through a bead, then a clay shape, then another bead. Tie a secure double knot underneath each shape or bead cluster to keep it at the desired height. -
Arrange the Pattern:
Vary the order to match the photo: place the largest terracotta star as the centerpiece. Alternate moons and stars on the outer strands, mixing colors so no two identical shades are right next to each other. -
Attach to Hoop:
Tie four of the decorated strands to the bamboo ring, spacing them evenly between your suspension strings. I usually secure these knots with a tiny dot of glue. -
Hang the Centerpiece:
Tie the final, longest strand directly to the center of the top suspension knot so it hangs straight down through the middle of the hoop. -
Trim and Balance:
Trim any excess string from your knots. Hang the mobile up temporarily to check if it tilts; if it does, adjust the top suspension strings until the hoop sits perfectly level.
Uneven Drying?
If your stars curl up while drying, place a light book over them once they are ‘leather hard’ (semi-dry) to force them to dry flat without cracking.
Now step back and watch your beautiful celestial creation gently rotate in the light