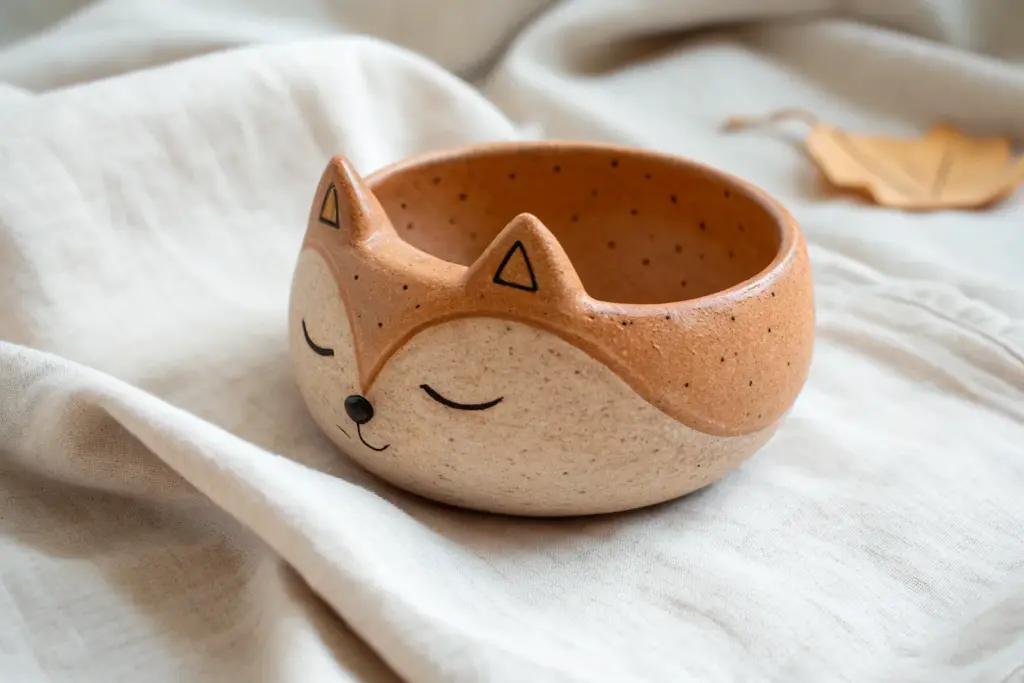
If you can make a basic pinch pot, you can turn it into just about any animal with a few well-placed ears, legs, and textures. Here are my go-to creature ideas that keep the build beginner-friendly while still giving you that instant “oh my gosh, it’s a real little critter” moment.
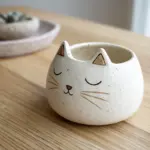
Classic Cat Face Pinch Pot Bowl

This charming little ceramic dish combines a simple pinch pot form with adorable feline features. Its soft pink glaze and delicate gold details make it the perfect resting spot for your favorite rings or earrings.
Step-by-Step Tutorial
Materials
- White air-dry clay or polymer clay (or earthenware if kiln-firing)
- Clay modeling tools or a butter knife
- Sponge and water cup
- Rolling pin (optional)
- Fine grit sandpaper
- Pale blush pink acrylic paint or ceramic glaze
- White acrylic paint or ceramic glaze
- Fine-point paintbrush
- Gold leaf pen or liquid gold gilding paint
- Gloss varnish or clear sealant (if using air-dry clay)
Step 1: Forming the Base
-
Start with a sphere:
Begin by rolling a ball of white clay about the size of a tennis ball. Ensure it is smooth and free of major cracks before you start forming the pot. -
Open the pot:
Hold the ball in one hand and gently press your thumb into the center, leaving about half an inch of clay at the bottom for the base. -
Pinch the walls:
Rotate the ball slowly while gently pinching the clay between your thumb and fingers. Work your way from the bottom up to create an even bowl shape. Aim for a wall thickness of uniform consistency, roughly a quarter-inch. -
Refine the shape:
Once you have the basic bowl, gently tap the bottom on your work surface to create a flat, stable base so the bowl won’t wobble.
Step 2: Sculpting the Cat Features
-
Pull the ears:
Choose one side of the rim to be the face. Using your thumb and forefinger, gently pinch and pull the clay upward at two points to form triangular ear shapes. Keep them subtle and integrated into the rim rather than attaching separate pieces. -
Sharpen the details:
Use your fingers to slightly flatten the front of the ears and pinch the tips to distinct points. If the clay cracks slightly while pulling, smooth it immediately with a touch of water. -
Smooth the surfaces:
Dampen a sponge slightly and wipe down the entire bowl to remove fingerprints and smooth out any uneven textures. Pay special attention to the rim between the ears to ensure a soft, curved transition. -
Dry the piece:
Allow your clay to dry completely according to the package instructions. If using air-dry clay, this usually takes 24-48 hours. I find flipping it over halfway through helps the bottom dry thoroughly. -
Sanding:
Once fully dry, use fine-grit sandpaper to gently buff away any remaining rough spots or sharp edges, particularly around the rim and ears.
Cracking Up?
If you see tiny hairline cracks appearing as the clay dries, mix a small amount of fresh clay with water to create a paste (slip) and fill them in immediately, then smooth over.
Step 3: Painting and Decoration
-
Base coat:
Mix a very pale pink color using white and a tiny drop of red or pink paint. Cover the entire bowl, inside and out, with two coats for an opaque, ceramic-like finish. Let dry between coats. -
Add dimension:
For the subtle two-tone look seen in the photo, mix a slightly darker or warmer pink shade. Paint just the bottom half of the exterior, blending the edge where it meets the lighter color with a slightly damp brush for a soft transition. -
Inner ear details:
Using a small brush and a slightly deeper pink shade, paint the inside triangular recesses of the ears to give them depth. -
Gold facial features:
Take your gold leaf pen or a fine brush with liquid gilding. Carefully draw two closed arched eyes, a small triangular nose, and three whiskers on each cheek. Keep the lines thin and delicate. -
Decorative speckles:
Using the same gold pen or paint, add tiny, spaced-out dots around the exterior rim of the bowl to mimic the texture seen in the inspiration image. -
Sealing:
Finish the piece with a coat of high-gloss varnish. This protects the paint and gives the piece that shiny, kiln-fired ceramic look.
Make it Yours
Try varying the ear shapes to make different animals—round ears for a bear or long, floppy ears for a puppy. You can also paint the base black with silver details for a sleek look.
Now your jewelry has the purr-fect place to call home

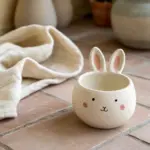
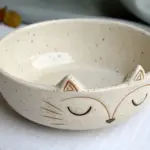
Floppy-Eared Bunny Pinch Pot
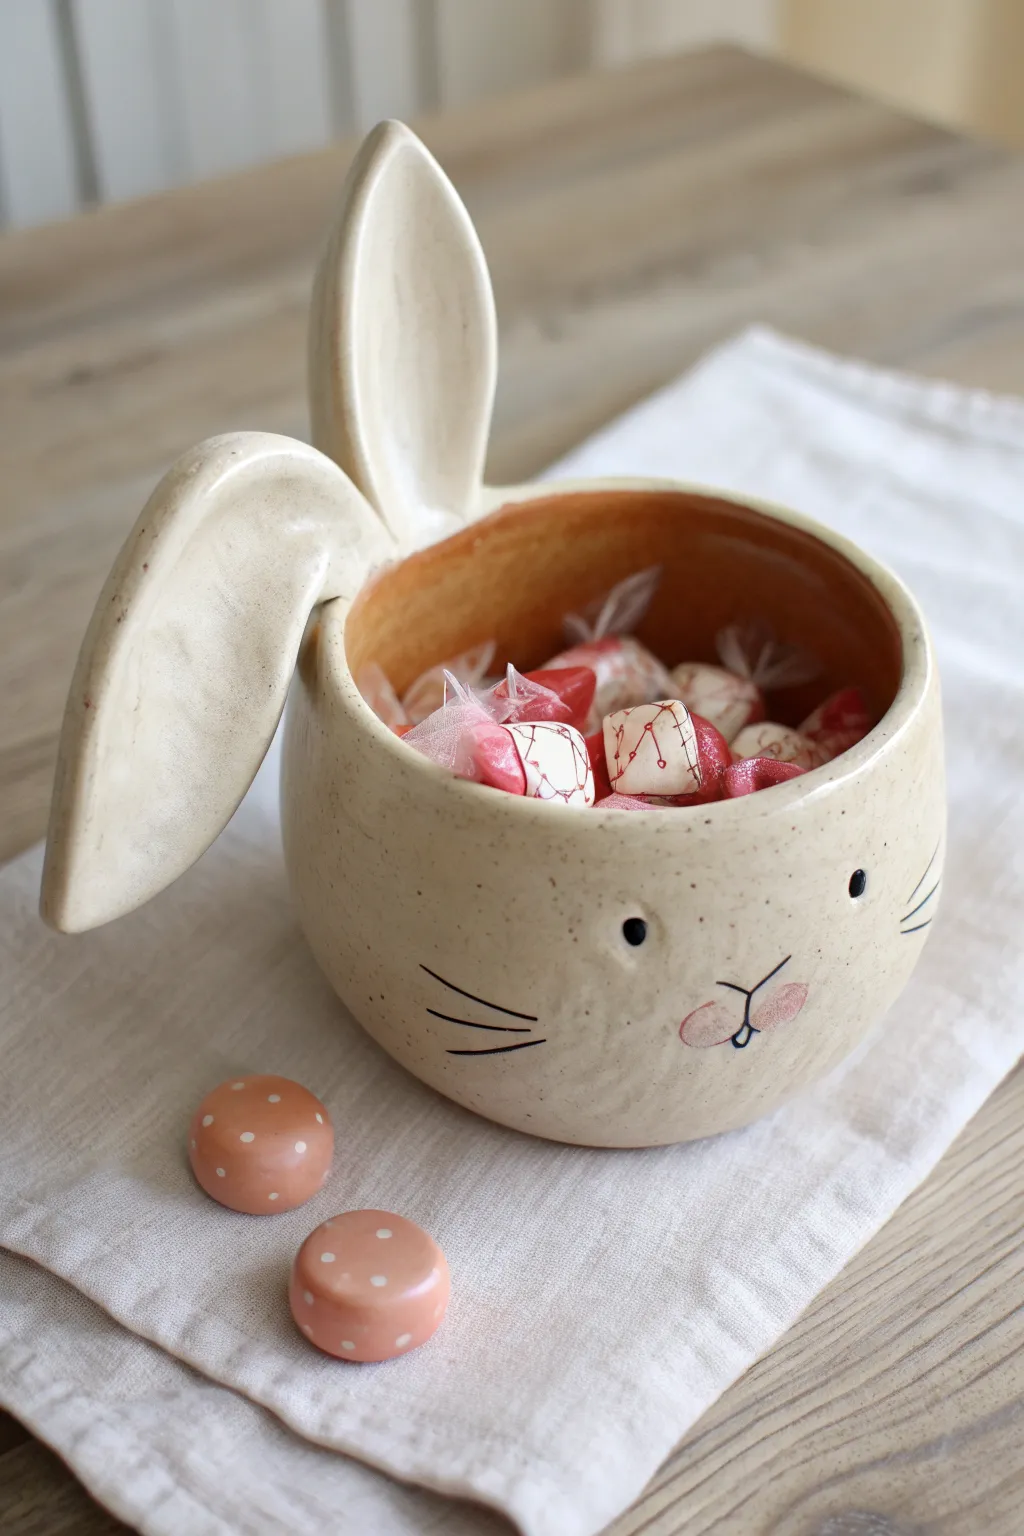
This adorable ceramic bowl features a classic pinch pot base transformed into a whimsical bunny with one upright and one delightfully floppy ear. Finished with a speckled cream glaze and a warm terracotta interior, it makes a perfect dish for springtime treats or Easter candies.
Step-by-Step Tutorial
Materials
- Earthenware or stoneware clay (white or light buff body)
- Pottery tools (needle tool, rib tool, scoring tool)
- Slip (clay mixed with water)
- Sponge
- Underglaze pencil or fine brush (black and pink)
- Clear glaze (dipping or brushing)
- Speckled cream glaze (for exterior)
- Terracotta or orange/brown glaze (for interior)
- Kiln access
Step 1: Forming the Base
-
Prepare the Clay:
Start with a ball of clay roughly the size of a grapefruit. Wedge it thoroughly to remove air bubbles and ensure an even consistency, which prevents cracking during firing. -
Pinch the Pot:
Insert your thumb into the center of the ball, leaving about half an inch at the bottom. Rotate the ball in one hand while gently pinching the walls upward with the thumb and fingers of your other hand. -
Shape the Curve:
Continue pinching and rotating until you have an even wall thickness of about 1/4 inch. Aim for a rounded, organic cup shape that curves slightly inward at the rim to contain the candies. -
Smooth the Surface:
Use a flexible rib tool or a slightly damp sponge to smooth out your finger marks on the exterior. I like to gently compress the rim at this stage to make it sturdy and rounded. -
Flatten the Bottom:
Gently tap the pot on your work surface to create a small, flat base so the bunny sits stable without wobbling.
Floppy Ear Fix
If the floppy ear cracks at the bend during drying, score and slip the crack immediately. Prop it up with a cosmetic sponge to reduce stress on the clay joint.
Step 2: Sculpting the Features
-
Form the Ears:
Roll out a slab of clay about 1/4 inch thick. Cut out two elongated oval shapes for ears, tapered at the top and slightly wider at the base. -
Shape the Upright Ear:
Take one ear shape and gently curve it vertically to give it a concave look, like a real rabbit ear. Smooth the edges so they are rounded, not sharp. -
Shape the Floppy Ear:
Take the second ear and bend it at the halfway point, creating a soft crease so it looks like it’s flopping downward. Support the fold with a small piece of sponge or paper towel if needed while it firms up. -
Attach the Ears:
Score the attachment points on the rim of the pot and the base of the ears. Apply slip generously and press the ears firmly onto the back rim. Blend the clay seams downward into the pot body until invisible. -
Check Balance:
Ensure the heavy floppy ear doesn’t tip the pot over. You may need to position the ears slightly forward or adjust the base flatness to compensate.
Step 3: Decorating and Firing
-
First Drying Phase:
Let the piece dry slowly to leather hard. This is the perfect time to refine the surface with a barely damp sponge to remove any final roughness. -
Bisque Fire:
Allow the bunny to dry completely to the bone-dry stage (this takes several days). Fire it in the kiln to bisque temperature (usually Cone 04). -
Glaze the Interior:
Pour a warm terracotta or honey-colored glaze into the interior. Swirl it around to coat the inside completely, then pour out the excess. -
Glaze the Exterior:
Dip the exterior into a speckled cream glaze, or brush it on carefully. Avoid getting the exterior glaze inside the pot for a clean line at the rim. -
Draw the Face:
Once the glaze is dry, use a black underglaze pencil or a very fine brush with black underglaze to draw the eyes, nose, mouth, and whiskers right over the unfired glaze. -
Add Pink Details:
Dab a tiny amount of pink underglaze or glaze onto the cheeks and the nose area for a rosy, cute effect. -
Candy Buttons (Optional):
With leftover scraps, form small rounded disks and paint them with pink underglaze and white dots to create little matching tokens. -
Final Firing:
Fire the piece again to the maturation temperature of your specific clay and glaze (likely Cone 5 or 6 for stoneware).
Textured Fur
Before the clay dries, gently tap the exterior with a stiff bristle brush. This creates a subtle fur-like texture that the glaze will break over beautifully.
Fill your finished bunny bowl with colorful candies and display it as a charming seasonal accent


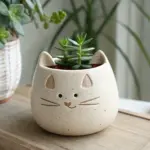
Wide-Eyed Owl Pinch Pot Planter
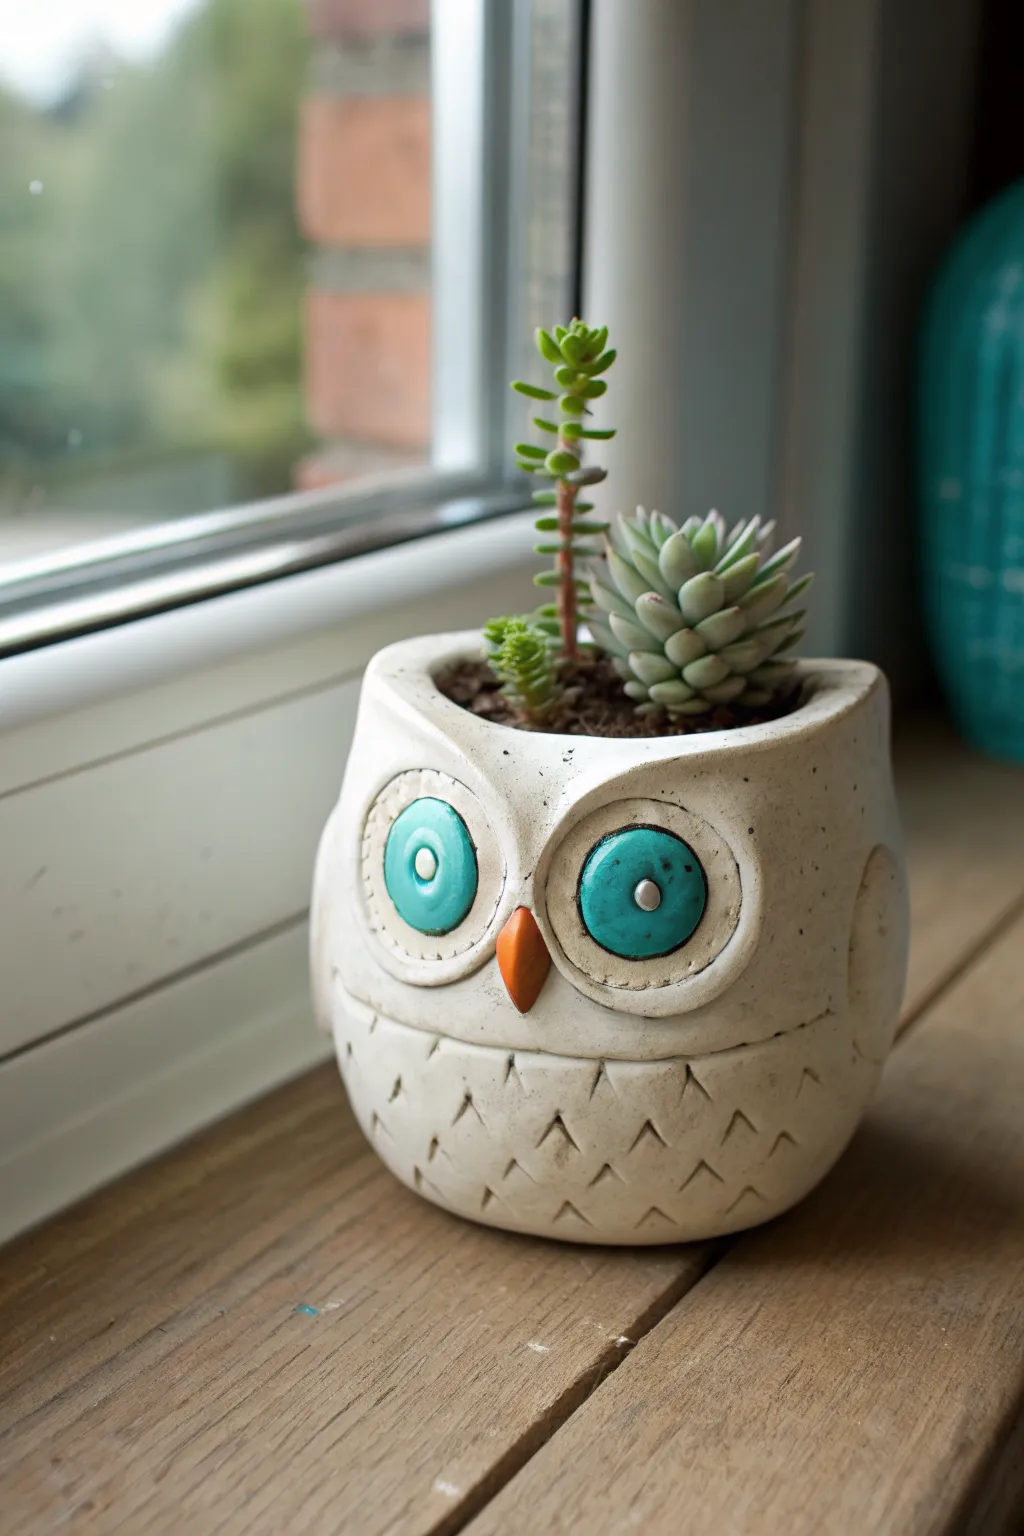
This adorable owl planter brings a touch of whimsy to any windowsill with its bright turquoise eyes and carved feather texture. Made from simple white clay, it features a classic pinch pot base transformed into a woodland creature perfect for hosting small succulents.
Detailed Instructions
Materials
- White beautiful air-dry clay or kiln-fire clay
- Ceramic tools (needle tool, small loop tool)
- Small rolling pin
- Slip (clay mixed with water) and scoring tool
- Turquoise acrylic paint or glaze
- Orange acrylic paint or glaze
- Fine-grit sandpaper
- Clear sealant (if using air-dry clay)
- Small detail paintbrush
- V-gouge carving tool (optional but helpful)
Step 1: Forming the Base
-
Prepare the Clay:
Start with a ball of white clay about the size of a large orange. Knead it well to remove air bubbles and ensure a smooth consistency. -
Pinch the Pot:
Insert your thumb into the center of the ball and gently pinch the walls while rotating the clay. Aim for an even thickness of about 1/4 inch all around. -
Shape the Body:
Gently tap the bottom of the pot on your work surface to create a flat, stable base. Push the sides slightly outward to give the owl a rotund, chubby appearance. -
Define the Rim:
Smooth the top rim with a damp sponge or finger. Unlike a perfect bowl, you can pull the front lip down very slightly to accommodate the face later.
Step 2: Adding Facial Features
-
Create Eye Discs:
Roll two small balls of clay and flatten them into thick coins about 1.5 inches in diameter. These will be the large eye sockets. -
Attach the Discs:
Score the back of the discs and the front of the pot where the eyes will go. Apply slip and press them firmly onto the body, smoothing the edges just a bit so they look integrated but distinct. -
Add the Beak:
Form a small, triangular pyramid shape for the beak. Score and slip it right between the lower halves of the eye discs, pointing downward. -
Sculpt the Eyes:
I like to use a small loop tool to carve a shallow, circular depression inside each eye disc, leaving a raised rim around the edge. -
Add Pupils:
Roll two tiny balls of clay and press them into the center of the carved eye sockets. Use the back of a paintbrush to make a small indentation in the center of each pupil. -
Create Wings:
Roll two tear-drop shapes and flatten them. Attach these to the sides of the pot to suggest folded wings, blending the clay seamlessly.
Owl Wisdom
To emphasize the feather texture, wipe a diluted wash of grey paint over the ‘V’ carvings and wipe off the excess surface paint immediately.
Step 3: Texturing and Refining
-
Carve Feathers:
Using a V-gouge or a needle tool, carve small ‘V’ shapes into the lower belly of the owl to simulate feathers. Stagger them in rows for a natural look. -
Detail the Eyes:
Use a needle tool to scratch tiny perpendicular lines all around the raised rim of the eye discs to give it that stitched or textured appearance. -
Dry the Piece:
Allow your clay owl to dry completely. For air-dry clay, this usually takes 24-48 hours. If firing, follow your kiln schedule. -
Sand Smooth:
Once fully dry (and before painting), gently sand any rough spots or fingerprints with fine-grit sandpaper.
Cracked Eyes?
If the eye discs crack while drying, fill the fissures with a mix of fresh clay and vinegar (a paste called ‘slip’) and smooth it over.
Step 4: Painting and Finishing
-
Paint the Eyes:
Carefully paint the inside depression of the eyes with a vivid turquoise color. Leave the pupils and the outer rims unpainted (white). -
Silver Accents:
Paint the small indentation in the center of the pupils with a metallic silver or light grey to create a highlight. -
Paint the Beak:
Apply a bright orange paint to the beak. -
Seal the Planter:
If using air-dry clay, apply a waterproof sealant to the inside and outside to protect it from moisture when watering your plants.
Once sealed and dry, nestle your favorite succulents inside for a charming desk companion.

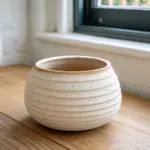

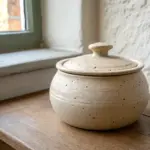
Low-Slung Turtle Shell Pinch Pot
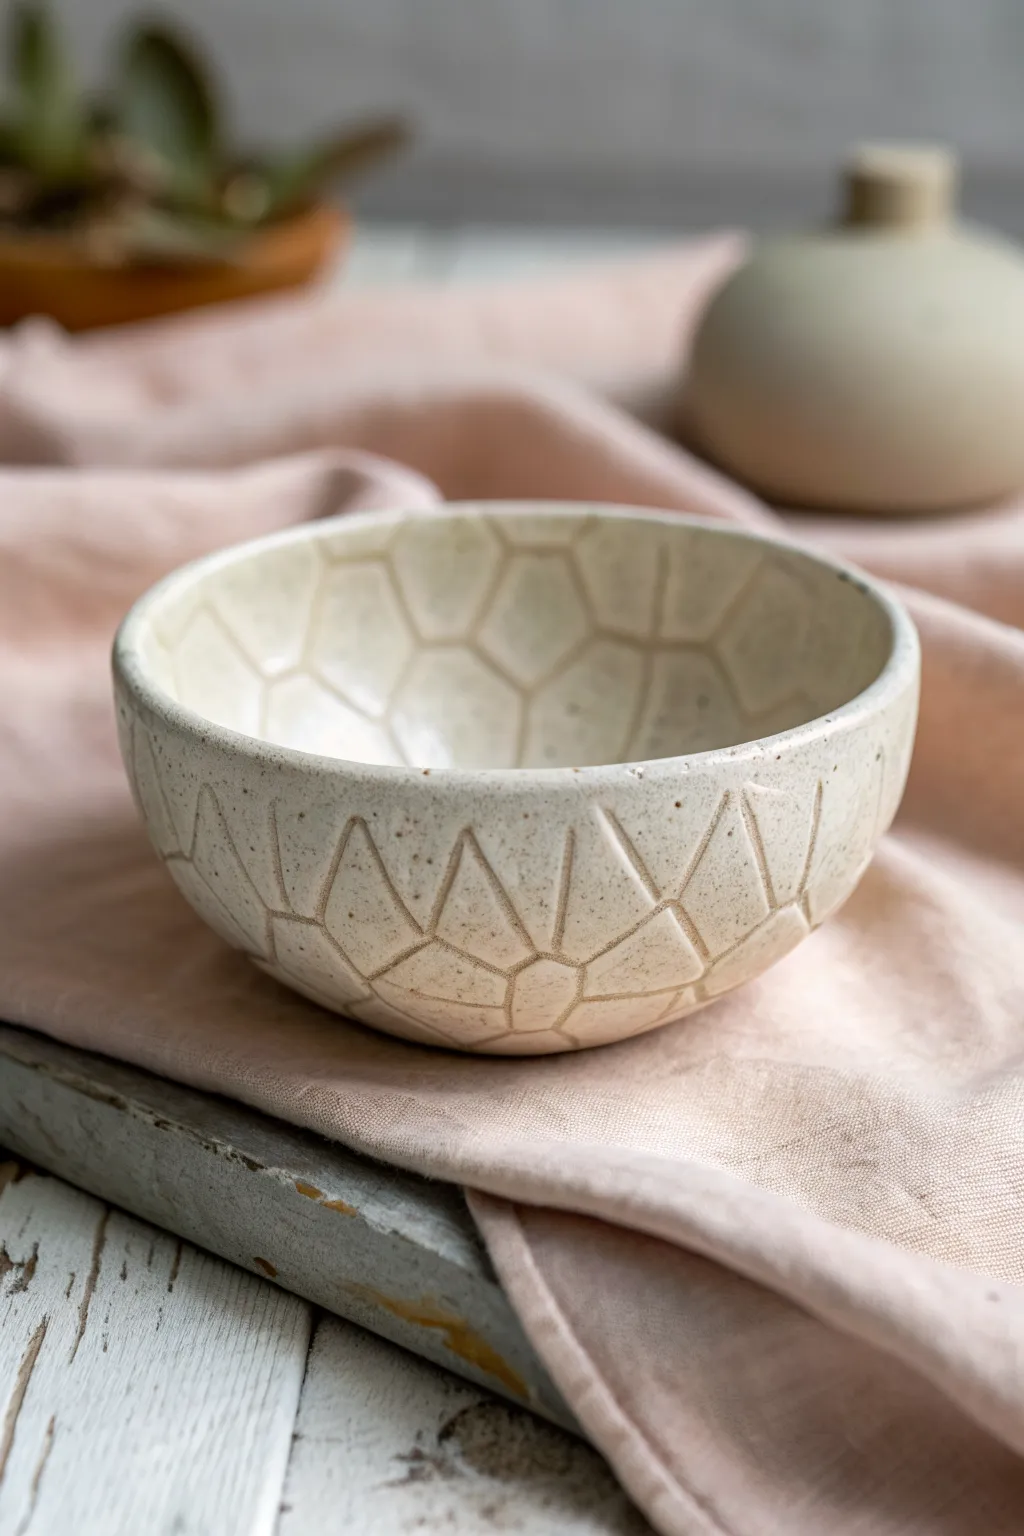
This project transforms a simple pinch pot into a sophisticated vessel featuring a carved pattern reminiscent of a turtle’s shell scutes. The cream-colored glaze settles beautifully into the incised lines, highlighting the geometric texture while keeping the overall look modern and earthy.
Step-by-Step Guide
Materials
- Stoneware clay (speckled or white)
- Small loop tool or carving tool
- Needle tool
- Sponge
- Rib tool (metal or rubber)
- Cream or breaking white glaze
- Kiln access
Step 1: Forming the Base
-
Start with a sphere:
Begin with a ball of clay roughly the size of a large orange. Pat it between your palms to ensure it is perfectly round and free of any air pockets. -
Open the pot:
Push your thumb into the center of the sphere, stopping about a half-inch from the bottom. This will be the floor of your bowl. -
Pinch the walls:
Gently pinch the clay between your thumb and fingers, rotating the ball as you go. Work your way from the bottom up to the rim in a spiral motion. -
Refine the shape:
Continue pinching until the walls are an even thickness, aiming for a low, wide profile rather than a tall cup shape. I find it helps to set it on a table and press gently to flatten the bottom slightly for stability. -
Smooth the surface:
Use a rib tool to scrape and compress the exterior and interior walls. This removes your fingerprints and creates a smooth canvas for the carving later. -
Let it stiffen:
Allow the pot to dry to a ‘leather-hard’ state. The clay should be firm enough to handle without warping but still soft enough to carve into easily.
Clean Lines Pro Tip
After carving but before sponging, let the clay dry for 30 more minutes. The burrs will become brittle and can be brushed off cleanly with a dry paintbrush.
Step 2: Carving the Shell Pattern
-
Map out the design:
Using a needle tool, very lightly sketch a grid of pentagons and irregular polygons on the exterior. Start near the rim and work downwards to create an interlocking ‘turtle shell’ effect. -
Carve the initial lines:
Take a carving tool or a small loop tool and gently gouge out the lines you sketched. You want these grooves to be somewhat wide to catch the glaze later. -
Bevel the edges:
To give the segments a slightly raised, pillowy look, use the flat edge of your tool to shave down the clay right next to the groove lines, angling towards the center of each shape. -
Continue inside:
Repeat the mapping and carving process on the interior of the bowl. The pattern doesn’t need to match the outside perfectly; a similar geometric tessellation works beautifully. -
Smooth the harsh bits:
Once all carving is done, use a very slightly damp sponge to wipe over the entire piece. This softens sharp clay burrs left by the carving tool. -
Final drying:
Let the piece dry completely to the bone-dry stage. It will become lighter in color and room temperature to the touch.
Step 3: Glazing and Finishing
-
Bisque fire:
Load the bone-dry pot into the kiln for a bisque firing (typically cone 04). This hardens the clay and prepares it for glaze application. -
Wipe down:
After the kiln cools, wipe the bisque ware with a damp sponge to remove any dust that might prevent the glaze from adhering. -
Apply the glaze:
Dip the bowl into a cream or breaking white glaze. A ‘breaking’ glaze is ideal because it thins out over high points (showing the clay color) and pools in the carved recesses. -
Clean the foot:
Use a sponge to wipe any glaze off the very bottom of the pot where it will touch the kiln shelf. -
Glaze fire:
Fire the piece again to the maturation temperature of your specific clay and glaze (often cone 5 or 6 for stoneware).
Level Up: Oxide Wash
For deeper contrast, apply an iron oxide wash into the grooves and wipe it back before glazing. This will make the ‘shell’ lines dark brown and prominent.
Your finished bowl will have a wonderful tactile quality that feels great in the hands.

The Complete Guide to Pottery Troubleshooting
Uncover the most common ceramic mistakes—from cracking clay to failed glazes—and learn how to fix them fast.
Smiley Frog Pinch Pot Ring Dish
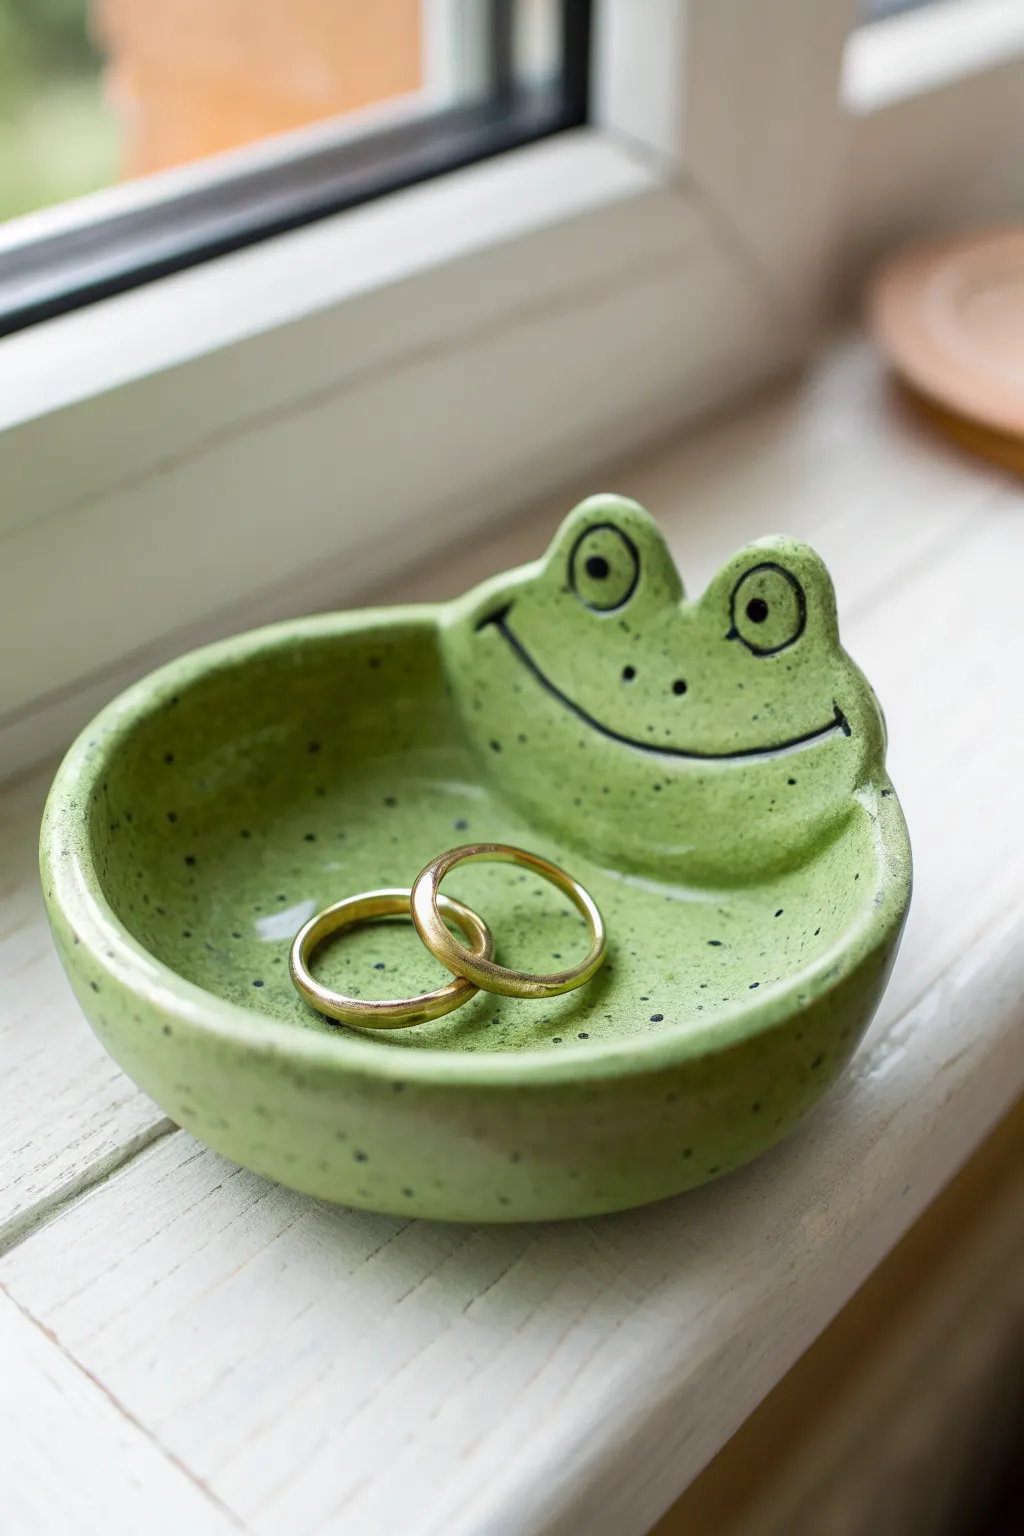
Keep your favorite rings safe with this adorable, bright green frog pinch pot featuring a wide, cheerful smile. The speckled finish gives it a charming, organic look perfect for brightening up any windowsill or nightstand.
Detailed Instructions
Materials
- Air-dry clay (or polymer clay)
- Small bowl of water
- Rolling pin
- Needle tool or toothpick
- Sponge or smoothing tool
- Acrylic paints (bright olive green, black)
- Old toothbrush
- Fine detail paintbrush
- Gloss varnish or clear sealant
Step 1: Shaping the Base
-
Prepare the Clay:
Start with a ball of clay roughly the size of a tangerine. Keep it smooth and free of major cracks by kneading it briefly. -
Start the Pinch Pot:
Push your thumb into the center of the ball, stopping before you push all the way through to the bottom. -
Pinch the Walls:
Gently pinch the clay between your thumb and fingers, rotating the ball as you go. Aim for an even wall thickness of about 1/4 inch all around. -
Flatten the Base:
Tap the bottom of the pot gently on your work surface to create a flat, stable base so it won’t wobble.
Cracking Issues?
If small cracks appear while the clay dries, mix a tiny bit of fresh clay with water to make a paste and fill them in before painting.
Step 2: Sculpting the Frog Features
-
Form the Face Plate:
Roll a separate, smaller piece of clay into a thick sausage shape, then flatten it slightly. This will become the raised back section for the frog’s face. -
Create the Eyes:
Mould two small humps on top of that flattened sausage shape to create the prominent frog eyes. -
Attach the Face:
Score (scratch) the back rim of your pinch pot and the bottom of your face piece. Add a dab of water (slip) and press the face piece firmly onto the back rim of the bowl. -
Blend the Seams:
Use a modeling tool or your finger to smooth the clay where the face piece meets the bowl, blending perfectly so it looks like one solid piece. -
Smooth the Surface:
Dip a sponge or your finger in a little water and go over the entire piece to remove fingerprints and crate a slick, smooth finish. -
Let it Dry:
Allow the clay to dry completely according to the package instructions. This usually takes 24-48 hours for air-dry clay.
Step 3: Painting and Finishing
-
Base Coat:
Paint the entire dish, inside and out, with a bright, cheerful olive green acrylic paint. You may need two coats for full opacity. -
Create the Speckles:
Mix a small amount of black paint with a drop of water. Dip an old toothbrush into this mixture. -
Apply the Splatter:
Hold the toothbrush over the dish and run your thumb across the bristles to flick tiny black speckles randomly over the green surface. -
Detail the Face:
Using a very fine detail brush and black paint, draw a wide, curved smile that stretches across the face piece. -
Paint the Eyes:
Paint two circles on the eye humps. Add a smaller black dot inside each circle for the pupils. I usually like to place them slightly closer together for a cuter expression. -
Add the Nostrils:
Place two tiny black dots between the eyes for the nose. -
Seal the Dish:
Once the paint is fully dry, apply a high-gloss varnish. This mimics the look of fired ceramic glaze and protects your rings.
Pro Tip: Glossy Finish
Use a thick, pouring glaze medium or resin specifically for air-dry clay to get that ultra-shiny, glass-like ceramic look shown in the photo.
Place your new froggy friend on a dresser and let him hold your treasures safe
Standing Mouse Pinch Pot Pencil Cup
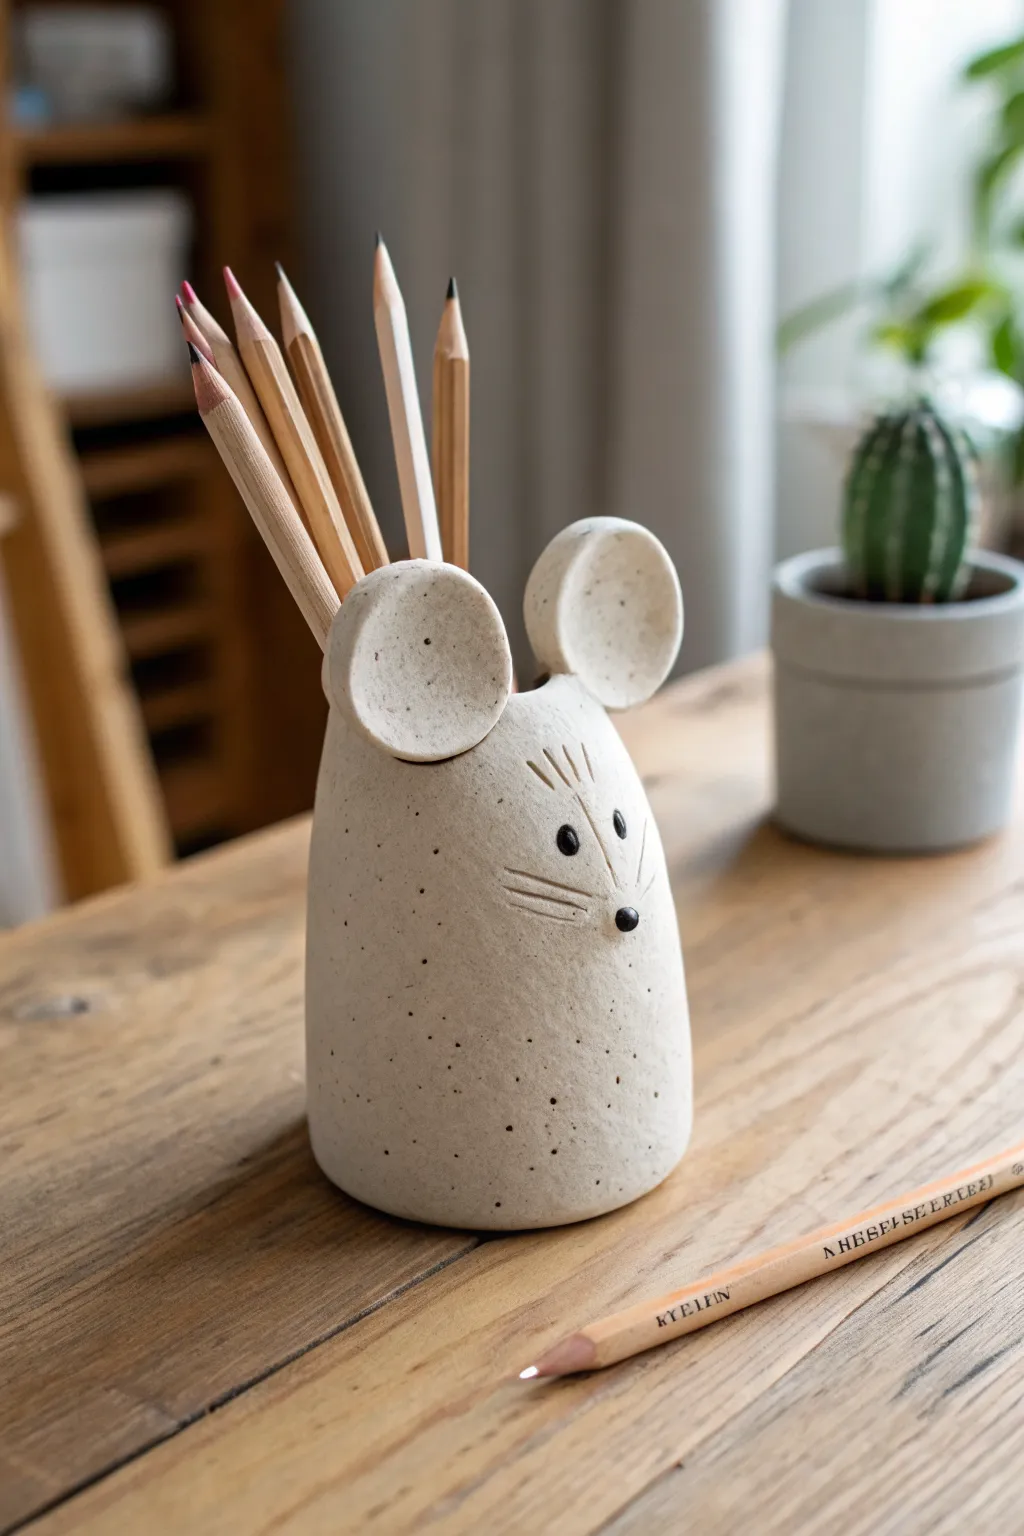
Transform a simple lump of clay into a charming desk companion with this standing mouse pencil holder. Featuring a speckled finish, sweet incised whiskers, and prominent ears, this functional sculpture adds a touch of playfulness to any workspace.
Step-by-Step
Materials
- White stoneware clay with speckles (or plain white air-dry clay)
- Small rolling pin
- Needs tool or toothpick
- Slip (clay mixed with water) and scoring tool
- Small sponge
- Black underglaze or acrylic paint (for eyes/nose)
- Clear matte or satin glaze (if firing) or matte varnish
Step 1: Forming the Body
-
Prepare the clay:
Start with a ball of clay roughly the size of a large orange. Wedge it well to remove air bubbles, creating a smooth, spherical foundation for your mouse. -
Start the pinch pot:
Push your thumb into the center of the ball, leaving about a half-inch of thickness at the bottom. Begin pinching the walls upwards, rotating the clay in your hand as you go to ensure even thickness. -
Raise the walls:
Continue pinching and pulling the clay upwards to create a tall, cylindrical shape rather than a wide bowl. You want it tall enough to hold pencils, so aim for about 4-5 inches in height. -
Shape the taper:
As you reach the top rim, gently angle your pinching inward to create a slightly tapered shape, similar to a rounded cone, which gives the mouse its head shape. -
Smooth the surface:
Use a damp sponge or a flexible rib tool to smooth out your finger marks on the outside. I like to leave a little bit of texture, but the surface should be generally uniform. -
Flatten the base:
Gently tap the bottom of your pot against your work surface to create a flat, stable base so the mouse won’t wobble when holding heavy pencils.
Pro Tip: Weighted Base
Make the bottom of the pinch pot slightly thicker than the walls. This extra weight at the base prevents the cup from tipping over when it’s full of tall pencils.
Step 2: Adding Features
-
Make the ears:
Roll two small balls of clay, roughly walnut-sized. Flatten them into thick discs. Use your thumb to press an indentation into the center of each disc, creating a concave, spoon-like ear shape. -
Attach the ears:
Score the bottom edge of the ears and the corresponding spots on the top rim of the pencil cup. Apply slip to both scored areas. -
Secure and blend:
Press the ears firmly onto the rim. Use a modeling tool or your finger to blend the clay from the back of the ear down into the main body for a strong bond. -
Create the nose:
Roll a tiny, pea-sized ball of clay. Score and slip a spot on the front of the face, about a third of the way down from the top, and attach the nose. -
Add the eyes:
For the eyes, you can either attach two tiny flattened discs of clay or simply make slight indentations that you will paint later. Place them symmetrically above the nose. -
Incise details:
Using a needle tool or toothpick, gently carve three lines on each cheek for whiskers. Add a few small vertical dashes between the eyes for cute forehead details. -
Final smooth:
Run your damp sponge over any sharp edges, especially around the rim and ear connections, to give the piece a soft, finished look.
Level Up: Tail Handle
Roll a coil of clay to create a long tail. Attach it to the back of the mouse and curl it into a loop to act as a functional handle for your cup.
Step 3: Finishing
-
Dry properly:
Let the mouse dry slowly under loose plastic for a day, then uncover it to dry completely until it is bone dry. -
Bisque fire or dry check:
If using ceramic clay, bisque fire the piece to cone 04. If using air-dry clay, ensure it is hard and dry to the touch. -
Paint the details:
Using a fine detail brush and black underglaze (for ceramics) or acrylic paint, carefully fill in the nose, the eyes, and trace the incised whisker lines. -
Apply finish:
If firing, dip or brush on a clear matte glaze and fire to the clay’s maturity temperature. For air-dry clay, apply a coat of matte varnish to seal and protect your work.
Once dry and fired or sealed, fill your little mouse with your favorite pens and let it organize your desk with style.


What Really Happens Inside the Kiln
Learn how time and temperature work together inside the kiln to transform clay into durable ceramic.
Round Pig Pinch Pot Coin Bowl
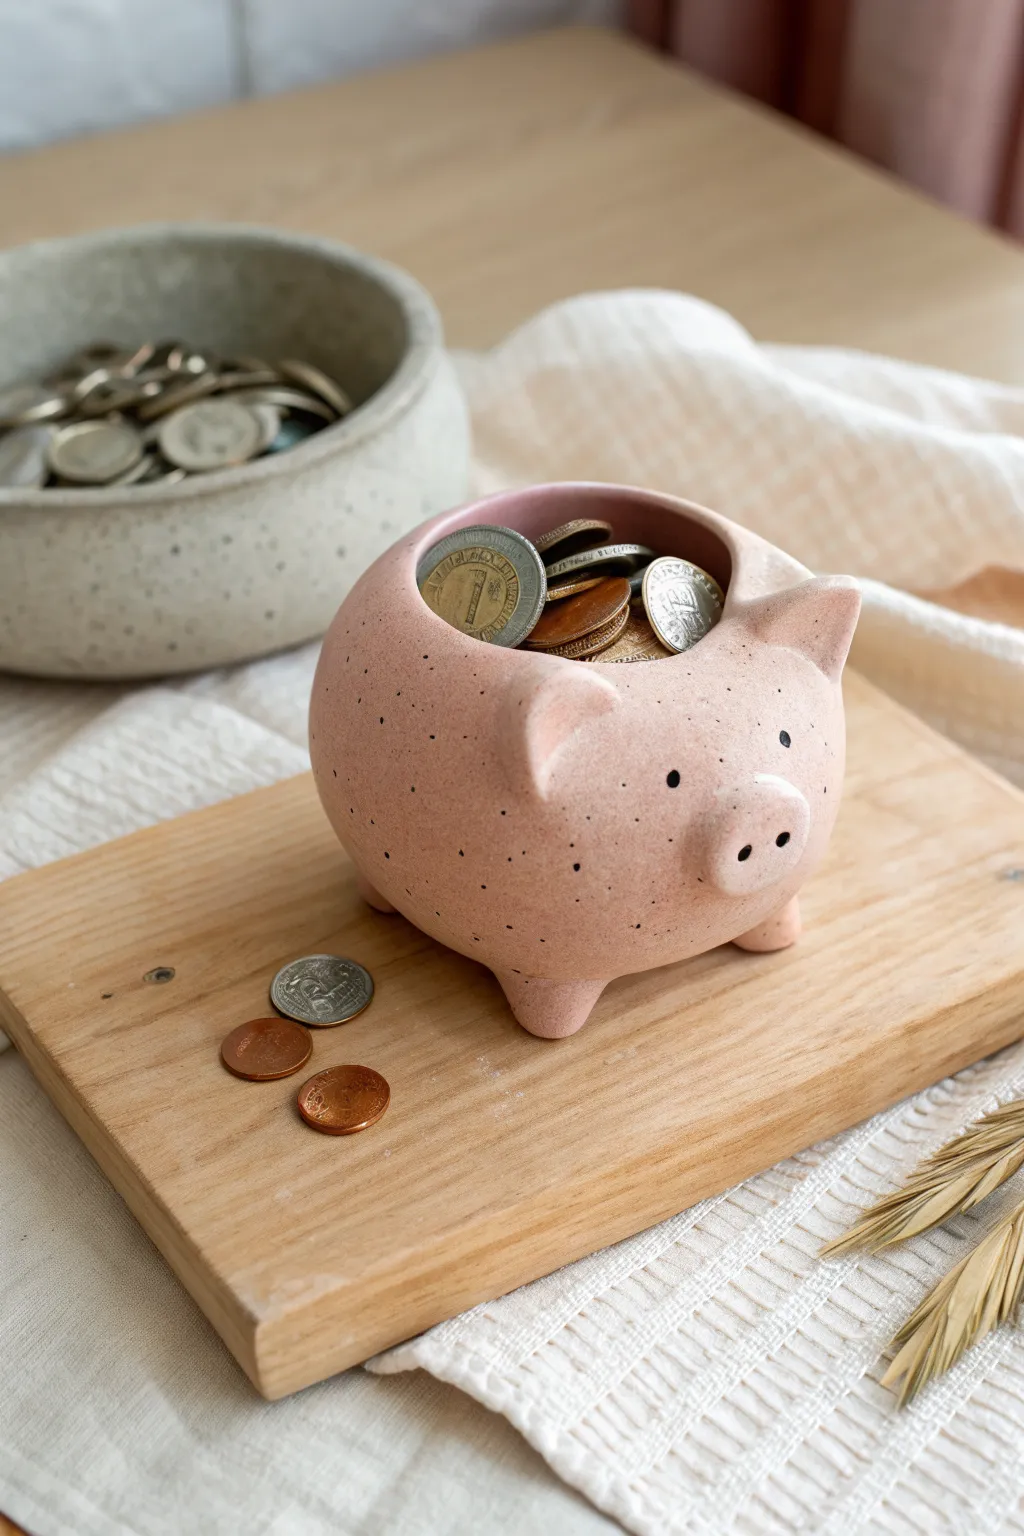
This charming little coin keeper combines the classic pinch pot method with adorable character sculpting. Finished with a soft matte pink glaze and subtle speckles, it looks like a modern ceramic piece you’d find in a boutique.
Step-by-Step Guide
Materials
- Earthenware or stoneware clay (white or light-colored)
- Pottery tools (needle tool, rib tool, modeling tool)
- Slip (clay mixed with water)
- Sponge
- Underglaze (black)
- Glaze (matte pink with speckles or separate clear glaze)
- Small fine-point paintbrush
- Kiln (or air-dry clay alternatives for a non-fired version)
Step 1: Forming the Body
-
Prepare the Clay:
Start with a ball of clay roughly the size of a large orange. Wedge it well to remove air bubbles, then pat it into a smooth, round sphere. -
Open the Pot:
Hold the sphere in one hand and press your thumb into the center, stopping about a half-inch from the bottom. This establishes the interior volume. -
Pinch the Walls:
Gently pinch the clay between your thumb and fingers, rotating the ball as you go. Work from the bottom up to thin the walls evenly to about 1/4 inch thickness. -
Shape the Opening:
Instead of leaving the top wide open, gently curve the upper edges inward to create a more enclosed, spherical shape. Smooth the rim with a damp sponge so it’s rounded and soft.
Fixing Cracks
If you see hairline cracks forming while drying, create ‘paper clay’ by mixing toilet paper pulp into your slip. Fill the cracks, smooth over, and cover with plastic to dry slowly.
Step 2: Adding Features
-
Create the Snout:
Roll a small ball of clay and flatten it slightly into an oval disk. Score the back of the disk and the spot on the pot where the nose will go. -
Attach the Snout:
Apply a dab of slip to the scored areas and press the snout firmly onto the body. Use a modeling tool to blend the edges of the clay seamlessly into the main pot. -
Make Nostrils:
With a small rounded tool or the back of a paintbrush, press two indentations into the snout to create the nostrils. -
Form the Ears:
Shape two small triangles of clay. Similar to the snout, score and slip the bottom edge of the triangles and attach them near the top rim of the opening. -
Refine the Ears:
Use your fingers to curve the ears slightly forward, giving the pig an alert expression. Blend the attachment points carefully so they don’t crack later. -
Add Small Legs:
Roll four tiny balls of clay for the feet. Flip the pot over gently, score, slip, and attach these to the bottom to stabilize the pig so it doesn’t roll away.
Curly Tail Twist
Don’t forget the back! Roll a very thin coil of clay, twist it into a pigtail corkscrew, and attach it to the rear of the pot for a 360-degree detailed finish.
Step 3: Finishing and Glazing
-
Smooth the Surface:
Once the clay is leather hard, run a damp sponge or a smooth rib tool over the enter exterior. I like to take extra time here to remove any fingerprints for a professional look. -
Bisque Fire:
Let the piece dry completely (bone dry) before firing it in the kiln for the initial bisque firing. -
Paint the Eyes:
Using a very fine brush and black underglaze, dot two small eyes above the snout. You can add tiny dots on the cheeks for ‘freckles’ or texture if desired. -
Apply Glaze:
Dip or brush on a matte pink glaze. If your glaze doesn’t have speckles built-in, you can flick a toothbrush with iron oxide or brown underglaze over the raw glaze to create the effect. -
Final Fire:
Place the pig back in the kiln for the designated glaze firing suited to your specific materials.
Now you have a sturdy and sweet spot to stash your spare change
Spotted Cow Pinch Pot Succulent Planter
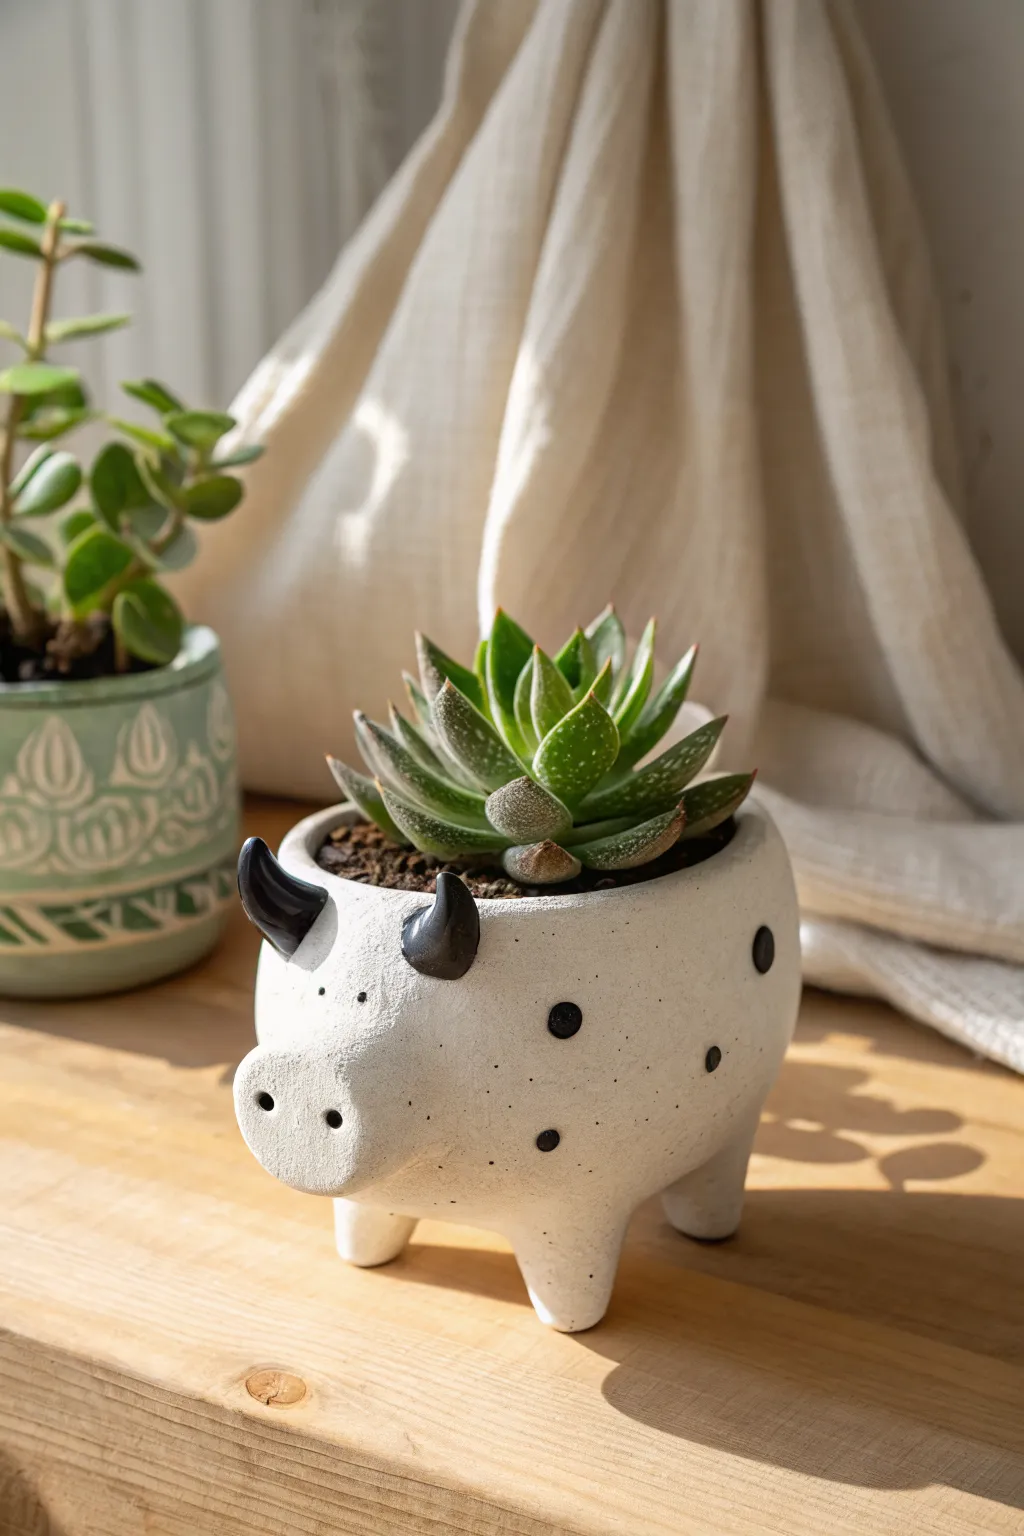
Moo-ve over ordinary pots, this spotted cow planter brings a touch of farmhouse charm to your succulent collection. Crafted from simple air-dry clay, this project features a sturdy four-legged base, cute curved horns, and a whimsical hand-painted pattern.
How-To Guide
Materials
- White or terracotta air-dry clay
- Sculpting tools (needle tool, smoothing rib)
- Small cup of water
- Slip (clay mixed with water)
- Acrylic paints (white, black)
- Small round paintbrush
- Fine-grit sandpaper
- Matte spray sealant or brush-on varnish
- Small succulent and potting soil
Step 1: Forming the Base Body
-
Prepare the clay:
Start with a ball of clay roughly the size of a large orange. Knead it in your hands to warm it up and remove air bubbles, ensuring it’s pliable and smooth. -
Pinch the pot:
Push your thumb into the center of the ball, leaving about a half-inch thickness at the bottom. Begin pinching the walls upwards while rotating the clay, aiming for an even thickness all around. -
Shape the oval:
Gently squeeze opposite sides of your round pot to elongate it slightly into an oval shape. This creates the cow’s body profile rather than a perfect circle. -
Smooth the surfaces:
Dip your finger in a little water and run it over the interior and exterior walls to smooth out any fingerprints or cracks. The rim should be flat and even.
Step 2: Adding Animal Features
-
Create the legs:
Roll four equal-sized small cylinders of clay, roughly 1 inch tall. Taper them slightly at the bottom to look like hooves. -
Attach the legs:
Score (scratch) the bottom of the pot and the tops of the legs. Apply a dab of slip to the scored areas and press the legs firmly onto the four corners of the belly. Smooth the seams upward into the body so they are seamless. -
Form the snout:
Roll a flattened oval of clay for the nose. Attach this to one end of the pot, blending the edges into the main body so it protrudes slightly. -
Add nostrils:
Use the rounded end of a paintbrush handle or a sculpting tool to press two distinct indents into the front of the snout. -
Sculpt the horns:
Roll two small cones of clay and curve them slightly to create the horn shape. Score and slip the top of the head area, then attach the horns securely, pointing slightly forward or upward.
Heavy Head Helper
If the snout makes the pot tip forward while wet, place a small folded piece of paper towel under the chin to support it until the legs stiffen.
Step 3: Finishing and Decorating
-
Dry thoroughly:
Set your cow aside in a cool, dry place. Let it dry completely for 24-48 hours until the clay turns white and feels hard. -
Sand imperfections:
Once dry, use fine-grit sandpaper to gently buff away any rough bumps or uneven textures on the surface. -
Base coat:
Paint the entire exterior of the cow with opaque white acrylic paint. It may need two coats for full coverage; I like to let the first coat dry for about 20 minutes before adding the second. -
Paint the horns:
Using a small brush, carefully paint the horns jet black. Taper the black paint right down to where the horn meets the head for a clean line. -
Add the spots:
Dip the back end of a paintbrush or a dotting tool into black paint. creates perfectly round spots. Add a few dots randomly around the body, varying the spacing. -
Paint the eyes:
Use a fine-point detail brush or a toothpick to add two tiny black dots just above the snout for the eyes. -
Protect the finish:
Once all paint is totally dry, apply a matte sealant spray or varnish. This protects the paint from moisture when you water your plant.
Leg Wobble Fix
If the pot rocks after attaching legs, gently tap the whole planter down on a flat table while the clay is soft to level out all four feet at once.
Now your adorable bovida is ready to hold your favorite succulent

TRACK YOUR CERAMIC JOURNEY
Capture glaze tests, firing details, and creative progress—all in one simple printable. Make your projects easier to repeat and improve.
Elephant Pinch Pot With Trunk Detail
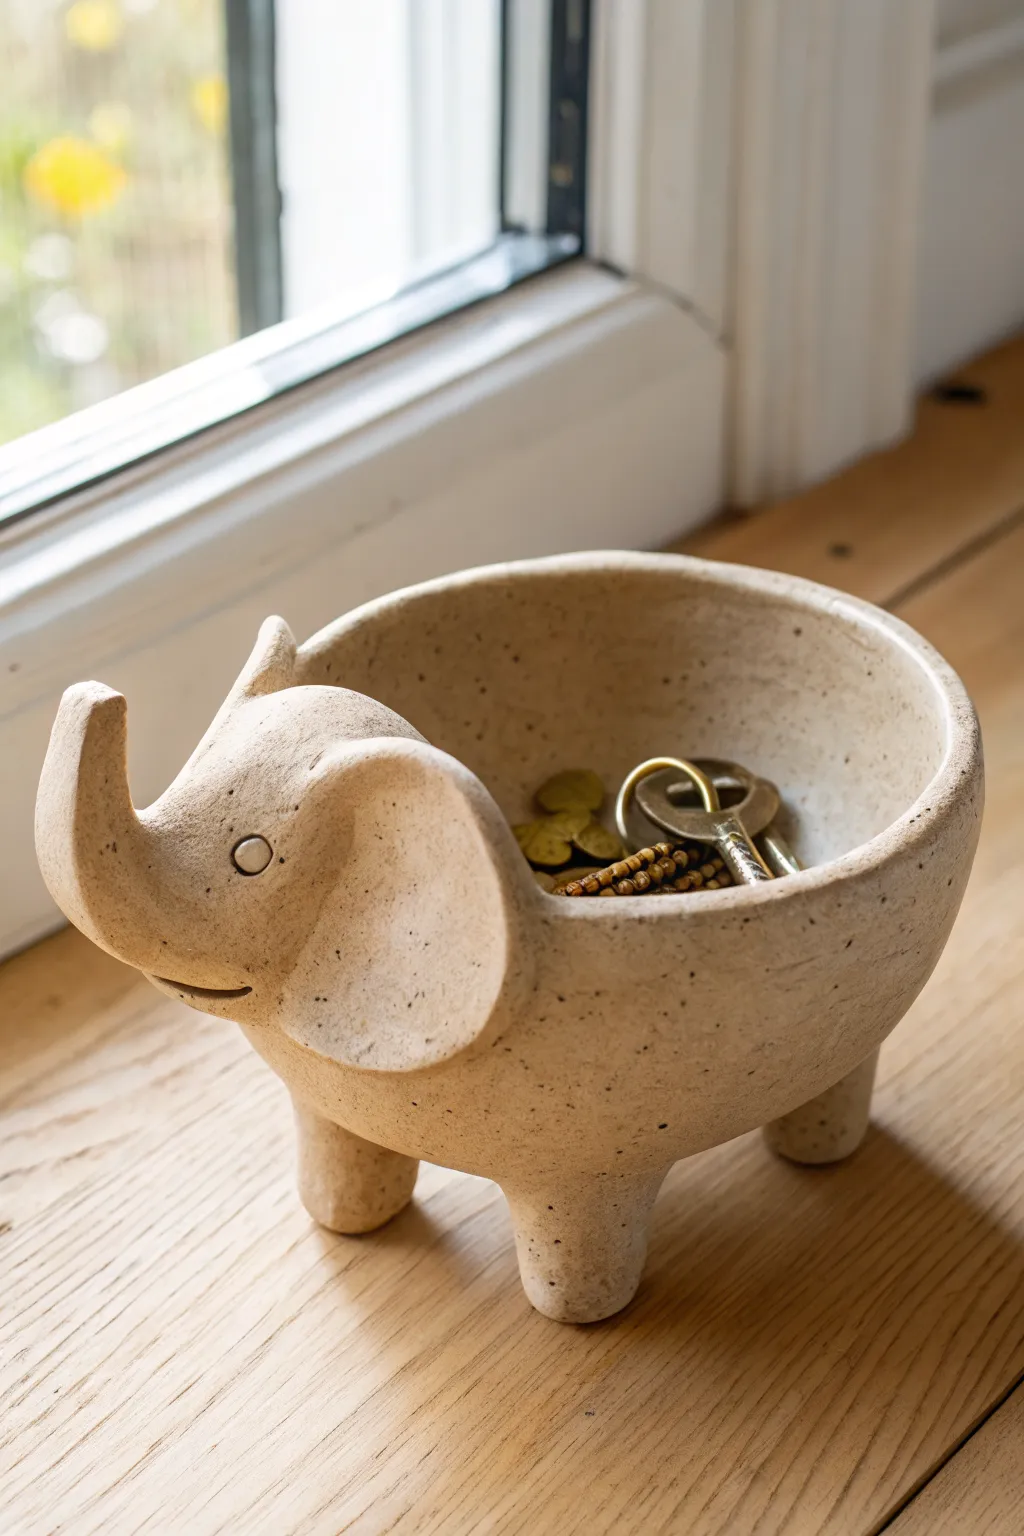
This charming elephant pinch pot combines functionality with adorable character, featuring a gentle upward trunk and speckled beige finish. Perfect for holding keys or loose change by the window, its sturdy legs and wide ears make it a delightful beginner-friendly sculpting project.
Step-by-Step Tutorial
Materials
- Speckled buff stoneware clay (or polymer clay with faux stone effect)
- Needle tool
- Loop tool or spoon
- Scoring tool (or an old toothbrush)
- Slip (water/clay slurry)
- Rubber kidney rib or plastic card
- Sponge
- Rolling pin
- Clear matte glaze
Step 1: Forming the Base
-
Start the pinch pot:
Begin with a ball of clay roughly the size of a large orange. Drive your thumb into the center, leaving about half an inch of thickness at the bottom. -
Pinch the walls:
Gently pinch and rotate the clay ball to thin out the walls evenly. Aim for a consistent thickness of about 1/4 inch, creating a deep, rounded bowl shape. -
Refine the shape:
Use a rubber kidney rib or a slightly damp sponge to smooth the interior and exterior walls, removing any fingerprints. -
Flatten the rim:
Gently tap the rim of the bowl on your work surface to create an even, flat top edge.
Step 2: Sculpting the Features
-
Shape the legs:
Roll four equal-sized cylinders of clay, roughly an inch tall. Tap the ends to flatten them so they are sturdy stubs. -
Attach the legs:
Flip your bowl upside down. Score and slip the four contact points on the belly of the bowl and the tops of the legs. Press them firmly into place. -
Level the pot:
Flip the pot back onto its legs and gently wiggle it to ensure all four legs touch the table evenly. I like to press down slightly from the inside bottom to secure the bond. -
Form the head mass:
Take a separate lump of clay and shape a rounded, tapering cone. This will become the transition from the bowl wall to the trunk. -
Attach the head base:
Score and slip one side of the bowl. Attach your clay cone so it merges seamlessly with the bowl’s curve, smoothing the clay downward with your thumb. -
Pull the trunk:
Gently pull and taper the end of the attached clay cone upward to form the trunk. Give it a slight curve back towards the bowl for that happy, lifted look. -
Make the mouth:
Use a needle tool or a small wooden sculpting tool to slice a curved smile just below the base of the trunk.
Trunk Drooping?
If the trunk sags while drying, prop it up with a small piece of foam or crumbled newspaper underneath the curve. Leave this support in place until the clay is leather hard.
Step 3: Adding Details & Refining
-
Create the ears:
Roll out a small slab of clay and cut two large, rounded intricate shapes—almost like butterfly wings or kidney beans. Smooth the edges with a wet finger. -
Attach the ears:
Score and slip the sides of the head area. Press the ears onto the body, ensuring the front edge of the ear blends into the cheek area while the back edge flares out slightly. -
Sculpt the eyes:
Roll two tiny balls of clay for the eyes. Score the placement area, press the balls flat, and then use the hollow end of a small tube or pen cap to imprint a circle around them for definition. -
Add pupils:
Use a needle tool to poke a small indentation in the center of each eye. -
Final smooth:
Wipe the entire piece with a very slightly damp sponge to soften harsh tool marks and expose the grog/speckles in the clay. -
Dry slowly:
Loosely cover the elephant with plastic for a day to equalize moisture, then uncover to let it dry completely bone dry. -
Fire and Glaze:
Bisque fire the piece. Apply a clear matte glaze to protect the surface while letting the natural speckles show through, then glaze fire to finish.
Smooth Seams
When attaching the head and legs, use the back of a spoon to burnish the seams. A completely invisible join creates the illusion that the animal was carved from a single stone.
Once fired, this sturdy little friend is ready to guard your treasures on any windowsill.
Scaled Fish Pinch Pot Dish
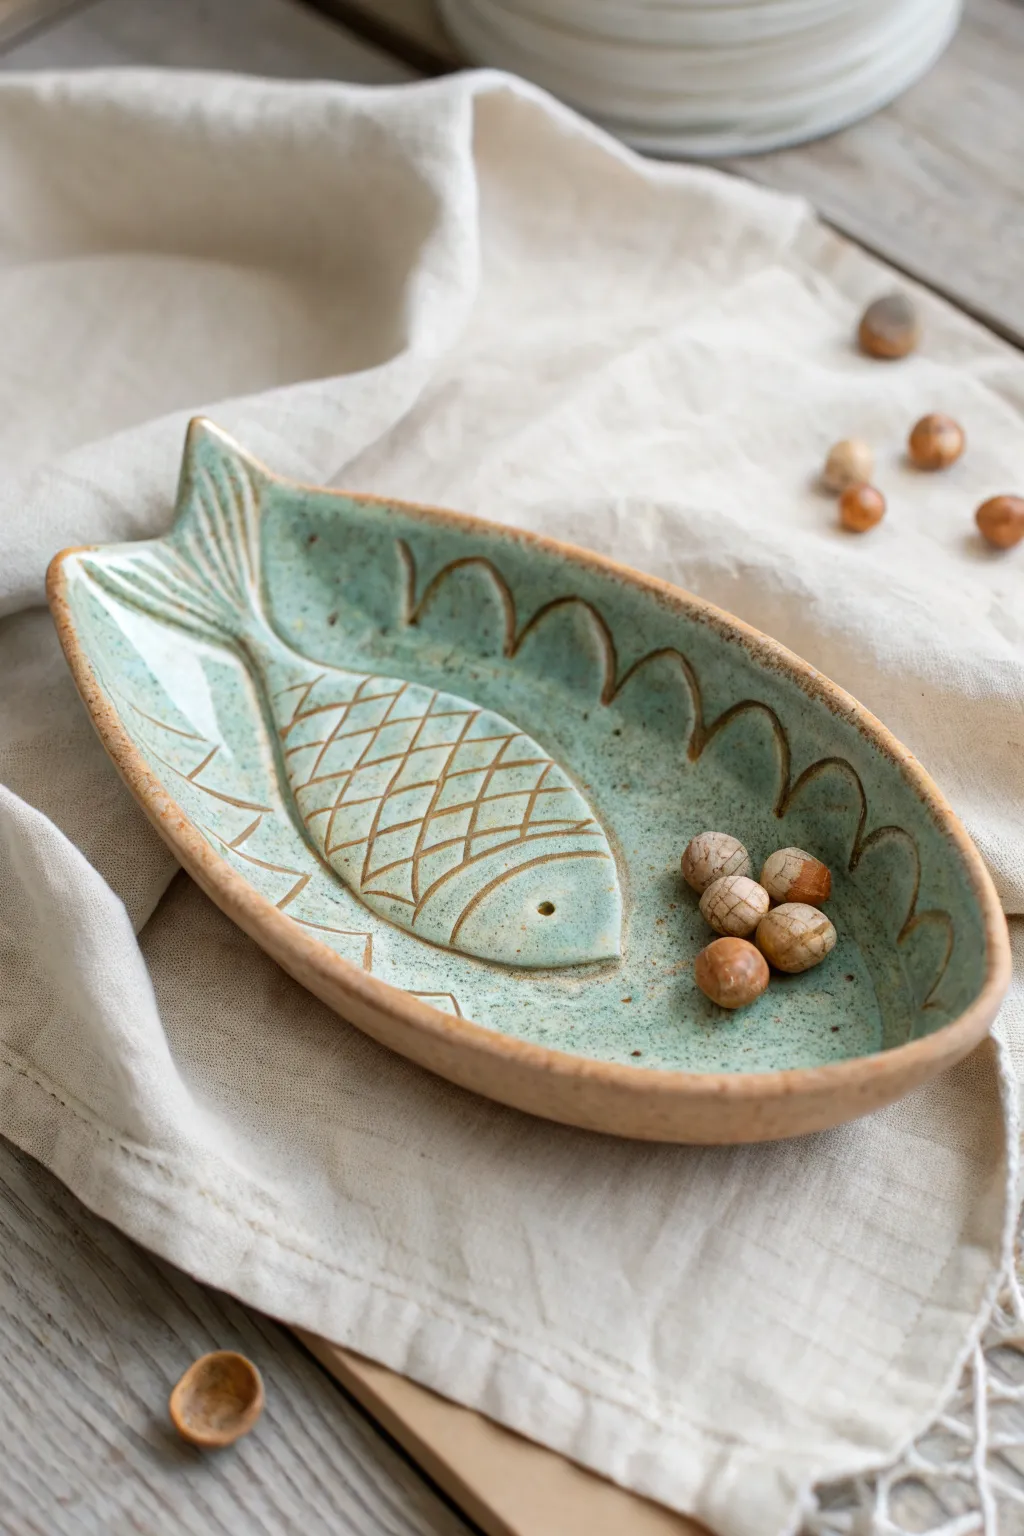
This delightful ceramic dish combines the rustic warmth of speckled clay with a stylized fish motif perfect for holding trinkets or snacks. The beautiful light teal glaze pools in the carved textures, highlighting the playful scales and fins against the raw clay rim.
Detailed Instructions
Materials
- Speckled stoneware clay body
- Rolling pin
- Canvas mat or cloth
- Needle tool
- Loop carving tool (small)
- Small sponge
- Fettling knife
- Rib tool (kidney shaped)
- Light teal/seafoam green ceramic glaze
- Kiln access
Step 1: Shaping the Base
-
Prepare the slab:
Begin by wedging a softball-sized piece of speckled clay to remove air bubbles. Flatten it onto your canvas mat and use a rolling pin to create an even slab about 1/4 inch thick. -
Cut the shape:
Freehand an elongated oval shape that tapers slightly at both ends—think of a pointy football or a warped almond. Use your needle tool to cut this out from the slab. -
Define the tail:
On one of the tapered ends, make a small ‘V’ notch cut to suggest the separation of tail fins. Gently pull the clay points outward slightly to accentuate the fishtail silhouette. -
Form the walls:
Instead of a traditional pinch pot ball method, we are pinching up the sides of this slab. Gently lift the edges of your oval and pinch the clay upwards to create a wall about 1 inch high. -
Refine the rim:
Use your thumb and forefinger to smooth the rim, ensuring it has a consistent thickness. I like to keep the rim slightly irregular and organic rather than perfectly straight. -
Smooth the interior:
Take a damp sponge or a soft rib tool and run it along the inside floor and walls of the dish to erase any fingerprints and create a smooth canvas for carving.
Clean Lines Tip
Don’t flick the little clay crumbs off while carving! Wait until the pot is bone dry, then brush them away. Wiping wet crumbs smears the detail.
Step 2: Carving the Details (Sgraffito)
-
Leather hard stage:
Let the dish dry until it reaches a ‘leather hard’ state. The clay should be firm enough to hold its shape but soft enough to carve into without chipping. -
Outline the body:
Using a needle tool, lightly scratch a central almond shape in the middle of the dish floor. This will be the main body of the fish. -
Connect the tail:
Draw lines extending from the back of the central body to the physical tail shape you sculpted earlier, connecting the interior drawing to the exterior form. -
Carve the scales:
Switch to a small loop tool. Carve a cross-hatch pattern inside the central body oval to resemble fish scales. Apply varying pressure to make the lines deep enough to catch glaze later. -
Add fin details:
Carve long, flowing lines on the tail section. Then, add a small circle for the eye at the front of the body oval. -
Decorate the surroundings:
around the fish body, carve stylized wave patterns or simple scallops along the inner walls of the dish to frame the central design. -
Clean up burrs:
Once carved, use a dry, soft brush or your finger to gently brush away the little clay crumbs (burrs) created by the carving tools.
Step 3: Glazing and Firing
-
Bisque fire:
Allow the piece to dry completely until it is bone dry. Fire it in the kiln to bisque temperature (usually cone 04). -
Wax resist (optional):
If you want the rim to remain bare and toasty like the example, carefully apply wax resist to the very top edge of the rim. -
Glaze application:
Pour a light teal or seafoam green glaze into the interior of the dish. Swirl it around to coat the bottom and let it flow into the carved lines. -
Wipe back:
For the effect shown, you don’t want a thick, opaque coat everywhere. While the glaze is damp, gently wipe the raised surfaces with a sponge, leaving more glaze pooled in the carved recesses. -
Glaze the exterior:
You can choose to leave the outside raw to show off the speckles, or apply a very thin coat of the same glaze. Ensure the bottom is wiped clean. -
Final fire:
Fire the piece again to the glaze maturity temperature appropriate for your clay and glaze (often cone 5 or 6 for stoneware).
Enhance the Contrast
Apply a dark underglaze wash (like black or dark blue) into the carved lines before glazing, then wipe it back. This makes the fish design pop!
Now you have a charming, handmade catch ready to display on your table.
Open-Mouth Shark Pinch Pot Bowl
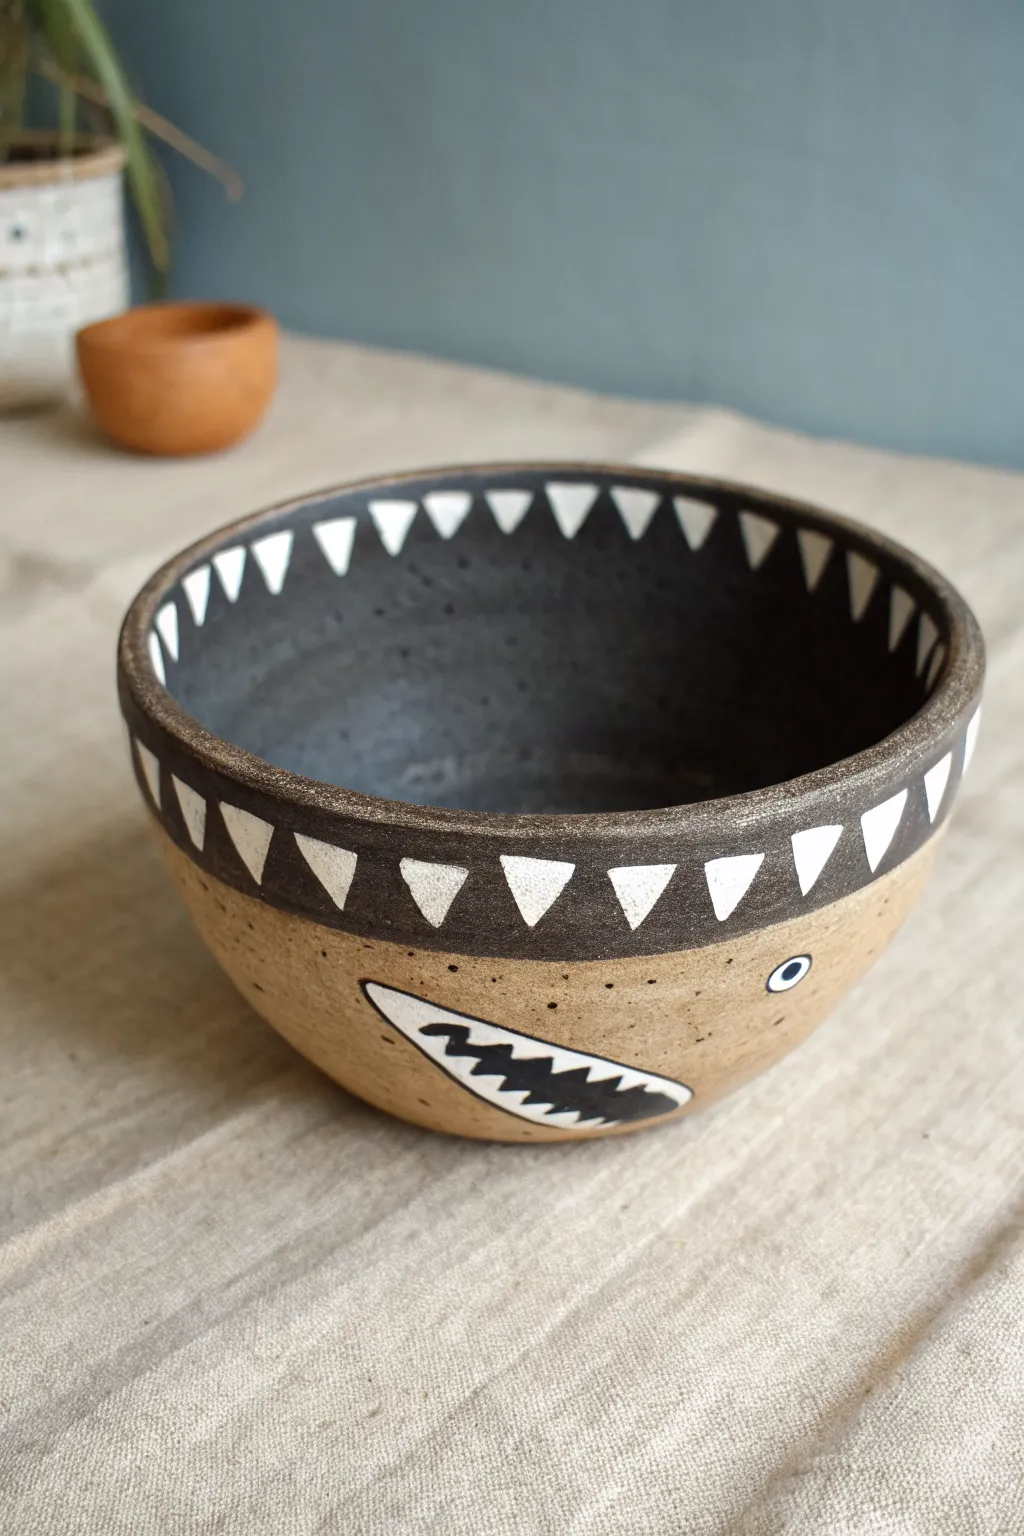
This playful ceramic bowl transforms a simple pinch pot into a stylized shark with a wide, toothy grin. The design uses contrasting black and unglazed clay to create a modern, graphic look that is perfect for holding snacks or serving as a catch-all dish.
Step-by-Step Guide
Materials
- Stoneware clay (speckled or tan buff)
- Black underglaze (or dark slip)
- White underglaze (or white slip)
- Clear glaze (food safe)
- Pottery tools (needle tool, rib tool)
- Small paintbrush (for fine details)
- Medium flat brush (for banding)
- Sponge and water bucket
- Kiln
Step 1: Forming the Bowl
-
Prepare the Clay:
Start with a ball of speckled stoneware clay about the size of a large orange. Wedge it thoroughly to remove any air bubbles, which helps prevent cracking in the kiln. -
Create the Pinch Pot:
Press your thumb into the center of the ball, leaving about a half-inch of clay at the bottom. Gently pinch and rotate the clay between your thumb and fingers to open up the walls, aiming for an even thickness. -
Shape the Walls:
Continue pinching upward and outward to form a wide, open bowl shape. I like to keep the walls relatively vertical but with a gentle curve to mimic a wide shark mouth. -
Smooth the Surface:
Once you have your basic shape, use a metal or rubber rib tool to smooth the interior and exterior walls. This cleans up your fingerprints and creates a canvas for the painting later. -
Refine the Rim:
Use a damp sponge or a chamois strip to compress and smooth the rim of the bowl. A rounded, smooth rim is crucial since this will be the shark’s ‘gums’. -
Dry to Leather Hard:
Set the bowl aside until it reaches a leather-hard state. It should be firm enough to handle without warping but still cool to the touch.
Uneven Rim Thickness
If your pinch pot rim is wavy or uneven, gently tap the bowl upside down on a flat table while the clay is still plastic to help level the top edge before smoothing.
Step 2: Decoration and Glazing
-
Apply the Interior Black Band:
Using a medium flat brush, apply 2-3 coats of black underglaze to the entire interior of the bowl. Ensure solid coverage so the inside looks like a dark cavernous mouth. -
Create the Exterior Band:
Paint a band of black underglaze around the top exterior rim, roughly 1 to 1.5 inches wide. This connects with the interior color to form the upper jaw area. -
Paint the Top Teeth:
With a smaller detail brush and white underglaze, paint a series of small V-shaped triangles along the black exterior band. Point the tips downward. Add a corresponding row of triangles on the inside rim pointing upward. -
Sketch the Lower Jaw:
On the bare clay section below the black band, lightly sketch the shape of a secondary mouth opening using a pencil. This will look like a sideways teardrop or an elongated oval. -
Fill the Lower Jaw:
Fill this secondary mouth shape with black underglaze. Let it dry completely before moving to the next step to prevent smearing. -
Add Sharp Teeth:
Using your fine detail brush and white underglaze, paint jagged, sharp teeth inside this lower black mouth shape. Make them irregular for a more predatory look. -
Outline the Jaw:
Carefully outline the entire lower mouth shape with a thick line of white underglaze to make it pop against the tan clay body. -
Add the Eye:
To the right of the lower mouth, paint a small white circle for the eye. Once dry, add a tiny black dot in the center for the pupil and outline the white circle with a thin black line. -
Bisque Fire:
Once the underglaze is completely dry, load the piece into the kiln for a bisque firing (usually cone 04 or 06, depending on your clay). -
Apply Clear Glaze:
After the bisque firing, dip the entire bowl into a clear, food-safe glaze. Wipe off any glaze from the foot of the bowl so it doesn’t stick to the kiln shelf. -
Final Firing:
Fire the piece again to the maturation temperature of your clay and glaze (often cone 5 or 6 for stoneware). This will make the clay vitrified and the surface glossy and durable.
Crisp Underglaze Lines
For sharper teeth, let the black underglaze dry fully before painting white over it. Use a high-quality liner brush to keep the triangle points distinct.
Once fired, you’ll have a charmingly fierce bowl ready to devour whatever you place inside it