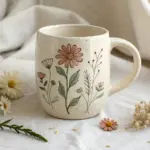
A simple clay plate is basically a blank canvas, and the fun part is deciding how you want that surface to speak. Here are my favorite clay plate design ideas—starting with the classics everyone loves and drifting into the playful, “ooh, I want to try that” stuff.
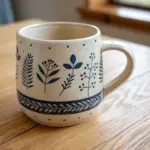
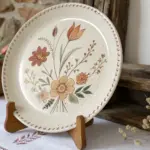
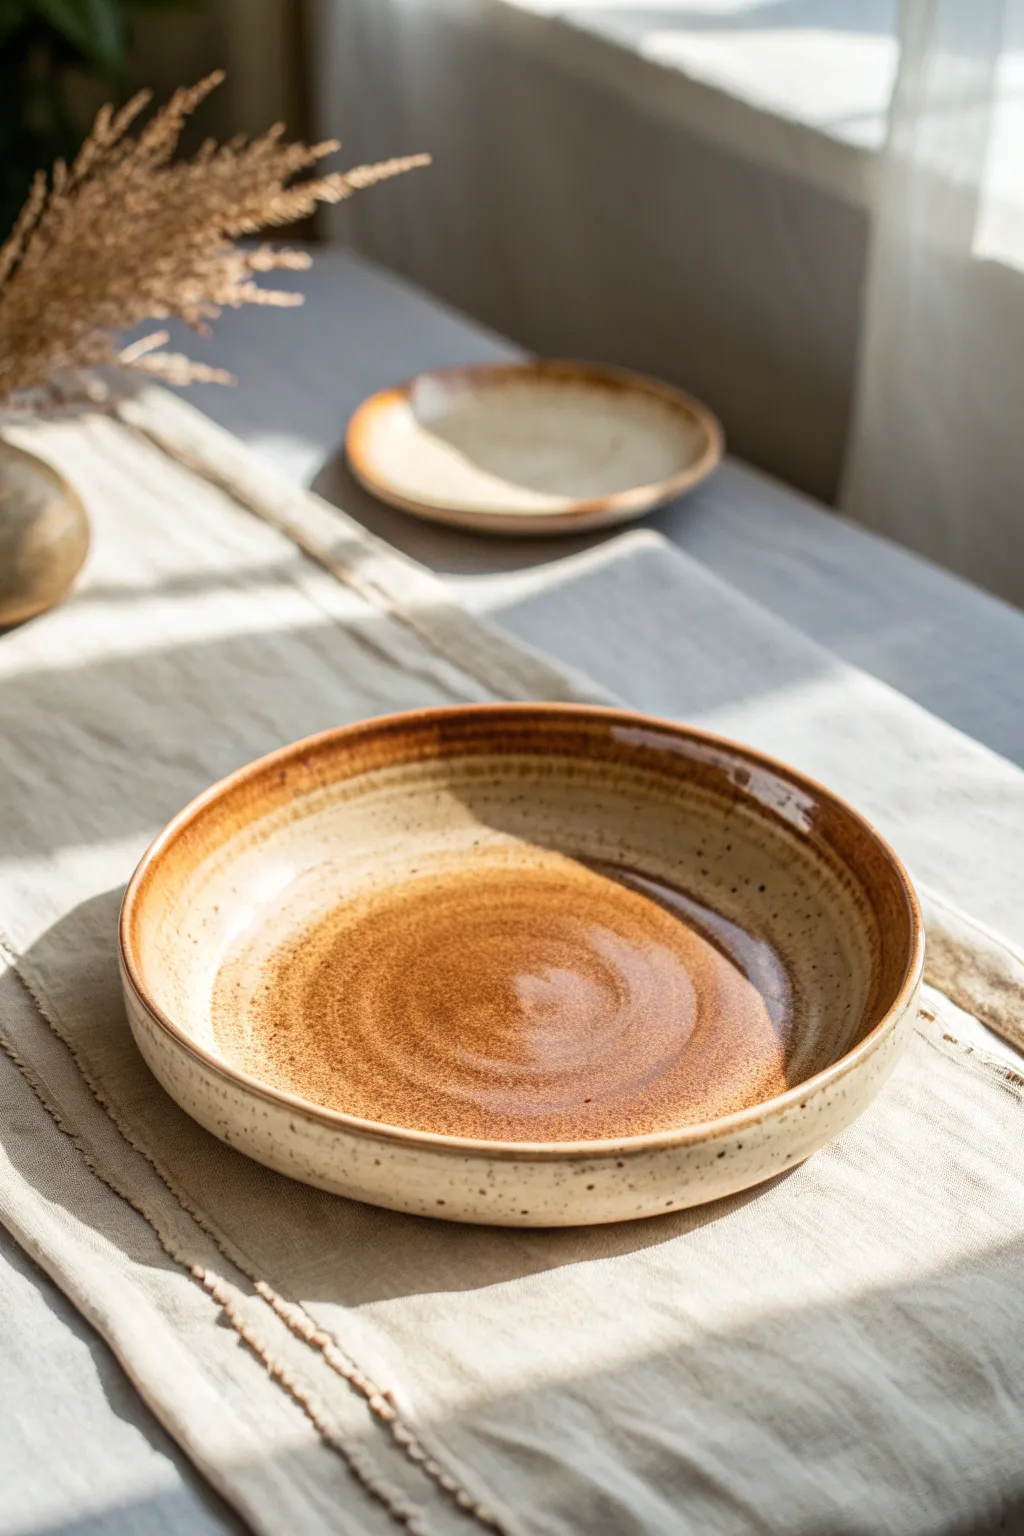
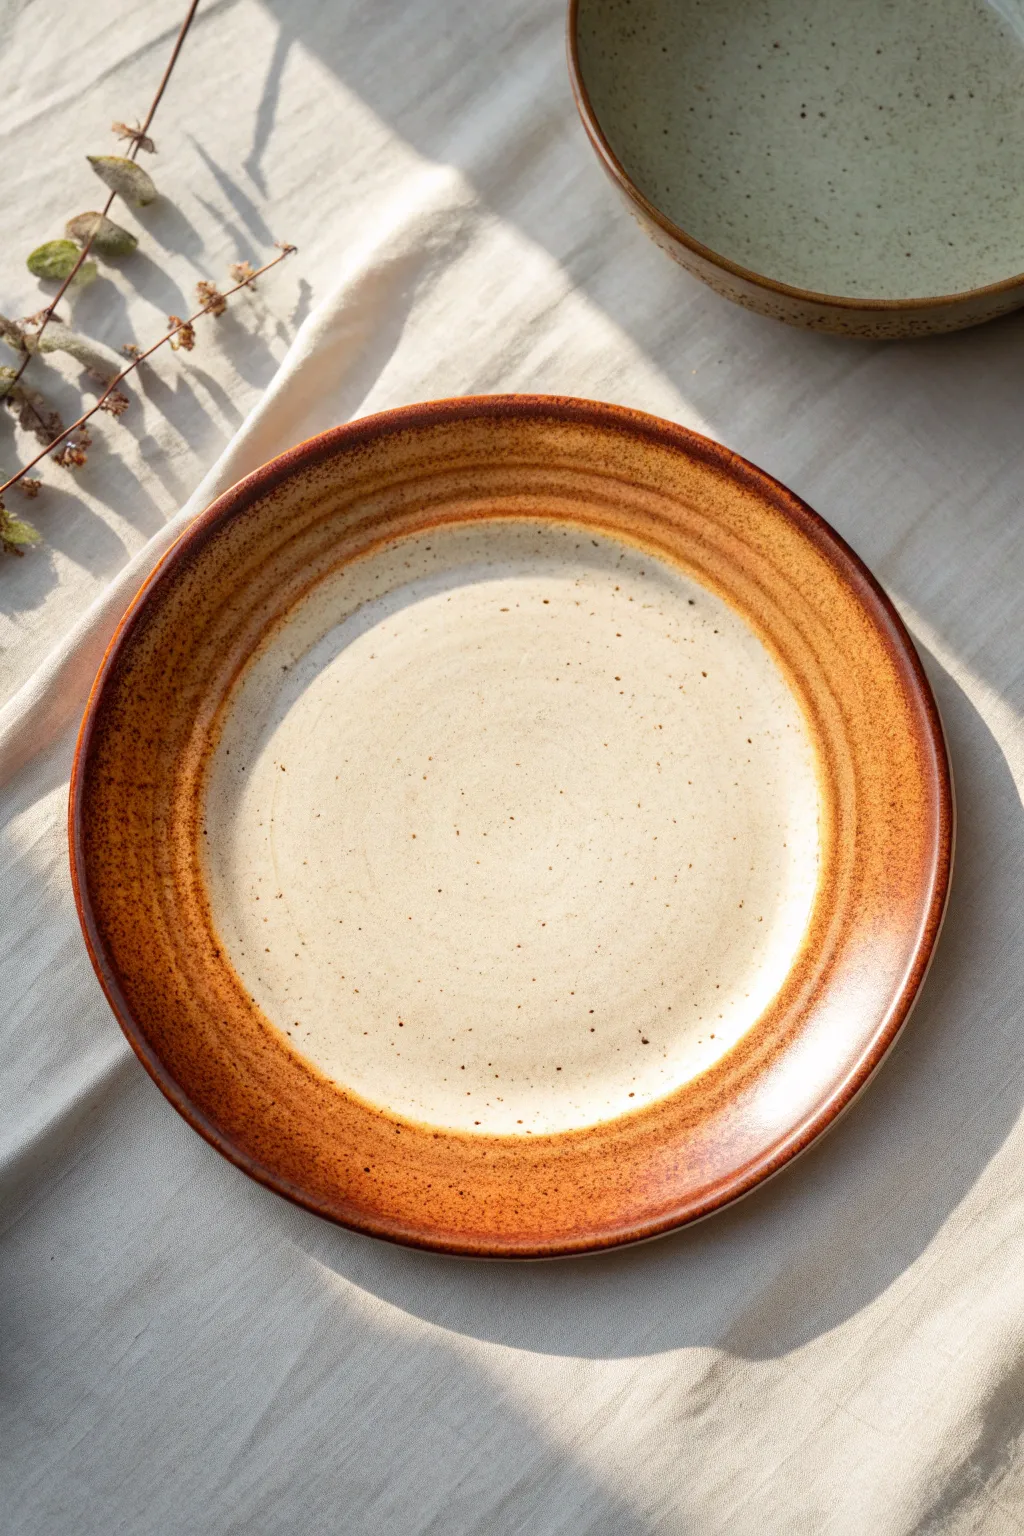
Classic Botanical Line Art
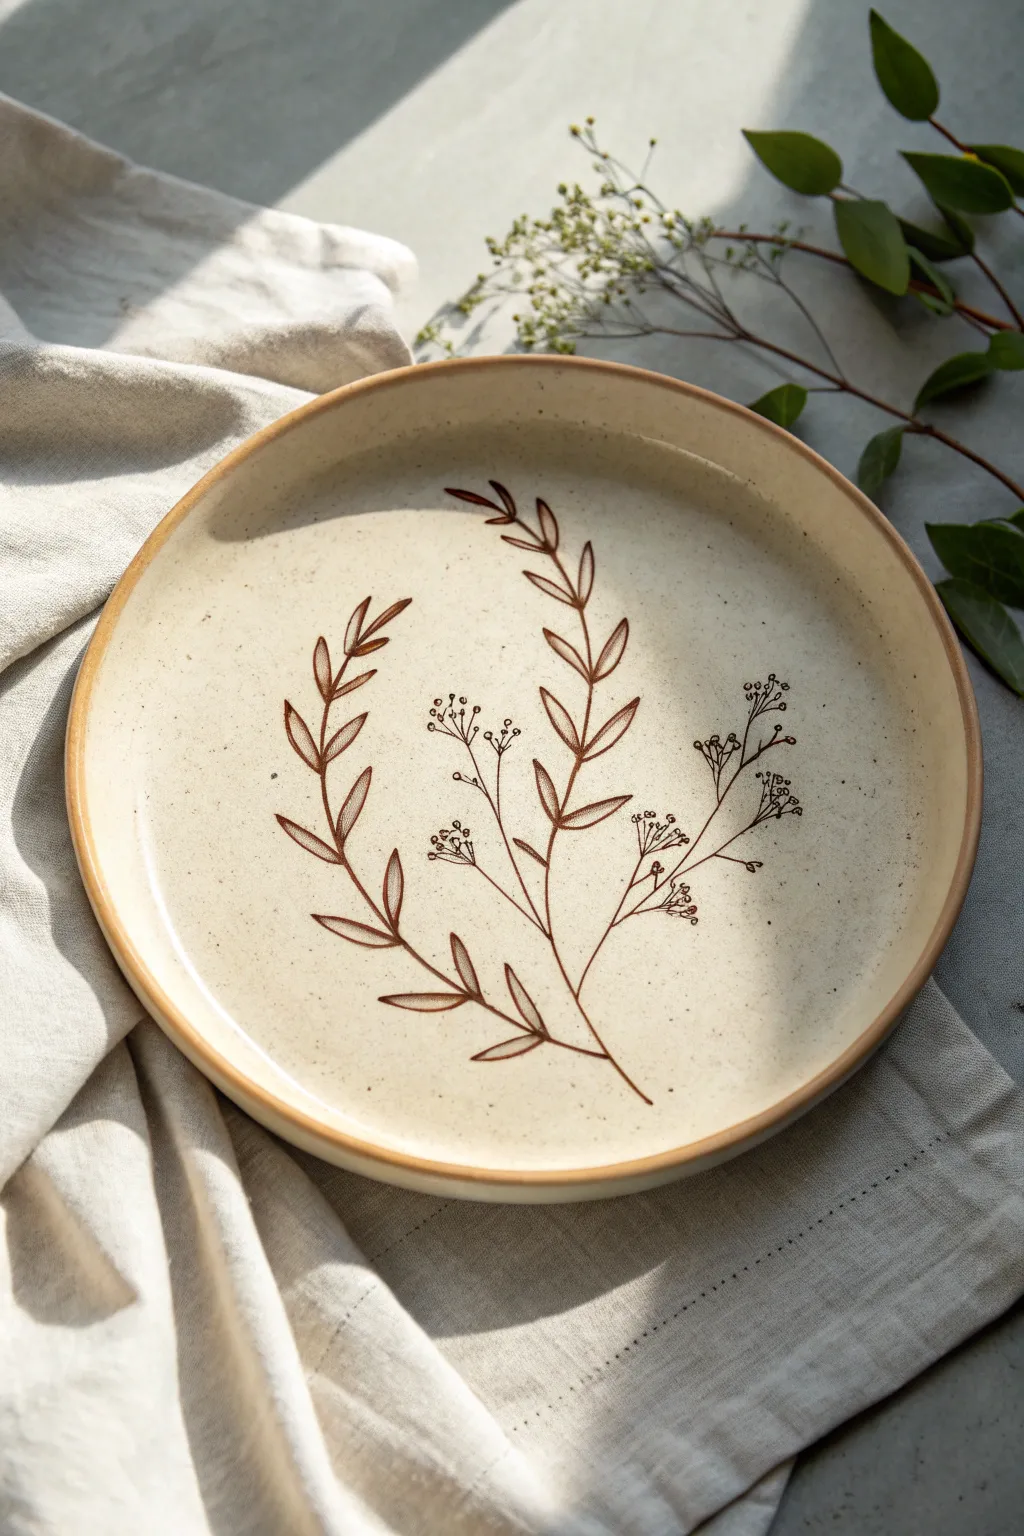
Embrace simplicity with this hand-built ceramic plate featuring delicate, sepia-toned botanical line art. The natural speckling of the clay combined with the fluid, hand-drawn flora creates a piece that feels both grounded and elegant.
Detailed Instructions
Materials
- Speckled stoneware clay (mid-fire)
- Rolling pin
- Canvas working mat
- GR Pottery Form (or a smooth, circular plate to use as a drape mold)
- Fettling knife or needle tool
- Soft rib tool (yellow or red)
- Clean sponge
- Underglaze (dark brown or sepia)
- Fine liner brush (size 0 or 00)
- Clear matte glaze
- Kiln access
Step 1: Forming the Plate
-
Prepare the Clay:
Begin by wedging a softball-sized amount of speckled stoneware clay to remove air bubbles and ensure consistency. -
Roll the Slab:
Place the clay on your canvas mat. Using a rolling pin, roll out a slab to an even thickness of about 1/4 inch. I like to flip the clay and rotate it quarter turns often to keep the circle shape. -
Compress the Surface:
Run a soft rib tool gently over the surface of the slab in all directions. This aligns the clay particles to prevent warping and creates that ultra-smooth canvas we need for painting later. -
Cut the Circle:
Place your circular form or template onto the slab. Using a needle tool, cut cleanly around the edge, holding the tool vertical to keep the rim square. -
Shape the Plate:
Lift the slab carefully and drape it over your mold (if using a hump mold) or press it into a slump mold. Smooth the slab onto the form with a damp sponge. -
Refine the Rim:
While the clay is on the mold, use a damp sponge or chamois cloth to round over the sharp cut edge of the rim. This looks better and is more durable against chipping. -
Dry to Leather Hard:
Allow the plate to dry slowly until it reaches a leather-hard state. It should be firm enough to hold its shape perfectly but still cool to the touch and receptive to painting.
Practice Makes Perfect
Before painting on your plate, practice your brush strokes on a jagged piece of scrap clay that is also leather hard. This helps you get a feel for absorbency.
Step 2: Painting the Botanical Design
-
Plan the Composition:
Before painting, visualize the layout. The design features two main curved stems that mirror the plate’s round shape, leaving plenty of negative space in the center. -
Load the Brush:
Shake your dark brown underglaze well. Load a fine liner brush, ensuring the bristles come to a sharp point, but aren’t dripping with excess liquid. -
Draw the Primary Stems:
Start near the bottom third of the plate. Paint two long, sweeping curves upward: one curving left and one curving right. Keep the pressure light for thin, delicate lines. -
Add Leaf Outlines:
Along the left stem, paint simple leaf shapes. Use a ‘press and lift’ motion: touch the tip down, press slightly to widen the stroke for the leaf body, and lift as you pull back to create a point. -
Add Vein Details:
Once the leaf outlines are set, draw a single, very thin line down the center of each leaf. Precision is key here, so steady your hand on the table edge if needed. -
Paint the Floral Sprigs:
On the right stem, alternate between small leaves and thin branches that split into tiny sub-stems. -
Detail the Flowers:
At the ends of the thin branches on the right, dab minuscule dots or tiny circles to represent clusters of baby’s breath or similar wildflowers. -
Clean Up:
If you make a mistake, you can gently scratch the underglaze off with a sharp tool once it’s dry, or wipe it very carefully with a barely damp q-tip.
Fixing Smudges
If you accidentally smear wet underglaze, don’t wipe it immediately! It will stain. Let it dry completely, then scrape the mistake off gently with an X-Acto knife.
Step 3: Glazing and Firing
-
Bisque Fire:
Once the plate is bone dry, fire it to cone 04 (bisque). This hardens the clay and sets the underglaze image permanently. -
Apply Clear Glaze:
Wipe the bisque plate with a damp sponge to remove dust. Dip the entire plate into a bucket of clear matte glaze. Shake gently to remove drips. -
Clean the Foot:
Use a sponge to completely wipe away any glaze from the bottom foot ring of the plate so it won’t stick to the kiln shelf. -
Final Glaze Fire:
Fire the plate to the maturation temperature of your clay (usually Cone 5 or 6). The clear glaze will reveal the speckles in the clay body and seal your design.
Now you have a timeless, handcrafted serving piece ready for your next gathering


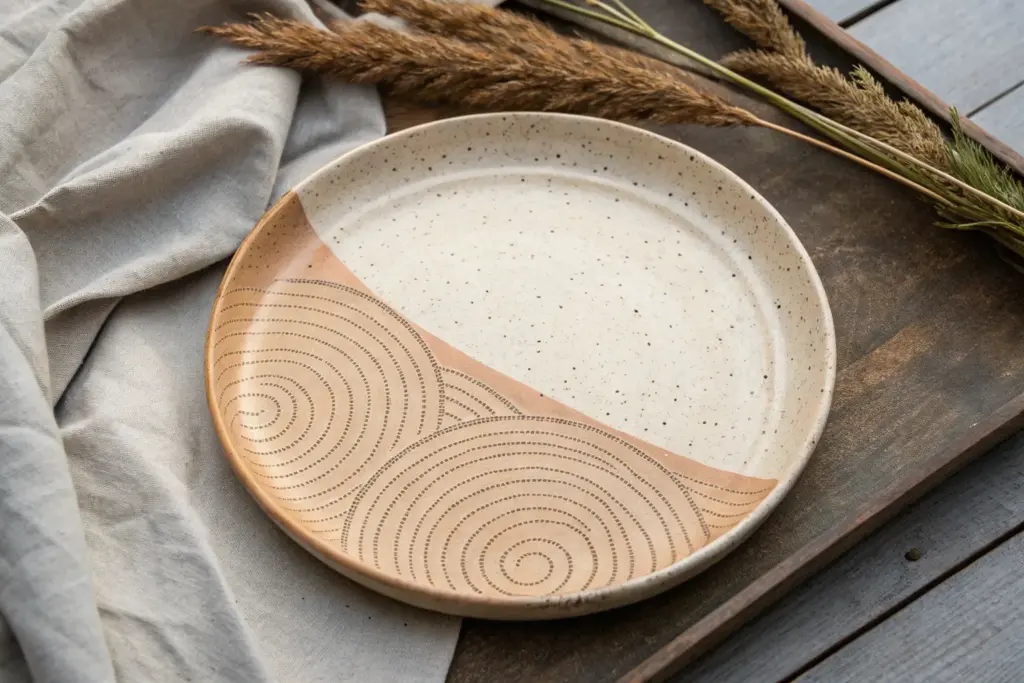
Simple Two-Tone Dip Glaze
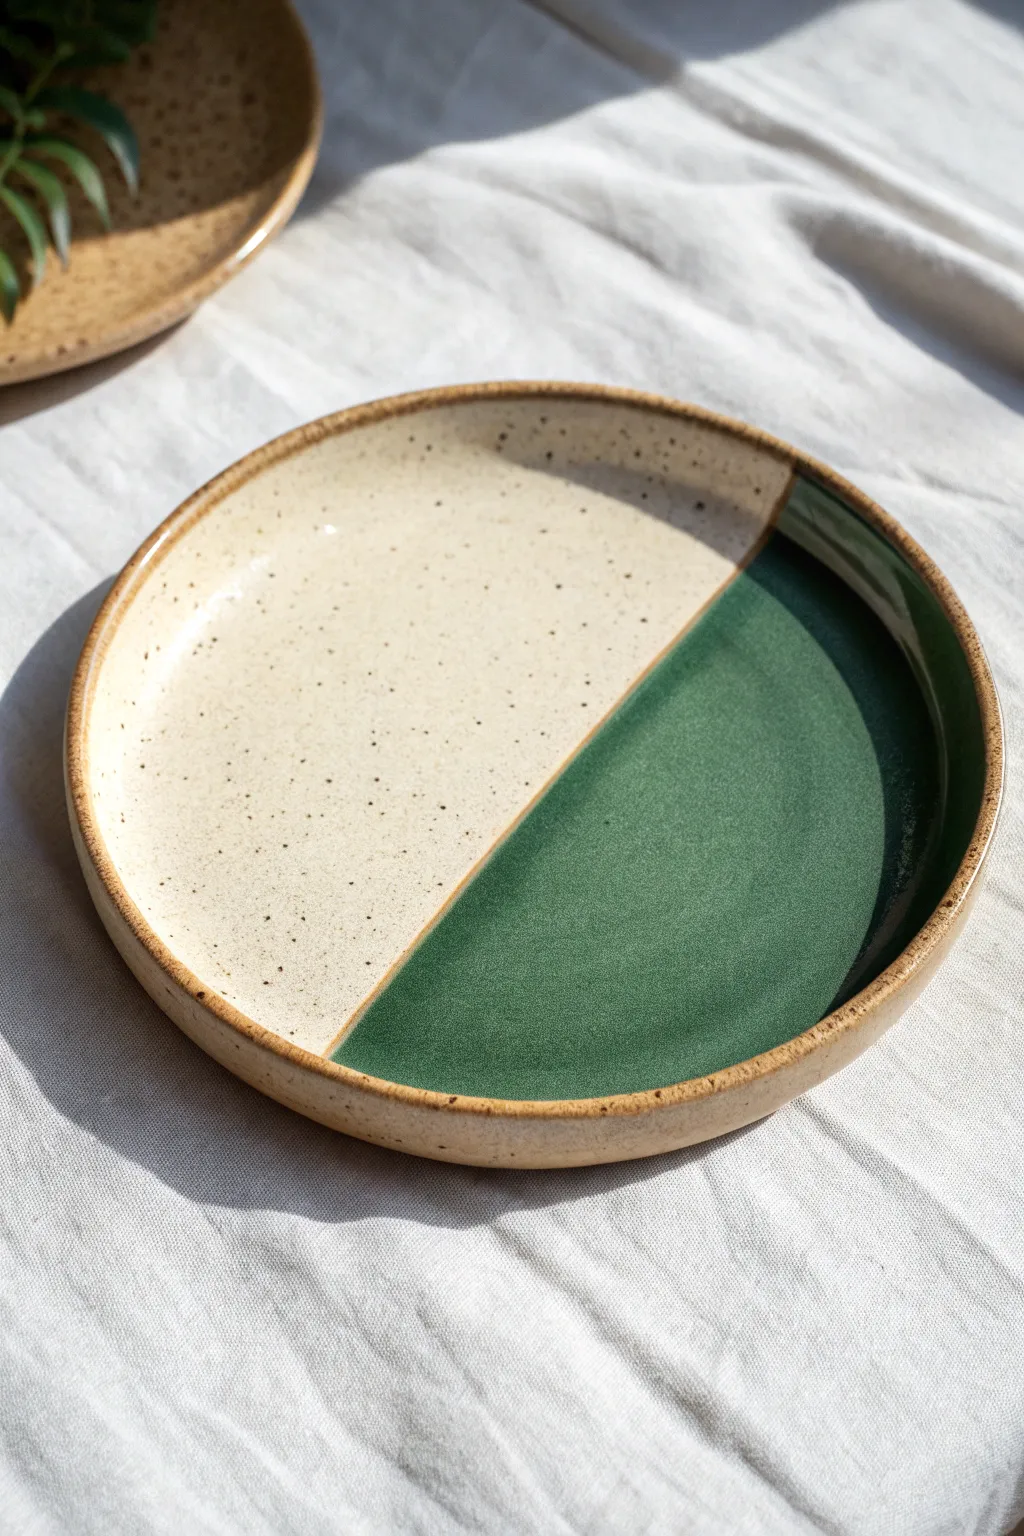
This elegant ceramic design relies on the natural beauty of speckled stoneware clay combined with a striking geometric dip. By dividing the surface between a warm, speckled cream and a deep forest green, you create a perfect balance of earthy tones and modern simplicity.
Step-by-Step Guide
Materials
- Speckled stoneware clay (mid-fire or high-fire)
- Pottery wheel
- Throwing tools (sponge, needle tool, rib)
- Trimming tools
- Wax resist (liquid latex or wax emulsion)
- Wide, flat paintbrush
- Speckled Cream/White glaze (matte or satin finish)
- Forest Green glaze (glossy or satin finish)
- Kiln (bisque and glaze firing capabilities)
- Container large enough for dipping
Step 1: Throwing and Trimming
-
Center the Clay:
Begin with a well-wedged ball of speckled stoneware clay. Secure it to the wheel head and center it meticulously, ensuring the speckles are distributed evenly throughout the mass. -
Open the Form:
Open the clay to create a wide, flat bottom. Since this is a plate, compress the floor thoroughly with a rib to prevent S-cracks during drying. -
Pull the Rim:
Pull the clay outward rather than upward, leaving a distinct rim. Keep the rim slightly thicker than the floor to prevent warping in the kiln. -
Refine the Profile:
Use a finishing rib to smooth the interior curve. The transition from the flat eating surface to the raised rim should be gentle but defined. -
Dry to Leather Hard:
Allow the plate to dry slowly to a leather-hard state. I like to flip it onto a bat once the rim is sturdy enough to support the weight. -
Trim the Foot:
Center the plate upside down on the wheel. Trim a clean, distinct foot ring, removing excess weight from the bottom while keeping the thickness consistent.
Step 2: Bisque Firing
-
Bone Dry:
Let the plate dry completely to the bone-dry stage. Ensure there is no coldness to the touch. -
Bisque Fire:
Load the kiln and bisque fire the plate to Cone 04 (or your clay body’s recommendation) to prepare it for glazing.
Messy Lines?
If your glaze line isn’t sharp, your wax resist was likely too thin or wet. Let the wax dry completely before the second dip, or use automotive striping tape for a razor-sharp edge.
Step 3: Glazing the Two-Tone Design
-
Clean the Bisqueware:
Wipe the fired plate with a damp sponge to remove any kiln dust. This ensures the glaze adheres properly without crawling. -
Apply Wax Resist:
Carefully paint wax resist along the bottom foot ring to keep it clean. You can also wax the very edge of the rim if you want a raw clay accent, as seen in the photo. -
Prepare the Glazes:
Stir both the Cream and Forest Green glazes thoroughly. If dipping, ensure they are the consistency of heavy cream. -
First Dip: The Cream:
Hold the plate firmly by the foot. Dip the entire plate into the Cream glaze first, or pour it over if your bucket isn’t large enough. Let it dry completely. -
Mark the Angle:
Once the cream base is dry, visualize a diagonal line cutting across the plate slightly off-center. You can use a pencil to lightly mark this line if needed. -
Wax the Reserve:
Apply wax resist over the Cream glaze on the section you want to remain cream. The edge of the wax will determine the sharpness of your straight line. -
Clean the Edge:
Wait for the wax to fully harden. If any wax dripped onto the area meant for the green glaze, scrape it off gently. -
Second Dip: The Green:
Dip the unwaxed portion of the plate into the Forest Green glaze. The wax over the cream section will repel the green glaze, creating that crisp geometric line. -
Wipe the Rim:
Before the glaze sets completely, use a damp sponge to wipe the glaze off the very outer rim of the plate, exposing the toasted clay body underneath for a rustic frame. -
Clean the Foot:
Double-check the foot ring. If any glaze has dripped onto the bottom, wipe it clean to save your kiln shelves.
Go Geometric
Instead of a simple half-dip, use tape or wax to create multiple geometric sections. Try adding a third color like a deep navy or mustard yellow for a Mondrian-inspired look.
Step 4: Final Firing
-
Glaze Fire:
Load the plate into the kiln. Fire to maturity (likely Cone 5 or 6 for stoneware). This will melt the glazes and bring out the iron speckles in the clay. -
Cooling:
Allow the kiln to cool naturally before opening. Removing the plate too early can cause thermal shock.
Once fired, the contrast between the matte cream and glossy green creates a stunning piece ready for your table

Speckled Minimalist Finish
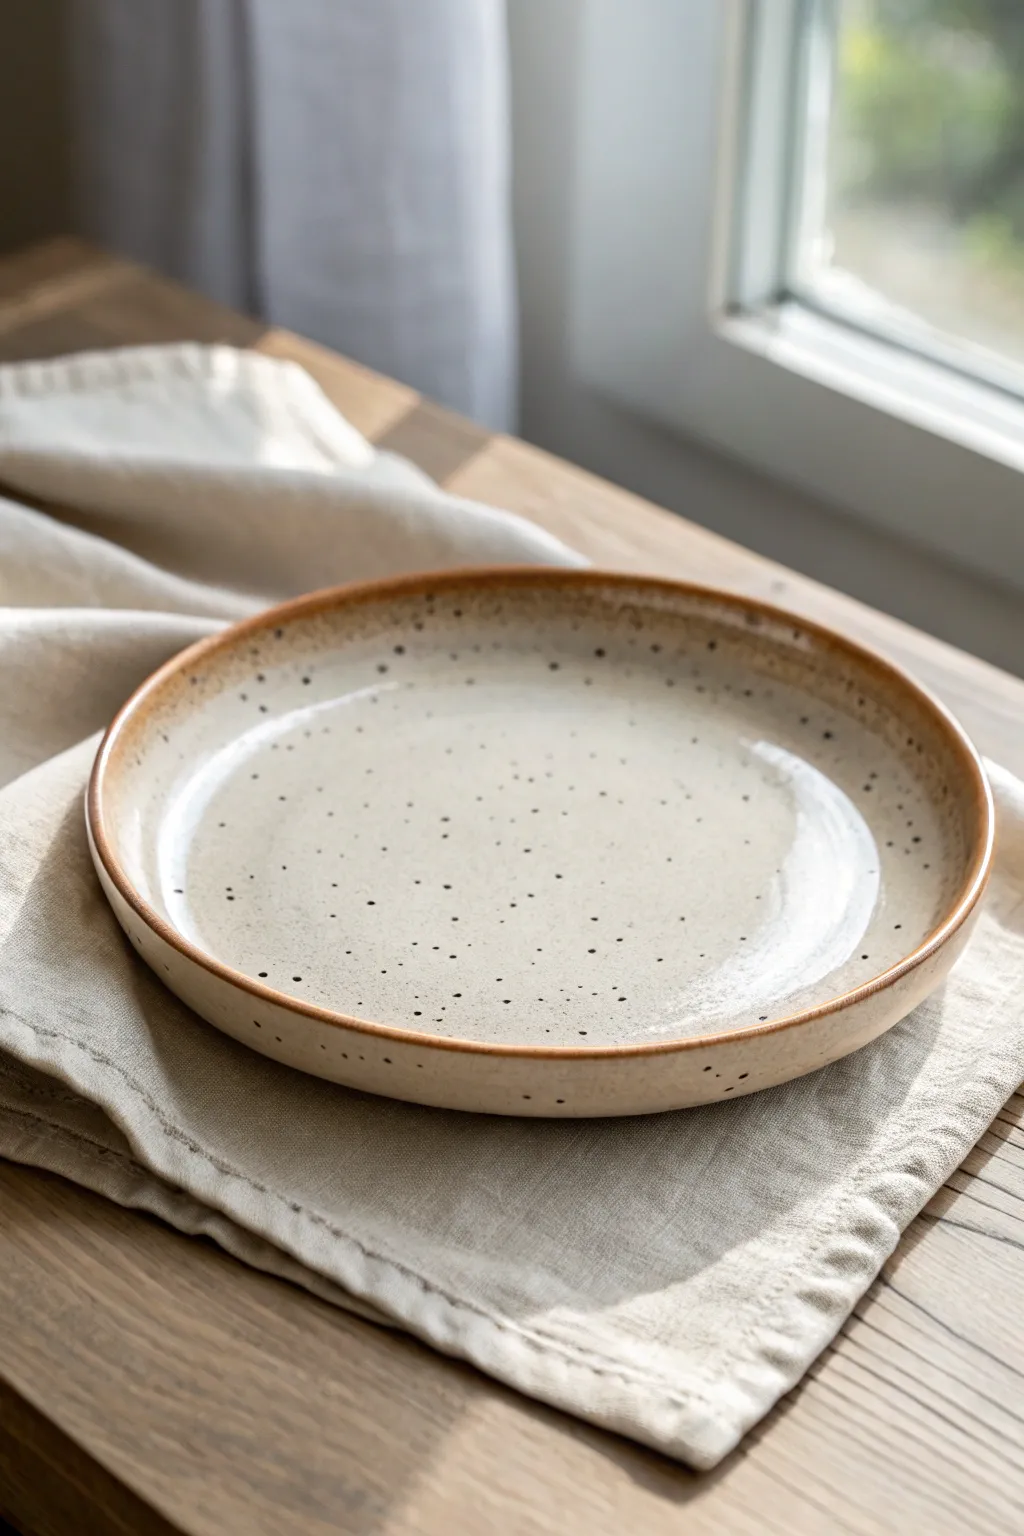
Achieve a timeless, earthy aesthetic with this minimalist plate design that highlights the natural beauty of speckled clay. The smooth, creamy glaze paired with a raw, toasted rim creates a perfect balance of refinement and rustic charm.
Step-by-Step Tutorial
Materials
- Speckled stoneware clay (buff or light grey)
- Pottery wheel (or slab roller/rolling pin for hand-building)
- Rib tool (wood and metal)
- Sponge
- Wire cutter
- Trimming tools
- Cream or transparent matte glaze
- Iron oxide wash or dark brown underglaze
- Small paintbrush
- Kiln
Step 1: Forming the Plate
-
Prepare the Clay:
Begin by thoroughly wedging about 1.5 to 2 pounds of speckled stoneware clay. This ensures all air bubbles are removed and the speckles are evenly distributed, which is crucial for the final look. -
Center and Open:
Secure the clay on the wheel head and center it. Open the clay wide and low, compressing the base firmly to prevent future S-cracks. -
Establish the Floor:
Use the heel of your hand or a wooden rib to flatten the floor, leaving it slightly thicker near the rim to support the vertical rise. Aim for a diameter between 8 to 10 inches. -
Pull the Rim:
Gently pull up a short wall, about 1 inch high. Instead of pulling straight up, angle the wall slightly outward to create that gentle, shallow bowl shape. -
Refine the Lip:
Compress the rim with a chamois or a damp sponge to round it off softly. This rounded edge is a key feature of the visual softness in the design.
Step 2: Trimming and Drying
-
Leather Hard Stage:
Allow the plate to dry slowly until it reaches a leather-hard state. It should be firm enough to handle without warping but still cool to the touch. -
Trim the Foot:
Center the plate upside down on the wheel. Trim away excess weight from the bottom and carve a clean, distinct foot ring. This elevates the plate and gives it a professional profile. -
Smooth the Surface:
Before the clay dries completely, run a damp sponge or a soft rib over the entire surface to bring the fine grog to the surface, creating that characteristic texture. -
Bisque Fire:
Once bone dry, load the plate into the kiln for a bisque firing (usually Cone 06 or 04). This sets the shape and prepares the clay for glazing.
Glaze Crawling?
If the glaze pulls back from the rim or spots during firing, ensure the bisque was dust-free and free of hand oils before glazing. Wash hands well before handling bisque.
Step 3: Glazing and Finishing
-
Clean the Bisque:
Wipe the fired plate with a damp sponge to remove any kiln dust. This ensures the glaze adheres perfectly without crawling. -
Apply the Glaze:
Dip the plate or pour a creamy, semi-opaque matte glaze over the interior. I prefer to swirl the glaze gently to get an even coat. -
Reveal the Speckles:
If your glaze is too thick, it might hide the clay’s natural speckles. If using a standard opaque white, consider thinning it slightly with water so the iron spots underneath can burn through during firing. -
Clean the Rim:
Using a damp sponge, carefully wipe the glaze off the very edge of the rim, exposing the raw clay body. This creates the ‘halo’ effect seen in the photo. -
Enhance the Edge:
Dip a small brush into an iron oxide wash or a diluted dark brown underglaze. Gently trace over the exposed clay rim to accentuate the toasted brown color. -
Splatter Effect (Optional):
If your clay body isn’t speckled enough, you can flick a toothbrush dipped in the iron oxide wash over the glazed surface to mimic the random speckling. -
Final Wipe:
Clean the foot ring thoroughly to prevent the plate from sticking to the kiln shelf. -
Glaze Fire:
Fire the plate to maturity (likely Cone 5 or 6 for stoneware). This final firing melts the glaze and vitrifies the clay, bringing out those rich, toasted iron tones.
Level Up: Texture
Before drying, gently press a coarse linen fabric into the wet clay surface. The glaze will break beautifully over the subtle weave texture.
Once cooled, your plate is ready for serving warm meals with a touch of handcrafted artistry


Scalloped or Fluted Rim
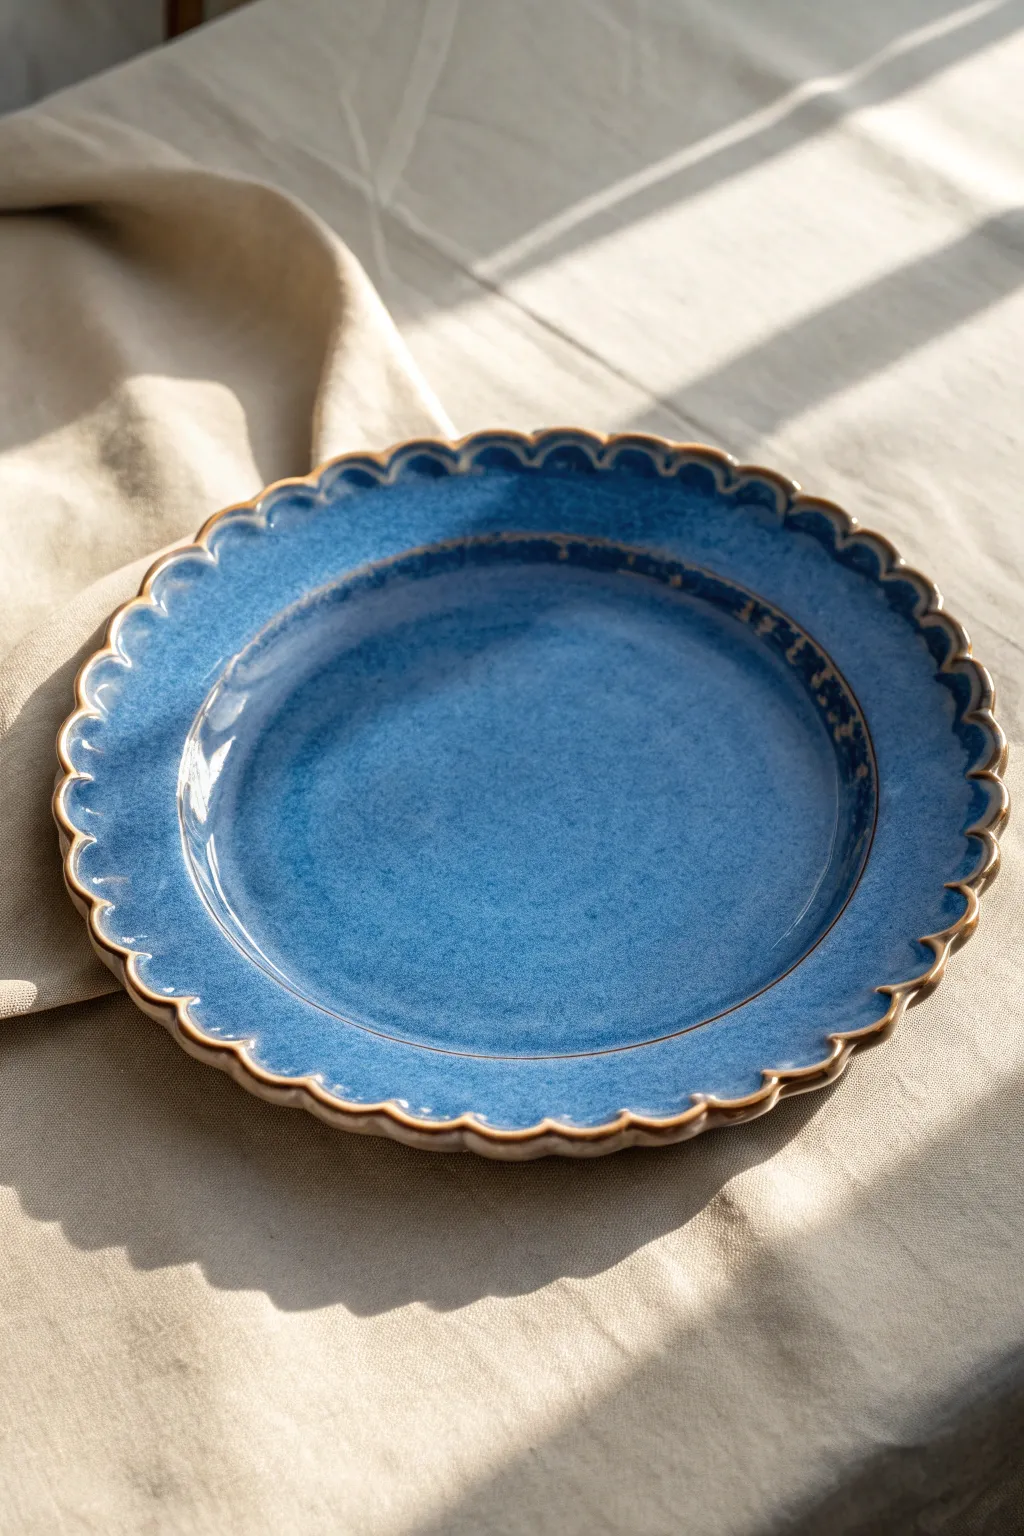
Capture the charm of vintage dinnerware with this hand-built ceramic plate featuring a delicate scalloped rim and a rich, mottled blue glaze. The exposed clay edge adds a rustic warmth that perfectly frames the cool tones of the center.
How-To Guide
Materials
- Stoneware clay body (buff or speckle recommended)
- Rolling pin
- Canvas work surface or slab mat
- Circular template or large dinner plate (approx. 10-11 inches)
- Needle tool
- Fettling knife
- GR Pottery Form or a slump mold (plaster or bisque)
- Small round sponge or chamois
- Rib tool (flexible metal or rubber)
- Modeling tool with a curved end (or a thumb)
- Mottled blue glaze (e.g., Rutile Blue or Floating Blue)
- Wax resist
- Angle shader brush for glazing
Step 1: Forming the Base
-
Prepare the slab:
Begin by wedging your clay thoroughly to remove air bubbles. Roll out a consistent slab that is roughly 1/4 inch thick. I like to rotate the slab while rolling to ensure an even thickness and circular shape. -
Smooth the surface:
Before cutting, take a flexible rib tool and compress the clay on both sides. This aligns the clay particles, prevents warping later, and creates a pristine canvas for that beautiful blue glaze. -
Cut the circle:
Place your circular template or an existing dinner plate onto the slab. Using your needle tool held vertically, trace around the edge to cut out your perfect circle. Remove the excess clay. -
Transfer to mold:
Carefully lift your clay circle and drape it over your slump mold or GR Pottery Form. Gently press the center down first, working your way outward to ensure the clay conforms to the shape without trapping air underneath.
Step 2: Sculpting the Scalloped Rim
-
Mark the intervals:
To keep your scallops even, lightly mark the rim at north, south, east, and west points with your needle tool. Then, divide each quadrant evenly. You don’t need to be mathematically perfect; a little variation adds handmade character. -
Create the heavy flutes:
Using the side of your thumb or a curved modeling tool, gently press down on the rim at your marked intervals. You want to create a distinct indentation that gently curves the edge of the plate downward. -
Refine the peaks:
As you press down to make the valleys, the clay between them will naturally rise. Use your fingers to pinch and shape these ‘peaks’ slightly, enhancing the wave-like motion of the rim. -
Smooth the edge:
Take a damp chamois or a small, squeezed-out sponge and run it along the very edge of the rim. This softens any sharp cuts and gives the scallops that professional, finished look. -
Dry slowly:
Cover the plate loosely with plastic. Allow it to dry to a leather-hard stage on the mold before removing it to prevent warping, then let it dry completely before the bisque fire.
Rim Alignment
When pressing the scallop indentations, support the underside of the rim with your other hand. This prevents the rim from drooping too low or cracking at the stress point.
Step 3: Glazing and Finishing
-
Wax the foot:
Once bisque fired, wipe the plate down with a damp sponge to remove dust. Apply wax resist to the foot ring on the bottom to prevent the plate from sticking to the kiln shelf. -
Apply the rim resist:
To achieve the brown/bronze edge seen in the photo, carefully paint a thin line of wax resist along the very tip of the scalloped edge. This will prevent the blue glaze from adhering there, revealing the raw clay body (or an oxide wash if you prefer). -
Glaze application:
Stir your mottled blue glaze well. Dip the plate or pour the glaze to get an even coat. If brushing, apply 2-3 flowing coats, allowing each to dry slightly in between. -
Clean up:
If any glaze beads up on the waxed rim edge, wipe it away cleanly with a damp sponge. The wax ensures a crisp line where the blue stops and the clay begins. -
Final fire:
Fire the plate to the temperature recommended for your specific clay and glaze combination (typically Cone 5 or 6 for stoneware). The heat will interact with the glaze thickness to create those deeper blue pools in the scallop valleys.
Oxide Definition
For a darker rim contrast, wipe a layer of iron oxide or manganese wash onto the edge before waxing. This creates a metallic, toasted look distinct from plain bare clay.
Set your table with your new creation and enjoy the play of light over those rhythmic curves

The Complete Guide to Pottery Troubleshooting
Uncover the most common ceramic mistakes—from cracking clay to failed glazes—and learn how to fix them fast.
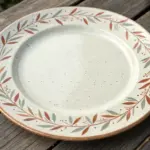
Stamped Repeat Pattern Border
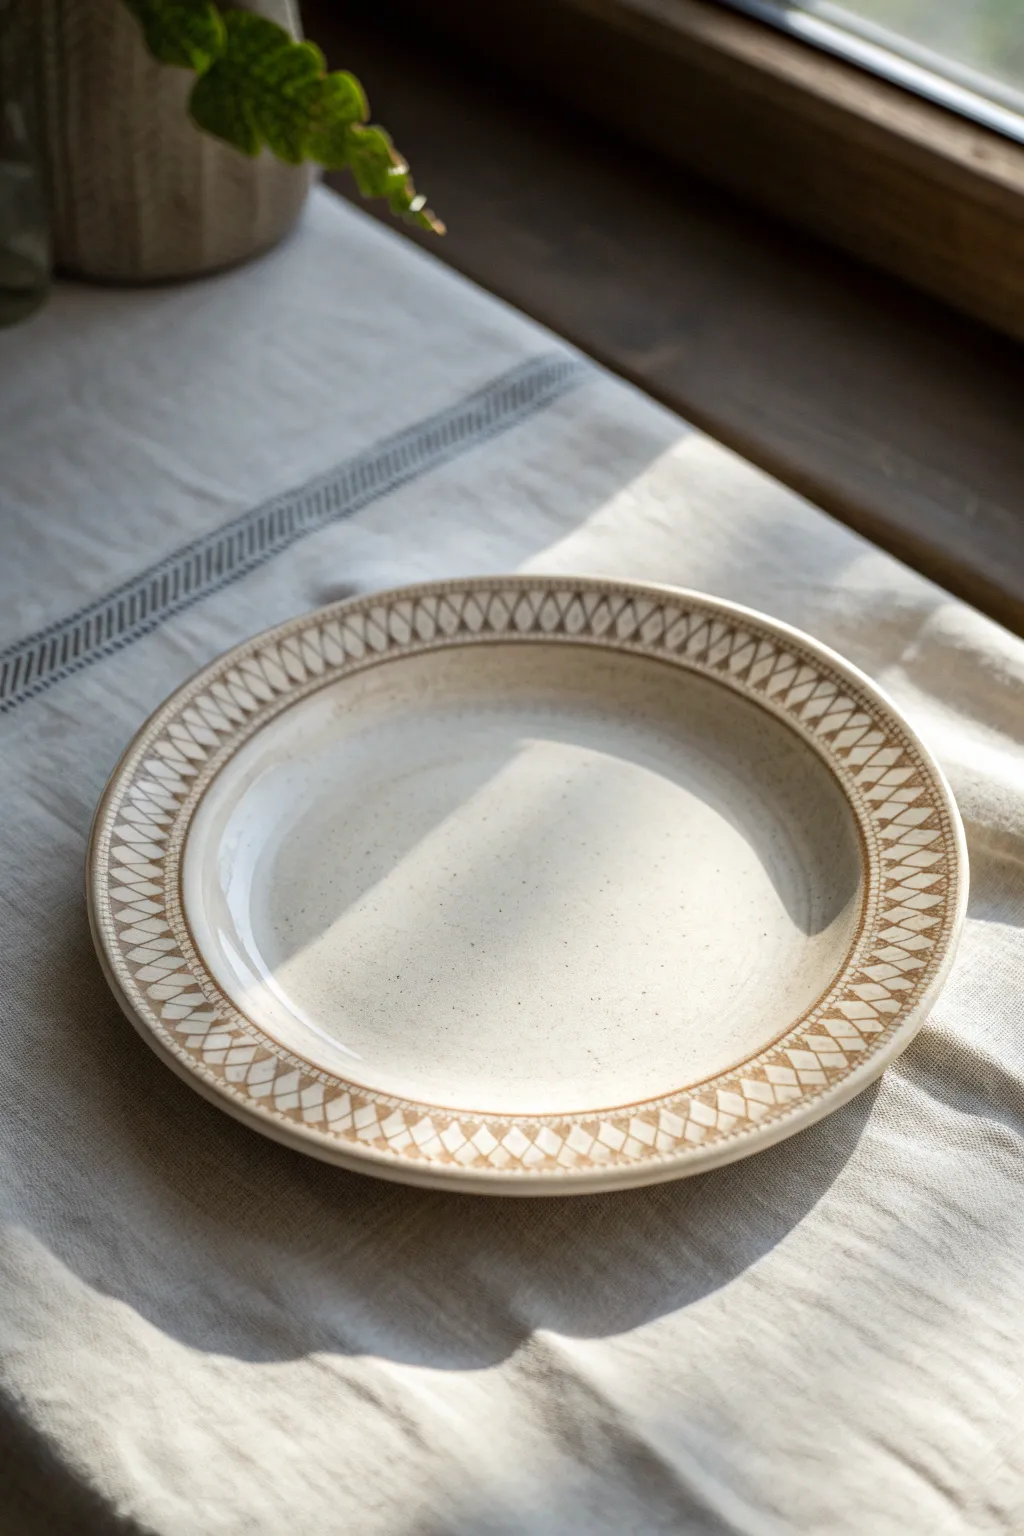
Achieve a timeless, artisanal look with this stamped ceramic plate featuring an intricate diamond lattice border. The combination of a speckled cream glaze and raw clay texture creates a warm, rustic elegance perfect for everyday dining.
Step-by-Step Guide
Materials
- Stoneware clay (speckled or buff)
- Pottery wheel (or slab roller/rolling pin & slump mold)
- Throwing tools (sponge, wire cutter, ribs)
- Trimming tools
- Bisque stamp (diamond/lattice pattern)
- Red iron oxide wash or brown underglaze
- Sponge or stiff brush for wiping back oxide
- Clear or translucent satin glaze
- Kiln
Step 1: Forming the Plate
-
Prepare the Clay:
Begin by thoroughly wedging about 2-3 pounds of speckled stoneware clay to remove air bubbles and ensure consistency. -
Center on the Wheel:
Center the clay on your wheel head, compressing it down into a puck shape wide enough for a dinner plate. -
Open and Flatten:
Open the clay and pull the floor outward. Compress the floor well with a rib to prevent S-cracks later. -
Define the Rim:
Pull up a low wall, then gently lay it outward to form a wide, flat rim. This rim is the canvas for your stamped design. -
Smooth the Surface:
Use a soft kidney rib or chamois to smooth the entire surface, erasing finger marks. -
Undercut and Wire Off:
Clean up the foot with a wooden tool, run a wire underneath, and carefully set to dry until leather-hard.
Seamless Borders
Make a custom roller stamp from bisque clay. This allows you to roll a continuous pattern around the rim without lifting the tool.
Step 2: Stamping the Design
-
Check Consistency:
Ensure the rim is at the perfect leather-hard stage—firm enough to hold shape but soft enough to take an impression without cracking. -
Test the Stamp:
Press your diamond lattice stamp into a spare piece of clay first to gauge the pressure needed. -
Begin Stamping:
Start at one point on the rim. Press the stamp firmly and evenly. Support the underside of the rim with your other hand to prevent warping. -
Align the Repeats:
Line up the next impression so the diamond grid connects seamlessly to the previous one. I find looking at the outer edge helps keep the alignment straight. -
Manage the Gap:
If you reach the end and have a small gap or overlap, gently smudge the texture slightly to blend the seam, or ease the spacing on the last few stamps. -
Trim the Foot:
Flip the plate over and trim a clean foot ring. Burnish the rim afterwards if the stamping distorted the roundness. -
Bisque Fire:
Slowly dry the plate to prevent warping, then bisque fire to cone 04 (or your clay body’s preference).
Warped Rims?
If the rim droops while stamping, the clay is too wet. Wait an hour or use a heat gun briefly to stiffen the surface before continuing.
Step 3: Glazing and Finishing
-
Apply Oxide Wash:
Mix red iron oxide with water. Brush this dark wash generously over the entire stamped rim, ensuring it gets deep into the crevices. -
Wipe Back:
Using a slightly damp sponge, wipe away the excess oxide from the high points of the relief. The dark color should remain only in the stamped lines. -
Glaze Application:
Dip or pour a translucent satin or clear glaze over the entire plate. A satin finish works beautifully to soften the speckles. -
Clean the Foot:
Wipe the foot ring completely clean of glaze to protect your kiln shelf. -
Final Firing:
Glaze fire the piece to maturity (usually cone 5/6 for stoneware).
Now you have a stunning, food-safe plate ready for your table setting
Lace-Impressed Texture Plate
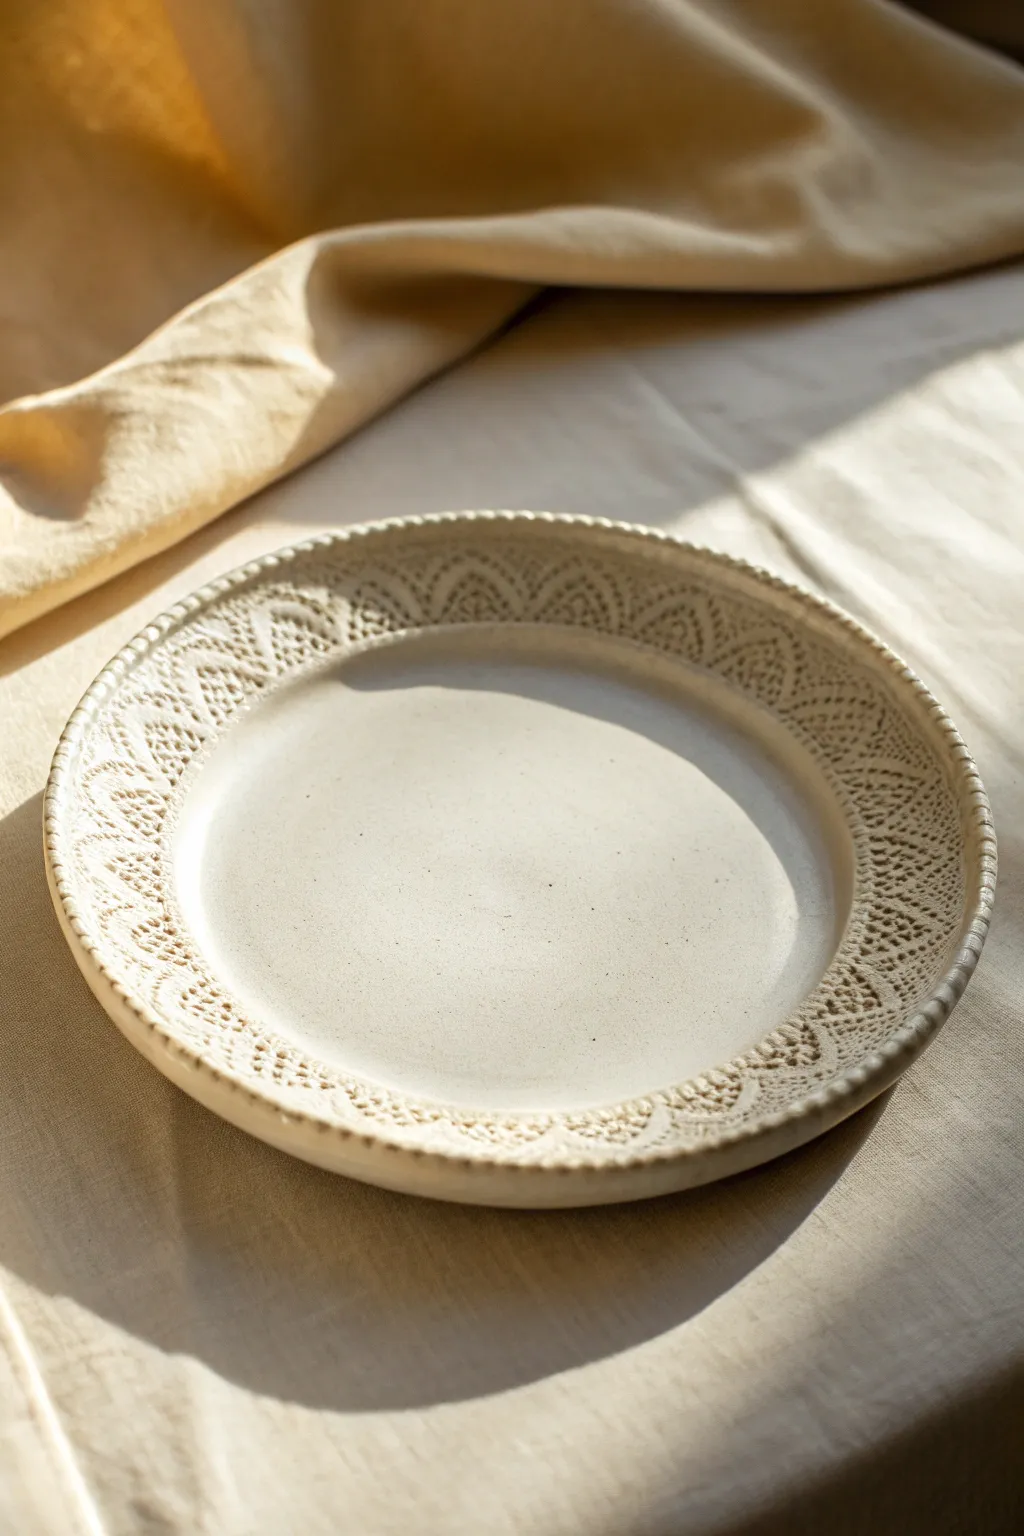
This elegant ceramic project transforms ordinary clay into an heirloom-quality piece by utilizing the delicate texture of vintage lace. The result is a creamy, speckled plate with a defined rim that catches the light beautifully, perfect for serving or display.
How-To Guide
Materials
- Light-colored stoneware clay (speckled or buff)
- Wide strip of vintage lace or crochet ribbon (approx. 2-3 inches wide)
- Rolling pin
- Canvas work surface or slab mat
- GR Pottery Form (round) or a plaster slump mold
- Rib tool (smooth wood or rubber)
- Needle tool
- Fettling knife
- Sponge
- Clear or transparent matte glaze
- Small texture tool or chopstick (for rim edge)
Step 1: Preparing the Slab
-
Roll the clay:
Begin by wedging your stoneware clay thoroughly to remove air bubbles. Roll it out on your canvas into a smooth, even slab approximately 1/4 to 3/8 inch thick. -
Check consistency:
Ensure the slab is uniform in thickness. I usually run a rib tool over the surface on both sides to compress the clay particles, which helps prevent warping later. -
Position the lace:
Select your lace strip. Lay it in a circle on top of your clay slab, ensuring the diameter is large enough for your desired plate size plus the rim. -
Impress the texture:
Using your rolling pin, roll firmly over the lace. You want to press the fabric deep enough to capture the intricate weave but not so deep that it thins the clay dangerously.
Cornstarch Release
Dust the lace lightly with cornstarch before rolling it into the clay. This prevents the delicate fibers from sticking to the tacky clay body.
Step 2: Shaping the Plate
-
Cut the circle:
Place your mold or a circle template over the textured area. Use a needle tool to cut a precise circle, centering the texture around the perimeter so the middle remains smooth. -
Smooth the edges:
Before moving the clay, run a damp sponge or your finger along the cut edge to soften the sharp angle created by the needle tool. -
Transfer to mold:
Carefully lift your slab and place it textured-side-up onto your slump mold or drape it over a hump mold. For the style in the image, a slump mold works best to define the break between the base and the rim. -
Define the basin:
Gently press the center of the clay down into the mold. Use a damp sponge to smooth the central basin, ensuring it is flat and free of texture, creating a nice contrast with the rim.
Preventing Warping
If the rim starts to wobble or curl while drying, place small weighted bags (filled with sand or rice) gently on the rim to hold it flat.
Step 3: Detailing and Finishing
-
Shape the rim:
With the plate in the mold, gently lift the rim edges slightly if needed to ensure they angle upwards. The lace texture should be prominently displayed on this wide shelf. -
Create the beaded edge:
To replicate the image’s edge detail, take a small, rounded tool or the textured end of a chopstick. Press it gently into the very outer rim of the clay at even intervals to create a ‘beaded’ or rope-like border. -
Slow drying:
Cover the piece loosely with plastic. Allow it to dry slowly to the leather-hard stage. This slow process is crucial for flatware to prevent the rim from curling. -
Refine the foot:
Once leather hard, flip the plate over (carefully supporting the rim). Trimming a shallow foot ring is optional but adds stability; otherwise, simply smooth the bottom with a rib. -
Bisque fire:
Allow the plate to dry completely to the bone-dry stage. Fire it in the kiln to a bisque temperature (usually cone 04). -
Glazing:
Dip or brush a clear or transparent matte glaze over the entire piece. A transparent glaze is essential here, as opaque colors will hide the delicate lace impressions and the clay’s natural speckles. -
Final wipe:
Wipe the foot of the plate clean with a sponge to prevent it from sticking to the kiln shelf. -
Glaze fire:
Fire the plate to its final maturity temperature (e.g., cone 5 or 6 depending on your clay body).
This beautiful plate is now ready to add a touch of handcrafted warmth to your table setting


What Really Happens Inside the Kiln
Learn how time and temperature work together inside the kiln to transform clay into durable ceramic.
Sgraffito Carved Illustration
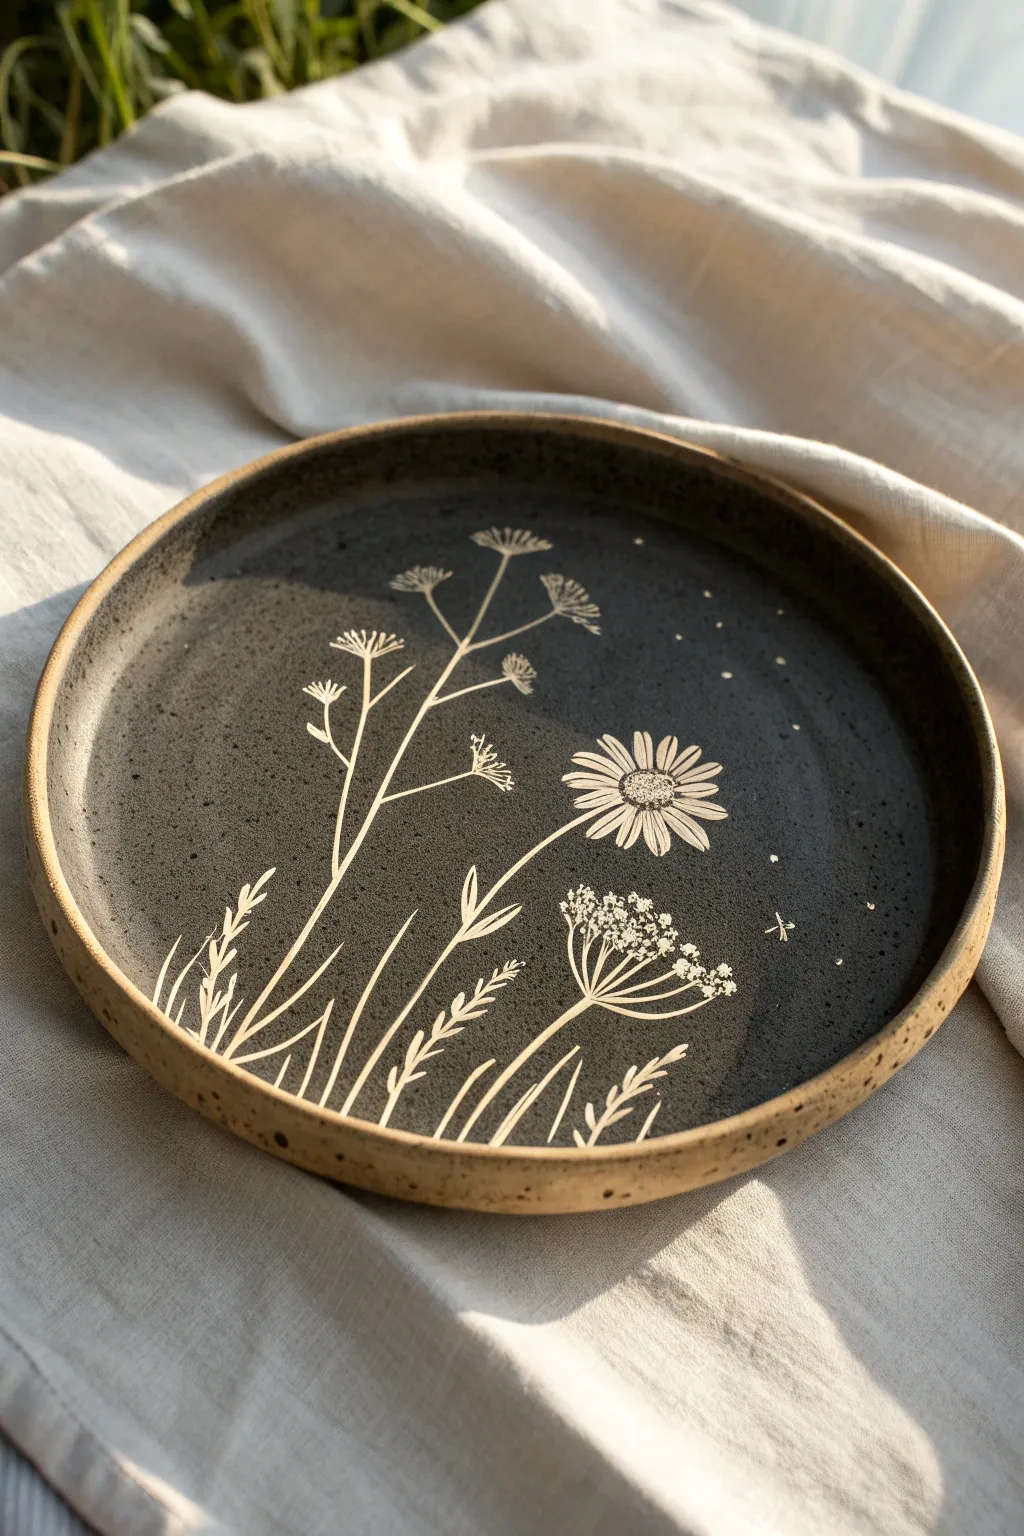
This project transforms a simple ceramic plate into a botanical masterpiece using the ancient technique of sgraffito. By carving through a layer of dark slip or underglaze to reveal the raw clay underneath, you’ll create a striking, high-contrast illustration of delicate wildflowers and grasses.
Step-by-Step Tutorial
Materials
- Leather-hard clay plate (speckled tan clay body recommended)
- Black underglaze or slip
- Soft fan brush or wide hake brush
- Sgraffito carving tool (small loop tool or needle tool)
- Pencil or paper/carbon paper (optional for sketching)
- Soft-bristle brush (for dust removal)
- Clear matte or satin glaze
- Sponge
Step 1: Preparation & Application
-
Prepare the connection:
Begin with a leather-hard clay plate. The clay should be firm enough to handle without warping but soft enough to carve into easily. A speckled stoneware clay body works beautifully for that rustic, organic texture shown in the reference. -
Clean the surface:
Wipe the interior surface of the plate with a slightly damp sponge to remove any dust or loose clay particles that might interfere with adhesion. -
Apply the first coat:
Using a soft fan brush, apply an even coat of black underglaze to the interior of the plate. Stop just short of the rim to leave that nice contrasting border of raw clay. -
Layer up:
Allow the first coat to lose its sheen (become touch-dry), then apply a second and potentially third coat. You want a solid, opaque black surface without brushstrokes showing through. -
Check the dryness:
Let the underglaze dry to a ‘leather-hard’ state along with the pot. If it’s too wet, the clay will smudge; if too dry, it will chip. It should feel cool and firm.
Chipping Lines?
If your lines are jagged or chipping rather than smooth, your clay is likely too dry. Mist it lightly with water and cover with plastic for an hour to rehydrate the surface before trying again.
Step 2: Designing & Carving
-
Plan your composition:
You can lightly sketch your design directly onto the black surface with a pencil. The graphite won’t show after firing, but it will leave a faint silvery line or indentation to guide you. -
Anchor the design:
Start by carving the main stems. Use a steady hand to pull long, slightly curved lines from the bottom edge upwards. Group them slightly to the left or right for a dynamic, asymmetrical composition. -
Carve the daisy:
For the focal flower, carve a textured center first using stippling dots. Then, curve the petals outward. Vary the length and thickness of the petals to make the flower look natural and slightly wild. -
Add delicate details:
Create the Queen Anne’s lace or umbellifers by carving thin, branching stems that radiate from a central point, topping them with tiny clusters of dots or small dashes. -
Fill with foliage:
At the base, carve variety into the grasses. Use quick, confident flicks of your tool to create tapered blades of grass and small fern-like leaves. -
Layer depth:
Add smaller stems behind the larger ones. I like to make these lines slightly thinner to suggest they are further in the background. -
Texture the background:
To mimic the starry or pollinated look in the reference, use the very tip of your tool to prick tiny random dots into the black background, concentrating them slightly near the flower heads.
Enhance the Rim
Mix some of the black underglaze with a bit of water and splatter it lightly onto the bare clay rim with a toothbrush for a speckled, integrated look.
Step 3: Finishing Touches
-
Clean up the crumbs:
As you carve, little ‘crumbs’ of clay will accumulate. Do not blow them off, as clay dust is hazardous. Instead, gently brush them away with a large, soft dry brush into a container. -
Refine the rim:
Use a damp sponge to clean up the rim where the black underglaze meets the bare clay, ensuring a crisp, intentional edge. -
Bisque fire:
Once the plate is bone dry, fire it to bisque temperature (usually Cone 04 or 06, depending on your clay). -
Glaze application:
After bisque firing, dip or brush a clear glaze over the entire interior. A satin or matte finish often looks best with sgraffito as it reduces glare and lets the drawing stand out. -
Final fire:
Fire the plate a second time to the maturation temperature of your clay body and glaze.
Now you have a stunning, functional piece of art that brings a touch of the meadow to your table
Mishima Inlay Lines
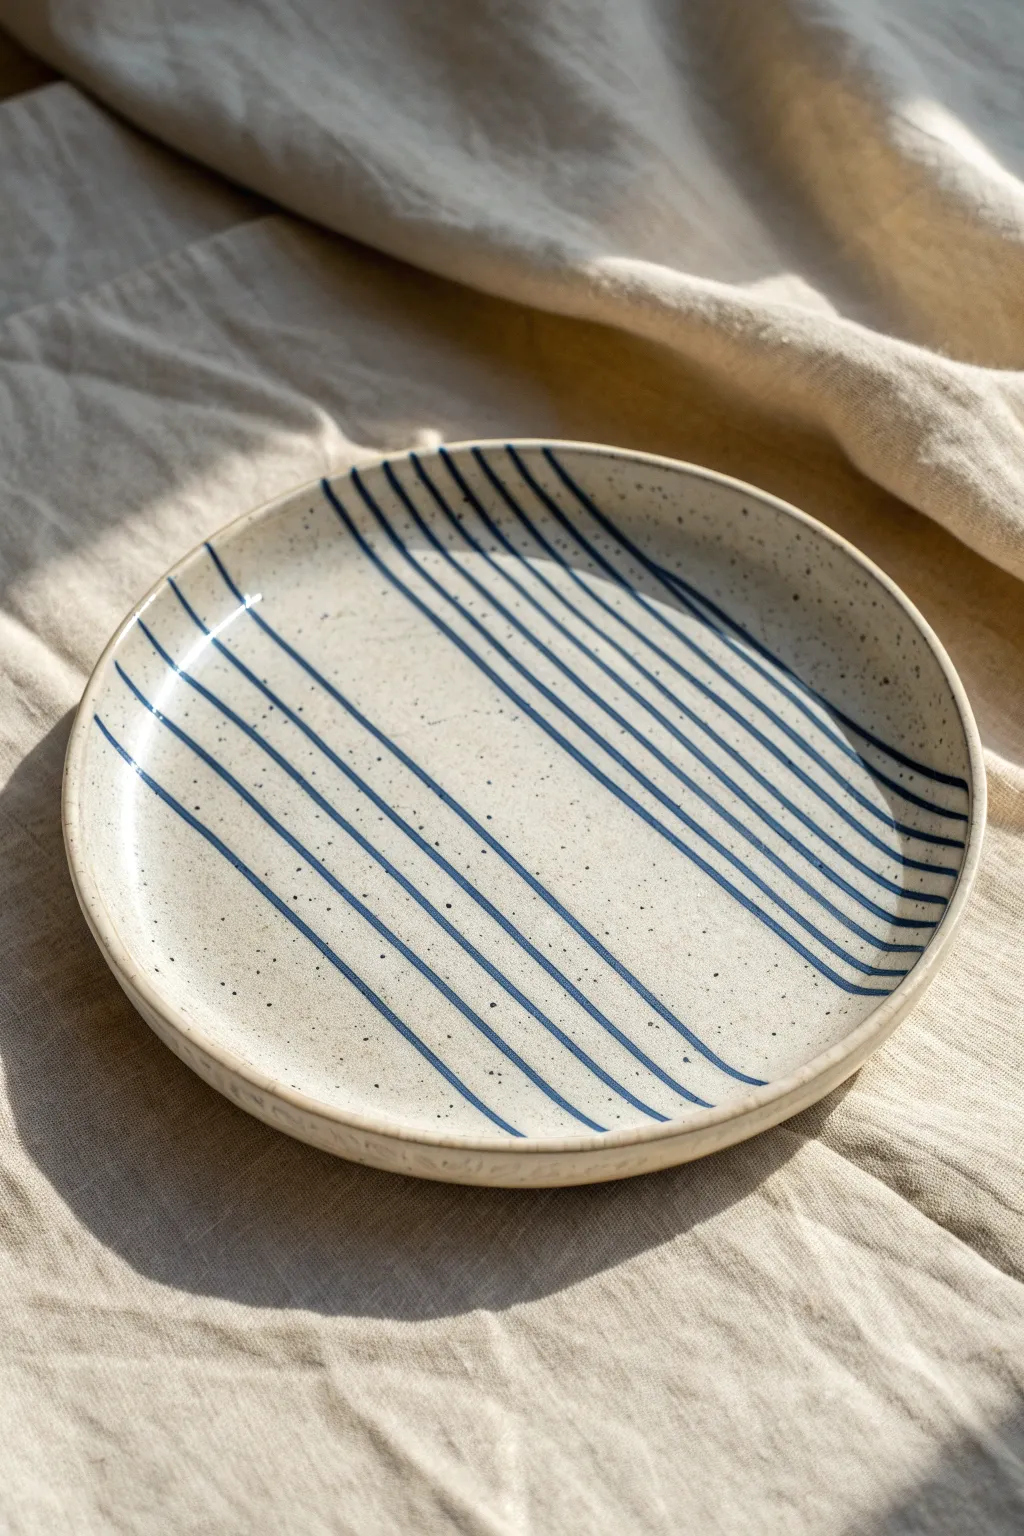
Achieve a stunning blend of rustic charm and modern geometry with this speckled Mishima plate. By inlaying crisp blue underglaze lines into a creamy clay body, you create a captivating, tactile design perfect for everyday dining.
Step-by-Step Guide
Materials
- Stoneware clay (speckled or buff)
- Rolling pin and guide sticks (approx. 1/4 inch)
- GR Pottery Form (or similar plate mold)
- Flexible rib tool
- Needle tool or X-acto knife
- Ruler or straight edge
- Wax resist (emulsion)
- Dark blue underglaze
- Clean sponge and bucket of water
- Loop trimming tool
- Clear glaze (dipping or brushing)
Step 1: Forming the Plate
-
Roll the slab:
Begin by rolling out your clay slab to an even thickness using guide sticks, ensuring it is slightly larger than your intended plate mold. -
Compress the clay:
Take your flexible rib and firmly compress the clay surface on both sides. This aligns the clay particles to prevent warping and creates a smooth canvas for your inlay work. -
Cut and shape:
Place your slab over your pottery form or mold. Gently press the clay to conform to the shape, then trim the excess clay from the edges using a needle tool. -
Dry to leather hard:
Allow the plate to dry slowly until it reaches a leather-hard state. It should be firm enough to handle without deforming but still hold moisture for carving.
Wax Resist Wisdom
If you don’t have wax, you can carve first and fill later, but you’ll need to sand the surface after it’s bone dry to remove the messy excess underglaze.
Step 2: Carving the Mishima Design
-
Apply wax resist:
Coat the entire top surface of the plate with a layer of wax resist. I find this extra step crucial because it protects the negative space and makes cleanup significantly easier later on. -
Let the wax set:
Wait until the wax is dry to the touch. It shouldn’t be tacky, or it might gum up your carving tool. -
Plan the spacing:
Lay your ruler across the plate. You are aiming for two groups of parallel lines with a distinct negative space gap in the middle. -
Carve the first section:
Using a sharp needle tool or a specialized mishima tool, carve a series of parallel lines through the wax and into the clay on one side of the plate. -
Carve the second section:
Create the second grouping of lines on the opposite side, mirroring the angle of the first group but keeping that clear, open space in the plate’s center. -
Clean the burrs:
Gently brush away any loose clay crumbs or ‘burrs’ created by the carving tool. Don’t wipe with a wet sponge yet.
Change the Angle
Instead of parallel lines, try carving a radiating sunburst pattern from the center or a cross-hatch grid for a more textile-like texture.
Step 3: Inlaying and Finishing
-
Apply underglaze:
Paint a generous coat of dark blue underglaze over the carved areas. Don’t worry about being neat; you want the underglaze to fill the carved lines completely. -
Initial wipe back:
Once the underglaze has stiffened slightly but isn’t bone dry, take a damp (not soaking) sponge and wipe across the surface. -
Reveal the lines:
Continue wiping the surface with a clean area of the sponge each time. The wax resist will help the excess underglaze slip right off the surface, leaving color only trapped in the carved lines. -
Bisque fire:
Let the plate dry completely to the bone-dry stage, then load it into the kiln for a bisque firing. -
Glaze application:
After the bisque fire, wipe the plate down to remove dust, then apply a clear glossy glaze. This will seal the clay and make the blue lines pop. -
Final fire:
Fire the plate to the maturation temperature of your specific clay and glaze combination.
Now you have a beautifully crisp, custom-designed plate ready for your next dinner party

TRACK YOUR CERAMIC JOURNEY
Capture glaze tests, firing details, and creative progress—all in one simple printable. Make your projects easier to repeat and improve.
Wax Resist Concentric Rings
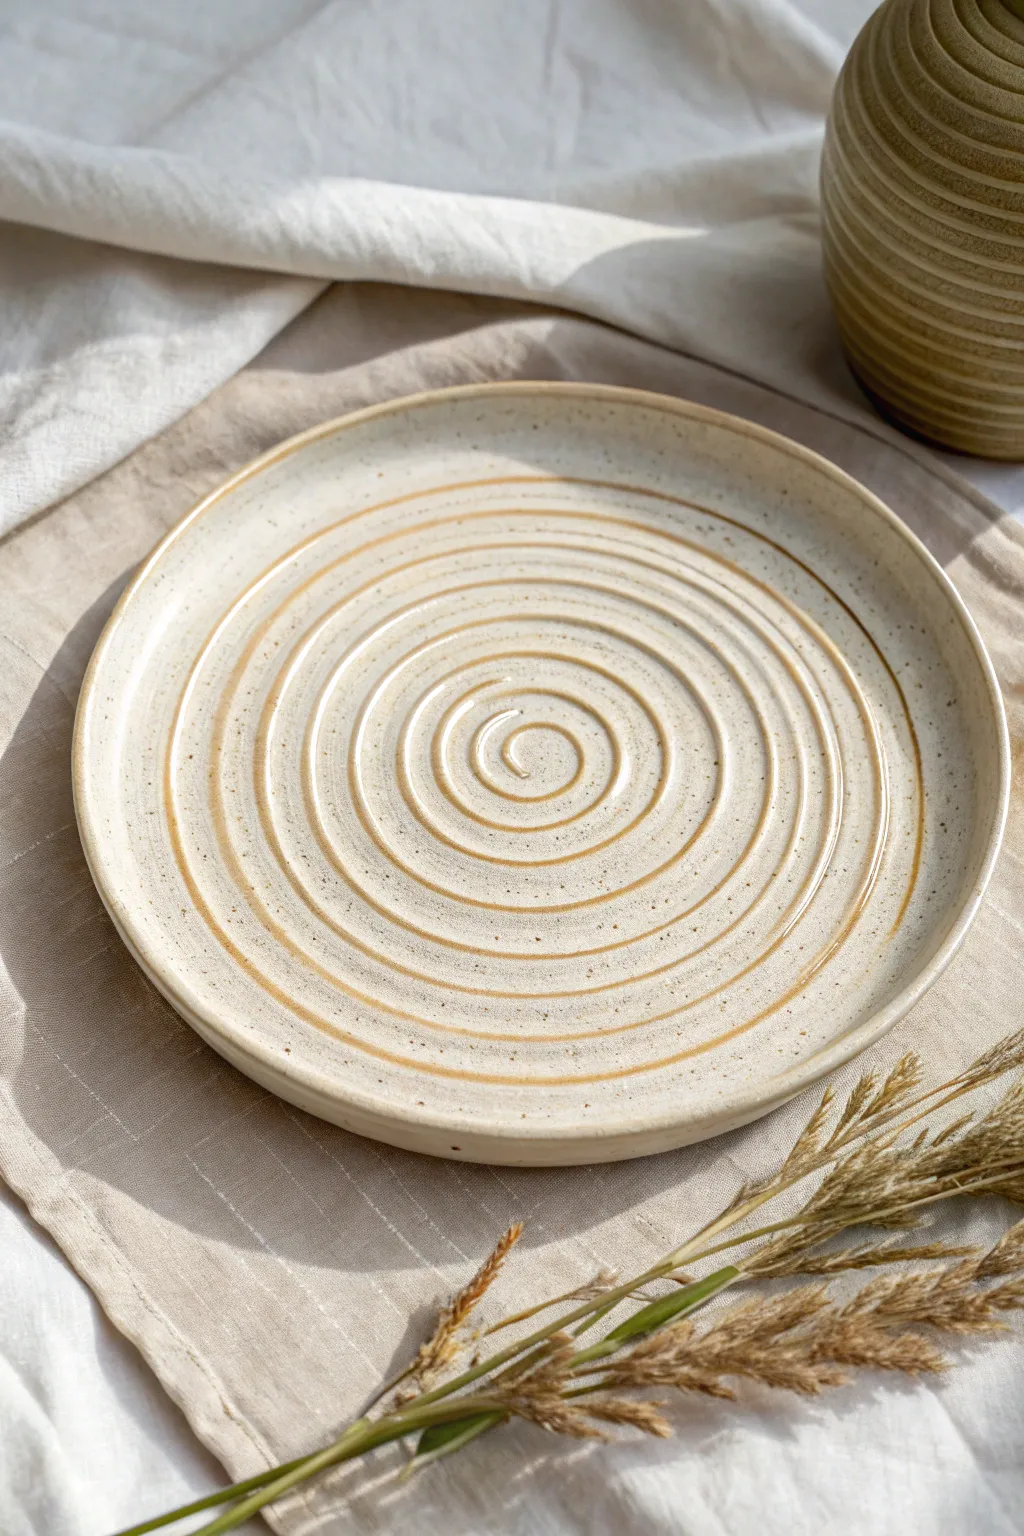
Achieve a stunning, rhythmic pattern on your pottery with this simple yet effective wax resist method. The contrast between raw clay texture and smooth white glaze creates a spiral that feels both modern and organic.
Step-by-Step Tutorial
Materials
- Stoneware clay (speckled or buff)
- Pottery wheel and throwing tools
- Rib tool (metal or rubber)
- Trimming tools
- Liquid wax resist
- Small or medium paintbrush (dedicated to wax)
- White or cream dipping glaze
- Sponge
- Pottery wheel or banding wheel for glazing
Step 1: Forming the Plate
-
Throw the Base:
Begin by centering your clay on the wheel and opening it up into a low, wide plate form. -
Compress the Bottom:
Use a rib to compress the floor of the plate thoroughly to prevent S-cracks later. -
Refine the Rim:
Lift a small, vertical rim. Smooth it with a chamois or your finger for a polished edge. -
Texture (Optional):
While spinning, you can leave slight finger ridges for texture, though for this look, a relatively smooth surface works best as a canvas for the spiral. -
Dry to Leather Hard:
Allow the plate to dry slowly until it reaches a sturdy leather-hard stage suitable for trimming.
Uneven Spiral?
If your hand shakes or the line wavers, don’t worry. Imperfections add organic charm. You can gently scrape erroneously placed wax off with a needle tool once dry.
Step 2: Trimming and Bisque
-
Trim the Foot:
Center the leather-hard plate upside down on the wheel and trim a defined foot ring. -
Clean and Smooth:
Use a damp sponge to smooth away any sharp trimming lines or burrs. -
Bisque Fire:
Fire the plate in the kiln to cone 04 (or your clay body’s bisque temperature) to prepare it for glazing.
Iron Wash Effect
Before waxing, apply a thin iron oxide wash. The wax will protect the dark oxide, creating a rich brown spiral contrasting against the white glaze.
Step 3: Applying the Wax Spiral
-
Clean the Bisqueware:
Wipe the fired plate with a damp sponge to remove any kiln dust and let it dry for a moment. -
Center for Waxing:
Place the plate on a banding wheel or your pottery wheel. Centering is crucial here for an even spiral. -
Load the Brush:
Dip a dedicated brush into liquid wax resist. I prefer using a brush I don’t mind ruining, as wax is hard to clean out entirely. -
Paint the Center Spiral:
Spin the wheel at a steady, slow-to-medium speed. Start painting a tight curl in the absolute center. -
Expand the Spiral:
As the wheel spins, slowly and steadily move your hand outward toward the rim, creating a continuous, expanding gap. Keep your hand braced against a steady surface for smooth lines. -
Check the Thickness:
Aim for a wax line that is roughly equal in thickness to the negative space between the lines. -
Dry the Wax:
Let the wax resist dry completely. It should feel firm to the touch before glazing.
Step 4: Glazing and Firing
-
Prepare the Glaze:
Stir your white or cream dipping glaze thoroughly to ensure it is the right consistency. -
Dip the Plate:
Using glazing tongs or your hands, dip the entire plate into the glaze for 3-4 seconds. -
Wipe Back:
As the glaze dries, the wax will resist it. Use a damp sponge to gently wipe any beads of glaze off the waxed spiral lines, revealing the raw clay underneath. -
Clean the Foot:
Ensure the foot ring is completely free of glaze to prevent it from sticking to the kiln shelf. -
Final Fire:
Load the kiln and glaze fire to your clay’s maturity temperature (e.g., cone 5 or 6).
Unload your kiln to reveal a beautiful mesmerizing spiral that draws the eye straight to the center of your piece
Geometric Color-Blocked Shapes
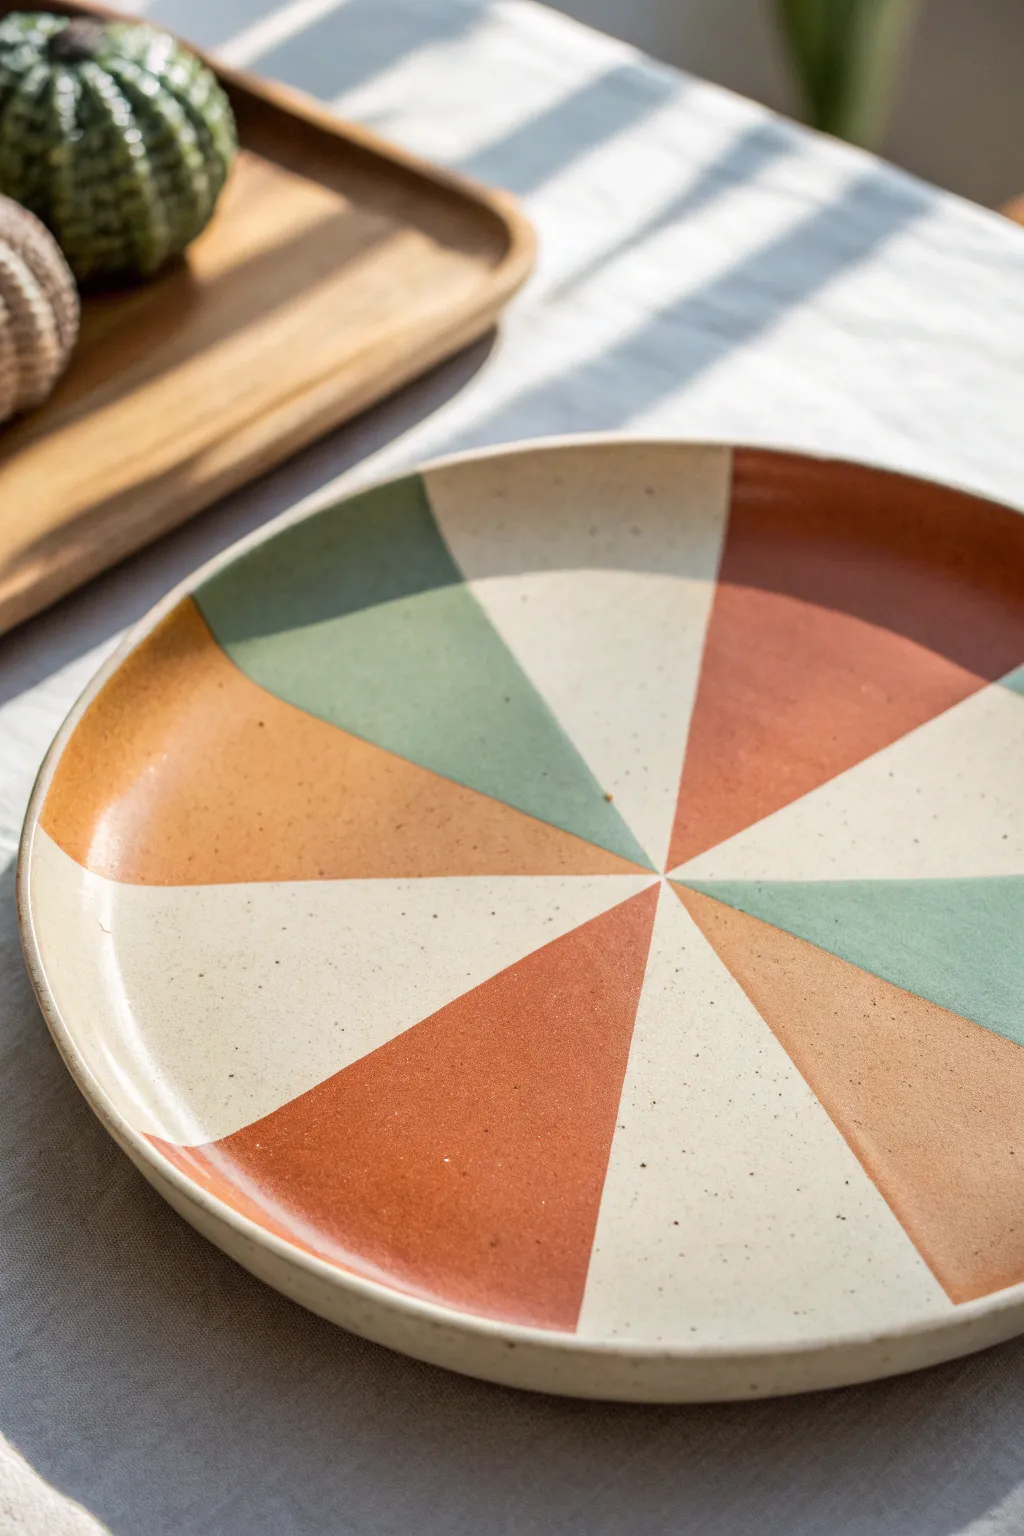
Capture the warmth of the sun with this striking ceramic plate design, featuring radiating triangles in muted, earthy tones. The alternating color blocks of rust, sage, and ochre against a creamy speckled background create a sophisticated yet playful geometric effect perfect for a modern table setting.
How-To Guide
Materials
- Bisque-fired ceramic plate (flat rimless or slight rim)
- Underglazes in Rust/Terracotta, Sage Green, Ochre/Mustard
- Speckled White glaze (or a clear matte glaze if using speckled clay)
- Pencil for sketching
- Ruler or straight edge
- Painter’s tape (thin width, e.g., 1/4 inch) or glazing tape
- Soft fan brush
- Detail liner brush
- Sea sponge (damp)
- Kiln access
Step 1: Preparation & Mapping
-
Clean surface:
Begin by wiping down your bisque-fired plate with a damp sea sponge. This removes any dust that could prevent the glaze from adhering properly. -
Find the center:
Using a ruler, lightly measure the diameter of the plate to locate the exact center point. Mark this tiny spot with a pencil. -
Establish quadrants:
Draw a vertical line and a horizontal line through the center point, dividing the plate into four equal quadrants. Keep your pencil pressure light so the graphite burns off easily in the kiln. -
Create the segments:
Divide each quadrant into three equal pie slices. You should end up with 12 triangular sections total, radiating from the center like a pizza. -
Double-check dimensions:
Take a moment to ensure the outer edges of your triangles are roughly the same width. Consistency here is key for that clean geometric look.
Uneven Lines?
If underglaze bleeds under your tape, wait until it’s barely dry and gently scratch the excess away with an X-Acto knife for a razor-sharp edge.
Step 2: Color Blocking
-
Masking strategies:
To get crisp lines, apply thin painter’s tape along the pencil lines of the sections you want to keep white. Alternatively, you can rely on steady hand painting if you prefer a more organic, painterly edge. -
Plan the pattern:
Visualize your color pattern: Rust, White, Sage, White, Ochre, White. I recommend lightly writing a tiny ‘R’, ‘S’, or ‘O’ in the corresponding sections so you don’t lose track while painting. -
First color: Rust:
Dip your soft fan brush into the Rust underglaze. Fill in the assigned triangles, starting from the center and pulling outward to the rim. -
Opacity check:
Let the first coat dry until chalky. Apply a second and possibly third coat to ensure the terracotta color is solid and opaque. -
Second color: Sage:
Move on to the green sections. Using a clean brush, apply the Sage underglaze, being careful near the edges where it meets the future white sections. -
Third color: Ochre:
Fill the final colored sections with the Ochre/Mustard underglaze. Build up the layers just like the previous colors for a rich, consistent hue. -
Tidy up:
If you used tape, peel it away gently once the underglaze is dry to the touch but not bone dry. If you freehand painted, use a damp stiff brush to clean up any wobbly edges.
Step 3: Glazing & Firing
-
Speckling effect:
If you aren’t using a speckled clay body, you can flick a toothbrush dipped in diluted black underglaze over the plate now to create faux speckles. -
Clear coat application:
Apply a clear matte or satin glaze over the entire face of the plate. This seals the underglaze design and makes the plate food-safe. -
Even coverage:
Ensure the clear glaze is applied evenly to avoid cloudy spots. Two smooth coats usually suffice for most commercial clear glazes. -
Wipe the foot:
Flip the plate and wipe the foot ring perfectly clean with a sponge so it doesn’t fuse to the kiln shelf. -
Final fire:
Fire the plate in the kiln according to the temperature guidelines for your specific clay and glaze (typically Cone 5 or 6).
Pro Tip: Wax Resist
Apply wax resist over your finished colored triangles before dipping the whole plate in the final clear glaze to prevent smearing during the dip.
Once cooled, your plate is ready to bring a touch of artisan geometry to your next meal
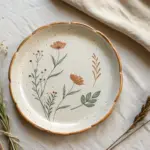
Hand-Painted Fruit Motifs
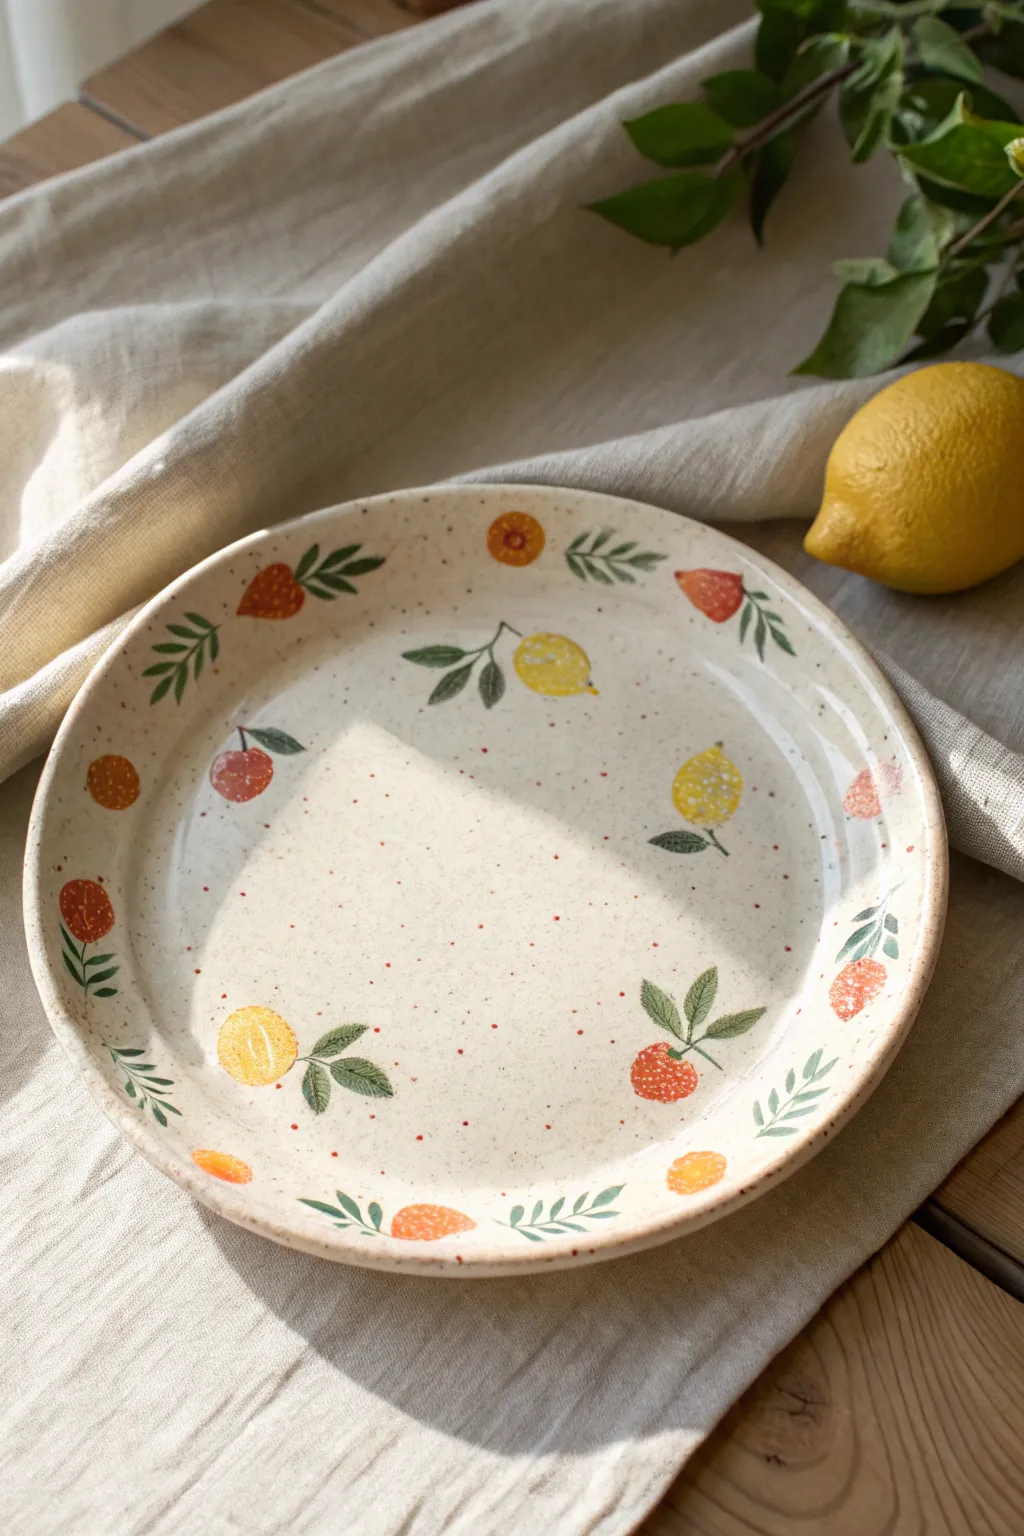
Bring the warmth of a Mediterranean orchard to your table with this speckled clay plate design featuring delicate hand-painted lemons, strawberries, and oranges. The finish relies on a creamy speckled glaze base and whimsical, loose brushstrokes to create a charmingly rustic aesthetic.
Detailed Instructions
Materials
- Bisque-fired ceramic plate (flat rim style)
- Cream or off-white speckled stoneware glaze (brush-on)
- Underglazes: Lemon Yellow, Burnt Orange, Bright Red, Fern Green, Forest Green
- Synthetic sable brushes: Size 2 round, size 0 liner
- Pencil for sketching
- Clear transparent glaze (optional, check speckled glaze instructions)
- Sponge and water bowl
- Paint palette
Step 1: Base Glazing
-
Prep the bisque:
Begin by wiping down your bisque-fired plate with a damp sponge. This removes any kiln dust and ensures the glaze adheres properly to the porous surface. -
Apply the first coat:
Using a wide fan brush or soft glaze brush, apply a smooth, even coat of the cream speckled glaze to the entire top surface of the plate. -
Let it dry:
Allow the first coat to dry until it is chalky to the touch. This usually takes about 10–15 minutes depending on humidity. -
Add layers:
Apply 2–3 more coats of the base glaze, alternating the direction of your brushstrokes to prevent streaks. Let the piece dry completely before moving to decoration.
Glaze Consistency
For the fruit, thin your underglaze slightly with water. This creates a semi-transparent, watercolor effect rather than a solid block of opaque color.
Step 2: Painting the Fruit
-
Plan the layout:
Lightly sketch your fruit placement directly onto the dry glaze using a pencil. The graphite will burn off in the kiln, so don’t worry about erasing mistakes. Aim for a mix of lemons, oranges, and strawberries scattered organically. -
Paint the lemons:
Dip your size 2 round brush into Lemon Yellow underglaze. Paint oval shapes for the lemons, leaving small negative spaces or lighter areas to suggest highlights. -
Add the oranges:
Using the same brush, clean it well and switch to Burnt Orange. Paint distinct round shapes. For variety, paint some as whole fruits and others as simple circles. -
Create strawberries:
With Bright Red underglaze, dab small triangular shapes with rounded tops. Keep the paint application slightly translucent to mimic the watercolor look of the original piece. -
Detail the fruit skins:
Once the base colors are touch-dry, use the size 0 liner brush. Add tiny dots of white or lighter yellow onto the lemons for texture. For the strawberries, add tiny specks of white or darker red to suggest seeds.
Step 3: Foliage & Finishing
-
Paint main stems:
Mix a small amount of Fern Green with a touch of brown if needed. Use the liner brush to draw thin, delicate stems connecting to the tops of your fruits. -
Add primary leaves:
Using the size 2 round brush and Fern Green, press down and lift up to create almond-shaped leaves attached to the stems. Vary the pressure to create thick-to-thin lines. -
Paint decorative sprigs:
I like to fill empty spaces with standalone leafy sprigs. Draw a central stem and add small, symmetrical pairs of leaves along it using Forest Green for contrast. -
Add speckling (optional):
If your base glaze isn’t speckled enough, load a stiff brush with watered-down brown underglaze and flick the bristles to spatter tiny dots across the plate surface. -
Final clear coat:
If your cream base glaze is matte, you may want to apply a layer of clear transparent glaze over the fruit designs to make the colors pop. If it’s a glossy base, this isn’t necessary. -
Fire the piece:
Load the plate into the kiln and fire to the temperature recommended by your clay and glaze manufacturer (typically Cone 5 or 6 for stoneware).
Level Up: Sgraffito
Once the fruit paint is dry, use a needle tool to gently scratch through the underglaze, revealing the cream base below to define citrus rinds or leaf veins.
Once fired, you will have a durable piece of art perfect for serving summer salads or breakfast pastries
Mushroom Woodland Plate
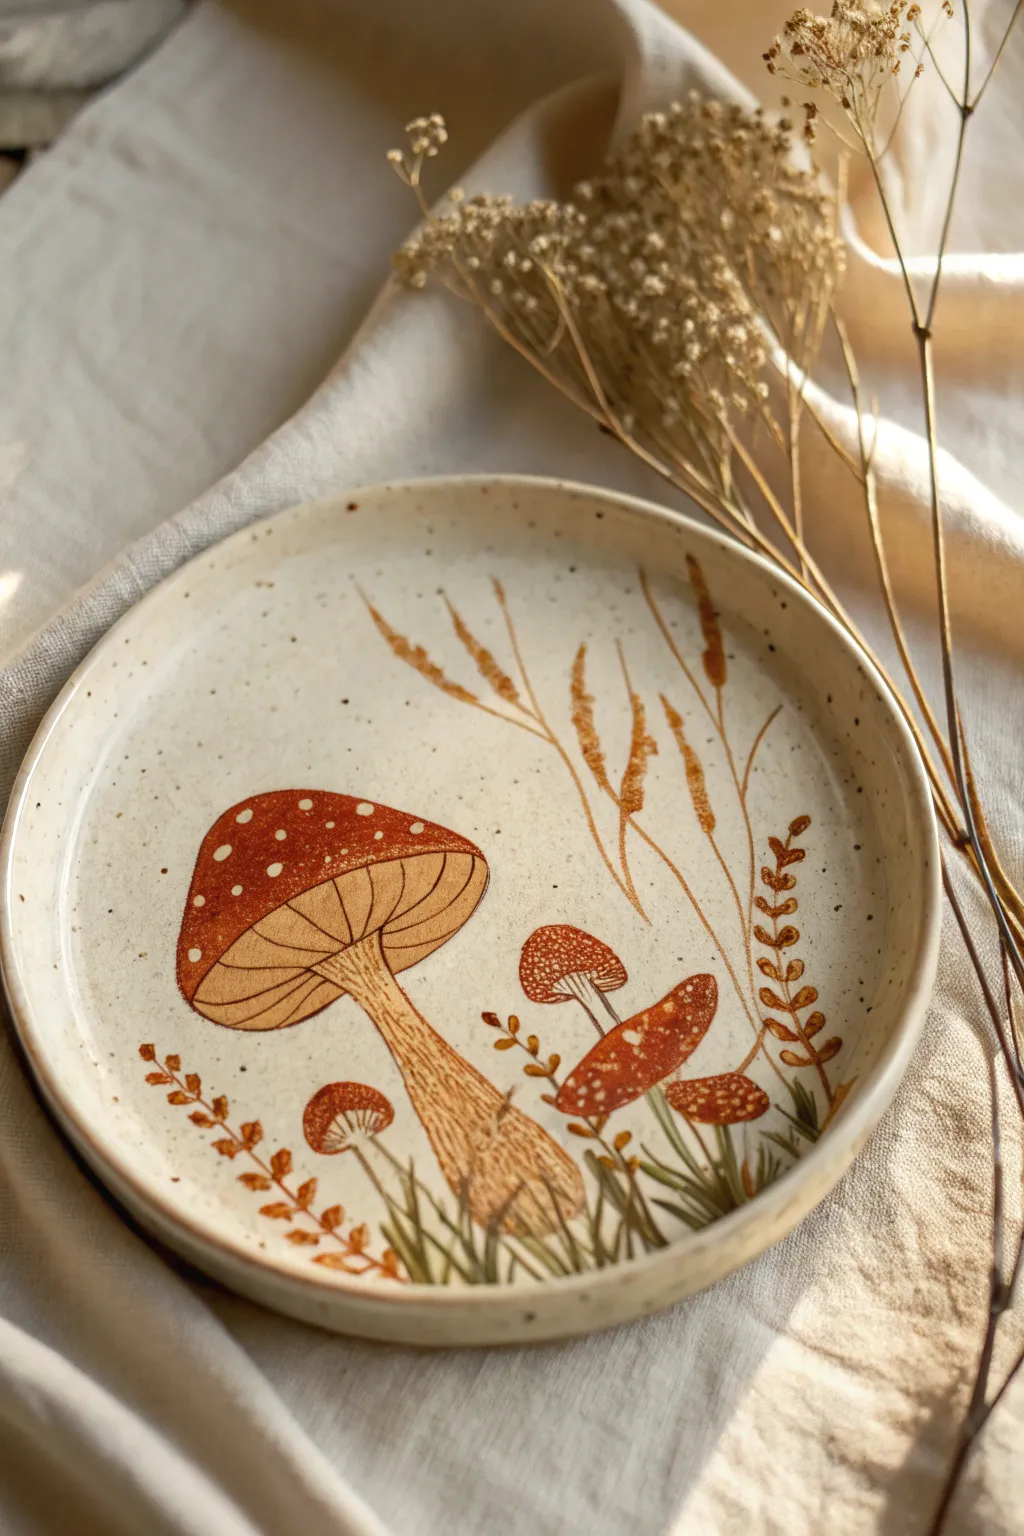
Bring the quiet charm of the woodland indoors with this hand-painted ceramic plate featuring a classic Fly Agaric mushroom surrounded by delicate grasses. The warm speckled clay body provides the perfect earthy canvas for this rustic, autumnal design.
Step-by-Step Tutorial
Materials
- Speckled buff stoneware clay (or pre-made bisque plate)
- Underglazes: Deep Red, Burnt Orange, Mustard Yellow, Dark Brown, Forest Green
- Clear satin or matte glaze
- Pottery wheel or rolling pin and slab mold (if making the plate)
- Fine detail brushes (sizes 00, 1, and 2)
- Needle tool
- Sponge
- Pencil (for sketching)
Step 1: Planning and Preparation
-
Create or Prep the Form:
If you are building from scratch, roll out a slab of speckled clay and form it over a shallow mold to create a rimmed plate. If buying bisque, wipe the surface down with a damp sponge to remove any dust. -
Sketch the Composition:
Lightly sketch your design directly onto the leather-hard clay or bisque using a pencil. Place the large mushroom slightly off-center to the left, and plan for tall grasses sweeping up the right side. Don’t worry about erasing; the graphite will burn off in the kiln.
Clean Lines
If you make a mistake with the underglaze, let it dry completely and gently scratch it off with an X-Acto knife or needle tool instead of wiping it, which can smear the pigment.
Step 2: Painting the Mushrooms
-
Base Coat the Cap:
Load a size 2 brush with Deep Red underglaze. Paint the cap of the large mushroom, following the curved bell shape. Apply 2-3 coats for solid opacity, letting each layer dry to the touch in between. -
Detail the Underside:
Switch to a Burnt Orange or a watered-down tan shade for the gills underneath the cap. Paint thin, curved lines radiating from the stem outward to the rim of the cap to mimic the gill texture. -
Form the Stem:
Using a mix of Mustard Yellow and a tiny dot of brown, paint the sturdy stem. Use vertical strokes to suggest fiber and texture, widening the base slightly where it meets the ground. -
Add Smaller Companions:
To the right of the main mushroom, paint two or three smaller red mushroom caps at varying heights. Keep these shapes simpler, as they are background elements. -
Apply the White Spots:
Once the red caps are fully dry, use a detail brush or a needle tool dipped in white underglaze (or leave the raw clay bare if using white clay) to dot the tops of the mushrooms. Vary the size of the dots for a realistic look.
Step 3: Adding Flora and Grasses
-
Paint Tall Wheat Stalks:
Mix a warm Mustard Yellow underglaze. On the right side of the plate, paint long, sweeping lines reaching upward. Add small, feathery dashes near the tops to create the seed heads of the wheat or grass. -
Add Fern Accents:
Using a Burnt Orange or reddish-brown hue, paint fern-like fronds growing near the base of the mushrooms. Use short, rhythmic teardrop strokes stemming from a central vein. -
Grounding the Scene:
Mix a dilute Forest Green or brownish-green. Paint quick, flicking strokes at the very bottom of the stems to create a patch of grass. This grounds the mushrooms so they don’t look like they are floating. -
Refine the Outlines:
I like to take a very fine liner brush (size 00) with thin Dark Brown underglaze to outline the mushroom caps, gills, and stems. This separates the elements and gives the piece an illustrative, storybook quality.
Speckled Magic
For that authentic spotted look, use a clay body like ‘Speckled Buff’ or ‘Laguna B-Mix with Speckles’. The iron spots will bleed through the clear glaze beautifully.
Step 4: Glazing and Firing
-
Bisque Fire:
If you painted on greenware (unfired clay), fire the piece to cone 04. If you painted on bisque, skip this step. -
Apply Clear Glaze:
Dip the plate into a clear satin or matte glaze. A glossy glaze works too, but a satin finish complements the earthy, speckled texture better. Ensure an even coat and shake off drips. -
Clean the Foot:
Use a sponge to wipe any glaze off the bottom foot ring of the plate to prevent it from sticking to the kiln shelf. -
Final Fire:
Fire the plate to the final temperature required by your clay body (usually Cone 5 or 6 for stoneware). This will melt the clear glaze and bring out the vibrancy of the underglazes.
Once cooled, your plate is ready to serve a slice of cake or simply be admired on a display stand
Celestial Sun and Moon Icons
This striking ceramic project features a matte black stoneware finish adorned with whimsical golden-hued celestial motifs. The contrast between the dark, moody background and the delicate sun and moon illustrations creates a mystical piece perfect for holding jewelry or trinkets.
How-To Guide
Materials
- Dark stoneware clay (black or dark brown)
- Circular bat or banding wheel
- Rolling pin and guide sticks
- Sponge
- Rib tool (metal or rubber)
- Gold luster or gold overglaze
- Small detail brush (size 0 or 00)
- Carving tool or needle tool (optional for texture)
- Clear matte glaze (optional)
- Kiln
Step 1: Forming the Plate
-
Prepare the slab:
Begin by wedging your dark stoneware clay to remove air bubbles. Roll it out into a smooth, even slab about 1/4 inch thick using guide sticks to ensure uniform thickness. -
Cut the circle:
Place a circular template or a plate of your desired size onto the slab. Using a needle tool, cut around the template to create a perfect circle. -
Shape the rim:
Gently lift the edges of the circle to create a shallow rim. You can place the clay into a shallow bowl mold or use your fingers to pinch and pull the edges upward slightly, smoothing as you go. -
Refine the surface:
With the plate spinning slowly on a banding wheel, use a damp sponge to smooth out the rim and the interior surface. I like to run a soft rubber rib over the clay at this stage to compress it and remove any canvas texture. -
First firing:
Allow the plate to dry slowly to the bone-dry stage. Once dry, bisque fire the piece in the kiln according to your clay body’s instructions (usually Cone 04).
Step 2: Creating the Celestial Design
-
Plan the layout:
Lightly sketch your design onto the bisque-fired plate using a regular pencil. The graphite will burn off in the kiln, so don’t worry about mistakes. Draw a central sun, two crescent moons, scattered stars, and small bordering dots. -
Prepare the gold:
Open your gold luster or gold overglaze in a well-ventilated area. These materials have strong fumes, so safety is key. Dip your fine detail brush into the essence. -
Paint the sun:
Start with the central sun figure. Paint a solid circle in the middle, then carefully add radiating rays. Alternate between longer, straight rays and shorter spikes to mimic the reference style. -
Add the moons:
Paint the two crescent moon shapes. Fill them in solidly with the gold luster to give them visual weight against the dark background. -
Detail the stars:
Using the very tip of your brush, add five-pointed stars and simple cross-stars around the main elements. Keep your hand steady for sharp points. -
Decorate the rim:
Move to the inner wall of the plate. Paint smaller crescents, tiny stars, and simple dots spaced randomly around the perimeter to frame the central design. -
Add final stardust:
Fill any large empty negative spaces on the plate floor with tiny dots of gold to represent distant stars.
Don’t Oversmudge
Gold luster is unforgiving. If you make a mistake, don’t wipe it; burn if off in the kiln and re-apply later, or scrape it off once dry.
Step 3: Final Firing
-
Dry the luster:
Allow the gold application to dry completely. It should be dry to the touch before moving to the kiln. -
Luster firing:
Load the kiln for a luster firing, which is typically much lower temperature (around Cone 018 or 019). Follow the specific temperature guide on your bottle of gold luster. -
Ventilation check:
Ensure your kiln utilizes an active vent system or is in a well-ventilated space, as burning off the luster mediums creates fumes. -
Cool down:
Let the kiln cool completely before opening. Opening it too early can cause thermal shock or dull the metallic finish. -
Final wipe:
Once cool, remove the plate. Wipe it down gently with a soft cloth to remove any residual dust and reveal the brilliant shine of the gold against the matte dark clay.
Carve vs. Paint
Instead of gold luster, try sgraffito: apply white slip over the raw dark clay and carve the design through to reveal the black before firing.
Now you have a stunning, galaxy-inspired dish ready to display your favorite treasures
Crackle Look With Soft Florals
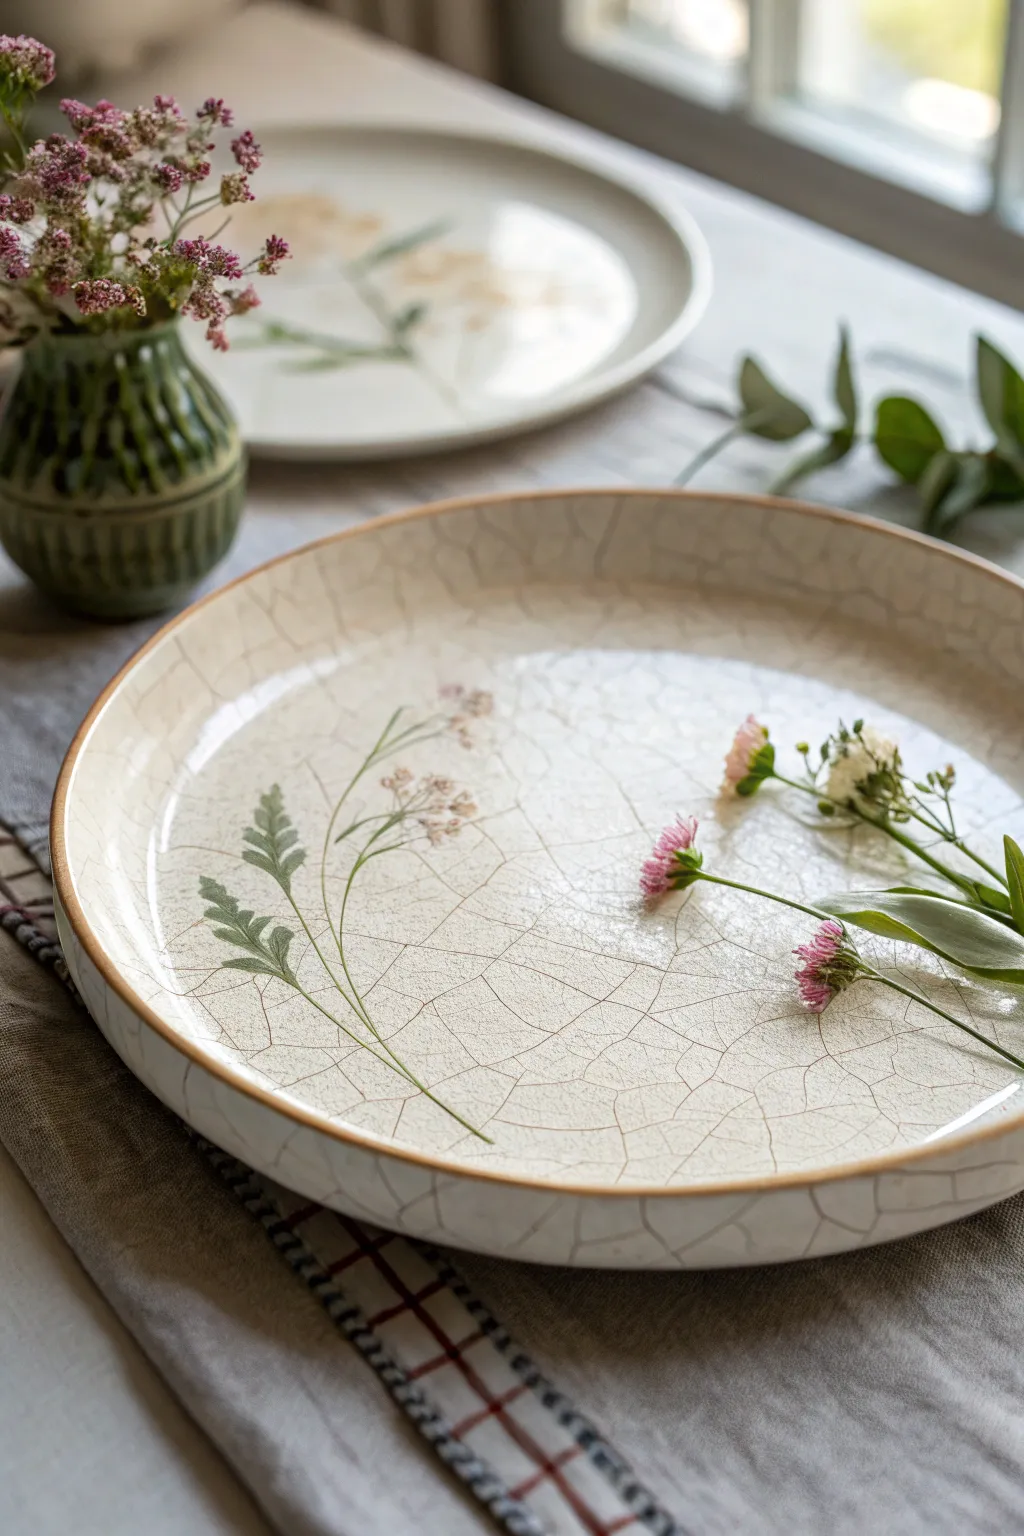
Capture the timeless elegance of antique pottery with this specialized glazing project. By combining layering techniques with delicate brushwork, you’ll transform a plain bisque plate into a stunning piece that looks like a cherished heirloom.
Step-by-Step Tutorial
Materials
- Bisque-fired ceramic plate (flat rim style)
- Cream or off-white underglaze
- Crackle glaze medium (clear)
- Black or dark brown ink/wash (for highlighting cracks)
- Fine liner brush (size 0 or 00)
- Small round brush (size 2)
- Ceramic pigments or underglaze paints (sage green, soft pink, white, ochre)
- Clean sponge and water
- Soft cloth
- Iron oxide or dark brown underglaze (for rim)
- Kiln (or oven if using low-fire/Pebeo imitation paints)
Step 1: Base Preparation
-
Clean surface:
Begin by wiping down your bisque plate with a damp sponge to remove any dust or kiln wash residue. Let it dry completely for about 10 minutes. -
Apply base color:
Using a soft fan brush or wide flat brush, apply three even coats of cream-colored underglaze to the entire surface. Allow each coat to become touch-dry before applying the next. -
Rim definition:
Load a small round brush with iron oxide wash or dark brown underglaze. Steady your hand or use a banding wheel to paint a thin, consistent line along the very edge of the plate’s rim.
Cracks too faint?
If the crackle pattern isn’t showing up well, the ink wash might be too thin. Try using slightly thicker acrylic paint, rubbing it in firmly in circular motions before wiping off the excess.
Step 2: Painting the Florals
-
Sketch placement:
Lightly pencil in the curve of the stem to guide your composition. Aim for an asymmetrical look, sweeping from the lower left toward the center. -
Paint the stems:
Mix a diluted sage green. With your finest liner brush, paint the main stems using long, fluid strokes. Keep the pressure light to ensure the lines remain delicate. -
Add foliage:
Using the same green, paint the fern-like leaves. Press the belly of the brush down to create the wider part of the leaf and lift up for the tip. -
Create blooms:
Mix a soft pink with a touch of white. Dab small clusters of dots at the ends of the stems to create the flower heads. Don’t overblend; texture is good here. -
Detail the flowers:
Once the pink base is barely dry, add tiny accents of white and ochre to the centers of the flower clusters to give them depth. -
Set the design:
Allow the painted floral design to dry completely, ideally overnight or for several hours, to ensure the pigments don’t smear during the glazing process.
Try Pressed Flowers
For an even more organic look, press real leaves into the soft clay before the bisque firing. Then, paint into the impressions to create a textured, fossil-like relief under the crackle.
Step 3: The Crackle Effect
-
Apply crackle glaze:
Apply a specialized clear crackle glaze over the entire plate. Follow the manufacturer’s specific instructions regarding thickness, as this dictates crack size. -
Fire the piece:
Fire the plate in the kiln according to the crackle glaze instructions (usually cone 06 or 04). Let the kiln cool naturally. -
Prepare the wash:
Once cool, mix a small amount of black india ink or diluted dark acrylic paint. This will be used to reveal the invisible cracks. -
Reveal the cracks:
Brush the dark wash over the entire surface of the fired plate. I find it messy, so wear gloves, but ensure the liquid penetrates every microscopic fissure. -
Wipe back:
Immediately wipe the surface clean with a damp cloth. The dark pigment will remain trapped in the glaze fractures, revealing the spiderweb pattern. -
Seal (Optional):
If intended for food use, you may need to refire or apply a food-safe sealer, though true crackle glazes are often considered decorative due to bacterial risks in the crevices.
Display your beautiful new plate on a stand or as a centerpiece to show off that convincing antique charm
Reactive-Style Flowing Glaze Pool
This project captures the warmth of a sun-drenched afternoon with a stunning reactive glaze effect on a speckled stoneware body. The deep amber center naturally feathers out to a creamier rim, highlighting the clay’s natural texture.
How-To Guide
Materials
- Speckled buff stoneware clay (mid-fire, cone 5-6)
- Pottery wheel
- Throwing tools (sponge, rib, wire cutter)
- Trimming tools
- Soft fan brush
- Details brush
- Reactive honey/amber glaze (cone 5-6)
- Clear or translucent cream glaze (cone 5-6)
- Damp sponge
- Kiln
Step 1: Throwing the Form
-
Center the clay:
Start with about 2-3 lbs of well-wedged speckled stoneware clay. Center it firmly on the wheel head, ensuring a wide, stable base appropriate for a plate or shallow bowl. -
Open wide:
Open the centered mound, focusing on pulling outward rather than deep down, leaving a floor thickness of about 3/8 inch to allow for later trimming. -
Establish the floor:
Compress the floor thoroughly with a rib or your sponge. I always take extra time here to prevent S-cracks, running the rib from the center out to the wall multiple times. -
Pull the walls:
Pull the walls outward and upward gently to create a shallow, open bowl shape. The walls should rise at a roughly 45-degree angle initially. -
Shape the curve:
Use a kidney rib on the inside to push the clay out gently while supporting the outside, creating a continuous, smooth curve from the rim down to the center. -
Define the rim:
Keep the rim slightly thicker than the walls for durability. Compress it with a chamois or sponge to round it off smoothly. -
Dry to leather hard:
Wire the plate off the wheel and let it dry slowly to a leather-hard state. This is crucial for clean trimming without warping the wide rim.
Layering Magic
Apply the amber glaze slightly thicker in the very center spiral. Gravity lets it pool beautifully during the melt, creating that deep, glassy caramel eye.
Step 2: Trimming and Bisque
-
Secure for trimming:
Center the leather-hard plate upside down on the wheel. Secure it with fresh clay lugs or a Giffin Grip. -
Trim the foot:
Carve a defined foot ring. Remove excess weight from the bottom curvature to match the interior profile. -
Smooth the surface:
Burnish the trimmed areas slightly with a smooth rib or the back of a spoon to press any grog back in and create a smooth surface for glazing. -
Bisque fire:
Fire the plate to cone 04 (or your clay body’s bisque temperature). Once cool, wipe it down with a damp sponge to remove any dust.
Glaze Running?
If your amber glaze is very fluid, leave a wider margin near the rim. Use a ‘cookie’ (a small clay disk) under your plate in the kiln to catch accidental drips.
Step 3: Glazing Technique
-
Apply base glaze:
Dip or brush the entire plate (focusing on the exterior and rim first) with a translucent cream or clear glaze that allows the speckles to show through. If brushing, apply two even coats. -
Glaze the interior pool:
Using a soft fan brush, load up your reactive amber or honey glaze. Apply a thick, generous coat to the center of the plate, spiraling outward. -
Create the gradient:
While the center glaze is still wet, use a slightly damp brush to feather the edges of the amber glaze outward toward the rim, stopping about an inch from the edge so the cream base shows. -
Add rim definition:
Dip a detail brush into the amber glaze and run it along the very edge of the rim. This will break brown over the edge during firing, framing the piece. -
Wipe the foot:
Clean the foot ring thoroughly with a damp sponge to ensure no glaze touches the kiln shelf. -
Glaze fire:
Load the kiln and fire to cone 5 or 6, depending on your clay and glaze specifications. A slow cool down can help develop the crystals in reactive glazes.
Once cooled, your plate reveals a rich landscape of toasted caramel tones ready for serving
Marbled Slip-Swirled Surface
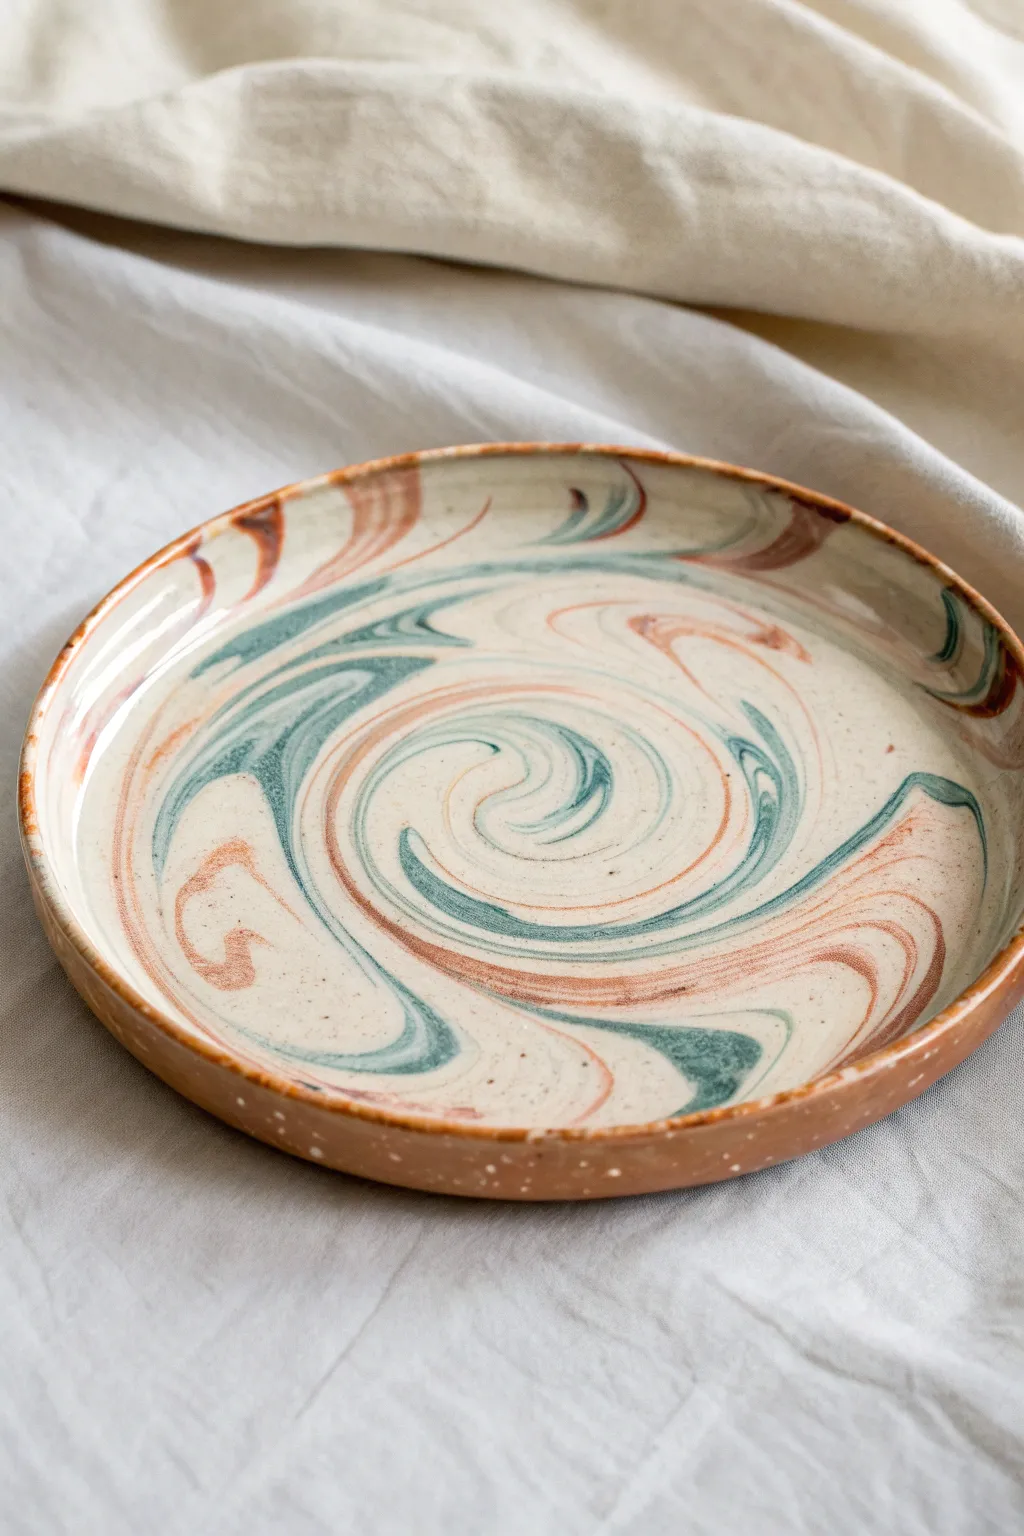
This project features a mesmerizing swirl of teal and terracotta colors dancing across a creamy ceramic surface. By using colored slips, you can achieve this fluidity and movement on a simple hand-built or wheel-thrown plate.
Detailed Instructions
Materials
- Light-colored smooth stoneware clay (cream or white)
- Teal colored slip (or mason stain to mix)
- Terra cotta/rust colored slip
- Pottery wheel (or slab roller/rolling pin for hand-building)
- Rib tool (metal or rubber)
- Sponge
- Wire cutter
- Clear glaze
- Kiln
Step 1: Preparation
-
Prepare the Clay:
Begin by wedging your main body of light-colored stoneware clay thoroughly to remove any air bubbles. You want a smooth, consistent canvas for your slip work later. -
Mix Slips:
Prepare your colored slips. You’ll need a creamy white slip (matches the clay body), a teal slip, and a rust-colored slip. Ensure all slips are the consistency of heavy cream—too runny and they won’t hold the pattern; too thick and they won’t swirl.
Muddy Colors?
If colors are blending into gray, your slip is too thin or you are over-tilting. Thicken slip slightly and move the plate less.
Step 2: Forming the Plate
-
Throw the Base:
Center your clay on the wheel and throw a flat plate form. Focus on creating a wide, flat bottom with a slightly raised rim, leaving the floor a bit thicker than usual to support the slip application. -
Clean the Surface:
Using a metal spread any slip created during throwing, or simply rib the surface smooth. You need a clean, slightly damp surface, but not sloppy wet.
Rim Pop
Wipe the very edge of the rim with a damp sponge after marbling to reveal the raw clay body for a lovely contrasting border.
Step 3: Marbling Application
-
Apply Base Slip:
While the wheel is slowly turning (or steady if hand-building), pour a generous layer of white slip over the interior of the plate. It needs to be thick enough to move but not overflow. -
Drizzle Colors:
Using a slip trailer or a spoon, drizzle lines or spiral patterns of the teal and rust slips directly on top of the wet white base. Don’t worry about precision here; organic placement is better. -
Tilt and Swirl:
Pick up the bat or the plate carefully. Gently tilt the plate in a circular motion. Watch as gravity pulls the colored lines through the white base, creating the marble effect. -
Refine the Spiral:
To get the specific spiral look in the photo, place the plate back on the wheel. Spin the wheel slowly and use a finger or a soft tool to gently disturb the surface, dragging from the outside in towards the center to encourage the spiral formation. -
Stop at the Right Moment:
This is crucial: stop manipulating the slip before the colors mud together. Distinct separation between the teal, rust, and white is what makes the design pop.
Step 4: Finishing and Firing
-
Initial Drying:
Let the plate sit untouched until the slip has lost its sheen and the clay reaches leather-hard. This will take longer than usual because of the added moisture from the slip. -
Trim the Foot:
Once leather hard, flip the plate and trim a neat foot ring. This cleans up the weight and gives the plate a professional lift. -
Bisque Fire:
Load the bone-dry plate into the kiln for a bisque firing (usually Cone 06 or 04). Ensure it is completely dry to avoid cracking. -
Glazing:
Apply a clear, glossy glaze over the entire piece. I like to dip mine to ensure an even coat, but brushing works if you are careful not to leave streaks. -
Final Fire:
Fire the plate to the maturity temperature of your clay body (likely Cone 5 or 6). The clear glaze will seal the design and make the colors vibrant. -
Sanding the Foot:
After the kiln cools, remove the plate and sand the unglazed foot ring so it is smooth and won’t scratch table surfaces.
Enjoy using your custom swirled plate for serving or as a stunning display piece
Ombre Gradient Rim Fade
This project captures the warmth of late afternoon light with a stunning gradient rim that fades from deep terracotta to a creamy speckled center. By using a sponge technique on simple stoneware, you can achieve this professional-looking ombre effect without needing complex dipping vats.
Step-by-Step Tutorial
Materials
- White or speckled stoneware clay (approx. 2 lbs)
- Pottery wheel (or slab roller/rolling pin for hand-building)
- Rib tool (kidney)
- Wire cutter
- Sponge
- Trimming tools
- Cream/Oatmeal colored glaze (food safe)
- Burnt Orange or Iron Oxide glaze (food safe)
- Natural sea sponge (for application)
- Clean bucket of water
- Kiln
Step 1: Forming the Plate
-
Prepare your clay:
Begin by wedging your stoneware clay thoroughly to remove air bubbles. This step is crucial for wheel throwing to ensure the clay is consistent and centers easily. -
Center and open:
Throw the clay onto the wheel head and center it. Open the clay wide and low, compressing the base well to prevent S-cracks during drying. -
Define the rim:
Pull the clay out to form a wide, flat plate. For this specific design, leave a slightly thicker rim to define the edge, creating a clear separation between the flat eating surface and the lip. -
Smooth the surface:
Use a rib tool to compress and smooth the inside surface of the plate. This is the perfect time to ensure you have a gentle, organic curve rather than a sharp angle. -
Cut and dry:
Wire the plate off the bat and let it dry to a leather-hard state. It needs to be firm enough to handle without warping but soft enough to trim.
Uneven Fade?
If the blending looks blotchy, overlap your sponge dabs more often. Glaze melts and moves in the kiln, so minor blotches usually smooth out during firing.
Step 2: Refining and Bisque
-
Trim the foot:
Flip the leather-hard plate over and center it on the wheel. Trim away excess clay to create a clean, defined foot ring. This lifts the plate and gives it a professional shadow. -
Smooth the edges:
Run a slightly damp sponge over any sharp trimmed edges or the rim to soften them before firing. -
Bisque fire:
Once bone dry, load the plate into the kiln for a bisque firing (usually Cone 04-06 depending on your clay body). This hardens the clay for glazing.
Speckle Magic
Use ‘Iron Spodumene’ or a glaze containing rutile for the rim. These minerals break over texture, creating natural darker specks and visual depth.
Step 3: Glazing the Ombre Effect
-
Clean the bisque:
Wipe the bisque-fired plate with a damp sponge to remove dust, which can cause glaze crawling. -
Apply base coat:
Dip the entire plate into your Cream/Oatmeal glaze, or brush on three even coats if you are brushing. Allow this base layer to dry until it’s powdery to the touch. -
Prepare the gradient color:
Pour a small amount of the Burnt Orange glaze onto a palette or shallow dish. Dampen your natural sea sponge and wring it out completely so it is barely moist. -
Sponge the rim:
Dip the sponge lightly into the orange glaze. Dab it gently around the very outer edge of the plate rim first to deposit the most pigment there. -
Create the fade:
Without reloading the sponge, work your way inward towards the center. As the glaze runs out on the sponge, the color will naturally become lighter and more speckled. -
Blend the transition:
Use a clean, slightly damp sponge to softly pat the inner edge of the orange ring, feathering it into the cream base so there is no harsh line. -
Clean the foot:
IMPORTANT: Wipe all glaze off the foot ring of the plate with a wet sponge. Any glaze left here will fuse the plate to the kiln shelf.
Step 4: Final Firing
-
Glaze fire:
Load the plate into the kiln for the final glaze firing. Ensure the plate isn’t touching any other pots. -
Fire to temperature:
Fire to the maturity temperature of your clay and glaze (often Cone 5 or 6 for stoneware). The heat will melt the two glazes together, enhancing the gradient effect. -
Cool and inspect:
Let the kiln cool completely before opening. Sand the foot ring with wet-dry sandpaper if there are any rough rough spots.
Enjoy serving meals on your beautiful, custom-made pottery that brings a touch of artisanship to the table
Textured Rim With Smooth Center
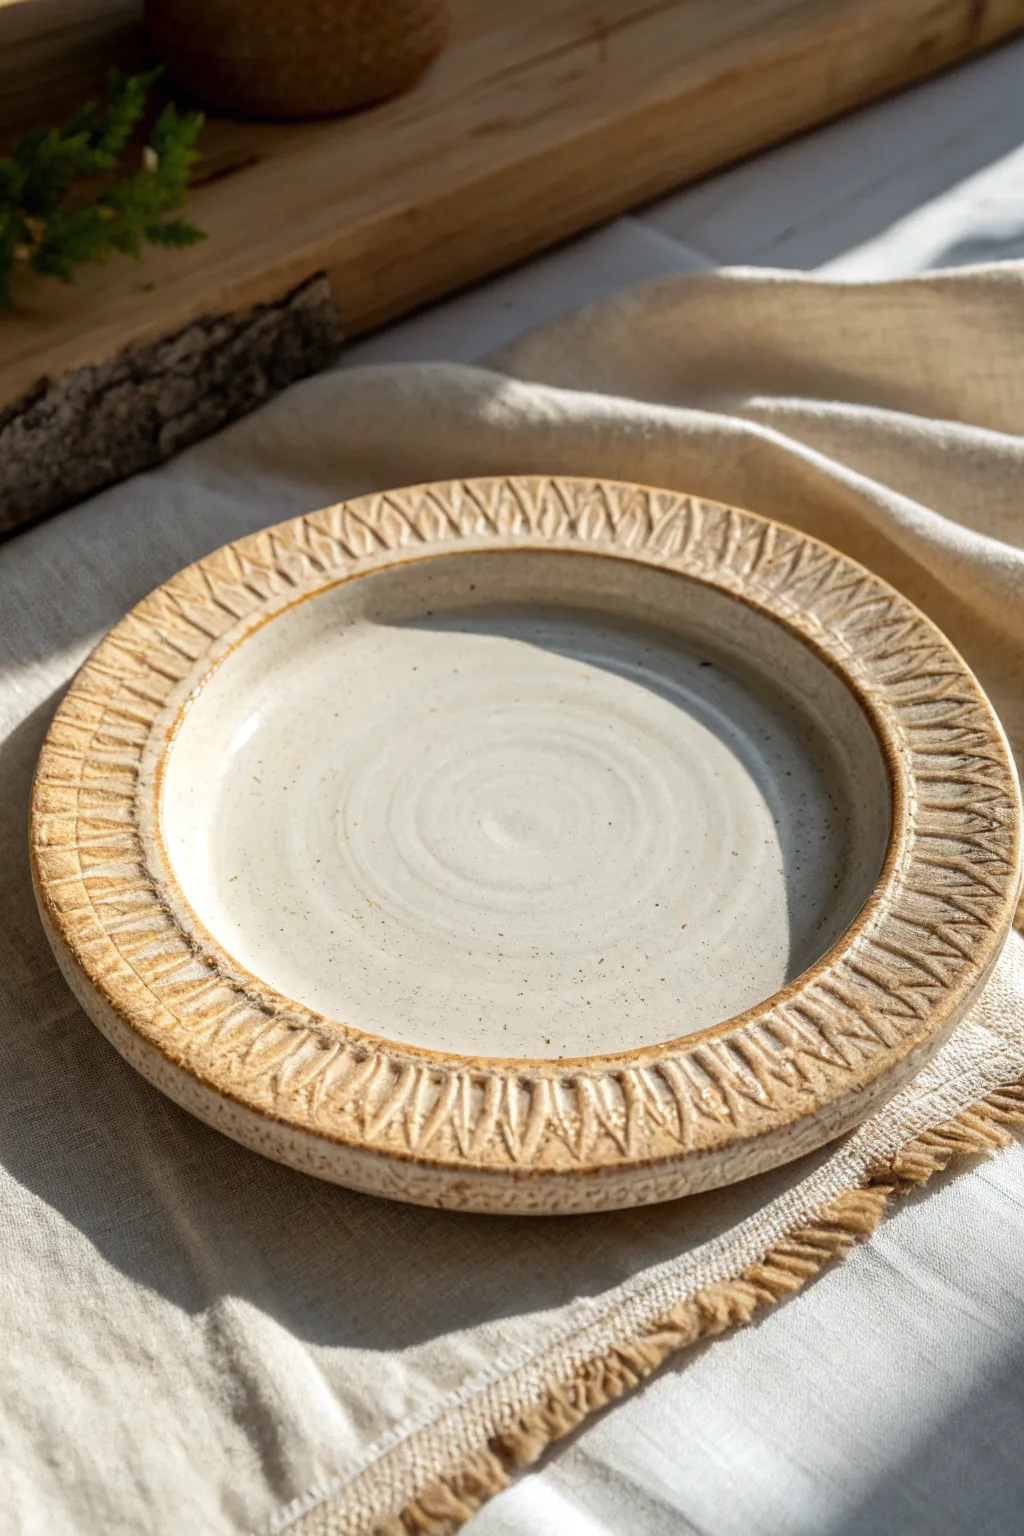
This project balances rustic charm with modern simplicity, featuring a wide, hand-carved rim framing a smooth, milky-white center. The repetitive triangular carving creates a satisfying tactile border that catches the glaze beautifully.
Detailed Instructions
Materials
- Speckled stoneware clay (approx. 2-3 lbs)
- Pottery wheel (or slab roller/rolling pin for hand-building)
- Small trimming tool (loop tool)
- V-tip carving tool or sgraffito tool
- Wooden throwing rib
- Sponge
- Wire cutter
- Bat for wheel
- Clear or transparent white glaze
- Iron oxide wash (optional)
Step 1: Throwing or Forming the Plate
-
Center the clay:
Start by wedging your clay thoroughly to remove air bubbles. Secure the clay ball to the center of your wheel head or bat. -
Open widely:
Open the clay, but instead of pulling up immediately, focus on widening the base. You want a broad, flat canvas. -
Define the rim:
Leave a significant amount of clay at the outer ring—more than you would for a bowl. Compress the center floor firmly to prevent S-cracks later. -
Flatten the rim:
Using a wooden rib or your fingers, flatten the outer 1.5 to 2 inches of the plate horizontally. This area needs to be distinct from the central well. -
Smooth the center:
Refine the central eating surface. You can leave faint spiral finger marks for texture or smooth it completely with a rib. -
Cut off and dry:
Wire the plate off the bat but leave it in place to dry until it reaches a solid leather-hard state. The rim must be firm enough to carve without warping.
Step 2: Trimming and Carving
-
Trim the foot:
Once leather-hard, flip the plate and trim a neat foot ring. This adds lift and professional finish to the piece. -
Mark your spacing:
Flip the plate right-side up. Lightly mark four cardinal points on the rim to help keep your pattern symmetrical as you work around. -
Start the V-cuts:
Using your V-tip carving tool, make angled cuts pointing inward towards the center well. I usually start at the outer edge and pull the tool inward. -
Create the pattern:
Carve a second line meeting the first to form a long, skinny triangle or ‘leaf’ shape. Repeat this continuously around the entire circumference. -
Detail the triangles:
Inside each large triangle, carve a single straight line down the center. This mimics the vein of a leaf or simply adds depth. -
Clean up burrs:
Wait until the plate is bone dry, then gently brush away any clay crumbs or sharp burrs with a stiff brush or a scouring pad.
Clean Lines
Don’t smooth the carved lines with a wet sponge while the clay is damp. It will wash away crisp edges. Sand them only when bone dry.
Step 3: Glazing and Finishing
-
Bisque fire:
Fire the plate to cone 04 (or your clay’s specific bisque temperature). -
Apply oxide wash (optional):
To get the look in the photo, brush a diluted iron oxide wash over the carved rim, then wipe it back with a damp sponge. The dark color will stay in the deep crevices. -
Wax the rim:
If you want the rim to feel raw and sandy like the example, apply wax resist carefully over the textured area. -
Pour the glaze:
Pour a creamy white or clear glaze into the center well. Swirl it to coat the bottom evenly, then pour out the excess. -
Clean the edges:
Wipe away any glaze drips on the rim or the foot ring. -
Final firing:
Glaze fire the piece to maturity (typically Cone 5 or 6 for stoneware). Let it cool slowly in the kiln.
Color Pop
Instead of a natural oxide, try rubbing a bright blue or teal underglaze into the rim texture before wiping back for a modern twist.
Now you have a stunning, functional piece of tableware that invites touch every time you use it
Terrazzo-Style Clay Confetti Inlay
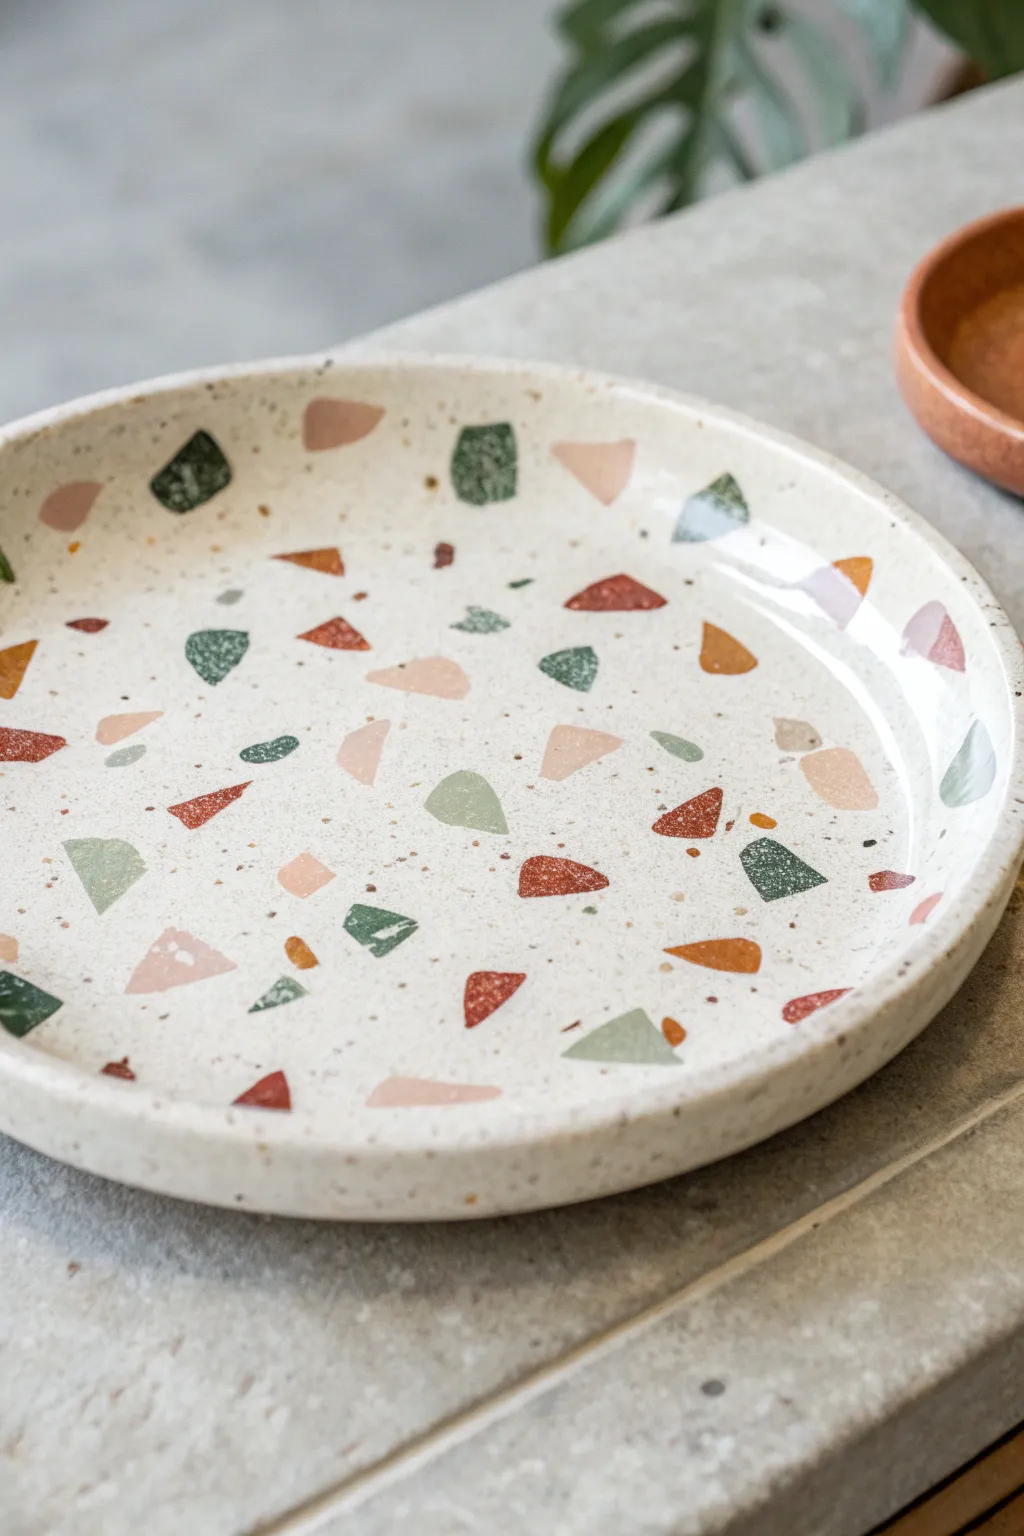
Capture the trendy, modern aesthetic of terrazzo stone with this fun polymer clay project. This technique uses irregular shards of colored clay inlaid into a speckled base to create a stunning, polished piece that looks deceptively professional.
Step-by-Step
Materials
- Polymer clay (white or translucent base)
- Granitex or speckled polymer clay (or black pepper)
- Polymer clay in various accent colors (terracotta, sage green, blush pink, mustard)
- Acrylic roller or pasta machine
- Circle cutter or template (approx. 6-8 inches)
- Round bowl or oven-safe form for shaping
- Craft knife or scalpel
- Sanding paper (wet/dry, grits 400 to 1200)
- Gloss or matte varnish (optional)
Step 1: Preparing the Clay Components
-
Create the confetti colors:
Begin by conditioning your accent colors—terracotta, sage green, blush pink, and mustard—until they are soft and pliable. -
Flatten accent sheets:
Roll each colored piece into a very thin sheet using an acrylic roller or the thinnest setting on a pasta machine. -
Make the confetti shards:
Tear these thin colored sheets into random, jagged bits. Aim for variety in size, from tiny specks to thumb-sized triangles, to mimic real stone chips. -
Prepare the base mixture:
Condition your white or translucent base clay. To achieve the sandy, speckled look seen in the photo, mix in pre-made ‘granite’ effect clay, or for a DIY hack, I like to knead in a generous pinch of cracked black pepper. -
Roll the base slab:
Roll your speckled base clay into a sturdy slab, about ¼ inch thick. This needs to be thick enough to hold the shape of the plate without sagging.
Smudged Colors?
If your roller drags colors across the white base, lay a sheet of parchment paper or plastic wrap over the clay before rolling. This prevents smearing.
Step 2: Inlaying the Pattern
-
Apply the confetti:
Gently scatter your prepared colored shards onto the white base slab. Distribute them randomly, avoiding large clumps of a single color. -
Press into place:
Use your fingers to lightly press the shards down so they stick to the surface. -
Embed the design:
Take your acrylic roller and roll over the slab again with firm pressure. You want the colored shards to become flush with the base clay, creating a completely smooth, unified surface. -
Check surface alignment:
Run your finger over the clay; if you feel bumps where the colors are, keep rolling until everything is level. -
Add texture (optional):
For a more organic stone feel, you can gently lightly tap the surface with an old toothbrush or sandpaper to remove the perfect smoothness before baking.
Mix it Up
Add gold leaf flakes into the confetti mix before the final roll-out. The metallic flecks will add a chic, high-end sparkle to the matte stone finish.
Step 3: Shaping and Finishing
-
Cut the circle:
Place your circle template or a large bowl upside down over the slab and cut around it cleanly with a scalpel or craft knife. -
Form the rim:
Gently lift the clay circle. To create the raised rim, you can either pinch the edges upward manually or, for a more uniform look, drape the clay inside a shallow, oven-safe bowl. -
Smooth the edges:
Run your finger along the cut edge of the rim to soften any sharp corners created by the knife. -
Bake the piece:
Bake according to your clay manufacturer’s instructions (usually 275°F/130°C for 15-30 minutes). Let it cool completely inside the oven or form to prevent warping. -
Wet sanding:
Once cool, submerge the plate in water and sand the surface with 400 grit sandpaper. This reveals the sharpness of the confetti shapes. -
Polish to finish:
Progress through higher grits (up to 1200) for a silky smooth stone-like feel. Finish with a thin coat of matte varnish if you want extra protection.
Your finished plate is perfect for holding jewelry or keys and brings a modern artistic touch to any table
Topographic Map Carved Contours
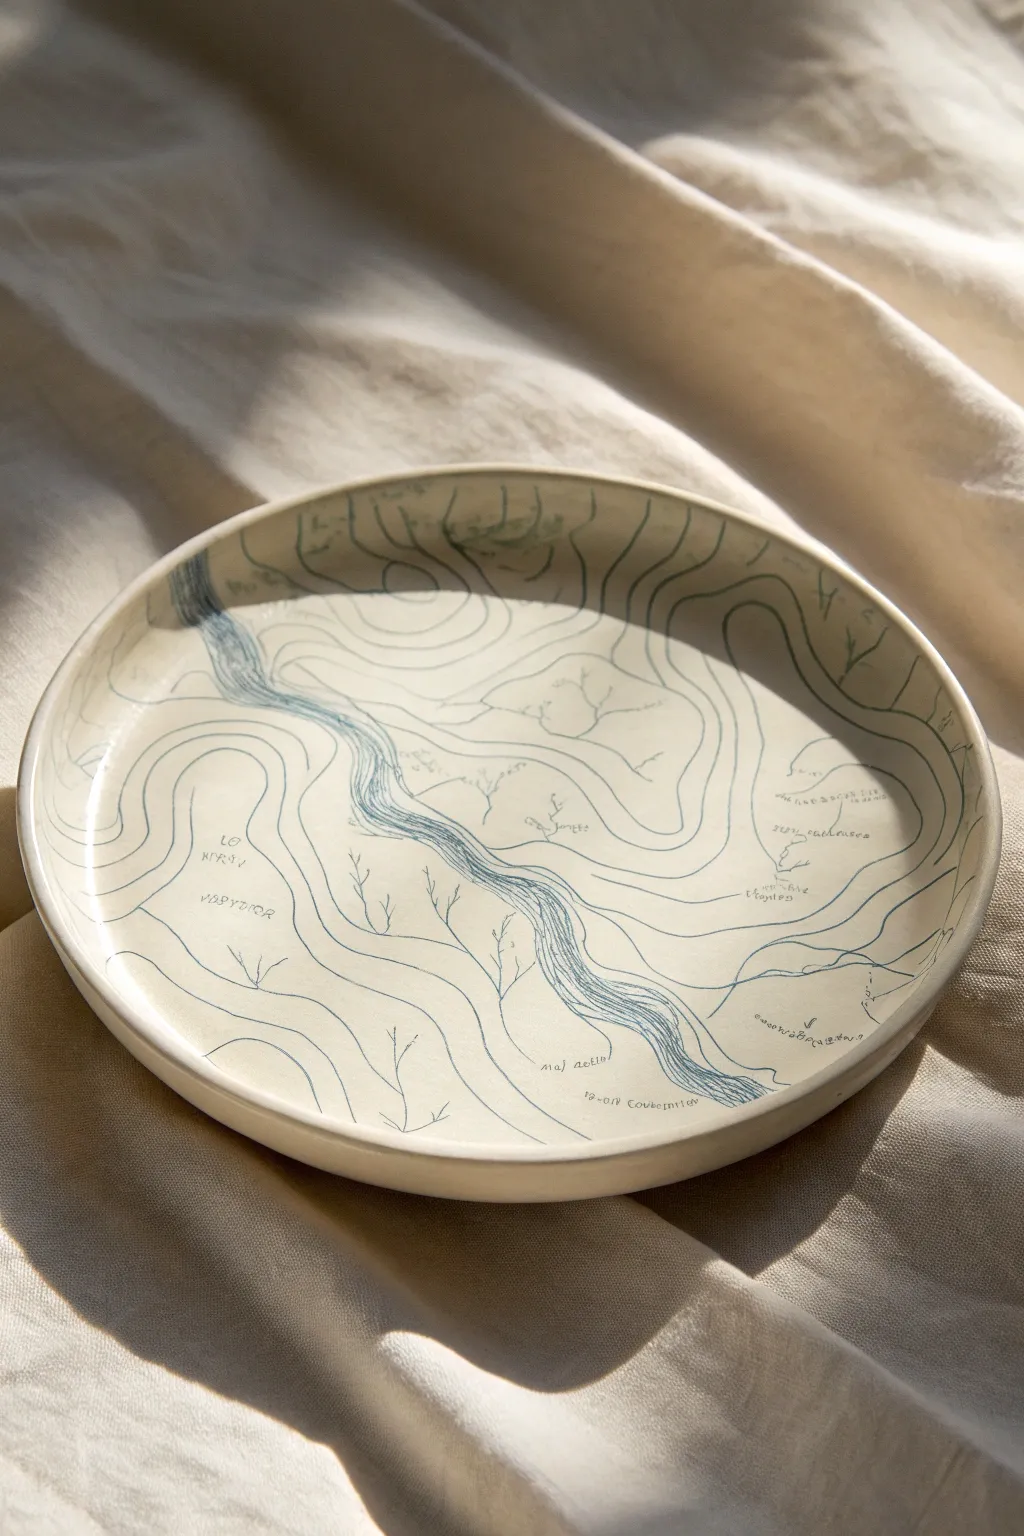
Bring the beauty of cartography to your table with this stunning topographic map plate. The delicate blue lines trace the flow of a river and the rise of the land, creating a functional piece of art that feels as organic as the landscape it depicts.
How-To Guide
Materials
- White or cream stoneware clay
- Rolling pin
- Canvas board or mat
- Shallow bowl or plate mold
- Rib tool (smooth wood or rubber)
- Needle tool
- Sponge
- Blue underglaze (fine tip applicator or liner brush)
- Pencil (optional)
- Clear glaze
- Pottery wheel (optional, for trimming)
Step 1: Forming the Plate
-
Prepare the Slab:
Begin by wedging your stoneware clay thoroughly to remove air bubbles. Roll it out into a smooth, even slab about 1/4 inch thick. I like to flip the slab and roll on both sides to compress the clay particles. -
Smooth the Surface:
Before cutting, use a soft rubber rib to compress the surface of the slab. This removes canvas textures and creates that silky-smooth canvas needed for delicate line work. -
Cut and Drape:
Cut a circle slightly larger than your intended mold. Gently drape the slab over a hump mold or press it into a slump mold to form the shallow curve and rim. -
Refine the Rim:
Trim any excess clay from the edge with a needle tool. Use a damp sponge or chamois to round the rim so it’s smooth to the touch. -
Initial Drying:
Let the plate dry slowly to the leather-hard stage. It needs to be firm enough to handle without warping but soft enough to accept the underglaze decoration.
Needle Tip Precision
For the finest lines, use a slip trailer with a metal needle tip. Keep a straight pin nearby to unclog the tip frequently.
Step 2: Drawing the Map
-
Plan the Landscape:
Lightly sketch your design with a soft pencil directly onto the leather-hard clay. Start with the main river flowing diagonally across the plate, then add concentric contour lines radiating outward. -
Prepare Underglaze:
Shake your blue underglaze well. Pour a small amount into a palette or load a fine-tip applicator bottle. If using a brush, thin the underglaze slightly with water for better flow. -
Line the River:
Using a very fine liner brush or the applicator, trace the central river first. Create multiple thin, parallel lines that separate and converge to mimic rushing water currents. -
Add Contours:
Draw the surrounding topographic lines. Keep your hand steady but allow for organic wobbles—nature isn’t perfect straight lines. Vary the spacing: lines close together indicate steep terrain, while wider gaps suggest flat plains. -
Detailing Foliage:
Add small, tree-like branch structures stemming from some contour lines. These simple ‘Y’ shapes add texture and suggest vegetation without cluttering the design. -
Adding Text:
If desired, carefully letter small notations or elevation numbers in open spaces using the finest brush tip available. Use a light touch to keep the text delicate and barely legible, enhancing the authentic map aesthetic. -
Cleanup:
If you make a mistake, gently scratch it off with a sharp tool once the underglaze is dry, or wipe carefully with a barely damp cotton bud.
Step 3: Firing and Finishing
-
Bisque Fire:
Allow the plate to dry completely to bone dry. Fire it to bisque temperature (usually cone 04 or 06) to harden the clay and set the underglaze. -
Wipe Down:
After the bisque fire, wipe the plate with a damp sponge to remove any kiln dust. This ensures the clear glaze will adhere properly without crawling. -
Apply Clear Glaze:
Dip the plate into a clear, gloss or satin glaze, or brush on three even coats. A dipping clear glaze usually provides the most uniform coverage over fine line work. -
Check the Foot:
Wipe the bottom foot of the plate completely clean of glaze to prevent it from sticking to the kiln shelf. -
Glaze Fire:
Fire the plate to your clay body’s maturity temperature (e.g., cone 5/6 for stoneware). Let the kiln cool naturally before opening.
Smudged Lines?
If you smudge a line, don’t wipe it wet! Let the underglaze dry completely, then gently scrape the mistake away with an X-Acto knife.
Now you have a unique landscape preserved forever in ceramic form