A plain little terracotta pot is basically a tiny canvas just waiting for a kid’s imagination to take over. Here are my favorite clay pot painting ideas that keep things simple, colorful, and super doable—no fancy brush skills required.
Classic Polka Dots and Bright Rims
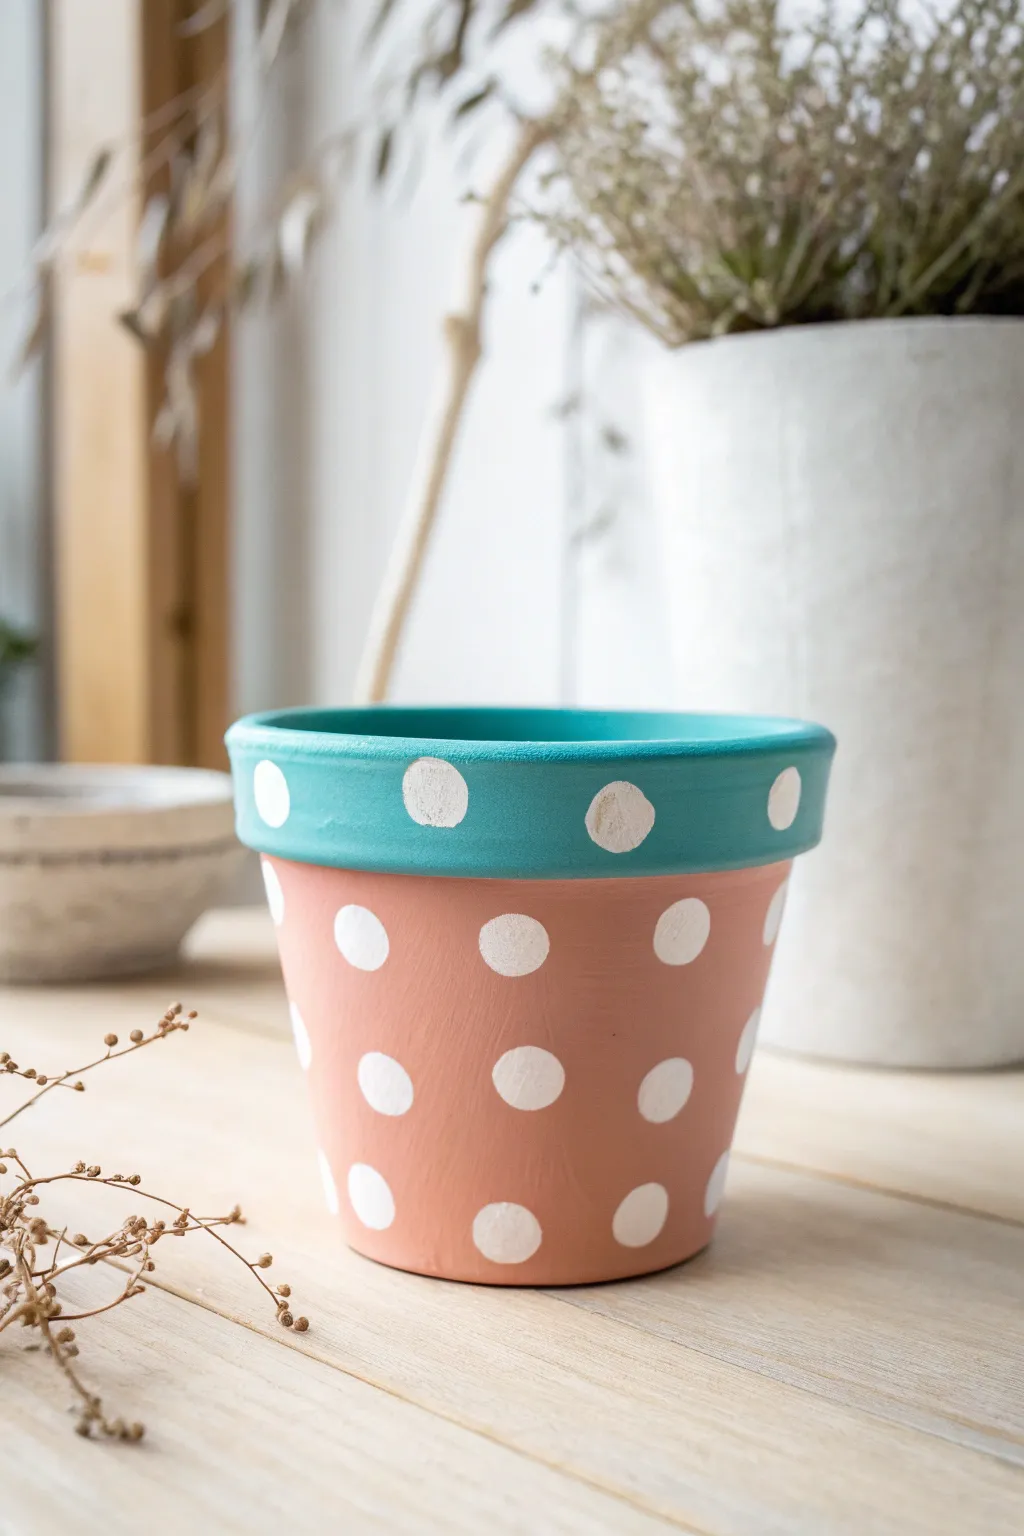
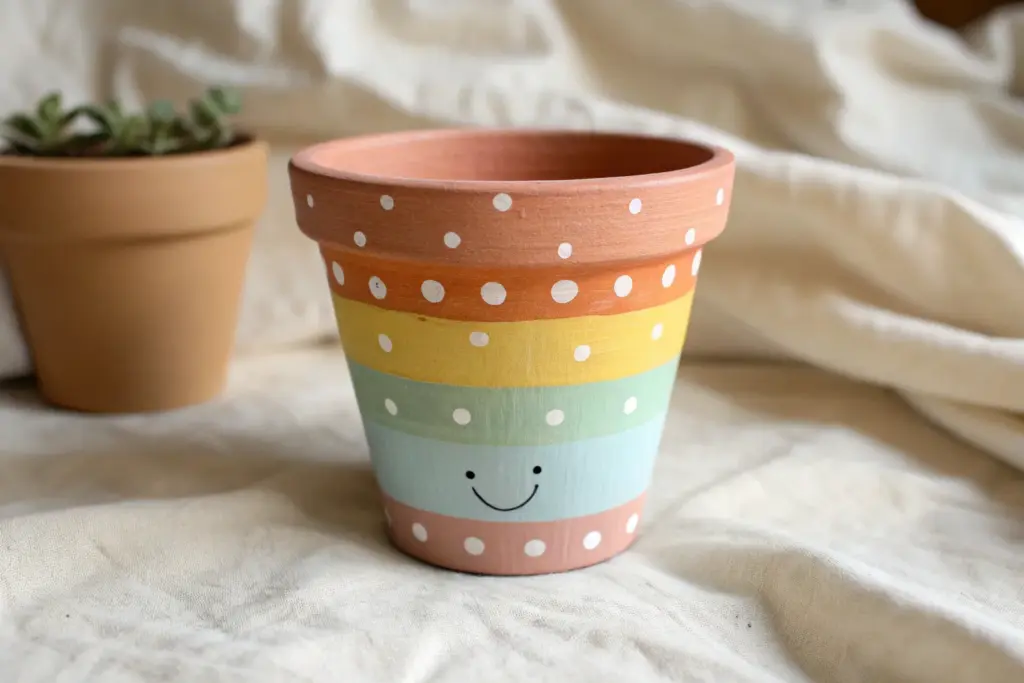
Bring a fresh, modern pop of color to your windowsill with this cheerful design featuring a bright teal rim and a soft peach body. The classic white polka dots tie the two contrasting colors together for a look that’s playful yet stylish enough for any room.
Step-by-Step
Materials
- Terra cotta pot (clean and dry)
- Acrylic craft paint: Teal/Turquoise
- Acrylic craft paint: Peach/Salmon
- Acrylic craft paint: White
- Flat paintbrush (medium width)
- Small round paintbrush or foam spouncer
- Paper plate or palette
- Cup of water
- Paper towels
- Clear acrylic sealer (optional)
Step 1: Preparation and Base Colors
-
Prepare your workspace:
Set up a clean area covered with newspaper or a craft mat. Ensure your terra cotta pot is free of dust or dirt before starting. -
Paint the rim base:
Dip your flat paintbrush into the teal paint. Apply an even coat around the entire upper rim of the pot, including the top edge. -
Paint down slightly:
Paint just a tiny bit inside the top of the rim as well so the raw clay doesn’t show when you add soil later. -
Paint the body base:
Rinse your brush thoroughly or switch to a clean one. Load it with the peach paint. -
Cover the bottom section:
Apply the peach paint to the entire body of the pot below the rim. Be careful when cutting in closely under the teal rim to keep a neat line. -
Let the first coat dry:
Allow the paint to dry to the touch, which usually takes about 15-20 minutes depending on humidity. -
Apply second coats:
Terra cotta is porous and soaks up paint, so I usually apply a second coat of both teal and peach to get that solid, opaque finish shown in the photo. -
Full dry time:
Let the base colors dry completely before moving on to the polka dots to prevent smearing.
Step 2: Adding the Polka Dots
-
Prepare white paint:
Squeeze a generous amount of white acrylic paint onto your palette. -
Start the rim dots:
Using a small round brush or a foam spouncer, press a white dot onto the center of the teal rim. -
Space the rim dots:
Continue adding white dots around the teal circumference, trying to space them evenly apart. Don’t worry if they aren’t perfect circles; that adds character. -
Begin the body dots:
Move to the peach section. Start a row of dots near the top, placing them in the spaces *between* the dots on the rim above (like a brick pattern). -
Create the middle row:
Paint a second row of dots around the middle of the pot, aligning them vertically with the dots on the rim. -
Finish the bottom row:
Add a final row of dots near the bottom edge, staggering them again so they sit between the dots of the middle row. -
check for coverage:
If your white paint looks a bit thin against the teal or peach, gently dab a second layer of white over the dry dots to brighten them up. -
Final dry:
Let the polka dots dry completely, preferably overnight. -
Optional sealing:
If this pot will live outside, spray it with a clear acrylic sealer to protect your beautiful work from the elements.
Uneven Dots?
If painting freehand is tricky, use the eraser end of a standard pencil as a stamp. Dip it in paint and press straight down for perfect circles.
Keep it Clean
Clean up the line where the rim meets the body by using a very small detail brush to touch up any accidental overlaps.
Once dry, fill your new dotted creation with a succulent or dried flowers for an instant mood booster


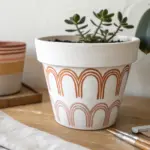
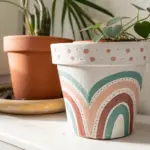
Rainbow Stripe Pots
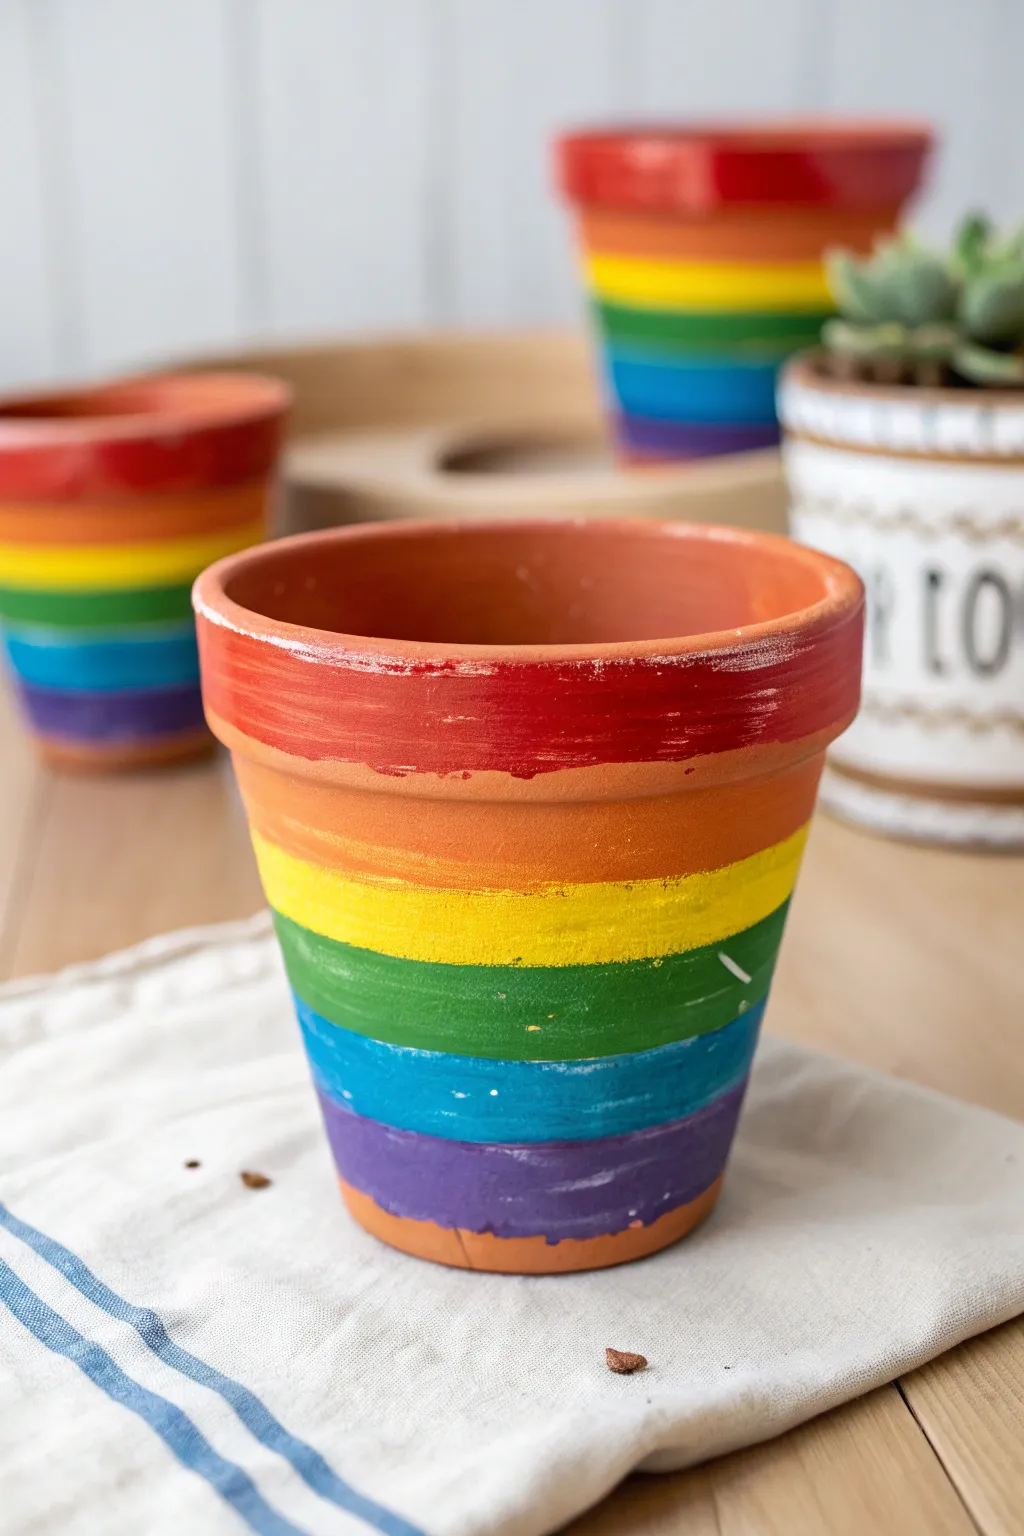
Brighten up your windowsill with these joyfully vibrant rainbow pots that are perfect for beginners. The simple horizontal stripes create an instantly recognizable classic pattern that celebrates color in a bold, cheerful way.
Step-by-Step Guide
Materials
- Terracotta pot (standard size)
- Acrylic craft paints (Red, Orange, Yellow, Green, Blue, Purple)
- Flat paintbrushes (medium width)
- Small detail brush (optional, for touch-ups)
- Water cup
- Paper towels
- Palette or paper plate
- Clear acrylic sealer (spray or brush-on)
- Clean cloth
Step 1: Preparation
-
Clean the surface:
Before you start painting, ensure your terracotta pot is completely clean. Wipe it down with a damp cloth to remove any dust or loose clay particles. -
Dry thoroughly:
Let the pot air dry completely. Acrylic paint adheres much better to dry clay, preventing peeling later on.
Use White First
For super bright colors on dark clay, paint a base coat of white acrylic where the yellow and orange stripes will go before adding color.
Step 2: Painting the Stripes
-
Start with the rim:
Dip a medium flat brush into your red acrylic paint. Paint the entire top rim of the pot first. This natural ridge gives you a perfect guide for your first stripe. -
Extend the red:
Carry the red paint just slightly below the rim’s lip onto the main body of the pot to create a smooth transition for the next color. -
Paint the orange band:
Clean your brush thoroughly. Pick up your orange paint and create a band directly beneath the red rim. Try to keep the width similar to the other bands you plan to paint. -
Feather the edges:
Don’t worry about a perfectly sharp line between colors. I find that letting the wet edges touch slightly creates a nice, organic blend rather than a rigid separation. -
Add the yellow stripe:
Rinse your brush again and apply the yellow stripe below the orange. Since yellow is a transparent color, you might need a slightly thicker application here. -
Continue with green:
Below the yellow, paint your green stripe. Keep turning the pot as you go to ensure the line stays relatively straight all the way around. -
Apply the blue band:
Add the blue stripe next. If your hand shakes a little, just embrace the rustic look; these imperfections add charm to the finished piece. -
Finish with purple:
Paint the final purple stripe at the very bottom of the pot. Ensure this band goes all the way down to the base edge. -
Check the bottom edge:
Lift the pot carefully and paint just slightly underneath the bottom edge so no bare clay shows when the pot is sitting on a table.
Gradient Magic
While the paint is wet, blend the boundary lines with a dry brush to create an ombre effect where the colors transition smoothly.
Step 3: Finishing Touches
-
Let it dry:
Allow the first coat of paint to dry for about 15-20 minutes. Terracotta absorbs moisture quickly, so this shouldn’t take long. -
Assess coverage:
Look closely at your stripes. If you can see the brown clay through the yellow or orange paint, apply a second coat to just those specific bands for better vibrancy. -
Touch up lines:
If any color accidentally dripped into a neighbor, use a small detail brush with the correct color to neatly cover the mistake. -
Dry completely:
Let the fully painted pot sit for at least an hour to ensure all paint layers are cured. -
Seal the pot:
Apply a clear acrylic sealer over the entire outside of the pot. This protects the paint from water damage when you water your plants.
Pop in a small succulent or flower to complete your colorful masterpiece


Fingerprint Flower Garden Pot
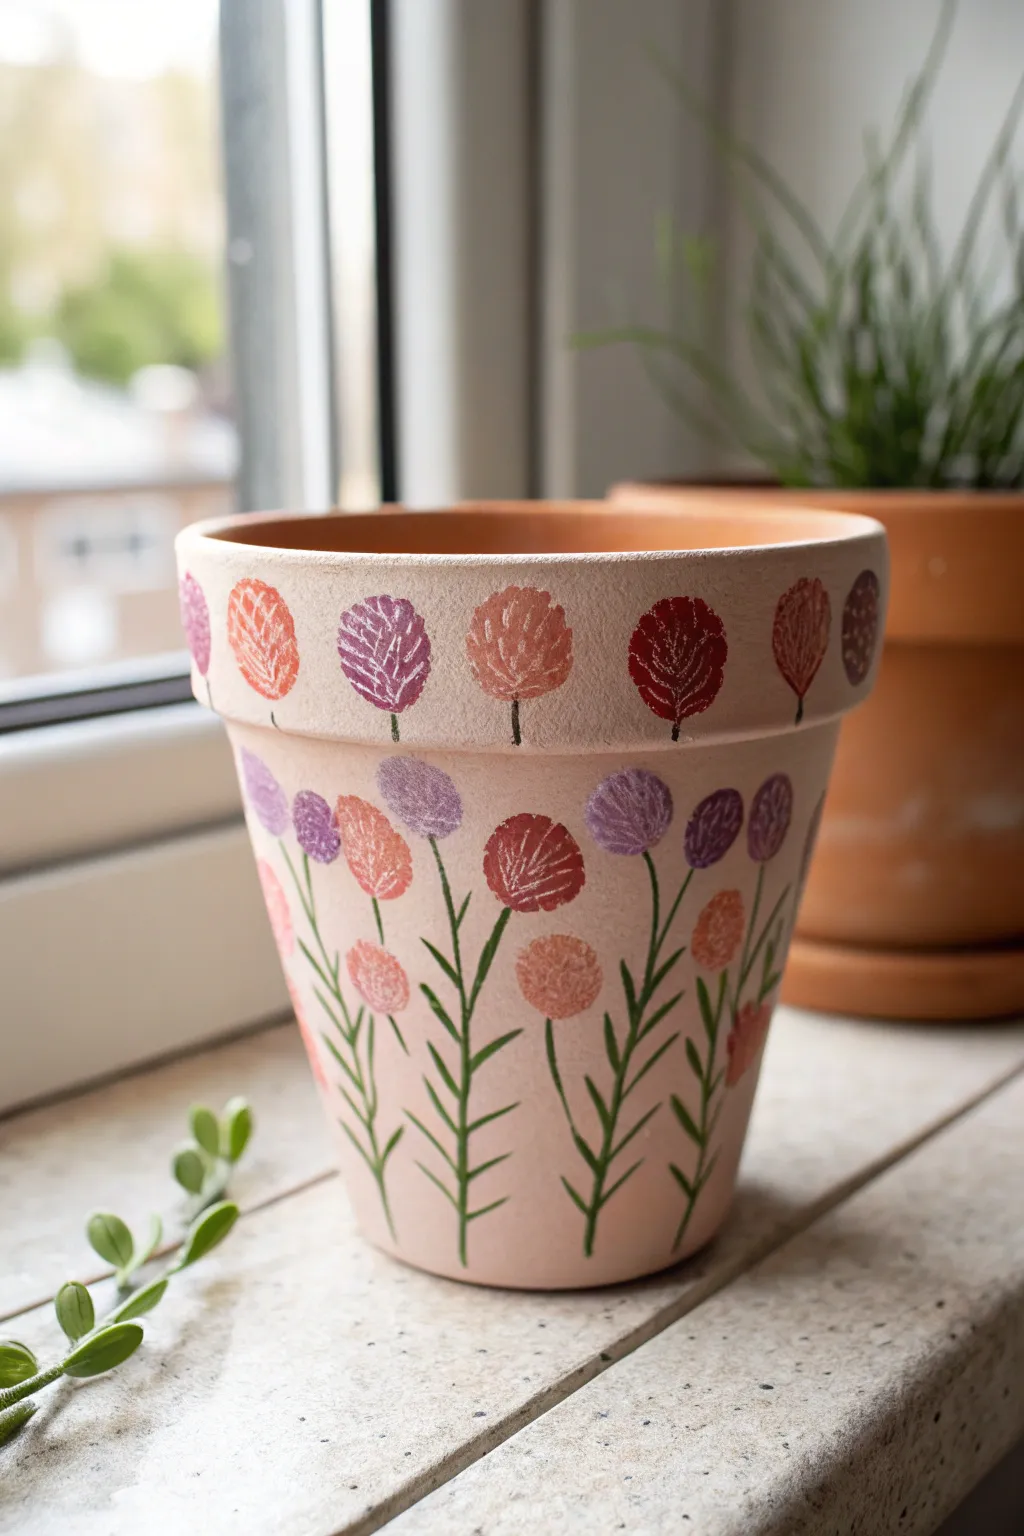
Transform a plain terra cotta pot into a blooming meadow using just your fingertips and a little creativity. This project features rows of charming, texture-rich flowers created with thumbprints in soft shades of red, purple, and orange, accented with simple vine-like stems.
Step-by-Step Tutorial
Materials
- Terra cotta pot (standard size)
- Acrylic craft paints (cream/light beige, red, orange, purple, green)
- Small flat paintbrush
- Fine liner paintbrush or detail brush
- Paper plate or palette
- Paper towels
- White gel pen (optional, for details)
- Clear acrylic sealer spray (matte or satin)
Step 1: Base Preparation
-
Clean the pot:
Wipe down your terra cotta pot with a damp cloth to remove any dust or debris. Let it dry completely before starting. -
Mix the base color:
Create a soft, creamy background color. Mix a large amount of cream or white acrylic paint with a tiny drop of orange or pink to warm it up. Aim for a ‘foundation’ shade that looks like pale plaster. -
Apply the first coat:
Using a flat paintbrush, cover the entire exterior of the pot, including the rim. Don’t worry if it looks streaky at first; terra cotta is thirsty and absorbs the first layer quickly. -
Apply the second coat:
Once the first layer is dry to the touch, apply a second coat for opaque, even coverage. Let this dry thoroughly until the surface feels matte and chalky.
Fingerprint Pro-Tip
Test your fingerprint on a piece of scrap paper first. If you have too much paint, the print will be a gloopy circle; too little, and it won’t show the nice texture.
Step 2: Creating the Blooms
-
Prepare your palette:
Squeeze dime-sized amounts of red, orange, purple, and a lighter purple onto your palette. Space them out so you can easily dip your finger without mixing colors unintentionally. -
Start with the rim:
Dip your thumb or index finger into the orange paint. Press it gently onto the rim of the pot to create an oval shape. Repeat this, alternating with red and purple prints, spacing them evenly around the circumference. -
Begin the lower garden:
Moving to the main body of the pot, start placing fingerprints for the larger flowers. Vary the height—place some higher up near the rim and others lower down. -
Layer the colors:
I like to work one color at a time here. place all your red blooms first, wipe your finger, then do the purple ones, and finally the orange ones. Keep the arrangement random for a natural, wildflower look. -
Add lower buds:
Use your pinky finger or just the tip of your index finger to add smaller, lower blooms near the bottom of the stems. These represent smaller buds or lower-growing flowers. -
Let the prints dry:
Allow the paint to dry completely. If the prints are too thick, they might smudge during the next step, so patience is key here.
Smudge Rescue
If you smudge a flower print, turn it into a ‘background’ element by dabbing a lighter color over it to create a faded look, or paint a leaf over the mistake once dry.
Step 3: Detailing and Stems
-
Add petal details:
Using a very fine liner brush directly into wet paint, or a white gel pen once dry, scratch or draw delicate lines inside each fingerprint. Create a ‘vein’ pattern that fans out from the bottom of the bloom to mimic petal texture. -
Paint the rim stems:
Load your fine liner brush with dark green paint or a black fine-tip marker. For the rim flowers, draw short, straight lines coming down from the center of each fingerprint to the bottom edge of the rim. -
Draw main flower stems:
For the main garden body, paint long, slender stems extending from the bottom of each flower down toward the base of the pot. Keep your hand loose so the lines aren’t perfectly straight. -
Add leaves:
Along these long stems, paint small V-shapes or simple lines branching outward to create grassy leaves. Keep the strokes quick and wispy. -
Connect the lower buds:
Don’t forget to draw shorter stems for those smaller, lower fingerprints you made earlier, connecting them into the garden arrangement. -
Seal the project:
Once all paint is perfectly dry (give it at least an hour), take the pot outside and spray it with a clear acrylic sealer to protect your artwork from water and dirt.
Now your pot is ready to be filled with soil and a bright green plant to complement your hand-painted garden


Ladybug and Bumblebee Bug Pots
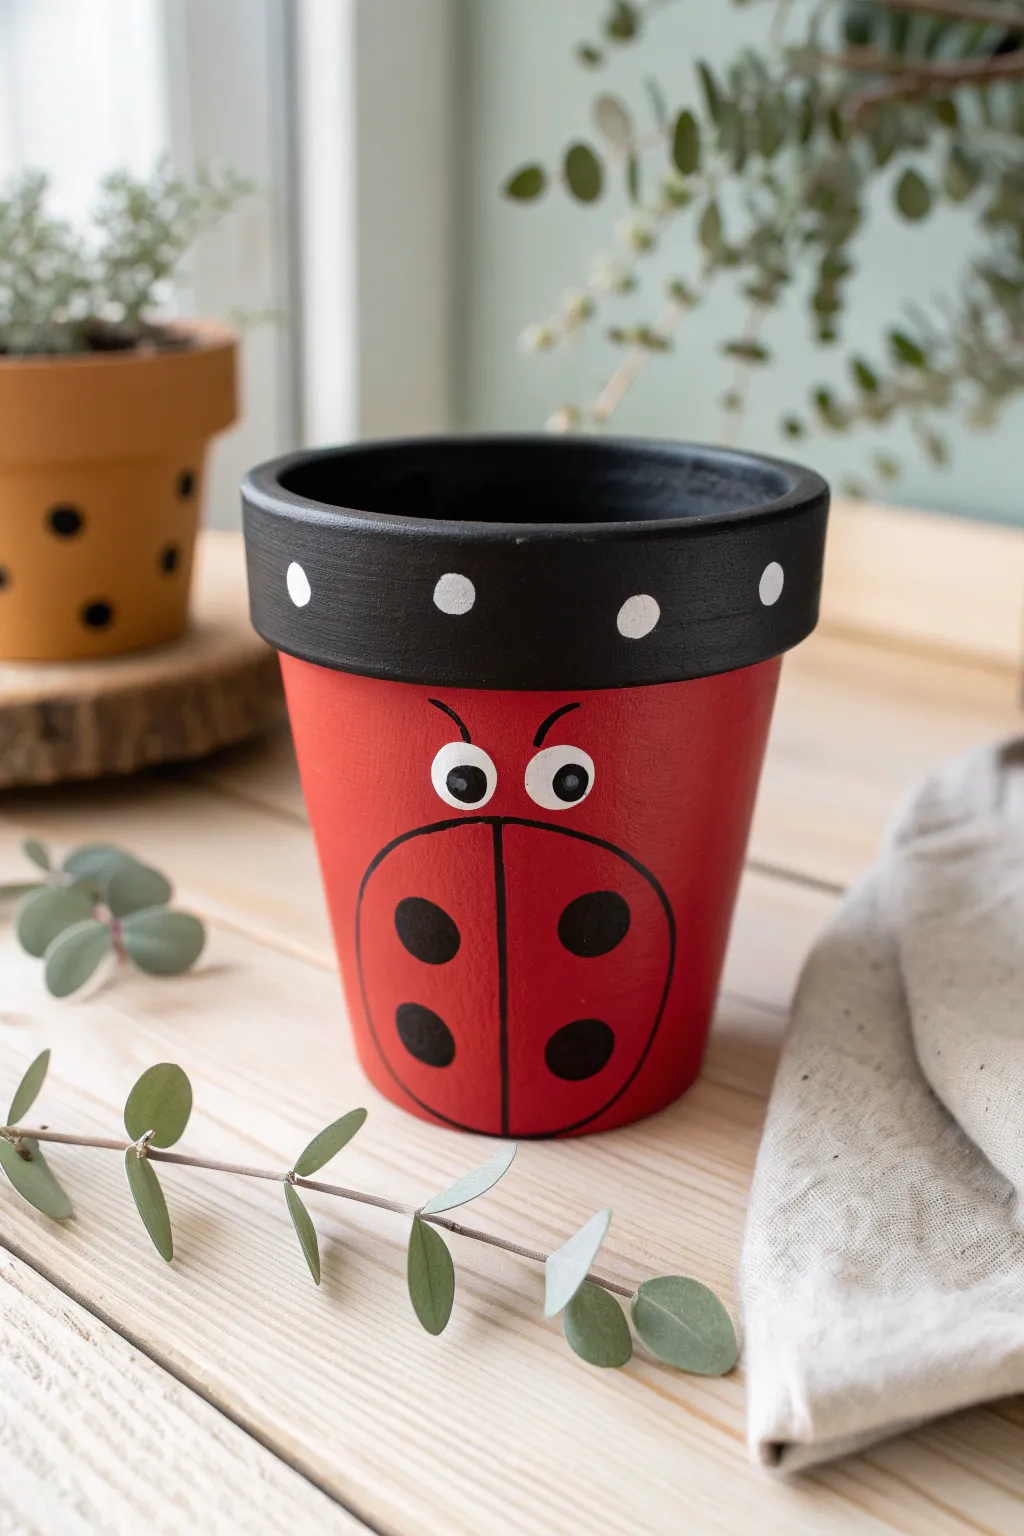
Transform a simple terracotta pot into a charming little ladybug with just a few coats of paint. This adorable character features a classic red body, a bold black rim, and whimsical hand-painted eyes that bring it to life.
Detailed Instructions
Materials
- Small or medium terracotta pot (clean and dry)
- Red acrylic paint (bright scarlet or primary red)
- Black acrylic paint
- White acrylic paint
- Medium flat paintbrush
- Small round paintbrush
- Detail brush or toothpick
- Pencil
- Water cup and paper towels
- Clear acrylic sealer (optional, for outdoor use)
Step 1: Base Colors
-
Paint the body red:
Start by painting the entire main body of the pot with your bright red acrylic paint. Use a flat brush for smooth coverage. -
Apply a second coat:
Terracotta is very porous and soaks up paint quickly. Once the first layer is dry to the touch, apply a second coat of red to ensure the color is solid and vibrant. -
Paint the rim black:
While the red dries, carefully paint the upper rim of the pot with black acrylic paint. I like to use the edge of the flat brush to get a crisp line where it meets the red section. -
Paint the inside rim:
Extend the black paint over the top lip and down about an inch into the interior of the pot. This gives the project a finished, professional look even before you add a plant.
Uneven Circles?
If painting perfect circles for the spots is tricky, glue on black buttons or use a round foam pouncer dipped in paint for an instant, flawless shape.
Step 2: Adding the Details
-
Outline the wings:
Once the red paint is fully dry, visualize where the face will be. Use a pencil to lightly sketch a large oval shape on the tummy of the pot, then draw a vertical line down the center to divide the wings. -
Paint the wing outlines:
Using a small round brush and black paint, carefully trace over your pencil lines. The oval should act as the body/wing outline, and the center line separates the two sides. -
Create the spots:
Dip your round brush or a foam dabber into black paint. Add two large circular spots on each wing section—four spots total inside your oval outline. -
Add rim dots:
For the polka dots on the black rim, dip the handle end of a paintbrush into white paint. Gently press it onto the black rim to create uniform, perfect white circles. Space them out evenly around the circumference.
Make it Sparkle
Mix a little fine bio-glitter into the red paint for the second coat, or sprinkle some onto the wet black spots to make your ladybug shimmer in the sunlight.
Step 3: Bringing the Face to Life
-
Paint the eye whites:
Just above the wing outline, paint two medium-sized white ovals for the eyes. They should be close together but not touching. -
Add pupils:
Wait for the white ovals to dry completely. Then, use a smaller brush or the tip of a handle to add a black dot inside each white oval. Place them slightly cross-eyed or looking sideways for a silly expression. -
Give it an eyebrow:
Using your thinnest detail brush or a toothpick with black paint, draw two small arched lines right above the eyes. These eyebrows give the ladybug distinct personality. -
Touch up lines:
Check the central black line dividing the wings. If it looks fading or uneven, gently go over it once more with black paint to make it bold. -
Clean up edges:
If any red paint got onto the black rim or vice versa, use a small detail brush to carefully cover the mistake with the correct color. -
Let it cure:
Allow the pot to sit undisturbed for several hours (or overnight) to ensure all layers of paint have fully hardened. -
Seal the pot:
If this ladybug will live outside on the patio, apply a coat of clear acrylic sealer spray. This protects your artwork from rain and sun damage.
Pop a fern or a flowering plant inside to give your new ladybug friend a wild, green hairstyle

The Complete Guide to Pottery Troubleshooting
Uncover the most common ceramic mistakes—from cracking clay to failed glazes—and learn how to fix them fast.
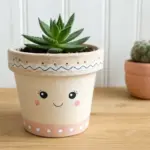
Silly Face Character Pots
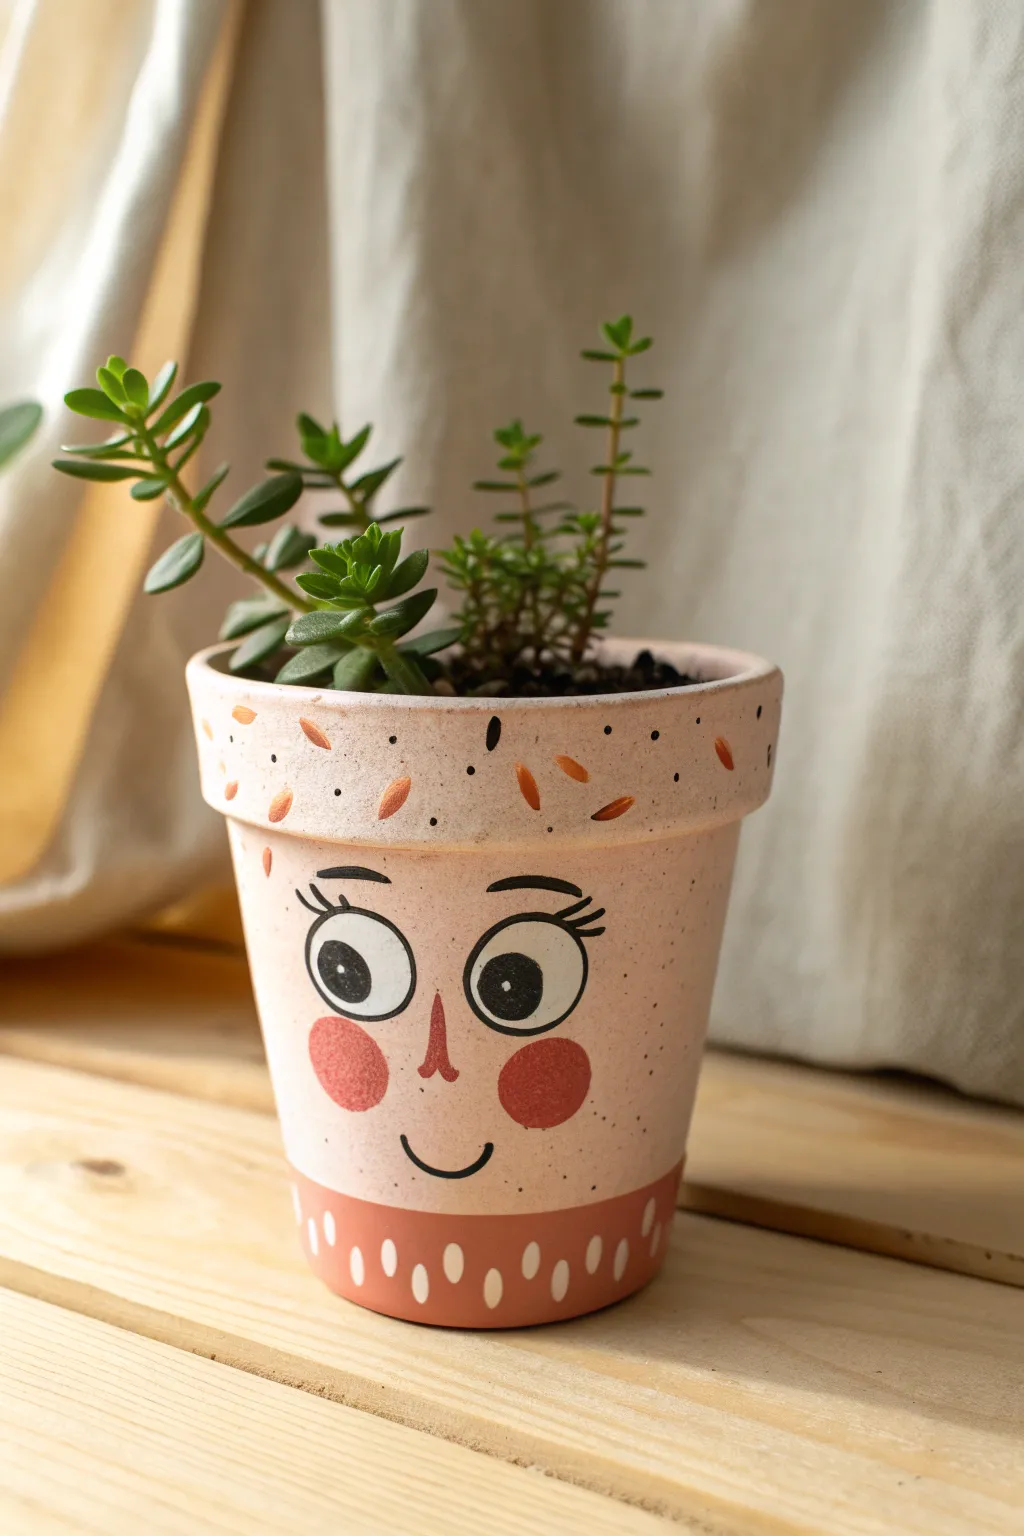
Transform a plain terracotta pot into a delightful new friend with just a few strokes of paint. This project features big, expressive eyes, rosy cheeks, and playful patterns that bring instant personality to your favorite succulents.
Step-by-Step
Materials
- Terracotta pot (standard 4-inch size or similar)
- Acrylic craft paints (light peach/pink, terracotta/rust orange, black, white)
- Flat paintbrush (medium size)
- Small round detail brush
- Pencil
- Sealant spray or Mod Podge (optional)
- Small plants and potting soil
Step 1: Base Coat & Prep
-
Clean the pot:
Start by wiping down your terracotta pot with a damp cloth to remove any dust or debris, then let it dry completely. -
Mix the skin tone:
Mix white acrylic paint with a tiny drop of orange or light pink to create a soft peach or pale pink base color. Aim for a distinct, creamy hue. -
Apply the base:
Using the flat paintbrush, cover the entire exterior of the pot, including the rim, with your mixed base color. -
Second coat:
Allow the first layer to dry for about 15 minutes. If the terracotta color is still showing through, apply a second coat for opaque coverage.
Step 2: Adding the Details
-
Paint the bottom stripes:
Switch to a rust or terracotta-colored paint. Paint a thick band around the very bottom edge of the pot, about an inch high. -
Add white dashes:
Once the bottom band is dry, use a small detail brush and white paint to create vertical dashes or teardrop shapes spaced evenly around that colored band. -
Decorate the rim:
Using that same rust/terracotta color, paint small, angled dashes along the top rim of the pot. Think of them like sprinkles or little leaves. -
Add speckles:
Dip a small brush or even a toothpick into black paint and add tiny, random dots around the rim area to give it a speckled, ceramic texture.
Uneven Circles?
If painting perfect circles is tough, trace a bottle cap or large coin lightly with a pencil before painting the eyes and cheeks.
Step 3: Painting the Face
-
Sketch the face:
Lightly pencil in two large circles for eyes in the center of the pot, along with a nose and a smile. -
Fill the eyes:
Paint the large circles completely white. You may need two coats here to cover the pink background well. -
Add pupils:
Once the white is dry, paint large black circles inside the eyes, looking slightly to the side or straight ahead. -
Highlight the eyes:
I usually add a tiny white dot inside the black pupils to bring the character to life and add a sparkle. -
Paint the nose:
Use the rust/terracotta paint to draw a small, elongated triangle for the nose between the eyes. -
Create rosy cheeks:
Mix a slightly darker pink or use thinned red paint to create two round circles on either side of the nose for blushing cheeks. -
Outline details:
Using your finest brush and black paint, carefully outline the eyes, add long eyelashes at the corners, and draw curved eyebrows above them. -
Draw the smile:
Finish the face with a simple, curved black line for the mouth perfectly centered under the nose.
Paint Pen Magic
For the thin black lines like eyelashes and the smile, switch to an acrylic paint marker. It offers much better control than a brush for fine details.
Step 4: Finishing Up
-
Seal the pot:
If you plan to keep this pot outside or water it frequently, spray it with a clear acrylic sealer to protect your artwork. -
Add greenery:
Fill the pot with soil and add a spiky or trailing plant to give your character some fun ‘hair’.
Now you have a charming little planter that invites a smile every time you water your plants
Sweet Strawberry Pots
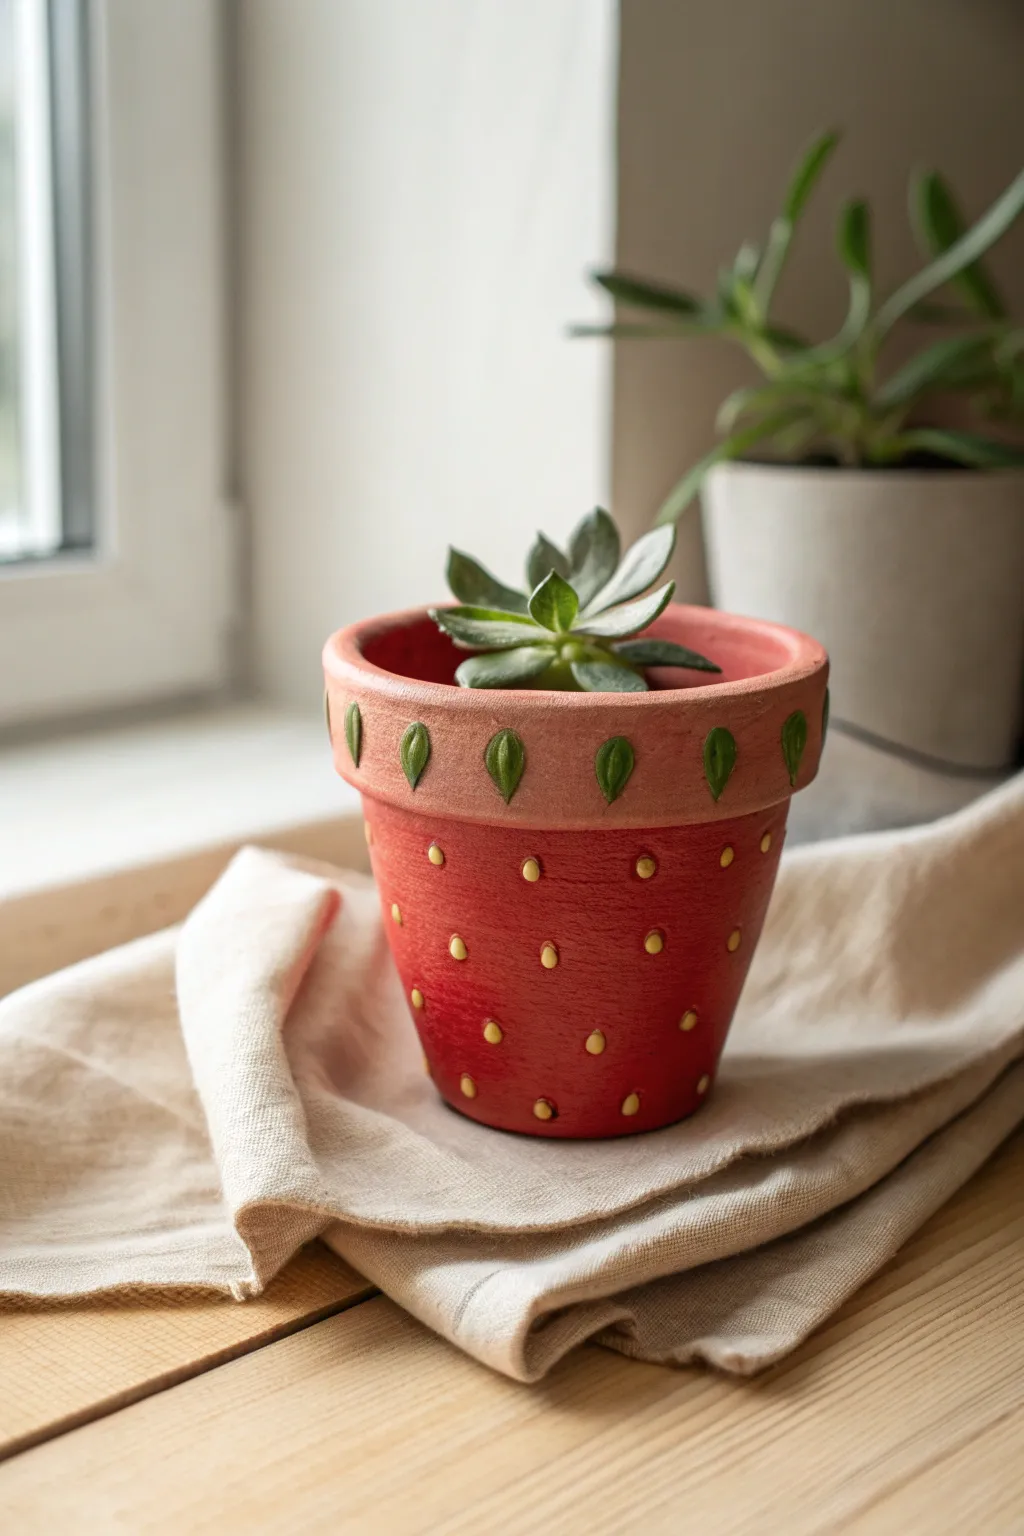
Transform a plain terra cotta planter into a delightful garden treat with this strawberry-inspired design. The project features a classic red body dotted with sunny yellow seeds and a rim adorned with charming green leaves.
How-To Guide
Materials
- Small terra cotta pot
- Acrylic paint (bright red, pastel pink or light terracotta, classic green, bright yellow)
- Medium flat paintbrush
- Small detail paintbrush
- Pencil
- Paper plate or palette
- Water cup
- Paper towels
- Clear acrylic sealer (spray or brush-on, optional)
Step 1: Base Coating
-
Clean the pot:
Before you begin, wipe down your terra cotta pot with a damp cloth to remove any dust or debris. Let it dry completely so the paint adheres properly. -
Paint the rim:
Dip your medium flat brush into the pastel pink or light terracotta paint. Apply a smooth, even coat around the entire upper rim of the pot. -
Paint the inside rim:
Don’t forget to paint the top edge and about an inch down inside the pot for a polished look. Allow this first layer to dry. -
Apply a second rim coat:
For solid coverage, apply a second coat to the rim. Terra cotta is porous and often soaks up the first layer quickly. -
Paint the body base:
Switch to your bright red acrylic paint. Carefully paint the body of the pot below the rim, creating a crisp line where the red meets the pink rim. -
Finish the red base:
Continue painting the red all the way to the bottom edge. Let this dry fully, then add a second coat to ensure the red is vibrant and opaque.
Step 2: Adding the Details
-
Initial seed planning:
Once the red paint is bone dry, use a pencil to lightly mark small dots where you want your seeds to go. Scattering them randomly creates a natural look. -
Paint the seeds:
Dip the very tip of your small detail brush into bright yellow paint. Carefully press the tip onto each pencil mark to create a small, teardrop-shaped seed. -
Shape the seeds:
If the press method doesn’t make a perfect shape, gently drag the brush upward slightly to taper the top of the seed. I prefer to do this row by row so I don’t smudge wet paint. -
Sketch the leaves:
On the pink rim, lightly sketch simple tear-drop shaped leaves using your pencil. Space them out evenly around the circumference. -
Paint the leaves:
Using your small detail brush and classic green paint, fill in your pencil sketches on the rim. A single stroke starting from the bottom and lifting at the top works well. -
Add leaf definition:
If the green looks transparent, let it dry and add a second layer. You can subtly outline the leaves with a slightly darker green if you have it, though simple blocks of color look great too. -
Final drying:
Set the pot aside in a safe spot to dry completely for several hours or overnight. -
Seal the pot:
To protect your artwork from water damage, apply a coat of clear acrylic sealer over the entire outside of the pot.
Oops, Smudged Paint?
If you accidentally smudge wet paint, wait for it to dry completely. Then, simply paint over the mistake with the background color (red or pink) to erase it.
Add a Blossom
Before sealing, paint a tiny white strawberry blossom with a yellow center on the rim between two of the green leaves for extra charm.
Pop in a succulent or small plant to complete your adorable strawberry display


What Really Happens Inside the Kiln
Learn how time and temperature work together inside the kiln to transform clay into durable ceramic.
Watermelon Slice Pots
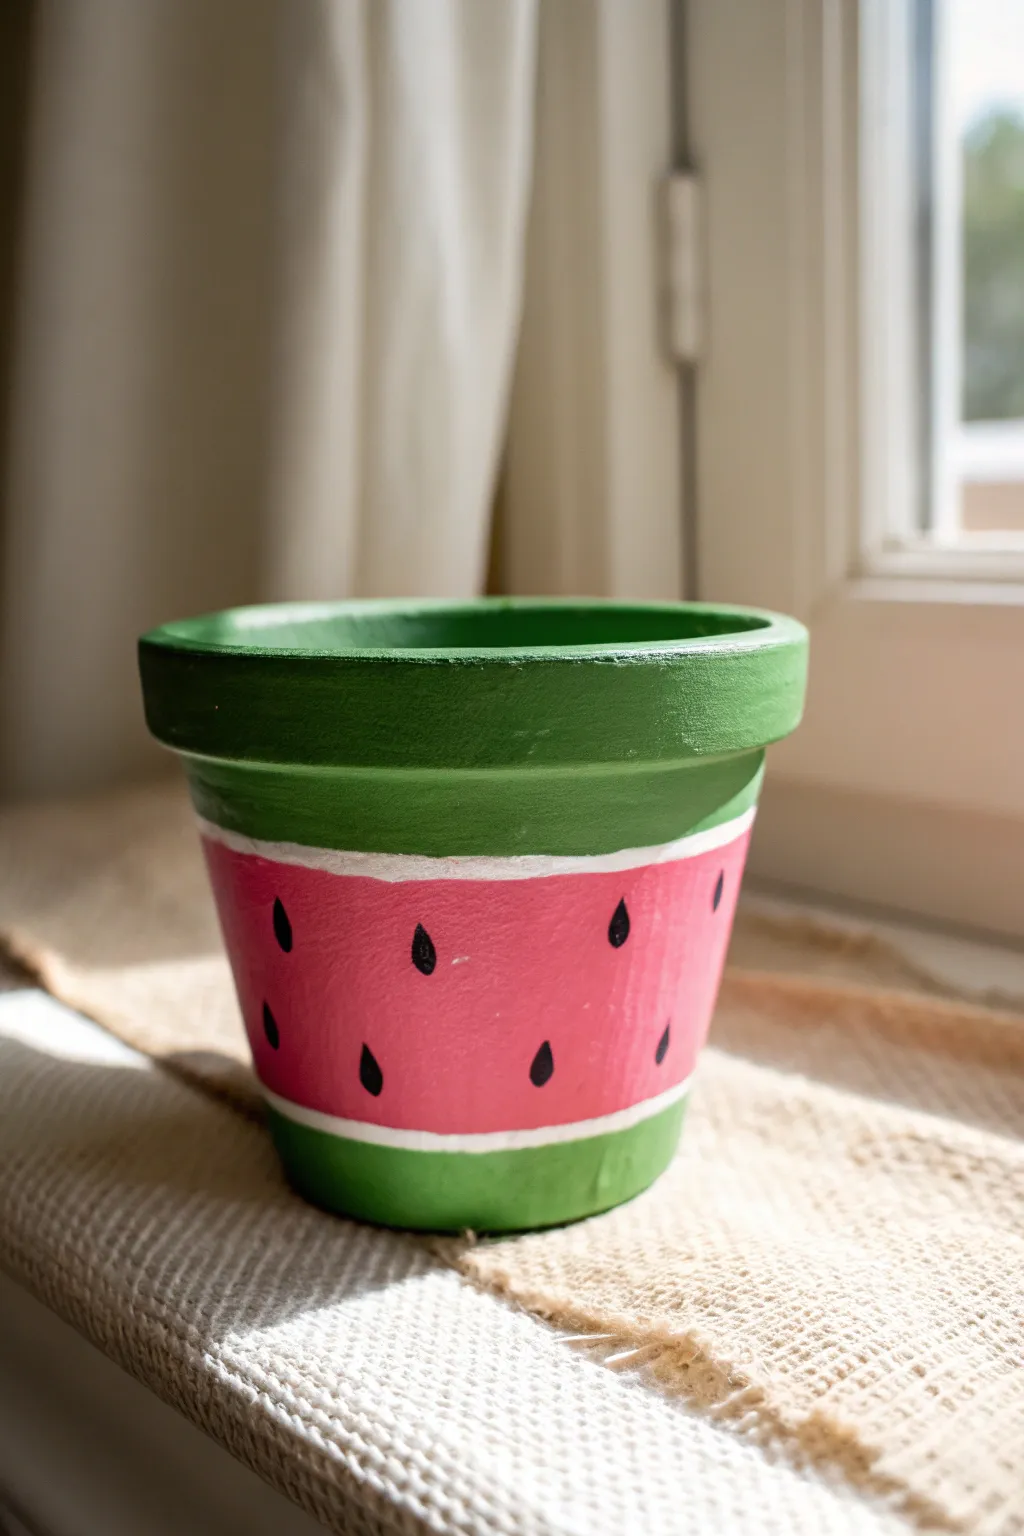
Transform a plain terracotta pot into a refreshing slice of summer with this vibrant watermelon design. The layered colors mimic the rind and juicy fruit perfectly, making it an adorable home for succulents or herbs.
Detailed Instructions
Materials
- Small to medium terracotta pot
- Acrylic craft paint (dark green, bright lime green, white, watermelon pink/red, black)
- Flat paintbrushes (medium and small sizes)
- Small fine-tip liner brush
- Paper plate or palette
- Cup of water
- Paper towels
- Clear acrylic sealer spray (optional)
Step 1: Painting the Rind
-
Base coat the rim:
Start by painting the entire thick upper rim of the pot with your dark green acrylic paint. Since terracotta is porous, you might need a second coat for solid coverage. -
Paint the bottom section:
Using a flat brush, paint the bottom inch or so of the pot with a bright lime green. This represents the lighter part of the outer rind. -
Add the upper green band:
Paint a matching band of bright lime green just underneath the dark green rim. This creates a transition zone before the fruit part starts. -
Create the white pith:
Dip a smaller flat brush into white paint. Carefully paint a thin, steady line right below the top lime green band. This is the white part of the rind. -
Add the bottom white line:
Repeat the previous step by painting another thin white line just above the bottom lime green section. Try to keep your hand steady for a crisp edge.
Seed Shape Trick
To make perfect seeds easily, press the belly of a round brush down and lift up quickly. This creates a natural teardrop shape in one stroke.
Step 2: Adding the Fruit
-
Fill the center:
Paint the large remaining middle section of the pot with your watermelon pink or red paint. Be careful not to paint over your white lines. -
Apply a second coat:
Let the pink paint dry to the touch, then add a second layer to make the color really pop and look juicy. -
Clean up edges:
If any pink paint smudged onto the white lines, use your small brush with a tiny bit of white to touch up the borders for a neat look. -
Paint the inside rim:
Don’t forget the top! Paint the inside of the rim with the dark green color down to where the soil level will be so it looks finished from above.
Step 3: The Seeds and Finish
-
Practice your seeds:
Before painting on the pot, practice making teardrop shapes on a paper scrap using your fine-tip brush and black paint. -
Start the top row:
Paint a row of black teardrop seeds near the top of the pink section. Space them out evenly around the circumference. -
Add the bottom row:
Paint a second row of seeds near the bottom of the pink section. I find it looks best if you stagger them so they sit between the seeds of the top row. -
Fill in gaps:
If the middle section looks too empty, add a few random seeds in the center space to balance out the pattern. -
Let it dry completely:
Allow the pot to sit for at least an hour to ensure the thickest parts of the paint are fully dry. -
Seal the pot:
If you plan to put a real plant inside, take the pot outside and spray it with a clear acrylic sealer to protect your artwork from water damage.
Make it Sparkle
Mix a tiny amount of glitter into the pink paint for the second coat, or sprinkle fine glitter on while the pink paint is wet for a sugary texture.
Once dry, this cheerful pot is ready to brighten up any windowsill with a splash of summer color
Cherry Pattern Pots
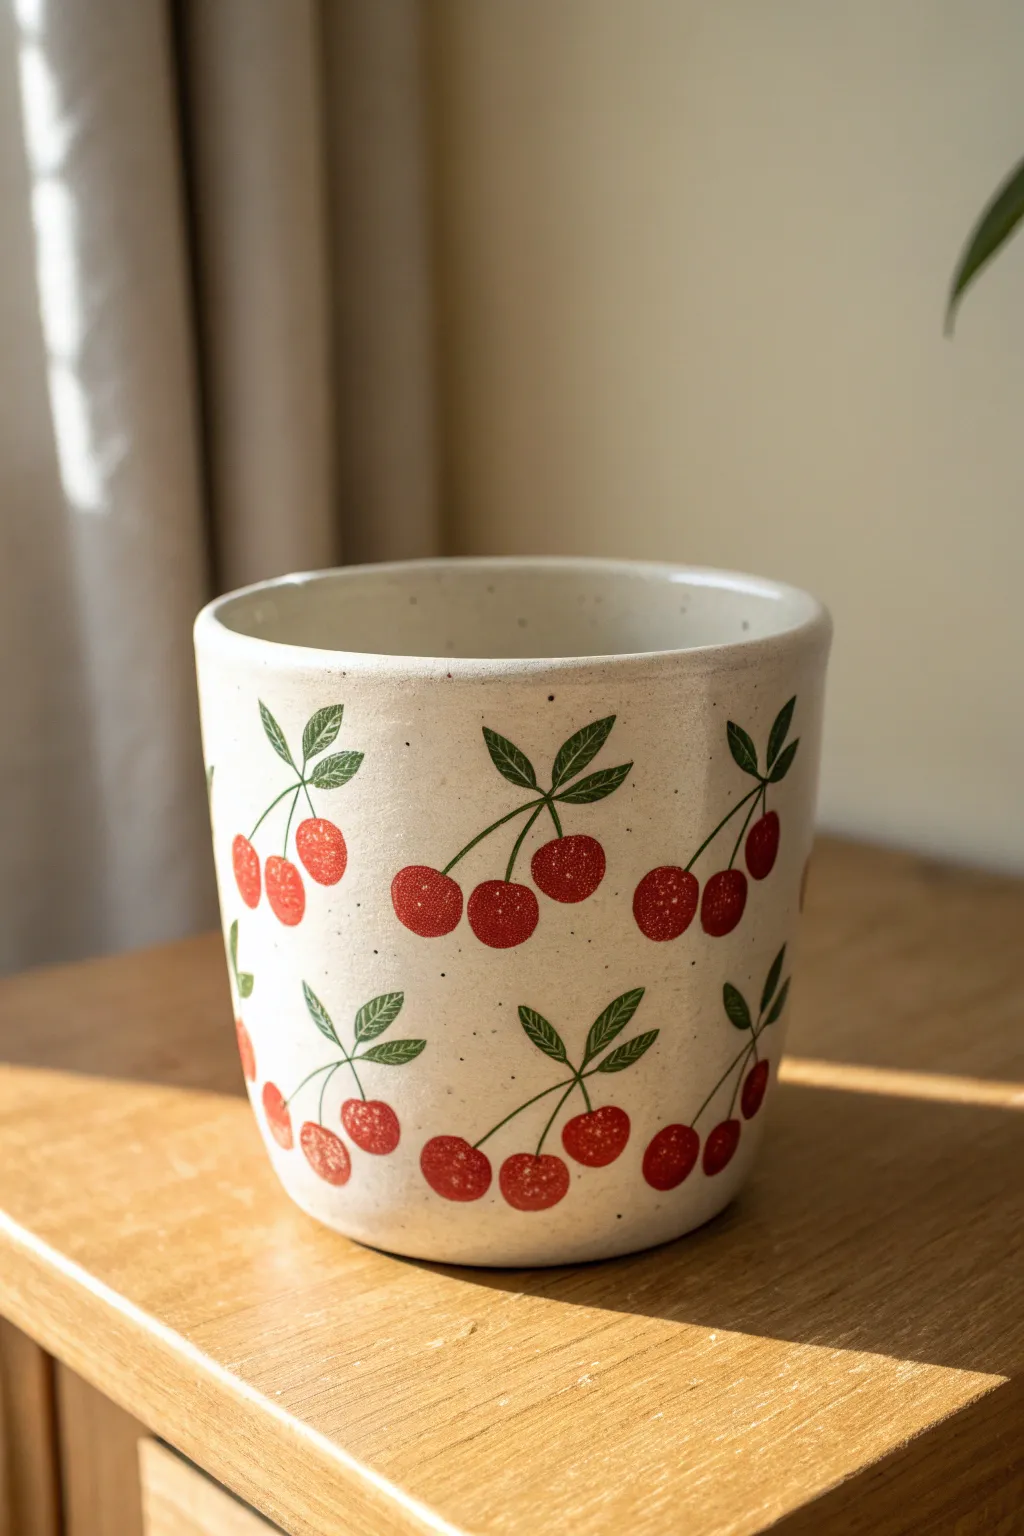
Transform a plain planter into a delightful piece of decor with this charming cherry pattern. The creamy speckled base gives it a trendy ceramic look, while the bright red fruit adds a perfect pop of playful color.
How-To Guide
Materials
- Terra cotta or ceramic pot (cleaned and dried)
- Cream or off-white acrylic paint
- Bright red acrylic paint
- Green acrylic paint (leaf tone)
- Black or dark brown acrylic paint (for speckling and stems)
- Medium flat brush
- Small round detail brush (size 1 or 2)
- Clean toothbrush (for splattering)
- Wait
- Round sponge dauber or cotton swab (optional)
- Matte spray sealer
Step 1: Base Prep
-
Clean surface:
Before starting, ensure your pot is completely free of dust and dirt. A quick wipe with a damp cloth followed by thorough drying works best. -
Base coat:
Paint the entire exterior of the pot with your cream or off-white acrylic paint. Use the medium flat brush for smooth, even strokes. -
Second layer:
Allow the first coat to dry for about 15-20 minutes. Apply a second coat to ensure the original pot color doesn’t show through, creating a solid, milky canvas. -
Create speckles:
Mix a tiny amount of water into your black paint to thin it slightly. Dip the bristles of a toothbrush into the mixture. -
Apply texture:
Hold the toothbrush near the pot and run your thumb across the bristles to flick tiny specks of paint onto the dry cream surface. This mimics expensive stoneware clay.
Fixing Smudges
If you accidentally smear a red cherry while painting, wait for it to fully dry, then paint over the mistake with your cream base color before trying again.
Step 2: Painting the Fruit
-
Plan placement:
Visualize a grid pattern around your pot. You want the cherries to be evenly spaced but offset slightly between rows, like bricks in a wall. -
Paint cherries:
Using a small round brush or a sponge dauber, paint pairs of small red circles. I find painting two touching circles creates the best cherry shape. -
Fill the pattern:
Continue painting these red pairs all around the pot. Don’t worry if they aren’t perfect circles; organic shapes look more hand-thrown. -
Add trios:
To break up the pattern, occasionally paint a group of three red circles instead of two, especially on the wider upper part of the pot. -
Let dry:
Allow the red paint to dry completely before adding stems to avoid smudging the colors together.
Pro Tip: Texture
For a truly rustic look, use a dry sponge rather than a brush to dab on the initial cream base coat. This adds a subtle, stony texture to the surface.
Step 3: Stems & Leaves
-
Draw stems:
Switch to your finest detail brush and the dark brown/black paint. Paint thin lines coming from the top of each cherry, meeting at a central point above them. -
Connect stems:
Ensure the lines meet neatly at a ‘V’ shape for pairs, or a tripod shape for trios. Keep your hand steady and pressure light for thin lines. -
Leaf shape:
With the green paint and a small brush, add two almond-shaped leaves at the junction where the stems meet. -
Vein details:
Once the green leaves are semi-dry, use your finest brush or even a toothpick to scratch or paint a tiny center line down the middle of each leaf. -
Final touches:
Check for any uneven spots in the red cherries and apply a second coat if the speckles are showing through too much. -
Seal it:
Once all paint is bone dry (give it a few hours), spray the entire pot with a matte sealer to protect your artwork from water damage.
Now your pot is ready to be the perfect home for a new houseplant or a handful of pens

TRACK YOUR CERAMIC JOURNEY
Capture glaze tests, firing details, and creative progress—all in one simple printable. Make your projects easier to repeat and improve.
Simple Flower Burst Pots
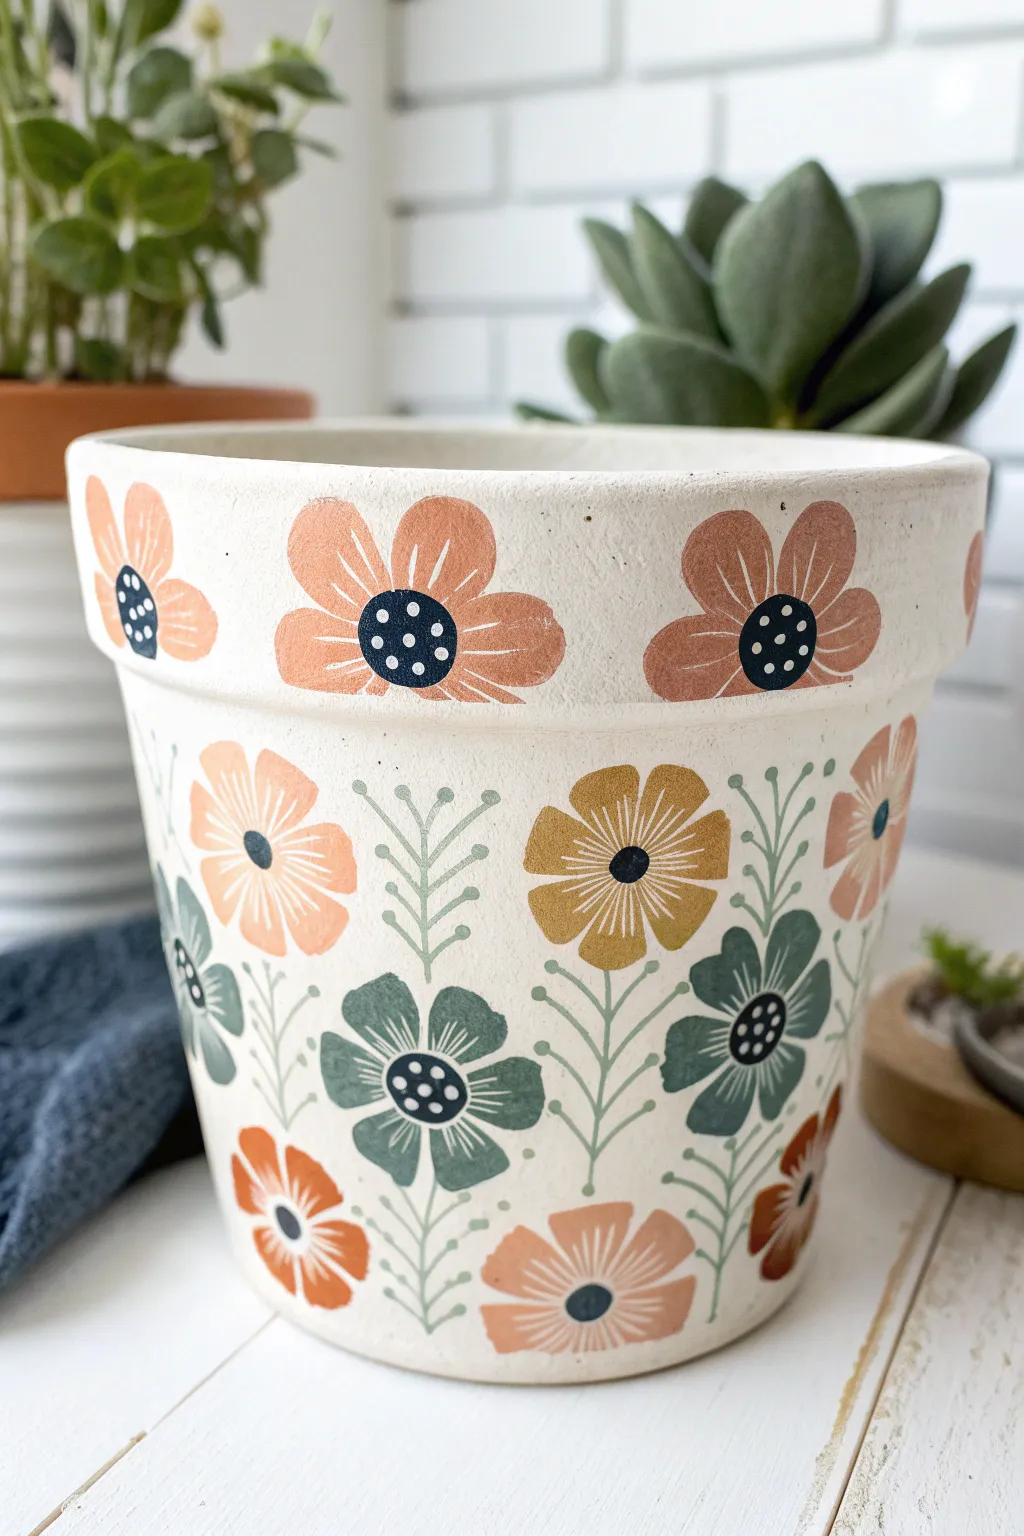
Transform a plain terra cotta planter into a charming boho-chic accent piece with this simple floral design. The combination of muted earth tones, soft whites, and stylized botanical shapes creates a modern look perfect for succulents or herbs.
Detailed Instructions
Materials
- Terra cotta pot (standard 4-inch or 6-inch size)
- White acrylic paint (eggshell or matte finish)
- Acrylic paints in peach, mustard yellow, sage green, dark teal, and dark navy
- Flat paintbrush (medium size for base coat)
- Small round paintbrushes (sizes 2 and 4)
- Small detail brush or dotting tool
- Pencil
- Palette or paper plate
- Water cup and paper towels
- Matte spray sealer (optional)
Step 1: Preparing the Canvas
-
Clean surface:
Before you start, make sure your clay pot is clean and dry. Wipe it down with a damp cloth to remove any dust or sticker residue, then let it air dry completely. -
Base coat:
Using your medium flat brush, apply an even coat of white acrylic paint to the entire exterior of the pot, including the rim and just inside the top edge. Allow this first layer to dry. -
Second coat:
Apply a second or even third coat of white paint until you achieve full opacity and can no longer see the orange clay peeking through. Let the paint dry thoroughly between coats to prevent streaks.
Stamp Helper
Make a simple stamp from a cut potato or foam sticker to get uniform petal shapes quickly if painting by hand feels tricky.
Step 2: Painting the Rim
-
Sketch placement:
Lightly use a pencil to mark the center points for four or five flowers around the rim of the pot to ensure even spacing. -
Petal shapes:
Load a small round brush with peach paint. Paint simple, rounded petal shapes radiating from your marked centers. Aim for four or five petals per flower, keeping the edges soft and organic. -
Flower centers:
Once the peach petals are dry, paint a solid circle in the center of each flower using dark navy blue paint. I find that a round brush works best for getting a clean circle here. -
Rim details:
Using a very thin detail brush or white paint pen, draw fine lines radiating from the center outward on each peach petal. Then, use a dotting tool or the handle end of a brush to add small white dots inside the navy centers.
Step 3: Creating the Floral Pattern
-
Plan the main blooms:
Moving to the body of the pot, visualize a repeating pattern. You want to alternate between three main flower colors: peach, mustard yellow, and dark teal. -
Paint main flowers:
Using the same petal technique as the rim, paint scattered flowers around the middle section of the pot. Mix up the colors (peach, yellow, teal) so no two identical colors are right next to each other. -
Add detail lines:
Just like on the rim, use your fine detail brush and white paint (or a lighter shade of the petal color) to add delicate radiating lines on the petals of the yellow and peach flowers. For the teal flowers, use a lighter teal or white for contrast. -
Navy centers:
Paint dark navy centers on all the main body flowers. Let these dry completely before moving to the next step. -
Center dots:
Add the signature white dots to the navy centers using your dotting tool. Usually, five or six small dots arranged in a circle look best.
Level Up: Texture
Mix a pinch of baking soda into your base white paint to give the pot a trendy, textured ceramic feel before you paint the design.
Step 4: Adding Greenery and Filler
-
Stem structure:
Mix a soft sage green color. With a thin liner brush, paint vertical stems rising up between the main flowers. These should look like stylized sprigs. -
Leaf details:
paints small, angled lines coming off the main stems to create leaves. Keep them symmetrical—pairs of leaves branching out left and right as you move up the stem. -
Berry accents:
At the top of these green stems, add tiny circles or ‘berries’ in the same sage green color to cap off the sprigs. -
Bottom row:
If you have extra space near the bottom, add smaller half-flowers or simple buds peeking up from the base to fill any large empty white spaces.
Step 5: Finishing Touches
-
Final inspection:
Rotate your pot and look for any uneven lines or spots that need a touch-up. Clean up any accidental smudges with a tiny bit of white paint. -
Seal the deal:
Once all paint is 100% dry (I usually wait overnight to be safe), spray the entire pot with a clear matte sealer. This protects your artwork from water damage when you water your plants.
Now you have a beautifully hand-painted pot ready to house your favorite greenery
Name and Letter Stencil Pots
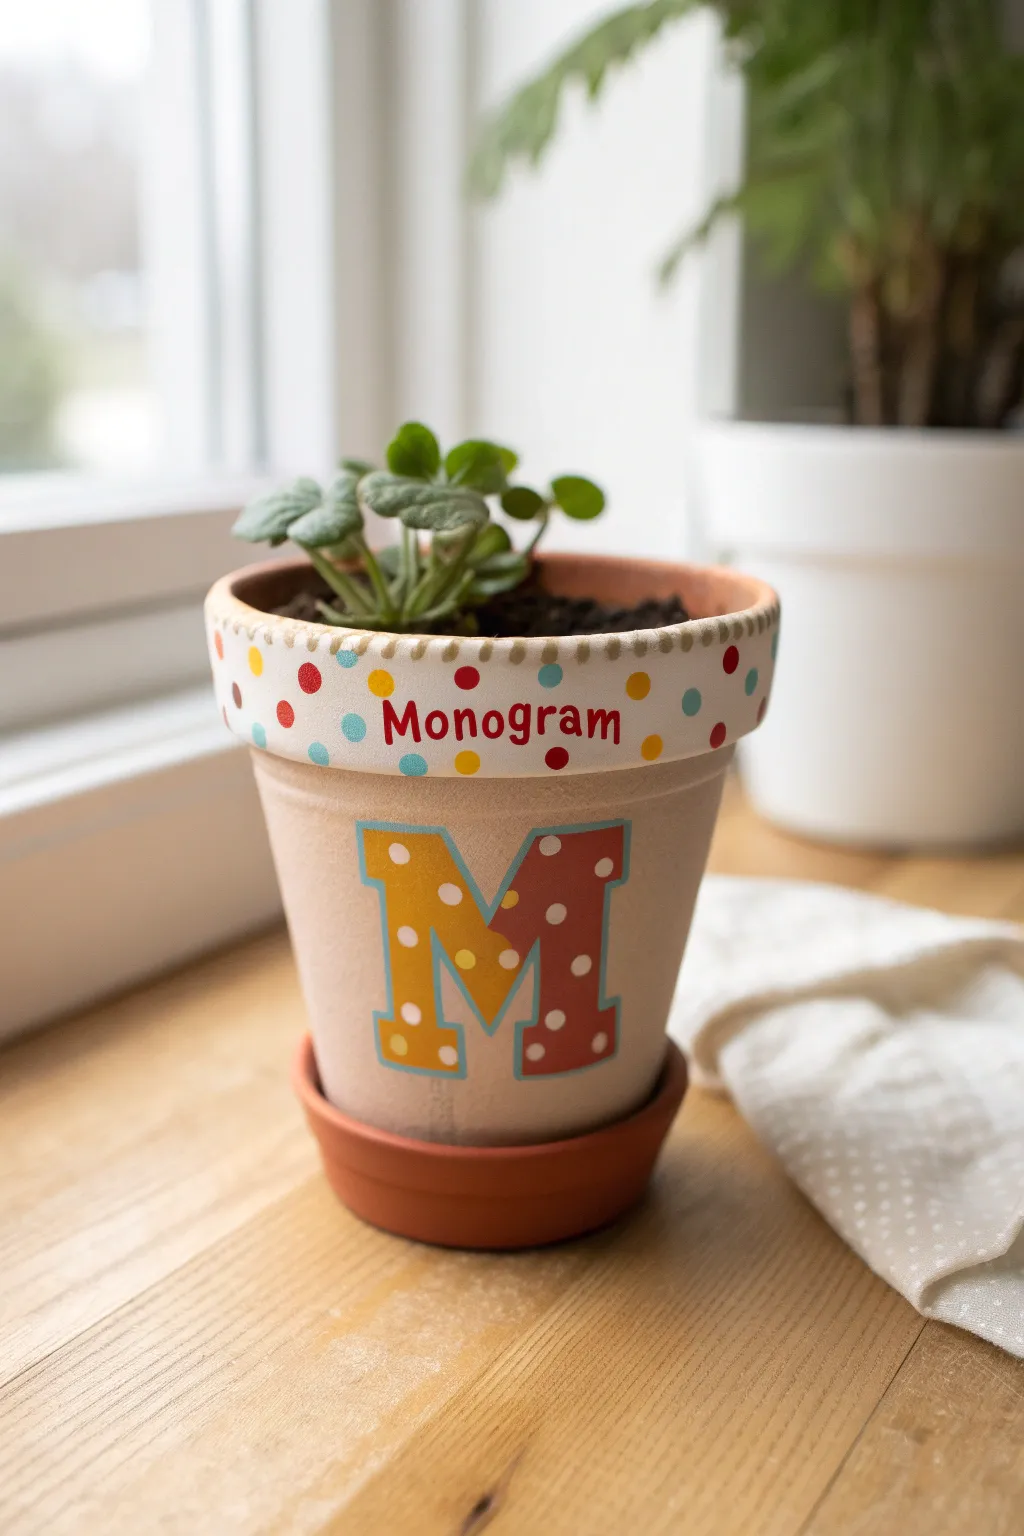
Transform a plain terracotta pot into a personalized masterpiece with this cheerful design featuring a bold central initial and playful polka dots. The combination of clean white accents and vibrant primary colors makes this a standout piece for any windowsill.
How-To Guide
Materials
- Terracotta pot with saucer (4-6 inch size recommended)
- White acrylic craft paint
- Red, yellow, and teal acrylic craft paints
- Medium flat paintbrush
- Small round detail brush
- Pencil
- Circular foam pouncers or cotton swabs (Q-tips)
- Letter stencil (optional)
- Small painting sponge (optional)
- Clear acrylic sealer (spray or brush-on)
Step 1: Preparation and Base Coat
-
Clean the surface:
Before starting, wipe down your terracotta pot with a damp cloth to remove any dust or loose clay particles. Let it dry completely so the paint adheres properly. -
Whitewash the rim:
Using your medium flat brush, apply a solid coat of white acrylic paint to the entire rim of the pot. You want this to look opaque, so apply a second coat if the clay color shows through after the first layer dries. -
Prepare the body:
For the main body of the pot, you can leave the natural terracotta showing as in the photo, or apply a very light wash of white paint watered down (1 part paint to 2 parts water) if you prefer a softer, chalky background look.
Uneven Dots?
If your polka dots look messy, use the eraser end of a new pencil. Dip it in paint and stamp straight down for perfect circles every time.
Step 2: Painting the Monogram
-
Draft the letter:
Lightly sketch a large block letter ‘M’ (or your chosen initial) in the center of the pot’s body using a pencil. Make sure the legs of the letter are thick enough to hold the polka dot pattern later. -
Color blocking:
Paint the left vertical leg of the ‘M’ with yellow acrylic paint. Use a small flat brush to keep the edges crisp and straight. -
Finish the letter base:
Paint the rest of the letter (the V-shape and right leg) with a deep reddish-orange paint. Let this base layer dry fully before moving on. -
Add the outline:
Using a tiny detail brush and teal paint, carefully outline the entire letter. This makes the monogram pop against the background and cleans up any uneven edges from the previous step. -
Dot the letter:
Dip the non-brush end of a paintbrush or a toothpick into white paint. Gently dab small white dots onto the painted letter blocks, spacing them out evenly for a classic pattern.
Step 3: Decorating the Rim
-
Create the polka dot pattern:
Dip a cotton swab or small foam pouncer into your colored paints (red, yellow, teal). Stamp random dots all over the white-painted rim. I like to rotate the pot as I go to ensure the pattern looks balanced from all angles. -
Add text:
In the center of the rim, directly above your large monogram, paint the word ‘Monogram’ (or a full name) in red script using your finest detail brush. If freehanding feels risky, lightly write it in pencil first. -
Stitch detail:
Mix a tiny bit of brown with yellow to make a tan color. Paint short, dashed lines along the very top edge of the rim to mimic a stitching effect.
Go 3D
Use puffy fabric paint for the dots on the Monogram letter. It adds a fun tactile element that kids love to touch once it dries.
Step 4: Saucer and Finishing Touches
-
Paint the saucer:
Paint the outer rim of the saucer with a solid coat of the reddish-orange paint to tie the whole design together. Leave the inside unpainted if you plan to water the plant heavily. -
Clean up:
Check for any pencil marks that might still be visible and gently erase them if the paint is bone dry. -
Seal the deal:
Once all paint is cured (usually 24 hours), apply a coat of clear acrylic sealer. This protects your artwork from water damage when you water your plant.
Place a small succulent or flowering plant inside to complete your personalized garden creation
Chalkboard Label Herb Pots for Kids
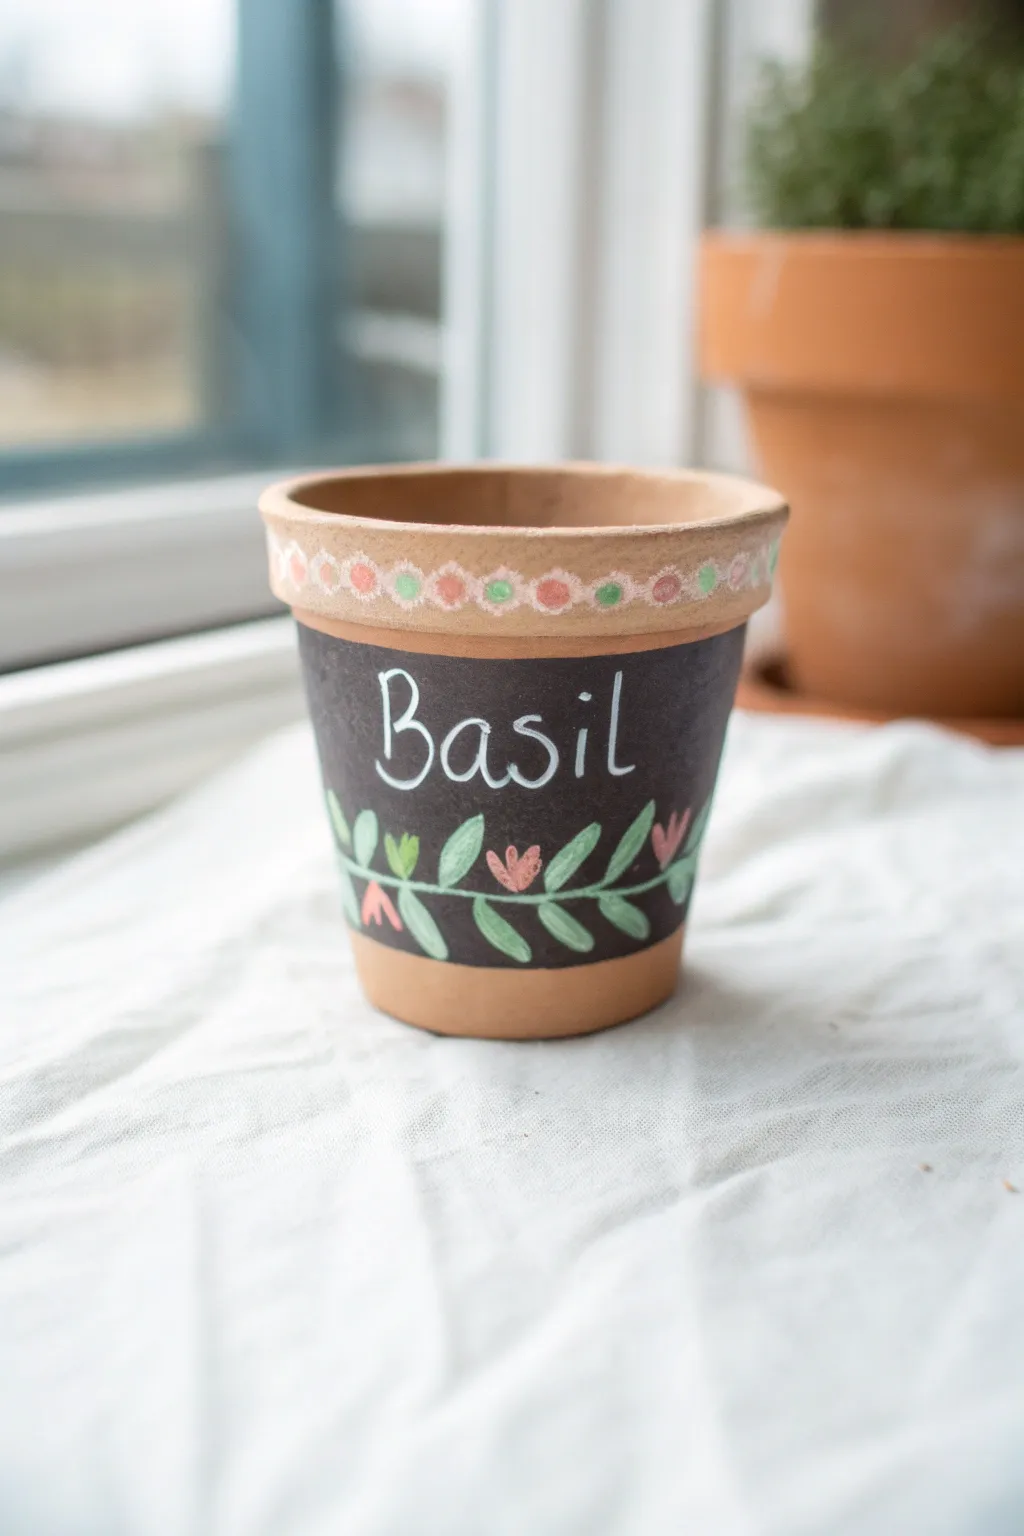
These adorable custom herb pots turn a simple gardening project into a fun labeling activity. By painting a chalkboard band around a terracotta pot, kids can easily practice their handwriting while creating a sweet home for their favorite basil plant.
Step-by-Step Tutorial
Materials
- Small terracotta pot (clean and dry)
- Black chalkboard paint
- Wide flat paintbrush
- White liquid chalk marker or white paint pen (fine tip)
- Pink paint marker or acrylic paint
- Green paint marker or acrylic paint
- Small detail brush (if using acrylic paint)
- Painter’s tape (optional)
- Regular chalk (for seasoning)
- Damp cloth
Step 1: Preparation and Base Coat
-
Clean the surface:
Before starting, ensure your terracotta pot is completely free of dust or price sticker residue. Wipe it down with a damp cloth and let it dry fully so the paint adheres properly. -
Define the painting area:
Plan where your chalkboard area will be. You want to leave the top rim natural and a small strip at the very bottom natural as well. If you want straight lines, run a strip of painter’s tape just under the rim and another strip about an inch from the bottom. -
Apply the chalkboard paint:
Using a wide flat paintbrush, apply a smooth layer of black chalkboard paint to the main body of the pot. Work in horizontal strokes around the circumference. -
Let it dry:
Allow the first coat to dry completely according to the bottle’s instructions, usually about an hour. -
Apply a second coat:
For a truly opaque finish that covers the orange clay tone, apply a second coat of chalkboard paint. I find this second layer makes writing on it much smoother later on. Let this dry overnight for the best durability.
Seasoning Secret
Don’t skip rubbing regular chalk over the dry paint before writing! It prevents ‘ghosting’ where your first word stays visible forever even after erasing.
Step 2: Decorating the Rim
-
Start the rim pattern:
On the unpainted terracotta rim, you will create a simple geometric pattern. Take your pink paint marker and draw small, evenly spaced circles all the way around the center of the rim. -
Add the green accents:
Using the green marker, place a small dot or tiny diamond shape in the spaces between each pink circle. -
Connect the design:
With a fine-tip white paint pen or chalk marker, carefully draw small scalloped lines or loops that connect the pink and green shapes, giving it a lace-like appearance. Let this dry for 10-15 minutes.
Shaky Lines?
If your markers slip on the curved surface, rest your pinky finger on the pot for stability. A damp Q-tip can quickly erase small mistakes.
Step 3: Lettering and Floral Details
-
Season the chalkboard:
Once the black paint is fully cured, take a piece of regular chalk and rub it sideways over the painted area, then wipe it off with a dry tissue. This ‘seasons’ the surface so your first writing doesn’t leave a permanent ghost image. -
Write the label:
Using your white liquid chalk marker, write the name of your herb—like ‘Basil’—in the center of the black band. Use a loose, playful handwriting style. -
Draw the main vine stem:
Below the text, draw a long horizontal white line that curves slightly. This will become the main vine for your floral border. -
Add leaves:
Switch to your green marker. Draw small, pointed oval leaves coming off the white vine. Alternate the direction of the leaves—one pointing up, the next pointing down—as you move across the vine. -
Fill in the leaves:
Color in the leaves with the green marker so they stand out against the black background. -
Add flower buds:
Using the pink marker, draw small tulip-shaped buds or hearts interspersed among the leaves. Place one pink bud for every two or three green leaves to balance the color. -
Final white accents:
To make the design pop, add tiny white accent lines or dots inside the pink flowers or along the leaves.
Now your pot is ready to be filled with soil and a fragrant herb plant for your kitchen windowsill
Sponge-Stamped Texture Pots

Brighten up your garden with this cheerful project that combines bold colors with a unique texture. Using round sponge stamps creates perfectly imperfect polka dots that pop against a crisp white background.
Detailed Instructions
Materials
- Unfinished terracotta pot (standard size)
- White acrylic paint (matte finish)
- Acrylic craft paints (orange, teal, yellow, sage green, navy blue)
- Wide flat paintbrush
- Round foam sponge pouncers (approx. 1-inch diameter)
- Paper plate or palette
- Paper towels
- Clear acrylic sealer spray (optional)
Step 1: Preparing the Base
-
Clean surface:
Before you start, make sure your terracotta pot is clean and free of dust. Wipe it down with a barely damp cloth and let it dry completely. -
First white coat:
Squeeze a generous amount of white acrylic paint onto your palette. Using the wide flat brush, apply a smooth coat of white paint over the entire exterior of the pot. -
Paint the rim:
Don’t forget to paint the top rim and just inside the lip of the pot (about an inch down) so the terracotta color doesn’t show through when it’s filled with soil. -
Let it dry:
Allow this first layer to dry for about 15-20 minutes. Terracotta is porous, so it will soak up the first coat quickly. -
Second white coat:
Apply a second coat of white paint to ensure solid coverage. You want a crisp, opaque white background so the colorful dots really stand out. -
Full drying time:
Let the white base coat dry completely before moving on to the colors. If the white paint is still wet, your colored dots might mix and become muddy.
Uneven Circles?
If the sponge slips and smears a dot, wait for it to dry completely. Then, paint over the mistake with white paint, let it dry again, and re-stamp the color.
Step 2: Stamping the Dots
-
Prepare colors:
Pour small puddles of your acrylic colors—orange, teal, yellow, sage green, and navy—onto your paper plate. Space them out nicely. -
Load the sponge:
Take a round foam pouncer and dab it into your first color. Tap the excess paint off onto a clean spot on the plate to ensure an even layer on the foam. -
Stamp the rim:
Starting with the thick rim of the pot, press the sponge firmly against the surface. Lift it straight up to leave a clean circle. I like to alternate colors as I go around the rim. -
Clean between colors:
If you only have one sponge pouncer, wash and dry it thoroughly between colors. Using a separate pouncer for each color is easier if you have them. -
Start the body:
Move down to the main body of the pot. Press a new colored dot below the rim, positioning it roughly in the spaces between the dots on the rim above. -
Vary the colors:
Continue stamping dots around the pot in a random but balanced pattern. Try not to put two of the exact same color right next to each other. -
Create texture:
If you want that slightly textured look seen in the photo, don’t overload the sponge with paint. A lighter load creates that nice ‘stamped’ interior texture. -
Bottom row:
Finish stamping a final row or scattered collection of dots near the bottom of the pot, filling in any large white gaps.
Step 3: Finishing Touches
-
Touch ups:
Scan the pot for any smudges or uneven edges. You can use a small detail brush to tidy up the edges of the circles if you want them perfectly round. -
Final dry:
Let the polka dots dry completely. Give it at least an hour since the sponge application can sometimes leave thicker deposits of paint. -
Seal the pot:
If you plan to use this pot outdoors or with real plants that need watering, apply a coat of clear acrylic sealer spray to protect your artwork from moisture.
Level Up: Pattern Play
Use different sizes of foam pouncers to create a variety of dot sizes, or use the stick end of your paintbrush to add tiny confetti dots between the large ones.
Your vibrant new planter is ready to be the perfect home for a succulent or small flower
Tissue Paper Collage Clay Pots
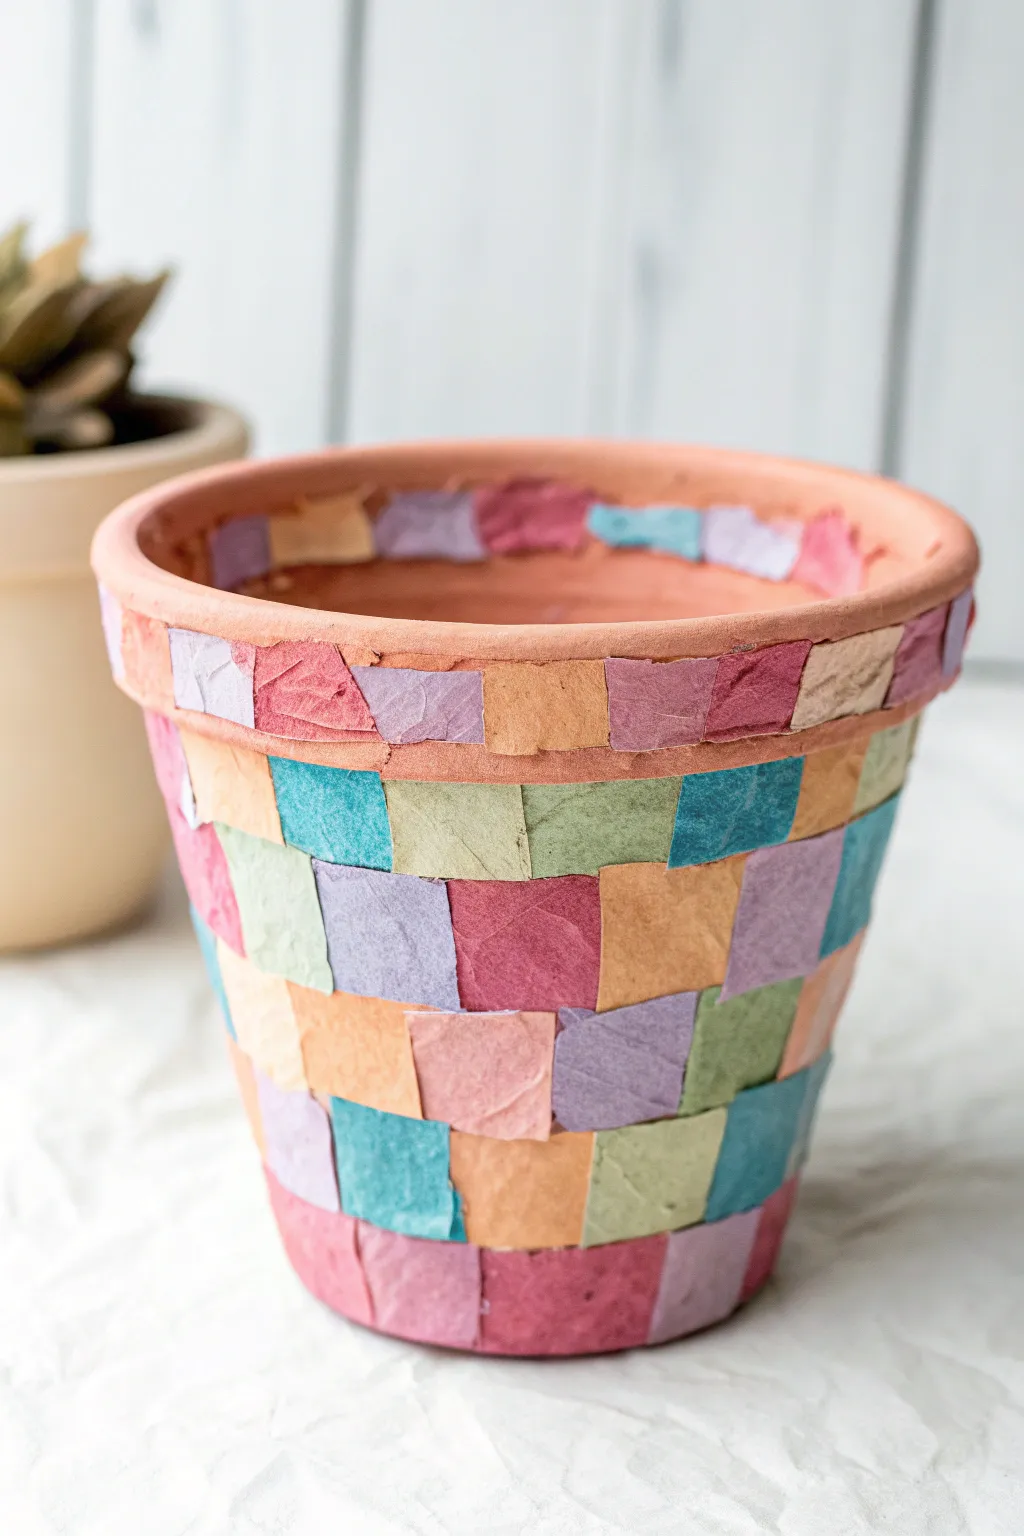
Transform a plain terracotta vessel into a vibrant mosaic masterpiece using the simplest of materials. This tissue paper collage technique creates a beautiful, stained-glass effect that is colorful, tactile, and incredibly easy for little hands to master.
Step-by-Step
Materials
- Terracotta clay pot (standard size)
- Tissue paper in assorted colors (pinks, purples, blues, greens, oranges)
- Mod Podge or white PVA glue diluted with a little water
- Foam brush or soft bristle paintbrush
- Scissors
- Wax paper or newspaper (for surface protection)
- Clear acrylic sealer spray (optional)
Step 1: Preparation
-
Clean the pot:
Start with a clean slate by wiping down your terracotta pot with a damp cloth to remove any dust or store shelf grime. Let it dry completely before starting. -
Select your palette:
Choose 5-6 complementary colors of tissue paper. The example uses a sweet pastel mix of pink, lavender, teal, light green, and peach. -
Cut vertical strips:
Cut your tissue paper sheets into long vertical strips. Aim for a width of about 1 inch to 1.5 inches. -
Create squares and rectangles:
Take your strips and snip them into smaller squares and rectangles. They don’t need to be perfectly uniform; a little variation adds to the handmade charm. -
Organize your pieces:
Separate your cut paper shapes into piles by color so you can easily grab the shade you need while working.
Bleeding Colors
Some tissue paper ‘bleeds’ color when wet. Test a scrap first! If doing this with very young kids, ‘bleeding’ tissue paper can create a cool watercolor effect intentionally.
Step 2: Applying the Collage
-
Set up your station:
Pour some Mod Podge or diluted glue into a small dish or paper cup for easy access. -
Start at the rim:
Brush a thin layer of glue onto a small section of the outer rim of the pot. -
Apply the first rim piece:
Place a piece of tissue paper onto the glued area of the rim. Gently smooth it down with your finger or the brush. -
Complete the rim:
Continue adding glue and paper pieces around the entire circumference of the rim, alternating colors as you go. Overlap the edges slightly to ensure no clay shows through. -
Begin the body:
Move down to the main body of the pot. Apply a patch of glue just under the rim. -
Layer the main sections:
Place your first square on the body of the pot. I find it works best to work in rough horizontal rows, but random placement is fine too. -
Smooth as you go:
After placing each piece, brush a very thin layer of glue over the top of it to seal it flat against the clay. -
Create the patchwork:
Continue gluing pieces around the pot, ensuring the corners and edges of new pieces overlap with the previous ones. -
Handle the bottom edge:
When you reach the bottom, wrap the tissue paper slightly under the base or trim it flush with the edge for a neat finish. -
Fill in gaps:
Inspect your pot for any spots of bare terracotta. If you find one, simply glue a small scrap of tissue paper over the hole.
Gilded Edges
For a fancy finish, use gold craft paint to paint the very top lip of the rim after the tissue paper dries. It frames the colorful mosaic beautifuly.
Step 3: Finishing Touches
-
Final seal coat:
Once the entire pot is covered, brush a final, generous coat of Mod Podge over the whole surface to bond everything together. -
Let it dry:
Allow the pot to dry completely. The glue will go from white to clear, revealing the bright colors. -
Optional weatherproofing:
If this pot will live outdoors or hold a real plant requiring water, take it outside and spray it with a clear acrylic sealer to make it water-resistant.
Now your colorful pot is ready to brighten up a windowsill or hold a special succulent
Drip-and-Pour “Messy Magic” Pots
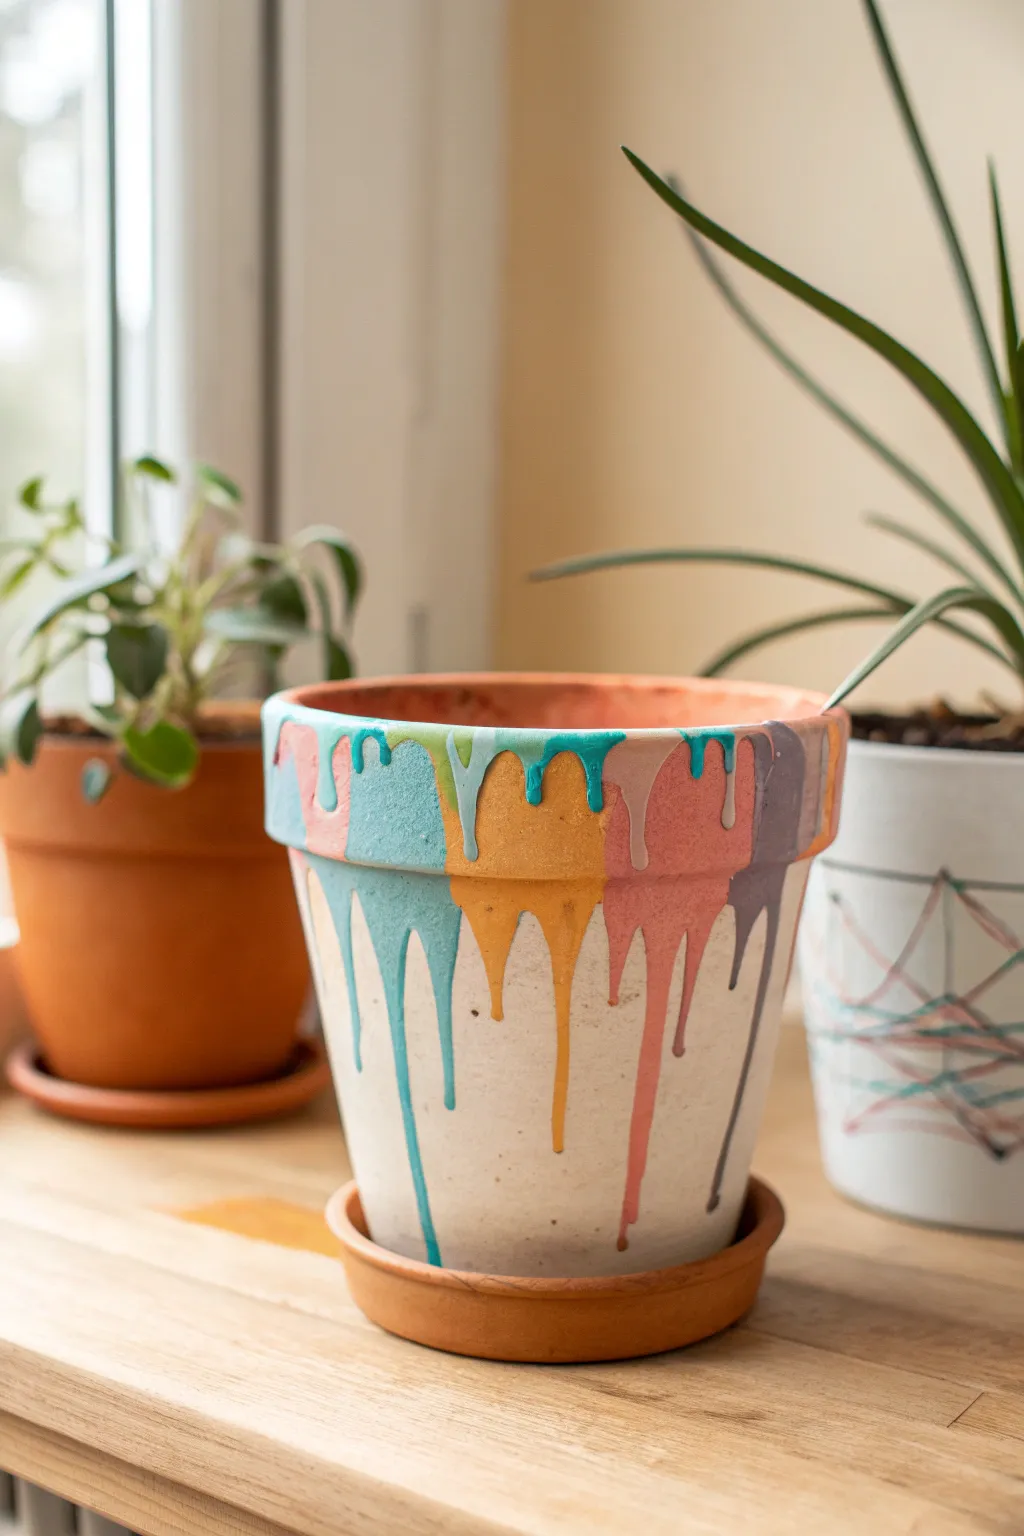
Embrace a little controlled chaos with this vibrant drip-painted masterpiece that looks like melting ice cream on a summer day. The result is a textural, colorful planter where pastel drips cascade down a contrasting neutral base.
Detailed Instructions
Materials
- 4-inch terracotta pot with saucer
- White or cream acrylic craft paint (matte finish)
- Pastel acrylic paints (light blue, teal, mustard yellow, coral pink, lavender)
- Foam sponge brush or large flat brush
- Squeeze bottles or plastic spoons
- Small condiment cups (for mixing)
- Water (to thin paint)
- Cardboard or drop cloth (for messy surface protection)
- Clear acrylic sealer spray (optional)
Step 1: Preparation and Base Coat
-
Prepare your space:
This project gets drippy, so cover your entire workspace generously with cardboard or a plastic drop cloth before you begin. -
Clean the pot:
Wipe down your terracotta pot with a damp cloth to remove any dust or loose clay particles, then let it dry fully. -
Paint the base layer:
Using a sponge brush, coat the entire exterior of the pot with your white or cream acrylic paint. Don’t forget the rim. -
Apply a second coat:
Once the first layer is touch-dry (usually 15-20 minutes), apply a second coat of white to ensure the terracotta orange doesn’t peek through. -
Let it cure:
Allow the base coat to dry completely. A fully dry surface ensures your colorful drips won’t mix with the white background and become muddy.
Drip Disaster?
If a drip runs too fast and is about to ruin the look, quickly wipe it away with a damp paper towel while wet, or wait for it to dry and paint over it with your base white color.
Step 2: Creating the Drips
-
Prepare the colored paints:
Pour a small amount of each pastel color into separate cups. You want the consistency to be pourable but thick enough to move slowly. -
The consistency test:
If your paint is too thick, add water one drop at a time. Aim for the texture of warm honey—it needs to run, but you want to control the speed. -
Flip the pot:
Place the pot upside down on your protected surface. Elevating it on an old can or cup helps the drips flow freely off the rim without pooling at the bottom. -
Start the first drip:
Using a squeeze bottle or a spoon, deposit a dollop of light blue paint right at the edge of the pot’s bottom (which is currently facing up). -
Encourage the flow:
Gently nudge the paint over the edge so it begins to run down the side of the pot. Gravity will do the heavy lifting here. -
Add the next color:
Rotate the pot slightly and repeat the process with the teal paint, placing it right next to the blue drip. -
Overlap slightly:
Allow the very top edges of the paint puddles on the bottom to touch and swirl slightly, but try to keep the drips running down the sides distinct. -
Continue the pattern:
Keep rotating and adding colors (yellow, coral, lavender) until the entire circumference is covered in beautiful, cascading lines. -
Manage the length:
I like to vary the amount of paint I use for each color; larger puddles create long drips that reach the rim, while smaller unexpected drops create shorter accents. -
Let gravity work:
Leave the pot upside down undisturbed. It may take several hours for thick drips to dry completely.
Pro Tip: Testing Flow
Test your paint consistency on a piece of vertical cardboard first. If it runs to the bottom instantly, it’s too thin. If it doesn’t move at all, add a tiny drop of water.
Step 3: Finishing Touches
-
Check dryness:
Touch the thickest part of a drip gently to ensure it is solid all the way through before flipping the pot over. -
Clean the rim:
If any paint pooled unevenly on the very top edge (which was on the ground), you can gently sand it smooth or touch it up with white paint. -
Seal the pot:
Take the pot outside and apply a coat of clear acrylic sealer spray. This protects the paint from water damage when you water your plants.
Once sealed and dry, your carefree, colorful pot is ready to tackle the serious job of holding your favorite houseplant