If you’re craving aesthetic clay sculptures that look adorable on a shelf and still feel doable at your kitchen table, you’re in the right place. These ideas lean into soft shapes, clean lines, and that satisfying “I made this” vibe—without needing advanced sculpting skills.
Minimalist Wavy Trinket Dish
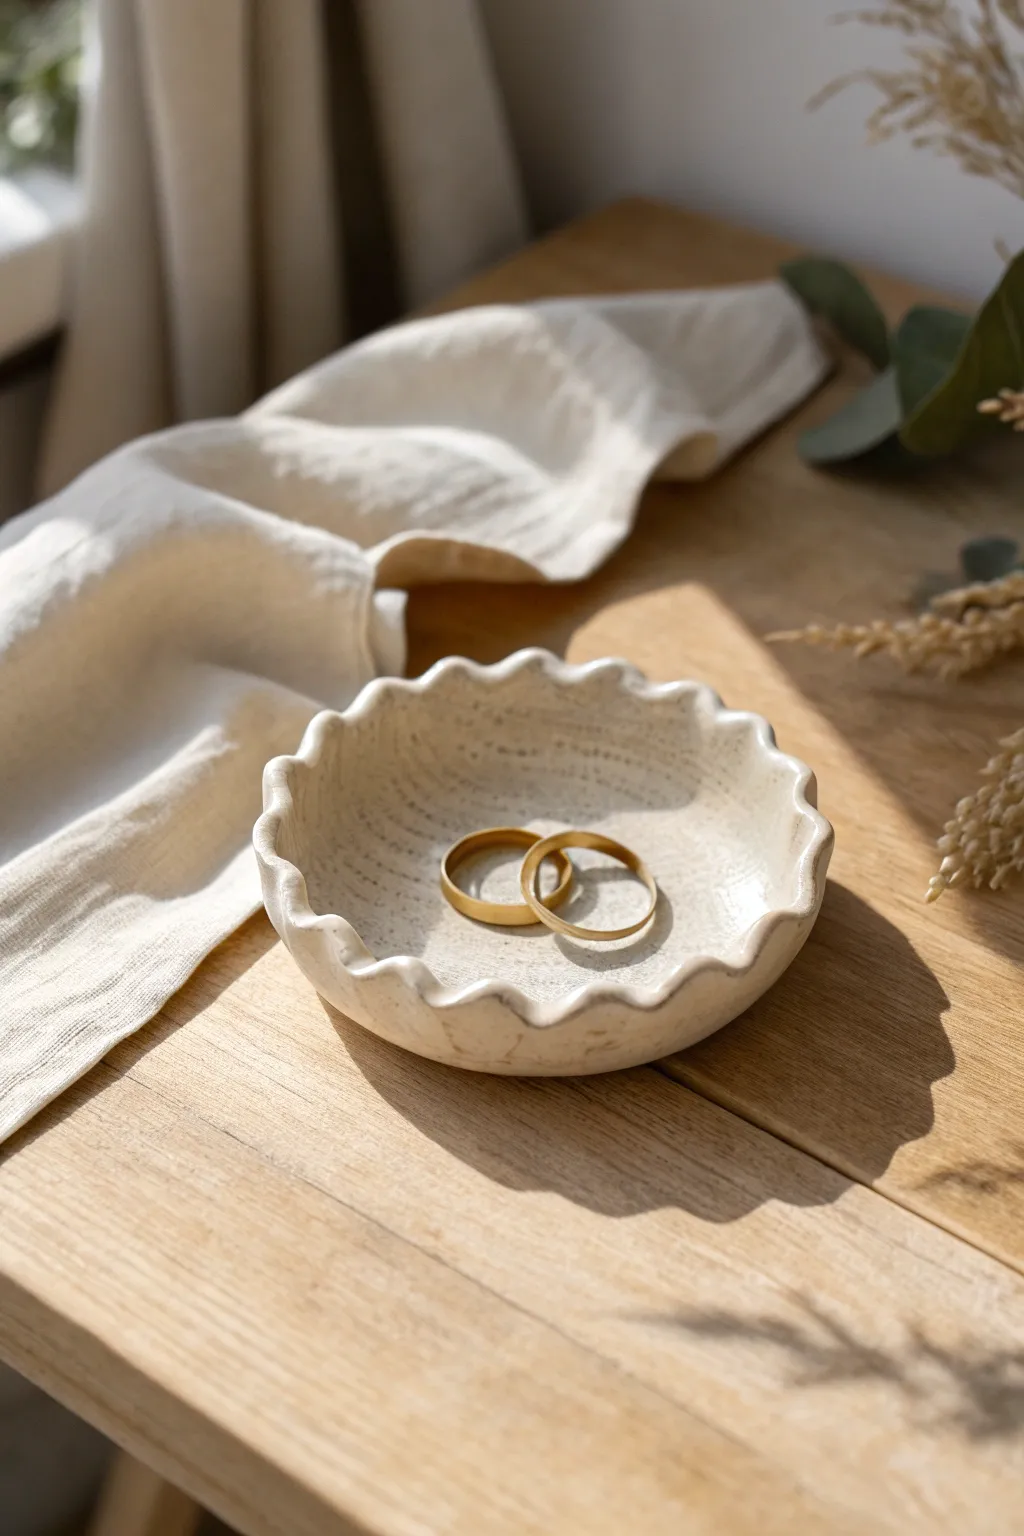
Embrace the beauty of imperfection with this lovely, minimalist trinket dish featuring organic, wavy edges. The subtle speckled clay and soft cream glaze give it a timeless look, perfect for holding your most treasured rings by the bedside.
Step-by-Step
Materials
- Speckled stoneware clay (or polymer clay with faux granite effect)
- Rolling pin
- Canvas mat or wooden board (for working surface)
- Round cookie cutter or bowl (approx. 4-5 inches diameter)
- Needle tool or fettling knife
- Small bowl (for forming the curve)
- Plastic wrap
- Pottery rib or old credit card
- Sponge
- Cream or off-white glossy glaze
- Kiln (if using stoneware) or Oven (if using polymer clay)
Step 1: Preparation & Rolling
-
Prepare your clay:
Begin by taking a handful of your speckled stoneware clay. Wedge it thoroughly on your canvas mat to remove any air bubbles, ensuring a consistent texture throughout. -
Roll out the slab:
Using your rolling pin, flatten the clay into a smooth slab. You are aiming for a consistent thickness of about 1/4 inch. Use guide sticks on either side if you have trouble keeping it level. -
Smooth the surface:
Take a damp sponge or a pottery rib and run it gently over the surface of the slab. This removes the canvas texture and any small imperfections from the rolling pin.
Wave Maker Tip
Use a thick marker pen or a dowel rod under the rim as you pinch. Pressing the clay over the round tool creates perfectly uniform arches.
Step 2: Shaping the Base
-
Cut the circle:
Place your circle template or bowl onto the clay slab. Using a needle tool, cut straight down around the edge to create a clean clay disc. -
Soften the rim:
Once the excess clay is removed, run your damp finger or a small piece of sponge around the sharp cut edge to round it off slightly. This prevents chipping later. -
Prepare the mold:
Take a small bowl that has a gentle curve. I like to cover the bowl with plastic wrap or a thin piece of fabric to prevent the clay from sticking to it during the forming process. -
Slump the clay:
Gently lift your clay circle and place it inside the lined bowl. Press down very lightly in the center so it takes on the concave shape of the bowl.
Step 3: Creating the Scalloped Edge
-
Mark your spacing:
Visually divide the rim of your dish into equal sections. You don’t need to mark them with a tool, just get a general sense of where you want the waves to peak. -
Pinch the waves:
Using your thumb and forefinger, gently pinch the rim at regular intervals. Push the clay slightly upward and inward at the pinch points to create the valleys of the wave. -
Refine the curves:
Go back around the rim and smooth out the peaks between your pinch points. Use your finger to stroke the clay into a deeply undulating, organic wave pattern like the reference image. -
Check for symmetry:
Take a step back and look at the dish from above. Adjust any waves that look too flat or too sharp. The goal is a soft, rhythmic ripple. -
Final smoothing:
Use a slightly damp sponge to do a final pass over the rim. This smoothing step is crucial for that high-end, finished look and ensures the glaze breaks beautifully over the edges.
Gilded Edge Upgrade
Apply a thin rim of gold luster over-glaze after your final firing. Refire at a lower temp to add a luxurious metallic outline to the waves.
Step 4: Drying & Finishing
-
Slow drying:
Let the dish dry inside the mold until it is leather hard. This usually takes a few hours to a day. Removing it too soon might cause it to collapse. -
Bisque fire:
Once bone dry, fire the piece in a kiln to bisque temperature (usually Cone 04). If using polymer clay, follow the baking instructions on your package instead. -
Glazing:
Dip or brush your bisque-fired dish with a creamy, semi-opaque glossy glaze. The semi-opaque nature will allow the dark speckles of the clay body to show through. -
Wipe the foot:
Use a wet sponge to wipe the glaze off the very bottom of the dish so it doesn’t fuse to the kiln shelf. -
Final firing:
Fire the piece again to the maturation temperature of your clay and glaze (often Cone 5 or 6 for stoneware) to achieve that durable, glassy finish.
Place this refined dish on your nightstand and enjoy the artisan touch it adds to your space


Abstract Body Sculpture Vase
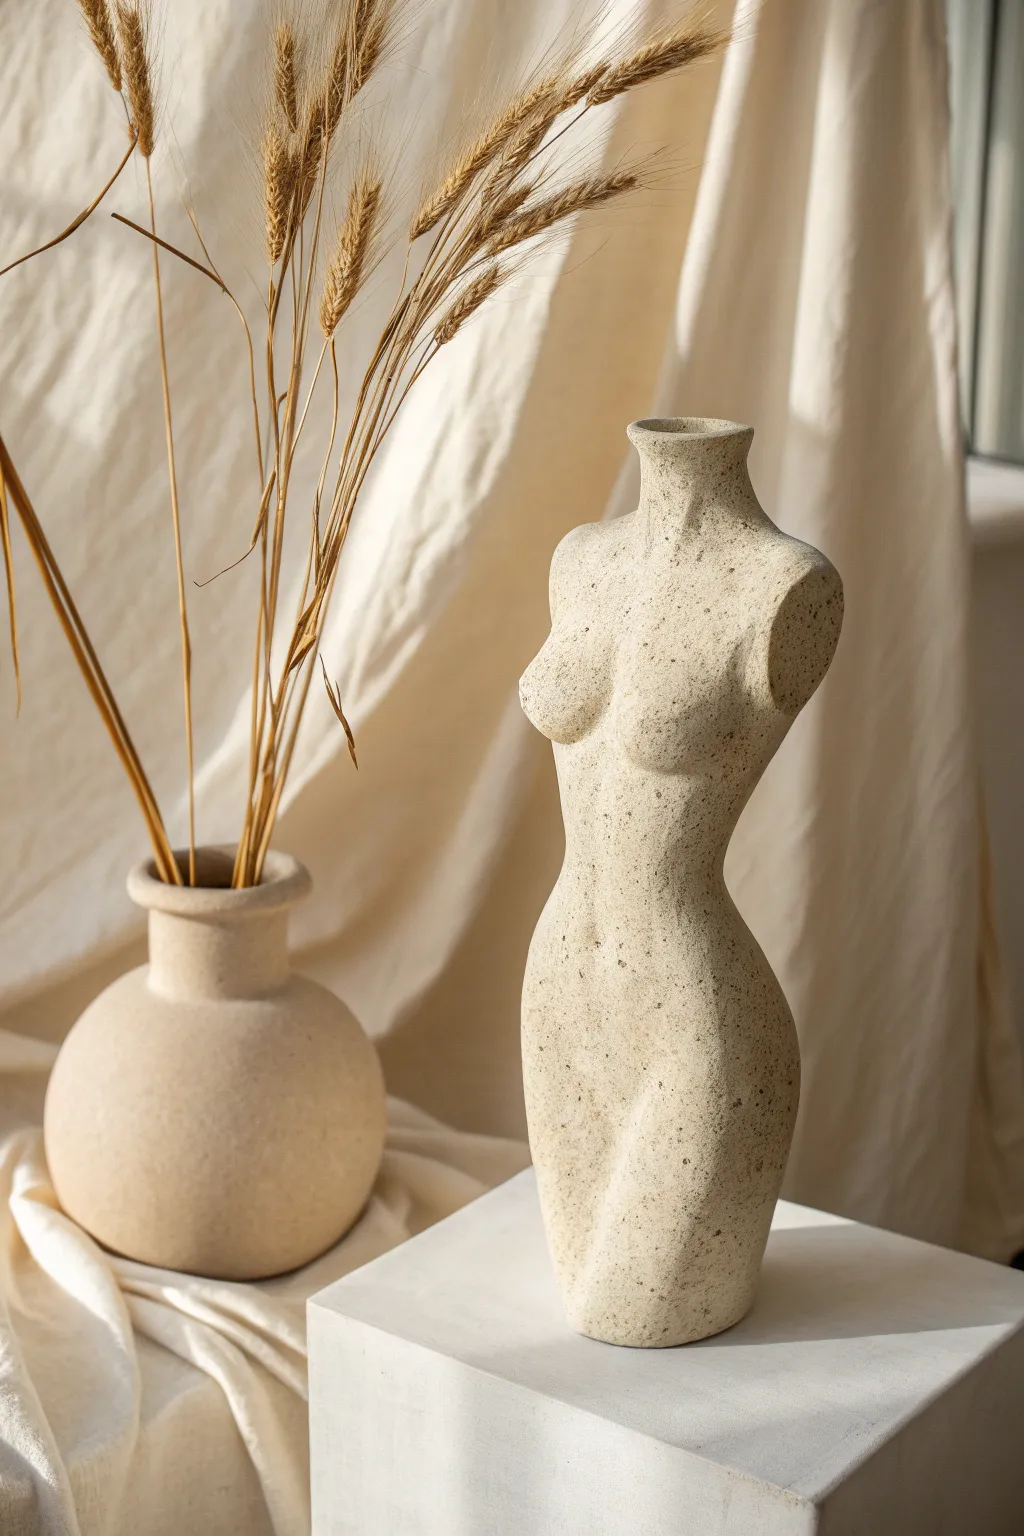
Sculpt a stunning celebration of the feminine form with this elegant torso vase. Using a speckled stoneware clay or a faux-stone finish, this project creates a minimalist and modern vessel perfect for holding dried florals.
How-To Guide
Materials
- Speckled buff stoneware clay (or air-dry clay)
- Pottery tools (needle tool, rib tool, loop tool)
- Wooden modeling tool
- Sponge
- Water in a small cup
- Rolling pin
- Slip (clay and water mixture)
- Scoring tool or old fork
- Acrylic paints (beige, brown, black) if using air-dry clay
- Old toothbrush (for splatter effect)
- Matte sealant
Step 1: Forming the Base Structure
-
Prepare the clay:
Begin by wedging your clay thoroughly to remove air bubbles. This is crucial for structural integrity whether you are kiln-firing or air-drying. -
Create the main cylinder:
Roll a thick slab of clay or build a tall, solid cylinder using the coil method. The cylinder should be roughly the height and width you want the final torso to be, leaving extra bulk for carving. -
Shape the waist:
Using your hands and a wooden rib, gently squeeze the middle of the cylinder to define the waistline. Push the clay inward to create that hourglass curve. -
Widen the hips:
Gently push the clay outward below the waist to form the hips. I like to add small coils of clay here if the form needs more volume, blending them seamlessly into the main body.
Step 2: Sculpting the Anatomy
-
Delineate the chest:
Above the waist, gently flare the clay outward again. Add two balls of clay for the bust area. Score the attachment points, add slip, and press the clay balls firmly onto the chest. -
Blend and smooth:
Use your thumbs or a wooden modeling tool to blend the added clay of the bust into the main torso. Smooth the transitions so there are no visible seams. -
Define the clavicle and neck:
At the top of the torso, taper the clay inward to form the base of the neck. Use your thumbs to create subtle indentations indicating the collarbones. -
Sculpt the thigh area:
At the bottom, carve away material or mold the clay to suggest the top of the thighs. The base should remain flat and stable so the vase stands upright. -
Carve the arm sockets:
On the sides of the shoulders, use a loop tool to carve slight indentations where the arms would naturally begin. This adds realistic dimension to the abstract form. -
Refine the back:
Turn the sculpture around and gently press along the spine area to create a vertical indentation. Smooth the shoulder blades outward for a natural look.
Natural Texture
Mix sand or used coffee grounds directly into your air-dry clay before sculpting. This creates authentic, built-in texture and speckling without needing to paint it later.
Step 3: Hollowing and Finishing
-
Hollow the vessel:
Once the exterior shape is firm (leather hard), carefully carve out the interior using loop tools. Leave the walls about a quarter-inch thick. Create a channel from the neck opening down into the main body. -
Refine the neck opening:
Smooth the rim of the neck opening. It should be circular and even to hold stems properly. -
Smooth the surface:
Use a slightly damp sponge to wipe down the entire sculpture. This removes fingerprints and softens harsh tool marks. -
Dry properly:
Allow the piece to dry slowly under plastic for a few days to prevent cracking.
Gilded Crackle
Embrace imperfection by filling any accidental surface cracks with gold leaf or gold paint, inspired by the Japanese art of Kintsugi.
Step 4: Applying the Stone Effect
-
Base coat painting:
If using air-dry clay (or if your stoneware isn’t speckled), apply a base coat of sandy beige acrylic paint once the clay is fully dry. -
Create the texture:
Mix a small amount of dark brown and black paint with water. Dip an old toothbrush into this mixture. -
Apply speckles:
Run your thumb over the toothbrush bristles to flick tiny specks of paint onto the vase. Rotate the vase to get even coverage. -
Seal the piece:
Finish with a matte clear coat to protect the paint and give it that dry, stone-like texture.
Place your finished sculpture near a window to let the natural shadows highlight the gentle curves you’ve created


Coquette Heart Ring Holder
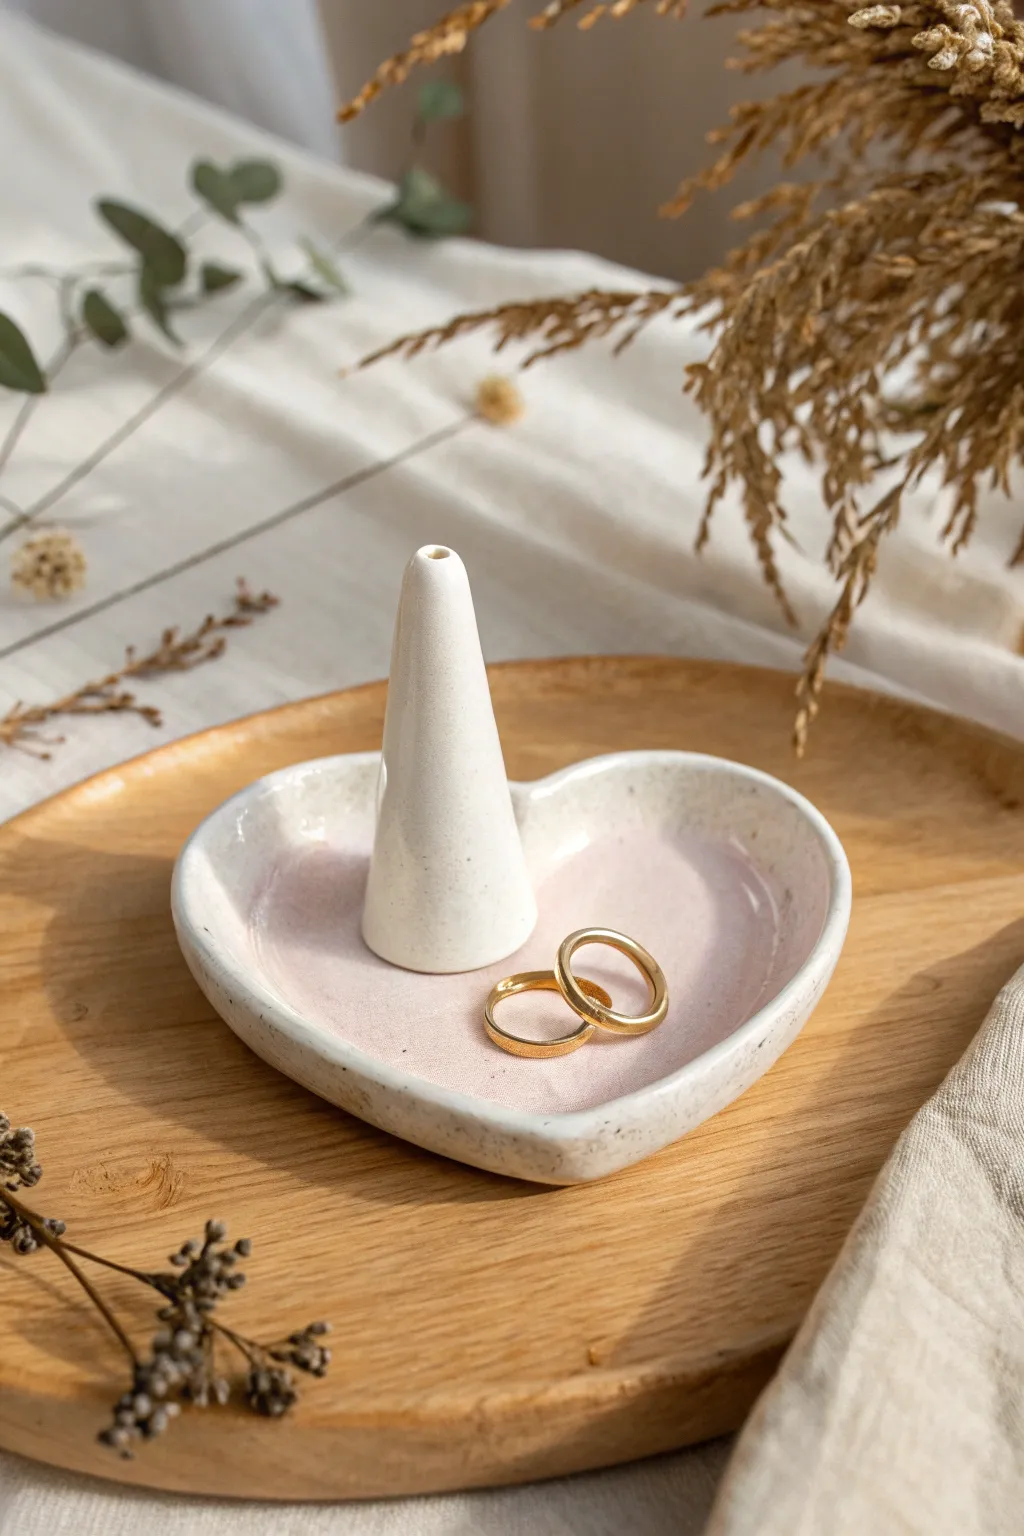
Embrace the soft, romantic coquette aesthetic with this charming heart-shaped ring dish featuring a central cone for stacking your favorite bands. The combination of speckled cream clay and a glossy baby pink interior creates a piece that is both functional and undeniably sweet.
Detailed Instructions
Materials
- Speckled stoneware clay (or white polymer clay with faux speckles)
- Rolling pin
- Heart-shaped cookie cutter (approx. 4-5 inches wide)
- Fettling knife or craft blade
- Small sponge
- Needle tool
- Scoring tool (or an old toothbrush)
- Slip (liquid clay)
- Smooth variety of wooden modeling tools
- Glossy baby pink glaze
- Clear variation or speckled cream glaze (if not using speckled clay)
- Kiln (if using ceramics) or Oven (if using polymer)
Step 1: Shaping the Heart Base
-
Prepare the slab:
Begin by rolling out a slab of your speckled clay to an even thickness of about 1/4 inch. If you are using polymer clay, knead it well first to condition it. -
Cut the shape:
Press your heart-shaped cookie cutter firmly into the slab. If you don’t have a cutter, sketch a heart on paper, cut it out, and trace around it with your needle tool. -
Soften the edges:
Once cut, take a damp sponge or your finger and gently smooth the sharp edges of the heart to round them over slightly. -
Form the rim:
Gently lift the edges of the heart upwards with your fingers to create a shallow dish shape. You want a subtle curve rather than a sharp wall. -
Refine the curve:
Use a wooden rib or your thumb to smooth the inside curve where the floor meets the wall, ensuring there are no cracks or sharp angles.
Step 2: Creating the Central Cone
-
Roll a coil:
Take a small ball of leftover clay and roll it into a thick, short coil between your palms. -
Shape the cone:
Use your fingers to taper this coil, rolling it back and forth on one end only, until you have formed a smooth cone shape about 2 to 3 inches tall. -
Flatten the base:
Tap the wider end of the cone onto your work surface to create a perfectly flat bottom for stability. -
Check the tip:
Smooth the very top point so it isn’t sharp; a slightly rounded tip usually holds rings better and is less fragile. -
Hollow or vent (Optional):
If your cone is thicker than your thumb, I suggest poking a hole up through the bottom with a needle tool to prevent air bubbles during firing.
Pro Tip: Seamless joins
Roll a very thin ‘snake’ of clay and wrap it around the base of the cone where it meets the dish. Smooth it out for an invisible, super-strong connection.
Step 3: Assembly and Finishing
-
Score the attachment points:
Use your scoring tool to scratch rough cross-hatching marks into the bottom of the cone and the exact center of the heart dish. -
Apply slip:
Dab a generous amount of slip (or liquid clay glue for polymer) onto the scored areas. -
Attach the cone:
Press the cone firmly into the center of the heart. Give it a tiny twist to lock the clay particles together. -
Blend the seam:
Use a small modeling tool to drag a little clay from the base of the cone down onto the dish, then smooth this seam away seamlessly with a damp sponge. -
Dry slowly:
Loosely cover the piece with plastic to let it dry slowly for a day or two to prevent warping, then uncover until bone dry. -
Bisque fire:
Fire the piece in a kiln to cone 04 (or bake according to package instructions if using polymer clay).
Troubleshooting: Warping
If the heart shape distorts while drying, place a small bag of rice or sand inside the dish (around the cone) to gently weigh down the floor as it dries.
Step 4: Glazing
-
Clean the bisque:
Wipe the fired piece with a damp sponge to remove any dust that might resist the glaze. -
Glaze the interior:
Pour or brush a glossy baby pink glaze into the basin of the heart. Carefully work it around the base of the cone, but try to keep the cone itself unglazed for now. -
Glaze the cone and exterior:
Apply a clear glaze over the cone and the outside of the heart to let the natural speckles show through. If you used plain white clay, use a ‘speckled vanilla’ glaze here instead. -
Wipe the foot:
Use a sponge to wipe all glaze off the very bottom of the heart so it doesn’t stick to the kiln shelf. -
Final fire:
Fire the piece a second time to the temperature required by your specific glaze (typically cone 5 or 6 for stoneware).
Once cooled, your ring holder is ready to organize your jewelry with a perfect touch of romance


Cute Animal Toothbrush Cup
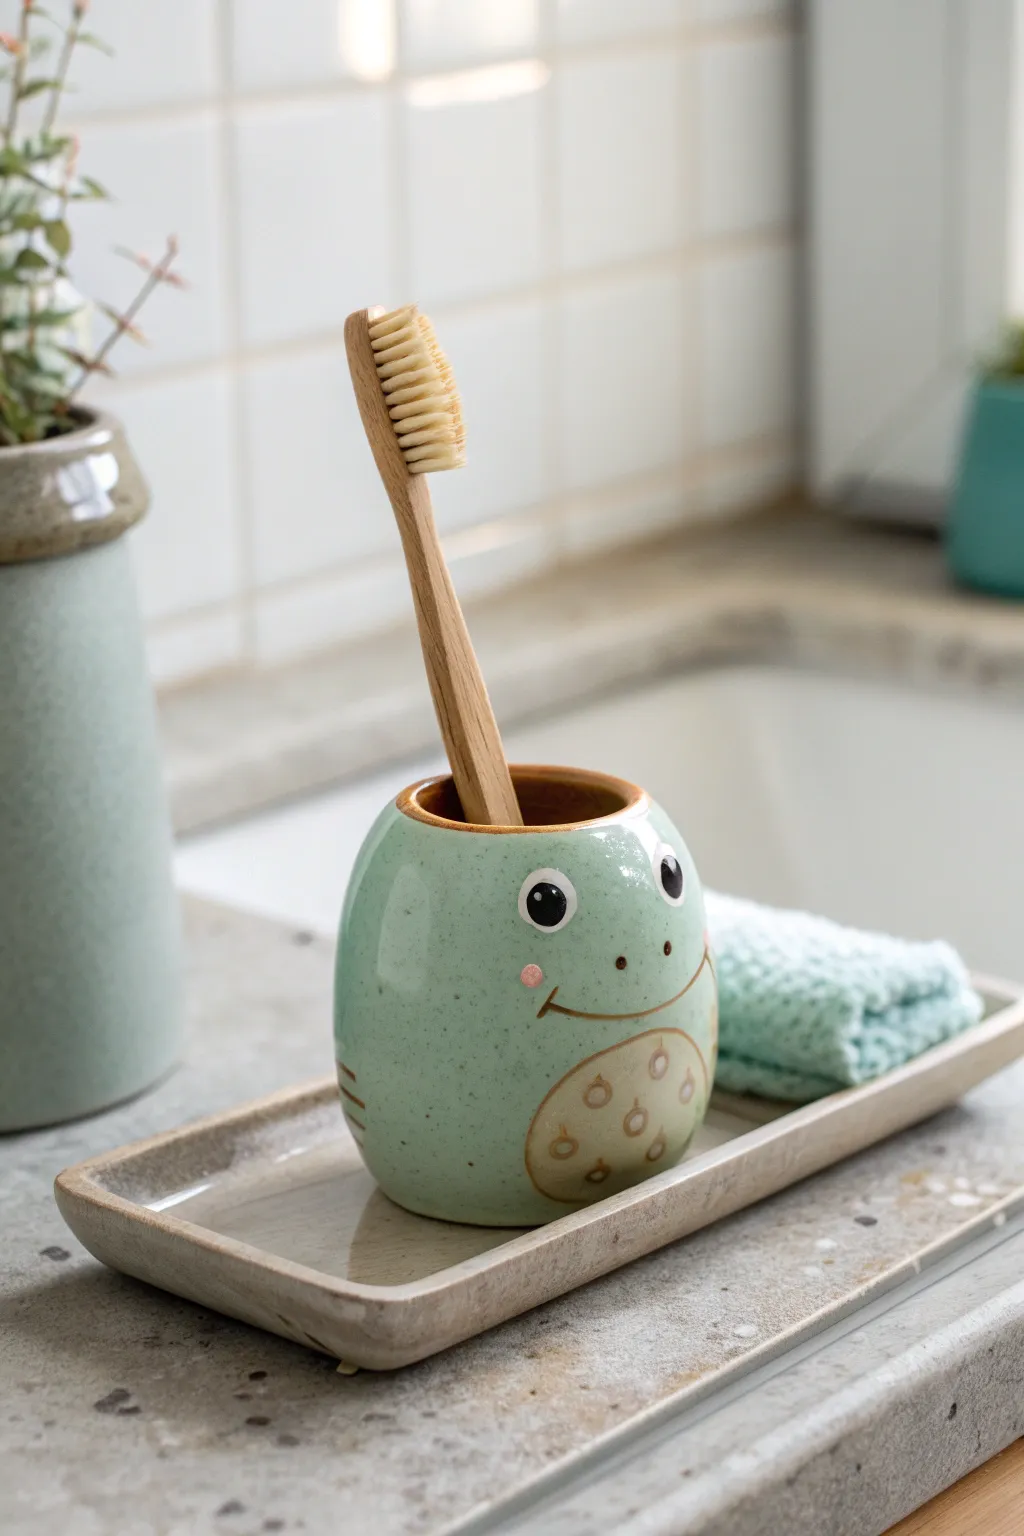
Bring a splash of pond-side joy to your bathroom sink with this adorable ceramic frog toothbrush holder. With its rotund shape, speckled mint glaze, and sweet painted face, this functional sculpture is the perfect mix of practical and precious.
How-To Guide
Materials
- Stoneware clay (smooth, light-bodied)
- Pottery wheel (optional) or rolling pin and canvas
- Loop tool for trimming
- Needle tool
- Scoring tool or old toothbrush
- Slip (clay mixed with water)
- Sponge
- Underglaze (black, white, pink, reddish-brown)
- Celadon glaze (mint or speckled green)
- Small liner brush
- Clear glaze (zinc-free recommended)
Step 1: Forming the Body
-
Wedge the Clay:
Start by thoroughly wedging about 1 lb of stoneware clay to remove air bubbles and ensure even consistency. -
Shape the Cylinder:
If throwing on the wheel, center your clay and pull a thick-walled cylinder. Instead of pulling straight up, gently belly the walls out from the inside to create a rounded, egg-like shape. -
Create the Opening:
Collar the neck of the pot inward slightly, leaving an opening wide enough for a toothbrush (about 1.5 inches). Smooth the rim with a damp chamois or your finger. -
Handbuilding Alternative:
If handbuilding, roll a slab, cut it into a rectangle, and join the edges to make a tube. Gently paddle the outside while supporting the inside with a rib or your hand to round out the form. -
Refine the Base:
Once leather hard, trim the bottom to create a stable foot ring or a flat bottom, ensuring it doesn’t rock. I like to smooth away any harsh tool marks with a damp sponge at this stage.
Step 2: Sculpting Details
-
Add Subtle Legs:
Roll very thin coils of clay to suggest the back legs. Score and slip these onto the lower sides of the rounded body, blending them seamlessly so they look like slight protrusions rather than added lumps. -
Smooth the Surface:
Run a soft rubber rib over the entire exterior to compress the clay and ensure the surface is perfectly smooth for glazing later. -
Initial Bisque Fire:
Allow the piece to dry completely (bone dry) before loading it into the kiln for a bisque firing to cone 04.
Celadon Secrets
For that speckled look without buying special glaze, mix a tiny amount of granular ilmenite into a standard transparent mint glaze. It creates lovely dark spots during firing.
Step 3: Glazing and Decoration
-
Wax Resist Method:
Before glazing, apply wax resist to the frog’s belly area (an oval shape) and two small circles for the eyes if you want them to remain white or be painted differently. -
Apply the Base Glaze:
Dip the entire cup into your mint green celadon glaze. If using a brush-on glaze, apply 3 even coats, letting each dry in between. -
Clean the Waxed Areas:
Use a damp sponge to wipe any glaze droplets off the waxed belly and eye areas. -
Paint the Belly:
Mix a diluted reddish-brown underglaze or oxide wash. Paint the oval belly area, then use a clean brush to wipe away the center, leaving a darker rim and faint markings for a rustic look. -
Detail the Belly Markings:
Using the same brown wash, paint small circles or ‘u’ shapes inside the belly patch to suggest texture. -
Paint the Face:
With a fine liner brush and black underglaze, paint the solid black pupils and the thin, curved smile line. Add two small dots for nostrils. -
Add Highlights and Blush:
Place a tiny dot of white underglaze in the upper corner of each pupil for a ‘sparkle.’ Dab a small circle of pink underglaze on the cheeks for blush. -
Protect the Details:
Carefully dab clear glaze over the painted belly and face details if your green glaze doesn’t cover them. This seals the underglaze. -
Final Firing:
Fire the piece to cone 5 or 6 (depending on your clay body) to vitrify the clay and melt the glaze into a glossy finish.
Glaze Crawling?
If the glaze pulls away from your painted details, you likely applied the underglaze too thickly or didn’t let it dry. Wash it off, let the pot dry, and re-apply thinner layers.
Once cool, your new amphibian friend is ready to hold your toothbrush in style

The Complete Guide to Pottery Troubleshooting
Uncover the most common ceramic mistakes—from cracking clay to failed glazes—and learn how to fix them fast.
Botanical Leaf Catchall Tray
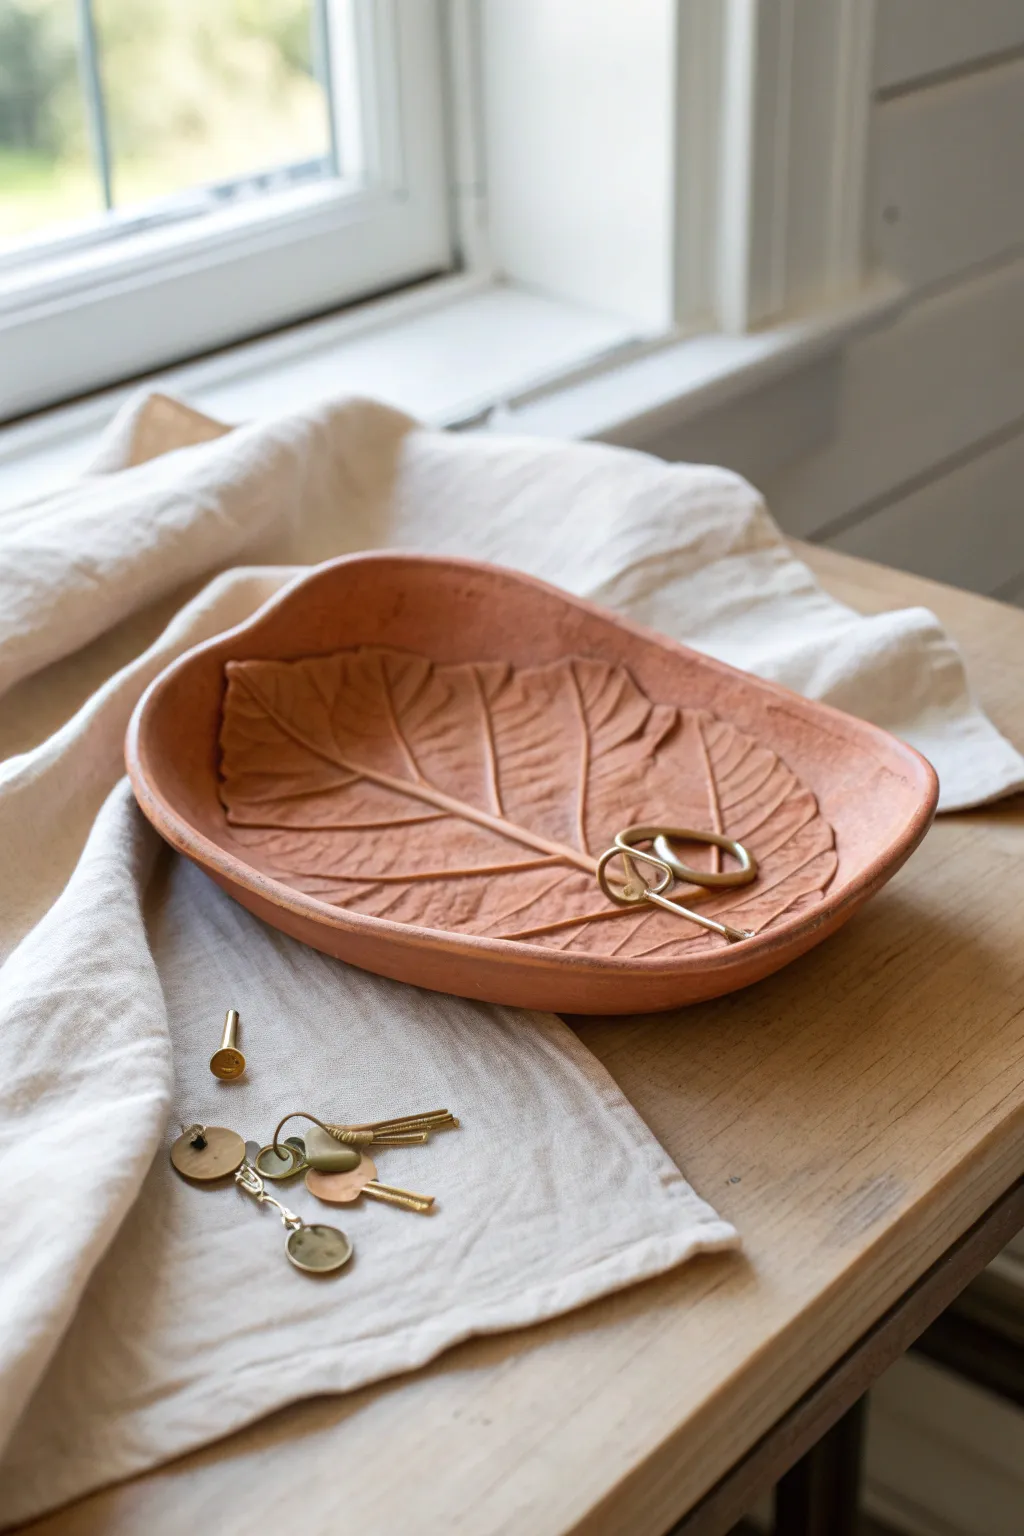
Capture the organic beauty of nature with this rustic terracotta catchall, featuring deep leaf impressions and a warm, earthy finish. This project uses real botanicals to create a textured, functional piece perfect for holding keys or jewelry.
Step-by-Step Guide
Materials
- Terracotta air-dry clay or kiln-fire clay
- Large, deeply veined leaf (like a Hosta, Hydrangea, or Rhubarb)
- Rolling pin
- Two 1/4 inch wooden guide slats
- Fettling knife or clay cutting tool
- Bowl or shallow dish (for use as a slump mold)
- Canvas mat or heavy cloth
- Sponge
- Small cup of water
- Clear matte sealant (if using air-dry clay)
Step 1: Preparing the Slab
-
Wedge the clay:
Start by wedging your terracotta clay thoroughly on a canvas mat to remove any air bubbles. Aim for a smooth, pliable consistency that won’t crack when bent. -
Set up guides:
Place your wooden guide slats on either side of the clay ball. These will ensure your slab is perfectly even, which is crucial for preventing warping during drying. -
Roll out the slab:
Using your rolling pin, roll the clay out until the pin rests on the wooden guides. Smooth the surface with a damp sponge or your fingers to remove any canvas texture.
Step 2: Creating the Impression
-
Position the botanical:
Select a large fresh leaf with prominent veins. Place it vein-side down onto the smooth clay slab. I like to gently press the center stem down first to anchor it. -
Embed the leaf:
Gently roll over the leaf with the rolling pin. Apply firm, even pressure to ensure the veins leave a deep impression, but be careful not to make the clay too thin. -
Cut the shape:
Using a needle tool or fettling knife, cut a freeform oval shape around the leaf. Leave about an inch of border around the leaf edges to create the walls of the tray later. -
Refine the edges:
Remove the excess clay. Dip your finger in a little water and smooth the cut edges of the slab so they are rounded and soft rather than sharp. -
Remove the leaf:
Create a small tab with a piece of scrap clay, press it to the stem of the leaf, and carefully peel the leaf away to reveal the detailed texture underneath.
Fixing Leaf Tears
If the leaf tears while peeling it off, use tweezers to remove small bits. If texture is lost, lightly re-score veins with a needle tool.
Step 3: Shaping and Finishing
-
Prepare the mold:
Cover your slump mold (a shallow bowl or platter) with a piece of thin plastic wrap or a dry cloth to prevent sticking. -
Form the curve:
Carefully lift your clay slab and place it into the mold. Gravity will help it settle, but you should gently press the center down so it takes the shape of the dish. -
Shape the rim:
Use your fingers to gently push the edges of the slab upward, creating a slightly irregular, organic rim that undulates like a natural leaf. -
Smooth imperfections:
Check the rim for any hairline cracks that formed during shaping. Smooth these out immediately with a damp sponge. -
Slow drying:
Loosely cover the piece with plastic to let it dry slowly. This is essential for terracotta to prevent warping. Let it dry until leather hard, then remove from the mold to dry completely. -
Sanding:
Once fully bone dry, use fine-grit sandpaper to gently smooth any rough spots on the rim, being careful not to sand away the vein details. -
Sealing or Firing:
If using kiln clay, fire according to manufacturer instructions. If using air-dry clay, apply 2-3 thin coats of clear matte sealant to protect the surface from moisture.
Highlighting Veins
After drying/firing, do a ‘black wash’. Paint watered-down dark acrylic into the veins and wipe the surface clean to make the texture pop.
Now you have a stunning, nature-inspired vessel ready to organize your small treasures
Bubble Texture Coaster Set
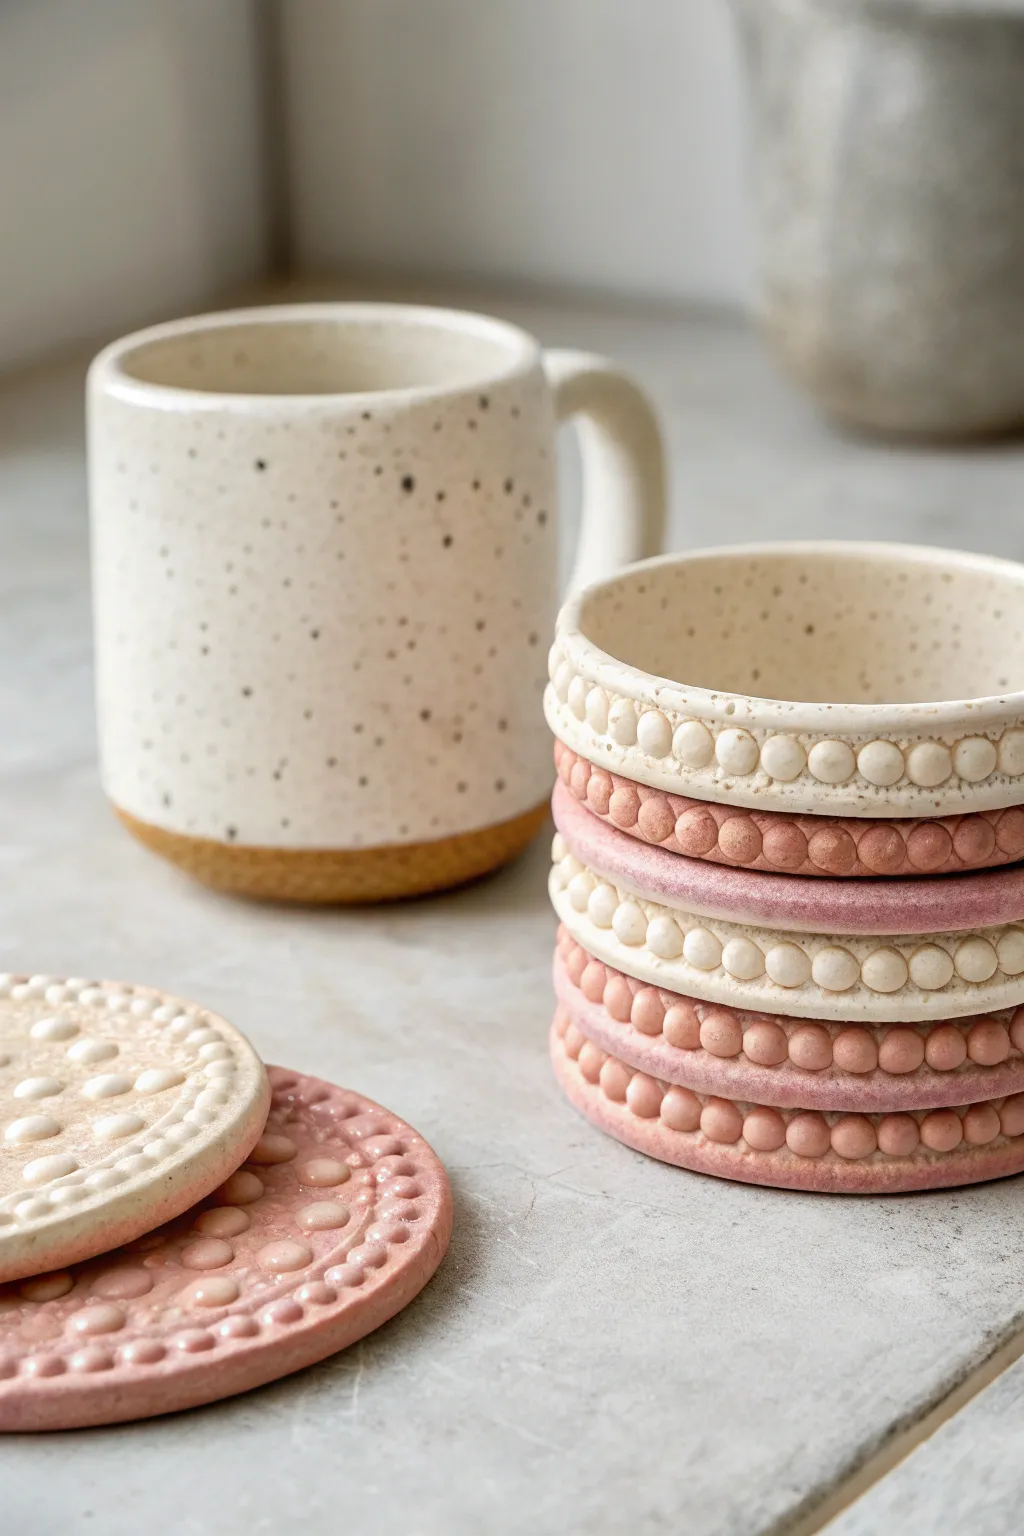
These charming coasters combine the sleek, modern look of flat ceramics with a playful, tactile bubble texture along the rim. The speckled clay finish gives them an earthy, handmade feel that beautifully complements the soft pastel pinks and creams.
Step-by-Step Tutorial
Materials
- Speckled stoneware clay or polymer clay with faux speckles
- Rolling pin
- Guide sticks or slats (approx. 5-6mm thick)
- Circular clay cutter (approx. 9-10cm diameter)
- Small spherical mold or pearl maker tool (optional)
- Alternatively: manual hand-rolling technique
- Scoring tool or needle tool
- Slip (if using stoneware) or liquid clay (if using polymer)
- Sponge and water
- Underglazes ( dusty pink, cream)
- Clear matte glaze
- Kiln (for stoneware) or Oven (for polymer)
Step 1: Base Preparation
-
Roll the slab:
Begin by wedging your speckled clay to remove air bubbles. Place your clay between two guide sticks and roll it out into a smooth, even slab. I like to aim for a thickness of about 5-6mm to ensure the coaster feels substantial but not clunky. -
Cut the circles:
Use your large circular cutter to punch out the coaster bases from the slab. Make sure to press straight down and lift carefully to avoid warping the circle shape. -
Smooth the edges:
Dip your finger or a small sponge in water and gently run it along the cut edge of each circle. This softens the sharp angle left by the cutter and prepares the surface for attachment.
Uneven Bubbles?
If hand-rolling perfectly matched spheres is difficult, try using a bead roller tool or a pearl maker silicone mold to batch-produce identical clay balls instantly.
Step 2: Creating the Bubbles
-
Measure the clay:
To keep the bubbles uniform, roll a thin coil of clay first, then slice it into equal small segments. Each segment should be roughly the size of a pea. -
Roll spheres:
Roll each small segment between your palms or fingers until it forms a perfect, smooth little ball. You will need enough spheres to circle the entire perimeter of your coaster—usually between 30 and 40 beads. -
Test fit:
Before attaching, loosely arrange the spheres around the edge of a coaster base to ensure they fit snugly without leaving a large gap at the end. Adjust the spacing slightly if needed.
Add a Pattern
Before attaching the bubble rim, gently press a piece of lace or a texture mat into the coaster base to add a subtle floral or geometric relief pattern to the center surface.
Step 3: Assembly
-
Score the connection points:
Using your needle tool, scratch up the very outer rim of the coaster base where the bubbles will sit. If using stoneware, score the bottom of each little sphere as well. -
Apply slip:
Dab a small amount of slip (or liquid clay for polymer) onto the scored rim. This acts as the glue that ensures your bubbly rim doesn’t pop off later. -
Attach the bubbles:
Press each sphere gently onto the rim. Apply just enough pressure to adhere them firmly without flattening their round shape. They should sit right on top of the edge, acting as a retaining wall. -
Secure the bond:
For extra durability, take a small modeling tool and gently blend the underside of each sphere onto the base clay on the *outside* edge only, keeping the top and inside distinct.
Step 4: Finishing and Firing
-
Dry slowly:
If using real ceramic clay, cover the coasters loosely with plastic to let them dry slowly. Uneven drying can cause the flat base to curl up. -
Bisque fire:
Once bone dry, fire the pieces in a kiln to bisque temperature. If using polymer clay, bake according to the package instructions now. -
Apply color:
For the two-tone look seen in the image, leave some coasters natural cream and paint others with a dusty pink underglaze. You can also paint just the rim or just the base for variety. -
Glaze:
Dip or brush a clear matte glaze over the entire piece to seal it and bring out the speckles in the clay body. -
Final fire:
Fire the coasters one last time to the glaze temperature appropriate for your clay body.
Once fired and cooled, your textured coaster stack is ready to add a cozy, modern touch to your coffee table


What Really Happens Inside the Kiln
Learn how time and temperature work together inside the kiln to transform clay into durable ceramic.
Tiny Pastel Animal Figurines

These delightfully chubby animal friends are characterized by their smooth, egg-like shapes and soft pastel palette. Perfect for beginners, this project relies on mastering simple forms and minimalist details to create a cohesive and adorable set.
Step-by-Step
Materials
- Polymer clay (white, beige, pink, yellow, blue)
- Acrylic rolling pin
- Small ball stylus tool
- Fine-grit sandpaper
- Black acrylic paint
- Fine detail paintbrush (000 size)
- Pink soft pastel chalk (for blush)
- Matte finish varnish
- Modeling tools (or a toothpick)
- Baking sheet and parchment paper
Step 1: Shaping the Bodies
-
Preparing the clay:
Begin by conditioning your polymer clay colors thoroughly. Warm the clay in your hands and knead it until it is perfectly soft and pliable to prevent cracks later. -
Creating the base form:
Roll a small amount of clay, roughly the size of a walnut, into a smooth ball. Ensure there are no visible seams or air bubbles. -
Refining the shape:
Gently taper the top of the ball slightly to create a very subtle egg or gumdrop shape. The base should be flattened just enough so the figurine stands stably on its own. -
Smoothing the surface:
Use your thumb to gently buff out any fingerprints. The aesthetic relies on a perfectly smooth, matte texture.
Fixing Dust Specks
Dust loves light clay. If you see specks before baking, use a q-tip dipped in rubbing alcohol or nail polish remover to wipe them off the surface.
Step 2: Adding Animal Features
-
Forming cat ears:
For the cats, pinch two tiny triangles of the same clay color. Gently press them onto the top of the head, blending the seams downward with a modeling tool so they look like one continuous piece. -
Forming bunny ears:
For the rabbit, roll two small white logs and flatten them slightly. Attach them vertically to the top of the head, blending the clay at the attachment point. -
Adding feet (optional):
Some figurines, like the front yellow cat and pink pig-cat, have tiny nub feet. Roll two minuscule balls of clay and press them underneath the front of the body. -
Creating the striped bunny:
If making the white bunny, roll out a very thin worm of black clay. Wrap it around the body and press it flat to create the stripe effect before baking. -
Pre-bake check:
Give your figures a final inspection. Use a little baby oil on your finger if you need to smooth out stubborn fingerprints before they go into the oven.
Step 3: Finishing Touches
-
Baking:
Place your animals on a parchment-lined baking sheet. Bake according to your specific clay brand’s instructions (usually 275°F/135°C for 15-30 minutes). -
Cooling and sanding:
Allow the pieces to cool completely. If there are any rough spots, I suggest using fine-grit sandpaper to gently buff them away. -
Painting the eyes:
Dip your fine detail brush or a ball stylus into black acrylic paint. Dot two wide-set eyes on the upper half of the face. -
Adding the nose and mouth:
Paint a tiny ‘x’ or a small inverted ‘v’ between the eyes to create the nose and mouth. Keep the lines very thin for that delicate look. -
Applying blush:
Scrape a little powder from a pink soft pastel chalk. Use a dry brush to gently dust this powder onto the cheeks for a rosy glow. -
Sealing:
Finish by applying a coat of matte varnish. This protects the paint and gives the clay that soft, high-quality ceramic appearance.
Make Charm Keychains
Turn these into functional accessories by inserting a metal screw eye pin into the top of the head before baking. Add a jump ring and strap later.
Arrange your little pastel family on a shelf or desk where they can bring a moment of calm to your day
Modern Arch Sculpture Decor
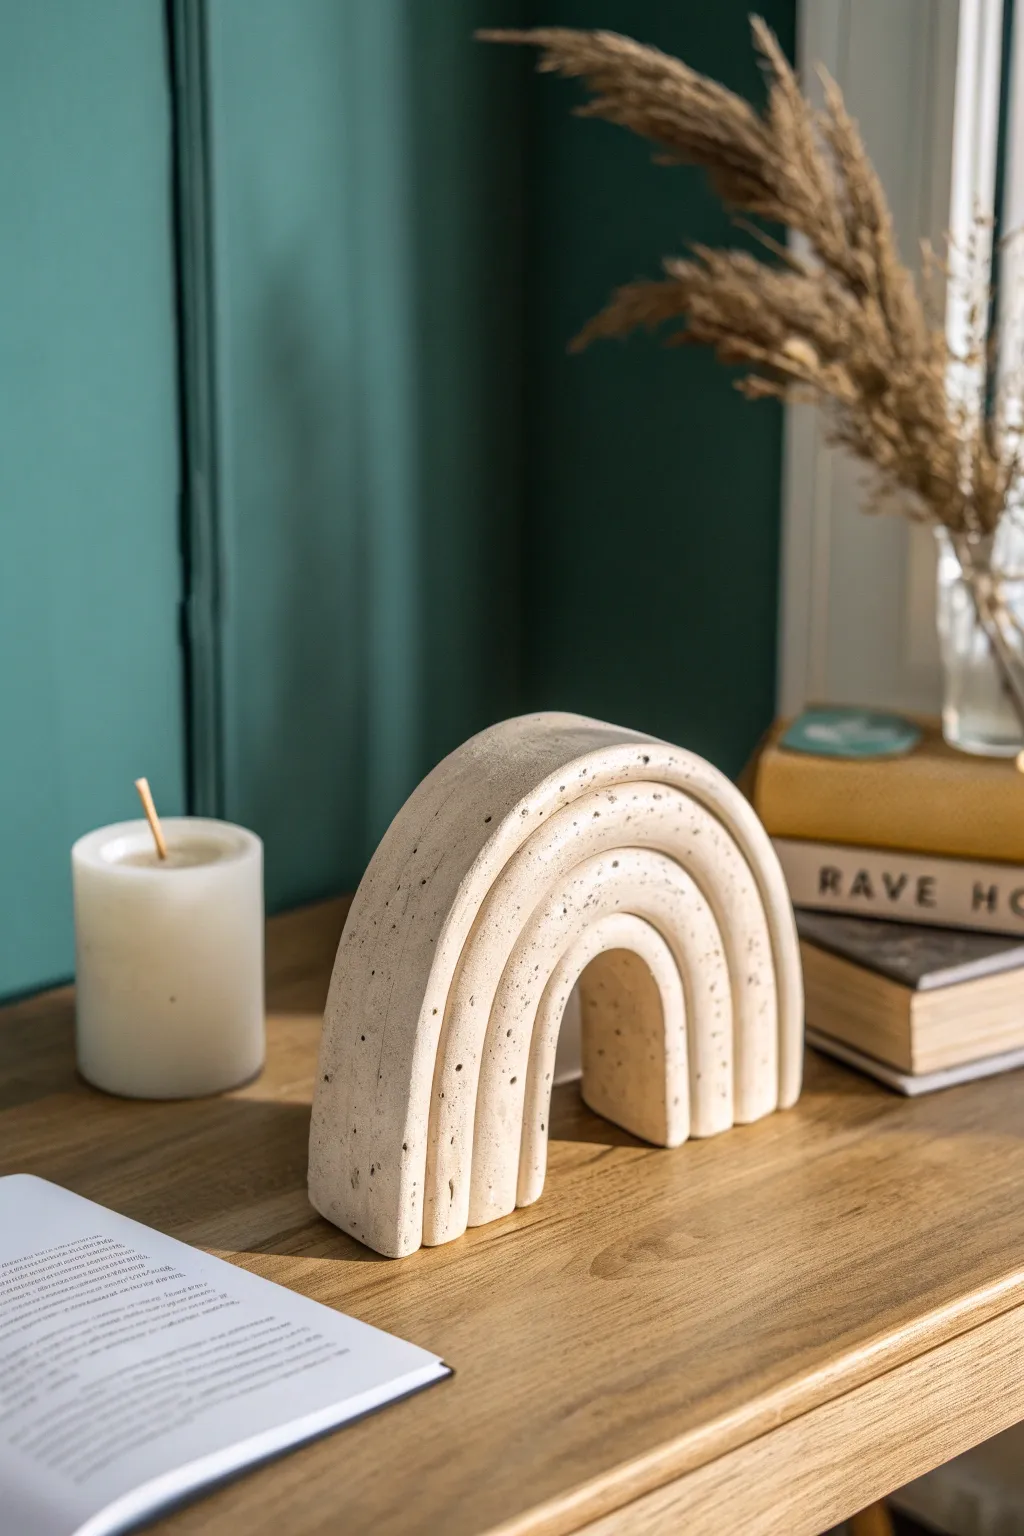
This minimalist arch sculpture brings a calm, modern aesthetic to any shelf with its organic, speckled finish and repetitive curves. By casting or molding nesting arches, you can recreate this solid, architectural decor piece that perfectly mimics the look of high-end stoneware.
Detailed Instructions
Materials
- Air-dry clay (stone effect) or Fine Concrete mix
- Rolling pin
- Sharp clay knife or X-Acto blade
- Ruler
- Cardboard or foam board (for templates)
- Sandpaper (medium and fine grit)
- Small bowl of water
- Sponge
- Acrylic paint (black/brown) – optional for speckling
- Matte sealant spray
Step 1: Preparation & Templating
-
Design your arches:
Begin by deciding on the overall size of your sculpture. Draw a base line on a piece of cardboard, then use a compass or a bowl to draw four concentric semi-circles, leaving about 1/2 inch to 3/4 inch thickness for each arch band. -
Cut the templates:
Carefully cut out these four arch shapes from the cardboard. These will serve as forms to drape your clay over or as stencils to cut against, ensuring perfect uniformity for each layer. -
Prepare the workspace:
Lay down a canvas cloth or parchment paper to prevent sticking. If using air-dry clay, knead it briefly to warm it up; if using concrete, mix a small batch to a moldable consistency.
Step 2: Forming the Arches
-
Roll out the slab:
Roll your clay or spread your concrete mix into a flat slab, aiming for a consistent thickness of about 3/4 inch. Use guide sticks on either side of your roller to ensure the slab is perfectly level. -
Cut the strips:
Using your ruler and knife, cut four long, straight strips of clay. The width of these strips should match the ‘depth’ you want for the sculpture (approx. 1.5 to 2 inches). -
Form the smallest arch:
Take your smallest cardboard arch template. Stand it up vertically or lay it flat depending on your strategy. Gently drape the first strip of clay over the curve to shape it. If the clay is stiff enough, stand it on its ends to see if it holds the arch shape independently. -
Create the nesting layers:
Repeat the process for the next three sizes. I generally like to form each arch individually first, pressing the clay gently to smooth out any cracks on the top curve. -
Assemble the structure:
While the clay is still slightly damp and tacky, nest the arches together. Score the touching surfaces (the top of the smaller arch and the bottom of the larger one) with a needle tool and apply a little water or slip. -
Fuse the layers:
Press the arches firmly together. You don’t want massive gaps, but distinct separation lines between the arches are part of the design, so don’t smooth them into a single blob. Just ensure they adhere structurally.
Uneven Arches?
If gaps appear between layers while drying, fill them with a mixture of clay dust (from sanding) and white glue. Smooth over with a finger for an invisible repair.
Step 3: Refining & Texturing
-
Clean the edges:
Use a damp sponge to smooth the front and back faces of the sculpture. The edges should be slightly rounded, not sharp, to mimic the softness of stone. -
Level the feet:
Stand the sculpture upright and press gently to ensure all ‘feet’ of the arches are touching the table. Slice off any excess from the bottom with a wire cutter or knife to make it sit perfectly flat. -
Add speckling (if needed):
If your clay isn’t pre-speckled, flick a stiff-bristled toothbrush loaded with watered-down black or brown acrylic paint over the damp surface. This creates that natural granite look seen in the photo. -
Initial drying:
Cover the sculpture loosely with plastic wrap to let it dry slowly for the first 24 hours. This prevents warping and cracking. -
Full cure:
Remove the plastic and let the piece air dry completely. This creates a solid base; depending on humidity and thickness, it might take 2-4 days.
Stone Texture Trick
Mix coffee grounds or coarse sand directly into your clay body before rolling. This adds genuine gritty texture and organic speckles throughout the piece.
Step 4: Finishing Touches
-
Sanding:
Once bone dry, use medium-grit sandpaper to remove any major bumps or unevenness on the curved surfaces. Switch to fine-grit sandpaper for a smooth, matte finish. -
Dusting off:
Wipe the entire piece down with a dry cloth or a slightly damp sponge to remove all sanding dust. -
Sealing:
Spray the sculpture with a matte clear sealant. This protects the finish and deepens the stone color slightly without making it shiny.
Now you have a timeless, architectural accent piece that looks beautiful on any mantle

TRACK YOUR CERAMIC JOURNEY
Capture glaze tests, firing details, and creative progress—all in one simple printable. Make your projects easier to repeat and improve.
Scalloped Jewelry Tray
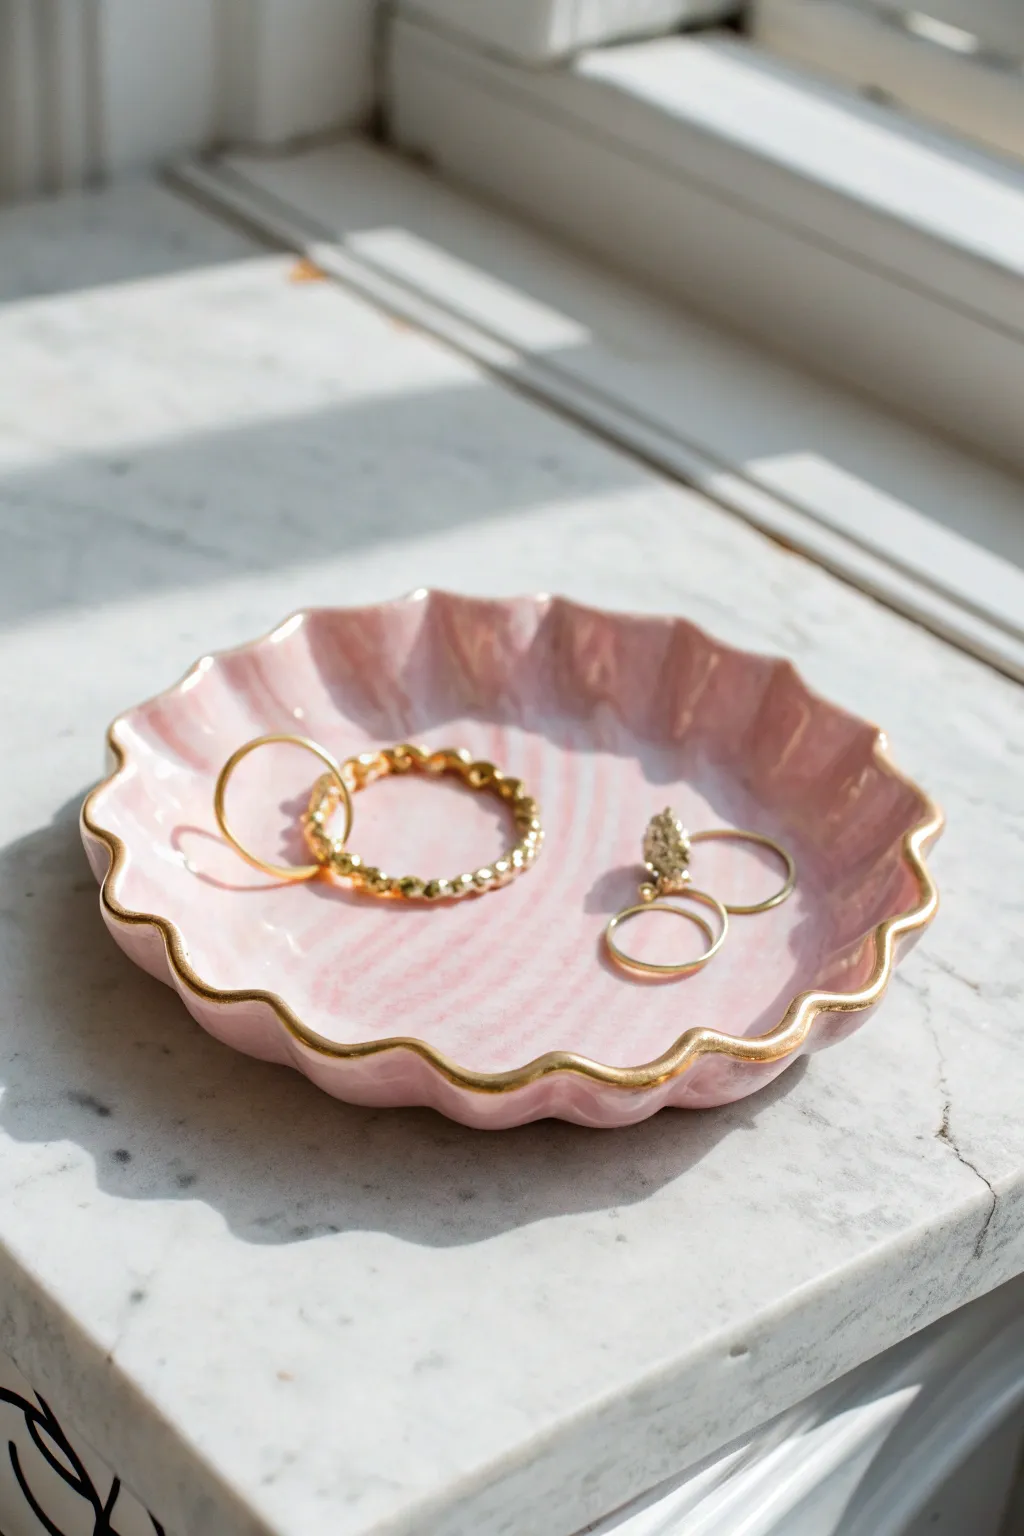
This delicate jewelry dish combines a soft pink marble effect with a sophisticated scalloped edge and a touch of liquid gold. It’s the perfect bedside catch-all for your favorite rings and dainty chains.
How-To Guide
Materials
- Polymer clay (white)
- Polymer clay (translucent or pearl white)
- Polymer clay (soft pink)
- Acrylic rolling pin
- Circle cookie cutter (approx. 4-5 inches)
- Small bowl or sphere (for shaping)
- Liquid gold leaf or gold paint pen
- Fine detail paintbrush
- Gloss glaze or polyurethane varnish
- Oven and baking sheet
- Sandpaper (fine grit)
Step 1: Creating the Marble Effect
-
Condition the clay:
Start by warming up your white, translucent, and pink polymer clay in your hands separately until they are soft and pliable. This prevents cracking later. -
Form ropes:
Roll each color into thin, snake-like ropes. Use more white and translucent clay than pink to achieve that subtle, milky look seen in the photo. -
Twist together:
Gather the ropes and twist them together into one large candy-cane spiral. Fold the twisted rope in half and twist again. -
Refine the marbling:
Repeat the twisting and folding process a few times, but be careful not to over-mix, or the colors will turn into a solid muddy pink rather than distinct streaks. -
Roll out the slab:
Ball up your marbled clay and place it on a clean work surface. Use your acrylic roller to flatten it into an even sheet, about 1/4 inch thick. I find rolling in different directions helps keep the pattern organic.
Uneven Scallops?
If your waves look irregular, use the handle of a paintbrush or a thick marker. Press it gently into the edge to create uniform indentations all around the circle.
Step 2: Shaping the Tray
-
Cut the circle:
Press your large circle cutter firmly into the best section of your marbled slab. If you don’t have a cutter, trace a bowl with a craft knife. -
Create the scallops:
Using your fingertips, gently pinch the edges of the circle at regular intervals to create waves. Push down between each pinch to emphasize the scalloped shape. -
Smooth the edges:
Run your finger lightly along the rim to soften any sharp cuts or fingerprints. The edges should look rounded and organic. -
Shape the curve:
Place your clay circle into a shallow, oven-safe bowl or over a curved form to give it a slight dish shape. Ensure the scallops drape naturally.
Step 3: Baking and Finishing
-
Bake:
Bake the clay according to the manufacturer’s package instructions (usually around 275°F or 135°C for 15-30 minutes). Let it cool completely before moving. -
Sand imperfections:
Once cool, use fine-grit sandpaper to gently buff away any rough spots on the rim or surface. Wipe away dust with a damp cloth. -
Apply gold rim:
Give the bottle of liquid gold leaf a good shake. Using a fine detail brush, carefully paint the very edge of the scallops. Let the gold follow the natural waves of the rim. -
Seal the piece:
For that shiny, ceramic-like finish visible in the image, apply a coat of gloss glaze over the entire piece, avoiding the gold rim if your gold leaf is self-sealing.
Gazing Glaze
For a glass-like finish, use UV resin instead of varnish. Pour a small amount in the center, spread to the edges, and cure under a UV lamp for a durable, high-shine surface.
Place your favorite rings in the dish to admire how the gold rim catches the light
Face Planter Sculpture
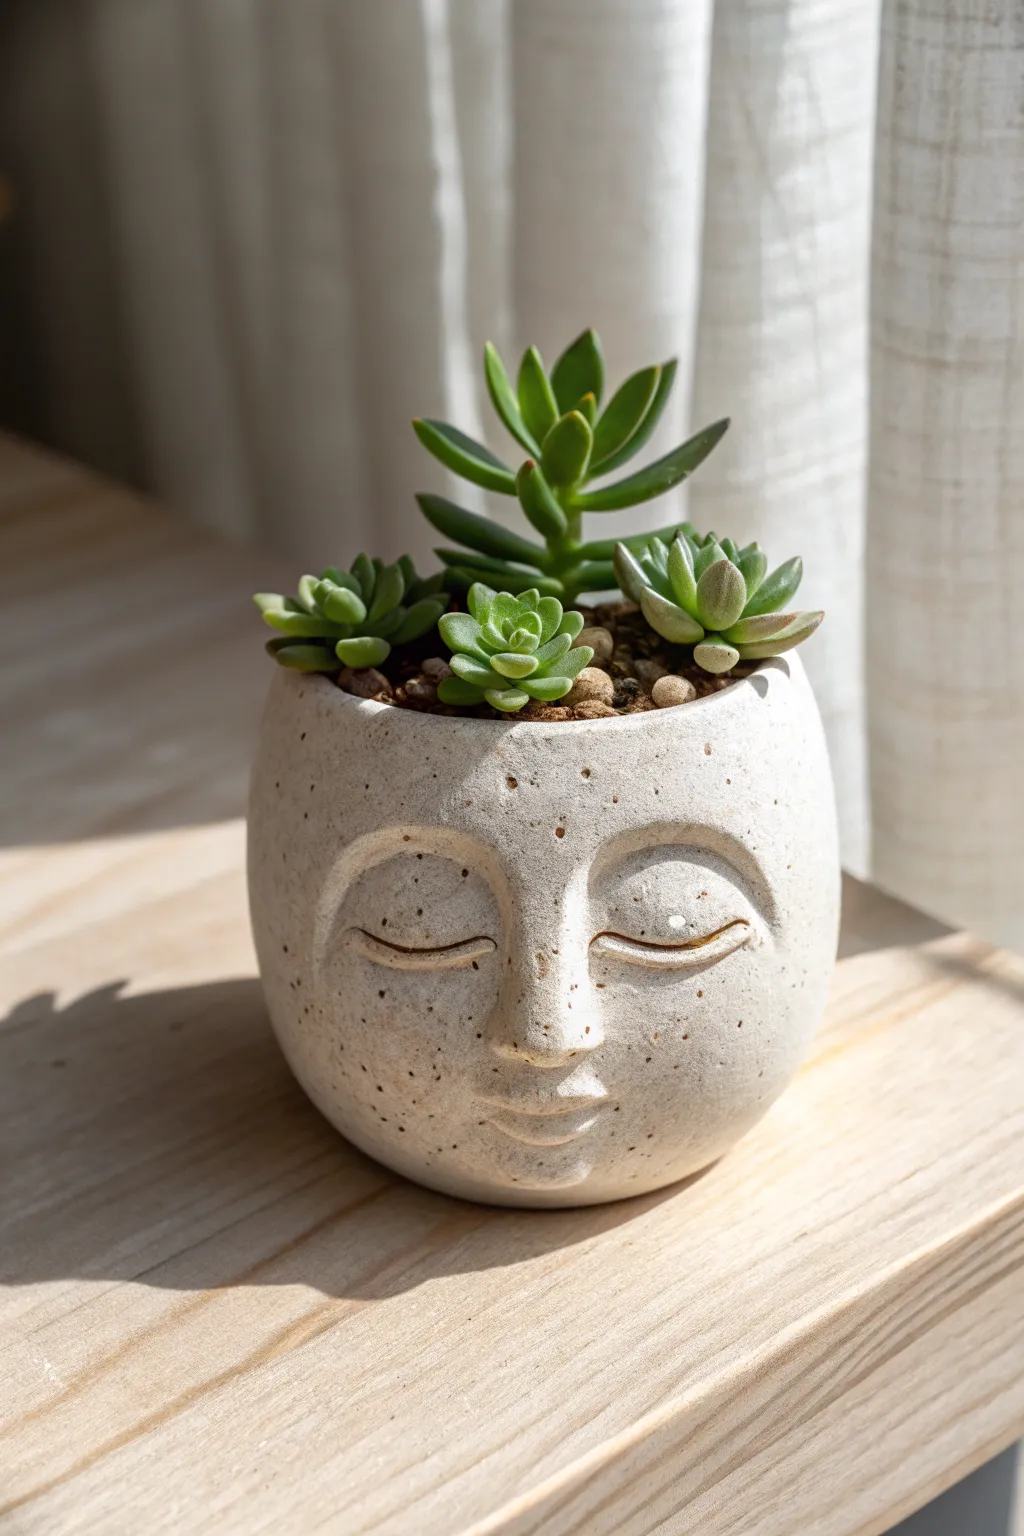
Sculpt a slice of tranquility with this charming, meditative face planter that brings a sense of calm to any windowsill. The speckled finish and softly closed eyes give it a timeless, zen-like quality perfect for housing your favorite succulents.
Step-by-Step Tutorial
Materials
- Speckled cone 6 stoneware clay (buff or white with grog)
- Pottery wheel (optional, can be hand-built)
- Rib tool (kidney shaped, silicone or metal)
- Needle tool
- Small loop tool
- Wooden modeling tool
- Sponge
- Clear matte glaze or satin glaze
- Kiln
Step 1: Forming the Base
-
Prepare the clay:
Wedge about 1 to 1.5 lbs of speckled stoneware clay thoroughly to remove air bubbles. This speckled clay is key to achieving that organic, stone-like texture seen in the final piece. -
Create the vessel:
If throwing on the wheel, center your clay and open it up. Pull the walls to create a rounded, bowl-like shape that curves inward slightly at the rim. If hand-building, use the pinch pot method to create a smooth, symmetrical half-sphere. -
Smooth the surface:
Using a flexible rib tool, compress and smooth the outside of the pot while it’s spinning (or rotating in your hand) to erase finger marks. You want a very clean canvas for the face sculpting later. -
Set up drainage:
Don’t forget the essentials for flower pots: use a circular punch or knife to cut a drainage hole in the bottom center while the clay is still wet. -
Initial drying:
I allow the pot to dry just until it reaches a soft leather-hard stage. It needs to be firm enough to hold its shape when pushed, but soft enough to carve and add clay.
Cracking Features?
If the nose or lips crack off during drying, you likely didn’t score (scratch) the surfaces enough before adding slip. Always rough up both contact points aggressively.
Step 2: Sculpting the Zen Face
-
Map out the features:
Lightly trace a vertical center line and a horizontal line where the eyes will sit using your needle tool. This ensures symmetry. -
Add the nose:
Score a small triangular area in the center and slip a small wedge of clay onto it. Blend the edges of the nose smoothly into the pot using your thumb or a wooden tool, ensuring there are no visible seams. -
Define the brow:
Gently press your thumbs into the clay just above the eyes to create a subtle indentation. This pushes the brow bone forward naturally, creating distinct eye sockets. -
Shape the eyes:
Roll two small, elongated coils of clay for the eyelids. Score and slip them into the eye sockets, curving them downwards to look like sleeping, closed eyes. -
Refine the eyelids:
Use a modeling tool to blend the top edge of the eyelid into the face, leaving the bottom edge crisp to define the lash line. Carve a very thin, gentle curve underneath to separate the upper and lower lid area. -
form the mouth:
Add a very small amount of clay below the nose for the lips. Press a line horizontally to separate the lips, and gently push the corners up slightly for a subtle smile. -
Soften the features:
Take a slightly damp sponge and wipe over the sculpted areas. This removes sharp tool marks and gives the face that soft, peaceful aesthetic.
Make it Blush
Before the final glazing, dab a tiny amount of diluted pink underglaze or iron oxide wash onto the cheeks to give the face a rosy, warm, living appearance.
Step 3: Finishing and Firing
-
Final drying:
Let the piece dry very slowly under plastic to prevent the added features (like the nose) from cracking away from the pot. -
Bisque fire:
Once bone dry, fire the piece in the kiln to cone 04 (or your clay’s specific bisque temperature). -
Glazing:
Dip the entire pot into a clear matte or satin glaze. Use a sponge to wipe the foot (bottom) clean so it doesn’t stick to the kiln shelf. -
Firing:
Fire the piece to cone 6 (oxidation). The clear glaze will reveal the beautiful natural specks in the clay body. -
Planting:
Once cool, fill with gritty succulent soil and arrange a few rosettes of varying heights to give your sculpture a wild, green ‘hairdo’.
Place your finished planter in gentle sunlight and enjoy the peaceful presence created by your own hands
Mushroom House Cottagecore Mini
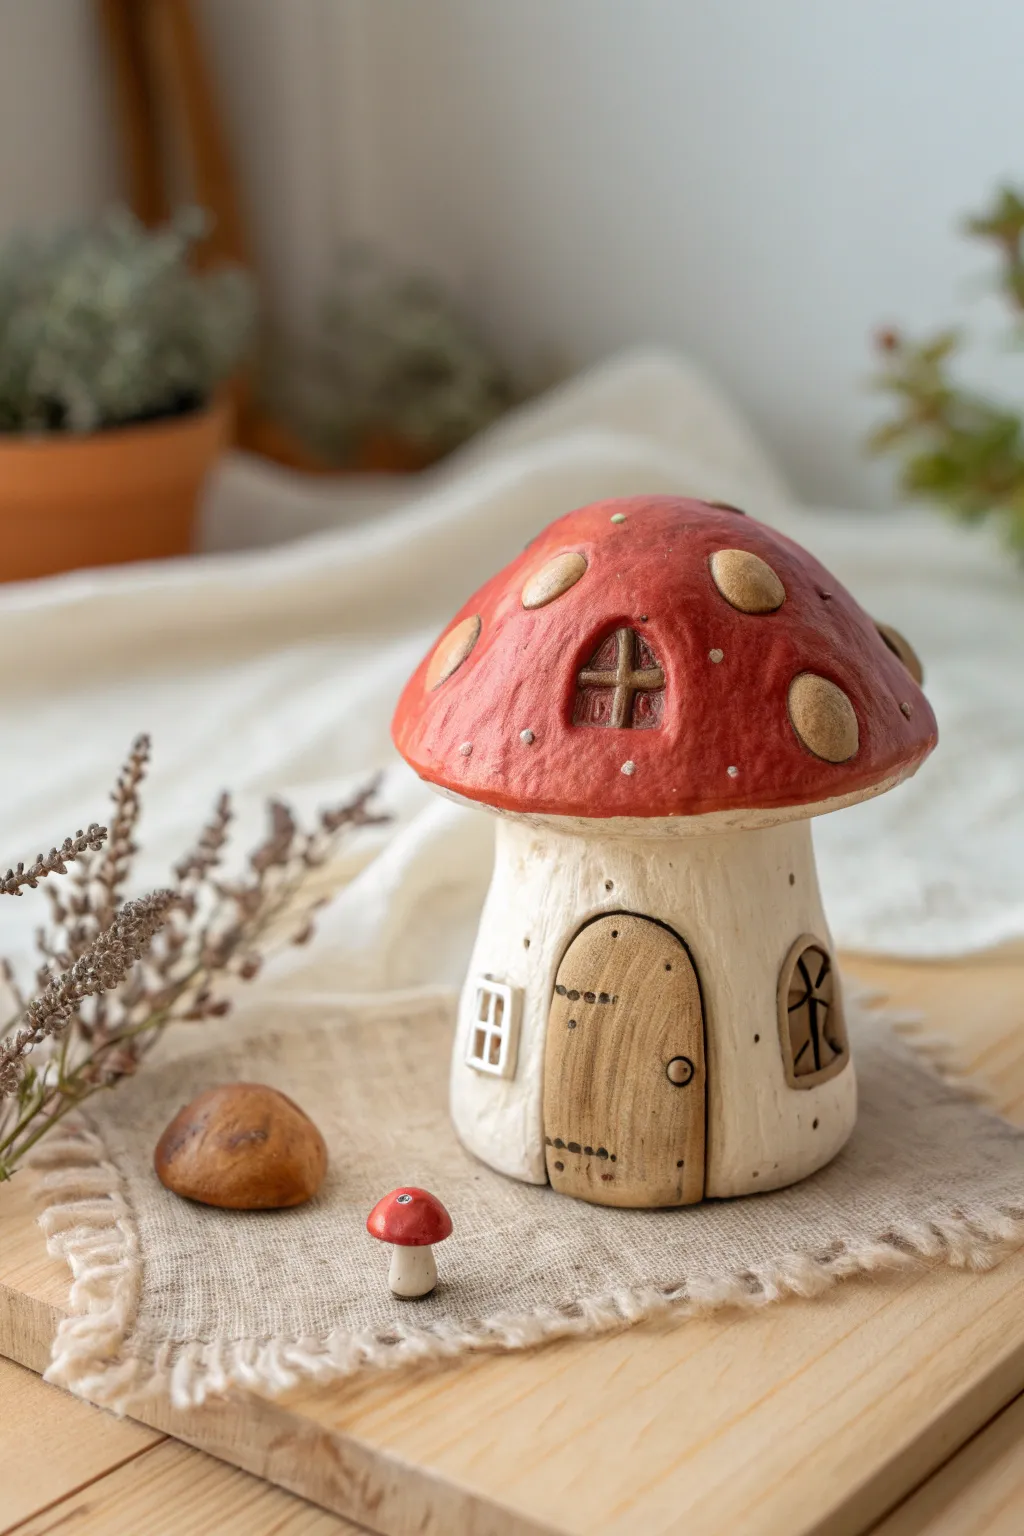
This charming clay mushroom house features a textured red cap dotted with cream spots and a rustic wooden door that invites you into a tiny world. Perfect for cottagecore enthusiasts, this sculpture uses simple hand-building techniques to create an enchanting shelf decoration.
Step-by-Step
Materials
- Air-dry clay or polymer clay (white or beige base)
- Acrylic paints (Red, Cream/Tan, Dark Brown, White, Black)
- Sculpting tools (needle tool, ball stylus, clay knife)
- Texture sponge or toothbrush
- Rolling pin
- Aluminum foil (for armature)
- Fine detail paintbrush
- Medium flat paintbrush
- Matte varnish or sealant
Step 1: Shaping the Base and Cap
-
Form the armature:
Crumple a piece of aluminum foil into a cylinder shape for the stalk and a separate, larger dome shape for the cap. This saves clay and keeps the sculpture lightweight. -
Cover the stalk:
Roll out a sheet of your white or beige clay to about 1/4 inch thickness. Wrap it around the cylindrical foil armature, smoothing the seam with a bit of water or slip. -
Texture the stalk:
Using a clay knife or a needle tool, gently drag vertical lines down the stalk to mimic natural mushroom fibers. Don’t make them too straight; a little wobble adds organic character. -
Cover the cap:
Roll out a round sheet of clay and drape it over the foil dome. Trim the excess edges, but leave a slight overhang to create the mushroom’s rim. -
Connect the pieces:
Score the top of the stalk and the underside of the cap. Apply a little water or liquid clay (for polymer) and press them firmly together. Blend the clay slightly at the connection point for stability.
Natural Texture
For the cap texture, press a real piece of crumpled tinfoil or a rough stone against the clay before it dries. This creates random, organic dimples that look great under paint.
Step 2: Adding Details
-
Create the door:
Flatten a small oval of clay. Use a needle tool to etch vertical wood grain lines and horizontal details for hinges. Add a tiny ball of clay for the doorknob. -
Attach the door:
Score the area on the stalk where the door will go, then press your door firmly onto the surface. I like to use a tool to gently push the edges down so it looks embedded. -
Make the spots:
Form several small, flat ovals or circles of clay. Press these randomly onto the mushroom cap. Push the edges down to smooth them into the cap’s surface. -
Sculpt the windows:
Create small rectangular or arched frames from thin clay snakes. Attach one to the cap and one to the stalk. Use a tool to impress a cross shape inside for the window panes. -
Texture the cap:
Before the clay hardens, tap a toothbrush or dry sponge lightly all over the red cap area (avoiding the spots) to give it a porous, realistic fungal texture. -
Dry or Bake:
If using air-dry clay, let it sit for 24-48 hours until fully white and hard. For polymer clay, bake according to the package instructions.
Step 3: Painting and Finishing
-
Base coat the cap:
Paint the main mushroom cap a vibrant, earthy red. You might need two coats for full opacity. Avoid painting over the raised spots if possible, but it’s okay if you get messy. -
Paint the spots:
Paint the raised spots on the cap with a cream or tan color. Once dry, lightly dry-brush a darker brown around the edges of the spots to make them pop. -
Detail the stalk:
Mix a watery wash of dark brown paint and brush it over the white stalk. Immediately wipe it off with a paper towel; the dark paint will stay in the textured grooves, highlighting the shape. -
Wood grain effects:
Paint the door and window frames light brown. Use a fine brush with dark brown to re-trace the etched wood grain lines and paint tiny black dots for the hinge nails. -
Paint the windows:
Fill the inside of the window panes with black or dark grey to create depth. -
Add highlights:
Use a tiny dot of white paint to add ‘sparkle’ or reflection points on the red cap, as seen in the reference, to give it a magical feel. -
Seal the piece:
Apply a coat of matte varnish to protect your paint job and give the clay a unified finish.
Cap Won’t Stay On?
If the heavy cap keeps sliding off the stalk while wet, insert a toothpick or a piece of dry spaghetti through the center of the stalk into the cap to act as an internal dowel.
Place your finished cottage on a shelf with some moss or dried flowers to complete the woodland scene
Tiny Duck Pond Diorama
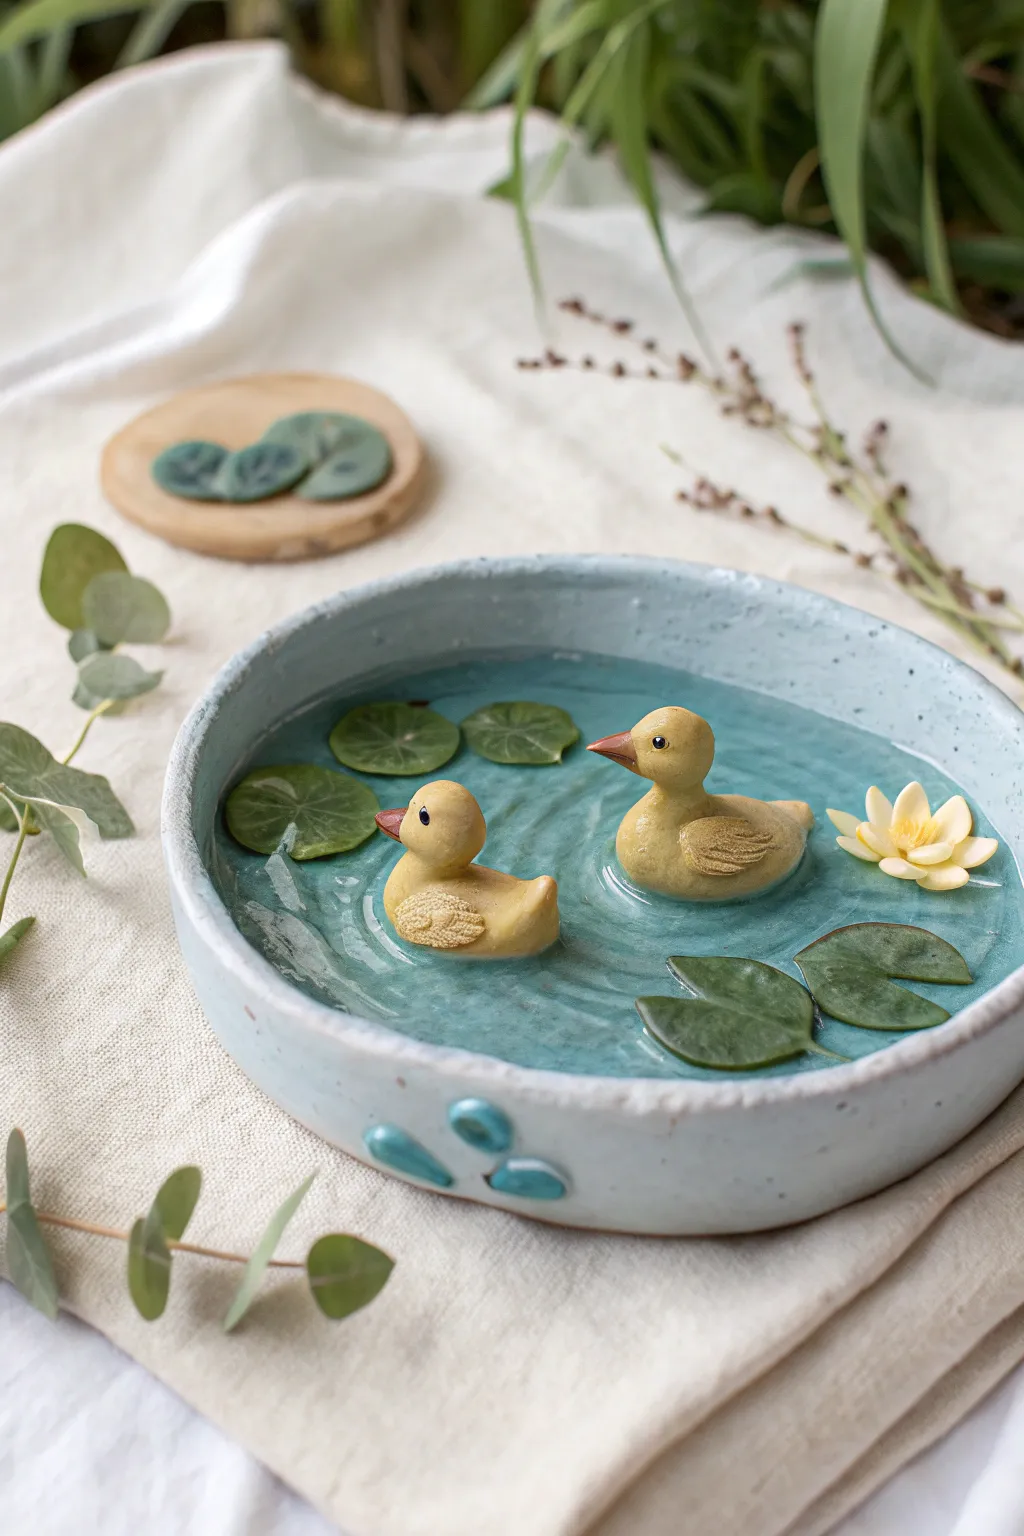
Capture the serenity of a quiet garden in miniature with this charming ceramic duck pond. Featuring two cheerful ducks gliding across glossy resin water and surrounded by delicate lily pads, this piece brings a peaceful, aesthetic touch to any shelf or desk.
How-To Guide
Materials
- Polymer clay or air-dry clay (white, yellow, orange, green, light yellow)
- Acrylic paints (if using white clay only)
- Round shallow ceramic dish or clay to make one
- Two-part clear epoxy resin
- Blue alcohol ink (or teal)
- Sculpting tools (needle tool, ball stylus)
- UV resin (optional, for ripples)
- Gloss varnish
- Tweezers
- Toothpicks
Step 1: Creating the Pond Base
-
Shape the basin:
If you aren’t using a pre-made ceramic dish, roll out a slab of clay to about 1/4 inch thickness. Cut a circle for the base and a long strip for the walls. -
Assemble the structure:
Score and slip the edges (if using water-based clay) or blend the seams firmly (if using polymer clay) to attach the wall strip to the base circle, creating a shallow bowl shape. -
Refine the rim:
Smooth the rim with a damp sponge or your finger to give it that organic, handmade pottery look. It doesn’t need to be perfectly round; a little unevenness adds charm. -
Add exterior details:
Roll tiny teardrop shapes of blue clay and press them onto the side of the bowl to create a decorative splash pattern. -
Base color:
Paint the inside bottom of the bowl a deep teal or greenish-blue to give depth to the water later on, then let it dry or bake according to your clay type.
Step 2: Sculpting the Inhabitants
-
Form the duck bodies:
Roll two balls of yellow clay, one slightly larger than the other. Gently pull one side of each ball into a tapered tail shape to create the classic duck body. -
Add heads and beaks:
Roll smaller yellow balls for heads and attach them to the bodies. Create tiny orange cones for beaks and gently press them onto the faces. -
Detail the wings:
Fashion small teardrops of yellow clay and flatten them slightly. Use a needle tool to scratch delicate feather textures before attaching them to the sides of the ducks. -
Make the lily pads:
Roll out thin circles of green clay. Cut a small pie-slice wedge out of each circle and use a ball tool to slightly curl the edges upward. -
Create the lotus flower:
Form tiny teardrops from pale yellow or cream clay. Arrange them in concentric circles, starting small in the center and working outward, to build a blooming water lily. -
Bake or dry:
Bake your clay pieces (the bowl, ducks, and plants) according to the manufacturer’s instructions. If you painted the bowl’s bottom previously, ensure the paint is fully cured first.
Ducks Sinking?
If your clay ducks are heavy and start sinking in fresh resin, let the resin cure until it becomes thick like honey before placing them, or prop them up with toothpicks.
Step 3: Pouring the Resin Water
-
Mix the resin:
Prepare your two-part epoxy resin, mixing slowly to avoid too many bubbles. I find letting it sit for 5 minutes after mixing helps micro-bubbles rise and pop. -
Tint the water:
Add a single drop of blue alcohol ink to the resin. You want it transparent enough to see the bottom of the bowl, so go easy on the color. -
Arrange the scene:
Pour a small layer of resin into the bowl. Carefully place your ducks, lily pads, and the lotus flower into the wet resin. The resin acts as glue. -
Add the main pour:
Gently pour the remaining resin around the figures until they appear to be floating at the correct depth. Do not submerge them completely. -
Create ripples:
Once the resin is thick and tacky (after a few hours) or fully cured, use a toothpick with clear UV resin (or clear gel medium) to draw circular ripples around the ducks and floating leaves.
Glow Up
Mix a tiny amount of glow-in-the-dark powder into the white clay of the water lily or the resin water for a magical nighttime effect.
Enjoy the peaceful vibe of your new handmade pond on your desk
Shell-Inspired Trinket Bowl
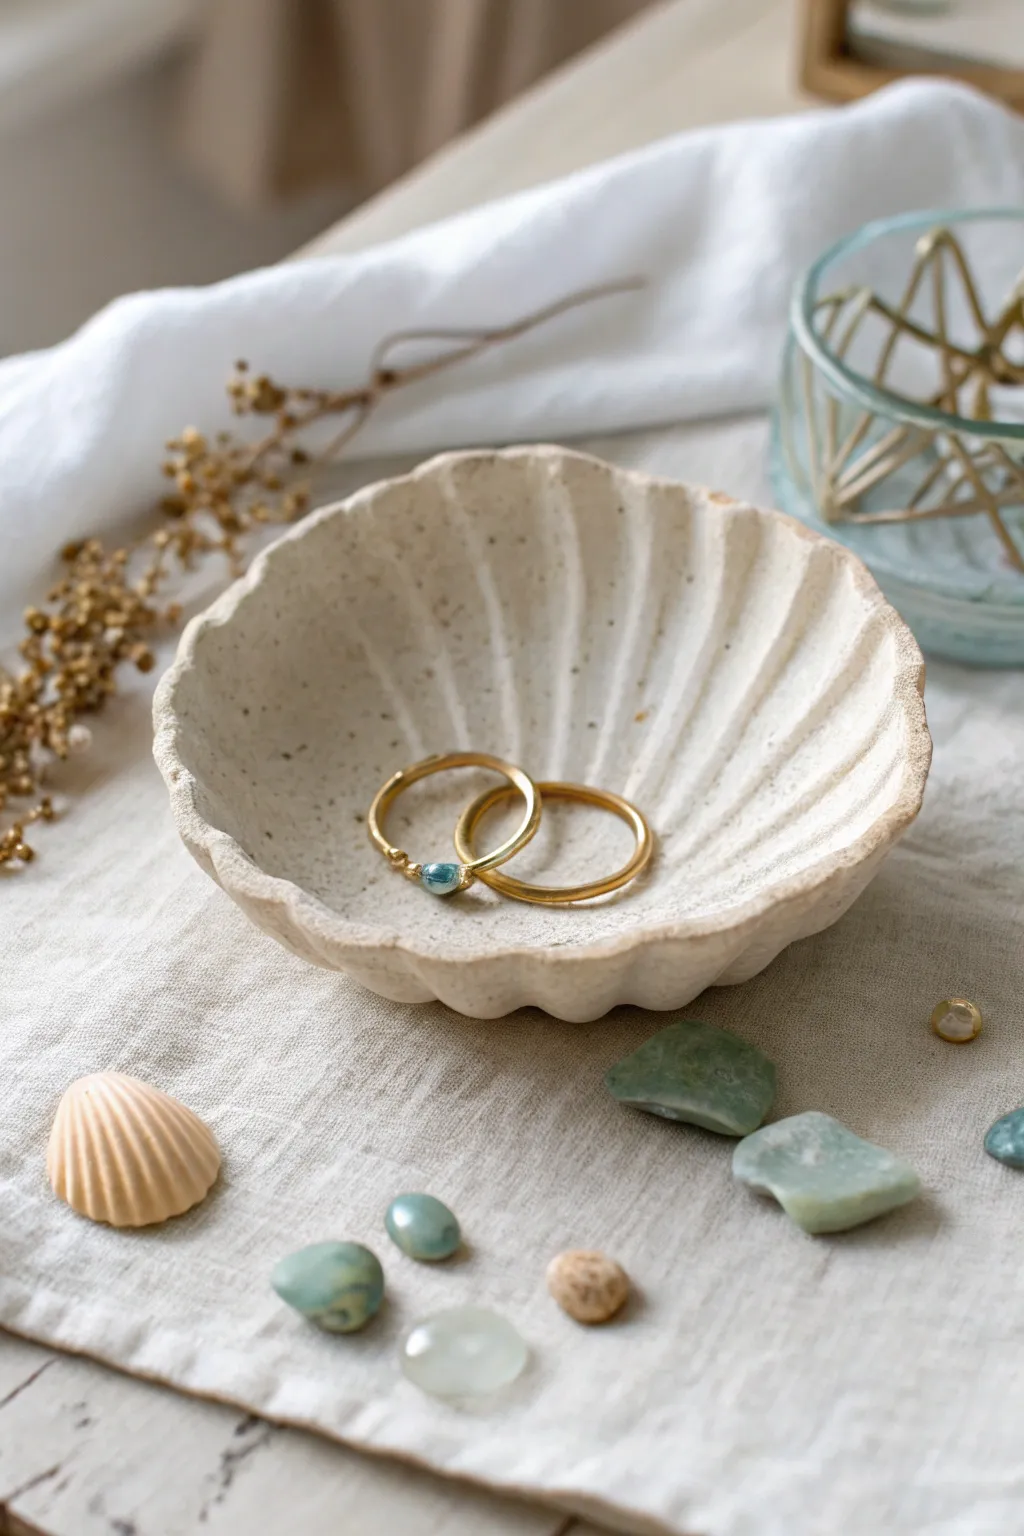
This elegant shell-shaped dish brings the serene vibes of the sea straight to your vanity or bedside table. Crafted with a beautiful stoneware finish and organic scalloped edges, it’s the perfect minimalist catch-all for your favorite rings and small treasures.
Detailed Instructions
Materials
- Air-dry clay (white or cream)
- Small rolling pin
- Rolling guides or wooden slats (approx. 5mm thickness)
- Round cookie cutter or bowl (about 4-5 inches diameter)
- Modelling tools (needle tool and smooth rib)
- Small scallop shell or plastic spoon (for imprinting)
- Sponge and water
- Fine-grit sandpaper
- Acrylic paints (cream, beige, brown)
- Old toothbrush (for speckling)
- Matte varnish or sealant
Step 1: Shaping the Base
-
Prepare your clay:
Begin by kneading a ball of air-dry clay until it is warm, pliable, and free of air bubbles. A smooth starting consistency is crucial for preventing cracks later. -
Roll out the slab:
Place the clay between your rolling guides or wooden slats. Roll it out evenly to get a uniform thickness of about 5mm (1/4 inch). -
Cut the circle:
Use your round cookie cutter or trace around a small bowl with a needle tool to cut a perfect circle from the slab. -
Smooth the edges:
Dip your finger or a sponge in a tiny bit of water and run it along the cut edge of the circle. This removes sharp burrs and creates a professional finish.
Step 2: Sculpting the Scallop
-
Mark the center:
Lightly mark a small dot near the bottom edge of your circle; this will be the ‘hinge’ of the shell where all the design lines radiate from. -
Create radial lines:
Using a dull modeling tool or the back of a knife, gently press indentation lines radiating from your hinge point outward to the top edge of the circle, fanning them out like sun rays. -
Form the ridges:
To enhance the shell texture, use the back of a spoon or your finger to gently press down in the spaces *between* the lines you just drew. This raises the lines into ridges. -
Scallop the rim:
At the outer rim of the circle, where each ridge ends, pinch the clay slightly or press inward with a tool to create the classic wavy, scalloped silhouette of a seashell. -
Shape the bowl:
Gently lift the sides of the clay circle. Using your palms, curve the clay upwards to form a shallow bowl shape. You can rest it inside a slightly larger bowl lined with plastic wrap to help it hold this curve while drying. -
Clean up texture:
Inspect the interior. If the pressing flattened any details, re-emphasize the radial grooves now while the clay is still workable.
Creating the Ridge
Use a thick straw or a round chopstick to press into the clay for really uniform, rounded grooves that look cleaner than hand-sculpting.
Step 3: Finishing and Decoration
-
Dry completely:
Allow the sculpture to dry for 24-48 hours. I find letting it dry slowly away from direct sunlight prevents warping. -
Sand rough spots:
Once fully dry and hard, use fine-grit sandpaper to gently smooth the rim and any sharp peaks on the ridges, giving it a weathered, sea-tumbled feel. -
Base coat:
Paint the entire bowl with a creamy off-white or light beige acrylic paint to unify the surface color. -
Add dimension:
Mix a watery wash of slightly darker beige or light brown paint. Brush it into the grooves and wipe the surface immediately with a damp cloth, leaving the darker color only in the recesses. -
Create the speckled stoneware look:
Prepare a small amount of watered-down dark brown paint. Dip an old toothbrush into it, point it at the bowl, and run your thumb across the bristles to flick tiny speckles over the surface. -
Seal the piece:
Once the paint is totally dry, apply a coat of matte varnish. This protects the clay from moisture and gives it that finished ceramic look.
Gilded Edge
Once sealed, paint the very rim of the scalloped edge with liquid gold leaf or metallic gold paint for a luxurious, high-end jewelry dish look.
Place your finished shell on your dresser to hold your daily essentials with effortless organic style
Checkerboard Accent Sculpture
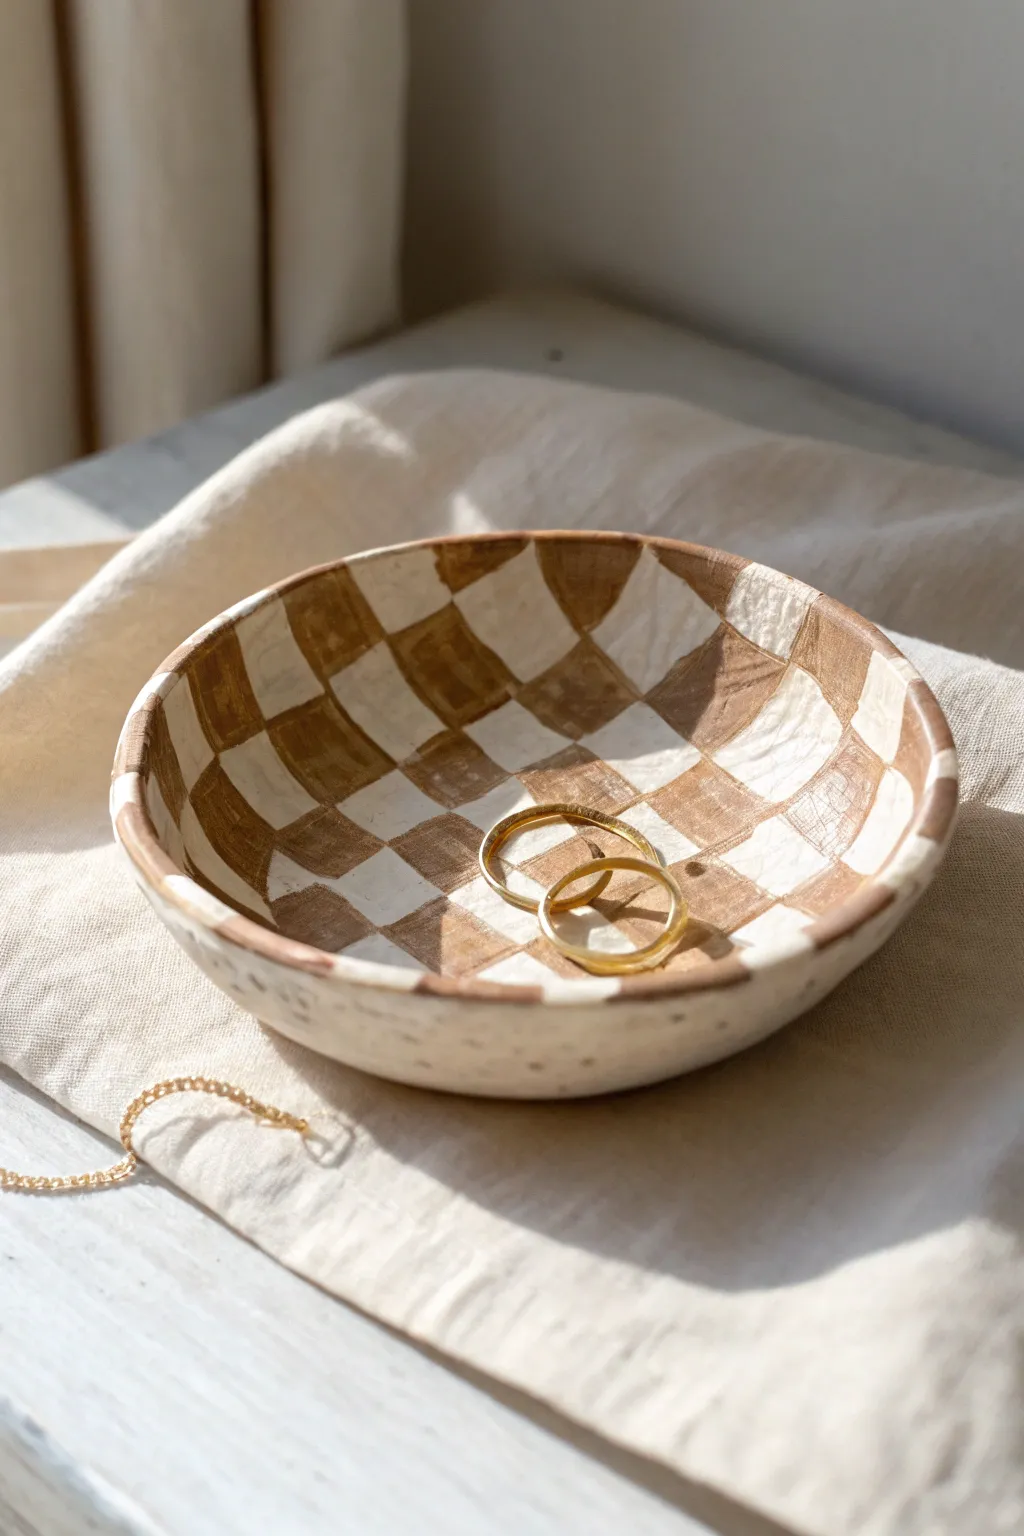
Capture the trendy checkerboard aesthetic with this charming, handmade trinket dish. Its simple form and warm, earthy tones make it the perfect minimalist holder for your favorite rings and delicate jewelry.
Step-by-Step
Materials
- Air-dry clay (white or light grey)
- Acrylic paint (burnt umber/dark brown and creamy white)
- Rolling pin
- Small bowl (to use as a mold)
- Craft knife or clay cutter
- Fine-grit sandpaper
- Small flat paintbrush
- Fine detail paintbrush
- Pencil
- Gloss or matte varnish (sealant)
- Water cup
- Canvas or parchment paper (work surface)
Step 1: Sculpting the Form
-
Prepare the Clay:
Take a handful of air-dry clay and knead it in your hands until it becomes soft, pliable, and free of cracks. Warm clay is much easier to work with, so don’t rush this step. -
Roll it Out:
Place the clay on a piece of parchment paper or canvas to prevent sticking. Use your rolling pin to flatten the clay into an even slab, aiming for a thickness of about 1/4 inch (6mm). -
Cut the Circle:
Place a bowl or a circular template (about 5-6 inches in diameter) gently onto the clay slab. Use your craft knife to trace around the edge, cutting out a perfect circle. -
Shape the Curve:
Lift your clay circle and gently drape it *inside* a small bowl to give it a curved shape. Gently press it against the bottom and sides so it adopts the bowl’s form without stretching the clay too thin. -
Refine the Edges:
Dip your finger in a little water and run it along the rim of the dish to smooth out any sharp cuts or roughness. I like to round the edge slightly for a softer, organic look. -
Initial Drying:
Leave the clay inside the bowl to dry for at least 24 hours. Drying it in the mold ensures it keeps that perfectly cupped shape. -
flip and Finish Drying:
Once the exposed side feels dry and hard, carefully pop the clay out of the mold. Turn it upside down and let the bottom dry completely for another 12-24 hours. -
Sand Smooth:
Once bone dry, take your fine-grit sandpaper and gently sand the entire surface. Focus on the rim and any bumps on the interior to create a smooth canvas for painting.
Wobbly Lines?
If freehand painting is stressful, use thin washi tape or masking tape to block out your grid lines before painting. Press edges down firmly to prevent bleed-through.
Step 2: Painting the Pattern
-
Sketch the Grid:
Using a pencil very lightly, draw a grid on the inside of the bowl. Start with a central cross, then add parallel curved lines that follow the contour of the bowl to create the checkerboard sections. -
Mix Your Brown:
Prepare your burnt umber acrylic paint. If it feels too thick, add a tiny drop of water to help it flow smoothly into the corners of your checks. -
Paint Dark Checks:
Using the small flat brush, fill in alternating squares with the brown paint. Work from the center outward to avoid smudging your work with your hand. -
Paint the Rim:
Continue the pattern over the lip of the bowl. If a brown square hits the edge, wrap that color slightly over the rim to give the piece a finished, dimensional look. -
Fill the Light Checks:
Once the brown is dry to the touch, mix a creamy white paint. Use your clean brush to fill in the remaining squares. You might need two coats here to cover the clay color completely depending on its opacity. -
Clean Up Lines:
Switch to your fine detail brush. Touch up any wobbly edges where the brown and cream meet to make the checkerboard look crisp. -
Speckle the Exterior:
For the outside, leave it mostly natural or paint it cream. To get the look in the photo, dilute a little brown paint on an old toothbrush and flick it lightly onto the exterior for a speckled pottery effect. -
Seal the Dish:
After the paint is fully cured (usually a few hours), apply a coat of varnish over the entire piece. This protects the paint from chipping and gives it a nice sheen similar to glazed ceramic.
Pro Tip: Weighted Center
While the clay is drying in the bowl mold, place a small, light object (like a tea light candle) in the center to weigh it down and prevent the bottom from puffing up.
Now you have a stylish spot to keep your jewelry safe and organized
Celestial Moon and Star Minis
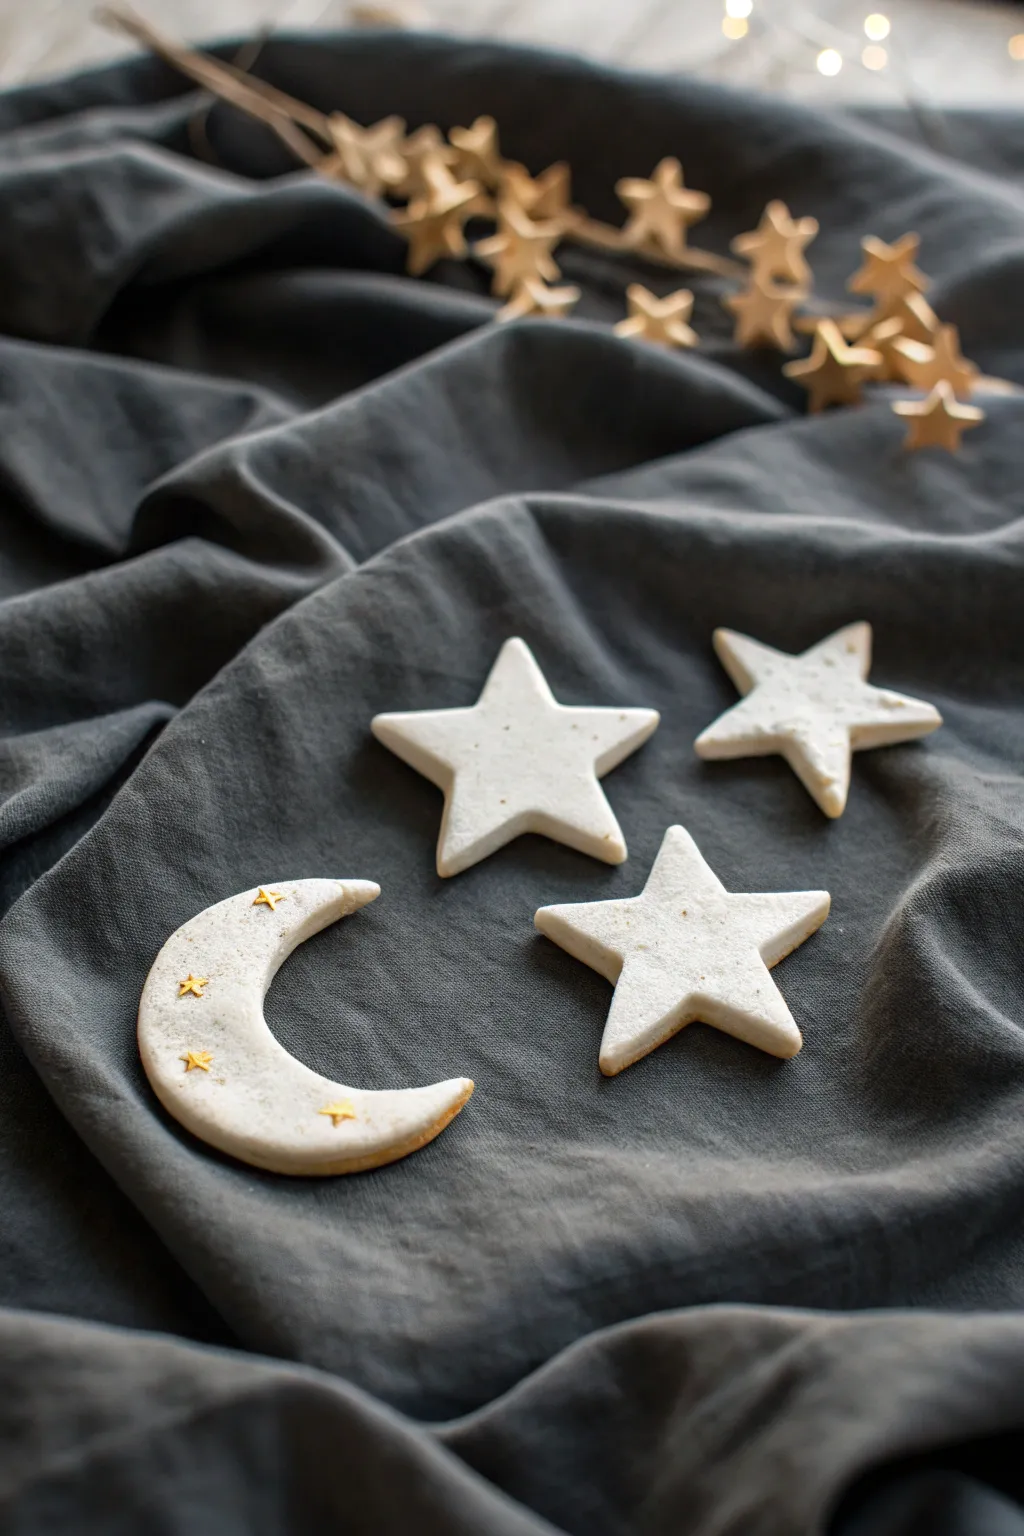
Capture the magic of the night sky with these minimalist moon and star clay sculptures. Their smooth, matte white finish speckled with delicate gold details makes them perfect for ethereal flat-lays or charming handcrafted ornaments.
Step-by-Step Guide
Materials
- White polymer clay or air-dry clay (smooth finish)
- Rolling pin
- Parchment paper or silicone mat
- Star-shaped cookie cutters (approx. 2 inches)
- Circular cookie cutters (two sizes) or a knife for the moon
- Small gold star confetti, glitter shapes, or gold metallic paint
- Fine-grit sandpaper (optional)
- Matte varnish or sealant (optional)
- Fine-point tweezers
Step 1: Shaping the Basis
-
Prepare your workspace:
Lay down a sheet of parchment paper or a silicone mat to prevent the clay from sticking to your table. Clean your hands thoroughly to avoid transferring lint or dust to the pristine white clay. -
Condition the clay:
Take a chunk of white clay and knead it in your hands until it becomes warm, soft, and pliable. This conditioning prevents cracks during drying or baking. -
Roll out the slab:
Use your rolling pin to flatten the clay into an even slab. Aim for a thickness of about 1/4 inch (6mm) so the pieces feel substantial but aren’t too heavy. -
Cut the stars:
Press your star-shaped cutter firmly into the clay slab. Wiggle it slightly to ensure a clean cut, then lift it away. Repeat this to make three individual stars. -
Shape the moon:
To form the crescent moon, first use the larger circular cutter to cut a full circle. Then, position the same cutter (or a slightly smaller one) off-center over that circle to cut away a section, leaving behind a perfect crescent shape.
Step 2: Refining and Decorating
-
Smooth the edges:
Dip your finger in a tiny bit of water (for air-dry clay) or baby oil (for polymer clay) and gently run it along the cut edges of your shapes to soften any sharp ridges. -
Create surface texture (optional):
If you want the subtle, speckled stone look seen in the photo, you can gently press a piece of coarse sandpaper or a stiff brush onto the surface for a moment, or simply leave the natural matte texture of the clay. -
Embed gold stars (Method A):
For the crescent moon specifically, identify where you want the gold accents. If using star confetti, use your fine-point tweezers to pick up a tiny star. -
Press into clay:
Gently press the gold confetti star into the soft clay surface so it sits flush. I like to do this while the clay is still raw so it bonds without glue. -
Repeat placement:
Place 3-4 gold stars randomly along the curve of the moon. Leave the larger white stars plain to create contrast in your final set.
Rough Edges?
If using air-dry clay and edges look ragged, wait until the piece is ‘leather hard’ (half-dried). You can then carve or smooth the edges with a damp sponge for a much cleaner finish than when wet.
Step 3: Curing and Finishing
-
Dry or Bake:
If using polymer clay, bake the pieces on a parchment-lined tray according to the package instructions (usually 275°F/135°C for 15-30 minutes). If using air-dry clay, let them sit undisturbed for 24-48 hours. -
Cool down:
Allow the pieces to cool completely or dry fully. Do not handle them while warm or damp as they can distort. -
Sand imperfections:
Once fully cured, inspect the edges. If there are any rough spots, gently buff them away with fine-grit sandpaper until the silhouette is crisp. -
Paint gold accents (Method B):
If you didn’t embed confetti earlier, now is the time to use a fine detail brush and metallic gold paint to hand-paint tiny stars onto the cured moon. -
Seal the surface:
To protect the white finish from dust and dirt, apply a thin coat of matte varnish. This keeps the look natural without adding unwanted gloss. -
Final check:
Let the varnish dry completely. Your celestial minis are now ready to be arranged as decor or used in your next creative project.
Turn Them Into Ornaments
Before drying, use a toothpick or straw to poke a small hole at the top of one star point or the moon’s tip. Thread invisible fishing line or gold ribbon through after curing for hanging decor.
Arrange your celestial pieces on a textured fabric to enjoy their peaceful, dreamy aesthetic
Stacked Pebble Zen Sculpture
Bring a sense of tranquility to your space by sculpting your own Zen rock stack using air-dry or polymer clay. These faux pebbles mimic the organic textures and matte finish of real river stones, creating a permanent sculpture that won’t topple over.
Step-by-Step
Materials
- White or grey air-dry clay (or polymer clay)
- Acrylic paints (white, beige, grey, raw sienna)
- Old toothbrush or stiff bristle brush
- Aluminum foil
- Fine grit sandpaper
- Sponge or sea sponge
- Matte varnish or sealant
- Strong craft glue or epoxy (optional for permanent hold)
- Rolling pin (optional)
Step 1: Forming the Stones
-
Prepare foil cores:
Crumple aluminum foil into six distinct oval shapes of graduating sizes. The largest should be roughly palm-sized for the base, shrinking down to a walnut size for the top. This saves clay and keeps the sculpture lightweight. -
Condition the clay:
Knead your clay until it is warm and pliable. If using air-dry clay, keep a small dish of water nearby to smooth out any cracks that appear. -
Cover the cores:
Flatten sheets of clay and wrap them around your six foil forms. Ensure the clay layer is roughly 1/4 inch thick so that the foil texture doesn’t press through. -
Shape organic forms:
Roll and press the clay-covered shapes into smooth, slightly flattened pebbles. Avoid perfect circles; real river stones are often irregular ovals. -
Flatten stacking spots:
Gently press the top and bottom of each stone against a flat surface. This creates a subtle flat spot which is crucial for stability when you stack them later. -
Add texture:
While the clay is still soft, tap the surface with an old toothbrush or a crumpled ball of foil. This creates tiny pits and imperfections that mimic natural stone. -
Dry or bake:
Follow the manufacturer instructions to cure your clay. For air-dry clay, let the stones sit for 24-48 hours, turning them occasionally for even drying.
Wobbly Stack?
If the stones won’t sit still, use a small piece of sandpaper to grind down the contact points between rocks until they sit flush against each other.
Step 2: Refining and Painting
-
Sand imperfections:
Once fully cured, use fine-grit sandpaper to smooth out any fingerprints or sharp ridges. You want them to look water-worn, so aim for soft curves. -
Base coat mixing:
Mix a few different shades of stone colors. I like to keep a palette of warm beige, cool grey, and off-white ready. -
Apply base colors:
Paint each stone a solid base color. Vary the shades slightly for realism—make the base stone a warmer tan and the middle one a lighter cream, for example. -
Spatter technique:
Load a stiff brush with watered-down dark grey or brown paint. Run your thumb across the bristles to flick tiny speckles onto the stones to mimic granite textures. -
Sponge dabbing:
Use a sea sponge with very little paint (dry brush style) to dab lighter highlights on the top curves of the stones. -
Seal the finish:
Apply a coat of matte varnish. Avoid glossy finishes, as real river stones usually look matte when dry.
Step 3: Assembly
-
Dry fit:
Stack your stones from largest to smallest to find the most balanced and aesthetically pleasing arrangement. Rotate them until the flat spots align perfectly. -
Permanent bonding:
If you want a sculpture that can’t be knocked over, apply a strong adhesive or epoxy between each layer. -
Final cure:
Allow the adhesive to set completely before moving your new center of zen.
Pro Tip: Weight
For the bottom-most stone, skip the foil core and use solid clay. This makes the base heavier and lowers the center of gravity for better stability.
Place your sculpture near a window where natural light can highlight the textured details of your creation
Mini Book Nook Scene Sculpture
Transform your bookshelf into a magical gateway with this charming clay sculpture that doubles as a sturdy bookend. Featuring a rustic wooden door nestled within a textured stone archway, this piece brings a touch of fairytale whimsy to any reading nook.
How-To Guide
Materials
- Air-dry clay (white or terracotta)
- Foil and cardboard (for armature)
- Rolling pin
- Sculpting tools (needle tool, ball stylus, knife)
- Texture tools (sandpaper, toothbrush, crushed foil)
- Acrylic paints (white, beige, browns, moss green, black)
- Fine detail paintbrushes
- Matte varnish or sealant
- Wood glue or heavy-duty craft glue
- Miniature faux plants (optional)
Step 1: Building the Structure
-
Core construction:
Begin by creating a rudimentary L-shape or block shape using cardboard to serve as the sturdy core of your bookend. This saves clay and keeps the piece lighter. -
Bulk it up:
Crumple aluminum foil tightly around your cardboard form to build up the rounded arch shape. Ensure the back is flat so it sits flush against your books. -
Base layer:
Roll out a slab of clay approximately 1/4 inch thick. Cover the entire foil armature with the clay, smoothing the seams with a little water on your finger. -
Define the face:
Use your fingers to press the front face of the sculpture flat, ensuring there is a distinct vertical area for the door and a horizontal area for the steps.
Step 2: Sculpting Details
-
Door frame arches:
Roll a snake of clay and flatten it slightly. Press this onto the front face to create the archway border. Use a knife tool to score deep lines, separating the ‘stones’ of the arch. -
Texturing the stone:
Take a ball of crushed foil or a stiff toothbrush and press it repeatedly into the archway stones and the side walls to create a pitted, realistic stone texture. -
Creating the door:
Roll a smaller slab of clay to fit inside the arch. Use a needle tool to deeply score vertical lines to resemble wood planks. -
Wood grain:
Lightly drag a needle tool or stiff brush down the ‘planks’ to create a wood grain texture. Add small knot holes for realism. -
Hardware details:
Roll tiny bits of clay into balls and thin coils to form the door hinges, handle, and the small semi-circle window frame at the top. Press these firmly onto the soft clay door. -
Forming the steps:
Add two rectangular slabs of clay at the base for the stairs. Use your knife to create separation lines between individual paving stones. -
Potted accents:
Sculpt two tiny thimble-sized pots from leftover clay. I usually make tiny cacti shapes to go inside them, or leave them hollow to glue inside faux moss later. -
Full dry:
Allow the sculpture to dry completely. For a piece this thick, it may take 48-72 hours. Turn it occasionally to ensure even airflow.
Weight It Down
Add a few heavy washers or a flat stone inside the initial foil armature at the very bottom. This extra weight prevents the bookend from tipping over when holding heavy books.
Step 3: Painting and Finishing
-
Base coat:
Paint the entire stone section (arch and steps) with a creamy off-white or light beige acrylic paint. -
Stone wash:
Mix a very watery grey or light brown paint. Brush it over the stone texture and immediately wipe the surface with a paper towel, leaving the darker color only in the crevices. -
Painting the wood:
Paint the door with a base of light tan. Once dry, use a ‘dry brush’ technique with a darker brown to highlight the wood grain texture you sculpted earlier. -
Metadata hardware:
And paint the hinges and door handle with black or dark metallic silver paint. -
Highlights:
Use a pure white paint to dry-brush the edges of the stone arch and steps. This makes the texture pop and gives it a sun-bleached look. -
Plant life:
Paint your tiny pots terracotta orange and the cacti green. Arrange the loose pots on the steps; glue them down if you want them permanent. -
Seal it up:
Coat the entire piece with a matte varnish to protect the paint and give it a finished, ceramic-like feel.
Cracking Clay?
If small cracks appear as the clay dries, don’t panic. Mix a small amount of fresh clay with water to make a paste (slip) and fill in the cracks, then smooth it out.
Place your finished door on the shelf and enjoy the tiny world you’ve created