Whenever I need a quick, satisfying sculpt, I roll out a little coil and suddenly I’m making clay snakes for everything from tiny desk buddies to functional holders. Here are my favorite clay snake ideas—starting with the classics and sliding into the fun, unexpected stuff.
Classic Coiled Garden Snake
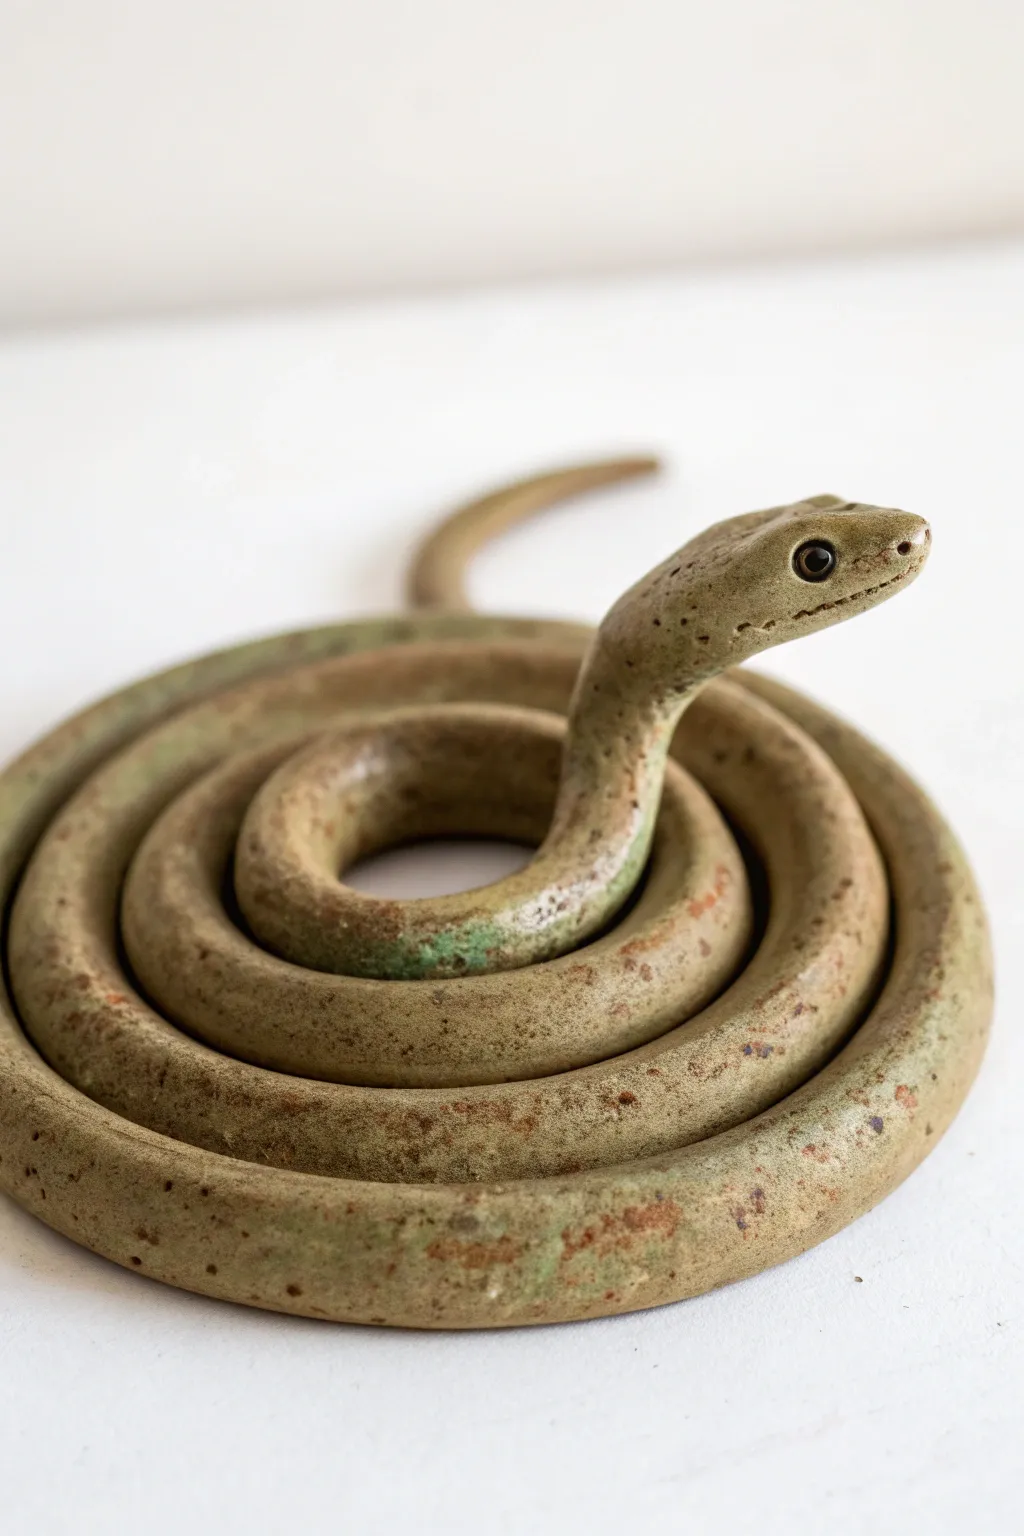
Create a charming, gently realistic garden guardian using simple coiling techniques and clever texturing. This project features a convincing aged stone or weathered bronze finish that gives the snake a timeless, unearthed artifact quality.
Step-by-Step Tutorial
Materials
- Polymer clay (granite, beige, or grey color base)
- Acrylic paints (olive green, burnt umber, raw sienna, black)
- Small glass bead or onyx bead (black, for the eye)
- Texturing tool or stiff toothbrush
- Sculpting tool with a needle point
- Aluminum foil
- Sponge or stiff paintbrush
- Matte or satin varnish
Step 1: Forming the Body
-
Condition the clay:
Start by kneading your polymer clay until it is soft and pliable. If the clay feels too stiff, use a small drop of clay softener or baby oil to help loosen it up. -
Roll the main coil:
Roll the clay into a long, consistent snake shape on a clean work surface. Aim for a thickness of about 3/4 inch (2cm) and a length of roughly 18-20 inches, tapering slightly at the tail end. -
Create the support:
Before coiling, loosely ball up a small amount of aluminum foil into a shape that can support the head later, though the main coil will support itself mostly by stacking. -
Wind the spiral:
Starting from the outside tail end, gently wind the clay coil inward. Keep the coils touching but not merged; you want distinct separation between the rings. -
Elevate the center:
As you reach the center of the spiral, begin to stack the coil upward on top of the previous ring to elevate the neck area, creating a sense of movement. -
Lift the head:
Bend the final few inches of the coil upwards so the head rises proudly from the center. Smooth out any fingerprints on the neck area as I find this is the focal point of the piece.
Step 2: Sculpting Details
-
Shape the head:
Gently pinch the raised end to form a distinct head shape. It should be slightly wider than the neck, with a soft triangular taper toward the nose. -
Add facial definition:
Use a sculpting tool to create a subtle ridge above where the eye will go. This brow ridge gives the snake personality and realism. -
Insert the eye:
Press a small black glass bead firmly into the side of the head. Create a small socket first with a ball tool so the bead sits flush rather than bulging out dangerously. -
Carve the mouth:
Use a needle tool or the edge of a credit card to slice a thin line for the mouth, curving it slightly downwards at the back for a natural expression. -
Nostril details:
Poke two very small, shallow holes at the tip of the snout for nostrils. Keep them subtle.
Sagging Head Syndrome
If the head droops while sculpting, prop it up with a temporary wedge of cardstock or extra foil. Bake the prop with the sculpture and remove it after cooling.
Step 3: Texturing and Finishing
-
Add surface texture:
Before baking, lightly tap a toothbrush or a crumpled ball of aluminum foil over the entire body. This removes the plastic-like smoothness of the clay and mimics stone or skin. -
Bake the piece:
Bake according to your clay manufacturer’s instructions. Usually, this means 275°F (130°C) for about 15-30 minutes depending on thickness. Let it cool completely. -
Base coat wash:
Mix olive green paint with a lot of water to create a thin wash. Brush this over the whole snake, letting it settle into the texture pits, then wipe away the excess with a paper towel. -
Speckling technique:
Dilute some burnt umber paint. Dip an old stiff brush in it and flick the bristles with your finger to spatter tiny brown dots across the snake’s back. -
Add rust accents:
Dab small spots of raw sienna or rust-colored paint randomly using a dry sponge. Focus on the curves of the coils to simulate organic weathering or lichen. -
Highlight the eye:
Carefully clean any paint off the black glass bead eye with a damp cotton swab to restore its shine. -
Seal the work:
Once the paint is fully dry, apply a coat of matte or satin varnish to protect the surface, especially if this little guy is heading outdoors.
Scale It Up
For a truly reptilian look, use a shaped piping tip or a small U-shaped wire loop to stamp individual scales into the wet clay before painting.
Place your finished serpent on a stone or amidst potted plants to watch over your greenery


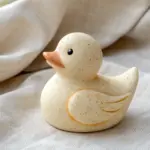
Cute Big-Eyed Pocket Snake
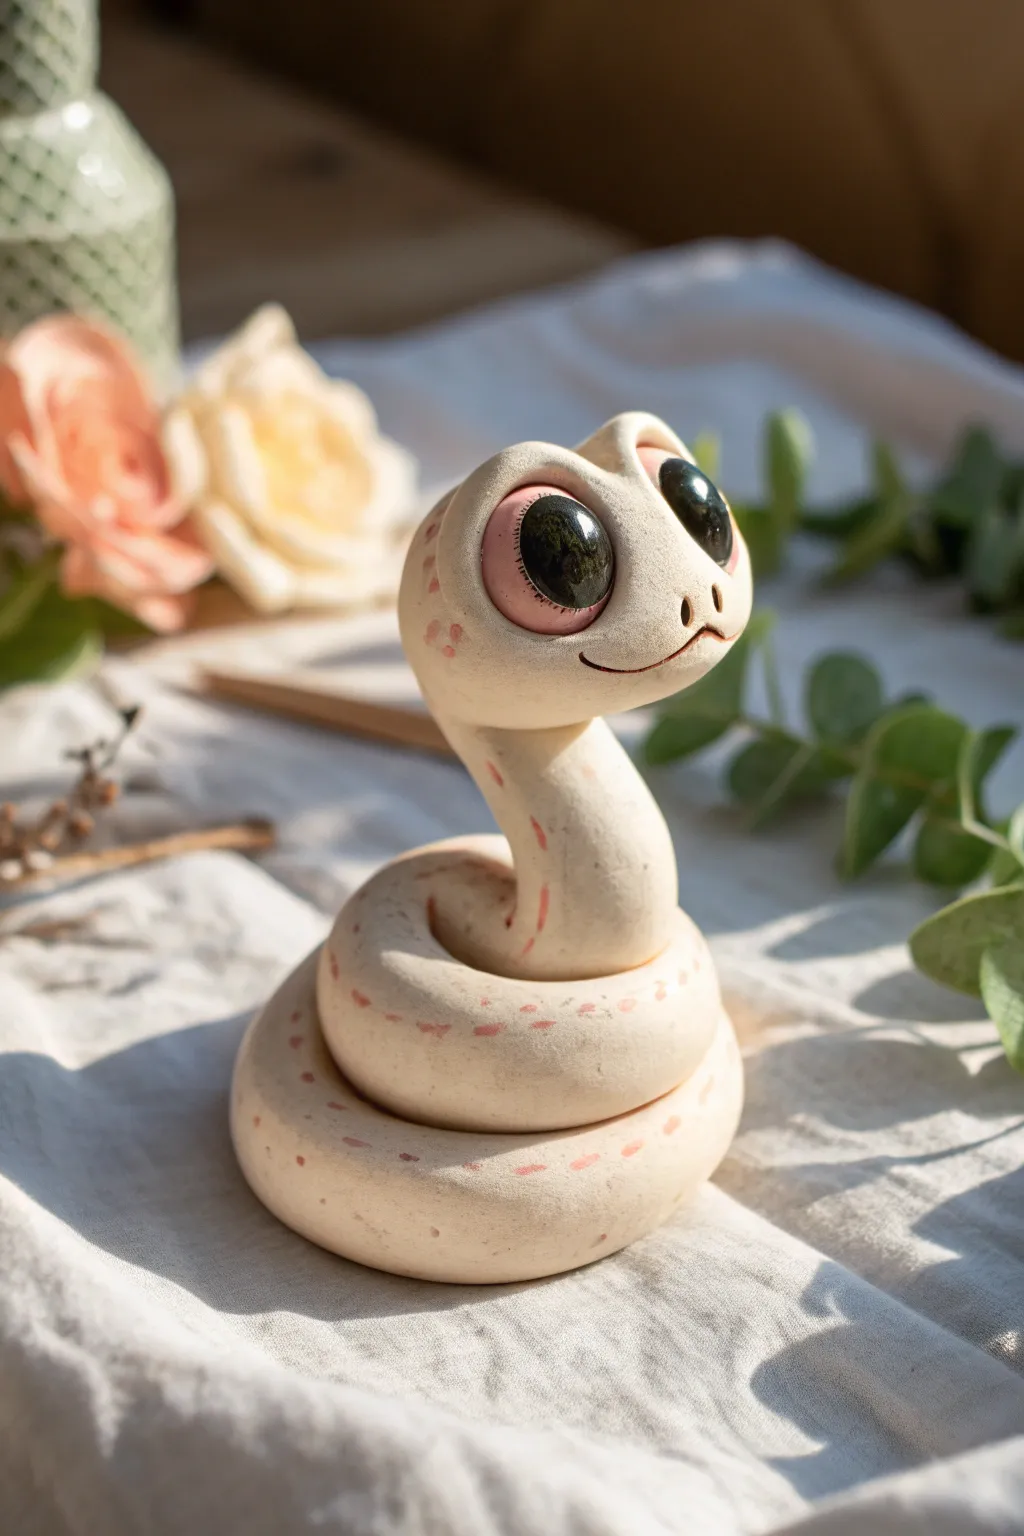
This adorable little serpent captures hearts with its oversized, expressive eyes and soft, coiled posture. Perfect for beginners, this sculpture relies on simple shapes to create a character full of innocent charm.
Detailed Instructions
Materials
- Light beige or cream polymer clay
- Translucent pink polymer clay (or soft pastels)
- Black glass cabochons or glossy black beads (8-10mm)
- Black acrylic paint
- Fine detail paintbrush
- Dotting tools or ball stylus
- Clay sculpting tools (needle tool, smoothing tool)
- Matte varnish
- Gloss varnish (optional, for eyes)
- Oven for baking
Step 1: Forming the Body
-
Condition the clay:
Start by warming up your beige clay in your hands until it becomes soft and pliable. This prevents cracking later on. -
Roll the snake log:
Roll the clay into a smooth, tapered snake shape. One end should be thicker for the neck and head transition, tapering down to a thinner tail. -
Create the coil base:
Take the tail end and begin coiling it flat against your work surface. Create two full loops, stacking them slightly so the structure gains height. -
Position the neck:
Curve the thickest part of the clay upwards from the center of the coil. Smooth the clay where the neck rises so it looks like a natural, continuous piece.
Droopy head?
If the head is too heavy to stay upright while baking, insert a small piece of crumpled aluminum foil or a toothpick inside the neck for internal support.
Step 2: Sculpting the Head
-
Shape the head:
On the top of the neck, flatten the clay slightly to form an oval-shaped head. It should look a bit cartoonish and oversized compared to the body. -
Indent eye sockets:
Use a large ball tool or your thumb to press two deep, large indentations into the sides of the head. These need to be big enough to hold your cabochons or beads. -
Insert the eyes:
Press your black glass cabochons firmly into the sockets. If you don’t have glass eyes, you can form black clay balls, but glass adds that lively shine. -
Add eyelids:
Roll two thin crescents of beige clay and place them over the top edge of the eyes. Blend the top seam into the head to create heavy, sleepy-looking upper eyelids. -
Define the snout:
Pinch the front of the face gently to create a slightly protruding snout area just below the eyes.
Make it a planter partner
Before baking, coil the snake around a small dowel or existing plant pot rim so it hardens in a custom shape that can grip onto household objects.
Step 3: Refining Details
-
Sculpt the mouth:
Use a needle tool or a thin blade to carve a gentle, curved smile line under the snout. Use a smoothing tool to soften the edges so it looks friendly, not sliced. -
Add nostrils:
Poke two small, teardrop-shaped holes above the mouth line for nostrils using a small dotting tool. -
Apply blush shading:
Before baking, use shaved pink pastel chalk or a tiny bit of translucent pink clay to add a soft blush around the eyes and on the cheeks. I find a soft brush works best for a gradient effect. -
Add patterns:
Using the same pink pastel dust or thinned pink paint, dab small, irregular spots along the back of the neck and the coil for a subtle pattern. -
Clean and bake:
Wipe away any fingerprints with a bit of baby oil, then bake according to your clay manufacturer’s instructions.
Step 4: Painting & Finishing
-
Enhance the eyes:
Once cool, paint tiny eyelashes on the outer corners of the eyelids using black acrylic paint and a very fine brush. -
Highlight the eyes:
Add a tiny white dot to the upper corner of each black eye to bring the character to life. -
Seal the piece:
Coat the clay body with a matte varnish to protect the surface. -
Gloss the eyes:
Finally, apply a coat of high-gloss varnish or UV resin specifically to the eyes and nostrils to make them look wet and realistic.
Place your little snake on a desk or shelf to keep you company with its gentle gaze


Banded Red-Yellow-Black Snake

Create a striking piece of decor with this handmade clay snake, featuring the bold and classic banding patterns of a coral snake. Sculpted into a gentle coil with a matte finish, this project brings a touch of wild elegance to any shelf or table setting.
Detailed Instructions
Materials
- Air-dry clay (white or terracotta)
- Acrylic paints (White, Red, Yellow, Black)
- Fine-grit sandpaper (220 grit)
- Small bowl of water
- Medium flat paintbrush
- Fine detail paintbrush
- Rolling surface (canvas or silicone mat)
- Matte spray varnish (optional)
Step 1: Sculpting the Form
-
Condition the clay:
Begin by taking a substantial chunk of air-dry clay and kneading it in your hands. Warm it up until it is soft, pliable, and free of any cracks. -
Roll the coil:
On your rolling surface, use the palms of your hands to roll the clay into a long, thick snake. Aim for a consistent thickness of about 1 to 1.5 inches. -
Taper the tail:
Focus on one end of the roll and gently apply more pressure to taper it down into a pointed tail tip. -
Shape the head:
On the opposite end, slightly blunt the tip to form the head. Using your fingers, gently pinch the sides to create a subtle diamond shape, distinguishing the head from the neck. -
Form the coil:
Carefully wind the snake into a loose circle. Position the head so it rests gracefully on top of the body coil, slightly raised as if the snake is observing its surroundings. -
Smooth the surface:
Dip your finger in a little water and run it over the entire sculpture to smooth out any fingerprints or cracks. I like to pay special attention to the underside to ensure it sits flat. -
Dry the sculpture:
Allow the clay to dry completely. This usually takes 24-48 hours depending on humidity. Rotate it occasionally to ensure even drying.
Cracking Up?
If small cracks appear while drying, don’t panic. Mix a tiny bit of fresh clay with water to make a paste (slip) and fill the cracks, then sand smooth once dry.
Step 2: Refining and Priming
-
Sand imperfections:
Once fully dry, take your fine-grit sandpaper and lightly buff the surface. Focus on any bumps or rough patches to get a clean finish. -
Wipe clean:
Use a slightly damp cloth or a dry brush to remove all sanding dust. The surface needs to be dust-free for the paint to adhere properly. -
Apply base coat:
Paint the entire snake with white acrylic paint. This acts as a primer and ensures your colors will pop. You may need two coats for full opacity.
Step 3: Painting the Bands
-
Plan the pattern:
Lightly sketch the banding pattern with a pencil directly on the white paint. The pattern shown repeats: Black, Yellow, Red, Yellow, Black. -
Paint the red bands:
Using your medium brush, fill in the red sections first. These are the widest bands in the pattern. Let this layer dry before moving to adjacent colors. -
Add yellow bands:
Paint the yellow stripes on either side of the red bands. These should be slightly thinner than the red sections. -
Paint black bands:
Fill in the remaining stripes with black paint. Be careful to keeping your edges crisp where the colors meet. -
Detail the head:
Paint the top of the head white, but add a black stripe across the snout if desired. For the eye, use a fine detail brush to paint a small red circle with a black dot in the center. -
Paint the mouth line:
Using the very tip of your detail brush and black paint, draw a thin, straight line extending back from the snout to create the mouth. -
Touch ups:
Go back over any messy edges with the appropriate color to crisp up your lines. White paint acts as a great ‘eraser’ for mistakes. -
Seal the piece:
To protect the paint and give it a finished look, spray the entire snake with a matte varnish. This removes the plastic-shine of acrylics and mimics a natural texture.
Clean Lines Hack
For perfectly straight bands, use thin masking tape or washi tape to mask off sections before painting. Press the edges down firmly to stop paint bleed.
Place your finished serpent on a sunlit table or shelf to show off those vibrant bands


Stamped Scale Texture Snake
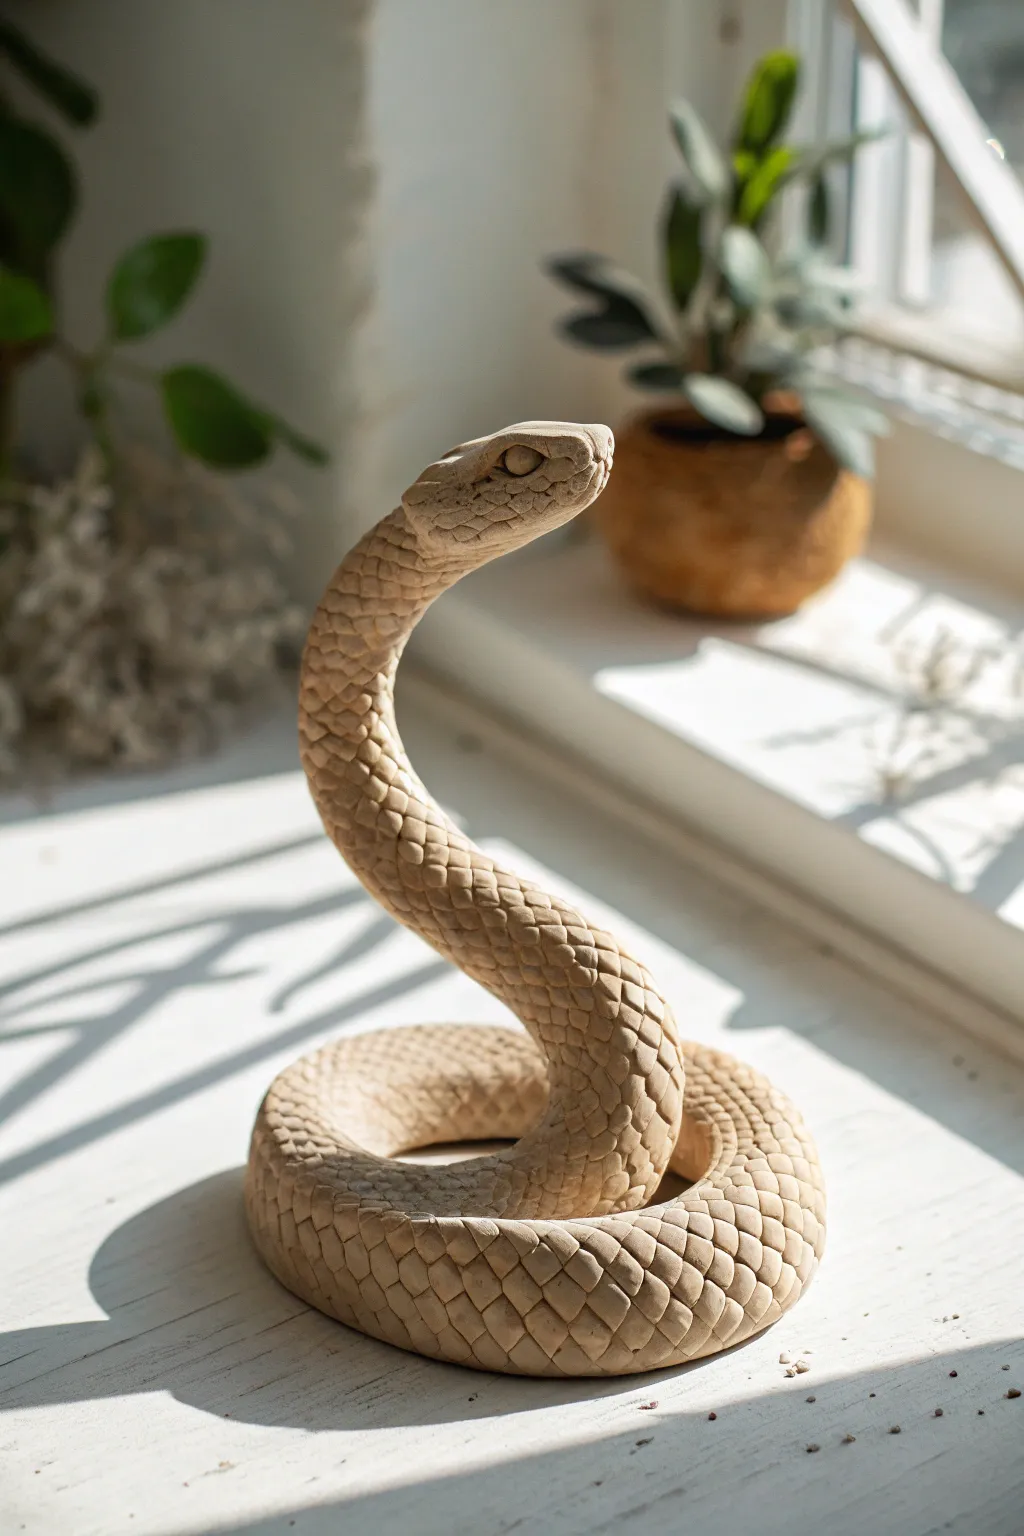
This striking sculpture captures the elegance of a coiled snake with incredible textural detail. The raised head and intricate scale pattern give it a lifelike presence while maintaining a raw, artistic finish that looks beautiful on any windowsill.
Step-by-Step
Materials
- High-quality air-dry clay or polymer clay (stone or beige color)
- Strong wire armature (14 or 16 gauge)
- Aluminum foil
- Small teardrop-shaped loop tool or custom scale stamp
- Sculpting tools (needle tool, smoothing tool)
- Water and sponge (for air-dry clay)
- Fine-grit sandpaper
Step 1: Building the Core
-
Wire armature:
Cut a length of strong wire about 18-20 inches long. Bend it into the desired coiled shape: a flat base spiral that transitions into an upright, S-curved neck. -
Bulking with foil:
Wrap the wire tightly with strips of aluminum foil to build the snake’s body volume. Make the foil thinnest at the tail, gradually thickening towards the middle, and bulking up slightly for the head area. -
Compressing the form:
Squeeze the foil firmly to remove air pockets and ensure the foil form is slightly thinner than your final desired thickness. -
Clay application:
Roll out a sheet of clay to about 1/4 inch thickness. Wrap this around your foil armature, pressing seams together securely. -
Smoothing the body:
Use a little water (or clay softener if using polymer) to smooth out all seams. The body should be a continuous, seamless cylinder that tapers naturally.
Scales getting messy?
If clay gets stuck in your stamping tool, dip the tool in water (for air-dry clay) or cornstarch (for polymer) between every few presses to keep lines crisp.
Step 2: Sculpting the Head
-
Shaping the skull:
Add a small extra lump of clay to the top of the neck. Sculpt a triangular, viper-like head shape that is distinct from the neck. -
Adding features:
Use a modeling tool to define the jawline and the brow ridges. I like to make the brows slightly prominent to give the snake more character. -
Creating eyes:
Press small indentations for eye sockets, then insert tiny balls of clay for the eyes. Use a needle tool to add a slit or round pupil depending on the species look you want. -
Refining the mouth:
Cut a faint line for the mouth closure, curving slightly upwards at the back of the jaw.
Step 3: Creating the Scales
-
Planning the texture:
Lightly trace a center guideline down the spine of the snake to help keep your scale pattern symmetrical. -
Stamping technique:
Using a small loop tool or a U-shaped stamp, press into the clay to create individual scales. Start at the back of the head and work your way down. -
Offset pattern:
Press the next row of scales in the gaps of the previous row (like bricklaying). This offset pattern is crucial for realism. -
Wrapping around:
Continue this pattern down the sides. As you reach the belly, you can either continue the small scales or transition to wide, horizontal bands for belly plates. -
Detailing the face:
Use a smaller tool to create tinier, more delicate scales around the eyes and nose bridge. -
Final texture check:
Look over the snake for any flattened areas where you might have held it. Carefully re-stamp those spots.
Make it stand out
Create a ‘shedding’ look by brushing dry white pigment powder over the rough edges of the scales before sealing, giving it a dusty, textured feel.
Step 4: Finishing
-
Drying:
Let the piece dry slowly away from direct heat to prevent cracking. Air-dry clay may take 24-48 hours depending on thickness. -
Sanding:
Once fully cured, use fine-grit sandpaper to gently smooth any rough burrs on the scales, but be careful not to sand away the texture. -
Optional wash:
To highlight the texture, apply a diluted wash of brown or dark beige acrylic paint, then wipe the surface with a damp cloth so the color stays only in the recesses.
Place your finished serpent in a sunny spot where the light can catch all those beautiful scale details

The Complete Guide to Pottery Troubleshooting
Uncover the most common ceramic mistakes—from cracking clay to failed glazes—and learn how to fix them fast.
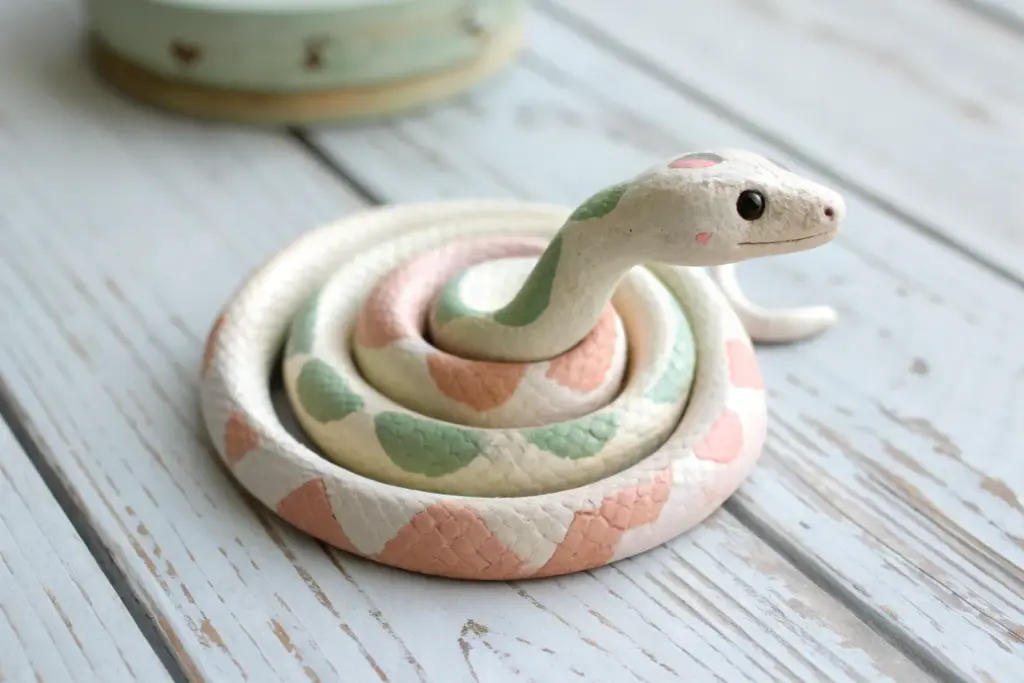
Tiny Snake Trio on a Pebble Base
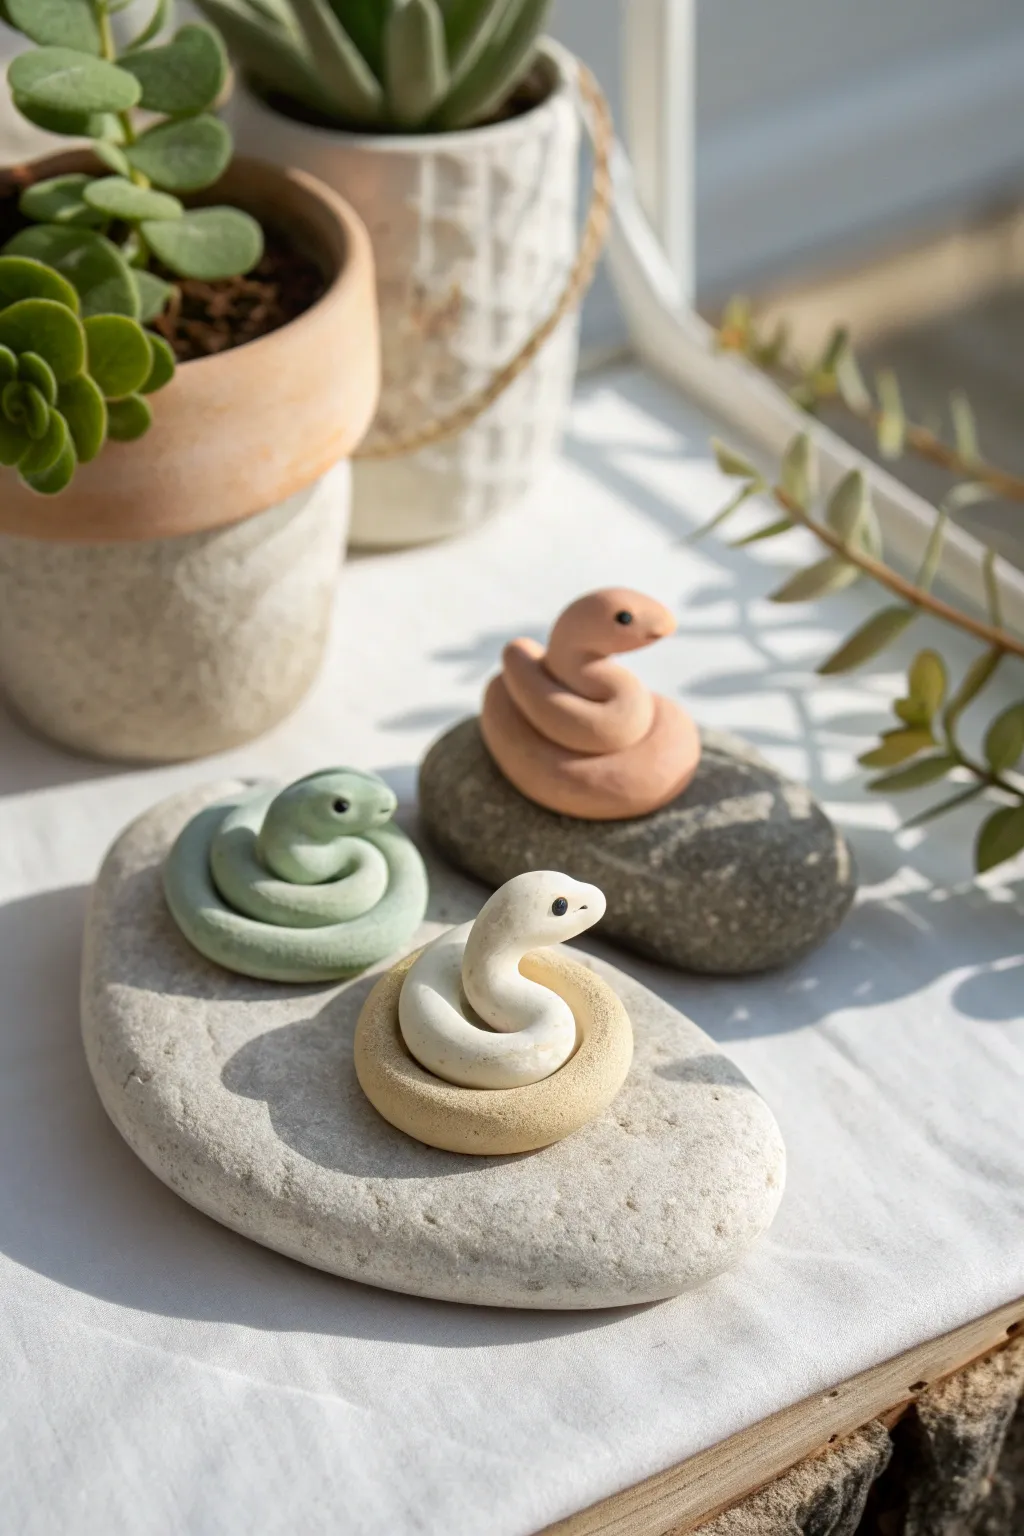
Capture the serenity of a desert garden with these adorable miniature snakes resting on smooth river stones. This beginner-friendly project uses muted pastel clay tones to create a peaceful, nature-inspired decorative accent perfect for plant shelves.
Detailed Instructions
Materials
- Polymer clay (Sage Green, Light Terracotta, Cream White, Pale Yellow)
- Black acrylic paint or a fine-tip permanent marker
- Large, smooth grey river stones (approx. 4-6 inches)
- Small ball tool or a toothpick
- Gloss glaze (water-based polyurethane)
- Small paintbrush
- Baking sheet
- Parchment paper
- Oven (for baking polymer clay)
Step 1: Prepping the Coils
-
Condition the Clay:
Start by warming up your sage green, terracotta, and cream clay in your hands. Knead each color separately until it is soft, pliable, and free of cracks. -
Roll the Bodies:
Take a walnut-sized amount of green clay and roll it into a smooth snake shape on your work surface. Aim for a tapered log about 4 inches long, slightly thicker at the head end and thinning out to a point at the tail. -
Create the Terracotta Coil:
Repeat the rolling process with the terracotta clay. For this one, try making the body slightly shorter and stouter to give each snake a unique personality. -
Mix the Two-Tone Snake:
For the white snake, we’ll create a nested look. Roll a cream white log for the snake’s body and a separate flattened ring using pale yellow clay to serve as its bed.
Cracking Clay?
If your clay cracks while coiling, it hasn’t been conditioned enough. Add a drop of clay softener or baby oil and knead longer until elastic.
Step 2: Shaping and Sculpting
-
Form the Green Spiral:
Take your green clay log and gently coil it onto itself. Keep the tail tucked underneath and spiral upward so the head rests comfortably on top of the loops. -
Lift the Head:
Gently lift the head portion of the green snake so it looks like it’s peering up. Smooth out any fingerprints with a light touch. -
Shape the Terracotta Snake:
Coil the terracotta clay in a looser ‘S’ curve or simple loop. Position the head so it is resting on the body but slightly elevated, looking sideways. -
Assemble the White Snake:
Place the cream white snake coil inside the pale yellow ring you created earlier. The yellow ring acts like a cozy nest. pose the white head rising straight up from the center. -
Refine the Shapes:
Check all three snakes from different angles. Ensure their coils look natural and soft, rather than mechanically perfect. -
Fit to Stones:
I like to test the fit by placing the raw clay snakes onto your river stones. Gently press them down just enough so the bottom contours to the uneven surface of the rock, ensuring stability later. -
Remove for Baking:
Carefully peel the snakes off the rocks and place them onto a parchment-lined baking sheet. Do not bake the rocks unless you are certain they are completely dry and safe for oven use (rocks can explode if they contain moisture).
Step 3: Adding Details and Finishing
-
Bake the Clay:
Bake the clay pieces according to the manufacturer’s instructions on your package (usually around 275°F or 130°C for 15-30 minutes). Let them cool completely before handling. -
Add the Eyes:
Using the smallest dotting tool or a toothpick, dip the tip into black acrylic paint. Carefully dot two tiny eyes onto the head of each snake. -
Dry the Paint:
Allow the black paint to dry fully. This usually takes only a few minutes purely for such small dots. -
Apply Glaze (Optional):
For a ceramic look, brush a thin layer of gloss glaze over the clay snakes. This mimics the shine seen in the reference photo. -
Final Assembly:
Once the glaze is dry, arrange your trio back onto the large river stones. You can use a dab of super glue to secure them permanently if you wish.
Make it Miniature
Use tiny bits of leftover clay to make minuscule succulents or mushrooms to glue onto the rock alongside your snakes for a full terrarium scene.
Now you have a charming set of stony companions ready to guard your houseplants
Hooded Cobra Pose Mini
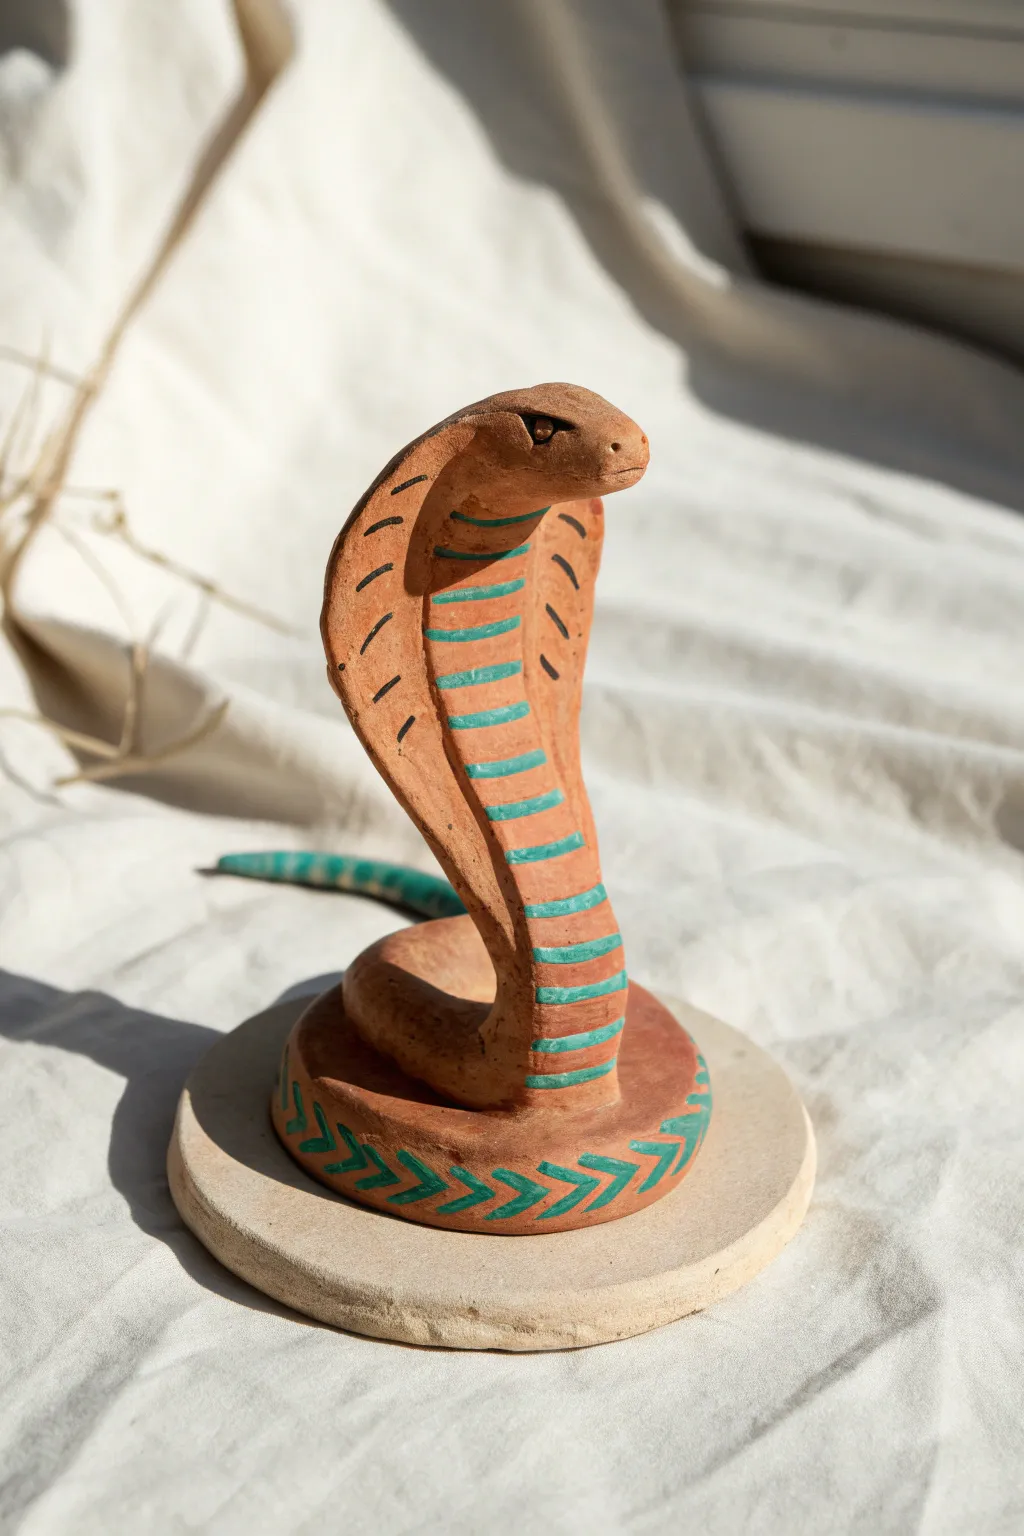
Sculpt a striking hooded cobra frozen in a watchful pose, complete with vibrant teal markings against a warm terracotta surface. This project captures the reptile’s iconic silhouette, from its coiled base to its flared hood, creating a charming piece of serpentine decor.
Step-by-Step
Materials
- Terracotta-colored polymer clay (or air-dry clay painted terracotta)
- Acrylic paint: Teal or turquoise green
- Acrylic paint: Black
- Fine detail paintbrush (size 0 or 00)
- Sculpting tool with a small round tip
- Needle tool or toothpick
- Small rolling pin
- Flat working surface or ceramic tile
- Optional: Matte varnish
Step 1: Forming the Body
-
Prepare the base:
Start by rolling a small ball of clay and flattening it into a neat, circular disc about 3-4 inches in diameter. This will serve as the stable foundation for your sculpture. -
Roll the coil:
Condition your main lump of clay and roll it out into a long, tapered snake shape. One end should remain relatively thick for the head, tapering down to a thinner tail. -
Create the coil:
Take the tail end of your clay snake and begin winding it into a loose spiral. Place this spiral directly onto your circular base plate. -
Elevate the torso:
As you continue the spiral, lift the thicker end of the snake upwards so it stands vertically. You want a smooth, organic curve rising from the coiled base. -
Shape the head:
Mold the top of the vertical section into a rounded head shape. Smooth out the ‘neck’ area just below the head to prepare it for the hood.
Step 2: Sculpting Details
-
Flatten the hood:
Gently pinch and flatten the clay on either side of the neck to create the cobra’s signature flared hood. Thin the edges out so they look delicate but not brittle. -
Define the face:
Use your fingers to slightly separate the head lump from the hood, giving it a distinct rounded snout. -
Add eye sockets:
With a small round sculpting tool, press indentations into the sides of the head to create eye sockets. This gives the cobra its intense gaze. -
Create the nostril:
Use a needle tool to make two tiny pricks on the very front of the snout for nostrils. -
Refine the tail:
If you have excess clay at the tail end, you can let it extend slightly off the back of the base for a dynamic touch, tapering to a point. -
Smooth and bake:
Check the entire piece for fingerprints or cracks. Smooth them with a little water (if using air-dry) or baby oil (if polymer). Bake according to your clay package instructions.
Hood Stability
If the hood droops while wet, prop it up with small balls of aluminum foil or paper towels until the clay firms up or is baked.
Step 3: Painting Markings
-
Paint the belly stripes:
Once cool, load your fine brush with teal paint. Carefully paint horizontal stripes across the front ‘belly’ of the snake, starting from the base and working up to the chin. -
Decorate the base:
Using the same teal color, paint a chevron or arrow pattern around the vertical edge of the circular clay base. -
Add the tail stripe:
Paint a single teal stripe running down the length of the exposed tail tip. -
Detail the eyes:
Dip a toothpick or fine spotting brush into black paint. Carefully paint in the eyes inside the sculpted sockets for depth. -
Draw hood markings:
Using the black paint, add small, angled dash marks on the flared hood. These should fan out slightly, following the curve of the hood. -
Paint a black mouth line:
Add a very thin black line horizontally across the snout to define the mouth opening. -
Final touches:
Check for any uneven paint lines. If you want to protect your work, apply a coat of matte varnish once the paint is fully dry.
Ancient Artifact Look
Mix a tiny bit of baking soda into your teal paint to give it a textured, oxidized copper look, mimicking ancient jewelry.
Place your finished cobra on a shelf where it can keep a watchful eye on your room


What Really Happens Inside the Kiln
Learn how time and temperature work together inside the kiln to transform clay into durable ceramic.
Sleeping Snake in a Little Bowl
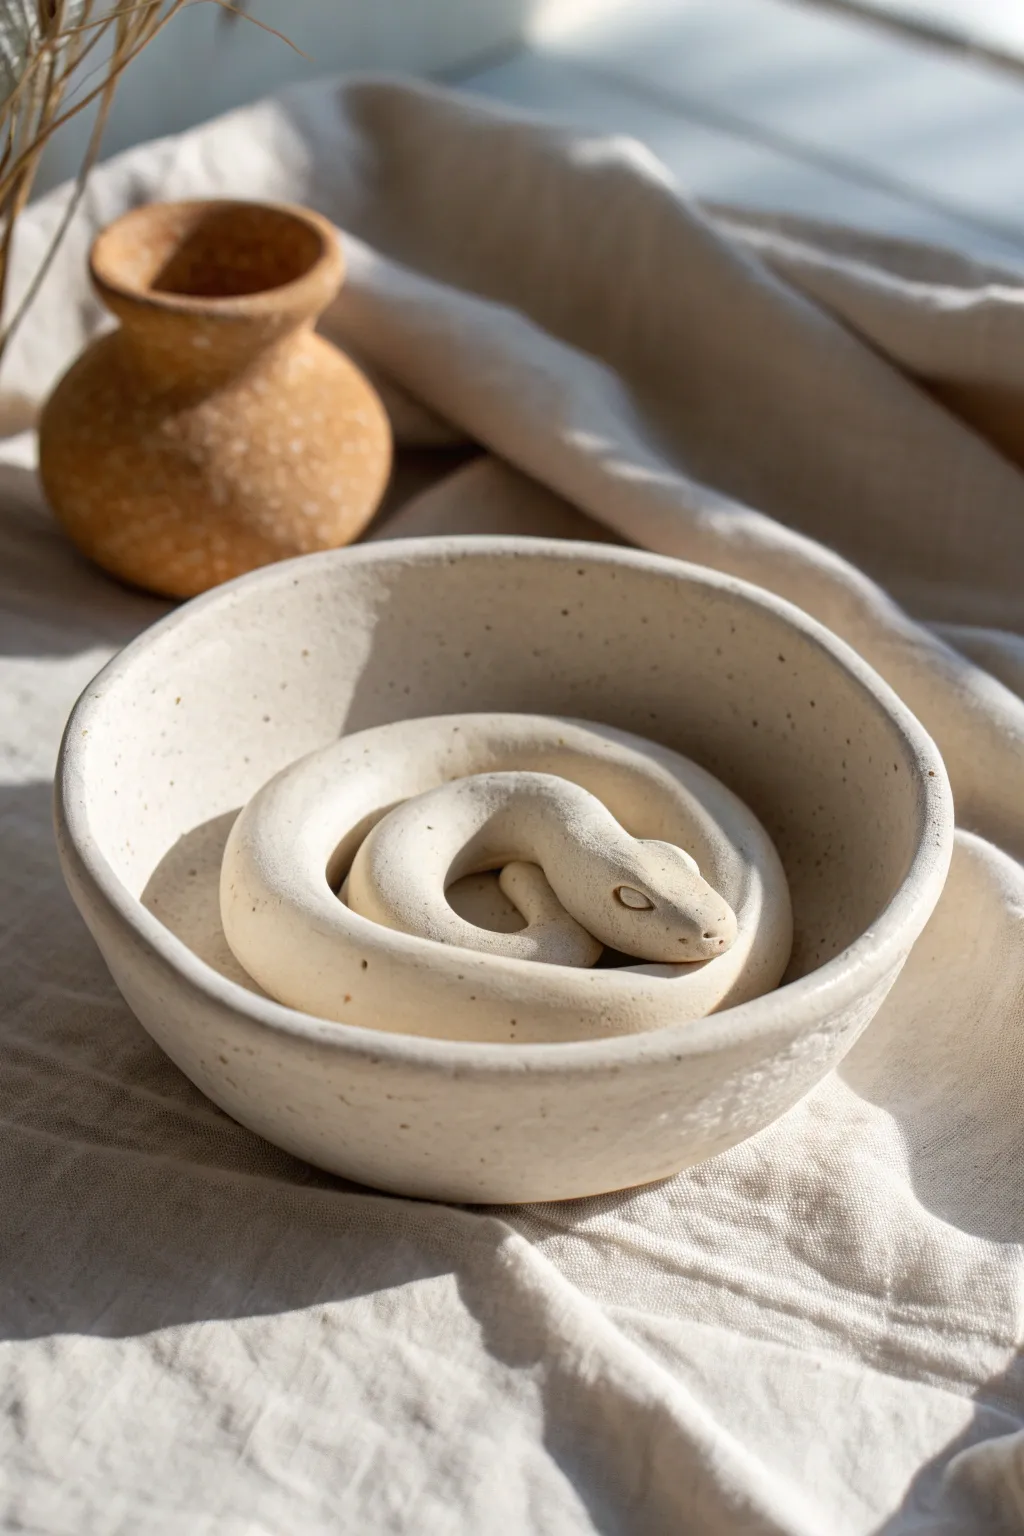
This minimalist project features a tranquil clay snake resting perfectly inside a matching handmade bowl, creating a unified piece of decor. The speckled stoneware finish gives it a warm, organic feel that looks beautiful on any shelf or side table.
Step-by-Step Guide
Materials
- Speckled buff stoneware clay (or polymer clay with granite effect)
- Pottery wheel (optional) or rolling pin and slab mat
- Kemper tool or needle tool
- Rib tool (kidney scraper)
- Sponge
- Slip (clay and water slurry)
- Scoring tool (serrated rib or toothbrush)
- Small clear glaze (matte finish recommended)
- Kiln (if using stoneware)
Step 1: Forming the Bowl Base
-
Prepare the clay:
Begin by wedging a softball-sized amount of speckled clay to remove air bubbles. This ensures a smooth working surface and prevents explosions in the kiln later. -
Shape the bowl form:
You can throw a simple, shallow bowl on the wheel or create a pinch pot. If hand-building, roll a slab to about 1/4 inch thickness and drape it over a plaster mold or an upside-down bowl covered in plastic wrap. -
Smooth the interior:
Use a damp sponge or a soft rib tool to compress the inside of the bowl. You want a very gentle curve at the bottom rather than a flat floor, so the snake nestles naturally. -
Clean up the rim:
While the clay is leather-hard, trim the rim to be slightly rounded and thick. This adds to the rustic, soft aesthetic of the piece. -
Let it firm up:
Set the bowl aside until it is leather-hard. It needs to be sturdy enough to hold the weight of the snake without deforming.
Crack Prevention
Drying thicker coils can be tricky. Cover your finished piece loosely with plastic for the first 24-48 hours to slow down drying and prevent the snake from cracking.
Step 2: Sculpting the Snake
-
Roll the coil:
Roll a long, even coil of clay. Aim for a thickness of about 3/4 of an inch. Keep rolling until it’s long enough to circle inside your bowl about two and a half times. -
Smooth the surface:
Run a damp sponge along the length of the coil to remove any finger marks or flat spots. The snake should look smooth and tubular. -
Form the head and tail:
Taper one end slightly for the tail. For the head, gently flatten and widen the other end into a soft diamond shape, smoothing the transition into the neck. -
Test the fit:
Gently coil the snake inside your leather-hard bowl to check the size. Ideally, the outer loop should touch the bowl walls, and the head should rest comfortably on top of the inner coil. -
Add facial details:
Using a needle tool, carve a simple line for the mouth. For the eyes, you can either carve small slits or press small balls of clay on and shape them into half-moons for a sleepy look.
Fleck Effect
Using polymer clay instead? Mix ‘Granite’ color with white to mimic the ceramic speckles shown here without needing a kiln.
Step 3: Assembly and Finishing
-
Separate for drying (Option A):
If you want the snake removable, let both dry completely separately. Ensure the snake dries in the coiled position so it fits later. -
Attach permanently (Option B):
To make one solid sculpture, score the bottom of the snake coils and the inside of the bowl. Apply slip generously and press the snake firmly into place. -
Refine the connection:
I like to use a small modeling tool to clean up any slip that squeezes out if I’m attaching them permanently. It keeps the look clean. -
Bisque fire:
Once bone dry, fire the piece(s) to cone 04 (or your clay’s specific bisque temperature). -
Apply glaze:
Dip or brush a matte white or clear glaze over the piece. If you want the raw speckled clay texture to shine, opt for a very thin wash or a clear matte glaze. -
Final firing:
Fire the piece to maturity (usually Cone 5 or 6 for stoneware). Be careful not to over-fire, or the speckles might melt too much.
Once cooled, your sleeping snake bowl is ready to hold trinkets or simply sit beautifully as a piece of art
Snake Ring Holder Coil
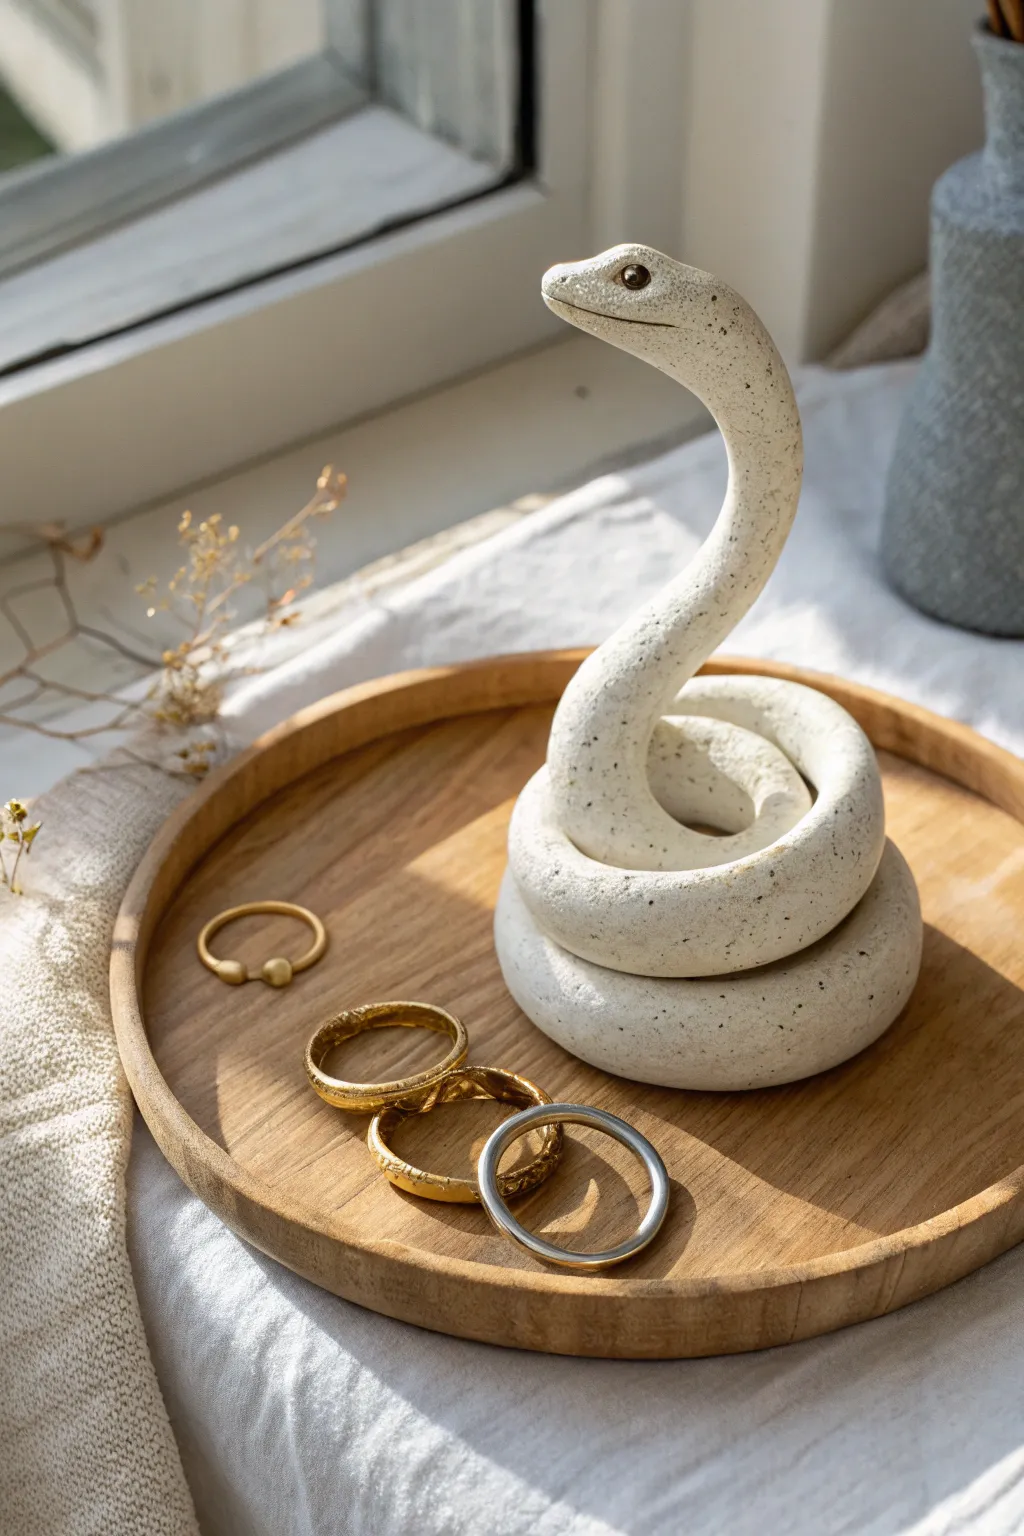
This charming, speckled snake coils elegantly upward to guard your favorite jewelry pieces while adding a touch of whimsy to your dresser. The stone-like finish gives it a sophisticated, minimalist look that pairs perfectly with gold and silver accessories.
Step-by-Step Tutorial
Materials
- White polymer clay or air-dry clay (approx. 8 oz)
- Black pepper or coarse sand (for faux speckling, if not using pre-speckled clay)
- Acrylic rolling pin
- Small ball tool or round sculpting tool
- Two tiny black beads or black clay for eyes
- Needle tool or toothpick
- Smooth work surface
- Potter’s sponge (damp)
- Small bowl of water (if using air-dry clay)
Step 1: Preparation and Base Coil
-
Prepare the clay:
Begin by conditioning your block of white clay until it is soft and malleable. If you are creating your own speckled effect rather than using specialty stoneware clay, knead in a small amount of ground black pepper or coarse black sand until completely distributed. -
Roll the main snake body:
Roll the clay into a long, thick sausage shape. Aim for a consistent thickness of about 3/4 of an inch, tapering very gradually towards what will become the tail end. The total length should be approximately 12-14 inches. -
Smooth the surface:
Before coiling, gently run your damp fingers or a sponge along the length of the roll to remove any cracks or fingerprints. This is much harder to do once the shape is set. -
Start the coil:
Take the tapered tail end and begin winding it into a flat spiral on your work surface. This will form the stable base of the holder. -
Build the spiral upward:
Once you have a complete base circle, start stacking the next coil gently on top of the previous one. You want the coils to rest securely on each other, creating a naturally ascending spiral.
Foil Support Trick
To prevent the head from drooping while curing, prop it up with a small armature of crumpled foil or extra clay.
Step 2: Shaping the Head
-
Lift the neck:
When you have about 4-5 inches of clay remaining, stop coiling. Gently curve this section upwards so it stands vertically. This vertical section will hold the rings, so ensure it looks balanced. -
Form the head shape:
At the very top of the vertical section, gently flatten and widen the clay to differentiate the head from the neck. Use your thumb and forefinger to pinch a slight snout shape. -
Refine the snake’s profile:
Smooth the transition area where the neck becomes the head. I find it helpful to look at photos of real snakes to get the subtle curves of the jawline right. -
Create eye sockets:
Use a small ball tool to press two small indentations on either side of the head where the eyes will go. Place them slightly forward on the face for a friendly expression. -
Add the eyes:
Press a small black bead into each socket. If using black clay, roll two tiny spheres and press them firmly into place, ensuring they are flush with the surrounding surface. -
Carve the mouth:
Use a needle tool or a very thin blade to slice a horizontal line across the snout for the mouth. Curve the corners slightly upward to give it a subtle smile.
Step 3: Finishing Touches
-
Blend the coils slightly:
Check the connection points where the coils stack. While you want the coil definition to remain visible, gently press down on the hidden inner side of the coils to adhere them together securely so the structure doesn’t wobble. -
Smooth out imperfections:
Take a final pass with a damp sponge or finger to smooth out any unintentional nail marks or bumps. Pay special attention to the nose and the top of the coils. -
Check balance:
Place a few rings on the unfinished sculpture gently to test if the head angle works and the base is stable. Adjust the neck alignment if it feels front-heavy. -
Bake or dry:
Follow the manufacturer’s instructions for your specific clay. If baking polymer clay, support the elevated head with a crumpled piece of aluminum foil to prevent it from drooping in the oven. -
Final polish:
Once fully cured and cooled (or dried), you can lightly sand any rough spots with fine-grit sandpaper for that stone-smooth finish.
Cracking Coils?
If the clay cracks while rolling the coil, it’s too dry. Knead in a drop of water or baby oil to recondition it.
Place your new serpentine friend on a tray or nightstand and enjoy organizing your jewelry

TRACK YOUR CERAMIC JOURNEY
Capture glaze tests, firing details, and creative progress—all in one simple printable. Make your projects easier to repeat and improve.
Snake Mug Hugger Accent
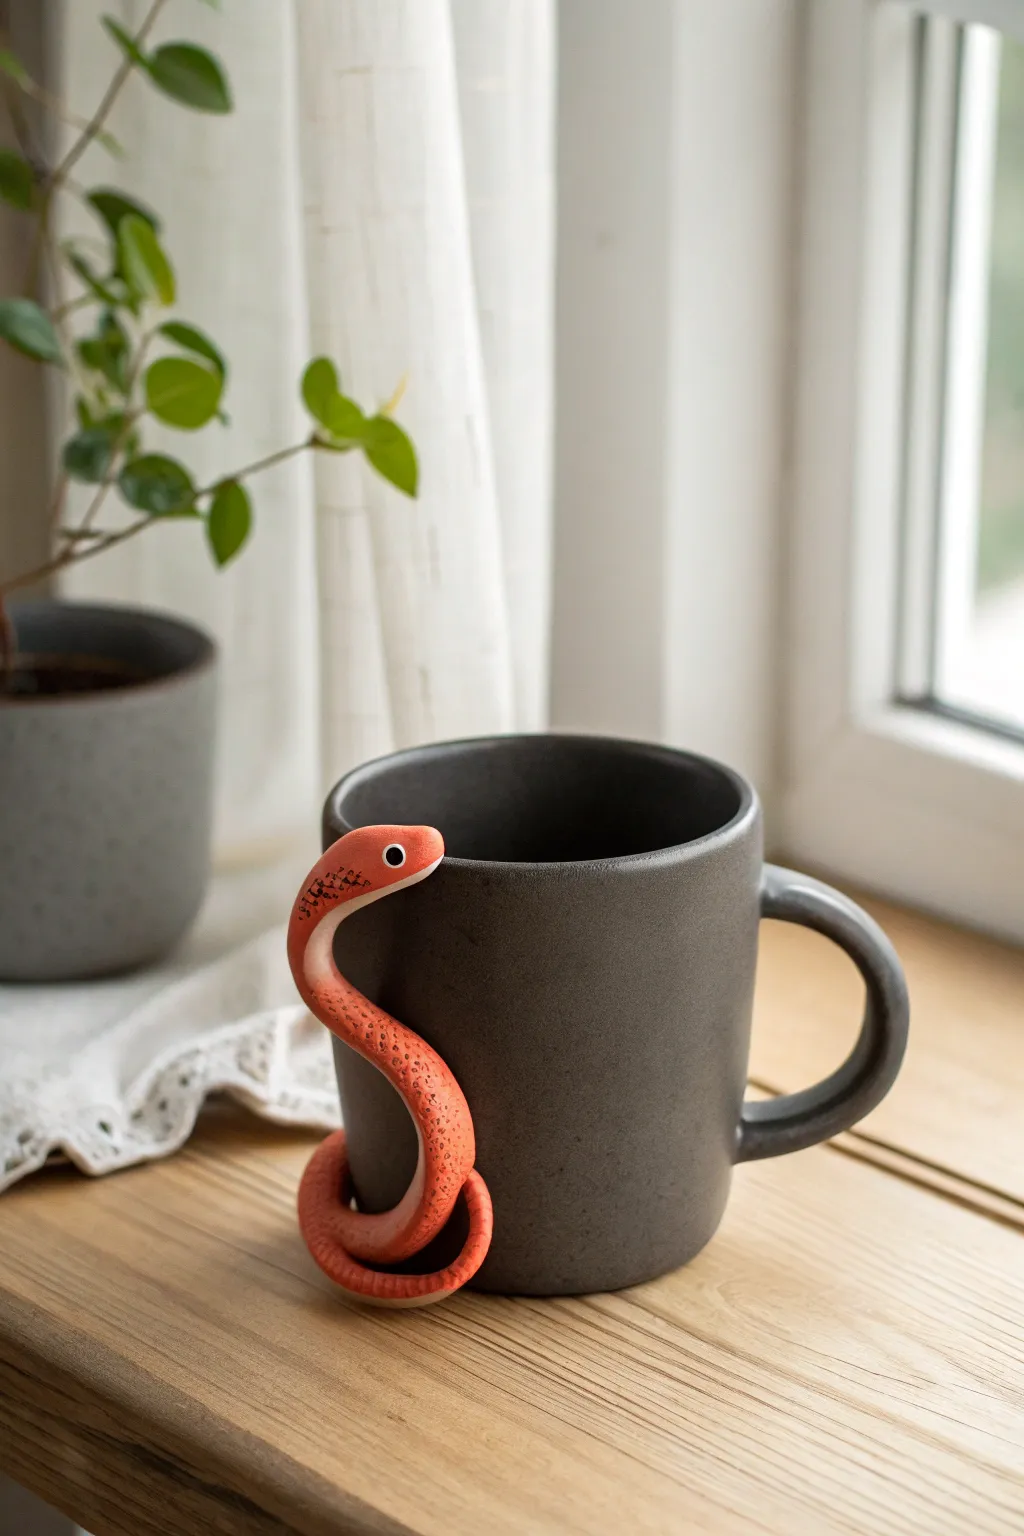
Transform a plain coffee mug into a whimsical companion with this charming clay snake hugger. Featuring a vibrant orange body with delicate black speckles, this little serpent coils protectively around your cup handle without getting in the way of your sip.
Step-by-Step Tutorial
Materials
- Polymer clay (terracotta or muted orange)
- Black acrylic paint
- White acrylic paint
- Glossy glaze or polyurethane varnish
- Ceramic mug (dark grey or black preferred)
- Dotting tool or toothpick
- Soft paintbrush
- Needle tool
- Aluminum foil
- Baking sheet
- Oven
Step 1: Shaping the Snake Body
-
Condition the Clay:
Begin by warming the orange polymer clay in your hands. Knead and roll it until it becomes soft, pliable, and free of cracks. -
Roll the Coil:
On a clean work surface, roll the clay into a long, even snake shape. Aim for a thickness of about 1/2 inch and a length of roughly 6-8 inches, depending on your mug’s size. -
Taper the Tail:
Gently roll one end of the coil against your work surface with slightly more pressure to create a naturally tapering tail. -
Form the Head:
At the opposite end, blunt the tip slightly to form the head. Using your fingers, gently flatten the sides just a tiny bit to give it a distinct head shape rather than just a rounded tube.
Slumping Snake?
If your clay is too soft and won’t hold the curve off the mug, pop the clay-on-mug assembly in the fridge for 15 minutes before sliding it off.
Step 2: Fitting and Baking
-
Drafting the Pose:
Take your ceramic mug and carefully drape the clay snake onto it. Start by hooking the ‘neck’ area over the top rim or just below it near the handle. -
Creating the Coil:
Guide the body down the side of the mug, creating a gentle ‘S’ curve. Bring the tail section around to loop completely around the base of the handle. -
Securing the Hug:
Press the clay gently against the mug surface to ensure it sits flush. The tail should curl back onto itself or the lower handle to lock the shape in place visually. -
Removing for Baking:
Because the mug might act as a heat sink or be sensitive to thermal shock, carefully slide the formed snake off the mug. Try to maintain its exact curved shape. -
Support with Foil:
To prevent the snake from sagging in the oven, scrunch up pieces of aluminum foil to match the curvature of your mug and place them inside the snake’s curves. -
Bake the Clay:
Place your foil-supported snake on a baking sheet. Bake according to the manufacturer’s instructions for your specific brand of polymer clay (usually around 275°F/135°C for 15-30 minutes). -
Cooling Down:
Let the piece cool completely on the baking sheet. It creates a stronger bond within the clay molecules if you allow it to return to room temperature slowly.
Make it Functional
Instead of a simple decor piece, flatten the top of the snake’s head slightly before baking to create a rest for your tea bag string or spoon.
Step 3: Painting and Finishing
-
Painting the Eye Base:
Dip a small dotting tool or the end of a paintbrush into white acrylic paint. Place a single clear dot on the side of the snake’s head for the eye. -
Adding the Pupil:
Once the white dot is dry, use a smaller tool to add a tiny black pupil in the center. This instantly gives your snake personality. -
Creating the Speckles:
Dilute a small amount of black acrylic paint with a drop of water. Dip an old toothbrush or a stiff bristled brush into it. -
Splatter Technique:
Hold the brush near the snake’s back (focusing on the neck and upper curve) and flick the bristles to create tiny, random speckles. I like to protect the face area with a piece of paper during this step. -
Refining Details:
If the splatter is too light, use a fine-tip brush to manually add a few larger, defined spots along the spine for contrast. -
Sealing the Piece:
Once all paint is visibly dry, apply a coat of glossy glaze or polyurethane varnish over the entire snake. This protects the paint and gives it that finished ceramic look. -
Final Assembly:
Slide your finished snake back onto the mug. For a permanent fix, you can use a dab of E6000 or strong epoxy glue; otherwise, let it be a removable decor piece.
Now you have a charming little reptile ready to keep you company during your morning coffee routine
Snake Planter Rim Wrap
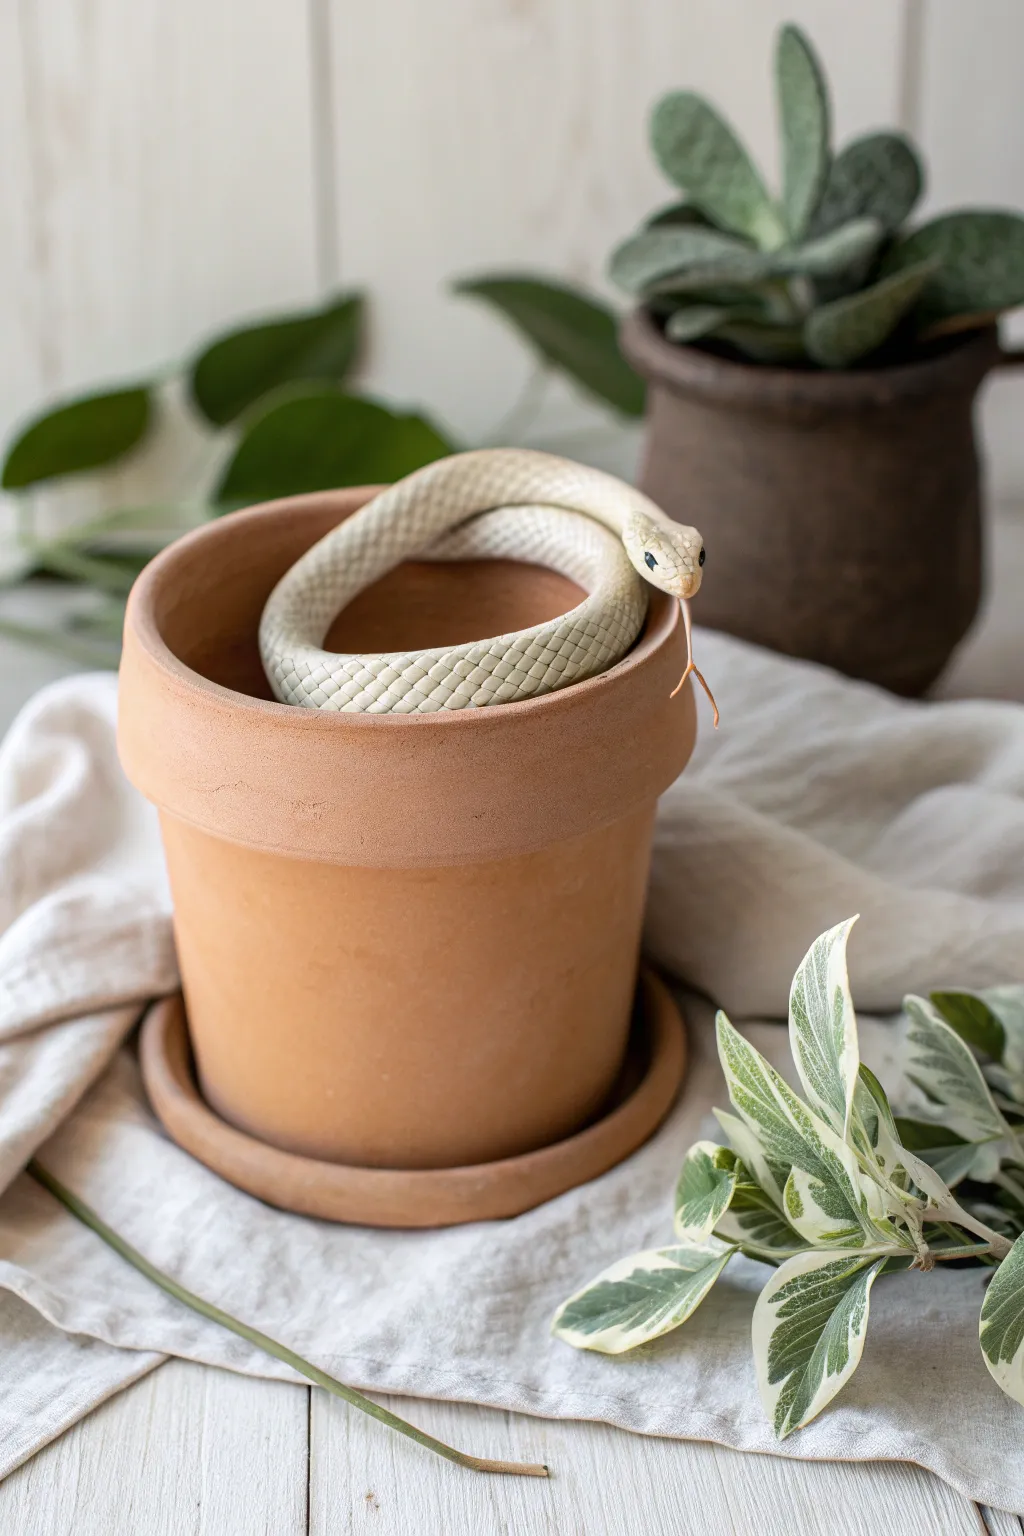
Transform a simple terracotta pot into a charming home for a faux reptile with this subtle yet striking project. By sculpting a realistic white clay snake that coils naturally inside the rim, you create a delightful surprise for anyone admiring your plants.
How-To Guide
Materials
- Polymer clay (white or off-white/bone color)
- Clean terracotta pot (standard rim style)
- Clay sculpting tools (specifically a needle tool and a small rounded tool)
- Wire armature (thin gauge floral wire or aluminum wire)
- Foil (aluminum)
- Acrylic paints (black, pale blue/grey for eyes, pink for tongue)
- Fine detail paintbrush
- Matte or satin varnish (optional)
- Liquid clay or Bake & Bond (optional)
- Oven (for baking polymer clay)
Step 1: Forming the Core
-
Prepare the armature:
Cut a length of wire about 2-3 inches longer than you want your snake to be. Twist a small amount of aluminum foil tightly around the wire to create a core, making it thicker in the middle and tapering at both ends. -
Check the fit:
Before adding clay, test the foil armature inside your chosen terracotta pot. Bend it gently so it curves naturally against the inner wall, ensuring the head will rest comfortably on or near the rim. -
Condition the clay:
Knead your white polymer clay until it is soft and pliable. This warmth prevents cracking later on. -
Build the body form:
Roll the clay into a long snake or log shape. Flatten it slightly, place your foil armature in the center, and wrap the clay around it. Roll gently on your work surface to smooth out any seams.
Scale Shortcut
Don’t have a scale tool? The cut end of a small plastic straw works perfectly. Just squeeze the straw into an oval shape for custom scale sizes.
Step 2: Sculpting the Snake
-
Position the snake:
Place the clay body back into the terracotta pot. Gently press the clay so it conforms to the curve of the pot’s interior. You want it to look like it’s resting there naturally, so let gravity help you position the coils. -
Refine the head:
Sculpt the head into a slightly triangular, rounded diamond shape. Smooth it seamlessly into the neck area. Use your finger to gently lift the chin so the head peeks over the rim. -
Add eye sockets:
Using a small ball tool or the end of a paintbrush, make small indentations on either side of the head where the eyes will go. -
Insert the tongue wire:
Take a tiny snippet of thin wire or a specialized clay tongue piece, dip the end in liquid clay if you have it, and insert it into the center of the mouth area. Curve it downwards slightly.
Troubleshooting: Sagging Clay
If the clay sags inside the pot before baking, prop it up with crumpled aluminum foil or tissue paper until it hardens in the oven.
Step 3: Detailing Scales
-
Start the scale pattern:
This is the most time-consuming part, but it’s worth it. Using a small U-shaped tool or a modified straw tip, gently press scale impressions into the clay. I usually start at the tail and work my way forward. -
Overlap the texture:
Ensure your scale impressions slightly overlap the previous row to create a realistic, shingled effect. -
Adjust scale size:
As you approach the head, make the scale impressions slightly smaller and tighter. As you move toward the thickest part of the body, they can be slightly larger. -
Adding head plates:
Instead of small scales, use your needle tool to draw larger, distinct plate shapes on the top of the head, referencing real snake anatomy if you want extra realism. -
Final smoothing:
Check for any fingerprints or accidental smudges. Lightly brush with baby oil if you need to smooth out imperfections without losing texture. -
Baking:
Bake the snake directly in or on the terracotta pot if the pot is oven-safe (terra cotta usually is). Follow the temperature instructions on your specific package of clay. Baking it in position ensures it retains the perfect curve.
Step 4: Finishing Touches
-
Cooling down:
Let the pot and snake cool completely inside the oven. Removing it too quickly can cause thermal shock to the clay. -
Painting the eyes:
Using your fine detail brush, paint the inside of the eye sockets black. Add a tiny dot of pale blue or grey for a highlight once the black is dry. -
Coloring the tongue:
Paint the thin wire or clay tongue with a soft pink or salmon acrylic paint. -
Adding a wash (optional):
If you want the scales to pop, mix a drop of brown paint with water and wash it over the snake, then immediately wipe off the surface with a paper towel. The dark pigment will stick in the crevices. -
Varnishing:
To seal your paint and give a slight sheen (snakes can be shiny!), apply a thin coat of satin varnish.
Place your new reptile friend in a sunny spot and enjoy the double-take reactions from your guests
Snake Hair Clip Topper
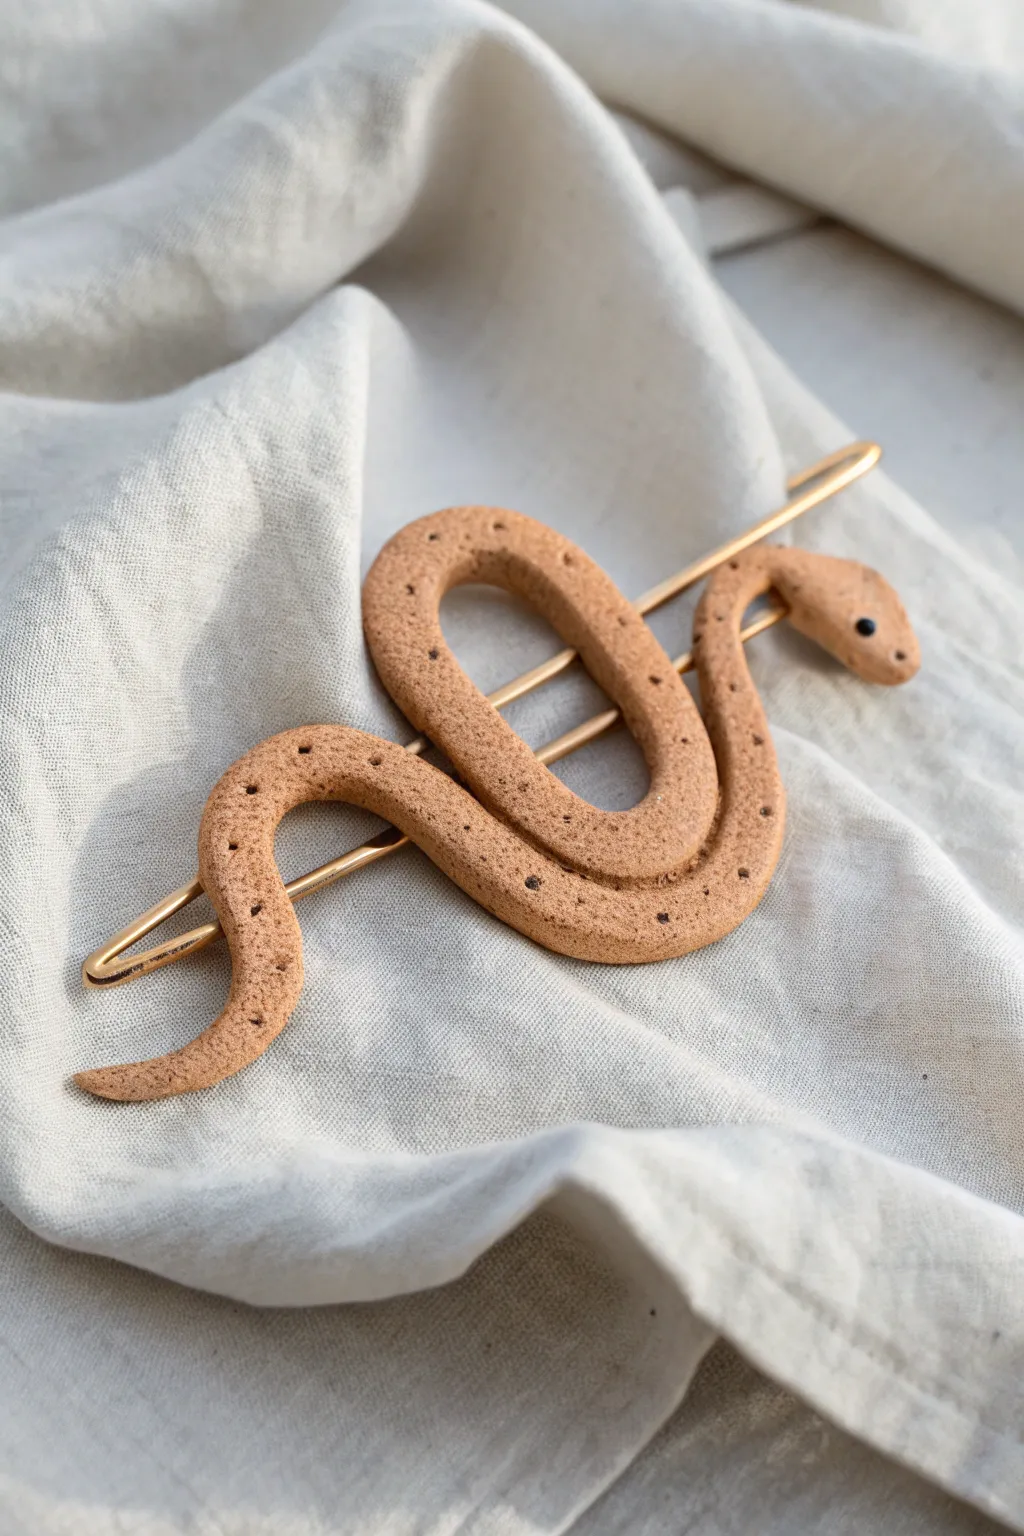
Transform a simple metal hair clip into a chic, serpentine accessory with just a bit of clay and shaping. This project features a sophisticated, stone-like texture that gives the snake an organic, modern feel perfect for casual updos.
Step-by-Step Tutorial
Materials
- Polymer clay (beige or tan)
- Black pepper or faux granite embossing powder
- Metal barrette clip (gold tone recommended)
- liquid polymer clay or strong adhesive (E6000)
- Black seed beads (2) for eyes
- Rolling tool or acrylic roller
- Needle tool or toothpick
- Oven for baking
- Parchment paper
Step 1: Preparing the Clay
-
Condition the base:
Start by warming a chunk of beige polymer clay in your hands until it becomes soft and pliable. -
Create the speckles:
To achieve that natural, sandy stone look seen in the photo, flatten your clay and sprinkle a generous pinch of ground black pepper or specialty granite embossing powder into the center. -
Mix thoroughly:
Fold the clay over the speckles and knead repeatedly until the particles are evenly distributed throughout the entire ball of clay. -
Roll the coil:
Place the ball on your work surface and roll it into a long, even snake shape. Aim for a diameter of about 1/3 inch (8mm), slightly tapering the ends.
Loose Beads?
If the bead eyes fall out after baking, simply secure them back into their sockets with a tiny dab of superglue or E6000.
Step 2: Shaping the Serpent
-
Form the head:
Gently pinch one tapered end to define a slightly wider, triangular head shape for your snake. -
Initial placement:
I find it helpful to lay the metal barrette next to your clay coil as a size guide before shaping. -
Create the loops:
Bend the clay body into a loose, loopy ‘S’ or figure-8 shape. The loops should be open enough to look relaxed, not tight knots. -
Refine the tail:
Curve the tail end gently outward so it flows naturally from the last body loop. -
Check sizing:
Test the clay shape directly on top of the metal barrette to ensure it covers the mechanism without hanging too far off the edges.
Add Some Shine
For a luxe finish, brush a little gold mica powder onto the snake’s spine before baking, or paint the tail tip gold after it cools.
Step 3: Adding Details
-
Insert eyes:
Take two small black seed beads and press them firmly into the sides of the head to create the eyes. -
Texture the body:
Using a needle tool or toothpick, gently poke random, shallow holes along the spine of the snake to mimic extra texture and pattern. -
Smooth the surface:
Run your finger lightly over the clay to remove any fingerprints, being careful not to smudge your texturing.
Step 4: Assembly and Baking
-
Prepare for baking:
Place your shaped snake onto a baking sheet lined with parchment paper. -
Bake:
Bake the clay according to the manufacturer’s instructions (usually around 275°F/135°C for 15-30 minutes). -
Cool down:
Let the clay cool completely before handling, as it is fragile while hot. -
Prepare the clip:
Scuff the top surface of the metal barrette slightly with sandpaper to help the glue adhere better. -
Attach the snake:
Apply a line of strong adhesive or liquid polymer clay along the top of the barrette. -
Final bond:
Press the cooled clay snake firmly onto the glue and let it cure for the full recommended time (often 24 hours for strong glues).
Enjoy styling your hair with this uniquely textured, handcrafted piece
Galaxy-Pattern Fantasy Snake
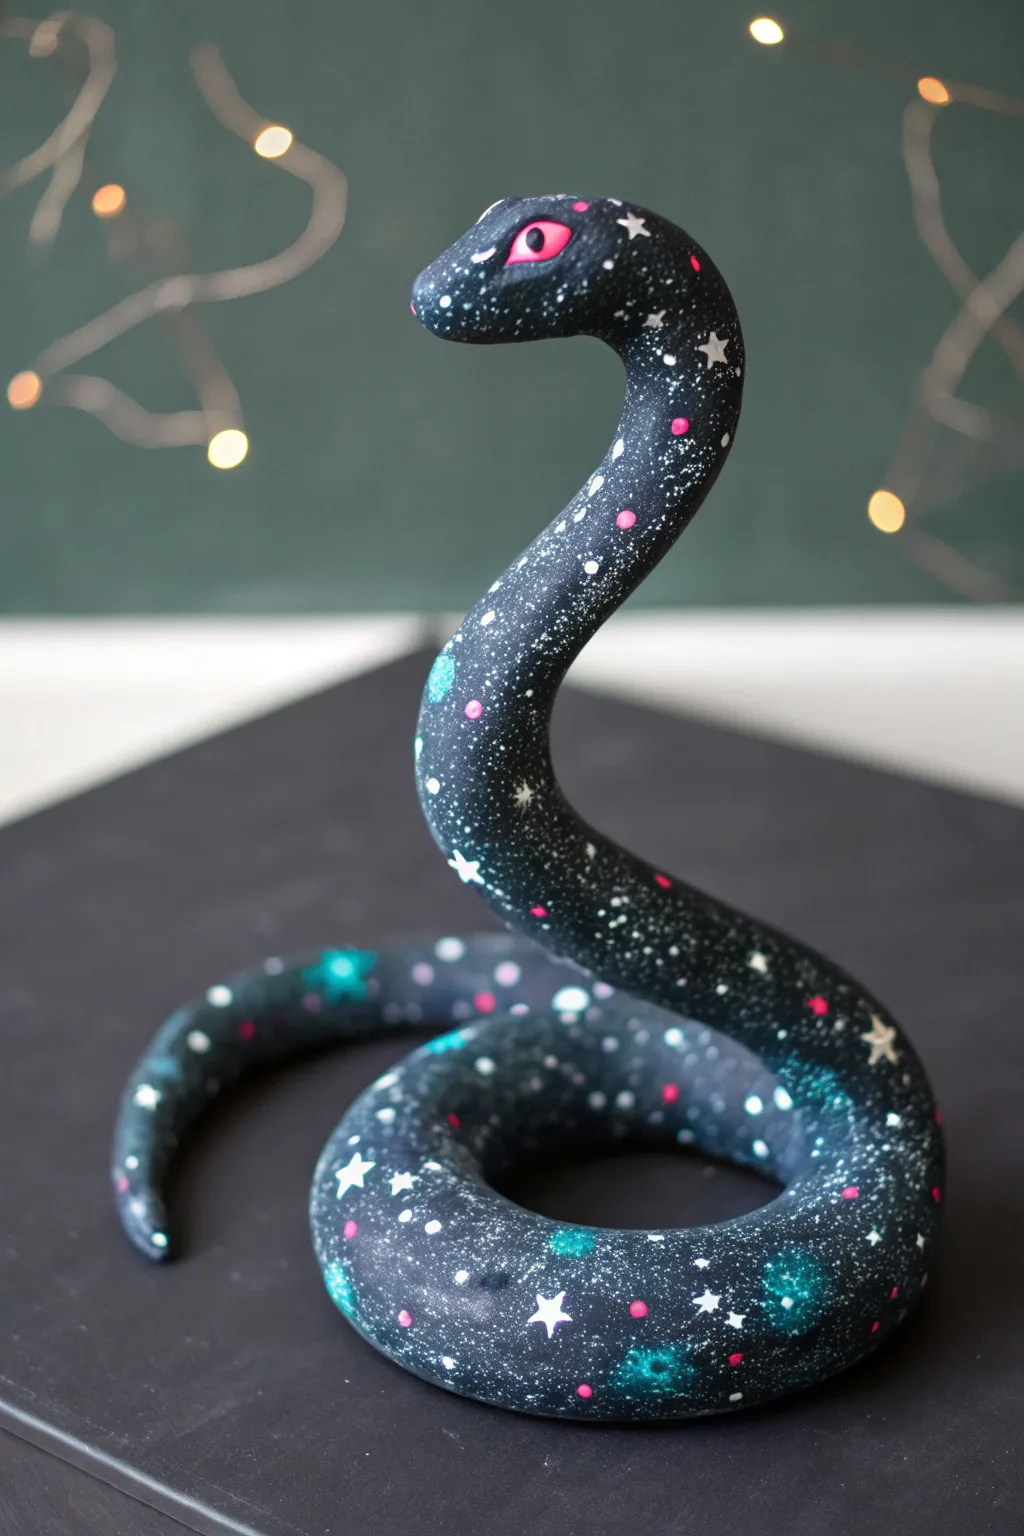
Transform a simple clay snake into a celestial traveler with this galaxy-themed project. The dark, matte body provides the perfect backdrop for glowing nebulas, scattered stars, and striking pink eyes.
How-To Guide
Materials
- Polymer clay (black)
- Aluminum foil
- Acrylic paints (black, white, teal/turquoise, pink)
- Fine detail paintbrush
- Old toothbrush or stiff bristle brush
- Makeup sponge or foam dabber
- Gloss varnish (optional for eyes)
- Matte varnish (optional for body)
- Sculpting tools (or a toothpick)
Step 1: Sculpting the Form
-
Create the Armature:
Begin by scrunching aluminum foil into a long, tapering snake shape. This saves clay and keeps the sculpture lightweight. Make one end slightly bulbous for the head and roll the tail end into a fine point. -
Condition the Clay:
Knead your black polymer clay until it is soft and pliable. Warm clay is much easier to smooth and less prone to cracking. -
Cover the Foil:
Flatten sheets of clay and wrap them around your foil armature. Use your thumbs to smudge the seams together until the foil is completely hidden. -
Smooth the Surface:
Roll the clay snake gently on your work surface to even out lumps. The body should be smooth and cylindrical, tapering naturally toward the tail. -
Pose the Snake:
Curve the body into a coiled, resting position. Lift the head and neck area upwards in an ‘S’ curve so the snake looks like it is peering around; ensure the base is flat enough to balance standing up. -
Shape the Head:
Refine the head shape, making it slightly triangular with a rounded snout. Use your thumbs to create subtle indentation sockets where the eyes will go. -
Add the Eyes:
Roll two small balls of clay and press them into the eye sockets. Shape them into almond or diamond slits for a reptile appearance. -
Bake the Clay:
Bake the sculpture according to your clay package’s instructions. Usually, this is around 275°F (135°C) for 15-30 minutes. Let it cool completely before painting.
Step 2: Painting the Galaxy
-
Base Coat Touch-up:
If your black clay has any fingerprints or dust, give the entire snake a quick coat of black acrylic paint to ensure a deep, uniform void. -
Create Nebulas:
Dip a small piece of makeup sponge into teal or turquoise paint. Dab most of the paint off onto a paper towel, then gently sponge cloudy patches onto the snake’s curves. -
Layer the Colors:
While the teal is drying, add smaller dabs of pink or magenta near the teal patches to create depth in your cosmic clouds. I find blending them slightly while wet creates a nice gradient. -
Splatter the Stars:
Dilute white acrylic paint with a tiny bit of water. Dip an old toothbrush into it, and flick the bristles with your thumb to spray a fine mist of white dots over the snake. -
Paint Larger Stars:
Using your finest detail brush, hand-paint a few larger, four-pointed glimmer stars or brighter white dots to make the constellations pop. -
Dot the Pink Accents:
Add tiny dots of bright pink paint scattered among the white stars to integrate the nebula colors throughout the ‘sky’ of the snake’s skin. -
Detail the Eyes:
Paint the eye shapes with a solid, vibrant pink. If you want a pupil, paint a thin black slit down the center once the pink is dry. -
Varnish and Seal:
Once all paint is fully dry, apply a matte varnish to the body to protect the paint. Finally, add a drop of gloss varnish to each eye to give it a wet, lifelike shine.
Uneven Splatter?
If your toothbrush splatter creates huge blobs instead of mist, the paint is too watery. Wipe it off immediately with a wet cloth, thicken the paint slightly, and test on paper first.
Glow in the Dark
Mix glow-in-the-dark powder into your white paint or use glow acrylics for the stars. Your snake will look like a regular galaxy by day but reveal secret constellations at night.
Place your finished cosmic serpent on a plain shelf where its intricate star patterns can really shine
Double-Headed Mythic Snake Totem

This elegant sculpture features a mythic double-headed snake rising in a graceful figure-eight curve, evoking ancient totemic art. The textured, off-white finish mimics the look of carved sandstone or bone, making it a sophisticated addition to any shelf.
Step-by-Step Tutorial
Materials
- Strong armature wire (12-gauge)
- Aluminum foil
- Air-dry stone clay or polymer clay (white/limestone color)
- Wooden circular base
- Sculpting tools (needle tool, loop tool, clay shapers)
- Texture sponge or stiff bristle brush
- Water spray bottle
- Acrylic paints (cream, beige, raw umber wash)
- Strong adhesive (E6000 or epoxy)
- Drill with bit matching wire gauge
Step 1: Building the Core Structure
-
Prepare the armature:
Cut two long lengths of heavy-duty wire. Twist them together for strength, leaving the top ends separate to form the two necks. Bend the twisted wire into a vertical figure-eight shape that stands upright. -
Attach to base:
Drill a hole into the center of your wooden base. Insert the bottom tail end of your wire armature securely into the hole using strong epoxy to ensure the sculpture won’t tip over while you work. -
Bulk out with foil:
Wrap aluminum foil tightly around the wire to build the snake’s body volume. Compress the foil firmly so it doesn’t shift; you want the general thickness of the snake established here, slightly thinner than the final goal to leave room for clay.
Step 2: Sculpting the Form
-
Apply the first clay layer:
Roll out sheets or snakes of your stone clay. Begin pressing the clay firmly over the foil armature, smoothing the seams as you go to create a continuous skin. -
Refine the shape:
Focus on the figure-eight curve. The body should be thickest at the bottom where it coils on the base and taper slightly as it moves upward toward the necks. Use a damp sponge to smooth out fingerprints. -
Shape the heads:
Add extra clay to the two wire tips to form the heads. Sculpt them into sleek, triangular viper shapes with distinct brow ridges and rounded snouts. -
Detail face features:
Use a small loop tool to carve out the eye sockets and a needle tool to create the mouth line. I find it helpful to look at reference photos of pit vipers to get the jawline angle just right. -
Blend the necks:
Ensure the transition from the single body into the two separate necks is smooth and organic. Add a little extra clay in the ‘V’ junction for structural reinforcement.
Smoothing Secret
Use a soft paintbrush dipped in water (or baby oil for polymer clay) to smooth out hard tool marks before adding final textures.
Step 3: Texturing and Finishing
-
Carve the belly scales:
For the smooth, segmented underbelly scales shown in the image, use a flat-edged modeling tool. Carve horizontal, slightly curved lines running up the front-facing sections of the snake. -
Texture the top scales:
On the back and sides of the snake, use a texture stamp or simply press a coarse sponge into the clay to create a pitted, organic ‘stone’ texture rather than individual scales. -
Add intricate details:
Use a needle tool to add deeper pitting or specific scale patterns near the head and neck areas, as seen in the reference image where the texture becomes more defined. -
Create the base texture:
Apply a layer of clay over the wooden base to blend it with the snake’s tail. Texture this bottom coil heavily with a scale tool to make it look like coiled skin resting on the ground. -
Dry completely:
Allow the sculpture to dry thoroughly. Depending on the thickness of the clay and humidity, this could take 24 to 48 hours. Turn it occasionally if possible to ensure even drying. -
Apply a wash:
Mix a very watery raw umber or beige acrylic paint. Brush it over the entire sculpture and immediately wipe it back with a rag. The dark paint will remain in the recesses of the texture, highlighting the ‘carved’ look. -
Dry brush highlights:
Take a clean, dry brush with a tiny amount of off-white paint. Lightly dust the raised areas of the scales and head to make the texture pop. -
Final eyes:
Paint the eyes a solid dark color or a realistic gold with a slit pupil, then add a gloss varnish just to the eyeballs for a wet, living look.
Level Up: Crystal Eyes
Embed small glass beads or amber gemstones into the eye sockets before the clay dries for a mystical, reflective gaze.
Place your finished totem in a spot with side lighting to really show off the subtle textures you created