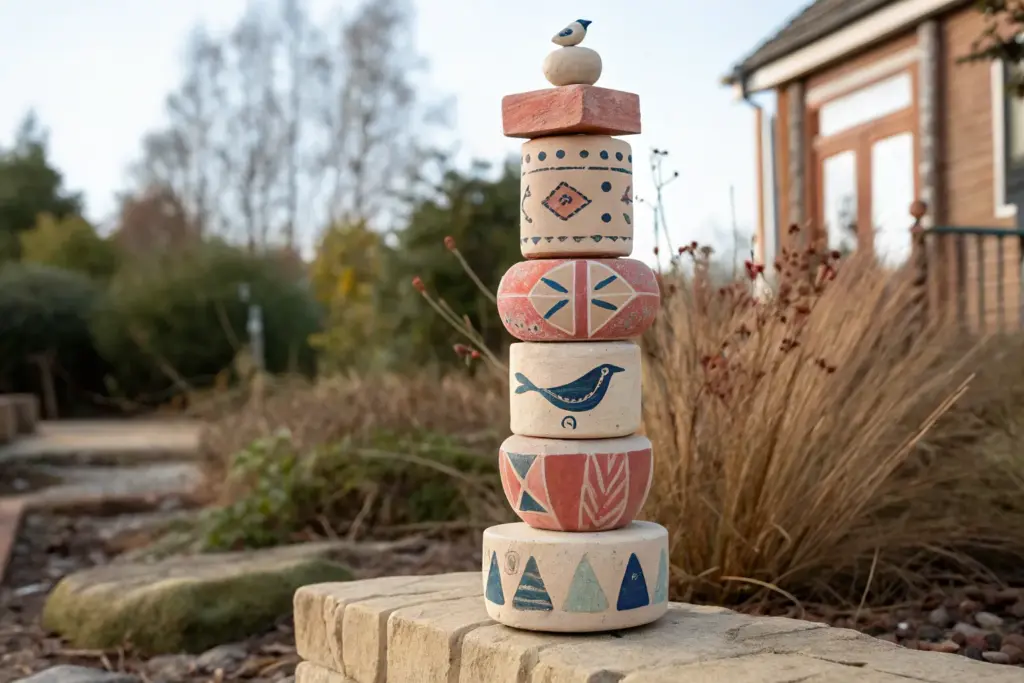
If you’ve been itching to build a clay totem, think of it like making a playful sculpture out of stacked “beads” with a little story from bottom to top. I love how stacked ceramic forms let you mix simple shapes, bold color, and cute motifs into one piece that looks amazing indoors or out.
Classic Stacked Bead Totem
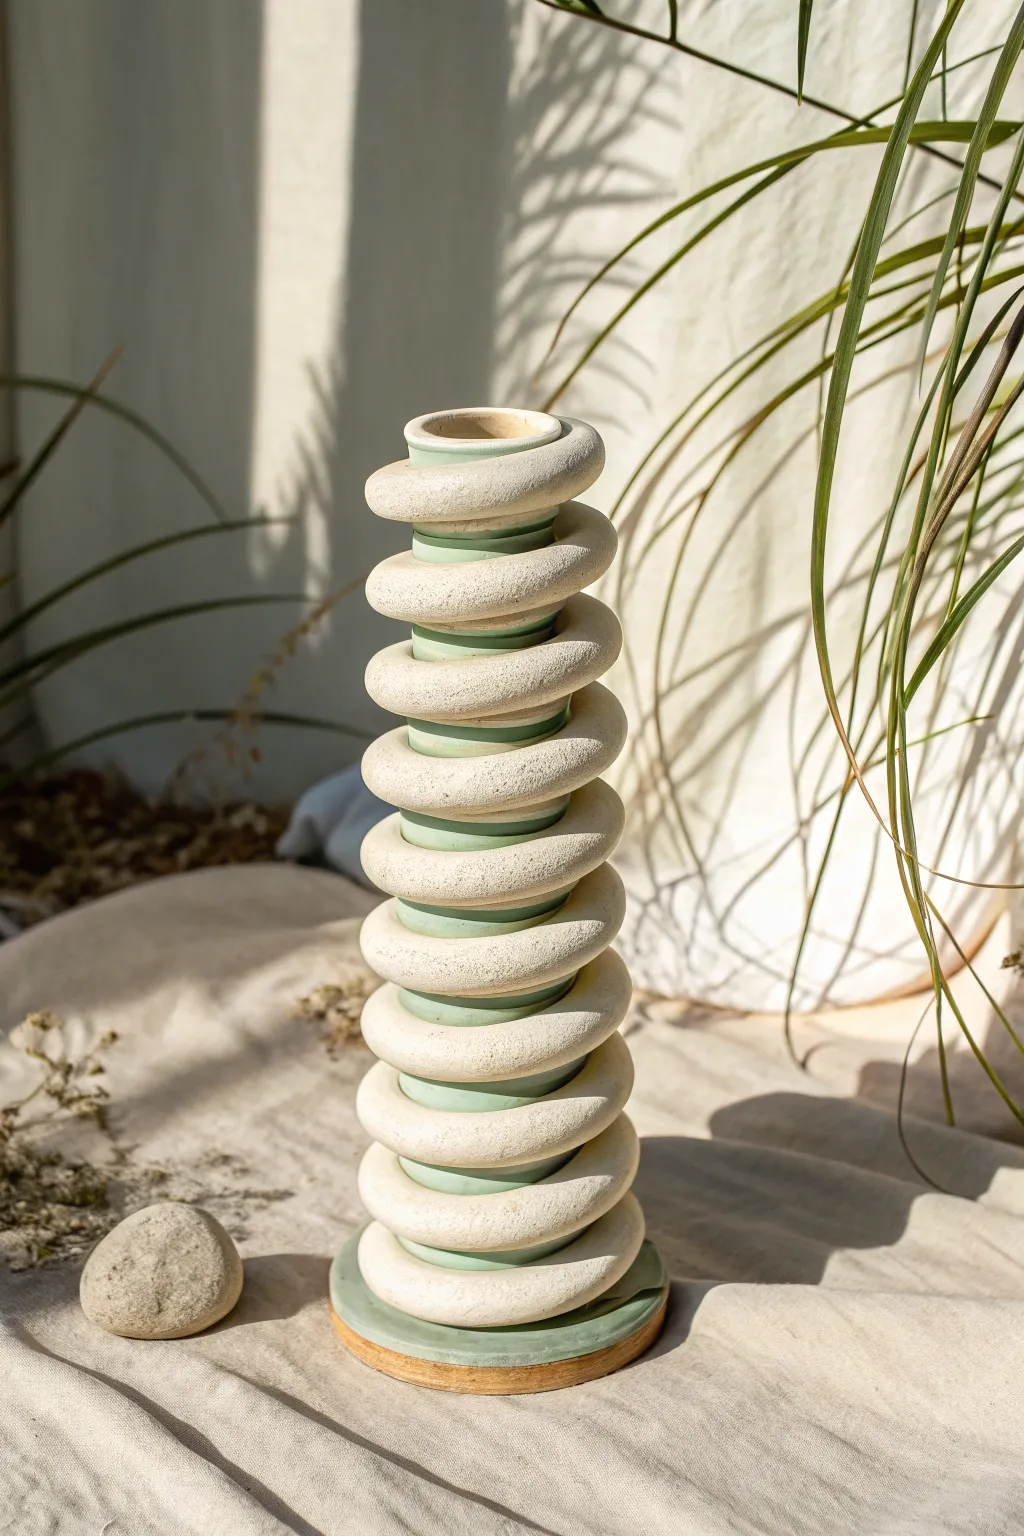
Bring a sense of tranquility to your garden with this elegant stack of handmade ceramic pebbles. Featuring organic shapes in a soothing palette of cream, terracotta, and soft grey, this architectural sculpture adds height and texture to any outdoor space.
Detailed Instructions
Materials
- High-fire stoneware clay (white or buff)
- Pottery wheel or slab roller (for hand-building)
- Rolling pin and guide sticks
- Underglazes (terracotta/pink, sage green)
- Clear glossy glaze
- Wooden sculpting tools
- Sponge
- Needle tool and hole cutter (1 inch diameter)
- Metal rebar or sturdy garden stake (for assembly)
- Wooden mounting base (optional)
- Kiln
Step 1: Forming the Pebbles
-
Prepare your clay:
Wedge your stoneware clay thoroughly to remove air bubbles. You will need enough clay for approximately 11-12 individual stones of varying sizes. -
Shape the large base:
Start with the foundation piece. Form a large, flattened disc shape, approximately 8-9 inches in diameter and 2 inches thick. Smooth the edges with a damp sponge to create a softened, water-worn look. -
Create the hollow centers:
Since these stones are thick, they shouldn’t be solid clay. Create them as hollow forms by pinching two pinch pots together or throwing a closed form on the wheel. This reduces weight and prevents kiln explosions. -
Pierce the vertical channel:
Using your hole cutter, slice a clean hole through the direct center of the base stone top-to-bottom. This is where the rebar will eventually pass through. -
Build the middle stack:
Form the next 3-4 stones, graduating them slightly smaller than the base. Mix shapes—some should be flatter discs, others slightly more bulbous and round. -
Detailing the lantern stone:
For the white stone near the bottom, create small decorative perforations. Use a small hole cutter or needle tool to punch random patterns around the circumference while the clay is leather hard. -
Shape the upper tiers:
Construct the remaining smaller stones for the top half, tapering the silhouette as you go. The very top piece should be the smallest, resembling a finial or small bead. -
Initial refinement:
Once all pieces are formed, stack them carefully to check the balance and silhouette. I like to do this while the clay is firm but not bone dry, so adjustments are still possible. -
Smooth and dry:
Disassemble the stack. Use a rib tool and damp sponge to compress the surface of each stone, removing fingerprints. Allow them to dry slowly under plastic to prevent warping.
Step 2: Glazing and Assembly
-
Bisque fire:
Load the bone-dry pieces into the kiln and bisque fire them to cone 04 (or your clay’s specific bisque temperature). -
Apply terracotta tones:
Select 3-4 specific stones for the pink/terracotta color. Apply 3 coats of underglaze, letting each coat dry in between. Focus on the smooth, rounded ones for this pop of color. -
Glaze the grey accent:
Choose one stone near the top to be your grey/green accent. Dip or brush this one with a semi-opaque reactive glaze to give it depth and contrast. -
The speckled white effect:
For the white stones, you can either leave the raw clay body (if it fires white) or apply a creamy white matte glaze. A satin finish works best to mimic real river rocks. -
Add surface shine:
Coat the colored stones (pink and grey) with a clear glossy glaze to make them look wet and polished. Leave the white stones matte for textural contrast. -
Glaze fire:
Fire the pieces again to the maturity temperature of your clay and glaze (typically cone 5 or 6 for stoneware). -
Prepare the base:
If using a wooden base like the image, drill a hole in a treated block of wood and insert your metal rebar or rod securely. -
Final assembly:
Slide the ceramic stones onto the rod one by one, following your original tapered layout. You can use small rubber washers between beads if they rattle or sit unevenly.
Wobbly stack?
If stones don’t sit flat, use a rasp or sanding block on the bottom of the bisque-fired pieces before glazing to level them out perfectly.
Solar Glow
Insert a small, waterproof solar puck light inside the hollow ‘lantern stone’ with the holes to create a gentle garden nightlight.
Step back and admire how the different textures and colors create a peaceful focal point in your garden


Bird Topper With Spacer Discs
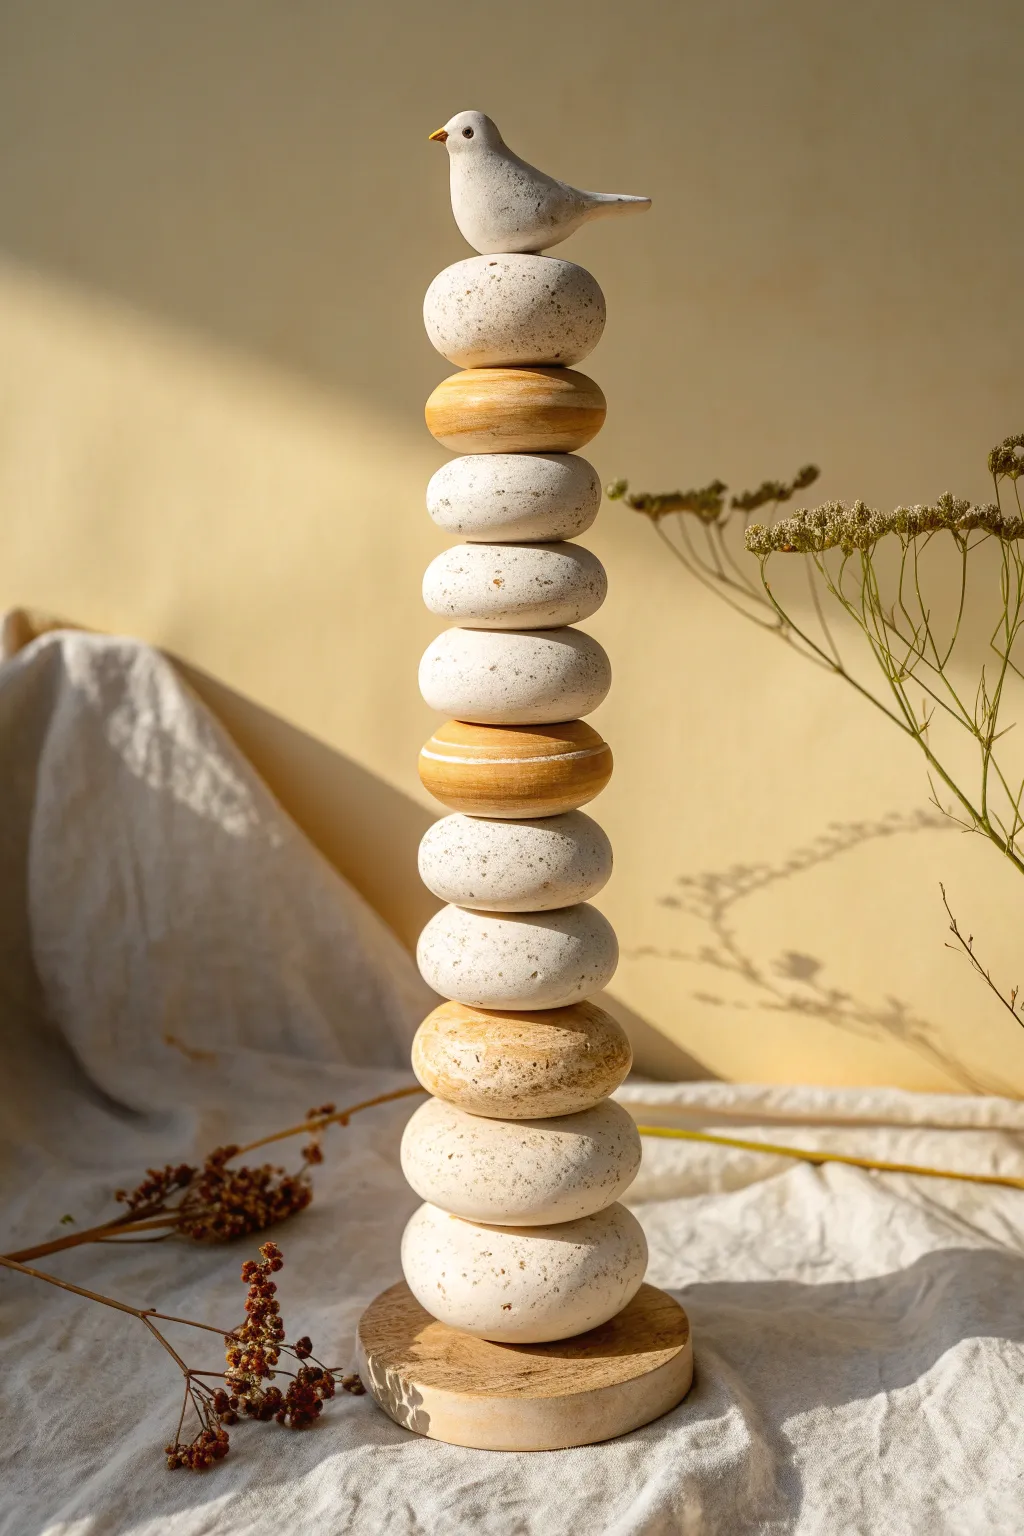
Create a calming, minimalist sculpture for your home using organic clay textures and a soothing earth-tone palette. This vertical totem features a stack of smooth, stone-like discs topped with a charming ceramic bird, resting on a sturdy wooden base.
Step-by-Step Tutorial
Materials
- White stoneware or polymer clay (oven-bake)
- Speckled tan clay (or textured add-ins like sand)
- Rolling pin
- Circle cookie cutters (varying sizes)
- Potter’s needle tool or toothpick
- Wooden dowel (approx. 1/4 inch diameter)
- Smooth wooden base (round)
- Drill with bit matching dowel size
- Pottery sponge and water
- Clear matte varnish (optional)
- Strong adhesive (E6000 or similar)
Step 1: Forming the Discs
-
Prepare the Clay:
Condition your white clay until it is soft and pliable. If you want that lovely speckled look shown in the image, knead in a small amount of black pepper or craft sand to mimic natural stone. -
Roll the Spheres:
Divide your clay into roughly 10-12 portions. Don’t worry about being perfectly equal; a little variation adds character. Roll each portion into a smooth ball between your palms. -
Create the Disc Shape:
Gently press each ball flat to create a thick, rounded disc shape – think of a slightly flattened marshmallow rather than a pancake. You want them substantial and rounded at the edges. -
Create Accent Discs:
Using the tan or gold-colored clay, form 3-4 discs of similar size. I like to marble these slightly with a bit of white clay to give them a sandstone appearance. -
Pierce the Centers:
Using a tool distinctively larger than your final dowel, poke a hole vertically through the center of each disc. Wiggle the tool slightly so the hole is loose enough for assembly later. -
Smooth the Edges:
Dip a sponge in water and gently wipe the perimeter of each disc to erase fingerprints and ensure a stone-smooth finish.
Step 2: Sculpting the Bird
-
Shape the Body:
Take a lump of white clay slightly smaller than your discs. Roll it into a teardrop shape, then gently curve the narrow end up to form the tail. -
Form the Head:
Pinch the rounded end of the teardrop to distinguish the head from the body. Pull a tiny bit of clay forward to create a small, pointed beak. -
Refine the Details:
Smooth out the connection points so the silhouette flows seamlessly. Use a needle tool to create a tiny indentation for the eye. -
Create the Mounting Hole:
Carefully insert your piercing tool into the bottom belly of the bird. Test this depth carefully so you don’t poke through the back.
Natural Texture
To get that pitted stone look without special clay, gently press a stiff bristle toothbrush or a textured rock against the wet clay before baking.
Step 3: Assembly and Finishing
-
Bake or Fire:
Follow the manufacturer’s instructions for your specific clay. Ensure all pieces are fully cured before proceeding. -
Paint the Details:
If you used plain white clay, now is the time to paint the accent discs with a golden-ochre acrylic wash. Add a tiny dot of gold or orange to the bird’s beak. -
Prepare the Base:
Take your wooden base disc and drill a hole in the direct center. Apply a dab of strong adhesive into the hole and insert your wooden dowel, ensuring it stands perfectly vertical. -
Stack the Totem:
Begin threading your clay discs onto the dowel. Start with two white discs, then an accent disc, and continue alternating in a pleasing irregular pattern. -
Secure the Stack (Optional):
If you want the totem to be permanent, add a tiny drop of glue between each disc as you stack them. Leaving them loose allows you to rearrange them later. -
Trim the Dowel:
Once all discs are stacked, mark the dowel about half an inch above the top disc. Remove the top few discs, cut the dowel at your mark, and sand the cut edge. -
Attach the Bird:
Place the final top discs back on. Apply adhesive to the tip of the dowel and slide the bird onto it, pressing down gently until it sits flush against the top disc.
Slumping Issues
If the bottom discs are squishing under the weight of the stack before baking, cure the discs in batches or let them firm up in the fridge first.
Place your finished totem near a window where the light can catch the subtle curves of the bird and the texture of the stones


Woodland Animal Stack Totem
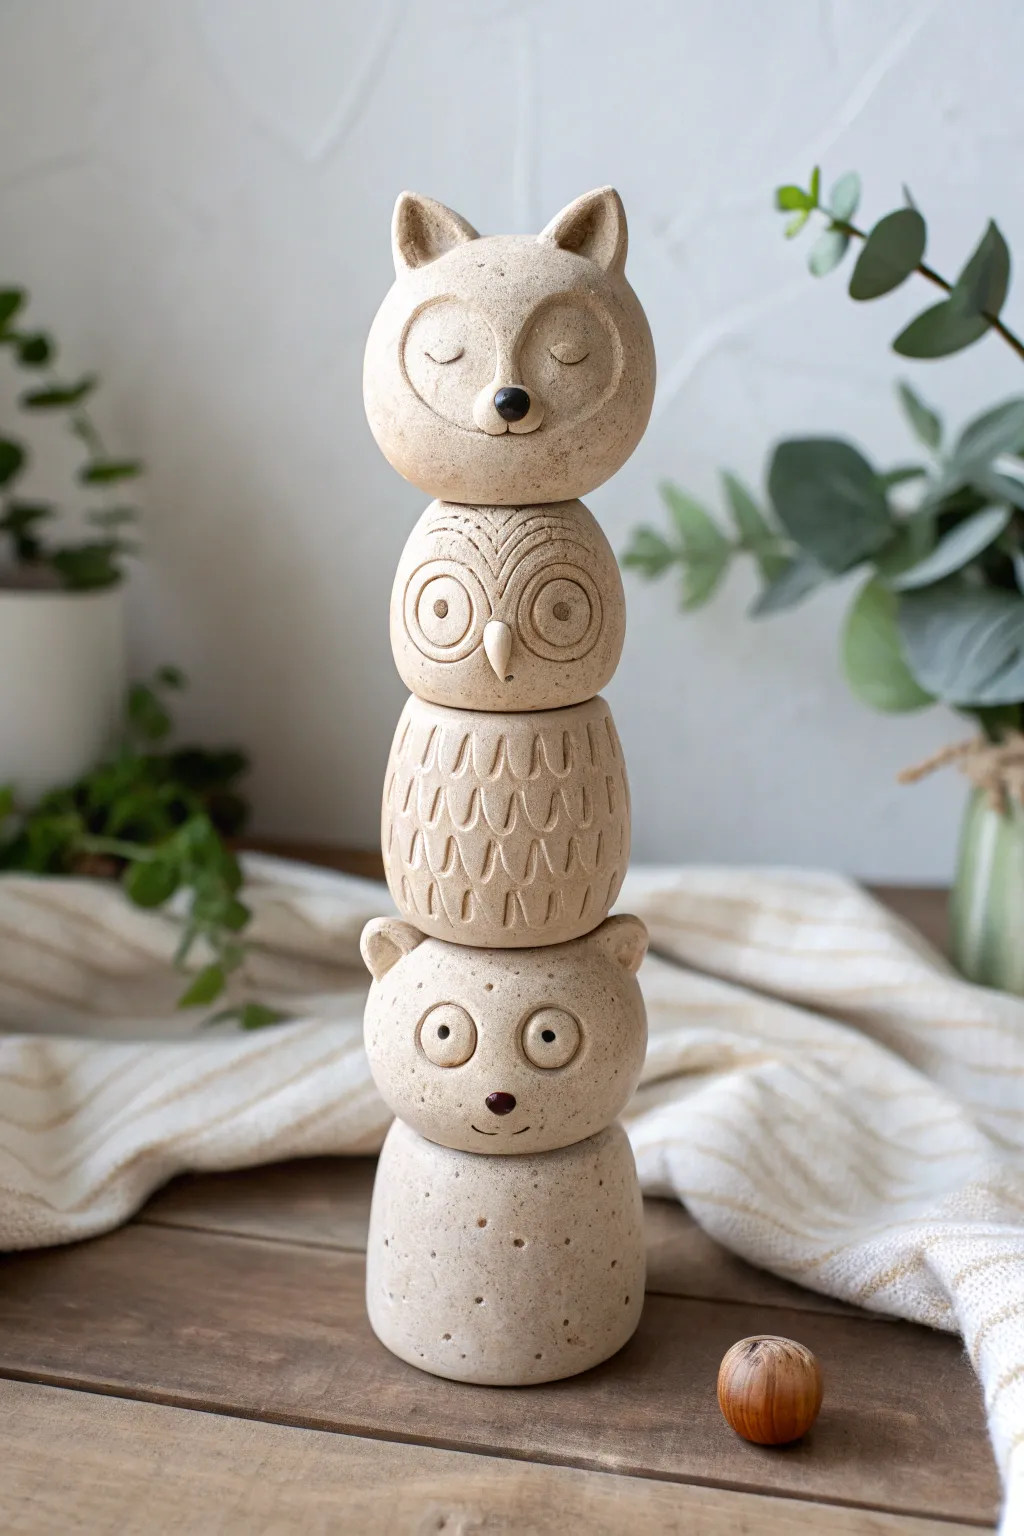
Bring the calming spirit of the forest into your home with this stacked ceramic-style sculpture featuring a serene fox, a watchful owl, and a curious bear. Its speckled, natural finish gives it a charming, earthy look perfect for rustic or minimalist decor.
Detailed Instructions
Materials
- White or sandstone-colored air-dry clay (or polymer clay)
- Speckled clay additive or black pepper/sand for texture
- Basic sculpting tools (needle tool, loop tool)
- Small rolling pin
- Water and sponge for smoothing
- Acrylic paints (black, dark brown)
- Matte spray sealant
- Toothpicks or a dowel for structural support
Step 1: Preparation & Base
-
Texture the clay:
Begin by kneading your clay. To achieve that beautiful stone-like speckled finish seen in the photo, mix in a pinch of course black pepper, black sand, or dried coffee grounds into the clay body until evenly distributed. -
Form the base cone:
Roll a ball of clay roughly the size of a tangerine for the bear’s body section. Shape it into a slightly tapered cylinder—wide at the bottom and slightly narrower at the top—to ensure the totem stands firmly. -
Add detail to the base:
Using a needle tool, poke scattered, shallow holes around the tummy area of this base piece to mimic fur texture or natural stone pitting.
Lean Prevention
If your totem starts leaning while wet, run a long wooden skewer straight down through the center of all three animals (head to base) and leave it inside until fully dry for internal support.
Step 2: Sculpting the Bear
-
Create the bear head:
Roll a second ball of clay, slightly flattened, and place it atop the base cylinder. Use slip (clay and water slurry) and scoring to join them securely. -
Add bear features:
Attach two small rounded triangles for ears. For the eyes, press two small balls of clay flat against the face, then press a smaller indentation into the center of each. Add a tiny triangle nose. -
Refine the expression:
Use a needle tool or small blade to carve a simple, curved line for the mouth. Ensure the head is sturdy enough to support the layers above.
Make it Functional
Before drying, carve a vertical channel down the back or hollow out the center thoroughly to use this stack as a whimsical incense burner or a heavy dried flower vase.
Step 3: Sculpting the Owl
-
Form the owl’s body:
Roll a ball of clay similar in size to the bear’s head. Gently press it into an egg shape, keeping the bottom flatter for stacking. -
Carve the feathers:
On the lower half of this shape, carve repetitive ‘U’ or ‘V’ shapes in rows to simulate breast feathers. The deeper you carve, the more shadow you’ll create later. -
Create the owl head:
Make a slightly smaller, rounded shape for the head and attach it to the body. Press large circular indentations for the eyes and add a small clay beak in the center. -
Add owl details:
Carve concentric circles inside the eyes for that wide-awake look. Add subtle feather lines above the eyes using a needle tool. -
Stack and secure:
Place the completed owl section onto the bear’s head. I recommend inserting a toothpick or short dowel between the layers invisibly to prevent the stack from toppling while drying.
Step 4: Sculpting the Fox
-
Shape the fox’s head:
Roll the final ball of clay for the topper. Shape it into a smooth, rounded sphere, slightly tapering towards the chin. -
Define the face shape:
Incise a heart-shaped outline onto the face to define the fox’s mask. Gently press the clay inside this line to make the cheeks puff out slightly. -
Add ears and nose:
Attach two prominent, pointed triangular ears to the top. Add a small, rounded ball for the nose right at the point of the heart shape. -
Carve sleepy eyes:
Using a curved tool or fingernail, press two crescent shapes into the face for closed, sleeping eyes. This gives the totem a peaceful top note. -
Final assembly:
Secure the fox head onto the owl. Check the alignment of the entire stack from all angles to ensure it isn’t leaning.
Step 5: Finishing
-
Drying:
Allow the sculpture to dry completely. If using air-dry clay, this may take 24-48 hours depending on humidity. Rotate it occasionally for even drying. -
Painting details:
Once fully dry, use a fine detail brush to paint the noses (bear, fox) and the pupils (owl) with black or dark brown acrylic paint. -
Sealing:
Finish with a light coat of matte spray sealant. This protects the clay while maintaining that raw, natural stone aesthetic.
Place your charming animal stack on a shelf or mantle to enjoy your handiwork.


Fish-and-Waves Totem Column
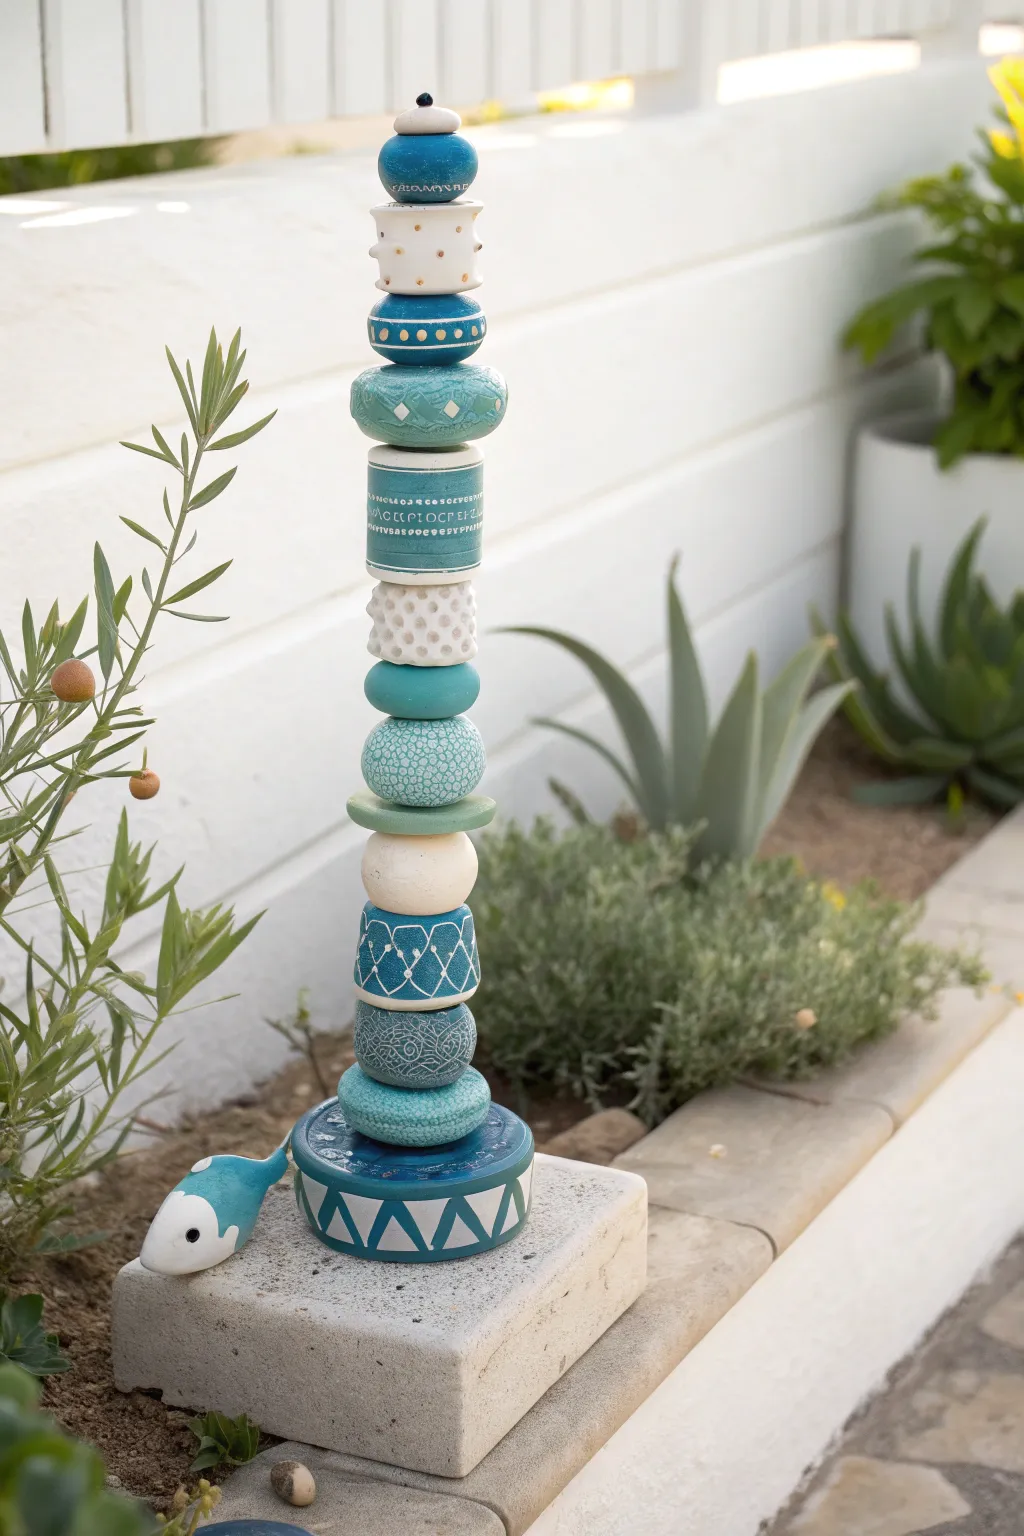
Bring a splash of coastal charm to your garden with this whimsical stacked clay totem. Featuring varied textures, calming teals, and a friendly fish guardian at the base, this vertical sculpture serves as a stunning focal point for any flowerbed or planter.
Step-by-Step Guide
Materials
- White earthenware clay (approx. 5-8 lbs)
- Rebar or sturdy metal garden stake (3-4 feet long)
- Rolling pin and canvas mat
- Pottery tools: needle tool, ribbon tool, sponge
- Texture tools: stamps, lace, burlap, or found objects
- Ceramic glazes: Dark Blue, Teal, Turquoise, White, Clear
- Underglaze pencil or fine brush (for details)
- Kiln (or access to a firing service)
- Epoxy adhesive (strong, outdoor-rated)
- Small wooden base or flat stone (optional for stability)
Step 1: Shaping the Beads and Totem Elements
-
Plan your stack:
Before touching clay, sketch out your vertical design. Note the alternating shapes—spheres, flattened discs, cylinders, and pinch pots—to create visual rhythm. -
Create the base cylinder:
Start with the large bottom piece. Roll a slab of clay about 1/2 inch thick and form a wide, sturdy cylinder or inverted bowl shape. This needs to be the widest piece to support the visual weight. -
Form the fish:
Sculpt a simple fish shape by pinching a lump of clay into a teardrop. Smooth the surface and use a tool to press in an eye socket. This piece will sit separate from the main stack, appearing to swim by the base. -
Build the geometric beads:
Form the remaining stack components. Roll spheres for the round beads, create chunky cylinders, and form thick discs. Vary the sizes from 2 to 4 inches in diameter. -
Pierce the holes:
While the clay is leather hard, carefully use a hole cutter or fettling knife to create a vertical channel through the center of every piece *except* the fish. Ensure the hole is slightly wider than your final garden stake to account for shrinkage. -
Hollow out larger forms:
To prevent explosions in the kiln, any piece thicker than an inch needs to be hollowed out. Cut them in half, scoop out the insides like an avocado, score and slip the edges, and rejoin them securely.
Clean Lines
Wipe the bottom of each bead with a wet sponge before firing. Glaze runs can fuse pieces to the kiln shelf, ruining your hard work.
Step 2: Adding Texture and Detail
-
Carve geometric patterns:
On the base cylinder, use a ribbon tool to carve deep triangular notches around the perimeter. This creates the bold ‘teeth’ or wave pattern at the bottom. -
Impress textures:
Take your textured beads (like the white dimpled cylinder) and press a tool handle or stamp repeatedly into the soft surface to create an organic, coral-like pattern. -
Scribe fine lines:
On the smooth, teal cylinder, use a needle tool to scratch horizontal bands and tiny text or repetitive rune-like symbols. Keep the pressure light for delicate lines. -
Smooth and refine:
Go over every piece with a slightly damp sponge. Smooth out any sharp burrs around the center holes and edges, as these can become razor-sharp after firing. -
Bisque fire:
Let all pieces dry completely (bone dry) for several days. Fire them to cone 04 (or your clay’s specific bisque temperature).
Coastal Sound
Insert small ceramic shapes or bells between the larger beads on the rod. When the wind blows, your totem will chime softly.
Step 3: Glazing and Assembly
-
Base coat application:
Apply your glazes. Use the dark blue for the base cylinder and the top finial. Use turquoise and teal for the mid-section rounded beads. -
Wax resist technique:
For the patterned pieces (like the triangle base), paint wax resist over the carved lines if you want them to remain raw clay, or wipe back the glaze with a sponge to reveal the texture after dipping. -
Detail the fish:
Glaze the fish body in a bright teal, leaving the head white. Paint a small dot of black underglaze for the eye. -
Glaze fire:
Fire the pieces a second time to the maturation temperature of your glaze (typically cone 05/06 or cone 5/6 depending on materials). -
Prepare the stake:
Drive your rebar or metal stake securely into the ground where you want the totem to stand. Ensure it is vertical. -
Stack the pieces:
Slide the ceramic pieces onto the rod one by one. I like to add a small washer or a dab of silicone between pieces if they don’t sit flush, to prevent rattling. -
Attach the fish:
Use a strong outdoor epoxy to attach the fish to the side of the bottom base piece, or simply nestle it into the dirt adjacent to the totem. -
Top it off:
Place the final finial cap on top. If your rod is too long, pile on an extra bead or cut the metal down so the cap hides the structural support.
Step back and admire how the different blues and textures harmonize to create a peaceful vertical statement in your green space

The Complete Guide to Pottery Troubleshooting
Uncover the most common ceramic mistakes—from cracking clay to failed glazes—and learn how to fix them fast.
Dolphin-and-Urn Inspired Totem
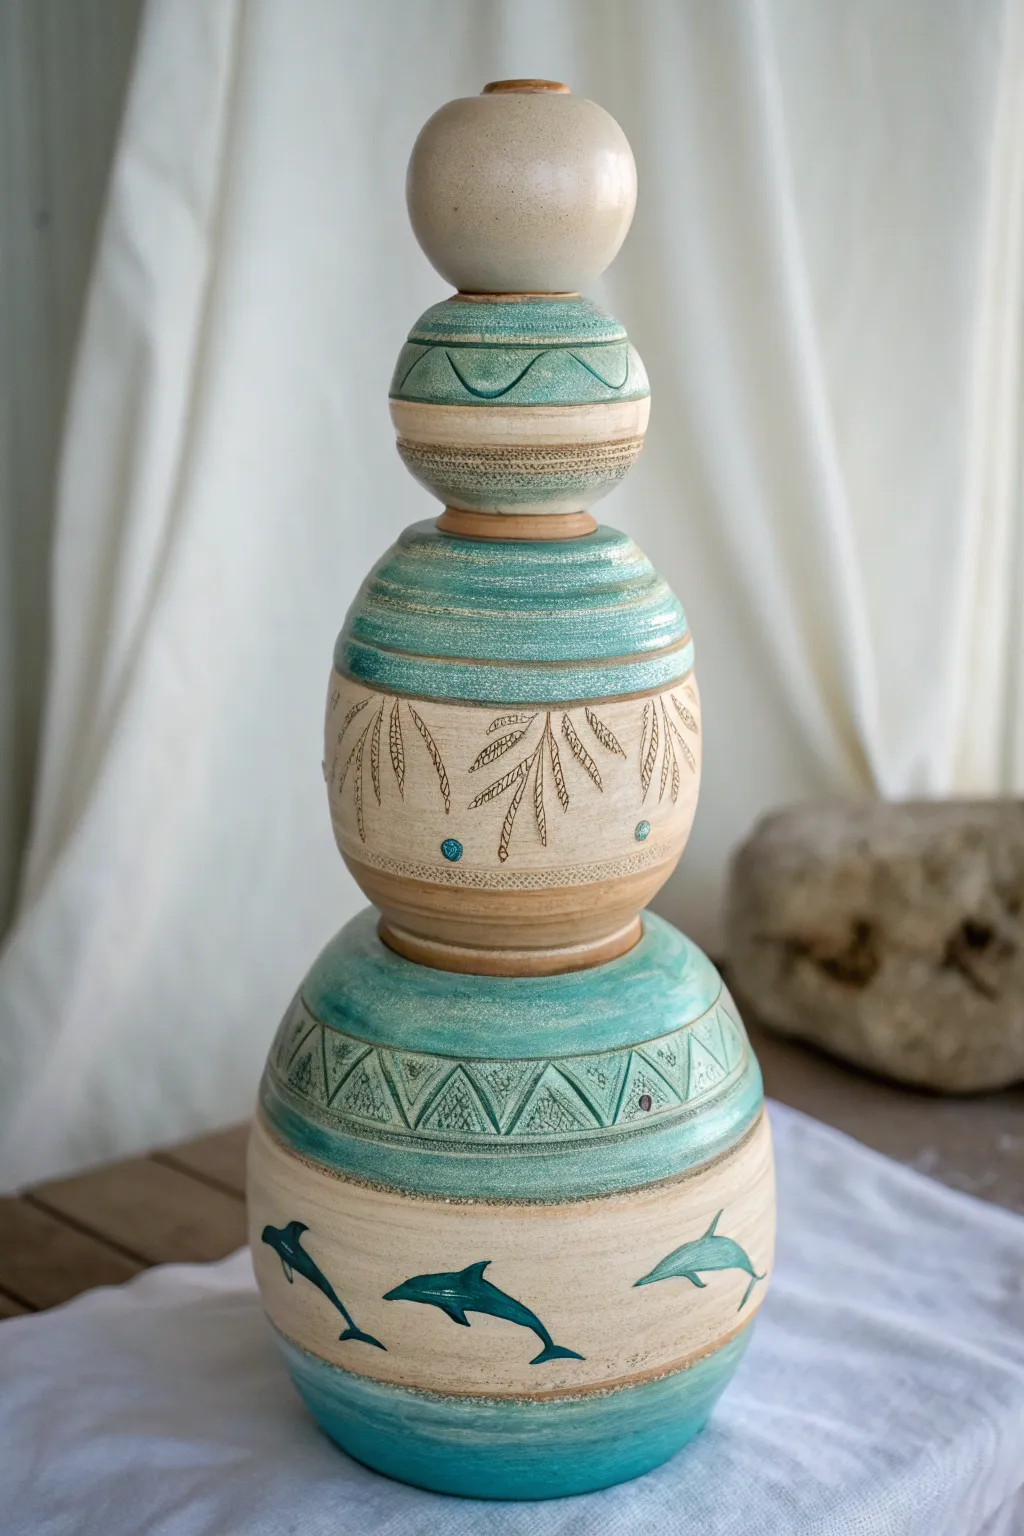
This striking clay totem combines the serene palette of sand and sea with a playful stack of spherical forms. Featuring incised palm fronds and swimming dolphins, it makes for a beautiful coastal centerpiece for a garden or mantle.
Step-by-Step Tutorial
Materials
- Stoneware clay (approx 5-8 lbs)
- Pottery wheel
- Throwing tools (ribs, sponge, wire cutter)
- Trimming tools
- Needle tool or sgraffito tool
- Underglaze (Teal or Turquoise)
- Clear glaze (transparent)
- Small paintbrush
- Wooden dowel or metal rod (for assembly)
- Kiln
Step 1: Throwing the Forms
-
Plan your stack:
Visualize the totem as four distinct hollow spheres of graduating sizes. You will need a large base sphere, a medium middle sphere, a smaller upper sphere, and a tiny top orb. -
Throw the base section:
Center a large ball of clay (about 3-4 lbs) on the wheel. Throw a closed form or a sphere with a narrow neck. This will be the dolphin section. Ensure the walls are even to support the weight above. -
Throw the middle and top sections:
Throw two smaller closed forms for the middle textured sections. Finally, throw a small, simple knob or orb for the very top. -
Create the connection points:
While the clay is leather hard, trim the tops and bottoms of the spheres so they sit flush against each other. If using a rod for stability, cut a hole through the center of the top and bottom of every piece (except the very top of the highest orb).
Wobbly Stack?
If the pieces rock when stacked, use a grinding stone or sandpaper on the fired bottoms to level them out perfectly before final assembly.
Step 2: Carving & Decoration
-
Divide the base:
On the largest sphere, use a needle tool to lightly scribe two horizontal bands. This creates a central ‘belt’ for your geometric pattern. -
Carve the geometric band:
Inside the belt on the base sphere, carve a repeating triangular pattern. Use a small carving tool to create texture inside specific triangles to add contrast. -
Incise the dolphins:
On the lower half of the base sphere, sketch outlines of swimming dolphins. Carve these out slightly so they can hold glaze later. -
Decorate the middle sphere:
On the second largest sphere, scribe a central band. Above this band, use your needle tool to freely draw fern or palm leaf patterns, scratching into the surface to create organic, leafy textures. -
Detail the upper sphere:
For the third piece up, crave a simple wavy line pattern around the upper hemisphere.
Make it Shine
Add a touch of melted glass frit into the carved triangular recesses before the final firing for a jewel-like, glistening effect.
Step 3: Glazing & Finishing
-
Bisque fire:
Once bone dry, fire all pieces to bisque temperature (usually cone 04/06). -
Apply base color:
Wipe the bisque ware with a damp sponge. Apply a teal underglaze to the top hemispheres of the two middle spheres and the geometric band of the base. -
Create the washed look:
I like to wipe back some of the underglaze with a damp sponge immediately after applying. This leaves pigment in the carved textures (like the wavy lines and triangles) while exposing the raw clay on the high points. -
Paint the dolphins:
Carefully fill in the dolphin silhouettes with a solid coat of teal underglaze. -
Add accent dots:
Using a fine brush, add small dots of teal or light blue glaze near the fern patterns on the middle sphere. -
Clear glaze application:
Dip or brush a clear transparent glaze over the entire surface of all pieces to seal them and make the colors pop. -
Final firing:
Glaze fire the pieces according to your clay body’s specifications (e.g., cone 5/6). -
Assembly:
Once cool, stack the pieces onto your central rod or dowel to complete the totem.
Now you have a stunning, handmade sculpture that captures the spirit of the ocean
Flower Bud and Seed Pod Stack
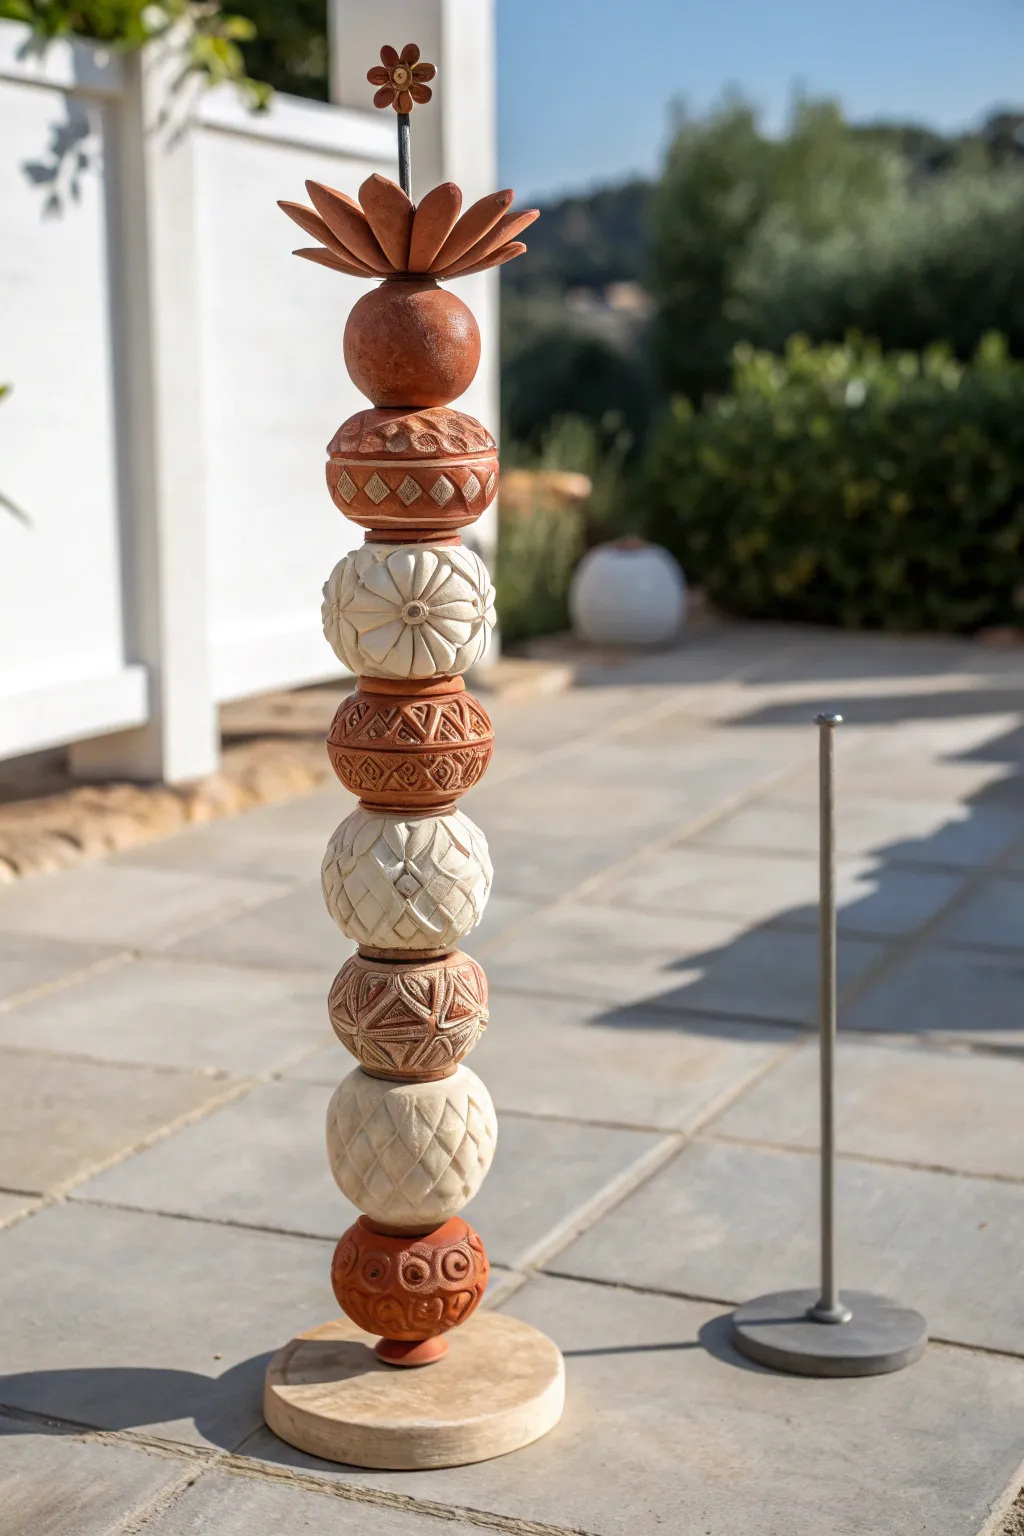
Bring sculptural elegance to your garden with this stacked totem featuring alternating terracotta and white clay forms. Each sphere is hand-carved with unique textures inspired by seed pods, flowers, and geometric patterns, creating a mesmerizing vertical accent.
Detailed Instructions
Materials
- Terracotta clay (low-fire or mid-fire)
- White stoneware or porcelain clay
- Metal rod (approx. 3/8 inch diameter) or rebar
- Heavy wooden base or concrete paver with center hole
- Wooden dowel (slightly larger than metal rod for hole making)
- Loop tools and carving ribbon tools
- Needle tool
- Sponge and bucket of water
- Wire cutter
- Calipers (optional, for sizing)
- Clear matte masonry sealer (optional)
Step 1: Forming the Base Spheres
-
Prepare Clay Balls:
Begin by wedging both your terracotta and white clay thoroughly to remove air bubbles. Portion out the clay into roughly 8-9 separate balls, aiming for a graduated size if desired or keeping them uniform at about 4-5 inches in diameter. -
Shape the Spheres:
Roll each portion into a smooth, tight sphere. Don’t worry about perfection; a slightly organic shape adds to the handmade charm. Gently flatten the top and bottom of each sphere just enough so they can stack stably. -
Create the Central Channel:
While the clay is still plastic but firm, use your wooden dowel to pierce a vertical hole straight through the center of each sphere. This hole needs to be slightly larger than your final metal display rod to account for clay shrinkage during firing. -
Form the Topper Elements:
Model a separate flower-like shape for the top. Create a central hub and attach flat, pointed oval coils to resemble petals. Separately, make a small, detailed finial, like the tiny flower shown at the very peak.
Step 2: Carving Textures and Patterns
-
Leather Hard Stage:
Allow all your spheres to dry to a ‘leather hard’ state. This is crucial—the clay should be firm enough to hold detail without smearing, but soft enough to carve easily. -
Map Out Designs:
Use a needle tool to lightly sketch your intended pattern onto the surface of a sphere. For the geometric one, sketch dividing lines; for the floral one, mark the center point. -
Carve the White Floral Sphere:
For the large white flower bead, use a loop tool to carve deep grooves radiating from the center hole to the outer edge, simulating petals. Soften the ridges with a damp sponge. -
Carve the Geometric Terracotta:
Take a terracotta sphere and carve repeating diamond or triangle patterns around the circumference. Vary the depth of your cuts to create shadow and visual interest. -
Create the Seed Pod Texture:
On another sphere, use a small ribbon tool to gouge out small, rhythmic scoops, creating a texture that mimics a pinecone or fruit skin. -
Detail the Swirl Base:
For the bottom-most bead, use a stylus or dull pencil to press in spiral motifs and circular indentations rather than removing clay, offering a different tactile finish. -
Refine Edges:
Go over all your carved areas with a soft brush or a slightly damp sponge to remove sharp burrs and clay crumbs. Clean up the holes to ensure they remain open.
Wobbly Stack?
If beads don’t sit straight, cut small washers from rubber or felt and place them between each clay sphere. This adds friction and helps level the pieces.
Step 3: Firing and Assembly
-
Drying:
Let all pieces dry very slowly under loose plastic for several days to prevent cracking, especially around the thickest parts of the spheres. -
Firing:
Bisque fire your pieces according to your clay body’s specifications. If you want them fully vitrified for frost resistance, follow up with a glaze firing (even without glaze) or fire to the clay’s maturity temperature. -
Prepare the Base:
Drill a hole in your wooden base or concrete block. Insert your metal rod securely. If using wood, apply a weatherproof sealant. -
Stacking:
Slide the ceramic beads onto the rod one by one. I find it works best to alternate colors (terracotta, white, terracotta) to create high contrast. -
Adding the Crown:
Place the large flower topper near the peak, followed by the smallest finial piece at the very top to cap off the rod.
Make It Grow
Plan ahead and make extra ‘spacer’ beads that are small, flat discs. Use them between the larger spheres to add height and rhythmic pauses in the visual stack.
Place your completed totem in a garden bed or on a patio where the changing sunlight can play across the carved textures


What Really Happens Inside the Kiln
Learn how time and temperature work together inside the kiln to transform clay into durable ceramic.
Succulent Garden Totem
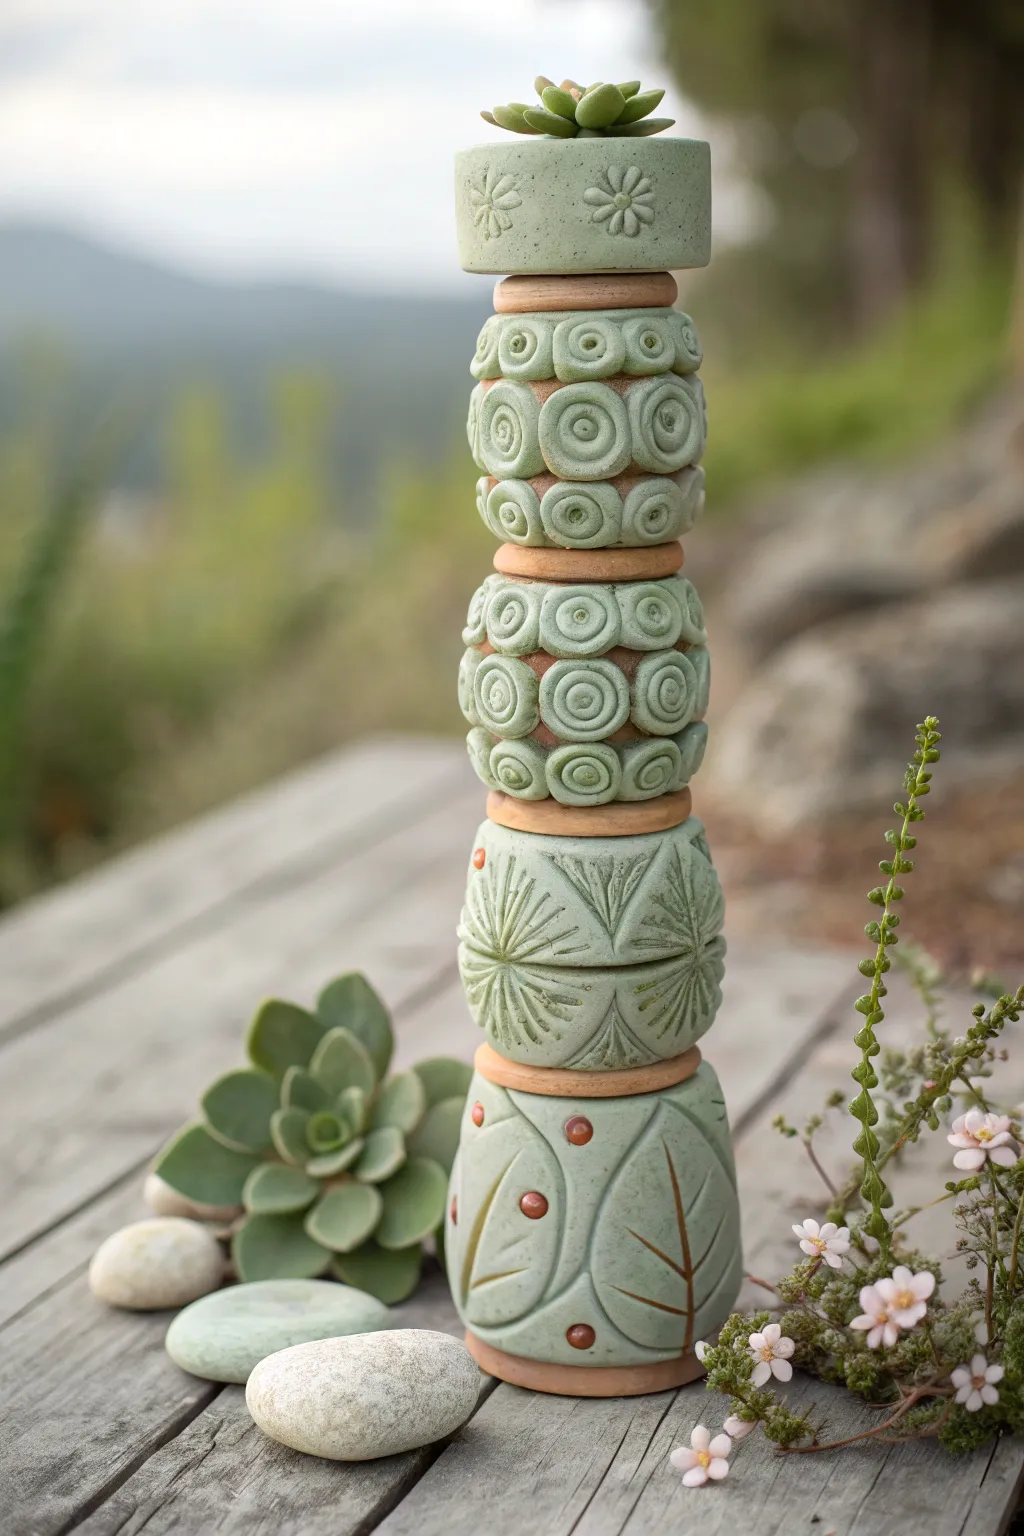
Bring height and tranquility to your garden with this multi-piece ceramic creation featuring calming sage green glazes and earthy terracotta accents. This stacked totem combines varied textures—from repeating spirals to carved leaves—capped perfectly with a live succulent planter.
Step-by-Step Tutorial
Materials
- Stoneware clay or terracotta clay body
- Rolling pin and guide sticks (1/4 inch thick)
- PVC pipe or wooden dowel (approx. 1 inch diameter) for center hole
- Carving tools (loop tools, needle tool)
- Small round cookie cutters or bottle caps
- Sage green matte glaze
- Red-brown underglaze or slip (optional for accents)
- Clear glaze
- Kiln access
- Rebar or sturdy metal rod for installation
Step 1: Forming the Base Components
-
Wedging the clay:
Begin by thoroughly wedging your clay to remove air bubbles, ensuring a smooth, workable consistency for throwing or hand-building. -
Creating the segments:
You will need to create four main vertical cylinder shapes. You can either throw these on the wheel as thick, hollow cylinders or hand-build them using slabs wrapped around a form. Aim for each segment to be roughly 4-5 inches tall. -
Making the spacer discs:
Roll out a slab of clay to about 1/4 inch thickness. Cut out four circular discs that are slightly wider than your cylinders. Smooth the edges with a damp sponge. -
Creating the top planter:
Fashion the topmost piece as a shallow, cup-like vessel. Make sure it has a solid bottom to hold soil, but don’t forget a small drainage hole if creating the center channel isn’t possible for this specific piece. -
Adding the central channel:
For the totem to stack securely, cut identical holes through the center of every cylinder and spacer disc using your pipe or dowel. Double-check that your rebar will fit loosely through these holes after shrinkage.
Wobbly Stack?
If the pieces rattle or don’t sit flush, shape small washers out of rubber or use distinct beads of silicone between the ceramic layers during assembly for stability.
Step 2: Texturing and Carving
-
Spiral segment detailing:
Select two of your cylinders to be the ‘spiral’ sections. Roll many small balls of clay, flatten them slightly, and press them onto the cylinder surface in neat rows. -
Defining the spirals:
Use a small loop tool or a rounded modeling tool to press concentric circles into each added button of clay, creating the spiral ‘fossil’ look shown in the upper sections. -
Carving the geometric section:
On the third cylinder, use a needle tool to lightly sketch vertical dividing lines. Carve deep V-shaped grooves radiating from a central point to create starburst or palm-frond patterns. -
Sculpting the leaf base:
For the bottom-most cylinder, carve large, sweeping leaf outlines. Use a modeling tool to scoop out the negative space around the leaves, making them appear raised. -
Adding organic accents:
Roll tiny balls of clay and attach them as berries or seeds on the bottom leaf segment. Score and slip these well so they don’t pop off during firing. -
Refining the top planter:
Keep the top planter simple. Stamp or carve small flower motifs around the rim to tie it visually to the rest of the stack.
Step 3: Glazing and Finishing
-
Bisque firing:
Allow all pieces to dry very slowly to prevent cracking, especially around the varied thicknesses of the appliqué. Fire to bisque temperature (usually Cone 04). -
Applying wax resist:
Wax the bottom layout of every single piece to prevent them from fusing to the kiln shelf. I also like to wax the rims of the spacer discs to keep them the raw terracotta color for contrast. -
Glazing the green:
Dip or brush your sage green matte glaze onto all the cylinders and the top planter. Ensure the glaze gets into the deep textures but doesn’t pool too thickly. -
Accent glazing:
Dab a touch of reddish-brown glaze or underglaze onto the small ‘berries’ on the bottom segment for a pop of earthy color. -
Final firing and assembly:
Fire the pieces to the final maturity temperature of your clay and glaze. Once cool, thread them onto a piece of rebar pounded securely into the ground in your garden.
Level Up: Lit Totem
Make the totem multi-functional by drilling small holes through the textured sections before firing. Thread a solar-powered LED string light up the center for a glowing night garden.
Now step back and admire how the natural green tones blend perfectly with your outdoor sanctuary
Sun, Moon, and Stars Totem
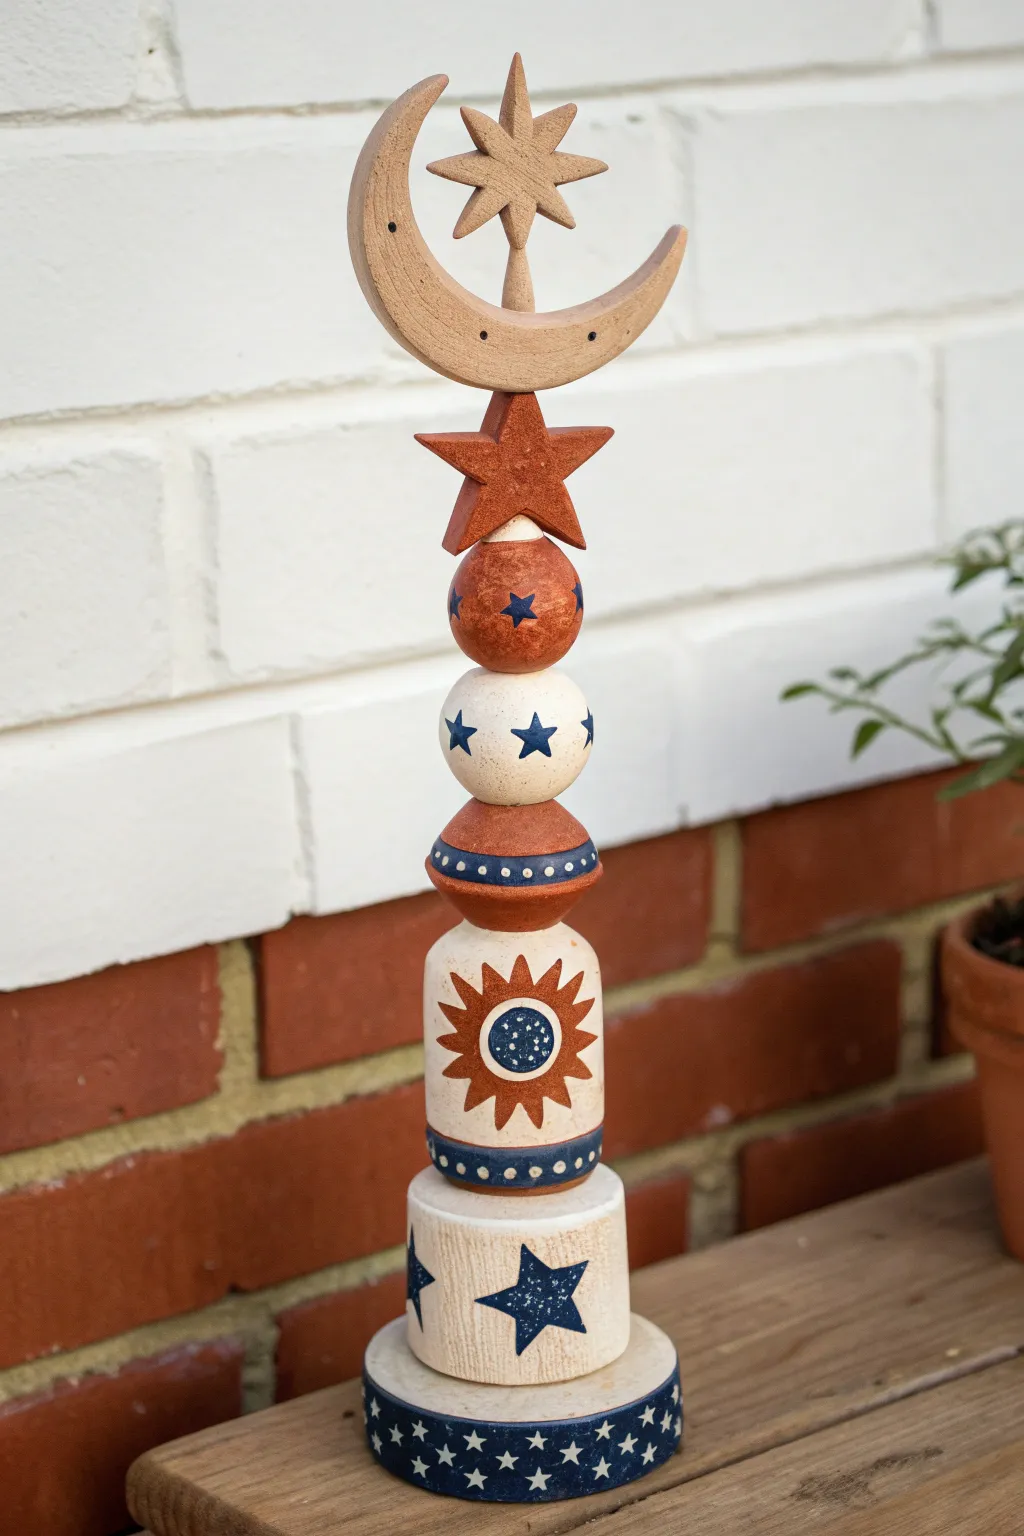
Reach for the heavens with this charming stacked sculpture featuring a whimsical crescent moon, radiant sun, and scattered stars. Using simple geometric forms and a classic Americana color palette, this clay totem brings a touch of celestial folk art to your garden or mantle.
Step-by-Step
Materials
- Polymer clay or air-dry clay (white or terracotta base)
- Wooden dowel (approx. 1/4 inch diameter)
- Acrylic paints (terracotta/burnt orange, cream/off-white, navy blue)
- Small detail brushes
- Medium flat brush
- Sculpting tools (needle tool, rolling pin)
- Basic clay adhesive or slip
- Fine-grit sandpaper
- Matte sealant or varnish
- Cardboard or foil (for armature support)
Step 1: Forming the Base Components
-
Prepare the dowel armature:
Cut your wooden dowel to the desired total height of your totem. Press a small ball of clay onto the bottom of the dowel to form a temporary stand, or insert the dowel into a block of wood to keep it upright while you work. -
Create the base cylinder:
Shape a thick cylinder of clay roughly 1.5 inches tall and 2.5 inches wide for the bottom-most tier. Create a separate flat disc slightly wider than the cylinder to serve as the footer. -
Sculpt the sun totem segment:
Form a second, slightly taller cylinder that tapers gently at the top and bottom. This barrel shape creates a nice visual break and will eventually host the sun motif. -
add the central spacer:
Roll a flattened sphere (like a macaron shape) and slide it onto the dowel. Add a decorative clay coil around its equator, blending the seams gently with a sculpting tool. -
Form the spherical beads:
Roll two distinct spheres: one larger white one and one slightly smaller terracotta-colored one. These will sit near the top of the stack.
Step 2: Sculpting the Crown
-
Shape the large star:
Roll out a slab of clay about 1/2 inch thick. Cut out a five-pointed star shape. I find it helpful to soften the sharp edges with a wet finger for a more weathered, folk-art look. -
Craft the crescent moon:
Form a thick crescent moon shape. Ensure the bottom curve is wide enough to rest securely on the star point below it. Use a needle tool to poke small indentations on the face of the moon for texture. -
Add the top star:
Sculpt a three-dimensional, faceted star (an eight-pointed star is shown). Attach this securely to the inner curve of the crescent moon using clay slip or adhesive. -
Assemble the stack:
Carefully slide all your dried or semi-dried components onto the dowel in order: base disc, base cylinder, barrel, spacer, white sphere, smaller sphere, large star, and finally the moon topper.
Structure Savvy
If using heavy clay for a tall totem, drill holes through your shapes before baking. Glue them onto the dowel afterward to prevent slumping during the cure.
Step 3: Painting and Finishing
-
Apply base coats:
Once the clay is fully cured and sanded smooth, paint the sections. Use cream for the base cylinder, barrel, and large sphere. Use terracotta for the spacer, small sphere, large star, and moon. -
Paint the decorative bands:
Using navy blue paint, create the band around the bottom base footer and the ring around the central spacer. Paint the rim of the sun barrel blue as well. -
Detail the sun motif:
On the barrel section, paint a terracotta sun with wavy rays. In the center of the sun, paint a navy circle, and once dry, add tiny white dots for texture. -
Add the stars:
Using a fine brush, paint navy blue stars onto the cream sections. Vary the sizes slightly for a hand-crafted feel. Add a ring of small white dots around the blue band on the central spacer. -
Enhance the moon texture:
Mix a very watery wash of dark brown paint. Brush it over the moon and the top wooden-style star, then immediately wipe most of it off to highlight the indentations and give it an antique wood grain appearance. -
Seal the project:
Protect your totem with two coats of matte varnish. This unifies the sheen and protects the paint from fading, especially if placed near a window.
Rustic Texture
Before the clay dries, gently press a piece of coarse sandpaper or a rough stone against the surface to mimic the texture of carved wood.
Display your celestial masterpiece proudly and enjoy the timeless, handcrafted warmth it brings to your space.

TRACK YOUR CERAMIC JOURNEY
Capture glaze tests, firing details, and creative progress—all in one simple printable. Make your projects easier to repeat and improve.
Texture-First Disc and Donut Totem
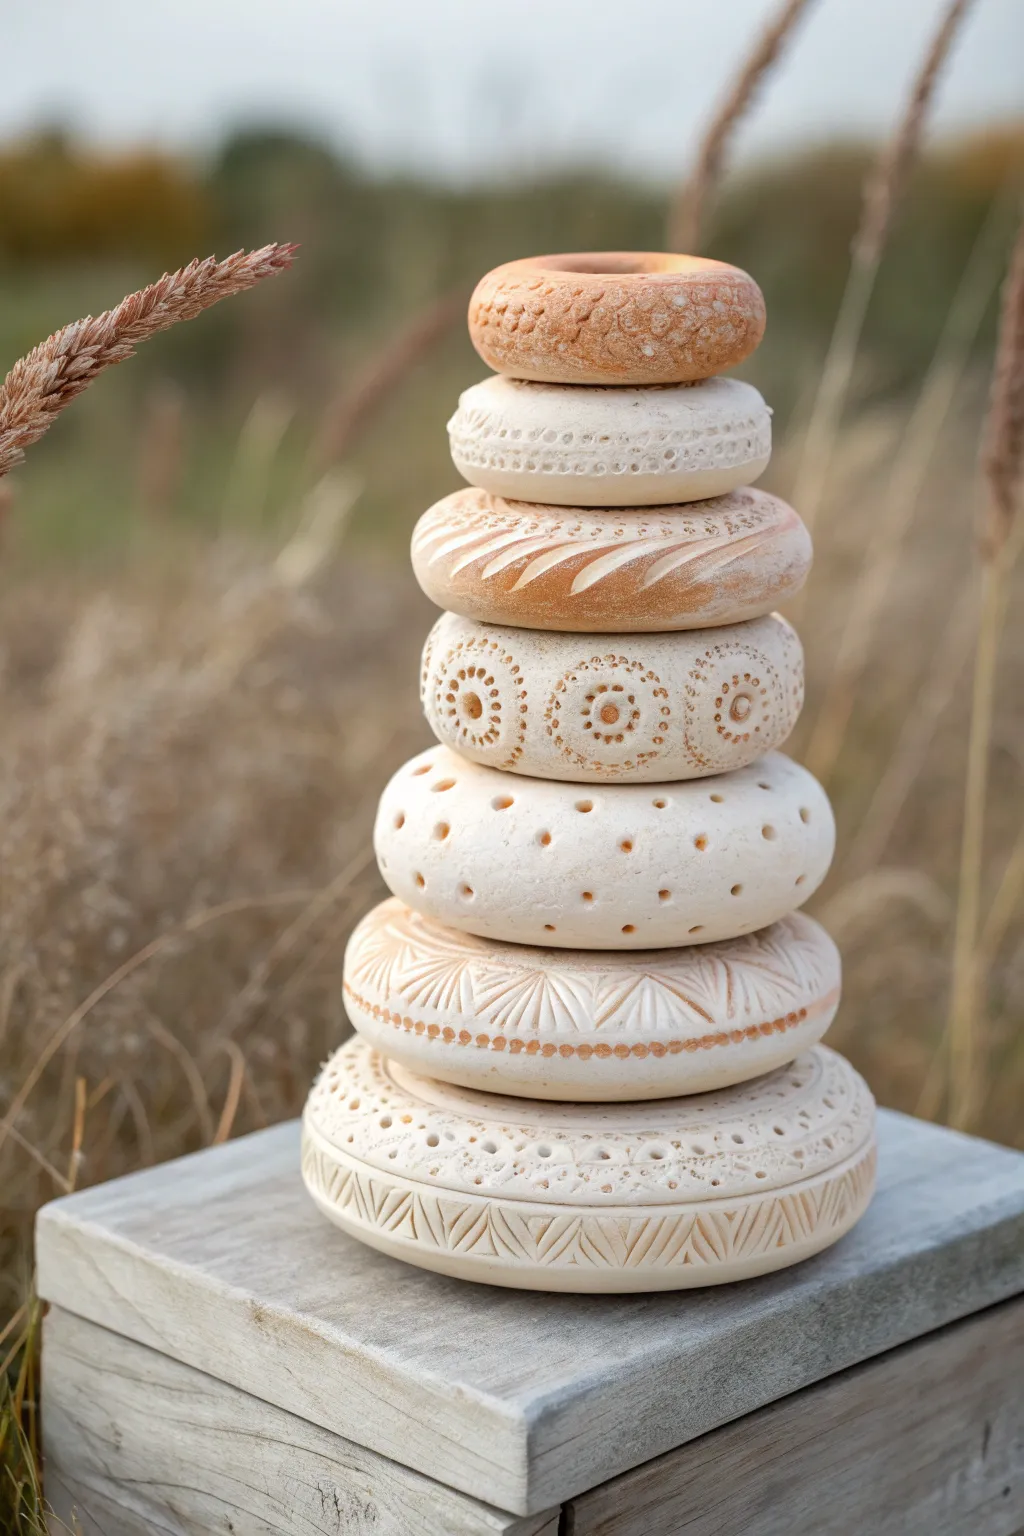
This meditative sculpting project focuses on stacking simple, organic forms to create a visually satisfying totem. The beauty lies in the subtle interplay of textures, where every layer offers a new pattern of dots, lines, or geometric carvings on natural clay.
How-To Guide
Materials
- Air-dry clay (stone or white color) or ceramic clay if firing
- Rolling pin
- Circle cutters (various sizes from 2″ to 5″)
- Small circular punch or straw (for center holes)
- Modeling tools (needle tool, loop tool, wooden spatula)
- Texturing items (ends of paintbrushes, lace, combs, stamps)
- Sponge and water
- Optional: Terra cotta acrylic wash or oxide stain
- Wooden dowel or metal rod (for assembly base)
Step 1: Shaping the Base Forms
-
Prepare the clay:
Begin by wedging your clay to remove air bubbles and ensure a uniform consistency. Divide the clay into seven lumps of graduating sizes, from large (for the base) to small (for the top). -
Form the donuts:
Roll each lump into a thick snake, then join the ends to create a ring shape. Alternatively, flatten spheres into thick discs and punch a hole through the center. Aim for a unified aesthetic where the edges are soft and rounded like river stones, rather than sharp and cylindrical. -
Size graduation:
Arrange your rough shapes in a stack to check the taper. You want the widest piece at the bottom (about 5-6 inches) graduating up to the smallest piece at the top (about 2-3 inches). Adjust the clay amounts now before adding detail. -
Smooth the surfaces:
Use a slightly damp sponge to smooth out any cracks or fingerprints. I like to let the forms sit for about 30 minutes to firm up slightly—this makes the texturing phase much cleaner.
Clean Carving Tip
Wait until the clay is ‘leather hard’ (firm but cool to the touch) before carving detailed lines. You’ll get crisp edges without dragging the clay.
Step 2: Texturing the Layers
-
Texturing the base (Layer 1):
Take the largest disc. Using a carving tool, create a band of zig-zag or triangle patterns around the bottom edge. Above that, press small indentations in a row using a dull pencil tip. -
Adding sunburst rays (Layer 2):
For the second largest disc, use a needle tool or knife to carve radiating lines from the center outward. Vary the depth of the lines, and perhaps add a dotted border along the bottom rim using a small stylus. -
Creating the perforated look (Layer 3):
This middle layer relies on negative space. Use tools of different diameters—like the end of a paintbrush and a needle tool—to poke holes of differing sizes all over the surface. Don’t punch all the way through; just create deep dimples. -
Stamping circular motifs (Layer 4):
On the next layer up, press a small circular object (like a macramé bead or piping tip) into the clay to create ring patterns. Use a needle tool to add a dot in the center of each ring for a decorative finish. -
Carving swirls (Layer 5):
Carve deep, diagonal swoops around the circumference of this smaller donut. These lines should mimic the motion of wind or waves. -
Detailing the top layers (Layers 6 & 7):
For the second-to-top piece, use a fine point to create a delicate lace-like pattern of tiny dots. For the very top crown piece, give it a rougher, dimpled texture using a texturing sponge or a stippling brush.
Natural Variation
Mix a small amount of sand or grog into your clay body before sculpting. This adds innate speckling and a stony texture without needing paint.
Step 3: Finishing and Assembly
-
Drying phase:
Allow all pieces to dry completely. If using air-dry clay, turn them over occasionally to ensure even drying. If utilizing ceramic clay, fire them according to your clay body’s specifications. -
Applying a wash (Optional):
To highlight the textures as seen in the photo, dilute a small amount of terra cotta paint or brown oxide with water. Brush it over the textured areas and immediately wipe the surface with a damp sponge. -
Clean finish:
The wipe-back technique leaves color only in the deep crevices of your carving, accentuating the patterns while keeping the high points bright. -
Stacking the totem:
Once fully dry or fired, stack the pieces on your chosen base. If you planned for stability, insert a wooden dowel or metal rod through the center holes to keep them aligned perfectly vertical.
Step back and admire the rhythmic pattern of your stacked sculpture
Carved Geometric Pattern Totem
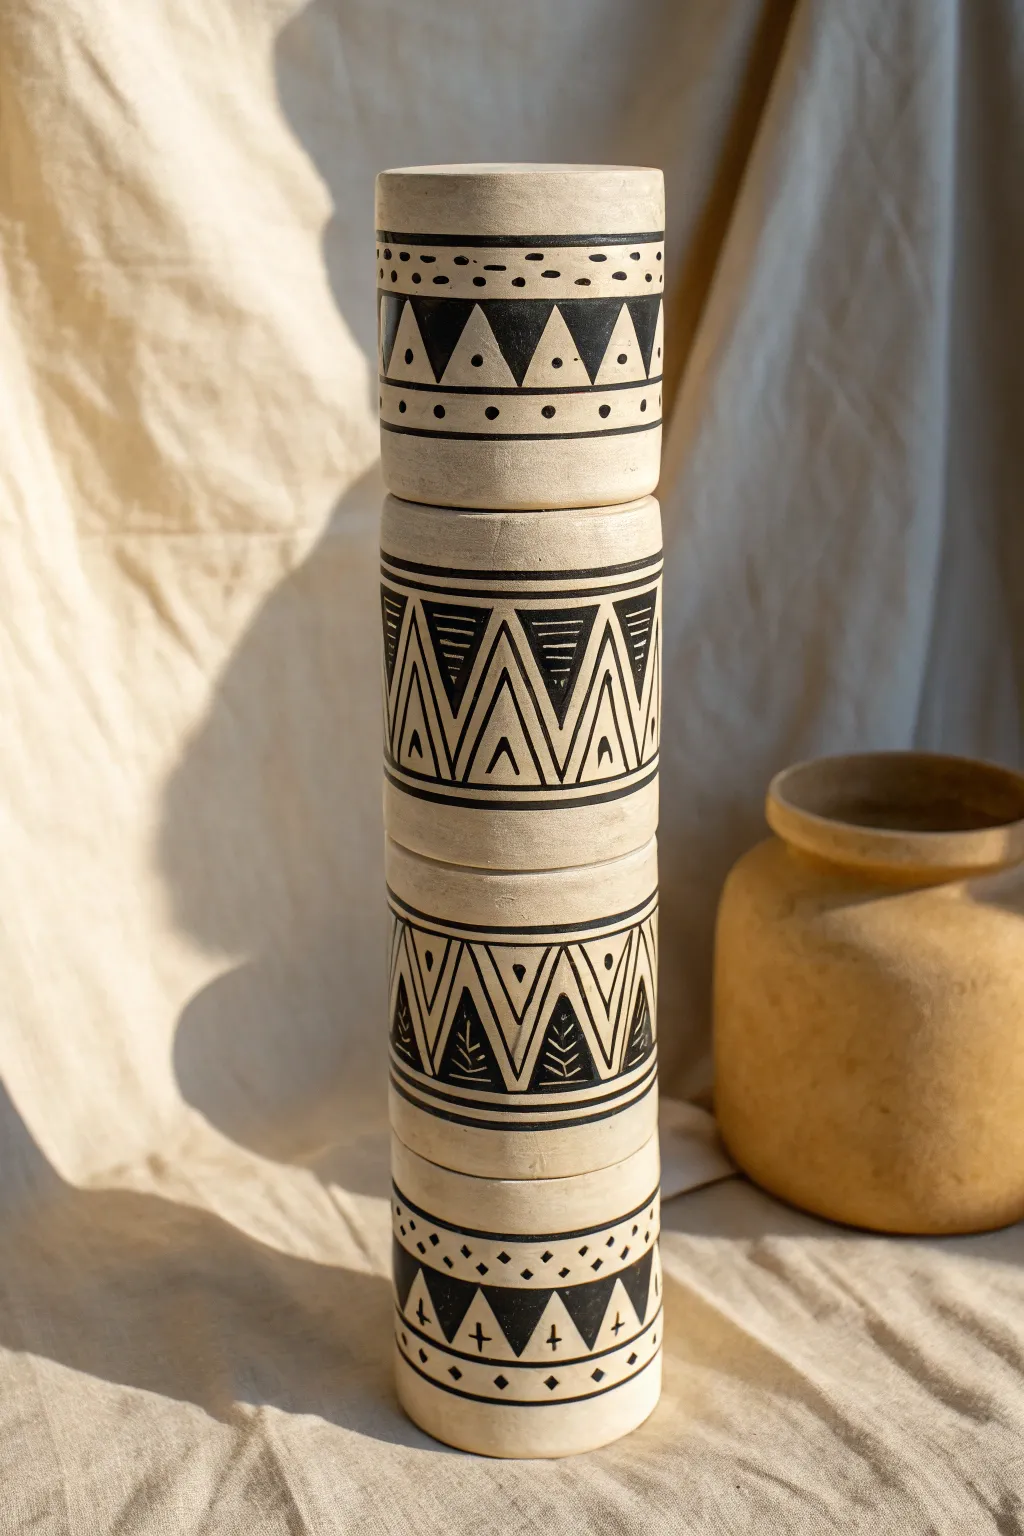
Create a striking vertical statement piece with this modular clay totem, featuring four distinct cylindrical sections that stack seamlessly. The design uses bold black geometric motifs against natural off-white clay, giving it a modern, tribal-inspired aesthetic perfect for shelves or mantels.
Detailed Instructions
Materials
- Light-colored stoneware clay (buff or white)
- Black underglaze
- Rolling pin and guide strips (canvas cloth optional)
- Circular cookie cutters or templates (approx. 3-4 inch diameter)
- Needle tool and trimming tools
- Slip and score tool
- Small carving loop tool (sgraffito tool)
- Fine detail paintbrush
- Clear matte glaze (optional)
- Potter’s wheel (optional, can be hand-built with slabs)
Step 1: Forming the Cylinders
-
Prepare your clay slabs:
Begin by rolling out your clay into an even slab, approximately 1/4 inch thick. Use guide strips on either side of your rolling pin to ensure consistent thickness, which is crucial for structural integrity when stacking. -
Cut the rectangles:
Measure and cut four long rectangular strips. These will become the walls of your cylinders. Aim for a height of about 2.5 to 3 inches per section, ensuring they are all uniform. -
Cut the bases and caps:
Cut out eight circles using your cookie cutter or template. Each cylinder needs a top and a bottom to be fully enclosed and stackable, though you can leave the very bottom cylinder open at the base. -
Form the tubes:
Wrap a rectangular strip around a cylindrical form (like a PVC pipe or rolling pin) to create a perfect tube. Score and slip the vertical seam, blending the clay thoroughly so the join disappears. -
Attach the end caps:
Score and slip the edges of your clay tubes and the circular caps. Attach a circle to both the top and bottom of each cylinder (except potentially the base piece) to create closed drums. Smooth the seams with a rib tool. -
Create the stacking mechanism:
For stability, gently depress the center of the top cap on three of the cylinders to create a slight concave indentation. This helps the piece above it sit securely without sliding off.
Sgraffito Success
Carve when clay is ‘chocolate bar hard’. Too wet and lines will be mushy; too dry and the clay will chip.
Step 2: Designing and Carving
-
Leather hard stage:
Allow your four cylinders to dry slowly to a leather-hard state. The clay should be firm enough to handle without deforming but soft enough to carve into. -
Plan your patterns:
Lightly sketch your geometric designs onto the surface using a pencil. The graphite will burn off in the kiln. Plan for four distinct but cohesive patterns: triangles with dots, chevron zig-zags with internal lines, leaf-like zig-zags, and a bottom band of inverted triangles. -
Apply the black field:
For the crispest lines, paint the specific bands where the patterns will go with two to three coats of black underglaze. Let the underglaze dry until it is no longer shiny. -
Carve the negative space:
Using a small loop tool or sgraffito tool, carve through the black underglaze to reveal the raw clay body underneath. This subtractive method creates the sharp geometric lines shown in the photo. -
Refining the heavy lines:
For the thick horizontal bands separating the patterns, you can either paint them directly or carve away the clay around them. Clean up any clay burrs or crumbs with a dry soft brush. -
Detail work:
Add the finer details, such as the small dots inside the triangles and the thin vertical hatching lines within the chevron patterns. I find a needle tool works best for the tiniest dots.
Step 3: Finishing and Firing
-
Bisque firing:
Once fully bone dry, load the pieces into the kiln. Fire to cone 04 (or your clay’s bisque temperature). Ensure the pieces are not touching each other during this firing. -
Waxing the connections:
Apply wax resist to the very bottom and top contact points of each cylinder if you plan to glaze them. This prevents them from fusing together if you decide to fire them as a stack (though firing separate is safer). -
Glazing (Optional):
For a natural look like the reference creates, leave the outside unglazed or apply a very thin clear matte glaze to seal the surface while keeping the texture. Wipe back any glaze that obscures the black carving. -
Final firing:
Fire the pieces to maturity (likely Cone 5/6 depending on your stoneware). Once cool, stack your totem pieces to check the fit and alignment.
Wobbly Stack?
If cylinder tops aren’t flat after firing, use a sanding block or diamond pad to level the contact points.
Arrange your finished totem near a window where the light can emphasize the carved texture and geometric shadows
Bold Color-Blocked Totem Stack
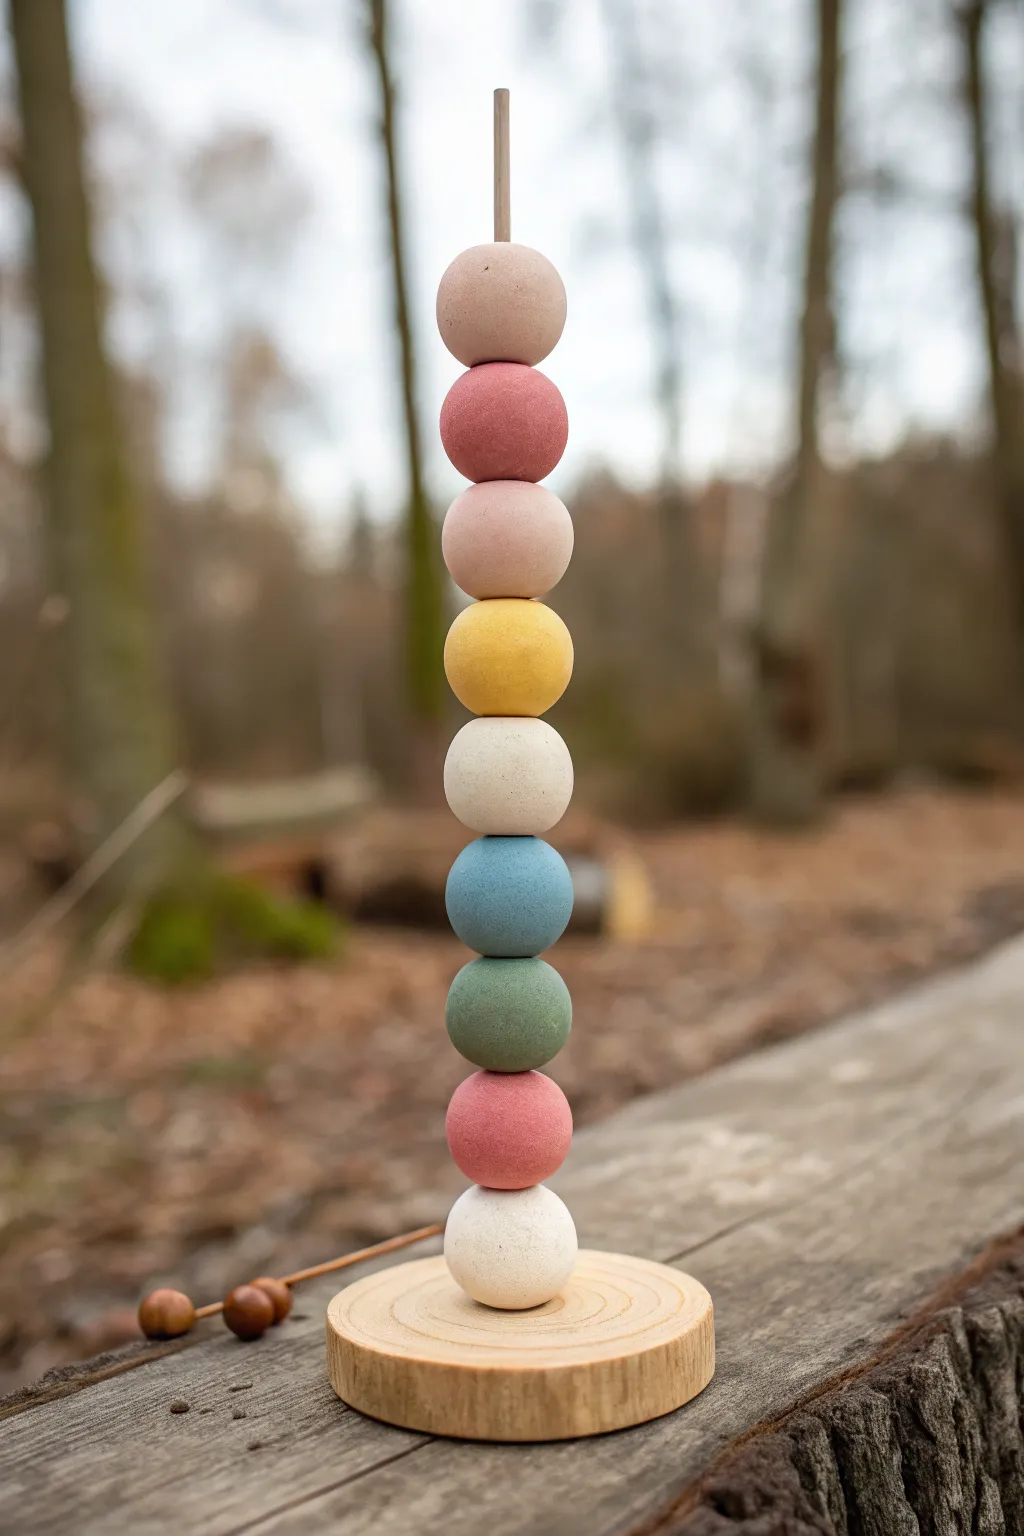
This charming garden totem brings a soft pop of colour to any outdoor nook by stacking handmade clay beads on a simple wooden spine. The smooth, matte texture and muted pastel palette create a calming, natural aesthetic perfect for sitting atop a fence post or nesting among potted plants.
Step-by-Step
Materials
- Air-dry clay or polymer clay (white base)
- Wooden dowel (approx. 6-8mm diameter)
- Round wooden slice or geometric wood block (for base)
- Acrylic paints (muted pink, mauve, ochre yellow, cream, teal blue, sage green)
- Fine-grit sandpaper
- Drill with bit matching dowel size
- Project sealer (matte finish, outdoor-rated if displaying outside)
- Wood glue
- Rolling pin (optional)
- Skewer or knitting needle (for bead holes)
Step 1: Prepping the Base and Spine
-
Select your base:
Choose a sturdy wooden slice for your foundation. A raw wood slice with the bark edge intact adds a lovely rustic touch, but a simple pine block works just as well. -
Drill the anchor hole:
Find the absolute center of your wooden base. Using a drill bit that matches the diameter of your dowel perfectly, drill a hole about halfway through the thickness of the wood—don’t go all the way through. -
Secure the dowel:
Apply a generous drop of wood glue into the drilled hole and insert your wooden dowel. Ensure it stands perfectly straight at a 90-degree angle and let it dry completely before stacking any weight on it.
Clean Hole Trick
When piercing the wet clay beads, twist the skewer as you push it through rather than pushing straight. This prevents the exit hole from blowing out.
Step 2: Crafting the Clay Beads
-
Section the clay:
Cut your clay into nine equal portions. I find using a kitchen scale helps here to ensure every bead is exactly the same weight, which gives the final totem a pleasing symmetry. -
Roll spheres:
Roll each portion of clay between your palms to create smooth, perfect spheres. If the clay is cracking, dampen your hands slightly with water to smooth out the surface. -
Create the pass-throughs:
While the clay is still wet, carefully push a skewer or tool through the center of each sphere to create a hole. The hole needs to be slightly larger than your wooden dowel to account for clay shrinkage. -
Refine the shape:
After piercing, the spheres might deform slightly. Gently re-roll them or tap the ends flat to restore their round shape while keeping the channel open. -
Dry completely:
Allow the clay beads to dry fully. For air-dry clay, this usually takes 24-48 hours depending on humidity. Rotate them occasionally so they dry evenly. -
Sand for finish:
Once bone dry, take fine-grit sandpaper and lightly buff the surface of each bead to remove any fingerprints or ridges, ensuring a professional matte look.
Texture Twist
Before the clay dries, gently press a piece of linen or burlap against a few beads to add subtle texture that catches the glaze or paint beautifully.
Step 3: Painting and Assembly
-
Plan your palette:
Mix your acrylic paints to achieve the muted tones shown: dusty rose, pale blush, mustard yellow, off-white, slate blue, and sage green. -
Paint the beads:
Paint each bead individually. You’ll need: 2 off-white, 2 pink/rose, 1 mauve, 1 yellow, 1 blue, 1 green. Two thin coats are better than one thick coat. -
Dry the paint:
Let the paint cure completely. Propping them up on skewers stuck into a foam block is a great way to let them dry without smudging the finish. -
Seal the beads:
Apply a matte sealer to protect the paint, especially if this totem will live in the garden. Avoid glossy finishes to maintain the natural, stone-like appearance. -
Assemble the stack:
Slide the beads onto your secured dowel. The order shown is: white (bottom), pink, green, blue, white, yellow, pale pink, darker rose, pale pink (top). -
Secure the cap:
While gravity holds the stack together, you can add a tiny dab of glue inside the very top bead to keep it from wobbling or being lifted off.
Place your finished totem on a patio table or garden wall to add a gentle artistic touch to your outdoor space
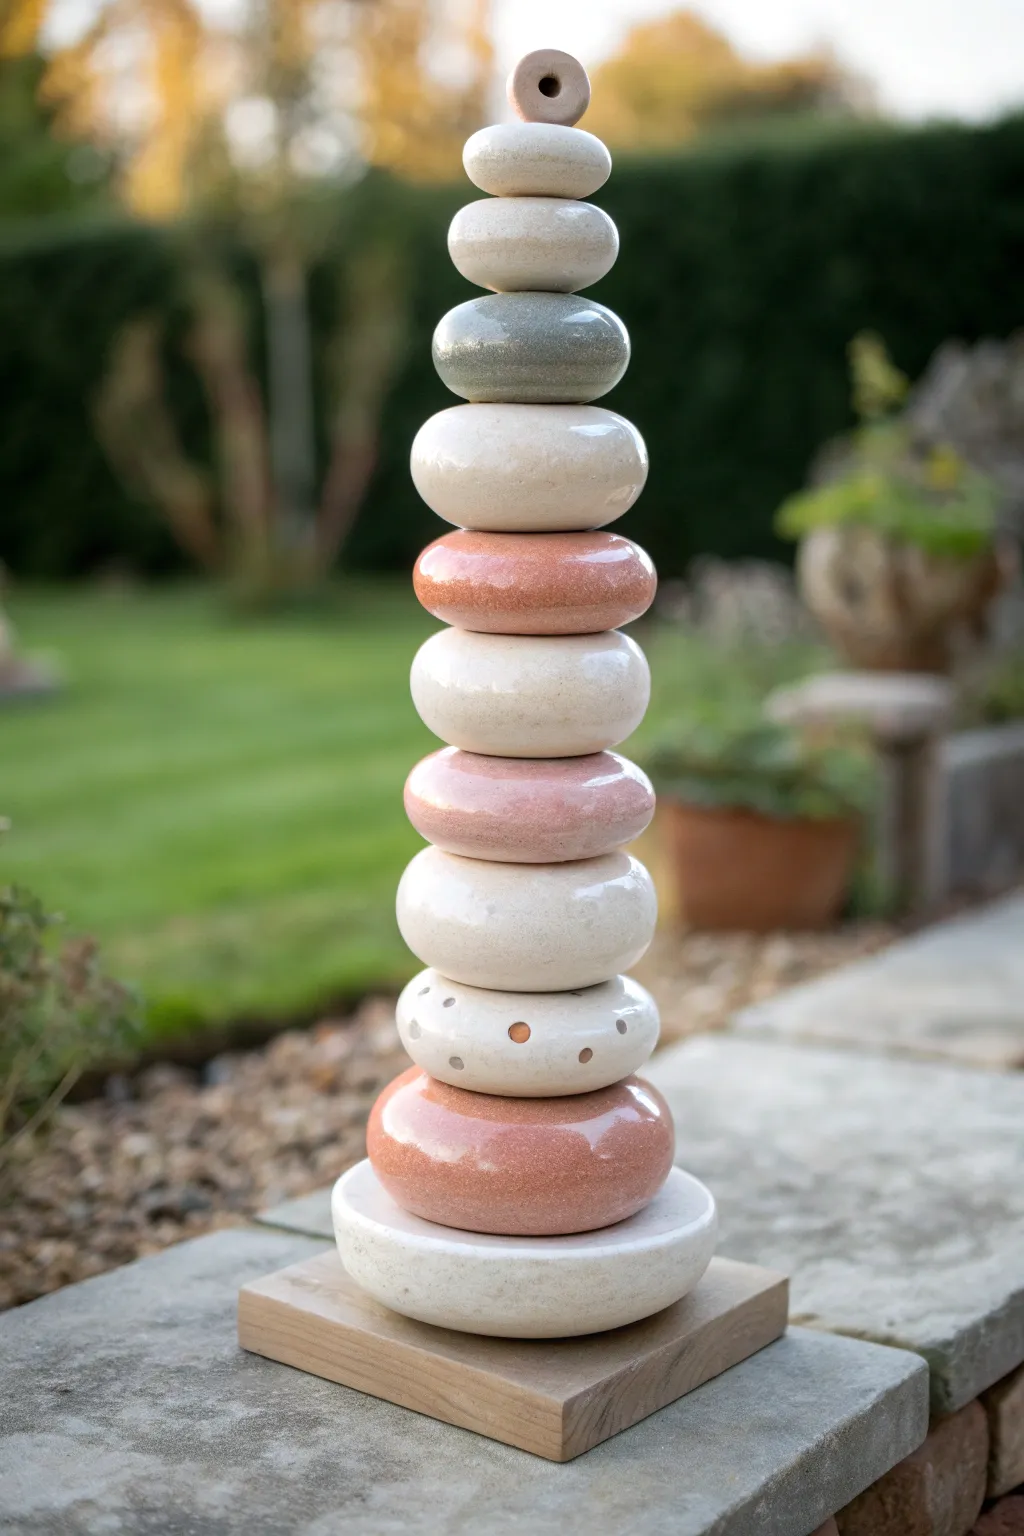
Ombre Glaze Gradient Totem
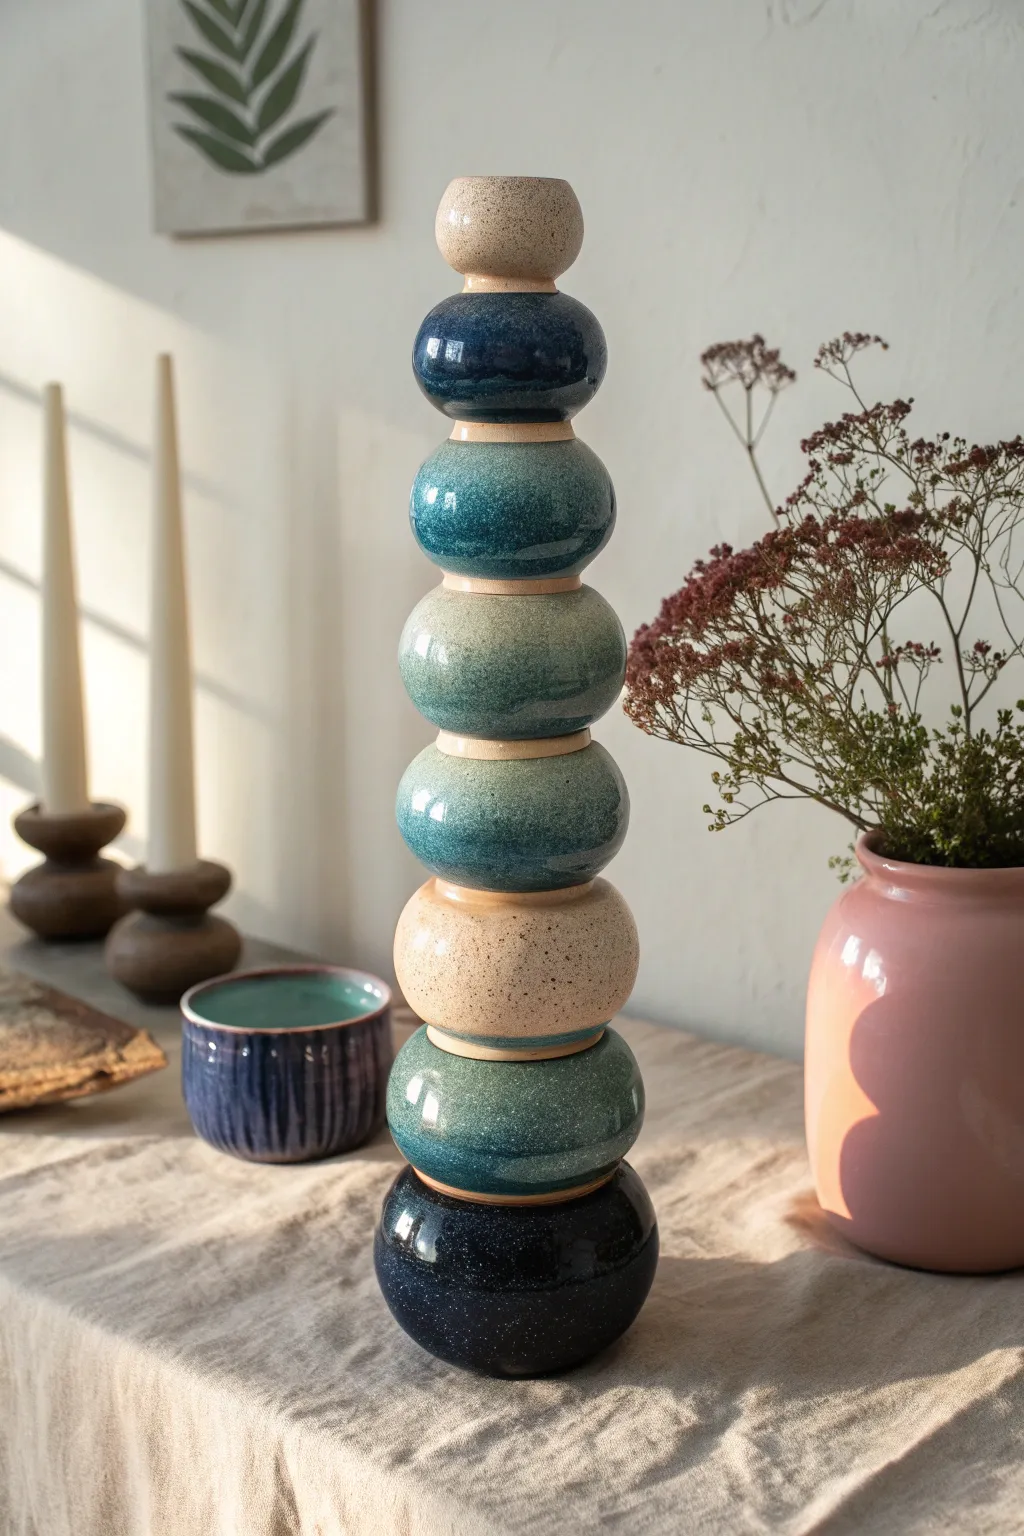
This elegant ceramic totem features a series of stacked, rounded forms that transition beautifully through an ombre glaze gradient from deep navy to sandy beige. The sculptural piece creates a stunning vertical focal point, blending organic shapes with a sophisticated, glossy finish.
Step-by-Step Guide
Materials
- Stoneware clay (smooth body recommended)
- Pottery wheel (or coil building supplies if hand-building)
- Throwing tools (sponge, needle tool, rib, wire cutter)
- Calipers for measuring
- Metal or wooden dowel (optional, for internal structure)
- High-fire glazes: Deep Navy, Teal Blue, Sage Green, Sandy Beige
- Wax resist
- Kiln
- Strong epoxy adhesive (if not using a central rod)
Step 1: Forming the Segments
-
Prepare your clay:
Wedge your stoneware clay thoroughly to remove air bubbles. You will need to prepare 8 separate balls of clay, ranging slightly in size if you want a tapered look, though most segments in this totem are roughly consistent in volume. -
Throw the base segment:
Center your first ball of clay on the wheel. Open it up and throw a closed-form spheroid (a squashed sphere). Aim for a shape that is wider than it is tall, with a flattened top and bottom for stacking stability. -
Refine the shape:
Use a metal rib to smooth the exterior and refine the curve. The bottom segment should be the widest and most stable, acting as the foundation. -
Create the connection points:
Flatten the top rim of the sphere slightly. If you plan to use a central rod for stability, pierce a clean hole through the top and bottom center of the form while it is still on the wheel. -
Throw the middle segments:
Repeat the process for the next 6 segments. These should be similar oblate spheroid shapes. Use calipers to ensure the width of each piece creates a pleasing silhouette when stacked. I like to vary the height slightly to keep it organic. -
Create the top finial:
For the very top piece, throw a form that resembles a small, rounded cup or bud vase rather than a closed sphere. This piece should have an open top rim, adding a lighter visual note to the summit. -
Trim the foot rings:
Once the pieces are leather hard, trim the bottoms. Instead of a traditional foot ring, you want a flattened area that will interlock or sit flush with the flattened top of the piece below it. This creates that ‘floating’ look between the glazed sections.
Step 2: Bisque & Glazing
-
Bisque fire:
Allow all 8 pieces to bone dry completely. Uneven drying can cause warping, which ruins the stacking ability, so dry them slowly. Bisque fire them according to your clay body’s specifications. -
Plan the gradient:
Arrange your bisque-fired pieces in their final order. Map out your glaze plan: the bottom piece will be the darkest navy, transitioning up to teal, sage, and finally a sandy beige at the top. -
Mask the connections:
Apply wax resist to the flattened stacking surfaces (the very top and bottom of each sphere) where they will touch. This leaves a raw clay band visible between segments, mirroring the natural aesthetic in the photo. -
Glaze the bottom sections:
Dip or brush the bottom two segments with your Deep Navy glaze. For the second piece from the bottom, you might overlap a little Teal Blue to start the transition. -
apply mid-tone glazes:
Glaze the middle three segments using your Teal Blue and Sage Green glazes. You can layer these slightly or mix them to create a softer gradient between the distinct colors. -
Glaze the top sections:
Finish the top three pieces with the Sandy Beige glaze. Allow the natural speckle of the clay to show through if using a transparent beige, or use a speckled glaze to achieve the texture seen in the reference. -
Glaze fire:
Load the kiln carefully, ensuring none of the pieces touch. Fire to the maturity temperature of your clay and glazes (typically Cone 6 or 10).
Wobbly Stack?
If your fired pieces don’t sit flat, wet-sand the contact points on a flat surface using varying grits of sandpaper until they lock together seamlessly without rocking.
Step 3: Assembly
-
Test fit the stack:
Once cooled, stack your pieces to check the fit. If any bottoms are wobbly, use a diamond sanding pad to grind them flat. -
Permanent assembly:
If you created holes for a rod, thread them onto a metal rod secured to a heavy base. If you kept them solid, use a strong two-part epoxy. Apply adhesive to the unglazed contact rings and press firmly. -
Final cure:
Let the adhesive cure fully for 24 hours before moving the totem to its final display location.
Level Up: Texture
Add subtle texture to the beige glaze sections by gently spattering iron oxide wash over the raw glaze before firing for an organic, speckled eggshell effect.
Now you have a striking, architectural centerpiece that brings a calm, artistic presence to any room
Rustic Earth-Tone Garden Totem
Bring a sense of Zen balance to your garden with this faux-stone totem crafted entirely from clay. By mixing different clay bodies and texturing them naturally, you can create a permanent, durable sculpture that mimics the meditative look of stacked river rocks without the precarious wobble.
Step-by-Step
Materials
- Stoneware clay (buff or speckled)
- Terra cotta clay (for red variation)
- Heavy grit grog or sand
- Thick wooden dowel or metal rod (for internal support)
- Fettling knife
- Old toothbrush or wire brush
- Large sponge
- Wooden paddle
- Needle tool
- Concrete slab or flat stone (for the base)
- High-strength epoxy or constructive adhesive
Step 1: Preparation & Clay Mixing
-
Prepare your workspace:
Set up on a sturdy canvas-covered board. Since you will be making multiple heavy stones, having ample space is crucial. -
Texture your clay bodies:
To achieve that realistic, weathered rock look, wedge a generous amount of heavy grit grog or coarse sand into half of your buff clay. This will create pockmarks and rough patches later. -
Create a marbled mix:
Take a portion of the buff clay and a smaller portion of terra cotta. Wedge them together loosely. Stop before they are fully blended to maintain streaks of red and tan, which will mimic natural sedimentation. -
Wedging the solids:
Prepare separate balls of pure terra cotta and pure buff clay. Wedging well ensures there are no air bubbles, which is vital for thick forms that will be fired.
Natural Texture Hack
Before drying, roll your clay stones gently over a patch of concrete or rough gravel. This imprints real stone texture into the clay surface instantly.
Step 2: Forming the Stones
-
Shape the base stone:
Start with your largest ball of clay (mix or solid color). Drop it onto your table to flatten the bottom. Use a wooden paddle to gently beat the sides into a rounded, organic boulder shape. It doesn’t need to be perfectly symmetrical. -
Create the support channel:
Since these stones are stacked permanently, use a hole cutter or a dowel roughly the same size as your final support rod to pierce vertically through the center of the base stone. -
Form the middle stones:
Repeat the shaping process for the next 4-5 stones, gradually decreasing the size of each clay ball. Alternate between your buff, terra cotta, and marbled clay bodies to create visual contrast. -
Flatten contact points:
Gently press the stones onto the table or against each other (with a piece of paper in between to prevent sticking) to ensure they sit flush. The stacking points should be stable. -
Make the capstones:
Form the smallest 2-3 pebbles for the very top. These do not necessarily need a hole all the way throug, but creating a partial hole underneath helps them sit securely on the rod.
Step 3: Texturing & Refining
-
Distress the surface:
Take your old toothbrush or wire brush and stipple the surface of the leather-hard stones. I find that being a bit aggressive here makes the ‘rock’ look much more convincing. -
Add deep pitting:
Use a needle tool or the back of a paintbrush to poke larger, random holes into the surface, particularly on the lighter-colored stones to mimic porous limestone. -
Smooth the edges:
River rocks are worn smooth by water. Use a damp sponge to soften any sharp ridges created during the texturing process, leaving the deep pits intact but smoothing the ‘skin’ of the clay. -
Dry completely:
Allow all clay pieces to dry slowly under plastic for at least a week. Because they are thick, rushing this step can cause cracking. -
Bisque fire:
Fire the pieces to bisque temperature (usually Cone 04). Since we want a raw stone look, you likely won’t glaze these, or perhaps only use a matte wash. -
High fire:
Fire to the maturity temperature of your clay body (e.g., Cone 5, 6, or 10) to make the stoneware vitrified and frost-proof for outdoor use.
Troubleshooting: Wobble
If stones wobble on the rod, the holes may be too wide. Wrap the internal rod with silicone tape or inject silicone sealant into the gap for a snug fit.
Step 4: Assembly
-
Prepare the base:
Select a heavy, flat stone or concrete paver for your foundation. Secure your metal rod or dowel vertically onto this base using strong construction adhesive. -
Stack and glue:
Thread the fired clay stones onto the rod one by one. Apply a ring of epoxy or outdoor-safe adhesive between each stone to prevent spinning or rattling. -
Final capstone:
Place the top-most small stone, which covers the tip of the rod, and secure it nicely with adhesive to seal the totem.
Place your finished totem near tall grasses or a quiet corner of the garden to enjoy a permanent sense of calm
Whimsical Face Bead Totem
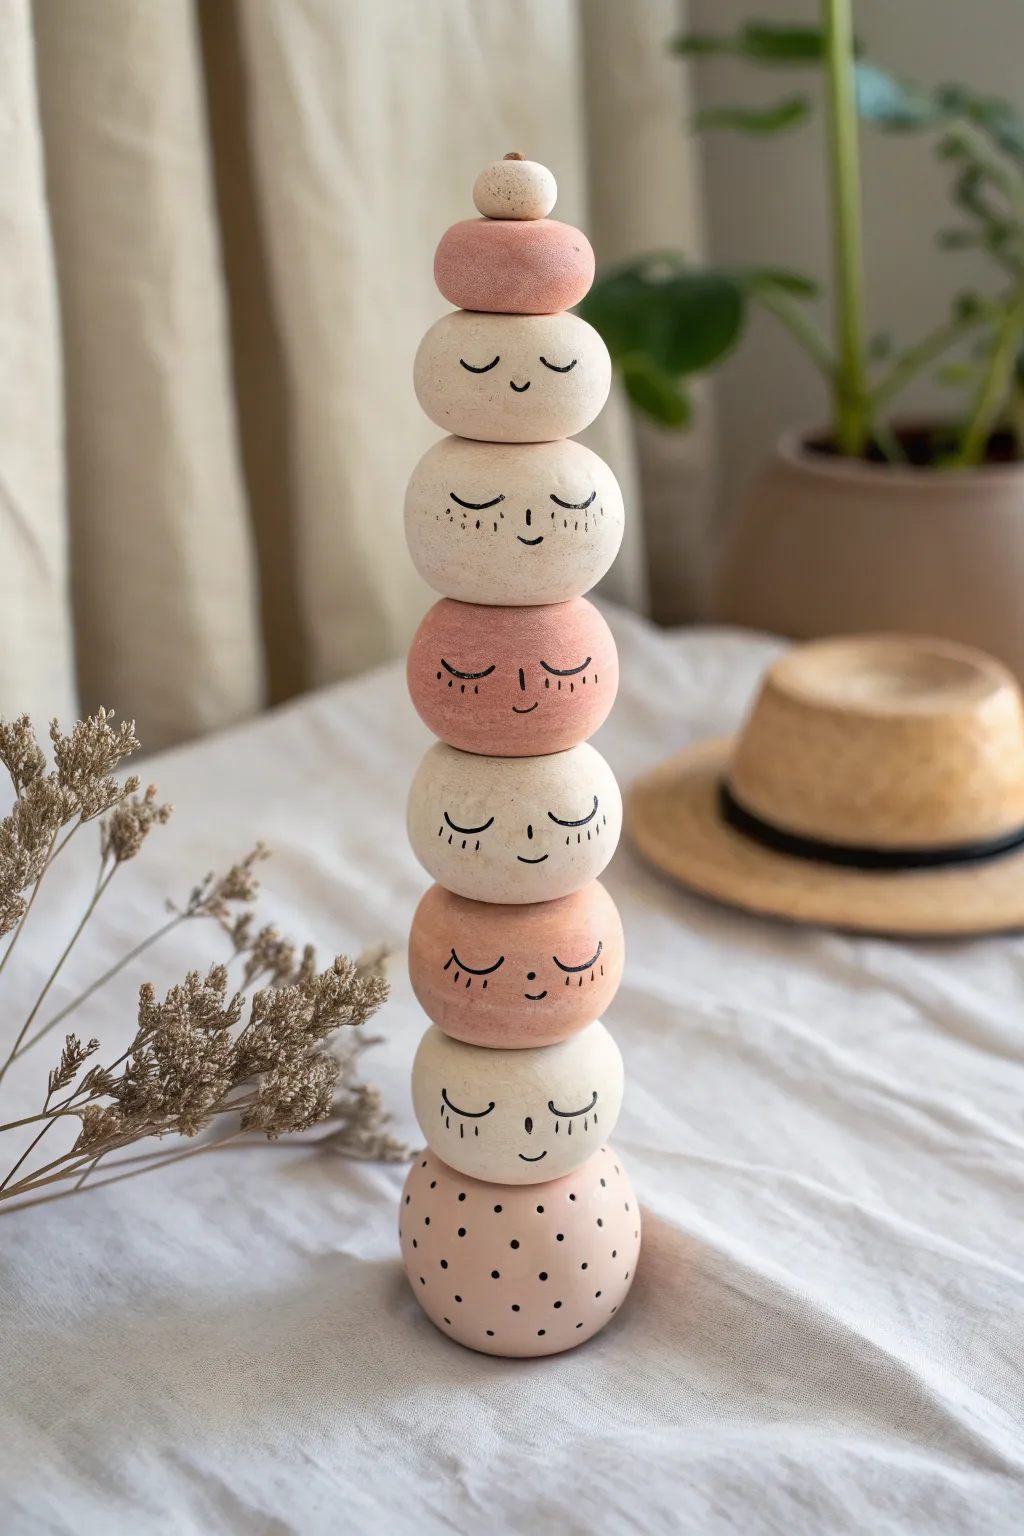
This charming, stacked sculpture features a procession of serene, sleeping faces ascending in size. With its soft, earthy palette of creams and dusty blush pinks, this totem brings a peaceful and whimsical element to any shelf or table setting.
How-To Guide
Materials
- Air-dry clay (white or light cream)
- Acrylic paints (cream/off-white, dusty rose/blush pink, black)
- Wooden skewer or strong metal wire (for the core)
- Fine-grit sandpaper
- Small round paintbrush
- super fine detail brush or black micropen
- Matte sealant spray or varnish
- Rolling pin
- Water and sponge for smoothing
Step 1: Shaping the Beads
-
Plan your stack:
Visualize the totem’s structure. You will need a large base bead, followed by about five to six face beads that decrease slightly in size as you go up, and finally two small cap pieces for the top. -
Form the base:
Start with a large ball of clay for the base. Roll it smooth between your palms, then gently flatten the bottom so it stands independently. It should be a rounded, slightly squat oval shape. -
Create the face beads:
Roll approximately five or six additional balls of clay. These should be roughly similar in shape—rounded but slightly flattened like a thick button or a rock. Make them graduate in size from larger at the bottom to smaller at the top. -
Shape the unique top pieces:
For the very top, create a flat, disc-like shape (like a beret) and a small, final bead to sit as the crown. These don’t need faces. -
Create the vertical channel:
While the clay is still wet, carefully pierce each bead vertically through the center using your skewer or wire. Rotate the skewer gently to ensure the hole is clean and won’t snag later. -
Smooth and perfect:
Dip your finger or a slightly damp sponge into water and smooth out any fingerprints or cracks on the surface of your beads. The smoother the clay now, the better the painted finish will look.
Wobbly stack?
If beads spin or don’t sit straight, add a tiny dab of clear craft glue between each bead during final assembly to permanently secure their rotation.
Step 2: Drying and Refining
-
Allow to dry completely:
Let all pieces air dry on a clean, flat surface. Depending on humidity and bead thickness, this usually takes 24-48 hours. Turn them occasionally to ensure even drying. -
Sand for texture:
Once fully dry, use fine-grit sandpaper to buff away any rough focal points or sharp edges around the holes. The goal is a stone-like, matte finish.
Step 3: Painting and Assembly
-
Base coat colors:
Select which beads will be cream and which will be blush pink. Paint the base bead pink. Alternate the colors for the face beads as you move up the stack (e.g., cream, pink, cream, pink). Paint the top ‘hat’ pink and the final crown bead cream. -
Apply a second coat:
Allow the first layer to dry, then apply a second coat if the clay is still showing through unevenly. I prefer a chalky, matte look, so avoid glossy paints here. -
Paint the dots:
On the large bottom base bead, use a small round brush or the back of a paintbrush handle dipped in black paint to stamp small, random polka dots all around the surface. -
Draw the faces:
Using a super fine detail brush or a black micropen, carefully draw the sleeping faces on the beads. Draw two curved ‘U’ shapes for closed eyes each with three small lashes, a tiny dot for a nose, and a simple curve for a smile. -
Add blush details:
For an extra cute touch, you can create faux freckles or rosy cheeks on the cream beads by lightly stippling diluted pink paint near the eyes. -
Seal the work:
Spray the beads with a matte sealant to protect the paint without adding unwanted shine. Let this dry completely. -
Assemble the totem:
Insert your skewer or wire through the base bead. Thread the face beads on in your size-graduated order, ensuring the faces align forward. Top with the hat piece and the final crown bead.
Level Up: Texture
Mix a small amount of baking soda into your acrylic paint before applying. This creates a realistic, grainy terracotta or stone texture on the surface.
Place your serene totem in a sunny spot to enjoy its calming presence
Spiral Coil Totem With Twists
Embrace organic forms with this striking ceramic totem, featuring a smooth, glazed inner cylinder embraced by a raw, textured clay coil. The contrast between the sleek, mint-green core and the rugged, unglazed spiral creates a mesmerizing sculptural effect perfect for modern interiors.
Step-by-Step Guide
Materials
- White stoneware or porcelain clay body (grogged for texture)
- Rolling pin or slab roller
- Extruder (optional, for the coil) or table surface for hand-rolling
- Slip and scoring tool
- Cylindrical form or wide dowel (for support during construction)
- Mint green/teal underglaze or glaze
- Sponge and water
- Fettling knife
- Wooden modeling tool
- Kiln
Step 1: Creating the Core Cylinder
-
Roll the slab:
Start by rolling out a smooth slab of clay to approximately 1/4 inch thickness. Ensure it is long enough to form the height of your desired totem and wide enough to wrap around your forming tool. -
Cut to size:
Using a straight edge and a fettling knife, cut a clean rectangle from your slab. The height determines the totem’s stature, while the width should be just enough to form a tube about 2-3 inches in diameter. -
Form the tube:
Wrap the slab around a cylindrical mold (like a PVC pipe wrapped in newspaper) to create the inner tube. Score and slip the connecting edges thoroughly to ensure a strong seam. -
Smooth the seam:
Use a wooden modeling tool or your fingers to blend the seam inside and out until it is invisible. This inner cylinder needs to be as smooth and perfect as possible. -
Create the base:
Cut a circular disc of clay slightly larger than the cylinder’s diameter. Score and slip the bottom of your tube and attach it firmly to this disc to close the bottom.
Coil Slumping?
If the heavy coil starts sliding down the wet cylinder, use small balls of paper or foam tucked between the gaps as temporary support until the clay stiffens.
Step 2: Forming the Textured Spiral
-
Make the coil:
Roll out a very long, thick snake of clay. You want this coil to be substantial—about 3/4 inch to 1 inch thick. I find hand-rolling on canvas adds a nice natural texture compared to an extruder. -
Texture the coil:
If your clay is smooth, gently roll the coil over a textured surface or dab it with a coarse sponge to give it that stone-like, gritty appearance seen in the photo. -
Begin the wrap:
Start at the very bottom of your cylinder. Score a line around the base where the coil will sit. Attach the start of the coil firmly to the base disc. -
Spiral upwards:
Wind the coil upward around the cylinder. Leave a gap between each loop of the coil so the inner cylinder remains visible. Use a little slip at contact points to tack it in place, but don’t blend the coil fully into the wall. -
Finish the top:
Continue winding until you reach the top rim. Cut the coil flush with the top of the cylinder and smooth the end so it looks intentional and unified.
Step 3: Finishing and Glazing
-
Dry slowly:
Because the coil is thick and the wall is thin, cover the piece loosely with plastic to let it dry very slowly. This prevents the coil from cracking away from the core. -
Bisque fire:
Once bone dry, fire the piece to bisque temperature designated for your clay body. -
Wax the coil:
Apply wax resist carefully to the entire outer spiral coil. We want this to remain raw and unglazed to highlight the texture. -
Apply glaze:
Brush or pour a satin mint-green glaze onto the inner cylinder. The wax on the coil will help keep the glaze only on the recessed parts, but wipe away any stray drips with a damp geometric sponge. -
Glaze the base:
Apply a complementary green glaze to the flat base disc if desired, or keep it consistent with the inner core. -
Final Fire:
Fire the piece again to glaze temperature. The contrast between the shiny green core and the matte, sandy coil will pop beautifully once cooled.
Level Up Designs
Make it a functional vase by ensuring the inner seal is watertight, or try using a dark stoneware for the coil to create high-contrast drama against a white core.
Place your finished totem near a light source to let the spiral shadows play across the surface
Lantern Segment Light-and-Shadow Totem
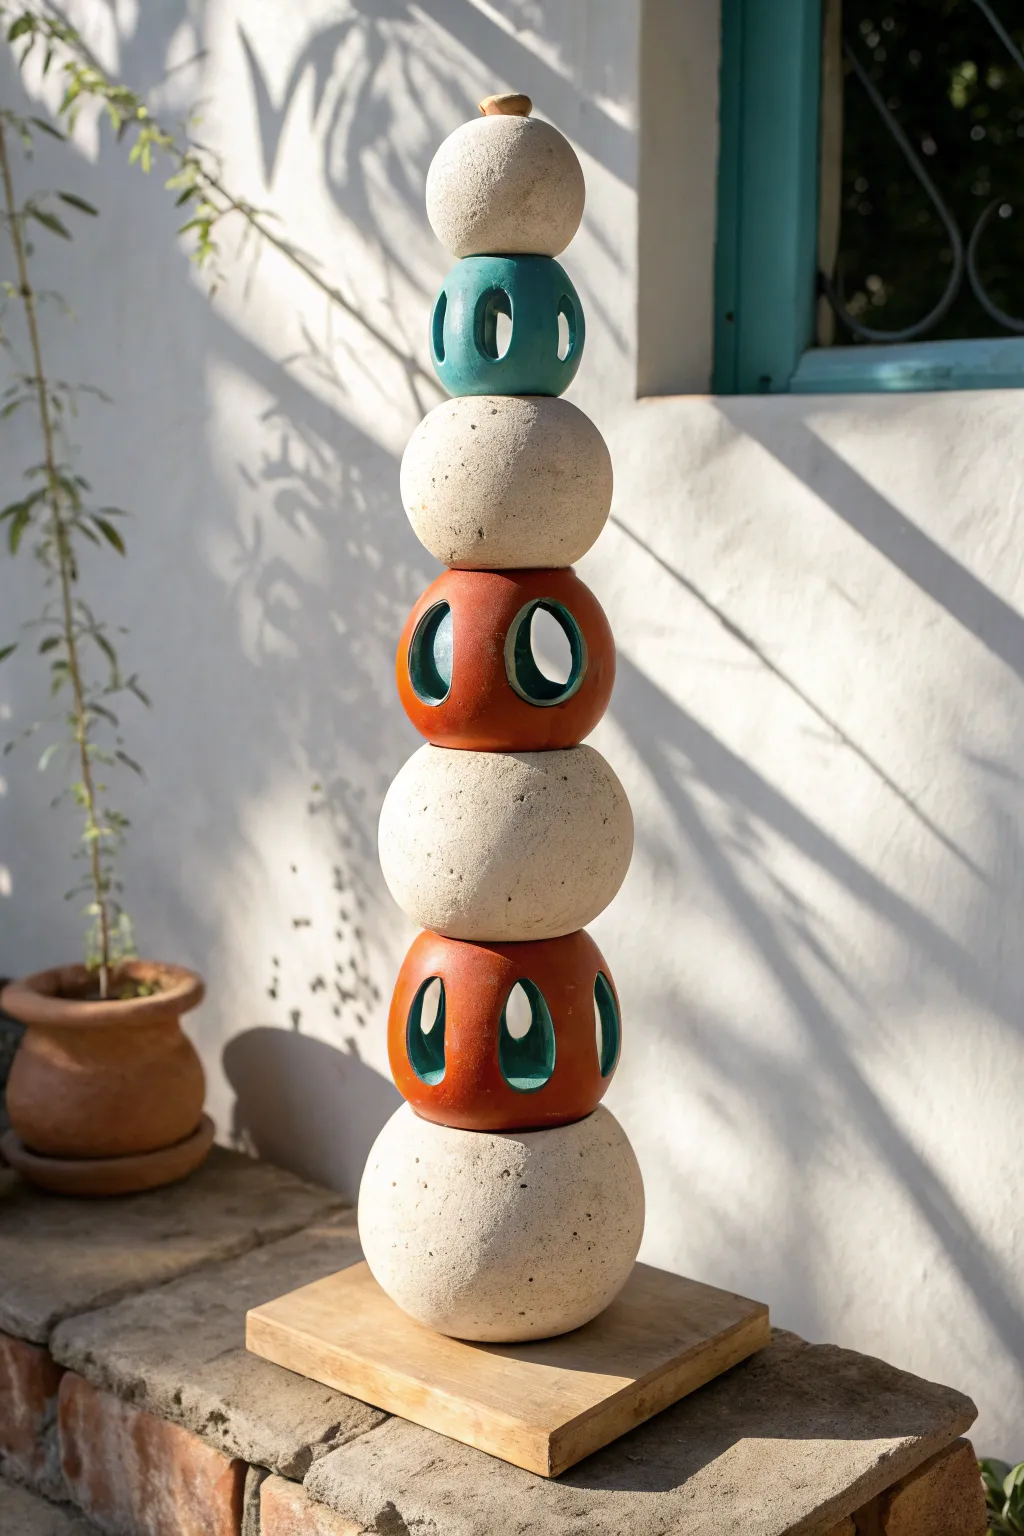
This striking totem combines the raw, earthen beauty of stoneware spheres with intricately carved lantern segments that catch the light beautifully. The alternating rhythm of solid, speckled orbs and hollow, glazed tiers creates a mesmerizing vertical sculpture for any garden or patio.
Detailed Instructions
Materials
- White or speckled stoneware clay (approx. 10-15 lbs)
- Red earthenware or terracotta clay (approx. 5-8 lbs)
- Pottery wheel (or coil building supplies)
- Circle cutter or sharp fettling knife
- Teal or turquoise glaze (cone 04-06 compatible)
- Clear matte glaze (optional)
- Metal or wooden ribs for smoothing
- Thick wooden dowel or PVC pipe (for center hole alignment)
- Sponge and bucket of water
- Wooden base for display
- Internal support rod (metal or wood)
Step 1: Shaping the Foundation Spheres
-
Prepare the speckled clay:
Start by wedging your white or speckled stoneware clay thoroughly to remove air bubbles. Divide the clay into massive balls for the solid segments: you will need one large base sphere (approx. 8 inches), one medium (6 inches), one small (4 inches), and a tiny topper. -
Form the base sphere:
Using either a coil-building technique or throwing two hemispheres on the wheel and joining them, create the large bottom sphere. It needs to be hollow but thick-walled (about 1/2 inch) to support the weight above. -
Texture the surface:
While the clay is leather hard, use a serrated rib or a rough sponge to enhance the natural, stony texture. I like to gently tap the surface with a wooden paddle to remove perfect spherical symmetry, giving it a more organic, stone-like feel. -
Create the upper spheres:
Repeat the forming process for the middle and upper stoneware spheres, scaling down the size as you go. Ensure the walls are consistent. -
Drill the central channel:
Once leather hard, carefully cut a hole through the exact vertical center of each sphere using your dowel or hole cutter. This channel is crucial for the final assembly rod.
Wobbly Stack?
If pieces rock when stacked, use small discs of felt or rubber washers between tiers. This adds grip and compensates for uneven shrinkage during firing.
Step 2: Crafting the Lantern Tiers
-
Throw the lantern forms:
Switch to your red earthenware or terracotta clay. Throw or coil three enclosed forms that are slightly flatter than spheres—think of a rounded donut or compressed pumpkin shape. -
Refine the shape:
Smooth the exterior with a metal rib to get a clean finish. These contrasting segments should be smoother than the stone-like spheres. -
Sketch the cutouts:
Lightly trace oval shapes around the circumference of your terracotta forms. Aim for three to four evenly spaced openings per tier. -
Carve the openings:
Using a sharp fettling knife, carefully cut out the oval windows. Be mindful of the clay’s moisture; if it’s too wet, the form will slump, so wait for a solid leather-hard stage. -
Refine the edges:
Use a damp sponge or a chamois cloth to smooth the cut edges of the windows. Sharp, ragged edges can chip easily after firing. -
Create the top nesting divots:
Gently press the curve of the corresponding stoneware sphere into the top of the lantern piece beneath it. This ensures they stack snugly without wobbling. -
Add central holes:
Just like the spheres, cut a central vertical hole through each lantern segment to accommodate the support rod.
Step 3: Glazing and Assembly
-
Bisque fire:
Let all pieces dry very slowly to prevent cracking, especially the large base sphere. Fire them to the appropriate bisque temperature for your clay bodies. -
Apply the turquoise glaze:
For the terracotta lantern segments, apply a bright teal or turquoise glaze. I prefer pouring the glaze inside the hollow form and swirling it to coat the interior, then brushing the exterior to highlight the window edges. -
Leaving stoneware bare:
Leave the white/speckled spheres unglazed to maintain that raw stone look. If you want protection, apply a very thin coat of clear matte glaze, but bare clay offers the best textural contrast. -
Glaze fire:
Fire all pieces again to the glaze temperature. Make sure to wipe any glaze off the contact points (top and bottom) of each piece so they don’t fuse to your kiln shelves. -
Prepare the base:
Drill a hole into your wooden base platform and insert your metal or wooden support rod securely. -
Stack the totem:
Begin assembly by sliding the largest stoneware sphere onto the rod, followed by the largest terracotta lantern. Continue alternating materials and decreasing sizes as you build upward. -
Secure the topper:
Place the final tiny stoneware cap on the very top. You can use a strong epoxy adhesive to secure this final piece if the rod doesn’t extend all the way through.
Illuminated Core
Use a hollow metal tube as your central rod and thread weather-resistant LED wire lights through it to make the lantern sections actually glow at night.
Step back and admire how the shadows play through the turquoise windows of your new garden centerpiece
Story Totem With Symbol Beads
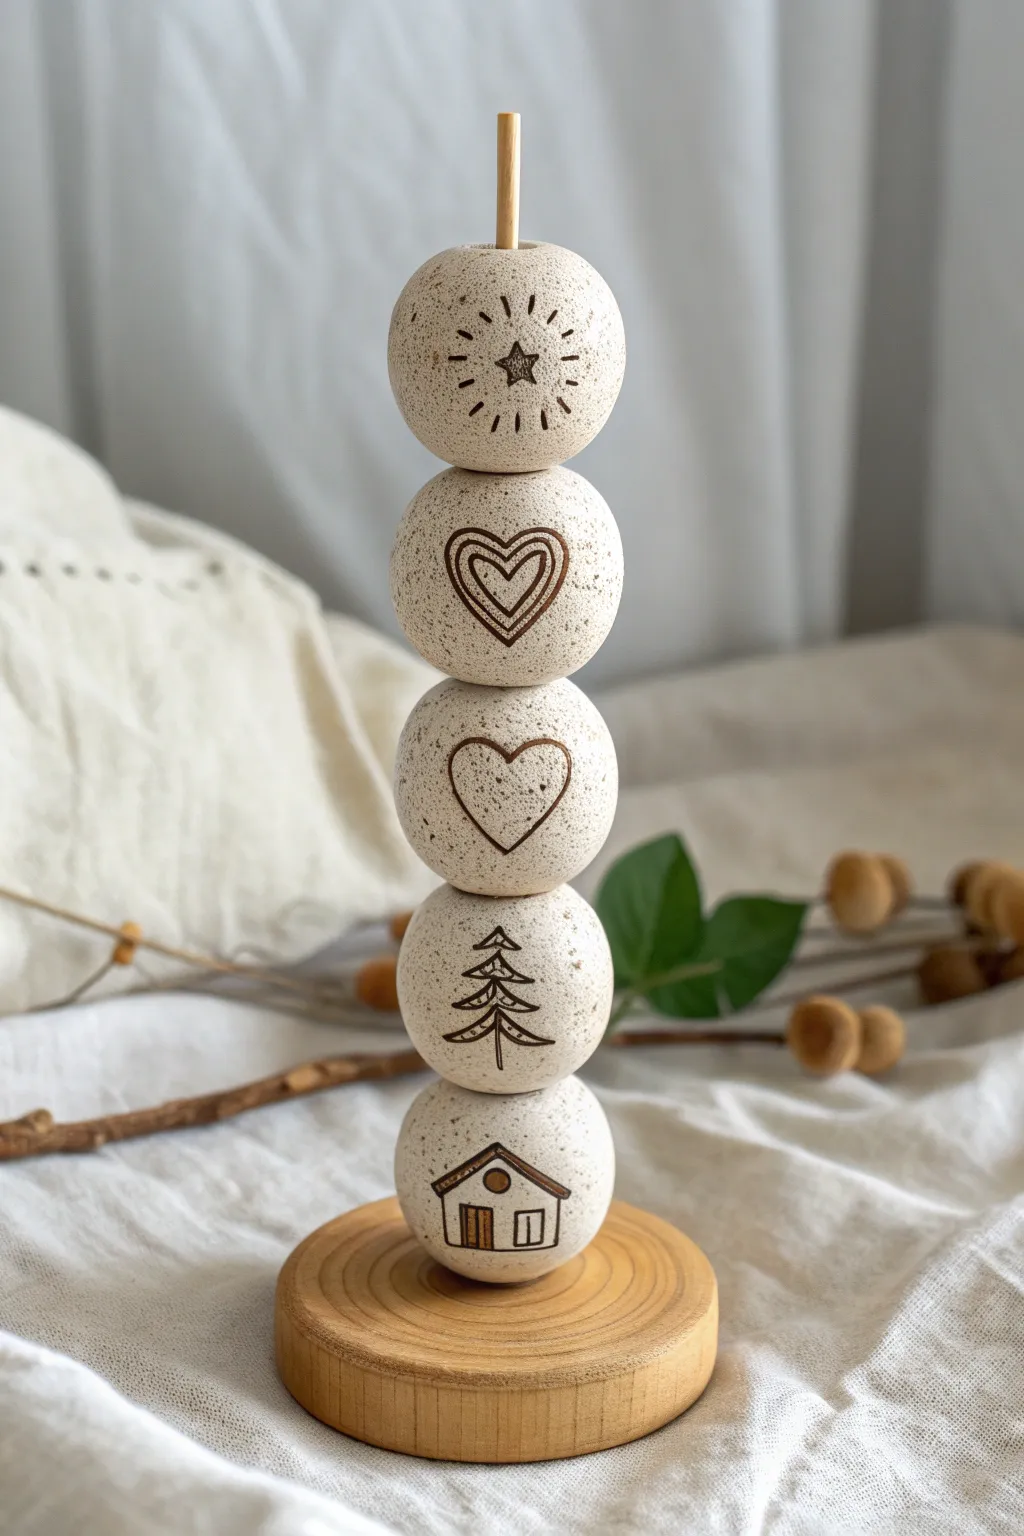
Create a meaningful keepsake or seasonal decoration with this charming clay totem featuring rustic, hand-carved symbols. Using speckled clay and a simple stacking method, this project combines minimalist design with personal storytelling through iconography.
How-To Guide
Materials
- Speckled white polymer clay (e.g., granite or stone effect)
- Wooden dowel (sized to fit your desired bead hole)
- Round wooden base plaque or coaster
- Carving needle tool or toothpick
- Brown acrylic paint
- Small paintbrush or sponge
- Paper towels or wet wipes
- Baking sheet
- Oven
- Wood glue or super glue
- Sandpaper (fine grit)
Step 1: Shaping the Beads
-
Condition the Clay:
Begin by warming up your speckled polymer clay in your hands until it becomes soft and malleable. This prevents cracks from forming later. -
Portion the Clay:
Divide your clay into five equal portions. You can use a kitchen scale for precision, or just eyeball it to ensure uniformity. -
Roll Spheres:
Roll each portion between your palms to create a smooth, tight sphere. Try to eliminate any seams or air bubbles as you work. -
Create the Holes:
Using your wooden dowel or a tool of similar thickness, pierce a hole straight through the center of each sphere. I find it helps to twist the tool gently as you push through to keep the shape round. -
Test the Fit:
Slide one bead onto your dowel to ensure it moves freely but isn’t too loose. Adjust the hole size if necessary.
Clean Lines Tip
If your carving tool is dragging clay and creating burrs, dip the tip of the needle in water (or cornstarch) before making your cuts for a cleaner line.
Step 2: Carving the Designs
-
Sunburst Bead:
On the first bead, use your needle tool to carve a small star in the center. Surround it with radiating dashes to create a sunburst effect. -
Double Heart Bead:
For the second bead, carve a large heart outline, and then carefully carve a smaller heart inside it, mirroring the shape. -
Single Heart Bead:
On the third bead, carve a simple, singular heart. Keep your lines deep enough to hold paint later. -
Evergreen Tree Bead:
Carve a stylized pine tree on the fourth bead. Start with a vertical trunk line and add triangular branches extending downwards. -
House Bead:
For the bottom bead, carve a small house shape with a pitched roof, a door, and a tiny circular window. -
Smoothing:
Check all beads for rough edges created by the carving tool. Gently smooth them down with your finger without erasing the design.
Seasonal Switch-Up
Make extra beads with different seasonal symbols like pumpkins, flowers, or snowflakes. You can swap out the middle beads to match the current holiday.
Step 3: Baking and Antiquing
-
Bake the Clay:
Place your beads on a baking sheet and bake according to the manufacturer’s instructions for your specific brand of clay. Let them cool completely. -
Apply Paint:
Squeeze out a small amount of brown acrylic paint. Brush it liberally over the carved designs, ensuring the paint gets deep into the grooves. -
Wipe Away Excess:
Before the paint dries completely, use a damp paper towel or wet wipe to clean the surface of the bead. This leaves paint only inside the carved lines, revealing the design. -
Repeat for All Beads:
Repeat this antiquing process for all five beads. If you wipe away too much paint, simply reapply and wipe again.
Step 4: Assembly
-
Prepare the Base:
Take your round wooden base and locate the exact center. Drill a hole that matches the diameter of your dowel rod. -
Secure the Dowel:
Apply a drop of wood glue into the hole in the base. Insert the wooden dowel firmly and ensure it stands perfectly straight while the glue sets. -
Stack the Beads:
Once the base is stable, slide your beads onto the dowel in your chosen order: House at the bottom, followed by the Tree, Single Heart, Double Heart, and Sun at the top. -
Final Trim:
If the dowel is extending too far above the top bead, mark the height and carefully trim the excess wood so just a small amount is visible, or none at all if you prefer a flush look. -
Glue in Place (Optional):
If you want the totem to be permanent, add a tiny dot of super glue between each bead as you stack them. I usually leave them loose so I can rearrange them later.
Set your new story totem on a shelf and enjoy the tactile, rustic charm it adds to your space
Modular Totem With Swappable Toppers
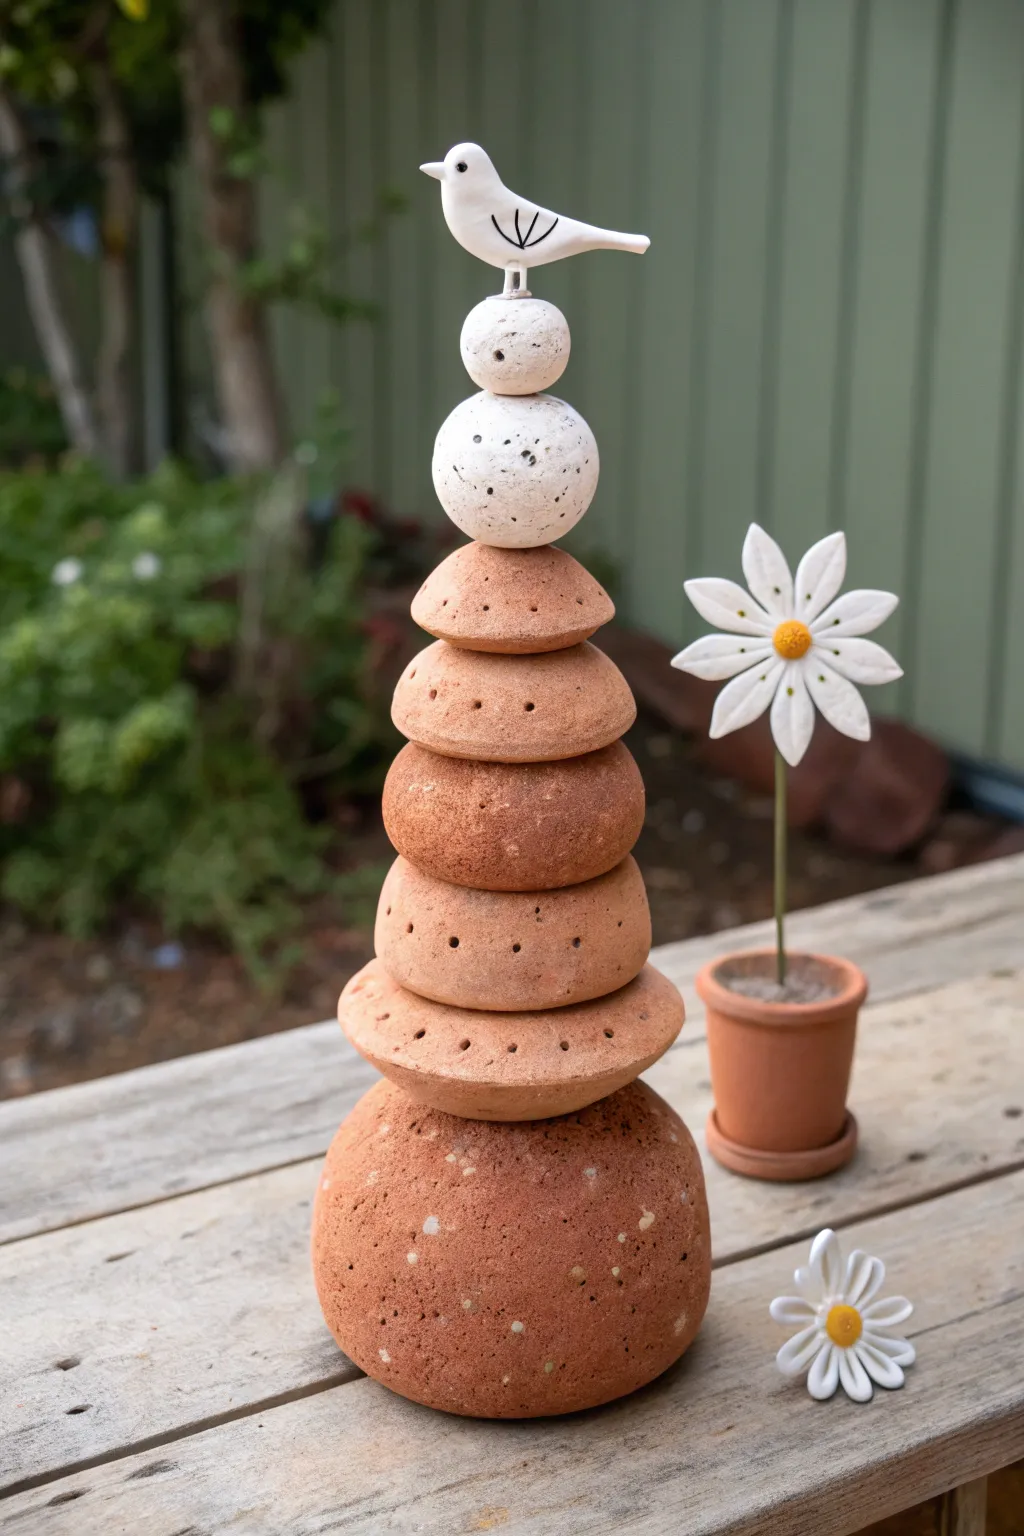
Bring a whimsical touch to your garden or shelf with this modular clay totem featuring earthy terracotta tones and a charming ceramic bird. The stackable design allows for playful rearrangement, while the contrasting white elements add a fresh, modern pop.
Step-by-Step Guide
Materials
- Earthenware clay (terracotta color)
- White stoneware clay or white slip
- Pottery wheel (optional, can be hand-built)
- Wooden dowel or metal rod (for structure)
- Clay carving tools
- Needle tool
- Sponge
- Clear matte glaze (optional)
- Black underglaze or acrylic paint (for bird details)
- Small fine-tip brush
Step 1: Forming the Base Components
-
Create the foundation:
Begin with a large lump of terracotta clay. Form a heavy, rounded mound shape for the bottom-most piece. This needs to be solid and wide enough to support the tower’s weight. Flatten the bottom so it sits flush on a table. -
Pierce the core:
Using a needle tool or a hole cutter, create a vertical channel through the center of the base. This hole must be slightly wider than your dowel rod to account for clay shrinkage during firing. -
Shape the discs:
Roll out or wheel-throw four to five flattened disc shapes of graduating sizes using the terracotta clay. The largest should sit just above the base, getting progressively smaller as you go up. -
Smooth the edges:
Use a damp sponge to round off the rims of your discs. They shouldn’t be sharp; aim for a soft, pebbled look like river stones. -
Drill center holes:
Just like the base, ensure every single disc has a central hole punched through it for the support rod. -
Add decorative perforations:
With a small hole cutter or needle tool, poke random, tiny holes horizontally into the sides of some discs for visual texture. I find this helps break up the solid color and mimics natural erosion.
Wobbly Stack?
If pieces rattle, add rubber washers or small felt pads between the clay stones. This cushions the ceramic and adds grip for stability.
Step 2: Crafting the White Accents & Bird
-
Form the spheres:
Switch to your white clay. Roll two balls, one slightly larger than the other. These will sit near the top of the totem. -
Texture the white stones:
Lightly roll the white spheres on a textured surface or dab them with a coarse sponge to give them a granite-like, porous appearance before piercing their center holes. -
Sculpt the bird body:
Hand-build a simple bird shape using white clay. Pinch a smooth curve for the body and pull a small tail. Keep the form minimalist and stylized. -
Attach the mounting tube:
Instead of a hole through the bird, attach a small clay tube or create a socket underneath its belly that will fit snugly onto the top of your dowel rod. -
Sculpt the flower petals:
If you want to make the matching daisy, form eight teardrop shapes from white clay and flatten them slightly. Arrange them in a circle, joining them at the center. -
Add the flower center:
Score and slip a small ball of terracotta or yellow-stained clay into the center of your petals to complete the daisy.
Step 3: Finishing and Assembly
-
Dry and bisque fire:
Allow all pieces to dry slowly to prevent cracking, especially the thick base. Fire them in a kiln according to your clay body’s specifications. -
Apply bird details:
Once fired, use a fine brush with black underglaze (if re-firing) or acrylic paint to draw the simple wing lines and dot the eye on the bird. -
Glaze (optional):
Depending on if you want a shiny finish, you can dip the white bird and spheres in a clear glaze and re-fire. The terracotta looks best left matte and unglazed for that raw earthen feel. -
Prepare the rod:
Secure your dowel or metal rod into the ground or a heavy separate stand if displaying indoors. Ensure it stands perfectly vertical. -
Stack the tower:
Thread the large terracotta base onto the rod first. Follow with the terracotta discs, largest to smallest. -
Top it off:
Place the two white spheres on next, followed finally by the bird topper. The beauty of this modular system is that you can rotate the irregular stones to find the best balance.
Seasonal Swaps
Make extra toppers! Swap the bird for a clay sun in summer, a ghost in autumn, or a star in winter to keep your garden art fresh year-round.
Step back and admire your custom garden sculpture, rearranging the stones whenever the mood strikes you