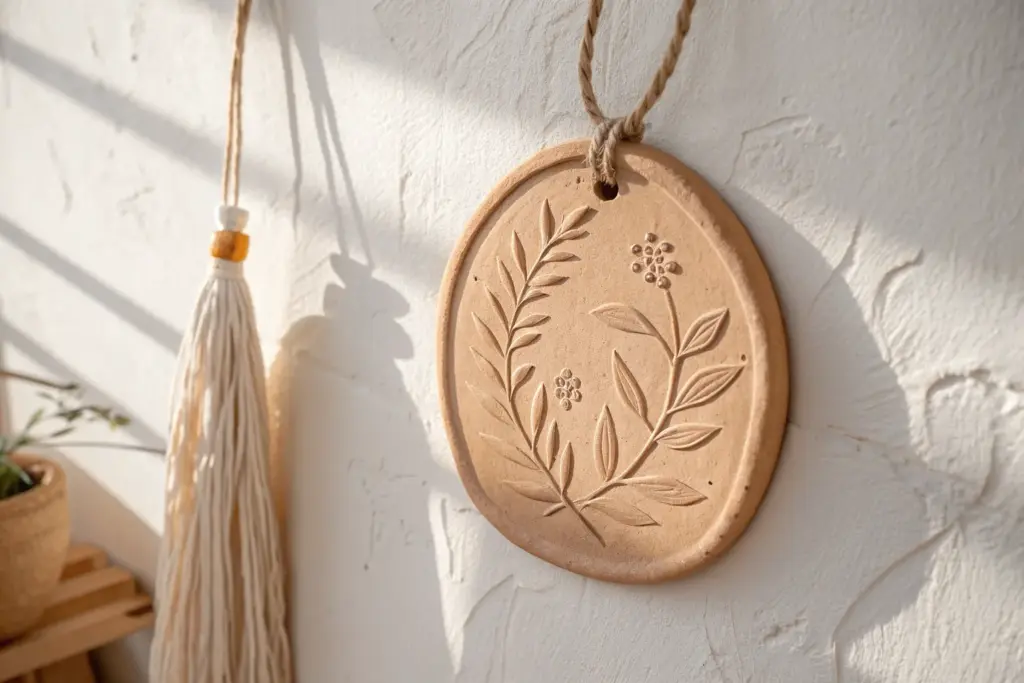
If you’ve ever stared at a blank wall and thought, “This needs something handmade,” clay wall decor is such a satisfying way to fill that space with texture and personality. I love that you can keep it super simple with air-dry clay or go bold with polymer clay colors and playful shapes.
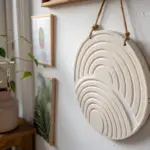
Clay Disc Garland Wall Hanging
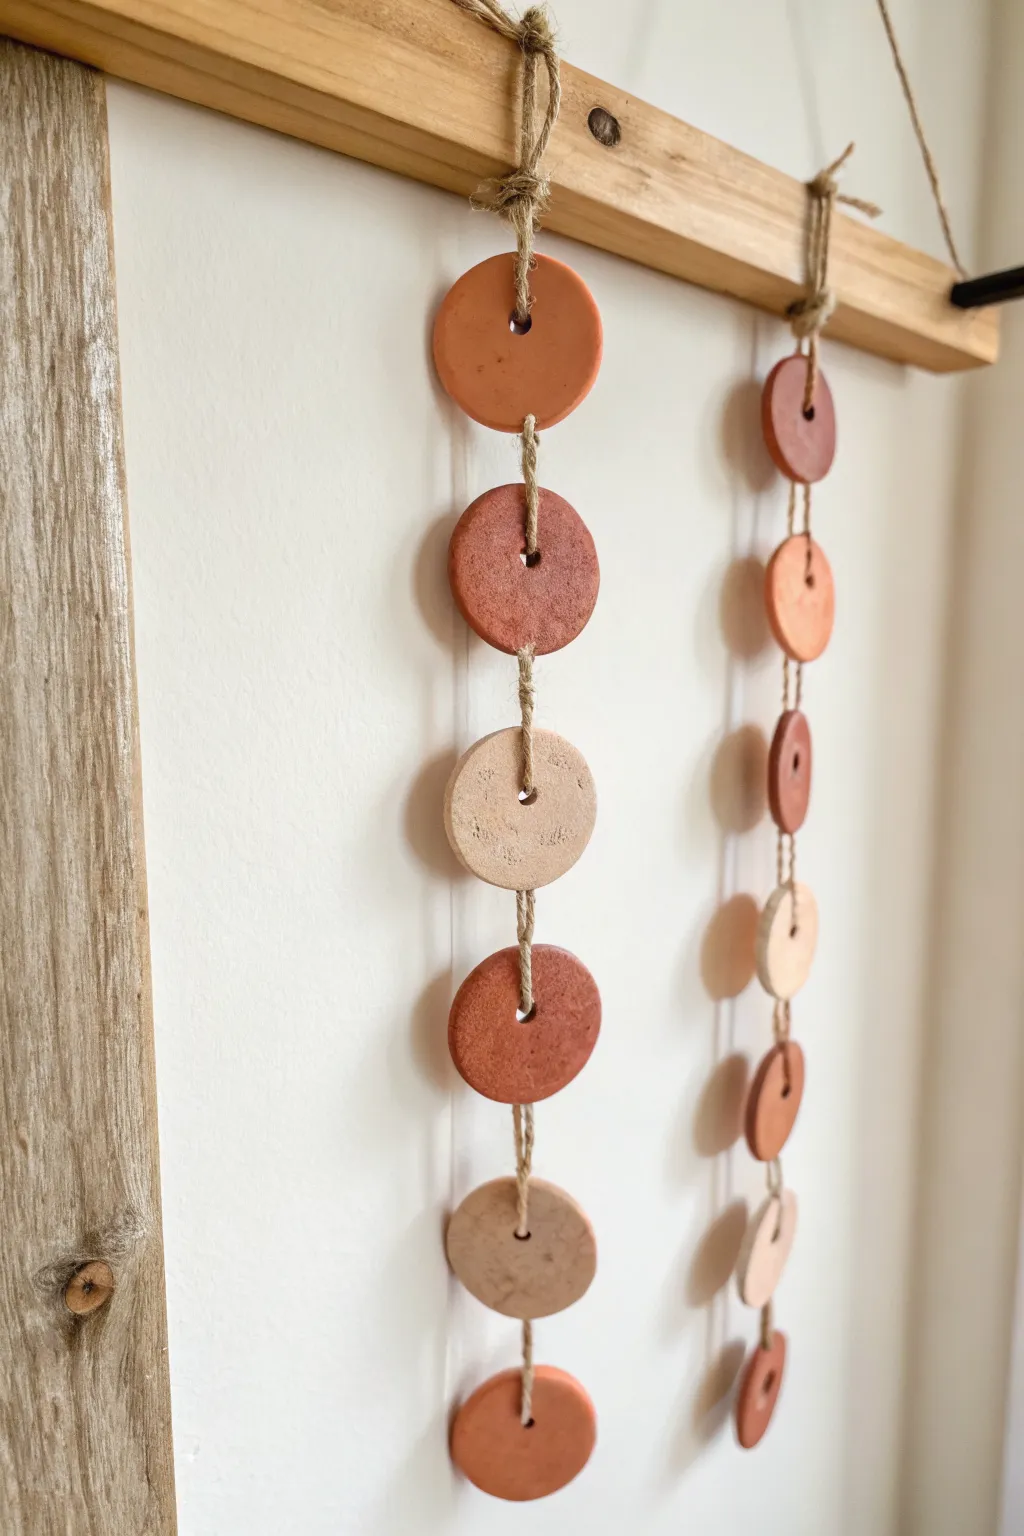
Bring earthy warmth to your walls with this simple yet striking clay garland. Alternating shades of rustic terracotta and sandy beige discs create a soothing rhythm that perfectly complements minimalist or bohemian decor.
Step-by-Step
Materials
- Air-dry clay (terracotta color)
- Air-dry clay (white or beige color)
- Rolling pin
- Circle cookie cutter (approx. 2 inches)
- Small straw or skewer
- Jute twine
- Wooden dowel or flat lath (approx. 12-16 inches)
- Sandpaper (fine grit)
- Scissors
Step 1: Shaping the Clay
-
Prepare your workspace:
Lay down a smooth mat or a sheet of parchment paper to prevent sticking. This ensures the back of your discs remains as smooth as the front. -
Roll out the terracotta clay:
Take a handful of the terracotta-colored air-dry clay and knead it briefly to soften. Roll it out to an even thickness of about 1/4 inch. -
Cut the terracotta circles:
Using your circle cookie cutter, press firmly into the clay to cut out your shapes. For the design shown, you aim for roughly 8-10 terracotta discs. -
Repeat with the lighter clay:
Clean your rolling pin, then repeat the process with the beige or white clay. Roll it to the same 1/4 inch thickness and cut out about 4-6 circles. -
Create the hanging holes:
Take a straw or a skewer and punch a hole directly in the center of each clay circle. Make sure the hole is wide enough for your jute twine to pass through easily. -
Smooth the edges:
Dip your finger in a little water and run it gently around the rim of each circle to smooth down any rough clay burrs left by the cutter. -
Allow to dry:
Lay the discs flat on a wire rack or parchment paper. Let them air dry completely according to the package instructions, often 24-48 hours. I find flipping them halfway through helps them dry flat without warping.
Smooth Surface Secret
To get that super textural yet flat look, gently press a piece of canvas fabric onto the wet clay surface with a rolling pin before cutting your circles.
Step 2: Finishing and Assembly
-
Sand for perfection:
Once fully dry, lightly sand the edges of the discs with fine-grit sandpaper to remove any remaining sharpness or irregularities. -
Cut the suspension cords:
Cut two long lengths of jute twine, each about 3 feet long. This gives you plenty of slack for knotting and adjusting the length. -
Attach to the wood:
Take your wooden dowel or lath. Tie one piece of twine onto the wood using a secure lark’s head knot or a simple double knot, leaving the long tail hanging down. -
Position the second string:
Tie the second piece of twine onto the wood about 4-6 inches away from the first one. -
Thread the first disc:
Thread a terracotta disc onto the first string. Slide it up to your desired starting height. -
Secure the disc:
Tie a simple overhand knot in the twine immediately underneath the disc to hold it in place. Make the knot large enough so the disc doesn’t slip over it. -
Continue the pattern:
Thread the next disc—perhaps alternating colors like terracotta, terracotta, beige, terracotta—leaving about 1 inch of space between each. Tie a knot under each one as you go. -
Finish the second strand:
Repeat the threading and knotting process for the second strand. You can stagger the heights of the discs slightly for a more organic look. -
Trim the ends:
Once all discs are secured, trim any excess twine at the bottom, leaving a short tail if desired. -
Add a hanger:
Cut a final piece of twine and tie it to both ends of the wooden dowel to create the main hanging loop for the wall.
Try Different Shapes
Mix up the geometry by adding the occasional square or semicircle bead, or paint geometric gold lines on the beige discs for a modern twist.
Hang your new garland near a window or above a side table to enjoy the warm, organic texture it adds to your space


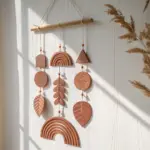
Leaf-Shaped Hanging Cluster

Bring a touch of nature indoors with this rustic and charming mobile, featuring hand-sculpted clay leaves suspended from weathered driftwood. The earthy tones of terracotta, sage green, and white create a serene, botanical aesthetic perfect for any cozy corner.
Step-by-Step Tutorial
Materials
- Air-dry clay (white and terracotta/red)
- Acrylic paints (sage green, mustard yellow, burnt orange)
- Rolling pin
- Real leaves (with thick veins) or clay sculpting tools
- Knife or clay cutter
- Jute twine
- Driftwood branch (approx. 18-24 inches)
- Straw or skewer (for poking holes)
- Fine-grit sandpaper
- Matte sealant or varnish (optional)
Step 1: Sculpting the Leaves
-
Prepare the Clay:
Start by conditioning your air-dry clay. Knead pieces of white clay until pliable. To achieve the muted terracotta look without painting, you can mix a small amount of terracotta clay into the white, or simply use separate blocks for variety. -
Roll Out Slabs:
Use your rolling pin to flatten the clay into a slab purely around 1/4 inch thick. Aim for an even thickness so they dry at the same rate and don’t crack. -
Create Texture:
For the most natural look, press a real leaf (vein side down/face down) firmly into the clay slab and roll over it gently. Alternatively, use a needle tool to hand-carve a central vein and branching side veins. -
Cut the Shapes:
Using a sharp knife or clay cutter, cut around the leaf impression or freehand a simple leaf silhouette. Smooth the rough edges with a dab of water on your finger. -
Add Suspension Holes:
Before the clay begins to set, use a drinking straw or a skewer to poke a hole at the very top of each leaf stem. Make sure the hole is wide enough for your jute twine to pass through. -
Shape for Dimension:
To make the leaves look organic rather than stiff, gently pinch the tips or curl the edges slightly. Lay them over a dowel or crumpled foil to dry with a subtle curve. -
Allow to Cure:
Let the leaves air dry completely, which usually takes 24-48 hours depending on humidity. Flip them halfway through the drying process to prevent warping.
Natural Texture Hack
Don’t have real leaves? Use the edge of a credit card to stamp the veins rather than drawing them. It creates a cleaner trench and displaces the clay just like a real vein would.
Step 2: Painting and Finishing
-
Sand Imperfections:
Once fully dry, lightly sand the edges of the leaves with fine-grit sandpaper to remove any sharp burrs or jagged bits left from cutting. -
Mix Your Palette:
If you used only white clay, prepare your acrylic paints. You’ll want an earthy palette: sage green, soft mustard, and muted terracotta. I like to water the paint down slightly to act as a wash, letting the texture show through. -
Apply Paint:
Paint the leaves, ensuring you get into the deep crevices of the vein textures. Wipe away excess paint on the surface with a damp cloth if you want a weathered, stone-like effect. -
Seal:
Apply a coat of matte varnish or sealant to protect the clay and deepen the colors without adding an unnatural shine.
Step 3: Assembly
-
Cut the Twine:
Cut lengths of jute twine. You will need varying lengths to create a staggered, cascading effect. Cut them longer than you think you need; you can always trim them later. -
attach Leaves:
Thread a piece of twine through the hole of each leaf. Secure it with a simple knot or a loop knot just above the leaf stem. -
Create Chains (Optional):
For the longer strands, tie a second leaf further up the same string. To keep it in place, tie a knot underneath where you want the upper leaf to sit, creating a multi-tiered strand. -
Tie to Driftwood:
Tie the tops of the twine strands onto your driftwood branch. Space them out evenly, alternating colors and heights to balance the composition. -
Add the Hanger:
Cut a final, sturdy piece of jute twine about 2-3 feet long. Tie each end securely to the far ends of the driftwood branch to create the main hanger. -
Final Adjustments:
Hang the mobile on a wall hook. Step back and adjust the spacing of the strings or trim the excess twine tails for a clean finish.
Level Up: Scent Diffuser
Leave the terracotta-colored leaves unsealed. You can then drop essential oils directly onto the porous clay, turning your wall hanging into a passive essential oil diffuser.
Hang this lovely piece near a window where the light can catch the textures of the leaves and bring a calm atmosphere to your room


Textured Boho Wall Medallions
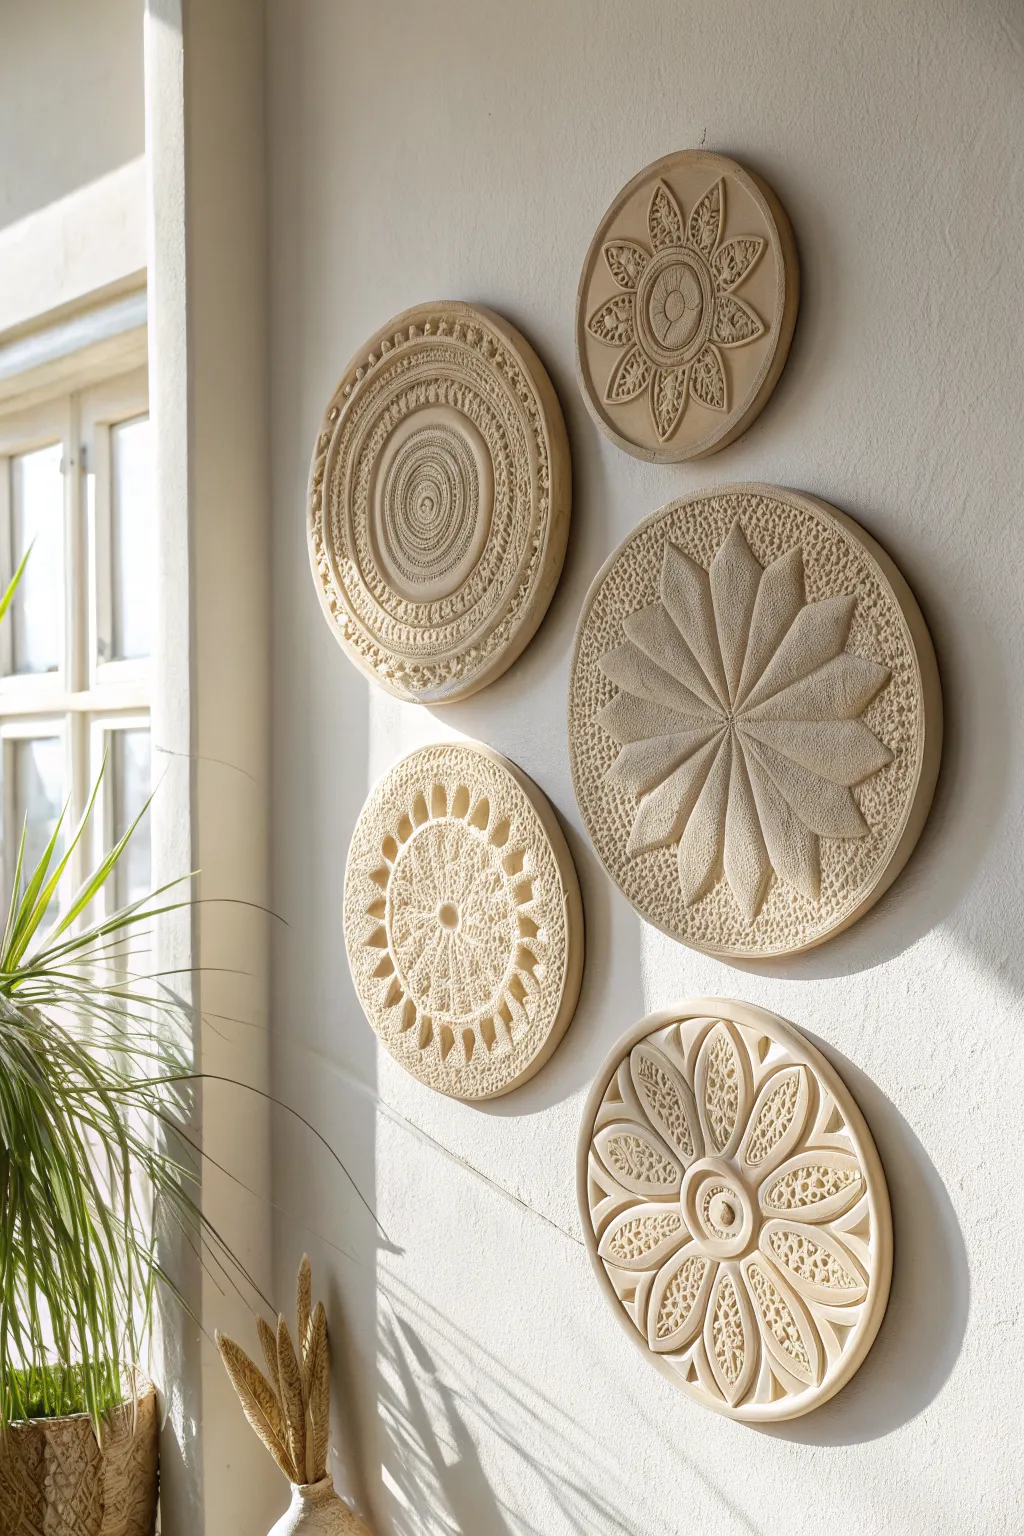
Bring an earthy, tranquil vibe to your space with these intricate clay wall medallions. Combining mandala-inspired patterns with deep relief carving, this project mimics the look of carved stone or plaster to create a stunning gallery wall feature.
Step-by-Step Guide
Materials
- Air-dry clay or polymer clay (white or cream)
- Circle cutters or bowls (various sizes)
- Rolling pin
- Carving tools (loop tools, needle tools, ribbon tools)
- Sponge and water
- Sandpaper (fine grit)
- Acrylic paint (cream, beige, or white)
- Matte sealant or varnish
- Strong adhesive mounting strips or D-hooks
Step 1: Base Preparation
-
Condition the clay:
Start by kneading your clay thoroughly. Whether using polymer or air-dry clay, ensure it is pliable, warm, and free of air bubbles to prevent cracking later. -
Roll out the slabs:
Roll the clay out on a flat, clean surface to a thickness of about 1/2 to 3/4 inch. You want these fairly thick to allow for deep carving without breaking through the back. -
Cut the circles:
Using large circle cutters, bowls, or plates as templates, cut out five distinct circles. Vary the sizes slightly—ranging from 6 inches to 10 inches in diameter—to create visual interest for your wall arrangement. -
Smooth the edges:
Dip your finger or a small sponge in water and run it along the cut edges of each circle to round them off and remove any sharp cutting marks.
Step 2: Designing the Patterns
-
Sketch guidelines:
Lightly trace concentric circles on your clay with a needle tool to act as guides. I find this helps keep the mandala patterns symmetrical. -
Carve the central geometric flower:
For the starburst-style medallion, use a knife tool to carve deep V-shapes radiating from the center. Remove the clay between the ‘petals’ to make them pop in high relief. -
Create the sunburst texture:
On a different medallion, press a small round tool into the center, then use a carving gouge to create petal shapes that radiate outward. Add texture inside the petals by stippling with a stiff bristled brush. -
Add intricate concentric rings:
For the circular mandala designs, use loop tools to carve channels around the center point. Leave raised ridges between the channels. -
Detail with texture:
Use a needle tool or the end of a paintbrush to press small dots or lines into the raised ridges. This stippling effect creates the stone-like texture seen in the reference. -
Build layered floral elements:
For the floral medallions, carve deep teardrop shapes. Create a ‘double petal’ look by carving a smaller teardrop inside the larger one, leaving a thin wall of clay between them. -
Clean up crumbs:
As you carve, small bits of clay will accumulate. Use a soft, dry makeup brush to gently sweep these away without damaging your detailed work.
Preventing Cracks
If you see tiny hairline cracks appearing while air-dry clay cures, smooth a mixture of clay and water (slip) over them immediately to fill the gap.
Step 3: Refining and Finishing
-
Smooth the surface:
Once you are happy with the carving, use a slightly damp sponge to gently smooth the highest points of the relief. This softens the look and mimics weathered stone. -
Allow to dry:
Let the medallions dry completely. For air-dry clay, this may take 24-48 hours depending on thickness. Flip them occasionally to ensure even drying and prevent warping. -
Sand for perfection:
Once fully cured, use fine-grit sandpaper to buff away any rough burrs or sharp edges left from the carving tools. -
Paint a base coat:
Apply a coat of cream or off-white acrylic paint. Even if your clay is white, painting it unifies the surface texture. -
Adding depth (optional):
To enhance the carving, you can mix a tiny drop of brown paint with water to create a wash. Brush it into the deep crevices and immediately wipe the surface clean with a rag, leaving shadows in the sculpted areas. -
Seal the work:
Finish with a matte spray varnish to protect the surface from dust and humidity without adding an unnatural shine. -
Mountming hardware:
Attach heavy-duty mounting strips or glue a flat D-hook to the back with strong epoxy once the sealant is dry.
Use Textured Tools
Don’t just use carving tools! Press lace, stamps, or the bottom of textured glasses into the clay to create intricate patterns instantly.
Arrange your finished medallions near a window to let the natural light highlight all your beautiful carving work


Minimal Clay Rainbow Arches
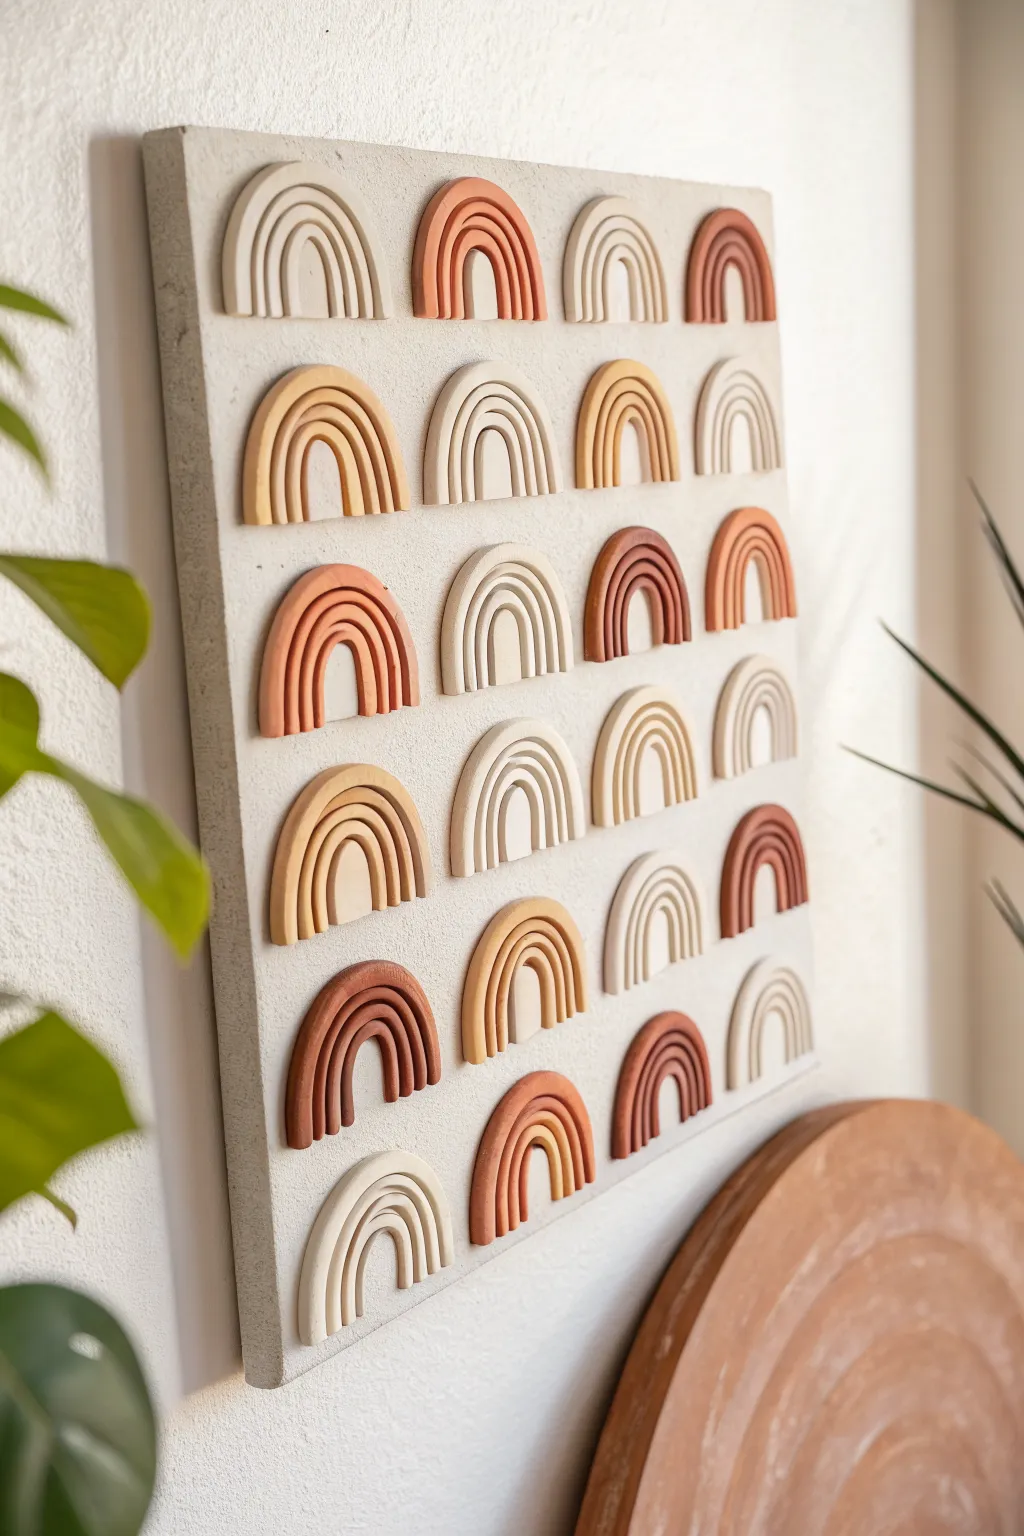
This project creates a soothing, structured statement piece by arranging minimalist clay rainbows in a grid pattern. The interplay of cream, terracotta, and warm beige tones against a textured background brings a modern bohemian vibe to any space.
Step-by-Step Tutorial
Materials
- Polymer clay or air-dry clay (white, beige, terracotta, brown)
- Square wooden canvas or sturdy plywood board (approx. 16×16 inches)
- Acrylic paint (white or cream for background)
- Baking soda (to mix with paint for texture)
- Clay roller or rolling pin
- Sharp blade or clay knife
- Strong craft glue (e.g., E6000 or heavy-duty super glue)
- Ruler
- Sandpaper (fine grit)
- Paintbrush (wide flat brush)
- Parchment paper
Step 1: Creating the Arches
-
Prepare your color palette:
Before sculpting, organize your clay into four or five distinct color groups ranging from white/cream to dark rust. If you are using polymer clay, condition it by kneading until it’s soft and pliable; for air-dry clay, keep a damp cloth nearby to prevent drying. -
Roll the clay coils:
Take a small portion of clay and roll it on a clean surface to create long, even snakes. Aim for a consistent thickness of about 1/4 inch for each strand, ensuring they look uniform. -
Form the first arch:
Take your first coil and bend it into a tight U-shape to form the smallest, innermost arch. Place it on a piece of parchment paper so it doesn’t stick to your work surface. -
Layer the outer arches:
Wrap a second and third coil over the first ones to build the rainbow shape. Gently press the coils together side-by-side so they bond without flattening the rounded tops. -
Slice the bottoms:
Once your three-layer rainbow is formed, use your sharp blade to cut straight uncrossed across the bottom. This creates a clean, flat base for the arch to stand or lie flat. -
Repeat the process:
Continue creating arches until you have enough to fill your board (the example image uses a 5×4 grid, requiring 20 arches). Vary the colors randomly or in a planned pattern. -
Smooth the edges:
I like to gently tap the cut edges with my finger to remove any sharp corners or clay burrs. This gives the final piece a more polished, professional look. -
Harden the clay:
If using polymer clay, bake the pieces on a parchment-lined sheet according to the package instructions (usually 275°F for 15-30 minutes). If using air-dry clay, let them sit undisturbed for 24-48 hours until fully cured.
Step 2: Preparing the Base
-
Mix textured paint:
Pour acrylic paint into a cup and mix in baking soda. Start with a 1:1 ratio, adjusting until you achieve a thick, fluffy consistency similar to cake frosting. -
Apply the base coat:
Using a wide flat brush, apply the paint mixture to your wooden canvas. Use cross-hatch strokes or dab the brush to enhance the texture, mimicking a stone or plaster finish. -
Paint the sides:
Don’t forget to extend the textured paint over the side edges of the canvas for a finished appearance from all angles. -
Let it dry completely:
Allow the painted board to dry fully. The baking soda mixture may take slightly longer than regular paint, so give it a few hours to ensure it is hard to the touch.
Consistent Coils
Use an acrylic clay extruder tool instead of hand-rolling. It pushes clay through a disc to create perfectly even snakes every single time.
Step 3: Assembly
-
Plan the layout:
Arrange your hardened clay rainbows on the dry board without glue first. Find a distribution of colors that feels balanced to your eye. -
Measure the grid:
Use a ruler to lightly mark small pencil dots where the center of each rainbow should sit to ensure perfectly straight rows and columns. -
Glue the first row:
Pick up the top-left rainbow, apply a generous dab of strong craft glue to the flat back side, and press it firmly onto your marked spot. Hold for 30 seconds. -
Finish the grid:
Continue gluing strictly row by row. Checking your alignment frequently prevents the grid from drifting diagonally as you work. -
Final cure:
Allow the adhesive to cure for the time specified by the manufacturer (usually 24 hours) before hanging the artwork vertically.
Cracking Clay?
If using air-dry clay, surface cracks can happen as water evaporates. Patch them with a tiny bit of wet clay slip and smooth with a damp finger.
Hang your finished textured masterpiece in a well-lit spot to let the shadows emphasize the 3D relief

The Complete Guide to Pottery Troubleshooting
Uncover the most common ceramic mistakes—from cracking clay to failed glazes—and learn how to fix them fast.
Wall Planter Pockets in Clay
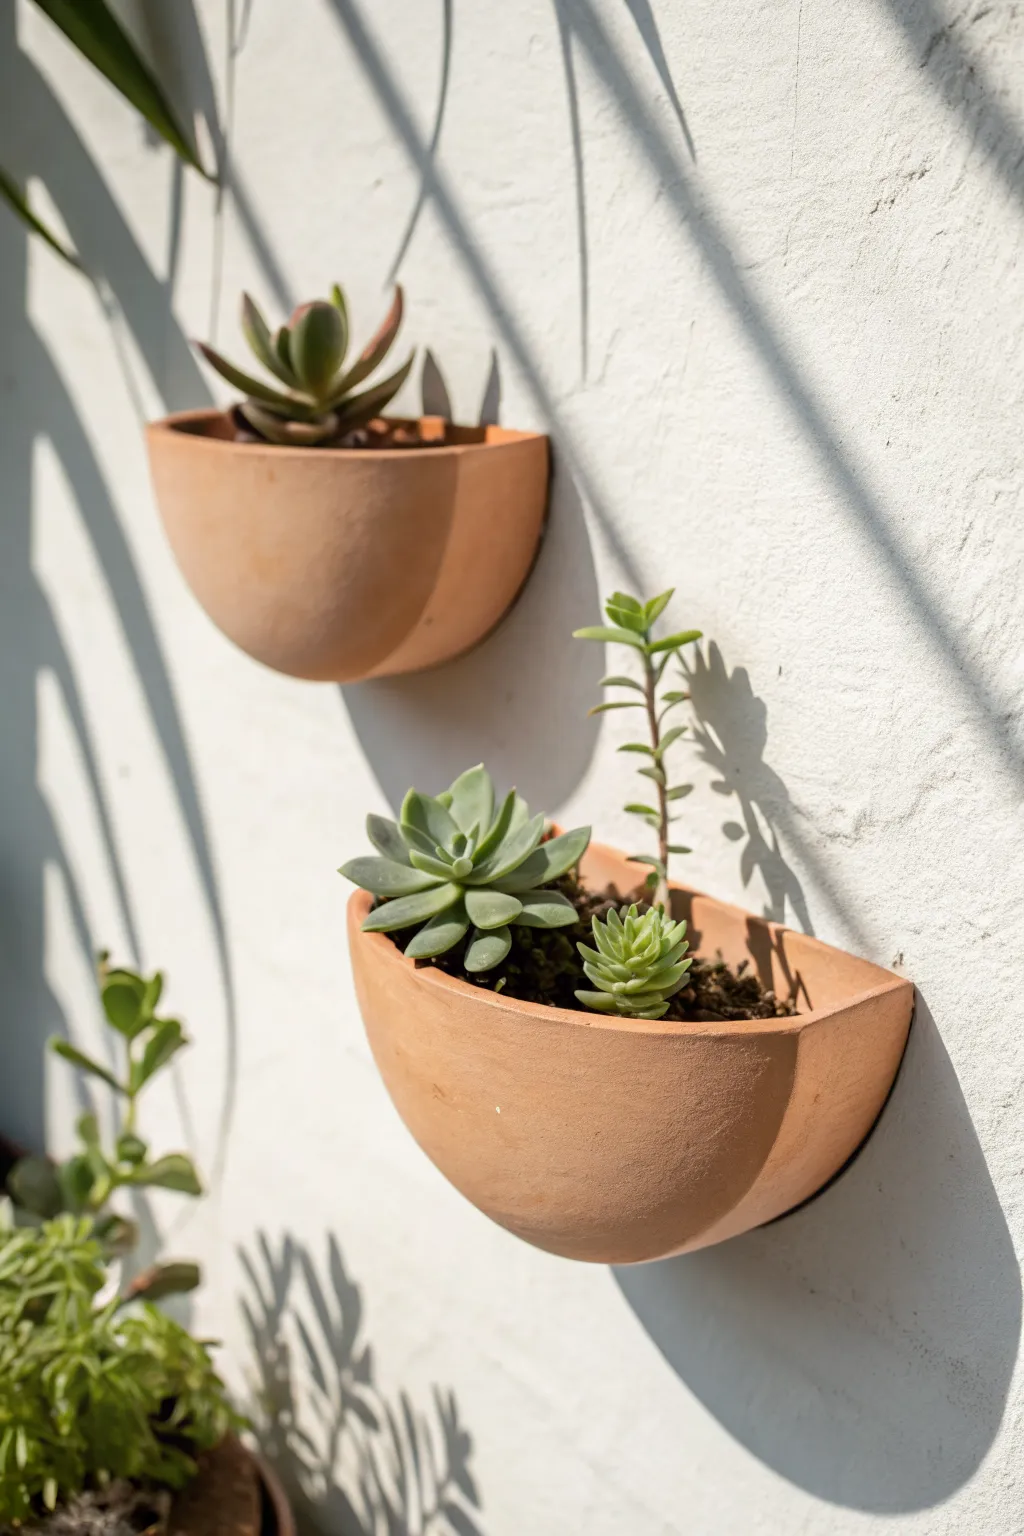
Bring earthy warmth to your vertical spaces with these charming half-moon wall pockets. Designed with a flat back to sit flush against the wall, they offer a perfect, minimalist home for your favorite succulents.
Step-by-Step Guide
Materials
- Air-dry clay (terracotta color) or terracotta pottery clay
- Rolling pin
- Cardboard or cardstock (for templates)
- Craft knife
- Small bowl of water
- Sponge
- Scoring tool or old fork
- Sandpaper (medium and fine grit)
- Clear matte sealant or varnish
- Strong adhesive hanging strips or D-ring hangers with epoxy
Step 1: Preparing the Templates
-
Design the back panel:
Start by drawing a semi-circle on your cardstock. A 6-inch diameter straight edge with a 3-inch depth is a good standard size, but feel free to adjust based on your plant size. -
Create the front pocket shape:
Draw a second shape that matches the curve of your semi-circle but is slightly wider to allow for the bulge of the pocket. Imagine unrolling a wide strip of clay; it should look like a long rectangle with slightly tapered ends. -
Cut out templates:
Cut both shapes out of the cardstock carefully, as these will guide your knife work.
Step 2: Forming the Clay
-
Roll out the slab:
Take a generous chunk of your terracotta clay and roll it out on a flat surface to an even thickness, aiming for about 1/4 inch. Too thin and it will crack; too thick and it becomes heavy. -
Cut the shapes:
Place your cardstock templates onto the clay slab. Using your craft knife, trace around them to cut out one semi-circle back piece and one front strip piece. -
Smooth the edges:
Dip your finger in a little water and run it along the cut edges of both clay pieces to soften any sharp corners or ragged bits left by the knife. -
Score the connection points:
Use your scoring tool or a fork to scratch up the curved edge of the back semi-circle and the bottom edge of the front strip where they will meet. This rough texture is crucial for a strong bond.
Cracking Seams?
If the clay starts separating at the seams while drying, dampen the crack immediately with a sponge and fill it with fresh soft clay or slip, blending well.
Step 3: Assembling the Pocket
-
Apply slip:
Dab a small amount of water or clay slip (clay mixed with water to a paste consistency) onto the scored areas. -
Attach the front to the back:
Gently curve the front strip and press it onto the scored edge of the back panel. Work from the center bottom upwards toward the flat top edge. -
Reinforce the seam:
I like to roll a very thin ‘snake’ of clay and press it into the interior seam where the pieces join, smoothing it out completely to ensure there are no gaps. -
Blend the exterior:
On the outside, use a modeling tool or your thumb to drag a little clay across the join line so the two pieces become one solid unit. -
Check the shape:
Stand the pocket upright on its flat back to ensure it isn’t warping. If the front droops, ball up some newspaper or plastic wrap and stuff it inside the pocket to support the shape while it stiffens.
Pro Tip: Texture
Before assembling, gently press a piece of canvas or linen into the wet clay slab to give the surface a subtle, organic fabric texture.
Step 4: Finishing Touches
-
Initial drying:
Let the clay dry slowly away from direct heat or sunlight. If you are using real pottery clay, this is the leather-hard stage where you can do final shaping. -
Sanding:
Once completely bone dry, use medium grit sandpaper to smooth out lumpy areas, followed by fine grit for a polished finish. Wear a mask to avoid inhaling dust. -
Sealing:
If using air-dry clay, apply two to three coats of a matte sealant inside and out to protect it from moisture. Terracotta pottery clay will need to be fired in a kiln. -
Mounting:
Attach a heavy-duty mounting strip to the flat back, or use strong epoxy to glue a D-ring hanger near the top edge for secure hanging. -
Planting:
Add your succulents. Since these pockets don’t have drainage holes, keep plants in small nursery pots that fit inside, or use faux variety.
Step back and enjoy the modern, organic feel these floating pockets add to your favorite wall.
Decorative Clay Tile Grid
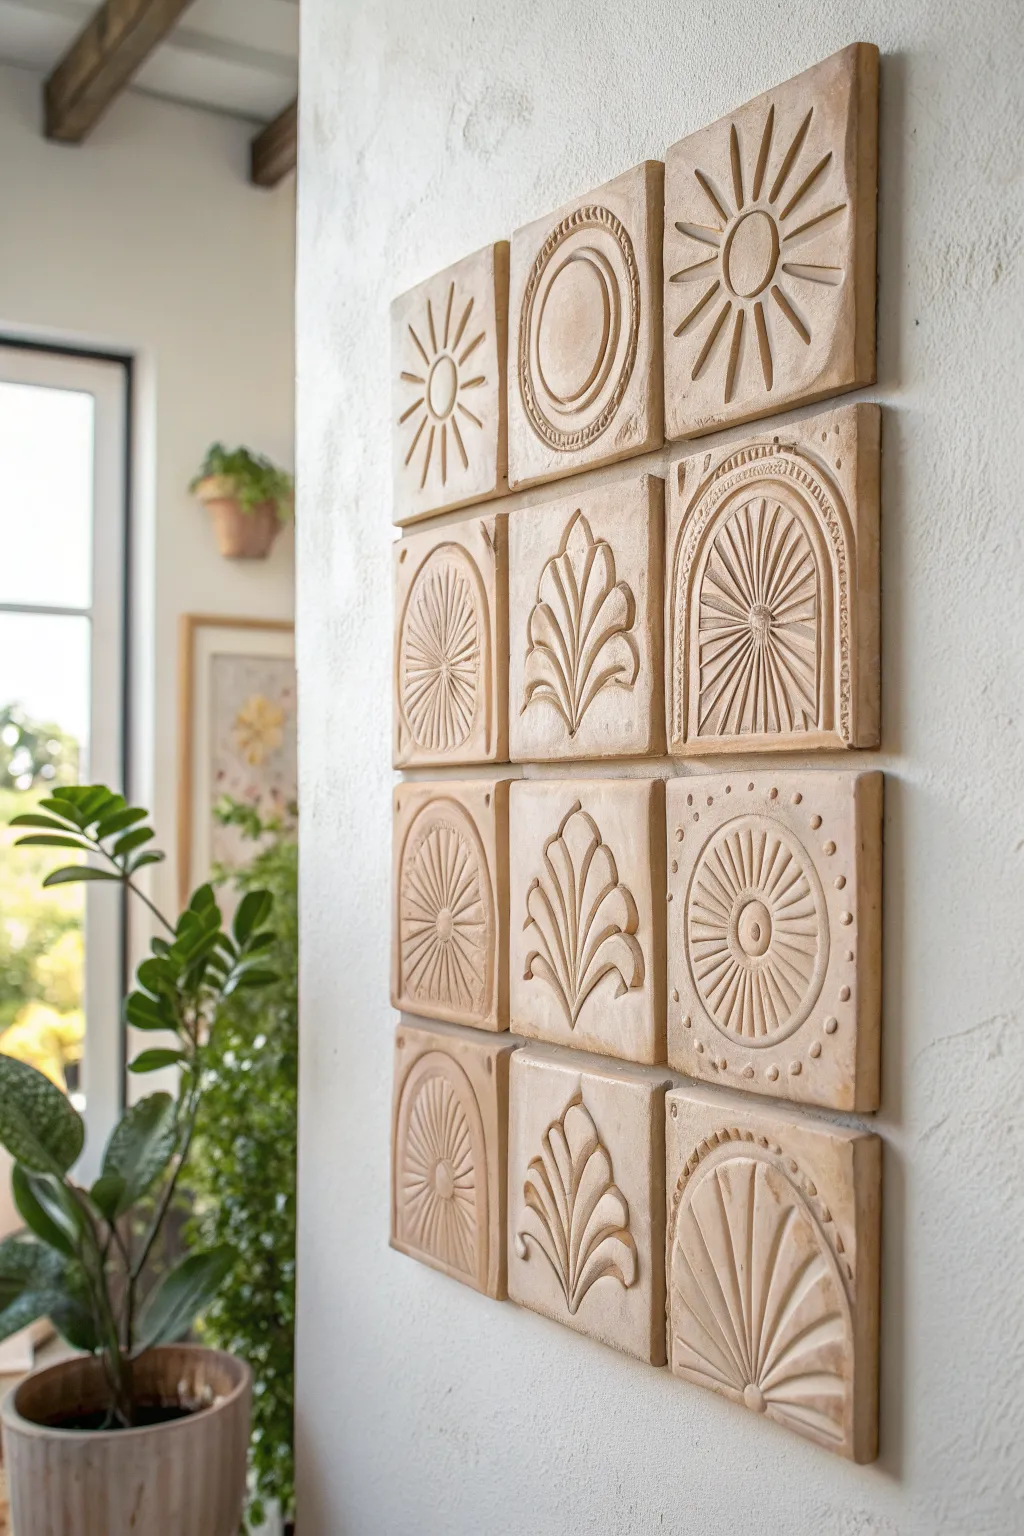
Bring the warmth of the Mediterranean into your home with this striking grid of relief-carved clay tiles. This project turns simple terracotta clay into a gallery-worthy installation featuring repeating sunbursts, arches, and botanical motifs.
Step-by-Step Tutorial
Materials
- Air-dry clay (terracotta color) or earthen clay if you have kiln access
- Rolling pin
- Two 1/4-inch wooden guide strips (for even thickness)
- Square cookie cutter or template (approx. 4×4 or 5×5 inches)
- Carving tools (loop tools, needle tool, modeling tool)
- Small sponge
- Canvas or heavy fabric (to work on)
- Ruler
- Water in a small cup
- Constructive adhesive or heavy-duty mounting tape
Step 1: Tile Formation
-
Prepare your workspace:
Lay down your canvas or heavy fabric on a flat table. This prevents the clay from sticking to your work surface and adds a subtle texture to the back of the tiles. -
Roll the slab:
Place a ball of terracotta air-dry clay between your two wooden guide strips. Roll the clay out until the rolling pin rests on the guides, ensuring a perfectly even thickness across the entire slab. -
Cut the squares:
Using your square cutter or a sharp knife with a ruler and paper template, cut out 12 identical squares. You can make extras just in case a design doesn’t turn out as planned. -
Smooth the edges:
Dip your finger in a little water and run it along the cut edges of each square to remove sharpness and create a more finished, professional look.
Step 2: Designing the Motifs
-
Plan your grid:
Before carving, sketch your 12 designs on paper. The reference image uses four main motifs: a simple sunburst, a decorative arch, a stylized palm leaf, and a medallion. Aim for 3 tiles of each design. -
Outline the designs:
Lightly trace your designs onto the damp clay squares using a needle tool. Don’t press too hard yet; these are just guidelines for your carving. -
Carve the sunbursts:
For the sun design, press a small round object (like a bottle cap) into the center. Then, use a carving tool to gouge out rays radiating outward. Vary the depth slightly to catch the light. -
Sculpt the arches:
Use a U-shaped loop tool to carve the interior of the arch shape, removing clay to make the ‘window’ recessed. Add texture inside the arch with radiating lines using a needle tool. -
Create the palm leaves:
This motif relies on relief. Instead of digging deep, use a modeling tool to press down the clay around a central leaf shape, making the leaf appear raised. Carve distinct veins for definition. -
Detail the medallions:
For the circular designs, combine impression and carving. Press circles into the clay, then use the tip of a tool to create dot patterns or rope textures along the rim. -
Refine the surface:
Once all carving is done, use a slightly damp sponge to gently wipe over the high points. This removes any little ‘crumbs’ of clay left from carving without blurring your crisp lines.
Warping Woes
If tile corners curl up while guiding, flip them immediately and weigh them down with a heavy book placed over a piece of paper. This gently forces them back completely flat as they finish drying.
Step 3: Drying and Montage
-
Slow drying process:
Place the tiles on a wire rack or leave them on the canvas. To prevent warping—a common issue—I like to loosely cover them with a plastic sheet for the first 24 hours to slow the drying. -
Flip regularly:
Turn the tiles over once a day so both sides face the air. Let them dry completely, which usually takes 48 to 72 hours depending on humidity. -
Sand the imperfections:
Once bone dry, take fine-grit sandpaper and lightly buff the edges or any rough spots on the surface. Wipe away the dust with a dry cloth. -
Map the wall:
Use painter’s tape and a level to mark a grid on your wall. Ensure spacing is even between where each tile will sit—about 1/2 inch looks nice. -
Mount the tiles:
Apply heavy-duty mounting tape or construction adhesive to the back of each tile. Press them firmly onto the wall within your marked grid, holding for a few seconds to ensure a strong bond.
Antique Finish
Mix a tiny bit of white acrylic paint with water to make a thin wash. Brush over the dried tiles and wipe off immediately. The white settles in the crevices, highlighting your carving work.
Step back and admire the rhythmic pattern and texture you’ve added to your space with just a bit of clay and creativity.


What Really Happens Inside the Kiln
Learn how time and temperature work together inside the kiln to transform clay into durable ceramic.
Framed Bas-Relief Landscape Panel
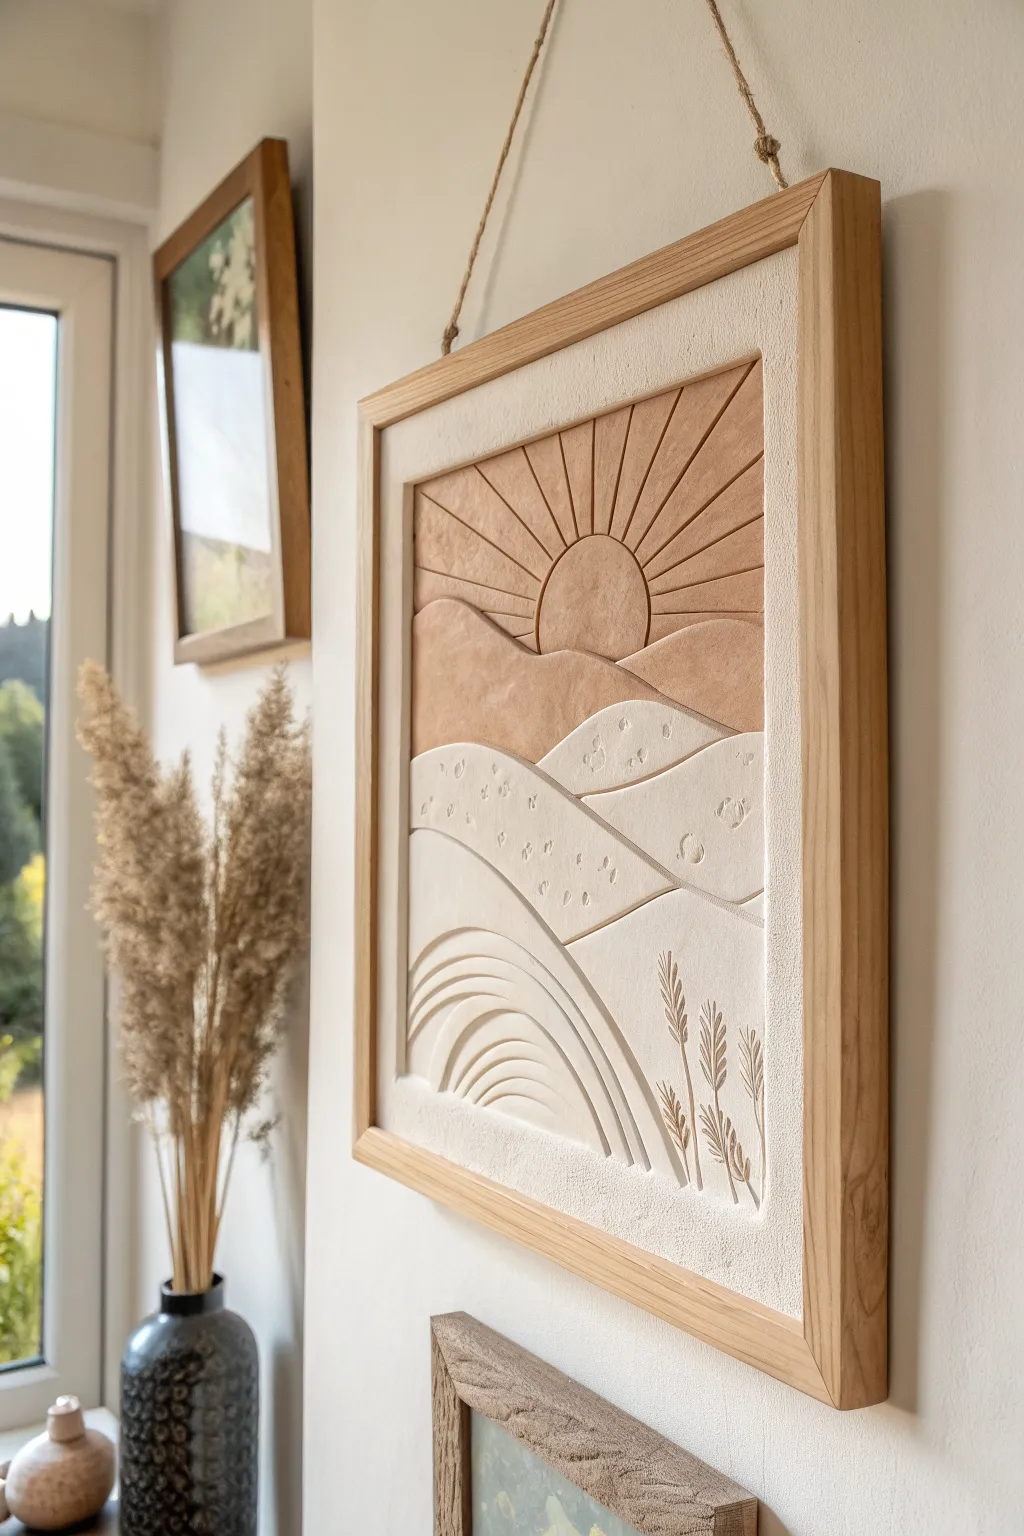
Bring the warmth of a sunset indoors with this textured bas-relief panel that captures rolling hills and radiant sunrays in earthy tones. This project combines the meditative process of clay sculpting with a clean, modern aesthetic perfect for any gallery wall.
Step-by-Step
Materials
- White sculpting clay (air-dry or polymer)
- Wooden rolling pin
- Square plywood backing board (approx 10×10 inches)
- Pottery needle tool or X-Acto knife
- Loop tool (for carving)
- Texture tools (or a crumpled foil ball)
- Acrylic paints (terracotta, beige, white, warm brown)
- Paintbrushes (flat shader and fine liner)
- Strong craft glue (E6000 or similar)
- Light wood shadow box frame
- Sandpaper (fine grit)
- Ruler
Step 1: Preparing the Base
-
Roll out the slab:
Start by rolling your clay into a large, even square slab approximately 1/4 inch thick. Aim for it to be slightly smaller than your plywood backing board to allow for a border. -
Cut to size:
Use a ruler and your needle tool to cut a clean, perfect square from the slab. Measure your frame first to ensure it will fit snugly inside eventually. -
Sketch the design:
Lightly trace your landscape design onto the wet clay using the needle tool. Draw a horizon line for the sun, curved lines for the hills, and the foreground arch.
Warping Woes?
If your large clay slab starts curling up while drying, place a heavy book on top of it (with a piece of parchment paper in between) to weigh it down until fully cured.
Step 2: Sculpting the Relief
-
Carve the sun & rays:
Using a needle tool, deeply score the outline of the setting sun semi-circle. Use a straight edge to press in the radiating sun rays, making them wide and distinct. -
Define the hills:
For the middle ground, use a loop tool to gently scrape away a thin layer of clay *below* the hill lines. This creates a physical step-down effect, making the hills behind look further away. -
Add foreground texture:
In the bottom right section, use a sculpting tool to carve out simple wheat or grass stalks. Press deeply to ensure the shapes remain visible after painting. -
Create the arch motif:
In the bottom left, carve a series of concentric arches. I like to bevel the edges of these lines slightly to catch the light better. -
Texturizing:
Leave the sky and sun smooth, but use a crumpled ball of foil or a stiff brush to gently tap texture into the ‘ground’ sections for contrast.
Level Up: Texture Play
Mix sand or coffee grounds into the paint for the lower hills. This gritty texture contrasts beautifully with the smooth, painted sun rays above.
Step 3: Finishing and Coloring
-
Drying phase:
Allow the clay panel to dry completely. For air-dry clay, this usually takes 24-48 hours. Flip it occasionally to prevent warping. -
Sanding:
Once bone dry, lightly sand the edges and the surface of the sun rays to ensure they are crisp and smooth. -
Base coat:
Apply a coat of white gesso or white acrylic paint to the entire piece to seal the clay and prepare it for color. -
Painting the sky:
Mix a warm terracotta or rust color. Carefully paint the sky section (the sun rays and background), keeping the paint opaque and flat. -
Painting the hills:
Mix a lighter shade of the terracotta with some beige. Paint the middle hill section with this transition tone. -
Painting the foreground:
Leave the foreground hills, arches, and plants a creamy white or very pale beige to create a high-contrast foreground. -
Detailed touch-ups:
Use a fine liner brush to clean up any edges where the paint colors meet the carved lines. A clean, sharp line is key to this graphic look. -
Mounting:
Apply strong craft glue to the back of your dried clay panel and press it firmly onto the plywood backing board. -
Framing:
Insert the mounted artwork into your light wood shadow box frame. Secure the back and add your hanging hardware.
Hang your new relief sculpture in a spot that gets side-lighting to really make those carved shadows pop
Clay-Framed Mirror Border
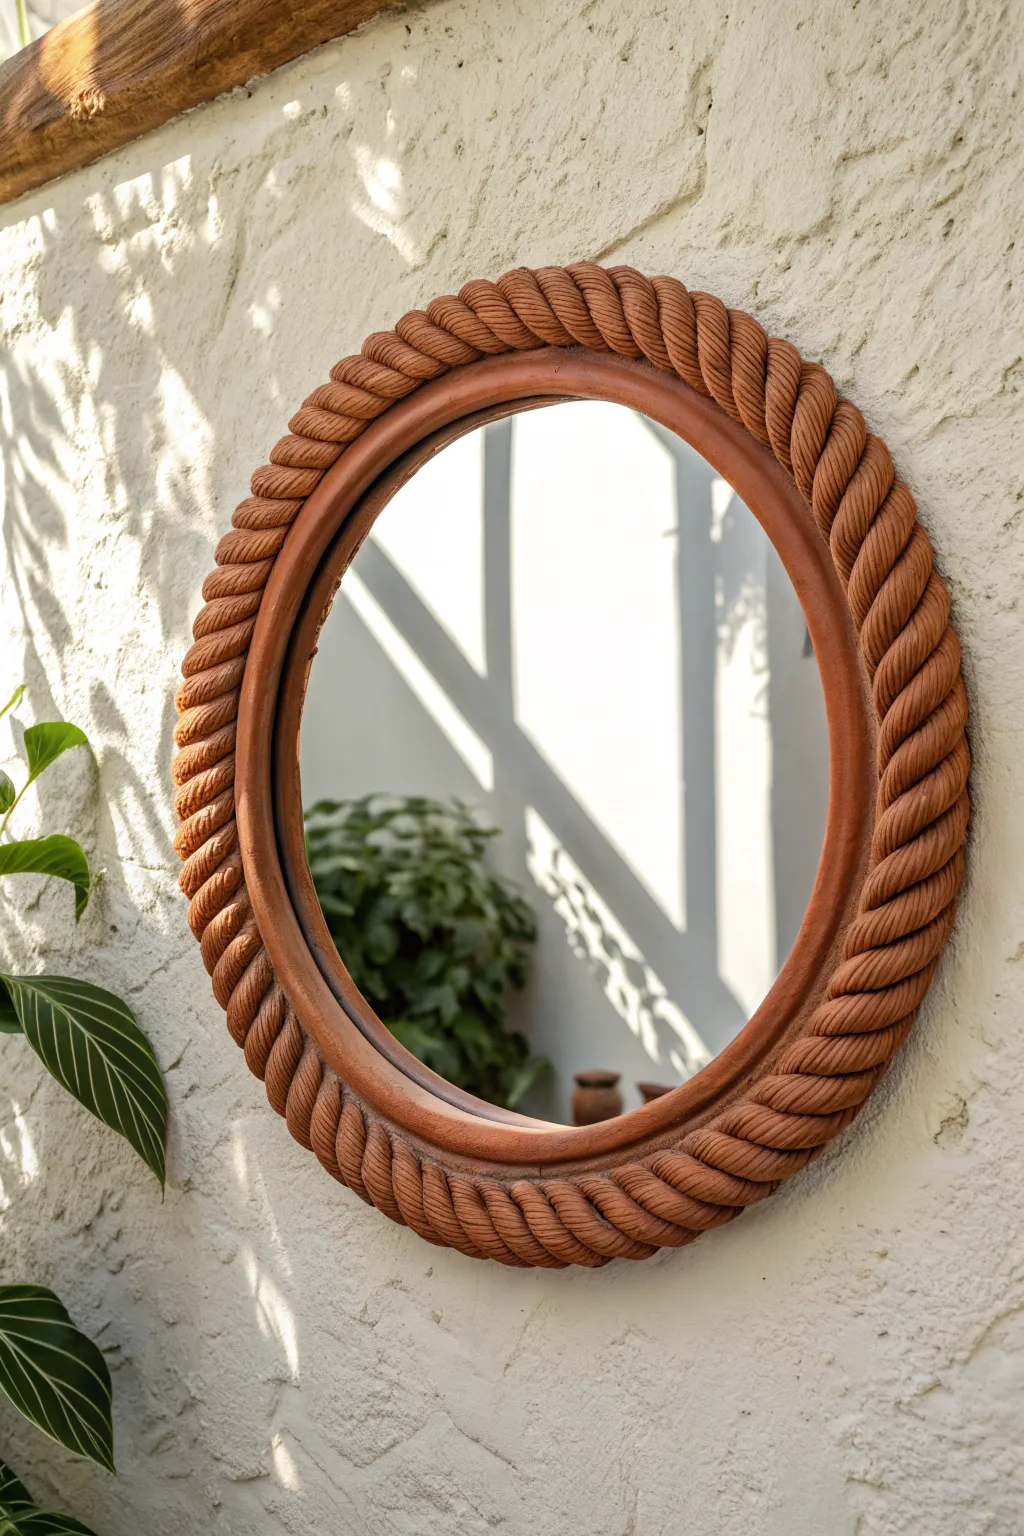
Capture the rustic warmth of earthy decor with this terracotta-style rope mirror. By meticulously sculpting air-dry clay around a simple mirror base, you’ll create a textured, durable statement piece that brings organic charm to any wall.
Step-by-Step Tutorial
Materials
- Round mirror (frameless or simple thin frame)
- Air-dry clay (terracotta color preferred, or white to be painted)
- Plywood or MDF sheet (slightly larger than mirror)
- Strong construction adhesive (e.g., E6000 or Liquid Nails)
- Jigsaw or coping saw
- Rolling pin
- Water spray bottle
- Sponge
- Pottery tools or a wooden skewer
- Fine-grit sandpaper
- Matte acrylic varnish
- Hanging hardware
Step 1: Base Preparation
-
Measure and cut the backing:
Place your round mirror onto the plywood or MDF sheet. Mark a circle that is approximately 1.5 to 2 inches wider than the mirror on all sides to accommodate the thick rope border. Cut this larger circle out using your jigsaw. -
Attach the mirror:
Apply a generous amount of strong construction adhesive to the back of the mirror. Center it perfectly onto your plywood base, leaving that even rim of wood exposed around the edge. -
Create a clay foundation:
Roll out a flat snake of clay and press it firmly onto the exposed wood rim, bridging the gap between the wood edge and the mirror glass. This creates a base layer for the rope to adhere to. -
Score and slip:
Use a pottery tool or fork to scratch up the surface of this base clay layer. Apply a little water or clay slip (clay mixed with water) to make it tacky.
Smooth Operator
Keep a small bowl of water nearby while rolling coils. If the clay creates surface cracks while bending, smooth them immediately with a damp finger to prevent deep breaks later.
Step 2: Sculpting the Rope
-
Roll primary coils:
Take two large, equal portions of clay. Roll them into very long, uniform snakes on a flat surface. Aim for a thickness of about 3/4 inch each to get that chunky look seen in the photo. -
Twist the pair:
Starting at one end, gently twist the two snakes together to form a spiral rope pattern. Keep the twist tight and consistent. If the snakes break, don’t panic; you can join sections directly on the frame. -
Apply the rope to the frame:
Carefully lift your twisted clay rope and press it onto the prepared base around the mirror. I like to work in sections if the mirror is large, joining new twisted segments as I go. -
Hide the seams:
Where the two ends of the rope meet (or where you joined sections), carefully smooth the clay together following the angle of the twist so the transition becomes invisible. -
Create the inner lip:
Roll a much thinner, single snake of clay. Press this flat against the inner edge where the rope meets the mirror glass to create a clean, finished border. -
Refine the texture:
Use a damp sponge to gently wipe over the high points of the rope. This removes fingerprints and softens any sharp edges while keeping the rustic texture. -
Detail with tools:
If the definition of the twist got lost during application, use a modeling tool to deepen the grooves between the two twisted strands.
Color Wash
If you couldn’t find terracotta clay, mix burnt sienna acrylic paint with water (1:1 ratio) and apply it as a wash over white clay. Wipe off the excess for a natural, stained look.
Step 3: Finishing Touches
-
Slow drying process:
Cover the mirror loosely with plastic wrap. Let it dry very slowly away from direct heat or sunlight for 48-72 hours to prevent cracking. -
Check for cracks:
Once dry, inspect for shrinkage cracks. Fill any gaps with a small amount of fresh clay or wood filler paste mixed with paint. -
Sand gently:
Lightly circular sand any rough patches on the clay surface using fine-grit sandpaper. -
Clean the glass:
Before sealing, carefully scrape any dried clay residue off the mirror glass with a razor blade or damp cloth. -
Seal the piece:
Apply a coat of matte acrylic varnish over the clay. This deepens the terracotta color and protects the porous surface from humidity. -
Install hardware:
Attach heavy-duty hanging hardware to the back of the plywood base, ensuring it can support the weight of the clay and glass.
Hang your handcrafted mirror near a window to let the natural light highlight those beautiful clay contours

TRACK YOUR CERAMIC JOURNEY
Capture glaze tests, firing details, and creative progress—all in one simple printable. Make your projects easier to repeat and improve.
Polymer Clay Accent Clock Face
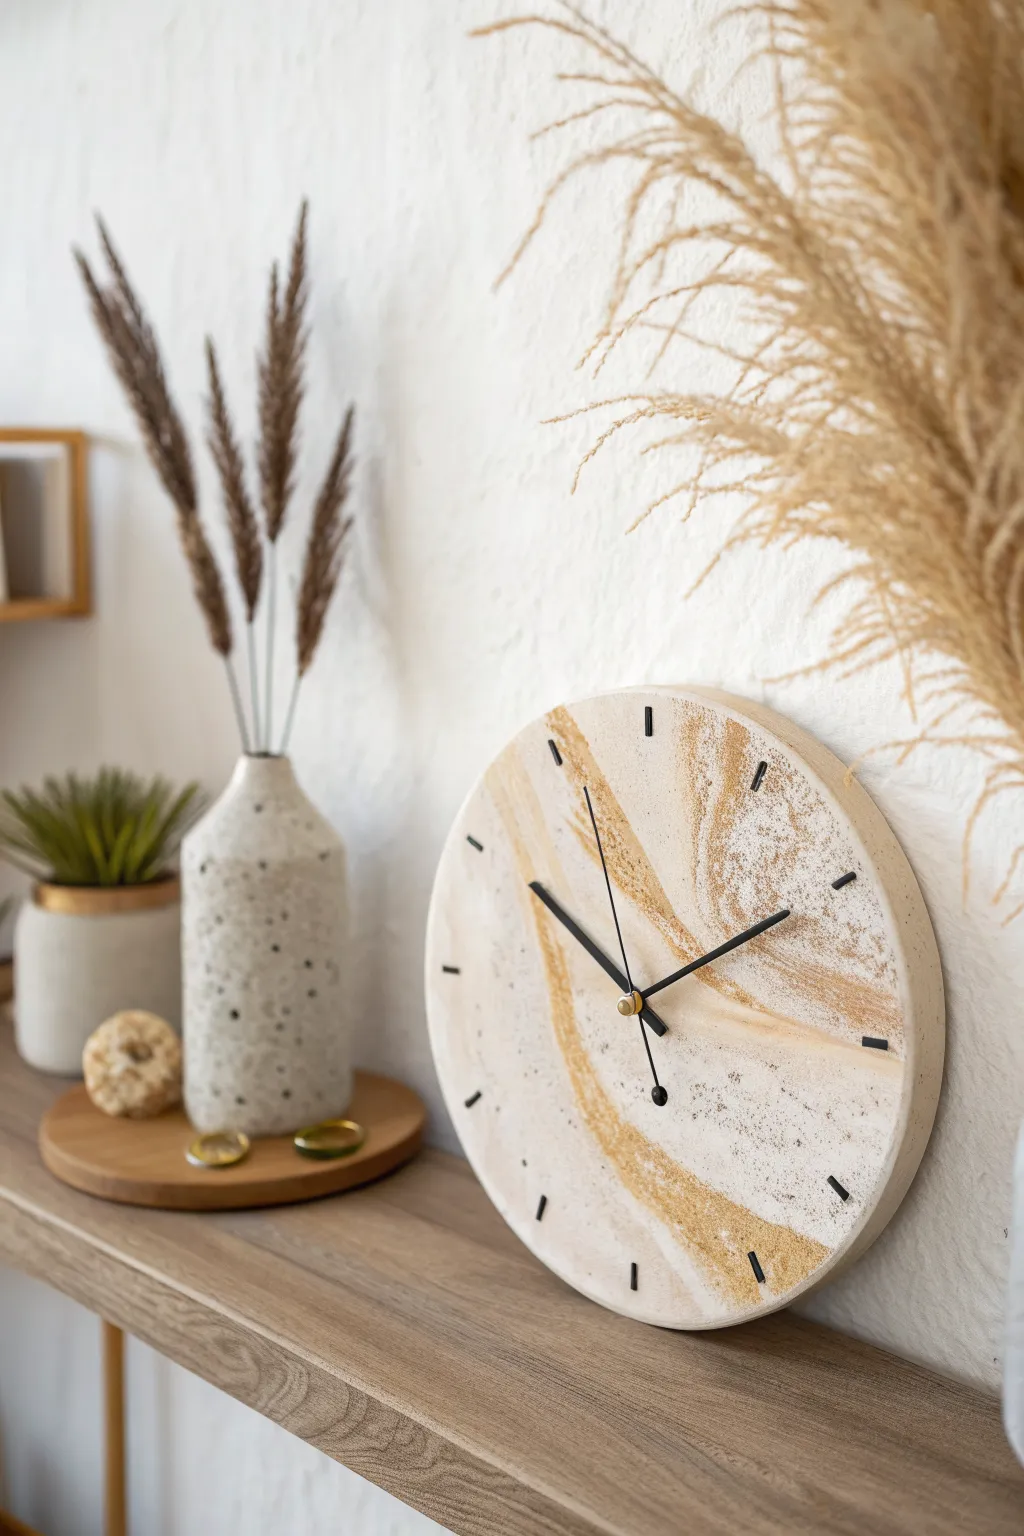
Bring a touch of organic modernism to your space with this elegant faux-stone clock. By marbling polymer clay with gold leaf and adding subtle speckling, you’ll create a functional timepiece that looks like high-end terrazzo or quartz.
How-To Guide
Materials
- White polymer clay (large block, ~8oz)
- Translucent polymer clay (2oz)
- Gold polymer clay or gold leaf flakes
- Sand or beige polymer clay (small amount)
- Acrylic rolling pin or pasta machine
- Round cookie cutter or template (8-10 inches)
- Craft knife
- Black acrylic paint
- Old toothbrush
- Clock mechanism kit with black hands
- Sandpaper (various grits from 400 to 1000)
- Black polymer clay (tiny amount for markers) or black paint pen
- Oven-safe baking surface (ceramic tile or glass)
Step 1: Marbling the Clay
-
Condition the base:
Begin by thoroughly conditioning your white polymer clay until it is soft and pliable. Roll it into a thick log. -
Prepare accent colors:
Roll thin snakes of the translucent, sand, and gold clays. If using gold leaf instead of gold clay, tear off small irregular flakes. -
Combine materials:
Lay the colored snakes and gold accents lengthwise along the white log. Twist the entire log like a candy cane to begin mixing the colors. -
Fold and roll:
Fold the twisted log in half and roll it out again. Repeat this twist-and-fold process 3-4 times, but be careful not to over-mix; you want distinct veins of gold and beige, not a muddy uniform color. -
Form the slab:
Roll the marbled clay into a ball and then flatten it. With your acrylic roller, roll it out into a smooth slab about 1/4 inch thick. Rotate the clay frequently to keep the circle relatively even.
Step 2: Shaping and Texturing
-
Cut the circle:
Place your large round cutter or paper template over the most attractive part of the marbled pattern. Cut the circle cleanly with a craft knife. -
Smooth the edges:
Dip your finger in a little cornstarch or water and gently smooth the cut edges of the circle to remove any sharpness or drag marks from the knife. -
Create the center hole:
Find the exact center of your circle and pierce a hole large enough for your clock mechanism’s shaft. Test the fit now before baking, as the clay shrinks slightly. -
Apply the speckle effect:
Dilute a small amount of black acrylic paint with water. Dip an old toothbrush into the mixture and run your thumb across the bristles to flick tiny specks of paint onto the raw clay surface.
Uneven Surface?
If your clay bubbles during baking, it usually means trapped air. Before baking, gently slice any visible air bubbles with a blade and smooth the clay back down with your finger.
Step 3: Adding Markers and Baking
-
Create hour markers:
Roll a tiny snake of black clay. Cut 12 small, equal-sized segments for the hour indicators. -
Embed the markers:
Press these small black lines gently into the raw clay face at the appropriate clock positions (12, 3, 6, 9, etc.). Using a ruler ensures they are perfectly aligned. -
Final smooth:
Give the surface one last gentle roll with the rolling pin to ensure the black markers are flush with the surface and everything is flat. -
Bake the clock face:
Place the clay on a ceramic tile or glass sheet. Bake according to your clay package instructions (usually 275°F for 30 minutes per 1/4 inch of thickness). I suggest tenting it with foil to prevent scorching the white clay.
Level Up: Resin Finish
For a true high-gloss polished stone look, pour a thin layer of UV resin or two-part epoxy over the face (avoiding the center hole) after baking and cure it under a UV light.
Step 4: Assembly
-
Cool and sand:
Let the clay cool completely inside the oven. Once cool, wet-sand the edges and surface with fine-grit sandpaper for a polished stone feel. -
Install mechanism:
Insert the clock movement through the back of the hole. Secure it with the washer and nut on the front side according to the kit instructions. -
Attach the hands:
Press the hour hand onto the shaft first, followed by the minute hand and the second hand cap. Ensure they are parallel so they don’t catch on each other.
Hang your new timepiece on a wall that receives plenty of natural light to catch the gold shimmer
Moon and Stars Hanging Mobile
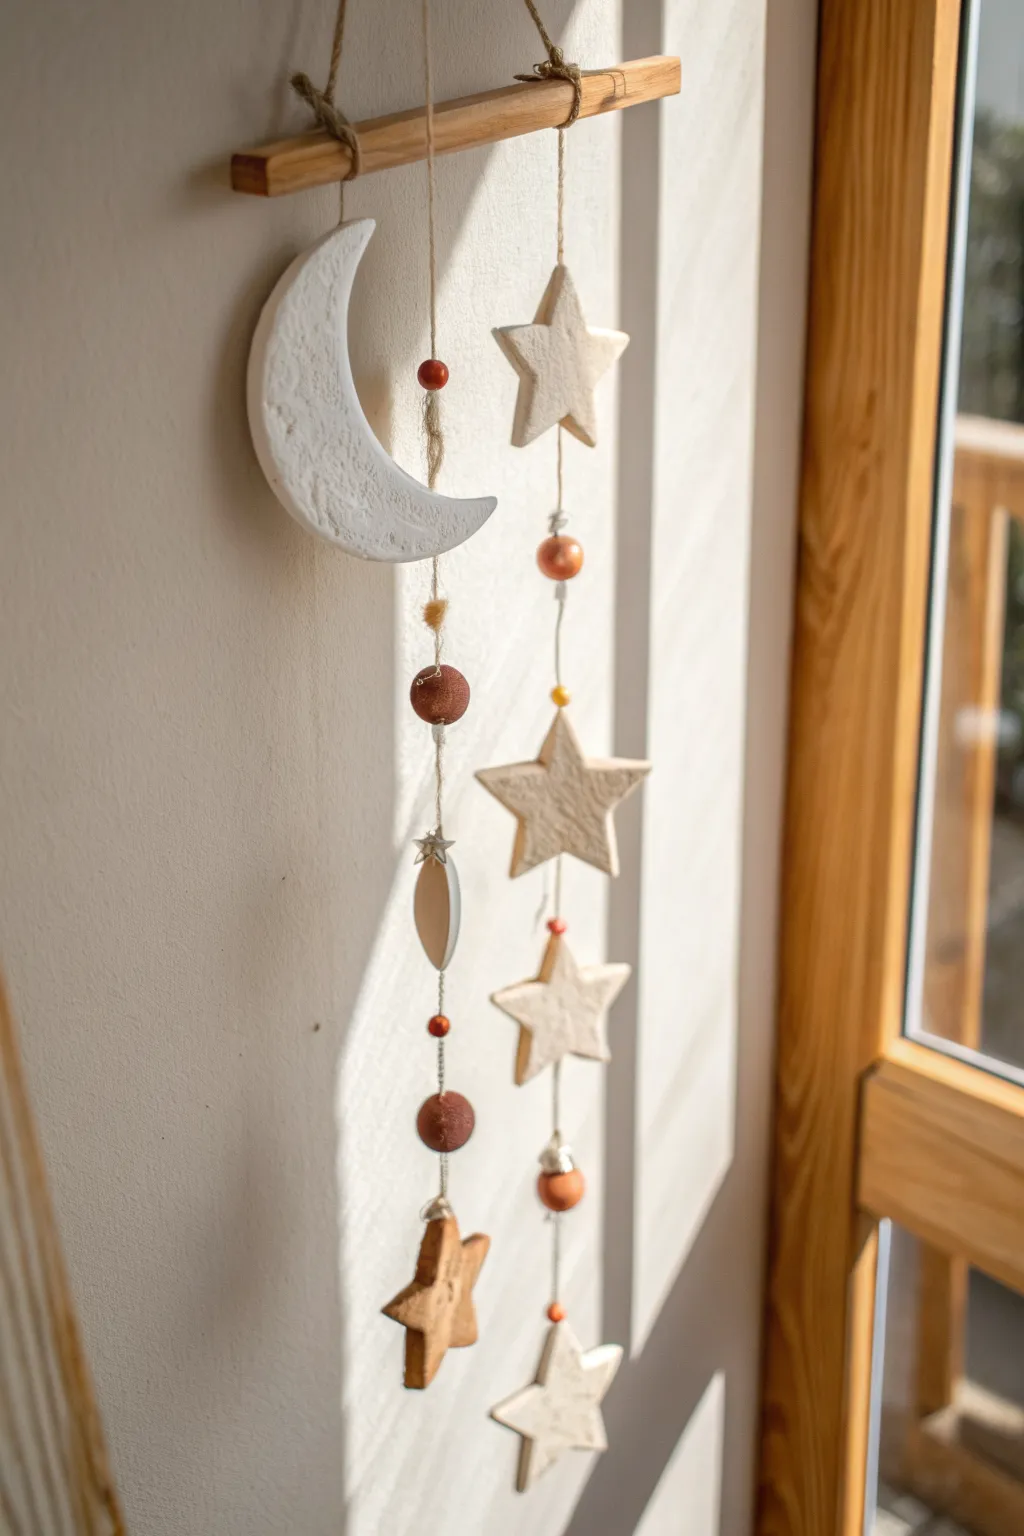
Capture the serene beauty of the night sky with this rustic yet elegant wall hanging. Featuring a textured crescent moon and cascading stars suspended from natural wood, this project combines the earthiness of clay with delicate beaded details for a dreamy nursery or bedroom accent.
Step-by-Step
Materials
- White or terracotta air-dry clay (e.g., DAS or Crayola)
- Wooden dowel or small piece of driftwood (approx. 8-10 inches)
- Natural jute twine
- Rolling pin
- Cookie cutters (large moon, various star sizes)
- Textured linen fabric or sandpaper (for imprinting)
- Assorted wooden and metallic beads (copper, cream, natural wood)
- A small drinking straw or toothpick
- Scissors
- Find-grit sandpaper
- Clear matte sealant (optional)
Step 1: Shaping the Celestial Bodies
-
Condition the clay:
Begin by kneading a good-sized chunk of air-dry clay in your hands until it becomes warm and pliable. If the clay feels dry, dip your fingers in a tiny bit of water to smooth it out. -
Roll the slab:
Roll the clay out onto a clean surface to about a 1/4 inch thickness. I maintain an even thickness to ensure the pieces dry at the same rate and don’t curl. -
Add texture:
Before cutting, gently press a piece of coarse linen fabric or a sheet of sandpaper onto the surface of the clay slab. Lift it away to reveal a stone-like, pitted texture similar to the moon’s surface. -
Cut the shapes:
Using your cookie cutters, press firmly to cut out one large crescent moon and roughly 4-5 stars. For the project shown, you need three larger stars and two smaller ones. -
Pierce holes:
Use a straw or toothpick to poke holes for hanging. For the moon, pierce a hole at the top tip and the bottom tip. For the stars, pierce a hole vertically through the center (top point to bottom crotch) if you want them to slide on the string, or just at the top point if you are tying them. -
Create variation:
To mimic the darker star at the bottom, knead a small drop of brown acrylic paint into a scrap of clay before rolling and cutting your final star, or plan to paint it later. -
Let them dry:
Arrange the shapes on a wire rack or parchment paper. Let them dry for 24-48 hours, flipping them halfway through to prevent warping.
Step 2: Assembly and Finishing
-
Sand edges:
Once fully dry, take fine-grit sandpaper and gently smooth the rough edges of your shapes where the cutter separated the clay. Keep the surface texture intact. -
Prepare the hanger:
Cut a piece of twine about 18 inches long. Tie each end to the wooden dowel or driftwood to create the main hanger that goes on the wall. -
Attaching the moon line:
Cut a long length of twine (approx. 24 inches). Tie one end securely onto the left side of the wooden dowel. Thread the other end through the top hole of the moon and knot it so the moon hangs a few inches below the wood. -
Decorating the moon strand:
Thread the twine through the bottom hole of the moon. Slide on a copper bead, a cream bead, and a flat pearl bead, spacing them out with small knots to keep them floating in place. -
Finish the first strand:
Tie a darker brown clay star or a wooden star charm at the very bottom of this strand to act as a weight. -
Start the star strand:
Cut a second piece of twine, slightly longer than the first. Tie it to the right side of the dowel. Thread your first clay star onto the twine. -
Layering the stars:
Continue adding stars and alternating them with wooden beads. Tie small overhand knots underneath each element (star or bead) to hold them at specific heights, rather than letting them bunch at the bottom. -
Adding metallic accents:
Intersperse the copper and metallic beads between the white clay stars. The contrast between the matte clay and the shiny beads adds beautiful visual interest. -
Secure and trim:
Once all elements are tied at your desired heights, double-knot the very ends of the twine strings and trim any excess tail close to the knot.
Tip: Prevent Warping
Place a light book or flat board gently over your clay pieces while they are half-dry. This weight ensures they dry perfectly flat rather than curling up at the edges.
Troubleshooting: Cracks?
If small hairline cracks appear as the clay dries, make a watery paste using a tiny bit of fresh clay and water. Rub this ‘slip’ into the crack and let it dry again.
Hang your celestial mobile near a window to catch the shifting light and enjoy the calming atmosphere it creates
Birds-on-a-Branch Relief Plaque
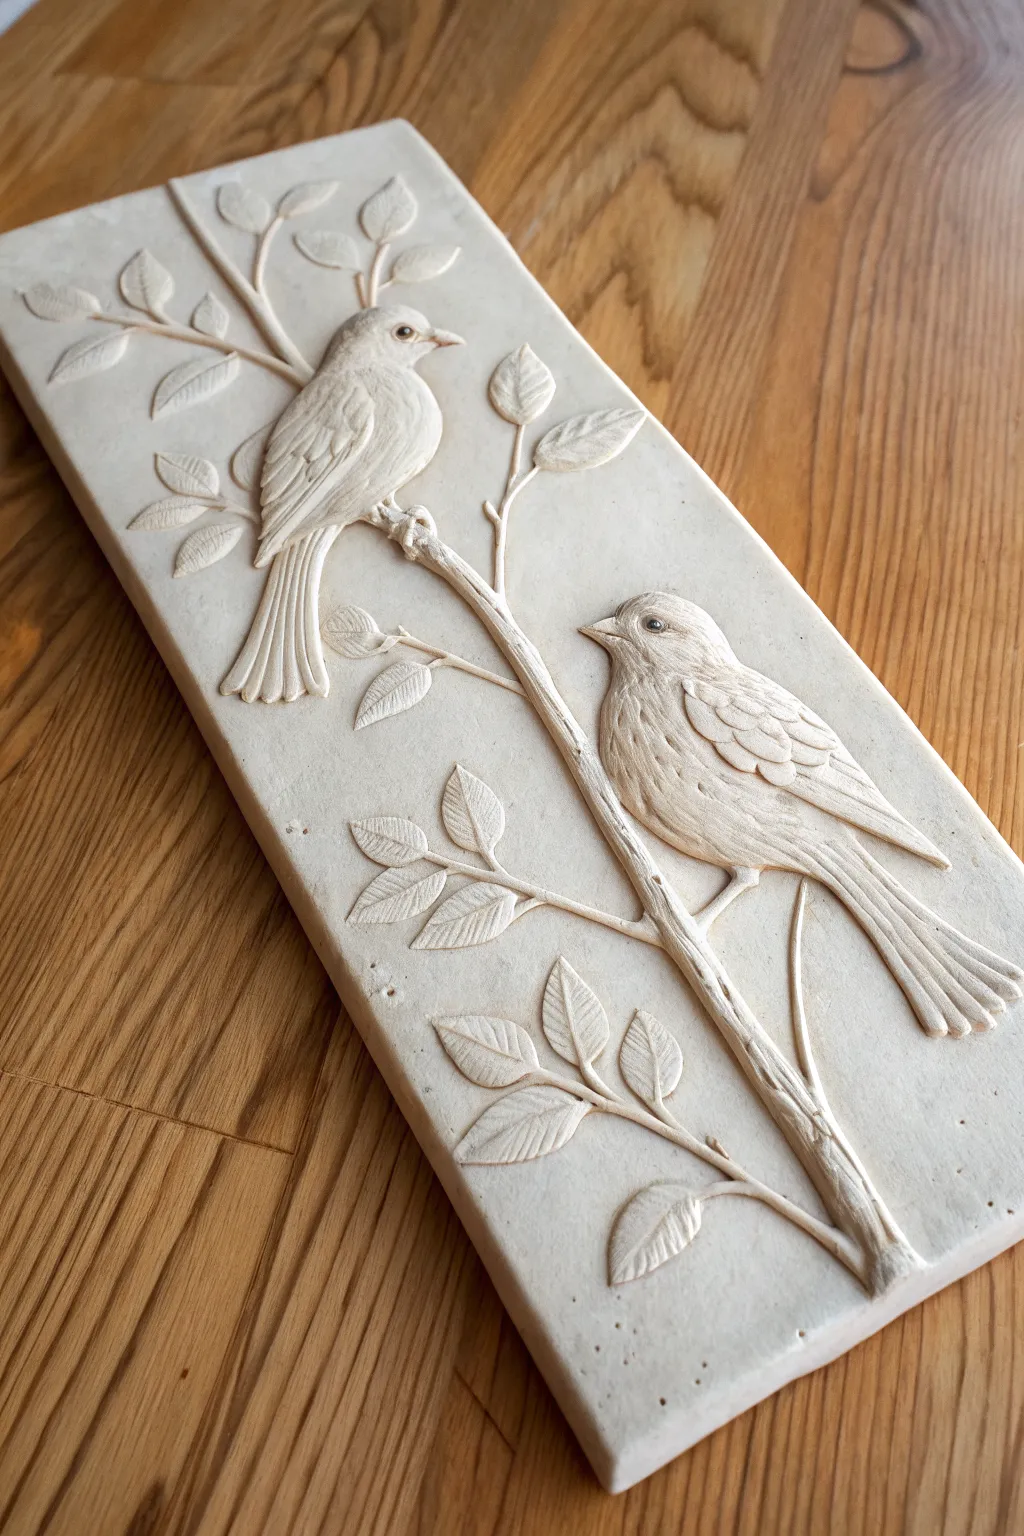
Capture the delicate beauty of nature with this elegant bas-relief clay project. The finished piece features two birds perched on leafy branches, sculpted in a monochromatic cream finish that highlights texture over color.
Step-by-Step Guide
Materials
- White or cream-colored air-dry clay (or polymer clay)
- Rolling pin with guide rings (1/4 inch thickness)
- Rectangular clay cutter or ruler and craft knife
- Sculpting tools (needle tool, small ball stylus, rubber shaper)
- Texture sheet or real leaves (optional)
- Small cup of water (for smoothing)
- Sandpaper (fine grit)
- Matte spray varnish
Step 1: Base Preparation
-
Condition and Roll:
Start by kneading your clay until it is soft, pliable, and free of cracks. Using your rolling pin and 1/4 inch guide rings, roll out a smooth, even slab that is roughly 4 inches wide by 10 inches tall. -
Cut the Shape:
Place your rectangular cutter or use a ruler and craft knife to cut a clean, sharp rectangle from the slab. Remove the excess clay and smooth the cut edges with a damp finger to remove any sharpness. -
Draft the Design:
Lightly sketch the main branch line and the placement of the two birds directly onto the wet clay using a needle tool. Keep the lines very faint; these are just guides for where your sculpting will happen.
Step 2: Sculpting the Branches and Leaves
-
Form the Branches:
Roll thin coils of clay (snakes) to act as the branches. Lay them over your sketched guide lines, tapering the ends slightly. -
Attach and Texture:
Press the coils firmly onto the base. Use a sculpting tool to drag small amounts of the coil clay onto the base to blend the seam, then use a needle tool to score bark-like lines along the length of the branch. -
Create Leaf Shapes:
Pinch off small pea-sized balls of clay and flatten them into teardrop shapes. You’ll need about 15-20 leaves of varying sizes. -
Attach Leaves:
Press the leaves onto the branches according to your composition. Ensure some overlap the branch slightly for a natural look. -
Detail the Leaves:
Using a needle tool or a small knife, press a central vein down the middle of each leaf. Then, create small diagonal veins branching out from the center line to add realistic texture.
Slip & Score
To ensure your branches and birds don’t fall off while drying, always scratch (score) the back of the clay piece and the base, then add a drop of water (slip) before pressing them together.
Step 3: Sculpting the Birds
-
Basic Bird Body:
Form two oval shapes for the bird bodies—one slightly larger for the lower bird. Flatten the back of the ovals and press them onto the clay slab where your branches intersect. -
Add the Head:
Add a smaller ball of clay for the head, blending the neck area seamlessly into the body using a rubber shaper tool. -
Wing Definition:
Roll a teardrop shape for the wing. Press it onto the side of the bird’s body. Use a small knife tool to carve scalloped layers to represent feathers, starting from the bottom of the wing and moving up. -
Tail Feathers:
Add an elongated, flattened triangle for the tail extending below the branch. Use a needle tool to draw long, parallel lines to simulate tail feathers. -
Facial Features:
Carefully sculpt a small triangular beak. Use a small ball stylus to press an indentation for the eye, and insert a tiny ball of clay into the socket for the pupil. -
Body Texturing:
I like to use a stiff brush or a needle tool to make tiny, short dash marks all over the bird’s chest and head to simulate fluffy down feathers.
Antique Finish
After sealing, apply a diluted brown acrylic wash over the piece and immediately wipe it off with a rag. The dark paint will stay in the feather and leaf crevices, making the details pop.
Step 4: Finishing Touches
-
Refining Edges:
Check the entire piece for stray clay crumbs or rough fingerprints. Smooth these away with a brush dipped in a tiny amount of water. -
Drying:
Allow the plaque to dry completely. For air-dry clay of this thickness, this usually takes 24-48 hours. Turn it over halfway through if possible to ensure the back dries evenly. -
Sanding:
Once bone dry, use fine-grit sandpaper to gently smooth the outer edges of the rectangular plaque for a polished, professional look. -
Sealing:
Work in a well-ventilated area to spray the piece with a matte varnish. This protects the relief without adding an unnatural shine.
Hang your new relief sculpture in a spot where angled light will hit it, bringing all those beautiful carved textures to life.
Terrazzo-Style Statement Slab
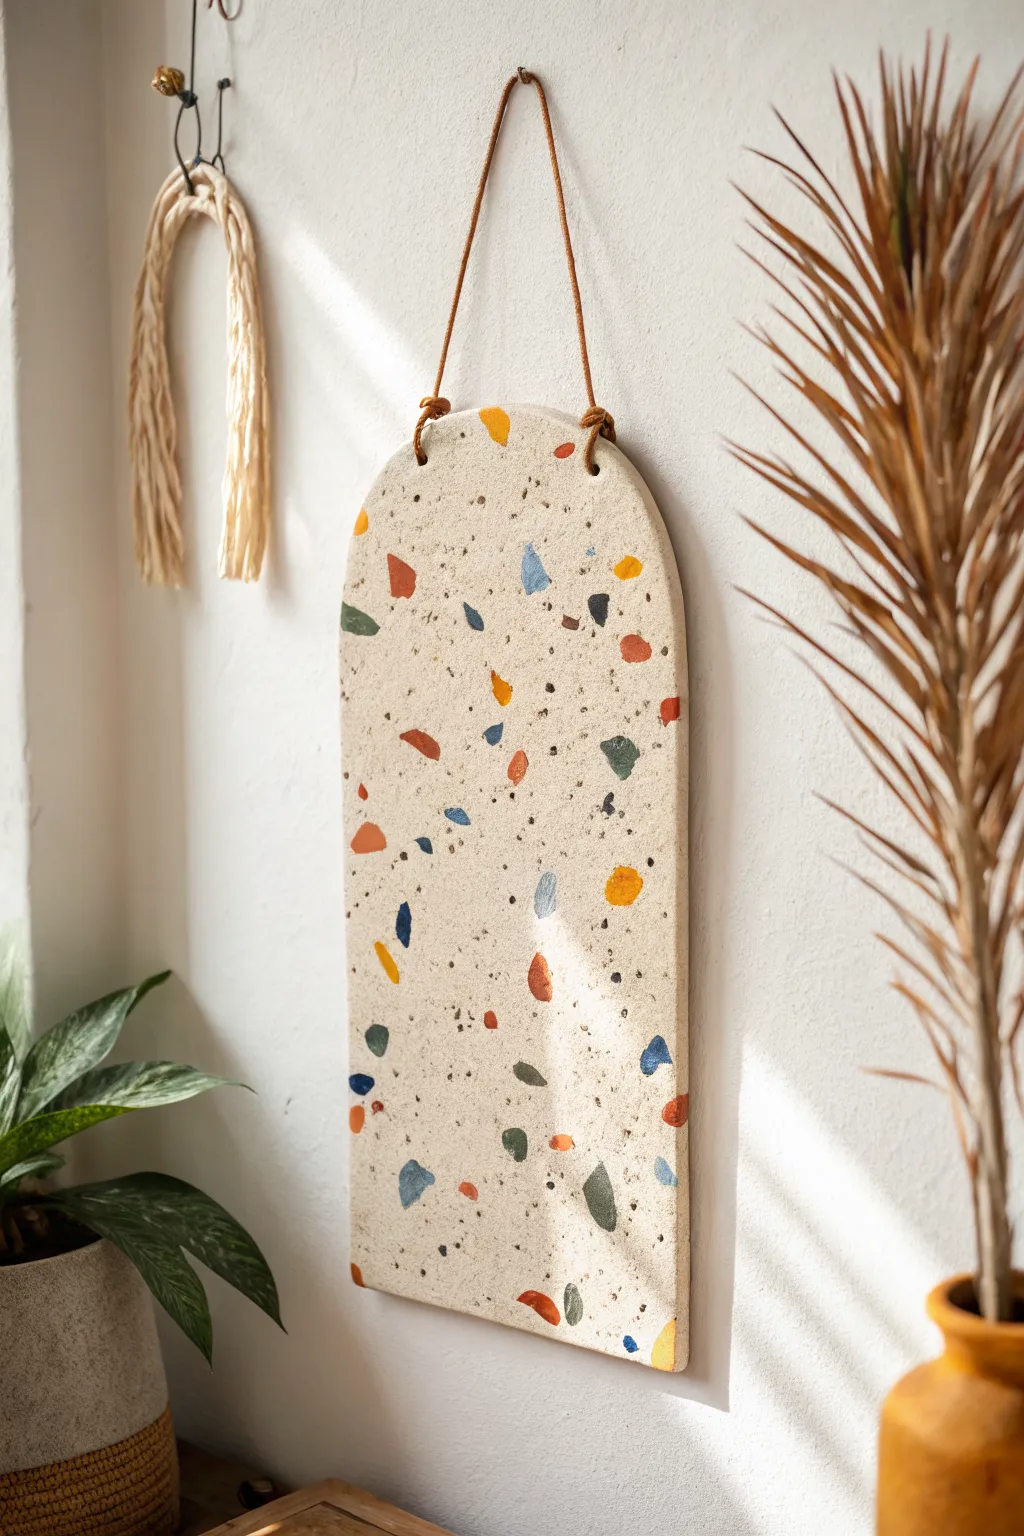
Bring the playful energy of Italian terrazzo into your home without using concrete or heavy tools. This faux-terrazzo wall hanging uses polymer clay and a clever painting technique to mimic the speckled stone look on a chic arch shape.
How-To Guide
Materials
- White or beige polymer clay (approx. 1 lb block)
- Acrylic rolling pin
- Sharp craft knife or clay blade
- Parchment paper
- Arch template (paper or cardboard)
- Round cookie cutter or straw (for hanging holes)
- Leather cord or twine
- Acrylic paints (terracotta, mustard yellow, navy blue, forest green, black)
- Small flat paintbrush
- Old toothbrush (for splatter effect)
- Fine-grit sandpaper
- Matte finish sealer (spray or brush-on)
- Oven
Step 1: Shaping the Clay Base
-
Prepare your workspace:
Lay down a piece of parchment paper on a flat surface to prevent the clay from sticking. This will also make transferring the slab to the baking sheet much easier later. -
Condition the clay:
Warm up your polymer clay by kneading it in your hands until it becomes soft and pliable. This prevents cracks during the rolling process. -
Roll out the slab:
Using your acrylic rolling pin, flatten the clay into a large, even slab. Aim for a thickness of about 1/4 inch (6mm) to ensure it’s sturdy enough to hang but not too heavy. -
Cut the arch shape:
Place your paper arch template onto the clay slab. Carefully trace around the edge with your craft knife to cut out the main shape. Remove the excess clay. -
Smooth the edges:
Dip your finger in a little water or baby oil and gently run it along the cut edges of the arch to soften any sharp corners for a more refined look. -
Create hanging holes:
Use a small round cutter or a thick straw to punch two holes near the top curve of the arch. Make sure they are centered and level with each other.
Stone Effect Tip
Mix a tiny pinch of black pepper or dried used coffee grounds into your white clay during the conditioning phase for an authentic, embedded gritty stone texture.
Step 2: Simulating the Terrazzo
-
Create the stone texture:
Before baking, lightly press a piece of coarse sandpaper or a textured sponge onto the surface of the clay. This gives it a realistic, stone-like grain rather than a perfect plastic finish. -
Bake the slab:
Transfer the parchment paper with the clay arch onto a baking sheet. Bake according to your clay package instructions (usually 275°F/135°C for 30 minutes per 1/4 inch of thickness). -
Cool completely:
Once baked, I like to let this cool inside the oven with the door cracked open to prevent any thermal shock cracking. Ensure it is fully cool before painting.
Step 3: Painting and Finishing
-
Paint the ‘chips’:
Using a small flat brush and your acrylic paints, paint irregular geometric shapes onto the surface. Mix up sizes—some small squares, some elongated triangles—to mimic crushed stone chips. -
Review color balance:
Alternate between your colors (terracotta, mustard, navy, green) ensuring they are scattered randomly. Avoid clustering too much of one color in a single spot. -
Add the speckled effect:
Dip an old toothbrush into black paint diluted slightly with water. Run your thumb across the bristles to flick tiny specks of paint onto the slab. This fills the negative space and ties the look together. -
Let the paint dry:
Allow the painted patterns to dry completely. This usually takes about 20–30 minutes depending on how thick your paint application was. -
Seal the piece:
Apply a coat of matte sealer over the entire front and sides. This protects the paint from scratching and eliminates any unnatural shine. -
Attach the cord:
Cut a length of leather cord. Thread each end through the holes from the back to the front. -
Secure the knots:
Tie a simple overhand knot on the front side of each hole. The knot should be large enough that it won’t slip back through the hole. -
Final adjustment:
Trim any excess cord sticking out from the knots and hang your new art piece on a hook or nail.
Level Up: 3D Texture
Instead of painting the shapes, press small, thin scraps of colored clay into the white slab before rolling it flat for a true inlaid terrazzo technique.
Hang your terrazzo arch in a bright spot where the natural light can highlight the lovely texture you created
Driftwood Totem With Clay Charms
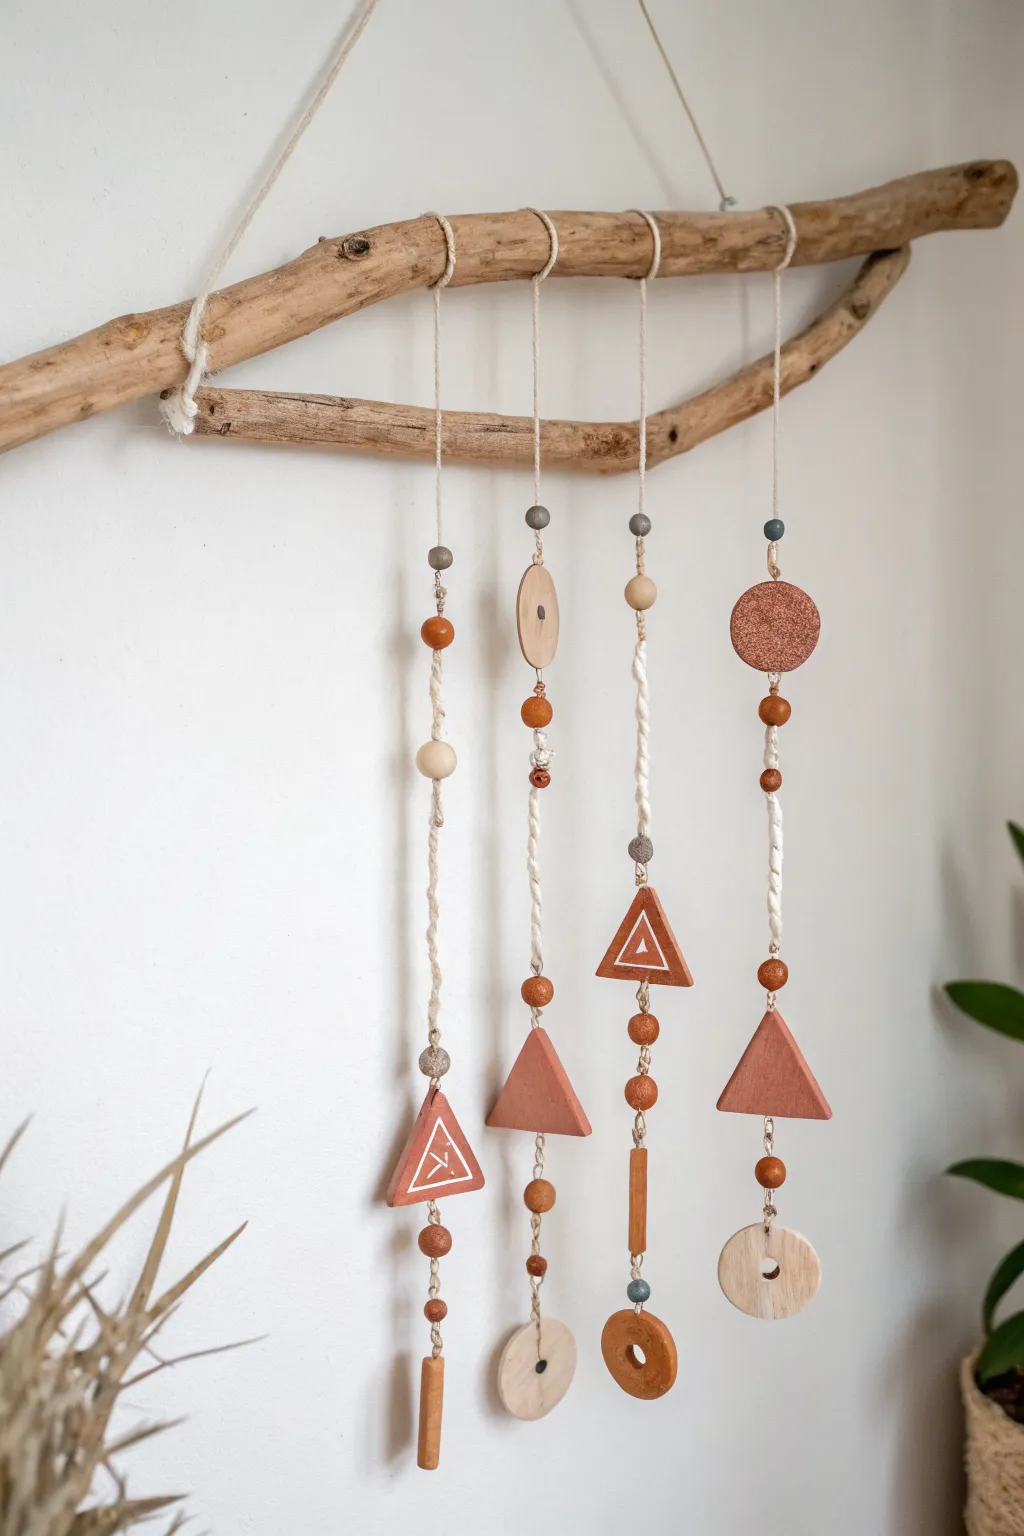
This rustic, nature-inspired wall hanging combines the raw beauty of driftwood with custom handmade clay charms. The earthy terracotta tones mixed with neutral woods create a calming, bohemian focal point perfect for any blank wall.
Step-by-Step Tutorial
Materials
- Air-dry clay (terracotta or white)
- A sturdy piece of driftwood (branched or straight)
- Acrylic paint (rust/terracotta, white, slate blue/grey)
- Natural cotton twine or hemp cord
- Rolling pin
- Clay cutting tools or a sharp knife
- Cookie cutters (circle and triangle) or stencils
- Toothpick, skewer, or drinking straw (for poking holes)
- Wooden beads (assorted sizes: large, medium, small)
- Fine-grit sandpaper
- Clear matte varnish (optional)
Step 1: Planning and Shaping the Clay
-
Prepare your workspace:
Lay down a piece of parchment paper or a silicone mat to prevent the clay from sticking to your table. Knead a large chunk of air-dry clay until it is warm and pliable. -
Roll out the slab:
Using a rolling pin, flatten the clay to a uniform thickness, about 1/4 inch thick. Try to keep it consistent so all pieces dry at the same rate. -
Cut geometric shapes:
Cut out your main shapes. For this design, you’ll need four large triangles, one large circle, one medium circle, one elongated oval, and a few small thick cylinders or squares to act as unique beads. -
Create the pass-through holes:
While the clay is still wet, use a skewer or a straw to punch holes in the pieces. Be strategic: vertical pendants need a hole at the top and bottom, while end-pieces only need a hole at the top. -
Smooth the edges:
Dip your finger in a little water and gently run it along the cut edges of your shapes to smooth out any roughness or burrs left by the cutting tool. -
Let them dry completey:
Place your clay pieces on a wire rack or leave them flat on parchment paper. Let them dry for 24-48 hours. I find flipping them over halfway through helps prevent warping.
Smooth Operator
Use a wet sponge to smooth clay edges before drying. It works better than sanding later because it keeps the hazardous dust down and creates a porcelain-like finish.
Step 2: Decorating and Finishing
-
Sand for perfection:
Once fully cured, use fine-grit sandpaper to gently buff the surfaces and edges until they are smooth to the touch. -
Paint the base colors:
Using a flat brush, paint your chosen clay pieces with the terracotta/rust acrylic paint. Leave some pieces raw or paint them white if you used non-terracotta clay, as shown in the natural wood-tone circles. -
Add detail work:
For the specific look in the photo, use a fine-tip brush and white paint to add geometric details to the triangles. Paint a smaller triangle inside a larger one, or add simple line details. -
Paint accent beads:
Take a few small wooden beads or your small handmade clay beads and paint them a slate blue or grey to add a pop of contrasting color. -
Seal the pieces:
If desired, apply a coat of clear matte varnish to protect the paint and give the clay a finished look without making it too glossy.
Step 3: Assembly
-
Cut the suspension cords:
Cut four lengths of cotton twine, each about 3 to 4 feet long. You want plenty of extra length for knotting. -
Attach cords to driftwood:
Tie each cord onto the driftwood branch using a lark’s head knot or a simple double knot. Space them out evenly along the branch. -
Start the beading sequence:
Begin threading your components. Use a mix of the handmade clay pieces and store-bought wooden beads. Secure each piece in place by tying a simple overhand knot directly underneath it. -
Vary the vertical spacing:
Create visual interest by varying the distance between beads. Leave an inch or two of exposed twine between some sections, and stack others tightly together. -
Incorporate the main pendants:
Tie on the large clay triangles and circles near the bottom third of the strands. Ensure the knots below them are bulky enough so the heavy clay pieces don’t slip off. -
Finish the ends:
At the very bottom of each strand, tie a final decorative clay charm or a heavy wooden bead. Trim any excess twine below the final knot for a clean finish. -
Add the hanging loop:
Cut a final piece of sturdy twine and tie it to both ends of the driftwood branch to create a hanger for the wall.
Natural Texture
Before the clay dries, gently press a piece of linen or burlap into the surface. This adds a subtle fabric texture that holds the paint beautifully.
Hang your new totem in a spot that gets good light to show off the earthy textures