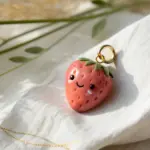
If you’re craving a project that feels soft, dreamy, and a little magical, cloud clay is such a fun place to play. I’ve pulled together my favorite cloud clay ideas—from classic cute clouds to functional pieces that still feel light-as-air.
Kawaii Cloud Faces
Brighten your desk with this incredibly sweet, smiling cloud figurine that radiates calm and happiness. Its soft, pillowy curves and minimalist kawaii features make it a perfect beginner sculpting project that captures the whimsical charm of a sunny day.
Step-by-Step
Materials
- White polymer clay or air-dry clay (smooth texture)
- Black acrylic paint or fine-point permanent marker
- Soft pink pastel chalk or acrylic paint
- Small round paintbrush
- Detail brush or dotting tool
- Smooth work surface or mat
- Rolling pin (acrylic or wooden)
- Foil or scrap clay for armature (optional)
Step 1: Shaping the Cloud Base
-
Conditioning:
Start by taking a generous joyful handful of white clay. Knead it thoroughly in your hands until it becomes warm, soft, and pliable. This conditioning step is crucial to prevent cracks later on. -
Forming the Core:
Roll the clay into a smooth ball. Then, gently flatten the bottom against your work surface to create a stable base so your cloud can stand upright on its own. -
Creating the Mounds:
Begin shaping the characteristic cloud bumps. Instead of adding separate balls, gently pinch and push the clay from the main mass upwards to form three distinct mounds. -
Refining the Silhouette:
Make the central mound slightly larger and taller than the two side mounds. This creates that classic, fluffy cumulus shape. -
Smoothing the Surface:
Use the pad of your thump to gently rub away any fingerprints or seams. I like to dip my finger in a tiny bit of water (for air-dry clay) or baby oil (for polymer) to get an ultra-smooth, marshmallow-like finish. -
Checking Stability:
Give your cloud a little tap to ensure it doesn’t rock. If it does, press the bottom firmly against the table again to level it out.
Step 2: Adding the Kawaii Features
-
Preparation for Face:
Before adding details, look at your cloud and decide which side has the smoothest surface; this will be the face. Keep the symmetry in mind. -
Planning the Eyes:
Visualize two small ‘U’ shapes for the sleepy eyes. They should be placed slightly lower than the center line to achieve that cute, high-forehead kawaii look. -
Painting the Eyes:
Using a very fine detail brush and black acrylic paint, carefully paint two small semi-circles. The curves should be gentle and downwards-facing. -
Eyelash Details:
If you want extra cuteness, you can add tiny little ticks at the outer corners of the eyes for lashes, though a simple line works beautifully too. -
Drawing the Smile:
Paint a small, simple upwards curve right between the eyes. Keep it subtle and centered to give it a contented expression. -
Drying the Black Paint:
Let the black paint dry completely before moving on to the cheeks to avoid smudging greys into your pinks. -
Creating Blush (Option A):
For a soft, airbrushed look, scrape a little pink pastel chalk into dust. Use a dry, soft brush to gently dab this powder onto the cheek area. -
Creating Blush (Option B):
For the solid look seen in the photo, mix a soft pink acrylic paint. Use a dotting tool or the back of a paintbrush handle to stamp two perfect circles just outside and below the eyes. -
Check Texture:
If the pink paint looks too flat, dab it lightly with a clean sponge or textured cloth while wet to give it a slightly organic, stamped feel.
Clean Hands, Clean Cloud
White clay attracts dust like a magnet. Keep a pack of wet wipes nearby and clean your hands and tools constantly to keep your cloud bright white.
Step 3: Finishing Up
-
Final Inspection:
Look over your cloud for any accidental smudges or dust particles. Gently pick them off with a piece of sticky tape or a damp brush. -
Drying or Baking:
If using air-dry clay, set it in a dry, safe spot for 24-48 hours. If using polymer clay, bake according to the manufacturer’s instructions on the packet. -
Protective Coat:
Once fully cured or dry, you can apply a matte varnish to protect the paint and keep the clay white, though leaving it raw preserves that soft, matte texture.
Make it a Set
Create a whole sky family by making a smaller grey cloud with a sad face, or a bright yellow sun friend to sit next to your happy cloud.
Now you have a serene little friend to keep you company on your windowsill


Rainbow Cloud Arch Plaques

Create a serene nursery decoration or tactile toy with this charming rainbow arch and cloud set. Featuring soft, muted pastels and a smooth matte finish, this project combines the structure of layered arches with the whimsy of a fluffy cloud shape.
Step-by-Step Tutorial
Materials
- Air-dry clay (white) or polymer clay
- Rolling pin with thickness guides
- Craft knife or scalpel blade
- Sandpaper (fine grit, 400-600)
- Acrylic paints (pastel pink, peach, pale yellow, mint, light blue, white)
- Matte sealant or varnish
- Circle cutter or round template (approx. 4-5 inches)
- Round wooden disc (for the base)
- Strong craft glue (e.g., E6000 or wood glue)
Step 1: Shaping the Rainbow Arches
-
Prepare the Clay:
Condition your clay until it is soft and pliable. Use a rolling pin to roll out a large slab of clay to a uniform thickness of about 0.5 inches. -
Cut the Base Arch:
Using a large circle cutter or a bowl as a template, cut out a semi-circle shape. This will be the outermost arch of your rainbow. -
Create Inner Layers:
Carefully cut concentric semi-circles from within that first shape to create the nested arches. Aim for about 5-6 distinct layers. -
Refine the Edges:
Dip your finger in a little water and smooth down any rough cut edges on each arch piece while the clay is still wet. -
Dry the Arches:
Lay the arches flat on a clean surface to dry. If using air-dry clay, let them cure for 24-48 hours, flipping them occasionally to prevent warping.
Step 2: Crafting the Cloud & Base
-
Sculpt the Cloud:
Roll out a thick piece of white clay, slightly thicker than your arches. Use a craft knife to cut out a fluffy cloud shape with a flat bottom. -
Smooth the Cloud Form:
Use your dampened fingertips to round off the harsh edges of the cloud cut-out, giving it a soft, puffy appearance. -
Dry the Cloud component:
Allow the cloud piece to dry completely alongside your arches. -
Prepare the Base:
While the clay dries, take your wooden round disc. If it feels rough, give it a quick sanding. -
Initial Sanding:
Once all clay pieces are fully bone-dry, use fine-grit sandpaper to gently smooth out any imperfections or bumps for a professional finish.
Smoother Cuts
Apply a tiny bit of lotion to your craft knife blade before cutting the raw clay. It helps the blade glide through without dragging or snagging the clay.
Step 3: Painting and Assembly
-
Mix Pastel Shades:
In the palette, mix your acrylics with white to achieve soft, muted pastel tones: blush pink, apricot, cream yellow, sage green, and sky blue. -
Paint the Arches:
Paint each arch a different pastel color, starting with the largest arch in pink and working inward to blue. Apply 2-3 thin coats for full coverage. -
Paint the Cloud:
Give the cloud shape two coats of bright white paint to maximize the contrast against the wooden base. -
Seal the Pieces:
Coat all painted clay pieces with a matte varnish. I like to do this before gluing so I don’t get glossy buildup in the corners. -
Arrange the Rainbow:
Glue the rainbow arches vertically onto the wooden base. Ensure they are centered and standing straight up. -
Attach the Cloud:
Apply a generous amount of strong glue to the bottom of the cloud and the back where it touches the rainbow. -
Final Placement:
Press the cloud firmly against the front of the rainbow arches and the wooden base. Hold it in place for a minute to let the bond tack up.
Make it Sparkle
Mix ultra-fine iridescent glitter into the white paint for the cloud, or use a pearlescent topcoat on just the smallest blue arch for a magical shimmer.
Place this lovely handmade piece on a shelf where it can catch the morning light


Cloud Charms and Keychains
These adorable cloud charms bring a touch of kawaii sweetness to any set of keys or backpack zipper. The project features soft pastel colors and charming, sleepy expressions for a relaxed, handcrafted vibe.
How-To Guide
Materials
- Polymer clay in white, light pink, and mint green
- Rolling pin or smooth glass jar
- Cloud-shaped clay cutter (small) or X-Acto knife
- Needle tool or toothpick
- Black fine-tip acrylic paint pen or permanent marker
- Pink acrylic paint or pink chalk pastel
- Small dotting tool or brush
- Jump rings (silver tone)
- Keychain hardware with chain
- Jewelry pliers
- Eye pins (if not drilling holes after baking)
- Gloss glaze (optional)
Step 1: Shaping the Clouds
-
Condition the clay:
Begin by kneading your white polymer clay until it is soft and pliable. If you want colored clouds, mix a tiny amount of pink or green into the white to achieve those soft pastel shades seen in the example. -
Roll it out:
Roll the clay on a clean, flat surface to a thickness of about 1/4 inch (6mm). You want them thick enough to be sturdy as keychains. -
Cut the shapes:
Use a small cloud-shaped cookie cutter to punch out your shapes. If you don’t have a cutter, I like to lightly sketch the shape with a needle tool and then carefully cut it out with a craft knife. -
Soften the edges:
Gently tap the edges of the cut clay with your finger to round them off slightly, removing any sharp angles from the cutter. -
Add texture:
Take your needle tool or a clean toothbrush and gently stipulate the surface if you want a stone-like texture, or keep it perfectly smooth for a marshmallow look.
Fixing Smudges
If you mess up the painted face, use a cotton swab dipped in a tiny bit of rubbing alcohol (if using marker) or scrape gently with a blade (if paint) to fix it before sealing.
Step 2: Adding Details and Baking
-
Insert the hardware:
Carefully insert a silver eye pin into the top center bump of the cloud. Ensure it goes deep enough to be secure but doesn’t poke through the back. -
Double-check structure:
Smooth the clay around the entry point of the eye pin to seal it in place. -
Bake the clay:
Place your clouds on a ceramic tile or baking sheet lined with parchment paper. Bake according to your clay package instructions (usually 275°F/135°C for 15-30 minutes). -
Cool down:
Let the pieces cool completely before handling them. They harden fully as they cool.
Step 3: Face Design and Assembly
-
Draw the eyes:
Using a fine-tip black paint pen or permanent marker, draw two small arched lines for smiling eyes. Vary them by adding little eyelashes to some for personality. -
Add the smile:
Draw a tiny ‘u’ shape slightly centered between the eyes for the mouth. -
Create rosy cheeks:
Dip a small dotting tool or the end of a toothpick into pink acrylic paint. Dab two small oval spots horizontally under the eyes to create blushing cheeks. -
Let the paint dry:
Wait for the paint to dry completely to avoid smudging. -
Optional glazing:
If you want a shiny finish or to protect the paint, apply a thin layer of polyurethane gloss varnish. -
Open the jump ring:
Use two pairs of jewelry pliers to twist open a jump ring laterally. -
Attach the chain:
Loop the open jump ring through the eye pin on the cloud and the bottom link of your keychain hardware. -
Secure the finish:
Twist the jump ring closed again with your pliers, ensuring the gap is perfectly shut so the cloud doesn’t fall off.
Add Raindrops
Make tiny teardrop shapes from blue clay and attach them to the bottom of the cloud with small jump rings for a dangling mobile effect.
Clip these cheerful little clouds onto your bag and enjoy your rainy day crafting success


Cloud Trinket Dishes
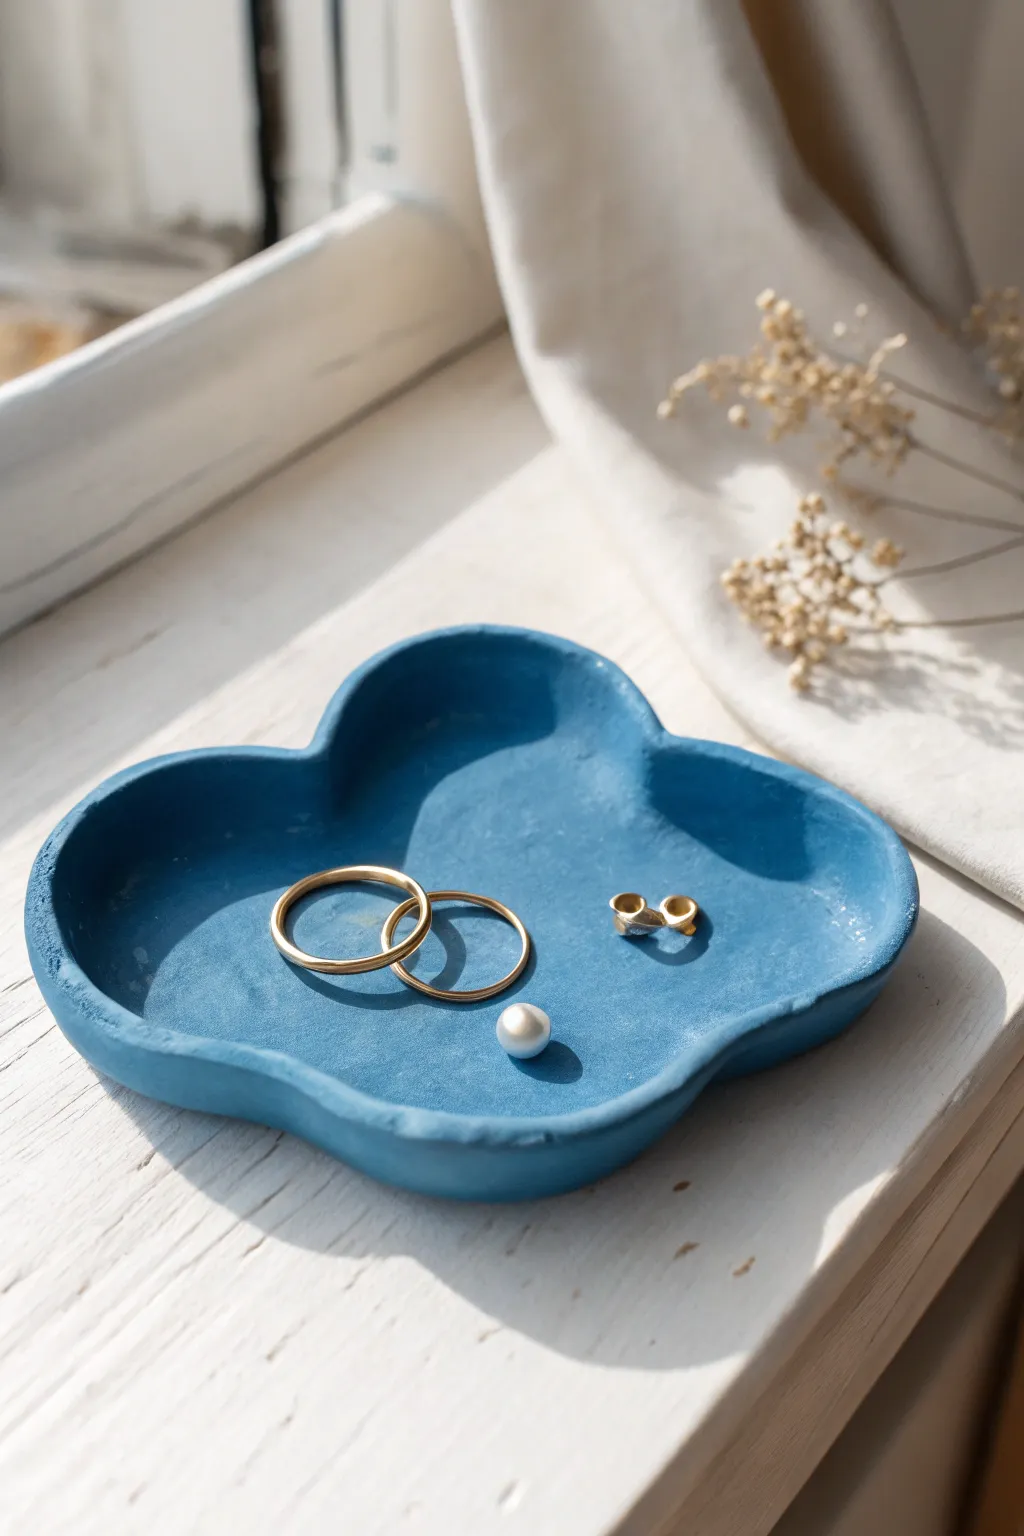
This whimsical trinket dish brings a touch of sky-blue serenity to any vanity or bedside table. Shaped like a soft, fluffy cloud with raised edges, it’s the perfect little spot to safeguard your favorite rings and earrings.
Step-by-Step Guide
Materials
- Air-dry clay (white or terracotta)
- Drying board or parchment paper
- Rolling pin
- Cloud template (printed or hand-drawn on cardstock)
- Craft knife or clay needle tool
- Small bowl with water
- Sponge or soft paintbrush
- Fine-grit sandpaper (220-400 grit)
- Acrylic paint (deep sky blue)
- Matte or satin varnish/sealant
- Paintbrushes (flat shader and soft round)
Step 1: Shaping the Base
-
Prepare the Clay:
Start by taking a handful of air-dry clay. Knead it in your hands for a minute or two to warm it up and make it pliable, removing any initial air bubbles. -
Roll it Out:
Place the clay on a smooth surface covered with parchment paper. Use a rolling pin to flatten it into an even slab, aiming for a consistent thickness of about 1/4 inch (6mm). -
Create the Template:
Draw a simple cloud shape on a piece of cardstock or thick paper. Look for a shape with 4-5 rounded bumps for that classic cartoon cloud look. Cut this template out. -
Trace and Cut:
Lay your paper template gently on top of the rolled clay. Using a craft knife or needle tool held vertically, carefully trace around the edge to cut out your cloud shape. -
Smooth the Edges:
Remove the excess clay. Dip your finger in a little bit of water and run it along the cut edges of the clay to smooth out any sharpness or jagged bits left by the knife.
Smooth Moves
Use a little bit of water on your fingertip to smooth out cracks while shaping, but avoid soaking the clay, or it will become weak and mushy.
Step 2: Building the Form
-
Lift the Edges:
Gently lift the edges of the cloud upwards with your fingers to create a shallow rim. You want the sides to stand up about half an inch to keep jewelry secure. -
Pinch and Refine:
Use a gentle pinching motion to thin out the top of the rim slightly. As I work around the curves, I like to use my thumb on the inside and index finger on the outside to maintain the cloud’s bouncy shape. -
Smooth the Interior:
Use a slightly damp sponge or a wet paintbrush to smooth out the transition where the base meets the walls. There shouldn’t be a sharp crease, but rather a gentle curve. -
Final Shaping Check:
Look at the dish from all angles. Adjust any bumps that look uneven and ensure the bottom is flat so it won’t wobble on a table. -
Let it Dry:
Set the dish aside in a cool, dry place. Allow it to air dry for 24-48 hours. Flip it over gently halfway through the drying process to ensure the bottom dries evenly.
Cloudy Accents
Before the clay dries, gently press small pearl beads into the rim or the center of the dish for a built-in decorative element.
Step 3: Finishing Touches
-
Sand Imperfections:
Once fully bone dry, inspect the dish for rough spots. Take a piece of fine-grit sandpaper and lightly buff the rim and surface until it feels smooth to the touch. -
Wipe Clean:
Use a dry brush or a slightly damp cloth to remove all the clay dust created by sanding. The surface needs to be dust-free for the paint to adhere properly. -
Base Coat:
Load a flat brush with your deep sky blue acrylic paint. Apply a thin, even layer over the entire top surface and rim. Let this layer dry to the touch. -
Second Coat:
Apply a second coat of blue to achieve an opaque, solid color. Don’t forget to paint the underside of the dish as well once the top is dry. -
Add Texture (Optional):
To mimic the matte, slightly earthy texture seen in the photo, you can dab the wet paint lightly with a dry sponge or paper towel rather than brushing it perfectly smooth. -
Seal the Project:
Finish by applying a coat of matte or satin varnish. This protects the paint from chipping and gives the dish a professional, finished look.
Now you have a charming, handmade spot to keep your smallest treasures organized and safe

The Complete Guide to Pottery Troubleshooting
Uncover the most common ceramic mistakes—from cracking clay to failed glazes—and learn how to fix them fast.
Hanging Cloud With Rainbow Rain
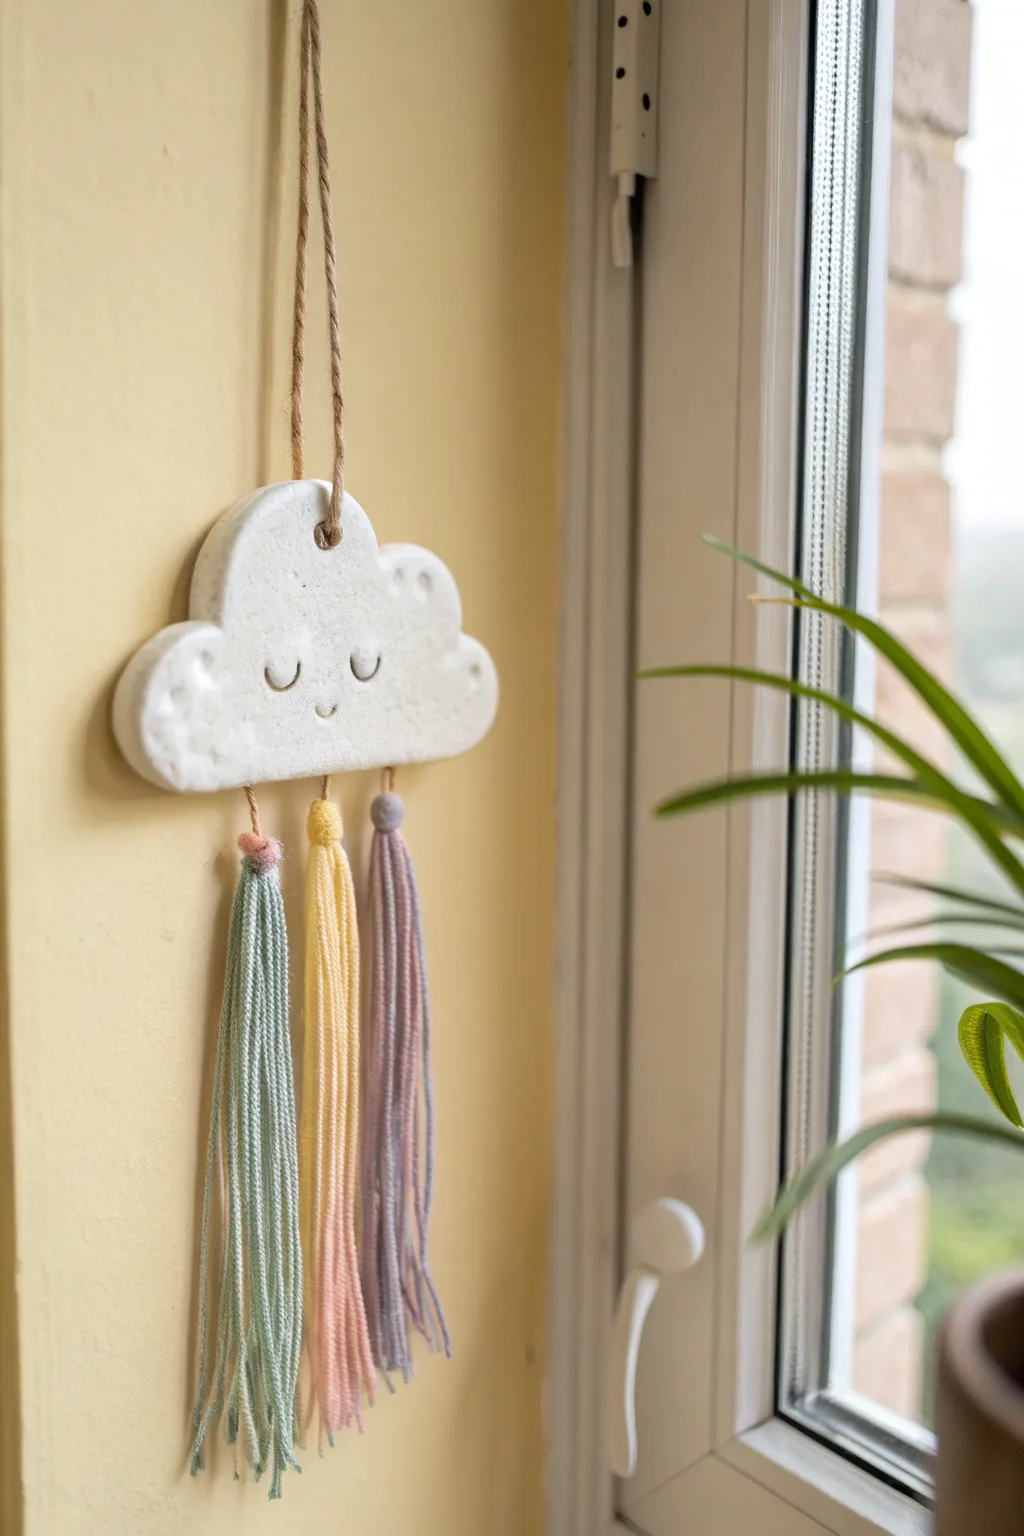
Bring a little textural joy to your walls with this sweet clay cloud mobile. Featuring a minimalist sculpted face and soft pastel yarn rain, it strikes the perfect balance between modern decor and playful nursery art.
How-To Guide
Materials
- White styling clay (air-dry or polymer, depending on preference)
- Rolling pin
- Cloud cookie cutter (large) or a printed template and craft knife
- Small sculpting tool or ball stylus
- Jute twine for hanging
- Yarn in three pastel colors (light blue, yellow, lavender)
- Multipurpose craft glue or hot glue gun
- Toothpick or skewer
- Scissors
- Fine-grit sandpaper (optional)
- Clear matte sealant (optional)
Step 1: Sculpting the Cloud
-
Condition and Roll:
Start by kneading a handful of white clay until it is soft, warm, and pliable. Roll it out on a smooth surface to an even thickness of about 1/4 inch (6mm). -
Cut the Shape:
Press your cloud cookie cutter firmly into the clay. If you don’t have a cutter, place a paper template on the clay and carefully trace around it with a craft knife to cut out the shape. -
Smooth the Edges:
Dip your finger in a little water (for air-dry clay) and gently run it along the cut edges. This softens any sharp corners or rough spots left by the cutting tool. -
Add Suspension Holes:
Using a toothpick or skewer, poke a hole near the top center of the cloud for the hanging loop. Wiggle the tool slightly to ensure the hole is large enough for your jute twine. -
Create Rain Holes:
Poke three evenly spaced holes along the straight bottom edge of the cloud. These will serve as anchor points for your yarn tassels later. -
Sculpt the Features:
To make the sleeping eyes, use a small U-shaped sculpting tool or press the side of a straw into the clay to create two crescent curves. Use a smaller round tool to impress a tiny smile centered below the eyes. -
Dry the Clay:
Let your cloud dry completely according to the package instructions. If using air-dry clay, flip it over halfway through the drying process to prevent curling.
Step 2: Creating the Rain Tassels
-
Review and Sand:
Once the cloud is fully hardened, check for any rough spots. I usually give the edges a quick pass with fine-grit sandpaper for a professional finish. -
Cut Yarn Bunches:
For each color of rain, cut roughly 6-8 strands of yarn, each about 10 inches long. You want enough strands to create a nice, full tassel. -
Anchor the Yarn:
Take one bunch of yarn (e.g., light blue) and fold it in half. Feed the folded loop through one of the bottom holes from front to back, then pull the loose ends through that loop to create a lark’s head knot. -
Repeat for Colors:
Repeat the previous step with the yellow yarn in the center hole and the lavender yarn in the final hole. -
Wrap the Tassels:
Cut a separate short piece of matching yarn for each tassel. Tie this piece tightly around the top of the tassel bundle, just below the knot attached to the cloud, to create a distinct ‘neck’ for the tassel. -
Trim the Rain:
Comb the yarn strands straight with your fingers. Use sharp scissors to trim the bottoms evenly so all three tassels hang at the same length.
Fixing Cracks
If small cracks appear as your clay dries, mix a tiny bit of fresh clay with water to make a paste (slip) and fill the crack, then smooth it over with a finger.
Step 3: Final Assembly
-
Secure the Knots:
For extra durability, you can add a tiny dot of glue to the back of the yarn knots where they meet the clay to stop them from shifting. -
Add the Hanger:
Cut a length of jute twine. Thread it through the top hole and tie a secure knot. -
Hide the Knot:
Pull the twine so the knot rests on the back side of the cloud, creating a clean loop for hanging from the front.
Add Sparkle
Before the sealant dries, dust a little iridescent glitter over the white cloud surface to make it shimmer in the sunlight like a real rain cloud.
Hang your cheerful new creation near a window and enjoy the handcrafted charm it brings to your space
Pastel Swirl Cloud Clay
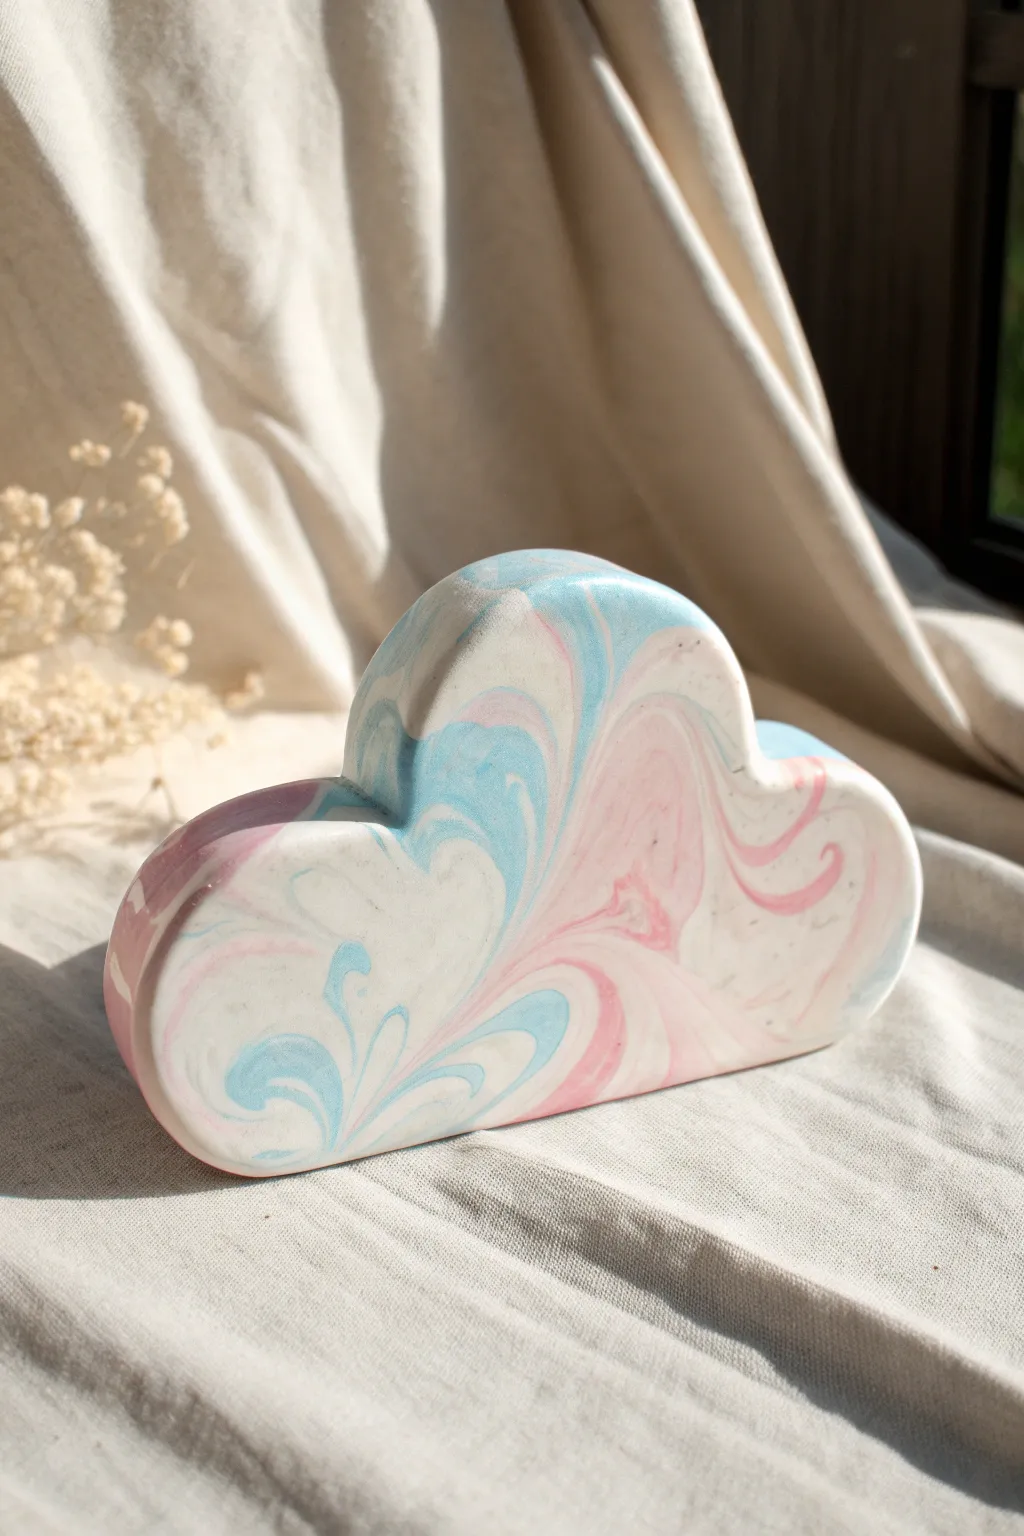
Capture the ethereal beauty of a sunset sky with this solid cloud sculpture featuring gentle swirls of baby blue, soft pink, and white. This self-standing piece creates a calming, whimsical accent perfect for a nursery shelf or a modern desk setup.
Step-by-Step Guide
Materials
- White polymer clay (approx. 2 blocks)
- Pastel pink polymer clay
- Pastel blue polymer clay
- Rolling pin (acrylic preferred)
- Cloud-shaped cookie cutter (large) or X-Acto knife and cardstock template
- Ceramic tile or glass work surface
- Fine-grit sandpaper (400, 600, and 1000 grit)
- Baking tray and parchment paper
- Optional: Gloss or satin glaze for finish
Step 1: Preparing the Clay
-
Condition the white clay:
Begin by taking your white polymer clay and kneading it thoroughly in your hands until it becomes soft, warm, and pliable. This is the bulk of your cloud, so use a generous amount. -
Prepare accent colors:
Condition smaller amounts of the pastel pink and pastel blue clay separately. You want about a 4:1 ratio of white to colored clay to maintain that light, airy look. -
Create clay ropes:
Roll each color of clay into long, snake-like ropes. Make the white ropes thicker and the colored ropes thinner to control the color distribution. -
Bundle the colors:
Gather the ropes together, twisting them gently into one large log. I like to alternate the placement of pink and blue strands around the white core.
Keep it Clean
White clay picks up dust instantly! Wipe your work surface, tools, and hands with a baby wipe or alcohol before handling the white clay to keep it pristine.
Step 2: Marbling Technique
-
Twist and fold:
Twist the large log tightly like a candy cane, then fold it in half. Roll it out into a log again. -
Repeat the fold:
Repeat the twisting, folding, and rolling process 3-4 times. Be careful not to over-mix, or the colors will turn muddy instead of distinct swirls. -
Form a ball:
Once you see nice streaks of color throughout the log, squish the clay into a compact ball. This compresses the layers and prepares it for rolling.
Step 3: Shaping the Cloud
-
Roll the slab:
Place the clay ball on your smooth work surface. Use your acrylic roller to flatten it into a thick slab, approximately 1 inch (2.5 cm) thick. We want a chunky, stand-up cloud. -
Check the thickness:
Ensure the thickness is consistent across the entire slab so the final piece stands upright without wobbling. -
Cut the shape:
Press your cloud cutter firmly into the best part of the marbled pattern. If using a paper template, place it on the clay and carefully trace around it with an X-Acto knife. -
Smooth the edges:
Gently lift the cloud shape. Use your finger or a smoothing tool to rub away any sharp edges or fingerprints left from the cutting process.
Colors Too Muddy?
If your colors blended into a solid purple or grey, you over-kneaded. Next time, stop twisting and folding as soon as you see distinct stripes appear.
Step 4: Baking and Finishing
-
Preheat the oven:
Set your oven to the temperature recommended on your specific brand of polymer clay (usually around 230°F to 265°F or 110°C to 130°C). -
Bake carefully:
Place the cloud on a parchment-lined baking tray. Bake for roughly 45-60 minutes depending on the thickness; thicker pieces need longer to cure fully. -
Cool down:
Turn off the oven and let the clay cool completely inside. This gradual cooling prevents cracking. -
Sand for smoothness:
Once cool, wet-sand the piece under a trickle of water. Start with 400 grit to shape any bumps, move to 600, and finish with 1000 grit for a silky touch. -
Buff to shine (Optional):
Vigorously rub the dried cloud with a piece of denim or a soft cotton cloth to bring out a natural sheen, or apply a thin layer of satin glaze if you prefer a wet look.
Place your finished cloud on a sunny windowsill where the light can highlight the delicate swirls


What Really Happens Inside the Kiln
Learn how time and temperature work together inside the kiln to transform clay into durable ceramic.
Smiling Storm Cloud With Raindrops
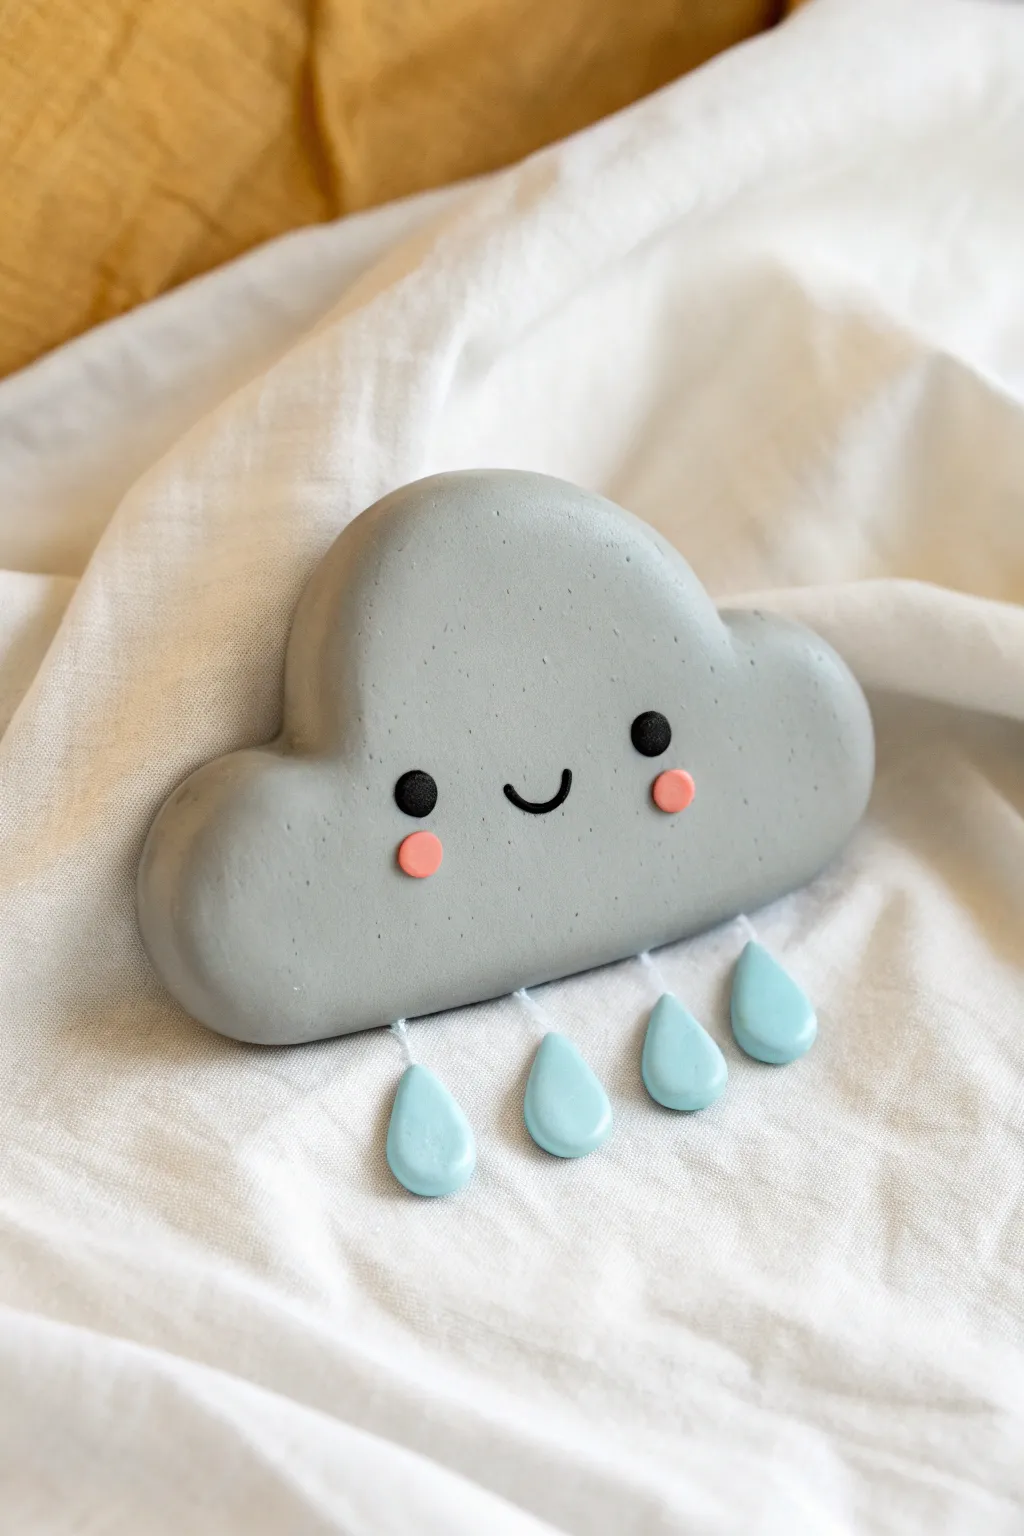
Bring a little stormy sweetness into your craft collection with this adorable grey cloud sculpture. Featuring dangling raindrops and a charming little face, this smooth clay creation is perfect for a nursery shelf or a rainy day desktop friend.
Detailed Instructions
Materials
- Polymer clay (grey, light blue, pink, and black)
- White sewing thread or fishing line
- Rolling pin or smooth acrylic roller
- Clay carving tools or a needle tool
- Small round cutter (optional, for cheeks)
- Strong craft glue (like superglue or E6000)
- Oven for baking polymer clay
- Parchment paper
Step 1: Sculpting the Cloud Body
-
Condition the grey clay:
Start by taking a substantial block of grey polymer clay. Knead it thoroughly in your hands until it becomes soft, pliable, and warm to the touch. -
Form the base shape:
Roll the grey clay into a smooth ball first to remove seams, then flatten it gently into a thick pancake, about 1/2 to 3/4 inch thick. -
Contour the curves:
Use your fingers to push and pinch the edges of the flattened shape to create the cloud’s signature humps. Aim for one large central hump at the top and two lower, rounded edges on the sides. -
Smooth the surface:
Gently rub your finger over the surface of the cloud to buff away any fingerprints. I find that a tiny drop of baby oil can help achieve a perfectly glass-smooth finish here. -
Flatten the base:
Tap the bottom edge of the cloud firmly against your work surface. You want a flat bottom so the holes for the rain can be easily accessed later. -
Create hanging holes:
Using a needle tool or toothpick, carefully poke four evenly spaced holes into the flat bottom edge of the cloud. Insert the tool about a quarter-inch deep.
Step 2: Creating the Raindrops
-
Shape the drops:
Take your light blue clay and divide it into four small, equal portions. Roll each piece into a teardrop shape, keeping the bottom bulbous and the top slightly tapered. -
Add attachment holes:
With your needle tool, pierce a hole through the top tapered point of each raindrop. Ensure the hole goes all the way through for threading later. -
Flatten the drops slightly:
Gently press each raindrop against your work surface so they are slightly flattened rather than fully round. This helps them hang nicely.
Keep it Clean
Before switching from black or grey clay to the light blue or pink colors, clean your hands thoroughly with a wet wipe. Dark pigments transfer easily and can ruin the pastel tones.
Step 3: Adding the Facial Details
-
Make the eyes:
Roll two tiny specks of black clay into balls. Press them gently onto the cloud face, spacing them widely apart for that cute ‘kawaii’ look. -
Add the cheeks:
Take a very small amount of pink clay and split it in two. Flatten these into tiny discs and press them onto the cloud, just below and outside the eyes. -
Create the smile:
Roll an extremely thin snake of black clay. Cut a small curved segment and carefully press it into the center of the face to create a U-shaped smile.
Turn it into a Mobile
Make the cloud double-sided by adding a face to the back. Insert a hook screw into the top before baking to hang the entire sculpture from the ceiling.
Step 4: Assembly and Baking
-
Bake the clay pieces:
Place the main cloud body and the four raindrops on a baking sheet lined with parchment paper. Bake according to your specific clay package’s instructions (usually 275°F for 15-30 minutes). -
Cool down:
Allow all pieces to cool completely before handling. The clay is fragile when hot. -
Cut the threads:
Cut four pieces of white thread, each about 3 inches long. This gives you plenty of room to tie knots without struggling. -
Thread the drops:
Feed a thread through the hole of a raindrop. Tie a small knot at the top of the drop, or create a loop, trimming any excess short tail. -
Attach to the cloud:
Put a tiny dab of strong craft glue into one of the holes on the bottom of the cloud. Use your needle tool to push the loose end of the thread into the hole. -
Secure and dry:
Repeat for all four raindrops. Let the glue cure fully while the cloud is supported upright so the strings don’t tangle.
Once the glue sets, your friendly little storm cloud is ready to brighten up any space
Cloud With Tiny Star Sprinkles
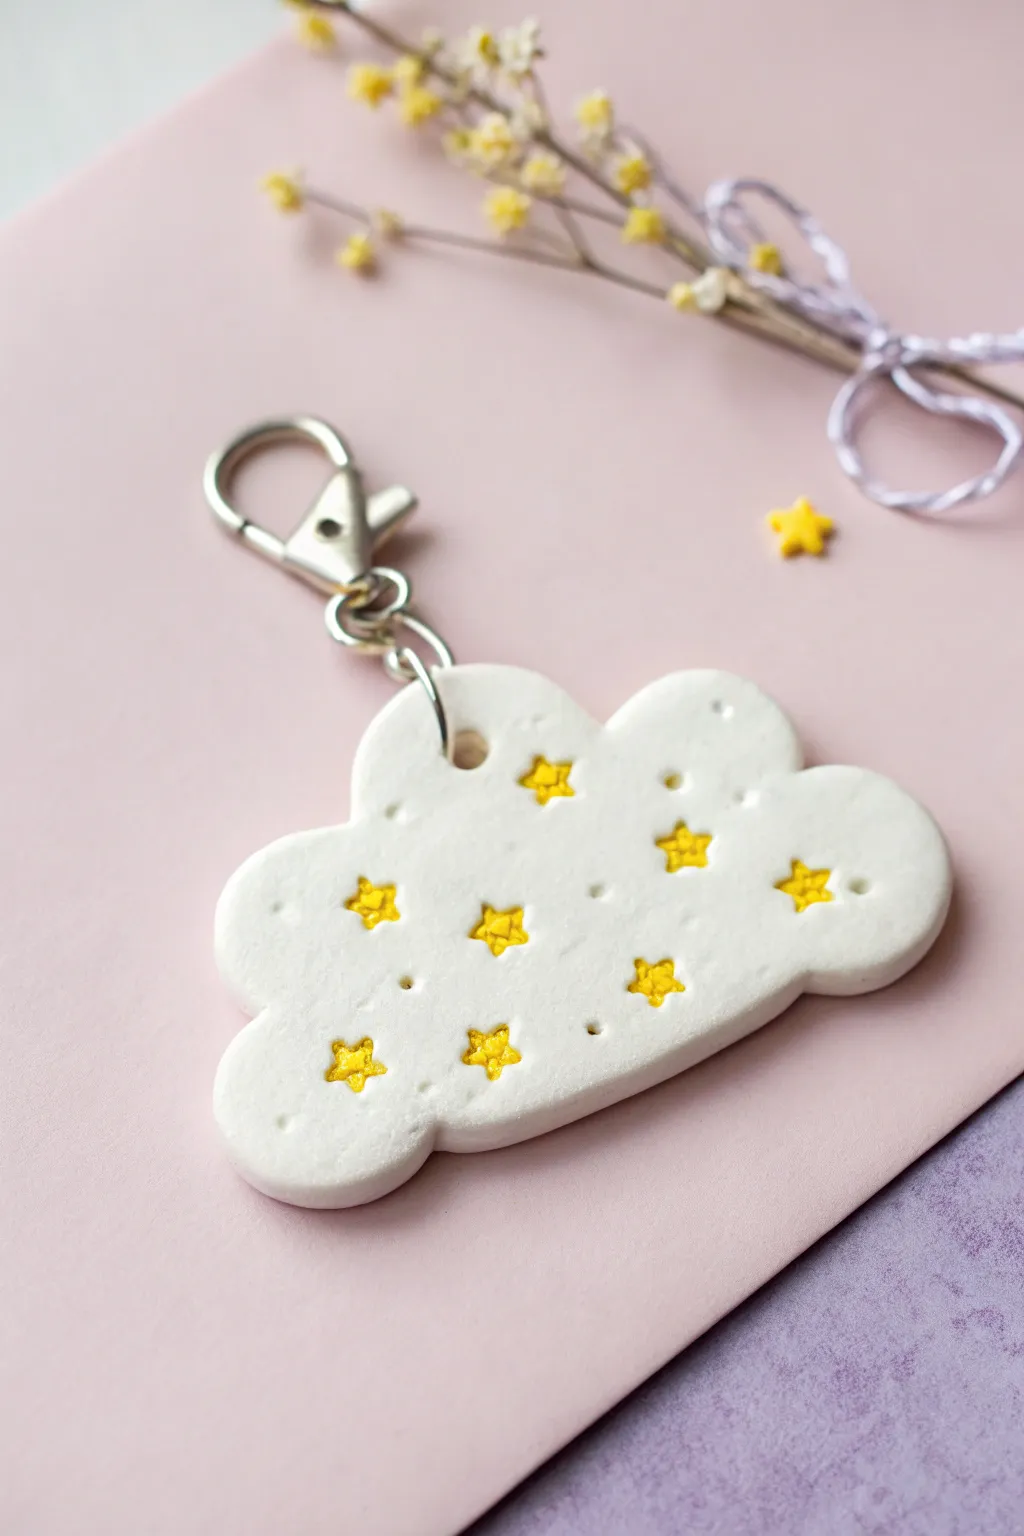
Capture a piece of the night sky with this dreamy, whimsical cloud keychain. Perfect for polymer or air-dry clay, this project features charming indented stars filled with bright yellow pigment for a sweet, celestial look.
Step-by-Step Guide
Materials
- White polymer clay (or air-dry clay)
- Small cloud-shaped cookie cutter (approx. 2-3 inches)
- Tiny star-shaped plunger cutter or stamp (approx. 3-5mm)
- Yellow acrylic paint or yellow pastel chalk shavings
- Fine-point needle tool or toothpick
- Rolling pin (acrylic roller preferred)
- Jump ring (silver tone)
- Lobster clasp keychain attachment
- Flat-nose jewelry pliers
- Parchment paper or clay work mat
- Sandpaper (fine grit, optional)
- Gloss or matte varnish (optional)
Step 1: Shaping the Base
-
Condition the clay:
Begin by taking a chunk of white clay and kneading it thoroughly in your hands until it becomes soft, pliable, and free of cracks. Warm clay is much easier to work with. -
Roll it out:
Place the clay on your work mat or parchment paper. Use your roller to flatten the clay into an even slab, aiming for a thickness of about 1/4 inch (6mm). You want it sturdy enough to hold hardware. -
Cut the shape:
Press your cloud-shaped cookie cutter firmly into the clay slab. Give it a little wiggle to ensure a clean cut, then lift the cutter away. -
Clean edges:
Peel away the excess clay from around your cloud shape. If the edges of the cloud look a bit ragged, gently smooth them with your finger or a little water if using air-dry clay.
Step 2: Adding Details
-
Plan your placement:
Visualize where you want your stars to go. A scattered, random pattern usually looks more organic than neat rows. -
Stamp the stars:
Take your tiny star plunger cutter or stamp. Press it gently into the surface of the clay to create an indentation, but do not cut all the way through. -
Create texture dots:
Using a needle tool or toothpick, gently poke small, shallow holes into the clay surfaces in the spaces between the stars to add a little extra texture. -
Make the attachment hole:
Use a straw or a larger needle tool to verify you have a hole at the top center of the cloud for the hardware. Ensure it is not too close to the edge to prevent tearing. -
Smooth the surface:
Do a final check for fingerprints. Lightly brush over the surface with a finger or a soft brush to remove any imperfections before curing.
Paint Oops?
If acrylic paint dries outside the lines, dip a Q-tip in rubbing alcohol (for polymer clay) or water (for sealed air-dry clay) to gently rub away the mistake.
Step 3: Curing and Finishing
-
Bake or dry:
Follow the manufacturer’s instructions for your specific clay. If baking polymer clay, place it on a dedicated baking sheet. If using air-dry clay, let it sit in a cool, dry place for 24-48 hours. -
Cool down:
Allow the piece to cool completely after baking before handling it further to avoid warping. -
Optional sanding:
If there are any sharp edges remaining after hardening, lightly buff them with fine-grit sandpaper. -
Prepare the color:
Put a small dot of yellow acrylic paint on a palette. I find using a very dry brush or a toothpick works best for filling the tiny indentations. -
Fill the stars:
Carefully dab the yellow paint into the star indentations. If you get paint on the white surface, quickly wipe it away with a damp paper towel or baby wipe. -
Seal (Optional):
To protect the white clay from getting dirty over time, apply a thin coat of matte or gloss varnish over the entire piece. -
Add hardware:
Use your pliers to twist open a jump ring. Slide it through the hole in the cloud and also hook on the lobster clasp. -
Close the ring:
Use the pliers to twist the jump ring back into a closed circle, ensuring the gap is tight so the cloud features stay secure.
Customize It
Try filling the stars with glow-in-the-dark paint instead of yellow. Your cloud will charge up during the day and have softly glowing stars at night!
Clip your new cloud onto a bag or keys to bring a little sunshine with you everywhere you go

TRACK YOUR CERAMIC JOURNEY
Capture glaze tests, firing details, and creative progress—all in one simple printable. Make your projects easier to repeat and improve.
Sleepy Moon-and-Cloud Minis
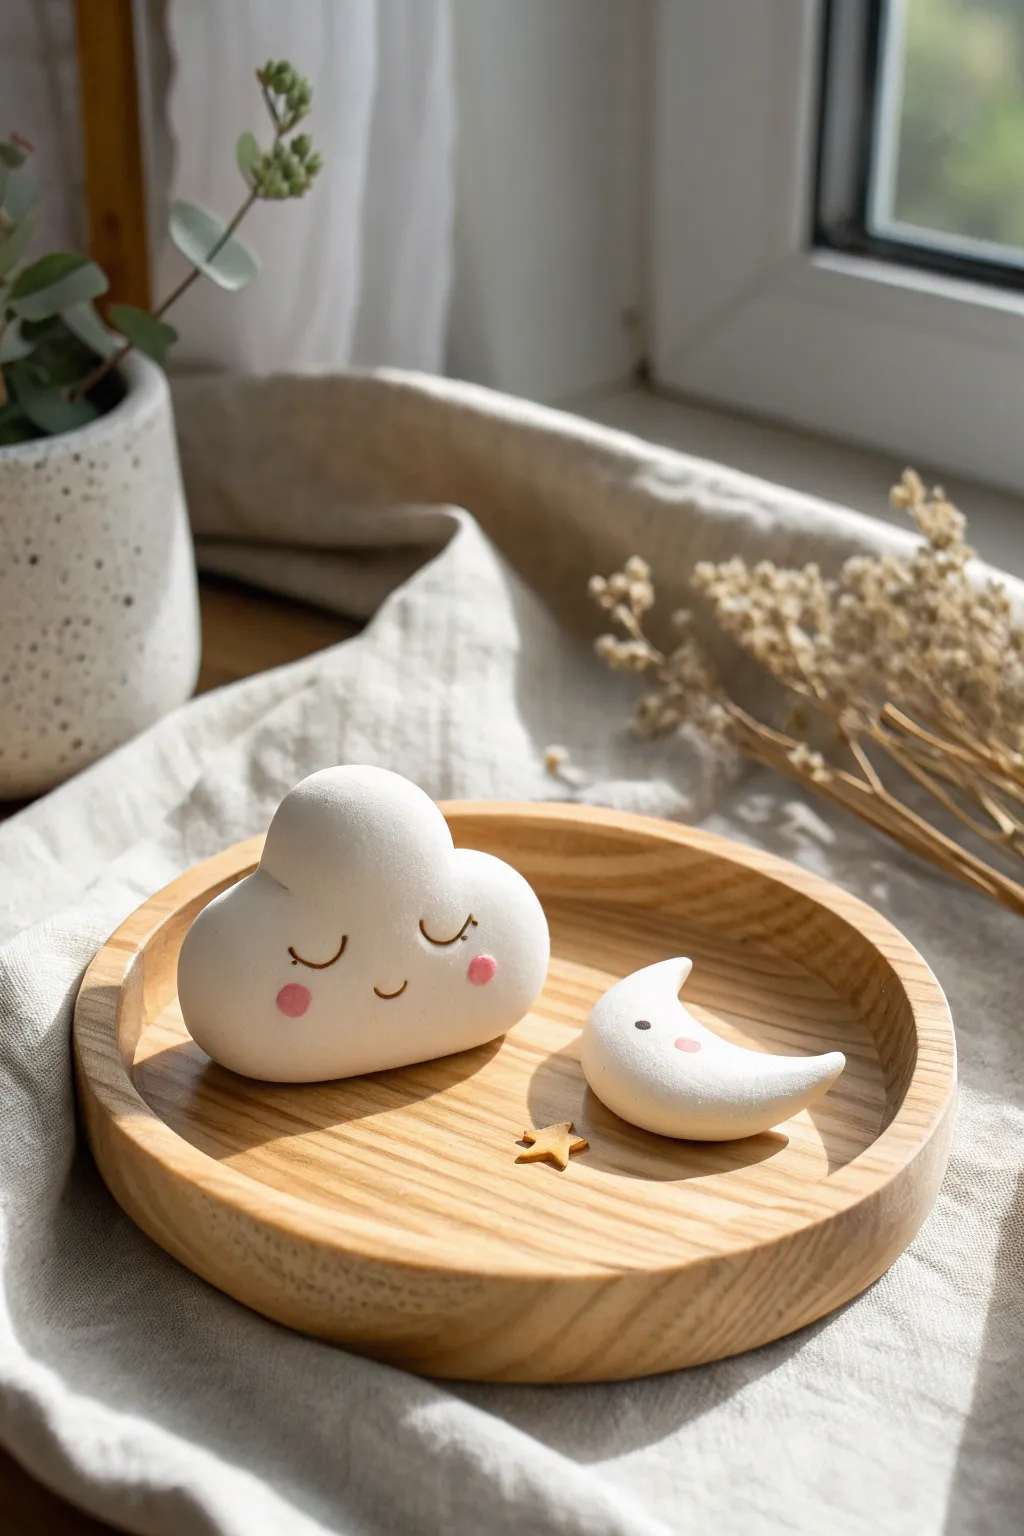
Create a soothing nursery decoration or desk companion with these adorable air-dry clay miniatures. This project features a puffy, sleeping cloud and its crescent moon friend, both finished with sweet, minimalist expressions.
Step-by-Step
Materials
- White smooth air-dry clay (or polymer clay)
- Non-stick rolling mat or parchment paper
- Rolling pin
- Small craft knife or clay slicing tool
- Water in a small cup
- Fine-grit sandpaper (400-600 grit)
- Black fine-point pigment liner or acrylic paint
- Pink soft pastel chalk or pink acrylic paint
- Small round paintbrush
- Cotton swab or Q-tip
- Matte varnish (optional)
Step 1: Shaping the Cloud
-
Condition the Clay:
Begin by taking a chunk of white clay roughly the size of a golf ball. Knead it thoroughly in your hands until it is warm, pliable, and free of cracks. -
Form the Base Shape:
Roll the clay into a smooth ball, then gently flatten it into an oval disk about 1/2 inch thick. -
Create the Puffs:
Using your thumb and forefinger, gently pinch and push the edges of the oval inwards to create round, billowing indentations. Aim for three distinct bumps along the top edge. -
Smooth the Surface:
Dip your finger lightly in water and run it over the clay to smooth out any fingerprints or sharp ridges. The cloud should look soft and puffy. -
Flatten the Bottom:
Gently tap the bottom edge of the cloud against your work surface. This creates a flat base so the figurine can stand upright on its own.
Water Smoothing
Keep a small dish of water nearby. Between shaping steps, a drop of water on your fingertip acts like an instant eraser for cracks and seams.
Step 2: Sculpting the Moon
-
Prepare the Moon Clay:
Take a smaller piece of clay, about the size of a large marble, and condition it just as you did for the cloud. -
Roll a Log:
Roll this piece into a short, thick log that tapers slightly at both ends. -
Curve the Crescent:
Gently bend the log into a ‘C’ shape. Pinch the ends to sharpen them into points, refining the classic crescent moon silhouette. -
Refine the Profile:
Flatten the sides slightly so the moon isn’t perfectly round like a banana, but keep the edges soft and rounded. -
Check Stability:
Just like the cloud, give the moon a gentle tap on its bottom curve against the table so it balances without tipping over. -
Scrap Clay Star:
If you have a tiny bit of leftover clay, flatten it and cut out a minuscule star shape using a knife tip to accompany your set.
Prevent Flat Spots
If your clay flattens on the bottom while drying, place the pieces on a soft foam sponge instead of a hard table. This helps maintain the roundness.
Step 3: Finishing Touches
-
Allow to Dry:
Set all pieces aside in a dry, cool area. Let them air dry completely for 24-48 hours. I usually flip them over halfway through so the bottom dries evenly. -
Sand Imperfections:
Once fully hard, gently buff away any remaining roughness or fingerprints using fine-grit sandpaper until the surface feels like porcelain. -
Dust Off:
Wipe the pieces down with a slightly damp cloth or a dry brush to remove all sanding dust before painting. -
Draw the Eyes:
Use a fine-point black pigment liner to draw sleepy, U-shaped closed eyes on the cloud. For the moon, draw a single open eye or a closed lash. -
Add Small Details:
Draw tiny eyelashes on the cloud’s closed eyes and a small, simple smile in the center. -
Prepare the Blush:
Scrape a small amount of pink soft pastel onto a piece of paper to create a fine powder. -
Apply Rosy Cheeks:
Dip a cotton swab or a dry paintbrush into the pastel powder and gently dab circular rosy cheeks onto both the cloud and the moon. -
Seal the Work:
To protect the delicate pastel and ink, apply a thin coat of matte varnish. This keeps the look natural while preventing smudges.
Arranging these sweet figures on a wooden tray creates an instantly calming atmosphere for any room
Cloud Magnets for Fridge Notes
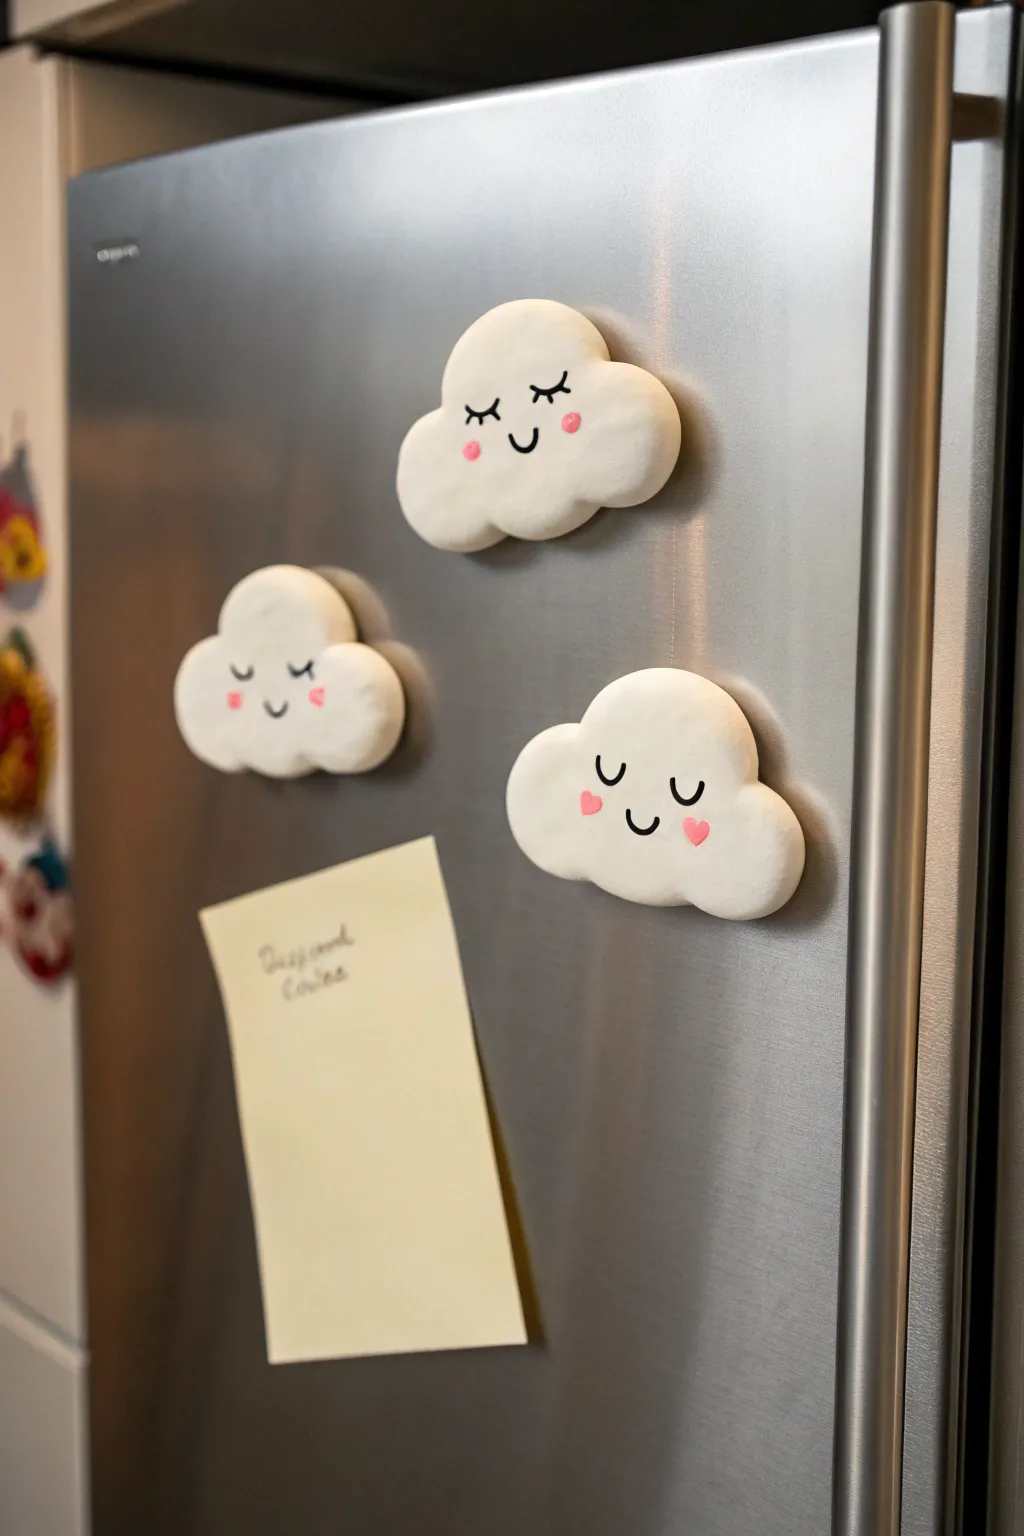
Bring a touch of whimsy to your kitchen organization with these adorable marshmallow-like cloud magnets. Their smooth, matte finish and sleepy expressions make them perfect for gently holding up your grocery lists or reminders.
Detailed Instructions
Materials
- White air-dry clay (or polymer clay)
- Small rolling pin
- Cloud cookie cutter (optional)
- Craft knife or clay tool
- Sandpaper (fine grit)
- Black acrylic paint or fine-tip permanent marker
- Pink acrylic paint
- Small detail paintbrush
- Dotting tool or toothpick
- Strong round magnets
- Super glue or E6000 adhesive
- Matte sealant or varnish
Step 1: Shaping the Clouds
-
Condition the Clay:
Begin by taking a handful of white air-dry clay and kneading it in your hands until it becomes soft, pliable, and free of cracks. If you are using polymer clay, condition it similarly until warm. -
Roll it Out:
Roll the clay into a slab that is roughly 1/4 to 1/2 inch thick. You want these to be quite chunky and puffy to mimic the look of a real marshmallow, so avoid rolling it too thin. -
Cut the Shapes:
If you have a cloud-shaped cookie cutter, press it firmly into the clay. If not, lightly sketch a cloud outline with a toothpick and carefully cut it out using your craft knife. -
Soften the Edges:
The cut edges will likely be sharp. Dip your finger in a tiny bit of water and gently rub the perimeter of each cloud to round off the harsh angles. -
Puff the Centers:
To enhance the puffy effect, gently press your thumb into the center of the cloud’s back side to push the front face outward slightly, or simply mold the edges downward to create a domed surface. -
Smooth the Surface:
Check for any fingerprints or uneven spots. Use a slightly damp smoothing tool or your finger to buff the surface until it is flawless. -
Initial Drying:
Place your clouds on a clean, flat surface lined with parchment paper. Let them air dry according to the package instructions, usually for 24-48 hours. Flip them halfway through to ensure even drying.
Smooth Operator
Keep a small bowl of water nearby while shaping. A damp finger is the best tool for erasing cracks instantly before the clay dries.
Step 2: Adding Details
-
Sand for Perfection:
Once fully dry and hard, use a fine-grit sandpaper to gently buff away any remaining rough spots or tiny bumps on the edges. -
Draft the Faces:
Before committing with paint, lightly sketch the sleepy facial expressions—two curved lines for closed eyes and a small ‘u’ for the mouth—using a pencil. -
Paint the Features:
Using a very fine detail brush and black acrylic paint, trace over your pencil lines. Alternatively, a fine-tip permanent marker works well here for cleaner control. -
Add Cheeks:
Dip a dotting tool or the blunt end of a toothpick into pink acrylic paint. Gently stamp two small dots or small hearts on either side of the smile for the rosy cheeks. -
Seal the Work:
Protect your paint job by applying a coat of matte sealant. This gives the magnets that soft, professional finish seen in the photo without making them too glossy.
Make it Sparkle
For a magical touch, mix fine iridescent glitter into the white clay before rolling, or dust the wet paint cheeks with shimmer powder.
Step 3: Assembly
-
Attach the Magnet:
Flip the cloud over to the flat back side. Apply a small dab of strong adhesive like E6000 or super glue to the center. -
Secure and Dry:
Press a strong round magnet firmly into the glue. I like to let this dry for several hours to ensure the bond is strong enough to hold heavy cardstock. -
Test:
Once the glue is completely cured, test your new cloud magnet on the fridge to make sure it holds securely.
Now your fridge is ready to host your notes in the dreamiest way possible
Cloud Name Tags and Bag Tags
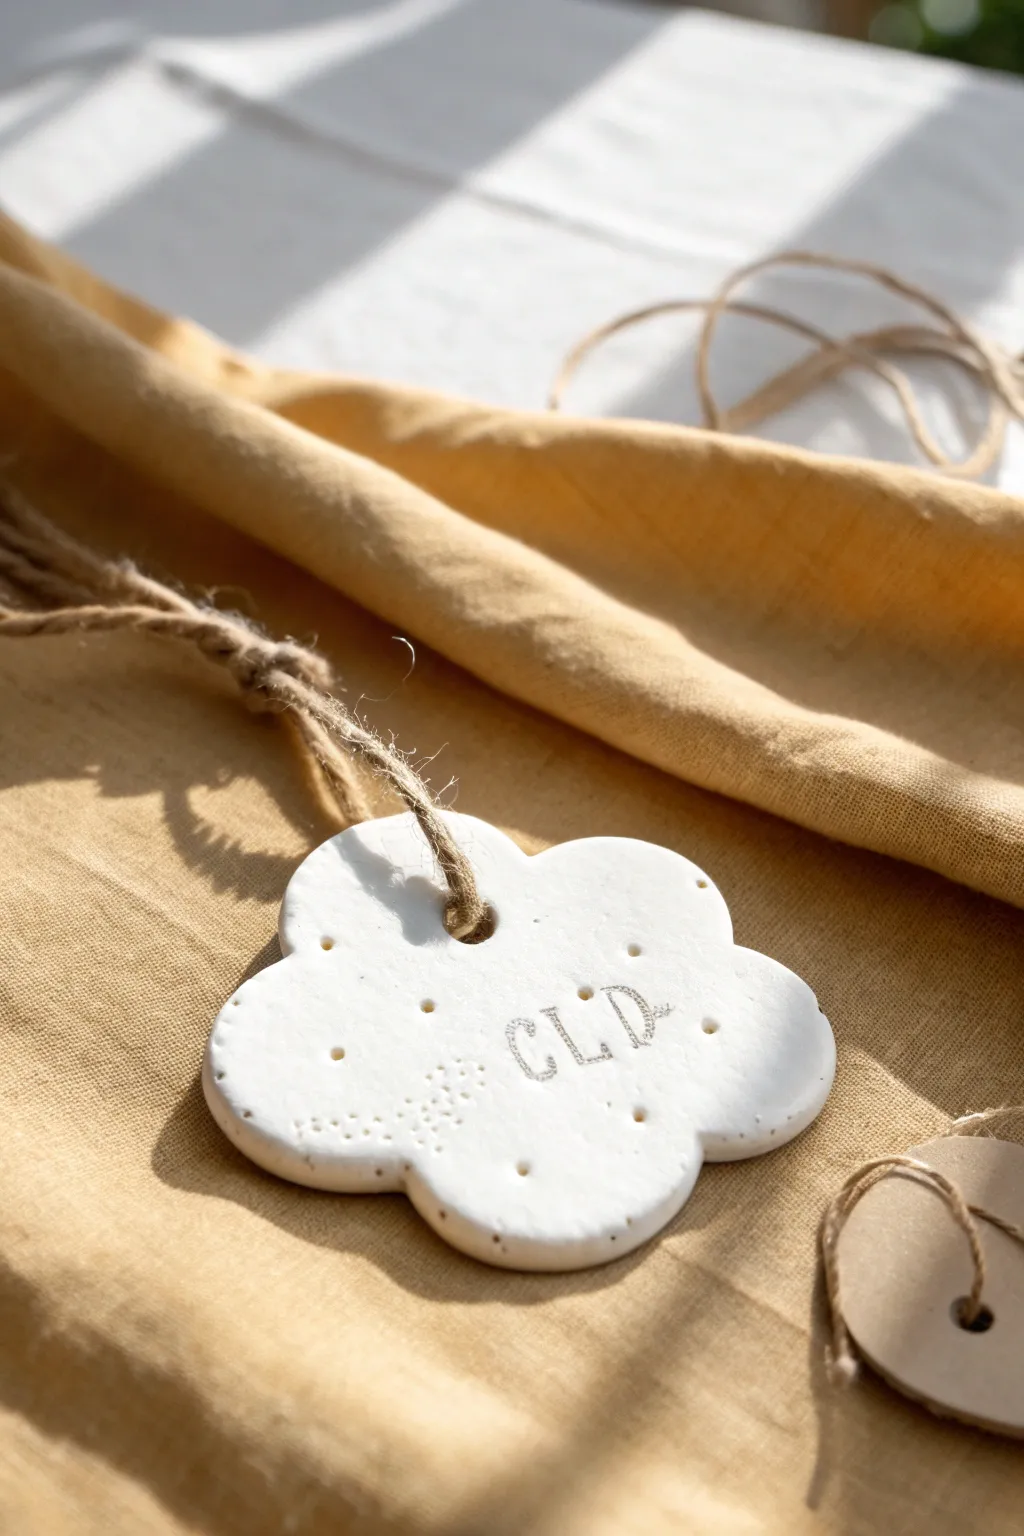
This rustic and charming clay tag combines simple cloud shapes with personalized stamped lettering for a sweet, handmade touch. The textured white clay and natural jute twine create an earthy aesthetic perfect for gift wrapping or labeling personal items.
Step-by-Step Guide
Materials
- White air-dry clay or polymer clay
- Rolling pin
- Cloud-shaped cookie cutter (medium size)
- Small alphabet stamps
- Toothpick or large needle tool
- Straw or coffee stirrer (for the hanging hole)
- Fine-grit sandpaper (optional)
- Jute twine
- Parchment paper or smooth work mat
Step 1: Shaping the Cloud
-
Condition the clay:
Begin by taking a handful of your white clay and kneading it in your hands until it becomes soft, pliable, and free of cracks. Warm clay is much easier to work with. -
Roll it out:
Place the clay on a sheet of parchment paper to prevent sticking. Use your rolling pin to flatten the clay into an even slab, aiming for a thickness of about 1/4 inch (6mm) to ensure it’s sturdy enough for a tag. -
Cut the shape:
Press your cloud-shaped cookie cutter firmly into the clay slab. Give it a tiny wiggle before lifting to get a clean cut. -
Remove excess:
Peel away the excess clay from around the cloud shape and set it aside for future projects. If the edges of your cloud look rough, dip your finger in a little water and gently smooth them down. -
Create the hanging hole:
Take a drinking straw or a coffee stirrer and poke a hole near the top center of the cloud. Twist the straw slightly as you pull it out to remove the core of clay cleanly.
Fixing Cracks
If you see tiny hairline cracks appearing as the clay dries, make a paste with a tiny bit of clay and water (slip) and smooth it over the crack with your finger to seal it.
Step 2: Adding Details
-
Plan your text:
Decide on the name or initials you want to stamp. In the example, we are using ‘CLD’. Place the stamps gently on the clay without pressing first to ensure you like the spacing. -
Stamp the letters:
Press each letter stamp firmly into the center of the cloud. Rock the stamp extremely slightly to ensure the full impression is made, but be careful not to create a square border impression around the letter. -
Add dot details:
Using a toothpick or a needle tool, poke random small holes around the letters to create a starry or textural effect. Vary the pressure to make some holes deeper than others. -
Create a constellation:
For added charm, group some minimal dots together in a cluster on the lower left side, mimicking a small constellation or a gust of wind.
Add Some Shine
Rub a tiny amount of metallic gold or silver paint into the stamped letters, then wipe the surface clean. The paint will stay in the grooves for a luxe inlay effect.
Step 3: Finishing Up
-
Let it dry:
Leave the clay on the parchment paper to dry completely. If using air-dry clay, this usually takes 24-48 hours. Flipping it over halfway through the drying process helps prevent curling. -
Sand edges:
Once fully dry and hard, check the edges for any sharpness. I like to run a piece of fine-grit sandpaper lightly over the rim to give it a professional, smooth stone finish. -
Prepare the twine:
Cut a length of jute twine, roughly 8-10 inches long. Fold it in half to create a loop. -
Thread the loop:
Push the folded end of the twine loop through the hole in the clay cloud from front to back. -
Secure the knot:
Pass the loose ends of the twine through the loop you just pushed through the hole and pull tight to create a lark’s head knot. -
Final trim:
Tie the loose ends together at the top if you need a closed loop for a bag tag, or leave them loose for tying onto a gift box.
Your personalized cloud tag is now ready to add a dreamy touch to your next gift or bag
Cloud Pencil Topper Buddies
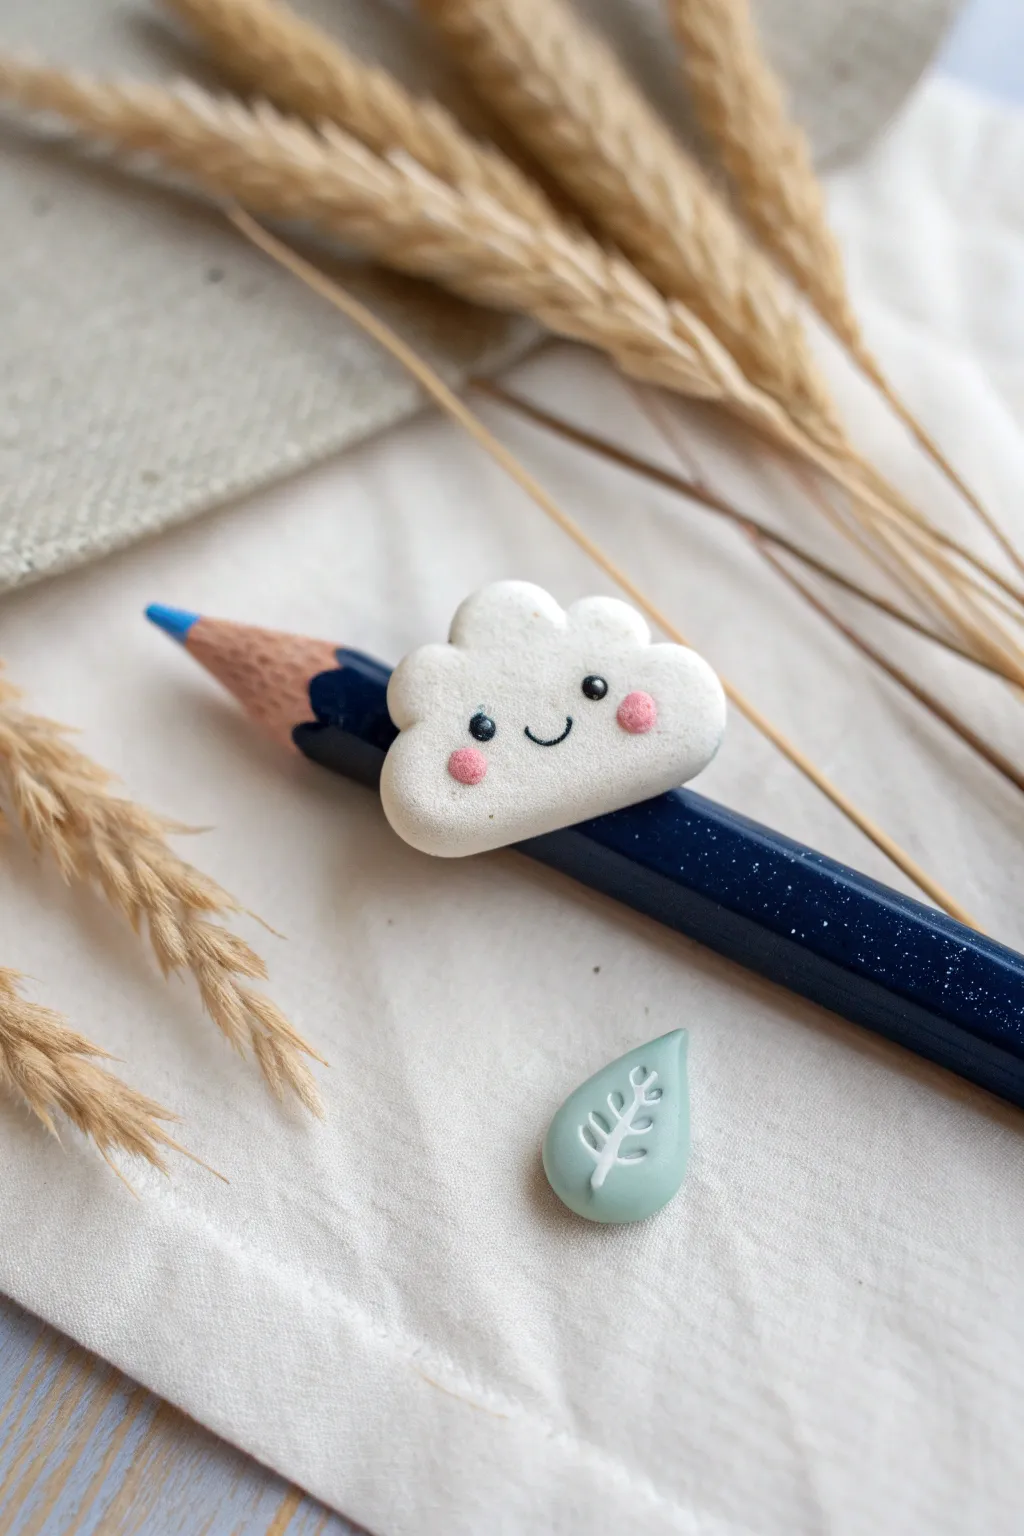
Transform an ordinary pencil into a cheerful companion with this adorable cloud pencil topper. Featuring a soft white finish, blushing pink cheeks, and a matching raindrop leaf accessory, this little buddy makes writing notes just a bit brighter.
Detailed Instructions
Materials
- White polymer clay
- Light pink polymer clay (very small amount)
- Black polymer clay or black acrylic paint
- Light sage green polymer clay
- Standard hexagonal pencil (for sizing)
- Sculpting tools (needle tool, small ball tool)
- Small circle cutter (optional)
- Oven for baking
- Matte glaze (optional)
Step 1: Shaping the Cloud Base
-
Condition the Clay:
Start by kneading a chunk of white polymer clay until it is soft, pliable, and free of cracks. This ensures a smooth finish later on. -
Flatten the Base:
Press the clay into a thick, flattened oval shape, roughly 1.5 inches wide and about 0.5 inches thick. -
Cut the Pencil Channel:
Flip the cloud over to the back side. Press the side of your pencil into the back of the clay to create a groove. Wiggle it slightly so the fit isn’t too tight; clay shrinks slightly when baked. -
Create the Fluff:
Use your fingers or a sculpting tool to press indentations along the top and side edges of the oval, creating the scalloped ‘bumpy’ look of a fluffy cloud. -
Smooth the Edges:
Gently rub any sharp edges with your fingertip to round them off, giving the cloud a soft, pillowy appearance.
Clean Clay Only
White clay picks up lint instantly! Always wipe your hands and work surface with a baby wipe before handling the white clay, especially after touching darker colors.
Step 2: Adding the Cute Face
-
Mark the Features:
Use a needle tool to very lightly mark where you want the eyes and mouth to go to ensure they are centered and symmetrical. -
Make the Eyes:
Roll two tiny specks of black clay into balls. Press them firmly into the spots you marked for the eyes. Alternatively, you can use a small ball tool to make indentations and fill them with black paint after baking. -
Create the Smile:
Roll an extremely thin snake of black clay for the mouth. Curve it into a ‘U’ shape and gently press it onto the face between the eyes OR use a needle tool to etch a smile line. -
Add Cheeks:
Taking tiny amounts of pink clay, roll two small balls. Flatten them slightly and press them onto the cloud face, just below and to the outside of the eyes. -
Texture the Cheeks:
For a textured look like the photo, gently tap the pink clay with an old toothbrush or a stiff bristled brush.
Textured Finish
Want that stone-like texture? Before baking, gently tap the entire surface with a piece of sandpaper or a stiff brush to remove fingerprints and add matte realism.
Step 3: Making the Leaf Drop
-
Shape the Drop:
Take a small piece of sage green clay and roll it into a ball, then pinch one end to create a teardrop shape. -
Flatten Slightly:
Press the teardrop down gently so it is flat on the bottom but slightly domed on top. -
Etch Details:
Using a needle tool, carefully draw a central vein line down the middle of the drop. -
Add Branch Lines:
Draw small, angled lines coming off the center vein to create a stylized leaf or fern pattern. -
Highlight the Lines:
I like to roll a microscopic thread of white clay and lay it into these etched grooves to make the design pop, pressing it flat so it is flush with the green surface.
Step 4: Baking and Finishing
-
Prepare for Baking:
Place your cloud (without the pencil inside) and the leaf drop onto a baking sheet lined with parchment paper. -
Bake:
Bake the pieces according to the temperature and time instructions on your specific brand of polymer clay packaging. -
Cool Down:
Let the pieces cool completely inside the oven with the door slightly ajar to prevent cracking from temperature shock. -
Attaching to Pencil:
Once cool, test the fit on your pencil. If it’s a bit loose, a dab of super glue in the groove will secure your cloud buddy permanently.
Now you have a charming desk accessory to keep you company while you work
Cloud Beads for Jewelry
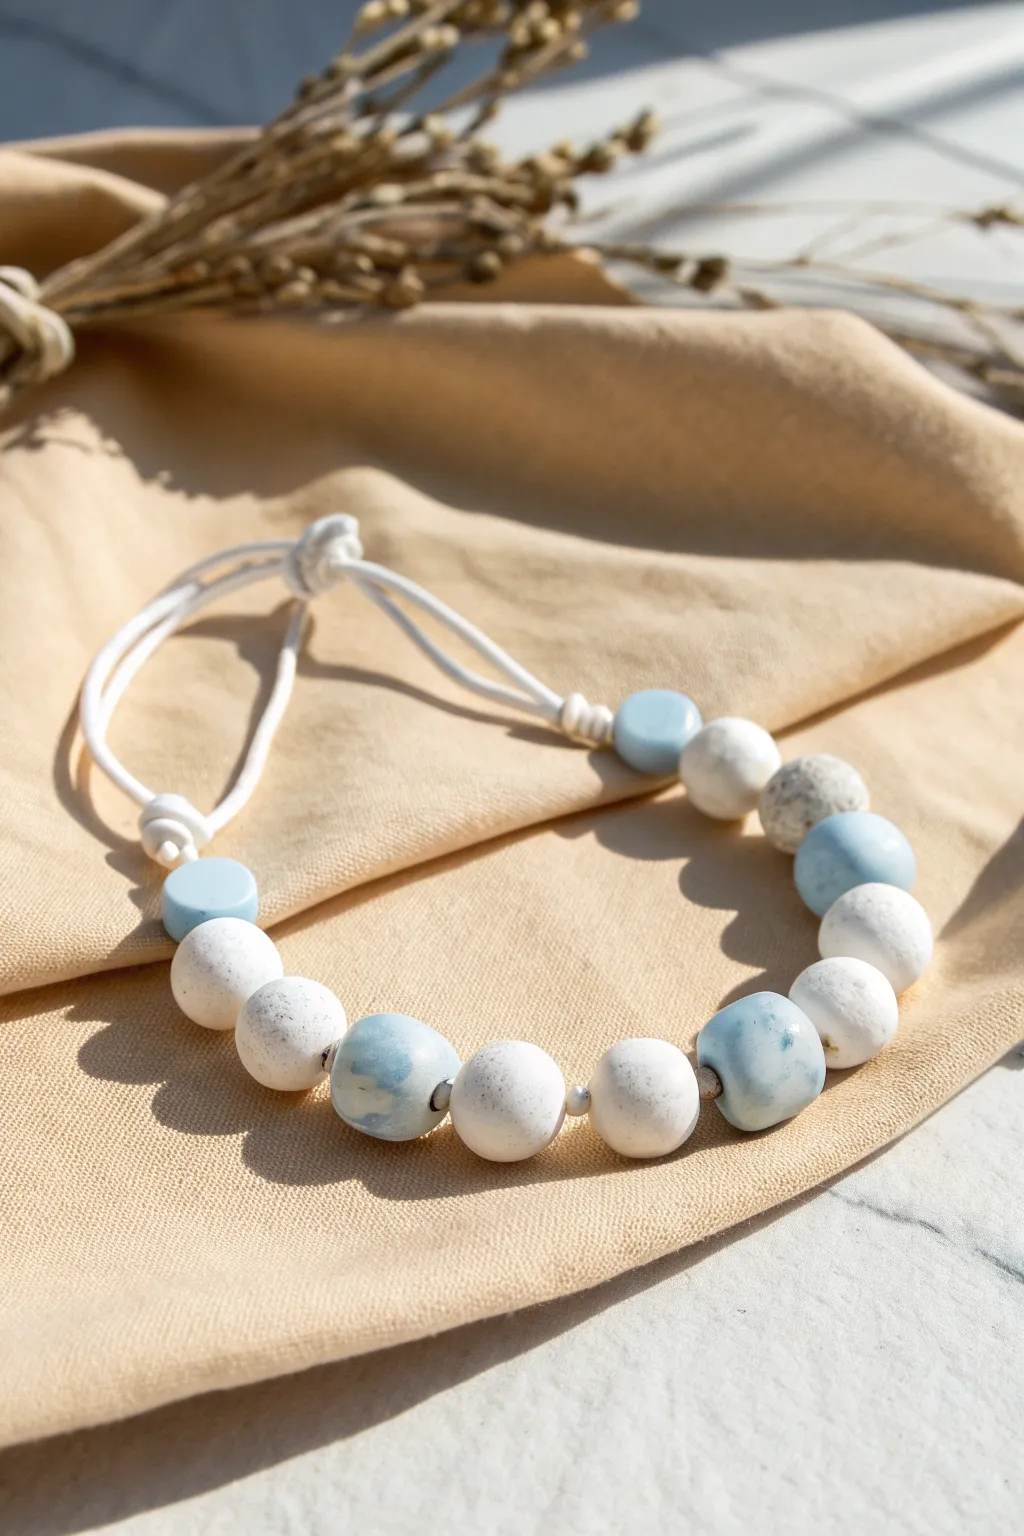
Capture the serene beauty of a summer sky with this lightweight necklace featuring hand-rolled cloud clay beads. The speckled white and marbled blue textures invoke fluffy clouds against a soft blue horizon, making for a truly dreamy accessory.
Step-by-Step Guide
Materials
- White cloud clay (or lightweight air-dry clay)
- Light blue cloud clay (or white clay mixed with blue pigment)
- Black acrylic paint or ink (for speckling)
- Toothbrush or stiff bristle brush
- Bamboo skewer or toothpick
- 2mm white cotton or leather cord (approx. 24 inches)
- Scissors
Step 1: Creating the Speckled White Beads
-
Portion the Clay:
Pinch off roughly equal amounts of white cloud clay to make about 6-8 beads. Aim for pieces roughly the size of a large marble. -
Roll into Spheres:
Roll each portion of clay between the palms of your hands to create smooth spheres. They don’t need to be perfectly round; a slightly organic shape adds charm. -
Pierce the Beads:
While the clay is still soft, gently push a bamboo skewer through the center of each bead. Wiggle it slightly to ensure the hole is wide enough for your cord later. -
Add Speckled Texture:
Load a toothbrush with a tiny amount of watered-down black acrylic paint. Run your thumb over the bristles to flick tiny specks of paint onto the wet white beads. -
Dry the Beads:
Leave these speckled beads on the skewer or slide them off onto parchment paper to dry completely according to package instructions.
Step 2: Creating the Blue Marbled Beads
-
Prepare Colors:
Take a portion of light blue clay and a smaller portion of white clay. If you don’t have pre-colored blue clay, knead a drop of blue pigment into white clay until uniform. -
Combine for Marbling:
Gently twist the white and blue clay ropes together. Fold the twisted rope in half and twist again, repeating 2-3 times. -
Stop Mixing Early:
Be careful not to over-knead, or you will lose the distinct marbled veins and end up with a solid light blue color. -
Shape the Blue Beads:
Pinch off portions of this marbled mixture and roll them into spheres, similar in size to your white beads. You’ll need about 4-6 of these. -
Create Cylinder Accents:
For variety, shape two smaller pieces of blue or white clay into flat, cylindrical drum shapes to act as end caps for your design. -
Pierce and Dry:
Use your skewer to create holes in these beads just as you did before. Set them aside to air dry completely.
Keep Holes Open
As cloud clay dries, it can shrink slightly. Rotate the beads on the skewer every 20 minutes during the first hour of drying to ensure the holes don’t close up.
Step 3: Assembly
-
Prepare the Cord:
Cut your white cord to your desired length, adding about 6 inches of extra slack for the knots. -
Start the Pattern:
Thread one of the small cylindrical flat beads onto the cord first to act as a stopper or visual bookend. -
Tie a Secure Knot:
Tie a simple overhand knot immediately after the flat bead to keep the subsequent beads from sliding too far up the cord. -
String Main Beads:
Thread your main beads, alternating between the white speckled spheres and the blue marbled ones. I personally like placing the largest blue bead in the center as a focal point. -
Finish the Strand:
Once all round beads are on, tie another overhand knot tightly against the last round bead. -
Add Final End Cap:
Thread on the second flat cylindrical bead and tie a final knot to lock the design in place in the center of the cord. -
Create the Closure:
Bring the two loose ends of the necklace cord together. Tie them into a sliding knot or a simple bow at the back so the necklace length is adjustable.
Glaze for Shine
For a polished ceramic look, brush a coat of gloss varnish or clear nail polish over the dry beads. It makes the colors pop and protects the speckles.
Wear your new cloud-inspired necklace over a simple linen top for an effortlessly breezy style
Shooting Star Cloud Tails
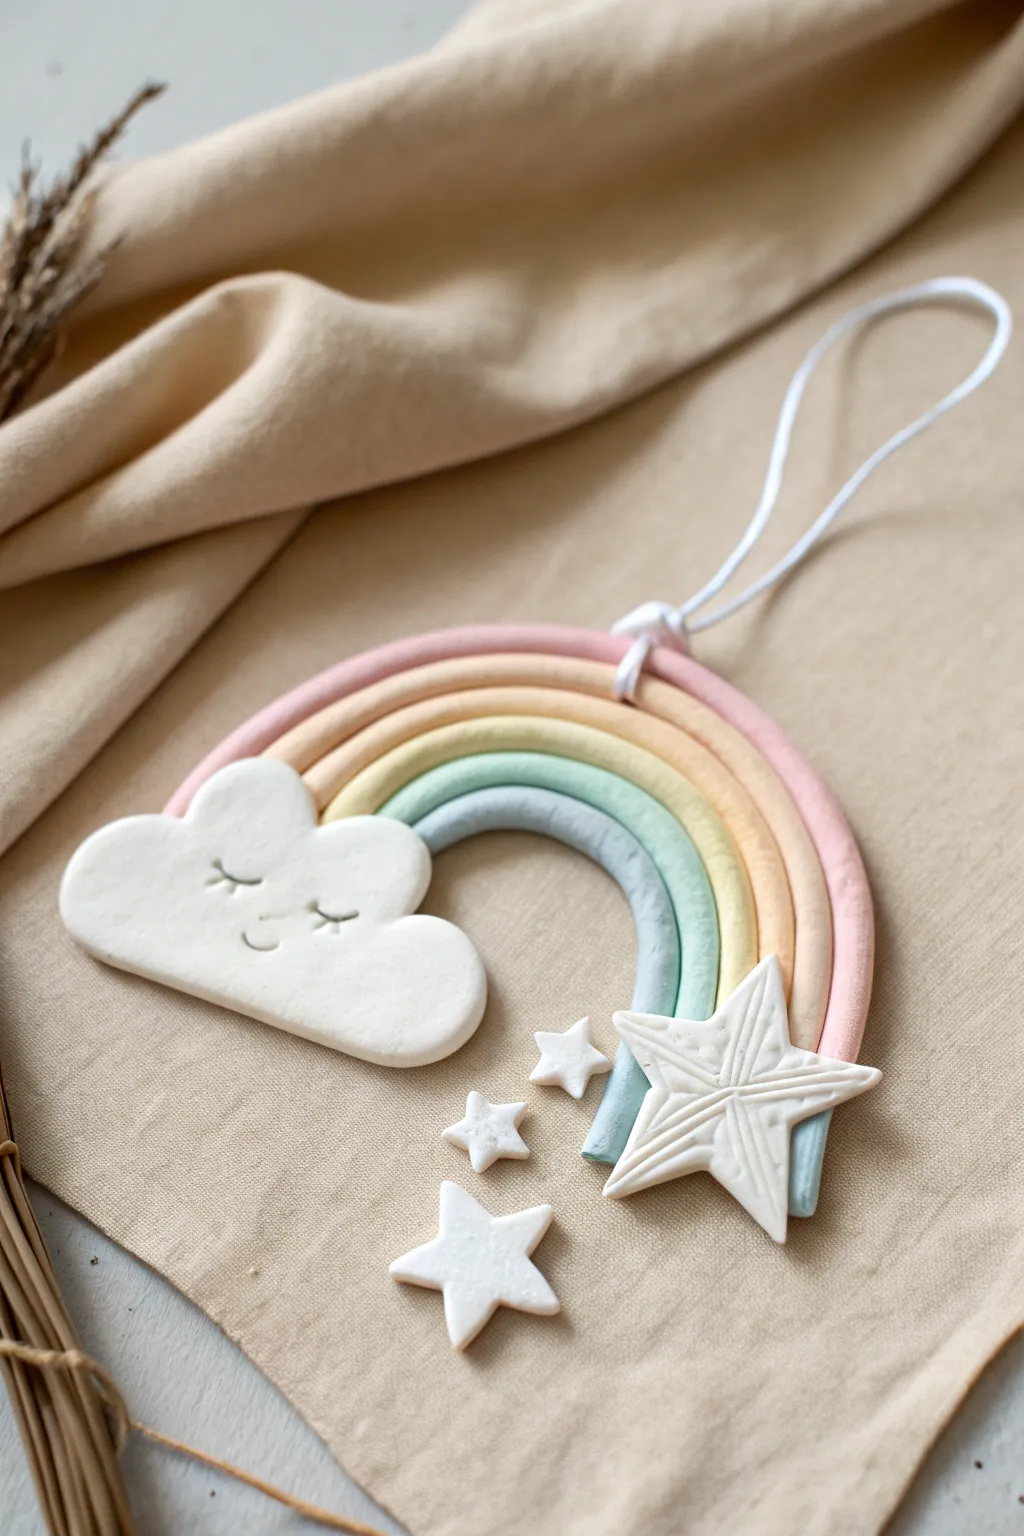
Bring a touch of celestial magic to any nursery or bedroom with this charming clay hanging ornament. Featuring soft pastel arches, a sleepy cloud, and a cluster of stars, this piece captures the whimsy of a shooting star in handcrafted clay form.
How-To Guide
Materials
- Air-dry clay (white)
- Acrylic paints (pastel pink, peach, pale yellow, mint green, baby blue)
- Clay roller or rolling pin
- Precision craft knife or clay cutter
- White cotton cord or ribbon
- Strong craft glue or hot glue gun
- Clean work surface (silicone mat or parchment paper)
- Fine-grit sandpaper
- Black fine-line marker or sharpie
- Small round paintbrush
- Water for smoothing
- Needle tool or toothpick
Step 1: Shaping the Rainbow Arches
-
Prepare the clay:
Begin by taking a handful of white air-dry clay and kneading it until soft and pliable. Divide it into five equal portions. -
Color the clay (Option A):
You can mix a tiny drop of acrylic paint into each portion of raw clay to create the pastel colors directly. Knead thoroughly until the color is uniform. -
Roll the coils:
Roll each portion into a long, even snake or coil. Aim for them to be roughly the same thickness, about the width of your pinky finger. -
Form the arch:
On your non-stick surface, bend the first coil into a tight U-shape. Take the next color and gently press it against the outer edge of the first arch, molding it to follow the curve. -
Complete the rainbow:
Continue layering the coils until you have five concentric arches. Gently press them together so they adhere, using a tiny bit of water on your finger to fuse the seams if necessary. -
Trim the ends:
Use your craft knife to slice across the bottom of the rainbow legs in a straight line, ensuring they are all even. Don’t discard the scraps yet.
Smooth Operator
Before the clay dries, dip your finger in water and gently rub the surface to remove fingerprints. This eliminates hours of sanding later.
Step 2: Sculpting the Celestial Characters
-
Roll out a slab:
Take a separate ball of white clay and roll it flat until it is about 1/4 inch thick. This will be the base for your cloud and stars. -
Cut the cloud shape:
Use a knife or needle tool to freehand a fluffy cloud shape. It needs to be large enough to cover the bottom of one side of the rainbow. -
Add facial details:
While the cloud clay is still soft, gently carve two small U-shapes for closed eyes and a small curve for a smile using a needle tool. I find gently pressing the tool rather than dragging it creates cleaner lines. -
Make the stars:
Cut out one large star and three smaller stars from the remaining flat clay. For the large star, use your knife to gently score lines from the center out to the tips to create a dimensional look. -
Create hanging hole:
Use a straw or a tool to poke a hole through the top center arch of the rainbow for the string. Make sure it’s big enough for your cord. -
Dry completely:
Let all your pieces dry fully according to the package instructions. Flip them over halfway through drying to prevent warping.
Step 3: Assembly and Finishing
-
Sand edges:
Once bone dry, use fine-grit sandpaper to gently smooth any rough edges on the rainbow, cloud, or stars. -
Paint (Option B):
If you didn’t pre-color your clay, carefully paint each arch of the rainbow in your chosen pastel shades now. Keep the cloud and stars white. -
Define the face:
Use a fine-line black marker to carefully trace over the indented eyes and mouth on the cloud to make the expression pop. -
Attach the cloud:
Apply strong craft glue to the back of the cloud and press it firmly onto the bottom left leg of the rainbow. Hold it in place for a moment to set. -
Attach the main star:
Glue the large textured star onto the bottom right leg of the rainbow. Position it so it overlaps the ends of the distinct color bands. -
Add floating stars:
Glue the smaller stars near the large one or slightly trailing below it to give the illusion of a shooting star tail. -
String it up:
Thread your white cord through the top hole, tie a secure knot, and trim any excess length.
Gloss it Up
After painting, apply a coat of satin or gloss varnish over just the rainbow arches. This contrast against the matte white cloud looks amazing.
Hang your sleepy rainbow on a wall hook or doorknob to add instant sweetness to the room
Seasonal Snow Cloud Characters
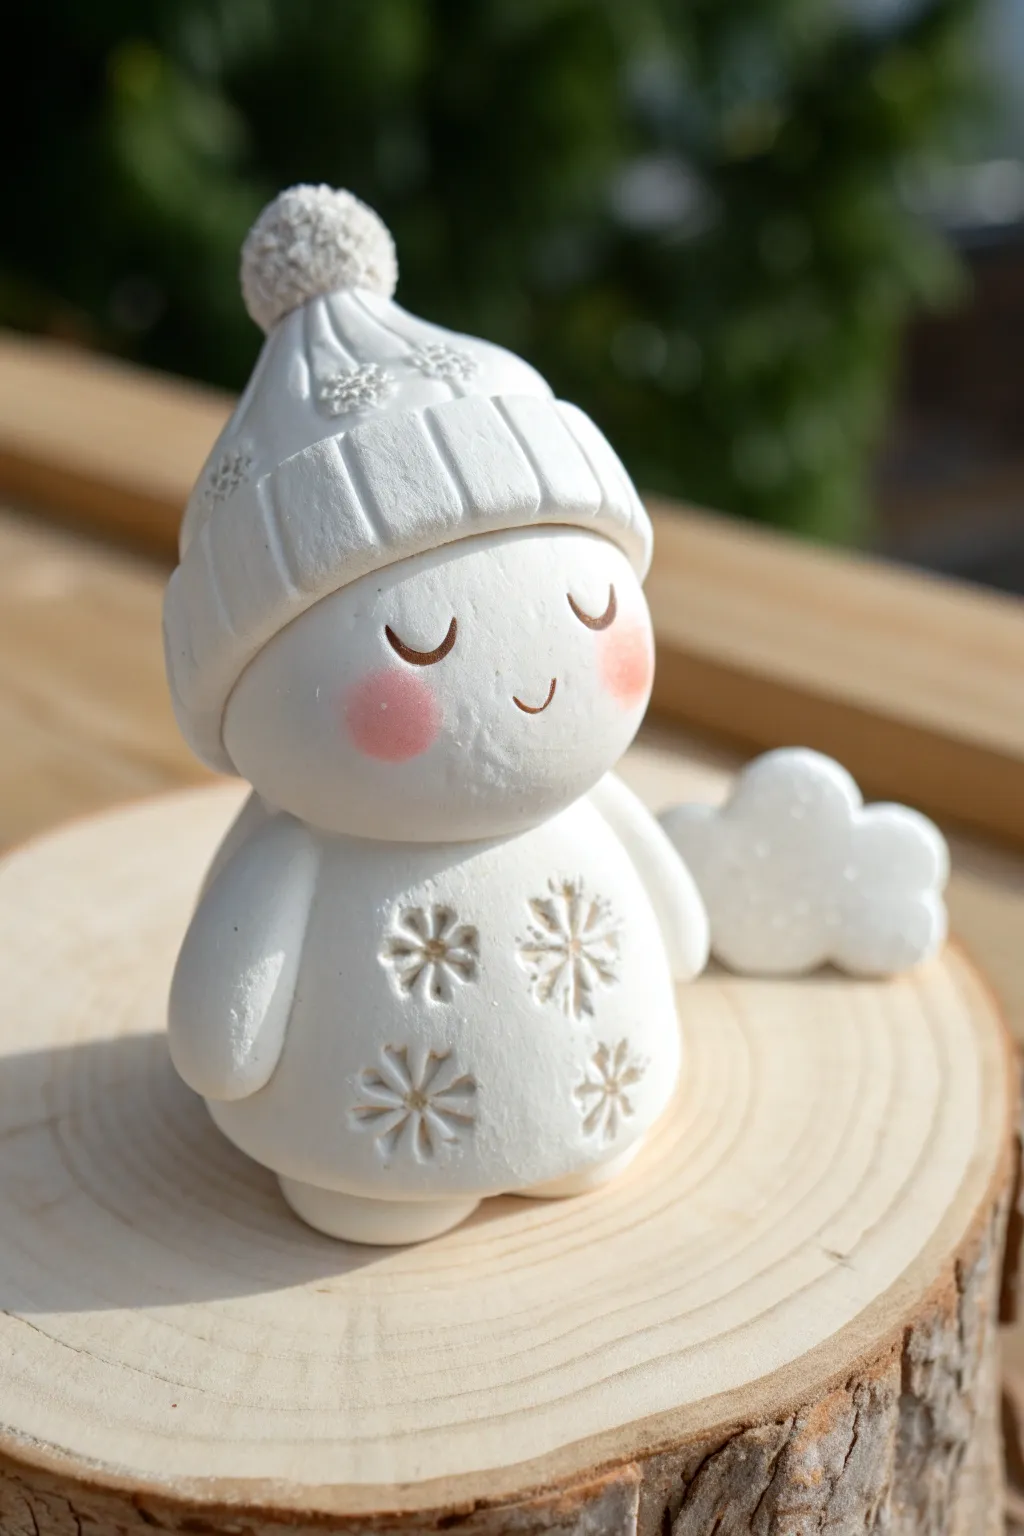
Embrace the soft, fluffy texture of cloud clay with this adorable winter figurine. This project features a serene, sleeping character bundled in a textured hat and sweater, perfect for adding a touch of cozy charm to your seasonal decor.
Detailed Instructions
Materials
- White cloud clay (lightweight air-dry clay)
- Set of small clay sculpting tools
- Ball stylus tool (or a rounded toothpick end)
- Small snowflake stamp or a toothpick for freehand detailing
- Pink soft pastel chalk
- Small soft paintbrush
- Brown fine-point marker or acrylic paint
- Textured fabric or knurled tool (for hat brim)
- Toothpick or wire for internal structure
Step 1: Forming the Cozy Core
-
Shape the Body base:
Begin by rolling a generous ball of white cloud clay, roughly the size of a tangerine, into a smooth sphere. Gently flatten the bottom so it stands independently without wobbling. -
Taper the Form:
Slightly elongate the sphere upwards into a very soft pear shape, keeping the top rounded. This will be the main body underneath the sweater. -
Create the Head:
Roll a slightly smaller sphere for the head. It should be proportional to the body but slightly oversized for a cute, chibi look. Lightly press it onto the body piece. -
Secure the Connection:
If the clay feels too dry to stick on its own, insert a small piece of toothpick or wire between the head and body to act as a spine, then smooth the seam at the neck slightly.
Sticky Situation?
If your cloud clay pieces aren’t sticking together, dampen the connection point with a tiny drop of water or white PVA glue for a permanent bond.
Step 2: Dressing for Winter
-
Basic Hat Shape:
Flatten a disc of clay and drape it over the top of the head. Smooth the edges down until it covers the ‘hairline’ area comfortably. Shape the top into a slight point. -
Create the Brim:
Roll a snake of clay and flatten it into a long rectangular strip. Wrap this strip around the base of the hat where it meets the forehead and press gently to adhere. -
Texture the Brim:
Use a sculpting tool or the back of a knife to press vertical lines all the way around the brim, mimics a ribbed knit texture. -
Add Hat Details:
Press a few snowflake shapes into the upper part of the hat using a stamp or carefully drawing them with a needle tool. -
Top with a Pom-Pom:
Roll a small ball of clay and attach it to the very peak of the hat. Use a stiff brush or a needle tool to stipple the surface vigorously, creating a fuzzy, yarn-like texture.
Sparkle Upgrade
Before the clay fully dries, dust the entire figure with clear iridescent glitter powder. It creates a frosty, magical snow effect perfect for winter.
Step 3: Sweet Sweater Details
-
Sculpt the Arms:
Roll two small sausage shapes for arms. Attach them to the sides of the body, blending the clay at the shoulder joint so they look seamless. -
Stamp the Pattern:
Using a snowflake stamp or a small flower cutter, gently press indentations into the front of the body to create a patterned sweater effect. I find pressing firmly but not too deep keeps the details distinct. -
Form the Feet:
Create two small distinctive mounds or flattened balls and place them underneath the body to serve as simple boots or feet. -
Companion Cloud:
Roll three or four various-sized balls of clay and squash them together into a cluster. Smooth the seams to create a puffy little cloud accessory to sit beside your figure.
Step 4: Bringing the Face to Life
-
Carve the Smile:
Use a curved sculpting tool or the side of a small straw to gently impress a tiny, U-shaped smile into the center of the face. -
Blush the Cheeks:
Scrape a little powder from a pink soft pastel stick. Dip a dry, soft brush into the powder and gently dab circular rosy cheeks onto the face while the clay is still slightly damp. -
Draw the Eyes:
Once the surface skin of the clay has dried slightly (about 30 minutes), use a brown fine-point marker to draw two sleepy, U-shaped closed eyes. -
Reference the Smile:
You can also carefully trace inside the carved smile indent with the brown marker to make the expression pop. -
Final Dry:
Allow the entire piece to dry completely for at least 24 hours in a dry, cool spot before handling excessively.
Now you have a serene winter friend ready to sit quietly on your shelf
Mini Cloud Worlds in a Jar
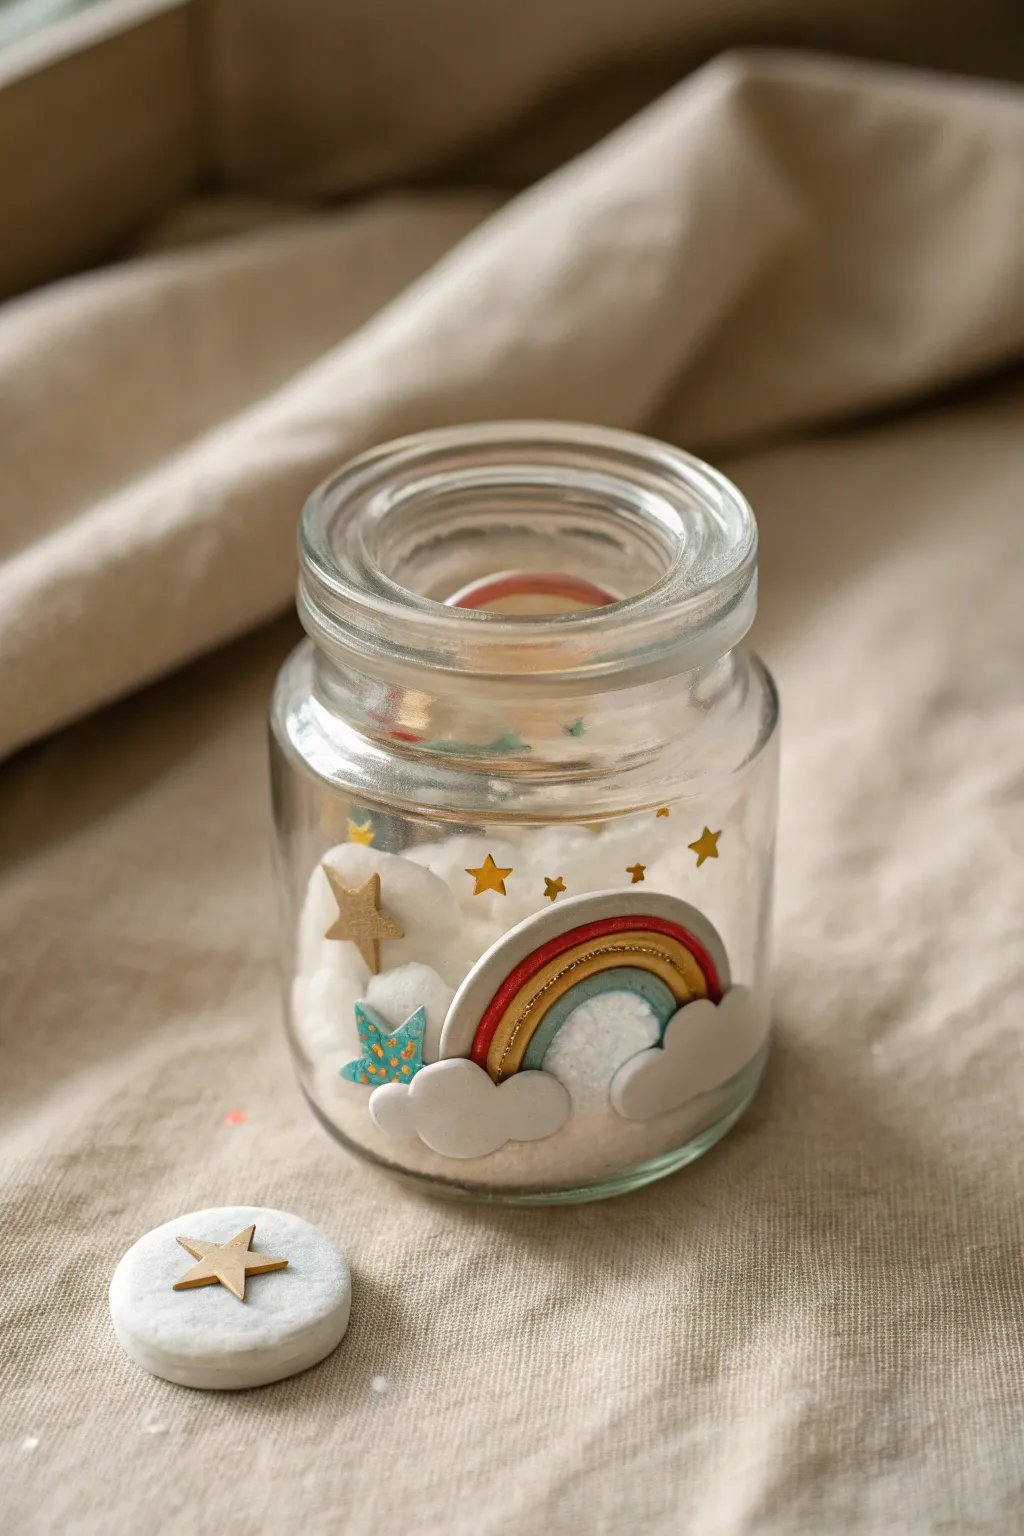
Capture a tiny slice of the sky in a jar with this charming cloud clay project. By combining soft textures with colorful clay accents, you’ll create a dreamy, self-contained world perfect for a desk ornament or a sweet handmade gift.
Step-by-Step Guide
Materials
- Small clear glass jar with a wide mouth
- White Cloud Clay (or lightweight air-dry clay)
- Polymer clay or air-dry clay in rainbow colors (red, white, blue, yellow, gold)
- Gold star confetti or stickers
- White craft sand or fine white glitter (optional)
- Small rolling pin
- Precision craft knife
- Liquid glue or clear craft adhesive
- Tweezers
Step 1: Creating the Clay Rainbow
-
Form the arches:
Start by rolling very thin, even snakes of clay in your chosen rainbow colors (red, gold/yellow, teal). I like to keep them slightly different thicknesses for visual interest. -
Assemble the curve:
Gently curve the red snake into an arch shape. Press the gold snake directly underneath it, followed by the teal one, creating a tight stack. -
Add the shimmer:
For the gold layer seen in the photo, you can use metallic gold clay, or lightly brush a standard yellow clay with gold mica powder before assembling. -
Trim the base:
Use your craft knife to slice across the bottom of the rainbow legs so they sit perfectly flat and even. -
Shape the clouds:
Roll two small balls of white clay and flatten them slightly. Use a tool or your fingers to indent the edges, creating fluffy, scallop-shaped clouds. -
Attach clouds to rainbow:
Press one cloud onto the bottom left and one onto the bottom right of your rainbow arch. The clay should stick together if fresh; otherwise, use a dab of glue.
Clean Glass Tip
Before placing the stickers, wipe the inside of the jar with vinegar on a cotton swab. This removes oils and ensures the stars stick reliably.
Step 2: Making the Starry Accents
-
Craft dimensional stars:
Roll out a small amount of gold or dark yellow clay. Use a tiny star cutter or your knife to cut out a 5-point star shape. -
Add a teal star:
Create a second, slightly smaller star using teal clay. To mimic the texture in the photo, gently poke small dots into its surface with a needle tool. -
Prep the lid decoration:
Using a larger piece of white clay, form a flattened disc that fits the size of your jar lid (or mimics a stone like in the reference). Press a gold clay star firmly into the center. -
Let everything cure:
Allow all your clay pieces to dry completely according to the package instructions before moving to assembly.
Level Up: Fairy Lights
Hide a tiny, battery-operated LED fairy light at the bottom of the cloud clay base. When lit, the entire jar will glow softly like a nightlight.
Step 3: Assembling the Cloud World
-
Prepare the jar base:
Fill the bottom of your clean glass jar with about an inch of white cloud clay. Press it down lightly, but leave the surface somewhat uneven to look like fluffy ground. -
Add texture:
Sprinkle a thin layer of white craft sand or fine glitter over the cloud clay base to enhance the sparkling, dreamy effect. -
Decorate the glass:
Using tweezers, carefully place small gold star stickers or confetti pieces onto the inside walls of the glass jar. -
Position the rainbow:
Place your dried rainbow structure into the jar, nestling the cloud feet slightly into the soft base so it stands upright. -
Add the floating stars:
Arrange the clay stars you made earlier around the rainbow. You can press the teal star slightly into the cloud base near the rainbow’s foot. -
Add vertical interest:
If you want a star to look like it’s rising, you can prop the large gold star against the side of the glass or attach it to the jar wall with a tiny dot of clear glue. -
Seal the scene:
Once you are happy with the arrangement, wipe the rim of the jar clean and place the lid on top.
Now you have a peaceful little sky scene captured forever on your shelf