Whenever I’m teaching kids in the studio, air dry clay is my go-to for quick wins that still feel totally magical. Here are my favorite cute project ideas that keep shapes simple, colors happy, and results something kids feel proud to show off.
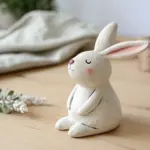
Blob Animals With Big Eyes

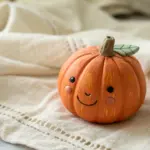
This adorable little bunny proves you don’t need complex sculpting skills to make something sweet. By starting with a simple egg shape and adding oversized features, you create an irresistibly cute desk companion that looks like a little marshmallow.
Step-by-Step Tutorial
Materials
- White smooth air dry clay
- Water (in a small cup)
- Black acrylic paint
- Pink acrylic paint
- Fine detail paintbrush
- Doting tool or toothpick
- Fine-grit sandpaper (optional)
- Matte varnish (optional)
Step 1: Sculpting
-
Form the base:
Start by taking a handful of white clay and rolling it into a smooth ball. Slowly begin to shape it into a rounded egg or teardrop shape, slightly wider at the bottom than the top, to create the blob body. -
Smooth the surface:
Check your shape for any cracks. Dip your finger in a tiny bit of water and gently rub out any imperfections until the surface is sleek. -
Flatten the base:
Tap the bottom of your egg shape gently against your table surface. This creates a flat bottom so your bunny stands up securely without wobbling. -
Create the ears:
Take two smaller equal pieces of clay. Roll them into small logs that taper at one end, resembling elongated tic-tacs. -
Shape the inner ear:
Using your thumb or a smoothing tool, gently press a shallow indentation into the center of each ear log to create the inner ear curve. -
Attach the ears:
Score the bottom of the ears and the top of the head slightly with a toothpick. Add a dab of water to these rough spots and press the ears firmly onto the head, positioning them close together. -
Blend the seams:
I like to use a silicone tool or just a wet finger to smooth the clay where the ears meet the head, making the connection seamless and strong. -
Dry completely:
Set your bunny aside in a safe, dry place. Depending on your humidity, let it dry for 24 to 48 hours until it feels hard and room temperature to the touch. -
Refine the texture:
Once fully dry, if you notice any rough bumps, you can very gently sand them away with fine-grit sandpaper for a porcelain-like finish.
Pro Smoothing Tip
Keep a small sponge damp with water nearby. Lightly dabbing the clay with the damp sponge creates a smoother finish than just using your fingers alone.
Step 2: Decorating
-
Outline the eyes:
Using a very fine paintbrush and black acrylic paint, carefully draw two large, oval outlines for the eyes. Place them relatively low on the face to increase the cuteness factor. -
Fill the eyes:
Fill in the outlines with solid black paint. Make sure the paint is opaque; you might need a second coat after the first one dries. -
Add eye sparkles:
Once the black paint is bone dry, dip the end of a paintbrush handle or a dotting tool into white paint (or leave blank areas if you are careful). Add a large white dot in the top corner of each eye for reflection. -
Paint the nose:
Mix a soft pink color and paint a tiny, inverted triangle or oval right between the eyes for the nose. -
Paint the mouth:
Using your finest brush or a black fine-liner marker (if the paint is dry), draw a simple ‘w’ shape descending from the nose to make the mouth. -
Add rosy cheeks:
With the same pink used for the nose, paint two soft oval blushes underneath the eyes. -
Color the ears:
Paint the indented inner sections of the ears with the pink paint. You can feather the edges slightly for a softer look. -
Seal the piece:
To protect your paint job, apply a thin layer of matte varnish over the entire bunny and let it dry.
Level Up: Fuzzy Texture
Before painting, tap a stiff-bristled toothbrush over the drying clay surface. This adds a subtle pitted texture that mimics fur or stone.
Place your little bunny near a window or plant to add a touch of cheer to the room


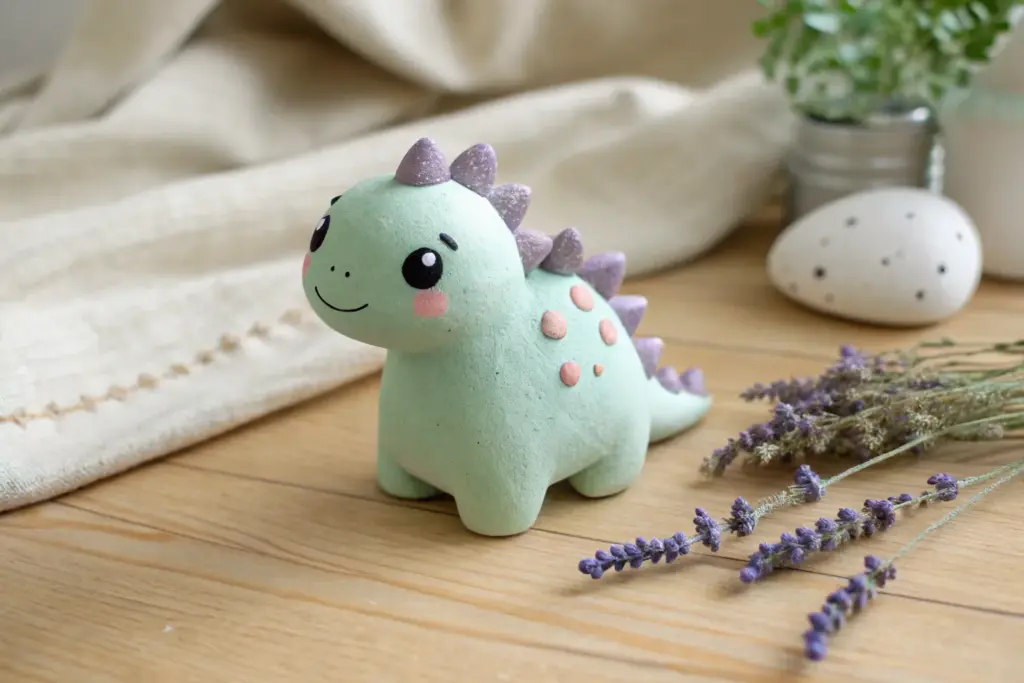
Chubby Dinosaur Figurines
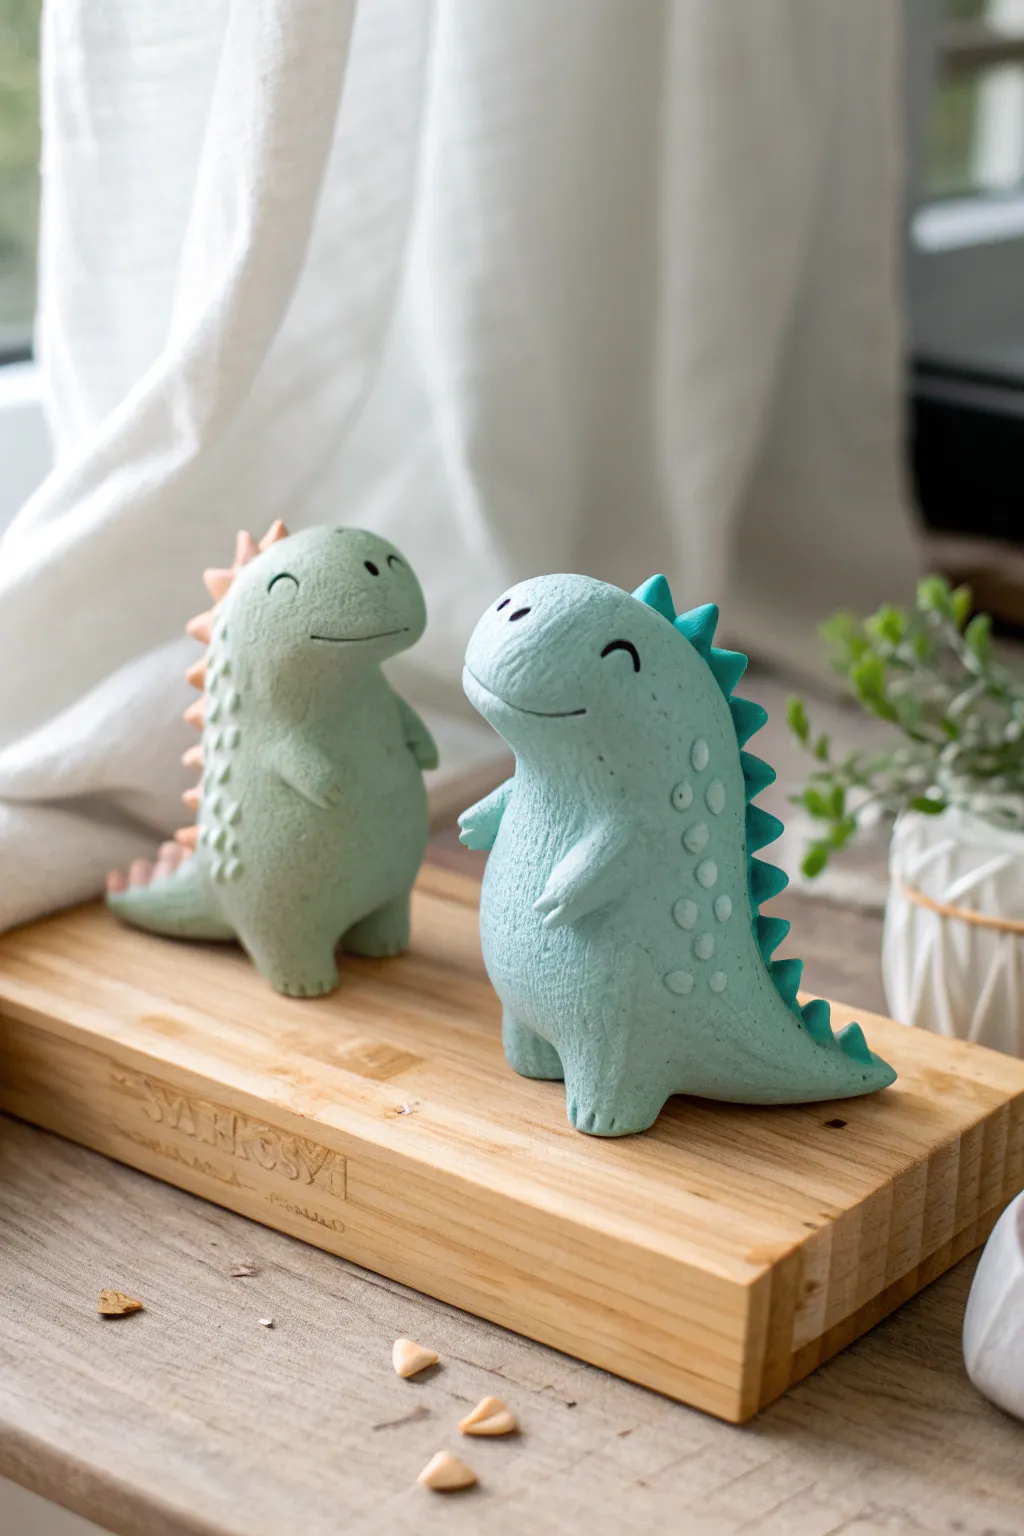
These adorable dinosaur figurines prove that fierce creatures can be endearing too, sporting a soft, chubby shape and gentle pastel hues. Their textured finish gives them a unique, stone-like appearance that adds character to any shelf or desk.
Detailed Instructions
Materials
- White air dry clay
- Acrylic paints (pastel green, teal, peach, black)
- Clean toothbrush or stiff bristle brush
- Clay tools (needle tool, small ball tool)
- Water in a small cup
- Parchment paper or craft mat
Step 1: Basic Body Shape
-
Tint the Clay:
Before sculpting, it’s best to pre-color your clay for this project. Mix a drop of pastel green or teal paint into a large ball of white clay, kneading until the color is uniform and streak-free. -
Form the Torso:
Roll almost all of your tinted clay into a smooth ball, then gently roll it into a pear shape. This will be the main body; the fat bottom part keeps the dinosaur stable. -
Define the Head:
Using your thumb and forefinger, gently pinch and smooth the narrower top part of the pear to define a rounded snout area, blending the neck seamlessly into the body. -
Add Texture:
Take a clean toothbrush and gently tap it all over the surface of the dinosaur’s body. This creates that lovely stone-like, matte texture seen in the photo. Do this before the clay starts to dry significantly.
Crack Control
If you see tiny cracks forming while drying, dip a brush in water and smooth a tiny bit of fresh wet clay (slurry) over the crack to seal it.
Step 2: Creating Details
-
Make the Arms:
Roll two tiny sausages of clay for arms. Flatten one end slightly to attach to the body, and keep the other end rounded. -
Attach the Limbs:
Score the attachment points on the chest with a needle tool, add a dab of water, and press the arms on. Use a silicone tool or your finger to smooth the seam completely so they look like they grow out of the body. -
Create Feet:
Form two small, flattened semi-circles for feet. Position them under the heavy base of the body, just peeking out, and blend the seams upward. -
Tail Time:
Roll a cone of clay and attach it to the lower back. Curve it slightly to the side for a playful pose, blending the join so it’s invisible. -
Spines and Scales:
For the back spikes, you can either pinch the clay directly along the spine or attach small triangle pieces. For the second dinosaur style, roll tiny balls of a contrasting color (like peach) and press them flat onto the back.
Step 3: Face and Finishing Touches
-
Carve the Smile:
Use a needle tool or a small blade to gently carve a curved line for the mouth. Press a small dimple at the end of the smile to make it look extra friendly. -
Eye Indentations:
Mark the spots for the eyes with a very light press of a small ball tool. Don’t go too deep; just mark the placement. -
Side Dots:
To mimic the texture on the teal dinosaur, roll tiny little balls of clay and press them flat onto the sides of the body in a random pattern, then re-texture slightly with the toothbrush. -
Drying:
Let the dinosaur sit undisturbed on parchment paper for at least 24-48 hours. Turn it over gently halfway through to ensure the bottom dries. -
Painting details:
Once fully bone dry, use a fine detail brush and black acrylic paint to carefully fill in the eyes and re-trace the smile line.
Spike It Up
Instead of clay spikes, try pressing small colorful beads or dried triangular pasta shapes into the back for a fun mixed-media texture twist.
Place your finished dino near a window for a cheerful decorative touch that brings a smile to your face


Mini Snail Friends
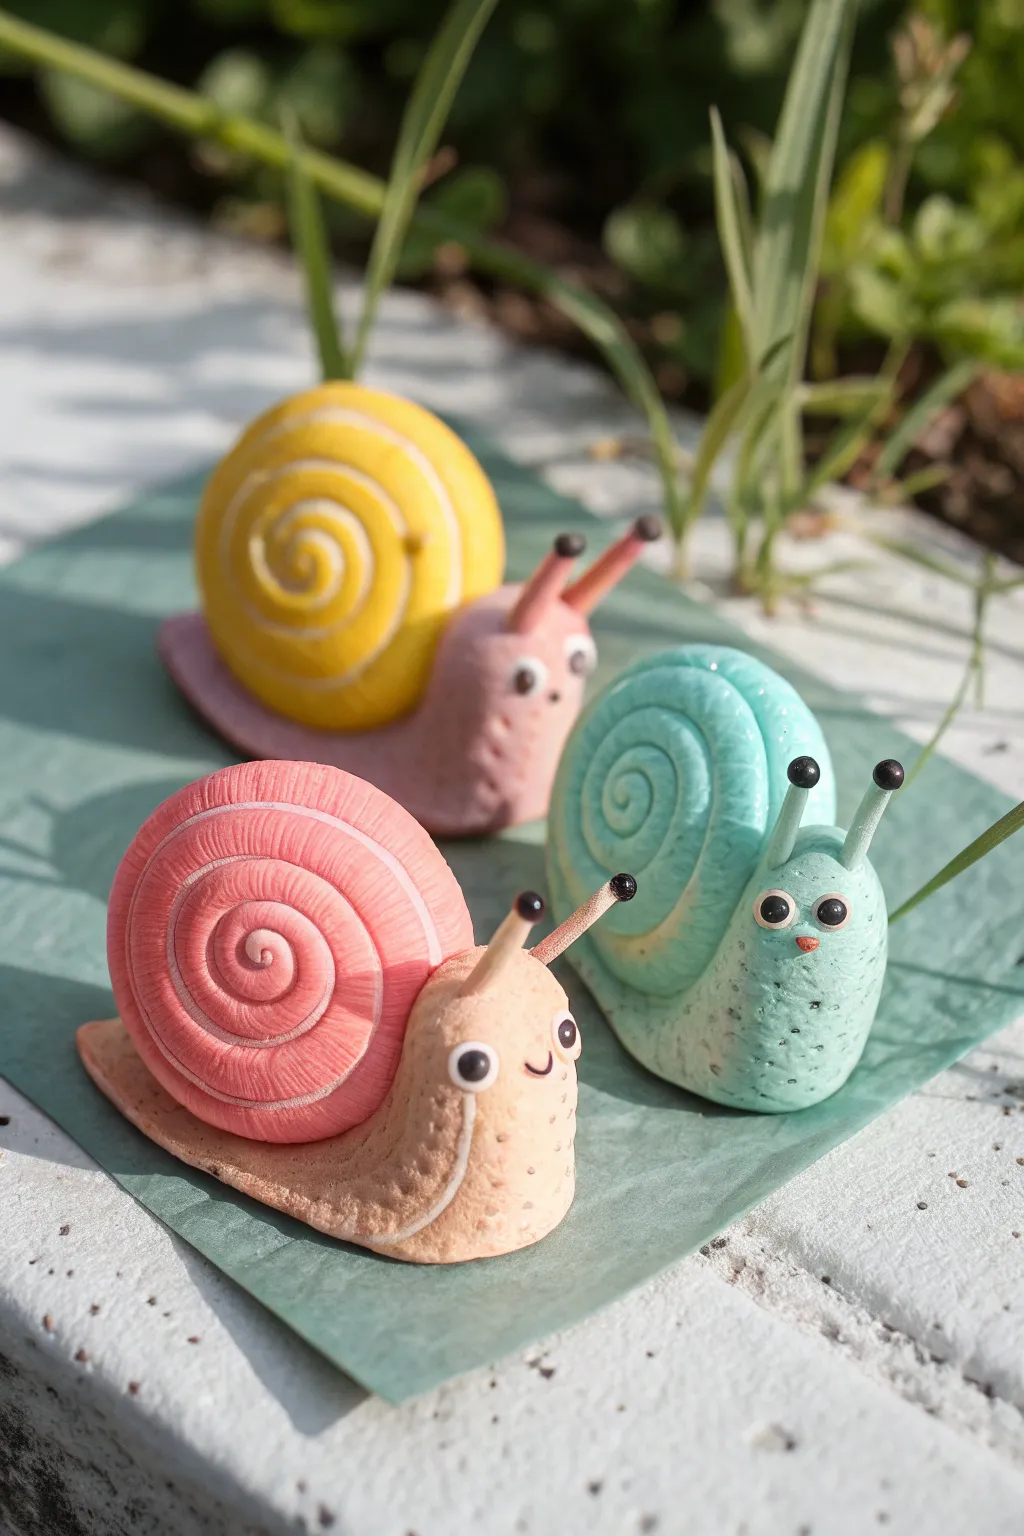
These delightful mini snail friends are bursting with personality, featuring pastel-colored swirled shells and adorable, expressive faces. Their textured skin and tiny antennae make them a perfect afternoon project for little hands to shape and sculpt.
Step-by-Step Guide
Materials
- Air dry clay (white or pre-colored in pink, yellow, blue, and tan)
- Acrylic paints (pastel pink, yellow, teal, beige, white, black, red)
- Fine-grit sandpaper or a nail file
- Sculpting tools (needle tool or toothpick, ball tool)
- Clear varnish (matte or satin finish)
- Short pieces of floral wire or stiff bristles (for eye stalks)
- Rolling pin
- Water cup for smoothing
Step 1: Shaping the Bodies
-
Mix your colors:
If using white clay, mix in small amounts of acrylic paint to create your base pastel colors: a soft pink, a creamy yellow, a light teal, and a warm beige. Knead until the color is uniform. -
Form the base log:
Take a walnut-sized piece of clay for the body (e.g., the tan or teal clay) and roll it into a thick log shape. Taper one end to a point for the tail and leave the other end slightly rounded and lifted for the head. -
Key indentation:
Press your thumb gently into the center of the body’s back to create a shallow saddle where the shell will eventually sit. This helps the shell adhere better later. -
Flatten the base:
Gently tap the bottom of the body on your work surface to flatten it so the snail stands up straight without tipping over. -
Add texture:
Using a needle tool or an old toothbrush, gently stipple the sides of the snail’s body to create a realistic, slightly bumpy skin texture. I like to focus this texture around the lower edges.
Step 2: Swirling the Shells
-
Create the coil:
Roll a contrasting color of clay (like pink for the tan body) into a long, tapered snake. The snake should be thicker at one end and get very thin at the other. -
Roll the spiral:
Starting from the thinnest end, tightly roll the snake up like a cinnamon roll. Keep the edges aligned so the shell forms a flat disc shape rather than a cone. -
Define the swirl:
Use a modeling tool to gently deepen the groove between the coils of the shell to make the spiral pattern pop. -
Attach the shell:
Score the bottom of the shell and the saddle on the body with a needle tool. Apply a tiny dab of water or slip, then press the shell firmly onto the body.
Shell slipping off?
If the heavy shell keeps tipping off the body while wet, insert a toothpick vertically through the bottom of the body into the shell as an internal anchor.
Step 3: Tiny Details & Faces
-
Insert eye stalks:
Cut two small pieces of wire or toothpick (about 1 cm long). Push them into the top of the head area. You can cover these with a thin layer of clay matching the body color if you prefer, or paint them later. -
Make the eyes:
Roll two tiny spheres of white clay (or paint them later) and attach them to the ends of your eye stalks or directly onto the face for the teal snail. -
Add pupils:
Press extremely tiny balls of black clay onto the white eyes, or wait until dry to paint them with a dotting tool. -
Sculpt the smile:
Use the edge of a small spoon tool or a straw cut in half to imprint a happy, curved smile onto the face.
Glitter Trail
Mix a small amount of iridescent glitter into your final varnish coat, or paint a wavy line of glitter glue behind the snail to mimic a magical slime trail.
Step 4: Finishing Touches
-
Dry completely:
Let your snails sit undisturbed in a dry area for 24–48 hours until they are hard and lightweight. -
Highlight the shell:
Once dry, dry-brush a very light coat of white or a paler shade of the shell color over the ridges of the spiral to accentuate the texture. -
Paint facial features:
Use a fine liner brush or a toothpick to add tiny white highlights to the eyes and a dab of pink for rosy cheeks if desired. -
Seal the work:
Apply a coat of satin or matte varnish to protect your snails and give them a finished, professional sheen.
Arrange your trio of snails on a windowsill or in a planter for a splash of cheer


Ladybug And Bee Magnets
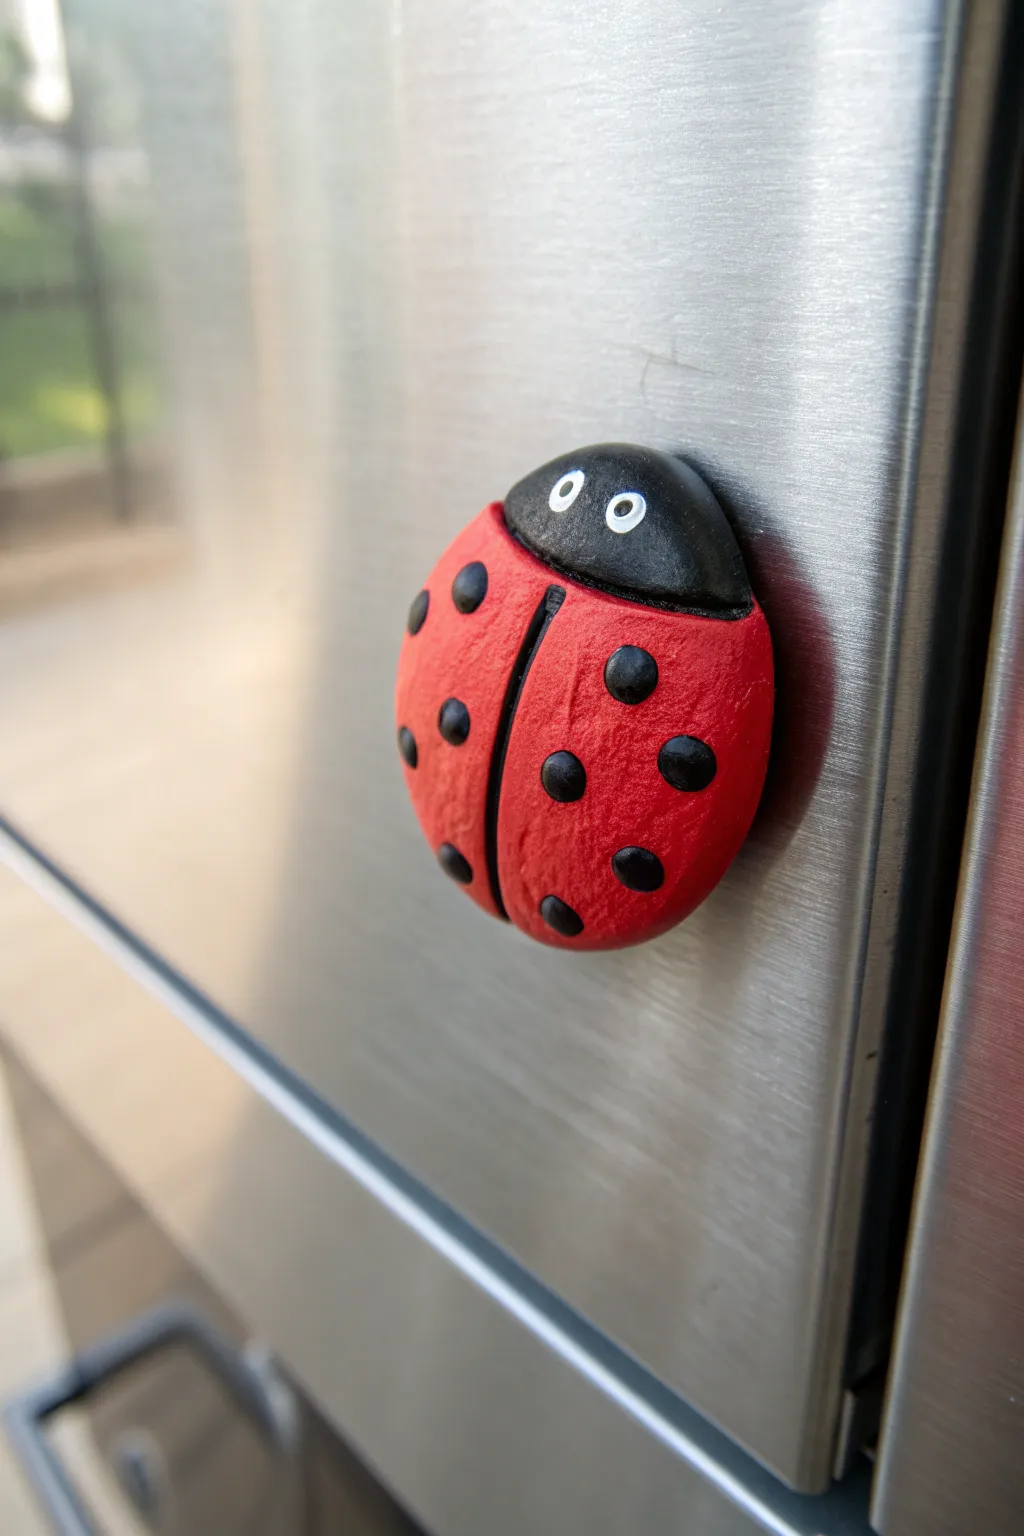
Brighten up your kitchen with this cheerful little ladybug magnet, featuring a vibrant red shell and adorable googly eyes. It’s a simple, chunky design that looks fantastic holding up artwork or photos on the refrigerator door.
Step-by-Step Tutorial
Materials
- Red air dry clay (or white clay + red acrylic paint)
- Black air dry clay (or white clay + black acrylic paint)
- White acrylic paint (or a white paint pen)
- Small round magnet
- Strong craft glue (like E6000 or super glue)
- Clay sculpting tool (or a dull plastic knife)
- Texture tool (optional, like a toothbrush or sandpaper)
- Matte or satin varnish (optional for finish)
- Small paintbrush
Step 1: Shaping the Base
-
Create the body:
Start with a piece of red air dry clay about the size of a ping-pong ball. Roll it into a smooth sphere between your palms to remove any cracks. -
Flatten the shape:
Gently press the sphere down onto your work surface to create a dome shape. The bottom should be completely flat so the magnet will attach securely later. -
Add texture:
If you want that slightly organic, matte look seen in the photo, gently tap the surface of the red dome with a toothbrush or a piece of crumpled foil to give it a tiny bit of texture. -
Form the head:
Take a smaller piece of black clay, about a third of the size of the red piece. Roll it into a ball and then slightly flatten it into a semi-circle shape.
Clay Won’t Stick?
If the black head won’t stay attached to the red body, scour the connecting surfaces with a toothpick (scratching X shapes) and add a drop of water to create a gripping ‘slip’ paste.
Step 2: Assembly and Details
-
Attach the head:
Press the flat edge of the black semi-circle against one side of the red dome. Use a tiny bit of water or clay slip on your finger to smooth the seam underneath where they join so they stick together firmly. -
Create the wing divide:
Using your sculpting tool or a dull knife, press a straight line down the center of the red back, starting from the black head and going all the way to the bottom. This creates the look of closed wings. -
Make the spots:
Roll very tiny balls of black clay. You’ll need about 10-12 of these for a classic ladybug look. -
Apply the spots:
Press the tiny black balls onto the red wings. Flatten them gently so they look like flush spots rather than bumps sticking out. -
Shape the eyes:
This is the personality part. Paint two small white ovals directly onto the black head section. I find a paint pen gives much better control here than a brush. -
Direct the gaze:
Once the white paint is dry, add two tiny black dots inside the white ovals for pupils. Placing them slightly off-center makes the ladybug look curious.
Step 3: Finishing Touches
-
Let it dry:
Allow your ladybug to dry completely. Depending on the thickness of your clay, this usually takes 24 to 48 hours. Turn it over halfway through so the bottom dries too. -
Seal the surface:
Apply a coat of matte or satin varnish if desired. This protects the clay and deepens the red color without making it too shiny and plastic-looking. -
Prepare the magnet:
Flip the dried ladybug onto its back. Ensure the surface is clean and dust-free. -
Attach the magnet:
Apply a strong dab of craft glue to the center of the flat back and press your round magnet into it. Let the glue cure fully before sticking it to the fridge.
Make a Colony
Don’t stop at ladybugs! Use yellow and black clay with this same dome method to make bumblebees, replacing the dots with horizontal black stripes across the back.
Now your fridge has a charming little guardian for your grocery lists and photos

The Complete Guide to Pottery Troubleshooting
Uncover the most common ceramic mistakes—from cracking clay to failed glazes—and learn how to fix them fast.
Smiley Face Pinch Pots
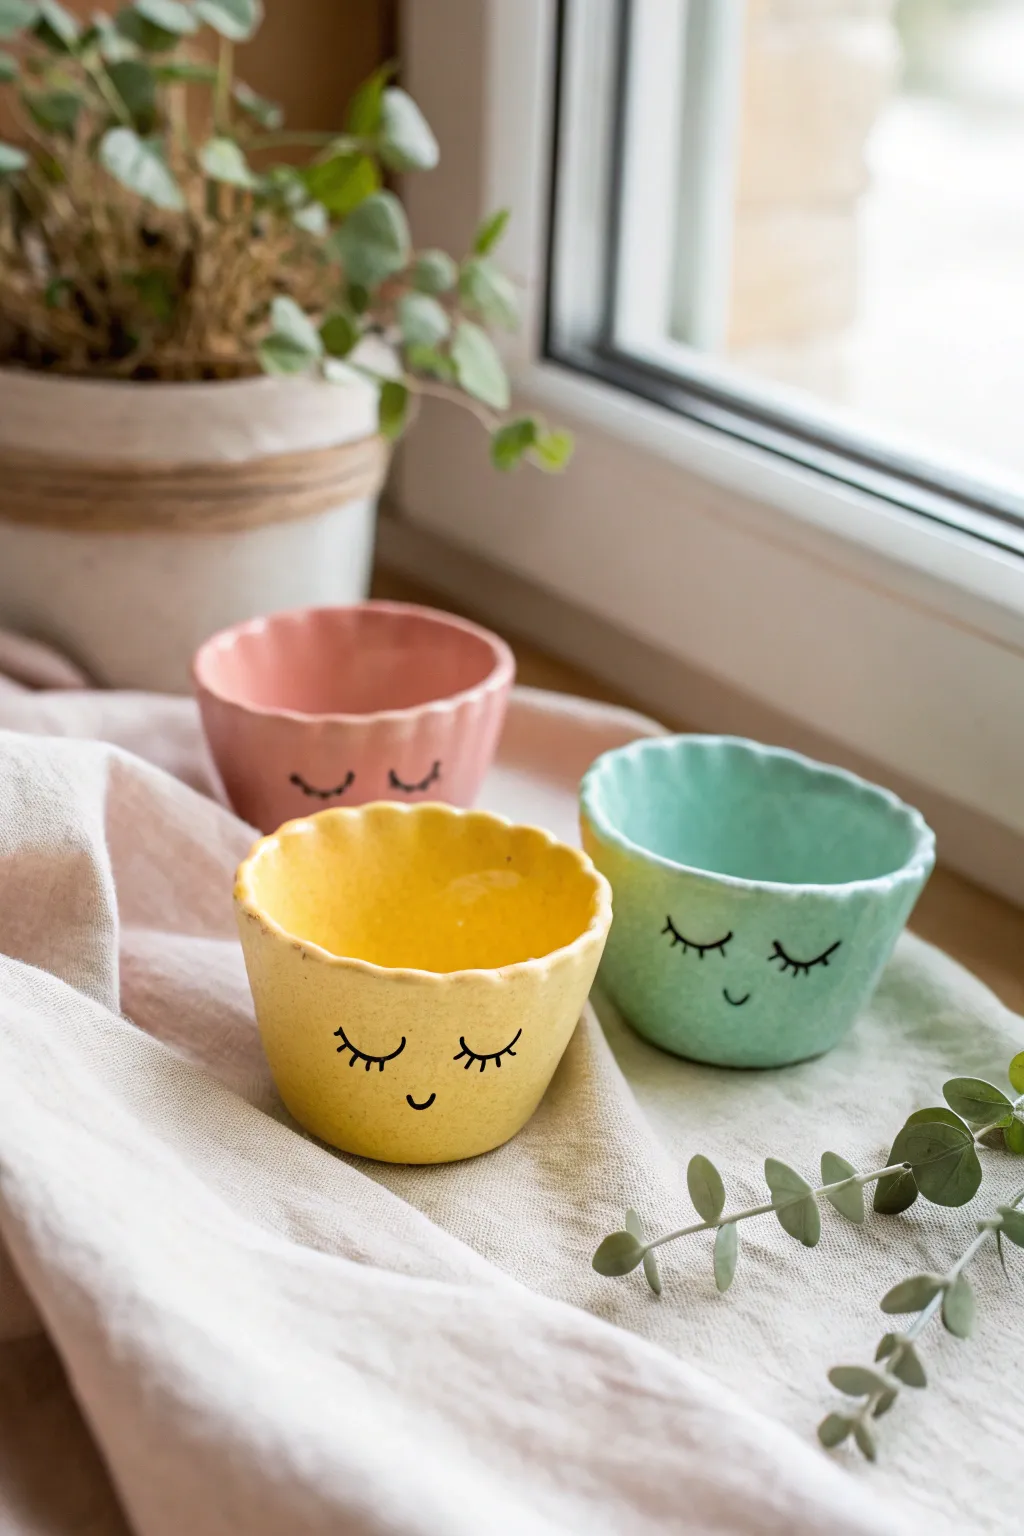
These adorable little vessels are the perfect beginner air-dry clay project, featuring ruffled edges and serene, sleeping faces. With their pastel colors and glossy finish, they make cheerful holders for tiny treasures or simply sweet windowsill decorations.
How-To Guide
Materials
- White air-dry clay
- Acrylic paints (pastel pink, yellow, mint green)
- Black fine-tip permanent marker or fine paintbrush with black paint
- Gloss varnish or clear sealer (like Mod Podge)
- Small bowl of water
- Sponge
- Paintbrushes
- Rolling pin (optional)
Step 1: Shaping the Pots
-
Form a ball:
Start by taking a piece of air-dry clay about the size of a tangerine. Roll it between your palms until you have a smooth, crack-free sphere. -
Begin the pinch:
Hold the ball in one hand and gently press your thumb into the center, stopping before you push through the bottom. This creates the basic hollow shape. -
Widen, pinch and rotate:
Using your thumb on the inside and fingers on the outside, gently pinch the clay walls while rotating the pot. Aim for an even thickness of about a quarter-inch all the way around. -
Create the flat base:
Once you have a cup shape, gently tap the bottom of the pot against your table to flatten it so it stands up straight without wobbling. -
Scallop the rim:
To get that cute ruffled look, use your index finger to gently press down on the rim from the inside, while supporting the outside with two fingers. Repeat this pinching motion all around the edge. -
Smooth it out:
Dip your finger in a little bit of water and rub it over the clay to smooth out any fingerprints or tiny cracks. Don’t use too much water, or the clay will get slimy. -
Drying time:
Place your pots in a safe, dry spot. Let them air dry completely for 24 to 48 hours. They will turn white and feel hard when they are ready.
Smooth Surface Trick
Before painting, use a barely damp sponge to gently wipe the dried clay. This acts like fine sandpaper, removing bumps without creating dust.
Step 2: Painting and Details
-
Base coat inside:
Choose a pastel color like mint, pale pink, or sunny yellow. Paint the entire inside of the pot first so you can hold onto the outside while you work. -
Base coat outside:
Paint the outside of the pot in the same color. I find applying two thin coats gives a much smoother finish than one thick gloppy one. -
Let the paint set:
Allow the paint to dry completely. Acrylic paint usually dries fast, so this should only take about 15-20 minutes. -
Pencil the face:
Lightly sketch the sleeping face design with a pencil. Draw two downward curves for closed eyes with eyelashes, and a small U-shape for a smile. -
Draw the features:
Trace over your pencil lines carefully using a black fine-tip permanent marker. If you have a very steady hand, you can use a tiny brush and black paint instead. -
Add the lashes:
Don’t forget to add three little vertical lines to each eyelid curve to create the cute eyelashes visible in the photo. -
Seal the deal:
Cover the entire pot, inside and out, with a coat of gloss varnish or clear sealer. This protects the paint and gives it that professional ceramic-like shine.
Make them Planters
Poke a drainage hole in the bottom while the clay is wet to turn these into real succulent planters. Just remember to seal the inside well!
Once dry, these cheerful little pots are ready to brighten up your desk or hold your favorite rings
Heart Handprint Keepsake Ornaments
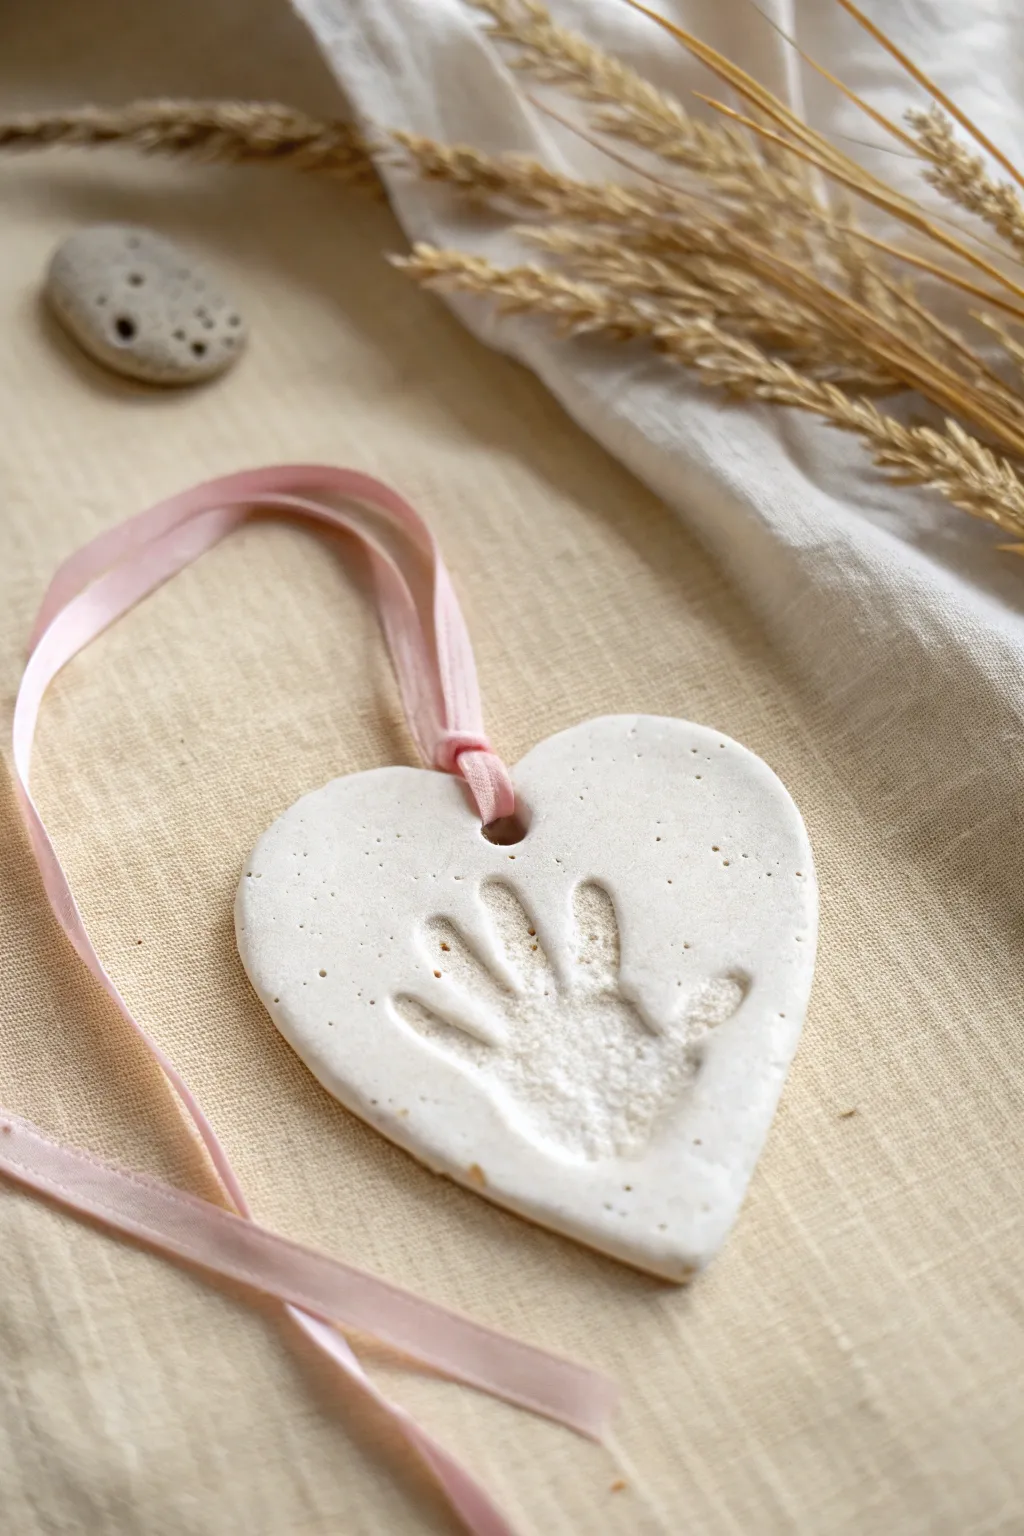
Capture a moment in time with this sweet and simple heart-shaped ornament featuring a tiny handprint impression. The soft white clay gives it a pure, timeless look, while a delicate pink ribbon adds the perfect finishing touch for hanging.
Step-by-Step
Materials
- White smooth air-dry clay (e.g., DAS or Crayola)
- Small rolling pin
- Large heart-shaped cookie cutter (approx. 4-5 inches)
- Parchment paper or a silicone craft mat
- A plastic straw or thick skewer (for the hole)
- Pale pink satin ribbon (1/4 inch width)
- Fine-grit sandpaper (optional)
- Small bowl of water
- Sealing varnish or clear acrylic spray (matte)
Step 1: Preparation and Shaping
-
Prepare your workspace:
Lay down parchment paper or a silicone mat on a flat, stable surface. This prevents the clay from sticking and picking up unwanted texture from the table. -
Condition the clay:
Take a handful of white air-dry clay from the package. Knead it in your hands for about a minute until it feels warm, pliable, and smooth. -
Roll it out:
Using a small rolling pin, flatten the clay ball into an even slab. You want it to be roughly 1/4 to 1/2 inch thick—thick enough to take a deep impression without cracking. -
Smooth the surface:
Dip your finger lightly in water and gently rub it over the surface of the clay slab to remove any small cracks or rolling pin marks. -
Cut the heart:
Place your heart-shaped cookie cutter over the clay. Press down firmly and evenly to cut the shape. Wiggle it slightly before lifting to release the clay cleanly.
Smooth Texture Trick
To get that speckled, natural stone look seen in the photo, you can lightly mix a tiny pinch of used coffee grounds or nutmeg into the clay before rolling it out.
Step 2: Creating the Impression
-
Position the hand:
Guide your child’s hand to the center of the heart. Open the fingers slightly to ensure a clear imprint of each digit. -
Press firmly:
Press the hand down into the clay. Apply firm pressure on the palm and then individually on each finger to ensure the print is deep and defined. -
Lift carefully:
Hold the edges of the clay heart down gently with one hand while you slowly lift the child’s hand straight up to avoid smudging the edges of the print. -
Refine the edges:
If the clay spread out a bit during pressing, gently tap the edges of the heart back into shape with your fingers. -
Smooth imperfections:
Look closely at the print. If there are tiny fingernail marks or rough spots you don’t want, use a damp finger or a clay tool to gently smooth them out. -
Create the hanging hole:
Using a plastic straw or a thick skewer, poke a hole near the top center of the heart (where the two lobes meet). Twist the straw slightly as you pull it out to get a clean hole.
Cracks while drying?
If small hairline cracks appear as it dries, make a paste of clay and water (called ‘slip’) and rub it into the cracks with your finger, then let it dry again.
Step 3: Drying and Finishing
-
Initial drying:
Leave the ornament on the parchment paper to dry in a cool, dry place. Avoid direct sunlight, which can cause cracking. -
Flip occasionally:
After about 12-24 hours, gently flip the heart over. This helps the underside dry evenly and prevents the clay from curling upward at the edges. -
Check for dryness:
Allow it to dry completely, which usually takes 48-72 hours depending on humidity. The clay should turn a stark white and feel hard to the touch. -
Sand edges (optional):
If the edges of the heart feel sharp or rough, take a small piece of fine-grit sandpaper and very lightly buff the rim until smooth. -
Apply sealer:
I usually like to protect the finish with a light coat of matte varnish or clear acrylic sealer. Apply one thin coat and let it dry according to the bottle instructions. -
Add the ribbon:
Cut a length of pale pink satin ribbon. Fold it in half, push the loop through the hole from front to back, and pull the tails through the loop to create a lark’s head knot, or simply tie a bow.
Hang this lovely keepsake on a wall or tree to cherish those little fingers forever


What Really Happens Inside the Kiln
Learn how time and temperature work together inside the kiln to transform clay into durable ceramic.
Monster Pencil Cup
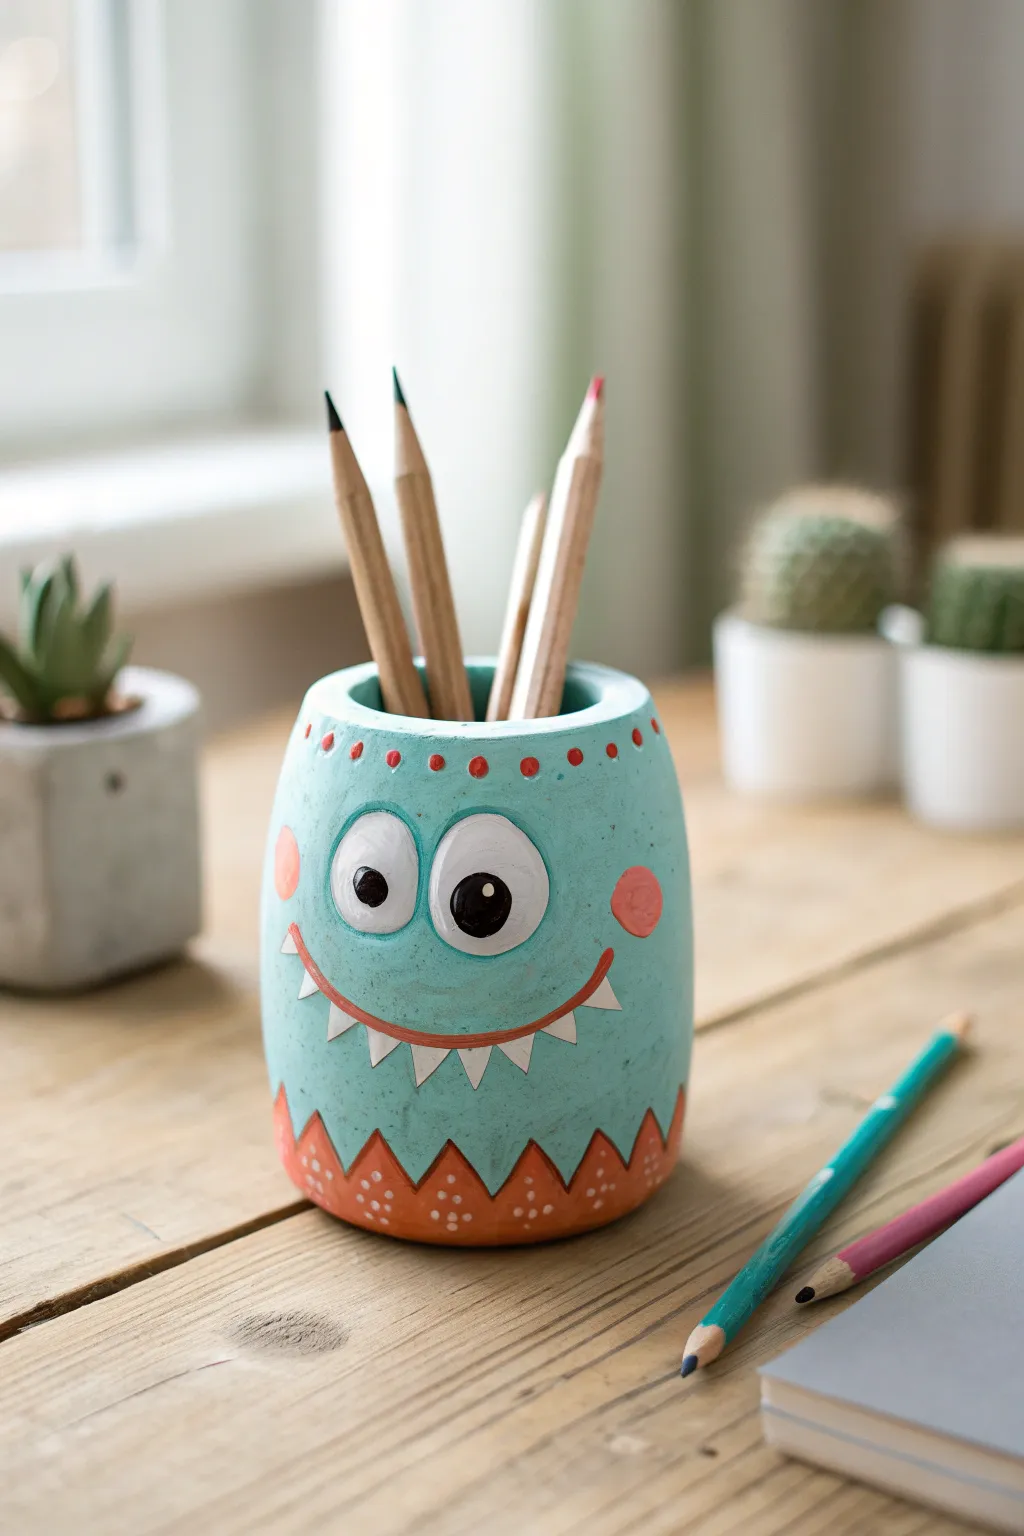
Brighten up any desk with this adorable little monster that’s eager to hold all your favorite colored pencils. With its wide eyes, toothy grin, and fun zigzag base, this clay pot is as practical as it is cute.
Step-by-Step Tutorial
Materials
- Air dry clay (white or terracotta)
- Acrylic paints (teal/turquoise, orange, white, black, red)
- Rolling pin
- Empty soup can or glass jar (to use as a mold)
- Clay sculpting tools (or a plastic knife/toothpick)
- Paintbrushes (small detail brush and medium flat brush)
- Water cup
- Sandpaper (fine grit)
- Clear varnish or sealant (optional)
Step 1: Shaping the Base
-
Prepare the core:
Start by finding a sturdy cylinder to build around, like an empty, clean soup can or a small glass jar. This ensures your pencil cup stays perfectly round and hollow while you work. -
Roll out the clay:
Take a large chunk of air dry clay and roll it out into a flat, even slab about 1/4 inch thick. Aim for a long rectangle that is tall enough to cover your can. -
Wrap the cylinder:
carefully wrap the clay slab around your chosen cylinder mold. Trim off any excess clay where the ends meet so they just touch without overlapping too much. -
Seal the seam:
Dip your finger in a little water and smooth the vertical seam until it disappears completely. This creates a continuous, smooth surface for your monster’s body. -
Curve the top:
Gently curve the top edge of the clay slightly inward toward the opening of the can to create a soft, rounded shoulder rather than a sharp rim. Smooth this edge with water.
Cracked Clay?
If small cracks appear during drying, mix a tiny bit of fresh clay with water to make a paste (slip) and fill the cracks, then smooth over.
Step 2: Sculpting Features
-
Add the eyes:
Roll two small balls of clay and flatten them slightly into discs. Press these firmly onto the upper half of the pot, positioning them side-by-side but slightly askew for a goofy look. -
Carve the mouth:
Using a clay tool or plastic knife, gently carve a wide, curved smile line into the clay surface below the eyes. Don’t cut all the way through; just make a clear indentation. -
Dry the structure:
Allow the clay to dry completely. This usually takes 24-48 hours depending on humidity. Once fully dry and hard, carefully slide the inner can or jar out if you wish, or leave it in for extra weight. -
Smooth it out:
If there are any rough bumps or fingerprints, lightly sand the surface with fine-grit sandpaper until the monster feel smooth to the touch.
Step 3: Painting the Details
-
Base coat:
Paint the entire exterior of the pot with a lovely teal or turquoise acrylic paint. You may need two coats to get a solid, opaque color. -
Paint the eyes:
Fill in the raised eye discs with white paint. Let this dry completely before moving on to the pupils. -
Create the zigzag base:
Using orange paint, carefully paint a zigzag pattern along the very bottom edge of the pot. Fill in the triangles so the bottom looks like it’s wearing a jagged sweater. -
Add pupils:
Dip the handle end of a paintbrush into black paint and dot it onto the white eyes. Make one pupil slightly larger than the other for extra character. -
Detail the mouth:
Using a very fine brush and red paint, trace the carved smile line. Then, paint small white triangles hanging down from the line to create sharp little teeth. -
Add spots and cheeks:
Paint two pinkish-orange circles on the cheeks. Then, use the tip of a toothpick or small brush handle to add huge orange dots around the top rim and tiny white dots inside the orange base triangles. -
Highlight the eyes:
I always add a tiny speck of white paint inside the black pupils to bring the character to life. -
Seal the deal:
Once all paint is totally dry, apply a coat of clear varnish or Mod Podge to protect your monster from scratches and give it a nice finish.
Pro Tip: Eye Pop
Make the eyes 3D! Instead of just painting flat discs, sculpt the eyelids slightly over the eyeballs before drying for more depth.
Now pop in your pencils and enjoy your friendly desk companion
Butterflies With Antennae
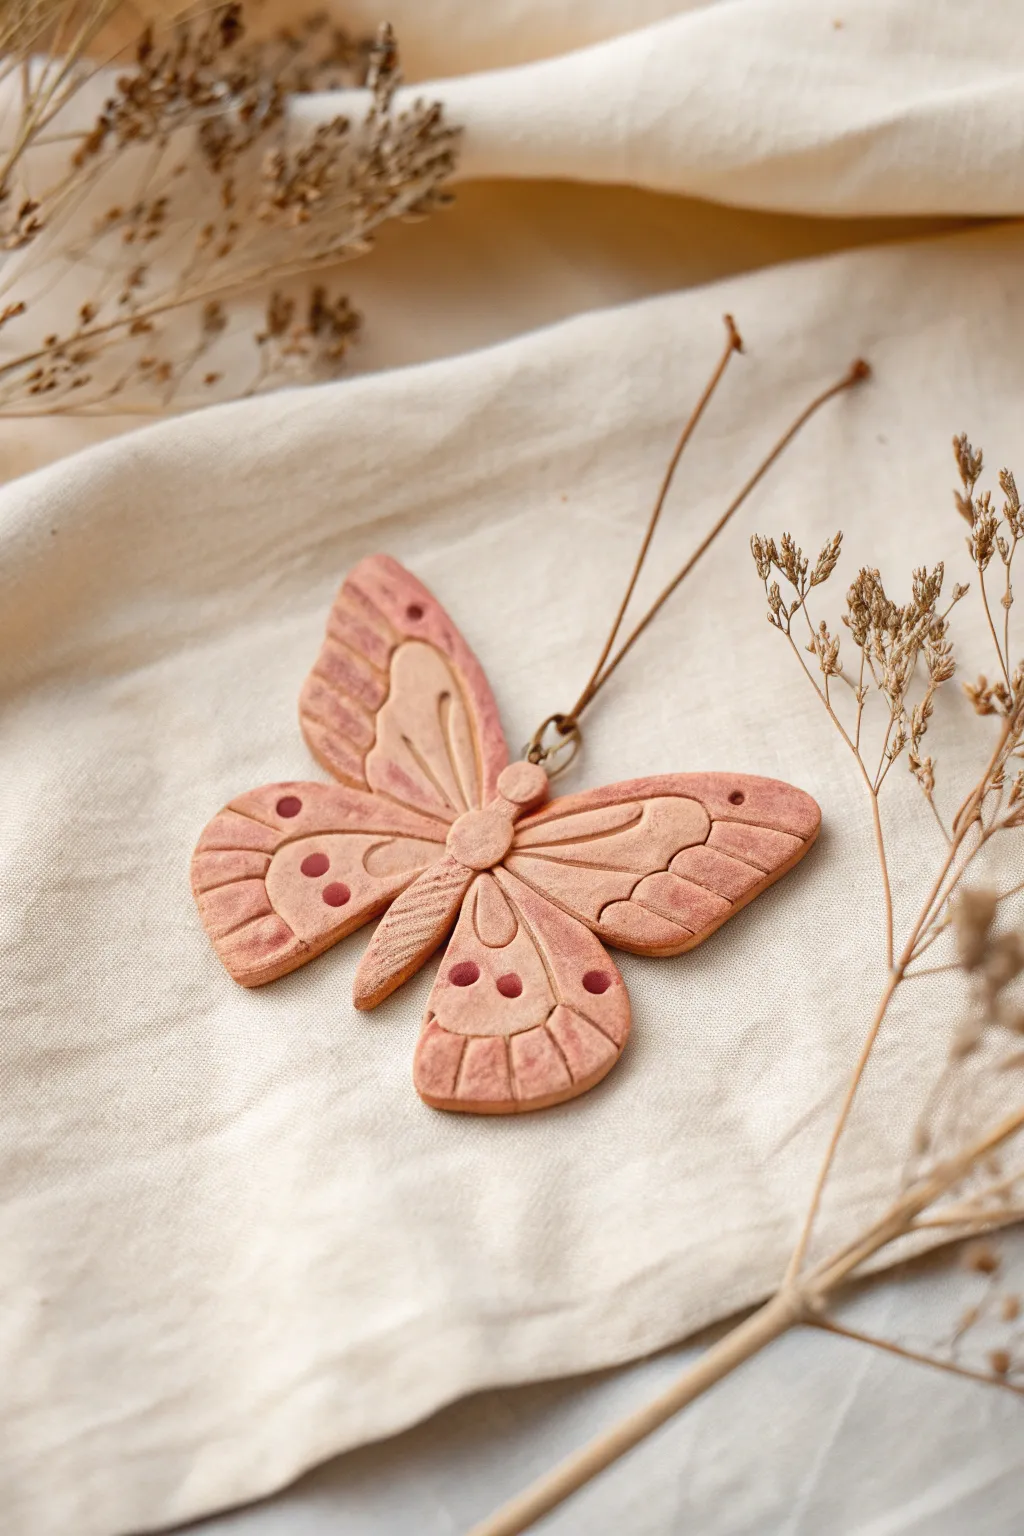
Capture the delicate beauty of nature with this charming terracotta-style butterfly ornament. Featuring carved wing details and sweet antennae, it’s a perfect afternoon project for adding a touch of whimsy to your decor.
Step-by-Step Guide
Materials
- Air dry clay (terracotta or white)
- Acrylic paint (rust red, dusty pink, cream)
- Wire for antennae (thin gauge, brown or copper)
- Leather cord or twine for hanging
- Rolling pin
- Parchment paper
- Needle tool or toothpick
- Small round piping tip or straw (for circles)
- Clay carving tools or a plastic knife
- Sponge or paper towel
- Small paintbrush
Step 1: Shaping the Wings
-
Roll the clay:
Start by kneading your clay until it is soft and pliable. Roll it out on a piece of parchment paper to an even thickness of about 1/4 inch. -
Cut the outline:
Using a needle tool or a small knife, freely cut out the shape of your butterfly wings. You want two upper wings and two slightly smaller lower wings. Don’t worry about perfect symmetry; a natural look is better. -
Smooth the edges:
Dip your finger in a little bit of water and run it along the cut edges of the clay to smooth out any roughness or jagged bits. -
Form the body:
Roll a small snake of clay for the butterfly’s body. It should be long enough to connect the wings. Slightly taper it at the bottom for the tail and round it at the top for the head. -
Assemble the pieces:
Score the attachment points (scratch hatching lines) where the wings will meet the body. Add a tiny dab of water or liquid clay (watered-down clay) and press the wings firmly onto the sides of the body. -
Add the centerpiece:
Roll a small ball of clay and flatten it slightly. Press this onto the center of the thorax where all four wings meet to secure the connection.
Clean Cuts Pro Tip
If your clay drags while cutting the wing shapes, let the rolled slab sit for 10-15 minutes to firm up slightly before you start carving.
Step 2: Carving Details
-
Carve wing sections:
Using your needle tool, gently carve curved lines into each wing to define the separate sections. These lines mimic the vein structure of real butterfly wings. -
Add texture:
Within the larger engraved sections, scratch lighter, shorter lines to add visual texture, especially near the outer edges of the wings. -
Create indented dots:
Use the back of a paintbrush, a small ball stylus, or a straw to press circular indentations into the wings. Place a few on the lower wings and near the tips of the upper wings. -
Make the hanger hole:
While the clay is still wet, carefully twist a small metal jump ring or a loop of wire into the top of the head for hanging later. Alternatively, poke a hole through the top wing. -
Insert antennae:
Cut a short piece of wire and fold it into a V-shape. Curl the ends slightly. Press the center of the V deep into the top of the head clay so it holds firm. -
Let it dry:
Set your butterfly aside on the parchment paper to dry completely. This usually takes 24-48 hours depending on humidity. Flip it halfway through to ensure the back dries evenly.
Golden Glow Up
Add a touch of metallic gold paint inside the incised vein lines or on the antenna tips for an elegant, vintage feel.
Step 3: Painting and Finishing
-
Apply base wash:
Once fully dry, mix a little rust-red acrylic paint with water to create a wash. Brush this over the entire butterfly, letting the color sink into the carved crevices. -
Wipe back color:
Before the wash dries completely, use a damp sponge or paper towel to wipe the surface. This leaves darker paint in the lines and indents while highlighting the raised clay. -
Paint the dots:
Dip a small brush into dusty pink or a darker red paint and carefully fill inside the circular indentations you made earlier to make them pop. -
Add subtle highlights:
I like to dry-brush a tiny bit of cream or pale pink paint over the very edges of the wings and raised textures to give it a soft, sun-faded look. -
Seal:
Give your butterfly a coat of matte varnish or sealant to protect the paint and clay. -
Attach the cord:
Thread a leather cord or piece of twine through the metal loop you embedded earlier create a hanger.
Hang your lovely new creation on a branch or in a window to enjoy its earthy charm

TRACK YOUR CERAMIC JOURNEY
Capture glaze tests, firing details, and creative progress—all in one simple printable. Make your projects easier to repeat and improve.
Flower Trinket Dishes
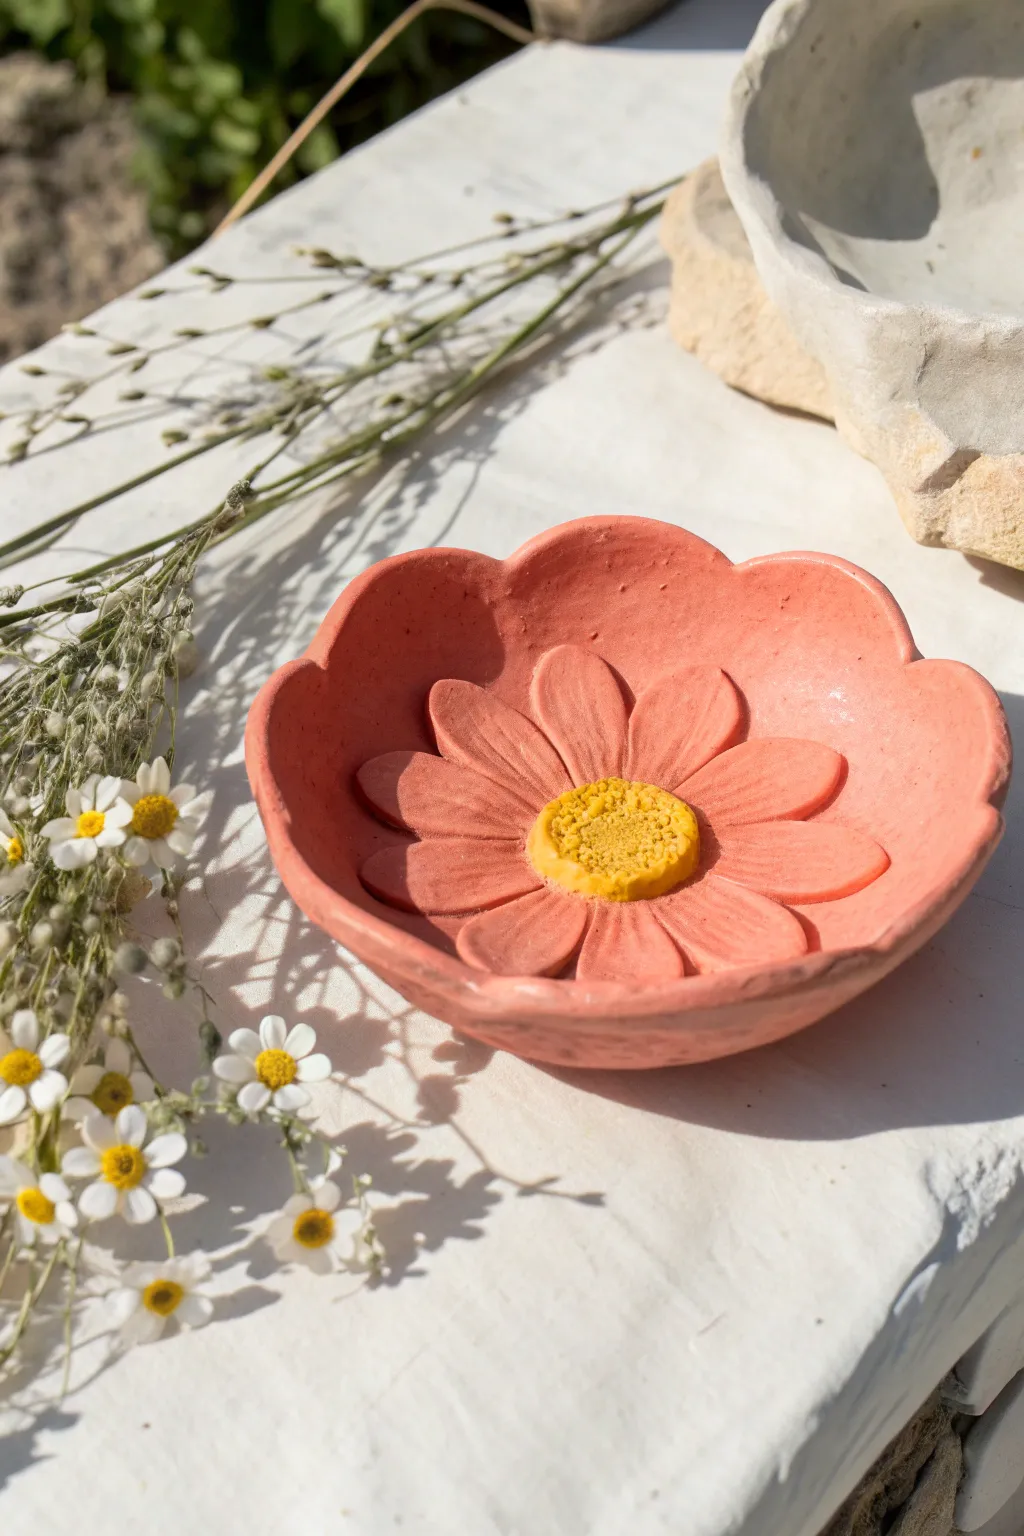
This charming little trinket dish captures the delicate beauty of a blooming flower, complete with soft pink petals and a sunny yellow center. It’s the perfect bedside catch-all for rings or tiny treasures, bringing a touch of nature indoors.
Step-by-Step Tutorial
Materials
- Air dry clay (white or terracotta)
- Pink acrylic paint (soft coral or salmon shade)
- Yellow acrylic paint (mustard or golden yellow)
- Rolling pin
- Clay carving tools or a butter knife
- Small bowl (for shaping)
- Sponge or fine-grit sandpaper
- Cardboard or parchment paper
- Water in a small cup
- Toothbrush (optional, for texture)
- Matte sealer or varnish
Step 1: Shaping the Bowl Base
-
Roll the clay:
Start with a ball of clay about the size of a tangerine. Flatten it on parchment paper using your rolling pin until it is an even slab, roughly 1/4 inch thick. -
Cut the outer shape:
Use a needle tool or a dull knife to cut a wavy, scalloped circle out of your clay slab. Aim for 5-7 large, gentle waves to simulate petals. -
Smooth the edges:
Dip your finger in a little water and run it along the cut edges of your scallop shape to smooth out any roughness or sharp bits. -
Create the curvature:
Gently lift your clay shape and place it inside a small cereal bowl. Press it lightly so it takes on a curved, dish-like form.
Crack Control
If small cracks appear while drying, don’t panic. Mix a tiny bit of fresh wet clay with water to make a paste and fill the cracks. Smooth it over and let dry.
Step 2: Sculpting the Flower Center
-
Make the inner petals:
Roll out a smaller, thinner piece of clay. Cut out 8-10 long, teardrop shapes to serve as the inner daisy petals. -
Attach the petals:
Score the backs of these teardrop shapes (scratch them up a bit) and add a dab of water. Arrange them in a radial circle in the center of your dish. -
Refine the petals:
Use a modeling tool to press a subtle line down the center of each attached petal for realistic detailing. -
Form the stigma:
Roll a small ball of clay for the flower’s center. Flatten it slightly into a thick disc. -
Add texture:
Before attaching, tap the top of the disc repeatedly with a toothbrush or a stiff brush to create a fuzzy, pollen-like texture. -
Attach the center:
Score the center of your petal arrangement and the bottom of your textured disc. Press the disc firmly into the middle. -
Dry completely:
Let the dish dry inside the bowl for 24-48 hours. Once rigid, pop it out and let the bottom dry fully.
Petal Definition
When painting the pink layer, try not to flood the gaps between the sculpted petals. Keeping paint thin there emphasizes the beautiful 3D relief.
Step 3: Painting and Finishing
-
Prepare the surface:
Once fully dry, lightly sand any rough spots with fine sandpaper or a dry sponge to ensure a smooth painting surface. -
Mix your pink:
Mix red and white paint with a tiny touch of yellow to achieve that warm, earthy coral-pink tone seen in the photo. -
Paint the base:
Coat the entire dish—front, back, and the sculpted petals—in your pink mixture. You may need two coats for opaque coverage. -
paint the stigma:
Using a small detail brush, carefully paint the textured center disc with a mustard yellow. -
Dry brush highlights:
I like to take a mostly dry brush with a lighter yellow and gently dust the top of the texture to make the details pop. -
Seal the piece:
Finish with a coat of matte varnish to protect the paint and give it a professional, non-shiny finish.
Now you have a sweet floral dish ready to hold your favorite jewelry pieces
Leaf-Imprint Animal Plates
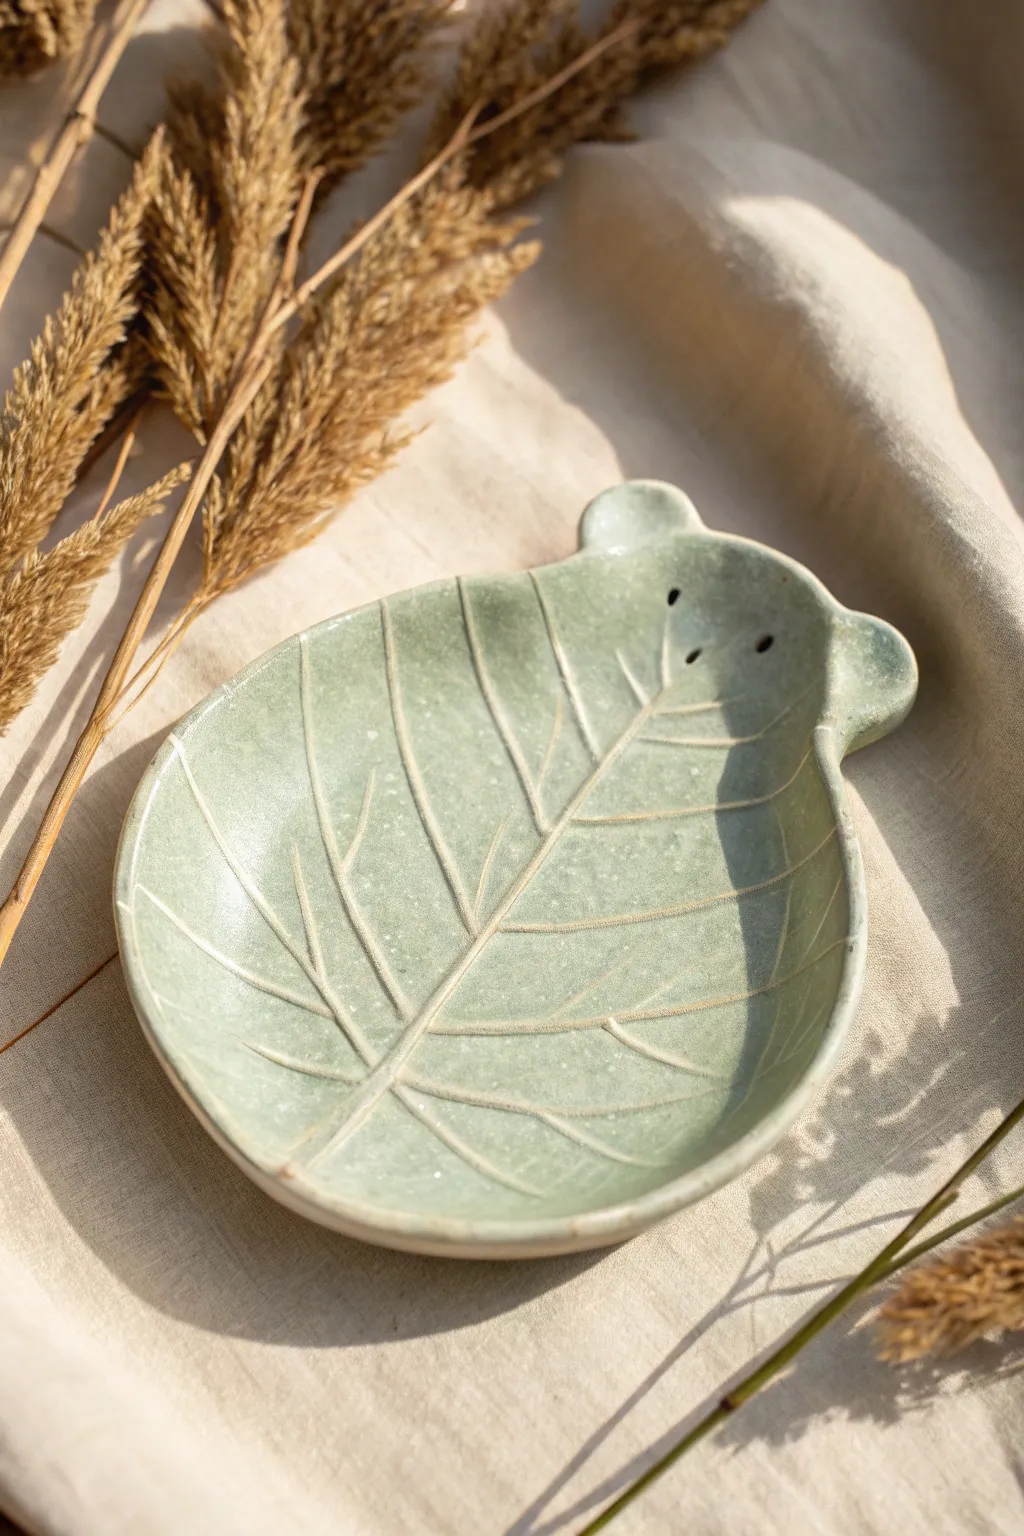
Transform a simple walk in the park into a charming keepsake with this bear-shaped trinket dish. By using a real leaf to stamp intricate textures directly into the clay, you’ll create a pale green, nature-inspired holder perfect for rings or small treasures.
Detailed Instructions
Materials
- Air dry clay (white or light grey)
- Large fresh leaf with prominent veins (like a macrophylla hydrangea or hosta)
- Rolling pin
- Sharp knife or clay cutting tool
- Small bowl (for shaping)
- Water in a cup
- Sponge or paintbrush
- Acrylic paints (Sage Green, White)
- Clear acrylic gloss varnish
Step 1: Preparing the Clay Canvas
-
Knead the clay:
Begin by taking a handful of air dry clay and kneading it firmly in your hands to warm it up. This removes air bubbles and makes the material more pliable. -
Roll out a slab:
Place the clay on a smooth surface or a silicone mat. Use your rolling pin to flatten it into an even slab, aiming for a thickness of about 1/4 inch (6mm) throughout. -
Smooth the surface:
Dip your finger or a slightly damp sponge into water and gently glide it over the clay surface. This ensures there are no cracks or rough patches before you add the texture.
Vein Definition Tip
If your leaf is flimsy, the veins won’t show. Choose thick leaves with rigid veins, like hydrangeas, for the deepest, crispest impressions.
Step 2: Creating the Leaf Texture
-
Position the leaf:
Take your fresh leaf and place it vein-side down onto the clay slab. The underside of the leaf usually has much more definition, which is critical for a good print. -
Roll the impression:
Gently roll your rolling pin over the leaf. Press firmly enough to embed the veins into the clay, but be careful not to make the slab too thin. Do this in one direction if possible to prevent the leaf from shifting. -
Peel and reveal:
Find the stem of the leaf and slowly peel it back to reveal the intricate vein pattern imprinted in the clay.
Step 3: Shaping the Bear
-
Cut the basic shape:
Using a knife or clay tool, cut an oval or egg shape around the leaf print. Leave about a half-inch border around the veins for a clean look. -
Form the ears:
At the wider end of your oval, gently use your fingers to push the clay outwards to form two small, rounded tabs. These will become the bear’s ears. -
Refine the edges:
Dip your finger in water again and run it along the cut edges of the clay. Smooth out any sharp angles or burrs from the cutting process. -
Curve the distinct ears:
Pinch the ear tabs slightly to give them a cupped shape, making them look more distinct from the rest of the leaf body. -
Add facial details:
Use a skewer or the end of a thin paintbrush to poke three small holes near the top center, just below the ears. Two holes for eyes and one slightly lower for a snout give a subtle animal suggestion.
Gilded Edges
Once the green wash is dry, use a small brush to paint the very rim of the dish with metallic gold paint for an elegant, high-end finish.
Step 4: Drying and Shaping
-
Create the curve:
Pick up your clay piece carefully and place it inside a shallow bowl. Let the clay slump naturally into the curve of the bowl; this ensures it dries in a dish shape rather than completely flat. -
Initial drying:
Leave the piece in the bowl for at least 24 hours. Keep it away from direct heat sources to prevent cracking. -
Final drying:
Once the top feels dry and stiff, remove it from the bowl and flip it over to let the underside dry completely. This might take another 12 to 24 hours.
Step 5: Painting and Finishing
-
Mix a wash:
Mix a small amount of sage green acrylic paint with water until it has a milky consistency. I find this works better than solid paint for highlighting texture. -
Apply the color:
Brush the watery paint mixture over the entire surface of the dish, making sure it gets deep into the vein impressions. -
Wipe back:
Before the paint dries, take a slightly damp paper towel or sponge and gently wipe the surface. This removes paint from the high points but leaves the green color settled in the deep veins. -
Seal the piece:
Once the paint is fully dry, apply a coat of clear acrylic gloss varnish. This gives it a ceramic-like shine and protects the clay from moisture.
Now you have a sweet little forest friend ready to hold your favorite jewelry pieces
Fairy And Gnome Tiny Houses

These enchanting little dwellings bring a touch of magic to any shelf or garden scene, featuring rustic textures and warm, earthy tones. With their speckled conical roofs and inviting arched doorways, they look like they were plucked straight from a storybook forest.
Step-by-Step Tutorial
Materials
- Air dry clay (white)
- Air dry clay (terracotta or reddish-brown)
- Clay rolling pin
- Small circle cutters (or bottle caps)
- Needle tool or toothpick
- Clay knife or craft blade
- Water and a small brush (for joining)
- Fine-grit sandpaper
- Matte acrylic varnish (optional)
Step 1: Building the Base Structure
-
Form the main body:
Start by taking a large handful of white air dry clay. Roll it into a smooth ball first to remove air bubbles, then shape it into a cylinder. It should be slightly wider at the bottom than the top, creating a gentle tapered slope. -
Flatten the base:
Tap the bottom of your cylinder firmly against your work surface to ensure it stands flat. Smooth out any major fingerprints on the sides with a little water on your finger. -
Create the roof cone:
Roll a separate piece of white clay into a ball, then flatten it into a thick disc. Place this on top of your cylinder and gently shape it upwards into a cone, blending the underside onto the cylinder body so it sits like a hat. -
Add the terracotta peak:
Take a small pinch of the terracotta-colored clay and roll it into a tiny cone. Attach this to the very tip of your white roof using a dab of water and cross-hatching the joining surfaces for gripping.
Core Strength
To save clay and reduce drying time, crumple a tight ball of aluminum foil to use as the core for the house body. Build your clay layer over this armature.
Step 2: Adding Architectural Details
-
Make the windows:
Roll out a small slab of terracotta clay until it’s about 3mm thick. Use a small circle cutter or a lid to punch out three circles for the windows. -
Add window panes:
Press these circles gently onto the house body—one on the roof and two on the main base. Use a knife tool to gently press a cross or ‘plus sign’ into each circle to mimic window panes. -
Frame the windows:
Roll very thin snakes of white clay. Wrap these carefully around the terracotta window circles to create frames, pressing them gently to adhere. -
Craft the door:
Cut a larger arch shape from your rolled-out terracotta clay. This will be the main door. Attach it to the front of the house base using the score-and-slip method (scratching both surfaces and adding water). -
Detail the door:
Press a tiny ball of terracotta clay onto the door for a doorknob. Create a thick snake of white clay, flatten it slightly, and arch it over the door for the frame.
Step 3: Texturing and Finishing
-
Texture the roof:
Using the tip of a needle tool or a small skewer, poke small, shallow holes all over the white part of the roof cone. I like to scatter them randomly rather than in strict rows for a more organic, rustic look. -
Detail the door frame:
Take your needle tool again and poke a row of evenly spaced holes along the white door frame you created earlier, mimicking the roof texture. -
Add the final touches:
Add a tiny dot of white clay to the doorknob for a highlight. Smooth any final rough edges with a water-dampened brush. -
Let it dry completely:
Allow the houses to dry for at least 24-48 hours. Because these are solid shapes, they need plenty of time to harden all the way through. -
Sand and seal:
Once bone dry, you can lightly sand any uneven spots. Seal with a matte varnish to protect the clay while keeping that natural look.
Glow Up
Instead of making the houses solid, build them hollow or pinch-pot style. Carefully cut out the windows so you can place a battery-operated tea light underneath for a cozy glow.
Place these charming cottages among your potted plants to create an instant secret village
Hanging Clay Disc Mobile
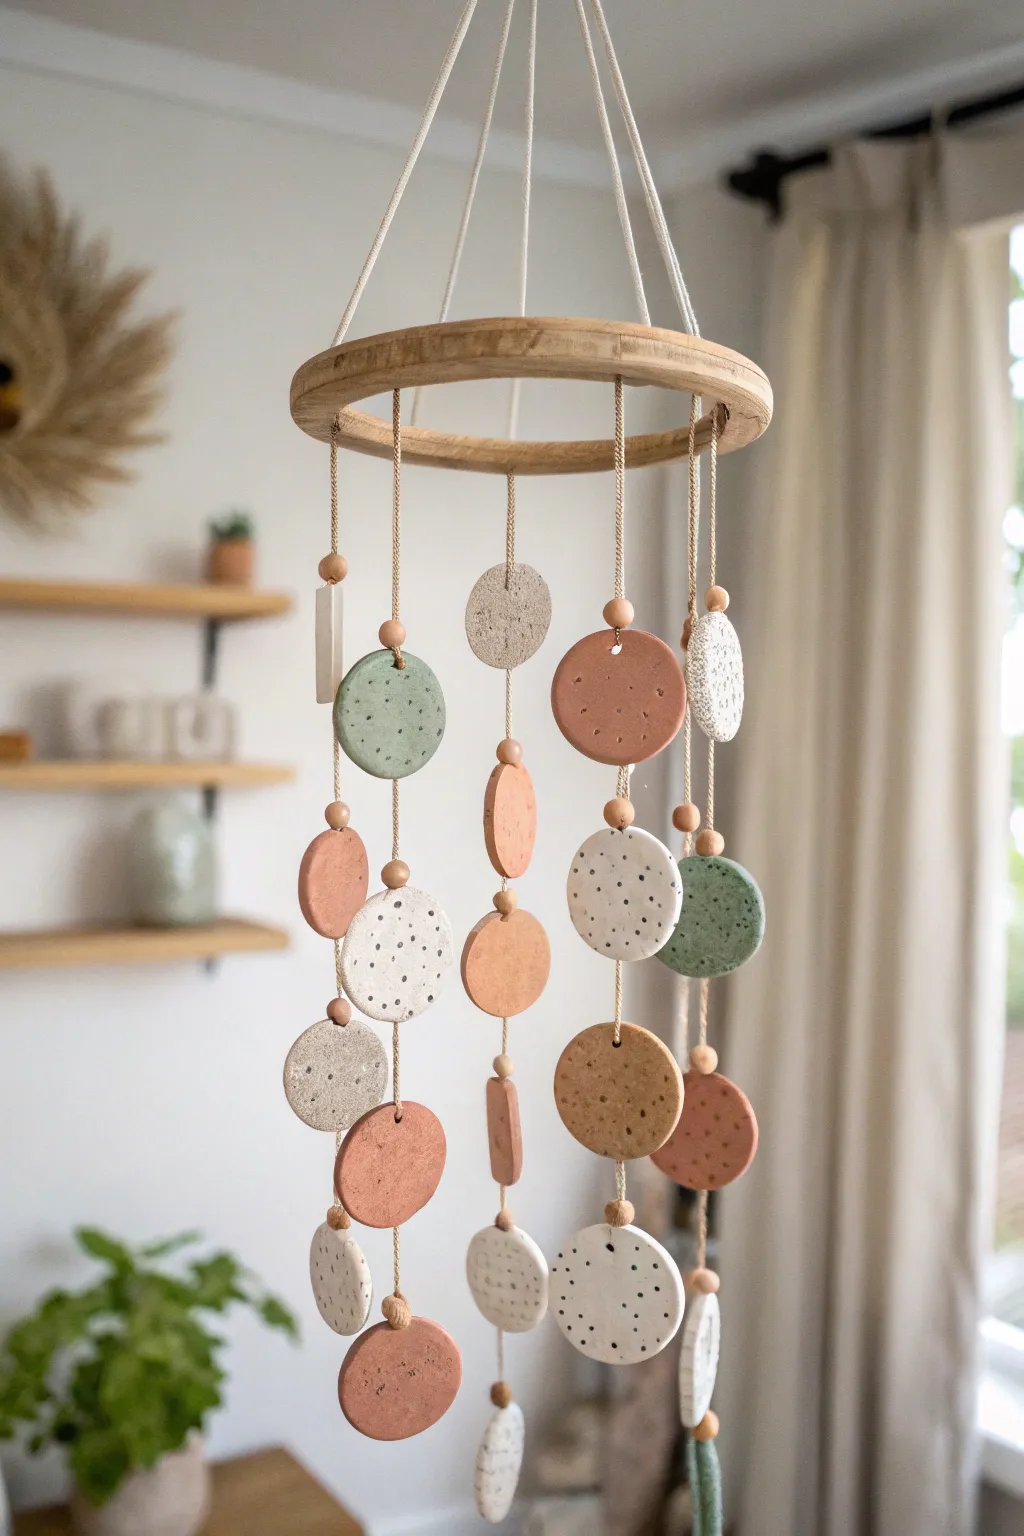
Bring a touch of natural elegance to any room with this beautiful hanging mobile made from simple clay discs. Featuring a calming palette of terracotta, sage, and speckled cream, this project combines rustic textures with clean lines for a sophisticated yet playful piece of decor.
Detailed Instructions
Materials
- Air dry clay (white or natural)
- Acrylic paints (terracotta, sage green, beige, brown)
- Wooden embroidery hoop (inner ring only, approx. 6-8 inches) or wooden wreath ring
- Rolling pin
- Circle cookie cutter (approx. 2 inches) or a small glass
- Skewer, straw, or toothpick for making holes
- Sandpaper (fine grit)
- Cotton twine or macramé cord (natural color)
- Small wooden beads
- Scissors
- Old toothbrush or stiff bristle brush (for speckling)
- Clear matte acrylic sealer (optional)
Step 1: Creating the Clay Discs
-
Roll out the clay:
Begin by kneading your air dry clay until it is smooth and pliable. flatten it onto a non-stick surface or parchment paper using a rolling pin until it is about 1/4 inch thick. Try to keep the thickness consistent for all pieces so they hang evenly later. -
Cut the shapes:
Using your circle cutter or the rim of a small glass, cut out approximately 20 to 25 circles. You can vary the sizes slightly if you wish, but the example uses uniform discs. -
Create hanging holes:
While the clay is still wet, use a skewer or a straw to punch a hole near the top edge of each circle. Make sure the hole is large enough for your twine to pass through easily, accounting for slight shrinkage as the clay dries. -
Add texture (optional):
If you want a more organic look, gently press a piece of sandpaper or fabric onto the surface of a few discs before they dry to give them a subtle texture. -
Let them dry:
Lay all the discs flat on a wire rack or parchment paper. Allow them to dry completely according to the package instructions, which usually takes 24-48 hours. I suggest flipping them over halfway through the drying process to prevent curling. -
Refine the edges:
Once fully dry, check the edges of your discs. If there are any sharp or rough spots, gently sand them down with fine-grit sandpaper until they are smooth.
Discs Curling Up?
If your clay circles warp while drying, place a heavy book on top of them once they are ‘leather hard’ (partially dry but firm) to flatten them out as they finish curing.
Step 2: Painting and Finishing
-
Mix your palette:
Prepare your acrylic paints. You’ll want a few earthy shades: a warm terracotta, a soft sage green, a sandy beige, and a creamy white. You can mix colors to get the perfect muted tones. -
Paint base coats:
Paint the front, back, and sides of each disc. Aim for an even distribution of colors—for example, paint five discs in each shade. Let the first side dry completely before flipping to paint the back. -
Add speckled details:
To achieve the stone-like effect seen in the photo, create a splatter mix. Dilute a small amount of dark brown or grey paint with water until it’s inky. Dip an old toothbrush into this mixture and run your thumb across the bristles to flick tiny specks onto the dried discs. -
Seal the pieces:
For durability, apply a coat of clear matte acrylic sealer to each disc. This will protect the paint and give the clay a finished professional look without making it too shiny.
Natural Texture
Mix dried coffee grounds or tiny bits of sand directly into the white paint or the wet clay itself for authentic, physical texture instead of just painted speckles.
Step 3: Assembling the Mobile
-
Prepare the hanger:
Take your wooden ring or embroidery hoop. Cut three equal lengths of twine, about 2 feet long each, to create the main hanger. Tie them evenly spaced around the ring and knot them together at the top to form a pyramid shape. -
Cut the suspension strings:
Cut 5 to 7 lengths of twine for the hanging strands. Vary the lengths slightly, ranging from 12 to 20 inches, to create a staggered, cascading effect. -
Tie on the discs:
Start with one length of twine. Thread a disc onto the string, positioning it near the bottom. Tie a knot underneath the disc to hold it in place. Determine where you want the next disc to sit above it, thread it on, and tie another supporting knot underneath it. -
Incorporate beads:
For added visual interest, slide a small wooden bead onto the string so it sits directly on top of the knot, effectively sitting just above or below a clay disc. This adds a nice polished detail. -
Attach to the ring:
Once a strand is full (usually 3-4 discs per strand), tie the top of the twine securely to the wooden ring. Repeat this for all strands, spacing them evenly around the hoop. -
Balance and adjust:
Hold the mobile up by the top loop. Check if it hangs straight. If it tilts, slide the strands along the ring slightly to redistribute the weight until it balances perfectly.
Hang your new creation near a window where it can gently rotate and catch the light throughout the day