If you’re craving cute air dry clay projects that look sweet, simple, and totally share-worthy, you’re in the right place. I’m all about beginner-friendly miniatures in soft pastel colors that feel like they belong in the coziest little craft day ever.
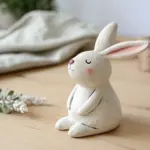
Chubby Animal Mini Figurines
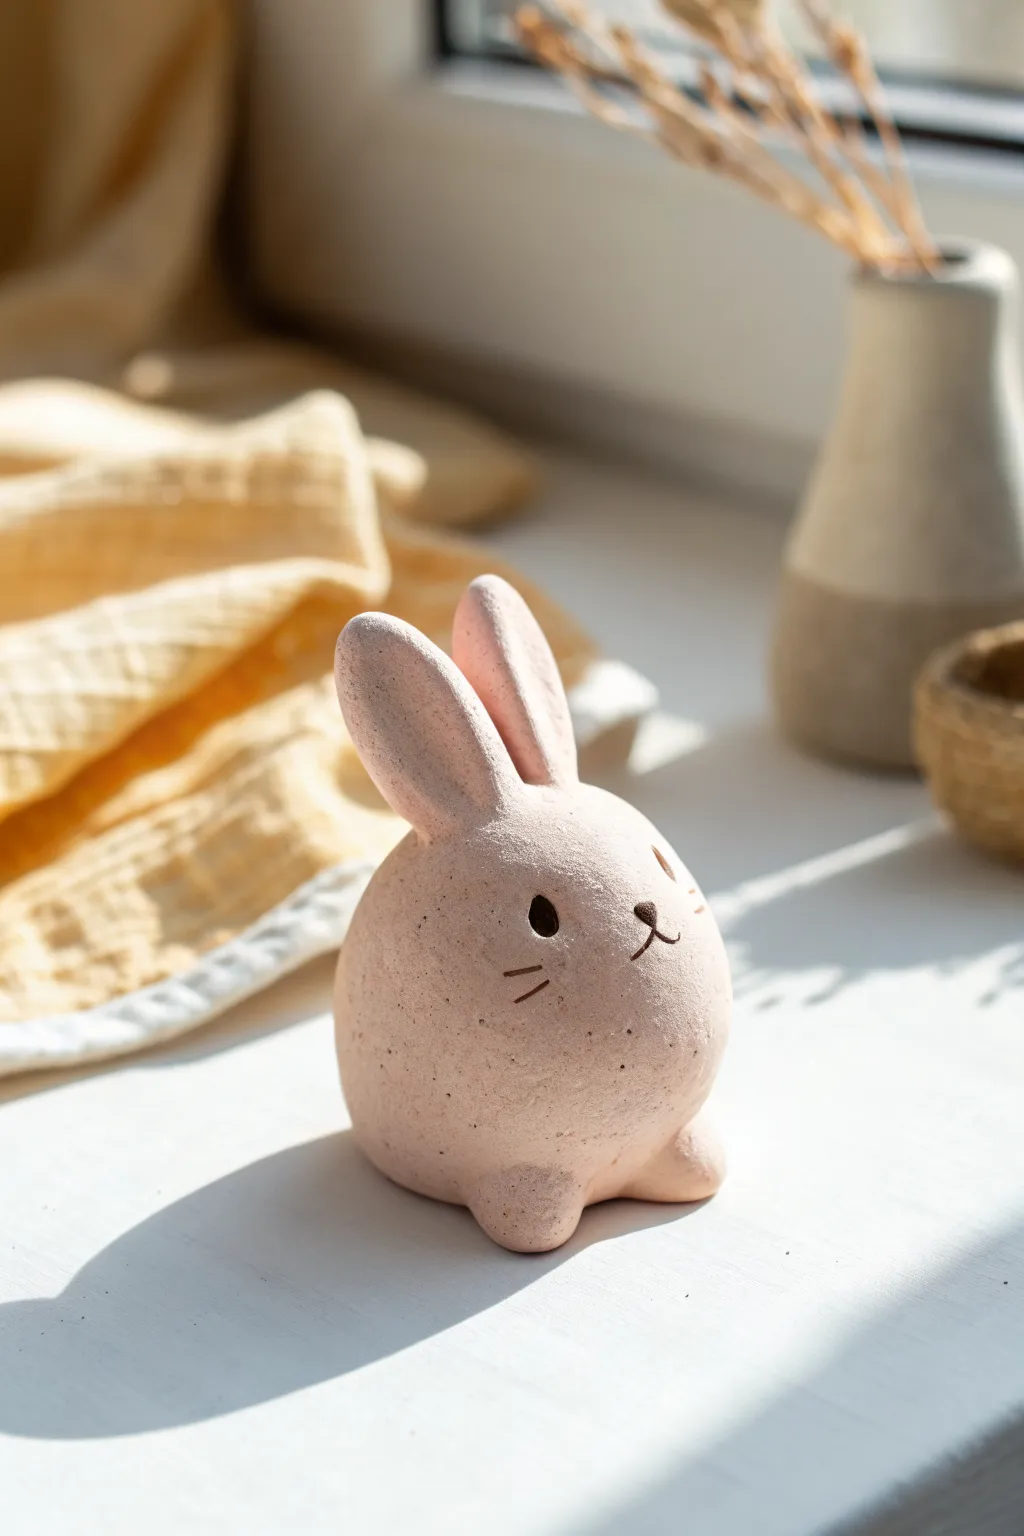
This adorable, rotund rabbit figurine captures the charm of minimalism with its soft pink hue and simple facial features. Its pleasingly plump shape and textured matte finish make it a perfect beginner-friendly project that radiates sweetness.
Step-by-Step Tutorial
Materials
- Air dry clay (white or pre-colored pink)
- Pink acrylic paint (if using white clay)
- Black fine-point marker or black acrylic paint
- Small paintbrush (detail brush)
- Water
- Aluminum foil (for armature core)
- Sandpaper (fine grit)
- Toothpick or clay sculpting tool
- Matte varnish polish (optional)
Step 1: Sculpting the Body
-
Prepare the core:
Start by crumpling a small amount of aluminum foil into a tight ball. This saves clay and helps the thick body dry evenly without cracking. -
Condition the clay:
Take a generous handful of air dry clay. Knead it thoroughly in your hands until it becomes warm, pliable, and free of cracks. -
Form the main shape:
Flatten the clay slightly and wrap it completely around your foil ball. Roll it extensively between your palms to create a very smooth, round sphere. It should look like a large egg or a rounded stone. -
Create the base:
Gently tap the bottom of the sphere against your work surface. You want to create a flat spot so the bunny sits securely without rolling away. -
Add the feet:
Roll two small marble-sized balls of clay. Position them at the bottom front of the body and press them firming into the main shape. Use a little water on your finger to blend the seams so the feet look like they emerge naturally from the body.
Seamless Smoothness
Keep a small bowl of water nearby while sculpting. Dip your finger and rub it over cracks instantly to ‘erase’ them before they dry.
Step 2: Ears and Details
-
Shape the ears:
Roll two medium-sized sausage shapes. Press them slightly flat to create an oval cross-section rather than a perfect circle. -
Attach the ears:
Score the top of the head and the bottom of the ears with a toothpick (make scratch marks). Add a dab of water or clay slip, then press the ears firmly onto the head. -
Blend the seams:
Use a clay tool or your finger to smooth the clay where the ears meet the head. I find using a downward motion works best here to seamless join the parts. -
Refine the shape:
Gently curve the ears slightly if desired to give the bunny a relaxed look. Smooth over the entire surface with a barely damp finger to remove fingerprints. -
Drying time:
Let the figurine sit in a cool, dry place for at least 24-48 hours. Turn it occasionally so the bottom dries fully.
Step 3: Finishing Touches
-
Sand for texture:
Once fully dry, lightly sand the surface. Don’t aim for perfect smoothness; the slight texture gives it that stone-like, rustic charm seen in the photo. -
Base coat painting:
If you used white clay, mix a soft, dusty pink acrylic paint. Apply two thin coats, letting the first dry before adding the second. If you used pink clay, skip this step. -
Create the stone effect:
To mimic the speckled stone look, dip a stiff brush or old toothbrush into slightly watered-down dark grey or brown paint. Run your thumb over the bristles to flick tiny specks onto the bunny. -
Draw the face:
Using a fine-point marker or a very thin brush with black paint, draw two small oval eyes. Space them fairly wide apart for maximum cuteness. -
Add nose and mouth:
Draw an inverted ‘Y’ shape for the nose and mouth right between the eyes. Add two small whisker lines on each cheek. -
Seal the piece:
Finish by applying a coat of matte varnish. This protects the paint and clay while preserving the soft, non-shiny finish.
Make it a Set
Make a tiny white puffball tail from clay for the back, or create a smaller second bunny in a contrasting color like sage green or cream.
Now you have a charming little desk companion to keep you company with its serene expression


Smiley Mushroom Mini Sculptures

Brighten up any windowsill with these adorable, cheerful mushroom figurines. Crafted to look like they popped straight out of a storybook, these mini sculptures feature charming red caps and sweet, simple smiley faces.
Step-by-Step
Materials
- Air dry clay (stone effect or white)
- Acrylic paint (bright red, white, black)
- Small ball of aluminum foil
- Water in a small cup
- Sculpting tool or toothpick
- Fine detail paintbrush
- Medium round paintbrush
- Sealer or matte varnish (optional)
Step 1: Sculpting the Base
-
Prepare the stems:
Begin by breaking off four chunks of air dry clay, roughly the size of a walnut. Roll each chunk into a short, thick cylinder to form the stems. They should be slightly wider at the bottom for stability. -
Shape the caps:
Take four slightly larger pieces of clay and roll them into balls. Gently flatten the bottom of each ball against a smooth surface while cupping the top to create a domed mushroom cap shape. -
Create connection points:
Score the top of each stem and the underside of each cap using a toothpick or sculpting tool. Scratching this texture helps the clay adhere better. -
Assembly:
Dab a tiny bit of water onto the scored areas to act as ‘slip.’ Press the caps firmly onto the stems. Smooth the seam slightly with your finger or a tool if you want a seamless look, or leave the join visible for a rustic feel. -
Add texture:
To mimic the slightly rough, organic surface seen in the photo, gently tap the surface of the clay with a stiff bristle brush or a crumpled ball of aluminum foil. This removes fingerprints and adds character. -
Drying time:
Set your mushrooms aside in a dry, safe spot. Let them dry completely for at least 24 to 48 hours, depending on the thickness of your clay and humidity.
Fixing Cracks
If small cracks appear as the clay dries, mix a tiny bit of fresh clay with water to make a paste. Fill the cracks, smooth it over with your finger, and let it dry again
Step 2: Painting and Details
-
Base coat the caps:
Once fully dry, use a medium round brush to paint the mushroom caps with a bright, matte red acrylic paint. You may need two coats for full opacity. -
Paint the stems (optional):
If you used stone-effect clay, you can leave the stems unpainted. If you used standard white clay, you might want to give them a wash of diluted cream or beige paint to create an earthy, textured look. -
Add the dots:
Dip the back end of a paintbrush or a dotting tool into white acrylic paint. Carefully press dots onto the red caps in a random pattern. I like to vary the pressure slightly so some dots are bigger than others. -
Draft the faces:
Use a pencil to very lightly sketch the placement of the eyes and mouths on the stems. Keep the features low on the stem for maximum cuteness. -
Paint the features:
Using your finest detail brush and black acrylic paint, trace over your pencil lines. Paint simple curved lines for the eyes and a small ‘U’ shape for the happy mouth. -
Add highlights:
Ensure the black paint is completely dry. Then, if your stems are painted a darker color, you might add a tiny dry-brush of white for texture, though on these simple figures, less is often more. -
Sealing:
Finish by applying a matte varnish over the entire sculpture to protect the paint and clay from moisture, keeping them looking fresh.
Variations
Try making tall, skinny toadstools or short, fat puffballs to create a diverse mushroom family. You can also swap red caps for teal or mustard yellow
Place your little clay friends on a tray or shelf to add a touch of whimsy to your room


Cute Fridge-Style Magnets Set
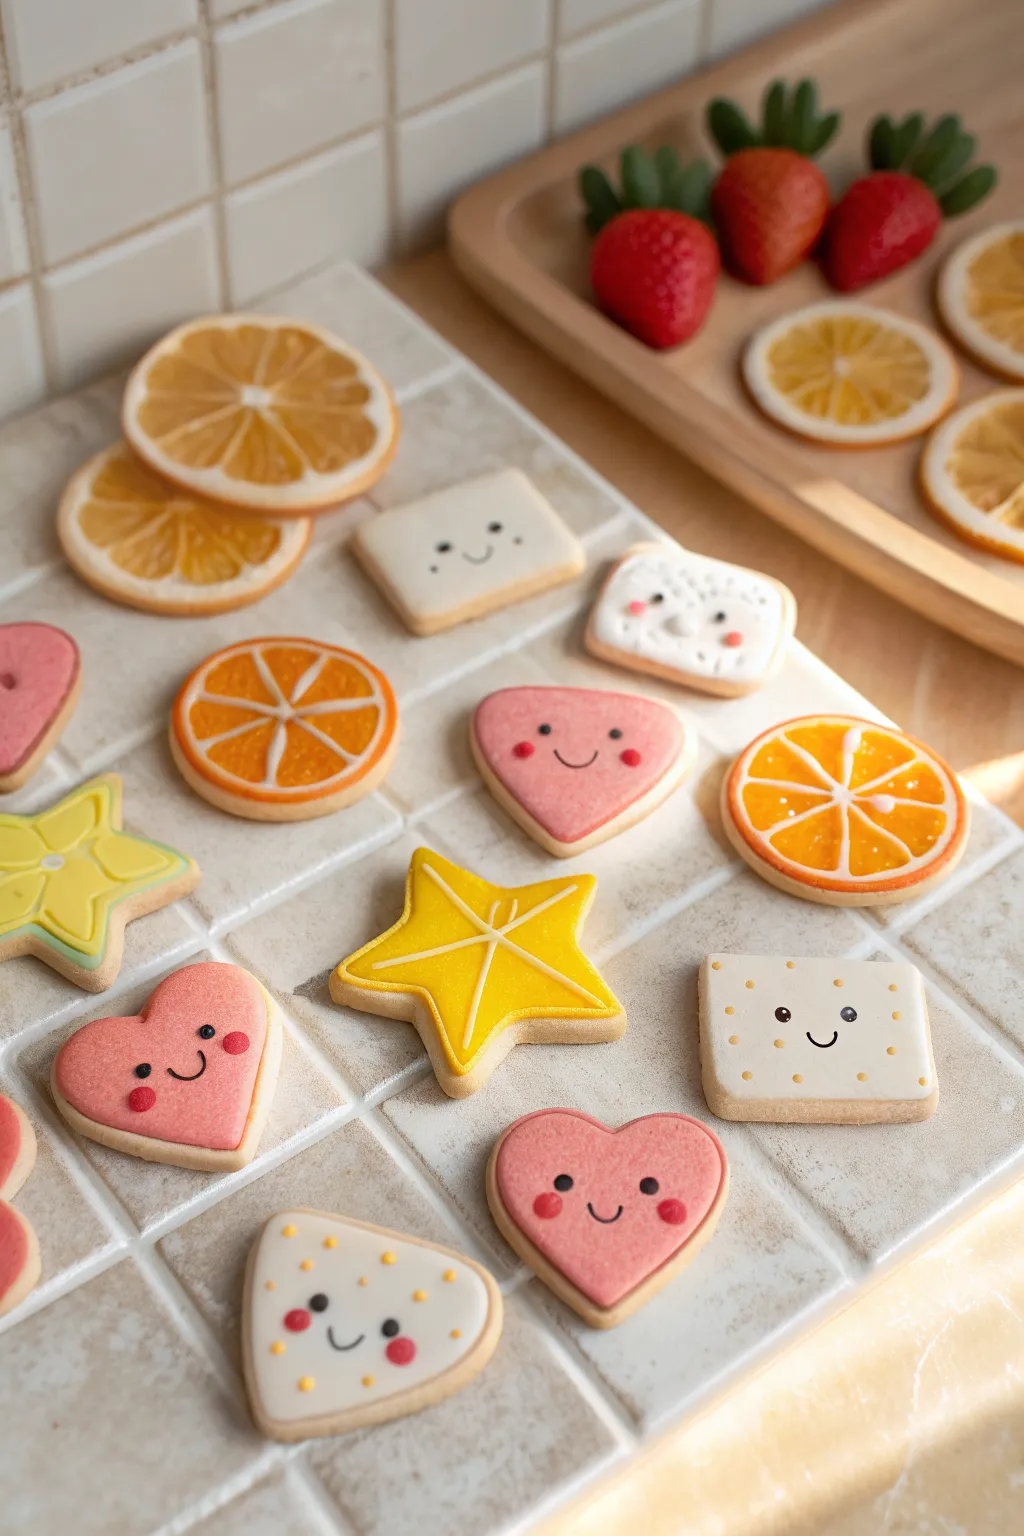
Transform your refrigerator into a charming little bakery with these adorable faux cookie magnets. Made from air dry clay, these sweet treats range from citrus slices to smiling hearts, adding a delightful pop of whimsy to your kitchen decor.
Step-by-Step Tutorial
Materials
- White air dry clay
- Rolling pin
- Cookie cutters (small heart, circle, star, square)
- Acrylic paints (orange, yellow, pink, red, brown, white)
- Fine detail paintbrushes
- Glossy varnish or UV resin
- Sandpaper (fine grit)
- Small round magnets
- Strong craft glue (E6000 or superglue)
- Needle tool or toothpick
Step 1: Shaping the Dough
-
Condition the clay:
Start by kneading your white air dry clay until it is smooth, pliable, and free of cracks. -
Roll it out:
Roll the clay onto a smooth surface to an even thickness of about 1/4 inch. Creating a consistent thickness makes the final set look more uniform. -
Cut the shapes:
Use your mini cookie cutters to punch out varied shapes: hearts, circles for the citrus slices, stars, and squares for the crackers. Smooth any rough edges with a bit of water on your fingertip. -
Texture the crackers:
For the square cracker shapes, use a needle tool to gently poke small, evenly spaced dots around the perimeter to mimic baking holes. -
Detail the stars:
For the star fruit shapes, gently press a knife or thin tool from the center out to the tips to create slight indentations for the fruit segments. -
Let them dry:
Place all your clay pieces on a drying rack or parchment paper. Allow them to dry completely for typically 24 to 48 hours, flipping them halfway through to prevent warping.
Step 2: Baking the Colors
-
Sand the surfaces:
Once fully dry, lightly sand the edges and surfaces to ensure a professional, smooth finish. -
Base coat the cookies:
Mix a very pale tan color using white and a tiny drop of brown paint. Paint the tops and sides of the hearts, stars, and squares to look like baked dough. -
Paint the citrus rinds:
For the orange slices, paint a white rim around the edge. For the lemon slices, keep the base tone separate. I find a steady hand works best here, but you can also use a paint pen for cleaner lines. -
Fill the fruit segments:
Using a vibrant orange or yellow, paint triangle wedges inside the citrus circles, leaving thin lines of the clay color showing in between to represent the pith. -
Add blush and icing:
Paint the top surface of the heart cookies with pink or red ‘icing’. Add two small pink circles to the cracker and heart shapes for rosy cheeks. -
Draw the faces:
With an ultra-fine brush and black or dark brown paint, carefully add the tiny smiling mouths and wide-set eyes to the hearts, squares, and even the toast shapes. -
Detail the star fruit:
Outline the star segments with a lighter yellow or white line to enhance the fruit’s natural pattern.
Sticky Situation?
If your magnets slide down the fridge, the clay might be too heavy. Try rolling your next batch thinner or use two small neodymium magnets for extra grip.
Step 3: Finishing Touches
-
Seal the deal:
Apply a coat of glossy varnish to the citrus slices and the ‘icing’ parts of the hearts to make them look juicy and sweet. Use a matte varnish for the cracker bases to keep them looking like dry baked goods. -
Attach the magnets:
Flip the dried and sealed pieces over. Apply a strong dab of glue to the back of each piece and press a magnet firmly into place. -
Final cure:
Let the glue set completely according to the manufacturer’s instructions before sticking them to your fridge.
Make It Sparkle
Sprinkle fine clear glitter over the wet paint of the ‘sugared’ cookies or fruit slices to mimic real crystallized sugar for an extra cute texture.
Now you have a batch of permanent pastries ready to sweeten up your magnetic surfaces


Tiny Trinket Dish With Sweet Motifs
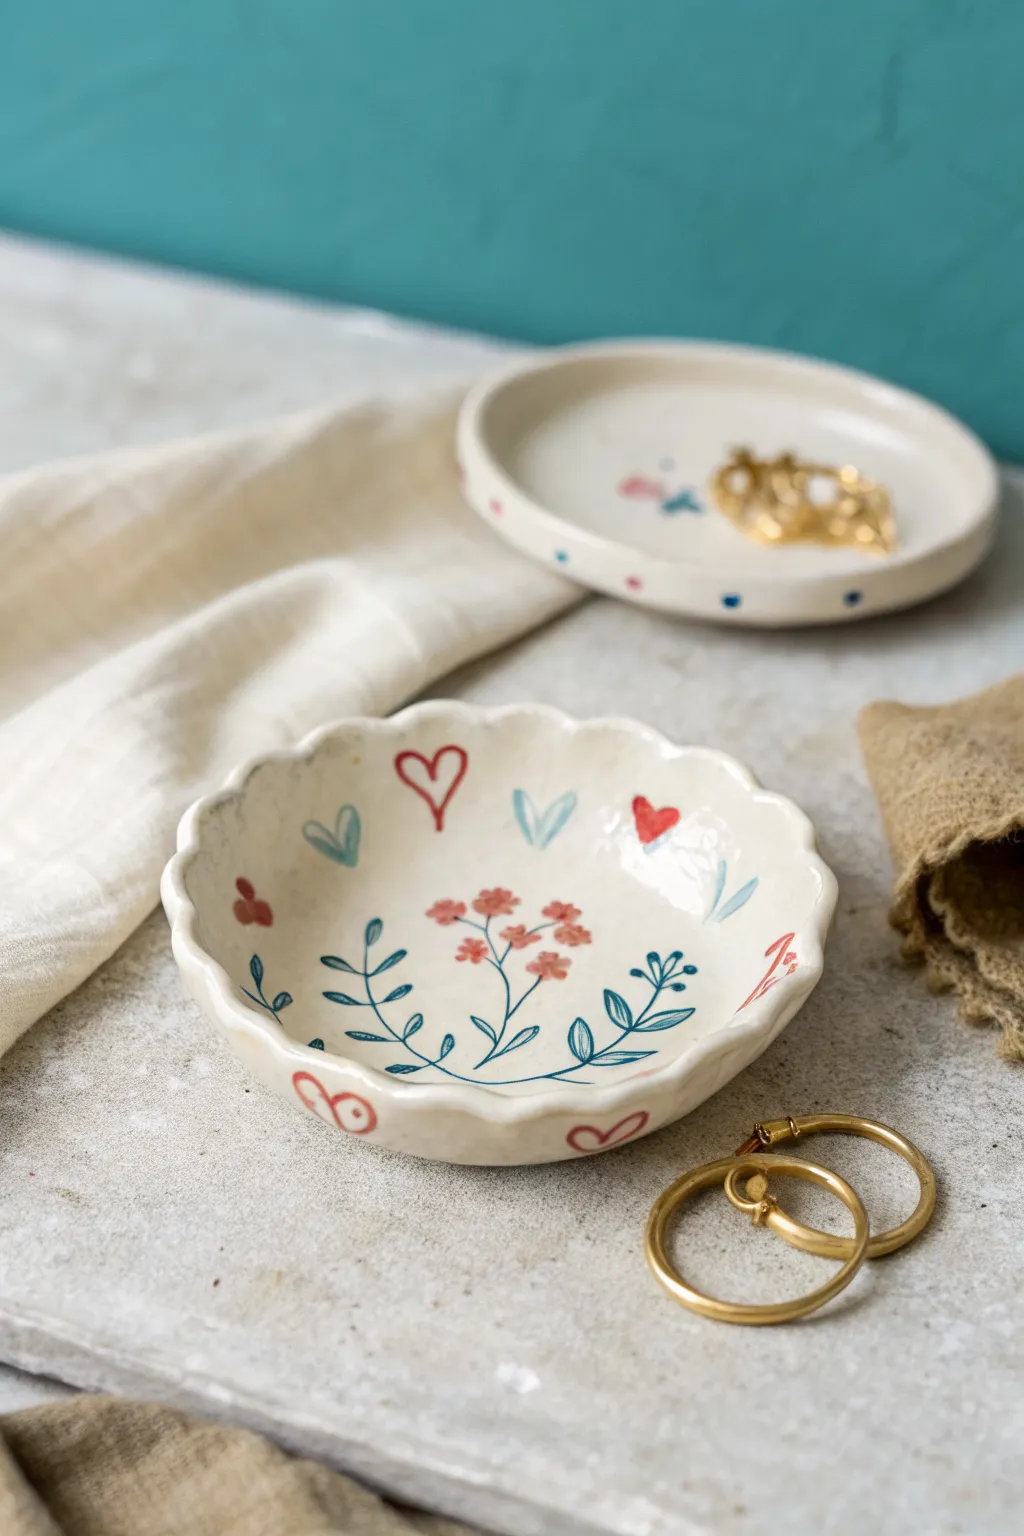
This darling little dish combines a gentle scalloped edge with whimsical hand-painted florals for a vintage-inspired look. It’s the perfect size for holding your favorite rings or simply brightening up a bedside table.
Detailed Instructions
Materials
- White air-dry clay
- Rolling pin
- Small bowl (approx. 4-5 inches diameter) to use as a mold
- Craft knife or clay tool
- Sponge
- Sandpaper (fine grit)
- Acrylic paints (Red, pink, navy blue)
- Fine detail paintbrushes (size 0 and 00)
- Gloss varnish or sealant
Step 1: Shaping the Clay
-
Prepare the clay:
Take a handful of air-dry clay and knead it until it is soft and pliable. If it feels too dry, you can wet your hands slightly to add moisture. -
Roll it out:
Roll the clay out evenly on a flat surface or a craft mat until it is about 1/4 inch thick. Aim for a consistent thickness to prevent cracking later. -
Cut the circle:
Place your bowl upside down on the clay to use as a template. Trace around it with a craft knife to cut out a perfect circle, then discard the excess clay. -
Form the scallop edge:
Using your thumb and forefinger, gently pinch the edge of the clay circle at regular intervals to create a wavy, scalloped rim. I like to work my way around twice to refine the shape. -
Shape the dish:
carefully lift the clay circle and place it inside your bowl mold. Press it gently down so it takes on the curved shape of the bowl bottom. -
Smooth imperfections:
Dip a small sponge or your finger in water and smooth out the rim and the surface of the clay to remove any fingerprints or rough textures. -
Let it dry:
Allow the dish to dry completely in the mold for 24-48 hours. Once the top feels dry, carefully pop it out of the mold and let the underside dry for another day. -
Sand for finish:
Once fully cured and hard, use fine-grit sandpaper to gently smooth the edges and any bumps on the surface, wiping away the dust with a barely damp cloth.
Step 2: Painting the Motifs
-
Paint the central stem:
Using a fine liner brush and navy blue paint, draw a simple vertical line in the center of the bowl, branching out into smaller stems at the top. -
Add side foliage:
Paint larger, curving leafy branches on the left and right sides of the central stem using the same navy blue, ensuring the leaves point upwards. -
Create the flowers:
Switch to a pinkish-red color. Paint small clusters of five-petal flowers at the tips of the central stem branches using quick, small dabs. -
Add floating hearts:
Using red paint, draw simple outline hearts and solid hearts scattered around the upper rim area. Vary the sizes slightly for a playful look. -
Paint side details:
Add small red accents or tiny buds to the side branches to balance the color composition. -
Decorate the rim:
Paint small red hearts or simple line dashes on the outside edge of the scalloped rim for an extra hidden detail. -
Let paint cure:
Allow the acrylic paint to dry completely, which usually takes about 20 to 30 minutes depending on how thick the paint application is. -
Seal the piece:
Apply two coats of gloss varnish to the entire dish. This seals the clay, protects the paint, and gives it a finished ceramic-like shine.
Smooth Moves
To get perfectly even scallops, use the rounded handle of a paintbrush to press indentations into the rim before pinching them with your fingers.
Gold Glamour
After the varnish dries, use a gold leaf pen to trace just the very edge of the scalloped rim for a chic, high-end jewelry dish aesthetic.
Enjoy displaying your delicate new dish or gift it to someone special

The Complete Guide to Pottery Troubleshooting
Uncover the most common ceramic mistakes—from cracking clay to failed glazes—and learn how to fix them fast.
Cat Paw Ring Holder Cone

Keep your favorite accessories organized with this adorable cone-shaped ring holder featuring alternating bands of soft pink and natural clay. The charming paw print cutout adds a playful touch, making it a perfect gift for pet lovers or a sweet addition to your own vanity.
Step-by-Step Guide
Materials
- White air dry clay
- Rolling pin
- Clay knife or craft blade
- Small paw print cutter (or small round cutters/straws)
- Pink acrylic paint
- Small paintbrush
- Sandpaper (fine grit)
- Small bowl of water
- Matte varnish or sealant
- Ruler
Step 1: Forming the Cone Base
-
Condition the clay:
Begin by taking a handful of air dry clay and kneading it in your hands until it becomes soft, pliable, and free of cracks. -
Shape the cone:
Roll the clay into a ball, then begin rolling it back and forth on your work surface while applying more pressure to one side to create a tapered cone shape. -
Flatten the bottom:
Once you have a cone shape roughly 3-4 inches tall, tap the wide bottom firmly against the table to create a flat, stable base so it stands upright without wobbling. -
Refine the surface:
Dip your finger in a little water and smooth out any fingerprints or bumps on the surface of the cone for a sleek finish. -
Create the paw print:
While the clay is still wet, use a small paw print cutter to stamp into the side of the cone. If you don’t have a specific cutter, use a straw to punch the toes and a small round tool to carve the pad. -
Clean up the cutout:
Carefully remove any excess clay crumbs from inside the paw print impression using a needle tool or toothpick to keep the edges crisp.
Smooth Operator
Use a tiny amount of water on your finger to ‘erase’ cracks while shaping. Too much water makes clay mushy, so keep a paper towel handy to dry your finger.
Step 2: Creating the Catch-All Dish
-
Roll out clay for the dish:
Take another piece of clay and use your rolling pin to flatten it into an even slab, about 1/4 inch thick. -
Cut the circle:
Find a circular object slightly larger than your cone’s base (like a large mug or bowl) and use it as a template to cut a perfect circle from the slab. -
Raise the edges:
Gently curb up the outer edges of the circle with your fingers to create a shallow rim, which will help contain smaller jewelry pieces. -
Smooth the dish:
Use a damp sponge or finger to smooth the rim and the surface of the dish, ensuring it looks cohesive with the cone. -
Dry thoroughly:
Set both the cone and the dish aside in a cool, dry place. Let them air dry for 24-48 hours, flipping them occasionally to ensure even drying.
Add a Metallic Pop
Paint the inside of the paw print indentation with gold leaf or metallic gold paint to make the design stand out and add a touch of luxury.
Step 3: Painting and Finishing
-
Sand imperfections:
Once fully dry, lightly sand any rough patches or sharp edges on both pieces with fine-grit sandpaper until they feel smooth to the touch. -
Mark the bands:
Using a pencil and ruler, lightly mark horizontal lines around the cone to designate where your pink and natural stripes will go. -
Paint the pink stripes:
Dip your brush into pink acrylic paint and carefully fill in the top section and the middle band, leaving the alternating sections unpainted for a natural look. -
Paint the dish:
Consider painting the interior of the dish with a light wash of the same pink, or leave it natural to match the unpainted stripes on the cone. -
Seal the project:
Apply a coat of matte varnish or sealant over the entire cone and dish to protect the clay from moisture and give it a professional finish. -
Assemble:
You can choose to glue the cone to the center of the dish with strong craft glue or leave them separate for modular use.
Place your favorite rings on the cone and enjoy this charming piece of functional art on your dresser
Cloud And Star Keychain Charms
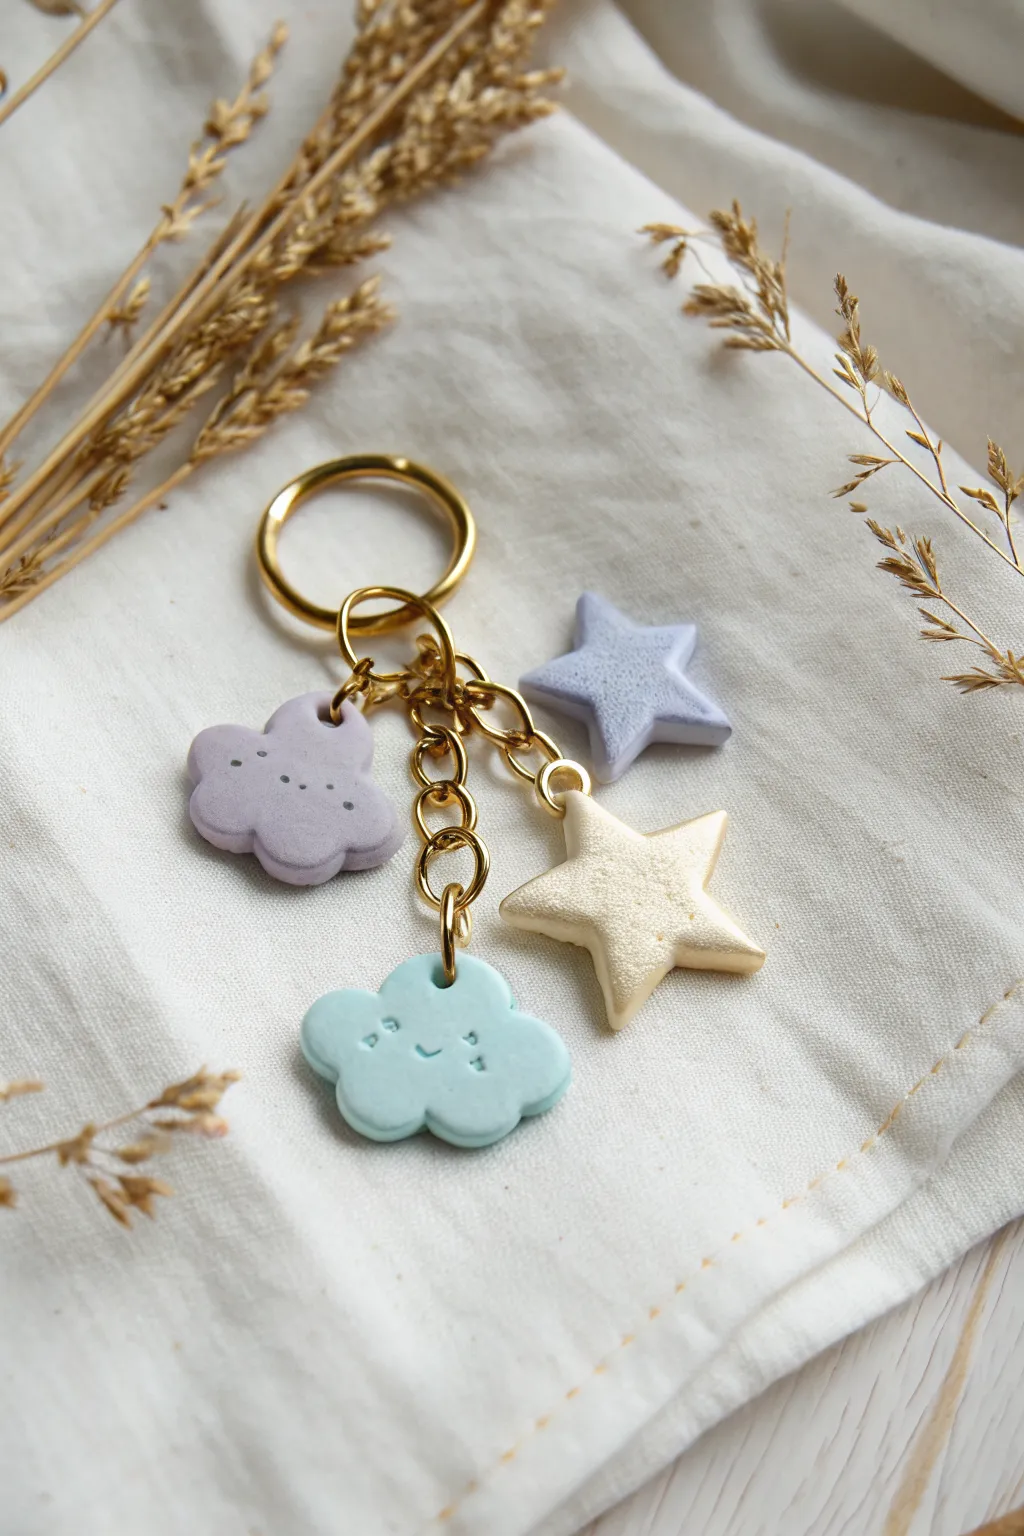
Carry a little piece of the sky with you everywhere using this adorable handmade keychain. Featuring soft pastel clouds and shimmering stars, this project combines air-dry clay sculpting with simple jewelry assembly for a sweet, personalized accessory.
How-To Guide
Materials
- Air-dry clay (white)
- Acrylic paints (pastel purple/grey, teal, white, gold)
- High-gloss or matte varnish (optional)
- Gold keychain ring with chain links and jump rings
- Rolling pin
- Small star cookie cutter (approx. 1 inch)
- Small cloud cookie cutter (or craft knife for freehand)
- Needle tool or toothpick
- Fine grit sandpaper
- Small paintbrushes
- Pliers (flat nose and chain nose)
Step 1: Shaping the Charms
-
Condition the clay:
Begin by taking a chunk of air-dry clay and kneading it in your hands until it is soft, pliable, and free of cracks. If it feels too dry, add a tiny drop of water. -
Roll it out:
On a smooth, clean surface, roll the clay out to an even thickness of about 1/4 inch (6mm). You want them thick enough to be sturdy but not heavy. -
Cut the shapes:
Using your cookie cutters, press firmly into the clay to create two star shapes and two cloud shapes. If you don’t have a cloud cutter, use a craft knife or needle tool to gently trace and cut a fluffy cloud shape. -
Smooth the edges:
Dip your finger in a little bit of water and run it along the cut edges of your charms to smooth out any roughness or jagged bits left by the cutter. -
Add the face details:
For the teal cloud, use a needle tool to gently press two small indentations for eyes and a small curved line for a smile. Don’t press all the way through; just create a surface impression. -
Create hanging holes:
While the clay is still wet, use a straw or a tool to poke a hole near the top of each charm. Ensure the hole is large enough for your jump rings to fit through later, accounting for slight shrinkage as the clay dries. -
Puff the stars:
To give the stars a slightly dimensional, ‘puffy’ look like the gold one in the photo, gently pinch the center of the star while softening the points with your fingers.
Clay Cracking?
If you see hairline cracks while drying, mix a tiny bit of fresh wet clay with water to make a paste (slip) and fill the cracks, then sand smooth once dry.
Step 2: Refining and Decorating
-
Let them dry:
Place your charms on a piece of parchment paper or a drying rack. Allow them to dry completely for 24-48 hours, flipping them occasionally to ensure even drying. -
Sand for smoothness:
Once fully cured, check for any rough spots. I like to use a very fine-grit sandpaper to buff the edges and surface gently until they feel silky smooth. -
Mix your colors:
Prepare your palette. You’ll need a muted lavender-grey, a soft pastel teal, and a metallic gold. -
Base coat painting:
Paint one cloud the lavender-grey and the other cloud the pastel teal. Paint one star grey (or purple-grey to match) and the other star with metallic gold paint. -
Add tiny details:
For the lavender cloud, paint three tiny white dots in a row using a detail brush or the tip of a toothpick. For the teal cloud, carefully paint the impressed eyes and mouth with a dark grey or black. -
Seal the charms:
Once the paint is bone dry, apply a coat of varnish. A matte finish looks soft and modern, while a gloss finish protects against scratches.
Step 3: Assembly
-
Prepare jump rings:
Using your two pairs of pliers, twist open four gold jump rings. Remember to twist the ends away from each other (front to back) rather than pulling them apart side-to-side. -
Attach the charms:
Slip an open jump ring through the hole of each clay charm. Before closing it, hook the jump ring onto the lowest link of a small chain segment. -
Connect to main ring:
Attach the top of these small chain segments to the main gold keyring loop. You want the charms to hang at slightly different lengths for a clustered look. -
Final check:
Ensure all jump rings are securely closed so your charms don’t slip off.
Level Up: Texture
Before the clay dries, gently press a piece of clean sandpaper or fabric onto the surface of the grey star to give it a speckled, stone-like texture.
Now you have a charming, custom accessory ready to brighten up your keys or backpack


What Really Happens Inside the Kiln
Learn how time and temperature work together inside the kiln to transform clay into durable ceramic.
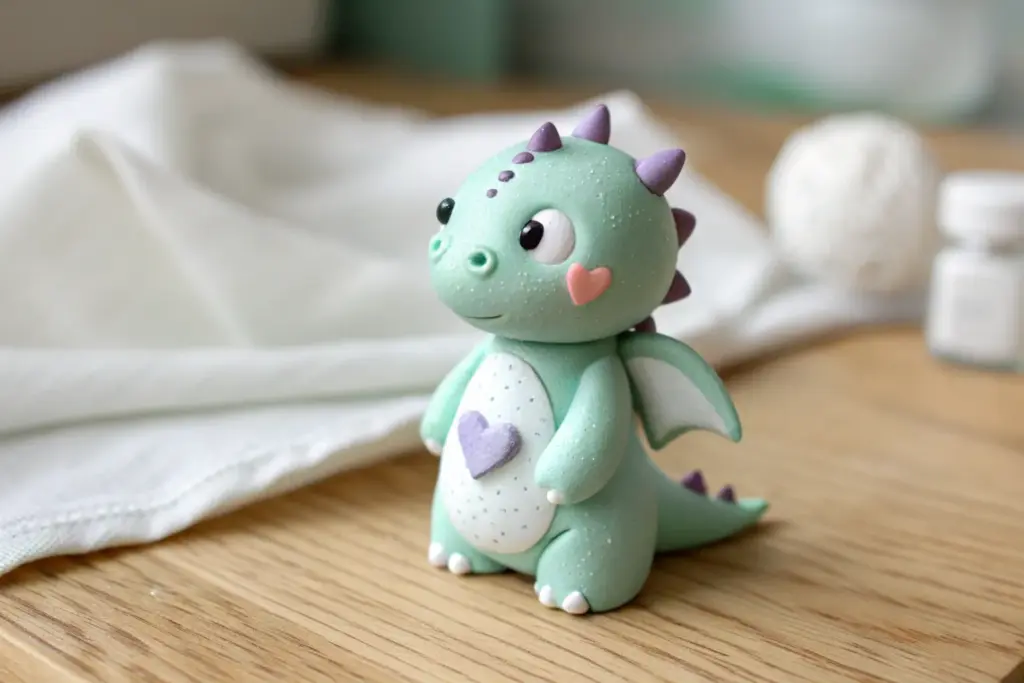
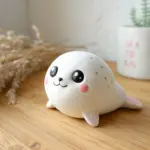
Mini Axolotl And Sea Buddy Charms
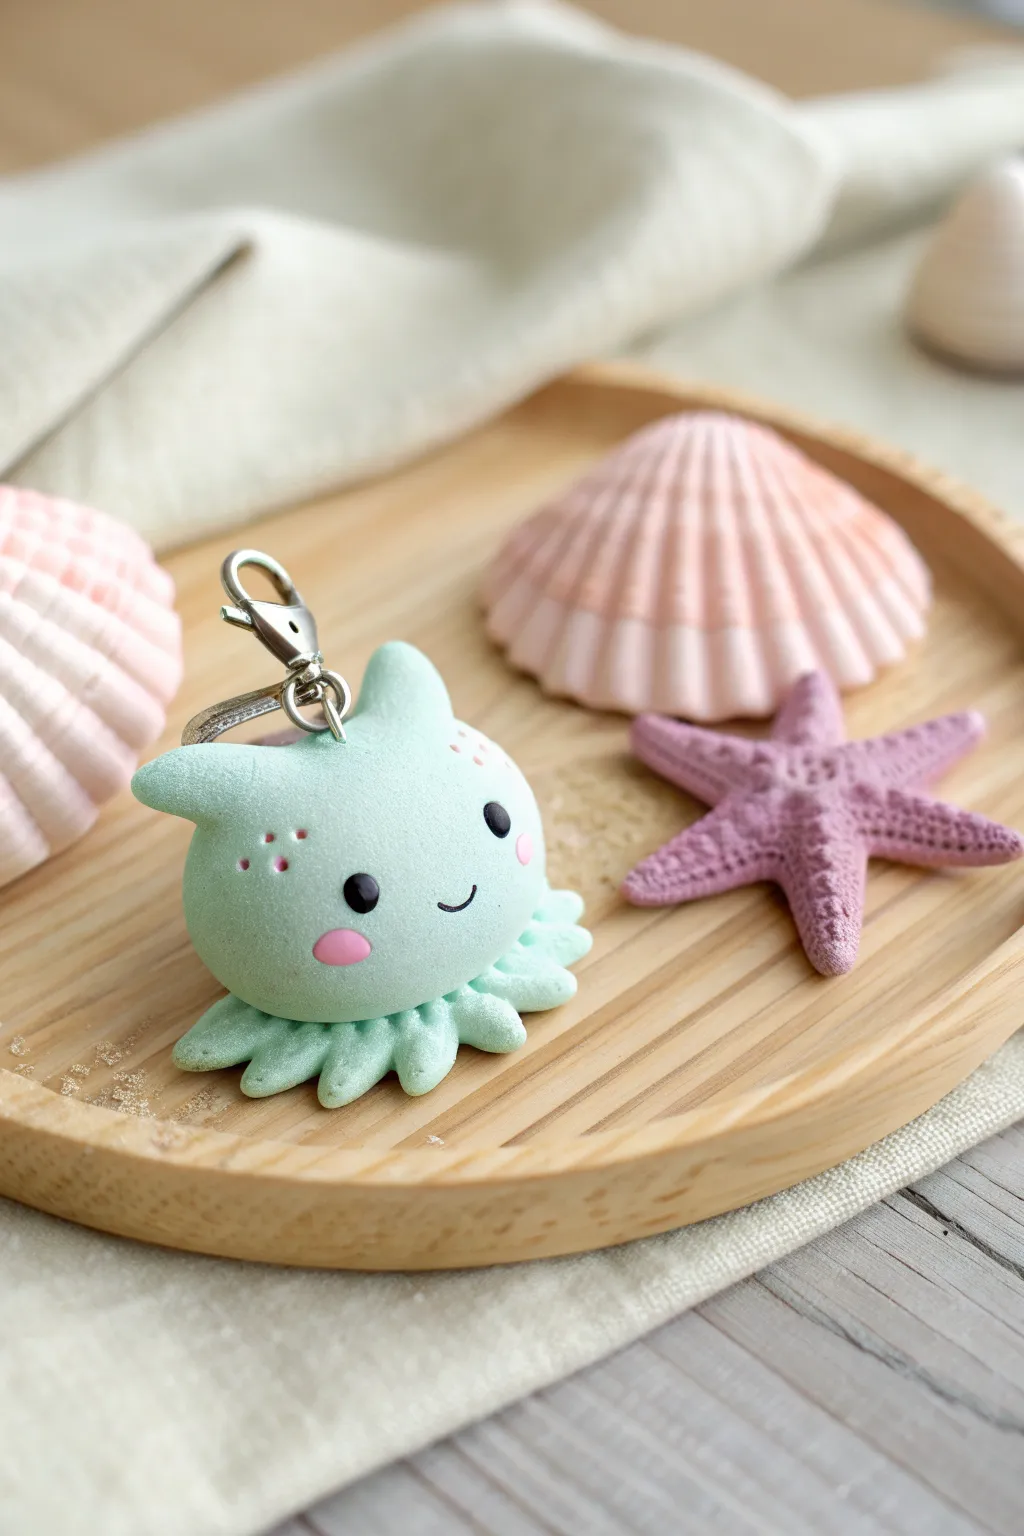
This adorable little sea creature charm captures the essence of kawaii with its soft mint green hue and simple, expressive face. It features a chubby, rounded body with tiny tentacles and blushy cheeks, making it the perfect companion for your keys or backpack.
Detailed Instructions
Materials
- White air dry clay (or cold porcelain)
- Mint green acrylic paint (or teal mixed with white)
- Black acrylic paint
- Pink acrylic paint
- Silver screw eye pin
- Lobster clasp keychain attachment
- Clay sculpting tools (needle tool, ball tool)
- Rolling pin
- Glue (PVA or super glue)
- Matte varnish or sealant
Step 1: Shaping the Base
-
Prepare the Clay:
Start by conditioning a golf-ball-sized amount of air dry clay. Mix in a small amount of mint green acrylic paint until you achieve a consistent, soft pastel shade. Knead it thoroughly to remove any streaks. -
Form the Body:
Roll the green clay into a smooth, seamless ball. Gently flatten the bottom against your work surface to create a dome shape, approximately 1.5 inches wide. -
Smooth Imperfections:
Use a tiny bit of water on your finger to smooth out any cracks or fingerprints on the dome surface. The texture should look almost like a smooth macaron shell. -
Create the Tentacles:
Take a separate, smaller piece of the mint clay and roll it into a thin log or snake shape. Cut this log into about 8-10 small, equal-sized segments. -
Attach the Tentacles:
Roll each small segment into a teardrop shape. Flatten them slightly and attach them to the underside of the main body dome, arranging them so the rounded tips poke out slightly like a skirt. -
Blend the Seams:
Carefully blend the top of the tentacles into the base using a silicone tool/shaper or your finger so they look like one continuous piece rather than glued-on parts.
Cracks Appearing?
If small fissures appear while drying, mix a tiny bit of fresh clay with water to make a ‘slip’ paste. Fill the cracks, smooth over, and let dry again.
Step 2: Adding Details
-
Sculpt the Ears/Fins:
Pinch off two very small balls of mint clay. Shape them into curved, soft triangles to act as the little head fins or ears. -
Attach Head Fins:
Place the fins on the upper sides of the head. Blend the base of the fins into the head using a sculpting tool to ensure a strong bond. -
Insert Hardware:
While the clay is still wet, screw the eye pin into the top center of the head. I recommend dipping the screw threads in a dab of glue first for extra security. -
Dry Time:
Set the figure aside to dry completely. Depending on your humidity and clay type, this usually takes 24-48 hours. Rotate it occasionally so the bottom receives air.
Make it Sparkle
Mix ultrafine iridescent glitter into your varnish before sealing. This gives the sea creature a magical, wet-looking shimmer, perfect for an ocean theme.
Step 3: Bringing it to Life
-
Paint the Eyes:
Using a small ball tool or the handle end of a paintbrush, dip into black acrylic paint and dot two wide-set eyes onto the face. -
Add the Smile:
With an ultra-fine detail brush or a fine-tip black marker, draw a tiny, shallow ‘u’ shape between the eyes for a sweet smile. -
Rosy Cheeks:
Mix a soft pink paint color. Use a smaller ball tool to dot pink cheeks just below and slightly outside the eyes. -
Freckle Details:
Using the very tip of a needle tool or toothpick, add three tiny dots of pink (or a slightly darker mint shade) on the forehead area near the ‘ears’ for texture. -
Seal the Charm:
Once the paint is totally dry, apply a coat of matte varnish. This removes the chalky look of air dry clay and protects your paint job from scratching. -
Finish Assembly:
Open the jump ring on your lobster clasp keychain assembly and attach it to the eye pin loop on top of your sea buddy. Close the ring securely with pliers.
Now you have a charming little pocket friend ready to accompany you on any aquatic adventure
Cute Ghost Minis With Tiny Hats
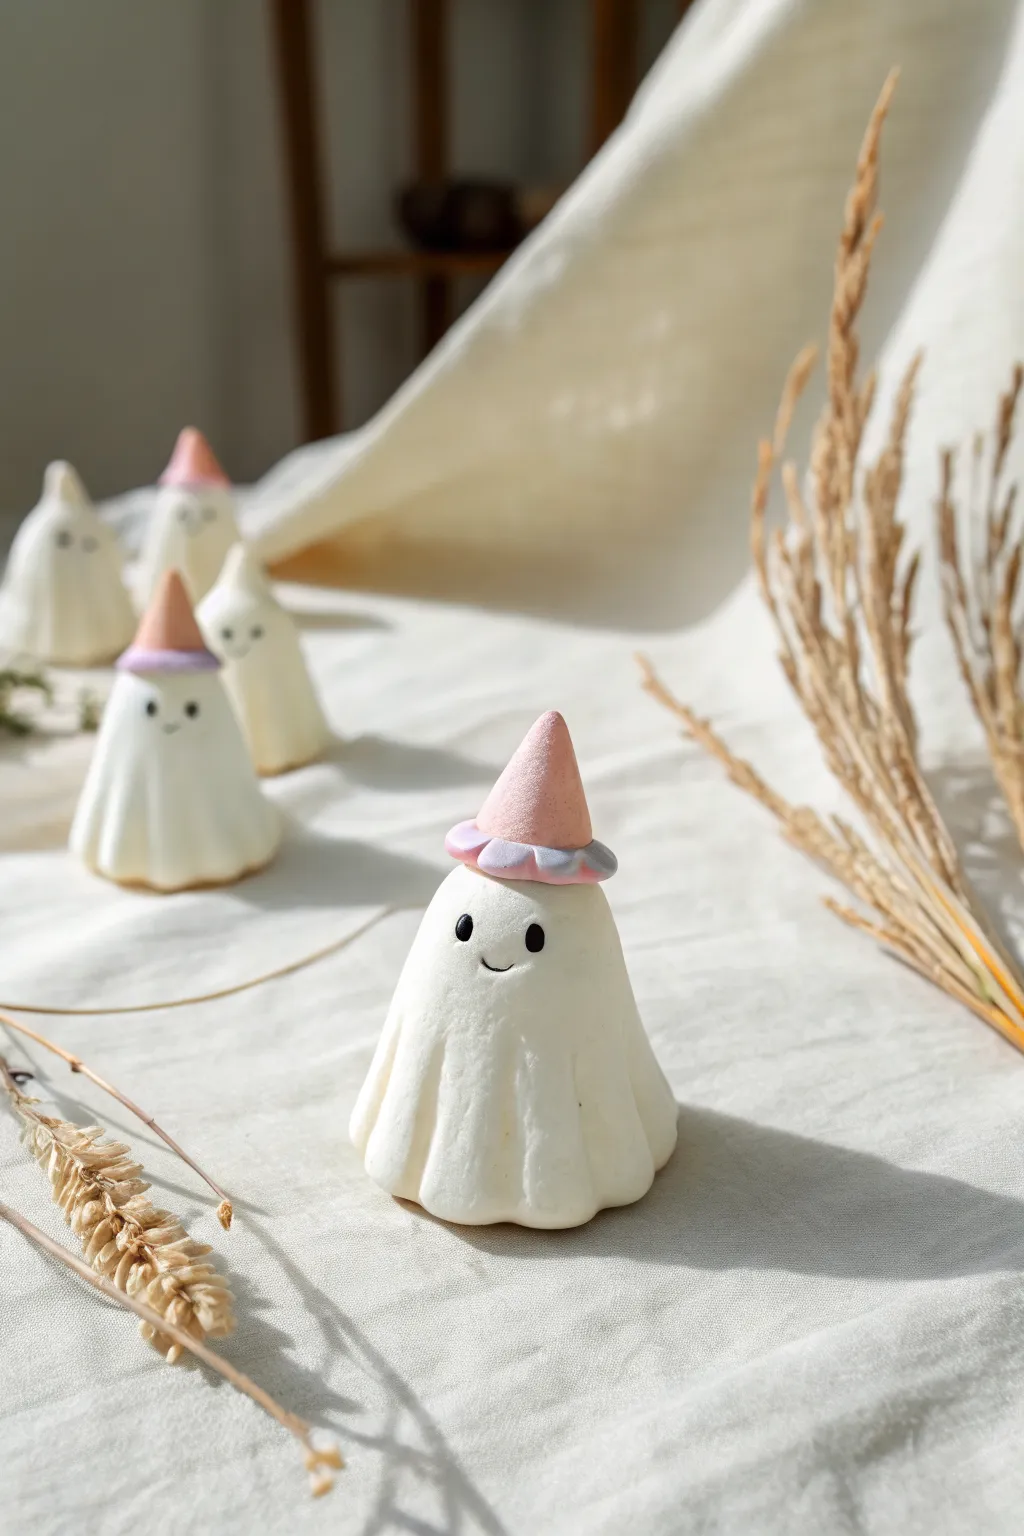
These adorable little ghosts are the perfect blend of spooky and sweet, featuring a soft matte finish and tiny pastel party hats. They make charming desk companions or seasonal decor that feels friendly rather than frightening.
Step-by-Step Guide
Materials
- White air dry clay (preferably lightweight or ‘hearty’ type for smoothness)
- Pastel pink and lavender acrylic paint (or pre-colored clay)
- Black acrylic paint or fine tip marker
- Basic sculpting tools
- Toothpick or needle tool
- Rolling pin
- Smooth work surface or silicone mat
- Small paintbrush
- Water for smoothing
Step 1: Sculpting the Ghost Base
-
Condition the clay:
Start by taking a walnut-sized ball of white air dry clay. Knead it in your hands until it feels soft, warm, and pliable to remove any air bubbles. -
Form the basic shape:
Roll the clay into a smooth ball, then gently roll it into a thick cone or gumdrop shape. The bottom should be wider than the top. -
Flatten the base:
Press the wide end of your cone onto your work surface firmly to create a stable, flat bottom so your ghost stands upright without wobbling. -
Smooth the dome:
Use your fingers to round off the top point of the cone, creating a classic rounded head shape. -
Create the folds:
Using a modeling tool or the handle of a paintbrush, gently press vertical indentations starting from about halfway down the body to the base. This mimics the draping of a sheet. -
Refine the edges:
Soften the ridges between your indentations with a slightly damp finger to make the ‘fabric’ look flowing and organic rather than sharp. -
Shape the bottom hem:
Gently pinch and pull the bottom edges of the clay outward periodically to enhance the wavy, floating skirt effect.
Cracking Up?
If you see tiny cracks forming as it dries, mix a small amount of fresh clay with water to make a paste (‘slip’) and fill in the cracks, then smooth with a wet finger.
Step 2: Adding the Tiny Hat
-
Prepare colored clay:
Mix a tiny pea-sized amount of pink paint into a small bit of white clay until the color is uniform. Do the same with a separate piece and lavender paint. -
Form the hat cone:
Take the pink clay and roll it into a very small, sharp cone for the top of the party hat. -
Create the hat brim:
Roll the lavender clay into a tiny ball, flatten it slightly into a disc, and then ruffle the edges with a needle tool to create a frilly texture. -
Assemble the hat:
Place the pink cone onto the center of the lavender ruffle. I find a tiny dab of water helps them bond securely. -
Mount the hat:
Position the finished hat onto the ghost’s head, pressing down very lightly to attach it without squashing the ghost’s shape.
Step 3: Face & Finishing Touches
-
Initial drying:
Let the ghost sit for about 30-60 minutes so the surface hardens slightly before painting fine details. -
Paint the eyes:
Using the handle end of a small paintbrush dipped in black acrylic paint, dot two wide-set eyes onto the face area. -
Add the smile:
With a very fine liner brush or a fine-tip marker, draw a tiny, shallow U-shape between the eyes for a sweet smile. -
Cleanup:
If there are any rough spots on the white body, you can smooth them with a slightly damp brush before the clay fully cures. -
Final cure:
Allow the entire project to dry completely for 24-48 hours in a cool, dry place away from direct sunlight.
Make It Glow
Mix glow-in-the-dark powder into your white clay during the kneading phase. Your little ghosts will charge up in the light and emit a spooky green glow at night!
Once fully dry, these charming figures are ready to haunt your shelves with cuteness

TRACK YOUR CERAMIC JOURNEY
Capture glaze tests, firing details, and creative progress—all in one simple printable. Make your projects easier to repeat and improve.
Smiling Fruit Slice Minis
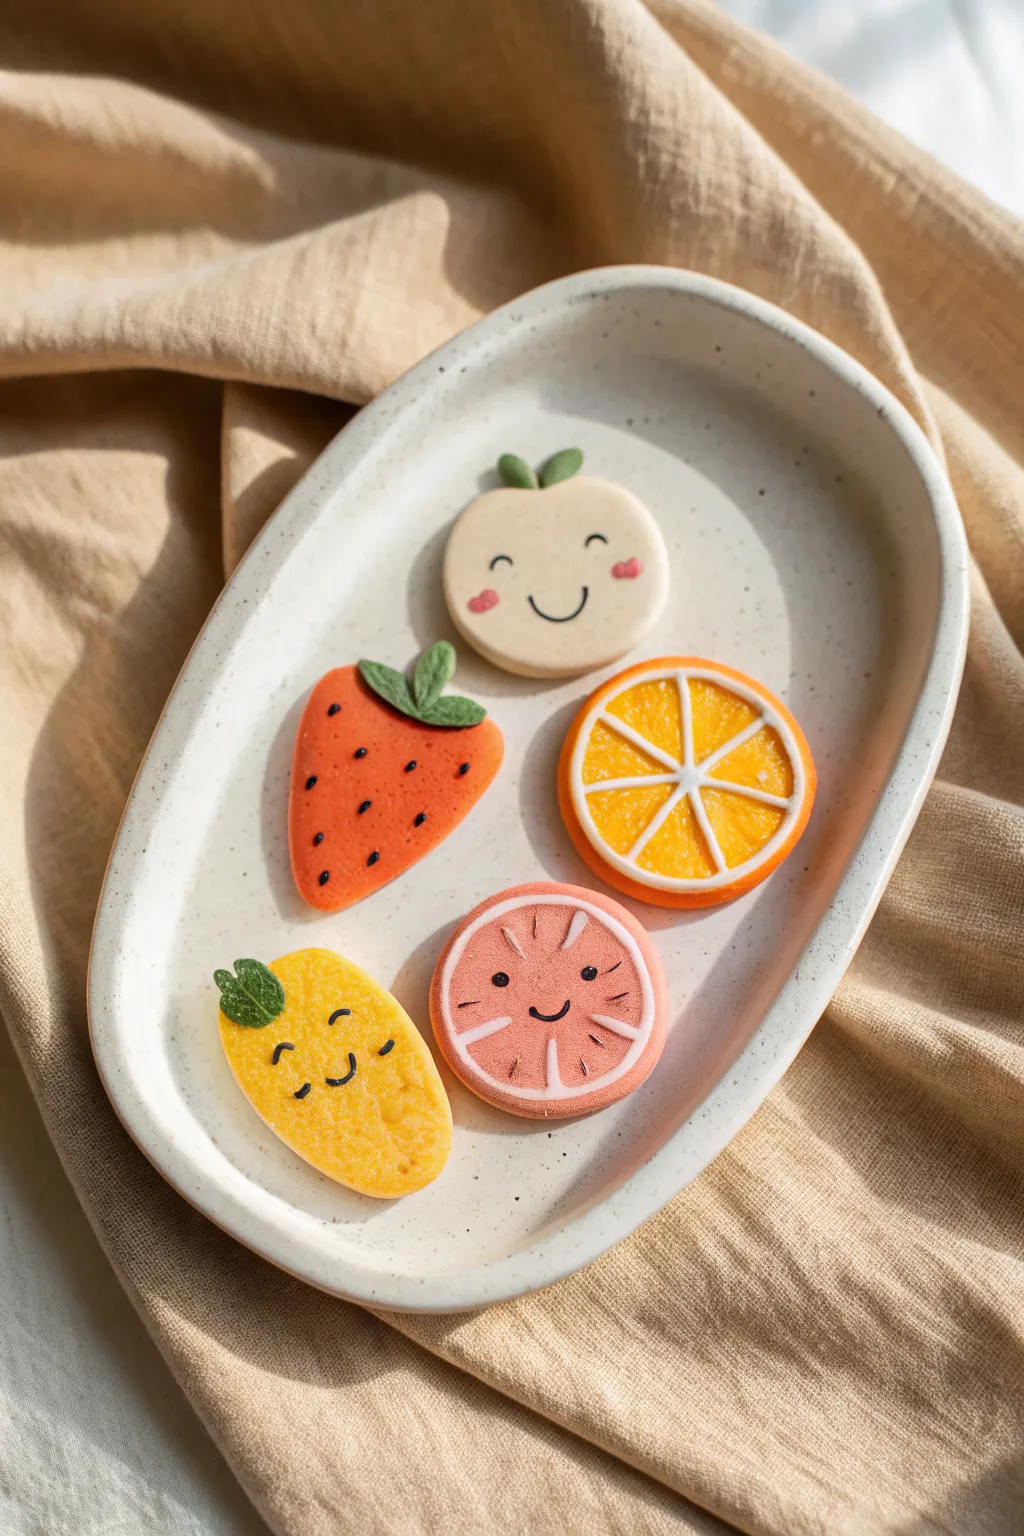
These adorable air dry clay fruit charms bring a burst of cheer to any desk or shelf with their sunny expressions and pastel hues. The smooth, matte finish and tiny hand-painted details give them a delightful, soft-touch whimsy that’s impossible to resist.
Detailed Instructions
Materials
- White air dry clay
- Acrylic paints (pale lemon yellow, strawberry red, tangerine orange, soft pink, apple green, peach/cream)
- Finetip paintbrush (0 or 00 size)
- Small rolling pin
- Precision craft knife or clay sculpting tool
- Needle tool or toothpick
- Fine grit sandpaper
- Matte varnish or sealant
Step 1: Prepping and Shaping the Clay
-
Condition the clay:
Start by kneading your white air dry clay until it is soft, pliable, and free of cracks. If it feels too dry, add a tiny drop of water. -
Color mixing (method choice):
You can either paint the finished dry pieces or, for a more seamless look like the photo, knead small amounts of acrylic paint directly into the wet clay. Mix batches of: cream (for the apple), bright orange, strawberry red, pale pink (for grapefruit), and lemony yellow. -
Roll out the base:
Roll your colored clay into a flat slab, approximately 1/4 inch thick. Try to keep the thickness consistent for all fruits so they look like a set. -
Cut the shapes:
Use a craft knife to cut your basic outlines: a round circle for the apple, a tear-drop triangle for the strawberry, two perfect circles for the citrus slices, and an elongated oval for the lemon.
Step 2: Adding Dimension and Texture
-
Detail the orange slice:
For the orange slice, use a needle tool to gently impress a circle just inside the outer edge to define the ‘rind’. Then, press six radial lines meeting in the center to create the segments. -
Create the grapefruit:
Repeat the segmenting process for the pink grapefruit slice, but make face details later using paint. -
Texture the strawberry:
Using the tip of your needle tool, press tiny, shallow indentations all over the red strawberry shape to mimic seed pockets. -
Craft the leaves:
Take a small bit of green-tinted clay (or white clay you will paint later). Shape tiny teardrops for the apple and lemon leaves. For the strawberry, shape three larger, connected leaves. -
Attach the greenery:
Score the backs of the leaves and the spot on the fruit where they will attach. Use a dab of water as ‘glue’ and press them firmly onto the top of the strawberry, apple, and lemon. -
Smooth the edges:
Dip your finger in water and gently run it along the cut edges of every fruit to soften sharp corners, giving them that rounded, friendly aesthetic.
Use baby oil
To smooth out fingerprints before drying, lightly brush the clay surface with a drop of baby oil instead of water.
Step 3: Painting and Finishing
-
Drying time:
Place your pieces on parchment paper and let them dry completely. This usually takes 24-48 hours. Flip them over halfway through so the backs dry evenly. -
Sanding:
Once bone dry, use fine grit sandpaper to gently buff away any fingerprints or rough edges. -
Detailing the citrus pith:
With white acrylic paint and your finest brush, carefully paint the impressed lines on the orange and grapefruit slices to create the white pith between segments. -
Adding texture to the orange:
If you want extra realism, stipple a tiny bit of darker orange paint into the segments of the orange slice using a nearly dry brush. -
Painting the seeds:
Dip a toothpick or fine brush into black paint and fill the indentations on the strawberry to make the seeds pop. -
Drawing the faces:
This is the most critical step for cuteness! Using black paint or a fine waterproof artist pen, draw the faces. For the apple: two curved arches for closed happy eyes and a simple U-smile. For the lemon: squiggly eyes and a smile. For the grapefruit: small dot eyes. -
Blushing cheeks:
Mix a very watery pink paint or use a pink pastel scraping. Dip a q-tip or soft brush and gently dab rosy cheeks onto the apple and lemon. -
Seal and protect:
Finish by applying a coat of matte varnish. This protects the paint and gives the clay that smooth, professional finish without making it look plasticky.
Make them functional
Before the clay dries, carefully glue a strong magnet to the back or insert an eyepin at the top to turn these into jewelry.
Once dry, arrange your cheerful fruit family in a small dish to brighten up your workspace
Flower Power Daisy Mini Pins
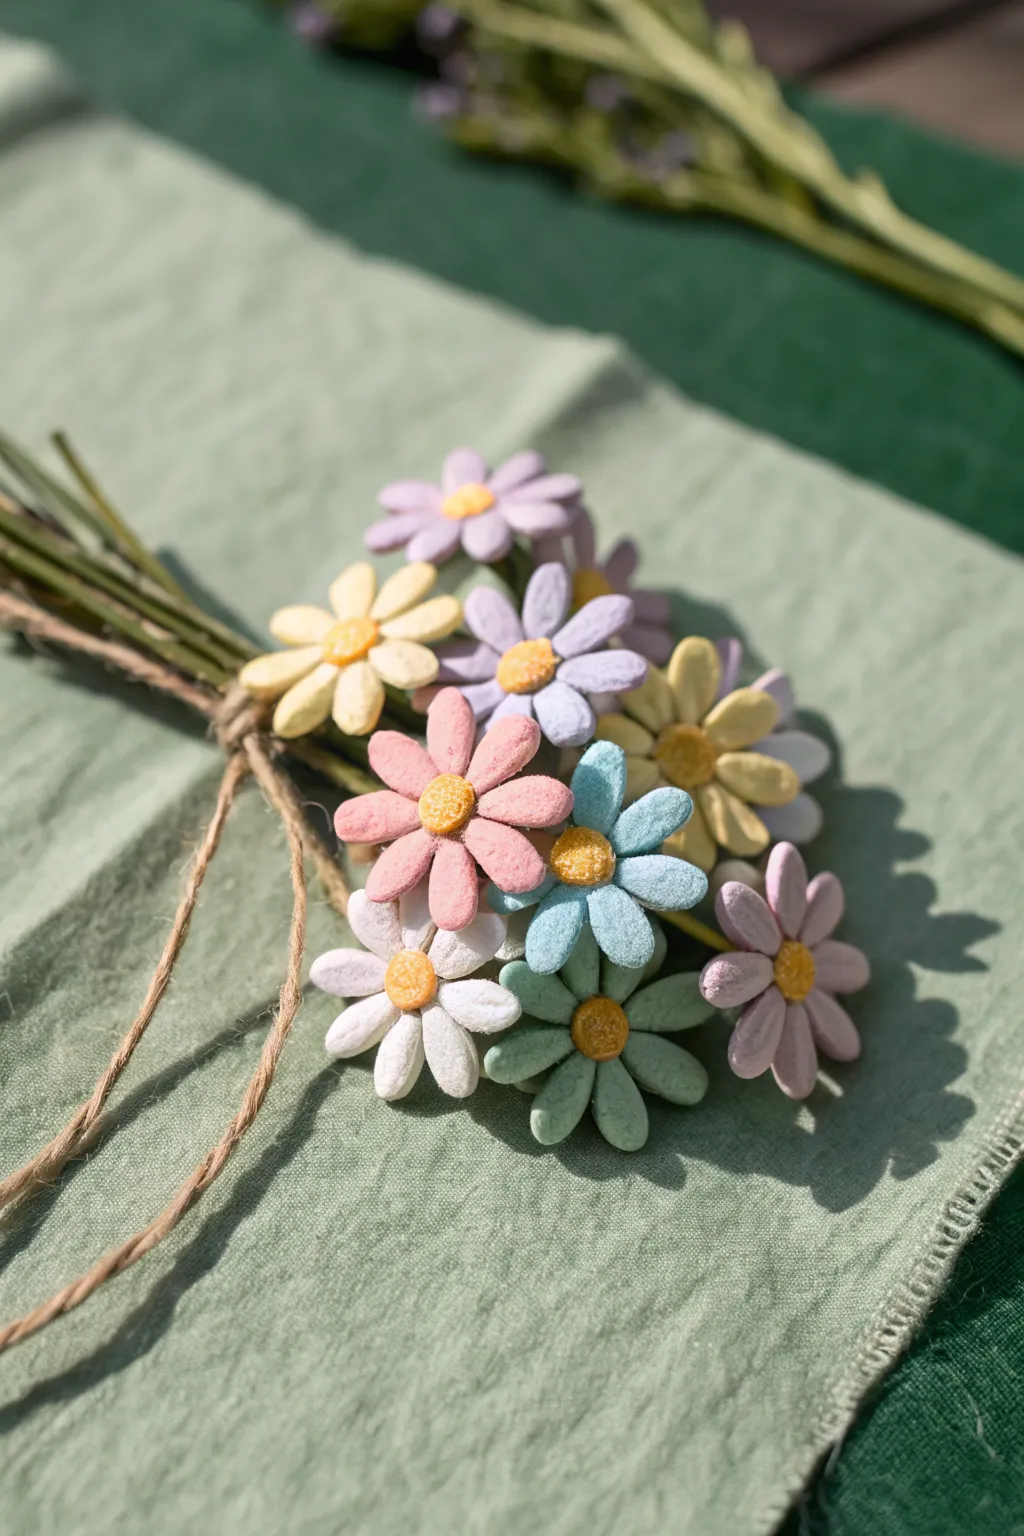
Capture the essence of spring with these darling mini daisy pins, featuring a charming matte finish that looks almost like sugar cookies. These pastel blooms are perfect for brightening up a lapel, a tote bag, or simply arranging in a tiny vase for a permanent burst of color.
Step-by-Step Guide
Materials
- White air-dry clay (foam or light clay recommended for texture)
- Acrylic paints (pastel pink, lavender, light blue, soft yellow, mint green)
- Floral wire (green, 18-20 gauge)
- Clay sculpting tools (specifically a small ball tool and a knife/needle tool)
- Fine-grit sandpaper or a clean toothbrush (for texturing)
- Tacky glue or strong craft adhesive
- Jute twine
- Rolling pin
- Small circle cutter (optional, about 1-1.5cm)
- Matte sealant spray
Step 1: Coloring and Base Prep
-
Mix your palette:
Begin by separating your white clay into five or six small, equal portions. Keep a slightly larger portion aside for the yellow centers. -
Tint the clay:
Add a tiny drop of acrylic paint to each portion—pink, lavender, blue, yellow, and mint—and knead thoroughly until the color is uniform and pastel. Remember that air-dry clay often dries slightly darker than it looks when wet. -
Prepare the stems:
Cut your floral wire into equal lengths, roughly 4-5 inches each. Create a tiny hook or loop at the very top of each wire using pliers; this helps the clay head grip the wire securely.
Step 2: Forming the Flowers
-
Create the center base:
Take a tiny sphere of colored clay (whichever color you want the petals to be) and push it onto the hooked wire loop to form a small, flat platform. This is the structural back of the flower. -
Shape the petals:
For the petals, roll small, teardrop-shaped pieces of clay. You’ll need about 6-8 per flower. Try to keep them consistent in size. -
Attach petals:
Flatten the teardrops gently and press the pointed ends onto your clay base on the wire. Arrange them in a radial circle so they touch. -
Refine the shape:
Use a modeling tool or the back of a knife to gently press an indentation down the center of each petal. This adds dimension and separates them visually. -
The sunny centers:
Roll a small ball of the yellow-tinted clay. Flatten it slightly into a dome shape. -
Texturize the center:
Before attaching, use a clean toothbrush or a needle tool to stipple the surface of the yellow dome, giving it that fuzzy, pollen-like texture seen in the photo. -
Final assembly:
Dab a tiny amount of tacky glue onto the center of your petals and press the textured yellow dome firmly into place.
Stay Smooth
If your clay starts cracking while you work, dip your finger in a tiny bit of water (or lotion if using cold porcelain) to smooth out the fissures immediately.
Step 3: Finishing Touches
-
Create the bouquet:
Repeat the process until you have a full bundle of colorful daisies. Vary the colors for a wildflower look. -
Drying time:
stick the wires into a block of floral foam or styrofoam so the heads don’t flatten while they dry. Let them cure for at least 24 hours. -
Bundle and bind:
Gather your finished stems into a bunch. Take a length of jute twine and wrap it tightly around the stems about halfway down, securing it with a simple knot or bow. -
Seal (Optional):
To protect them from moisture without losing that sugary look, lightly mist the flower heads with a matte varnish spray.
Turn Them Into Pins
Instead of using floral wire stems, create the flower heads flat. Once dry, glue a metal brooch back or a magnet to the reverse side for wearable art.
Enjoy the everlasting cheer these little blooms bring to your space
Frog Buddy Plant Markers
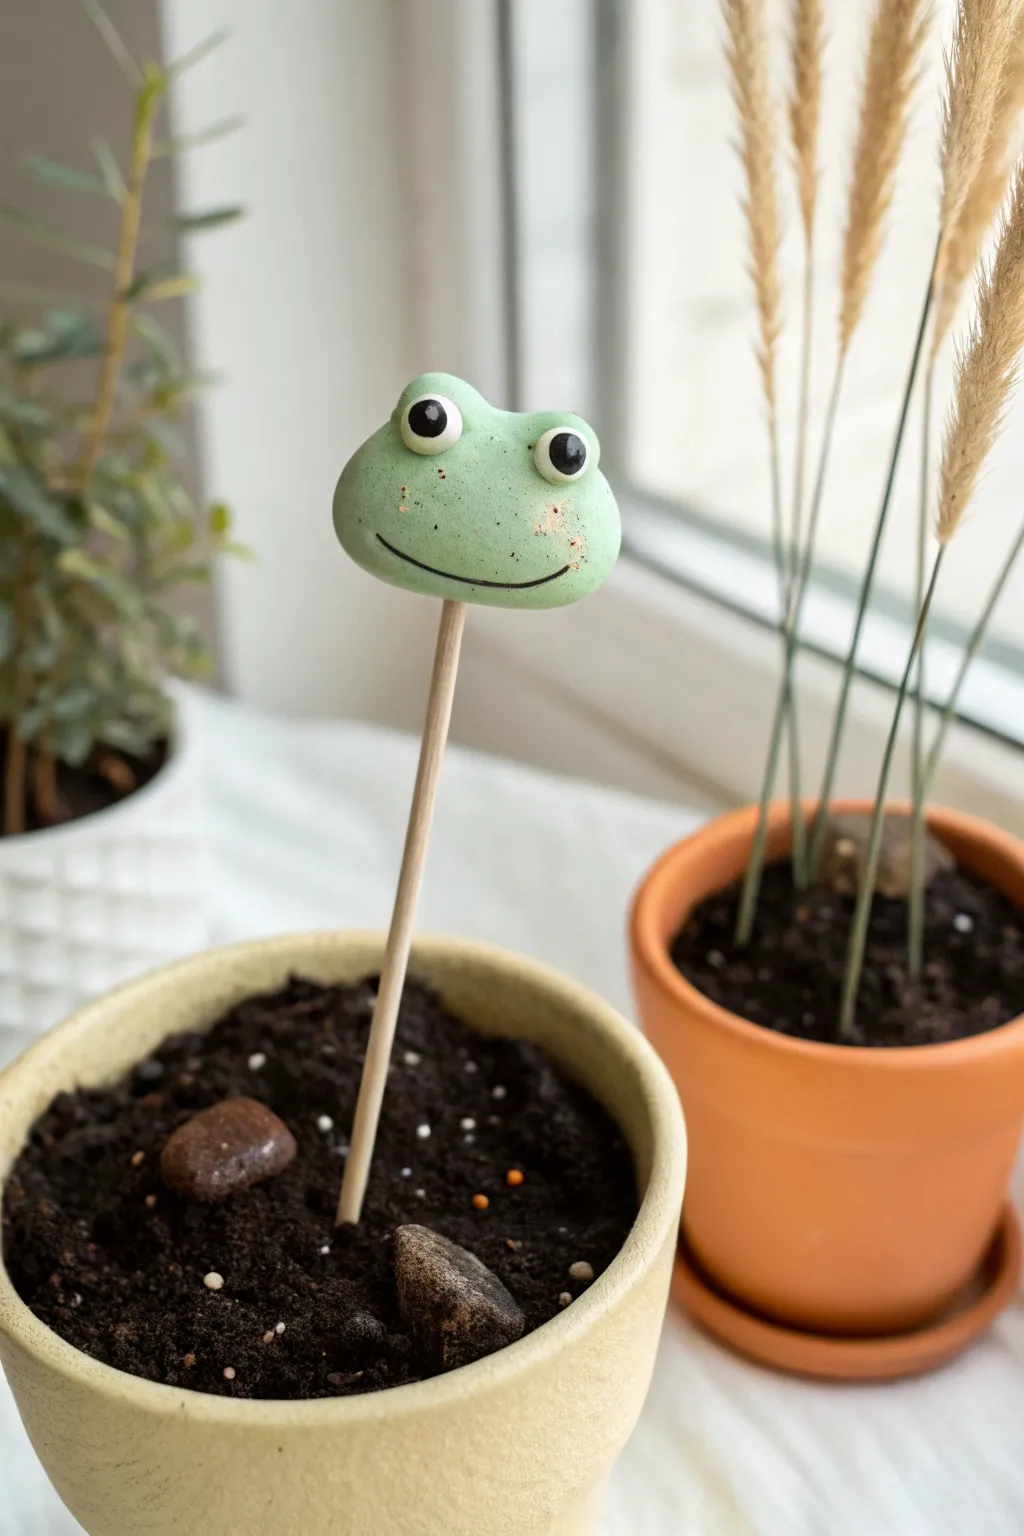
Add a touch of whimsy to your indoor garden with this adorable frog plant marker. Its soft green hue and friendly smile make it a charming guardian for your favorite succulents or herbs.
Step-by-Step
Materials
- Air dry clay (white)
- Acrylic paints (light green, white, black, pink/brown)
- Wooden skewer or dowel
- PVA glue or craft glue
- Paintbrushes (small detail brush and medium flat brush)
- Glossy varnish or sealant (optional)
- Old toothbrush (for texture)
- Water and paper towels
Step 1: Shaping the Frog Head
-
Portion the clay:
Start by taking a lump of white air dry clay about the size of a golf ball or a large walnut. Knead it in your hands until it feels soft, warm, and pliable to prevent cracks later. -
Form the base shape:
Roll the clay into a smooth ball between your palms, then gently flatten it into an oval shape that is slightly wider horizontally. This will be the frog’s main face. -
Create the eye bumps:
Pinch off two very small, pea-sized pieces of fresh clay. Roll them into balls and press them onto the top edge of the oval, spacing them out slightly to create the classic frog eye bumps. -
Smooth the seams:
Use a tiny bit of water on your finger or a clay tool to blend the bottom of the eye bumps into the main head. The transition should be seamless so the eyes don’t fall off when dry. -
Refine the surface:
Dip your finger in water and gently rub over the entire surface to smooth out any fingerprints or tiny cracks. The smoother the clay now, the better the paint will look later. -
Insert the stick:
Take your wooden skewer or dowel and gently insert the blunt end into the bottom center of the frog’s head. Push it in about halfway up the head for stability. -
Secure the connection:
Remove the stick, add a drop of PVA glue to the tip, and re-insert it into the hole. Gently pinch the clay around the stick entrance to seal it tight. -
Let it dry:
Place the stick upright in a jar or stick it into a piece of floral foam so the head doesn’t touch anything. Allow it to dry completely for 24-48 hours until hard and white.
Cracked Clay?
If small cracks appear while drying, don’t restart! Mix a tiny bit of fresh clay with water to make a paste (slip) and fill the cracks, then sand smooth when dry.
Step 2: Painting and Details
-
Base coat:
Mix a soft, pastel green using white and a tiny drop of green acrylic paint. Paint the entire head, including the eye bumps. I like to do two thin coats for opaque coverage. -
Paint the eyes:
Using a small detail brush, paint two white circles on the front of the eye bumps. Let this dry completely before moving to the next step. -
Add pupils:
Dip the back end of a paintbrush into black paint and dot it onto the white circles to create perfect, round pupils. -
Draw the smile:
Mix a very dark green or use thinned black paint. With your finest brush, paint a wide, thin smile that stretches across the face. -
Create speckles:
Dilute a small amount of brownish-pink paint with water. Dip an old toothbrush into it, tap off the excess, and gently flick the bristles with your thumb to spray tiny speckles across the frog’s cheeks. -
Add blush:
While the speckles are drying, use a dry brush with a tiny amount of pink paint to softly dab rosy cheeks near the edges of the smile. -
Highlight the eyes:
Add a tiny dot of white paint to the upper corner of each black pupil. This ‘catchlight’ brings the character to life. -
Seal the project:
Once all paint is bone dry, coat the frog head with a layer of glossy varnish or sealant to protect it from moisture in the plant pot.
Level Up: Accessories
Give your frog personality by sculpting a tiny clay mushroom hat or a flower to place on its head before the clay dries.
Pop your new green friend into a potted plant and enjoy the cheerful company
Mini Animal Face Drawer Knobs
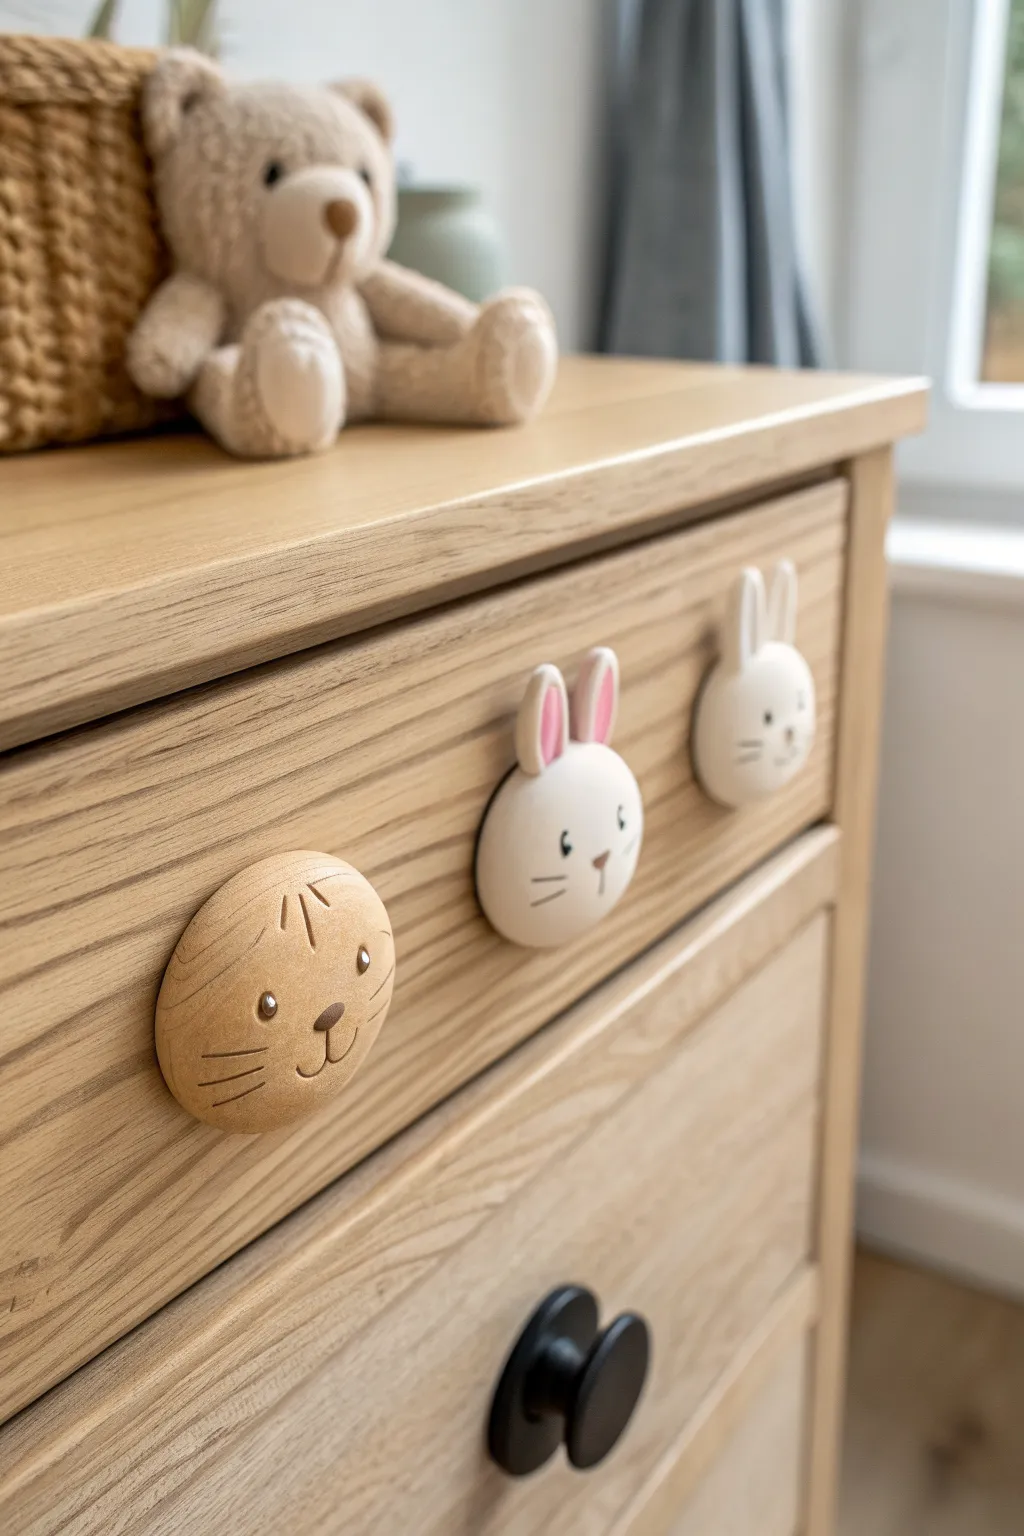
Transform a plain dresser into a nursery centerpiece with these adorable, handcrafted animal face knobs. Using air dry clay, you’ll create a textured wood-look bear and sweet white bunnies to add a touch of playful charm to your furniture.
How-To Guide
Materials
- White air dry clay
- Wooden drawer knobs (flat-faced preferred) or screw-in knob hardware bases
- Acrylic paints (white, soft pink, caramel/tan, dark brown, black)
- Small detail paintbrush
- Sculpting tools (needle tool and smooth modeling tool)
- Strong craft adhesive (like E6000)
- Fine-grit sandpaper
- Matte varnish or sealant
- Rolling pin
- Water bonding cup
Step 1: Base Prep & Shaping
-
Prepare the hardware:
If you are upcycling existing wooden knobs, sand them lightly to create a rough surface for the clay to grip. If using metal knob bases, ensure they are clean and dry. -
Condition the clay:
Knead a chunk of air dry clay until it is soft, pliable, and free of cracks. This conditioning step is crucial to prevent structural weakness later on. -
Cover the base:
Flatten a ball of clay into a disc and press it firmly over the face of your knob hardware. Smooth the edges down around the sides, ensuring there are no air pockets trapped between the hardware and the clay. -
Create the rounded face:
Add a little more bulk to the center and smooth it out with a wet finger to create a gentle, domed cabochon shape. Aim for a diameter of about 1.5 to 2 inches.
Adhesion Pro-Tip
For maximum durability, apply a thin layer of E6000 glue to the wooden knob base before pressing your wet clay onto it. This bonds the clay permanently so it won’t pop off later.
Step 2: Sculpting the Bunny
-
Form the ears:
Roll two small, equal-sized logs of clay appearing slightly tapered at the ends. Flatten them gently to create the bunny ear shape. -
Attach the ears:
Score the top of the head and the bottom of the ears with a needle tool. Add a dab of water (slip) and press the ears firmly in place. Use a silicone tool to blend the seam so the ears look like they are growing out of the head. -
Refine the shape:
Use your fingers to round off any sharp edges on the ears. For the bunny, keep the surface as smooth and clean as possible.
Mix & Match Animals
Add a fox by pointing the ears and painting it orange, or a puppy with floppy ears. Create a whole forest zoo by giving each drawer a different character.
Step 3: Sculpting the Bear/Cat
-
Shape the round face:
Follow the same base steps as the bunny, but keep the overall shape completely round without tall ears. -
Add texture:
Unlike the smooth bunny, this character needs a wood-grain effect. Gently drag a stiff bristle brush or a needle tool across the surface in curved lines to mimic carved wood texture. -
Drying time:
Set all your knobs aside in a safe, dry place. I like to let this dry briefly for about 24-48 hours, flipping them occasionally if possible to ensure even drying.
Step 4: Painting & Details
-
Base coat – Bunny:
Once fully dry and sanded smooth, paint the bunny knobs with two coats of opaque white acrylic paint. -
Base coat – Bear:
Paint the round knob with a caramel or light tan color. To enhance the ‘wood’ texture, you can do a light wash of darker brown and wipe it back, leaving pigment in the grooves. -
Paint the bunny ears:
Mix a soft pastel pink and carefully paint the inner section of the bunny ears. -
Add facial features:
Using your finest detail brush and black paint (or dark brown for a softer look), paint two small dots for eyes widely spaced apart. -
Nose and whiskers:
Paint a small inverted triangle for the nose. Draw a simple vertical line down from the nose, and add three horizontal whiskers on each cheek for the bunny, or angled whiskers for the bear. -
Highlight the eyes:
Dip the tip of a toothpick into white paint and add a tiny spec to the top corner of each eye. This ‘catchlight’ brings the character to life instantly. -
Seal the work:
Because these will be handled frequently, apply two to three coats of a durable matte varnish. Allow the varnish to cure completely before installing the knobs on your dresser.
Screw these charming little faces onto your drawers and enjoy the instant personality upgrade they bring to the room
Pocket-Size Trinket Boxes With Faces
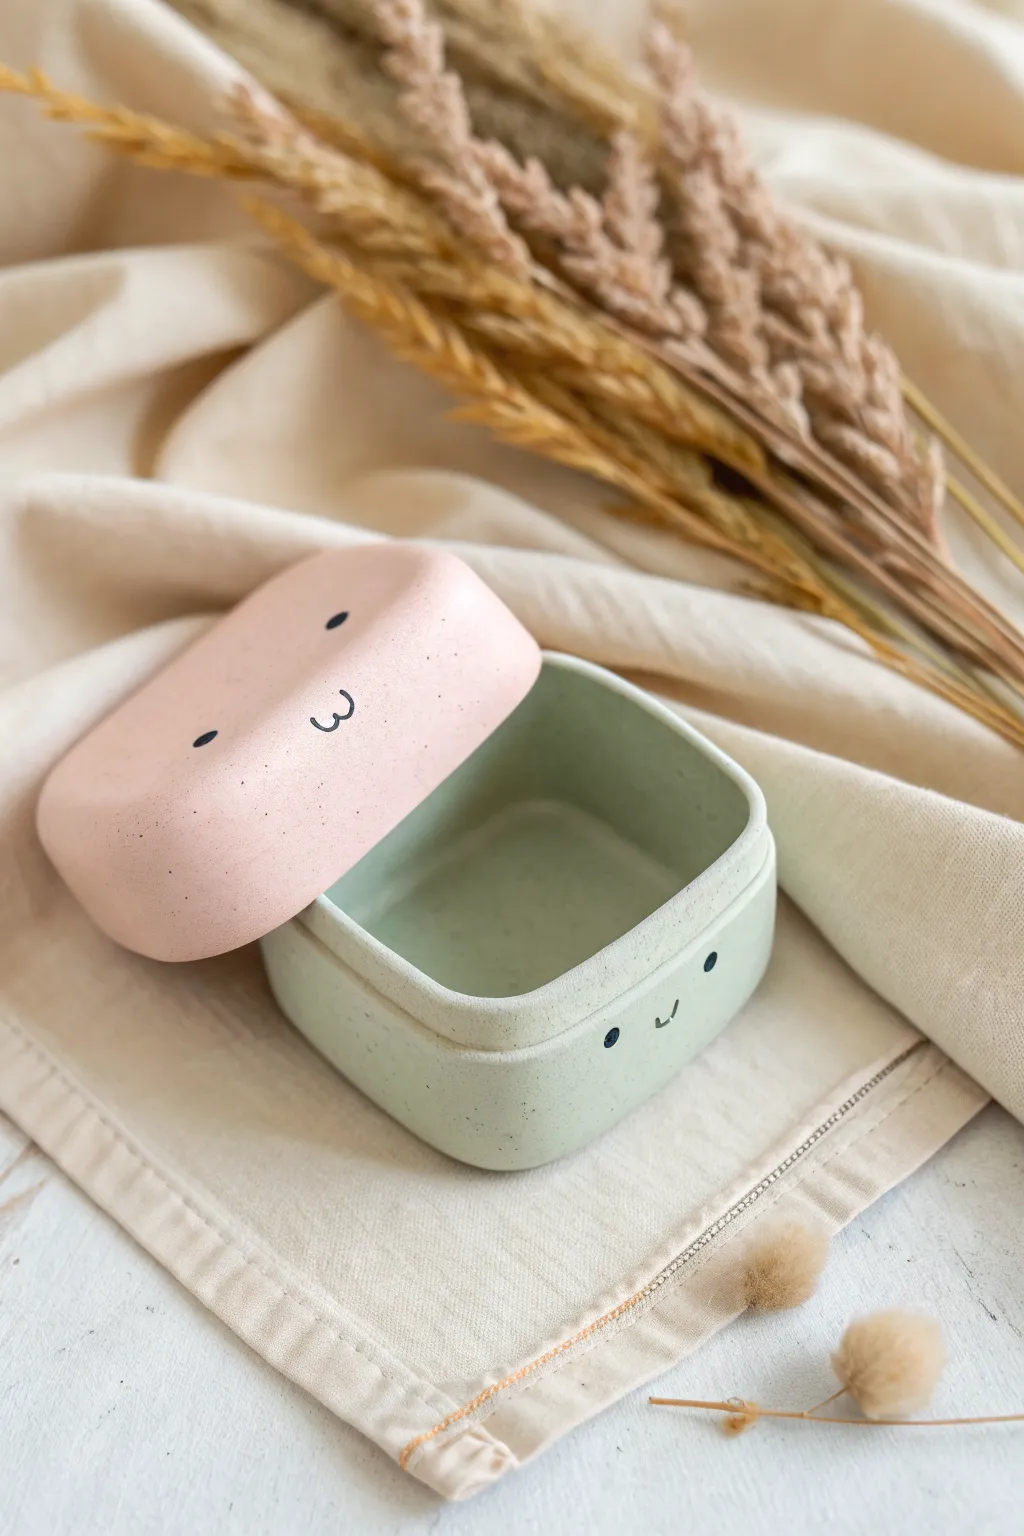
These adorable pocket-sized containers feature a blushing pink lid and a minty green base, each with its own sweet personality. With their smooth, speckled finish, they look just like high-end ceramic, perfect for holding rings or tiny treasures.
Step-by-Step Guide
Materials
- Air dry clay (white)
- Acrylic paints (pastel pink, pastel sage green, black)
- Rolling pin
- Square cookie cutter (approx. 2.5 – 3 inches)
- Craft knife or clay tool
- Water and a small sponge
- Sandpaper (fine grit)
- Old toothbrush (for speckling)
- Matte varnish or sealant
- Ruler
Step 1: Creating the Base
-
Roll the slab:
Start by rolling out a portion of your white air dry clay on a flat surface until it is roughly 1/4 inch thick. Try to keep the thickness even for a sturdy box. -
Cut the base:
Use your square cookie cutter to stamp out the bottom piece of your box. -
Measure the walls:
Measure the perimeter of your square base. Roll out a long strip of clay, also about 1/4 inch thick, and cut it to match that length with a height of about 1.5 inches. -
Attach the walls:
Score the edges of the base and the bottom edge of your strip with a craft knife. Apply a little water to create slip, then wrap the strip around the base to form the walls. -
Blend the seams:
Where the ends of the wall meet and where the wall meets the base, use your fingers or a smoothing tool to blend the clay together seamlessly so no joint lines are visible. -
Round the corners:
Gently press and smooth the outer corners of the square box to give them a soft, rounded shape rather than a sharp 90-degree angle.
Smooth Seams
Use a wet finger to smooth the clay seams immediately after joining. If cracking occurs while drying, patch it with a tiny bit of wet clay paste.
Step 2: Shaping the Lid
-
Create the lid slab:
Roll out another piece of clay, slightly thicker than the base. Cut a square that is just slightly larger than your box base to serve as the lid. -
Add an inner lip:
To keep the lid from sliding off, roll a small coil of clay and attach it to the underside of the lid in a square shape. This inner square should fit snugly inside the box opening. -
Shape the top:
Turn the lid over and gently smooth the edges downward to create a domed, pillow-like effect. Smooth away any sharp edges with a damp sponge. -
Dry completely:
Let both pieces dry for 24-48 hours. I find flipping them occasionally helps them dry evenly without warping.
Inner Surprise
Paint the inside of the box a contrasting bright color like sunny yellow for a fun pop of joy every time you open it up.
Step 3: Painting and Finishing
-
Sand until smooth:
Once bone dry, use fine-grit sandpaper to buff away any fingerprints or bumps. Wipe away the dust with a slightly damp cloth. -
Base coats:
Paint the lid with a soft pastel pink acrylic and the base with a muted sage or mint green. You may need two coats for opaque coverage. -
Add the speckles:
Dip an old toothbrush into slightly watered-down black or dark grey paint. Run your thumb across the bristles to flick tiny speckles over both pieces. -
Paint the faces:
Using a very fine detail brush and black paint, add two small dots for eyes widely spaced apart. On the pink lid, paint a small ‘w’ mouth; on the green base, add tiny curved lines for a smile. -
Seal:
This is the crucial step for durability. Apply a coat of matte varnish to protect the paint and give it that finished ceramic look.
Place these sweet little characters on your desk to organize your space with a touch of whimsy
Sampler Platter Of Mini Icons
Create a delightful collection of miniature charms that look good enough to eat with this “sampler platter” project. Using air dry clay in soft, muted pastels, you’ll sculpt everything from tiny hearts and flowers to rainbows, perfect for jewelry or just arranging in a satisfying display.
Step-by-Step
Materials
- White air dry clay (or cold porcelain)
- Acrylic paints (pastel pink, peach, mint green, white, pale yellow, lavender)
- Small rolling pin
- Tiny cookie cutters (stars, hearts, flowers)
- Needle tool or toothpick
- Ball stylus tool
- Clean work surface or silicone mat
- Sandpaper (fine grit)
- Matte varnish (optional)
Step 1: Preparing the Clay Palette
-
Base Mixing:
Begin by establishing your color palette. Take small portions of white air dry clay and mix in tiny drops of acrylic paint before sculpting. Aim for muted, milky tones—think peach, dusty rose, sage green, and cream. -
Kneading:
Knead each color thoroughly until the pigment is evenly distributed and the clay feels pliable and warm. If the clay feels too sticky from the paint, let it sit for a few minutes to air out. -
Storage:
Keep any colored clay you aren’t immediately using wrapped tightly in plastic wrap or a damp towel to prevent it from drying out while you work on individual pieces.
Step 2: Sculpting the Shapes
-
Rolling:
Roll out a portion of clay to about 1/4 inch thickness. You want these to be chunky and substantial, not paper-thin. -
Classic Hearts:
Use a small heart cutter or freehand cut a heart shape. Soften the sharp edges by gently tapping them with your finger to give it a puffed, pillow-like look. -
Simple Flowers:
For the five-petal flowers, create five tiny balls of clay of the same size. Press them together in a circle and flatten them slightly. Use a dot tool to press an indentation into the center of each petal. -
Adding Centers:
Take a tiny dot of contrasting clay (like white on pink) and press it into the center of your flowers to create the pollen area. You can texture this center with a needle tool. -
Button Icons:
Shape a small circle or heart and flatten it slightly. Use a needle tool or toothpick to poke two or four symmetrically placed holes in the center to mimic a button. -
Star Accents:
Cut out small star shapes. To give them texture like sugary treats, you can gently press a piece of coarse fabric or paper towel against the surface before the clay creates a skin. -
Textured Wheels:
Create small discs and use a toothpick to press radiating lines from the center outward, creating a wheel or citrus slice effect. -
Mini Rainbows:
Roll very thin snakes of three different pastel colors. Arch them over each other, creating a rainbow shape, and slice the bottom straight across with a knife. -
Mushrooms:
Form a tiny stem from white clay and a small cap from pink or red clay. Press them together gently. I find a tiny dab of water helps them bond instantly. -
Leaves:
Shape tiny teardrops from sea-foam green clay. Use a knife tool to press a single central vein down the middle.
Cracking Colors?
If your clay cracks while drying, it usually means water evaporated too fast. Keep them away from direct sunlight or heat vents while they cure.
Step 3: Finishing and Drying
-
Initial Drying:
Arrange all your finished pieces on a clean, flat board. Let them air dry for at least 24 hours. Flip them over halfway through to ensure the bottoms dry evenly. -
Sanding:
Once fully cured and hard, gently gently run a fine-grit sandpaper over any rough edges or fingerprints to achieve a professional, matte finish. -
Sealing:
To maintain the ‘sugar candy’ look shown in the image, leave them raw or use a very matte varnish. Glossy finishes will change the aesthetic significantly.
Smoother Cuts
Dip your cookie cutters in a little bit of cornstarch or baby powder before pressing into the clay. This prevents sticking and keeps edges sharp.
Now you have a charming collection of sweets for your trinket dish or next jewelry project
Mini Shadow Box Scene In Clay
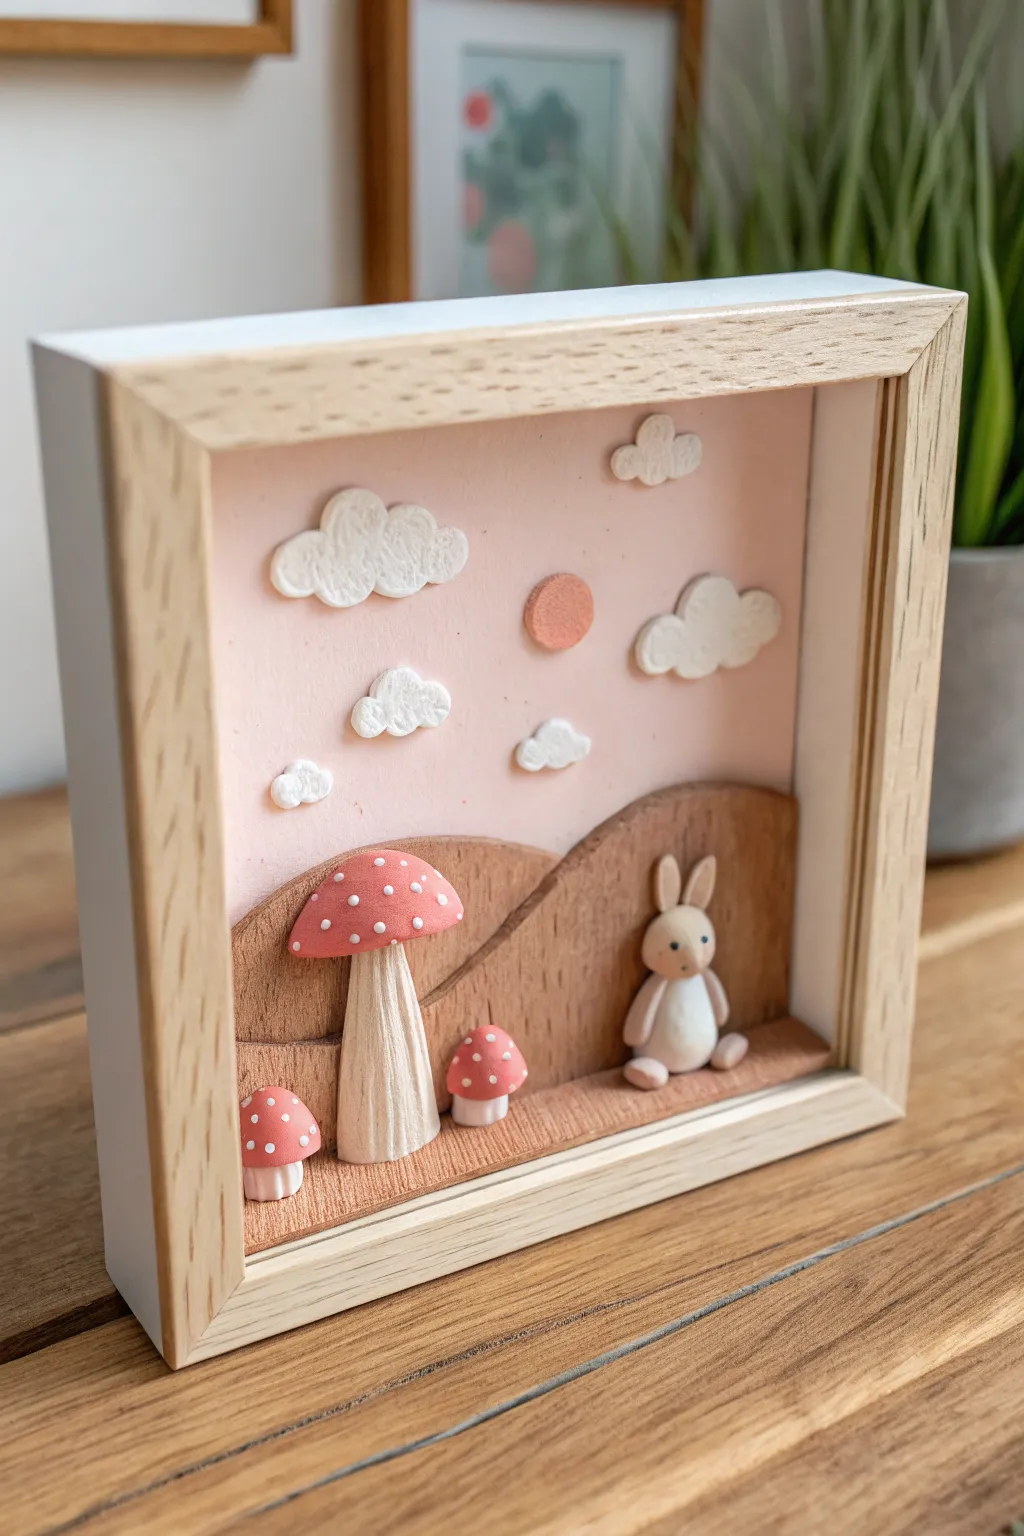
Capture a slice of fairytale magic with this adorable 3D shadow box scene. Featuring rolling textured hills, spotted mushrooms, and a sweet little bunny, this project combines air dry clay sculpting with layered composition for a charming piece of nursery or desk decor.
How-To Guide
Materials
- Deep shadow box frame (approx. 6×6 or 8×8 inch)
- White air dry clay
- Rolling pin
- Craft knife or clay tools
- Texture tool (coarse sandpaper or stiff bristle brush)
- Acrylic paints (pastel pink, warm brown, red, white, soft orange)
- Fine detail paintbrushes
- Strong craft glue or hot glue gun
- Cardstock or thick paper (for the back panel)
- Matte varnish (optional)
Step 1: Preparing the Backdrop
-
Prep the frame:
Disassemble your shadow box frame, removing the glass and the back panel. Wipe down the interior sides if necessary to ensure they are clean. -
Create the sky:
Cut a piece of cardstock to fit exactly inside the back of your frame. Paint this sheet a smooth, solid pastel pink to serve as your sky. Let it dry completely before gluing it securely to the frame’s backboard. -
Sculpt the clouds:
Take small pinches of white air dry clay and flatten them into organic cloud shapes. Use your fingers to soften the edges so they look fluffy rather than sharp. -
Texture the clouds:
Before the clay dries, gently press a stiff bristle brush or a crumpled ball of aluminum foil into the cloud surfaces to give them that distinct, bubbly texture seen in the photo. -
Make the sun:
Roll a small ball of clay and flatten it into a perfect circle for the sun. Set the sun and clouds aside on a flat surface to dry completely.
Step 2: Sculpting the Landscape
-
Form the hills base:
Roll out a thicker slab of clay, roughly 1/4 inch thick. Cut two wavy shapes that act as your rolling hills. One should be taller for the background, and one shorter for the foreground. -
Add earthy texture:
Press a texture tool—like coarse sandpaper, a sponge, or a dedicated clay texture mat—into the wet clay hills. This creates a wood-like or grassy grain. I like to drag the tool slightly vertically to mimic the look of tree bark or tall grass. -
Create the mushroom caps:
Roll three balls of clay: one large and two small. Flatten the bottoms and gently dome the tops to create mushroom caps. -
Sculpt mushroom stems:
Roll three cylinders for the stems. Use a needle tool or toothpick to scratch vertical lines down the sides of the stems for a striated, natural texture. -
Assemble the bunny:
Roll a larger oval for the bunny’s body and a smaller sphere for the head. Attach two long, tear-drop shapes for ears and two tiny ovals for feet. Smooth the seams with a little water.
Clean Edges Only
Use a little water on your fingertip to smooth out the edges of your clay cuts before they dry. This removes stray ‘crumbs’ and makes the final painted piece look much more professional.
Step 3: Painting and Assembly
-
Dry time:
Allow all your clay pieces to dry for at least 24 hours. The thicker hill pieces may need up to 48 hours to fully cure and harden. -
Paint the hills:
Paint your textured hills in a warm, medium-brown shade. To enhance the texture, you can dry-brush a slightly lighter tan color over the raised areas once the base coat is dry. -
Decorate the mushrooms:
Paint the mushroom caps a muted red and the stems a cream or off-white. Once the red is dry, use a dotting tool or the back of a paintbrush to add small white polka dots. -
Detail the bunny:
Paint the bunny white with a soft cream tummy patch. Use a very fine brush to add black dots for eyes and a tiny pink nose. -
Paint the sun:
Paint the small sun circle a soft, dusty orange or terracotta color to contrast with the pink sky. -
Layering the scene:
Using strong craft glue, attach the tall hill to the pink backdrop first. Then, layer the shorter hill in front of it to create depth. -
Placing the elements:
Glue the sun and clouds into the sky area. Position the large mushroom on the left side of the foreground hill, and the bunny and smaller mushrooms on the right. -
Final assembly:
Once all glue is dry, reassemble the frame. You can leave the glass off for a tactile 3D effect, or put it back on to protect your artwork from dust.
Level Up: Light It Up
This shadow box looks magical with light. Before gluing the hills, hide a small string of battery-operated warm white fairy lights behind the back hill for a glowing sunset effect.
Hang your new miniature world on the wall or place it on a shelf to bring a calm, woodland vibe to your room