
Cute clay rings are my favorite kind of tiny project because you get a big personality payoff from a teeny little piece of clay. If you’re craving whimsical ring designs you can actually make, here are some of my go-to ideas—from classic sweet styles to a few studio “wait, that’s a ring?” surprises.
Pastel Heart Dome Rings
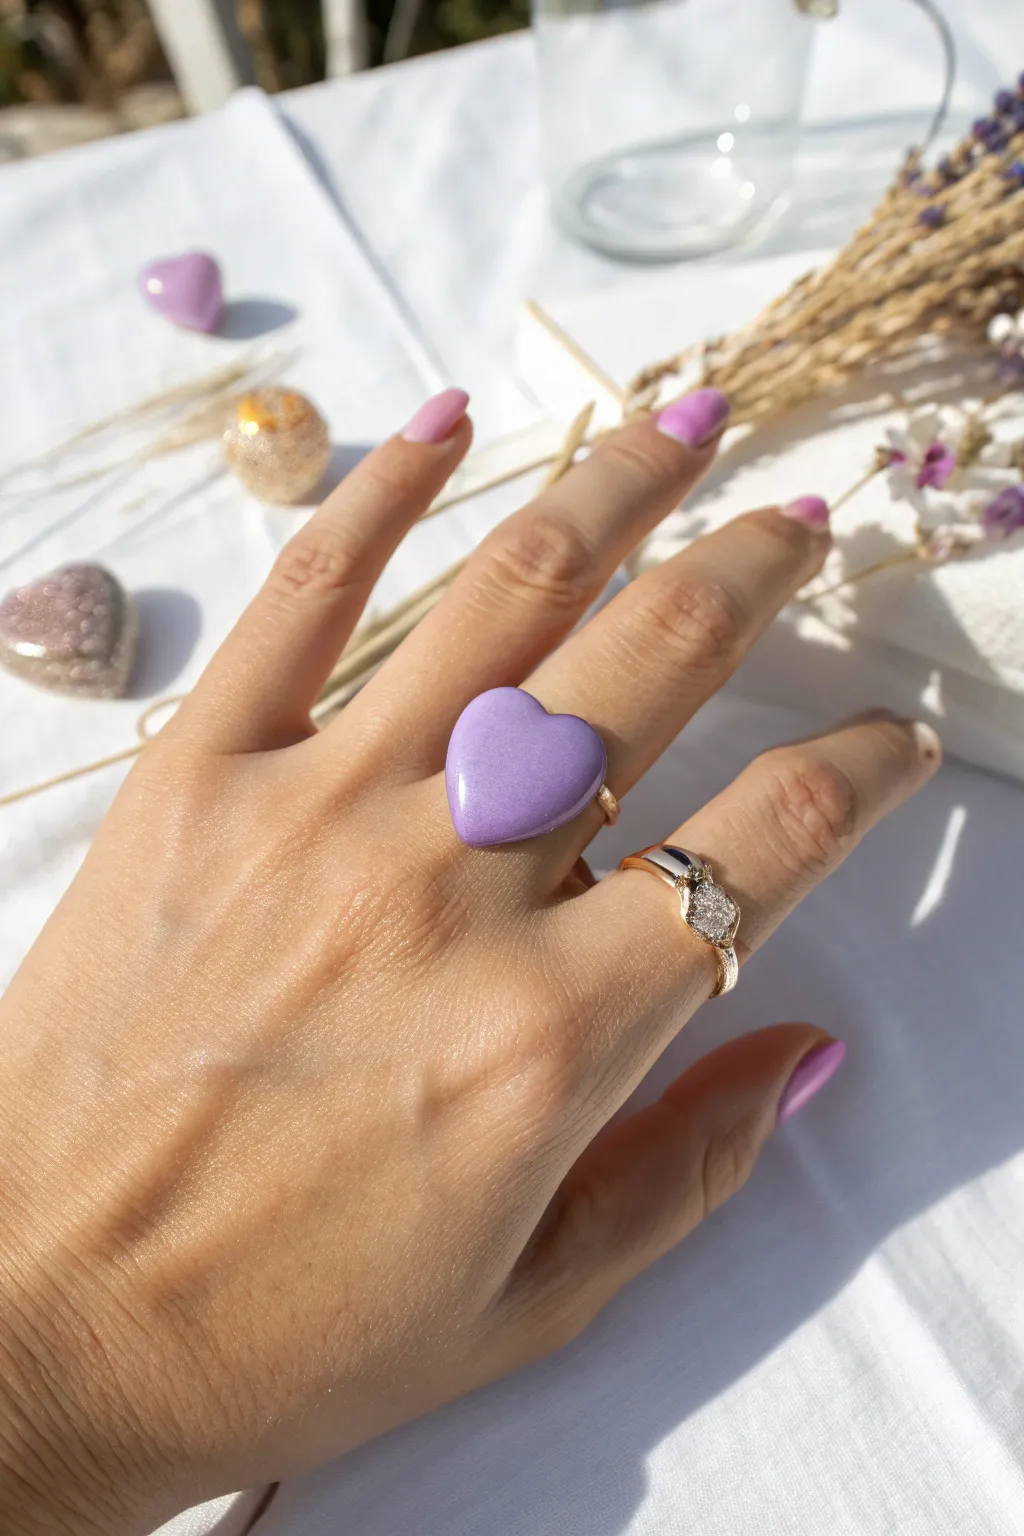
Create a statement piece that’s as sweet as candy with this chunky, pastel purple heart ring. The glossy finish gives the clay a polished ceramic look, while the rounded dome shape adds a modern, sculptural touch to your jewelry collection.
Step-by-Step
Materials
- Polymer clay (lilac or pastel purple)
- Adjustable ring blank pad (flat surface)
- Glossy polyurethane varnish or UV resin
- Small heart-shaped cutter (approx. 1 inch)
- Acrylic rolling pin
- Ceramic tile or glass work surface
- Plastic wrap (cling film)
- Super glue (cyanoacrylate) or E6000
- Silicon brush or soft paintbrush
- Sandpaper (fine grit, 400-600)
- Oven (for baking polymer clay)
Step 1: Prepping the Clay Heart
-
Condition the clay:
Begin by warming up your pastel purple polymer clay in your hands. Knead and roll it until it is completely soft and pliable, ensuring there are no air bubbles trapped inside. -
Roll a thick slab:
Place your clay on a ceramic tile or glass surface. Use your acrylic rolling pin to roll out a slab. Unlike flat earrings, we want bulk here, so aim for a thickness of about 1/4 inch (6mm) to achieve that chunky dome look. -
Prepare for cutting:
Lay a piece of plastic wrap (cling film) loosely over the top of your rolled clay slab. This is the secret to getting those soft, rounded ‘pillowy’ edges instead of sharp, harsh cuts. -
Cut the heart shape:
Press your heart cutter firmly down into the clay through the plastic wrap. Wiggle it slightly to ensure a clean separation from the surrounding clay, then lift the cutter. -
Refine the dome:
Remove the plastic wrap and carefully peel the clay heart off the work surface. With your fingertips, gently smooth the top surface and round off the edges even more to exaggerate the domed silhouette. -
Smooth imperfections:
Inspect the clay for any fingerprints. I find that lightly brushing the surface with a tiny bit of cornstarch or baby oil can help smooth these out completely without altering the shape.
Use Plastic Wrap
Placing plastic wrap over your clay before cutting creates instantly rounded, domed edges without needing hours of sanding later.
Step 2: Baking and Assembly
-
Bake the clay:
Place your sculpted heart on a parchment-lined baking sheet. Bake according to the manufacturer’s instructions on your clay package (usually around 275°F/135°C for 15-30 minutes depending on thickness). -
Cool down:
Once bakes, turn off the oven and let the clay cool down completely inside. This gradual cooling helps prevent cracks and ensures the clay is durable. -
Sand the back:
Take your fine-grit sandpaper and lightly sand the flat back of the heart. This creates a slightly rough texture that will help the glue adhere much better than a perfectly smooth surface. -
Prepare the ring blank:
Check your metal ring blank pad. If it’s very smooth, you can scuff it slightly with sandpaper or a metal file to create ‘tooth’ for the adhesive. -
Glue the components:
Apply a dot of strong super glue or E6000 to the center of the ring blank pad. Press the flat back of the clay heart firmly onto the pad and hold it in place for 30-60 seconds. -
Cure time:
Set the ring aside in a safe spot where it won’t be knocked over. Allow the glue to cure fully—usually 24 hours for maximum strength—before handling.
Add Sparkle
Mix a pinch of fine pearlescent mica powder into your varnish coat. It gives the ring a subtle, magical shimmer in the sunlight.
Step 3: The Glossy Finish
-
Clean the surface:
Wipe the surface of the clay heart with a damp cloth or a little rubbing alcohol to remove any dust or oils from handling. -
Apply the first coat:
Using a soft brush, apply a thin, even layer of glossy varnish or UV resin over the top and sides of the heart. Watch out for drips gathering at the bottom edge. -
Dry or cure:
If using varnish, let it air dry completely. If using UV resin, place the ring under a UV lamp for 1-2 minutes until hard. -
Second coat:
For that ultra-shiny, glass-like finish seen in the photo, apply a second coat of your gloss medium. This adds depth and smooths out any tiny brush strokes. -
Final inspection:
Check for any air bubbles in the finish. If you see one, pop it gently with a needle before the finish sets. Let the final coat cure completely before wearing.
Now you have a charming, glossy accessory that adds a pop of pastel joy to any outfit you wear

Strawberry Slice Rings
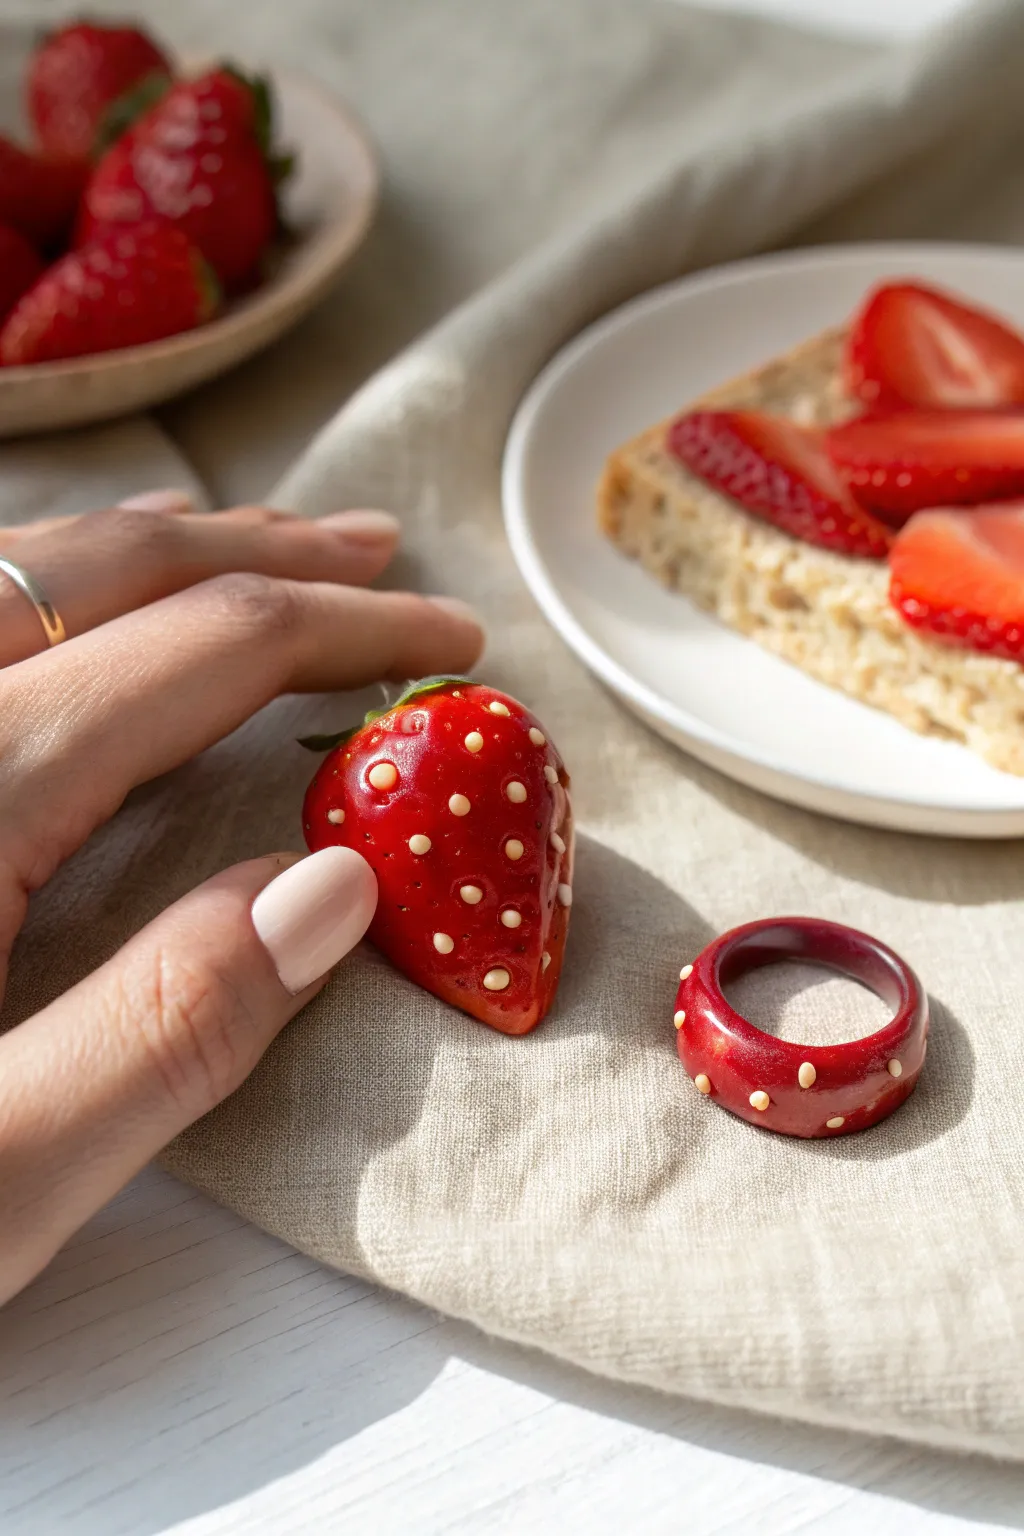
Capture the essence of summer sweetness with this adorable chunky ring that mimics the texture of a ripe strawberry. With its vibrant red hue, raised white seeds, and high-gloss finish, this accessory looks good enough to eat.
Detailed Instructions
Materials
- Red polymer clay (translucent red or standard red with a touch of translucent)
- White or cream polymer clay
- Ring sizing mandrel (or a tube of the correct diameter)
- Polymer clay blade or craft knife
- Rolling pin or pasta machine
- Cornstarch or baby powder (for release)
- Liquid polymer clay (optional, for adhesion)
- Wet/dry sandpaper (400-1000 grit)
- UV resin or high-gloss polyurethane varnish
- UV lamp (if using resin)
- Small paintbrush
Step 1: Shaping the Base
-
Condition the clay:
Start by thoroughly conditioning your red polymer clay until it is soft and pliable. If you want that juicy, jelly-like look seen in the photo, mix a bit of translucent clay into your standard red. -
Create a snake:
Roll the red clay into a thick snake or log. The thickness will determine the width of your ring band, so aim for something substantial, about 1/2 inch thick. -
Flatten the profile:
Gently press down on the log to flatten it slightly into a rectangular strip rather than a perfect cylinder. This creates a more comfortable ring profile. -
Size the ring:
Wrap the clay strip around your ring mandrel at the desired size. Cut the excess clay where the ends meet using your blade. -
Seamless join:
Blend the seam together carefully. I prefer to use a rubber sculpting tool here to smooth the clay until the join is completely invisible. -
Refine the shape:
While on the mandrel, smooth out any fingerprints and ensure the band has a nice, rounded, organic curve to it.
Seed Security
If seeds fall out after baking, use a tiny drop of liquid polymer clay or superglue in the indent before placing the white ball to ensure a permanent bond.
Step 2: Adding the Seeds
-
Prepare the seeds:
Take a tiny amount of white or cream clay and roll it into a very thin snake, almost like a piece of thread. -
Cut tiny segments:
Slice the thin white snake into tiny, uniform bits. These will become your strawberry seeds. -
Roll seeds into balls:
Roll each tiny segment into a microscopic ball between your fingertips. -
Create indents:
Use a needle tool or a small dotting tool to gently press small indentations all around the red ring band. Space them somewhat randomly but evenly. -
Place the seeds:
Place a tiny white ball into each indentation. Gently press them down so they adhere but remain slightly raised above the surface. -
Baking:
Bake the ring on the mandrel according to your clay manufacturer’s instructions (usually 275°F/130°C for 15-30 minutes). Let it cool completely before removing from the mandrel.
Step 3: Finishing Touches
-
Sanding:
Once cool, lightly wet-sand the ring if there are any rough spots or fingerprints, being very careful not to sand off the raised seeds. -
Clean surface:
Wash the ring with soap and water to remove sanding dust and natural oils. Dry thoroughly. -
Apply gloss:
Apply a thin, even coat of UV resin or high-gloss varnish over the entire ring. This gives it that wet, fresh-fruit appearance. -
Cure or dry:
If using resin, cure under a UV lamp for 2-4 minutes. If using varnish, allow it to air dry completely in a dust-free area.
Make it Juicy
For an extra realistic look, mix a tiny drop of red alcohol ink into your UV resin glaze. creates a deep, syrupy finish over the seeds.
Slide on your new ring and enjoy a pop of fruity color on your hand


Mini Mushroom Cap Rings
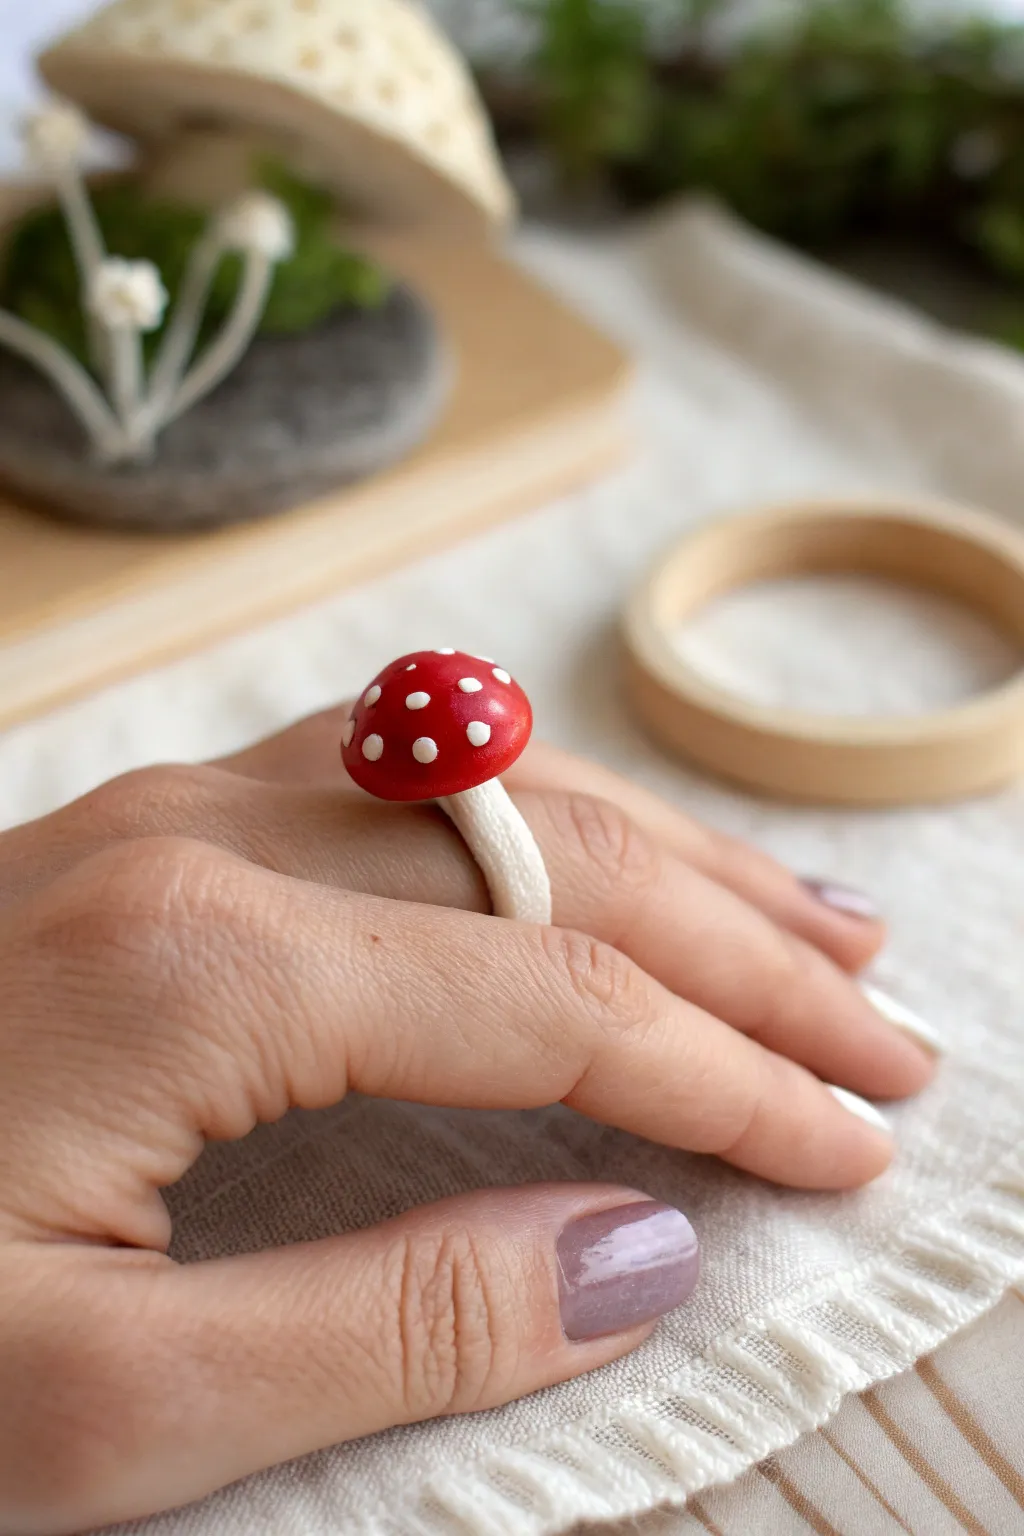
Transform a bit of polymer clay into a fairytale accessory with this delightful mini mushroom ring. Featuring a bright red cap with classic white dots and a textured stalk band, it looks freshly picked from a magical forest floor.
Step-by-Step Tutorial
Materials
- Red polymer clay
- White or cream polymer clay
- Ring mandrel (or a dowel wrapped in paper)
- Clay sculpting tools (needle tool, small ball tool)
- Liquid polymer clay (optional but recommended)
- Gloss varnish or glaze
- Small paintbrush
- Sandpaper (fine grit)
- Oven for baking
Step 1: Forming the Ring Base
-
Size your band:
Start by checking your ring size on a mandrel. If you don’t have one, trace the inside of a well-fitting ring onto a piece of paper and use that as a guide for circumference. -
Roll the stalk:
Condition a small lump of white or cream clay until it’s soft and pliable. Roll it into a long, even snake that is thick enough to be sturdy but comfortable to wear—about 3-4mm thick is a good range. -
Texture the surface:
To mimic the organic look of a mushroom stem, lightly roll the snake over a piece of sandpaper or gently press a toothbrush against it. This creates a natural, earthy texture rather than perfectly smooth plastic. -
Shape the ring:
Wrap your textured coil around the mandrel at your size mark. Cut the ends where they meet, but don’t just butt them together; angle the cuts slightly for more surface area. -
Create the stem platform:
Instead of blending the seam completely invisible, pinch the joined ends upwards to form a small, rising nub. This will become the actual stem that holds the cap. -
Smoothing the join:
Use a sculpting tool to blend the clay around the base of that nub so the ring is one solid, seamless loop. I find a silicone tipped tool works wonders here for not ruining the texture.
Step 2: Sculpting the Cap
-
Form the cap shape:
Roll a ball of red clay, slightly larger than the stem nub you created. Flatten the bottom and gently dome the top with your fingers until you have a classic mushroom cap shape. -
Identify the connection point:
On the underside of the red cap, use a ball tool to create a small indentation. This socket will help the cap sit securely on the white ring stem. -
Create the gills (optional):
For extra detail, you can use a needle tool to score fine lines radiating from the center indentation to the edge of the cap on the underside. -
Attach the cap:
Place a tiny drop of liquid polymer clay (or liquid bakeable adhesive) into the indentation. Press the red cap firmly onto the white stem nub on your ring band. -
Secure the bond:
Gently smooth the clay underneath where the red meets the white to ensure there are no gaps, but try to keep a distinct color separation line.
Stronger Stalks
For a ring you can wear daily, embed a small piece of wire inside the white clay coil. It acts as an armature, preventing the band from snapping.
Step 3: Detailing and Finishing
-
Make the spots:
Roll extremely tiny, almost microscopic balls of white clay. You’ll want varying sizes to make it look organic. -
Apply the spots:
Pick up the white dots with the tip of a needle tool or your finger and press them gently onto the red cap. Flatten them slightly so they adhere well but remain somewhat raised. -
Final texture check:
Look over the ring band one last time. If you smoothed out too much texture while attaching the cap, re-apply it gently with your texture tool now. -
Bake the project:
Bake the ring on the mandrel (if oven-safe) or supported by cornstarch batting according to your clay package instructions. Supporting the curve is crucial so it doesn’t slump. -
Cool down:
Let the ring cool completely. Most polymer clay is slightly brittle when hot, so patience here prevents snapping. -
Add the shine:
Using a small brush, apply a coat of gloss varnish only to the red cap and the white spots. Leave the white stem matte for a realistic contrast.
Glow Up
Swap the standard white clay for glow-in-the-dark polymer clay for the spots and the stem. Your mushroom will look cute by day and magical by night.
Slip on your new ring and enjoy a little piece of nature wherever you go


Smiley Face Button Rings
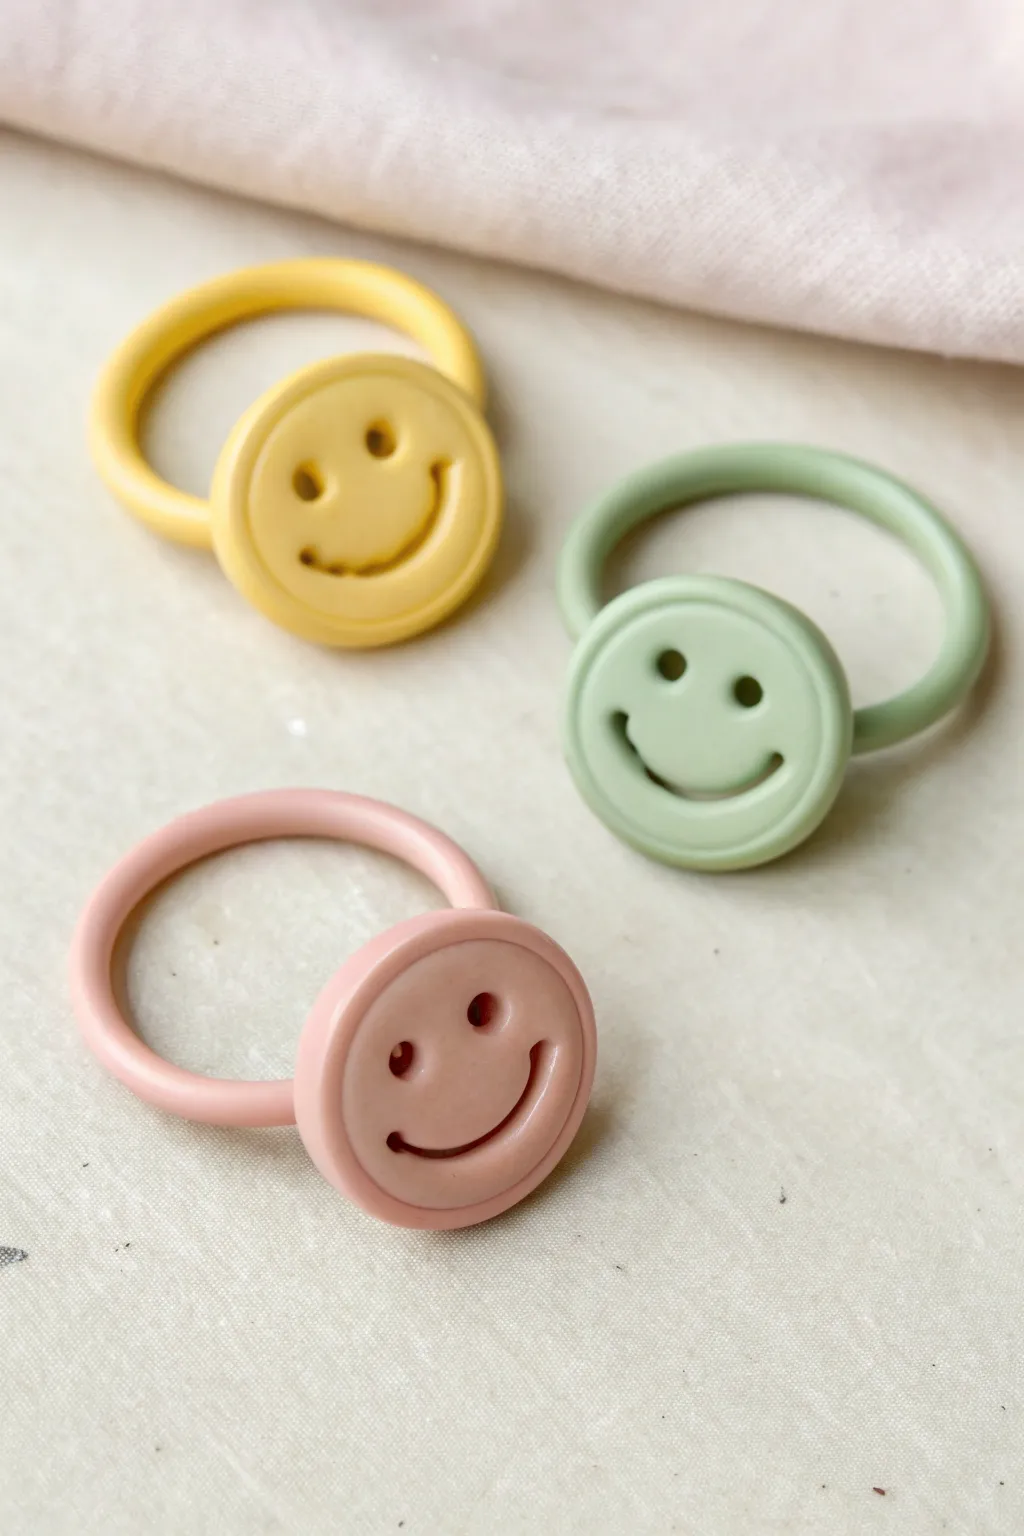
Brighten up your accessories with these cheerful, monochromatic smiley face rings that are as fun to make as they are to wear. Featuring a chunky, retro-style band and a raised button face, they offer a glossy, durable finish perfect for everyday smiles.
Step-by-Step Guide
Materials
- Polymer clay in pastel yellow, mint green, and dusty pink
- Rolling pin or clay machine
- Small circle cutter (approx. 1/2 inch)
- Medium circle cutter (approx. 3/4 inch)
- Ball stylus tool or toothpick
- Small curved tool or drinking straw segment (for the smile)
- Liquid polymer clay or bake and bond
- Ring mandrel or thick marker (oven-safe if possible)
- Glossy glaze or UV resin
- Fine sandpaper (optional)
- Oven
Step 1: Creating the Band
-
Condition the clay:
Start by taking your chosen color of polymer clay—let’s say the yellow—and knead it thoroughly until it is soft and pliable. This conditioning step is crucial to prevent cracking later. -
Roll the snake:
Roll a portion of the conditioned clay into a long, even snake. Aim for a thickness of about 3-4mm so the band feels sturdy but not too bulky on the finger. -
Measure the size:
Wrap the clay snake around an oven-safe ring mandrel or a marker that matches your desired ring size. Overlap the ends slightly and cut through both layers simultaneously with a sharp blade for a perfect seam. -
Seal the seam:
Gently press the two cut ends together. Smooth the join with your finger or a silicone tool until the seam is invisible. I like to double-check the sizing here before moving on. -
Pre-bake the band:
To keep the ring perfectly round while you work on the face, bake the ring band on the mandrel for about 10-15 minutes at the temperature recommended on your clay package. Let it cool completely.
Step 2: Crafting the Smiley Face
-
Roll the sheet:
Using the same color clay, roll out a sheet that is roughly 3mm thick. You want it substantial enough to hold the facial features without warping. -
Cut the button shape:
Use your medium circle cutter to punch out a clean disc. This will be the main face of your ring. -
Create the rim:
This style has a subtle rim detail. Gently press a slightly smaller circle cutter partially into the clay disc—do not cut all the way through—to create an indented ring border. -
Add the eyes:
Take your ball stylus tool or a blunt toothpick and press two small, deep holes into the upper half of the disc to form the eyes. -
Make the smile:
Use a small curved tool, or cut a small section of a drinking straw in half lengthwise, to press a perfect ‘U’ shape for the smile. Rock it slightly to deepen the impression. -
Smooth edges:
Run your finger gently around the edge of the disc to soften any sharp cuts left by the cutter, giving it that molded plastic look.
Smooth Seams Tip
Use a drop of baby oil on your finger when smoothing the clay seams. It helps blend the clay without leaving fingerprints and creates a glass-like surface before baking.
Step 3: Assembly and Finishing
-
Prepare the connection:
Identify where the seam was on your pre-baked ring band. Sand a small flat spot on the outside of the band near the seam to create a better bonding surface. -
Attach the face:
Apply a small drop of liquid polymer clay or bake-and-bond to the flat spot on the ring band. Center the raw smiley face disc on top of the band. -
Secure the bond:
Gently press the face onto the band without distorting the features. You can add a tiny bit of fresh clay underneath the join if there’s a gap to ensure stability. -
Prop for baking:
Place the assembled ring back in the oven. You may need to prop the face up with some crumpled foil or tissue paper so gravity doesn’t make it slide off the band while baking. -
Final bake:
Bake the entire piece for the full duration recommended by the manufacturer (usually 30 minutes) to ensure maximum strength. -
Cool and inspect:
Allow the ring to cool completely. Check for any rough spots and lightly sand them with fine-grit sandpaper if needed. -
Apply gloss:
To get that wet-look shine seen in the photo, coat the entire ring with a layer of glossy polymer clay glaze or UV resin. Cure or dry according to the product instructions.
Color Pop Idea
Before glazing, carefully fill the indented eyes and smile with a tiny amount of darker acrylic paint or resin to make the expression stand out more dramatically.
Slip on your new ring and enjoy the instant mood boost every time you look at your hand

The Complete Guide to Pottery Troubleshooting
Uncover the most common ceramic mistakes—from cracking clay to failed glazes—and learn how to fix them fast.
Frog Face Band Rings
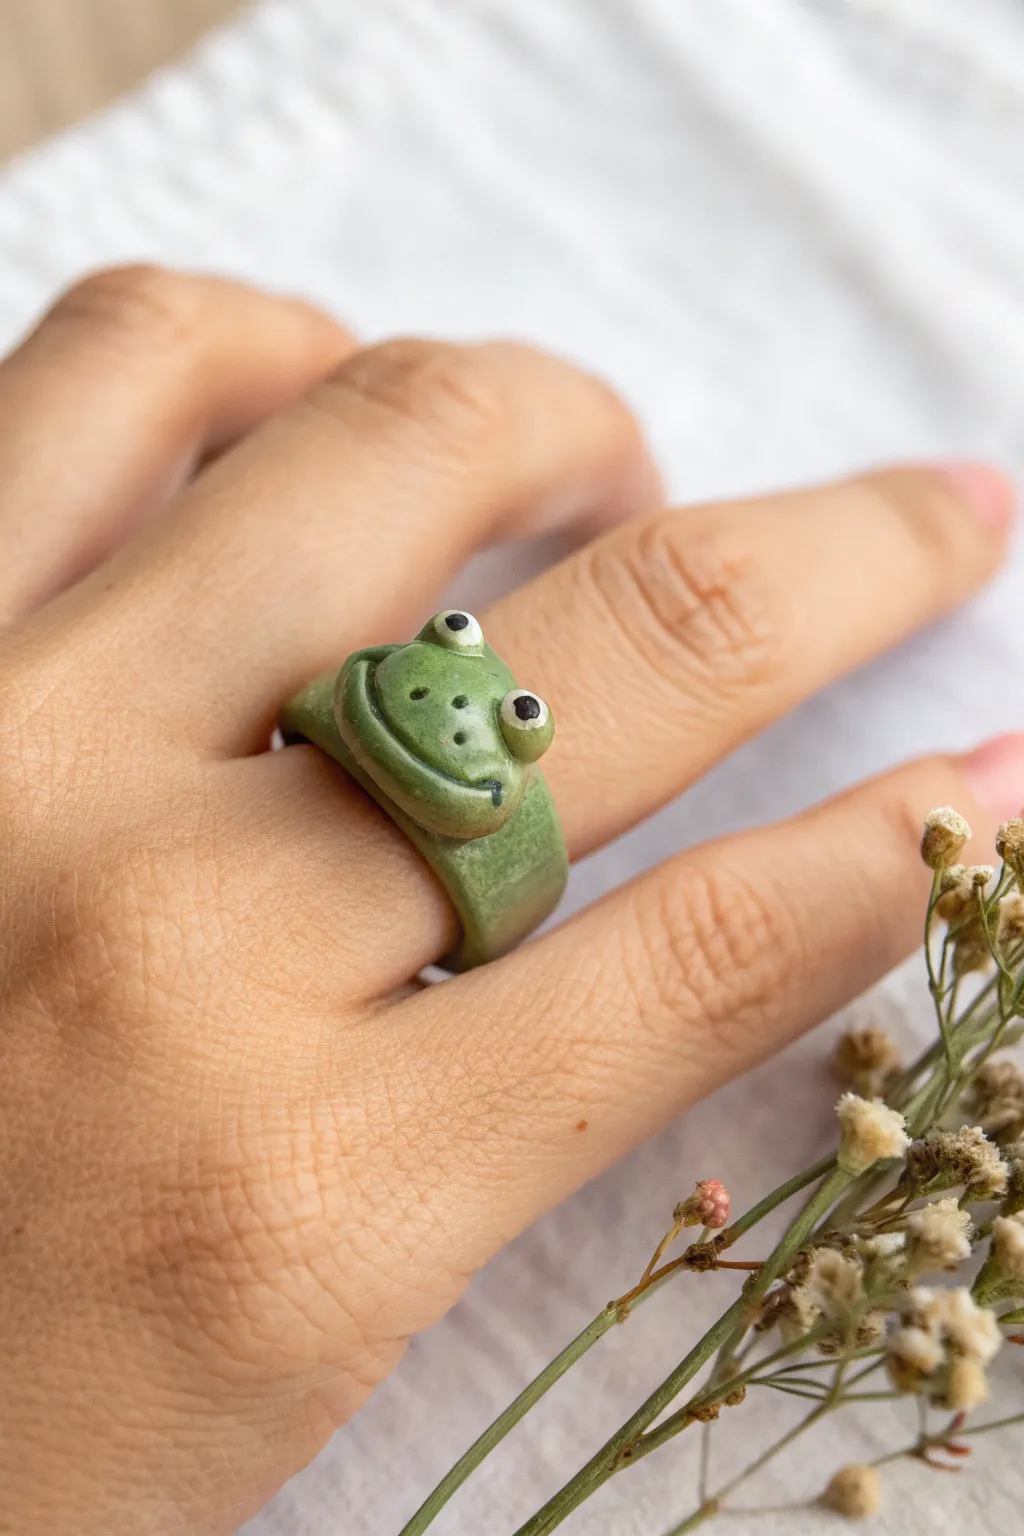
This whimsical ring features a charming frog face perched right on your finger, complete with googly eyes and a friendly smile. The muted sage green glaze gives it a lovely handcrafted, earthy feel that looks adorable with any outfit.
How-To Guide
Materials
- Green polymer clay (sage or moss shade)
- White polymer clay (tiny amount)
- Black polymer clay (tiny amount)
- Glossy glaze or UV resin
- Sculpting tools (needle tool, ball stylus)
- Ring mandrel or thick marker
- Rolling pin
- Craft knife
- Baking sheet and parchment paper
- Oven
Step 1: Forming the Base Band
-
Condition the clay:
Begin by kneading your green polymer clay until it is soft, pliable, and free of cracks. Warm clay is much easier to smooth later. -
Roll the strip:
Roll the clay into a flat sheet, roughly 3-4mm thick. Using your craft knife, cut a clean long strip about 1cm wide. -
Size the ring:
Wrap the strip around your ring mandrel or a marker that matches your finger size. Overlap the ends slightly where the frog’s face will sit. -
Merge the seam:
Gently blend the overlapping clay together using your finger or a smoothing tool so the band is seamless and sturdy.
Step 2: Sculpting the Frog Face
-
Create the head shape:
Roll a small ball of green clay and flatten it slightly into an oval disc. This will be the main face plate. -
Attach the head:
Place the oval disc centrally over the seam area on your ring band. Press gently to bond the clays without distorting the band’s shape. -
Smooth the connection:
Use a silicone tool or your finger to smooth the underside of the head into the band for extra durability. -
Make the eye sockets:
Roll two small balls of green clay for the eye mounds. Place them on top of the head, spaced slightly apart. -
Blend the eyes:
Smooth the bottom edges of the eye mounds into the head so they look like part of the skull rather than just stuck on. -
Add the whites:
Roll two tiny balls of white clay. Press them gently into the front center of each green eye mound. -
Add the pupils:
Take the tiniest specks of black clay and place them onto the white circles. I find using a needle tool helps position these precisely.
Fixing Cracks
If you see tiny cracks before baking, brush on a tiny bit of baby oil or clay softener and smooth it out with your finger.
Step 3: Adding Details and Finishing
-
Carve the mouth:
Using a needle tool or a curved blade, press a wide, shallow smile into the lower part of the face. -
Add nostrils:
Poke two tiny indentations above the mouth with a needle tool to create the nostrils. -
Refine the texture:
Gently tap the surface with your finger to remove any harsh tool marks or fingerprints, giving it that smooth ceramic look. -
Bake:
Bake the ring according to your clay package instructions. usually around 275°F (135°C) for 15-30 minutes. -
Cool down:
Let the ring cool completely before handling. Polymer clay is slightly soft when hot and hardens as it cools. -
Glaze:
Apply a coat of gloss glaze or UV resin over the entire ring to give it a shiny, wet-frog finish and protect the details.
Add a Lily Pad
Make a tiny clay lily pad or pink flower to attach to the side of the band for an extra pop of color and cuteness.
Slip on your new amphibian accessory and carry a little nature with you everywhere
Bunny Ears Peekaboo Rings
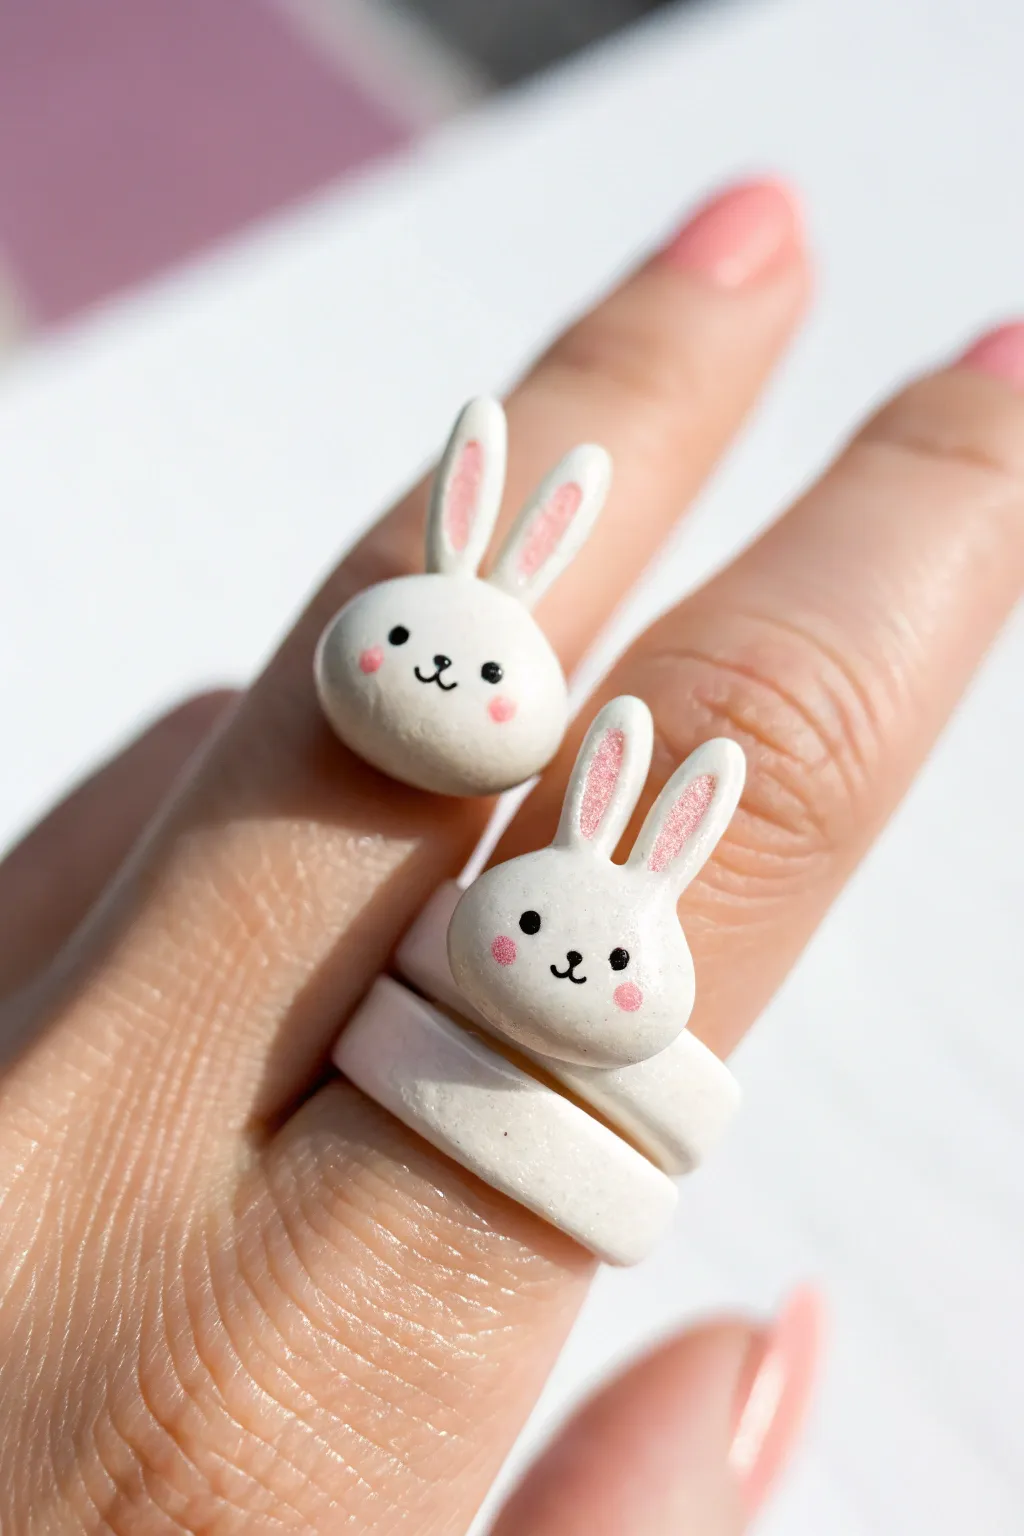
These adorable chunky rings feature a sweet white bunny face that seems to peek out right from your finger. With their smooth matte finish and minimalist kawaii features, they make a charming addition to any jewelry stack.
Detailed Instructions
Materials
- White polymer clay (e.g., Fimo Soft or Sculpey Premo)
- Black acrylic paint or a very fine tip black permanent marker
- Pink acrylic paint or soft pink pastel chalk
- Liquid polymer clay (such as Sculpey Bake & Bond)
- Small paintbrush or dotting tool
- Clay roller or pasta machine
- X-acto knife or clay blade
- Ring mandrel or an oven-safe tube/dowel sized to your finger
- Sandpaper (fine grit, 400-1000 range)
- Matte or satin polyurethane varnish (optional)
Step 1: Sculpting the Base Ring
-
Condition the white clay:
Begin by kneading a portion of white polymer clay until it is soft, pliable, and free of air bubbles. Clean your hands thoroughly first to avoid transferring dust to the pristine white clay. -
Roll the band strip:
Roll the conditioned clay into a smooth, even snake or flatten it into a thick strip, approximately 4-5mm wide and 2-3mm thick. It should be sturdy enough to hold its shape. -
Form the ring:
Wrap the strip around your ring mandrel or sizing tool. Cut the ends where they meet and blend the seam together smoothly with your finger or a clay tool so it looks like a continuous circle. Ensure it fits a slightly larger size than your finger to account for minimal shrinkage or fitting adjustments.
Step 2: Creating the Bunny Face
-
Shape the head:
Roll a small ball of white clay, slightly flattened into a rounded oval shape. This will be the bunny’s head. It should be proportional to the width of the ring band. -
Sculpt the ears:
Create two tiny, elongated teardrop shapes from white clay. Flatten them slightly to form the ears. -
Attach the ears:
Press the rounded bottom of the ears onto the top of the head. I find using a tiny drop of liquid clay here helps ensure a super strong bond. Smooth the seam where the ears meet the head using a silicone tool. -
Mount the head to the ring:
Apply a small amount of liquid clay to the spot on the ring band where you want the bunny to sit. Press the head firmly onto the band, blending the clay at the connection point underneath so it becomes one solid unit.
Clean Clay Tip
White clay picks up every speck of dust. Keep a pack of baby wipes nearby to frequently clean your hands and work surface while rolling.
Step 3: Baking and Finishing
-
Bake the piece:
Place the ring (still on the mandrel if it’s oven-safe, or carefully removed) onto a baking sheet. Bake according to your clay package instructions, usually around 275°F (130°C) for 15-30 minutes. -
Cool and sand:
Let the ring cool completely. Once hard, use fine-grit sandpaper to gently smooth out any fingerprints or rough edges on the band, rinsing off the dust afterwards. -
Draw the face features:
Using a very fine tool dipped in black paint (or a fine marker), carefully place two dots for eyes and a tiny ‘w’ shape for the mouth. Keep the features centered and low on the face for maximum cuteness. -
Add rosy accents:
Mix a tiny amount of pink paint or scrape some pink pastel dust. Dab this gently into the inner ears and onto the cheeks using a dry brush or small dotting tool for a soft, blushed look. -
Seal the ring:
Once the paint is fully dry, apply a thin coat of matte varnish to protect the surface features and give the ring a professional, smooth feel.
Make it a Set
Create a matching second ring that looks like a fluffy round bunny tail to wear on an adjacent finger for a complete front-and-back look.
Wear your new bunny ring anytime you need a little cheerful companion on your hand


What Really Happens Inside the Kiln
Learn how time and temperature work together inside the kiln to transform clay into durable ceramic.
Chubby Bear Head Rings

Sculpt a delightfully chubby bear face that sits proudly on your finger with this nature-inspired project. Using a textured clay and soft, earthy tones, you’ll create a piece that looks carved from light wood but is shaped by hand.
Step-by-Step Tutorial
Materials
- Polymer clay (beige, granite/stone effect, or wood effect)
- Wooden ring base (blank)
- Small dotting tool or ball stylus
- Detail needle tool
- Brown acrylic paint
- Fine detail paintbrush (000 size)
- Black acrylic paint
- Liquid polymer clay (Bake & Bond)
- Matte varnish or sealant
- Sandpaper (fine grit)
- Oven for baking
Step 1: Forming the Base
-
Prepare the Clay:
Begin by conditioning your beige or wood-effect polymer clay until it is soft and pliable. If using a standard beige, I like to mix in a tiny pinch of granite effect clay or translucent clay to give it that speckled, organic stone-like texture seen in the photo. -
Shape the Head:
Roll a medium-sized ball of clay, approximately 2-2.5cm in diameter. Gently flatten the back side against your work surface so it has a stable base to attach to the ring later, but keep the front rounded. -
Create the Muzzle:
Roll a much smaller ball of the same clay and flatten it into an oval. Press this gently onto the lower center of the face to form the bear’s muzzle area, blending the edges very slightly with your finger so it looks like one cohesive piece. -
Shape the Ears:
Roll two very small balls of clay for the ears. Place them on top of the head, spaced widely apart, and press them down gently to adhere. -
Detail the Ears:
Use a medium-sized ball stylus or dotting tool to press an indentation into the center of each ear. This creates the inner ear definition and gives the bear character. -
Texturizing:
To mimic the sandy or woody texture shown, use an old toothbrush or a stiff bristle brush to gently tap over the entire surface of the bear head. This removes fingerprints and adds a matte, organic finish.
Head sliding off?
If the clay head won’t stay put on the curved ring while baking, bake the head separately first. Then, glue the finished, hardened bear to the wooden ring using strong two-part epoxy.
Step 2: Assembly & Baking
-
Prepare the Ring Base:
Take your wooden ring blank and lightly sand the top surface where the bear will sit. This roughens the grain and ensures a stronger bond with the adhesive. -
Apply Liquid Clay:
Apply a drop of liquid polymer clay (or Bake & Bond) to the sanded area of the wooden ring. -
Attach the Head:
Press the flat back of your bear head firmly onto the ring base. Ensure it is centered and sitting straight. Use a sculpting tool to smooth any clay that might have squished out at the connection point. -
Bake the Piece:
Place the ring on a baking sheet. Prop it up (using a folded piece of cardstock or crumpled foil) so the bear head doesn’t get flattened by gravity. Bake according to your clay manufacturer’s instructions, usually around 275°F (130°C) for 15-20 minutes. -
Cool Down:
Allow the ring to cool completely inside the oven with the door cracked, or remove it and let it rest for at least 30 minutes. The clay is fragile while hot, so patience is key here.
Step 3: Painting & Finishing
-
Paint the Nose:
Using a fine detail brush and brown acrylic paint, carefully paint a small, rounded triangle on the upper part of the muzzle. Keep the edges soft and rounded for a cuter look. -
Draw the Mouth:
With the very tip of your brush (or a fine-point permanent marker if you prefer), draw a straight vertical line down from the nose, curving into a small anchor shape for the mouth. -
Add the Eyes:
Using the smallest dotting tool or the end of a toothpick, dip into black acrylic paint. Place two tiny, wide-set dots for the eyes just above the muzzle line. -
Highlight the Eyes:
For extra life, you can add microscopic white dots to the black eyes, though preserving the simple, rustic look often works best without reflections. -
Seal the Face:
Once the paint is fully dry, apply a thin coat of matte water-based varnish over the clay parts only. This protects the paint from chipping during wear without making the bear look unnaturally shiny. -
Final Sanding:
If there are any rough spots on the wooden ring band itself, give it a quick pass with fine-grit sandpaper for a comfortable fit. -
Final Check:
Inspect the bond between clay and wood. If it feels loose, carefully detach, add a drop of superglue or two-part epoxy, and reattach for a permanent hold.
Make it a polar bear
Swap the textured beige clay for a bright white or pearl finish clay. Keep the features consistent but use a dark grey for the nose instead of brown to match a polar bear’s coloring.
This charming nature-inspired accessory is ready to add a touch of sweetness to your daily style
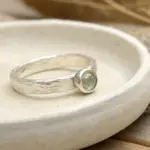
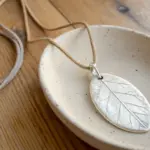
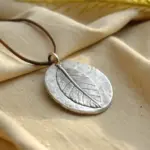
Tiny Leaf Sprout Rings
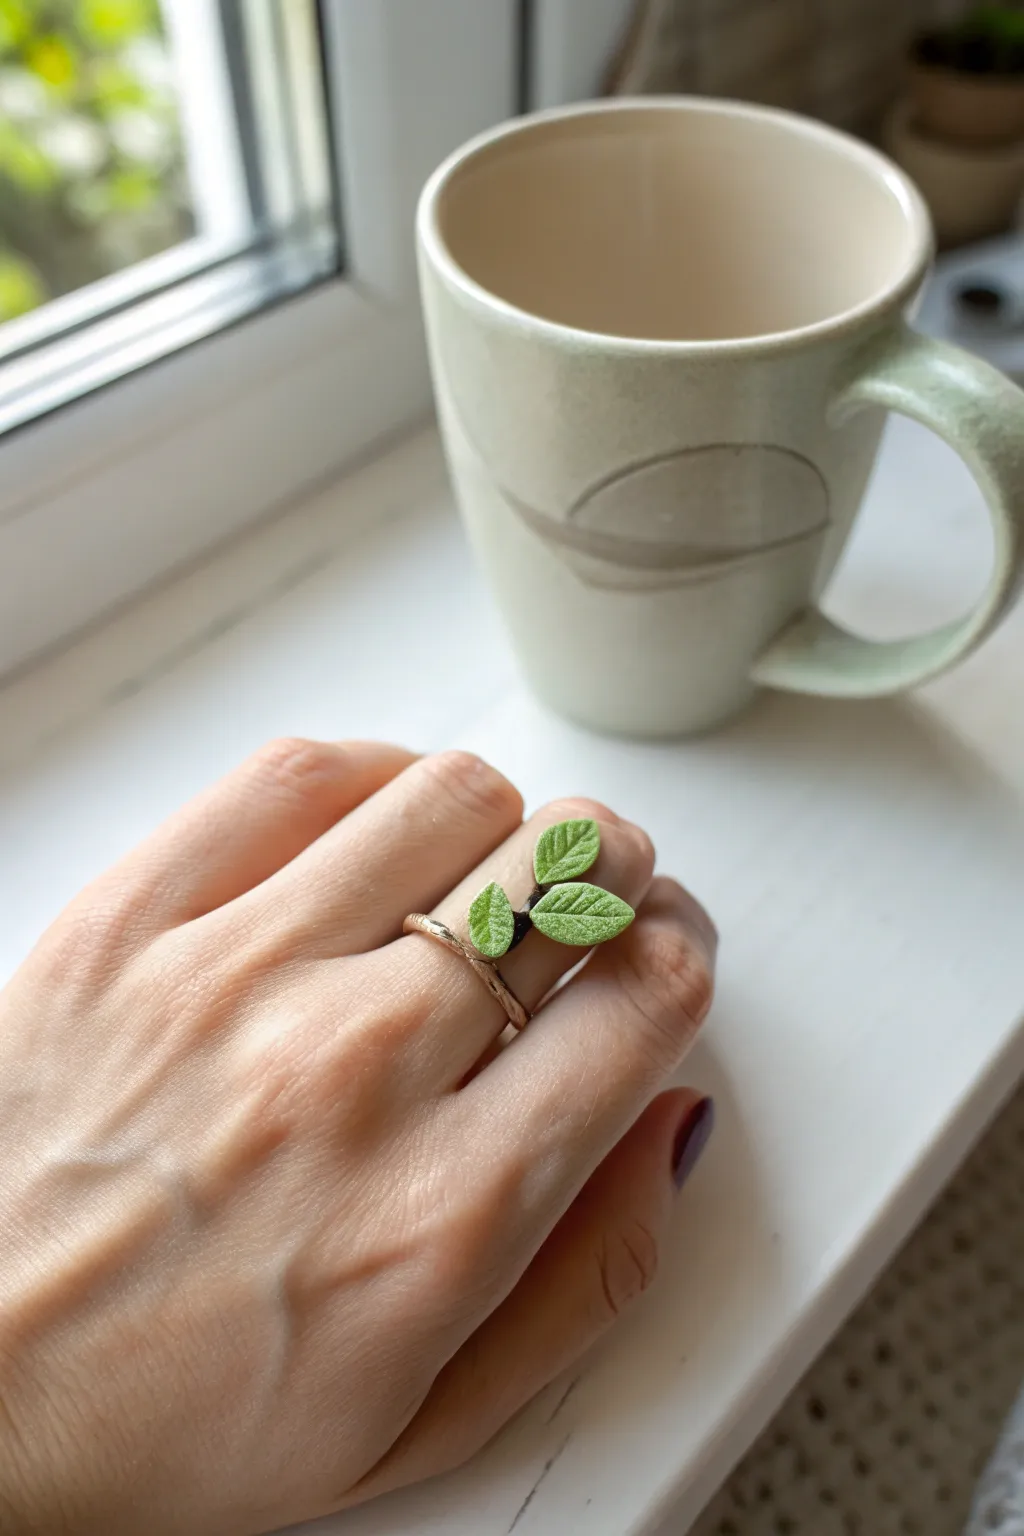
Capture the essence of spring focusing on your finger with this delicate sprout ring. Blending a metallic-finished band with incredibly realistic, textured polymer clay leaves, this accessory looks like a tiny plant is growing right around your hand.
Step-by-Step Tutorial
Materials
- Green polymer clay (sage or moss green)
- Brown polymer clay (dark chocolate)
- Needle tool or fine sewing pin
- Liquid polymer clay (translucent or bake and bond)
- Craft knife or scalpel
- Copper or rose gold craft wire (18-20 gauge)
- Wire cutters and round nose pliers
- Ring mandrel (or cylindrical object like a marker)
- Sandpaper (fine grit)
- Soft pastel chalks (lighter green/yellow)
- Small soft brush
- Matte varnish (optional)
Step 1: Forming the Ring Base
-
Measure and cut:
Cut a piece of your copper or rose gold wire about 3-4 inches long, which gives you plenty of slack to work with. -
Shape the loose twist:
Wrap the wire around your ring mandrel at the desired size. Instead of soldering, twist the ends over each other slightly to create an organic, branch-like texture where the sprout will sit. -
Texture the metal:
Using your pliers, gently squeeze and crimp the twisted decorative part of the wire to make it look less like manufactured wire and more like a gnarly twig. -
Trim the excess:
Trim any sharp poking ends and file them down with sandpaper so the ring is comfortable to wear.
Sticky Situation?
If leaves get stuck to your fingers while sculpting, dip your fingertips in a little cornstarch or baby powder before handling the clay.
Step 2: Sculpting the Tiny Leaves
-
Mix your greens:
Condition your green polymer clay until soft. I find mixing a tiny bit of white or yellow into a standard green creates a more natural, fresh leaf tone. -
Create the base droplets:
Roll three incredibly tiny balls of green clay, smaller than peppercorns. -
Flatten into shape:
Press each ball gently between your thumb and forefinger to flatten them into oval leaf shapes, pinching one end to a subtle point. -
Add the central vein:
Place the leaves on a tile or work surface. Use the very tip of your needle tool to lightly score a central vein down the middle of each leaf. -
Detail the texture:
Carefully press short, diagonal lines branching from the center vein to the edges to mimic leaf structure. Keep your touch light to avoid distorting the shape. -
Add dimension with pastels:
Shave a little light green or yellow soft pastel into dust. Use a dry brush to dust the center of the leaves, highlighting the texture you just created.
Step 3: Assembly and Curing
-
Prepare the stem:
Take a tiny amount of brown clay and wrap it thinly around the twisted wire section of your ring to create a surface for the leaves to grip. -
Apply adhesive:
dab a minuscule amount of liquid polymer clay onto the brown clay stem area. -
Attach the leaves:
Pick up your leaves with the needle tool and press them onto the stem. Arrange two leaves on one side and one on the other for an organic look. -
Refine the connection:
Use a silicone tool or the dull side of a needle to smooth the clay where the green leaf meets the brown stem, blending them seamlessly. -
Curve the leaves:
Gently curl the tips of the leaves outward slightly so they don’t lay completely flat, giving them a lively, growing appearance. -
Bake carefully:
Bake the ring according to your clay manufacturer’s instructions. Since the parts are tiny, keep a close eye on the oven temperature to prevent scorching. -
Cool and finish:
Let the ring cool completely before moving it. If desired, brush a thin layer of matte varnish over the clay parts to protect the pastel details.
Make it Sparkle
Add a tiny rim of translucent liquid clay mixed with water to the leaf edges after baking to simulate morning dew drops.
Slip on your new ring and enjoy a permanent touch of nature handling your day

TRACK YOUR CERAMIC JOURNEY
Capture glaze tests, firing details, and creative progress—all in one simple printable. Make your projects easier to repeat and improve.
Pastel Checkerboard Band Rings
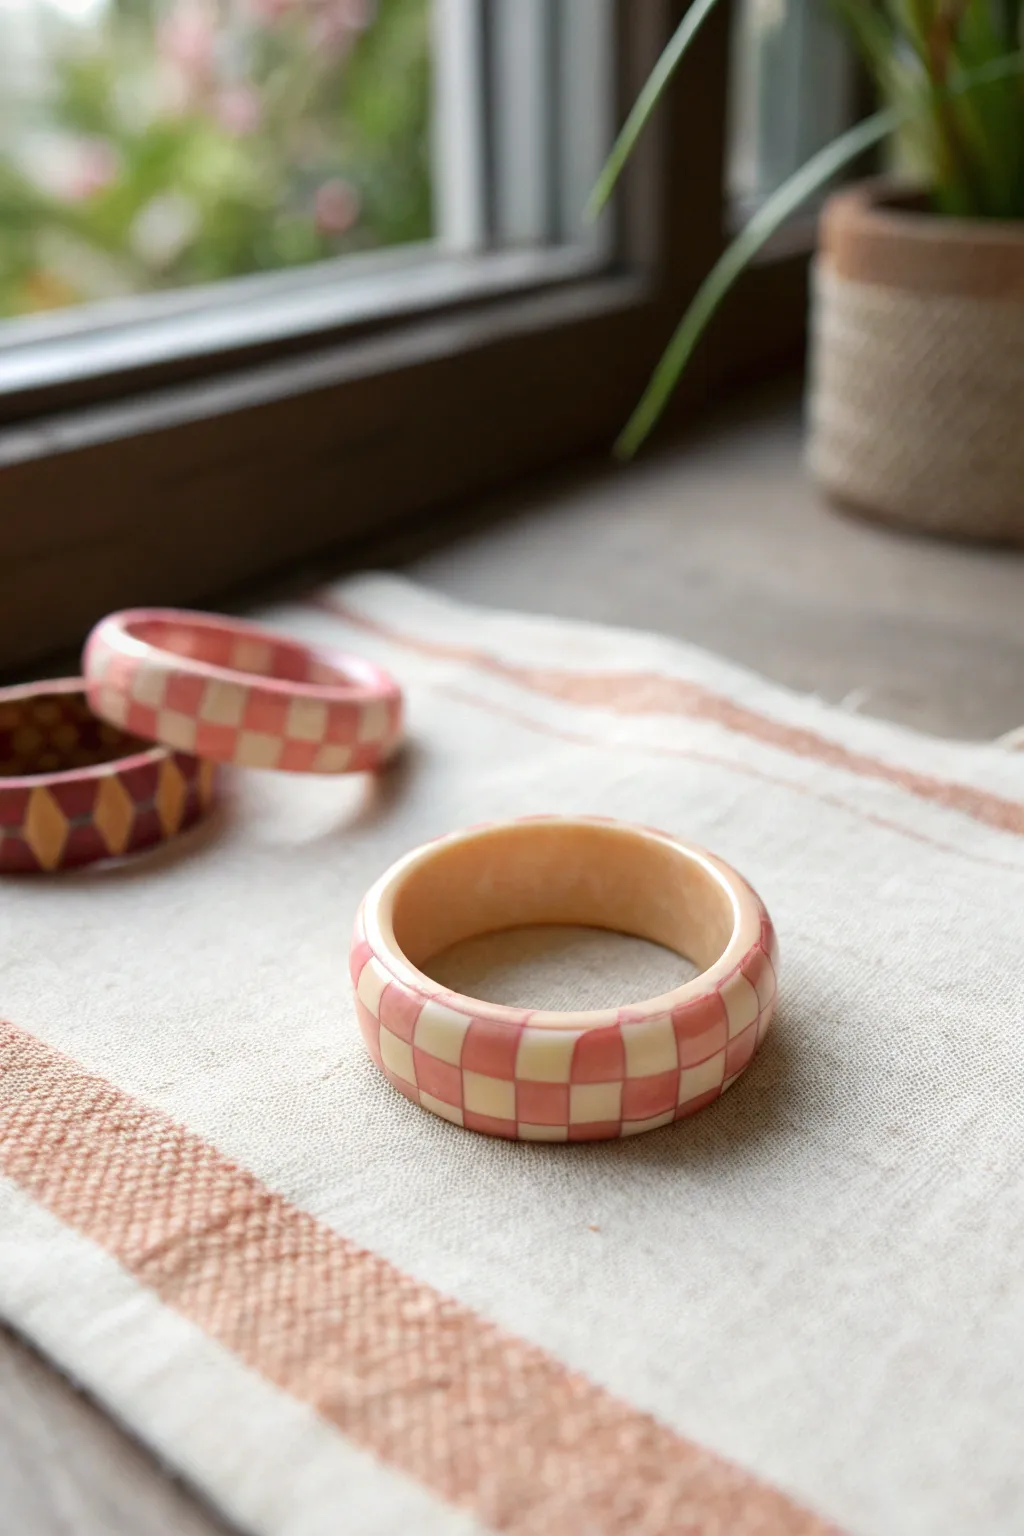
Embrace a retro aesthetic with this chunky, statement ring featuring a soft pastel pink and cream checkerboard pattern. The smooth, glossy finish gives it a professional look that pairs perfectly with cozy knitwear or summer dresses.
Detailed Instructions
Materials
- Polymer clay (Pastel Pink)
- Polymer clay (Cream or Translucent White)
- Acrylic rolling pin or pasta machine
- Flexible tissue blade or craft knife
- Circle cutter (sized for your ring size)
- Small circle cutter (for the inner hole)
- Ruler
- Liquid polymer clay (optional)
- Sandpaper (various grits: 400, 600, 800, 1000)
- UV resin or polyurethane gloss varnish
- Soft brush
Step 1: Preparing the Pattern
-
Condition the Clay:
Start by thoroughly conditioning your pink and cream polymer clay separately. Knead them until they are soft, pliable, and free of air bubbles. -
Create Sheets of Clay:
Roll out both colors of clay to an even thickness. If you have a pasta machine, use a medium setting (around 2-3mm). If rolling by hand, use depth guides to ensure consistency. -
Cut Strips:
Using your flexible blade and a ruler, cut long, straight strips from both the pink and cream sheets. Aim for strips that are approximately 5mm wide. Precision is key here for a neat checkerboard. -
Assemble the Striped Slab:
Lay the strips side-by-side, alternating colors (pink, cream, pink, cream). Gently press them together at the seams so they bond without distorting the straight lines. -
Consolidate the Slab:
Place a piece of parchment paper over your striped slab and gently roll over it with your roller to smooth the seams and ensure the clay is a single cohesive sheet. -
Cut Crosswise Strips:
Turn your striped slab 90 degrees. Using your blade and ruler, cut fresh strips across the pattern, keeping them the same 5mm width as before. You now have strips made of alternating colored squares.
Distorted Checks?
If your squares are squishing into diamonds, let the clay ‘rest’ and cool down in the fridge for 10 minutes before cutting your strips. Firm clay holds sharp lines much better.
Step 2: Forming the Ring
-
offset the Pattern:
Arrange these new multi-colored strips side-by-side. Shift every second strip down by one square so that a pink square sits next to a cream square, creating the checkerboard effect. -
Final Slab Assembly:
Once arranged, gently press the strips together and roll lightly with the roller just enough to bond them into a solid sheet of checkerboard pattern. -
Prepare the Base:
Roll out a thicker strip of scrap clay or plain cream clay to act as the core structure of the ring. Form this into a ring shape that fits your finger comfortably. -
Apply the Veneer:
Cut a strip from your checkerboard slab that matches the width of your base ring. Wrap this veneer carefully around the outside of the ring base. -
Seamless Join:
Where the ends of the checkerboard strip meet, slice through both overlapping ends simultaneously with a sharp blade. Remove the excess and press the cut edges together for a perfect seam. -
Refine the Shape:
I like to gently roll the ring on my work surface to smooth the outside. Use your fingers to curve the edges slightly inwards for that soft, rounded bangle look shown in the photo.
Step 3: Baking and Finishing
-
Bake:
Place your ring on a dedicated baking tile or cardstock. Bake according to the manufacturer’s instructions for your specific brand of clay, usually around 275°F (130°C) for 30-45 minutes. -
Cool Down:
Allow the ring to cool completely before handling. It will be slightly soft when hot but hardens as it cools. -
Wet Sanding:
Dip your ring and sandpaper in water. Start with 400 grit to remove any fingerprints or bumps, then work your way up to 1000 grit for a silky smooth feel. -
Buffing:
Dry the ring thoroughly. Rub it vigorously with a piece of denim or a soft cotton cloth to bring out a natural sheen. -
Glazing:
For that high-gloss finish seen in the image, apply a thin, even layer of UV resin or gloss varnish. Cure the resin under a UV lamp or let the varnish air dry completely in a dust-free area.
Make it Matte
Skip the gloss glaze for a modern, matte ceramic look. Instead, spend extra time buffing with a high-grit polishing pad or a rotary tool with a felt wheel.
Slide on your new chunky ring and enjoy the pop of pastel pattern
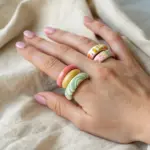
Wavy Squiggle Stacking Rings
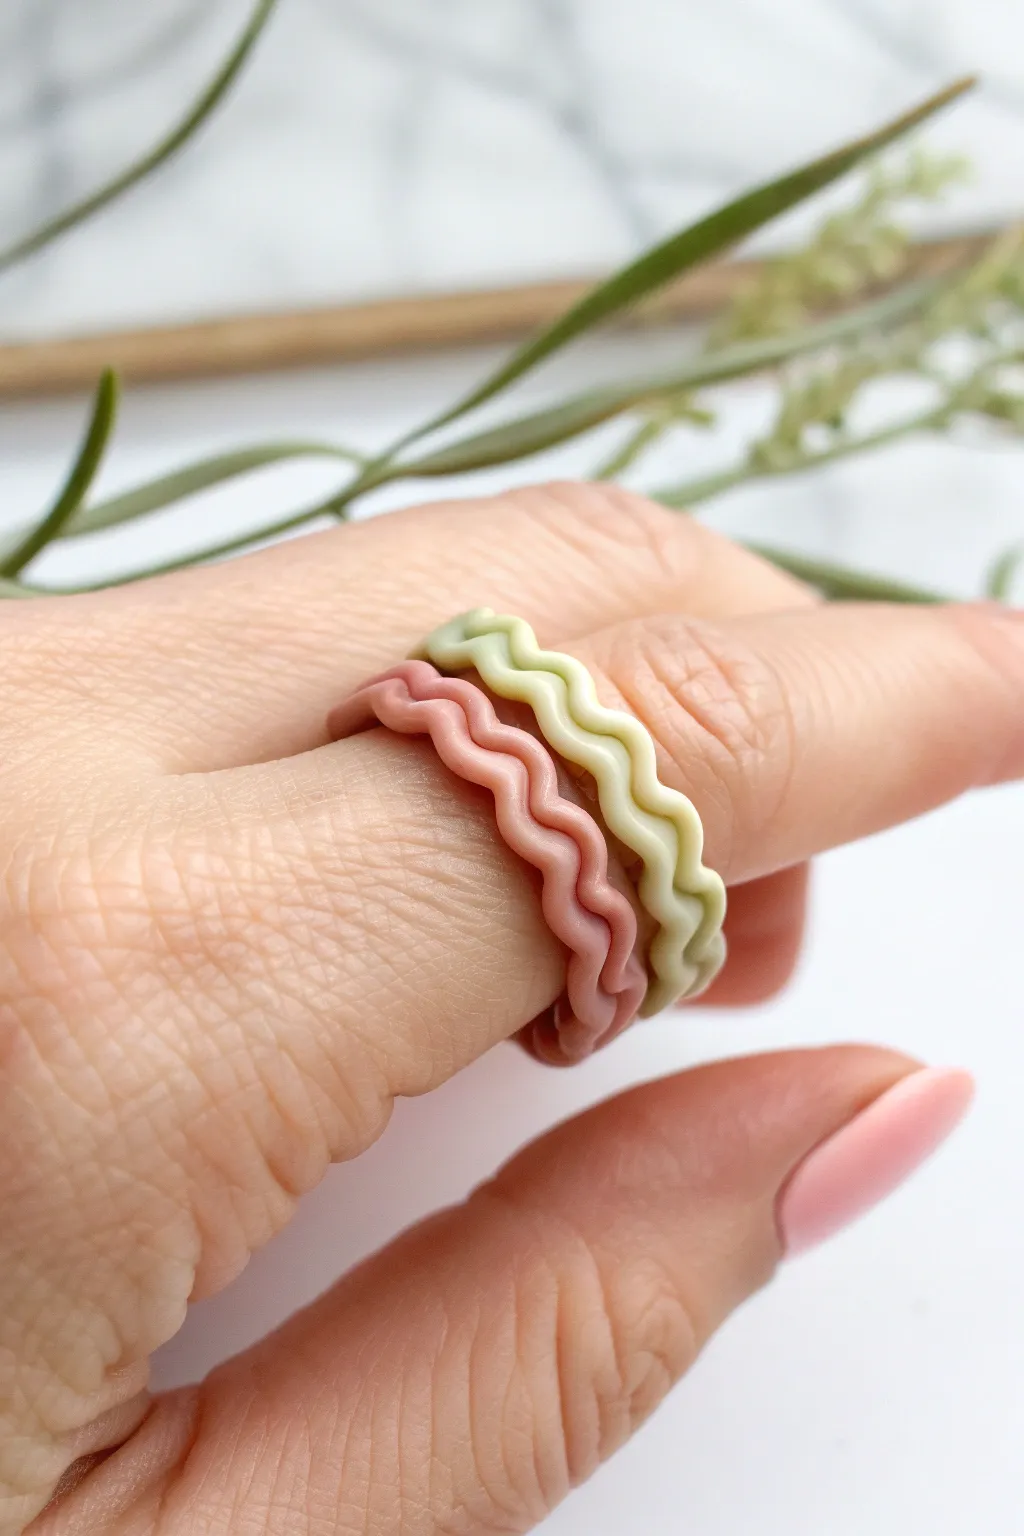
These charming, minimalist rings feature a fun wavy texture that looks deceptively intricate but is wonderfully simple to make. With their matte finish and soft pastel tones, they are perfect for stacking or wearing singly for a pop of playful color.
How-To Guide
Materials
- Polymer clay (dusty rose and pale sage green)
- Acrylic roller or pasta machine
- Extruder tool with a small round disc (optional but helpful)
- Flexible tissue blade or craft knife
- Ring mandrel or a metal tube sized to your finger
- Liquid polymer clay (translucent)
- Small silicone sculpting tool or toothpick
- Ceramic tile or glass baking surface
- Oven
Step 1: Preparing the Clay Snake
-
Condition the clay:
Begin by kneading your chosen clay color—dusty rose or sage green—in your hands until it is soft, pliable, and free of air bubbles. -
Roll a coil:
Roll the conditioned clay into a long, thin snake on your work surface. Aim for a consistent diameter of roughly 2mm to 3mm. -
Extruder option:
For the most consistent thickness, I find using a clay extruder fitted with a small round disc gives perfectly uniform snakes every time. -
Smooth the surface:
If you hand-rolled the snake, gently roll it under a flat acrylic block to smooth out any fingerprints or bumps.
Step 2: Creating the Wave Pattern
-
Set up your guide:
Place your clay snake on your work surface. You can lightly dust the surface with cornstarch if your clay is particularly sticky. -
Begin the wave:
Using a small, cylindrical tool handle or a thick knitting needle, gently push the clay snake to one side to create a curve. -
Alternate the direction:
Move the tool slightly down the snake and push the clay in the opposite direction, creating a sine wave or ‘S’ shape. -
Refine the squiggles:
Continue this alternating push-pull motion down the entire length of the snake until you have a long, consistent squiggle pattern. -
Ensure uniformity:
Look closely at the waves; try to keep the amplitude (height) and wavelength (width) of each squiggle as similar as possible for a tidy look. -
Compress slightly:
Gently tap the sides of the wavy snake with your flat blade to compress the pattern slightly, ensuring the curves are tight and sturdy.
Wiggle Work
Use the teeth of a wide-tooth comb to press into the clay snake at even intervals. This creates perfectly spaced divots to guide your wavy bends.
Step 3: Forming and Baking
-
Wrap the mandrel:
Carefully lift your wavy clay strand and wrap it around your ring mandrel at the correct size marking. -
Measure the join:
Identify where the two ends of the ring will meet. Aim to cut the clay at matching points in the wave pattern so the join is invisible. -
Cut the excess:
Use your sharp craft blade to cut the ends cleanly. A straight vertical cut usually works best for these thin bands. -
Seal the seam:
Apply a tiny dot of liquid polymer clay to one cut end, then press the two ends together gently on the mandrel. -
Blend the joint:
smooth the seam with a silicone tool or your finger, reshaping the wave at that spot if it got flattened. -
Baking time:
Place the ring (still on the mandrel if it’s oven-safe, or carefully slide it off onto a tile) into the oven. -
Follow instructions:
Bake according to your specific clay manufacturer’s directions, typically around 275°F (135°C) for 15-30 minutes. -
Cool down:
Allow the rings to cool completely before handling to ensure they reach their full hardness. -
Optional matte finish:
The rings in the image have a lovely matte look; if desired, lightly sand them with fine-grit sandpaper for an extra soft finish.
Twisted Texture
Before making the waves, twist two very thin strands of different colored clay together securely. Form the S-waves with this twisted rope for a marbled effect.
Enjoy mixing and matching your new squiggle rings with different outfits for a subtle, artistic touch
Geometric Candy Gem Rings
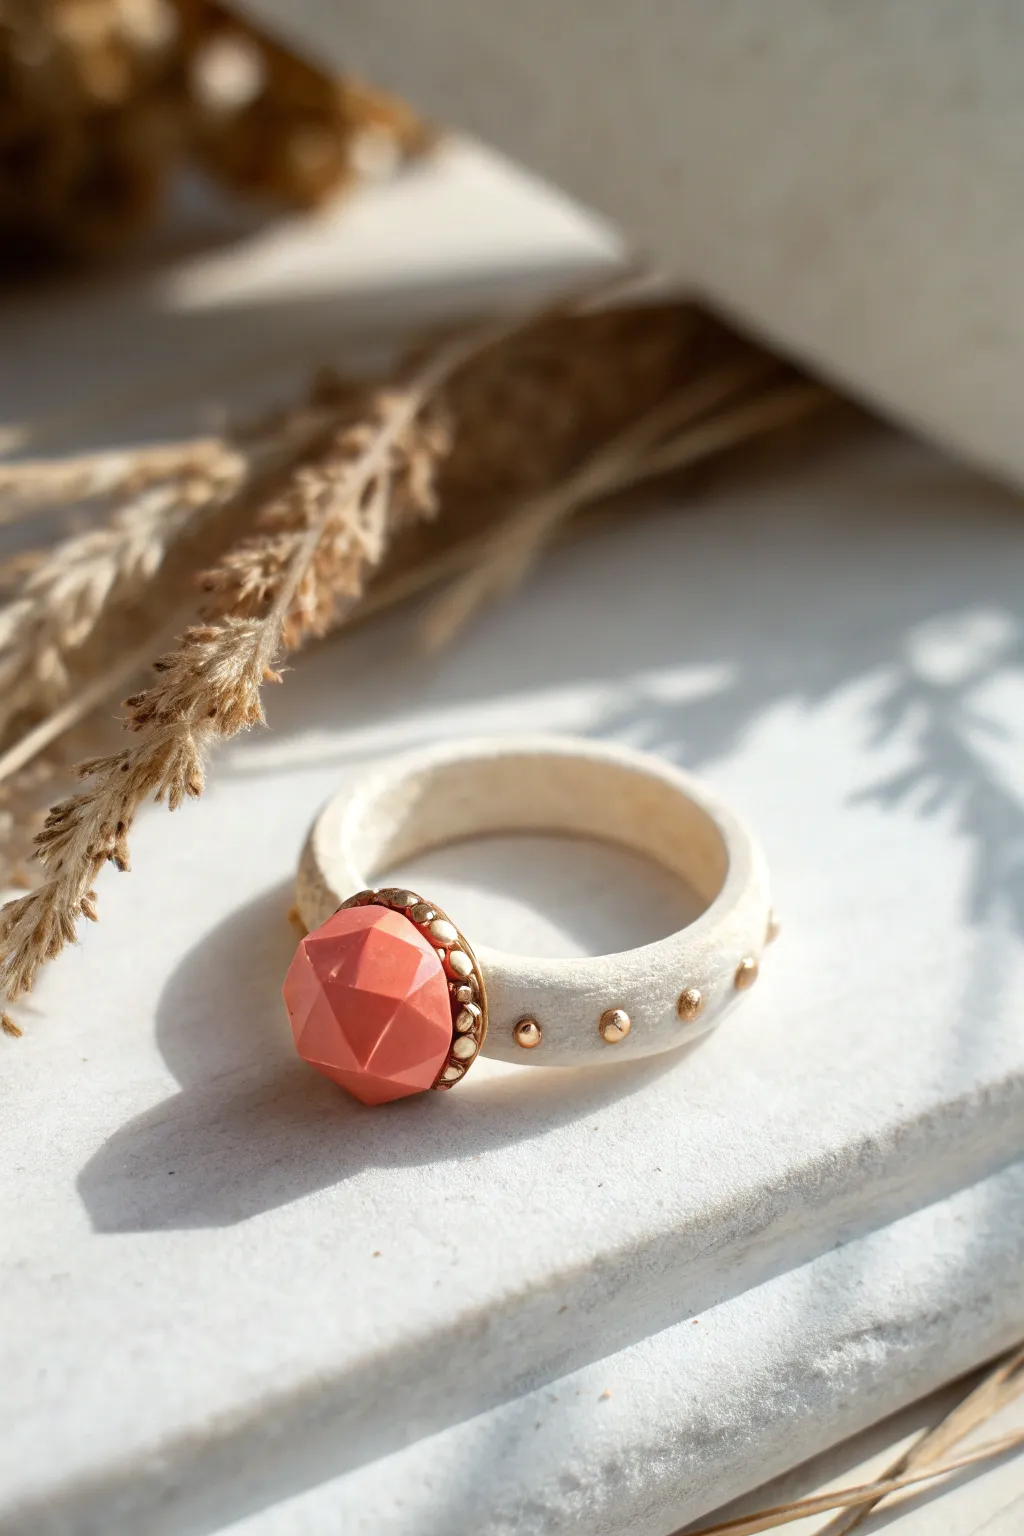
Embrace a chic, modern aesthetic with this stunning geometric ring that combines the softness of matte clay with the sparkle of gold accents. The chunky white band provides a perfect neutral canvas for the vibrant, faceted focal point, making it a statement piece that looks deceptively high-end.
How-To Guide
Materials
- White or beige polymer clay (granite effect optional)
- Coral or peach polymer clay
- Gold micro beads or gold seed beads (no-hole/caviar beads work best)
- Liquid polymer clay (translucent)
- Craft knife or tissue blade
- Ring mandrel (or cylindrical object)
- Small dotting tool or needle tool
- Fine-grit sandpaper (400-800 grit)
- Gloss glaze (optional, for the gem only)
- Oven for baking
Step 1: Shaping the Ring Base
-
Condition the base clay:
Start by thoroughly conditioning your white or beige clay until it’s pliable. If you want a stone-like texture, you can mix in a tiny amount of scraping dust from baked black clay or use pre-mixed ‘granite’ polymer clay. -
Form the band:
Roll the clay into a thick log, approximately 6-8mm in diameter depending on how chunky you want the final ring. Flatten it slightly with your palm to create a D-profile, keeping the inside flat for comfort. -
Size the ring:
Wrap the clay log around your ring mandrel at the desired size. Cut the excess clay at an angle where the ends meet to ensure a seamless join. Smooth the seam well with your fingers or a sculpting tool. -
Texture surface (optional):
For that matte, organic look seen in the photo, gently dab the surface with a coarse sponge or a crumpled piece of aluminum foil. This removes fingerprints and adds a lovely stone feel.
Clean Cuts Matter
Chill your clay in the fridge for 10 minutes before cutting the gem facets. Cooler clay is firmer and won’t drag, resulting in much sharper, crisp geometric edges.
Step 2: Creating the Geometric Gem
-
Prepare the gem color:
Condition a small ball of coral or peach clay. Roll it into a smooth sphere about the size of a large pea. -
Cut the facets:
Using a very sharp craft knife or tissue blade, begin slicing thin, flat sections off the sphere. Work your way around, changing angles with every cut to create a geometric, multi-faceted polyhedron shape. -
Refine the shape:
Continue shaving off tiny slivers until you’re happy with the complexity of the shape. I find it helpful to keep the base of the gem flat so it sits securely on the ring band. -
Attach to band:
Apply a tiny drop of liquid polymer clay to the top of your ring band where the join seam is. Press the faceted gem firmly onto this spot.
Go Luxe with Leaf
Don’t have beads? Use tiny flakes of gold leaf. Apply small dots of liquid clay where you want sparkle, place the leaf, and it will bake right onto the surface.
Step 3: Adding Gold Accents
-
Create the setting:
Roll a very thin snake of the white/beige base clay. Wrap this carefully around the base of the coral gem to create a bezel, smoothing it down onto the band with a tool. -
embed the central beads:
Using your dotting tool, gently press gold micro beads into the thin clay bezel you just created. Place them side-by-side to form a continuous metallic halo around the stone. -
Decorate the band:
Now, press larger gold beads directly into the main white ring band. Space them out evenly along the sides. Ensure they are pushed in deep enough that the clay hugs the widest part of the bead so they won’t pop out later. -
Final smooth:
Do a final check for any fingerprints or distortions. If necessary, gently re-texture the white clay around the beads to ensure everything looks cohesive.
Step 4: Baking and Finishing
-
Bake:
Bake the ring on the mandrel (if oven-safe) or supported by cornstarch batting according to your clay package instructions. Usually, this is around 275°F (130°C) for 30 minutes. -
Cool down:
Let the ring cool completely before handling. Polymer clay is strongest once fully cooled. -
Sand edges:
If the edges of the ring band feel sharp, use a little water and fine-grit sandpaper to gently buff the inside rim for a comfortable fit. -
Glaze (optional):
To make the coral gem look polished, carefully brush a coat of gloss glaze only on the faceted ‘stone’ part, leaving the band matte.
Now you have a striking, architectural piece of jewelry ready to complement any outfit.
Hugging Cat Wrap Rings
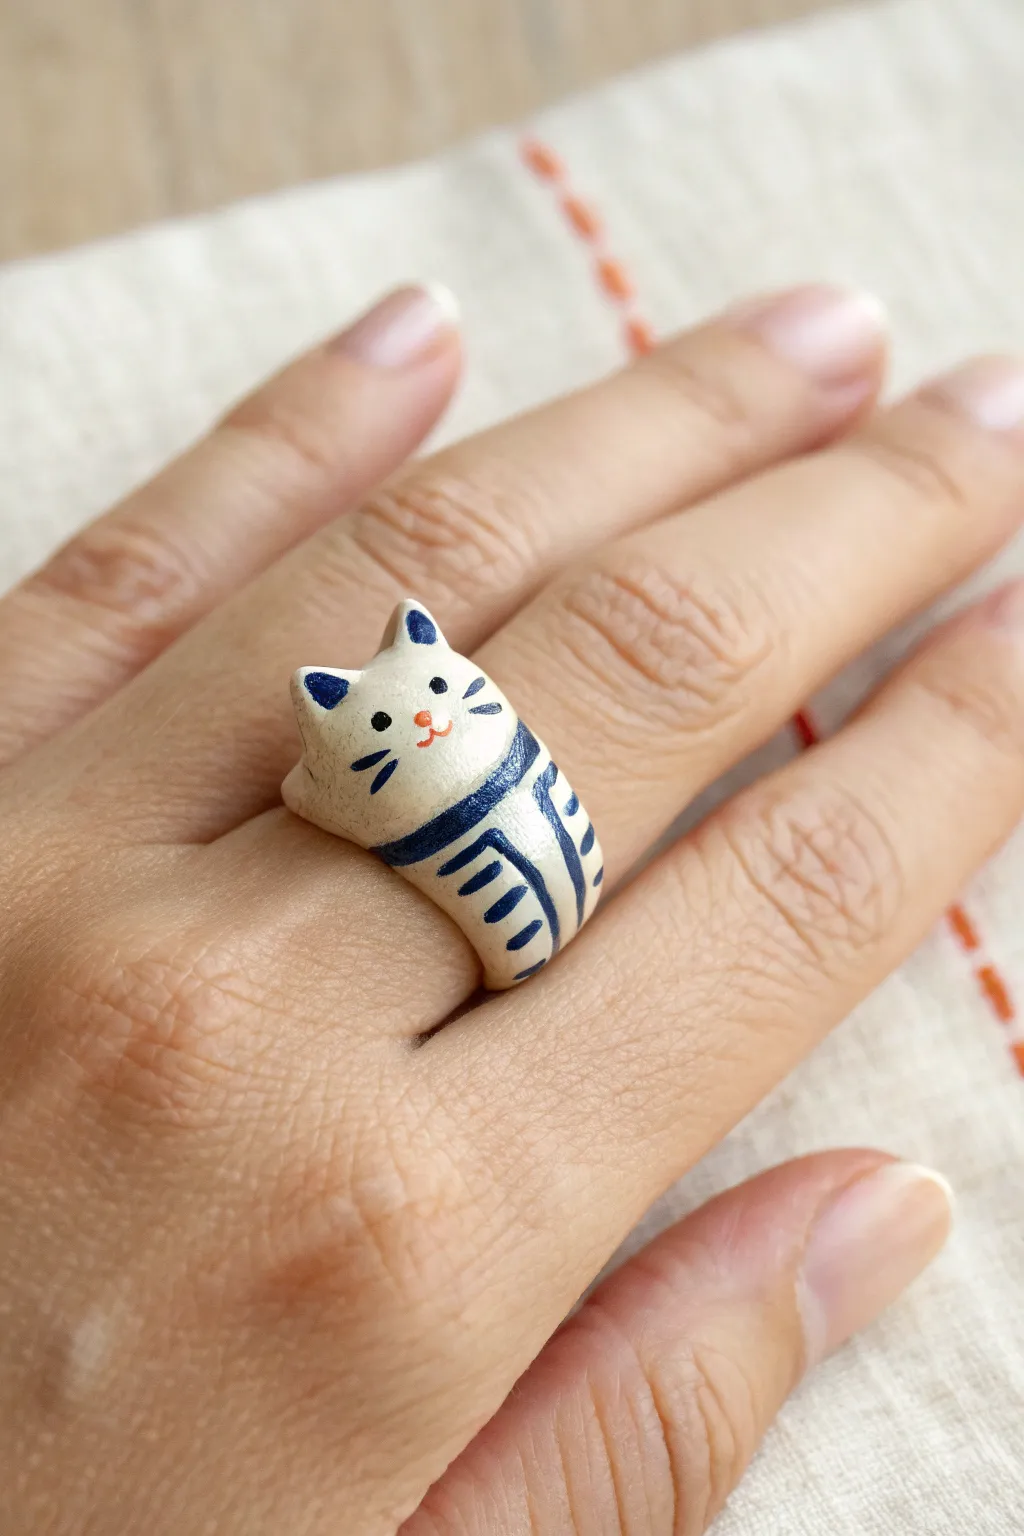
This adorable accessory features a charming white cat that wraps snugly around your finger as if giving a tiny hug. With its painted blue tabby markings and sweet expression, this clay piece adds a touch of whimsical companionship to any outfit.
Detailed Instructions
Materials
- White polymer clay (or high-quality air-dry clay)
- Acrylic rolling pin or straight glass jar
- X-acto knife or clay blade
- Ring mandrel (or a dowel wrapped in parchment paper)
- Needle tool or toothpick
- Acrylic paints: Navy Blue, Soft Pink, Black
- Fine detail paintbrushes (size 000 and 00)
- Matte or satin varnish/glaze
- Sandpaper (fine grit)
Step 1: Shaping the Base
-
Condition the clay:
Start by warming the white clay in your hands, kneading it until soft and pliable. This prevents cracks later on. -
Roll the band:
Roll the clay into a thick, even snake, then flatten it slightly with your rolling pin to create a strip about 4-5mm thick and 1cm wide. -
Size the ring:
Wrap the flattened strip around your mandrel or sized dowel. This is where I like to overlap the ends slightly to ensure a strong bond, blending the seam smooth with a sculpting tool. -
Form the head:
Create a separate, slightly flattened ball of clay for the head. Shape it into a soft oval. -
Attach the head:
Score the surface of the ring band where the head will sit. Press the head firmly onto the band, smoothing the clay connection points underneath so it looks like one solid piece. -
Add the ears:
Pinch two tiny triangles of clay. Attach them to the top of the head, blending the seams downward into the skull for durability. -
Create the hugging paws:
Roll two small teardrop shapes for the front paws. Attach them to the sides of the band just below the head, angling them slightly forward as if the cat is holding on.
Fixing Broken Ears
If an ear snaps off after baking, use a tiny dab of cyanoacrylate (super glue) gel. Avoid liquid glue, as it can run and ruin the finish
Step 2: Refining and Baking
-
Smooth the surface:
Dip your finger in a little rubbing alcohol (polymer) or water (air-dry) and gently rub away any fingerprints or lint. -
Check the fit:
Ensure the clay isn’t stuck to the mandrel. Gently rotate it to make sure it will slide off after baking. -
Bake or dry:
Follow your clay manufacturer’s instructions for baking temperatures or drying times. For polymer clay, tenting with foil helps prevent scorching. -
Sand imperfections:
Once fully cured and cooled, use fine-grit sandpaper to gently smooth any rough edges, especially around the ring opening for comfort.
Step 3: Painting and Finishing
-
Paint the ears:
Using your smallest brush and navy blue paint, fill in the front triangles of the ears. -
Add facial features:
Dot two tiny black eyes wide apart. Add a small pink nose and simple black whisker lines. -
Add stripe details:
Paint a thick blue collar line around the neck. From this line, paint vertical stripes down the body of the ring band to mimic tabby markings. -
Seal the piece:
Apply two thin coats of matte or satin varnish to protect the paint from chipping during wear.
Rainbow Kitty
Don’t stop at blue stripes! Make a calico version with orange and black splotches, or a celestial cat with gold stars
Slide on your new feline friend and enjoy your handmade accessory