Whenever I need a quick, happy project, I reach for cute frog designs because they’re basically built from easy little shapes and lots of personality. Below are my favorite frog clay ideas that stay beginner-friendly while still giving you that irresistible big-eyed charm.
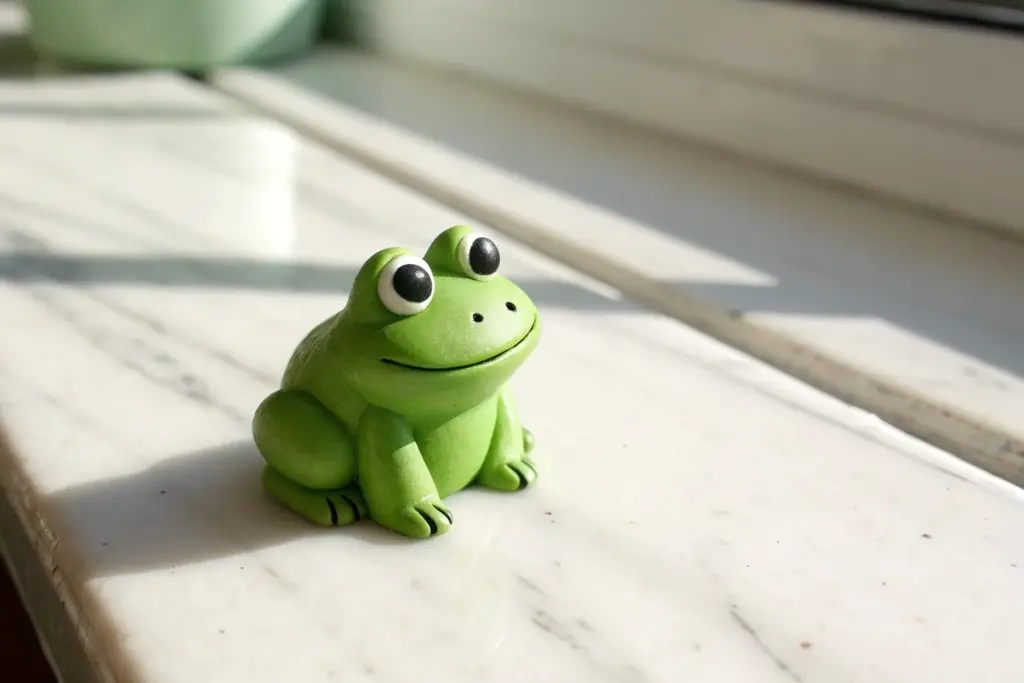
Classic Chubby Frog Figurine
Capture the serene essence of a garden guardian with this delightful, chubby frog figurine. Sculpted with simple shapes and finished with a textured, matte look, this little character brings a touch of calm to any desk or shelf.
Step-by-Step
Materials
- Polymer clay (sage green, white, black, pale pink)
- Acrylic rolling pin
- Ball stylus tools (large and medium)
- Needle tool
- Soft pastel chalks (blush pink)
- Fine-grit sandpaper or a stiff brush (for texturing)
- Hobby knife or clay blade
- Matte varnish
- Clean work surface (ceramic tile or glass)
Step 1: Body & Base Shape
-
Conditioning the Clay:
Begin by thoroughly conditioning a large chunk of sage green polymer clay until it is soft and pliable. Warm clay helps prevent cracks during the shaping process. -
Forming the Main Body:
Roll the green clay into a smooth ball, then gently flatten the bottom against your work surface. Taper the top slightly to form a very subtle pear shape, keeping it mostly round and chubby. -
Creating the Mouth:
Using a needle tool or a thin clay blade, press a long, gentle curve into the front of the face area. Make the smile wide and slightly upturned at the corners for a friendly expression. -
Adding Texture:
To mimic a stone-like or organic skin texture, gently pat the entire surface of the green body with a stiff toothbrush or a piece of crumpled aluminum foil. Avoid the mouth area to keep the smile crisp.
Clean Clay Trick
Keep wet wipes nearby to clean your hands between colors. White clay picks up lint easily, so shape the white eye parts first or wash hands thoroughly before handling.
Step 2: Facial Features
-
Eye Sockets:
Use a large ball tool to press two indentations on the top of the head where the eyes will sit. Space them somewhat wide apart for a cuter look. -
Sculpting the Eye Base:
Roll two smaller balls of the same sage green clay. Place them into the indentations you created, blending the bottom seams into the head so they look like protrusions. -
Adding the Whites:
Press a small indentation into the front of each green eye mound. Roll two small balls of white clay, flatten them slightly, and press them into these hollows. -
Adding Pupils:
Roll two tiny balls of black clay. Press these onto the white circles, placing them slightly inward-facing to give the frog a focused, sweet gaze. -
Creating Nostrils:
Use a needle tool or small dotting tool to poke two small holes above the mouth line for nostrils. -
Blush Cheeks:
Using a soft brush or a Q-tip, apply a small amount of shaved pink pastel chalk to the cheeks, just below the eyes. Rub it in circular motions for a soft, diffused glow.
Droopy Arms?
If the front arms slide down while you work, use a tiny dab of liquid polymer clay or ‘Bake & Bond’ as a glue to secure them firmly to the belly before baking.
Step 3: Limbs & Details
-
Forming the Back Legs:
Create two medium-sized teardrop shapes from green clay. Flatten them slightly and press them against the lower sides of the body, with the wider part facing the back. -
Adding Feet:
For the back feet, attach small flattened ovals to the bottom of the visible leg sections. Use a knife tool to mark three toes on each foot. -
Front Arms:
Roll two smaller sausages of green clay for the arms. Attach them starting just below the ‘chin’ area, curving them down so the hands rest on the belly. -
Marking Fingers:
Use your knife tool to gently impress lines into the ends of the arms to suggest fingers, keeping the design simple and stylized. -
Tiny Speckles:
Roll extremely tiny balls of white and pale pink clay. Press these randomly onto the sides and back of the frog’s body. Flatten them completely so they look like painted spots. -
Painting the Mouth Line:
I prefer to use a specific trick here: take a tiny bit of dark brown acrylic paint on a fine brush and run it carefully inside the mouth groove for depth.
Step 4: Baking & Finishing
-
Pre-Bake Check:
Give your frog a once-over. Smooth out any fingerprints with a drop of baby oil on your finger if needed, and ensure the texture still looks good. -
Baking:
Bake the figurine according to your clay package instructions (usually 275°F/130°C for 15-30 minutes depending on thickness). -
Cooling Down:
Let the frog cool completely in the oven with the door cracked open. This gradual cooling prevents thermal shock cracks. -
Sealing:
Apply a coat of matte varnish to the skin to protect the pastel blush and surface texture. Start with the bottom, let it dry, appearing seamless. -
Glossing the Eyes:
For a spark of life, apply a drop of gloss varnish or clear UV resin specifically to the eyes (white and black parts only).
Now you have a serene little companion ready to keep you company at your desk


Lily Pad Sitting Frog
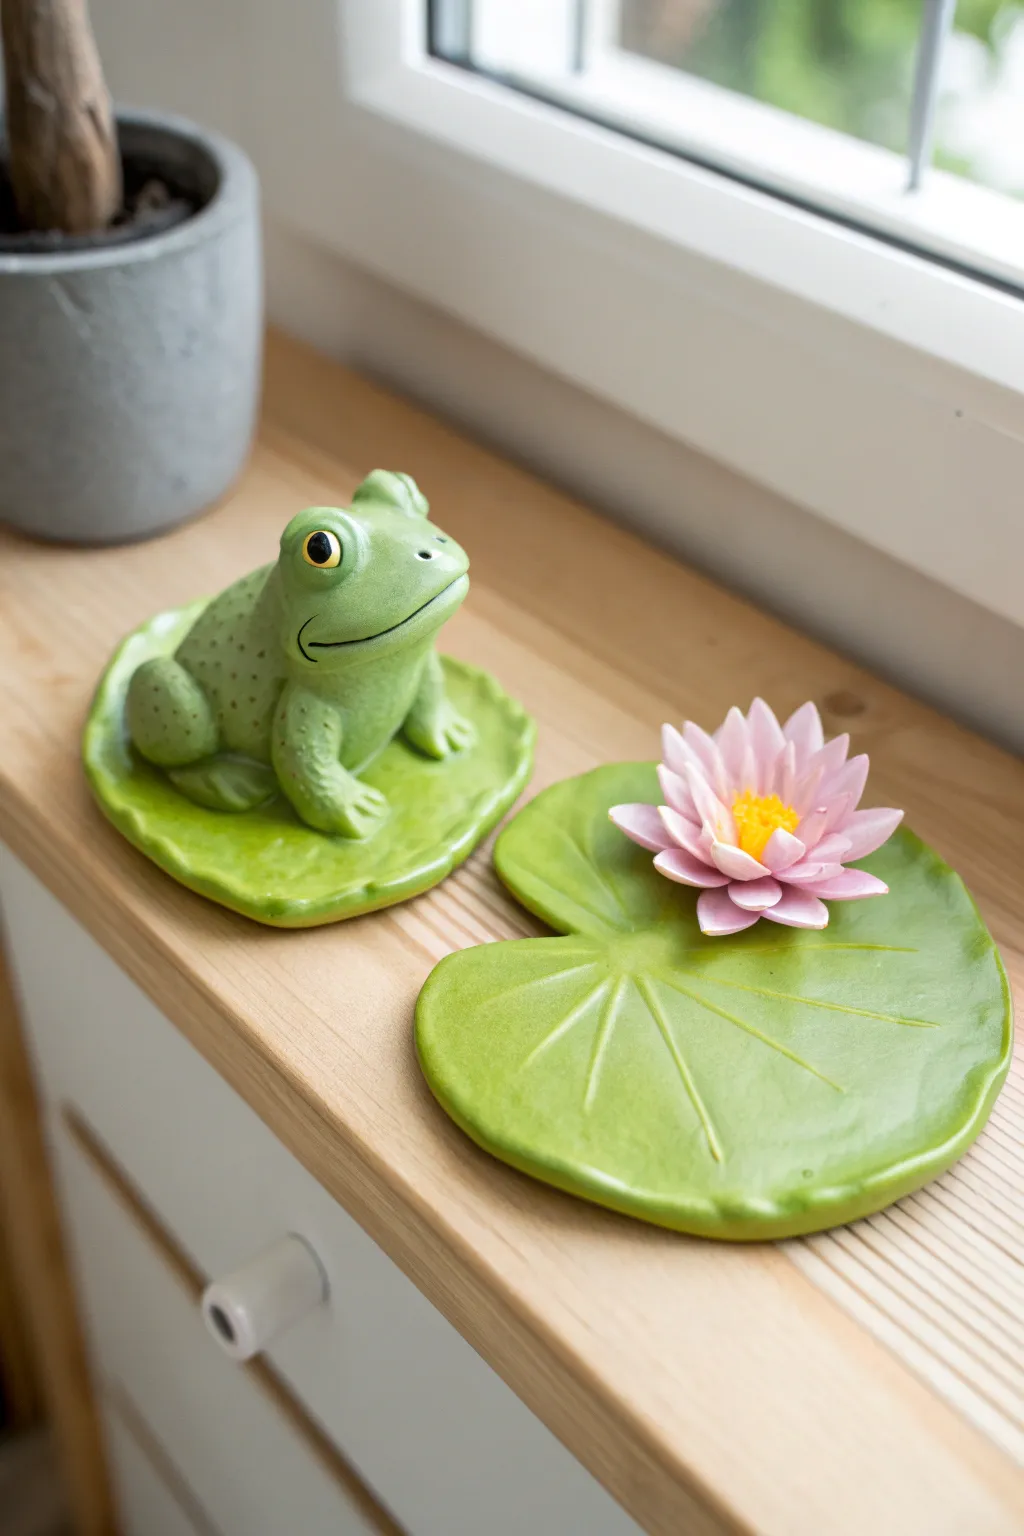
Create a charming desk companion with this two-part project featuring a smiling frog and a blooming water lily. The glossy finish gives these pieces a high-end ceramic look without needing a kiln, perfect for adding a touch of whimsy to any windowsill.
Detailed Instructions
Materials
- Green polymer clay (one light, one slightly darker)
- Pink and yellow polymer clay
- Black and white acrylic paint or polymer clay bits
- Sculpting tools (needle tool, ball stylus)
- Rolling pin
- Wire armature or aluminum foil core
- High-gloss varnish or UV resin
- Small paintbrush
- Circle cutter (optional)
Step 1: Sculpting the Lily Pads
-
Prepare the Clay:
Begin by conditioning the lighter green clay until it is soft and malleable. Roll it out into a flat sheet about 1/4 inch thick. -
Shape the Pads:
Cut two rough circles from the sheet. Gently pull and stretch the edges to make them organic and uneven, rather than perfect circles. -
Create the Notch:
Using a craft knife, cut a ‘V’ shape into one side of each circle to create the classic lily pad shape. Smooth the cut edges with your finger. -
Add Veins:
With a needle tool or a dull knife, lightly score lines radiating from the center of the pad towards the edges to create the leaf veins. Leave the center smooth. -
Form the Edge:
Gently pinch and lift the outer rim of the lily pads slightly upward to give them a natural, cupped appearance.
Sticky Fingerprints?
If you notice fingerprints on your raw clay, brush a tiny amount of baby oil or cornstarch over the surface and gently rub until smooth before baking.
Step 2: Forming the Frog
-
Body Core:
Roll a ball of aluminum foil into a pear shape to save clay and strengthen the structure. Cover this core with a smooth layer of green clay. -
Legs and Thighs:
Roll two thick teardrop shapes for the rear legs. Press them onto the sides of the body, blending the upper seams so they integrate smoothly. -
Feet and Toes:
Add smaller flattened clay pieces for the front feet. Use a needle tool to impress indentations for the toes. -
Facial Features:
Sculpt raised brows for the eyes. Use a ball tool to make sockets, then insert white spheres with small black pupils for the eyes. Use a needle tool to carve a wide, happy smile line. -
Texture Details:
Stipple the back of the frog lightly with a texture tool or toothbrush to create a subtle skin texture before placing him securely onto one of the lily pads.
Ceramic Look Hack
To truly mimic the photo’s ceramic style, use a thick UV resin as your final coat. It self-levels and creates a glass-like barrier indistinguishable from kiln glaze.
Step 3: Crafting the Lotus Flower
-
Petal Prep:
Roll small balls of pink clay and flatten them into teardrop shapes to form individual petals. You will need about 12-15 petals. -
Assembly:
Arrange the petals in concentric circles directly on the second lily pad, starting with the outer layer and working inward. -
Center Stamens:
Take a small ball of yellow clay and texture it with a needle tool to look fuzzy. Place this in the very center of the pink petals. -
Baking:
Follow the baking instructions on your specific package of clay. Typically, bake at 275°F (135°C) for 15-30 minutes depending on thickness.
Step 4: Finishing Touches
-
Painting Accents:
Once cool, use diluted darker green acrylic paint to wash over the frog’s skin and the lily pad veins, wiping away excess to accentuate the texture. -
Glazing:
I prefer to apply two to three thin coats of high-gloss varnish or UV resin over the entire piece. This is the secret step that makes the clay look like glazed ceramic.
Place your new amphibian friend near a window for a cheerful pop of green


Tiny Frog Trio Minis
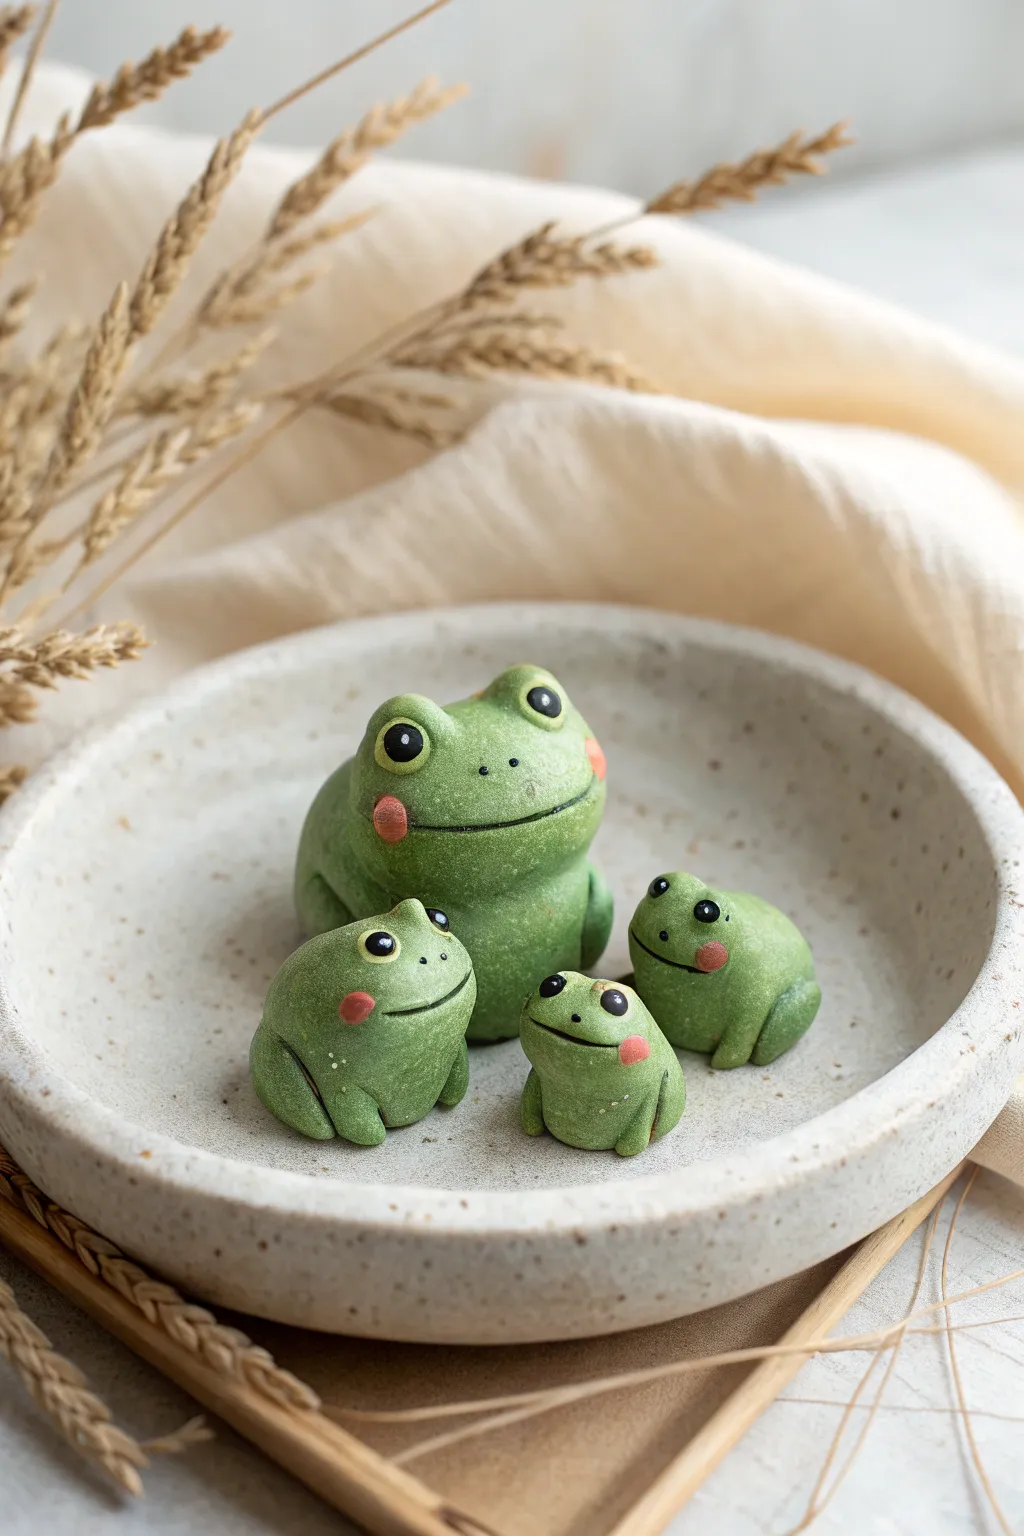
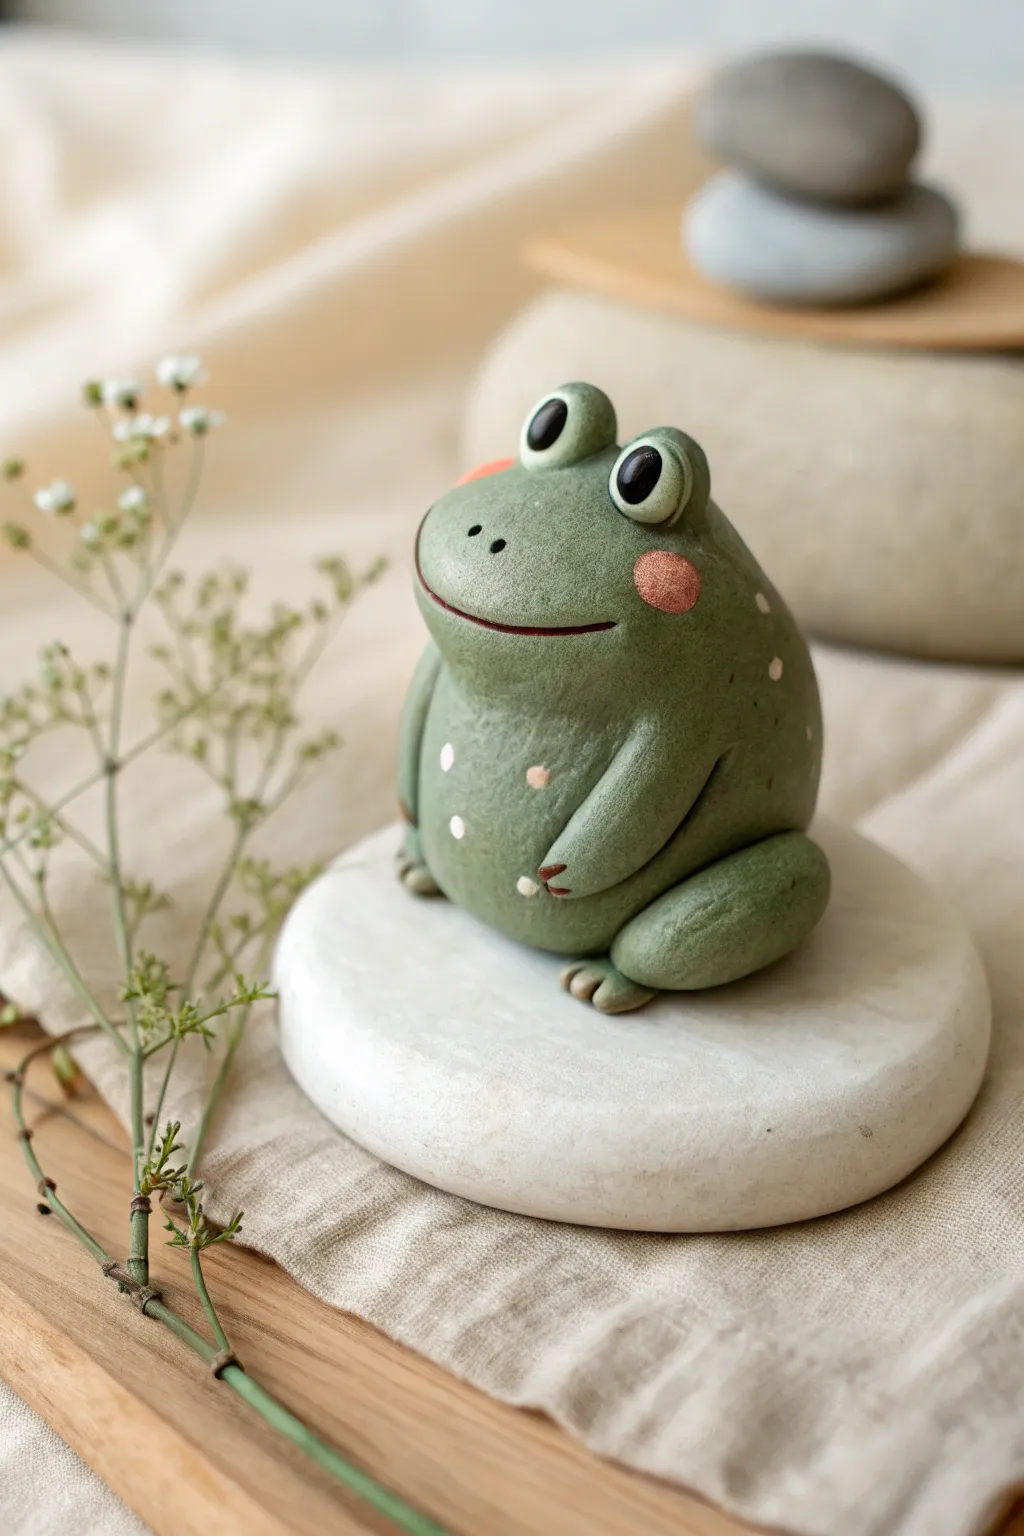
Sculpt a delightful family of four green frogs with a distinctively soft, matte finish reminiscent of moss or dry fondant. These charming figures feature simple rounded shapes, blushing cheeks, and adorable wide-set eyes, creating a peaceful scene perfect for desk decor.
How-To Guide
Materials
- Green polymer clay (a muted, mossy shade)
- Black polymer clay
- Pink or coral chalk pastels (soft)
- Translucent liquid clay or bake and bond
- Detailing tools (needle tool, ball stylus)
- Small paintbrush (soft bristle)
- White acrylic paint (optional for highlights)
- Matte varnish
- Texturing sponge or toothbrush
Step 1: Sculpting the Mother Frog
-
Form the Body Base:
Start with a large walnut-sized ball of green clay. Roll it into a smooth sphere, then gently flatten the bottom against your work surface to create a stable, rounded mound shape. -
Shape the Eye Mounds:
Pinch two smaller balls of green clay. Place them on top of the head area, spaced slightly apart. Blend the bottom edges of these balls seamlessly into the main body using a blending tool or your fingertip so they look like natural protrusions. -
Add Texture:
To mimic the stone-like or mossy texture seen in the photo, gently tap the entire surface of the green clay with a clean toothbrush or a texture sponge. This removes fingerprints and adds that organic matte finish. -
Carve the Mouth:
Using a needle tool or a thin clay blade, press a long, slightly curved line across the front of the face, just below the eye mounds. Make it wide and gentle for a happy expression. -
Create the Legs:
Roll two medium teardrop shapes for the rear legs. Flatten them slightly and press them against the sides of the body, blending the back edge. The pointed end should face forward to suggest folded legs. -
Position the Arms:
Form two smaller logs for the front arms. Attach them vertically under the chin area so they merge into the belly, giving the frog a sturdy, sitting posture.
Uneven Texture?
If the texture looks too rough, lightly roll the frog in cornstarch before using the toothbrush. It softens the impact and prevents the tool from sticking to the clay.
Step 2: Creating the Froglets
-
Size the Babies:
Divide your remaining green clay into three smaller portions—one slightly larger than the other two. Repeat the body-forming process, creating chestnut-sized mounds. -
Attach Baby Eyes:
Roll tiny balls of green clay for the eye sockets. Place them high on the head. For variety, you can place some slightly wider apart or closer together to give each froglet a unique personality. -
Add Baby Limbs:
Keep the limbs simpler for the small ones. Small, flattened ovals pressed to the sides work perfectly for legs. Blend them gently so they don’t look stuck on. -
Texture the Babies:
Don’t forget to apply the toothbrush texture to the little ones as well. I find this step crucial for unifying the look of the whole family.
Leafy Addition
Make tiny clay umbrellas using a lotus leaf shape on a wire stem. Place one next to the mother frog to create a ‘rainy day’ scene for the family.
Step 3: Face Details & Finishing
-
Apply the Blush:
Scrape a little pink chalk pastel into a powder. Using a soft, dry brush, gently dust round rosy cheeks onto the frogs just below the eyes. Do this *before* baking to embed the color. -
Insert the Eyes:
Roll tiny spheres of black clay. Press them firmly into the center of the green eye mounds. Flatten them slightly so they look inlaid rather than bulging out too far. -
Add Highlights:
For that spark of life, add a minuscule dot of white clay (or white paint after baking) to the upper corner of each black eye. -
Final Inspection:
Check all four frogs from different angles. Smooth out any accidental fingernail marks and re-texture if necessary. -
Baking:
Bake the figures according to your clay package instructions (usually 275°F/130°C for 15-30 minutes depending on thickness). tent them with foil to prevent scorching the green color. -
Matte Finish:
Once cool, apply a coat of ultra-matte varnish. Avoid glossy finishes, as the charm of this project relies on that soft, dry stone look.
Arranging your little amphibian family together creates an instantly heartwarming display


Pocket Frog Worry Charm
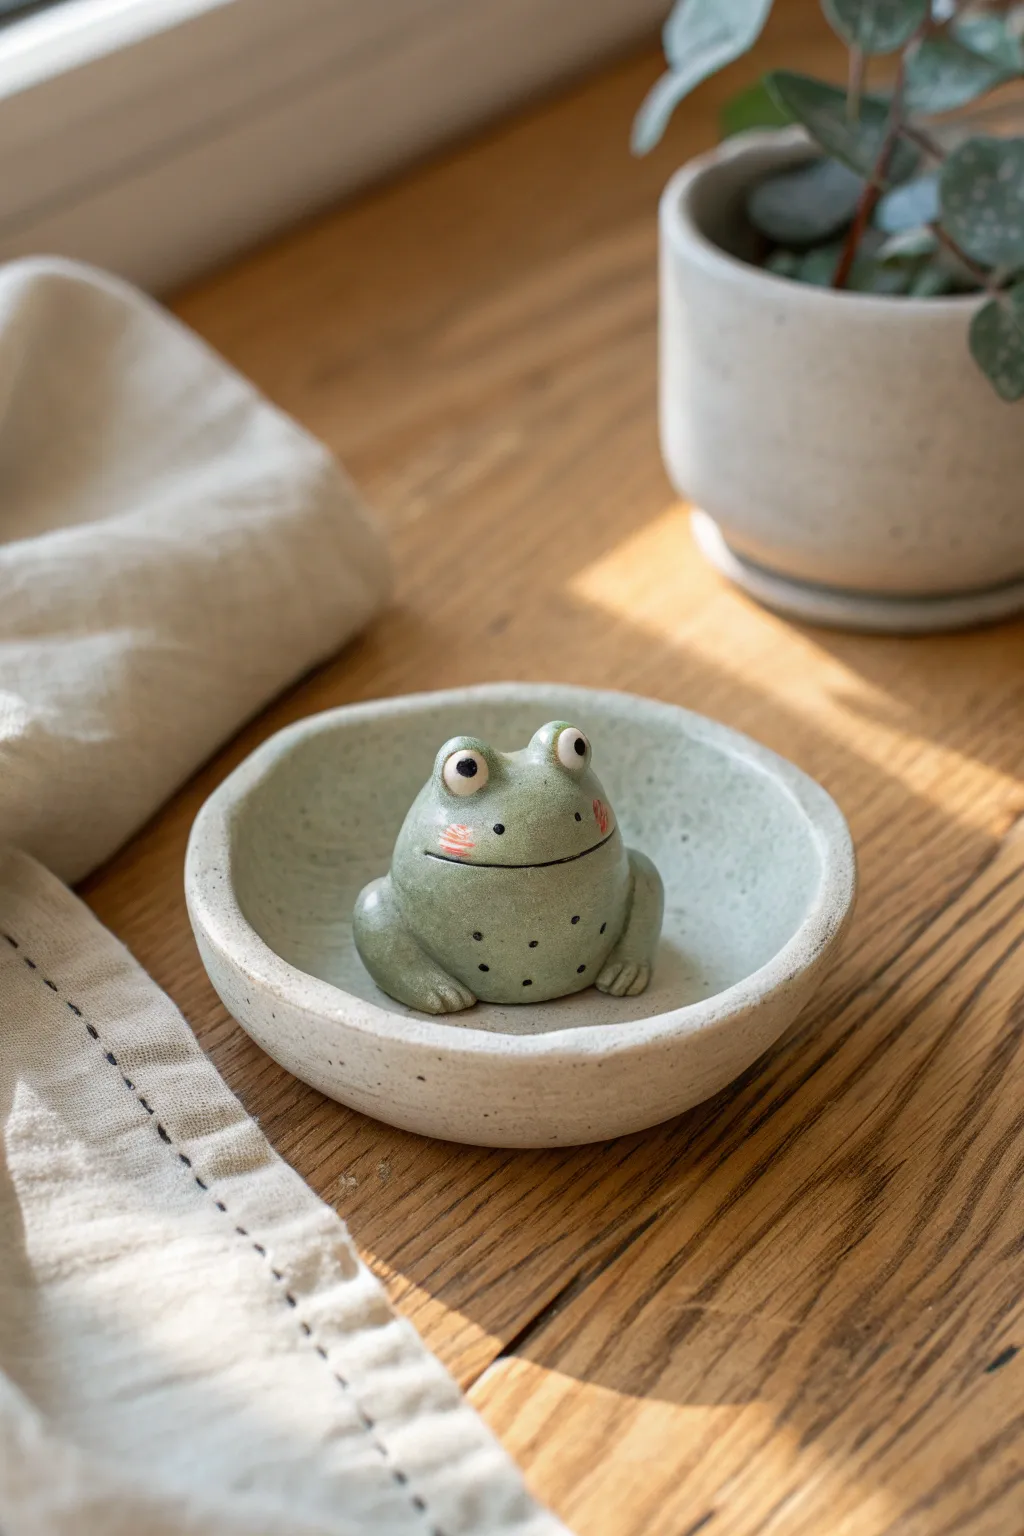
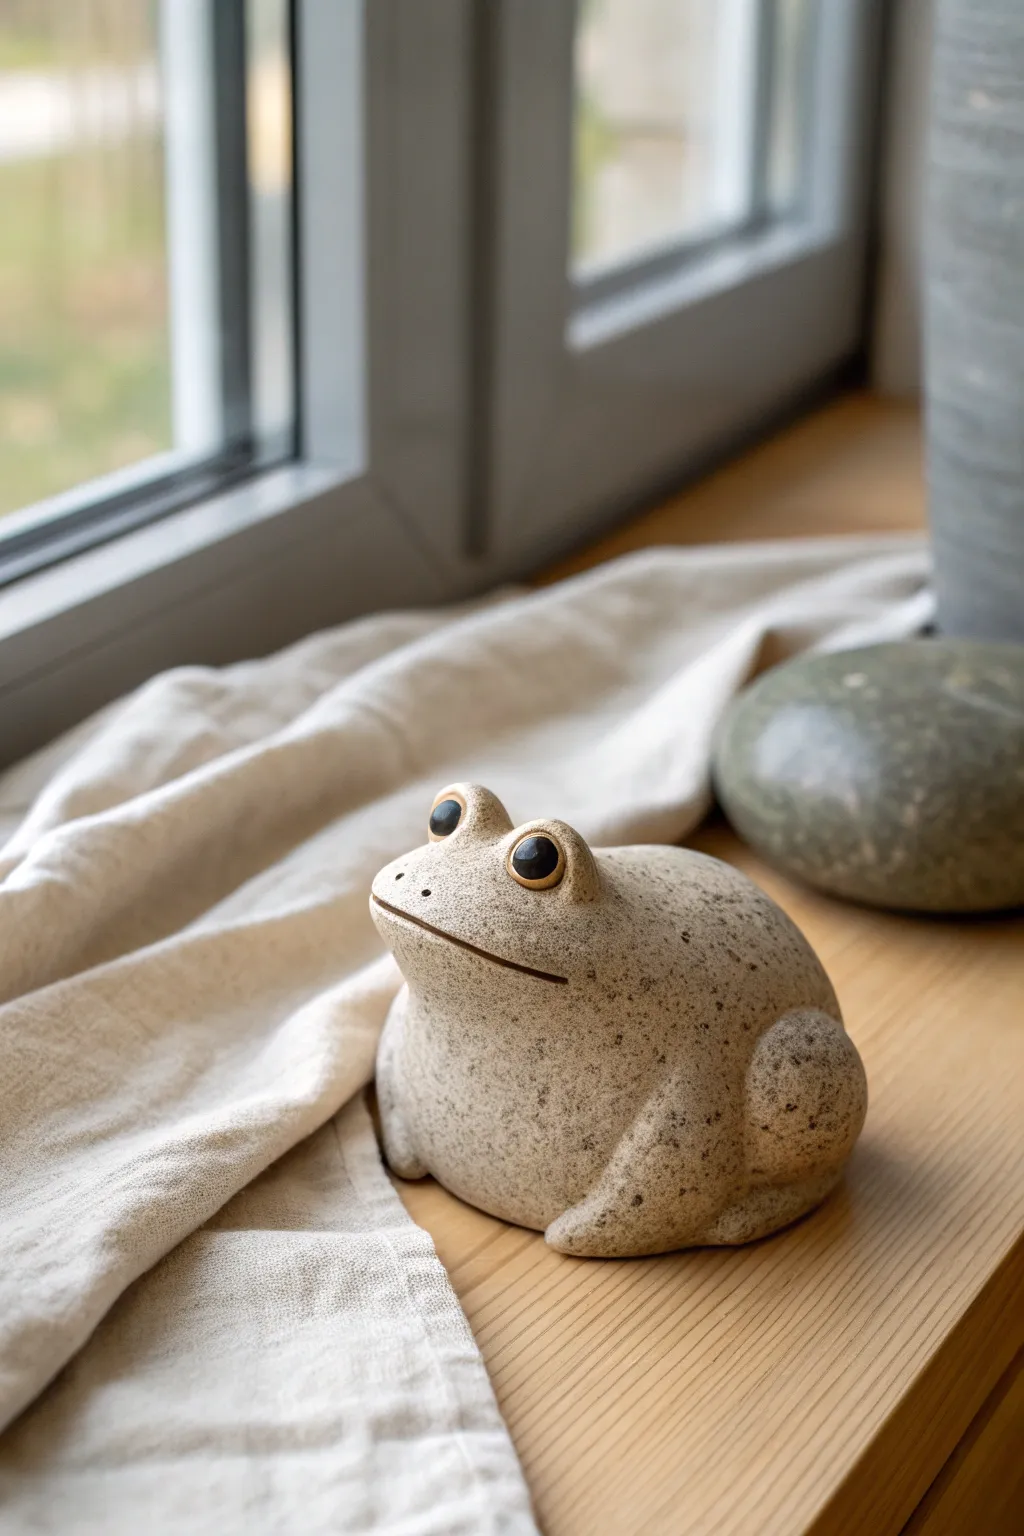
This endearing little project features a chubby, tranquil frog resting inside its own shallow dish, perfect for holding rings or simply bringing a smile to your face. The speckled clay finish gives it a wonderful organic texture that feels great to the touch.
Step-by-Step Guide
Materials
- Speckled Stoneware or Polymer Clay (granite effect)
- Clean work surface or mat
- Rolling pin
- Small round cutter (approx. 3-4 inches) or bowl for template
- Modeling tools (specifically a needle tool and a small ball stylus)
- Smoothing sponge
- Water or slip (if using ceramic clay)
- Black acrylic paint or glaze
- Pink acrylic paint or glaze
- Fine tip paintbrush
- Clear matte varnish (for polymer clay)
Step 1: Shaping the Dish
-
Roll out the base:
Begin by rolling out a portion of your speckled clay to an even thickness of about 1/4 inch. If you are using polymer clay, condition it well first. -
Cut the circle:
Use your round cutter or trace around a small bowl to cut a perfect circle from the slab. -
Form the rim:
Gently pinch the edges of the circle upwards to create a shallow rim. Rotate the piece as you work to keep the height consistent all the way around. -
Smooth the surface:
Use a damp sponge (for ceramic clay) or your finger (for polymer) to smooth the rim and the interior of the dish, removing any fingerprints or sharp edges.
Smooth Seams
Dip your finger in a tiny bit of baby oil (for polymer) or water (for earthen clay) to erase fingerprints and blend seams effortlessly.
Step 2: Sculpting the Frog Body
-
Create the main form:
Roll a ball of clay slightly smaller than a golf ball. Gently press it onto a flat surface to flatten the bottom so it sits stable, creating a rounded gumdrop shape. -
Add the eye mounds:
Take two small pea-sized balls of clay and attach them to the top of the head. Blend the bottom seams of these balls into the main body so they look like natural protrusions rather than stuck-on spheres. -
Form the legs:
Roll two thick, short logs of clay for the legs. Bend them slightly to mimic a sitting frog’s haunches. -
Attach the legs:
Press one leg onto each side of the body. Blend the clay at the back and top where it meets the body, ensuring a strong bond. -
Detail the feet:
Flatten the front of the leg logs slightly to create feet. Use a needle tool to gently press vertical lines into the flattened area to suggest toes. -
Make the arms:
Roll two smaller, thinner logs for the front arms. These should be short enough to rest comfortably on the frog’s belly or the ground. -
Attach the arms:
Place the arms centrally on the front of the body, blending the shoulders into the main form. Press toe details into these hands as well.
Make it a Incense Holder
Poke a small hole into the frog’s hand or the dish rim before baking to hold a stick incense, turning cute decor into functional art.
Step 3: Assembly and Detailing
-
Place the frog:
Position your frow comfortably in the center of the dish. If using ceramic clay, score and slip the bottom of the frog and the spot on the dish before pressing them together firmly. -
Sculpt the face:
Use a needle tool or a thin blade to make a wide, gentle horizontal cut for the mouth. Curve it slightly at difficulty ends for a subtle smile. -
Refine the eyes:
Press a small indentation into the center of each eye mound using a ball tool to prepare the spot for painting later. -
Impress textures:
Using a small stylus or the blunt end of a needle, gently press tiny random dots across the frog’s belly and back to simulate bumpy skin texture. -
Bake or Fire:
Process your piece according to your material. For ceramic clay, this means slow drying and kiln firing. For polymer clay, bake according to the package temperature instructions.
Step 4: Painting the Character
-
Paint the eyes:
Once cool, paint the indented pupils solid black. Add a tiny white dot highlight to each eye to bring him to life. -
Add blushing cheeks:
Mix a soft pink color (or diluted red glaze). Paint three small, horizontal dash lines on each cheek, just below the eyes. -
Darken the details:
Use a very fine brush with black paint to carefully darken the mouth line and fill in the textured dots on the body for contrast. -
Seal the piece:
If you used polymer clay or unglazed ceramic, apply a matte varnish to protect the paint and give the piece a finished, professional look.
Enjoy the calming presence of your new little green friend sitting peacefully on your desk

The Complete Guide to Pottery Troubleshooting
Uncover the most common ceramic mistakes—from cracking clay to failed glazes—and learn how to fix them fast.
Simple Frog Earrings Pair
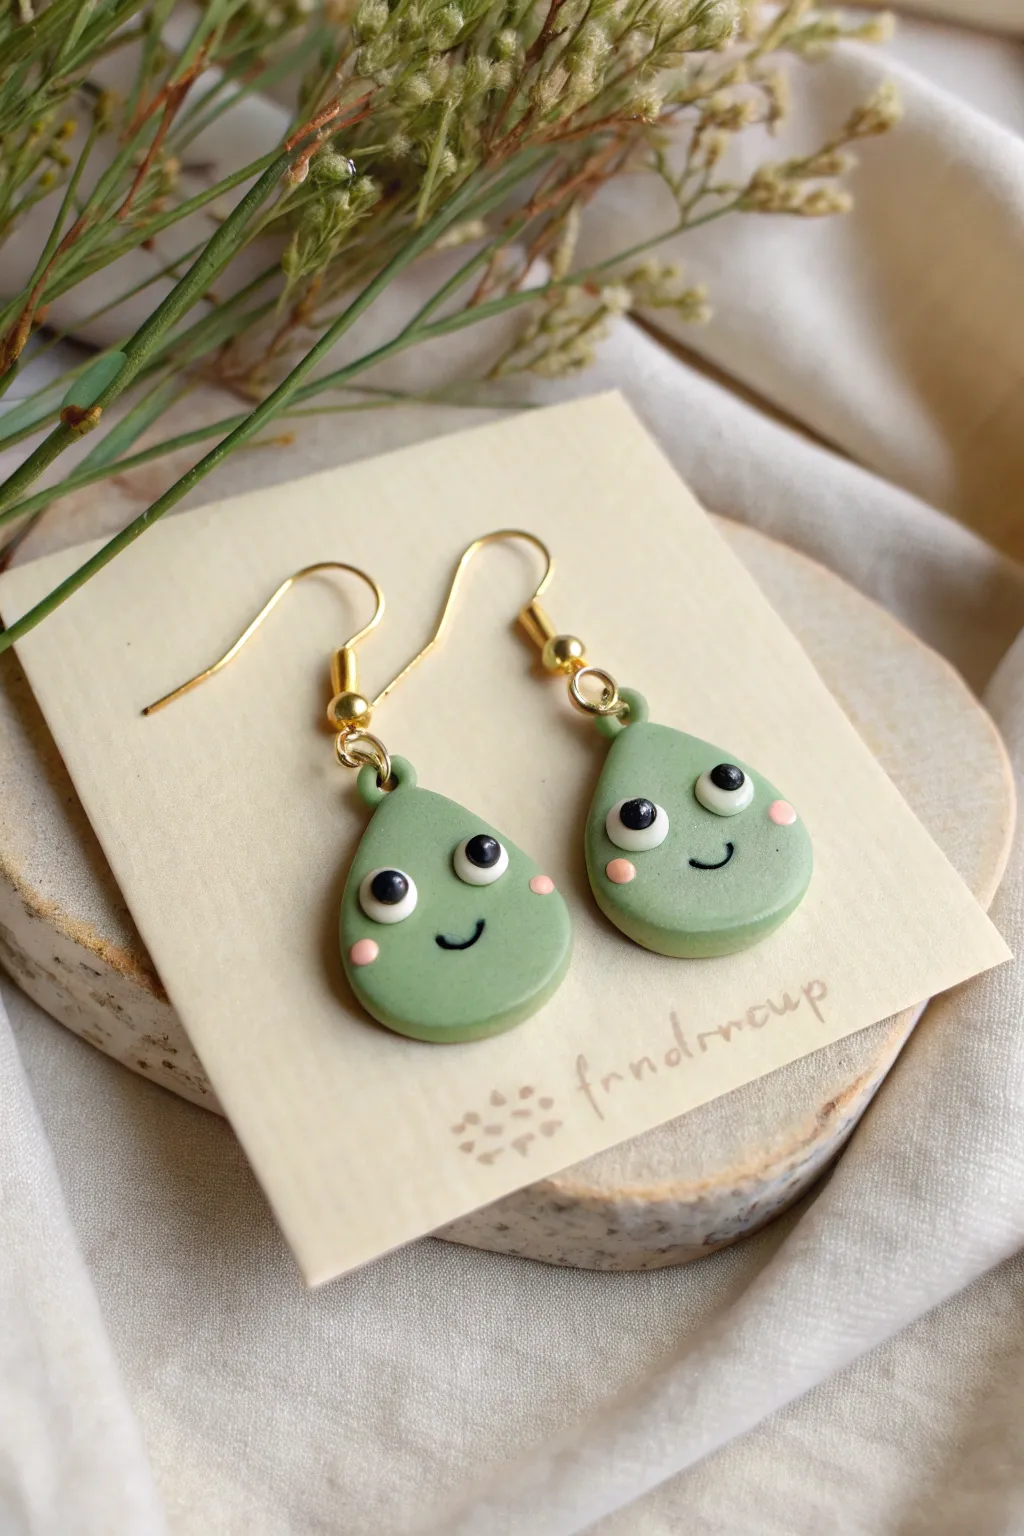
These utterly charming earrings feature minimal frog faces sculpted onto simple sage green teardrops. With their wide-set eyes and rosy cheeks, they offer a quirky, streamlined take on classic frog motifs perfect for everyday wear.
Step-by-Step Guide
Materials
- Polymer clay (Sage Green, White, Black, Pastel Pink)
- Clay roller or pasta machine
- Teardrop cutter (approx. 2cm height)
- Ball stylus tool (small)
- Basic needle tool
- Gold eyepins (2)
- Gold earring hooks (2)
- Jump rings (gold, 4mm or 5mm)
- Jewelry pliers (round nose and flat nose)
- Baking sheet/tile and parchment paper
- Liquid polymer clay (optional, for extra adhesion)
- Oven
Step 1: Shaping the Base
-
Condition the clay:
Begin by taking your sage green clay and kneading it thoroughly in your hands until it is soft and pliable. Warm clay prevents cracking later. -
Roll it out:
Roll the green clay into a slab that is approximately 3mm to 4mm thick. You want it thick enough to hold the eyepin securely but light enough for ears. -
Cut the shapes:
Use your teardrop cutter to punch out two identical shapes. If you don’t have a cutter, I find rolling two equal balls of clay and pinching one end into a point works just as well. -
Smooth the edges:
Gently run your fingertip along the cut edges of the teardrops to soften any sharp lines or burrs left by the cutter.
Clean Prints Only
Fingerprints showing up on your smooth clay? Lightly brush the raw clay with a little baby oil or cornstarch before baking to smooth them away.
Step 2: Creating the Face
-
Roll the eyeballs:
Take a tiny amount of white clay and roll four equal spheres. These need to be quite small, about 2-3mm in diameter. -
Place the eyes:
Position two white spheres on each green teardrop. Place them slightly lower than the middle, spaced widely apart to achieve that derpy, cute look. -
Flatten the eyes:
Gently press down on the white spheres so they flatten against the green base but still retain a rounded, 3D dome shape. -
Add pupils:
Roll even tinier balls of black clay. Press these into the center of the white eyes. Make sure they are uniform in size to avoid a lopsided stare. -
Sculpt the cheeks:
Take the pastel pink clay and roll four very small balls. Press these onto the green base, placed slightly lower and wider than the eyes. -
Create the smile:
Roll an extremely thin snake of black clay—as thin as a thread. Cut a tiny segment about 3mm long. -
Apply the mouth:
Using your needle tool, carefully curve the black thread into a ‘U’ shape and press it gently onto the clay between the eyes.
Step 3: Assembly & Finishing
-
Snip the eyepins:
Cut your gold eyepins so the straight shaft is about 0.5cm long. You don’t want it piercing through the bottom of the frog. -
Insert hardware:
Dip the end of the eyepin into a tiny bit of liquid clay for grip, then push it straight down into the pointed top of the teardrop. -
Prepare for baking:
Place your frogs on a parchment-lined baking sheet or ceramic tile. -
Bake:
Bake according to your clay manufacturer’s instructions (usually 275°F/130°C for 15-30 minutes). Let them cool completely before handling. -
Open jump rings:
Use your two sets of pliers to twist open a jump ring. Remember to twist sideways (bringing one hand toward you, one away) rather than pulling apart. -
Connect the hook:
Slide the open jump ring through the loop of the eyepin sticking out of the frog, and then slide on the earring hook. -
Close the ring:
Twist the jump ring back completely flush so there is no gap for the hook to slip out. -
Final check:
Repeat the assembly for the second earring and ensure all painted details and clay bonds are secure.
Make It Glossy
For a wet amphibian look, coat the finished baked frogs with UV resin or a polyurethane gloss varnish. It adds durability and distinct shine.
Enjoy wearing these quirky little green friends on your next outing
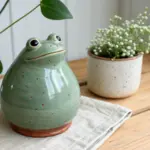
Frog Tea Light Hugger
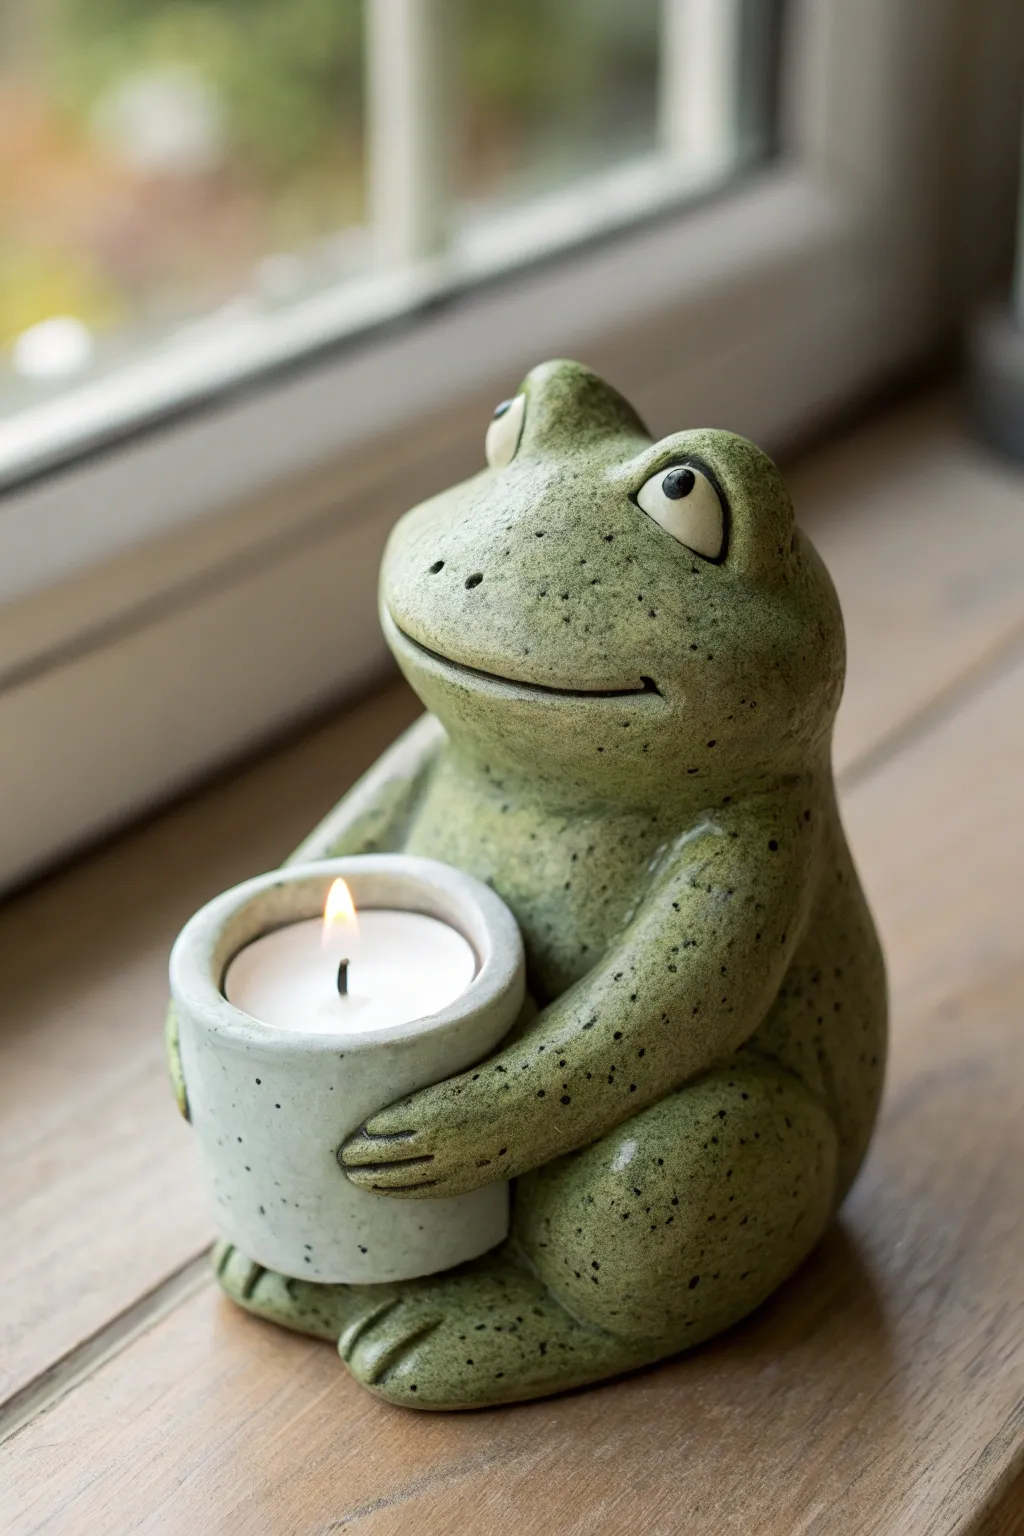
Brighten your windowsill with this adorable ceramic frog that doubles as a cozy candle holder. With his speckled green skin and gentle smile, he hugs a small pot perfect for a standard tealight, adding warmth and personality to any room.
Step-by-Step Guide
Materials
- Stoneware or earthenware clay (groggy for strength)
- Tealight candle (for sizing)
- Small rolling pin
- Modeling tools (wooden knife, needle tool)
- Score and slip tool (or a fork)
- Sponge and water
- Ceramic underglazes or glazes (Sage Green, Dark Green/Brown, White, Black)
- Clear glaze (if using underglazes)
- Small paintbrush for speckling
Step 1: Sculpting the Body Base
-
Form the main shape:
Start with a grapefruit-sized ball of well-wedged clay. Gently tap and roll it on your work surface to create a pear shape with a wide, stable bottom and a slightly narrower top for the head. -
Hollow out the form:
Since a solid piece this thick will explode in the kiln, turn the pear shape upside down. Use a loop tool to carefully hollow out the interior, leaving the walls about 1/4 to 1/2 inch thick. -
Define the head:
Flip the form back upright. Use your thumbs to gently press an indentation about two-thirds of the way up to distinguish the head from the belly, keeping the transition smooth and rounded. -
Add the legs:
Roll two thick sausages of clay for the hind legs. Attach them to the sides of the body using the score and slip method, bending them at the ‘knee’ so the feet rest flat on the table in front. -
Shape the feet:
Flatten the ends of the leg coils slightly and use a wooden knife tool to press in three indentations, creating defined toes for your frog.
Air Escape Vent
Since the body is hollow, you MUST poke a hidden hole in the bottom or under a leg. This allows trapped hot air to escape in the kiln, preventing your frog from exploding.
Step 2: Creating the Candle Holder
-
Make the pot:
Roll a small ball of clay and pinch it into a cup shape. Check the size frequently by placing your actual tealight candle inside; there should be a little wiggle room to account for clay shrinkage. -
Smooth the pot:
Once the size is right, roll the pot on the table to flatten the sides and create a smooth rim. It should look like a miniature flower pot. -
Attach the pot:
Score and slip the belly of the frog and the back of the pot. Press them firmly together so the pot rests on the table between the frog’s legs. -
Wrap the arms:
Create two long, thinner coils for the arms. Attach them at the shoulders and curb them around the sculpted body so the hands firmly grasp the sides of the tealight pot. -
Refine the hands:
Just like the feet, use a knife tool to mark fingers on the hands, ensuring they look like they are holding the pot securely.
Tealight Fit Issues
Did the pot shrink too much? If a metal-cup tealight won’t fit, try shaving down the wax of the candle slightly, or use a smaller battery-operated LED tealight instead.
Step 3: Facial Features and Details
-
Sculpt the eyes:
Roll two small balls of clay and attach them to the top of the head. Smooth the clay from the back of the eyes down into the head so they look integrated, not just stuck on. -
Carve the mouth:
Use a needle tool or a wire tool to slice a wide, curving smile across the face. Press gently at the corners effectively giving him chubby cheeks. -
Add nostrils:
Poke two small holes above the mouth for the nose. I like to keep these subtle so they don’t distract from the eyes. -
Dry and Bisque Fire:
Allow the piece to dry slowly under plastic for a few days to prevent cracking, then let it dry completely before the first bisque firing in the kiln.
Step 4: Glazing and Finishing
-
Apply base color:
Once bisque-fired, paint the frog’s body with 2-3 coats of a sage green glaze. Paint the tealight pot white or a very pale grey for contrast. -
Paint the eyes:
Carefully paint the eyeballs white. Once dry, add a black pupil looking slightly upward to give him a sweet expression. -
Create the speckled texture:
Dip a stiff toothbrush or a coarse brush into dark green or dilute black iron oxide. Flick the bristles with your thumb to spray tiny speckles all over the green skin. -
Highlighting:
Wipe away a tiny bit of glaze on protruding areas like the eyebrows and toes to create depth, or dry-brush a lighter green on these spots. -
Final Fire:
Fire the piece again according to your glaze instructions (usually Cone 5 or 6 for stoneware). Once cool, place a tealight inside and enjoy.
Now you have a charming amphibian friend ready to hold a light in your home


What Really Happens Inside the Kiln
Learn how time and temperature work together inside the kiln to transform clay into durable ceramic.
Frog Plant Pot Pal

This charming little guardian adds a whimsical touch to your indoor garden, appearing as if he just hopped into a spare pot. Crafted to mimic natural terracotta, this simple clay project brings a warm, earthy vibe to any windowsill.
Detailed Instructions
Materials
- Polymer clay (beige or white)
- Acrylic paints (terracotta orange, warm brown, burnt sienna, black, off-white)
- Sculpting tools (ball styluses, needle tool)
- Aluminum foil
- Small paintbrush
- Matte varnish or sealant
- Small terracotta pot (for sizing reference)
Step 1: Shaping the Base Form
-
Core Creation:
Start by crumpling a small ball of aluminum foil into a rough oval shape, slightly flattened on the bottom. This saves clay and keeps the figurine lightweight. -
Covering the Core:
Condition your polymer clay until soft, then roll out a sheet about 1/4 inch thick. Wrap this completely around your foil core, smoothing the seams so no foil is visible. -
Basic Body Shape:
Mold the clay-covered form into a frog-like lump. It should be round and chubby, slightly tapering towards what will be the head. Gently press it into your reference pot to ensure it fits snugly inside the rim.
Step 2: Sculpting the Features
-
Adding Back Legs:
Roll two thick logs of clay for the rear legs. Attach them to the sides of the body, starting near the back and curving forward. Smooth the connection points seamlessly into the main body. -
Creating Front Arms:
Roll two smaller sausages of clay for the front arms. Position them so they look like they are resting on the edge of the pot or tucked under the chin, depending on your preference. I like to pose them slightly tucked in for a cozy look. -
Defining the Head:
Pinches the clay gently at the front to define the snout area. It shouldn’t be too pointy; aim for a soft, rounded triangle shape. -
Eye Sockets:
Roll two small balls of clay and place them on top of the head for the prominent eye ridges. Blend the bottom edges of these balls into the head so they look like natural bumps. -
The Mouth:
Use a needle tool or creating a long, sweeping collecting line for the mouth. Curve it slightly upwards at the corners to give him a subtle, contented smile. -
Tiny Details:
Use a small ball stylus to make tiny indentations for nostrils. You can also lightly texture the skin with a sponge if you want a rougher look, but smooth works best for the faux-ceramic style. -
Baking:
Bake the frog according to your clay manufacturer’s instructions. Usually, this is around 275°F (135°C) for 15-30 minutes. Let it cool completely before painting.
Cracked Clay?
If small cracks appear after baking, fill them with a mix of liquid clay and scrap clay, then re-bake briefly to seal the surface.
Step 3: Painting the Faux-Terracotta Finish
-
Base Coast:
Mix terracotta orange with a touch of warm brown to create an earthy base tone. Paint the entire frog with this mixture. Two thin coats are better than one thick one. -
Adding Depth:
While the base is dry, mix a slightly darker, watered-down brown wash. Brush this into the crevices—around the legs, mouth, and neck—and quickly wipe away the excess with a paper towel to create shadows. -
Highlighting:
Dry brush a lighter peach or off-white color over the raised areas like the eye ridges, snout, and back. This highlights the texture and mimics the dusty look of aged clay. -
Painting the Eyes:
Paint the eyeballs inside the ridges a solid black using a fine detail brush. Make sure the edges are crisp. -
Eye Shine:
Dip the tip of a toothpick into white paint and place a tiny dot near the top of each black pupil. This ‘catchlight’ brings the frog to life. -
Protective Seal:
Once all paint is perfectly dry, apply a coat of matte varnish. Avoid glossy finishes if you want to maintain that authentic terracotta pot appearance.
Mossy Makeover
Dab bits of dark green paint with a rough sponge on the frog’s back to mimic moss growing on an old garden pot.
Now your new little friend is ready to settle into his planter home
Frog Straw Topper

Transform your morning coffee routin with this adorable little amphibian companion that clings securely to your favorite mug. Sculpted with a natural green tone and a textured finish, this friendly frog peeks over the rim to greet you with every sip.
Step-by-Step Guide
Materials
- Light green polymer clay (or ceramic clay if you have a kiln)
- White polymer clay
- Dark green soft pastel or acrylic paint
- Black acrylic paint
- Small ball stylus tools
- Needle tool or toothpick
- Soft paintbrush
- Gloss varnish or UV resin
- Aluminum foil
- Oven-safe mug (for sizing/baking)
Step 1: Body Basics
-
Prepare the mug form:
To ensure the frog fits perfectly, cover the rim of your mug with a small piece of aluminum foil where the frog will sit. This prevents the clay from sticking to the ceramic and makes removal easier after baking. -
Shape the torso:
Roll a medium-sized ball of light green clay into a smooth, slightly flattened teardrop shape. This will be the main body. Gently curve it over the foil-covered mug rim so the ‘belly’ side sits inside the cup and the back leans over the edge. -
Add the belly:
Take a small pinch of white clay and flatten it into an oval. Press this onto the chest/belly area of the green body. I like to use a soft brush to feather the edges slightly so the transition isn’t too harsh.
Step 2: Legs & Limbs
-
Create the hind legs:
Roll two equal-sized balls of green clay. Flatten them slightly into thick discs and press them onto the sides of the lower body, wrapping them slightly around towards the front. -
Form the feet:
Roll two smaller sausage shapes for the feet attaching them to the bottom of the thigh discs. Use a needle tool to press three indentations into the end of each foot to create toes. -
Position the hind legs:
Gently bend the legs so the feet hook over the handle or rest against the side of the mug, anchoring the frog in place. -
Sculpt the arms:
Roll two tubes of clay for the arms. Attach them near the top of the torso. Bend them at the ‘elbows’ and bring the hands forward so they rest naturally over the rim of the mug. -
Detail the hands:
Just like the feet, use your needle tool to define the fingers. Ensure the hands are pressing securely against the inner rim.
Sliding Frog?
If your frog doesn’t grip tightly after baking, add a tiny dab of clear silicone glue or removable museum putty under the paws to keep him secure on the ceramic rim.
Step 3: Head & Face
-
Attach the head:
Roll a slightly flattened oval for the head. Attach this securely to the top of the body, blending the clay at the neck seam with a silicone tool or your finger so it looks like one piece. -
Make the eye sockets:
Roll two small balls of green clay and press them onto the top of the head for the prominent froggy brow ridges. -
Insert the eyes:
Press a small indentation into each green brow ridge using a ball tool. Roll tiny balls of white clay and insert them into these sockets. -
Sculpt the mouth:
Use a needle tool or thin blade to carefully slice a wide smile across the face. Curve the ends slightly upward for a happy expression. -
Add nostrils:
Use the very tip of your needle tool to poke two tiny holes above the mouth for the nose.
Texture Tip
For the speckled belly texture, mix tiny flecks of black pepper or dried tea leaves into your white clay before attaching it. It creates a natural, organic look without painting.
Step 4: Texture & Finish
-
Texturize the skin:
To mimic the speckled look in the photo, take an old toothbrush or a stiff bristled brush and gently tap it all over the green skin. This creates a realistic, porous texture. -
Shading:
Shave a little dark green pastel into a powder. With a dry, soft brush, dust this powder into the creases of the legs, under the chin, and around the eyes to add depth. -
Bake:
Bake the piece according to your clay manufacturer’s instructions. You can bake it directly on the mug (if the mug is oven-safe) to ensure it holds its shape perfectly. -
Paint the pupils:
Once cool, use a fine detail brush and black acrylic paint to add the pupils. A tiny dot of white paint in the corner of the black pupil adds a spark of life. -
Gloss coat:
Apply a coat of gloss varnish or UV resin specifically to the eyes to make them look wet and shiny. Leave the body matte for contrast.
Now you have a charming little buddy to keep you company during your tea breaks

TRACK YOUR CERAMIC JOURNEY
Capture glaze tests, firing details, and creative progress—all in one simple printable. Make your projects easier to repeat and improve.
Frog With Flower Crown
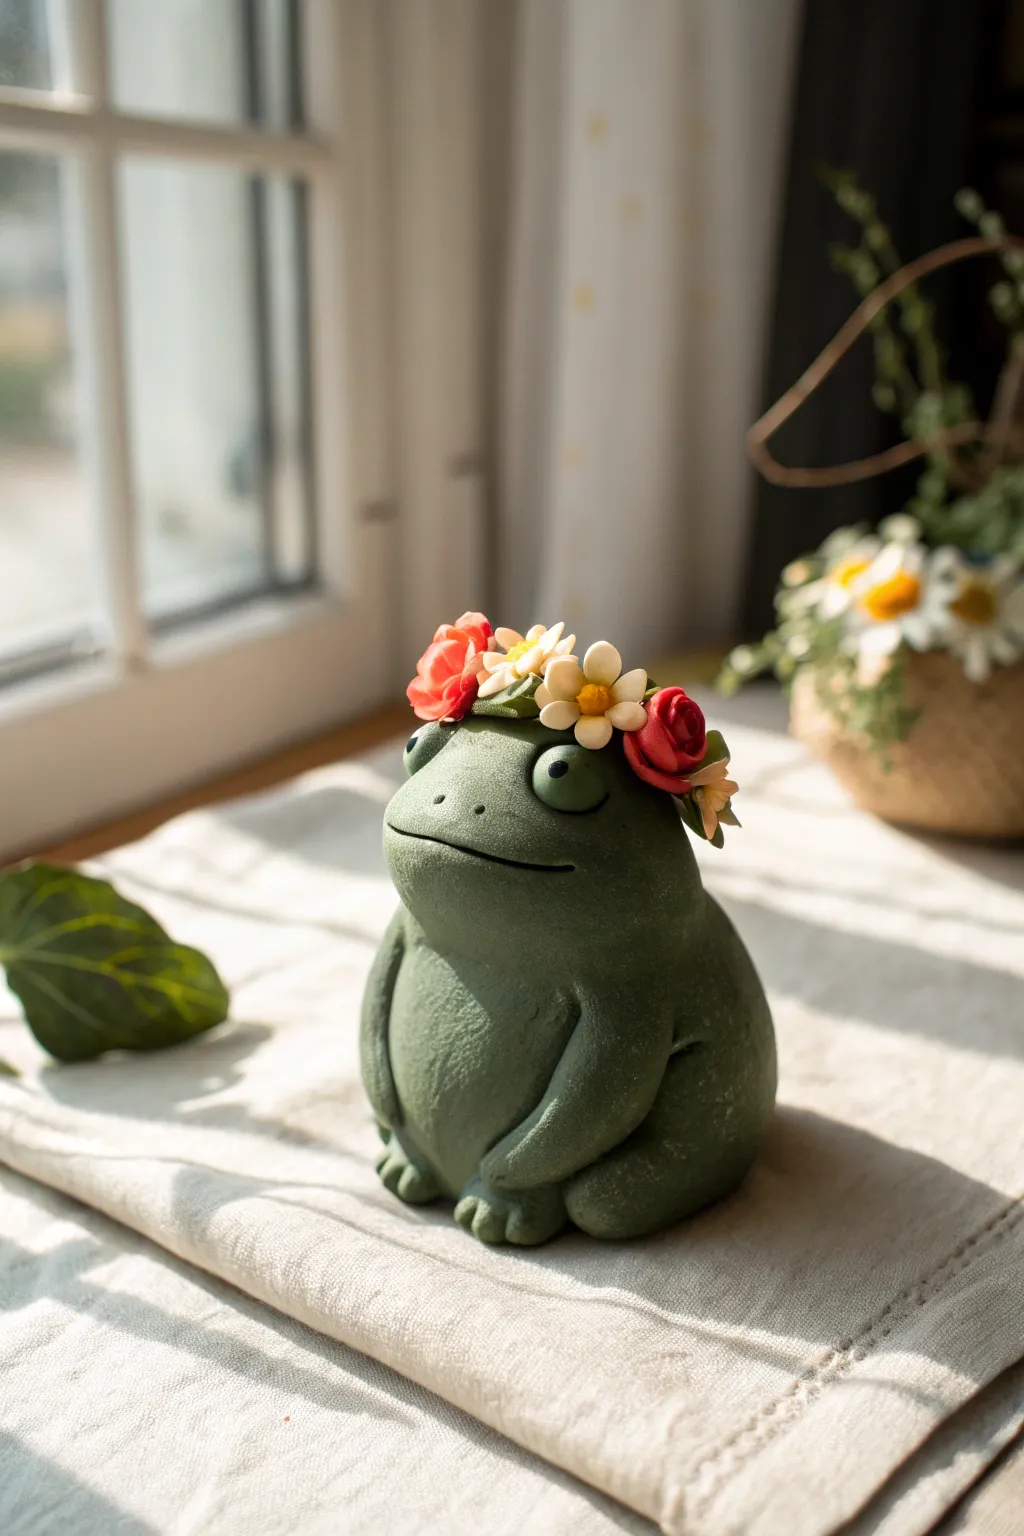
Bring a sense of calm and whimsy to your windowsill with this adorable clay frog sculpture sporting a delicate floral headpiece. This project captures a smooth, matte finish and charmingly simple details that make the character come alive.
How-To Guide
Materials
- Polymer clay (olive green for body)
- Polymer clay (white, yellow, red/coral for flowers)
- Basic sculpting tools (needle tool, ball stylus)
- Foil (for armature core)
- Black acrylic paint or clay for eyes
- Matte finish sealant or varnish
- Soft brush
- Oven (for baking polymer clay)
Step 1: Shaping the Base
-
Prepare the Core:
Start by crumpling a small ball of aluminum foil into a pear shape. This saves clay and keeps the figurine lighter; ensure it’s tightly packed so the clay sits smoothly over it. -
Cover the Core:
Condition your olive green clay until it is soft and pliable. Flatten a large sheet and wrap it completely around your foil core, smoothing out any seams with your thumb until the surface is uniform. -
Refine the Body Shape:
Gently roll and press the clay-covered form to create a seated posture. The bottom should be wider and flatter for stability, slightly tapering upward toward the head area without a distinct neck. -
Smooth the Surface:
Take a moment to buff out any fingerprints. I find lightly rolling the piece on a clean piece of paper or using a tiny drop of baby oil on my finger helps get that flawless matte look.
Fixing Fingerprints
Are fingerprints ruining the smooth skin? Before baking, lightly brush the clay with a little baby oil or cornstarch. This smooths ridges without altering the shape.
Step 2: Adding Frog Features
-
Form the Arms:
Roll two thick, sausage-like logs of green clay for the arms. They should be long enough to reach from the shoulder area down to the ground. -
Attach the Limbs:
Press the arms onto the sides of the body, blending the clay at the shoulder joint so it looks seamless. Curve them forward so the hands rest naturally near the belly. -
Sculpt the Hands and Feet:
Using a needle tool or small knife, make small indentations at the ends of the arms to suggest fingers. Add small, flat ovals of clay at the base for feet and add similar toe details. -
Create the Eyes:
Roll two small balls of green clay for the eye sockets and press them onto the top of the head. Add flattened circles of black clay (or paint them later) to the center for the pupils. -
Carve the Smile:
Use a thin sculpting tool or a blade to carefully press a wide, gentle smile across the face. Curve the ends slightly upward to give him a contented expression.
Step 3: Crafting the Flower Crown
-
Make Miniature Roses:
Roll a tiny strip of coral/red clay and coil it tightly to form a rosebud center. Add tiny flattened petals around it until it reaches the desired size. Make two or three of these. -
Create Daisies:
Form tiny balls of white clay and flatten them into teardrop shapes for petals. Arrange five or six petals in a circle and press a small yellow ball into the center. Texture the center with a needle tool. -
Assemble the Crown Base:
Roll a very thin snake of green clay to act as the vine for the crown. Place it gently circling the top of the frog’s head, behind the eyes. -
Attach the Flowers:
Press your pre-made roses and daisies onto the green vine. vary the placement so the colors are balanced, mixing the red and white blooms nicely across the forehead. -
Add Greenery:
Shape tiny leaves from leftover green clay and tuck them under the flowers to fill any gaps and add volume to the crown.
Pro Tip: Eye Sparkle
After the matte varnish dries, add a tiny dot of high-gloss glaze or UV resin just to the black pupils. It makes the figure look alive and moist.
Step 4: Refining and Baking
-
Final Surface Check:
Look over the frog one last time. If you see dust particles, lift them off with a piece of tape or a damp brush before baking. -
Bake the Sculpture:
Place your frog on a ceramic tile or baking sheet. Bake according to your brand of polymer clay instructions (usually around 275°F/135°C for 15-30 minutes depending on thickness). -
Cool Down:
Allow the kiln or oven to cool completely before removing the frog to prevent thermal shock cracks. -
Seal the piece:
Protect your work with a coat of matte varnish. This removes the plastic-like sheen of raw clay and gives it that professional, stone-like texture.
Place your peaceful new friend in a sunny spot to enjoy his eternal garden crown
Wizard Hat Frog Figurine
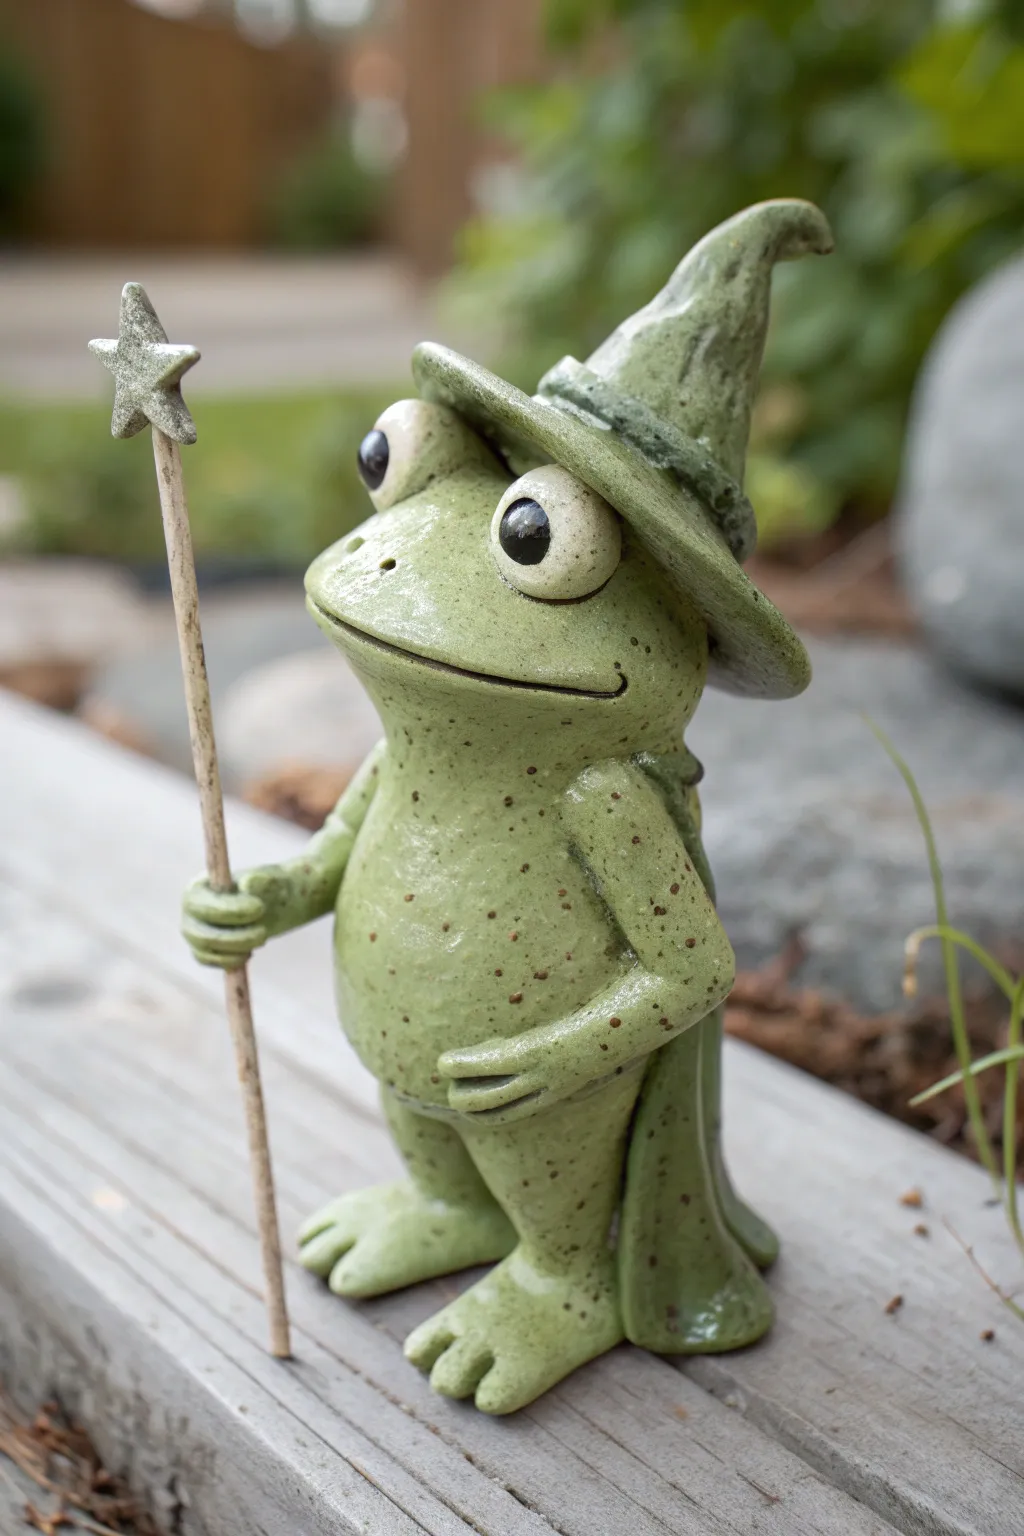
Summon a touch of magic to your garden or shelf with this adorable clay frog wizard. Featuring a speckled green finish, a classic pointed hat, and a star-tipped wand, this figurine has a charmingly rustic, handmade feel.
Detailed Instructions
Materials
- Polymer clay or air-dry clay (white or light grey)
- Acrylic paints (olive green, dark green, cream/white, black)
- Glossy varnish or glaze
- Thin wooden dowel or sturdy skewer (for the wand)
- Sculpting tools (needle tool, ball tool)
- Aluminum foil (for armature core)
- Small paintbrush and old toothbrush
- Strong craft glue (e.g., E6000)
Step 1: Sculpting the Body
-
Form the core:
Start by scrunching aluminum foil into a pear shape. This will be the inside of your frog’s body, saving clay and reducing weight. The shape should be wider at the bottom for the belly. -
Cover with clay:
Roll out a sheet of your clay and wrap it fully around the foil armature. Smooth the seams carefully with your fingers until you have a seamless, pear-shaped body. -
Add the legs:
Roll two thick sausage shapes for legs. Attach them to the lower sides of the body, blending the clay upwards into the hips. Bend the bottom outward to create the feet. -
Shape the feet:
Flatten the ends of the leg rolls slightly. Use a needle tool or knife to separate three toes on each foot, rounding off the tips so they look soft and webbed. -
Create the arms:
Roll two thinner coils for arms. Attach them near the top of the ‘pear’ shape. Position the left arm bent at the elbow to hold the wand, and let the right arm rest naturally against the belly.
Sticky Situation
If the clay wand keeps drooping, create the star and stick separately. Bake or dry the frog with a hole in his hand, then glue the finished wand in later.
Step 2: The Wizard’s Attire
-
Sculpt the head and mouth:
Add a slightly flattened dome of clay to the top of the body for the head. Use a needle tool to carve a wide, happy smile that curves up at the corners. -
Attach the eyes:
Roll two medium-sized balls of clay. Place them high on the head, spacing them out slightly. These should be prominent and bulbous. -
Fashion the cape:
Roll a thin sheet of clay and cut it into a trapezoid shape. Drape this onto the back of the frog, gently folding it to create fabric-like ripples. Blend the top edge near the frog’s neck. -
Make the hat brim:
Cut a circle of clay for the hat brim. Place it on the frog’s head, tilting it slightly back so it doesn’t cover those big eyes. Smooth the connection point underneath. -
Form the hat cone:
Shape a cone of clay and curve the tip slightly for a jaunty ‘wizard’ look. Attach this to the brim, blending the seam. Add a thin snake of clay around the base of the cone for a hat band.
Pro Tip: Texture
Before baking, lightly gently pat the frog’s skin with a crumpled ball of aluminum foil. This adds a subtle, stony skin texture that catches the glaze beautifully.
Step 3: The Magical Wand
-
Prepare the rod:
Take your thin wooden dowel or skewer and cut it to the right height relative to your frog. It should be slightly taller than the frog’s head. -
Sculpt the star:
Form a small five-pointed star out of clay. Carefully push this onto the non-pointed end of your wooden stick. You might need a drop of glue here if using air-dry clay. -
Place the wand:
Insert the wand into the frog’s curled hand. Gently squeeze the clay hand around the stick to secure it, but keep the stick loose enough to remove for painting if needed. -
Dry or bake:
If using polymer clay, bake according to package instructions. For air-dry clay, let the piece sit undisturbed for 24-48 hours until fully hard.
Step 4: Painting and Finishing
-
Base coat:
Paint the entire frog body (skin only) with a nice, muted olive green. I find mixing a tiny bit of yellow into the green warms it up nicely. Paint the cape and hat a slightly darker, mossy green. -
Detail the eyes:
Paint the eyeballs a creamy white. Once dry, add large black pupils. A tiny white dot in each black pupil adds that crucial spark of life. -
Speckle technique:
Dip an old toothbrush into diluted brown or dark green paint. Run your thumb across the bristles to flick tiny specks onto the frog’s skin. This gives it that realistic ceramic texture. -
Paint the wand:
Paint the wooden stick a light beige or grey to look like old wood. Use a metallic silver or soft grey for the star. -
Seal the magic:
Once all paint is completely dry, coat the entire figure with a high-gloss varnish. This mimics the glazed look of the ceramic frog in the photo and protects your work.
Place your new magical friend near a plant pot to watch over your garden
Frog Holding a Tiny Gift
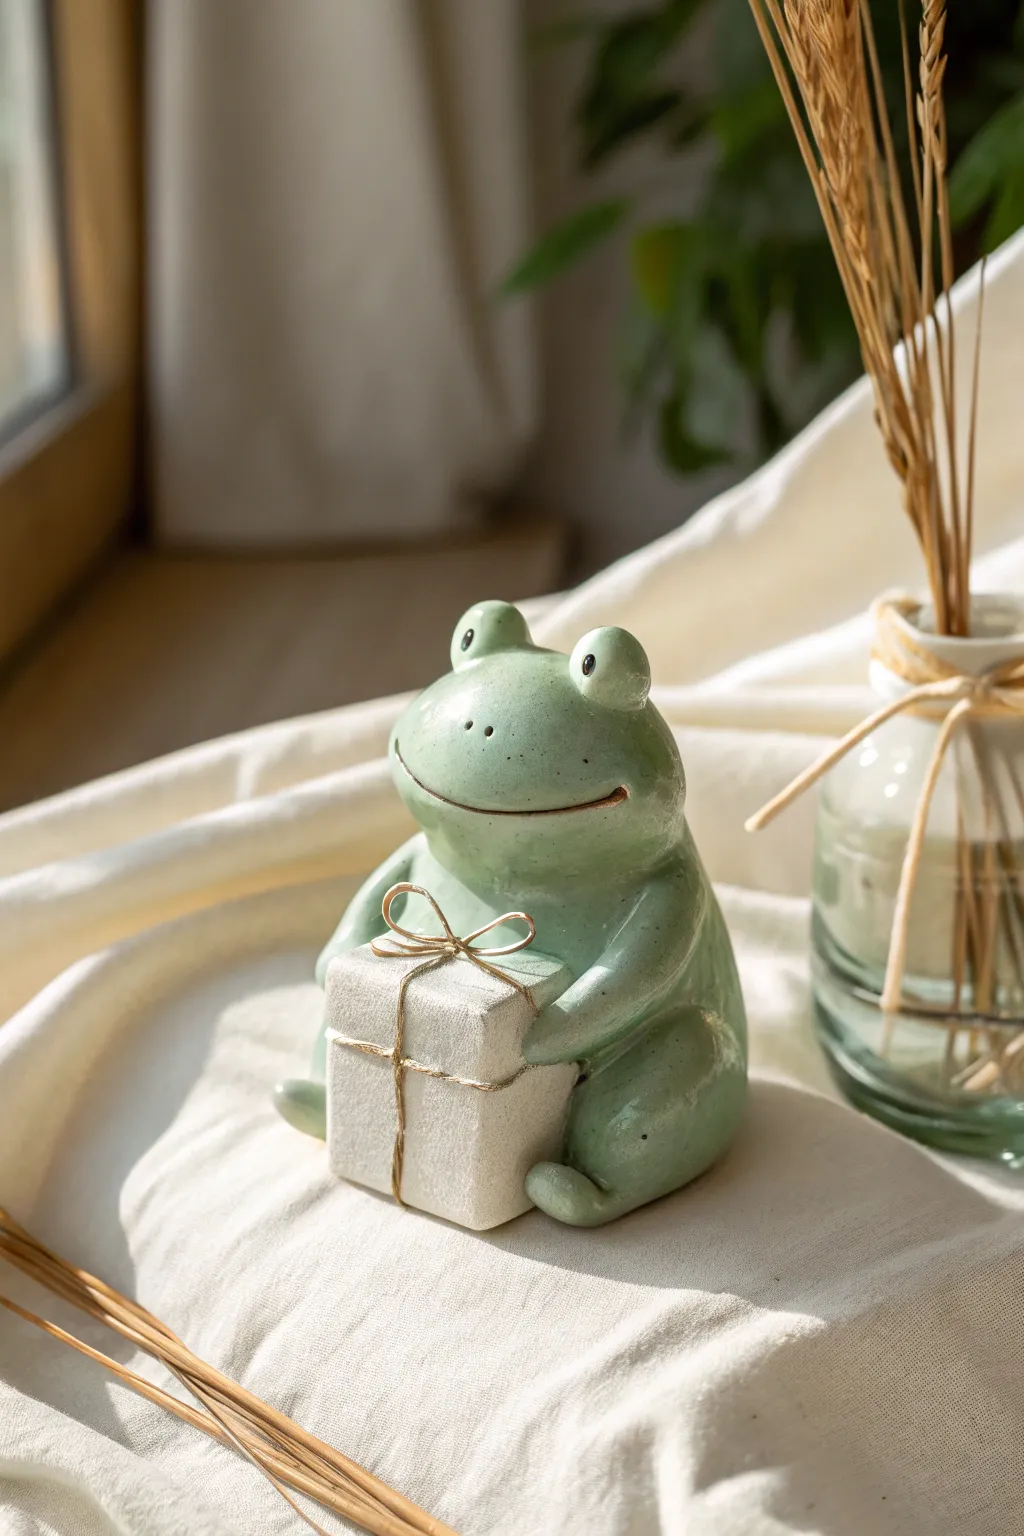
This adorable clay project features a chubby, cheerful frog clutching a tiny present, perfect as a keepsake or decoration. With its smooth, glossy finish and simple shapes, it captures a charming whimsical style that brightens any shelf.
Step-by-Step
Materials
- Polymer clay (light sage green, white)
- Acrylic paints (black, pink for cheeks, metallic gold)
- Glossy varnish or glaze (polyurethane or resin)
- Clay sculpting tools (dotting tool, needle tool)
- Crumpled aluminum foil (for armature core)
- Rolling pin
- Gold wire or thin gold twine
- Super glue (optional)
Step 1: Sculpting the Body
-
Prepare the core:
Since this frog has a nice round belly, start by crumpling a small ball of aluminum foil about the size of a golf ball. This saves clay and keeps the figurine lighter. -
Cover with green clay:
Condition your sage green clay until it’s pliable. Flatten a large portion into a pancake and wrap it completely around the foil ball, smoothing out all seams until you have a perfect, seamless sphere. -
Shape the torso:
Gently press the sphere onto your work surface to create a flat base so the frog sits securely without rolling. Slightly taper the top half to define the head area versus the body, though keep the transition very subtle for that chubby look. -
Add the legs:
Roll two thick logs of green clay for the legs. Attach them to the sides of the body, starting near the hips and curving them forward so the feet rest on the ground. Blend the top seams into the body using a sculpting tool. -
Create the feet:
At the end of each leg log, flatten the clay slightly to form the feet. You don’t need detailed toes for this stylized look; simple rounded nubs work perfectly.
Step 2: Creating the Head Features
-
Form the eyes:
Roll two small balls of green clay. Place them on top of the head, spacing them slightly apart. Press them down firmly and use a blending tool to smooth the clay where the eyes meet the head so they don’t pop off later. -
Add the smile:
Using a needle tool or a clay knife, carve a long, wide smile across the face. Make the cut fairly deep and curve it upwards at the ends to give him a happy expression. -
Mold the arms:
Roll two smaller logs for the arms. Attach them at the shoulder area, bending them forward as if the frog is reaching out to hold something in its lap. Blend the shoulders smooth.
Smooth Operator
Before baking, brush a tiny amount of baby oil or clay softener over the green clay with your finger to remove fingerprints and achieve a flawless finish.
Step 3: The Tiny Gift
-
Shape the box:
Clean your hands thoroughly to avoid transferring green pigment, then take a block of white clay. Shape it into a neat, sharp-edged cube. I find using the side of a ruler helps flatten the sides evenly. -
Texture the box (optional):
If you want the textured look seen in the photo, gently press a piece of canvas or sandpaper against the white clay to give it a fabric-like surface. -
Place the gift:
Position the white cube between the frog’s arms. Gently press the frog’s hands against the sides of the box to make it look like he is gripping it tightly. -
Create the ribbon indentation:
Use a needle tool to lightly score a cross shape around the gift box where the ribbon will go later. This acts as a guide for your wire or string.
Droopy Arms?
If the arms sag while holding the gift during baking, prop them up with extra bits of crumpled foil or polyester batting until the clay hardens.
Step 4: Finishing Touches
-
Bake the piece:
Bake the figurine according to your clay manufacturer’s instructions (usually 275°F/135°C for 15-30 minutes per 1/4 inch thickness). Let it cool completely. -
Paint facial details:
Using a small dotting tool dipped in black acrylic paint, add the pupils to the protruding eyes. You can also dry-brush a tiny bit of dark pink on the cheeks for blush. -
Highlight the smile:
To make the mouth stand out like the image, dilute a little brown or dark green paint and run it into the mouth groove, wiping away any excess on the surface. -
Add the ribbon:
Take your thin gold wire or twine and wrap it around the white box, following the indentations you made. Tie a small, neat bow on top. A tiny dab of super glue will keep the knot secure. -
Apply the glaze:
Finish by coating the entire green frog in a high-gloss varnish to achieve that wet, ceramic look. You can leave the white gift box matte for a nice textural contrast.
Enjoy displaying your delightful little friend and the gift of creativity he brings to your space
Speckled “Pond Stone” Frog
Embrace the natural aesthetic with this charming frog sculpture that mimics the look of a smooth, speckled river stone. Its rounded form and earthy texture make it a perfect, unobtrusive companion for your windowsill or garden planters.
Step-by-Step Guide
Materials
- Stoneware clay (speckled or buff)
- Black underglaze (or acrylic paint if not firing)
- Matte clear glaze
- Pointed wooden modeling tool
- Rib tool (kidney shaped)
- Needle tool
- Old toothbrush (for spattering)
- Sponge
- Slip (clay mixed with water)
Step 1: Forming the Body
-
Shape the Base:
Start with a ball of clay roughly the size of a grapefruit. Gently pat and roll it on your work surface to create a squat, slightly flattened oval shape. This forms the main body. -
Smooth the Surface:
Use a damp sponge or a flexible rib tool to smooth out any fingerprints or uneven bumps. The goal is to make the clay look like a naturally eroded river stone. -
Create Eye Bulges:
Roll two smaller balls of clay, about the size of large grapes. Score and slip the top of the body where the eyes will sit, then press these balls firmly onto the surface. -
Blend the Seams:
Using your thumb or a modeling tool, drag the clay from the base of the eye balls down into the main body to seamless blend them. Keep the tops rounded and distinct.
Air Pockets
If using a solid lump of clay thicker than 1 inch, hollow out the body from the bottom before closing it up. Thick clay can explode in the kiln if trapped moisture turns to steam.
Step 2: Detailed Features
-
Sculpt the Eyelids:
Roll two tiny coils of clay. Wrap one around the base of each eye bulge to create an eyelid structure. Blend the bottom edge of the coil into the head, leaving the top edge slightly raised for definition. -
Define the Mouth:
Take your needle tool or the sharp edge of a wooden tool. Carve a long, wide, slightly curved line across the front of the face for the mouth. It should stretch almost from one side of the ‘face’ area to the other. -
Deepen the Expression:
Go back over the mouth line with a slightly blunter tool to widen it just a fractions, giving the frog a gentle, contented expression rather than a sharp cut. -
Form the Hind Legs:
Roll two medium-sized egg shapes. Flatten them slightly and attach them to the rear sides of the body using the score and slip method. -
Shape the Thighs:
Blend the front edge of the leg attachment into the body completely. Leave the back curve of the leg bulky and prominent to suggest the powerful thigh muscle of a sitting frog. -
Add Front Feet:
Create two small, flat triangular shapes. Attach them underneath the front of the chest area so they just peek out, grounding the frog.
Natural Texture
Gently press a real stone or a piece of coarse sandpaper against the clay while it’s soft to imprint a realistic, pitted rock texture before smoothing it slightly.
Step 3: Texturing and Finishing
-
Refine the Surface:
Once the clay is leather hard, give the entire piece a final smoothing with a very slightly damp sponge to remove any sharp tool marks. -
Bisque Fire:
Allow the frog to dry completely (slowly, to prevent cracking). Fire the piece to bisque temperature designated for your specific clay body. -
Paint the Eyes:
Using a small brush, carefully paint large black pupils onto the center of the eye bulges using black underglaze. I prefer to leave a tiny rim of unpainted clay around the black for depth. -
Add Speckles:
Dilute a small amount of dark brown or black underglaze with water. Dip an old toothbrush into it, and flick the bristles with your thumb to spray a fine mist of speckles over the frog’s back and legs. -
Glaze Application:
Apply a coat of matte clear glaze over the entire piece. This protects the underglaze details while maintaining that natural, stony finish without high gloss. -
Final Fire:
Fire the piece again to the glaze temperature appropriate for your materials to seal the sculpture.
Place your finished stone frog near a sunny window to enjoy its calm presence every day
Stackable Frog Totem Set
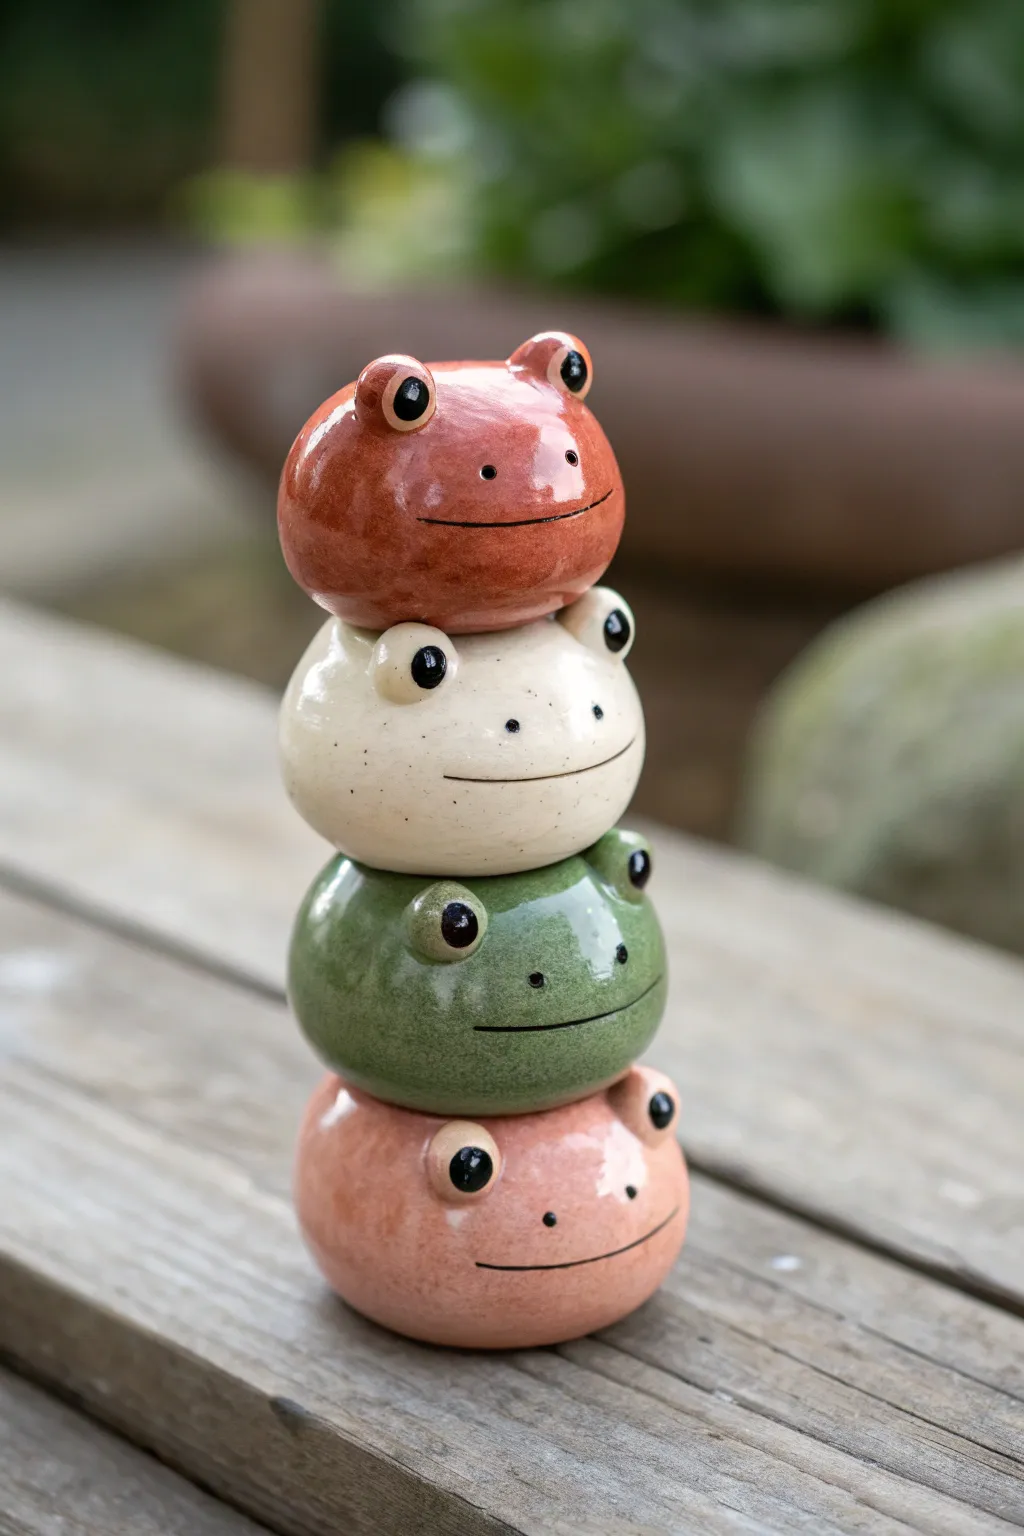
Create a whimsical tower of amphibian friends with this stackable ceramic set. These glossy, round frogs are designed to nestle perfectly on top of one another, making for a delightful and customizable garden decoration or desk accessory.
How-To Guide
Materials
- Earthenware or stoneware clay body (suitable for throwing or hand-building)
- Pottery wheel (optional, can be pinch-potted)
- Underglazes: Terracotta Red, Cream/White, Sage Green, Coral Pink
- Clear transparent glossy glaze
- Modeling tools (wooden knife, needle tool)
- Black underglaze for details
- Fine detail brush
- Kiln for bisque and glaze firing
Step 1: Forming the Bodies
-
Prepare the clay:
Begin by wedging four equal-sized balls of clay, roughly the size of a large tangerine, ensuring there are no air bubbles. -
Shape the base forms:
Create four enclosed hollow spheres. If throwing on the wheel, throw a closed form similar to a small bud vase, then collar it completely shut. If hand-building, create two pinch pots and score and slip them together to form a ball. -
Refine the shape:
Gently paddle or roll the spheres on your work surface to flatten them slightly into ‘bun’ shapes rather than perfect circles. They should look a bitsquat. -
Create the stacking mechanism:
For the bottom three frogs, gently press a thumb or a rounded tool into the very top center to create a shallow concave divot. -
Match the bottoms:
For the top three frogs, press the bottom of the form gently against the top of another to ensure the curve nests perfectly into the divot you just made. This ensures stability when stacked.
Clean Lines
To get perfectly round pupils, use the flat end of a drill bit or a dowel dipped in black underglaze to stamp the circle rather than painting it.
Step 2: Sculpting Features
-
Add the eyes:
Roll eight small, pea-sized balls of clay for the eyes. Score and slip two onto the top-front of each body, spacing them widely apart for that cute, derpy look. -
Smooth the connections:
Use a small modeling tool to blend the clay from the back of the eye balls down into the body so they don’t pop off during firing. -
Refine the surface:
Once the clay is leather hard, use a slightly damp sponge to smooth out any fingerprints or joining marks, particularly around the eye sockets.
Garden Glow
Leave the very bottom of the lowest frog open during forming to insert a small LED tea light, turning the base of your totem into a glowing garden feature.
Step 3: Painting & Firing
-
Bisque fire:
Allow the frogs to dry completely (bone dry) before loading them into the kiln for a bisque fire to cone 04 (or your clay’s specification). -
Base coat colors:
Apply 2-3 coats of underglaze to each frog. I like to vary the colors—paint the top one terracotta, the second cream, the third sage green, and the bottom a soft coral pink. -
Paint the eyes:
Carefully paint the protruding eye bumps with a cream or white underglaze if the body color is dark; otherwise, leave them the body color. -
Add facial details:
Using a fine detail brush and black underglaze, paint large solid circles for pupils on the eye bumps. Add two small dots for nostrils and a wide, thin line for the mouth. -
Apply clear glaze:
Once the underglaze is dry, dip each frog into a clear transparent glaze. Ensure the foot (bottom) is wiped clean of glaze so it doesn’t fuse to the kiln shelf. -
Glaze fire:
Fire the pieces again to the maturity temperature of your clay and glaze (typically cone 5 or 6 for stoneware). The clear glaze will turn the colors vibrant and glossy. -
Final assembly:
Once cool, stack your frogs according to their fitted divots and admire your creation.
You now have a charming family of ceramic frogs ready to brighten up your shelf or garden
Frog Pond Mini Diorama
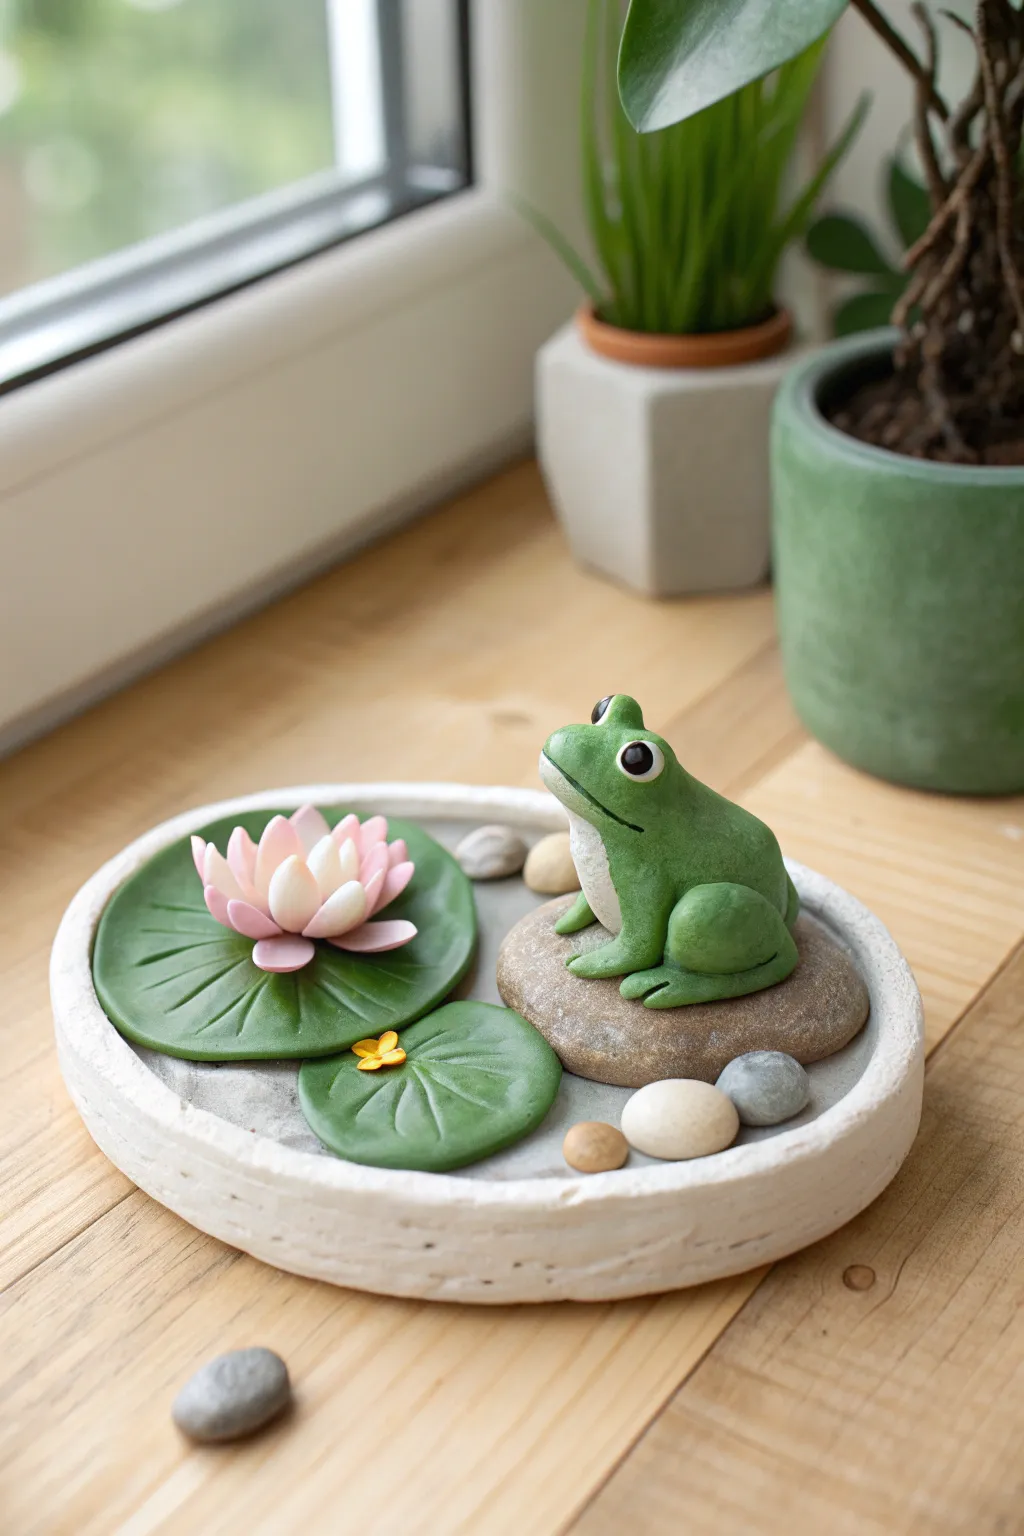
Bring the tranquility of nature indoors with this adorable miniature pond scene featuring a friendly frog perched on a rock. This detailed diorama combines simple sculpting techniques with thoughtful composition to create a peaceful, self-contained little world.
Step-by-Step Tutorial
Materials
- Polymer clay (green, white, pink, grey/brown, black, yellow, translucent)
- Shallow round dish or lid (white ceramic or painted clay)
- Sculpting tools (ball styluses, needle tool, clay knife)
- Small smooth stones/pebbles
- Liquid polymer clay or strong glue
- Clear resin or UV resin (optional for water effect)
- Grey sand or fine grit texture paste
- Oven for baking
Step 1: Sculpting the Frog
-
Body Base:
Start by conditioning your green clay until soft. Roll a medium-sized ball for the body, shaping it slightly into a rounded pear shape. The wider bottom will be where the legs attach. -
Legs and Thighs:
Shape two smaller balls of green clay into thick teardrops. Press these firmly onto the sides of the body near the back to form the powerful thigh muscles. -
Feet Details:
For the front legs, roll two thin logs of green clay. Attach them under the chest area. Use a needle tool to gently impress three lines at the end of each limb to define the toes. -
Adding the Belly:
Mix white clay with a tiny dot of black to make a very light grey. Flatten a thin oval and press it onto the frog’s chest and belly area for contrast. Use a tool to texture it slightly if desired. -
Face and Eyes:
Use a large ball tool to make indentations for the eye sockets. Place small balls of white clay inside, then add smaller black pupils. Use a clay knife to slice a wide, friendly mouth line.
Fingerprint Fix
If you see fingerprints on your raw clay frog, lightly brush the surface with a little baby oil or cornstarch before baking to smooth them out completely.
Step 2: Creating the Flora
-
Lily Pad Bases:
Roll out dark green clay into a flat sheet. Cut two uneven circles—one larger, one smaller. I like to gently pinch the edges to make them look organic rather than perfectly round. -
Leaf Texture:
Use a needle tool or knife to score radial lines from the center of each pad outwards. Cut a small pie-slice shape out of each leaf to give it that classic lily pad silhouette. -
Lotus Petals:
For the flower, mix white and pink clay to get a soft gradient. Shape several tiny teardrops. Arrange the larger petals in a circle first, then layer smaller petals inside to build volume. -
Flower Center:
Place a tiny yellow center inside the petals. Attach the finished flower to the larger lily pad using a dab of liquid clay to ensure it bonds during baking. -
Tiny Details:
Create a microscopic yellow flower or bug for the smaller lily pad. Simple shapes work best here; just a few specks of yellow clay can suggest a fallen petal or insect.
Make it Sparkle
Add a tiny dot of UV resin or high-gloss varnish to the frog’s eyes after baking. It gives them a wet, lifelike glint that makes the character pop.
Step 3: Assembly and Finish
-
Preparing the Base:
Take your shallow dish. If you made it from clay, ensure it has a textured, stone-like edge. Fill the bottom with a thin layer of grey polymer clay or texture paste to simulate a sandy riverbed. -
Rock Placement:
Choose a large, flat river stone as the main perch. Press it firmly into the base layer so it sits naturally. Arrange smaller pebbles around the perimeter. -
Setting the Scene:
Place the lily pads onto the base layer. Position the frog carefully on the large rock. Check the composition from all angles to make sure the frog looks like he is gazing at the flower. -
Baking:
Bake the entire piece according to your clay manufacturer’s instructions (usually 275°F/130°C for 15-30 minutes). Let it cool completely inside the oven to prevent cracking. -
Optional Water Effect:
Once cool, you can pour a thin layer of clear resin into the bottom of the dish around the rocks and lily pads to create a permanent, glossy ‘water’ look.
Now you have a serene little pond friend to keep you company on your desk or windowsill