Whenever I’m planning air dry clay time with kids, I stick to projects that feel playful, forgiving, and totally doable with small hands. Here are my go-to kids crafts that dry into cute little keepsakes and functional treasures you’ll actually want to keep.
Cute Animal Pencil Toppers
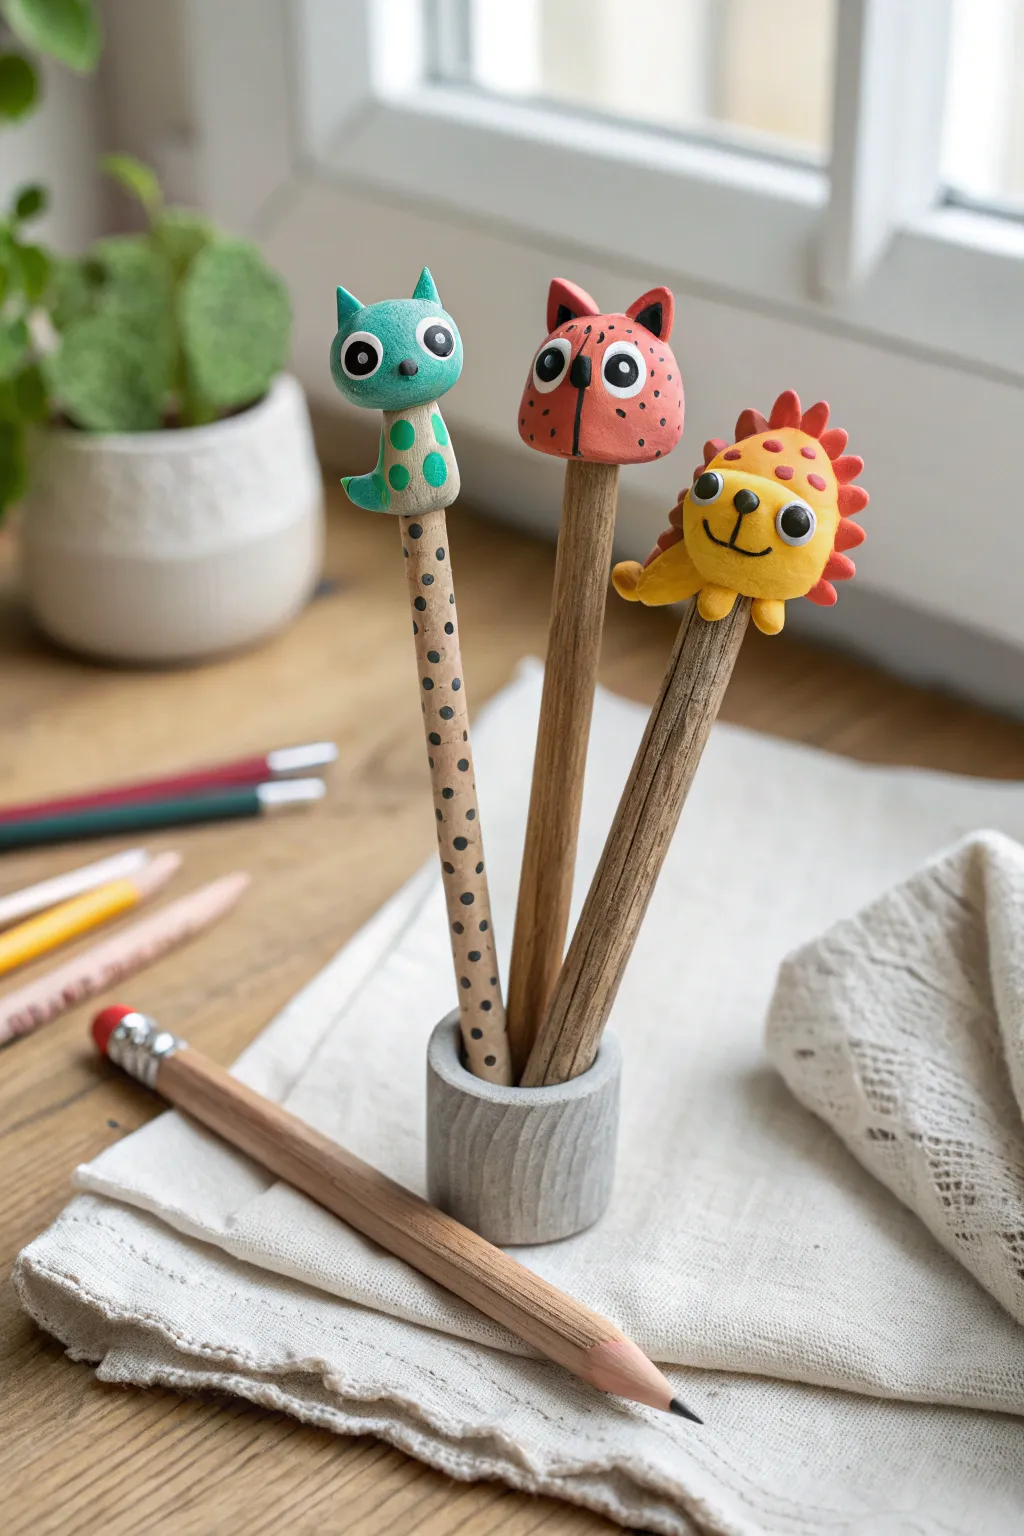
Transform ordinary pencils into adorable writing companions with these playful air dry clay animal toppers. Featuring a spotted teal cat, a polka-dot fox, and a sunny yellow lion, this project adds a burst of charm to any homework session.
How-To Guide
Materials
- Air dry clay (white or pre-colored)
- Wooden pencils (unsharpened ends)
- Acrylic paints (teal, coral red, yellow, black, white)
- Fine detail paintbrushes
- Ball stylus or toothpick (for texturing)
- Water cup
- Matte varnish or sealant (optional)
- Strong craft glue (optional)
Step 1: Shaping the Base Structures
-
Prepare the connection point:
Start by taking a small ball of clay about the size of a large marble. Push the unsharpened end of your pencil into the ball about halfway down to create a snug fit. -
Secure the clay:
Remove the pencil, add a tiny drop of craft glue into the hole if you want extra durability, and re-insert the pencil. Gently mold the clay down comfortably around the wood shaft to blend the transition. -
Form the Teal Cat’s head:
For the teal creature, shape the clay on the pencil into a smooth, slightly flattened sphere. Pinch two small triangles at the very top to create pointy ears. -
Add the Cat’s body:
Mold a small, curved sausage shape and attach it to the front of the pencil, just below the head, blending the clay so it looks like the animal is clinging to the pencil. Curve a little tail around the side. -
Sculpt the Red Fox head:
For the middle topper, shape a slightly taller, more oval-shaped dome. Pinch the top corners dramatically to form prominent ears, creating a silhouette that looks a bit like a tulip. -
Create the Yellow Lion:
Roll a smooth round circle for the third pencil. Flatten it slightly so it isn’t perfectly spherical. -
Add the Lion’s mane:
Form many tiny tear-drop shapes from clay. Press these all around the back perimeter of the yellow head to create a radiating mane. -
Attach the Lion’s paws:
Add two small oval nubs just under the lion’s chin, pressing them onto the pencil shaft to look like little paws holding on.
Step 2: Drying and Painting Details
-
Allow to dry completely:
Stand the pencils upright in a jar or foam block. Let the clay dry for at least 24 hours until it is hard and turns a chalky white (if using white clay). -
Base coat colors:
Paint the first topper with a solid coat of teal green. Paint the fox head a reddish-coral color, and paint the lion’s face bright yellow. -
Paint secondary features:
Once the base is dry, paint the lion’s mane spikes in an orange or reddish tone. Add a lighter green oval on the teal cat’s tummy. -
Paint the large eyes:
Using white paint, add two large circles to each face for the eyes. Let this layer dry completely before moving to the next step to avoid smudging. -
Add pupils and noses:
With a fine brush or a toothpick dipped in black paint, add the black pupils inside the white circles. Paint small black triangle noses on all three animals. -
Detail the pattern spots:
Dip the back end of your paintbrush into paint to stamp dots. Add dark blue dots to the teal cat’s tummy and black polka dots all over the red fox’s head. -
Draw the smiles:
Use your thinnest brush or a waterproof black maker to draw the simple anchor-shaped mouths on the cat and lion, and a straight line on the fox. -
Decorate the pencil shaft:
For an extra touch, I like to paint loose block dots down the wooden shaft of the teal pencil to match the pattern on the cat’s belly. -
Seal the work:
Protect your hard work by brushing a thin layer of matte varnish over the clay parts once all the paint is bone dry.
Loose Toppers?
If the dried clay feels loose on the pencil, carefully pull it off, add a dab of superglue to the pencil tip, and slide the topper back on for a permanent hold.
Make it fuzzy!
While the paint is still wet on the lion’s mane or the fox, sprinkle a tiny bit of flocking powder or very fine glitter to give the animals a textured, fuzzy look.
Enjoy your new set of custom stationery that makes writing feel like a creative adventure


Rainbow Cloud Hanging Decor
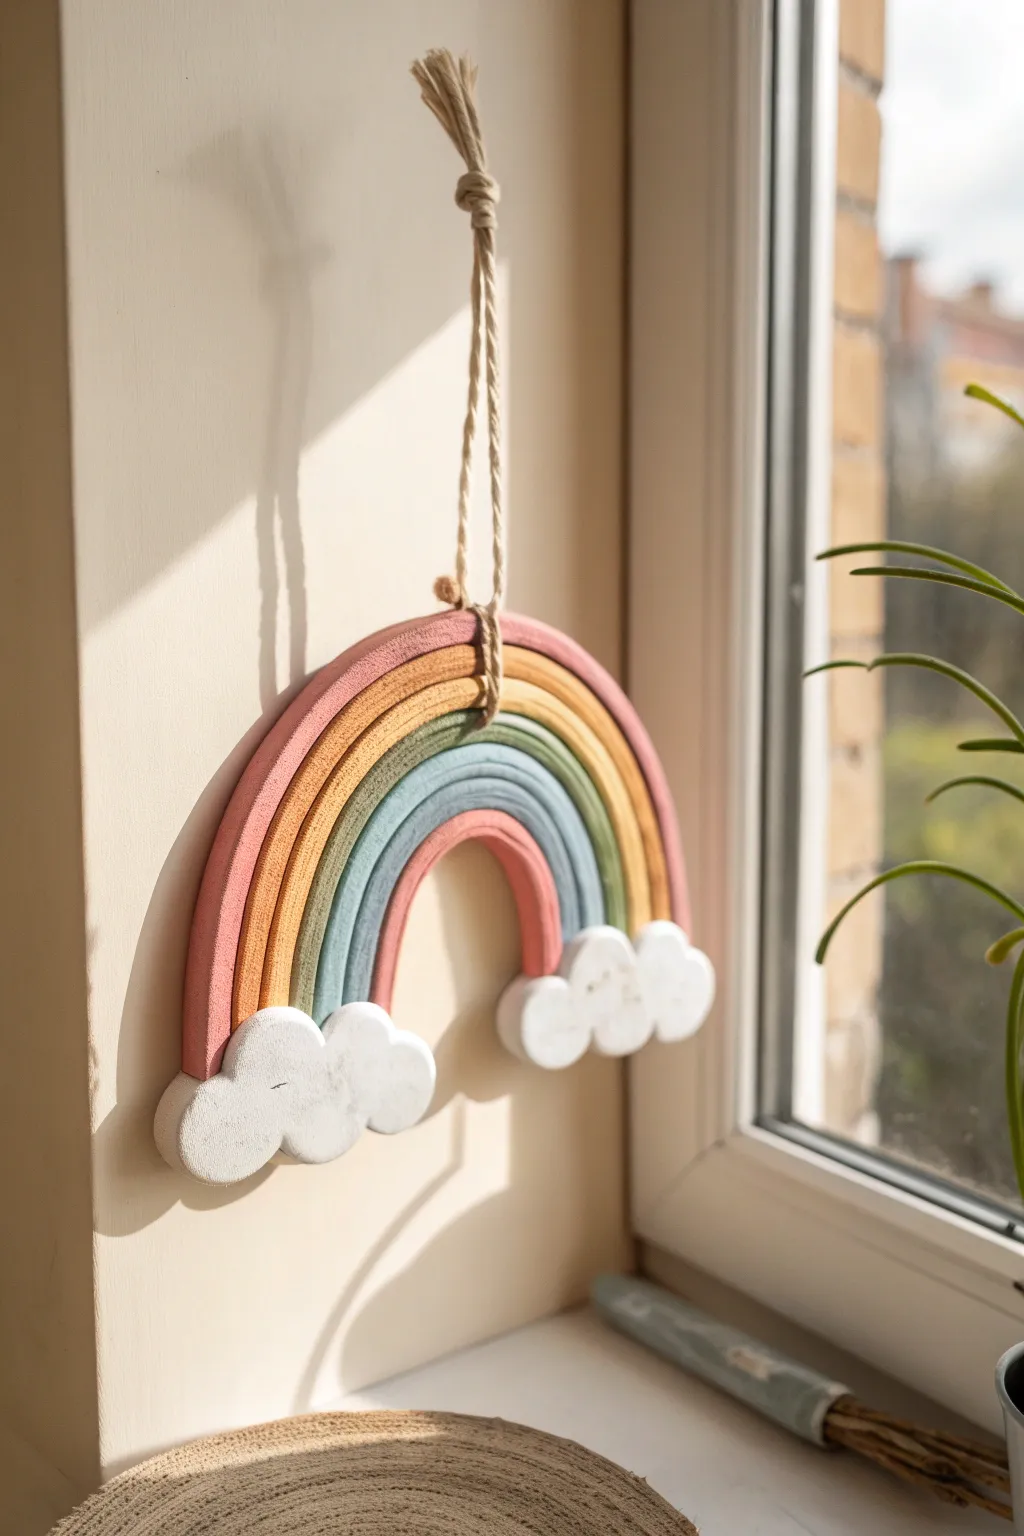
Brighten up any window or nursery wall with this charming pastel rainbow hanger made from simple air dry clay. With its soft, muted colors and fluffy cloud bases, it captures a whimsical, handmade aesthetic that is perfect for a beginner’s sculpting project.
Step-by-Step Guide
Materials
- White air dry clay
- Rolling pin
- Clay knife or plastic crafting tool
- Acrylic paints (dusty pink, mustard yellow, sage green, sky blue)
- Paintbrushes (medium flat brush and fine detail brush)
- Water cup
- Jute twine or rustic string
- Strong craft glue (e.g., tacky glue) if clay doesn’t self-adhere well
- Parchment paper or silicone mat
- Small cup of water for smoothing
Step 1: Forming the Rainbow Arches
-
Divide the clay:
Start by dividing a portion of your white clay into four even lumps. These will become the four bands of your rainbow. -
Roll the first coil:
Take the first lump and roll it into a long, even snake shape on your work surface. Aim for a thickness of about half an inch. This will be the smallest, innermost arch. -
Shape the arch:
Curve the snake into a ‘U’ shape. I find it helpful to shape this directly on parchment paper so you don’t have to move it later. -
Create subsequent arches:
Roll three more snakes, making each one slightly longer than the last so they can wrap around the previous arch. -
Assemble the stack:
Gently press the arches together side-by-side so they touch. Use a tiny bit of water on your finger to smooth the seams slightly if you want them to stick together securely as one unit. -
Trim the bottom:
Once your four arches are nested together, use your clay knife to cut straight across the bottom of the ‘legs’ so they are perfectly flush and even. -
Add the hole:
Using a skewer or the end of a paintbrush, poke a hole through the top center of the rainbow (between the top two arches or through the very top one) large enough for your twine to pass through later.
Step 2: Creating the Cloud Bases
-
Form cloud shapes:
Roll two medium-sized balls of clay and flatten them slightly into thick oval shapes. -
Sculpt the fluff:
Use your fingers or a rounded tool to press indentations into the edges, creating the bubbly, scalloped look of a cloud. -
Attach to the rainbow:
Score (scratch) the back of the clouds and the front bottom of the rainbow legs. Apply a dab of water or slip (watery clay) and press the clouds firmly onto the bottom of the rainbow legs. -
Smooth the transition:
Gently smooth the clay where the clouds meet the rainbow arches efficiently, ensuring a strong bond so they don’t pop off later. -
Let it dry:
Allow the entire piece to dry completely on a flat surface. This can take 24-48 hours depending on humidity. Flip it over halfway through to ensure the back dries evenly.
Cracks appeared?
Make a ‘slurry’ paste by mixing a tiny scrap of clay with water. Smear this paste into any cracks, smooth it over with your finger, and let it dry again.
Step 3: Painting and Finishing
-
Paint the outer arch:
Once dry, paint the outermost arch a soft dusty pink. Use a steady hand to keep the lines clean between colors. -
Paint the middle layers:
Moving inward, paint the next arch mustard yellow, followed by sage green for the third arch. -
Paint the inner arch:
Finish the rainbow arches by painting the smallest inner arch a soft sky blue. -
Paint the clouds:
Paint the fluffy cloud bases solid white. If your clay dried an off-white color, a coat of white acrylic will make them pop. -
Add the hanger:
Cut a length of jute twine. Thread it through the hole you made earlier at the top of the rainbow. -
Secure the knot:
Tie a secure knot at the base of the twine near the rainbow, and create a loop at the top for hanging.
Add some sparkle
Before the white paint on the clouds dries, sprinkle a pinch of iridescent glitter over them to make them shimmer in the sunlight.
Hang your beautiful new creation in a sunny spot and enjoy the handmade charm it brings to your space


Mini Monster Magnets With Big Eyes
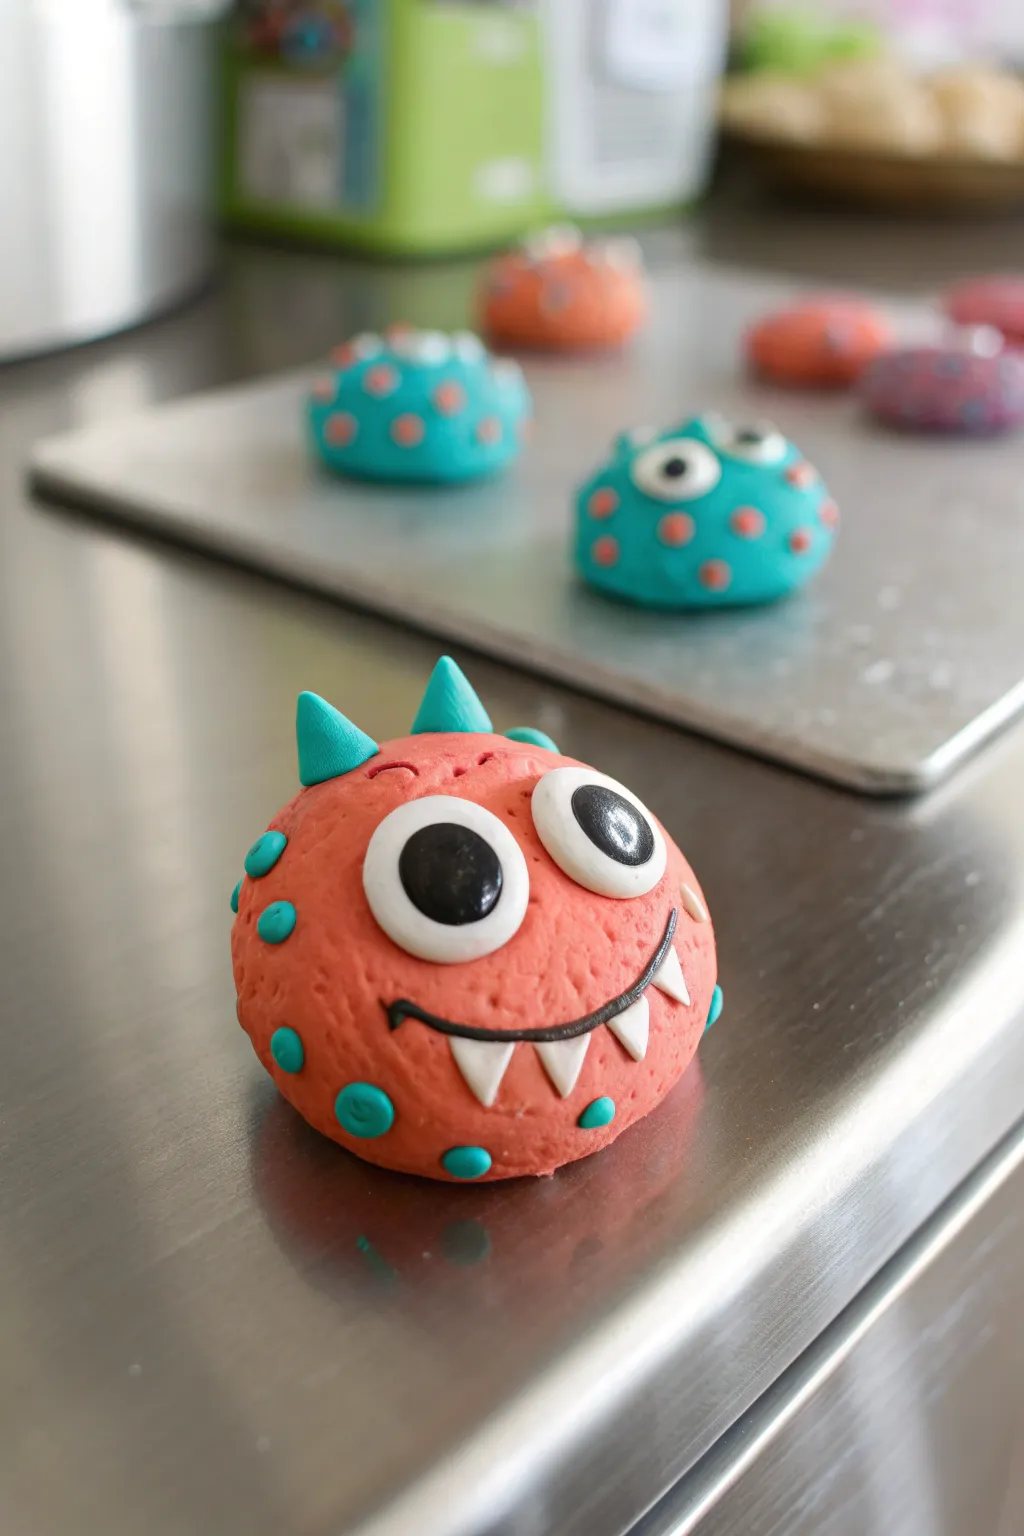
These adorable, round monster magnets are bursting with personality thanks to their oversized eyes, snaggle-toothed smiles, and vibrant colors. They are perfectly palm-sized and make a cheerful addition to any fridge or magnetic board.
Step-by-Step Tutorial
Materials
- Air dry clay (red, teal, white, black)
- Clay sculpting tools (or a toothpick)
- Round magnets
- Strong craft glue or hot glue
- Rolling pin (optional)
- Parchment paper or silicone mat
Step 1: Creating the Base Body
-
Prepare the main color:
Start by taking a chunk of red air dry clay about the size of a golf ball or a large walnut. Knead it in your hands until it feels soft and pliable, which prevents cracks later. -
Shape the body:
Roll the red clay into a smooth ball between your palms. Gently press it down onto your work surface so the bottom flattens slightly, creating a dome shape rather than a perfect sphere. -
Add texture:
Using a crumpled piece of aluminum foil or a stiff bristle brush, gently tap the surface of the red dome to give it a slightly bumpy, skin-like texture.
Smooth Seams
If the clay isn’t sticking well, dip your finger in a tiny bit of water and rub it over the joint to act as ‘glue’ and smooth the seam.
Step 2: Adding the Spots and Horns
-
Form the spots:
Take a small amount of teal clay and roll several tiny balls, each about the size of a peppercorn. You will need about 6-8 of these. -
Attach the spots:
Press the tiny teal balls randomly onto the red body. Flatten them gently with your finger so they look like spots on the monster’s skin rather than bumps. -
Shape the horns:
Roll two small cones from the same teal clay to serve as horns. They should be short and stubby. -
Attach the horns:
Place the horns on top of the head, spacing them slightly apart. Blend the base of the horns into the red body just a little bit with a modeling tool to secure them.
Glow In The Dark
Swap the standard white clay for glow-in-the-dark clay for the eyes and teeth to make a spooky night-time version.
Step 3: Sculpting the Face
-
Make the whites of the eyes:
Roll two balls of white clay. One should be slightly larger than the other to give a goofy, asymmetric look. Flatten them into thick discs. -
Place the eyes:
Press the white discs onto the upper front of the face, ensuring they are touching each other. -
Add the pupils:
Roll two smaller balls of black clay. Flatten them and press them onto the white discs. I like to place them slightly off-center or looking in different directions for extra character. -
Create the eye highlights:
Roll two tiny, microscopic specks of white clay and press them onto the upper right corner of each black pupil to create a ‘sparkle’ effect. -
Form the smile:
Roll a very thin ‘snake’ of black clay. Gently press this onto the face below the eyes in a wide U-shape to form the smile. -
Refine the smile:
Use a small tool or toothpick to press the ends of the smile slightly upward.
Step 4: Teeth and Finishing Touches
-
Make the teeth:
Roll three or four tiny white cones for the teeth. Vary the sizes slightly. -
Attach the teeth:
Position the teeth along the black smile line, pointing downwards. Press them firmly so they adhere to the red body. -
Let it dry:
Allow your monster to dry completely in a safe place. This usually takes 24 to 48 hours depending on the brand of clay and humidity. -
Attach the magnet:
Once fully hard and dry, flip the monster over. Apply a strong dab of glue to the flat bottom and press your round magnet into place.
Now your little monster is ready to guard your grocery list with a smile


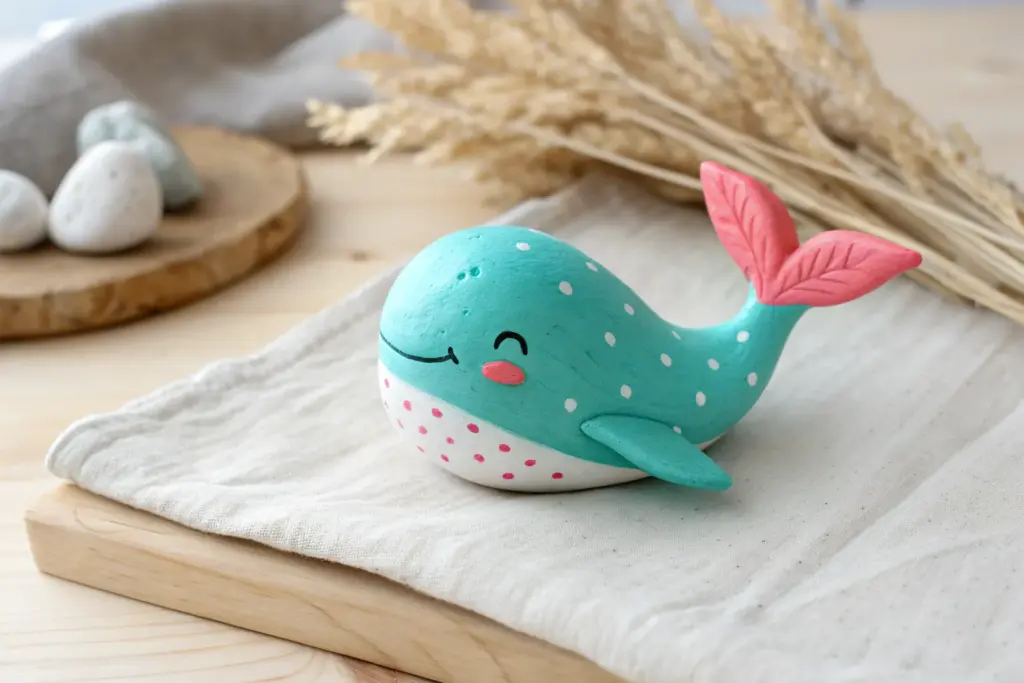
Painted Story Stones for Pretend Play
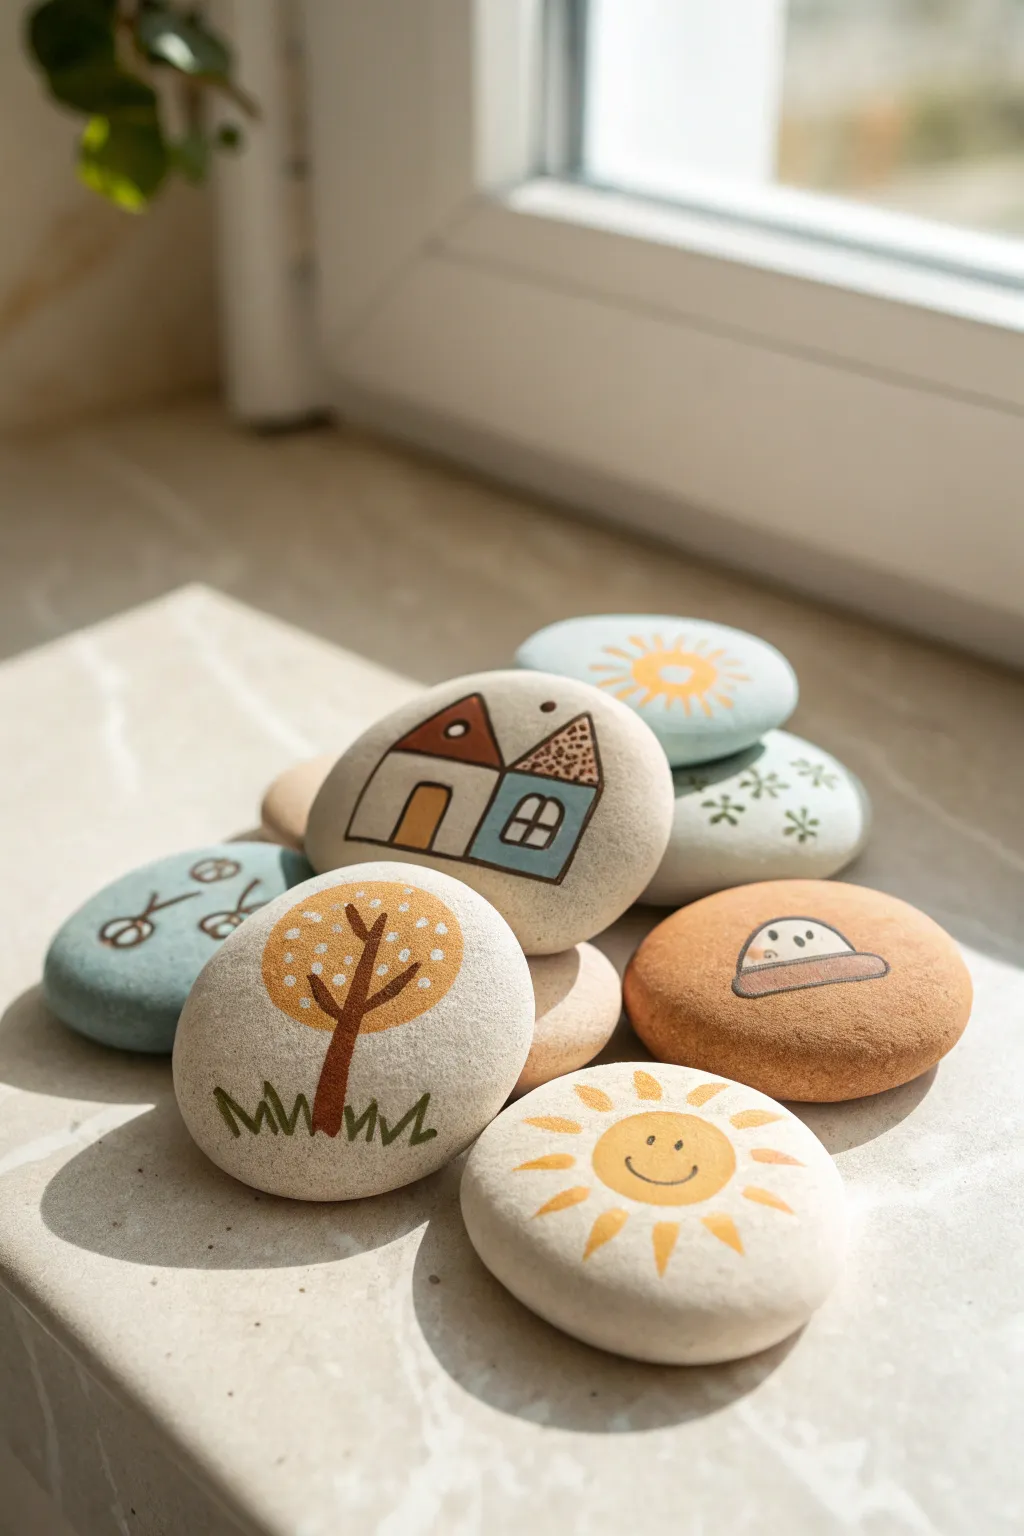
These charming, smooth story stones feel wonderful in the hand and act as perfect prompts for unfolding creative tales. By shaping simple discs of air-dry clay and decorating them with rustic, nature-inspired motifs like suns, trees, and cozy houses, you create a tangible library for pretend play.
Step-by-Step Guide
Materials
- White or stone-colored air-dry clay
- Rolling pin
- Circle cutter or a glass
- Fine-grit sandpaper
- Acrylic paints (primary colors + white)
- Fine detail paintbrushes (size 0 and 2)
- Black fine-liner pen (permanent ink)
- Small bowl of water
- Clear matte varnish or sealant spray
Step 1: Shaping the Canvases
-
Prepare the clay:
Start by kneading a handful of air-dry clay until it’s pliable and smooth. This warms up the material and removes air bubbles that could cause cracks later. -
Roll it out:
On a clean, flat surface, roll the clay out to a thickness of about 1/2 inch. You want them thick enough to feel like real river stones, not thin wafers. -
Cut the shapes:
Use a circle cutter or the rim of a glass to stamp out perfectly round discs. Alternatively, shape them by hand into irregular ovals for a more organic, natural rock look. -
Soften the edges:
Dip your finger in a little water and run it gently around the cut edges of each clay stone. This smooths out any harsh angles and mimics the worn texture of river pebbles. -
Let them cure:
Place your clay stones on a drying rack or parchment paper. Allow them to dry completely for 24-48 hours, flipping them halfway through to ensure even drying. -
Sand for smoothness:
Once fully rock-hard, lightly buff the surface with fine-grit sandpaper to remove any small bumps or fingerprints, creating a perfect surface for painting.
Stone Weight Trick
Want them to feel real? Knead a small, real pebble into the center of your clay ball before flattened it. The hidden weight makes them feel high-quality.
Step 2: Painting the Story Elements
-
Apply base coats:
For designs that need a background, paint a soft, muted color first. For example, mix a pale blue-grey for the bicycle stone or a warm terracotta for the UFO stone. -
Create the house duo:
On a bare clay stone, paint two simple shapes side-by-side: a larger white rectangle with a brown triangle roof, and a smaller blue square with a speckled brown roof. -
Add the sun’s circle:
Paint a solid yellow circle in the center of another stone. While the paint is wet, you can blend in a tiny touch of orange for depth. -
Paint the tree foliage:
Dab a round, orange shape onto a stone for the tree canopy. Use a stippling motion with your brush to add white dots for texture or blossoms. -
Detail the sun rays:
Go back to your sun stone. Using a slightly darker yellow or orange, carefully paint triangular rays radiating outward, alternating their lengths for a playful style. -
Form the tree trunk:
Using brown paint and a fine brush, draw a trunk extending down from the orange canopy, adding two small branches reaching upward into the leaves.
Fixing Curls
If your clay discs start curling up at the edges while drying, place a lightweight book on top of them (with parchment paper in between) to keep them flat.
Step 3: Inking and Sealing
-
Outline the houses:
Once the paint is bone dry, use your black fine-liner pen to trace the outline of the houses. Draw a simple door on the white house and a window grid on the blue one. -
Draw the grass:
Beneath your tree, use a green marker or fine paint brush to create zig-zag lines representing grass tufts. -
Add the sun’s face:
Give your sun personality by drawing two small dots for eyes and a wide, simple u-shape smile with the black pen. -
Sketch the bicycle:
On the blue-grey stone, draw a simple bicycle using stick lines and circles. Don’t worry about perfection; a sketchy style looks adorable here. -
Detail the UFO:
On the terracotta stone, outline a simple dome shape and draw a little alien figure inside. It’s fun to add whimsical elements like this to spark different genres of stories. -
Seal the artwork:
To protect your stories from sticky fingers, apply a coat of clear matte varnish. I prefer a spray sealant for an even finish that won’t smear the ink.
Once dry, toss them in a basket and let the storytelling begin

The Complete Guide to Pottery Troubleshooting
Uncover the most common ceramic mistakes—from cracking clay to failed glazes—and learn how to fix them fast.
Animal Buddy Mini Planters

Transform a plain lump of air-dry clay into an adorable bunny buddy for your tiniest succulents. This sweet pink planter features distinct fabric-lined ears and a cheerful painted face that is sure to brighten up any windowsill.
How-To Guide
Materials
- White air-dry clay (approx. 500g)
- Small rolling pin
- Empty plastic yogurt cup or small nursery pot (to use as a mold)
- Craft knife or clay cutting tool
- Bowl of water
- Acrylic paint: Coral pink (or mix red and white), black, white
- Small paintbrush and a fine detail brush
- Scrap of light gray fabric (linen or cotton)
- Strong craft glue or hot glue gun
- Clear matte varnish or sealant (optional but recommended)
Step 1: Shaping the Pot Base
-
Prepare the Clay:
Start by kneading your air-dry clay until it is soft, pliable, and free of cracks. If it feels too dry, dip your fingers in water and work it in. -
Create the Base Slab:
Roll out a portion of the clay into a flat circle, about 1/4 inch thick. This will be the bottom of your pot. Use your plastic mold to trace the size and cut it out. -
Roll the Walls:
Roll out a long, rectangular strip of clay. The width should match the height of your mold, and the length should be enough to wrap fully around it. -
Assemble the Cylinder:
Wrap the rectangular strip around your plastic mold (covering the mold with plastic wrap first helps prevent sticking). Join the two ends by blending the clay together with a wet finger. -
Attach the Bottom:
Place your clay cylinder on top of the circular base. Smooth the seam where the wall meets the floor on both the inside and outside using small upward strokes. -
Smooth the Surface:
With a little water on your fingertips, gently smooth out the exterior of the pot until it looks seamless. Remove the inner plastic mold carefully while the clay is still damp but holds its shape.
Cracked Clay Rescue
If small cracks appear as the clay dries, mix a tiny bit of fresh clay with water to make a paste. Fill the cracks, smooth over, and let it dry again.
Step 2: Sculpting the Bunny Features
-
Form the Ears:
Roll two medium-sized sausage shapes of clay. Flatten them slightly to create long ovals that taper at the top for the ears. -
Create the Ear Indents:
Press your thumb or a modeling tool into the center of each ear to create a shallow depression. This is where the fabric lining will go later. -
Attach the Ears:
Score (scratch up) the bottom of the ears and the top rim of the pot where you want them to sit. Apply a dab of water or clay slip, press them firmly onto the rim, and smooth the clay downward to secure them. -
Add the Muzzle:
Roll a small ball of clay and flatten it into a wide oval. Press this onto the lower front of the pot to create the raised snout area. -
Refine and Dry:
Do a final check for rough edges, smoothing them with a damp sponge. Let the pot dry completely for 24-48 hours until it is hard and white.
Step 3: Painting and Finishing
-
Base Coat:
Paint the entire outside of the pot, including the clay parts of the ears, with your coral pink acrylic paint. You may need two coats for opaque coverage. -
Paint the Eyes:
Using a small brush, paint two solid black circles just above the raised muzzle area for the eyes. -
Add Eye Sparkle:
Dip the non-brush end (the handle tip) of your paintbrush into white paint and dot a tiny highlight onto the top right of each black eye. -
Detail the Face:
With your finest detail brush or a black paint pen, draw a small inverted triangle nose on the muzzle and two curved lines extending outward for the mouth. -
Face Texture:
Add tiny white or light pink dots on the forehead and cheeks specifically to mimic whiskers and texture. -
Prepare the Fabric:
Cut two oval shapes from your gray fabric scrap that perfectly fit inside the indented areas of the clay ears. -
Attach Fabric Lining:
Apply craft glue to the inside indentation of the painted clay ears and carefully press the fabric ovals into place. -
Seal the Pot:
Once all paint is dry, apply a coat of matte varnish to protect the surface, especially if you plan to put a real plant inside.
Pro Tip: Waterproofing
Air-dry clay melts if it gets soaked! Always keep your plant in a small plastic nursery pot inside your bunny, rather than planting directly into the clay.
Now you have a charming handmade home for your favorite little green friend
Mini Fairy Doors for Plant Pots
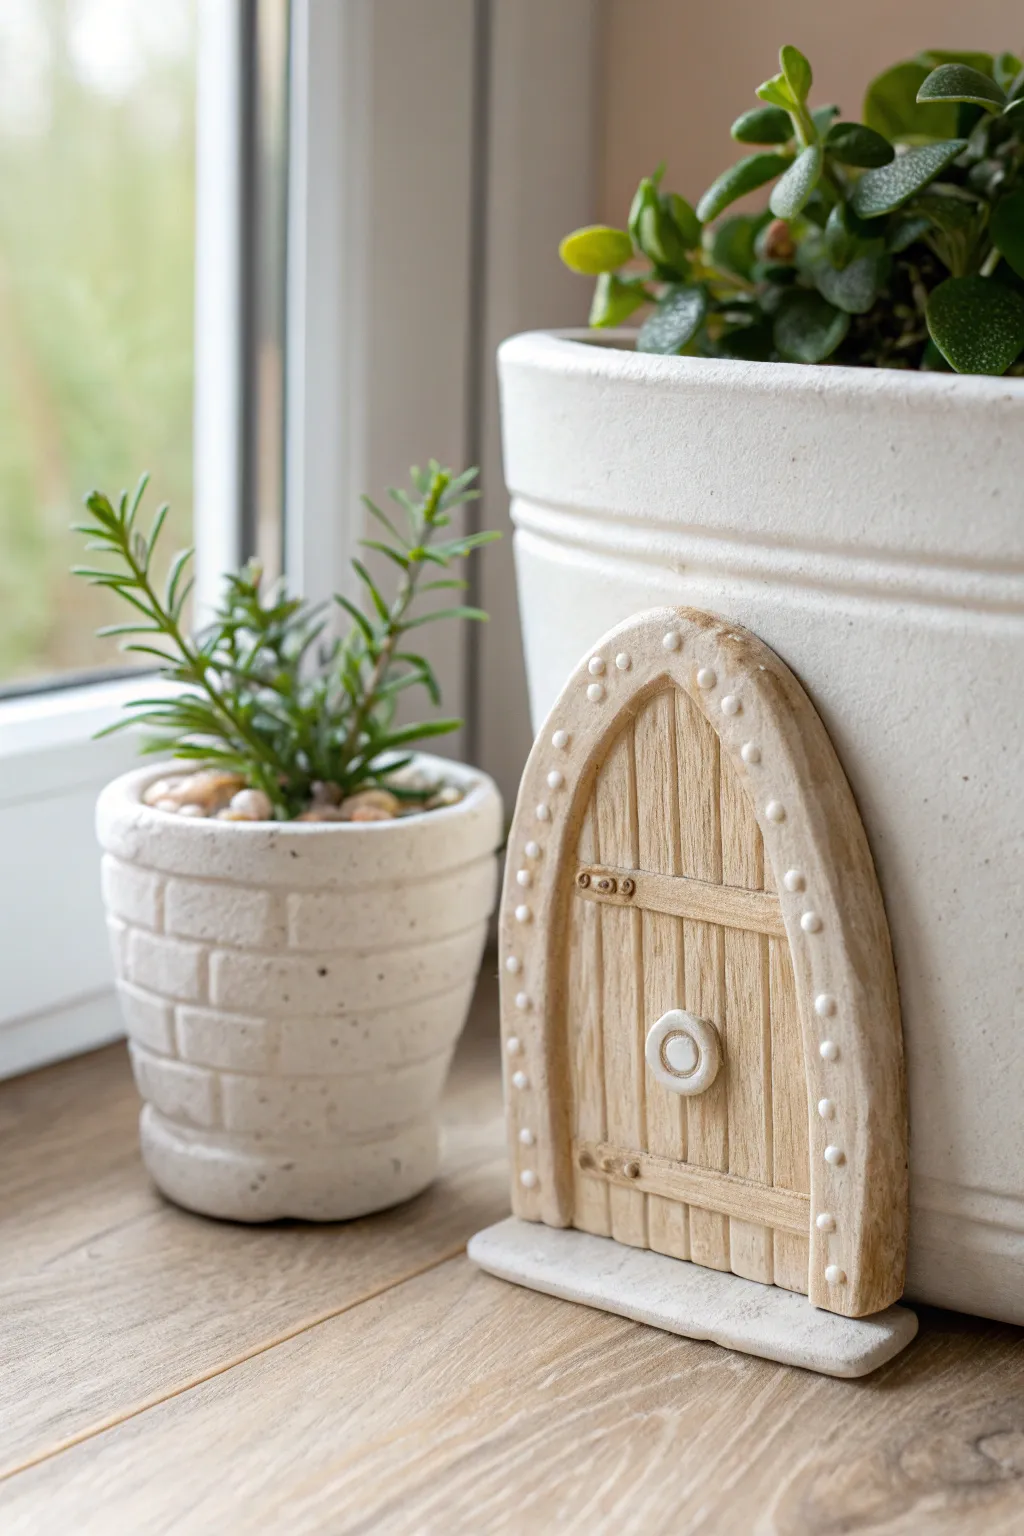
Transform an ordinary houseplant into a magical dwelling with this charming, easy-to-make fairy door. This project looks wonderfully realistic with its faux wood grain texture and arched stone frame, making it a perfect secret portal for tiny garden friends.
How-To Guide
Materials
- White air dry clay
- Rolling pin or smooth bottle
- Clay sculpting tools (or a toothpick/plastic knife)
- Small circular cutter or bottle cap
- Acrylic paints (beige, light brown, white, cream)
- Small paintbrush
- Water cup for smoothing
- Clear matte varnish (optional)
Step 1: Shaping the Base
-
Roll the clay:
Begin by rolling out a chunk of air dry clay until it’s about a quarter-inch thick. You want it sturdy enough to stand but thin enough to adhere nicely to a pot. -
Cut the arch shape:
Use a knife tool to freehand cut a tall arch shape. Measure it against your intended plant pot to ensure the curvature fits well. -
Create the door frame:
Roll a long, thin snake or coil of clay. Flatten it slightly, then dampen the back with a little water and press it along the outer curved edge of your arch to create a raised frame. -
Make the doorstep:
Roll a small rectangular block of clay, slightly wider than your door. Flatten it and attach it to the bottom of the arch using the scoring and slipping method (scratching both surfaces and adding water) so the door sits securely on it.
Fixing Cracks
If small cracks appear as the clay dries, mix a tiny bit of fresh clay with water to make a paste and smooth it over the crack with your finger.
Step 2: Adding Textures
-
Scoring the wood grain:
Use a needle tool or toothpick to draw vertical lines down the center part of the door. Don’t make them perfectly straight—slightly wavy lines look more like natural wood planks. -
Detailing the planks:
Add smaller, shorter scratches within the planks to mimic wood texture. I find varying the pressure creates a nice realistic depth. -
Adding cross-beams:
Roll two very thin ribbons of clay. Press one horizontally across the upper third of the door and one across the lower third to simulate iron hinges or wooden cross-beams. -
Sculpting the doorknob:
Roll a tiny ball of clay, flatten it into a disc, and attach it to the center right of the door. Roll an even smaller ball and press it into the center of the disc for the handle detail. -
Adding hinge details:
Use a small tool to press two tiny dimples into the left side of each horizontal cross-beam to look like nail heads or bolts. -
Texturing the frame:
Use a rounded tool to press small, evenly spaced indentations all along the outer frame arch. These act as decorative ‘stone’ or dotted patterns.
Glow in the Dark
Paint the little dots on the frame or the doorknob with glow-in-the-dark acrylic paint for a magical surprise at night.
Step 3: Finishing Touches
-
Drying time:
Let the piece dry completely on a flat surface. Depending on humidity, this usually takes 24 to 48 hours. Rotate it occasionally so both sides dry evenly. -
Painting the base:
Paint the entire door area (the planks) with a light beige or cream acrylic paint. Let this base coat dry. -
Adding wood depth:
Mix a watery light brown paint (a wash). Brush it over the planks and quickly wipe off the excess with a paper towel. The dark paint will settle into the grooves you carved, popping the wood texture. -
Painting the frame:
Paint the outer arch frame and the doorstep in a slightly lighter cream or white shade to distinguish the stone from the wood. -
Highlighting details:
Use a tiny brush to paint the little dots on the frame and the doorknob with pure white paint to make them stand out. -
Sealing the door:
Once fully dry, apply a coat of matte varnish if you plan to keep this near a real plant that gets watered.
Place your finished door against the base of a fluffy plant and enjoy the subtle magic it brings to your windowsill