Whenever you’ve got a little time and a lump of clay, you’ve got a shot at making something genuinely cute and actually useful. Here are my favorite DIY clay craft ideas—all approachable, beginner-friendly, and perfect for air-dry clay or polymer clay depending on what you’ve got on the table.
Classic Trinket Dish
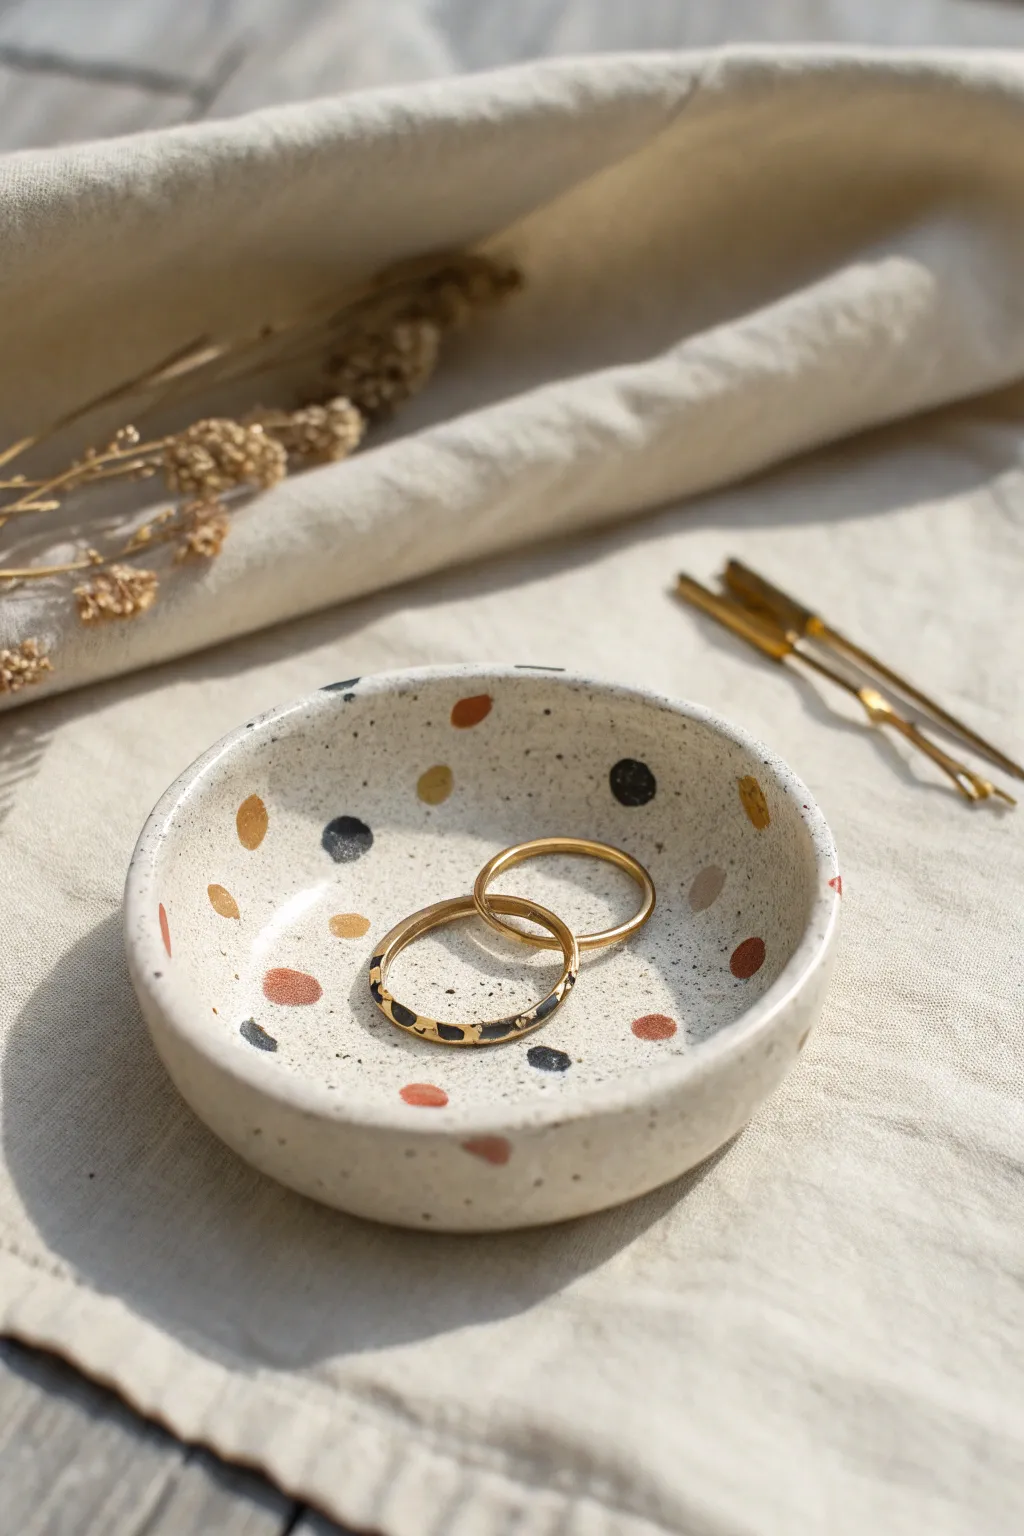
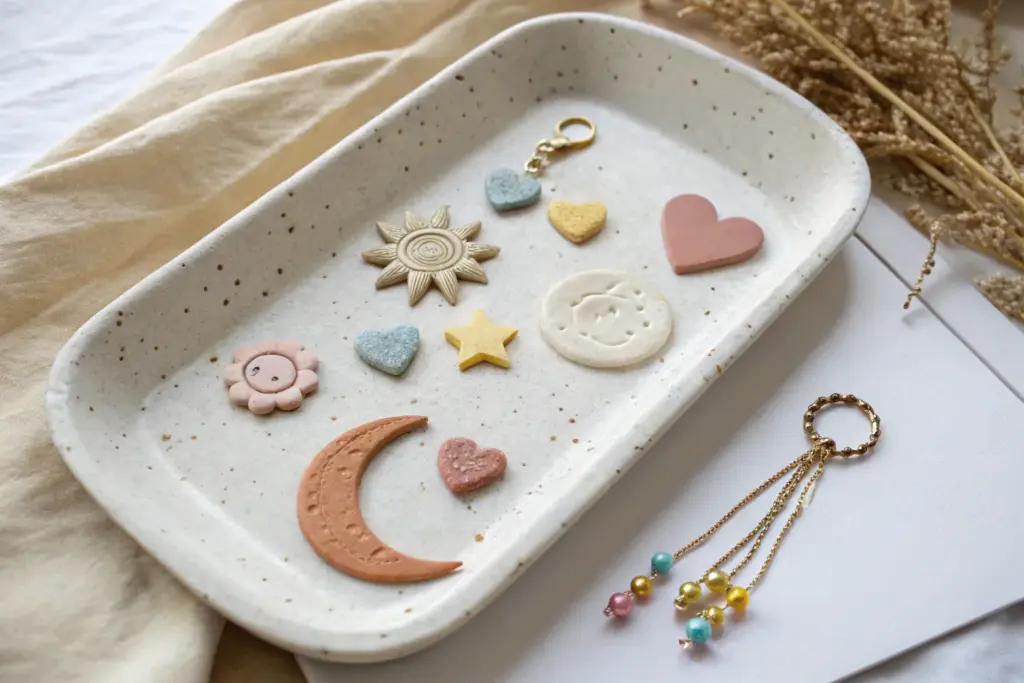
Capture the trendy look of terrazzo without the heavy equipment using simple polymer or air-dry clay. This charming little dish features a creamy speckled base adorned with organic spots of mustard, rust, and slate for a modern, earthy aesthetic perfect for holding your favorite rings.
Step-by-Step
Materials
- White or cream polymer clay (or air-dry clay)
- Small amounts of colored clay (mustard yellow, rust/terracotta, slate blue, black)
- Black pepper or dried coffee grounds (for the speckles)
- Rolling pin or acrylic roller
- Circle cutter or a round bowl (approx. 4-5 inches)
- X-acto knife or clay blade
- Small smooth sponge
- Fine-grit sandpaper (400-600 grit)
- Gloss or matte varnish (optional)
Step 1: Preparing the Base
-
Condition the clay:
Start by taking a generous amount of your white or cream clay. Knead it thoroughly in your hands until it becomes soft, warm, and pliable. Conditioning is crucial to prevent cracks later on. -
Add texture:
To achieve that realistic stony look, sprinkle a pinch of ground black pepper or dried coffee grounds onto your conditioned clay. Fold the clay over and knead it again until the specks are evenly distributed throughout the white base. -
Roll it out:
Place the speckled clay on a smooth work surface. Use your rolling pin to flatten it into an even sheet, aiming for a thickness of about 1/4 inch (6mm). If you enjoy a unifying look, try to keep the thickness consistent across the slab.
Cracking Up?
If using air-dry clay and you see cracks forming as it dries, smooth a tiny bit of wet clay into the fissure immediately. Slower drying away from direct heat prevents this.
Step 2: Creating the Pattern
-
Prepare colored bits:
Take tiny pinches of your colored clays—mustard, rust, slate blue, and black. Roll these tiny pieces into varying small shapes; some can be balls, others slight ovals or irregular crumbs. -
Place the spots:
Gently press these colored bits onto your rolled white slab in a random, scattered pattern. Leave plenty of white space between them to maintain that airy, modern terrazzo vibe. -
Embed the pattern:
Once you are happy with the arrangement, take your rolling pin and gently roll over the slab again. You want to press the colored spots flat so they become flush with the white surface, effectively embedding the design. -
Cut the shape:
Place your circle cutter or a small bowl upside down on the patterned area. Use your clay blade or knife to trace around it, cutting out a clean, perfect circle.
Step 3: Shaping and Finishing
-
Soften edges:
Before shaping, run your finger along the cut edge of the circle to smooth out any sharpness or dragged clay from the cutting process. -
Form the curve:
Gently lift the clay circle. Using your thumbs, slowly press into the center while pulling up the edges to create a shallow bowl shape. Alternatively, you can drape the clay inside a small bowl to help it hold its form. -
Refine the rim:
The rim in the photo is slightly thick and rounded. Use a damp sponge (for air-dry clay) or your finger (for polymer) to round over the top lip of the dish so it feels soft and handmade rather than sharp. -
Bake or dry:
If using polymer clay, bake according to the package instructions (usually 275°F/135°C for 15-30 minutes). If using air-dry clay, leave it in a cool, dry place for 24-48 hours until fully hardened. -
Sand for smoothness:
Once fully cured or dry, take your fine-grit sandpaper and lightly sand the edges and surface. This reveals the crispness of the ‘terrazzo’ chips and makes the piece feel professionally finished. -
Seal the piece:
To protect your jewelry dish, brush on a thin layer of matte or gloss varnish. This will deepen the colors and provide a nice protective barrier against scratches.
Make it Shine
For a luxe finish, paint the very rim of the dish with liquid gilde or gold paint after the varnish has dried. It adds a beautiful metallic outline.
Place this lovely handmade dish on your nightstand or vanity to keep your treasures safe and stylish


Ring Cone Holder
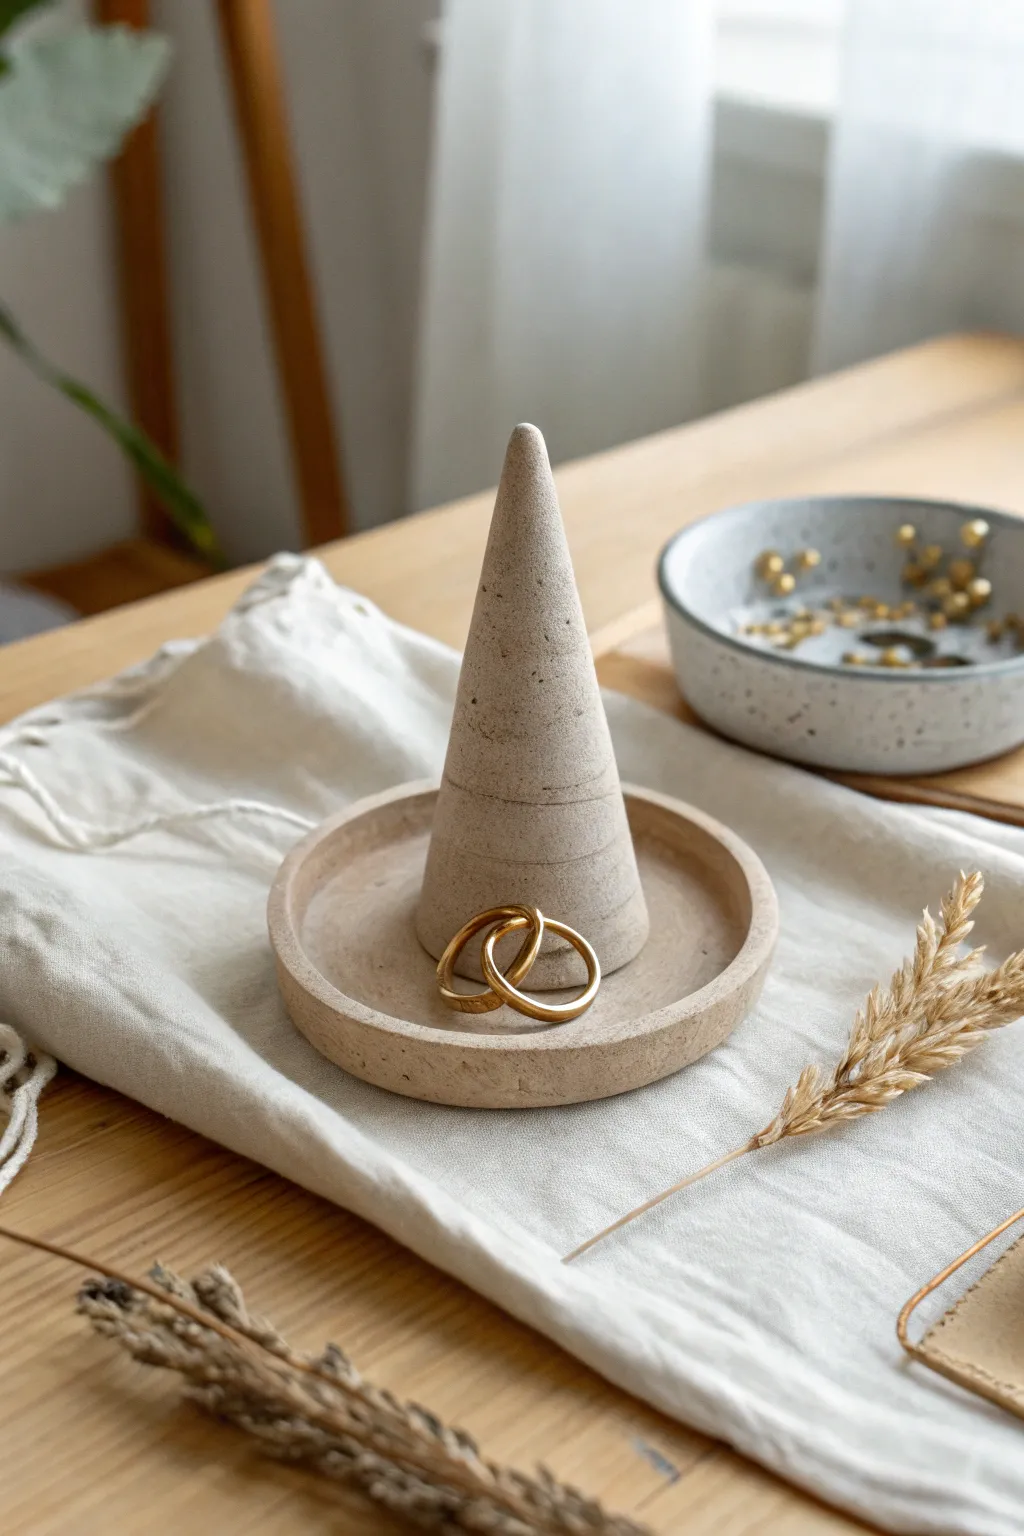
Create a sleek and functional jewelry organizer that mimics the look of natural stone. This two-piece ring cone features a sturdy base dish and a central spire, perfect for keeping your favorite rings safe and display-ready.
Step-by-Step Guide
Materials
- Air-dry clay (stone gray or speckled)
- Rolling pin
- Circle cutter or small bowl (approx. 4 inches)
- Craft knife
- Sandpaper (fine grit)
- Small bowl of water
- E6000 glue or strong craft adhesive
- Parchment paper or glay mat
Step 1: Forming the Base Dish
-
Condition the clay:
Begin by taking a handful of air-dry clay and kneading it in your hands until it becomes pliable and warm. If the clay feels too dry, dip your fingers in water and work it in. -
Roll out the slab:
Place the clay on parchment paper and roll it out to a thickness of about 1/4 inch. Try to keep the thickness consistent across the entire slab for a stable base. -
Cut the circle:
Use your circle cutter or trace around a small bowl with a craft knife to cut out a perfect circle, roughly 4 inches in diameter. -
Create the rim:
Roll a long, thin snake of clay, approximately the thickness of a pencil. This coil needs to be long enough to wrap around the entire circumference of your clay circle. -
Attach the coil:
Score the outer edge of your circle base and the underside of the coil with a craft knife. Dab a little water on the scored areas and press the coil firmly onto the base. -
Blend the seams:
Using your thumb or a modeling tool, drag the clay from the coil down into the base on both the inside and outside. Smooth it until the seam disappears completely and it looks like one solid piece. -
Refine the shape:
Go around the rim with damp fingers to smooth out any bumps. Ensure the top edge is flat and the walls stand vertically. -
Initial drying:
Set the dish aside on a flat surface to begin drying while you work on the cone.
Step 2: Sculpting the Cone
-
Shape a cylinder:
Take a new ball of clay and roll it into a thick cylinder between your palms. -
Form the cone taper:
Place the cylinder on your work surface. Rolling with the side of your hand at an angle, apply more pressure to the top end to begin tapering it into a point. -
Adjust the height:
Stand the cone up to check its height and width. It should be tall enough to hold multiple rings but wide enough at the bottom to be stable. -
Flatten the bottom:
Tap the wide base of the cone firmly against the table to create a perfectly flat bottom surface. This ensures it will stand straight in the dish later. -
Smooth the surface:
Dip your finger in water and run it up and down the cone to remove fingerprints and create a silky, stone-like finish. I usually spend a little extra time here to get that silhouette perfect. -
Add texture lines:
To recreate the subtle rings seen in the photo, gently spin the cone while lightly holding a modeling tool against the lower third. Don’t cut deep; just make a faint indentation.
Faux Stone Hack
If you don’t have speckled clay, mix used coffee grounds or cracked pepper into plain white clay. It creates a stunning, natural granite texture.
Step 3: Assembly and Finish
-
Dry completely:
Allow both pieces to air dry separately for 24-48 hours. Turn the dish over halfway through to ensure the bottom dries evenly. -
Sand for smoothness:
Once solid, use fine-grit sandpaper to gently buff away any rough edges on the rim of the dish or the tip of the cone. -
Clean off dust:
Wipe both pieces with a slightly damp cloth or a dry brush to remove all sanding dust before gluing. -
Apply adhesive:
Apply a strong adhesive like E6000 to the bottom of the cone. -
Secure the cone:
Place the cone directly into the center of the dish. Press down firmly and verify it is centered from all angles. Let the glue cure completely before placing rings on it.
Gilded Edge
Paint the very rim of the dish or the tip of the cone with liquid gold leaf after sanding. This adds a luxurious contrast to the matte stone finish.
Now your jewelry has a stylish home that looks like modern sculpture


Stamped Initial Keychain
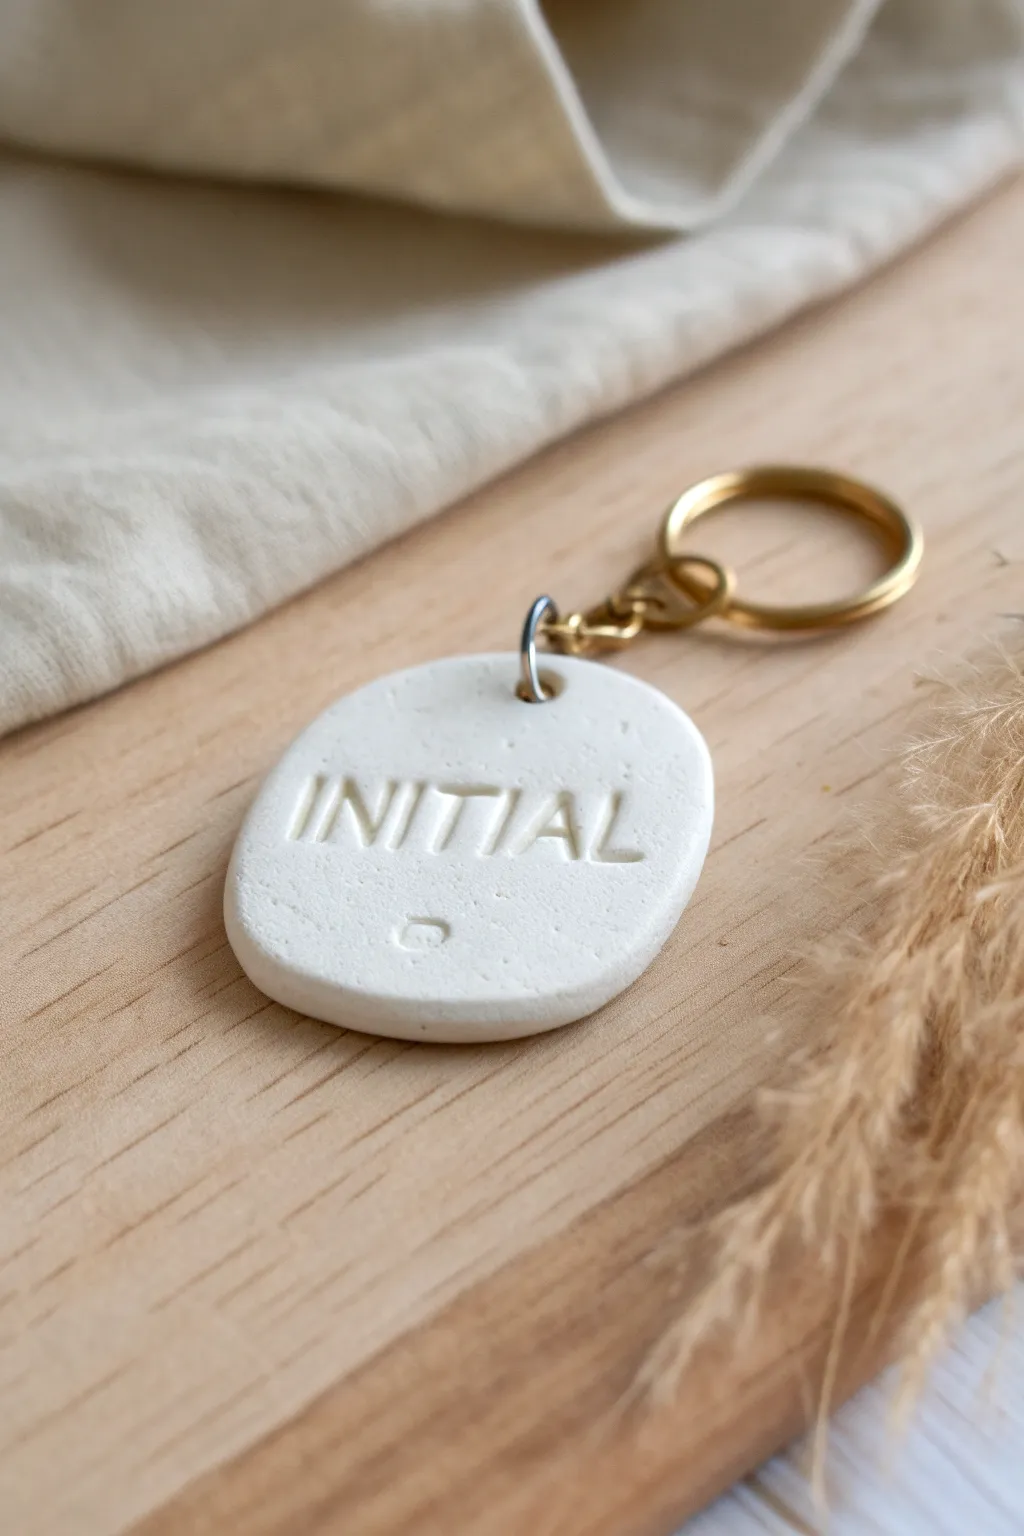
Create a personalized, boutique-style accessory with this simple yet elegant clay project. Using polymer or air-dry clay, you’ll craft a smooth, organic shape stamped with custom text, perfect for gifting or organizing your keys.
How-To Guide
Materials
- White polymer clay (or air-dry clay)
- Acrylic rolling pin
- Oval clay cutter (or a knife and a paper template)
- Letter stamp set
- Small straw or toothpick (for the hole)
- Fine-grit sandpaper (optional)
- Gold keyring hardware
- Small jump ring
- Pliers (flat nose and round nose)
- Baking sheet and parchment paper (if using polymer clay)
Step 1: Prepping the Clay Base
-
Condition the clay:
Start by taking a chunk of your white clay and kneading it thoroughly in your hands. You want it to be warm, pliable, and free of any air bubbles. -
Create a slab:
Place the clay on a clean, smooth surface. Using your acrylic rolling pin, roll the clay out evenly. Aim for a thickness of about 1/4 inch (6mm) to ensure the keychain is sturdy enough for daily use. -
Cut the shape:
Press your oval cutter firmly into the clay slab. If you don’t have a cutter, you can lightly trace an oval shape onto the clay and carefully cut it out with a craft knife. -
Smooth the edges:
Dip your finger in a tiny bit of water (or baby oil for polymer clay) and gently run it along the cut edges to soften any sharp corners for a finished look.
Fixing Faint Stamping
If your letters aren’t distinct enough after baking, dilute acrylic paint with water, brush it into the grooves, and immediately wipe the surface clean, leaving color only in the letters.
Step 2: Stamping and Detailing
-
Prepare your letters:
Select the letters for your desired word or name from your stamp set. Arrange them in order on your workspace to double-check spelling before pressing them into the clay. -
Align the stamp:
Position your first letter stamp in the center of the oval. You can use a ruler as a light guide if you want it perfectly straight, or eyeball it for a more organic feel. -
Press the letters:
Firmly press the stamps into the clay one by one to spell ‘INITIAL’ or your chosen word. Apply even pressure so the impression depth is consistent across all letters. -
Add the attachment hole:
Using a small straw or a toothpick, punch a hole near the top edge of the oval. Make sure the hole is large enough for your jump ring to pass through freely, accounting for slight shrinkage. -
Final inspection:
Check the surface for any unwanted fingerprints or dust. Lightly smooth them away with your finger or a soft brush before moving to the curing phase.
Add a Marble Effect
Mix a tiny amount of grey or beige clay into your white base but stop kneading before fully blended to create subtle, elegant marble streaks.
Step 3: Curing and Assembly
-
Bake or dry:
If using polymer clay, place the piece on a parchment-lined baking sheet and bake according to the package instructions (usually 275°F/135°C for 15-30 minutes). If using air-dry clay, let it sit undisturbed for 24-48 hours. -
Cool down:
Allow the clay piece to cool completely before handling. This hardening phase is crucial for the material’s structural integrity. -
Sand imperfections:
Once fully cured, inspect the edges again. I usually take a piece of fine-grit sandpaper to gently buff away any rough spots, giving the piece a professional, matte finish. -
Open the jump ring:
Take your pliers and twist the jump ring open laterally (twist ends away from each other, don’t pull them apart). -
Attach hardware:
Thread the open jump ring through the hole in your clay piece. Slide the gold keyring onto the jump ring as well. -
Secure the ring:
Using your pliers, twist the jump ring back into a closed position, ensuring the ends meet perfectly flush so the everyday movement doesn’t work the clay loose.
Clip your new custom accessory onto your bag or keys and enjoy the minimalist aesthetic


Easy Leaf Imprint Coasters
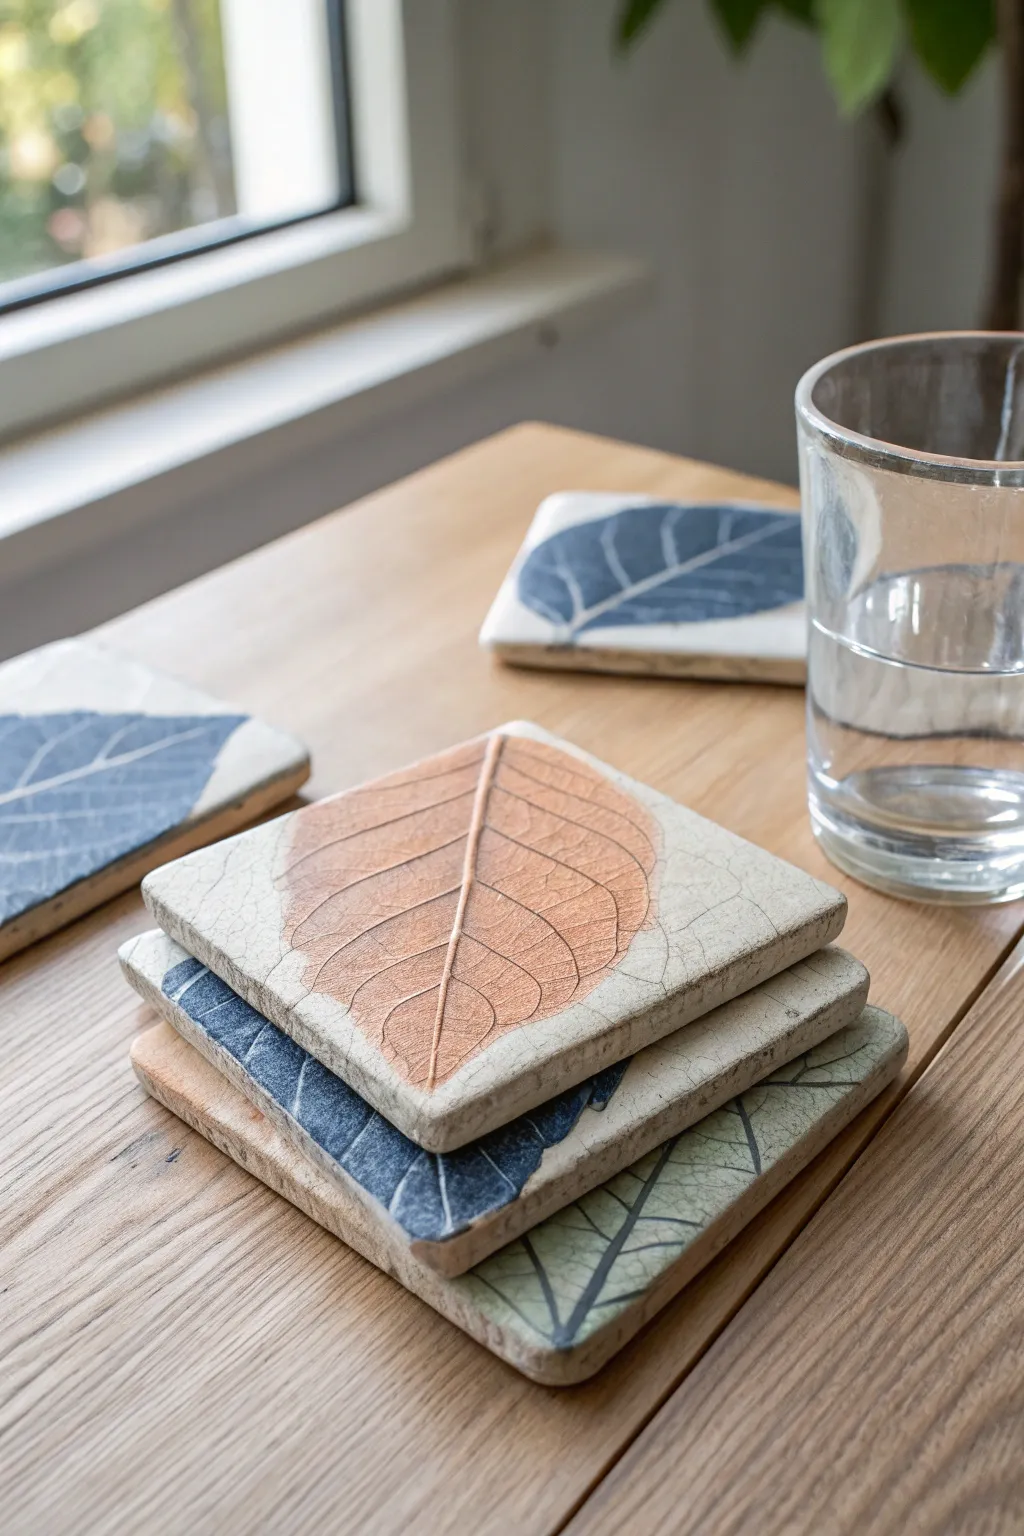
Capture the delicate details of nature with these elegant clay coasters featuring deep leaf impressions and an antiqued finish. The combination of air-dry clay and metallic or matte paints creates a sophisticated, fossil-like effect that brings the outdoors onto your coffee table.
Step-by-Step Guide
Materials
- White or light grey air-dry clay (approx. 500g)
- Fresh leaves with prominent veins (like hydrangea or beech)
- Rolling pin
- Square cookie cutter (approx. 4 inches) or a knife and template
- Sandpaper (fine grit)
- Acrylic paints (Copper/Deep Orange, Navy Blue, Sage Green)
- Antiquing medium or dark brown acrylic paint diluted with water
- Clear matte varnish or sealant (waterproof)
- Small flat paintbrush
- Soft cloth or sponge
- Parchment paper
- Felt pads (optional, for feet)
Step 1: Shaping the Clay
-
Prepare your workspace:
Lay down a sheet of parchment paper to prevent sticking. Taking a handful of air-dry clay, knead it briefly until it is pliable and smooth. -
Roll the slab:
Roll the clay out to an even thickness of about 1/4 to 1/3 inch. Try to keep the thickness consistent so the coasters dry flat. -
Select your leaf:
Place a fresh leaf vein-side down onto the clay slab. Leaves with thick, rigid veins work best for getting a crisp impression. -
Make the imprint:
Gently roll over the leaf with your rolling pin. Press firm enough to embed the veins, but not so hard that you thin the clay drastically. -
Reveal the texture:
carefully lift the leaf away by the stem to reveal the intricate impression left behind. -
Cut the shape:
Using your square cutter or a knife, cut the coaster shape, centering the leaf design nicely within the frame. -
Smooth the edges:
Dip your finger in a little water and run it along the cut edges to smooth out any roughness or sharp corners. -
Drying time:
Let the coasters air dry for 24-48 hours. I recommend flipping them over halfway through to ensure even drying and prevent curling.
Step 2: Decorating and Finishing
-
Sand imperfections:
Once fully bone dry, lightly sand the edges and the surface with fine-grit sandpaper to remove any burrs. -
Paint the impression:
Using a small flat brush, paint the inside of the leaf imprint. Use copper for an autumnal look, or navy and sage for cooler tones. Don’t worry about staying perfectly in the lines. -
Wipe back:
immediately after painting, take a slightly damp cloth and gently wipe the surface. This removes paint from the raised clay but leaves it deep in the veins. -
Create the antique look:
Mix a very watery wash of dark brown paint or use an antiquing medium. Brush this over the entire coaster, including the unpainted clay areas. -
Wipe again:
Quickly wipe this dark wash off with your damp cloth. The dark pigment will settle into the tiny cracks and textures of the clay, creating that aged, stone-like appearance shown in the photo. -
Seal the coaster:
Since these are for drinks, protection is vital. Apply 2-3 coats of a waterproof matte varnish, letting each coat dry completely in between. -
Add feet:
Stick small felt pads or cork backing to the underside of the coaster to protect your furniture surfaces from scratches.
Fixing Curled Edges
If your clay starts lifting at the corners while drying, place a light book on top of them (sandwiching the clay between parchment paper) to weigh them down until fully dry.
Use Polymer Clay
For a waterproof finish without varnish, switch to white polymer clay. Bake according to package instructions, then paint the baked clay with acrylics to get the same look.
Now you have a set of durable, nature-inspired coasters ready to gift or keep

The Complete Guide to Pottery Troubleshooting
Uncover the most common ceramic mistakes—from cracking clay to failed glazes—and learn how to fix them fast.
Marbled Jewelry Tray
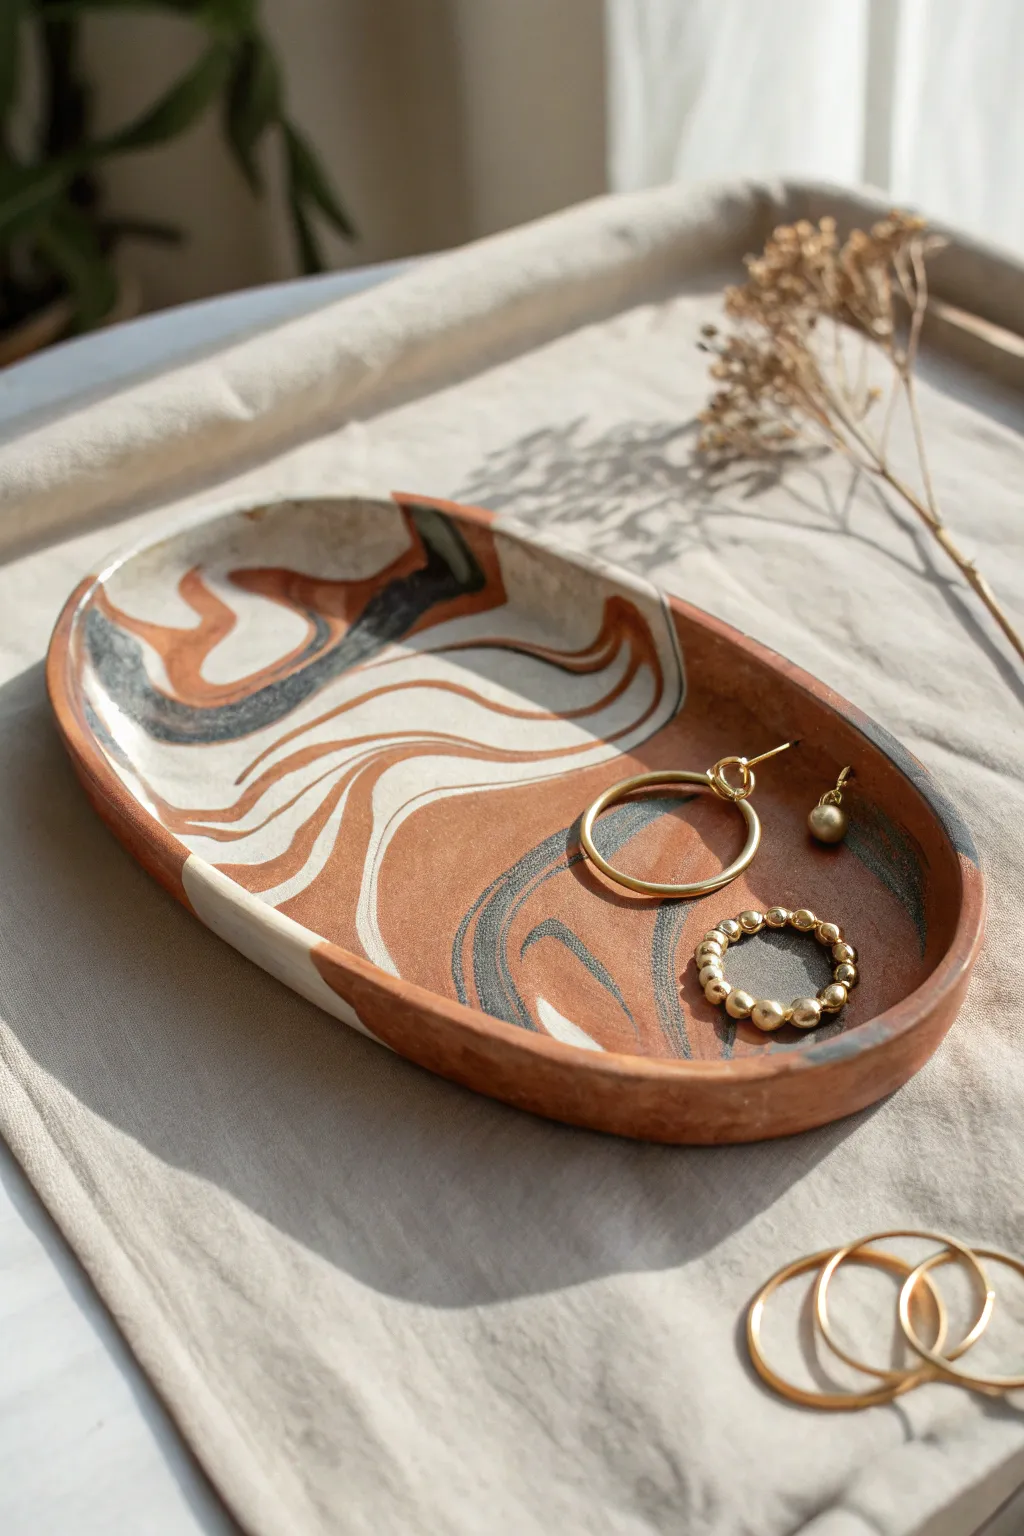
Bring an earthy elegance to your vanity with this marbled clay trinket dish, featuring warm rust tones swirled with cream and slate blue. This project creates a unique, organic shape perfect for holding your favorite rings and studs.
How-To Guide
Materials
- Polymer clay (Terra cotta/Rust color)
- Polymer clay (White or Translucent)
- Polymer clay (Slate blue or Dark grey)
- Rolling pin or acrylic roller
- Oval paper template
- Craft knife or scalpel
- Smooth work surface (ceramic tile or glass mat)
- Small bowl or sponge
- Sandpaper (fine grit)
- Matte or glossy glaze (optional)
Step 1: Preparing the Pattern
-
Condition the Clay:
Warm up your three clay colors by kneading them individually in your hands. You want the clay soft and pliable so the colors will blend smoothly later without cracking. -
Create Snakes:
Roll each color into several long snakes of varying thicknesses. Since the reference image is dominated by the terra cotta color, I suggest making three times as many rust snakes compared to the white and blue. -
Twist and Combine:
Gather all your snakes into one large bundle. Twist the bundle tightly like a candy cane to begin merging the colors together. -
Fold and Roll:
Fold the twisted log in half and roll it out again into a single long snake. Repeat this twisting and folding process 2-3 times, but be careful not to over-mix, or the colors will turn muddy instead of distinct swirls. -
Consolidate into a Ball:
Squish the marbled snake into a solid ball. This compression helps eliminate air bubbles inside the clay mass. -
Roll Out the Slab:
Place the ball on your work surface and use your rolling pin to flatten it into a slab about 1/4 inch thick. As you roll, you’ll see the beautiful organic marble pattern emerge on the surface.
Clean Cuts
Chill your rolled clay slab in the fridge for 10 minutes before cutting the oval shape. The firmer clay won’t drag against the knife, resulting in a cleaner edge.
Step 2: Shaping and Baking
-
Cut the Shape:
Place your oval paper template on top of the most visually interesting section of your clay slab. Use your craft knife to trace around the paper, cutting cleanly through the clay. -
Smooth the Edges:
Remove the excess clay. Dip your finger in a little bit of water (or baby oil if using polymer clay) and gently run it along the cut edge to smooth out any sharpness or jagged bits. -
Form the Lip:
To give the tray its depth, gently lift the edges of the oval slab upwards. You can pinch the rim slightly to create a messy, organic wall around the perimeter. -
Refine the Form:
Use your thumbs to smooth the interior curve where the floor meets the wall. The transition should be gradual, not a sharp 90-degree angle. -
Final Shaping:
Inspect the rim for symmetry. If the clay feels too soft and is sagging, you can prop up the edges with crumpled foil to hold the shape. -
Bake:
Place the tray on a baking sheet lined with parchment paper. Bake according to your specific clay brand’s package instructions—usually around 275°F (135°C) for 15-30 minutes. -
Cool Down:
Allow the tray to cool completely in the turned-off oven or on a wire rack before handling. The clay is still fragile when hot.
Step 3: Finishing Touches
-
Sand Imperfections:
Once cool, check the edges one last time. Use fine-grit sandpaper to gently buff away any fingerprints or rough spots on the rim. -
Clean Up:
Wipe the tray down with a damp cloth or rinse it quickly to remove sanding dust. -
Seal (Optional):
To achieve a look closer to the glossy reference photo, brush on a thin layer of gloss glaze or polyurethane varnish. Let it dry completely before organizing your jewelry.
Make it Metallic
Before baking, gently press bits of gold leaf onto the surface or paint the outer rim with liquid gold gilding after baking for a luxe, high-end finish.
Now your vanity has a chic new centerpiece ready to organize your treasures
Polymer Clay Statement Earrings
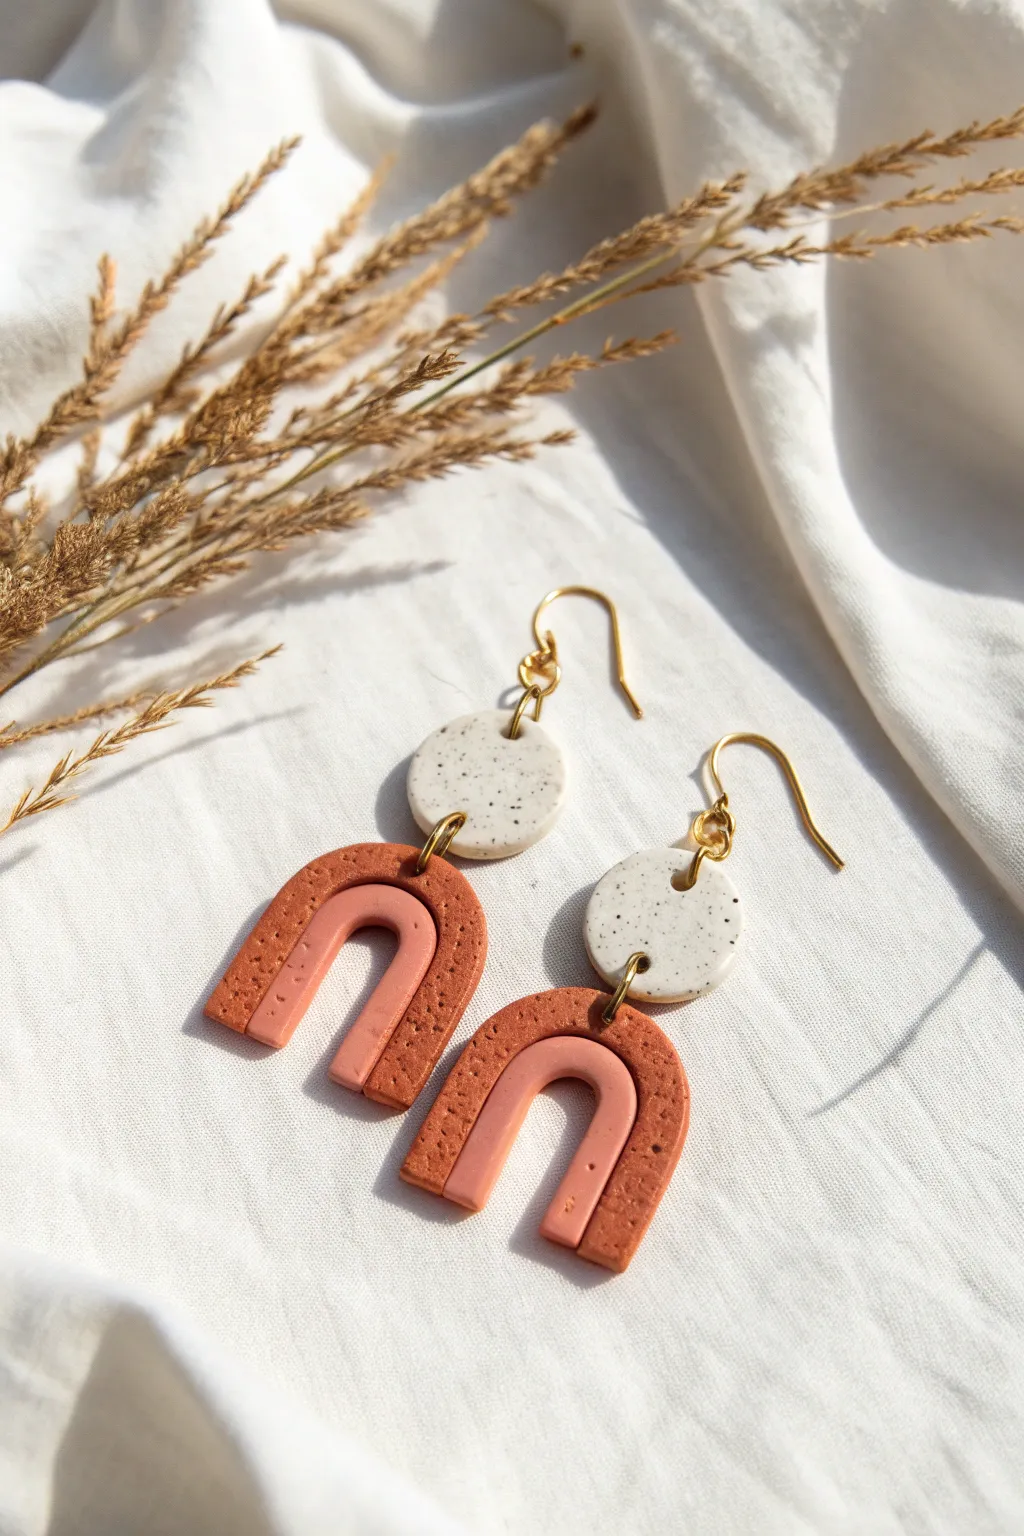
These boho-chic statement earrings combine earthy textures and warm terracotta tones for a look that is both modern and grounded. Featuring a speckled white stud and a layered arch design, this project introduces fundamental polymer clay techniques like texture rolling and jump-ring assembly.
Step-by-Step Tutorial
Materials
- Polymer clay (white or beige, terracotta/brick red, soft pink)
- Black pepper or pre-mixed inclusions (for speckling, optional)
- Acrylic roller or pasta machine
- Circle cutter (approx. 15mm)
- U-shape or oval cutters (two sizes to nest)
- Texture sponge, toothbrush, or sandpaper
- Clay slicer or precision knife
- Hand drill or needle tool
- Gold jump rings (6-8mm)
- Gold earring hooks
- Jewelry pliers (flat nose and chain nose)
- Parchment paper and baking sheet
Step 1: Preparing the Clay
-
Create the Speckled Blend:
Start by conditioning your white or beige clay until soft. To achieve that organic speckled look, mix in a tiny pinch of ground black pepper or use pre-speckled ‘granite’ style clay. Roll this out to a medium thickness, about 3mm. -
Condition the Colors:
Condition your terracotta and pink clays separately. Roll the terracotta clay to the same 3mm thickness as your speckled clay, but roll the pink clay slightly thinner so it nests comfortably without bulging. -
Add Texture:
Take your rolled-out sheet of terracotta clay and gently press a coarse texture sponge or a clean toothbrush over the surface. This creates the stone-like, pitted texture seen on the outer arch.
Seamless Stickiness
If your inner and outer arches won’t stick together, apply a thin layer of liquid polymer clay (Bake & Bond) to the edges before pressing them together.
Step 2: Cutting and Shaping
-
Cut the Top Circles:
Using your small circle cutter, punch out two identical circles from the speckled clay sheet. Place these aside on your parchment-lined baking sheet. -
Cut the Outer Arches:
For the main dangling element, use a U-shaped cutter on the textured terracotta clay. If you don’t have a U-cutter, you can use a large oval cutter and slice off the bottom third with your blade to create a flat edge. -
Cut the Inner Arches:
Using a slightly smaller U-shaped cutter, cut two shapes from the smooth pink clay. Similar to the previous step, trim the bottom edge flat with your blade so it aligns perfectly with the outer terracotta arch. -
Create the Nested Gap:
To make space for the pink arch inside the terracotta one, use the smaller cutter to remove the center of your terracotta piece. Alternatively, carefully freehand cut the interior with a craft knife. -
Assemble the Arches:
Gently place the smooth pink arch inside the textured terracotta arch. Press them together lightly at the seams so they bond; you can use a tiny amount of liquid polymer clay as ‘glue’ if they aren’t sticking.
Color Shift
Try a retro 70s palette by swapping the pink for mustard yellow and the terracotta for an olive green while keeping the speckled top neutral.
Step 3: Piercing and Baking
-
Pierce Hole:
Using a needle tool or toothpick, poke a hole near the bottom edge of the speckled circle and the top center of the terracotta arch. Ensure the holes are large enough for your jump rings. -
Smooth the Edges:
Before baking, I always run a finger dipped in a little cornstarch or baby oil along the cut edges to smooth out any harsh cutter marks or fingerprints. -
Bake:
Place all pieces on a ceramic tile or parchment-lined baking sheet. Bake according to your clay package instructions (usually 275°F/135°C for 15-30 minutes per 1/4 inch of thickness). -
Cool Down:
Let the pieces cool completely in the oven with the door slightly ajar. This gradual cooling helps prevent brittleness.
Step 4: Assembly
-
Open Jump Rings:
Using two pairs of pliers, twist your gold jump rings open laterally (never pull them apart outward) to maintain their circular shape. -
Connect the Clays:
Thread an open jump ring through the hole in the terracotta arch and the hole in the speckled circle. Close the ring securely using the pliers. -
Attach the Hooks:
At the top of the speckled circle (if you made a second hole) or via a new jump ring, attach the earring hook. Ensure the front of the hook faces the same direction as the front of your textured clay.
With your new earrings assembled, you have a perfectly stylish accessory ready to pair with your favorite cozy sweater


What Really Happens Inside the Kiln
Learn how time and temperature work together inside the kiln to transform clay into durable ceramic.
Mini Pinch Pot Planter
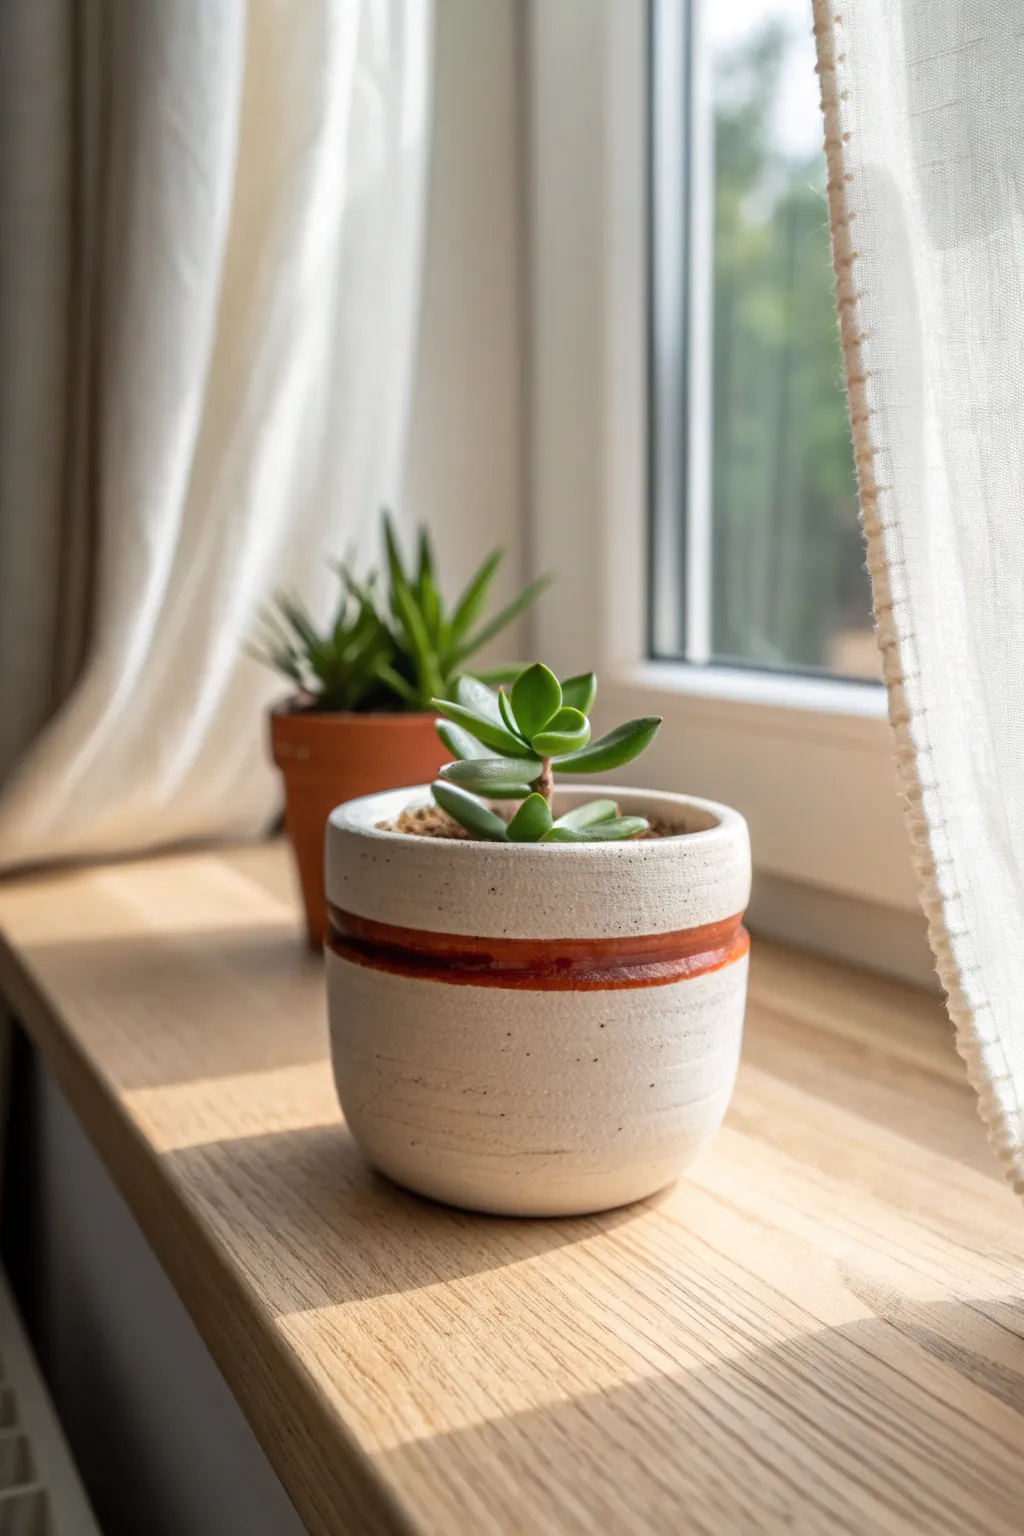
This charming little planter combines a rough, speckled clay aesthetic with a sleek, vibrant accent stripe. The textured white surface contrasts beautifully with the recessed amber band, making it the perfect modern home for your favorite succulent.
Step-by-Step
Materials
- Air-dry clay or polymer clay (white or light speckled stone)
- Clay carving tool or needle tool
- Rolling pin
- Small cup or cookie cutter (approx 3-4 inches)
- Acrylic paint (burnt orange/terra cotta)
- Fine grit sandpaper
- Small paintbrush
- Water based sealant or varnish
- Small bowl of water (for smoothing)
Step 1: Shaping the Pot
-
Prepare the clay:
Start by kneading a tennis-ball-sized amount of clay until it is soft and pliable. If you are using polymer clay, make sure it is fully conditioned to prevent cracking. -
Form the base:
Roll a small portion of clay flat to about 1/4 inch thickness. Use your circular cutter or a cup to cut out a perfect circle for the base of your planter. -
Create the walls:
Roll the remaining clay into a long, even snake or coil, roughly the thickness of your pinky finger. This will form the walls intended for a pinch-pot style look but with coil stability. -
Stack the coils:
Place the first coil onto the outer edge of your base circle. Gently smudge the clay downward on the inside to fuse it to the base. Continue stacking coils until you reach a height of about 3 inches. -
Smooth the surface:
Using your fingers and a little water, blend the coils together on both the inside and outside. You want a single, solid wall. Don’t worry about making it perfectly smooth; that handmade texture is part of the charm.
Step 2: Texturing and Carving
-
Add surface texture:
Once the basic shape is formed, take a piece of crumpled aluminum foil or a stiff bristle brush and gently tap it all over the exterior. This replicates the stone-like finish seen in the photo. -
Mark the stripe:
Decide where you want your colored band to sit—slightly below the midway point works well for visual balance. Use a needle tool to lightly score two parallel lines around the circumference. -
Carve the channel:
Using a loop tool or the flat end of a sculpting tool, gently scrape away the clay between your scored lines. You want to create a shallow recessed channel, about 1/8 inch deep. -
Refine the edges:
Smooth the edges of your carved channel with a damp fingertip to remove any sharp burrs or clay crumbs. -
Dry or bake:
If using air-dry clay, let the pot sit for 24-48 hours until completely white and hard. If using polymer clay, bake according to the package instructions.
Uneven Walls?
If your pot walls are getting too thin or floppy while building, let the clay firm up for 20 minutes before adding more height.
Step 3: Finishing Touches
-
Initial sand:
Once hardened, lightly sand the rim and bottom to ensure the pot sits flat and the top is relatively even. -
Paint the channel:
Load a small detail brush with burnt orange or terra cotta acrylic paint. Carefully paint inside the recessed channel you carved earlier. -
Add depth:
I like to add a tiny drop of brown to the orange paint for a second coat; this creates a richer, glazed ceramic look. -
Clean up:
If any paint got onto the white textured sections, quickly wipe it away with a damp cloth or wait for it to dry and sand it off gently. -
Seal the pot:
Apply a coat of water-resistant varnish to the entire pot. This seals the paint and protects the clay from moisture when you water your plant.
Faux Speckles
To get the speckled look without special clay, flick a toothbrush loaded with watered-down black paint over the finished white pot.
Now you have a stylish, minimalist vessel ready to display your greenery on a sunny windowsill
Face Pot Desk Buddy
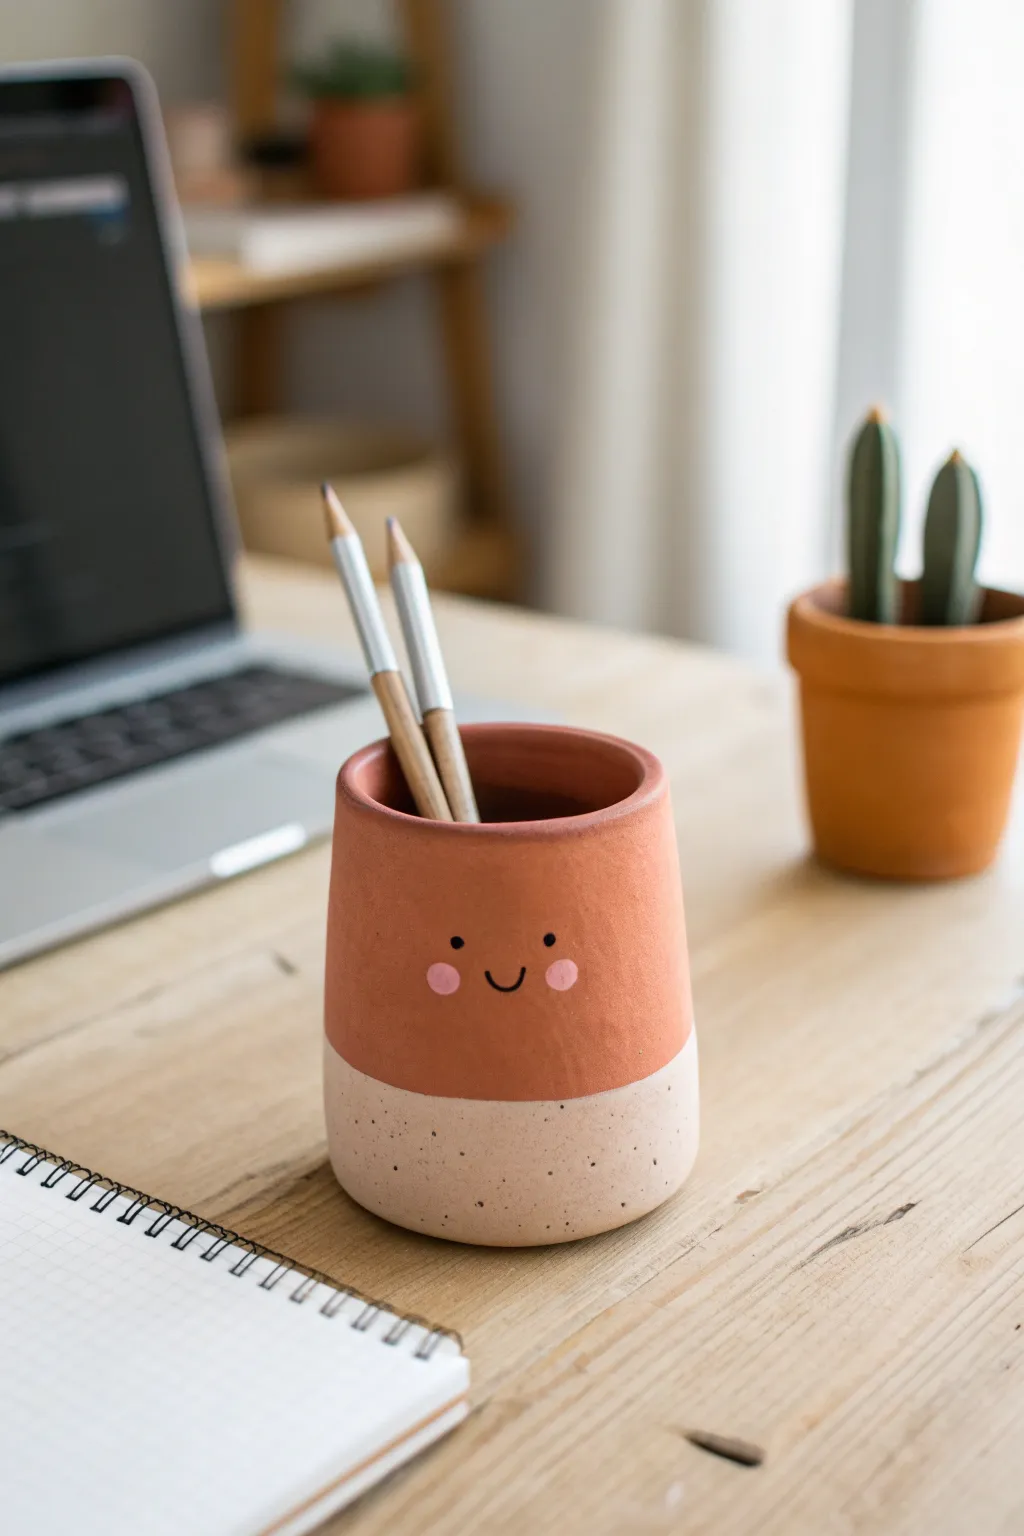
Add a touch of whimsy to your workstation with this adorable two-toned pencil holder. Featuring a warm terracotta upper and a speckled cream base, its minimalist smiley face brings just the right amount of cheer to your desk organization.
How-To Guide
Materials
- Air-dry clay (white or natural)
- Acrylic paints (terracotta/rust orange, cream/beige, pink, black)
- Rolling pin
- Craft knife or clay cutter
- Small paintbrush (detail brush)
- Flat paintbrush
- Cup of water
- Sandpaper (fine grit)
- Old toothbrush (optional for speckling)
- Clear matte varnish or sealant
- Template or ruler
Step 1: Forming the Pot
-
Roll the slab:
Start by conditioning your air-dry clay until it’s pliable, then use a rolling pin to create a smooth, even slab about 1/4 inch thick. Aim for a consistent thickness to ensure the pot stands straight. -
Cut the rectangle:
Using a ruler and craft knife, cut out a long rectangle. The height should be about 4-5 inches, and the length should be enough to wrap around to form a cylinder (roughly 10-12 inches). -
Create the base:
Cut a separate circle from the remaining clay slab. You can trace around a cup or a circular cookie cutter that matches the diameter of your intended cylinder. -
Assemble the cylinder:
Wrap the rectangular slab into a tube shape. Score (scratch textures into) the edges where they meet, add a little water as ‘slip,’ and press them firmly together to seal the vertical seam. -
Attach the base:
Place the cylinder onto the circular base. Smooth the clay from the outside of the cylinder down onto the base to create a seamless connection, using a bit of water on your finger to blend the join. -
Smooth the surfaces:
Dip your finger in water and gently smooth out the entire surface, erasing any fingerprints or seam lines. Pay special attention to the rim, rounding it off slightly so it isn’t sharp. -
Dry completely:
Let the pot sit in a dry, safe place for 24-48 hours. I find that turning it upside down halfway through the drying process helps the bottom dry more evenly.
Pro Tip: Masking Tape
For a perfectly crisp horizon line between the terracotta and beige sections, wrap low-tack painter’s tape around the pot before painting the top color.
Step 2: Painting and Detailing
-
Sand imperfections:
Once fully dry, take fine-grit sandpaper and gently sand away any uneven bumps or rough edges until the surface feels smooth to the touch. -
Paint the base layer:
Mix a cream or beige acrylic paint and cover the entire bottom third of the pot. Bring the paint line up slightly higher than you want the final separation to be to ensure full coverage. -
Create the speckles:
Dip an old toothbrush into diluted black or dark brown paint. Run your thumb over the bristles to flick tiny speckles onto the beige section for that stone-like texture. -
Paint the top section:
Using your terracotta or rust orange paint, carefully paint the top two-thirds of the pot. Use a slow, steady hand to create a clean horizontal line where it meets the speckled beige section. -
Add the cheeks:
Dip the tip of your pinky finger or a circular sponge dobber into soft pink paint. Stamp two rosy cheeks onto the terracotta section, spacing them widely apart. -
Draw the eyes:
Using your finest detail brush or a black paint pen, make two small, solid black dots just above the cheeks for the eyes. -
Add the smile:
Paint a very small, simple ‘U’ shape exactly centered between the cheeks to create the happy mouth. -
Seal the piece:
Protect your paint job by applying a coat of clear matte varnish over the entire pot. This will keep the clay durable and the colors vibrant.
Troubleshooting: Cracks
If hairline cracks appear while drying, don’t restart. Simply mix a tiny bit of fresh clay with water to make a paste and fill the cracks, then sand smooth when dry.
Now you have a charming little companion to keep your favorite pens and pencils organized

TRACK YOUR CERAMIC JOURNEY
Capture glaze tests, firing details, and creative progress—all in one simple printable. Make your projects easier to repeat and improve.
Magnet Mini Bud Vases
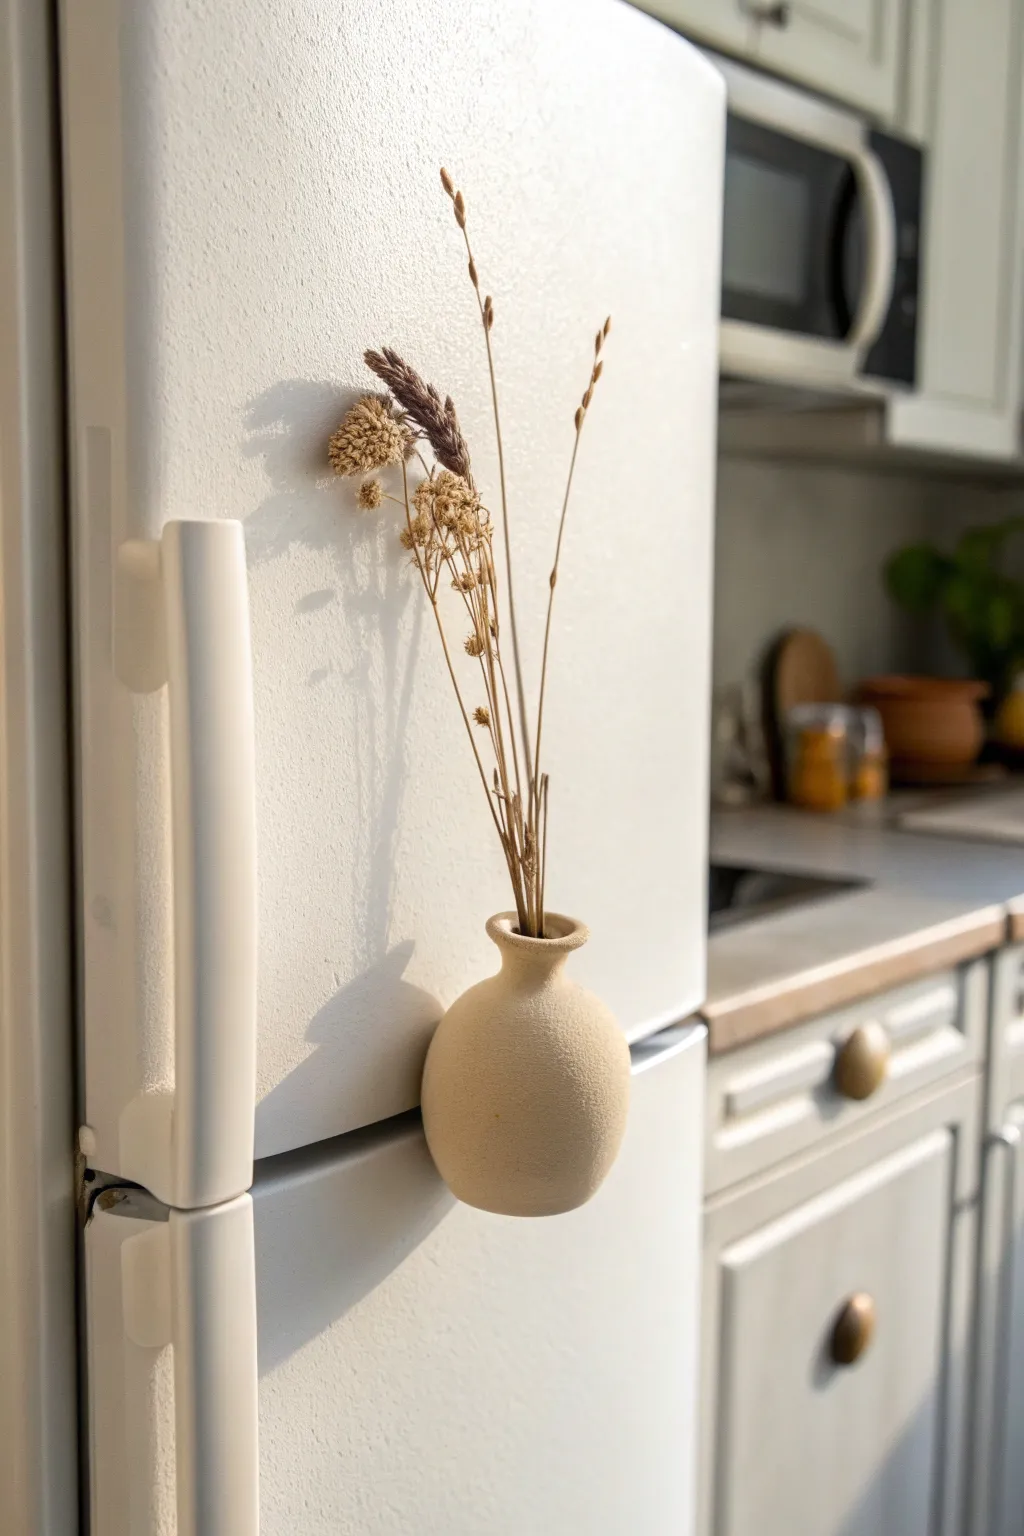
Bring a touch of minimalist charm to your kitchen with this tiny, textured bud vase magnet. Its organic shape and rough, sandstone-like finish make it the perfect vessel for displaying delicate dried grasses right on your refrigerator door.
Step-by-Step
Materials
- Air-dry clay (white or cream)
- Strong neodymium disc magnets (approx. 1/2 inch)
- Acrylic paint (beige/sand color)
- Baking soda (for texture)
- Small paintbrush
- Water in a small cup
- Super glue or E6000 adhesive
- Rolling pin or smooth jar
- Mod Podge or matte sealant spray
- Dried flowers or grasses
Step 1: Shaping the Vase
-
Condition the clay:
Start with a golf-ball-sized amount of air-dry clay. Knead it in your hands until it’s soft, warm, and pliable to prevent cracking later. -
Form the base:
Roll the clay into a smooth sphere. Gently tap the bottom on your work surface to create a flat base, but keep the overall shape rounded. -
Create the opening:
Use your pinky finger or the back of a paintbrush to press a deep hole into the top center of the sphere, stopping about a centimeter from the bottom. -
Form the neck:
Pinch the clay around the opening gently, pulling it slightly upward to create a distinct neck that is narrower than the body of the vase. -
Refine the rim:
Flare the very top edge of the neck outwards slightly to create a finished rim. Use a little water on your fingertip to smooth any rough edges. -
Flatten the back:
Press the back of the vase against your flat work surface. You need a completely flat, vertical area to ensure the magnet sits flush against the fridge. -
Embed the magnet recess:
Take your magnet and press it gently into the flat back to create an indentation, then remove it. This ensures the magnet won’t protrude too much later. -
Smooth the surface:
Dip your finger in water and run it over the entire exterior of the vase to erase fingerprints and smooth out imperfections. -
Dry thoroughly:
Set the vase aside in a safe spot to dry. Depending on humidity, this can take 24 to 48 hours. I like to flip it occasionally so the bottom dries evenly.
Step 2: Finishing and Assembly
-
Create textured paint:
Mix a small amount of beige acrylic paint with a teaspoon of baking soda. This mixture creates that lovely ceramic, stoneware look seen in the photo. -
Apply the texture:
Paint the entire exterior of the dried clay vase with your textured mixture. Dab the brush rather than stroking it to enhance the stone effect. -
Let paint set:
Allow the paint to dry completely. The baking soda mix tends to dry quite quickly, usually within an hour. -
Seal the surface:
Apply a coat of matte sealant or Mod Podge to protect the finish and keep the baking soda texture from dusting off over time. -
Attach the magnet:
Place a dot of strong super glue or E6000 into the indentation you made earlier on the back. -
Secure the hold:
Press the magnet firmly into the glue and let it cure according to the package instructions (usually 24 hours for maximum strength). -
Add florals:
Trim your dried stems to size and arrange them in your new mini vase.
Magnet slipping?
If the fully loaded vase slides down the fridge, the magnet isn’t strong enough. Use two neodymium magnets stacked together or switch to a larger diameter disc.
Pro Tip: Waterproofing
Since air-dry clay dissolves in water, these are strictly for dried flowers. If you want fresh blooms, you must line the inside with waterproof resin or varnish.
Enjoy styling your fridge with these chic little pockets of nature
Cute Fruit Slice Magnets
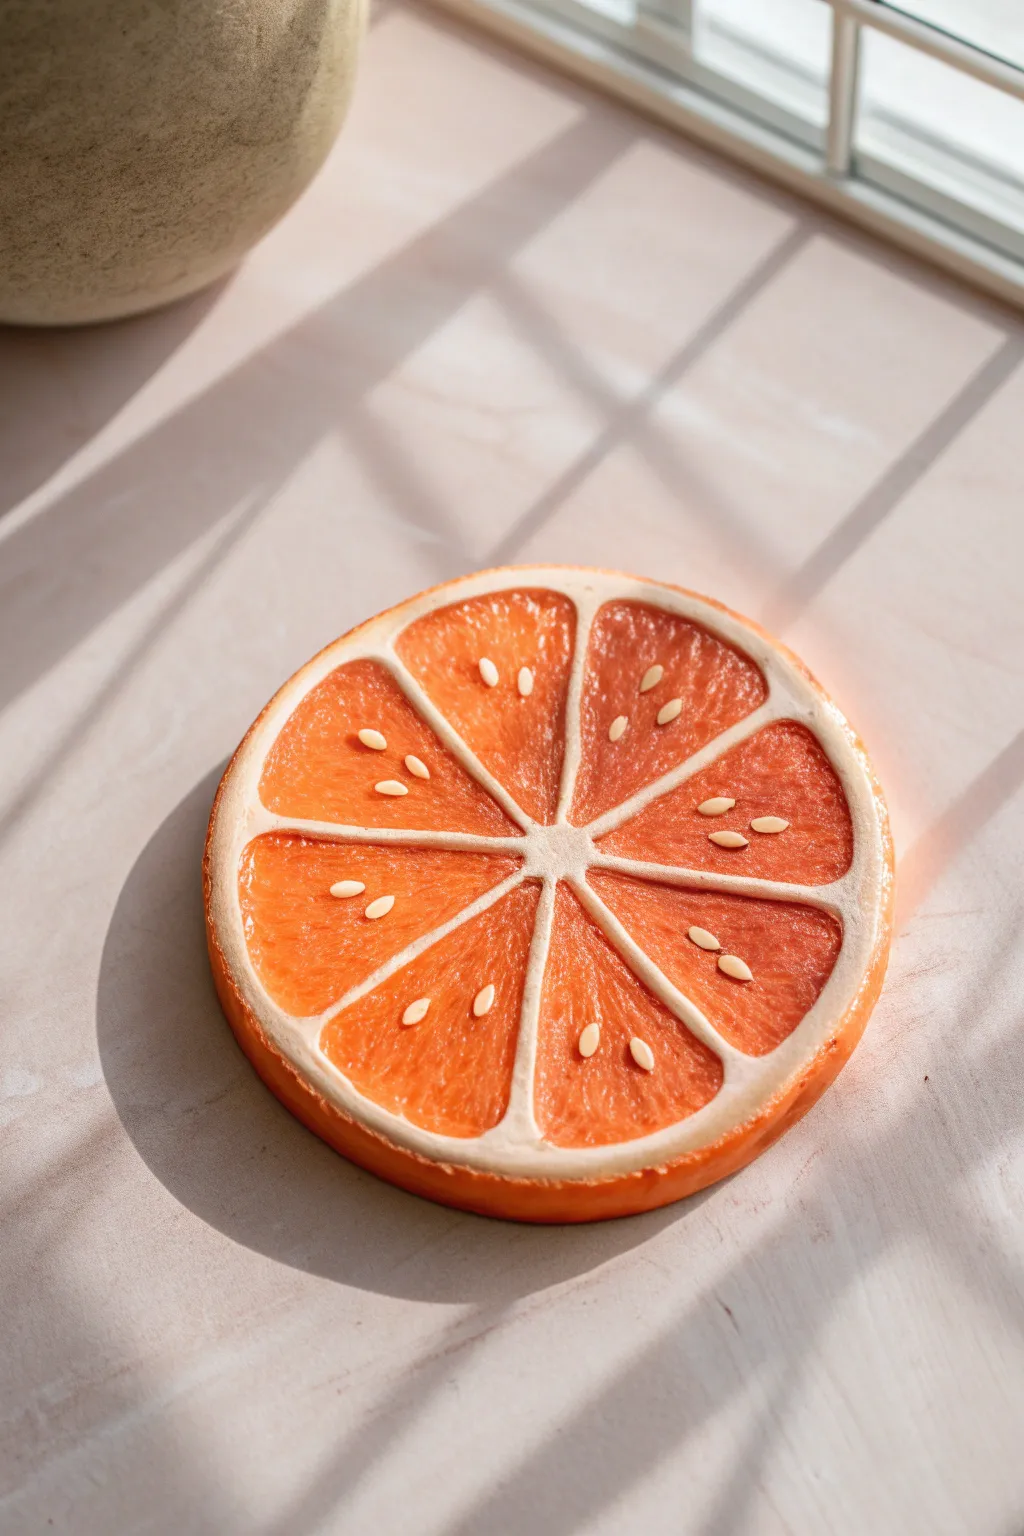
Brighten up your fridge with this deceptively realistic clay citrus slice that captures the juicy texture of fresh fruit. By layering translucent and opaque clays, you’ll create a vibrant orange or grapefruit slice that looks good enough to eat.
How-To Guide
Materials
- Translucent polymer clay
- Orange polymer clay
- White polymer clay
- Yellow polymer clay (small amount)
- Liquid polymer clay (translucent)
- Texturing tool (needle tool or toothpick)
- Round clay cutter (approx. 2-3 inches)
- Acrylic rolling pin
- Gloss glaze or UV resin
- Strong round magnet
- Superglue
- Pastel chalks (orange, red, yellow) for shading
Step 1: Mixing the Colors
-
Create the pulp mix:
Start by mixing translucent clay with a generous amount of orange clay. You want the color to be vibrant but still allow light to pass through, mimicking real fruit flesh. A 2:1 ratio of translucent to color usually works well. -
Prepare the pith color:
Mix white clay with a tiny speck of yellow. Real citrus pith isn’t stark white; it has a slight creaminess to it. Roll this into a thin sheet. -
Make the rind color:
Mix a solid orange shade that matches your pulp color but use opaque clay instead of translucent for the outer skin.
Needle Tool Secret
When texturing the pulp, dip your needle tool in liquid clay or baby oil first. It prevents the clay from dragging and creates smoother, juicier-looking grooves.
Step 2: Constructing the Cane
-
Form the segments:
Roll your translucent pulp mixture into a thick log, about 1 inch in diameter. This will form the core of your fruit cane. -
Shape the wedge:
Cut the log into 8 equal pie-slice wedges. It helps to mark the top like a clock first to ensure even sizing. -
Add the pith lines:
Roll out your cream-colored pith clay into a very thin sheet. Cut strips and place one between each of your orange wedges, reassembling the log as you go so the white lines radiate from the center. -
Wrap the core:
Once the log is reassembled, wrap the entire cylinder in another thin sheet of the cream pith clay. -
Add the rind:
Finally, wrap the cylinder in a slightly thicker sheet of the opaque orange rind clay. Smooth the seams gently with your fingers.
Step 3: Slicing and Texturing
-
Reduce the cane:
Gently squeeze and roll the cane to reduce its diameter to your desired size (around 2-3 inches). Let the clay rest in the fridge for 20 minutes to firm up—this prevents distortion when slicing. -
Cut the slice:
Using a very sharp tissue blade, slice a distinct disk from your cane, about 1/4 inch thick. Keep the blade steady to ensure an even thickness. -
Reshape the edges:
Lay the slice flat. If the slicing squashed it slightly, gently tap the edges back into a perfect circle. -
Texture the pith:
Take your needle tool and gently rough up the white pith trigger lines and the outer rim. Stippling it creates a natural, porous look. -
Texture the pulp:
This is the crucial step for realism. Using a needle tool, scratch tiny, radiating lines and teardrop shapes into the translucent orange segments. I like to work from the center outward, digging slightly to create depth. -
Add seeds:
Roll tiny teardrops of the cream clay. Press 2-3 seeds into the pulp near the center of a few segments. Make sure they are embedded deeply enough to look natural.
Change the Flavor
Switch up the colors to make a whole fruit salad set! Use translucent yellow for lemons, green for limes, or a deep ruby red for blood oranges.
Step 4: Finishing Touches
-
Shade the rind:
Using a soft brush, dust a little orange or reddish chalk pastel on the outer rind to give it a sun-kissed, uneven color. -
Bake the piece:
Bake according to your clay manufacturer’s instructions (usually 275°F for 15-30 minutes). Let it cool completely. -
Gloss it up:
Apply a coat of gloss glaze or UV resin over just the juicy pulp sections, leaving the white pith matte. This contrast sells the wet fruit effect. -
Attach the magnet:
Flip the slice over and glue a strong magnet to the center using superglue or E6000.
Once the glaze is dry, your fresh and zesty magnet is ready to hold up your grocery list
Boho Clay Rainbow Hanging
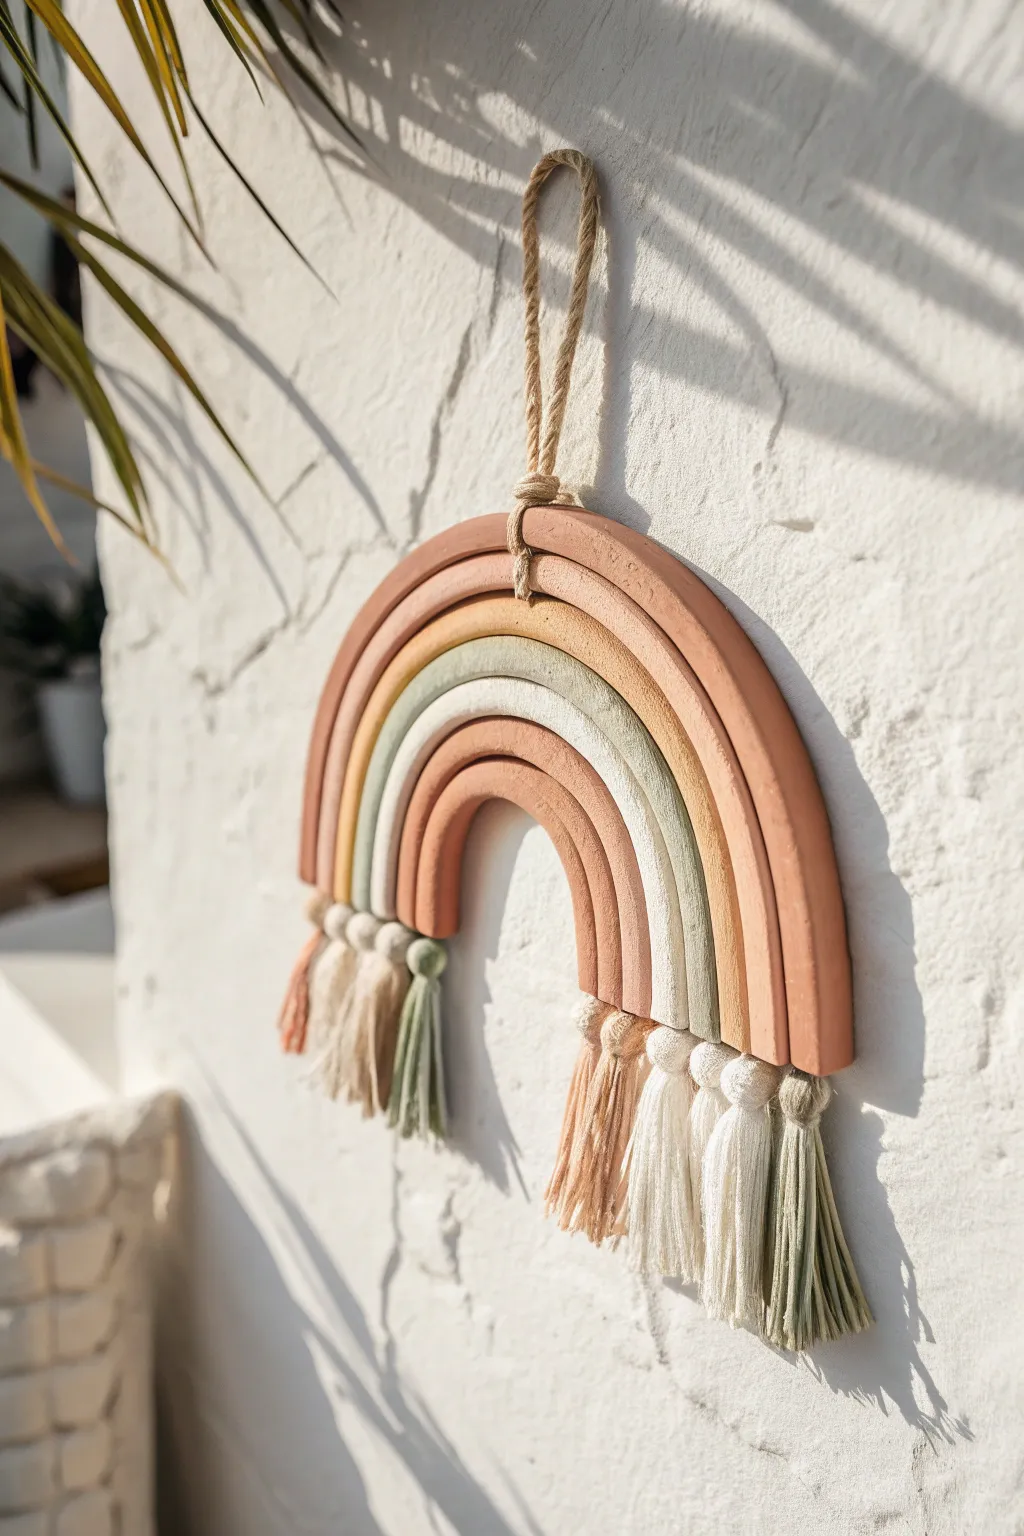
Bring a touch of modern bohemian charm to your walls with this sculptural clay rainbow. Featuring warm, earthy terra cotta and sage tones finished with playful yarn tassels, this piece adds beautiful texture and dimension to any nursery or living space.
Detailed Instructions
Materials
- Air-dry clay (terra cotta and white colors)
- Acrylic rolling pin
- Sharp craft knife or clay slicer
- Guide sticks or wooden rulers (approx. 1/4 inch thick)
- Circular cookie cutters or bowls (various graduating sizes)
- Sandpaper (fine grit)
- Cotton yarn or macrame cord (cream, sage, terracotta)
- Tacky glue or strong craft adhesive
- Jute twine for hanging
- Small paintbrush
- Water cup
- Cardboard scraps
Step 1: Shaping the Clay Arches
-
Prepare your workspace:
Lay down a non-stick mat or parchment paper to prevent sticking. I like to tape the corners down so the paper doesn’t shift while rolling. -
Condition the clay:
Knead your terra cotta air-dry clay until it is soft and warm. If you are mixing colors to get lighter shades (like the lighter peach tone), blend white clay with the terra cotta until fully uniform. -
Roll out the slabs:
Using guide sticks on either side of your clay ball to ensure even thickness, roll the clay out into a smooth slab about 1/4 inch thick. -
Cut the primary arches:
Use your graduated circle cutters or bowls as templates. Cut concentric arches, starting with the largest outer arch in terra cotta. You will need four distinct arches in descending sizes. -
Create color variations:
The image features four specific bands: a large outer terra cotta band, a slightly lighter peach band, a muted sage green band, and a smaller inner terra cotta band. Mix your clay or use acrylic paint later to achieve these tones. -
Refine the edges:
Once cut, dip your finger in a little water and smooth down any rough or jagged edges on the clay arches to give them a polished, professional look. -
Add the hanging hole:
Pierce a small hole directly through the top center of the largest (outermost) arch. Make sure it is wide enough to accommodate your jute twine. -
Dry the pieces:
Lay your arches flat on a drying rack or mesh screen. Let them air dry for 24-48 hours, flipping halfway through to prevent warping.
Step 2: Assembly and Painting
-
Sand for smoothness:
Once fully dry, gently sand the edges and surface with fine-grit sandpaper to remove any imperfections or fingerprints. -
Paint the arches (optional):
If you didn’t use colored clay, paint your arches now. Use matte acrylic paints to mimic the terra cotta and sage finishes seen in the photo. Let the paint dry completely. -
Glue the structure:
Cut a piece of cardboard or backing felt into an arch shape slightly smaller than your total rainbow. Glue the clay arches onto this backing, pressing them snugly against each other so there are no gaps.
Cracking Woes?
If minor cracks appear while drying, don’t panic. Mix a tiny bit of fresh clay with water to make a paste (slip) and fill in the crack. Smooth it over and let it dry again.
Step 3: Making and Attaching Tassels
-
Wrap the yarn:
To make the tassels, wrap your cotton yarn around a 3-inch piece of cardboard about 15-20 times depending on desired thickness. -
Tie the tops:
Thread a small piece of yarn under the wrapped loops at one end and tie it tightly to secure the bundle. Slide the yarn off the cardboard. -
Create the tassel neck:
Take another piece of yarn and wrap it multiple times around the bundle, about 1/2 inch below the top tie. Knot it securely and hide the ends inside the tassel. -
Cut the loops:
Cut the loops at the bottom of the bundle to create the fringe. Repeat this process until you have enough tassels—two per arch end, matching the yarn color to the clay arch color. -
Attach the tassels:
Glue the top of each tassel directly to the bottom flat edge of its corresponding clay arch. Hold in place for a few seconds until the glue tacks. -
Trim the fringe:
Once the glue is dry and tassels are secure, give them a final haircut so the bottom edge is even and uniform. -
Add the hanger:
Fold a length of jute twine in half and thread the loop through the hole you made in the top arch. Pass the loose ends through the loop to create a lark’s head knot for hanging.
Texture Twist
Before the clay dries, gently press a piece of linen fabric or a lace doily onto the surface of one arch to leave a subtle, imprinted texture for added visual interest.
Hang your new masterpiece in a sunny spot and enjoy the handmade warmth it brings to your room
Geometric Wall Hanging Tiles
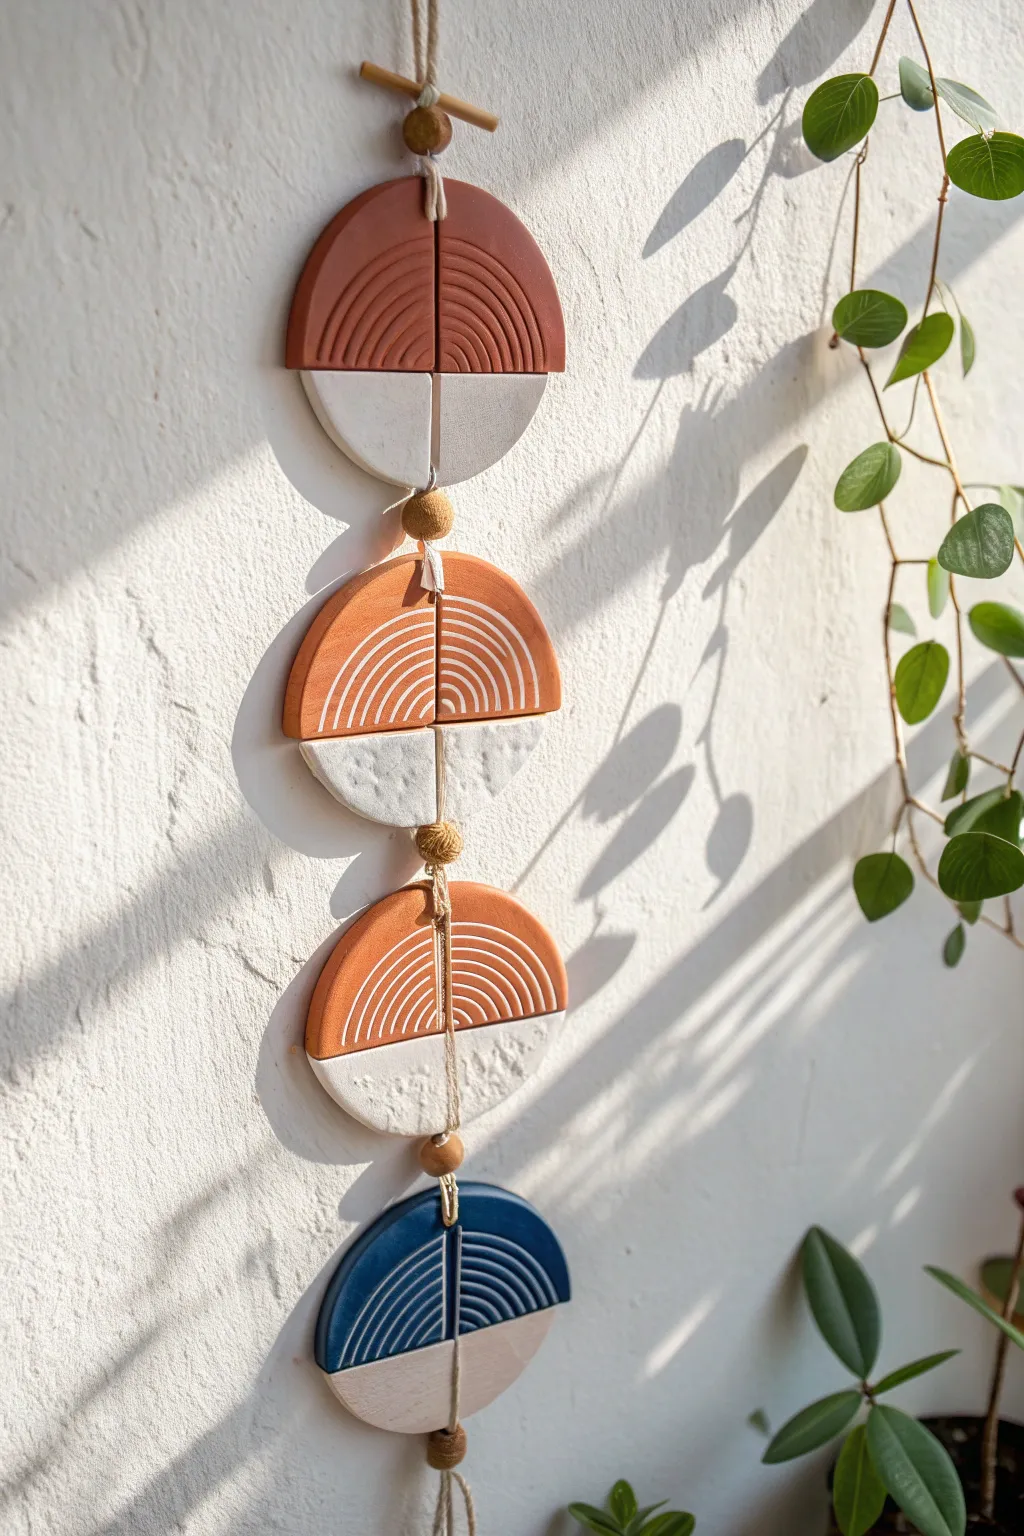
Bring modern bohemian charm to your walls with this vertical mobile featuring split-circle designs. The combination of etched terracotta textures and smooth, creamy contrasts creates a striking visual rhythm perfect for any corner needing a little artistic touch.
Step-by-Step
Materials
- Polymer clay (terracotta/burnt orange, navy blue, and white/ecru)
- Acrylic rolling pin
- Circle cookie cutter (approx. 3-4 inches diameter)
- Craft knife or clay blade
- Modeling tool or needle tool (for etching)
- Texture sponge or sandpaper
- Small wooden craft beads
- Top wooden dowel or stick (approx. 4 inches)
- Jute twine or cotton cord
- Parchment paper
- Oven and baking sheet
- Super glue or strong craft adhesive
Step 1: Shaping the Base Circles
-
Condition the terra cotta clay:
Begin by warming up your terracotta or burnt orange polymer clay in your hands until it is pliable. Roll it out on parchment paper to an even thickness of about 1/4 inch using your rolling pin. -
Cut the top semicircles:
Use your circle cutter to punch out three circles. Then, use a straight blade to cut each circle exactly in half horizontally. Set aside the top halves; these will be the colorful arched sections. -
Prepare the navy accent:
Repeat the previous process with a small amount of navy blue clay to create the bottom-most geometric element. You only need one semi-circle of this color. -
Create the white halves:
Condition and roll out your white or ecru clay. Cut four circles and slice them in half just like the others. These will serve as the bottom section for each ornament. -
Join the halves:
Take one colored semicircle and one white semicircle. Gently press their straight cut edges together on your work surface to form a full circle again. Use your finger to smooth the seam on the *back* side so they bond, but leave the front distinct.
Uneven Seams?
If the clay halves separate after baking, apply a small amount of liquid clay or strong super glue to the seam and press together firmly until set.
Step 2: Adding Texture and Detail
-
Etch the arches:
On the top colored half of each circle, use a needle tool to carve concentric arches. I find it easiest to start with the smallest arch in the center divot and work my way outward to keep the spacing consistent. -
Texture the white sections:
For the bottom white halves, gently press a coarse texture sponge or a crumpled ball of foil into the surface. This creates a stone-like look that contrasts beautifully with the smooth etched lines above. -
Add vertical definition:
Use your blade to gently score a vertical line down the center of each circle, emphasizing the split design without cutting all the way through. -
Punch holes:
Use a straw or small round tool to punch a hole at the very top and very bottom of each completed circle. Ensure the holes are large enough for your twine to pass through later. -
Bake the pieces:
Arrange the four circles on a baking sheet lined with parchment paper. Bake according to your clay package instructions (usually 275°F for 15-30 minutes). Let them cool completely before handling.
Add Metallic Flair
After baking, rub a tiny amount of gold leaf or metallic wax into the etched arch lines to make the geometric pattern pop against the matte clay.
Step 3: Assembly
-
Prepare the dowel:
Take your small wooden dowel or stick. Tie a length of jute twine to the center of it, creating a hanging loop at the top. -
Attach the first string:
Tie a long piece of twine (about 3 feet to be safe) to the center of the wooden dowel, letting it hang straight down. Thread a decorative wooden bead onto this string and push it up to the dowel. -
Thread the first circle:
Pass the string through the top hole of your first terracotta circle, run it along the back, and out through the bottom hole. -
Secure the segment:
Thread a wooden bead onto the string immediately after the circle. Tie a knot underneath the bead to hold the circle in place. Adjust the knot position so the circle hangs at your desired height. -
Repeat the pattern:
Continue adding the remaining circles in order (terracotta, terracotta, navy), separating each with a bead and a knot. Ensure the spacing between each geometric element is roughly equal. -
Final touches:
Once the navy circle is secured with a final bead and knot at the bottom, trim any excess twine. You can fray the very end of the string slightly for a tassel effect if desired.
Hang your new geometric art piece near a window where shadows can play across the textured surfaces
Modern Incense Holder
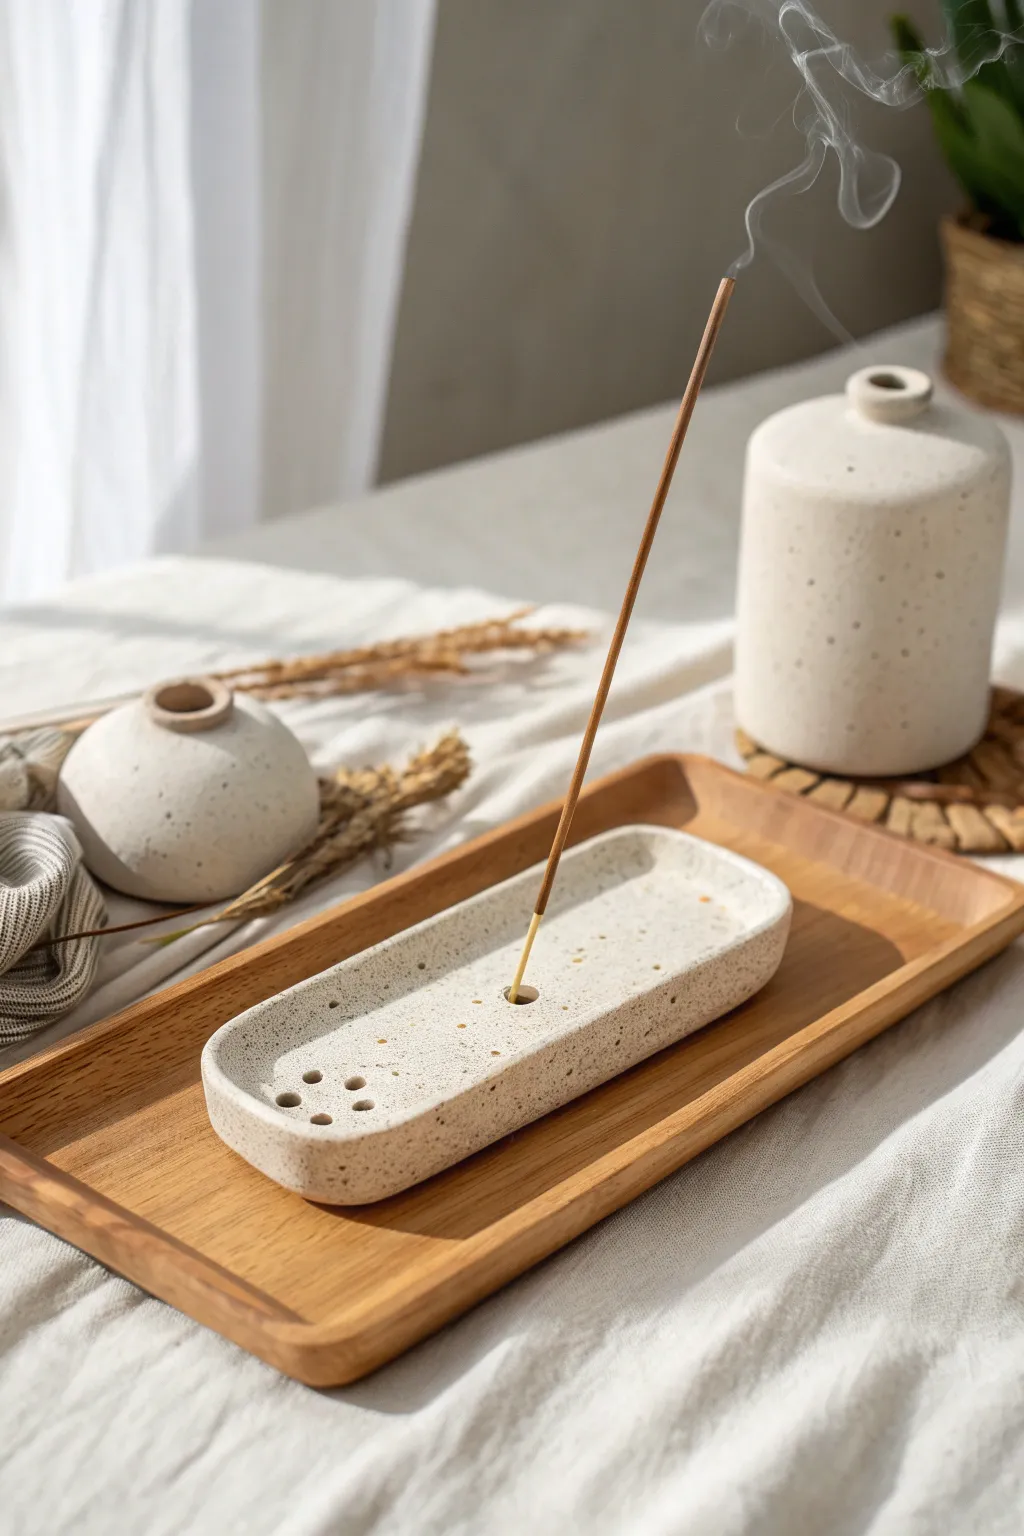
Create a serene atmosphere with this modern, oblong incense holder featuring a natural speckled finish. Its clean lines and functional design make it a perfect beginner-friendly project that looks effortlessly high-end.
Step-by-Step Tutorial
Materials
- Air-dry clay (white or cream)
- Speckle additive (sand, dried coffee grounds, or black pepper)
- Rolling pin
- Craft knife or clay cutter
- Small bowl of water
- Fine-grit sandpaper
- Wooden skewer or toothpick
- Straw or small piping tip (for decorative holes)
- Clear matte varnish or sealant
- Ruler
Step 1: Preparing the Clay
-
Condition the Clay:
Begin by taking a handful of white air-dry clay and kneading it in your hands to warm it up. This conditioning process makes the clay more pliable and less prone to cracking later. -
Add Texture:
To achieve that beautiful speckled stone look, sprinkle in your chosen additive—finely ground black pepper or sand works wonderfully here. Knead the clay thoroughly until the speckles are evenly distributed throughout the batch. -
Roll it Out:
Place the clay on a smooth surface. Use a rolling pin to flatten it into an even slab, aiming for a consistent thickness of about 1/4 inch (6mm) to ensure durability.
Step 2: Shaping the Form
-
Create the Template:
Sketch a long, pill-shaped oval on a piece of paper to use as a guide, roughly 6 inches long and 2 inches wide. Rounded ends are key to this soft, modern aesthetic. -
Cut the Shape:
Place your paper template onto the rolled clay slab. Using a sharp craft knife or clay tool, trace around the template with a steady hand to cut out the base shape. -
Prepare the Wall Strip:
Roll out a long, thin snake of clay or a flat strip, depending on your preference. For this specific look, cut a long strip from your remaining slab that is about 1/2 inch tall. -
Score the Edges:
Using a needle tool or toothpick, gently scratch cross-hatching marks (scoring) all along the outer edge of your oval base and along one side of your wall strip. -
Apply Slip:
Dab a small amount of water heavily onto the scored areas to create ‘slip,’ which acts as the glue for your clay components.
Fixing Cracks
If small cracks appear while drying, mix a tiny bit of fresh clay with water to make a paste. Fill the cracks, smooth it over, and let it dry again before sanding.
Step 3: Assembly and Detailing
-
Attach the Walls:
Carefully wrap the clay strip around the perimeter of the oval base. Press firmly to adhere the scored sides together, creating a shallow tray. -
Blend the Seams:
Use your finger or a modeling tool to smooth the seam where the wall meets the base, both on the inside and outside. I find wetting my finger slightly helps create a seamless transition. -
Smooth the Rim:
Gently run your finger along the top edge of the wall to round it off slightly, removing any sharp cutting marks for interrupted softness. -
Create the Holder Hole:
Find the center point of the tray. Insert a wooden skewer or incense stick straight down into the clay base, wiggling it slightly to ensure the hole is large enough for a standard stick to fit once the clay shrinks during drying. -
Add Decorative Accents:
At one end of the tray, use a straw or a small circular cutter to punch out three small decorative holes in a triangular formation, purely for aesthetic balance.
Make it Marble
Instead of speckles, twist two different colors of clay (like white and beige) together before rolling to create a subtle, natural marble effect.
Step 4: Finishing Touches
-
Slow Drying:
Place your piece in a cool, dry area away from direct sunlight. Let it dry slowly for 24-48 hours. Flipping it gently halfway through helps prevent warping. -
Sanding:
Once fully dry and hard, take your fine-grit sandpaper and gently smooth any rough edges or uneven spots on the rim and surface. -
Seal the Piece:
Apply a coat of clear matte varnish to protect the clay from ash marks. This also deepens the color of your speckles slightly, making them pop.
Place this on your favorite side table and enjoy the calm vibe it brings to your space
Textured Tea Light Holder
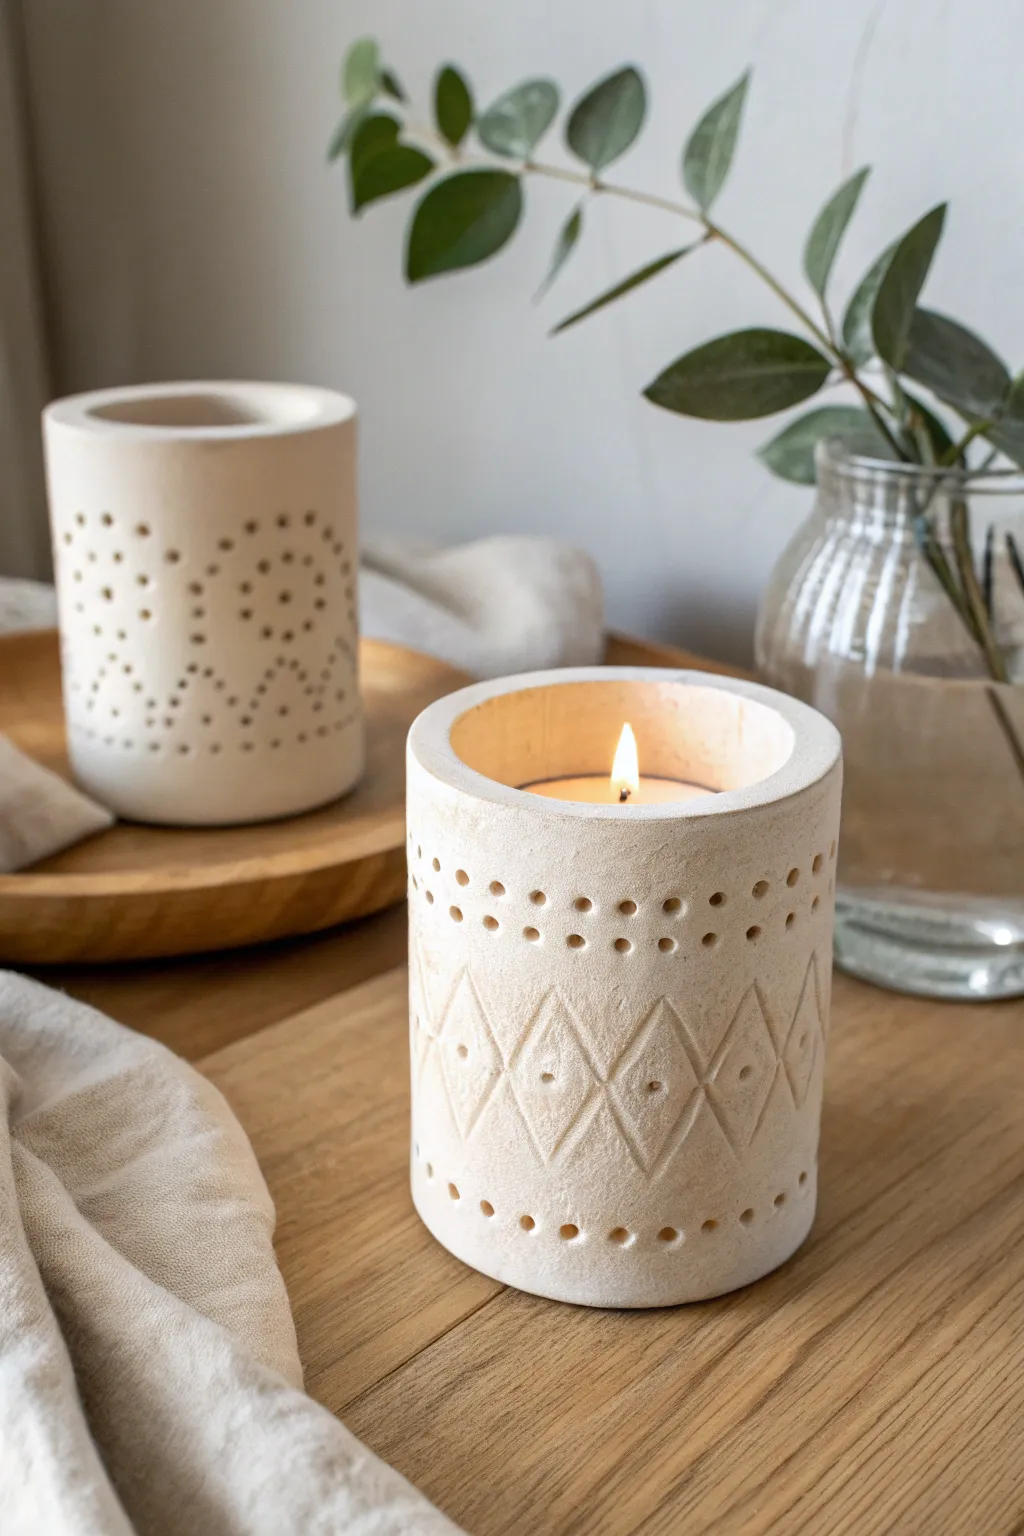
Create a warm, artisanal atmosphere with this handcrafted clay tea light holder featuring a delicate diamond lattice pattern. The textured surface and creamy matte finish mimic the look of carved stone, making it a sophisticated addition to any tabletop vignette.
Step-by-Step
Materials
- Air-dry clay (white or cream)
- Non-stick rolling pin
- Rolling guides or wooden slats (approx. 5mm thickness)
- Cylindrical mold (like a smooth glass jar or PVC pipe, approx. 3-4 inches diameter)
- Parchment paper or wax paper
- Ruler
- Craft knife or clay blade
- Clay carving tools or a wooden skewer
- Small round piping tip or a straw (for creating larger dots)
- Slip (clay mixed with water)
- Fine-grit sandpaper
- Matte sealant or varnish (optional)
Step 1: Preparation & Base Formation
-
Prepare the workspace:
Lay down a sheet of parchment paper on your work surface to prevent sticking. Knead a large ball of air-dry clay until it is soft, pliable, and free of air bubbles. -
Roll the slab:
Place your clay between two wooden rolling guides to ensure an even thickness. Roll the clay out into a long rectangular slab, roughly 5mm thick. Ensure the slab is long enough to wrap around your chosen cylindrical mold with a little overlap. -
Cut to size:
Using a ruler and a craft knife, trim the clay slab into a neat rectangle. The height should be slightly taller than a standard tea light (about 3-4 inches), and the length should match the circumference of your mold plus a half-inch for joining. -
Prepare the mold:
Wrap your glass jar or PVC pipe in a layer of parchment paper. This is crucial as it allows the clay to slide off easily later without suction getting in the way. -
Form the cylinder:
Carefully lift the clay slab and wrap it around the paper-covered mold. Bring the two short ends together. -
Join the seam:
Score both edges of the clay where they meet by scratching cross-hatch marks with a needle tool. Apply a little slip (clay water) to the scored areas. -
Smooth the connection:
Press the edges firmly together. Use your finger or a modeling tool to smooth the seam on the outside until it creates a seamless cylinder. Repeat on the inside if accessible, or just press firmly to bond.
Uneven Seams?
If the seam is visible after smoothing, roll a texture tool (or a crumpled ball of foil) over the join to blend the surface texture and hide the line.
Step 2: Adding Texture & Details
-
Mapping the pattern:
While the clay is still on the mold for support, lightly mark a horizontal guide line around the center of the cylinder using a ruler. This will be the midline for your diamond shapes. -
Carving the diamonds:
Using a needle tool or small carving gouge, gently carve a series of connecting diamond shapes around the center. I find it easiest to mark the top and bottom points first to keep the spacing consistent. -
Adding inner details:
Inside each large diamond, carve a smaller, concentric diamond shape. Keep your pressure even so the lines have a consistent depth. -
Creating the dot accents:
Use a small, blunt tool (like the end of a paintbrush or a specialized ball stylus) to press a single dot into the very center of each diamond. -
Punching the borders:
Create the decorative borders at the top and bottom rims. Using a tool with a slightly larger circular tip (like a small straw or piping tip), press rows of dots about half an inch from the top and bottom edges relative to your diamond pattern. -
Refining the surface:
Gently rub your finger over any jagged bits of clay created by the carving tools to soften them slightly before drying.
Glow Up
Poke the holes in the border completely through the clay rather than just indenting them. This allows candlelight to shine through the dots for a magical effect.
Step 3: Finishing Touches
-
Initial drying:
Let the clay sit on the mold for about an hour until it is leather-hard—firm enough to hold its shape but not fully dry. -
Remove the mold:
Carefully slide the clay cylinder off the mold. Peel away the parchment paper from the inside. -
Full cure:
Allow the piece to dry completely for 24-48 hours. Turn it upside down halfway through the process to ensure even airflow to the bottom rim. -
Sanding:
Once fully bone dry, use fine-grit sandpaper to smooth out the top and bottom rims and any rough patches on the seam. -
Final protection:
To mimic the stone look in the photo, leave the clay raw or apply a very matte varnish to protect it from dust without adding shine.
Place a tea light inside your new vessel and enjoy the soft, patterned shadows it casts on your walls
Flower Frog Vase Insert
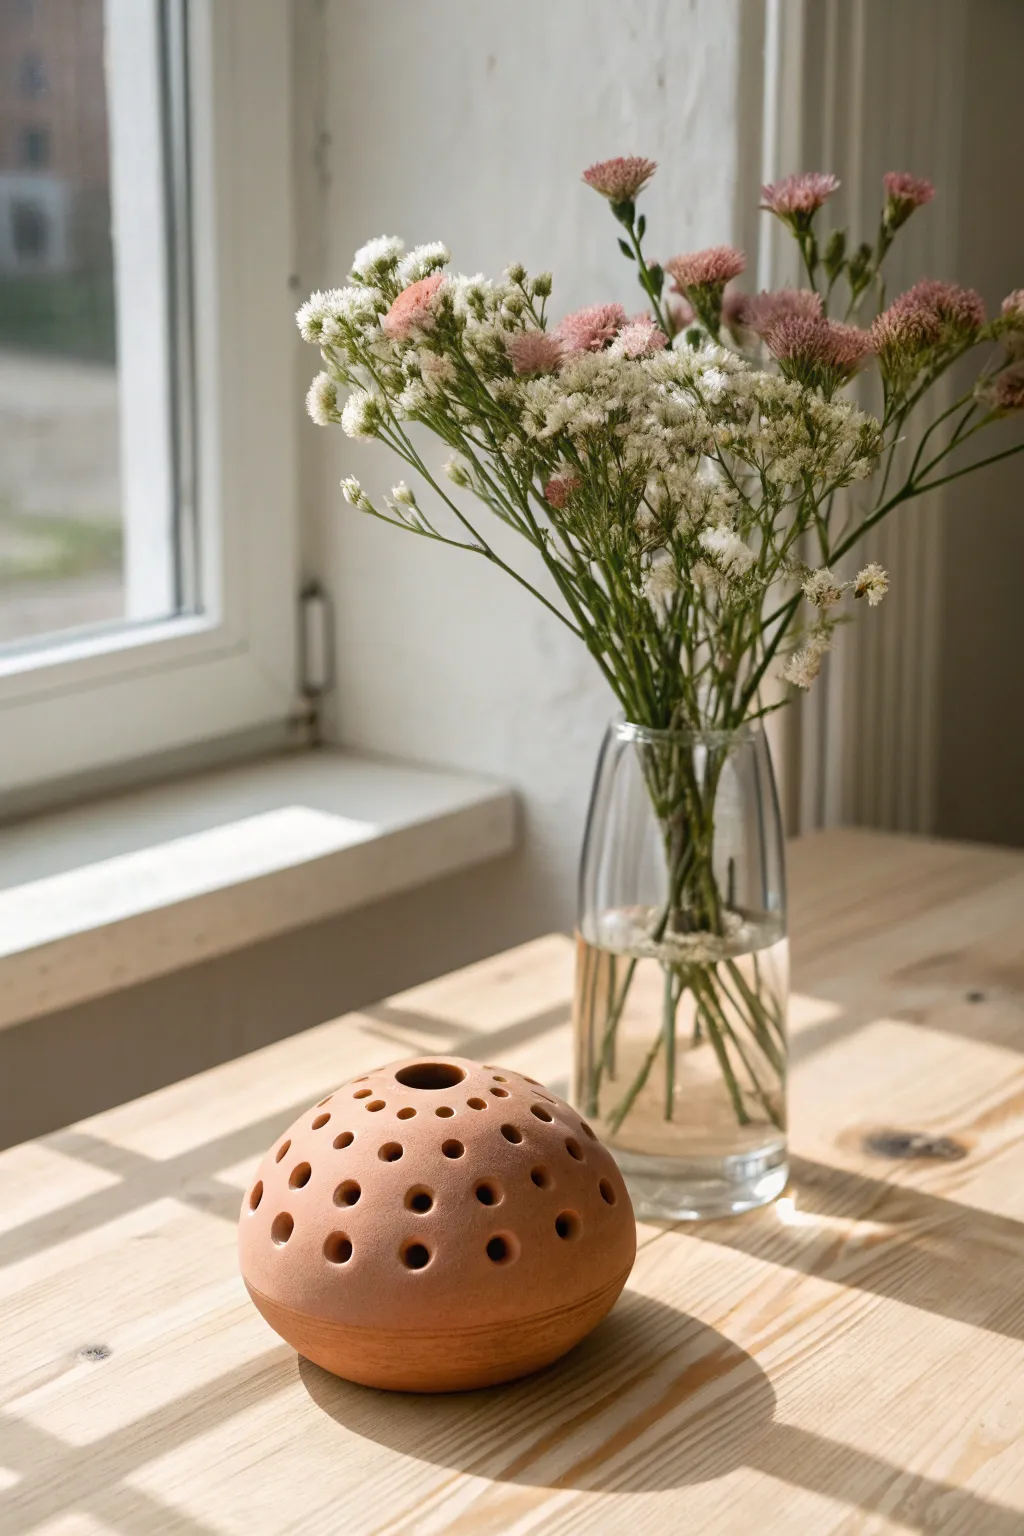
This rustic, functional piece works beautifully seated atop a jar or vase to create minimalist floral arrangements with ease. Modeled to look like raw terracotta, this clay dome features a pattern of punched holes perfect for supporting varied stem sizes.
Detailed Instructions
Materials
- Terracotta-colored air-dry clay (or polymer clay)
- Small bowl or half-sphere mold (approx. 4-5 inches diameter)
- Plastic wrap
- Rolling pin
- Drinking straw (standard size)
- Larger circular cutter (like a marker cap or large bubble tea straw)
- Sponge
- Cup of water
- Sandpaper (fine grit)
- Matte spray varnish (optional, for water resistance)
Step 1: Preparation & Forming the Dome
-
Prepare the Mold:
Select a bowl that matches the desired curve of your flower frog. Flip it upside down and cover the exterior smoothly with plastic wrap to prevent the clay from sticking. -
Condition the Clay:
Take a generous chunk of your terracotta clay and knead it in your hands until it is pliable and warm. This helps reduce cracking later on. -
Roll the Slab:
Roll the clay out on a flat surface to an even thickness of about 1/4 inch. You want it thick enough to be sturdy but not so heavy it collapses the vase. -
Shape Over Mold:
Gently lift your clay slab and drape it over the plastic-covered bowl. Use your palms to smooth it downward, conforming it to the bowl’s shape. -
Trim the Excess:
Using a knife or clay tool, cut away the excess clay around the base of the bowl to create a clean, circular edge. I like to leave it slightly taller than needed, as we will refine the rim next. -
Create the Lip:
To ensure stability when it sits on a vase, create a subtle ‘step’ or lip at the bottom edge. If the clay is thick enough, gently press an indentation around the exterior base, or adhere a small coil to the underside.
Cracking Up?
If small cracks appear while drying, mix a tiny bit of fresh clay with water to make a paste (slip) and fill the cracks. Smooth over and let dry again.
Step 2: Design & Detailing
-
smooth the Surface:
Dip a sponge lightly in water and run it over the entire surface of the dome. Smooth out any fingerprints, slight lumps, or texture from the rolling pin. -
Mark the Center:
Locate the very top center of your dome. Make a small mark here to guide your pattern. -
Create Central Hole:
Using your largest circular tool (like a marker cap), punch a clean hole directly in the center. -
Punch First Ring:
Using a standard drinking straw, punch a ring of holes around the central opening. Keep the spacing roughly equal. -
Punch Outer Rings:
Continue punching concentric rings of holes moving down the sides of the dome. Alternate the hole placement (like windows in a brick wall) for a pleasing aesthetic. -
Clean the Holes:
As you punch, the clay might pull slightly. Gently smooth the edges of each hole with a damp fingertip to ensure they are neat and round.
Step 3: Finishing Touches
-
Initial Drying:
Let the clay sit on the mold for about an hour until it stiffens slightly, then carefully lift it off and remove the plastic wrap. -
Refine the Base:
Now that it’s off the mold, check the bottom rim. Smooth any rough edges with your damp sponge so it will sit flat. -
Air Dry:
Allow the piece to dry completely according to package directions, usually 24-48 hours. Turn it over occasionally to ensure the inside dries evenly. -
Sand Imperfections:
Once fully dry, take fine-grit sandpaper and lightly buff away any rough spots or sharp edges around the holes. -
Seal:
Since this will be near water, apply several light coats of matte spray varnish to protect the clay from moisture breakdown.
Clean Cuts
Twist your straw or cutter as you pull it out of the clay rather than pulling straight up. This keeps the hole edges cleaner and prevents deformation.
Place your finished frog on a clear vase and enjoy how easily it turns a handful of wildflowers into a professional arrangement
Handmade Domino Set
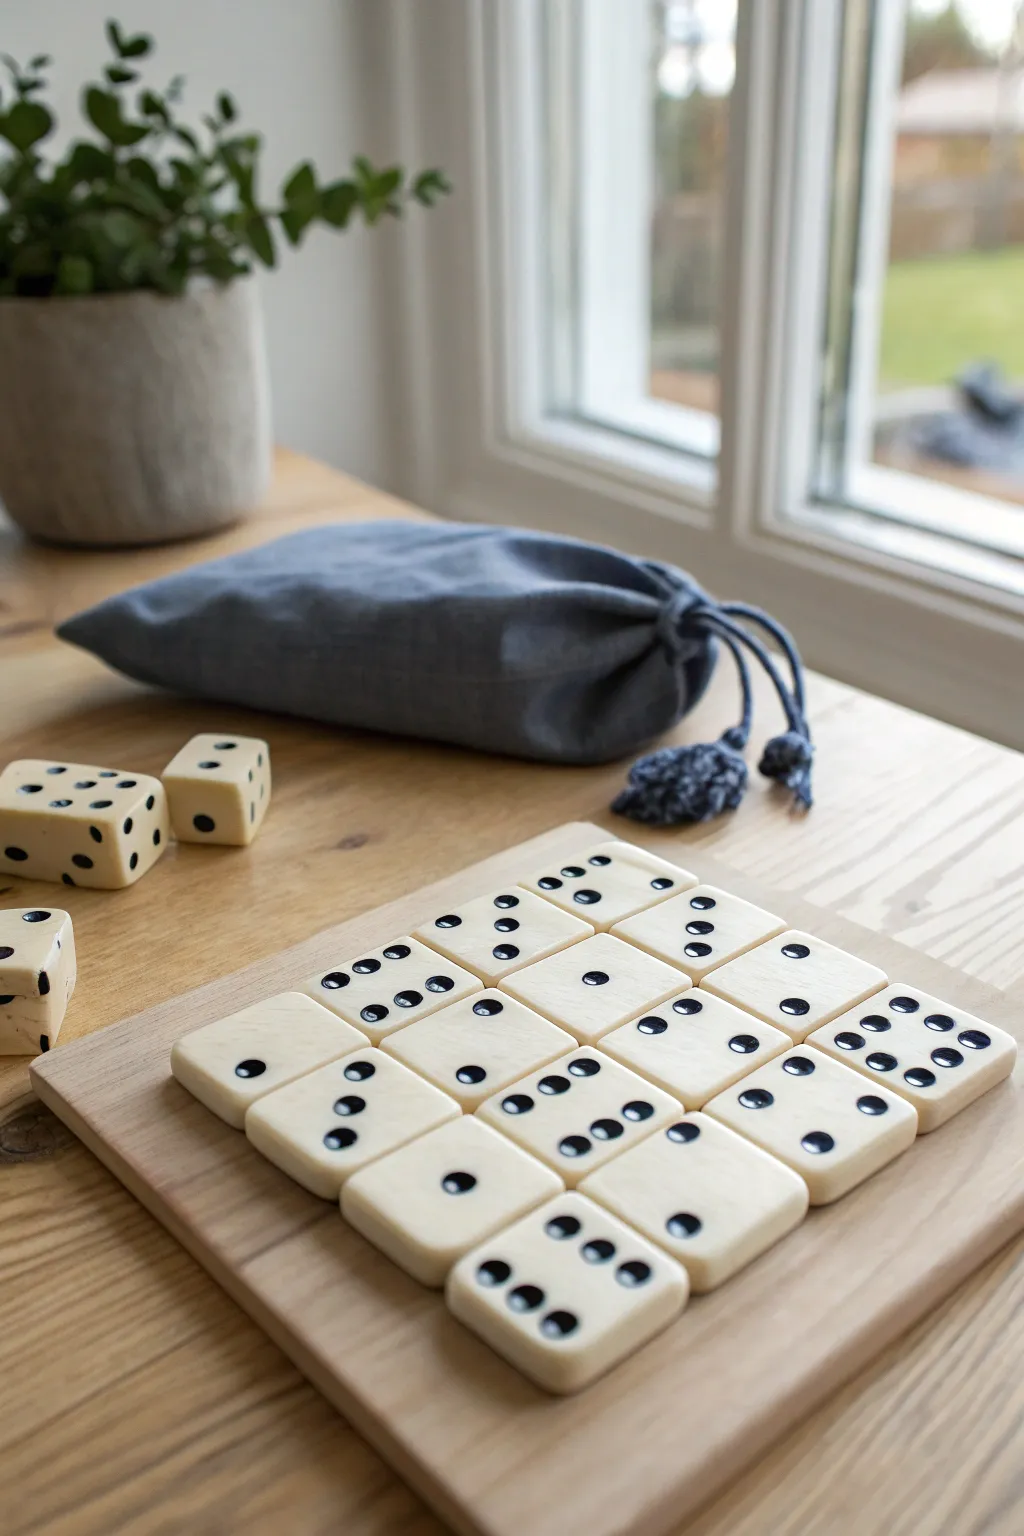
Elevate your game night with a sleek, minimalist set of handmade dominoes crafted from smooth polymer clay. These tiles feature a polished, bone-like finish and deeply indented pips for a classic, tactile feel that is both sturdy and stylish.
Step-by-Step Guide
Materials
- White or beige polymer clay (approx. 8 oz)
- Black acrylic paint
- Rolling pin or pasta machine
- Sharp blade or clay slicer
- Small round paintbrushes (size 0 or 1)
- Dotting tool or small round stylus
- Sandpaper (fine grit, 400-1000)
- Gloss or matte polyurethane varnish
- Ruler
- Parchment paper
Step 1: Shaping the Tiles
-
Condition the Clay:
Begin by warming the polymer clay in your hands, kneading it thoroughly until it creates a smooth, pliable consistency without cracks. If creating a custom color, mix your white and beige clays now to achieve that creamy, bone-like hue visible in the photo. -
Roll out the Slab:
Roll the clay out onto parchment paper to a uniform thickness, aiming for roughly 1/4 to 3/8 of an inch. A pasta machine is ideal for getting this perfectly even, but a rolling pin with guide rings works well too. -
Cut the Rectangles:
Using a sharp blade and a ruler, carefully measure and cut the clay into 28 identical rectangles. A standard domino size is about 1 inch by 2 inches, but you can adjust this to your preference. -
Smooth the Edges:
Gently tap the sides of each rectangle with your finger or the flat side of your blade to round off the sharp cut edges. This gives the tiles that soft, tumbled look seen in the finished set. -
Add the Dividers:
Use the back of your blade or a needle tool to gently press a shallow line across the center of each tile, separating the top and bottom halves.
Sticky Paint Solution
If acrylic paint dries on the surface before you can wipe it off, use a cotton swab dipped in rubbing alcohol or nail polish remover to gently clean the flat areas without disturbing the dots.
Step 2: Adding the Pips
-
Plan the Numbers:
Consult a standard double-six domino chart to ensure you create the correct number combinations, ranging from blank-blank to six-six. -
Impress the Dots:
Take your dotting tool or stylus and press firmly into the soft clay to create indented craters for the pips. I find that pressing slightly deeper than seems necessary helps, as the varnish can fill shallow holes later. -
Clean Up Edges:
Inspect each hole; if the tool pushed up a ridge of clay around the rim of the dot, gently smooth it back down with a fingertip. -
Bake the Set:
Arrange the tiles on a parchment-lined baking sheet and bake according to your specific clay package instructions (usually around 275°F for 15-30 minutes). Let them cool completely before handling.
Pro Tip: Weight
For a heavier, more luxurious feel similar to real bone or resin, you can embed small metal washers or flat weights into the center of the clay slab before cutting your rectangles.
Step 3: Finishing Touches
-
Initial Sanding:
Once cool, lightly sand the edges and faces of the tiles with fine-grit sandpaper to remove any fingerprints or imperfections. -
Paint the Pips:
Dip a fine-point brush into black acrylic paint and carefully fill each indented dot. Don’t worry if you get paint on the surface; the indentation is what matters. -
Wipe the Excess:
While the paint is still wet or tacky, take a slightly damp paper towel or baby wipe and swipe it flat across the surface of the tile. This removes the surface smear but leaves the paint trapped inside the deep indentations. -
Paint Correction:
If you wipe away too much paint, simply re-dot that specific pip and repeat the wiping process until every dot is crisp and black. -
Seal the Tiles:
Apply a thin layer of matte or gloss varnish to seal the clay and protect the paint. A matte finish mimics the natural look of bone, while gloss gives a more polished, plastic feel. -
Dry and Cure:
Allow the varnish to dry fully according to the bottle’s instructions, ensuring the tiles don’t touch each other while wet.
Now you have a beautiful, heirloom-quality game set ready for your next family gathering
Tiny Clay Room Diorama
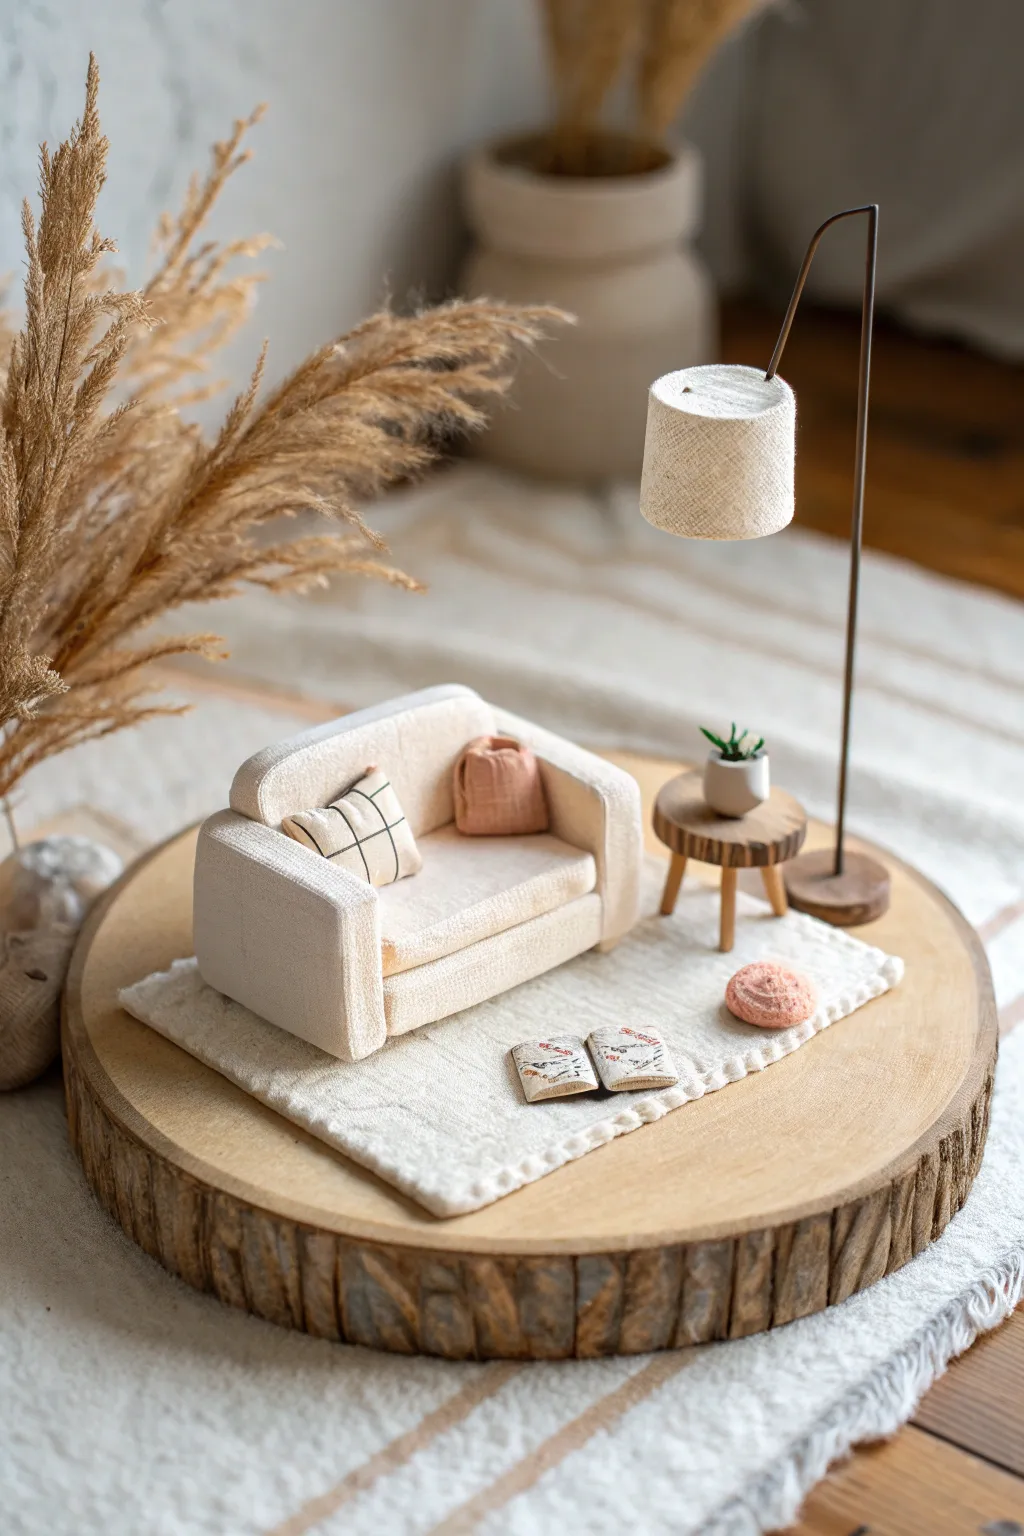
Create a tiny, serene sanctuary using polymer clay and natural elements. This miniature diorama captures the essence of a cozy living space on a rustic wood slice base, perfect for display on a bookshelf.
Step-by-Step
Materials
- Polymer clay (white, beige, terracotta, green)
- Wood slice (approx. 6-8 inches diameter)
- Thick crafting felt or white fabric scraps
- Thin wire (20 or 22 gauge)
- E6000 glue or strong craft glue
- Cardboard or foam core scraps
- Texturing tools (toothbrush, needle tool)
- Acrylic paint (black and red/pink)
- Fine detail brush
- Small dried flowers or faux plants
- Scissors and wire cutters
- Rolling pin
Step 1: Constructing the Sofa
-
Build the armature:
Cut small pieces of cardboard or foam core to create the basic rectangular shape of the sofa seat, backrest, and two armrests. Glue these pieces together to form a solid base structure. -
Cover with clay:
Roll out a sheet of white polymer clay to about 1/8 inch thickness. Gently drape and smooth the clay over your cardboard armature, ensuring all seams are blended. I like to press the clay firmly into the corners to keep the shape defined. -
Add texture:
Before the clay hardens, take a clean toothbrush or a piece of coarse sandpaper and tap it gently over the entire surface of the sofa. This stippling effect mimics the look of fabric upholstery. -
Create the cushions:
Form two small squares of white clay for the pillow. For the grid pattern, use a needle tool to lightly score lines or paint them on after baking. Create a second, rounder lump from terracotta clay to serve as the throw pillow. -
Bake the components:
Place the sofa and cushions on a baking sheet and bake according to your clay package instructions. Let them cool completely before handling.
Texturing Trick
To make the lamp shade look exactly like woven linen, press a scrap of real denim or canvas into the raw clay before baking.
Step 2: Creating the Accessories
-
Make the coffee table:
Cut a small circle from wood or shape a disc from brown polymer clay. For the legs, shape three small tapered logs of brown clay or use tiny snippets of dowel rods. Glue the legs to the underside of the table top. -
Sculpt the lamp shade:
Roll a small cylinder of beige clay. Hollow out one end slightly to look like a shade. Texture the outside with a stiff brush or fabric scraps to create a linen appearance. -
Form the lamp stand:
Bend a piece of thin wire into an L-shape with a slight curve at the top. Insert one end into a small clay base disc and bake. After baking, wiggle the wire out, add a dab of superglue, and reinsert it for hold. -
Pot the plant:
Form a tiny pot shape using grey or beige clay. Insert tiny bits of green clay rolled into spikes to mimic a succulent plant. Bake this tiny piece alongside your other accessories. -
Craft the open book:
Flatten two tiny rectangles of white clay and press them together at an angle to look like an open book. Use a needle tool to scratch ‘page’ lines on the sides. Bake briefly.
Saggy Sofa Fix
If your clay sofa sags while baking, prop the armrests up with crumpled aluminum foil to support the shape in the oven.
Step 3: Assembly and Detailing
-
Paint the details:
Once the book is cool, use a fine detail brush and black paint to add tiny scribbles for text and red for illustrations on the open pages. Paint the grid lines on the white pillow if you didn’t score them earlier. -
Prepare the rug:
Cut a rectangle of thick white felt or textured fabric slightly larger than the sofa. Use pinking shears on the edges or pull a few threads loose to create a fringe effect. -
Secure the rug:
Glue the fabric rug onto the center of your wood slice base using craft glue. Press it down flat so it doesn’t curl up at the corners. -
Position the furniture:
Apply a dab of strong glue to the bottom of the sofa and place it centrally on the rug. Glue the small side table to the right of the sofa. -
Install the lighting:
Glue the lamp shade onto the top of your wire stand. Secure the base of the lamp stand to the wood slice, positioning it so the shade hangs over the side table. -
Final touches:
Glue the tiny plant onto the side table. Place the open book on the rug in front of the sofa. Arrange the dried flowers or pampas grass behind the scene for a boho backdrop.
Now you have a charming miniature scene that captures a moment of quiet relaxation
DIY Clay Knobs and Pulls
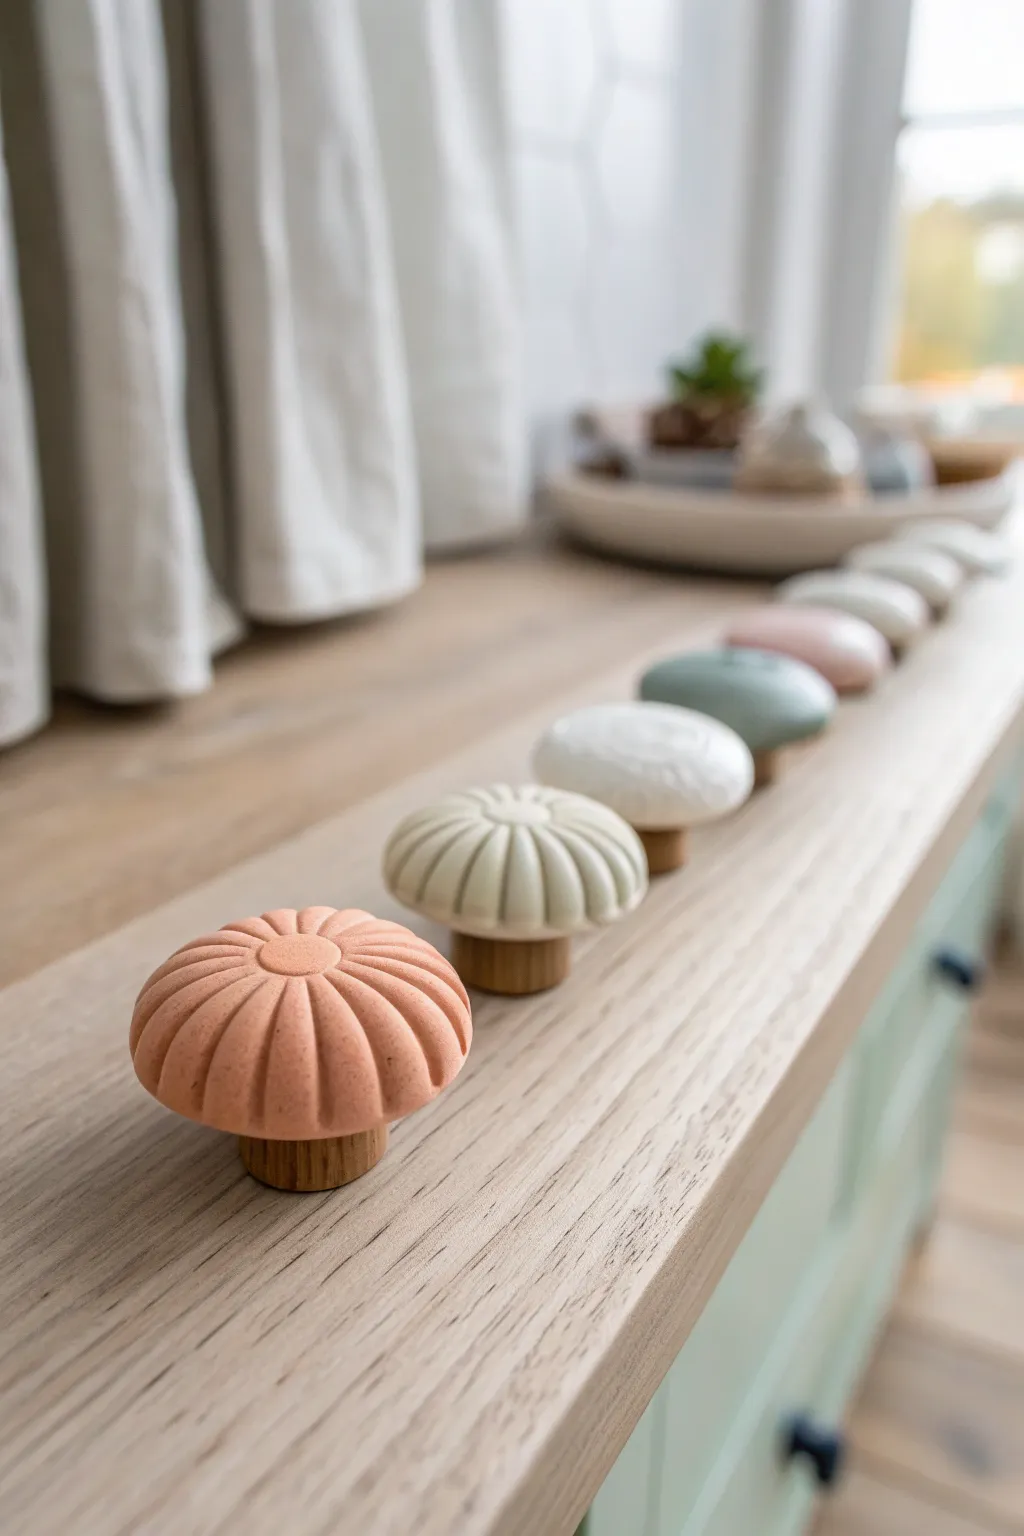
Transform ordinary furniture into a bespoke statement piece with these scalloped, pastel-toned drawer pulls. Combining the organic matte texture of polymer clay with warm wooden bases, these knobs offer a soft, tactile upgrade for any dresser or cabinet.
Step-by-Step Tutorial
Materials
- Polymer clay in various pastel shades (terracotta, sage green, cream, blush pink)
- Wooden knob bases (unfinished)
- Strong craft adhesive (e.g., E6000)
- Clay sculpting tools (specifically a curved modeling tool)
- Small round cookie cutter or circle template (slightly larger than your wooden base)
- Acrylic roller
- Baking sheet and parchment paper
- Oven (for curing)
- Sandpaper (fine grit)
- Matte varnish (optional)
Step 1: Preparing the Base
-
Select your palette:
Choose a soft, muted color palette. To achieve the specific organic tones seen in the image, you may need to mix white clay into standard colors to desaturate them. -
Condition the clay:
Warm the clay in your hands by kneading it thoroughly. This is crucial for preventing cracks during the sculpting process, especially for thicker pieces like these. -
Form the initial dome:
Roll a portion of clay into a smooth, crack-free ball about the size of a walnut. Slightly flatten the bottom so it sits stable on your work surface. -
Refine the shape:
Gently press the ball down to create a mushroom-cap shape. You want a distinct dome that is wider than your wooden base but not too flat.
Step 2: Sculpting the Scallops
-
Mark the center:
Using a small circular cutter or the back of a pen cap, gently press a small circle into the very top center of your dome. This creates the central ‘button’ feature. -
Divide the sections:
Imagine the knob as a clock face. Use a needle tool to lightly mark lines radiating from the center circle down to the bottom edge at 12, 3, 6, and 9 o’clock to ensure symmetry. -
Create the grooves:
Using a curved modeling tool or the handle of a paintbrush, press into the clay along your guide lines to create deep, rounded indentations. -
Fill the gaps:
Add additional grooves between your main four sections. You aim for a pumpkin-like ribbed texture that flows smoothly from the center circle to the base. -
Smooth the ridges:
I like to use a fingertip dipped in a tiny bit of baby oil to gently rub over the ridges, softening any sharp edges left by the tool. -
Texture the surface (optional):
For the stone-like finish seen in the terracotta knob, lightly tap the surface with a coarse sponge or a toothbrush to create a subtle pitted texture.
Fixing Fingerprints
If you notice fingerprints on your clay right before baking, a light brush of cornstarch or baby oil can smooth them out without ruining the shape.
Step 3: Baking and Assembly
-
Create the mounting divot:
Turn the clay piece over and press your actual wooden knob base into the underside to create a perfectly sized indentation. Wiggle it slightly and remove it before baking. -
Bake the clay:
Place your sculpted tops on a parchment-lined baking sheet. Bake according to your specific clay manufacturer’s instructions—usually around 275°F (135°C) for 30 minutes per 1/4 inch of thickness. -
Cool down:
Allow the clay pieces to cool completely in the oven with the door cracked open. This gradual cooling helps prevent thermal shock and cracking. -
Sand the wood:
While the clay cools, lightly sand your wooden knob bases to ensure a clean, grippy surface for the glue. -
Attach the base:
Apply a generous dab of strong adhesive like E6000 into the indentation on the underside of the clay. -
Secure the wood:
Press the wooden base firmly into the glue. Wipe away any excess that squeezes out immediately. -
Cure the glue:
Let the assembled knobs sit upside down (clay side down) for at least 24 hours to ensure the bond is fully cured before mounting.
Terrazzo Twist
Mix tiny shavings of contrasting clay colors into your main ball before rolling it. Sanding after baking will reveal a beautiful terrazzo stone effect.
Once mounted, these charming custom pulls add an instant touch of artisanal warmth to your favorite drawers