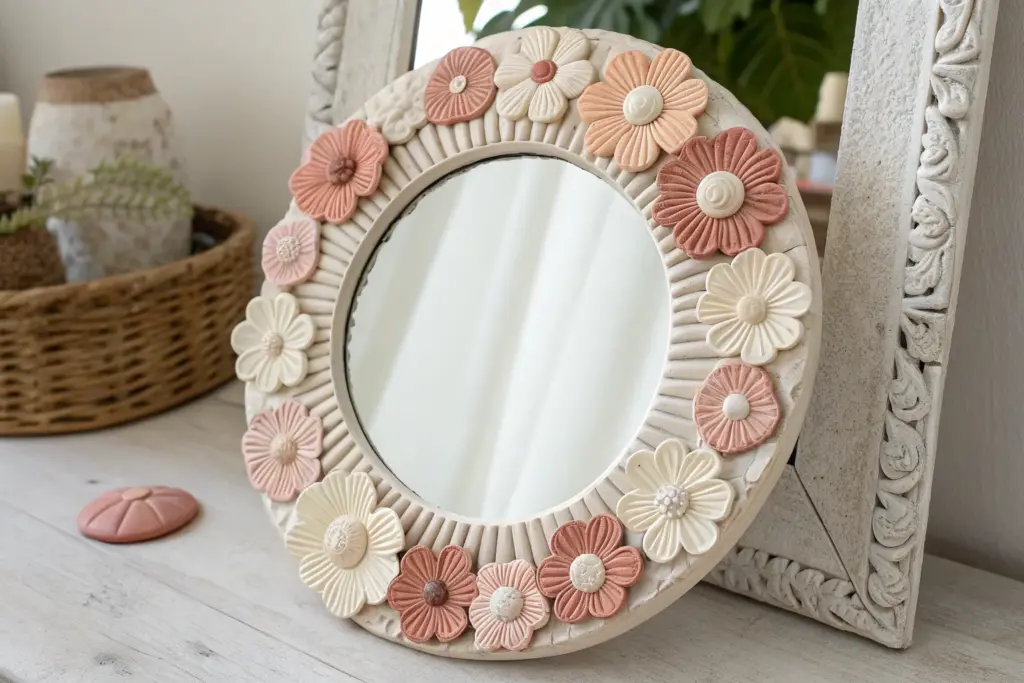
If you’ve got a plain mirror that feels a little too basic, foam clay is my favorite way to give it an instant personality boost. These foam clay mirror ideas are all about easy, lightweight 3D frames you can customize with color, texture, and cute little sculpted details.
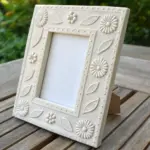
Classic Daisy Border Frame
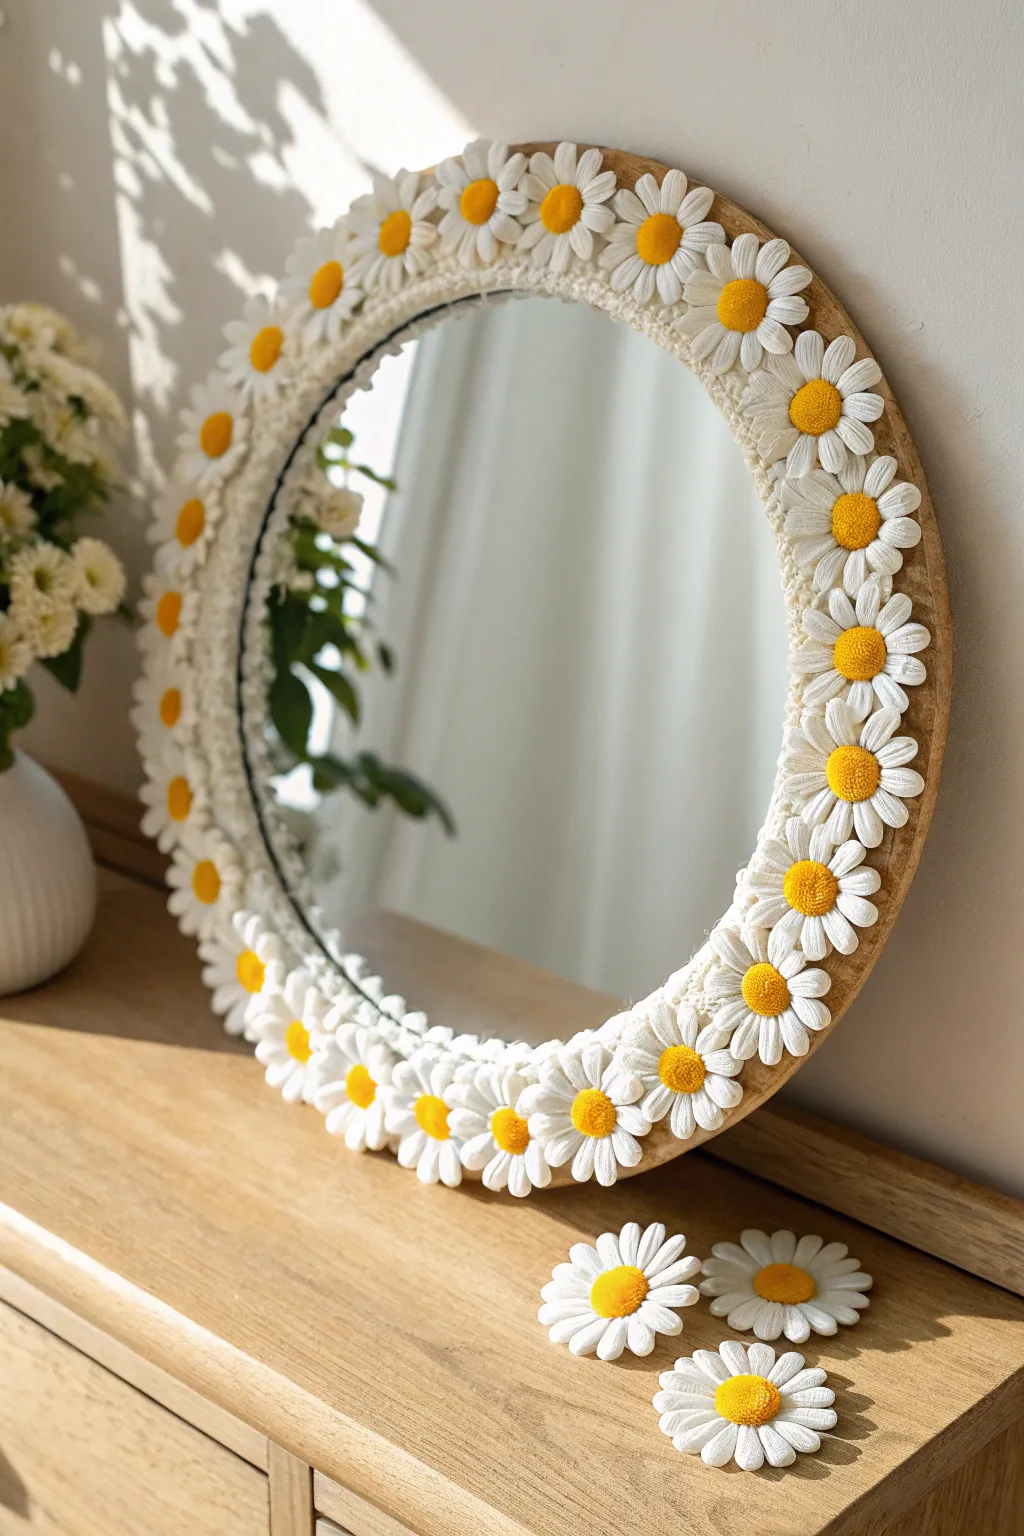
Bring a burst of eternal spring into your room with this cheerful DIY mirror project. Using lightweight foam clay, you’ll sculpt delicate white daisies with textured yellow centers to create a frame that looks soft, organic, and incredibly charming.
Step-by-Step Tutorial
Materials
- Round wooden framed mirror (approx. 18-24 inches)
- White foam clay (air dry)
- Yellow foam clay (air dry)
- Set of small sculpting tools (or a toothpick and a dull knife)
- Small ball tool or round-tipped stylus
- Texture tool (stiff bristle brush or a piece of rough sandpaper)
- White craft glue or strong clear adhesive
- Wax paper or silicone mat (for working surface)
- Wet wipes (for keeping hands clean)
Step 1: Preparing the Daisy Centers
-
Mix your yellow:
Start by conditioning your yellow foam clay. Knead it in your hands until it is warm and pliable. If the yellow is too bright, mix in a tiny pinch of orange or brown clay to get that warm, natural pollen look. -
Roll the centers:
Pinch off small pieces of yellow clay, about the size of a pea. Roll them into smooth, tight balls between your palms. You will need roughly 25-30 of these, depending on the size of your mirror. -
Create the dome shape:
Gently press each yellow ball down onto your work surface so the bottom flattens but the top remains a nice, rounded dome. -
Add pollen texture:
Using a stiff bristle brush or a dedicated needle tool, stipple the surface of the yellow domes repeatedly. You want a fuzzy, pitted texture that mimics real flower centers.
Loose Petals?
If a dry petal pops off during assembly, don’t panic. Foam clay is porous. Just add a drop of super glue or strong tacky glue to the detached spot and hold it for 30 seconds.
Step 2: Sculpting the Petals
-
Condition white clay:
Knead your white foam clay thoroughly. This is crucial for preventing cracks later on. Roll it into a long, even log about half an inch thick to make measuring easier. -
Cut petal segments:
Cut the white log into small, equal segments. Each daisy needs about 12-14 petals. Keeping the segments equal ensures your flowers look uniform. -
Shape the teardrops:
Take a white lush segment and roll it into a ball, then taper one end to form a teardrop or cone shape. -
Flatten and detail:
Flatten the teardrop gently with your thumb. Use a sculpting tool or a dull knife to press two or three faint longitudinal lines down the length of the petal for a realistic veined look. -
Assemble the first flower:
Arrange the petals in a circle on your wax paper, pointing the tapered ends inward. They should touch in the center, leaving a small depression for the yellow core. -
Attach the center:
Place a dab of glue in the middle of the petal ring and press one of your textured yellow domes firmly into place. The foam clay might stick on its own if fresh, but I prefer a dot of glue for longevity. -
Repeat the process:
Continue making full daisy heads until you have enough to cover the circumference of your mirror frame. Make 3 to 5 extra flowers just in case of spacing issues. -
Let them cure:
Allow your finished daisies to air dry for at least 24 hours. Foam clay shrinks slightly as it dries, so don’t be alarmed if they tighten up a bit.
Step 3: Assembly
-
Clean the frame:
Wipe down the wooden rim of your mirror to ensure there is no dust or oil that could interfere with the adhesion. -
Dry fit the layout:
Before gluing, arrange your dried daisies around the mirror frame. This helps you check the spacing. If you have gaps, you can space them slightly apart or squeeze them closer together. -
Glue the flowers:
Lift one flower at a time, apply a generous amount of strong craft glue to the back, and press it onto the wooden rim. -
Overlap slightly:
For a lush look, allow the petals to slightly overhang the inner edge of the mirror glass (without blocking the view) and the outer wooden edge. -
Fill the gaps:
If you encounter awkward small gaps between the main flowers, sculpt tiny single white petals or small white balls of clay and tuck them into the spaces to hide the wood beneath. -
Final clean up:
Once everything is glued, inspect the mirror glass for any smudge marks or stray glue strands and clean them off gently with glass cleaner.
Add Dimension
Before the clay dries, gently curl the tips of random petals upward or downward. This disrupts the uniform look and makes the flowers appear more organic and wind-blown.
Hang your new mirror near a window to catch the light and enjoy the handmade floral vibes every day


Maximalist Wildflower Meadow Frame
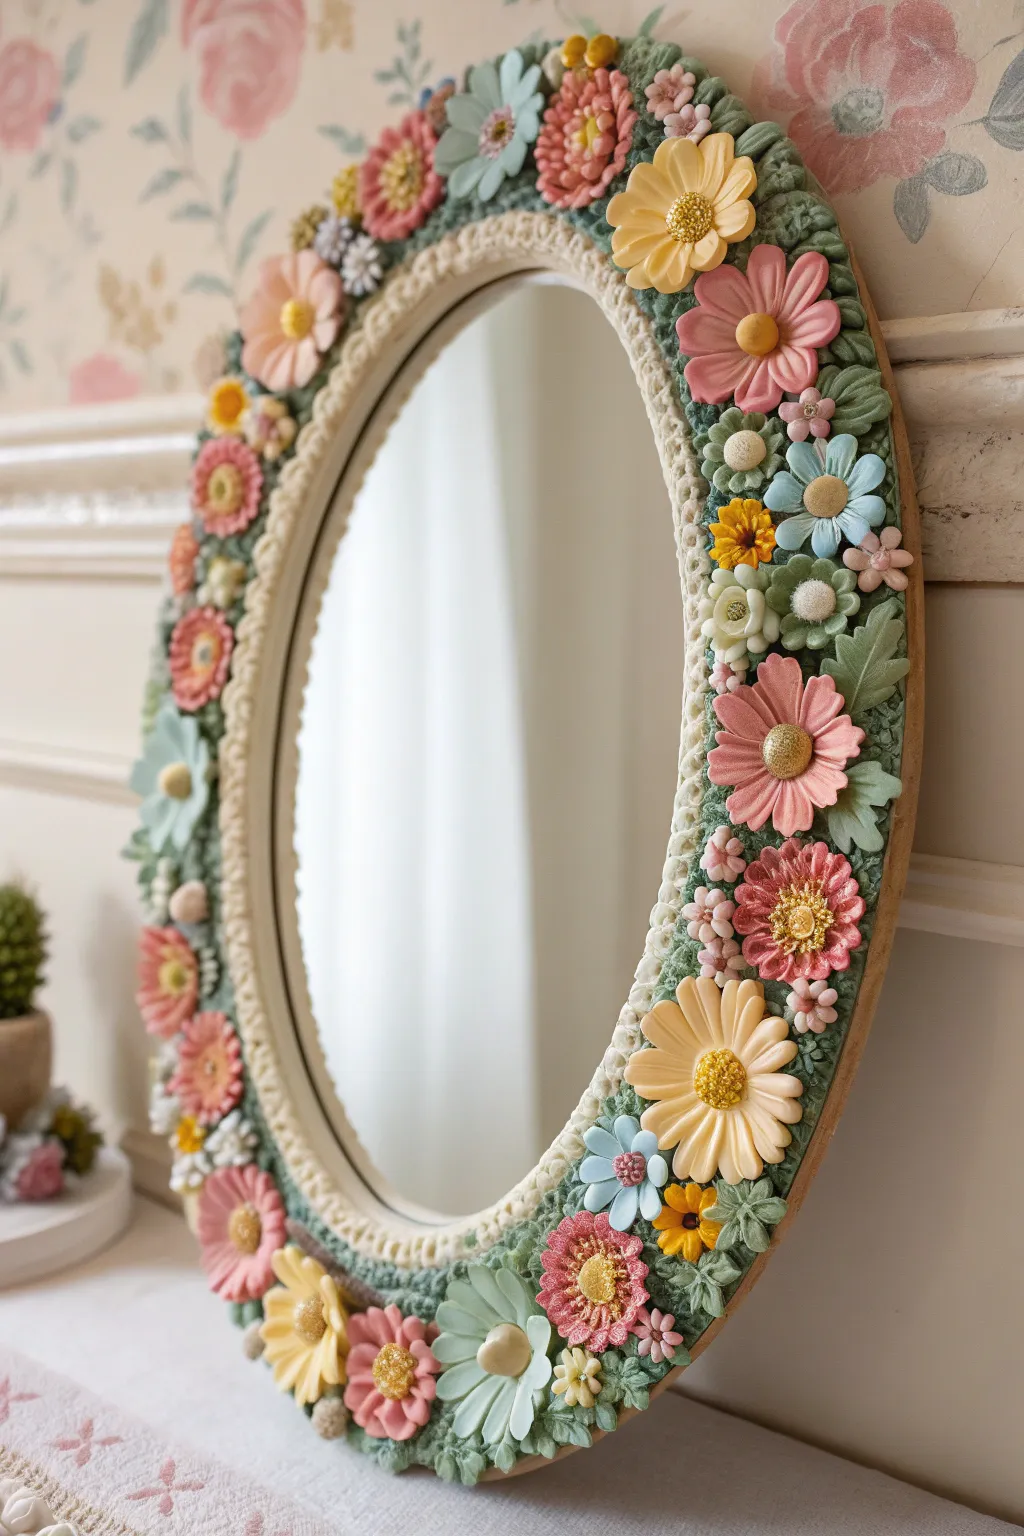
Transform a plain oval mirror into a whimsical garden portal with layers of soft foam clay. This project features a vibrant, texturized mossy base teeming with handcrafted daisies, wildflowers, and delicate buds in a romantic, matte finish.
How-To Guide
Materials
- Oval mirror (wood or plastic frame)
- Foam clay in various colors (moss green, sage green, yellow, pink, light blue, cream, white)
- Clay sculpting tools (ball stylus, needle tool, knife)
- White craft glue or tacky glue
- Texture sponge or toothbrush
- Small rolling pin
- Pastel chalks or acrylic paint (for shading centers)
- Soft brush
- Optional: Pearl beads or rhinestones for flower centers
Step 1: Creating the Mossy Base
-
Prepare the frame:
Clean your oval mirror frame thoroughly to ensure the clay adheres well. If the frame is very slick, give it a quick sanding with fine-grit sandpaper. -
Apply the green base:
Mix moss green and sage green foam clay together just enough to create a marbled effect. Press this mixture firmly onto the frame’s surface, wrapping it slightly around the outer and inner edges. -
Texturize the moss:
Before the clay dries, take a stiff texture sponge, toothbrush, or a crumpled ball of aluminum foil and press it repeatedly into the green clay. This creates a realistic, fluffy moss texture rather than a flat surface. -
Add rim detail:
Roll a long, thin snake of cream-colored clay. Press this gently along the inner rim of the mirror (where the glass meets the frame) to create a neat border. Use a needle tool to indent small lines or dots along this strip for a braided look.
Clay Texture Trick
To mimic the crocheted look seen on the inner rim, twist two thin snakes of clay together before pressing them onto the frame.
Step 2: Sculpting the Large Blooms
-
Forming petals:
For the large yellow and pink daisies, roll small balls of clay into teardrop shapes. Flatten them with your finger or a rolling pin to create individual petals. -
Assembling the first flowers:
Arrange the petals in a circle directly onto the mossy base while it’s still slightly tacky. If the base has dried, use a dab of white glue. Overlap the petals slightly for a fuller look. -
Creating intricate centers:
Roll a small ball of contrasting yellow or orange clay for the center. Press it into the middle of the petals. Use a needle tool to stipple the center repeatedly, giving it a pollen-like texture. -
Making the layered mums:
For the complex pink mum-like flowers, create three layers of petals, starting with larger ones on the bottom and getting smaller towards the top. Stack them and press a textured center firmly in the middle.
Fixing Cracks
If foam clay cracks while drying, mix a tiny bit of fresh clay with water to make a paste and smooth it into the fissures.
Step 3: Adding Filler Flowers & Leaves
-
Sculpting leaves:
Shape sage green clay into small diamonds. Flatten them and use a knife tool to score a central vein and smaller side veins. Bend them slightly for a natural, flowing shape. -
Placement strategy:
Tuck these leaves under the edges of your large flowers and scatter them around empty patches of the moss base. I like to group leaves in twos or threes to mimic natural growth. -
Creating blue forget-me-nots:
Make tiny five-petal flowers using light blue clay. These should be much smaller than your main blooms. A ball stylus is great for indenting the center of each petal to give it a cupped shape. -
Adding micro-details:
Roll extremely tiny balls of white and cream clay to create clusters of buds or berries. Press these in bunches near the leaves to fill any remaining gaps.
Step 4: Finishing Touches
-
Shading with pastels:
Once the clay is dry to the touch, scrape some pastel chalk dust (in dark pinks or oranges) and brush it gently into the centers of the flowers to add depth and realism. -
Adding highlights:
You can also dry-brush a tiny amount of white acrylic paint onto the tips of the textured moss to make the details pop. -
Cleaning the glass:
Use a cotton swab dipped in water or glass cleaner to carefully wipe away any clay smudges or glue residue on the mirror face.
Hang your new floral mirror in a bright spot to enjoy your everlasting garden view
Wavy Blob Outline Frame
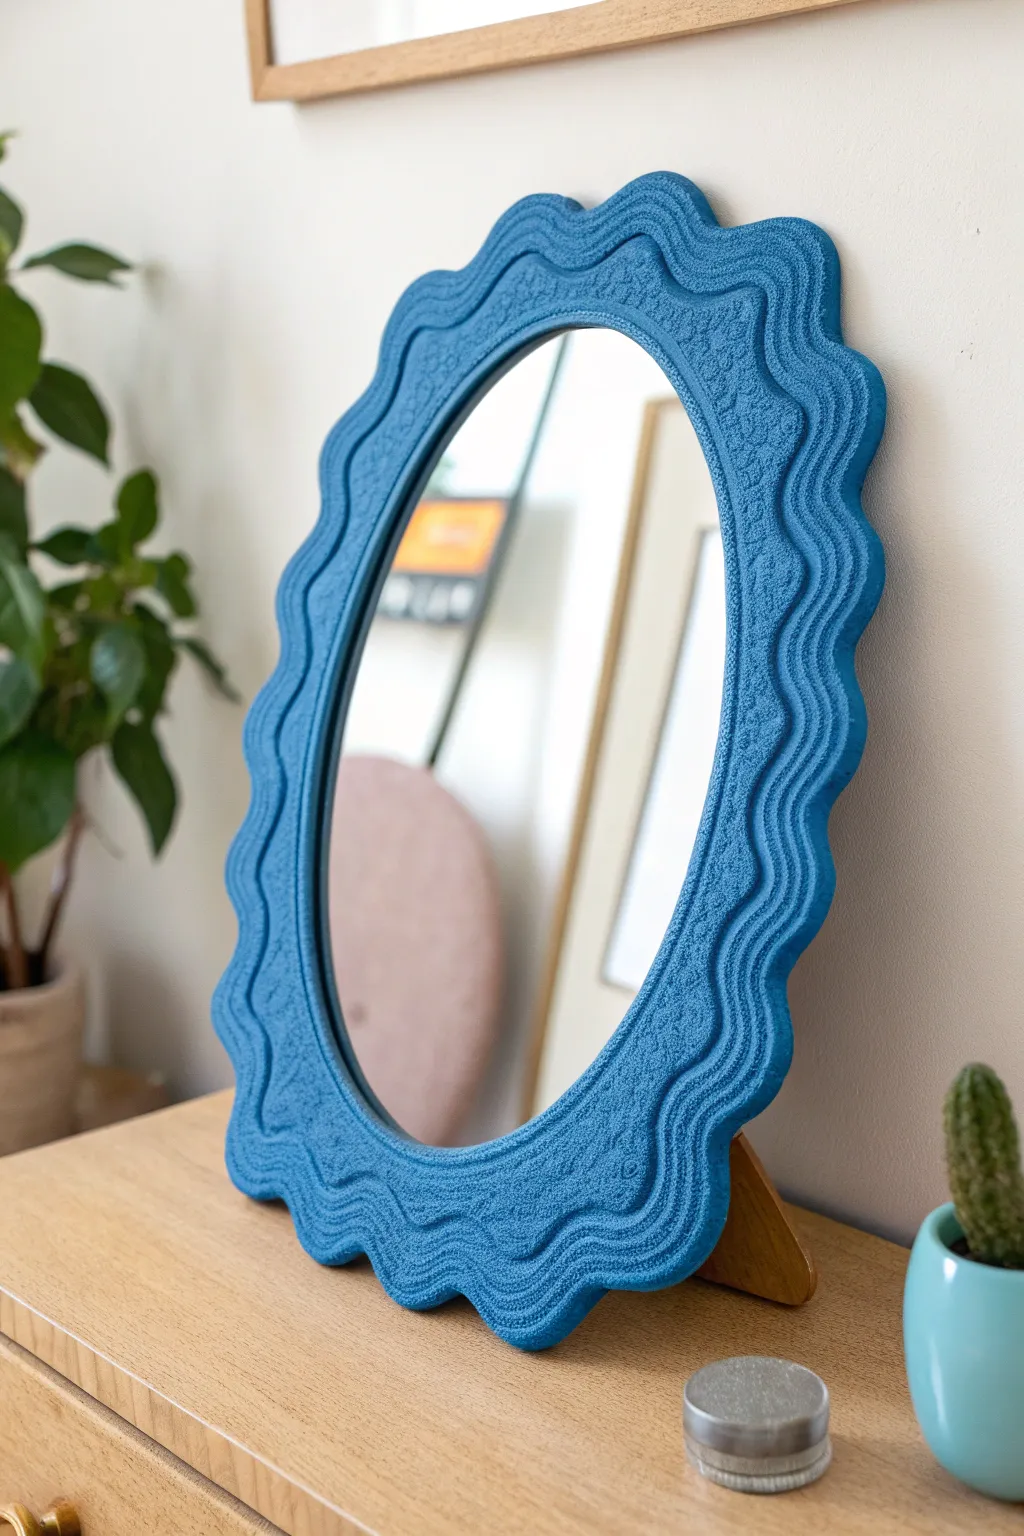
Transform a plain, inexpensive mirror into a funky statement piece with this tactile, wavy frame design. The bright blue hue and unique grainy texture give it a playful, modern aesthetic perfect for brightening up any corner.
Detailed Instructions
Materials
- Oval mirror (can be thrifted or new)
- Foam clay (blue)
- Texture tool (stippling brush, sponge, or sandpaper)
- Rolling pin or smooth glass jar
- Clean workspace/mat
- Water (for smoothing)
- Craft knife or sculpting tool
- Optional: Cardboard or wood backing if making the frame from scratch
- Sealant (spray varnish)
Step 1: Preparation
-
Clean the Surface:
Start by thoroughly cleaning your base mirror. Use glass cleaner on the reflective part and ensure the rim area where the clay will adhere is free of dust and oils. If using a pre-framed mirror, lightly sand the existing frame for better adhesion. -
Condition the Clay:
Take a large portion of your blue foam clay out of the packaging. Knead it in your hands for a few minutes; the warmth and motion help activate the clay, making it more pliable and less prone to cracking.
Pro Tip: Seamless Joins
Keep a small dish of water nearby. Wetting your finger just slightly is the secret to blending seams and smoothing out unwanted fingerprints without dissolving the clay.
Step 2: Creating the Wavy Frame
-
Roll Snakes:
Divide your clay into several manageable chunks. Roll these chunks into long, thick snake-like coils. Aim for a thickness of about 1 to 1.5 inches, trying to keep them consistent. -
Outline the Mirror:
Press the clay coil directly onto the edge of your mirror. If you are covering an existing frame, mold it over the top. If working directly on glass, create a border. -
Join the Seams:
Where one coil ends and the next begins, press the ends together firmly. Use a tiny bit of water on your finger to smooth the join line until it disappears completely. -
Flatten and Spread:
Gently press the clay down so it adheres securely to the base. You want a relatively flat surface for the waves, but keep enough thickness (about half an inch) to maintain that substantial, blobby look. -
Scallop the Edges:
This is the crucial shaping step. Using your fingers or a rounded sculpting tool, push indentations into the outer edge of the clay to create the wavy, scalloped silhouette. Repeat this on the inner edge, but make the waves slightly more subtle.
Level Up: Ombré Effect
Mix a small amount of white foam clay into your blue clay for the inner waves to create a subtle gradient or ombré effect radiating outward.
Step 3: Texturing and Refining
-
Define the Ridges:
To get the look in the photo, you need internal ripple lines. Use a modeling tool with a rounded tip to press shallow, continuous wavy grooves that mimic the outer scalloped shape. I find doing two or three parallel lines creates the best flow. -
Add the Grit:
The specific finish in the example has a grainy, almost stucco-like texture. Achieve this by taking a stiff stippling brush, a rough sponge, or even a ball of crumpled foil, and firmly tapping it all over the wet clay surface. -
Refine the Inner Rim:
Use a damp finger to clean up the very inner edge where the clay meets the glass. You want a crisp line here so the reflection isn’t obscured by jagged clay bits. -
Check Symmetry:
Take a step back and look at the overall shape. Are the scallops relatively even? Adjust any wonky waves while the clay is still workable.
Step 4: Finishing
-
Initial Drying:
Let the mirror sit flat in a dry, room-temperature area. Foam clay shrinks slightly as it dries, so avoid placing it in direct sunlight which might cause warping. -
Rotate:
After about 12 hours, carefully flip the mirror over if possible (or prop it up) to let air reach the underside of the clay edges, ensuring even drying. -
Full Cure:
Allow a full 24 to 48 hours for the clay to harden completely. It should feel firm and lightweight like hardened foam when done. -
Clean Up Glass:
Once fully dry, use a glass cleaner and a microfiber cloth to polish the mirror, removing any fingerprints or clay residue left from the crafting process. -
Seal (Optional):
To protect that great texture from dust and moisture, give the frame a light coat of matte spray varnish.
Hang your new wavy creation on the wall and enjoy the pop of color it brings to your space


Chunky Scalloped Candy Edge
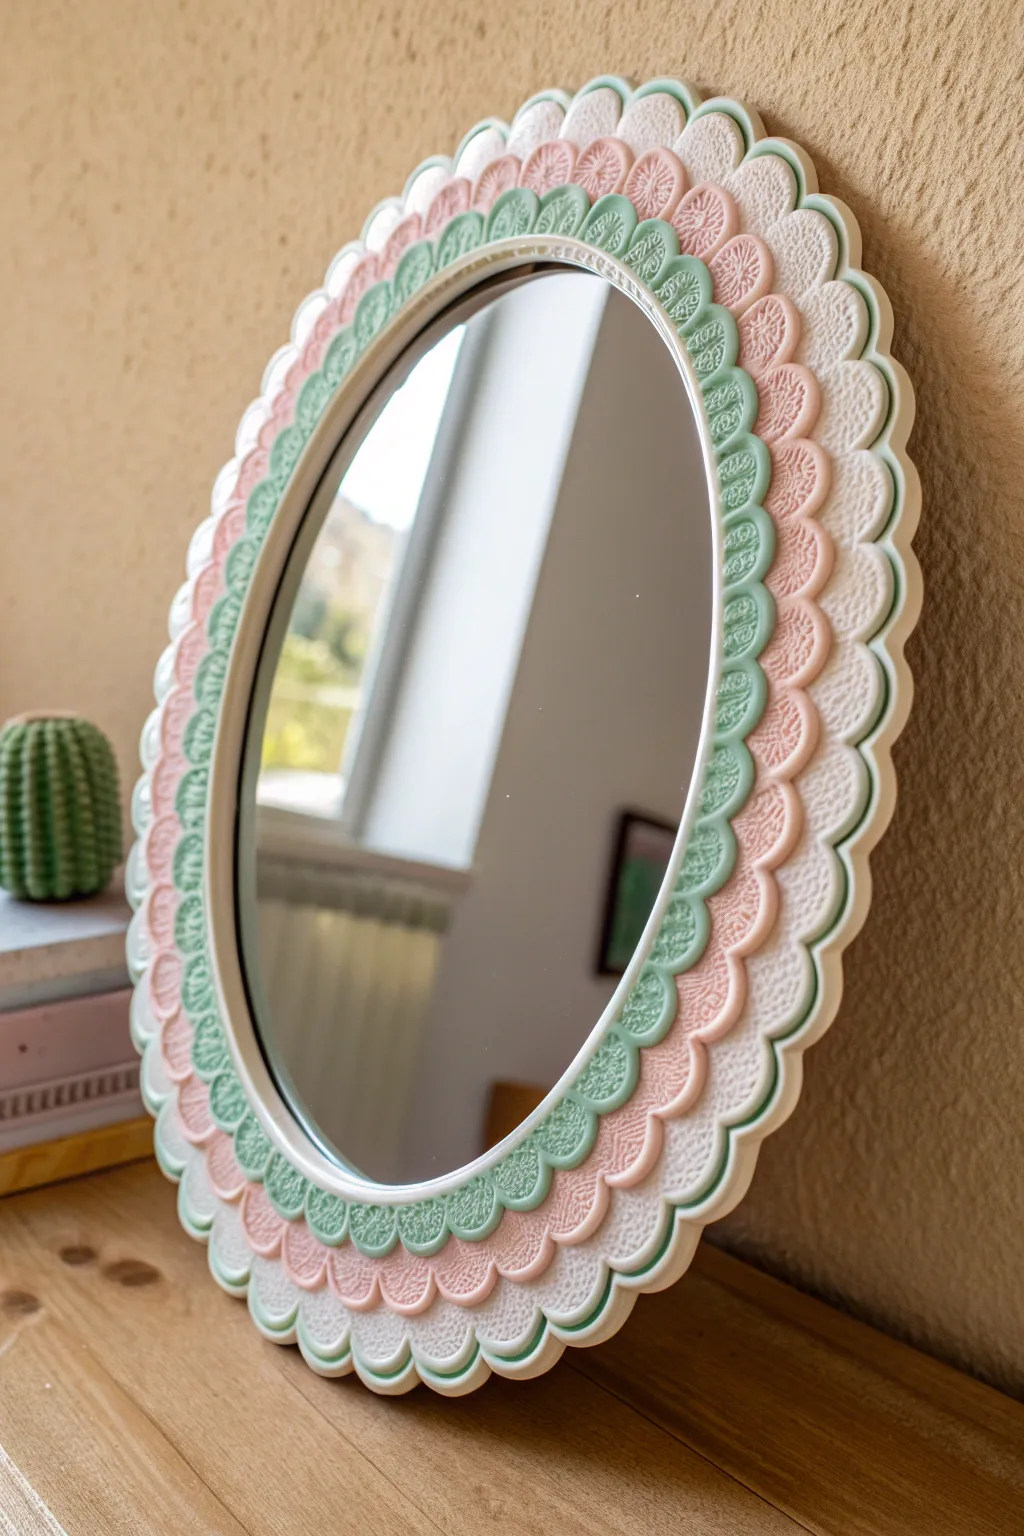
Transform a plain oval mirror into a whimsical statement piece with layers of soft, scalloped foam clay. This project features a delightful, candy-like texture and a soothing palette of mint green, baby pink, and white that adds a touch of sweetness to any room.
Step-by-Step
Materials
- Oval mirror (frameless or simple thin frame)
- Foam clay (Mint Green, Baby Pink, White)
- Rolling pin or smooth acrylic roller
- Round scalloped cookie cutters (three graduated sizes: large, medium, small)
- Texture mat or lace doily (for embossing)
- Craft glue or strong adhesive (e.g., E6000)
- Parchment paper or silicone mat
- Craft knife
- Sandpaper (fine grit, optional for prepping mirror frame)
Step 1: Preparation and Base Layer
-
Prepare the workspace:
Lay down parchment paper or a silicone mat to prevent the foam clay from sticking to your table. Clean your mirror surface thoroughly with glass cleaner to ensure no oils interfere with adhesion. -
Condition the white clay:
Take a large handful of white foam clay and knead it in your hands until it feels warm, pliable, and stretchy. This helps prevent cracks later on. -
Roll out the outer layer:
Roll the white clay out into a long slab, slightly thicker than a coin (about 1/4 inch). You want it sturdy enough to hold its shape. -
Texture the white clay:
Gently press a texture mat or a piece of lace onto the surface of the rolled clay to imprint a delicate, patterned design similar to the one in the photo. -
Cut the large scallops:
Using your largest scalloped cutter, cut out semi-circles. Instead of full circles, position the cutter so you only cut the scalloped edge, creating a long, continuous strip of scallops if possible, or individual scalloped semi-circles to layer. -
Attach the white border:
Apply a thin line of strong craft glue along the very edge of the mirror backing. Press your white scalloped pieces firmly onto the edge so they extend outward, creating the widest silhouette.
Clay Won’t Stick?
If the clay layers aren’t bonding to each other, mist the bottom layer lightly with water. Foam clay acts like its own glue when damp. Use E6000 for clay-to-glass bonds.
Step 2: Adding the Color Layers
-
Prepare the pink layer:
Condition and roll out your baby pink foam clay. Aim for the same thickness as the white layer for consistency. -
Texturizing the pink:
Apply the same texture technique to the pink clay using your mat or lace. Consistent texture across all colors ties the look together. -
Cut and place medium scallops:
Use the medium-sized scalloped cutter to create the pink shapes. Apply a dab of water or a tiny bit of fresh clay to the back of these pieces to help them stick to the white layer. -
Layering alignment:
Position the pink scallops directly on top of the white ones, but stepped slightly inward towards the mirror center. I like to offset them slightly so the valleys of the pink align with the peaks of the white for a dynamic look. -
Prepare the mint green layer:
Repeat the conditioning, rolling, and texturing process with the mint green foam clay. -
Cut the smallest scallops:
Use your smallest scalloped cutter for the green clay. These will be the innermost detail. -
Final placement:
Adhere the green scallops on top of the pink layer, moving even closer to the mirror’s reflective surface. Ensure the spacing represents equal steps, creating a tiered amphitheater effect.
Step 3: Finishing Touches
-
Clean up edges:
If any clay has smudged onto the glass, gently wipe it away with a damp cloth or scrape it carefully with a craft knife before it cures. -
Smooth the seams:
Inspect the sides where the layers stack. If the clay looks rough, gently run a damp finger along the edges to smooth the foam down. -
Inner rim refinement:
To give the mirror a polished look, roll a very thin snake of white clay and press it into the seam where the green scallops meet the glass. This hides any gaps. -
Drying time:
Let the mirror sit flat for at least 24 to 48 hours. Foam clay shrinks slightly as it dries, so allowing it to cure slowly ensures it stays adhered to the frame.
Add Some sparkle
Before the clay dries, dust specific textured areas with iridescent mica powder or press tiny faux pearls into the center of each scallop for a vintage vanity look.
Once fully cured, your mirror will be lightweight, durable, and ready to hang as a charming focal point in your space

The Complete Guide to Pottery Troubleshooting
Uncover the most common ceramic mistakes—from cracking clay to failed glazes—and learn how to fix them fast.
Puffy Cloud Halo Frame
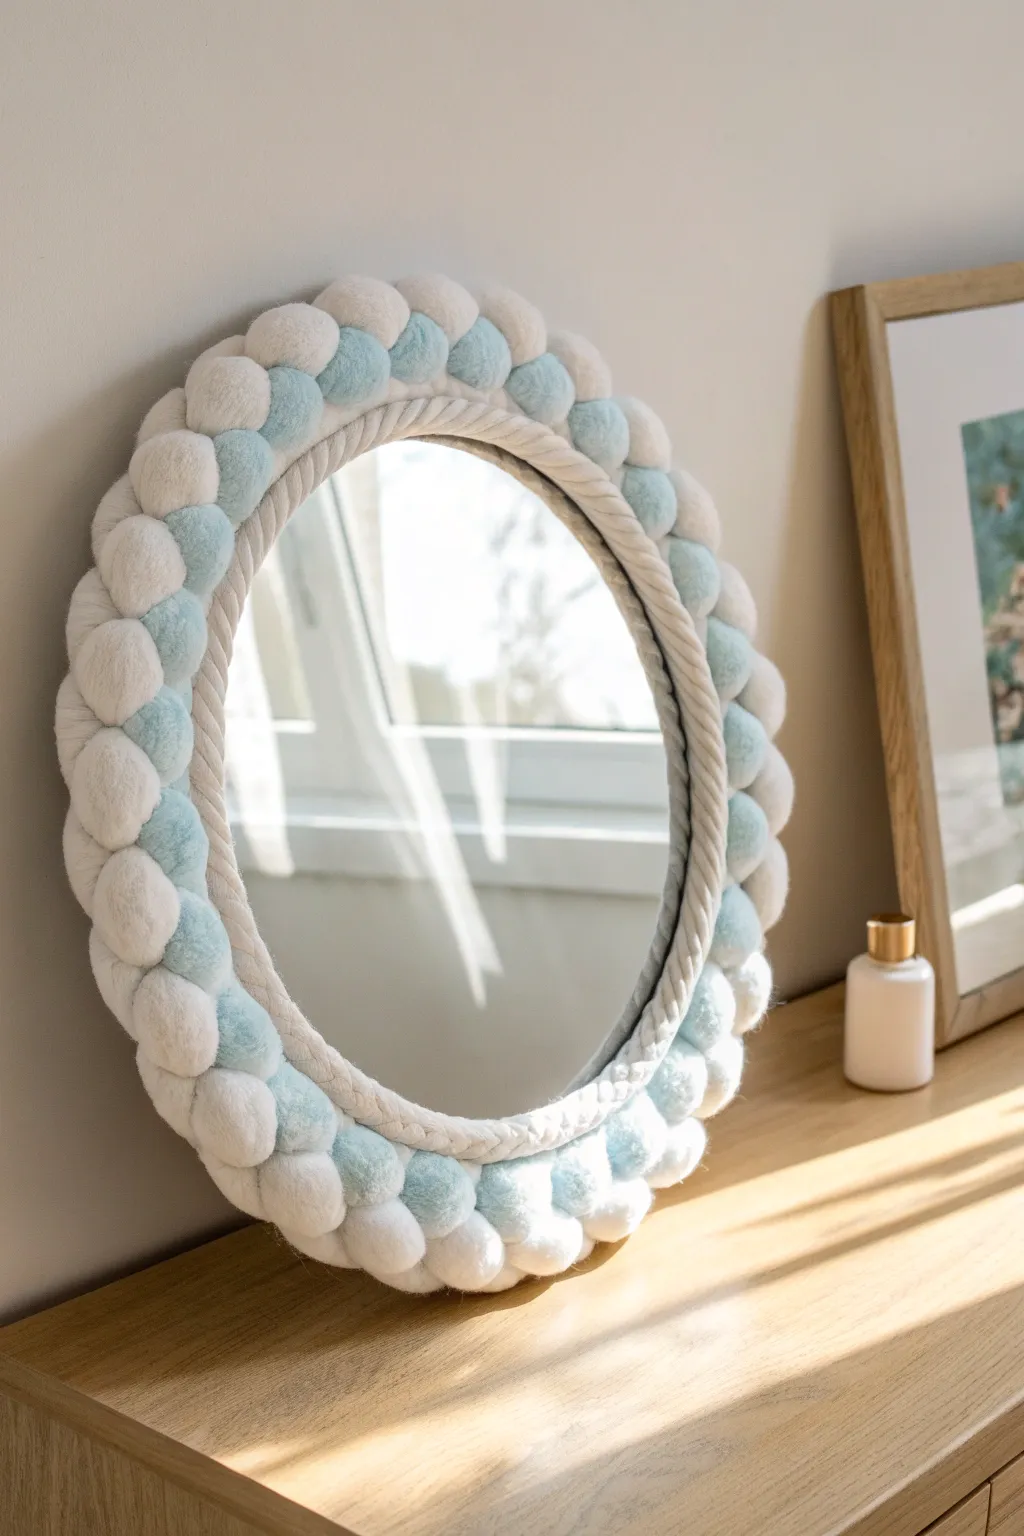
Transform a plain round mirror into a whimsical piece of decor that looks like it’s floating in the sky. This project combines the soft versatility of foam clay with simple twisting techniques to create a puffy, textural frame in soothing white and baby blue tones.
Step-by-Step Tutorial
Materials
- Round mirror (without frame or simple thin frame)
- White air-dry foam clay (large tub)
- Light blue air-dry foam clay
- Hot glue gun and glue sticks
- Measuring tape
- Parchment paper or silicone mat
- Sharp crafting knife or scissors
- Clean work surface
Step 1: Creating the Inner Rope Border
-
Measure and Mix:
Start by measuring the circumference of your mirror’s glass edge. Take a large handful of white foam clay. If your clay feels a bit dry, knead it thoroughly with warm hands until it is pliable and stretchy. -
Roll Snakes:
Divide your white clay into two equal portions. Roll each portion into a very long, even snake on a clean surface. The snakes need to be slightly longer than the circumference of your mirror to allow for twisting. -
Twist the Rope:
Pinch the ends of the two snakes together. Gently twist them around each other to create a classic rope effect. Try to keep the twist tightness consistent as you work your way down the length. -
Attach to Mirror:
Apply a thin line of hot glue directly to the outer edge of the mirror glass. Carefully press your clay rope onto the glue, working in sections so the glue doesn’t harden before you adhere the clay. -
Join the Ends:
When the rope ends meet, cut them cleanly with a sharp knife so the twist pattern continues seamlessly. Press the cut ends together and smooth the seam with a slightly damp finger.
Step 2: Forming the Cloud Spheres
-
Prepare Colors:
Set up your workspace with your white and light blue clay. You will need significantly more white than blue for this design to keep it airy. -
Create Varied Sizes:
Start rolling balls of foam clay in your palms. You want a mix of sizes specifically ranging from large walnut-sized spheres to smaller grape-sized ones. This variation is key to the organic look. -
Mix Shades:
Create a pile of pure white spheres and a smaller pile of light blue spheres. I also like to mix a tiny bit of blue into a chunk of white to create a swirling marble effect for a few transition pieces. -
Texture Check:
Inspect your spheres. If they have cracks, roll them again firmly against your palm. Foam clay should be perfectly smooth for that soft, puffy appearance. -
Initial Drying:
Let the spheres sit on parchment paper for about 20-30 minutes. This allows the outer shell to firm up slightly, preventing them from getting squished out of shape during assembly.
Wrinkled Spheres?
If your clay balls are cracking or wrinkling as you roll them, your clay is too dry. Dip your fingers in water and knead the moisture into the clay before re-rolling.
Step 3: Assembling the Halo
-
Plan the Layout:
Before gluing, dry-fit a section of spheres around the rope border to see how they nest together. Aim for an alternating pattern where white is dominant, peppered with blue accents. -
Start the Base Layer:
Begin gluing the largest spheres directly against the outside of your rope border. Apply glue to the side of the sphere and press it firmly to the rope and the mirror backing if available. -
Build Outward:
Continue adding spheres around the perimeter. As you work, vary the height and position slightly; don’t line them up like soldiers. Let them nudge each other naturally. -
Create Depth:
Once the primary ring is done, glue smaller spheres into the gaps and crevices between larger ones. This ‘stacking’ technique creates the fluffy, cloud-like volume seen in the photo. -
Fill the Gaps:
Look for any empty spaces where the mirror backing or table shows through. Fill these spots with tiny clay balls to ensure the frame looks solid and full. -
Final Shaping:
While the glue is fresh and clay is still somewhat flexible, gently cup your hands around the outer edge to ensure the overall silhouette is roughly circular. -
Curing Time:
Let the entire project sit flat undisturbed for at least 24 hours. Foam clay needs airflow to dry completely through to the center, especially on the larger spheres.
Pro Tip: Seamless Texture
To hide glue strands or visible join lines between spheres, take a tiny bit of wet clay on your finger and smooth it over the gap like spackle for a unified look.
Hang your new puffy mirror in a well-lit spot to enjoy the soft, dreamy vibes every time you check your reflection
Leafy Vine Corner Clusters
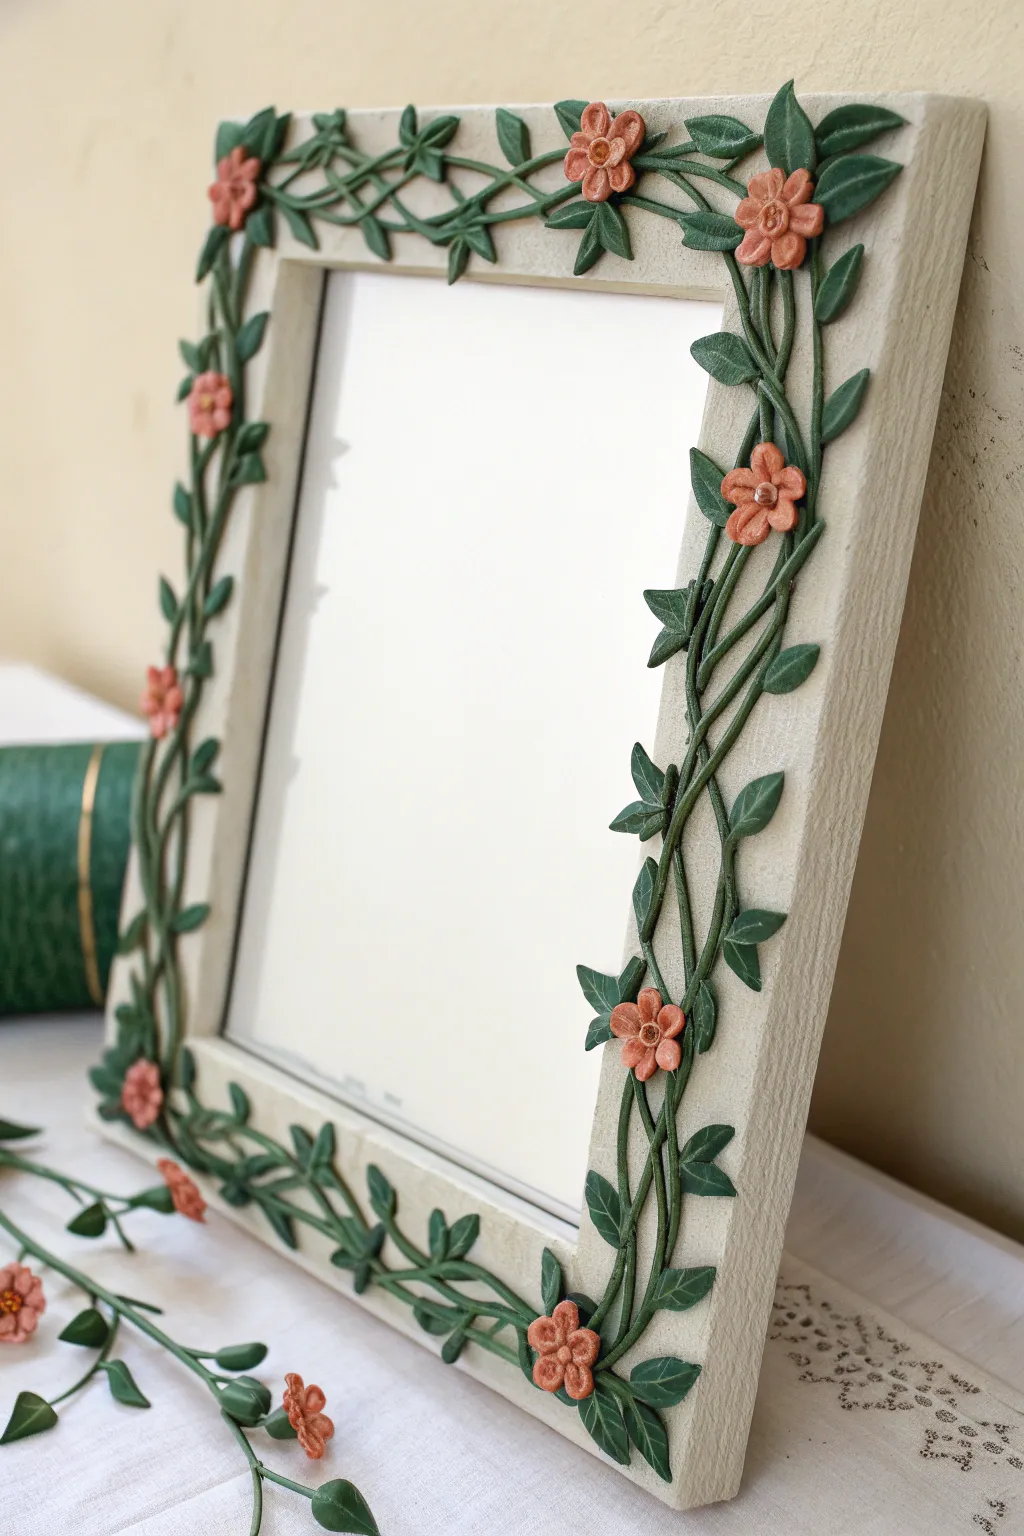
Bring a touch of cottagecore charm to your decor with this vine-wrapped mirror frame. Using lightweight foam clay, you’ll sculpt delicate wandering ivy and petite peach blossoms that create a whimsical, overgrown garden effect.
Detailed Instructions
Materials
- Rectangular mirror with wide flat frame (wood or MDF)
- Foam clay (Green, Peach/Terracotta, White, Black)
- Clay sculpting tools (needle tool, small ball stylus)
- White acrylic paint (matte or chalk finish)
- Paintbrushes (flat shader and fine detail)
- Texturing sponge or heavy stiff brush
- Strong craft glue or hot glue gun
- Rolling pin or smooth acrylic roller
- Water spray bottle (optional, to keep clay moist)
Step 1: Preparing the Foundation
-
Base Coating:
Begin by cleaning your mirror frame thoroughly. Apply two coats of matte white acrylic paint. For that slightly rustic, stone-like texture visible in the image, dab the wet paint with a sponge or a stiff brush instead of brushing it smooth. -
Adding Texture:
If you want even more texture, mix a small amount of baking soda into your white paint before applying the final coat. Let the frame dry completely before attaching any clay elements.
Clay Won’t Stick?
If your foam clay isn’t sticking to the painted wood, roughen the contact points slightly with sandpaper before gluing. A tacky PVA glue works best for porous surfaces.
Step 2: Sculpting the Vines
-
Mixing Custom Greens:
Knead your green foam clay until soft. I like to mix a tiny speck of black or brown into the green to deepen it, making it look more like organic ivy rather than bright artificial plastic. -
Rolling the Stems:
Pinch off small pieces of green clay and roll them into long, very thin snakes or coils on your work surface. These will be your main vines. -
Laying the Main Path:
Apply a thin line of glue along the frame where you want the first vine to sit. Gently press a clay coil onto the glue, creating a wavy, organic meandering pattern that travels up the sides and across the corners. -
Adding Branching Vines:
Roll thinner coils and attach them branching off from the main vine. Twist them slightly or cross them over the main stem to create a tangled, realistic growth pattern.
Step 3: Creating the Leaves
-
Forming Leaf Shapes:
Roll tiny balls of green clay (about the size of a peppercorn). Pinch one end of the ball to form a teardrop shape, then flatten it gently with your finger. -
Detailing the Leaves:
Use a needle tool or craft knife to press a central vein down the middle of each flattened teardrop. You can also add tiny side veins for extra detail. -
Attaching Foliage:
Place a dot of glue on the back of a leaf and press it against the vine on the frame. Angle them in different directions—some pointing up, some sideways—to mimic natural movement. -
Clustering:
Group leaves in clusters of two or three, especially near the corners of the frame where the ‘growth’ should look denser.
Natural Leaf Trick
For ultra-realistic leaves, gently curl the very tip of each leaf upward or downward just after attaching it. Nature is rarely perfectly flat
Step 4: Blossoming Flowers
-
Petal Preparation:
Switch to your peach/terracotta foam clay. Roll five tiny balls for each flower you plan to make. Flatten them slightly into circles. -
Assembling Blooms:
Arrange the five flattened circles in a ring, pressing their edges together at the center to form a flower shape. Use a ball stylus tool to indent the center where they meet, bonding them securely. -
Adding Centers:
Take a microscopic bit of the same peach clay (or a lighter shade for contrast), roll it into a ball, and press it into the indented center of the flower. Use a needle tool to poke tiny texture holes into this center pistil. -
Planting the Garden:
Apply a dab of glue to the back of each flower. Nest them onto the vines, placing them sporadically. Focus on corners or curves in the vine for a balanced composition.
Step 5: Finishing Touches
-
Adding Depth:
Once the clay has started to set (about 30 minutes), create a very watery wash of dark green or brown acrylic paint. Use a fine brush to carefully apply this wash into the crevices of the leaves and vines to create shadows. -
Sealing:
Allow the entire project to dry for 24-48 hours until the foam clay is fully hardened. You can brush on a layer of matte varnish over the clay parts to protect them from dust.
Hang your new botanical mirror in a sunny spot to enjoy the everlasting spring vibe it brings to your room


What Really Happens Inside the Kiln
Learn how time and temperature work together inside the kiln to transform clay into durable ceramic.
Mushroom Garden Frame
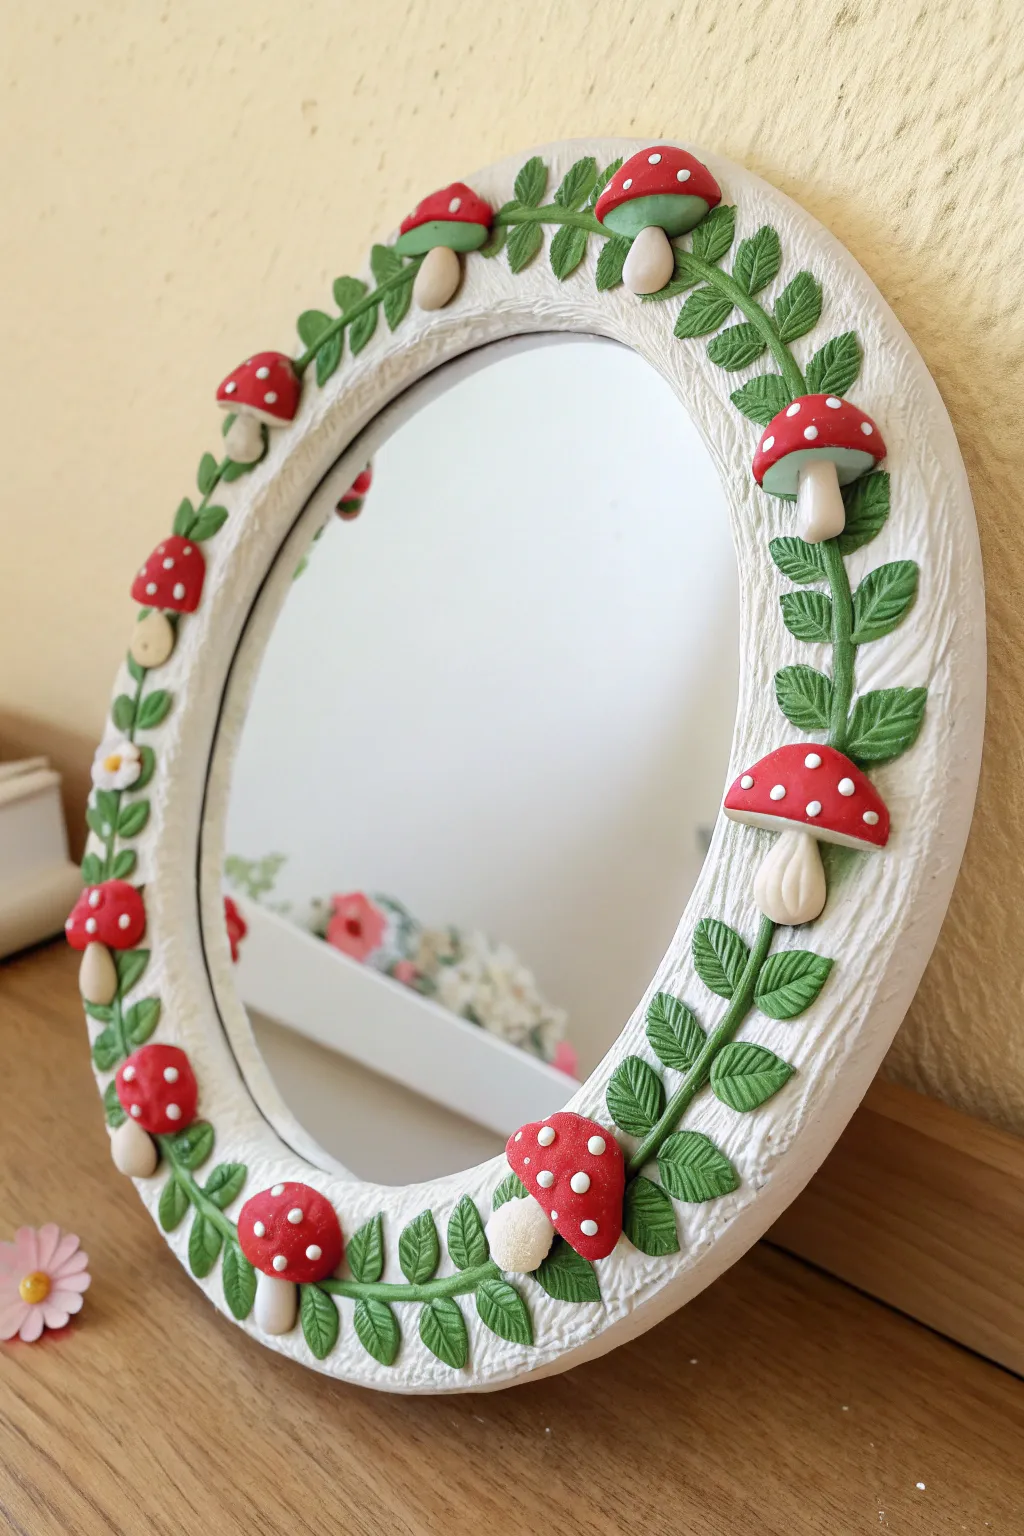
Transform a plain round mirror into a magical forest gateway with this delightful foam clay project. Featuring sculpted red toadstools and trailing green vines on a textured white base, this cottagecore-inspired piece brings fairytale charm to any room.
Step-by-Step Guide
Materials
- Round mirror with a wide frame (plastic or wood)
- White foam clay (large tub)
- Green foam clay (various shades or mixable)
- Red foam clay
- Beige or cream foam clay
- Basic sculpting tools (needle tool, ball tool)
- Texture tool (old toothbrush, sponge, or crinkled foil)
- White acrylic paint or tiny white foam clay balls (for dots)
- Craft glue (optional, for extra hold)
Step 1: Creating the Textured Base
-
Prepare the frame:
Make sure your mirror frame is clean and dry. If the surface is very slick, you might want to lightly sand it to help the clay adhere better. -
Apply the white base:
Take large handfuls of white foam clay and press them firmly onto the frame. Work in sections, spreading the clay evenly until the original frame is completely covered. -
Add wood grain texture:
While the white clay is still fresh and soft, use a sculpting tool or a stiff bristled brush to drag vertical lines through the clay. Vary the pressure to create grooves that mimic the look of tree bark.
Step 2: Sculpting the Vines
-
Mix your greens:
I like to mix a little yellow or brown into my green clay to get a more natural, earthy moss tone rather than a bright artificial green. -
Roll the main stems:
Roll thin, long snakes of green clay. Gently press these onto the white base in a winding, circular pattern that follows the curve of the mirror. -
Form the leaves:
Shape tiny teardrops of green clay. Flatten them slightly between your fingers. -
Detail the leaves:
Use a needle tool or small knife to press a central vein down the middle of each leaf for realistic texture. -
Attach the foliage:
Press the leaves onto the main vine stem in a symmetrical, fern-like pattern. Arrange them so they fan out neatly on either side of the stem.
Clay Hydration Hack
If your foam clay feels tough or cracks while rolling, knead in a tiny drop of water. It restores elasticity instantly.
Step 3: Growing the Mushrooms
-
Shape the stems:
Using beige or cream clay, roll short, thick cylinders for the mushroom stalks. Taper the tops slightly where the cap will sit. -
Texture the stems:
Use a needle tool to gently scratch vertical lines up the stalk, giving it a fibrous mushroom texture. -
Place the stalks:
Position the stalks at regular intervals along your vines. Press the base of each stalk firmly into the underlying white clay so they merge. -
Create the caps:
Roll balls of red clay, then flatten the bottom and round the top to create a dome shape. Make some caps slightly flatter and others more rounded for variety. -
Attach the caps:
Press a red cap onto each beige stalk. You can curve the edges of the cap down slightly to hug the stem. -
Add underneath details:
For a hidden detail, you can texture the underside of the red caps with radiating lines before attaching them, mimicking gills.
Glow Up
Mix glow-in-the-dark powder into the white clay used for the mushroom spots. At night, your mirror will turn into a glowing fairy portal.
Step 4: Finishing Touches
-
Add the iconic spots:
Roll extremely tiny balls of white foam clay and press them gently onto the red caps. Alternatively, wait for the clay to dry and dot them on with white acrylic paint. -
Create baby mushrooms:
Fill in any empty spaces with smaller, button-sized mushrooms to make the growth look organic and lush. -
Inspect the edges:
Check the inner and outer rims of the mirror to ensure the white base clay covers everything cleanly and no original frame is showing. -
Allow to cure:
Let the mirror sit flat in a dry area for at least 24-48 hours. Foam clay shrinks slightly as it dries, so ensure your connections are solid.
Hang your new mirror and enjoy the touch of woodland magic it brings to your reflection
Citrus Slice Pop Frame
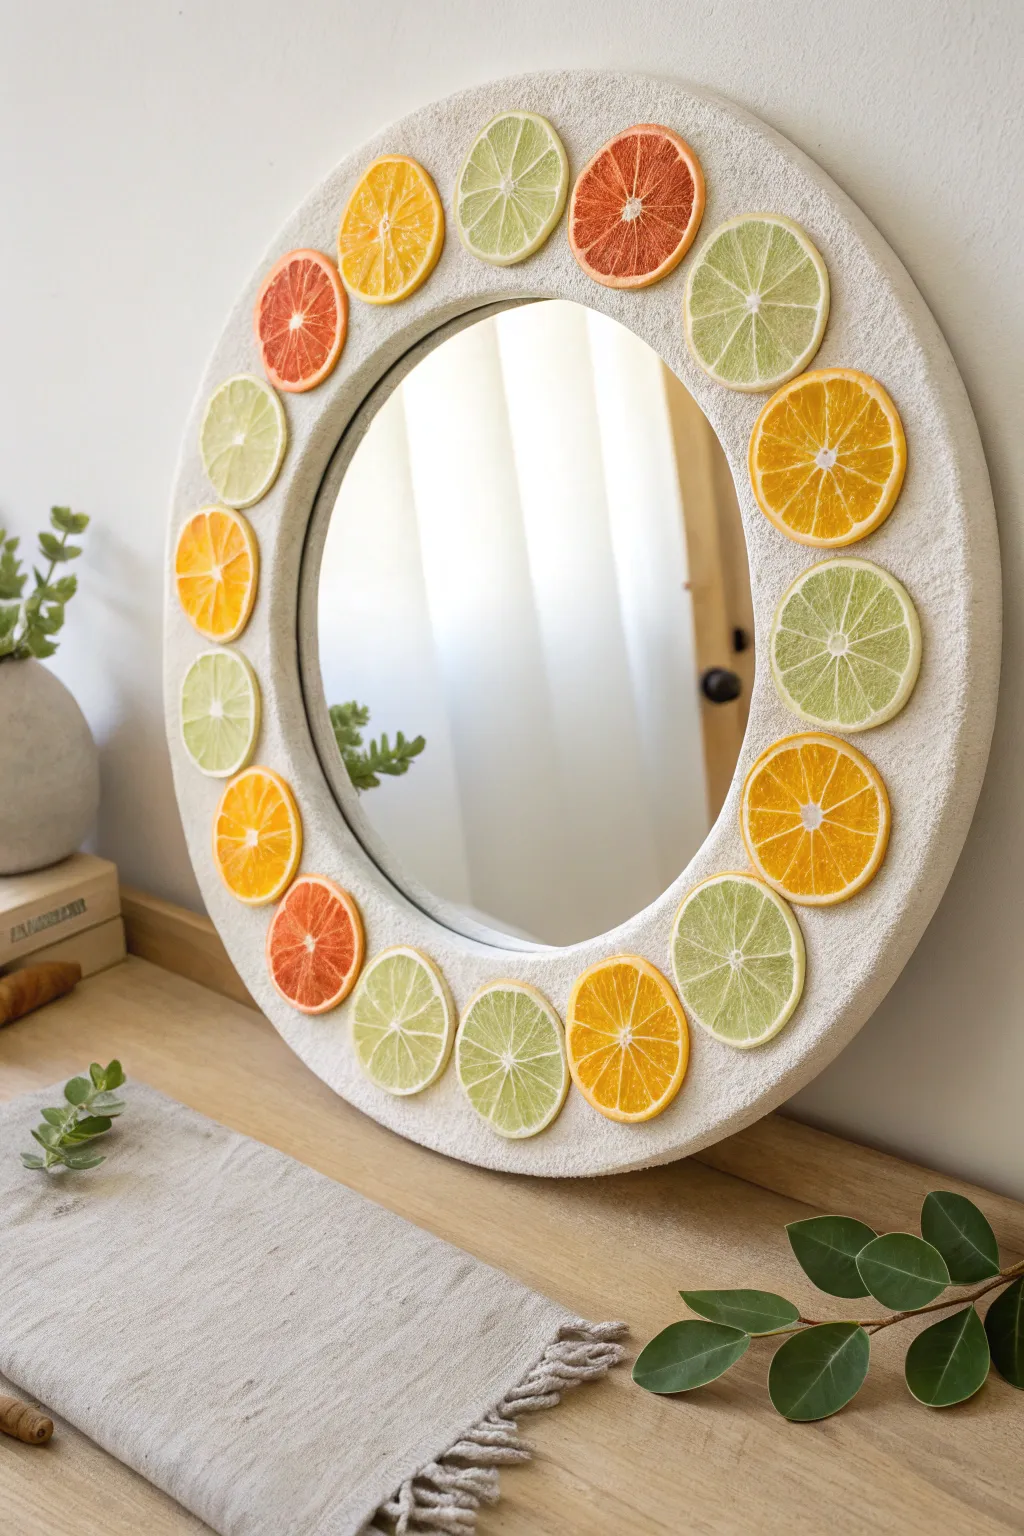
Bring the refreshing energy of summer indoors with this vibrant citrus-themed mirror. Using foam clay to create a textured, stone-like base and decorating it with colorful fruit slices, you’ll craft a statement piece that feels both organic and playful.
Step-by-Step Tutorial
Materials
- Round mirror (without frame or a simple flat frame)
- White or cream foam clay
- Faux citrus slices (dried plastic or resin cabochons)
- Sandpaper (medium grit)
- Texture tool (stiff bristle brush or scrunched aluminum foil)
- Strong craft glue (E6000 or similar)
- Rolling pin
- Parchment paper
- Protective sealant spray (optional)
Step 1: Preparing the Base
-
Clean surface:
Begin by thoroughly cleaning your mirror surface with glass cleaner. If you are applying the clay directly to the glass edge, ensure it is completely free of dust and oils. -
Protect the glass:
Cut a circle of parchment paper or cardstock that is slightly smaller than the mirror’s reflective area. Tape this over the center of the mirror to protect it from stray clay or glue. -
Prep the clay:
Take a large handful of white foam clay and knead it in your hands to warm it up. This makes it more pliable and easier to spread without cracking. -
Roll coils:
Roll the clay into long, thick snakes or coils on your parchment paper. You want them to be roughly 1-2 inches in diameter, depending on how wide you want your frame.
Sticky Slices
If the faux fruit slices aren’t sticking to the wet clay, don’t force them. Mark the spot, let the clay dry completely, and then glue them on securely with E6000.
Step 2: Sculpting the Textured Frame
-
Apply the clay:
Press the foam clay coils around the perimeter of the mirror. Push down firmly so the clay adheres to the backing or the existing frame edge. -
Flatten and shape:
Use your palms or a small rolling pin to flatten the coils into a wide, uniform band. Ensure the inner edge creates a clean, circular border around the mirror glass. -
Blend seams:
Where your coils join, wet your finger slightly and smooth the clay together until the seam disappears completely. -
Create texture:
Immediately after shaping, take a stiff bristle brush or a ball of scrunched aluminum foil. Tap it repeatedly all over the clay surface to create a pitted, stone-like texture. -
Refine the edges:
Run your finger or a smoothing tool along the outer and inner rims to soften any sharp ridges created by the texturing process, keeping the overall shape rounded and organic.
Step 3: Adding the Citrus Pop
-
Plan the layout:
Before the clay dries, gently press your faux citrus slices into the clay to mark their positions. Alternating colors like orange, lime green, and grapefruit pink creates a balanced, rhythmic look. -
Create indentations:
Press the slices deep enough so they sit flush or slightly embedded within the frame, rather than just resting on top. Remove them carefully once the indentation is made. -
Secure the slices:
Apply a dab of strong craft glue to the back of each citrus slice. I find this ensures they stay put permanently, as foam clay can sometimes shrink slightly away from embedded objects as it dries. -
Insert fruit:
Place the glued slices back into their designated indentations. Press gently to ensure good contact with the clay. -
Final texture touch-up:
If handling the frame smoothed out any texture near the fruit, tap your foil or brush lightly around the slices to restore that gritty, stone finish.
Scented Decor
Use dried real orange slices instead of plastic ones and seal them with resin. The texture will be incredible, and they add a subtle, natural variation to the piece.
Step 4: Finishing Touches
-
Drying time:
Allow the mirror to dry flat in a well-ventilated area for at least 24-48 hours. Foam clay needs time to harden completely, especially when applied thickly. -
Check adhesion:
Once fully dry, gently wiggle the citrus slices to ensure they are secure. If any feel loose, add a tiny drop of super glue to the gap. -
Clean up:
Remove the protective paper from the center of the mirror. Use a cotton swab with a little glass cleaner to wipe away any clay residue on the glass edge.
Hang your new fruity mirror in a hallway or kitchen to add a daily dose of brightness to your routine

TRACK YOUR CERAMIC JOURNEY
Capture glaze tests, firing details, and creative progress—all in one simple printable. Make your projects easier to repeat and improve.
Hearts and Stars Confetti Frame
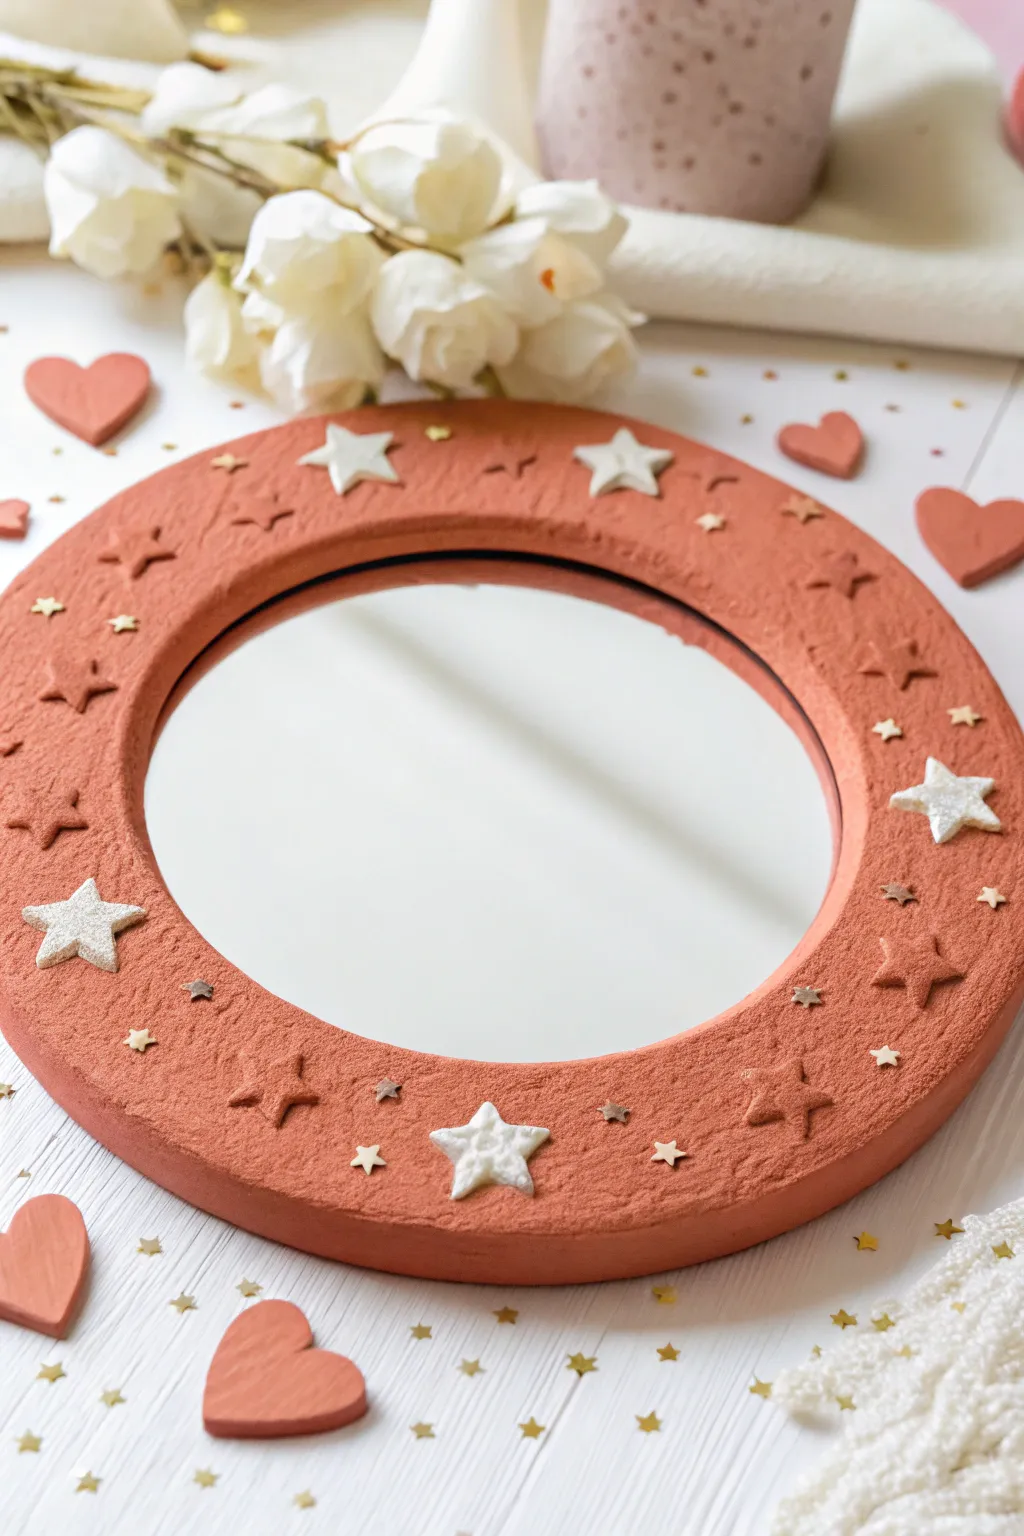
Transform a plain round mirror into a dreamy, celestial accent piece using the unique texture of foam clay. This project combines a warm, earthy terracotta tone with whimsical white stars for a look that feels both grounded and magical.
Step-by-Step
Materials
- Round mirror (with or without a wide frame to cover)
- Foam clay (white base)
- Terracotta acrylic paint or pigment (to mix into clay)
- White or pearlescent foam clay (for accent stars)
- Small star-shaped cookie cutters (various sizes)
- Small heart-shaped cookie cutter (optional for confetti)
- Sculpting tools or a toothpick
- Rolling pin
- Clean work surface (silicone mat recommended)
- Gold star confetti (optional for extra sparkle)
Step 1: Base Preparation
-
Mix your color:
Start by taking a large portion of white foam clay. Add a few drops of terracotta or burnt orange acrylic paint. Knead the clay thoroughly until the color is uniform and streak-free. Add more paint slowly if you want a deeper hue. -
Prepare the mirror surface:
Ensure your mirror frame is clean and dry. If you are applying directly to a frameless mirror edge, create a border guide with masking tape to keep the center clean. -
Apply the base layer:
I like to flatten pieces of the terracotta-colored clay and press them firmly onto the mirror frame. Work your way around the circle, smoothing the seams between pieces with wet fingers until you have a consistent, even layer covering the entire frame. -
Texture the surface:
While the clay is still fresh, gently pat the entire surface with your fingertips or a slightly textured sponge to remove fingerprints and create that soft, stone-like matte finish visible in the photo.
Step 2: Creating the Stars
-
Roll out clay sheets:
Roll out a small slab of your leftover terracotta clay and a separate slab of white foam clay. Aim for a thickness of about 1/4 inch. -
Cut out the shapes:
Using your star cutters, punch out several stars from both the terracotta and white slabs. The white stars will be your focal points, so create about 4-5 of those. -
Make the confetti hearts (optional):
If you want the matching table confetti shown in the photo, use the remaining terracotta clay to cut out small heart shapes and set them aside to dry. -
Glitter the white stars:
If using plain white clay, you can press the white stars into fine iridescent glitter while they are sticky, or brush them with a pearlescent mica powder for a subtle shimmer.
Clay Shrinkage Fix
If the clay pulls away from the mirror edge while drying, fill the gap with a tiny snake of fresh wet clay and smooth it down with a damp finger.
Step 3: Assembly and Detailing
-
Place the white stars:
Gently press the white stars onto the frame at equal intervals. Use the image as a guide—roughly 12, 3, 6, and 9 o’clock positions work well for balance. -
Add terracotta stars:
Arrange the terracotta-colored stars in the spaces between the white ones. Press them down lightly so they adhere but remain raised. -
Create indented stars:
For texture variety, take your smallest star cutter and gently press it into the base clay without cutting all the way through. Carefully lift it out to leave an imprinted star outline. -
Micro-star detailing:
Using a very small tool or a shaped stamp, press tiny star indentations randomly around the larger applied shapes to fill empty visual space. -
Embed gold confetti:
If you have tiny gold star confetti, press them sporadically into the soft clay frame for a metallic speckle effect. -
Clean the edges:
Run a finger along the inner and outer rim of the frame to ensure the clay lines are smooth and not jagged. Remove any clay smudges from the mirror glass immediately with a damp cloth. -
Final drying:
Let the mirror sit flat in a dry, well-ventilated area for at least 24-48 hours. Foam clay shrinks slightly as it dries, tightening around the frame.
Cosmic Glow Up
Mix glow-in-the-dark pigment powder into your white clay stars before cutting them out for a mirror that illuminates at night.
Now you have a stunning, celestial piece of decor that adds warmth to any wall
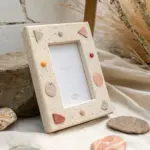
Seashell and Coral Reef Frame
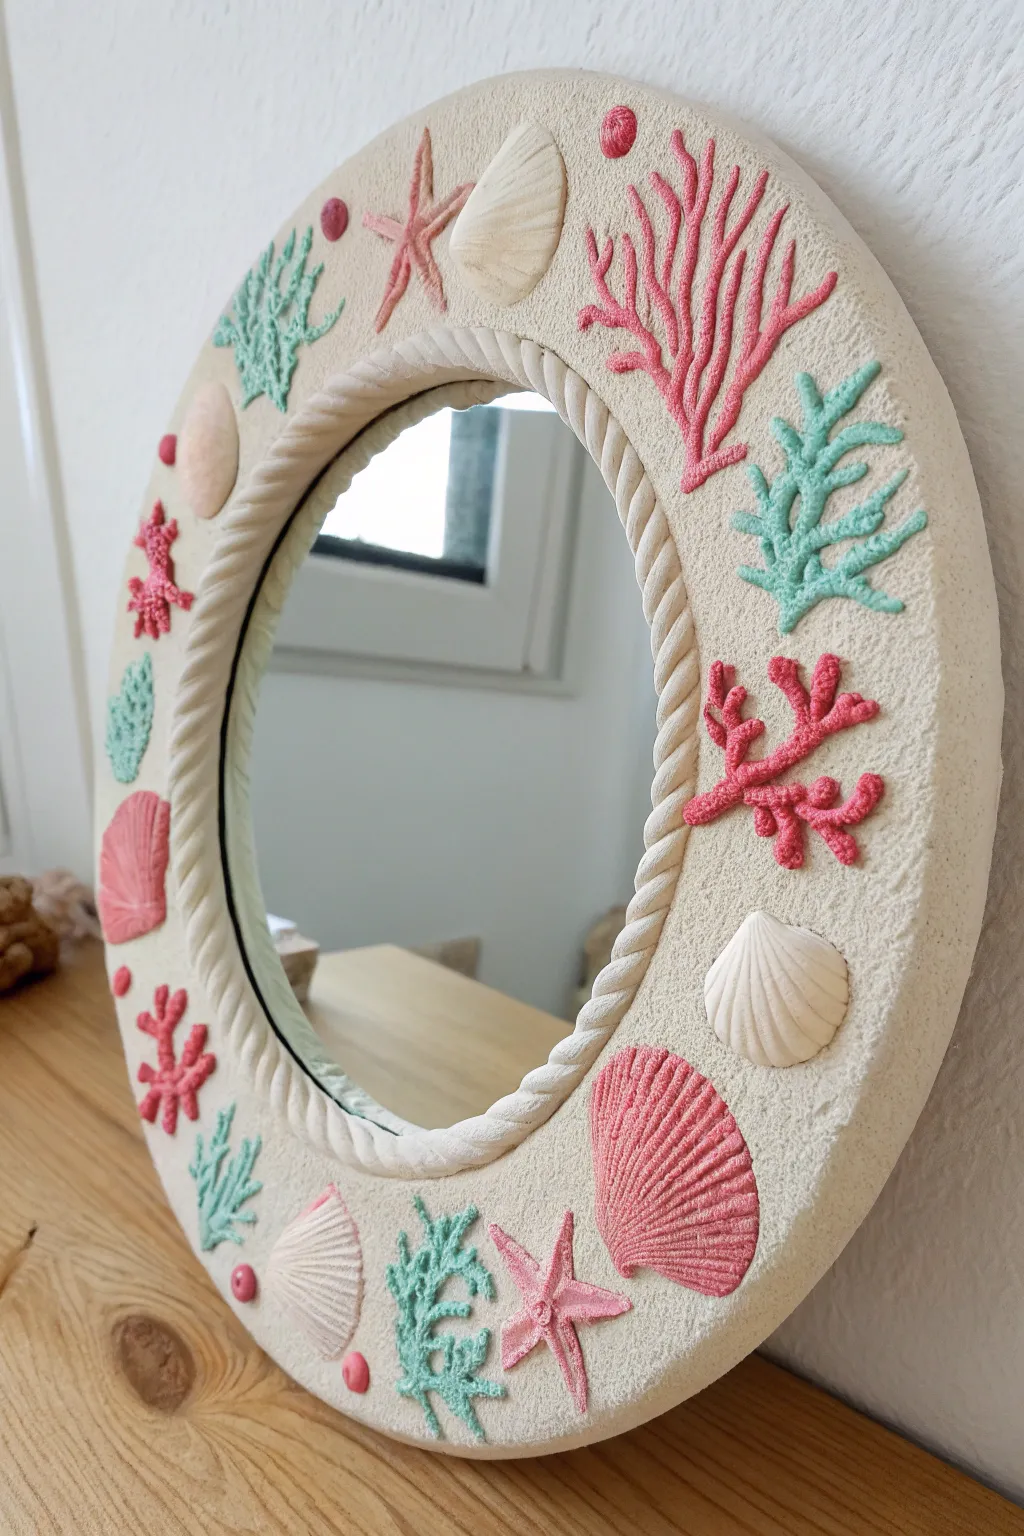
Transform a plain mirror into a soft, seaside daydream using foam clay to sculpt delicate coral branches and shells. This tactile frame combines a sandy texture with sweet pastel hues of pink and mint for a refreshing coastal accent.
Step-by-Step Guide
Materials
- Round mirror (framed or frameless with a wide enough rim)
- Foam clay (White, Pink, Mint Green, Beige)
- White or cream acrylic paint (optional, for base)
- Texture paste or sand-texture medium
- Twisted cotton rope (white or cream)
- Sculpting tools (needle tool, small ball stylus)
- Strong craft glue (e.g., tacky glue or hot glue)
- Rolling pin (acrylic or plastic)
- Silicone shell molds (optional but helpful)
Step 1: Preparing the Base
-
Prime the frame:
If you are using a wooden or plastic frame, ensure it is clean and dry. If the original color is dark, give it a coat of white or cream acrylic paint to provide a neutral background for your clay work. -
Add the sandy texture:
Apply a layer of texture paste or a sand-texture medium over the entire face of the frame. Dab it with a stiff brush or sponge to create a rough, grainy surface that mimics the ocean floor. Let this dry completely before moving on. -
Attach the rope border:
Measure a length of twisted cotton rope to fit exactly around the inner circumference of the mirror frame (closest to the glass). Glue it securely in place, ensuring the ends meet cleanly for a seamless look.
Sticky Situation?
If the clay is too sticky to handle, let it sit out for 5 minutes or dust your hands lightly with cornstarch. If it’s too dry, knead in a drop of water.
Step 2: Sculpting the Reef Elements
-
Mix your colors:
Prepare your foam clay colors. You’ll need a soft mint green, a vibrant coral pink, and a pale beige. Since foam clay blends easily, you can mix white with darker colors to achieve these soft pastel shades. -
Create mint coral branches:
Roll thin snakes of mint green clay. Lay them onto the frame in branching patterns. Use a needle tool to gently texture the surface of the clay, creating tiny dots or lines to mimic the porous look of real coral. -
Form pink staghorn coral:
Using the pink clay, roll slightly thicker snakes. Arrange them into upward-reaching, fan-like coral structures. Taper the ends of each branch so they look natural rather than blunt. -
Detail the pink coral:
With a needle tool or the tip of a toothpick, prick the surface of the pink coral branches repeatedly to give them a rough, realistic texture. Variation is key here, so don’t worry about being perfectly uniform. -
Sculpt the starfish:
Take small balls of pink clay and flatten them slightly. Pull out five points to form a star shape. Gently curve the arms to give the starfish a sense of movement, as if it’s resting on the sand. -
Texture the starfish:
Use a ball stylus to press a line of small divots down the center of each starfish arm.
Make It Sparkle
Brush a very light layer of pearl mica powder or iridescent glitter over the white shells before they dry for a wet, pearlescent ocean sheen.
Step 3: Adding Shells and Assembly
-
Mold or sculpt shells:
Using white and beige foam clay, create shell shapes. You can press the clay into silicone molds for crisp details, or sculpt simple scallop shapes by flattening a ball of clay and scoring lines radiating from the bottom to the top edge. -
Create the large pink scallop:
Fashion a larger, focal-point shell using pink clay. Flatten a teardrop shape and use a sculpting tool to press deep, fan-like ridges across the surface, mimicking a classic scallop shell. -
Arrange the composition:
Before the clay sets permanently, place your sculpted pieces onto the textured frame. Aim for a balanced distribution, alternating between the pink coral, mint branches, and various shells. -
Adhere the elements:
Foam clay will often stick to textured surfaces on its own while fresh, but for longevity, I prefer applying a dab of glue to the back of each piece as I place it on the frame. -
Add final details:
Roll tiny spheres of pink clay to create ‘pebbles’ or sea urchin dots. Scatter these in the empty spaces between the larger elements to tie the color palette together. -
Dry and set:
Allow the entire mirror to sit flat in a dry area for at least 24 hours. Foam clay shrinks slightly as it dries, which will help it grip the texture of the frame tightly.
Hang your new mirror in a sunny spot to enjoy those relaxing beach vibes every day
Bold Checkerboard Tile Frame
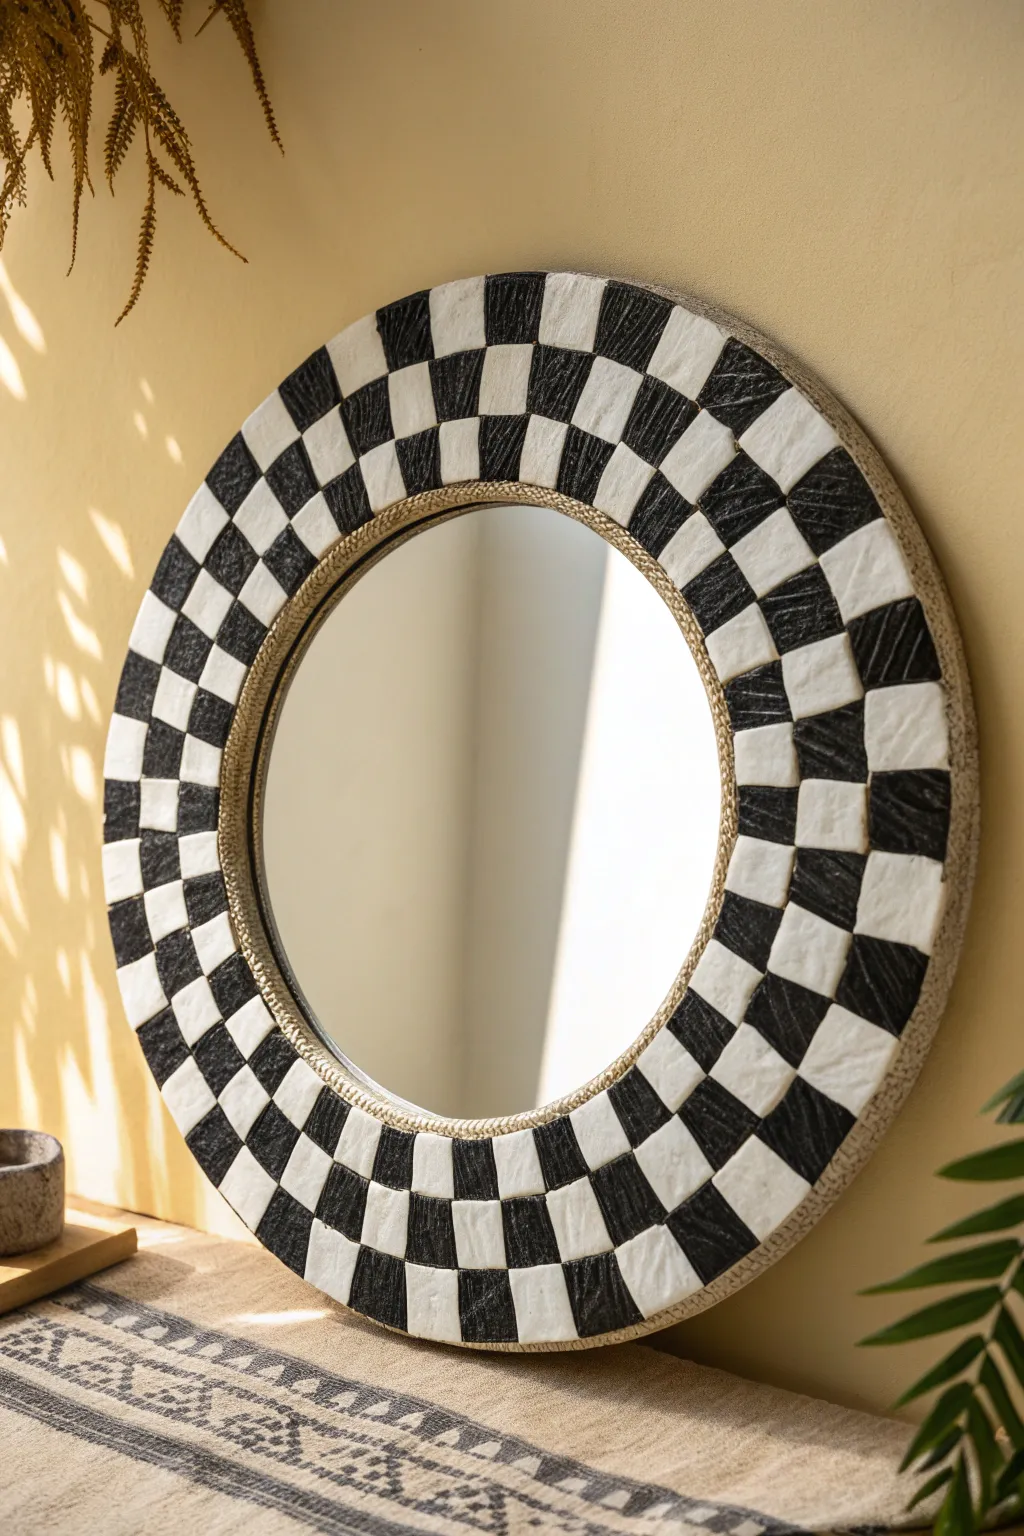
Achieve a bold, graphic look with this checkerboard mirror that combines the trendy checkered pattern with organic, handmade textures. The monochromatic contrast creates a stunning focal point, while the gold braid detail adds a polished, high-end finish.
Step-by-Step
Materials
- Round mirror (without frame or simple thin frame)
- White air-dry foam clay
- Black air-dry foam clay
- Rolling pin or clay roller
- Square cookie cutter (approx. 1.5 – 2 inches)
- Craft knife or clay slicer
- Cardboard or MDF backing (larger than your mirror)
- Strong construction adhesive or heavy-duty craft glue
- Gold braided trim or twisted rope
- Hot glue gun and glue sticks
- Texture tool (old toothbrush or coarse sandpaper)
- Matte sealant spray (optional)
Step 1: Base Preparation
-
Prepare the backing:
Cut a large circle from sturdy cardboard or MDF. This should be significantly wider than your mirror glass to accommodate the checkerboard border. Aim for a border width of at least two checker rows. -
Center the mirror:
Place your mirror exactly in the center of the backing circle. Trace around it with a pencil so you know where the glass will sit later. -
Mount the mirror:
Apply strong construction adhesive to the back of the mirror glass and press it firmly onto the center of your backing within your traced lines. Let this set fully according to the glue instructions.
Shrinking Squares?
Foam clay shrinks as it dries! Pack tiles tightly together when wet. If gaps appear after drying, fill them with a thin ‘grout’ line of extra clay or paint the backing board black beforehand.
Step 2: Creating the Tiles
-
Roll out the white clay:
Take a large chunk of white foam clay and condition it by kneading it in your hands until it’s pliable. Roll it out to an even thickness of about 1/4 inch. -
Cut white squares:
Using your square cookie cutter, punch out enough white tiles to cover half of your frame area. Keep the edges clean, but don’t worry if they aren’t factory-perfect; the hand-cut look adds charm. -
Roll out the black clay:
Repeat the process with the black foam clay. I find it helpful to wipe down the rolling pin first to avoid transferring any white residue onto the black clay. -
Texturize the black clay:
Before cutting, lightly drag a coarse tool or stiff brush across the surface of the black clay sheet to create linear scratches or a faux-wood grain texture. -
Cut black squares:
Punch out your black tiles using the same cutter. Because foam clay shrinks slightly as it dries, make a few extras just in case.
Level Up: Color Pop
Swap the classic black and white for pastel pink and red or sage and cream. You can also mix metallic mica powder into the white clay for a subtle shimmer.
Step 3: Assembly
-
Initial layout:
Before gluing, dry-fit your tiles onto the frame border. Start with the inner ring touching the mirror. Arrange them in alternating colors to ensure your spacing works out. -
Adjusting the fit:
If the tiles don’t fit perfectly around the curve, you may need to gently squish the sides of the foam squares to slightly taper them into keystones, allowing them to follow the radius. -
Glue the first row:
Once satisfied with the placement, secure the inner ring of tiles using dabs of adhesive or hot glue. Press them close together to minimize gaps. -
Place the second row:
Begin the outer row, ensuring the colors alternate from the row below (a black tile should sit next to a white tile). Stagger or align them based on your preference; the image creates a strict grid. -
Trim the overhang:
If the outer tiles extend past your backing board, use scissors or a craft knife to trim the excess backing away so it’s flush with the clay.
Step 4: Finishing Touches
-
Inner trim application:
Measure a length of gold braided trim to fit the circumference of the mirror glass where it meets the tiles. Secure it carefully with hot glue to hide the raw edges of the clay. -
Outer trim application:
Apply a second strip of gold braided trim to the very outer edge of the mirror frame. This covers the layers of backing and clay, giving the piece a professional, cohesive side profile. -
Drying and sealing:
Let the foam clay cure for at least 24-48 hours. Once fully hardened, you can mist the frame with a matte sealant to protect the surface from dust and fingerprints. -
Clean the glass:
Use glass cleaner to remove any smudges or glue strings from the mirror surface, being careful not to soak the clay or trim.
Hang your new statement piece in an entryway or bathroom to instantly modernize the space
Swirled Marble Color Frame
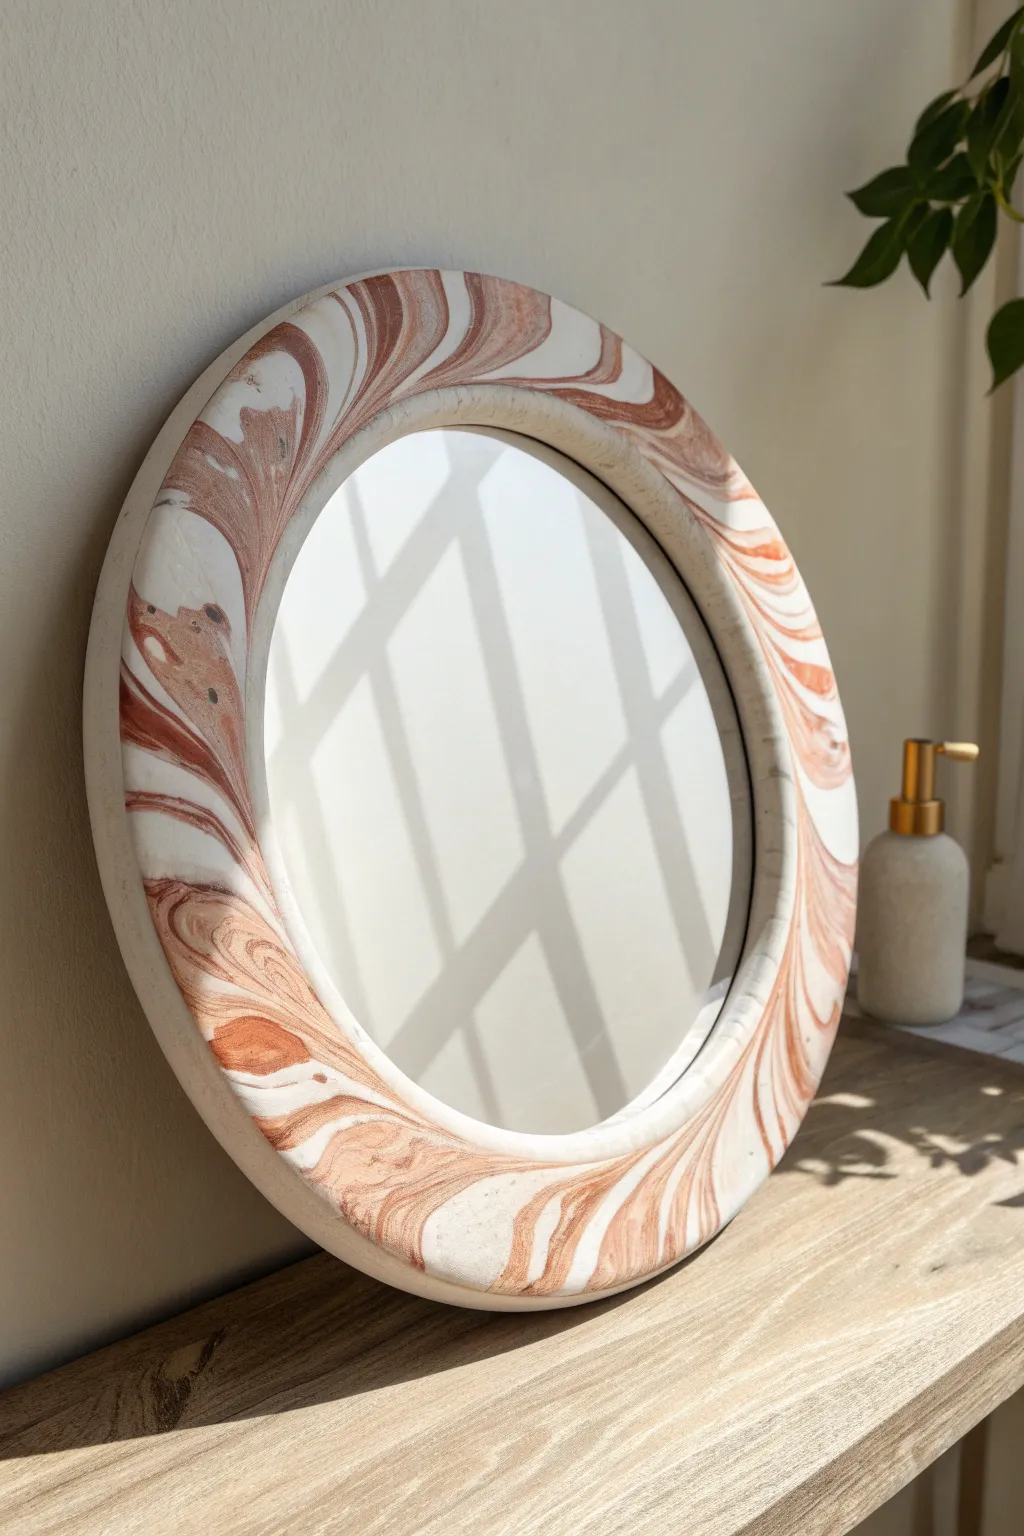
Transform a plain round mirror into an artisanal statement piece using the mesmerizing technique of clay marbling. This project creates a soft, matte-finish frame that mimics the high-end look of natural stone with warm terracotta and creamy white hues.
How-To Guide
Materials
- Round mirror (frameless or simple thin frame)
- White foam clay (large tub)
- Terracotta or rust-brown foam clay (or white clay mixed with acrylic paint)
- Rolling pin (acrylic or non-stick)
- Craft knife or clay sculpting tools
- Water spray bottle
- Sandpaper (fine grit)
- Clear matte sealant spray (optional)
- Clean, flat work surface (silicone mat recommended)
Step 1: Preparing the Clay Base
-
Clean the mirror:
Before touching any clay, ensure your mirror surface is completely clean and free of dust or oils to help the clay adhere properly around the edges. -
Condition the white clay:
Take a large handful of white foam clay and knead it thoroughly in your hands until it becomes warm, stretchy, and pliable. -
Prepare the color accent:
Prepare a smaller amount of the terracotta-colored clay; you want roughly a 1:4 ratio of color to white to maintain that airy marble look. -
Create distinct ropes:
Roll both the white clay and the colored clay into several long, thick snake-like ropes.
Muddy colors?
If your swirl looks grey or muddy, you over-mixed the clay. Stop twisting as soon as you see distinct streaks. You can add fresh white chunks to restore contrast.
Step 2: Creating the Marble Effect
-
Combine the ropes:
Lay the terracotta ropes alongside the white ropes and twist them together into one massive, multi-colored log. -
Fold and twist:
Fold the twisted log in half and twist it again. I usually repeat this motion 3-4 times—stop before the colors blend completely so you keep distinct streaks. -
Form the initial shape:
Shape your marbled clay log into a large circle that roughly matches the circumference of your mirror. -
Flatten the frame:
Using your rolling pin, gently flatten the clay ring until it is uniform in thickness, aiming for about 1/2 to 3/4 inch thick. -
Check the swirl:
Look closely at the surface; if the marbling isn’t organic enough, you can pinch and push the clay slightly to distort the lines into natural-looking waves.
Step 3: Assembly and Refining
-
Position on the mirror:
Carefully lift your clay ring and place it directly onto the border of the mirror. -
Secure the edges:
Gently press the clay down onto the glass surface to create a seal, ensuring the inner circle is relatively smooth and round. -
Trim the excess:
If the clay extends too far over the mirror’s edge or looks uneven, use a craft knife or clay tool to slice away the excess for a clean outer perimeter. -
Smooth with water:
Dip your finger in a little bit of water and run it along the cut edges to smooth out any harsh lines or knife marks. -
Create the bevel:
Use your thumb to gently bevel the inner edge where the clay meets the glass, creating a soft transition rather than a sharp cliff. -
Allow to dry:
Let the mirror sit undisturbed on a flat surface for at least 24-48 hours until the foam clay hardens completely. -
Sand for perfection:
Once fully cured, use fine-grit sandpaper to lightly buff away any fingerprints or bumps on the surface. -
Seal the finish:
Ideally, spray a light coat of matte sealant over the clay to protect the white sections from dust and yellowing over time.
Add metallic veins
For a luxe upgrade, paint thin veins of gold leaf liquid into the crevices of the marbling after the clay has dried but before sealing.
Now you have a stunning, lightweight decor piece that looks heavy and expensive but hangs easily on any wall
Celestial Sunburst and Moon Details
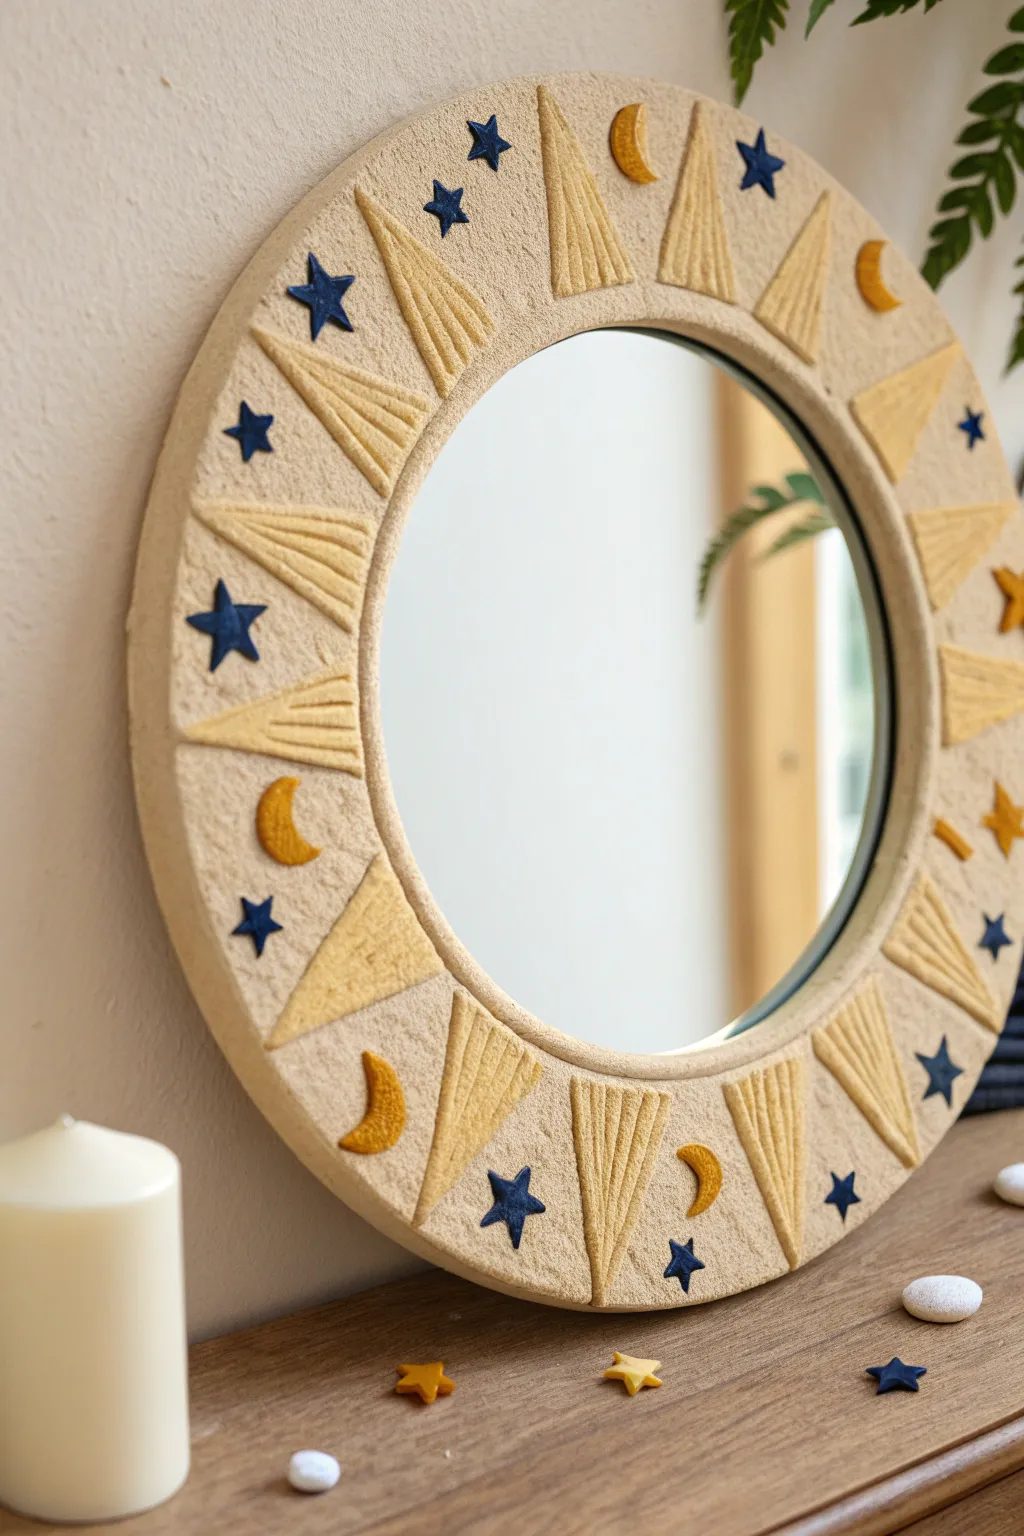
Transform a plain round mirror into a dreamy piece of decor with this celestial-inspired design. Featuring textured sun rays, deep blue stars, and golden crescent moons set against a stone-like background, this project brings a touch of magic to any vanity or wall.
Step-by-Step Guide
Materials
- Round mirror (framed or frameless with a wide backing)
- Foam clay (white/beige, yellow/gold, dark blue)
- Acrylic paint (stone/sand color) if using white clay for base
- Pointed sculpting tool or toothpick
- Rolling pin
- Clay knife or craft blade
- Texture sponge or stiff brush
- Strong craft glue (e.g., E6000 or tacky glue)
Step 1: Preparing the Base
-
Clean the surface:
Begin by wiping down the frame of your mirror with a damp cloth or rubbing alcohol to ensure it is free of dust and ready for the clay to adhere. -
Mix your base color:
If you don’t have a pre-colored sandy beige foam clay, mix small amounts of brown and yellow into white clay until you achieve a warm, stone-like hue. -
Apply the base layer:
Take handfuls of your beige clay and press it firmly onto the mirror frame. You want a consistent layer about 1/4 inch thick that covers the entire rim. -
Create stone texture:
While the base clay is still fresh and tacky, firmly dab a rough texture sponge or a stiff-bristled brush all over the surface. This creates that realistic, sandy stone finish. -
Smooth the edges:
Run your finger gently along the inner and outer rims to ensure the clay is flush with the mirror glass and the outer edge, creating a neat border.
Texturing Tip
For the most realistic sandy look, dab the base clay with a crumpled ball of aluminum foil instead of a sponge.
Step 2: Sculpting the Sun Rays
-
Roll out the sun clay:
Take your yellow or gold foam clay and roll it out on a non-stick surface until it’s about 1/8 inch thick. -
Cut the triangles:
Using a craft knife, cut out long, slender isosceles triangles. I prefer to vary the sizes slightly for a more organic, hand-crafted look. -
Add ray texture:
Before attaching them, use a needle tool or toothpick to score lines lengthwise down each triangle, radiating from the wider base to the tip. -
Attach the rays:
Press the triangles onto the textured base at regular intervals. Orient them so the wider base faces the mirror glass and the point aims outward. -
Secure the tips:
Gently press the tip of each ray into the base clay so it bonds securely without losing its triangular shape.
Step 3: Adding Stars and Moons
-
Roll out blue clay:
Roll out a small amount of dark blue foam clay. Depending on your preference, you can use a tiny star cutter or freehand cut small five-pointed stars with your knife. -
Place the stars:
Scatter the blue stars randomly in the gaps between the sun rays. Press them gently onto the sandy base so they embed slightly. -
Sculpt crescent moons:
Roll small balls of the gold clay into thick tapered snakes, then curve them into a ‘C’ shape to form crescent moons. -
Texture the moons:
Lightly tap the surface of the moons with your sponge to give them a craters-and-texture look before placing them. -
Arrange the moons:
Place the crescent moons intermittently around the frame, filling in larger gaps between rays to balance the composition. -
Final cure:
Allow the entire mirror to dry for at least 24-48 hours. Foam clay shrinks slightly as it dries, which will help it grip the frame.
Adhesion Help
If the dried clay pieces pop off the base, use a dab of E6000 or strong craft glue to reattach them permanently.
Once fully cured, your celestial mirror is ready to reflect the light and add a whimsical charm to your room