When I’m making easy clay projects with kids, I lean hard on simple shapes—balls, coils, and slabs—because they turn into something adorable fast. Here are my go-to clay ideas for kids that feel playful, doable, and totally studio-table friendly.
Cute Clay Snails From One Coil
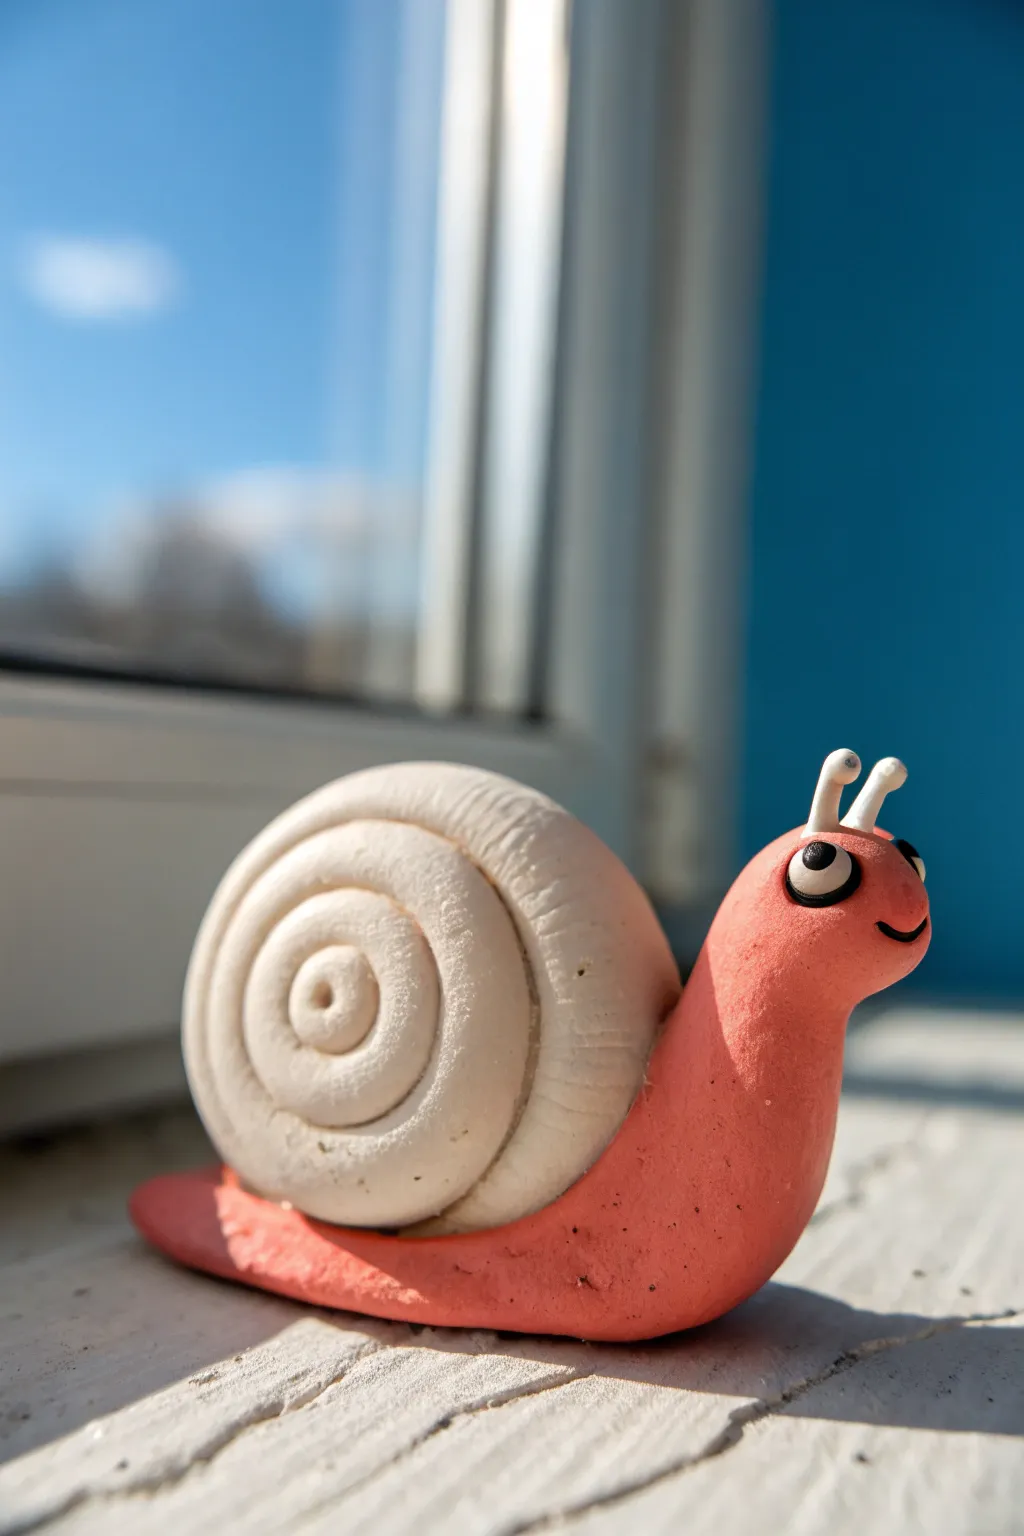
This adorable little garden friend is a perfect beginner sculpting project that combines simple coils with basic shaping techniques. With its bright coral body and classic white shell, this cheerful snail brings a pop of color to any windowsill or shelf.
How-To Guide
Materials
- Polymer clay or air-dry clay (Coral/Pink)
- Polymer clay or air-dry clay (White)
- Polymer clay or air-dry clay (Black)
- Sculpting tool or plastic knife
- Smooth work surface
- Toothpick (optional, for structure)
Step 1: Forming the Body
-
Prepare the Base Clay:
Start by taking a chunk of your coral or pink clay and kneading it in your hands until it becomes soft, warm, and pliable. -
Roll a Cylinder:
Place the softened clay on your work surface and roll it back and forth to create a thick, smooth cylinder or sausage shape, roughly 3 inches long. -
Taper the Tail:
Focus your rolling on just one end of the cylinder to create a tapered point. This will be the tail section of the snail. -
Shape the Head:
Gently press and round the opposite, thicker end to form the head. You want it to curve upwards slightly, so bend the neck area up just a bit. -
Flatten the Bottom:
Tap the bottom of the body on your table gently to create a flat surface so the snail sits upright without tipping over.
Step 2: Creating the Shell
-
Prepare White Clay:
take a large piece of white clay, slightly more than you used for the body, and condition it until soft. -
Roll a Long Snake:
Roll this white clay into a very long, even snake. It should be relatively thick, similar in width to a marker. -
Begin the Coil:
Start at one end of the white snake and begin rolling it tightly onto itself to form a spiral pattern. -
Build the Dome:
As you continue rolling, don’t just roll flat like a cinnamon roll. Instead, slightly overlap the coils so the center bulges outward, creating a 3D dome shape. -
Finish and Smooth:
Once the shell is the desired size, tuck the end of the clay coil underneath or blend it into the side so it disappears seamless into the spiral. -
Attach Shell to Body:
Press the flat side of your coiled shell firmly onto the middle of the pink body. I find that roughening the contact points slightly helps them stick better.
Cracking Issues?
If using air-dry clay, cracks can happen while drying. Smooth a tiny bit of water over the crack with your finger to seal it back up immediately.
Step 3: Adding the Face
-
Make Eye Stalks:
Roll two very small, short logs of white clay for the eye stalks. -
Position the Stalks:
Press these stalks onto the top of the head area, spacing them slightly apart. -
Add Pupils:
Take tiny specs of black clay, roll them into balls, and flatten them onto the front of the white eye stalks to create the pupils. -
Create the Smile:
Using a sculpting tool or the edge of a plastic knife, gently press a curved line into the side of the face to give your snail a happy smile. -
Refine the Surface:
Look over your snail for any fingerprints. Gently rub them away with your finger or a slightly damp brush/sponge. -
Final Cure:
Bake your snail according to polymer clay package directions, or let it sit in a dry spot for 24-48 hours if using air-dry clay.
Make It Sparkle
After the clay is fully dry or baked, brush a coat of clear gloss varnish over just the shell to make it look slimy and realistic while keeping the body matte.
Place your finished snail near a sunny window to keep your plants company


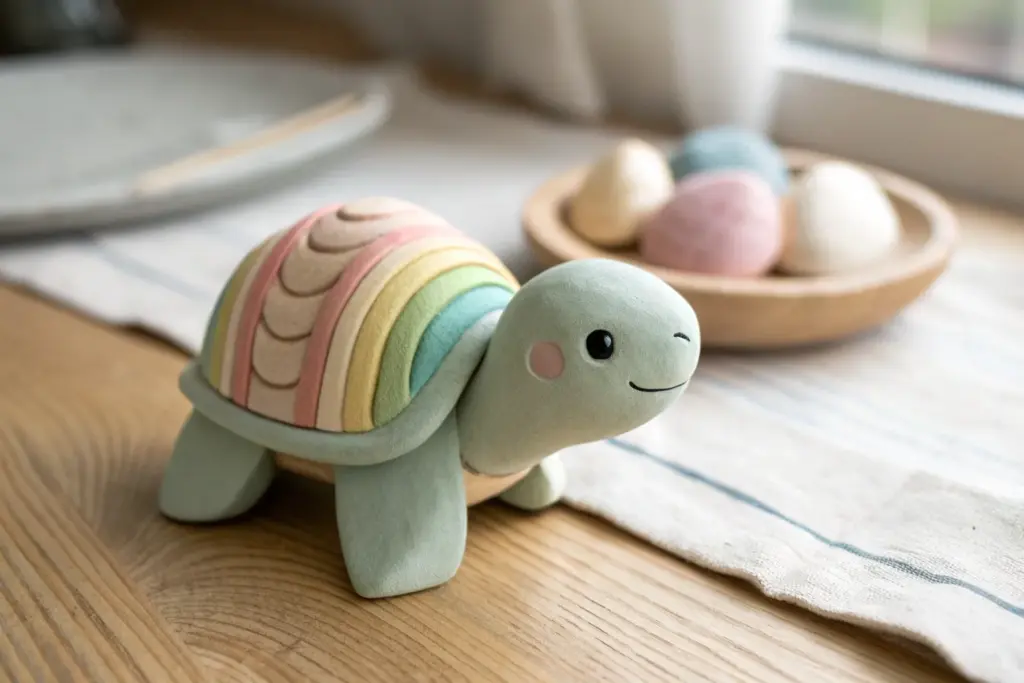
Coil Caterpillars With Rainbow Segments
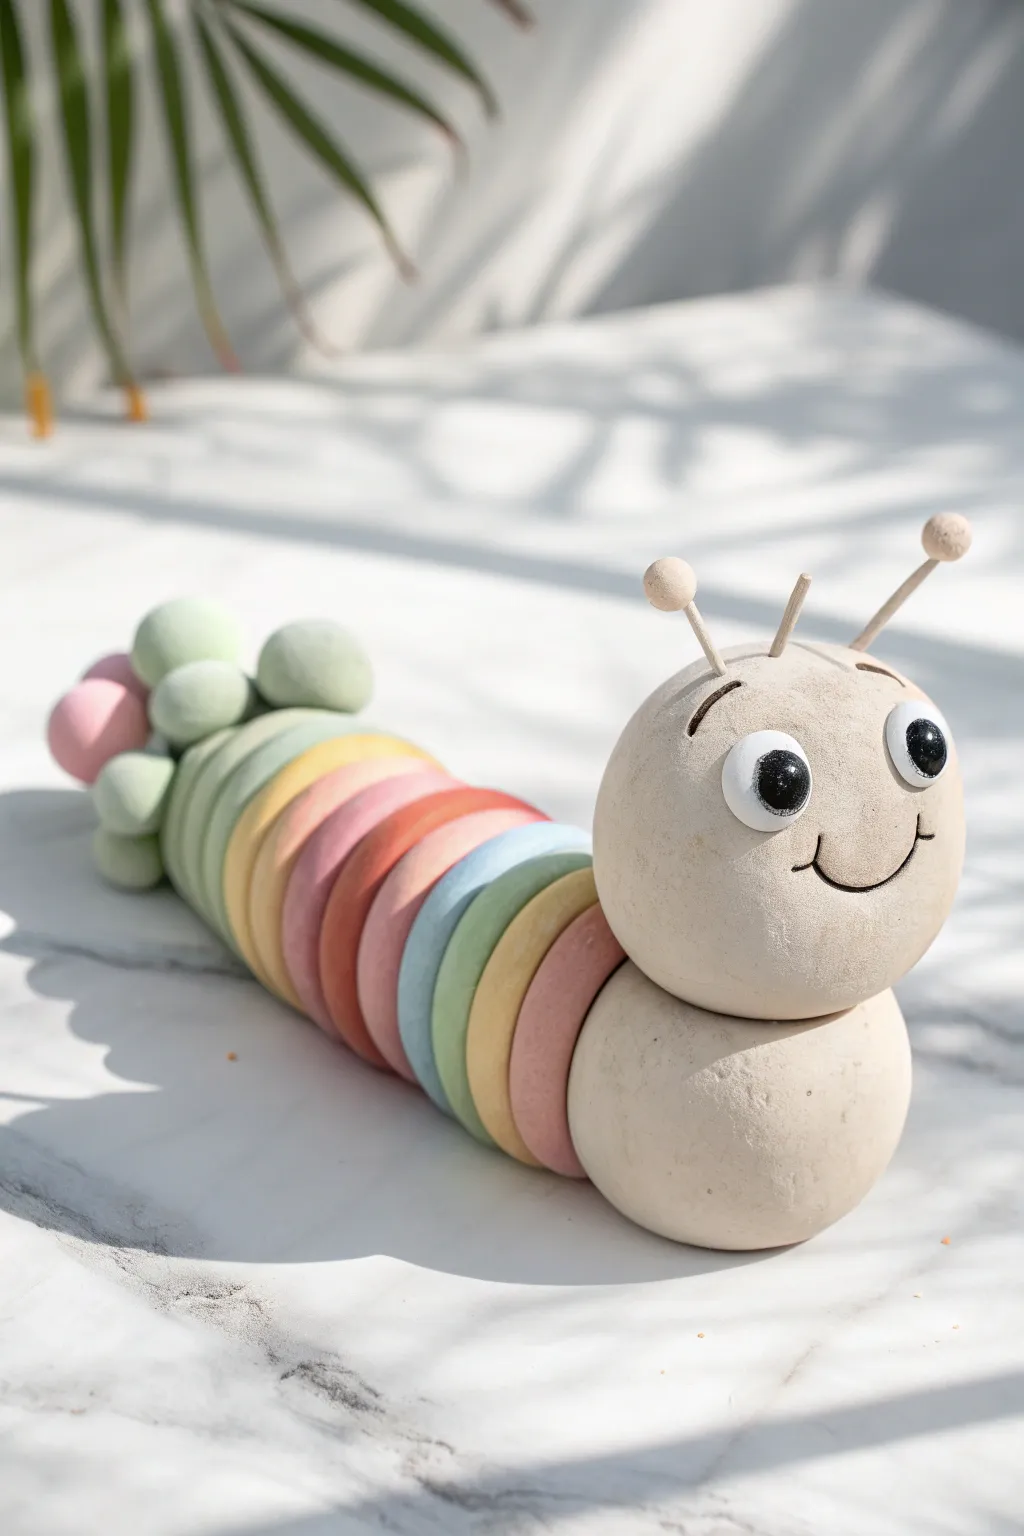
This charming little sculpture combines simple shapes to create a cheerful character with a pastel rainbow body. It is a fantastic way to practice stacking and joining clay while playing with soft, muted colors.
Step-by-Step
Materials
- Air-dry clay (white)
- Acrylic paints (pastel sets work best, or mix distinct colors with white)
- Paintbrushes (small round and medium flat)
- Two short wooden dowels or toothpicks (for antennae)
- Two small wooden beads (tips of antennae)
- Craft glue
- Googly eyes (medium size)
- Black fine-point marker
- Rolling pin
- Water cup (for smoothing)
Step 1: Forming the Body Segments
-
Roll the base coils:
Start by pinching off about 10-12 medium-sized pieces of clay. Roll each piece into a smooth ‘snake’ or rope on your work surface. -
Create rings:
Take each clay rope and gently curve it into a ring shape, pressing the ends together to seal them. They should look like little donuts. -
Flatten the rings:
Gently press down on each ring to flatten it slightly so they can stand up side-by-side. Aim for uniform thickness so your caterpillar doesn’t wobble. -
Smooth the edges:
Dip your finger in a little bit of water and run it along the seams and edges of your rings to ensure they are smooth and free of cracks. -
Assemble the line:
Line the rings up horizontally, pressing the flat face of one ring against the next. Use a dab of water or clay slip between them to act as glue. Arrange them in a gentle curve if you like movement.
Step 2: Creating the Tail
-
Roll spheres:
Roll about 5 or 6 small balls of clay, roughly the size of marbles. -
Cluster them together:
Attach these small spheres in a cluster at the back end of your ring segment line. Press them firmly into the last ring and into each other.
Cracked Clay Rescue
If small cracks appear while the clay dries, mix a tiny bit of fresh clay with water to make a paste. Fill the cracks, smooth over, and let it dry again.
Step 3: Sculpting the Head
-
Form the head sphere:
Roll a large, smooth ball of clay for the head. It should be slightly taller than your body rings. -
Form the neck segment:
Roll a second sphere, slightly smaller than the head, to serve as the base or ‘neck’ piece. -
Stack and join:
Place the head sphere on top of the neck sphere. Use water and a smoothing tool (or your finger) to blend the clay slightly at the connection point so they don’t fall apart. -
Attach to body:
Press this stacked head unit onto the front of your ring segment line. I find it helps to score the clay—scratching little cross-hatch marks—where the pieces join for a stronger bond. -
Add antennae sticks:
Insert two short toothpick pieces or wooden dowels into the top of the head at an angle. -
Cap the antennae:
Pop a tiny wooden bead or a very small ball of clay onto the tip of each antenna stick.
Sturdy Structure Tip
For a longer caterpillar, run a piece of wire or a bamboo skewer through the center of the rings while the clay is wet to act as a supportive spine.
Step 4: Painting and Details
-
Dry completely:
Let your sculpture dry fully. This usually takes 24-48 hours depending on the thickness of the clay. -
Paint the body:
Paint each ring a different pastel color, creating a rainbow pattern. Paint the tail cluster in green and pink tones. -
Paint the head:
Paint the head and neck segment a warm, sandy beige or off-white color. -
Attach the eyes:
Once the paint is dry, glue two googly eyes onto the front of the face. -
Draw the expression:
Use a black fine-point marker to carefully draw curved eyebrows above the eyes and a sweet, upturned smile.
Place your colorful coiled friend on a shelf to brighten up the room


Easy Ladybugs and Bees With Spots and Stripes

Transform smooth garden stones into a buzzing collection of ladybugs and bumblebees with nothing more than a little paint and patience. These cheerful garden friends add a wonderful pop of color to any flower pot or windowsill display.
Detailed Instructions
Materials
- Smooth, oval-shaped stones or baked clay lumps
- Red acrylic paint
- Yellow acrylic paint
- Black acrylic paint
- White acrylic paint
- Medium flat paintbrush
- Fine detail paintbrush
- Palette or paper plate
- Cup of water and paper towels
- Clear varnish or sealant (optional)
Step 1: Painting the Base Coats
-
Clean your canvas:
Begin by washing your stones thoroughly with soap and water to remove any dirt or dust. Let them dry completely, as moisture will prevent the paint from sticking properly. -
Base coat selection:
Decide which stones will be ladybugs and which will be bees. For ladybugs, paint the entire top surface with bright red acrylic paint. For bees, coat the whole stone in a vibrant yellow. -
Second layer:
Depending on the opacity of your paint, the stones might need a second coat. Let the first layer dry to the touch, then apply another thin layer of red or yellow to ensure the color is solid and bright. -
Painting the faces:
Once the base colors are fully dry, switch to black paint. Paint a semi-circle at the narrower end of each stone to create the face for both the bees and the ladybugs.
Paint Won’t Stick?
If the stone surface is too slick, the paint might bead up. Try mixing a tiny bit of white school glue into your base coat paint to help it adhere better.
Step 2: Designing the Ladybugs
-
Dividing the wings:
Using a fine detail brush and black paint, draw a straight line down the center of the red ladybug body, starting from the black face and going all the way to the back. -
Adding dots:
Dip the handle end of your paintbrush into black paint to create perfect circles. Stamp several spots onto the red wings on either side of the center line. -
Varying the spots:
I like to mix up the sizes slightly by using different brush handle sizes or even a toothpick for tiny spots near the edges. -
Creating eyes:
Clean your brush handle or grab a fresh toothpick. Dip it into white paint and dab two small dots onto the black face area to give your ladybug sight.
Step 3: Designing the Bees
-
Creating stripes:
For the yellow bee stones, paint horizontal black stripes across the body. You can make them thick or thin depending on the look you want. -
Refining the center:
Paint a thin black line down the center of the bee’s back, crossing over the yellow and black stripes, just like you did for the ladybug’s wings. -
Detailing the wings:
To suggest folded wings, you can paint slightly curved outlines on the yellow sections if you wish, though the simple stripes look great on their own. -
Adding bee eyes:
Just like the ladybug, use the tip of a brush handle and white paint to add two small, bright eyes to the black face section.
Perfect Circles Trick
Don’t have a dotting tool? Use the flat head of a nail, a cotton swab, or the eraser end of a pencil dipped in paint for perfectly round spots.
Step 4: Finishing Touches
-
Dry thoroughly:
Let all the paint dry completely. Acrylics dry fast, but thick dots might take a little longer. -
Optional sealing:
If these rocks will live outside in the garden, apply a coat of clear varnish or outdoor sealant to protect the paint from rain and sun.
Place your new insect friends around the garden for a playful surprise


Silly One-Eyed Monsters With Big Expressions
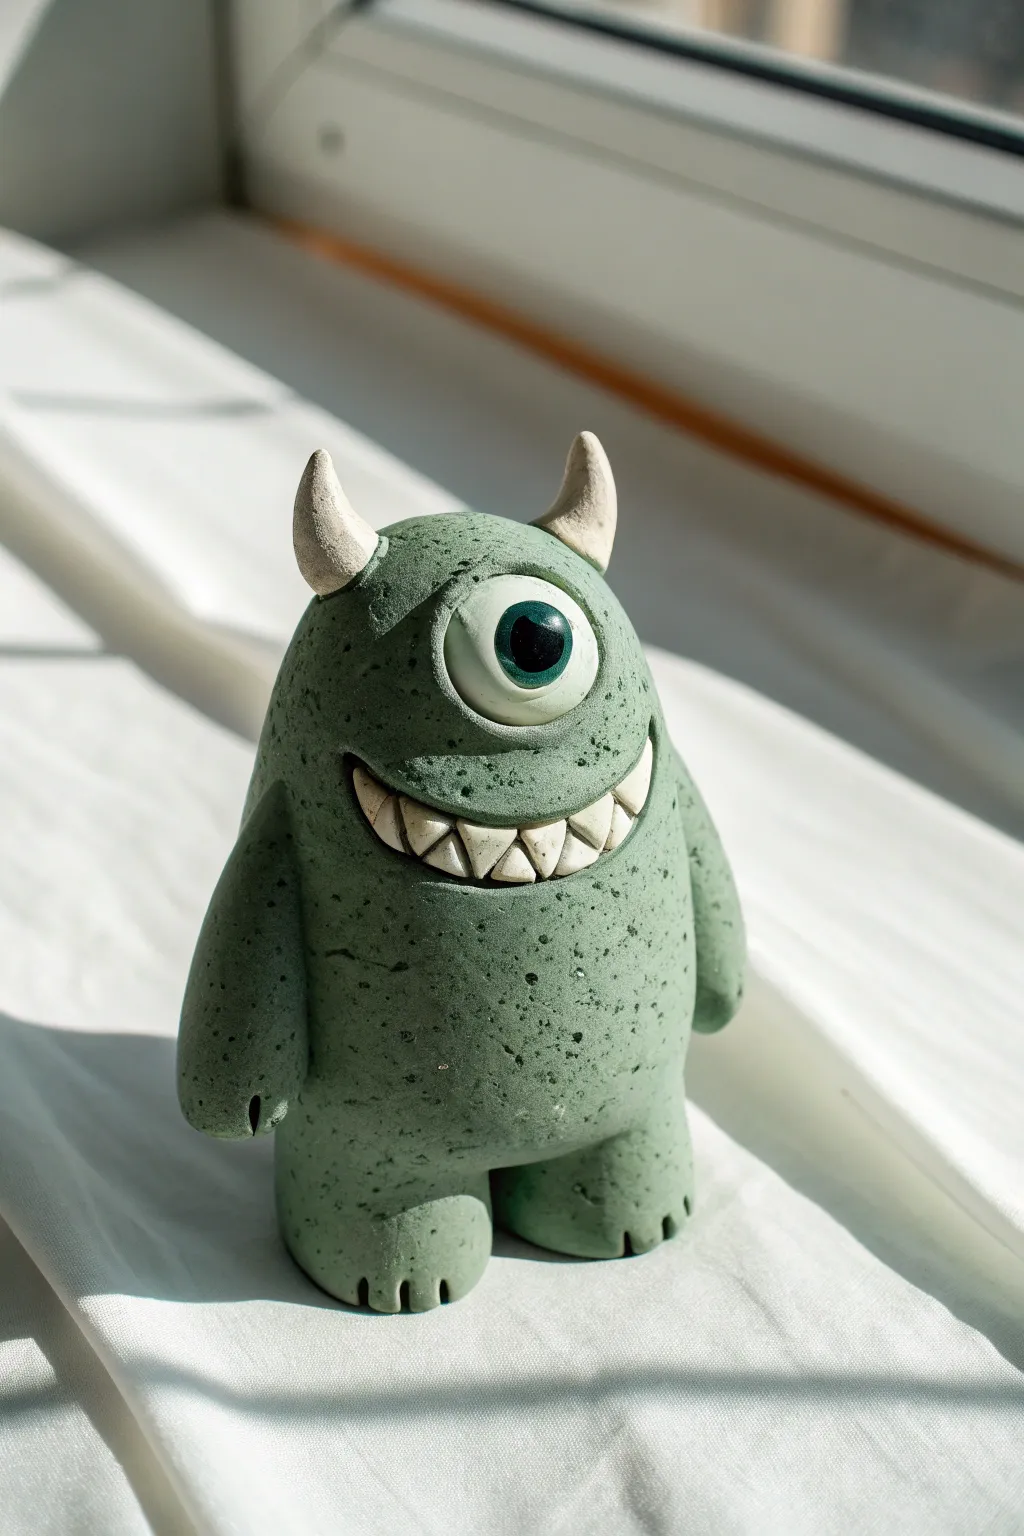
This delightful little monster features a stocky green body speckled with darker spots, giving it a playful, stony texture. With its giant, expressive eye and a wide toothy grin, this clay creation is perfect for guarding your windowsill or bookshelf.
Step-by-Step Guide
Materials
- Green polymer clay (or air-dry clay)
- White polymer clay
- Black polymer clay
- Dark teal or blue polymer clay
- Beige or light tan polymer clay
- Coarse black pepper or dark sand (for speckling)
- Clay sculpting tools (needle tool, rounded dotting tool)
- Acrylic rolling pin
- Blade or craft knife
- Wet wipes (for cleaning hands between colors)
Step 1: Preparing the Speckled Body
-
Mix the Monster Skin:
Start by conditioning a large ball of green clay until it is soft and pliable. To achieve that stony, speckled texture seen in the photo, knead in a pinch of course black pepper or a tiny amount of dark sand. -
Shape the Base:
Roll the green clay into a smooth, thick cylinder. It should be slightly wider at the bottom than the top to give the monster a stable, chunky look. -
Form the Legs:
Instead of attaching separate legs, use your thumb to push up into the bottom center of the cylinder to create an arch. Smooth the split to form two thick, stump-like legs. -
Define the Feet:
Slightly flatten the bottom of each leg so the monster stands on its own. Use a needle tool or the side of a toothpick to press three small indentations into the front of each foot for toes.
Loose Parts?
If horns or arms wobble or fall off after baking, don’t panic. A tiny dab of superglue or clear epoxy will reattach them permanently and invisibly
Step 2: Adding the Face
-
Cut the Smile:
Use a curved blade or a clay tool to slice a wide, crescent-shaped indentation into the middle of the body for the mouth. Gently push the clay inwards to create a deep groove where the teeth will go. -
Create the Teeth:
Roll a thin snake of white clay. Cut it into small triangular pieces. Alternatively, I find it easier to make a solid white crescent shape that fits into the mouth groove, then use a knife to carve the individual teeth lines. -
Insert the Teeth:
Place your teeth (individual or the strip) into the mouth smile. Ensure the top row slightly overhangs the bottom for a goofy expression. -
Make the Eyeball:
Roll a medium-sized ball of white clay. Flatten it slightly so it doesn’t bulge out too much and press it firmly onto the upper center of the face. -
Add the Iris and Pupil:
Take a small ball of dark teal clay, flatten it, and place it in the center of the white eye. Top it with an even smaller ball of black clay for the pupil. Add a tiny white dot for a light reflection to bring it to life. -
Sculpt the Eyelids:
Roll two thin snakes of your speckled green clay. specific to shape the eyelids. Place one over the top of the eye and one underneath, blending the outer edges into the main body so the eye looks embedded, not just stuck on.
Make It Glossy
For a wet, slimy monster look, coat just the eyeball and the teeth with a high-gloss polymer clay glaze after baking, leaving the skin matte
Step 3: Arms and Accessories
-
Shape the Arms:
Roll two thick logs of green clay for the arms. They should be slightly curved and tapered near the top where they attach to the body. -
Attach the Limbs:
Press the arms firmly onto the sides of the body. You can blend the clay at the shoulder joint with a smoothing tool for a seamless look. -
Detail the Hands:
Just like the feet, use a tool to press two small indentations into the end of each arm to suggest simple fingers. -
Form the Horns:
Condition a small amount of beige clay. Roll two small cones that taper to a dull point. -
Curve the Horns:
Gently curve the tips of the cones slightly. This give the horns a more organic feel. -
Mount the Horns:
Press the horns onto the top of the head, spaced widely apart. You can use a tiny bit of liquid clay or bake-and-bond if you are worried about them falling off. -
Final Surface Texture:
Before baking, give the whole body a very light texture by preserving the matte finish. Check for fingerprints and smooth them away with a drop of baby oil. -
Bake:
Bake the figure according to your clay package instructions (usually 275°F or 130°C for 15-30 minutes). Let it cool completely before handling.
Set your new green friend on a sunlit ledge to watch over the room with a friendly grin

The Complete Guide to Pottery Troubleshooting
Uncover the most common ceramic mistakes—from cracking clay to failed glazes—and learn how to fix them fast.
Rainbow Coil Pots That Look Like Candy
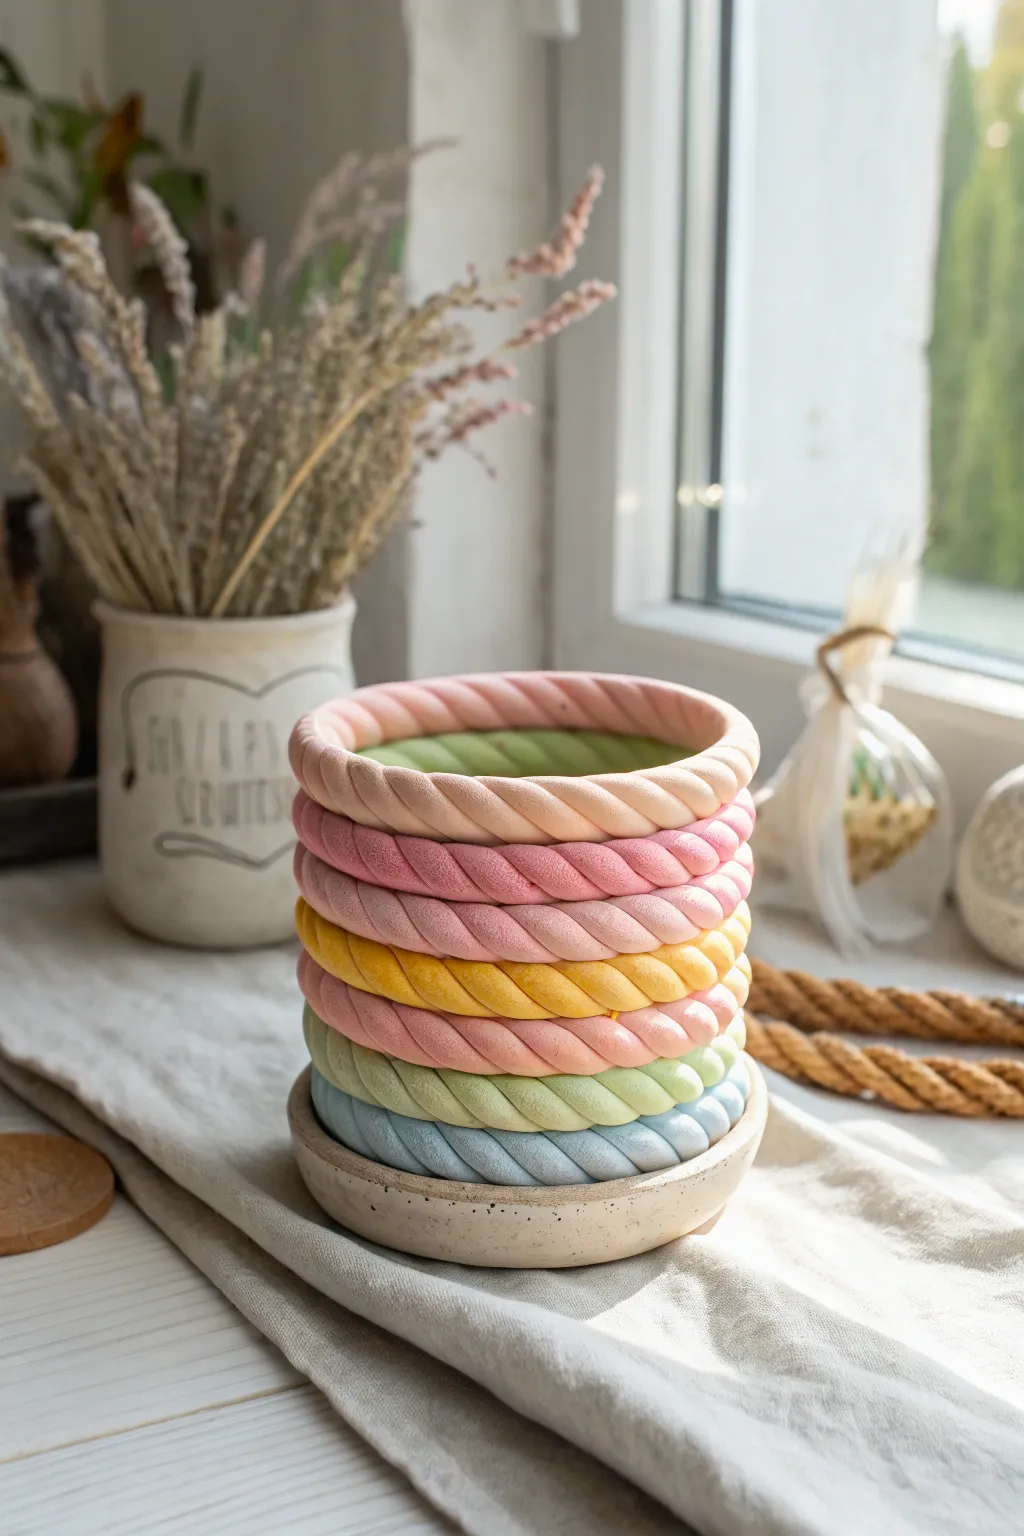
Transform simple ropes of clay into a functional and sweet-looking container that mimics the look of twisted marshmallows or candy canes. This coil pot technique uses soft pastel colors stacked to create a textured, durable vessel for your favorite treasures.
Step-by-Step Tutorial
Materials
- Air-dry clay or polymer clay (pastel pink, yellow, blue, green, peach)
- Clay rolling pin or smooth cylinder
- Clay knife or plastic cutting tool
- Small bowl of water (slip) or liquid clay adhesive
- Round cookie cutter (approx. 4 inches) or a cup for tracing
- Smooth work surface or silicone mat
Step 1: Creating the Base
-
Prepare the Clay:
Start by selecting a neutral color or one of your pastel shades for the base. Knead a ball of clay roughly the size of a lemon until it is soft, pliable, and free of cracks. -
Roll the Slab:
Place the clay ball on your work surface and use the rolling pin to flatten it into an even slab. Aim for a thickness of about 1/4 inch so the base is sturdy enough to hold the walls. -
Cut the Circle:
Use your round cookie cutter or place a cup upside down on the clay to cut out a perfect circle. Remove the excess clay around the edges and smooth the rim of your circle with a fingertip dipped in a tiny bit of water. -
Make the Saucer Lip:
Roll a very thin snake of clay and attach it around the outer top edge of your base circle to create a slight lip, making it look like a shallow saucer. Smooth the seam down into the base so it becomes one solid piece.
Step 2: forming the Twisted Ropes
-
Roll the First Snake:
Choose your first color—perhaps a light blue—and roll it back and forth on the table with your palms to create a long, even snake. It should be slightly thicker than a pencil. -
Roll the Second Snake:
Using the same color, roll a second snake of identical length and thickness. To get uniform coils, I like to place them side-by-side to check they match before proceeding. -
Twist Them Together:
Pinch the ends of the two snakes together. Gently twist them around each other to create a rope effect. Keep the twist tight and even all the way down the length of the clay. -
Sizing the Coil:
Wrap your twisted rope around the perimeter of your base to check the length. It needs to encircle the base exactly once. Cut off any excess clay so the two ends meet perfectly. -
Attach the First Layer:
Score the top edge of your base (make little scratch marks) and dampen it with a drop of water or liquid adhesive. Place the twisted ring on top, pressing down gently to secure it. -
Blend the Seam:
Where the two ends of the potential ring meet, use your modeling tool to smudge the clay together on the *inside* of the pot. This hides the connection and keeps the ring strong.
Cracking Clay?
If your clay starts cracking while twisting, it’s likely too dry. Dip your fingers in water and knead the moisture back into the clay before rolling your snakes again.
Step 3: Building the Walls
-
Prepare More Colors:
Repeat the rope-making process with your other pastel colors: green, pink, yellow, and peach. You will need one long twisted rope for each layer of your pot. -
Stack the Second Layer:
Apply a little slip or adhesive to the top of your blue layer. Place your green twisted rope directly on top. Try to stagger the vertical seam (where the rope ends meet) so it isn’t directly above the seam of the blue layer. -
Continue Stacking:
Continue adding layers one by one—yellow, pink, peach—checking from all sides to ensure the walls are going straight up and not leaning outward or inward. -
Secure the Inside:
As you stack, gently support the outside with one hand while using a finger or tool to smooth the coils together on the interior wall. While the outside keeps the rope texture, the inside should be relatively smooth for stability. -
The Final Rim:
For the top layer, choose your favorite color (perhaps a soft peach or pink). Be extra careful when joining the ends of this final ring so the seam is invisible, as this is the most visible part of the pot. -
Final Shaping:
Once all layers are stacked, gently cup the pot with both hands to adjust the shape if needed. Ensure the rim is level. -
Dry or Bake:
If using air-dry clay, let the pot sit undisturbed in a dry spot for 24-48 hours. If using polymer clay, bake according to the manufacturer’s instructions on the package.
Seamless Finish
Cut the ends of your twisted ropes at a 45-degree angle rather than straight down. Overlapping these angled cuts makes the seam much stronger and easier to hide.
Now you have a charming, candy-colored vessel perfect for holding pencils, dried flowers, or trinkets
Leaf Impression Clay Keepsakes
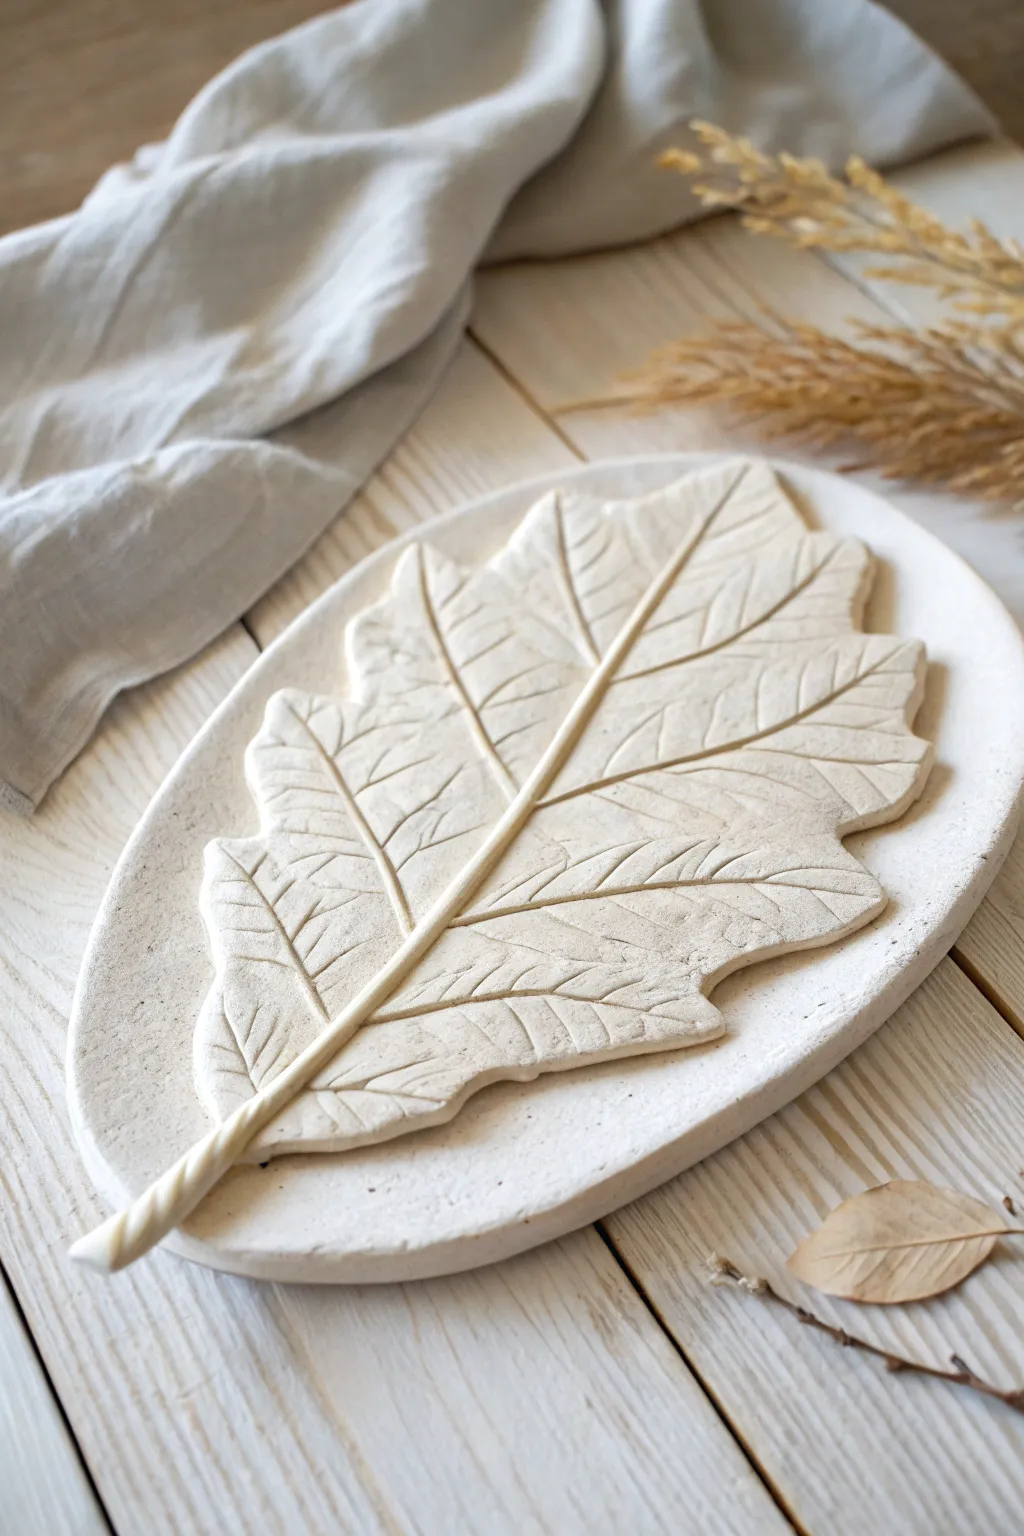
Capture the delicate beauty of nature with this elegant monochromatic clay project that turns a simple leaf shape into a stunning piece of decor. By layering a detailed sculpted leaf onto a smooth oval base, you create a dimensional keepsake perfect for holding trinkets or simply displaying on a shelf.
Detailed Instructions
Materials
- White spreadable air-dry clay or polymer clay
- Rolling pin
- Oval cookie cutter or oval paper template
- Drying board or baking sheet (depending on clay type)
- Clay sculpting needle tool or toothpick
- Clay knife or plastic knife
- Small cup of water (for smoothing)
- Fine-grit sandpaper (optional)
- Matte white acrylic paint (optional)
Step 1: Creating the Base
-
Prepare the slab:
Start by kneading a large ball of white clay until it is warm and pliable. Using your rolling pin, roll it out into an even slab that is approximately 1/4 inch thick. -
Cut the oval shape:
Place your oval cutter or paper template onto the rolled clay slab. Carefully cut around the shape to create the base dish seen in the photo. -
Smooth the edges:
Dip your finger lightly into water and run it along the cut edge of the oval base. This softens any sharp corners and gives it that refined, stone-like finish. -
Create a slight curve:
To give the base a dish-like appearance, gently lift the edges of the oval upwards. You can place a small rolled towel or foil underneath the rim to support this curve while you work on the next part.
Step 2: Sculpting the Leaf
-
Roll the leaf slab:
Roll out a second, slightly smaller portion of clay. This should be thinner than your base, roughly 1/8 inch thick. -
Outline the leaf shape:
Using a needle tool, lightly sketch the outline of an oak style leaf onto the clay surface. Look for a shape with deep, rounded lobes. -
Cut out the leaf:
Once you are happy with the outline, use your clay knife to cut the leaf shape out cleanly. -
Position the leaf:
Gently lift the cut clay leaf and place it directly onto the center of your oval base. Press it down very lightly so it adheres but doesn’t flatten completely. -
Form the Stem:
Roll a thin snake of clay for the central stem. Twist it gently to give it the spiral texture seen at the bottom of the stem in the image. -
Attach the Stem:
Lay the twisted snake down the center of the leaf, extending slightly off the bottom edge. Press it gently into the leaf surface to bond them together.
Crack Prevention
If using air-dry clay, cracks can happen if it dries too fast. drape a slightly damp paper towel over the piece for the first 12 hours to slow the drying process.
Step 3: Adding Details and Finishing
-
Carve the primary veins:
Use your needle tool to draw lines radiating from the central stem out toward the tip of each leaf lobe. I find drawing with a light touch first helps ensure symmetry before pressing deeper. -
Add secondary texture:
Between the main veins, scratch shorter, fainter diagonal lines to mimic the fine network of veins found on real dried leaves. -
Refine the edges:
Go back around the perimeter of the applied leaf and gently press the edges downward with a modeling tool to make it look embedded, rather than just floating on top. -
Dry the project:
Allow the clay to dry completely according to package directions. Air-dry clay may take 24-48 hours, while polymer requires baking. -
Sand for perfection:
Once fully cured, inspect the edges. If there are any rough spots, gently buff them away with fine-grit sandpaper. -
Final coat (Optional):
To achieve the unified matte look in the photo, you can brush a single coat of matte white acrylic paint over the entire piece.
Natural Texture
Before cutting out your leaf shape, gently press a piece of coarse linen or canvas onto the clay slab to imprint a subtle fabric texture.
Display your beautiful botanical sculpture on a coffee table or give it as a handmade gift that celebrates nature


What Really Happens Inside the Kiln
Learn how time and temperature work together inside the kiln to transform clay into durable ceramic.
Alphabet Magnets With Chunky Letters

These substantial, decorative alphabet magnets add a touch of earthy warmth to any fridge or magnetic board. With their raised patterns and warm terracotta color palette, they are as fun to touch as they are to look at.
Step-by-Step
Materials
- Polymer clay (terracotta, white, camel, and mixed earth tones)
- Small rolling pin
- Alphabet cookie cutters (large/chunky style)
- Clay carving tools or a dull needle tool
- Acrylic paints (terracotta, ochre, cream, white)
- Fine detail paintbrushes
- Strong round craft magnets
- Superglue or E6000
- Gloss or matte varnish (optional)
Step 1: Shaping the Base
-
Condition the clay:
Begin by warming your polymer clay in your hands, kneading it until it is soft and pliable. If you want a specific background color like the creamy white ‘A’, mix white with a tiny dot of brown. -
Roll out a slab:
Roll your conditioned clay into a thick slab. Aim for about 1/4 to 1/2 inch in thickness so the letters feel chunky and substantial. -
Cut the letter shape:
Press your large alphabet cutter firmly into the slab. Wiggle it slightly to ensure a clean cut all the way through, then lift the cutter. Gently pop the clay letter out. -
Smooth the edges:
Use your fingertip, dipped slightly in water or baby oil, to smooth out any rough edges or seams left by the cutter. The sides should look rounded and finished.
Smooth Operator
Before baking, lightly brush the unbaked clay with a little baby oil or cornstarch. This removes fingerprints and leaves a silky professional finish.
Step 2: Adding Texture & Patterns
-
Plan your design zones:
Using a very light touch with a needle tool, lightly sketch out zones on your letter where different patterns will go. Think in blocks: stripes here, dots there, arches in the corners. -
Carve the arches:
For the rainbow-like arches seen on the terracotta ‘A’, use a small loop tool or a carving tool to gently gouge out curved lines. Keep them concentric and evenly spaced. -
Create indented dots:
Use the back of a paintbrush or a small ball stylus to press varied dot patterns into specific sections. You can make some deep and some shallow for variety. -
Add raised clay details:
Alternatively, you can roll tiny snakes of clay and press them onto the surface to create raised lines instead of carved ones. Smooth them down gently so they bond.
Make It 3D
Instead of just painting, press tiny clay balls or thin coils onto the surface before baking for true tactile patterns kids will love to touch.
Step 3: Baking & Painting
-
Bake the letters:
Place your clay letters on a parchment-lined baking sheet. Bake according to your polymer clay package instructions—usually around 275°F (135°C) for 15-30 minutes depending on thickness. -
Cool completely:
Let the letters cool fully before painting. The clay hardens as it cools, so don’t rush this part. -
Base coat blocking:
Using your acrylic paints, fill in the sketched ‘zones’ with your different earth tones—ochre, terracotta, and soft pinks. I find usually two thin coats gives better coverage than one thick one. -
Highlight the textures:
Paint inside the carved grooves with a darker shade to make them pop, or carefully paint the raised areas with a lighter color. -
Add fine details:
Use your finest brush to add the tiniest details: little white dots, thin wavy lines, or geometric dashes on top of your dry base colors. This mimics the intricate look of the example.
Step 4: Assembly
-
Seal the surface:
Once the paint is bone dry, apply a coat of varnish. A matte varnish keeps the earthy, natural look, while gloss will make the colors more vibrant. -
Attach the magnets:
Flip the letter over. Apply a strong dab of superglue or E6000 to the back of the magnet and press it firmly onto the center of the letter back. -
Final cure:
Allow the glue to cure for at least 24 hours to ensure the heavy clay letter won’t slide off the magnet later.
Enjoy arranging your personalised alphabet art on the fridge.
Mini Food Charms From Basic Shapes
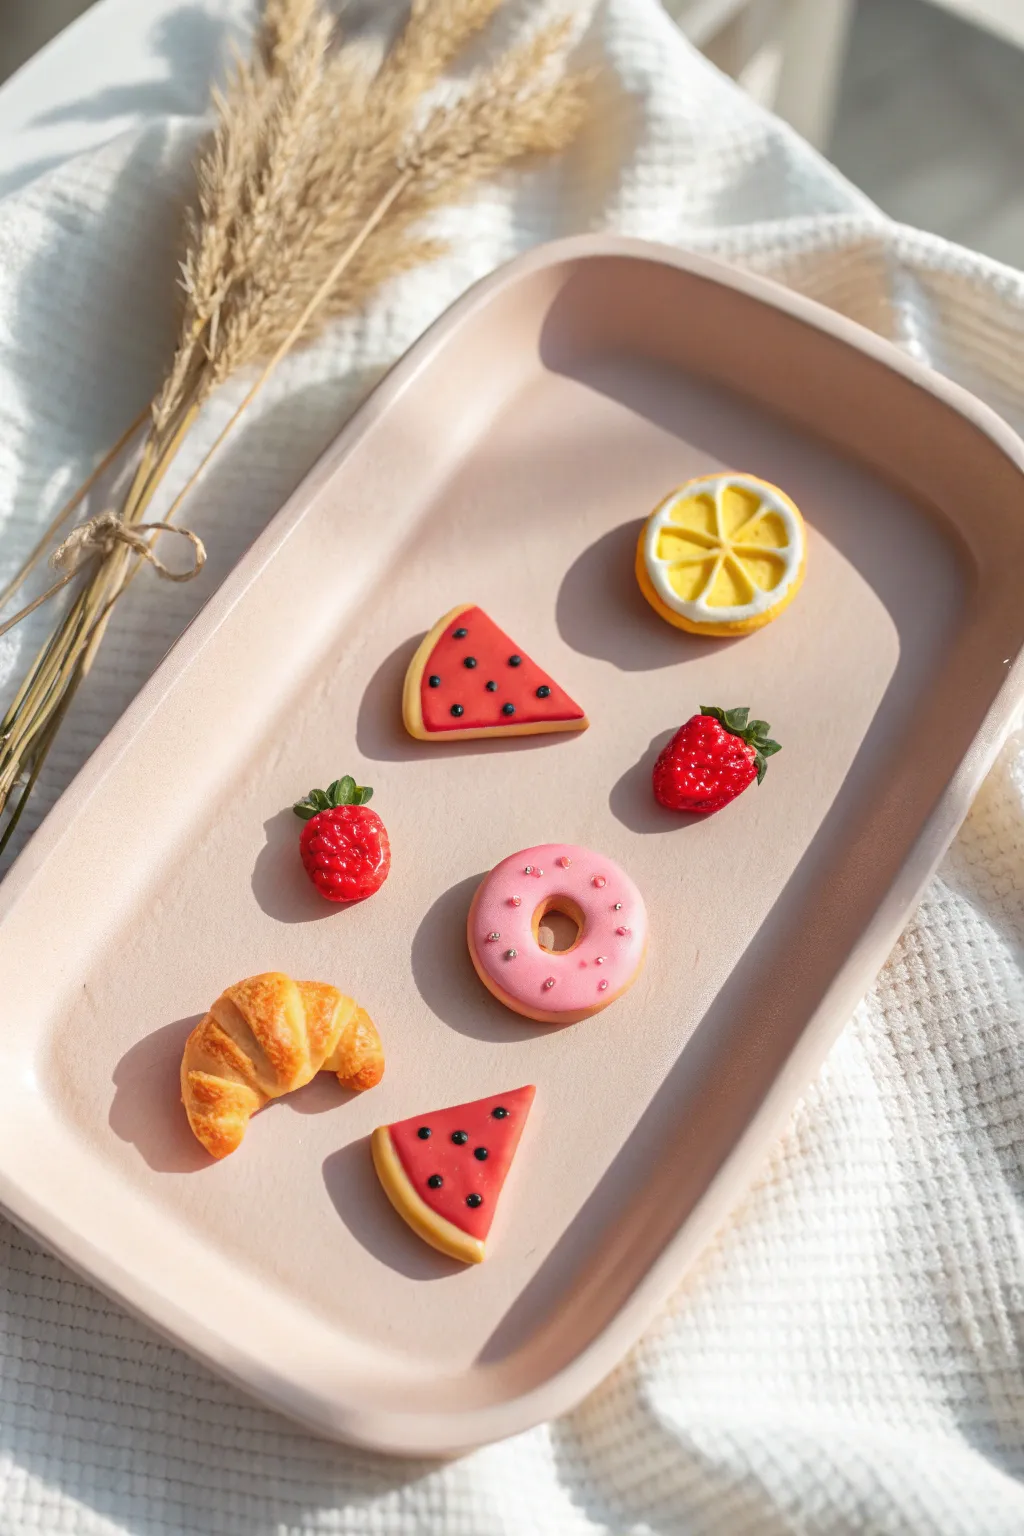
Transform simple balls of clay into a delightful assortment of miniature treats, including juicy fruits, a glazed donut, and a flaky croissant. These tiny charms are perfect for jewelry making or simply arranging on a mini platter.
Detailed Instructions
Materials
- Polymer clay (red, pink, orange, yellow, translucent white, brown/tan, green, black)
- Clay tools (needle tool, ball tool, craft knife)
- Liquid polymer clay (white and red/pink)
- Soft pastels (orange/brown for shading)
- Small paint brush
- Gloss glaze or UV resin (optional)
- Eye pins (if making into charms)
Step 1: The Citrus Slice
-
Create the segments:
Roll a small snake of yellow clay and cut it into six equal, tiny triangular wedges. -
Add the pith:
Roll very thin snakes of white clay and place them between the yellow wedges to separate the segments, reassembling them into a circle. -
Wrap the rind:
Roll a flat strip of white clay to wrap around the entire circle, followed by a slightly thicker strip of yellow clay for the outer skin. Slice a clean disk off the cane you’ve created.
Sticky Finger Syndrome?
If the clay gets too soft and sticky while handling tiny parts, pop it in the fridge for 10 minutes. This firms it up, making detailed work much easier.
Step 2: Watermelon Slices
-
Form the fruit flesh:
Shape a ball of red clay into a flat semi-circle or triangle with rounded edges. -
Add the rind:
Roll a thin snake of white clay and wrap it along the curved bottom edge, followed by a green snake of the same thickness. Smooth them gently into the main red shape. -
Add seeds:
Roll incredibly tiny specks of black clay into teardrops and press them onto the red surface, or use black paint after baking for easier application.
Jewelry Upgrade
Before baking, insert a small metal eye-pin into the top of each fruit or pastry. After baking, use jump rings to attach them to a bracelet chain or earring hooks.
Step 3: Textured Strawberries
-
Shape the berry:
Roll a small ball of red clay and gently pinch the top to create a slightly flattened heart or rounded triangle shape. -
Add texture:
Use a needle tool or a toothpick to poke small, evenly spaced indentations all over the surface to mimic seeds. -
Attach leaves:
Create tiny teardrops of green clay, flatten them, and press them onto the top of the berry in a star pattern.
Step 4: The Pink Donut
-
Base shape:
Roll a ball of tan or light brown clay and flatten it slightly into a thick disk. Use a small tool to poke a hole through the center. -
Add frosting:
Roll a thin sheet of pink clay. Cut a wavy, irregular circle shape and drape it over the donut, poking the hole through again. -
Sprinkle time:
Add tiny silver micro-beads or roll minuscule balls of contrasting clay to act as sprinkles, pressing them gently into the pink icing.
Step 5: The Golden Croissant
-
Create the roll:
Start with a snake of tan clay that is thicker in the middle and tapers into points at both ends. -
Shape the crescent:
Flatten the snake slightly, then roll it up starting from the wide center towards the points, or simply twist the tapered ends inward to form a crescent moon shape. -
Add flakiness:
Use a craft knife to gently score lines across the surface to mimic layers of pastry. -
Golden finish:
Scrape some orange or brown soft pastel into a powder. I like to dry-brush this onto the ridges of the croissant before baking to give it a perfectly baked look.
Step 6: Final Touches
-
Bake:
Bake all pieces according to your clay manufacturer’s instructions, usually at 275°F (130°C) for 15-30 minutes. -
Glaze:
Once cool, coat the fruit interiors and the donut icing with a gloss glaze to make them look juicy and sweet.
Now you have a whole bakery’s worth of tiny treats ready to display or wear

TRACK YOUR CERAMIC JOURNEY
Capture glaze tests, firing details, and creative progress—all in one simple printable. Make your projects easier to repeat and improve.
Pencil Holder Cups With Easy Cutout Shapes
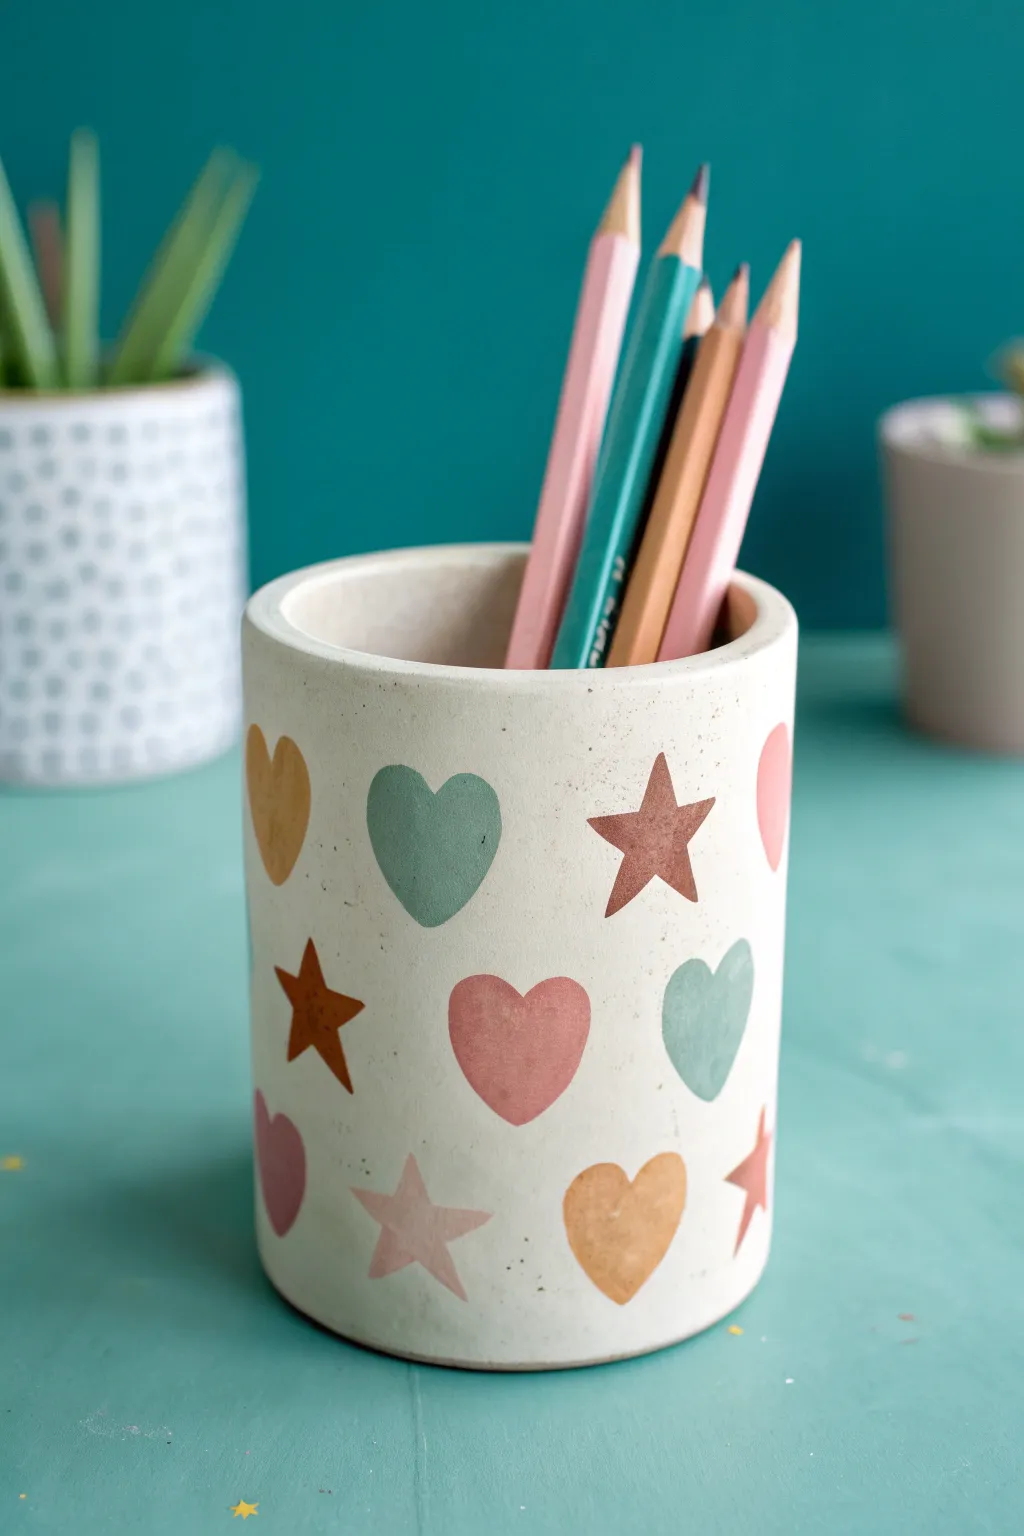
Keep your desk tidy with this charming handmade pencil holder, featuring sweet heart and star motifs in muted pastel tones. Perfect for budding artists, this clay project is simple enough for little hands but looks professional enough to gift.
Step-by-Step Tutorial
Materials
- White or sandstone air-dry clay (approx. 500g)
- Small rolling pin
- Empty can or glass jar (to use as a mold)
- Parchment paper or cling film
- Clay knife or plastic butter knife
- Small bowl of water
- Sandpaper (fine grit)
- Acrylic paints (pastel pink, sage green, mustard yellow, terracotta)
- Small round paintbrushes
- Mod Podge or matte acrylic sealer
Step 1: Build the Clay Base
-
Prepare the workspace:
Lay down a piece of parchment paper to prevent sticking. Take a large handful of clay and knead it until it’s soft and pliable. -
Roll the slab:
Roll the clay out into a long rectangular slab, aiming for a consistent thickness of about 5mm (1/4 inch). -
Prep the mold:
Wrap your empty can or glass jar in cling film or parchment paper. This is crucial so you can remove the mold later without the clay sticking. -
Cut to size:
Wrap the clay slab loosely around the can to estimate fit, then trim it into a neat rectangle with your knife so the edges meet perfectly without overlapping too much. -
Form the cylinder:
Wrap your trimmed clay rectangle around the covered mold. Gently press the two vertical ends together. -
Seal the seam:
Dip your finger in water and smooth the joined seam until it disappears. I find using a little cross-hatch scratching pattern before adding water helps it bond better. -
Create the base:
Roll a separate small ball of clay and flatten it. Place your clay-wrapped cylinder on top of this disk and trace around it, cutting away the excess to form a perfect bottom. -
Attach the bottom:
Blend the clay from the cylinder walls down onto the base disk, using wet fingers to smooth everything together so there are no gaps.
Clay Cracking?
Cracks often happen if clay dries too fast. Repair them by mixing a tiny bit of clay with water to make a paste, filling the crack, and sanding smooth when dry.
Step 2: Refine and Decorate
-
Dry partially:
Let the clay sit on the mold for about an hour until it is slightly firm but not fully dry. -
Remove mold:
Carefully slide the can or jar out from the center. Peel away the parchment paper lining from the inside of your clay cup. -
Smooth the rim:
Dip your finger in water again and run it along the top rim of the cup to soften any sharp edges. -
Full dry:
Allow the cup to dry completely for 24-48 hours. It should turn a lighter color and feel hard to the touch. -
Sand it smooth:
Once bone dry, take fine-grit sandpaper and gently sand the outside to remove bumps or fingerprints for a sleek finish. -
Sketch the pattern:
Lightly draw your heart and star shapes onto the cup using a pencil. Keep the arrangement random and varied for a playful look. -
Paint the shapes:
Using your small round brush, fill in the shapes with pastel acrylics. Use sage green for some hearts, terracotta for stars, and mustard yellow for others. -
Second coat:
If the paint looks streaky, wait for it to dry and apply a second coat to make the colors solid and opaque. -
Seal the project:
Protect your artwork by applying a layer of matte sealer or Mod Podge over the entire outside of the cup.
Stamp Instead of Paint
For a textured look, gently press small heart or star cookie cutters into the wet clay before it dries, then paint inside the impressions later.
Fill your new cup with your favorite colored pencils and enjoy a more organized creative space
Texture Stamp Tiles Using Everyday Objects
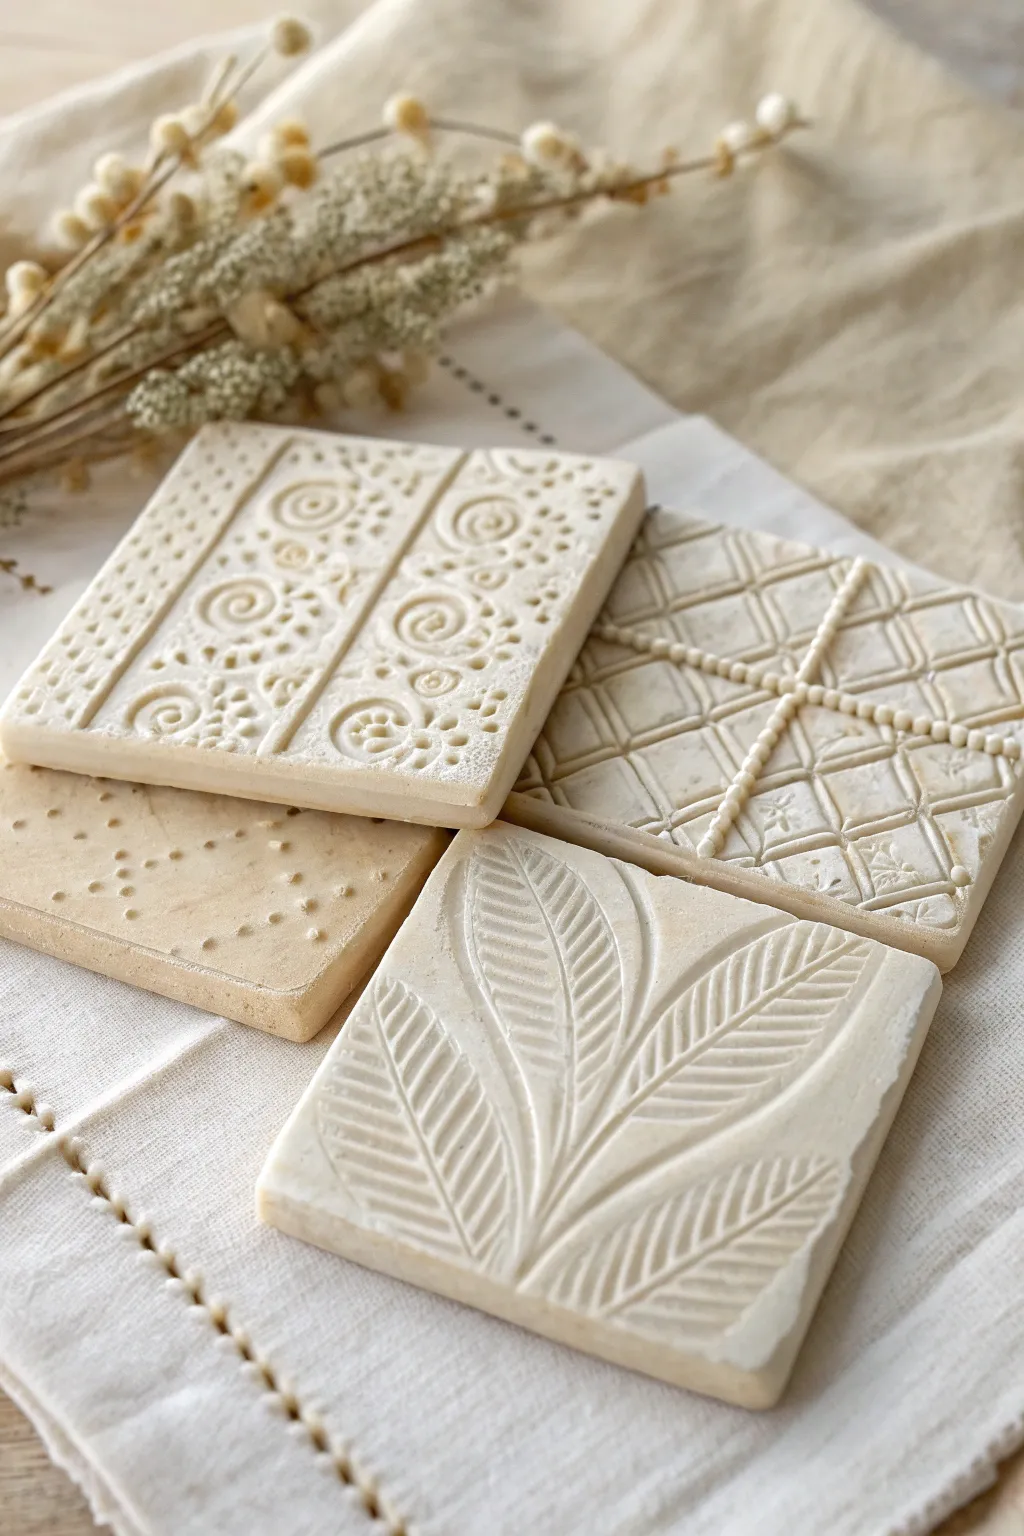
These elegant clay tiles turn simple impressions into sophisticated art, perfect for coasters or decorative accents. By using everyday objects and natural elements, you can create intricate relief patterns that look professionally sculpted but are easy enough for kids to master.
Step-by-Step Tutorial
Materials
- Air-dry clay (white or cream)
- Rolling pin
- Square cookie cutter (approx. 3-4 inches) or a sharp knife and ruler
- Parchment paper or non-stick craft mat
- Texture tools: Lace scraps, buttons, beads, burlap texture mats
- Nature tools: Sturdy leaves with prominent veins, dried flowers
- Everyday tools: Fork, straw, toothpick, mesh bags
- Fine-grit sandpaper
- Acrylic matte sealer or Mod Podge (optional)
Step 1: Preparing the Clay Canvas
-
Condition the Clay:
Begin by taking a handful of air-dry clay and kneading it in your hands until it becomes soft, pliable, and free of cracks. If it feels too separate or dry, dip your fingers in a tiny bit of water and work it in. -
Roll It Out:
Place your clay ball onto a piece of parchment paper to prevent sticking. Use a rolling pin to flatten the clay into an even slab about 1/4 inch thick. Try to keep the thickness consistent so the tiles dry evenly. -
Cut the Squares:
Using a square cookie cutter, press firmly into the slab to cut out your tile shapes. Alternatively, use a ruler and a plastic knife to measure and cut precise squares. Gently peel away the excess clay from the edges. -
Smooth the Edges:
Dip your finger in a little water and gently run it along the cut edges of each square to smooth out any roughness or sharp corners created by the cutter.
Clean Impressions
Does the clay stick to your stamps? Lightly dust your leaves, stamps, or texture tools with a pinch of cornstarch or baby powder before pressing them into the clay.
Step 2: Creating the Textures
-
Design the Leaf Tile:
For the botanical tile, select a leaf with very strong veining. Place it vein-side down onto the clay surface. Gently roll over the leaf with your rolling pin once to press it deep into the clay, then carefully peel it off by the stem to reveal the impression. -
Make the Beaded Grid:
To create the geometric grid tile, lightly score diagonal lines with a dull knife. Where the lines intersect, gently press a small string of beads or a dotted texture tool into the clay to create raised bumps. -
Create Spiral Patterns:
For the spiral design, look for buttons with swirl patterns or use a small coil of wire. Press these repeatedly in rows. Add variety by pressing the tip of a toothpick around the spirals to create tiny dotted accents. -
Add Minimalist Dots:
For the simpler tile, use the rounded end of a paintbrush or a styluses tool. Press gently into the clay in a scattered or linear pattern. I like to vary the pressure here to make some dots deeper than others for visual interest. -
Check for Distortion:
Sometimes pressing hard can warp the square shape. Before setting them aside, gently nudge the sides back into a perfect square if they have spread out.
Step 3: Finishing Touches
-
Let Them Dry:
Place the tiles on a wire rack or leave them on the parchment paper in a cool, dry place. Let them air dry for at least 24-48 hours. Carefully flip them over halfway through the drying process to ensure the bottom dries thoroughly. -
Sand the Roughness:
Once fully hard and white, use a piece of fine-grit sandpaper to gently buff the edges and surface. This removes any stray clay crumbs and gives the piece a professional, polished feel. -
Enhance the Detail (Optional):
If you want the texture to pop, you can brush a very diluted brown or grey paint wash over the tile and immediately wipe the surface with a damp cloth, leaving darker color only in the deep crevices. -
Seal the Work:
To protect your tiles from moisture and handling, apply a thin coat of matte acrylic sealer or Mod Podge. This is especially important if you plan to use them as coasters.
Make Them Hangable
Before the clay dries, use a drinking straw to punch a neat hole near the top corner. Thread with twine or ribbon later for instant ornaments or wall decor.
Enjoy displaying your beautifully textured tiles on a shelf or wrapping them as handmade gifts
Clay Pebble Pets Made From Flattened Ovals
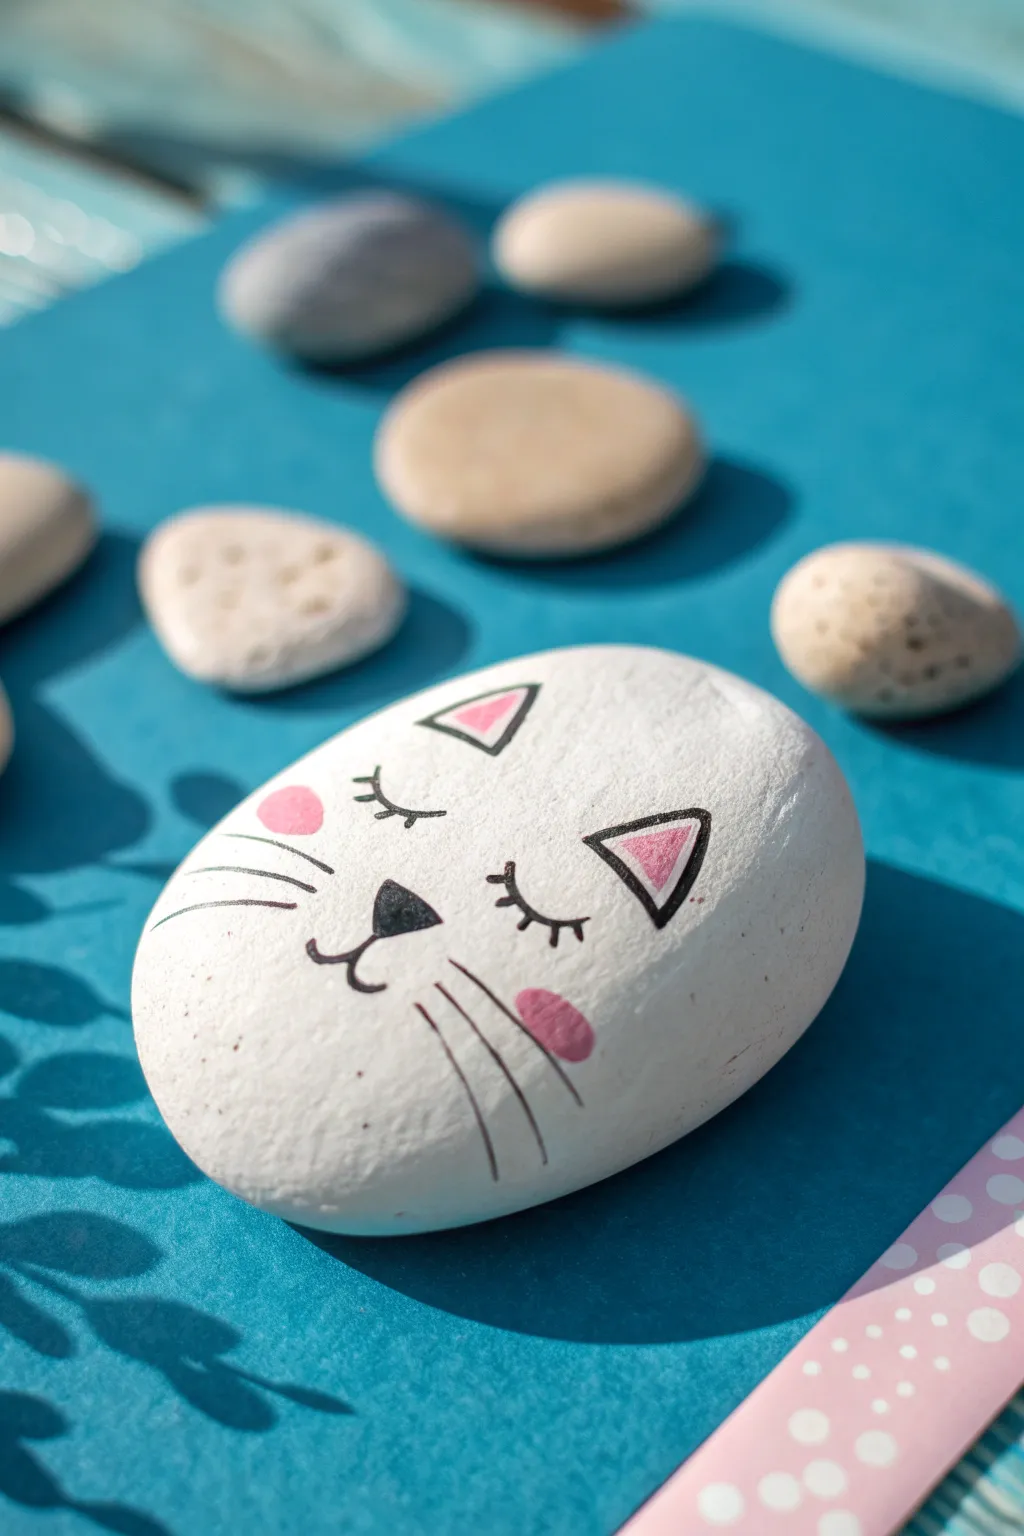
Transform a simple oval shape into a serene sleeping kitten with this charming clay project. The smooth, white finish and minimalist features give this little pet a modern, peaceful look that’s perfect for a desk buddy or garden decoration.
Step-by-Step
Materials
- White or grey air-dry clay (or a smooth river rock)
- White acrylic paint
- Black fine-point permanent marker or paint pen
- Pink acrylic paint or paint marker
- Small paintbrush
- Matte sealant or varnish (optional)
- Small bowl of water
- Sandpaper (fine grit)
Step 1: Shaping the Base
-
Form the clay:
Take a handful of air-dry clay and roll it into a ball between your palms to smooth out any cracks. -
Flatten into an oval:
Gently press the ball onto your work surface using the palm of your hand, shaping it into a smooth, slightly flattened oval that resembles a natural river stone. -
Smooth the edges:
Dip your finger in a tiny bit of water and run it along the edges to round them out perfectly, ensuring there are no sharp corners. -
Let it dry completely:
Set your clay stone aside to dry on a clean surface. Depending on the thickness, this usually takes 24-48 hours. Turn it over halfway through to ensure the bottom dries evenly. -
Sand for smoothness:
Once fully dry, use fine-grit sandpaper to gently buff away any remaining bumps or fingerprints, creating a pristine canvas for your painting.
Use a Pencil First
Sketch the face lightly with a pencil before using permanent marker. This lets you adjust the spacing of the eyes and nose without stress.
Step 2: Creating the White Canvas
-
Apply the base coat:
Paint the entire top surface of the stone with white acrylic paint. Painting in long, smooth strokes helps minimize brush marks. -
Check for coverage:
Let the first coat dry for about 15 minutes. If you can still see the clay color underneath, apply a second coat for a solid, opaque white finish. -
Dry thoroughly:
Allow the white paint to cure completely before moving on to the details. The surface must be bone-dry so your markers don’t bleed.
Family of Cats
Make several stones in different sizes to create a whole family. Paint them grey, orange, or black for variety.
Step 3: Adding the Kitty Face
-
Draw the ears:
Using a fine-point black marker or paint pen, draw two triangles near the top of the oval. The outer lines should be bold, representing the outside of the ears. -
Fill the ears:
Inside each black triangle, paint a smaller pink triangle for the inner ear. I prefer using a very small brush here to keep the edges crisp. -
Sketch the nose:
In the center of the face, slightly lower than the eyes will be, draw a small inverted triangle with your black marker and fill it in completely. -
Create the mouth:
Draw a small vertical line down from the bottom tip of the nose, then curve outward to the left and right to make a sweet ‘w’ shape for the mouth. -
Add sleeping eyes:
Draw two gentle downward curves for the closed eyelids. Place them symmetrically on either side above the nose. -
Add eyelashes:
From each eyelid curve, draw three small flicks pointing outward to serve as long, sleepy eyelashes. -
Draw the whiskers:
On each cheek area, draw three long, sweeping lines extending outward. Try to make these lines quick and confident for a smooth look. -
Blush the cheeks:
Dip a fingertip or a small round sponge dabber into pink paint. Gently press a soft oval of pink onto the cheeks, right over the base of the whiskers. -
Seal the artwork:
Once all paint and ink are fully dry, apply a thin layer of matte varnish to protect your new pet from scratches and dust.
Place your sleeping kitty on a sunny windowsill where it can nap all day long
Fairy House Mini Homes With Simple Details
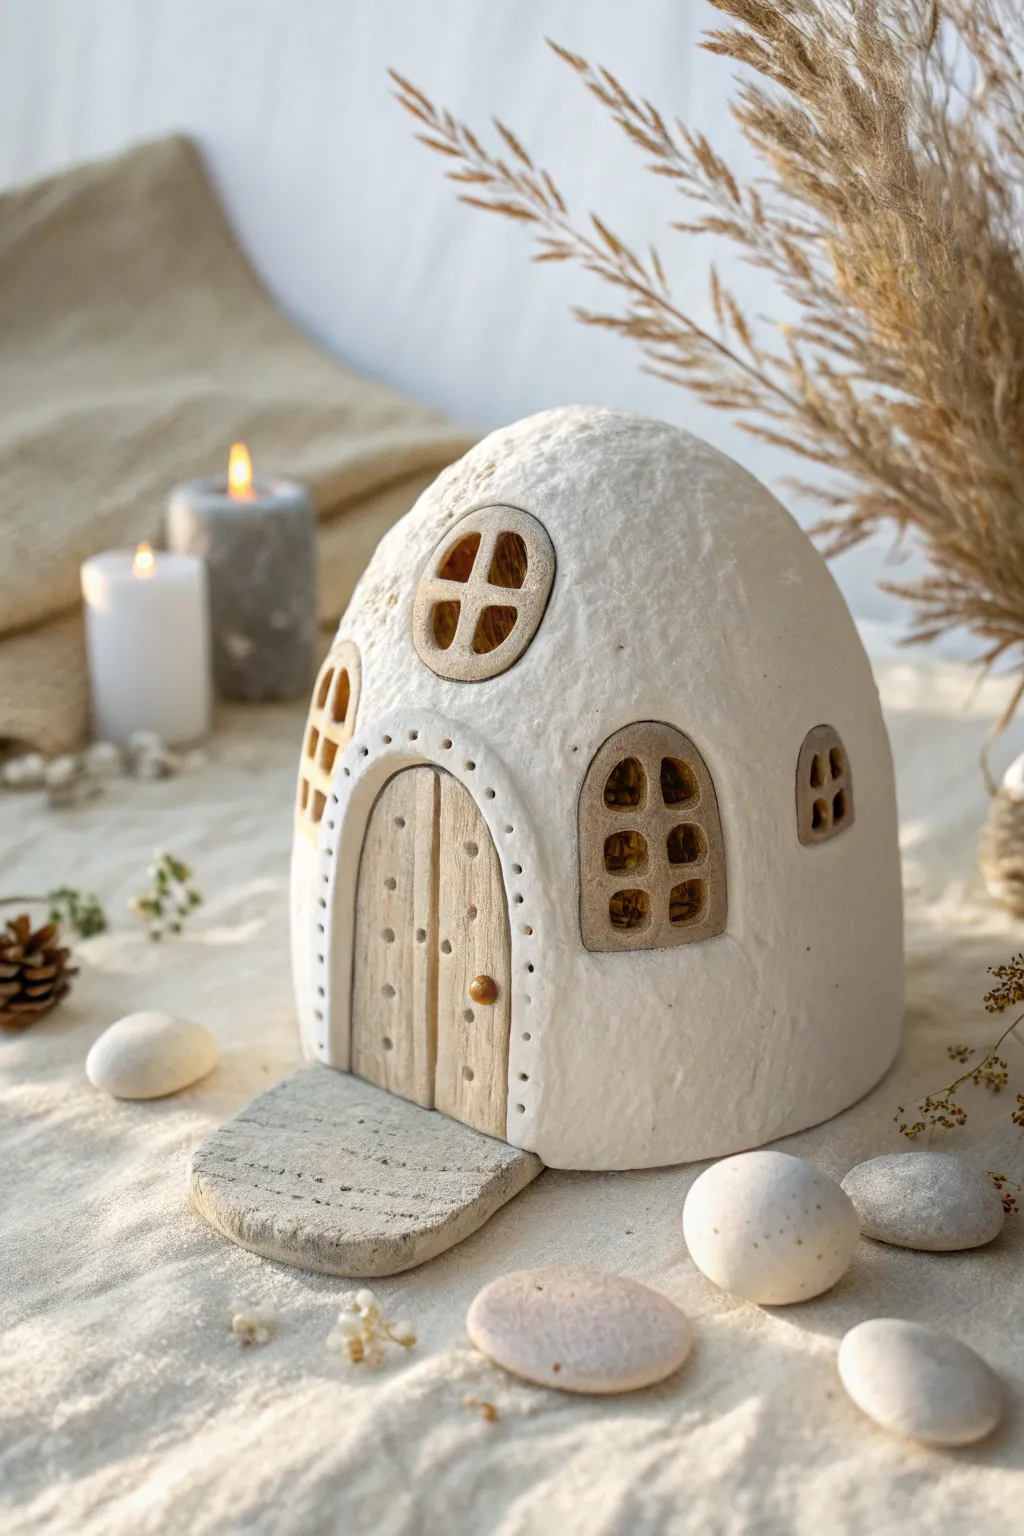
Create a cozy, magical abode for your garden fairies with this charming dome-shaped house. Feauturing rustic wooden details and a textured white finish, this project is perfect for imaginative play and looks beautiful on a shelf.
How-To Guide
Materials
- Air-dry white clay (or polymer clay)
- Wooden sculpting tools (or a butter knife and toothpick)
- Small rolling pin
- Aluminum foil
- Cardboard or sturdy paper (for the structure base)
- Light brown acrylic paint or watercolor
- Small paintbrush
- A smooth, flat stone (for the porch)
- Water in a small cup
- Sponge or textured cloth
Step 1: Building the Dome Structure
-
Create the core form:
To save clay and make the house lighter, crumple aluminum foil into a large ball. Flatten the bottom so it sits stable, then gently mold the top into a rounded dome shape. -
Prepare the clay:
Take a large chunk of your white clay and knead it in your hands until it is soft and pliable. If it feels too dry, dip your fingers in a tiny bit of water. -
Roll out a slab:
Using your rolling pin, flatten the clay into a large, even pancake. It should be about a quarter-inch thick—not too thin, or it might crack. -
Cover the form:
Drape your clay pancake over the foil dome. Gently press it down to conform to the shape, trimming away any excess clay at the bottom with a plastic knife. -
Add texture:
Instead of smoothing the clay perfectly, dab the surface gently with a damp sponge or a crumpled cloth. This gives it that lovely, stucco-like cottage wall look.
Texture Tip
Work a tiny bit of sand into the white clay before rolling it out. This creates an authentic, gritty stone texture automatically as you sculpt.
Step 2: Crafting the Windows and Door
-
Outline openings:
Use a toothpick to lightly trace where you want your door and windows to go. I find sketching it directly on the clay helps with spacing. -
Make the door frame:
Roll a thin snake of clay and press it around your door outline to create an arched frame. Use a tool to poke small indentations along this frame for a decorative dotted pattern. -
Sculpt the door planks:
Take a small slab of clay shaped like the door arch. Use a knife tool to score vertical lines, making it look like wooden planks. Press a tiny ball of clay on one side for a doorknob. -
Attach the door:
Score the back of your door piece and the space on the house where it will sit. Add a drop of water (slip) and press the door firmly into place inside the frame. -
Create window frames:
Roll out small, flat ovals or circles of clay for the windows. Use a tool to cut out the inner sections, leaving a ‘cross’ shape for the panes, or simply press deep indentations to simulate depth. -
Attach windows:
Attach the window frames to the dome using the score-and-slip method. You can place a round one near the top and arched ones on the sides.
Light it Up
Cut actual holes through the clay and foil for the windows. Once dry, remove the foil interior and place a battery-operated tea light inside for a glow.
Step 3: Finishing Touches and Assembly
-
Add the porch:
Find a flat, smooth stone or sculpt a flat slab of grey clay. Position it directly in front of the door to serve as the entrance step. -
Let it dry:
Allow the clay to dry completely according to the package instructions. This usually takes 24 to 48 hours for air-dry clay. -
Painting the wood:
Once dry, use a small brush to paint the door and window frames with a light brown wash. Watering down the paint slightly helps it settle into the grooves, emphasizing the ‘wood’ texture. -
Highlight the doorknob:
Paint the tiny doorknob a slightly darker brown or gold to make it pop against the wood door. Let everything dry completely.
Now your little fairy cottage is ready to welcome its magical new residents into a peaceful, whimsical home.
Dinosaur Fossil Stones With Easy Imprints

Create your own mini museum exhibit with this incredibly realistic fossil stone project. Using simple air-dry clay and a clever stamping technique, you’ll make a smooth, ancient-looking rock featuring a distinct, dark dinosaur track that looks freshly discovered.
Step-by-Step
Materials
- White or beige air-dry clay
- Acrylic paint (black or dark brown)
- Acrylic paint (stone grey or tan – optional for tinting)
- Small toy dinosaur with distinct feet (or a rubber animal stamp)
- Fine grit sandpaper
- Matte finish sealant spray or Mod Podge
- Sponge or foam brush
- Assorted smooth river stones (optional, for shape reference)
- Water in a small cup
Step 1: Shaping the Stone
-
Prepare the Clay:
Start with a handful of air-dry clay roughly the size of a tangerine. Knead it in your warm hands until it becomes soft, pliable, and free of cracks. -
Form a Sphere:
Roll the clay between your palms to create a smooth, tight ball. Aim for a seamless surface. -
Flatten the Shape:
Gently press the ball down against your work surface to create a flattened disc. It shouldn’t be pancake-thin; keep it about 1 inch thick to resemble a hefty river rock. -
Smooth the Edges:
Dip your finger in a little water and run it along the edges and surface of the clay to smooth out any small wrinkles or fingerprints. I find this water-smoothing step crucial for that polished river-stone look. -
Dry Completely:
Set your clay stone in a warm, dry spot. Depending on your clay brand and humidity, let it dry for 24-48 hours until it is hard and chalky to the touch. -
Sand for Perfection:
Once fully dry, take a piece of fine-grit sandpaper and gently sand the entire surface of the stone. Focus on making the top face as smooth as glass.
Step 2: Creating the Fossil Imprint
-
Select Your Stamp:
Choose a toy dinosaur foot that has clearly defined toes and claws. If you don’t have a toy, you can carve a simple paw shape into a raw potato or use a rubber stamp. -
Prepare the Paint:
Squeeze a small amount of black or dark brown acrylic paint onto a palette or scrap paper. A dark, contrasting color works best to make the ‘fossil’ pop. -
Load the Stamp:
Using a sponge or foam brush, dab a thin, even layer of paint onto the bottom of the toy foot. Avoid globs of paint, as they will smear the detail. -
Test the Print:
Press the painted foot onto a scrap piece of paper first. This ensures you have the right amount of paint and gives you a feel for the pressure needed. -
Stamp the Stone:
Position the foot carefully over the center of your smooth clay stone. Press down firmly and lift specifically straight up to avoid smudging the track. -
Add Texture (Optional):
If the print looks too perfect, you can lightly dab a dry, stiff paintbrush over the wet paint to give it a speckled, gritty texture. -
Dry the Paint:
Allow the painted footprint to dry completely, which should only take about 15-20 minutes.
Natural Stone Look
Mix a tiny pinch of sand or coffee grounds into the clay while kneading. This adds speckles and texture that mimic real sedimentary rock.
Step 3: Finishing Touches
-
Tinting the Stone (Optional):
If your white clay looks too bright, mix a very watery wash of tan or grey paint. Brush it over the whole stone and immediately wipe it off with a paper towel, leaving subtle color in the pores. -
Seal the Artifact:
Apply a coat of matte sealant or matte Mod Podge over the entire stone. This protects the paint and gives the clay a finish that feels more like real rock and less like chalk.
Double Sided Discovery
Make a matching ‘negative’ imprint! Press the toy foot deep into wet clay to make an indentation, then stamp the painted version on the other side.
Place your finished fossil stones in the garden or on a shelf to spark curiosity about the prehistoric world
Marbled Beads for Kid-Made Bracelets
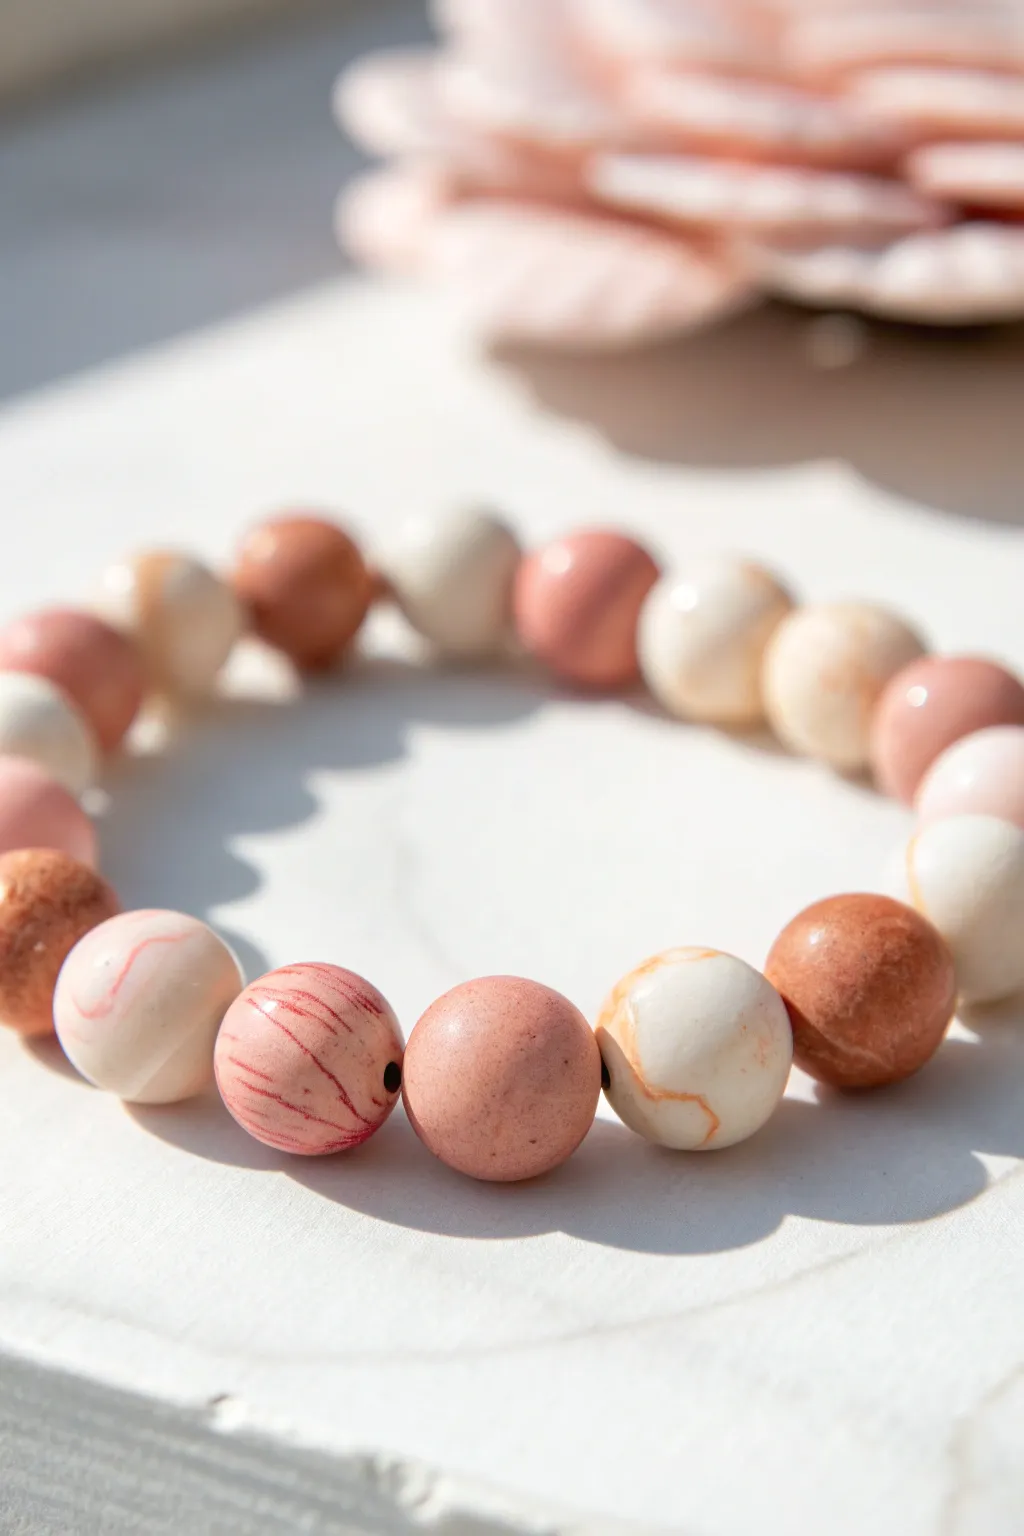
These beautiful beads look like polished stones but are actually made from simple clay techniques. By mixing soft pinks, warm terra cotta, and cream, you can create a sophisticated marbled effect that feels both earthy and elegant.
Detailed Instructions
Materials
- Polymer clay (white, peach/light pink, terra cotta/rust)
- Small bead roller (optional, but helpful for uniformity)
- Toothpicks or a bead piercer tool
- Parchment paper or a dedicated clay baking tile
- Elastic jewelry cord
- Scissors
Step 1: Preparing Your Clay Colors
-
Condition the clay:
Start by warming up each block of clay in your hands. Knead the white, peach, and terra cotta clays separately until they are soft, pliable, and easy to shape. -
Create base logs:
Roll each color into a thin ‘snake’ or log about the thickness of a pencil. You want equal lengths of each color if you aim for a balanced mix, or vary the amounts for dominant colors. -
Plan your combinations:
Decide on your bead styles. The bracelet in the photo uses three types: solid colors, subtle two-tone marbles, and three-color blends. Separate your clay logs accordingly.
Muddy Colors?
Stop mixing sooner! The biggest mistake is over-rolling. Twist and fold only 2-3 times maximum. You want distinct streaks, not a new blended color.
Step 2: Creating the Marbled Effect
-
Twist the colors:
For the marbled beads, take a strand of white and a strand of terra cotta (or peach). Twist them together like a candy cane. -
Fold and roll:
Fold the twisted rope in half and roll it smooth again. Repeat this folding and rolling process just 2 or 3 times. Be careful not to over-mix, or the colors will turn muddy instead of distinct swirls. -
Form the solid beads:
For the solid-colored beads like the speckled pink ones, simply roll a small ball of just that single color clay. -
Portion the clay:
Cut your marbled log into equal-sized segments. Each segment will become one bead. Keeping the cuts consistent helps ensure all your beads are the same size.
Step 3: Shaping and Piercing
-
Roll into spheres:
Take a segment and roll it between your palms in a circular motion. I usually apply gentle pressure initially and then lighten my touch to smooth out fingerprints until it’s a perfect sphere. -
Check for smoothness:
Inspect the bead for any air bubbles or cracks. Gently smooth these out with your finger. If using a bead roller, place the clay inside and slide the top back and forth for uniformity. -
Pierce the hole:
Hold a bead gently without squishing it. Using a toothpick or piercing tool, slowly drill a hole through the center. A twisting motion works better than pushing straight through to avoid deforming the sphere. -
Refine the shape:
The bead might get slightly oval during piercing. Give it a gentle roll between your fingers once more while the toothpick is still inside to restore its round shape.
Fingerprint Free
Chill the shaped raw beads in the fridge for 10 minutes before piercing. The firmer clay holds its shape better and resists fingerprints.
Step 4: Baking and Assembly
-
Arrange for baking:
Place your pierced beads on parchment paper or a baking tile. Make sure they aren’t touching each other so they don’t fuse together. -
Bake the beads:
Bake according to your clay manufacturer’s instructions (usually around 275°F or 135°C for 15-30 minutes). Let them cool completely before handling. -
String the bracelet:
Cut a piece of elastic cord slightly longer than your wrist size. Thread your cooled beads onto the cord, alternating between solid, marbled, and speckled designs for visual interest. -
Tie the knot:
Tie a secure surgeon’s double knot with the elastic. Pull tight to secure it, and trim the excess string. You can tuck the knot inside one of the bead holes to hide it.
Now you have a stunning, custom-patterned bracelet that looks like it came from a boutique
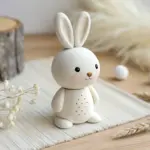
Animal Finger Puppets From Tiny Tubes
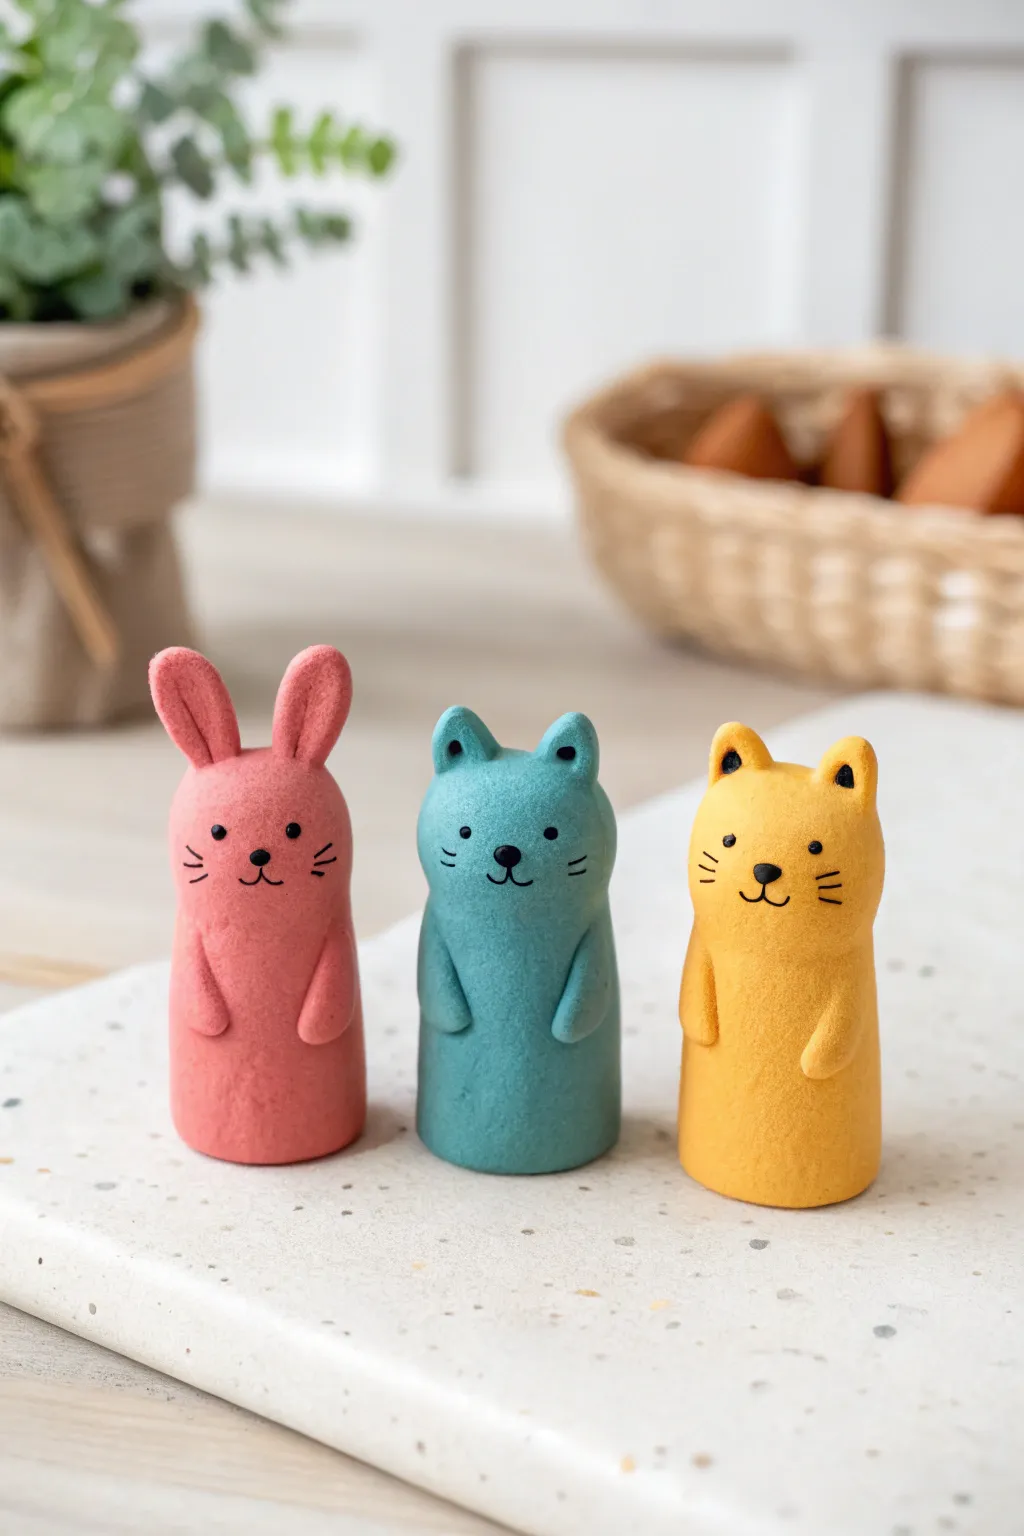
Transform simple clay cylinders into adorable woodland friends with this easy finger puppet project. The result is a set of textured, matte-finish characters—a pink bunny, a blue bear, and a yellow cat—perfect for imaginative play.
How-To Guide
Materials
- Polymer clay or air-dry clay (Pink, Teal Blue, Yellow, Black)
- Small rolling pin
- Modeling tools (or a toothpick)
- Small dotting tool
- Craft knife or plastic clay knife
- Optional: Cardboard tube or thick marker (to use as a form)
- Baking sheet and parchment paper (if using polymer clay)
Step 1: Forming the Base
-
Prepare the clay:
Start by conditioning your three main colors of clay—pink, teal, and yellow—kneading them until they are soft and pliable. -
Roll the cylinders:
Take a walnut-sized ball of the pink clay and roll it into a thick log shape. Gently flatten the bottom so it stands upright on your work surface. -
Create the hollow:
To make them into finger puppets, gently push your pinky finger or a thick market cap into the base of the cylinder to create a hollow space. Reshape the outside as you go to keep the walls even. -
Smooth the surface:
Roll the cylinder gently on the table again to smooth out any fingerprints. Repeat this process for the teal and yellow clay balls so you have three uniform standing tubes.
Pro Tip: Velvet Finish
Gently stippling the wet clay with a stiff toothbrush creates the soft, matte texture shown in the photo.
Step 2: Sculpting the Features
-
Form the bunny ears:
For the pink bunny, roll two small logs of pink clay. Flatten them slightly into long ovals and press them firmly onto the top of the pink cylinder. -
Blend the ears:
Use a modeling tool or your finger to smooth the seam where the ears meet the head, ensuring they are securely attached. -
Create bear ears:
For the blue figure, make two small balls of teal clay. Press them onto the top corners of the head and use a small loop tool or the back of a paintbrush to make a tiny indentation in the center of each ear. -
Add cat ears:
For the yellow cat, shape two small triangles of yellow clay. Attach these pointed ears to the top of the yellow cylinder. -
Attach the arms:
For each animal, roll two small, elongated teardrops of their respective body color. Press these vertically onto the sides of the body, just below the halfway point, blending the top edge so it looks seamless.
Step 3: Adding the Details
-
Make the noses:
Roll three tiny specks of black clay into balls. Press one firmly into the center of each face to create a cute button nose. -
Create the eyes:
I find using a dotting tool works best here; dip it into black paint or use tiny balls of black clay to place the eyes evenly on either side of the nose. -
Draw the mouth:
Roll an incredibly thin thread of black clay. Cut two tiny curved pieces and place them under the nose to form a ‘w’ shape for the mouth. Alternatively, you can paint this on after drying. -
Add whiskers:
Using the same thin black clay technique or a fine-tip marker later, add three short whiskers to each cheek of the animals. -
Texture the surface:
To achieve that soft, felt-like look seen in the photo, gently tap the surface of the clay with a clean, stiff-bristled toothbrush before baking or drying. -
Final touches:
Add tiny black triangles inside the yellow cat’s ears or small black dots inside the blue bear’s ears for extra dimension. -
Finish the project:
If using polymer clay, bake according to the package instructions (usually 275°F/135°C for 15-30 minutes). If using air-dry clay, let them sit undisturbed for 24-48 hours until fully hardened.
Level Up: Mix & Match
Create removable accessories like tiny scarves, hats, or glasses to swap between your characters for more play value.
Now your colorful trio is ready for a puppet show or to sit cheerfully on your desk
Small World Figures for Pretend Play Scenes
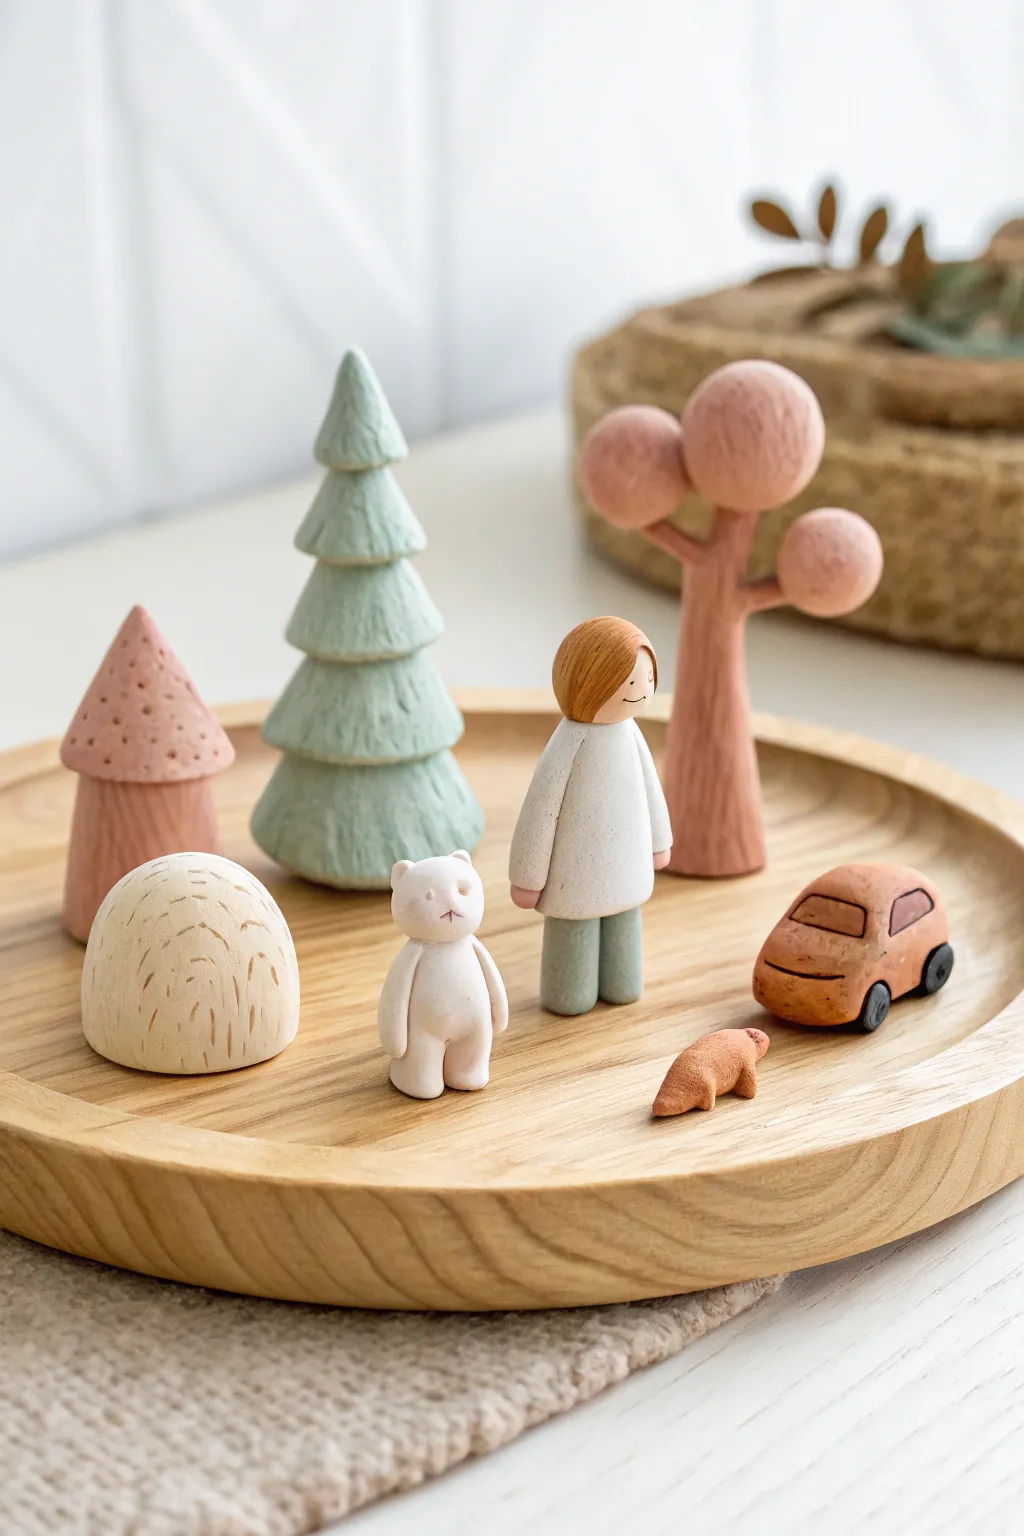
These charming, minimalist figures create a self-contained world perfect for imaginative play or sweet shelf decor. Using soft pastel tones and simple geometric shapes, this project captures the essence of a serene forest adventures with a handcrafted, matte finish.
Step-by-Step Guide
Materials
- Polymer clay (white, beige, terracotta, sage green, light pink)
- Small rolling pin
- Clay sculpting tools (needle tool, ball stylus)
- Hobby knife or plastic clay knife
- Baking sheet and parchment paper
- Oven (for baking polymer clay)
- Fine-grit sandpaper (optional)
- Matte varnish (optional)
Step 1: Shaping the Characters
-
Form the person’s body:
Roll a smooth cylinder of white clay for the torso, tapering it slightly at the top. For the legs, create two smaller cylinders of sage green clay and press them firmly onto the bottom of the white torso. -
Add the head and hair:
Roll a small ball of beige clay for the head. Attach it to the torso. Flatten a small pancake of terracotta clay for the hair, draping it over the head and smoothing the seams so it looks like a bob cut. -
Sculpt arms and face:
Roll two thin white snakes for arms and attach them to the sides of the body. Use a needle tool or the edge of a card to gently press a simple curved smile into the face. -
create the standing bear:
Form a plump, pear-shaped piece of white clay for the bear’s body. Add a smaller sphere on top for the head. -
Detail the bear:
Attach two tiny flattened balls for ears. Roll two sausage shapes for arms and press them to the sides. Use a needle tool to etch a tiny ‘x’ for the nose and mouth. -
Make the tiny crawler:
Roll a very small piece of terracotta clay into a bean shape. Pinch one end slightly for a head and add tiny legs if desired, though a simple abstract shape works well here.
Sticky Situation?
If your clay gets too soft and sticky while handling, stick it in the fridge for 10 minutes. A firmer clay holds detail better, especially when sculpting the tree textures.
Step 2: Building the Forest & Car
-
Construct the fir tree:
Create a central cone of green clay. Then, create three or four graduated ruffled discs of green clay. Stack these discs onto the cone, smoothing them downwards to create tiered branches. -
Texture the fir tree:
Use a needle tool or toothpick to scratch vertical lines all over the green tiers, giving it a rough, pine-needle texture. -
Form the deciduous tree:
Roll a thick snake of pinkish-brown clay for the trunk, splitting the top into two branches. Roll three balls of pink clay and press them onto the branch ends to form the foliage clusters. -
Shape the mushroom house:
Create a thick cylinder of pinkish-brown clay for the base. Form a cone of lighter pink clay for the roof. Use a ball stylus to press varied dots into the roof for texture. -
Create the bush/rock:
Roll a beige ball and flatten the bottom to make a dome. Use a knife to make small, random vertical dashes all over the surface for a grassy texture. -
Model the car body:
Shape a block of terracotta clay into a car shape, rounding all the edges so it looks soft and toy-like. I like to press the roof down slightly to define the hood. -
Add car details:
Use a tool to impress outlines for windows on the sides and front. Roll four tiny black or dark grey discs and attach them as wheels, pressing the center of each with a tool to secure them.
Step 3: Finishing Touches
-
Pre-bake inspection:
Check all connection points. If the clay feels dry, you can use a tiny drop of liquid clay or water (depending on clay type) to bond limbs and heads securely. -
Bake the batch:
Place all figures on a parchment-lined baking sheet. Bake according to your polymer clay package instructions—usually around 275°F (130°C) for 15-30 minutes. -
Cool and smooth:
Let the pieces cool completely on the tray. If there are any fingerprints, gently buff them away with fine-grit sandpaper. -
Seal (Optional):
For extra durability during play, brush on a coat of matte varnish. Avoid glossy finishes to maintain the natural, wooden toy aesthetic.
Make It a Playset
Create a fabric storage bag that unzips into a circular play mat painted with roads and grass green patches, making this a perfect portable travel toy for restaurants.
Arranging your finished figures on a wooden tray completes the charming, small-world aesthetic
Galaxy Planets With Splatter-Paint Magic
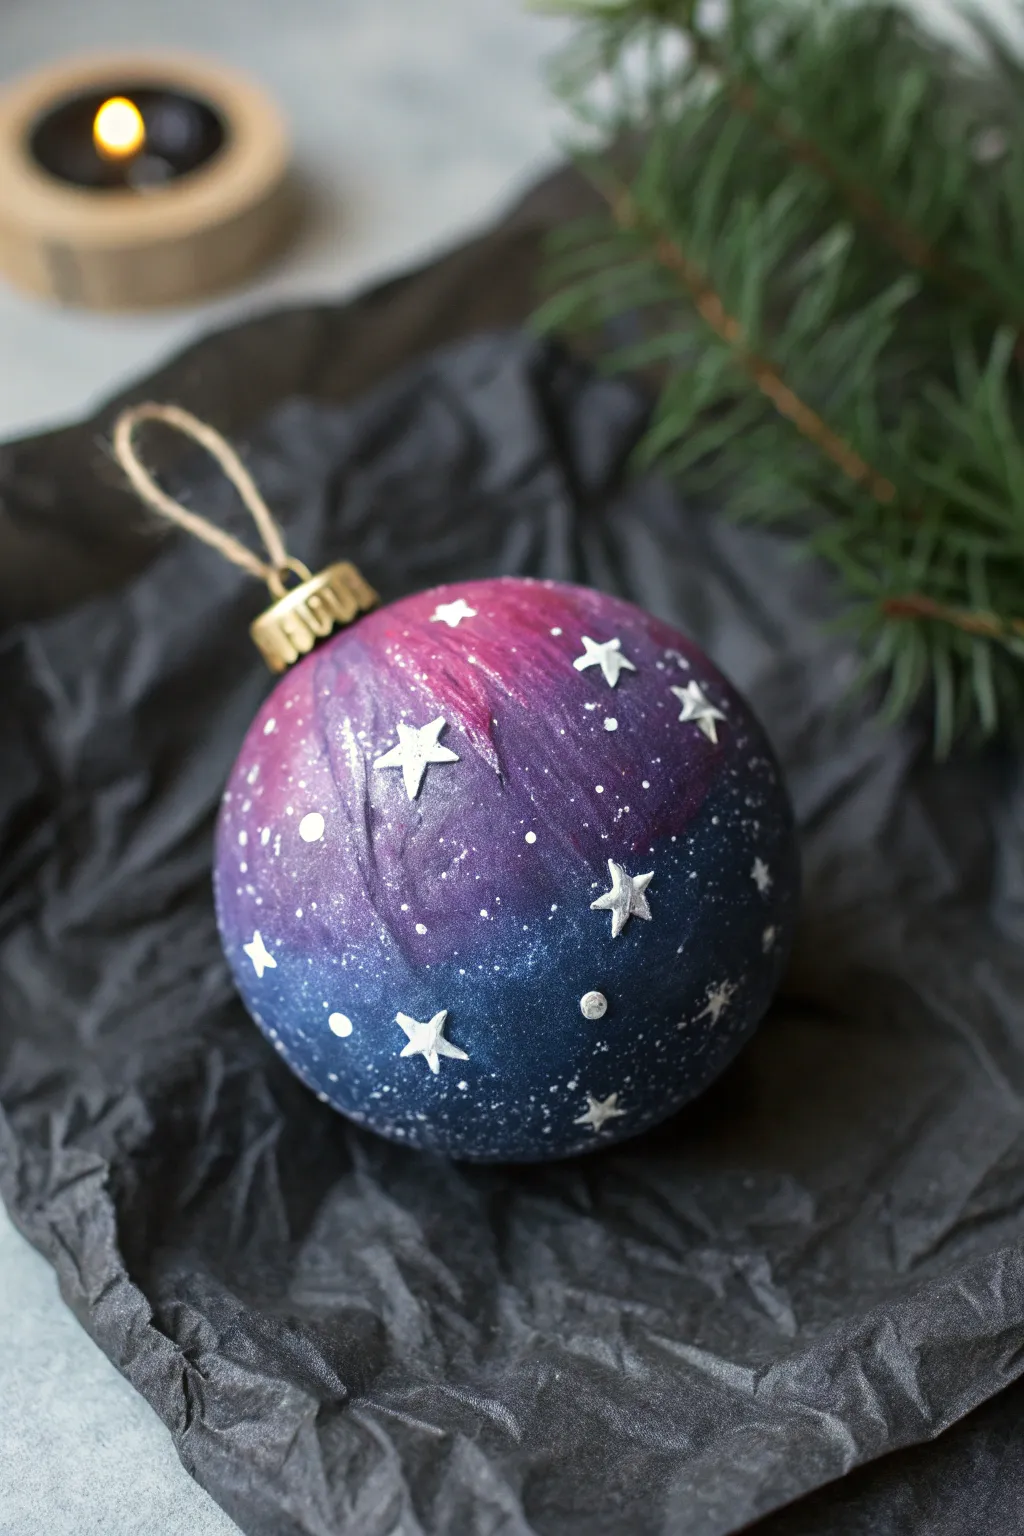
Transform a simple sphere into a mesmerizing piece of the universe with swirling purples, deep blues, and shimmering stars. This galaxy-inspired ornament uses blended acrylics and splatter techniques to create a stunning, starry night sky effect that looks beautiful on any tree.
Detailed Instructions
Materials
- Lightweight air-dry clay (white)
- Styrofoam ball (approx. 3-inch diameter)
- Acrylic paints (dark blue, purple, pink, black, white)
- Paintbrushes (flat brush and old toothbrush)
- Small star-shaped clay cutters or a craft knife
- Gold or silver crafting wire or a pre-made ornament cap
- Twine or ribbon for hanging
- Rolling pin
- Water cup
- Palette or paper plate
- Varnish or gloss glaze (optional)
Step 1: Creating the Base
-
Prepare the Clay:
Start by taking a handful of white air-dry clay and kneading it until it is soft and pliable. If the clay feels dry, you can dip your fingers in water to rehydrate it slightly. -
Roll it Out:
Using a rolling pin, flatten the clay into a thin, even sheet. You want it to be roughly 1/8th of an inch thick—thick enough to not tear, but thin enough to not make the ornament too heavy. -
Wrap the Sphere:
Place your styrofoam ball in the center of the clay sheet. Gently wrap the clay up and around the ball, smoothing it as you go. -
Smooth the Seams:
Where the clay edges meet, pinch them together and trim off the excess with scissors or a craft knife. Dip your finger in water and rub the seam until it disappears and the surface feels relatively smooth. -
Add Texture (Optional):
Don’t worry if the surface isn’t perfectly glass-smooth. A few slight ripples or fingerprints actually add to the textured, dimensional look of a nebula once painted. -
Insert the Hanger:
Before the clay dries, press a pre-made ornament cap into the top, or form a small loop with wire and push the ends deep into the clay/styrofoam core. -
Drying Time:
Set the ball aside to dry completely. This usually takes 24 hours depending on humidity. Rotate it occasionally so the bottom creates a flat spot.
Step 2: Painting the Galaxy
-
Base Coat:
Once dry, paint the entire sphere with a deep midnight blue or a mix of blue and black acrylic paint. Let this base layer dry for about 15 minutes. -
Sponging the Nebula:
Squeeze out small amounts of purple, pink, and lighter blue paint. Using a small sponge or a dry brush, dab patches of purple randomly across the surface. -
Adding Depth:
While the purple is still slightly wet, layer bits of pink or magenta into the center of the purple clouds to create a glowing effect. I find blending the edges with a clean, slightly damp brush makes the transition softer. -
Highlighting:
Add tiny hints of white or light blue into the brightest parts of your nebula swirls to make them pop against the dark background. -
Splatter Stars:
Dilute a small amount of white paint with water until it’s milky. Dip an old toothbrush into it, point the bristles at the ornament, and run your thumb across them to spray tiny white specks over the galaxy.
Pro Tip: Nebula Effect
Use a piece of torn kitchen sponge instead of a brush for the purple and pink layers. The sponge texture naturally creates soft, cloud-like blends that look just like deep space gas clouds.
Step 3: Finishing Touches
-
Make Clay Stars:
Roll out a tiny scrap of leftover clay very thinly. Use small star cutters (or cut jagged shapes by hand) to create several 3D stars. -
Paint the Stars:
Paint these tiny stars white or silver. Let them dry on your work surface for a few minutes. -
Attach the Stars:
Use a dab of white glue or tacky glue to adhere the clay stars onto the finished painted ornament. -
Add Polka Dots:
For extra detail, use the handle end of a paintbrush dipped in white paint to create larger, round ‘planet’ dots scattered among the splattered stars. -
Seal the Deal:
Once all paint is completely dry, apply a coat of gloss varnish to protect the paint and give your planet a shiny, glass-like finish. -
String it Up:
Thread a piece of rustic twine or festive ribbon through the wire loop or cap to complete your galactic creation.
Troubleshooting: Cracks?
If small cracks appear as the clay dries over the styrofoam, don’t panic! Mix a tiny bit of fresh clay with water to make a paste and fill the cracks, then smooth it over with your finger.
Now you have a captured piece of the cosmos ready to hang and admire