Whenever I’m teaching kids, I’m always amazed at how a little lump of clay turns into instant confidence and big laughs. Here are my go-to fun clay ideas for kids that feel easy to start, colorful to finish, and actually exciting to play with or display afterward.
Animal Pinch Pot Critters
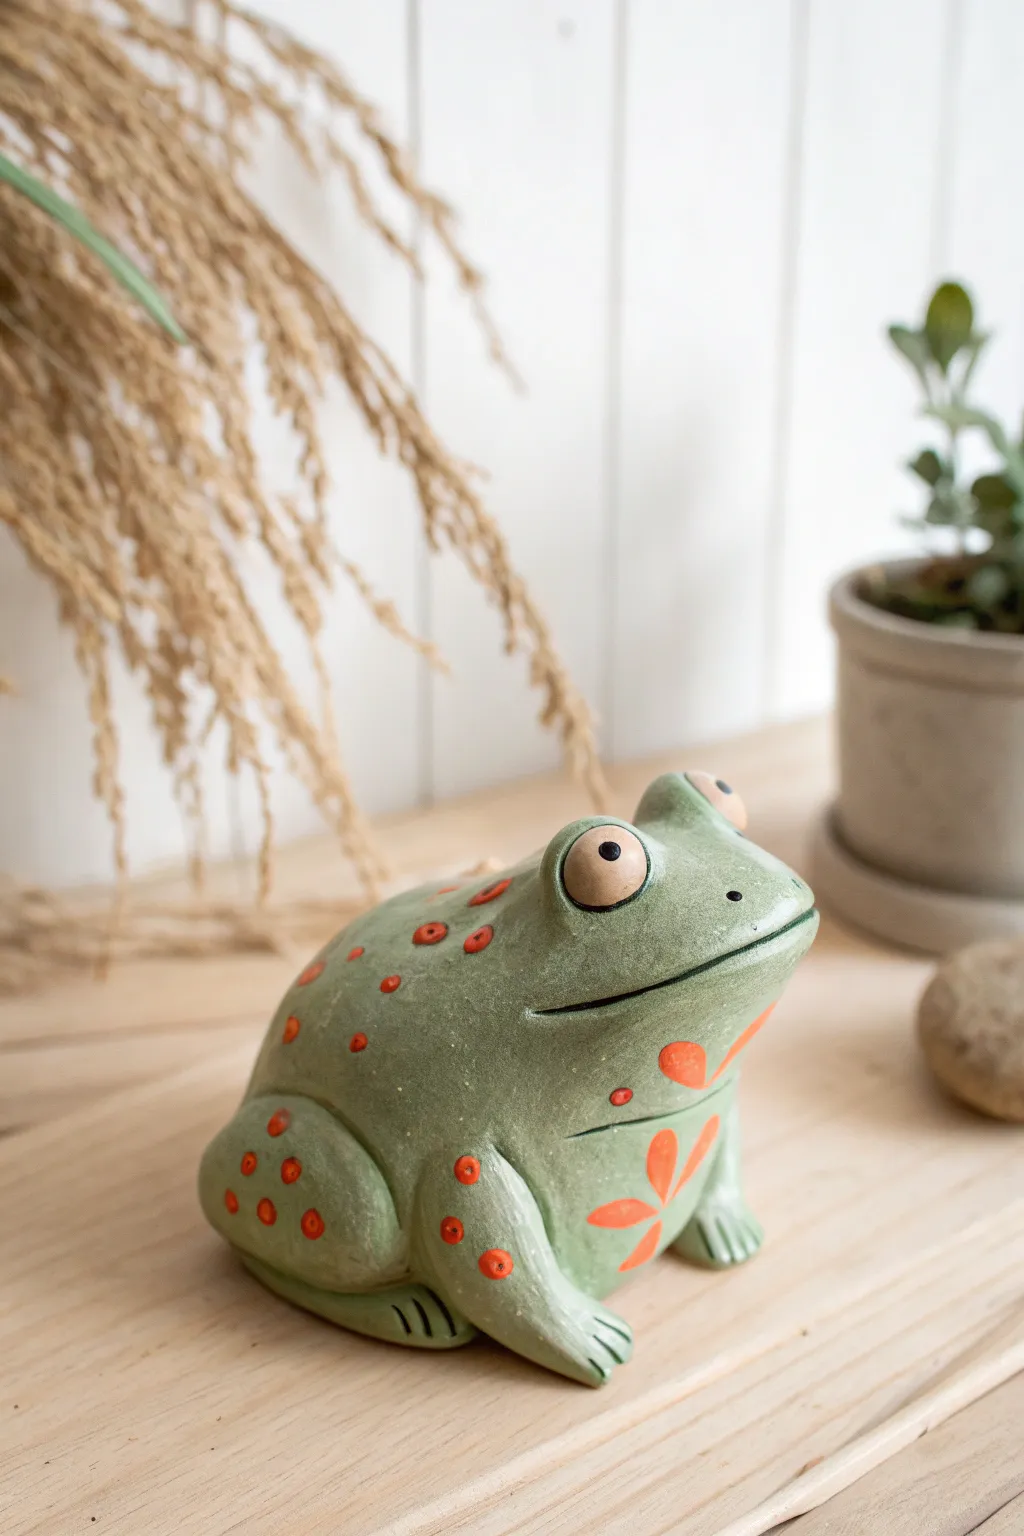
Transform a simple pinch pot into a charming, wide-eyed frog friend perfect for sitting on a shelf. With its earthy green finish and bright orange geometric spots, this little amphibian brings a touch of nature indoors.
Step-by-Step Guide
Materials
- Air-dry clay or polymer clay (white or grey base)
- Clay carving tools or a wooden skewer
- Sponge and water bowl
- Acrylic paints (Sage green, warm orange, white, black)
- Small paintbrush and medium flat brush
- Matte or satin varnish
- Rolling pin (optional)
Step 1: Forming the Body
-
Create the base:
Start with a ball of clay roughly the size of a tennis ball. Press your thumb into the center to create an opening, pinching and turning to form a uniform pinch pot. Turn it upside down so the opening faces the table; this dome shape is your frog’s body. -
Shape the head:
Gently gently squeeze the front part of the dome to make it slightly narrower and more raised than the back, suggesting a head shape. Smooth out any cracks with a damp sponge. -
Add the hind legs:
Roll two thick, sausage-shapes of clay. Curve them into ‘C’ shapes and attach them firmly to the rear sides of the body using the score-and-slip method (scratching both surfaces and adding a bit of water). Blend the seams until smooth so they look like hunched frog legs. -
Form the front legs:
Create two shorter, slightly tapered legs. Attach these to the front of the chest area, angling them slightly outward. Flatten the ends slightly to prepare for toes. -
Sculpt the toes:
Use a carving tool or dull knife to press identifying lines into the ends of the front and back legs, creating three distinct toes on each foot. -
Attach the eyes:
Roll two small spheres of clay. Place them high on the head, spacing them apart but keeping them forward-facing. Blend the clay at the bottom of the spheres into the head so they don’t pop off later. -
Carve the mouth:
Use a sharp tool or the edge of a credit card to press a wide, sweeping smile line across the face, extending almost cheek to cheek. Make the corners curve up slightly.
Cracks while smoothing?
If the clay starts cracking while you shape the legs, dip your finger in water (or vinegar for stubborn clay) and smooth it over the fissure immediately.
Step 2: Drying and Painting
-
Let it dry:
Allow your frog to dry completely. For air-dry clay, this usually takes 24-48 hours depending on humidity. It should be light in color and hard to the touch. -
The base coat:
Paint the entire frog with a sage or mossy green acrylic paint. Apply it somewhat thinly so it looks like a glaze; I find this gives it that nice textured ceramic look. Let this layer dry. -
Add the eye details:
Paint the protruding eyeballs a creamy beige or off-white. Once dry, use a fine-tip brush or a dotting tool to add a solid black pupil in the center of each eye. -
Paint the spots:
Using a bright, warm orange paint, add small circular spots across the back and top of the head. Vary the sizes slightly for a natural look. -
Create the flower motif:
On the frog’s chest, right between the front legs, paint a large, stylized flower or starburst shape using the same orange paint. Use teardrop shapes radiating from a center point. -
Highlight the dots:
To make the spots pop and look slightly raised like ceramics, add a tiny dot of a darker orange or red in the very center of each back spot. -
Antiquing (optional):
If you want a weather-worn look, lightly brush a very watered-down grey or brown paint into the crevices (like the mouth and toes) and wipe away the excess immediately with a paper towel. -
Seal the piece:
Once all paint is completely dry, coat your frog with a matte or satin varnish to protect the finish and give it a professional sheen.
Pro Tip: Eye Placement
Don’t put the eyes right on top of the head; place them slightly forward on the slope of the forehead. This makes the frog look curious rather than startled.
Find a nice sunny spot on a shelf for your new amphibian friend to sit


Mini Food Pretend Play Set

Create a mouth-watering spread of miniature foods perfect for pretend play or simply as adorable decor. This project uses polymer or air-dry clay to sculpt realistic-looking treats, from a sprinkle-topped donut to a tiny taco loaded with fixings.
Step-by-Step Tutorial
Materials
- Polymer clay (tan, pink, yellow, red, green, white, blue)
- Clay sculpting tools (needle tool, ball tool)
- Small rolling pin
- Soft pastel chalks (browns, oranges) for shading
- Small paintbrush
- Liquid clay or strong craft glue
- Gloss glaze (optional)
- Small cardboard circle (for the fries cup)
- Kraft paper
- Toothbrush (for texturing)
Step 1: Sculpting the Taco
-
Make the shell:
Roll a ball of yellow-tan clay into a flat circle about 2 inches wide. Gently fold it in half without creasing the bottom to create a U-shape taco shell. -
Texture the shell:
Before the shell hardens or cures, lightly dab the surface with a clean toothbrush to mimic the texture of a fried corn tortilla. -
Prepare the filling:
Roll a rough cylinder of dark brown clay for the meat base and place it inside the shell to hold the shape. -
Add toppings:
Create tiny irregular shapes from green clay for lettuce, small red cubes for tomatoes, and yellow shreds for cheese. Use tweezers to arrange them generously inside the shell.
Step 2: Crafting the Donut & Cupcake
-
Form the donut base:
Roll tan clay into a thick snake and join the ends to form a ring. Smooth the seam completely with your finger until it disappears. -
Add the frosting:
Flatten a small piece of pink clay into a wavy, irregular circle. Drape it over the donut, pressing gently so it looks like it was dipped. -
Sprinkle time:
Roll tiny, thin strands of various clay colors (white, blue, green). Chop them into almost microscopic bits and gently press them into the pink frosting. -
Make the cupcake base:
Roll a ball of white clay and place it into a small ribbed mold if you have one, or use a needle tool to press vertical lines around the sides to mimic a wrapper. -
Frost the cupcake:
Roll a snake of white clay. Coil it upward into a spiral on top of the base, getting smaller as you go up. -
Top with fruit:
Roll a tiny red ball for a strawberry. Add tiny green leaves on top and press it onto the peak of the cupcake frosting.
Secret to Realistic Texture
For bread items like the donut or taco, use a ball of heavy-duty aluminum foil to press texture into the clay surface before shading. It mimics baked goods perfectly.
Step 3: Making the Banana & Fries
-
Shape the banana:
Roll bright yellow clay into a curved cylinder that tapers at both ends. Pinch one end to form the stem and blunt the other slightly. -
Add banana details:
Use a tool to lightly score ridges down the length of the fruit. Dab a tiny bit of brown pastel dust on the stem and tip for ripeness. -
Cut the fries:
Flatten a sheet of yellow clay to about 1/8 inch thick. Use a blade to cut long, thin rectangular strips. They don’t need to be perfectly straight. -
Texturing fries:
With a needle tool or toothbrush, roughen up the edges of the fries slightly so they look crispy. -
Create the fry cup:
Cut a strip of kraft paper and roll it into a cylinder, gluing it to a small cardboard circle base. Fill the bottom with scrap clay or foil to prop the fries up. -
Arrange the fries:
stick the clay fries into the cup, fanning them out so they look abundant and overflowing.
Sticky Situation?
If your clay gets too soft or sticky to handle, put it in the fridge for 10 minutes. This firms it up, making it easier to carve details without squishing the shape.
Step 4: Baking & Finishing
-
Shade for realism:
Before baking (if using polymer), brush brown and orange soft pastel dust lightly over the taco shell, donut edges, and fry tips to create a ‘baked’ look. -
Cure the clay:
Bake the clay pieces according to the manufacturer’s instructions on your package. If using air-dry clay, let them sit undisturbed for 24 hours. -
Final touches:
Once cool, apply a spot of gloss glaze only to the strawberry and the ‘meat’ inside the taco to make them look moist and fresh.
Now you have a charming miniature menu ready for display or play time


Rainbow Clay Bead Jewelry
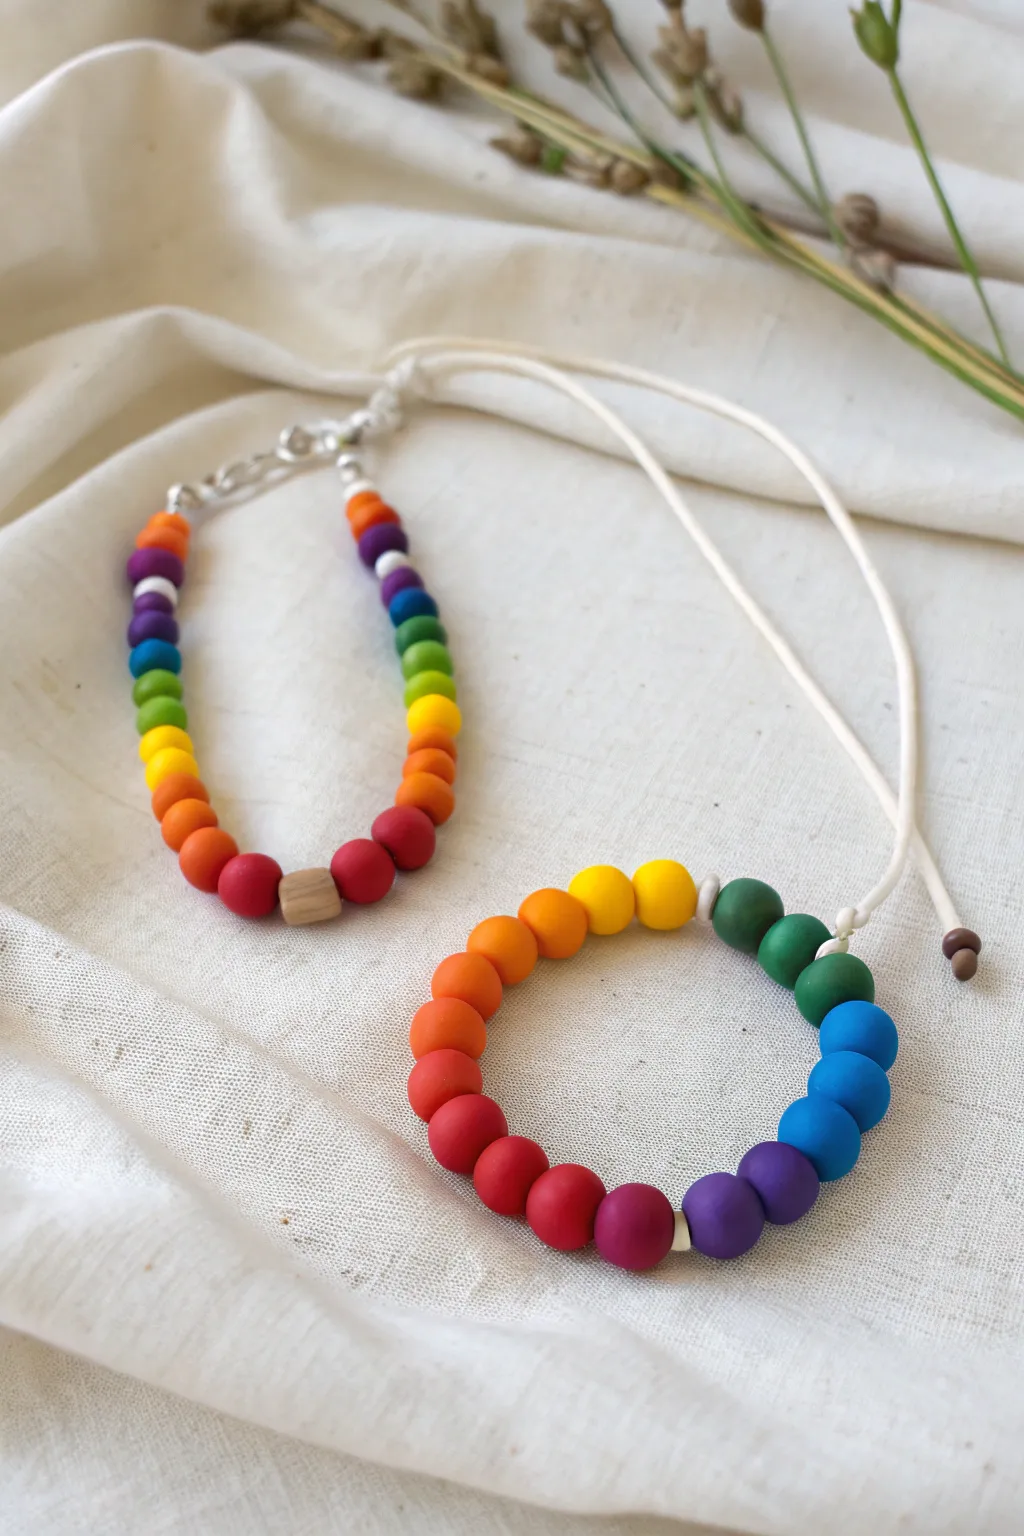
Create a vibrant, wearable rainbow with this charming bead set that brings a pop of color to any outfit. Using polymer clay allows you to hand-roll perfectly matte, uniform beads that look professional yet playful.
Step-by-Step Tutorial
Materials
- Polymer clay in rainbow colors (red, orange, yellow, green, blue, purple, white)
- Beading awl or toothpick
- Parchment paper-lined baking sheet
- Jewelry wire or nylon beading cord (white)
- Silver chain extender and lobster clasp
- Crimp beads and jump rings
- Small wooden bead (optional accent)
- Jewelry pliers
- Oven
Step 1: Creating the Beads
-
Condition the Clay:
Begin by taking small portions of each polymer clay color. Knead the clay in your hands until it becomes soft, pliable, and warm to the touch, ensuring there are no air bubbles trapped inside. -
Portion Control:
To make uniform beads, roll each color into a consistent snake shape of the same thickness. Use a blade to cut equal-sized segments from each color snake; about the size of a pea is perfect for these necklaces. -
Roll Spheres:
Take a cut segment and roll it between your palms using a gentle circular motion. Aim for a perfectly smooth sphere without any creases or flat spots. -
Piercing the Beads:
Hold a sphere gently between your thumb and forefinger. Using a beading awl or a toothpick, carefully pierce the center of the bead. I prefer to push halfway through, then flip the bead and push from the other side to avoid distorting the shape. -
Create Gradients:
For a smoother rainbow transition, try mixing adjacent colors. For example, mix a little yellow into your green, or red into your orange, to create intermediate shades for the bracelet. -
Bake:
Arrange all your pierced beads on a parchment-lined baking sheet. Bake according to your brand of clay’s instructions (usually around 275°F for 15-30 minutes). Let them cool completely before handling.
Step 2: Assembling the Necklace
-
Stringing the Pattern:
Cut a length of beading wire. Thread your beads in a mirror pattern: start with purple at both ends, working inward through blue, green, yellow, orange, and finally red in the center. -
Adding the Centerpiece:
Place a single raw wood bead or a contrasting clay bead in the very center to serve as a focal point between the two red sections. -
Securing Ends:
Thread a crimp bead onto one end of the wire, followed by a jump ring. Loop the wire back through the crimp bead and use flat-nose pliers to squash the crimp bead tight. -
Attaching Clasp:
Repeat the crimping process on the other end. Open the jump rings using pliers and attach your lobster claw clasp on one side and the chain extender on the other.
Smooth Surface Secret
To remove fingerprints before baking, lightly brush your unbaked clay spheres with a drop of baby oil or cornstarch.
Step 3: Assembling the Bracelet
-
Prepare the Cord:
Cut a longer piece of white nylon cord (about 12 inches) to allow room for adjustable knots. -
String the Rainbow:
Thread the beads onto the cord in a continuous spectrum: purple to blue, green, yellow, orange, red, and back to purple. This creates a circle of color. -
Knot the Layout:
Once the beads are centered on the cord, tie a simple overhand knot with the cord itself right next to the first and last bead to keep them in place. -
Create a Sliding Closure:
Cross the two tail ends of the cord over each other to form a circle. Using a separate short piece of cord, tie a series of square knots (macramé style) over the overlapped section to act as a slider. -
Finish the Tails:
Tie a small knot or add a tiny clay bead at the very tips of the hanging cords so the slider doesn’t slip off.
Distorted Holes?
If your beads squash while piercing, try refrigerating the rolled spheres for 10 minutes to firm them up before making the holes.
Now you have a stunning, colorful jewelry set ready to wear or gift to a friend


Ladybugs, Snails, and Caterpillars
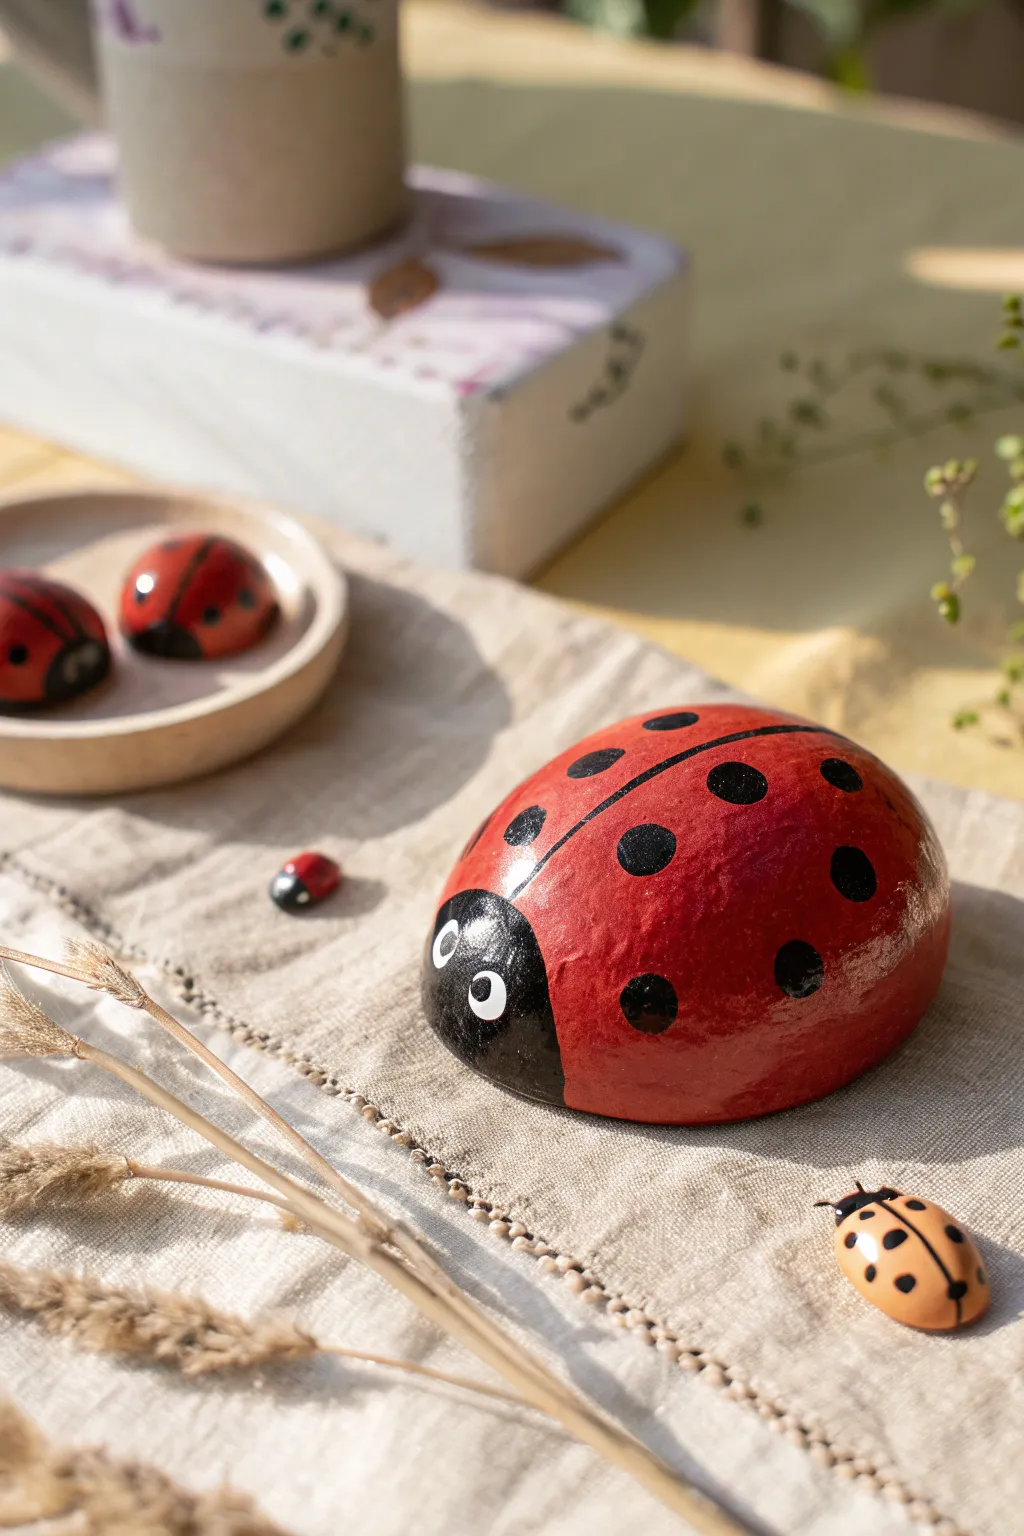
These charming garden guardians are a joy to sculpt, bringing a pop of bright red and happy energy to any windowsill. The smooth, rounded shapes are perfect for little hands to master, resulting in a cheerful family of beetles ranging from tiny specks to big, bold friends.
Step-by-Step
Materials
- Air-dry clay (white or terracotta)
- Acrylic paints (bright red, black, white, and orange/yellow)
- Paintbrushes (flat shader brush and fine detail brush)
- Gloss varnish or clear sealant (optional)
- Water cup
- Parchment paper or craft mat
- Dotting tool or toothpick
Step 1: Sculpting the Base
-
Prepare the Clay:
Start by kneading a chunk of your air-dry clay until it feels warm and pliable. This conditioning step prevents cracks later on. -
Roll a Sphere:
Roll the clay between your palms to create a smooth, tight ball. You can make one large one for the ‘mama’ ladybug and several tiny ones for the babies. -
Flatten the Bottom:
Gently press the ball down onto your parchment paper to flatten the bottom. You want a nice, stable dome shape, like a halved egg. -
Refine the Shape:
Use a little bit of water on your finger to smooth out any fingerprints or bumps on the dome. The smoother the clay now, the better the paint will look later. -
Let it Dry:
Allow the clay domes to dry completely. For a large piece like the one shown, this might take 24 to 48 hours depending on humidity. Flip them over halfway through so the bottom dries too.
Cracks in the Clay?
If small cracks appear while drying, mix a tiny bit of fresh clay with water to make a paste (slip) and smooth it into the cracks with your finger.
Step 2: Painting the Body
-
Base Coat:
Once dry, paint the entire dome with white acrylic paint first. This acts as a primer and ensures your red will look vibrant rather than dull. -
Apply the Red:
Paint the main body a bright, true red. Use long, smooth strokes to avoid brush marks. I usually apply two coats for solid coverage. -
Define the Head:
Using black paint, color the front section of the dome to create the face. This should be a semi-circle shape at the front. -
Draw the Wings:
With a fine brush and black paint, draw a thin line straight down the center of the red back, starting from the black head and going to the tail. -
Add the Spots:
Painting distinct circles can be tricky. Dip the handle end of a paintbrush into black paint and stamp it onto the red surface to create perfect, round dots. -
Vary the Sizes:
Make some dots larger and some smaller for a natural look. Try to make the pattern somewhat symmetrical on both sides of the wing line.
Step 3: Adding Personality
-
Create the Eyes:
Dip a smaller tool or brush handle into white paint and stamp two dots onto the black head area. -
Add Pupils:
Once the white is dry, use a toothpick to add a tiny black dot inside each white circle. Placing them slightly off-center gives the ladybug a cute, looking-sideways expression. -
Make the Tiny Ladybugs:
For the baby bugs, simply paint the tiny clay pebbles red, add a black speck for a head, and maybe just one or two black spots on the back. -
Create the Yellow Variant:
To match the image, paint one medium-sized bug with an orange-yellow mix instead of red. Give it elongated spots for a different species look. -
Seal the Work:
Finish with a coat of gloss varnish. This mimics the hard, shiny shell of a real beetle and protects the paint from chipping.
Make Them Climb
Before the clay dries, gently press a small magnet into the flat bottom. Now your ladybugs can climb up the fridge door or a magnetic board
Group your new beetle family together on a shelf or scatter them among your house plants for a sweet surprise

The Complete Guide to Pottery Troubleshooting
Uncover the most common ceramic mistakes—from cracking clay to failed glazes—and learn how to fix them fast.
Ocean Creatures That Stand Up
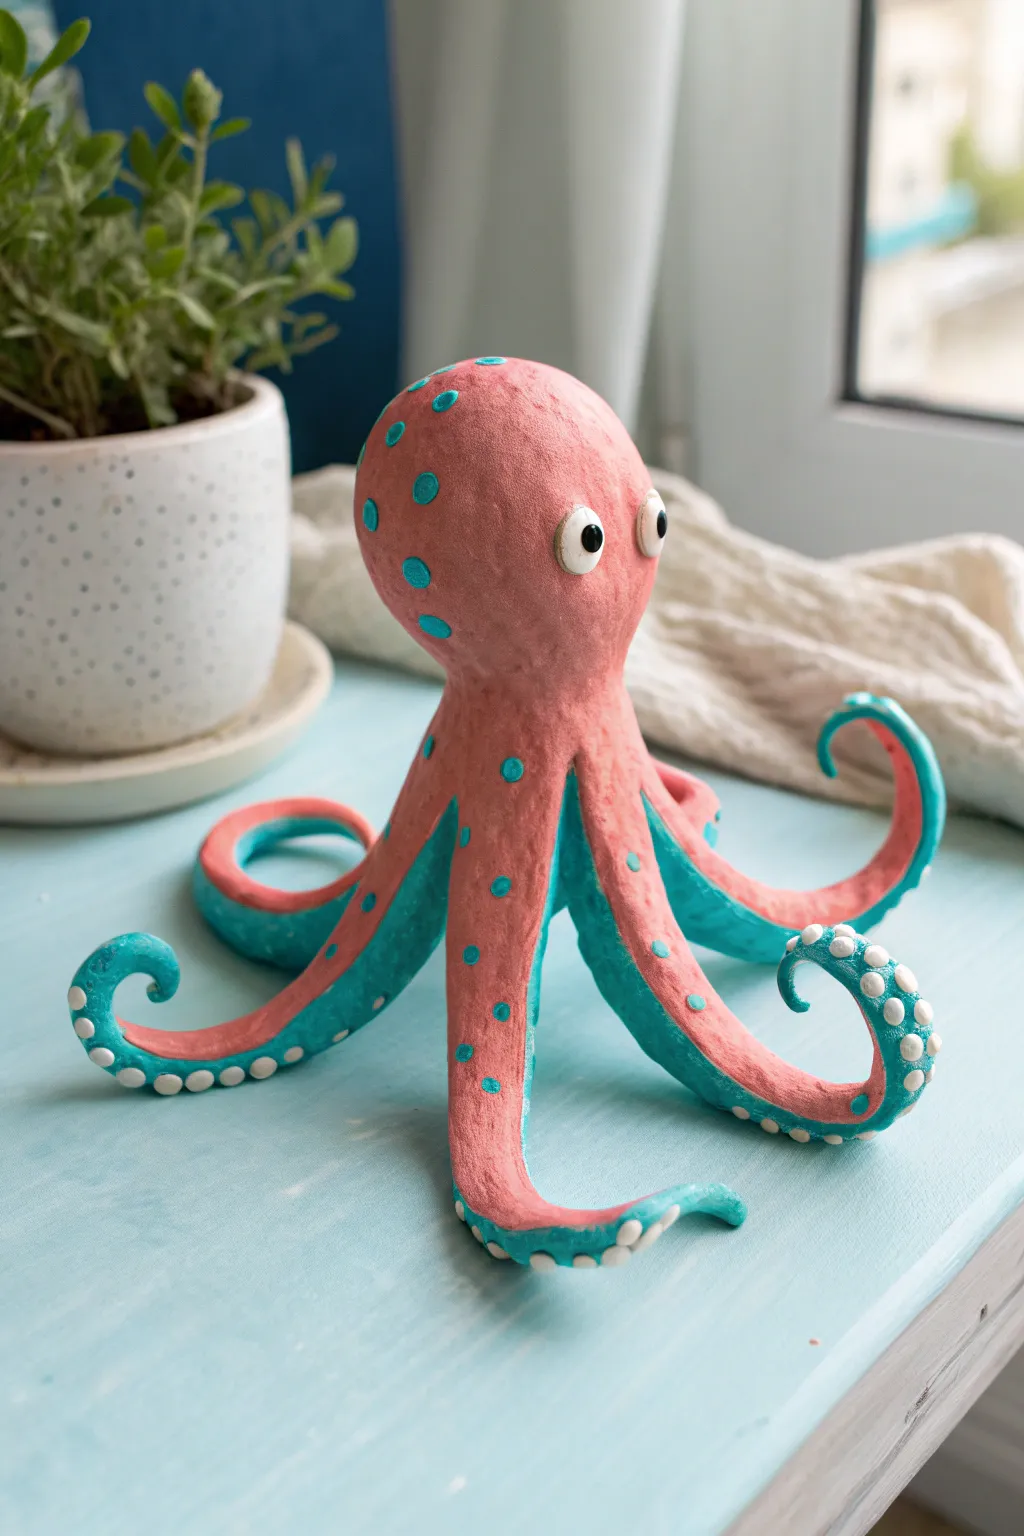
Create a whimsical, freestanding ocean friend with this delightful octopus project. Featuring a textured pink finish with bright teal accents, this sturdy sculpture brings character to any shelf or windowsill.
Step-by-Step Guide
Materials
- Air-dry clay or polymer clay (white or light colored)
- Aluminum foil
- Acrylic paints (pastel pink, teal/turquoise, white, black)
- Paintbrushes (medium flat and small detail)
- Small dotting tool or toothpick end
- Gloss varnish (optional)
Step 1: Building the Core Structure
-
Form the foil armature:
Start by crumpling a piece of aluminum foil into a smooth egg shape, about the size of a lemon. This will be the octopus’s head and keeps the sculpture lightweight while saving clay. -
Cover the head:
Roll out a sheet of clay to about 1/4 inch thickness. Wrap it completely around your foil egg, smoothing the seams together with your thumb until the surface is uniform. -
Shape the neck:
Gently pinch the bottom of the covered egg to create a slightly narrower neck area, leaving excess clay at the bottom where the tentacles will attach. -
Prepare the tentacles:
Roll eight long, tapered snake shapes from your clay. Make them thicker at one end and pointy at the other, varying the lengths slightly for a natural look. -
Position the main supports:
Take four of your strongest tentacle coils and attach them firmly to the base of the neck. Arrange them so they spread out like a tripod or quad-pod to ensure the sculpture can stand on its own. -
Add movement:
Attach the remaining four tentacles in the gaps. Curve the ends of all the tentacles upwards in cute spirals; this curling motion is what gives the piece its lively personality. -
Smooth the connections:
I like to use a little water on my finger to blend the clay where the tentacles meet the body, ensuring there are no visible cracks or weak points. -
Create the eyes:
Roll two small balls of white clay and flatten them slightly. Press them onto the sides of the head, spacing them wide apart for a goofy, friendly expression. -
Let it dry:
Allow the sculpture to dry completely according to your clay package instructions. For air-dry clay, this usually takes 24-48 hours depending on thickness.
Step 2: Painting and Details
-
Base coat the body:
Paint the entire top surface of the octopus—head and the tops of the tentacles—with a pastel pink acrylic paint. You may need two coats for solid coverage. -
Paint the underside:
Carefully paint the underside of the tentacles with a vibrant teal or turquoise color. Don’t worry if the line isn’t perfectly straight; organic lines look better here. -
Add texture spots:
Using the back of a paintbrush handle or a dotting tool, dip into the teal paint and stamp small circles onto the pink head and upper tentacles. -
Create the suckers:
Dip a smaller tool into white paint and add rows of tiny dots along the teal undersides of the curling tentacles to mimic suction cups. -
Define the eyes:
Paint the clay eye mounds white. Once dry, add a small black pupil to each eye. Placing the pupils slightly off-center can make the expression even cuter. -
Highlight the dots:
Go back to your teal spots on the head. If you want more dimension, add a tiny highlight of lighter blue or white to the center of a few larger spots. -
Check for balance:
Stand your octopus up and see if any tentacle tips need a touch-up where they touch the table surface. -
Seal the work:
Apply a coat of gloss varnish over the eyes to make them shine, or over the whole piece if you want a wet, aquatic look.
Armature Secret
Pack the foil ball very tight! Loose foil makes a squishy core that’s hard to cover smoothly. A dense foil egg acts like a hard stone.
Wobbly Octopus?
If it tips over while drying, prop the raised tentacles up with crumpled paper towels or extra foil bits until the clay hardens in place.
Now you have a charming sea creature ready to guard your desk
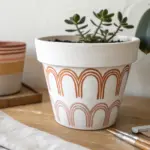
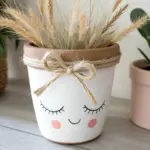
Smiley Succulent Pots
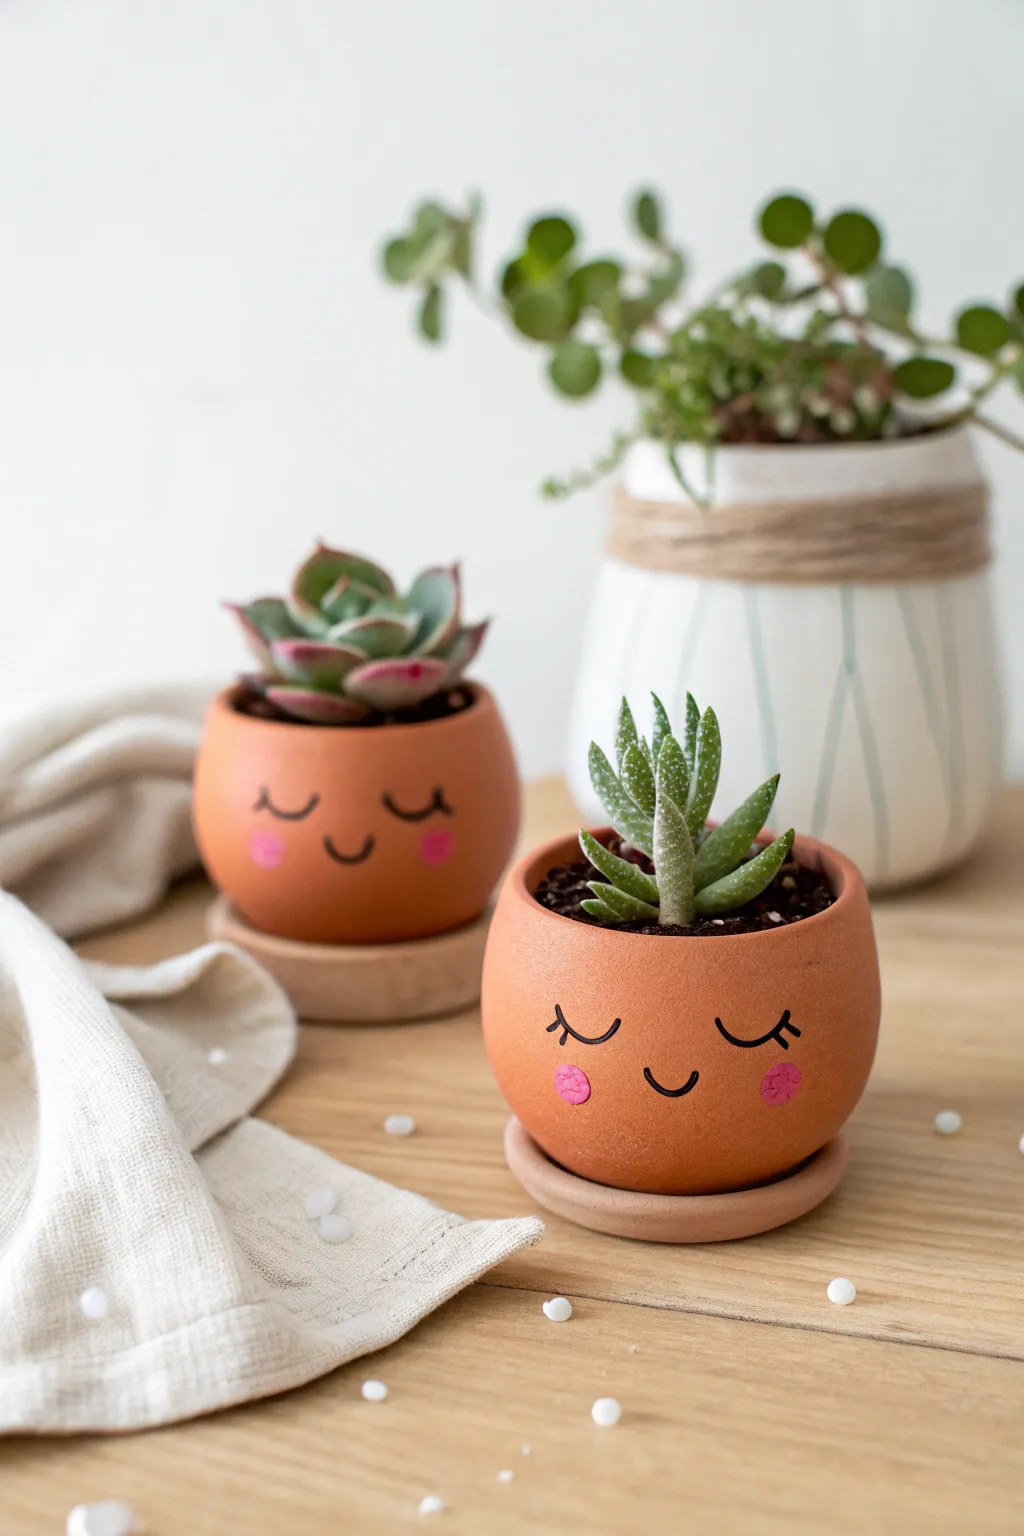
Brighten up any windowsill with these adorable terra cotta-style succulent pots featuring sweet, sleepy faces. Using air-dry clay or oven-bake polymer, you’ll sculpt perfectly round homes for your favorite tiny plants, complete with rosy cheeks and charming expressions.
Step-by-Step
Materials
- Terracotta-colored air-dry clay (or polymer clay)
- Small rolling pin
- Circle cutter (approx. 4-inch diameter) or a bowl to trace
- Spherical mold (like a foam ball or small bowl wrapped in plastic)
- Small detail knife or clay tool
- Smoothing sponge and water
- Black acrylic paint or permanent marker
- Pink acrylic paint
- Fine detail paintbrush
- Clear matte varnish (waterproof sealant)
- Small succulent plants and potting soil
Step 1: Shaping the Pot
-
Condition the clay:
Start by taking a generous handful of your terracotta-colored clay. Knead it thoroughly in your hands until it becomes soft, pliable, and free of any cracks. -
Roll out a slab:
Using your rolling pin, flatten the clay into a smooth slab that is about 1/4 inch thick. Try to keep the thickness consistent so the walls of your pot are sturdy. -
Cut the base shape:
Use your circle cutter or trace around a bowl to cut out a large circle from the slab. This will form the main body of your pot. -
Form the sphere:
Gently drape the clay circle over your spherical mold (like a styrofoam ball wrapped in cling film to prevent sticking). Smooth the clay down the sides to create a rounded cup shape. -
Flatten the bottom:
While the clay is still on the mold, gently press the very bottom against a flat surface. This creates a stable base so your pot won’t roll away later. -
Refine the rim:
Carefully trim any excess clay from the rim to make it even. I find running a wet finger along the edge helps create that smooth, professional finish. -
Create a matching saucer:
Roll out a smaller piece of clay and cut a circle slightly larger than the base of your pot. Slightly curve the edges upward to create a simple drainage saucer. -
Dry or bake:
If using air-dry clay, let the pieces sit in a cool, dry place for 24-48 hours until fully hard. If using oven-bake polymer, bake according to the manufacturer’s temperature instructions.
Prevent Cracks
If using air-dry clay, wrap your drying pot loosely in a plastic bag for the first 12 hours. This slows drying and prevents cracks from forming.
Step 2: Adding the Personality
-
Smooth the surface:
Once dry and cool, check for any rough spots. You can use fine-grit sandpaper to gently buff the surface, creating a perfect canvas for the face. -
Sketch the face:
Lightly sketch the sleepy eyes and smile using a pencil. Aim for the center of the pot, keeping the eyes symmetrical and the mouth small and curved. -
Paint the eyes:
Using a very fine detail brush dip into black acrylic paint. Carefully trace over your pencil lines for the closed eyelids. Add three small lashes to the outer corner of each eye. -
Draw the smile:
Paint a small, simple ‘u’ shape between the eyes. Keep the line thin and crisp for a delicate look. -
Add rosy cheeks:
Dip a round paintbrush (or the back of a pencil eraser) into pink paint. Dab two distinct circles just below the outer corners of the eyes. -
Seal the pot:
Apply two coats of clear waterproof varnish to the inside and outside of the pot. This is crucial to protect the clay from moisture when you water your plant. -
Add drainage:
If you plan to plant directly inside and used air-dry clay, ensure you drilled a hole before drying. If not, nest a plastic nursery pot inside your clay creation to keep it safe from standing water. -
Plant the succulent:
Fill your pot with succulent-specific soil and gently nestle your plant inside. Place the finished pot on its matching saucer.
3D Features
Instead of painting cheeks, roll tiny balls of pink clay and press them onto the face before drying for a cute, textured 3D effect.
Place your happy little planters in a sunny spot and enjoy their cheerful company


What Really Happens Inside the Kiln
Learn how time and temperature work together inside the kiln to transform clay into durable ceramic.
Monster Pencil Holder Cups

This friendly little desk monster is full of personality and perfect for holding all your creative tools. With his silly grin, dotted texture, and wonky eyes, he’s a delightful clay project for kids that’s as useful as it is cute.
Detailed Instructions
Materials
- Air-dry clay or polymer clay (white or light grey)
- Paints (Sage green, white, black, burgundy/dark pink)
- Clay rolling pin
- Cylindrical mold (like a jam jar or sturdy cardboard tube)
- Modeling tools (needle tool, small ball tool)
- Old toothbrush or stippling sponge
- Rolling pin
- Clay adhesive or slip
- Clear varnish (matte or satin)
Step 1: Forming the Base
-
Roll the clay:
Begin by conditioning your clay until it’s pliable, then roll out a slab that is roughly 1/4 inch thick. You want it substantial enough to stand up but not too heavy. -
Cut the base:
Cut a circle for the bottom of the pot. A cookie cutter works well, or just trace around the base of your cylindrical mold. -
Prepare the walls:
Measure the height and circumference of your mold. Cut a large rectangle from your clay slab that will wrap all the way around the mold with a little overlap. -
Build the cylinder:
Wrap the rectangular slab around your mold. Join the seam by scoring the edges (making scratch marks), adding a dab of water or clay slip, and smoothing the clay together until the line disappears. -
Attach the bottom:
Place the cylinder onto the circular base. Smooth the clay from the walls down onto the base to create a seamless, watertight seal. -
Shape the rim:
Gently curve the top rim of the pot inward just slightly to give it a softer, more organic look, smoothing away any sharp edges with a wet finger. -
Add arm details:
Roll two small, thin snakes of clay. Attach them vertically to the sides of the pot to look like little arms resting against the body, blending the top edge so they look seamless.
Clean Seams
To make the vertical seam on the back invisible, use a little water on your finger and rub in a circular motion until the clay merges completely.
Step 2: Adding Personality
-
Create the mouth cavity:
Using a modeling tool, gently carve out a wide, bean-shaped indention for the mouth. Don’t cut all the way through; just press the clay in to create depth. -
Form the teeth:
Roll tiny little cones of white clay. Attach them along the top and bottom ridges of the mouth indentation, creating a jagged, friendly smile. -
Make the eyes:
Roll two balls of clay, one slightly larger than the other for a goofy look. Flatten them slightly and attach them securely above the mouth. -
Add pupils:
Press a small ball tool or the end of a paintbrush into the center of each eye to create a divot where the pupils will be painted later. -
Texture the skin:
Take an old toothbrush or a stiff stippling brush and gently tap it all over the green parts of the monster’s body to give it a speckled, stone-like texture. -
Let it dry:
Allow the clay to dry completely according to the package instructions. If using a mold inside, remove it carefully once the clay is leather-hard to prevent cracking.
Make it a Set
Make a shorter, wider version to hold paperclips, or a tiny version for an eraser! Vary the eye sizes and number of teeth for a whole monster family.
Step 3: Painting and Finishing
-
Base coat:
Mix a soft sage green paint. Cover the entire outer body and the arms, being careful to paint around the white teeth and eyes. -
Paint the mouth:
Use a burgundy or deep pink color to paint the inside of the mouth cavity behind the teeth, giving the grin some depth. -
Paint the eyes:
Paint the eye mounds white. Once dry, use a fine-tip brush or a dotting tool to add black dots inside the divots you made earlier. -
Add speckling:
I find that flicking a toothbrush with slightly watered-down dark green or black paint creates the best natural speckles over the green skin. -
Seal the deal:
Protect your monster with a coat of matte or satin varnish to keep the paint from chipping and make it easier to wipe clean.
Now your desk has a quirky new guardian ready to keep your pencils organized.
Leaf and Flower Fossil Tiles
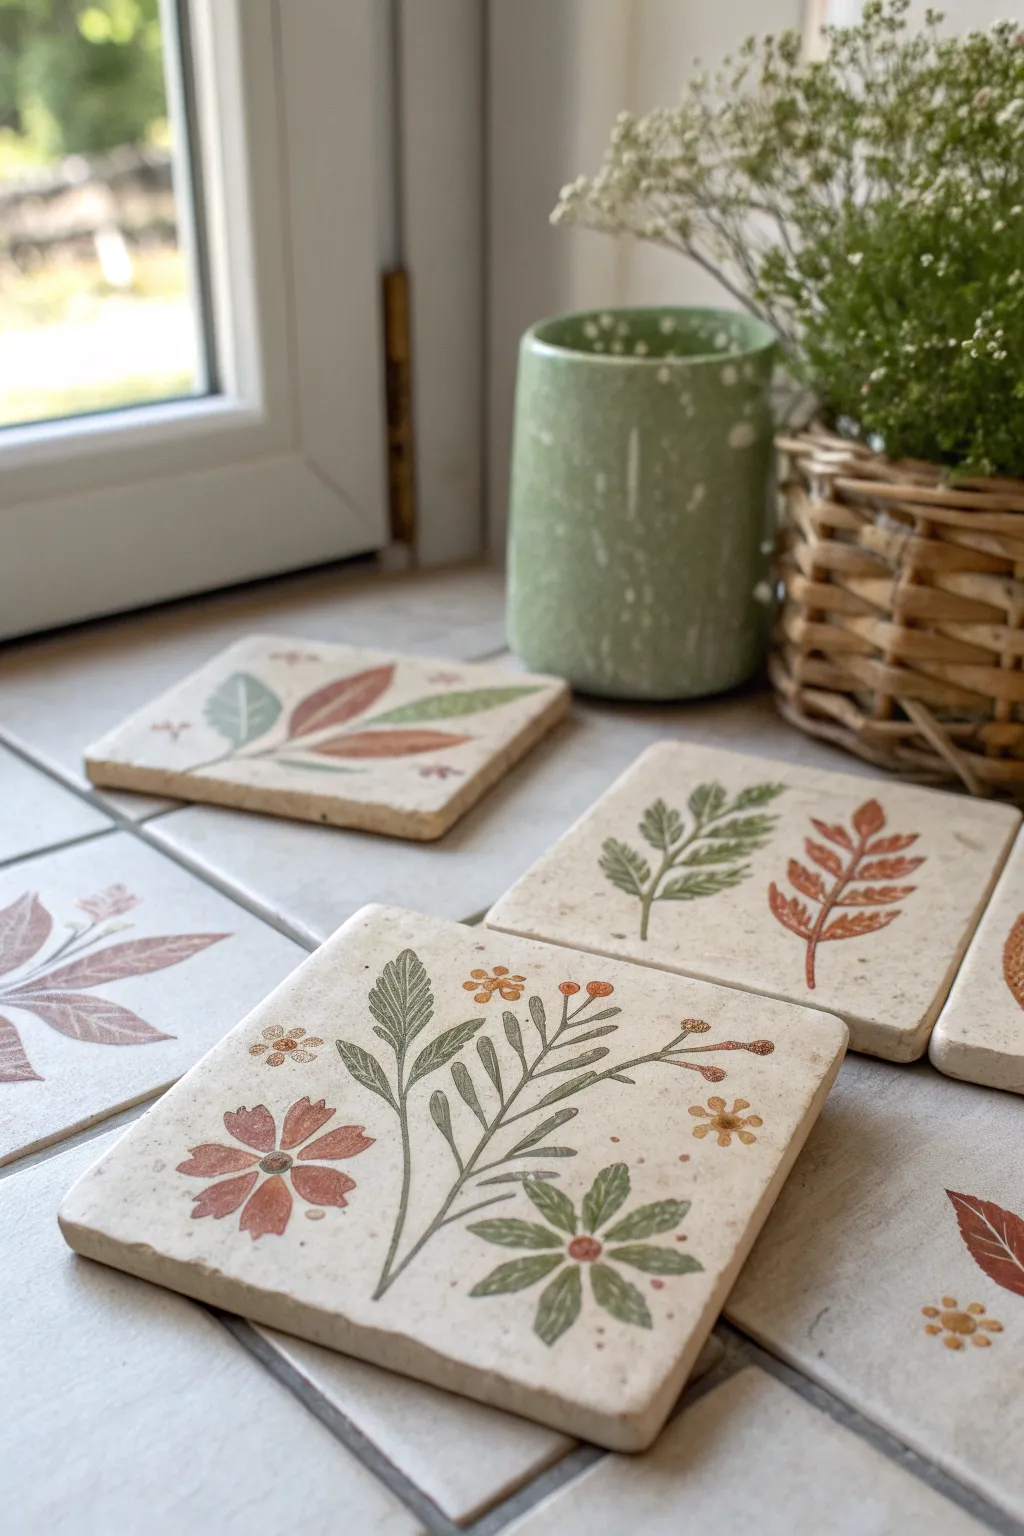
Capture the beauty of the outdoors with these lovely ceramic-style clay tiles that double as coasters or decorative art. By pressing real leaves and flowers into clay and adding soft, earthy paint tones, you’ll create a permanent botanical garden that looks like it came straight from a pottery studio.
Step-by-Step Tutorial
Materials
- White or cream air-dry clay (or polymer clay)
- Rolling pin
- Square cookie cutter or a knife and ruler
- Fresh leaves, ferns, and small flowers (flat varieties work best)
- Acrylic paints (terracotta, sage green, forest green, mustard yellow)
- Fine detail paintbrush
- Small sponge or foam pouncer
- Sandpaper (fine grit)
- Matte or satin varnish sealant
- Parchment paper or craft mat
Step 1: Preparing the Base
-
Condition the clay:
Start by taking a generous handful of white air-dry clay and kneading it until it feels warm and pliable without cracking. -
Roll it out:
Place the clay on a sheet of parchment paper to prevent sticking. Use your rolling pin to flatten it into an even slab, aiming for a thickness of about 1/4 inch (6mm) to ensure the tiles are sturdy. -
Cut the squares:
Using a square cookie cutter or a knife guided by a ruler, cut out perfect 4×4 inch squares. Create a few extras just in case you want to experiment with different flower layouts. -
Smooth the edges:
Dip your finger in a tiny bit of water and run it along the cut edges of each square to smooth down any rough clay burrs or sharp corners.
Sticky Situation?
If leaves get stuck in the clay, wait for the clay to dry slightly. As the clay shrinks during drying, the plant matter often pops out easily or can be brushed away with a dry stiff brush.
Step 2: Creating the Fossils
-
Arranging nature:
Select your leaves and flowers. Lay them gently onto the soft clay surface to plan your design. Try mixing a fern leaf with a small daisy for a balanced look like the example in the photo. -
Pressing the print:
Once you are happy with the arrangement, place a piece of parchment paper carefully over the botanicals. Roll your rolling pin over the paper firmly once or twice to embed the plants into the clay. -
Removing the plants:
Peel back the parchment paper. Use a pair of tweezers or a pin to very gently lift the leaves and petals out of the clay, revealing the detailed impression left behind. -
Drying time:
Let the tiles dry completely according to the clay package instructions. I find flipping them over halfway through the drying process helps prevent the corners from curling up. -
Sanding:
Once bone dry, take a piece of fine-grit sandpaper and lightly buff the edges and surface to ensure everything is perfectly smooth.
Step 3: Painting and Finishing
-
Mixing earth tones:
Prepare your palette with earthy, natural tones. You’ll want a sage green, a deeper forest green, and a warm reddish-brown terra cotta color. -
The base wash technique:
For a subtle, aged look, water down a tiny drop of brown paint and brush it over the entire tile, then immediately wipe it off with a paper towel. This leaves color just in the deepest textures. -
Painting the leaves:
Use your fine detail brush to carefully paint inside the leaf impressions. Use the sage green for broad leaves and the darker forest green for stems or fern fronds. -
Adding floral details:
Paint the flower petals with the terracotta or rust color. For the centers of the flowers, dab a tiny dot of mustard yellow or brown. -
Speckling effect:
To mimic the stone-like texture seen in the photo, dip an old toothbrush or stiff brush into diluted brown paint and lightly flick tiny speckles across the surface from a distance. -
Sealing the work:
Protect your painting by applying a coat of matte or satin varnish. This is especially important if you plan to use these as functional coasters.
Mix It Up
Instead of painting inside the lines, try doing an ‘inverse’ paint job. Paint the surface of the tile a solid color, then wipe it back so the paint stays dark only in the deep floral impressions.
Display your new fossil tiles on a sunny windowsill or tie a stack of them with twine for a beautiful handmade gift

TRACK YOUR CERAMIC JOURNEY
Capture glaze tests, firing details, and creative progress—all in one simple printable. Make your projects easier to repeat and improve.
Mini Animal Figurines With Big Personalities

This charming little penguin figurine brings arctic vibes to your shelf with its speckled belly and round, curious eyes. It’s a fantastic beginner sculpture that focuses on simple shapes to build a character with a huge personality.
Detailed Instructions
Materials
- Air-dry clay or polymer clay (white is best)
- Acrylic paints (Navy blue, white, mustard yellow, black)
- Small paintbrush
- Fine-point paintbrush or toothpick
- Old toothbrush (for texture)
- Clear matte varnish (optional)
- Small cup of water
Step 1: Shaping the Base
-
Create the body:
Start with a lump of clay about the size of a golf ball or egg. Roll it into a smooth ball between your palms to remove any cracks. -
Form the egg shape:
Gently roll the top half of the ball slightly more to taper it, creating a classic egg shape. The bottom should remain wider and flatter so it stands up on its own. -
Flatten the base:
Tap the bottom of your egg shape firmly against your work surface. You want a nice flat area so your penguin doesn’t wobble later. -
Add the wings:
Take two small, bean-sized pieces of clay. Flatten them into teardrop shapes and press them firmly onto the sides of the body. -
Blend the seams:
Use your finger or a clay tool to smooth the top edge of the wings into the body, so they look attached rather than just stuck on. Leave the bottom tips slightly lifted.
Cracking Up?
If small cracks appear while air-dry clay is curing, don’t panic. Mix a tiny bit of fresh clay with water to make a paste and smooth it into the cracks.
Step 2: Adding the Details
-
Make the beak:
Roll a very tiny piece of clay into a cone or triangle shape. Press it gently onto the ‘face’ area, slightly above the middle point. -
Create the feet:
Form two small, flat ovals for the feet. Use a tool or a credit card edge to make two little indentations in each for toes. -
Attach the feet:
Press the feet under the front edge of the body so just the toes are peeking out. -
Texturizing:
Before the clay dries, take an old toothbrush and very gently tap it all over the surface. I find this gives it that nice, stone-like texture seen in the photo. -
Drying time:
Let the sculpture dry completely. If using air-dry clay, wait 24-48 hours; if using polymer, bake according to package instructions.
Step 3: Painting the Character
-
Paint the belly:
Using white acrylic paint, paint a large oval on the front of the body. You might need two coats to get it opaque. -
Add the main color:
Paint the rest of the body, wings, and back of the head with a deep navy blue. Be careful around the edges of the white belly to keep a clean line. -
Color the beak and feet:
Use a mustard yellow paint for the beak and the little feet peeking out at the bottom. -
Paint the eyes:
Dip the handle end of a paintbrush into white paint and dot two circles above the beak. Let this dry completely. -
Add pupils:
once the white dots are dry, use a toothpick dipped in black paint to add tiny pupils. Place them slightly off-center for a quirky look. -
Create the speckles:
Dilute a tiny bit of grey or black paint with water. Dip an old toothbrush in it, and flick the bristles with your thumb to spray tiny speckles onto the white belly. -
Finishing touches:
Add tiny white highlight dots to the eyes if desired, and coat with a matte varnish once fully dry to protect your new friend.
Make it a Family
Create a whole colony by making different sizes! Try making a tiny grey chick with fluffy texture, or give one a clay scarf for winter.
Place your penguin on a desk or shelf to add a whimsical touch to your decor
Polka Dot Coil Snakes and Pots

Create a charming duo with this coiled clay snake resting atop its matching spotted pot. This project combines simple pinch pot techniques with coil rolling for a whimsical, speckled set that’s perfect for holding tiny treasures.
How-To Guide
Materials
- White or light-colored air-dry clay
- Rolling pin
- Clay sculpting tools or a butter knife
- Small bowl of water
- Acrylic paints (red, orange, yellow, pink, blue, black)
- Small round paintbrushes
- Matte sealant or varnish (optional)
- Sandpaper (fine grit)
Step 1: Making the Pot Base
-
Prepare the clay:
Start with a ball of clay roughly the size of a tennis ball. Knead it in your hands until it is pliable and free of cracks. -
Form the base shape:
Roll the clay into a smooth sphere, then create a flat bottom by gently pressing it onto your work surface. -
Pinch the walls:
Press your thumb into the center of the ball, leaving about half an inch at the bottom. Begin pinching the clay walls between your thumb and fingers, rotating as you go to thin the walls evenly. -
Shape the cylinder:
Work the clay upwards rather than just outwards to create a cylindrical pot shape with straight sides, rather than a bowl. Aim for a height of about 3-4 inches. -
refine the rim:
Flatten the top rim slightly with your fingers. Then, roll a small, thin coil of clay and attach it to the outer edge of the rim using a bit of water to create a subtle lip. -
Smooth the surface:
Dip your finger in water and smooth out any fingerprints or cracks on the pot’s exterior and interior. Set the pot aside to firm up.
Smooth Snake Tip
When rolling coils, use the full length of your palms from wrist to fingertips to keep the snake thickness even and prevent lumpy sections.
Step 2: Creating the Coil Snake
-
Roll the main coil:
Take a new lump of clay and roll it into a long, even snake shape on your table. It should be thick enough to hold its shape—about the thickness of your thumb. -
Taper the tail:
Gently roll one end of the coil with a bit more pressure to taper it into a pointy tail. -
Sculpt the head:
On the other end, slightly flatten and round the clay to form a distinct head shape. It should look a bit wider than the body. -
Shape the coil:
Coil the snake body into a spiral stack. The loops should be wide enough to rest comfortably inside or on top of your pot. I find it helpful to test the fit on the pot while the clay is still wet. -
Add facial details:
Use a sculpting tool to carve a tiny mouth line on the snake’s face. -
Final smoothing:
Use a damp finger to smooth out the snake’s body, ensuring the coils look unified but distinct.
Fixing Cracks
If cracks appear while drying, don’t panic! Mix a tiny bit of clay with water to make a paste (slip) and fill the cracks, then smooth over.
Step 3: Painting and Finishing
-
Dry completely:
Let both the pot and snake dry fully. This usually takes 24-48 hours depending on humidity. They will turn a lighter white color when dry. -
Sand for smoothness:
Once dry, lightly sand the pot and snake with fine-grit sandpaper to remove rough bumps, especially around the rim. -
Paint the snake’s spots:
Using a small round brush, paint colorful polka dots all over the snake’s back. Alternate colors like blue, red, pink, and yellow for a playful look. -
Paint the snake’s face:
Use a very fine brush or a toothpick dipped in black paint to add two small eyes. -
Paint the pot:
Paint larger, spaced-out circles on the exterior of the pot. To match the photo, paint diagonal stripes inside these circles using contrasting colors (like orange stripes on a yellow circle). -
Let paint dry:
Allow all paint to dry completely before handling. -
Seal the project:
Apply a coat of matte varnish or sealant to protect the paint and give the clay a finished, professional feel.
Now you have a delightful handmade set ready to display a small succulent or keep your desk organized
Dinosaur Footprint Stamp Medallions
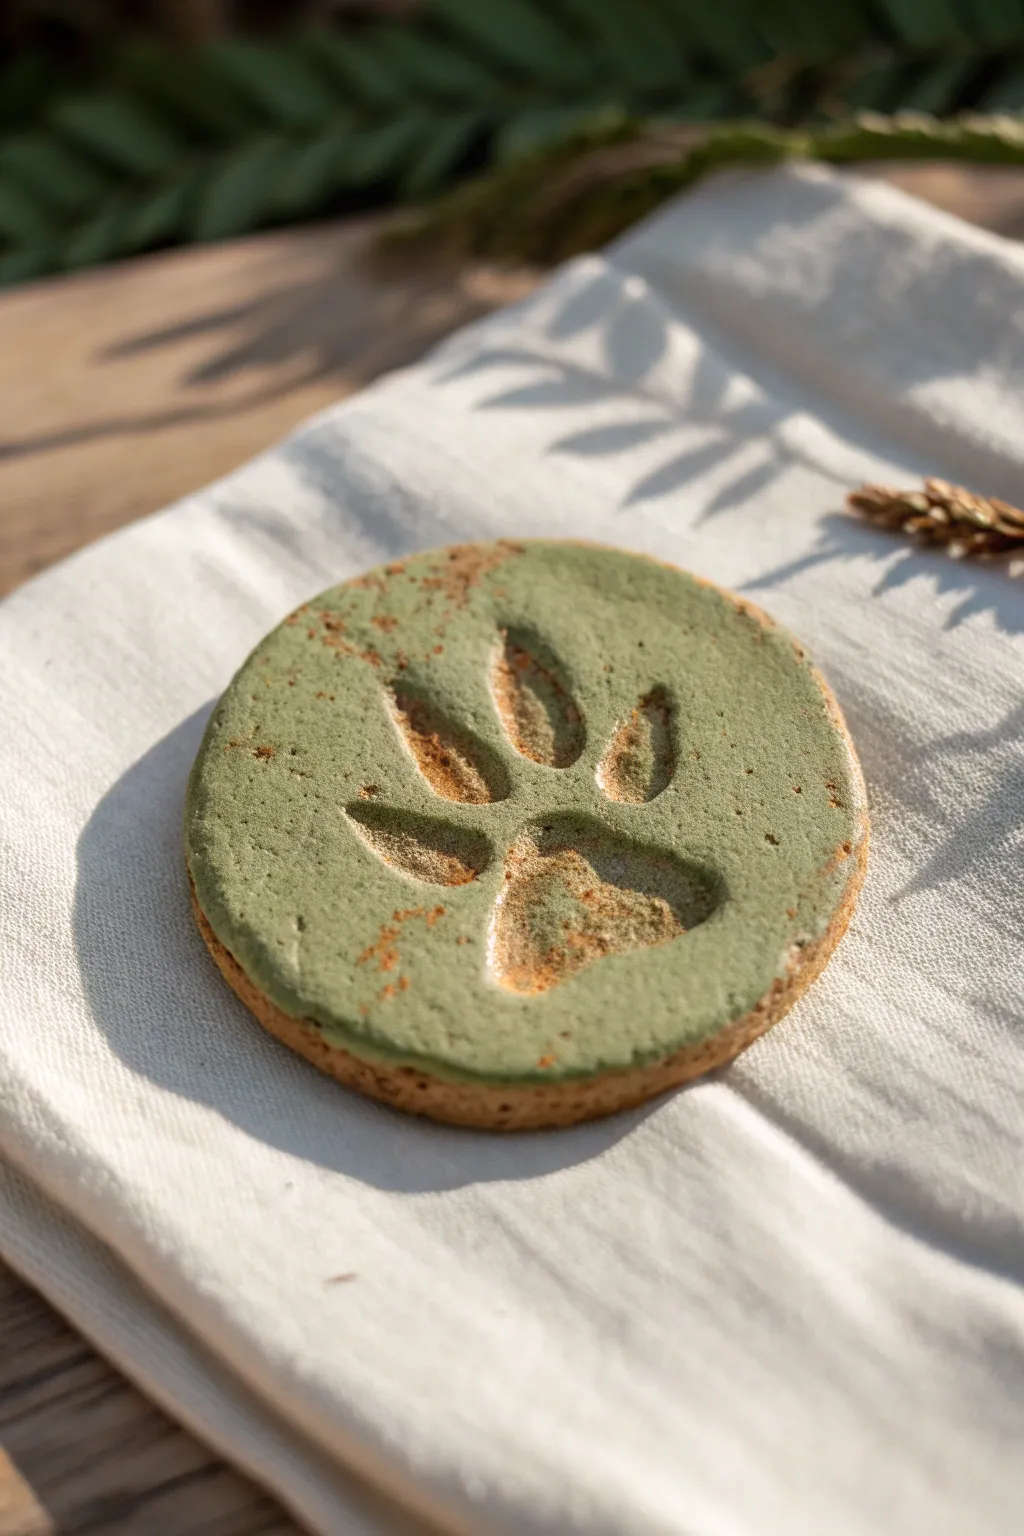
Capture the prehistoric world with these charming, rustic medallions featuring a fossil-like dinosaur footprint. The finished piece combines earthy greens and shimmering gold accents for an ancient artifact look that fits perfectly in any young explorer’s collection.
Detailed Instructions
Materials
- Air-dry clay or salt dough
- Rolling pin
- Round cookie cutter (approx. 3-4 inches)
- Dinosaur figurine with distinct feet or a footprint stamp tool
- Fine-grit sandpaper
- Sage green acrylic paint (matte finish)
- Gold or bronze metallic paint
- Small paintbrush
- Sponge or paper towel
- Sealant or clear varnish (optional)
Step 1: Shaping the Fossil Base
-
Prepare the Clay:
Begin by kneading a ball of air-dry clay until it is soft, pliable, and free of cracks. If the clay feels too dry, add a tiny drop of water to smooth it out. -
Roll it Out:
Roll the clay flat on a clean surface to an even thickness of about 1/4 inch. Avoid making it too thin, as you need enough depth to press the footprint in without breaking the bottom. -
Cut the Circle:
Use your round cookie cutter to punch out a perfect circle from the rolled clay. If you don’t have a cutter, you can trace a glass rim and cut it out with a plastic knife. -
Smooth the Edges:
Dip your finger in a little water and gently run it around the cut edge of the circle to soften any sharp ridges or rough spots left by the cutter.
Stamp Clean Release
Dust the dinosaur foot or stamp with a little cornstarch or baby powder before pressing into the clay. This prevents sticking and ensures a crisp, clean fossil impression.
Step 2: Making the Impression
-
Position the Stamp:
Take your dinosaur toy or stamp tool and center the foot over the clay disc. You can also offset it slightly if you want an artistic, asymmetrical look. -
Press Down Firmly:
Press the foot straight down into the clay with steady, even pressure. Push deep enough to create bold shadows, but stop before you hit the table underneath. -
Remove Step:
Lift the stamp straight up to avoid smudging the toes. Inspect the impression; if the edges of the toes look rough, smooth them very gently with a damp fingertip or the rounded end of a paintbrush. -
Dry Completely:
Set the clay disc aside in a warm, dry place. Depending on your clay type and thickness, this usually takes 24 to 48 hours. Flip it over halfway through drying to prevent curling.
Magnetize It
Before the clay dries, gently press a strong magnet into the back of the medallion. Secure it with glue after painting to create a cool prehistoric fridge magnet.
Step 3: Color and Shine
-
Sand Imperfections:
Once the disc is bone-dry and hard, use fine-grit sandpaper to lightly buff the edges and surface for a smooth finish. -
Apply Base Color:
Paint the top surface of the medallion with sage green acrylic paint. Use a flat brush to get an even coat, but avoid flooding the deep crevices of the footprint too much. -
Clean the Edges:
While I paint, I like to leave the vertical rim of the disc unpainted or wipe it clean, creating a nice contrast between the raw clay color and the green top. -
Let Base Dry:
Allow the green paint to dry completely to the touch. This matte layer needs to be stable before we add the metallic detailing. -
Add Metallic Touches:
Dip a small brush into gold or bronze metallic paint. Dab it inside the footprint depression to make it look like mineral deposits in a fossil. -
Create a Distressed Look:
To mimic the image, wipe away some of the wet gold paint with a paper towel or sponge immediately after applying, leaving a shimmering residue rather than a solid block of gold. -
Speckle the Surface:
For that earthy texture, take a stiff-bristled brush with a tiny amount of brown or gold paint and flick speckles across the green surface to break up the solid color. -
Final Seal:
Once everything is dry, you can apply a thin layer of matte varnish to protect the paint, though leaving it unsealed keeps the rustic, excavational vibe intact.
Now you have a timeless fossil replica ready for display
Butterflies and Bugs With Mixed Materials
This earthy butterfly mixes the warmth of terracotta-colored clay with fresh pops of teal, creating a charming decorative piece. It features a lovely play of textures, from smooth raised wings to dotted details, all hung on a rustic cord with wooden beads.
Step-by-Step Guide
Materials
- Polymer clay (Terracotta or Sanguine color)
- Polymer clay (Teal or Mint color)
- Acrylic paint (White, Light Blue)
- Small round paintbrush or dotting tool
- Rolling pin or clay roller
- Butterfly cookie cutter (or paper template and knife)
- Craft knife or scalpel
- Brown suede or leather cord
- Wooden beads (two sizes, natural finish)
- Toothpick or needle tool
- Gloss varnish (optional)
Step 1: Shaping the Base
-
Condition the clay:
Begin by warming up your terracotta-colored clay in your hands until it is soft and pliable. Roll it out into an even slab, roughly 1/4 inch thick, ensuring there are no air bubbles. -
Cut the shape:
Use a butterfly-shaped cookie cutter to stamp out your main form. If you prefer a custom shape like the one pictured, lightly trace your design onto the clay with a needle tool and carefully cut it out using a craft knife. -
Smooth the edges:
Gently run your finger along the cut edges of the butterfly to soften any sharp corners or clay burrs left by the cutter. -
Create the hanging hole:
Use a straw or a large needle tool to punch a hole at the very top of the butterfly’s head, between the antennae area. Make sure it’s wide enough for your suede cord to pass through later.
Step 2: Adding Clay Details
-
Prepare the teal accents:
Roll out a thin sheet of your teal or mint-colored clay. It should be thinner than your base layer so it sits delicately on top. -
Cut wing shapes:
Freehand cut four elongated teardrop shapes from the teal clay—two larger ones for the top wings and two smaller ones for the bottom wings. -
Attach the wing panels:
Press the teal teardrops gently onto the terracotta wings. The clay should bond naturally, but you can use a tiny dab of liquid clay if needed for extra grip. -
Indent the details:
Using a dull knife or a modeling tool, press a central line down the middle of each teal teardrop to create a leaf-like vein texture. -
Form the body:
Roll a small snake of teal clay for the butterfly’s abdomen. Place it down the center of the terracotta body and use a knife to press horizontal lines across it, mimicking segments. -
Add the thorax:
Roll a small ball of teal clay and press it just above the segmented abdomen to create the upper body section. -
Create lower wing accents:
Cut small, curved triangle shapes from the teal clay and arrange them in a fan pattern at the very bottom edge of the lower wings.
Clean Cuts Pro Tip
Before cutting your clay shapes, place a piece of plastic wrap over the clay. Press your cutters down through the plastic. This creates lovely rounded edges instead of sharp, blocky cuts.
Step 3: Baking and Painting
-
Bake the piece:
Preheat your oven according to the clay manufacturer’s instructions (usually around 230°F to 275°F). Place the butterfly on a parchment-lined baking sheet and bake for the recommended time. -
Cool down:
Allow the clay to cool completely before handling. I like to let this rest for at least an hour to ensure the clay hardens properly. -
Paint white details:
Dip a fine brush or toothpick into white acrylic paint. Add small dots to the tips of the upper wings and sketch delicate lines or dashes on the terracotta sections of the lower wings. -
Add blue dots:
Using a light blue paint, add tiny accent dots interspersed near the white details for a subtle pop of color. -
Seal the piece:
Once the paint is fully dry, you can apply a thin coat of matte or gloss varnish to protect the paint and give the clay a finished look.
Level Up: Scented Diffuser
Use unsealed terracotta air-dry clay instead of polymer. Once dry, add a few drops of essential oil to the back of the butterfly to turn this pendant into a wearable aromatherapy difuser.
Step 4: Assembly
-
Thread the cord:
Cut a length of brown suede cord. Fold it in half and push the looped end through the hole at the top of the butterfly. -
Secure the loop:
Pass the loose ends of the cord through the loop you just pushed through, pulling tight to create a lark’s head knot. -
Add beading:
Thread a medium-sized wooden bead onto both cords, sliding it down until it meets the knot. -
Create a spacer:
Wrap a smaller contrasting piece of cord or thick thread around the main cord just above the first bead to create a textured spacer. -
Final bead:
Add a second, slightly larger wooden bead above the wrapped spacer to complete the rustic pendant assembly.
Now you have a beautiful, nature-inspired pendant ready to wear or hang in a sunny window
Hanging Mobile of Happy Shapes
Bring a touch of magic to any room with this charming hanging mobile featuring textured clay stars, hearts, and moons. Painted in soft, earthy tones of blue, terracotta, and cream, these dangling shapes catch the light beautifully as they gently spin.
Detailed Instructions
Materials
- Air-dry clay or salt dough
- Rolling pin
- Cookie cutters (stars, hearts, crescents)
- Wooden dowel (approx. 12 inches)
- Jute twine or heavy string
- A straw or toothpick (for poking holes)
- Acrylic paints (muted blue, terracotta, dusty pink, grey, cream)
- Paintbrushes
- Small wooden beads (optional)
- Scissors
- Sandpaper (fine grit)
Step 1: Crafting the Clay Charms
-
Roll out the clay:
Begin by kneading your air-dry clay until it is soft and pliable. Roll it out on a flat surface to an even thickness of about 1/4 inch. If the clay sticks, you can put down a sheet of parchment paper first. -
Cut the shapes:
Use your cookie cutters to punch out a variety of shapes. Aim for about 12-15 pieces in total: a mix of large and small stars, hearts, and crescent moons works best for visual balance. -
Create hanging holes:
Before the clay starts to dry, use a plastic straw or a toothpick to poke a hole through the top of each shape. Make sure the hole is big enough for your twine to pass through later. -
Add texture (optional):
For that lovely rustic look seen in the photo, gently tap the surface of the clay with a crumpled ball of aluminum foil or a toothbrush to create a subtle, stony texture. -
Let them dry:
Arrange the shapes on a flat surface and let them dry completely. This usually takes 24-48 hours depending on humidity; flip them halfway through to ensure the backs dry evenly. -
Sand the edges:
Once fully cured, use a piece of fine-grit sandpaper to smooth out any rough or jagged edges left by the cookie cutters, but leave the surface texture intact.
Clay Cracking?
If your clay cracks while drying, fill the cracks with a wet mixture of clay and water (slip). Smooth it over with your finger and let it dry again.
Step 2: Painting and Decorating
-
Prepare your palette:
Squeeze out your acrylic paints. I like to mix a little white into the blue and terracotta colors to give them that soft, matte, pastel finish. -
Paint the shapes:
Paint each clay piece on both sides. Use different colors for variety—perhaps blue for the larger stars, terracotta for the hearts, and grey for the moons. Let the first side dry before flipping. -
Add details:
If you want extra depth, you can use a dry brush with a tiny bit of darker paint to lightly dust the textured areas, highlighting the rough surface.
Pro Tip: Balance
Before tying the final knots, lay the mobile flat on a table to visualize the layout. Ensure heaviness is distributed evenly so it hangs straight.
Step 3: Assembly
-
Prepare the dowel:
Cut five long pieces of jute twine, varying in length from roughly 15 to 25 inches. Tie one end of each string securely around your wooden dowel, spacing them out evenly. -
String the beads:
Thread a small wooden bead onto the first string. You can hold it in place by tying a simple knot directly underneath it at your desired height. -
Attach the shapes:
Thread the twine through the hole of a clay shape. Tie a knot underneath the shape so it rests securely. You can add multiple shapes to a single string, separating them with knots or beads. -
Vary the heights:
Continue attaching shapes to all five vertical strings. Try to stagger the heights of the shapes so they don’t bump into each other; having them cascading at different levels looks best. -
Create the hanger:
Cut a final piece of thick twine, about 20 inches long. Tie each end to the far edges of the wooden dowel to create a triangle shape for hanging. -
Secure everything:
Double-check all your knots. If the twine feels slippery, a tiny dot of craft glue on the knots will keep everything permanently in place. -
Final adjustments:
Hold the mobile up by the top hanger and gently slide the strings along the dowel until the mobile hangs straight and level without tilting to one side.
Hang your beautiful new mobile near a window where the sunlight can highlight the textures and soft colors
Wind Chime With Clay Charms
Bring a touch of the ocean indoors with this charming wind chime made from air-dry clay and natural driftwood. Featuring soft pastel shells, stars, and beads suspended on rustic twine, this mobile adds a peaceful, coastal vibe to any window or corner.
Step-by-Step Guide
Materials
- Air-dry clay (white and terracotta/peach colored)
- Acrylic paints (pastel blue, soft pink, sage green)
- Rolling pin
- Cookie cutters (small star, shell) or clay tools for sculpting
- Textured stamps or a toothpick for detailing
- Driftwood stick or sturdy branch (approx. 8-10 inches)
- Jute twine or hemp cord
- Wooden beads (assorted sizes)
- Straw or toothpick (for poking holes)
- Paintbrushes
- Clear matte sealant (optional)
Step 1: Sculpting the Charms
-
Prepare the clay:
Knead your air-dry clay until it is soft and pliable. If you want custom colors directly in the clay, mix a small drop of acrylic paint into white clay now, kneading until fully blended. -
Roll out slabs:
Roll the clay out on a flat surface to an even thickness of about 1/4 inch. This ensures the charms are sturdy enough to hang but not too heavy. -
Cut the shapes:
Use cookie cutters to punch out shapes like stars and circles. For the shell and fish shapes, you might need to freehand cut them with a clay knife or plastic tool if you don’t have cutters. -
Add texture details:
On the starfish, use a toothpick to press a starburst pattern into the center. For the scallop shell, use a clay tool to press vertical lines radiating from the base. -
Create hanging holes:
Before the clay dries, use a straw or toothpick to poke holes completely through the top and bottom of each charm. Make sure the hole is wide enough for your twine to pass through. -
Make clay beads:
Roll small leftover bits of clay into balls to create handmade beads. I like to make them slightly irregular for an organic look. Poke holes through the centers of these as well. -
Dry thoroughly:
Place all your pieces on a flat surface lined with parchment paper. Let them air dry for 24-48 hours, flipping them occasionally to ensure even drying.
Step 2: Painting & Assembly
-
Paint the charms:
Once dry, paint your shapes in soft coastal hues. Use a dusty blue for the star and fish, and a warm peach or terra cotta for the shells and simple circles. -
Seal the pieces:
For durability, apply a thin coat of clear matte sealant to the painted charms. This helps protect the clay from humidity. -
Prepare the hanger:
Take your driftwood stick and tie a piece of jute twine to both ends to create the main hanging loop. Wrap the extra twine around the wood a few times for a decorative knot. -
Cut suspension strings:
Cut three long pieces of jute twine. These will be the vertical strands that hold your charms. -
Start threading:
Begin by tying a knot at the very bottom of one string and threading on your bottom-most charm (like the scallop shell). -
Secure the charms:
To hold charms higher up the string, tie a knot in the twine right where you want the charm to sit, thread the charm, and tie another knot immediately above it to lock it in place. -
Add bead accents:
Interperse wooden beads and your handmade clay beads between the larger shapes. Varing the spacing adds visual interest. -
Attach to driftwood:
Tie the top of each completed strand securely onto the driftwood branch. Adjust the lengths so the central strand hangs slightly lower or higher than the sides for balance. -
Finish the ends:
For any loose twine ends at the very top or sides, fray the rope slightly to create little tassels.
Cracks while drying?
Smoothen cracks with a tiny bit of water on your finger before drying. If a crack appears after drying, fill it with a mix of white glue and clay dust.
Pro Tip: Hidden weights
For better hanging, make the bottom charm on each string slightly thicker and heavier. This added weight pulls the twine taut and keeps the mobile hanging straight.
Hang your new creation in a sunny window and enjoy the gentle movement of your seaside mobile