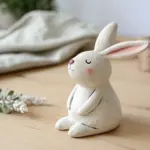
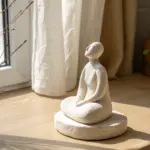
Green air dry clay is basically an instant shortcut to that fresh, nature-y vibe—no heavy painting required. If you’re craving projects that feel cute, calming, and totally doable on a cozy craft day, these ideas will keep your hands busy in the best way.
Monstera Leaf Ring Dish
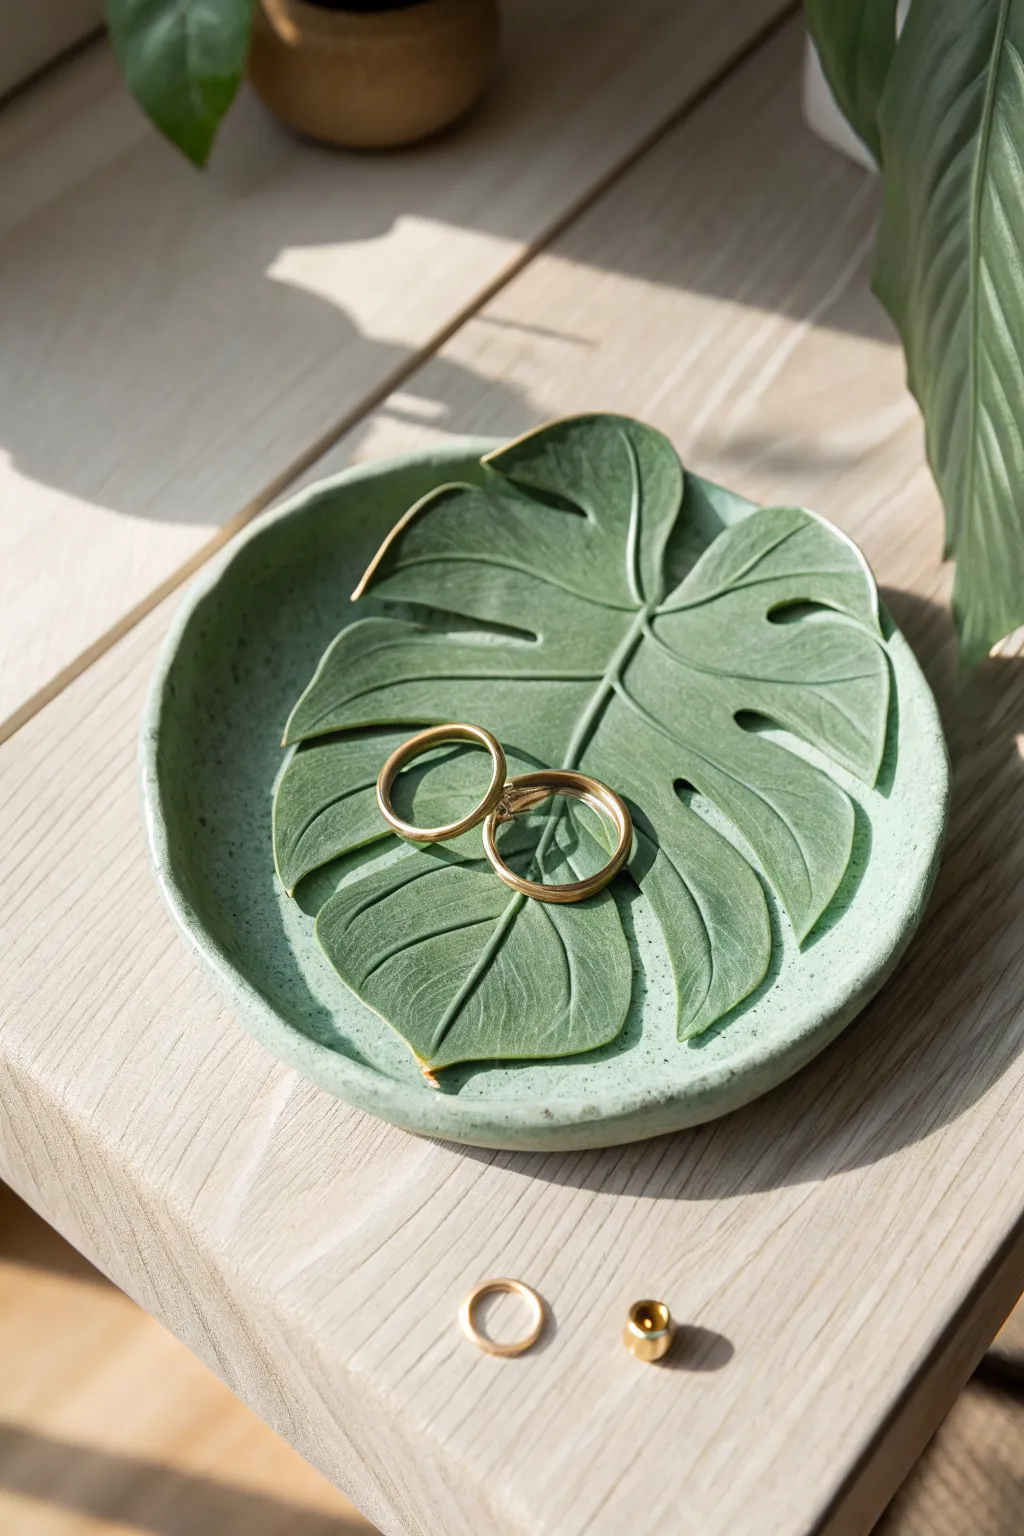
Bring the botanical beauty of the rainforest to your vanity with this charming ring dish. Featuring a realistic relief leaf set into a speckled green base, it’s the perfect resting spot for your favorite jewelry pieces.
Step-by-Step Guide
Materials
- Air dry clay (white)
- Acrylic paint (sage green, dark green, white)
- Monstera leaf (real or artificial) or a printed template
- Rolling pin
- Small bowl (for shaping)
- Clay knife or craft blade
- Modeling tool or toothpick
- Sponge or old toothbrush
- Fine grit sandpaper
- Gloss varnish or sealant
Step 1: Forming the Base
-
Prepare the Clay:
Start by conditioning a ball of white air dry clay until it is soft and pliable. If the clay feels too dry, you can wet your hands slightly to add moisture as you knead. -
Roll the Slab:
Roll the clay out into an even slab, aiming for a thickness of about a quarter of an inch. Ensure the surface is smooth and free of air bubbles. -
Cut the Circle:
Use a round cutter or trace around a small bowl (approx. 4-5 inches wide) to cut a perfect circle from your clay slab. This will form the main bowl of the dish. -
Shape the Curve:
Gently lift your clay circle and place it inside a small bowl to give it a curved shape. Press it lightly so it takes the form without getting stuck. -
Refine the Rim:
While the clay is in the bowl, smooth the outer rim with a damp finger to soften any sharp edges left by the cutting tool.
Step 2: Sculpting the Leaf
-
Roll Thinner Clay:
Roll out a separate, smaller piece of clay slightly thinner than your base slab. This will be used for the leaf detail. -
Trace the Shape:
Place your real Monstera leaf or template onto this thinner clay and trace around the outline with a needle tool or craft knife. -
Add Texture:
Use a modeling tool to gently press veins into the clay leaf. Start with a central line and branch out, mimicking natural growth patterns. -
Cut the Fenestrations:
Carefully cut out the signature holes and slits (fenestrations) of the Monstera leaf using your craft knife. -
Attach the Leaf:
Score the back of the clay leaf and the center of your drying bowl base. Apply a little water or slip to these areas and press the leaf firmly into the center of the bowl. -
Curve the Leaves:
Once attached, use your fingers to slightly curl the edges of the leaf upward so it looks three-dimensional and lively, rather than flat against the bowl.
Fixing Cracks
Does your clay show tiny cracks while drying? Mix a small amount of fresh clay with water to make a paste and fill in the gaps, then smooth it over with a damp finger.
Step 3: Finishing Touches
-
Dry Completely:
Allow the entire piece to dry in the bowl for at least 24-48 hours. I prefer to let it dry slowly away from direct heat to prevent cracking. -
Sand Smooth:
Once fully hard, remove the dish from the mold and sand down any rough edges or uneven spots on the rim with fine-grit sandpaper. -
Base Color:
Mix sage green acrylic paint and apply a solid coat to the entire dish, ensuring you get into the crevices around the raised leaf. -
Highlight the Leaf:
Paint the raised leaf area with a slightly deeper green to make it stand out, or use a dry-brushing technique with a lighter green to highlight the veins. -
Create Speckles:
Dip an old toothbrush into dark green or black paint diluted with a little water. Run your thumb over the bristles to flick tiny speckles across the dish for a ceramic pottery look. -
Seal the piece:
Finish by applying two coats of gloss varnish to protect the paint and give the dish a polished, high-end feel.
Gold Edges
For a luxe finish, paint the very rim of the dish and the edges of the Monstera leaf with metallic gold, liquid leaf paint after the green base coat is dry.
Your sophisticated jewelry holder is now ready to organize your treasures in style


Kawaii Cactus in a Mini Pot
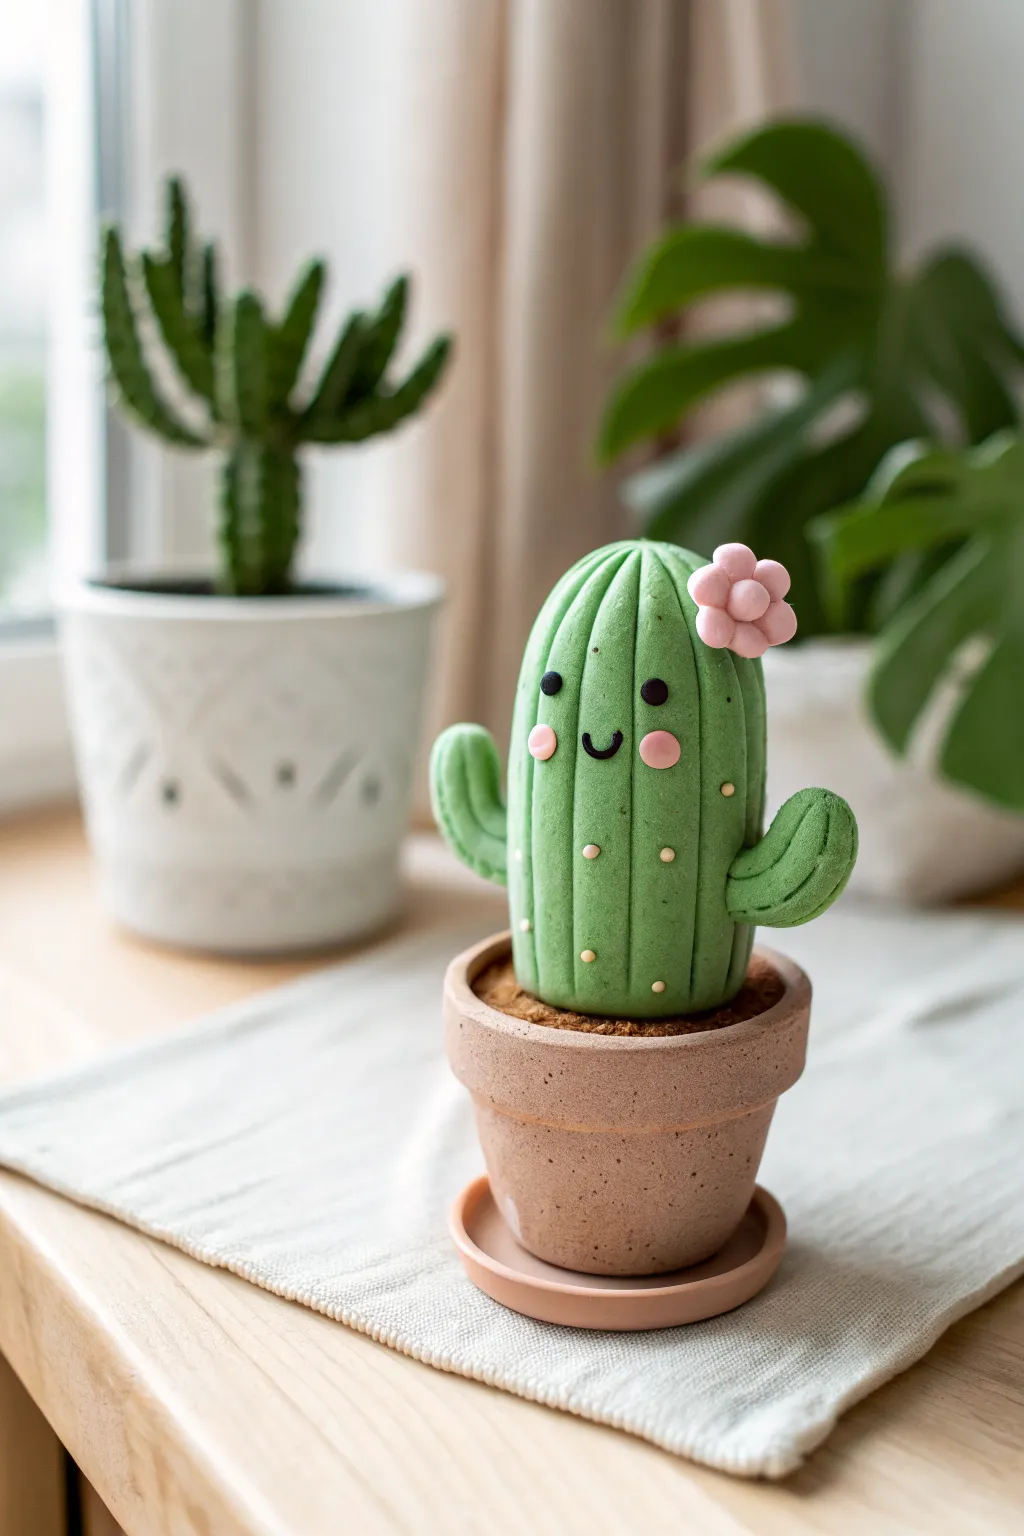
Bring a little desert charm to your desk without the need for watering with this adorable clay sculpture. This smiling cactus sits nestled in its own mini pot, featuring sweet details like rosy dimples and a tiny blooming flower.
Detailed Instructions
Materials
- Green air dry clay (mid-tone)
- Terracotta or light brown air dry clay
- Dark brown air dry clay (for soil)
- Pink air dry clay (two shades if possible, or mix with white)
- Black air dry clay (tiny amount)
- White acrylic paint or dimensional fabric paint
- Toothpick or needle tool
- Small ball tool
- Rolling pin
- Craft glue or water
Step 1: Sculpting the Pot
-
Base shape:
Begin by rolling a ball of terracotta-colored clay. Flatten the top and bottom slightly to create a cylinder that tapers just a bit toward the base. -
Hollowing out:
Using your thumb or a large ball tool, press into the center of the top to create a deep indentation for the ‘soil’ to sit in later. Smooth out the walls so they are even. -
Adding the rim:
Roll a long snake of the same terracotta clay. Flatten it gently with a rolling pin to create a band. Wrap this band around the top edge of your pot, blending the seam at the back so it looks like a traditional folded rim. -
Creating the saucer:
Flatten a smaller ball of terracotta clay into a thick disc for the saucer. Press the pot gently onto it to ensure the size is right, then create a small lip around the edge of the disc. -
Beveling the edges:
Use your finger to gently soften the sharp edges of the pot rim and saucer for a more realistic ceramic look.
Clean Lines Tip
Wipe your tools and hands with a distinct wet wipe relative to each color change. Green clay easily picks up dust from the dark brown soil clay.
Step 2: Forming the Cactus Body
-
Main shape:
Roll a smooth, thick log of green clay. Round off the top into a perfect dome shape. This will be the main body of the cactus. -
Creating ribs:
I find it helpful to use a needle tool or toothpick to gently press vertical lines down the length of the green body. Space them evenly around the cylinder to mimic cactus ribs. -
Adding arms:
Roll two smaller logs of green clay. Bend them slightly into an ‘L’ or ‘U’ shape to form the arms. -
Attaching the arms:
Score the attachment points on the main body and the arms with a needle tool. Add a dab of water or glue and press the arms onto the sides. Reshape them slightly so they curve upward nicely. -
Detailing the arms:
Extend your vertical rib lines from the main body onto the arms so the texture flows continuously.
Step 3: Planting and Texture
-
Adding soil:
Take a piece of dark brown clay and press it into the hollow of your terracotta pot. Use a toothbrush or a ball of tin foil to stipple the surface, giving it a rough, soil-like texture. -
Assembly:
Place the green cactus firmly onto the brown soil. You may want to insert a toothpick halfway into the cactus and halfway into the pot for extra stability while it dries.
Level Up: Texture
Before drying, gently sponge the terracotta pot with a damp coarse sponge. This removes fingerprints and imparts a realistic earthenware texture.
Step 4: Kawaii Details
-
The flower:
Roll five tiny balls of pink clay and arrange them in a circle. Flatten them slightly to make petals. Place a slightly smaller ball in the center to complete the flower. -
Placing the bloom:
Attach the flower to the top side of the cactus using a tiny dot of water. -
The face:
Roll two tiny specks of black clay for eyes and press them onto the face area. Roll a very thin, tiny snake of black clay and curve it into a ‘U’ shape for the smile. -
Rosy cheeks:
Flatten two small balls of pink clay into discs and press them below the eyes for blushing cheeks. -
Final spines:
Using the tip of a toothpick dipped in white paint, or a dimensional fabric paint pen, apply small dots in vertical rows between the rib lines to represent soft spines.
Let your new prickly pal dry completely before displaying it on your shelf


Smiling Succulent Magnet
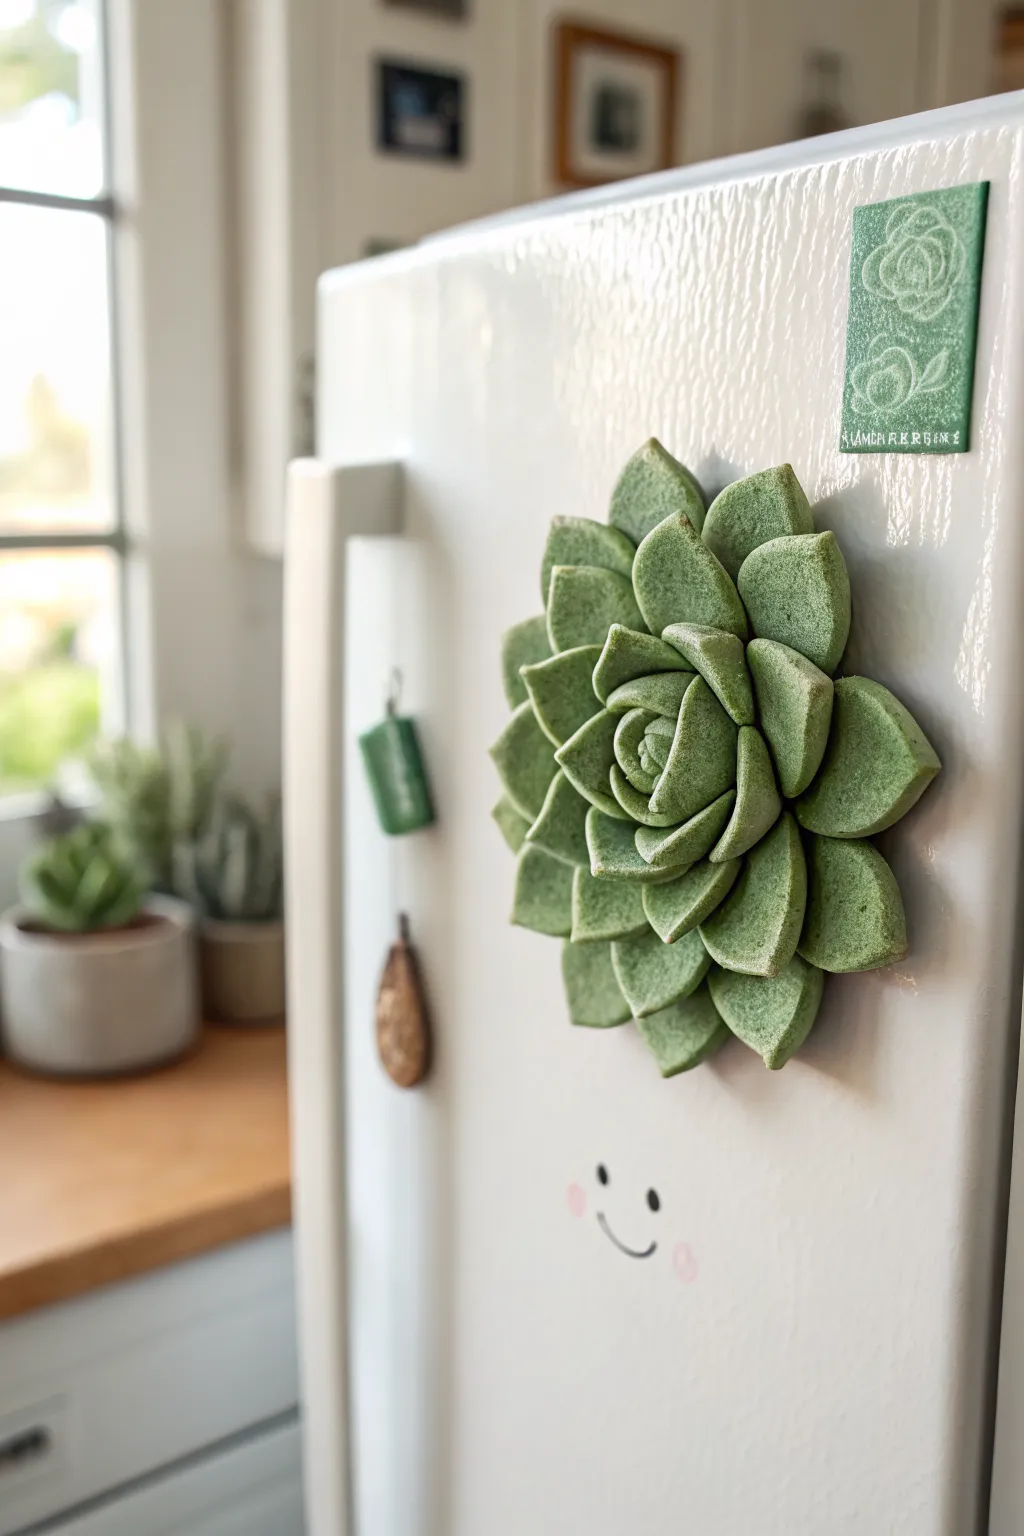
Bring a touch of greenery to your kitchen appliances with this hyper-realistic succulent magnet that never needs watering. The textured, slightly fuzzy surface of air-dry clay mimics real leaves perfectly, while the layered rosette shape adds beautiful dimension to any magnetic surface.
Step-by-Step
Materials
- Green air-dry clay (or white clay mixed with green acrylic paint)
- Strong round craft magnet
- Super glue or heavy-duty craft glue
- Texture tool (an old toothbrush or rough sponge)
- Modeling tools or a small knife
- Rolling pin
- Parchment paper
- Small cup of water
- Dark green soft pastel or eyeshadow (optional for shading)
Step 1: Prepping the Base
-
Condition the Clay:
Begin by kneading a ball of green air-dry clay until it is warm and pliable. If your clay is white, knead in green acrylic paint now until the color is uniform. -
Form the Base:
Pinch off a small amount of clay, about the size of a quarter, and flatten it into a thick disc. This will serve as the anchor for all your leaves. -
Attach the Magnet:
While the base disc is still wet, press your magnet firmly into the back to create an indentation. Remove the magnet, add a dab of super glue to the indentation, and press the magnet back in to secure it permanently.
Step 2: Creating the Leaves
-
Roll and Cut:
Roll out the remaining clay on parchment paper to about 1/8 inch thickness. Using a small knife or tear-drop cutter, cut out approximately 15-20 leaf shapes in graduating sizes: large, medium, and small. -
Shape the Tips:
Take each leaf and gently pinch the pointed end to sharpen it. Use your thumb to create a slight concave curve in the center of the leaf, mimicking the spoon-like shape of a real succulent. -
Add Texture:
To achieve that realistic, slightly fuzzy look seen in the photo, gently tap the surface of each leaf with an old toothbrush or a rough sponge. I find this step crucial for getting rid of fingerprints. -
Dry Fit:
Lay your leaves out on your work surface in size groups so you can easily grab the right size during assembly.
Cracking Issues?
If leaves crack while drying, mix a tiny bit of fresh clay with water to make a paste. Fill the cracks, smooth with a wet finger, and let re-dry.
Step 3: Assembling the Rosette
-
Layer One:
Take your largest leaves and attach them to the outer edge of your base disc. Use a tiny bit of water on the connection point to act as slip. Arrange them so they slightly overlap. -
Prop for Dimension:
If the outer leaves droop too much, tuck small balls of scrap clay or bits of paper towel underneath them to hold them up while they dry. -
Layer Two:
Attach the medium-sized leaves in a second ring, staggering them so each new leaf sits in the gap between the two leaves below it. -
Creating the Core:
Take the three smallest leaves and curl them tightly together to form the central bud. -
Final Assembly:
Place this central bud into the very middle of your rosette, using a modeling tool to gently press the bottom down into the base without crushing the tips. -
Shading (Optional):
For extra depth, shave a little dark green pastel into a powder. Use a dry brush to dust this powder deep into the crevices between the leaves before the clay dries.
Pro Tip: Realistic Tips
Brush a tiny amount of burgundy or reddish eyeshadow solely on the very tips of the leaves to mimic sun-stressed succulent edges.
Step 4: Drying and Refining
-
Undisturbed Drying:
Place the succulent in a safe, dry area. Because the layers are thick, let it dry for at least 24-48 hours. Don’t rush this part or the leaves may crack. -
Face Detail:
Once fully dry and hardened, use a fine-tip black marker or paint pen to draw a tiny, simple smiley face on the fridge surface below it—or, for a twist, draw it on a lower leaf if space permits. -
Sealing:
Coat the succulent with a matte varnish spray. Avoid glossy finishes if you want to maintain the natural, velvety look of the plant.
Your finished magnet will add a permanent smile and a pop of nature to your daily routine, holding up your photos in style


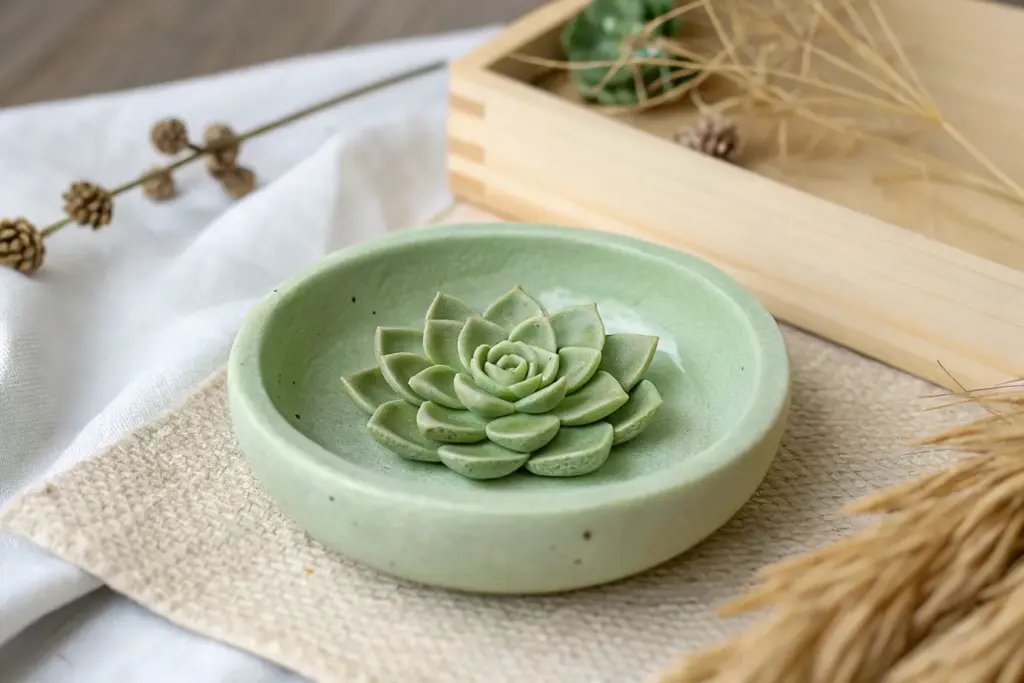
Frog on a Lily Pad Trinket Tray
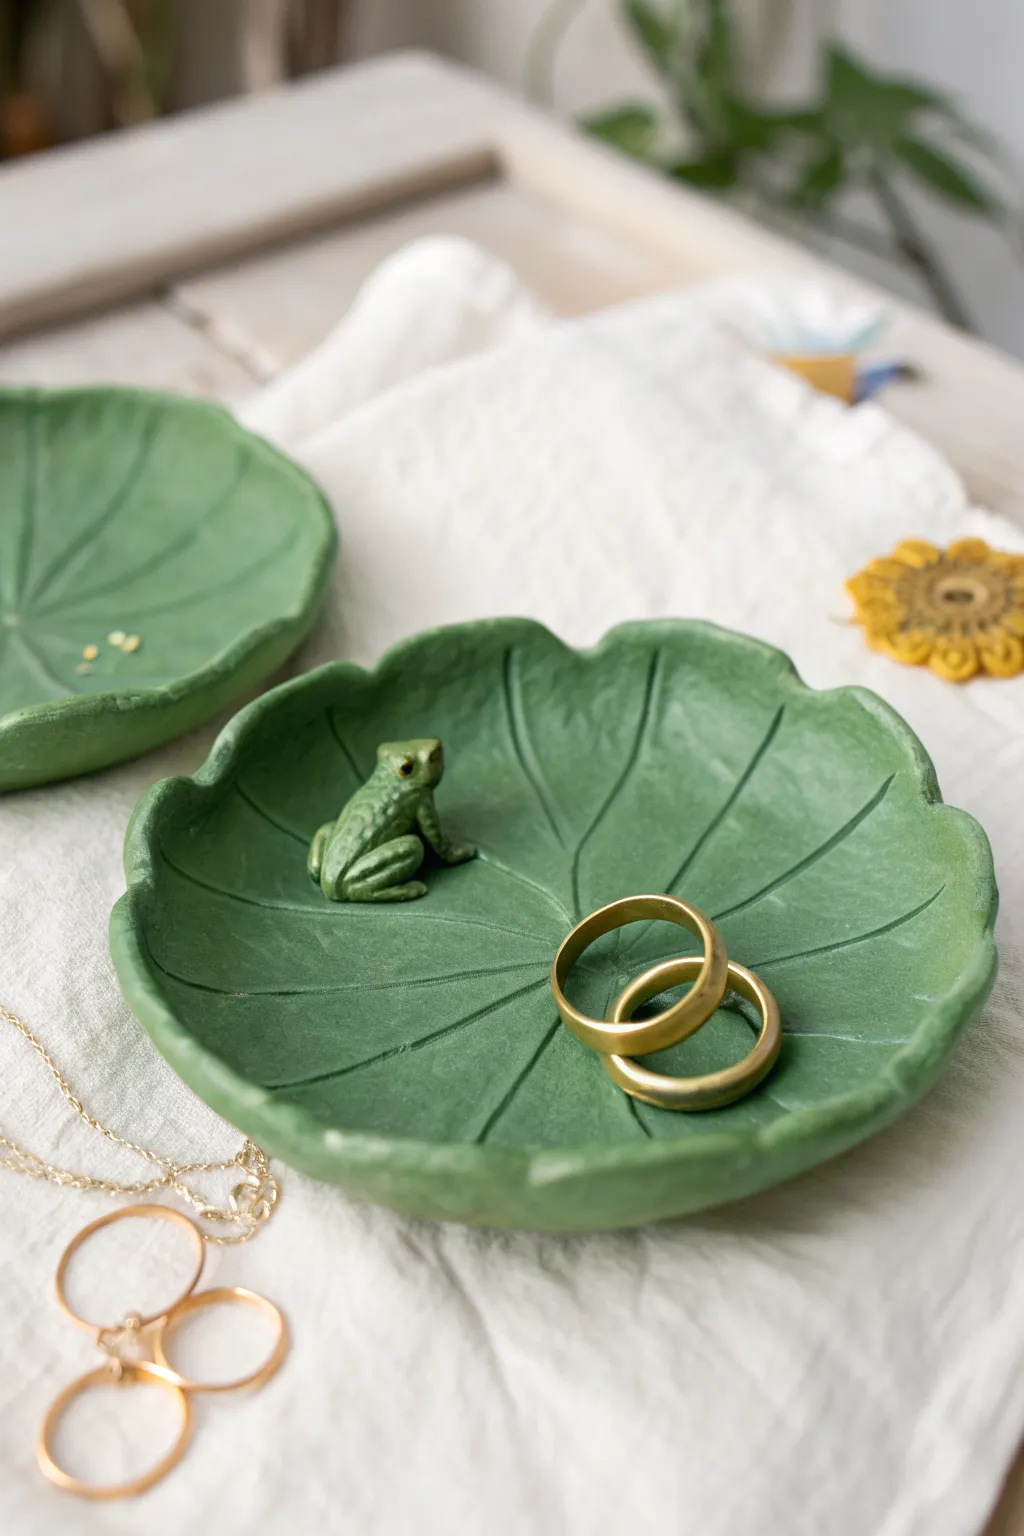
Bring a touch of the pond to your dresser with this charming lily pad dish, complete with a tiny amphibian guardian. The matte green finish and subtle leaf veining give it an organic, peaceful feel perfect for holding your favorite rings.
Step-by-Step Guide
Materials
- Air dry clay (white or terracotta)
- Acrylic paint (sage green, dark green, black, white, gold)
- Rolling pin
- Rolling guides or wooden slats (approx. 1/4 inch thick)
- Needle tool or toothpick
- Small bowl (to use as a mold)
- Plastic wrap
- Sharp crafting knife
- Fine grit sandpaper (220 or higher)
- Paintbrushes (flat shader and fine detail)
- Matte varnish or sealant
- Small sponge (optional for texturing)
- Water cup
Step 1: Shaping the Lily Pad Base
-
Prepare the clay:
Begin by conditioning a handful of air dry clay until it is soft, pliable, and free of cracks. -
Roll the slab:
Place your rolling guides on either side of the clay and use your rolling pin to create an even slab about 1/4 inch thick. This thickness ensures the tray is sturdy but elegant. -
Cut the rough circle:
Use a needle tool to loosely trace a circle about 4-5 inches in diameter. It doesn’t need to be perfect since lily pads are naturally irregular. -
Carve the wavy edges:
Refine the circle by cutting gentle, wavy indentations around the perimeter to mimic the scalloped edge of a lily pad. Don’t forget one deeper V-shaped notch where the stem would attach. -
Create the veins:
Starting from the center point, use your needle tool to lightly score lines radiating outward toward the scalloped edges. Press gently—you just want surface texture, not to cut through. -
Shape the dish:
Cover your small bowl with plastic wrap to prevent sticking. Gently lift your clay slab and drape it inside the bowl so it takes on a curved, concave shape. -
Refine the curve:
Smooth the edges with a bit of water on your finger to remove any sharp cuts or crumbs while it rests in the mold.
Smooth Operator
Use a damp sponge to smooth your clay before drying. It works better than sandpaper later because it doesn’t create dust and preserves the soft, organic look.
Step 2: Sculpting the Frog Guardian
-
Form the body:
Take a small marble-sized ball of clay and shape it into a tear-drop for the frog’s body. -
Attach the legs:
Roll two tiny ropes of clay for the back legs. Fold them into a ‘Z’ shape and blend them onto the sides of the body using little water or slip. -
Add front legs:
Add two smaller, straight cylinders for the front legs, ensuring they look like they are propping the frog up. -
Sculpt the face:
Add two tiny beads of clay for eyes on top of the head and use a needle tool to press in a small smile. -
Mount the frog:
Score the bottom of the frog and a spot on the lily pad (while it’s still in the bowl). Apply a dab of water and press the frog gently into place. -
Dry completely:
Let the entire piece dry in the mold for at least 24-48 hours. I find flipping it over halfway through helps the bottom dry evenly.
Step 3: Painting and Finishing
-
Sand the surface:
Once bone dry, use fine-grit sandpaper to gently smooth the rim and any rough patches on the underside. -
Base coat:
Paint the entire dish and frog with a solid coat of sage or leaf green acrylic paint. Let it dry fully. -
Enhance texturing:
Mix a slightly darker green with water to create a wash. Brush this over the veins and wipe away the excess with a paper towel, leaving shadow in the crevices. -
Detail the frog:
Use a darker green to add spots or stripes to the frog’s back. Use a tiny dot of black for the eyes, and perhaps a speck of gold for a magical touch. -
Dry brush highlights:
Take a dry brush with a tiny amount of lighter green or yellow-white paint and lightly dust the raised edges of the lily pad to make the texture pop. -
Seal the piece:
Finish with two coats of matte varnish to protect your jewelry tray from scratches and moisture.
Make it Bloom
Sculpt a small flattened lotus flower using teardrop shapes and attach it near the frog. Paint the center yellow and petals pink for a pop of contrasting color.
Now your jewelry has a safe, whimsical spot to rest at the end of the day

What Really Happens Inside the Kiln
Learn how time and temperature work together inside the kiln to transform clay into durable ceramic.
Mini Green Dinosaur Buddy
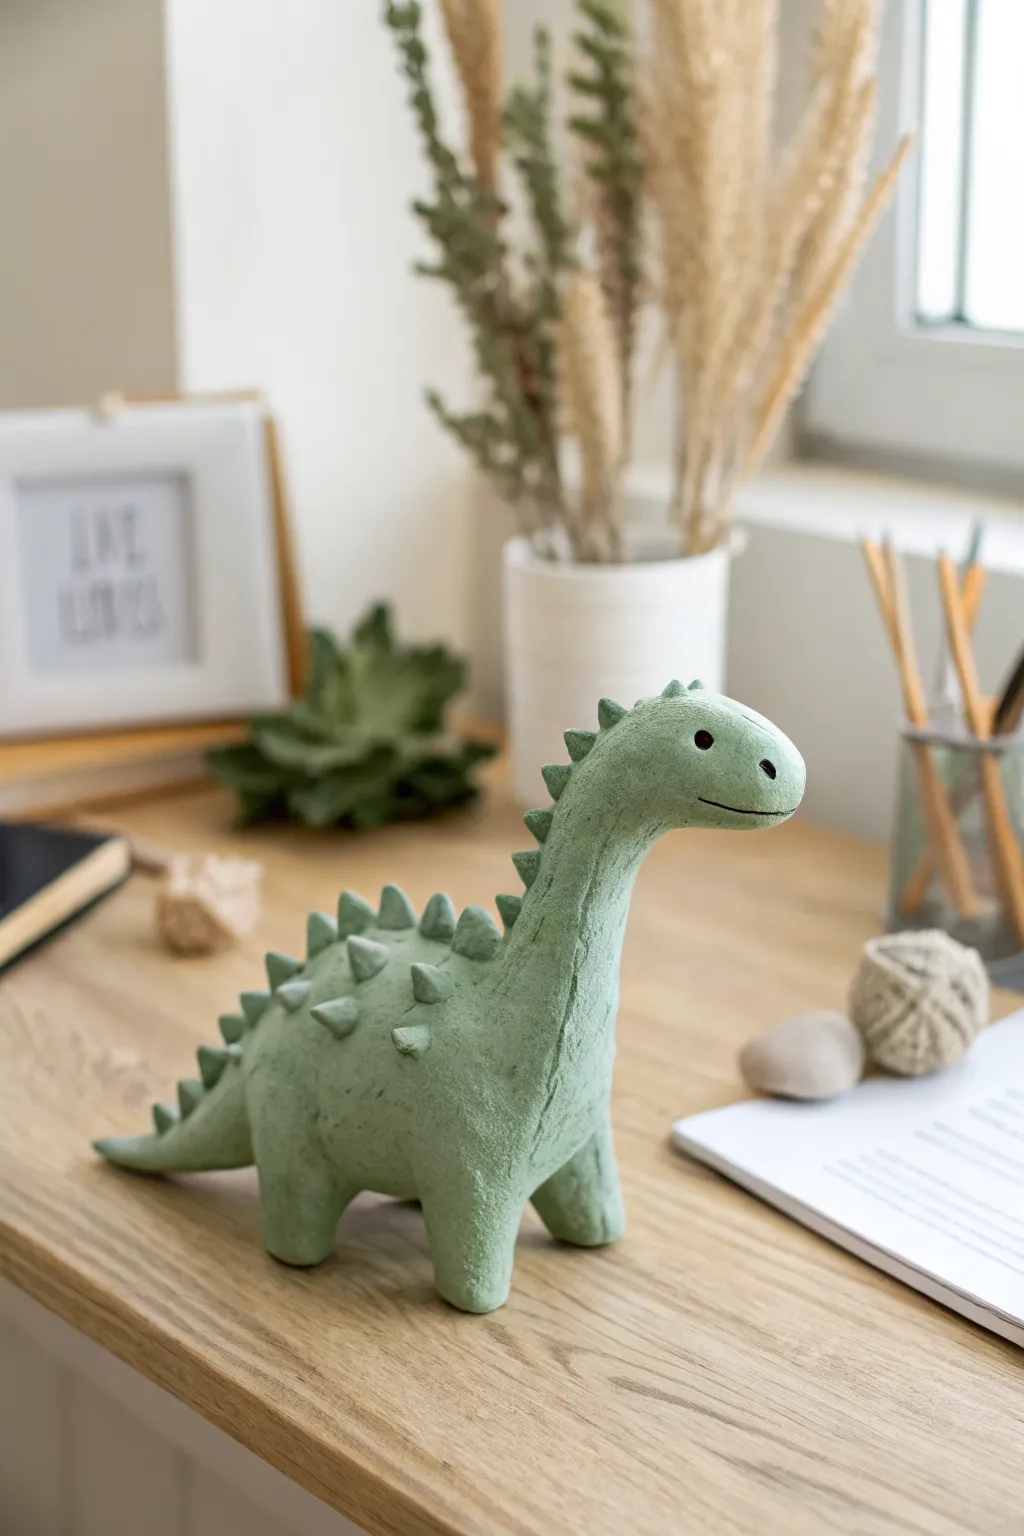
This charming little dinosaur brings a playful prehistoric vibe to any desk or shelf with its soft green hue and friendly smile. The project captures a lovely textured finish that mimics stone or felt, making it a delightful tactile piece.
Step-by-Step
Materials
- Green air dry clay (or white clay mixed with green acrylic)
- Small rolling pin
- Modeling tools (or toothpicks/skewers)
- Water in a small cup
- Black acrylic paint
- Fine detail paintbrush
- Sandpaper (fine grit)
- Matte sealant or varnish
Step 1: Shaping the Body
-
Form the torso:
Begin by taking a handful of green clay and rolling it into a smooth, oval-shaped ball for the main body. Gently flatten the bottom so it can stand stable on your work surface. -
Create the legs:
Roll four smaller, sausage-shaped cylinders of equal size. These will be the sturdy legs. Firmly press them onto the bottom of the body. I find it helps to score the attachment points with a toothpick and add a dab of water to ensure a strong bond. -
Blend the seams:
Use your thumb or a modeling tool to smooth the clay where the legs meet the body, blending the clay until the seams disappear completely. -
Shape the neck and head:
Roll a thicker coil of clay that tapers slightly. Attach the wider end to the front of the body, curving it upward to form the neck. Mold the top into a rounded head shape, blending the neck connection seamlessly into the torso. -
Add the tail:
Create a cone shape for the tail and attach it to the rear of the body. Smooth the joint and curve the tip slightly to give the dinosaur a sense of movement.
Seamless Spikes
If your spikes keep falling off, use a ‘slip’ mixture (clay mixed with water into a paste) as glue. It bonds wet clay parts much better than plain water alone.
Step 2: Adding Details
-
Make the spine plates:
Roll tiny balls of clay and pinch them into small triangles or flat spikes. You will need a variety of sizes, starting larger for the back and getting smaller toward the tail and head. -
Attach the main spikes:
Starting at the center of the back, press the largest spikes onto the spine. Use a tiny bit of water to stick them down, then smooth the base of each spike into the main body. -
Continue the pattern:
Work your way down the tail and up the neck, attaching progressively smaller spikes. Keep them roughly aligned in a single row. -
Add side texture:
Create a second row of much smaller, rounder bumps along the sides of the larger back spikes for added texture and interest. -
Define the face:
Use a modeling tool to gently press a horizontal line for the mouth, curving it slightly upward for a smile. Use a rounded tool to make small indentations for the nostrils.
Step 3: Finishing Touches
-
Add surface texture:
Before the clay dries, take a dense sponge or a crumpled ball of aluminum foil and gently press it all over the dinosaur’s skin. This creates that lovely, stone-like pitted texture seen in the photo. -
Allow to dry:
Set your dinosaur in a safe, dry place away from direct sunlight. Depending on the brand of clay and humidity, this could take 24 to 48 hours. -
Refine the surface:
Once fully cured, use fine-grit sandpaper to gently smooth any rough fingerprints or sharp edges on the feet, but try to preserve the texture you added earlier. -
Paint the eyes:
Dip a fine detail brush into black acrylic paint. Carefully paint two small, solid black circles for the eyes. Add a tiny thin line inside the mouth indentation if you want to emphasize the smile. -
Seal the piece:
Apply a coat of matte varnish or sealant to protect the clay and give it a unified, professional finish without making it too shiny.
Pastel Personality
Instead of pre-colored green clay, use white air-dry clay and knead in a drop of sage green acrylic paint. This gives a beautiful, soft pastel marble effect.
Now you have a sturdy little prehistoric friend ready to guard your workspace
Tiny Turtle with Textured Shell
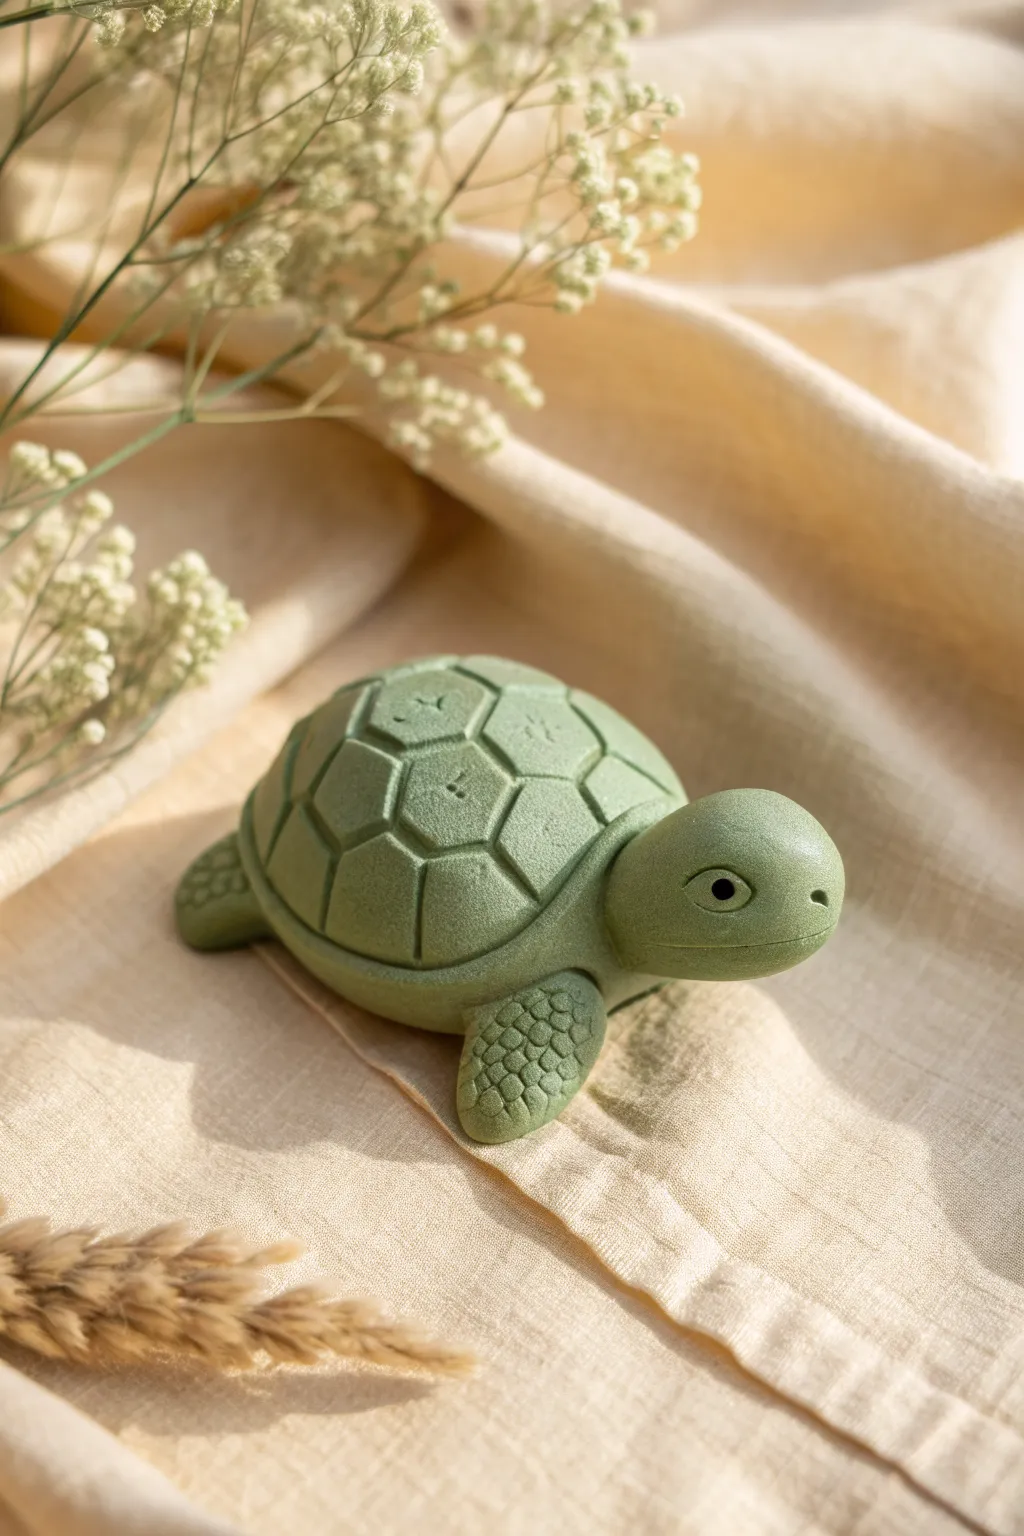
Sculpt a serene, miniature turtle that brings a touch of nature indoors with its earthy green tones. This project focuses on simple geometric shapes and careful texturing to create a clean, stylized shell pattern that looks wonderfully organic.
Step-by-Step Guide
Materials
- Green air dry clay (olive or sage tone)
- Modeling tools (needle tool and ball stylus)
- Small rolling pin
- Water in a small dish
- Smooth work surface or clay mat
- Optional: Fine sandpaper
Step 1: Forming the Body and Shell
-
Prepare the clay:
Begin by conditioning your green air dry clay. Knead it in your hands until it’s warm, pliable, and free of any cracks. -
Shape the main body:
Roll a medium-sized ball of clay, roughly the size of a golf ball. Flatten it slightly into a thick oval to serve as the turtle’s main body base. -
Create the shell dome:
Roll a second, slightly smaller ball for the shell. Gently press it onto a flat surface to create a hemisphere shape, keeping the dome high and rounded. -
Attach the shell:
Score the bottom of the shell dome and the top of the body piece with your needle tool. Dab a little water on the scored areas and press them firmly together to join. -
Sculpt the head:
Roll a smaller ball of clay for the head. Shape it into a smooth teardrop, blunting the narrow end slightly where it will attach to the body. -
Attach the head:
Position the head at the front of the body, angled slightly upward. Blend the clay at the neck seam using a modeling tool or your finger dipped in water until the join is invisible.
Step 2: Adding flippers and features
-
Make the front flippers:
Create two equal-sized small balls. Flatten them into elongated teardrop shapes. These should be thick enough to support the turtle’s front. -
Make the back flippers:
Repeat the process with two slightly smaller balls for the rear legs, shaping them into shorter, rounded tabs. -
Attach the limbs:
Score and slip the flippers onto the underside of the body. Angle the front flippers backward slightly and the rear ones forward to mimic a swimming or resting pose. -
Refine the seams:
Check all connection points. Use a rubber tipped tool or a damp finger to smooth out any rough transitions between limbs and the body.
Crack Control
If hairline cracks appear while drying, mix a tiny bit of fresh clay with water to make a paste. Fill the cracks, smooth over, and let dry again.
Step 3: Detailing textures
-
Mark the shell center:
Using a needle tool, lightly sketch a hexagon in the very center top of the shell. This will be the anchor for your pattern. -
Create the shell pattern:
Carve deep, clean lines radiating from the central hexagon to create the surrounding scutes (shell plates). Ensure the lines are uniform in depth for that stylized look. -
Texture the flippers:
Use a small ball stylus or a specialized texture tool to press a scale pattern into the flippers. Start at the tips and work your way up toward the body, overlapping impressions slightly. -
Add facial features:
Use the needle tool to gently carve a horizontal line for the mouth, curving it up at the ends for a subtle smile. -
Sculpt the eyes:
Press deep indentations for eye sockets. Roll tiny balls of clay for eyes, insert them, and use a needle tool to create a pupil indentation in the center. -
Pore texture:
I find that gently tapping the surface of the shell plates with a toothbrush or stiff brush adds a lovely, realistic stone-like texture to the otherwise smooth clay. -
Final smoothing:
Do a final check for fingerprints. A brush dampened with a tiny bit of water can be swept over the whole piece to soften hard edges before drying. -
Dry completely:
Let the turtle dry in a cool, dry place for at least 24-48 hours. Turn it over halfway through to ensure the bottom dries evenly.
Earthy Accents
Once dry, use a dry-brush technique with a lighter green or cream acrylic paint to highlight the raised textures on the shell and flippers.
Now you have a charming little reptile friend to keep you company on your desk


The Complete Guide to Pottery Troubleshooting
Uncover the most common ceramic mistakes—from cracking clay to failed glazes—and learn how to fix them fast.
Avocado Half Desk Buddy
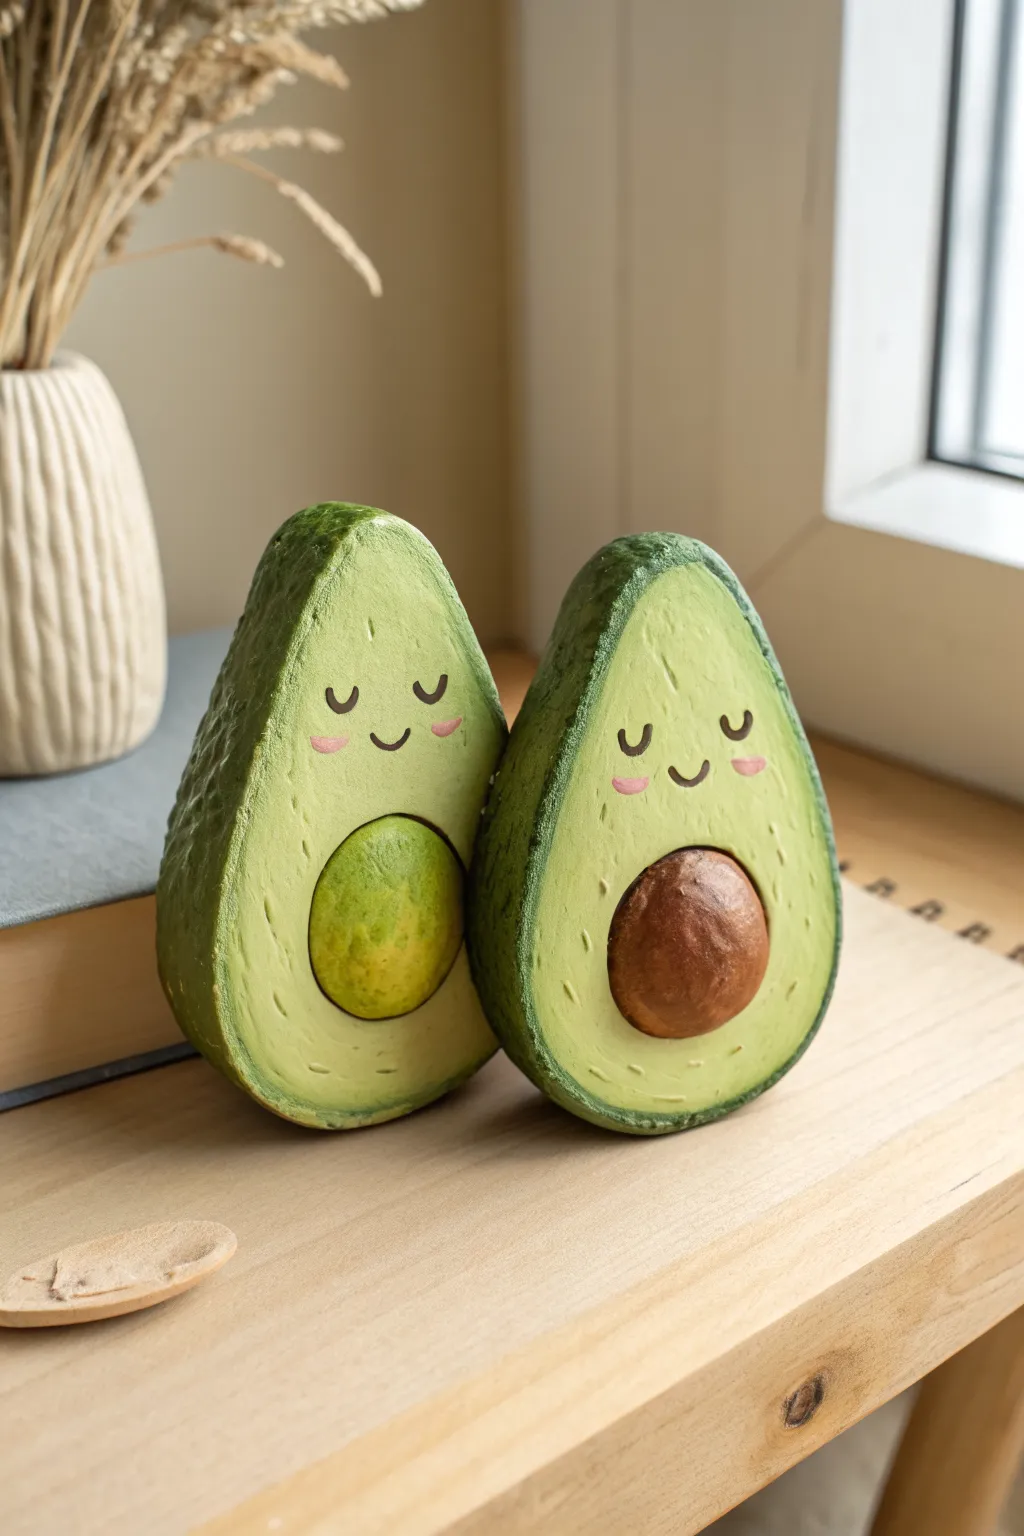
These charming avocado halves serve as cheerful guardians for your workspace, featuring detailed textured skins and adorable painted expressions. Sculpted from air-dry clay, one sports a ripe brown pit while the other showcases a unique yellowish-green center, making them a perfect mismatching pair.
How-To Guide
Materials
- Air-dry clay (white or pre-colored green)
- Acrylic paints: Dark green, lime green, yellow, brown, black, pink
- Sculpting tools: Ball tool, needle tool, texturing sponge or brush
- Aluminum foil
- Fine-grit sandpaper
- Paintbrushes: Detail liner brush, flat shader brush
- Matte varnish or sealant
Step 1: Sculpting the Base
-
Create the core:
Begin by crumpling aluminum foil into a pear-like teardrop shape. This saves clay and keeps the figure lightweight. Press it firmly so it is dense and holds its shape. -
Prepare the clay:
Condition your air-dry clay by kneading it until pliable. Roll it out into a flat sheet, roughly 1/4 inch thick. -
Wrap the foil:
Lay the clay sheet over your foil armature. Wrap it completely, smoothing the seams together with a bit of water on your finger until the surface is seamless. -
Shape the avocado:
Refine the shape to look like a sliced avocado half. Flatten the front face completely so it looks like a clean cut, while keeping the back round and bulbous. -
Indent the pit:
Using a large ball tool or your thumb, press a gentle, circular indentation into the lower center of the flat face where the pit will sit. Don’t go too deep; just create a shallow nest. -
Sculpt the pit:
Roll a separate ball of clay that fits snugly into your indentation. I prefer to flatten the back slightly so it adheres well. Score both the pit back and the indentation, add a drop of water, and press the pit into place. -
Texture the skin:
For the realistic skin texture on the back and sides, use a stiff bristle brush or a textured sponge. Dab it repeatedly over the outer green areas to create a pebbled, bumpy surface. -
Create inner texture:
On the flat front face (the flesh), use a needle tool to scratch very faint, tiny lines radiating slightly from the center, mimicking the fibrous look of real avocado flesh.
Texturing Tip
Use a real avocado skin to impress texture! Press a piece of clean, dried avocado peel onto the wet clay of the outer shell for ultra-realistic bumps.
Step 2: Painting & Details
-
Base coat the skin:
Once fully dry (24-48 hours), paint the bumpy outer skin with a dark forest green acrylic paint. Ensure you get the paint into all the textured crevices. -
Paint the flesh:
Mix a pale lime green with plenty of white and a touch of yellow. Paint the flat front face, creating a soft gradient that gets slightly lighter near the center pit. -
Add the rim effect:
Using a dry-brush technique, lightly dab a lighter green along the very edge where the skin meets the flesh. This highlights the rim texture. -
Color the pits:
For the traditional pit, use a rich cocoa brown with subtle lighter brown highlights. For the unique pit shown in the Reference, create a gradient of lime green fading into yellow at the center. -
Paint the face:
With your finest detail brush and black paint, carefully draw two small ‘U’ shapes for sleeping eyes and a tiny smile. Position them slightly above the center of the avocado face. -
Add rosy cheeks:
Dip the tip of a small brush or a toothpick into pink paint. Dab two small oval cheeks just below the outer corners of the eyes. -
Seal the work:
Finish by applying a thin coat of matte varnish over the entire piece to protect the paint and give it a cohesive, professional finish.
Level Up: Functional Art
Before drying, insert a heavy-duty magnet into the flat back of the avocado to turn these desk buddies into strong fridge magnets.
Now you have an adorable pair of avocado friends to brighten up your desk every day
Leaf-Imprint Coaster Set
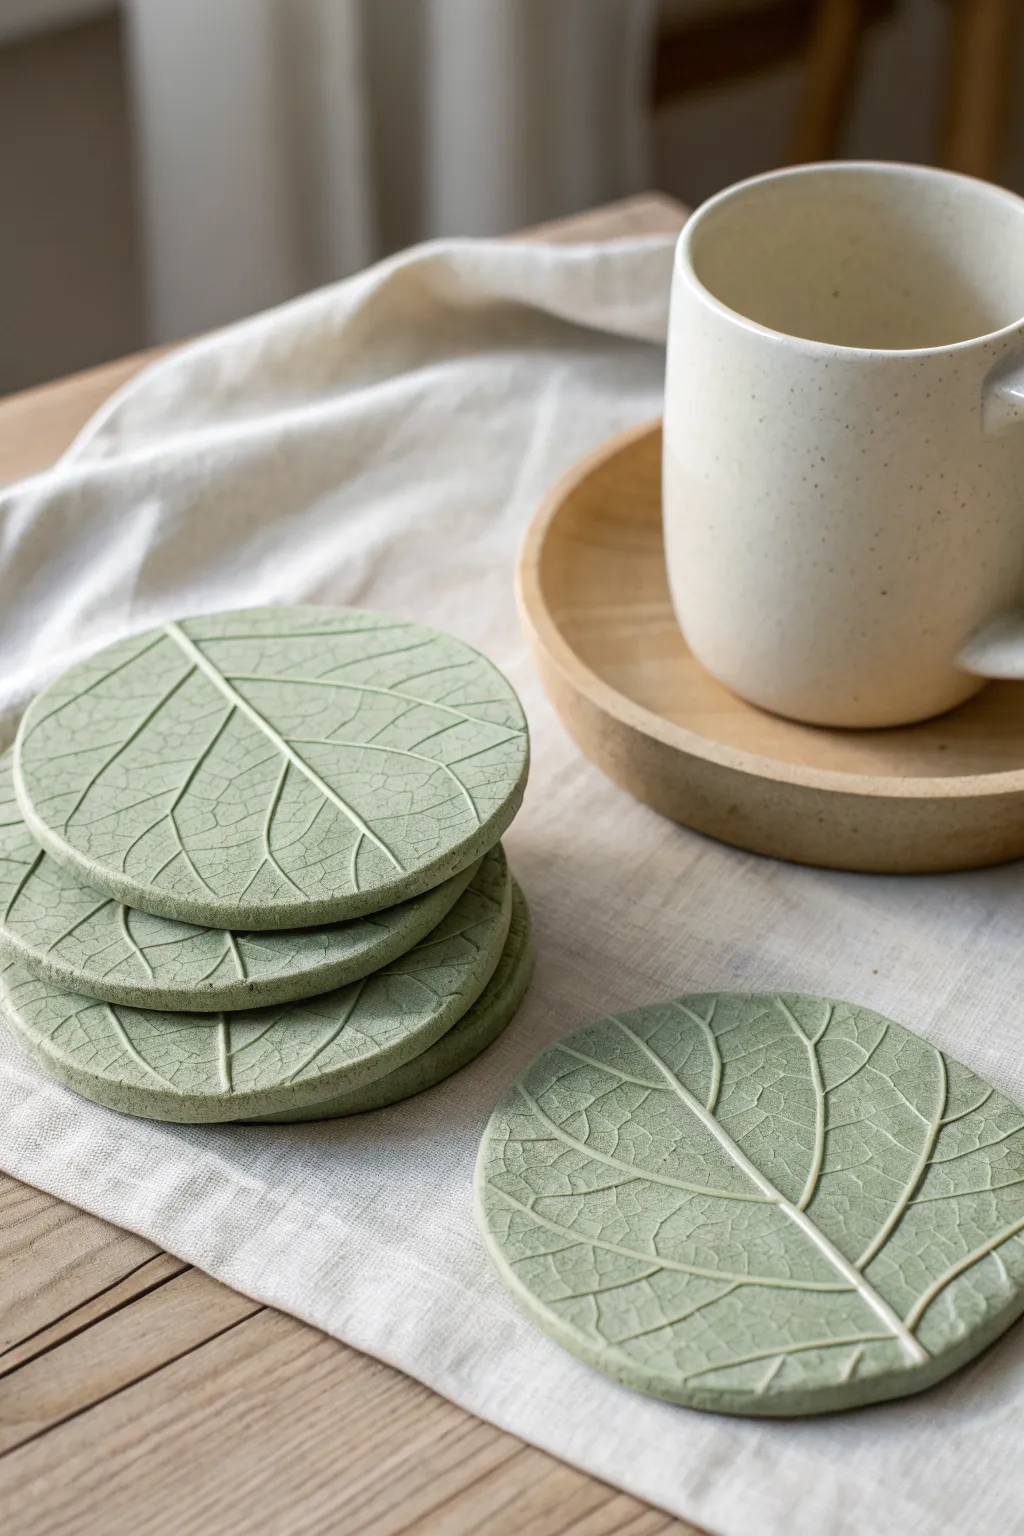
Bring a touch of nature to your table with these elegant, minimalist coasters featuring intricate leaf vein patterns. The subtle sage green color and matte finish give them a modern, organic look that perfectly complements natural wood and linen.
Step-by-Step Guide
Materials
- White or pre-colored sage green air-dry clay
- Acrylic paint (sage green and subtle brown/grey if tinting white clay)
- Fresh leaves with prominent veins (hydrangea, hosta, or fig leaves work well)
- Rolling pin
- Round cookie cutter (approx. 4 inches) or a bowl to trace
- Parchment paper or non-stick mat
- Craft knife or needle tool
- Fine-grit sandpaper (220 grit)
- Matte finish varnish or sealant (water-resistant)
- Sponge or soft paintbrush
Step 1: Preparation & Texturing
-
Tint the clay:
If you are starting with white clay, mix in a generous amount of sage green acrylic paint. Knead the clay thoroughly until the color is uniform and streak-free. Add a tiny drop of brown to knock back the brightness for that earthy tone seen in the image. -
Roll out the slab:
Place your ball of clay onto parchment paper. Use your rolling pin to flatten it into an even slab, aiming for a thickness of about 1/4 inch (6mm). This thickness ensures durability without being too chunky. -
Select your leaf:
Choose a fresh leaf that is slightly larger than your intended coaster size. The veins on the backside of the leaf are usually more prominent, so this is the side you’ll press into the clay. -
Create the impression:
Place the leaf vein-side down onto your clay slab. Use your rolling pin to gently but firmly roll over the leaf once. Don’t roll back and forth, as this can shift the image; just one confident pass is best. -
Reveal the pattern:
Carefully lift and peel the leaf away from the clay by its stem. You should see a crisp, detailed network of veins left behind in the surface.
Pro Tip: Flatness
If your coasters curl while drying, slightly dampen the concave side with a sponge and place them under a heavy stack of books for overnight flattening.
Step 2: Shaping & Refining
-
Cut the shape:
Position your round cookie cutter or bowl over the most interesting part of the leaf pattern. Press down firmly to cut the circle. If using a bowl, trace around it with a needle tool. -
Clean the edges:
Remove the excess clay from around your circle. Dip your finger in a little bit of water and gently run it along the cut edge to smooth out any harsh roughness, being careful not to smudge the leaf texture on top. -
Create the set:
Repeat the process to create a set of 4 or 6 coasters. Re-roll your excess clay scraps, but be aware that air bubbles can sometimes form in reworked clay. -
Initial drying phase:
Transfer the coasters (still on their parchment paper if possible) to a flat board. Let them air dry in a cool, draft-free spot. Avoid direct sunlight which can cause cracking. -
Flip for flatness:
After about 24 hours, when the top feels dry to the touch, gently flip the coasters over. I like to weigh them down lightly with a book placed on top of a paper towel during this stage to prevent curling edges.
Step 3: Finishing Touches
-
Sand for smoothness:
Once fully dry (usually 48-72 hours), inspect the edges. Use fine-grit sandpaper to gently buff away any remaining sharp burrs on the rim. Do not sand the top surface or you will lose the texture. -
Enhance the veins (optional):
If you want the veins to pop more, you can do a dry-brush technique with a slightly lighter green paint, catching just the raised areas, though the plain monochrome look is very chic. -
Seal the top:
Apply a thin coat of matte varnish to the top and sides using a soft brush. This step is crucial because air dry clay is porous and water will ruin unsealed coasters. -
Seal the bottom:
Once the top is dry, flip them and seal the bottom. Ensure the sealant covers every pore. -
Final coat:
Apply a second coat of varnish for extra durability. Let them cure for at least 24 hours before placing a hot mug on them.
Level Up: Gilded Veins
For a luxe touch, rub a tiny amount of gold wax paste into the deepest vein impressions before sealing, or paint the rim with liquid gold leaf.
Now you have a stunning set of botanical coasters ready to protect your furniture in style

TRACK YOUR CERAMIC JOURNEY
Capture glaze tests, firing details, and creative progress—all in one simple printable. Make your projects easier to repeat and improve.
Mini Plant Stake Markers
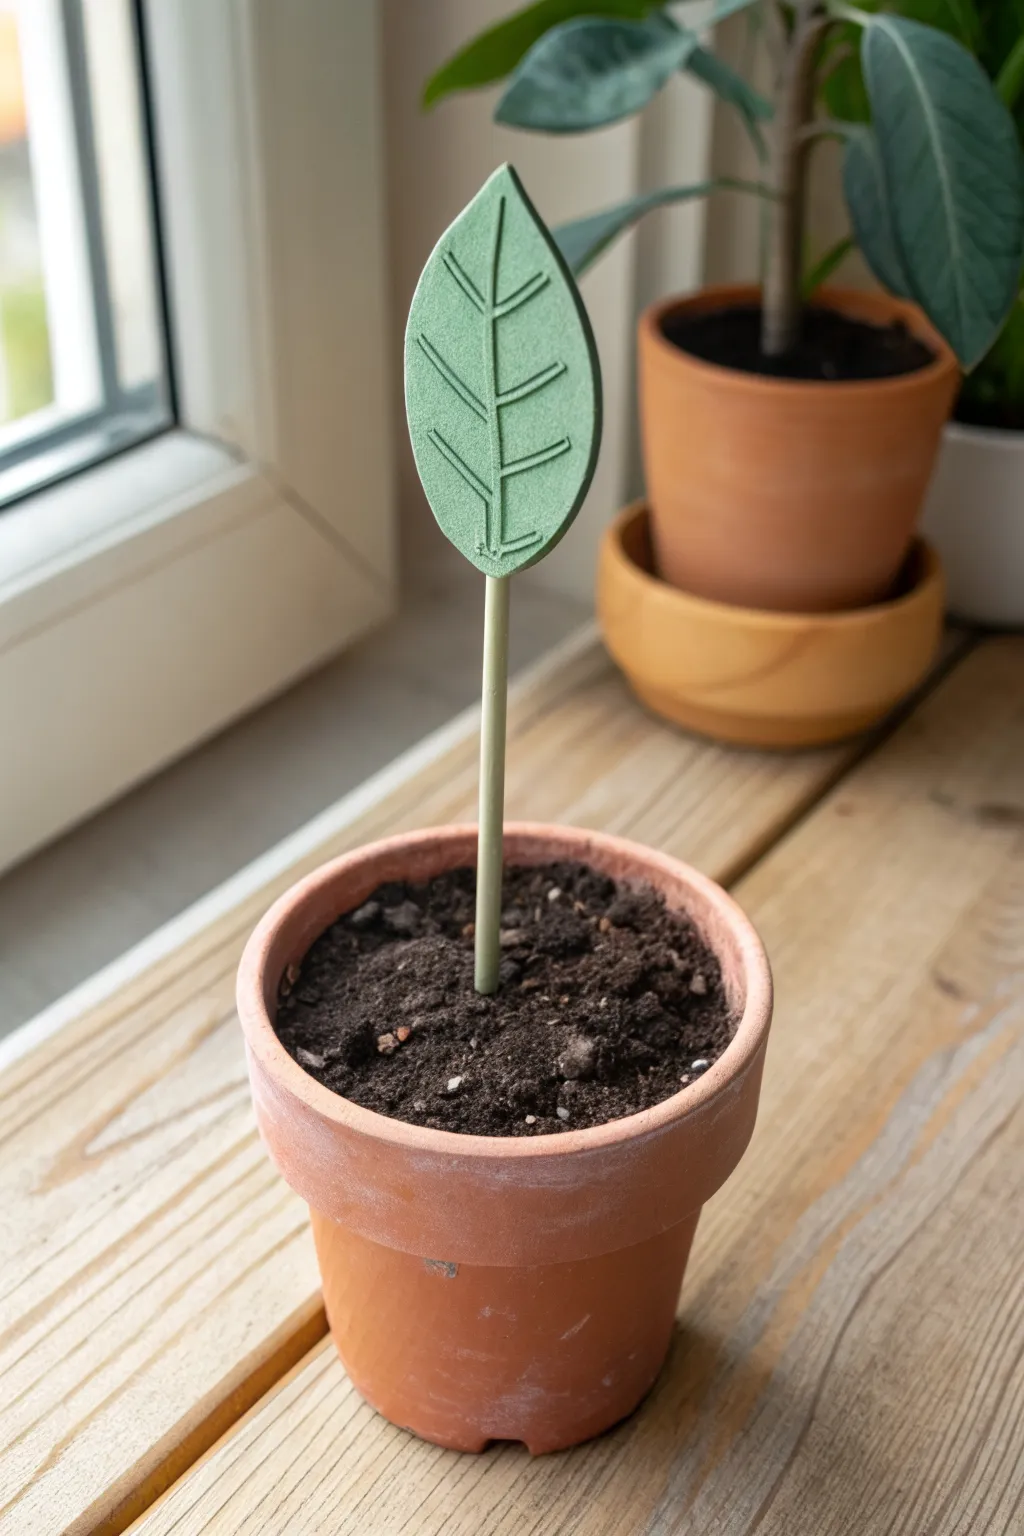
Add a touch of handmade charm to your indoor garden with this simple yet stylized leaf marker. Its clean lines and soft green hue mimic nature while offering a durable way to label pots or just add decoration.
Detailed Instructions
Materials
- Green air dry clay (or white clay + acrylic paint)
- Rolling pin
- Leaf-shaped cookie cutter (optional)
- Clay knife or craft scalpel
- Wooden skewer or dowel
- Smooth work surface (silicone mat or parchment paper)
- Water in a small cup
- Fine-grit sandpaper
- Matte varnish or sealant
Step 1: Shaping the Clay
-
Prepare your clay:
Start by conditioning a ball of green air dry clay in your hands. Knead it until it’s pliable and smooth, removing any potential air bubbles. -
Roll it out:
Place the clay on your work surface. Use a rolling pin to flatten it into an even slab, aiming for a thickness of about 1/4 inch (6mm) to ensure sturdiness. -
Cut the leaf shape:
If you have a leaf-shaped cookie cutter, press it firmly into the clay. Alternatively, use a needle tool or clay knife to freehand a simple, symmetrical almond or tear-drop leaf shape. -
Smooth the edges:
Dip your finger lightly in water and run it along the cut edges of the leaf to soften any sharp corners or clay burrs created by the cutting tool.
Clean Lines Tip
Running a wet brush through the indented vein lines before the clay dries helps smooth out rough ‘crumbs’ inside the grooves.
Step 2: Adding Details
-
Mark the center vein:
Using a blunt tool or the back of your knife, gently press a vertical line starting from the bottom of the leaf and stopping just short of the top tip. Ensure you indent the clay but do not cut all the way through. -
Create side veins:
Add angled lines branching off the center vein. Create three or four pairs of these diagonal lines to mimic the stylized veins shown in the reference image. -
Refine the lines:
Check your indentations. If the clay has pushed up around the lines, gently tap it back down with a smooth tool or your finger to keep the surface flat.
Textured Twist
Before cutting the leaf shape, press a real leaf or a textured fabric into the clay slab to imprint a realistic organic pattern.
Step 3: Attaching the Stem
-
Prepare the skewer:
Take your wooden skewer. If you want the stem to be green like the leaf, you can wrap a very thin layer of clay around the top portion of the skewer now, or simply paint it later. -
Insert the support:
Carefully insert the pointed end of the skewer into the bottom edge of the leaf. Push it up slowly about an inch into the clay body, being careful not to distort the leaf shape. -
Secure the join:
At the point where the stick meets the leaf, smooth the clay downward slightly onto the stick to create a seamless, strong bond.
Step 4: Finishing Touches
-
Initial drying:
Lay the plant stake flat on a piece of parchment paper. Let it sit in a cool, dry place. -
Flip for even drying:
After about 12 hours, I find it helpful to gently flip the stake over so the bottom side gets air exposure, preventing warping. -
Sand imperfections:
Once fully cured (24-48 hours usually), take fine-grit sandpaper and lightly buff the edges or surface to remove any remaining roughness. -
Apply protection:
Since this will live near soil and water, apply a coat of matte waterproof varnish or sealant to the entire piece, including the wooden stick.
Now pop your lovely new marker into a pot and enjoy the handmade detail
Gecko Key Dish
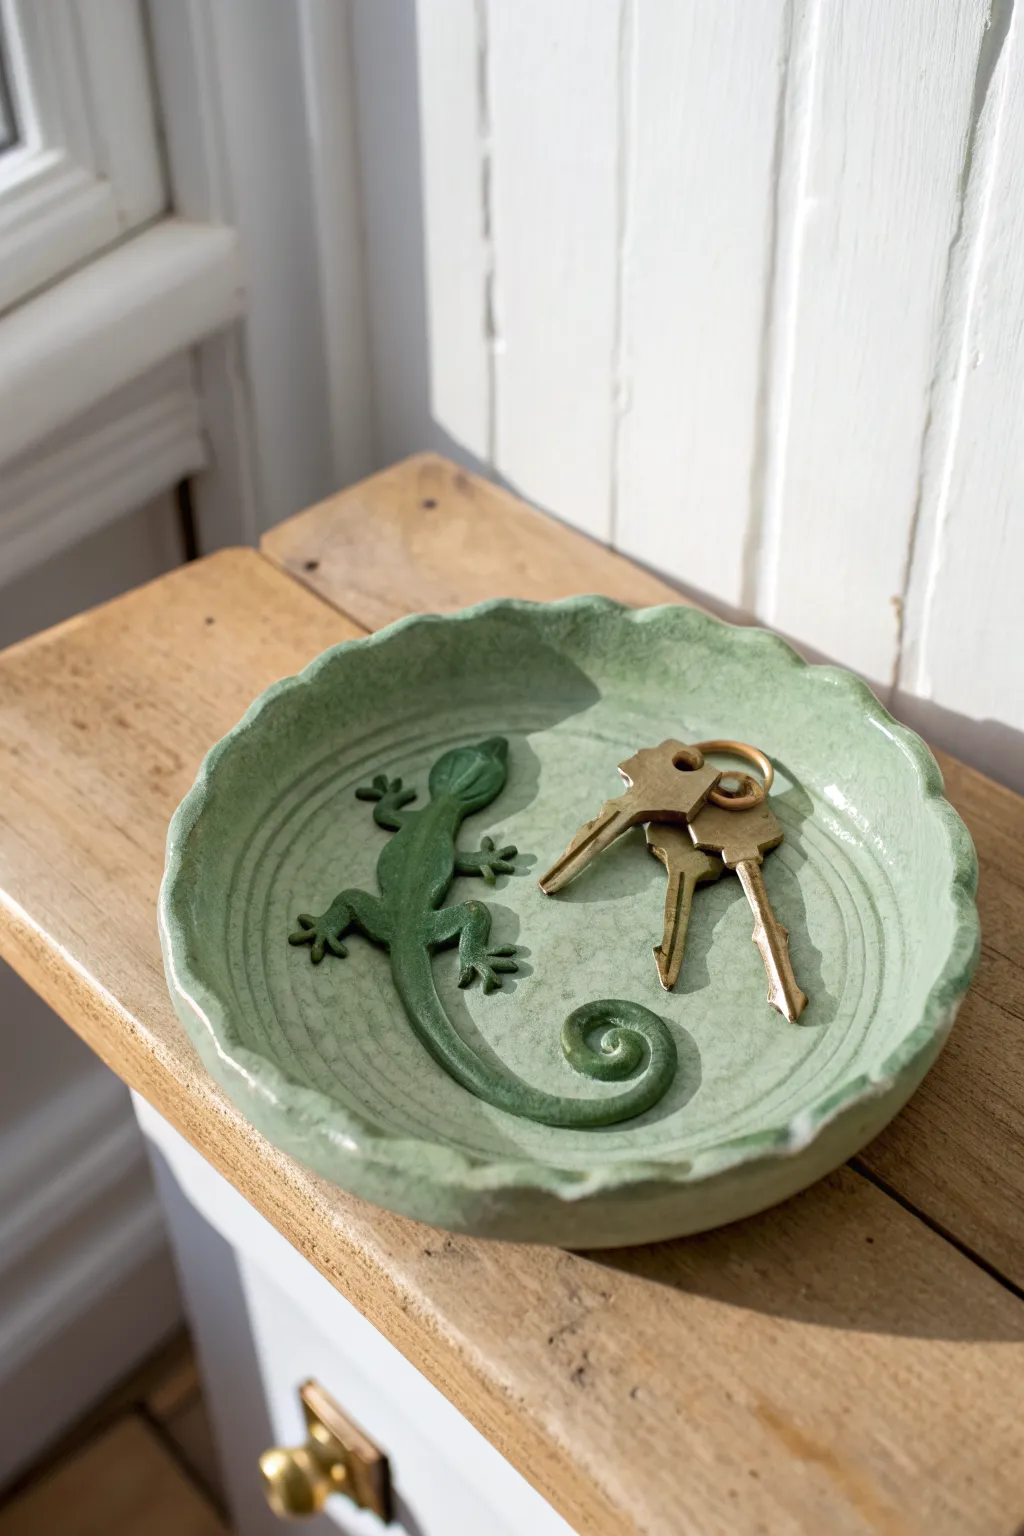
This charming catch-all dish features a playful gecko sculpted in relief right on the surface, perfect for guarding your keys or loose change. The soft green finish and gently ruffled edges give it an organic, handmade ceramic feel without needing a kiln.
Step-by-Step Guide
Materials
- Air dry clay (white or terracotta)
- Small rolling pin
- Bowl (for use as a mold)
- Clay sculpting tools (needle tool, small ball tool)
- Water in a small cup
- Sponge or brush
- Fine grit sandpaper
- Acrylic paint (sage green and white)
- Matte or satin sealant/varnish
- Paintbrushes (soft bristle)
Step 1: Forming the Base
-
Roll the slab:
Start by conditioning a ball of air dry clay in your hands until it’s pliable. Roll it out on a flat surface to an even thickness of about 1/4 inch. -
Cut the circle:
Place a bowl or round template (about 6 inches in diameter) onto the clay slab and use a needle tool or knife to cut out a perfect circle. -
Create the ruffled edge:
Gently pinch and lift the edges of the clay circle at regular intervals to create a wavy, fluted rim. Smooth out any fingerprints with a slightly damp sponge. -
Shape the dish:
Place your clay circle inside a slightly larger bowl lined with plastic wrap. This will help the clay hold a curved, bowl-like shape as you work on the interior details. -
Add texture rings:
Using a needle tool or a pottery rib, lightly score concentric circles into the bottom of the dish. Don’t cut all the way through; just create shallow grooves for texture.
Smooth Moves
Keep a small dish of water nearby. If the clay starts cracking while you sculpt the tiny toes or tail, a damp finger can smooth those fissures instantly.
Step 2: Sculpting the Gecko
-
Shape the body:
Roll a small coil of clay that is thicker at one end (the head) and tapers to a long, thin point (the tail). Flatten it slightly. -
Attach the body:
Score the back of the gecko body and the spot on the dish where it will sit. Apply a dab of water (slip) and press the body firmly onto the dish surface. -
Curl the tail:
Arranging the long tail into a decorative spiral is my favorite part; curve it around the bottom of the dish for a whimsical look. -
Add the legs:
Roll four tiny balls of clay. Attach two near the head and two near the hips using the score-and-slip method. Flatten them slightly to form the limbs. -
Sculpt feet and toes:
Use a needle tool or small knife to cut tiny slits into the ends of the limbs, fanning them out to create the distinct gecko toes. -
Detail face and spine:
Use a small ball tool to indent eyes on the head. Create a ridge along the spine by gently pinching the clay or smoothing it with a tool. -
Refine transitions:
Dip a paintbrush in water and run it along the seams where the lizard meets the dish to ensure a seamless, integrated look.
Step 3: Finishing Touches
-
Dry thoroughly:
Allow the dish to dry completely in a cool, dry place. This usually takes 24-48 hours depending on humidity. Flip it halfway through if possible. -
Sand the surface:
Once bone dry, use fine-grit sandpaper to smooth any rough edges on the rim or the gecko’s back. Wipe away dust with a slightly damp cloth. -
Mix the paint:
Mix sage green acrylic paint with a tiny bit of white to get a soft, chalky hue. For a glazed look, you can water the paint down slightly. -
Apply base coat:
Paint the entire dish, ensuring you get into the concentric grooves and the crevices around the lizard’s legs. -
Highlighting:
Once the base is dry, dry-brush a lighter shade of green over the raised areas (the gecko’s spine and the dish rim) to accentuate the relief texture. -
Seal the piece:
Finish with a coat of matte or satin varnish to protect the clay from moisture and give it that finished ceramic sheen.
Make It Glossy
Use a high-gloss varnish only on the gecko’s body while keeping the dish matte. This subtle contrast makes the lizard look wet and realistic.
Place your finished dish on an entryway table to greet you every time you come home
Cabbage Rose Jewelry Bowl
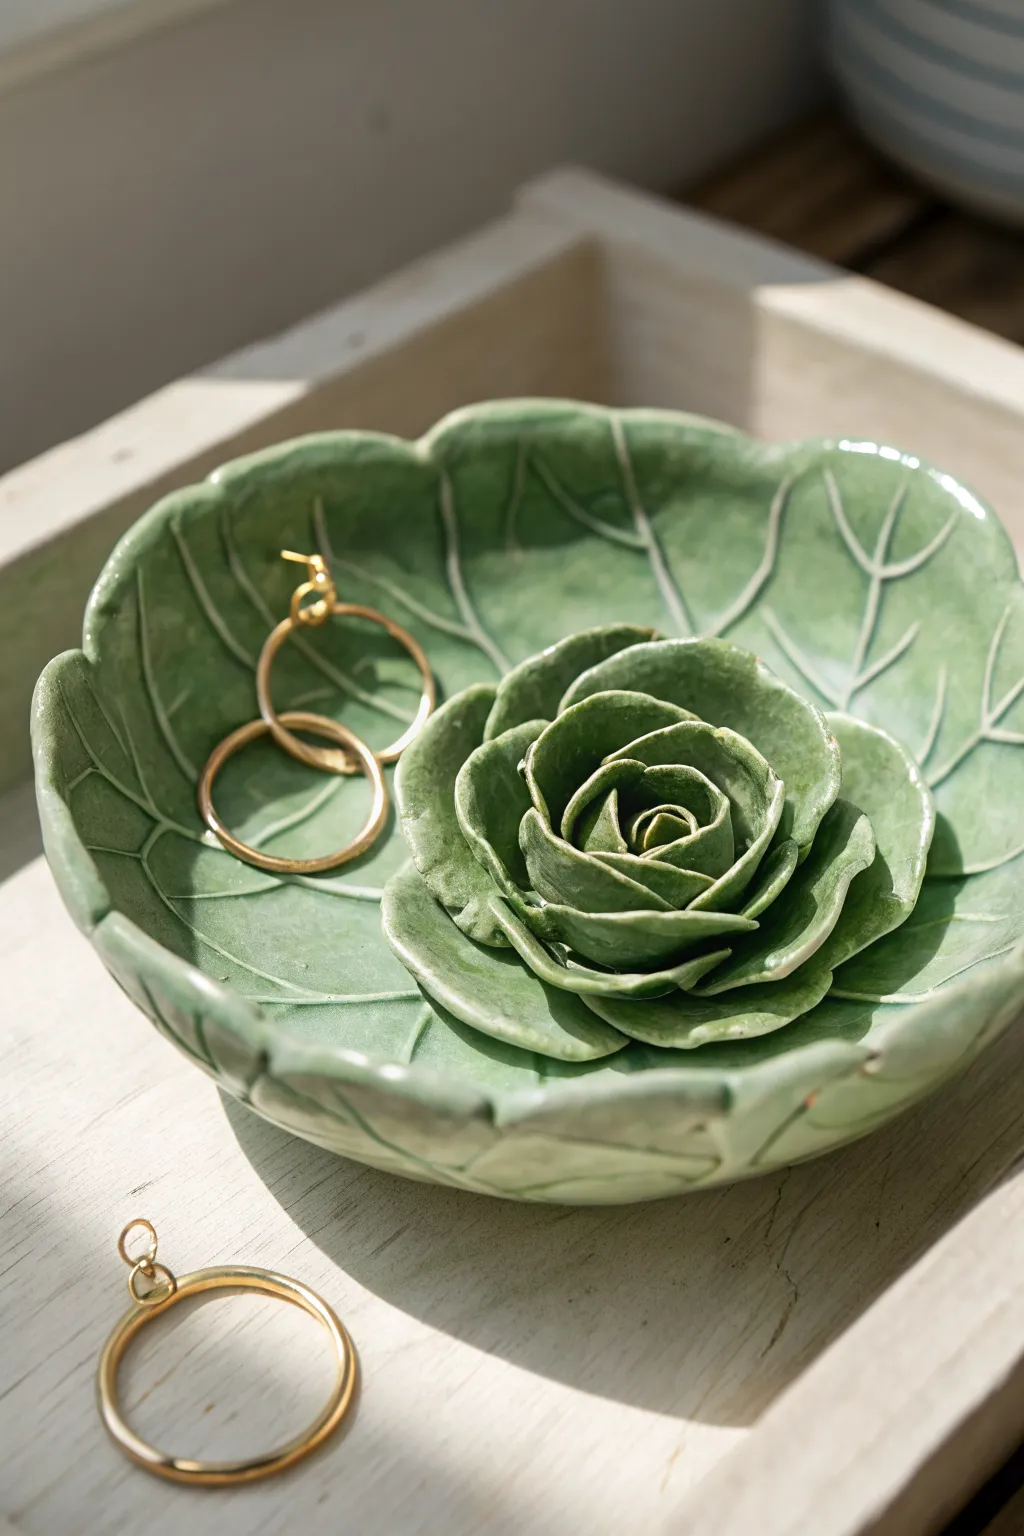
This whimsical jewelry dish captures the delicate texture of a cabbage leaf in a functional, floral design. With its glossy green finish and detailed veining, it mimics high-end ceramic ware while being crafted entirely from humble air-dry clay.
How-To Guide
Materials
- White air-dry clay (approx. 500g)
- Rolling pin
- Small bowl (to use as a mold)
- Cutting tool or craft knife
- Needle tool or toothpick
- Sponge
- Water cup
- Acrylic paints (Forest Green, Leaf Green, White)
- High-gloss varnish or glaze
- Paintbrushes (flat shader and fine liner)
- Plastic wrap
Step 1: Forming the Base Bowl
-
Prepare the workspace:
Lay down a clean work surface or silicone mat. Take your small bowl (the mold) and line the inside loosely with plastic wrap to prevent sticking. -
Roll the main slab:
Roll out a portion of air-dry clay until it is about 1/4 inch thick. Aim for a circle slightly larger than the bowl you are using as a mold. -
Shape the base leaf:
Cut a rough, wavy circle from the slab. Don’t make it perfectly round; give the edges organic curves to look like a large cabbage leaf. -
Add vein textures:
Using a needle tool, gently score a central vein line down the middle of the slab, then branch off smaller veins toward the edges. Keep the lines light but visible. -
Mold the shape:
Gently lift the clay slab and press it into the plastic-lined bowl. Smooth it down so it takes the cupped shape, but allow the wavy edges to ripple naturally near the rim.
Step 2: Sculpting the Center Rose
-
Create the center bud:
Roll a small ball of clay and flatten it into a thin teardrop shape. Curl it tightly onto itself to form the very center of the flower. -
Form individual petals:
Roll out thin, small sheets of clay and cut 8-10 rough ovals of increasing sizes. These will be your rose petals. -
Shape the petals:
Take a petal, gently pinch the edges to thin them out, and curve it slightly with your thumb to give it a cupped form. -
Assemble the inner layers:
Attach the smallest petals around the center bud using a dab of water (slip) to glue them. Overlap each new petal slightly over the previous one. -
Build the outer layers:
Continue adding larger petals, angling them more openly as you move outward. I find it helps to offset the petals so the gaps are covered by the new layer. -
Attach to base:
Score the bottom of your rose and the center of the base bowl. Add water and press the rose firmly into the center of the bowl. -
Blend the seams:
Use a small tool or your finger to smooth the clay where the bottom of the rose meets the bowl, ensuring a strong bond.
Cracks Appearing?
If small cracks form while drying, mix a tiny amount of clay with water to make a paste (slip) and fill them in. Smooth with a damp finger.
Step 3: Finishing and Painting
-
Dry thoroughly:
Allow the piece to dry completely in the bowl mold for at least 24-48 hours. Remove it from the mold once the top feels firm to let the bottom dry. -
Sand imperfections:
Once fully dry, use fine-grit sandpaper to gently smooth any rough edges on the rim or petals. -
Apply base color:
Mix a medium leaf green acrylic paint. Apply two coats to the entire bowl, ensuring you get paint into the crevices of the rose. -
Highlight the details:
Mix a lighter green (add white to your base green) and use the dry-brush technique to lightly sweep over the raised veins and petal edges. This creates depth. -
Clean up veins:
If the veins got too filled with paint, use a very fine liner brush with a darker green or white wash to re-define those lines, mimicking the image’s crisp details. -
Seal for shine:
Finish with two coats of high-gloss varnish. This is crucial to achieve that wet, ceramic-like glaze effect seen in the reference photo.
Pro Tip: Realistic Veins
Instead of drawing veins, press a real cabbage leaf into the wet clay slab before shaping it. The natural texture transfer is unbeatable.
Now you have a stunning, organic catch-all dish that looks kiln-fired but was made right at your kitchen table
Forest Gnome With Green Hat
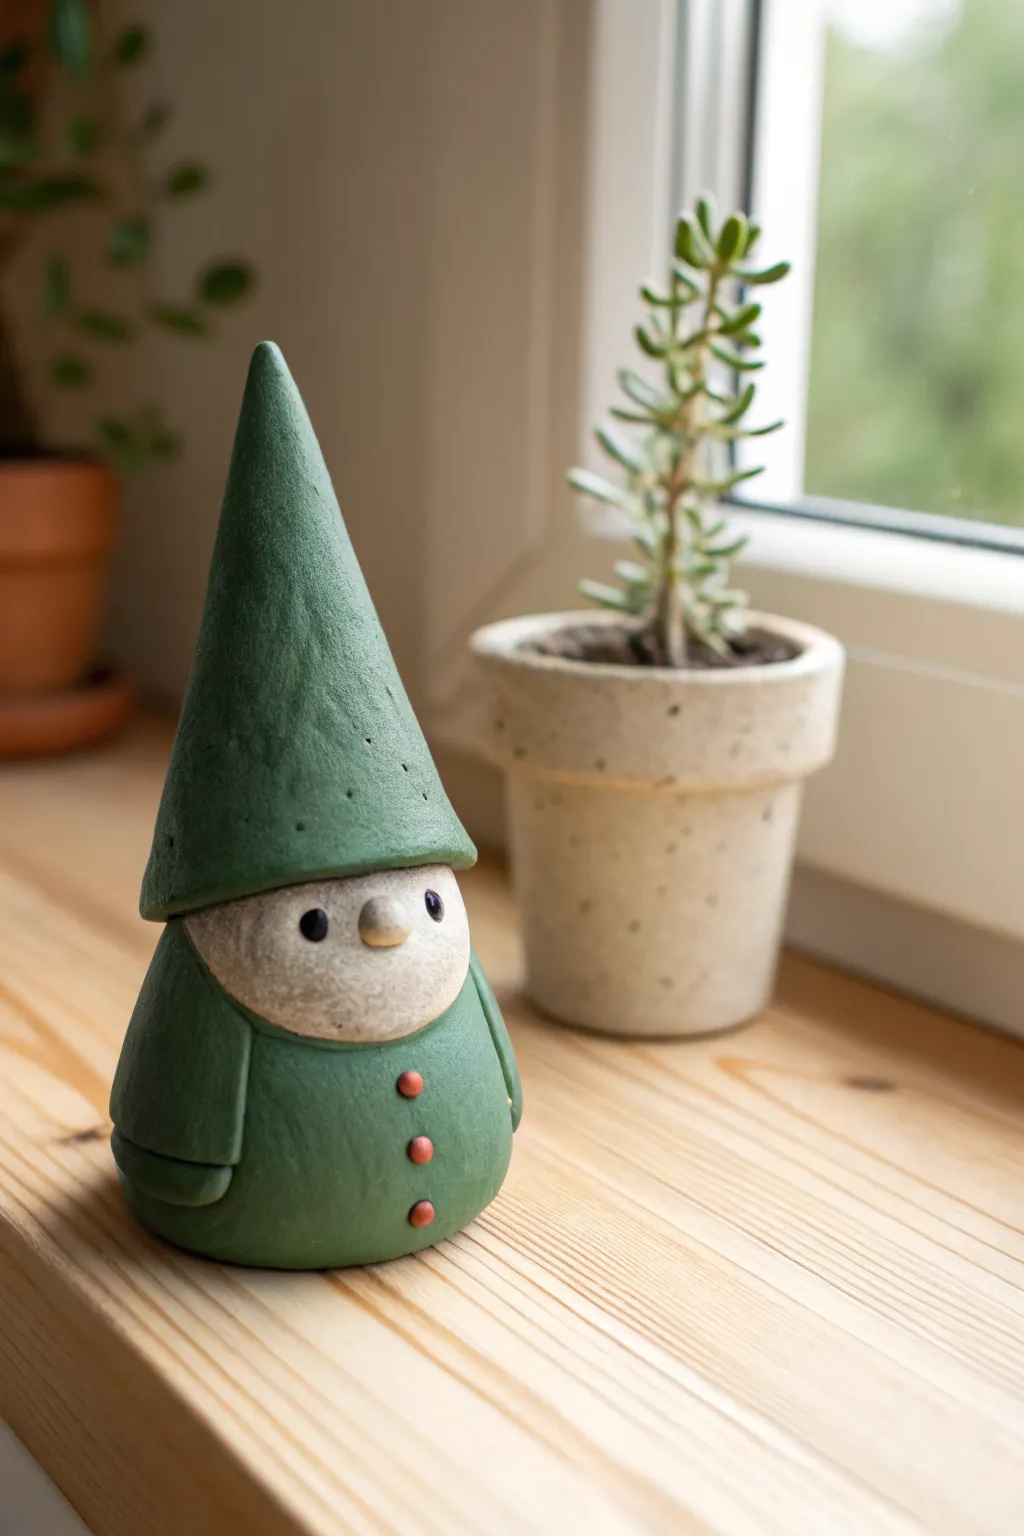
Bring a touch of forest charm to your home with this adorable green gnome figurine. With its tall, textured hat and sweet button details, this clay chraracter makes a perfect guardian for your houseplants.
Detailed Instructions
Materials
- Green air dry clay (or white clay + green acrylic paint)
- Beige or oatmeal-colored air dry clay
- Small amount of red clay (or paint)
- Acrylic rolling pin
- Clay sculpting tools (needle tool, smoothing tool)
- Texture sponge or toothbrush
- Water in a small cup
- Aluminum foil (for core structure)
- Black acrylic paint or clay for eyes
- Fine grit sandpaper
Step 1: Building the Body
-
Create the core:
Crumple a piece of aluminum foil into a stout egg shape. This will serve as the armature for the gnome’s body, saving clay and reducing drying time. -
Roll out the body clay:
Take a handful of green air dry clay and condition it by kneading until soft. Roll it into a flat sheet about 1/4 inch thick. -
Cover the armature:
Wrap the green clay sheet around the foil egg. Trim off excess clay and pinch the seams together. Dip your finger in water to smooth out the joins until seamless. -
Shape the base:
Gently tap the bottom of the clay egg on your work surface to create a flat base so the gnome stands securely on its own.
Step 2: Adding the Head and Face
-
Form the face area:
Roll a ball of beige or oatmeal-colored clay. Flatten it slightly into a thick oval disc. -
Attach the face:
Score the top front of the green body and the back of the beige oval. Apply a little water or slip, then press the beige clay firmly onto the body. -
Texture the beard:
Using a stiff toothbrush or a texture sponge, gently tap the lower half of the beige oval to create a subtle, stippled texture that resembles a short beard. -
Add facial features:
Roll two tiny balls of black clay (or paint them later) for eyes and press them into the upper part of the beige face. Add a small oval of beige clay between them for the nose.
Cracks Appearing?
If small cracks form while drying, mix a tiny bit of fresh clay with water to make a paste (slip) and fill them in with a finger.
Step 3: Sculpting the Hat
-
Form the cone:
Take a larger portion of green clay and roll it into a tall, classic cone shape. The base should be wide enough to cover the top of the body and slightly overlap the face. -
Hollow the base:
Use your thumb or a rounded tool to form a concave indentation at the wide end of the cone so it sits snugly on the round head. -
Texture the hat:
I prefer to add texture before attaching the hat. Use a crumpled piece of aluminum foil or a sponge to press a rustic, fabric-like texture into the surface of the green cone. -
Attach the hat:
Score and slip the contact points, then place the hat onto the body. The rim should come down low, just covering the top edge of the beige face piece. -
Detail the rim:
Using a modeling tool, create a slight separation line around the bottom of the hat to make it look like a separate piece of clothing resting on the head.
Make it Mossy
After drying, dab diluted dark green or brown paint into the textured crevices of the hat to give it a weathered, mossy forest look.
Step 4: Final Details
-
Add the arms:
Roll two small sausage shapes of green clay. Flatten one end of each and attach them to the sides of the body to suggest arms tucked into a coat. -
Define the cuffs:
Use a needle tool or knife to etch a gentle line near the bottom of each arm to represent the sleeve cuffs or hands tucked away. -
Create coat buttons:
Roll three tiny spheres of red clay. Flatten them slightly and attach them in a vertical row down the center of the green body. -
Distress the surface:
For added character, lightly poke a few random pinholes or small nicks into the hat and coat using a needle tool, giving it an aged, earthy look. -
Let it dry:
Set your gnome in a cool, dry place away from direct sunlight. Allow it to dry completely for at least 24-48 hours before handling.
Once fully dry, place your new clay friend on a windowsill to watch over your garden
Mini Pond Diorama Tray

Capture the serenity of a quiet lily pond with this charming diorama tray. Mixing structural concrete textures with playful green clay elements creates a peaceful desktop accessory perfect for holding trinkets or simply admiring.
Step-by-Step Guide
Materials
- Air dry clay (white and green)
- Concrete mix or stone-effect air dry clay
- Oval mold or plastic container (for the base)
- Acrylic paints (dark green, light green, pink, black, white)
- Floral wire or thin metal wire
- Modeling tools (or a toothpick)
- Fine grit sandpaper
- Clear matte varnish or sealant
- Craft glue
Step 1: Crafting the Base
-
Shape the basin:
Begin by creating the heavy base. If using concrete mix, pour it into an oval mold and let it cure fully. If using stone-effect clay, roll out a thick slab and shape it into an oval with a raised rim, approximately 8-10 inches wide. -
Smooth the surface:
Once the base is dry, sand down any rough edges or bumps on the interior floor to ensure a flat surface for your clay attachments. -
Add the water effect (optional):
For a subtle water look, you can paint the interior floor of the tray with a very light, watered-down wash of sage green or pale blue acrylic paint before adding the clay pieces.
Clay Cracking?
If small cracks appear as the clay dries, mix a tiny bit of fresh clay with water to make a paste (slip) and smooth it over the cracks with your finger.
Step 2: Creating the Pond Life
-
Form the lily pads:
Take small balls of green clay and flatten them into thin pancake shapes. Vary the sizes, making two large ones and three smaller ones. -
Detail the leaves:
Using a modeling tool or knife, cut a small ‘V’ wedge out of each circle. Then, gently score lines radiating from the center to the edges to mimic leaf veins. -
Sculpt the frog body:
Roll a medium-sized ball of green clay for the frog’s body, slightly elongating it into a teardrop shape that sits upright. -
Add frog legs:
Create two thick sausage shapes for hind legs. Bend them at the knee and attach them to the sides of the body, blending the clay seams carefully. -
Frog features:
Add two tiny balls of clay to the top of the head for eyes. Use a tool to impress a wide, simple smile. -
Make the succulents:
For the bottom-left corner, create two succulent plants. Roll many tiny teardrop shapes and assemble them in a rosette pattern, starting from the center and working outward. -
Create the cattail stems:
Cut five lengths of floral wire at varying heights. Roll very thin snakes of green clay and wrap them around the wires to coat them completely. -
Form the cattail heads:
Mix a tiny drop of brown paint into green clay (or use brown clay) to make small cylinders. Slide these onto the tops of your tallest wire stems. -
Sculpt the water lily:
Using white clay, form small, delicate petal shapes. Pinch them together at the base to form a small blooming flower. -
Paint the center:
Once the flower is shaped, dab a tiny bit of pale pink paint into the very center of the petals for depth.
Step 3: Assembly and Finishing
-
Arrange the scene:
Before gluing, place all your dry clay elements into the tray to finalize the composition. I find it helpful to take a quick photo here so I remember where everything goes. -
Secure the elements:
Apply a strong craft glue to the bottom of the lily pads, frog, succulents, and flower. Press them firmly into place on the tray floor. -
Plant the cattails:
Drill small holes if your base is hard, or use a generous dab of glue and a small mound of clay to secure the base of the wire cattails so they stand upright. -
Paint final details:
Using a fine brush, paint the frog’s eyes white with black pupils. Add any final highlights to the lily pads with a lighter green shade. -
Seal the project:
Apply a coat of clear matte varnish over the clay elements to protect them from dust and moisture, giving the ‘water’ areas a slight sheen if you use a semi-gloss finish there instead.
Resin Finish
For a realistic water effect, pour a thin layer of clear epoxy resin into the bottom of the tray after gluing your pieces down to simulate real water depth.
Place your finished pond scene near a window where nature can admire your handiwork