I’m obsessed with how grey clay beads can feel effortlessly modern while still having that cozy, handmade charm. If you’re staring at a pile of grey heishi and wondering how to make it look intentional (not boring), these grey clay bead bracelet ideas will get your creativity moving.
Classic Grey Heishi With Gold Spacers

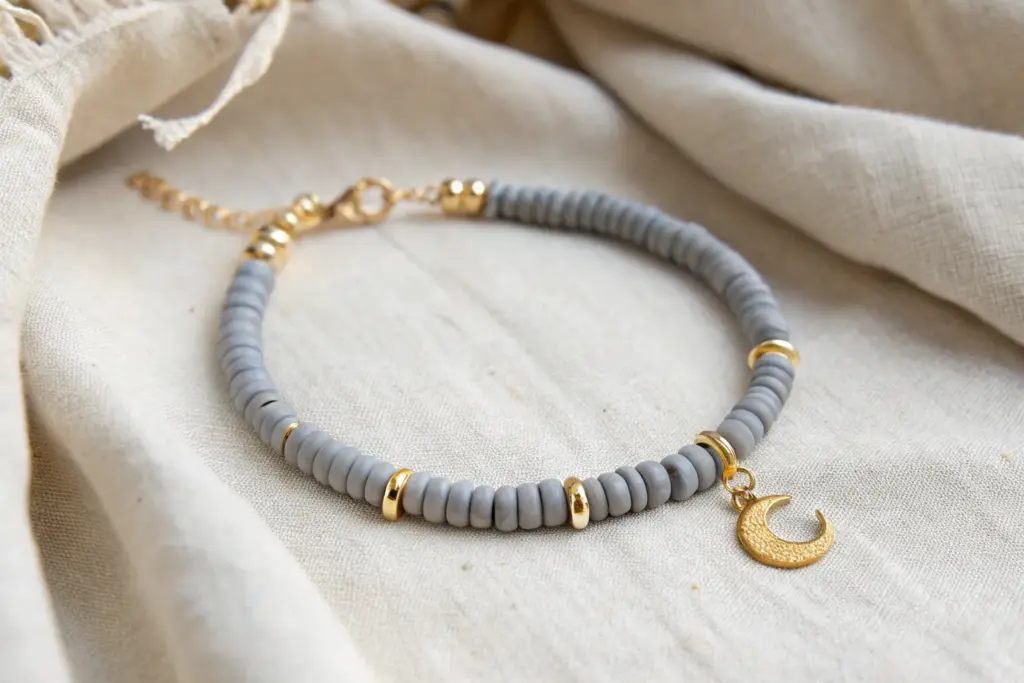
This sophisticated bracelet combines the modern, rugged texture of matte grey clay beads with the luxurious shine of gold spacers. The alternating pattern creates a rhythm that feels both grounded and elegant, perfect for everyday wear or stacking.
Step-by-Step Tutorial
Materials
- Matte grey polymer clay Heishi beads (approx. 6mm)
- Gold tone metallic spacer beads (rounded or barrel shape, approx. 4mm)
- Strong elastic cord (0.8mm or 1mm thickness)
- Jewelry glue or clear nail polish
- Scissors or jewelry wire cutters
- Bead stopper or a simple piece of tape
- Measuring tape
Step 1: Preparation
-
Measure your wrist:
Wrap a measuring tape comfortably around your wrist to determine the desired length. Add about 0.5 inches to this measurement to ensure a comfortable fit that isn’t too tight. -
Cut the cord:
Cut a piece of elastic cord about 3-4 inches longer than your final measured length. This extra length gives you plenty of room to tie the knot securely without struggling. -
Pre-stretch the elastic:
Hold the cord firmly at both ends and give it several gentle tugs. Pre-stretching is crucial because it prevents the bracelet from sagging or loosening permanently after you wear it a few times. -
Secure the end:
Attach a bead stopper to one end of the cord. If you don’t have one, just fold a piece of tape over the end to stop the beads from sliding off while you work.
Hiding the Knot
Plan your pattern so the knot lands next to a gold spacer bead. Metal beads usually have larger holes than clay ones, making it much easier to pull the knot inside for a seamless finish.
Step 2: Creating the Pattern
-
Start with grey:
Begin stringing your grey clay beads onto the elastic. Thread approximately 8 to 10 grey beads to start the sequence. -
Add first gold accent:
Slide on one gold spacer bead. This will act as a bright highlight against the matte texture of the clay. -
Repeat the sequence:
Continue the pattern: add another set of 8-10 grey beads, followed by a gold spacer. I find that consistent counting is key here to keep the spacing symmetrical. -
Check the spacing:
As you build the strand, lay it down occasionally to ensure your gold accents look evenly distributed. The image shows about 5 distinct gold sections. -
Adjust bead count:
If your pattern doesn’t perfectly fit your wrist size, add or remove a few grey beads from each section evenly rather than just at the end. This keeps the design balanced. -
Final check:
Wrap the unfinished strand around your wrist to check the fit once more. The ends should touch comfortably without stretching the elastic too much.
Step 3: Finishing Up
-
Prepare to tie:
Remove the bead stopper or tape carefully, holding both ends of the elastic firmly so no beads escape. -
Tie the first knot:
Tie a simple overhand knot to bring the beads together into a circle. Pull it tight, but not so tight that the bracelet puckers. -
Secure with a surgeon’s knot:
For the second knot, make a loop just like the first one, but pass the tail end through the loop twice instead of once before pulling tight. This is a surgeon’s knot and is much more secure. -
Apply adhesive:
Dab a tiny drop of jewelry glue or clear nail polish directly onto the knot. This prevents the slick elastic from slowly untying itself over time. -
Hide the knot:
While the glue is still slightly tacky, try to slide the knot inside the hole of the nearest gold spacer or clay bead if the hole is large enough. -
Trim the excess:
Once the glue is fully dry, use your scissors to trim the excess elastic tails as close to the knot as possible without cutting the knot itself.
Texture Play
Instead of smooth gold spacers, try faceted or hammered gold beads. The texture on the metal catches the light differently and adds a beautiful contrast to the smooth matte clay.
Now you have a versatile accessory ready to add a touch of modern minimalism to any outfit


Light-to-Charcoal Grey Gradient Bracelet
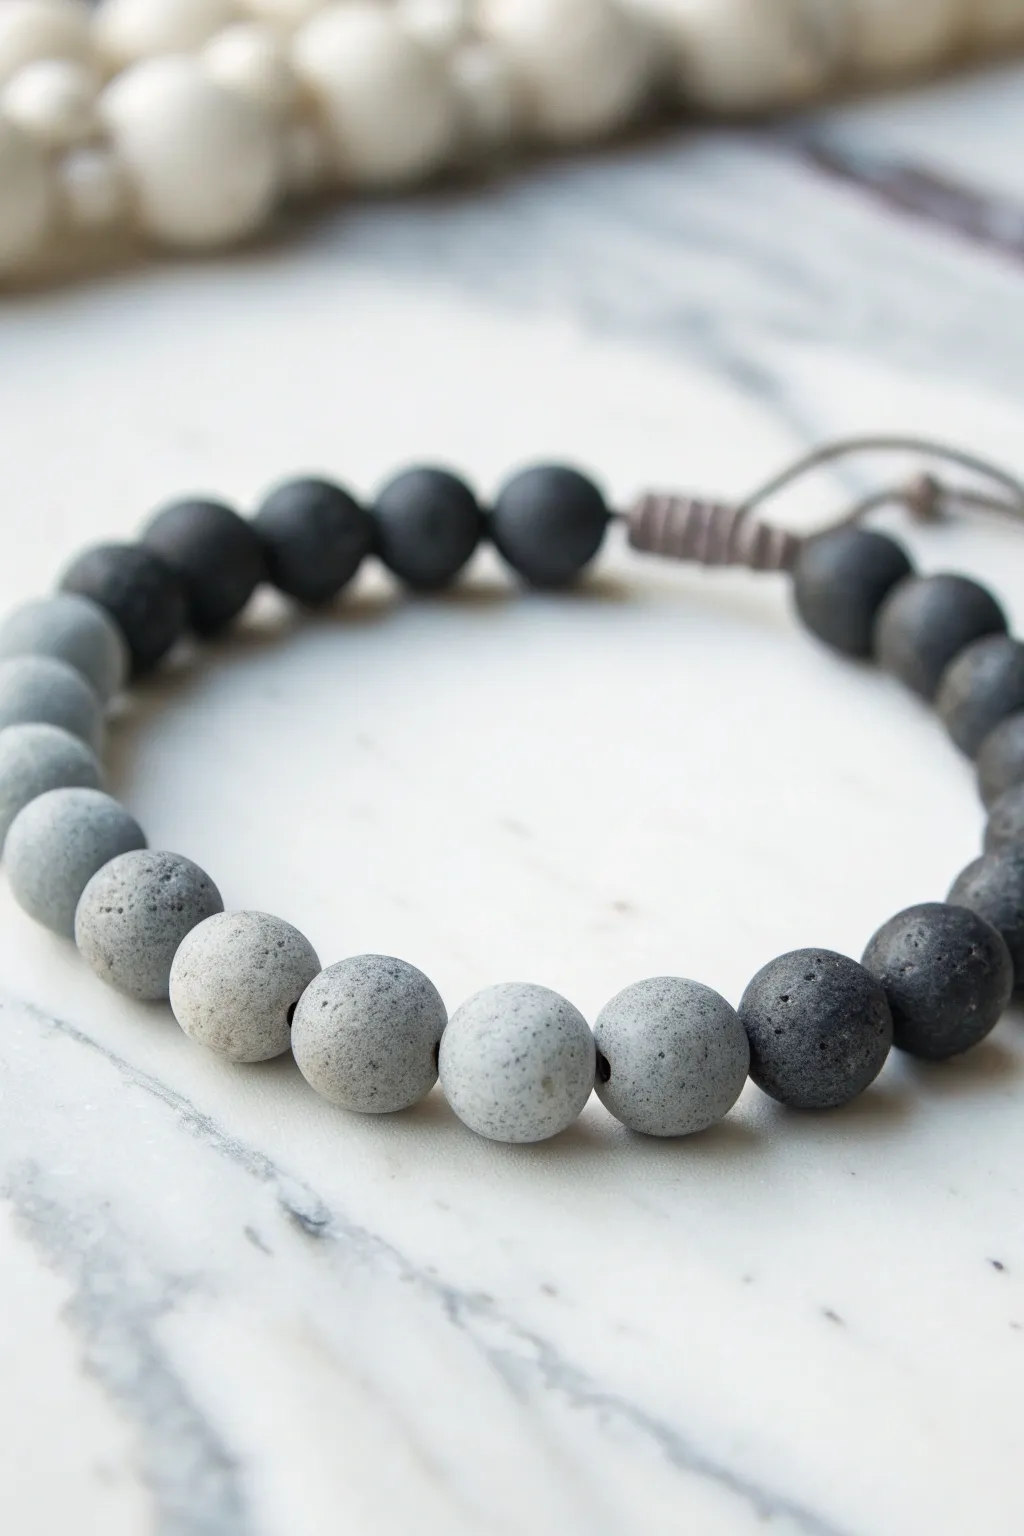
This sophisticated bracelet project captures the moody transition from day to night with a stunning gradient of matte grey beads. By arranging clay beads from misty white to deep charcoal, you’ll create a modern accessory that feels both earthy and elegant.
Detailed Instructions
Materials
- Polymer clay in white, grey, and black
- Rolling pin or pasta machine for clay
- Small circle cutter or bead rolling tool
- Beading awl or toothpick
- Toaster oven and baking sheet
- 1mm waxed cotton or nylon cord (grey or brown)
- Scissors
Step 1: Mixing the Gradient
-
Prepare your base colors:
Start by conditioning your white, grey, and black polymer clay separately until they are soft and pliable. You want a smooth consistency free of cracks. -
Create the lightest shade:
Take a chunk of white clay and mix in a tiny pinhead-sized amount of grey. Knead until fully blended to create a misty off-white color. -
Mix the mid-tones:
To achieve the gradual ombre effect, you’ll need at least three distinct transitional shades. Mix white and grey in varying ratios: 75/25, 50/50, and 25/75. -
Prepare the darkest shades:
Create your dark grey by mixing a little black into your pure grey clay. Keep a portion of pure black clay as your final, darkest endpoint. -
Texture the clay:
To mimic the porous, stone-like texture seen in the image, gently press a piece of coarse sandpaper or a stiff toothbrush onto the surface of your clay batches before rolling.
Step 2: Forming the Beads
-
Portion the clay:
Roll each color batch into a thick log of even diameter. Cut equal-sized segments from each log to ensure your beads end up uniform in size. -
Roll spheres:
Roll each segment between your palms to form a smooth sphere. I find using a circular motion with light pressure helps keep them perfectly round. -
Add detail texture:
Once rolled, lightly tap the surface of the beads with a stiff-bristled brush or roll them gently over a textured surface like concrete or sandpaper to enhance the ‘lava stone’ look. -
Create the holes:
Using your bead awl or a thick needle, carefully pierce the center of each bead. Twist the tool gently as you push through to prevent squashing the sphere. -
Bake the beads:
Arrange your beads on a baking sheet, ideally resting on a bed of cornstarch or accordion-folded paper to prevent flat spots. Bake according to your clay manufacturer’s instructions, usually around 275°F (135°C) for 30 minutes. -
Cool down:
Allow the beads to cool completely in the oven before handling them. This curing process ensures they are hard and durable.
Uneven Bead Holes?
If the holes close up during baking, carefully re-drill them with a small hand drill or twisting a craft knife tip while the clay is still slightly warm.
Step 3: Assembly & Knotting
-
Layout the design:
On a bead board or towel, arrange your cooled beads in the full gradient order, starting from the lightest off-white, moving through the greys, to the black, and back again if you want a mirrored look. -
String the beads:
Cut a length of cord about 12 inches long. Thread your beads onto the cord following your laid-out pattern. -
Check the fit:
Wrap the strung beads around your wrist to verify the size. Add or remove beads from the dark or light ends to adjust the fit without breaking the gradient pattern. -
Prepare the closure:
Bring the two ends of the cord together, crossing them over each other to form a circle. -
Start the macramé sliding knot:
Cut a separate short piece of cord (about 5-6 inches). Lay it under the crossed main cords where they overlap. -
Tie square knots:
Tie consecutive square knots with this new piece around the two main cords. Continue for about 0.5 inches to create a sturdy sliding mechanism. -
Finish the slider:
Trim the excess tails of the knotting cord close to the knots and carefully singe the ends with a lighter or use a dab of glue to secure them. -
Final touches:
Tie a simple overhand knot at the very end of each main cord tail to prevent them from slipping through the slider. Trim any remaining excess.
Scent Diffuser Upgrade
Use actual lava stone beads for the black section instead of clay. The porous rock creates a natural essential oil diffuser for your favorite scents.
Now you have a versatile piece of jewelry that adds a touch of modern minimalism to any outfit


Grey and White Clean Minimal Bracelet
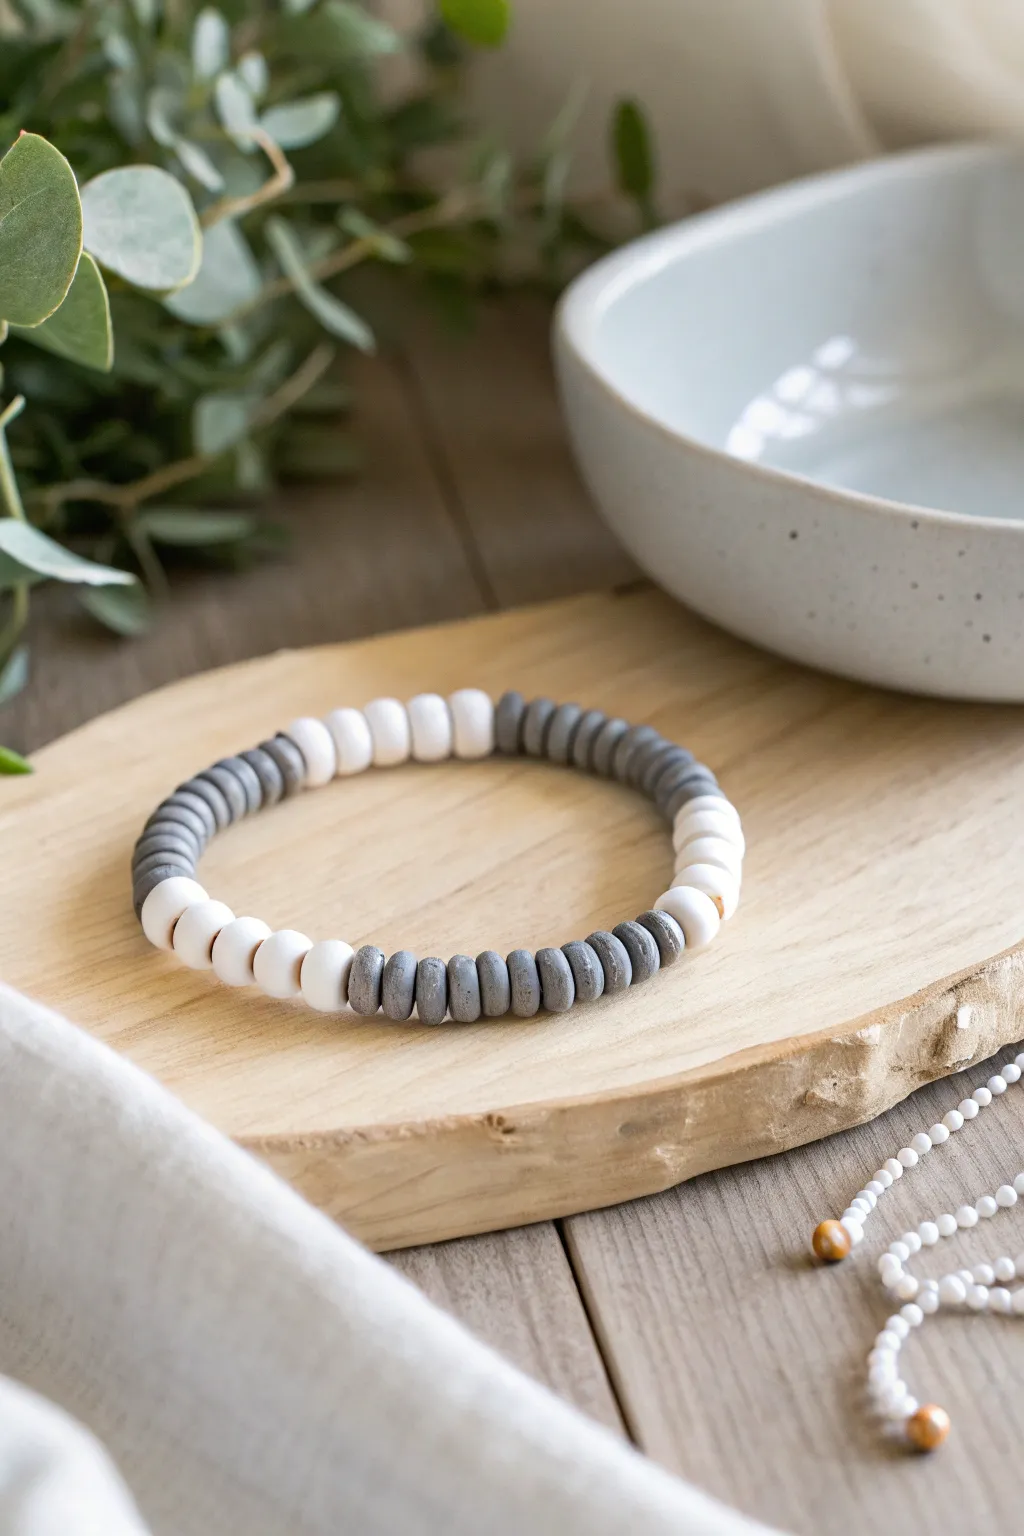
This minimalist bracelet combines the raw, matte texture of grey clay disc beads with smooth, polished white round beads for a balanced, modern look. The repeating block pattern gives it a distinct rhythm that feels both grounded and fresh.
Step-by-Step
Materials
- Matte grey polymer clay Heishi beads (approx. 6mm)
- White round wood or ceramic beads (approx. 6mm or 8mm)
- Strong elastic bead cord (0.8mm or 1.0mm recommended)
- Beading needle (optional but helpful)
- Super glue or jewelry cement
- Scissors
Step 1: Preparation
-
Measure your cord:
Cut a length of elastic cord about 10-12 inches long. This gives you plenty of slack for tying the final knot without struggling. -
Pre-stretch the elastic:
Before adding any beads, give the cord a few gentle tugs. This pre-stretching prevents the bracelet from becoming loose immediately after wearing it. -
Secure the end:
Attach a piece of tape or a bead stopper to one end of the cord to stop your beads from sliding off while you work.
Step 2: Beading the Pattern
-
Start with the grey section:
Thread approximately 12 to 15 grey clay disc beads onto the cord. Since these vary slightly in thickness, you want to aim for a section length of about 1 inch rather than a strict count. -
Add the first white accent:
String on 4 to 5 white round beads. This creates the first crisp contrast block against the grey texture. -
Repeat the grey block:
Add your second section of grey clay discs. Try to match the length of this section to your first grey block visually, checking them side-by-side. -
Add the second white accent:
Thread on another set of 4 to 5 white round beads. -
Continue the pattern:
Repeat this alternating sequence—large block of grey discs, small block of round white beads—until you reach your desired wrist size. -
Check the fit:
Wrap the unfinished strand around your wrist. The ends should meet comfortably without stretching the elastic too much. -
Adjust lengths if needed:
If the sizing is off, I usually add or remove just a few grey discs from the final section to fine-tune the fit without disrupting the main pattern.
Knot Hiding Trick
Plan your pattern so the knot finishes next to the white round beads. Their holes are typically larger than the clay discs, making it much easier to hide the knot.
Step 3: Finishing the Bracelet
-
Prepare for the knot:
Remove the tape or bead stopper from the end, being careful not to drop the beads. -
Tie the first knot:
Bring the two ends together and tie a standard overhand knot, pulling it tight to bring the beads together. -
Tie a surgeon’s knot:
For the second knot, loop the cord through twice before pulling tight. This extra pass creates friction that holds the elastic significantly better. -
Secure with glue:
Apply a tiny dab of jewelry cement or super glue directly onto the knot. Let this dry for a minute or two. -
Hide the knot:
Trim the excess cord ends close to the knot, leaving about 2mm. Gently pull the elastic so the knot slides inside the hole of one of the white round beads to hide it.
Add a Metallic Pop
Insert a single gold or silver spacer bead between the grey and white sections for a touch of elegance that breaks up the matte finish.
Enjoy wearing your handcrafted accessory that brings a calm, natural aesthetic to any outfit


Grey and Black Color-Block Bracelet
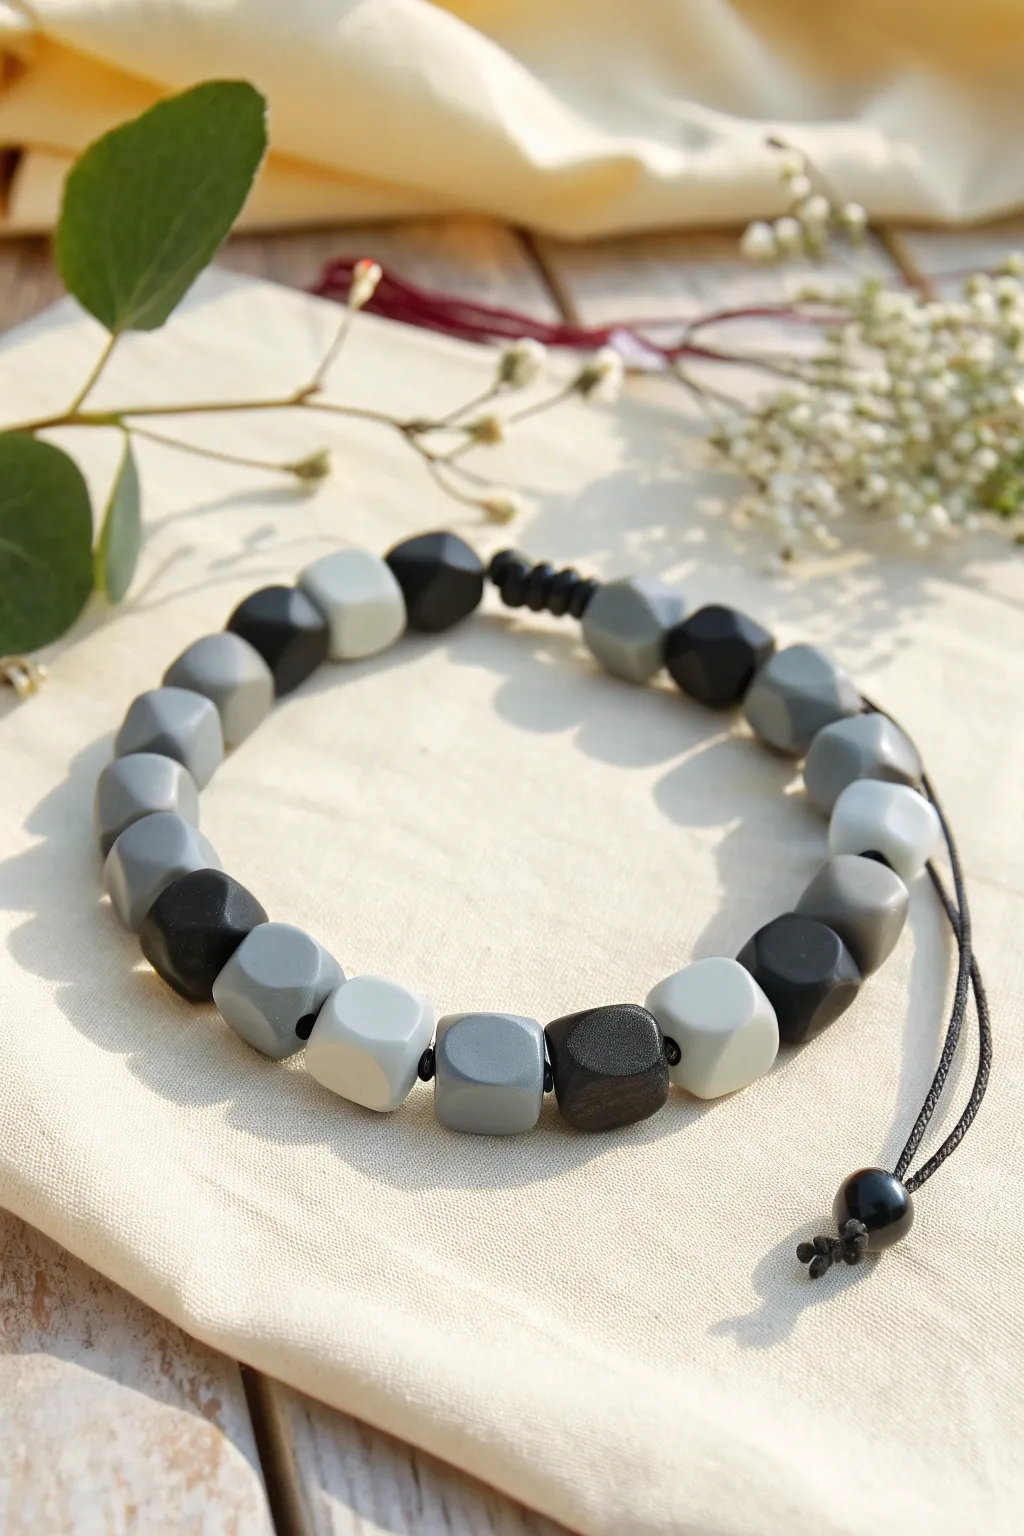
Achieve a sleek, modern aesthetic with this faceted bead bracelet featuring a sophisticated palette of graphite, charcoal, and cloud grey. The matte finish and irregular geometric cuts give it an architectural feel that pairs perfectly with the adjustable cord design.
Detailed Instructions
Materials
- Polymer clay in black, dark grey, light grey, white, and translucent (for mixing)
- Black nylon beading cord (approx. 1mm thick)
- Clay roller or pasta machine
- Tissue blade or X-Acto knife
- Bead piercing pin or needle tool
- Fine-grit sandpaper (400-800 grit)
- Oven for baking
- Ceramic tile or glass sheet (for baking surface)
- Lighter (to seal cord ends)
Step 1: Creating the Clay Palette
-
Prepare base colors:
Start by conditioning your blocks of black, white, and dark grey clay until they are soft and pliable. Warm clay is much easier to mix without leaving streaks. -
Mix custom shades:
To get the seamless gradient seen in the photo, create two intermediate colors. Mix a small amount of black into dark grey for a charcoal tone, and mix white into light grey for that soft, near-white cloud color. -
Form logs:
Roll each color into a thick log, approximately 1/2 inch in diameter. Ensure the logs are relatively uniform in thickness so your beads end up similar in size.
Step 2: Shaping the Geometric Beads
-
Cut equal segments:
Using your tissue blade, slice the logs into equal segments roughly 1/2 inch long. You want them to start as rough cubes. -
Initial rounding:
Take a segment and gently roll it between your palms to smooth out the sharp edges, forming a soft sphere or rounded cube. -
Faceted cutting technique:
Place a bead on your work surface. Use the sharp blade to slice off small, flat sections of the clay at random angles. Don’t overthink this; simple, clean cuts create the best geometric planes. -
Refine the shape:
Continue slicing until the entire surface is covered in flat facets. Aim for a slightly irregular, organic geometric look rather than a perfect mathematical shape. -
Repeat for all beads:
Process all your color segments this way. You will need approximately 18-22 beads depending on your wrist size.
Clean Cuts Pro Tip
Chill your clay in the fridge for 15 minutes before cutting the facets. Cooler clay is firmer and yields sharper, crisper geometric edges without dragging.
Step 3: Drilling and Baking
-
Pierce the holes:
While the clay is still raw, gently twist your needle tool through the center of each bead. I find twisting prevents the bead from squishing out of shape compared to pushing straight through. -
Widen the channel:
Ensure the holes are wide enough to accommodate two strands of your nylon cord, as the closure will need them to pass through. -
Bake the beads:
Arrange the beads on your ceramic tile and bake according to the manufacturer’s instructions (usually 275°F/135°C for 15-30 minutes). Let them cool completely. -
Sanding for matte finish:
Once cool, lightly sand the flat faces with fine-grit sandpaper to remove fingerprints and enhance that ultra-matte stone look. -
Wash and dry:
Rinse the beads in soapy water to remove sanding dust and dry them thoroughly.
Level Up: Granite Effect
Before shaping, mix fine black pepper or glitter into the grey clay. After baking and sanding, this creates a realistic faux-stone or granite texture.
Step 4: Assembly and Knots
-
String the pattern:
Cut a 24-inch length of nylon cord. Thread the beads onto the cord, alternating colors in a random or calculated pattern (e.g., black, mid-grey, light-grey). -
Check the fit:
Wrap the beaded section around your wrist to verify length. Add or remove beads as necessary, leaving about 1/2 inch of space for movement. -
Create the sliding knott:
Cross the two tail ends of the cord. Using a separate short piece of cord (about 5 inches), tie a square knot or macramé sliding knot over the overlapped tails. -
Secure the closure:
Tighten the sliding knot, trim the excess from the *knotting* cord (not the main bracelet cords), and carefully melt the tips with a lighter to seal them. -
Add stopper beads:
Slide one extra bead onto each tail end of the main cord. Tie a simple overhand knot at the very end to keep these stopper beads in place. -
Final trim:
Trim any excess cord past the stopper knots and quickly seal with the lighter flame.
Now you have a stylish, architectural accessory that looks high-end but was shaped by your own hands

The Complete Guide to Pottery Troubleshooting
Uncover the most common ceramic mistakes—from cracking clay to failed glazes—and learn how to fix them fast.
Grey Clay Beads Framing Letter Beads
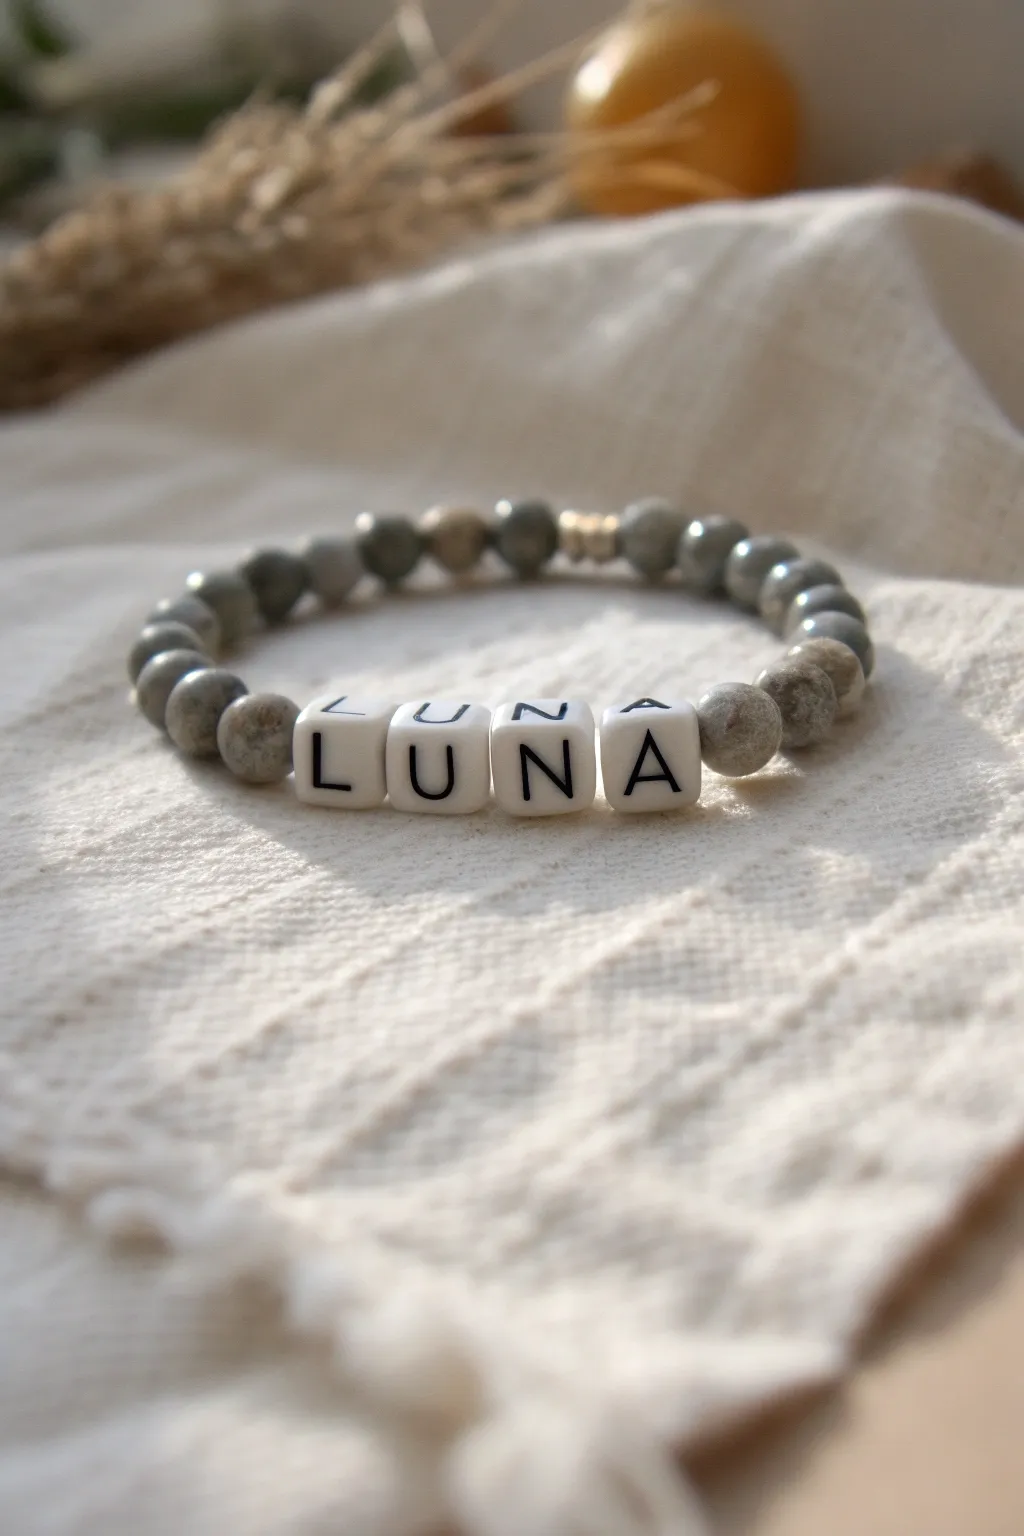
This personalized bracelet combines the earthy texture of speckled grey beads with stark white letter cubes for a minimalist look. The design features the name ‘LUNA’ framed perfectly by natural tones, making it sleek enough for everyday wear or stacking.
Step-by-Step Guide
Materials
- Elastic cord (0.8mm or 1.0mm recommended)
- Speckled grey round beads (6mm or 8mm, likely jasper, agate, or ceramic)
- Square white letter beads (spelling LUNA)
- Small gold spacer bead or crimp bead cover
- Scissors
- Jewelry glue or clear nail polish
- Bead stopper or tape
Step 1: Preparation & Layout
-
Measure the wrist:
Wrap a flexible measuring tape around your wrist to find your size. Add about half an inch to this measurement to ensure the bracelet fits comfortably without being too tight against the skin. -
Cut the cord:
Cut a piece of elastic cord approximately 10-12 inches long. This extra length gives you plenty of room to work with when tying the final knot, preventing frustration later. -
Secure the end:
Place a bead stopper or a piece of masking tape on one end of the cord to stop beads from sliding off while you string them. -
Pre-stretch the elastic:
Gently pull tightly on the elastic cord a few times. This pre-stretching technique ensures the bracelet maintains its shape and doesn’t sag immediately after you start wearing it.
Knot Hiding Trick
If the bead hole is too small to hide the knot, gently ream the hole of the bead adjacent to the knot with a bead reamer to widen it just enough to tuck the knot inside.
Step 2: Stringing the Design
-
Start the grey base:
Begin threading the grey speckled beads onto the cord. You will want to string about half of the total grey beads needed for your size now. -
Add the gold accent:
Locate the center point of the back of the bracelet. Thread your small gold spacer bead here. This adds a tiny flash of metal opposite the name, balancing the design. -
Finish the first half:
Continue adding grey beads until you have reached the halfway point of the bracelet loop. Stop and hold it around your wrist to check the spacing if needed. -
Add the name segment:
Thread the letter beads in order: L – U – N – A. Double-check the orientation so they are all facing the correct way and are legible. -
Complete the loop:
Finish stringing the remaining grey beads on the other side of the name block until the total length matches your measured wrist size plus the comfort allowance.
Step 3: Finishing the Bracelet
-
Check fit:
Bring the two ends together very carefully to form a circle. Wrap it around your wrist one last time to ensure it sits exactly how you like it. -
Tie the first knot:
Remove the bead stopper or tape. Tie a simple overhand knot, pulling the elastic tight enough to close gaps between beads but not so tight that the bracelet buckles. -
Secure with a surgeon’s knot:
Tie a surgeon’s knot for extra security. To do this, cross the strands as usual, but loop one end through the circle twice before pulling tight. -
Apply adhesive:
Place a very small drop of jewelry glue or clear nail polish directly onto the knot. I find a toothpick helps apply the glue precisely without getting it on the beads. -
Let it dry:
Allow the glue to dry completely according to the package instructions. This usually takes at least 15-20 minutes, though overnight is safest. -
Hide the knot:
Once dry, trim the excess cord ends close to the knot. Gently pull the elastic to slide the knot inside the hole of the nearest grey bead to hide it from view.
Loose Letter Beads?
If the letter cubes rotate too freely, use slightly thicker elastic cord (1.0mm) to fill the larger holes of the cube beads more snugly, keeping ‘LUNA’ facing forward.
Now you have a custom personalized accessory that pairs beautifully with any neutral outfit
Grey Beads With a Tiny Heart Charm
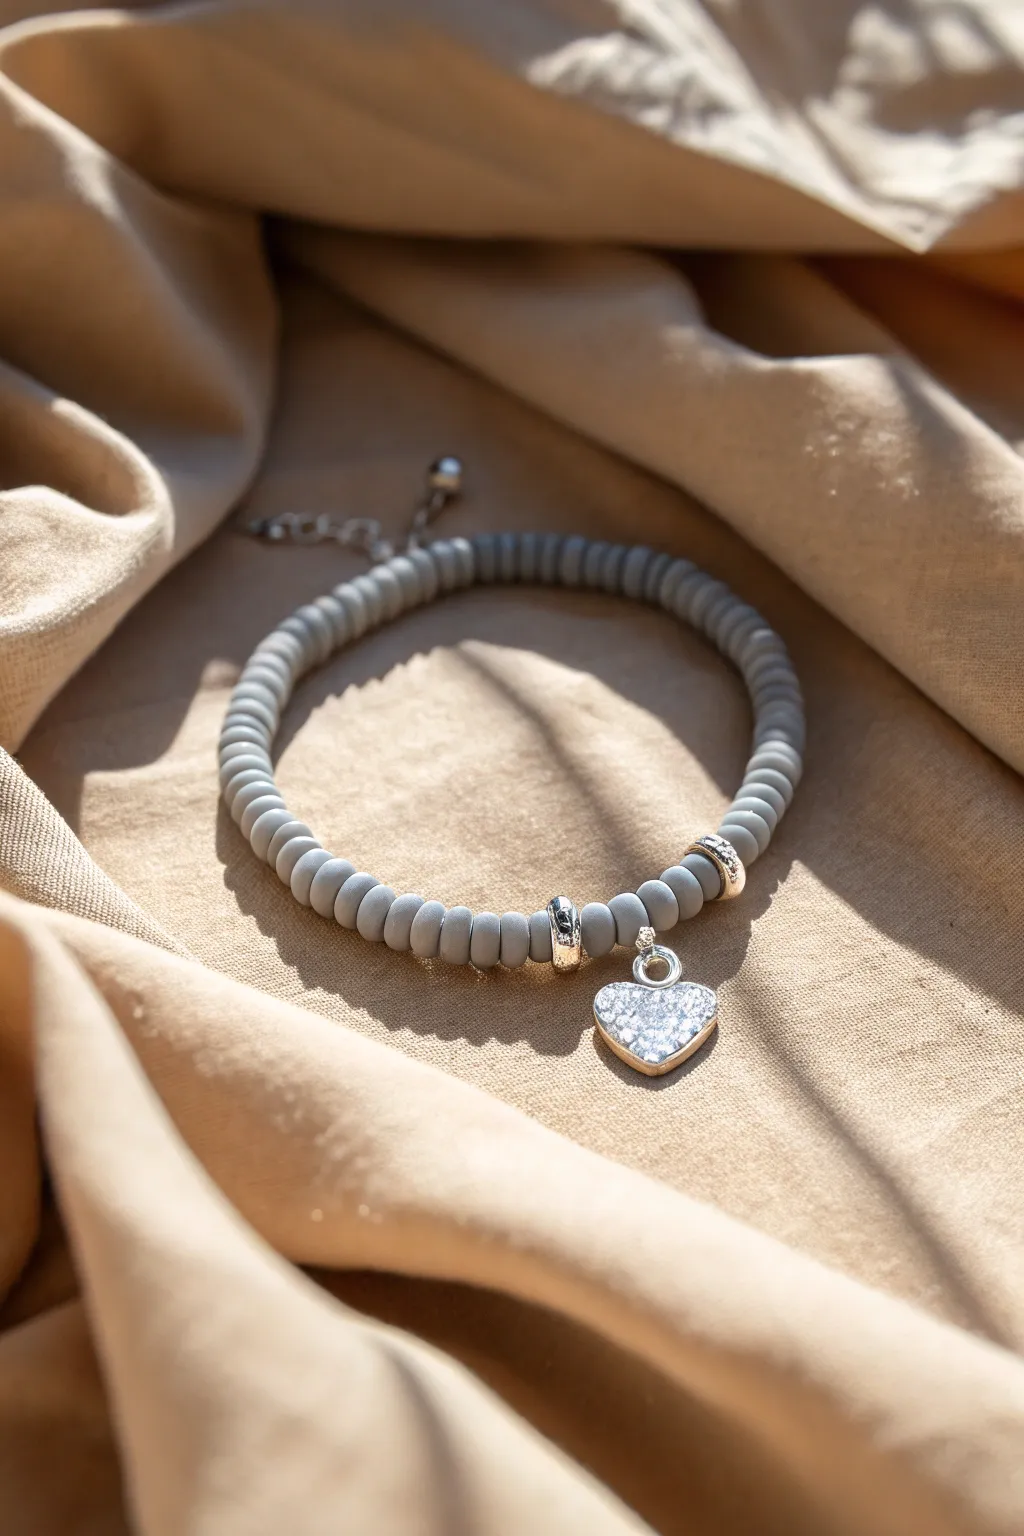
This sophisticated bracelet combines the modern, matte texture of grey polymer clay heishi beads with the sparkle of a rhinestone-encrusted heart charm. It’s a perfect everyday accessory that balances casual materials with a touch of evening glam.
Detailed Instructions
Materials
- Grey polymer clay heishi beads (approx. 6mm diameter)
- Elastic clear beading cord (0.8mm or 1.0mm)
- Silver pave rhinestone heart charm
- Two silver spacer beads (rounded/rondelle style)
- Two jump rings (if charm doesn’t have a bail)
- Jewelry glue or clear nail polish
- Scissors
Step 1: Planning and Measuring
-
Measure your wrist:
Before cutting any cord, wrap a measuring tape around your wrist to find your exact size. Add about half an inch to this measurement for a comfortable fit that isn’t too tight. -
Prepare the workspace:
Lay out a bead board or a soft piece of fabric like felt. This prevents your disc beads from rolling away while you organize your pattern. -
Cut the cord:
Cut a piece of elastic cord about 10-12 inches long. Having this extra length makes tying the final knots significantly easier than struggling with short ends. -
Pre-stretch the elastic:
Give your cut piece of elastic a few gentle tugs. This is a crucial step I always do to prevent the bracelet from stretching out permanently after the first wear.
Step 2: Stringing the Beads
-
Secure the end:
Place a piece of tape over one end of your cord or use a bead stopper clip to keep your work secure as you string. -
Start the grey base:
Begin threading the grey clay heishi beads onto the cord. You will need to string enough beads to cover roughly half of your wrist measurement. -
Add the first spacer:
Slide on one of the shiny silver spacer beads. This will act as a frame for your focal charm. -
Ideally position the charm:
If your heart charm has a large enough bail, slide it directly onto the cord next. If it has a small loop, attach a jump ring first, then slide the jump ring onto the cord. -
Add the second spacer:
Place the second silver spacer bead immediately after the charm to complete the centerpiece arrangement. -
Finish the bead strand:
Continue threading the remaining grey clay beads until the bracelet reaches your desired length. -
Check the fit:
carefully wrap the unfinished strand around your wrist to ensure the size feels right. The ends should meet comfortably without gaps.
Knot Slipping?
If the elastic feels too slippery to hold a knot, try sanding the very ends of the cord slightly with a nail file before tying. The rough texture grips better.
Step 3: Finishing Touches
-
Prepare the knot:
Remove the tape or bead stopper from the end. Bring both ends of the cord together carefully. -
Tie the first knot:
Tie a simple overhand knot, pulling the cord tight enough so there are no gaps between the beads, but not so tight that the bracelet buckles. -
Secure with a surgeon’s knot:
For the second knot, modify a standard square knot by looping the cord through the loop an extra time before pulling tight. This is the secret to a secure hold. -
Apply adhesive:
Dab a tiny drop of jewelry glue or clear nail polish directly onto the knot. This prevents the smooth elastic from slipping undone over time. -
Let it dry:
Allow the glue to dry completely before touching it again. It usually takes just a few minutes. -
Hide the mechanism:
Once dry, trim the excess cord ends short, leaving about 2mm. Gently tug the bracelet to pull the knot inside one of the adjacent clay beads to hide it.
Level Up: Layered Look
Create a stack by making two more bracelets: one entirely of silver spacer beads and another using a darker shade of charcoal clay beads for a monochromatic gradient.
Enjoy the refined look of your new handmade bracelet, perfect for stacking or wearing solo


What Really Happens Inside the Kiln
Learn how time and temperature work together inside the kiln to transform clay into durable ceramic.
Grey and Pearl Soft Glam Mix
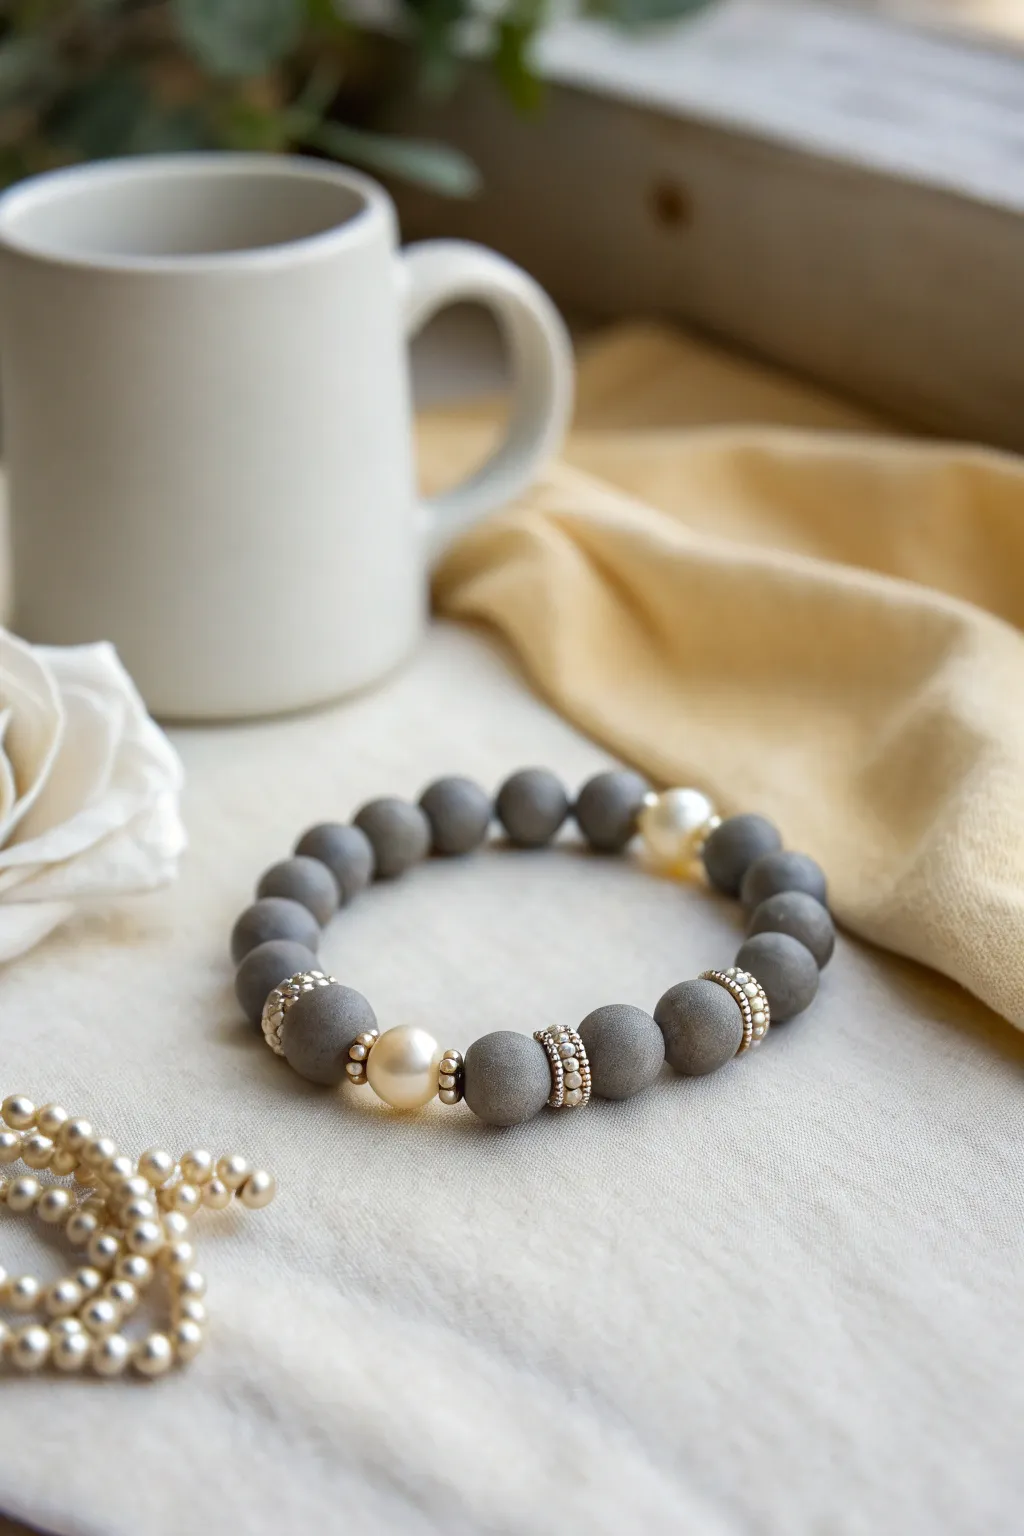
Combine the earthy texture of matte grey beads with the lustrous shine of pearls in this sophisticated design. This mixed-texture bracelet strikes the perfect balance between casual everyday wear and a touch of evening elegance.
How-To Guide
Materials
- Matte grey round beads (10mm or 12mm), likely polymer clay or matte agate
- Large cream or ivory glass pearls (10mm or 12mm)
- Gold rhinestone rondelle spacers
- Small gold bead caps or daisy spacers
- Elastic beading cord (clear, 0.8mm or 1mm)
- Jewelry glue or clear nail polish
- Scissors
Step 1: Planning and Sorting
-
Measure your wrist:
Wrap a flexible measuring tape around your wrist to find your size, then add about half an inch to ensure a comfortable fit that isn’t too tight. -
Lay out the pattern:
Before stringing, lay your beads on a bead board or a soft felt cloth to visualize the design. The pattern shown uses a symmetrical arrangement. -
Establish the focal points:
Place two large pearls opposite each other in your circle layout. These will be the bright highlights against the grey background. -
Add the bling:
Sandwich the focal pearls between small gold daisy spacers or bead caps to frame them elegantly. -
Place spacers:
Plan where your rhinestone rondelles will go. In the reference image, they are used to break up the grey segments, typically placed after every two or three grey beads.
Step 2: Stringing the Design
-
Prepare the cord:
Cut a piece of elastic cord about 10-12 inches long. This generous length makes tying the knot significantly easier later on. -
Pre-stretch the elastic:
Gently pull on the elastic cord a few times. This prevents the bracelet from stretching out and becoming loose after you wear it for the first time. -
Secure the end:
Attach a bead stopper or a piece of tape to one end of the cord to stop your beads from sliding off while you work. -
Start with grey beads:
Begin by threading two or three of the matte grey beads onto the cord. -
Add a fancy spacer:
Slide on one of the rhinestone rondelles. The sparkle should sit snugly against the matte surface of the grey beads. -
Continue the pattern:
Add the next section of grey beads according to your layout, working your way towards the first focal pearl. -
Thread the focal section:
Slide on a gold daisy spacer, followed by the large cream pearl, and then another gold daisy spacer. -
Repeat for symmetry:
Continue stringing the second half of the bracelet, mirroring the pattern you just created so the design matches on both sides. -
Double-check the length:
Wrap the unfinished strand around your wrist to check the fit. Add or remove a grey bead near the ends if adjustments are needed.
Pro Tip: Matte Textures
If you can’t find matte beads, buy regular glossy grey agate or clay beads and lightly buff them with fine-grit sandpaper or a sanding sponge to remove the shine.
Step 3: Finishing Touches
-
Tie the knot:
Remove the bead stopper and bring the ends together. Tie a surgeon’s knot (right over left, left over right, looping through twice) and pull it tight. -
Secure with adhesive:
Dab a tiny drop of jewelry glue or clear nail polish directly onto the knot. Wait a moment for it to become tacky. -
Hide the knot:
If holes allow, gently tug the cord so the knot slides inside one of the larger grey beads or pearls to hide it from view. -
Trim excess cord:
Use your scissors to trim the remaining tails of the elastic cord, being careful not to cut the main knot.
Troubleshooting: Visible Knots
If your knot won’t fit inside a bead, start your pattern with the bead that has the largest hole. Pearls often have very small holes, so avoid starting there.
Slip on your new bracelet and enjoy how the soft pearl luster complements the modern grey tones
Grey With Clear Faceted Accent Beads
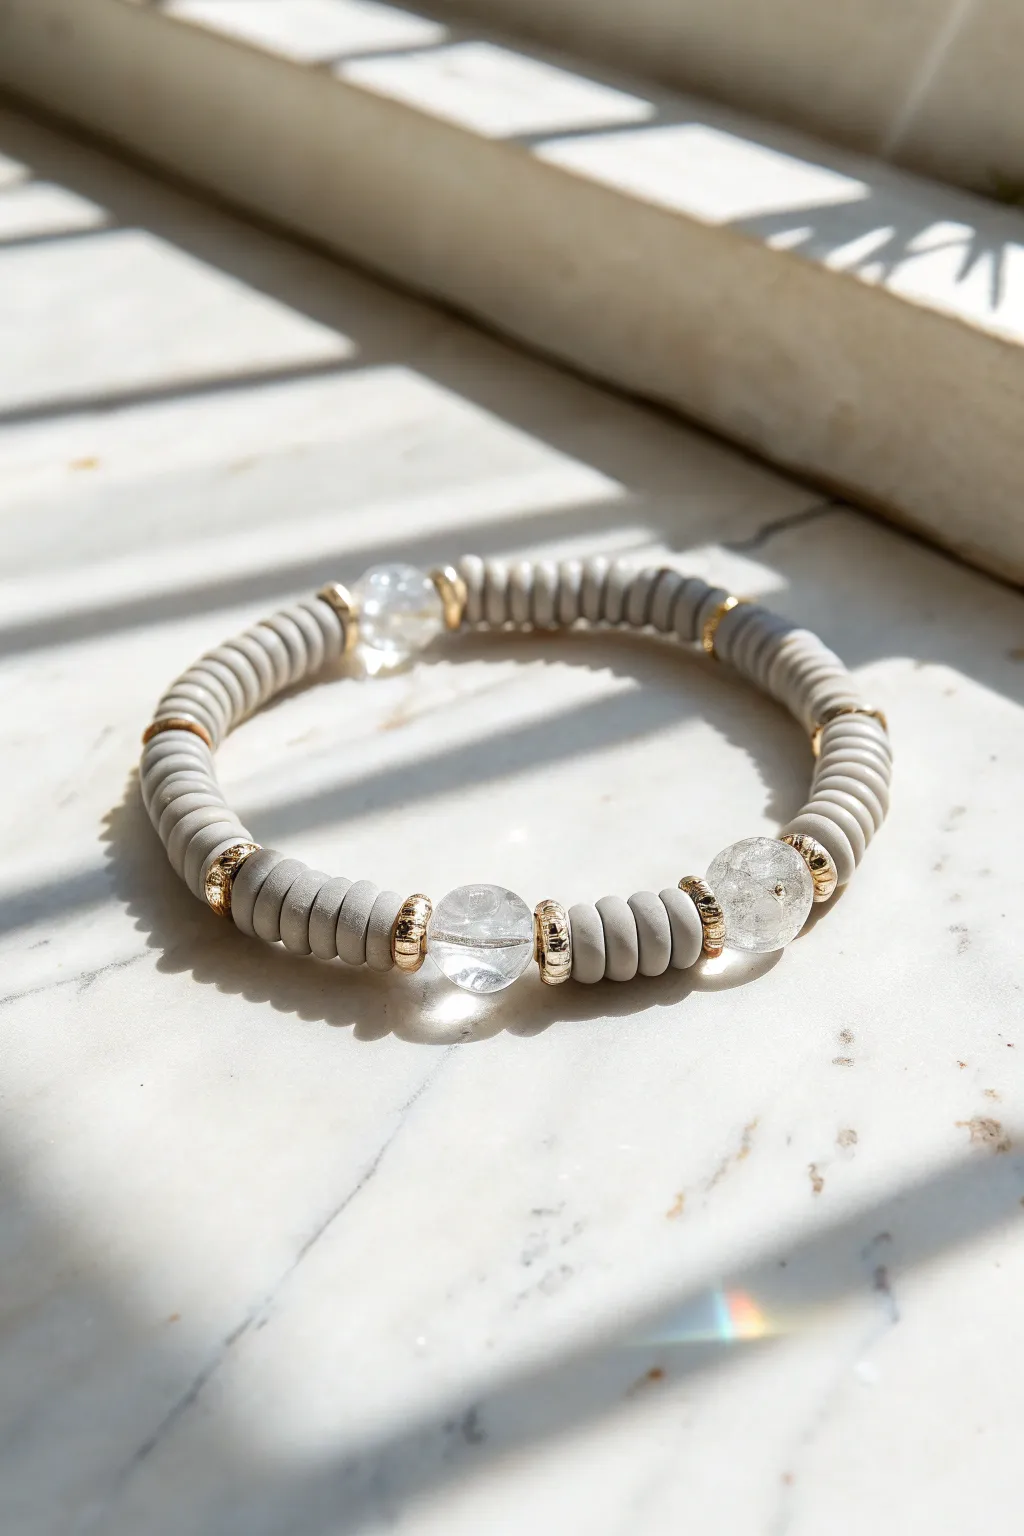
This elegant bracelet balances matte grey textures with the shimmering clarity of large crystal accents. The addition of gold spacers elevates the design, making it perfect for both casual stacking and a touch of everyday luxury.
Step-by-Step Guide
Materials
- Matte grey polymer clay Heishi beads (6mm or 8mm)
- Clear quartz or faceted glass round beads (8mm or 10mm)
- Gold tone disc spacer beads (metal or hematite)
- Elastic beading cord (0.8mm clear)
- Beading needle (optional but helpful)
- Jewelry glue or clear nail polish
- Scissors
Step 1: Planning and Preparation
-
Measure your wrist:
Wrap a flexible measuring tape around your wrist where you want the bracelet to sit. Note the measurement and add about half an inch for a comfortable fit. -
Cut the cord:
Cut a piece of elastic cord roughly 10-12 inches long. Having extra length makes tying the final knot much easier than struggling with short ends. -
Pre-stretch the elastic:
Hold the cord firmly at both ends and give it several gentle tugs. This crucial step prevents the bracelet from drooping or stretching out permanently after you wear it a few times. -
Secure one end:
Place a piece of tape or a bead stopper clip on one end of the cord so your beads don’t slide off while you are working.
Step 2: Creating the Pattern
-
Establish the main grey section:
Begin stringing your grey Heishi beads. I usually start with about 15-20 grey discs to form the back section of the bracelet, depending on your total wrist size. -
Add first gold accents:
Slide on one gold disc spacer, followed immediately by a second spacer to create a distinct metallic border. -
Insert the crystal focal bead:
Thread on one of your large clear quartz or glass beads. The contrast between the clear round bead and the flat grey discs is the highlight of this design. -
Close the focal section:
Frame the crystal bead by adding two more gold disc spacers on the other side. -
Create the spacing segment:
Add a shorter segment of grey Heishi beads, perhaps 5 to 8 discs, to separate the crystal accents. -
Repeat the accent pattern:
Add your gold spacers, another crystal bead, and closing gold spacers. -
Continue the rhythm:
Repeat the ‘short grey segment, gold, crystal, gold’ pattern until you have three distinct crystal focals in the design. -
Finish the loop:
Fill the rest of the cord with grey Heishi beads until the bracelet reaches your desired total length.
Needle Trick
If stringing floppy clay beads is tedious, stack 10-15 on a thin needle first, then slide them all onto the elastic at once.
Step 3: Finishing Touches
-
Check the fit:
Carefully wrap the unfinished strand around your wrist to verify the size. Add or remove a few grey beads if necessary to get the perfect fit. -
Tie the knot:
Remove the tape or stopper. Bring the two ends together and tie a surgeon’s knot (loop the right end over the left twice, then pull tight). -
Secure the hold:
Apply a tiny dab of jewelry glue specifically to the knot. Let it dry for a moment before proceeding. -
Hide the knot:
If hole size permits, gently tug the elastic so the knot slides inside one of the larger clear beads or a gold spacer to conceal it. -
Trim excess cord:
Use your scissors to trim the remaining tail ends of the elastic, being careful not to cut too close to the knot itself.
Add Variety
Swap one clear crystal for a crackle quartz or a pearl bead to add a different texture while keeping the neutral palette.
Slip on your new bracelet and enjoy the sophisticated sparkle it brings to your wrist stack.

TRACK YOUR CERAMIC JOURNEY
Capture glaze tests, firing details, and creative progress—all in one simple printable. Make your projects easier to repeat and improve.
Grey Terrazzo Accent Sections
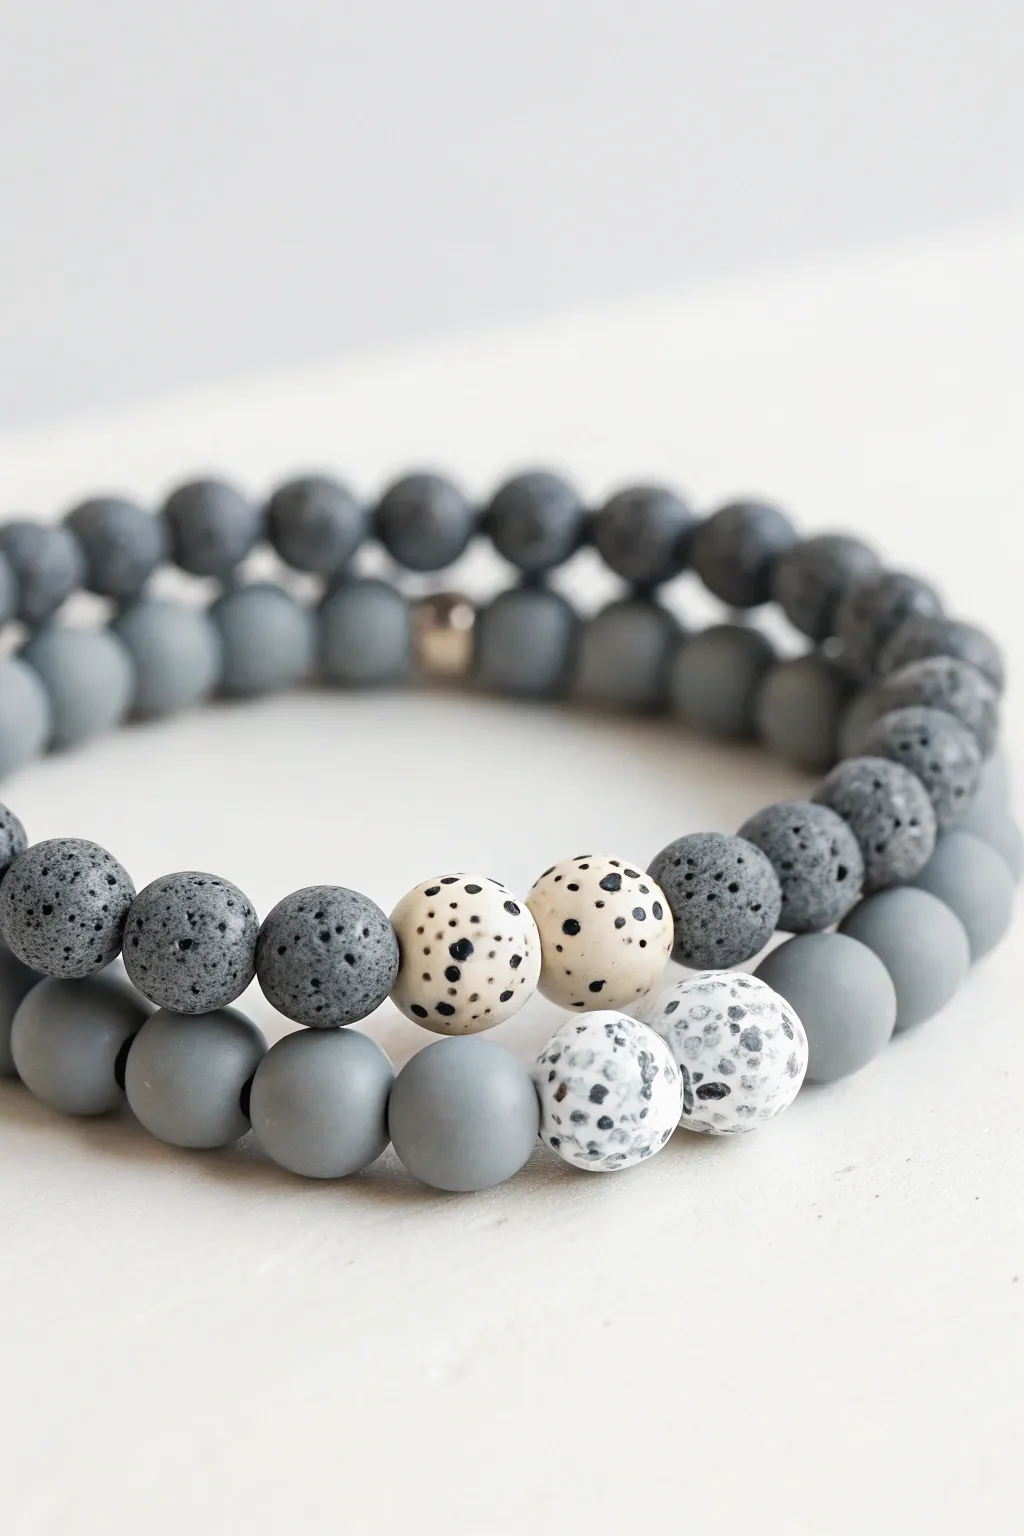
Embrace the understated elegance of monochrome with this dual-strand bracelet set, featuring a sophisticated mix of matte solids and terrazzo-style textures. The cool grey tones are broken up by striking focal beads that mimic natural stone speckling, creating a modern accessory perfect for everyday wear.
How-To Guide
Materials
- Matte grey round beads (8mm or 10mm)
- Black lava stone beads (8mm or 10mm)
- Cream or beige ceramic beads with black speckles (dalmatian jasper look-alikes)
- White or light grey ceramic beads with grey/black terrazzo speckles
- Strong elastic stretch cord (0.8mm or 1mm)
- Jewelry glue or clear nail polish
- Scissors
- Tape or bead stopper
- Small crimp bead cover (optional, metallic finish shown in back)
Step 1: Designing the Layout
-
Measure your wrist:
Before stringing, wrap a piece of string around your wrist to find your comfortable circumference. Add about half an inch to this measurement to ensure the bracelets roll on easily without snapping. -
Plan the top bracelet (darker theme):
Lay out your beads on a bead board or soft towel. For the first bracelet, you’ll want a base of dark, porous lava stone beads. -
Create the focal point:
In the center of your layout, place two cream-colored speckled beads. These will act as the high-contrast ‘terrazzo’ accent against the dark lava stones. -
Plan the bottom bracelet (lighter theme):
For the second strand, lay out a string of smooth, matte grey beads. These offer a textural contrast to the rougher lava stones of the first bracelet. -
Add the secondary focal point:
Align this strand with the first one. Directly below the cream beads, place two white or light grey speckled beads. This creates a cohesive look when the bracelets are stacked.
Knot Hiding Trick
If bead holes are too small for the knot, ream them slightly with a bead reamer tool to widen the opening just enough to tuck the knot inside.
Step 2: Stringing the Beads
-
Prepare the cord:
Cut two lengths of elastic cord, each about 10-12 inches long. Is simply find it easier to work with excess length than struggling with short ends. -
Pre-stretch the elastic:
Give each piece of cord a few firm tugs. This pre-stretching process helps prevent the bracelet from sagging or loosening shortly after you finish it. -
Secure the end:
Place a piece of tape or a bead stopper on one end of your first cord to keep the beads from sliding off as you work. -
String the lava strand:
Thread the black lava beads onto the cord, inserting the two cream speckled beads in the middle of the sequence according to your design. -
String the matte grey strand:
Repeat the process with the second cord, stringing the smooth grey beads and positioning the white speckled beads in the center to match the first bracelet’s alignment. -
Check the fit:
Wrap the unfinished strands around your wrist to double-check the sizing. Add or remove filler beads from the ends (the back of the bracelet) if necessary, keeping the speckled beads centered.
Step 3: Finishing Touches
-
Tie the first knot:
Remove the tape and bring the two ends of the cord together. Tie a simple overhand knot, pulling it tight against the beads. -
Secure with a surgeon’s knot:
Follow up with a surgeon’s knot—loop the elastic through twice before pulling tight. This creates a much more secure bond than a standard square knot. -
Apply adhesive:
Dab a tiny drop of jewelry glue or clear nail polish onto the knot. Be careful not to get glue on the neighboring beads, as it can ruin the matte finish. -
Hide the knot:
Once the glue is tacky but not fully hard, slide the knot inside the hole of the nearest bead. If the hole is too small, simply trim the ends close to the knot. -
Optional metallic accent:
If you notice a metallic bead in the reference image’s background, you can add a small gold spacer bead to the back of the bracelet to cover the knot area or add a hidden flash of shine. -
Final trim:
Trim any excess elastic carefully with sharp scissors, ensuring you don’t nick the main knot.
Drooping Elastic?
If the bracelet stretches out quickly, you likely skipped the pre-stretching step. Always pull the cord firmly 3-4 times before stringing any beads.
Now you have a perfectly coordinated set of stone bracelets ready to add texture to any outfit
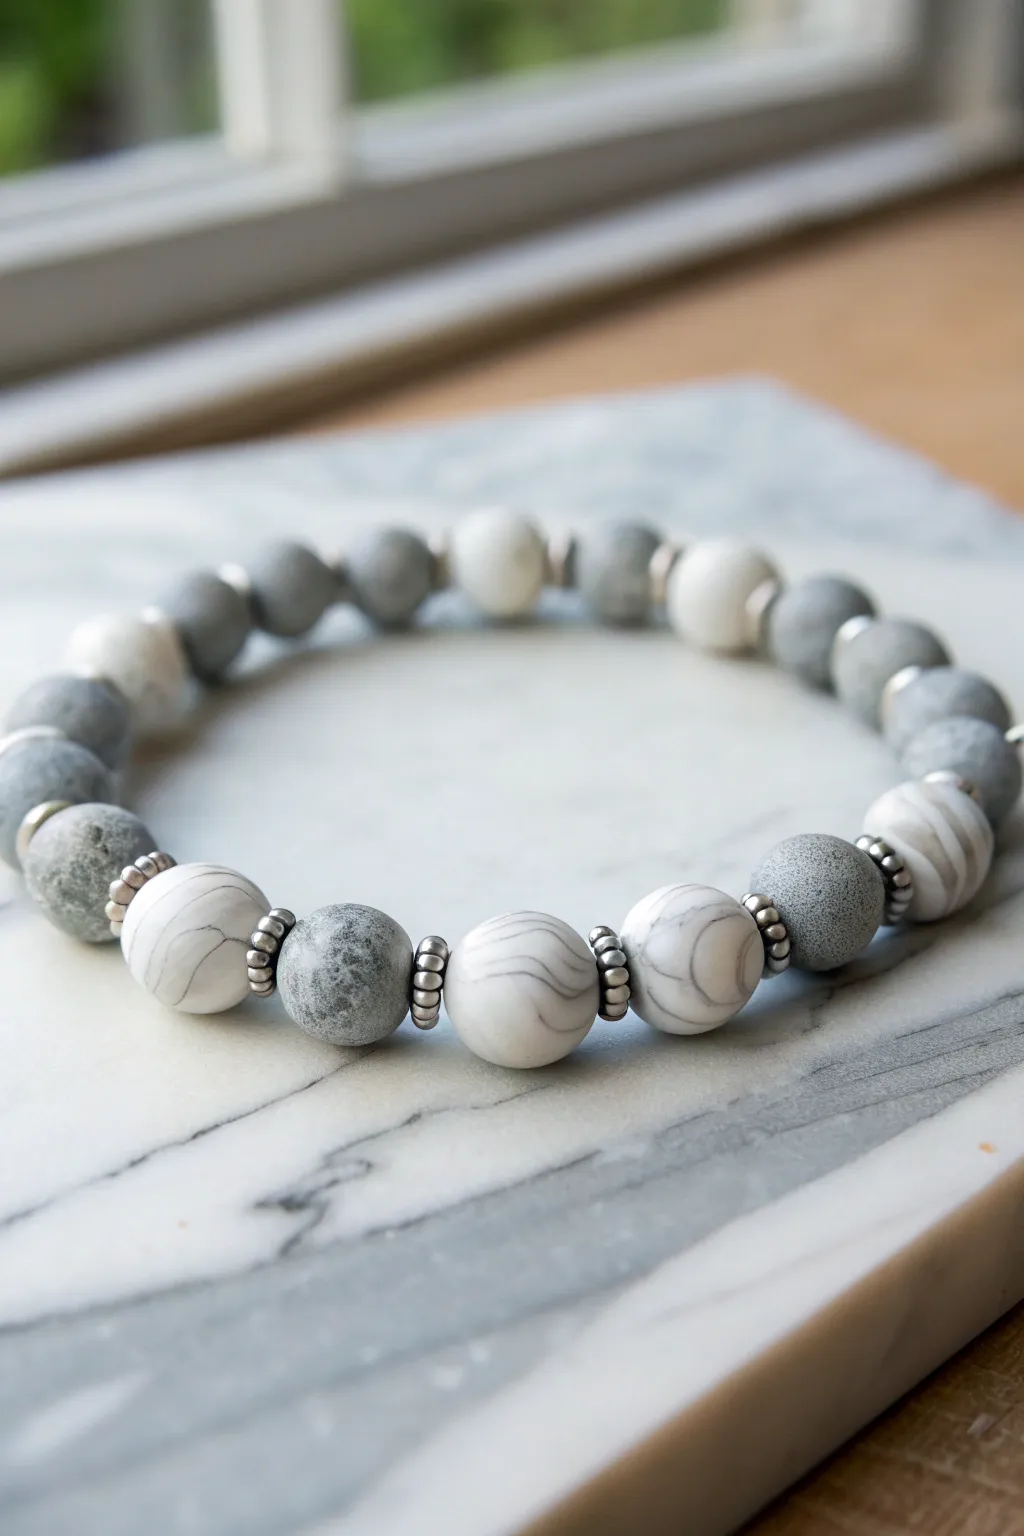
Grey Marble Swirl Focal Beads
This sophisticated bracelet combines the raw, earthy texture of solid grey clay with the polished refinement of white marble-effect focal beads. The addition of metallic spacers elevates the design, making it a versatile piece that transitions seamlessly from day to night.
Detailed Instructions
Materials
- Polymer clay (white)
- Polymer clay (black or dark grey)
- Polymer clay (granite or stone effect grey)
- Acryllic bead roller (round)
- Beading elastic cord (0.8mm or 1mm)
- Silver-tone metal spacer beads (daisy or rondelle shape)
- Clay slicing blade
- Toothpicks or bead piercing pins
- Oven for baking clay
- Clear varnish (optional, for the marble beads only)
- Jewelry glue
Step 1: Creating the Solid Grey Beads
-
Condition the clay:
Start by taking your grey stone-effect or solid grey polymer clay and kneading it in your hands until it becomes soft and pliable. -
Portion the clay:
Roll the conditioned clay into a long, even snake shape. Use your slicing blade to cut equal-sized segments to ensure your beads will be uniform. -
Roll spheres:
Take each segment and roll it between your palms to form a rough ball. For a perfectly round shape, I like to use an acrylic bead roller, moving it in a circular motion over the clay. -
Add texture:
To achieve the matte, stone-like finish seen in the photo, gently tap the surface of the raw beads with a clean toothbrush or fine-grit sandpaper instead of smoothing them completely. -
Pierce the holes:
Carefully insert a toothpick or piercing pin through the center of each bead. Twist gently as you push to avoid deforming the sphere.
Keep it Clean
Clean your hands or wear gloves when switching from dark grey clay to white clay. Even tiny specks of grey residue can dirty the pristine white background of your marble beads.
Step 2: Crafting the Marbled Focal Beads
-
Prepare marble colors:
Condition a large amount of white clay and a tiny amount of black or dark grey clay. You want a ratio of about 20:1 white to black. -
Create the streaks:
Roll the black clay into very thin, thread-like snakes. -
Combine clays:
Wrap the thin black threads randomly around a thick cylinder of white clay. -
Twist and fold:
Roll the log to embed the black lines. Twist the log like a candy cane, fold it in half, and roll it again. Repeat this twisting process until fine, swirled veins appear. -
Shape the focal beads:
Cut segments from your marbled log and roll them into smooth spheres using the bead roller, just as you did before. -
Inspect the pattern:
Check your spheres; if the marbling looks too chunky, roll the ball between your palms to distort the surface further. -
Pierce focal beads:
Create the holes in your marbled beads using a piercing pin.
Natural Stone Look
For the grey beads, mix clear translucent clay with your grey at a 1:1 ratio. This adds depth that mimics real stone better than opaque pigment alone.
Step 3: Baking and Assembly
-
Bake the beads:
Place all your beads on a baking sheet or tile. Bake according to the manufacturer’s instructions for your specific brand of clay (usually 275°F/130°C for 15-30 minutes). -
Cool and finish:
Allow the beads to cool completely. If you want the white beads to look like polished marble, apply a thin coat of gloss varnish, but leave the grey beads matte. -
Plan the pattern:
Lay out your design on a bead board or towel. Alternate the solid grey beads with the white marble beads. -
Insert spacers:
Place two silver spacer beads between the focal marble beads and the grey beads to bracket them, matching the photo’s metallic accents. -
String the beads:
Cut a length of elastic cord and thread your beads in the planned pattern. Pre-stretching the elastic a few times prevents it from sagging later. -
Tie the knot:
Tie a secure surgeon’s knot (right over left, left over right) and pull tight. -
Secure and trim:
Add a tiny dab of jewelry glue to the knot, let it dry, and trim the excess cord before tucking the knot inside a bead hole.
Now you have a handmade accessory that perfectly captures the cool, neutral tones of natural stone
Concrete Speckle Grey Industrial Look
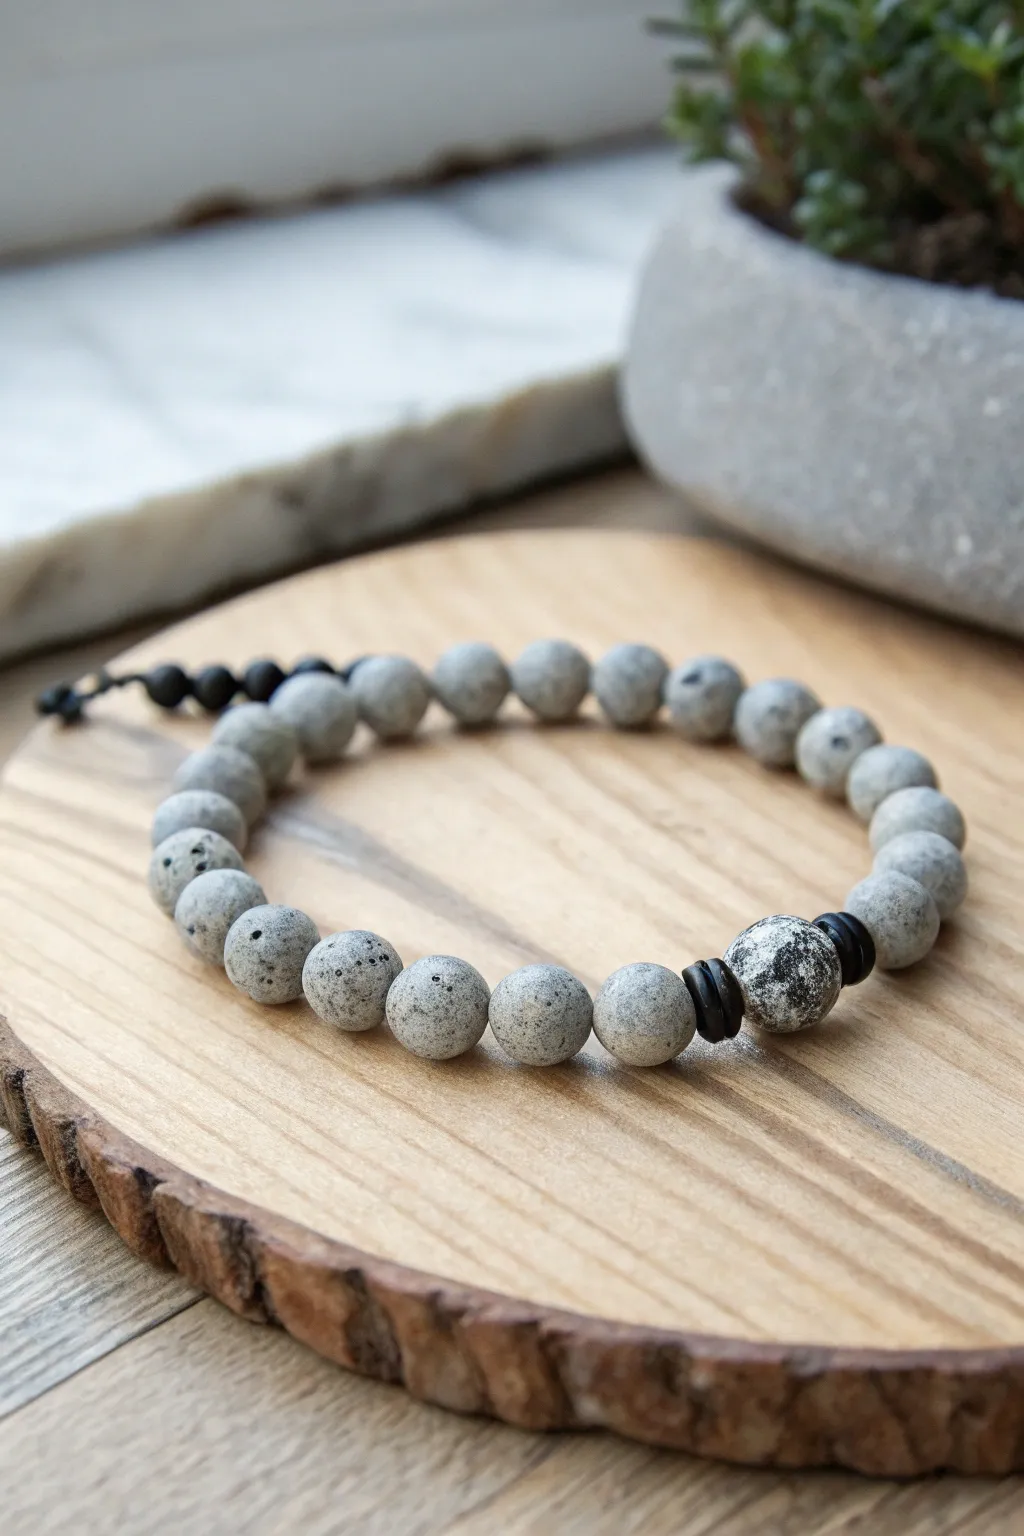
Achieve a sleek, modern industrial vibe with these handcrafted clay beads that mimic the look of matte concrete. This project combines subtle grey speckling with a bold, marbled focal bead for a minimalist accessory that feels both raw and refined.
Step-by-Step Guide
Materials
- Polymer clay (grey, white, and black)
- Black acrylic paint
- Toothbrush or stiff bristle brush
- Elastic cord (0.8mm or 1mm)
- Bead roller (optional, but helpful for symmetry)
- Needle tool or toothpick
- Sandpaper (fine grit)
- Gloss varnish (optional, for the focal bead)
- Black spacer beads or washers (rubber or metal)
- Oven for baking
Step 1: Creating the Speckled Clay Base
-
Mix the Base Grey:
Start by conditioning your grey polymer clay until it is soft and pliable. If you want a lighter ‘concrete’ shade, mix in a small amount of white clay until fully blended. -
Add Texture:
To get that gritty, authentic concrete look, mix in some finely ground black pepper or dried used coffee grounds into the clay. Knead it thoroughly so the specks are evenly distributed. -
Splatter Effect:
Flatten the clay into a sheet. Dip an old toothbrush into slightly watered-down black acrylic paint and flick it onto the clay surface to create tiny, random specks. I like to let this paint dry completely before rolling the clay again to avoid smearing. -
Form the Beads:
Once dry, roll the clay into a log and cut it into equal segments. Roll each segment into a smooth, round ball between your palms. -
Pierce the Holes:
Using a needle tool, carefully pierce a hole through the center of each bead. Rotate the bead as you push the needle through to prevent it from flattening.
Hole Deformed?
If piercing the raw clay squashes your bead shape, let the balls sit in the fridge for 15 minutes to firm up before piercing, or drill the holes after baking.
Step 2: The Focal Bead & Accents
-
Create the Focal Bead:
Take a slightly larger portion of your grey clay mix for the centerpiece bead. -
Marble the Surface:
Add small, jagged bits of black clay to the surface of your grey ball. Roll it in your hands firmly to embed the black into the grey, creating a swirly, marbled industrial effect. -
Texture the Focal Bead:
Use a piece of coarse sandpaper or a crumpled ball of foil to tap texture onto the focal bead, giving it a rougher, stone-like appearance. -
Make the Clasp Beads:
Create 2-3 small beads using pure black clay to serve as the closure accent at the back of the bracelet. -
Bake:
Arrange all your beads on a baking sheet or foil. Bake according to the polymer clay package instructions (usually 275°F/130°C for 15-30 minutes).
Step 3: Finishing and Assembly
-
Cool and Sand:
Allow the beads to cool completely. Lightly wet-sand the grey beads (but not the textured focal one) to achieve a smooth, matte finish that feels like polished river stone. -
Prepare the String:
Cut a length of elastic cord about 10-12 inches long. Pre-stretch it by pulling firmly on both ends to prevent the bracelet from loosening later. -
String the Accent:
Start by threading on the large marbled focal bead. -
Add Spacers:
Slide one black washer or spacer bead onto the cord on either side of the focal bead to frame it. -
Complete the Pattern:
Thread the grey speckled beads onto the cord, filling in the rest of the length until it fits comfortably around your wrist. -
Add the Closure Detail:
Finish by adding the small black clay beads at the very ends of the pattern, where the knot will be. -
Tie the Knot:
Tie a secure surgeon’s knot (right over left, left over right twice). Pull the elastic tight to secure the beads. -
Secure and Trim:
Add a tiny drop of super glue or jewelry cement to the knot for extra security using a toothpick. Once dry, trim the excess cord carefully.
Level Up: Metallic Touch
Roll your focal bead in a tiny bit of silver or copper leaf before baking. The metal will crackle as the clay expands, creating an exposed rebar aesthetic.
Wear your new industrial bracelet solo or stack it with a watch for a crisp, structured look
Grey and Sage Green Earthy Neutral Stack
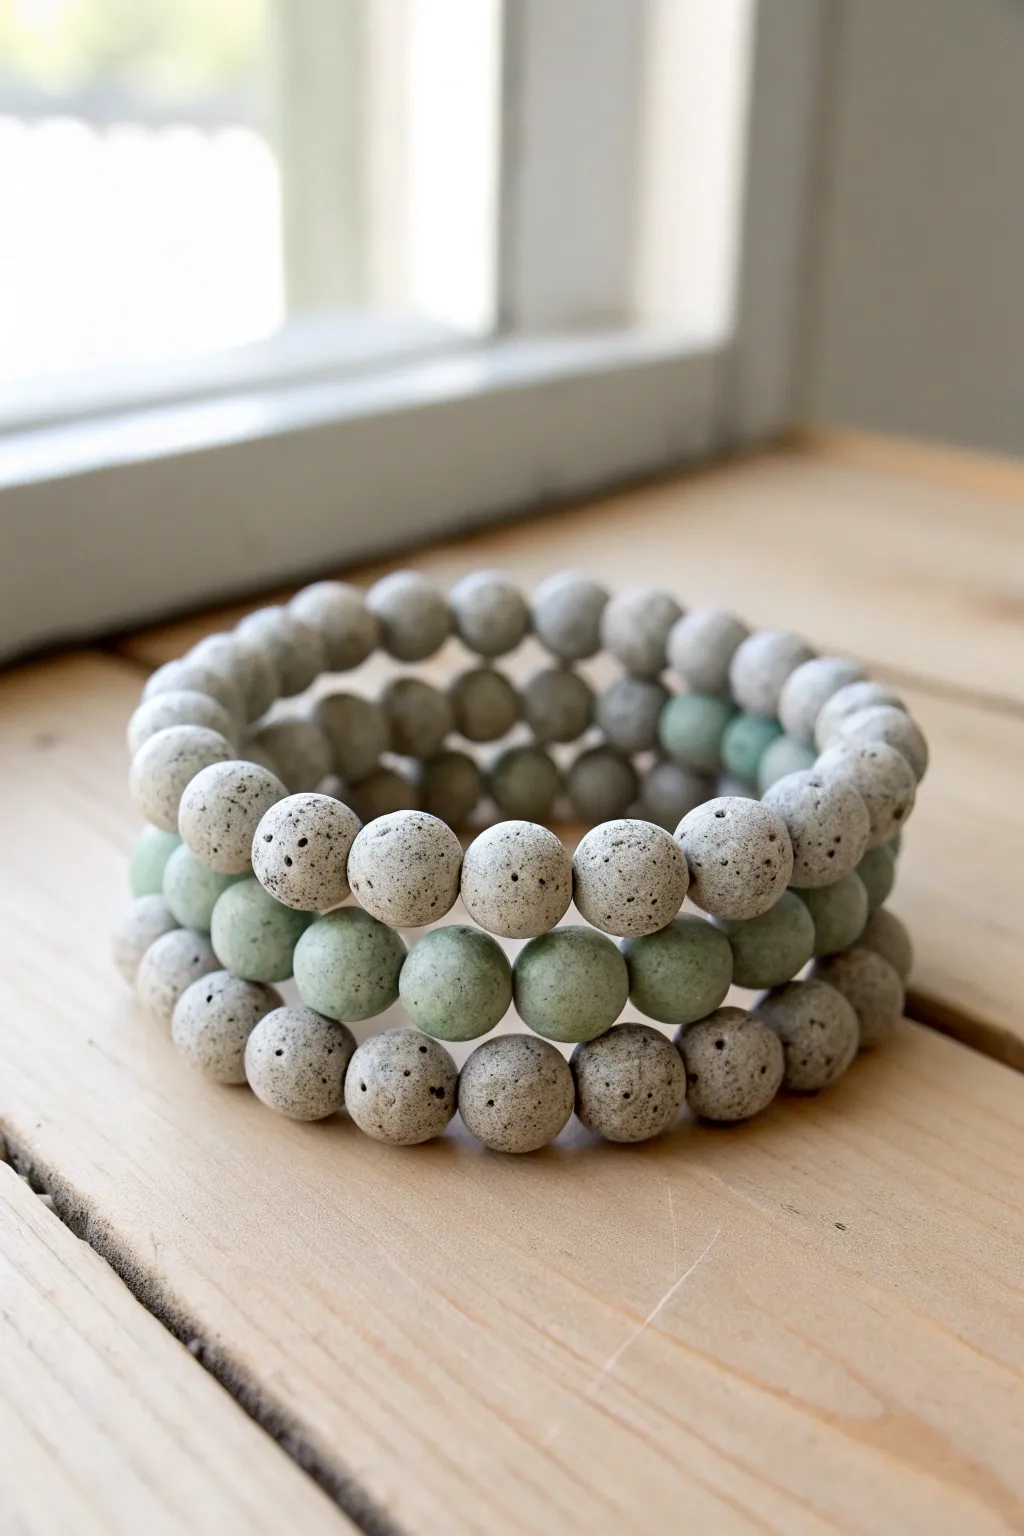
This serene bracelet set combines the grounding energy of grey speckled clay with soft, mute sage green accents for a truly earthy aesthetic. The porous texture of these beads not only adds visual depth but makes them perfect candidates for diffusing essential oils.
Step-by-Step Tutorial
Materials
- Grey speckled clay or lava beads (approx. 8mm-10mm)
- Sage green matte stone or clay beads (approx. 8mm-10mm)
- Strong elastic cord (0.8mm or 1mm thickness)
- Bead stopper or binder clip
- Jewelry adhesive (e.g., G-S Hypo Cement)
- Scissors or jewelry nippers
- Ruler or tape measure
Step 1: Planning Your Designs
-
Measure your wrist:
Start by measuring your wrist with a flexible tape measure. Add about half an inch to this measurement to ensure the bracelets fit comfortably without digging into your skin. -
Determine bead count:
Lay out your beads in a straight line along a ruler to match your desired length. For standard 8mm beads, an average wrist usually requires 22-24 beads per bracelet. -
Design the first grey strand:
For the top bracelet in the stack, select only your grey speckled clay beads. Check each bead for uniformity, setting aside any that are significantly misshapen. -
Design the mixed strand:
For the middle bracelet, create a pattern. A popular choice shown here is a 50/50 split or a color block, where the front half is sage green and the back half is grey, creating a peekaboo effect. -
Design the third strand:
For the bottom bracelet in your stack, revert to the solid grey speckled design to frame the colorful middle strand perfectly.
Step 2: Stringing the Beads
-
Prepare the elastic:
Cut a piece of elastic cord about 10-12 inches long. This generous length gives you plenty of room to tie knots later without struggling. -
Pre-stretch the cord:
Firmly pull on the elastic strand several times. Pre-stretching is crucial because it prevents the bracelet from sagging or loosening permanently after the first few wears. -
Secure the end:
Attach a bead stopper or a simple binder clip to one end of the elastic cord to stop beads from sliding off while you work. -
Thread the first bracelet:
Begin threading your grey beads onto the cord. If the bead holes are rough (common with clay or lava beads), double-check that they don’t snag or fray the elastic. -
Check the fit:
Wrap the strung beads around your wrist to verify the size. There should be no gaps between beads, but the elastic shouldn’t be stretched tight when simply resting on your skin. -
Thread the remaining bracelets:
Repeat the stringing process for the sage green mixed strand and the final grey strand, keeping your bead counts consistent across all three pieces.
Aromatic Addition
Since these are porous clay beads, add a drop of essential oil (like lavender or cedarwood) to one bead. The clay absorbs it and acts as a diffuser.
Step 3: Finishing and Securing
-
Prepare the knot:
Remove the bead stopper carefully, holding both ends of the elastic securely. -
Tie the surgeon’s knot:
Cross the ends over each other, then loop one end under the other twice (instead of just once like a standard shoe knot). Pull tight so the knot cinches down into the beads. -
Secure with a second knot:
Perform a standard overhand knot on top of your surgeon’s knot to lock everything in place, pulling firmly. -
Apply adhesive:
Dab a tiny droplet of jewelry cement directly onto the knot. I like to let this dry for about a minute before moving to the next step to ensure it doesn’t slip. -
Hide the knot:
While the glue is still slightly tacky but not wet, pull the elastic so the knot slides inside the hole of the nearest bead. This hides the mechanics for a professional finish. -
Trim the excess:
Once the glue has fully cured (check your glue’s instructions, usually 10-15 minutes), trim the excess elastic tails as close to the bead as possible using sharp scissors.
Knot Slipping?
If your elastic is slippery, dust the ends with a tiny bit of cornstarch or baby powder before tying. The friction helps the knot grip tighter.
Now you have a harmonious stack that brings a touch of nature to your daily style
Grey and Blush Modern Romantic Combo
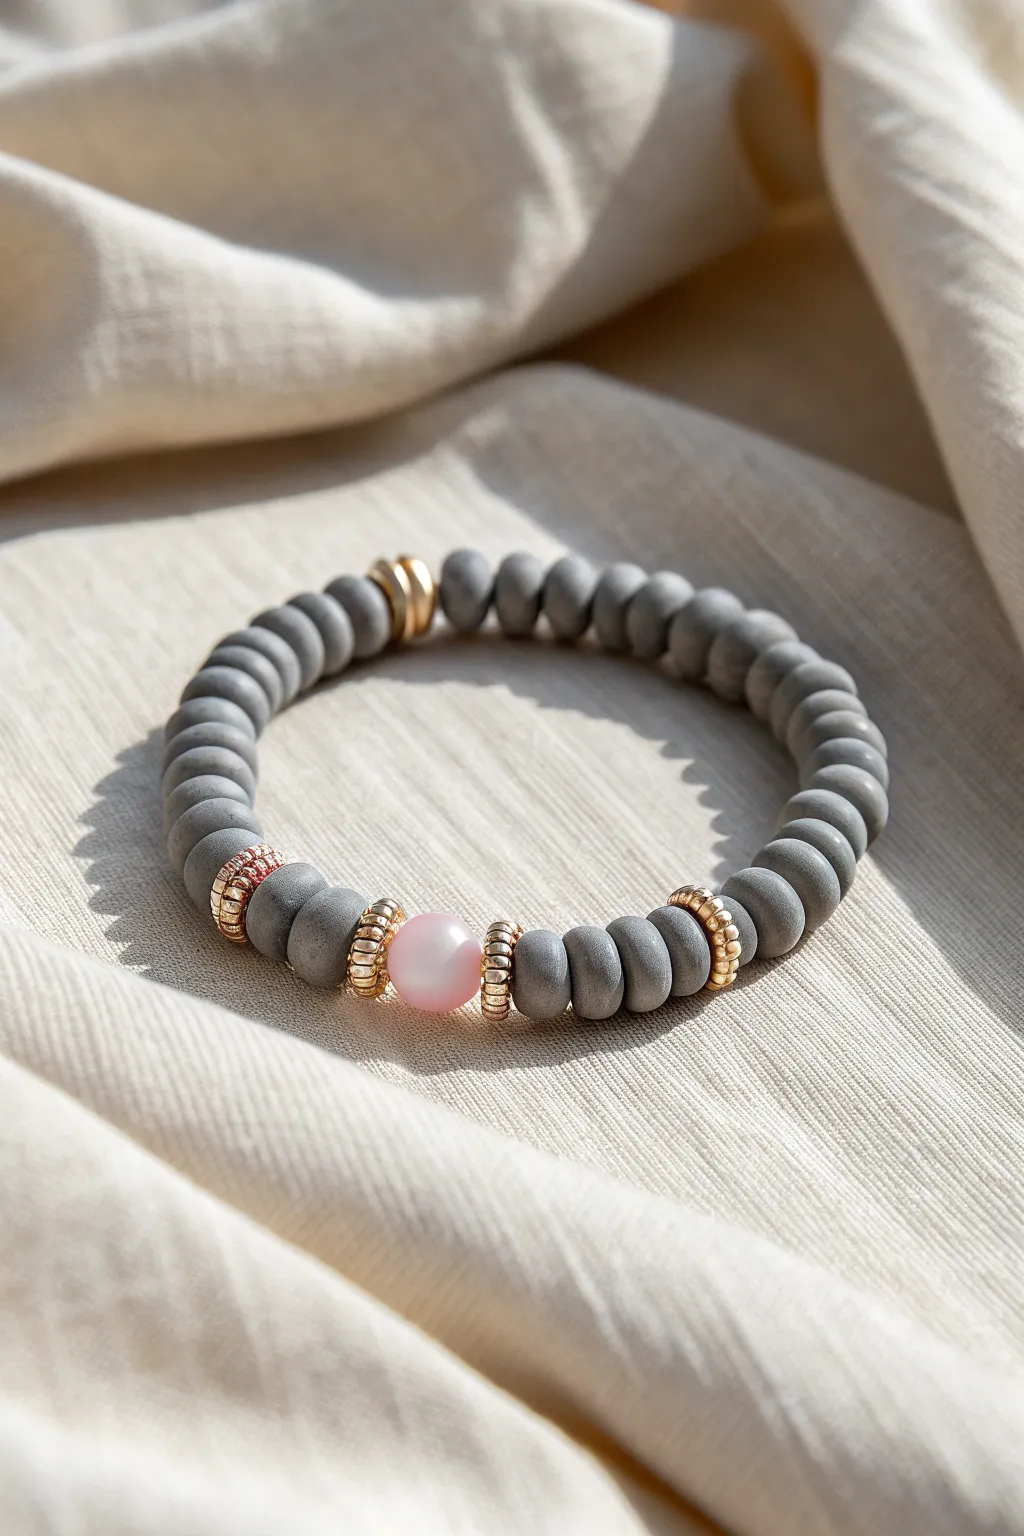
This project features sleek, matte grey heishi beads interrupted by shimmering gold accents and a single, soft blush focal point. The combination creates a modern yet romantic look perfect for stacking or wearing as a subtle statement piece.
Step-by-Step Guide
Materials
- Grey polymer clay heishi beads (approx. 6mm)
- One blush pink round bead (glass, quartz, or high-polish acrylic, approx. 8-10mm)
- Four gold rondelle spacer beads (ribbed or twisted texture)
- Three gold polished flat disc spacer beads
- Strong elastic cord (0.8mm crystal string recommmended)
- Scissors or jewelry snips
- Super glue or G-S Hypo Cement
- Beading board or measuring tape
- Tape or bead stopper
Step 1: Preparation
-
Measure and Cut:
Cut a piece of elastic cord about 10-12 inches long. This generous length gives you plenty of room to tie secure knots later without struggling with short ends. -
Pre-stretch the Cord:
Give your elastic a firm but gentle tug several times along its length. Pre-stretching prevents the finished bracelet from sagging or loosening after you wear it a few times. -
Secure the End:
Attach a piece of tape or a bead stopper to one end of the cord so your beads don’t slide off while you are working. I usually just loop it around a piece of masking tape.
Step 2: Beading the Pattern
-
Start the Grey Base:
Begin threading your grey heishi beads onto the cord. You will need enough to cover approximately one-third of your wrist circumference to start. -
Add Rear Gold Detail:
Slide on three gold flat disc spacer beads. These will sit at the back of the bracelet, opposite the focal point, adding a hidden touch of shine. -
Continue the Grey Base:
Resume threading the grey heishi beads. Continue until you have enough length to reach where you want the focal accents to begin on your wrist. -
First Gold Accent:
Add one ribbed gold rondelle spacer bead. Contrast is key here, so ensure this bead has a distinct texture compared to the smooth clay. -
Short Grey Segment:
Thread on a small section of grey clay beads—about 8 to 10 beads is usually perfect to create spacing before the main focal point. -
Focal Framework Start:
Add another ribbed gold rondelle spacer bead. This will act as the left-side frame for your center bead. -
Add the Blush Focal:
Slide on your single blush pink round bead. The round shape breaks up the repetitive rhythm of the flat discs beautifully. -
Focal Framework End:
Immediately follow the pink bead with your third ribbed gold rondelle spacer. -
Second Short Grey Segment:
Add another small section of grey clay beads, matching the count you used in the previous short segment (about 8-10 beads) for symmetry. -
Final Gold Accent:
Add the fourth and final ribbed gold rondelle spacer. -
Complete the Circle:
Finish stringing the remaining grey heishi beads until the strand reaches your desired total bracelet length (standard is usually 6.5 to 7 inches).
Knot Slipping?
If your surgeon’s knot feels slippery, try coating the ends of the elastic with a little beeswax or chalk before tying. This adds friction and helps the knot hold tight.
Step 3: Finishing Touches
-
Check the Size:
Wrap the unfinished strand around your wrist to check the fit. It should sit comfortably without pinching your skin or dropping too low. Add or remove a few grey beads if necessary. -
Tie the Knot:
Remove the tape or stopper. Bring the two ends together and tie a surgeon’s knot: essentially a square knot but loop the cord through twice on the first pass for extra grip. -
Secure with Glue:
Apply a tiny dot of jewelry glue or super glue directly onto the knot. Be careful not to get glue on the visible parts of the clay beads. -
Hide the Knot:
Before the glue fully hardens, pull the knot inside the hole of the nearest bead if possible. If the hole is too small, simply let it dry securely between two beads. -
Trim Excess:
Once the glue is dry, use your scissors to snip off the excess tail ends of the elastic as close to the knot as possible.
Design Symmetry
Count your beads carefully! For the professional look in the photo, ensure the grey sections flanking the pink bead have the exact same number of discs.
Enjoy styling your new bracelet solo or as part of a soft, neutral stack
Grey With Tiny Neon Pinstripes
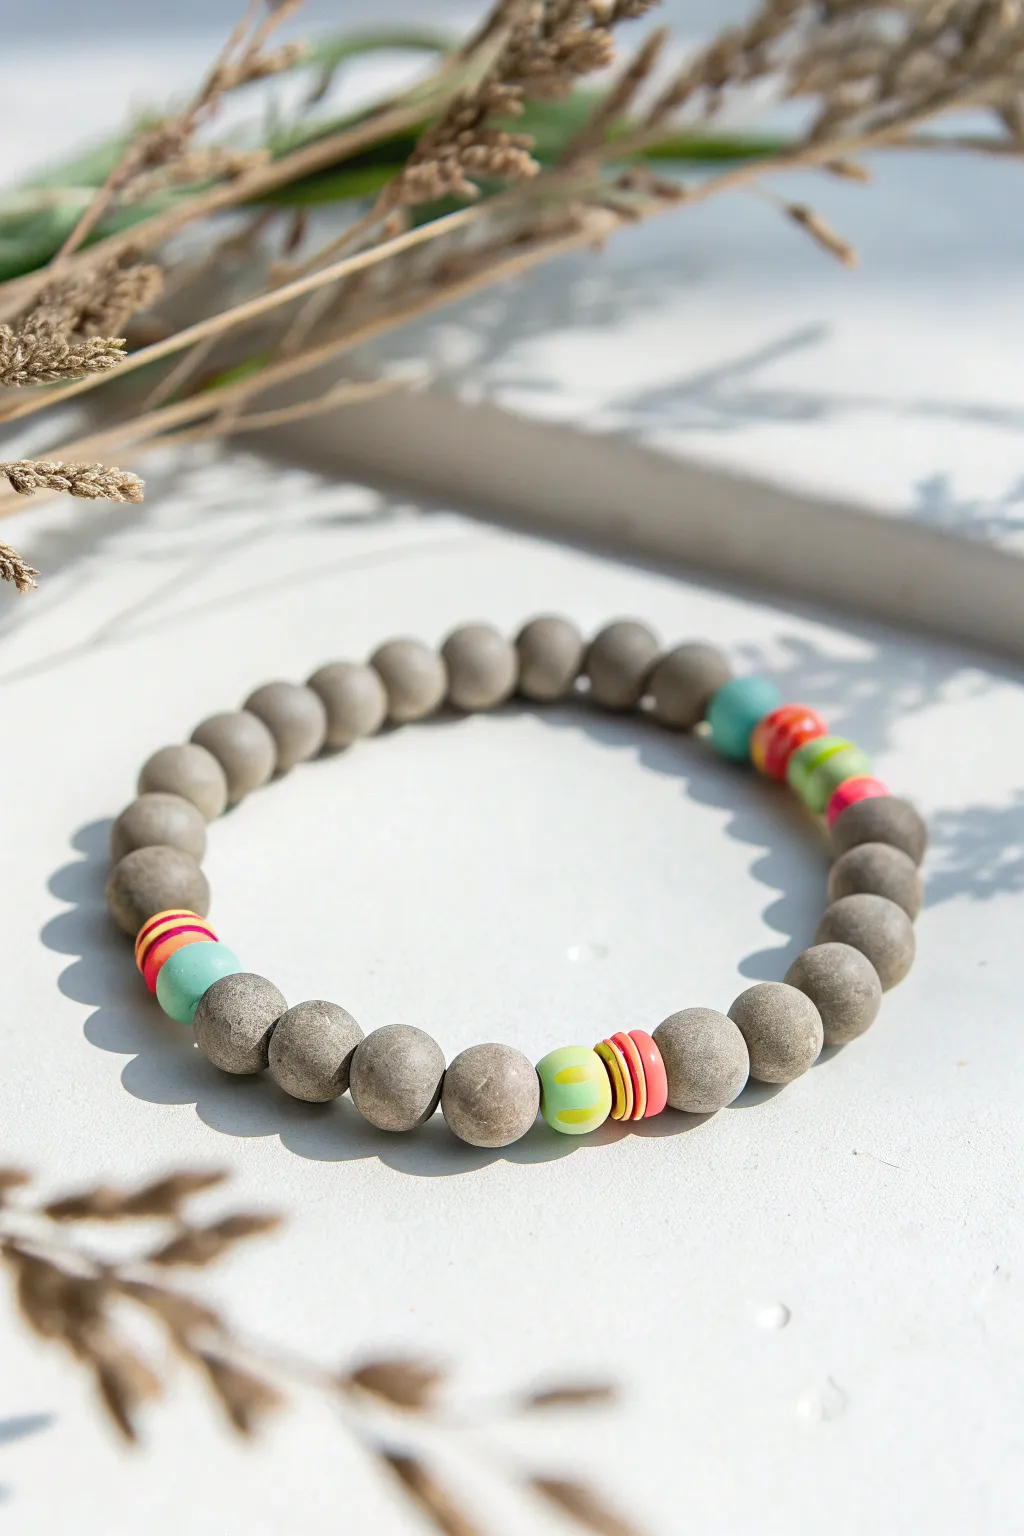
This project combines the understated elegance of matte grey clay beads with unexpected pops of vibrant neon stripes. It creates a modern, minimalist accessory that feels earthy yet playful, perfect for stacking or wearing as a solo statement piece.
Step-by-Step
Materials
- Matte grey polymer clay (or pre-made grey clay beads, 8-10mm)
- Neon polymer clay (pink, lime green, orange, teal)
- Bead roller tool (optional but helpful for uniform size)
- Beading elastic cord (0.8mm or 1mm thickness)
- Clay slicing blade or craft knife
- Toothpick, knitting needle, or bead piercing tool
- Super glue or jewelry cement
- Oven for baking clay
- Baking sheet with parchment paper
- Ruler
Step 1: Creating the Grey Base Beads
-
Condition the clay:
Start by warming the grey polymer clay in your hands, kneading it until it is soft and pliable. This conditioning step ensures your beads won’t crack during baking. -
Portion the clay:
Roll the grey clay into a long snake with a diameter of roughly 10mm. Use your slicing blade to cut equal segments, each about 1cm long. -
Roll into spheres:
Take each segment and roll it between your palms to create a smooth sphere. Aim for a slightly imperfect, organic texture rather than machine-perfect roundness to mimic the look in the photo. -
Texturize slightly:
To achieve that specific matte, stone-like finish seen in the image, you can gently roll the raw beads over a piece of coarse sandpaper or a textured sponge before piercing them. -
Pierce the holes:
Using your piercing tool, gently create a hole through the center of each grey sphere. I find rotating the bead while pushing the tool effectively prevents the shape from distorting.
Pro Tip: Matte Finish
To get that powdery, ultra-matte look on the grey beads, lightly dust them with cornstarch before baking. Wipe it off after they cool.
Step 2: Crafting the Neon Accent Beads
-
Prepare neon colors:
Condition small amounts of your neon polymer clays. Roll thin sheets of pink, orange, and lime green clay. -
Create striped canes:
Stack the thin sheets of neon colors on top of each other. Compress the stack gently and slice off thin cross-sections to reveal the stripes. -
Form the base accent bead:
Roll small balls of a solid neon color (like teal or lime green) that are slightly smaller than your grey beads, roughly 6-8mm. -
Apply the stripes:
Take your thin striped slices and wrap them around sections of the small neon balls. Alternatively, roll very thin snakes of contrasting neon clay and press them into the bead surface to create ‘pinstripes’. -
Smooth the surface:
Roll the striped accent beads between your fingers again to ensure the added stripes are flush with the surface, creating a smooth, continuous bead. -
Pierce accent beads:
Carefully poke holes through these smaller, colorful beads, ensuring the hole is large enough for your elastic cord.
Troubleshooting: Distortion
If your beads are squishing into ovals when you pierce them, try letting the clay rest in the fridge for 10 minutes to firm it up first.
Step 3: Baking and Assembly
-
Bake the beads:
Arranged your beads on the baking sheet. Bake according to your polymer clay package instructions (usually around 275°F/135°C for 15-30 minutes). Let them cool completely. -
Cut the elastic:
Measure your wrist and cut a piece of elastic cord about 4 inches longer than that measurement to allow room for tying knots. -
Stretch the cord:
Pre-stretch your elastic cord by pulling it firmly a few times. This prevents the bracelet from loosening up after you’ve worn it for a while. -
String the pattern:
Begin threading your beads. Following the image, thread about 4-5 grey beads, then add a cluster of 2-3 neon accent beads. Repeat this pattern until you reach the desired length. -
Check the fit:
Wrap the strung beads around your wrist to check the sizing. Add or remove a grey bead if necessary for a comfortable fit. -
Tie the knot:
Tie a surgeon’s knot (right over left, left over right, passing through twice on the second loop). Pull it tight. -
Secure and trim:
Place a tiny drop of super glue on the knot. Allow it to dry for a few seconds, then trim the excess cord close to the knot but not touching it. -
Hide the knot:
Gently pull the elastic so the knot slides inside the hole of one of the larger grey beads, hiding it from view.
Enjoy the satisfying weight and unique texture of your new handmade jewelry piece
Grey With Cowrie Shell Beachy Neutral
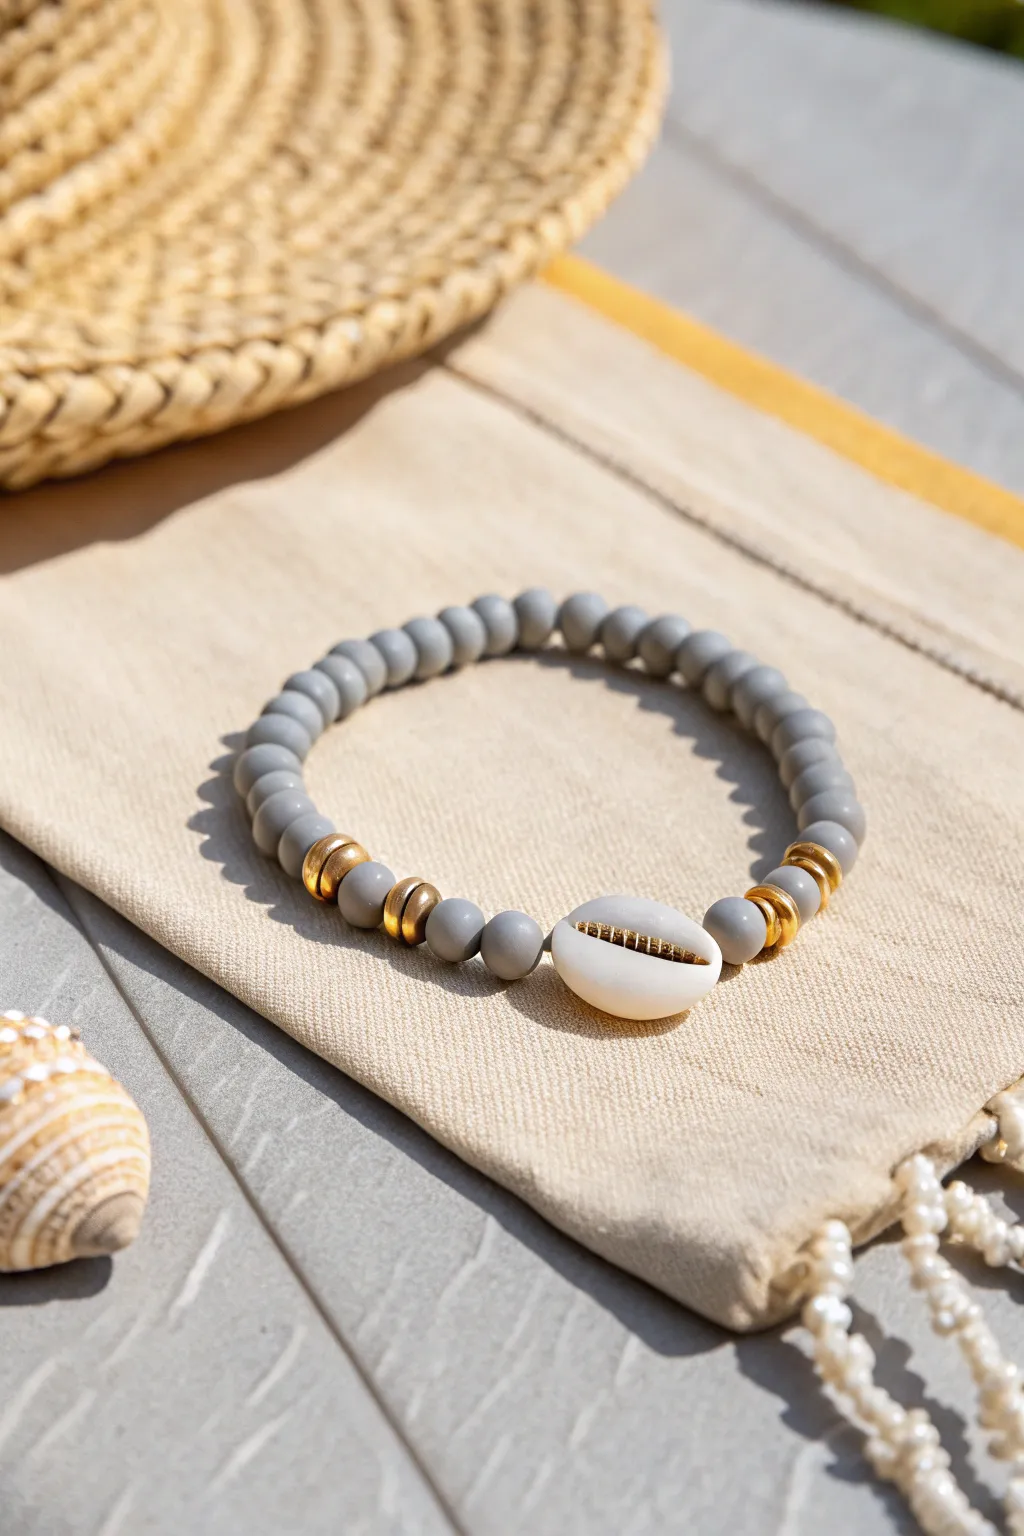
Embrace a sophisticated beach aesthetic with this handmade bracelet, featuring smooth matte grey clay beads and a striking gold-rimmed cowrie shell centerpiece. Its neutral palette makes it a versatile accessory that pairs beautifully with summer textures like woven straw and linen.
Step-by-Step Guide
Materials
- Grey round polymer clay beads (approx. 6mm or 8mm, matte finish)
- Natural cowrie shell bead with gold electroplated rim (approx. 20mm)
- 4 Gold spacer beads (heishi or disc shape, 6-8mm)
- Strong elastic cord (0.8mm or 1.0mm recommended)
- Jewelry glue or clear nail polish
- Scissors
Step 1: Planning and Preparation
-
Measure your wrist:
Before cutting any cord, wrap a measuring tape around your wrist to find your size. Add about 0.5 to 1 inch to this measurement depending on how loose you want the fit. -
Cut the elastic:
Cut a piece of elastic cord about 10-12 inches long. Having extra length makes tying the final knot much easier than struggling with short ends. -
Pre-stretch the cord:
Hold the length of elastic in both hands and give it a few firm tugs. This pre-stretching step is crucial because it prevents the bracelet from sagging or stretching out permanently after you wear it a few times. -
Secure the end:
Attach a bead stopper or simply place a piece of tape on one end of your elastic to stop beads from sliding off while you string them.
Shell Orientation
Cowrie shells often flip over. String the elastic through the bottom-most holes if possible, or ensure beads fit snugly against the shell to keep it facing up.
Step 2: Creating the Centerpiece
-
Threading the cowrie shell:
Locate the holes on either side of your gold-rimmed cowrie shell. Thread the free end of your elastic through the shell bead so it sits in the middle of your work area. -
Adding gold accents:
Slide one grey clay bead onto the elastic, placing it right next to the right side of the shell. -
Positioning spacers:
Follow that single grey bead with two gold disc spacer beads. These act as a brilliant metallic frame for the focal point. -
Repeat for symmetry:
Now, recreate this pattern on the other side of the shell. Slide one grey clay bead onto the left side (you may need to remove your tape stopper briefly) followed by two gold disc spacers.
Pro Tip
If the hole of your clay bead is too small to hide the knot, gently ream it out slightly with a bead reamer or a thick needle before hiding the knot.
Step 3: Stringing the Band
-
Add main beads:
Continue threading the round grey clay beads onto the cord. I like to alternate adding a few to the left side and a few to the right side to keep the cowrie shell perfectly centered on the strand. -
Check the length:
Periodically wrap the strand around your wrist to check the fit. You want the beads to touch comfortably without gaps, but not be so tight they pinch. -
Final bead count:
Ensure you have enough grey beads to complete the circle. The ends should meet without excessive stretching of the elastic.
Step 4: Finishing Touches
-
Remove stopper:
Carefully remove the tape or bead stopper from the end of your cord, ensuring you don’t lose any beads. -
Tie the surgeon’s knot:
To secure the bracelet, tie a surgeon’s knot. Make a standard overhand knot, but loop the end through the circle an extra time before pulling tight. This extra loop adds friction. -
Tighten securely:
Pull the elastic ends firmly to tighten the knot. You should feel it lock into place against the beads. -
Secure with glue:
Apply a tiny dot of jewelry glue (GS Hypo Cement works well) directly onto the knot. Let it dry for a moment. -
Hide the knot:
Trim the excess elastic ends close to the knot, but not too close. Gently pull the elastic so the knot slides inside the hole of one of the adjacent grey beads to hide it completely.
Now you have a stunning, beach-ready accessory perfect for stacking or wearing solo.
Grey With Wood Beads Rustic Unisex
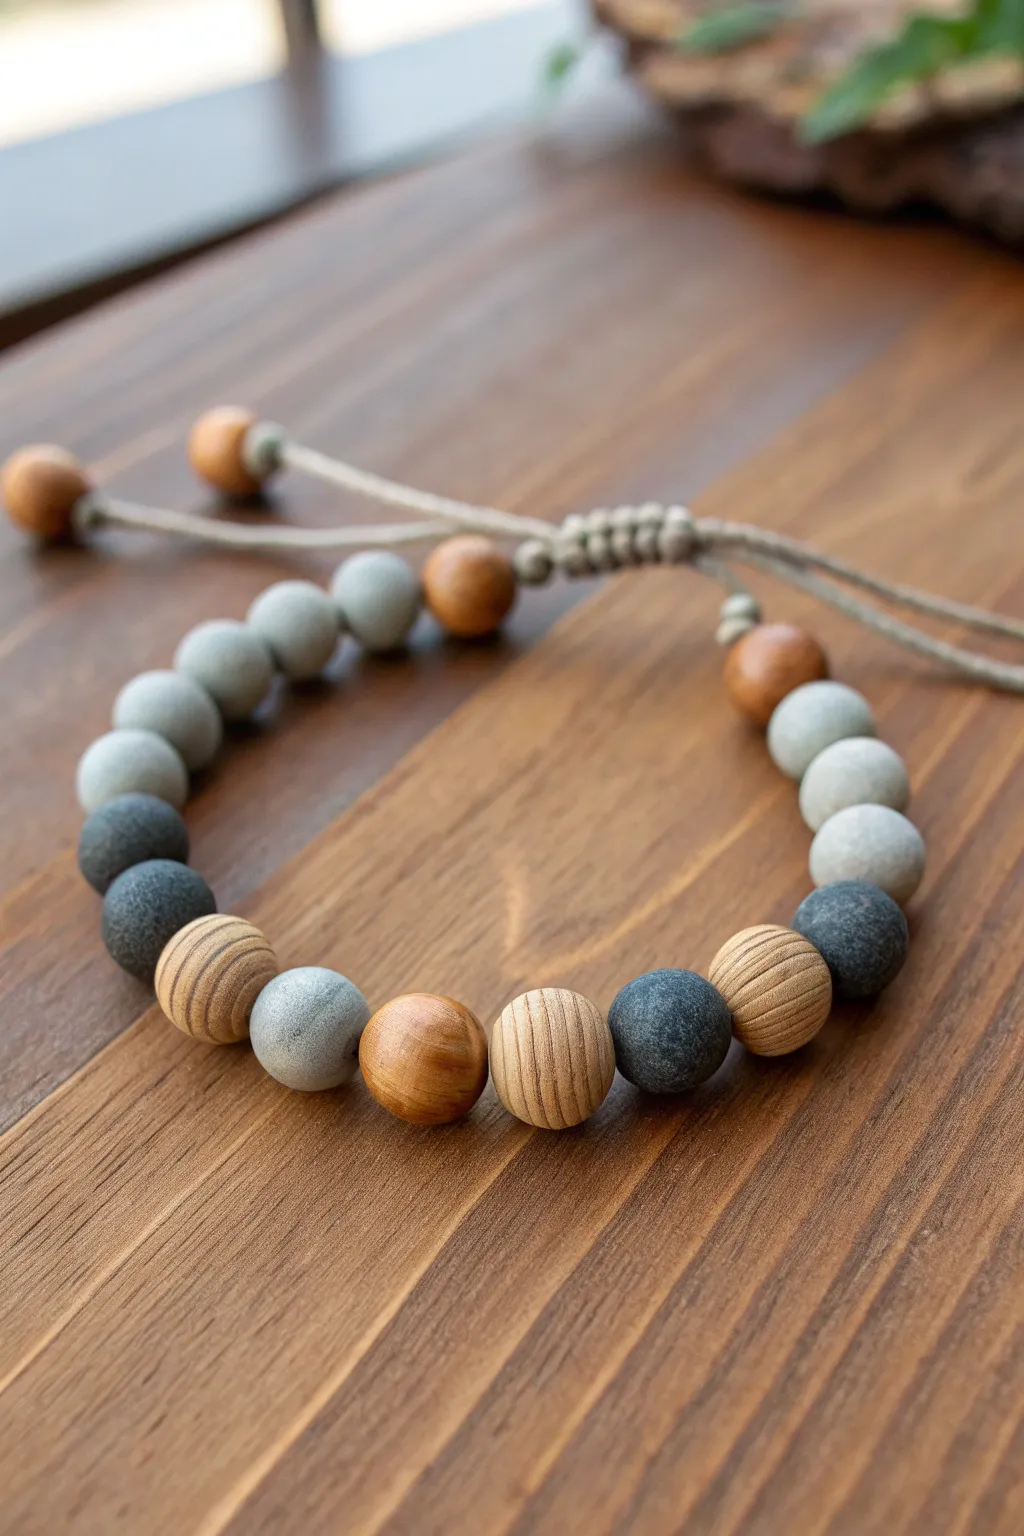
This unisex bracelet combines the grounded feel of natural wood grain with the modern, matte texture of grey clay. The adjustable macramé closure adds a practical and stylish finish, making it perfect for everyday wear.
Step-by-Step
Materials
- Matte grey polymer clay beads (10mm)
- Dark grey/charcoal textured stone or clay beads (10mm)
- Unfinished light wood beads with visible grain (10mm)
- Varnished amber-toned wood beads (10mm)
- Small wooden spacer beads (6mm or 8mm) for the cord ends
- Light beige or grey waxed cotton or hemp cord (1mm thick)
- Scissors
- Super glue or clear jewelry adhesive
- Clip or tape (for securing cord while knotting)
Step 1: Preparation & Stringing
-
Cut the cord:
Cut a piece of waxed cord roughly 24 inches long. This generous length gives you plenty of room to work the knots later without struggling. -
Plan the bead pattern:
Lay out your beads on a tray or towel before stringing. For the look in the image, you aren’t aiming for perfect symmetry. -
Create the focal section:
Group the light wood beads (the ones with the strong grain) and the grey beads near the bottom center, interspersed with the single large amber wood bead. -
Arrange the sides:
Transition from the darker grey beads to lighter matte grey beads as you move up the sides of the design. -
Add the end beads:
Finish the sequence on both ends with a single amber wood bead. These will sit right next to the sliding knot closure. -
String the beads:
Thread all your chosen beads onto the central part of the 24-inch cord.
Knot Security
When applying glue to the sliding knot, press the knot open slightly to ensure glue only hits the cut tips, not the sliding tracks.
Step 2: Creating the Adjustable Closure
-
Cross the cords:
Bring the two loose ends of the cord together so they overlap each other, forming a circle with the beads at the bottom. -
Prepare the knotting cord:
Cut a separate piece of cord, about 10–12 inches long. This will be used to make the sliding square knot. -
Start the square knot:
Place the 10-inch cord underneath the two overlapped bracelet strands. I usually center it so equal lengths are on either side. -
Tie the first half-knot:
Take the right end of the knotting cord, pass it over the bracelet strands and under the left knotting cord. Then take the left end, pass it under the bracelet strands and up through the loop on the right. Pull tight. -
Complete the square knot:
Reverse the process: take the left end over the bracelet strands, and thread the right end under and through. Tighten firmly. -
Build the slider:
Continue alternating left and right starting points to create a series of about 5 or 6 square knots. This creates the ‘bumpy’ bar shown in the photo. -
Secure the slider:
Once the knot sequence is long enough (about half an inch), trim the excess ends of the knotting cord very close to the knot. -
Glue the tips:
Dab a tiny amount of super glue on the cut ends of the knotting cord to prevent fraying. Be careful not to glue the knot to the main bracelet cords—they need to slide.
Step 3: Finishing Touches
-
Add stopper beads:
Slide one small wooden spacer bead onto each of the dangling tail ends of the main bracelet cord. -
Position the stoppers:
Decide how wide the bracelet needs to open to fit over a hand, and place the beads at that limit. -
Knot the ends:
Tie a simple overhand knot right after each stopper bead to keep it in place. -
Trim final cords:
Cut off any excess cord past the endpoint knots. -
Final adjustment:
Slide the closure back and forth a few times to loosen the wax slightly and ensure the mechanism works smoothly.
Stiff Cord Issues
If your waxed cord feels too stiff and creates loops, run a hair dryer over it for ten seconds to soften the wax before knotting.
Now you have a naturally elegant accessory that pairs beautifully with almost any casual outfit
Grey on Leather Cord Wrap Bracelet
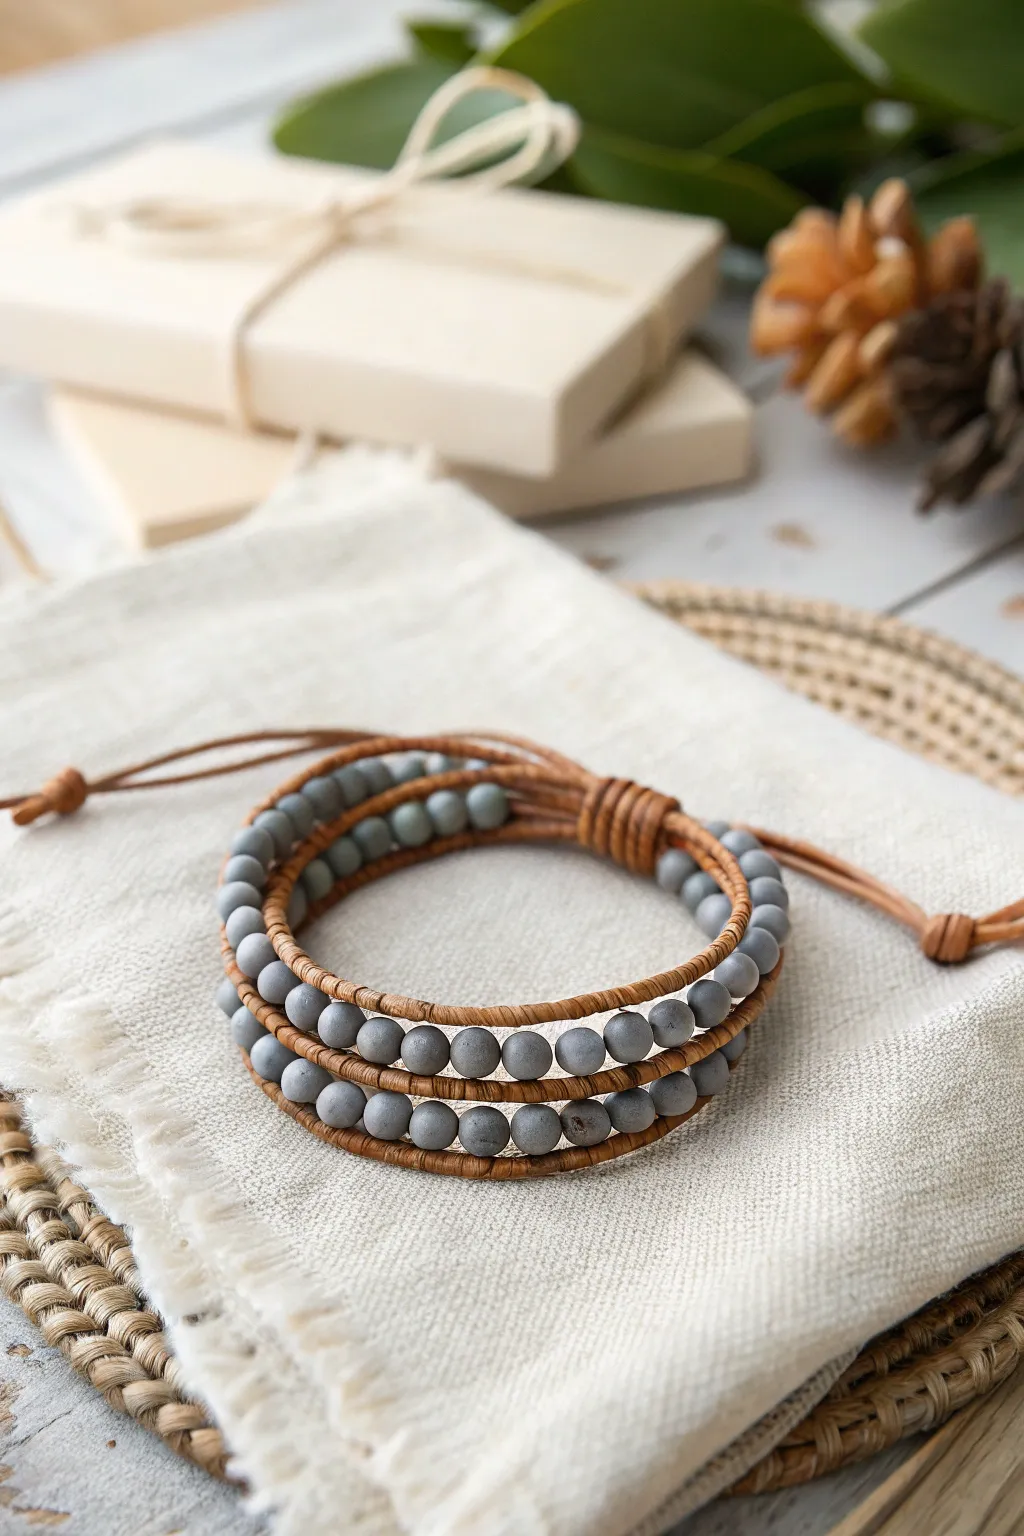
Embrace a natural, earthy aesthetic with this beautiful wrap bracelet showcasing matte grey clay beads against rich brown leather. The triple-wrap design creates a stacked look with a single piece, perfect for adding texture to any casual outfit.
Step-by-Step Guide
Materials
- 2mm round brown leather cord (approx. 40-50 inches)
- Grey matte round beads (6mm or 8mm clay/stone)
- Beading thread (brown or subtle grey)
- Beading needle
- Metal button or large bead for closure
- Clip board or masking tape
- Scissors
- Clear jewelry adhesive (optional)
Step 1: Setting Up the Framework
-
Measure and Fold:
Cut a length of leather cord approximately 40 to 50 inches long. Fold the cord in half to create a loop at the bent end. -
Size the Loop:
Check the size of the loop by sliding your button or large closure bead through it. It should pass through snugly but not fall out easily. Tie a simple overhand knot with the folded leather to secure this loop size. -
Secure Your Work:
Clip the loop end onto a clipboard or tape it securely to a table. This tension is crucial for keeping your leather strands straight while you wrap. -
Attach the Thread:
Cut a long piece of beading thread (about an arm’s span) and thread your needle. Tie the end of the thread securely to one of the leather cords, right underneath the knot you just made. I prefer to add a dab of glue here for extra security.
Loose Beads?
If beads flop around, your thread is too loose. Tug the thread firmly after every pass through a bead. The leather cords should slightly indent around the beads.
Step 2: Weaving the Beads
-
Start the Wrap Pattern:
Bring the thread *over* the right leather cord, *under* the right leather cord, then *under* the left leather cord, and finally *over* the left leather cord. This creates a figure-8 motion establishing the base. -
Add the First Bead:
Pick up one grey bead with your needle. Hold the bead between the two leather cords. -
Secure the Bead:
Pass the needle under the right cord, through the bead hole again (going in the opposite direciton), and over the left cord. The thread should essentially wrap around the outside of the leather and pass through the bead in the center. -
Tighten the Tension:
Pull the thread taut so the bead sits clearly between the two leather strands without the leather bunching up too much. -
Establish the Rhythm:
Continue this pattern: thread goes *under* the right cord, pick up a bead, thread goes *over* the left cord. Then bring the needle back *under* the left cord, go back through the bead, and *over* the right cord for the next starting position. -
Check Bead Alignment:
After every 3-4 beads, pause to push them snugly upwards against the previous beads. You want a solid line of grey without large gaps of visible thread. -
Adding Thread:
If you run out of beading thread, tie off the old thread to a leather cord with a tight double knot and a dot of glue. Start a new thread by tying it to the cord and continuing the pattern. -
Measure Length:
Keep adding beads until the beaded section is long enough to wrap around your wrist three times comfortably. Remember to account for the closure length.
Mix It Up
Try varying bead sizes for texture! Insert a few smaller metallic spacer beads every 10 grey beads to add a subtle shimmer to the matte finish.
Step 3: Finishing the Closure
-
End the Thread:
Once the beading is complete, weave the thread in a figure-8 motion around the leather cords (without beads) a few times. Tie off tightly against the leather and trim the excess thread. -
Knot the Leather:
Tie an overhand knot with both leather tails right up against the last bead to lock everything in place. -
Attach the Button:
Slide your button or large closure bead onto one of the leather tails. Bring the other tail alongside it. -
Final Secure Knot:
Tie a final overhand knot with both leather tails immediately after the button to hold it in place. -
Trim Tails:
Cut the remaining leather tails, leaving about half an inch for a rustic finish. You can knot the very tips of the tails individually if you like the look.
Now you have a stylish, handcrafted accessory that looks great layered with other jewelry or standing on its own
Grey Morse Code Hidden-Message Bracelet
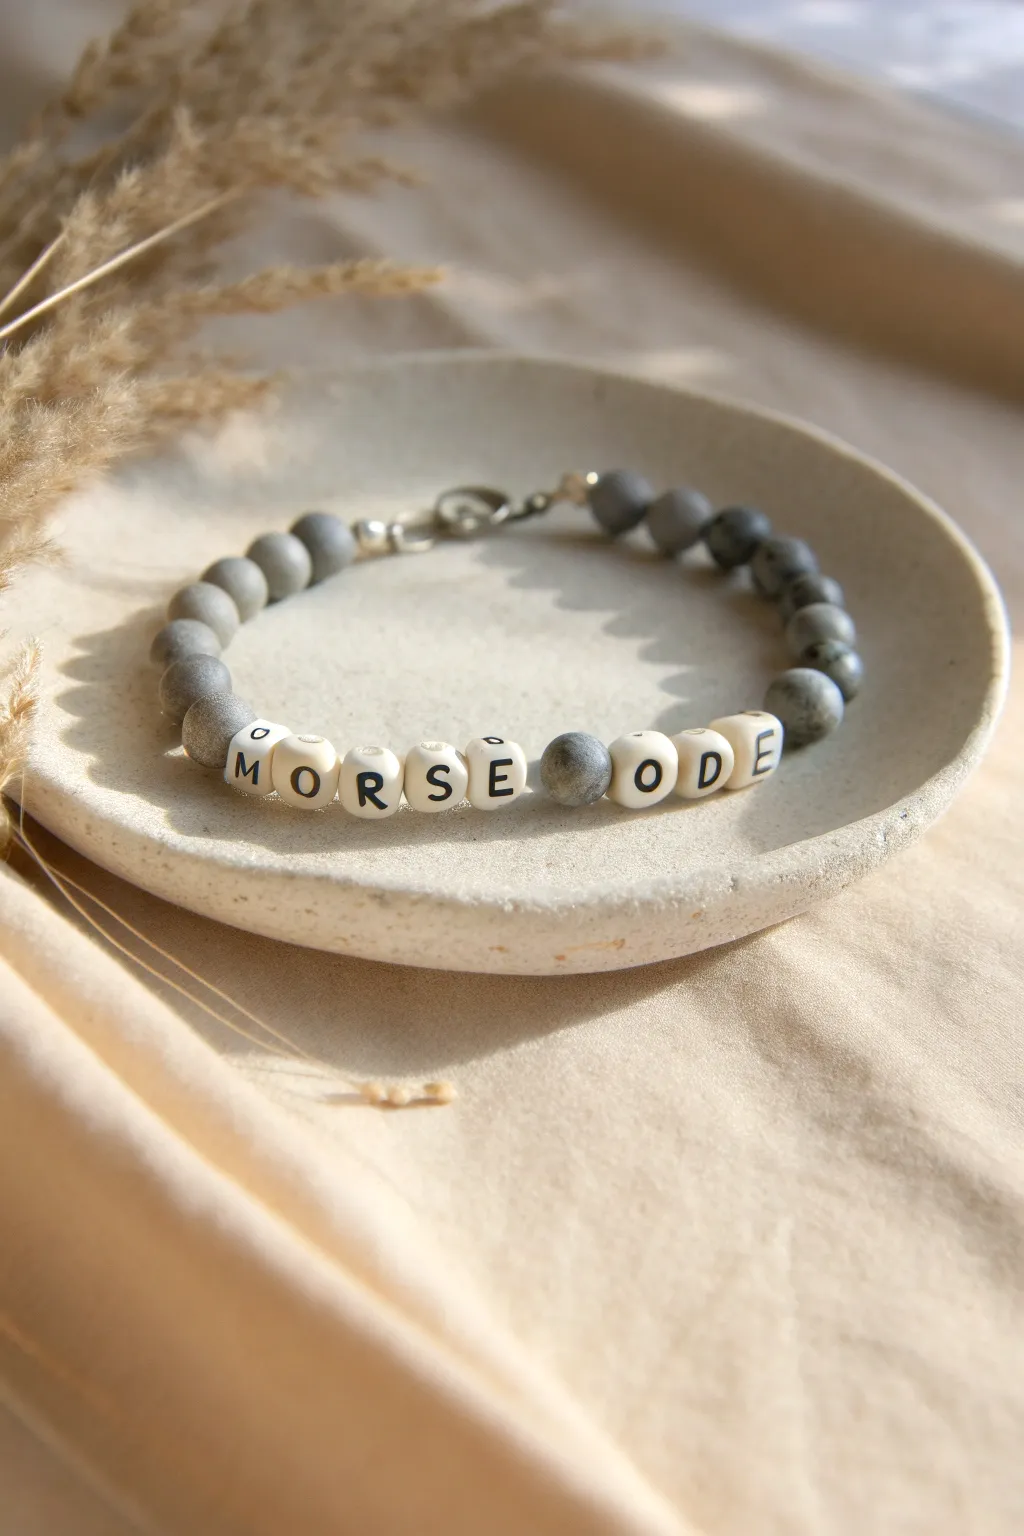
This understated project combines the rugged texture of matte grey stone beads with clear, typographic elements for a personalized accessory. It’s a fantastic beginner project that results in a sleek, neutral-toned bracelet perfect for stacking or wearing solo.
Step-by-Step Tutorial
Materials
- Matte grey round beads (6mm or 8mm, likely jasper or agate)
- White cube letter beads spelling ‘MORSE’ and ‘ODE’
- One grey spacer bead for separation
- Strong elastic cord (0.8mm recommended)
- Two silver-tone crimp bead covers
- Two small crimp tubes (2mm)
- Small jump rings (silver)
- Lobster clasp closure
- Jewelry pliers (chain nose and flat nose)
- Scissors or bead snips
- Bead design board (optional but helpful)
- Clear jewelry glue (e.g., G-S Hypo Cement)
Step 1: Planning and Stringing
-
Measure your wrist:
Before cutting any cord, wrap a measuring tape loosely around your wrist to determine the desired length. Add about an inch to this measurement to account for the clasp and bead bulk. -
Lay out the design:
Arrange your beads on a flat surface or a bead board. Place the letter beads in the center first—spelling ‘MORSE’ then placing one grey bead, followed by ‘ODE’. Interestingly, the ‘C’ is missing in the photo, so feel free to correct the spelling or copy the eclectic style shown! -
Balance the sides:
Count out your matte grey beads. Divide them evenly and place half on the left side of your word section and half on the right side. This ensures the text stays centered on your wrist. -
Prepare the wire:
Cut a length of beading wire or elastic cord about 10-12 inches long. Having extra length makes tying knots or attaching crimps much less frustrating than working with a short tail. -
Begin stringing:
Start stringing from one end of the grey beads. I find it easiest to work from left to right. String all the left-side grey beads first. -
Add the text:
Thread on the first word ‘MORSE’. Double-check the orientation of the letters to ensure they are all facing the correct way and aren’t upside down. -
Insert the spacer:
Slide on a single grey stone bead to act as the space between the two words. -
Finish the lettering:
Thread on the remaining letter beads (either ‘CODE’ or ‘ODE’) and ensure they align with the first word. -
Complete the strand:
String the remaining set of grey beads onto the other side.
Loosey Goosey?
If the bracelet feels stiff after crimping, you pulled too tight. Always leave a tiny gap (width of a sheet of paper) before the final crimp so beads can rotate.
Step 2: Clasp and Finishing
-
Prepare the first crimp:
Slide a crimp tube onto one end of the wire, followed by a jump ring or the loop of your lobster clasp. -
Create the loop:
Thread the tail of the wire back through the crimp tube, creating a small loop that holds the clasp component securely. -
Secure the crimp:
Use your pliers to flatten the crimp tube firmly. Make sure the wires aren’t crossed inside the tube before you squash it for the strongest hold. -
Cover the hardware:
Place a crimp cover over the flattened crimp tube. Gently squeeze it closed with pliers until it looks like a round silver bead. -
Repeat on the other side:
String on a crimp tube and a jump ring to the other end of the bracelet. Thread the wire back through the crimp tube. -
Tighten the tension:
Pull the wire taut so there are no large gaps between beads, but leave just enough wiggle room (about 1mm) so the bracelet remains flexible and doesn’t get stiff. -
Final crimping:
Flatten the final crimp tube securely with your pliers. -
Hide the mechanics:
Apply the second crimp cover over this tube, gently forming it into a ball shape. -
Trim excess wire:
Snip off the excess wire tails as close to the crimp covers as possible without nicking your main wire.
Knot Security
If you skip the clasp and use elastic tie knots instead, add a drop of G-S Hypo Cement or clear nail polish to the knot before trimming ends to prevent slipping.
Now you have a stylish, personalized accessory ready to add a modern touch to your everyday outfit