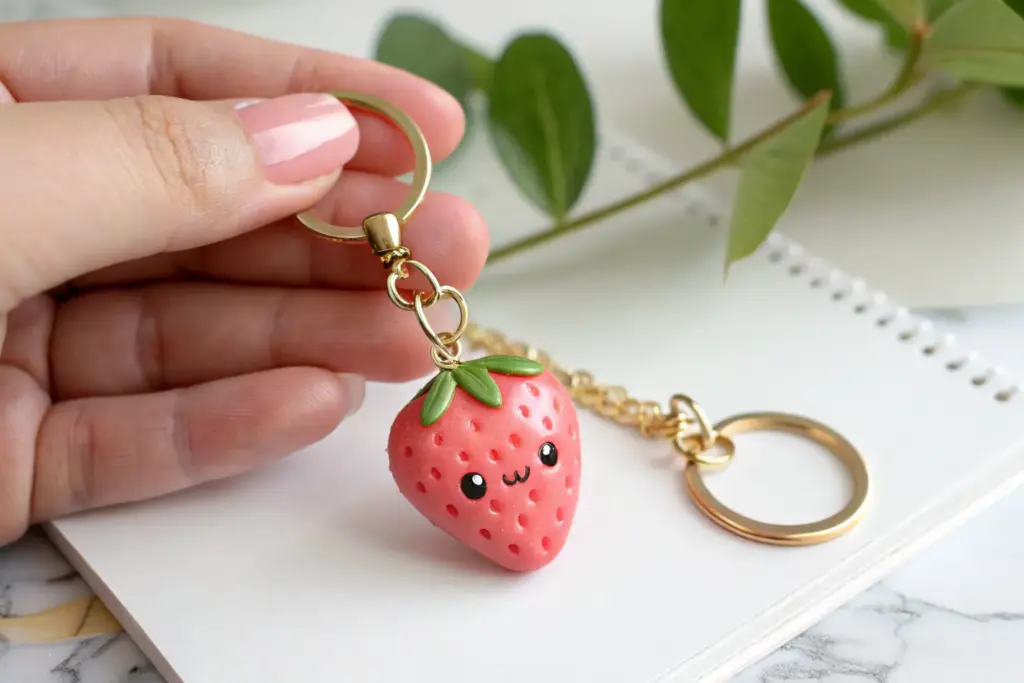
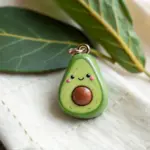
If you’re itching to make something quick, cute, and actually useful, handmade clay keychains are my favorite little win in the studio. I’m sharing my go-to ideas that stay chunky and durable, so they can handle real life on your keys and bags.
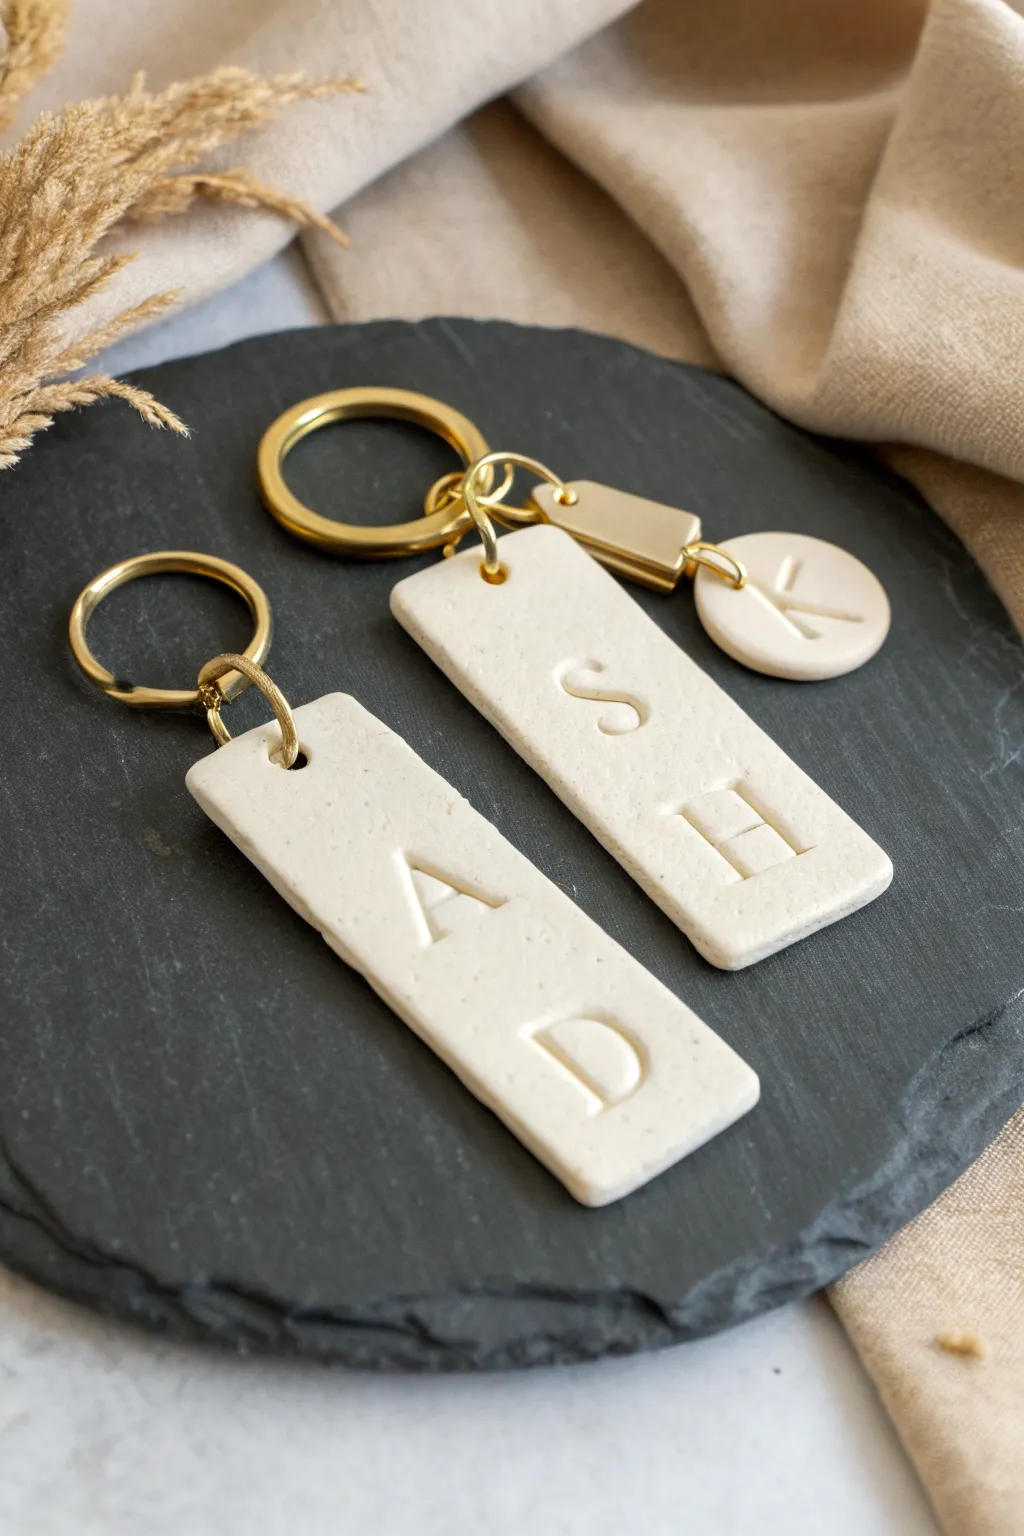
Classic Initial Monogram Charm
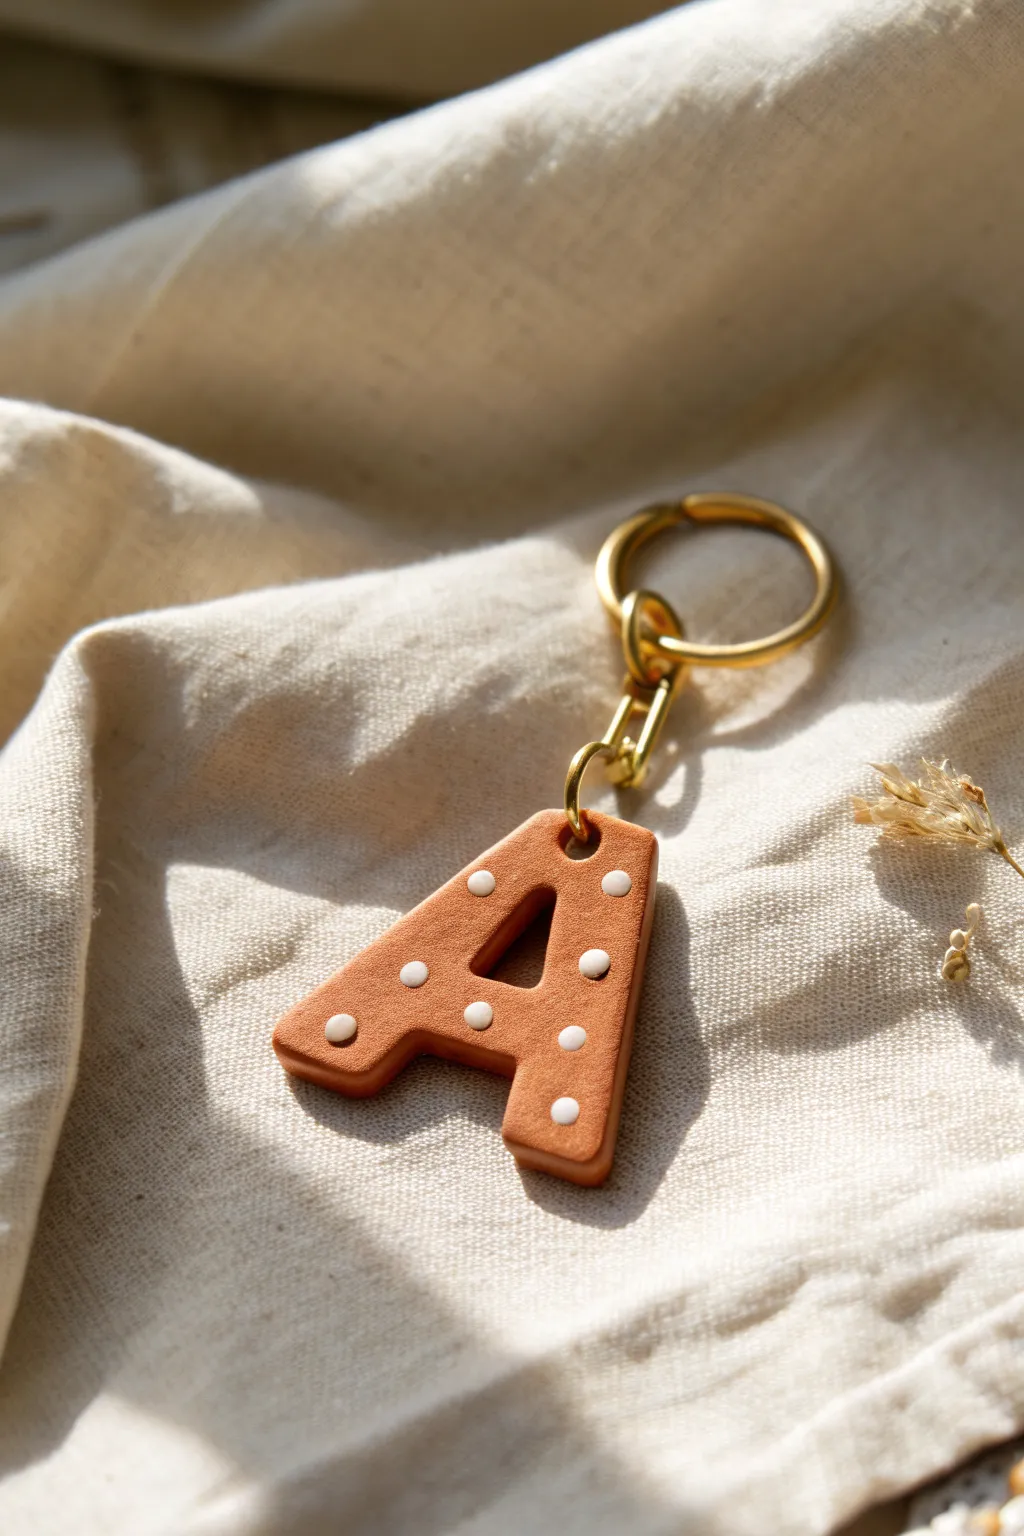
This charming initial keychain combines a warm, earthy terracotta base with playful white polka dots for a classic yet handcrafted look. The thick, dimensional letter makes a sturdy accessory that feels great in hand and adds a personalized touch to any set of keys.
Step-by-Step Tutorial
Materials
- Polymer clay (terracotta or reddish-brown)
- Polymer clay (white)
- Letter cookie cutter (or X-Acto knife and paper template)
- Acrylic rolling pin
- Hand drill or small diameter drill bit
- Pliers (round nose and flat nose)
- Gold jump rings (10mm or larger)
- Gold lobster clasp keychain hardware
- Baking sheet and parchment paper
- Oven
- Fine grit sandpaper (optional)
Step 1: Shaping the Base
-
Prepare the clay:
Begin by conditioning your terracotta polymer clay. Knead it in your hands until it becomes soft, pliable, and warm, which prevents cracks during baking. -
Roll it out:
Using an acrylic rolling pin or a pasta machine, roll the terracotta clay into a slab. Aim for a thickness of about 4mm to 5mm; you want the keychain to be chunky and durable. -
Cut the letter:
Press your ‘A’ cookie cutter firmly into the clay. If you don’t have a cutter, print a letter on paper, cut it out to make a stencil, lay it on the clay, and carefully trace around it with a sharp craft knife. -
Smooth the edges:
Gently lift the letter from the work surface. Use your finger or a soft silicone tool to smooth down any sharp ridges along the cut edges, giving the piece a refined finish.
Step 2: Adding the Polka Dots
-
Create white dots:
Condition a very small amount of white polymer clay. Roll it into tiny, poppy-seed-sized balls. Try to keep them consistent in size, or vary them slightly for a more organic feel. -
Place the pattern:
Gently place the white balls onto the surface of your terracotta letter. Arrange them in a loose, random pattern, ensuring they are evenly spaced but not too rigid. -
Flatten the dots:
Once you are happy with the arrangement, use the tip of your finger to press each white ball flat so it becomes flush with the surface of the terracotta clay. This integrates the pattern seamlessly. -
Create the hole:
Before baking, use a needle tool or a small drinking straw to punch a hole at the top of the letter (on the apex of the ‘A’). Ensure the hole is not too close to the edge to prevent breakage later.
Clean Finish
Before baking, wipe the clay surface lightly with a cotton swab dipped in rubbing alcohol or acetone to remove any fingerprints or lint.
Step 3: Baking and Assembly
-
Bake carefully:
Place the letter on a parchment-lined baking sheet. Bake according to your specific clay brand’s instructions (usually around 275°F or 135°C for 15-30 minutes). I usually tent a piece of foil over the top to prevent the white dots from yellowing. -
Cool down:
Remove the tray from the oven and let the piece cool completely. The clay hardens as it cools, so don’t be alarmed if it feels slightly flexible while hot. -
Drill if needed:
If your pre-made hole closed up slightly during baking, use a small hand drill or a drill bit twisted between your fingers to clear the opening. -
Open the jump ring:
Using two pairs of pliers, grip a large gold jump ring on either side of the split. Twist one hand forward and the other back to open the ring sideways (never pull it apart outwards). -
Attach hardware:
Slide the open jump ring through the hole in your clay letter. Before closing it, thread on the gold lobster clasp assembly. -
Secure the ring:
Using the pliers again, twist the jump ring back into position until the ends meet perfectly flush. Give it a tiny squeeze to ensure it’s tightly closed.
Glossy Upgrade
For a shinier, ceramic-like look, coat the baked and cooled piece with a layer of UV resin or glossy water-based polyurethane varnish.
Now you have a sturdy, stylish monogram ready to organize your keys or gift to a friend

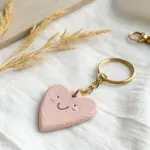
Simple Puffy Heart Keychain
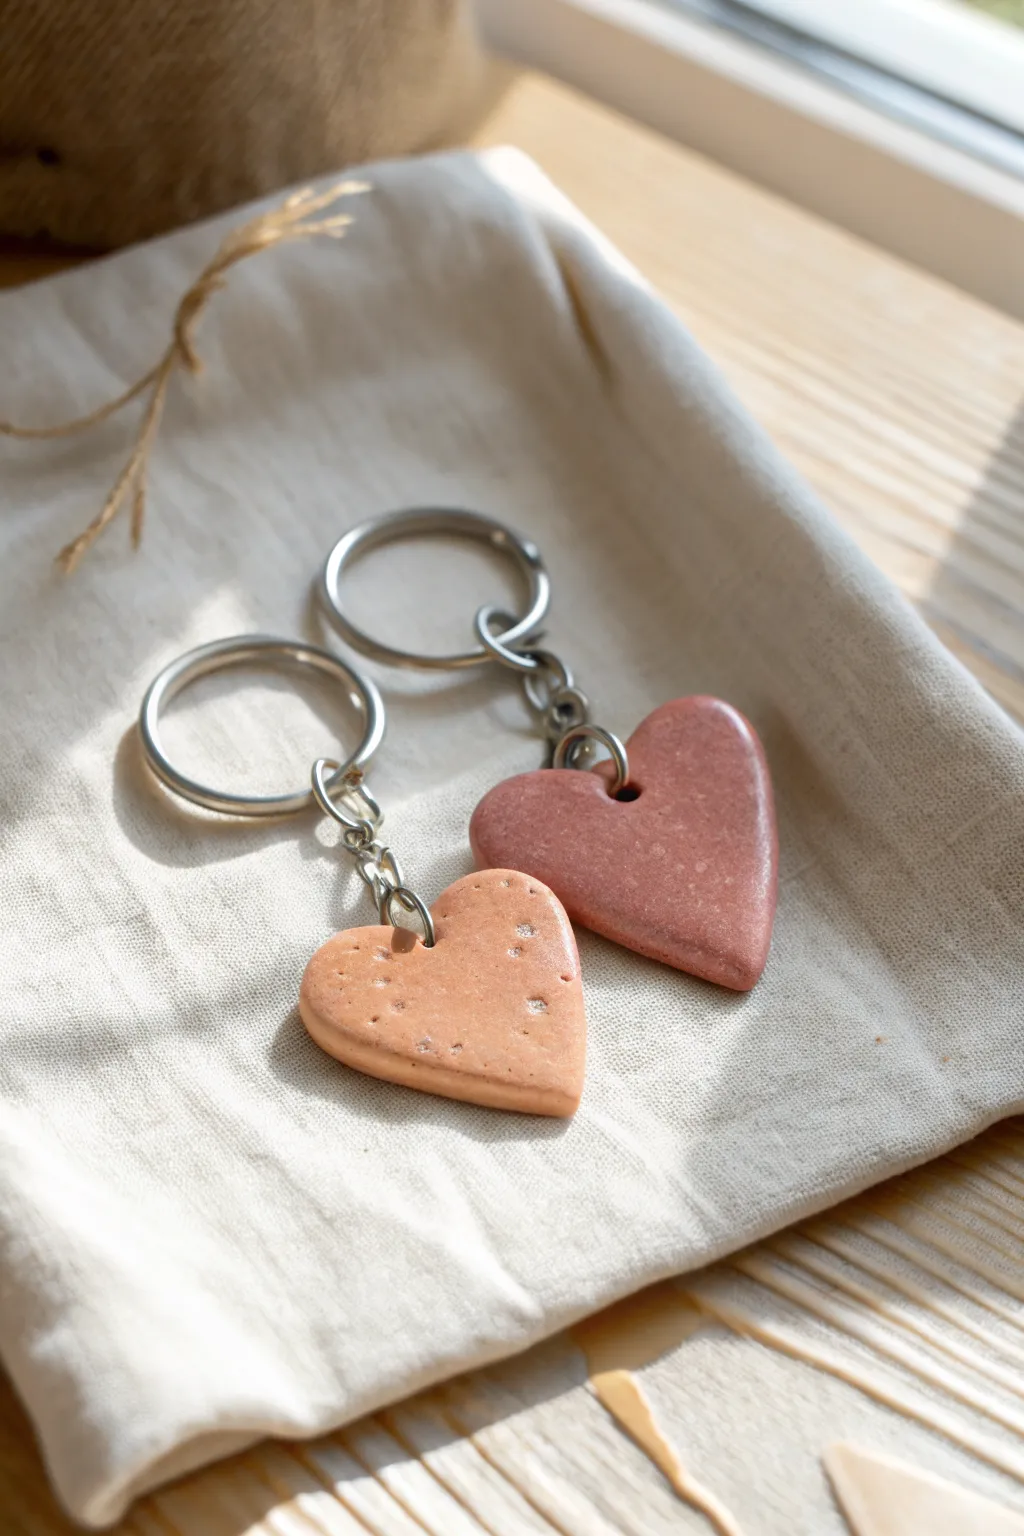
These charming, minimalist keychains feature soft curves and muted, earthy tones that feel wonderful to hold. The design focuses on a clean, puffy shape with a natural finish, making them perfect for understated gift-giving or personal use.
Detailed Instructions
Materials
- Polymer clay (terracotta, peach, or muted pink shades)
- Heart-shaped cookie cutter (approx. 1.5 – 2 inches)
- Acrylic roller or glass bottle
- Parchment paper or ceramic tile (for working surface)
- Small round tool, straw, or toothpick (for creating the hole)
- Fine-grit sandpaper (400 and 800 grit)
- Silver keychain hardware (ring and chain)
- Jump rings (6mm or 8mm)
- Needle-nose pliers
- Cornstarch or baby powder (optional, to prevent sticking)
Step 1: Shaping the Clay
-
Condition the clay:
Start by warming the polymer clay in your hands. Knead it thoroughly until it becomes soft, pliable, and free of any cracks or air bubbles. -
Roll it out:
Place the clay on a sheet of parchment paper. Roll it out to a thickness of about 1/4 inch (6mm). You want it relatively thick to achieve that nice ‘puffy’ look rather than a flat wafer. -
Cut the shape:
Dip your heart-shaped cutter into a little cornstarch to prevent sticking. Press firmly into the clay to cut out your heart shape. -
Soften the edges:
Gently lift the clay heart. Use your finger to lightly rub the sharp cut edges, rounding them off slightly to create a smoother, more organic silhouette. -
Create the hole:
Using a small tool or a straw, pierce a hole at the top center of the heart or slightly to one side. Ensure the hole is large enough for your jump ring to move freely, and not too close to the edge to prevent breakage.
Fixing Fingerprints
If you notice fingerprints on your raw clay before baking, lightly brush them with a tiny amount of baby oil or cornstarch to smooth them away instantly.
Step 2: Baking and Refining
-
Bake carefully:
Place your clay hearts on a parchment-lined baking sheet. Bake according to the manufacturer’s instructions for your specific brand of clay—usually around 275°F (135°C) for 15-30 minutes. -
Cool down:
Allow the pieces to cool completely inside the oven if possible, or on a wire rack. Clay is fragile when hot, so resist the urge to handle them until they are room temperature. -
Initial sanding:
Once cool, use the 400-grit sandpaper to gently smooth over the surface. I find dipping the sandpaper in water helps keep the dust down and creates a smoother finish. -
Buffing:
Switch to the finer 800-grit sandpaper to buff the surface until it feels satiny and smooth to the touch. -
Clean up:
Wipe the hearts with a damp cloth or rinse them quickly to remove any sanding residue, then dry them thoroughly.
Speckled Stone Effect
Mix uniform black pepper or dried used coffee grounds into your clay before rolling it out. This creates a trendy, faux-stone granite look effortlessly.
Step 3: Assembly
-
Open the jump ring:
Hold a jump ring with your pliers. Open it by twisting the ends away from each other (side-to-side motion), rather than pulling them apart, to maintain the circle shape. -
Attach the heart:
Slide the open jump ring through the hole you created in the clay heart. -
Connect the hardware:
Before closing the ring, slip the bottom link of the keychain hardware onto the jump ring as well. -
Secure the closure:
Use the pliers to twist the jump ring back into a closed position. Ensure the two ends meet flush so the hardware doesn’t slip out later. -
Final check:
Give the keychain a gentle tug to make sure everything is secure.
Now you have a durable, custom accessory ready to organize your keys or gift to a friend


Cute Donut With Sprinkle Texture

This charming keychain captures the glossy sweetness of a bakery favorite with surprising realism. Featuring a perfectly golden-brown dough base and a generous layer of mint-green icing, it’s finished with hand-rolled sprinkles for a delightful pop of texture and color.
Step-by-Step Tutorial
Materials
- Polymer clay (beige/tan, translucent, white, mint green, and pink)
- Soft artist pastels (yellow ochre, burnt umber, orange)
- Liquid polymer clay (or TLS – Translucent Liquid Sculpey)
- Gloss glaze or UV resin
- Ball tool or dotting tool
- Small paintbrush
- Eye pin or screw eye
- Keychain hardware with jump rings and lobster clasp
- Needle tool or toothpick
- Toothbrush (for texturing)
- Craft knife or tissue blade
Step 1: Shaping the Dough Base
-
Mix the dough color:
Creating a realistic dough color is key. Mix a large portion of beige or tan polymer clay with a very small amount of white and translucent clay. This adds depth and prevents the ‘plastic’ look of straight beige clay. -
Form the ring:
Roll your mixed clay into a smooth ball about 1 inch in diameter, then gently flatten it into a thick disc. It should look like a small hamburger patty at this stage. -
Punch the center:
Using a small circular cutter or the back of a large piping tip, press directly into the center of the disc to remove the middle. Smooth the inner edges with your finger so the hole looks natural, not sharp. -
Soften the edges:
Gently press along the outer rim of the donut with your thumb to round off the harsh edges. You want a puffy, risen look rather than a flat cylinder. -
Add texture:
Take a clean toothbrush and tap it firmly all over the surface of the clay donut. Focus especially on the top and sides, but leave a faint horizontal line around the middle untextured—this mimics the ‘fry line’ real donuts have.
Clean Edges Pro Tip
To clean up messy liquid clay drips before baking, use a cotton swab dipped in a tiny bit of baby oil or rubbing alcohol to wipe the excess off the dough area.
Step 2: Baking and Coloring
-
Shade the dough:
Scrape some yellow ochre, orange, and burnt umber chalk pastels into fine powders. Using a fluffy paintbrush, dust the yellow ochre all over the raw clay. -
Deepen the golden brown:
Layer the orange and burnt umber pastel dust lightly on the top curve and the bottom curve of the donut, avoiding that center ‘fry line’ strip. This creates that freshly fried gradient. -
Insert hardware:
Trim an eye pin to about half an inch long. Dip the end in a tiny bit of liquid clay or super glue and insert it firmly into the top of the donut. -
First bake:
Bake the donut base according to your clay manufacturer’s instructions (usually 275°F/135°C for 15-20 minutes). Let it cool completely before adding icing.
Scented Surprise
Mix a single drop of vanilla or chocolate fragrance oil into your clay dough before shaping. Your keychain will smell like a real bakery treat for weeks!
Step 3: Creating the Icing
-
Prepare the liquid clay:
In a small container or on a glass palette, mix liquid polymer clay with a small amount of mint green solid clay. Mash and stir until you have a smooth, thick consistency similar to heavy cream or honey. -
Apply the glaze:
Carefully drip the mint mixture onto the top of your cooled donut. Use a needle tool to guide the liquid to the edges, bringing it down slightly in uneven drips for a natural look. Make sure the icing surrounds the metal eye pin. -
Make the sprinkles:
While the icing settles, roll out extremely thin snakes of pink, white, and light yellow clay. I prefer to roll these paper-thin for scale accuracy. -
Cut the sprinkles:
Use a sharp blade to cut the thin snakes into tiny segments. Don’t worry if they aren’t all identical lengths; variety looks more realistic. -
Decorate:
Using tweezers or a slightly damp toothpick, pick up the tiny sprinkles and place them randomly onto the wet liquid clay icing. Gently press them down just enough so they adhere.
Step 4: Final Touches
-
Final bake:
Bake the donut again for about 15 minutes to set the liquid clay and sprinkles. Watch the temperature closely so the white sprinkles don’t brown. -
Glaze for shine:
Once fully cooled, brush a coat of gloss glaze or UV resin exclusively over the icing area. This makes the frosting look wet and sugary while keeping the dough matte. -
Assemble keychain:
Open a jump ring with two pairs of pliers (twist, don’t pull apart). Attach your donut to the keychain chain and close the ring securely.
Now you have a sweet, distinctive accessory ready to organize your keys or gift to a dessert-loving friend

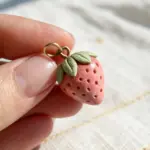
Best-Friends Avocado Half Set
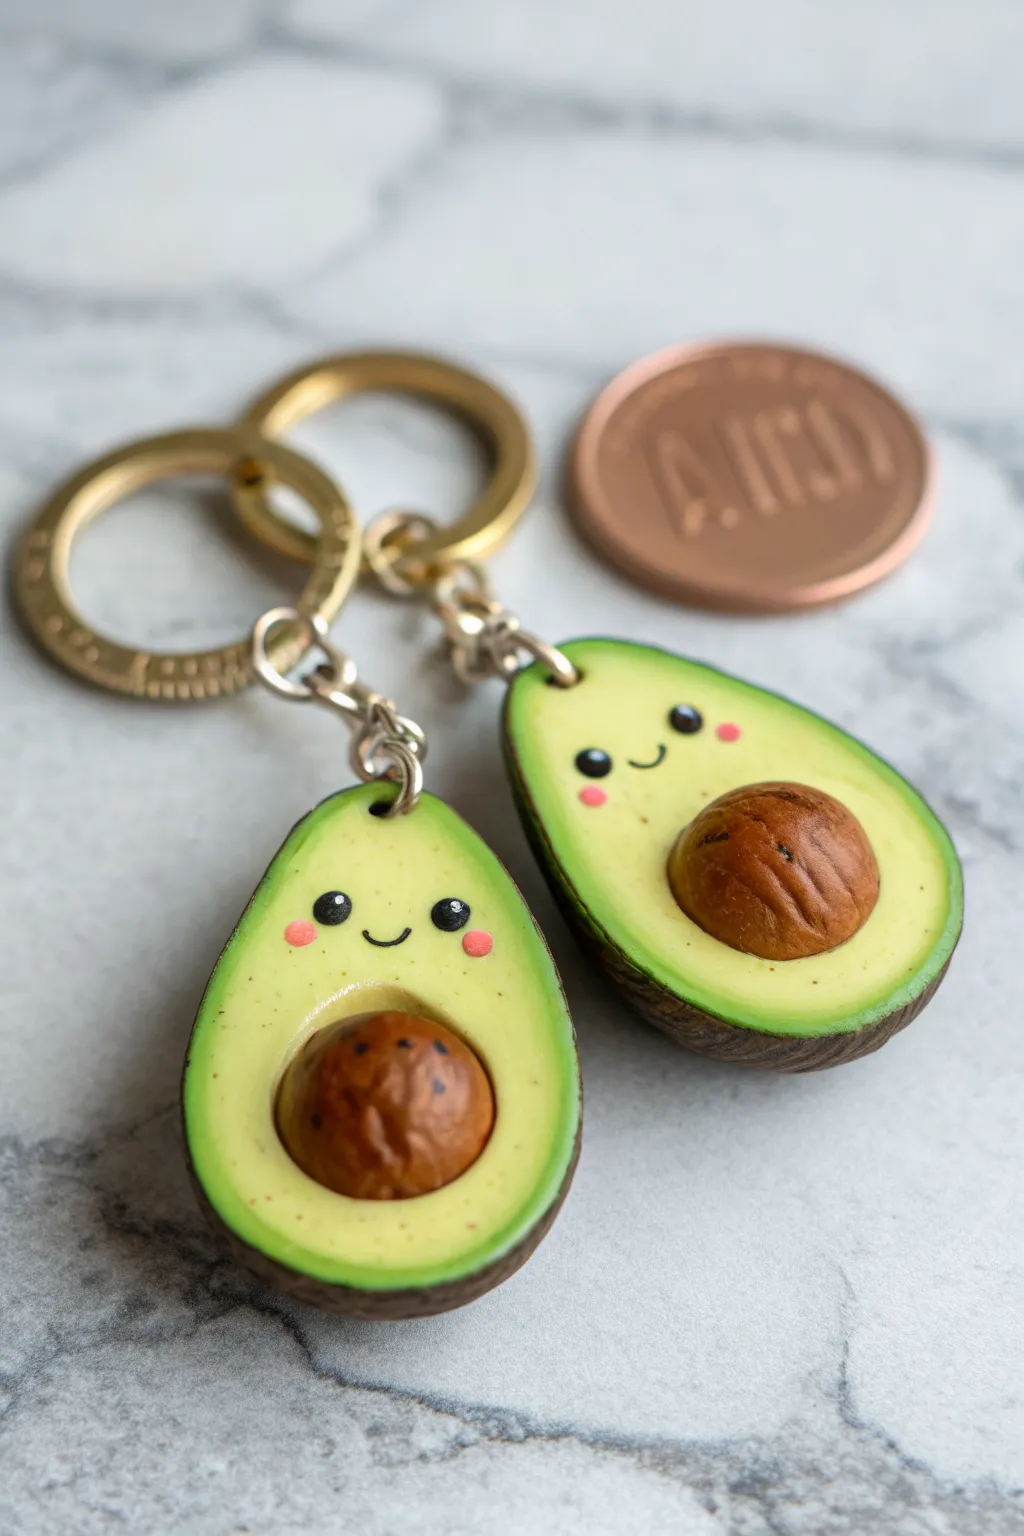
These adorable matching avocado keychains are the perfect symbol of friendship—you stick together just like an avocado and its stone. This beginner-friendly polymer clay project results in two durable, kawaii accessories that fit perfectly together.
How-To Guide
Materials
- Polymer clay (dark green, light yellow-green, brown, pink, black)
- Small metal jump rings (approx 6-8mm)
- Two keychain mechanisms
- Ball stylus or dotting tool
- Aluminum foil (for texture)
- Needle tool or toothpick
- Craft blade or exacto knife
- Gloss glaze or UV resin (optional)
- Small paintbrush
- Brown acrylic paint (optional for detailing)
Step 1: Shaping the Base
-
Prepare the greens:
Start by conditioning your light yellow-green clay until it is soft and pliable. Roll a walnut-sized amount into a smooth ball, then gently taper the top to create a classic pear shape. -
Flatten the shape:
Place the pear shape on your work surface and press it down gently with your palm until it is about 1/4 inch thick. This will be the fleshy part of the avocado. -
Create the skin:
Roll out a thin snake of dark green clay. Wrap this snake around the perimeter of your light green shape, smoothing the seam where the two colors meet. Alternatively, roll a thin sheet of dark green and back the light green shape with it, trimming the excess. -
Blend the edge:
Use your fingers to gently smooth the transition between the dark skin and the light flesh so they look like one cohesive piece. -
Texture the skin:
Using a crumpled ball of aluminum foil or a stiff toothbrush, gently firmly tap the dark green exterior to give it that bumpy, realistic avocado skin texture. -
Replicate:
Repeat these steps to create a second identical avocado half. These will be the two halves of your set.
Clean Those Prints
Before baking, lightly brush the light green clay with a tiny amount of baby oil or cornstarch. This smoothes out fingerprints and removes any stray dust specs.
Step 2: The Pit and the Indent
-
Make the indent:
On one of the avocado halves, press a large ball stylus or the back of a measuring spoon into the lower, wider center to create a smooth, round hollow. -
Form the pit:
Condition some brown clay and roll it into a ball that fits perfectly into the hollow you just made. Press it securely onto the *other* avocado half, slightly flattening the bottom so it sticks well. -
Detail the pit:
I like to use a needle tool to scratch fine, irregular lines into the surface of the brown pit to mimic the fibrous texture of a real seed.
Step 3: Kawaii Details
-
Add the eyes:
Roll two tiny specks of black clay into balls for each face. Press them gently onto the light green area, roughly halfway up the avocado shape. -
Create the smile:
Roll an incredibly thin thread of black clay. Cut tiny curved segments and place them between the eyes to form a sweet little smile. -
Apply blush:
Take the tiniest amount of pink clay, flatten it into minute circles, and place them just below and to the outside of the eyes for rosy cheeks. -
Insert hardware:
Before baking, insert a screw eye pin into the top center of each avocado. If you don’t have screw pins, carefully use a needle tool to pierce a hole through the top for a jump ring later.
Face Falling Off?
If facial features won’t stick, use a tiny dot of liquid polymer clay (like Sculpey Bake & Bond) as ‘glue’ under the eyes and mouth before baking.
Step 4: Finishing Up
-
Bake:
Bake the pieces according to your clay manufacturer’s instructions (usually 275°F/135°C for 15-30 minutes). Let them cool completely before handling. -
Secure the pin:
Once cool, gently twist out the eye pin, add a drop of superglue to the shaft, and screw it back in for a permanent hold. -
Add speckles (optional):
To add realism, dip a stiff brush in watered-down brown acrylic paint and flick tiny speckles onto the light green area, avoiding the face. -
Glaze:
Apply a coat of gloss glaze or UV resin to the pit and the eyes to make them shine, leaving the skin matte for contrast. -
Assemble:
Use pliers to open a jump ring, thread it through the eye pin, attach your keychain ring, and close the jump ring securely.
Now you have a charming set of charms ready to share with your best friend

The Complete Guide to Pottery Troubleshooting
Uncover the most common ceramic mistakes—from cracking clay to failed glazes—and learn how to fix them fast.
Toast and Egg Couple Keychains
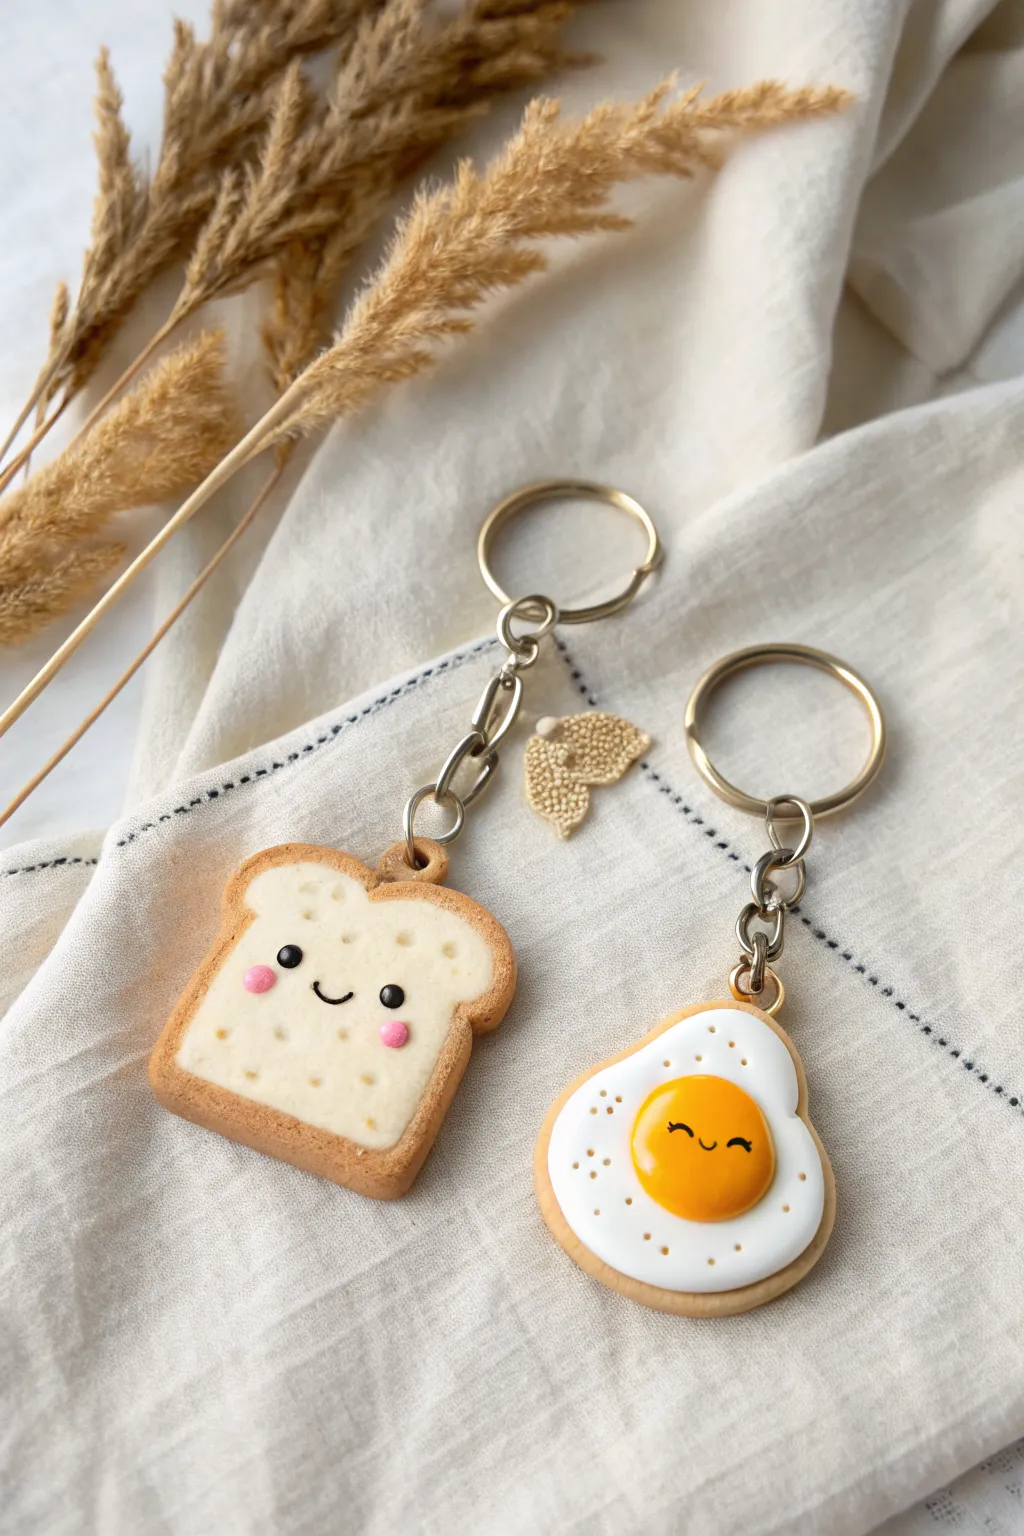
These adorable polymer clay keychains turn the classic breakfast duo into the perfect matching set for you and a friend. With their charming kawaii faces and warm, toasted colors, this project is as fun to make as it is to share.
Detailed Instructions
Materials
- Polymer clay: White, Translucent, Yellow, Tan/Beige, Black, Pink
- Liquid polymer clay (Translucent or White)
- Soft chalk pastels (Orange, Brown, Yellow)
- Small paintbrush
- Dotting tools or ball stylus
- Needle tool
- Rolling pin or pasta machine
- Shape cutters (Rounded square for toast, freehand or teardrop for egg)
- Keychain hardware with jump rings
- Eye screws
- Gloss glaze (optional)
Step 1: Prepping the Toast Base
-
Mix the bread color:
Start by mixing white clay with a tiny amount of translucent and yellow to get a soft, airy bread interior color. -
Roll and cut:
Roll the clay out to a thickness of about 1/4 inch (6mm). Use a rounded square cutter, or hand-cut a square shape, gently indenting the top edge to create the classic loaf dip. -
Texture the bread:
Take a clean toothbrush or a ball of aluminum foil and tap it gently all over the surface of the clay to create a realistic, porous bread texture. -
Create the crust:
Roll a snake of tan clay long enough to wrap around the perimeter. Flatten it slightly into a strip. -
Attach the crust:
Wrap the tan strip around the edge of your textured bread shape. Smooth the seam where the ends meet, and blend the back edge of the crust into the back of the bread so it stays secure.
Texturing Tip
For ultra-realistic toast texture, use an old toothbrush and dab it vertically. Don’t drag it! Vertical dabbing creates better ‘crumbs’.
Step 2: Shading and Baking
-
Shade the toast:
Scrape some brown and orange chalk pastel into a fine powder. Using a dry, soft brush, dust the edges of the bread face and the crust to give it that golden-brown baked look. -
Add texture dots:
Using a small needle tool, poke random, slightly deeper holes across the face of the toast to mimic air bubbles. -
Form the egg white:
Condition white clay and flatten it into an irregular, organic shape. It’s an egg, so it shouldn’t be perfect! Keep the edges slightly rounded and smooth. -
Add the yolk:
Roll a ball of yellow clay mixed with a tiny bit of orange for a rich yolk color. Flatten it slightly into a dome and press it firmly onto the center of the egg white. -
Shade the egg:
Lightly dust the very edges of the egg white with a tiny bit of brown pastel to make the edges look crispy and fried. -
Insert hardware:
Screw a small eye pin into the top center of both the toast and the egg. Remove it, add a drop of liquid clay or strong glue to the threads, and screw it back in for a permanent hold.
Make it a Set
Create a whole breakfast club by adding a bacon strip keychain or a tiny coffee mug charm to hang alongside the toast.
Step 3: Kawaii Details
-
Pre-bake steps:
It is often safer to bake the base shapes now according to your clay package instructions before adding the delicate faces, but you can also add faces raw if you have a steady hand. -
Create the toast eyes:
Roll two tiny balls of black clay and press them onto the toast. Add minuscule specks of white clay to the upper corners of the black eyes for that sparkling reflection. -
Add the smile:
Roll an incredibly thin snake of black clay. Cut a tiny U-shape and press it between the eyes of the toast. -
Apply blush:
Two small flattened circles of pink clay placed under the eyes give the toast its rosy cheeks. -
Create the egg face:
For the egg, paint the face directly onto the yolk after baking using black acrylic paint and a fine liner brush, or create a thin clay smile and closed ‘happy eyes’ arcs if shaping directly. -
Final bake and glaze:
Bake everything one last time. Once cooled, brush a coat of gloss glaze over the egg yolk to make it look runny and shiny. -
Assembly:
Open your jump rings with pliers and attach your finished charms to the keychain hardware.
Attach these to your keys or backpack and enjoy your delightful new breakfast accessories
Chubby Cat Face Charm
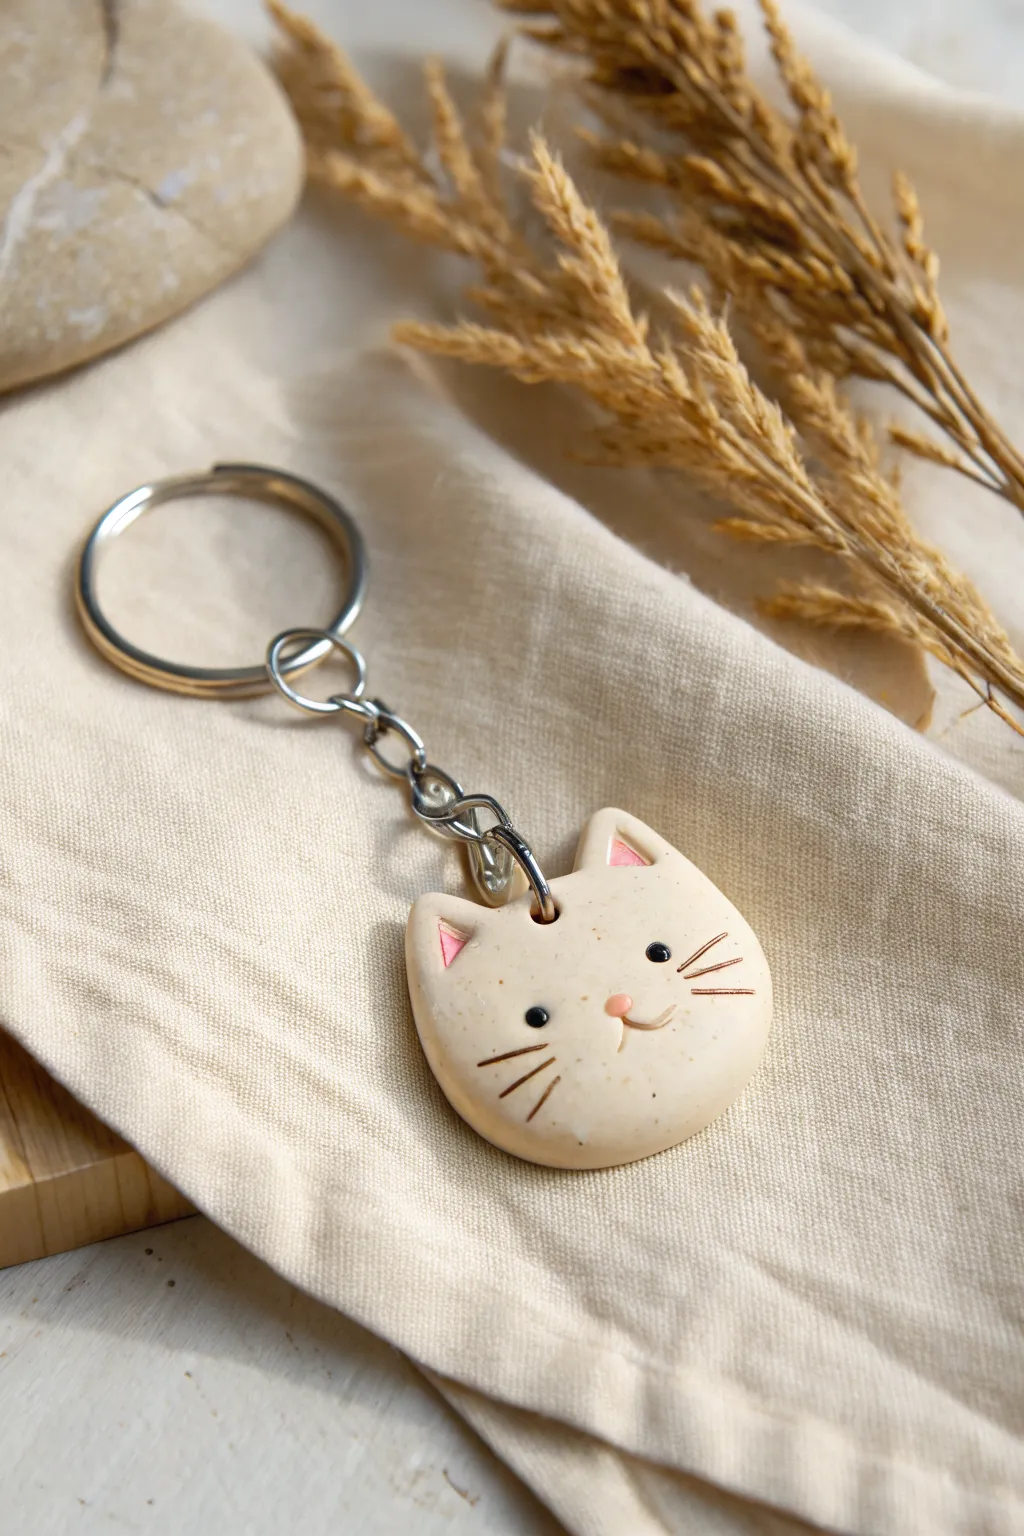
This adorable keychain features a minimalist, creamy beige cat face with simple painted details and charming pink ears. Its smooth, rounded finish gives it a polished look that makes for a perfect gift or a cute addition to your own keys.
Step-by-Step Guide
Materials
- Beige or cream-colored polymer clay
- Small amount of pink polymer clay
- Black acrylic paint
- Brown acrylic paint
- Small quantity of light pink acrylic paint
- Fine detail paintbrush (size 00 or 000)
- Dotting tool or toothpick
- Keyring hardware with chain and screw eye pin
- Gloss glaze or polyurethane varnish (optional)
- Oven for baking clay
- Rolling pin or pasta machine
- Round cutter (approx. 1.5 inches)
Step 1: Shaping the Base
-
Condition the clay:
Start by kneading your beige polymer clay until it is soft and warm. This prevents cracks and makes it easier to shape. -
Roll out the slab:
Roll the clay out to a thickness of about 1/4 inch (6mm). You want it to be thick enough to hold the hardware securely but not too heavy. -
Cut the basic shape:
Use your round cutter to punch out a perfect circle. Gently smooth the edges with your finger to remove any sharp cut lines. -
Form the ears:
Pinch the top left and right sides of the circle gently to pull out two small triangles. Shape them into soft, rounded cat ears, ensuring they blend seamlessly into the head without distinct seams. -
Refine the shape:
Press the bottom of the circle slightly to flatten the chin area just a tiny bit, giving the face a more oval, ‘chubby’ appearance rather than a perfect geometric circle.
Clean Clay Trick
Keep baby wipes nearby to clean your hands before handling the beige clay. Light colors pick up lint easily, and dirty hands will smudge the pristine finish immediately.
Step 2: Adding Details
-
Create the inner ears:
Take two tiny balls of pink clay and flatten them into triangles. Press these firmly into the center of your beige ears so they sit flush with the surface. -
Insert the hardware:
Screw the eye pin into the top center of the head, right between the ears. To ensure it stays put, I usually remove it, add a dab of liquid clay or strong glue to the threads, and screw it back in. -
Smooth fingerprints:
Before baking, lightly brush the surface with a little baby oil or cornstarch to gently buff away any fingerprints or dust specks. -
Bake the charm:
Bake the clay according to the manufacturer’s instructions on the package. Typically, this is around 275°F (135°C) for 15-20 minutes depending on thickness. -
Cool down:
Let the charm cool completely before painting. Painting on hot clay can cause the paint to dry too fast and crack.
Step 3: Painting the Face
-
Paint the eyes:
Dip a large dotting tool or the back of a paintbrush into black acrylic paint. Stamp two wide-set eyes onto the center of the face. -
Add eye highlights:
Once the black paint is barely dry, use a pin or a very fine tip to add a microscopic dot of white paint to each eye for a spark of life. -
Paint the nose:
Use a small dotting tool with light pink paint to create a soft, rounded oval nose centered just below the eyes. -
Draw the mouth:
Using your thinnest detail brush and brown paint (dilute it slightly with water for better flow), paint a small ‘w’ shape connecting to the nose for the mouth. -
Add whiskers:
With the same brown paint, carefully flick three short lines on each cheek. Try to keep your hand steady and lift the brush at the end of the stroke for a tapered look.
Shaky Hands?
If you struggle with painting fine whiskers, use a fine-tip permanent marker instead of a brush. Just test it on a scrap piece of baked clay first to ensure it doesn’t bleed.
Step 4: Final Assembly
-
Seal the piece:
Once all paint is totally dry, apply a coat of gloss glaze if you want a shiny finish, or matte varnish for a natural look. This protects the paint from scratching off. -
Attach the keyring:
Use pliers to open the jump ring on your keychain hardware. Loop it through the eye pin on the cat’s head and close it securely.
Attach your new feline friend to your keys and enjoy your handmade accessory


What Really Happens Inside the Kiln
Learn how time and temperature work together inside the kiln to transform clay into durable ceramic.
Mini Frog With Blush Cheeks
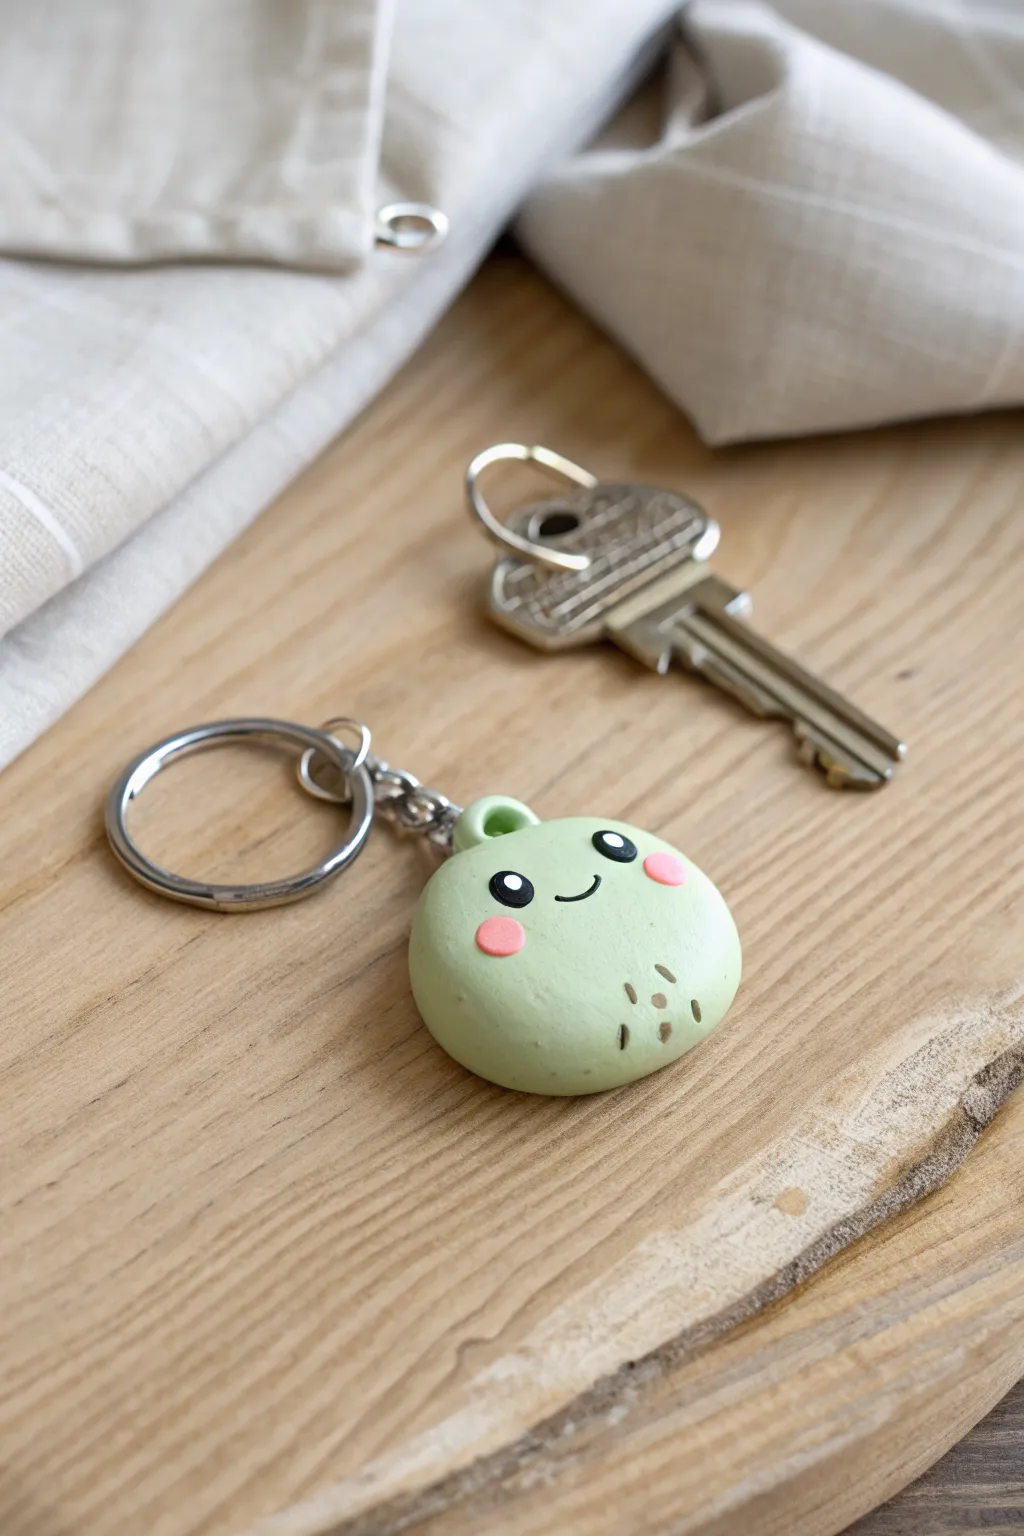
This adorable, minimalist charm brings a soft touch of kawaii to your keyring with its rounded shape and sweet expression. The pastel green clay and delicate blushing cheeks create a gentle, friendly character that is surprisingly simple to sculpt.
Step-by-Step Tutorial
Materials
- Polymer clay (light mint green or pastel green)
- Polymer clay (baby pink)
- Polymer clay (black)
- Acrylic paint (brown) or a fine-tip brown marker
- Rolling pin or pasta machine
- Circle cutter (approx. 1.5 inches)
- Ball stylus tool (small)
- Needle tool or toothpick
- Eye pin or screw eye pin
- Jump ring
- Keychain ring with chain
- Silicone smoothing tool (optional)
- Oven for baking
Step 1: Shaping the Base
-
Condition the clay:
Start by kneading your mint green polymer clay until it is soft, pliable, and free of air bubbles. -
Roll the sphere:
Roll the conditioned clay into a smooth ball between your palms to remove any seams. -
Flatten the shape:
Place the ball on your work surface and gently press it down with your palm or a flat acrylic block until it becomes a thick, rounded disc. You want it to look like a soft macaron cookie, not a flat pancake. -
Smooth the edges:
Run your finger or a silicone smoothing tool around the circumference to ensure the edges are rounded and smooth, not sharp.
Dirty Clay Blues
Pastel clay picks up lint easily! Keep a pack of baby wipes nearby and clean your hands and tools thoroughly before handling the light green clay.
Step 2: Adding the Loop
-
Create the loop housing:
Take a tiny pinch of the same green clay and roll it into a small ball, much smaller than a pea. -
Attach the housing:
Press this small ball onto the very top center of your main disc. Blend the seams downward into the main body using a silicone tool or your finger so it looks like one solid piece. -
Insert the hardware:
If using a screw eye pin, you can insert it after baking. If using a standard eye pin, trim the wire shorter, add a drop of bake-and-bond or liquid clay, and insert it directly into that top bump you just created.
Step 3: Creating the Face
-
Make the eyes:
Roll two minuscule balls of black clay. Position them higher up on the face, spaced slightly apart. -
Flatten the eyes:
Gently press the black balls flat against the green surface so they fuse with the base. I prefer using a flat tool for this to keep them even. -
Add the eye highlights:
Roll two microscopic bits of white clay (or wait to paint this later) and place them in the top right corner of each black eye for that sparkling look. -
Sculpt the smile:
Roll an extremely thin snake of black clay. Cut a tiny U-shaped segment and carefully place it between the eyes to form a smile. Press it gently to secure. -
Apply blush:
Condition a small amount of baby pink clay. Roll two small, flat discs and press them onto the cheeks, just below and to the outside of the eyes.
Pro Tip: Seamless Blend
When attaching clay parts (like the eyes or cheeks), use a tiny drop of translucent liquid clay as ‘glue’ to ensure they don’t pop off after baking.
Step 4: Finishing Details
-
Add texture marks:
Using a needle tool or toothpick, gently indent three or four small, vertical dash marks on the lower right side of the body for texture. -
Paint the marks (Optional):
If you want the marks to be dark like the photo, you can carefully paint inside the indentations with diluted brown acrylic paint now, or wait until after baking. -
Bake carefully:
Bake the piece according to your clay package instructions. Since this piece is thick, I recommend baking it at a slightly lower temperature for a longer time to prevent scorching the light green color. -
Cool down:
Let the charm cool completely inside the oven or on the tray before handling. -
Assemble keychain:
Once cool, use pliers to open your jump ring. Thread it through the eye pin loop on your charm and attach it to the main keychain assembly. -
Close the ring:
Use your pliers to securely close the jump ring so there is no gap for the charm to slip through.
Now your keys have a cheerful little guardian to brighten your day
Sleepy Bunny Head Keychain

Capture a moment of quiet sweetness with this adorable sleepy bunny keychain. Crafted from polymer clay in soft cream tones, this charm features delicate painted lashes and blushing cheeks for a serene, whimsical accessory.
How-To Guide
Materials
- Beige or cream-colored polymer clay
- Pink polymer clay (soft pastel shade)
- Black acrylic paint or fine-point craft marker
- Pink chalk pastel or blush powder
- Small paintbrush
- Clay texture sponge or toothbrush
- Clay roller or pasta machine
- Circle cutter (approx. 1.5 – 2 inches)
- Needle tool or toothpick
- Gold screw eye pin
- Gold jump rings and lobster clasp
- UV resin or glossy glaze (optional)
- Jewelry pliers
Step 1: Shaping the Base
-
Condition the Clay:
Begin by taking a block of beige or cream polymer clay. Knead it thoroughly in your hands until it becomes soft, pliable, and warm to the touch. -
Roll and Cut:
Roll the conditioned clay out to a thickness of about 1/4 inch (6mm). Using your circle cutter, punch out a clean, round shape for the bunny’s head. -
Soften the Edges:
Take the circle and gently smooth the sharp cut edges with your fingertip. You want the head to look like a soft, puffed bun rather than a sharp disc. -
Texture the Surface:
To give the bunny a baked-good or organic texture, lightly tap the surface with a clean toothbrush or texture sponge. This subtle detail removes fingerprints and adds character.
Step 2: Adding Ears and Details
-
Form the Ears:
Roll two small logs of beige clay. Flatten them slightly and taper the ends to create long tear-drop shapes for the ears. -
Create Inner Ears:
Take a tiny amount of pink clay and roll two smaller, thinner teardrops. I find it easiest to press these directly onto the center of the beige ears, smoothing them flat so they integrate seamlessly. -
Attach the Ears:
Press the base of the ears firmly against the top of the head. Use a blending tool or your fingertip to smooth the seam on the back of the keychain to ensure they stay attached after baking. -
Insert Hardware:
Twist a gold screw eye pin into the top center of the head, right between the ears. Remove it, add a tiny dot of liquid clay or bake-and-bond into the hole, and screw it back in for a secure hold. -
Bake:
Preheat your oven according to the clay manufacturer’s instructions. Place the bunny on a parchment-lined baking sheet and bake for the recommended time (usually 15-30 minutes).
Clean Clay Tip
Keep baby wipes nearby! Use them to wipe your hands and tools before switching from the pink clay back to the cream clay to avoid color transfer.
Step 3: Bringing it to Life
-
Cool Down:
Allow the clay to cool completely before decorating. Painting on warm clay can cause the paint to dry too fast or crack. -
Paint the Face:
Using a very fine brush and black acrylic paint, carefully draw two curved lines for the sleeping eyes. Add three tiny vertical lashes to each eye for a gentle expression. -
Add the Nose:
Paint a tiny vertical line for the nose area and top it with a small dot in the center, just below the eyes. -
Dust the Cheeks:
Scrape a little pink chalk pastel into a powder. Use a soft brush to gently dust rosy circles onto the cheeks. Build the color slowly for a natural fade. -
Seal (Optional):
For durability, coat the entire piece in a thin layer of matte varnish, or use UV resin on just the eyes and nose for a glossy highlight. -
Assemble the Keychain:
Once everything is dry, use jewelry pliers to open a jump ring. Loop it through the eye pin on the bunny’s head. -
Final Connection:
Attach the chain and lobster clasp to the jump ring, then close the ring securely to finish your charm.
Make it Sparkle
Before baking, brush a tiny amount of mica powder over the cream clay for a subtle, pearlescent shimmer that catches the light beautifully.
Enjoy carrying this peaceful little companion on your keys or bag

TRACK YOUR CERAMIC JOURNEY
Capture glaze tests, firing details, and creative progress—all in one simple printable. Make your projects easier to repeat and improve.
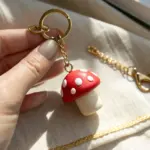
Chunky Mushroom Cap Charm
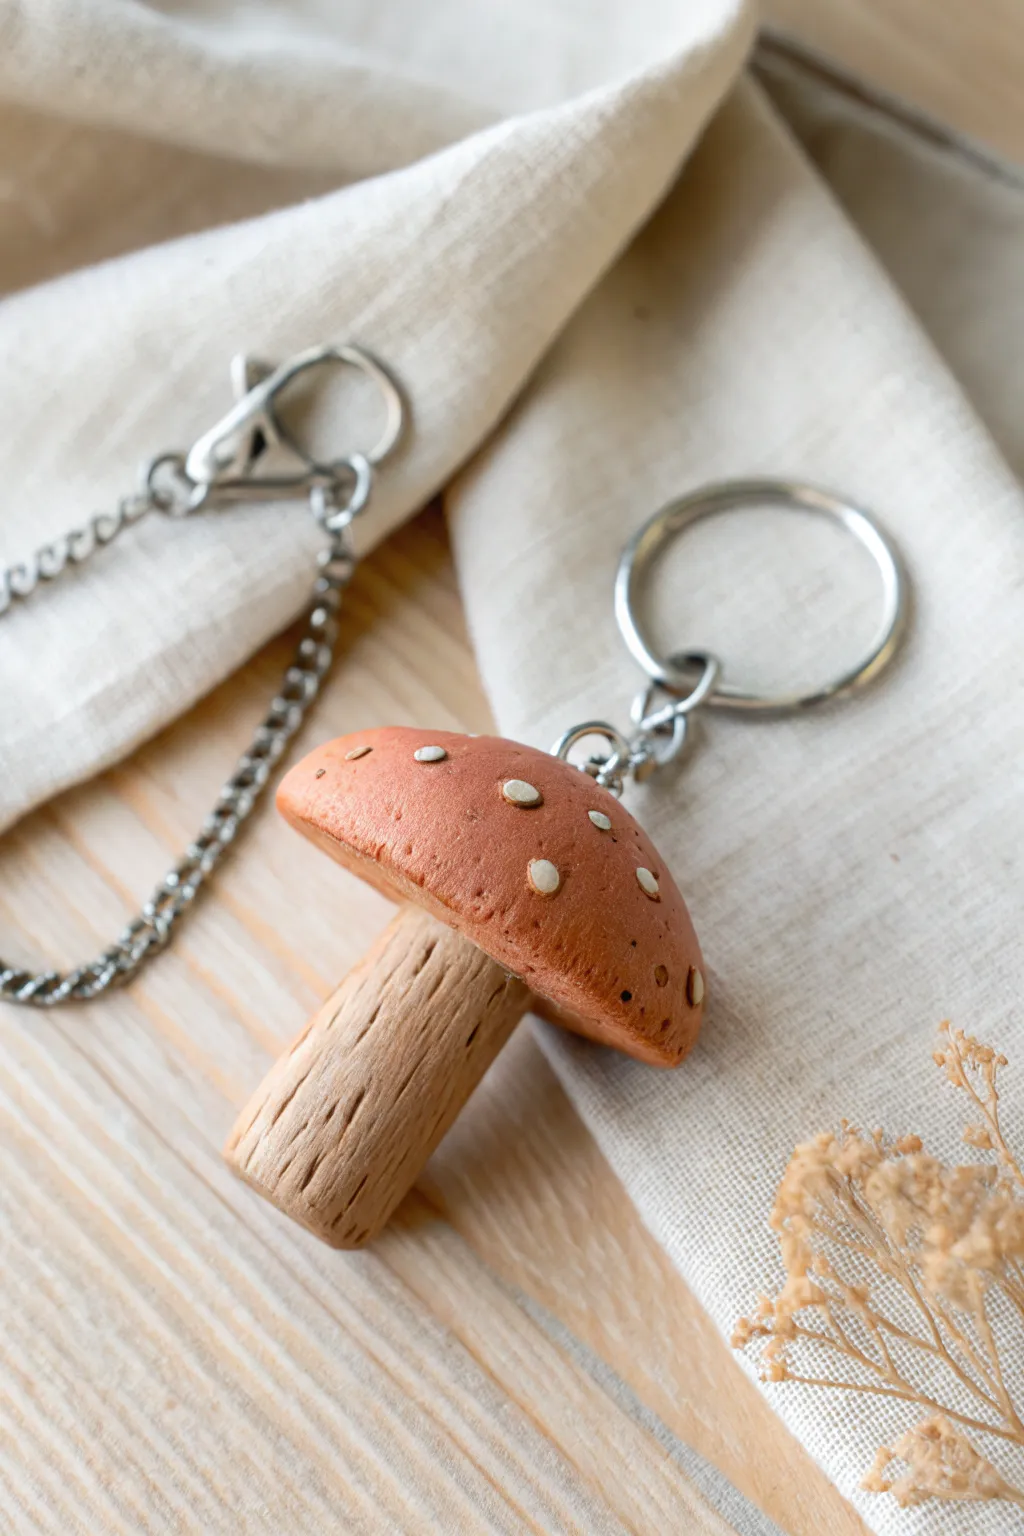
This rustic mushroom charm brings a touch of the forest to your everyday carry with its earthy textures and warm tones. The realistic wood grain stalk paired with a hearty, spotted cap creates a satisfyingly solid little companion for your keys.
Step-by-Step
Materials
- Polymer clay (terracotta/rust red, beige/tan, and translucent white)
- Needle tool or toothpick
- Texture sponge or sandpaper
- Acrylic paint (dark brown or burnt umber)
- Small paintbrush
- Eye pin or screw eye
- Keyring hardware with jump ring
- Gloss or matte varnish (optional)
- Oven for baking
Step 1: Sculpting the Stalk
-
Condition the beige clay:
Start by warming up a chunk of beige or tan polymer clay in your hands until it’s soft and pliable. Roll it into a smooth ball to remove any air bubbles. -
Shape the cylinder:
Roll the ball into a thick, sturdy cylinder. Based on the photo, you want this quite chunky, not thin, so keep the width substantial. Flatten the bottom slightly so it can stand upright. -
Apply rough texture:
Using a needle tool, drag distinct vertical lines down the length of the cylinder to mimic bark. Vary the depth and length of these strokes—some should be deep gouges, others shallow scratches. -
Refine the wood grain:
Add smaller, random nicks and shorter lines between your main grooves. This adds to the organic, weathered wood look we are aiming for.
Stalk Texture Trick
Twist the stalk slightly after texturing but before baking. This spirals the ‘bark’ lines, making the wood grain look even more organic and natural.
Step 2: Forming the Cap
-
Prepare the cap color:
Take your terracotta or rust-red clay. If the color feels too flat, I sometimes mix in a tiny pinch of brown to deepen it. Condition it thoroughly. -
Shape the dome:
Roll the red clay into a ball slightly larger than the stalk’s width. Press it gently onto a flat surface to flatten the underside, then smooth the top into a rounded, classic mushroom dome shape. -
Texture the surface:
Before attaching it, gently press a texture sponge or a piece of coarse sandpaper over the top of the cap. You don’t want deep holes, just a matte, porous skin texture like a real fungus. -
Connect the pieces:
Press the cap firmly onto the textured stalk. You can use a small dab of liquid clay or ‘Bake & Bond’ if you want extra security. -
Blend the seam:
Look underneath the cap where it meets the stalk. Use a modeling tool to ensure the clay makes full contact, though you don’t need to blend them completely smooth since they are distinct parts.
Glow-in-the-Dark Magic
Swap the cream clay used for the cap spots with glow-in-the-dark polymer clay. It remains subtle in daylight but reveals a magical forest vibe at night.
Step 3: Details & Assembly
-
Add the spots:
Roll tiny, flattened discs of translucent white or light cream clay. Press these randomly onto the cap. Some can be flush with the surface, while others can sit slightly raised. -
Insert the hardware:
Trim an eye pin to the right length (about half the height of the mushroom). Dipping the end in liquid clay or super glue gel helps it grip. Push it straight down into the center of the cap. -
Bake the charm:
Bake the piece according to your clay manufacturer’s instructions (usually 275°F/135°C for 15-30 minutes). Use an oven thermometer to ensure precise heat. -
Apply an antique wash:
Once cool, dilute dark brown acrylic paint with water. Brush this wash over the entire stalk, ensuring it gets into those deep texture grooves. -
Wipe away excess:
Immediately wipe the high points of the stalk with a damp paper towel or cloth. The dark paint will remain in the cracks, highlighting the lovely ‘wood’ texture you carved. -
Seal:
Protect your paint job with a light coat of matte varnish if desired, though leaving the clay raw creates a nice natural feel. -
Attach the keyring:
Use pliers to open the jump ring on your keychain hardware. Loop it through the eye pin on the mushroom and close it securely.
Now your keys have a sturdy, woodland guardian ready for adventure
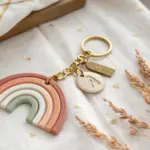
Boho Rainbow Arch Keychain
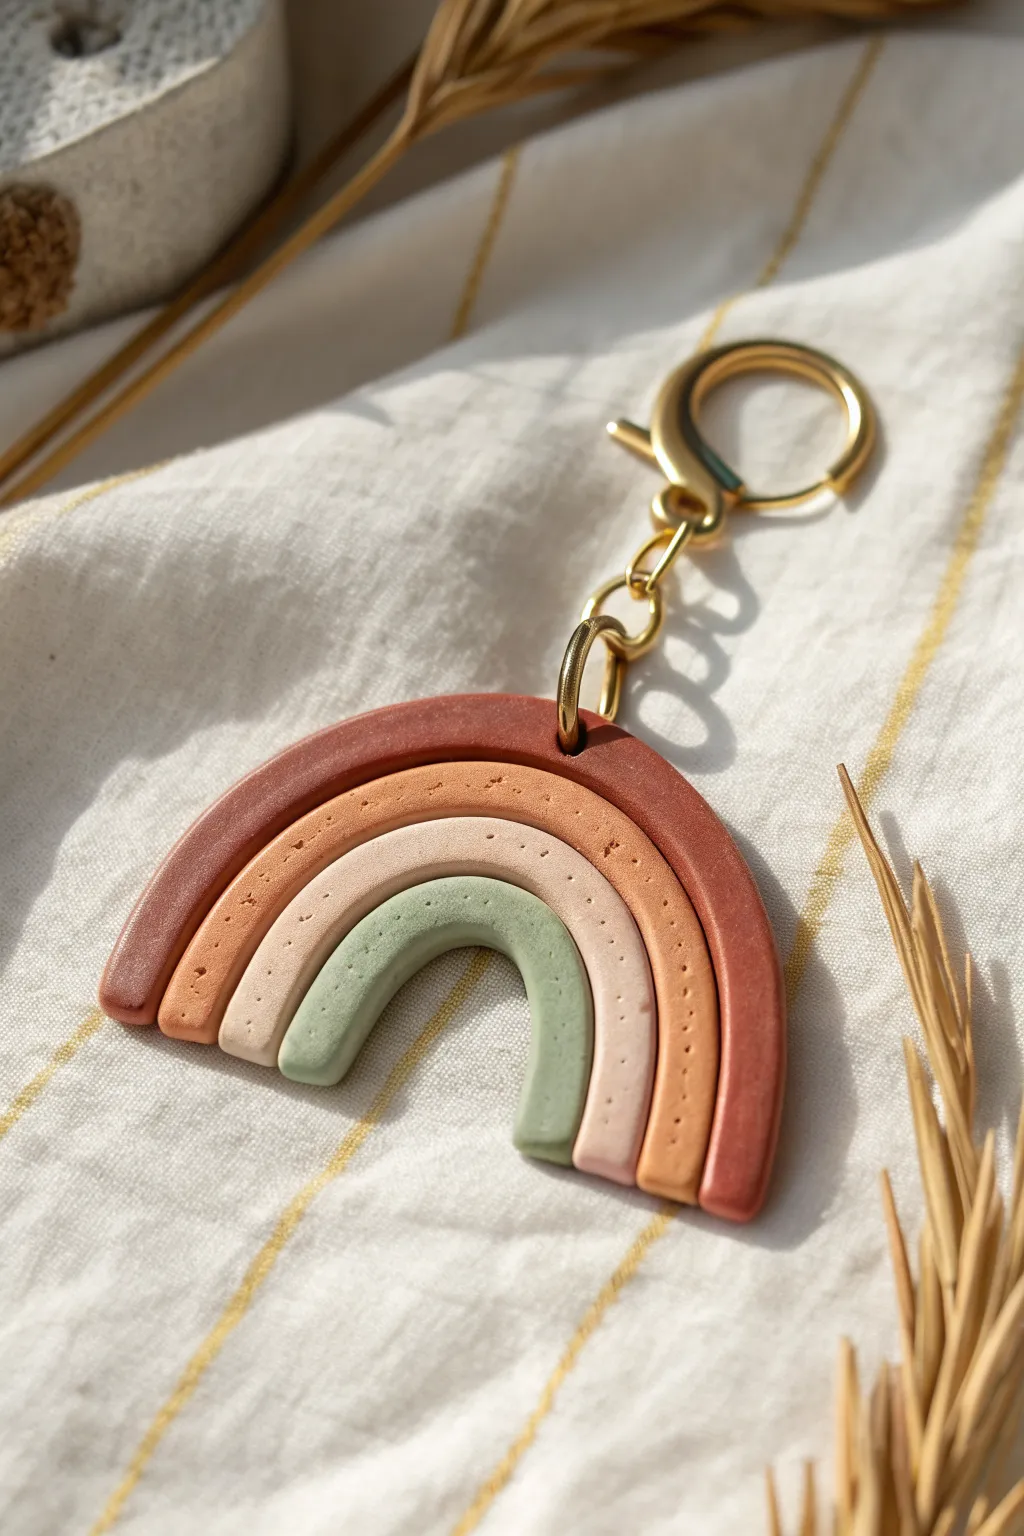
Embrace earthy, natural tones with this simple yet striking polymer clay rainbow keychain. Featuring a warm palette of terracotta, rust, beige, and sage green, this textured arch design is finished with elegant gold hardware for a high-end look.
How-To Guide
Materials
- Polymer clay in four colors: Rust/Terracotta, Light Orange/Sand, Beige/Skin Tone, Sage Green
- Acrylic rolling pin or clay machine
- Clay extruder (optional but helpful for even coils)
- Blade or craft knife
- Needle tool or toothpick
- Gold jump rings (heavy gauge)
- Gold lobster clasp keychain finding
- Needle nose pliers
- Parchment paper or ceramic tile for baking
- Oven
Step 1: Preparing the Clay Coils
-
Condition the clay:
Start by kneading each color of polymer clay separately until it is soft, pliable, and free of air bubbles. This prevents cracks during baking. -
Roll the coils:
Roll each color into a long, even snake or coil. Aim for a thickness of about 4-5mm for a sturdy keychain. -
Check consistency:
If rolling by hand, use an acrylic block or large book to roll over the snakes to ensure they are perfectly uniform in thickness. -
Cut to rough size:
Cut your coils into segments. You’ll need the sage green to be the shortest, followed by the beige, the light orange, and finally the longest piece in rust red.
Uneven Seams?
If your arch layers aren’t sticking, rush a tiny bit of liquid polymer clay or ‘Bake & Bond’ between the coils before pressing them together for a permanent hold.
Step 2: Assembling the Arch
-
Form the inner arch:
Take the sage green coil and bend it into a tight ‘U’ shape on your work surface. This forms the innermost layer of your rainbow. -
Add the second layer:
Gently press the beige coil around the outside of the green arch. Ensure the clays touch along the entire seam without smashing the round shape. -
Add the third layer:
Repeat the process with the light orange coil, wrapping it snugly around the beige layer. -
Add the final layer:
Finish the arch by wrapping the rust/terracotta coil around the outside. Press all layers gently together towards the center to bond them. -
Trim the bottom:
Use your rigid blade to cut straight through the bottom of all four arches simultaneously, creating a flat, clean base.
Level Up: UV Resin
For a glossy, durable finish, coat the front of the baked rainbow with a thin layer of UV resin and cure it under a UV lamp for a professional-grade shine.
Step 3: Adding Texture and Hardware Prep
-
Create the hole:
Using a tool or a drinking straw, punch a hole at the top center of the outer rust arch. Make sure the hole is big enough for your jump ring. -
Texture the surface:
This is what gives it that organic look. Use a needle tool or toothpick to gently prick random dots across the surface of the clay. -
Refine the texture:
Focus the texture slightly more on the center of the strands rather than the seams, keeping the overall look subtle and speckled. -
Bake the piece:
Place your rainbow on the tile or parchment paper and bake according to your specific clay brand’s instructions (usually 275°F/130°C for 15-30 minutes). -
Cool down:
Allow the piece to cool completely in the oven or on a wire rack before handling to ensure maximum strength.
Step 4: Final Assembly
-
Prepare the jump ring:
Use two pairs of pliers to twist open a large gold jump ring. Never pull rings apart; always twist sideways to preserve the circle shape. -
Attach the hardware:
Thread the open jump ring through the hole you created in the clay arch. -
Add the clasp:
Slide the gold lobster clasp chain onto the jump ring before twisting the ring closed securely. -
Final check:
Wiggle the connection to ensure the jump ring is fully closed so your keychain doesn’t slip off during use.
Your stylish boho keychain is now ready to organize your keys or add flair to a bag
Terrazzo Speckled Tag Charm

Embrace the trendy, scattered beauty of terrazzo with this simple yet chic clay project. This rectangular tag features a creamy white base dappled with organic chips of terracotta, sage green, and soft pink, creating a modern accessory that looks professionally made.
Step-by-Step Tutorial
Materials
- White or cream polymer clay (base color)
- Small amounts of colored polymer clay (terracotta, sage green, blush pink, dark green)
- Rolling pin or acrylic roller
- Rectangle clay cutter (or sharp blade)
- Parchment paper or ceramic tile
- Needle tool or small straw
- Sandpaper (fine grit)
- UV resin or glossy varnish (optional)
- Jump ring and keyring hardware
- Jewelry pliers
Step 1: Preparing the Clay Chips
-
Condition the colors:
Start by warming up your small bits of colored clay in your hands until they are soft and pliable. You’ll need terracotta, sage green, blush pink, and a tiny bit of dark forest green for contrast. -
Create thin sheets:
Roll each colored piece into a very thin, flat sheet. It doesn’t need to be perfect or even; aim for paper-thin thickness so the chips embed easily later. -
Bake the sheets (Optional Technique):
For crisp, jagged terrazzo chips, I sometimes flash-bake these thin sheets for about 5-10 minutes. If you want a softer, more organic smear look, skip this step and use the raw clay. -
Chop the clay:
Using your blade, chop the colored clay sheets into tiny, irregular confetti-like pieces. Vary the sizes—some should be tiny specks, others distinct chunky triangles.
Smudged Colors?
If your colored chips are smearing into the white base instead of keeping crisp edges, your clay is too warm. Pop the slab in the fridge for 10 minutes before rolling.
Step 2: Forming the Base
-
Condition the base:
Take your white or cream clay and condition it thoroughly until it’s smooth and free of air bubbles. -
Roll the slab:
Roll the white clay out on parchment paper or a tile to a thickness of about 3mm to 4mm. This ensures the keychain is sturdy enough for daily use. -
Apply the terrazzo:
Sprinkle your colored clay chips randomly over the white slab. Don’t overthink the placement—randomness is key to the terrazzo aesthetic. -
Embed the chips:
Gently roll over the slab again with your acrylic roller. Press firmly enough to force the colored chips flush into the white base, creating a smooth, single surface.
Step 3: Cutting and Refining
-
Cut the shape:
Position your rectangular cutter over the most pleasing section of the pattern and press down firmly. Alternatively, measure a rectangle and cut it freehand with a sharp blade. -
Punch the hole:
Use a small drinking straw or a larger needle tool to create a hole near the top center of the rectangle. Ensure the hole is not too close to the edge to prevent tearing. -
Smooth the edges:
Dip your finger in a little cornstarch or water and gently rub the raw edges of the rectangle to soften any sharp cutting marks. -
Bake:
Bake the piece according to the manufacturer’s instructions for your specific brand of clay (usually 275°F/135°C for 30 minutes). Let it cool completely.
Pro Tip: Depth Effect
Roll a very thin layer of translucent clay over the finished terrazzo slab before baking. This adds incredible depth, making the chips look like they are floating inside stone.
Step 4: Finishing Touches
-
Sand the surface:
Once cool, wet-sand the surface with fine-grit sandpaper under running water. This reveals the crisp edges of the terrazzo chips and removes any fingerprints. -
Seal (Optional):
If you want a glossy finish like ceramic, apply a thin layer of UV resin or polymer clay varnish. Cure or dry as directed. -
Attach hardware:
Open a jump ring by twisting it sideways with your pliers. Thread it through the hole in the clay tag. -
Connect the ring:
Before closing the jump ring, slide on the large split keyring. Twist the jump ring closed securely so there is no gap.
Now you have a durable, stylish accessory ready to organize your keys or gift to a friend
Marbled Stone Pebble Keychain
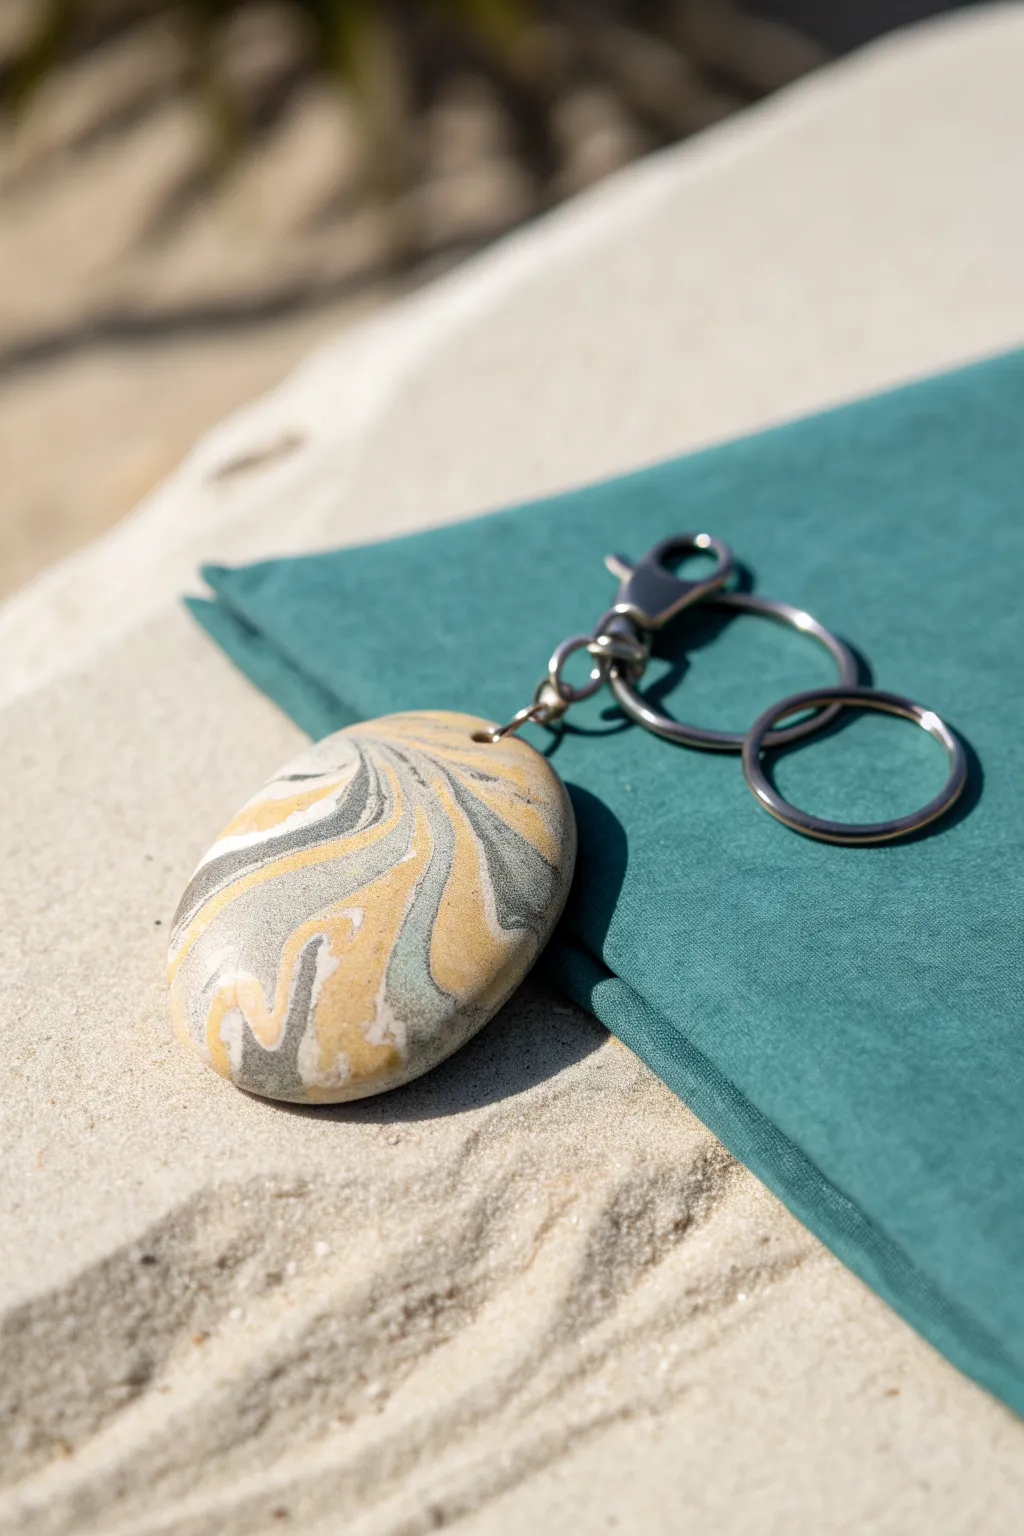
Capture the serene beauty of a wave-washed stone with this polymer clay project. By mixing sand, soft grey, and white tones, you can achieve a sophisticated organic marble effect that looks just like a polished river rock.
How-To Guide
Materials
- Polymer clay (beige/sand color)
- Polymer clay (cool grey or silver)
- Polymer clay (white)
- Acrylic rolling pin
- Clay slicing blade
- Sandpaper (various grits from 400 to 1200)
- Hand drill or pin drill with small bit
- Jump rings (silver tone)
- Lobster clasp keychain assembly
- Jewelry pliers
- Oven for baking
- Gloss or matte glaze (optional)
Step 1: Preparing the Clay
-
Condition the colors:
Start by knitting and warming up each block of polymer clay in your hands until it becomes soft and pliable. You want the clay to be smooth without any crumbling edges. -
Create the logs:
Roll each color—beige, grey, and white—into a long snake or log shape. Aim for the beige log to be the thickest since it is the dominant color, with the grey and white logs being slightly thinner to act as accents. -
Combine the logs:
Gather the three logs and twist them together into one large rope. Fold this rope in half and twist it again. Repeat this twisting and folding process a few times to start blending the colors, but be careful not to over-mix, or the distinct lines will turn muddy. -
Check the pattern:
Roll the twisted rope into a ball, then flatten it slightly. If you want finer striations, you can slice the ball in half and stack the pieces back together before reshaping.
Natural Texture
Mix a pinch of real sand or black pepper into the beige clay before marbling. This creates tiny speckles mimicking real granite.
Step 2: Shaping the Pebble
-
Form the oval:
Take your marbled clay ball and gently roll it between your palms to smooth out any seams. Apply gentle pressure to flatten it into a thick oval shape, resembling a natural river stone or skipping rock. -
Refine the edges:
Use your fingers to round off the edges so there are no sharp corners. The goal is an organic, water-worn look, so slight imperfections in the silhouette actually add to the realism. -
Smooth the surface:
Lightly buff the surface with your fingertip to remove any fingerprints. I find that a tiny drop of baby oil often helps smooth the clay perfectly without leaving drag marks. -
Pierce the hole:
Using a needle tool or toothpick, pre-pierce a hole near the top edge of the stone for the hardware. Make sure the hole travels front-to-back and is wide enough for your jump ring.
Beach Glass Vibes
Use translucent clay mixed with a tiny dot of sea-green ink instead of beige for a frosted sea glass appearance.
Step 3: Baking and Finishing
-
Bake the clay:
Place your clay pebble on a tile or parchment-lined baking sheet. Bake according to the manufacturer’s instructions for your specific brand of clay, usually at 275°F (130°C) for about 15-30 minutes depending on thickness. -
Cool down:
Allow the piece to cool completely in the oven with the door cracked open. This gradual cooling helps prevent cracks from thermal shock. -
Wet sand the stone:
Once cool, dip the pebble in water and sand it using wet/dry sandpaper. Start with 400 grit to remove bumps, then move up to 800 and 1200 grit for a silky smooth, polished stone finish. -
Buff for shine:
Vigorously rub the dry stone with a piece of denim or a soft cotton cloth. This friction polishing brings out a natural semi-gloss sheen without needing varnish. -
Drill cleanup:
If your hole closed up slightly during baking or sanding, use a small hand drill to carefully reopen and clean out the channel. -
Attach the hardware:
Open a silver jump ring using two pairs of jewelry pliers (twist sideways, don’t pull apart). Thread it through the hole in your clay pebble. -
Secure the clasp:
Before closing the jump ring, slide on the loop of your lobster clasp keychain assembly. Twist the jump ring closed until the ends meet perfectly flush.
Now you have a durable, nature-inspired accessory that carries a little piece of the beach wherever you go
Leaf-Imprint Medallion Keychain

This elegant keychain captures the delicate beauty of nature by preserving the intricate veins of a leaf in durable clay. The contrast between the matte, speckled white stone and the shimmering gold leaf imprint creates a sophisticated accessory perfect for gifting.
Step-by-Step Tutorial
Materials
- White polymer clay (with granite or speckle effect)
- Small rolling pin
- Round clay cutter (approx. 2 inches)
- Skeletal leaf (dried leaf skeleton)
- Gold acrylic paint or gold leafing pen
- Fine detail paintbrush
- Small jump ring (gold)
- Gold keychain hardware (keyring, chain, clasp)
- Needle tool or toothpick
- Sandpaper (fine grit)
- Gloss glaze (optional)
- Parchment paper or baking tile
Step 1: Shaping the Base
-
Prepare the Clay:
Start by conditioning your speckled white polymer clay in your hands until it becomes soft and pliable. If you don’t have pre-speckled clay, you can mix a tiny pinch of black pepper or black sand into plain white clay for that natural stone look. -
Roll It Out:
Place the clay on a clean surface or parchment paper. Use your rolling pin to flatten it into an even slab, aiming for a thickness of about 4mm to 5mm. You want it sturdy enough to be a keychain but not too heavy. -
Cut the Circle:
Press your round cutter firmly into the clay slab to create a clean circle. Lift away the excess clay from the outside before removing the cutter to keep the edge sharp. -
Smooth the Edges:
Gently run your finger around the perimeter of the clay circle to soften any sharp ridges left by the cutter. A smooth, rounded edge feels better in the hand.
Uneven Impression?
If the leaf isn’t pressing in evenly, place a piece of parchment paper over the leaf before rolling. This prevents the roller from dragging the delicate skeleton.
Step 2: Creating the Imprint
-
Position the Leaf:
Select a dried skeletal leaf that fits well within your circle. Place it gently onto the clay surface where you want the design to sit. -
Press the Design:
Using the rolling pin, roll over the leaf once with firm, even pressure. You need to push the leaf veins deep enough to create a texture, but not so deep that it distorts the circle shape. -
Remove the Leaf:
Carefully peel the leaf away from the clay using tweezers or a needle tool. You should now see a perfect, recessed impression of the veins. -
Add the Hole:
Use a straw or a tool to punch a small hole near the top edge of the circle. Ensure it is not too close to the edge to prevent tearing later. -
Bake the Piece:
Transfer the clay to a baking sheet lined with parchment paper. Bake according to the manufacturer’s instructions for your specific brand of polymer clay (usually around 275°F/135°C for 15-30 minutes). Let it cool completely.
Step 3: Gilding and Assembly
-
Paint the Veins:
Dip a fine detail brush into metallic gold acrylic paint. Carefully paint inside the recessed leaf impression. I find it easiest to let the paint pool slightly in the deeper veins for better definition. -
Clean Up Excess:
If you get paint outside the lines, wait for it to dry slightly and then simulate sanding it off, or wipe it immediately with a damp cotton bud. Since the design is recessed, the paint should naturally stay in the grooves. -
Optional Sealing:
Once the paint is fully dry, you can apply a thin coat of matte or gloss varnish over the leaf area to protect the gold, though raw polymer clay is quite durable on its own. -
Attach the Jump Ring:
Open a gold jump ring using two pairs of pliers (twist side-to-side, don’t pull apart). Thread it through the hole in your clay medallion. -
Connect Hardware:
Attach the chain of your keychain hardware to the open jump ring. Close the jump ring securely by twisting it back into place until the ends meet perfectly. -
Final Polish:
Give the non-painted areas a quick rub with a soft cloth to remove any fingerprints and make the speckled clay shine.
Level Up: Antique Look
After baking, rub brown acrylic paint over the entire piece and wipe it off immediately with a wet cloth. This leaves dark paint in the crevices for an aged fossil look.
Now you have a chic, nature-inspired keychain ready to organize your keys or gift to a friend
Geometric Stack Bead Keychain
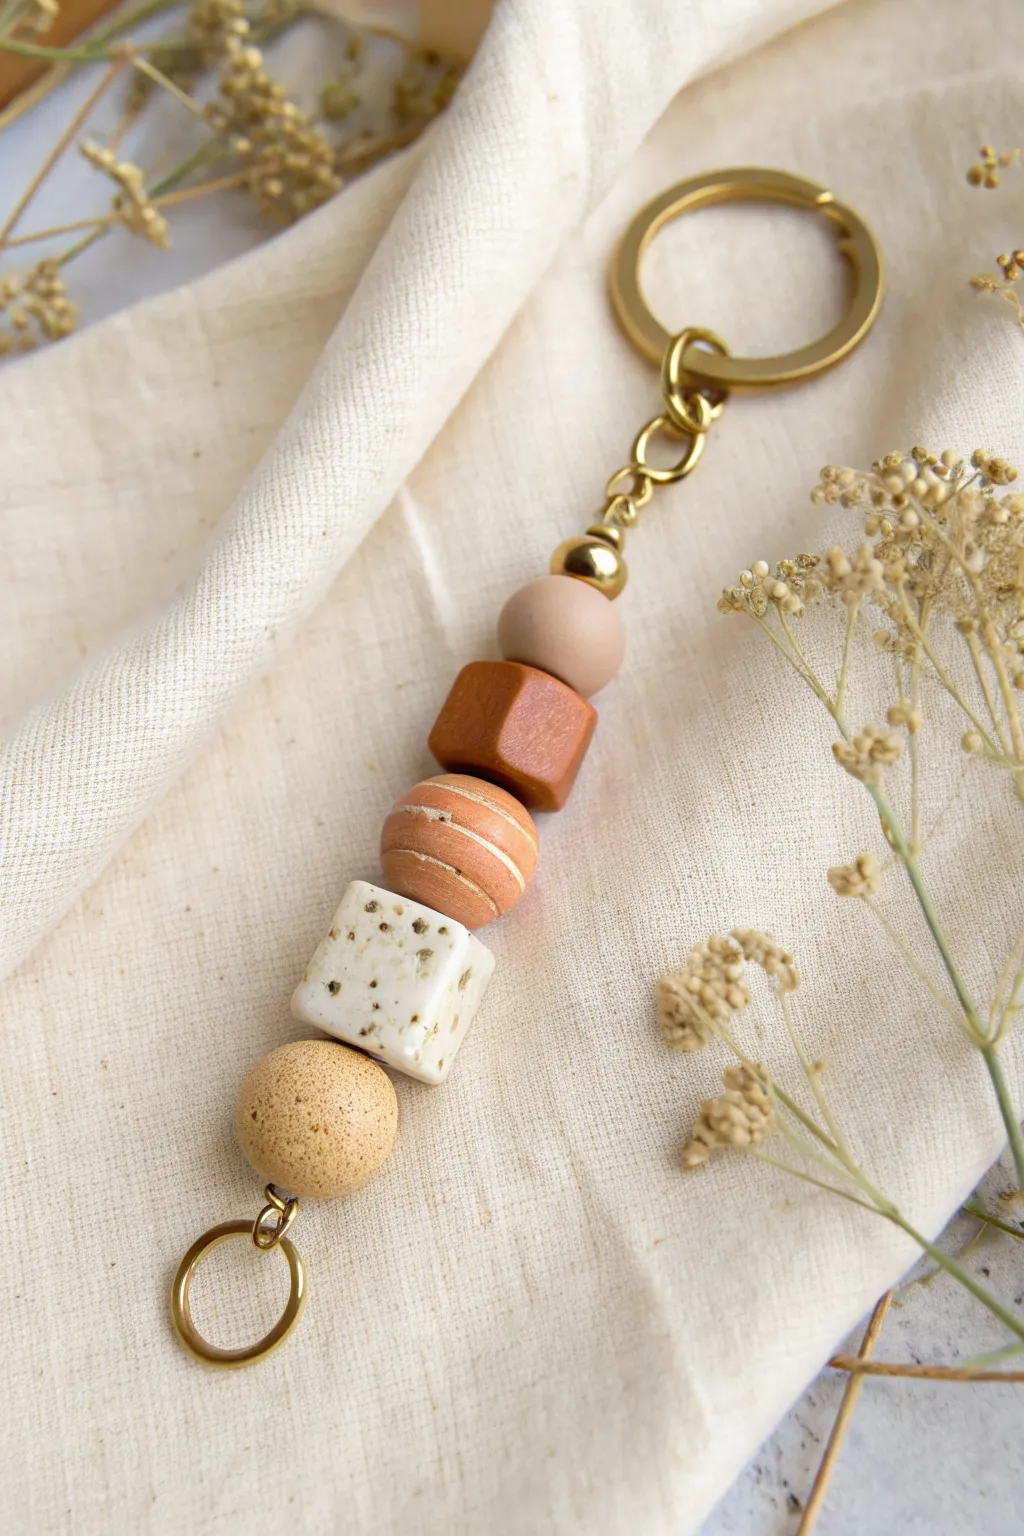
This sophisticated keychain combines earthy, organic textures with clean geometric shapes for a modern bohemian look. The mixture of speckled cream, warm terracotta, and neutral beige tones creates a beautifully balanced accessory that feels both grounded and stylish.
Step-by-Step Guide
Materials
- Polymer clay in beige/tan, terracotta/burnt orange, cream/white, and chocolate brown
- Baking spice (like ground black pepper or dried oregano) or specialized speckled clay
- Gold keychain hardware (large split ring, chain, small jump ring)
- Medium-gauge jewelry wire or headpin
- Small gold bead spacer
- Clay roller or acrylic rolling pin
- Clay blade or sharp craft knife
- Needle tool or toothpick
- Round-nose jewelry pliers
- Wire cutters
- Oven and baking sheet
- Sandpaper (fine grit, optional)
- Matte varnish (optional)
Step 1: Creating the Bead Shapes
-
Prepare the speckled clay:
Start by conditioning your cream or white clay until soft. To achieve that gorgeous stone-like speckle, knead in a tiny pinch of coarse ground black pepper or dried herbs. If you are using pre-speckled clay, simply condition it until pliable. -
Form the square bead:
Take a portion of your speckled clay and roll it into a ball. Gently press it against your work surface to flatten the sides, rotating until you have a soft cube shape. Keep the edges slightly rounded rather than razor-sharp for a more organic feel. -
Create the bottom sphere:
Using a beige or sandy-colored clay, roll a medium-sized sphere. To mimic the texture seen in the photo, you can lightly roll this ball over a piece of coarse sandpaper or gently tap it with a toothbrush to create a subtle pitted surface. -
Shape the terracotta disc:
Condition your terracotta or burnt orange clay and roll it into a ball, then flatten it slightly into a thick lentil or oblate spheroid shape. This bead should be wider than it is tall. -
Add texture to the disc:
Using your needle tool or a dull knife, carefully etch horizontal lines around the circumference of the terracotta bead. Vary the pressure slightly to give the lines a natural, hand-carved appearance. -
Form the brown cube:
Condition the chocolate brown clay. Similar to the speckled bead, shape this into a cube, but creating a slightly more rounded, ‘cushion’ cut shape to contrast with the sharper speckled cube. -
Make the top sphere:
Finally, roll a small, smooth sphere from a soft pink-beige or light taupe clay. This will sit at the very top of your stack.
Stone Texture Trick
Mix actual sand or baking soda into the beige clay for the bottom bead. It creates a genuine gritty texture that looks incredibly high-end after baking.
Step 2: Assembly and Finishing
-
Pierce the beads:
Using your needle tool, carefully poke a hole directly through the center of each bead. I find twisting the tool as I push through helps prevent the bead from squishing out of shape. -
Bake the clay:
Arrangement the beads on a baking sheet lined with parchment paper. Bake according to your specific clay brand’s instructions (usually around 275°F/135°C for 15-30 minutes). Let them cool completely before handling. -
Prepare the wire:
Cut a length of jewelry wire or take a long headpin. If using wire, create a loop at the bottom using your round-nose pliers and attach the large decorative gold ring to it. -
Stack the beads:
Thread your cooled beads onto the wire in the following order: textured beige sphere, speckled cube, striped terracotta disc, brown cushion cube, and finally the small taupe sphere. -
Add the gold accent:
Slide a small gold spacer bead on top of the final clay sphere to give the stack a polished finish. -
Create the top loop:
Using your wire cutters, trim the excess wire leaving about 1cm sticking out. Use round-nose pliers to bend this tail into a secure loop, closing the stack tight so the beads don’t wiggle. -
Attach hardware:
Using a jump ring or by opening the chain link directly, attach your bead stack to the main gold keychain ring. -
Final touches:
Check that all loops are closed securely. If you want extra durability, you can coat the beads in a matte varnish, though leaving them raw preserves that nice tactile finish.
Scent Diffuser Upgrade
Leave the terracotta bead unsealed and porous. You can then add a drop of essential oil to it, turning your keychain into a portable aromatherapy diffuser.
Enjoy carrying a little piece of handmade art with you wherever you go
Stamped Nameplate Keychain
These minimalist keychains have a sophisticated, stony look that pairs beautifully with gold hardware. The speckled polymer clay gives them an authentic granite texture, while simple stamped lettering adds a personalized touch perfect for gifts.
How-To Guide
Materials
- Polymer clay (granite or speckled beige effect)
- Acrylic rolling pin
- Alphabet letter stamps
- Small circle cutter
- Rectangle clay cutter (or craft knife and ruler)
- Sandpaper (fine grit)
- Gold keyrings with chain
- 10mm Gold jump rings
- Needle tool or toothpick
- Pliers (flat nose and round nose)
- Small metal geometric charm (optional)
- Oven and baking tray
Step 1: Shaping the Clay Base
-
Condition the Clay:
Begin by warming up your speckled polymer clay in your hands. Knead it until it is soft, pliable, and free of cracks. -
Roll It Out:
Using your acrylic rolling pin, roll the clay into an even slab. Aim for a thickness of about 4-5mm—you want it thick enough to be durable but not too bulky. -
Cut the Rectangle:
Press a rectangular clay cutter into the slab to create the main tag shape. If you don’t have a cutter, carefully measure and slice a rectangle using a craft knife and a straight edge. -
Make the Circle Charm:
Use a small circle cutter to punch out a complementary round tag if you want to add an initial charm like the ‘K’ in the photo. This creates a nice layered effect. -
Smooth the Edges:
Before the clay hardens or bakes, gently run your finger along the cut edges of your shapes to soften any sharp corners. This makes the finished keychain feel much nicer in the hand.
Sticky Stamps?
If your stamps are sticking to the clay and ruining the impression, lightly dust the stamp face with cornstarch or dip it in water before pressing it down.
Step 2: Stamping and Detailing
-
Plan Your Spacing:
Lay your letter stamps gently on top of the clay without pressing down to visualize the spacing. Ensure your word fits comfortably within the rectangle. -
Stamp the Letters:
Press each letter stamp firmly and evenly into the clay. Rock the stamp extremely slightly if needed to ensure the full impression is made, but be careful not to create a border halo. -
Create the Hanging Hole:
Use a needle tool or a straw to punch a hole at the top of the rectangle and the circle charm. Make sure the hole is big enough for your jump rings to pass through, but leave enough clay margin at the top so it doesn’t break.
Step 3: Baking and Assembly
-
Bake the Pieces:
Place your clay pieces on a baking tray lined with parchment paper or a ceramic tile. Bake according to your specific clay package’s instructions (usually 275°F/135°C for about 15-30 minutes, depending on brand). -
Cool Down:
Allow the pieces to cool completely on the tray. Polymer clay is fragile when hot and reaches its full strength only after cooling. -
Sand for Perfection:
Once cool, inspect the edges. If there are any rough spots, use fine-grit sandpaper to gently buff them smooth. -
Prepare Jump Rings:
Locate the opening on your gold jump rings. Use two pairs of pliers to twist the ring open sideways (never pull them apart outward) to preserve the circle shape. -
Attach the Clay:
Slide the open jump ring through the hole in your clay tag. Before closing it, hook it onto the bottom link of your keychain hardware. -
Add Charms:
If you are using the circle tag or a metal geometrical charm, attach them using the main jump ring or a secondary smaller jump ring for a clustered look. -
Secure the Hardware:
Use your pliers to twist the jump rings back closed, ensuring the ends meet perfectly flush so the clay doesn’t slip off.
Pro Tip: Contrast
To make the letters pop, paint acrylic paint into the impressions after baking. Wipe away the excess on the surface immediately with a damp cloth.
Your stylish, stone-effect keychain is now ready to organize your keys or serve as a thoughtful handmade gift
Layered Mini Landscape Charm
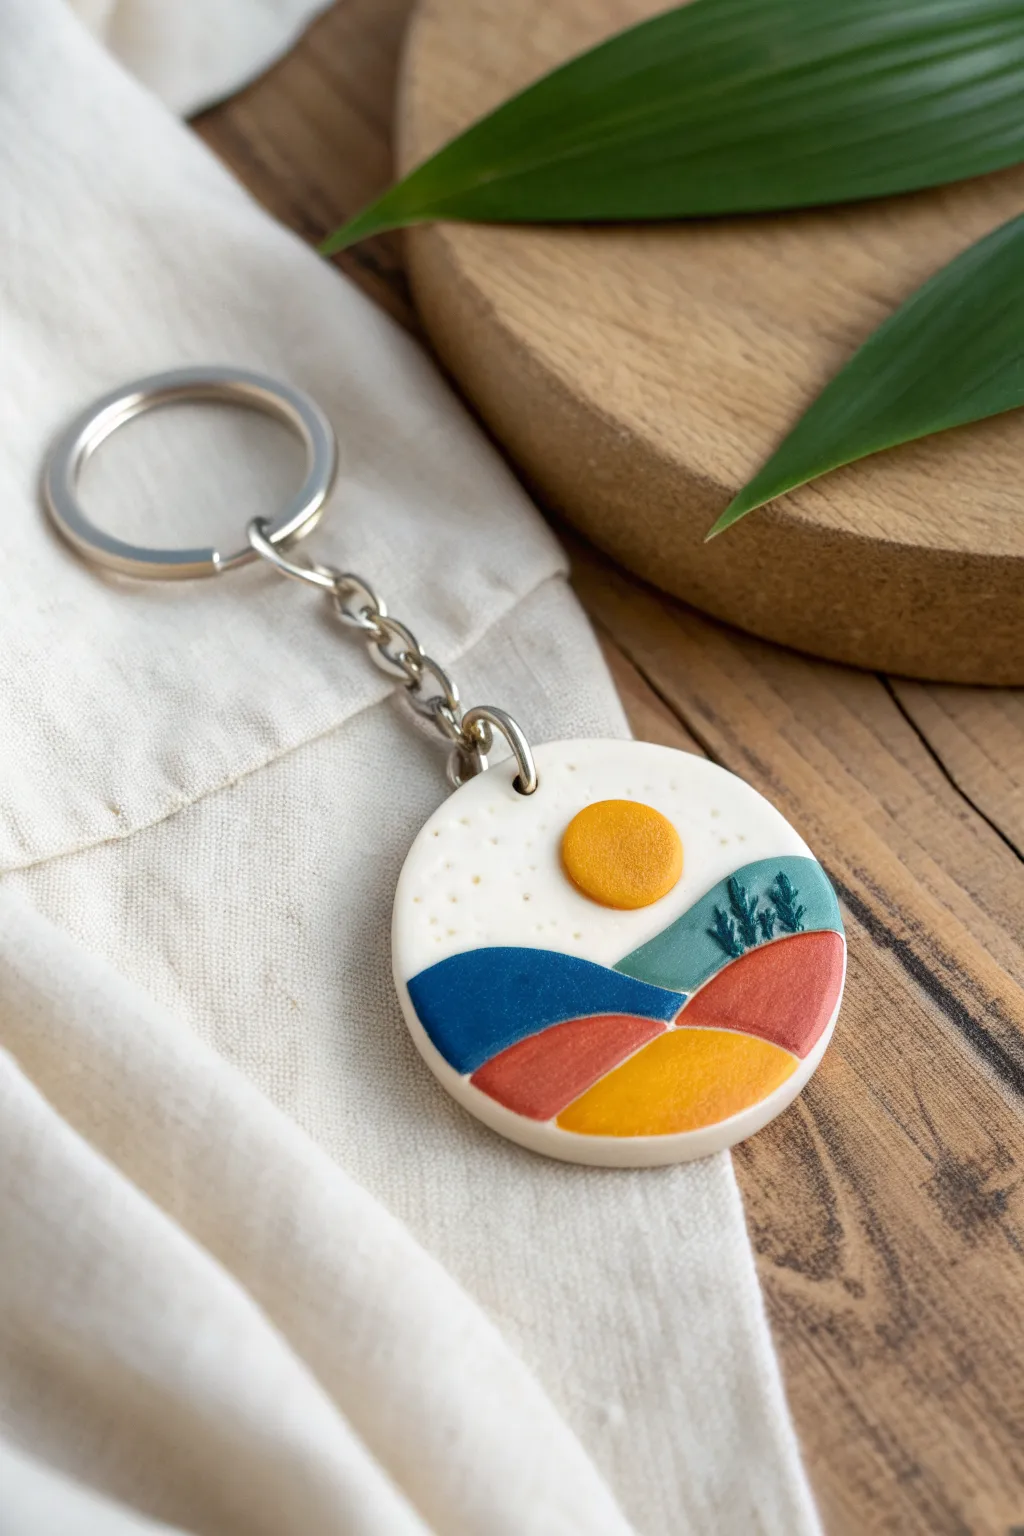
Capture the serenity of a sunset over rolling hills with this charming layered clay project. The design uses bold, contrasting colors and subtle textures to create a miniature landscape that fits right in the palm of your hand.
Step-by-Step
Materials
- Polymer clay (white, mustard yellow, teal/turquoise, terracotta, navy blue, forest green)
- Acrylic rolling pin
- Round cutter (approx. 2 inches)
- X-Acto knife or clay blade
- Small needle tool or toothpick
- Dotting tool (optional)
- Keychain hardware (jump ring and split ring)
- Pliers
- Small hand drill or piercing tool
- Oven for baking
Step 1: Base Preparation
-
Condition the white clay:
Start by thoroughly kneading your white polymer clay until it is soft and pliable. This prevents cracks and ensures a smooth working surface. -
Roll out the slab:
Using your acrylic roller, flatten the white clay into an even slab, approximately 3-4mm thick. This will be the foundational sky and backing. -
Cut the circle:
Press your round cutter firmly into the white slab to create a clean circle. Remove the excess clay from around the edges but leave the circle on your work surface. -
Add sky texture:
Take your needle tool and gently poke tiny, shallow dots into the upper half of the white circle. Keep these random and sparse to mimic distant stars or simply add visual interest to the sky.
Dirty Clay Blues?
White clay picks up dust easily. Keep a pack of baby wipes nearby to clean your hands and tools before handling the white backing, or use a piece of scrap clay to lift lint off your fingers.
Step 2: Creating the Landscape
-
Form the sun:
Roll a small ball of mustard yellow clay and flatten it into a perfect circle. Place this in the upper center of your sky, pressing lightly so it adheres. -
Create the first hill:
Condition a piece of teal or turquoise clay. Roll it flat and use your blade to cut a gentle, waving curve across the top. -
Place the teal layer:
Lay the teal piece over the middle-right section of the circle. Use the round cutter again to trim the bottom and side edges perfectly flush with the white base. -
Add tiny trees:
Before adding more layers, use a very small amount of forest green clay to roll tiny, thin tapered logs. Press them onto the teal hill and use a needle tool to scratch texture into them, making them look like pines. -
Form the navy hill:
Repeat the rolling process with navy blue clay. Cut a curved top edge that slopes downward. -
Position the navy layer:
Place this blue layer on the left side, slightly overlapping the bottom of the teal layer. Trim the outer edge with your round cutter so it matches the circle’s curve. -
Add the terracotta layer:
Roll out terracotta or rust-colored clay. Cut a curve and place it below the navy hill, filling the bottom left area. Trim the excess with the cutter. -
Finish with the foreground:
For the final hill, use the same mustard yellow as the sun. Place it at the very bottom right, overlapping the terracotta and navy sections. Trim the final outer edge with the round cutter one last time to ensure a perfect circle.
Pro Tip: Seamless Cut
When trimming the colored layers, define the curve with a blade first, stick it to the base, and use the round cutter *over the whole stack* to trim the excess. This guarantees perfectly aligned edges.
Step 3: Finishing Touches
-
Smooth the seams:
Gently run your finger or a silicone tool over the seams where the clay layers meet to ensure they are bonded, creating a unified surface. -
Pierce the hole:
Using a needle tool or small straw, create a hole at the very top of the charm, centered above the sun. Make sure it’s wide enough for your jump ring. -
Bake the piece:
Transfer the clay to a baking tile or parchment-lined tray. I create a tent with foil to prevent scorching. Bake according to your specific clay brand’s instructions (usually 275°F/135°C for 15-30 minutes). -
Cool down:
Let the piece cool completely in the oven or on a wire rack. The clay is fragile while hot and hardens as it cools. -
Attach hardware:
Once cool, use two pairs of pliers to twist open a jump ring. Thread it through the hole you made and attach the keychain split ring. Twist the jump ring closed securely.
Now you have a durable, scenic accessory ready to brighten up your keys or bag