When I’m craving a creative reset, I reach for homemade clay—it’s the quickest way to turn a plain afternoon into something you can actually use or gift. Here are my favorite homemade clay ideas that feel doable at your kitchen table, whether you’re using air-dry clay or polymer clay.
Easy Trinket Dishes
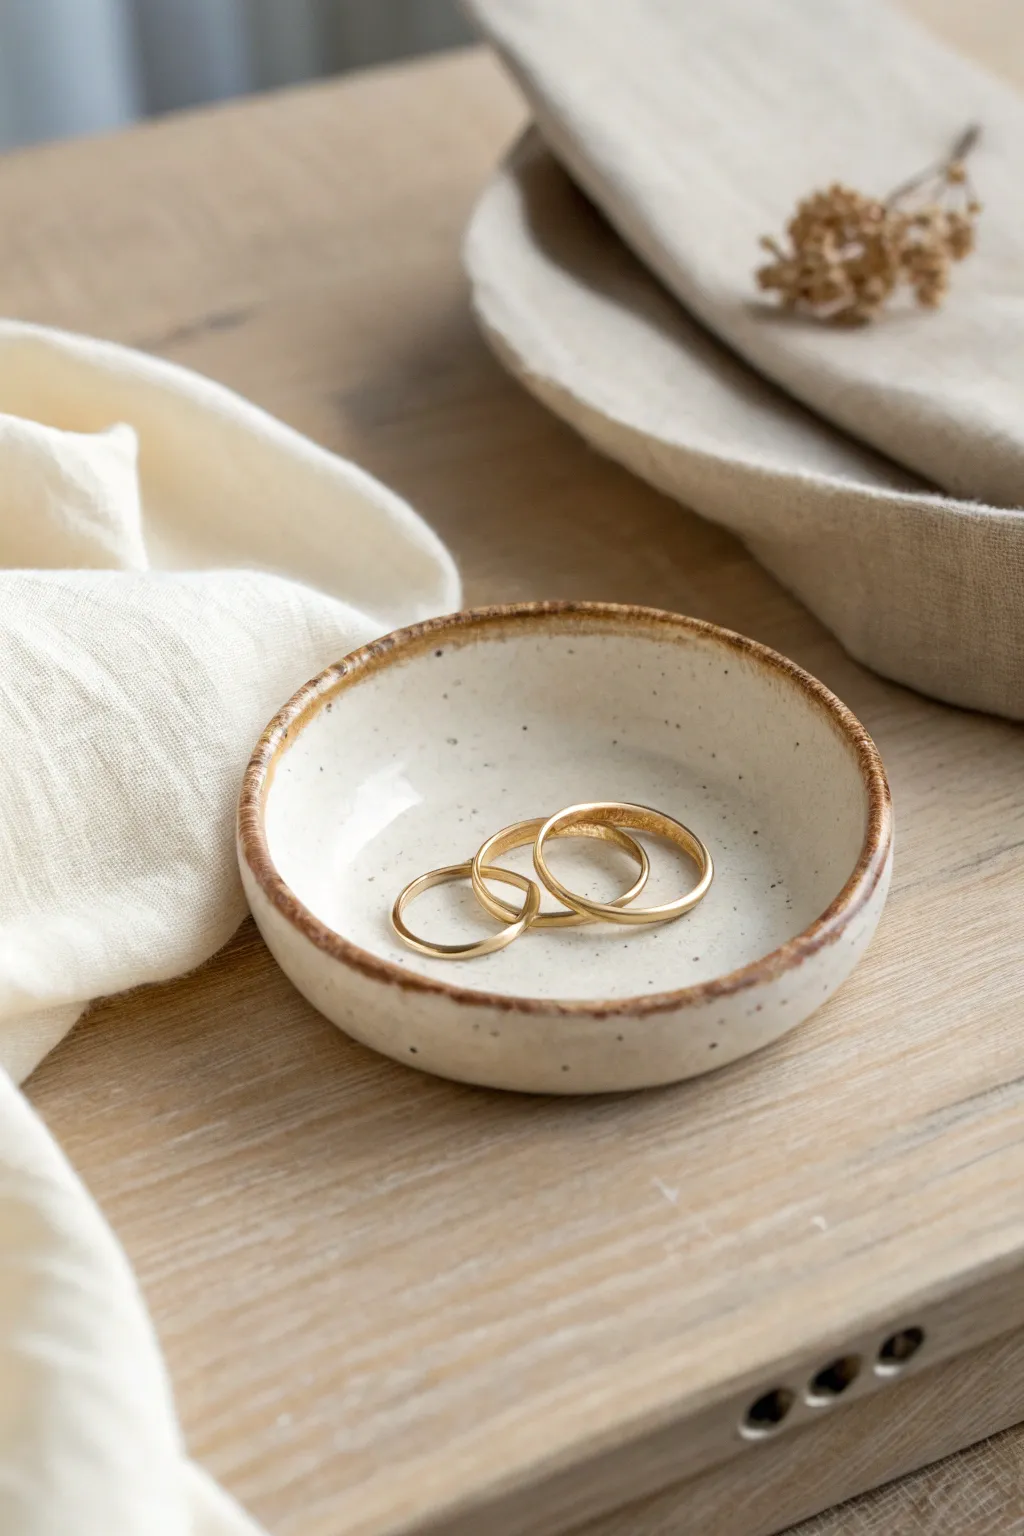
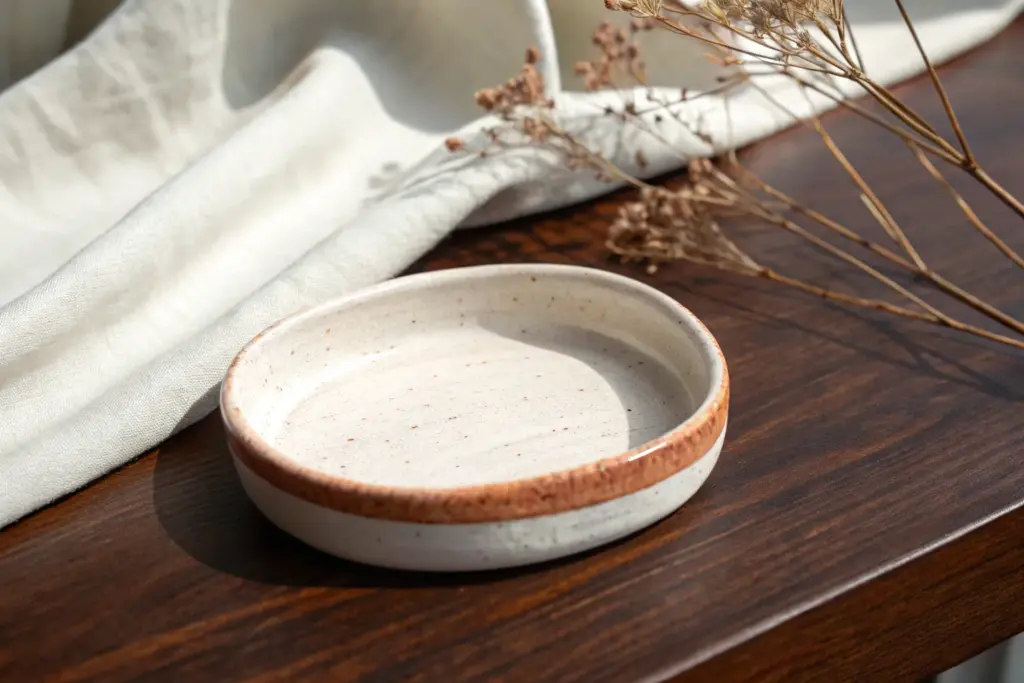
This charming, petite trinket dish captures a rustic elegance with its creamy, speckled surface and warm, amber-brown rim. It’s the perfect size for keeping your favorite rings safe and adds a touch of organic beauty to any bedside table.
Step-by-Step
Materials
- White polymer clay or air-dry clay (approx. 50g)
- Speckled clay additive (like cracked pepper or dried coffee grounds) or pre-speckled clay
- Rolling pin or smooth glass jar
- Small bowl or round cookie cutter (approx. 3-4 inches)
- Small sponge
- Fine-grit sandpaper
- Glossy varnish or glaze
- Amber/Brown acrylic paint or alcohol ink
- Small detail paintbrush
- Wax paper or parchment paper
Step 1: Forming the Dish
-
Prepare the Clay:
Start by conditioning your white clay until it is soft and malleable. If you are using plain white clay, knead in a tiny pinch of speckled additive (like faux granite specks or even dried coffee grounds) to achieve that stone-like texture seen in the photo. -
Roll the Slab:
Place the clay on a piece of wax paper to prevent sticking. Use a rolling pin to flatten the ball of clay into an even slab, aiming for a thickness of about 1/4 inch. -
Cut the Circle:
Use a round cookie cutter or place a small bowl upside down on the clay and trace around it with a craft knife to create a perfect circle. -
Soften the Edges:
Dip your finger in a little water (for air-dry clay) or baby oil (for polymer) and gently run it around the cut edge to smooth out any sharpness or roughness. -
Shape the Curve:
Place the clay circle into the palm of your hand. Gently curl your fingers upward to cup the clay, slightly raising the edges to form a shallow bowl shape. -
Refine the Form:
Set the dish down on your workspace. Use your thumbs to gently press the center down while pulling the walls slightly up, ensuring the bottom is flat enough to sit stability. -
Add Organic Character:
I like to gently press the rim with my fingertips at random intervals to give it that slightly undulating, handmade quality rather than a mechanically perfect circle. -
Initial Drying/Baking:
If using polymer clay, bake according to the package instructions (usually 275°F for 15-30 mins). If using air-dry clay, let it sit undisturbed for 24-48 hours until completely hard and white.
Glazing Pro Tip
To get the ultra-glassy look of real ceramic, use UV resin instead of varnish for your final coat. Cure it under a UV lamp for 2 minutes for a rock-hard finish.
Step 2: Decorating and Finishing
-
Sand for Smoothness:
Once fully cured or dry, inspect the edges. If there are any sharp points or fingerprints, lightly buff them away with fine-grit sandpaper. -
Mix the Rim Color:
Prepare your amber-brown paint. You want a translucent, glaze-like consistency, so dilute acrylic paint with a little water or glazing medium to get that watercolor effect. -
Apply the Rim:
Load a small detail brush with the diluted brown paint. Carefully run the brush along the very top edge of the rim. -
Create the Drip Effect:
Allow the paint to pool naturally in some spots on the rim, letting it bleed slightly down the inner and outer walls to mimic the look of fired pottery glaze. -
Add Speckles (Optional):
If your clay wasn’t pre-speckled, you can now flick a toothbrush loaded with diluted brown or black paint over the dish to add tiny dots. -
Seal the piece:
Once the paint is totally dry, apply a generous coat of high-gloss varnish or glaze over the entire dish. This gives it that ceramic, kiln-fired shine. -
Second Coat:
For extra durability and shine, apply a second coat of gloss varnish, paying special attention to the inside where the rings will sit. -
Final Cure:
Let the varnish dry completely according to the manufacturer’s instructions before placing any jewelry inside.
Sticky Situation?
If your air-dry clay keeps cracking as it dries, you can patch it with a ‘slip’ made of clay dissolved in water, then sand it smooth once dry.
Place your delicate new dish on a dresser to catch the morning light and hold your treasures safe


Leaf-Imprint Ring Bowls
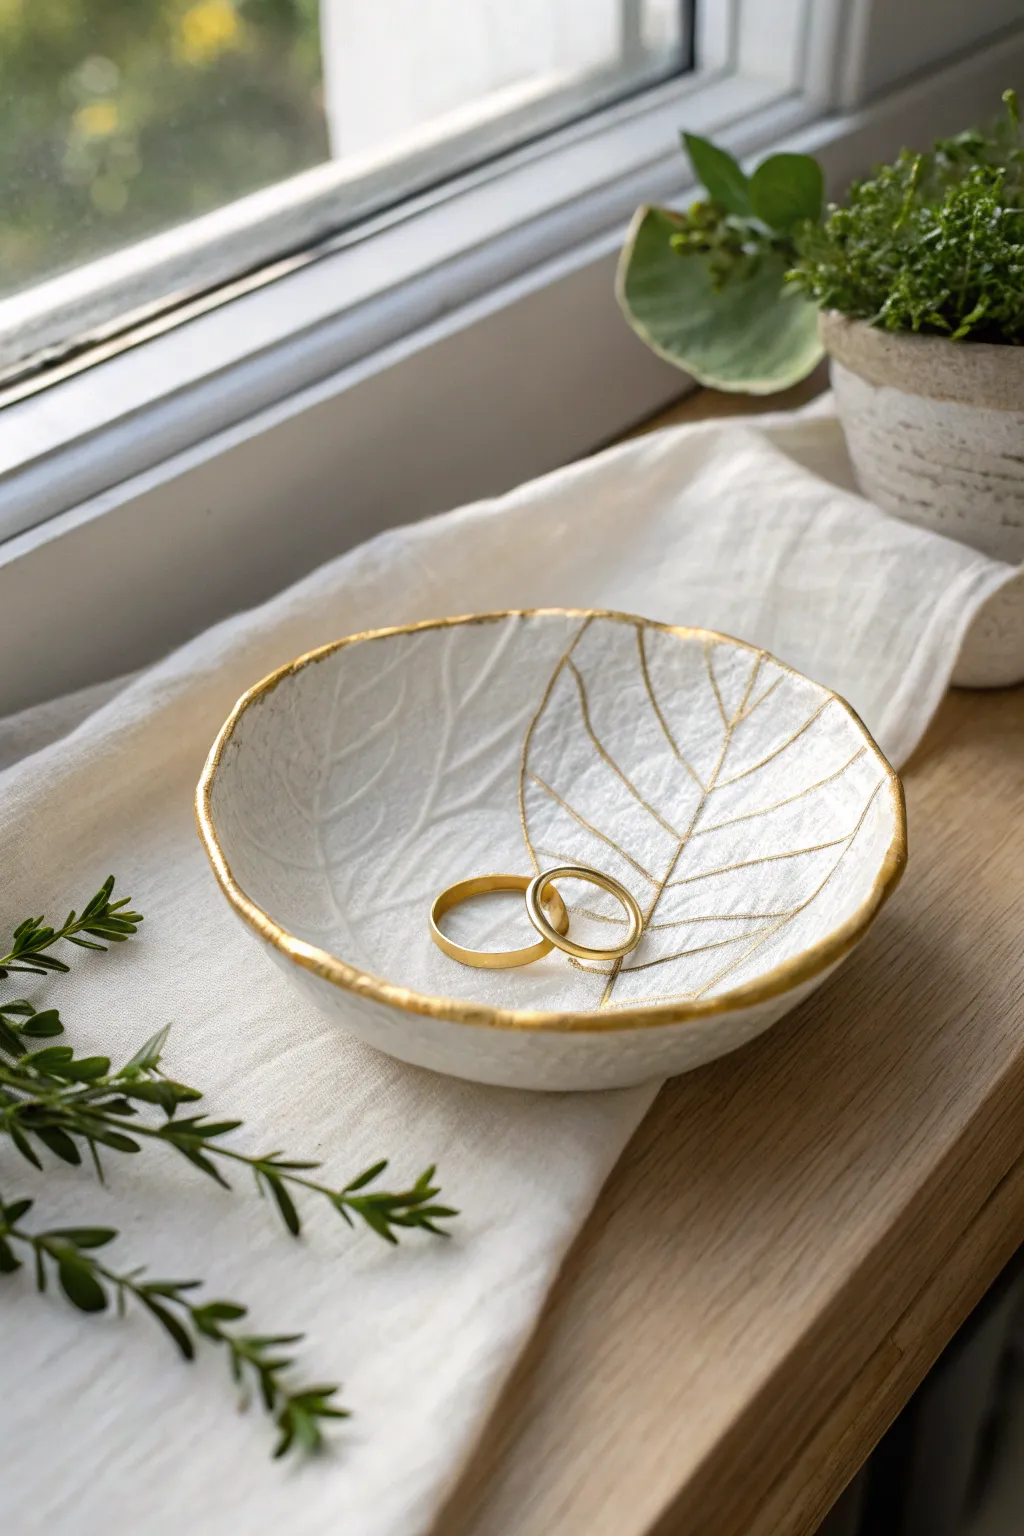
Capture nature’s intricate details forever with this elegant, minimal jewelry dish featuring a realistic leaf texture. The stark white clay combined with a delicate gold rim creates a sophisticated piece perfect for holding your favorite rings.
Step-by-Step Guide
Materials
- White polymer clay or air-dry clay
- Rolling pin or acrylic roller
- Fresh leaf with prominent veins (e.g., hydrangea or hosta)
- X-acto knife or clay cutting tool
- Small oven-safe bowl (for shaping)
- Fine grit sandpaper
- Gold liquid gilding paint or gold leaf pen
- Small liner paintbrush
- Gloss varnish or sealant (optional)
- Parchment paper or craft mat
Step 1: Preparation & Impression
-
Prepare the Clay:
Begin by conditioning your clay. Knead a ball of white clay in your hands until it becomes soft, pliable, and free of any cracks. If it feels too stiff, the warmth of your hands will help soften it over a few minutes. -
Roll it Out:
Place the clay onto a sheet of parchment paper or a craft mat. Use your rolling pin to flatten the clay into an even slab, aiming for a thickness of about 1/4 inch so it’s sturdy but not chunky. -
Position the Leaf:
Select a leaf with deep, distinct veins on the underside. Place the leaf vein-side down onto your rolled clay slab. The underside usually offers the crispest impression. -
Create the Texture:
Gently roll over the leaf with your rolling pin. Apply firm, even pressure to embed the veins deeply into the clay surface, but be careful not to make the clay too thin. -
Reveal the Pattern:
Carefully find the stem of the leaf and slowly peel it away from the clay. This is always the most satisfying part, revealing the intricate natural skeleton stamped into the surface.
Vein Definition
If your leaf isn’t making a deep enough mark, flip the clay over and gently rub the back to press it into the leaf veins rather than rolling the top.
Step 2: Shaping & Drying
-
Cut the Shape:
Using a knife or a large circular cookie cutter, cut a round shape out of the clay. You can center the leaf imprint or offset it slightly for an artistic, asymmetrical look as seen in the photo. -
Smooth the Edges:
Dip your finger in a little bit of water and run it along the cut edge of the clay circle to smooth out any roughness or sharp cuts before drying. -
Form the Bowl:
Lift the clay circle and gently place it inside a small, oven-safe bowl. Press it down lightly so the clay takes on the curved shape of the bowl. -
Dry the Clay:
If using polymer clay, bake according to the package instructions (usually 275°F for 15-30 mins). If using air-dry clay, leave it in a cool, dry spot for 24-48 hours until completely hard. -
Refine the Surface:
Once fully cured and cool, remove the clay from the shaping bowl. Use fine-grit sandpaper to briefly buff the rim if there are any remaining uneven spots.
Step 3: Gilding & Finishing
-
Prepare the Paint:
Mishake your liquid gilding or gold paint thoroughly. Using a very fine liner brush, pick up a small amount of gold pigment. -
Highlight the Veins:
With a steady hand, paint thin gold lines directly into the deepest valleys of the main leaf veins. You don’t need to paint every single tiny vein; highlighting the main structure creates a beautiful contrast. -
Paint the Rim:
Apply the gold paint along the top edge of the bowl. I find that allowing the brush to wobble slightly here gives it that charming, organic handmade feel rather than a perfect factory line. -
Let it Set:
Allow the gold paint to dry completely. Liquid gilding usually dries very quickly, but give it an hour to be safe. -
Seal the Project:
For durability, apply a coat of matte or gloss varnish over the entire piece, or just on the painted areas to protect the gold from tarnishing over time.
Cracked Clay?
If air-dry clay cracks while drying in the bowl, mix a tiny bit of fresh clay with water to make a paste and fill the cracks, then sand smooth once dry.
Now you have a stunning, nature-inspired vessel ready to cradle your most precious trinkets


Minimal Ring Cones
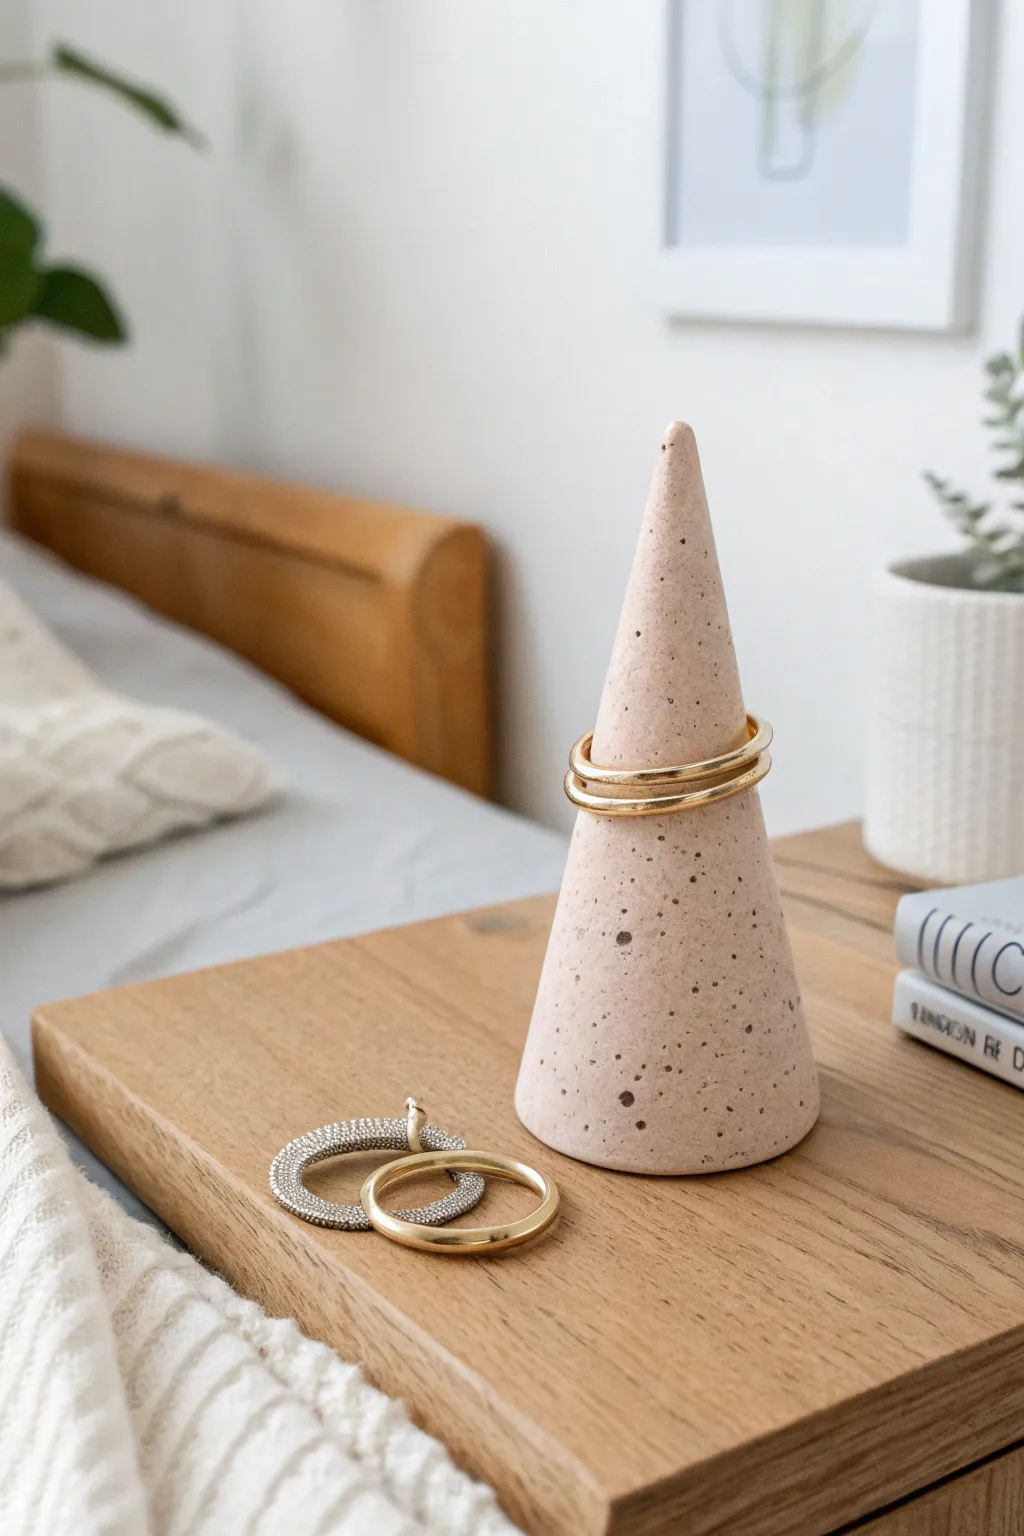
These elegant, minimalist ring cones mimic the look of natural speckled sandstone but are crafted easily at home. The sleek conical shape keeps your rings organized while adding a modern, sculptural touch to your bedside table.
Detailed Instructions
Materials
- Polymer clay (beige/tan and black or dark brown)
- Acrylic rolling pin
- Circle cutter (approx. 4 inches diameter) or a bowl and craft knife
- Parchment paper or baking mat
- Baking sheet
- Oven
- Sandpaper (fine grit, 400-600)
- Matte sealant (optional)
Step 1: Prepping the Clay
-
Condition the Base:
Start by taking a large block of beige or tan polymer clay. Knead it thoroughly in your hands until it becomes soft, warm, and pliable. This prevents cracking later on. -
Create the ‘Speckles’:
Take a tiny amount of black or dark brown clay—you need surprisingly little for this effect. Roll it into a very thin snake. -
Chop the Specks:
Using a craft knife or blade, chop the thin snake into minuscule crumbs. Vary the sizes slightly for a natural stone look, keeping most very fine. -
Mix the Clays:
Press the black crumbs into your beige clay block. Fold and knead the clay repeatedly to distribute the specks throughout the block evenly. -
Roll it Out:
Place your mixed clay on parchment paper. Use your acrylic roller to flatten the clay into a slab about 1/4 inch thick. Aim for an even thickness across the surface.
Step 2: Forming the Cone
-
Cut the Shape:
Use a large circle cutter or trace around a bowl with a craft knife to cut a perfect circle from your slab. -
Create a Wedge:
Cut a triangular wedge out of the circle, similar to slicing a pie. Removing about one-third of the circle usually works well for a standard cone shape. -
Initial Roll:
Take the larger remaining portion of the circle and bring the two straight cut edges together. Gently curve the clay so the edges meet. -
Sealing the Seam:
Where the edges touch, gently pinch and smooth the clay together. I like to use a silicone tool or my finger to drag clay across the seam until it disappears. -
Refining the Point:
Gently roll the tip of the cone between your fingers to ensure it is sharp and not blunt. Be careful not to twist it, just smooth upward. -
Leveling the Base:
Stand the cone up on your work surface. If it wobbles, gently press it down to flatten the bottom, or slice off any unevenness with your blade to ensure it stands straight. -
Smoothing the Surface:
Give the entire cone one last rub with your fingers or a smoothing tool to remove any fingerprints or imperfections.
Natural Texture
Add used coffee grounds or cracked pepper instead of black clay to achieve an even more organic, earthy texture.
Step 3: Finishing Touches
-
Bake:
Preheat your oven according to the clay manufacturer’s instructions. Place the cone on a baking sheet lined with parchment and bake for the recommended time. -
Cool Down:
Once baked, remove from the oven and let it cool completely. Do not try to sand it while it is still warm. -
Sand for Texture:
Using fine-grit sandpaper, gently sand the surface of the cone under running water. This reveals the black specks more clearly and gives it that true stone matte finish. -
Clean Up:
Rinse off any clay dust and dry the cone thoroughly with a soft cloth. -
Optional Seal:
If you want extra durability, apply a very thin coat of matte sealant, though leaving it raw preserves the stone-like texture best.
Gold Dip Effect
Use masking tape to section off the tip after baking, then paint it with liquid gold leaf for a luxe, two-toned finish.
This simple yet chic accessory is ready to display your favorite rings


Coasters With Texture Stamps

Elevate your coffee table with this set of earthy, textured coasters that look strikingly professional yet are wonderfully simple to make. Combining geometric stamps with a warm terra cotta and teal color palette, these coasters offer a modern bohemian vibe for your home decor.
Step-by-Step Guide
Materials
- White creative paper clay or air-dry clay
- Rolling pin
- Square cookie cutter (approx. 4×4 inches) or knife/ruler
- Geometric texture stamps or embossing mats
- Fine-grit sandpaper (220 grit)
- Acrylic paints (Terra Cotta, Teal/Deep Green, and White)
- Small flat paintbrush
- Detail brush
- Matte spray sealant or clear varnish
- Felt pads or cork sheet for backing
Step 1: Shaping the Clay
-
Condition the clay:
Start by taking a large chunk of white clay and kneading it in your hands until it becomes soft, pliable, and free of air bubbles. If the clay feels dry, I like to dampen my hands slightly to add moisture back in. -
Roll it out:
Use your rolling pin to flatten the clay on a clean, smooth surface or a silicone mat. Aim for a consistent thickness of about 1/4 inch (6mm) to ensure they are sturdy enough for everyday use. -
Stamp the texture:
Press your geometric stamps or embossing mat firmly into the rolled clay. For the four-square design shown, you can use a large square stamp or creating quadrants by pressing smaller stamps into four distinct sections. -
Create the shape:
Place your square cookie cutter over the stamped design, aligning it so the pattern is centered or arranged artistically. Press down firmly to cut the shape. -
Smooth the edges:
Gently lift the square away from the excess clay. Dip your finger in a little water and run it along the cut edges to smooth out any roughness or sharp corners before drying. -
Repeat the process:
Continue rolling, stamping, and cutting until you have a full set of coasters. Don’t forget to create a few round ones if you want variety like in the background of the reference photo.
Clean Imprints
Dust your rubber stamps lightly with cornstarch or baby powder before pressing them into the clay. This acts as a release agent and prevents the clay from sticking inside the detailed crevices.
Step 2: Drying and Refining
-
Let them dry:
Place the coasters on a flat wire rack or a board covered with parchment paper. Allow them to dry completely for 24-48 hours, flipping them occasionally to prevent warping. -
Sand for smoothness:
Once bone dry, take your fine-grit sandpaper and lightly sand the edges and the flat surfaces. Be gentle over the textured areas so you don’t erase the beautiful details you stamped in. -
Wipe away dust:
Use a damp cloth or a soft dry brush to remove all the clay dust. This step is crucial because leftover dust will prevent the paint from adhering properly.
Gilded Upgrade
Instead of white dry-brushing, use metallic gold paint to highlight the raised textures. Just a light touch of gold leaf pen on the edges adds an instant touch of luxury.
Step 3: Adding Color
-
Section off the design:
Analyze your stamped pattern. In the reference, the square is divided into four quadrants. Decide which sections will be teal, terra cotta, or left natural white. -
Apply the base colors:
Using a flat brush, paint the designated quadrants. You don’t need to be perfectly neat near the raised textures yet; just get good coverage on the flat areas. -
Dry brush technique:
To highlight the raised dots and lines within the colored sections, dip your brush in white paint and wipe most of it off on a paper towel. Lightly drag the brush over the textured areas to catch only the raised details. -
Detail work:
Conversely, for the white quadrants with colored details, use a very fine detail brush to carefully fill in the indented lines or dots with terra cotta or teal paint. -
Clean up edges:
Use a small brush to touch up the sides of the coaster. You can paint the edges a solid color or leave them natural white to match the exposed clay aesthetic.
Step 4: Finishing Touches
-
Seal the surface:
Once the paint is fully dry, apply 2-3 coats of a matte spray sealant. This protects the clay from moisture and stains from cups. Allow proper drying time between coats. -
Add protective backing:
Cut a square of cork sheet slightly smaller than the coaster or attach four small felt pads to the corners of the underside. This prevents the stone-like texture from scratching your furniture.
Stack your new creations on the coffee table and enjoy the custom, handmade touch they add to your living space

The Complete Guide to Pottery Troubleshooting
Uncover the most common ceramic mistakes—from cracking clay to failed glazes—and learn how to fix them fast.
Polymer Clay Statement Earrings
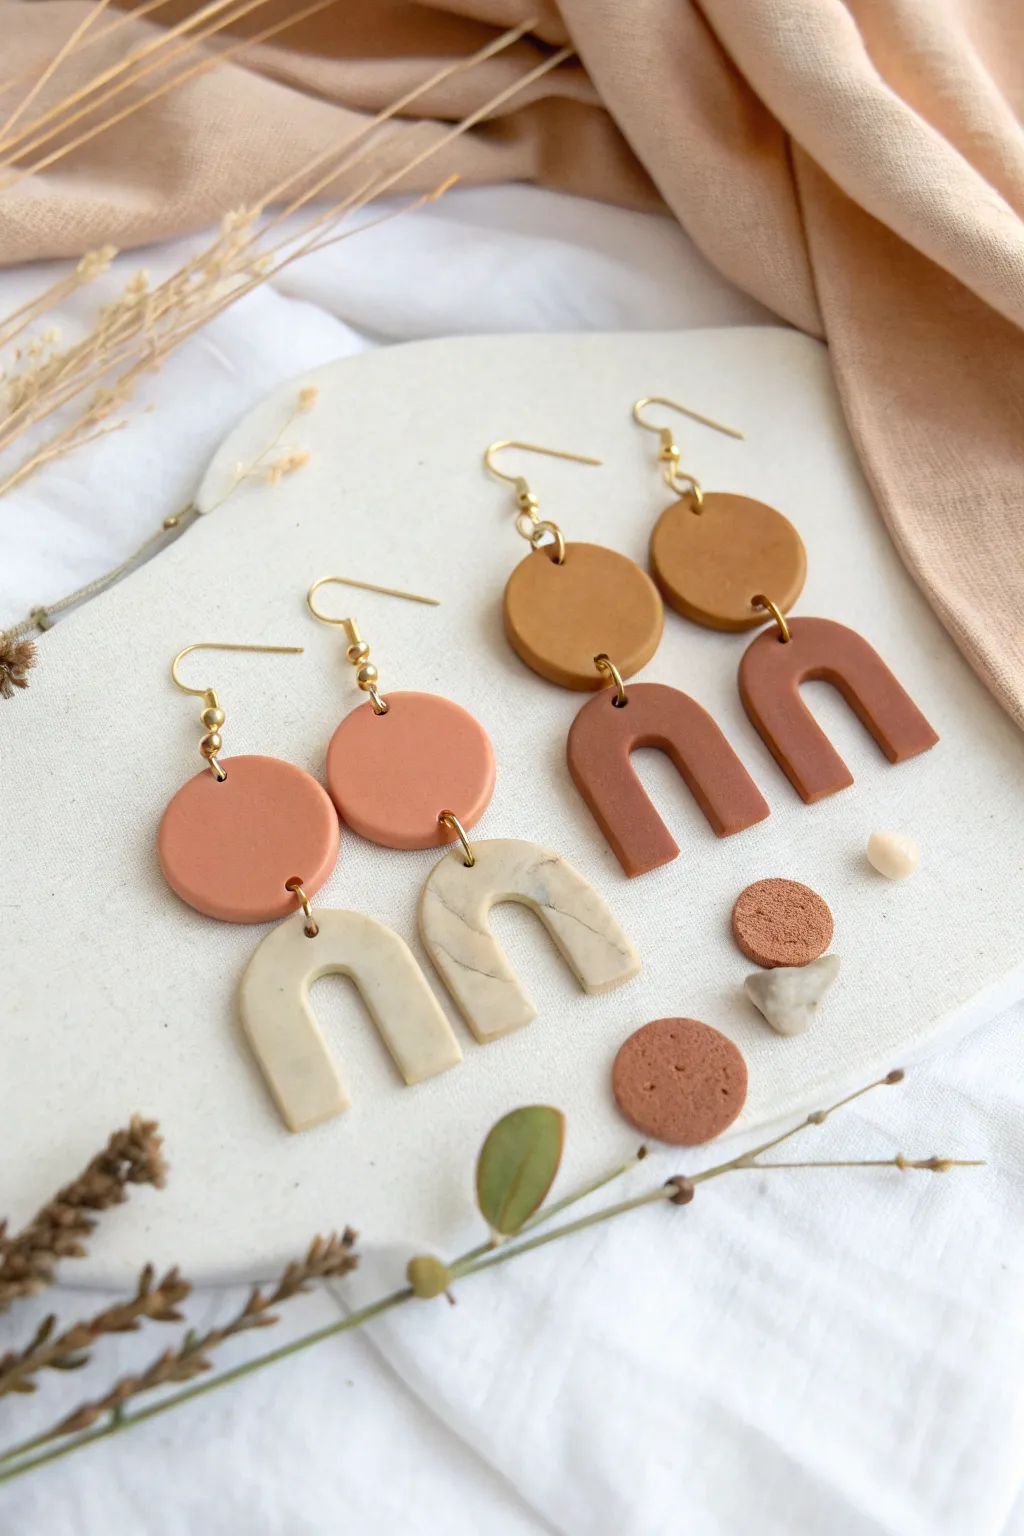
Embrace earthy tones and modern shapes with these stunning polymer clay statement earrings. Featuring a classic circle-top and arch-bottom design, you’ll learn to create two distinct variations: a solid terracotta set and a marbled cream style.
Step-by-Step
Materials
- Polymer clay in peach/terracotta, dark mustard, reddish-brown, cream/beige, and translucent (optional)
- Acrylic roller or pasta machine
- Circle clay cutter (approx. 15mm-20mm)
- U-shaped arch clay cutter (approx. 25mm-30mm)
- Ceramic tile or glass work surface
- Parchment paper
- Hand drill or needle tool
- 4 earring posts (gold finish)
- 4 large jump rings (gold finish)
- 2 small jump rings (optional, depending on assembly)
- Jewelry pliers (flat nose and round nose)
- Super glue or UV resin
- Sandpaper (fine grit)
Step 1: Conditioning and Mixing
-
Prepare the Solid Colors:
Start by conditioning your clay. Knead the dark mustard, reddish-brown, and peach/terracotta blocks separately until they are soft and pliable. Hand rolling ensures the clay is warm enough to work with without cracking. -
Create the Marble Effect:
For the cream pair, take a large chunk of cream clay and a tiny sliver of grey or translucent clay. Twist them together like a candy cane, fold, and twist again. Stop when you see subtle streaks; over-mixing will just create a muddy solid color. -
Roll Out Slabs:
Using your acrylic roller or pasta machine, roll all your clay colors into slabs of even thickness. Aim for about 3mm thick to ensure the earrings are sturdy but lightweight.
Clean Cuts Matter
Before cutting your shapes, lift the clay slab off the work surface and lay it back down. This releases suction so your shapes won’t distort when you lift the cutter.
Step 2: Cutting and Baking
-
Cut the Top Circles:
Press your circle cutter firmly into the peach/terracotta slab to make two circles. Repeat this with the dark mustard clay for the second pair. Using a piece of cling film over the clay before cutting can give you nice rounded edges. -
Cut the Bottom Arches:
Use your U-shaped cutter on the marbled cream slab to create two arches. Do the same with the reddish-brown slab for the deeper colored pair. -
Smooth the Edges:
Before baking, gently run your finger along the cut edges of your clay shapes to smooth out any loose bits or cutter seams. This saves sanding time later. -
Create Holes:
Use a needle tool to poke a hole at the bottom center of each circle and the top center of each arch. Ensure the holes are large enough for your jump rings but not too close to the edge. -
Bake the Pieces:
Arrange your pieces on a ceramic tile or baking sheet lined with parchment paper. Bake according to your brand of clay’s instructions (usually around 275°F/130°C for 30 minutes). -
Cool and Finish:
Let the pieces cool completely. If there are any rough spots, gently wet-sand the edges with fine-grit sandpaper for a professional finish.
Add Texture
Before baking, gently press a piece of coarse sandpaper or a toothbrush onto the surface of the clay to create a stone-like texture, perfect for the earthy aesthetic.
Step 3: Assembly
-
Open the Jump Rings:
Using your flat nose and round nose pliers, twist a large jump ring open. Always twist the ends away from each other (side-to-side), never pull them apart, to maintain the circle shape. -
Connect the Shapes:
Loop the open jump ring through the hole in a mustard circle and then through a reddish-brown arch. Close the ring securely by twisting it back into place. -
Assemble the Second Pair:
Repeat the connection process for the peach circles and the marbled cream arches. -
Apply Earring Posts:
Turn the circles face down. Apply a small dot of gel super glue or UV resin to the flat pad of an earring post. -
Secure the Backs:
Press the glued post onto the back of the top circle piece, near the upper edge but leaving space for the earlobe. I prefer to hold this in place for 30 seconds to ensure a strong initial bond. -
Final Cure:
Allow the glue to cure fully according to the package directions (or use a UV lamp if using resin) before wearing.
Now you have a stylish set of custom accessories ready to wear or gift to a friend
Beaded Clay Mini Bowls
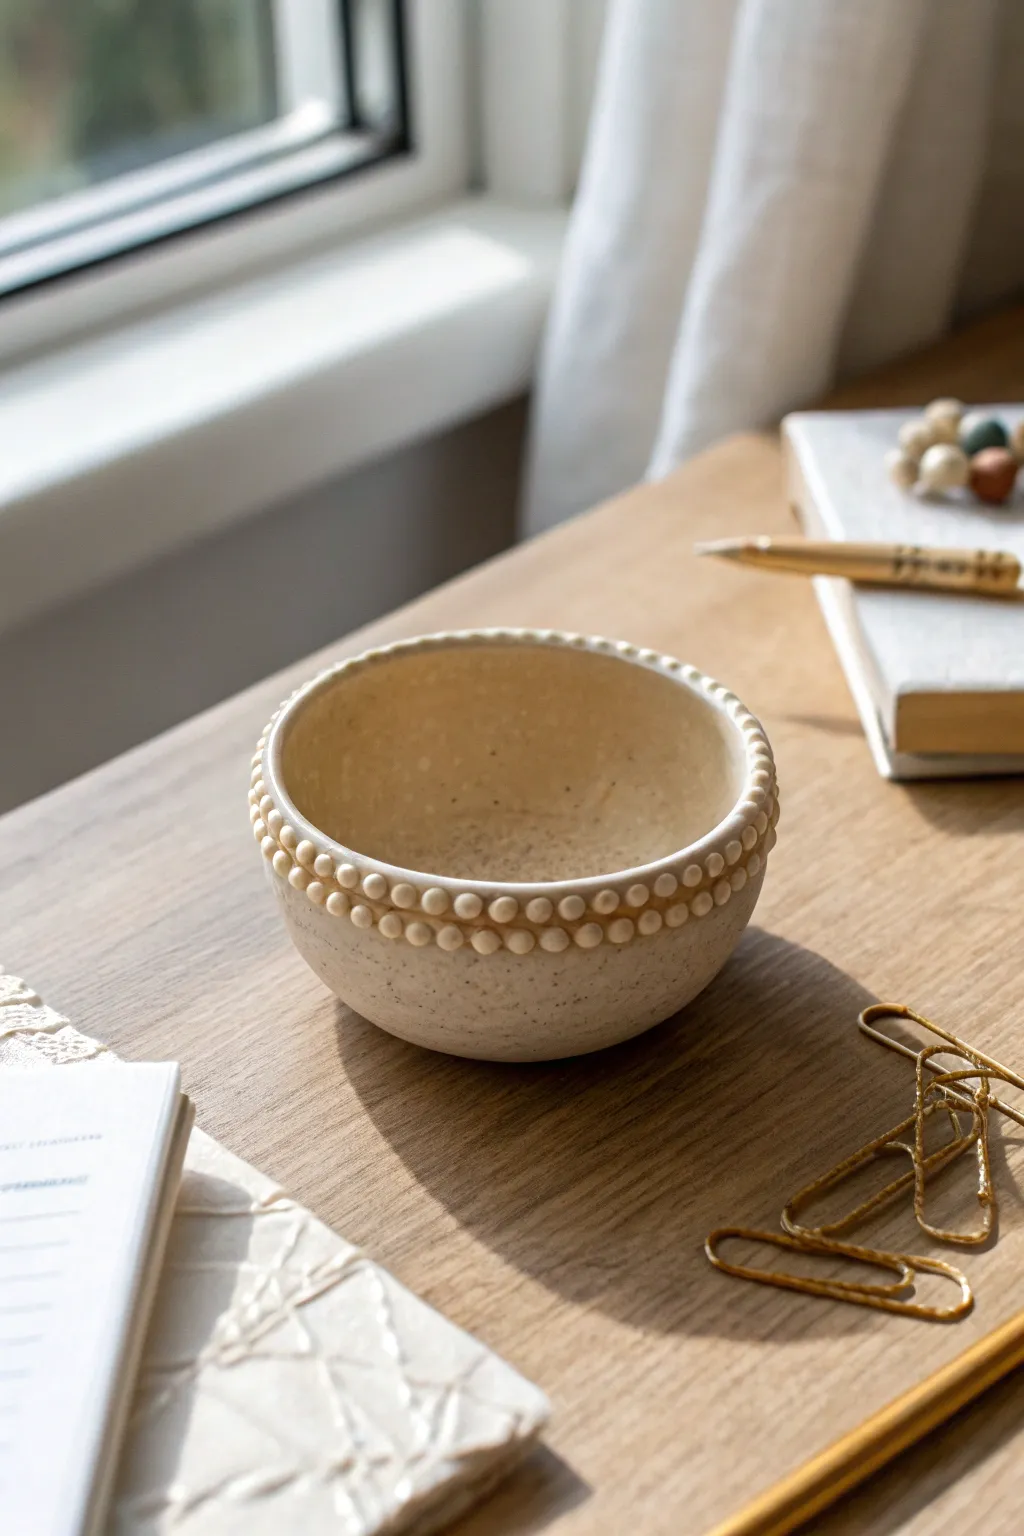
This charming, earthy bowl brings a touch of artisan pottery to your desk without requiring a potter’s wheel. Featuring a lovely speckled finish and a distinctive double row of beads around the rim, it’s perfect for holding paperclips, jewelry, or trinkets.
Step-by-Step Tutorial
Materials
- Air-dry clay (stone or speckled effect preferred)
- Small bowl (to use as a mold)
- Plastic wrap
- Rolling pin
- Needle tool or craft knife
- Small sponge
- Water bowl
- Fine-grit sandpaper
- Glossy or satin acrylic varnish
- Soft paintbrush
Step 1: Forming the Base
-
Prepare the mold:
Select a small bowl from your kitchen to act as a mold. Tightly cover the outside of the bowl with plastic wrap to ensure your clay doesn’t stick later. -
Roll out the slab:
Take a handful of your speckled air-dry clay and condition it by kneading it slightly. Roll it out into an even slab, aiming for a consistent thickness of about 1/4 inch. -
Drape the clay:
Gently lift your clay slab and drape it over the upside-down plastic-wrapped bowl. Press the clay firmly but gently against the mold to shape it, smoothing out any air bubbles as you go. -
Trim the excess:
Using your needle tool or craft knife, carefully trim around the bottom (which is currently at the top) to create an even rim. I prefer to hold the knife steady and rotate the bowl for a smoother cut. -
Smooth the surface:
Dip your finger or a small sponge in water and run it over the exterior of the clay to smooth out any fingerprints or rough texture. -
Initial drying:
Let the bowl sit on the mold for about 2-3 hours until it is leather-hard—firm enough to hold its shape but soft enough to attach additions.
Beads falling off?
If beads detach while drying, your clay was likely too dry when attaching. Repair by adding a dab of white craft glue or heavy gel medium, then hold in place for a minute.
Step 2: Adding the Beaded Detail
-
Roll tiny spheres:
Pinch off very small amounts of clay and roll them into tiny, uniform spheres between your fingertips. You will need enough to circle the bowl twice, so prepare a good batch. -
Score the rim:
Take your needle tool and gently scratch (score) the surface of the clay bowl just below the rim where the beads will sit. This rough texture helps the clay adhere. -
Attach the top row:
Dab a tiny amount of water or clay slip onto the scored area. Press the first row of clay beads gently onto the bowl, right at the rim edge, ensuring they touch each other. -
Attach the second row:
Repeat the process immediately below the first row. Nest the second row slightly offset or directly beneath the first, pressing gently to bond them to the bowl’s surface. -
Secure the join:
Use the back of a spoon or your finger to gently press the beads inward towards the bowl wall to ensure a strong bond without flattening their round shape. -
Remove mold:
Once the beads are attached, carefully lift the clay bowl off the mold and peel away the plastic wrap. Check the inside for any rough spots.
Step 3: Finishing Touches
-
Slow drying:
Place the bowl right-side up in a cool spot away from direct sunlight. Allow it to dry completely for at least 24-48 hours. Using a wire rack helps air circulate underneath. -
Sanding:
Once bone dry, use fine-grit sandpaper to gently smooth the rim and any rough patches on the body. Be very gentle around the decorative beads. -
Remove dust:
Wipe the entire piece down with a slightly damp cloth or a dry soft brush to remove all sanding dust before sealing. -
Varnishing:
Apply a coat of glossy or satin acrylic varnish to the entire bowl. This seals the clay and enhances the speckled stone effect visible in the reference. -
Final cure:
Let the varnish dry according to the manufacturer’s instructions before placing any items inside.
Uniformity Hack
To get perfectly equal beads, roll a long, thin snake of clay first. Cut it into equal tiny segments using a blade, then roll each segment into a ball.
Enjoy the simple elegance of your new handmade pottery piece on your desk or shelf


What Really Happens Inside the Kiln
Learn how time and temperature work together inside the kiln to transform clay into durable ceramic.
Photo And Card Holders
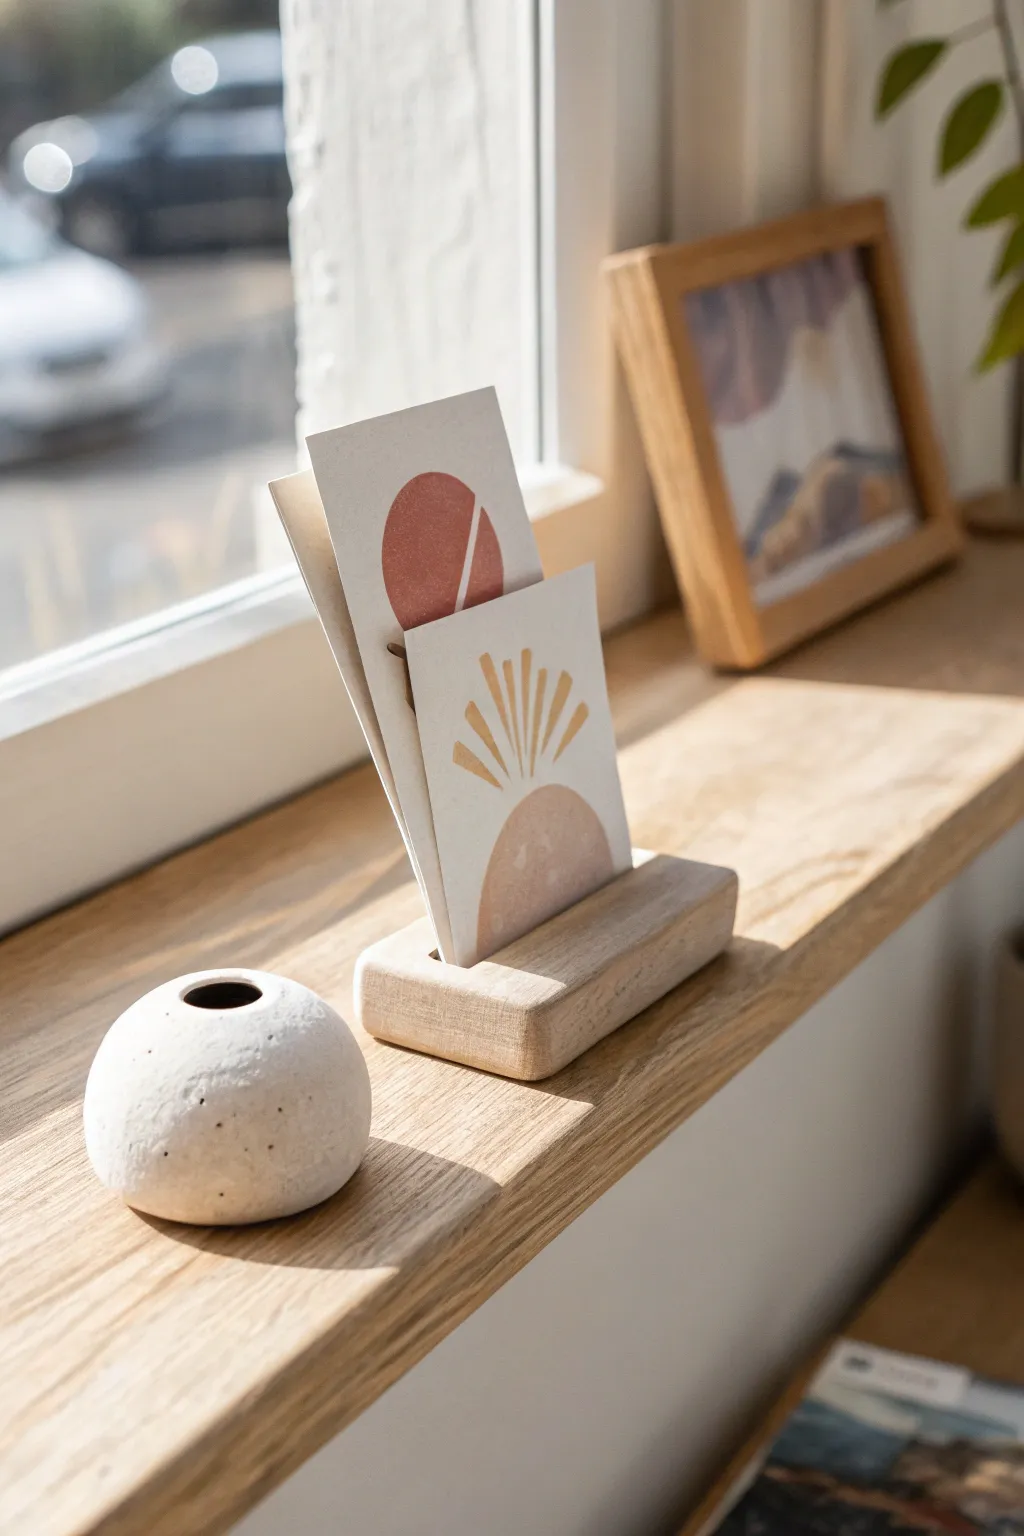
This minimalist card holder mimics the warm, natural grain of oak wood while being crafted entirely from air-dry clay. Its clean rectangular shape and deep central groove make it perfect for displaying postcards, photos, or small art prints on a sunny windowsill.
Detailed Instructions
Materials
- White or terracotta air-dry clay (approx. 200g)
- Rolling pin
- Sharp craft knife or clay blade
- Ruler
- Fine-grit sandpaper (220-400 grit)
- Water in a small cup
- Cardstock or a thick ruler (for creating the groove)
- Acrylic paints (Raw Sienna, Burnt Umber, White, Pale Yellow)
- Stiff bristle brush (chip brush)
- Soft synthetic brush
- Matte varnish or sealant
Step 1: Shaping the Base
-
Condition the Clay:
Begin by kneading your air-dry clay thoroughly until it is soft, pliable, and free of any air bubbles. This prevents cracking later. -
Form a Rough Block:
Shape the clay into a rough rectangular log in your hands, tapping the ends against your work surface to square them off. -
Roll to Thickness:
Place the block on a flat surface and gently roll over the top to flatten it. You want an even thickness of about 1 inch (2.5 cm). -
Trim the Edges:
Use your ruler and a sharp craft knife to slice away the irregular sides. Aim for a neat rectangle measuring approximately 4 inches long by 1.5 inches wide. -
Smooth the Surfaces:
Dip your finger in a little bit of water and run it over the cut edges and the top surface to erase any cutting marks or fingerprints. -
Create the Groove:
Take a piece of thick cardstock or a thin ruler and press it firmly into the center of the block, running lengthwise. Press down about half an inch deep. -
Widen the Slot:
Wiggle the cardstock or ruler slightly back and forth to widen the slot just enough so it can hold two pieces of thick paper easily. -
Refine the Edges:
The pressure from making the groove may have distorted the sides. Use your flat ruler to gently push the sides back into a perfect rectangular shape. -
Round the Corners:
Here I prefer to gently tap the sharp corners with my finger to soften them slightly, giving the piece a more finished, sanded-wood look. -
Let it Cure:
Set the block aside to dry completely. This usually takes 24-48 hours depending on humidity. Flip it over halfway through to ensure the bottom dries evenly.
Straighten Up
If the clay creates a slight curve while drying, simply glue a small strip of felt or cork to the bottom to level it out perfectly.
Step 2: Creating the Wood Effect
-
Sand Smooth:
Once fully dry, use fine-grit sandpaper to remove any remaining bumps. Pay special attention to the top edges near the groove. -
Base Coat:
Mix White acrylic paint with a touch of Raw Sienna to create a pale, unfinished wood color. Paint the entire block with an even coat and let it dry. -
Mix the Grain Color:
Prepare a darker glaze by mixing Raw Sienna with a tiny dot of Burnt Umber and a few drops of water to make it translucent. -
Dry Brush Technique:
Dip a stiff bristle brush into the glaze and wipe most of it off on a paper towel. The brush should be almost dry. -
Apply the Grain:
Drag the stiff brush lengthwise across the block in long, single strokes. The bristles will leave fine streaks that resemble wood grain. -
Detail the Ends:
On the short ends of the block, dab the brush slightly to mimic the end-grain texture of cut wood. -
Soften the Look:
If the grain looks too harsh, apply a very thin wash of Pale Yellow over the top to unify the colors. -
Seal the piece:
Finish by applying a coat of matte varnish. Avoid glossy finishes as they will ruin the natural wood illusion.
Make it Organic
Instead of a perfect rectangle, mold the clay into an irregular pebble shape for the round holder seen in the foreground.
Place your favorite postcards into the slot and enjoy your new natural-looking display piece
Succulent Pinch Pots
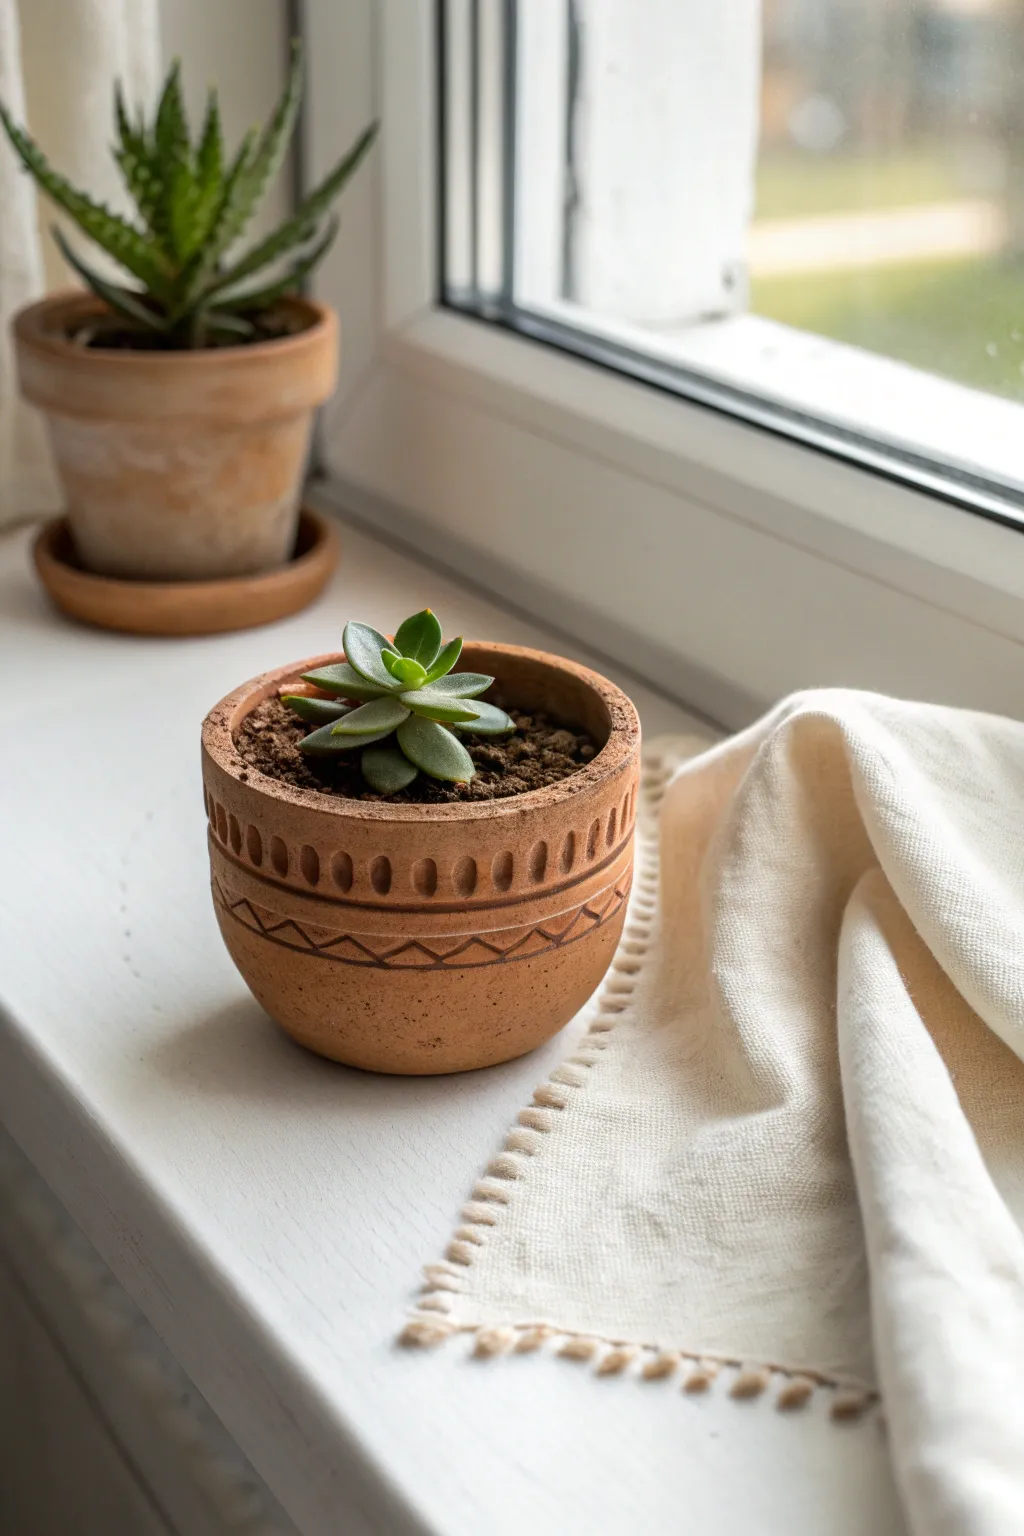
This charming, earthy planter combines the simplicity of a classic pinch pot with intricate etched details for a high-end look. With its warm terracotta tones and geometric patterns, it makes a perfect cozy home for your favorite small succulents.
Step-by-Step
Materials
- Air-dry clay (terracotta color) or polymer clay
- Small bowl of water (for smoothing)
- Wooden sculpting tool or popsicle stick
- Needle tool or toothpick
- Sponge
- Rolling pin (optional)
- Sandpaper (fine grit)
- Acrylic matte varnish (optional)
Step 1: Forming the Base
-
Prepare the Clay:
Start with a ball of terracotta-colored clay about the size of a tennis ball. Knead it thoroughly in your hands until it is warm, soft, and free of air bubbles. -
Create the Opening:
Hold the ball in one hand and push your thumb into the center, stopping about a half-inch from the bottom to ensure a sturdy base. -
Pinch the Walls:
Using your thumb and fingers, gently pinch the clay walls while rotating the ball in your hand. Work from the bottom up to create an even thickness, aiming for walls about 1/4 inch thick. -
Shape the Cylinder:
Instead of flaring the walls out like a bowl, gently press them inward slightly as you reach the top to create a more vertical, cylindrical upper section. The bottom should remain rounded and bulbous. -
Flatten the Base:
Tap the bottom of your pot gently against your work surface to create a flat stable base so the pot won’t wobble.
Cracking Up?
If you see tiny hairline cracks forming as it dries, mix a small amount of clay with water to make a paste (slip) and fill them in immediately with your finger.
Step 2: Refining and Smoothing
-
Smooth the Rim:
Use a damp sponge or your finger dipped in a little water to smooth out the top rim. I like to keep the rim flat and squared off rather than rounded for a more modern look. -
Surface Smoothing:
Run a damp sponge over the entire exterior to remove fingerprints and bumps. If the clay is too wet, let it sit for 15-20 minutes before proceeding to the detailing phase.
Step 3: Adding Details
-
Define the Decoration Zone:
Using a needle tool, lightly scribe a horizontal line around the circumference of the pot, separating the upper cylindrical rim area from the rounded body. -
Create Oval Indentations:
Select a tool with a rounded, oval tip—the back of a small paintbrush or a specific sculpting tool works well. Press this firmly into the clay in the upper zone to create a vertical oval impression. -
Repeat the Pattern:
Continue pressing these oval shapes side-by-side around the entire top rim. Try to keep the spacing consistent, but embrace slight irregularities as part of the handmade charm. -
Scribe the Zig-Zags:
Below the line of ovals, use your needle tool or a sharp toothpick to carve a continuous zig-zag line. The points of the zig-zags should align roughly beneath the spaces between the ovals. -
Add the Bottom Border:
Carve a second horizontal line just below your zig-zag pattern to frame the design. Deepen your carvings slightly to ensure they show up clearly once dry.
Perfectly Rustic
Don’t fret if your pot isn’t perfectly symmetrical. The wobble in the rim and slight variations in the pattern give this piece its authentic, hand-thrown aesthetic.
Step 4: Finishing Touches
-
Clean Up Edges:
As you carve, small crumbs of clay will appear. Wait until the clay is slightly drier (leather hard) to brush these away with a soft, dry brush to avoid smearing the design. -
Drying:
Allow the pot to dry completely. For air-dry clay, this usually takes 24-48 hours. Turn it upside down halfway through to ensure the bottom dries evenly. -
Sanding:
Once bone dry, use fine-grit sandpaper to gently smooth any sharp edges on the rim or rough spots on the bottom. -
Sealing:
To enhance the durability and deepen the terracotta color, apply a coat of matte acrylic varnish. This also helps protect the pot if you plan to put real plants inside.
Place your favorite small succulent inside and enjoy the warm, natural vibe this pot brings to your windowsill

TRACK YOUR CERAMIC JOURNEY
Capture glaze tests, firing details, and creative progress—all in one simple printable. Make your projects easier to repeat and improve.
Cute Magnet Sets
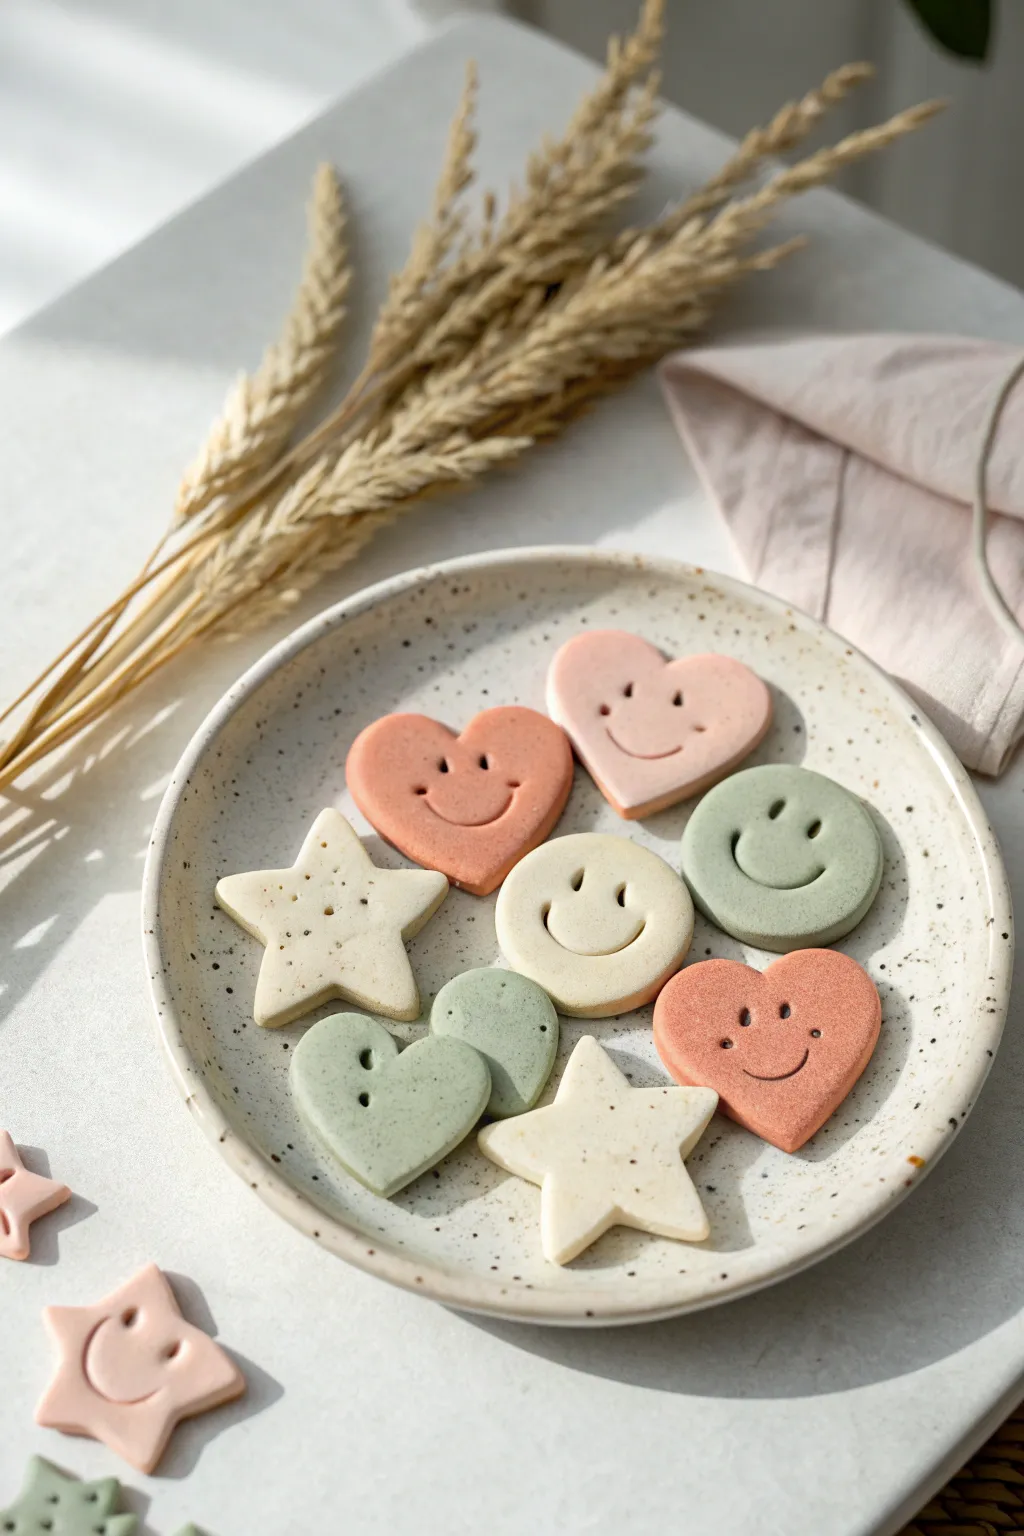
These charming little magnets bring a touch of warmth and personality to any fridge or magnetic board. Featuring soft, muted tones of sage, blush, and cream with a subtle speckled stone effect, these easy-to-make shapes are finished with sweet, simple smiley faces.
Detailed Instructions
Materials
- Polymer clay (white, beige, translucent)
- Acrylic paints (muted pink, sage green, cream)
- Black pepper or faux stone granules
- Rolling pin
- Cookie cutters (heart, circle, star)
- Small round tool (like a straw or piping tip)
- Needle tool or toothpick
- Curved carving tool or spoon edge
- Strong craft glue (E6000)
- Small round magnets
- Parchment paper
- Baking sheet
Step 1: Preparing the Speckled Clay
-
Mix base colors:
Start by conditioning your white polymer clay until it is soft and malleable. Separate it into three equal balls. -
Tint the clay:
To achieve the muted pastel look, mix a very small amount of acrylic paint or clay pigment into each ball. Aim for a dusty rose pink, a soft sage green, and a warm cream color. -
Add the speckles:
Flatten each colored ball slightly. Sprinkle a pinch of coarse black pepper or specialized faux granite granules onto the clay. Fold the clay over and knead thoroughly until the specks are evenly distributed throughout the material.
Step 2: Shaping and Sculpting
-
Roll out the slab:
Place your first color of clay between two sheets of parchment paper. Roll it out to a uniform thickness of about 1/4 inch (6mm). You want them substantial enough to hold a magnet but not too heavy. -
Cut the shapes:
Using your cookie cutters, press firmly into the clay to create hearts, stars, and circles. Peel away the excess clay carefully to keep the edges sharp. -
Smooth the edges:
Gently run your finger along the cut edges of each shape to soften any sharp ridges left by the cutter. This gives the finished piece a more polished, ceramic-like feel. -
Create the eyes:
For the eyes, use a small, round tool. A plastic straw works perfectly for larger eyes, or the back of a small paintbrush for smaller ones. Press straight down into the clay; don’t go all the way through. -
Carve the smile:
To make the curved mouth, use the edge of a small spoon, a curved clay tool, or a cut section of a straw. Press it gently into the clay below the eyes. Rock it slightly side-to-side to widen the smile if desired. -
Add cheeks (optional):
For the smiley faces, use a needle tool to create tiny indentations at the ends of the smile to mimic dimples or cheeks. -
Detail the stars:
For the star shapes specifically, use a needle tool to prick tiny random holes across the surface if you want added texture, or simply leave them smooth like the hearts.
Problem: Fingerprints?
If you see fingerprints on your clay before baking, lightly brush the surface with a tiny amount of baby oil or cornstarch to smooth them out instantly.
Step 3: Baking and Assembly
-
Prepare for baking:
Arrange all your cut and sculpted shapes on a parchment-lined baking sheet, ensuring they aren’t touching each other. -
Bake the clay:
Bake according to your polymer clay manufacturer’s specific instructions (usually around 275°F/135°C for 15-30 minutes). I monitor the oven closely to ensure the light colors don’t scorch or brown. -
Cool down:
Once baked, turn off the oven and strip the door slightly. Let the clay pieces cool completely on the baking sheet to prevent cracking. -
Attach magnets:
Flip the cooled shapes over. Apply a pea-sized dot of strong craft glue like E6000 to the center of the back. -
Press and set:
Press a round magnet firmly into the glue. Allow the adhesive to cure fully for at least 24 hours before sticking them to your fridge.
Make it Glossy
After baking, apply a coat of UV resin or glossy water-based varnish to the eyes and mouth only. This makes the features pop and look wet.
Now your workspace or kitchen has a set of cheerful, stony faces to brighten your day
Modern Desk Organizer Trays
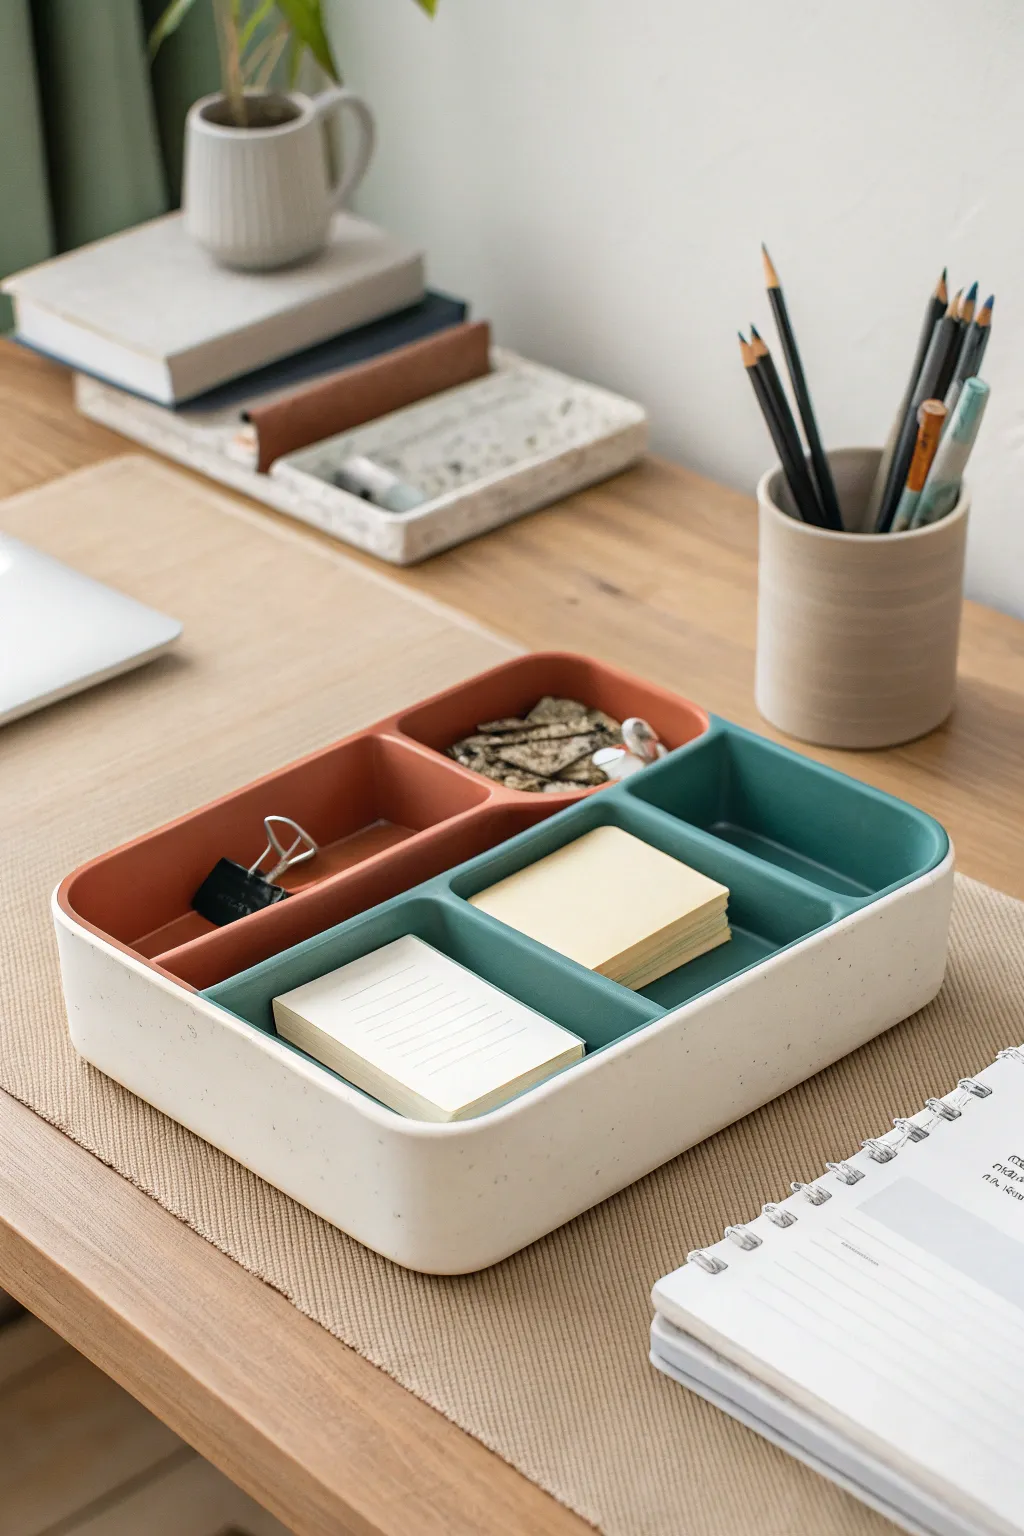
This sleek, minimalist desk organizer combines functionality with high-end design, featuring distinct color-blocked compartments nestled within a speckled cream shell. The clean lines and matte finish give it a professional look that’s perfect for tidying up sticky notes, clips, and loose odds and ends.
Step-by-Step Tutorial
Materials
- Polymer clay (white, translucent, terracotta/rust, teal/dark green)
- Black pepper or dried coffee grounds (for speckling)
- Pasta machine or acrylic rolling pin
- Clay blades (rigid and flexible)
- Graph paper and pencil
- Ruler
- Liquid polymer clay (bake and bond)
- Cornstarch (for release)
- Fine grit sandpaper (400-1000 grit)
- Oven and baking sheet
- Cardstock (for templates)
Step 1: Planning the Structure
-
Design the compartments:
Begin by sketching your tray layout on graph paper. The design in the image uses a large rectangular footprint split into two main sections: one L-shaped teal section and one rectangular rust section within a thick cream border. -
Create cardstock templates:
Cut out templates for the base of the entire tray and specific templates for the inner colored walls. Precision here is key, so double-check that your inner wall lengths account for the thickness of the clay slabs.
Pro Tip: Seamless Walls
Use a straight edge or acrylic block to push against the walls from the outside while assembling. This ensures they stay perfectly vertical and don’t bow outward.
Step 2: Creating the Speckled Stone Effect
-
Mix the base clay:
Combine white polymer clay with a small amount of translucent clay to create a softer, ceramic-like finish. Condition the clay thoroughly until it’s pliable and warm. -
Add the texture:
Sprinkle a pinch of coarse black pepper or dried coffee grounds onto the flattened clay. Fold the clay over and pass it through the pasta machine repeatedly to distribute the specks evenly without streaking. -
Roll the outer shell slabs:
Roll your speckled clay out on the thickest setting of your pasta machine (or about 1/4 inch thick with a roller). You will need enough for the large base and the four outer walls.
Level Up: Felt Bottom
Cut a piece of adhesive cork or heavy felt to size and stick it to the underside of the baked tray. This adds weight and protects your desk surface from scratches.
Step 3: Constructing the Colored Inserts
-
Prepare the colored clay:
Condition your rust and teal clays separately. Roll them out to the same thickness as your speckled clay to ensure uniform wall heights. -
Cut the inner walls:
Using your templates and a sharp rigid blade, cut the strips for the internal dividers. You need an L-shaped formation for the teal section and a simple rectangle for the rust section. -
Assemble the colored compartments:
Assemble the colored walls first on a glass tile or work surface. Use a touch of liquid clay at the seams where the corners meet, smoothing the join with a tool or fingertip so it looks seamless.
Step 4: Final Assembly
-
Cut the main base:
Place your large rectangular template onto the sheet of speckled clay and cut out the main foundation of the tray. -
Attach the colored inserts:
Apply a thin layer of liquid clay to the bottom edges of your colored wall assemblies. Position them carefully onto the speckled base, pressing down gently to adhere them without distorting the shape. -
Add the outer walls:
Measure and cut long strips of the speckled clay for the exterior border. Apply liquid clay to the exposed edges of the base and wrap the speckled strips around the perimeter, pressing firmly against the colored inserts. -
Refine the corners:
I usually slice the corners at a 45-degree angle for a cleaner join, but a simple butt joint works too if smoothed well. Blend the outer seams so the exterior looks like one continuous piece. -
Smooth the edges:
Dip your finger in a little cornstarch and run it along the top rim of all walls to soften the sharp edges and remove any fingerprints.
Step 5: Baking and Finishing
-
Bake carefully:
Bake the piece according to your clay manufacturer’s instructions. Tent it with aluminum foil to prevent the white clay from scorching or yellowing closer to the heating element. -
Cool down:
Let the tray cool completely in the oven. Moving it while hot can cause the heavy base to warp or crack. -
Sand for a matte look:
Once cool, wet-sand the entire piece, starting with 400 grit and moving to 1000 grit. This removes the plastic sheen and gives the ‘stone’ surface a true matte, professional texture.
Place your new organizer on your desk and enjoy the satisfaction of a tidy, stylish workspace
Clay Candle Holders
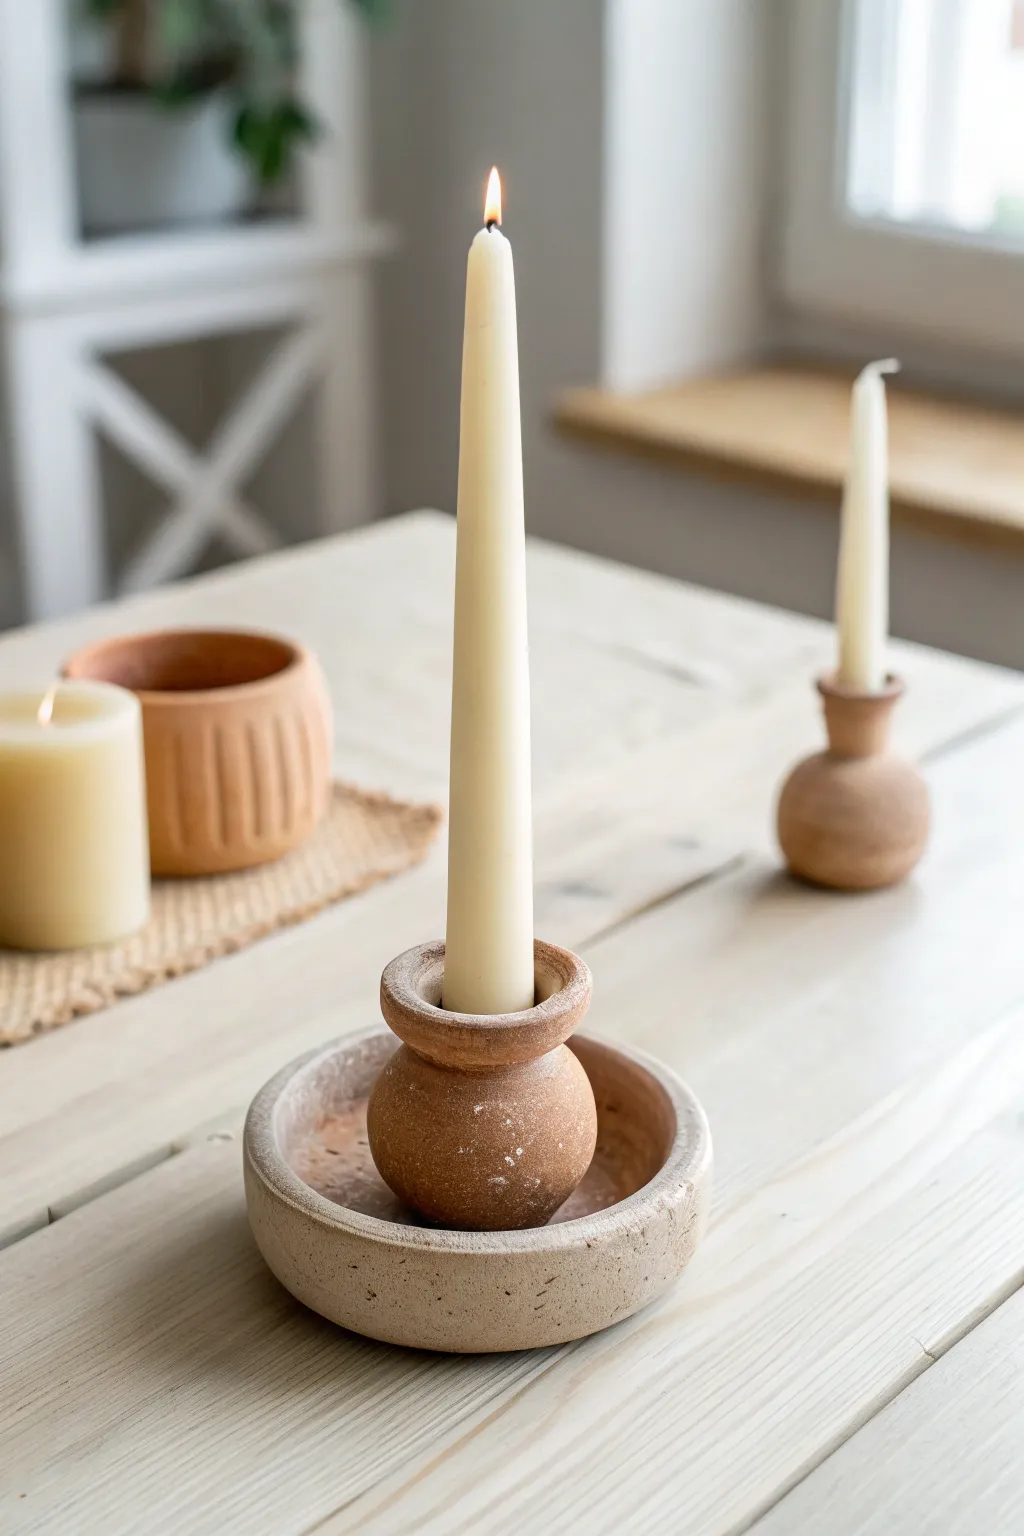
Embrace the natural beauty of earthenware with this two-part candle holder design. Its textured, stone-like finish and simple geometry make it a grounding centerpiece for any table setting.
Step-by-Step Tutorial
Materials
- Air-dry clay (terra cotta or stone effect)
- Roller or rolling pin
- Small circular cookie cutter or jar lid (approx. 4 inches)
- Ruler
- Craft knife
- Sponge and water
- Taper candle (for sizing)
- Fine-grit sandpaper
Step 1: Forming the Base Dish
-
Prepare the Clay:
Start by taking a generous chunk of your air-dry clay. Knead it in your hands until it becomes pliable and warm, removing any air bubbles that might be hiding inside. -
Roll the Slab:
Using your rolling pin, roll the clay out into an even slab. Aim for a thickness of about 1/4 to 1/2 inch to ensure the base is sturdy enough to hold the weight of the candle. -
Cut the Circle:
Press a 4-inch circular cutter or a jar lid into the clay to create a perfect circle. Peel away the excess clay from the edges and set it aside for the next part. -
Create the Wall Strip:
Roll out a long, thin coil or a ribbon of clay. Flatten it slightly so it is about 3/4 inch tall and long enough to wrap around the circumference of your base circle. -
Attach the Wall:
Score the outer edge of your base circle and the bottom edge of your clay strip. Add a little water or slip to the scored areas, then wrap the strip around the base to create the rim of the dish. -
Smooth the Seams:
Use your fingers or a modeling tool to blend the clay where the wall meets the base, both inside and outside. I like to smooth the vertical seam of the wall until it completely disappears. -
Refine the Rim:
Run a damp sponge along the top edge of the dish to soften any sharpness. The goal is a slightly imperfect, organic look, so don’t worry about being too precise.
Cracks Appearing?
If you see hairline cracks while drying, mix a tiny bit of fresh clay with water to make a paste. Fill the cracks, smooth it over with your finger, and let it dry again.
Step 2: Creating the Bulb Holder
-
Roll a Sphere:
Take a new ball of clay, roughly the size of a tangerine. Roll it firmly between your palms until you have a smooth, solid sphere. -
Flatten the Bottom:
Gently tap the sphere onto your work surface to create a flat bottom. This ensures it will sit stable inside the saucer you just made. -
Create the Opening:
Press your thumb into the center of the top of the sphere to start the hole. Gently widen it until it is deep enough to hold a candle securely. -
Check the Fit:
Insert your actual taper candle into the hole to test the size. Wiggle it slightly to create just enough clearance so the candle slides in easily once the clay shrinks during drying. -
Add the Lip:
Roll a small, thin coil of clay. Score the top rim of the sphere opening, add a touch of water, and attach the coil to create a pronounced lip around the candle hole. -
Blend the Lip:
Smooth the coil downward onto the sphere so it becomes one integrated piece, leaving the top edge rounded and defined. -
Texture the Surface:
To mimic the stone look in the photo, gently dab the surface of your wet clay with a stiff bristle brush or a crumpled ball of aluminum foil.
Faux Stone Texture
Mix baking soda or used coffee grounds directly into the clay before sculpting. This creates a speckled, grainy texture similar to real stoneware or granite.
Step 3: Assembly and Finishing
-
Dry Separately:
Let the base dish and the bulb holder dry separately. This usually takes 24-48 hours depending on humidity; flip them occasionally for even drying. -
Sand and Refine:
Once fully dry, use fine-grit sandpaper to smooth out any unwanted rough spots on the rims, but keep the textured surface intact. -
Optional Glue Steps:
If you want a permanent single piece, apply a strong craft glue to the bottom of the bulb holder and press it firmly into the center of the dish. -
Clean Up:
Wipe away any dust from sanding with a slightly damp cloth. Your earthy, textured candle holder is now ready for display.
Light a taper candle and enjoy the warm, grounded atmosphere your new creation brings to the room
Millefiori-Style Pattern Canes

These charming, coin-sized clay pendants feature vibrant sunburst patterns that evoke a modern, geometric feel. Using a simplified millefiori-inspired technique, you can create a batch of these distinctively patterned discs perfect for earrings, necklaces, or decorative accents.
Step-by-Step Tutorial
Materials
- Polymer clay in white, terracotta, teal, yellow, and black
- Acrylic rolling pin
- Round clay cutters (approx. 1 inch diameter)
- Craft knife or tissue blade
- Needle tool or toothpick
- Jump rings for jewelry making
- Oven for curing
- Varnish or glaze (optional)
Step 1: Creating the Base
-
Condition the clay:
Start by kneading your white clay until it is soft and pliable. This forms the base canvas for your charms, so ensure it’s free of air bubbles. -
Roll out the slab:
Using your acrylic rolling pin, flatten the white clay into an even sheet, about 3-4mm thick. Aim for a consistent thickness so all your charms bake evenly. -
Cut the discs:
Press your round clay cutter firmly into the white slab to create multiple discs. Lift them carefully to avoid distorting the circle shape and smooth the edges with your fingertip.
Step 2: Building the Radial Pattern
-
Prepare colored strips:
Roll out your colored clays (terracotta, teal, yellow) into very thin sheets. Use your craft knife to slice these sheets into small, wedge-shaped triangles, resembling pizza slices. -
Apply the wedges:
Place the colored wedges onto a white clay disc in a circular arrangement, leaving small gaps of white space between each ‘spoke’ of color. The white clay underneath acts as the grout line. -
Create the center eye:
Roll a tiny ball of contrasting clay (like black or dark blue) and flatten it slightly. Press this into the exact center of the disc where all the wedges meet. -
Embed the design:
Gently roll over the top of the patterned disc with your acrylic roller. Apply just enough pressure to make the colored wedges flush with the white base without distorting the circle. -
Add stripe details:
For designs like the teal charm with lines, roll extremely thin ‘snakes’ of black or white clay. Press these gently onto the colored wedges to create linear accents before the final rolling.
Smooth Operator
Place a piece of plastic wrap over the clay before using your circle cutter. It creates a lovely, rounded ‘domed’ edge rather than a sharp, flat cut.
Step 3: Finishing Touches
-
Pierce the hole:
Use a needle tool or a small straw to create a hole near the top edge of each disc. Ensure the hole is wide enough for your jump rings but not so close to the edge that it creates a weak spot. -
Refine the edges:
I always do a final check around the rim of each disc, smoothing away any fingerprints or roughness with a drop of baby oil on my finger. -
Bake the clay:
Place your charms on a parchment-lined baking sheet. Bake according to your polymer clay package instructions (typically 275°F/135°C for 15-30 minutes). -
Cool down:
Let the charms cool completely in the oven with the door slightly ajar. This gradual cooling helps prevent cracks. -
Seal and assemble:
Once cool, you can apply a thin layer of matte or gloss varnish for durability. Finally, use pliers to open a jump ring, thread it through the hole, and attach it to your jewelry findings.
Mix It Up
Try marbling two colors for the wedges before cutting them. A white and terracotta marble creates a stunning, natural stone look for the spokes.
Now you have a collection of artisan-style charms ready to wear or gift to a friend