There’s just something magical about mixing kawaii cuteness with Christmas clay—suddenly every little holiday icon turns into a tiny character with a sweet face. Grab your favorite clay and let’s make a whole crew of cheerful, pocket-sized holiday buddies.
Kawaii Santa Head Charms
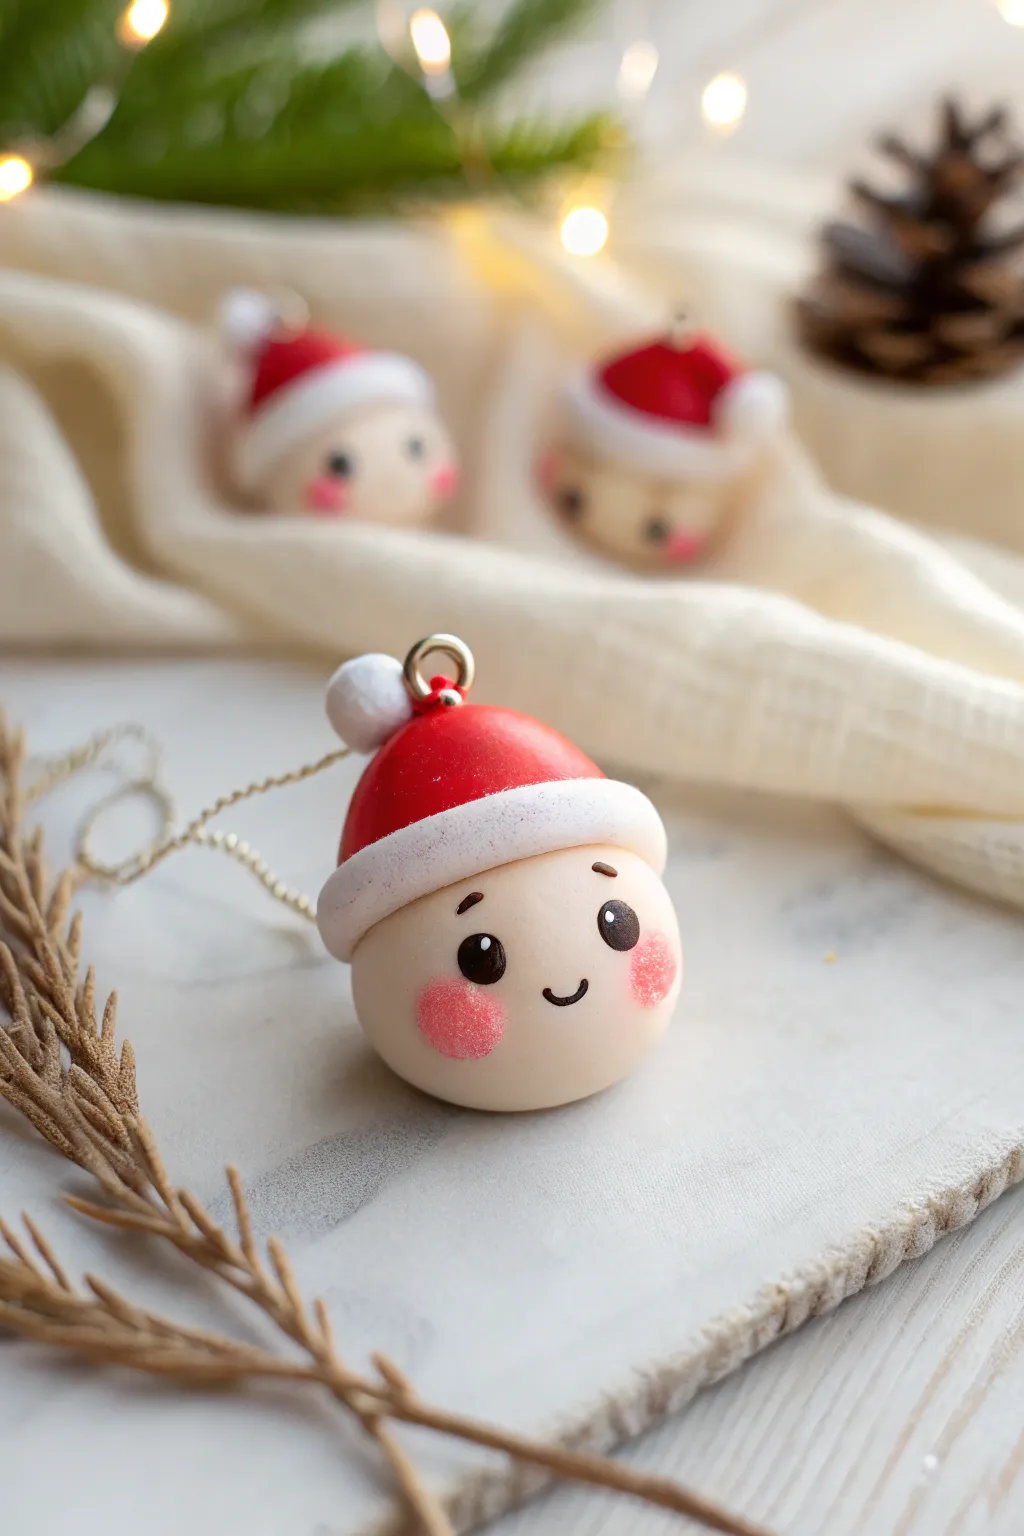
Capture the magic of the holidays with these adorable kawaii Santa head charms, perfect for hanging on the tree or gifting to friends. Their round, smooth faces and tiny button noses feature a signature blushing look that makes them irresistibly cute.
Step-by-Step Tutorial
Materials
- Polymer clay (pale beige/skin tone, bright red, white)
- Black acrylic paint or fine detail marker
- Pink soft pastel chalk
- Small soft brush
- Needle tool or toothpick
- Dotting tool (small and medium)
- Eye pin findings
- Gloss glaze (optional)
- Gold thread or ribbon for hanging
- Oven for baking
Step 1: Shaping the Head
-
Prepare the base:
Condition a piece of pale beige polymer clay until soft and pliable, then roll it into a smooth, seamless sphere about the size of a large gum ball. -
Flatten the base:
Gently tap the bottom of the sphere against your work surface to create a tiny flat spot so the head can stand upright without rolling away. -
Insert the hardware:
Take a silver eye pin and carefully push it straight down into the top center of the head until only the loop is visible.
Clean Clay Hacks
White clay picks up dust easily. Keep a scrap piece of ‘garbage clay’ nearby to roll in your hands periodically, pulling off lint before handling the white brim.
Step 2: Creating the Hat
-
Form the hat cone:
Roll a piece of bright red clay into a ball, then shape it into a cone that is roughly the same width as the head. -
Attach the hat:
Slightly hollow out the bottom of the red cone with your thumb to make it fit snugly, then press it onto the top of the beige head, ensuring the eye pin pokes through the top of the hat. -
Add the brim:
Roll a snake of white clay and flatten it slightly to create a band. Wrap this around the base of the red hat where it meets the face. -
Texture the brim:
Using a needle tool or a clean toothbrush, gently stipple the white band to give it a fluffy, fleece-like texture. -
Top it off:
Roll a small ball of white clay for the pom-pom, texture it to match the brim, and press it onto the very tip of the hat next to the eye pin.
Add Sparkle
Before baking, brush a tiny amount of pearl mica powder or iridescent white glitter over the white hat trim and pom-pom for a snowy, frosted effect.
Step 3: Detailed Features
-
Apply the blush:
Scrape a little pink pigment from a soft pastel chalk using a blade. I prefer to pick up this powder with a soft brush and gently dab two large circles on the cheeks before baking to bond the color. -
Bake the clay:
Bake your charm according to the manufacturer’s instructions for your specific brand of polymer clay, usually around 275°F (135°C) for 15-20 minutes. -
paint the eyes:
Once fully cooled, dip a medium dotting tool into black acrylic paint and stamp two wide-set eyes onto the face. -
Add eye highlights:
Using a very fine needle or toothpick, place a tiny white dot in the upper corner of each black eye pupil to bring the character to life. -
Draw the details:
Use a super fine brush or a thin black marker to draw small curved eyebrows above the eyes and a tiny ‘u’ shape for the smiling mouth between the cheeks. -
Finishing touches:
Apply a coat of gloss glaze to the eyes only to make them shine, then thread a gold cord through the eye pin loop once everything is dry.
Now you have a charming little Santa face ready to brighten up your holiday decor


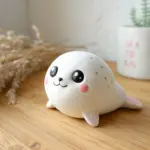
Chubby Snowman Mini Figurines
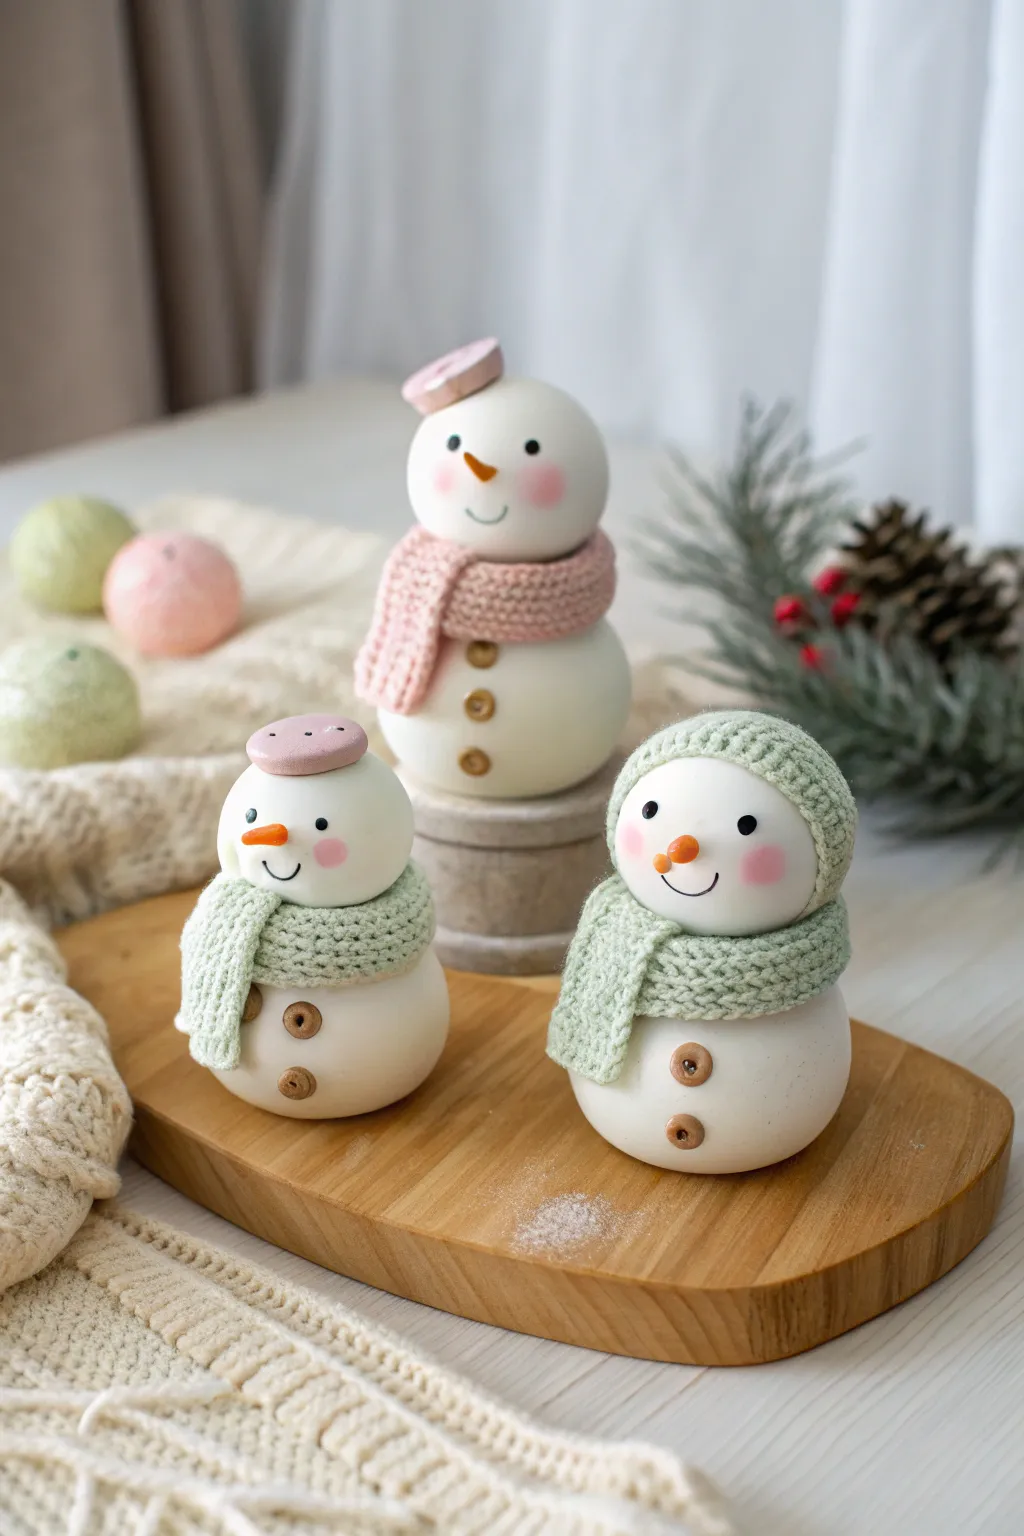
These adorable, round-bellied snowmen bring a touch of kawaii warmth to your holiday decor with their textured scarves and sweet expressions. The realistic knit effect on their accessories is a surprising detail that is easier to achieve than it looks.
Detailed Instructions
Materials
- White polymer clay
- Pastel pink polymer clay
- Sage green polymer clay
- Orange polymer clay
- Brown polymer clay
- Black acrylic paint or clay
- Needle tool or toothpick
- Ball stylus tool
- Pink chalk pastel
- Soft paintbrush
- Small circle cutter (optional)
Step 1: Forming the Body
-
Create the base:
Start by conditioning a large portion of white polymer clay until it is soft and plausible. Roll this into a smooth, slightly flattened ball for the snowman’s body. The bottom needs to be flat enough for the figure to stand securely. -
Shape the head:
Roll a second, slightly smaller ball of white clay for the head. Gently press it onto the body piece, ensuring a good bond without squishing the shapes too much. You want that classic stacked snowball look. -
Add cheery cheaks:
Before baking or adding features, use a soft brush to apply a small amount of shaved pink chalk pastel to the cheek area. Blush applied to raw clay creates a seamless, airbrushed effect.
Fixing Dust Specks
White clay attracts dust like a magnet. Keep baby wipes nearby to clean your hands often. If dust gets on the raw clay, gently scrape it off with a craft knife or use a bit of acetone on a Q-tip.
Step 2: The Knit Accessories
-
Mix your colors:
Decide on your accessory colors. For the look in the photo, you’ll need a pale pink and a soft sage green. Mix white clay into standard colors if you need to soften the hues. -
Roll the scarf strip:
Flatten a strip of your colored clay to create the scarf. It should be relatively thick to hold texture. -
Create the knit texture:
Using a needle tool, gently impress two twisted strands of clay, or simply press repetitive ‘V’ shapes or tiny parallel lines into the strip to mimic a knitted rib pattern. Be patient here; the texture sells the illusion. -
Wrap the scarf:
Drape the textured strip around the snowman’s neck where the head joins the body. Overlap the ends slightly at the front or side to look like a natural knot. I like to let one end hang down a bit longer for visual interest. -
Make the hat (optional):
For the green snowman, create a semi-circle of textured clay similar to the scarf and drape it over the head like a bonnet. For the pink snowman, fashion a small beret-style disc and place it at a jaunty angle.
Make It Sparkle
Before baking, lightly dust the white parts of the snowman with pearlex powder or fine white glitter. This gives the ‘snow’ a magical, frosty shimmer that catches the holiday lights.
Step 3: Bringing them to Life
-
Add the nose:
Roll a tiny speck of orange clay into a cone shape. Press this into the center of the face for the carrot nose. -
Insert eyes:
Use a small ball stylus to make two small indents for the eyes. You can either place tiny balls of black clay into these holes or paint them after baking. -
Scribe the smile:
Use your needle tool or a small curved blade to gently press a simple, curved smile line into the clay between the pink cheeks. -
Attach buttons:
Roll very tiny balls of brown clay and flatten them onto the snowman’s belly. Use a needle tool to poke two or four tiny holes in each disc to resemble wooden buttons. -
Final inspection:
Check your figurine for fingerprints. You can smooth them away gently with a little baby oil on your finger before baking. -
Bake the figures:
Bake your snowmen according to the package instructions of your specific clay brand. Usually, this is around 275°F (135°C) for 15-30 minutes.
Once cooled, your trio of chubby snowmen is ready to guard your desk or hang on the tree


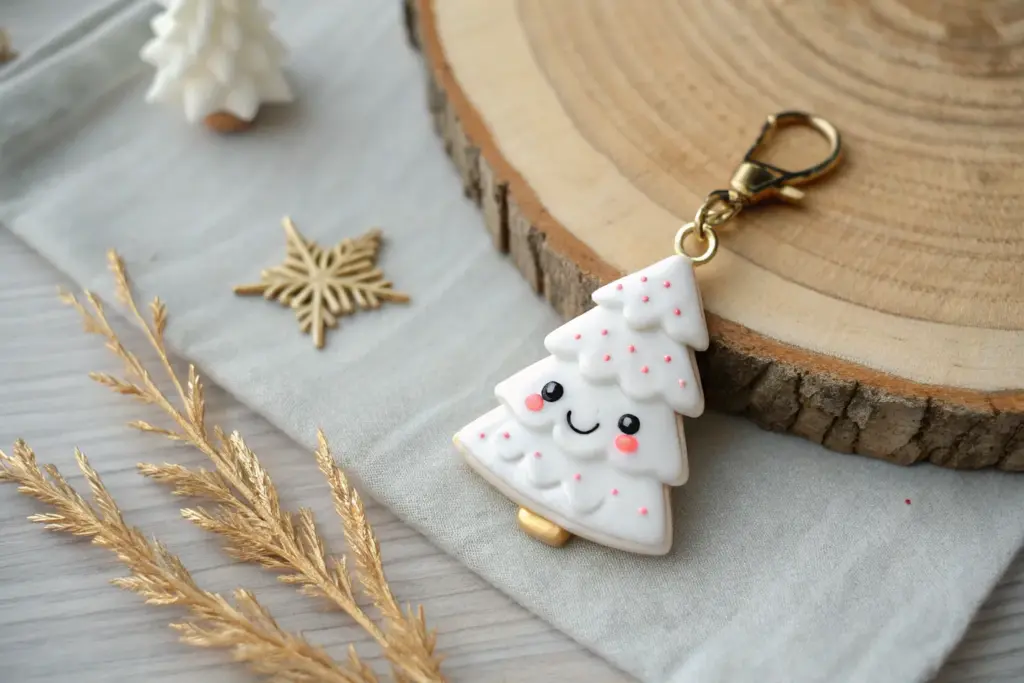
Smiling Christmas Tree Cones
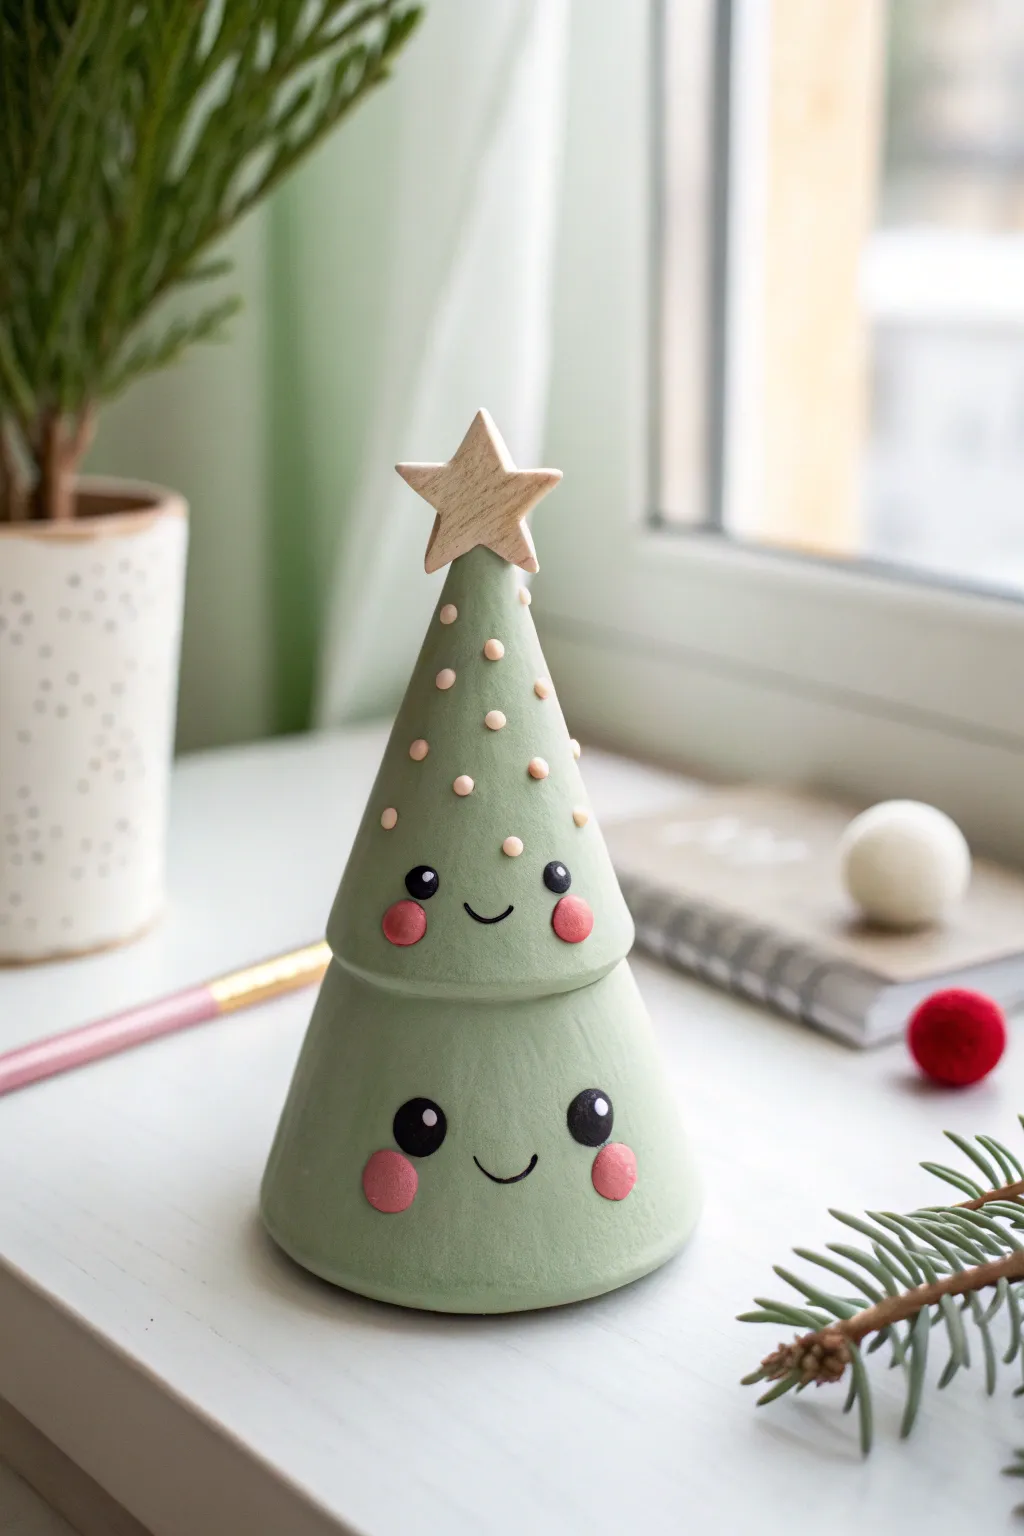
This adorable dual-tiered Christmas tree features two smiling cone sections stacked to create a whimsical holiday character. With its soft sage green finish, tiny snowy dots, and charming double faces, it makes the perfect shelf sitter for the season.
Step-by-Step Guide
Materials
- Air-dry clay or polymer clay (white)
- Acrylic paints (sage green, black, soft pink, cream/white)
- Paintbrushes (flat shader and fine detail)
- Rolling pin
- Cutting tool or craft knife
- Small wooden star cut-out (or create one from clay)
- Strong craft glue or clay slip
- Sandpaper (fine grit)
- Water and sponge for smoothing
- Matte varnish (optional)
Step 1: Shaping the Cones
-
Condition the clay:
Begin by kneading your white clay until it is soft, pliable, and free of any air bubbles. -
Form the base cone:
Roll a smooth ball of clay and shape it into a stout cone with a wide, flat bottom. This will be the tree’s base, so ensure it sits steadily on a flat surface. -
Form the top cone:
Create a second, slightly smaller cone for the top tier. The base of this cone should be roughly the same diameter as the top of the lower cone so they stack neatly. -
Adjust the fit:
Gently press the top cone onto the bottom one to check the proportions. The top section should look like it’s resting naturally, like a hat. Adjust the shapes until you are happy with the silhouette. -
Smooth and perfect:
Use a damp sponge or your finger dipped in water to smooth out any fingerprints or cracks on both cones. -
Dry completely:
Separate the two pieces and allow them to dry fully. If using air-dry clay, turn them occasionally to ensure even drying; for polymer, bake according to package instructions.
Fixing Wobbly Cones
If the cones don’t sit flat, tape a piece of sandpaper to your table and gently rub the bottom of the dried cone in circles against it until perfectly level.
Step 2: Painting and Details
-
Base coat application:
Mix a muted sage green acrylic paint. Apply two even coats to both cones, letting the first coat dry before adding the second for opaque coverage. -
Sand for texture:
Once the green paint is fully dry, I like to lightly sand the surface with fine-grit sandpaper. This gives it that soft, matte ceramic look seen in the photo. -
Paint the cheeks:
Using a small round brush or a dotting tool, dab soft pink circles onto the lower half of both cones to create rosy cheeks. -
Draw the eyes:
Use a fine detail brush or a black paint marker to draw two solid black circles for eyes on each face, placing them slightly wider than the mouth area. -
Add eye highlights:
Dip the very tip of a toothpick or a tiny dotting tool into white paint and add a small sparkle dot to the upper right corner of each black eye. -
Create the smiles:
Carefully paint a thin, curved black line between the cheeks on each cone to create the sweet, simple smiles. -
Decorate the top tier:
Mix a pale cream or soft pink color. Using the back of a paintbrush or a small dotting tool, add scattered dots all over the top cone to represent ornaments or snow.
Make it a Jar
Hollow out the bottom cone and create a lip on the top cone to turn this figurine into a functional stash jar for small candies or jewelry.
Step 3: Assembly
-
Stack and glue:
Apply a generous amount of strong craft glue to the tip of the bottom cone and press the top cone firmly in place. -
Prepare the star:
If you have a wooden star, leave it natural. If using clay, cut a star shape, let it dry, and paint it a light beige or gold. -
Attach the topper:
Glue the star securely to the very tip of the top cone, ensuring it faces forward. -
Seal the piece:
Finish with a coat of matte varnish to protect the paint without making it too shiny, preserving the stone-like texture.
Now you have a charming little festive friend to brighten up your windowsill or desk


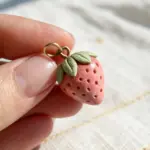
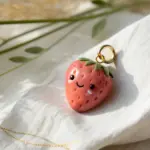
Mini Candy Cane Friends
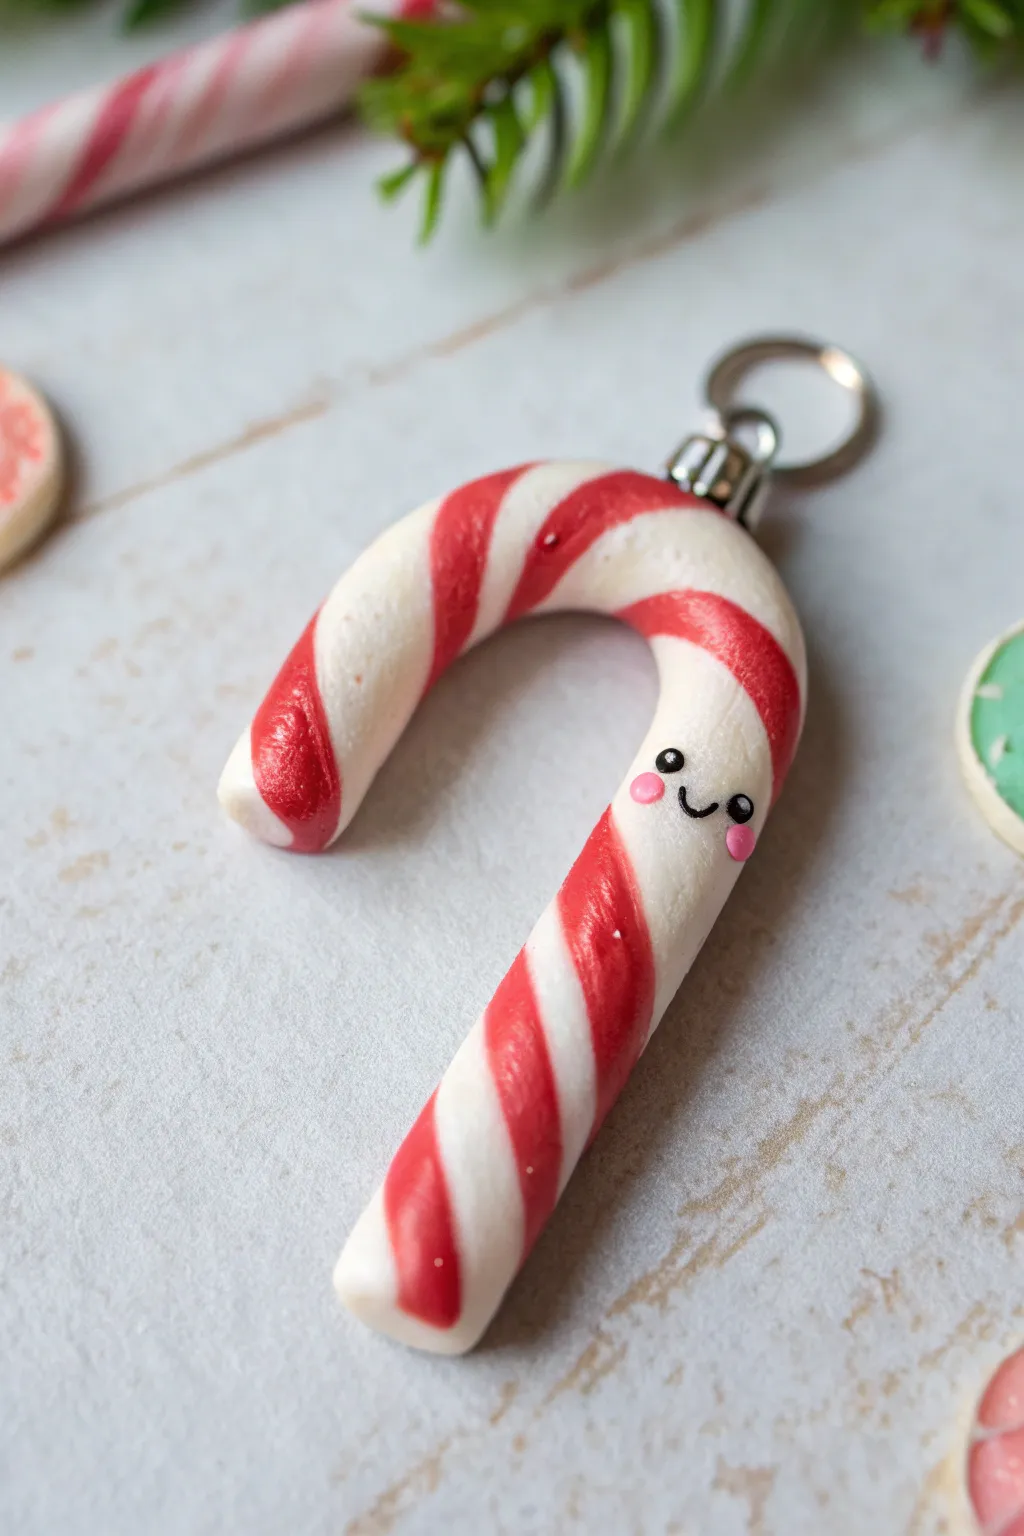
This adorable little candy cane brings a sweet, festive smile to your keychain or Christmas tree. With its classic red and white stripes and a tiny kawaii face, it captures the cozy charm of holiday treats in polymer clay form.
Step-by-Step
Materials
- White polymer clay
- Red polymer clay
- Black acrylic paint or fine detail pen
- Pink acrylic paint or chalk pastel
- Dotting tool or toothpick
- Eye pin (screw or straight)
- Jump ring and keychain attachment
- Gloss glaze (optional)
- Clean work surface (tile or glass)
- Blade or craft knife
Step 1: Creating the Candy Cane Base
-
Condition the Clay:
Start by kneading your white and red polymer clay separately until they are soft, pliable, and free of cracks. Ensure your hands are clean when switching to white to avoid color transfer. -
Roll the Logs:
Roll a portion of the white clay into a smooth, even snake about 1/4 inch thick. Repeat this process with the red clay, trying to match the thickness of the white log exactly. -
Twist Together:
Place the red and white logs side-by-side. Gently press them together at one end, then carefully twist them around each other to create the spiral peppermint pattern. -
Smooth the Snake:
Once twisted, gently roll the combined log on your work surface. This helps fuse the two colors together into a single cylinder and smooths out the ridges for a seamless look. -
Shape the Cane:
Cut your striped log to the desired length (about 2-3 inches). Gently bend the top third over your finger to form the classic shepherd’s hook shape of a candy cane. -
Refine the Ends:
Using your blade or fingers, tap the cut ends of the cane to slightly round them off, removing any sharp edges from the cutting process.
Keep it Clean
Keep baby wipes nearby to clean your hands and tools often. Red pigment loves to stain white clay, and keeping the white pristine is key for that fresh candy look.
Step 2: Adding Hardware & Baking
-
Insert the Eye Pin:
Take your metal eye pin (I prefer the screw type for extra grip) and carefully twist or push it into the center of the rounded top curve of the candy cane. -
Secure the Pin:
If the clay distorts while inserting the pin, gently reshape the area around the metal to ensure a snug fit. -
Bake:
Place your candy cane on a baking sheet lined with parchment paper. Bake according to your brand of clay’s instructions—usually around 275°F (135°C) for 15-20 minutes. -
Cool Down:
Allow the piece to cool completely before handling. Polymer clay is fragile when hot and hardens fully as it returns to room temperature.
Step 3: Bringing it to Life
-
Add the Eyes:
Dip a small dotting tool or the tip of a toothpick into black acrylic paint. Carefully place two small dots on the straight part of the cane for the eyes. -
Draw the Mouth:
Using a very fine detail brush or a fine-tip permanent marker, draw a tiny ‘U’ shape between and slightly below the eyes for a happy smile. -
Create Cheeks:
Using a fresh toothpick add two tiny dots of pink paint just below the eyes. Alternatively, brush on a tiny bit of pink chalk pastel dust for a softer look. -
Add Eye Highlights:
For that extra sparkle, add the tiniest speck of white paint to the upper corner of each black eye dot once the black paint is dry. -
Seal (Optional):
If you want a shiny, candy-like finish, coat the entire piece in a gloss glaze. This also protects the painted face details from scratching off. -
Attach to Keychain:
Open a jump ring using pliers, loop it through the eye pin on your candy cane and the keychain attachment, and close the ring securely.
Loose Eye Pin?
If the metal pin pulls out after baking, pull it out completely, add a tiny dab of superglue to the shaft, and reinsert it into the existing hole.
Now your sweet new friend is ready to hang on your keys or brighten up a holiday gift package

The Complete Guide to Pottery Troubleshooting
Uncover the most common ceramic mistakes—from cracking clay to failed glazes—and learn how to fix them fast.
Kawaii Ornament Baubles With Faces

Transform plain ornaments into adorable characters with this simple painting project. These soft pink baubles feature happy kawaii faces and delicate botanical details that bring a gentle charm to your Christmas tree.
Step-by-Step Tutorial
Materials
- Clear glass or ceramic bauble ornaments
- Matte pale pink acrylic paint
- Titanium white acrylic paint
- Carbon black acrylic paint
- Bright red acrylic paint
- Green acrylic paint (sage or olive tone)
- Small flat brush (size 4 or 6)
- Fine detail brush (size 0 or 00)
- Round creative sponge or foam pouncer (optional)
- Dotting tool or toothpick
- Matte spray varnish
- Silver or gold ornament caps
Step 1: Base Coating
-
Prepare the Bauble:
Remove the metal cap and wire hanging loop from your ornament. Wipe the surface down with a little rubbing alcohol to ensure it’s free of oils and dust for better paint adhesion. -
Apply First Pink Layer:
Using a flat brush or a foam pouncer, apply a thin, even coat of pale pink acrylic paint over the entire bauble. Don’t worry if it looks streaky at first; thin layers are better than thick ones. -
Let it Dry:
Allow the first coat to dry completely. This usually takes about 15-20 minutes depending on your paint brand. -
Establish Opacity:
Apply a second and possibly third coat of pink paint until you have a smooth, solid, and opaque finish. I like to pounce the final layer with a sponge for a soft, eggshell-like texture.
Fixing Wobbly Lines
If your smile or lashes are shaky, wait for the paint to dry fully. Then, use a toothpick to gently scrape away the mistake or paint over it with the pink base color before trying again.
Step 2: Painting the Face
-
Map the Face:
Visualize where the face will sit. The eyes should be wide-set, positioned slightly below the midline of the bauble for maximum cuteness. -
Paint the Eyes:
Dip a medium-sized dotting tool or the handle end of a brush into black paint. Stamping gently, create two solid black circles for eyes. -
Add Eyelashes:
Switch to your finest detail brush (size 00). Carefully pull two tiny curved lines extending from the outer corner of each eye to create sweet little lashes. -
Create the Smile:
With the same fine detail brush and black paint, draw a small, simple ‘U’ shape between the eyes for the mouth. Keep the line thin for a delicate look. -
Blush the Cheeks:
Using a slightly larger dotting tool or a small round brush, dab bright red paint onto the cheeks just below and outside the eyes. These spots should be perfectly round and bold. -
Add Eye Highlights:
Once the black paint is fully dry, take a toothpick dipped in white paint and place a tiny dot near the top right of each black eye pupil. This ‘catchlight’ brings the character to life.
Step 3: Adding Details & Finishing
-
Paint the Foliage:
Above the face, centered on the forehead area, paint a simple sprig using green paint. Draw a thin stem first, then add small teardrop-shaped leaves on either side. -
Add Texture Dots:
Mix a tiny amount of red with your base pink to create a darker rose shade. Using a toothpick, speckle tiny dots randomly around the forehead and cheeks for a textured, freckled effect. -
Dry Thoroughly:
Let all the painted details dry completely for at least an hour to prevent smudging during the sealing process. -
Seal the Ornament:
Take the ornament to a well-ventilated area and apply a light coat of clear matte spray varnish. This protects the paint from scratches and keeps the finish velvety. -
Reassemble:
Once the varnish is dry, carefully place the metal cap and wire loop back onto the neck of the ornament.
Make It Sparkle
For a magical winter touch, lightly brush a clear glitter glaze over the red cheeks or the green leaves while the paint is still wet to add subtle shimmer.
Now you have a charming little character to hang on your tree or gift to a friend
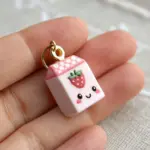
Tiny Present Boxes With Bow Cheeks
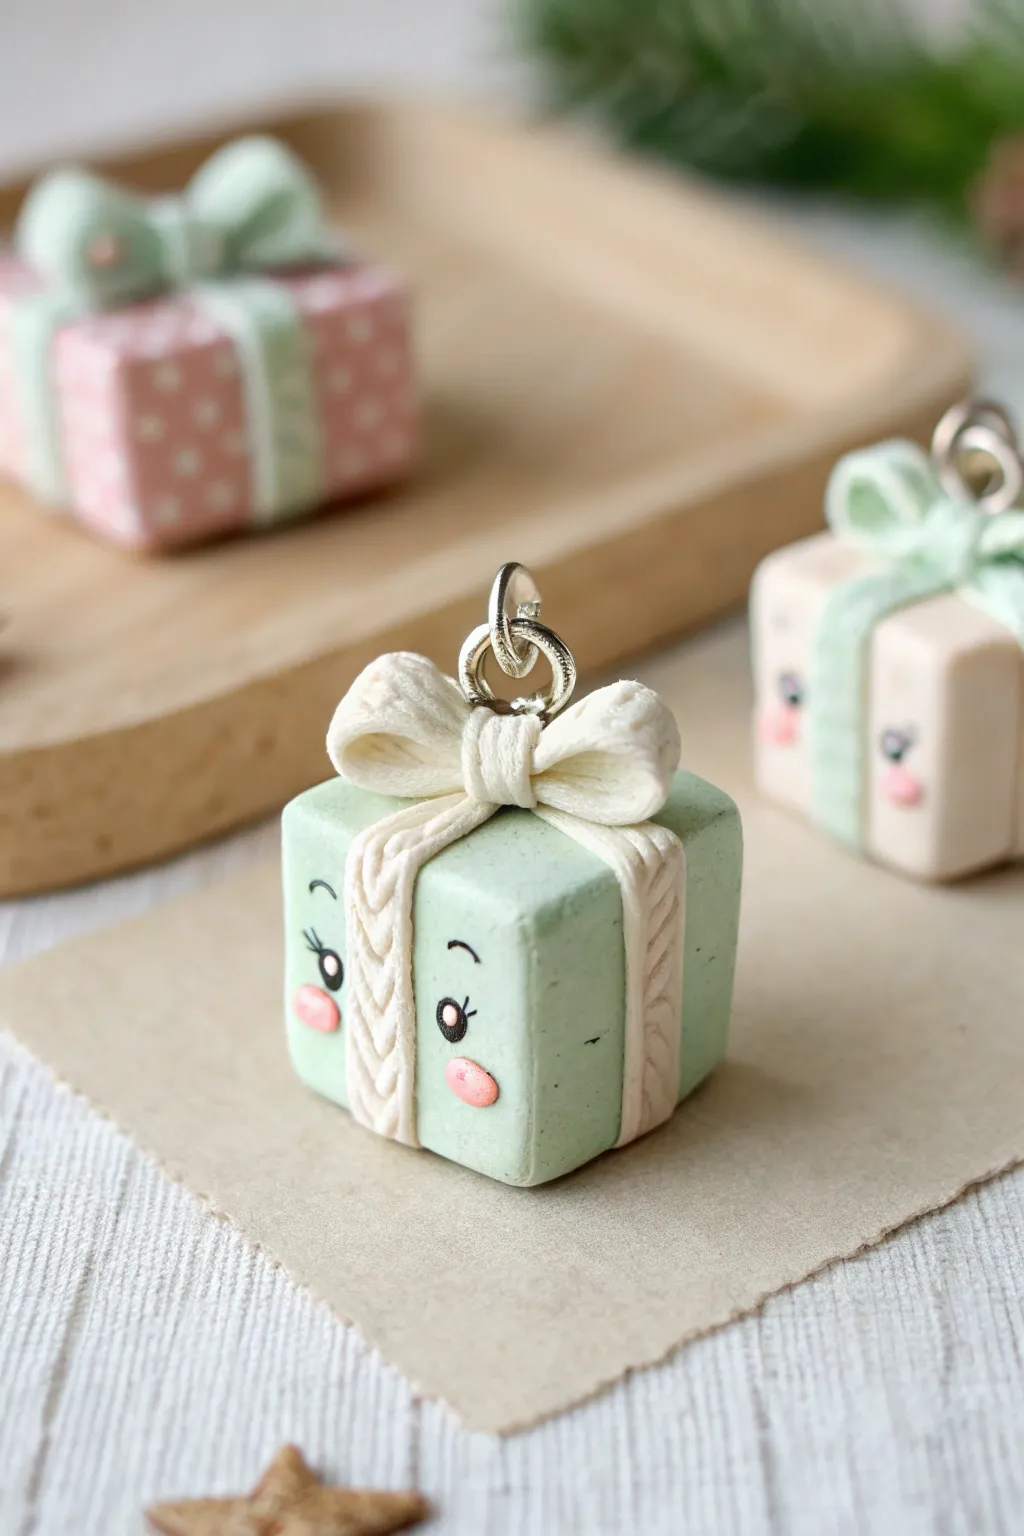
These adorable pastel gift boxes bring holiday cheer with their sweet, expressive faces and cozy textured ribbons. Perfect as earrings, charms, or tiny ornaments, they combine simple geometric shapes with detailed character work for a truly kawaii result.
How-To Guide
Materials
- Polymer clay in light mint green
- Polymer clay in cream or white
- Polymer clay in soft pink and black
- Clay blade or sharp craft knife
- Needle tool or toothpick
- Small eye pin
- Liquid clay or Bake & Bond
- Gloss glaze (optional)
Step 1: Forming the Box Base
-
Condition the base clay:
Start by warming up your light mint green clay in your hands until it is soft and pliable, ensuring there are no air bubbles trapped inside. -
Shape the cube:
Roll the green clay into a smooth ball, then gently press against your work surface on all six sides to form a neat cube. Aim for a size of about 1.5 cm on each side. -
Sharpen the edges:
Use your acrylic block or a flat ruler to gently tap each side of the cube, creating crisp, defined corners and flat surfaces that look like a real wrapped box.
Step 2: Creating the Cozy Ribbon
-
Prepare the ribbon clay:
Condition a small amount of cream or white clay and roll it into a very thin, long snake. -
Twist the texture:
To mimic the knitted look seen in the photo, take two very thin strands of the cream clay and twist them tightly together. Gently roll this twist on the table to flatten it slightly into a band. -
Apply vertical ribbons:
Cut strips from your textured twist and lay them vertically across the center of each side of the cube, connecting at the top and bottom. Trim any excess cleanly at the base. -
Add the horizontal wrap:
Create another twisted strand and wrap it horizontally around the sides of the cube, intersecting with the vertical ribbons. The texture should look like a soft yarn tying the package together.
Ribbon Troubles?
If your twisted clay ‘ribbon’ keeps breaking, knead a drop of baby oil or clay softener into the white clay to make it more elastic before rolling.
Step 3: Sculpting the Bow
-
Form the loops:
Make two small teardrop shapes from the textured cream clay. Flatten the wide ends slightly and curve them inward to meet at the point, forming the two loops of a bow. -
Place the center knot:
Place a tiny ball of the textured cream clay on the top center of the box where the ribbons meet. Press the two loops into either side of this center knot. -
Secure the hardware:
Before the clay hardens or is baked, insert a metal eye pin directly through the center of the bow knot into the cube. I like to add a dot of liquid clay on the pin shaft for extra grip.
Variation Idea
Swap the pastel green for a classic red and use gold or silver clay for the ribbon to create a traditional Christmas ornament version.
Step 4: Adding the Kawaii Face
-
Position the cheeks:
Roll two minuscule balls of soft pink clay. Press them gently onto the front face of the cube, fairly low down and wide apart, to serve as rosy cheeks. -
Draft the eyes:
Take the tiniest amount of black clay imaginable and roll thin threads. Create small arches for winking eyes or open circles for wide eyes. -
Place the facial features:
Using a needle tool, carefully position the black eyes just above the pink cheeks. Add tiny eyelashes if you want extra character. -
Add highlights:
For open eyes, place a microscopic dot of white clay inside the black circle to act as a light reflection, bringing the character to life.
Step 5: Finishing Up
-
Final smooth:
Check the whole piece for fingerprints. You can lightly brush the green areas with a little cornstarch or baby oil on your finger to smooth them out without damaging the ribbon texture. -
Bake:
Bake the charm according to your specific polymer clay’s package instructions—usually around 275°F (130°C) for 15-20 minutes depending on thickness. -
Cool and conclude:
Let the piece cool completely before handling. If desired, brush a light coat of semi-gloss glaze over the eyes to make them shine.
Now you have a charming little gift that never needs unwrapping to be enjoyed


What Really Happens Inside the Kiln
Learn how time and temperature work together inside the kiln to transform clay into durable ceramic.
Reindeer With Button Noses

This adorable reindeer, featuring a smooth, matte finish and charming button details, brings a touch of kawaii magic to your holiday decor. Its simple shapes make it perfect for beginners, yet the result looks polished and professional.
Step-by-Step Guide
Materials
- Polymer clay (beige/tan, red, brown)
- Acrylic paint (black, white, pink)
- Fine detail paintbrush
- Ball stylus tool
- Aluminum foil (for armature core)
- Small rolling pin
- Craft knife
- Needle tool
- Liquid polymer clay (or strong glue)
- Oven (if using oven-bake clay)
Step 1: Creating the Base Structure
-
Core Prep:
Start by crumpling a small ball of aluminum foil, roughly 1 inch in diameter. This will act as a lightweight core for the head and save on clay. -
Head Formation:
Condition your beige or tan clay until it is soft and pliable. Flatten a large piece and wrap it completely around the foil ball, rolling it between your palms until it is perfectly smooth and spherical. -
Body Shaping:
Roll a second, slightly smaller ball of beige clay for the body. Gently taper the top just a little so it resembles a stout pear shape. -
Legs and Feet:
Roll two small, equal-sized balls of beige clay. Flatten the tops slightly to create sturdy little feet. Place the body on top of these feet, pressing down gently to secure the bond.
Droopy Antlers?
If the antlers keep falling over, bake the brown antler pieces separately first for 10 minutes. Once hard, press them into the raw head clay and bake the whole figure again.
Step 2: Adding the Reindeer Features
-
Connecting Head and Body:
Before attaching the head, flatten a small disk of red clay to act as a collar or scarf. Place this on the neck area of the body. -
Assembly:
Use a drop of liquid polymer clay on the red disk, then press the head firmly onto the body. You can insert a toothpick or small wire piece between the head and body for extra structural support if you like. -
Ear Details:
Shape two small teardrops of beige clay. Flatten them slightly and use your ball tool to create an indentation in the center of each. Attach these to the sides of the head. -
Antler Creation:
Roll thin snakes of brown clay. Cut two main beams and several smaller points. Attach the smaller points to the main beams to create branched antlers. -
Attaching Antlers:
Press the base of each antler onto the top of the head. Use your needle tool to blend the clay at the join site for a seamless transition. -
Arm Placement:
Roll two long, thin sausage shapes of beige clay for arms. Attach them vertically alongside the body, smoothing the top shoulder connection so they hang naturally.
Texture Trick
To give the reindeer a fuzzy, felt-like texture like the photo, gently tap the unbaked clay surface all over with an old toothbrush or a stiff bristle brush.
Step 3: Refining the Details
-
The Button Nose:
Roll a small, perfect sphere of bright red clay. Press this onto the center of the face, slightly lower than grand center, for that iconic nose. -
Button Details:
Create three tiny, flat red disks. Press these down the center of the reindeer’s chest to mimic buttons on a coat. -
Final Smoothing:
Look over your figurine. If you see any fingerprints, gently buff them out with a tiny bit of baby oil on your finger or a soft brush. -
Baking:
Bake the figurine according to your clay manufacturer’s specific time and temperature instructions. Let it cool completely before handling.
Step 4: Painting the Face
-
Eye Base:
Using a fine detail brush or a dotting tool, paint two vertical oval shapes in black for the eyes. Space them widely for a cuter look. -
Eye Highlights:
Once the black paint is dry, add a tiny white dot to the upper right corner of each eye to bring them to life. -
Rosy Cheeks:
Dilute a tiny bit of pink paint or use a dry brush technique to dab soft, circular blush marks right under the eyes. -
Finishing Touches:
If desired, you can add a small matte varnish coat to protect the paint, though preserving the raw matte texture of the clay looks lovely too.
Now you have a charming little reindeer friend ready to sit on your mantle or holiday table
Penguins in Winter Hats
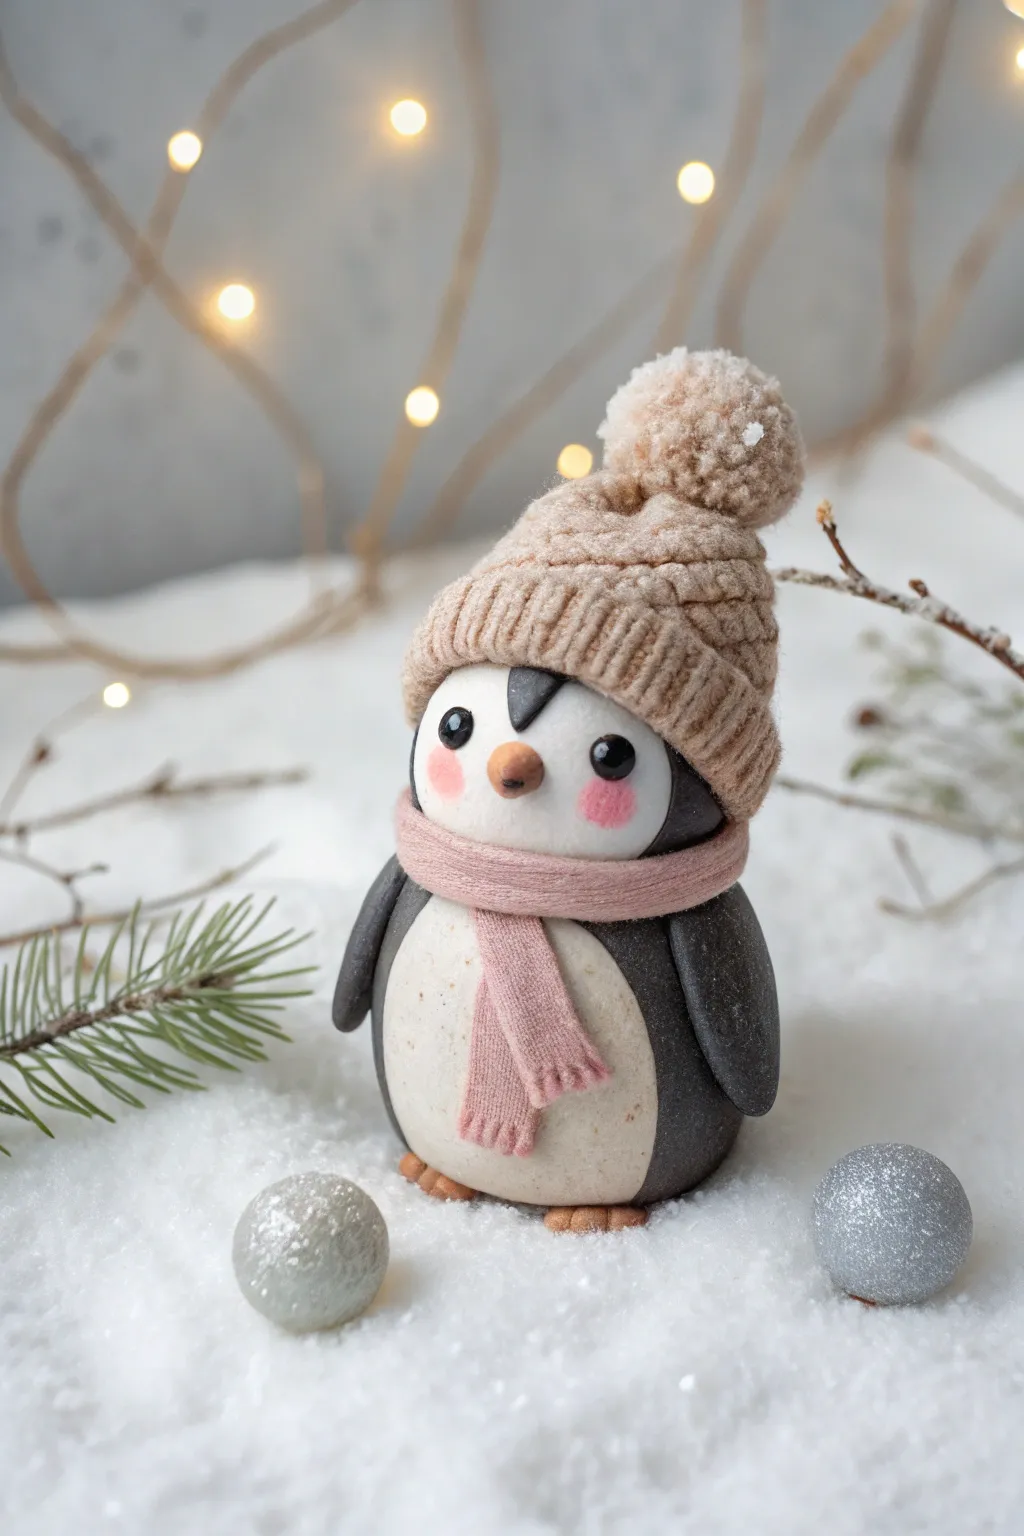
This adorable clay penguin is bundled up for winter, featuring a textured knit-style hat and a matching pink scarf. With his rosy cheeks and wide-eyed expression, he makes a perfect holiday ornament or festive desk companion.
How-To Guide
Materials
- Polymer clay (black, white, soft beige/tan, pastel pink, orange)
- Black glass beads or small black clay balls (for eyes)
- Needle tool or toothpick
- Small dotting tool
- Soft pastel chalks in pink (optional for shading)
- Gloss glaze or UV resin (for eyes)
- Soft brush
- Blade or craft knife
- Texture sheet or fine mesh (optional)
Step 1: Shaping the Penguin Base
-
Form the body:
Start with a chunk of black clay and roll it into a very smooth, slightly egg-shaped oval. Flatten the bottom gently on your work surface so it stands upright on its own. -
Create the belly:
Roll a smaller piece of white clay into a ball, then flatten it into a thin oval. Press this securely onto the front of the black body, smoothing the edges so it sits flush. -
Mark the wings:
Take two small pieces of black clay and shape them into elongated teardrops. Flatten them slightly and attach them to the sides of the body, curving the tips inward towards the belly. -
Shape the face:
Using your thumb, gently make an indentation near the top of the white oval where the face will be to give the head slight definition distinct from the belly.
Step 2: Adding Facial Features
-
Place the eyes:
Use a dotting tool to make two small sockets in the upper white area. Press two black glass beads (or small baked black clay balls) into these sockets. -
Add the beak:
Roll a tiny amount of orange clay into a cone. Press it centrally below the eyes, flattening the bottom edge slightly so it looks like a small triangle. -
Blush the cheeks:
For the rosy cheeks, you have two options: either use a soft brush to apply pink pastel dust below the eyes, or press tiny flattened circles of pink clay onto the face.
Needle Tool Trick
For realistic knit texture, twist two very thin snakes of clay together first, then press them into the hat shape in rows.
Step 3: Crafting the Knitted Accessories
-
Prepare the hat band:
Roll a strip of beige or tan clay. To simulate the ribbed knit texture, use a needle tool to score vertical lines close together along the entire length of the strip. -
Attach the hat band:
Wrap this textured strip around the top of the penguin’s head, covering the boundary where the black and white clay meet on the forehead. -
Form the hat dome:
Create a semi-sphere of the same beige clay and place it on top of the head, blending it into the band. Texture this dome with cross-hatching or small V-shapes to look like knitting. -
Make the pom-pom:
Roll a ball of beige clay. Rather than smoothing it, use a needle tool or toothbrush to vigorously stipple and poke the surface until it looks fluffy and fuzzy. Attach this to the very top. -
Dust with ‘snow’:
Before baking, I like to lightly tap the top of the hat with a little white pastel powder or cornstarch to give it a frosted, snowy look. -
Create the scarf:
Roll a long, thin snake of pink clay and flatten it. Using your needle tool again, scratch parallel lines lengthwise to mimic fabric weave. -
Wrap the scarf:
Wrap the pink strip around the penguin’s neck area, just under the ‘chin’. Cross one end over the other. -
Detail the fringe:
For the hanging end of the scarf, use your blade to make small cuts at the very bottom edge to create fringe tassels.
Winter Texture
Mix translucent liquid clay with white acrylic paint and dab it on the hat and feet after baking for a melted snow effect.
Step 4: Finishing Touches
-
Add the feet:
Make two small balls of orange clay, flatten them slightly, and use a knife to mark two indents for toes. Slide these under the front of the body. -
Bake the figurine:
Bake the penguin according to your clay package instructions (usually 275°F/135°C for 15-30 minutes). Let it cool completely. -
Glaze the eyes:
Once cool, apply a tiny drop of gloss glaze or UV resin to the black eyes (and beak if desired) to make them shine and look alive.
Now your little penguin is dressed warmly and ready to bring a chill winter vibe to your shelf

TRACK YOUR CERAMIC JOURNEY
Capture glaze tests, firing details, and creative progress—all in one simple printable. Make your projects easier to repeat and improve.
Stockings With Peekaboo Pets
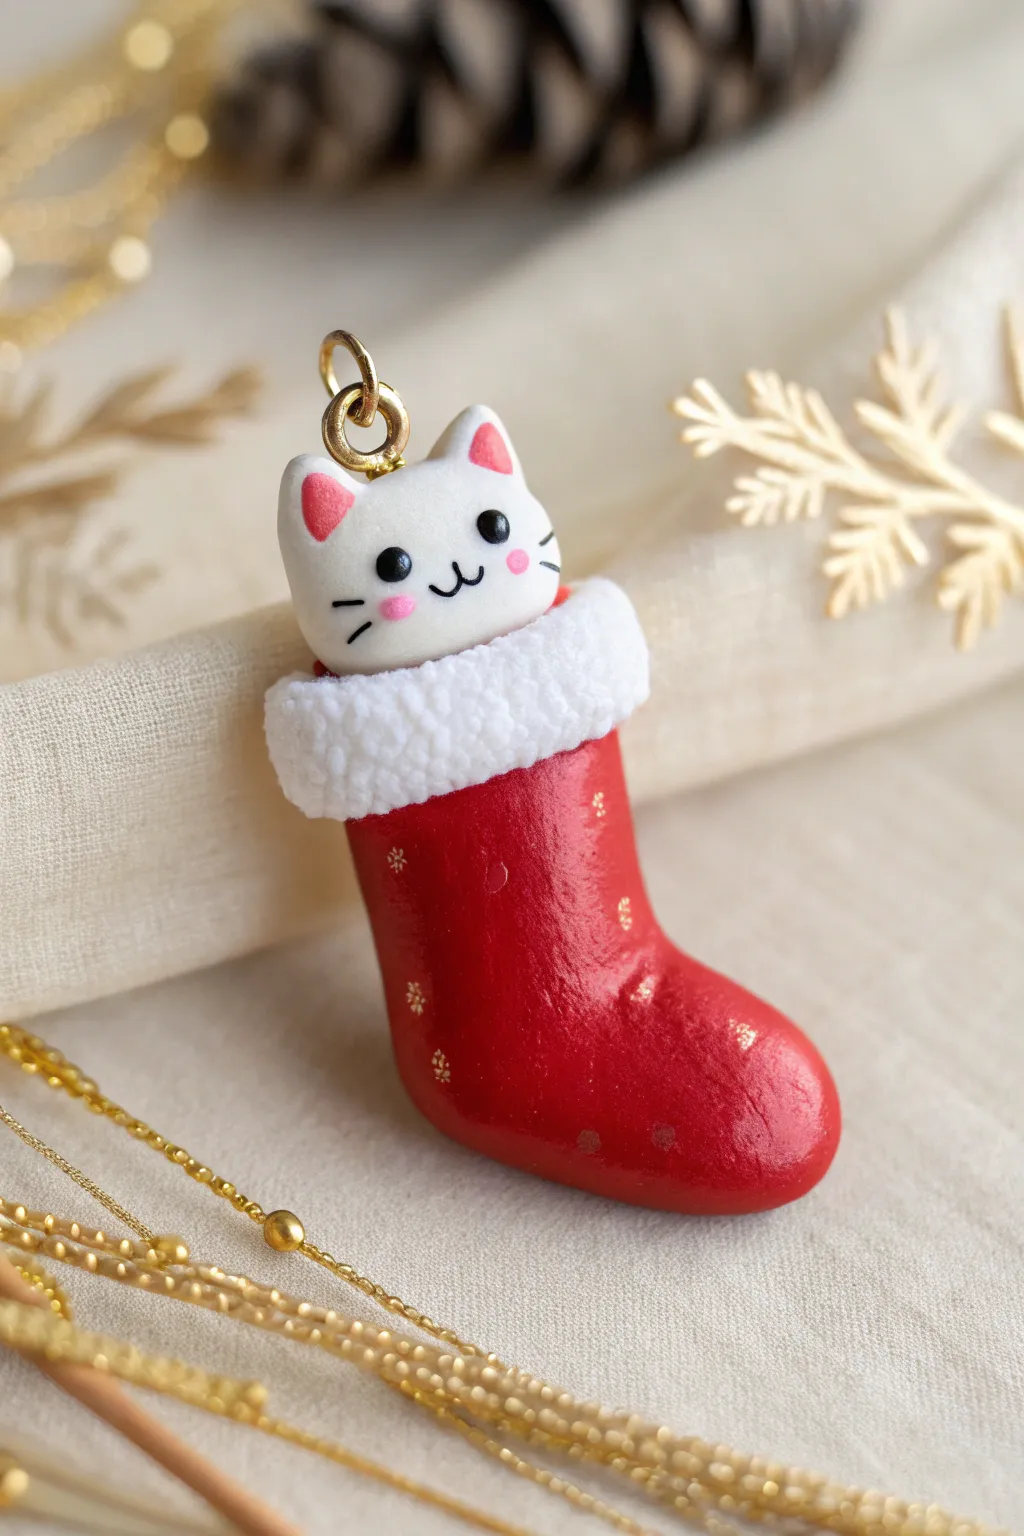
Capture the magic of Christmas morning with a miniature stocking that holds a special surprise inside. This charming polymer clay pendant features a textured fuzzy cuff and a sweet white cat peeking out, ready to hang on your tree or a festive necklace.
Step-by-Step Tutorial
Materials
- Polymer clay (Red, White, Pink, Black)
- Gold acrylic paint or gold leaf flakes
- Gold eye pin
- Texturing tool (toothbrush or needle tool)
- Small dotting tool or toothpick
- Gloss glaze or UV resin
- Clay roller or pasta machine
- X-acto knife or clay blade
- Oven for baking
Step 1: Sculpting the Stocking
-
Shape the base:
Start with a medium-sized ball of red polymer clay. Roll it into a thick cylinder, approximately the width of your pinky finger. -
Form the foot:
Gently bend the lower third of the cylinder to create an L-shape, smoothing the heel area so it curves naturally rather than creating a sharp angle. -
Refine the toe:
Round off the end of the foot section to create a classic soft toe shape and slightly flatten the main shaft of the stocking so it isn’t perfectly round. -
Prepare the opening:
Use the handle of a paintbrush or a large dotting tool to create a deep indentation in the top of the stocking leg where the cat will eventually sit.
Clean Clay Tip
Keep wet wipes handy! Red clay pigment transfers easily. Always clean your hands and tools thoroughly before touching the white clay pieces.
Step 2: Creating the Kitty
-
Mold the head:
Roll a ball of white clay that is slightly wider than the stocking’s opening. Flatten it just a tiny bit into a soft oval shape. -
Add the ears:
Pinch two small triangles of white clay and blend them seamlessly onto the top of the head. -
Detail the ears:
Press tiny triangles of pink clay into the center of the white ears for the inner ear detail. -
Insert the pet:
Place the head securely into the indentation you made in the red stocking. If the fit is loose, add a drop of liquid clay or Bake & Bond. -
Add the hardware:
Insert a gold eye pin into the top center of the cat’s head. I like to bend the bottom of the wire slightly before inserting it to ensure it anchors firmly once baked.
Custom Pets
Swap the white kitty for a tan dog with floppy ears, or marble grey and white clay to create a tabby cat pattern for a personalized gift.
Step 3: Adding the Cuff
-
Create the trim:
Roll a snake of white clay and flatten it into a thick strip. Wrap this strip around the top of the red stocking, covering the seam where the cat meets the red clay. -
Texture the fluff:
Using a clean toothbrush or a needle tool, aggressively tap and stipple the white cuff to create a faux-fur or fleece texture. Be careful not to poke the smooth red clay or the cat’s face.
Step 4: Face & Baking
-
Shape the eyes:
Roll two minuscule balls of black clay and press them gently onto the face. Ensure they are spaced widely for that cute kawaii look. -
Add blush:
Apply two tiny flattened ovals of pink clay under the eyes for rosy cheeks. -
Draw the mouth:
Roll an incredibly thin thread of black clay and shape a tiny ‘3’ or ‘w’ shape carefully on the face using a needle tool. -
Add whiskers:
Add two very short, thin threads of black clay on each cheek for whiskers. -
Bake carefully:
Bake the piece according to your clay manufacturer’s instructions, usually around 275°F (130°C) for 15-20 minutes depending on thickness.
Step 5: Finishing Touches
-
Paint the sparkles:
Once cool, use a fine brush to dab tiny specks of gold acrylic paint or apply gold leaf flakes sporadically across the red part of the stocking. -
Glazing:
Apply a coat of gloss glaze or UV resin over the red stocking and the cat’s eyes and nose to make them shine, but leave the white fluffy cuff matte for contrast.
Now you have an adorable festive charm ready to bring holiday cheer to anyone who sees it
Wreath Characters With Berry Blush
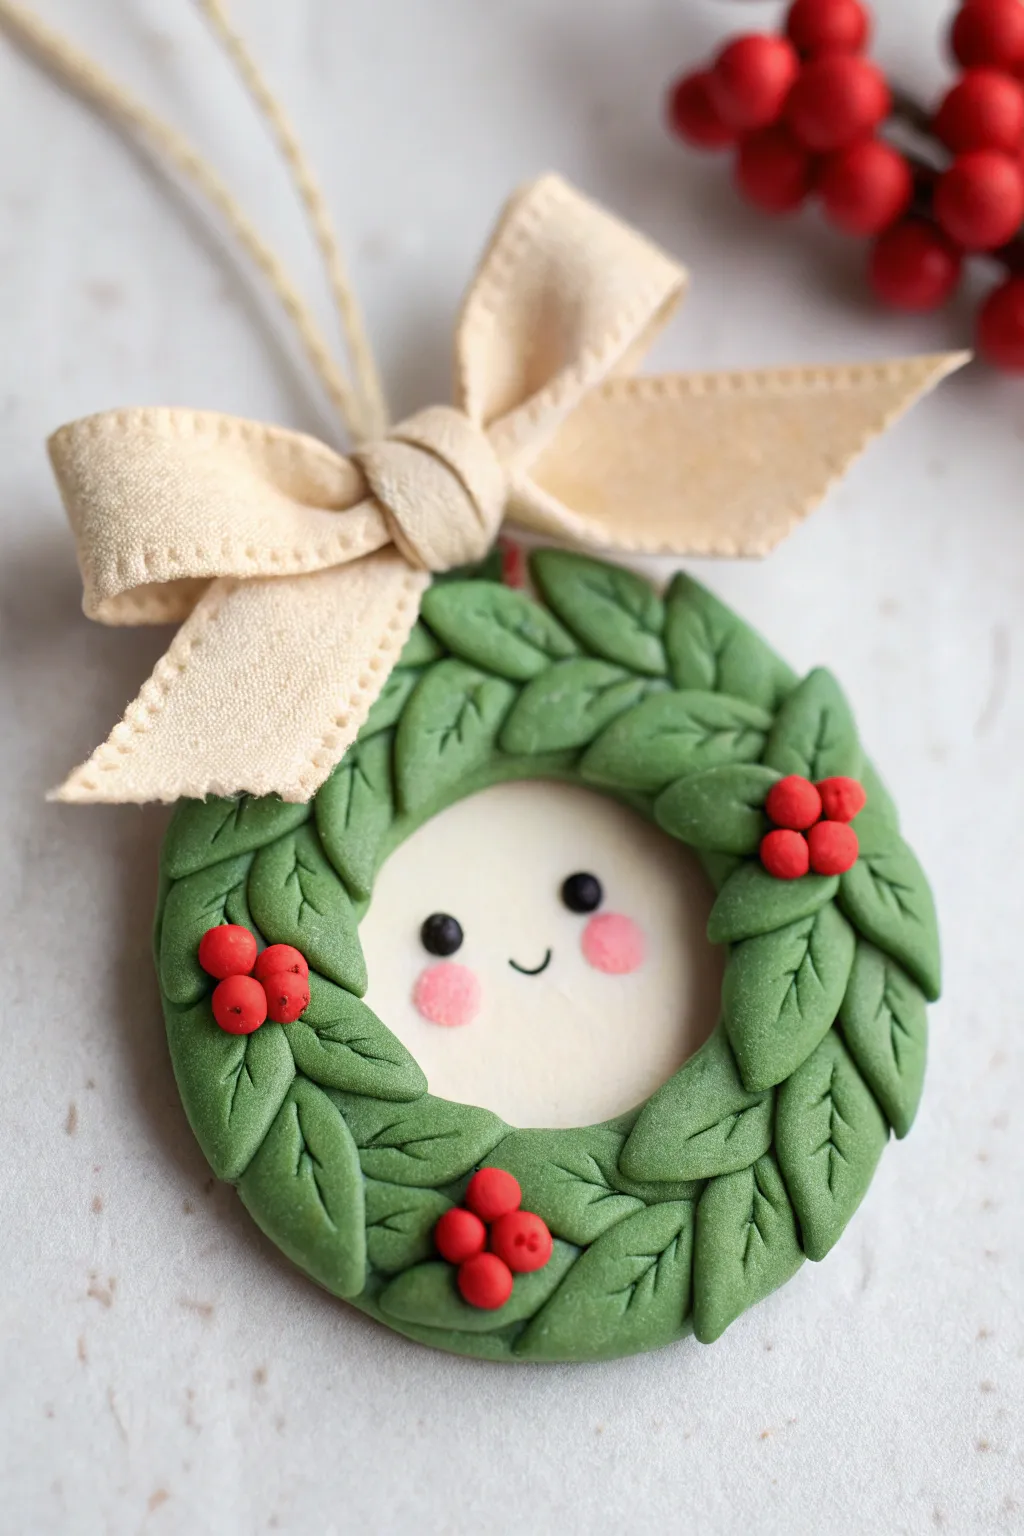
Transform a traditional holiday wreath into an adorable friend with this sweet polymer clay character ornament. The charming face nestles inside a ring of textured leaves, topped with a soft cream bow for a rustic finish.
Step-by-Step Guide
Materials
- Polymer clay (Leaf Green, White/Cream, Red, Black, Translucent – optional)
- Circle cutter (approx. 2-3 inches)
- Smaller circle cutter (approx. 1.5 inches)
- Needle tool or toothpick
- Small craft knife
- Pink soft pastel chalk (for blush)
- Small soft paintbrush
- Baling wire or heavy gauge craft wire
- Cream ribbon or fabric strip
- Twine for hanging
- Liquid polymer clay (optional)
- Acrylic roller
- Oven
Step 1: Creating the Base
-
Shape the face:
Start by conditioning the cream or white clay until soft. Roll it into a smooth sheet about 1/4 inch thick. Cut out a circle using your larger cutter. -
Cut the background:
This cream circle will serve as both the face and the backing for the leaves. If you want the wreath to be hollow in the middle with just a floating face, precise measurement is trickier, so I prefer using a solid circle base where the center remains exposed. -
Add blush:
Before baking or adding details, use a small knife to scrape some pink pastel into a powder. Pick it up with a soft brush and gently dab two rosy circles onto the lower half of the clay face. -
Create the expression:
Roll two tiny specks of black clay for the eyes and press them firmly into the clay above the blush. Use a needle tool to gently carve a small, U-shaped mouth between the cheeks.
Vary Green Shades
Mix a tiny bit of yellow or brown into half your green clay. Alternating shades adds depth and makes the foliage look more organic.
Step 2: Building the Wreath
-
Prepare leaf cane:
Roll a log of green clay. Pinch one side of the log along its entire length to create a teardrop cross-section. This speeds up making uniform leaves. -
Slice leaves:
Using a sharp blade, slice thin cross-sections (about 2-3mm thick) from your teardrop log. You will need roughly 30-40 slices depending on your wreath size. -
Detail the leaves:
Take each slice and use a needle tool to press a central vein line down the middle. Add tiny diagonal veins branching off if you want extra detail. -
Attach the first layer:
Apply a thin smear of liquid clay or just press firmly to attach the leaves around the outer rim of your face circle. Overlap them slightly, all pointing in the same direction (clockwise or counter-clockwise). -
Add inner layer:
Place a second ring of leaves slightly inward, covering the inner edge of the first ring. Ensure the cream face is still visible in the center, acting as a frame.
Dirty Clay Fix
If dust gets on your light face clay, use a Q-tip dipped in rubbing alcohol or acetone to gently wipe the surface clean before baking.
Step 3: Berries and Baking
-
Make berry clusters:
Roll small balls of red clay. Group them into clusters of three or four. -
Position berries:
Place three clusters symmetrically around the wreath on top of the leaves. Press them down gently so they bond with the green clay. -
Texture the berries:
For a realistic look, poke a tiny hole in the center of each berry with your needle tool. -
Insert hanging loop:
Cut a small piece of wire, bend it into a U-shape, and insert the ends into the top of the wreath, behind the leaves. This will hold your string later. -
Bake:
Bake the piece according to your clay package directions (usually 275°F/130°C for 15-30 minutes). Let it cool completely.
Step 4: Finishing Touches
-
Make the fabric bow:
While the ornament cools, cut a strip of cream fabric or ribbon. Tie a simple bow, trimming the ends into a ‘V’ shape. -
Attach the bow:
Use a dab of super glue or strong craft glue to attach the bow to the top of the wreath, right in front of your wire loop. -
Add the string:
Thread a piece of natural twine through the wire loop and tie a knot to finish the hanger.
Hang your new festive friend on the tree or use it as a special gift topper this holiday season
Soft-Serve Snow Toppers

Transform a simple cylinder into this adorable winter cottage that looks good enough to eat. With its soft-serve ice cream roof and sweet little face, this project combines food-inspired textures with cozy holiday vibes.
Step-by-Step Tutorial
Materials
- White polymer clay (approx. 2oz)
- Tan/beige polymer clay (small amount for door)
- Black acrylic paint
- Pink acrylic paint or chalk pastel
- Ball tool or dotting tool
- X-acto knife or clay blade
- Needle tool
- Liquid clay (optional but helpful)
- Fine grit sandpaper
Step 1: Shaping the Base
-
Condition the Clay:
Begin by thoroughly kneading your white clay until it is soft and pliable. This prevents cracks from forming later during the shaping process. -
Create a Cylinder:
Roll about half of your white clay into a smooth ball, then gently flatten the top and bottom against your work surface to form a stout cylinder. This will be the main walls of the house. -
Smooth the Sides:
Use your fingers or a flat tool to smooth out any fingerprints on the cylinder walls. Aim for a height of about 1.5 inches.
Swirl Secret
For a realistic soft-serve look, twist the clay snake tightly *before* coiling it up. This creates those deep, delicious-looking ridges.
Step 2: Crafting the Roof
-
Form the Cone Base:
Take a portion of the remaining white clay and shape it into a low, wide cone that fits perfectly atop your cylinder base. -
Add Waffle Texture:
Using the back of your knife blade or a specialty texturing tool, gently press a diamond grid pattern into the lower rim of this cone piece. This mimics a waffle cone texture. -
Roll the Soft Serve Coil:
Roll a long snake of white clay. One end should be thicker, tapering gradually to a point at the other end. -
Twist the Coil:
Starting with the thick end, gently twist the snake of clay to give it deep ridges, just like extruded ice cream. -
Coil the Roof:
Place the twisted snake on top of the textured cone base. Spiral it upward, letting the clay get thinner as you reach the peak, finishing with a satisfying little curl. -
Blend the Seams:
Use a silicone tool or your finger to smooth the bottom of the swirl into the textured base so it looks like one solid piece. -
Attach Roof to Base:
Press the finished roof firmly onto the cylinder body. I find a tiny dab of liquid clay here helps ensure a permanent bond.
Clean Clay
White clay picks up dust instantly. Keep baby wipes nearby and clean your hands and tools thoroughly before starting the white sections.
Step 3: Adding Details
-
Shape the Door:
Create a small arch shape from your tan or beige clay. Flatten it slightly so it sits flush against the house. -
Texture the Wood:
Use a needle tool to scratch vertical grain lines into the door. Add a tiny dot for a doorknob using a speck of black clay or paint. -
Attach the Door:
Press the door onto the lower center of the house body. Make sure the bottom aligns with the base of the cylinder. -
Bake the Piece:
Bake your creation according to the package instructions for your specific brand of clay. Let it cool completely before painting.
Step 4: Painting the Face
-
Paint the Eyes:
Dip a small dotting tool into black acrylic paint. Place two wide-set eyes on either side of the door. -
Add Eye Highlights:
Once the black paint is dry, use a sewing needle to add the tiniest speck of white inside each eye for that sparkling kawaii look. -
Apply Cheeks:
Using a dry brush technique with pink paint or pink chalk pastel dust, gently dab rosy oval cheeks just below and outside the eyes. -
Tiny Heart Nose:
For the final touch, paint a microscopic pink heart right in the center of the door.
This sweet little house makes a perfect festive decoration for your desk or mantle
Sparkly Pastel Holiday Charm Set
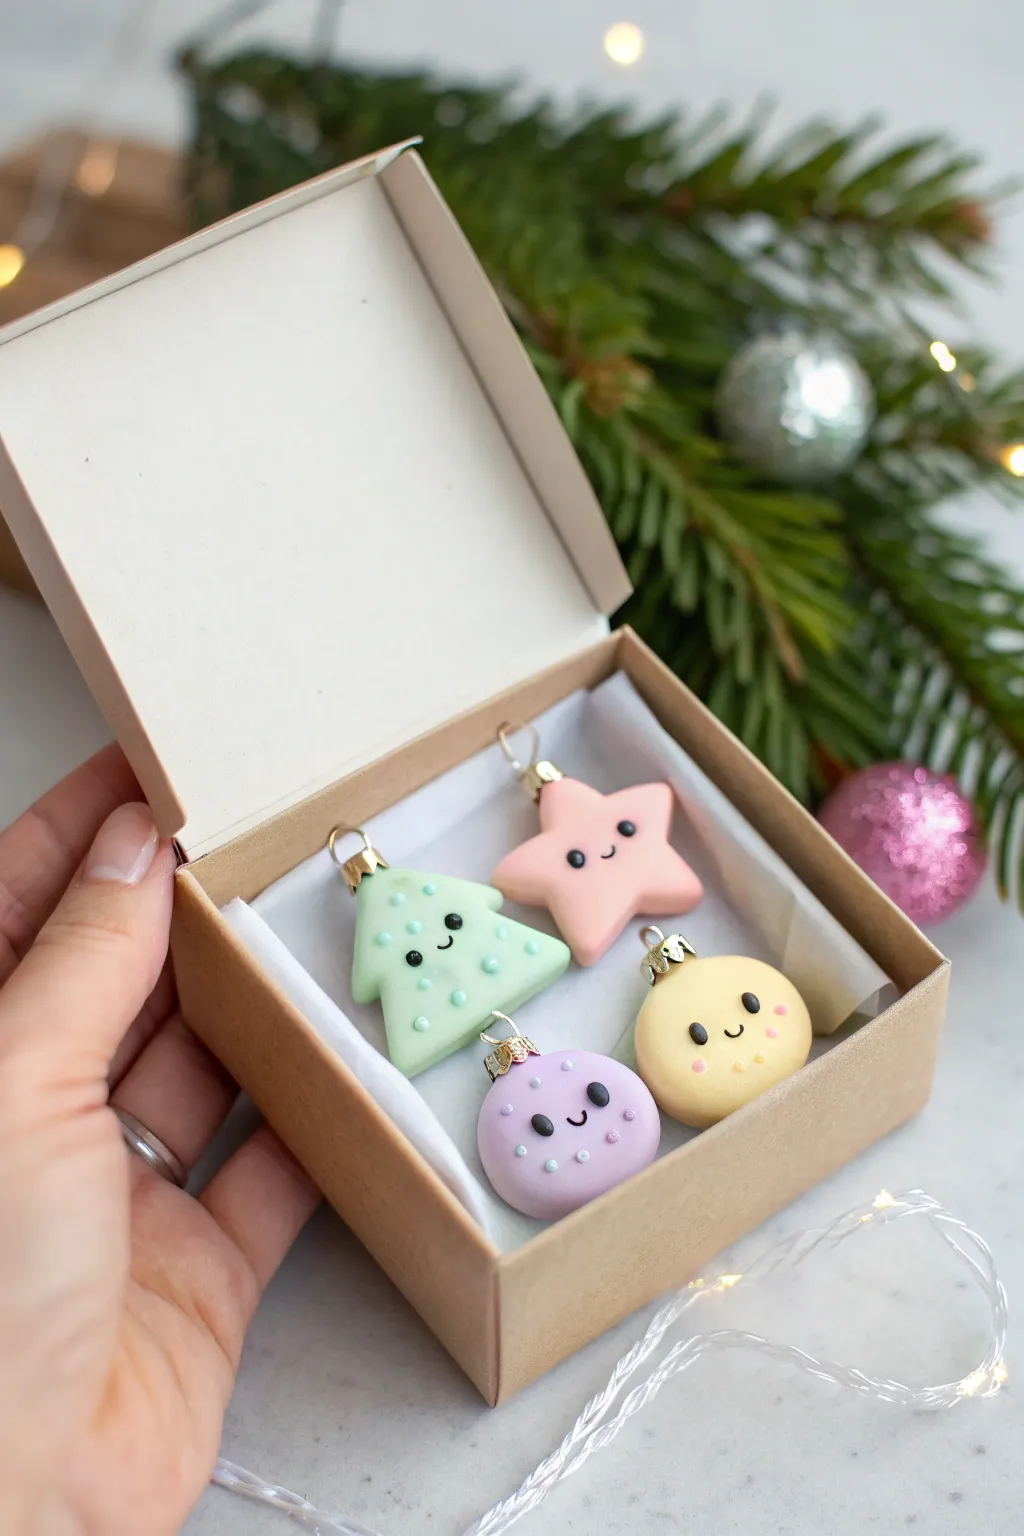
Create a set of four impossibly cute polymer clay charms featuring pastel holiday icons with sweet, tiny faces. This miniature collection includes a tree, a star, and two baubles, all tucked into a cozy gift box for the perfect handmade present.
Detailed Instructions
Materials
- Polymer clay (pastel mint green, baby pink, pale yellow, lilac, and black)
- White acrylic paint or dimensional fabric paint
- Gloss glaze or polyurethane varnish (optional but recommended)
- Clay roller or pasta machine
- Cookie cutters (small star, tree, circle) or craft knife
- Eye pins or small screw eyes
- Needle tool or dotting tool
- Baking sheet and parchment paper
- Fine detail paintbrush
Step 1: Shaping the Charms
-
Condition the Clay:
Begin by kneading each of your pastel clay colors—mint, pink, yellow, and lilac—until they are soft and pliable. This warmth helps prevent cracking later on. -
Roll the Sheets:
Roll each color out to a uniform thickness, ideally about 1/4 inch (6mm). You want them thick enough to hold an eye pin securely but light enough to hang. -
Cut the Shapes:
Use your small cutters to punch out one shape from each color. Use the mint for the tree, pink for the star, and circles for the yellow and lilac baubles. If you don’t have cutters, gently hand-mold these shapes or cut them with a craft knife. -
Soften the Edges:
Gently tap the edges of your cut shapes with your fingertip to round them off slightly. This gives that soft, ‘puffy’ look characteristic of kawaii charms rather than sharp, cookie-cutter edges.
Step 2: Adding Details & Faces
-
Create the Eyes:
Roll tiny, equal-sized balls of black clay. Position two balls on the lower half of each charm, spacing them slightly apart. Press them gently into the base clay so they adhere. -
Form the Smiles:
Roll an incredibly thin snake of black clay. Cut tiny segments for the mouths. Curve each segment into a ‘U’ shape and press it carefully between the eyes using your needle tool. -
Insert Hardware:
Trim your eye pins to an appropriate length if needed. Push an eye pin into the top center of each charm. I find adding a tiny dab of liquid clay or ‘Bake and Bond’ on the pin helps secure it permanently. -
Add Texture Details:
For the tree and round baubles, use a small dotting tool to gently indent where you plan to put the white sprinkles later. This isn’t strictly necessary, but it helps guide your painting.
Eyes Falling Off?
If tiny clay eyes won’t stick, use a needle tool to make a small divot first, then press the black ball in. Liquid clay acts as great glue here.
Step 3: Baking & Finishing
-
Bake the Pieces:
Arrangement the charms on a parchment-lined baking sheet. Bake according to your specific brand of clay’s instructions (usually around 275°F/135°C for 15-30 minutes). Let them cool completely before handling. -
Paint the Sprinkles:
Using white acrylic paint and a fine dotting tool (or a toothpick), add the decorative dots. On the tree, scatter them like ornaments. On the lilac bauble, cluster them slightly. Add tiny cheek blushes to the yellow one if desired. -
Seal (Optional):
Once the paint is fully dry, apply a coat of gloss glaze. This will seal the paint and give the charms a lovely finished ceramic look. -
Add Jump Rings:
Open a small gold or silver jump ring using pliers and attach it to the eye pin loops. This makes it easier to thread a string or ribbon through later. -
Box Them Up:
Line a small kraft jewelry box with tissue paper. Nestle your four finished charms inside for a professional-looking presentation.
Sparkle Upgrade
Mix a pinch of clear or iridescent glitter into your glaze before sealing. It adds a festive shimmer without hiding your cute painted details.
These sweet little faces are now ready to brighten up a miniature tree or delight a friend when they open the box
Cat Tangled in Christmas Lights
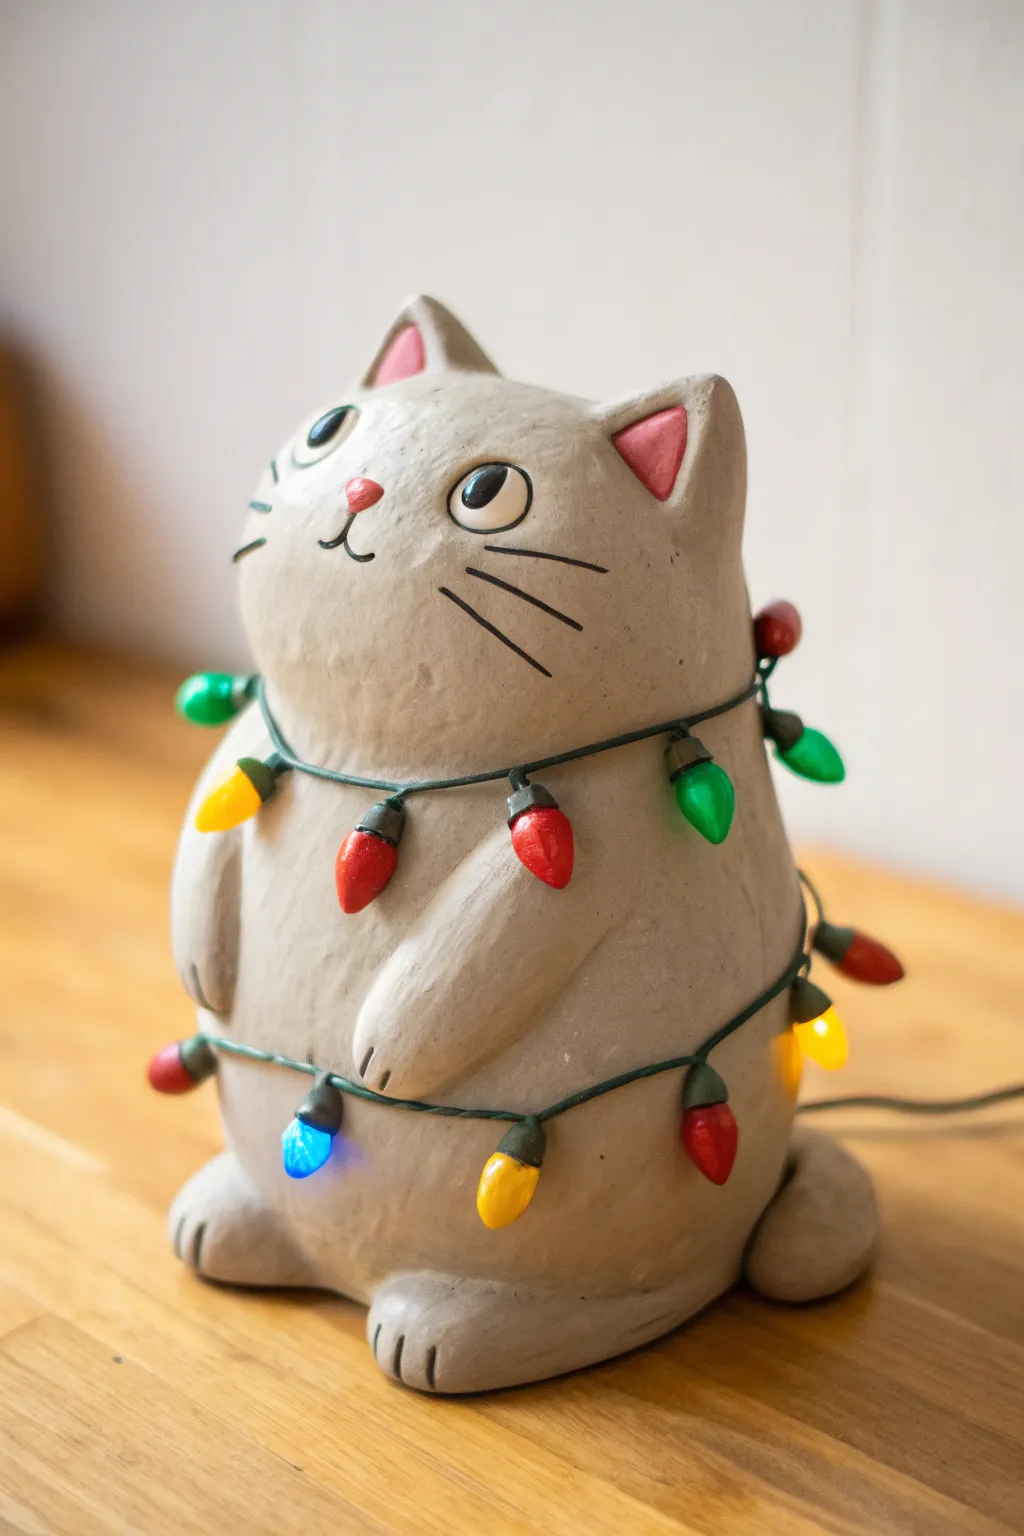
This adorable stone-look cat is wrapped in festive frustration, tangled in a colorful string of retro Christmas lights that actually glow. It functions as a cozy holiday nightlight or just a whimsical shelf sitter, bringing warmth to your kawaii Christmas decor.
How-To Guide
Materials
- Air-dry clay (grey stone effect) or polymer clay (granite)
- Small LED fairy light string (battery pack style)
- Translucent polymer clay or resin (red, blue, yellow, green)
- Acrylic paints (black, pink, white)
- Sculpting tools (needle tool, smoothing tool)
- Aluminum foil (for armature)
- Wire armature (optional, for stability)
- Sandpaper (fine grit)
- Matte varnish
Step 1: Sculpting the Cat Base
-
Form the armature:
Crumple aluminum foil into a large teardrop shape. This will be the body of the cat. It helps save clay and keeps the figure lighter. -
Cover with clay:
Roll out a slab of your grey clay—I prefer a stone-effect air-dry clay for that textured pottery look—and wrap it entirely around the foil core. Smooth the seams until distinct lines disappear. -
Shape the body:
Refine the shape so it is wider at the bottom (the haunches) and slightly tapered at the top (the head). The head and body should be one continuous, smooth form without a defined neck. -
Add the ears:
Form two small triangles of grey clay. Attach them to the top of the head, blending the clay downwards so they become part of the main sculpture rather than just stuck on top. Pinch them slightly to create depth. -
Create the legs:
Roll two thick, short sausages of clay for the back legs. Attach them to the bottom sides of the body, bending them slightly forward to suggest sitting paws. Use a sculpting tool to press in three lines for toes. -
Add front arms:
Create two smaller sausage shapes for the front arms. Attach them to the chest area, angling them downwards and slightly inwards, as if the cat is looking at its belly. Blend the shoulders into the body.
Stone Texture Trick
Mix a small amount of fine sand or dried used coffee grounds into your grey clay before specialized sculpting. It creates a speckled, authentic granite look without painting.
Step 2: Creating the Light Strand
-
Roll the wire:
Roll a very long, very thin snake of dark green clay. This will be the electrical wire. If you are embedding real LEDs, gently press your wire strand flat, lay the LED wire on it, and fold the clay over to conceal it. -
Wrap the cat:
Drape the clay ‘wire’ around the cat. Start near the bottom, spiral up around the back, across the chest, and around the shoulders. Make sure it looks a bit haphazard, like a true tangle. -
Make the sockets:
Form small, dark green cylinders or cones. Attach these along the wire at regular intervals. If using real lights, position these sockets directly over the LED bulbs poking out of your wire strand.
Step 3: Crafting the Bulbs
-
Shape the bulbs:
Using translucent colored clay (or creating molds to fill with tinted resin later), shape classic C9-style bulbs—teardrops with a pointed tip. Make a mix of red, green, yellow, and blue. -
Attach the bulbs:
Press each colored bulb securely into the green sockets you created earlier. If you are using real LEDs underneath, make sure the translucent clay is thin enough for the light to shine through. -
Texture the surface:
Before the clay hardens, take a stiff bristle brush or a crumpled ball of foil and gently tap the grey cat body. This creates a concrete or stone-like texture, contrasting with the smooth bulbs.
Make it Glow
Can’t wire LEDs? Make the bulbs from glow-in-the-dark polymer clay instead. Charge it under a lamp, and your kitty will still light up when the room goes dark.
Step 4: Face Features & Finishing
-
Sculpt the face:
Add a tiny triangle nose. Use a needle tool to incise the mouth lines (an inverted ‘Y’ shape) and long whiskers. Press in slight indentations where the eyes will go. -
Dry or bake:
Follow the instructions for your specific clay type. If using air-dry clay, allow at least 24-48 hours for the core to dry completely. -
Sand and prep:
Once fully cured, use fine sandpaper to smooth out any unintentional rough spots on the bulbs or the base of the cat. -
Paint the face:
Paint the nose pink. Fill the eye indentations with white, then add large black pupils with a tiny white reflection dot. Paint the carved whiskers and mouth lines with thin black paint. -
Final details:
Paint the inside of the ears a soft pink. Add a coat of gloss varnish only to the light bulbs and the eyes to make them shine, while finishing the cat body with a matte varnish.
Now you have a permanently festive feline friend to brighten up your holiday display