If you’ve got access to a kiln, you’ve basically unlocked the “forever” version of clay—strong, waterproof, and ready for real daily life. Here are my favorite kiln clay ideas that hold up beautifully through firing and look even better once the glaze magic happens.
Everyday Mugs With Big Handles
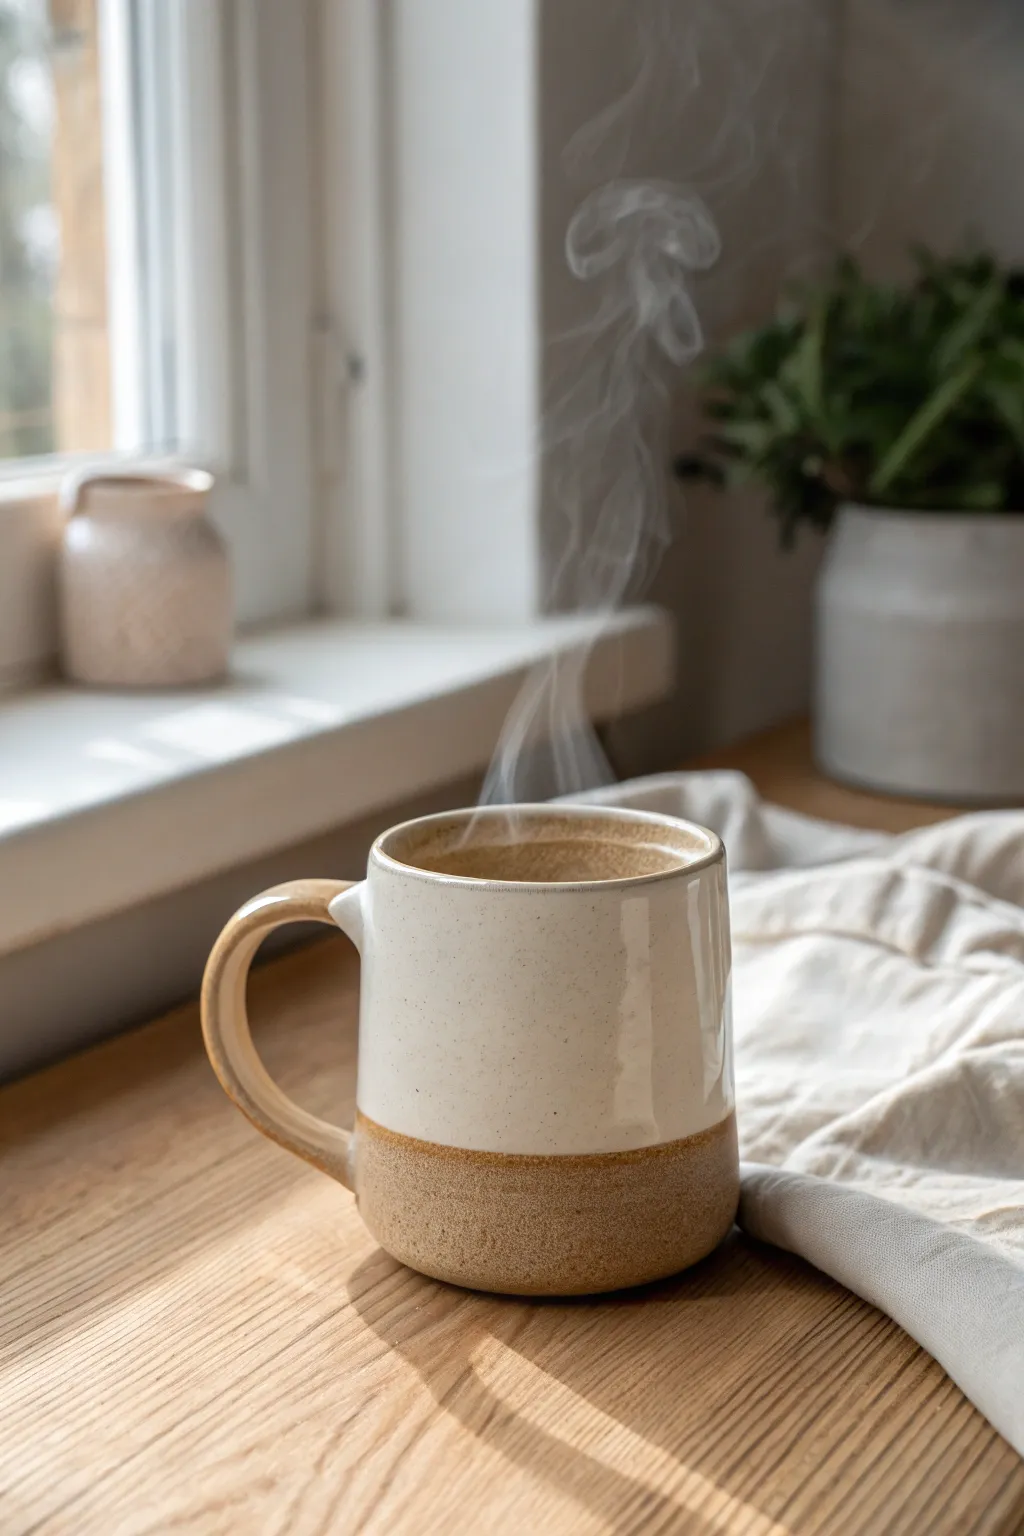
This comforting project focuses on function and texture, resulting in a dual-finished mug that feels perfect in the hand. By leaving the base unglazed, you create a tactile contrast against the smooth, creamy upper section, highlighting the natural beauty of speckled stoneware.
Step-by-Step
Materials
- Speckled stoneware clay (approx 1 lb per mug)
- Pottery wheel (or slab roller/rolling pin for hand-building)
- Throwing tools: sponge, wire cutter, rib tools
- Trimming tools
- Needle tool
- Scoring tool or serrated rib
- Slip (clay mixed with water)
- Cream or oatmeal-colored speckled glaze
- Wax resist (liquid)
- Small paintbrush
- Extruder (optional for handle)
Step 1: Throwing the Body
-
Prepare your clay:
Begin by thoroughly wedging about 1 pound of speckled stoneware clay to remove air bubbles and ensure consistency. Form it into a smooth ball. -
Center on the wheel:
Throw the ball firmly onto the center of the wheel head. Using wet hands, cone the clay up and push it back down until perfectly centered. -
Open the form:
Press your thumbs into the center to open the clay, leaving about a half-inch of thickness at the bottom for the foot. -
Pull the walls:
Gently pull the cylinder walls upward, keeping them straight and vertical. Aim for an even thickness from bottom to top, slightly tapering inward at the rim. -
Shape the profile:
Using a rib tool on the inside and a sponge on the outside, gently belly out the form slightly to create a soft, cylindrical shape rather than a severe straight line. -
Refine the rim:
Compress the rim using a piece of chamois or your sponge to ensure it is smooth and pleasant for drinking. -
Wire off:
Run a wire cutter under the base of the mug and set the cylinder aside on a ware board to dry to a leather-hard state.
Step 2: Trimming and Handle
-
Trim the foot:
Once leather-hard, center the mug upside down on the wheel. Trim away excess clay from the bottom, creating a clean, flat foot ring that distinguishes the base. -
Pull the handle:
Using a fresh lump of clay and plenty of water, pull a thick strap handle. For this ‘big handle’ look, keep the coil generous in width. -
Shape the loop:
Curve the handle into a large ‘C’ or ear shape and let it stiffen slightly on a table, ensuring the curve is wide enough for several fingers. -
Attach the handle:
Score the mug body and the handle attachment points vigorously. Apply slip, then press the handle firmly onto the mug. -
Blend seams:
Smooth the clay where the handle meets the mug using a modeling tool or your thumb. I like to add a tiny coil of clay at the join for extra strength before blending. -
Texture the base:
Use a slightly rough sponge or a stiff brush to gently stipple the bottom third of the mug’s exterior. This enhances the raw clay texture seen in the photo. -
Bisque fire:
Allow the mug to dry completely (bone dry) before loading it into the kiln for a bisque firing (usually to Cone 04).
Pro Tip: Handle Comfort
When attaching the handle, ensure the top attachment point is level with the rim. This balance makes the mug feel lighter when full of coffee.
Step 3: Glazing
-
Clean the bisque:
Wipe the fired mug with a damp sponge to remove any dust that might prevent glaze adhesion. -
Apply wax resist:
Paint a clean, straight line of liquid wax resist around the exterior, roughly one-third of the way up from the bottom. Paint the entire bottom section and foot with wax as well. -
Glaze the interior:
Pour your cream or oatmeal glaze inside the mug, roll it around to coat the entire interior, and pour out the excess. -
Dip the exterior:
Holding the mug by the foot (which is waxed), dip the top section into the glaze bucket. The wax line will resist the glaze, creating that crisp two-tone separation. -
Final wipe:
If any glaze beads up on the waxed bottom section, wipe it away gently with a damp sponge. -
Glaze fire:
Fire the mug to maturity (likely Cone 5 or 6 depending on your clay body). The speckled clay will show through the glaze and the raw base.
Level Up: Thumb Rest
Press a small, smooth indentation into the very top curve of the handle right after attaching. It creates a perfect resting spot for your thumb.
Now brew your favorite tea and enjoy the warmth of handmade stoneware between your hands


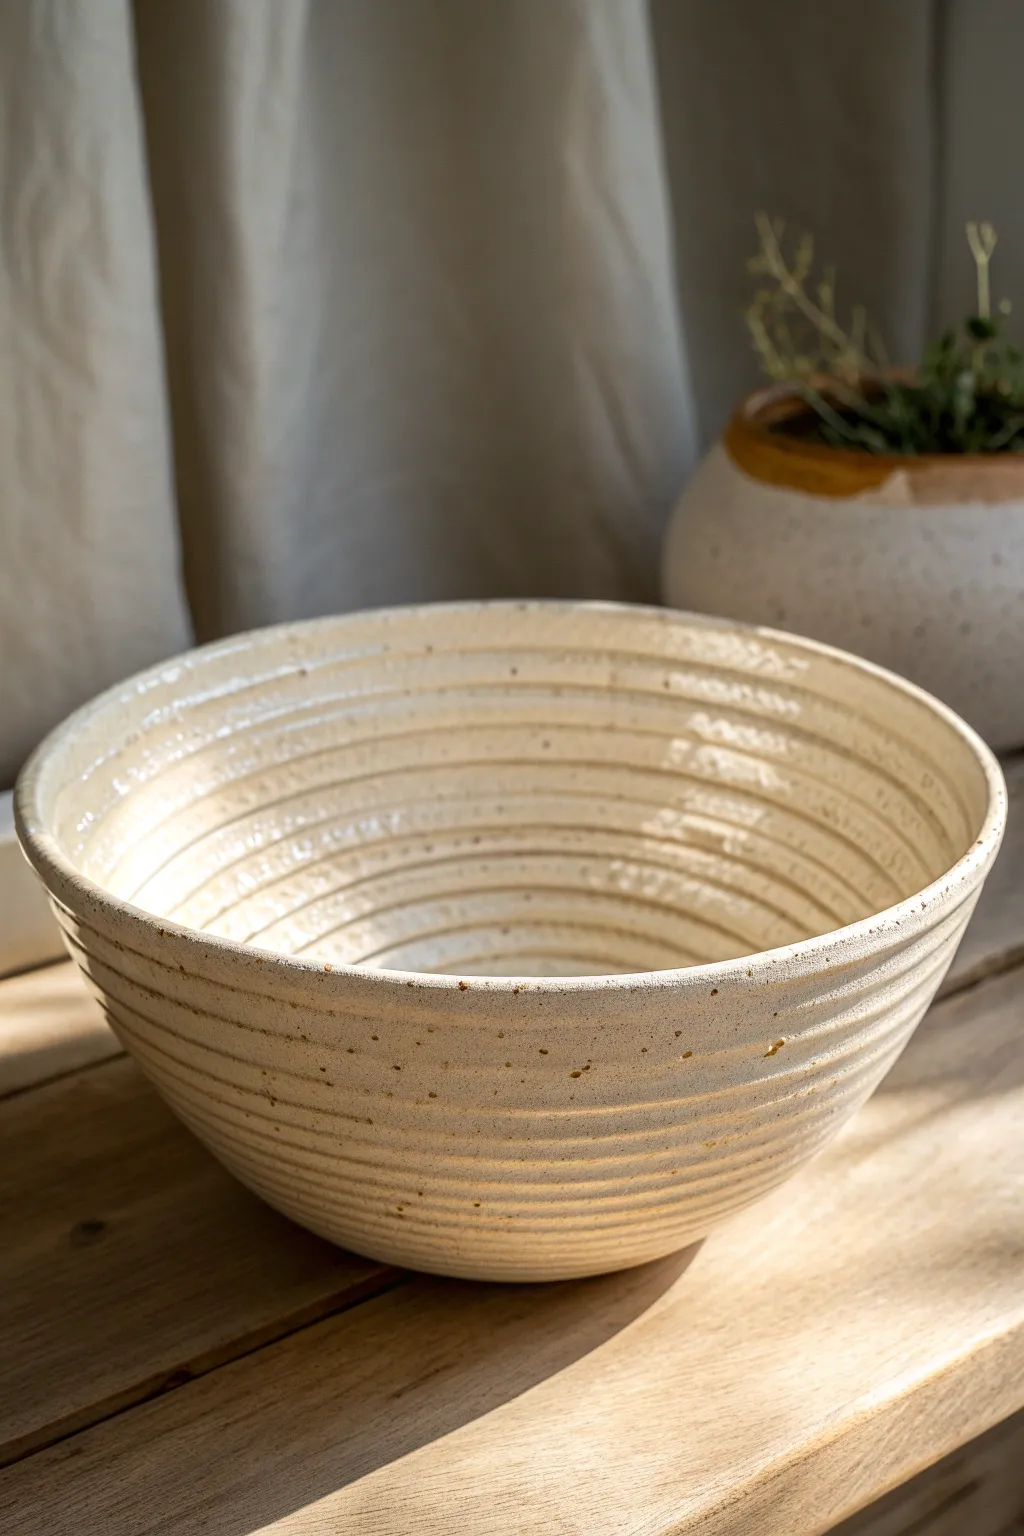
Stackable Snack Bowls
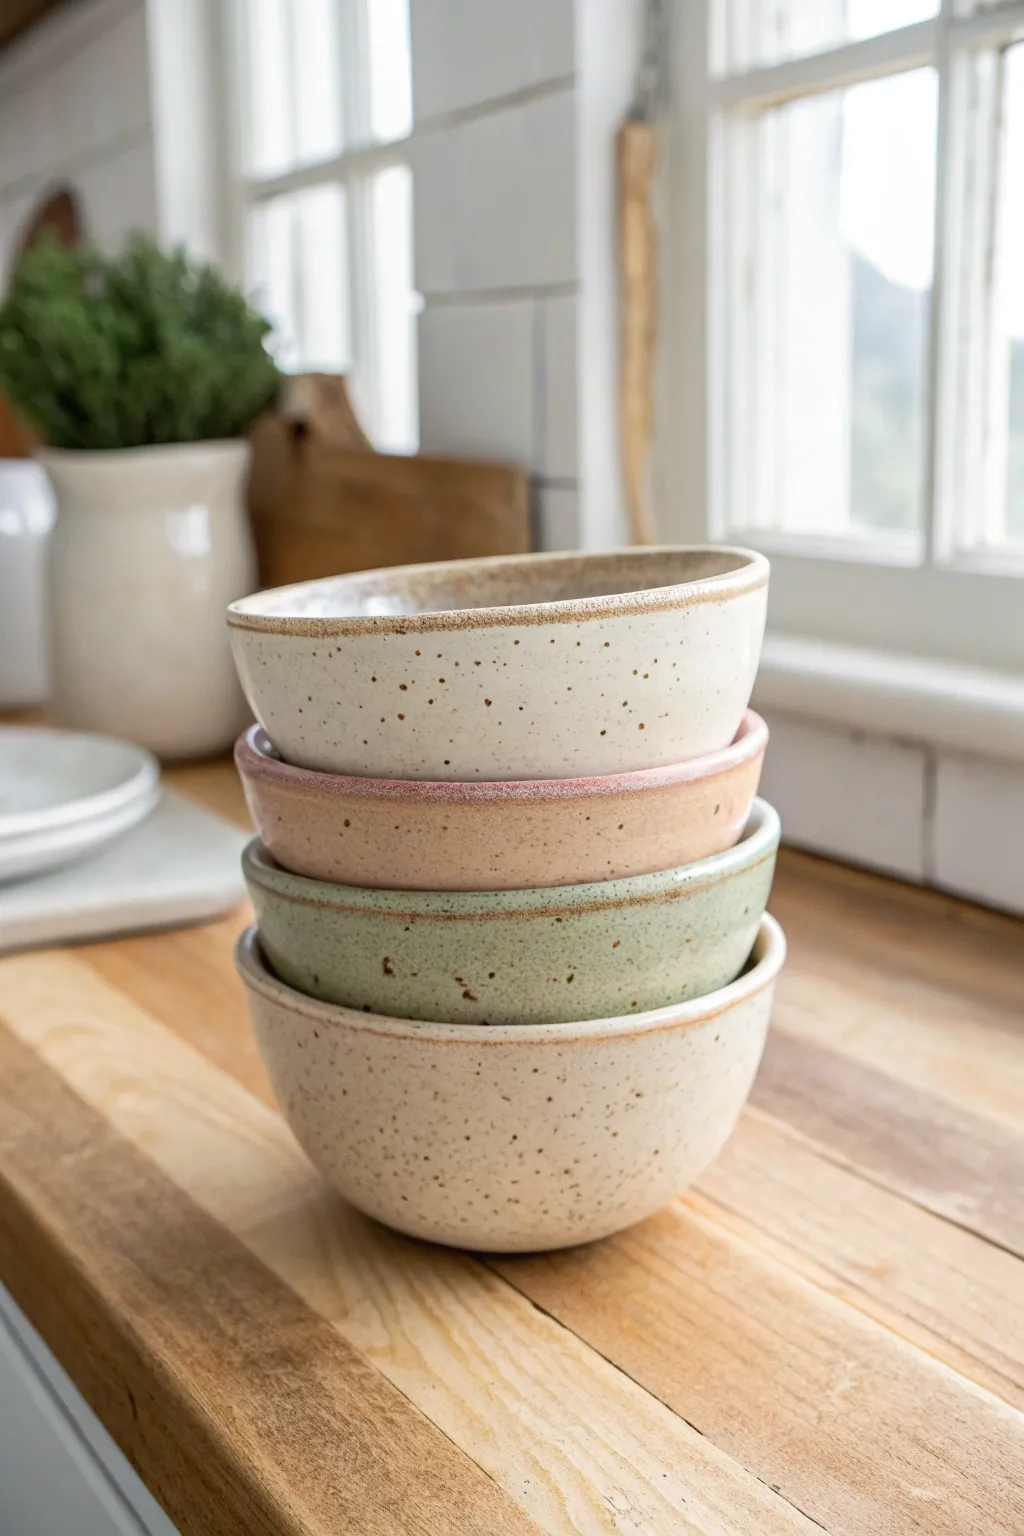
These charming, rustic bowls prove that mismatched sets can still feel cohesive and intentional. With their earthy speckles and soft pastel rims, this stackable design is perfect for serving snacks or simply displaying on open shelving.
Step-by-Step Guide
Materials
- Stoneware clay (preferably a speckled buff body)
- Pottery wheel
- Throwing tools (sponge, wire cutter, rib, needle tool)
- Trimming tools
- Loop tool
- Kiln
- Cone 5-6 speckled white glaze
- Underglazes or coloring oxides (terracotta pink, sage green)
- Wax resist
- Iron oxide wash (for rims)
Step 1: Throwing the Forms
-
Weigh your clay:
Start by weighing out four balls of clay, roughly 1 to 1.5 pounds each. Consistency in weight is the first step toward getting bowls that stack neatly together. -
Center and open:
Throw the clay onto your wheel head and center it firmly. Open the clay to a curved bottom rather than a flat one to achieve that nice rounded interior profile. -
Pull the walls:
Pull the walls up and slightly outward. Aim for a gentle curve that widens at the rim. These bowls have a classic ‘cereal bowl’ shape—wide enough for generous servings but deep enough to hold soup. -
Refine the rim:
Compress the rim with your chamois or sponge. I like to leave the rim slightly thickened and rounded, as this matches the rustic aesthetic we are aiming for. -
Shape with a rib:
Use a smooth kidney rib on the inside of the bowl while supporting the outside to remove throwing lines and define the final curve. -
Check sizing:
Before cutting the first bowl off, use calipers to measure the rim diameter. Use this measurement as a guide for the next three bowls to ensure they look like a coherent set.
Wobbly Stack?
If bowls don’t nest well, your foot rings might be too wide. Next time, use a chuck to trim deeply into the foot, mirroring the interior curve of the bowl below it.
Step 2: Trimming and Drying
-
Leather hard stage:
Allow the bowls to dry to a leather-hard state. The rim should be firm enough to support the weight of the bowl when flipped over without warping. -
Trim the foot:
Center the bowl upside down on the wheel. Trim a clean foot ring. For stackable bowls, make sure the foot ring is wide enough to sit stable, but slightly narrower than the interior bottom curve of the bowl below it. -
Smooth the exterior:
Run a smooth rib or the back of a spoon over the trimmed areas to burnish the clay grains back in, creating a tidy surface for the glaze. -
Bisque fire:
Let the bowls dry completely (bone dry) before loading them into the kiln for a bisque firing to Cone 04.
Step 3: Glazing the Palette
-
Prepare the base glaze:
Stir your speckled white glaze thoroughly. This will be the base for all four bowls. If your clay body doesn’t have speckles, choose a glaze that includes iron flecks. -
Mix custom tints:
Pour small amounts of the white glaze into separate containers. Tint one batch with a small amount of mason stain or oxide to create the sage green, and another for the dusty pink. -
Dip the bowls:
Wax the foot rings. Dip the top and bottom bowls in the plain speckled white. Dip the second bowl in the pink tint, and the third in the green tint. Hold them upside down for a few seconds to let drips settle. -
Rim detail application:
Once the main glaze is dry to the touch, use a small brush or a sponge to apply a wash of iron oxide or a darker brown glaze just to the very edge of the rim. -
Cleanup:
Wipe away any glaze that may have dripped onto the waxed foot ring with a damp sponge. -
Glaze fire:
Load the kiln carefully, ensuring bowls aren’t touching. Fire to Cone 5 or 6 (depending on your clay and glaze specifications). -
Cooling:
Allow the kiln to cool naturally before opening. Removing pieces too early can cause thermal shock and crack your new set.
Make it a Set
Create a matching pitcher or small creamer using the same clay body. Glaze the bottom half in the pink or green tint and leave the top speckled white for a two-tone look.
Enjoy using your custom stackable bowls for everything from morning oatmeal to evening snacks


Tiny Trinket Dishes for Rings
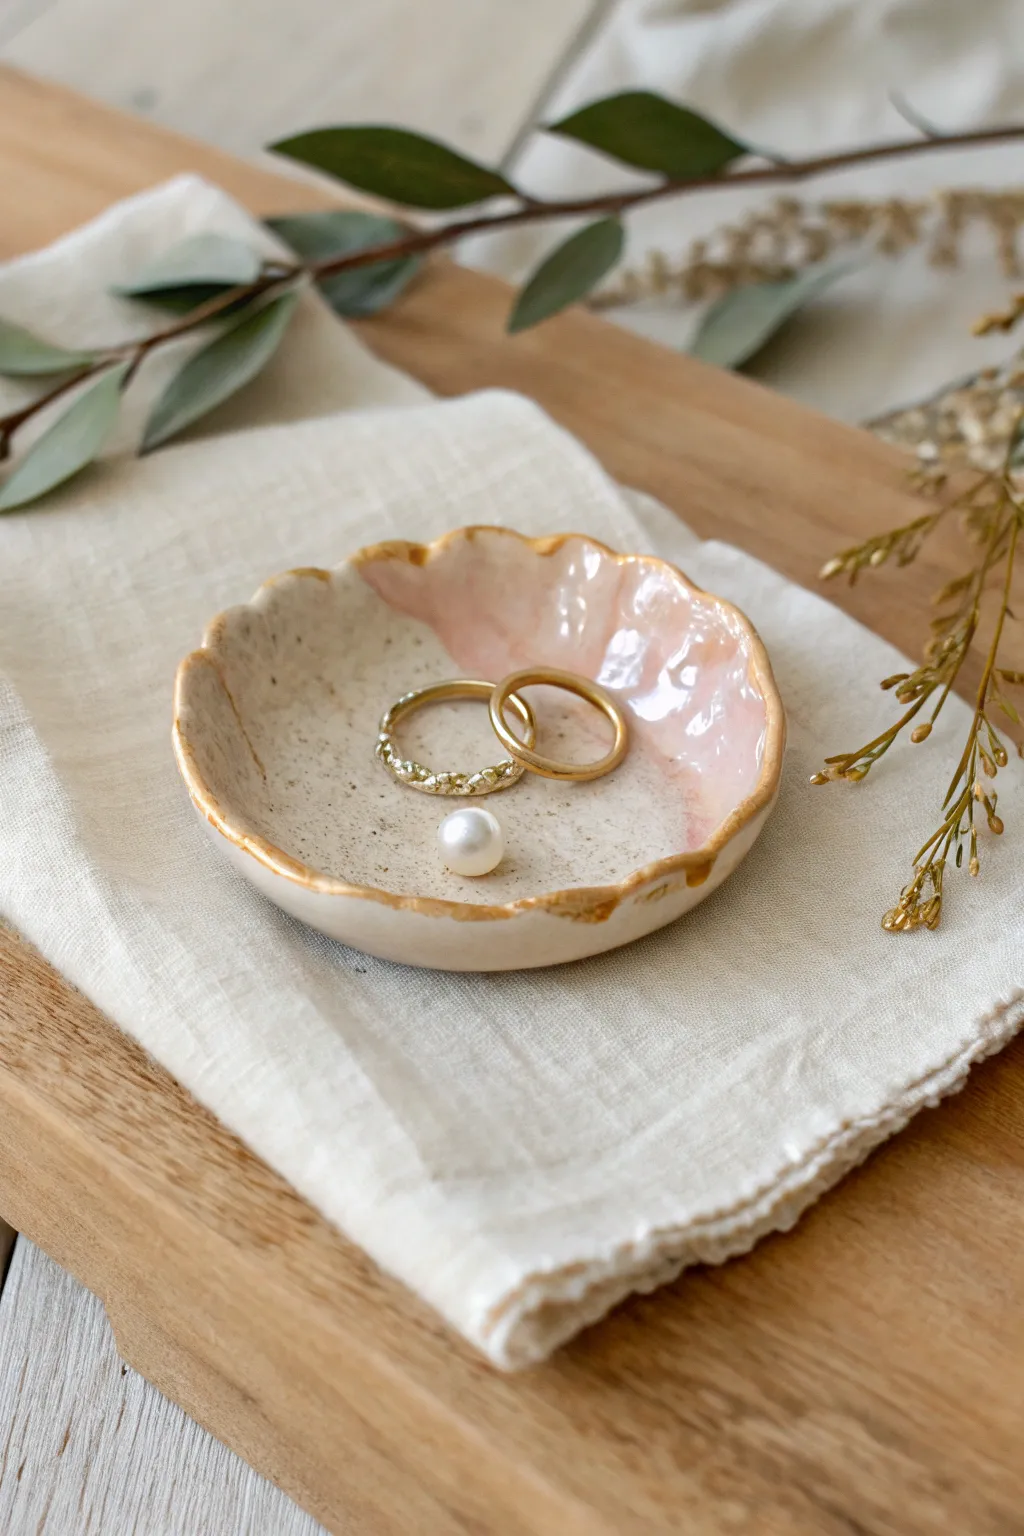
These delicate trinket dishes offer a perfect home for your most precious rings and pearls. With their organic, scalloped edges and a touch of gold luster, they combine rustic handmade charm with a hint of elegance.
Step-by-Step
Materials
- Speckled stoneware clay (mid-fire)
- Small rolling pin
- Circle cutter (approx. 3-4 inches) or a bowl to trace
- Small foam sponge
- Wooden modeling tool or fingers
- Light pink glossy glaze
- Clear glossy glaze (optional)
- Gold luster overglaze (low-fire)
- Small liner brush for gold
- Soft fan brush for glaze
- Kiln
Step 1: Forming the Dish
-
Roll the slab:
Begin by rolling out a ball of speckled stoneware clay into a slab that is about 1/4 inch thick. Ensure the thickness is even to prevent cracking during drying. -
Cut the circle:
Use a circle cutter or place a small bowl upside down on the clay to trace and cut out a perfect circle. A diameter of 3 to 4 inches is ideal for a small ring dish. -
Smooth the edges:
Dip your finger or a small sponge in water and gently run it along the cut edge of the circle. This removes any sharp burrs and compresses the clay particles. -
Create the curve:
Place the clay circle into the palm of your hand. Gently press the center down with your thumb while cupping the sides up to create a shallow bowl shape. -
Pinch the scallops:
To achieve that organic, flowery rim, use your thumb and forefinger to gently pinch sections of the rim. Create gentle undulations rather than sharp points for a softer look. -
Refine the shape:
Go around the rim once more, smoothing out any fingerprint marks with a slightly damp sponge. Make sure the rim feels pleasant to the touch. -
Dry slowly:
Set the dish aside to dry completely. Because thin rims can warp, I like to let this dry away from drafts. Once bone dry, bisque fire the piece according to your clay’s instructions.
Fixing Wobbly Rims
If the rim warps too much during drying, try drying the next batch upside down on a piece of foam or cushion to support the delicate edges.
Step 2: Glazing and Firing
-
Clean the bisque:
Wipe the bisque-fired dish with a damp sponge to remove any kiln dust, which helps the glaze adhere properly. -
Apply pink glaze:
Using a soft fan brush, apply a light pink glossy glaze to roughly one-half of the interior. Paint in an abstract, curvy shape so it looks like a washed tide line. -
Layering density:
Apply 2-3 coats of the pink glaze, letting each coat dry briefly in between, to ensure a rich, opaque color. -
Glaze the rest (optional):
If you want the speckled clay to be sealed, apply a clear glaze over the remaining interior. Alternatively, leave the speckled clay raw for a matte contrast against the glossy pink. -
Glaze firing:
Load the kiln and fire to the maturation temperature of your glaze (typically Cone 5 or 6). Allow the kiln to cool completely before unloading.
Step 3: Gold Luster Accents
-
Prepare for luster:
Ensure the fired glazed surface is absolutely clean and free of oils or dust. Handle the dish by the bottom if possible. -
Paint the rim:
Dip a dedicated small liner brush into your gold luster. Carefully paint a thin line along the very edge of the scalloped rim. -
Add organic variation:
Allow the gold line to be slightly thicker in the ‘valleys’ of the scallops and thinner on the peaks to enhance the handmade aesthetic. -
Gold firing:
Place the dish back in the kiln for a third firing. Luster fires at a much lower temperature, usually around Cone 018 to 019. Check your specific luster bottle for guidelines.
Add Texture
Before cutting your circle, press a piece of lace or a textured fabric into the raw clay slab. The glaze will break beautifully over the pattern.
Once the final firing is complete, your elegant dish is ready to hold treasures


Stamped Coasters With Crisp Texture
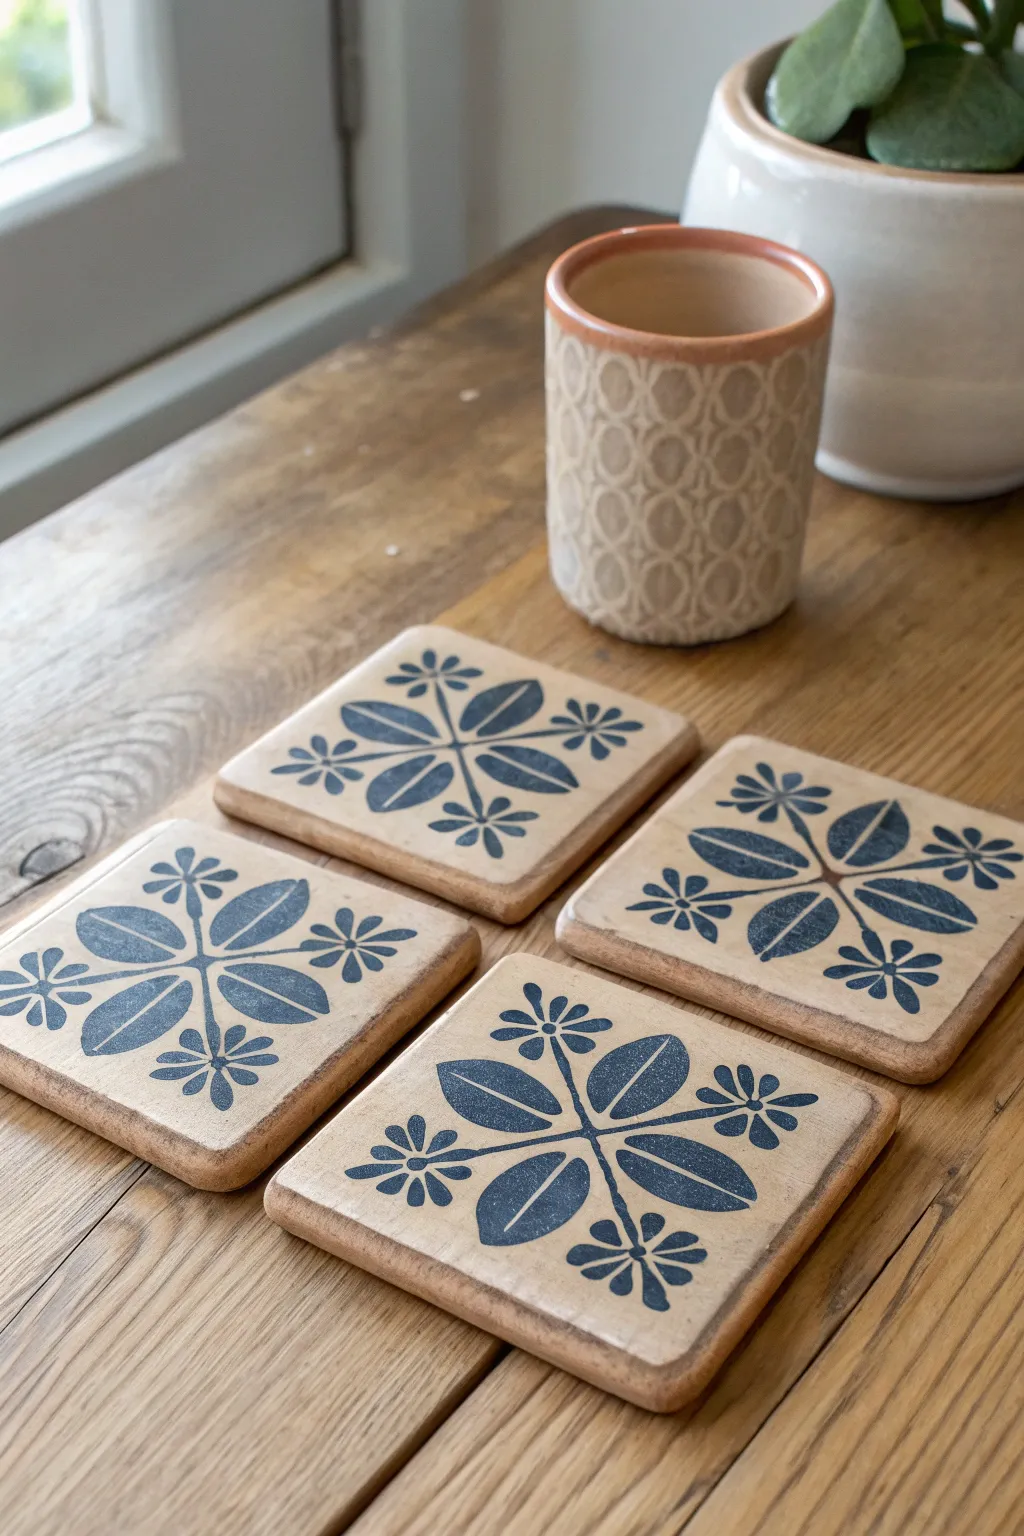
Create a set of polished, functional art with these stoneware coasters featuring a crisp, navy blue floral motif. The raw clay finish paired with a clean, dark underglaze stamp creates a beautiful contrast that feels both rustic and modern.
How-To Guide
Materials
- Buff or light speckled stoneware clay
- Rolling pin
- Two 1/4-inch wooden thickness strips (slats)
- Wide, flat stamp with floral or leaf design (rubber or wood)
- Navy blue underglaze
- Small foam roller or sponge dauber
- Square cookie cutter (approx. 4×4 inches) or fettling knife and ruler
- High-grit sandpaper or sanding sponge
- Clear matte glaze (optional)
- Small board or bat for drying
Step 1: Preparation & Rolling
-
Prepare the Clay:
Begin by wedging your stoneware clay thoroughly to remove air bubbles. You’ll need about 1-1.5 lbs of clay for a set of four coasters. -
Roll the Slab:
Place the clay between your two 1/4-inch thickness strips. Roll the clay out into a smooth, even slab. The strips ensure every coaster is perfectly uniform in thickness. -
Smooth the Surface:
Take a rubber rib tool or a slightly damp sponge and compress the surface of the slab. This aligns the clay particles and creates a pristine canvas for stamping.
Smudged Print?
If the underglaze smears during stamping, let the underglaze dry slightly on the stamp (wait 30-60 secs) before pressing. It should be tacky, not wet.
Step 2: Stamping & Cutting
-
Load the Stamp:
Pour a small amount of navy blue underglaze onto a palette. Using a foam roller or sponge dauber, apply a thin, even layer of underglaze onto the raised surface of your stamp. Avoid flooding the crevices. -
Test the Impression:
I always recommend doing a quick test stamp on a scrap piece of clay first. This helps you gauge how hard to press and ensures the underglaze coverage is solid. -
Stamp the Slab:
Press the stamp firmly onto your clay slab. Apply even pressure across the entire back of the stamp so the floral design transfers clearly without smudging. -
Repeat the Pattern:
Re-ink your stamp and repeat the process three more times, spacing them out enough to cut around them later. -
Cut the Shapes:
Center your square cookie cutter over each stamped design and press down to cut. If using a ruler and knife, measure equal distances from the center pattern and slice clean squares. -
Soften the Edges:
Gently run a damp finger along the cut edges to round them off slightly. Sharp clay edges can become razor-sharp after firing, so smoothing now is crucial.
Step 3: Drying & Firing
-
Slow Drying:
Place the coasters on a flat board or drywall piece. Cover them loosely with plastic to ensure they dry slowly and evenly, which prevents warping. -
Bisque Fire:
Once bone dry, load the coasters into the kiln for a bisque firing (typically Cone 04). This hardens the clay and sets the underglaze. -
Sanding (optional):
If the clay feels rough after bisque firing, lightly sand the bottom and edges with a sanding sponge. Wipe away any dust with a damp sponge. -
Glazing Choices:
For the look in the image, leave the clay unglazed for a raw, tactile finish. Alternatively, you can brush a coat of clear matte glaze over the top to seal the underglaze. -
Final Firing:
Fire the coasters again to the maturation temperature of your specific clay body (e.g., Cone 5 or 6 for stoneware). Ensure they are lying perfectly flat on the kiln shelf. -
Add Protection:
Once cool, adhere small cork pads or felt dots to the bottom corners of each coaster to protect delicate tabletop surfaces.
Make it a Set
Create a matching trivet by rolling a larger slab and stamping a grid of four motifs together, then glazing with the same technique.
Stack your finished coasters on the coffee table and enjoy the satisfaction of using handmade art every day

What Really Happens Inside the Kiln
Learn how time and temperature work together inside the kiln to transform clay into durable ceramic.
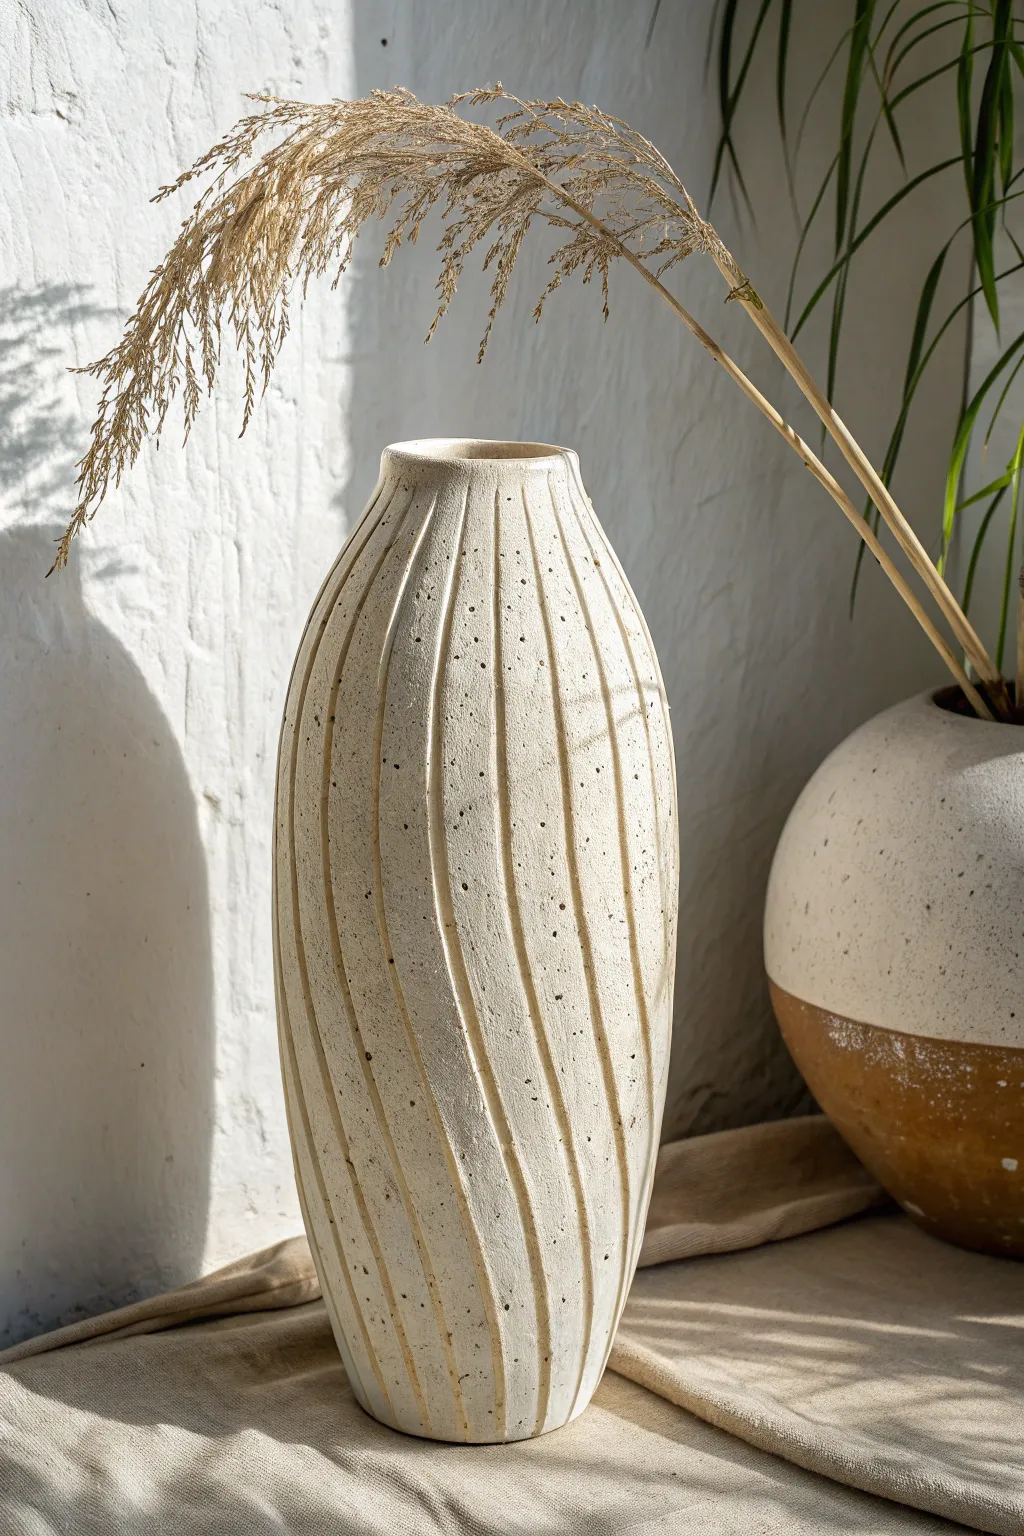
Simple Bud Vases That Always Work
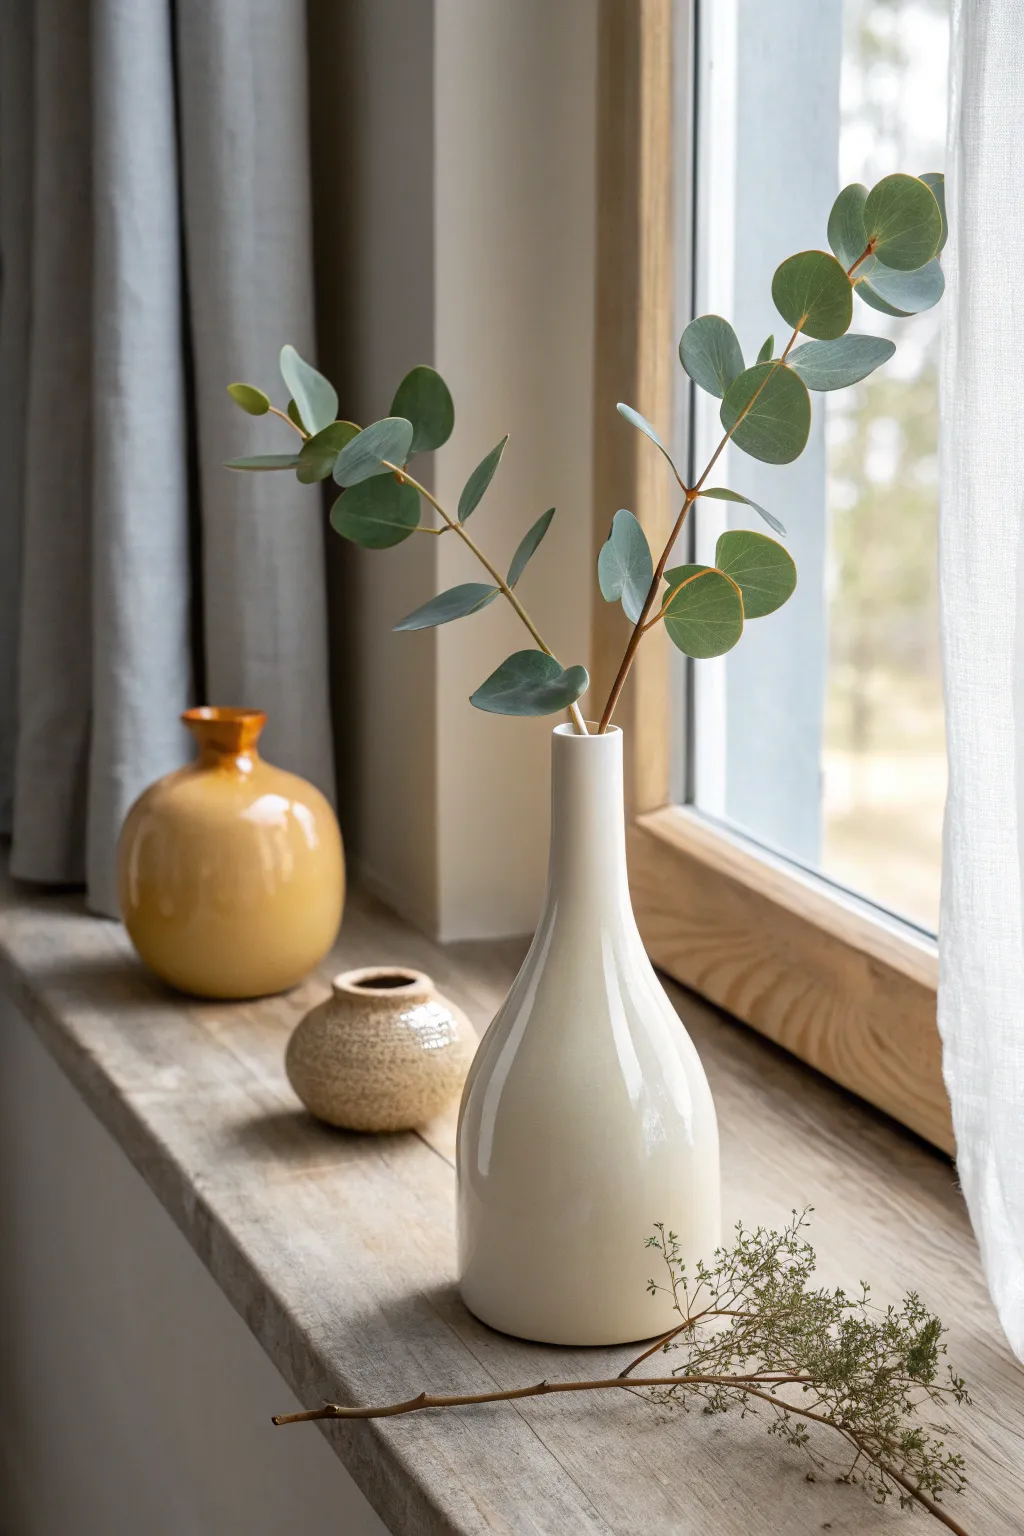
This project guides you through creating a harmonious set of three ceramic bud vases: a tall, elegant bottle vase, a textured squat spherical pot, and a round, high-gloss accent vessel. By playing with height, form, and surface finish, you’ll achieve a balanced composition that looks effortless on any windowsill.
Step-by-Step
Materials
- White stoneware clay (throwing body)
- Pottery wheel
- Throwing sponges and bucket of water
- Wooden ribs (various profiles)
- Metal rib (smooth)
- Wire clay cutter
- Needle tool
- Trimming tools (loop tool)
- Heat gun or torch (optional)
- Opaque cream/white glaze
- Glossy amber/ochre glaze
- Textured matte beige glaze (or crawling glaze)
Step 1: Throwing the Tall Bottle Vase
-
Center the clay:
Start with about 2-3 pounds of wedged white stoneware. Firmly center it on the wheel head, ensuring a tall, narrow cone shape to set yourself up for height. -
Open the form:
Drill down into the center, leaving about a half-inch floor. Open the floor narrowly—only about 2.5 inches wide—since this will be a slender bottle form. -
Pull the cylinder:
Begin pulling the walls up. Focus on maintaining a consistent thickness. You want a tall cylinder, slightly tapering inward as you go higher to prepare for the neck. -
Shape the belly:
Using a wooden rib on the outside and your hand on the inside, gently push the lower section out to create a subtle belly that tapers gracefully toward the shoulder. -
Collar the neck:
Using both hands around the rim, gently squeeze and lift to collar the clay inward. This compresses the clay particles, so work slowly to prevent buckling. -
Refine the spout:
Continue collaring until the neck is distinct and slender. Use a needle tool to trim the rim evenly, then smooth it with a chamois or your finger for a polished look.
Uneven Drying?
Tall necks dry faster than thick bases, causing cracks. Lightly wrap the neck in plastic while the base catches up, or use a damp box for inconsistent drying limits.
Step 2: Creating the Accent Vessels
-
Throw the round ochre vase:
Center a smaller amount of clay (1.5 lbs). Open wider than the bottle. Pull a short cylinder and belly it out aggressively with a rib to create a distinct ‘orb’ shape with a very short, narrow neck. -
Throw the textured squat pot:
For the smallest vessel, center 1 lb of clay. Throw a low, wide form with a closed-in rim. Unlike the others, keep the walls slightly thicker to support texturing later. -
Add texture:
While the squat pot is still on the wheel (or leather hard), use a trimming tool or a rough sponge to disturb the surface, creating that pitted, organic ‘stone’ look.
Collaring Success
When narrowing a bottle neck, always speed up the wheel slightly. The centrifugal force helps keep the clay centered and prevents the walls from twisting or collapsing.
Step 3: Trimming and Glazing
-
Dry to leather hard:
Allow all three pieces to dry slowly under plastic until they are leather hard. The tall bottle may need to dry upside down initially to keep the rim round. -
Trim the foot rings:
Center each piece upside down on the wheel. Trim away excess clay from the bottom to create a defined foot ring, mirroring the curves of the vessels. -
Bisque fire:
Load the bone-dry pots into the kiln and bisque fire to Cone 04 (or your clay’s specific bisque temperature). -
Glaze the bottle:
Pour a creamy opaque white glaze inside the tall bottle, pour out, then dip the exterior. Keep the application smooth for that sleek modern look. -
Glaze the ochre vase:
Apply a high-gloss amber or ochre glaze to the round vase. This color variation adds warmth to the trio. -
Glaze the textured pot:
Use a matte beige or a glaze specifically designed to break over texture for the small squat pot. This highlights the rough surface you created earlier. -
Final firing:
Fire the glazed pieces to maturity (likely Cone 6 or 10, depending on your clay and glaze choice). Ensure they don’t touch in the kiln.
Arranging these distinct shapes together creates a lovely dialogue between height, texture, and color on your mantle
Pinch Pots Turned Into Planters

Embrace the natural beauty of clay with this minimalist succulent planter, featuring a charming contrast between raw stoneware and a crisp white glaze. Perfect for beginners, this project transforms a humble ball of clay into a functional and stylish home for your favorite small plants.
How-To Guide
Materials
- Speckled stoneware clay
- Pin tool or needle tool
- Wooden modeling tool or old credit card
- Sponge
- Bowl of water
- White matte glaze
- Wax resist (optional)
- Small paintbrush
- Kiln access
Step 1: Shaping the Form
-
Start with a sphere:
Begin with a lump of speckled stoneware clay roughly the size of a tennis ball. Roll it back and forth in your palms until you have a smooth, round sphere without deep cracks. -
Open the pot:
Hold the sphere in one hand and gently push your thumb into the center, going about three-quarters of the way down. Be careful not to push all the way through the bottom. -
Pinch the walls:
Using your thumb on the inside and fingers on the outside, start pinching the clay wall. Rotate the ball slightly with every pinch to ensure even thickness all around. -
Build height:
Continue pinching systematically from the bottom upward, thinning the walls and rising the sides until you have a slightly squat, cylindrical shape. -
Flat base:
Tap the bottom of your pot gently against your table surface to create a stable, flat base so it won’t wobble on the windowsill. -
Smooth the rim:
I like to run a slightly damp sponge or a chamois cloth over the rim to compress the clay and round off any sharp edges. -
Define the lip:
Use your fingers to gently flare the very top edge outward just a tiny bit, or press down slightly to create a distinct, flat rim depending on your preference. -
Smooth the exterior:
Use a flexible rib tool or an old credit card to smooth out fingerprints on the outside walls, creating a clean, modern silhouette. -
Punch a drainage hole:
Use a hole cutter or a straw to create a drainage hole in the very center of the bottom. This is crucial for succulent health. -
Dry properly:
Allow your piece to dry slowly under plastic for a day, then uncover it until bone dry. Fire to bisque temperature (usually cone 04 or 06).
Don’t Crack Under Pressure
If you notice cracks along the rim while pinching, your clay is too dry. Smooth a tiny amount of water over the cracks immediately with your finger to heal them.
Step 2: Glazing and Finishing
-
Clean the bisque:
Once your pot comes out of the bisque firing, wipe it down with a damp sponge to remove any kiln dust that might repel the glaze. -
Mark the glaze line:
Decide where your two-tone line will be. You can use a pencil to lightly mark a straight horizontal line about halfway down the pot. -
Apply wax resist:
Paint liquid wax resist on the bottom half of the pot, carefully following your line. This will repel glaze and keep the bottom raw. -
Dip or paint:
Holding the pot by the foot, dip the top half into your white matte glaze. Alternatively, brush on 2-3 even coats if you don’t have enough glaze to dip. -
Check the interior:
Ensure the inside is fully glazed to make the pot water-tight. Pour glaze inside, swirl it around to coat the walls, and pour the excess out. -
Clean the resist:
Use a damp sponge to wipe away any glaze beads that might represent sticking to the waxed area. The line should be clean and sharp. -
Final firing:
Fire the piece again to the maturation temperature of your specific stoneware clay and glaze, typically cone 5 or 6. -
Sand the bottom:
Once cool, use fine-grit sandpaper briefly on the unglazed bottom to ensure it won’t scratch your furniture.
Make it a Set
Make three pots of varying heights but keep the glaze line at the exact same level across all three for a cohesive architectural look.
Pop in a cactus or succulent and enjoy the serenity this handcrafted pot brings to your space


The Complete Guide to Pottery Troubleshooting
Uncover the most common ceramic mistakes—from cracking clay to failed glazes—and learn how to fix them fast.
Slab-Built Soap Dishes With Drainage
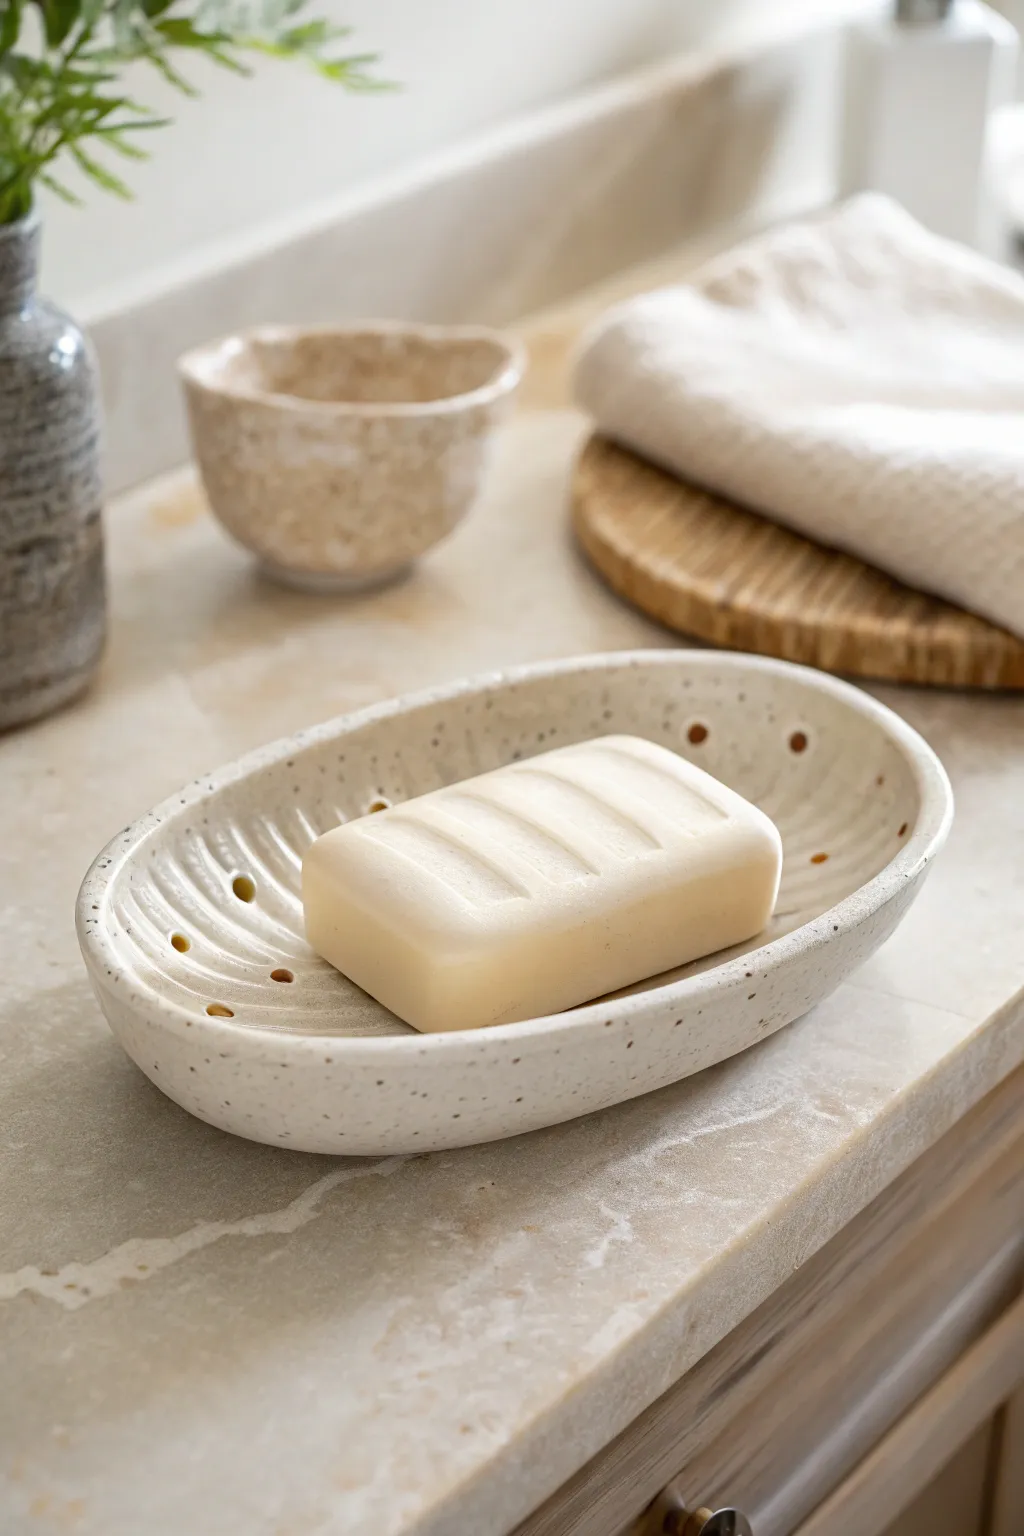
This project combines functional design with simple elegance, creating a sturdy oval soap dish featuring raised internal ridges and drainage holes to extend the life of your soap bars. Using speckled stoneware clay gives the finished piece a beautiful, natural texture that mimics river stone.
Step-by-Step Guide
Materials
- Speckled stoneware clay (mid-fire)
- Rolling pin
- Canvas working mat or slab roller
- Oval paper template (approx. 5×7 inches)
- Fettling knife or needle tool
- Small oval slump mold (or a bisqued bowl)
- Rib tool (flexible metal or rubber)
- Drill bit or hole punch tool (approx. 5-7mm)
- Loop tool or carving tool
- Sponge
- Clear or white satin glaze
Step 1: Prepping the Slab
-
Wedge the clay:
Begin by thoroughly wedging about 1-2 pounds of speckled stoneware clay to remove any air pockets and ensure a consistent texture. -
Roll the slab:
Using a rolling pin and guide sticks (or a slab roller), roll the clay out to a uniform thickness of approximately 1/4 inch. Smooth the surface with a flexible rib to compress the clay particles. -
Cut the shape:
Place your oval paper template onto the smooth slab. Trace around it with a fettling knife or needle tool, holding the tool perpendicular to the table for a straight edge. -
Refine the edges:
Once the oval is cut, run a damp finger or a small piece of sponge along the rim to soften the sharp cut angle into a nice rounded edge.
Step 2: Forming the Interior
-
Carve the ridges:
While the slab is still flat, use a loop tool or carving tool to gently gouge parallel lines lengthwise across the center. Don’t go too deep; you just want to create valleys so the ‘hills’ support the soap. -
Smooth the channels:
Dip a finger in water and run it through the carved channels to smooth out any rough clay crumbs left by the carving tool. -
Add drainage holes:
Using a hole punch tool or a small drill bit, carefully punch holes in the lowest points of the channels, specifically near the outer edges of the ridged area. This ensures water drains away effectively. -
Clean the holes:
Flip the slab over gently and clean up any clay burrs that pushed through to the underside during punching.
Clean Drainage Tip
Use a small, dry paintbrush to sweep glaze out of the drainage holes before firing. If glaze fills these gaps, they will seal shut during the melt.
Step 3: Shaping and Drying
-
Slump the form:
Carefully lift your slab and place it into your oval slump mold. I prefer to press a small bag of sand or rice into the center to weigh it down evenly without marring the surface texture. -
Establish the curve:
Ensure the edges curve upward gently to create a shallow bowl shape. If using a deeper mold, don’t press it all the way to the bottom; you want a gentle curve, not steep walls. -
Stiffen leather had:
Let the dish dry in the mold until it reaches a leather-hard state. This ensures it holds its curved shape when removed. -
Refine the foot:
Once removed from the mold, turn the dish upside down. Use a damp sponge to smooth the bottom, or if you prefer, carve a shallow foot ring for stability.
Warping Issues?
If your oval warps during drying, weigh down the rim with small sandbags while it’s in the mold.Uneven drying causes tension, so dry it slowly under plastic.
Step 4: Firing and Glazing
-
Bisque fire:
Allow the piece to dry completely (bone dry) before loading it into the kiln for a bisque firing to cone 04. -
Glaze application:
Wipe the bisqued piece with a damp sponge to remove dust. I recommend dipping the entire piece into a clear or semi-opaque white satin glaze to let the clay’s speckles show through. -
Clean the bottom:
Thoroughly wipe off any glaze from the bottom of the dish (and the rim of the drainage holes if necessary) to prevent it from sticking to the kiln shelf. -
Glaze fire:
Fire the piece to the maturity temperature of your clay body (usually cone 5 or 6 for stoneware).
Place your favorite bar of handmade soap on the ridges and enjoy the clean, modern look of your stone-like creation
Spoon Rests With Fun Curves
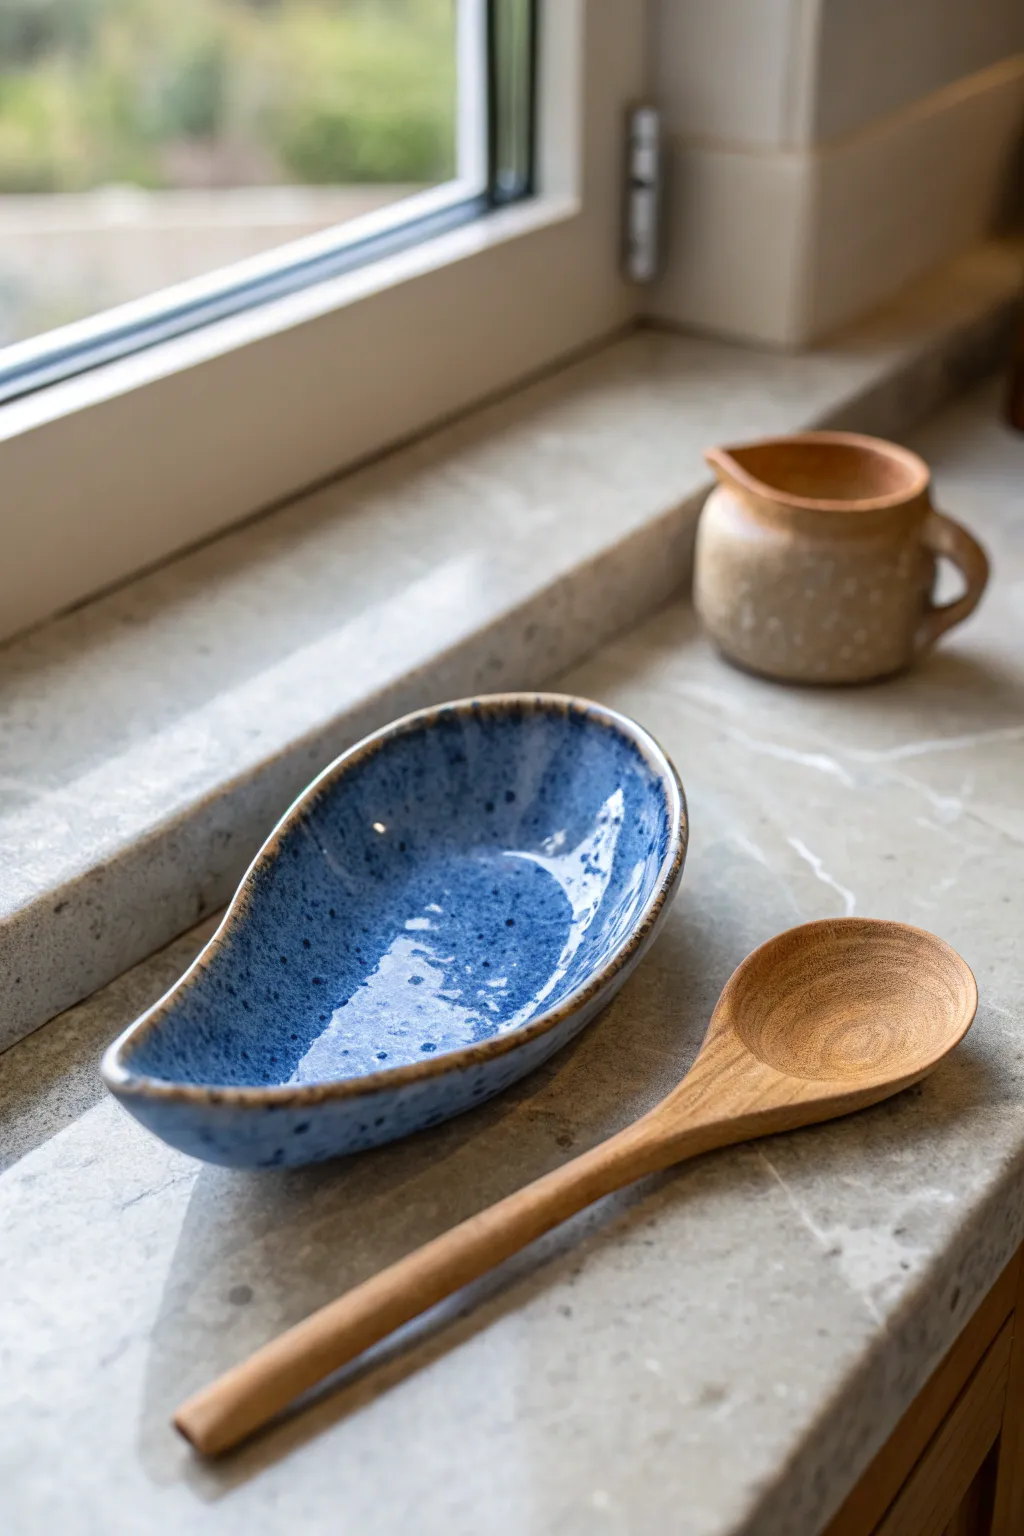
This elegant spoon rest features a sweeping, organic teardrop shape with lifting curves that cradle your utensils perfectly. The glossy, speckled blue glaze contrasts beautifully with the bare clay rim, creating a piece that is both functional and artful.
Step-by-Step
Materials
- Stoneware clay (buff or white)
- Rolling pin
- Canvas work surface or slab mat
- Needle tool or fettling knife
- Teardrop paper template (approx. 7-8 inches long)
- Sponge
- Rib tool (smooth wood or rubber)
- Modeling tool or dull pencil
- Glossy speckle blue glaze (stoneware)
- Wax resist (optional)
- Kiln
Step 1: Forming the Shape
-
Roll the slab:
Begin by wedging your stoneware clay to remove air bubbles. Roll it out into an even slab, aiming for a consistent thickness of about 1/4 inch. If you want a more substantial feel, go slightly thicker. -
Cut the teardrop:
Place your paper teardrop template onto the slab. Using a needle tool or fettling knife, trace around the template to cut out the shape. Remove the excess clay. -
Smooth the edges:
Take a damp sponge and gently run it along the cut edges to soften the sharp angles left by your knife. Compressing these edges now prevents cracking later. -
Create the curve:
Lift the clay teardrop and gently curl the wider end upwards to create a bowl-like depression. simultaneously, lift the pointed tail slightly. You can use a foam pad or simply pinch and mold it with your fingers to hold the curve.
Slumping Issue?
If the clay flattens out while drying, prop the curved sides up with pieces of foam, crumpled newspaper, or small fabric bags of rice until it becomes leather hard.
Step 2: Refining and Drying
-
Define the rim:
Using a wet finger or a chamois cloth, smooth the very top edge of the rim specifically. This creates that distinct, professional border where the glaze will eventually break. -
Refine the interior:
Use a smooth rubber rib on the inside curve of the spoon rest to ensure there are no fingerprints or lumps. This surface needs to be easy to wipe clean later. -
Dry slowly:
Place the piece on a ware board. loosely cover it with plastic to let it dry slowly to the leather-hard stage. This helps maintain the lifted curves without warping. -
Bisque fire:
Once the piece is bone dry, load it into your kiln for the bisque firing (usually Cone 04 or 06, depending on your clay body).
Rim Texture
For a rustic touch, lightly tap the drying rim with a rasp tool before firing. The glaze will break beautifully over the rough texture, highlighting the brown clay body.
Step 3: Glazing and Finishing
-
Clean the bisque:
After the kiln cools, wipe the bisque ware with a damp sponge to remove any kiln dust that could repel the glaze. -
Establish the rim:
For the look in the image, we want a bare rim. Apply a steady line of wax resist along the very top edge of the spoon rest, or plan to wipe the glaze back carefully. -
Prepare the glaze:
Mix your glossy blue speckled glaze thoroughly to ensure the colorants are suspended evenly. -
Apply the glaze:
Dip the piece or brush on the glaze. I usually prefer brushing three even coats for this type of finish, allowing each coat to dry to the touch before adding the next. -
Reveal the rim:
If you used wax, simply wipe any glaze beads off the wax. If you didn’t, take a damp sponge and carefully wipe the glaze off the very top edge of the rim to expose the raw clay line. -
Clean the foot:
Flip the piece over and sponge off any glaze from the bottom where it will sit on the kiln shelf. -
Glaze fire:
Fire the piece to the maturation temperature of your glaze and clay (typically Cone 5 or 6 for stoneware). Allow the kiln to cool completely before unloading.
This simple yet stunning project results in a durable kitchen accessory you’ll use every day

TRACK YOUR CERAMIC JOURNEY
Capture glaze tests, firing details, and creative progress—all in one simple printable. Make your projects easier to repeat and improve.
Coil Bowls With Exposed Ridges
Embrace the tactile beauty of hand-building with this coiled bowl project that celebrates texture rather than hiding it. By leaving the coil seams gently exposed and smoothed, you create a rhythmic, ribbed surface that catches the light beautifully under a creamy, speckled glaze.
How-To Guide
Materials
- Speckled Stoneware Clay (cone 5/6)
- Clay scoring tool or serrated kidney
- Slip (clay mixed with water)
- Wooden modeling tool or blending tool
- Sponge
- Potter’s wheel or banding wheel (optional but helpful)
- Rubber rib (soft)
- Cream or breaking white glaze
- Clear glaze (optional for interior)
Step 1: Base Construction
-
Prepare the Base:
Start by rolling out a slab of speckled clay to about 1/4 inch thickness. Use a needle tool to cut a perfect circle, approximately 4-5 inches in diameter, which will serve as the floor of your bowl. -
Score the Edge:
thoroughly score the outer perimeter of your clay circle. Apply a generous amount of slip to the scored area to prepare it for the first coil. -
Roll Consistent Coils:
Roll out several long, even coils of clay. Aim for a thickness similar to your pinky finger. Consistency here is key to achieving that uniform ribbed look later on.
Pro Tip: Seamless Strength
Even though you aren’t blending the outside, compress the coils firmly downward as you stack them. This ensures the layers bond tightly without relying solely on surface blending.
Step 2: Building the Walls
-
Attach First Coil:
Place your first coil directly on top of the slipped edge of the base. Cut the ends at an angle where they meet to ensure a strong, seamless join. -
Blend the Interior:
Using your thumb or a wooden tool, smear the clay from the coil down onto the base on the *inside* of the bowl only. Smooth this internal seam completely so the bottom is flat and seamless. -
Leave Exterior Exposed:
Crucially, do *not* blend the coil on the outside. Leave that deep groove visible between the separate ropes of clay, as this forms the primary aesthetic of the piece. -
Stack and Step Out:
Score and slip the top of your first coil. Place the second coil slightly outward from center to begin widening the bowl shape. Repeat the internal blending process. -
Continue Building:
Continue stacking coils, stepping each one slightly outward until you reach the desired width, then stack vertically or slightly inward to finish the rim. Keep the interior smooth and the exterior distinct.
Step 3: Refining and Shaping
-
Review the Shape:
Step back and look at the profile. If you have a banding wheel, give it a spin to check for symmetry. Make gentle adjustments to the overall curve while the clay is still plastic. -
Enhance the Grooves:
Take a rounded wooden tool or your finger wrapped in a slightly damp sponge. Run it gently along the exterior grooves to clean up any rough bits without erasing the separation between coils. -
Smooth the Rim:
Use a damp chamois or sponge to compress and smooth the top rim. I like to make sure the rim is slightly rounded to be comfortable for handling. -
Dry Slowly:
Cover the bowl loosely with plastic to let it dry slowly. Because the coils aren’t blended on the outside, rushing the drying process can sometimes cause cracks at the seams.
Level Up: Oxide Wash
Before glazing, brush iron oxide wash into the exterior grooves and wipe it back with a sponge. This creates dramatic contrast, making the ridges pop under a semi-transparent glaze.
Step 4: Glazing and Finishing
-
Bisque Fire:
Once bone dry, fire the piece to bisque temperature (usually Cone 04) to prepare it for glazing. -
Interior Glazing:
Pour a glossy cream or clear glaze inside the bowl. Roll it around to coat the interior evenly and pour out the excess. Wipe any drips off the rim immediately. -
Exterior Application:
For the outside, you want a glaze that breaks over texture. A thin application of a translucent cream glaze works best here. You can dip the exterior or spray it. -
Highlight the Texture:
If the glaze looks too thick in the grooves, gently wipe the exterior with a damp sponge. This removes glaze from the high points (ridges) and leaves it in the recesses, accentuating the coil pattern. -
Final Fire:
Fire the bowl to the maturity temperature of your clay body (likely Cone 5 or 6). The heat will melt the glaze, letting the speckles of the clay shine through the thinner areas on the ridges.
Now you have a functional vessel that beautifully displays the process of its creation
Carved Sgraffito Plates
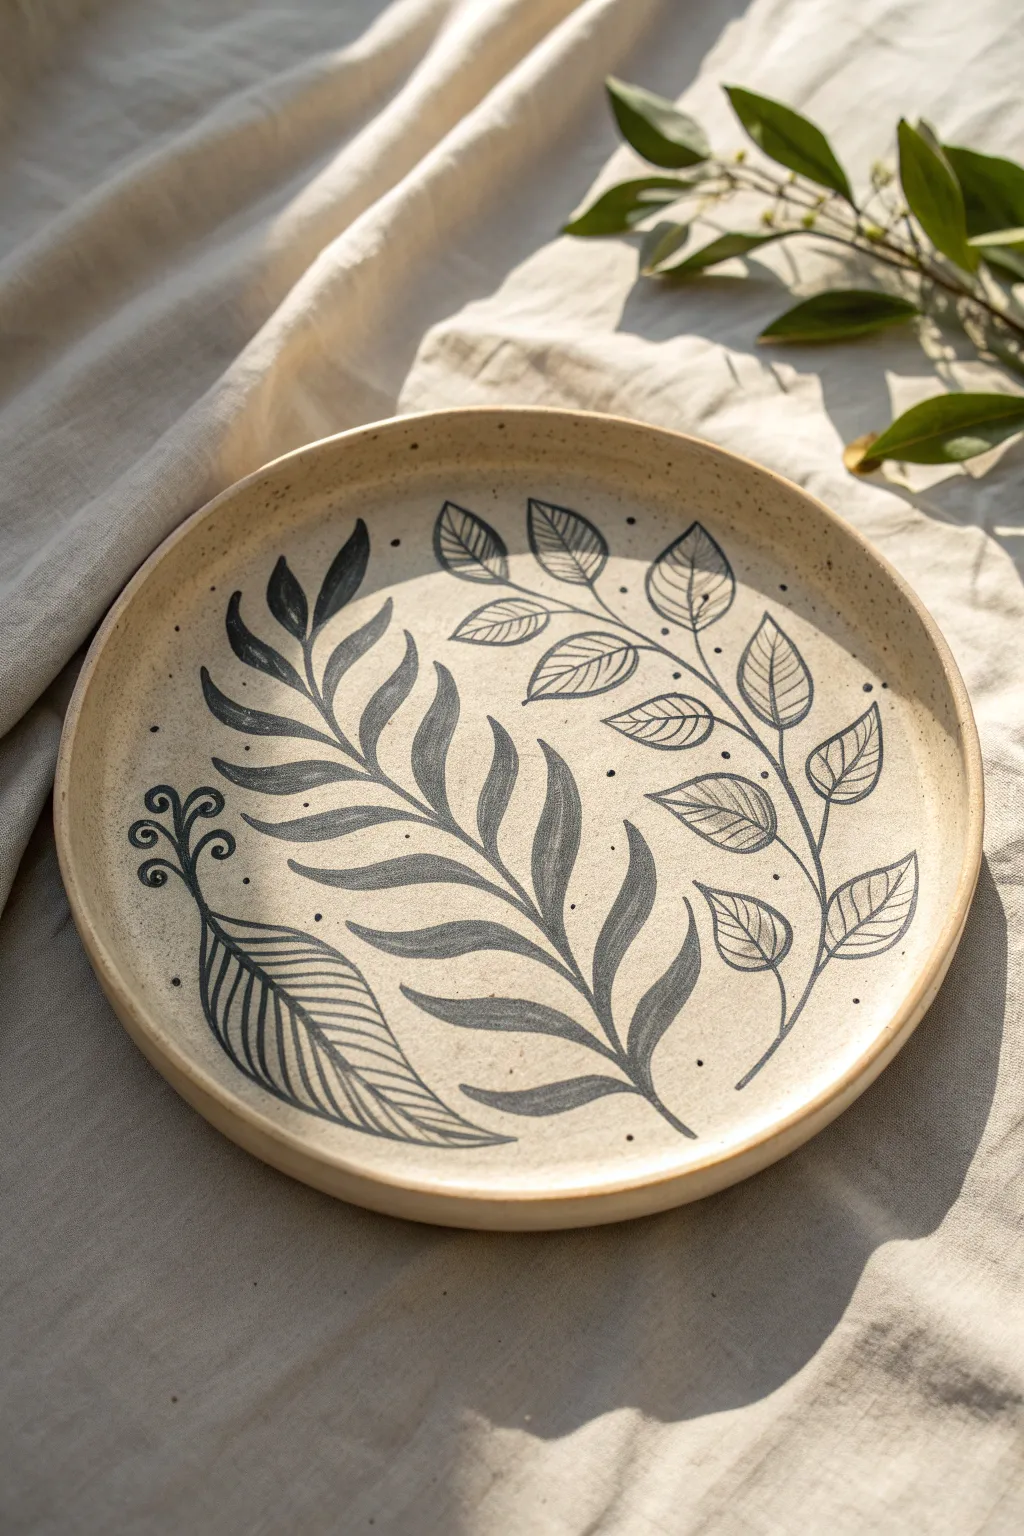
Capture the delicate beauty of nature on your dinnerware with this elegant sgraffito plate project. The contrast between deep black underglaze and speckled beige clay creates a timeless, organic look that highlights every leaf and vine.
Step-by-Step Tutorial
Materials
- Speckled buff stoneware clay
- Rolling pin
- Guide sticks (1/4 inch thick)
- Round plate mold or slump mold
- Black underglaze
- Wide hake brush or sponge brush
- Small loop carving tool
- Needle tool
- Rib tool (smooth metal or rubber)
- Clear matte glaze
- Sponge
Step 1: Forming the Plate
-
Proportioning clay:
Begin by wedging a softball-sized amount of speckled buff stoneware clay to remove air bubbles and ensure consistency. -
Rolling the slab:
Place your clay between two 1/4 inch guide sticks and roll it out into a smooth, even slab. Rotate the clay occasionally to keep it circular. -
Smoothing the surface:
Use a damp sponge or a rubber rib to compress the clay surface on both sides, removing any canvas texture or imperfections. -
Slumping the form:
Carefully lift your slab and drape it over your plate mold. Press gently from the center outwards to conform the clay to the mold’s shape without stretching it too thin. -
Trimming the rim:
Once the clay is settled on the mold, use a needle tool to trim the excess clay around the edge, creating a perfect circle. -
Initial refinement:
Run a damp chamois or sponge along the cut rim to soften the edge so it isn’t sharp. -
Leather hard stage:
Allow the plate to dry slowly until it reaches a leather-hard state. It should be firm enough to hold its shape but soft enough to carve into.
Clean Lines
Work from the center outward when carving. This prevents your hand from resting on and smudging areas you’ve already carved.
Step 2: Applying Design
-
Underglaze application:
Using a wide hake brush, apply 2-3 even coats of black underglaze to the entire top surface of the plate. Let each coat dry until it loses its sheen before applying the next. -
Sketching guidelines:
Once the final coat of black underglaze is dry to the touch, lightly sketch your botanical design using a pencil. The graphite won’t show after firing, so don’t worry about mistakes. -
Outline carving:
Using a needle tool or very fine sgraffito tool, scratch through the black underglaze to reveal the clay body underneath, following the main stems of your leafy design. -
Leaf detailing:
Switch to a small loop tool to carve out larger areas. For the solid black leaves, you are actually carving away the *background* around them, leaving the black leaf shape intact. -
Vein work:
For the open, skeleton-style leaves on the right side of the design, carve out the interior white space of the leaf, leaving thin black lines for the veins and outline. -
Texture contrast:
Notice the bottom left leaf has heavy interior lines; carve these deliberately to create shading and texture differences between the foliage types. -
Adding accents:
Use a needle tool to add small dots and stippling around the leaves to fill negative space and add visual interest to the composition. -
Cleanup:
Gently brush away the clay burrs (crumbs) with a soft, dry brush. Avoid rubbing them with your finger, as this can smudge the black underglaze into the raw clay lines.
Color Pop
Try using a deep forest green or navy blue underglaze instead of black for a softer, but still dramatic, botanical vibe.
Step 3: Finishing
-
Bisque fire:
Slowly dry the plate completely before loading it into the kiln for a bisque fire (typically Cone 04). -
Glazing:
After bisque firing, wipe the plate down with a damp sponge to remove dust. I find dipping the entire plate in a clear matte glaze works best to seal the work without creating glossy reflections that hide the carving. -
Final fire:
Fire the plate to maturity (Cone 5 or 6 depending on your clay body specifications) to vitrify the clay and finish the piece.
Once fired, you’ll have a stunning, food-safe piece of art ready for your table or wall display
Textured Slab Vases With Slip Trails
Create a stunning statement piece with this tall, slender vase featuring elegant vertical texture that gently twists around the form. The natural cream clay body is enhanced with iron speckles, giving it a rustic yet modern finish perfect for dried botanicals.
Detailed Instructions
Materials
- Speckled buff stoneware clay
- Rolling pin
- Slab roller (optional)
- Thick slip (matching clay body)
- Slip trailer bottle with medium nozzle
- PVC pipe or sturdy cardboard tube pattern form (approx. 3-4 inch diameter)
- Newsprint or paper
- Needle tool
- Scoring tool or serrated rib
- Rubber kidney rib
- Sponge
- Fettling knife
- Wooden modeling tool
- Clear matte glaze
Step 1: Preparing the Slab
-
Roll out the clay:
Begin by rolling out a generous amount of speckled buff stoneware clay. You want a large, consistent slab that is approximately 1/4 inch thick. If you are using a rolling pin, rotate the clay frequently to ensure even thickness. -
Smooth the surface:
Use a rubber kidney rib to compress the slab on both sides. This removes any canvas texture and aligns the clay particles, which helps prevent warping later in the drying process. -
Cut to size:
Measure your form (the PVC pipe or tube) to determine the necessary width for your slab. Cut a large rectangle that is wide enough to wrap around your form with a slight overlap, and as tall as you want your finished vase to be.
Slip Consistency Tip
Add a teaspoon of vinegar to your slip trailer mixture. This flocculates the clay, making it thicker and creamier without reducing water content, helping lines stand tall.
Step 2: Adding the Texture
-
Prepare the slip:
Ensure your slip is the consistency of thick yogurt or frosting. If it’s too runny, the lines will flatten; too thick, and they won’t flow from the trailer. -
Draft the lines:
Lightly trace vertical lines onto your flat slab using a needle tool as a guide. To achieve the spiral effect seen in the photo, create these lines at a very slight diagonal angle rather than perfectly straight up and down. -
Apply the trails:
Fill your slip trailer and carefully squeeze thick lines of slip over your traced guides. Maintain steady pressure to keep the line thickness consistent from top to bottom. -
Let it firm up:
This is crucial: allow the slab to dry until the slip lines are no longer tacky but the slab itself is still flexible (soft leather hard). If you try to build too soon, the lines will smudge.
Color Variation
Mix Mason stains into your trailing slip before applying. A white slip on dark clay or a dark slip on white clay creates stunning high-contrast geometric patterns.
Step 3: Assembling the Form
-
Wrap the form:
Wrap a sheet of newsprint around your PVC pipe or tube; this prevents the clay from sticking to the mold. Stand the form upright. -
Wrap the clay:
Carefully lift your textured slab and wrap it around the paper-covered form. The texturing should face outward. -
Bevel the edges:
Where the two ends of the slab meet, use a fettling knife to cut 45-degree bevels. This creates a stronger, cleaner seam than a simple butt joint. -
Score and slip:
Aggressively score the beveled edges and apply a generous amount of slip (not the trailing slip, but joining slip). Press the edges together firmly. -
Blend the seam:
Use a wooden modeling tool to blend the seam on the inside of the vase. On the outside, carefully blend vertically between the slip-trailed ribs so you don’t crush the texture. I usually smooth this area with a damp sponge or finger to make the join invisible.
Step 4: Shaping and Finishing
-
Narrow the neck:
While the clay is still on the form or just after removing it, gently compress the top rim inward with your hands to create the tapered neck shape. -
Add a bottom:
Roll a small slab for the base. Place your cylinder on top, trace around it, and cut out the circle. Score and slip both the bottom of the cylinder and the base slab, then attach them firmly. -
Remove the form:
Carefully slide the PVC pipe out of the vase. Peel away the newsprint from the inside. -
Refine the rim:
Smooth the rim with a damp sponge or a chamois cloth to ensure it is soft and rounded, removing any sharp edges. -
Dry slowly:
Cover the vase loosely with plastic for the first few days to allow the moisture levels in the thick slip trails and the slab to equalize. Uneven drying can cause cracks along the ribs. -
Bisque fire:
Once bone dry, fire the piece to bisque temperature (usually cone 04). -
Glaze:
Dip or spray the vase with a clear matte glaze. This will seal the clay while letting the natural speckles and the dimension of the slip trails shine through. -
Glaze fire:
Fire again to the maturity temperature of your clay body (likely cone 5 or 6 for stoneware).
Fill your new vase with tall dried grasses to accentuate those vertical lines.
Hanging Bell Chimes With Cutouts

These charming ceramic bells bring a touch of earthy elegance to any window or garden space with their warm white glaze and detailed floral cutouts. The project combines simple pinch pot techniques with delicate carving to create a vertically strung set that chimes gently in the breeze.
Detailed Instructions
Materials
- White earthenware or stoneware clay (low fire)
- Small rolling pin
- Carving tools (specifically a small loop tool and X-Acto knife)
- Small flower petal cutter (optional, or freehand)
- Wooden dowel or straw (for cord holes)
- Sponge and water
- Clear or white glossy glaze
- Gold or brown underglaze (for details)
- Twine or jute rope
- 3 Small wooden beads
Step 1: Forming the Bell Shapes
-
Prepare clay balls:
Start by dividing your clay into three equal portions. Roll each portion into a smooth ball about the size of a tangerine, ensuring there are no air bubbles trapped inside. -
Pinch pot basics:
Take one ball and press your thumb into the center, stopping about a half-inch from the bottom. Gently pinch the clay between your thumb and fingers, rotating the ball as you go to thin the walls evenly. -
Shape the bell:
Instead of keeping a bowl shape, gently pull the clay downward to elongate the sides into a cone or bell shape. I like to keep the walls slightly thicker at the rim for durability. -
Smooth the surface:
Use a damp sponge or a flexible rib tool to smooth the exterior and interior surfaces, removing any fingerprints or uneven bumps. -
Create the cord hole:
Using a wooden dowel or a straw, punch a clean hole directly through the center of the top dome of the bell. Make this hole slightly larger than your final rope size, as clay shrinks when fired.
Step 2: Adding Details and Cutouts
-
Dry to leather hard:
Allow your three bells to dry until they are ‘leather hard’—firm enough to handle without deforming, but soft enough to carve. -
Mark petal guides:
Lightly sketch your flower patterns onto the clay surface using a needle tool. Aim for two or three flower clusters per bell. -
Carve the petals:
Using a small, sharp loop tool or X-Acto knife, carefully cut out the petal shapes. Be gentle; you want clean holes that go all the way through the clay wall. -
Refine the edges:
Once the cutouts are made, use a tiny damp brush to smooth the raw edges of the petals so they aren’t sharp or jagged. -
Add surface texture:
Use a needle tool to scratch delicate leaf veins or abstract floral lines near the top rim of the bell for added texture. -
Bisque fire:
Let the bells dry completely (bone dry) before loading them into the kiln for a bisque firing according to your clay’s specifications.
Clean Cuts Every Time
When carving cutouts, support the clay wall from the inside with a firm finger or a smooth stone. This prevents the wall from collapsing under the pressure of the knife.
Step 3: Glazing and Assembly
-
Apply accent color:
Before the main glaze, carefully paint the inside edges of your flower cutouts with a gold or brown underglaze to make the pattern pop. -
Glaze the body:
Dip or brush the bells with a white or clear glossy glaze. If brushing, apply 2-3 coats for full coverage, avoiding the inside of the cord hole so it doesn’t seal shut. -
Glaze fire:
Fire the bells again to the maturity temperature of your glaze and clay body. -
Prepare the rope:
Cut a long length of thick jute twine. Tie a sturdy loop at the very top for hanging. -
Attach the top bell:
Thread the rope through the top of the first bell. Slide a wooden bead onto the rope underneath the bell and tie a distinct knot below the bead to hold the bell in place. -
String remaining bells:
Leave a few inches of space, tie a knot, add a bead, and slide on the second bell. The bead should sit on top of the bell for the lower tiers, or inside depending on your preference. Repeat for the third bell. -
Final securement:
Tie a final decorative knot at the very bottom of the string to secure the entire assembly and prevent fraying.
Clapper Trouble?
If you want these to ring louder, tie a ceramic bead or metal washer inside the bells at the same height as the rim. Without a striker, they make a soft clinking sound only when they hit each other.
Hang your new handcrafted chime near a window to catch the afternoon light and enjoy the subtle sounds of handmade clay
Whistles Shaped Like Cute Creatures
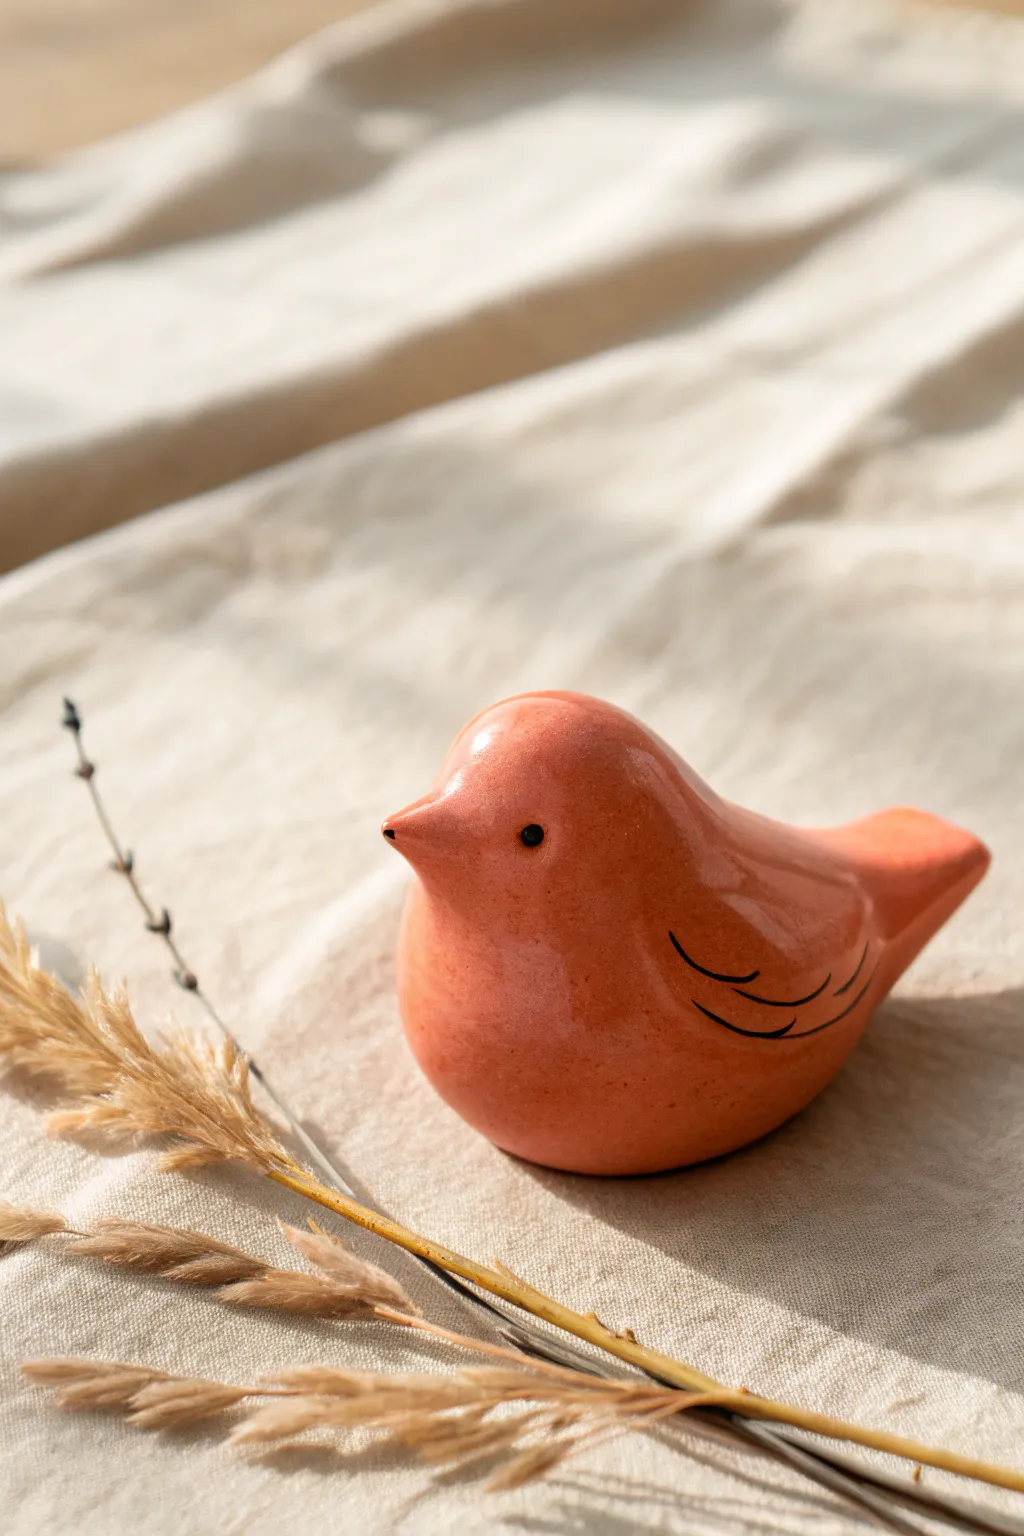
Bring a touch of whimsy to your garden or windowsill with this beautifully glazed ceramic bird. Its smooth, rounded form and cheerful peach hue make it a delightful project for clay enthusiasts looking to practice hollow forms and simple glazing techniques.
Step-by-Step
Materials
- Low-fire white earthenware clay
- Pottery tools (needle tool, rib tool, sponge)
- Small bowl of water
- Slip (clay mixed with water)
- Underglaze pencil or fine brush
- Peach or coral colored ceramic glaze
- Black underglaze
- Clear transparent glaze
- Popsicle stick or modeling tool
Step 1: Sculpting the Form
-
Prepare the Clay:
Start by wedging a ball of clay about the size of a tangerine to remove any air bubbles. Divide this into two equal halves. -
Form Pinch Pots:
Take one half-sphere of clay and press your thumb into the center. Gently pinch the walls while rotating the clay to create a small, even bowl shape. Repeat with the second half. -
Join the Halves:
Score the rims of both pinch pots with a needle tool or serrated rib. Apply a generous amount of slip to the scored areas and press the two halves together firmly to create a hollow sphere. -
Blend the Seam:
Using a modeling tool or your thumb, drag clay across the seam to merge the two halves completely. Smooth the area with a damp sponge until the join is invisible. -
Shape the Body:
Gently gently paddle or roll the sphere on your work surface to elongate it slightly into an egg shape. This will become the bird’s body. -
Pull the Tail:
Pinch one end of the egg shape and gently pull the clay outward and upward to form a small, triangular tail. Keep the edges soft and rounded. -
Create the Head:
On the opposite end, use your thumb and forefinger to push the clay slightly upward to define a head area, then pinch a small, pointed beak protruding from the front. -
Checking Air Pressure:
Because this is a hollow form, the trapped air supports the shape. Be careful not to press too hard, or the form might collapse. -
Refine the Surface:
Use a flexible rib tool to smooth the entire surface of the bird, removing any fingerprints or bumps. The goal is a sleek, modern silhouette. -
Vent the Piece:
Take a needle tool and poke a tiny, inconspicuous hole in the bottom of the bird. This allows expanding air to escape during firing so the piece doesn’t explode.
Air Pocket Protection
Don’t forget the vent hole! If sculpting a hollow form, trapped air expands in the kiln and will crack your bird. A pin-sized hole in the base is mandatory.
Step 2: Glazing and Finishing
-
Bisque Fire:
Allow the bird to dry completely (bone dry) for several days. Fire it in the kiln to a bisque temperature (usually cone 04) to prepare it for glazing. -
Apply the Base Color:
Once cooled, wipe the bisque piece with a damp sponge to remove dust. Apply 2-3 coats of the peach or coral glaze, allowing each coat to dry to the touch before adding the next. -
Detailing the Wings:
Using a very fine liner brush dipped in black underglaze, carefully paint three curved lines on the side of the body to suggest feathers. Keep your hand steady for clean, sweeping strokes. -
Adding the Face:
Paint a small black dot for the eye on either side of the head. I like to dip the end of a paintbrush handle in the black underglaze and stamp it for a perfectly round eye. -
Highlight the Beak:
Add a tiny dot of black to the very tip of the beak to define it against the peach body. -
Clear Coat (Optional):
If your peach glaze isn’t naturally glossy, apply a clear transparent glaze over the entire piece (except the bottom) to seal the underglaze details and add shine. -
Wipe the Foot:
Use a sponge to wipe any glaze off the very bottom of the bird where it will sit on the kiln shelf. -
Final Fire:
Fire the piece again to the temperature recommended for your specific glaze (usually cone 05 or 06). Let the kiln cool completely before retrieving your finished bird.
Make it Sing
Turn this figurine into a working whistle by cutting a rectangular window near the tail and inserting a specialized fipple mouthpiece pathway before closing the form.
Now you have a charming little ceramic friend to brighten up your home decor
Incense Holders With Ash Catch Trays
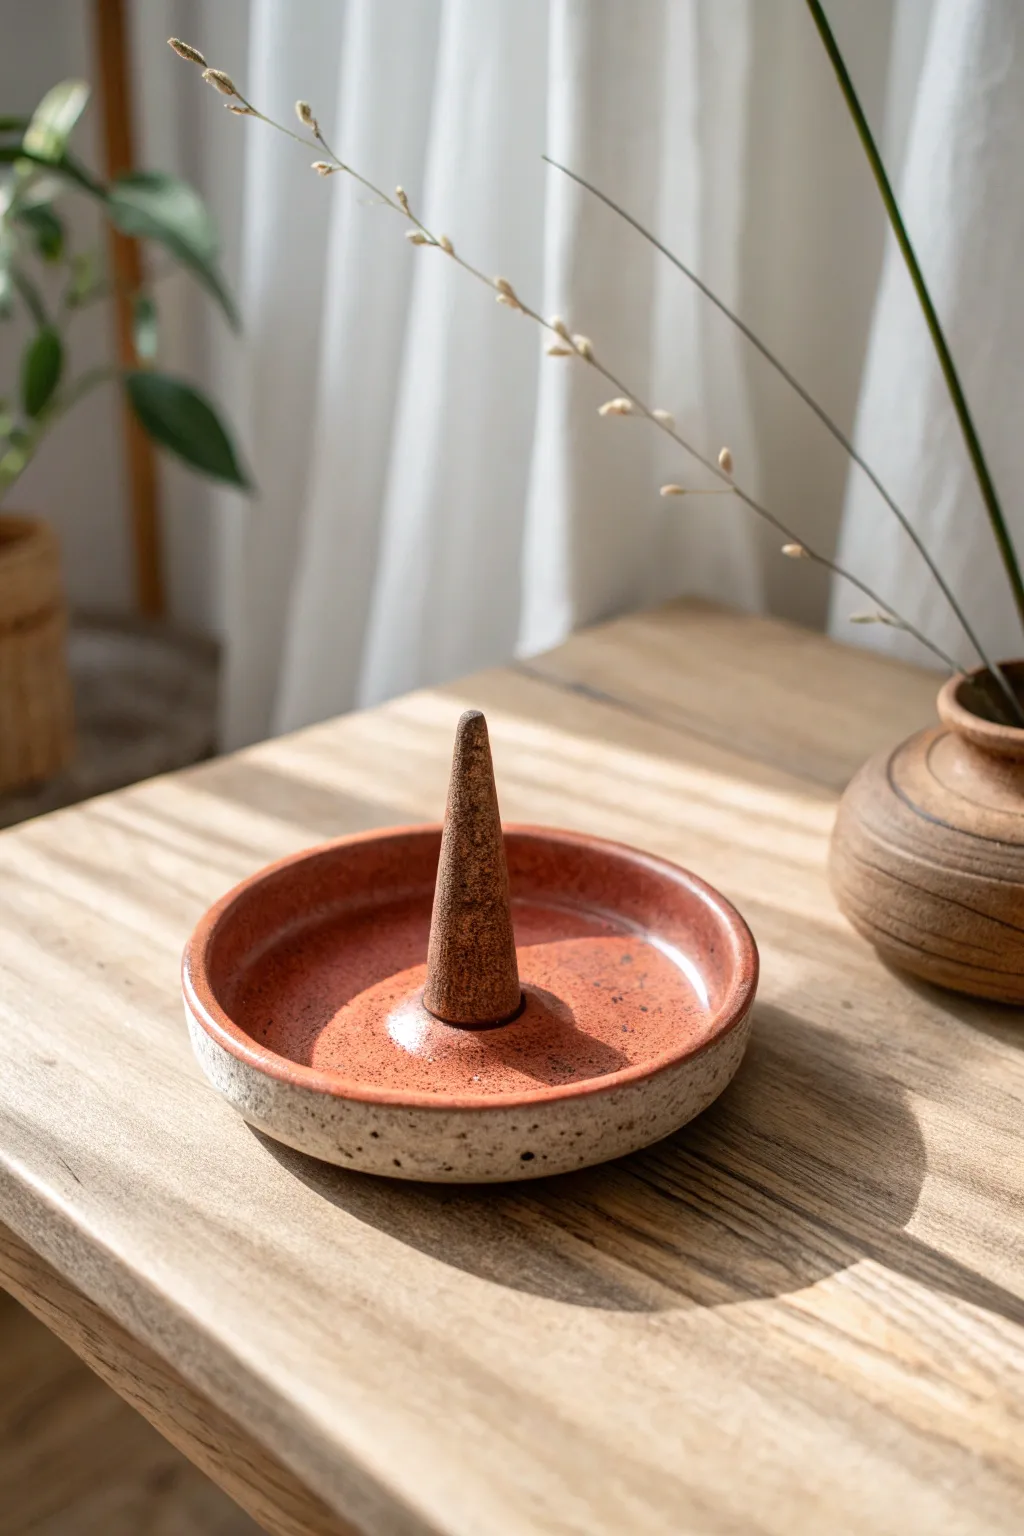
This simple yet elegant incense holder features a wide catch tray with a rustic speckled beige exterior and a striking reddish-brown interior glaze. Its central cone support is perfectly sized for standard incense cones or heavier sticks, making it a functional and aesthetic addition to any meditation space.
Step-by-Step Tutorial
Materials
- Stoneware clay (speckled or light buff)
- Pottery wheel (can also be hand-built)
- Needle tool
- Loop trimming tool
- Sponge
- Wire cutter
- Rib tool (wood or metal)
- Red-brown or iron-rich glaze
- Clear matte glaze (optional for exterior)
- Small paintbrush
- Kiln
Step 1: Throwing the Form
-
Prepare the Clay:
Begin by thoroughly wedging about 1 to 1.5 pounds of speckled stoneware clay to remove any air bubbles. Form it into a rough ball shape. -
Center on the Wheel:
Slam the clay onto the center of your wheel bat. With the wheel spinning at medium-high speed, use your palms and heavy pressure to center the clay until it runs smooth without wobbling. -
Open the Form:
Press your thumbs into the center, leaving about a half-inch of clay at the bottom for the floor. Instead of pulling the walls up immediately, pull the clay outwards to create a wide, low dish shape. -
Establish the Rim:
Gently pull up a short wall, approximately 1 inch high. Use a sponge or a wooden rib to compress the rim and ensure the walls are an even thickness. -
Refine the Interior:
Use a rib tool to smooth the interior floor of the dish. I like to create a very slight curve where the floor meets the wall to make cleaning ash easier later. -
Create the Center Post:
Normally, you might attach this later, but throwing it integrally provides strength. If you have enough clay left in the center hump, shape a small cone directly in the middle. If not, you will hand-build this in the next phase. -
Cut and Dry:
Run a wire cutter underneath the pot to separate it from the bat. Set it aside to dry until it reaches a leather-hard state.
Dual-Purpose Post
Make the center post versatile by poking a small hole into the very tip of the damp clay cone. This allows it to hold standard stick incense as well as wide-base cones.
Step 2: Trimming and Assembly
-
Trim the Foot:
Once leather hard, flip the dish over and center it on the wheel again. Use a loop tool to trim away excess clay from the bottom, creating a clean, flat foot or a slight foot ring depending on your preference. -
Smooth the Exterior:
While trimming, use a metal kidney rib to smooth the exterior walls, revealing the nice texture of the gritty clay body. -
Form the Cone (If needed):
If you didn’t throw the center post, roll a small coil of clay into a tapered cone shape roughly 1.5 inches tall. Ensure the base is wide enough to be stable. -
Attach the Cone:
Score the center of the dish and the bottom of your clay cone. Apply slip to both surfaces and press the cone firmly into the center of the dish. Smooth the seam with a modeling tool so it looks seamless. -
Bisque Fire:
Allow the piece to bone dry completely. This usually takes a few days. Once dry, load it into the kiln for a bisque firing to roughly Cone 04.
Level Up: Texture Play
Before the clay dries, tap the exterior walls gently with a stiff-bristled brush or a rock. This enhances the raw, earthy texture and contrasts beautifully with the glossy interior glaze.
Step 3: Glazing and Finishing
-
Wax Resist:
Apply wax resist to the bottom of the foot and, optionally, the very outer rim of the exterior if you want that raw clay look shown in the reference. -
Glaze the Interior:
Pour a rich reddish-brown or iron-oxide glaze into the interior of the dish. Swirl it around to coat the floor, the interior walls, and the center cone completely. -
Glaze the Cone Tip:
Ensure the glaze covers the tall center cone but be careful not to let it pool too thickly at the base of the cone where it meets the floor. -
Exterior Treatment:
For accurate recreation, leave the exterior unglazed to show off the speckled clay body. Alternatively, wipe on a very thin wash of oxide to highlight the speckles. -
Clean Up:
Use a damp sponge to wipe any stray glaze droplets off the raw exterior rim or the foot of the pot. -
Final Fire:
Load the kiln for the final glaze firing (temperature depends on your specific clay and glaze, typically Cone 5 or 6 for stoneware).
Once cooled, your handmade holder is ready to catch ash and add a warm, earthy touch to your home
Relief-Sculpted Nature Platters
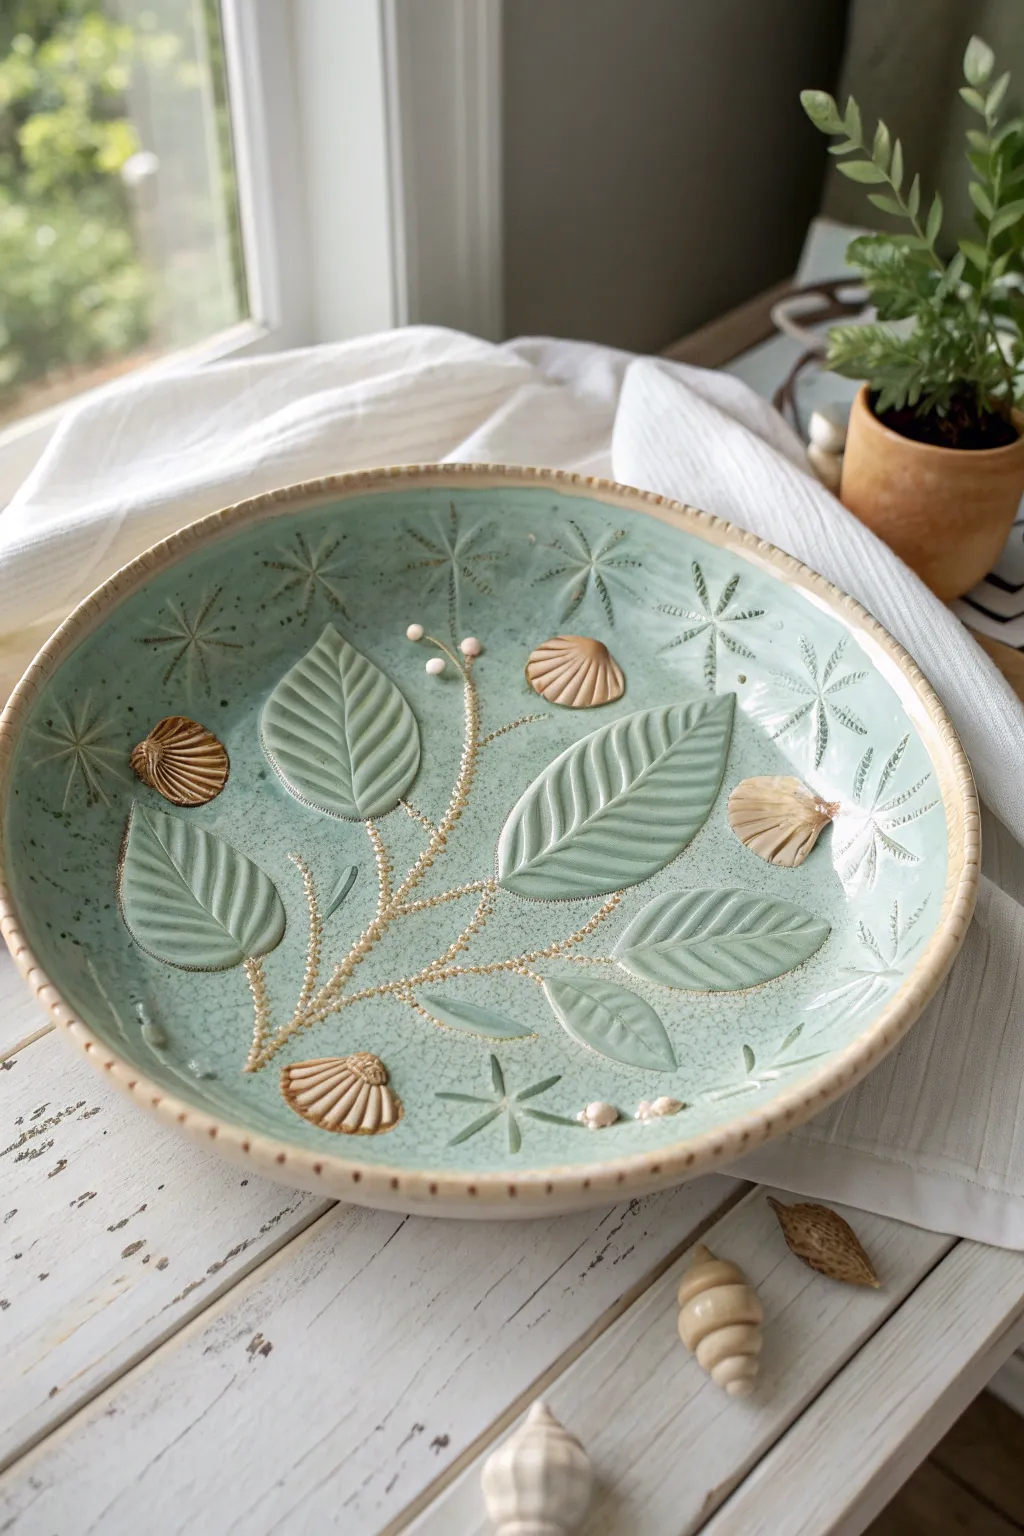
Bring the calm of the coast to your table with this relief-sculpted ceramic platter, featuring realistic leaves and seashells. The soft teal glaze pools beautifully around the raised textures, creating a stunning centerpiece reminiscent of a sea-glass treasure.
Detailed Instructions
Materials
- Light-colored stoneware clay body (cone 5/6)
- Slab roller or rolling pin with thickness strips
- Platter mold or large bowl (for slumping)
- Leaf stamps or actual textured leaves
- Small seashell press molds or commercially available ceramic sprigs
- Needle tool
- Slip and scoring tool
- Small round piping tip or bead tool
- Star/snowflake stamp tool (optional)
- Celadon-style teal glaze (translucent)
- Small sponge
- Clear crackle glaze (optional top coat)
- Oxide wash (brown or iron oxide)
Step 1: Forming the Base
-
Roll the slab:
Start by rolling out a generous slab of stoneware clay to a uniform thickness of about 3/8 inch. Smooth both sides with a rib to compress the clay particles, which helps prevent warring later. -
Cut the circle:
Place your platter template or a large round object on the slab and cut a clean circle using your needle tool. -
Create the rim texture:
Before shaping the bowl, use a small textured tool or the edge of a ruler to create a uniform, notched pattern along the very edge of the rim. -
Slump the form:
Gently lift your clay circle and lay it into your plaster hump mold or slump mold to create the shallow bowl shape. Press gently with a sponge to ensure it conforms to the curve without stretching the clay too thin.
Warp Whack-a-Mole
Platters love to warp. Dry very slowly and evenly. If the rim lifts, weight it gently with a sandbag during the leather-hard drying phase.
Step 2: Sculpting the Relief
-
Make the leaves:
Roll a thinner slab (approx 1/4 inch) for your decorations. Press real leaves or use leaf cutters/stamps to create five or six detailed leaf shapes. Smooth the rough edges with a damp finger. -
Create the shells:
Using small press molds, create three or four detailed scallop shell shapes from the same clay. If you don’t have molds, you can hand-sculpt these by making a fan shape and scoring lines radiating from the base. -
Arrange the composition:
Lay your leaves and shells onto the damp platter base to test your layout. Aim for a natural, flowing branch arrangement, perhaps sweeping from the center towards one side. -
Score and slip:
Once satisfied with the placement, trace lightly around each piece. Remove them, score the back of the sprig and the spot on the platter, apply slip, and press them firmly into place. -
Add the stems:
Roll very thin coils of clay to connect the leaves. Attach these with slip to form the central stem structure, tapering them gently at the ends. -
Detail the texture:
I like to use a small beading tool or piping tip to press tiny circles along the stems, mimicking berries or buds. This adds lovely tactile detail. -
Stamp the background:
Using a star or snowflake-shaped stamp, gently impress a scattered pattern into the negative space around the leaves. Vary the pressure so some are faint and others are deep.
Coastal Sparkle
Add a pinch of crushed white glass into the center of the ‘berry’ pressed textures before the final firing for melted gem-like accents.
Step 3: Glazing and Finishing
-
Bisque fire:
Allow the platter to dry slowly and completely, covering it loosely with plastic for the first day. Fire to cone 04 for the bisque stage. -
Apply oxide to rim:
Wipe a watered-down iron oxide wash onto the rim and the shell details. Sponge it back off so the color remains only in the deep textures and creates a rustic edge. -
Apply the main glaze:
Pour or brush a translucent teal celadon glaze over the entire interior. This type of glaze is crucial as it breaks clear over high points (like the leaf veins) and pools darker in the recesses. -
Clean the relief points:
If you want the leaves to pop more, gently wipe the very tops of the leaf veins with a damp sponge to thin the glaze there, allowing the clay body to show through slightly. -
Final fining:
Fire the piece to cone 5 or 6 (depending on your clay and glaze). Let the kiln cool completely before opening to prevent thermal shock to the wide, flat form.
Now you have a serene, nature-inspired vessel ready to hold fruit or serve simply as art.
Modular Tile Sets for Backsplashes
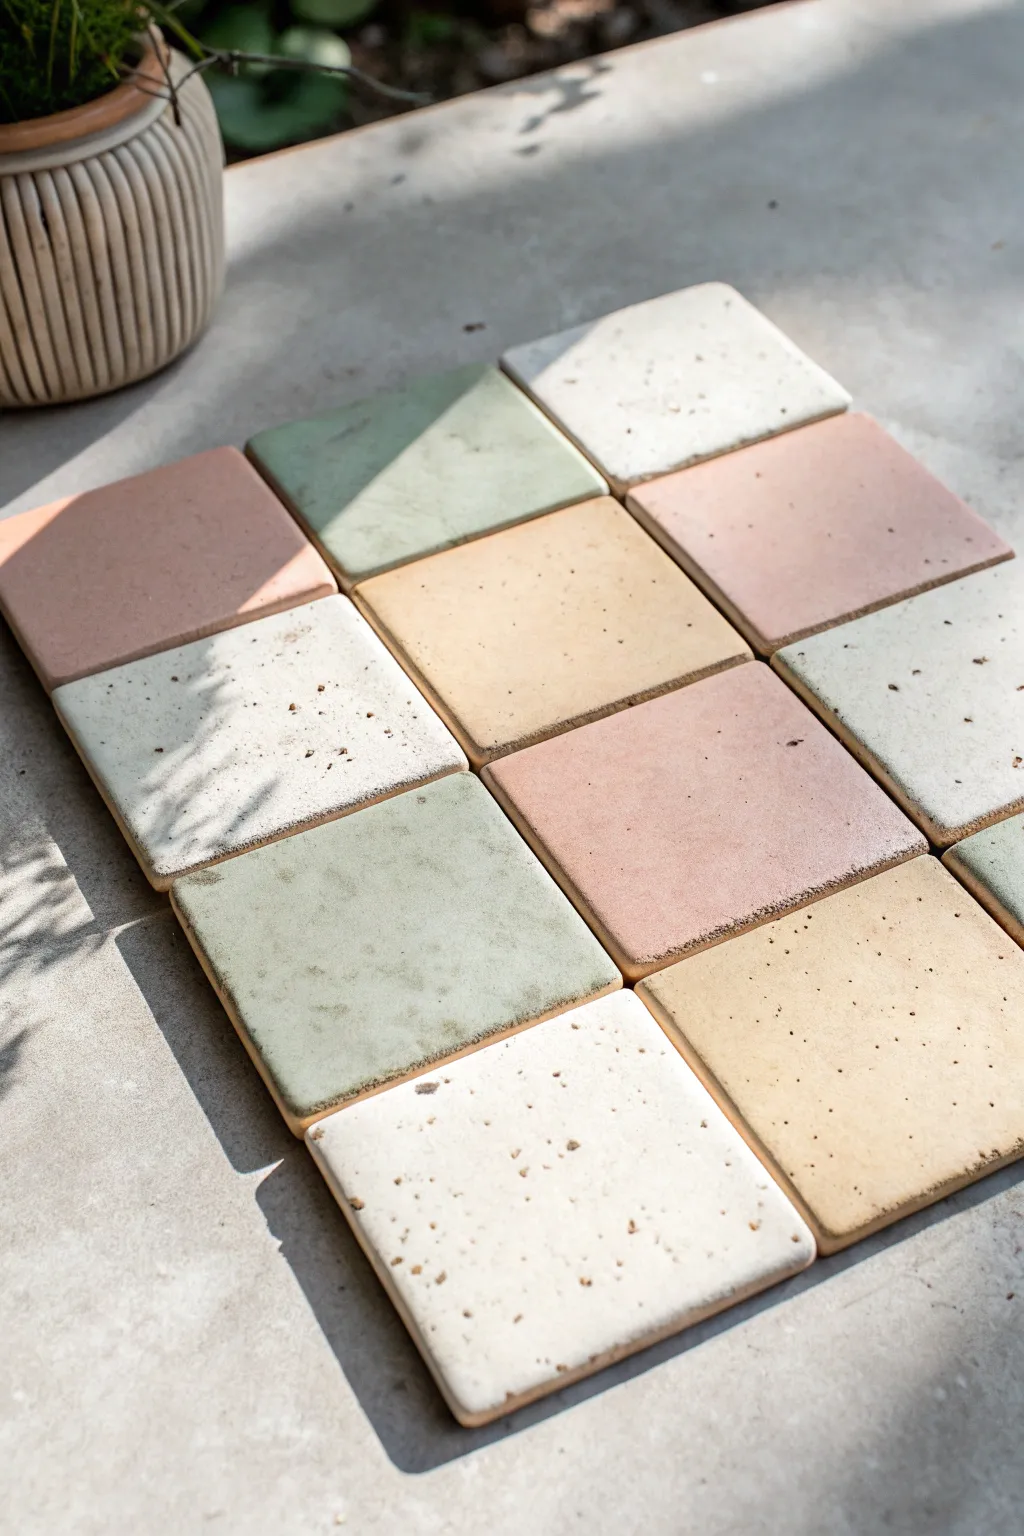
Embrace the beauty of imperfection with these soft, earthy ceramic tiles ideal for a unique backsplash or coaster set. This project features a soothing palette of sage, charcoal-speckled cream, dusty pink, and warm sand, all finished with a smooth matte glaze.
Step-by-Step
Materials
- White earthenware clay body (mid-fire)
- Square tile cutter or plaster mold (4×4 or 5×5 inches)
- Rolling pin with thickness guides (approx. 1/4 inch or 6mm)
- Canvas work surface
- Fettling knife
- Rubber kidney rib
- Sponge
- Underglazes: Sage Green, Dusty Pink, Sand/Ochre
- Speckled clay addition or iron oxide wash (for speckling)
- Clear matte glaze
- Drywall board or ware board for drying
Step 1: Forming the Base Tiles
-
Wedge the clay:
Begin by thoroughly wedging your white earthenware clay to remove any air bubbles. This step is crucial for tiles to prevent warping in the kiln later. -
Roll out the slab:
Roll your clay out onto a canvas surface. Use thickness guides or slats on either side of your rolling pin to ensure a perfectly even thickness of about 1/4 inch across the entire slab. -
Compress the slab:
Take a rubber kidney rib and drag it across the surface of the clay slab in multiple directions. This compresses the clay particles, realigning them to reduce warping and creates a smooth canvas for your glazes. -
Cut the squares:
Using your square tile cutter or a template with a fettling knife, cut out your tiles. I find it helpful to cut a few extra tiles than needed for the final grid to account for any drying mishaps. -
Soften the edges:
Once the clay is leather-hard (firm but still cool to the touch), gently wipe the sharp edges with a damp sponge. You want slightly rounded corners to mimic the soft look in the inspiration image.
Warping Worries?
If tiles curl upward at edges, they dried unevenly. Next time, flip them daily during drying and keep weights on corners longer.
Step 2: Creating Texture and drying
-
Create the speckled effect:
For the cream-colored tiles, you want that beautiful organic speckle. You can achieve this by flicking a stiff toothbrush dipped in iron oxide wash over the raw clay, or by kneading granular manganese into that specific portion of clay before rolling. -
Slow drying process:
Place your tiles on a piece of drywall or a ware board. Cover them loosely with plastic for the first 24 hours to ensure they dry slowly and evenly from the center out. -
Sandwich method:
To further prevent curling corners, you can gently weigh the tiles down with a second piece of drywall board placed on top once they are leather hard. -
Bisque fire:
Once the tiles are bone dry, load them into the kiln for a bisque firing to cone 04 (or the temperature recommended for your specific clay body).
Step 3: Glazing and Finishing
-
Prepare your palette:
Mix your underglazes or glazes. You aim for a muted palette: Sage Green, Dusty Pink, and a warm Sand/Ochre. Leave the speckled tiles uncolored if you used a speckled clay body, or use a translucent white glaze. -
Apply base colors:
Dip or brush the glaze onto the bisque tiles. For a consistent finish like the photo, dipping is often best, but brushing three even coats works well too. -
Create variation:
To get that slightly weathered look seen on the green and pink tiles, you can gently wipe back a tiny bit of glaze on the edges with a sponge, allowing the clay body to peek through slightly. -
Add surface speckles (optional):
If you didn’t add speckles ideally in the clay stage, you can now flick a iron-oxide enriched glaze lightly over the cream tiles before the final firing. -
Clean the bottoms:
Flip every tile over and meticulously wax the bottom or wipe away any glaze drips with a sponge. Any glaze on the bottom will fuse the tile to your kiln shelf. -
Glaze fire:
Fire the tiles a second time to the maturation temperature of your glaze (typically cone 5 or 6 for mid-fire). Ensure the tiles aren’t touching inside the kiln. -
Arrangement:
Once cooled, lay out your tiles on a flat surface to plan your grid, mixing the colors (pink, sand, green, cream) to create a balanced composition before permanent installation.
Grout Choice Matters
Use a ‘sand’ or ‘warm gray’ grout rather than stark white. This softens the grid and complements the earthy clay tones perfectly.
Arrange your finished tiles on a table first to find the most pleasing color distribution before mounting them.
Fairy Houses for the Garden

Capture the whimsy of the forest floor with this hand-built ceramic fairy house, featuring a charming spotted mushroom roof and arched wooden-style door. Its sturdy stoneware body is perfect for nestling among moss and tree roots in your garden.
Step-by-Step Guide
Materials
- Speckled stoneware clay (mid-fire)
- Rolling pin
- Fettling knife
- Scoring tool and slip
- Wooden modeling tools
- Circle cutter (optional)
- Small oval cutters (for windows)
- Underglazes (terracotta/orange, black, forest green)
- Texture tool or rough sponge
- Canvas work surface
Step 1: Constructing the Base
-
Roll the slab:
Begin by rolling out a medium-sized slab of speckled clay to an even thickness of about 1/4 inch. Ensure the clay is compressed on both sides to prevent warping later. -
Cut the walls:
Cut a rectangular strip from your slab, approximately 4 inches high and 10 inches long. This will form the cylindrical body of the house. -
Form the cylinder:
Stand the strip up and curl it into a cylinder, overlapping the ends slightly. Score the overlapping edges deeply, apply slip, and press them firmly together to create a seamless join. -
Smooth the seam:
Use a wooden rib or your fingers to smooth the vertical seam inside and out until it disappears completely. The cylinder should be slightly tapered, wider at the bottom. -
Create the floor:
Place the cylinder on a remaining piece of slab and trace around the base. Cut this circle out, score and slip the contact points, and attach the floor to the cylinder.
Slumping Roof?
If the roof sags while working, support it from the inside with a ball of crumpled newspaper. Leave the paper in until the clay is leather hard, then remove it before firing.
Step 2: Adding Architectural Details
-
Carve the door opening:
Using a needle tool, lightly sketch an arched doorway on the front. Carefully cut out the opening, saving the clay piece you removed to serve as the door itself. -
Detail the door frame:
Roll a thin coil of clay and flatten it slightly. Attach this around the door frame arch. Use a knife or needle tool to impress horizontal lines, mimicking stone blocks or bricks. -
Create the wooden door:
Take the clay piece saved from the door opening and trim it slightly so it fits recessed within the frame. Use a modeling tool to score vertical wood grain lines into it. -
Install the door:
Score the back of the door piece and the inside edge of the frame. Press the door into place so it looks slightly ajar or recessed. Add a tiny ball of clay for a doorknob. -
Add windows:
Cut out small circular or arched windows on the upper walls. I like to frame these with thin clay coils similar to the door, adding a clay cross in the center for window panes.
Step 3: Sculpting the Mushroom Roof
-
Form the roof shape:
Roll a ball of clay and pinch it into a deep bowl or mushroom cap shape. It needs to be wide enough to overhang the walls of your house by about half an inch. -
Refine the surface:
Smooth the exterior of the roof. It should have a gentle, organic curve rather than being a perfect geometric cone. -
Add the chimney:
Create a small, stubby cylinder or pinch a tiny knob of clay. Attach this to the very peak of the roof to act as a chimney stem. -
Check the fit:
Place the roof gently onto the base cylinder to check the fit. If you want it permanently attached, score and slip the rim now; otherwise, create a small flange on the underside of the roof to keep it centered. -
Decorate the base:
Apply small dabs of texture paste or tiny bits of rough clay around the bottom edge of the house to simulate tufts of grass or moss growing up the walls.
Tree Bark Texture
Before cutting your walls, roll the slab onto a piece of textured fabric or real tree bark. This imitates the rough texture seen in the photo instantly.
Step 4: Glazing and Finishing
-
Bisque fire:
Allow the piece to dry slowly under plastic to prevent cracking, then bisque fire to cone 04 (or your clay’s specification). -
Apply roof color:
Brush an orange or terracotta underglaze onto the roof. Wipe it back slightly with a sponge if you want a weathered look that reveals the clay texture. -
Add roof spots:
Using a small detail brush or the end of a paintbrush handle, dot black underglaze in a regular pattern across the roof and along the rim. -
Paint the details:
Use a dark wash for the window interiors to create depth. Paint the tiny grass tufts at the base with a deep forest green underglaze. -
Final firing:
Apply a clear matte glaze over the entire piece to seal it for outdoor use, then fire to the final maturity temperature of your clay body.
Now your fairy dwelling is ready to welcome tiny visitors into the garden