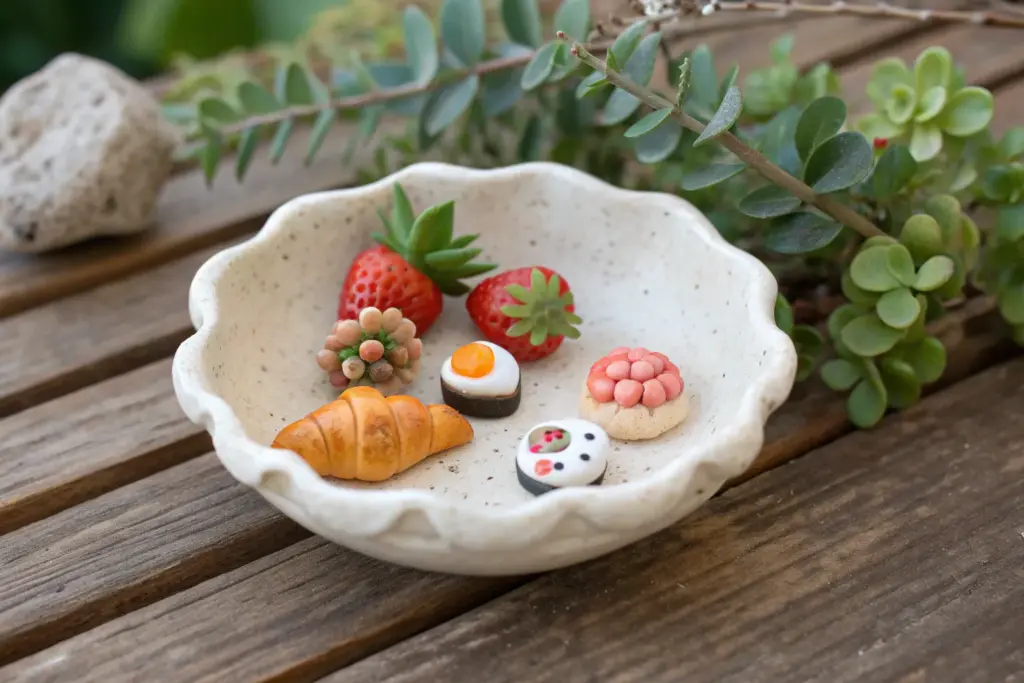
Mini clay crafts are my favorite kind of project because you can finish something adorable in one sitting and still feel like a wizard. If you’re craving that cute “tiny world” vibe, here are my go-to mini clay craft ideas that stay small, simple, and totally doable.
Mini Fruit Tart Charms
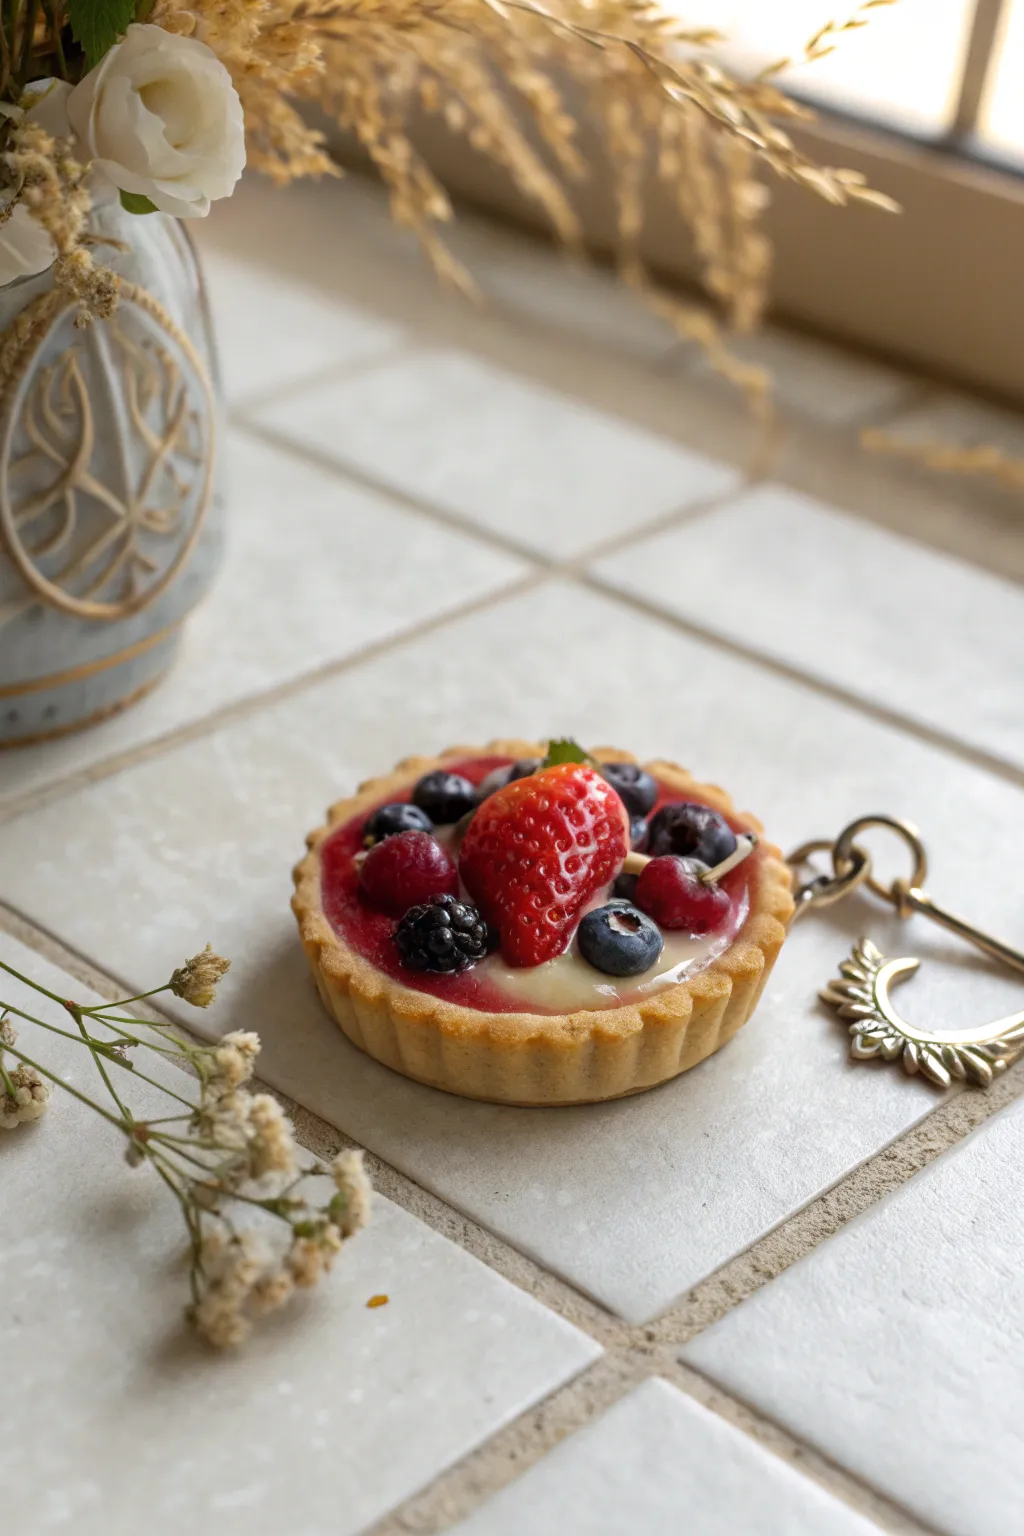
Capture the sweetness of summer with this incredibly realistic miniature fruit tart charm, perfect for keychains or jewelry. The delicate golden crust holds a medley of blueberries, raspberries, and a juicy strawberry, all glistening with a faux fruit glaze.
Step-by-Step Guide
Materials
- Polymer clay (beige for crust, translucent liquid clay, red, blue, purple, white)
- Chalk pastels (orange, brown, yellow ochre)
- Miniature tart mold or a bottle cap
- Ball stylus and needle tool
- Toothbrush or sandpaper (for texture)
- Gloss varnish or UV resin
- Small paintbrush
- Metal eyepin and jump ring
- Keychain attachment (lobster clasp style)
- X-acto knife or craft blade
Step 1: Baking the Crust
-
Mix the dough color:
Start by mixing beige polymer clay with a tiny amount of yellow ochre and translucent clay. This creates a realistic ‘pastry’ dough color rather than a flat tan. -
Form the base:
Roll the clay into a ball and press it into your miniature tart mold. If you don’t have a mold, press it over a bottle cap to get the fluted edge shape, then carefully remove it. -
Texture the pastry:
Gently tap the surface of the unbaked crust with a clean toothbrush or a crumpled ball of aluminum foil. This mimics the porous texture of baked shortcrust pastry. -
Add baked shading:
Use a soft brush to dust yellow ochre and light brown chalk pastel powder onto the edges and ridges of the crust. Concentrate the darker brown on the very high points for that ‘golden brown’ look. -
Pre-bake the crust:
Bake the crust alone according to your clay manufacturer’s instructions (usually about 10-15 minutes). Let it cool completely before filling so the base is solid.
Step 2: Filling and Fruit Sculpting
-
Create the custard:
Mix liquid polymer clay with a small amount of white and yellow clay to create a thick, creamy custard color. Pour this into the cooled crust until it’s about three-quarters full. -
Sculpt the strawberry:
Shape a small teardrop from red clay. Use a needle tool to gently poke tiny divots all over the surface for seeds. I like to add a tiny green clay calyx (leaves) on top for contrast. -
Make the blueberries:
Roll tiny balls of dark blue clay. Use a needle tool to press an asterisk (*) shape into the top of each ball to create the blossom end. -
Form the raspberries/blackberries:
For blackberries, make a core of black clay and cover it with tiny rolled balls of black clay. Do the same for raspberries using deep red clay mixed with a touch of translucent. -
Frost the berries (optional):
Lightly dust the blueberries and blackberries with a tiny amount of white pastel or cornstarch to simulate the natural bloom found on fresh berries.
Berry Realism Tip
For ultra-realistic strawberries, rub a tiny bit of red pastel powder over the seed indentations after baking to deepen the color.
Step 3: Assembly and Finishing
-
Arrange the fruit:
Using tweezers, carefully place the fruit into the liquid clay custard. Start with the strawberry as the focal point, then nestle the berries around it. -
Add the coulis:
Mix a drop of red liquid clay (or translucent liquid clay mixed with red shavings). Drizzle a small amount between the fruits to look like fruit sauce or jam bleeding into the custard. -
Insert the hardware:
Before the final bake, trim an eyepin to size and insert it into the side of the tart crust, ensuring it goes deep enough to be secure. -
Final bake:
Bake the entire piece again for roughly 15-20 minutes to set the liquid clay and fruit. Monitor the oven closely so the thin crust edges don’t burn. -
Apply the glaze:
Once fully cooled, coat just the fruit sections with a high-gloss varnish or UV resin. Leave the crust matte for realistic textural contrast. -
Attach the keychain:
Open a jump ring with pliers, loop it through the eyepin loop and your decorative keychain clasp, and close it securely.
Soggy Bottom Blues?
If your liquid clay soaks into the raw crust too much, brush a thin layer of liquid clay on the raw crust and bake it briefly to seal it first.
Now you have a delectable miniature treat that looks good enough to eat but will last forever as a charming accessory


Tiny Lattice Pie Minis
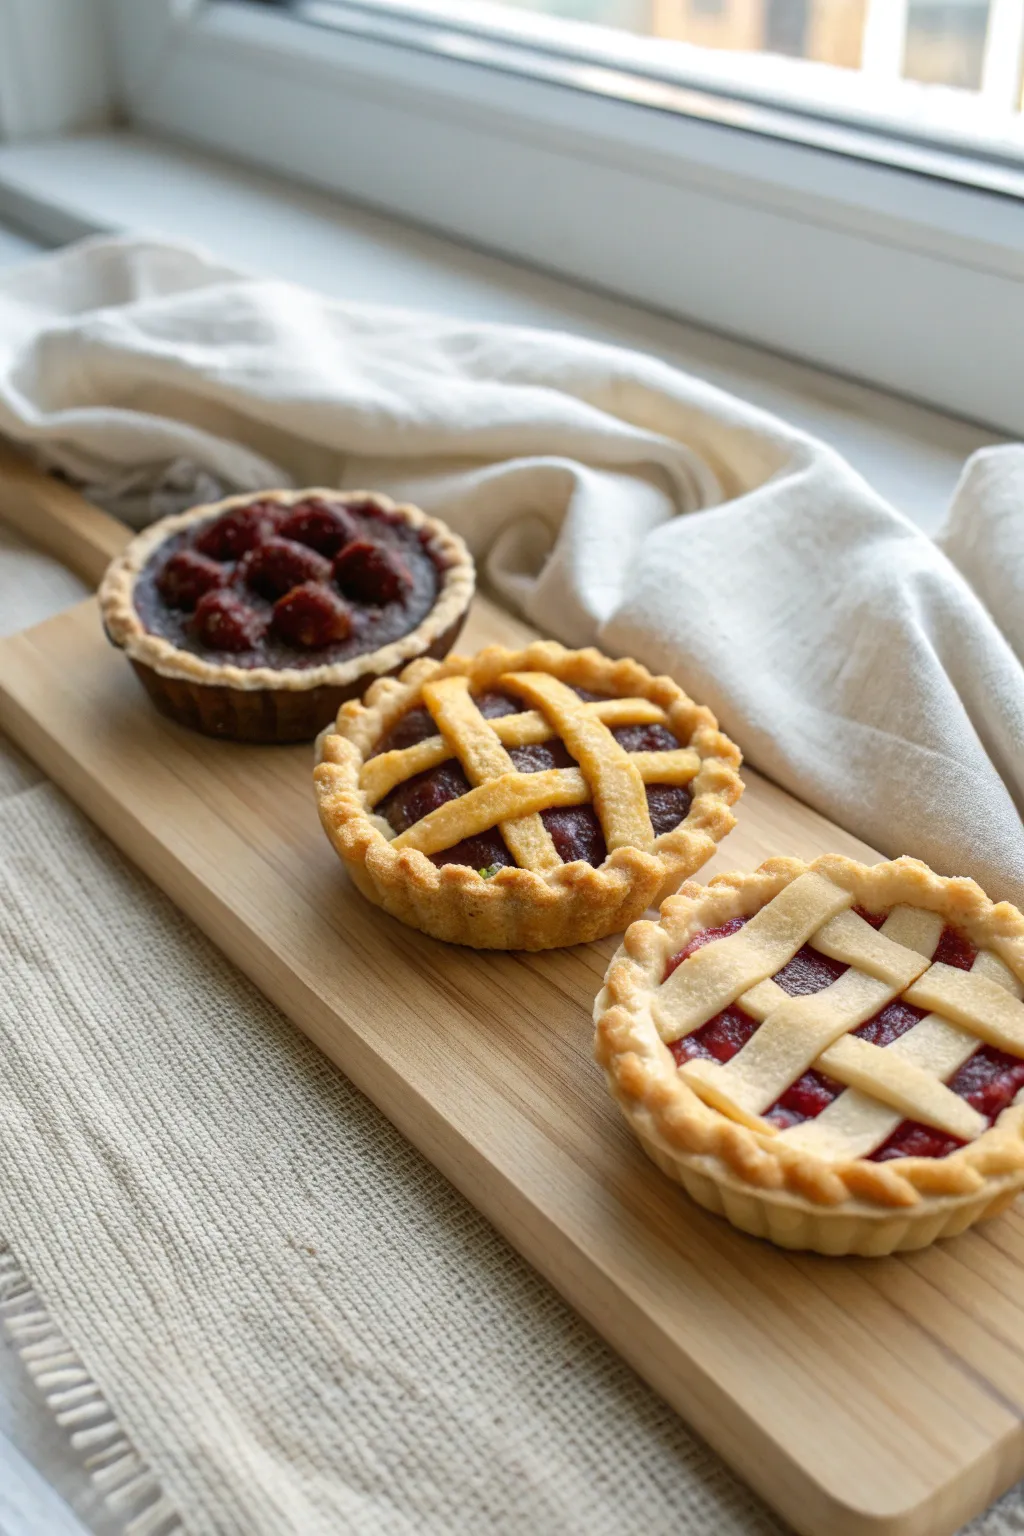
These miniature bakery delights capture the cozy charm of homemade pastry with stunning realism, featuring golden crusts and juicy fruit fillings. Perfect for dollhouse displays or jewelry, these tiny tarts use polymer clay to mimic the texture of flaky dough and sweet, bubbling jam.
Step-by-Step Tutorial
Materials
- Polymer clay (beige/translucent mix for crust, dark red/purple for filling)
- Liquid polymer clay (Fimo liquid or similar)
- Soft pastel chalks (yellow ochre, burnt umber, orange)
- Miniature tart molds or bottle caps
- Rolling pin or smooth pen
- X-acto knife or craft blade
- Toothbrush or balls of tin foil (for texturing)
- Gloss varnish
- Tiny glass beads (optional, for texture)
Step 1: Preparing the Dough & Base
-
Mix the perfect crust color:
Blend equal parts beige and translucent polymer clay. This translucency is key to making the pastry look baked and edible rather than ‘plastic’. If the color is too pale, add a tiny speck of yellow ochre. -
Roll out the dough sheet:
Roll your clay mixture into a thin, even sheet, approximately 2mm thick. You want it substantial enough to hold the shape but thin enough to look delicate. -
Cut the bases:
Use a round cutter (or bottle cap) slightly larger than your tart mold to punch out circles of the clay. -
Form the tart shells:
Gently press the clay circles into your miniature tart molds. Make sure to press the clay into the fluted edges to capture that classic ridged pie look. -
Trim the excess:
Use your blade to carefully slice off any clay overhanging the top edge of the mold. It creates a clean, professional finish. -
Add texture:
Gently tap the rim of the crust with a toothbrush or a crumpled ball of aluminum foil. This breaks up the smooth surface and mimics the porous nature of baked pastry.
Step 2: Creating the Fruit Filling
-
Chop the ‘fruit’:
Take your dark red or purple clay and chop it into tiny, irregular bits to simulate berry chunks. For the raspberry tart, roll small balls instead. -
Mix the sauce:
In a small container, mix liquid polymer clay with shaved red or purple pastel chalk. Stir until you have a syrupy, jam-like consistency. -
Combine fruit and sauce:
Fold your chopped clay bits into the liquid mix. I find using a toothpick helps to coat everything evenly without making a mess. -
Fill the shells:
Spoon the mixture into your prepared crusts, filling them just below the rim so they don’t overflow when you add the lattice.
Smudged Lattice?
If your strips are stretching or breaking while weaving, the clay is too warm. Pop the rolled sheet in the fridge for 5 minutes to firm it up before cutting.
Step 3: The Lattice Top & Baking
-
Cut the lattice strips:
Roll out another thin sheet of your crust clay. Use a straight blade to cut very thin, even strips for the pie top. -
Weave the pattern:
Lay 3-4 strips vertically across the pie. Fold back every other strip, lay a horizontal strip down, and unfold the vertical ones. Repeat this weaving process until covered. -
Seal the edges:
Press the ends of the lattice strips gently into the rim of the crust to secure them, then trim away any hanging ends with your blade. -
Pre-bake shading:
Before baking, use a soft brush to dust the top of the lattice and the rim with shaved yellow ochre and a tiny bit of orange pastel. This gives a ‘raw egg wash’ look. -
Bake the pies:
Bake according to your clay manufacturer’s instructions (usually 230°F/110°C for 15-30 minutes). Let them cool completely before removing from the molds. -
Post-bake browning:
For a ‘well-done’ look, brush a little burnt umber pastel powder on the high points of the lattice where the oven heat would naturally catch. -
Glaze the filling:
Finally, carefully apply a gloss varnish only to the visible fruit filling sections. This creates that mouth-watering, juicy shine.
Make it a Necklace
Turn your pie into a charm by inserting a tiny metal eye pin into the crust rim before baking. Add a jump ring later to hang it on a chain.
Display your freshly baked miniatures on a tiny wooden board for the ultimate cute presentation


Cute Cookie Stud Earrings
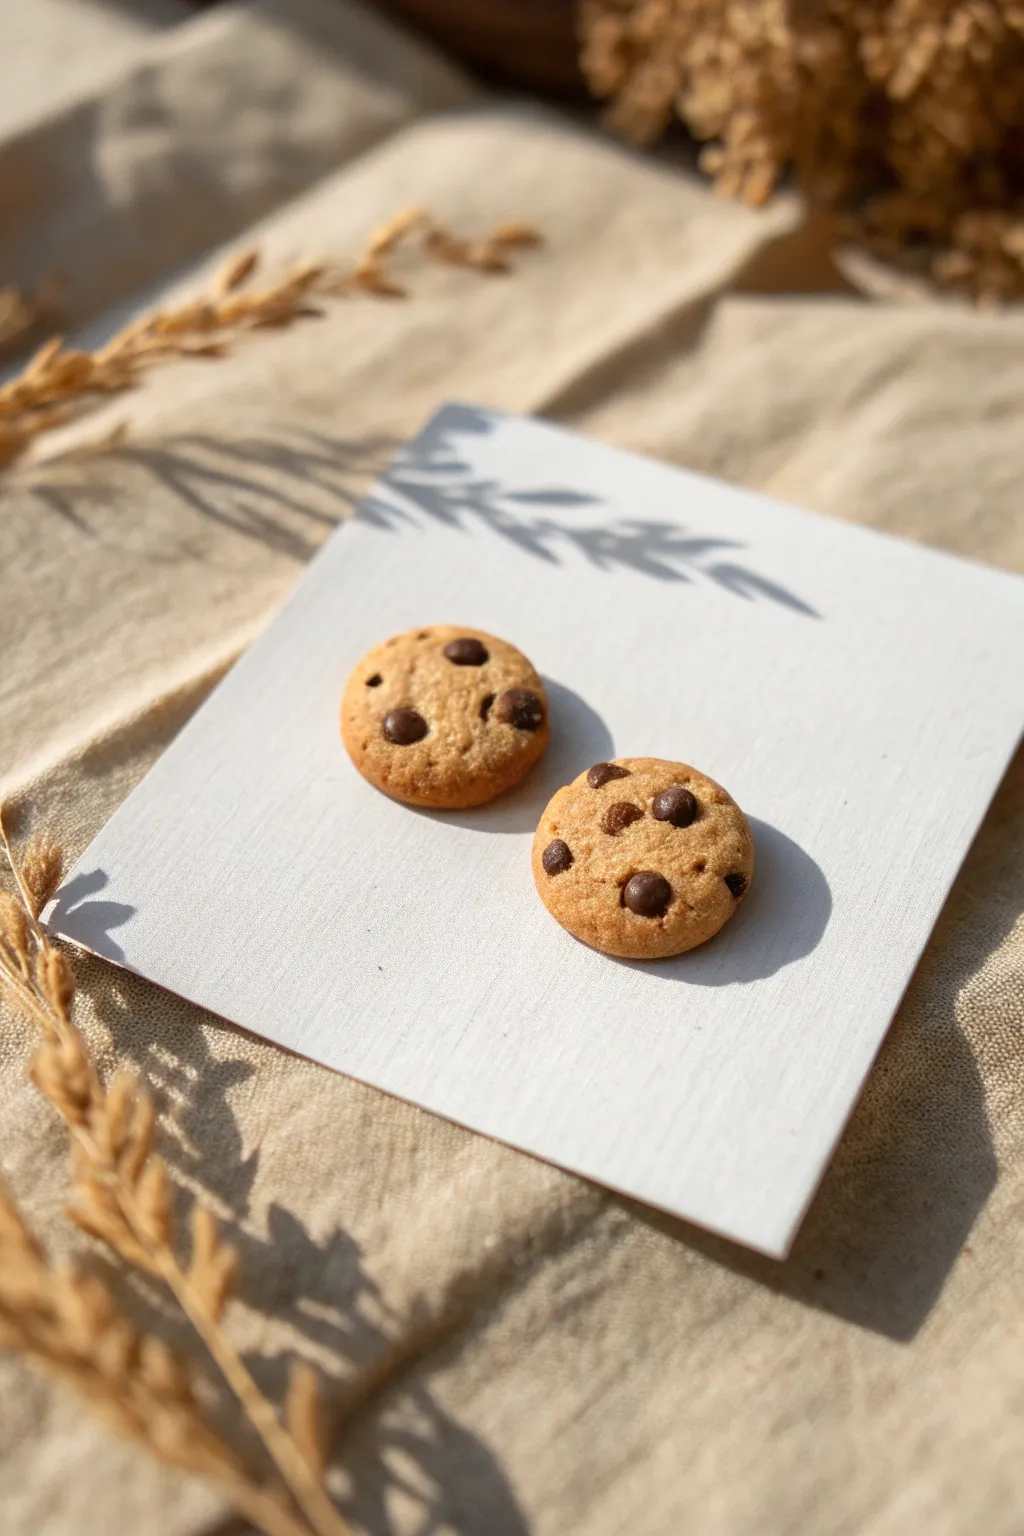
These adorable miniature cookies look good enough to eat but are actually a delightful accessory for your ears. With realistic texture and tiny chocolate chips, you’ll master the art of polymer clay baking in no time.
How-To Guide
Materials
- Polymer clay (beige/tan for dough, dark brown for chips)
- Soft pastels (yellow ochre, burnt sienna, dark brown)
- Soft paintbrush for shading
- Toothbrush or balls of aluminum foil for texturing
- Dotting tool or toothpick
- Translucent liquid polymer clay (optional)
- Gloss glaze or polyurethane varnish (for chips only)
- Two earring stud posts
- Strong craft glue (e.g., E6000) or UV resin
- Craft knife or tissue blade
- Ceramic tile or baking sheet
Step 1: Mixing the Dough
-
Create the dough color:
Start by conditioning your beige or tan polymer clay. If it’s too pale, mix in a tiny pinpoint amount of translucent clay and a speck of yellow ochre clay to get that perfect, warm cookie dough shade. -
Portion the cookies:
Pinch off two equal-sized balls of clay, roughly 6-8mm in diameter each. Roll them between your palms until they are perfectly smooth spheres. -
Flatten into shape:
Place the spheres on your work surface and gently press down with your finger to flatten them into thick discs. Don’t make them too thin; real cookies have a nice height to them. -
Round the edges:
Use your fingertip to gentle tap and round off any sharp edges created by flattening. You want a soft, baked look, not a cylinder.
Sticky Situation?
If your texturing tool sticks to the clay, dust it lightly with cornstarch or baby powder before pressing it into the dough. This keeps the clay from pulling up.
Step 2: Adding Texture and Details
-
Texture the surface:
Take a clean toothbrush or a crumpled ball of aluminum foil and gently press it all over the top and sides of your cookie discs. This mimics the crumbly texture of baked goods. -
Prepare the pastel shading:
Scrape a little powder from your yellow ochre and burnt sienna pastels onto a piece of paper using your craft knife. -
Apply the first bake color:
Load a soft brush with the yellow ochre powder and dust the entire surface of both cookies. This gives a base baked color. -
Add the golden brown finish:
I like to use the burnt sienna powder more sparingly, focusing on the edges and the textured high points to simulate browning in the oven. -
Make the chocolate chips:
Condition a very small amount of dark brown clay. Roll it into a super thin snake also so you can slice off tiny chunks, or just pinch off minuscule uneven bits. -
Shape the chips:
Roll each tiny bit into a rough ball, then slightly shape them into cones or irregular chunks. Uniformity isn’t the goal here; irregularity looks more realistic.
Step 3: Assembly and Baking
-
Embed the chips:
Pick up the chocolate chips with a dotting tool or needle. Press 5-7 chips firmly into the top of each cookie. Use the tool to push them in slightly so they look baked-in, not just sitting on top. -
Re-texture if needed:
If pressing the chips flattened your texture, lightly dab the toothbrush around the chips again to restore the crumb look. -
Bake the clay:
Place your cookies on a ceramic tile and bake according to your polymer clay manufacturer’s instructions (usually around 275°F/130°C for 15-30 minutes). Let them cool completely. -
Choose your glaze:
For that melted chocolate look, apply a tiny drop of gloss glaze or polyurethane varnish specifically to each dark brown chip using a fine toothpick.
Make it a Set
Use the same technique to create a slightly larger cookie, add a jump ring before baking, and thread it onto a chain for a matching necklace pendant.
Step 4: Turning into Earrings
-
Prepare the backs:
Flip the cooled cookies over. If the backs aren’t perfectly flat, you can sand them briefly on fine-grit sandpaper. -
Attach the posts:
Apply a small dab of strong craft glue or UV resin to the flat pad of your earring post. -
Secure the post:
Press the glued post firmly onto the center of the cookie back. If using UV resin, cure it under a UV lamp; otherwise, let the glue cure for the recommended time (often 24 hours for maximum strength).
Wear your sweet new accessories with pride and watch as people do a double-take at the realistic details


Mini Vegetable Characters With Faces
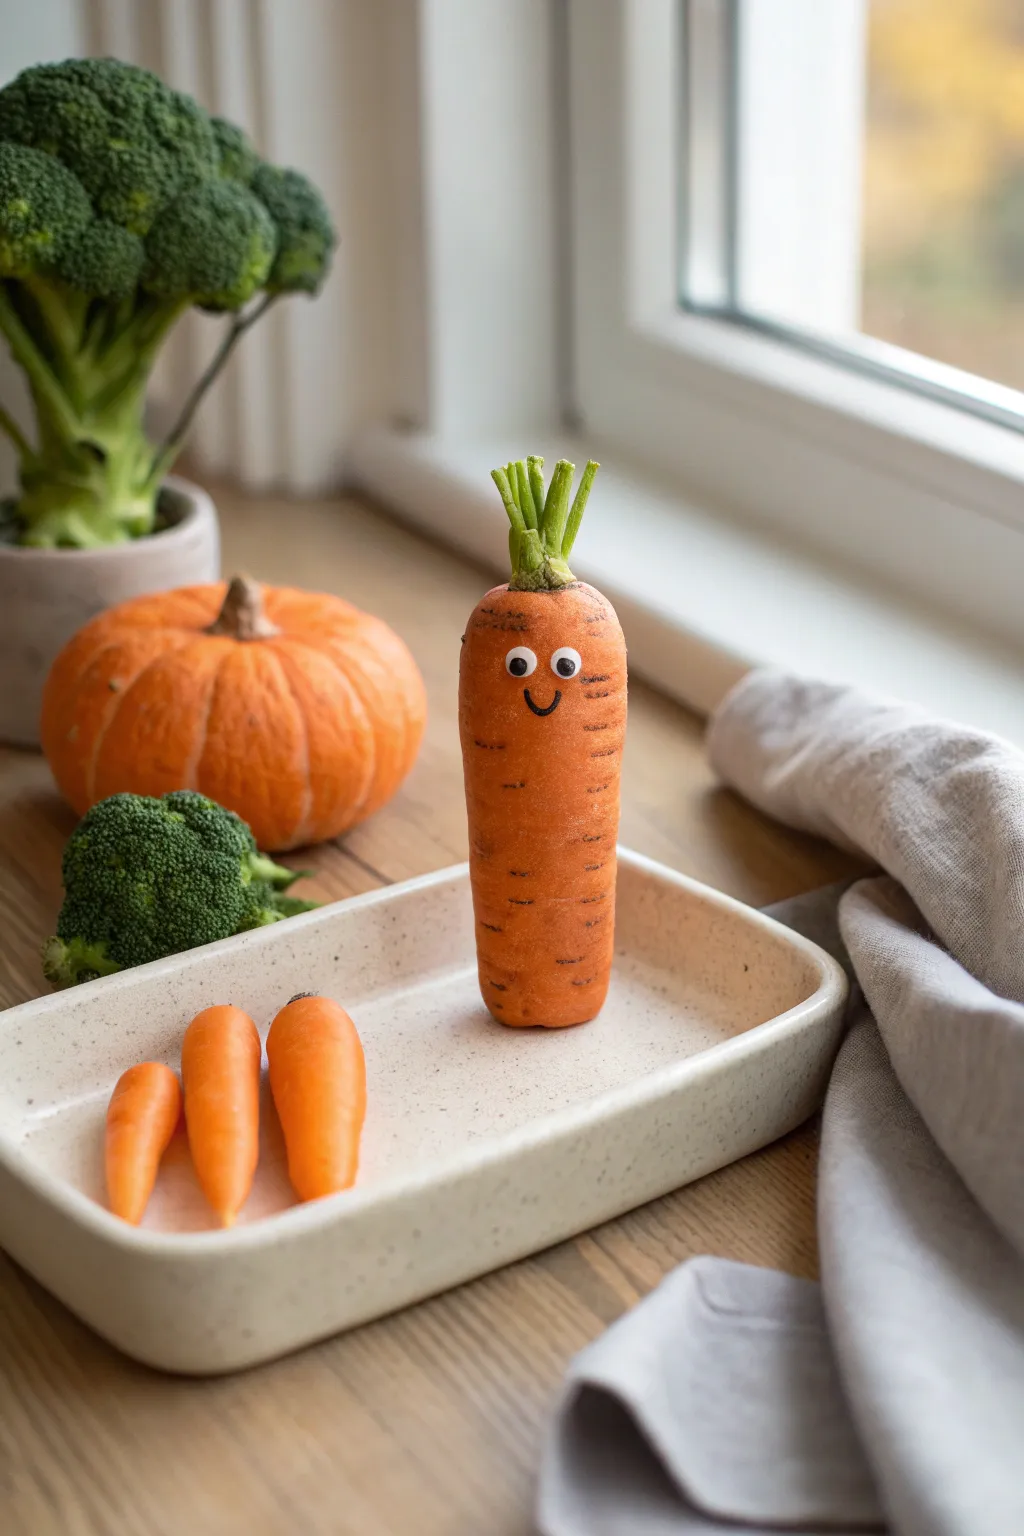
Brighten up your windowsill with this adorable clay vegetable family, featuring one happy Papa Carrot and his three little sprouts. This project combines realistic texturing with cartoonish charm for a decoration that’s sure to make you smile.
Detailed Instructions
Materials
- Orange polymer clay
- Green polymer clay
- Black acrylic paint or fine-tip black marker
- Small googly eyes (approx. 4-6mm)
- Craft glue or liquid clay
- Sculpting tool or toothpick for texturing
- Needle tool
- Rectangular ceramic or clay dish (optional for display)
- Clear matte varnish (optional)
Step 1: Sculpting Papa Carrot
-
Form the base:
Start by conditioning a large chunk of orange polymer clay until it is soft and pliable. Roll it into a thick cylinder, approximately 3-4 inches tall. -
Shape the taper:
Gently roll the bottom half of the cylinder so it tapers slightly inward, but keep the very bottom flat and blunt so it can stand upright on its own. The top should remain rounded like natural vegetable shoulders. -
Add texture lines:
Take your sculpting tool or a toothpick and press horizontal lines randomly around the body of the carrot. These shouldn’t be perfect circles; short, broken horizontal indentations mimic real organic growth. -
Deepen the details:
Add a few deeper, small nicks and scratches to give the surface character. I find that varying the depth of these marks makes the clay look much more like organic root vegetable skin.
Step 2: Creating the Greenery
-
Prepare the stems:
Condition a small amount of light green clay. Roll out several thin snakes of clay, about 1 inch long each. -
Group the stems:
Gather 5-7 of these green strands together in a bunch. pinch them together at the bottom to fuse them into a single unit. -
Trim the tops:
Use a blade or scissors to cut the tops of the green strands bluntly, so they look like cut stalks rather than leafy fronds. -
Attach to the body:
Press a small indentation into the center of the orange carrot top. Apply a drop of liquid clay or utilize the natural tackiness to press the green stem bundle firmly into this spot.
Texture Tech
Roll a crumpled ball of aluminum foil over the orange clay before baking. This imitates the pitted skin of a real raw carrot instantly.
Step 3: Making the Little Sprouts
-
Roll baby carrots:
Take three smaller pieces of orange clay. Roll them into tapered cylinders, each about 1 to 1.5 inches long, resembling baby carrots. -
Refine the shape:
Smooth the ends so they are rounded but distinct. You want them to look like the cleaned, peeled baby carrots you buy at the store, so keep their surface smoother than the big carrot. -
Add subtle texture:
Lightly scratch just a few very faint lines on these smaller carrots if you wish, but keeping them mostly smooth helps distinguish them as ‘young’ vegetables. -
Final arrangement check:
Test the arrangement by standing the big carrot up and laying the three small ones next to it to ensure the scale looks cute and family-like.
Garden Variety
Make a whole veggie patch by creating a purple eggplant or a red radish friend using the same face and eye technique.
Step 4: Baking and Finishing
-
Bake the clay:
Place all your clay pieces on a baking sheet lined with parchment paper. Bake according to your brand of polymer clay instructions (usually around 275°F for 15-30 minutes). -
Cool down:
Let the pieces cool completely before handling. The clay is fragile while hot and hardens as it returns to room temperature. -
Paint the smile:
Using a very fine detail brush and black acrylic paint, or a permanent marker, draw a small, simple ‘U’ shape smile on the upper third of the large carrot. -
Attach the eyes:
Select two small googly eyes. Glue them just above the smile using a strong craft glue. Placing them close together gives a cute, goofy expression. -
Add dirt effects (optional):
For extra realism, you can dry-brush a tiny amount of brown paint into the textured crevices of the big carrot to look like garden soil. -
Seal the work:
Coat the vegetable parts (avoiding the googly eyes) with a matte varnish to protect the paint and give the clay a finished, non-plastic look.
Now you have a whimsical kitchen companion that never goes spoil

The Complete Guide to Pottery Troubleshooting
Uncover the most common ceramic mistakes—from cracking clay to failed glazes—and learn how to fix them fast.
Peas-in-a-Pod Pocket Pal
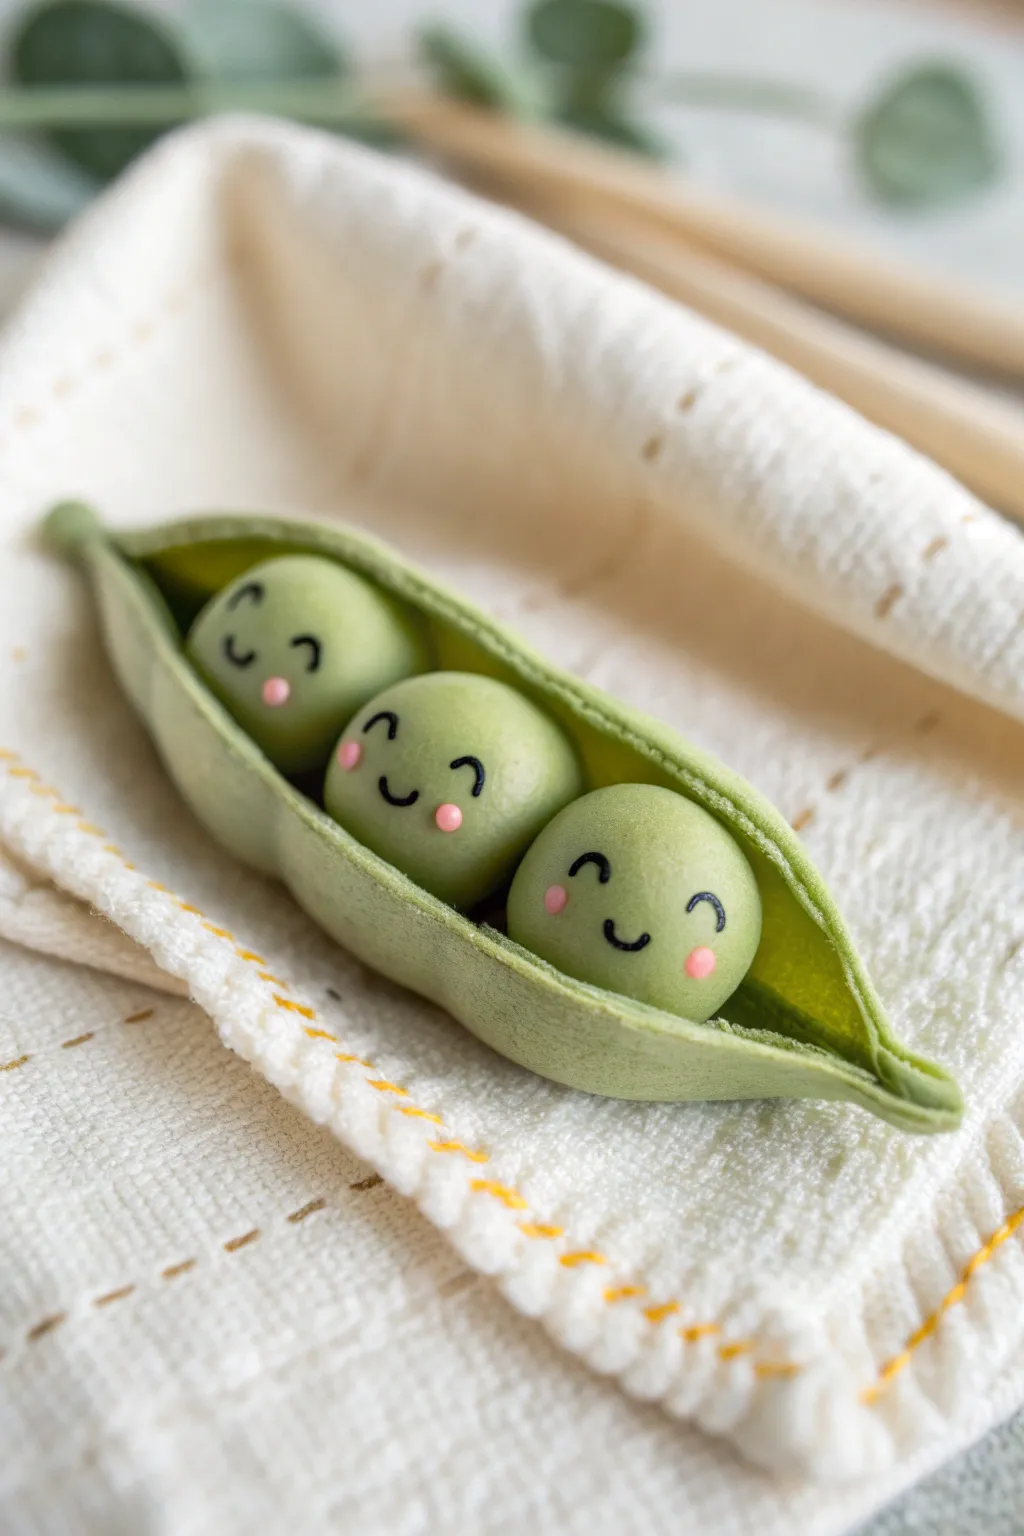
These three adorable little friends nestled snugly in their pod make for a charming miniature sculpture that radiates happiness. With their rosy cheeks and sweet smiles, this clay creation is perfect for a keychain, desk buddy, or a thoughtful handmade gift.
Step-by-Step Guide
Materials
- Polymer clay (light green, medium green, black, pink)
- Clay sculpting tools (needle tool, ball tool)
- Rolling pin or pasta machine
- Translucent liquid clay (optional)
- Very fine paintbrush or fine-tip black marker
- Soft pastel chalks for shading (optional)
- Baking sheet and parchment paper
Step 1: Shaping the Pod
-
Prepare the green clay:
Start by conditioning your medium green clay until it is soft and pliable. If the color feels too flat, try mixing in a tiny dot of yellow or brown to give it a more natural, organic vegetable tone. -
Roll out the base:
Roll a portion of the green clay into a flat oval shape, about 3-4 mm thick. This will form the outer shell of the pod. It should be long enough to comfortably fit three pea-sized balls. -
Texture the surface:
Before shaping, lightly press a piece of rough fabric or a toothbrush against the clay to give it a realistic, organic texture rather than a perfectly smooth plastic look. -
Form the canoe shape:
Gently curve the long sides of the oval upwards to create a canoe or boat shape. Pinch the two ends together to form pointy tips characteristic of a pea pod. -
Refine the edges:
Smooth out the pinched ends so they look seamless. Use your fingers to gently curl the very tips slightly upward or to the side for a whimsical touch.
Step 2: Creating the Peas
-
Roll the peas:
Take your lighter green clay and roll three distinct balls. They should be sized so they fit snugly side-by-side inside your prepared pod without being squished. -
Test the fit:
Place the balls into the pod temporarily to check the sizing. They should look cozy but clearly defined as individual peas. -
Secure the peas:
Apply a tiny drop of liquid clay or translucent sculpey to the bottom of the pod interior. Press the three peas gently into place, securing them in a row. -
Add blush:
Before baking or detailing, take minuscule specks of pink clay. Roll them into tiny flat discs and gently press them onto the ‘cheeks’ of each pea. Alternatively, you can brush on a little pink soft pastel powder.
Keep it Clean
Keep a pack of baby wipes or hand sanitizer nearby. Clean your hands thoroughly before switching from the darker green pod to the lighter green peas to avoid color transfer.
Step 3: Finer Details & Baking
-
Add facial features:
Roll extremely thin threads of black clay for the mouths and eyes. Carefully apply them to the peas using a needle tool. I find using a magnifying glass helps with this delicate placement. -
Alternative face method:
If working with tiny clay strings is frustrating, you can bake the piece first and then draw the faces on with a fine-tip permanent marker or acrylic paint. -
Create the smiles:
Curve the little black threads into ‘U’ shapes for happy mouths. Vary the eyes—some can be upside-down ‘U’ shapes for squinting smiles, giving them distinct personalities. -
Add the stem:
Attach a small, thin cylinder of green clay to one end of the pod to act as the stem. Texture it slightly with your needle tool. -
Final inspection:
Check for any fingerprints. If you find any, lightly brush them away with a tiny dazzling of baby oil or cornstarch on your finger. -
Bake:
Place your creation on parchment paper. Bake according to your clay manufacturer’s instructions—usually around 275°F (135°C) for 15-30 minutes. -
Cool and seal:
Let the piece cool completely before handling. If you want extra durability, finish with a matte varnish, avoiding the urge to use glossy glaze which can look artificial.
Uneven Baking?
If your peas are scorching before the thick pod is cured, tent a piece of aluminum foil over the craft while it’s in the oven to protect the delicate surface from direct heat.
Now you have a trio of cheerful garden friends ready to brighten up any corner of your room
Mini Mushroom Fairy Set
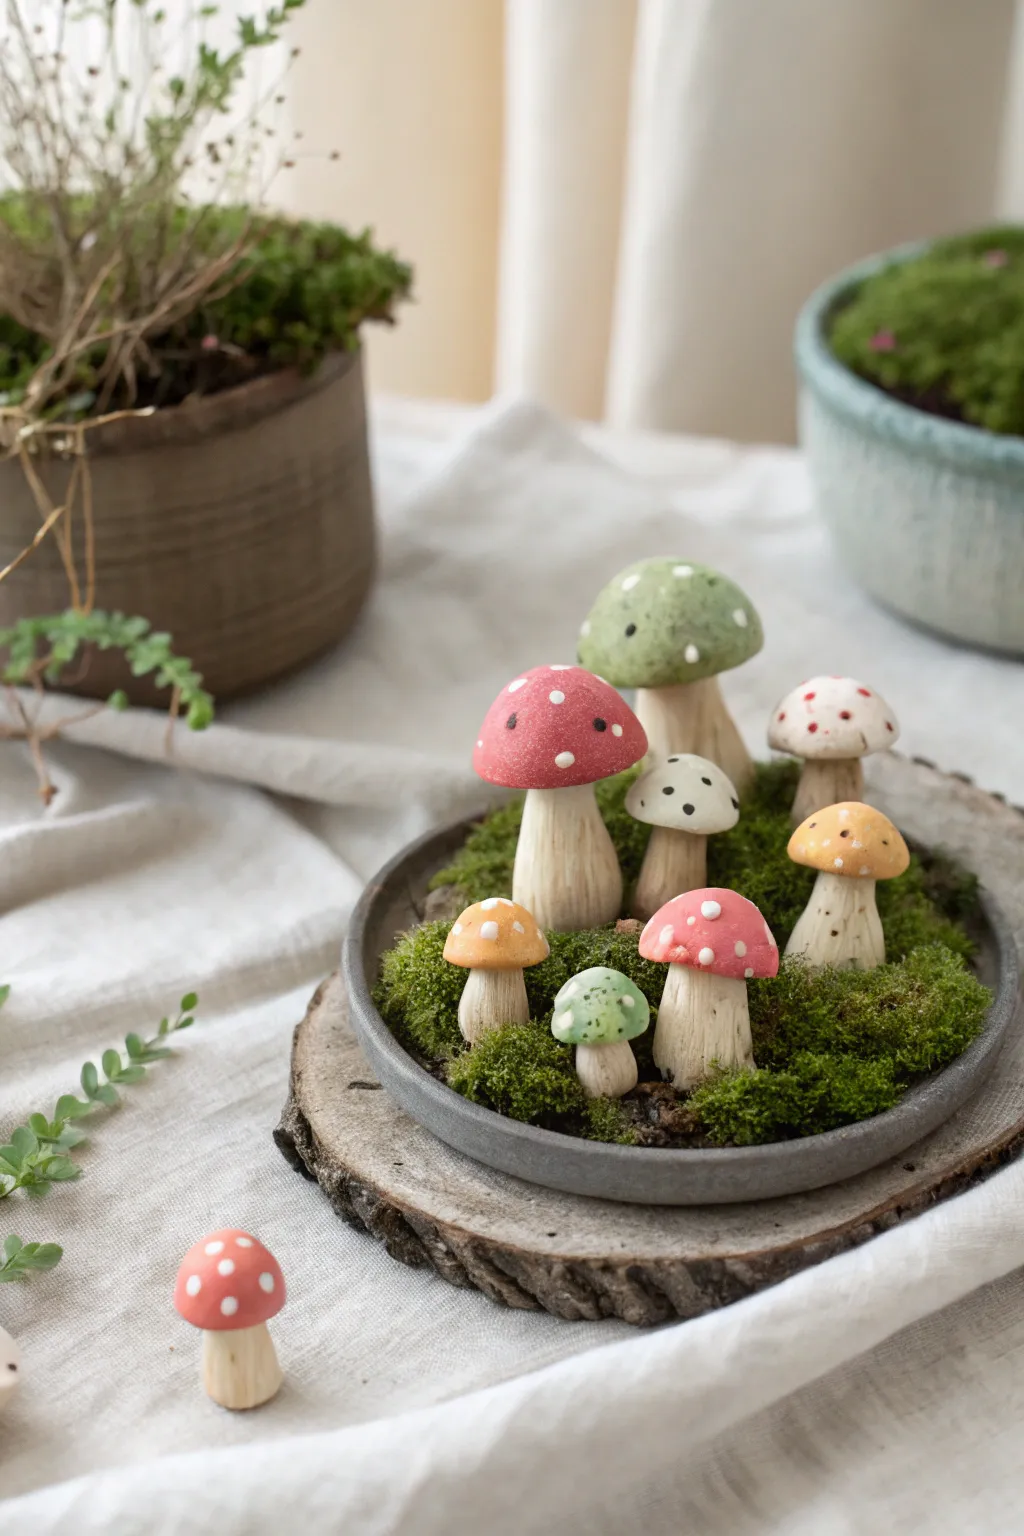
Bring a touch of forest magic indoors with this charming clay mushroom display. These hand-sculpted fungi feature textured stems, varied cap shapes, and delicate polka dots, all nestled into a bed of preserved moss for a realistic fairytale look.
Step-by-Step Tutorial
Materials
- Polymer clay (white, beige, red, calming green, and translucent)
- Acrylic paints (white, brown wash)
- Sculpting tools (needle tool, ball stylus)
- Clay roller or pasta machine
- Liquid polymer clay or bake-and-bond
- Small round ceramic or concrete saucer (approx. 4-5 inches)
- Preserved reindeer moss or sheet moss
- Wooden slice base (slightly larger than saucer)
- Strong craft glue or hot glue gun
- Gloss or matte varnish (optional)
Step 1: Sculpting the Stems
-
Condition the clay:
Begin by thoroughly kneading your beige or off-white polymer clay until it is soft and pliable. Mix in a tiny pinch of brown if you want a more natural, earthy tone. -
Roll the stems:
Create varying sizes of teardrop or cylinder shapes. Aim for a mix of thick, sturdy trunks and slender stems, ranging from 0.5 to 2 inches tall. -
Texture the surface:
Using a needle tool or a stiff toothbrush, gently drag vertical lines up and down the stems to mimic the fibrous texture of real mushroom stalks. Don’t worry about being too neat; organic imperfection looks best. -
Shape the base:
Flatten the bottom of each stem significantly so they can stand upright on their own during baking. You can flare the base slightly for added stability.
Natural Texture Hack
Gently roll the raw clay stems over a piece of coarse sandpaper or a clean rock before baking. This imitates organic imperfections better than tools alone.
Step 2: Creating the Caps
-
Form the cap shapes:
Roll balls of red, soft green, light orange, and cream clay. Flatten them slightly into domes. I like to vary the shapes—some can be tall and conical, others wide and flat like an umbrella. -
Hollow the undersides:
Use a large ball stylus or your thumb to create an indentation underneath each cap where the stem will connect. -
Attach caps to stems:
Apply a tiny drop of liquid clay or bake-and-bond to the top of a stem, then press the cap firmly onto it. Ensure the connection is secure by gently blending the clay at the join if hidden, or simply pressing firmly. -
Add the dots:
Roll extremely tiny balls of white clay. Press these randomly onto the colored caps. Flatten them gently so they look like natural growths rather than raised bumps. -
Bake the mushrooms:
Arrange your mushrooms on a baking tile or parchment-lined tray. Bake according to your clay manufacturer’s instructions (usually 275°F/130°C for 15-30 minutes depending on thickness). Let them cool completely.
Step 3: Assembly and Finishing
-
Apply a wash:
Mix a small amount of brown acrylic paint with water. Brush this wash over the textured stems and quickly wipe away the excess with a paper towel. The dark paint will settle into the grooves, highlighting the texture. -
Prepare the base:
Take your small ceramic saucer. Place a generous amount of glue in the bottom. -
Arrange the mushrooms:
Before gluing, do a test arrangement. Place the tallest mushrooms (like the large green one) towards the back or center, and the tiny ones near the front edges. -
Glue the mushrooms:
Secure the mushrooms into the saucer with strong glue. Hold them in place for a moment until they stand unsupported. -
Add the moss:
Tuck small clumps of preserved moss tightly around the base of the stems, covering all the visible glue and filling the saucer completely. Use a tool to poke moss into tight gaps. -
Mount on wood:
Center the planted saucer onto the wooden slice base. You can glue the saucer down for a permanent display or leave it loose. -
Final touches:
Scatter a loose mushroom or two on the table or just outside the saucer for a playful, ‘spilling over’ effect.
Falling Fungi?
If a mushroom head is too heavy for the stem during baking, support the rim of the cap with a small pillow of aluminum foil or cornstarch until it hardens.
Enjoy your tiny enchanted forest scene on a bookshelf or desk


What Really Happens Inside the Kiln
Learn how time and temperature work together inside the kiln to transform clay into durable ceramic.
Tiny Succulents in Mini Pots
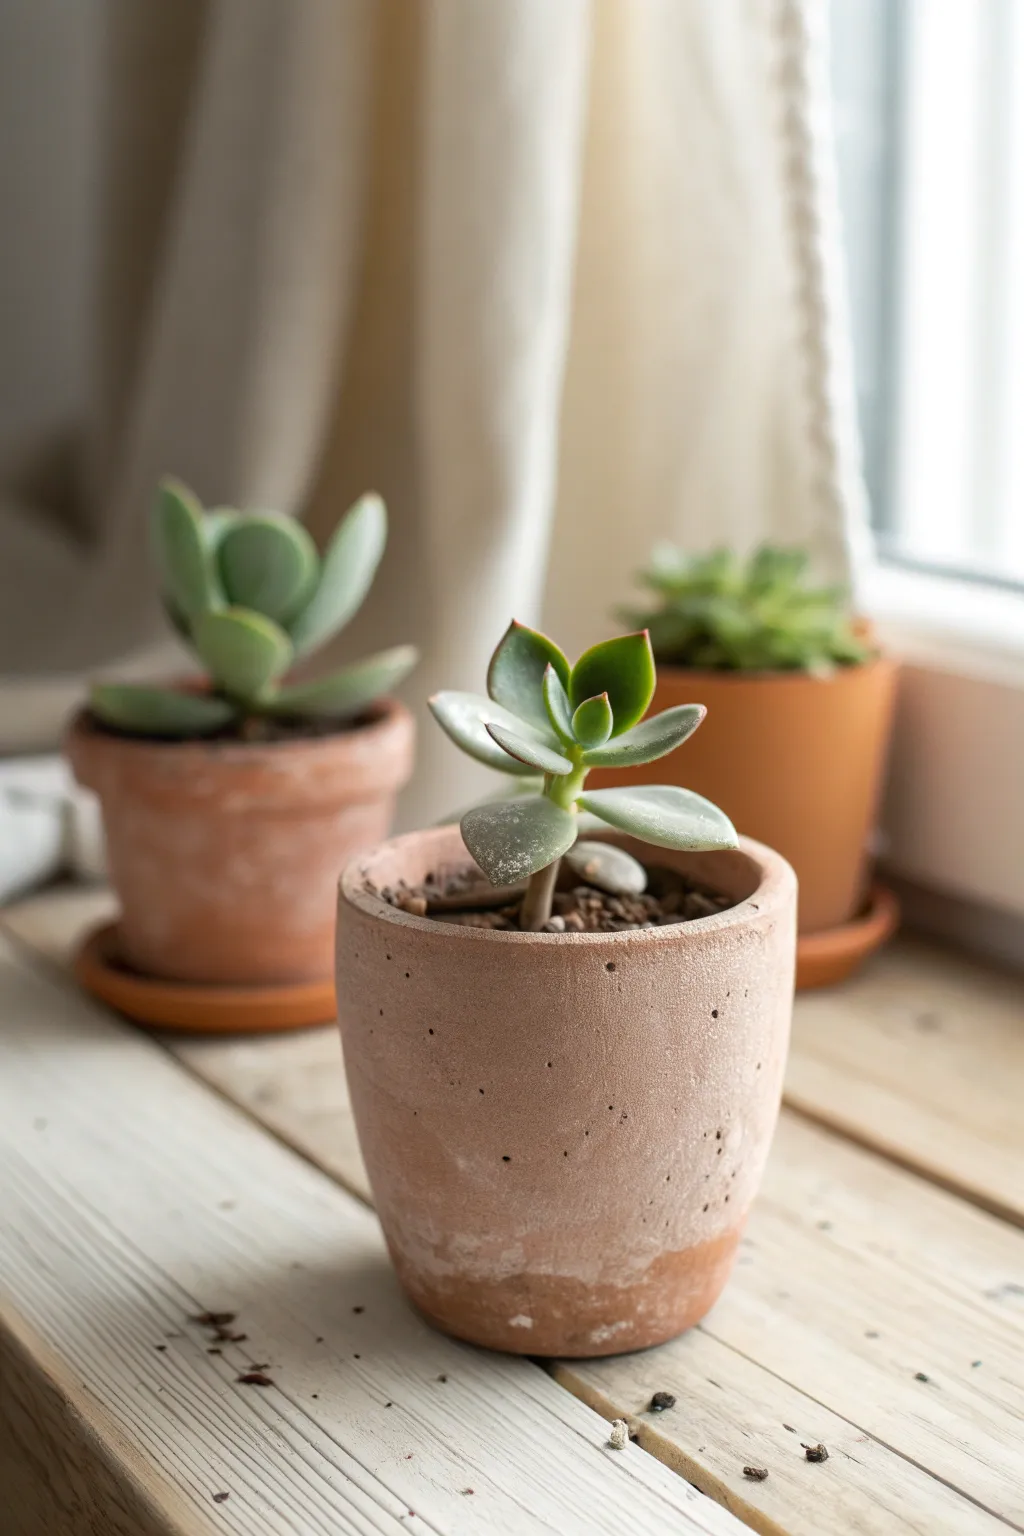
Capture the rustic charm of aged terracotta and lively greenery without needing a green thumb. These miniature clay succulents sitting in weathered pots look incredibly realistic and add a touch of botanical warmth to any windowsill.
Step-by-Step
Materials
- Polymer clay (terracotta, green, translucent white or pale green, dark brown)
- Liquid polymer clay (optional)
- Texturing tool (old toothbrush or stiff bristle brush)
- Needle tool
- Small round cutter or different sized bottle caps
- Acrylic paints (white, burnt umber, sage green)
- Small paintbrush
- Sponge or paper towel
- Gloss varnish (optional for leaves)
- Fine sand or coffee grounds (for soil texture)
Step 1: Crafting the Terracotta Pot
-
Form the Base:
Start with a ball of terracotta-colored polymer clay about the size of a walnut. Roll it into a smooth sphere, then flatten the bottom against your work surface to create a stable base. -
Shape the Cylinder:
Using your thumb, press into the center of the ball to create an opening, pinching the sides upwards to form a cylinder walls. Keep the walls relatively thick to mimic the sturdy look of a clay pot. -
Create Texture:
Terracotta is rarely perfectly smooth. Take an old toothbrush or a stiff bristle brush and tap it all over the outside of your pot. This stippling creates that authentic, porous clay texture. -
Add Pockmarks:
Use a needle tool or a toothpick to poke a few deeper, scattered holes into the surface. These small imperfections suggest air bubbles often found in handmade pottery. -
Form the Rim:
Slightly curve the top edge inwards or outwards depending on your preference, smoothing it with your fingertip so it isn’t sharp or jagged.
Cracking Clay?
If the pot cracks while baking, fill the crack with a mix of liquid clay and terracotta clay, then rebake. Sand it smooth afterward.
Step 2: Modeling the Succulent
-
Mix Leaf Colors:
Blend green polymer clay with a small amount of translucent clay to give the leaves a realistic, fleshy depth. You can marble in a tiny bit of red for tippy edges. -
Roll Leaf Shapes:
Create several small teardrop shapes in varying sizes. Flatten them gently between your fingers, keeping the center slightly thicker than the edges. -
Curve the Leaves:
Press your thumb into the center of each flattened teardrop to give it a slight cup shape. Pinch the narrow end to create a stem attachment point. -
Assemble the Core:
Start with two or three of your smallest leaves. Press them together at their bases to form a tight central bud. -
Build the Rosette:
Layer larger leaves around the central bud in an overlapping pattern. I like to place each new leaf in the gap between the two previous ones. -
Add the Stem:
Roll a small snake of brownish-green clay for the stem. Attach your leaf rosette to the top of this stem, ensuring a secure bond.
Step 3: Assembly and Finishing
-
Create the Soil:
Fill the pot with dark brown clay until it is just below the rim. Texture the surface aggressively with a needle tool or press real coffee grounds into the raw clay. -
Plant the Succulent:
Poke a hole in the center of your clay soil and insert the stem of your succulent. Gently press the soil around the base to secure it. -
Bake:
Bake the entire piece according to your polymer clay package instructions. Let is cool completely before moving to the painting phase. -
Dry Brush the Pot:
Dip a dry brush into a tiny amount of white acrylic paint. Wipe almost all of it off on a paper towel, then lightly brush over the textured pot to simulate mineral deposits. -
Age the Rim:
Dab a sponge with watered-down burnt umber paint around the base and rim of the pot. Wipe it back immediately, leaving darkness only in the crevices. -
Highlight the Leaves:
If your leaves look too flat, dry brush the very tips with a lighter green or red acrylic paint to mimic sun stress. -
Final Varnish:
Apply a satin or matte varnish to the pot to seal the paint, and optionally use a gloss varnish just on the leaves for that waxy succulent shine.
Creative Variation
Make a saucer! Roll a thin disk of terracotta clay slightly larger than the pot’s base and curve the edges up to create a matching drainage dish.
Place your finished miniature on a warm wooden surface to enjoy your maintenance-free garden
Mini Animal Figurines You Can Batch-Make
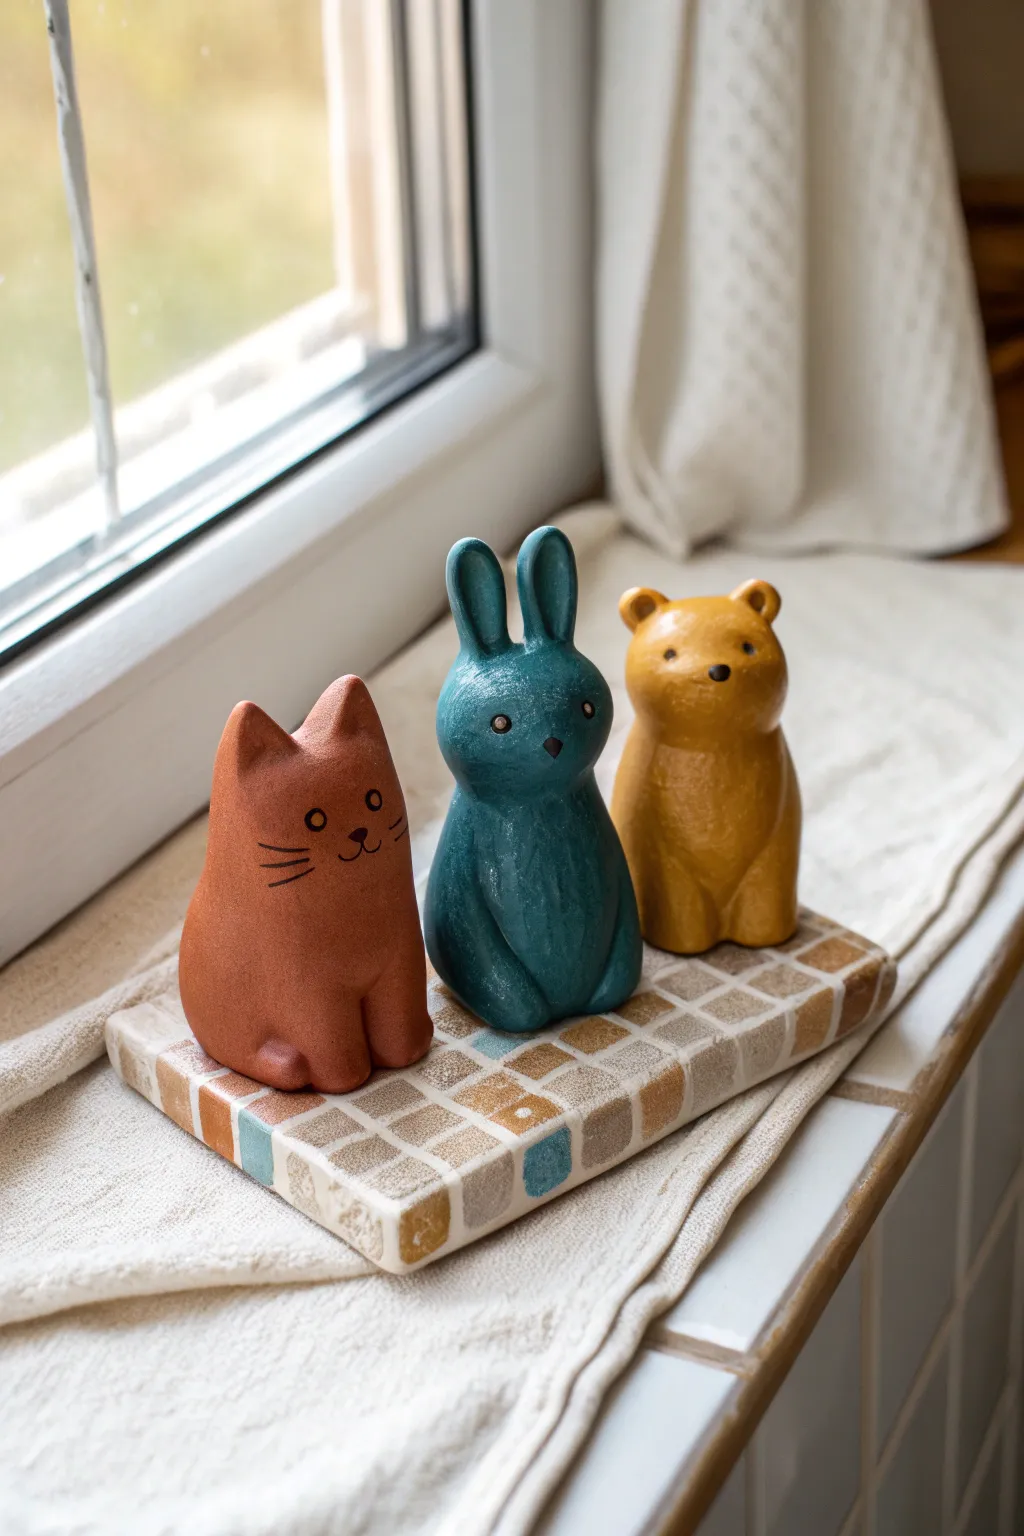
These simple, charming animal figurines—a cat, a rabbit, and a bear—combine smooth, rounded forms with a muted, earthy color palette. They sit perfectly atop a faux-tiled display base, making for a sophisticated yet adorable decorative accent.
How-To Guide
Materials
- Air-dry clay (or polymer clay)
- Acrylic paints (terracotta, teal, mustard yellow, black, white, cream)
- Small square ceramic tiles (mosaic size) or faux tile clay rectangles
- Grout mix or textured paste (for the base)
- Matte varnish or sealant
- Modeling tools (balls styluses, sculpting knife)
- Rectangular wooden base or thick cardboard
- Fine detail paintbrush
- Sandpaper (fine grit)
Step 1: Sculpting the Animals
-
Form the base shapes:
Start with three equal portions of clay. Roll each into a smooth, slightly tapered cylinder or pear shape to form the main bodies. Flatten the bottoms firmly against your work surface so they stand independently without wobbling. -
Sculpt the cat’s ears:
For the cat, pinch the top of the clay upward into two triangular points. Use your fingers to smooth the transition from the ears to the head, creating a seamless, sleek silhouette. -
Add the rabbit’s ears:
Create two separate, long sausage shapes for the rabbit ears. Attach them to the top of the second body, blending the clay downwards into the head using a modeling tool so no seam is visible. Gently curve the tips for character. -
Shape the bear’s features:
For the bear, pinch two small rounded nubs on the top corners of the head for ears. Then, press a tiny ball of clay onto the center of the face area to create a protruding snout, blending the edges smoothly. -
Define the limbs:
Using a modeling tool or sculpting knife, gently carve shallow grooves into the front of each body to suggest front paws or legs resting against the tummy. This minimalist approach keeps the figures looking stylized rather than realistic. -
Smooth and perfect:
Dip your finger in a little water (for air-dry clay) or baby oil (for polymer clay) and run it over the figurines to remove any fingerprints or cracks. Let the clay cure completely according to package instructions.
Step 2: Creating the Tiled Base
-
Prepare the foundation:
Take your rectangular wooden or cardboard base. If you are making faux tiles out of clay, roll out a thin sheet of clay and cut small, uniform squares. If using real mosaic tiles, arrange them dry first to check the fit. -
Attach the tiles:
Glue your tiles (clay or ceramic) onto the base in a neat grid pattern. Leave small, even gaps between each square to simulate grout lines. -
Grouting:
Once the glue is dry, spread grout or textured modelling paste over the tiles, filling the gaps. Wipe the surface of the tiles clean with a damp sponge before the grout sets, revealing the grid pattern.
Seamless Smoothness
To get that professional, stone-like finish, wet your finger and buff the clay constantly while sculpting. Eliminating every tiny crack before drying saves hours of sanding later.
Step 3: Painting and Finishing
-
Base coat the animals:
Paint the cat in a warm terracotta orange, the rabbit in a deep teal or petrol blue, and the bear in a mustard yellow. Apply two thin coats for opaque, even coverage, allowing drying time in between. -
Sand for texture:
I like to lightly sand the painted surfaces after they dry with very fine grit sandpaper. This creates a slightly worn, stone-like texture and knocks back any glossy shine from the acrylics. -
Paint the faces:
Using your finest detail brush and black paint, add simple faces. Paint small circles for eyes and simple lines for noses and mouths specifically. Use the sculpting cues you made earlier (like the bear’s snout) as guides. -
Add highlights:
Place a tiny white dot in the center of the eyes to bring the characters to life. You can also dry-brush a tiny bit of lighter paint on the curved areas (like the knees or ears) to accentuate the form. -
Finish the base:
Paint the tiles on your base in varying shades of beige, cream, and soft blue to match the rabbit. Keep the colors muted to maintain the cohesive aesthetic. -
Seal everything:
Apply a coat of matte varnish to both the figurines and the base. This unifies the sheen and protects the paint from chipping.
Level Up: Seasonal Scarves
Knit tiny scarves or shape miniature clay accessories like hats or bowties that are removable, allowing you to dress up your trio for different holidays.
Arrange your finished trio on their tiled platform near a window to let the natural light highlight their charming forms

TRACK YOUR CERAMIC JOURNEY
Capture glaze tests, firing details, and creative progress—all in one simple printable. Make your projects easier to repeat and improve.
Teeny Trinket Dishes for Rings
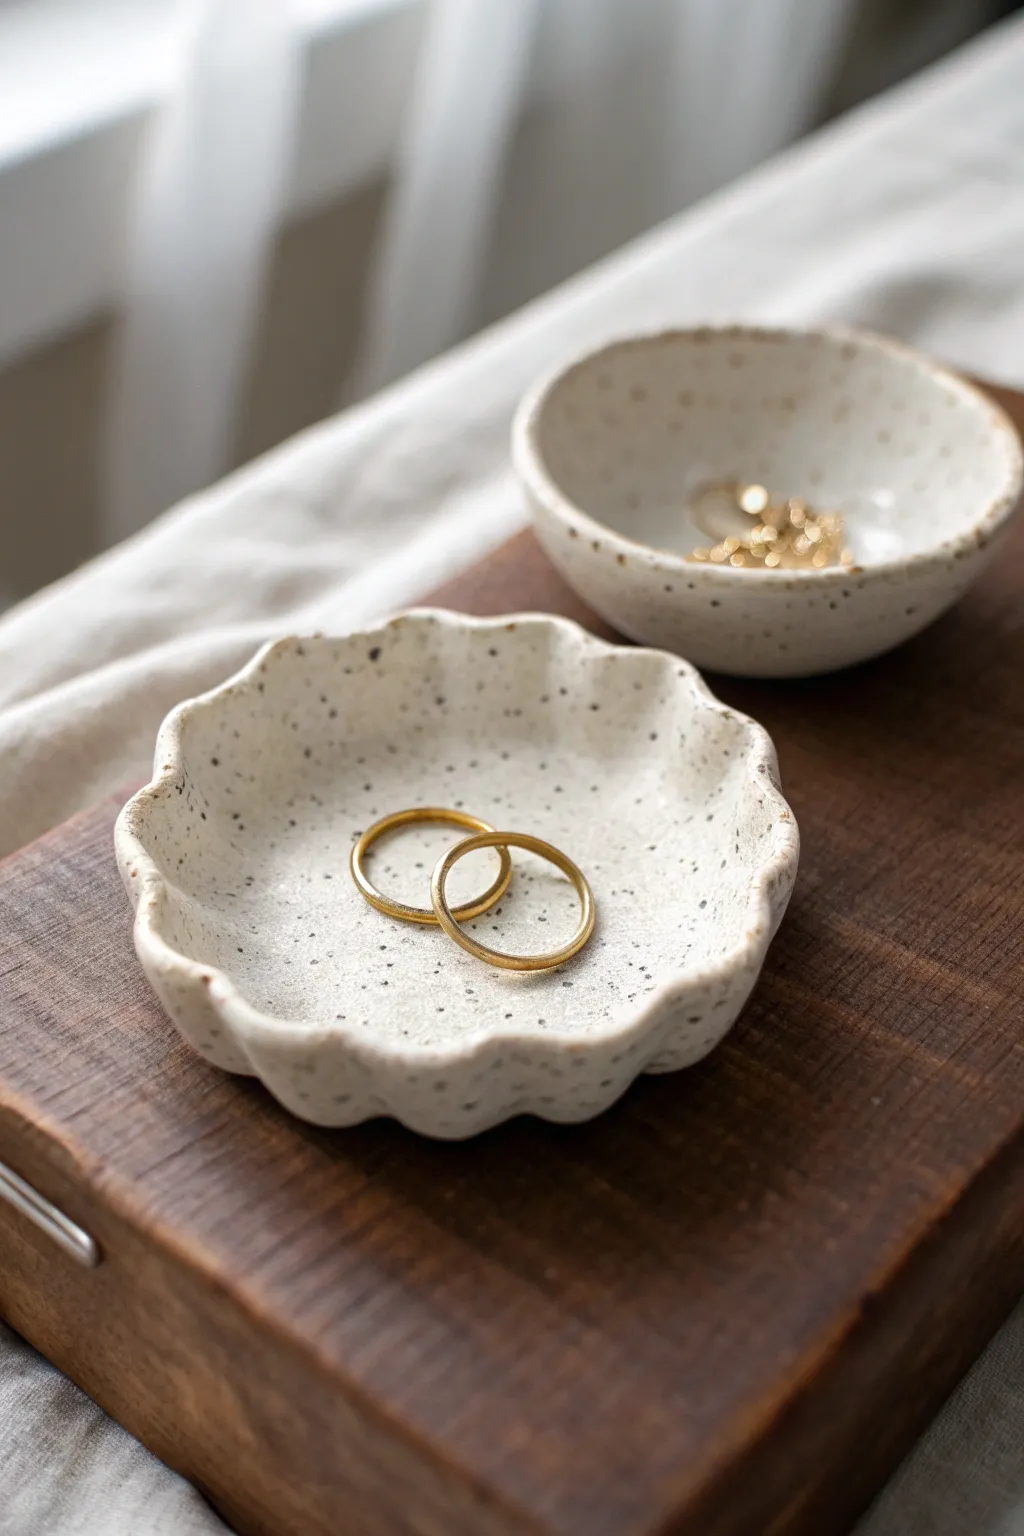
Create a charming home for your daily jewelry with these organic, speckled clay dishes. Their undulating, wavy rims and pottery-inspired finish give them a high-end ceramic look without needing a kiln.
Step-by-Step Tutorial
Materials
- Air-dry clay (white or cream)
- Acrylic rolling pin
- Parchment paper or craft mat
- Round cookie cutter (approx. 3-4 inches)
- Small bowl or sponge for shaping
- Water in a small cup
- Fine grit sandpaper
- Acrylic paint (cream/off-white)
- Acrylic paint (black or dark brown)
- Old toothbrush or stiff bristle brush
- Gloss or satin varnish/sealer
- Soft paintbrushes
Step 1: Shaping the Clay Base
-
Condition the clay:
Start by taking a ball of air-dry clay about the size of a golf ball. Knead it in your hands for a minute until it feels soft, warm, and pliable to prevent cracking later. -
Roll it out:
Place the clay on parchment paper. Using your acrylic rolling pin, roll the clay out evenly until it is about 1/4 inch thick. Aim for a consistent thickness so it dries evenly. -
Cut the circle:
Press your round cookie cutter firmly into the rolled clay. Remove the excess clay from around the edges and gently lift your clay circle. -
Smooth the edges:
Dip your finger in a little water and run it along the cut edge of the circle. This smooths out any sharp ridges left by the cutter, giving it a more finished look.
Cracked Clay?
If small cracks appear while drying, mix a tiny bit of fresh wet clay with water to make a paste (slip) and fill them in before painting.
Step 2: Creating the Forms
-
Form the wavy rim:
For the foreground dish with the scalloped edge, gently pinch the rim between your thumb and forefinger at regular intervals. Push slightly inward and upward to create a gentle, undulating wave pattern around the entire circumference. -
Refine the shape:
Place the scalloped circle into a slightly curved surface, like a shallow bowl or even a large spoon rest lined with plastic wrap, to help it hold a concave shape while drying. I like to press the center down gently to ensure there’s a nice resting spot for rings. -
Create the simple bowl:
For the background dish, take a second clay circle and simply press it over the bottom of a small inverted dipping bowl or round object. Smooth it down to create a simple, deeper curve without the wavy edge. -
Let them dry:
Allow both pieces to dry completely in a cool, dry place. This usually takes 24-48 hours depending on humidity. Flip them over halfway through to ensure the bottom dries thoroughly. -
Sand for smoothness:
Once fully dry and hard, use fine-grit sandpaper to gently smooth any rough spots on the rims or surface. Wipe away all dust with a slightly damp cloth.
Natural Texture
For an even more realistic stoneware look, mix a pinch of used dried coffee grounds into your clay before rolling it out.
Step 3: Applying the Faux-Ceramic Finish
-
Base coat painting:
Paint the entire surface of the dishes (front and back) with a cream or off-white acrylic paint. You may need two coats for full opacity; let the first coat dry before applying the second. -
Prepare the speckle mix:
Dilute a small amount of black or dark brown acrylic paint with water. You want it to be the consistency of ink or thin watercolor, fluid enough to splatter easily. -
Splatter technique:
Dip an old toothbrush into your thinned dark paint. Hold the brush over your dishes and run your thumb across the bristles to flick tiny droplets of paint onto the surface. -
Vary the density:
Apply the speckles lightly at first. You can always add more, but you can’t take them away. Aim for an organic, random distribution to mimic stoneware clay. -
Dry the speckles:
Let the paint speckles dry completely. This usually happens quickly since the dots are so small. -
Seal the deal:
Apply a coat of gloss or satin varnish to the entire dish. This seals the paint, protects the clay from moisture, and gives it that glazed ceramic shine. -
Final cure:
Let the varnish cure according to the manufacturer’s instructions before placing any jewelry inside.
Now you have a set of custom, boutique-style dishes ready to hold your favorite treasures
Mini Ring Cones With Cute Details
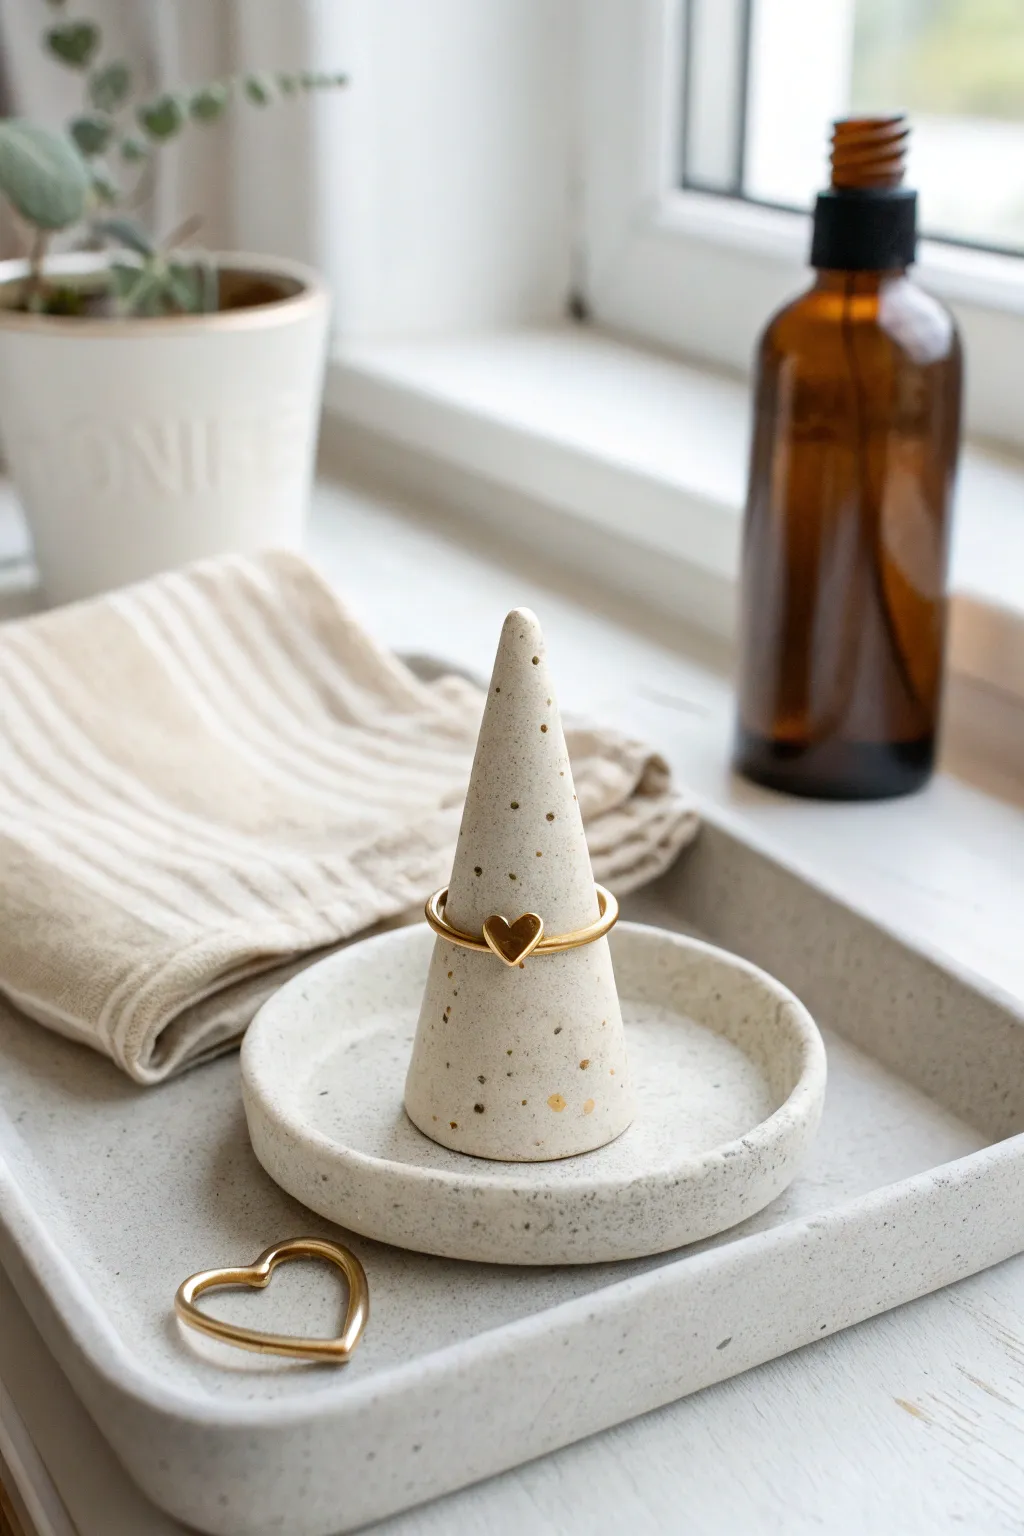
Create a minimalist and modern jewelry holder that mimics the look of high-end speckled stoneware. This dual-piece set features a classic ring cone centered in a shallow catch-all dish, perfect for keeping your favorite accessories organized.
How-To Guide
Materials
- White polymer clay
- Grounded black pepper or specialized granite-effect polymer clay
- Gold acrylic paint
- Small round paintbrush
- Rolling pin
- Knife or clay blade
- Small round cookie cutter (approx. 3 inches)
- Sandpaper (fine grit)
- Oven for baking
Step 1: Preparing the Speckled Clay
-
Condition the clay:
Start by warming up your white polymer clay in your hands, kneading it until it is soft and pliable. -
Add the speckles:
If you aren’t using pre-mixed granite clay, flatten your white clay and sprinkle a pinch of ground black pepper onto it. -
Mix thoroughly:
Fold the clay over the pepper and knead repeatedly until the specks are distributed evenly throughout the entire ball. Keep adding small amounts until you achieve the desired density of ‘stone’ speckles.
Step 2: Forming the Cone
-
Shape the base:
Pinch off a portion of clay roughly the size of a large walnut and roll it into a smooth ball. -
Create the cone:
Place the ball on your work surface and use the palm of your hand to roll it back and forth, applying more pressure to one side to taper it into a cone shape. -
Refine the shape:
Stand the cone up and tap the bottom gently against the table to flatten the base so it stands perfectly straight. -
Smooth the tip:
Gently pinch and smooth the top of the cone to ensure it isn’t too sharp, giving it a soft, rounded finish.
Pepper Protocol
Don’t use coarse ground pepper; the chunks will be too large. Finely ground black pepper or even dried tea leaves create the most realistic granite look.
Step 3: Crafting the Catch-All Dish
-
Roll out the slab:
Take the remaining clay and roll it out into a slab about 1/4 inch thick using your rolling pin. -
Cut the circle:
Use your round cookie cutter to punch out a clean circle for the base of the dish. -
Make the rim:
Roll a long, thin snake of clay, ensuring it is even in thickness along its entire length. -
Attach the rim:
Wrap the clay snake around the edge of your flat circle base. Trim any excess where the ends meet. -
Blend the seams:
Using your thumb or a modeling tool, gently smudge the clay from the snake down into the base on the inside and outside to join them seamlessly. -
Smooth the edges:
Run a damp finger along the top rim to smooth out any fingerprints or uneven textures.
Gilded Edges
For a luxe upgrade, paint the very rim of the dish and the tip of the cone with liquid gold leaf instead of splattering paint for a dipped-gold effect.
Step 4: Finishing Touches
-
Bake the clay:
Place both the cone and the dish on a baking sheet and bake according to your clay manufacturer’s specific temperature and time instructions. -
Cool down:
Allow the pieces to cool completely inside the oven or on a wire rack before handling them. -
Sand for stone effect:
Once cool, lightly sand the surfaces with fine-grit sandpaper. This removes any gloss and enhances the matte, stone-like texture. -
Add gold accents:
Dip a small brush into gold acrylic paint and flick the bristles over the pieces to create random, elegant gold spatters. -
Final assembly:
While you can glue the cone to the dish, leaving them separate allows for easier cleaning and versatile styling.
Now you have a chic, modern place to store your daily sparkling essentials
Tiny Fridge Magnets With Smiley Faces
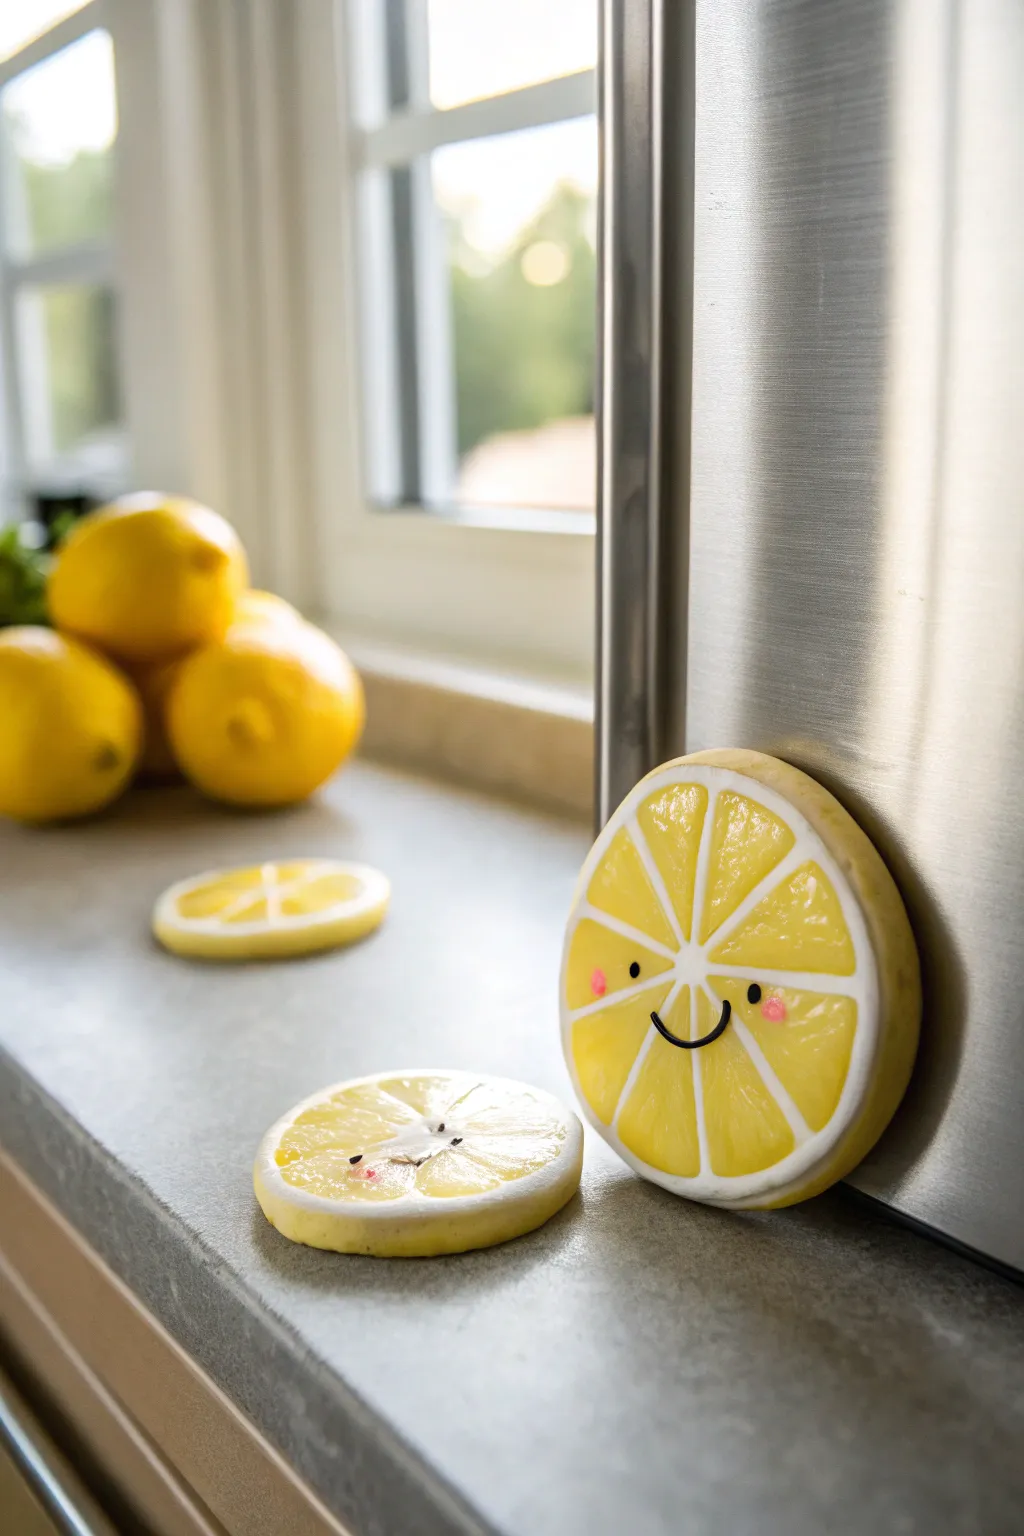
Brighten up your kitchen with these impossibly cute polymer clay lemon magnets featuring cheerful little faces. These translucent, juicy-looking slices instantly add a pop of summer sunshine to any metallic surface.
Step-by-Step Guide
Materials
- Translucent yellow polymer clay
- Opaque white polymer clay
- Translucent liquid polymer clay (optional but recommended)
- Black polymer clay (tiny amount)
- Pink chalk pastel or pink clay
- Small round magnets (neodymium recommended)
- Gloss glaze or UV resin
- X-acto knife or craft blade
- Acrylic rolling pin
- Needle tool
- Baking sheet and parchment paper
- Super glue (cyanoacrylate)
Step 1: Creating the Lemon Cane
-
Prepare the segments:
Start by conditioning your translucent yellow clay until it is soft and pliable. Roll it into a thick log, approximately 1 inch in diameter. -
Shape the wedge:
Pinch the top of your yellow log to form a teardrop or heavy triangular prism shape. This will form the juicy segments of the lemon. -
Wrap in pith:
Roll out a thin sheet of opaque white clay. Wrap this sheet around your yellow triangular log, trimming the excess creates a clean seam. -
Reduce the cane:
Gently squeeze and pull this triangular cane to lengthen it, reducing its diameter until it’s about the size of a single lemon segment you want for your final slice. Cut this long cane into 8 equal lengths. -
Assemble the center:
Roll a very thin snake of white clay to act as the central axis. Arrange your 8 triangular segments in a circle around this center point, with the pointy ends facing inward. -
Wrap the rind:
Roll out a slightly thicker sheet of yellow clay (you can mix a little white into it for a more opaque rind look). Wrap this around the entire assembled circle to create the outer lemon peel.
Juicy Texture Tip
Mix liquid polymer clay with the translucent yellow until it’s sticky. Apply this ‘jam’ to the segments before baking for an ultra-realistic wet fruit look.
Step 2: Slicing and Shaping
-
Compress and reduce:
Gently squeeze the entire assembled cylinder to ensure all layers adhere. If it’s too large, reduce the diameter by rolling it gently on your work surface. -
Slice the rounds:
Using a very sharp blade to avoid distortion, slice the cane into rounds about 1/4 inch thick. Wait a moment if the clay is too warm, as slightly cooler clay slices cleaner. -
Texture the fruit:
With a needle tool, gently poke and scratch the translucent yellow segments to mimic the texture of juice vesicles. This adds incredible realism once baked.
Citrus Variations
Swap colors to make a full set! Use orange clay for oranges, green for limes, or a pinkish-red for grapefruits. Keep the pith white for all of them.
Step 3: Adding the Personality
-
Create the eyes:
Take tiny specks of black clay and roll them into microscopic balls. Press them gently onto the lemon slice surface, spacing them wide apart for maximum cuteness. -
Form the smile:
Roll an impossibly thin snake of black clay. Cut a small U-shape and gently press it onto the slice between and slightly below the eyes. -
Add rosy cheeks:
I prefer to use a soft brush and dry pink chalk pastel dust for this step. Dab small circles of pink dust right next to the mouth ends for a sweet blush effect. -
Bake the pieces:
Place your slices on parchment paper and bake according to your polymer clay manufacturer’s instructions (usually 275°F/135°C for 15-30 minutes).
Step 4: Finishing Touches
-
Glaze for shine:
Once cool, coat the front and sides (but not the back) with a high-gloss glaze or UV resin. The translucent clay will become significantly clearer and ‘juicier’ looking with this clear coat. -
Attach the magnet:
Apply a drop of strong super glue to the back of the lemon slice and press your magnet firmly into place. Let it cure fully before sticking it to the fridge.
Now you have a refreshing little citrus friend to hold your important notes and photos
Mini Keychain Charms (One-Shape Series)
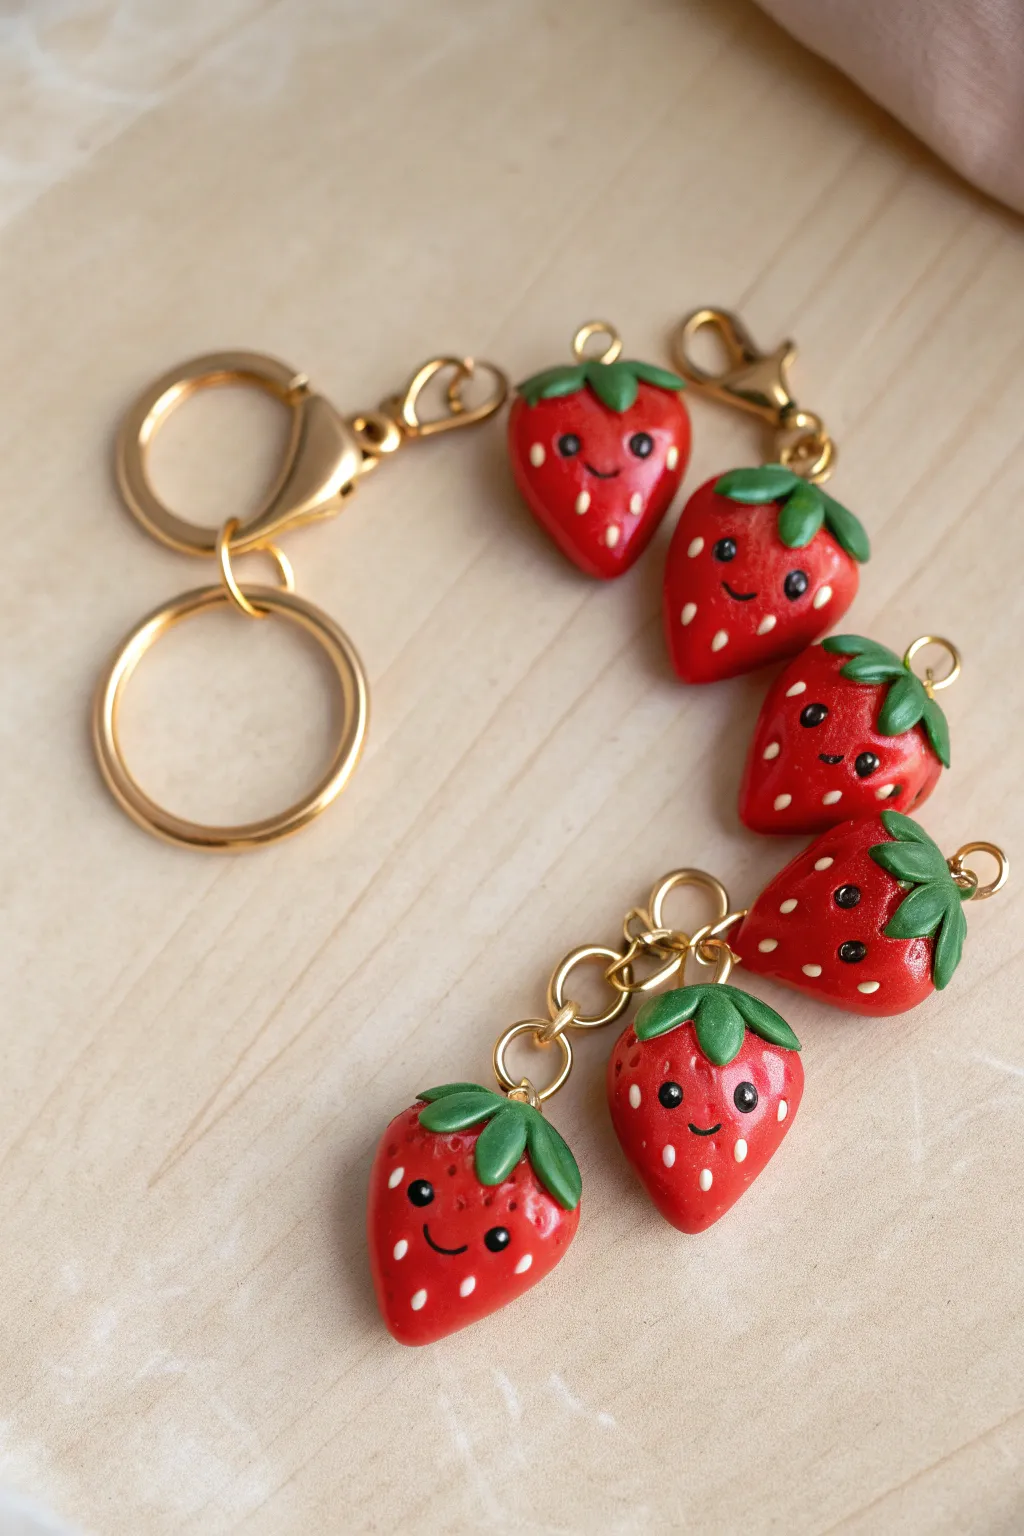
Brighten up your keyring with a whole squad of smiling berries. These polymer clay charms feature adorable kawaii faces and are simple enough to make in a big batch for friends.
Step-by-Step Tutorial
Materials
- Red polymer clay
- Green polymer clay
- Black acrylic paint
- White acrylic paint
- Fine detail paintbrush or dotting tool
- Headpins or eye pins (gold)
- Gold jump rings (4mm and 6mm)
- Gold keychain hardware (lobster clasps, key rings)
- Chain links (gold)
- Clay sculpting tools (needle tool)
- Gloss glaze or polyurethane varnish
- Jewelry pliers (round nose and flat nose)
- Oven for baking
Step 1: Sculpting the Berries
-
Shape the base:
Start by conditioning a small chunk of red polymer clay until it’s soft and pliable. Roll it into a smooth ball about the size of a marble. -
Form the strawberry:
Gently pinch one side of the ball and roll it slightly between your fingers to create a tapered bottom, forming a rounded teardrop or strawberry shape. -
Flatten the top:
Press the wider top end of your strawberry gently against your work surface to flatten it slightly so the leaves will sit nicely later. -
Create the leaves:
Take a tiny amount of green clay and flatten it into a thin disc. Use an X-acto knife or small blade to cut out a messy star shape with 5-6 points. -
Attach the greenery:
Place the green star on the flat top of your strawberry. Gently press the points down over the curved shoulders of the red clay to look like leaves hugging the fruit. -
Add texture:
Use a needle tool or a dull point to press a small indent into the center of the green cap where the stem would be. -
Insert the hardware:
Take a gold eye pin and trim it if it’s too long. Push the straight end down through the center of the green leaves into the red body until the loop rests flush against the clay.
Step 2: Painting and Finishing
-
Bake the batch:
Repeat the sculpting process to make as many strawberries as you desire. Bake them according to your clay package instructions (usually 275°F/135°C for 15-30 minutes). -
Cool down:
Let the charms cool completely before painting; painting on warm clay can make the acrylics get gummy. -
Paint the eyes:
Dip a very fine dotting tool or a toothpick into black paint. carefully place two small dots on the upper half of the strawberry for eyes. -
Add the smile:
Using your finest detail brush, paint a tiny, thin ‘u’ shape between the eyes for a smiling mouth. I find it helps to hold my breath for a second while doing this steady line. -
Add the seeds:
Switch to white paint and a needle tool or toothpick. Tap tiny, staggered dots all over the red surface to mimic strawberry seeds, avoiding the face area. -
Seal the deal:
Once the paint is fully dry, coat the entire strawberry in a glossy glaze. This protects the paint and gives it that juicy, fruit-like shine. -
Assemble the chain:
Open a small jump ring using two pairs of pliers. Attach it to the loop of the eye pin on your strawberry. -
Link them up:
Connect the jump ring to a short length of gold chain or directly to a lobster clasp, depending on how you want your keychain to hang. -
Final connection:
Attach the other end of your chain or clasp to the main large keyring loop to finish your accessory.
Seed Spacing Trick
Don’t paint seeds in straight rows. Stagger them in a diamond pattern. This looks more organic and keeps the design from looking rigid or grid-like.
Make It a Shaker
Create a clear resin shaker charm and put these tiny clay strawberries inside instead of glitter for a fun, rattling keychain filled with mini fruit.
Now you have a sweet little cluster of berries to keep your keys company
Bottle-Cap Mini Pies for Upcycled Cuties
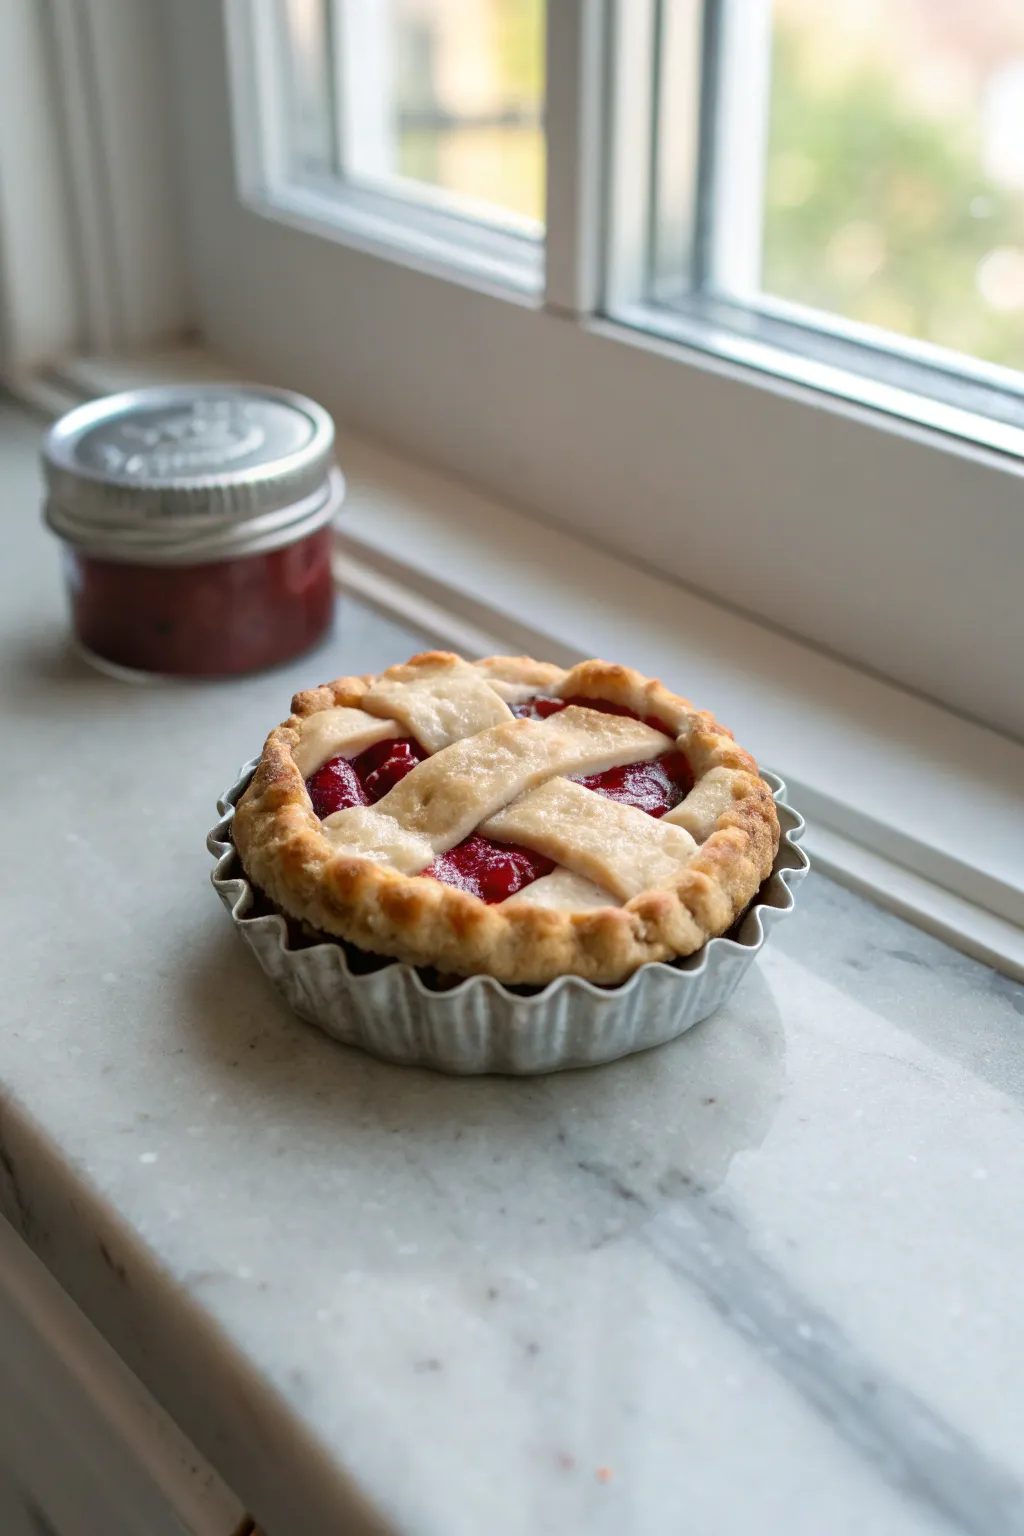
Turn a simple upcycled bottle cap into an adorable, bite-sized faux pastry that looks good enough to eat. This realistic miniature pie features a golden lattice crust and a glossy, translucent berry filling made from liquid clay.
Detailed Instructions
Materials
- Metal bottle cap (fluted edge works best)
- Beige or tan polymer clay (pastry color)
- Translucent liquid polymer clay
- Red alcohol ink or red glass paint
- Soft pastel chalks (yellow ochre, orange, brown)
- Small rolling pin or smooth marker
- Standard craft blade or X-Acto knife
- Needle tool or toothpick
- Small paintbrush
- Gloss glaze (polyurethane or UV resin)
- Aluminum foil
- Oven or toaster oven dedicated to crafts
Step 1: Preparing the Crust
-
Mix the Pastry Color:
Start with a beige polymer clay. If it looks too pale, mix in a tiny pinhead-sized amount of ochre or yellow clay to get a rich, buttery dough tone. -
Roll the Dough:
Flatten your clay into a thin sheet, about 2-3mm thick. I find using a small acrylic roller helps keep the thickness even, but a smooth pen works in a pinch. -
Line the Cap:
Cut a circle slightly larger than your bottle cap. Press the clay gently into the cap, smoothing it against the bottom and sides to create the bottom crust. -
Trim the Excess:
Run your craft blade along the top edge of the bottle cap to trim away the overhanging clay, leaving a clean, flat rim. -
Pre-Texture the Rim:
Using a needle tool, gently tap or poke the top edge of the clay crust to give it a slightly flaky, baked texture rather than a smooth, manufactured look. -
Blind Bake:
To prevent the crust from sagging when we add the liquid filling, bake this bottom crust in the bottle cap for about 10 minutes at the temperature recommended on your clay package. Let it cool completely.
Clean Crust Tip
Chill your rolled clay sheet in the fridge for 5 minutes before cutting strips. Cold clay cuts cleaner and stretches less when woven.
Step 2: Creating the Filling
-
Mix the Fruit Sauce:
Pour a small amount of translucent liquid clay into a disposable mixing cup. Add two drops of red alcohol ink or glass paint and stir well until you have a deep, jelly-like red. -
Make the Berries:
Roll tiny, irregular balls of red polymer clay (or chopped up bits of cured red clay) to simulate fruit chunks. -
Combine and Fill:
Place the clay ‘berries’ into the cooled crust, then pour your liquid red mixture over them until the pie is about three-quarters full.
Step 3: Lattice and Finishing
-
Cut Lattice Strips:
Roll out another thin sheet of your beige pastry clay. Use your blade to cut four to six narrow, even strips. -
Weave the Pattern:
Place strips across the top of the pie in a crisscross pattern. You can weave them over-and-under for realism, or just layer them if you’re a beginner. -
Trim and Seal:
Press the ends of the lattice strips onto the rim of the bottom crust. Trim off any excess overhang and tap the connection points with a toothbrush or needle tool to blend the seams. -
Shade the Crust:
This step makes the magic happen. Scrape some yellow ochre, orange, and brown pastel chalk into dust. Using a soft brush, gently dust the clay strips, focusing on the high points to mimic browning. -
Final Bake:
Bake the entire pie again for the full recommended time (usually 15-30 minutes). I recommend tenting it with foil so the white parts of the crust don’t scorch or darken too quickly. -
Glaze the Filling:
Once fully cooled, carefully paint a coat of high-gloss glaze or UV resin only on the visible red fruit sections to give them a wet, juicy shine.
Add a Magnet
Glue a strong neodymium magnet inside the bottle cap recess underneath the finished pie to create an adorable fridge magnet.
Display your freshly baked miniature on a windowsill or turn it into a sweet accessory
Tiny Lidded Turtle Trinket Box
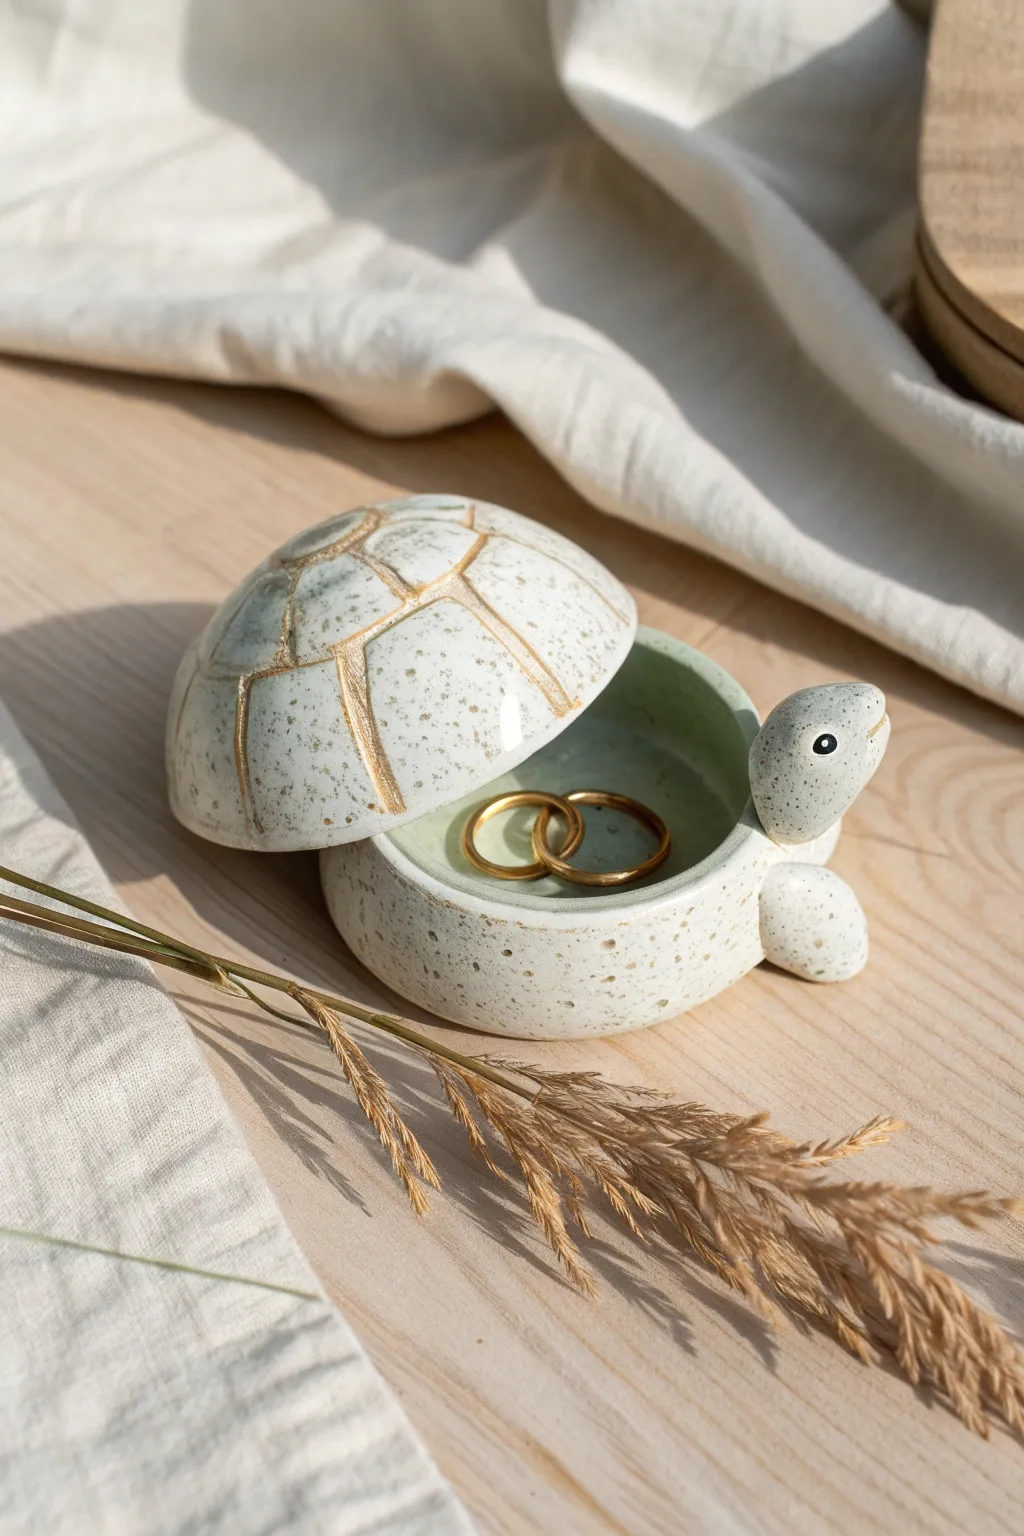
This adorable speckled turtle is more than just a figurine; it’s a secret keeper for your tiniest treasures. With its removable shell lid and charming expression, it makes a perfect bedside guardian for rings or earrings.
Step-by-Step Tutorial
Materials
- White polymer clay or air-dry clay (Speckled variety preferred)
- Small rolling pin
- Modeling tools (ball tool, needle tool)
- Circle cutters (two sizes: one for the body, one slightly smaller for the opening)
- Something dome-shaped to mold the shell (like a large marble or lightbulb)
- Gold acrylic paint
- Fine detail paintbrush
- Black acrylic paint
- Clear gloss varnish
- Sandpaper (fine grit)
- Water or liquid clay for joining
Step 1: Shaping the Base
-
Prepare the Clay:
Start by conditioning your speckled clay until it is soft and pliable. If you don’t have pre-speckled clay, you can mix black pepper or dried used coffee grounds into white clay for a similar organic effect. -
Roll the Base Slab:
Roll out a slab of clay to about 1/4 inch thickness. This needs to be sturdy enough to be the bottom of your box. -
Cut the Base Circles:
Use your larger circle cutter to punch out the main floor of the turtle. Then, cut a long strip of clay, about 3/4 inch wide, long enough to wrap around the circumference of your base circle. -
Build the Box Walls:
Wrap the clay strip around the edge of the base circle to create the walls. Blend the seam where the ends meet and smooth the joint between the wall and the floor on both the inside and outside so it looks like one solid piece. -
Refine the Rim:
I like to use a wet finger to smooth the top rim of the box perfectly flat. This ensures the shell lid will sit securely later without wobbling.
Step 2: Sculpting the Lid
-
Mold the Shell:
Roll another slab of clay, slightly thinner this time. Drape it over your dome mold (a lightbulb work well here if covered in plastic wrap). Trim the edges so you have a perfect half-sphere that matches the diameter of your base box. -
Create the Lip:
To keep the lid from sliding off, you’ll need to add a small inner rim. Roll a thin snake of clay and attach it to the underside of the shell lid, slightly inset from the edge, smoothing it thoroughly. -
Carve the Shell Pattern:
While the clay is still on the mold for support, use a needle tool to gently carve deep chaotic geometric lines. Create a central hexagon or irregular shape and radiate lines outward to mimic a turtle shell pattern.
Uneven Lid?
If the lid wobbles, place a sheet of sandpaper on a flat table. hold the lid flat against it, and rub in circles until the rim is perfectly level
Step 3: Head and Flippers
-
Shape the Head:
Roll a small ball of clay into a teardrop shape. Flatten the wider end slightly to form the head and curve the neck upwards so the turtle looks like it’s stretching. -
Attach the Head:
Score and slip (or use liquid clay) to attach the neck securely to the front of the box base. Blend the clay well at the join line. -
Form the Flippers:
Create four small, flattened ovals for the flippers. Attach two near the front by the head and two near the back. Press them firmly onto the underside of the base so the turtle sits flat. -
Add Facial Detail:
Use a small dotting tool to create slight indentations for the eyes on the sides of the head. Use a needle tool or craft knife to slice a tiny, happy mouth line.
Level Up: Velvet Lining
Cut a small circle of self-adhesive velvet or felt to place at the bottom of the inside. It adds a luxurious feel and protects delicate jewelry
Step 4: Finishing Touches
-
Smooth and Dry:
Do a final pass with a damp sponge or finger to smooth out any fingerprints. Let the clay dry (if air dry) or bake it according to your polymer clay package instructions. -
Sand for Perfection:
Once fully cured or dry, use fine-grit sandpaper to gently smooth the rim of the base and the edge of the lid to ensure a perfect fit. -
Paint the Gold Lines:
Dip a fine detail brush into gold acrylic paint. Carefully fill in the carved lines on the shell lid. Don’t worry if it’s messy; you can wipe the surface with a damp cloth immediately, leaving gold only in the crevices. -
Paint the Eyes:
Using the smallest brush or a toothpick, paint a white circle inside the eye socket, let it dry, then add a smaller black dot for the pupil. -
Paint the Interior:
For a pop of hidden color, paint the interior floor of the box with a soft sage or mint green, leaving the walls speckled white. -
Seal the piece:
Coat the entire turtle, inside and out, with a clear gloss varnish. This protects the paint and gives it that shiny, ceramic-like finish seen in the photo.
Now your little shelled friend is ready to guard your favorite rings on your nightstand
Mini Charm Bracelets With Mixed Shapes
Capture a playful vibe with this rustic-meets-colourful bracelet featuring handmade polymer clay charms on a natural hemp cord. The mix of cheerful icons like smiley faces, mushrooms, and stars creates a personalized accessory that is both earthy and bright.
Step-by-Step
Materials
- Polymer clay (pink, red, white, yellow, blue, black)
- Natural hemp cord or jute twine (thin gauge)
- Small eye pins or wire for charm loops
- Jewelry pliers (round nose and wire cutters)
- Small gold bead (for the clasp)
- Clay sculpting tools or a needle tool
- Gloss glaze or UV resin (optional)
- Oven and baking sheet
- Scissors
Step 1: Sculpting the Charms
-
Shape the Bases:
Begin by conditioning your clay. Roll small balls of clay to create the base shapes: two flat pink circles for the faces, a flattened blue circle, a red mushroom cap shape with a white stem, and two star shapes (one yellow, one white). -
Add Smiley Face Details:
For the pink charms, roll incredibly thin snakes of black clay. Carefully curve them into smiles and two tiny dots for eyes, pressing them gently onto the pink circles. -
Create the Mushroom:
Attach the white stem to the bottom of the red cap. Roll tiny balls of white clay and flatten them onto the red cap to create the polka dots. -
Design the Celestial Charms:
On the blue circle, add tiny yellow clay stars or paint them on later. For the white star, use a tiny bit of black clay to add a central detail or eye. -
Insert Eye Pins:
Before baking, carefully trim your eye pins to be short. Insert one pin into the top of each charm, ensuring the clay hugs the wire tightly so it won’t pull out later. -
Bake and Finish:
Bake the charms according to your clay manufacturer’s instructions (usually 275°F/135°C for 15-30 minutes). Once cool, I like to coat them with a thin layer of gloss glaze for durability and shine.
Loose Pins?
If an eye pin feels loose after baking, pull it out, add a dab of superglue or E6000 to the shaft, and reinsert it. Let it cure fully before braiding.
Step 2: Creating the Braided Band
-
Cut the Cord:
Cut three strands of hemp cord, each about 15 inches long. This extra length makes knotting easier. -
Start the Braid:
Knot the three strands together at one end, leaving a 2-inch tail. Tape this end to a table for tension and begin a standard three-strand braid. -
Incorporate Charm Loops:
Braid for about an inch. Thread a charm onto one of the side strands before crossing it over into the middle. Continue braiding normally for another inch. -
Add Remaining Charms:
Repeat the process—braid an inch, add a charm, braid an inch—until all charms are attached. Space them out evenly based on your wrist size. -
Finish the Braid:
Continue braiding for a final inch after the last charm. Secure the end with a simple overhand knot.
Glow Up
Use glow-in-the-dark polymer clay for the stars or the mushroom dots. It adds a magical hidden surprise when the lights go down!
Step 3: Making the Closure
-
Create the Loop:
On one end of the bracelet, fold the tail back to create a loop large enough for your gold bead to pass through. Wrap the excess cord around the base of the loop to secure it, creating a ‘wrapped knot’ look. -
Attach the Button Bead:
On the opposite end, thread a gold bead onto all tail strands. Push it close to the main knot and tie another overhand knot securely behind it to keep the bead in place. -
Trim the Ends:
Trim any excess cord from your knots. You can add a dab of craft glue to the knots for extra security. -
Final Adjustments:
Gently twist the charms so they lay flat against the wrist when worn. Your earthy, cheerful bracelet is ready to wear.
Enjoy wearing your handcrafted collection of tiny, happy art on your wrist
Tiny “Tiny World” Shelf Scenes
Create a cozy, miniature world with this charming rustic shelf display. Featuring tiny clay succulents, faux wooden books, and weathered finishes, this project perfectly captures the essence of cottagecore in miniature form.
Step-by-Step Tutorial
Materials
- Balsa wood or craft plywood sheets (various thicknesses)
- White acrylic paint
- Brown antique wax or watered-down brown acrylic paint
- Air-dry clay or polymer clay (green, terracotta, white)
- Craft glue or wood glue
- Sandpaper (medium and fine grit)
- Dried decorative grass or wheat stems
- Cardstock or thin cardboard
- Ruler and craft knife
- Small paintbrush and detail brush
- Small piece of natural branch or bark (optional)
Step 1: Building the Shelf Structure
-
Cut the frame pieces:
Begin by measuring and cutting your wood. You will need two tall side panels (approx. 8-10 inches), a back panel to fit between them, and three smaller pieces for the shelves. The shelves should be slightly deeper than the side panels for a rustic overhang. -
Distress the wood:
Before assembling, use your craft knife to carefully chip away small slivers from the edges of the shelf pieces. This mimics the look of raw, hewn timber rather than perfect factory cuts. -
Paint the base coat:
Paint the side panels and back panel with white acrylic paint. Don’t aim for perfection; a slightly streaky application adds character. -
Create the whitewash effect:
Once the white paint is dry, lightly sand the surfaces, focusing on edges and corners to let the raw wood peek through. -
Stain the shelves:
Apply your brown antique wax or diluted brown paint to the shelf pieces. Wipe off excess immediately with a cloth to keep the grain visible and the color natural. -
Assemble the unit:
Glue the back panel to the side panels first. Once stable, glue the three shelves in place: one at the very top, one in the middle, and one near the bottom.
Texture Trick
Use an old toothbrush to flick tiny specks of watered-down brown paint onto the white shelf walls for an authentic speckled, aged look.
Step 2: Crafting the Accessories
-
Form the faux books:
Cut five small rectangular blocks of balsa wood for the middle row’s book collection and two thinner rectangles for the top and bottom stacks. -
Cover the spines:
Cut strips of cream-colored cardstock the same height as your wood blocks. Glue these to the ‘spines’ of the blocks, gently rounding them as you glue to simulate a book shape. -
Age the pages:
Lightly brush a tiny amount of diluted coffee or tea on the top and side wooden edges of your book blocks to mimic aged paper pages. -
sculpt the miniature mug:
Using a small ball of white clay, pinch and shape a cylinder. Roll a tiny snake of clay for the handle and attach it firmly. Using a detail brush, paint thin horizontal green stripes around the mug. -
Create the terracotta pots:
Shape small amounts of terracotta-colored clay into two tiny pots—one taller for the dried grass and one squat pot for a succulent. Use a pen cap or tool to create the hollow center. -
Sculpt the succulents:
With green clay, form tiny teardrop shapes and press them together in a rosette pattern to create the succulents. I find it easiest to work from the center outward.
Step 3: Assembly and Styling
-
Prepare the base book:
Take a slightly larger, flatter wood block for the bottom base. Paint the cover a muted green or blue, leaving the ‘pages’ natural wood. -
Plant the greenery:
Once your clay pots are hardened (bake or dry according to package instructions), glue the green succulent inside the squat pot. Fill the taller pot with a dab of glue and insert the dried grass stems. -
Create the wood slice display:
If you have a small branch slice, glue two tiny clay succulents or textured clay balls onto it for the bottom shelf feature. -
Final arrangement:
Place your items: the two stacked books and small pot on top, the row of standing books and mug in the middle, and the large book, branch slice, and tall grass pot on the bottom or side.
Level Up: Hidden details
Hollow out one of the ‘books’ before covering it to create a secret hiding spot for a tiny key or message.
Step back and admire your peaceful, rustic miniature scene
Mini Surprise Capsules With Hidden Faces
Create adorable, nesting ceramic-style capsules that reveal a hidden smiling friend inside. These multi-part pieces combine a soft pink dipped base with a creamy, speckled white finish for a modern, playful look.
Step-by-Step
Materials
- White classic polymer clay or air-dry clay
- Acrylic rolling pin
- Circle cutters (graduated sizes)
- Small pottery sponge
- Smoothing tools or dental tools
- Sandpaper (fine grit)
- Acrylic paints: Blush Pink, Creamy White, Black
- Stiff bristle brush or toothbrush (for speckling)
- Gloss varnish or clear resin
- Paintbrushes (flat soft brush and fine detail liner)
Step 1: Shaping the Base Component
-
Prepare the Clay:
Condition your white clay until it is soft and pliable. Roll it into a smooth ball slightly larger than a golf ball to ensure there are no air bubbles trapped inside. -
Form the Cup Shape:
Press your thumb into the center of the ball and begin pinching the walls upwards to form a small cup or bowl shape. Keep the walls relatively thick, about 1/4 inch, to act as the sturdy base. -
Refine the Walls:
Use your fingers and a smoothing tool to make the walls even in height. Flatten the bottom slightly on your work surface so the capsule stands up straight without wobbling. -
Smooth the Rim:
Dip your finger in a little water (if using air-dry clay) or baby oil (for polymer) and run it along the rim to round it off smoothly.
Lid Won’t Stay Put?
If the lid slides off, roll a very thin snake of clay and attach it to the underside of the lid to create a tighter inner rim, then re-bake or dry.
Step 2: Creating the Inner Capsule
-
Size the Middle Tier:
Create a second ball of clay, slightly smaller than the first. Test the size by placing it inside your base cup; it should nestle in but stick out significantly. -
Shape the Shoulders:
Mold this second piece into a rounded cylinder. The bottom part needs to fit inside the pink base, while the top creates a ‘shelf’ or shoulder for the lid to rest on. -
Hollow the Center:
Carefully hollow out the center of this middle piece, just like you did with the base, but keep the opening slightly narrower. This creates the hidden compartment. -
Check the Fit:
Place the middle piece into the base. I usually rotate it a few times to ensure the contact points are smooth and the nesting action feels satisfying.
Step 3: Sculpting the Lid & Face
-
Form the Dome:
Take a final, smaller piece of clay and shape it into a smooth dome that matches the diameter of the middle tier’s opening. -
Create the Lip:
On the underside of the dome, sculpt a small inner ridge or lip that will sit securely inside the middle tier so the lid doesn’t slide off. -
Final Surface Smoothing:
Go over all three pieces—base, middle, and lid—with a damp sponge or finger to remove fingerprints. Let the clay dry (air-dry) or bake it according to the package instructions. -
Sanding:
Once fully cured or dry, gently sand any rough edges, particularly where the pieces connect, to ensure a smooth nesting mechanism.
Secret Message
Before baking, hide a tiny rolled-up paper scroll with positive affirmations inside the middle chamber.
Step 4: Painting and Glazing
-
Paint the Base:
Paint the bottom cup component with the Blush Pink acrylic paint. You may need two coats for an opaque, dipped-ceramic look. -
Paint the Upper Sections:
Paint the middle tier and the dome lid with Creamy White. Ensure the paint extends down the neck of the middle piece where it meets the pink base. -
Add the Speckles:
Dilute a tiny amount of light brown or beige paint with water. Dip a stiff brush or toothbrush into it and flick the bristles to spray fine speckles over the white sections to mimic stoneware clay. -
Paint the Face:
Using your finest detail brush or a dotting tool, paint two small black circles for eyes and a tiny ‘u’ shape for a smile on the lid. -
Seal the Work:
Apply a coat of gloss varnish to the entire project. This mimics the glazed finish of real ceramics and protects your paint job.
Now you have a charming little desk companion ready to hold your tiniest treasures