I love mini clay pots because they’re basically tiny blank canvases you can finish in one relaxing studio session. Here are my favorite mini terracotta pot decorating ideas—starting with the classics and ending with a few playful, head-turning twists.
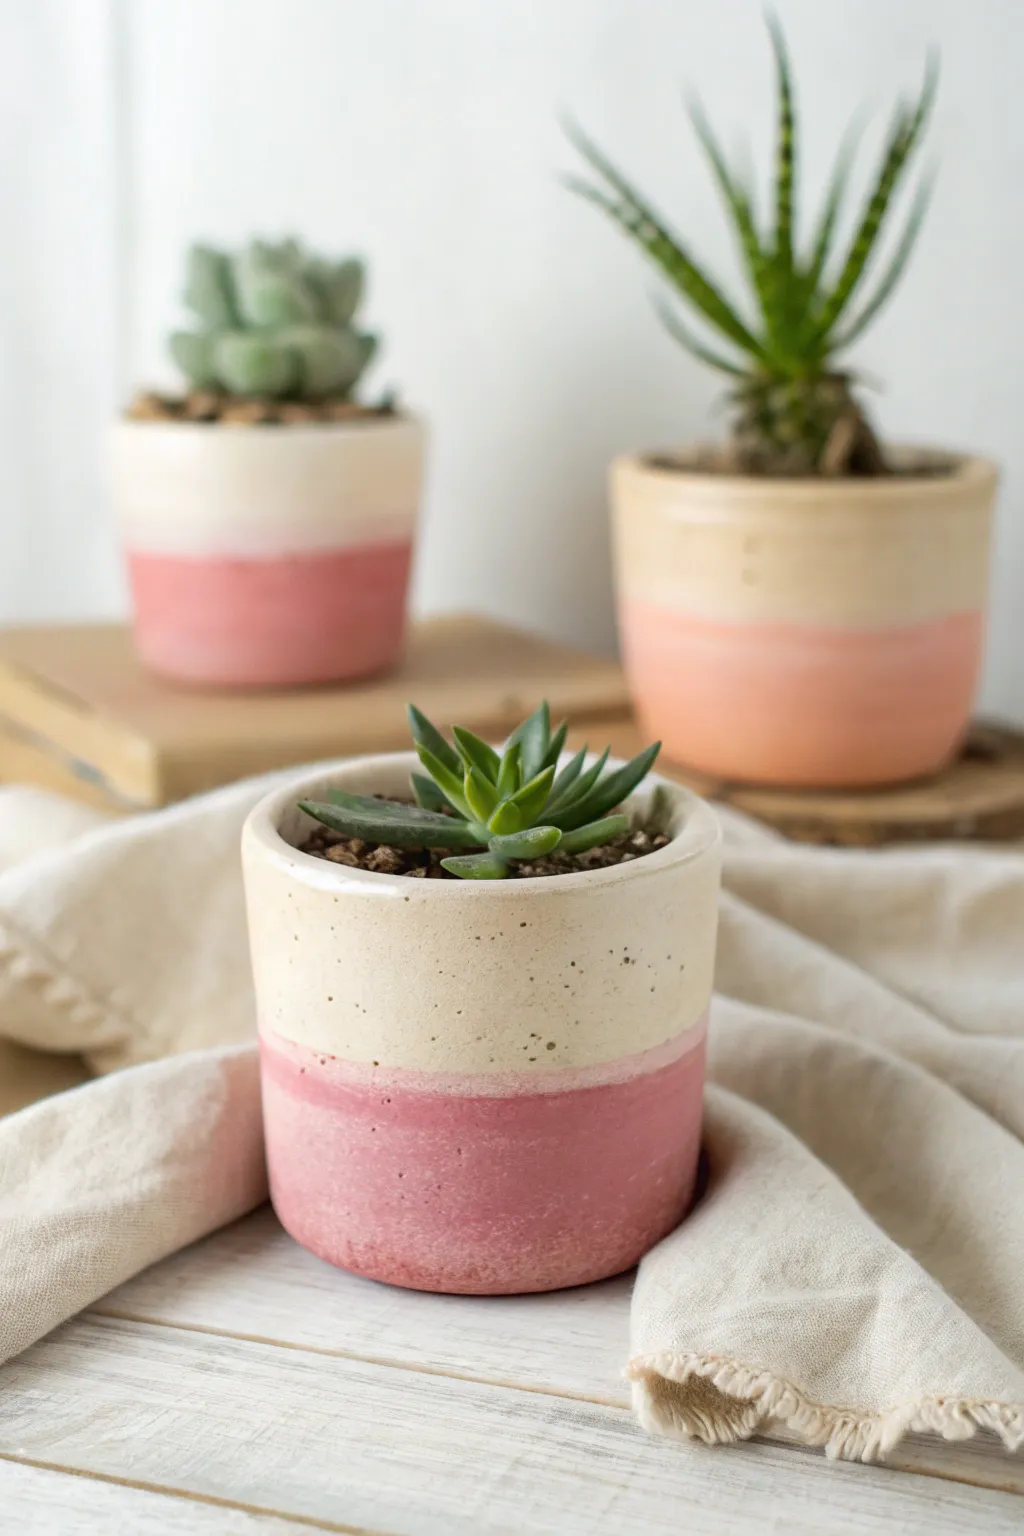
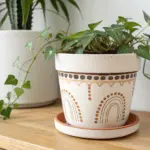
Classic Solid Color With a Dipped Rim
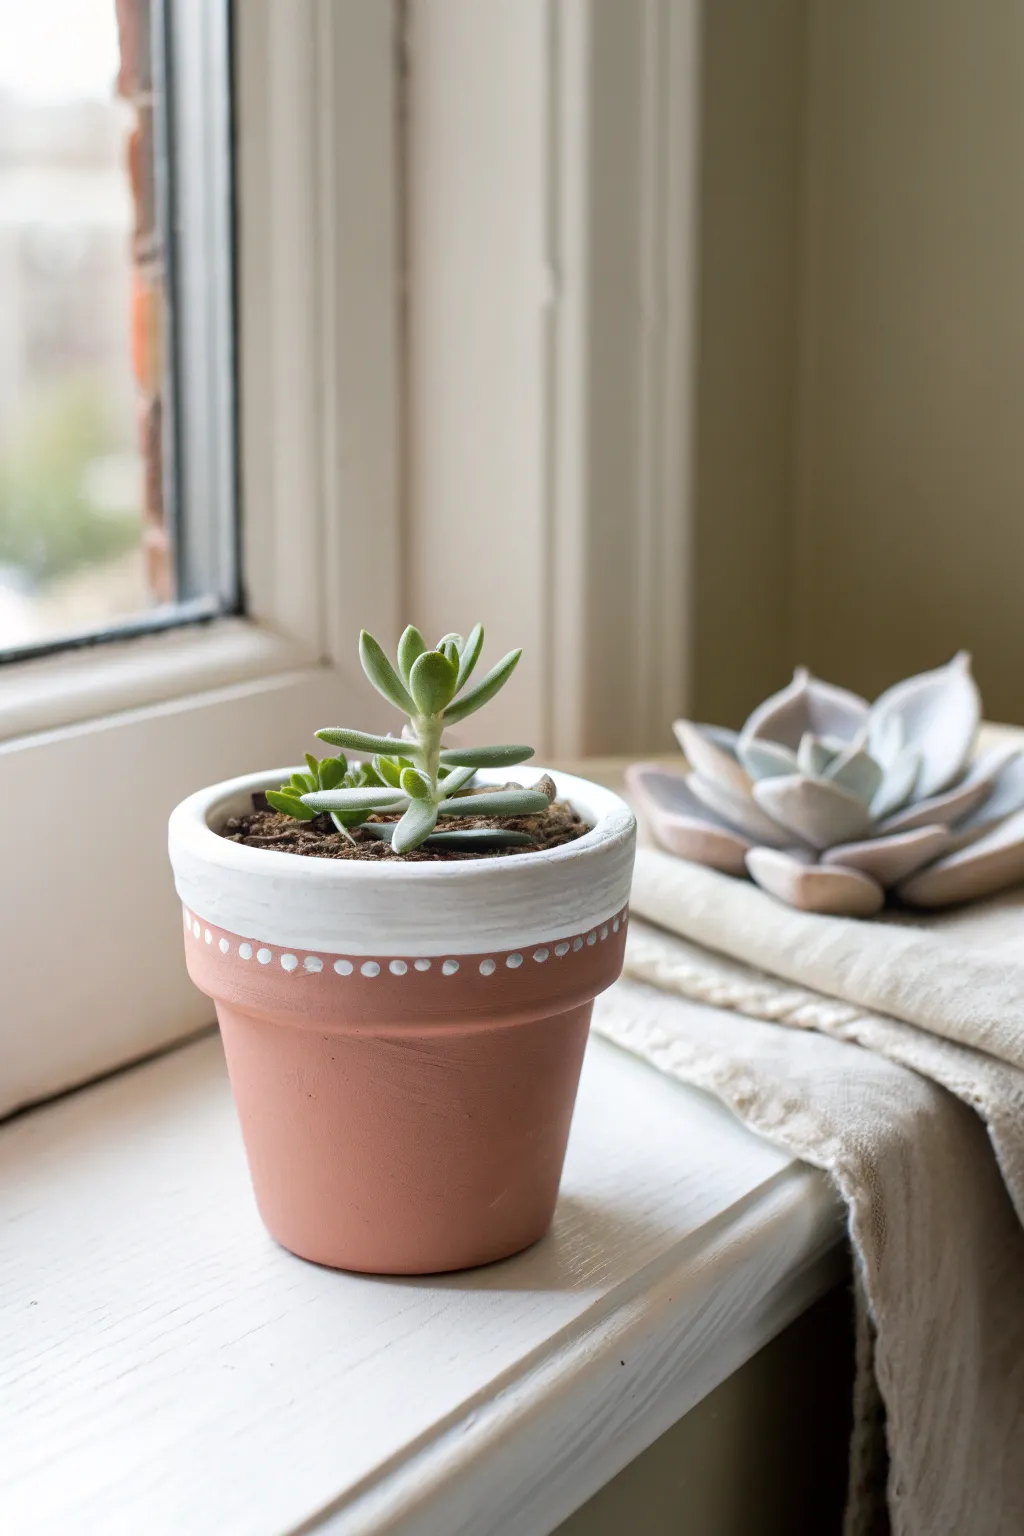
This minimalist design adds a crisp, modern touch to plain clay pots without overwhelming their natural warmth. By combining a solid dipped-look rim with a delicate dotted border, you create a charming home for your favorite succulents.
Detailed Instructions
Materials
- Small terracotta pot (cleaned and dried)
- White acrylic craft paint
- Small flat paintbrush (approx. 1/2 inch)
- Small dotting tool or toothpick
- Paper plate or palette
- Painter’s tape (optional)
- Clear matte sealer spray
Step 1: Preparation & Base Coat
-
Clean the surface:
Begin with a clean slate by wiping down your terracotta pot with a damp cloth to remove any warehouse dust or oils. Let it dry completely before applying any paint. -
Define the rim:
Locate the natural ridge where the rim of the pot meets the body. For a super crisp line, apply a strip of painter’s tape just below this ridge, pressing down firmly to seal the edge. -
Load your brush:
Squeeze a small dollop of white acrylic paint onto your paper plate. Dip your flat brush in, ensuring it’s coated evenly but not dripping creative excess. -
Paint the rim:
Apply the white paint to the upper rim of the pot using horizontal strokes. Don’t worry about painting the inside of the pot deeper than half an inch; the soil will cover most of it. -
Refine the edge:
If you aren’t using tape, carefully use the flat edge of your brush to cut in the line right at the bottom of the rim. I like to rest my pinky finger on the pot for stability while doing this freehand. -
Apply a second coat:
Let the first layer dry for about 10-15 minutes. If the terracotta color is showing through significantly, apply a second coat of white for a solid, opaque finish. -
Paint the top lip:
ensure the very top flat surface of the rim—the lip—is also painted white to complete the dipped look. -
Remove tape:
If you used painter’s tape, peel it off gently while the paint is still slightly tacky to prevent chipping the edge.
Uneven Dots?
If your dots are varying in size, try reloading your tool with paint after every singe dot. This ensures the same amount of paint is deposited each time.
Step 2: Detailing & Finishing
-
Prepare for dotting:
Refresh your paint supply on the palette if the previous blob has started to dry out. You want the paint fluid enough to form round beads. -
Select your tool:
Dip the tip of a dotting tool, the handle end of a small paintbrush, or a blunt toothpick into the white paint. -
Test the size:
Make a practice dot on a piece of scrap paper to ensure it matches the scale of the dots in the reference image—they should be small and dainty. -
Start the pattern:
Place your first dot on the unpainted terracotta section, directly underneath the white painted rim. Leave a tiny gap between the white rim and the dot. -
Establish spacing:
Rotate the pot slightly and place a second dot. Aim for consistent spacing, keeping them close together but not touching. -
Continue the ring:
Work your way around the entire circumference of the pot, reloading your tool frequently to keep the dots uniform in size and opacity. -
Correct mistakes:
If a dot smudges or looks wonky, quickly wipe it away with a damp Q-tip before the paint sets, then try again. -
Allow to cure:
Set the pot aside in a safe, dust-free area and let the paint dry completely for at least one hour. -
Seal the work:
Take the pot outdoors or to a well-ventilated area and apply a light coat of clear matte sealer spray. This protects the paint from water damage during planting. -
Plant:
Once dry, fill your stylish new pot with cactus soil and your favorite small succulent.
Use a Lazy Susan
Place the pot on a small turntable or Lazy Susan while painting the rim. Spin the wheel while holding the brush steady for a perfect horizontal line.
Now you have a beautifully customized planter ready for your windowsill display


Clean Geometric Stripes Using Tape

Transform a plain terra cotta pot into a stunning piece of modern decor with crisp white geometric patterns. This design combines bold triangles, diagonal stripes, and chevron details for a clean, tribal-inspired look that pops against the natural clay.
How-To Guide
Materials
- Terra cotta pot (standard size)
- Terra cotta saucer
- White acrylic craft paint
- Painter’s tape or drafting tape (various widths)
- Flat paintbrush (medium size)
- Fine liner detail brush
- Pencil
- Ruler or measuring tape
- Matte spray sealer (optional)
Step 1: Preparation and Base Design
-
Clean surface:
Begin by wiping down your terra cotta pot and saucer with a damp cloth to remove any dust or debris. Let it dry completely so the adhesive sticks properly. -
Plan the rim:
On the thick rim of the pot, use your pencil and ruler to mark even intervals all the way around. These marks will be the center points for your large downward-pointing triangles. -
Draft the triangles:
Connect your marks to create a zigzag pattern around the rim. You want alternating triangles: some pointing up (which will stay unpainted) and some pointing down (which will be painted white). -
Tape the rim:
Carefully apply painter’s tape to mask off the triangles that point *upward*. Press the edges of the tape down firmly with your fingernail to prevent paint bleed. -
Paint the rim:
Using your flat brush and white acrylic paint, fill in the exposed downward-pointing triangles. Apply 2-3 coats for solid coverage, letting each coat dry for about 15 minutes.
Step 2: Middle and Lower Patterns
-
Define the middle band:
Once the rim is dry, move to the body of the pot. Measure about an inch down from the rim and apply a horizontal strip of tape around the circumference. -
Create the diagonal stripe zone:
Place another strip of tape parallel to the first one, leaving a gap of about 3/4 of an inch. This gap will become your diagonal stripe band. -
Paint the diagonals:
Instead of taping every tiny line, I find it easier to freehand these with a liner brush for a more organic feel. Paint evenly spaced diagonal lines within that band using white paint. -
Add boundary lines:
Use your liner brush to paint a thin horizontal line touching the top and bottom of your diagonal pattern, framing it neatly. -
Paint the solid band:
Below the diagonal section, tape off a wide area (about 1.5 inches). Paint this entire band solid white. This anchors the design visually. -
Create the lower chevron band:
Near the bottom of the pot, define another horizontal band similar to the diagonal one above. Using your liner brush, paint a sideways ‘V’ or chevron pattern repeatedly around the pot.
Tape Hack
If your painter’s tape isn’t sticking well to the dusty clay, run a slightly damp sponge over the tape once applied to activate the adhesive better.
Step 3: Refining Details and Saucer
-
Detail the rim triangles:
Return to the rim where you painted the large white triangles. Using a very steady hand and your fine liner brush, paint a nested ‘V’ shape inside the unpainted terra cotta triangles. -
Tape the saucer:
For the saucer, apply a strip of tape around the side edge, leaving the bottom rim exposed. -
Paint the saucer rim:
Paint the exposed bottom rim white. Remove the tape while the paint is slightly tacky to ensure a crisp line. -
Add faux stitching:
Once the white band on the saucer is dry, use a very fine brush or even a white paint pen to add small dashed lines along the unpainted upper edge of the saucer rim. -
Final clean up:
Check the entire project for any smudges. If you made a mistake, you can gently scrape excess dry acrylic off the clay with a craft knife. -
Seal the work:
To protect your design from water damage, spray the entire pot and saucer with a clear matte sealer. This is crucial if you plan to plant directly inside the pot.
Level Up: Gloss Finish
For a high-contrast look, swap the matte sealer for a high-gloss varnish on just the white painted sections to make them shine against the matte clay.
Now you have a stylish, custom planter ready to house your favorite succulents or herbs


Soft Ombre Fade for a Gentle Look
Capture the delicate beauty of a sunrise with these soft, two-tone planters that blend creamy beige into gentle coral pink. This project transforms standard mini pots into modern, minimalist homes for your favorite succulents using a simple gradient technique.
Detailed Instructions
Materials
- Mini clay or terracotta pots (2-3 inch diameter)
- Acrylic craft paint in ‘Cream’ or ‘Antique White’
- Acrylic craft paint in ‘Soft Coral’ or ‘Dusty Pink’
- Matte white spray primer
- Medium flat paintbrush
- Small sea sponge or cosmetic wedge sponge
- Paper plate or palette
- Cup of water
- Paper towels
- Matte clear sealant spray
Step 1: Base Preparation
-
Clean the surface:
Begin by wiping down your terracotta pots with a damp cloth to remove any warehouse dust or oils. Let them dry completely, or the paint won’t adhere properly. -
Prime the pots:
Take the pots to a well-ventilated area. Apply a light, even coat of matte white spray primer. This step is crucial because raw terracotta soaks up acrylic paint unevenly; the primer ensures your cream top coat looks solid and smooth. -
Let primer cure:
Allow the primer to dry for at least 30 minutes until it feels chalky and dry to the touch.
Sponge Technique Tip
A damp sponge blends better than a dry one. In step 10, squeeze your sponge out thoroughly so it is humid but not dripping water before dipping in paint.
Step 2: Applying the Base Colors
-
Paint the top section:
Load your flat brush with the cream paint. Start painting from the top rim down, covering about two-thirds of the pot’s exterior. Don’t worry about a perfect straight line at the bottom. -
Detailed rim work:
Paint the very top lip of the pot and extend the cream color just inside the rim (about half an inch down) so the soil line looks neat once planted. -
Second coat:
Acrylics often need two coats for full opacity. Once the first cream layer is dry, apply a second coat for a rich, solid finish. -
Paint the bottom section:
Clean your brush thoroughly. Now, apply your coral or dusty pink paint to the bottom third of the pot, brushing upwards toward the cream section but stopping just before they touch.
Add a Speckled Effect
For the stoneware look in the photo, dip an old toothbrush in watered-down brown paint and flick the bristles to spray tiny speckles over the dried ombre.
Step 3: Creating the Ombre Fade
-
Prepare the transition:
While the pink layer is still slightly wet, use your brush to drag the pink paint upward until it barely overlaps the dry cream paint. This establishes your horizon line. -
Mix a transition shade:
On your palette, mix a small amount of the cream paint with a dab of the coral pink to create a lighter, intermediate shade. -
Sponge application:
Dip your damp sea sponge or cosmetic wedge into this mixed intermediate shade. Dab off the excess paint onto a paper towel until the sponge is almost dry. -
Blend the line:
Gently tap the sponge along the line where the cream and pink colors meet. Use a light, stippling motion to blur the hard edge. -
Soften upwards:
Reload the sponge with just a tiny bit of plain cream paint and dab along the upper edge of your blended line to feather the fade into the top section. -
Soften downwards:
I like to flip the sponge to a clean side, dip it in the pure pink paint, and dab along the lower edge of the blend to smoothen the transition into the solid pink base. -
Wait and assess:
Step back and look at the blend from a distance. If the line still looks too harsh, repeat the stippling process with the intermediate mix once the current layer is tacky but not fully dry.
Step 4: Finishing Up
-
Full drying time:
Set the pots aside to dry completely for at least 2-3 hours. The paint must be fully cured before sealing. -
Sealing the work:
Spray the exterior with a matte clear sealant. This protects your ombre effect from water damage when you water your plants later. -
Final inspection:
Check the bottom drainage hole to ensure no paint has clogged it. If it has, poke it clear with a skewer. -
Planting:
Fill with succulent soil and add your favorite green friend to complete the look.
Place your trio of pots near a sunny window to let those soft colors glow


Easy Polka Dots and Confetti Speckles

Transform a plain clay pot into a stylish, minimal accent piece featuring earthy tones and playful patterns. This project combines bold, hand-painted polka dots with delicate confetti speckling for a modern, textured ceramic look.
Step-by-Step Guide
Materials
- Small round terracotta or ceramic pot
- Terra cotta saucer (fitting the pot base)
- Cream or off-white acrylic paint (matte finish)
- Navy blue acrylic paint
- Rust or terracotta-orange acrylic paint
- Medium foam pouncer or round sponge applicator
- Small stiff-bristled brush (for speckling)
- Medium flat paintbrush (for base coat)
- Paper plate or palette
- Matte spray sealer
Step 1: Preparing the Canvas
-
Clean and Dry:
Begin by wiping down your clay pot and saucer with a damp cloth to remove any dust or manufacturing residue. Let them dry completely before applying any paint to ensure the best adhesion. -
Base Coat Application:
Squeeze a generous amount of cream or off-white acrylic paint onto your palette. Using the medium flat brush, apply a smooth, even coat over the entire exterior of the pot. Don’t forget to paint the top rim for a finished look. -
Layering Up:
The first coat might look a bit streaky, which is normal. Allow it to dry for about 20 minutes, then apply a second coat. I find that two or three thin layers create a much more convincing ceramic glaze effect than one thick one. -
Drying Time:
Set the pot aside to dry fully for at least an hour. The surface needs to be completely dry to the touch so the dotting step doesn’t lift the base paint.
Perfect Circles Trick
If you struggle with foam pouncers sliding, use paper reinforcement labels as stencils. Stick them on, paint the center circle, then peel off immediately for crisp edges.
Step 2: Adding the Pattern
-
Preparing the Colors:
Pour equal, small puddles of the navy blue and rust/terracotta paints onto your paper plate. Ensure they are spaced apart so your sponge doesn’t accidentally pick up the wrong color. -
Loading the Pouncer:
Take your round foam pouncer and dip it straight down into the navy blue paint. Dab it lightly on a clean part of the palette a few times to remove excess paint and ensure an even distribution on the foam. -
First Blue Dot:
Press the pouncer firmly against the side of the pot. Apply a slight twisting motion (just a millimeter or so) as you lift it away to keep the edges crisp. Place this first dot centered on the front. -
Creating the Grid:
Continue adding blue dots around the pot. Aim for a staggered or diamond pattern, leaving enough negative space between them for the secondary color. Clean your pouncer thoroughly or switch to a fresh one. -
Adding Rust Accents:
Repeat the loading process with the rust-colored paint. Stamp these dots into the empty spaces between the blue ones. If a dot looks too faint, let it dry briefly and stamp over it again directly. -
Check the Spacing:
Step back and look at the pattern. It doesn’t need to be mathematically perfect; a little irregularity adds to the hand-thrown pottery aesthetic shown in the photo.
Step 3: Texture and Finishing
-
Preparing the Speckle:
Take a very small amount of the black or dark grey paint and dilute it slightly with a drop of water. You want an inky consistency that flicks easily but isn’t drippy. -
The Flicking Technique:
Load the tips of your stiff-bristled brush (an old toothbrush works wonders here too). Hold the brush near the pot and run your thumb across the bristles to flick tiny specks of paint onto the surface. -
Controlling Density:
Go lightly with the speckling. You want a subtle ‘stoneware clay’ look, not a messy splatter. Rotate the pot constantly to ensure even coverage. -
Cleaning the Rim:
If any large splatters landed on the rim or inside the pot where you don’t want them, quickly wipe them away with a damp cotton swab or paper towel. -
Painting the Base:
While the pot dries, paint the terracotta saucer. In the reference image, the saucer is left natural or painted a warm terracotta tone to contrast with the cream pot. Choose whichever suits your style. -
Sealing the Work:
Once all paint layers are bone dry (give it a few hours), take the pot outside and apply a coat of matte spray sealer. This protects the design from moisture when you water your plants.
Uh-oh, Smudged Dot?
Don’t panic if a dot smudges. Let it dry completely, paint over it with your cream base color to ‘erase’ it, let that dry, and then restamp your colored dot.
Now you have a charming, custom planter ready for your favorite succulent or cactus

The Complete Guide to Pottery Troubleshooting
Uncover the most common ceramic mistakes—from cracking clay to failed glazes—and learn how to fix them fast.
Simple Stenciled Florals and Leaves
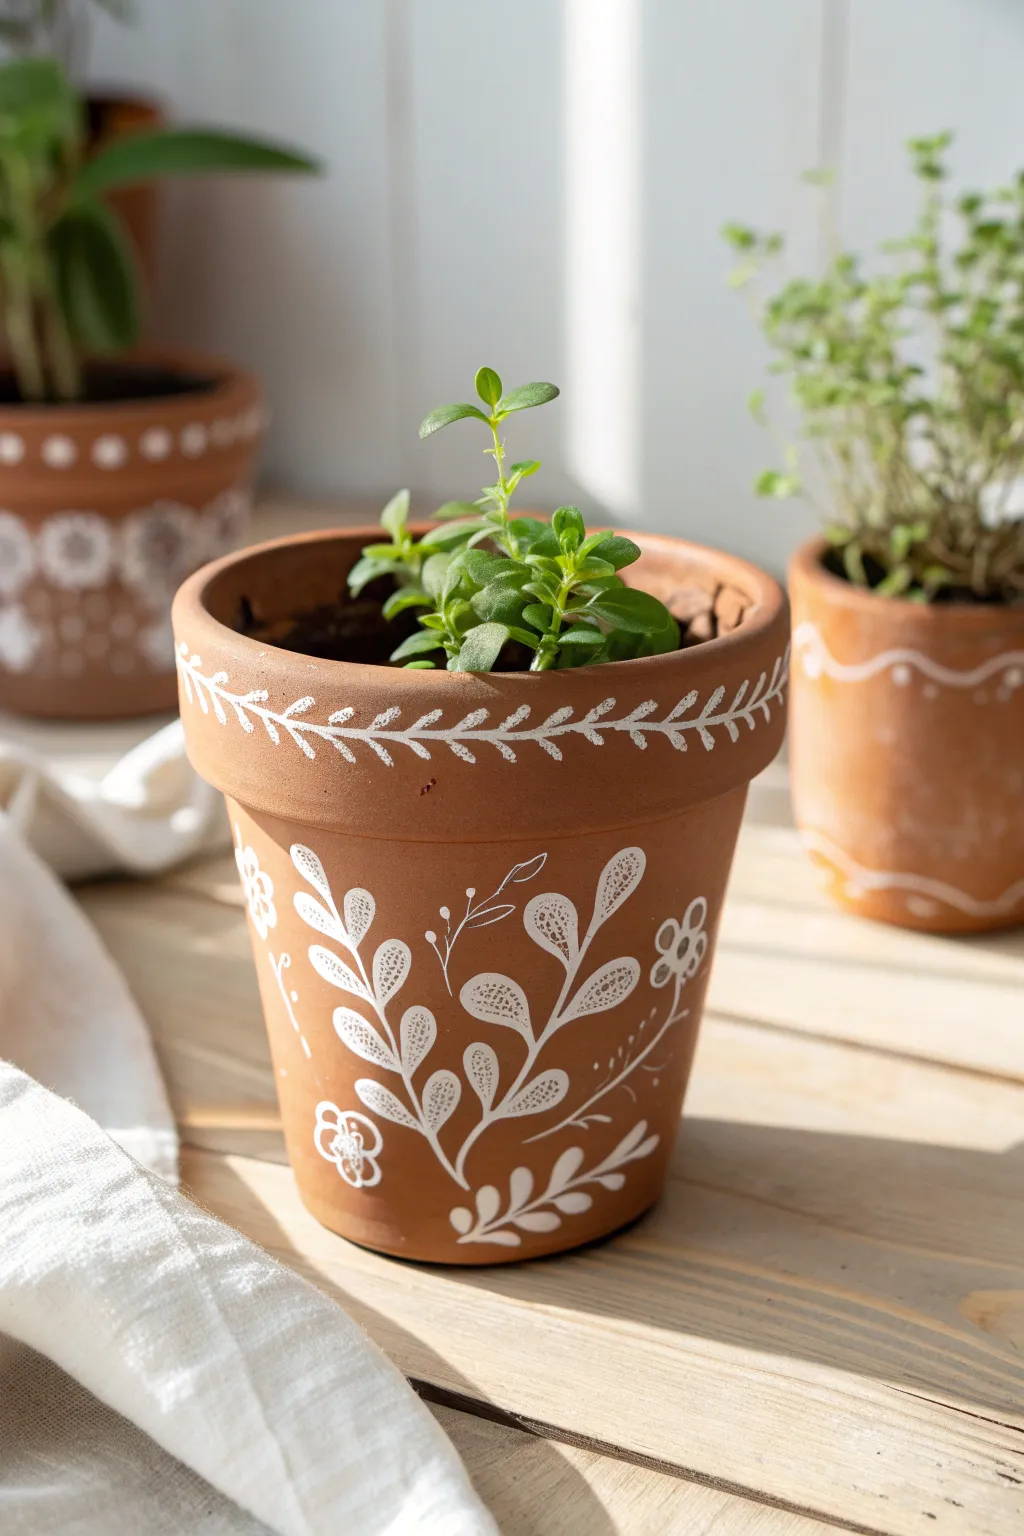
Transform a plain terracotta pot into a charming home for your herbs with delicate white botanical designs. The contrast of crisp white paint against the warm, earthy clay creates a timeless look that feels both rustic and refined.
Step-by-Step Tutorial
Materials
- Small terracotta pot (clean and dry)
- White acrylic paint or specialized terracotta paint
- Fine detail paintbrush (size 0 or 00)
- Small flat paintbrush
- Pencil
- Paper for sketching
- Sealant (spray or brush-on matte varnish)
- Potting soil and small plant (like thyme or basil)
Step 1: Preparation and Planning
-
Clean surface:
Begin by wiping down your terracotta pot with a damp cloth to remove any dust or residue. Let it dry completely, as moisture can prevent the paint from adhering properly. -
Sketch design:
On a piece of scrap paper, practice drawing the floral motifs you see on the pot. Focus on the main branch shape: a central curved stem with paired oval leaves extending outwards. -
Plan rim pattern:
Decide on the simple vine pattern for the rim. This looks like a continuous horizontal line with small, V-shaped leaves branching off at regular intervals. -
Draft on pot:
Using a pencil, very lightly sketch the main floral shapes onto the side of the pot. Don’t press too hard; you just want faint guidelines for placement. -
Mark the rim:
Lightly mark the center line around the thick rim of the pot where your vine will go.
Clean Lines Tip
If your brushstrokes feel shaky, rest your pinky finger on the pot’s surface to stabilize your hand while painting delicate stems.
Step 2: Painting the Rim
-
Paint the vine stem:
Dip your fine detail brush into the white acrylic paint. Carefully paint a thin, continuous line all the way around the center of the rim. -
Add first leaves:
Starting at one point on the line, paint small diagonal dashes pointing upwards and to the right to create the top row of leaves. -
Complete the vine:
Paint corresponding dashes on the bottom side of the line, pointing downwards and to the right. Try to keep the spacing consistent for a uniform look. -
Review consistency:
Rotate the pot and check for any gaps in the paint on the rim. Touch up any faint areas with a second light coat if needed.
Step 3: Painting the Body
-
Paint main stems:
Switching focus to the body of the pot, use the fine brush to paint the main curved stems of your floral design over your pencil marks. -
outline leaves:
For the leaves on the main branch, paint the outline of the oval shapes first. Keep the lines delicate. -
Fill with texture:
Instead of filling the leaves with solid white, stipple small dots or tiny dashes inside the leaf outlines. This creates a textured, stenciled appearance rather than a blocky one. -
Add secondary flora:
Paint the smaller, simpler sprays. These are just thin stems with simple, solid tear-drop shapes for leaves, contrasting with the larger textured leaves. -
Paint small flowers:
Add the small flower details. Draw a simple five-petal shape with an open center. I like to keep these loose and organic rather than perfectly symmetrical. -
Add whimsical details:
Paint tiny accent dots, small spirals, or little floating ‘pollen’ specks around the main branches to fill empty space without crowding the design. -
Let dry:
Allow the paint to dry completely for at least an hour. Terracotta is porous and absorbs paint quickly, but surface designs need time to set.
Switch it Up
Try using a gold or copper metallic paint pen instead of white acrylic for a glamorous, shimmering version of this design.
Step 4: Finishing Touches
-
Erase guidelines:
Once the paint is 100% dry and hard to the touch, gently erase any visible pencil marks that weren’t covered by paint. -
Seal the pot:
Apply a coat of matte varnish or sealant over the painted areas. This is crucial if you plan to water a real plant in the pot, as moisture seeping through the clay can bubble the paint. -
Plant:
Fill your new pot with soil and add your small plant, pressing the soil firmly around the roots.
Now you have a beautifully customized pot ready to brighten up your windowsill
Distressed Whitewashed Cottage Style
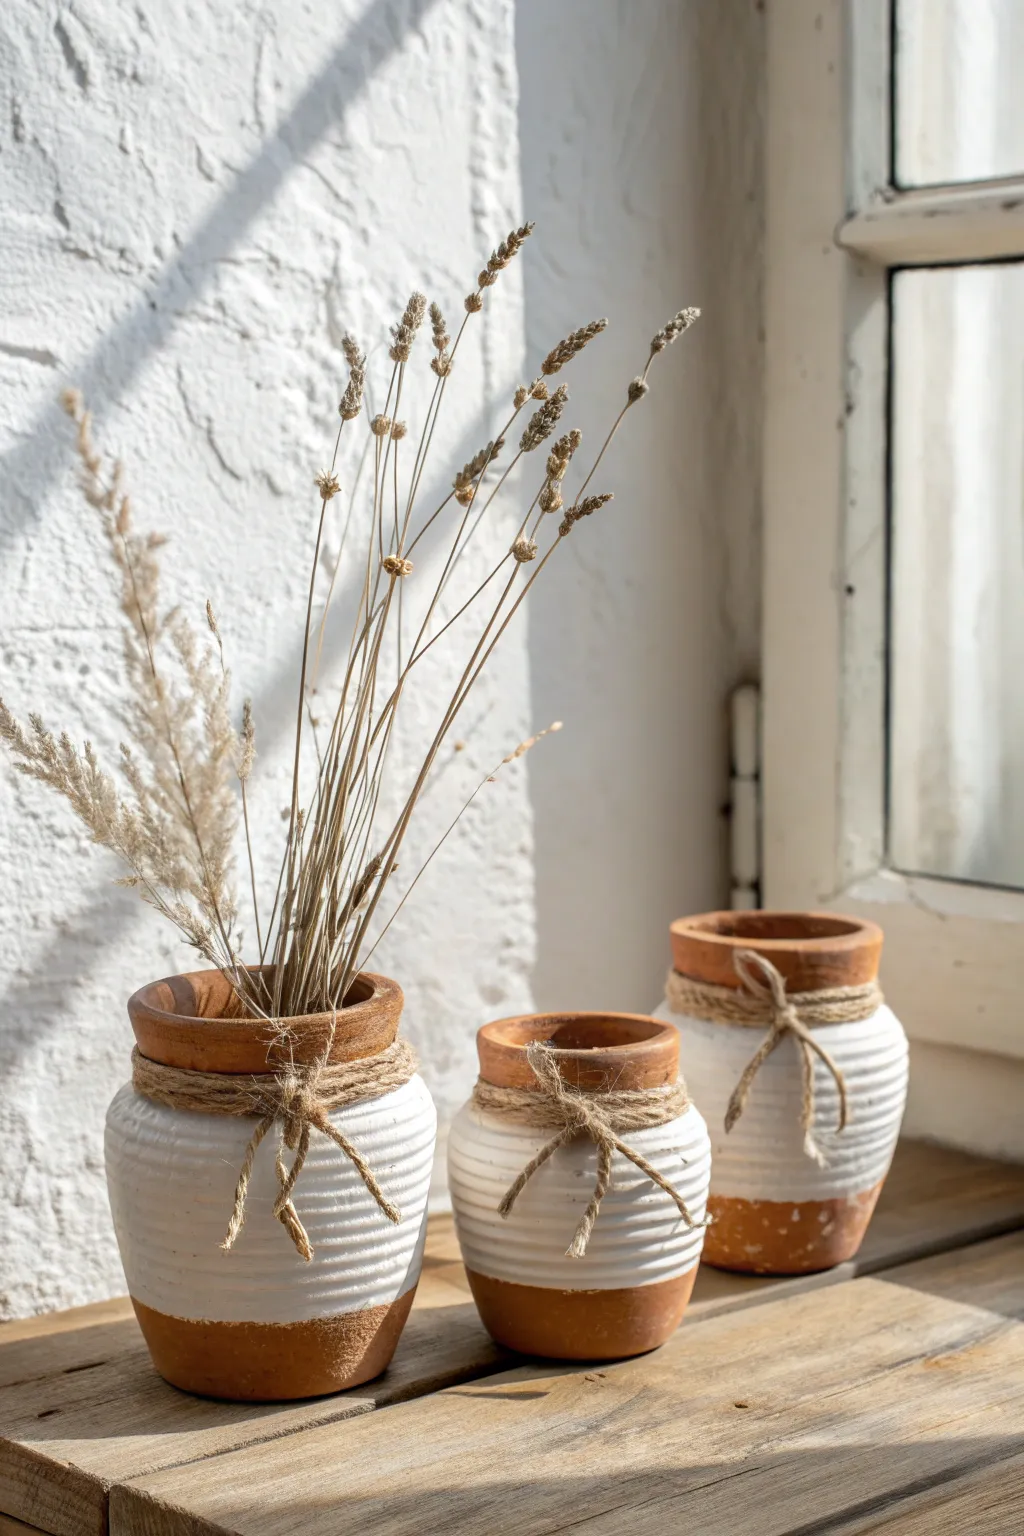
Bring a touch of coastal cottage charm to your windowsill with these textured terra cotta vessels. The unique combination of raw clay, ribbed white paint, and natural jute creates a beautifully weathered look that feels effortless and grounded.
Step-by-Step
Materials
- Small terra cotta pots (traditional shape)
- White chalk paint or matte acrylic paint
- Paintbrush (medium flat brush)
- Jute twine or hemp cord
- Hot glue gun and glue sticks
- Fine-grit sandpaper (optional)
- Dried lavender, wheat stalks, or pampas grass
Step 1: Preparation & Base Texture
-
Clean surface:
Begin by wiping down your terra cotta pots with a damp cloth to remove any dust or debris. Let them dry completely, as moisture will prevent the paint from adhering properly to the porous clay. -
Define the paint line:
Decide where you want the white section to begin. Looking at the reference, the paint starts just below the rim’s neck and stops about an inch from the bottom. You can use painter’s tape to mark these boundaries if you want sharp lines, or freehand it for a more rustic feel. -
Apply thick paint:
Load your brush heavily with white chalk paint. We aren’t aiming for a smooth coat here. Apply the paint to the middle section of the pot in a very thick layer. -
Create the ribbed texture:
While the paint is still wet and thick, take the handle of a paintbrush or a specialized sculpting tool. Press it gently into the wet paint and drag it horizontally around the pot, creating grooves. -
Refine the ridges:
Repeat the grooving process, stacking the horizontal lines closely together. If the paint starts to dry too quickly, lightly mist it with water to keep it workable. -
Allow to cure:
Let this textured paint layer dry completely. Because the paint is applied thick to hold the texture, this might take longer than usual—perhaps an hour or two.
Step 2: Distressing & Finishing
-
Sand for distress (optional):
Once dry, if the white looks too pristine, gently run fine-grit sandpaper over the raised ridges. This scrapes away a tiny bit of white to reveal the terra cotta underneath, enhancing the weathered look. -
Prepare the twine:
Cut a length of jute twine roughly 18-24 inches long. You need enough to wrap around the neck adjacent to the rim multiple times with extra length for a bow. -
Secure the twine start:
Place a small dot of hot glue strictly on the back of the pot’s neck, just below the rim lip. Press one end of the twine into the glue to anchor it. -
Wrap the neck:
Wind the twine around the neck of the pot three to four times. Keep the wraps snug and close together so they form a solid band of texture. -
Tie the bow:
Bring the loose end around one final time to meet the section where you started the wrap (if you left a tail) or simply cut a separate piece to tie a standard bow knot at the front. -
Adjust the knot:
Tease the loops of the bow so they look relaxed rather than stiff. If the bow feels floppy, a tiny dot of hot glue behind the knot will keep it perfectly centered. -
Trim the ends:
Snip the tails of the twine at an angle. They should hang down slightly onto the white painted section but not drag too low.
Paint Won’t Hold Texture?
If your paint is too thin to hold grooves, mix in a teaspoon of baking powder or cornstarch. This thickens the paint instantly, making it perfect for creating raised 3D effects.
Step 3: Styling
-
Select your botanicals:
Choose dried grasses that complement the rustic vibe. Wheat grass, dried lavender stems, or fluffy pampas grass work best for this palette. -
Arrange the stems:
Place a generous handful of dried stems into the largest pot, letting them fan out naturally. For the smaller pots, you can leave them empty or add just a few shorter stems. -
Group together:
Arrange your finished trio on a wooden surface or windowsill where the light can catch the ribbed texture of the paint.
Add an Aged Patina
For an antique look, dilute brown acrylic paint with water (1:5 ratio) and brush it over the white section. Immediately wipe it off with a rag, leaving dark residue in the grooves.
Enjoy the calming, artisanal atmosphere these simple pots add to your home decor


What Really Happens Inside the Kiln
Learn how time and temperature work together inside the kiln to transform clay into durable ceramic.
Hand-Lettered Names and Tiny Sayings

Embrace the beauty of simplicity with this charming, hand-lettered mini terra cotta pot. The clean black serif text against the natural clay creates a modern farmhouse look that is perfect for identifying your windowsill herbs.
How-To Guide
Materials
- Mini terra cotta pot (2-3 inch diameter)
- Fine-grit sandpaper (optional, but recommended)
- Black waterproof paint marker (extra-fine tip) or fine liner pen
- Pencil
- Eraser
- Small mint seedling/cutting
- Potting soil
- Paper towel or cloth
- Matte spray sealer (optional)
Step 1: Preparing the Pot
-
Clean surface:
Begin by wiping down your terra cotta pot with a slightly damp cloth to remove any warehouse dust or loose clay particles. -
Smoothen imperfections:
Inspect the rim of the pot specifically. If there are any rough bumps or jagged bits of clay where you plan to write, gently buff them away with fine-grit sandpaper to create a smooth writing surface. -
Dry completely:
Allow the pot to dry fully if you used a damp cloth. The porous clay must be bone dry, or the ink might bleed into the moisture.
Ink Bleeding into Clay?
If your marker bleeds into the porous surface, spray a light coat of matte sealer on the clay *before* writing. This seals the pores and creates a bleed-proof barrier for crisp lines.
Step 2: Lettering the Design
-
Plan placement:
Hold the pot and decide exactly where the center of your design should be. I find it helpful to look for the ‘best side’ of the pot that is free of chips or discoloration. -
Pencil draft:
Using a pencil very lightly, sketch the word ‘Mint’ on the rim. Use a classic serif font style (little feet on the letters) to match the example image. -
Refine spacing:
Check your kerning (the spacing between letters). The word should look centered and balanced horizontally on the rim. -
Ink the outline:
Take your extra-fine black paint marker. Carefully trace over your pencil lines, starting with the vertical strokes of the ‘M’. -
Detail the serifs:
Add the small horizontal lines (serifs) at the top and bottom of your strokes. Keep these delicate and consistent. -
Thicken slightly:
To mimic the printed look, go back and ever-so-slightly thicken the vertical downstrokes of the letters while leaving the horizontal cross-strokes thin. -
Dry time:
Let the ink dry completely for at least 15-20 minutes. Don’t touch it, as oil from your fingers can smear the letters before they set. -
Erase guidelines:
Once you are certain the ink is dry, gently erase any visible pencil marks. Be soft with the eraser to avoid rubbing off the fresh ink.
Step 3: Finishing Touches
-
Optional sealing:
If this pot will live outdoors or get very wet, give the rim a quick coat of matte spray sealer to protect the lettering. -
Add soil base:
Fill the bottom third of the small pot with high-quality potting soil. -
Planting:
Gently place your small mint seedling or rooted cutting into the center of the pot. -
Fill and tamp:
Fill in the remaining space around the roots with soil, pressing down gently with your thumbs to secure the plant. -
Final clean:
Brush off any stray soil crumbs from the rim so your beautiful lettering stays clean and visible.
Pro Tip: Font Mockup
Type the word ‘Mint’ in a serif font (like Times New Roman) on your computer at the actual size. Cut it out and tape it to the pot as a visual reference while you sketch.
Now you have a stylish, custom-labeled home for your fresh herbs that looks great on any wooden table
Mini Mosaic Patchwork Texture
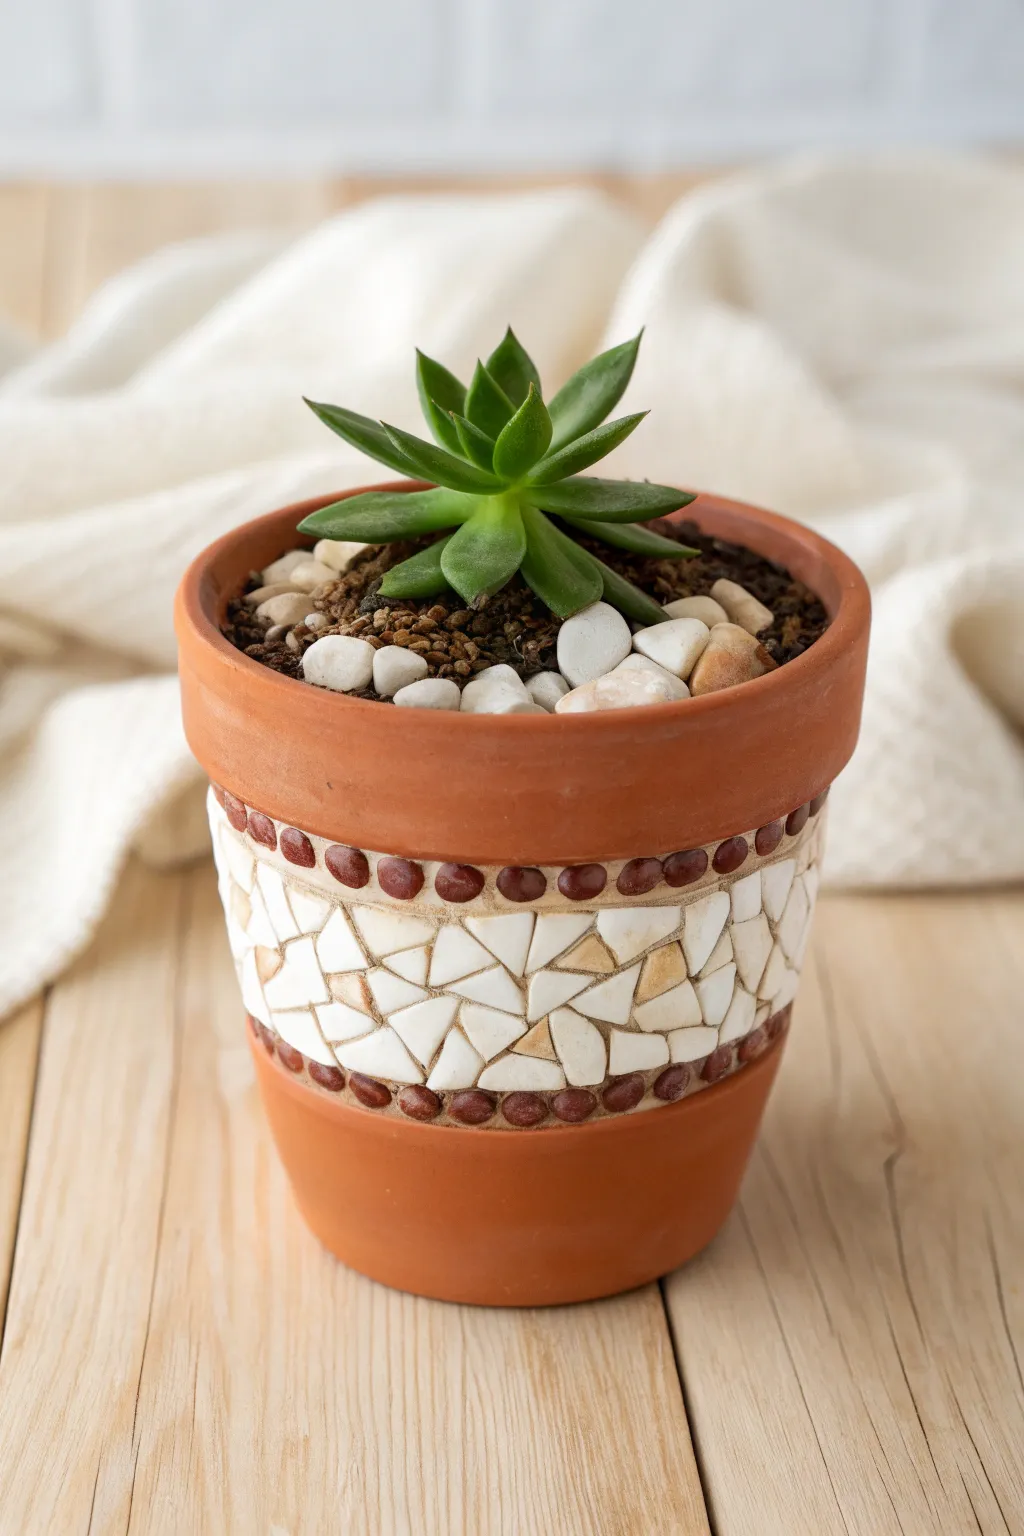
Transform a simple terracotta planter into a textured masterpiece with this mosaic patchwork design. Using irregular ceramic shards and tiny polished seeds or beads, this project creates an organic, sophisticated band that elevates any succulent display.
Step-by-Step
Materials
- Small terracotta pot (approx 4-5 inches)
- White or cream ceramic tiles (or broken china pieces)
- Small brown seeds, wooden beads, or lentil beans (for the borders)
- Tile adhesive or thick craft tacky glue
- Pre-mixed grout (sanded, beige or light tan color)
- Tile nippers or hammer
- Safety glasses
- Sponge and water
- Popsicle stick or palette knife
- Clean soft cloth
- Clear matte sealant spray
Step 1: Preparing the Mosaic Pieces
-
Safety First:
Before breaking any ceramic material, put on your safety glasses to protect your eyes from flying shards. -
Create Shards:
Take your white ceramic tiles or old china plates and wrap them in an old towel. Gently strike them with a hammer to create large cracks. -
Refine Shapes:
unwrapping the towel, use tile nippers to further shape the broken pieces into small, irregular triangles and polygons. You want them to be roughly 0.5 to 0.75 inches in size. -
Sort the Pieces:
Sort your shards into a pile, discarding any dust or pieces that are too small to handle easily.
Use Natural Elements
Dried lentils or coffee beans make excellent, cheap border materials if you don’t have wooden beads. Seal them well!
Step 2: Designing the Mosaic Band
-
Mark the Band:
Using a pencil, lightly draw two parallel lines around the circumference of the pot to define the width of your mosaic band. About 1.5 to 2 inches wide works well for this pot size. -
Apply Adhesive:
Working in small sections of about 2 inches at a time, apply a layer of tile adhesive or tacky glue within your pencil lines using a popsicle stick. -
Place the Top Border:
Press your small brown seeds or beads into the wet adhesive along the very top pencil line to create the upper border. Ensure they are spaced evenly, almost touching. -
Place the Bottom Border:
Repeat the previous step for the bottom pencil line, creating a symmetrical frame for your mosaic work. -
Fill the Mosaic Field:
Begin placing your white ceramic shards into the adhesive between the seed borders. I find it easiest to fit them together like a puzzle, leaving small gaps (about 1/8 inch) between each piece for grout. -
Adjust and Dry:
Continue working your way around the pot until the band is completely filled. If pieces slide, gently nudge them back into place. Let the adhesive dry completely according to manufacturer instructions, usually overnight.
Adhesive Troubleshooting
If tiles slide down the curved surface, let the adhesive tack up for 2-3 minutes before pressing the shards in.
Step 3: Grouting and Finishing
-
Prepare Grout:
If not using pre-mixed grout, mix your sanded grout powder with water until it reaches the consistency of peanut butter. -
Apply Grout:
Scoop a generous amount of grout onto the mosaic band. Use a gloved finger or a rubber spatula to press the grout firmly into the crevices between the shards and the seed borders. -
Reveal the Design:
Wait about 10-15 minutes for the grout to set slightly. It should look hazy but not wet. -
Clean the Surface:
Dampen your sponge (wrung out thoroughly so it’s barely moist) and gently wipe across the surface of the mosaic to remove excess grout. Rinse the sponge frequently. -
Detail Cleaning:
Pay special attention to the seed borders, ensuring the grout doesn’t cover their rounded shape. -
Buff to Shine:
Allow the pot to dry for another hour until a haze forms, then buff the ceramic tiles briskly with a soft, dry cloth to make them shine. -
Seal:
Once fully cured (after 24 hours), spray the entire pot with a clear matte sealant to protect the grout and seed elements from moisture.
Now you have a beautifully textured planter ready for your favorite succulent

TRACK YOUR CERAMIC JOURNEY
Capture glaze tests, firing details, and creative progress—all in one simple printable. Make your projects easier to repeat and improve.
Terrazzo-Style Flecks on a Neutral Base
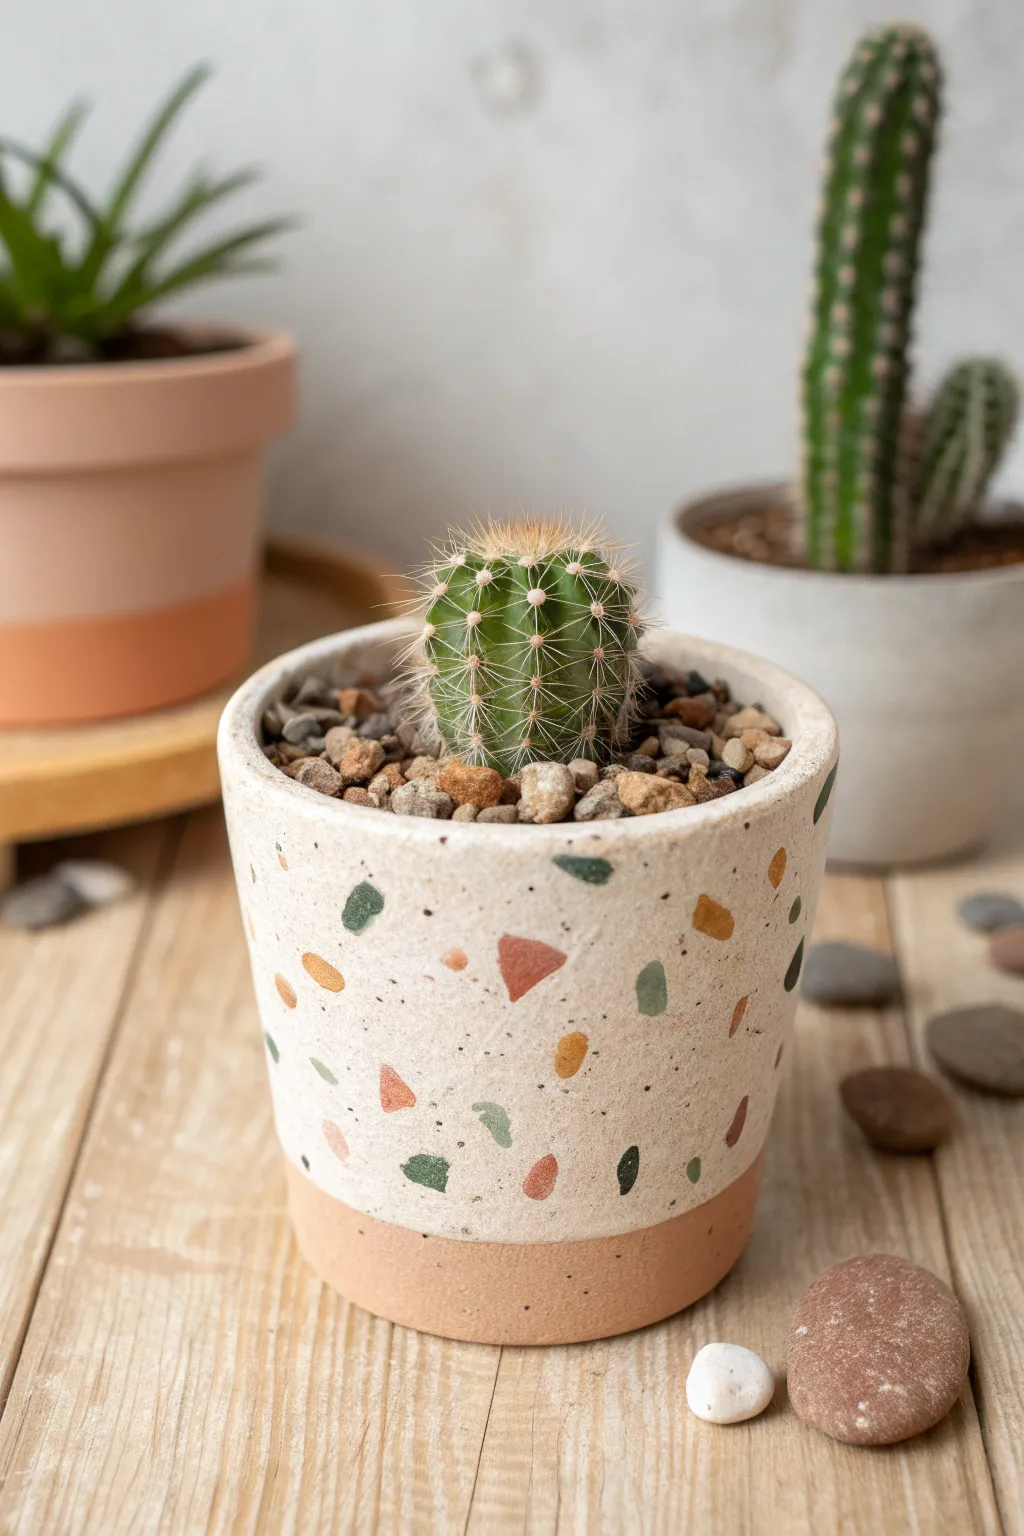
Transform a plain terracotta planter into a modern art piece with this simple painting technique. The creamy, textured-looking base and playful geometric flecks mimic the trendy look of real terrazzo stone without the weight or cost.
How-To Guide
Materials
- Small terracotta pot
- Painter’s tape or masking tape
- Cream or off-white acrylic craft paint
- Assorted acrylic paint colors (terra cotta orange, deep green, mustard yellow, light sage, dark grey)
- Small flat paintbrush
- Fine-point detail brush
- Sea sponge (optional)
- Potting soil
- Small cactus or succulent
- Pea gravel or decorative stones for topping
Step 1: Preparing the Base
-
Clean the surface:
Begin by wiping off any dust or debris from your terracotta pot with a damp cloth. A clean surface ensures the paint adheres properly. -
Tape off the rim:
Apply a strip of painter’s tape around the bottom edge of the pot, covering the bottom 1 to 1.5 inches. This will preserve the raw clay look at the base, creating a stylish dipped effect. -
Paint the background:
Using a flat paintbrush, coat the upper portion of the pot with your cream or off-white acrylic paint. -
Build coverage:
Let the first coat dry for about 15 minutes. Depending on the opacity of your paint, apply a second or even third coat until the terracotta color is completely hidden. -
Add texture (optional):
For a more authentic stone-like feel, you can lightly dab a barely-damp sea sponge with a tiny bit of darker beige paint over the wet cream base to add subtle dimension. -
Let it cure:
Allow the base coat to dry completely before starting the pattern work. This prevents the colors from muddying.
Uneven Edges?
If paint bled under the tape, wait for it to fully dry. Then, gently scrape the excess paint off the raw terracotta using a craft knife or fine sandpaper for a crisp line.
Step 2: Creating the Terrazzo Pattern
-
Plan your palette:
Select 4-5 contrasting colors for your flecks. Earthy tones like rust, mustard, sage green, and dark grey work beautifully for a natural look. -
Paint the first shape:
Dip your fine detail brush into your first color (e.g., rust orange). Paint small, irregular geometric shapes randomly around the pot—think triangles, trapezoids, and jagged blobs. -
Vary the sizes:
Make some shapes slightly larger and others tiny. I find that keeping them random rather than uniform makes the faux terrazzo look much more convincing. -
Rotate and repeat:
Turn the pot as you work to ensure even distribution. Switch to your next color (e.g., deep green) and fill in some of the empty spaces with new irregular shapes. -
Add bright accents:
Clean your brush and switch to a lighter accent color, like mustard yellow or light sage. Paint a few shapes near the previous ones, but try not to let them touch. -
Add the smallest details:
Finally, use your darkest color (like charcoal grey or black) to add tiny specks and dots. These act as the ‘aggregate’ in the stone mix and tie the look together. -
Refine the pattern:
Step back and look at the pot from a distance. If you see any large empty patches, fill them in with a small fleck of color to balance the composition. -
Remove the tape:
Once the paint is dry to the touch but not fully cured, carefully peel off the painter’s tape at the bottom to reveal the crisp line of raw clay.
Step 3: Planting and Styling
-
Seal the pot (optional):
If this pot will live outdoors, apply a clear acrylic sealer over the painted section to protect your artwork from moisture. -
Fill with soil:
Fill the pot about three-quarters full with a cactus-specific potting mix, ensuring good drainage. -
Plant the cactus:
Carefully place your small cactus into the center of the pot. Use tongs or a folded strip of paper to handle the cactus if it’s spiky. -
Top with gravel:
Finish by covering the exposed soil with a layer of small pea gravel or decorative stones. This not only looks polished but helps stabilize the plant.
Add Metallic Flair
Mix just a hint of gold or copper paint into your terrazzo pattern. A few metallic flecks will catch the light and make the pot look exceptionally high-end.
Now you have a trendy, custom planter ready to showcase your favorite succulent collection
Drip-Paint Minis for Instant Abstract Art
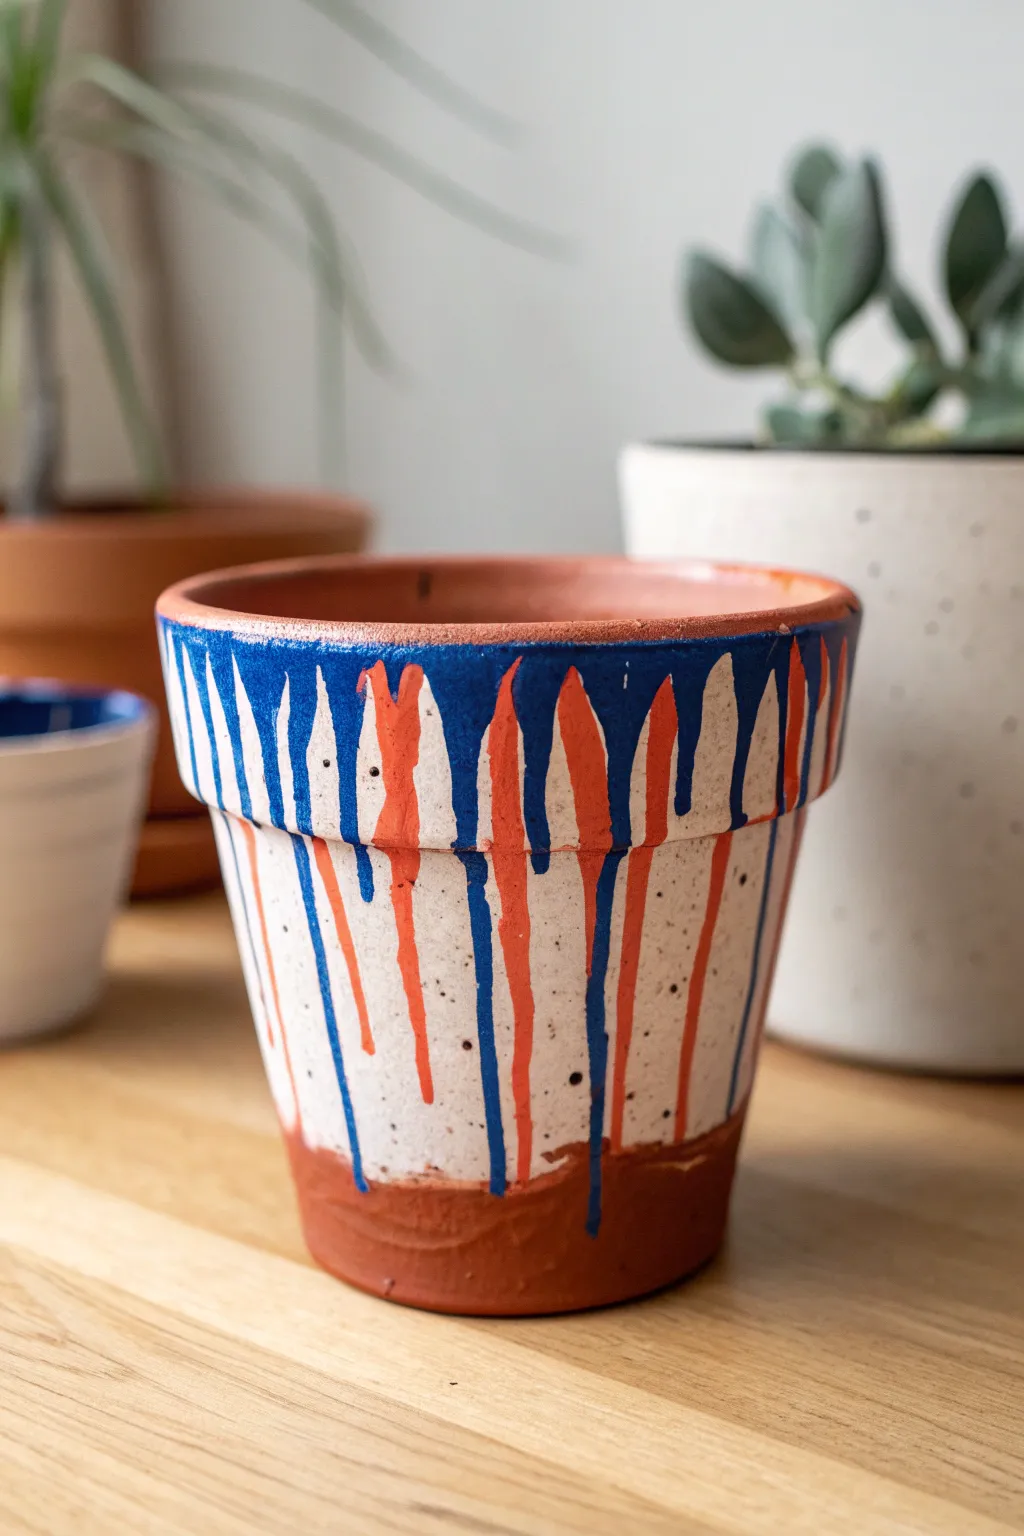
Transform a simple terracotta planter into a modern art piece with this striking drip technique. The bold contrast of royal blue and vibrant orange against a speckled white base creates a dynamic, stylized rain effect that instantly brightens up any plant styling.
Step-by-Step
Materials
- Mini terracotta pot (approx. 4-inch diameter)
- White acrylic paint (matte finish)
- Royal blue acrylic paint
- Bright orange acrylic paint
- Soft flat brush (medium size)
- Small round detail brush (size 1 or 2)
- Black acrylic paint (or fine tip permanent marker)
- Old toothbrush (optional for speckling)
- Paper plate or palette
- Painter’s tape
- Cup of water and paper towels
Step 1: Preparation and Base Coat
-
Clean surface:
Begin by wiping down your terracotta pot with a damp cloth to remove any dust or debris. Let it dry completely so the paint adheres properly. -
Tape the base:
Apply a strip of painter’s tape around the bottom edge of the pot, leaving about an inch of raw terracotta exposed at the base. Press the tape down firmly to seal the edge. -
Paint the background:
Using your flat brush, apply an even coat of white acrylic paint to the area above the tape, covering the rim and the main body. Don’t worry about perfect opacity yet; a slightly translucent look is fine. -
Add texture:
While the white is still wet, mix a tiny drop of brown or beige into a bit of white paint to create a slightly off-white, pottery-like tone. -
Create speckles:
Dip an old toothbrush into slightly watered-down black paint. Run your thumb across the bristles to flick tiny speckles onto the white section. Alternatively, use a very fine marker to dot the surface once dry. -
Dry thoroughly:
Allow this base layer to cure completely. This is crucial because we want crisp lines for the drip effect later.
Uneven Lines?
If your hand shakes while painting long drips, rest your pinky finger on the dry base of the pot for stability. A slightly faster brush stroke often creates a smoother line.
Step 2: Painting the Drips
-
Start the rim:
Load a medium round brush with royal blue paint. Paint the very top horizontal surface of the rim first to anchor your color. -
Create blue drips:
Instead of literally pouring paint, we will hand-paint the drips for control. Paint vertical stripes extending from the rim down the side of the pot. -
Vary the lengths:
Make some blue lines stop just below the rim, while extending others all the way down to the taped line. Taper the ends to a rounded point to mimic a natural drip. -
Add orange accents:
Repeat the process with bright orange paint, placing these drips in the gaps between the blue ones. I maintain a roughly even pattern—one orange drip between every one or two blue drips. -
Refine the shapes:
Go back with your small detail brush. If any drips look unmatched or shaky, smooth out the edges to ensure they look like liquid flowing downward. -
Check the rim edge:
Ensure the colors wrap slightly over the top lip of the pot for a finished look, connecting seamlessly to the vertical drips.
Step 3: Finishing Touches
-
Remove tape:
Once the paint is tacky but not fully hardened, carefully peel away the painter’s tape at the bottom to reveal the clean terracotta line. -
Touch up:
If any paint bled under the tape, use a damp Q-tip or a craft knife to gently scrape it away for a sharp edge. -
Seal (optional):
To protect your design from water damage during watering, apply a coat of matte clear acrylic sealer over the painted areas.
Go 3D
Mix your acrylic paint with a textile medium or a bit of baking soda. This thickens the paint, creating actual raised texture on the drips for a tactile effect.
Now your custom planter is ready to house your favorite succulents with a fresh pop of color
Metallic Accents and Gilded Edges
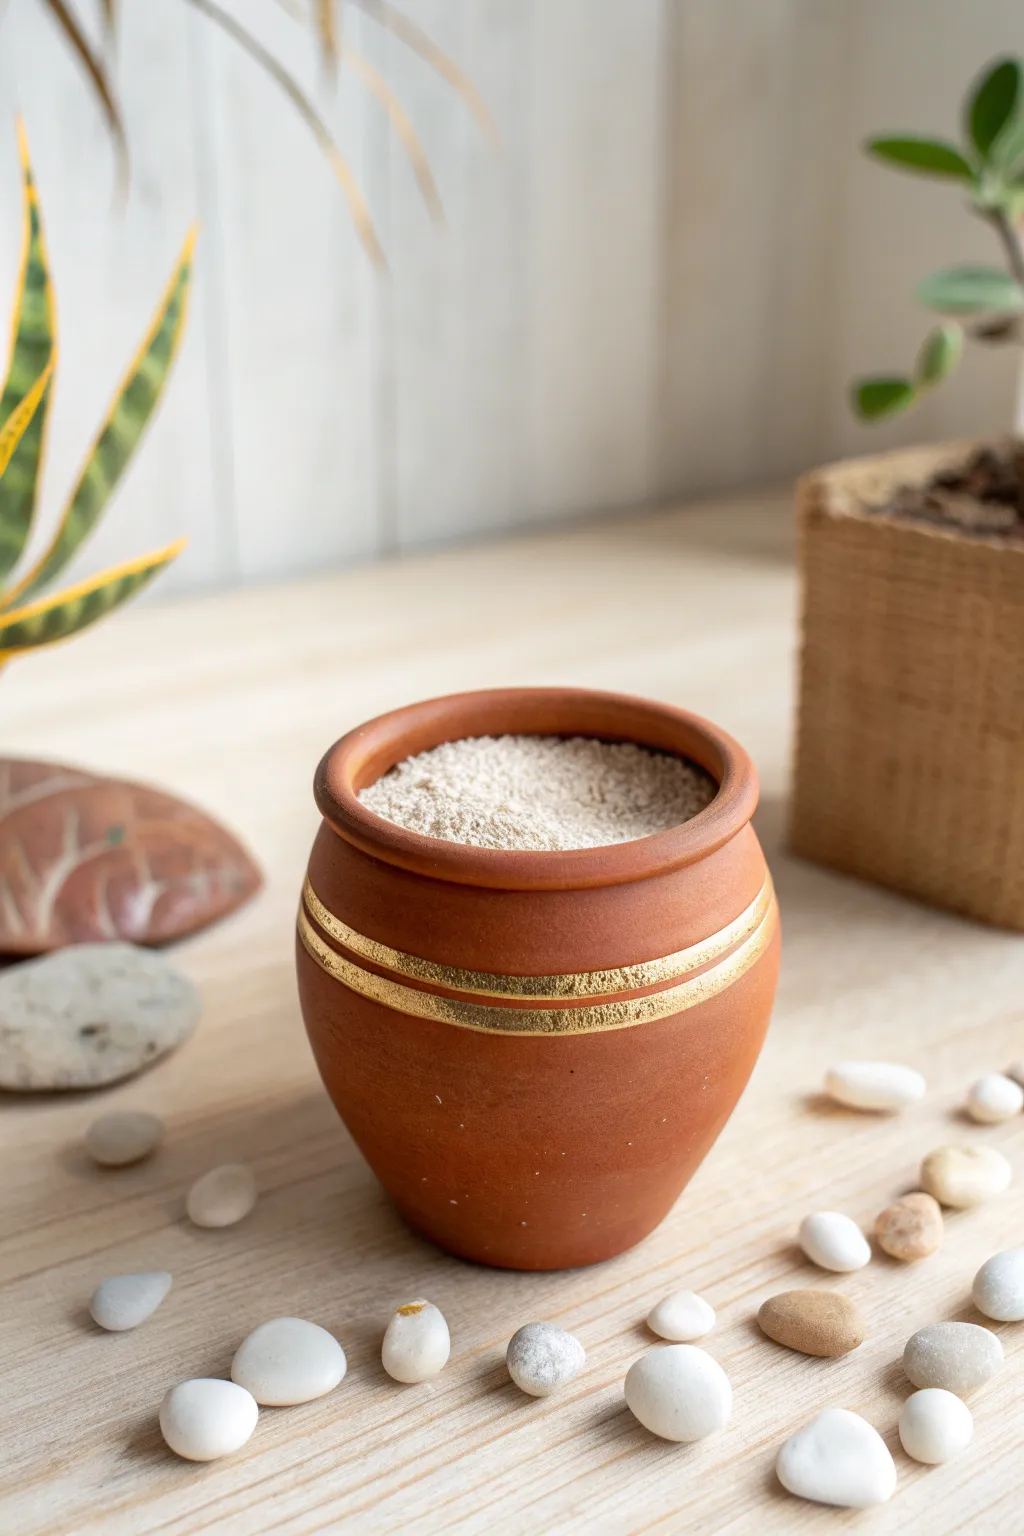
Elevate a standard terracotta vessel into a piece of minimalist decor with just a few stripes of shimmer. This project focuses on clean lines and rich metallic textures to create a sophisticated accent piece that looks beautiful holding succulents or decorative sand.
Step-by-Step Guide
Materials
- Small terracotta pot (cleaned and dried)
- Gold metallic acrylic paint or liquid gold leaf
- Painter’s tape or masking tape (narrow width works best)
- Small flat paintbrush
- Fine-grit sandpaper (optional)
- Clear matte sealer spray
- Ruler or measuring tape
- Pencil
Step 1: Preparation
-
Clean surface:
Begin by wiping down your terracotta pot with a damp cloth to remove any dust or manufacturing residue. Let it dry completely. -
Smooth the clay:
If your pot feels rough to the touch, lightly sand the exterior with fine-grit sandpaper. This ensures the tape adheres well and the paint goes on smoothly. -
Mark the bands:
Decide where you want your gold stripes to sit. Using a ruler, measure down from the rim and make small pencil tick marks around the circumference to guide your taping.
Step 2: Taping the Design
-
Apply the first tape line:
Place your painter’s tape around the pot, using your pencil marks as a guide. Press down firmly to seal the edge, which prevents paint from bleeding under. -
Create the gap:
To create the painted gold stripe, place a second piece of tape parallel to the first one, leaving a gap of about 1/4 to 1/2 inch depending on how thick you want the band. -
Repeat for second band:
Move lower down the pot and repeat the taping process to create the area for the second gold stripe. Ensure both gaps appear roughly equal in width for visual balance. -
Seal the edges:
Run your fingernail or a credit card edge along the tape lines one last time. Terracotta is porous, so a tight seal is crucial for crisp lines.
Bleeding Lines?
If paint bleeds under the tape, wait for it to dry. Then, gently scratch the excess away with a craft knife or use a tiny bit of sandpaper to erase the error.
Step 3: Gilding
-
Load the brush:
Dip your small flat brush into the gold metallic paint. Be generous but not dripping; you want good coverage without running. -
First coat application:
Paint the exposed clay between your tape lines. Use horizontal strokes that follow the curve of the pot. -
Texture check:
For the textured look seen in the photo, dab the wet paint slightly with the bristle ends rather than just smoothing it out. This catches the light better. -
Drying time:
Allow the first coat to dry for about 20 minutes. Metallic pigments often require a second layer to be truly opaque. -
Second coat:
Apply a second layer of gold paint. I like to be a bit thicker with this layer to enhance the metallic sheen. -
Remove tape:
While the second coat is still slightly tacky (not fully wet, but not rock hard), carefully peel away the painter’s tape at a 45-degree angle.
Pro Tip: Base Coat
For ultra-bright gold, paint a thin layer of yellow ochre or primer in the gap before applying the metallic paint. It makes the gold pop significantly more.
Step 4: Finishing Touches
-
Touch ups:
Inspect your lines. If any gold seeped under the tape, use a damp Q-tip or a craft knife to gently scrape away the excess paint while it’s fresh. -
Full cure:
Let the gold paint cure completely for at least an hour before handling the pot extensively. -
Sealing:
To protect the gold finish from tarnishing or chipping, spray a light coat of clear matte sealer over the painted areas. -
Fill and style:
Fill your new vessel with decorative white sand or small pebbles to contrast against the warm terracotta and bright gold.
Place your finished gilded pot in a spot with natural light to really show off those metallic bands
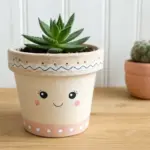
Tiny Animal-Face Mini Planters
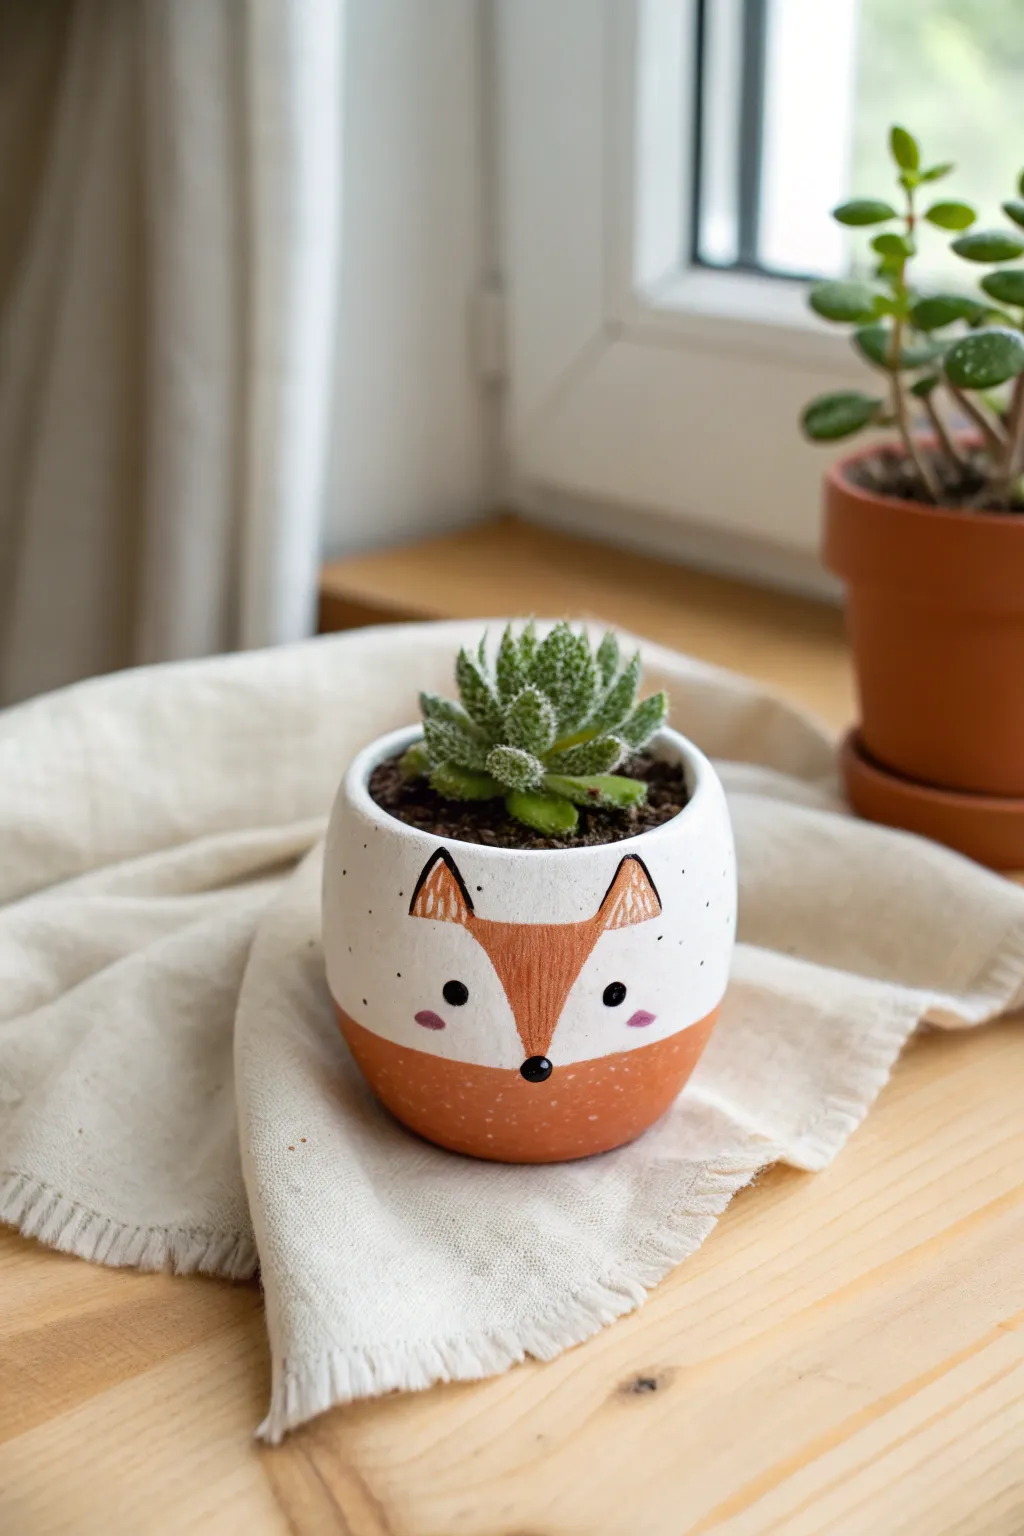
Transform a simple terracotta planter into an adorable woodland creature with just a few strokes of paint. This charming fox design relies on negative space and simple geometric shapes to create a sweet, modern look perfect for tiny succulents.
How-To Guide
Materials
- Small terracotta pot (2-3 inch diameter)
- White acrylic paint (matte finish)
- Terracotta or rust-orange acrylic paint
- Black acrylic paint or fine-tip paint marker
- Pink acrylic paint
- Small flat paintbrush
- Fine detail paintbrush (size 0 or 00)
- Pencil for sketching
- Matte spray sealer or Mod Podge
Step 1: Base Coat & Preparation
-
Clean the surface:
Before starting, wipe down your terracotta pot with a damp cloth to remove any pottery dust or oils, and let it dry completely so the paint adheres properly. -
Paint the top half white:
Using a small flat brush, paint the upper half of the pot white. Don’t worry about a perfectly straight bottom edge; just ensure the coverage is solid around the rim and down the sides. -
Apply a second coat:
Once the first layer is dry to the touch, apply a second coat of white to ensure the terracotta color doesn’t show through. Let this dry fully before moving on.
Step 2: Sketching the Fox Face
-
Mark the nose point:
Find the center of your pot’s front face. Lightly mark a small dot with your pencil where the white paint meets the unpainted terracotta section—this will be the nose. -
Draw the forehead V:
Sketch a wide ‘V’ shape starting from the nose dot and extending upwards and outwards toward the rim. This defines the white cheeks and the orange forehead. -
Outline the ears:
At the top of your ‘V’ lines, sketch two triangular ear shapes pointing upward.
Use a Paint Pen
Struggling with the thin ear outlines or the tiny freckles? Swap the brush for an ultra-fine tip black Posca marker for shaky-hand-proof precision.
Step 3: Painting the Orange Details
-
Paint the lower body:
Using the terracotta or rust-orange paint, fill in the bottom half of the pot. I like to carefully blend this edge up to meet the white paint for a seamless horizon line. -
Fill in the forehead:
Using the same orange shade and a smaller brush, carefully fill in the ‘V’ shape on the forehead, staying inside your pencil lines. -
Paint the outer ears:
Fill in the triangular ear shapes with orange, leaving the very inner centers unpainted if you want a lighter look, or paint them solid orange to detail later. -
Wait for drying:
Allow all the orange sections to dry completely. This is crucial to prevent smudging when adding the fine details next.
Create a Woodland Set
Don’t stop at a fox! Use the same color blocking technique with gray for a raccoon or brown for a bear to create a whole family of matching forest planters.
Step 4: Adding the Face & Finish
-
Detail the ears:
Switch to your fine detail brush. Use white paint (or leave space empty) to make small inner triangles inside the orange ears, then outline the main orange ear triangles with a very thin black line. -
Add the eyes:
Dip the handle end of a paintbrush into black paint to create two perfectly round dots for eyes on the white cheek area, spaced evenly apart. -
Create the nose:
Paint a small black dot or oval right at the point of the ‘V’ where the white and orange sections meet. -
Add blushing cheeks:
Mix a tiny bit of pink paint (or dilute red with white). Use a dry brush or your finger to lightly dab small oval blush spots underneath the eyes. -
Add freckles:
Using your finest brush or a black paint pen, tap three tiny dots on each cheek area near the outer edges for whiskers or freckles. -
Weather the bottom (optional):
To match the reference photo’s textured look, lightly sponge or dry-brush a tiny bit of white onto the bottom orange section to give it a speckled, organic feel. -
Seal the pot:
Once all paint is cured (wait a few hours), spray the entire pot with a matte sealer to protect the design from moisture when watering your plant.
Pop in a spiky succulent like the one shown to give your clever little fox a fun, green hairstyle
Cute Bug Pots Like Bees and Ladybugs
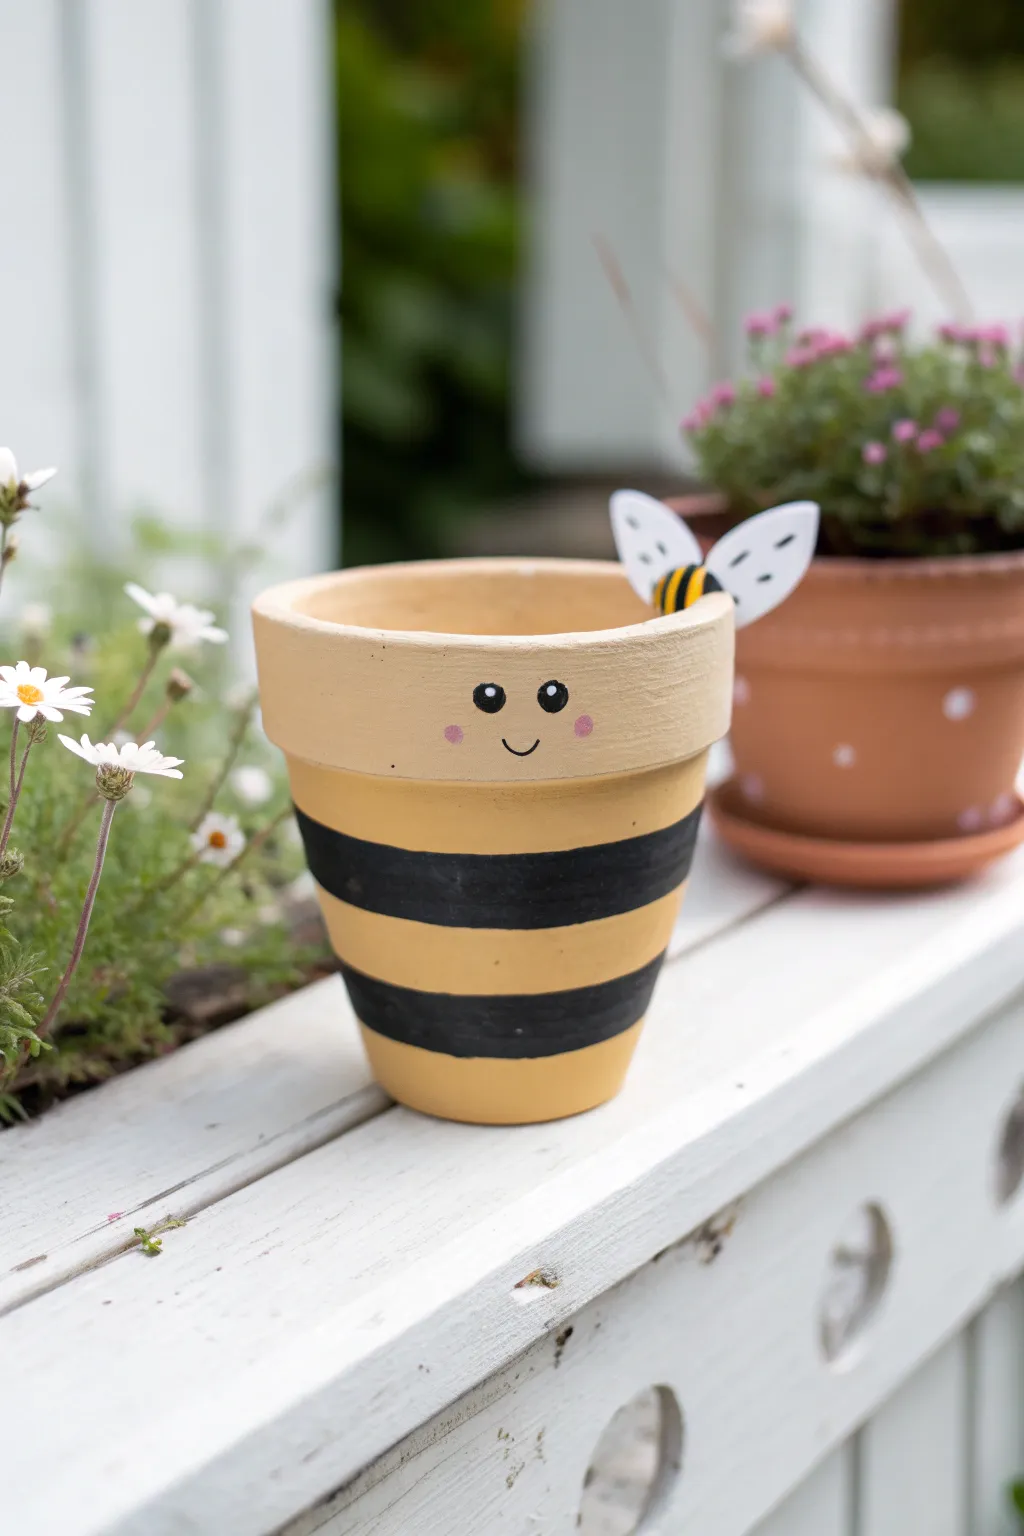
Transform a simple terracotta pot into an adorable garden friend with this cheerful bumblebee design. Featuring bold black stripes and a sweet smiling face, this project is perfect for brightening up any windowsill or patio space.
Step-by-Step Guide
Materials
- Mini terracotta pot (clean and dry)
- Yellow acrylic paint (bright, sunny shade)
- Black acrylic paint
- White acrylic paint
- Pink acrylic paint
- Flat paintbrushes (medium size)
- Fine detail paintbrush or toothpick
- White cardstock or craft foam
- Black fine-point permanent marker
- Hot glue gun or strong craft glue
- Scissors
- Sealer or outdoor varnish (optional)
Step 1: Base Painting
-
Prepare the pot:
Start with a clean, dry terracotta pot. Wipe away any dust with a damp cloth and let it dry completely to ensure the paint adheres well. -
Apply the yellow base:
Using a flat paintbrush, cover the entire exterior of the pot with bright yellow acrylic paint. Don’t forget to paint about an inch down inside the rim for a finished look. -
Let it dry:
Allow the first coat to dry fully. This usually takes about 15-20 minutes depending on your paint thickness. -
Add a second coat:
Apply a second layer of yellow paint to ensure the color is opaque and vibrant, covering any terracotta that might be showing through.
Clean Lines Hack
Use painter’s tape or masking tape to mark off the stripe areas before painting black. Peel the tape off while the paint is still slightly wet for crisp, sharp edges.
Step 2: Adding the Stripes
-
Plan your lines:
Visualise where the stripes will go. You’ll need two thick black bands on the lower half of the pot, below the rim. -
Paint the first stripe:
Using black paint and a steady hand, paint a thick horizontal stripe around the middle section of the pot’s body. -
Paint the second stripe:
Paint a second, identical black stripe near the bottom edge of the pot. Leave a band of yellow showing between the two black stripes. -
Touch up edges:
If your lines are a bit wobbly, wait for the black paint to dry completely, then use a small brush with yellow paint to straighten the edges.
Oops! Runny Paint?
If the black paint bleeds into the yellow, don’t panic. Let it dry completely, then paint over the mistake with the opaque yellow base coat to cover it up.
Step 3: Creating the Face
-
Position the face:
Locate a smooth spot on the upper rim of the pot—this will be the bee’s face area. -
Paint the eyes:
Dip the handle end of a paintbrush into black paint and dot two eyes onto the yellow rim. This creates perfectly round circles. -
Add eye highlights:
Once the black dots are dry, use a toothpick or a very fine brush to add a tiny white dot in the upper corner of each eye for a sparkling effect. -
Draw the smile:
Using a fine detail brush with black paint or a black permanent marker, draw a small, simple ‘U’ shape between the eyes for a smile. -
Add rosy cheeks:
Dip a cotton swab or a small brush handle into pink paint and gently stamp a small dot on either side of the smile.
Step 4: Finishing Touches
-
Create the wings:
Cut two small teardrop or oval shapes out of white cardstock or craft foam to serve as wings. -
Decorate the wings:
Use a black marker to draw small dashes or veins on the wings to give them a bit of cartoonish texture. -
Attach the wings:
Glue the wings onto the back rim of the pot using hot glue, positioning them so they stick out at jaunty angles. -
Add a mini bee (optional):
For extra flair, glue a tiny wooden or plastic bee embellishment onto the rim near the wings, just like in the inspiration photo. -
Seal the pot:
If you plan to keep this pot outdoors, apply a clear acrylic sealer over the painted areas to protect your hard work from the elements.
Now your buzzing little planter is ready to hold a tiny succulent or flower
Mushroom Mini Pots for Fairy Gardens
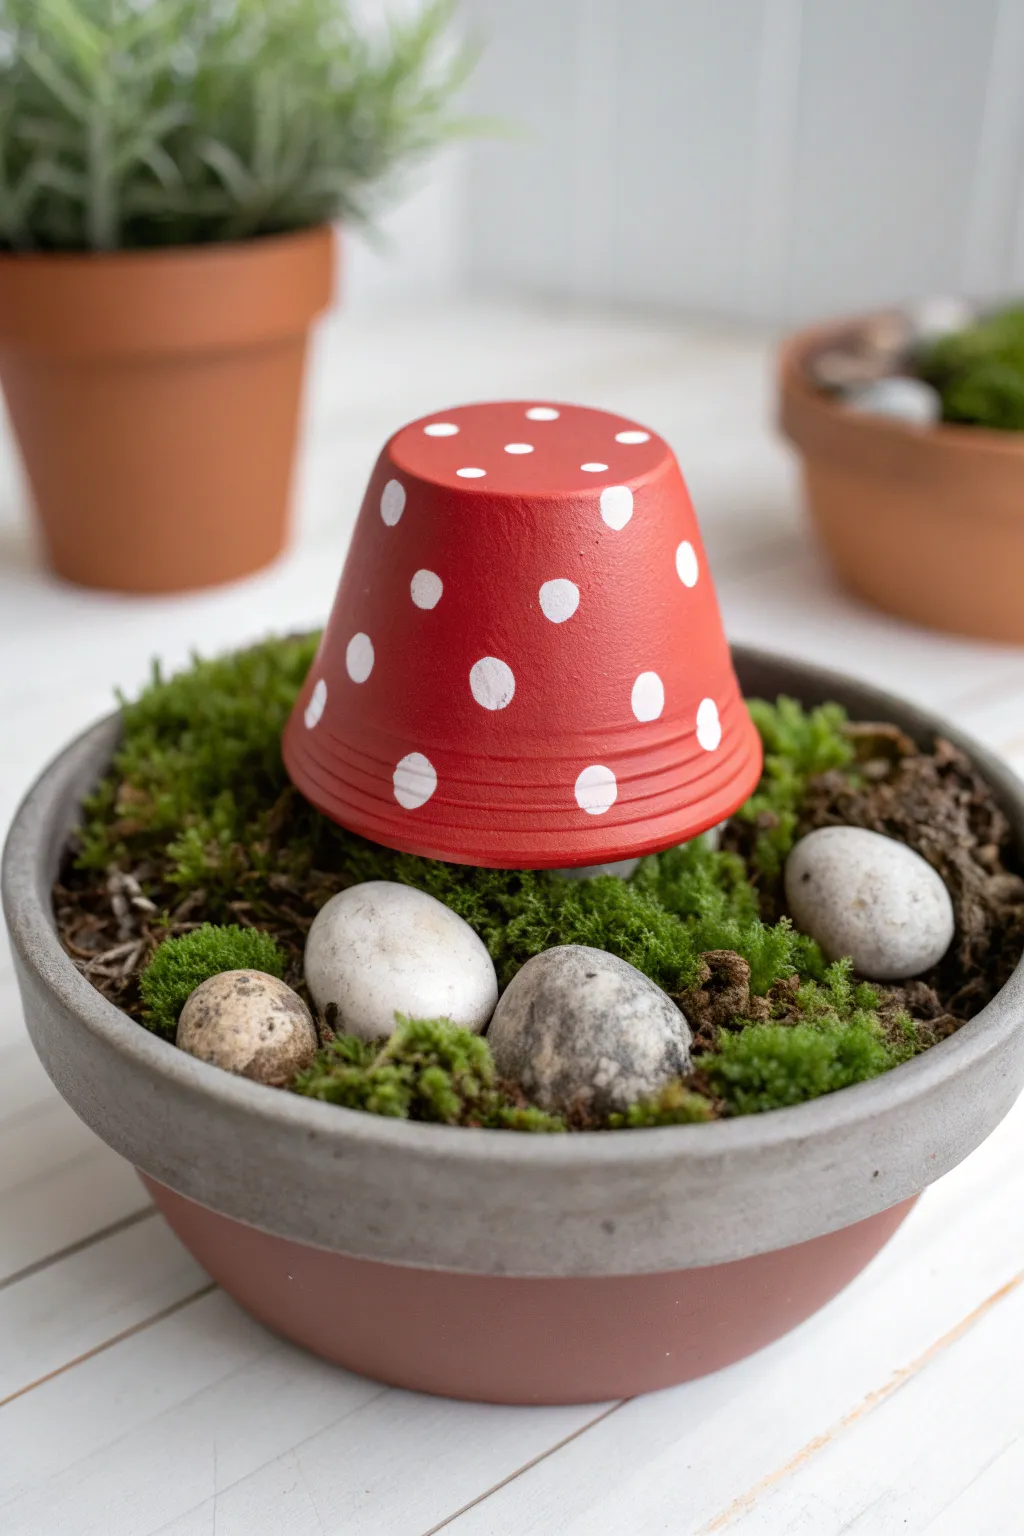
Transform a simple terracotta pot into a charming mushroom that looks right at home nestled in some moss. This delightful toadstool adds a pop of fairytale color to any miniature garden arrangement.
Detailed Instructions
Materials
- Small terracotta pot (approx 2-3 inches)
- Wide, shallow terracotta saucer or bowl
- Smaller terracotta pot (for the stem, optional)
- Red acrylic craft paint (bright tomato red)
- White acrylic craft paint
- Medium flat paintbrush
- Small round paintbrush or pouncer sponge
- Clear matte or satin sealant spray
- Sheet moss (preserved or fresh)
- Small river stones or white decorative pebbles
- Hot glue gun and glue sticks
- Potting soil
Step 1: Painting the Cap
-
Clean surface:
Begin by wiping down your small terracotta pot with a damp cloth to remove any dust or manufacturing residue. Let it dry completely so the paint adheres properly. -
Base coat:
Turn the pot upside down. Using your flat brush, apply a generous coat of bright red acrylic paint to the entire exterior surface, including the rim. -
Second layer:
Once the first coat is dry to the touch, apply a second layer of red paint. Terracotta is porous and tends to soak up paint, so this ensures a solid, opaque finish. -
Drying time:
Allow the red base to dry fully. This usually takes about 20-30 minutes depending on humidity. You don’t want wet red paint mixing with your white dots.
Perfect Polka Dots
For perfectly round, uniform dots every time, dip the eraser end of a standard pencil into white paint and stamp it onto the pot.
Step 2: Adding the Details
-
Dot placement:
Dip a small round brush or a pouncer into white acrylic paint. Press gently onto the red surface to create your first dot near the top center. -
Create pattern:
Here I prefer to work in a triangular pattern, adding dots randomly but evenly spaced around the pot. Vary the pressure slightly if you want the dots to have different sizes. -
Rim details:
Add a few half-dots along the bottom rim (which is actually the top lip of the pot) to make the pattern look like it wraps underneath. -
Correcting mistakes:
If a dot smears, wait for it to dry, paint over it with a dab of red, and try again. Acrylics are very forgiving that way. -
Sealing:
Take the project outside or to a well-ventilated area. Spray the painted pot with a clear matte or satin sealant to protect the paint from moisture.
Step 3: Assembling the Scene
-
Prepare the base:
Fill your wide shallow saucer or bowl with potting soil, leaving about half an inch of space from the rim. -
Create the stem:
Place a smaller pot upside down in the center of the soil to act as a stem, or simply mound the soil slightly where the cap will sit if you want a shorter mushroom. -
Secure the cap:
Place your painted red pot upside down onto the stem or soil mound. If using a stem pot, a dab of hot glue on its bottom (now top) can keep the cap secure. -
Add greenery:
Tuck pieces of sheet moss around the base of the mushroom, covering the soil completely. Press it down gently so it stays in place. -
Stone accents:
Select three or four smooth river stones or white pebbles. Nest them into the moss around the mushroom base to add texture and visual interest. -
Final touch:
Brush away any loose soil crumbs from the painted cap or the rim of the base bowl for a clean, finished look.
Glow Up Idea
Paint the inside of the mushroom cap with glow-in-the-dark paint, then prop it up slightly higher to create a magical glowing reflection at night.
Now you have an adorable forest floor scene that brings a touch of magic to your home decor