
Whenever I need a quick creative win, I reach for air-dry clay and make something tiny enough to fit in my palm. These miniature air-dry clay ideas are cute, beginner-friendly, and basically impossible to make just one of.
Mini Donuts and Pastry Charms
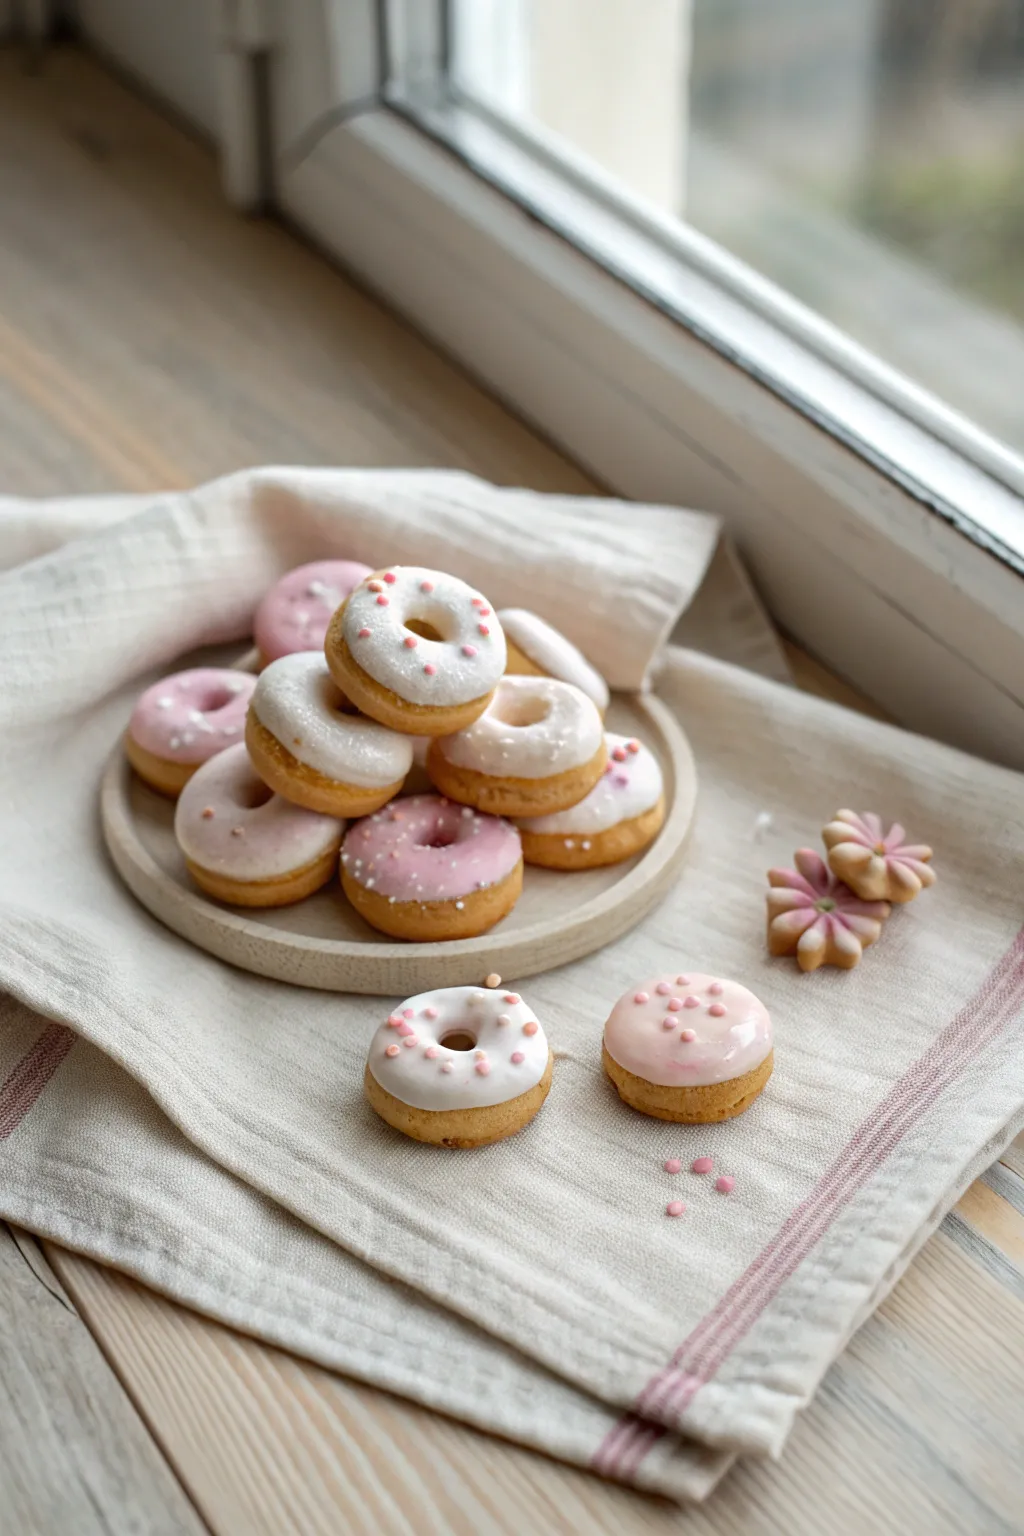
These adorable miniature donuts and flower cookies look good enough to eat but are actually made from long-lasting air dry clay. With their realistic golden-brown dough and glossy pastel icing, they make perfect charms for jewelry or dollhouse displays.
Detailed Instructions
Materials
- Air dry clay (white or translucent)
- Acrylic paints (ochre, burnt sienna, white, pink)
- Glossy varnish or UV resin
- Small round piping tip or a straw
- Fine-grit sandpaper
- Dotting tool or toothpick
- Soft pastel chalks (browns and oranges)
- Soft makeup brush
- Old toothbrush
Step 1: Shaping the Dough Base
-
Tint the clay:
Start by mixing a very small amount of ochre or yellow ochre acrylic paint into your white air dry clay. You want a pale, raw dough color, so add the paint gradually until you reach a creamy beige. -
Form the rounds:
Pinch off pea-sized balls of clay for the donuts. Roll them between your palms until they are perfectly smooth spheres, then gently flatten them slightly into thick discs. -
Create the hole:
Use the back end of a small paintbrush or a dedicated clay tool to poke a hole through the center of each disc. Wiggle the tool slightly to widen the hole, smoothing the edges with your finger so they look baked, not sharp. -
Add texture:
To mimic the texture of fried dough, take an old toothbrush and gently tap it all over the surface of the donuts. Avoid the very center ring where the ‘fried’ line usually sits. -
Shape the cookies:
For the flower cookies, rollout a small slab of the same dough-colored clay. Use a miniature flower cutter or shape five petals by hand, pressing them together at the center. -
Indent the cookies:
Using a knife tool, press a line down the center of each petal to give it dimension, similar to a piped star cookie.
Realistic Sprinkles
For the uttermost realism, chop up cured polymer clay scraps or dried air dry clay ‘snakes’ with a razor blade to create custom colored sprinkles that won’t bleed.
Step 2: Baking Effect
-
First shading layer:
Once the clay is semi-dry, use a soft makeup brush to dust yellow ochre pastel chalk over the donuts. Focus on the top and bottom, leaving a lighter line around the middle circumference. -
Deepen the golden tone:
Layer a burnt sienna or light brown pastel over the ochre. Apply this more heavily on the edges and textured areas to simulate a well-baked crust. -
Cookie shading:
Dust the tips of the flower cookie petals with the brown pastel, leaving the centers lighter to accentuate the shape.
Step 3: Icing and Decorating
-
Mix the icing:
Create your icing mixture by combining liquid clay (or mixing your air dry clay with water until it’s a thick paste) with white acrylic paint. Divide this batch and tint one half with a drop of pink paint. -
Apply the glaze:
Using a toothpick or small tool, carefully spread the thick ‘icing’ onto the top half of the donuts. Allow it to drip naturally down the sides in a few spots, but don’t cover the ‘fried’ line completely. -
Add translucent detail:
I like to mix a tiny bit of clear gloss medium into the icing mix for the white donuts; this makes the glaze look sugary and slightly shear rather than opaque plastic. -
Sprinkle placement:
While the icing is still wet, you have two options for sprinkles: roll tiny snakes of pink clay and cut them into bits, or use micro-beads. Place them individually using a needle tool for precision. -
Flower centers:
For the cookies, drop a tiny bead of pink icing into the center of the flower shapes and add a dot of white in the very middle. -
Final drying:
Let the icing dry completely, which usually takes several hours depending on the thickness. -
Glazing:
Finish by applying a coat of high-gloss varnish or UV resin specifically over the icing parts to make them look wet and sticky. Leave the dough areas matte for realistic contrast.
Sticky Textures
If your brush leaves streaks in the icing, switch to a toothpick. Use a circular motion to float the mixture over the donut for a self-leveling, smooth finish.
Now you have a batch of guilt-free sweets ready to display or turn into charming jewelry pieces


Tiny Sushi and Bento Bites
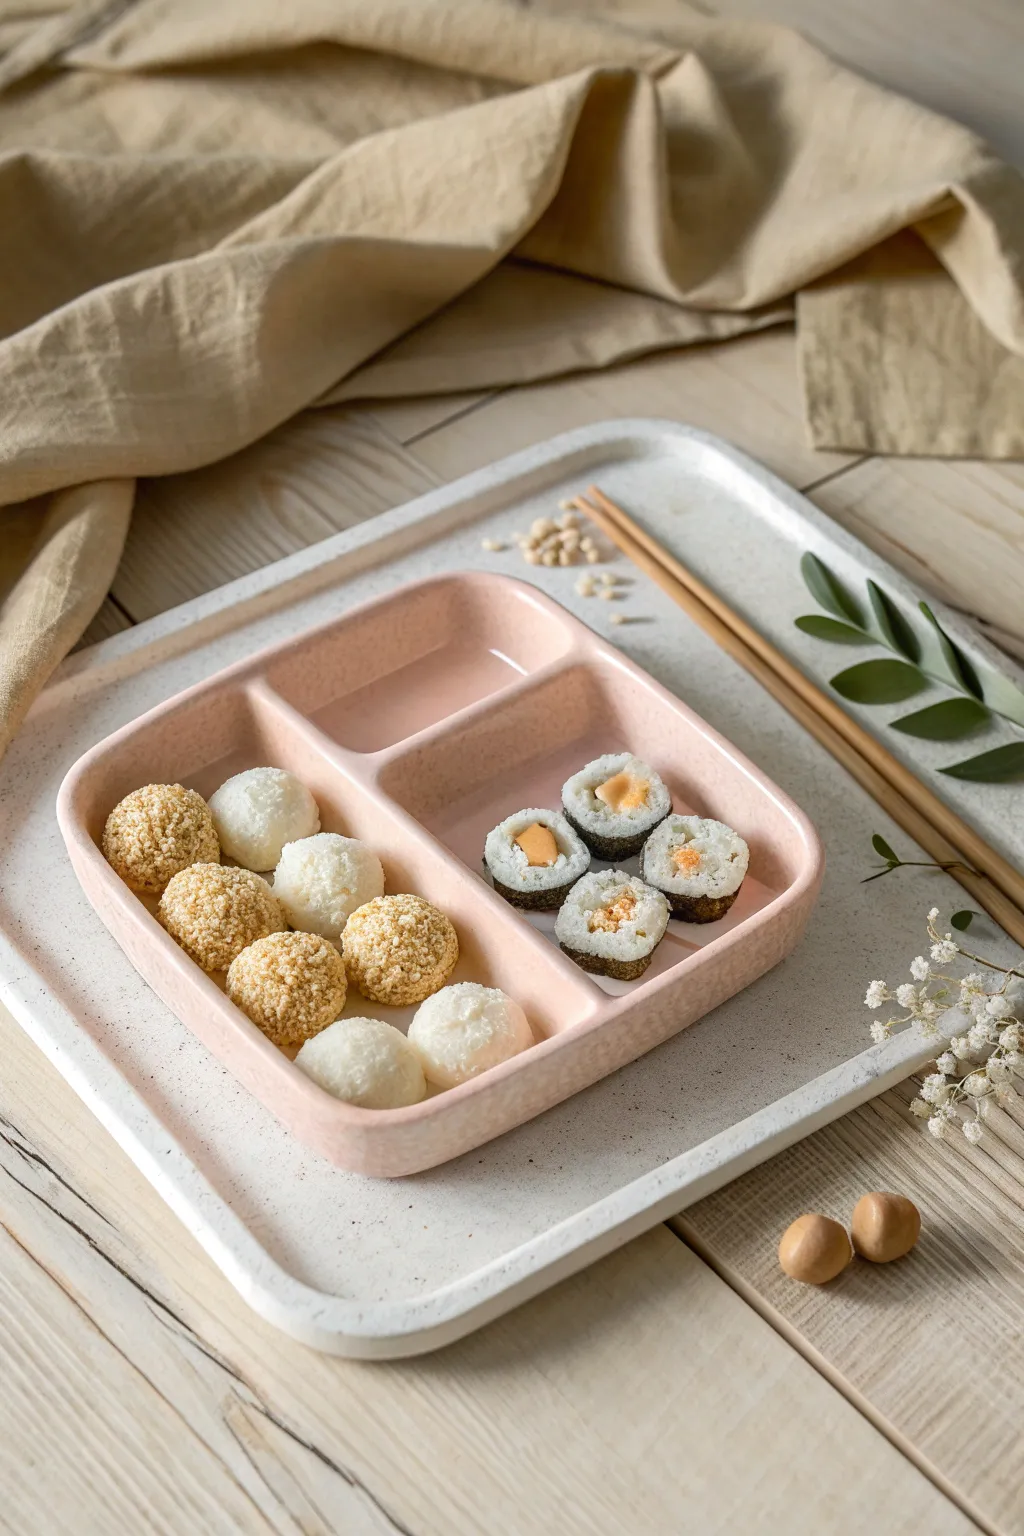
Craft a darling lunchtime scene with this miniature pink bento box filled with tiny sushi rolls and textured sesame balls. The soft pastel colors and realistic textures make this air dry clay project a feast for the eyes.
Step-by-Step Tutorial
Materials
- Air dry clay (white)
- Acrylic paints (pastel pink, tan/beige, orange, black, green)
- Fine-grit sandpaper or a texture tool (sponge/toothbrush)
- Rolling pin
- Craft knife or clay blade
- Needle tool or toothpick
- Gloss varnish (optional)
- Matte varnish
- Tiny seed beads (optional for sesame seeds)
- Wooden skewer or toothpicks (for chopsticks)
Step 1: Sculpting the Bento Tray
-
Mix the color:
Knead a very small amount of pastel pink acrylic paint into a ball of white air dry clay until the color is uniform and streak-free. -
Shape the base:
Roll the pink clay out into a thick slab, roughly 1/4 inch thick. Cut it into a rounded square shape, smoothing the edges with a bit of water on your finger. -
Create the compartments:
Using a clay tool or the back of a knife, gently press indentations to mark where the walls will go. Roll thin snakes of pink clay and attach them to form the dividers, blending the seams seamlessly into the base and outer walls. -
Refine the shape:
Once the basic box structure is formed, use a flat tool to straighten the inner walls and smooth the bottom of each compartment. Let this dry completely before filling.
Step 2: Creating the Sushi Rolls
-
Make the rice:
Take fresh white clay and texture it by poking it repeatedly with a coarse brush or a balled-up piece of foil to mimic individual rice grains. -
Form the fillings:
Mix tiny bits of clay with orange paint (for salmon) or yellow-orange (for egg/tamago). Roll these into very thin, short snakes. -
Assemble the roll:
Wrap the textured white ‘rice’ clay around the colored filling snakes. Roll the entire cylinder gently on your work surface to tighten the shape. -
Add the nori:
Roll out a paper-thin sheet of clay colored with black paint. Wrap this around the outside of your rice cylinder, trimming any excess for a clean seam. -
Slice the sushi:
Let the roll firm up slightly (about 15 minutes) so it doesn’t squish, then use your sharpest blade to slice it into four small sushi segments. -
Texture the cut surface:
After slicing, I like to go back in with a needle tool to re-texture the white rice areas on the cut faces, ensuring they look fluffy rather than smeared.
Uneven Walls?
If your bento box walls are warping, build them around a rectangular block of wood or a small square cutter. Remove the support only after the clay has begun to stiffen.
Step 3: Crafting the Sesame Balls
-
Roll the centers:
create several small spheres using plain white clay. Keep them uniform in size. -
Coat the tan balls:
For the sesame-covered treats, mix a light tan clay. Roll the white spheres in a thin layer of this tan clay, or simply paint them later. -
Add sesame texture:
To mimic the sesame seed coating, prick the surface of the tan balls repeatedly with a needle tool, or roll the damp clay balls in real sand or tiny beads for authentic texture. -
Create the coconut mochi:
For the white balls, stipple the surface aggressively with a stiff toothbrush to create a fluffy, coconut-flake appearance.
Realistic Speckles
To get the stone look on the large white tray, use an old toothbrush to flick tiny droplets of watered-down grey or brown paint onto the dry surface.
Step 4: Finishing Touches
-
Arrange the food:
Once the food items are dry, glue the sushi rolls into the larger bento compartment and stack the sesame and coconut balls in the other section. -
Make chopsticks:
Sand a toothpick or wooden skewer down until it is very thin and tapered. Cut it to scale length and stain it with watered-down brown paint. -
Sculpt the large tray:
Roll a larger slab of white clay with high sides to act as the serving tray. Sponge the surface while wet to give it a speckled, stone-like texture. -
Seal the piece:
Apply a matte varnish to the bento box and the sesame balls. Use a tiny dot of gloss varnish on the ‘salmon’ or ‘egg’ centers of the sushi to make them look moist.
Display your tiny culinary masterpiece on a shelf or adhere a magnet to the back for a cute fridge decoration


Mini Pizza Slice Magnets
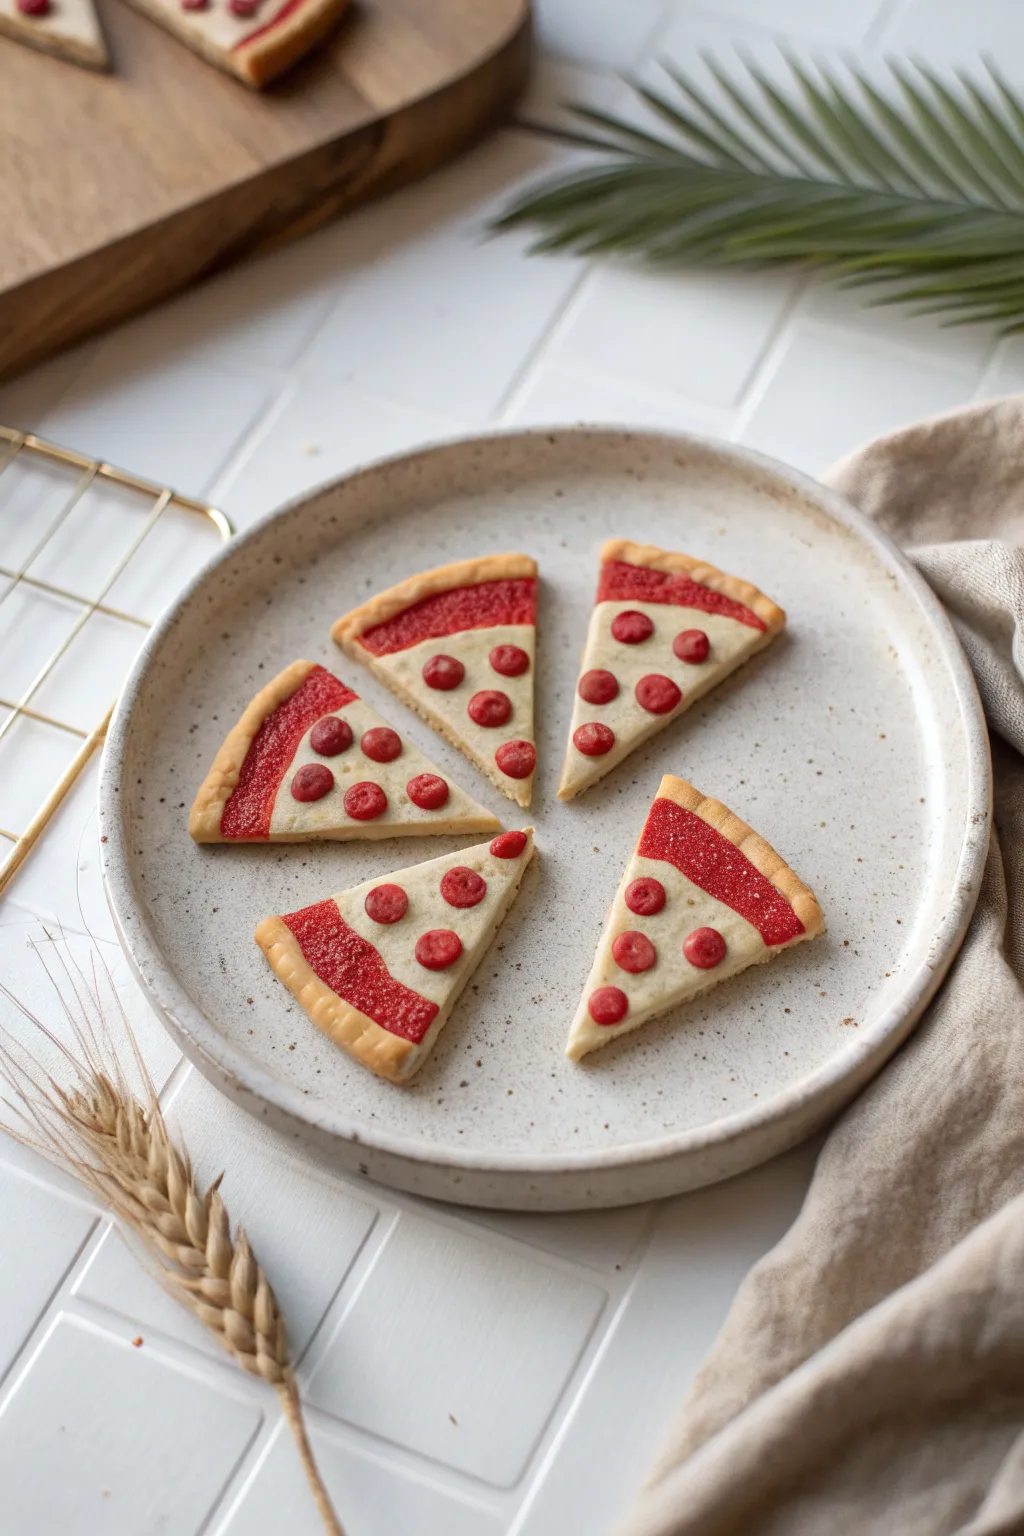
These adorable pizza slices look good enough to eat but are actually clever air dry clay creations! With a realistic crust texture and tiny pepperoni details, they make perfect whimsical magnets for your fridge.
Step-by-Step
Materials
- White air dry clay
- Acrylic paints: Straw yellow, ochre, bright red, deep maroon
- Rolling pin
- Craft knife or clay blade
- Toothbrush or balls of tin foil (for texturing)
- Small round piping tip or straw (for pepperoni cutting)
- Fine detail paintbrush
- Mod Podge or gloss varnish
- Small round craft magnets
- Strong craft glue (E6000 or similar)
Step 1: Shaping the Dough
-
Mix your dough color:
Before sculpting, tint a lump of white air dry clay with a very small amount of straw yellow and ochre acrylic paint. Knead it thoroughly until the color is uniform—you want a pale, unbaked dough color. -
Roll it out:
Roll your tinted clay out on a smooth surface until it is about 1/4 inch thick. Aim for an even thickness so all your slices match. -
Create texture:
To mimic the porous look of baked dough or a sugar cookie, gently press a clean toothbrush or a crumpled ball of aluminum foil over the entire surface of the clay slab. -
Cut the slices:
Using a craft knife, cut perfect triangles out of your textured slab. You can make a paper template first if you want them all identical. -
Form the crust:
Roll a very thin snake of clay from your remaining tinted mixture. Press this strip along the top edge of each triangle to form the raised pizza crust. -
Secure the crust:
Blend the underside of the crust snake onto the back of the slice so it doesn’t fall off, then re-texture the top of the crust with your toothbrush to match the rest of the slice.
Step 2: Adding Toppings
-
Make the pepperoni:
Take a small amount of clay and mix in bright red paint. Roll it out very thinly. -
Cut the circles:
Use a small round cutter, like the tip of a piping bag or a straw, to punch out tiny pepperoni circles. -
Placement:
Press 3-4 pepperoni slices onto each pizza wedge. Press them down firmly so they adhere to the ‘cheese’ layer without falling off later. -
Drying:
Let your pizza slices dry completely on a wire rack. This usually takes 24-48 hours depending on humidity; flip them occasionally to prevent warping.
Uneven Drying?
If your pizza slices start curling up as they dry, place a lightweight book on top of them (with wax paper in between) after about 2 hours of drying time to keep them flat.
Step 3: Painting & Finishing
-
Base shading:
Once dry, use a dry brush with a tiny bit of ochre paint to lightly dust the edges of the crust. This gives it a ‘baked’ appearance. -
Painting the sauce:
Mix bright red with a touch of maroon. Carefully paint the triangular area just below the crust, leaving a border of ‘cheese’ exposed. This represents the sauce peeking out. -
Pepperoni details:
For extra realism, dab a slightly darker red shade on the center of each pepperoni slice to give them depth. -
Sugary texture (optional):
If recreating the cookie look exactly, you can tap a tiny bit of textured medium or sand mixed with red paint onto the sauce area to resemble red sugar sprinkles. -
Sealing:
Seal the entire piece with a matte varnish for a natural look, or use gloss varnish just on the pepperoni and sauce for a greasy, delicious shine. -
Magnet assembly:
Flip the slice over and glue a small round magnet to the back using strong craft glue. Let it set for at least an hour before sticking it to your fridge.
Spicy Variation
For a ‘supreme’ pizza look, use tiny bits of chopped green rubber bands or green dried clay crumbs to simulate green peppers sprinkled on top.
Now you have a whole pie’s worth of cute magnets to organize your fridge photos


Kawaii Fruit and Citrus Slices
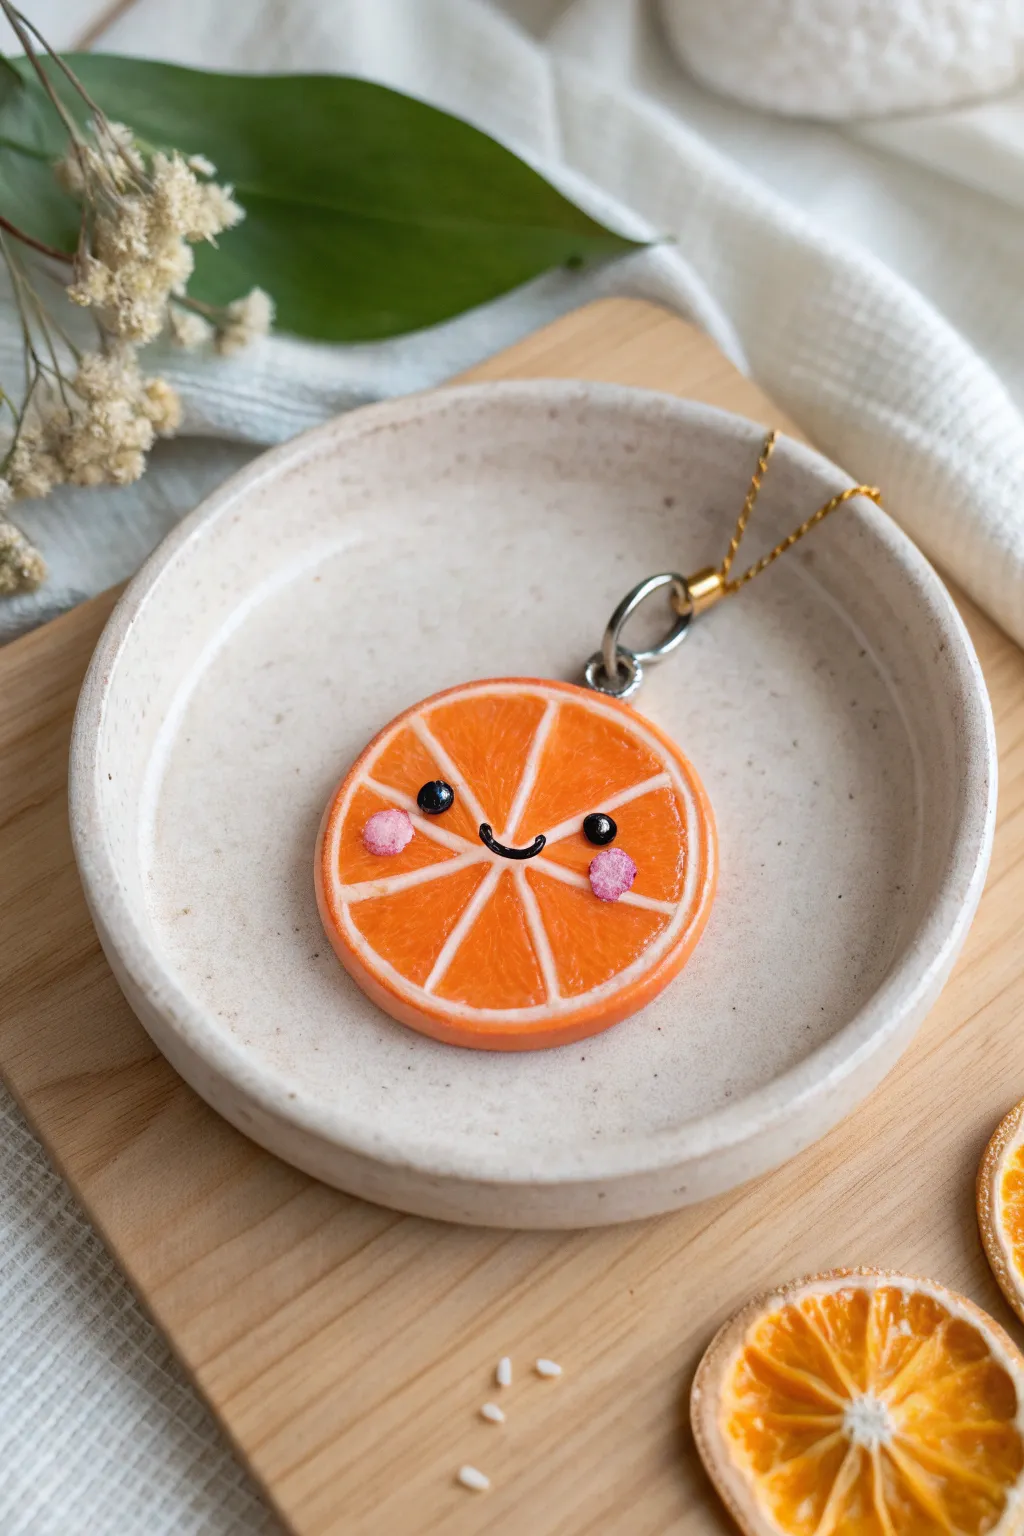
Brighten up your accessories with this adorable citrus friend that looks good enough to squeeze. This project captures the translucent juiciness of an orange slice and adds a sweet, blushing face for extra charm.
Step-by-Step Tutorial
Materials
- Translucent or transparent air dry clay (or polymer clay)
- Opaque white air dry clay
- Orange acrylic paint or alcohol ink
- Black acrylic paint
- Pink soft pastel chalk
- High-gloss varnish or UV resin
- Clay roller or pasta machine
- Needle tool or toothpick
- Round cutter (approx. 1.5 inch diameter)
- Small paintbrush
- Dotting tool or ball stylus
- Jump ring and phone strap loop
- Super glue (optional)
Step 1: Creating the Citrus Canes
-
Tint the clay:
Start by mixing a vibrant orange color into your translucent clay base. You want a saturated, juicy orange hue. Keep a smaller portion of white clay separate for the pith. -
Form the segments:
Roll your orange clay into a thick log, about 1 inch in diameter. Shape it into a teardrop or triangular prism shape by pinching one side along the length. This will form the individual fruit segments. -
Wrap the segments:
Roll out a very thin sheet of white clay. Wrap this sheet around your orange triangular log. This white layer represents the thin membrane between the fruit segments. -
Assemble the wheel:
Cut your triangular log into 8 equal lengths. Arrange them in a circle with the pointy ends meeting in the center to form a wheel shape. Press them gently together so the white membranes touch. -
Add the rind:
Roll out a thicker sheet of white clay and wrap it around the entire circle to create the inner pith. Follow this with a final, slightly thinner layer of orange clay wrapped around the outside to act as the skin.
Step 2: Slicing and Texturing
-
Reduce the cane:
Gently squeeze and roll your large cylinder to reduce its diameter to your desired size (around 1.5 inches). Be patient to avoid distorting the internal pattern. -
Slice the charm:
Use a sharp blade to slice a coin-shaped piece from your cane, about 4-5mm thick. If the shape warps during cutting, gently reshape it into a perfect circle. -
Texture the fruit:
Take a needle tool and gently rough up the orange segments. Poke and drag tiny lines radiating from the center to mimic the fibrous texture of real citrus pulp. -
Create the hanger hole:
While the clay is still wet, insert a screw eye pin into the top of the rind, or use a straw to punch a small hole for a jump ring later.
Juicy Texture Trick
Before texturing, brush a tiny amount of baby oil or water over the orange segments. This softens the top layer, making it much easier to create realistic pulp lines with your needle tool.
Step 3: The Kawaii Face
-
Dry the base:
Allow your orange slice to dry completely according to package instructions. This usually takes 24-48 hours for air dry clay. -
Paint the smile:
Using a very fine detail brush and black acrylic paint, draw a small, U-shaped mouth in the center of the slice, bridging across the central segments. -
Add the eyes:
Dip a dotting tool or the round end of a paintbrush handle into black paint. Stamp two wide-set eyes on either side of the mouth. -
Apply blush:
Scrape a little pink soft pastel into a powder. Use a dry brush or cotton swab to gently dab rosy cheeks just below the eyes. I find this creates a softer, cuter look than paint. -
Highlight the eyes:
Once the black paint is dry, use a toothpick to add a tiny white dot in the upper corner of each eye for that sparkling life-like effect.
Level Up: Glitter Zest
Mix extremely fine iridescent glitter into the orange clay used for the outer rind or the segments. It gives the charm a magical, sugary finish like a candied fruit slice.
Step 4: Finishing Touches
-
Seal with gloss:
Coat the entire front and back with a thick layer of high-gloss varnish or UV resin. This is crucial—it makes the translucent clay look juicy and protects the painted face. -
Attach hardware:
Open a sturdy jump ring with pliers and loop it through the eye pin or hole you made earlier. Attach your lanyard strap and close the ring securely.
Now you have a refreshing citrus companion to dangle from your phone or bag

What Really Happens Inside the Kiln
Learn how time and temperature work together inside the kiln to transform clay into durable ceramic.
Mini Ice Cream Cones and Pops
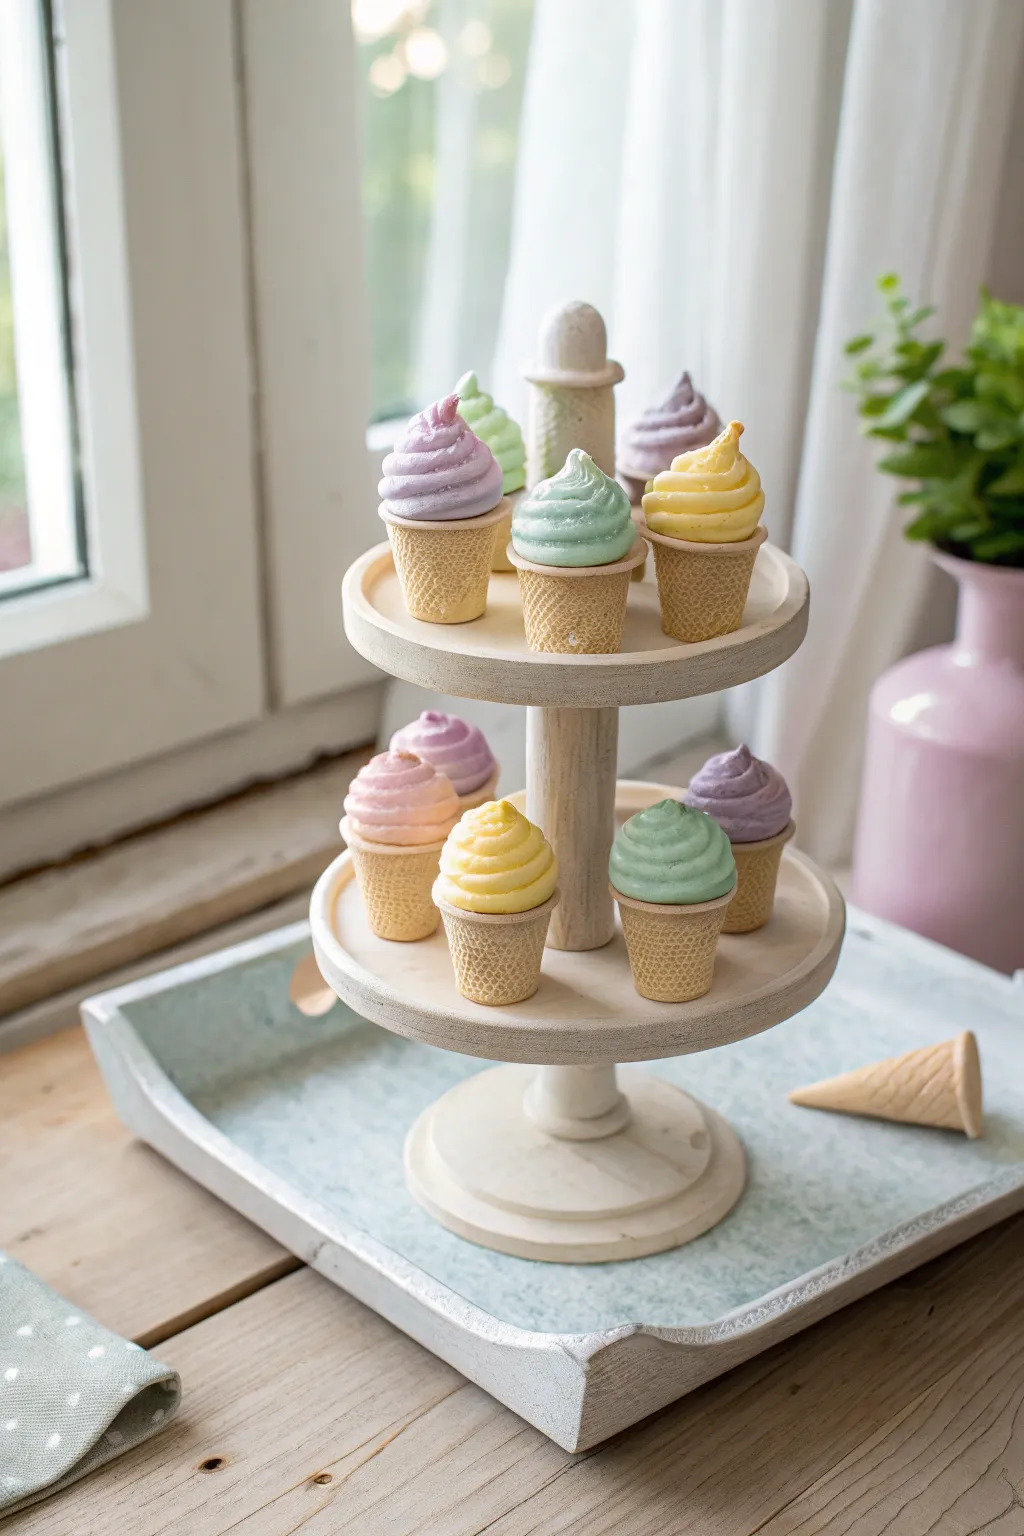
These delightful miniature ice cream cones capture the sweetness of summer in soft pastel shades, displayed charmingly on a wooden stand. The realistic waffle texture and perfectly piped swirls make them an irresistible addition to any dollhouse kitchen or miniature collection.
Detailed Instructions
Materials
- Air dry clay (white)
- Acrylic paints (pastels: pink, purple, yellow, mint green, and a biscuit/tan color)
- Miniature wooden tiered stand (unfinished)
- Mold for waffle cone texture (or a fine mesh strainer)
- Small piping bag with a tiny star tip (or a clay extruder)
- Clay sculpting tools (needle tool, ball tool)
- White craft glue
- Rolling pin
- Sandpaper (fine grit)
- Soft paintbrush
- Matte varnish or sealant
Step 1: Crafting the Waffle Cones
-
Color the clay:
Start by mixing a small amount of biscuit or tan acrylic paint into a ball of white air dry clay. Knead it thoroughly until the color is uniform and resembles a baked waffle cone. -
Roll it out:
Roll the tan clay into a thin, varying sheet. It needs to be thin enough to look realistic but sturdy enough to hold its shape. -
Create texture:
Press a waffle texture mold firmly onto the clay sheet. If you don’t have a specific mold, pressing a piece of fine mesh net or a clean strainer gently onto the surface works wonders to mimic the grid pattern. -
Cut the shapes:
Using a craft knife or a circular cutter, cut out small circles (about 1 inch in diameter, depending on your desired scale). -
Form the cones:
Gently cut a slit from the center to the edge of each circle. Overlap the cut edges and roll the clay into a cone shape, pressing the seam gently to seal it. -
Flatten the base:
Since these cones need to stand exclusively on the display, tap the bottom point gently on your work surface to create a tiny flat base so they don’t tip over. -
Dry the cones:
Set the cones aside to dry completely. I usually prop them up in a lump of scrap clay or an egg carton so they keep their round opening.
Step 2: Creating the Ice Cream Swirls
-
Prepare pastel clays:
Divide your remaining white clay into several small portions. Mix a tiny drop of different pastel acrylic paints into each ball—mint, lavender, pale pink, and lemon yellow. -
Soften the consistency:
To pipe the clay like frosting, mixing in a small amount of water or liquid clay softener is key. You want a consistency similar to toothpaste. -
Fill the piping bag:
Load one color of the softened clay into a small piping bag fitted with a miniature star tip. Squeeze out any air bubbles first. -
Pipe the swirl:
Pipe a classic soft-serve swirl directly into the opening of a dried cone. Start at the outer rim and spiral upward to a peak. -
Repeat colors:
Clean your bag and tip thoroughly between colors, and repeat the piping process until all your cones are filled with assorted pastel flavors. -
Shape manually (alternative):
If piping proves difficult, roll a thin snake of clay and coil it manually into the cone, using a needle tool to scratch in the ‘swirl’ texture lines.
Clay Cracking?
If the clay swirls crack while drying, mix equal parts white glue and water, then brush it over the cracks to fill and seal them invisibly.
Step 3: Preparing the Display & Assembly
-
Sand the stand:
While the ice cream dries, take your wooden tiered stand and lightly sand any rough edges to ensure a smooth finish. -
Whitewash the wood:
Dilute some white acrylic paint with water and brush it over the wood. Wipe off the excess with a rag to let the wood grain show through for a rustic look. -
Final assembly:
Once the clay ice cream is fully hardened (usually 24 hours), arrange the cones on the tiers. Secure them with a tiny dot of white glue if you want them permanently fixed. -
Seal the project:
Apply a coat of matte varnish to the cones to protect the paint and give the waffle texture a nice finished sheen without being too glossy.
Make it Sparkle
Before the ‘ice cream’ dries, dust the tops with ultra-fine clear glitter or crush dry pastels to simulate sugar crystals or sprinkles.
Now you have a sweet, everlasting dessert display ready to be admired
Pocket-Size Cat and Bunny Figurines
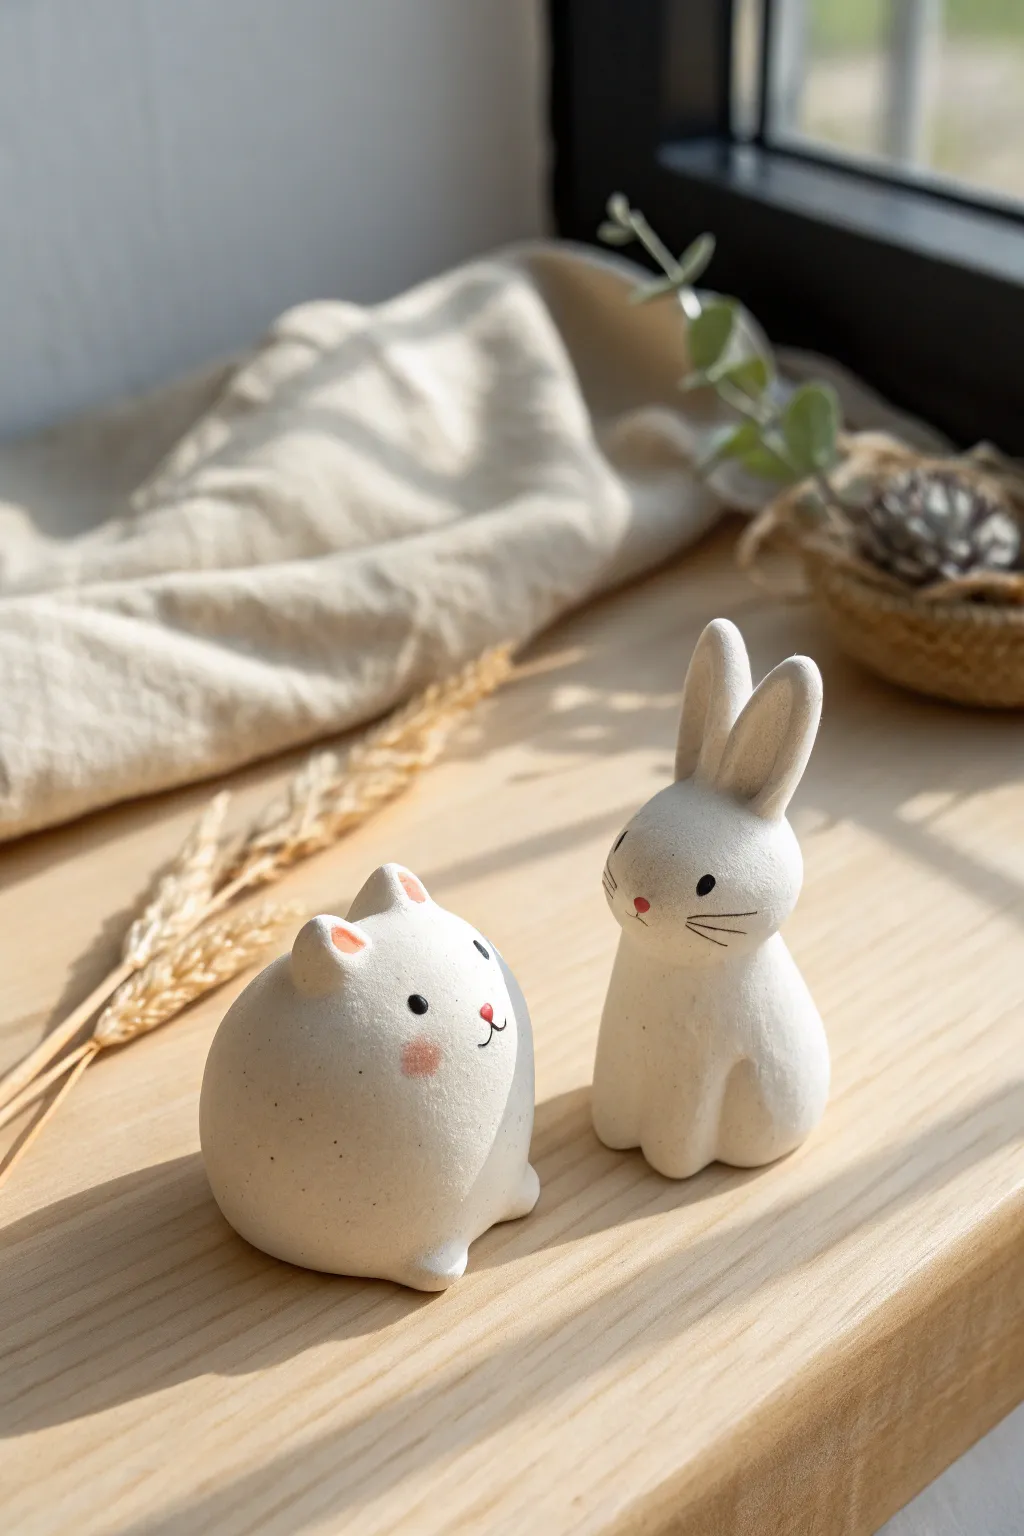
These charming, minimalist animal figurines showcase the beauty of simple shapes and subtle details. Their smooth, matte white finish gives them a modern ceramic look without the need for a kiln, making them perfect little guardians for your windowsill or desk.
Step-by-Step
Materials
- White smooth air dry clay (or cold porcelain)
- Small rolling pin
- Modeling tools (specifically a small ball tool and needle tool)
- Water in a small cup
- Fine grit sandpaper (400-600 grit)
- Black acrylic paint or fine tip marker
- Pink soft pastel chalk or blush powder
- Small soft paintbrush
- Clear matte varnish (optional)
Step 1: Sculpting the Round Cat
-
Form the base:
Start with a ball of clay roughly the size of a golf ball. Roll it between your palms until it is perfectly smooth and free of cracks. -
Shape the body:
Gently press the ball onto your work surface to flatten the bottom. Use your palms to taper the top slightly, creating a soft dome or gumdrop shape that feels substantial and round. -
Pull the ears:
Instead of attaching separate pieces, use your fingers to gently pinch two small triangles at the very top of the dome. Smooth the transition so the ears look like they are growing naturally from the head. -
Add the feet:
Pinch two tiny nubs at the bottom front of the body to suggest paws. You can also attach two very small flattened balls if pinching is difficult, blending the seams with a little water. -
Smooth the surface:
Dip your finger in a tiny amount of water and glide it over the entire sculpture to remove fingerprints. Let the cat dry completely, which may take 24-48 hours depending on humidity.
Seamless Smoothing
Keep a wet sponge nearby. Instead of dipping fingers directly in water (which can make clay slimy), dab your finger on the sponge for the perfect moisture level to erase prints.
Step 2: Sculpting the Sitting Bunny
-
Create the body column:
Take a slightly smaller amount of clay than used for the cat. Roll it into a cylinder that is wider at the base and slightly tapered at the neck area. -
Form the head:
Roll a separate, smaller sphere for the head. Flatten the underside slightly and attach it to the neck of the body piece. I find scoring both surfaces and using a drop of water creates the best bond here. -
Blend the neck:
Use a modeling tool or your wet finger to smooth the clay across the seam where head meets body, ensuring the neck area looks seamless and sturdy. -
Shape the rabbit ears:
Roll two small sausage shapes and flatten them slightly. Pinch one end of each to create a point. Attach these to the top of the head, blending the clay downwards so they stand tall. -
Define the legs:
For the sitting posture, use a sculpting tool to gently carve a vertical line into the lower front of the body, separating the front legs visually without detaching them. -
Let it cure:
Allow the bunny to dry alongside the cat. Turn them occasionally during the first few hours to prevent the bottoms from staying damp.
Weighted Bottoms
Before sealing the bottom of your shapes, push a small flat washer or coin inside the clay base. This lowers the center of gravity so your figurines won’t tip over easily.
Step 3: Refining and Painting
-
Sand for perfection:
Once fully dry, use fine-grit sandpaper to buff away any remaining fingerprints or rough texture. The goal is a surface that looks like unglazed porcelain. -
Apply blush:
Scrape a little pink pastel chalk into a powder. Use a soft, dry brush to gently dub this powder onto the inside of the cat’s ears and create rosier cheeks on the cat’s face. Keep the bunny simpler with just a tiny touch on the nose if desired. -
Draw the faces:
Using a very fine black marker or a needle tool dipped in black paint, add two small dots for eyes widely spaced on the cat. Add a tiny ‘Y’ shape for the mouth. -
Bunny details:
For the bunny, place the eyes on the sides of the head rather than the front. Add three delicate whiskers on each cheek and a tiny red or pink dot for the nose. -
Seal (Optional):
To protect the pastel blush from smudging, apply a thin coat of matte varnish. Avoid glossy finishes to maintain the natural, stone-like aesthetic.
Arranged together on a sunlit shelf, this quiet little pair brings a sense of calm to any corner of your home


The Complete Guide to Pottery Troubleshooting
Uncover the most common ceramic mistakes—from cracking clay to failed glazes—and learn how to fix them fast.
Chubby Mini Dinosaur Friends
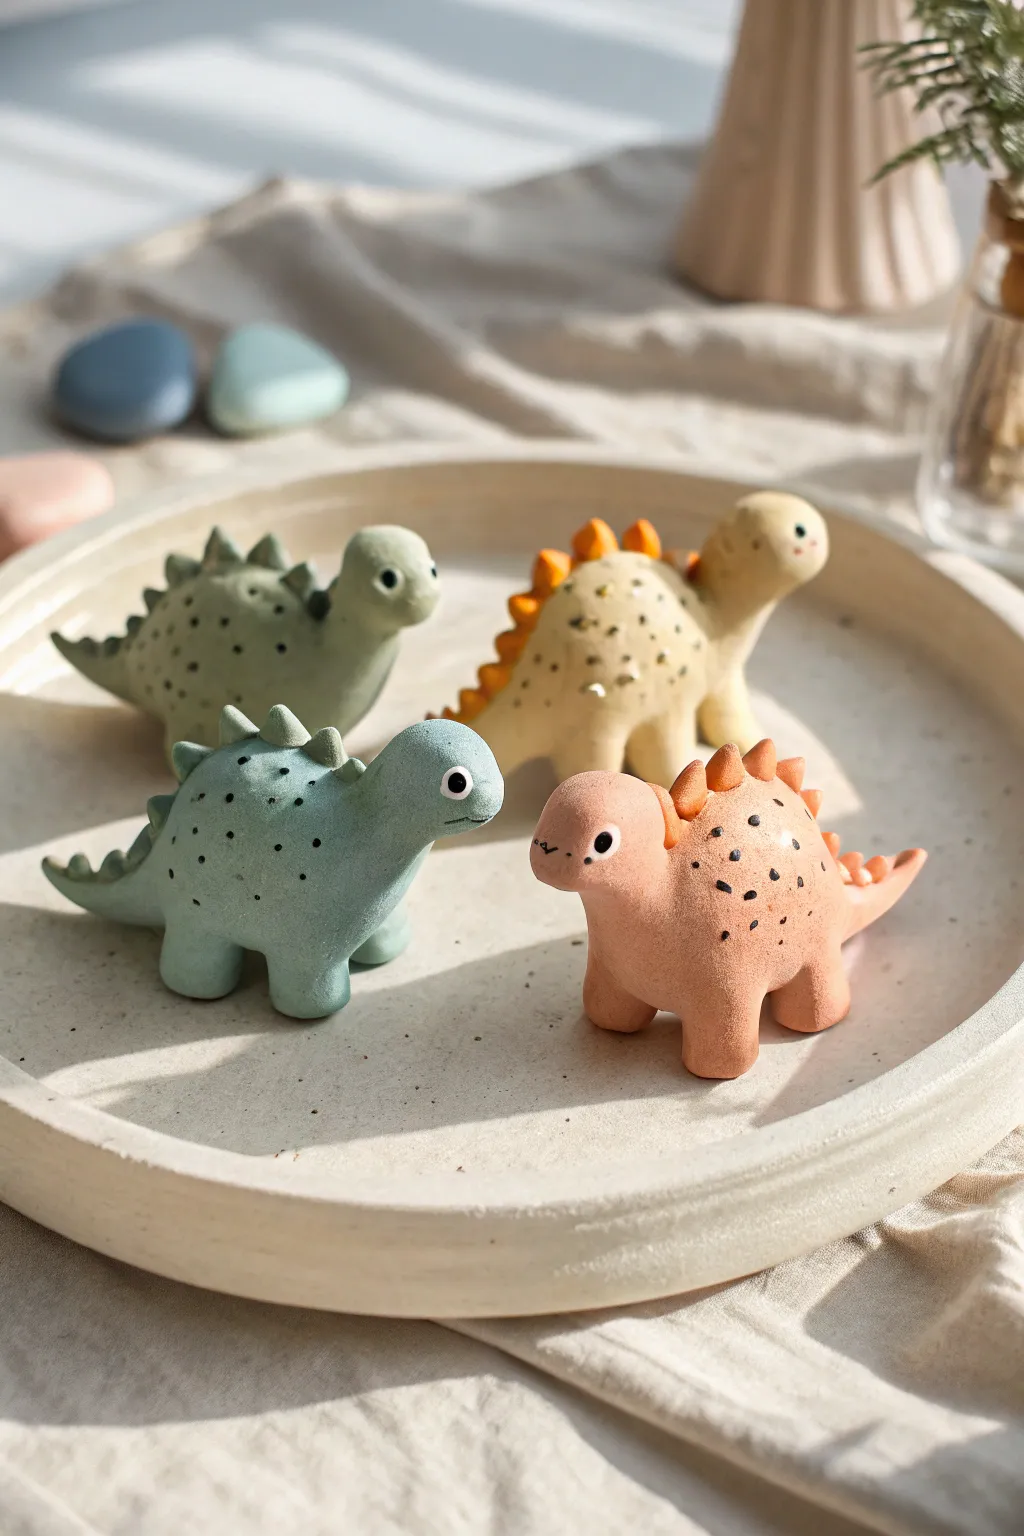
These adorable, chunky stegosauruses are perfect for beginners due to their simple, rounded shapes and muted, earthy palette. With their tiny spike details and dotted textures, they make charming desk companions or decorative accents for a shelf.
Step-by-Step Guide
Materials
- Air dry clay (white)
- Acrylic paints (sage green, forest green, cream, mustard yellow, terracotta, black, white)
- Small rolling pin
- Modeling tools (or toothpicks)
- Fine detail paintbrush
- Water cup
- Fine grit sandpaper (optional)
- Matte varnish
Step 1: Shaping the Bodies
-
Mix your base colors:
Before sculpting, it is easiest to color your clay first. Knead acrylic paint directly into four separate balls of white clay to create a sage green, a deeper forest green, a creamy beige, and a terracotta pink. Knead until the color is uniform. -
Form the main body:
Take a walnut-sized piece of colored clay and roll it into a smooth ball. Gently elongate one side to form a thick, chubby tail, keeping the main body round and substantial. -
Create the head and neck:
Pull a smaller portion of clay from the opposite side of the tail to form the neck. Shape the head into a soft, rounded oval. I like to gently curve the neck upward so the dinosaur looks inquisitive. -
Add the legs:
Roll four small, equal-sized cylinders for each dinosaur. These should remain short and stout to maintain the ‘chubby’ aesthetic. Press them firmly onto the underside of the body and blend the seams with a modeling tool or your finger and a dab of water. -
Smooth the seams:
Go over all the joints where the legs meet the body. Use a damp finger to smooth out any fingerprints or cracks, ensuring the transition is seamless.
Step 2: Adding Details
-
Make the back plates:
For the spine details, roll tiny balls of a contrasting clay color (or the same body color). Flatten them slightly into triangles or rounded nubs. -
Attach the plates:
Starting from the back of the head and moving down to the tail, press these small plates onto the spine. Use a tiny amount of water as separate glue to ensure they stick permanently. -
Form the tail spikes:
For the very end of the tail, shape even tinier cones of clay to create the thagomizer (tail spikes). Attach two or three vertically at the tip. -
Smooth the features:
Give the entire figure a final once-over with a slightly damp brush to smooth out any rough textures on the plates or feet before setting it aside. -
Drying time:
Let the figures dry completely. Depending on humidity and thickness, this usually takes 24 to 48 hours. Turn them over halfway through so the belly dries evenly.
Cracking Clay?
If small cracks appear during drying, make a ‘slip’ by mixing a tiny bit of clay with water until it’s a paste. Fill the cracks, smooth over, and let dry again.
Step 3: Painting & Finishing
-
Paint the eyes:
Once dry, use a fine detail brush or the head of a pin to paint a white circle for the eye. Let it dry, then add a smaller black dot in the center for the pupil. -
Add texture dots:
Using a toothpick or a very fine brush, add speckled details on the back and sides. Use black or dark brown paint for a natural, speckled stone look. -
Highlight the plates (optional):
If you want the back plates to stand out more, you can dry-brush a lighter shade of the body color onto the tips of the spikes. -
Draw the mouth:
Use the very tip of your finest brush or a fine-tip marker to draw a tiny, curved line for a smile. -
Seal the work:
Apply a coat of matte varnish to protect the paint and give the dinosaurs a finished, professional look without making them too shiny.
Make it a Mobiles
Before the clay dries, carefully insert a small metal eye screw hook into the top of the back. Once painted, string them up for a prehistoric nursery mobile.
Now you have a herd of delightful prehistoric friends ready to roam your desk
Tiny Frogs With Mini Lily Pads
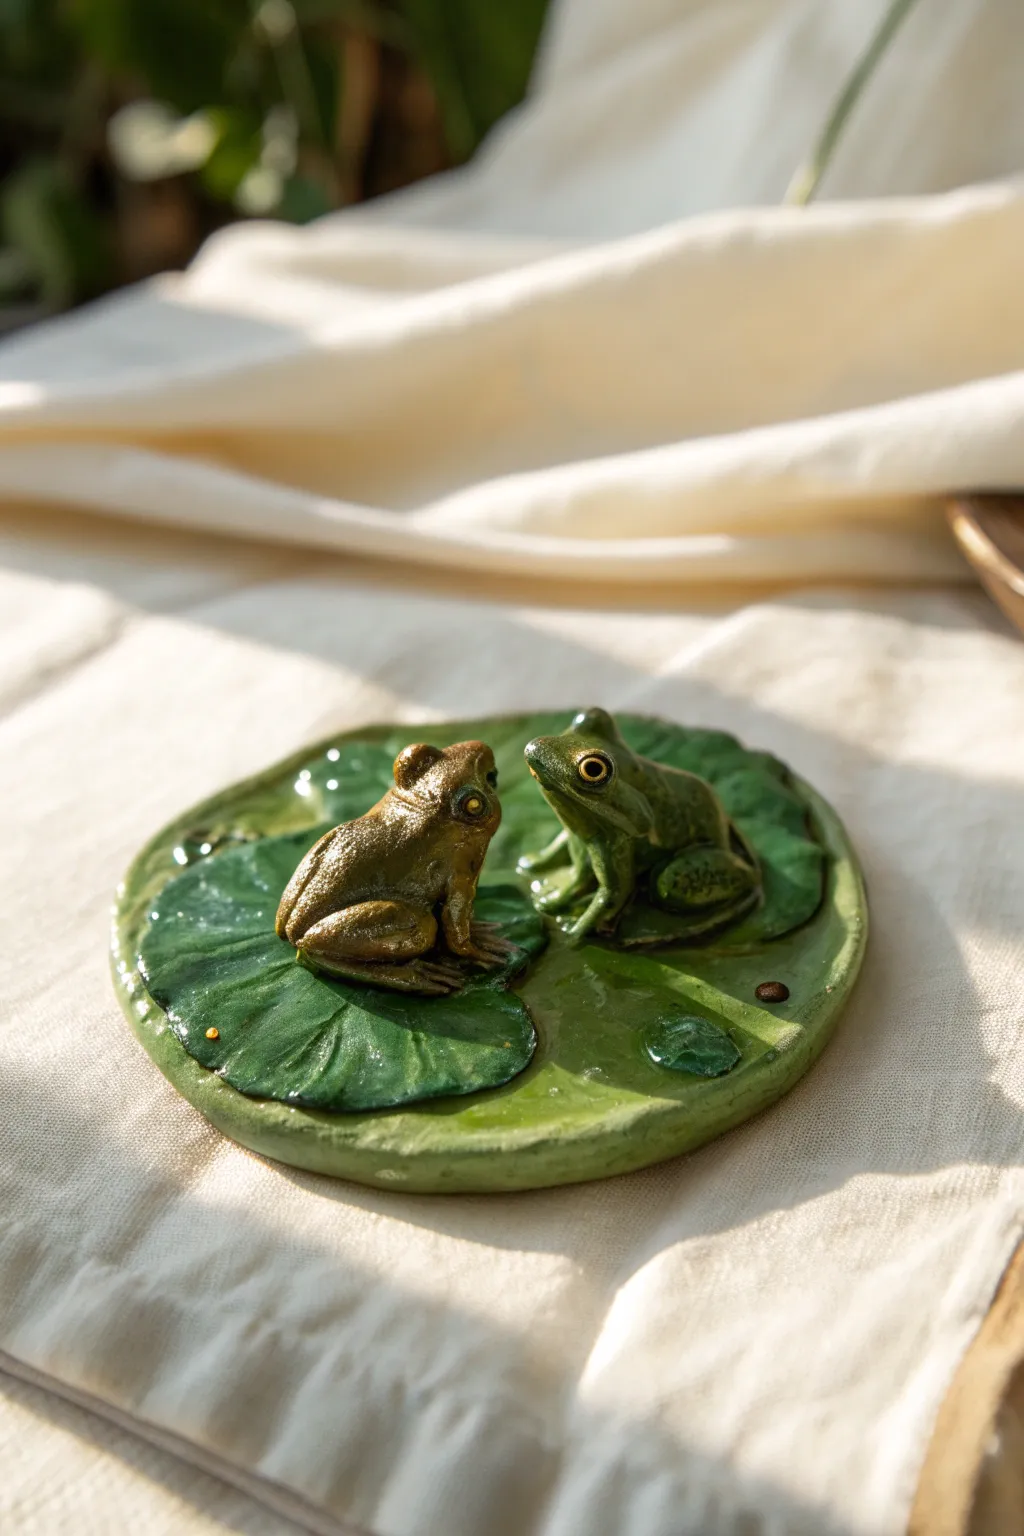
Capture the serenity of a quiet pond with this charming air dry clay sculpture featuring two inquisitive frogs perched on a lily pad. The glossy finish gives the piece a perpetually wet, lifelike appearance that catches the sunlight beautifully.
Step-by-Step
Materials
- Air dry clay (white or terracotta)
- Acrylic paints (olive green, forest green, yellow ochre, brown, black, gold, off-white)
- Gloss varnish or polyurethane sealer
- Sculpting tools (needle tool, ball stylus)
- Fine detail paintbrushes (size 0 and 00)
- Water cup and paper towels
- Rolling pin
- Aluminum foil (for armature if making larger figures)
Step 1: Shaping the Lily Pad Base
-
Roll out the base:
Start by conditioning a ball of clay until it’s smooth and pliable. Roll it out into a flat, circular disc about 1/4 inch thick to serve as your lily pad base. -
Add texture:
Using a needle tool or toothpick, gently scribe veins radiating from a slightly off-center point on the disc. It helps to curve these lines slightly to mimic organic growth. -
Create the notch:
Cut a small V-shaped wedge out of one side of the circle to create the classic lily pad shape. Soften the cut edges with a damp finger so they aren’t too sharp. -
Add leaf detail:
Roll a small, separate piece of clay very thin and shape it into a smaller, secondary leaf. Press this directly onto the main pad to add dimension and layering. -
Ruffle the edges:
Gently pinch and lift the outer rim of the lily pad at random intervals. I find this slight waviness makes the leaf look like it’s naturally floating on water.
Step 2: Sculpting the Frogs
-
Form the bodies:
Roll two small ovals of clay for the frog bodies. One should be slightly larger and more sitting upright, the other can be smaller and crouched. -
Shape the heads:
Use your fingers to gently pull and taper the top of the oval to form a snout. Press your thumbs into the sides to define the eye sockets. -
Add legs:
Roll thin sausages of clay for the rear legs. Fold each leg into a ‘Z’ shape—thigh, shin, and foot—and blend them seamlessly onto the back sides of the body. -
Front arms:
Create two smaller cylinders for the front arms. Attach them under the chest area, ensuring the frogs look like they are propping themselves up. Use a needle tool to separate the tiny toes. -
Create the eyes:
Roll tiny spheres of clay and press them onto the top of the head for the bulging frog eyes. Use a small ball tool to make a tiny indentation if you want to paint the pupil inside later. -
Mount and dry:
Place your frogs onto the lily pad while the clay is still slightly tacky. Use a drop of water or slip to secure them in place, facing each other. Let the entire piece dry completely (24-48 hours).
Cracking Clay?
If you notice small cracks forming as the frogs dry, smooth a mixture of clay and water (slip) into the fissures with your finger, then sand lightly once fully dry.
Step 3: Painting and Finishing
-
Base coat:
Paint the entire sculpture with a mix of olive green and yellow ochre. Don’t worry about variation yet; just get solid coverage. -
Detailing the lily pad:
Mix a darker forest green and carefully paint the secondary leaf layer and the depressed veins of the lily pad to create shadow depth. -
Highlighting the frogs:
Dry brush a lighter yellowish-green on the frogs’ bellies, backs, and the tops of their legs to highlight their muscles. -
Adding texture spots:
Using the tip of a fine brush, stipple tiny dots of dark brown and dull gold onto the frogs’ backs to mimic their bumpy, mottled skin texture. -
Painting the eyes:
Paint the eyeballs a bright gold. Once dry, add a vertical black slit for the pupil and a tiny white dot for a reflection highlight. -
Water droplets:
If you want extra realism, use a clear UV resin or dimensional glaze to add a few raised ‘water drops’ on the lily pad surface. -
Sealing:
Coat the entire piece with a high-gloss varnish. This is crucial as it mimics the wet, slimy texture of amphibians and the sheen of the wet plant.
Create a Scene
Make a tiny fly out of wire and a bead, attaching it to a thin wire hovering near one frog’s mouth for a dynamic, storytelling element.
Once the varnish cures, your glossy green companions are ready to add a touch of nature to any desk or shelf

TRACK YOUR CERAMIC JOURNEY
Capture glaze tests, firing details, and creative progress—all in one simple printable. Make your projects easier to repeat and improve.
Mini Mushrooms and Toadstools
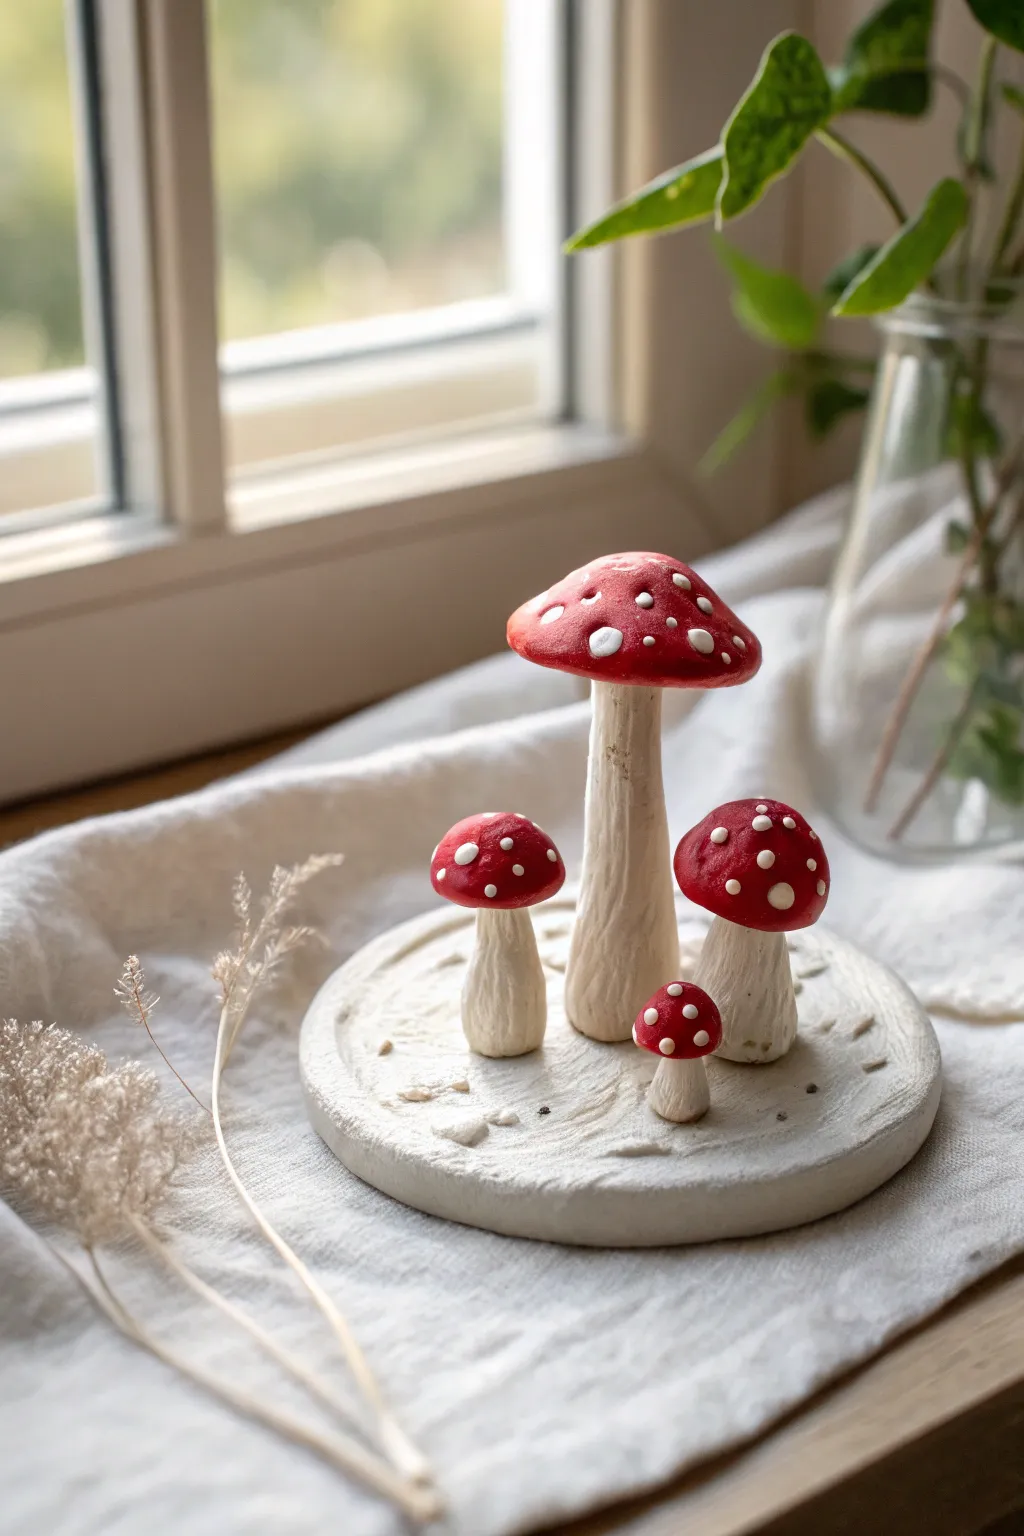
Create an enchanting little forest floor scene with this cluster of four classic fly agaric toadstools. Resting on a textured circular base, these clay mushrooms add a touch of fairytale magic to any shelf or windowsill.
Step-by-Step Tutorial
Materials
- White air-dry clay
- Acrylic paints (bright red, warm white/cream, earthy brown)
- Small paintbrush for details
- Medium paintbrush for base coats
- Sculpting tools or a toothpick
- Water cup
- Fine-grit sandpaper (optional)
- Matte varnish
Step 1: Sculpting the Base and Stems
-
Form the base:
Start by rolling a ball of clay roughly the size of a tangerine. Flatten it into a circular disc about 1/2 inch thick to serve as your display stand. -
Texture the ground:
While the base is still soft, use a sculpting tool or a crumpled ball of aluminum foil to gently press uneven textures into the surface, mimicking a natural forest floor. -
Shape the main stem:
Roll a thick sausage of clay for the largest mushroom stem. Keep the bottom slightly wider for stability and taper it gently as you go up. -
Create the smaller stems:
Repeat the rolling process to create three additional stems in graduating sizes—one medium, one small, and one tiny baby mushroom. -
Attach stems to base:
Score the bottom of each stem and the corresponding spot on the base with a needle tool or toothpick. Apply a dab of water (slip) and press the stems firmly onto the base to fuse them. -
Refine the surface:
Use your fingers or a tool to drag small amounts of clay from the base up onto the bottom of the stems, smoothing the seam so they look like they grown naturally from the ground.
Step 2: Creating the Caps
-
Form the large cap:
Roll a ball of clay and then flatten the bottom while doming the top to create the classic mushroom cap shape. Make it slightly wider than the top of your largest stem. -
Shape remaining caps:
Make three smaller caps to match the remaining stems. Vary the roundness slightly; maybe the smallest one is more spherical while the larger ones are flatter. -
Attach the caps:
Score and slip the tops of the stems and the undersides of the caps. Press them together gently. I find a tiny twisting motion helps lock the clay pieces together securely. -
Add gills (optional):
If you want extra detail, use a knife tool to gently press lines radiating from the stem to the edge on the underside of the caps before the clay dries. -
Drying time:
Allow the entire sculpture to dry completely. This usually takes 24-48 hours depending on the thickness of your clay and local humidity.
Clay Connector Tip
For extra strong bonds between the stem and the base, insert a small piece of dry spaghetti or wire into the stem and push it into the base while the clay is wet.
Step 3: Painting and Finishing
-
Base coat the stems:
Paint the stems and the base with a warm white or cream color. Don’t worry about perfect opacity; a little streakiness adds to the organic texture. -
Paint the caps:
Apply a coat of bright red acrylic paint to the tops of the caps. You may need two coats to get a rich, opaque color. -
Add an antique wash:
Mix a tiny amount of brown paint with water to create a thin wash. Lightly brush this over the stems and base, wiping it back with a paper towel so it only settles in the crevices. -
Paint the dots:
Using a very fine brush or the tip of a toothpick, carefully dot the red caps with thick white paint. Vary the size of the dots for a realistic look. -
Detail the base:
Add tiny brown speckles or dashes to the base to represent stray pine needles or dirt. -
Seal the work:
Once all paint is fully dry, coat the sculpture with a matte varnish to protect the clay and unify the finish.
Make It Mossy
After painting, apply small patches of craft glue to the base and sprinkle on dried tea leaves or fake model flocking to simulate patches of green moss.
Place your finished mushroom family near a window where the light can highlight the textures you created.
Micro Succulent Pots
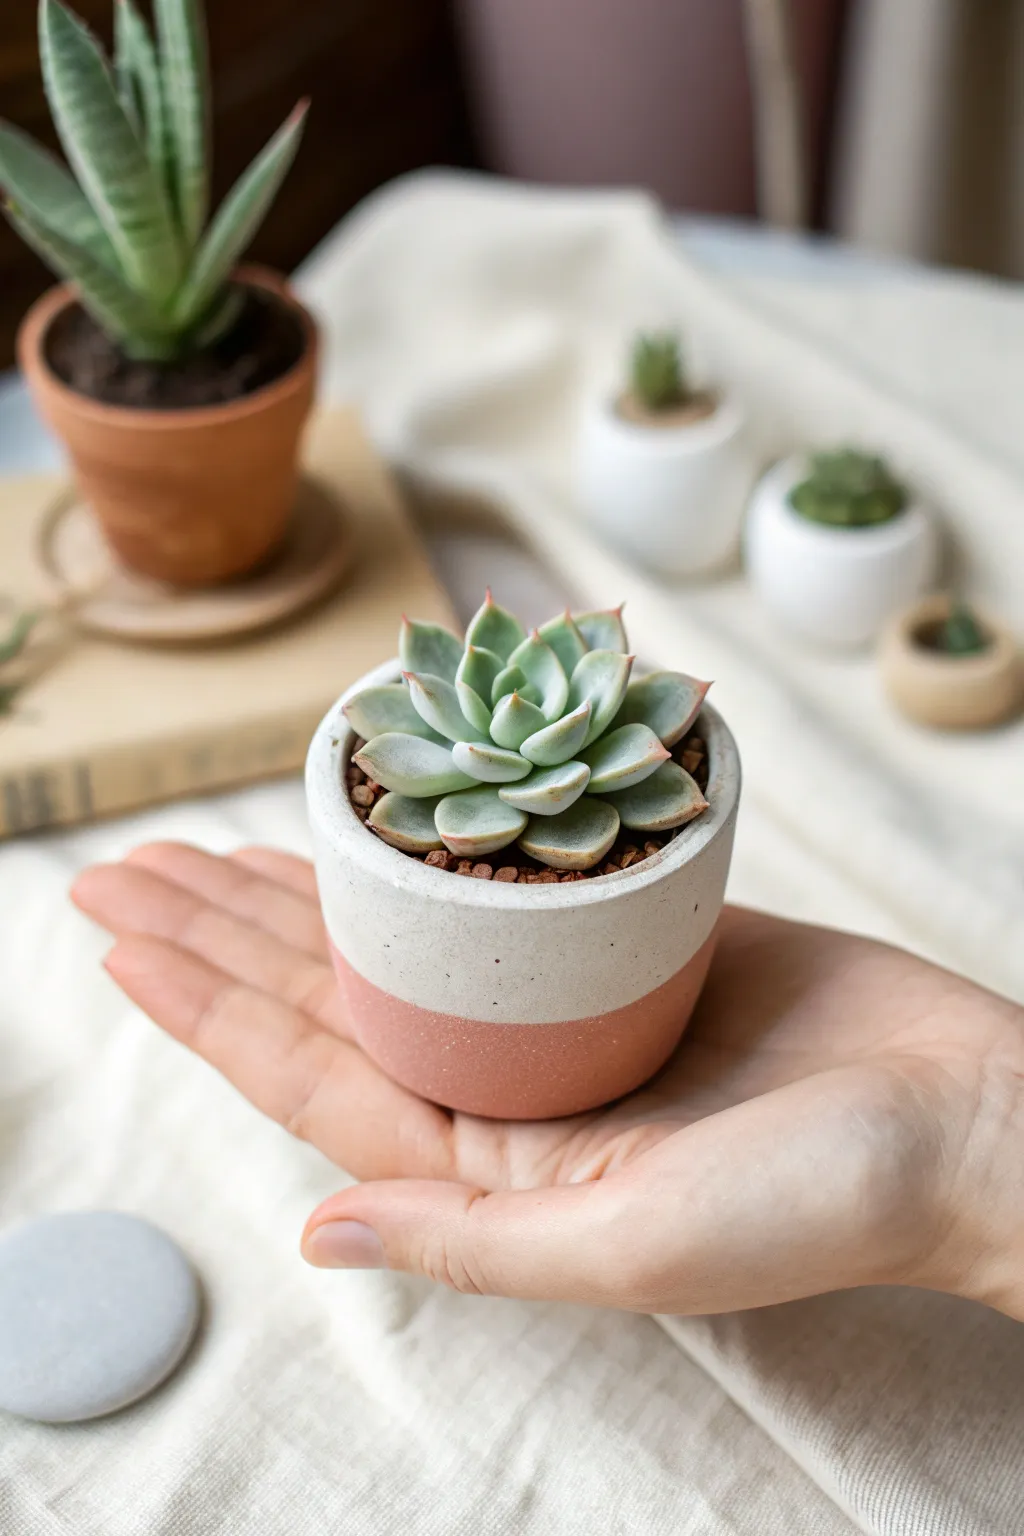
This charming, palm-sized pot features a minimalist two-tone design that mimics the look of dipped ceramic. The soft white upper half contrasts beautifully with a warm, terra-cotta pink base, creating the perfect cozy home for a single rosette succulent.
How-To Guide
Materials
- White air dry clay
- Terra cotta or pink acrylic paint
- Rolling pin
- Craft knife or clay blade
- Small cylindrical object (like a spice jar) to use as a mold or template
- Fine-grit sandpaper
- Water and a small sponge
- Varnish or sealant (matte finish)
- Small succulent and potting mix
Step 1: Forming the Base
-
Prepare the Clay:
Start by conditioning a ball of white air dry clay. Knead it in your hands until it becomes soft, pliable, and free of any internal cracks. -
Roll out a Slab:
Use your rolling pin to flatten the clay on a smooth surface. Aim for a thickness of about 1/4 inch (approx 5-6mm) to ensure the walls are sturdy enough to hold soil later. -
Create the Base Disc:
Use a round cutter or trace the bottom of your cylindrical mold to cut out a perfect circle. This will serve as the floor of your pot. -
Cut the Wall Strip:
Measure the circumference of your base disc. Cut a long rectangular strip from your clay slab that matches this length plus a tiny overlap, with a height of about 2 inches. -
Assemble the Cylinder:
Wrap the rectangular strip around the edge of the base disc. I like to score the touching edges (make tiny cross-hatch scratches) and add a drop of water to create a strong slip bond. -
Smooth the Seam:
Gently blend the vertical seam where the wall strip ends meet using your finger or a modeling tool. Do the same for the seam connecting the wall to the base. -
Refine the Shape:
Wet your finger slightly and run it along the top rim to smooth out any sharp edges or unevenness. Ensure the walls are standing straight up. -
Dry Thoroughly:
Set the pot aside in a cool, dry place. Allow it to air dry completely for 24-48 hours, turning it occasionally to ensure even drying.
Straight Edge Trick
For a perfectly crisp paint line, wrap a strip of painter’s tape or masking tape around the pot at your desired height before painting the bottom section.
Step 2: Finishing and Painting
-
Sand for smoothness:
Once fully rigid, gently sand the exterior with fine-grit sandpaper. Focus on the rim and the sides to get that clean, modern ceramic look. -
Mark the Color Line:
Lightly trace a horizontal line around the pot, roughly one-third of the way up from the bottom. This will guide your two-tone painting. -
Mix the Terra Cotta Shade:
Mix pink acrylic paint with a tiny dot of brown or orange to achieve that warm, earthy terra cotta tone seen in the reference image. -
Apply the Bottom Color:
Carefully paint the bottom section below your guideline. Use a flat brush to get a crisp, straight line where the color meets the white clay. -
Paint the Top (Optional):
If your clay dried off-white or yellowish, you can paint the upper section with white acrylic paint to get a cleaner contrast. -
Apply Speckles:
To mimic stoneware, dip an old toothbrush or stiff brush into diluted brown or grey paint. Run your thumb over the bristles to flick tiny speckles onto the white section. -
Seal the Pot:
Apply two coats of matte varnish to the entire pot, inside and out. This step is crucial for air dry clay to protect it from moisture when watering the plant. -
Plant the Succulent:
Fill the bottom with a small amount of rocky succulent mix, nestle your Echeveria rosette inside, and fill the gaps with soil.
Make it Functional
Before the clay dries, use a straw to poke a drainage hole in the center of the base. This is vital for keeping real succulents healthy long-term.
Now you have a stylish miniature planter ready to brighten up any window sill or desk
Mini Trinket Dishes and Ring Cones
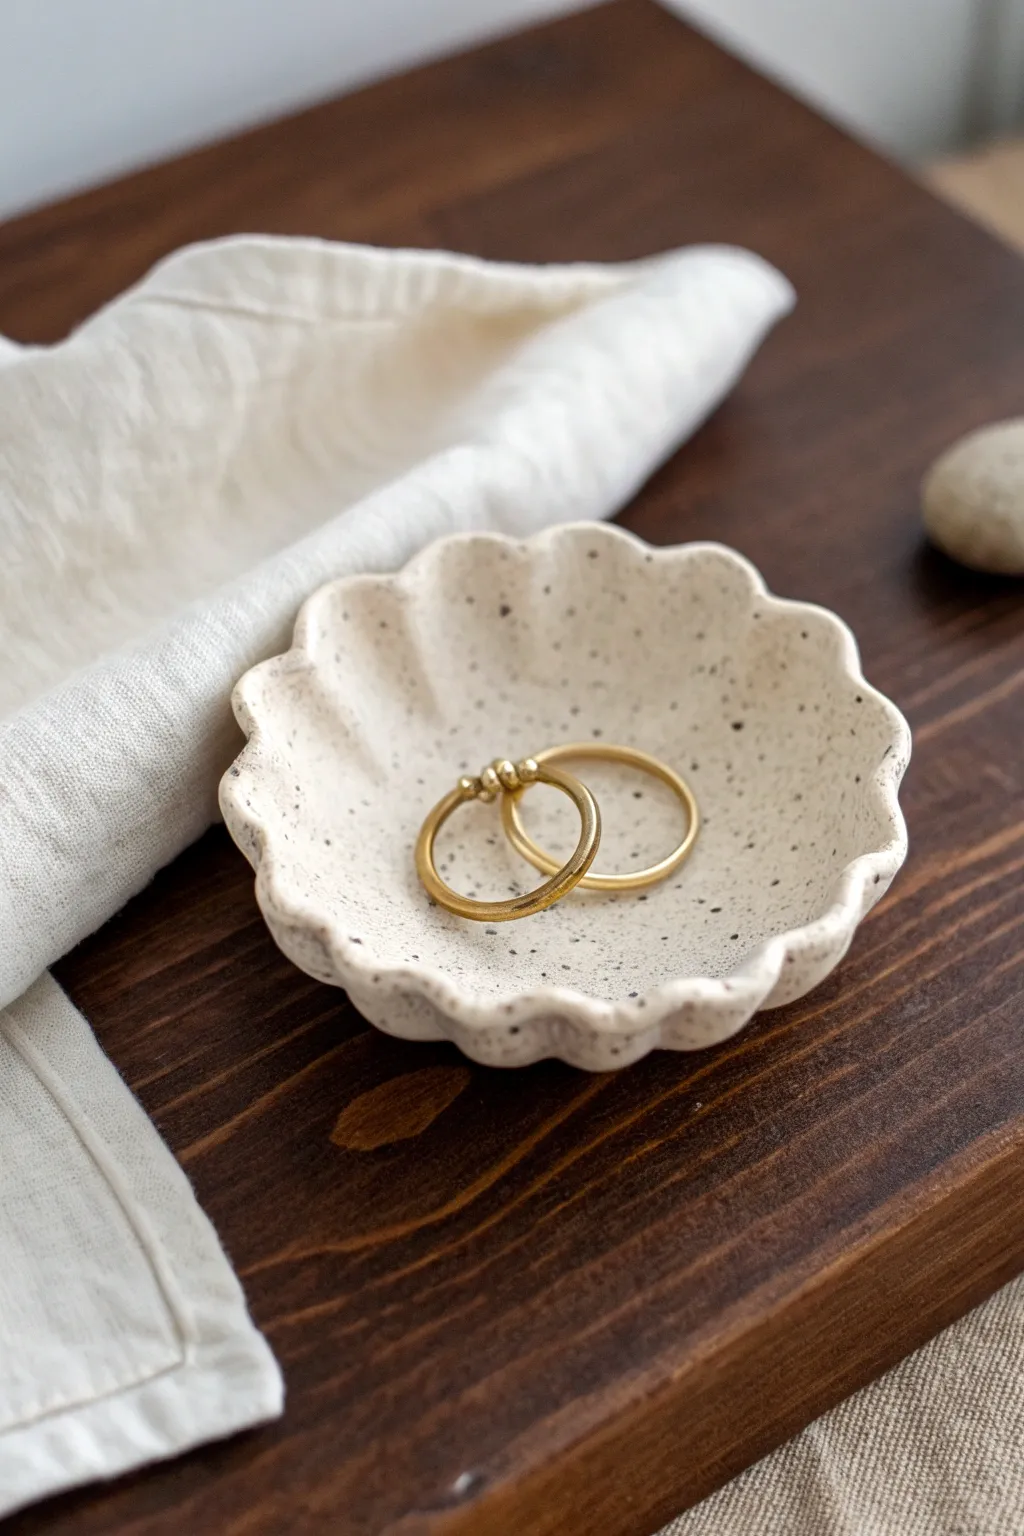
This charming little ring dish captures the trendy look of speckled stoneware pottery without needing a kiln. Its gentle, fluted edges and dark speckles create a natural, organic feel perfect for holding your favorite delicate jewelry.
Step-by-Step Guide
Materials
- White air dry clay
- Rolling pin
- Small round cookie cutter or a glass (approx. 3-4 inches diameter)
- Black or dark brown acrylic paint
- Old toothbrush
- Small bowl or sponge (for drying shape)
- Water and a small bowl
- Sandpaper (fine grit)
- Glossy varnish or sealant (Mod Podge or polyurethane)
- Modeling tool or back of a paintbrush
Step 1: Shaping the Clay
-
Condition the clay:
Start by taking a golf-ball-sized amount of white air dry clay. Knead it in your hands for a minute until it feels soft, warm, and pliable, which helps prevent cracks later on. -
Roll it out:
Place the clay on a smooth surface or a silicone mat. Use your rolling pin to flatten it into an even sheet, aiming for about 1/4 inch thickness. Don’t go too thin, or the edges will be fragile. -
Cut the circle:
Using your circular cutter or simply tracing around a glass with a knife, cut out a clean circle from the rolled clay. Remove the excess clay scraps. -
Smooth the edges:
Dip your finger in a tiny bit of water and run it along the cut edge of the circle. This smooths out any harsh lines or burrs left by the cutter. -
Create the fluted rim:
To make the scalloped flower shape, gently use your thumb and forefinger to pinch the edge of the circle at regular intervals. I like to push in with my index finger while supporting the clay on either side with my thumb and middle finger. -
Refine the scallops:
Go around the rim a second time to ensure the waves are relatively even. You aren’t looking for machine-perfect symmetry; the organic look adds to the charm. -
Form the shallow bowl:
Place your clay circle into a small curved bowl or rest it continuously on a curved sponge to dry. Gravity will help it slump slightly into a dish shape rather than staying flat.
Cracks while scalloping?
If the clay starts cracking as you pinch the edges, it’s too dry. smooth a drop of water over the crack with your finger immediately to bond it back together.
Step 2: Drying and Finishing
-
Let it dry completely:
Allow the dish to air dry for 24 to 48 hours. It should be totally white and hard to the touch. Do not rush this with heat, as it can cause warping. -
Initial sanding:
Once dry, verify the edges are smooth. If there are any rough spots or fingerprints, lightly sand them away with fine-grit sandpaper until the surface feels satiny. -
Prepare the speckle paint:
Squeeze a small dot of black or dark brown acrylic paint onto a palette. add a drop of water to thin it down to an inky consistency. -
Flick the speckles:
Dip an old toothbrush into this watery paint mixture. Hold the brush over the dish and run your thumb across the bristles to flick tiny droplets onto the clay surface. -
Control the density:
Practice the flicking motion on a piece of scrap paper first. You want a fine mist of dots, not large blobs. Apply the speckles evenly across the inside and rim of the dish. -
Dry the paint:
Let the paint speckles dry completely. Since acrylic dries fast, this usually only takes about 10-15 minutes. -
Apply the first coat of gloss:
Using a soft brush, apply a layer of glossy varnish or sealant over the entire top surface. This mimics the look of a ceramic glaze and protects the speckles. -
Seal the bottom:
Once the top is touch-dry, flip the dish over and seal the bottom side as well to ensure the clay is fully protected from moisture. -
Add a final coat:
For that ultra-shiny, faux-ceramic look, apply a second coat of gloss to the interior of the dish.
Use a sponge support
To keep the bottom rounded while drying, dry the dish on a piece of soft foam or a large sponge. This prevents a flat spot from forming on the base.
Place your favorite rings inside and enjoy the handmade warmth this piece brings to your vanity.
Tiny Incense Holders With Cute Scenes
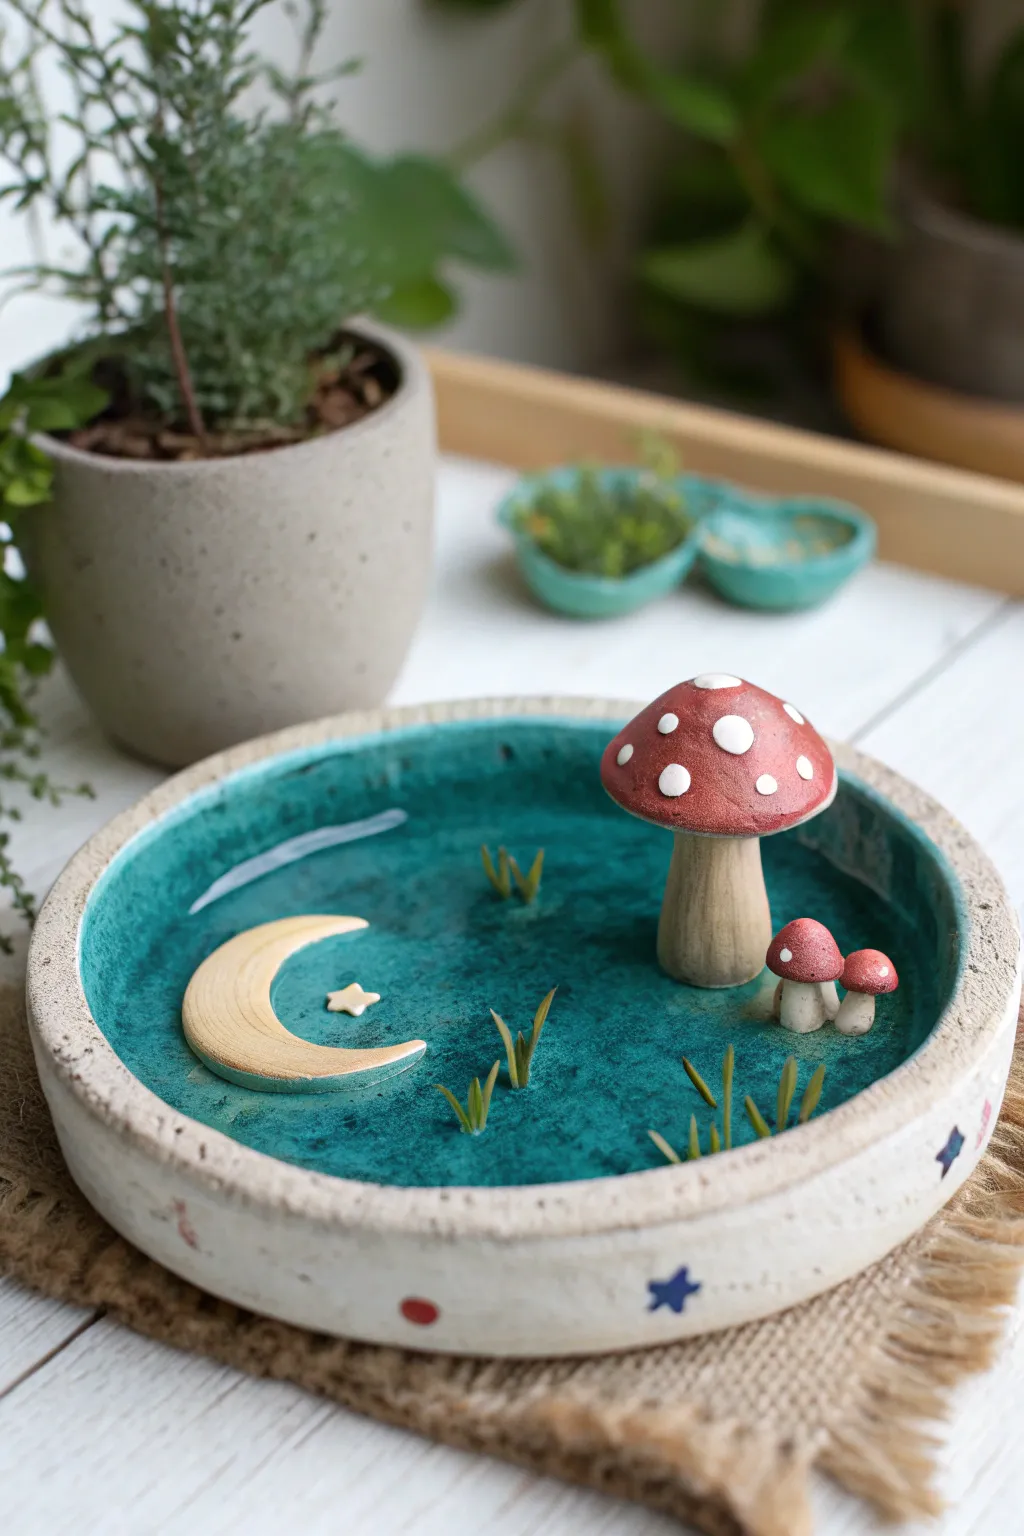
This enchanting miniature dish features a glossy teal base that looks like a mystical pond under moonlight, complete with a sculpted mushroom trio and tiny crescent moon. It serves as a perfect little catch-all tray or a whimsical incense holder for your favorite scents.
Step-by-Step
Materials
- Air dry clay (white)
- Acrylic paints (teal, deep red, cream/beige, yellow, white, brown)
- High-gloss varnish or resin
- Matte varnish (optional for rim)
- Clay sculpting tools (needle tool, ball stylus)
- Rolling pin
- Round cookie cutter or bowl (approx. 4-5 inches)
- Water and sponge for smoothing
- Fine grit sandpaper
- Small paintbrushes (flat and detail)
Step 1: Shaping the Base
-
Roll the slab:
Begin by rolling out a ball of air dry clay into a smooth, even slab about 1/4 inch thick. Ensure the surface is free of cracks. -
Cut the circle:
Use a round cookie cutter or trace around a small bowl to cut a perfect circle for the base of your dish. -
Form the rim:
Roll a long, thin snake of clay. Score and slip the outer edge of your base circle, then attach the snake to create a raised rim. Blend the seam on the inside and outside thoroughly so it looks like one solid piece. -
Smooth the surface:
Dip your finger in a little water and smooth out any fingerprints or join lines, paying special attention to the inner curve where the rim meets the base.
Fixing Cracks
If tiny cracks appear during drying, make a slip paste (clay mixed with water) and fill the cracks. Smooth over with a damp finger and let dry again before painting.
Step 2: Sculpting the Details
-
Create the main mushroom:
Roll a thick cylinder for the stem and a rounded cap for the top. Join these pieces securely using scratching and a dab of water. Place this larger mushroom off-center in the dish. -
Add tiny mushrooms:
Form two very small mushrooms using the same technique and attach them right next to the base of the large one to create a little cluster. -
Sculpt the moon:
Flatten a small piece of clay and cut out a crescent moon shape. Smooth the edges and attach it flat against the base of the dish, opposite the mushrooms. -
Add the star:
Shape a tiny, five-pointed star and press it gently into the clay near the curve of the crescent moon. -
Plant the grass:
Roll extremely thin, tiny spikes of clay to resemble grass blades. Attach these in small clumps around the mushrooms and moon, ensuring they stand upright. -
Texture the rim:
If you want a rustic look like the photo, lightly tap the rim with a toothbrush or stiff brush to give it a stone-like texture. Let the entire piece dry completely for 24-48 hours.
Step 3: Painting and Finishing
-
Sand imperfections:
Once bone dry, use fine grit sandpaper to gently smooth any rough edges on the rim or the mushroom caps. -
Paint the water:
Paint the entire inner floor of the dish with a rich teal or turquoise acrylic paint. Avoid painting the 3D elements (mushrooms and moon) for now. -
Detail the mushrooms:
Paint the mushroom caps a deep red and the stems a natural beige or soft brown. Once the red is dry, carefuly dot on white spots using the end of a paintbrush handle or a toothpick. -
Paint celestial elements:
Color the crescent moon and the tiny star with a soft, pale yellow paint. I like to add a second coat here to make the yellow pop against the dark water. -
Highlight the grass:
Paint the tiny grass tufts with an olive green, keeping the tips slightly lighter for dimension. -
Decorate the rim:
Leave the rim a natural creamy white or paint it beige. Us a fine detail brush to paint tiny blue stars and red dots spaced evenly around the outside edge. -
Seal the piece:
Apply a thick coat of high-gloss varnish or resin only to the teal ‘water’ area to make it look wet and glassy. Use a matte or satin varnish for the mushrooms, moon, and rim to maintain a grounded texture.
Incense Tip
To use this as an incense holder, poke a small angled hole into the mushroom cap or the ground *before* the clay dries. Ensure it’s sized for your incense sticks.
Place this little magical scene on your desk or shelf to catch the light and spark some joy
Mini Photo and Note Holders

Achieve the trendy, industrial look of poured concrete without the mess of mixing cement. This star-shaped note holder uses clever texturing techniques on standard air dry clay to create a modern desktop accessory perfect for displaying photos or reminders.
Step-by-Step Tutorial
Materials
- White air dry clay
- Rolling pin
- Star-shaped cookie cutter (approx. 3 inches)
- Craft knife or thin blade
- Sandpaper (fine grit)
- Acrylic paint (black or dark grey)
- Old toothbrush
- Water
- Palette or small dish
- Ruler
Step 1: Shaping the Base
-
Condition the clay:
Start by taking a handful of white air dry clay and kneading it thoroughly in your hands until it becomes warm, pliable, and free of cracks. -
Roll it out:
Place the clay on a smooth surface and roll it out with your rolling pin. You want a substantial thickness for stability—aim for about 3/4 of an inch (around 2 cm) thick. -
Cut the star:
Press your star-shaped cookie cutter firmly into the thick clay. If the clay is thicker than the cutter, you may need to press down and then carefully cut around the excess with a craft knife. -
Release the shape:
Gently wiggle the cutter to release the clay star. Push it out slowly to avoid deforming the points. -
Smooth the edges:
Details matter here. Dip your finger in a little water and run it along all the cut edges to smooth out any roughness or loose bits of clay left by the cutter. -
Flatten the bottom:
Identify which two points of the star will be the ‘feet.’ Gently tap the star down onto your work surface on these two points to create a slightly flattened base so it stands up securely.
Clean The Cut
Before the clay dries, slide a folded piece of wax paper into the card slot. This prevents the clay from fusing back together while it shrinks and dries.
Step 2: Creating the Slot
-
Mark the center:
Using a ruler, find the center of the top point of the star. You want the slot to be perfectly vertical so your note stands up straight. -
Cut the groove:
Take your craft knife or a thin blade and press it straight down into the top point. You’ll need to cut about half an inch deep. -
Widen the gap:
Since clay shrinks when drying, you need to widen the cut slightly. Wiggle the blade gently back and forth to create a gap just wide enough for a piece of cardstock. -
Initial drying:
Let the star sit for about 24-48 hours. I like to flip it over halfway through the drying process to ensure the moisture evaporates evenly from both sides.
Step 3: Faux Concrete Finish
-
Sand it smooth:
Once fully dry and hard, use fine-grit sandpaper to buff the surface. Focus on the edges to make them crisp, mimicking cast concrete. -
Prepare the speckle paint:
Squeeze a tiny drop of black or dark grey acrylic paint onto a palette. add a significant amount of water until it is very runny and inky. -
Load the brush:
Dip an old toothbrush into this watery paint mixture. Test it on a piece of scrap paper first to control the spray. -
Apply the splatter:
Hold the toothbrush near the clay star and run your thumb across the bristles to flick tiny droplets of paint onto the surface. -
Layer the texture:
Rotate the star and repeat the splattering process on all sides. Vary the distance slightly to get different sized specks for a realistic stone effect. -
Final dry:
Let the paint specks dry completely, which should only take a few minutes.
Stone Texture
Mix a small amount of used coffee grounds or sand directly into the white clay before rolling it out. This adds genuine gritty texture to the final piece.
Slide your favorite photo or a kraft paper note into the slot and enjoy your new industrial-chic decor piece
Mini Alphabet Tiles and Name Tags
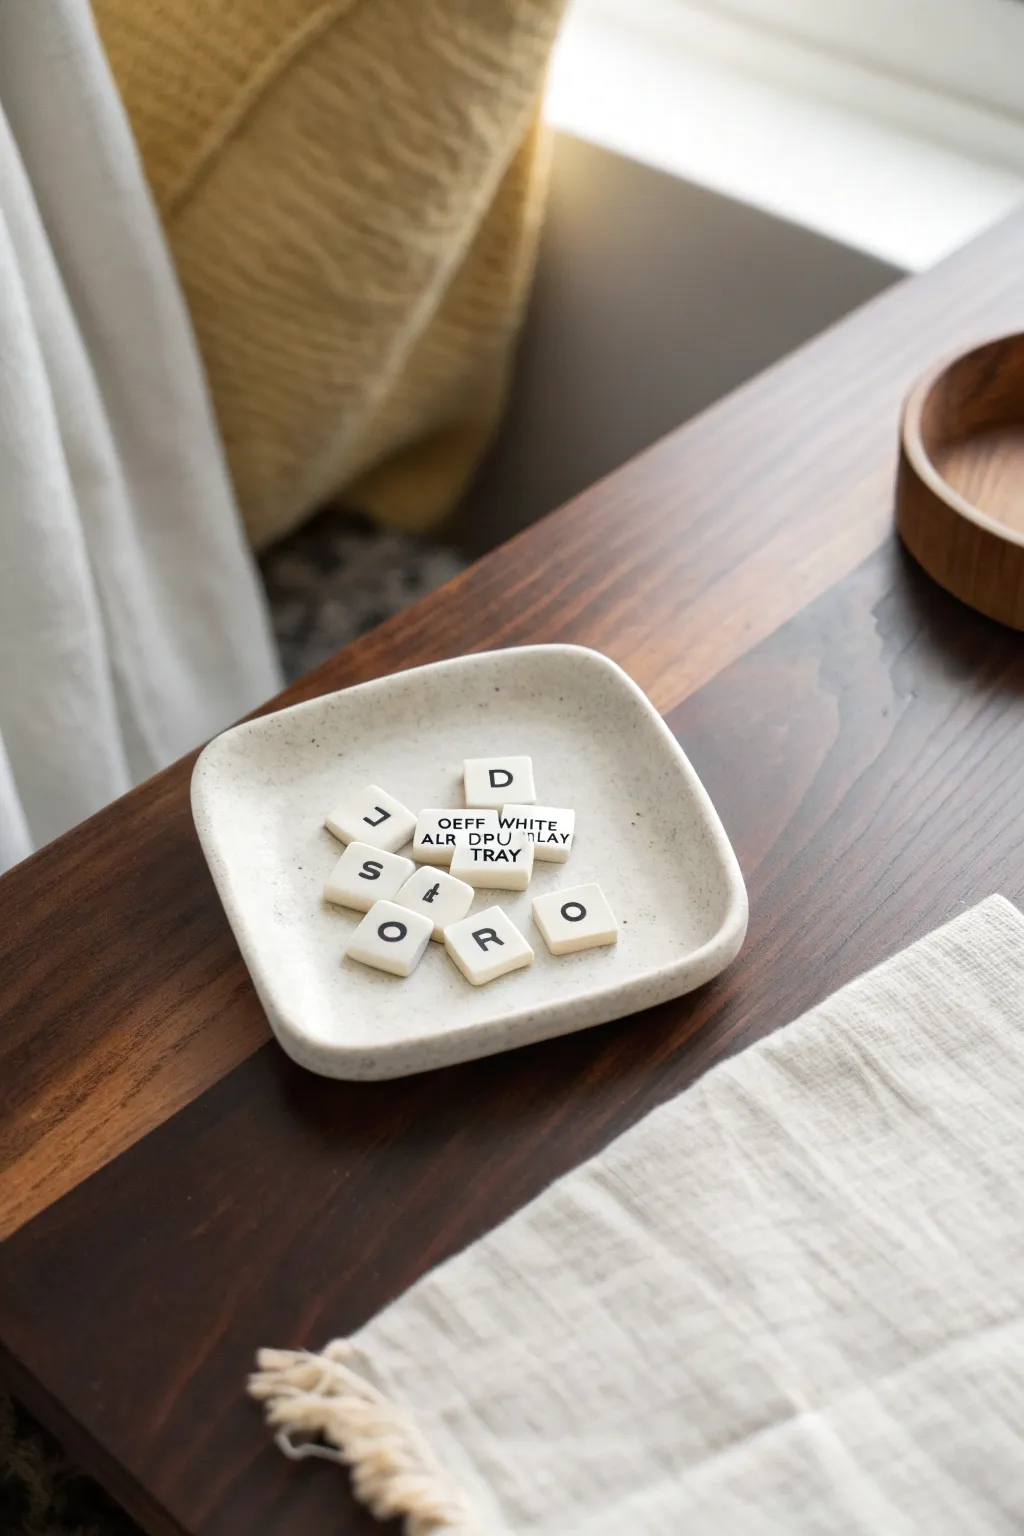
Create your own personalized alphabet set with these adorable miniature tiles. Their clean, minimalist look mimics vintage game pieces, while the subtle speckled finish adds a modern, handcrafted touch perfect for jewelry making or decorative accents.
How-To Guide
Materials
- White air dry clay
- Rolling pin or acrylic roller
- Small square clay cutter (approx. 0.5 inch / 1.2 cm)
- Miniature alphabet stamp set
- Black ink pad (permanent/archival quality)
- Fine-grit sandpaper (400-600 grit)
- Wax paper or craft mat
- Matte sealant or varnish (optional)
- Small detail brush
Step 1: Preparing the Clay
-
Condition the Clay:
Begin by taking a chunk of white air dry clay and kneading it in your hands until it becomes soft, pliable, and free of cracks. -
Roll it Out:
Place the clay on a sheet of wax paper or a craft mat to prevent sticking. Use your rolling pin to flatten the clay into an even slab. -
Check Thickness:
Aim for a consistant thickness of about 3mm to 4mm. You want the tiles to be sturdy but not chunky. Using depth guides or two stacks of playing cards on either side of the clay can help ensure an even surface.
Clean Impressions
If you get ink on the stamp’s border, wipe it off with a baby wipe before pressing it into the clay. This ensures only the letter transfers.
Step 2: Cutting and Stamping
-
Cut the Squares:
Using your small square cutter, punch out as many shapes as you need. Try to place the cuts close together to minimize waste. -
Smooth the Edges:
Gently lift the squares away from the scrap clay. Run your fingertip lightly along the cut edges of each square to soften any sharp corners or burrs left by the cutter. -
Prepare the Stamps:
Select the letters you wish to stamp. I find it helpful to lay out my word or phrase beforehand so I don’t accidentally skip a letter. -
Ink the Stamp:
Lightly tap your letter stamp onto the black ink pad. You want an even coating of ink on the raised letter, but avoid getting ink on the background rubber, as this leaves stray marks. -
Stamp the Clay:
Ideally, you should wait about 10-15 minutes after cutting for the clay to firm up slightly; this prevents the stamp from squishing the tile shape. Press the stamp firmly into the center of a clay square. -
Lift Straight Up:
Pull the stamp straight up to remove it. Wiggling the stamp can cause the impression to blur or the ink to smudge. -
Repeat the Process:
Continue inking and stamping until all your tiles are complete. If you make a mistake, simply ball up that specific square and re-roll it.
Step 3: Finishing Touches
-
Drying Time:
Transfer the stamped tiles to a flat, clean surface to dry. Let them air dry completely for at least 24-48 hours. Turn them over halfway through the drying process to prevent warping. -
Sand for Perfection:
Once fully dry, check the edges again. If any rough spots remain, use a fine-grit sandpaper (400 grit or higher) to gently buff the sides. Be careful not to sand over the stamped ink area. -
Clean Up Dust:
Wipe away any clay dust with a soft, dry brush or a barely damp cloth. -
Seal the Tiles:
To protect the ink and the clay, apply a thin coat of matte varnish or sealant. Use a soft brush and light strokes to avoid smearing the black ink.
Stamp Stuck?
If the clay sticks to your stamp, dust the stamp surface very lightly with cornstarch before inking heavily. Tap off excess powder first.
Arrange your finished tiles on a small dish or glue them onto projects for a charming customized message
Miniature Chair or Stool Charms
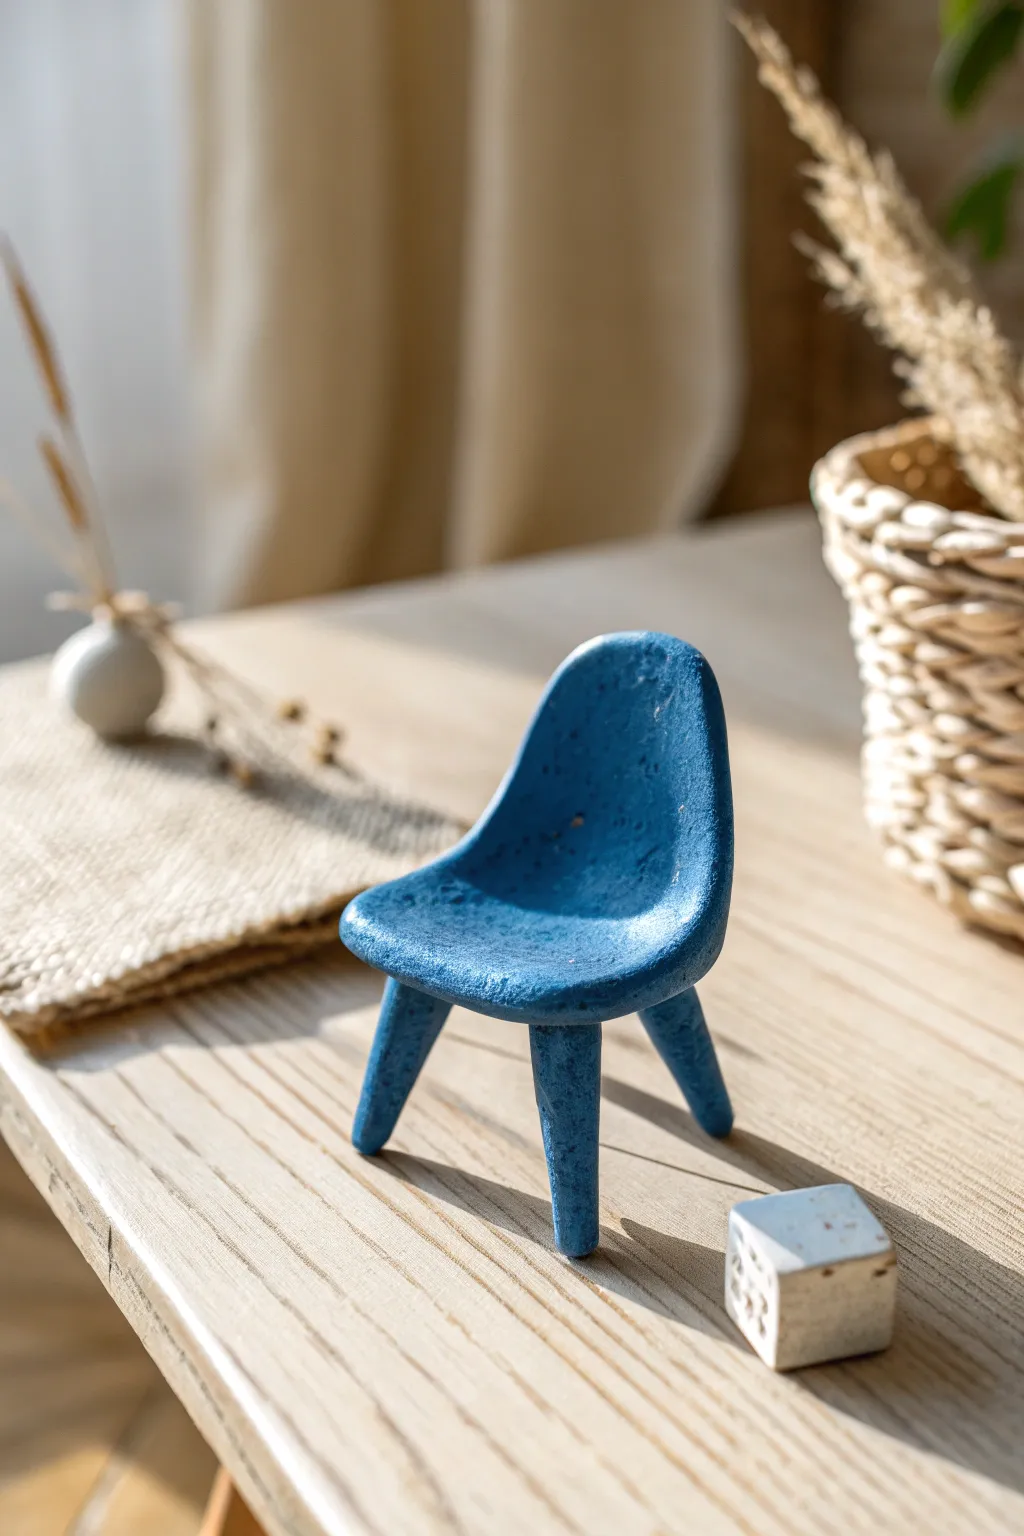
Capture the iconic curves of mid-century design with this charming miniature chair project. Crafted from air-dry clay and painted a bold blue, this tiny seat makes an adorable desk companion or dollhouse accent.
Step-by-Step Tutorial
Materials
- Air-dry clay (white or terracotta)
- Acrylic paint (deep denim blue)
- Gloss or matte varnish (optional)
- Rolling pin or smooth round marker
- Precision craft knife or clay tool
- Water for smoothing
- Fine-grit sandpaper
- Small paintbrush
- Toothpicks (for internal structure, optional)
Step 1: Shaping the Seat
-
Prepare the Clay:
Start by conditioning a walnut-sized ball of air-dry clay in your hands until it is warm and pliable without cracks. -
Roll the Slab:
Press the ball flat and use a small rolling pin to create a smooth slab about 1/4 inch thick. This will become the seat and backrest. -
Cut the Outline:
Visualizing an hourglass or rounded spade shape, use your craft knife to cut out the base form. The bottom should be wider for the seat, tapering slightly before widening again for the back. -
Form the Curve:
Gently lift the clay shape and curl the narrower waist section upward to create an L-shape with a soft, organic curve. This mimics the molded plastic look of mid-century furniture. -
Smooth the Edges:
Dip your finger in a little water and run it along the cut edges of the chair to round them off. You want to execute a seamless, molded appearance rather than sharp cuts.
Uneven Legs?
If the chair wobbles after drying, don’t break the legs! Simply glue a tiny piece of sandpaper to the table and rub the longer leg against it until level.
Step 2: Creating the Legs
-
Draft the Legs:
Roll out a thin coil or ‘snake’ of clay. Cut four equal segments, each about 3/4 inch long. -
Taper the Shape:
Roll each segment individually against your work surface to taper one end slightly, creating a cone-like shape for the legs. -
Score and Slip:
Where the legs will attach to the underside of the seat, scratch the surface a bit with your tool (scoring) and add a drop of water (slip) to act as glue. -
Attach the Legs:
Press the thicker end of each leg firmly onto the underside of the seat. I find it helpful to angle the back legs slightly outward for better stability and style. -
Blend the Seams:
Use a clay tool or your fingernail to drag clay from the leg onto the seat bottom, blending the seam until the join is invisible.
Step 3: Finishing Touches
-
Check Balance:
Flip the chair right-side up and gently press it onto a flat surface to ensure all four legs touch the ground evenly. Adjust carefully while the clay is still soft. -
Dry Completely:
Set the chair aside to dry. Depending on humidity, this usually takes 24 to 48 hours. Prop the back against something if it starts to slump. -
Sand Imperfections:
Once fully rigid, use fine-grit sandpaper to smooth out any fingerprints or rough bumps on the surface. -
Apply Base Coat:
Paint the entire chair with your deep blue acrylic paint. You may need to water the first coat down slightly to get into the texture. -
Add Second Coat:
Apply a second, thicker layer of blue paint for opaque coverage. Let this dry completely. -
Seal the piece:
For durability, brush on a layer of matte or gloss varnish to protect the paint and give it a finished look.
Pattern Play
Before the clay dries, gently press a piece of textured fabric (like burlap or linen) into the seat surface to create a realistic upholstery texture.
Now you have a stylish piece of miniature furniture ready to display on your desk or shelf
Tiny Fairy Doors for Plant Pots

Invite a little magic into your home with this freestanding fairy door, designed to sit nestled next to your favorite potted plants. It features a realistic textured wood grain finish, charming faux-iron hinges, and distinct stonework details that make it look like an ancient entryway.
How-To Guide
Materials
- White air dry clay
- Rolling pin
- Clay sculpting tools (needle tool, small knife tool)
- Texturizing tool (old toothbrush or stiff bristle brush)
- Brown acrylic paints (dark brown, light beige/tan)
- Small paintbrushes (detail and flat shader)
- Water cup
Step 1: Shaping the Structure
-
Form the base block:
Start with a generous handful of white air dry clay. Condition it by kneading until smooth, then shape it into a thick, upright block with a rounded, arched top. It should be substantial enough to stand on its own. -
Create the main frame:
Roll out a separate long, flat strip of clay, about 1/4 inch thick. Wrap this strip over the arched top of your base block to create the protruding door frame. Use a little water to securely bond the clay seams together. -
Define the door inset:
Using a flat modeling tool or your fingers, gently press the inner area of the block inwards to create depth, making it look like the wooden door is recessed inside the stone frame.
Clean Lines
Keep a small bowl of water and a smoothing tool nearby. Before texturing, run a damp tool over any harsh fingerprints to ensure your ‘stone’ looks naturally weathered rather than messy.
Step 2: Detailed Texturing
-
Carve the wood planks:
Take a needle tool or a sharp knife tool and score vertical lines into the recessed door area. Vary the spacing slightly to mimic individual wooden planks. -
Add wood grain texture:
In between your vertical cuts, lightly scratch fine, wavy lines. This creates a realistic wood grain effect that will really pop once painted. -
Texture the frame:
Use an old toothbrush or a stiff brush to stipple the white arched frame. Tap it repeatedly against the clay to give it a porous, limestone-like stone texture. -
Detail the door spacing:
Along the outer edge and backside of the door block, use your knife tool to carve horizontal and vertical lines, creating the look of stacked bricks or stones supporting the structure.
Step 3: Adding Hardware
-
sculpt the hinges:
Roll two very small, thin triangles of clay. Attach them to the left side of the door planks, positioned near the top and bottom. Press a needle tool into the wide end of each triangle to mimic screw holes. -
Create the peephole:
Form a tiny ring of clay and attach it to the upper center of the door. Flatten a tiny ball of clay inside the ring to create a sealed peephole or window, adding a small indentation in its center. -
Attach the doorknob:
Roll a small ball of clay into a teardrop or knob shape. Attach this firmly to the right side of the door using a dab of water. Let the entire piece dry completely, usually for 24-48 hours.
Mossy Magic
Mix a tiny amount of dried tea leaves or craft moss with PVA glue and dab it into the corners of the stone frame to make the door look like it has been standing in the forest for years.
Step 4: Painting the Magic
-
Base coat the wood:
Dilute a light tan or beige acrylic paint with water to create a wash. Paint the entire wooden door area, letting the color settle into the grain grooves. -
Highlight the planks:
Once the wash is dry, dry-brush a slightly lighter cream color over the raised parts of the wood grain to enhance the texture. -
Paint the stonework:
For the side bricks and outer structure, use a warm brown or terra cotta shade. Paint carefully, ensuring you get into the crevices between the ‘bricks’. -
Keep the frame natural:
Leave the front arched frame unpainted (showing the natural white clay) to contrast beautifully with the painted wood and brick sections, or add a very faint white wash to brighten it. -
Color the hardware:
Paint the hinges, doorknob, and peephole with a solid coat of the same warm brown used for the bricks, making them look like rusted iron or copper. -
Add final dots:
Using the tip of a toothpick and your brown paint, add tiny equidistant dots along the white arch frame for a decorative finish.
Place your finished door beside a lush succulent and wait for the fairies to move in
Mini Terrarium Scenes in Jar Lids
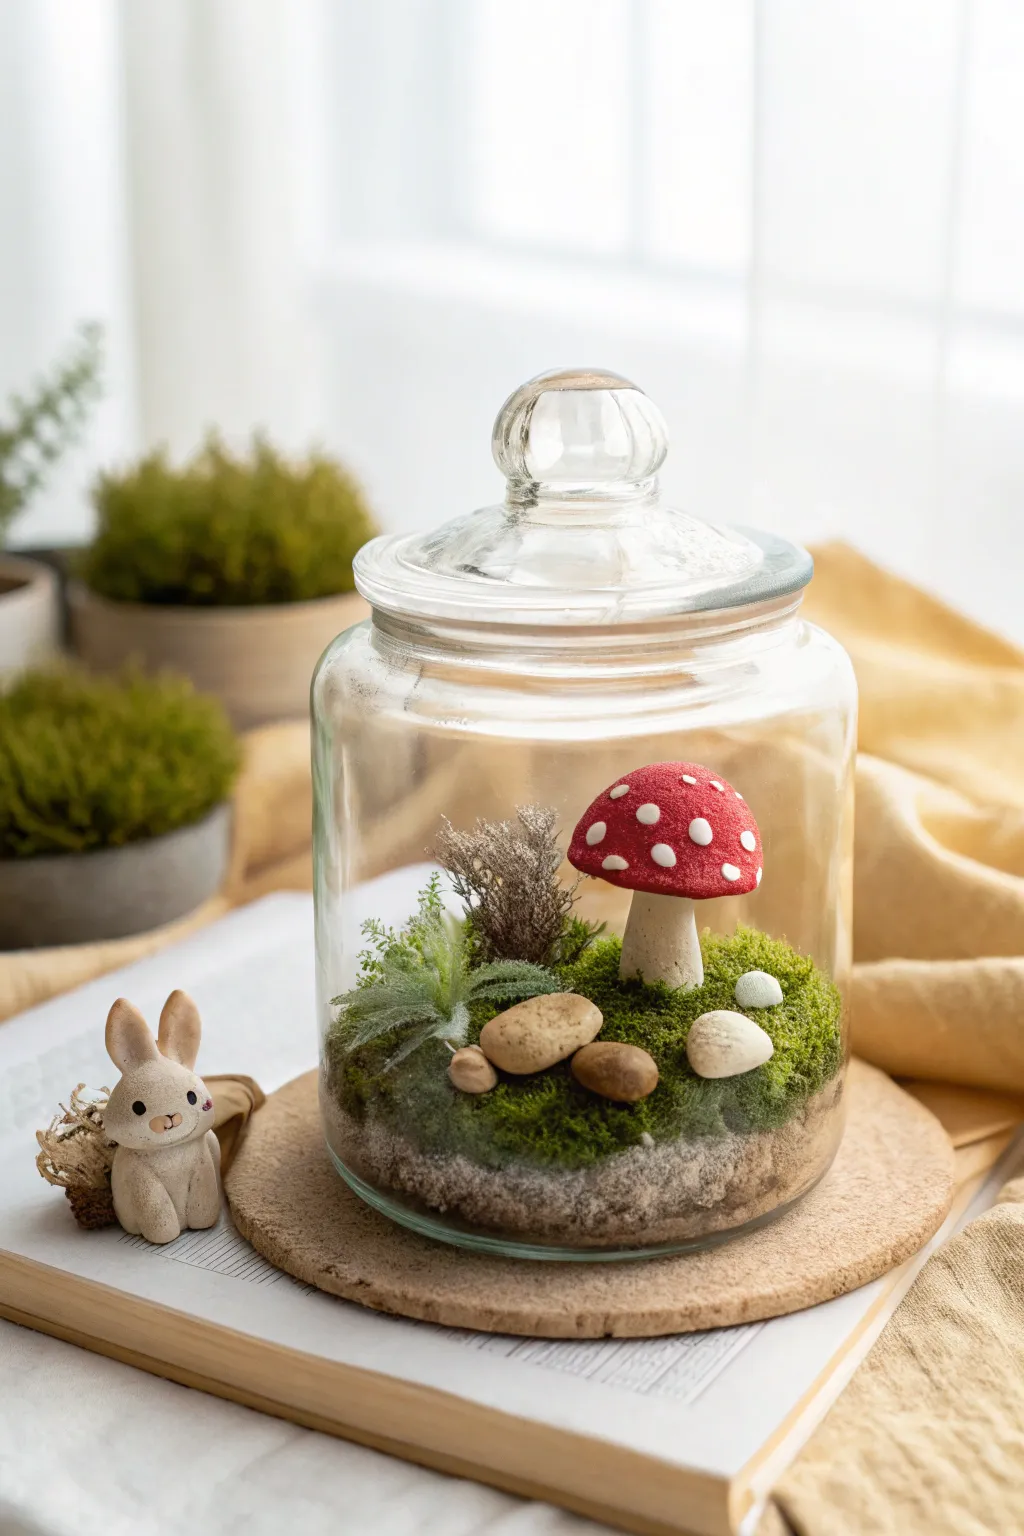
Capture a slice of a fairy forest inside a simple glass jar with this charming miniature terrarium. Using air dry clay to sculpt the focal mushroom, you’ll build a zero-maintenance ecosystem perfect for brightening up a desk or bookshelf.
Step-by-Step Tutorial
Materials
- Clear glass jar with lid (apothecary style or recycled jam jar)
- Air dry clay (white)
- Acrylic paints (red, white, cream/beige)
- Small paintbrushes (fine tip)
- Florist foam or styrofoam block
- Preserved moss (sheet moss or reindeer moss)
- Fine sand (beige or white)
- Small river rocks or pebbles
- Dried floral bits or faux succulent sprigs
- Craft glue or hot glue gun
- Toothpick or sculpting tool
- Cork coaster (optional base)
Step 1: Sculpting the Mushroom
-
Form the stem:
Take a small nugget of white air dry clay, roughly the size of a thimble. Roll it into a cylinder that is slightly wider at the bottom to create a stable stalk for your mushroom. -
Shape the cap:
Roll a second ball of clay, slightly larger than the stem. Flatten the bottom and gently round the top to create a classic dome shape. -
Join the pieces:
Score the top of the stem and the underside of the cap with a toothpick to create texture. Apply a tiny dab of water or slip to the scored areas and press them together firmly. -
Create texture:
If you want a rustic look, use a dry paintbrush or an old toothbrush to gently stipple the surface of the clay while it’s still damp, giving it a velvety texture. -
Dry thoroughly:
Set your mushroom aside to dry completely. Depending on the humidity, this usually takes about 24 hours. I like to flip it occasionally so the bottom dries evenly.
Step 2: Painting the Details
-
Base coat the stem:
Paint the stalk of the mushroom with a cream or beige acrylic paint. Let it dry, then perhaps add a very watery wash of light brown near the bottom for a soil-stained effect. -
Paint the cap:
Coat the top dome in a vibrant red. You may need two thin coats to get a solid, opaque color without brushstrokes showing. -
Add the spots:
Once the red paint is fully dry, use a fine-tip tool or the back of a paintbrush handle to dot on white spots. Vary the sizes slightly for a more organic, natural appearance.
Natural Texture
For a ‘fuzzy’ mushroom cap, coat the painted red cap with clear craft glue and sprinkle heavily with red flocking powder before adding the white clay dots.
Step 3: Assembling the Terrarium
-
Prepare the jar base:
Cut a piece of floral foam or styrofoam to fit snugly inside the bottom of your jar. It doesn’t need to be tall, just enough to anchor your elements. -
Add the sandy ground:
Pour fine sand over the foam, ensuring it slides down the sides to conceal the foam completely from the outside view. -
Position the mushroom:
Glue your painted clay mushroom into the center of the jar. If the foam is soft enough, you can insert a toothpick into the mushroom base and stick that into the foam for stability. -
Lay the moss carpet:
Tuck pieces of preserved moss around the base of the mushroom, covering the rest of the sand surface. Use a chopstick or tweezers to push the moss into the edges. -
Insert greenery:
Place a small sprig of dried gray-green foliage or a tiny faux air plant to the left of the mushroom to add height and variety. -
Place the stones:
In the foreground, arrange two or three small river stones. Nest them slightly into the moss so they look like they’ve been there for years. -
Final touches:
Use a soft, clean brush to sweep any stray sand grains off the mushroom cap or the inside walls of the glass. -
Seal it up:
Place the lid on your jar. If you like, display the finished jar on a cork coaster or slice of wood to complete the woodland aesthetic.
Glow Up
Hide a tiny battery-operated LED fairy light under the moss layer behind the mushroom to create a magical glowing forest scene at night.
Now you have a permanent piece of nature that requires no watering and looks perfect year-round