I never get tired of turning a simple lump of clay into a sweet little pig with a button snout and a curly tail. Grab whatever clay you love—air-dry clay, polymer clay, or pottery clay—and let’s make some piggy projects that feel totally doable.
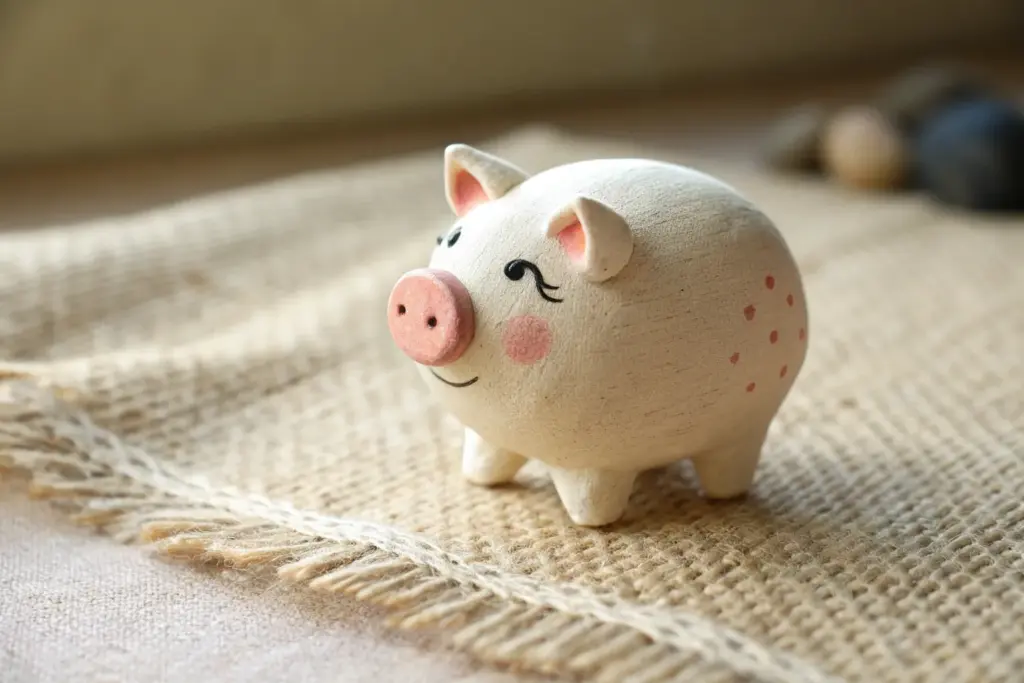
Classic Mini Pig Figurine
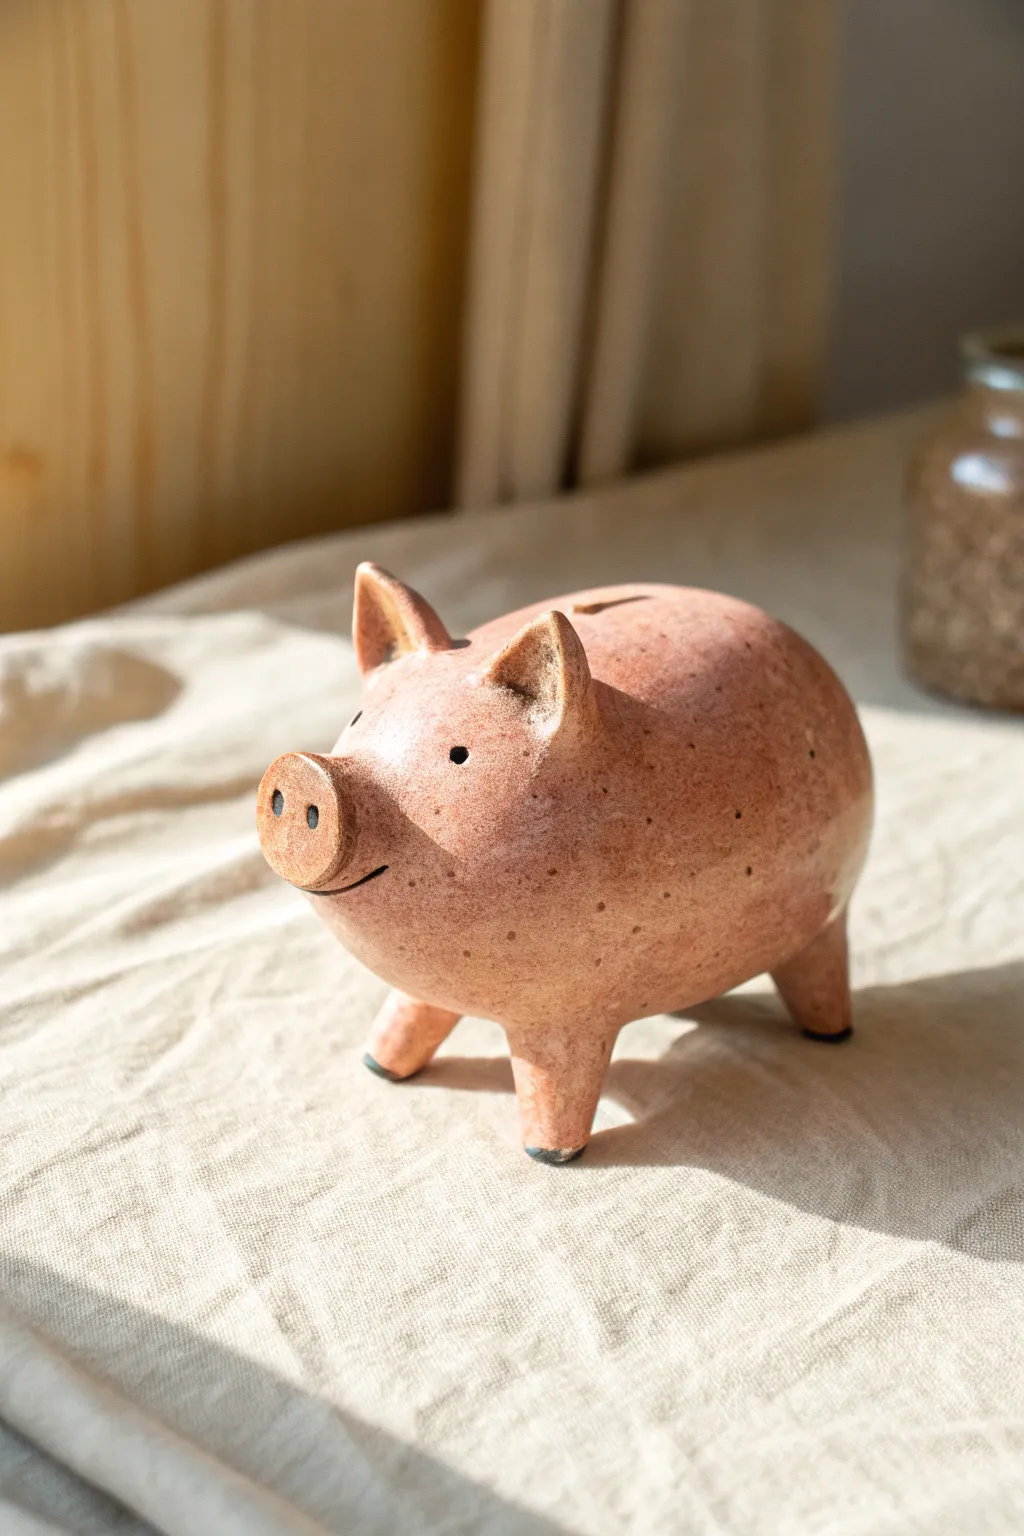
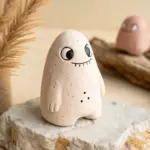
Capture the charm of traditional pottery with this delightful, speckled clay pig figurine. Its organic shape, soft pink glaze, and sturdy stance make it a perfect beginner-friendly project that radiates rustic warmth.
How-To Guide
Materials
- Spectled stoneware clay or polymer clay (terra cotta color)
- Potter’s needle tool
- Wooden modeling tool
- Small sponge
- Slip (clay mixed with water) for joining
- Scoring tool or old toothbrush
- Gloss glaze (transparent or lightly tinted pink)
- Kiln (if using stoneware) or Oven (if using polymer)
Step 1: Forming the Body
-
Prepare the main shape:
Start with a large ball of clay roughly the size of a grapefruit. Use your palms to gently roll and pat it into an elongated oval shape, slightly wider at the back than the front. -
Smooth the surface:
Run your hands over the clay to remove any major bumps or ridges. I like to use a slightly damp sponge here to get that preliminary smoothness before adding details. -
Hollow the form (optional):
If making a bank, slice the bottom off, hollow out the inside with a loop tool leaving 1/4 inch walls, and reattach the bottom slab. If making a solid figurine, ensure your clay is free of air bubbles.
Leg Balance Check
Before the clay hardens, tap the pig gently on a flat table. This flattens the bottom of the feet slightly and ensures he stands perfectly stable without wobbling.
Step 2: Legs and Snout
-
Shape the legs:
Roll four equal-sized cylinders of clay approximately 1 inch long. Taper them slightly toward the bottom so they look sturdy but elegant. -
Attach the legs:
Score the underside of the body and the top of each leg deeply. Apply a generous amount of slip to both surfaces. -
Blend the seams:
Press the legs firmly onto the body. Use a wooden tool to drag clay from the leg onto the body (and vice versa) to erase the seam, then smooth the join with your finger. -
Create the snout:
Form a flat, thick disk or button of clay. Score the front of the face and the back of the disk, add slip, and press it firmly onto the narrower end of the body. -
Detail the nose:
Use the back of a paintbrush or a medium-sized dotting tool to press two distinct nostril indentations into the snout disk.
Curly Tail Addition
Roll a very thin snake of clay and coil it around a pencil to create a perfect spring-shaped tail. Attach it to the rear using score and slip for extra character.
Step 3: Ears, Eyes, and Tail
-
Shape the ears:
Flatten two small balls of clay into triangles. Gently pinch the sides to curve them slightly, mimicking a natural pig ear shape. -
Attach the ears:
Score and slip the spots on top of the head where the ears will sit. Press them on, ensuring they are upright and alert. -
Secure the join:
Use a small modeling tool to blend the clay at the base of the ears into the head so they don’t pop off during drying. -
Add the eyes:
Use a needle tool or small stick to poke two small, deep holes for the eyes. Position them halfway between the ears and snout. -
Carve the mouth:
Use a needle tool to slice a gentle, curved line under the snout to give your pig a subtle smile. -
Create the coin slot:
Carefully slice a rectangular slot into the top center of the back if you are creating a functioning piggy bank. -
Refine the surface:
Go over the entire piece with a damp sponge one last time to soften any sharp edges from your tooling and bring out the texture of the clay.
Step 4: Finishing and Firing
-
Slow drying:
Loosely cover the pig with plastic wrap to let it dry slowly over a few days. Uneven drying can cause cracks, especially around the leg joints. -
Bisque fire:
Once bone dry, fire the piece in a kiln to bisque temperature (or bake according to package instructions if using polymer clay). -
Apply glaze:
Brush on a translucent or semi-transparent pink glaze. This allows the natural speckles of the clay body to show through. -
Final fire:
Fire the piece again to the glaze temperature specific to your clay and glaze choice.
Place your finished pig on a sunny shelf where the light can catch the soft gloss of the glaze to highlight its charming form


Chubby Pig Head Magnet

This adorable, chubby pig magnet features a smooth, glossy finish and soft speckling for a ceramic-like appearance. With its cute blushing cheeks and dimensional snout, it makes for a charming, functional piece for your kitchen decor.
Step-by-Step
Materials
- Polymer clay (pale beige or translucent white mixed with a tiny drop of orange/brown)
- Polymer clay (pink for snout and ears)
- Black polymer clay (or black acrylic paint)
- Pink soft pastel chalks (for cheeks)
- Black peppercorns or faux speckle inclusions (optional)
- Glossy UV resin or high-gloss glaze
- Strong neodymium magnet
- Super glue or E6000
- Dotting tools
- Sharp blade or clay knife
- Small paintbrush
- UV lamp (if using UV resin)
Step 1: Base Shaping
-
Mix the color:
Start by mixing your main clay body. You want a creamy, pale beige that mimics skin tone. If you want that realistic speckled look shown in the photo, knead in a tiny pinch of ground black pepper or faux granite inclusions. -
Form the head:
Roll a ping-pong ball sized amount of clay into a smooth sphere. Gently press it down onto your work surface to flatten the back, creating a thick dome or rounded oval shape. Smooth out any fingerprints. -
Add the ears:
Pinch off two tiny pealike balls of the beige clay. Shape them into rounded triangles. Attach these to the top corners of the head, blending the back seams so they attach firmly but stand up slightly. -
Detail the ears:
Take a very small dotting tool and gently press into the center of each ear triangle to create the inner ear cavity. I like to add a tiny smear of pink pastel dust inside these dents before baking for depth.
Sticky Situation?
If the back of your magnet keeps peeling off, score the baked clay back with a craft knife to create a rough texture before gluing. This helps the adhesive grip better.
Step 2: Face Features
-
Create the snout:
Roll a small ball of pink clay and flatten it slightly into an oval. Press this firmly into the lower center of the face. It should stick out dimensionally. -
Add nostrils:
Using a small ball tool or stylus, press two vertical oval indentations into the pink snout. Angle them slightly outward for a cute expression. -
Place the eyes:
Make two tiny balls of black clay. Position them wide apart, just above the snout level. Press them flat so they sit flush with the surface of the face. -
Add blush:
Scrape some pink pastel chalk into a powder. Use a soft, dry paintbrush to gently dab a circle of pink powder onto the cheeks below the eyes. Build the color slowly for a natural airbrushed look. -
Bake the piece:
Bake the clay according to the manufacturer’s instructions (usually 275°F/135°C for 15-30 minutes). Let it cool completely before moving to the next phase.
Step 3: Finishing Touches
-
Prepare the glaze:
Once cool, wipe the surface gently to ensure no dust is sticking to the clay. Prepare your UV resin or high-gloss varnish. -
Apply resin:
Pour a generous amount of resin onto the center of the face. Use a toothpick or brush to guide the liquid to the edges, covering the eyes, snout, and ears seamlessly. -
Pop bubbles:
Check closely for air bubbles. If you see any, pass a lighter quicky over the surface or pop them with a pin. -
Cure the glaze:
Place under a UV lamp for 2-4 minutes until the surface is rock hard and non-tacky. If using regular varnish, let it dry overnight in a dust-free box. -
Attach the magnet:
Flip the pig over. Apply a dab of strong super glue or E6000 to the center of the flat back. -
Secure and dry:
Press your neodymium magnet into the glue. Let the adhesive cure fully for 24 hours to ensure it can hold up papers on the fridge without popping off.
Glassy Finish Tip
Warm your UV resin bottle in a bowl of warm water for 5 minutes before applying. This thins the liquid, helping bubbles escape faster for a crystal-clear coat.
Now your little piggy is ready to brighten up your kitchen and keep your important notes safe


Pig Trinket Dish With Snout Details
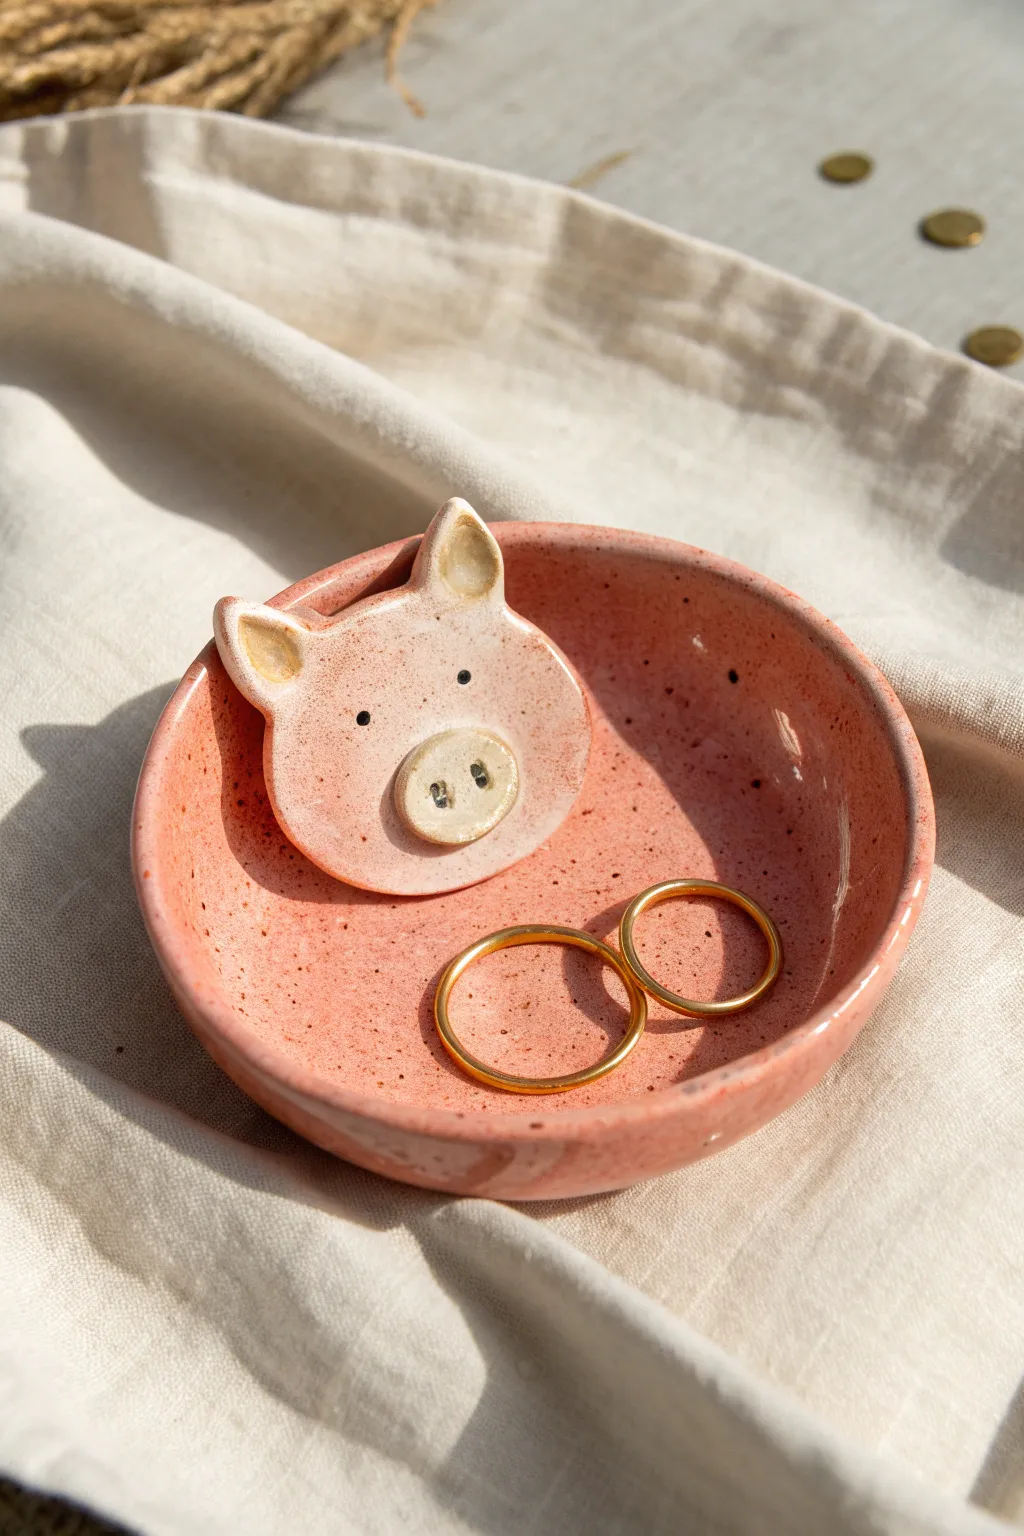
This adorable trinket dish features a charming pig face peering over the rim, perfect for guarding your favorite rings and small jewelry. The soft pink glaze and speckled finish give it a warm, handmade feel that adds character to any bedside table.
Step-by-Step Guide
Materials
- Pink polymer clay or air-dry clay (light rose colored)
- White clay (small amount for snout/ears)
- Black acrylic paint or clay (for eyes/nostrils)
- Clay rolling pin
- Circle cutter (approx. 4 inches)
- Small bowl (for forming shape)
- Needle tool or toothpick
- Slip (if using ceramic clay) or liquid clay/bakeable bond (if polymer)
- Glossy glaze or polyurethane varnish
- Soft paintbrush
- Sponge or sandpaper
Step 1: Forming the Base Dish
-
Condition the clay:
Begin by kneading your pink clay until it is soft, pliable, and free of any air bubbles. If you want the speckled look shown in the photo, mix in a tiny pinch of black pepper or craft sand into your clay body now. -
Roll out the slab:
Roll the clay out to an even thickness of about 1/4 inch. Try to keep the surface smooth and consistent. -
Cut the circle:
Use your 4-inch circle cutter (or a bowl rim as a guide) to cut a perfect circle from the slab. -
Create the curve:
Gently lift the clay circle and place it inside a small bowl lined with plastic wrap. Press it lightly so it takes on a shallow curved shape, forming the dish. -
Smooth the edges:
Dip your finger in a little water (for pottery clay) or baby oil (for polymer) and run it along the rim of the dish to smooth out any sharp or rough cutting lines.
Faux Ceramic Look
Mix black pepper or used coffee grounds directly into white polymer clay before sculpting. It creates an authentic ‘speckled stoneware’ effect without needing a kiln.
Step 2: Sculpting the Pig Face
-
Shape the head:
Roll a separate piece of pink clay into a slightly flattened oval about 1.5 inches wide. This will be the main face piece. -
Form the ears:
Pinch two small triangles of pink clay. Gently indent the centers with a modeling tool or your pinky finger to give them depth. -
Add inner ear details:
Take tiny teardrops of cream or white clay and press them into the indented centers of the ears to create contrast. -
Make the snout:
Roll a small ball of cream-colored clay and flatten it into a thick disc. This will serve as the prominent snout. -
Assemble the face features:
Attach the ears to the top two corners of the head oval. Then, place the snout disc on the lower center of the face. -
Detail the face:
Use a needle tool to poke two small holes into the snout for nostrils. Use the blunt end of a paintbrush or a dotting tool to mark the position for the eyes.
Step 3: Assembly and Finishing
-
Attach face to dish:
Score the back of the pig head and the inside rim of your formed dish. Apply slip or liquid bond, then press the head firmly against the inner wall of the bowl relative to how it rests in the mold. -
Blend the join:
On the back side of the dish, gently smooth the clay where the head meets the rim so it looks like one cohesive piece rather than just stuck on. -
Initial dry/bake:
If using air-dry clay, let it dry for 24-48 hours. If using polymer clay, bake according to package instructions (usually 275°F for 15-30 mins). -
Paint the details:
Once hardened and cool, use a fine-tip brush and black paint to fill in the eyes and the nostril indents. I like to keep the eyes simple dots for a cute, minimalist look. -
Apply speckles:
To enhance the ceramic look if you didn’t mix speckles in earlier, dilute some brown acrylic paint and gently flick it onto the dish using an old toothbrush. -
Seal the piece:
Finish by applying a coat of high-gloss glaze or varnish over the entire piece. This protects the paint and gives it that shiny, fired-ceramic appearance.
Curly Tail Addition
Don’t forget the back. Roll a tiny snake of pink clay and coil it into a corkscrew. Attach it to the outside of the bowl directly behind the face for a complete piggy.
Place your new porcine friend on your dresser to keep your daily jewelry safe and organized


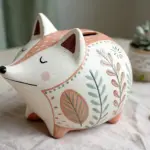
Pig Planter for a Tiny Succulent
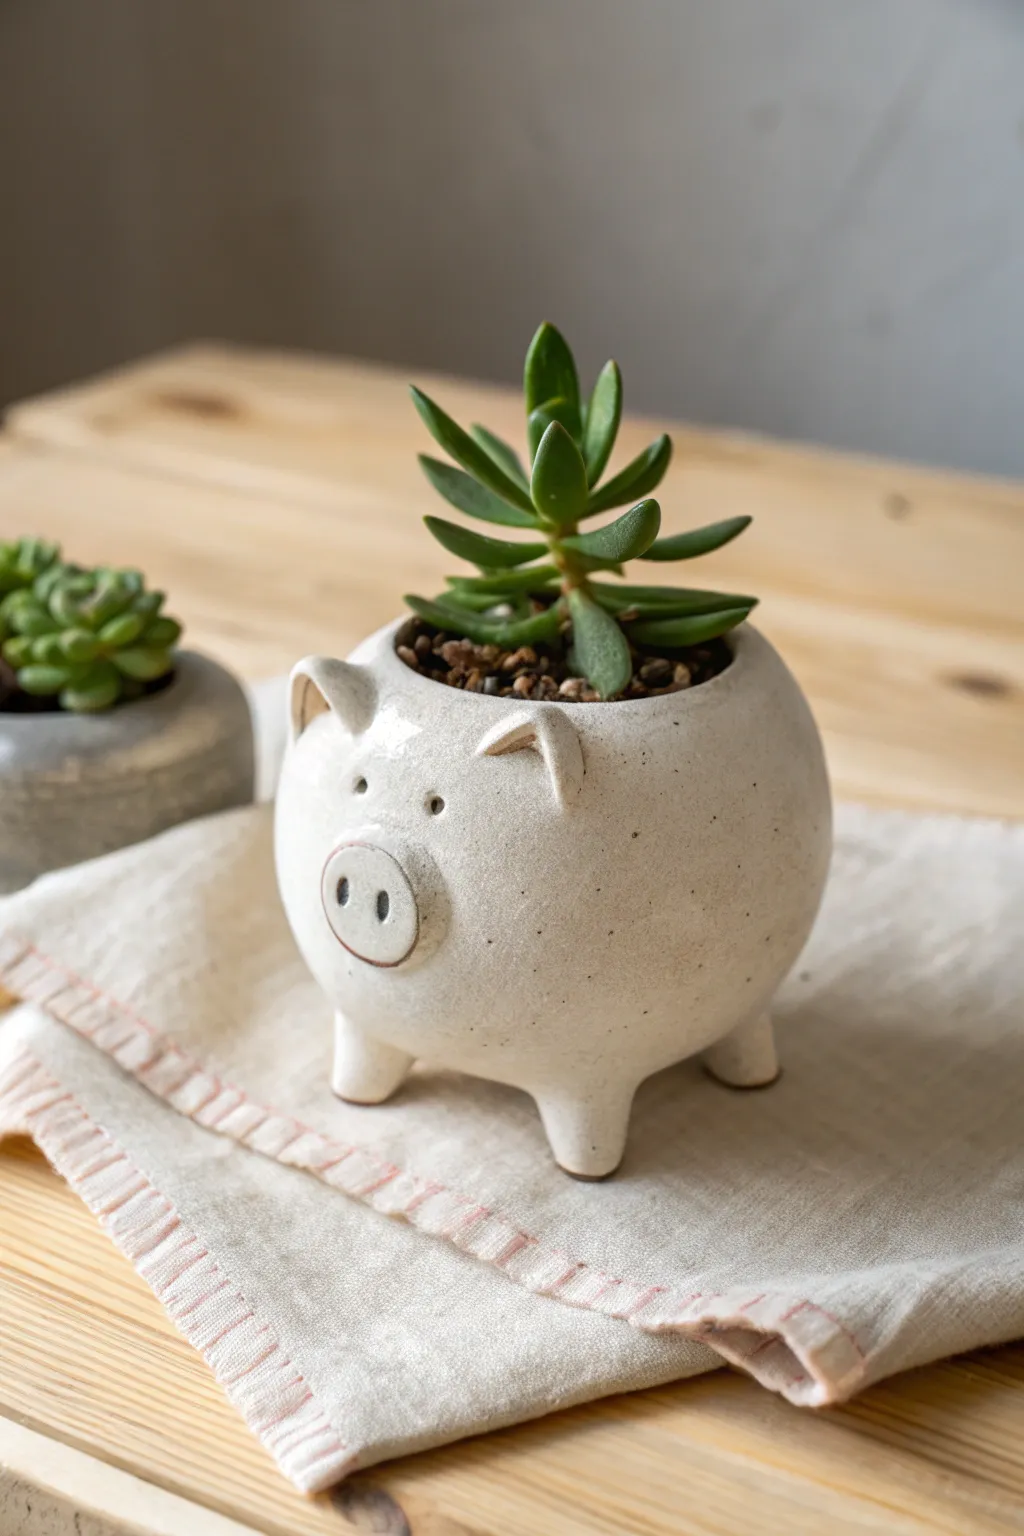
This adorable little pig planter captures a minimalist charm with its rounded form and speckled cream glaze. Perfect for housing a small succulent, this handmade ceramic piece adds a touch of whimsy to any desk or windowsill.
Step-by-Step Tutorial
Materials
- White stoneware clay (preferably with speckles)
- Pottery wheel (or can be hand-built)
- Rib tool
- Sponge
- Pin tool or needle tool
- Slip (liquid clay)
- Scoring tool
- Small loop tool or drill bit (for drainage)
- Creamy white dipping glaze (gloss or satin)
- Kiln for firing
Step 1: Forming the Body
-
Throw the base form:
Start by centering a small ball of clay (about 1 lb) on the wheel. Open it up and pull the walls into a rounded, enclosed sphere shape, leaving a circular opening at the top about 3 inches wide. -
Refine the curve:
As you shape the walls, use a rib tool on the outside to create a smooth, continuous curve that bulges out slightly, giving the pig a nice, plump belly appearance. -
Trim the base:
Once the form is leather hard, trim away excess clay from the bottom to ensure it’s rounded but has a defined area where the legs will attach. I find using a sharp trimming tool helps keep the walls even. -
Smooth the surface:
Take a slightly damp sponge and wipe down the exterior to remove any throwing ridges or trimming marks, aiming for a clean, uniform surface.
Step 2: Adding Features
-
Create the legs:
Roll four small, equal-sized cones of clay. Gently tap the wider ends on the table to flatten them for attachment points. -
Attach the legs:
Score the bottom of the pot and the top of the legs. Apply slip and press the legs firmly into place, four-square style. Blend the seams completely so the legs look like they are growing out of the body. -
Check stability:
Flip the pig over and gently tap it on a flat surface to make sure all four legs touch evenly so it doesn’t wobble. -
Form the snout:
Roll a small ball of clay and flatten it into a thick disc. This will become the characteristic pig snout. -
Attach the snout:
Score and slip the front center of the pot and the back of the disc. Press it on securely, blending the edges just slightly while keeping the disc shape distinct. -
Make the nostrils:
Use the blunt end of a paintbrush or a small modeling tool to press two deep, oval indentations into the snout disc. -
Shape the ears:
Form two small triangles from a slab of clay. Gently curve them forward to mimic alert animal ears. -
Attach the ears:
Score and slip the placement spots near the rim on top of the head. Attach the ears, blending the clay at the base for a strong bond. -
Create the eyes:
Using a small needle tool or a tiny drill bit, poke two small, shallow holes above the snout to create the eyes. Keep them simple and minimalist. -
Add drainage:
Don’t forget to drill a hole in the very bottom of the planter to allow water to escape, which is crucial for succulent health.
Air Pocket Safety
When attaching the thick snout disc, poke a tiny hidden pinhole behind it (through the main wall) to let trapped air escape during firing.
Step 3: Firing and Glazing
-
Bisque fire:
Allow the piece to dry completely (bone dry) before loading it into the kiln for a bisque firing (usually to Cone 04). -
Prepare the glaze:
Select a creamy white glaze. If your clay body doesn’t have speckles, you can mix a small amount of granular ilmenite into the glaze to achieve that spotted effect. -
Apply glaze:
Dip the entire piece into the glaze bucket for an even coat. Shake off excess glaze carefully. -
Clean the feet:
Wipe the bottoms of the four legs clean with a wet sponge to prevent them from sticking to the kiln shelf. -
Glaze fire:
Fire the piece again to the maturation temperature of your clay and glaze (often Cone 5 or 6). Once cool, it’s ready for planting.
Wobbly Pig?
If the legs are uneven after attaching, place a wooden board on top of the inverted legs and gently tap. This levels them all simultaneously.
Now you have a charming ceramic companion ready to hold your favorite little plant

The Complete Guide to Pottery Troubleshooting
Uncover the most common ceramic mistakes—from cracking clay to failed glazes—and learn how to fix them fast.
Pig Ornament for Shelves or Trees
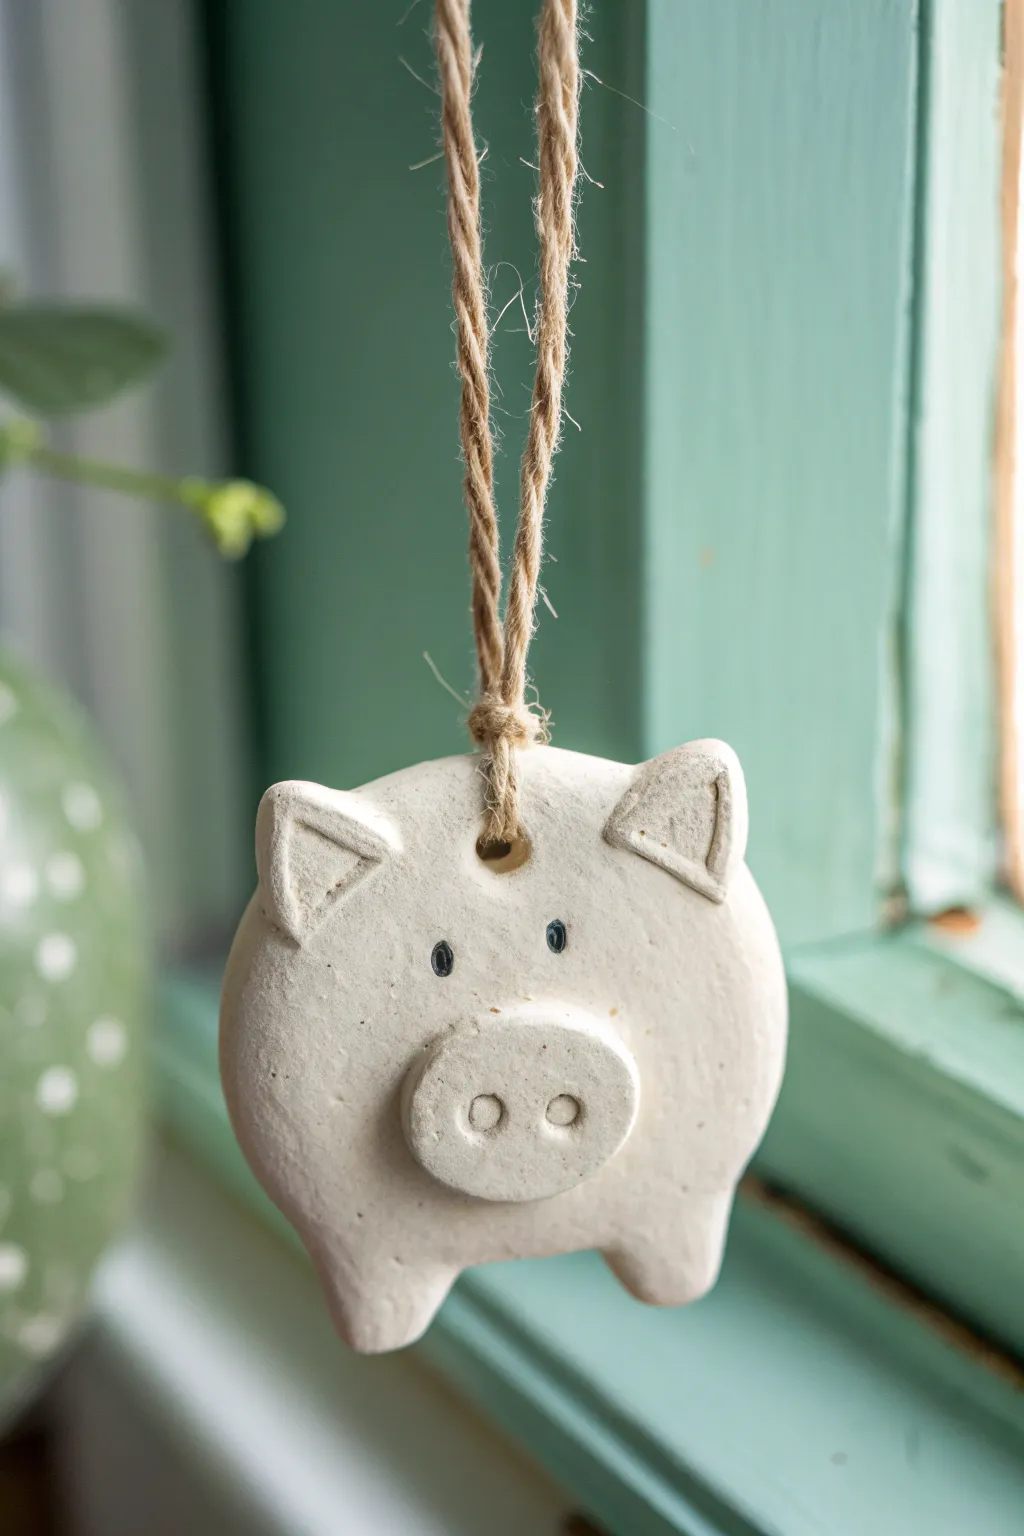
This charming, minimalist pig ornament brings a touch of farmhouse whimsey to any tree or window latch. Its textured, matte white finish and simple jute hanger create an effortless handmade look that pairs perfectly with rustic decor.
Detailed Instructions
Materials
- White air-dry clay or polymer clay
- Rolling pin
- Circle cookie cutter (approx. 2.5 – 3 inches)
- Small circle cutter or bottle cap (for snout)
- Craft knife or clay tool
- Straw or toothpick for piercing hole
- Small round tool or end of paintbrush (for nostrils)
- Black acrylic paint
- Fine-point paintbrush or toothpick
- Water and sponge for smoothing
- Jute twine or hemp cord
Step 1: Shaping the Base
-
Prepare the Clay:
Start by kneading a handful of white clay until it is soft, pliable, and free of cracks. If usage feels sticky, dust your surface lightly with cornstarch. -
Roll It Out:
Use your rolling pin to flatten the clay to an even thickness, roughly 1/4 inch thick. Make sure it isn’t too thin, or the legs might be fragile. -
Cut the Main Body:
Press your large circle cutter firmly into the clay to create the main round shape of the pig’s body. -
Form the Legs:
Instead of adding separate legs, we will pull them from the circle. Gently pinch and pull the bottom of the circle on the left and right sides to elongate two short, stubby legs. -
Refine the Shape:
Tap the bottom of the legs on your work surface to flatten them slightly so they look uniform. Smooth out any finger marks with a damp sponge.
Step 2: Adding Details
-
Create the Snout:
Roll a small piece of leftover clay flat and cut out a smaller circle using a bottle cap or small cutter. This should be about 1/3 the size of the body. -
Attach the Snout:
Score the back of the snout and the center of the pig’s face with a needle tool. dab a little water (slip) on the scored areas and press the snout firmly into place near the bottom center. -
Make the Nostrils:
Using the back of a paintbrush or a small round tool, press two distinct indentations into the snout to create the nostrils. -
Cut the Ears:
Roll a small scrap of clay and cut two identical triangles using your craft knife. Soften the sharp points slightly with your finger. -
Attach the Ears:
Score and slip the top corners of the pig’s head. Press the triangle ears onto the top edge, angling them slightly outward. -
Detail the Ears:
Use a clay tool or toothpick to press an indented triangle shape inside each ear. This adds depth and mimics the look of the photo perfectly. -
Create the Hanger Hole:
Use a straw to punch a clean hole directly between the ears at the top of the head. Ensure it goes all the way through and has enough clay above it to support the weight.
Cracking Up?
If you see tiny cracks forming as the clay dries, dip your finger in a sludge of clay and water (slip) and rub it gently into the fissures to seal them.
Step 3: Finishing Touches
-
Dry the Clay:
Let the ornament dry completely according to your clay package instructions. I find flipping it over halfway through the drying process helps keep it perfectly flat. -
Paint the Eyes:
Once fully dry and hard, dip the very tip of a fine paintbrush or a toothpick into black acrylic paint. Dot two small, vertical oval eyes just above the snout. -
Let Paint Set:
Allow the black paint to dry completely. Since the dots are small, this should only take a few minutes. -
Thread the Twine:
Cut a length of jute twine, about 8-10 inches long. Fold it in half to create a loop. -
Secure the Hanger:
Push the folded end of the twine through the hole from front to back, then pull the loose ends through the loop to create a lark’s head knot. -
Tie it Off:
Determine how low you want the ornament to hang, then tie a simple overhand knot with the loose ends of the twine to finish the loop.
Make It Glossy
For a ceramic look without the kiln, coat the dry clay with a layer of Mod Podge or clear acrylic sealer to give the matte surface a shiny, glazed finish.
Now hang your adorable porker in a sunny spot and enjoy its simple charm
Pig Keychain-Style Tag
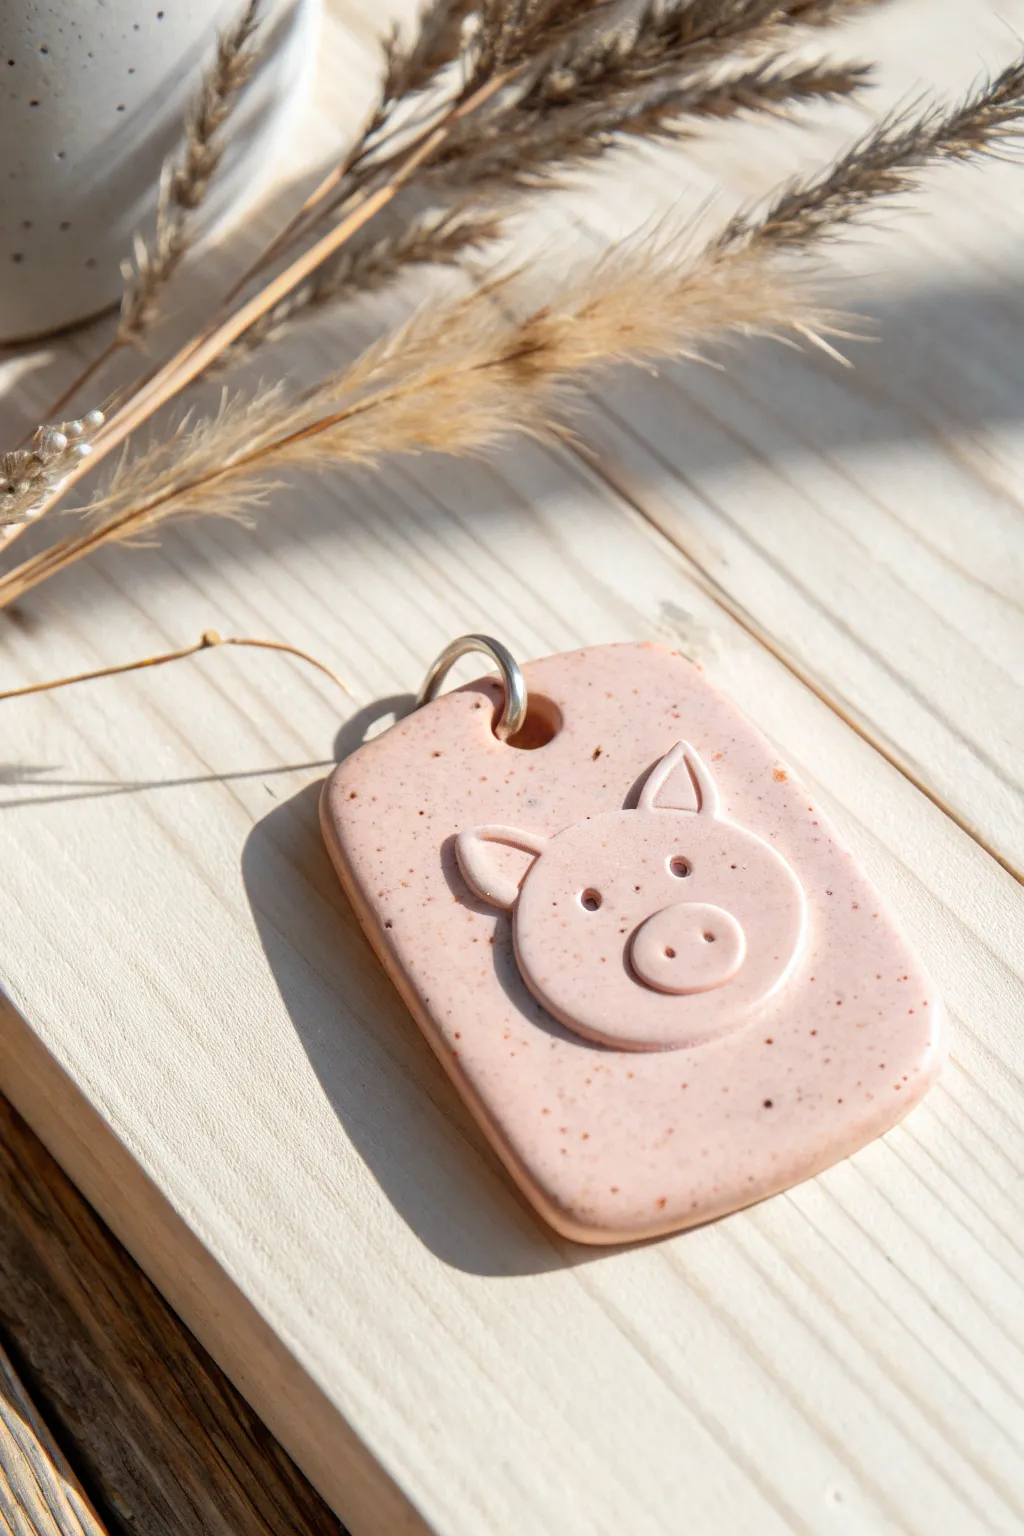
This charming project features a minimalist, raised-relief pig face on a rectangular tag, crafted from beautiful speckled clay. With its smooth matte finish and distinct texture, it makes an adorable keychain or a unique gift tag.
Detailed Instructions
Materials
- Polymer clay (Speckled pink or granite beige)
- Small rolling pin
- Rectangle clay cutter (approx. 1.5″ x 2″)
- Round cutters (various small sizes for the head)
- Small ball stylus or dotting tool
- Clay knife or craft blade
- Jump ring (silver)
- Parchment paper
- Oven
Step 1: Preparing the Base
-
Condition the clay:
Begin by kneading your speckled polymer clay until it is soft, pliable, and free of cracks. Warm clay is much easier to work with. -
Roll the slab:
Roll out a sheet of clay to a thickness of about 4-5mm. You want it substantial enough to be durable as a keychain. -
Cut the tag shape:
Use your rectangle clay cutter to punch out the main tag shape. If you don’t have a cutter, you can cut a neat rectangle freehand with your craft blade. -
Smooth the edges:
Gently run your finger around the perimeter of the rectangle to soften the sharp cut edges, giving it a more finished, stone-like look. -
Add the hardware hole:
Use a small straw or a tool to poke a hole at the top center of the rectangle for the jump ring. Make sure it’s not too close to the edge to prevent tearing.
Uneven Surface?
If your clay has fingerprints after sculpting, dip your finger in a tiny bit of rubbing alcohol or baby oil and gently glide it over the surface to melt them away.
Step 2: Sculpting the Pig Face
-
Create the head:
Roll out a slightly thinner sheet of the same clay (about 2-3mm). Cut out a circle for the pig’s head using a round cutter. -
Attach the head:
Place the circle onto the lower center of your rectangle tag. Press it down gently to bond the layers without distorting the shape. -
Form the snout:
Cut a significantly smaller oval or circle for the snout. Position this near the bottom center of the head circle. -
Detail the nose:
Using a small ball stylus, press two small indentations into the snout to create the nostrils. -
Add the ears:
Cut two tiny triangles for the ears. I find it helpful to slightly curve the triangles before attaching them to the top of the head circle. -
Refine the ears:
Use a modeling tool or the back of your knife to press a small indentation into the center of each ear, defining the inner ear shape. -
Create the eyes:
Use your ball stylus again to press two small, wide-set holes above the snout for the eyes.
Step 3: Finishing Touches
-
Final smoothing:
Check for any fingerprints. You can lightly brush the surface with a tiny bit of cornstarch or baby oil to smooth them away before baking. -
Bake:
Bake the piece according to your polymer clay package instructions. Usually, this is around 275°F (135°C) for 15-30 minutes. -
Cool down:
Let the clay cool completely in the oven or on a flat surface. It will be slightly soft when hot but hardens as it cools. -
Install hardware:
Open a sturdy silver jump ring using pliers. Thread it through the hole you made earlier and close it securely.
Clean Edges Pro Tip
Place a piece of plastic wrap over the clay before using your cutters. This creates a soft, rounded bevel on the edges instantly, saving you sanding time later.
Now your adorable speckled pig tag is ready to hang on your keys or bag


What Really Happens Inside the Kiln
Learn how time and temperature work together inside the kiln to transform clay into durable ceramic.
Flying Pig With Little Wings
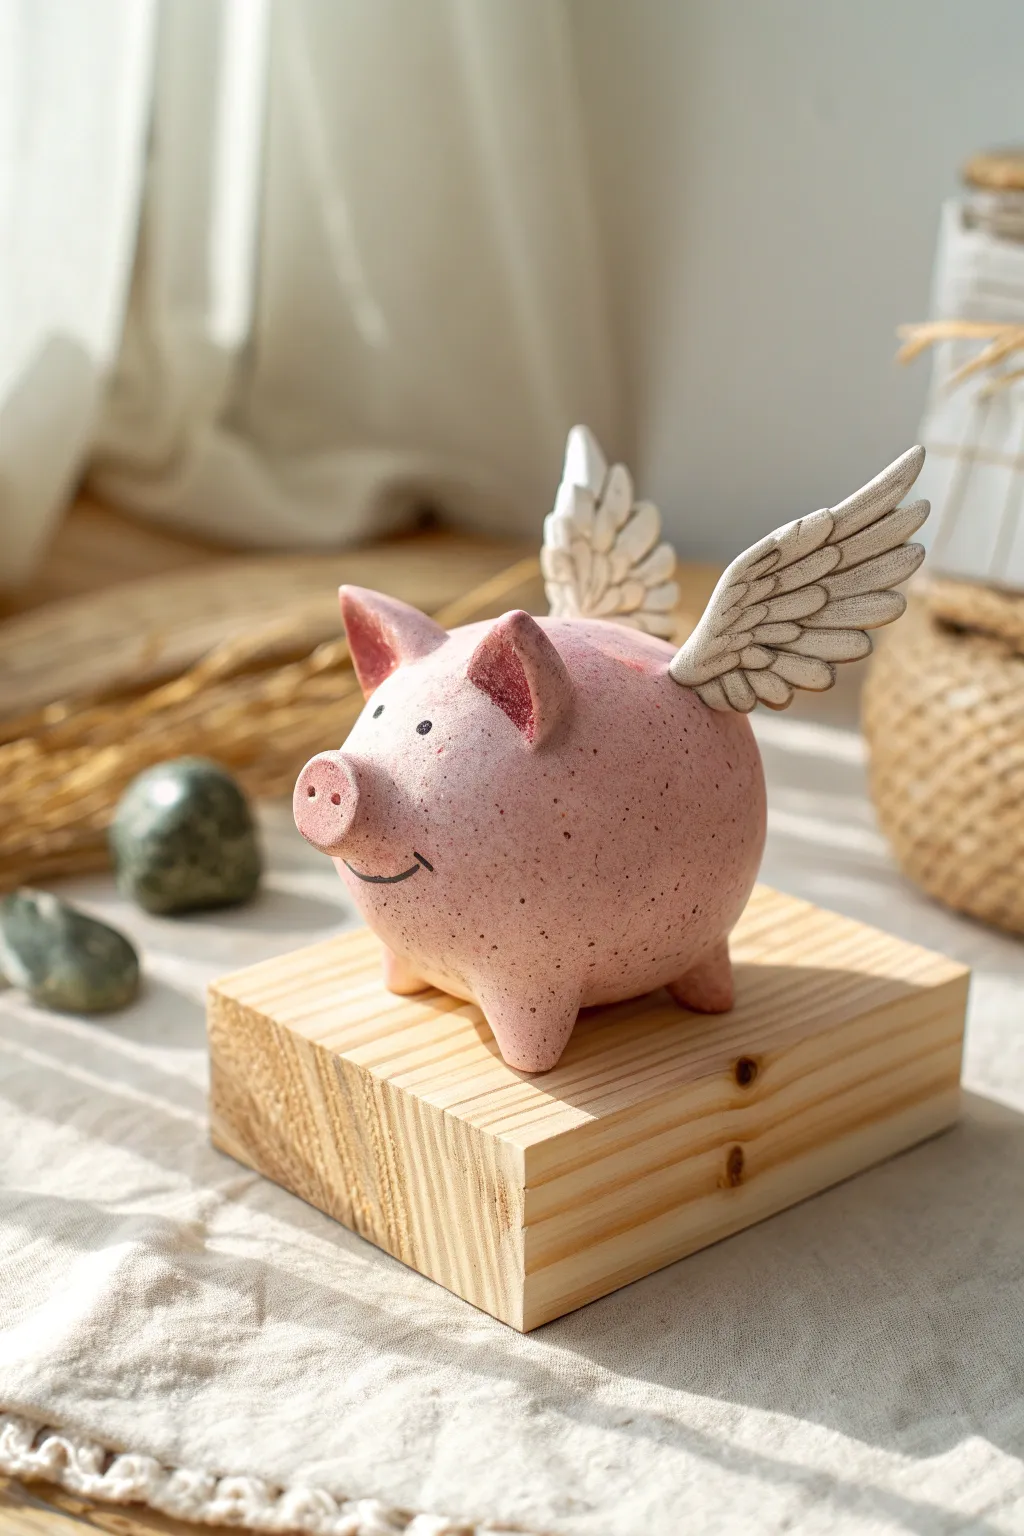
This charming ceramic pig features delicate, feather-like wings and a speckled pink finish that gives it a rustic, handmade character. With its simple round body and upturned snout, this flying pig adds a touch of playful magic to any shelf or desk.
How-To Guide
Materials
- Air-dry clay or polymer clay (white or light pink)
- Acrylic paints (pastel pink, dark pink, antique white/cream, black)
- Sculpting tools (needle tool, modeling tool)
- Small paintbrush
- Old toothbrush (for speckling)
- Wire or toothpicks (for internal support)
- Water cup (for smoothing)
- Clear matte varnish
Step 1: Shaping the Base Idea
-
Form the main body:
Start by rolling a large ball of clay about the size of an orange. Gently tap it on your work surface to create a slightly flattened bottom so the pig sits stable without rolling away. -
Add the feet:
Create four small, equal-sized cones of clay. Attach these to the underside of the body using the score-and-slip method (scratching both surfaces and adding water) to ensure a strong bond. -
Smooth the foundation:
Blend the seams of the legs into the body using your thumb or a modeling tool. The transition should be seamless, making the legs look like they are pulled directly from the main shape.
Wing Wobble?
If wings droop while drying, prop them up with crumpled aluminum foil or small sponges underneath until the clay hardens completely.
Step 2: Creating the Face
-
Sculpt the snout:
Roll a small oval of clay and flatten the front slightly. Attach this to the center of the face area. Use a needle tool or small ball stylus to press two distinct nostril indentations into the flat playing. -
Form the ears:
Shape two triangular pieces of clay. Press your thumb into the center of each to create the inner ear cavity. Attach them near the top of the head, blending the base of the ears into the skull. -
Carve the smile:
Using a needle tool or a thin blade, carve a gentle, curved line under the snout for the mouth. Add tiny tick marks at the ends of the smile for extra personality. -
Refine the eyes:
Use a small dotting tool to create shallow indentations where the eyes will be painted later. This helps anchor the gaze of your pig.
Step 3: Fabricating the Wings
-
Cut the wing shapes:
Roll out a slab of clay to about 1/4 inch thickness. Use a knife tool to cut out two majestic, tapered wing shapes similar to a bird’s spread wing. -
Detail the feathers:
Use a needle tool to draw horizontal lines separating the rows of feathers. Then, carve ‘U’ shapes along the bottom edge of each row to verify the feather texture. -
Create individual separation:
At the very tips of the wings, carefully slice between the feathers to separate them slightly, giving the wings a more realistic, airy appearance. -
Attach the wings:
I prefer to insert short pieces of wire or toothpick into the pig’s back for support. Slide the wings onto these supports and blend the clay at the shoulder attachment point firmly.
Go Metallic
For a magical twist, paint the wings with metallic gold or silver paint instead of cream, or dust shimmer powder over the wet speckles.
Step 4: Painting and Finishing
-
Base coat application:
Once fully dry, paint the entire body (excluding the wings) with a soft pastel pink acrylic paint. Apply two coats if necessary for opaque coverage. -
Paint the wings:
Paint the wings in an antique white or cream color. Let the paint settle into the carved grooves to highlight the texture. -
Add shading details:
Mix a slightly darker pink and dry-brush it inside the ears, on the snout, and lightly around the cheeks to add depth and warmth to the sculpture. -
Paint facial features:
Use a fine liner brush and black paint to carefully fill in the eye indentations and trace the carved smile line. -
Create the speckled effect:
Dilute a small amount of reddish-brown paint with water. Dip an old toothbrush into it and run your thumb across the bristles to flick tiny speckles all over the pig’s body for a ceramic look. -
Seal the project:
Once all paint is completely dry, apply a coat of clear matte varnish to protect your work and unify the finish.
Now your adorable flying pig is ready to bring a little impossible magic to your home decor
Pig Peek-a-Boo Cup Topper
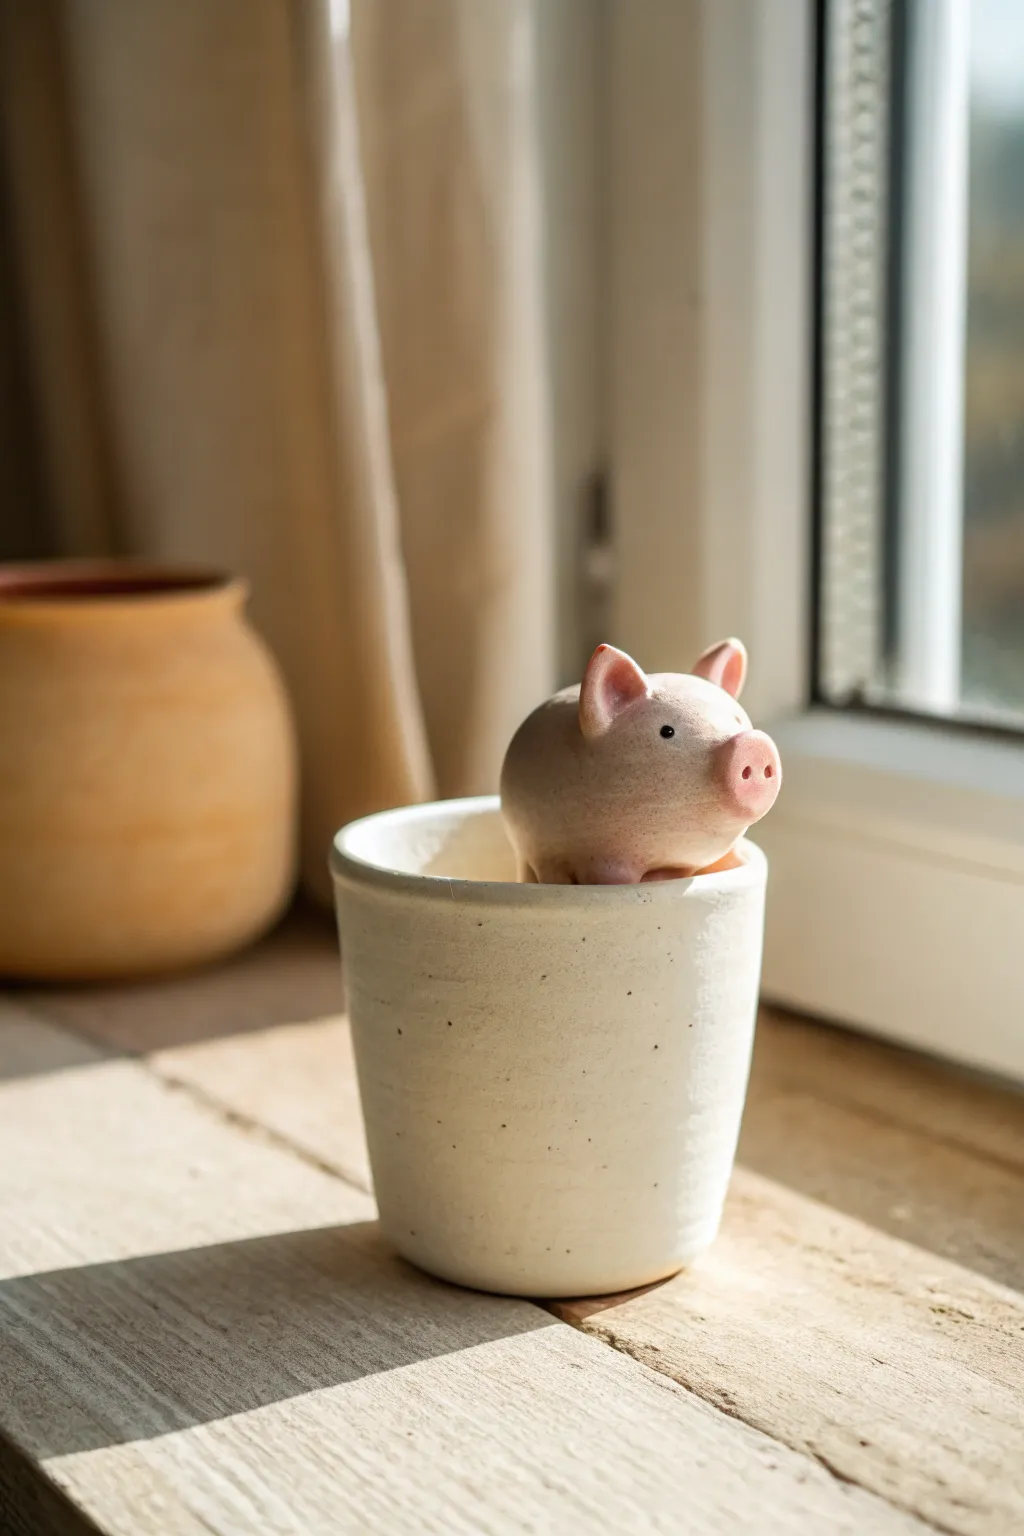
Add a touch of whimsy to your morning coffee with this charming ceramic project featuring a small pink pig peering over the rim of a speckled cup. This two-part sculpture creates a delightful illusion of a tiny friend hiding inside your drinkware.
Step-by-Step
Materials
- White stoneware or polymer clay (oven-bake)
- Speckled clay body (or white clay mixed with cracked pepper/sand for effect)
- Small rolling pin
- Pottery needle tool
- Sponge
- Slip (liquid clay) and scoring tool
- Soft pink underglaze or acrylic paint (depending on clay type)
- Black underglaze or fine-tip black marker
- Clear glaze or glossy varnish
- Cylindrical form (like a soda can) for shaping the cup
Step 1: Sculpting the Cup Base
-
Prepare the slab:
Begin by rolling out your speckled clay (or white clay with texture added) into a consistent slab about 1/4 inch thick. I find using wooden guide strips on either side helps keep the thickness perfectly even. -
Cut the rectangle:
Measure and cut a rectangular strip from the slab. The height determines your cup’s depth (aim for 2.5–3 inches) and the length should wrap fully around your chosen cylindrical form with a slight overlap. -
Form the cylinder:
Wrap the clay strip around your form. Score (scratch) the overlapping edges, apply a dab of slip, and press them firmly together to create a seam. Smooth this seam with a damp sponge or rib tool until it disappears. -
Create the base:
Roll a small ball of clay and flatten it into a circle slightly larger than the cylinder’s opening. Score the bottom edge of your cylinder and the edge of the circle. -
Attach the bottom:
Press the cylinder onto the base circle. Use a modeling tool to blend the clay from the base up onto the walls for a secure seal, then trim away any excess clay sticking out from the bottom. -
Smooth the form:
Remove the cylindrical form carefully. Use water and a sponge to smooth the rim and walls, giving it that organic, hand-thrown handmade look shown in the photo.
Step 2: Creating the Peeking Pig
-
Shape the body:
Using the pink-tinted or white clay, roll a smooth, egg-shaped oval. This will form the pig’s head and upper back. It needs to be sized so it looks like it’s emerging comfortably from the cup. -
Form the snout:
Take a tiny ball of clay, flatten it slightly into an oval, and attach it to the narrower creates end of the egg shape. Blend the edges seamlessly so it looks like one solid piece. -
Add nostrils:
Use the blunt end of a small paintbrush or a dotting tool to press two small indentations into the front of the snout. Keep them close together for a cute expression. -
Make the ears:
Shape two small triangles of clay. Gently pinch them to create a slight curve, mimicking a real pig’s ear shape. -
Attach the ears:
Score and slip the top of the head, then press the ears in place. Position them high and perky, angling them slightly forward. -
Define the legs:
Roll two small sausage shapes for the front legs. Attach these to the underside of the body, positioning them so they will look like they are resting over the rim of the cup. -
Test the fit:
This is crucial: Place the pig onto the rim of your still-damp cup. The legs should hang over the outside while the body rests inside. Gently press down to contour the pig’s belly to the cup’s distinct curve. -
Secure the pig (Optional):
If you want the pig permanently attached, score and slip the contact points heavily now. If you want it removable, leave it resting there during the drying phase so it retains the correct shape, but remove it before firing/baking.
Gravity Assistance
When drying the pig on the rim, place a crumpled ball of paper towel inside the cup underneath the pig’s body. This supports the weight so the clay doesn’t sag while it hardens.
Step 3: Finishing Touches
-
Dry and fire/bake:
Follow the specific instructions for your clay type. If using ceramic clay, slow dry it before the bisque fire. If using polymer, bake according to package directions. -
Painting details:
If your clay wasn’t pre-colored, paint the pig with a soft, dusty pink wash. Use a tiny dot of black for the eyes, placing them wide apart for character. -
Glazing:
Apply a clear, food-safe glaze over the entire cup (if ceramic) or a glossy varnish (if polymer). Leave the pig slightly more matte if you prefer a textural contrast, or glaze it for a unified shiny look.
Cracked Seams?
If the cup’s vertical seam starts to split while drying, create a ‘patch’ with very wet soft clay (vinegar helps too!) and smooth it over the crack, compressing the clay walls.
Now you have a sweet little companion to keep you company during your quiet moments by the window

TRACK YOUR CERAMIC JOURNEY
Capture glaze tests, firing details, and creative progress—all in one simple printable. Make your projects easier to repeat and improve.
Pig Earrings in Matching Pairs
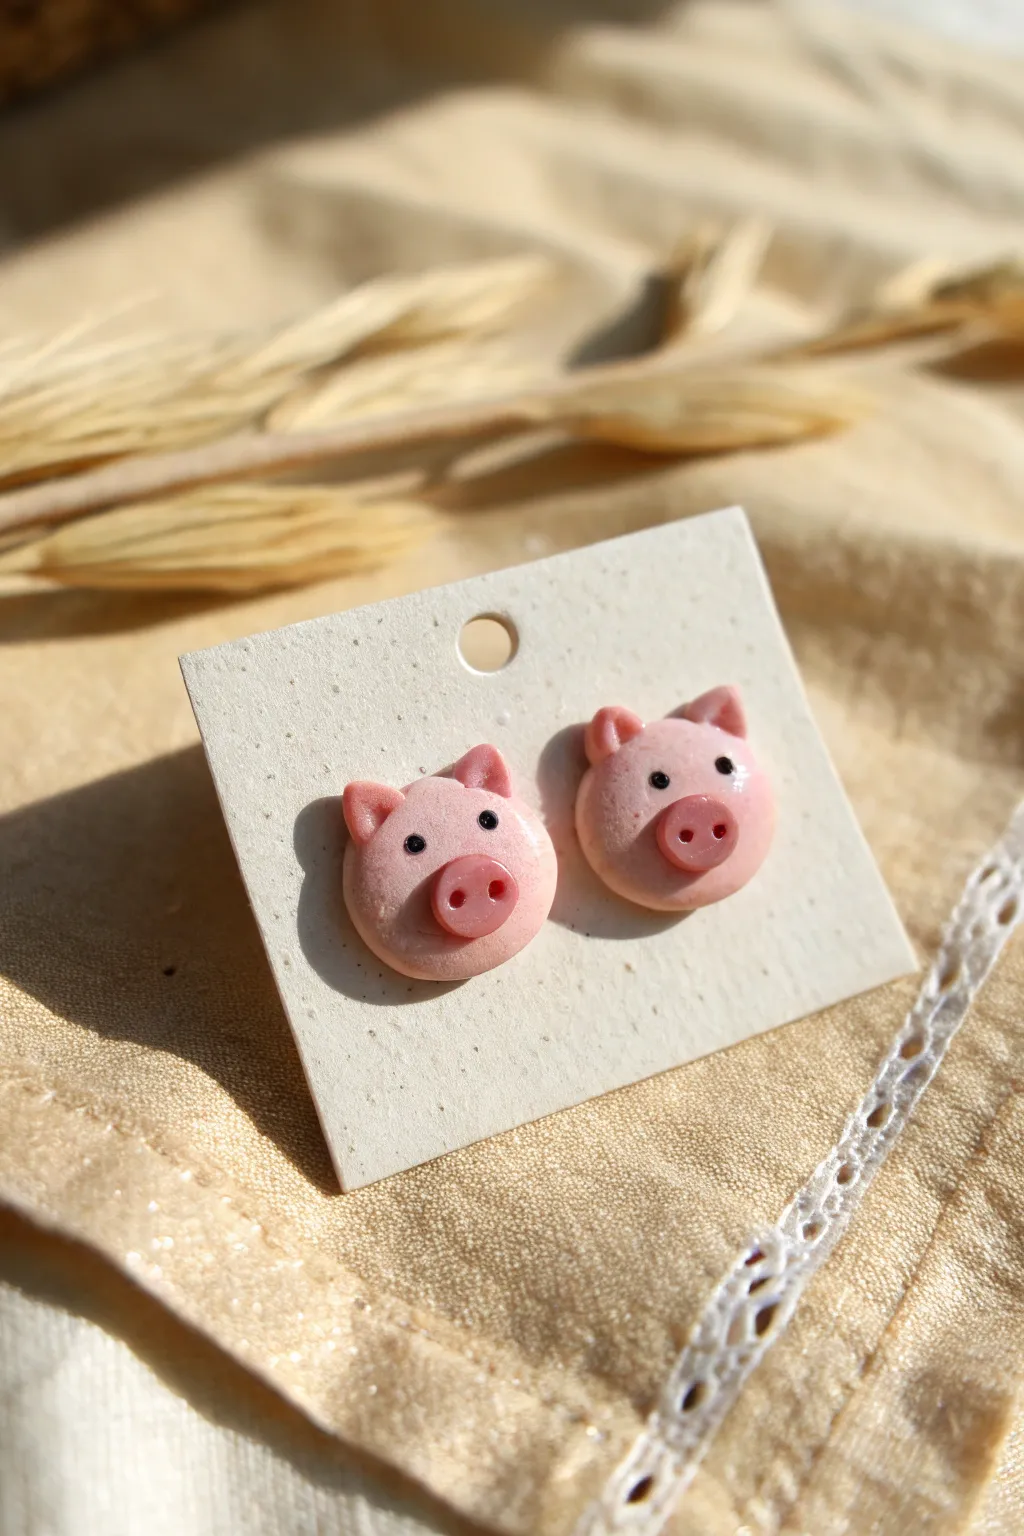
These adorable stud earrings feature simple, rounded shapes and a soft glossy finish that brings the little pigs to life. They make a sweet addition to any jewelry collection and are surprisingly simple to sculpt from polymer clay.
Step-by-Step Guide
Materials
- Polymer clay in light pink
- Polymer clay in a slightly darker pink (for the snout)
- Black acrylic paint or black liquid clay
- High-gloss varnish or UV resin
- Stainless steel earring posts
- Superglue or E6000 adhesive
- Small dotting tool or a toothpick
- Knife or cutting blade
- Needle tool
- Small paintbrush
- Oven for baking
Step 1: Forming the Base
-
Condition the clay:
Start by kneading your light pink polymer clay until it is soft and pliable. This prevents cracks and ensures a smooth finish on your earrings. -
Roll spheres:
Pinch off two equal amounts of the light pink clay. Roll each piece between your palms to form two smooth, identical spheres. -
Flatten the faces:
Place the spheres on your work surface and gently press down on them with your thumb or a flat tool. You want to create thick, rounded discs rather than flat pancakes, maintaining a soft, cushion-like shape. -
Smooth the edges:
Use your finger to gently tap around the circumference of each disc to round off any sharp edges created by flattening.
Step 2: Adding Features
-
Create the ears:
Take tiny pinched amounts of the light pink clay to make four very small triangles for the ears. -
Attach the ears:
Place two triangles at the top of each pig face, spacing them slightly apart. Gently press them onto the main disc to bond the clay. -
Shape the ears:
Use a small dotting tool or the rounded end of a paintbrush handle to gently press an indentation into the center of each ear triangle. This adds dimension and helps secure the ear to the head. -
Make the snouts:
Switch to your darker pink clay. Roll two tiny balls, then flatten them into small ovals. -
Place the snouts:
Position an oval snout in the center of the lower half of each face. Press down lightly so it sticks without losing its shape. -
Add nostrils:
Using a needle tool or a very fine dotting tool, poke two small holes into each snout oval to create the nostrils. -
Clean up:
Before baking, check for any fingerprints or lint. I like to use a tiny bit of baby oil on a brush to smooth these imperfections away quickly.
Clean Clay Pro Tip
Keep wet wipes or baby oil handy. Light pink clay shows dust easily, so wipe your hands and tools often while working to keep the color pure.
Step 3: Finishing Touches
-
Bake the clay:
Bake your clay pieces according to the manufacturer’s instructions on the package. Usually, this is around 275°F (130°C) for 15-30 minutes. -
Cool down:
Allow the clay pigs to cool completely before moving to the next step to ensure the clay hardens properly. -
Paint the eyes:
Using a very fine detail brush or a toothpick, dip into black acrylic paint. Carefully dot two small eyes above the snout. Keep them wide-set for a cuter look. -
Add highlights:
Once the black paint is dry, you can add an optional tiny speck of white paint to the eyes for a ‘sparkle’ effect, though plain black works perfectly too. -
Seal with gloss:
Coat the front and sides of each pig with a layer of high-gloss varnish or UV resin. This gives that shiny, ceramic-like finish visible in the photo. -
Attach posts:
Turn the pigs over. Apply a strong adhesive like E6000 to the flat pad of an earring post and press it firmly onto the back of the clay. -
Final cure:
Let the glue set for at least 24 hours (or cure instantly if using UV resin to bond the post) before wearing.
Level Up: Curly Tails
Make matching dangle earrings! Instead of studs, insert eye pins before baking, and add a tiny coiled wire tail hanging from the bottom.
Once dry, these charming little pigs are ready to be mounted on a card or worn to brighten your day
Pig Tile or Coaster With Impressed Face
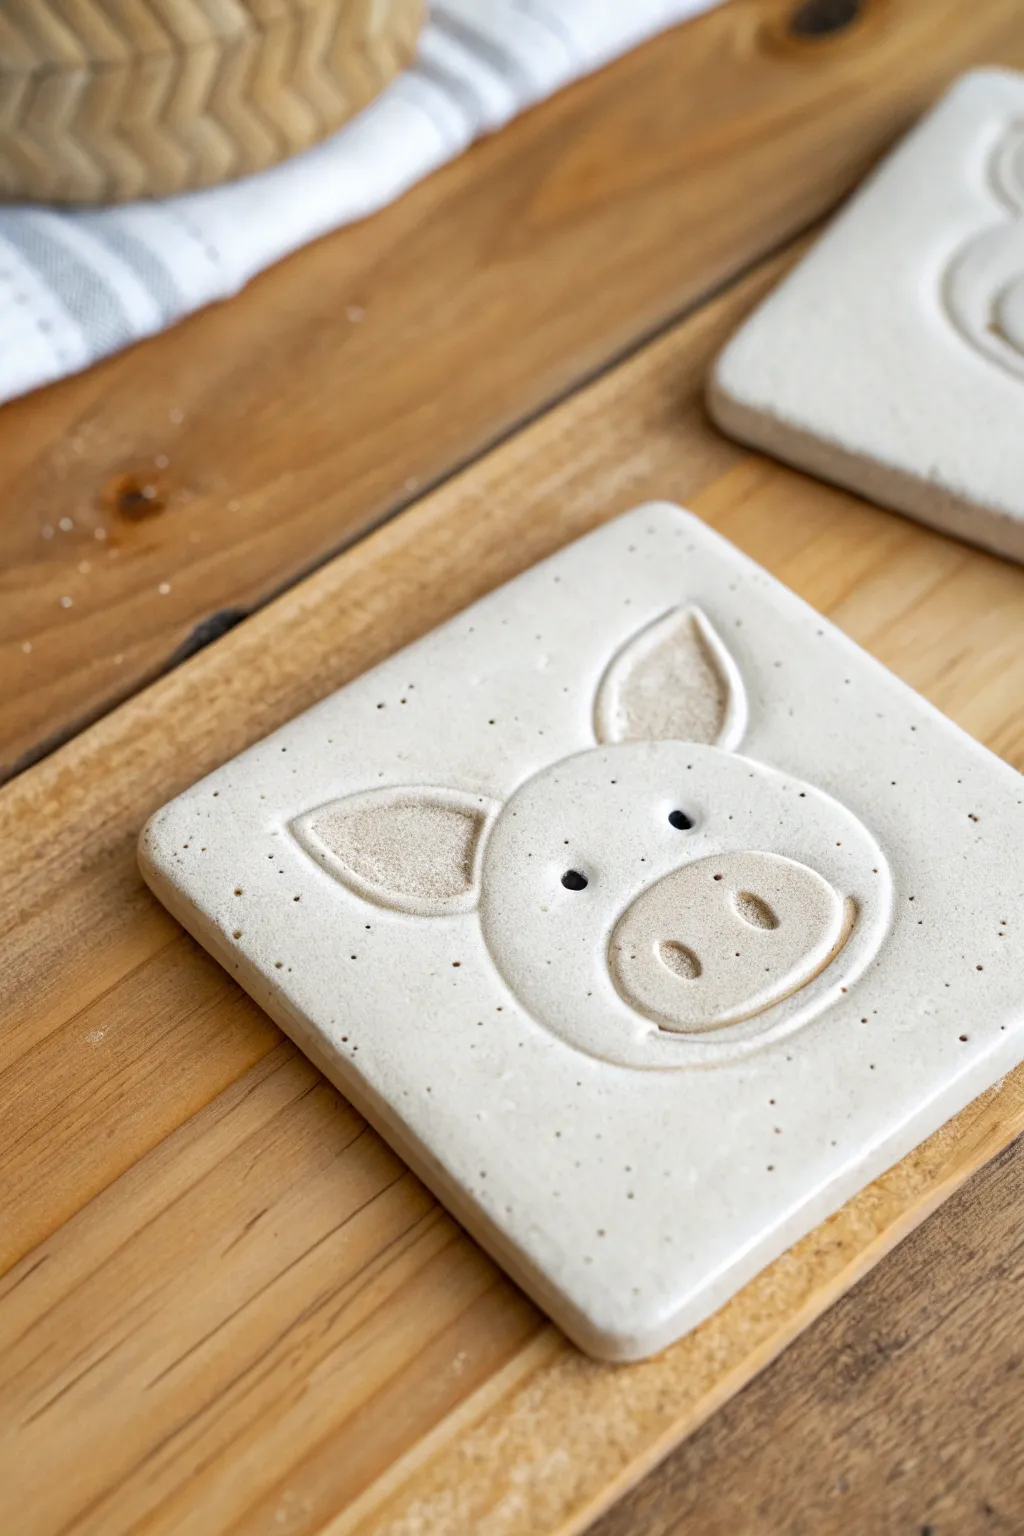
These charming coasters feature a sweet, simple pig face impressed directly into speckled clay for a modern farmhouse look. Perfect for beginners, this project relies on clean lines and texture rather than complex sculpting, resulting in a durable and functional piece of art.
Step-by-Step Guide
Materials
- Speckled stoneware clay (mid-fire)
- Square cookie cutter (approx. 4 inches) or ruler and knife
- Rolling pin with guide strips (1/4 inch thick)
- Small oval cutter or round object (for the snout)
- Needle tool or toothpick
- Small loop tool or carving tool
- Wooden modeling tool with a rounded tip
- Sponge
- Canvas or slab mat for rolling
- Kiln (or air-dry clay alternative for non-functional use)
Step 1: Preparing the Base
-
Wedge the clay:
Start by wedging a ball of speckled stoneware clay thoroughly to remove any air bubbles, which ensures a smooth surface for your design. -
Roll out the slab:
Using guide strips or two wooden rulers as depth gauges, roll the clay out into an even slab about 1/4 inch thick. I find this thickness is substantial enough to prevent warping but thin enough to fire well. -
Smooth the surface:
Before cutting, take a damp sponge or a flexible rib tool and gently compress the clay surface to remove canvas texture and smooth out any imperfections. -
Cut the square:
Press your square cookie cutter firmly into the clay. If you don’t have a cutter, measure a 4×4 inch square with a ruler and cut cleanly with a potter’s knife or needle tool. -
Soften edges:
Run a slightly damp finger along the cut edges of the square to round them off gently, removing any sharp corners or burrs.
Clean Lines Tip
Use a piece of plastic wrap over the clay before pressing your cutters into it. This creates soft, beveled edges instantly and reduces cleanup time.
Step 2: Creating the Face Design
-
Outline the head:
Lightly trace a large circle in the center of the square using a needle tool. Do not cut through; just make a faint guide line for where the main head shape will be. -
Position the snout:
Place a small oval cutter or a bottle cap in the lower center of your head circle. Press it gently into the clay to create the outline of the snout, but don’t cut all the way through. -
Define the ears:
Above the snout area, lightly sketch two leaf-shaped ears attached to the top of the head circle. Make sure they are symmetrical. -
Carve the main lines:
Using a small loop tool or a modeling tool, deepen the outline of the head and the ears. You want a distinct groove, not just a scratch. -
Detail the ears:
Inside each ear outline, use your loop tool to carve a smaller, inner triage shape. Gently scoop out a tiny bit of clay here to create depth, making the ear look folded. -
Sculpt the snout:
Go back to your snout oval. Use a modeling tool to deepen the outline, creating a distinct separation between face and nose.
Step 3: Adding Features and Refining
-
Add nostrils:
Use the rounded end of a wooden tool or the back of a paintbrush to press two vertical oval indentations into the snout for nostrils. -
Create the eyes:
For the eyes, take a small round tool or a straw and press two small, clean circles into the clay above the snout. Place them wide apart for a cute expression. -
Clean up crumbs:
Carving often leaves little clay crumbs. wait until the clay is leather hard, then brush them away with a soft, dry brush to avoid smearing. -
Smooth the grooves:
Dip a fine paintbrush in water and run it through all your carved lines. This smooths out tool marks and gives the piece a professional, finished look. -
Dry slowly:
Place the tile between two pieces of drywall or cover loosely with plastic to ensure slow, even drying. This is critical to prevent the corners from curling up. -
Fire the piece:
Once bone dry, bisque fire the coaster. For the look in the photo, you can leave the raw stoneware unglazed on the outside or apply a matte clear glaze before the final glaze firing.
Make it a Set
Create a barnyard set by using the same technique to make cow, sheep, and chicken faces on matching square tiles for a cohesive gift.
Once fired, these sturdy little pigs are ready to protect your tabletops with style.
Pig Stamp for Repeating Snouts
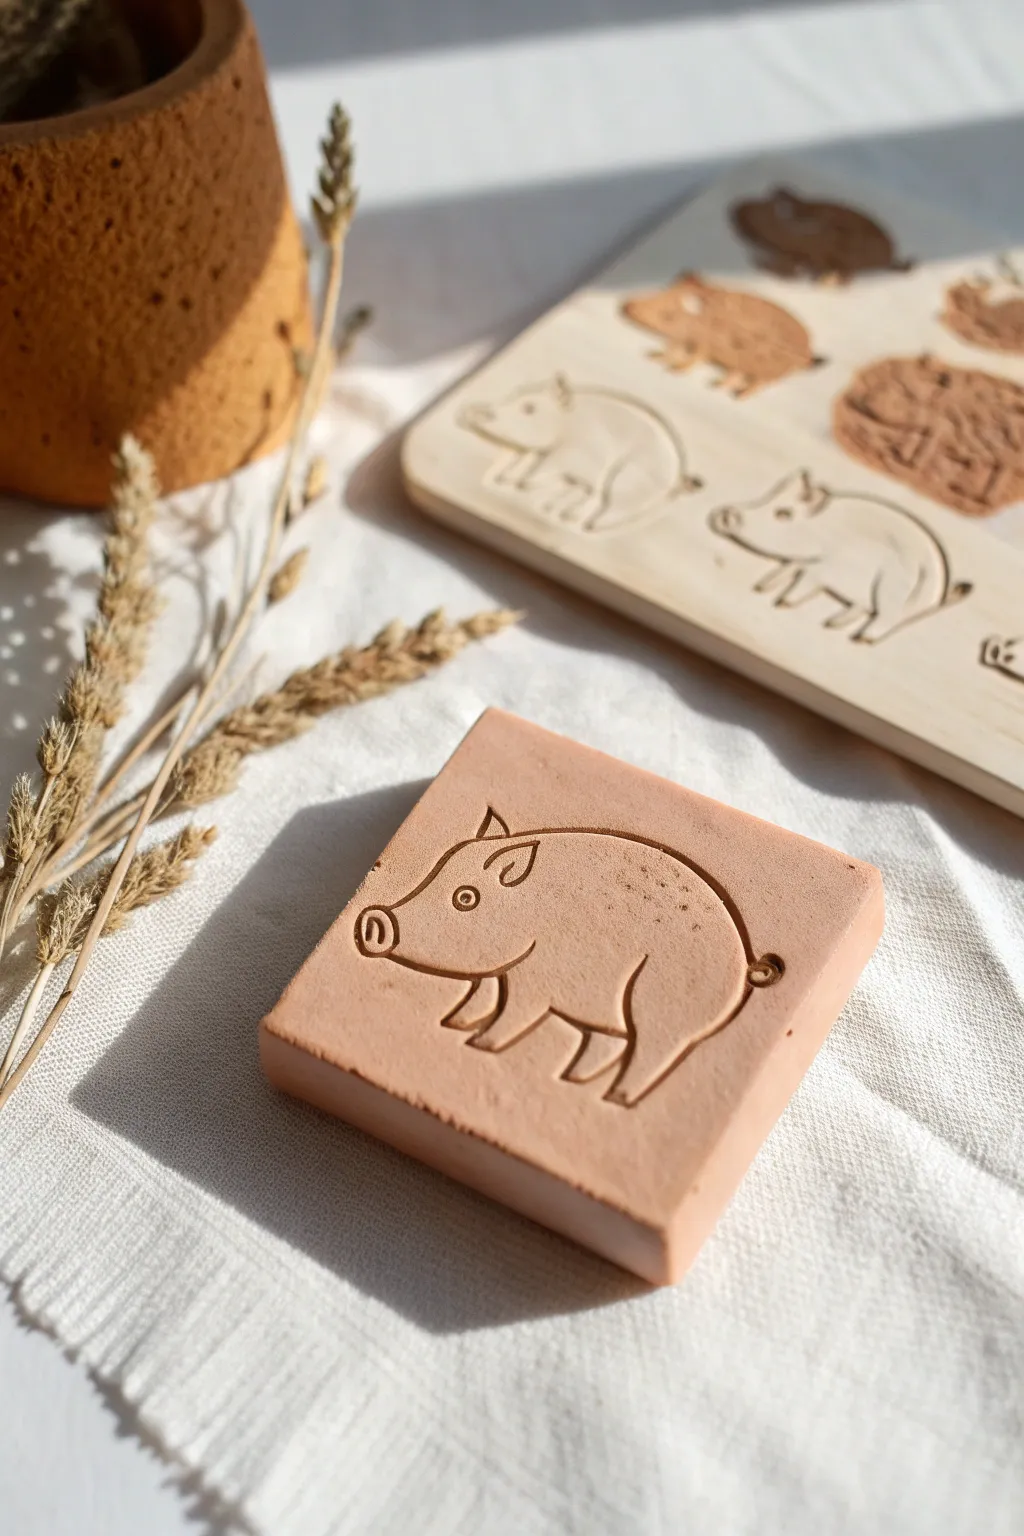
This charming project involves creating a relief-style clay tile featuring a simple, rustic pig design. By using a carved wooden mold, you can easily reproduce this adorable porcine motif to create unique coasters, decorative accents, or even custom game pieces.
Step-by-Step Tutorial
Materials
- Terracotta air-dry clay (or polymer clay)
- Wooden pig mold or stamp (relief carved)
- Cornstarch or baby powder (release agent)
- Soft-bristle brush (for powder)
- Rolling pin
- Sharp knife or clay blade
- Fine-grit sandpaper (optional)
- Clear matte varnish (optional)
Step 1: Preparation & Molding
-
Prepare the workspace:
Set up on a clean, flat surface. Lay down a sheet of parchment paper or a silicone mat to prevent the clay from sticking to your table as you work. -
Condition the clay:
Take a chunk of terracotta-colored clay slightly larger than your mold size. Knead it thoroughly in your hands until it becomes warm, pliable, and free of cracks. I generally knead for at least 3-5 minutes to ensure the perfect consistency. -
Dust the mold:
This is a crucial step to prevent sticking. Dip a soft dry brush into cornstarch or baby powder and lightly dust the inside of the wooden pig mold. -
Tap out excess:
Turn the mold upside down and give it a sharp tap against your hand. You want a fine film of powder, not clumps that will obscure the tiny details of the snout or ears. -
Form the initial block:
Shape your conditioned clay into a smooth ball, then flatten it slightly into a thick disk or square that roughly matches the dimensions of your mold. -
Press the clay:
align the clay over the carved area of the wood. Using the heel of your hand, press the clay firmly down into the carving. Rock your hand slightly to ensure the clay fills every crevice. -
Roll for flatness:
Once the clay is pressed in, use a small rolling pin over the back of the clay while it is still in the mold. This ensures the back of your tile will be perfectly flat and level.
Step 2: Refining & Finishing
-
Release the clay:
Check that the edges are loose. Gently pry one corner, or if your mold is deep, tap the wooden edge firmly against the table. The clay tile should pop out with the pig design raised on the surface. -
Trim the edges:
With the impressed tile now on your work surface, use a sharp clay blade or knife to trim the outer edges into a neat, clean square. Make perpendicular cuts for sharp 90-degree corners. -
Inspect the details:
examine the pig’s eye, ears, and curly tail. If any powder is trapped in the deep grooves, brush it away gently with a clean, dry brush. -
Smooth the perimeter:
Dip your finger in a tiny bit of water and run it along the cut edges of the square to soften any sharpness left by the knife. -
Dry the tile:
Place the finished tile on a wire rack to dry. If using air-dry clay, let it sit for 24-48 hours away from direct heat to prevent warping. Turn it over halfway through the drying process. -
Sand imperfections:
Once fully dry (and hard), check the edges again. If they feel rough, lightly sand them with fine-grit sandpaper for a professional finish. -
Seal the surface:
To protect the piece from moisture and dirt, apply a thin coat of matte clear varnish. This deepens the terracotta color slightly without making it look plasticky.
Sticky Situation?
If clay sticks to the wood, clean the mold with a toothbrush. Next time, use more cornstarch or place a layer of cling film between clay and mold.
Pro Tip: Release Hack
Place the clay-filled mold in the freezer for 10-15 minutes. The cold stiffens the clay, making it shrink slightly and pop out effortlessly.
Enjoy using your rustic pig tile as a cute paperweight or part of a larger decorative mosaic.
Pig Family Set With Tiny Piglets
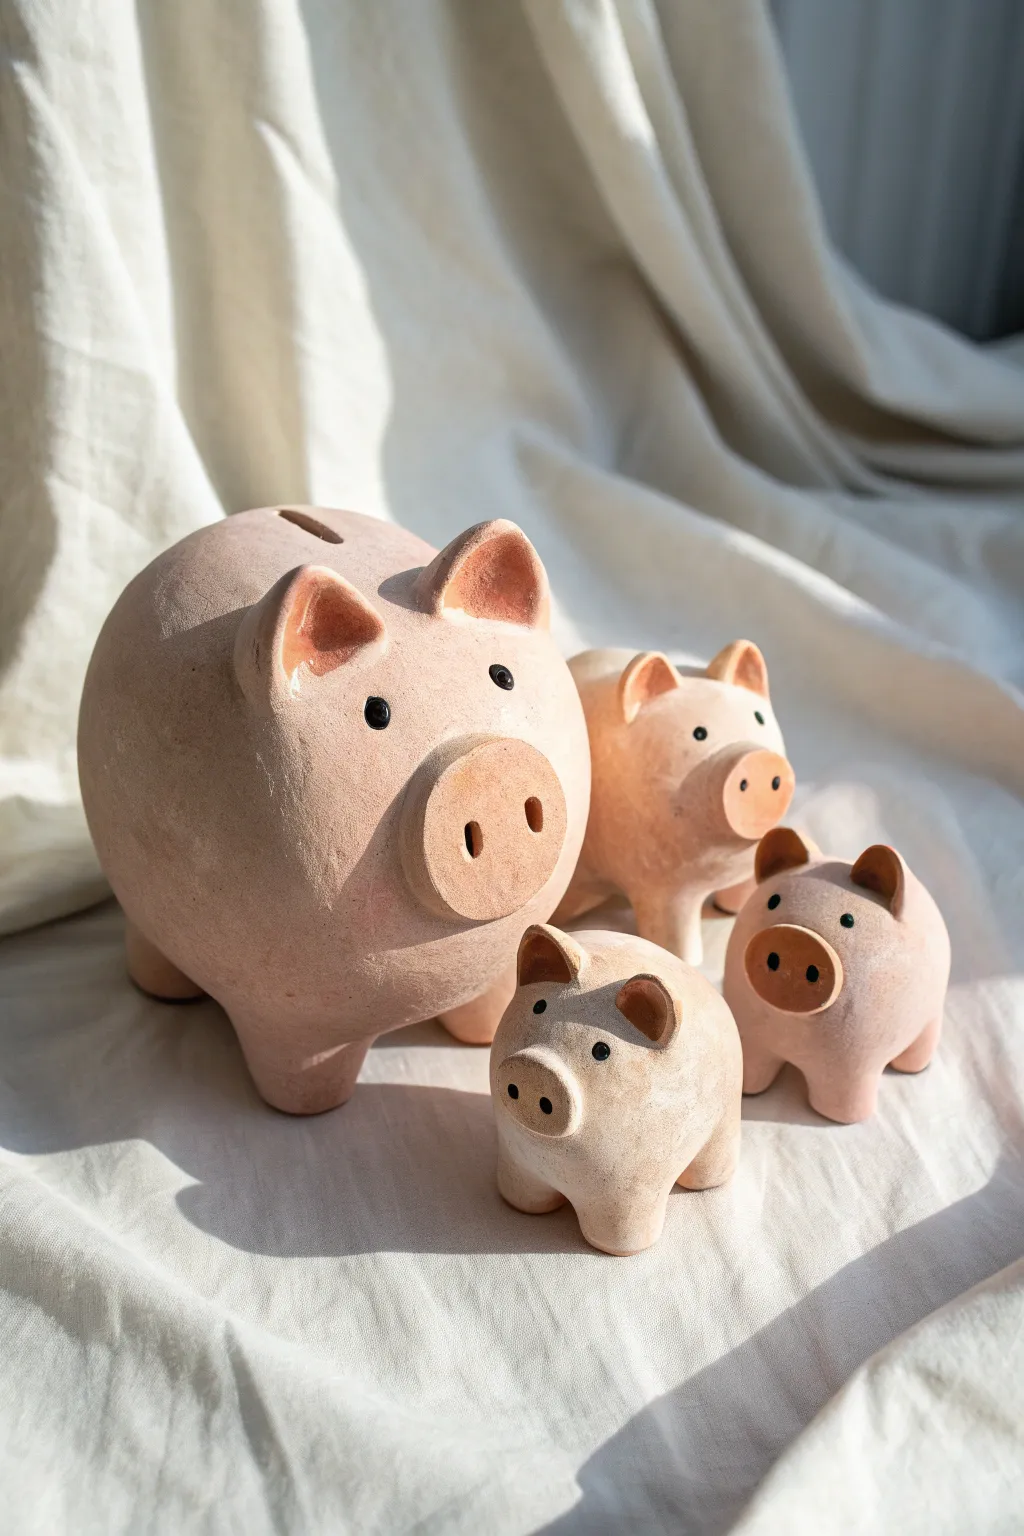
Sculpt your own adorable drove of pigs with this charming family set, featuring a large parent pig and accompanying piglets. The project uses a natural finish to highlight the raw, earthy texture of the clay, giving each piece a timeless, handmade feel.
Detailed Instructions
Materials
- Air-dry clay (terra cotta color or paintable white)
- Small bowl of water
- Modeling tools (or a butter knife and toothpick)
- Sponge or textured cloth
- Rolling pin
- Black acrylic paint
- Fine-point paintbrush or dotting tool
- Clear matte varnish spray (optional)
Step 1: Sculpting the Parent Pig
-
Form the main body:
Start with a large ball of clay, roughly the size of a grapefruit. Roll it between your palms to smooth out cracks, then gently gently flatten the bottom so it stands stable. Shape it into a slightly elongated oval to form the pig’s torso. -
Create the legs:
Roll four small, equal balls of clay. Attach them to the bottom of the body by scoring both surfaces (scratching them up creates a better bond) and adding a dab of water. Smooth the seams upward into the body so the legs look integrated, not just stuck on. -
Add the snout:
Flatten a medium-sized ball of clay into a thick disk. Attach this to the front of the face area. Using the back of a paintbrush or a rounded tool, press two deep oval indentations into the disk to create the nostrils. -
Shape the ears:
Form two triangular shapes from clay. Gently press your thumb into the center of each to curve them slightly. Attach these to the top of the head, blending the clay at the base thoroughly so they don’t fall off during drying. -
Refine the surface:
To get that lovely rustic texture shown in the photo, take a damp sponge or a piece of textured cloth and gently pat the entire surface of the pig. This removes fingerprints and adds a stone-like quality. -
Carve the coin slot:
If you want the large pig to be a functional piggy bank, use a knife tool to carefully carve a rectangular slot on the very top of the back. Smooth the edges with a wet finger.
Cracks Appearing?
If you see hairline cracks while drying, mix a small amount of fresh clay with water to make a paste (slip). Paint this into the cracks and smooth it over with your finger.
Step 2: Creating the Piglets
-
Form smaller bodies:
Repeat the body-forming process but on a smaller scale. Create one medium-sized pig and two tiny piglets. Keep their bodies round and chubby for a cute effect. -
Simplified legs:
For the tiny piglets, instead of attaching separate legs, you can pinch the clay at the four corners of the bottom and pull gently to create nubby little feet. Tap the pig on the table to flatten the feet so it stands. -
Miniature snouts:
Roll very small balls for the snouts and press them flat onto the faces. Use a toothpick or a smaller tool for the nostril holes on these tinier versions. -
Attach tiny ears:
Make small triangles for ears. On the tinier piglets, you might find it easier to use tweezers to place them. Blend the seams carefully with a sculpting tool or your pinky finger. -
Texture match:
Don’t forget to texture the little ones too. A gentle dab with a stiff bristle brush can work well for these smaller surface areas.
Step 3: Finishing Touches
-
Dry properly:
Set your pig family in a safe, dry place away from direct sunlight. Let them dry completely, which may take 24 to 48 hours depending on the thickness of the clay. -
Sand imperfections:
I like to check for any sharp edges once dry. Use a fine-grit sandpaper to gently smooth down any unwanted rough spots, but keep the overall texture intact. -
Paint the finish:
If you used white clay, mix a palette of beige, light brown, and a touch of pink acrylic paint. Sponge this color onto the pigs to create a mottled, terracota-like appearance. If you used terracotta clay, you can skip this step. -
Add the eyes:
Dip a fine-point paintbrush or a dotting tool into black acrylic paint. Carefully place two solid black dots for eyes on each pig. Position them slightly wide apart for a sweet expression. -
Seal the work:
Once the paint is fully dry, spray the entire family with a matte clear varnish. This protects the clay from moisture and preserves that soft, natural look.
Make Them Unique
Give each piglet a different personality by varying ear positions—making one ear flop forward or tilting both slightly enhances their expressive character.
Now you have a charming little clay family to display on your shelf or give as a thoughtful gift
Fancy Pig With Patterns and Marbling
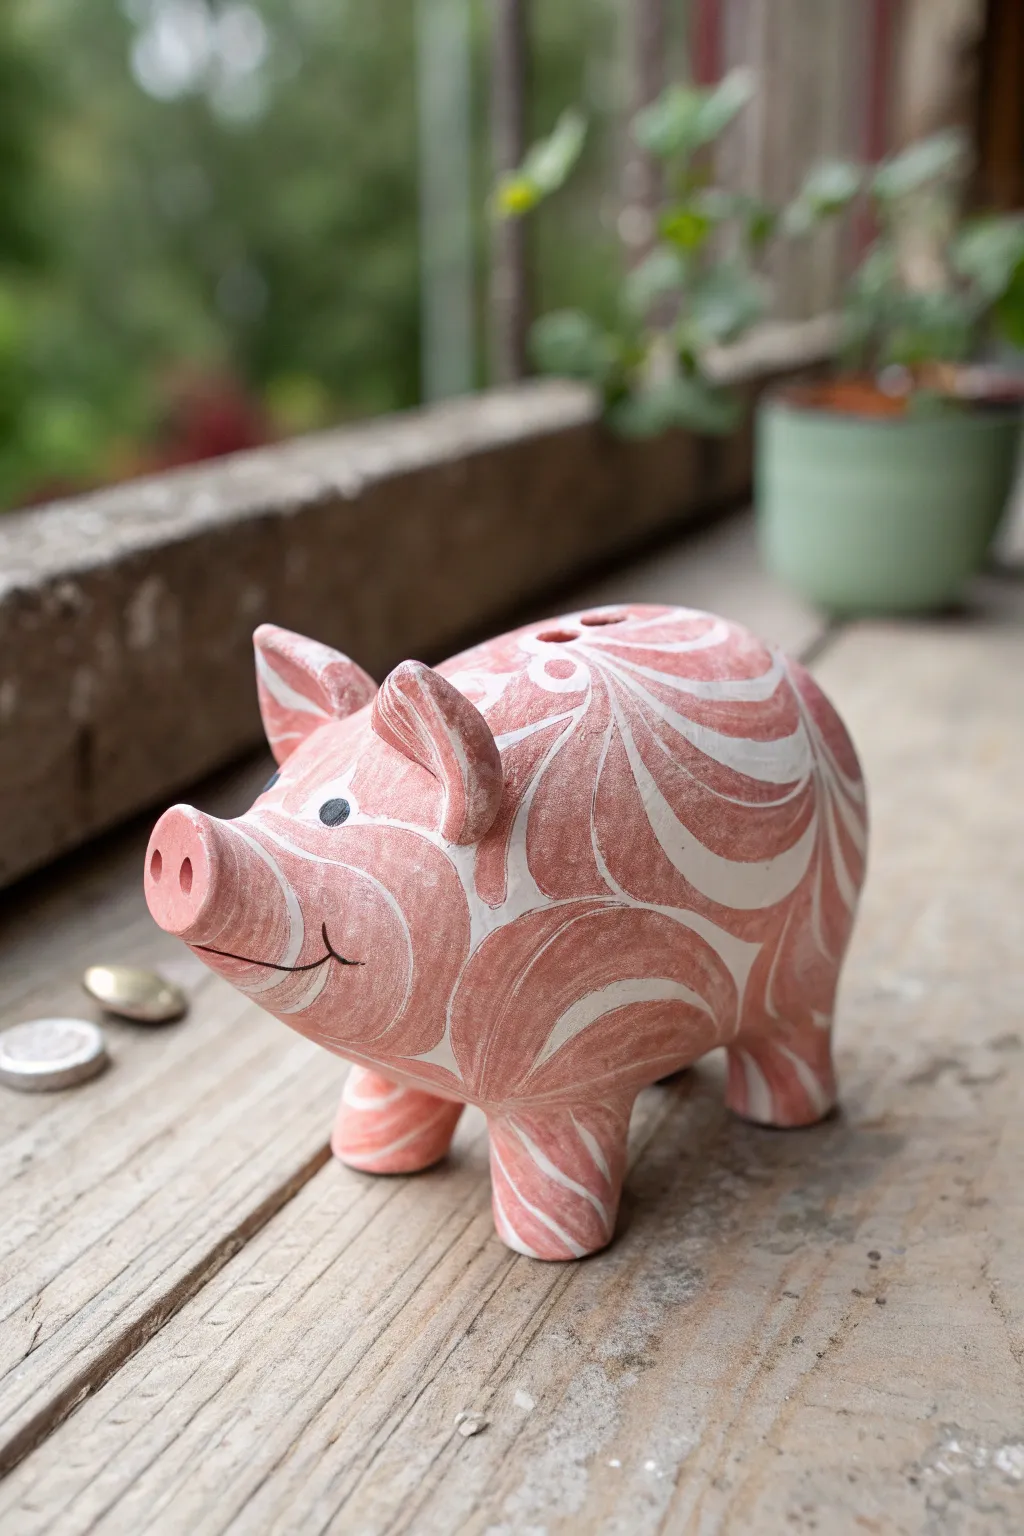
This charming project transforms a simple clay pig form into a piece of folk art using a striking faux-marbling technique. With swirling white ribbons dancing across a soft terra cotta pink base, this piggy bank combines rustic warmth with an elegant, detailed finish.
Step-by-Step Tutorial
Materials
- Air-dry clay or pre-made ceramic pig bisqueware
- Acrylic paints: Terra Cotta/Salmon Pink and Titanium White
- Fine detail paintbrush (size 0 or 1)
- Medium flat paintbrush
- Black fine-tip paint marker or detail brush
- High-gloss varnish or sealant
- Sculpting tools (if building from scratch)
- Small cup of water
- Palette or paper plate
Step 1: Sculpting the Base Form
-
Shape the body:
Start with a large ball of clay and elongate it slightly into a smooth oval shape for the pig’s torso. Smooth out any cracks with a damp finger to ensure a flawless surface for painting later. -
Add the legs:
Roll four short, stout cylinders of equal size. Score and slip (scratch the surface and add water/clay slurry) the attachment points, then firmly press the legs onto the underside of the body. -
Create the snout and ears:
Attach a small disk to the front for the snout, blending the edges seamless. Form two triangular shapes for ears, pinching them slightly to create a curve, and attach them near the top front of the head. -
Refine the details:
Use a modeling tool to poke two nostrils into the snout and carve the coin slot on the pig’s back. Carefully smooth all joins once more. -
Dry completely:
Allow the clay to dry fully according to the package instructions. This usually takes 24-48 hours depending on thickness. Sand any rough spots lightly if needed.
Step 2: Applying the Base Coat
-
Mix the base color:
Create a warm, rustic pink by mixing salmon pink with a tiny drop of brown or terra cotta. You want a color that mimics natural fired clay but with a brighter, rosy hue. -
Paint the first layer:
Apply the pink paint over the entire pig using your medium flat brush. Use long, even strokes to avoid thick buildup. -
Check for coverage:
Once the first coat is dry to the touch, inspect it for streaks. Apply a second coat to ensure opaque, solid coverage. Let this dry completely before starting the detailed pattern.
Pro Tip: Fluid Lines
Thin your white acrylic paint with a tiny drop of water or flow medium. Inky paint creates smoother, longer swirls without the brush dragging or skipping.
Step 3: Painting the Marbled Pattern
-
Plan the swirls:
Visualize where your main swirls will go. The pattern flows organically around the curves of the body, radiating from the ears and legs like a topographic map. -
Start the white lines:
Load your fine detail brush with Titanium White paint. Starting at the shoulder area, paint a thin, confident curved line that sweeps down toward the belly. -
Thicken and taper:
Go back over your line, making certain sections thicker while keeping the ends tapered to a sharp point. This variation in line weight is key to the marbled look. -
Build the pattern:
Continue adding curved white lines. Keep them close together but not touching, leaving channels of the pink base showing through. I find it helpful to turn the pig constantly in my hand to follow the form. -
Follow the contours:
Ensure your lines wrap around the legs and snout. On the legs, the stripes should curve horizontally to emphasize the roundness. -
Fill the gaps:
If you have large empty pink spaces, add smaller, floating ‘island’ shapes or swirls to balance the design.
Level Up: Metallic Accent
Trace along one edge of your white swirls with a very thin line of gold leaf paint. This adds a ‘kintsugi’ or luxury porcelain effect to the marbling.
Step 4: Final Details and Finish
-
Add the face:
Using a tiny dot of white, paint the eyes. Once dry, use a black paint marker or very fine variety paintbrush to add the black pupils and a small curved smile line. -
Define the snout:
If you painted over the nostril holes, use a dark pink or diluted black wash to gently define the inside of the nostrils for depth. -
Seal the artwork:
Once all paint is perfectly dry, apply a coat of high-gloss varnish. This protects the paint and gives the pig that ceramic-glazed shine shown in the photo.
Place your finished pig on a sunny shelf or use it to start saving for your next craft project supply run