When I’m craving a quick, satisfying project, I reach for polymer clay and make a little bowl that actually gets used. Here are my favorite polymer clay bowl ideas—from simple marbled dishes to artsy sculptural catchalls you can totally tailor to your style.
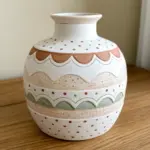
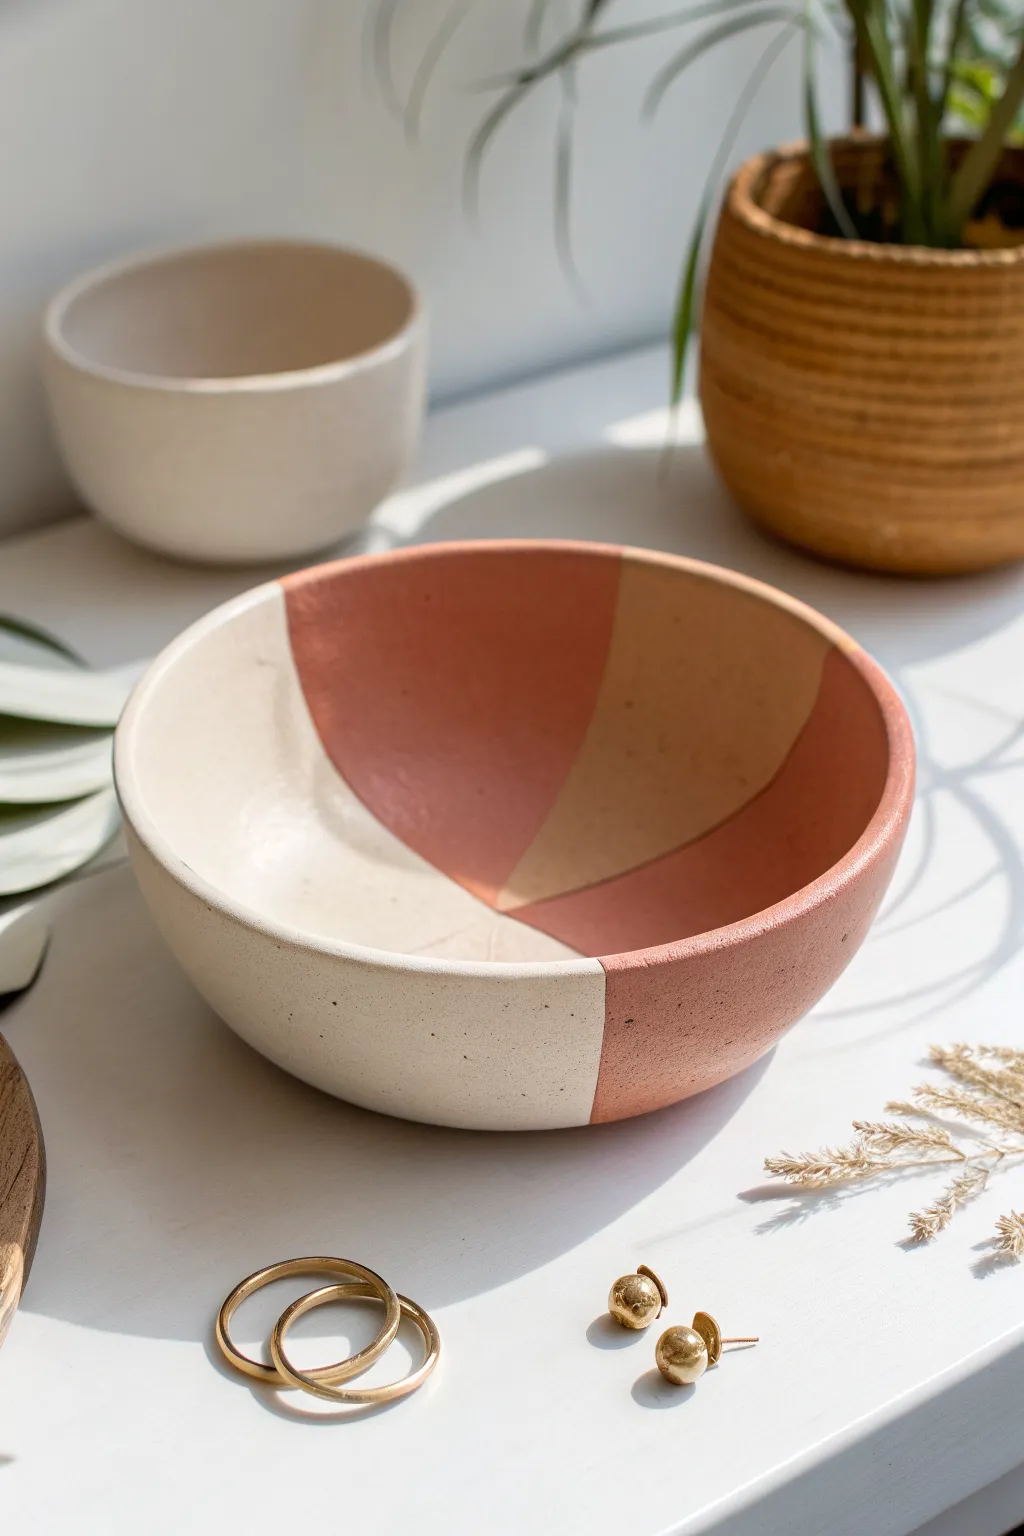
Classic Marbled Trinket Bowl
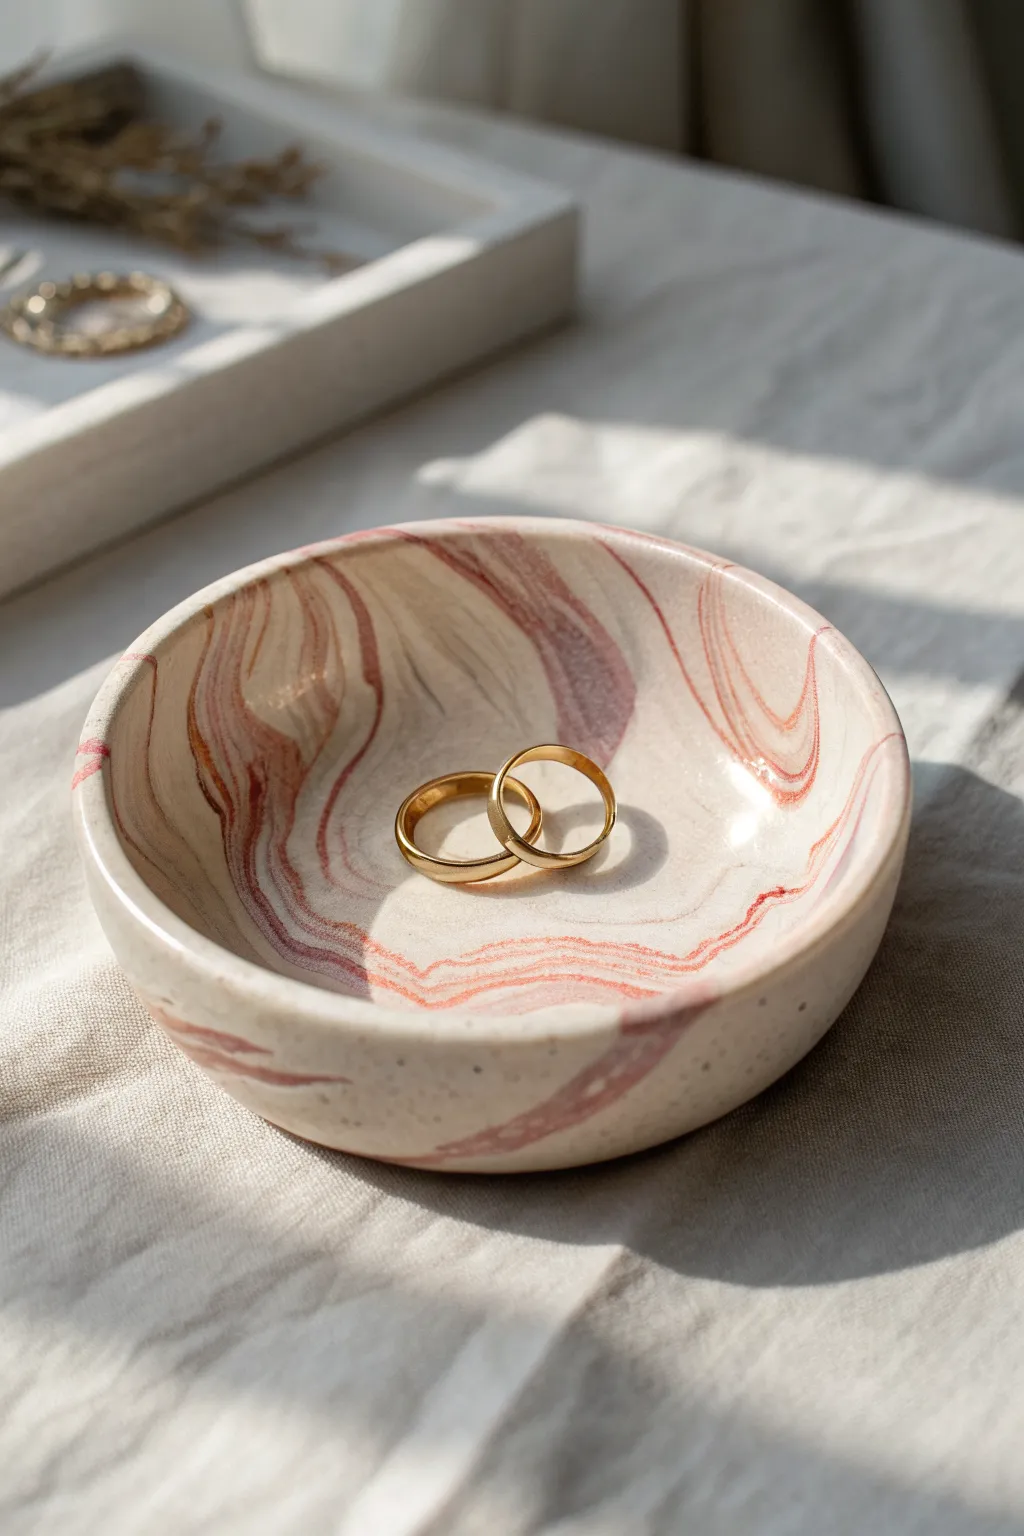
This sophisticated trinket dish captures the timeless beauty of natural stone with a soft, swirling palette of cream, terracotta, and dusty rose. It’s the perfect bedside catch-all for your most precious rings, offering a high-end look with surprisingly simple techniques.
How-To Guide
Materials
- Polymer clay (White, Translucent, Beige, and Terracotta/Rose Gold)
- Acrylic rolling pin or clay pasta machine
- Circle clay cutter (approx. 4-5 inches) or a bowl to trace
- Smooth glass or ceramic oven-safe bowl (for forming)
- Craft knife
- Fine-grit sandpaper (400 to 1000 grit)
- Glaze or polyurethane varnish (optional)
- Baking sheet
- Oven
Step 1: Prepping the Palette
-
Condition the white base:
Start with a large block of white polymer clay. Knead it in your hands until it is soft, pliable, and warm to the touch. This will be your primary color, so you need about three times as much white as any other shade. -
Mix the stone color:
To achieve that natural, creamy pottery look rather than a stark bright white, I like to mix a very small pinch of beige or translucent clay into the large white ball. Blend until uniform. -
Prepare accent colors:
Condition your terracotta and rose gold colored clays separately. Roll them into thin little “snakes” or ropes. These should be much smaller than your white base to keep the marbling delicate. -
Combine the clays:
Roll your large ball of white clay into a thick log. Place the thin ropes of terracotta and rose gold lengthwise along the white log.
Step 2: Creating the Marble Effect
-
Twist the log:
Pick up the combined log and twist it firmly, like wringing out a towel. This begins to swirl the colors together inside the clay. -
Fold and roll:
Fold the twisted log in half and roll it smooth again on your work surface. Repeat the twist-and-fold process about 3-4 times. Be careful not to over-mix, or the colors will turn muddy instead of defined streaks. -
Form a ball:
Roll the marbled log into a tight, smooth ball. Inspect the surface to see if you like the color distribution; usually, the pattern looks even better once flattened. -
Roll out the slab:
Using your acrylic roller or pasta machine, roll the ball out into a flat sheet about 1/4 inch thick. Roll in different directions to stretch the marble pattern organically.
Air Pocket Patrol
If you see a bubble while rolling, pierce it gently with a needle tool and smooth the air out immediately. Trapped air creates bumps after baking.
Step 3: Shaping and Baking
-
Cut the circle:
Place your circle cutter or a small bowl upside down on the most attractive part of your patterned clay sheet. Press down firmly to cut, or trace around the bowl with a craft knife. -
Smooth the edges:
Lift your clay circle gently. Run your finger along the cut edge to soften any sharp corners and smooth out the rim for a professional finish. -
Form the curve:
Take an oven-safe glass or ceramic bowl and turn it upside down. Gentle drape your clay circle over the bottom of the bowl. Press lightly to ensure it takes the shape of the bowl’s curve. -
Bake the bowl:
Place the bowl (with the clay still draped on it) onto a baking sheet. Bake according to your polymer clay package instructions—usually around 275°F (135°C) for 15-30 minutes.
Clean Cuts Matter
Chill your rolled clay sheet in the fridge for 10 minutes before cutting the circle. Cool clay cuts cleaner and distorts less when you lift it.
Step 4: Finishing Touches
-
Cool down:
Remove the project from the oven and let it cool completely before trying to pop the clay off the glass bowl. The clay hardens fully as it cools. -
Sand for smoothness:
Once cool, use fine-grit sandpaper wet with a little water to gently sand the rim and any rough spots on the surface. This gives it that stone-ground texture. -
Seal (optional):
If you want a glossy ceramic look, apply a thin coat of polymer clay gloss glaze. For a matte, natural stone finish like the photo, leave the clay unglazed and buff it with a soft cotton cloth.
Place your favorite rings inside and enjoy the sophisticated touch this handmade piece adds to your dresser


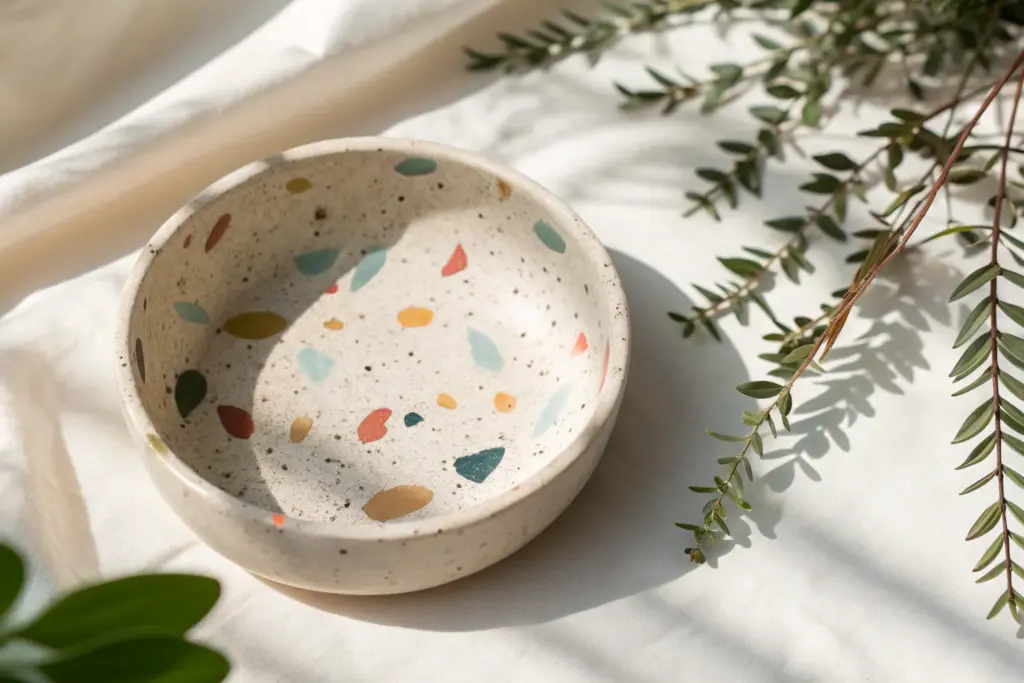
Terrazzo Speckled Catchall Bowl
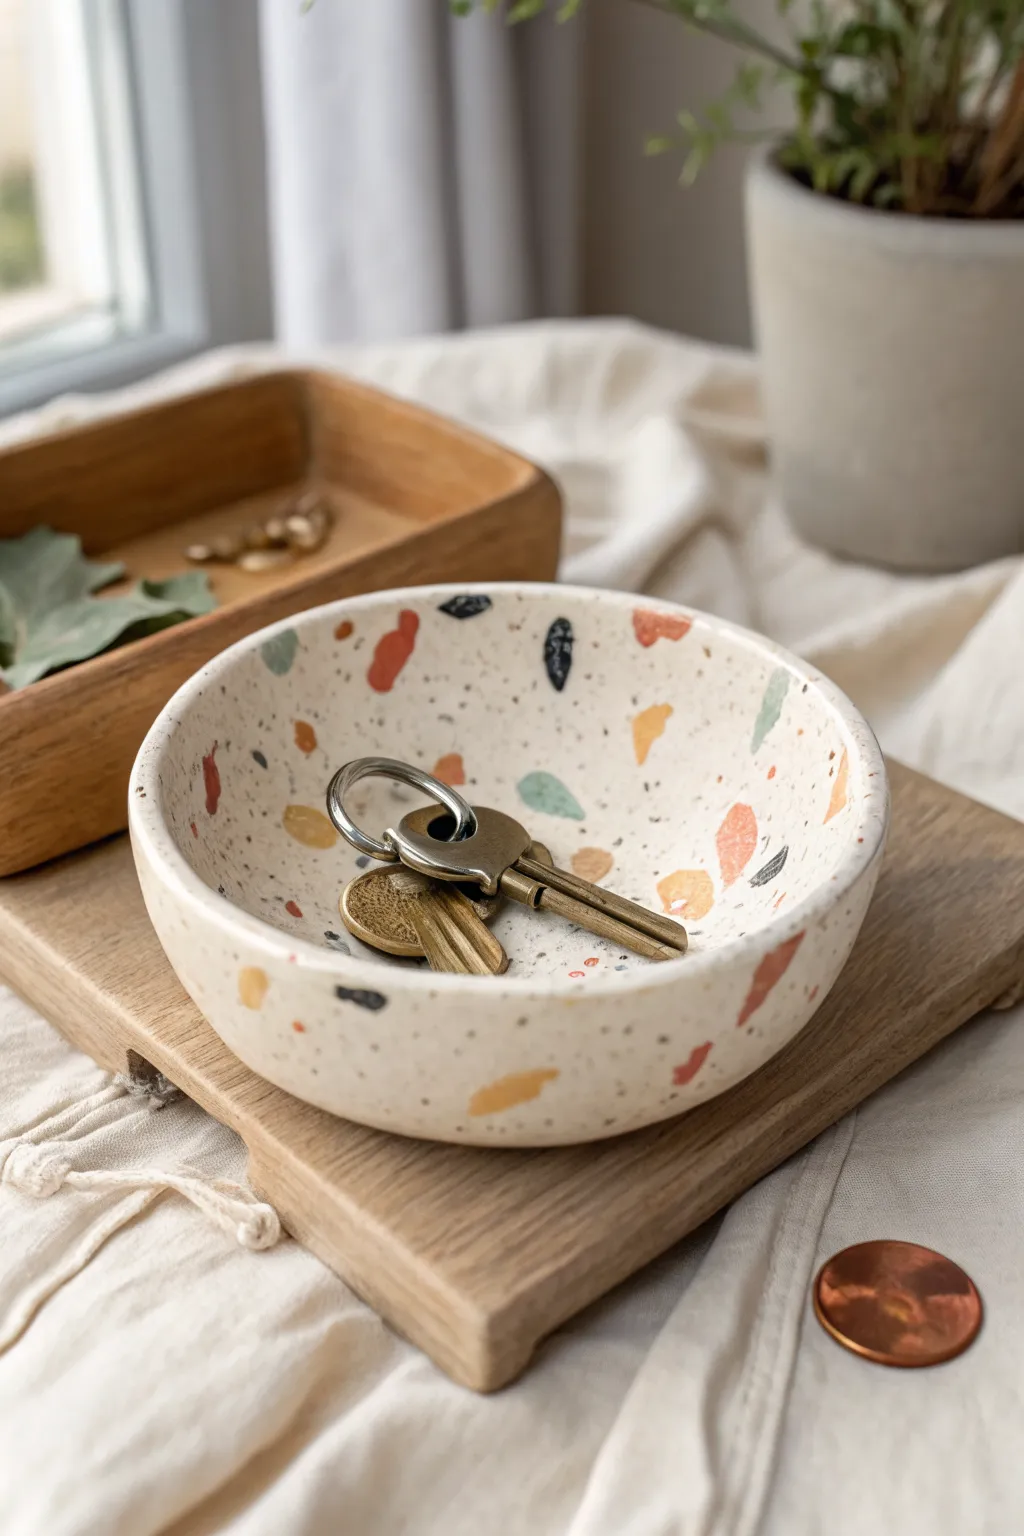
Bring a trendy, modern touch to your entryway table with this speckled terrazzo-style catchall bowl. The design features a creamy, granite-effect base scattered with organic shapes of muted teal, rust, and mustard for a high-end ceramic look without the kiln.
Step-by-Step Tutorial
Materials
- Polymer clay (granite or speckled beige effect)
- Polymer clay (small amounts of rust, teal, mustard yellow, and black)
- Rolling pin or acrylic roller
- Medium-sized oven-safe bowl (for use as a mold)
- Craft knife or scalpel
- Parchment paper
- Fine-grit sandpaper (400 to 1000 grit)
- Fimo or Sculpey gloss glaze (optional)
Step 1: Preparing the Terrazzo Chips
-
Condition the colors:
Start by conditioning your small blocks of colored clay—rust, teal, mustard, and black. Roll them out into very thin sheets, roughly 1mm thick or less. -
Create the chips:
Tear or cut these thin sheets into tiny, irregular angular pieces. Make a variety of sizes, from tiny specks to slightly larger chunks, to mimic authentic terrazzo stone fragments. -
Set aside:
Scatter these chips onto a piece of parchment paper so they are easy to grab later. Keep the colors somewhat separated so you can control the distribution.
Step 2: Forming the Base
-
Condition the base clay:
Take a large block of your granite or speckled beige clay. Knead it thoroughly until it is soft and pliable, ensuring there are no air bubbles trapped inside. -
Roll the slab:
Roll the base clay out into a uniform slab, approximately 4mm to 5mm thick. It needs to be thick enough to hold its shape as a bowl but thin enough to look delicate. -
Apply the chips:
Gently sprinkle your prepared colored chips onto the rolled slab. I like to drop them from a small height to get a random, natural scatter pattern. -
Embed the pattern:
Once you are happy with the arrangement, place a sheet of parchment paper over the slab. Use your roller to firmly press the chips into the base clay until the surface is completely smooth and flush.
Fixing Smears
If sanding smears the colored chips into the beige base, your sandpaper is too rough or the clay wasn’t cured enough. Bake longer and switch to a finer grit paper.
Step 3: Shaping and Baking
-
Cut the circle:
Find a circular cutter or a bowl that is slightly larger than your desired finished size. Place it on the slab and cut out a perfect circle using your craft knife. -
Smooth the edges:
Run your finger gently around the cut rim to soften the sharp edge created by the knife. This gives the finished piece a more polished, ceramic-like quality. -
Form the bowl:
Drape your clay circle securely over the bottom of your oven-safe bowl. Gently press it down so it conforms to the curve of the mold. -
Check the shape:
Ensure the clay is centered on the mold. If you want a flat bottom for stability, press the very center of the clay gently against a flat surface while it’s on the mold to create a small foot. -
Bake:
Place the clay-covered mold onto a baking tray. Bake according to your polymer clay package instructions—usually around 230°F to 275°F (110°C to 135°C) for 30 minutes.
Gold Leaf Accent
For an elevated look, press small flakes of gold leaf onto the slab alongside the clay chips before the final roll. This adds a stunning metallic shimmer to the terrazzo.
Step 4: Finishing Touches
-
Cool down:
Let the bowl cool completely in the oven or on a wire rack before attempting to pop it off the mold. Removing it while hot can warp the shape. -
Sand the surface:
Once cool, wet sand the bowl using fine-grit sandpaper. This step is crucial for terrazzo; sanding reveals the crisp edges of the colored chips and makes the pattern pop. -
Rinse and dry:
Wash off any milky residue from the sanding process under running water and dry the bowl thoroughly with a clean cloth. -
Seal:
If you want a glossy finish like the inspiration photo, apply a thin layer of polymer clay glaze. Let it dry completely to protect your beautiful new catchall.
Place your finished bowl on a console table to elegantly catch keys and coins as you walk through the door


Metallic-Rim Jewelry Dish
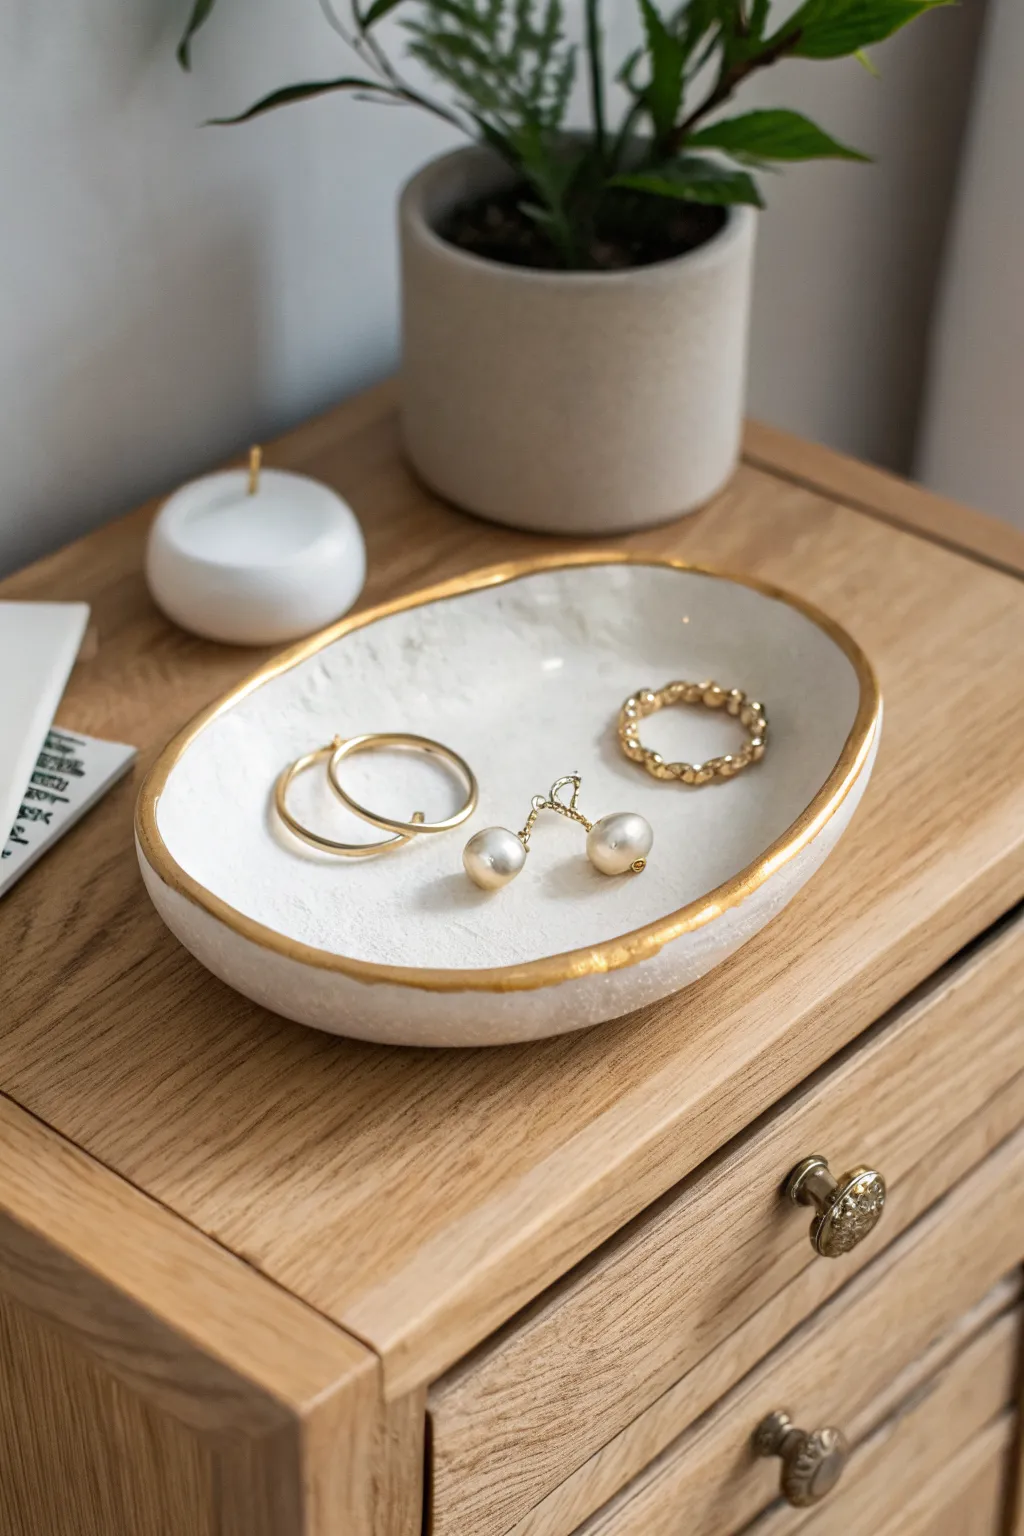
Elevate your bedside table with this sophisticated jewelry dish featuring an organic shape and a stunning, hand-painted metallic edge. The subtle texture of white polymer clay combined with liquid gold leaf creates a high-end boutique look for a fraction of the cost.
Step-by-Step Guide
Materials
- White or translucent white polymer clay (approx. 2oz)
- Acrylic rolling pin or pasta machine
- Course sandpaper or a textured sponge (for surface texture)
- Small bowl or ramekin (oven-safe, for shaping)
- Craft knife or clay blade
- Liquid gold leaf or gold gilding paint
- Small, fine paintbrush
- Gloss glaze or polyurethane varnish (optional)
- Baking sheet and parchment paper
- Soft cloth
Step 1: Shaping the Clay
-
Condition the Clay:
Begin by warming the white polymer clay in your hands, kneading it thoroughly until it becomes soft and pliable. This conditioning step is crucial to prevent cracking later. -
Roll Out the Slab:
Using your acrylic rolling pin or a pasta machine on a wide setting, roll the clay out into a smooth slab. Aim for a thickness of about 1/4 inch (6mm) to ensure the bowl feels substantial. -
Add Subtle Texture:
To mimic the stone-like finish visible in the photo, gently press a piece of coarse sandpaper or a clean textured sponge onto the surface of the clay slab. Don’t press too hard; you just want a light impression. -
Cut the Shape:
Freehand cut an oval or organic circle shape using your craft knife. Don’t worry about being perfectly symmetrical; the slight irregularity adds to the modern, artisanal charm. -
Smooth the Edges:
Dip your finger in a tiny bit of water (or cornflour) and run it along the cut edge of the clay to smooth out any harsh angles or burrs left by the knife.
Step 2: Forming and Baking
-
Create the Curve:
Gently lift your clay slab and drape it inside your chosen oven-safe bowl or ramekin. Press it down very lightly so it takes the curved shape solely at the bottom. -
Refine the Rim:
While in the mold, gently push the edges of the clay slightly outward or inward to enhance the organic wave of the rim. -
Bake the Piece:
Place the bowl (with the clay inside) onto a baking sheet. Bake according to your specific clay package’s instructions—usually around 275°F (135°C) for 15-30 minutes. -
Cool Completely:
Once bakes, turn off the oven and let the dish cool down completely inside the oven or on a wire rack before attempting to pop it out of the mold. -
Remove from Mold:
Carefully slide the hardened clay dish out of the shaping bowl. If it sticks slightly, a gentle tap on the bottom usually loosens it.
Uneven Gold rim?
Don’t panic if your hand shakes! If the gold line gets too thick in one spot, dab it quickly with a paper towel or let it dry and scrape the excess away gently with a craft knife.
Step 3: Gilding the Edge
-
Prepare the Gold:
Shake your liquid gold leaf or gilding paint well. Pour a tiny amount onto a disposable palette or piece of scrap paper. -
First Pass Painting:
Load a fine paintbrush with the gold. Hold the brush perpendicular to the rim and gently drag it along the very top edge of the dish. -
Thicken the Line:
Go back over the rim, intentionally allowing the brush to slip slightly down the inside and outside walls of the dish. This creates that lovely, imperfectly thick golden border. -
Dry the Paint:
Allow the gold paint to dry completely. Liquid gold leaf usually dries very quickly, but give it at least 20 minutes to be safe. -
Seal the Finish (Optional):
If you plan to use this for items other than jewelry, apply a coat of gloss glaze over the entire piece to protect the paint and clay surface.
Top Tier Texture
For a specked ceramic look, mix tiny amounts of black pepper or used dried coffee grounds into the white clay during the conditioning phase before rolling it out.
Place your favorite rings and earrings inside to enjoy your chic new organizer
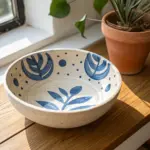


Leaf-Imprint Botanical Bowl
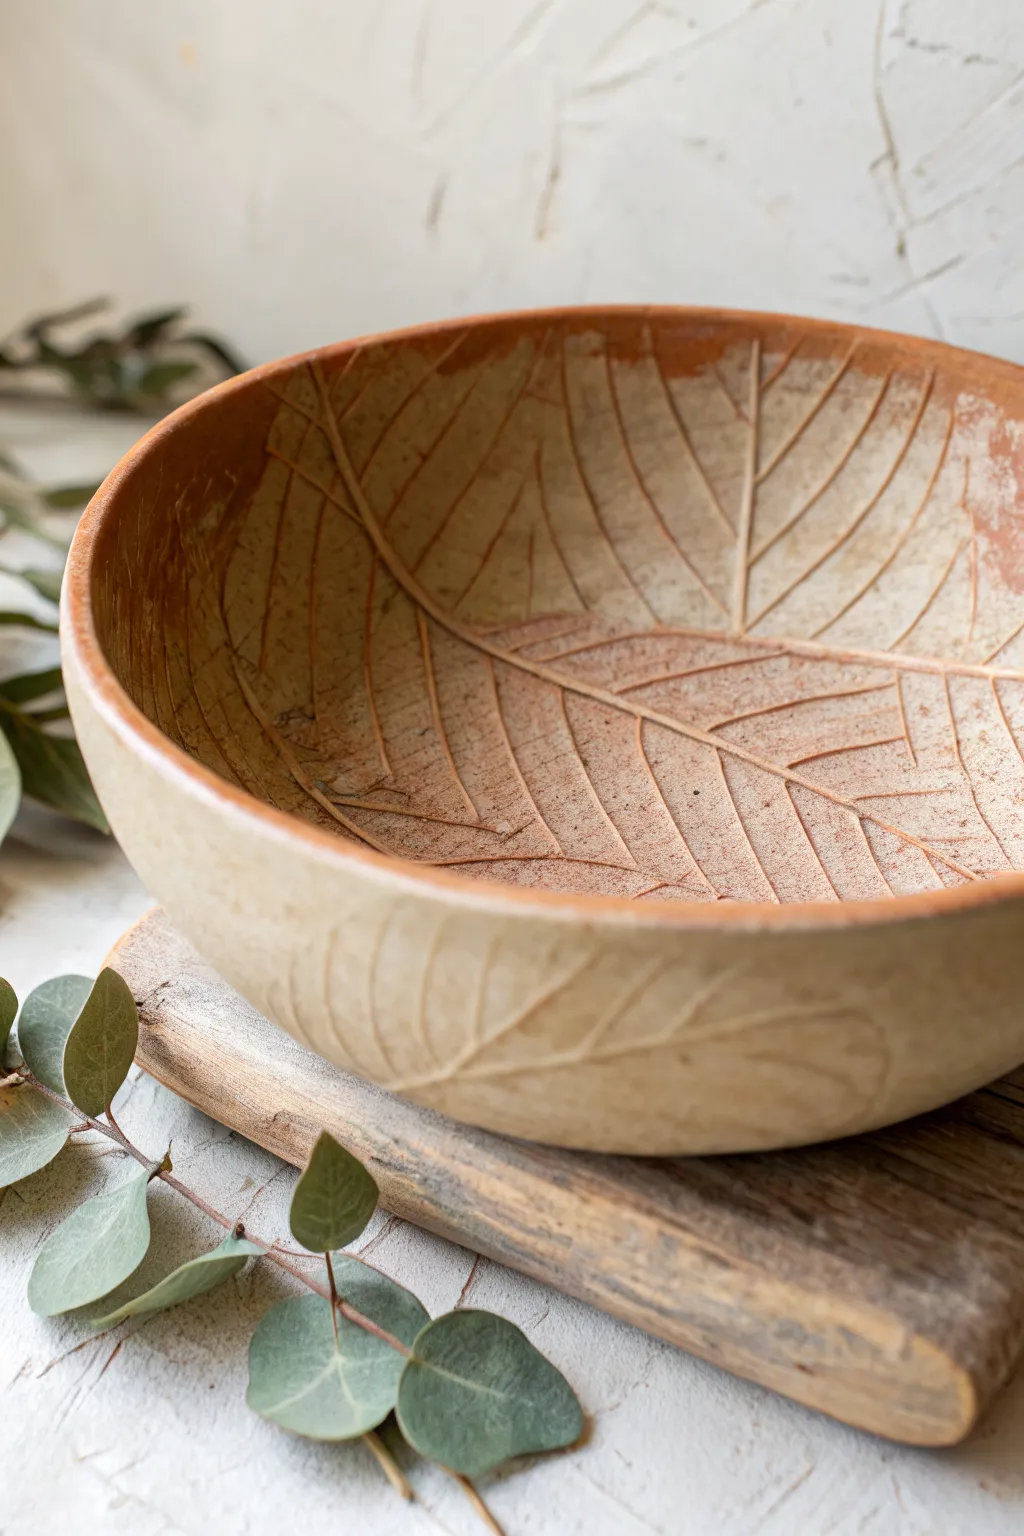
Capture nature’s intricate details forever with this stunningly simple botanical bowl project. Using the texture of real leaves and a warm, earthy finish, you will create a vessel that looks like authentic rustic pottery.
Step-by-Step
Materials
- Polymer clay (white or beige base)
- Terra cotta colored polymer clay (or acrylic paint)
- Large, heavily veined leaves (like Hosta or Hydrangea)
- Rolling pin or acrylic roller
- Oven-safe bowl (glass or metal) for shaping
- Craft knife or scalpel
- Sandpaper (fine grit)
- Brown and burnt orange acrylic paints
- Paper towels or sponge
- Cornstarch or baby powder (release agent)
- Matte varnish (optional)
Step 1: Preparing the Clay Canvas
-
Condition the Clay:
Begin by conditioning your polymer clay until it is soft and pliable. If you want a natural stone look, mix a beige clay with a small amount of terra cotta or translucent clay, but don’t blend them fully—leave subtle swirls. -
Roll out a Slab:
Roll the clay out into a large, even slab about 1/4 inch thick. It needs to be slightly larger than the bowl you intend to use as a form. -
Prepare the Leaf:
Select a fresh leaf with prominent veins. Dust the veined side (usually the back) lightly with cornstarch or baby powder so it doesn’t stick to the clay.
Fixing Cracks
If you notice small cracks after baking, fill them with a mix of liquid polymer clay and a bit of leftover solid clay. Smooth it over and bake again for 10 minutes.
Step 2: Creating the Texture
-
Place the Leaf:
Lay the leaf vein-side down onto your clay slab. Position it carefully, as you won’t be able to move it once you start pressing. -
Roll the Impression:
Use your rolling pin to firmly press the leaf into the clay. rolling from the center stem outwards. Apply firm, even pressure to capture the finest veins without thinning the clay too much. -
Reveal the Design:
Gently catch the stem or edge of the leaf and peel it away to reveal the botanical imprint. This is always the most magical moment of the process.
Gilded Edge
For a luxe modern twist, paint just the thin rim of the bowl with liquid gold leaf or metallic gold acrylic paint after the antiquing step is fully dry.
Step 3: Shaping the Bowl
-
Cut the Shape:
Using a bowl as a template or cutting freehand, cut a large circle out of the clay. Ensure the leaf design is centered or positioned artistically within the circle. -
Form the Curve:
Take your oven-safe bowl and turn it upside down. Lightly dust the outside with cornstarch. Carefully drape your clay circle over the bowl. -
Secure the Form:
Gently press the clay against the bowl form so it takes the shape. Be careful not to squish the texture you just created. If the edges are rough, smooth them gently with your fingertip. -
Bake:
Bake the bowl according to your polymer clay package instructions. usually around 275°F (130°C) for 15-30 minutes depending on thickness. Let it cool completely on the form before removing.
Step 4: Finishing and Antiquing
-
Sanding Edges:
Once cool, remove the clay bowl from the form. Use fine-grit sandpaper to smooth any sharp edges along the rim. -
Apply Base Wash:
To mimic the terra cotta look in the photo, water down some burnt orange acrylic paint. Brush this wash over the entire inside and outside of the bowl. -
Highlight the Veins:
While the paint is still wet, use a paper towel to wipe most of it off the surface. The dark paint will remain trapped in the deep veins of the leaf imprint, highlighting the texture. -
Add Depth:
For an aged look, dab a tiny bit of dark brown paint onto a sponge and lightly tap it around the rim and random spots on the exterior. Wipe away excess immediately. -
Dry Brush:
I like to take a dry brush with a tiny amount of cream or white paint and whisk it lightly over the raised parts of the veins. This makes the texture pop even more. -
Seal:
Finish with a coat of matte varnish to protect the paint and give the bowl a finished, ceramic-like feel.
Enjoy displaying your beautiful botanical creation or gifting it to a nature lover

The Complete Guide to Pottery Troubleshooting
Uncover the most common ceramic mistakes—from cracking clay to failed glazes—and learn how to fix them fast.
Lace-Texture Vintage Bowl
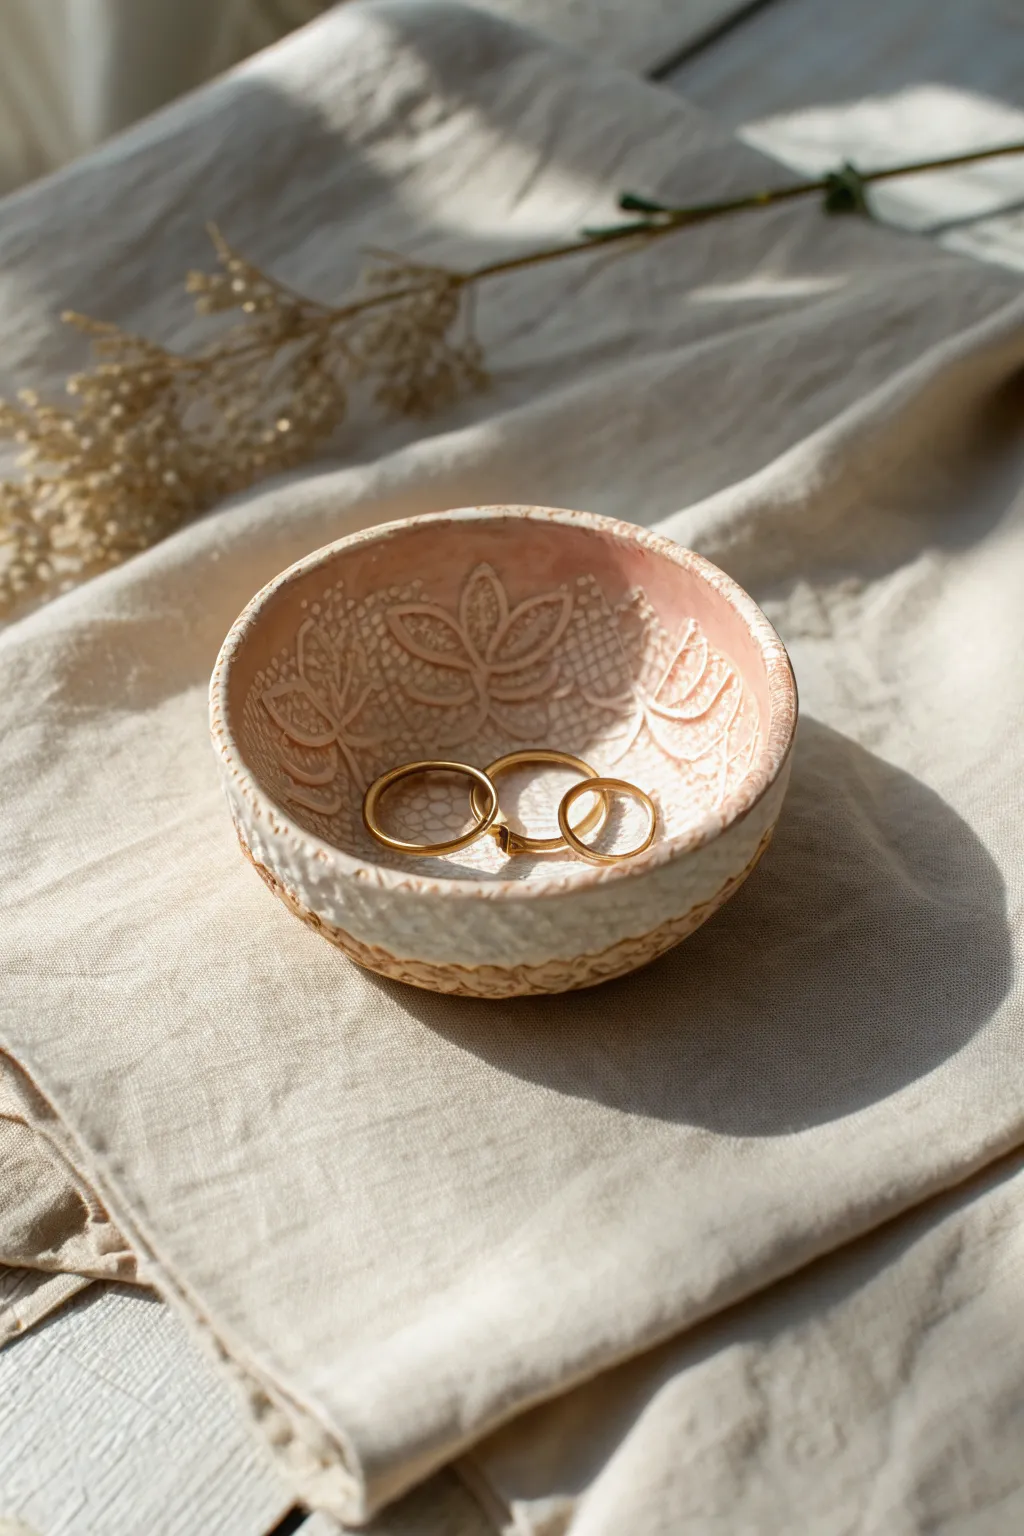
This charming trinket dish combines the timeless elegance of vintage lace with a soft, blush-pink glaze. The intricate texture captures light beautifully, making it a perfect spot to safe-keep your favorite dainty rings or earrings.
How-To Guide
Materials
- White polymer clay
- Rolling pin or acrylic roller
- A piece of textured lace or a doily
- Small bowl (oven-safe) to use as a mold
- Round cookie cutter (approx 4-5 inches)
- Pink acrylic paint
- Water based varnish or glaze
- Paper towels or sponge
- Sandpaper (fine grit)
- Gold acrylic paint or metallic wax (optional)
- Small paintbrush
Step 1: Preparing the Clay
-
Conditioning:
Begin by warming the white polymer clay in your hands. Knead and fold it repeatedly until it feels soft, pliable, and free of any air bubbles. -
Rolling out:
Using your acrylic roller or rolling pin, flatten the clay into an even sheet. Aim for a thickness of about 1/4 inch so the bowl will be sturdy but delicate. -
Smoothing:
Check the surface for any lint or fingerprints. Smooth them out gently with your fingertip or a baby wipe before proceeding to the texture phase.
Clean Impressions
Dust your lace with cornstarch or baby powder before rolling. This prevents the fabric from sticking to the raw clay and messing up the pattern.
Step 2: Creating the Texture
-
Placing the Lace:
Lay your piece of lace or doily directly onto the clay sheet. Ensure it’s flat and not wrinkled, as every detail will be captured. -
Imprinting:
Roll over the lace firmly with your roller. I like to stand up while doing this to apply even pressure from above, ensuring a deep, crisp impression. -
Revealing the Pattern:
Carefully peel back the lace from one corner to reveal the intricate design stamped into the clay. -
Cutting the Shape:
Position your round cookie cutter over the most attractive part of the textured area and press down firmly to cut out your circle. -
Refining Edges:
Gently lift the circle and smooth the cut edges with your finger to remove any sharpness or stray bits of clay.
Two-Tone Effect
Try using a dark wash (like burnt umber) for the outside texture and the pink wash for the inside to create an antique, weathered contrast.
Step 3: Shaping and Baking
-
Forming the Bowl:
Place your clay circle inside or over your oven-safe bowl mold. Press it gently so it takes the curved shape, being careful not to smudge the lace texture. -
Baking:
Bake the clay according to the manufacturer’s instructions on the package (usually around 275°F or 130°C for 15-30 minutes). Let it cool completely inside the mold before removing. -
Sanding:
Once cool, use fine-grit sandpaper to lightly buff the rim of the bowl for a professional, smooth finish.
Step 4: Painting and Finishing
-
Creating a Wash:
Mix a small amount of pink acrylic paint with water until it has a milky, ink-like consistency. -
Applying the Wash:
Brush the pink wash generously over the textured interior of the bowl, ensuring the liquid gets into all the deep grooves of the lace pattern. -
Wiping Back:
Immediately use a damp paper towel or sponge to wipe the paint off the raised surface areas. The pink will remain in the crevices, highlighting the texture. -
Rim Detail:
For a vintage touch, use a dry brush or your finger to apply a faint amount of gold paint or metallic wax specifically along the top rim. -
Sealing:
Protect your work by applying a coat of water-based varnish or glaze. A matte finish looks very natural, while gloss mimics ceramic. -
Drying:
Allow the varnish to dry completely in a dust-free area for the time recommended on your product label.
Place your new heirloom-style dish on a vanity to enjoy its subtle beauty every day
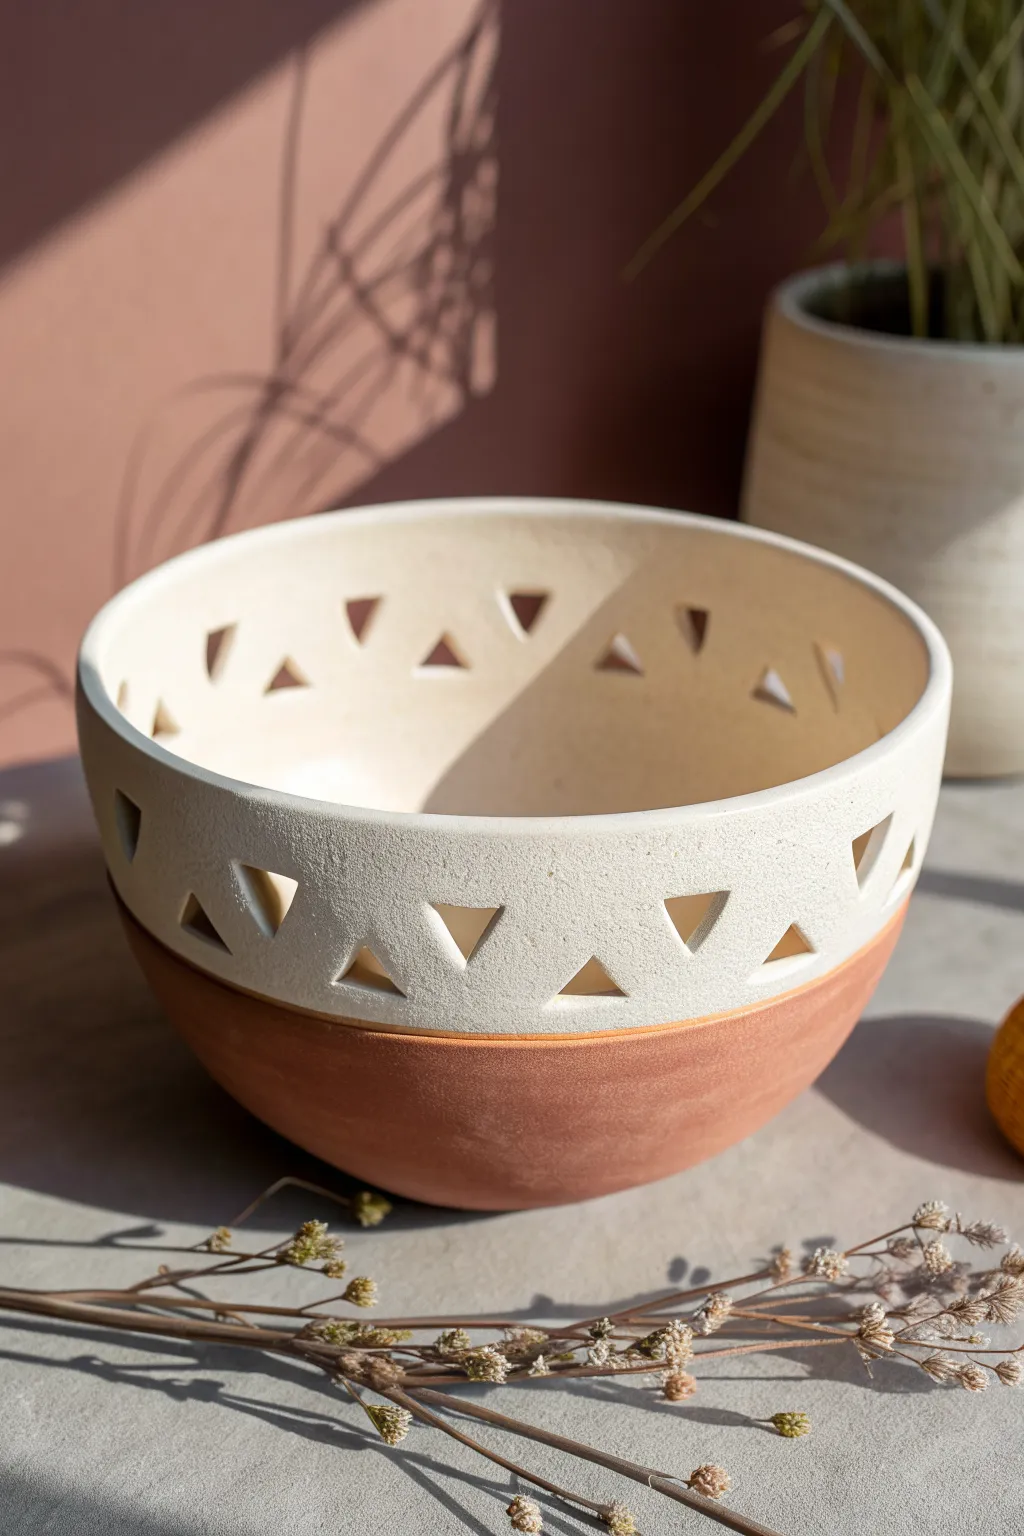
Stamped Geometric Pattern Bowl
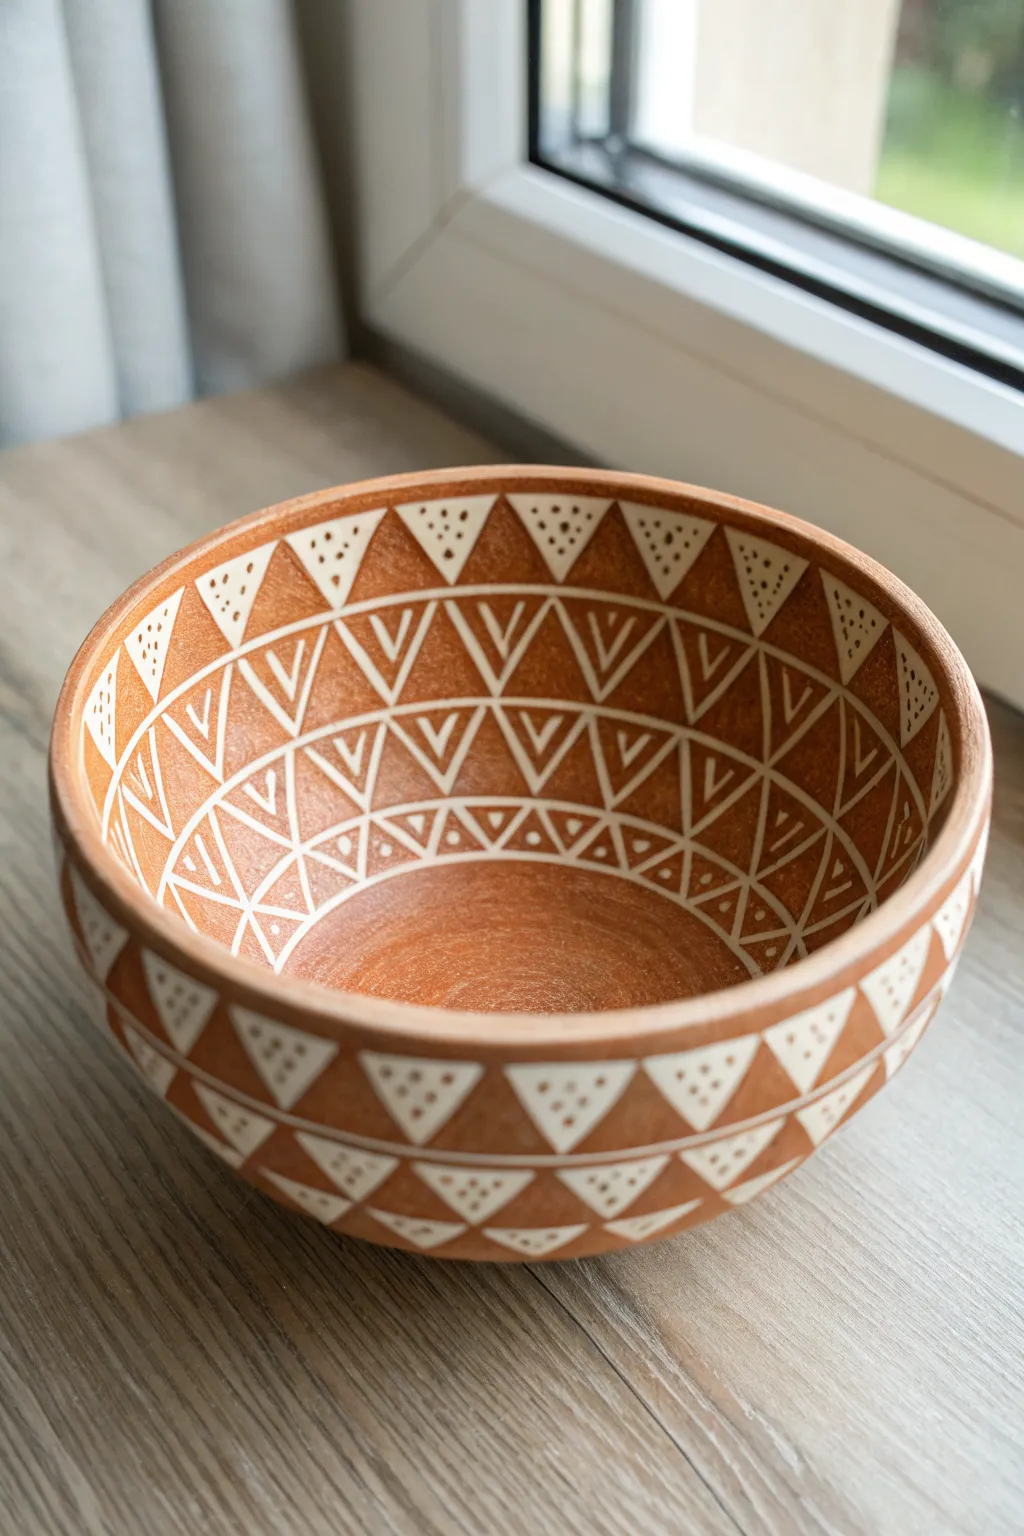
This project mimics the rustic charm of traditional sgraffito pottery using accessible polymer clay techniques. By layering white liquid clay over a rich terracotta base, you create a striking high-contrast geometric vessel perfect for holding trinkets.
Step-by-Step Tutorial
Materials
- Terracotta colored polymer clay (approx. 4oz)
- White liquid polymer clay
- Medium-sized oven-safe glass bowl (to use as a form)
- Acrylic rolling pin
- Craft knife or scalpel
- Fine-point stylus tool or needle tool
- Small geometric triangle stamps (optional)
- Cornstarch or baby powder (release agent)
- Fine grit sandpaper (400-600 grit)
- Matte polymer clay varnish
Step 1: Forming the Base
-
Condition the clay:
Begin by thoroughly conditioning your terracotta polymer clay until it is soft and pliable. Warm hands make this easier. -
Roll out the slab:
Using your acrylic roller, flatten the clay into a large, even sheet about 1/4 inch thick. Aim for a consistent thickness to prevent cracking during baking. -
Prepare the mold:
Dust your oven-safe glass bowl lightly with cornstarch or baby powder. This acts as a release agent so the clay doesn’t stick to the glass. -
Shape the bowl:
Gently drape the clay sheet *inside* the glass bowl for a smooth interior finish. Press it firmly against the sides, working from the center outward to push out any trapped air bubbles. -
Trim the rim:
Use your craft knife to slice off the excess clay hanging over the rim of the glass bowl. Create a clean, flat edge by running the blade flush against the glass rim. -
Smooth the surface:
Dip your finger in a little water or clay softener and gently rub the interior surface to remove any fingerprints or imperfections.
Step 2: Creating the Design
-
Apply the white layer:
Squeeze a thin layer of white liquid polymer clay onto the upper rim area and the interior walls where you want the pattern. I like to spread this very thinly with a finger or brush so it becomes a ‘skin’ rather than a thick puddle. -
Initial bake:
Bake the bowl inside the glass form for about 15 minutes at the manufacturer’s recommended temperature to ‘set’ the liquid clay. Let it cool completely. -
Carving the rim triangles:
Once cool, use your carving tool to scratch through the thin white layer revealing the terracotta underneath. Create a row of triangles pointing downwards along the very top edge. -
Adding texture details:
Inside each rim triangle, use a needle tool to poke small clusters of dots (stippling). Press just hard enough to reveal the dark clay beneath. -
Carving the interior pattern:
Move down into the bowl’s interior. Carve concentric rings of ‘V’ shapes or connected zig-zags. The goal is to carve away the white spaces between the lines to define the geometric structure. -
Detailing the lower sections:
For the lower rings of triangles, replicate the dotted pattern you used on the rim. Consistency in the dot size really ties the design together. -
Decorating the exterior:
Carefully pop the clay out of the glass bowl. Apply a thin layer of white liquid clay to the exterior, set-bake it briefly again, and then carve a matching row of dotted triangles around the outside.
Uneven Carving Lines?
If your carving tool is slipping, the liquid clay layer might be too fresh. Bake it for another 5-10 minutes to harden the surface before trying to scratch the design again.
Step 3: Finishing Touches
-
Final Bake:
Place the clay bowl back into the oven for a full cure (usually 30-45 minutes at 275°F/135°C, but check your packaging). Support it with some polyester batting if needed to keep its shape. -
Cool and inspect:
Allow the bowl to cool slowly in the oven to prevent thermal shock. -
Sanding edges:
Use fine-grit sandpaper to smooth the top rim of the bowl, ensuring it feels pleasant to the touch. -
Sealing:
Apply a coat of matte varnish to protect the surface, especially over the carving areas, to keep the white clay from getting dirty over time.
Inverted Colors
Try using a white clay base and painting it with terracotta acrylic paint. Once dry, carve through the paint to reveal white triangles for a reverse-sgraffito effect.
Place your finished bowl on a side table to add a touch of handcrafted geometric elegance to your decor


What Really Happens Inside the Kiln
Learn how time and temperature work together inside the kiln to transform clay into durable ceramic.
Color-Blocked Modern Bowl
Achieve a high-end designer look with this simple yet striking geometric clay bowl. Featuring clean lines and a modern palette of white, terracotta, and soft beige, this project creates a functional catchall that looks like it came straight from a boutique.
Step-by-Step Guide
Materials
- Polymer clay in White, Terracotta, and Beige
- Rolling pin or acrylic roller
- Oven-safe glass or metal bowl (to use as a mold)
- Craft knife or scalpel
- Parchment paper
- Sandpaper (fine and medium grit)
- Matte polymer clay varnish (optional)
- Clean work surface (tile or glass mat)
- Cornstarch (to prevent sticking)
Step 1: Preparing the Clay
-
Condition the clay:
Start by thoroughly kneading each color of polymer clay separately until it is soft, pliable, and free of cracks. -
Roll out sheets:
Roll each conditioned color into a sheet of uniform thickness, aiming for about 1/4 inch (6mm) thick. An acrylic roller works best here to keep the surface smooth. -
Cut geometric wedges:
Visualize your bowl design as a pie. Using your craft knife, cut large, triangular wedge shapes from each color sheet. You don’t need them to be perfect triangles; slightly organic edges work well for this style.
Air Bubble Blues?
If a bubble appears after baking, don’t panic. Piercing it gently with a pin and sanding it down usually fixes the surface flawlessly.
Step 2: Assembling the Pattern
-
Arrange the slab:
On a large piece of parchment paper, arrange your colored wedges into a circular or rough oval shape. Fit the edges together tightly like a puzzle. -
Fuse the seams:
Gently press the seams together with your fingers. Then, lay a piece of parchment paper over the top and roll over the entire assembly with your roller. -
Smooth the surface:
Continue rolling in different directions until the clay is a single, cohesive slab and the seams feel smooth to the touch. -
Cut the final circle:
Find a circular template (like a plate or pot lid) that acts as your final size guide. Place it on your patterned clay slab and cut around it with your knife to get a perfect clean edge.
Step 3: Shaping and Baking
-
Prepare the mold:
Lightly dust the outside of your oven-safe bowl with cornstarch. This crucial step prevents the clay from fusing to the mold during baking. -
Form the bowl:
Carefully lift your clay circle and drape it centrally over the upside-down bowl. Gravity will help it settle into shape. -
Smooth the curve:
Gently press the clay against the mold, working from the center outward to remove any trapped air bubbles. Ensure the bottom is flat so it sits stably. -
Clean the rim:
If the clay stretches unevenly at the rim, trim it gently with your knife while it’s on the mold to ensure an even height all around. -
Bake:
Place the bowl (still on the mold) into the oven. Follow the temperature instructions specifically for your brand of clay, usually around 275°F (135°C). -
Extend baking time:
Bake for at least 30-45 minutes. Longer baking times generally result in stronger polymer clay, which is essential for a functional bowl. -
Cool down:
Let the bowl cool completely inside the oven with the door open. Removing it while hot can cause warping or cracking.
Gilded Edge
Paint the rim with gold liquid leaf after baking for a chic metallic pop that contrasts beautifully with the matte clay.
Step 4: Finishing Touches
-
Remove from mold:
Once fully cooled, gently pop the clay bowl off the glass or metal form. -
Sand the edges:
Use medium grit sandpaper to smooth out any sharp or uneven spots on the rim. I find wet-sanding (dipping the paper in water) keeps the dust down significantly. -
Surface sanding:
Switch to fine-grit sandpaper to buff the surface if you see any fingerprints, giving the clay a matte, stone-like texture. -
Optional sealing:
If you want extra protection or a slight sheen, apply a thin layer of matte polymer clay varnish, though the raw sanded finish looks very modern on its own.
Now you have a stunning, handcrafted piece perfect for holding your favorite jewelry or keys.
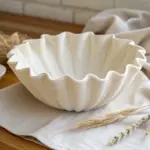
Wavy Fluted Edge Bowl
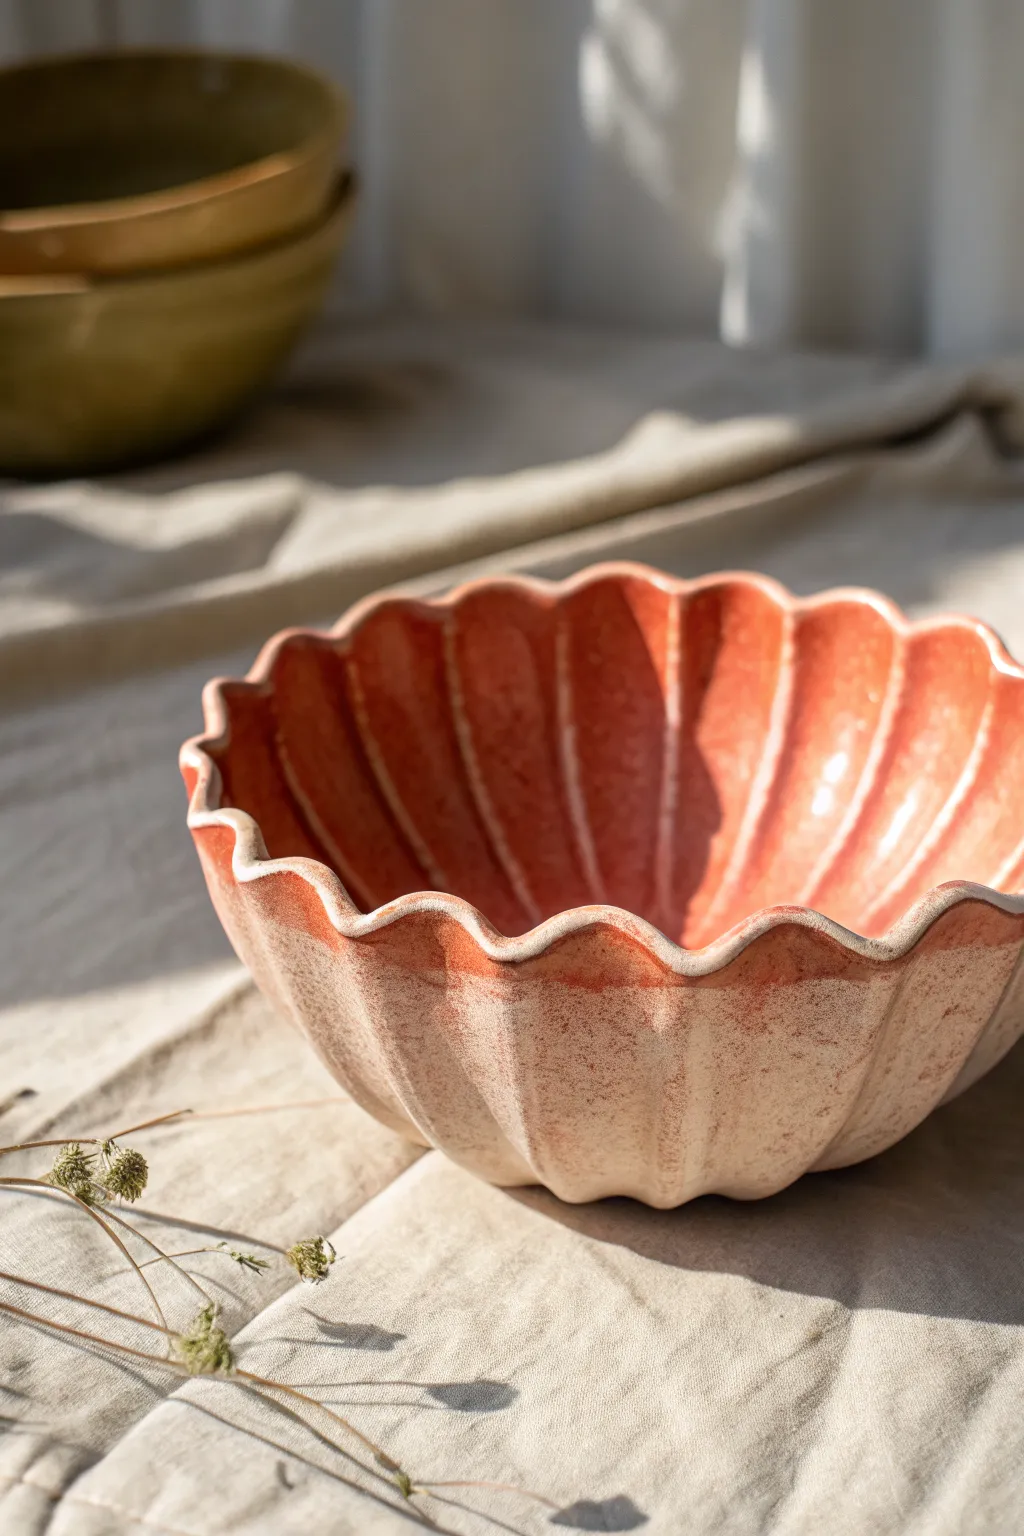
Capture the organic elegance of a sea scallop with this beautiful fluted bowl project. With its warm terracotta tones and a subtle, dusty texture on the exterior, this piece creates a sophisticated vessel for holding trinkets or purely for display.
Step-by-Step
Materials
- Terracotta or warm coral polymer clay (approx. 4-6 oz)
- Medium-sized glass mixing bowl (oven-safe, to use as a form)
- Cornstarch or baby powder (for release)
- Acrylic rolling pin or pasta machine
- Large round cookie cutter or a bowl to trace (slightly larger than your mold)
- Craft knife
- Modeling tool with a rounded handle or a thick dowel
- Gloss glaze or resin (for interior)
- White acrylic paint (optional, for texture)
- Rough sponge or sandpaper
- Oven thermometer
Step 1: Preparation & Base
-
Condition the Clay:
Start by thoroughly conditioning your terracotta polymer clay until it is soft and pliable. If you want that speckled look seen in the photo, mixing in a tiny pinch of white or black embossing powder or coarse sand at this stage works wonders. -
Roll the Sheet:
Roll your clay out into a large, even sheet. You want it to be slightly thicker than usual, about 1/4 inch (or a #1 setting on a pasta machine), to support the deep flutes without tearing. -
Cut the Circle:
Place your large tracing bowl or cutter onto the clay sheet. Cut out a perfect circle using your craft knife. This circle needs to be significantly larger than the glass bowl you are using as a mold to allow for the draping effect. -
Texture the Exterior (Optional):
To mimic the sandy texture in the image, lightly press a coarse sponge or sandpaper onto one side of the clay circle. This roughened side will become the outside of your bowl.
Uneven Flutes?
If your spacing is tricky, make light marks on the clay circle before draping it. Divide it like a pizza into 8 or 12 equal slices to guide where your tool should press.
Step 2: Shaping the Flutes
-
Prepare the Mold:
Dust the outside of your oven-safe glass bowl liberally with cornstarch. This release agent is crucial so your clay doesn’t fuse to the glass during baking. -
Center the Clay:
Gently lift your clay circle and drape it over the upside-down glass bowl. Take a moment to ensure it is perfectly centered, or your rim will be uneven. -
Begin the Scallops:
Using your fingers, gently press the clay down against the glass in even intervals. I like to visualize a clock face, pressing down at 12, 6, 3, and 9 first to establish symmetry. -
Deepen the Grooves:
Use the handle of a modeling tool or a thick wooden dowel to press the clay into the ‘valleys’ of the flutes. Press the tool firmly against the glass mold, running it from the clear rim down toward the base. -
Refine the Ridges:
As you press the valleys down, the clay in between will naturally rise up. Pinch these rising sections gently to sharpen the ridges, creating that distinct wavy edge. -
Smooth the Rim:
Check the very edge of the clay bowl. If the draping caused any jagged bits, gently smooth them with your finger so the final scallop is soft and rounded. -
Re-texture if Needed:
If your handling smoothed out the exterior texture too much, carefully dab your sponge over the high points of the flutes again.
Two-Tone Effect
Before rolling your sheet, stack a layer of white clay on top of the terracotta. When draped, the white will become the interior color for a modern dip-dyed aesthetic.
Step 3: Finishing Touches
-
Bake the Bowl:
Place the glass bowl with the clay still on it onto a baking sheet. Bake according to your clay manufacturer’s instructions. A typical range is 275°F (135°C) for about 30-45 minutes to ensure strength. -
Cool Completely:
Allow the project to cool completely in the oven with the door cracked. Removing the clay while it’s still warm can cause warping or cracking. -
Remove from Mold:
Once cool, gently twist the clay to pop it off the glass bowl. Wash off any residual cornstarch with water and dry thoroughly. -
Distress the Exterior:
To achieve the whitish, dusty look from the photo, dry brush a tiny amount of white acrylic paint onto the exterior, focusing on the textured areas. Wipe almost all of it off immediately with a paper towel, leaving just a hint of white in the crevices. -
Glaze the Interior:
For that striking contrast between the matte outside and shiny inside, apply two coats of gloss glaze or a thin layer of UV resin only to the interior of the bowl.
Place this beauty on a linen cloth to catch the afternoon light and admire the organic shadows cast by the flutes

TRACK YOUR CERAMIC JOURNEY
Capture glaze tests, firing details, and creative progress—all in one simple printable. Make your projects easier to repeat and improve.
Coiled Swirl Rope Bowl
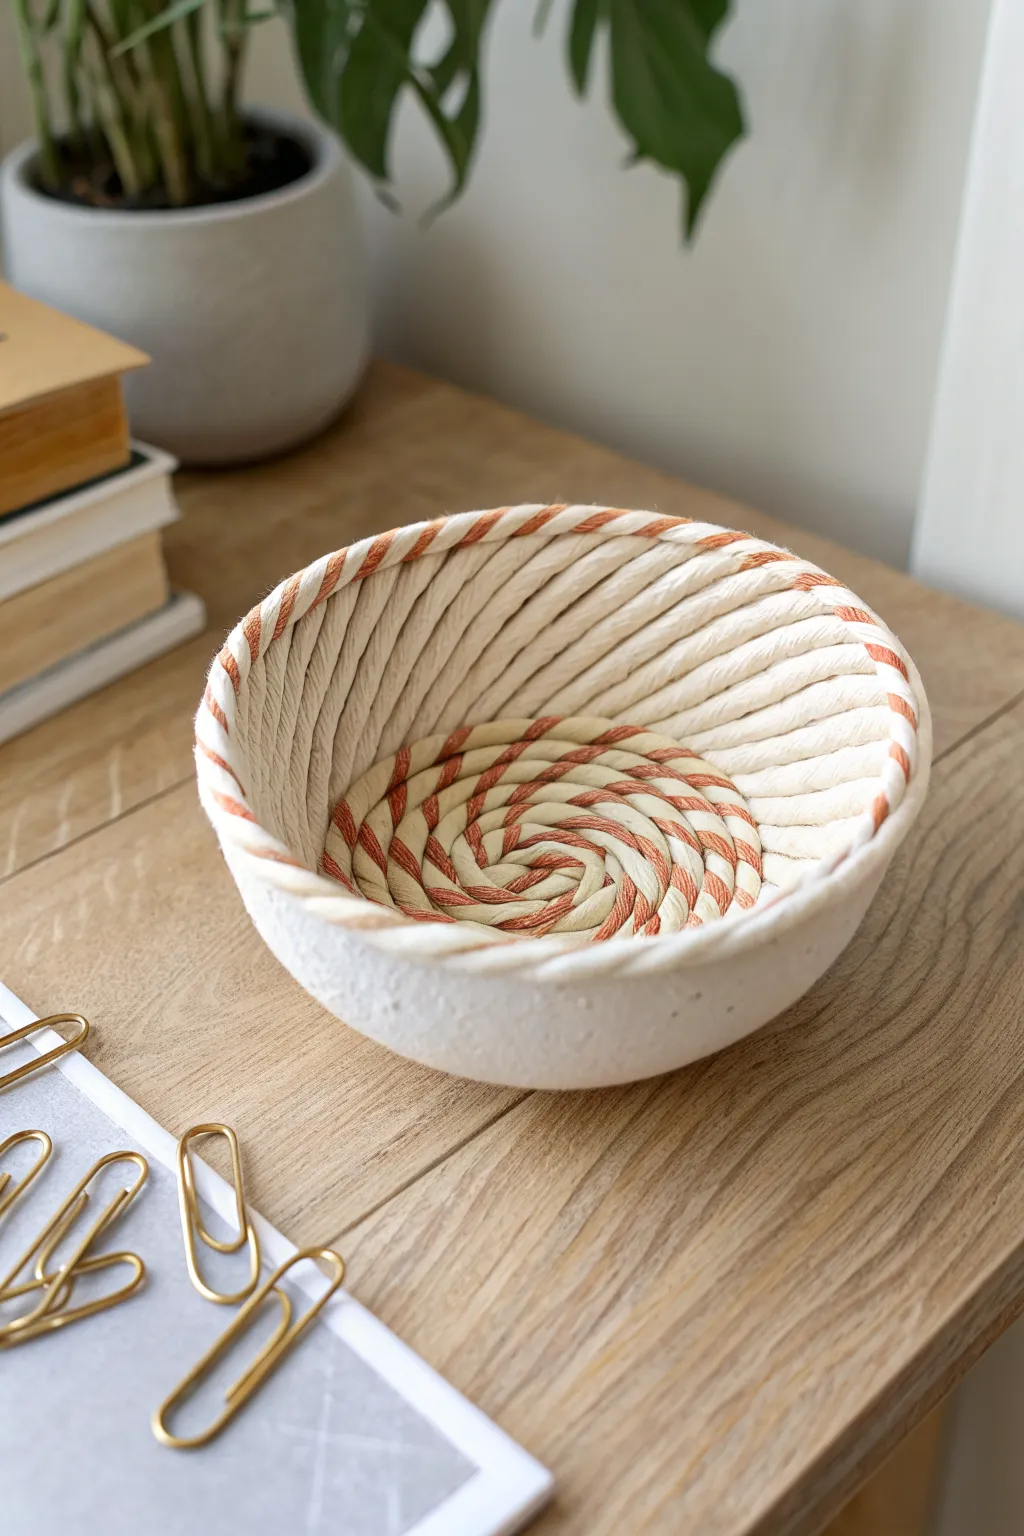
Transform simple polymer clay into a stunning textured vessel that mimics the look of a woven rope basket. This project combines the rustic charm of coiled textiles with the durability of clay, featuring a clever two-tone twist effect nestled inside a smooth outer shell.
How-To Guide
Materials
- White or cream polymer clay (approx. 4-6 oz)
- Terracotta or rust-colored polymer clay (small amount)
- Small Oven-safe glass or metal bowl (to use as a mold)
- Acrylic roller or pasta machine
- Clay extruder (optional but helpful)
- Liquid polymer clay (translucent or white)
- Sharp clay blade or craft knife
- Cornstarch or baby powder (release agent)
- Ceramic tile or baking surface
- Oven
Step 1: Creating the Rope Strands
-
Condition the Clay:
Begin by thoroughly kneading your white clay until it is soft and pliable. Do the same with a smaller amount of the terracotta-colored clay. -
Form the Base Coil:
Roll out a long, thin snake of white clay. If you want uniform thickness, using a clay extruder with a medium round disc works wonders here, but hand-rolling works perfectly fine too. -
Add the Stripe:
Roll a very thin snake of the terracotta clay. It should be significantly thinner than your white coil—think spaghetti sized versus marker sized. -
Twist the Design:
Lay the thin terracotta strand alongside the white strand. Gently twist them together to create a candy-cane effect. The goal is to embed the terracotta slightly into the white so it looks like a dyed thread running through a rope. -
Smooth the Twist:
Once twisted, gently roll the combined snake on your work surface just enough to bond the clays together without losing the twisted definition. Repeat this process until you have several long ‘rope’ strands prepared.
Step 2: Building the Bowl Structure
-
Prepare the Outer Shell:
Roll out a sheet of white clay, roughly 1/8 inch thick. Select an oven-safe bowl to use as your form and lightly dust the *outside* with cornstarch to prevent sticking. -
Mold the Shell:
Drape your flat sheet of white clay over the bottom of the inverted bowl. Trim the edges to your desired height, creating a smooth, simple bowl shape. This acts as the structural support for your coils. -
Prepare the Interior:
Carefully remove the clay shell from the form if it holds its shape well, or leave it on the form if it needs support. I usually prefer to flip it right-side up, nestling the clay shell inside the glass bowl now so gravity helps push the coils down. -
Begin Coiling:
Take your twisted rope strands. Apply a thin layer of liquid polymer clay to the bottom inside center of your white clay shell to act as glue. -
Spiral the Bottom:
Start coiling the rope in a tight spiral at the very center of the bowl’s interior. Press down gently to ensure it bonds with the shell underneath. -
Work Up the Sides:
Continue spiraling the rope outward and up the sides of the bowl. Keep the coils tight against each other so no gaps show through. -
Rim Detail:
When you reach the top edge, run one final loop of the twisted rope along the very rim. This covers the edge of the smooth outer shell and ties the whole look together. -
Clean Up:
Inspect the inside for any gaps. If the rope ends need joining, cut them at an angle and smooth them together for a seamless transition.
Seamless Splices
When joining two rope segments, cut both ends at a 45-degree angle. Apply a drop of liquid clay and press the angled cuts together to hide the seam within the twist pattern.
Step 3: Baking and Finishing
-
Pre-Bake Check:
Ensure the clay is fully pressed against the mold (if using one) or holding its shape. Use a soft brush to texturize the white parts of the rope slightly if they look too smooth—a toothbrush works great for a fiber look. -
Bake:
Place the project (and the oven-safe bowl mold, if used) into the oven. Bake according to your brand of clay’s specific instructions, typically around 275°F (135°C) for 30 minutes per 1/4 inch of thickness. -
Cooling:
Let the bowl cool completely inside the oven with the door slightly ajar. This gradual cooling helps prevent cracking. -
Demolding:
Once fully cool, carefully pop the clay bowl out of the glass mold. The cornstarch should allow it to release easily. -
Surface Finish:
If desired, give the smooth outer shell a light sanding with fine-grit sandpaper for a matte, stone-like finish.
Speckled Stone Effect
Mix black pepper or dried used coffee grounds into the white clay of the outer shell before rolling it out. This creates a realistic ceramic pottery texture.
Fill your new faux-rope bowl with trinkets or display it empty to show off the mesmerizing spiral pattern inside
Faux Agate Stone Bowl
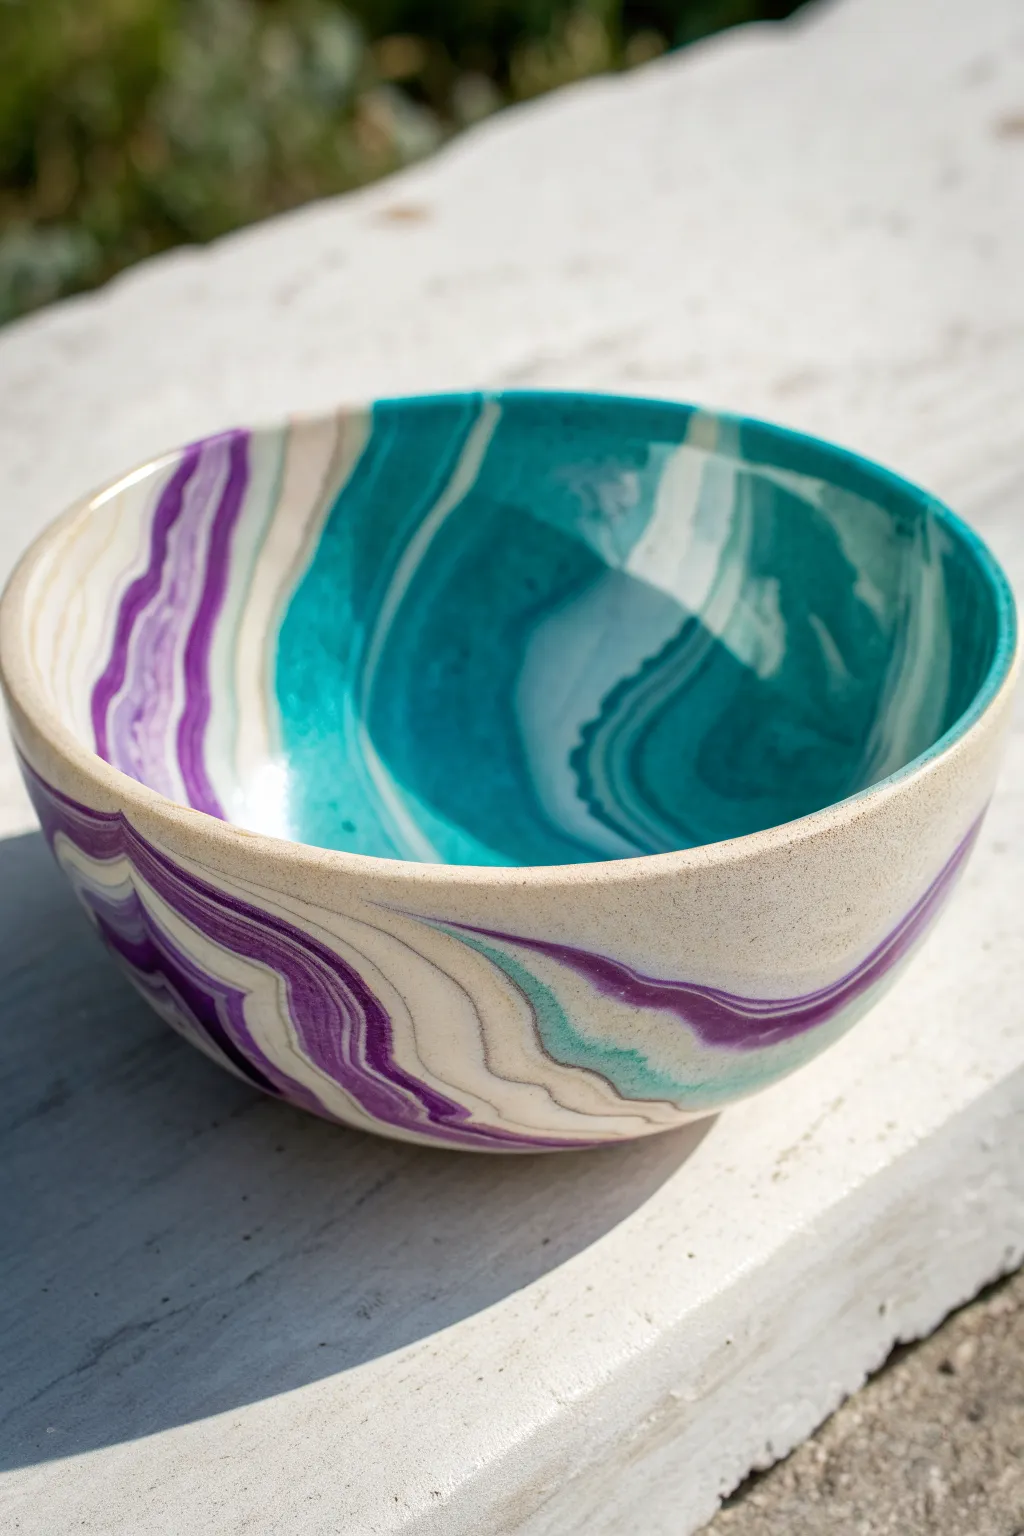
Capture the breathtaking beauty of natural stone with this faux agate bowl project. Using simple marbling techniques, you will blend teal, purple, and cream polymer clays to create winding, organic bands of color that mimic geode slices.
Detailed Instructions
Materials
- Polymer clay (Teal, Purple, White, Translucent)
- Acrylic roller or pasta machine
- Tissue blade or sharp clay knife
- Oven-safe glass or ceramic bowl (to use as a form)
- Cornstarch or water (release agent)
- Wet/dry sandpaper (400, 600, 1000 grit)
- Polycrylic or resin glaze (optional for high gloss)
Step 1: Preparing the Clay Palette
-
Condition the white base:
Begin by thoroughly conditioning a large block of white polymer clay until it is soft and pliable. This will act as the primary separator between your colors, imitating the quartz bands in agate. -
Mix custom shades:
To achieve the organic look in the photo, don’t use colors straight from the package. Mix a bit of translucent clay into your teal and purple blocks; this adds depth and that realistic ‘stone’ translucency once baked. -
Create color logs:
Roll your conditioned teal, purple, and white clays into thick logs or snakes. You want different thicknesses for variety—make the white logs slightly thinner than the colored ones for delicate banding.
Translucency Trick
Mix 1 part translucent clay to 2 parts colored clay. After baking, hold it to the light; the translucent areas glow, making the ‘stone’ heavy and realistic.
Step 2: Creating the Agate Cane
-
Bundle the logs:
Group your logs together, alternating colors. Place a white log between a purple and teal one to prevent them from blending into a muddy color. Press them firmly into one large cylinder. -
Twist the bundle:
Holding both ends of your large cylinder, gently twist in opposite directions. Continue twisting until you see the stripes spiraling tightly like a candy cane. -
Fold and roll:
Fold the twisted log in half and roll it smooth again on your work surface. Repeat this twist-and-fold process 2-3 times, but stop before the colors completely merge. -
Form a block:
Squish your marbled log into a solid rectangular block or a thick patty. This compresses the layers and prepares it for slicing.
Air Bubble Blues
If you see a bubble while draping clay on the form, pierce it with a needle and smooth the air out immediately. Trapped air expands in heat and causes bumps.
Step 3: Forming the Bowl
-
Slice the slabs:
Using your tissue blade, cut thin slices from your clay block. You should start seeing beautiful, unique agate-like rings and swirls in each slice. -
Create a sheet:
Arrange these slices side-by-side on a flat surface, overlapping the edges slightly. Use your acrylic roller to flatten them into a single, cohesive sheet of patterned clay. -
Prepare the mold:
Take your oven-safe bowl form and lightly dust the outside (if shaping over the bottom) or inside with cornstarch. This ensures your clay won’t stick permanently. -
Drape the clay:
Please gently lift your patterned clay sheet and drape it over your bowl form. I prefer shaping over the outside bottom of a bowl to keep the inside surface smooth. -
Trim the edges:
Use your blade to trim away excess clay around the rim. You can leave it slightly uneven for a natural stone look or cut it straight for a modern finish. -
Smooth the surface:
Rub the clay gently with your finger or a little water to smooth out any seams where the slices joined. Ensure no air bubbles are trapped between the clay and the form.
Step 4: Baking and Finishing
-
Bake the bowl:
Place the bowl (still on the form) into the oven. Follow the baking temperature and time directed on your specific brand of clay packaging, generally around 275°F (135°C) for 15-30 minutes. -
Cool down:
Let the piece cool completely inside the oven or on the counter before attempting to remove it from the form. Removing it while hot can warp the shape. -
Pop it off:
Gently pry the clay bowl off the glass form. If you used cornstarch, it should release easily with a little wiggle. -
Sand the edges:
Under running water, use wet/dry sandpaper to smooth the rim and any rough spots. Start with 400 grit and work your way up to 1000 for a silky feel. -
Buff or glaze:
For a matte stone finish, buff vigorously with a denim cloth. For the glossy shine seen in the photo, apply a thin coat of water-based glaze or resin.
Enjoy displaying your sophisticated, handcrafted faux stone vessel as a stunning centerpiece.
Ocean Wave Sculpted Bowl
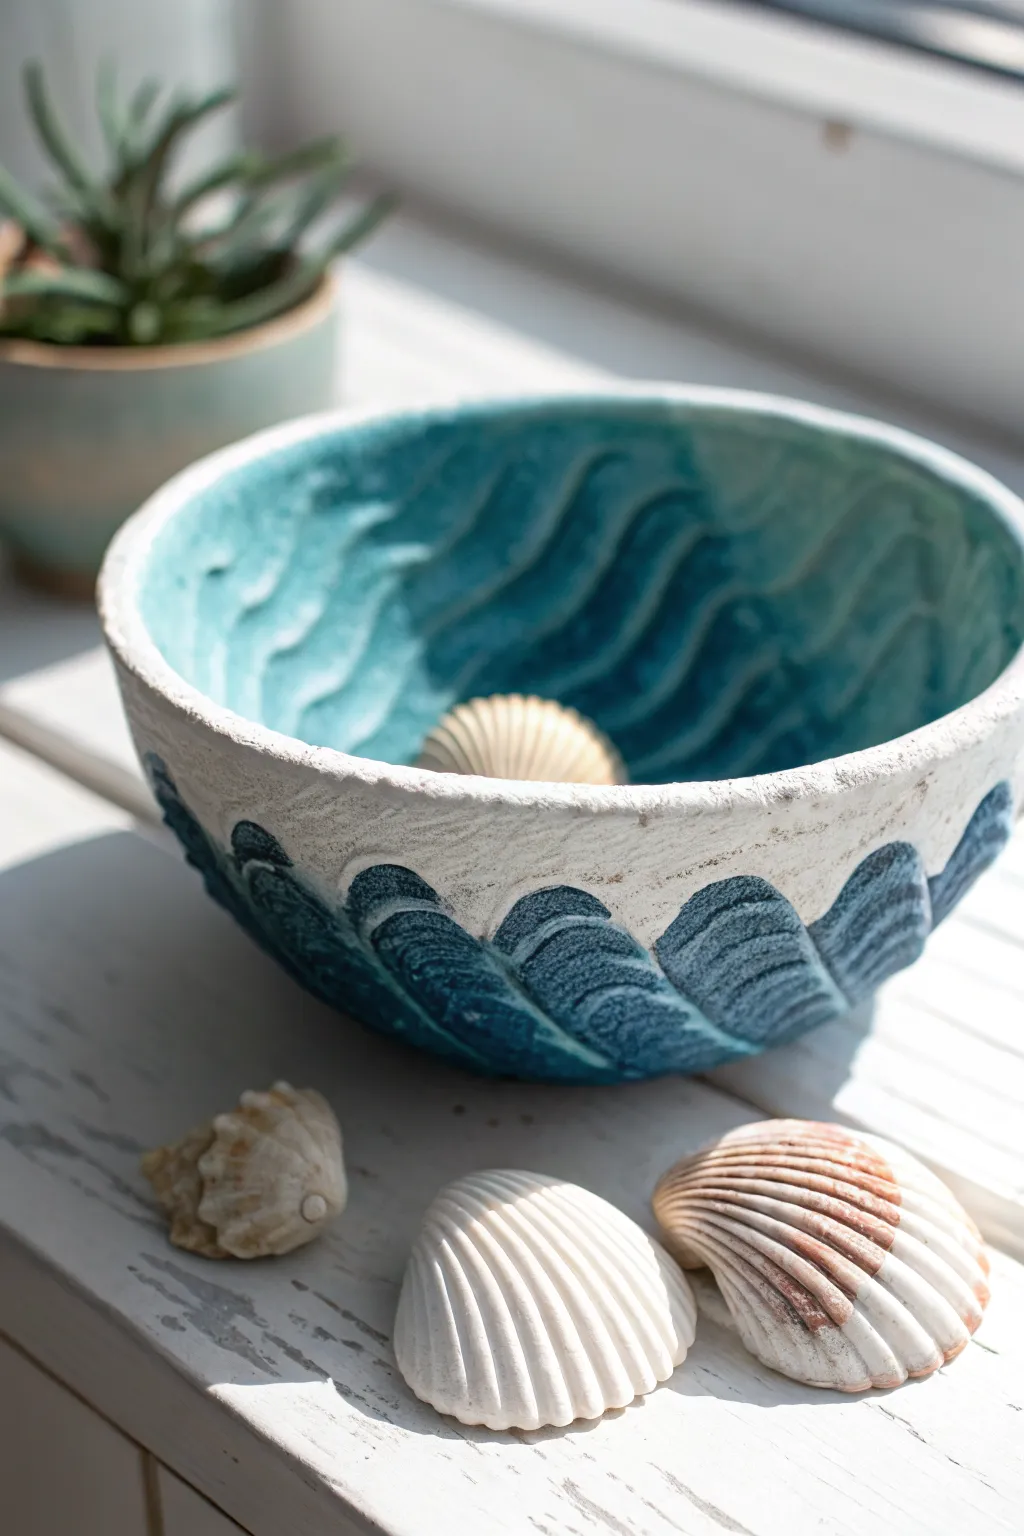
Bring the calming rhythm of the ocean into your home with this textured vessel that captures the essence of crashing waves. The distinct relief pattern mimics the flow of water, while the two-tone color palette creates a refreshing, coastal aesthetic perfect for holding trinkets or sea glass.
How-To Guide
Materials
- White polymer clay (approx. 8 oz)
- Blue polymer clay (teal or ocean blue)
- Medium oven-safe glass or metal bowl (to use as a mold)
- Cornstarch or baby powder
- Acrylic rolling pin
- Sculpting tool with a curved scoop or rounded edge
- Texture sponge or sandpaper (for the rim)
- Liquid polymer clay (optional, for smoothing)
- White acyclic paint (if using only white clay)
- Matte varnish
Step 1: Preparing the Base
-
Condition the Clay:
Begin by thoroughly conditioning your white polymer clay until it is soft and pliable. If you want the blue integrated into the clay itself, marble a small amount of blue into a portion of the white, but for this specific painted look, starting with a solid white base works best. -
Roll the Slab:
Roll out the clay on a clean surface to an even thickness of about 1/4 inch. Making it too thin might cause the deep textures we’ll add later to tear through the bottom. -
Prepare the Mold:
Dust the outside of your oven-safe bowl lightly with cornstarch. This acts as a release agent so your clay doesn’t fuse to the mold during baking. -
Form the Bowl:
Drape your clay slab over the upside-down bowl. Gently press it down to conform to the shape, trimming away excess clay at the rim with a craft knife to create a clean or slightly organic edge.
Uneven Texture?
If your carving leaves rough burrs or crumbs of clay, brush them with a little baby oil or clay softener before baking. This melts the rough edges for a smoother finish.
Step 2: Sculpting the Waves
-
Define the Water Line:
Visualize where your waves will crash. While the clay is still on the mold, use a needle tool to lightly sketch a wavy line around the lower two-thirds of the bowl exterior. This marks the separation between texture and the smooth rim. -
Carve the Exterior:
Using a rounded sculpting tool, press into the clay below your marked line and drag upwards in a curved motion. You want to create overlapping scallop shapes that look like rising water. -
Refine the Ridges:
Deepen the grooves between the scallops. Typically, I like to smooth the top edge of each ‘wave’ with my finger to make it look soft rather than sharp. -
Texture the Rim:
For the upper white portion, dab a coarse texture sponge or a crumpled ball of foil against the clay. This gives it a sandy, weathered stone appearance that contrasts nicely with the smooth waves. -
Interior Detailing (Optional):
If you are comfortable removing the clay from the mold before baking, you can gently flip it and carve swirling wave lines on the inside. Otherwise, bake it on the mold first and add painted details later. -
First Bake:
Bake the bowl according to your clay manufacturer’s instructions (usually 275°F for 15-30 minutes) while strictly keeping it on the mold to hold its shape.
Add Sea Foam
Mix white acrylic paint with baking soda to create a thick, gritty paste. Dab this onto the very tops of your blue waves to simulate realistic, foamy sea spray.
Step 3: Painting and Finishing
-
Cool and Remove:
Let the bowl cool completely before popping it off the mold. If it sticks, a gentle twist usually breaks the seal. -
Base Coat:
If you used plain white clay, you can leave the upper rim raw or paint it a stark matte white. For the waves, prepare a deep teal or ocean blue acrylic paint. -
Painting the Depths:
Apply the blue paint into all the carved recesses of the wave pattern on the exterior. Don’t worry about being too messy initially; getting paint deep into those crevices is the priority. -
Dry Brushing:
Once the blue base is dry, take a clean brush with a tiny amount of white paint. Lightly whisk it over the raised ridges of the waves. This highlights the texture and makes the breaking waves pop. -
Painting the Interior:
Paint the entire interior of the bowl in a swirling motion with the teal paint to mimic the movement of water. You can wipe away some paint with a paper towel while wet to create a washed-out, watercolor effect. -
Seal the Project:
Finish with a coat of matte varnish. This protects the paint and gives the bowl a non-shiny, stone-like finish that feels more like natural pottery.
Place your favorite seashells inside and admire your handmade slice of the ocean.
Soft Ombre Gradient Bowl
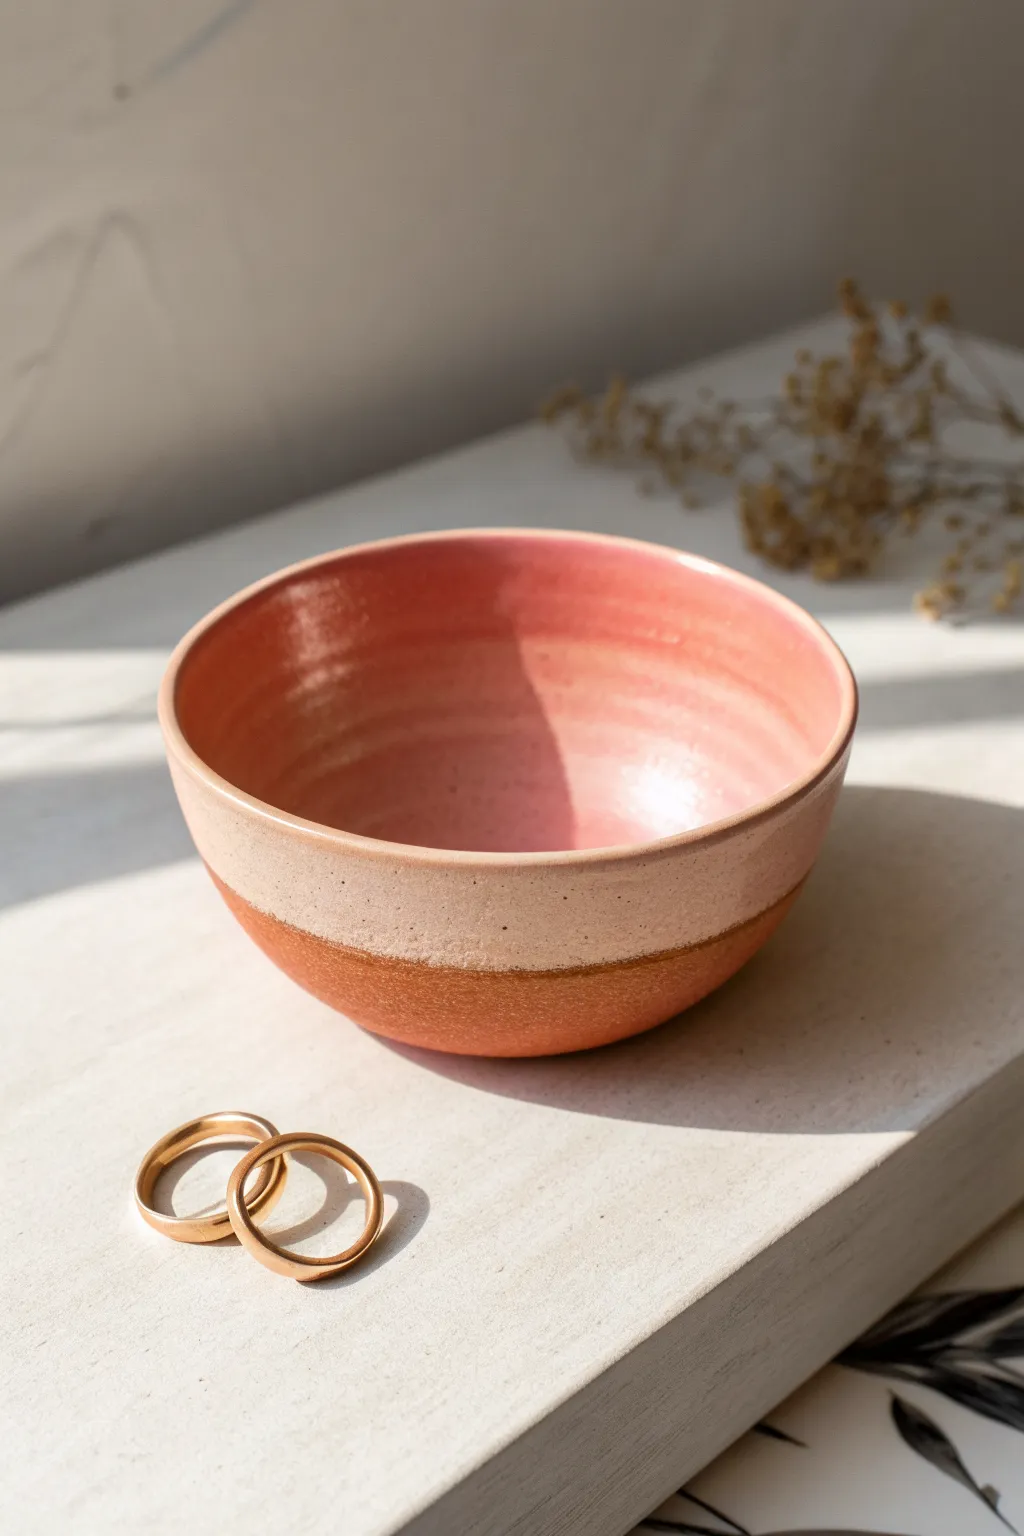
Capture the soft elegance of dawn with this two-tone polymer clay bowl featuring a beautifully smooth pink interior and a contrasting, textured rust base. This project combines sophisticated color blocking with simple slab-building techniques to create a functional piece of art perfect for holding rings or trinkets.
Step-by-Step
Materials
- Polymer clay (colors: Terracotta or Rust, Pale Peach, and Translucent)
- Acrylic rolling pin or clay machine
- Ceramic or metal bowl/mold (oven-safe) to shape the clay
- Cornstarch or baby powder (release agent)
- Craft knife or tissue blade
- Coarse grit sandpaper or a stiff wire brush (for texturing)
- Liquid polymer clay (optional)
- Gloss or satin polyurethane varnish
- Soft paintbrush
- Circle cutter (optional, or use a template)
Step 1: Color Mixing and Prep
-
Condition the clay:
Begin by thoroughly conditioning your clay. Warm the clay in your hands and roll it until it is pliable and smooth. You will need two distinct batches. -
Create the base color:
For the bottom section, stick with a rich terracotta or rust color. If you want it more earthy, mix in a tiny pinch of brown or black. -
Mix the top color:
For the upper section and interior, mix pale peach with a roughly equal amount of translucent clay. The translucent clay adds that delicate, almost ceramic-glaze depth you see in the photo.
Sticky Situation?
If the clay fuses to your baking mold, place the entire piece in the freezer for 10 minutes. The clay will contract slightly, making it pop off easily.
Step 2: Forming the Bowl
-
Roll the sheets:
Roll out your peach mixture into a large, medium-thickness sheet (about 3-4mm). Roll the rust color into a sheet of the exact same thickness. -
Cut the join line:
Using your tissue blade, make a clean, straight cut across the rust sheet and a corresponding cut across part of the peach sheet. You are preparing to splice them together. -
Splicing:
Place the cut edges of the rust and peach clay together on your work surface. Gently push them together so they adhere, but don’t distort the line. -
Smooth the seam:
Cover the clay with a piece of parchment paper or plastic wrap. Use an acrylic roller to gently roll over the seam, compressing the two colors into one single sheet without blurring the line too much. -
Prepare the mold:
Select an oven-safe bowl to use as your form. Lightly dust the outside of the bowl (for a wider shape) or inside (for a smoother shape) with cornstarch so the clay doesn’t stick. -
Shape the clay:
Drape your two-tone clay sheet over the mold. Position it so the rust color forms the bottom third and the peach color covers the rest. -
Trim the edge:
Use a craft knife to trim the excess clay around the rim of your bowl mold to create a clean, even circle. Smooth the rim with your fingertip.
Step 3: Texturing and Finishing
-
Texture the base:
Take your coarse sandpaper or a stiff wire brush. Gently tap perpendicular to the clay surface on the rust-colored section only. This replicates the rough, earthen pottery look seen in the image. -
Smooth the interior:
If you are molding over a bowl, your interior will be naturally smooth. If molding inside a bowl, use a damp finger or a rubber shaper to lovingly smooth out any fingerprints on the peach interior. -
First bake:
Bake the bowl according to your clay manufacturer’s instructions (usually 275°F/135°C) for about 30 minutes. Let it cool completely inside the mold. -
Remove and sand:
Carefully pop the clay off the mold. Use fine-grit sandpaper to gently smooth the rim if it’s sharp, and lightly buff the peach section if any dust settled on it. -
Clean surface:
Wipe the entire bowl with a damp cloth or baby wipe to remove any sanding dust or cornstarch residue. -
Apply varnish:
To achieve that high-gloss ceramic look on the inside, apply 2-3 thin coats of gloss varnish to the entire interior and the upper peach exterior. Let each coat dry fully. -
Leave the base matte:
Be careful not to varnish the textured rust section. Keeping this matte creates the beautiful contrast between ‘glazed’ and ‘unglazed’ ceramic styles.
Seam Perfection
To reinforce the seam between colors, apply a tiny amount of liquid polymer clay on the edges before pressing them together for extra durability.
Place your favorite rings inside and admire how the glossy finish catches the light like real pottery
Confetti Scrap-Clay Bowl
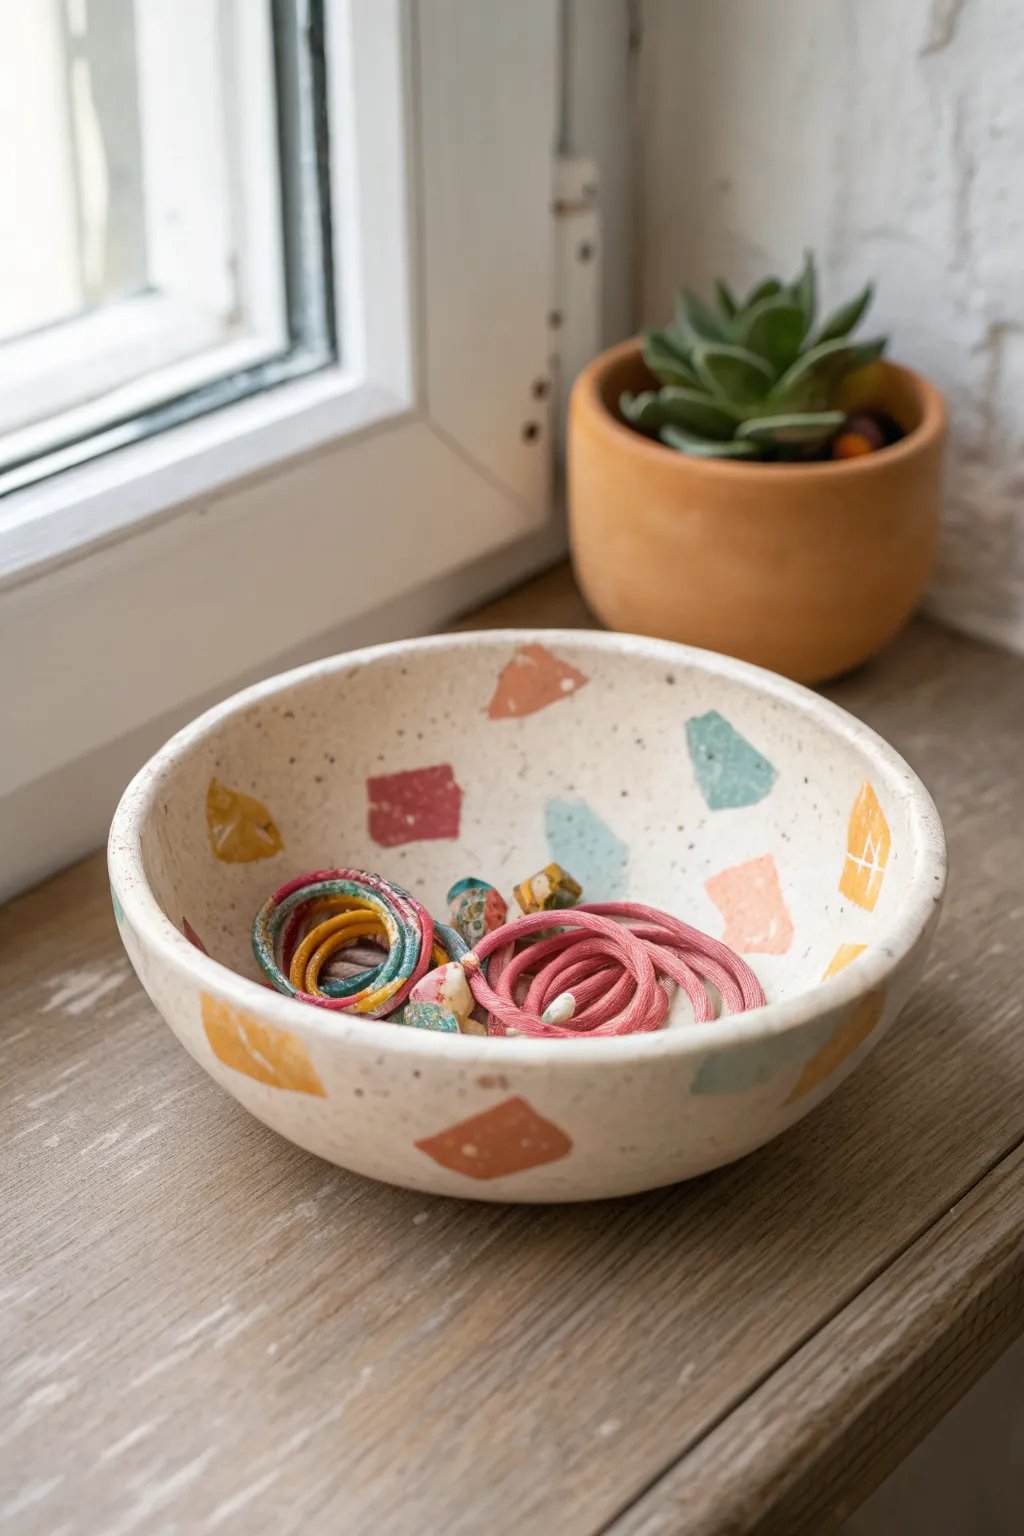
Turn your leftover clay bits into a stunning home accessory with this modern terrazzo-style bowl. The white base highlights vibrant pops of geometric color, creating a piece that looks like high-end ceramic but is surprisingly easy to make at home.
Step-by-Step Tutorial
Materials
- White or cream polymer clay (large block, ~2oz)
- Scrap polymer clay in various colors (rust, teal, mustard, peach)
- Glass or metal oven-safe bowl (to use as a mold)
- Acrylic roller
- Sharp craft knife or tissue blade
- Parchment paper
- Fine-grit sandpaper (400 to 1000 grit)
- Matte or satin polymer clay varnish (optional)
Step 1: Prepping the Confetti
-
Flatten scrap colors:
Take your colored scrap clay pieces and condition them until soft. Roll each color out individually into very thin sheets, about 1mm thickness. -
Cut geometric shapes:
Use your craft knife to slice these thin sheets into random, jagged geometric shapes. Aim for triangles, uneven rectangles, and shards of varying sizes, similar to the photo. -
Set aside:
Keep your pile of colorful ‘confetti’ separates on a piece of parchment paper so they don’t stick together while you prepare the base.
Fixing sticky spots
If the clay fuses too tightly to your glass bowl mold, pop the entire thing in the freezer for 10 minutes. The cold often shocks the clay enough to pop it right off.
Step 2: Creating the Base
-
Condition the white clay:
Thoroughly condition your large block of white clay. This needs to be pliable and free of air bubbles to ensure a smooth finish. -
Roll out the slab:
Roll the white clay into a consistent slab about 3-4mm thick. It needs to be thick enough to hold the bowl shape but thin enough to look delicate. -
Apply the confetti:
Gently pick up your colored shards and place them onto the white slab. Scatter them randomly, leaving plenty of white space between them. -
Embed the pattern:
Place a sheet of parchment paper over the decorated slab. Use your acrylic roller to roll over the paper, pressing the colored pieces firmly into the white base until the surface is completely flat and seamless.
Textured terrazzo
Add flecks of black pepper or used loose-leaf tea into the white base clay before rolling it. This adds organic speckles that mimic real stone or ceramic glazes.
Step 3: Shaping and Baking
-
Prepare the mold:
Flip your oven-safe bowl upside down on your work surface. I find lightly dusting the outside of the bowl with cornstarch helps prevent sticking later. -
Drape the clay:
Carefully lift your patterned slab and drape it over the upturned bowl. Gently press the clay down to conform to the bowl’s curve. -
Trim the edge:
Using your knife, trim the excess clay around the rim of the bowl to create an even, circular edge. You can make it perfectly straight or leave it slightly organic. -
Smooth the imperfections:
Run your finger along the cut rim to soften the sharp edge. Check for any air bubbles trapped between the clay and the mold and gently press them out. -
Bake:
Place the bowl (still on the mold) into the oven. Bake according to your brand of clay’s instructions, usually 275°F (135°C) for about 30-45 minutes.
Step 4: Finishing Touches
-
Cool and remove:
Let the piece cool completely before attempting to remove it from the mold. The clay hardens as it cools, so removing it too early can warp the shape. -
Sand the surface:
Wet sand the bowl under running water using 400 grit then moving up to 1000 grit sandpaper. This reveals the crisp edges of your confetti pieces and smooths the texture. -
Clean up:
Wash off any white sanding residue and dry the bowl thoroughly with a lint-free cloth. -
Seal (Optional):
If you want a different sheen or extra protection, apply a thin coat of matte or satin varnish to seal the terrazzo effect.
Now you have a chic catch-all dish perfect for holding jewelry or keys
Cane-Slice Mosaic Bowl
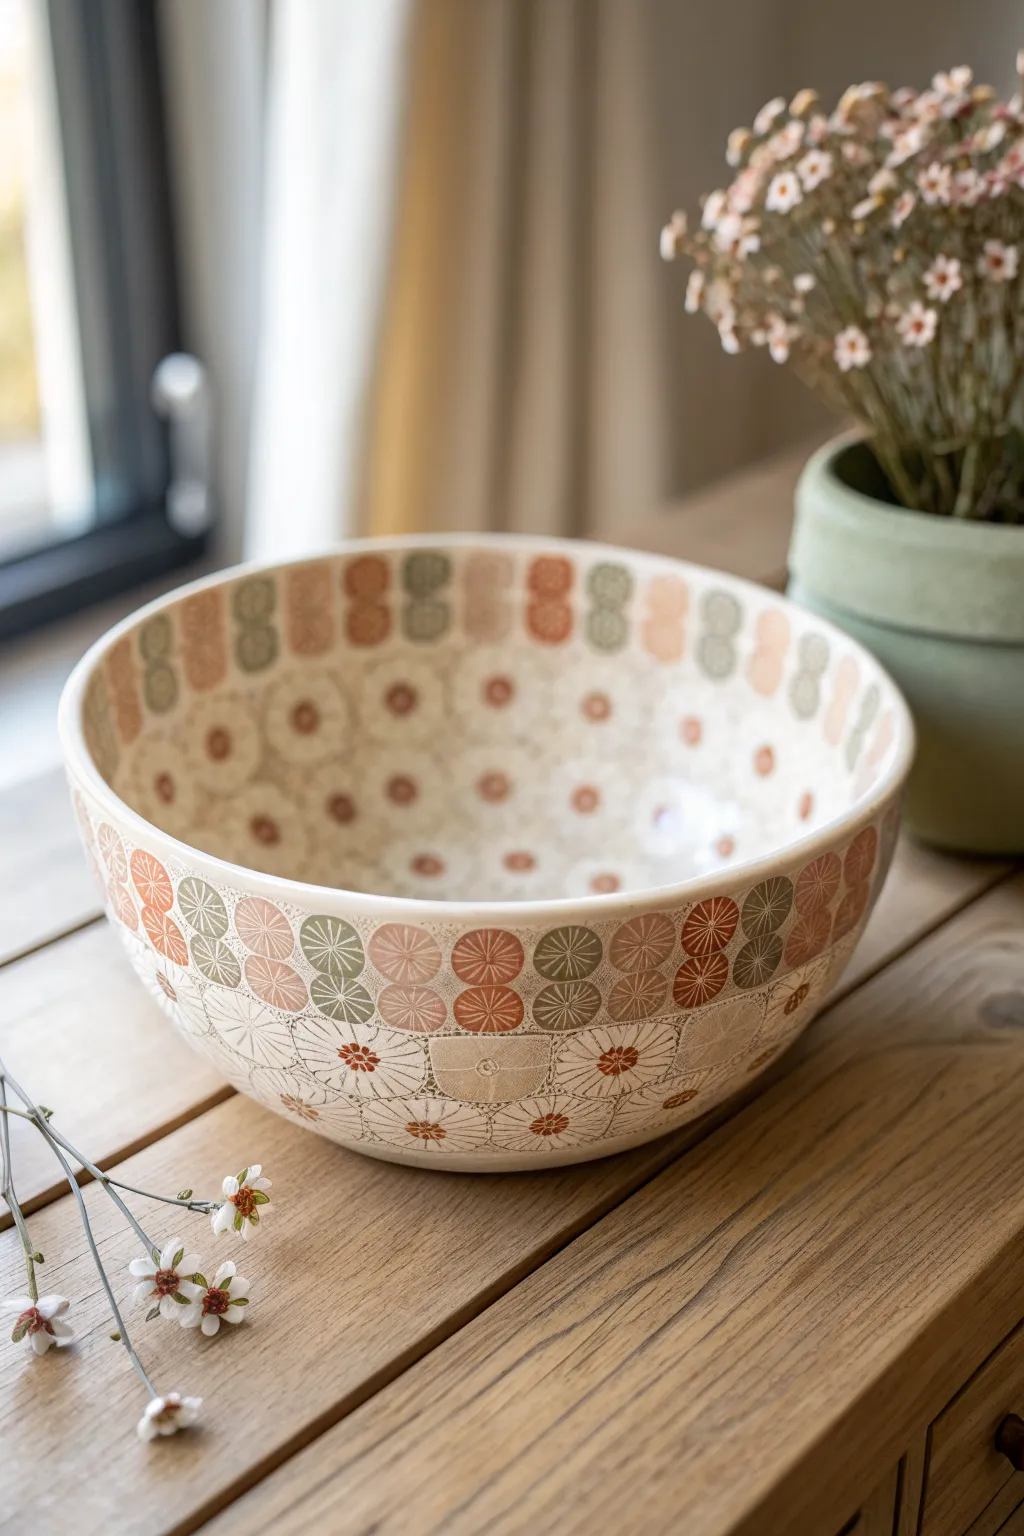
Transform a simple glass mixing bowl into a stunning piece of faux-ceramic art using detailed polymer clay canes. This project features concentric bands of repeating patterns in earthy rust, sage, and cream tones that mimic traditional hand-painted pottery.
Detailed Instructions
Materials
- Polymer clay (white, translucent, terracotta, sage green, beige)
- Oven-safe glass bowl (to use as a form)
- Pasta machine or acrylic roller
- Tissue blade (rigid and flexible)
- Liquid polymer clay (clear or translucent)
- Extruder (optional)
- Sandpaper (wet/dry, various grits)
- Matte or satin varnish
- Needle tool
Step 1: Preparing the Base and Canes
-
Condition the clay:
Begin by thoroughly conditioning your white polymer clay. Roll it out into a large, even sheet about 2-3mm thick. This will serve as the inner foundation for your bowl. -
Cover the form:
Clean the outside of your glass bowl with rubbing alcohol. Carefully drape your white clay sheet over the upside-down bowl, smoothing out any air bubbles. Trim the excess clay at the rim for a clean edge. -
Create the wheel cane:
To make the circular medallions seen on the rim, create a ‘jelly roll’ cane. Roll a thin sheet of white clay and layer it with a very thin sheet of terracotta or sage. Roll them tightly together into a log. -
Construct the segmented cane:
Cut your jelly roll log into equal lengths and arrange them around a central core of solid color. Wrap the entire bundle in a thin sheath of clay to bind them. Reduce this cane by rolling it longer until it’s about 1cm in diameter. -
Make the flower/star cane:
For the lower pattern, create a simple flower cane. Form a center log (rust or orange) and surround it with 5-6 petals made of teardrop-shaped logs in white or beige. Fill the gaps with translucent clay.
Step 2: Applying the Pattern
-
Slice the canes:
Using a very sharp tissue blade, slice your various canes as thinly and evenly as possible. Aim for slices that are about 1-1.5mm thick. I like to pop my canes in the fridge for 10 minutes first to reduce distortion while slicing. -
Apply the bottom layer:
Coat the white base layer on your bowl with a very thin layer of liquid polymer clay to act as glue. Begin applying your flower/star cane slices near the bottom center of the bowl, pressing them gently onto the base. -
Create the vertical dividers:
Use a needle tool or a small extruder to create thin ‘grout’ lines. Place these vertical lines between your pattern sections to mimic the segmented look of the original ceramic design. -
Apply the rim border:
Take your ‘wheel’ cane slices (the rust and sage circles) and arrange them in two alternating rows just under the rim of the bowl. Ensure they touch tightly to minimize gaps. -
Fill the middle section:
For the main body, apply a pattern of spaced-out dots or smaller cane slices on a cream background. You can achieve this background by applying a sheet of cream clay first, then pressing small cane slices into it. -
Smooth the surface:
Once the entire bowl is covered in pattern, use a flexible piece of plastic or just your curved palm to gently burnish the clay. This merges the seams between slices and makes the surface uniform.
Uneven Slices?
If cane slices are different thicknesses, the surface will be bumpy. After applying them, roll a smooth glass jar over the clay to force them into a uniform level before baking.
Step 3: Finishing Touches
-
First bake:
Bake the bowl (still on the glass form) according to your clay manufacturer’s instructions, typically around 275°F (130°C) for 30 minutes. Let it cool completely before attempting to remove it from the form. -
Remove from form:
Carefully slide a blade or spatula under the edge to break the suction, then pop the clay bowl off the glass form. If it sticks, soaking it in warm soapy water often helps. -
Inside detailing:
The inside of your bowl will be plain white from the base layer. If you want the pattern visible inside, you would need to double-side your application, but for this project, simply sand the interior until smooth. -
Sanding the exterior:
Wet-sand the outside of the bowl starting with 400 grit and working up to 1000 grit. This removes fingerprints and reveals the crispness of the cane patterns. -
Seal the piece:
Apply two thin coats of matte or satin varnish to protect the surface and give it that slight ceramic sheen. Allow the varnish to dry fully between coats.
Antique Finish
After baking but before varnishing, rub a wash of brown acrylic paint into the crevices and wipe off the excess surface paint. This creates an aged, earthy pottery look.
Now you have a durable, custom-designed bowl perfect for holding keys or dry decorative items
Layered Cutout Peekaboo Bowl
Achieve a sophisticated ceramic look without a pottery wheel using this layered polymer clay technique. This project combines an earthy terracotta base with a creamy, textured upper rim featuring geometric triangular cutouts for a stunning play of light and shadow.
How-To Guide
Materials
- Terracotta colored polymer clay (approx. 4oz)
- Cream or Ecru polymer clay (approx. 4oz)
- Small glass or metal bowl (oven-safe) to use as a form
- Cornstarch or water (release agent)
- Acrylic roller or pasta machine
- X-acto knife or scalpel blade
- Small triangle cutter (approx. 0.5 inch)
- Flexible smoothing tool or rib
- Fine grit sandpaper (400-800 grit)
- Liquid polymer clay (clear or matching colors)
- Texture sponge or stiff brush (optional)
Step 1: Creating the Base Form
-
Prepare your mold:
Select an oven-safe glass or metal bowl that has the shape you want. Lightly dust the exterior with cornstarch or spritz with a little water to prevent the clay from sticking permanently. -
Condition the terracotta clay:
Knead warm terracotta clay until it’s soft and pliable. Roll it out into a sheet about 1/4 inch thick. I prefer using guide rails for this step to ensure the thickness is perfectly even all around. -
Form the bottom layer:
Drape the terracotta sheet over the bottom half of your inverted bowl form. Gently smooth it down with your hands, working from the center outward to push out any trapped air bubbles. -
Trim the edge:
Use your blade to cut a clean, straight horizontal line around the bowl, removing excess clay. This should cover roughly the bottom third to half of the bowl height. -
Smooth the surface:
Use a flexible smoothing tool to eliminate fingerprints. Create a slight bevel on the upper rim of the terracotta clay where it will meet the next layer.
Clean Cuts Pro-Tip
Place a piece of cling wrap over the clay before using your triangle cutter. This creates soft, rounded pillow edges on your cutouts rather than sharp mechanical lines.
Step 2: Building the Peekaboo Layer
-
Prepare the cream layer:
Condition the cream-colored clay and roll it out to the same thickness as the base layer. Cut a long rectangular strip that is wide enough to form the top half of the bowl and long enough to wrap around the circumference. -
Cut the triangles:
Lay the cream strip flat on your work surface. Using your small triangle cutter, punch out a repeating pattern along the length of the strip. Space them evenly, alternating pointing up and pointing down if you like, or keep them uniform. -
Clean up the cuts:
Carefully remove the punched-out triangles. Use your finger or a small tool to gently smooth the inner edges of the cutouts so they aren’t sharp or ragged. -
Add texture (optional):
For a stone-like finish, gently dab the surface of the cream strip with a texture sponge or a stiff toothbrush. This mimics the raw ceramic look in the photo. -
Apply the top layer:
Apply a very thin line of liquid polymer clay to the top edge of the terracotta base on the bowl form. Wrap the cream strip around the upper part of the bowl form, ensuring it meets the terracotta edge snugly. -
Join the seam:
Where the two ends of the cream strip meet, cut through both layers simultaneously with your blade for a perfect flush butt joint. Smooth the seam together gently so it disappears.
Step 3: Finishing Touches
-
Secure the join:
On the inside of the cream strip (where it touches the terracotta), use a modeling tool to gently drag a little clay across the junction to bond them securely. Smooth the exterior join again with your finger. -
Final shaping:
Check the rim of the bowl. If it’s uneven, trim it carefully while the bowl is spinning (if you have a turntable) or by measuring height from the table up. -
Baking:
Bake the bowl while it is still on the glass form according to your clay manufacturer’s instructions (usually 275°F/130°C for 30 minutes per 1/4 inch of thickness). Let it cool completely in the oven to prevent cracking. -
Removal:
Once cool, carefully pop the clay bowl off the form. If it resists, running it under cool water can help release the suction. -
Sanding:
Lightly sand the rim and any rough edges with fine-grit sandpaper under running water. This removes any final imperfections and gives it a professional matte finish.
Faux-Ceramic Level Up
Mix black pepper or dried used coffee grounds into the cream clay before rolling. This adds speckles that make the polymer clay look exactly like stoneware pottery.
Now you have a stunning, modern vessel that brings a touch of artisan charm to any shelf or table
Pedestal Footed Trinket Bowl
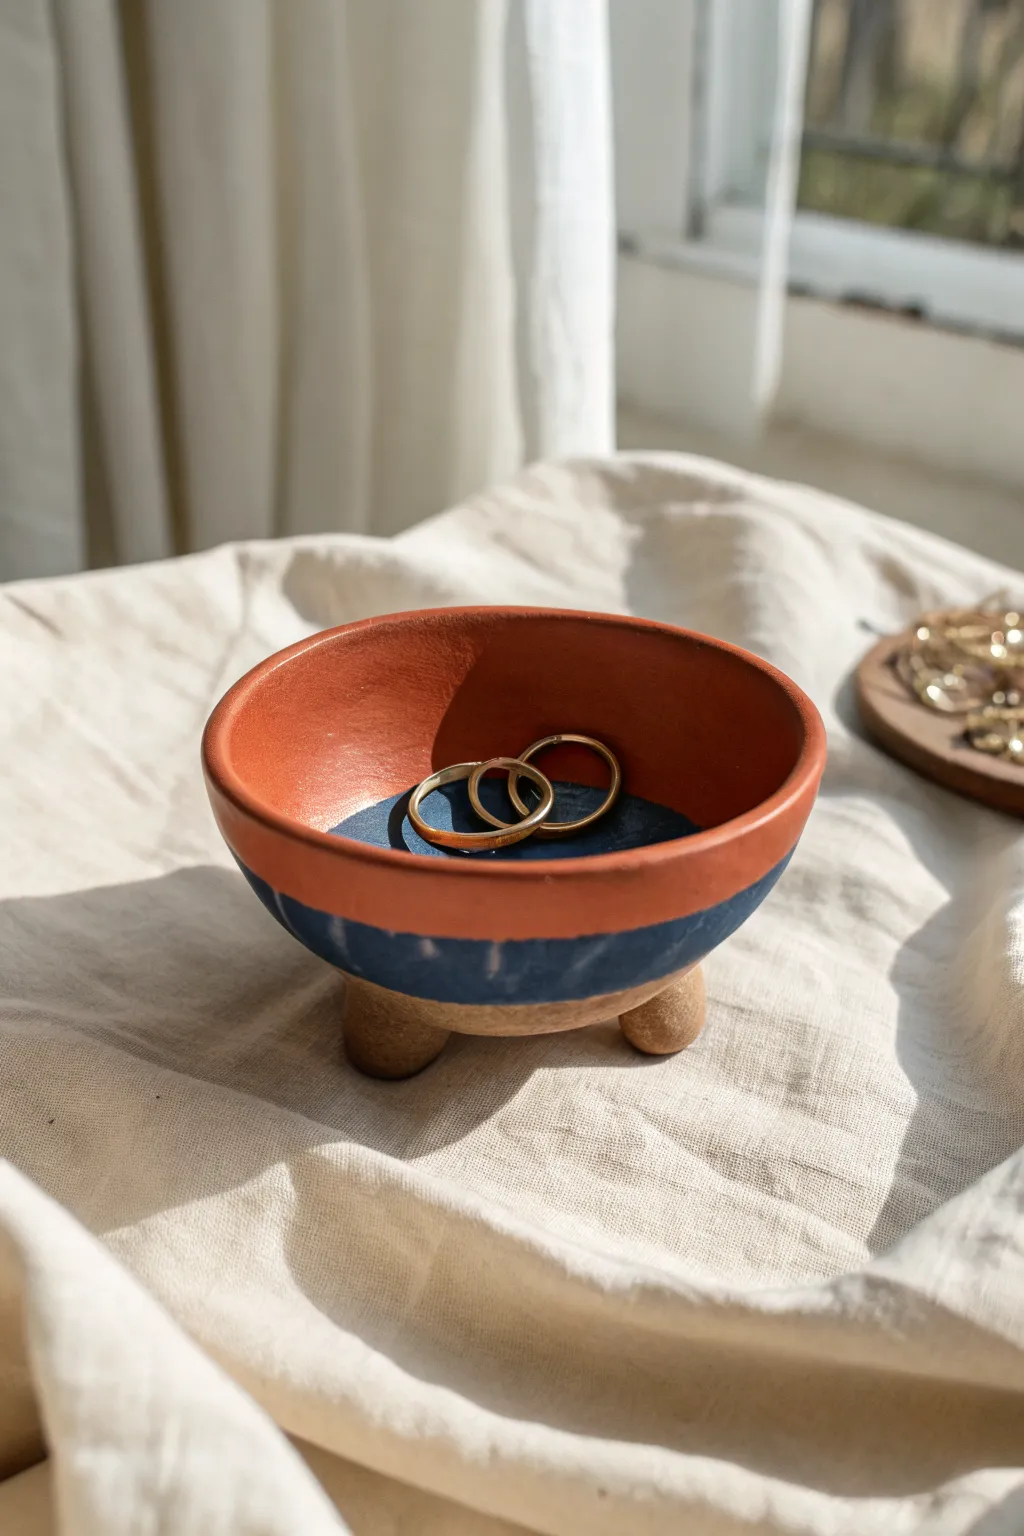
This charming trinket bowl combines the warmth of terracotta with a striking indigo dip-dye effect. Raised on three sturdy feet, it is a perfectly sized vessel for keeping your favorite rings and small treasures safe.
Detailed Instructions
Materials
- Terracotta colored polymer clay
- Rolling pin or pasta machine
- Small bowl or ramekin (for molding)
- Circle cutter (approx. 4 inches) or hobby knife
- Needle tool or toothpick
- Acrylic paint (Deep Indigo or Navy Blue)
- Painter’s tape or washi tape
- Paintbrush (medium flat)
- Matte varnish or glaze (optional)
- Baking sheet and parchment paper
- Sandpaper (fine grit)
Step 1: Shaping the Base Bowl
-
Condition the Clay:
Begin by warming the terracotta polymer clay in your hands. Knead and fold it repeatedly until it is soft, pliable, and free of any air bubbles. -
Roll a Slab:
Roll out the clay into an even slab, approximately 1/4 inch thick. Aim for a consistent thickness to ensure the bowl bakes evenly. -
Cut the Circle:
Use a large circle cutter or place a 4-inch bowl upside down on the clay as a template. Carefully cut around the edge with a hobby knife to create a perfect clay disc. -
Form the Curve:
Take your oven-safe molding bowl (like a small Pyrex or ceramic ramekin) and gently lay the clay circle inside it. Press it down lightly so it takes the shape of the container without thinning the bottom too much. -
Smooth the Rim:
While the clay is in the mold, run your finger along the top rim to round off any sharp edges cut by the knife. A little water on your finger helps smooth it out perfectly.
Pro Tip: Liquid Clay
For extra durability, add a drop of liquid polymer clay or ‘Bake & Bond’ between the feet and the bowl base before blending. This acts like superglue once baked.
Step 2: Adding the Feet
-
Create the Feet:
Roll three balls of the remaining terracotta clay. Each should be about the size of a large marble or a grape. Try to make them exactly the same size for a level bowl. -
Shape into Cones:
Gently roll one side of each ball to taper it slightly into a stout cone shape with a flat top and a rounded bottom. -
Score the Attachments:
Use a needle tool to scratch up (score) the flat top of each foot and three corresponding spots on the bottom of the bowl where they will attach. -
Attach and Blend:
Press the feet firmly onto the scored spots. Use your thumb or a modeling tool to blend the clay from the top of the foot onto the bowl base so there is no visible seam. -
Check for Balance:
Turn the bowl right side up on a flat surface. Adjust the feet slightly until the bowl stands perfectly level.
Step 3: Baking and Decorating
-
Bake the Project:
Place the bowl (still inside its molding container if needed for support, or freestanding if stiff enough) on a parchment-lined baking sheet. Bake according to your clay package instructions, usually around 275°F (135°C). -
Cool and Sand:
Allow the bowl to cool completely in the oven. Once cool, lightly sand any rough spots on the rim or feet with fine-grit sandpaper. -
Mask the Line:
To get that crisp two-tone look, apply painter’s tape horizontally around the exterior of the bowl, dividing it roughly in half. Ensure the tape is pressed down firmly to prevent leaks. -
Paint the Base:
Paint the area below the tape line, including the underside and the feet, with your deep indigo acrylic paint. I find two thin coats work better than one thick glove. -
Paint Interior Accent:
Add a matching circle of blue paint to the very bottom inside of the bowl to mirror the exterior design. -
Remove Tape:
Carefully peel away the painter’s tape while the paint is still slightly tacky to avoid chipping the dry edge. -
Seal (Optional):
Finish by applying a matte varnish over the painted areas (or the whole bowl) to protect the finish from chipping over time.
Level Up: Texture
Before baking, press a piece of coarse linen fabric into the wet clay surface. This adds a subtle, organic texture that looks amazing once the paint is applied.
Now you have a stylish, modern vessel ready to organize your jewelry collection