If you’ve got a block of polymer clay and a table that needs protecting, coasters are the sweetest little weekend project. Here are my favorite polymer clay coaster ideas—from classic faux-stone looks to playful shapes that feel totally handmade.
Classic Faux Marble Coasters
Recreate the sophisticated look of Carrara marble without the heavy price tag using simple polymer clay techniques. These coasters feature realistic, delicate veining and a thick, sturdy profile that adds a touch of modern elegance to any coffee table.
Detailed Instructions
Materials
- White polymer clay (approx. 2oz per coaster)
- Black polymer clay (small amount)
- Translucent polymer clay (optional, for depth)
- Acrylic roller or pasta machine
- Tissue blade or craft knife
- Round cutter (approx. 4 inches) or a template
- Parchment paper or ceramic tile (for baking)
- Fine grit sandpaper (400, 600, 1000 grit)
- Rubbing alcohol
- Water-based polyurethane varnish or resin (optional)
Step 1: Creating the Marble Mix
-
Condition the base:
Start by thoroughly conditioning your white polymer clay until it is soft and malleable. This is the bulk of your coaster, so ensure there are no air bubbles trapped inside. -
Prepare the veins:
Take a very small pea-sized amount of black clay and roll it into extremely thin, snake-like strands. If you are using translucent clay, mix a tiny bit with some white to create a ‘ghost’ vein color. -
Apply the veins:
Lay the thin black strands randomly across your block of white clay. Don’t worry about making straight lines; organic, jagged placement looks more natural. -
Incorporate the color:
Begin twisting the white clay log gently, then fold it in half and roll it out again. Repeat this twist-and-fold process a few times. -
Check the pattern:
Slice into the clay log periodically to check the marbling. Stop mixing when you see distinct, sharp veins. If you overmix, the black will blend into the white and create solid grey clay.
Clay Too Grey?
If your whole block turned grey, you over-mixed. Stop sooner next time! To save it, chop the grey clay into chunks and mix into a fresh block of white for a subtler effect.
Step 2: Shaping and Refining
-
Form the slab:
Roll your marbled clay into a ball, compressing it tightly to remove air pockets. Place it on your work surface or parchment paper. -
Roll to thickness:
Using your acrylic roller, flatten the ball into a thick slab. Aim for about 1/4 inch (6mm) thickness to match the substantial look in the photo. -
Cut the circle:
Press your large round cutter firmly into the slab. If you don’t have a cutter, place a round template (like a wide mug) on top and carefully trace around it with your craft knife. -
Smooth the edges:
Once the circle is cut, use your finger to gently rub the cut edge. This softens the sharp corner created by the cutter and mimics the tumbled look of real stone. -
Inspect the surface:
Look closely for fingerprints or lint. Lightly brush the surface with a little rubbing alcohol on your finger to smooth away imperfections before baking.
Metallic Touch
Add loose gold leaf flakes alongside the black veins before rolling. As you twist and slice the clay, the gold will break apart and embed for a luxury quartz aesthetic.
Step 3: Baking and Finishing
-
Bake the coasters:
Transfer the coasters to a ceramic tile or baking sheet lined with clean parchment paper. Bake according to your brand of clay’s instructions, typically between 265°F and 275°F (130°C-135°C). -
Cover while baking:
I like to tent a piece of foil over the coasters during baking to prevent white clay from scorching or yellowing. -
Cool down:
Let the coasters cool completely in the oven with the door slightly ajar. Sudden temperature changes can sometimes cause cracking in thicker pieces. -
Wet sanding:
Submerge the coaster in a shallow bowl of water. Start sanding the edges and top with 400 grit sandpaper, moving to 600 and then 1000 grit for a silky smooth finish. -
Buffing:
Dry the coaster vigorously with a soft denim cloth or a buffing wheel. This natural friction will give the clay a soft, stone-like sheen without needing varnish. -
Optional sealing:
If you want a high-gloss ceramic look, apply a thin coat of water-based polyurethane or UV resin, though the natural buffed finish looks most like the photo.
Stack your new set of coasters on the table and enjoy the sophisticated upgrade to your home decor

Terrazzo Sprinkle Coasters
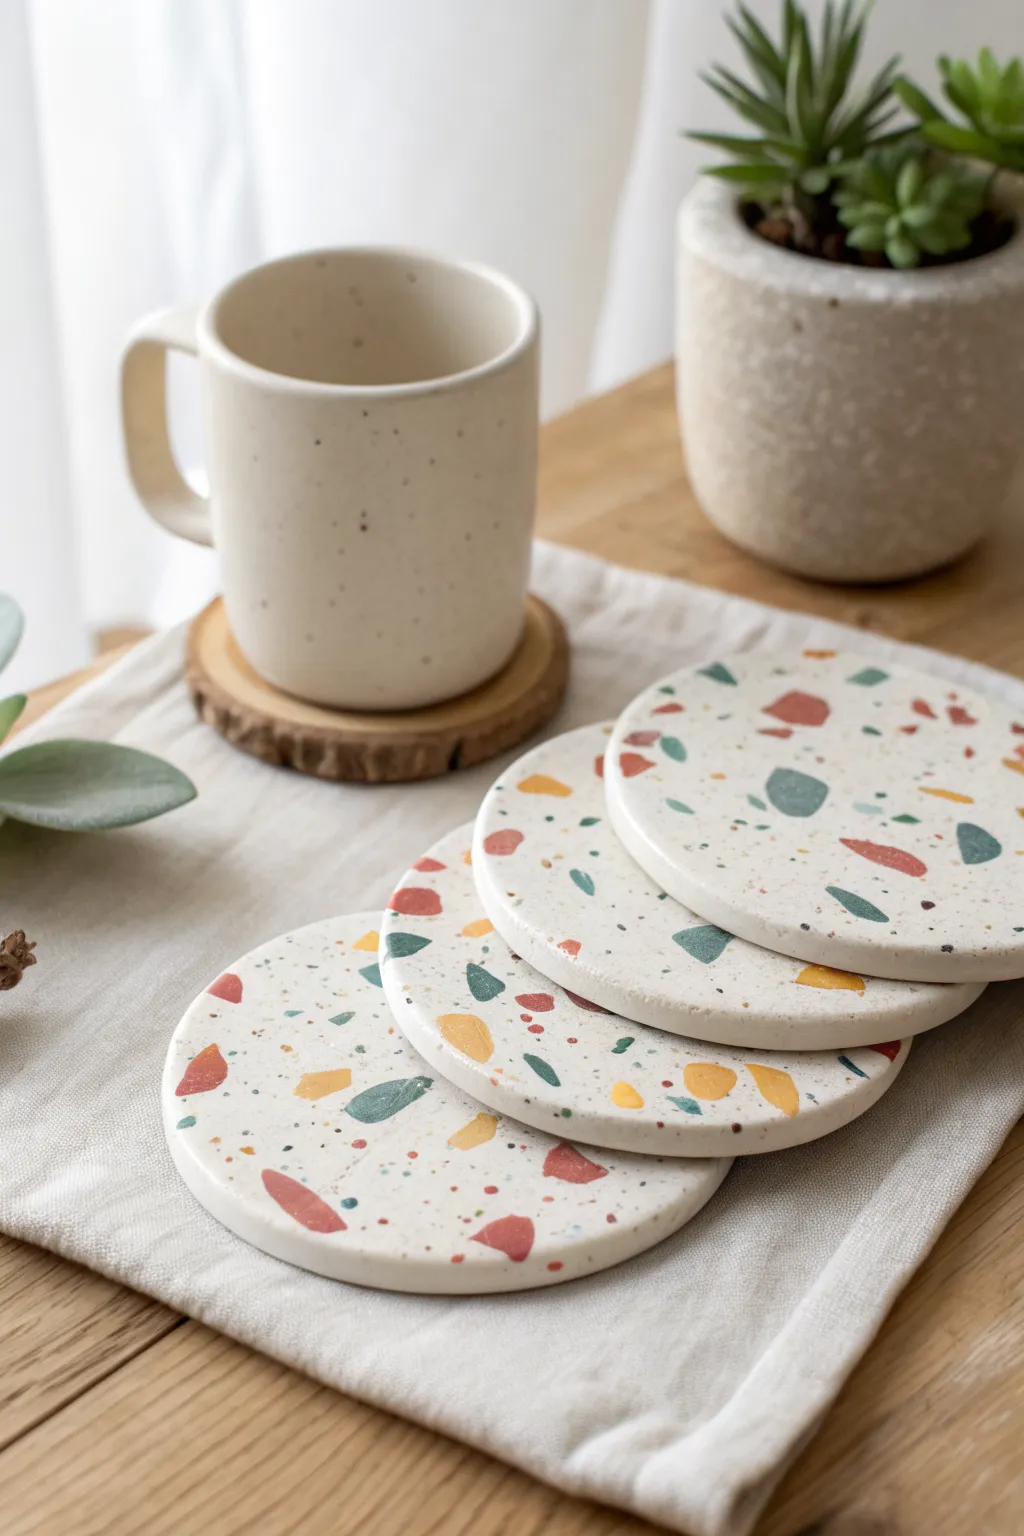
Capture the trendy, energetic look of terrazzo with this simple yet sophisticated polymer clay project. These coasters feature a creamy base speckled with hand-cut chips in earthy terracotta, teal, and mustard tones for a modern tabletop staple.
Step-by-Step Guide
Materials
- White or ecru polymer clay (large pack for base)
- Small amounts of colored polymer clay (terracotta, teal, mustard yellow, brown/black)
- Rolling pin or pasta machine
- Large round cookie cutter (approx. 4 inches)
- Craft knife or tissue blade
- Parchment paper or ceramic tile work surface
- Sandpaper (various grits: 400, 600, 800)
- UV resin or polyurethane varnish (optional for gloss finish)
- Oven for baking
Step 1: Creating the Chips
-
Condition the colors:
Start by conditioning your colored clays—the terracotta, teal, mustard, and a tiny bit of dark brown—until they are soft and pliable. -
Flatten the sheets:
Roll each color out into a very thin sheet. You don’t need much thickness here because these will become the embedded chips. -
Bake the sheets (partial bake):
Place the thin sheets on a tile or parchment paper and bake them for about 10–15 minutes. We want them firm enough to chop but not fully cured to rock-hard perfection yet. -
cool and chop:
Once the sheets have cooled completely, use your craft blade to chop them into irregular geometric shards. Aim for a mix of sizes—some larger triangles and rectangles, and some tiny specks.
Step 2: Forming the Base
-
Condition the white clay:
Take a large amount of your white or ecru base clay. Condition it thoroughly. This is the main structure, so make sure there are no air bubbles. -
Mix in the speckles:
Here I prefer to mix the smallest, tiniest specks (especially the dark ones) directly into the white ball of clay before rolling. This creates depth throughout the piece. -
Roll out the slab:
Roll the white clay out to a thickness of about 1/4 inch (approx. 6mm). Use depth guides if you have them to ensure an even surface.
Double Rolling Trick
To prevent smearing colors, place a sheet of parchment paper over your clay before that final roll to embed the chips. This keeps the colors crisp.
Step 3: Assembling the Terrazzo
-
Apply the large chips:
Scatter your larger colored chips (red, teal, yellow) onto the surface of the white slab. Arrange them randomly, leaving white space between them to avoid clutter. -
Press them in:
Gently press the chips down with your fingers to secure them slightly. -
Roll smooth:
Running your rolling pin over the slab again, embed the chips fully into the clay so the surface is completely flat and level. -
Cut the shapes:
Use your large round cutter to punch out your coaster shapes. If the clay sticks to the cutter, dip the cutter in a little cornstarch first. -
Smooth the edges:
Gently rub the edges of the circles with your finger to soften the sharp cut line and remove any stray clay bits.
Metallic Accent
Add tiny flecks of gold leaf along with the colored chips before the final roll. This adds a subtle, high-end shimmer to the finished stone look.
Step 4: Finishing
-
Final bake:
Bake the coasters according to the manufacturer’s instructions for the white clay (usually 275°F/135°C for 30–45 minutes). Longer baking ensures durability. -
Wet sanding:
Once fully cooled, wet sand the surface. Start with 400 grit to expose the sharp edges of the chips, then move to 600 and 800 for a smooth finish. -
Buff and seal:
Wash off any sanding residue. You can leave them matte for a natural look or apply a thin coat of matte varnish to protect against stains.
These chic coasters bring a lovely splash of color to your coffee table while protecting your surfaces


Faux Agate Slice Coasters
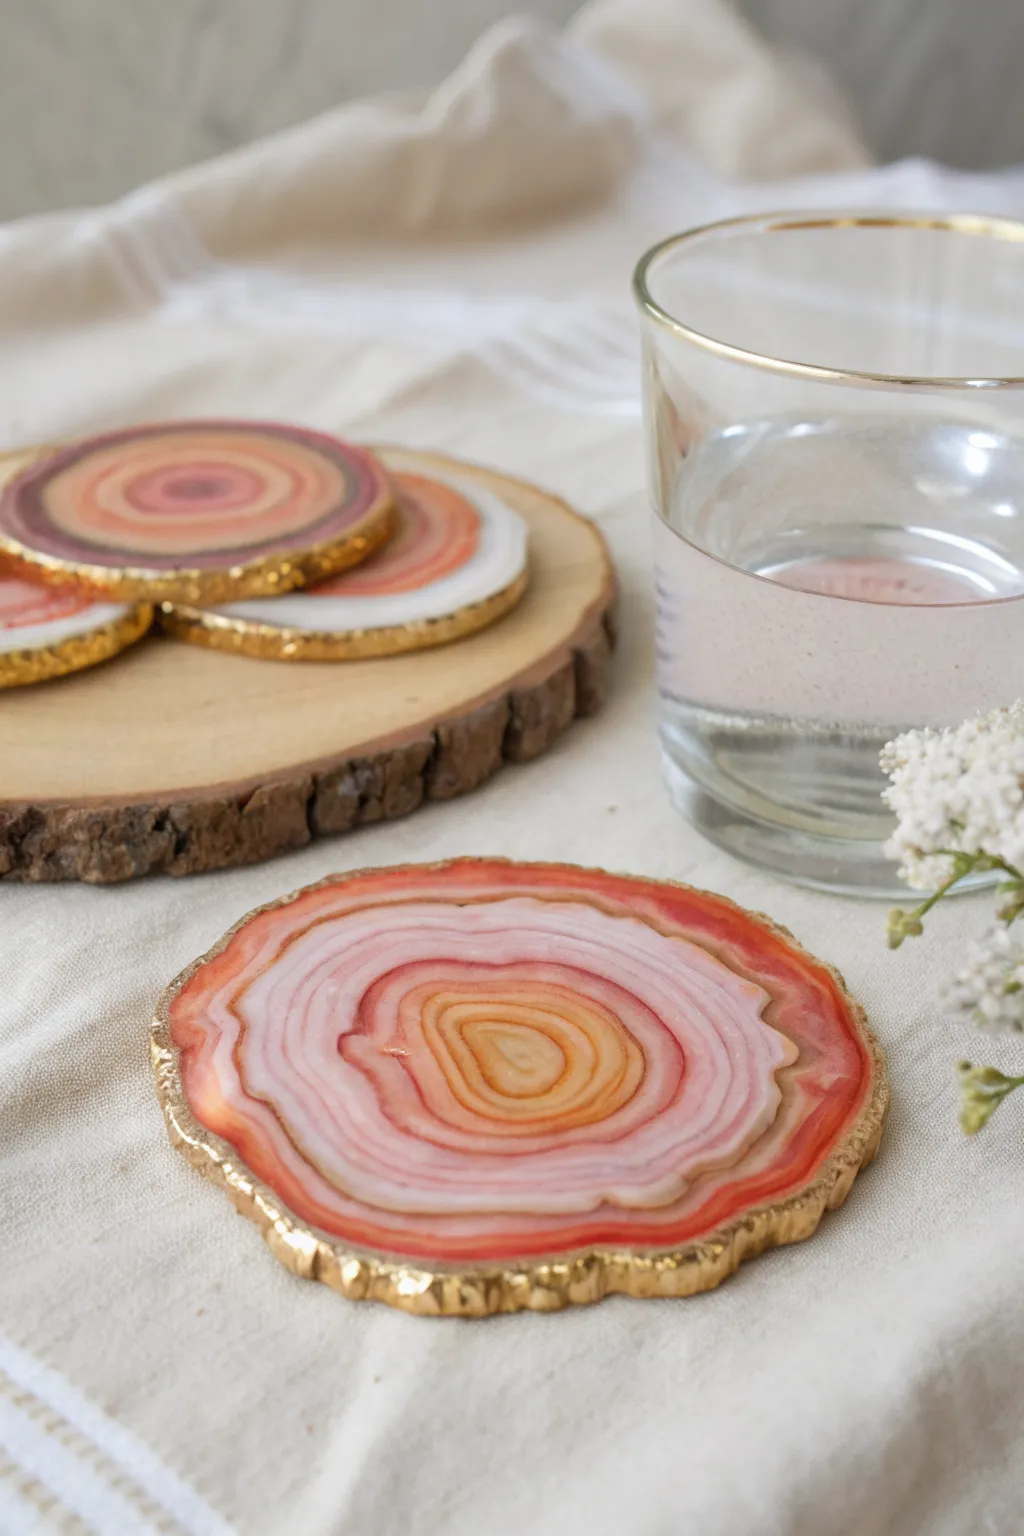
These stunning coasters mimic the intricate banding of natural agate geodes using simple polymer clay techniques. By layering translucent and opaque clays in warm peach and terracotta tones, you’ll create a sophisticated home accessory finished with a luxurious gold rim.
Step-by-Step Tutorial
Materials
- Polymer clay (translucent white, opaque white, peach, terracotta/dark red)
- Acrylic rolling pin or pasta machine
- Tissue blade or sharp clay knife
- Circle cutter (approx. 3.5 – 4 inches) or a template
- Baking sheet and parchment paper
- Sandpaper (varying grits from 400 to 1000)
- Liquid gold leaf or metallic gold paint
- Fine paintbrush
- Gloss varnish or UV resin (optional for extra shine)
Step 1: Preparing the Clay Cane
-
Condition your clay:
Start by thoroughly conditioning each block of clay until it is soft and pliable. You will need roughly equal parts of translucent white, opaque white, peach, and the darker terracotta color. -
Create color blends:
To achieve a natural gradient, mix small amounts of your colored clays with translucent clay. Create diverse shades: a pale translucent pink, a solid peach, a translucent terracotta, and pure white. -
Roll out sheets:
Roll each color into flat sheets of varying thickness. The beauty of agate is its irregularity, so don’t worry about making them perfectly uniform; some layers should be paper-thin while others can be chunky. -
Stack the layers:
Begin stacking your clay sheets on top of one another. Alternate between opaque and translucent layers to create depth. For example, sandwich a thin white opaque layer between two thick translucent peach layers. -
Form the log:
Once you have a stack about 2 inches high, gently compress it. Then, cut the stack in half and layer one half on top of the other to double the stripe count, repeating until you are happy with the complexity. -
Shape the cane:
Gently squeeze and roll your stacked block into a rough cylinder or log shape. Twist the log slightly as you roll to warp the straight lines into the wavy, organic patterns seen in real stone.
Translucency Tip
To maximize depth, plunge freshly baked coasters into ice water immediately after removing them from the oven. This thermal shock increases the clarity of translucent clay.
Step 2: Slicing and Shaping
-
Slice the cookies:
Using your tissue blade, slice thin rounds off your clay log, aiming for about 1/4 inch thickness per slice. These will look like raw agate slices. -
Combine slices:
If your log is small, you may need to place 2-3 slices side-by-side on your work surface. Gently press their edges together to form a larger, cohesive sheet that maintains the swirling pattern. -
Flatten and smooth:
Use your acrylic roller to flatten the combined slices into a single coaster shape. Roll in different directions to stretch the pattern organically, thinning the clay to your desired coaster thickness. -
Cut the final shape:
Use a large circle cutter or a jar lid as a guide to cut out your coaster. For a more authentic geode look, wiggle the blade slightly to create a wavy, uneven edge rather than a perfect circle. -
Texture the edges:
Take a rough tool or your fingers and gently pinch or texture the very rim of the coaster. I find this creates the perfect jagged surface for the gold paint to catch onto later.
Step 3: Baking and Finishing
-
Bake the coasters:
Place your coasters on parchment paper and bake according to the manufacturer’s instructions for your specific brand of clay. Usually, this is around 275°F (135°C) for 30 minutes. -
Cool and sand:
Allow the coasters to cool completely. Once hard, sand the surface under running water, starting with 400 grit and working up to 1000 grit to reveal the translucency and smooth out fingerprints. -
Paint the rim:
Dip a fine brush into liquid gold leaf or metallic paint. Carefully paint the jagged edge of the coaster, letting the gold spill slightly onto the top surface to frame the design. -
Seal the surface:
For that glass-like stone finish, apply a thin layer of gloss varnish or UV resin to the top. This step is crucial as it makes the translucent clay layers pop and look like real gemstone. -
Final cure:
Let the varnish dry fully or cure the resin under a UV lamp. Your faux agate coasters are now ready to protect your table in style.
Add Sparkle
Mix a tiny pinch of fine glitter or embossing powder into your translucent clay layers before rolling. It mimics the crystalline inclusions found in real geodes.
Enjoy the warm glow these sophisticated coasters bring to your coffee table


Soft Neutral Swirl Coasters
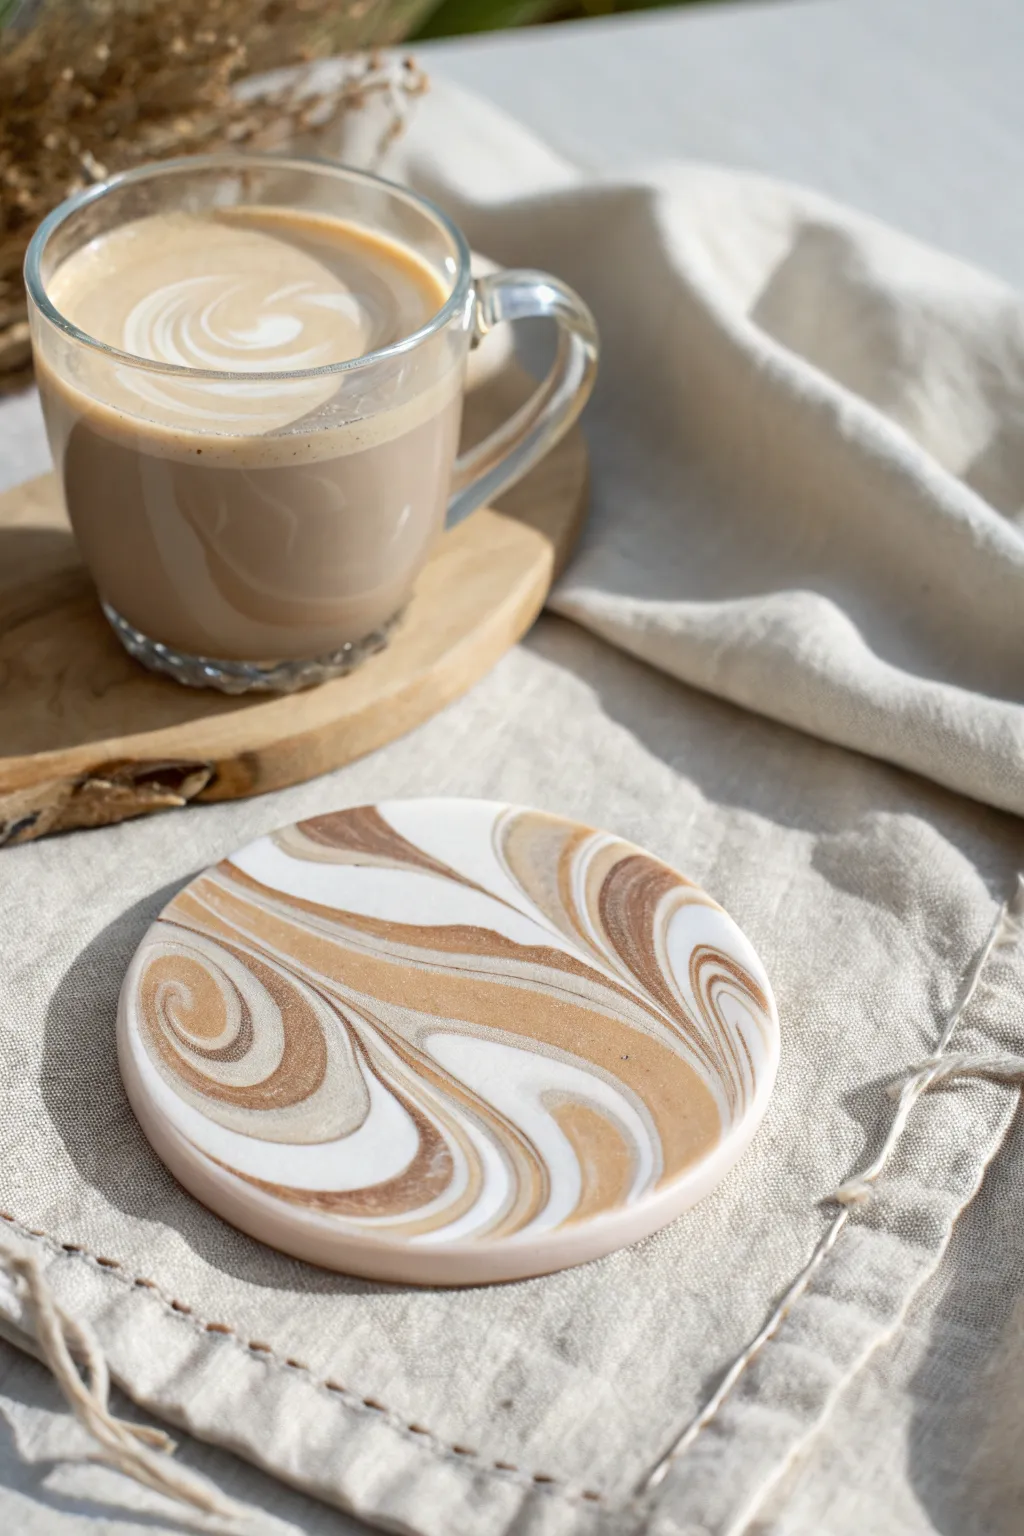
Capture the comforting essence of a warm latte with these elegant polymer clay coasters. Their organic, marbled design features gentle swirls of white, beige, and warm brown that blend seamlessly for a sophisticated, soft neutral look.
Step-by-Step
Materials
- Polymer clay (White, Beige/Tan, Chocolate Brown, Translucent or Pearl – optional)
- Acrylic rolling pin or pasta machine
- Round cookie cutter (approx. 4 inches) or a jar lid/template
- Ceramic tile or baking sheet
- Parchment paper
- Craft knife or clay blade
- Fine grit sandpaper (400 to 1000 grit)
- Polymer clay varnish or UV resin (optional for gloss finish)
- Oven
Step 1: Preparation and Mixing
-
Conditioning the clay:
Begin by kneading each block of clay separately until it is soft, pliable, and easy to work with. If your clay feels too stiff, the warmth of your hands will eventually soften it up. -
Creating color logs:
Roll each conditioned color—white, beige, and brown—into long, thin snakes or logs. I like to make the white log slightly thicker than the others to ensure the base remains light and airy. -
Adding shimmer (optional):
If you want that subtle sheen seen in the photo, mix a bit of pearl or translucent clay into your beige snake, or use a metallic gold clay as a fourth accent color. -
Combining the logs:
Gather all your clay snakes together and twist them into one large rope. Fold this rope in half and twist it again. Do this gently to start merging the colors without turning them into a single muddy shade.
Step 2: Marbling the Pattern
-
Rolling and folding:
Roll the twisted rope into a smooth log again on your work surface. Fold it, twist it, and roll it out one or two more times. Stop when you see thin streaks of color defining naturally. -
Forming the block:
Once you are happy with the swirl density, squish the log into a compact ball or block shape. This consolidates the pattern inside. -
Flattening the canvas:
Place the clay ball onto a piece of parchment paper. Use your acrylic roller to flatten it out into a slab approximately 1/4 inch thick. Roll in different directions to spread the swirl pattern outward organically. -
Checking the design:
Examine your slab. If you don’t love the pattern on top, you can carefully slice off a thin layer with a clay blade to reveal the potentially more interesting swirls underneath.
Clean Cuts Only
To avoid fingerprint distortions, place a sheet of plastic wrap over the clay before using your cookie cutter. This creates a beautifully rounded, domed edge instantly.
Step 3: Shaping and Refining
-
Cutting the coaster:
Place your round cutter or template over the most attractive part of the pattern. Press down firmly to cut out your circle. -
Removing excess:
Peel away the excess clay from around the cutter before lifting the cutter itself. This prevents the circle from warping. -
Smoothing edges:
Dip your finger in a tiny bit of water (or baby oil) and gently run it along the cut edge of the clay to smooth out any sharpness or irregularities. -
Creating a lip (optional):
If you want a slight rim like a tray, gently press the center of the coaster with the bottom of a wide glass, leaving the very edges slightly higher.
Golden Hour Glow
Mix just a pinch of gold mica powder or gold leaf flakes into the translucent clay snake. The sparkles will remain suspended and catch the light beautifully once baked.
Step 4: Baking and Finishing
-
Baking:
Transfer the parchment paper with the clay onto a baking sheet or ceramic tile. Bake according to your clay manufacturer’s instructions, usually around 275°F (135°C) for 30 minutes depending on thickness. -
Cooling down:
Let the coaster cool completely in the oven with the door cracked, or remove it and place it on a heat-safe surface. Do not handle it much while hot, as polymer clay is fragile until cool. -
Sanding:
Once fully cooled, wet-sand the edges and surface lightly with fine-grit sandpaper to achieve a buttery smooth finish. Rinse and dry. -
Sealing (optional):
For extra durability against hot mugs, apply a thin coat of matte or gloss polymer clay varnish. Let it dry completely before use.
Now you have a stunning, coffee-shop worthy set of coasters ready to protect your table in style

The Complete Guide to Pottery Troubleshooting
Uncover the most common ceramic mistakes—from cracking clay to failed glazes—and learn how to fix them fast.
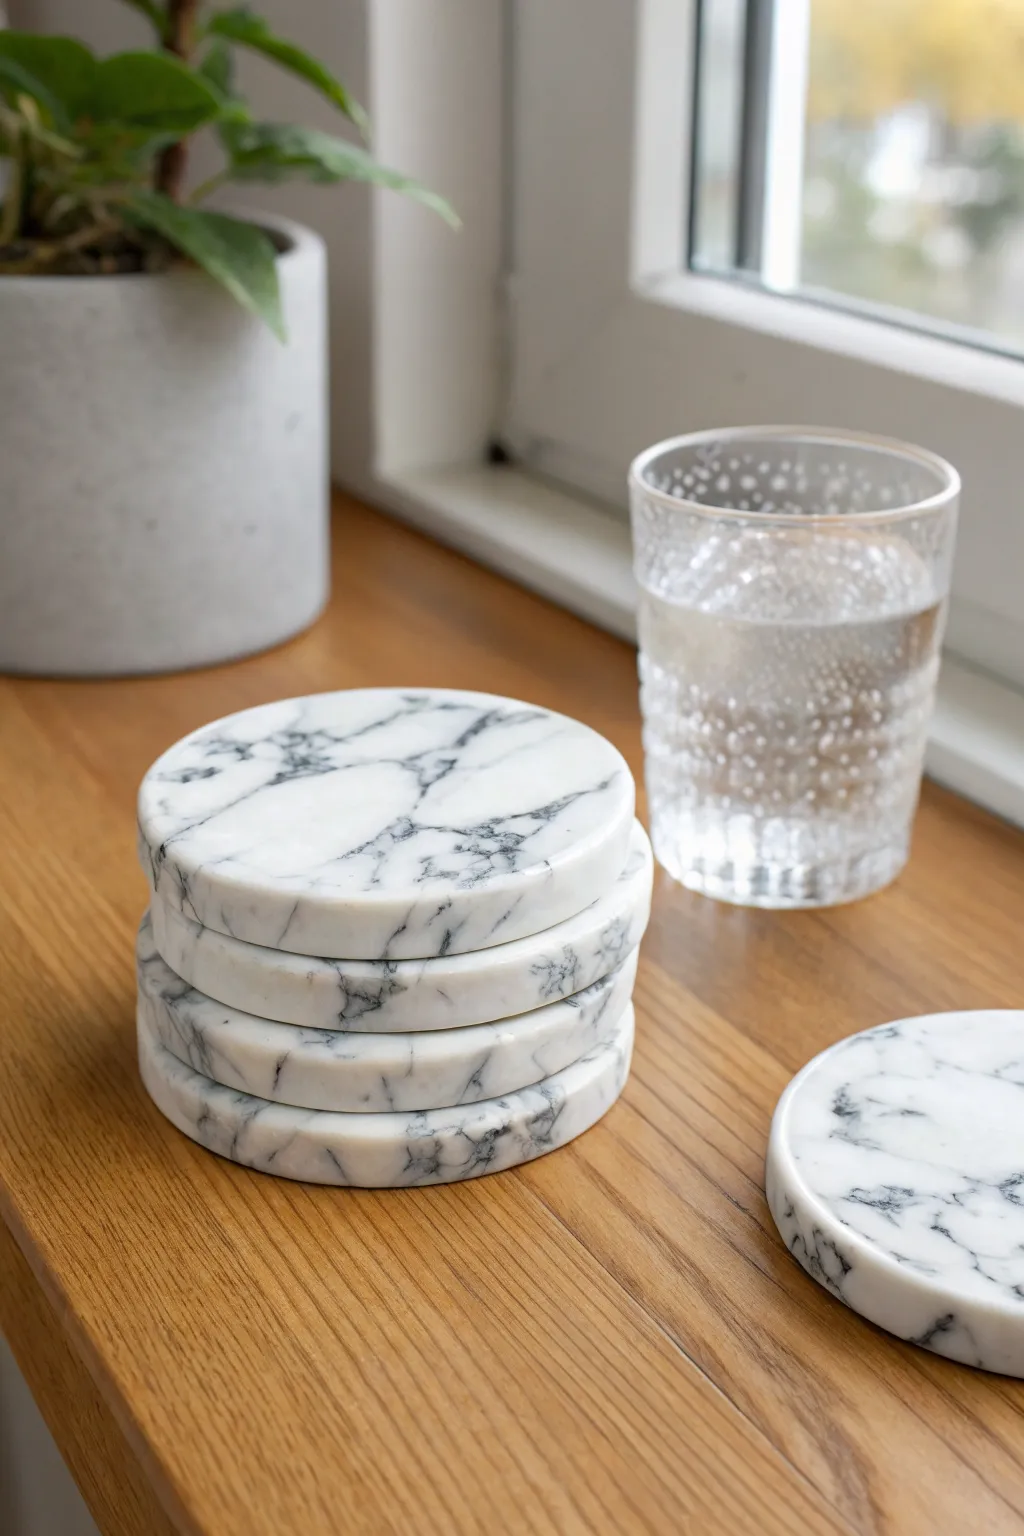
Marbled Hexagon Coasters
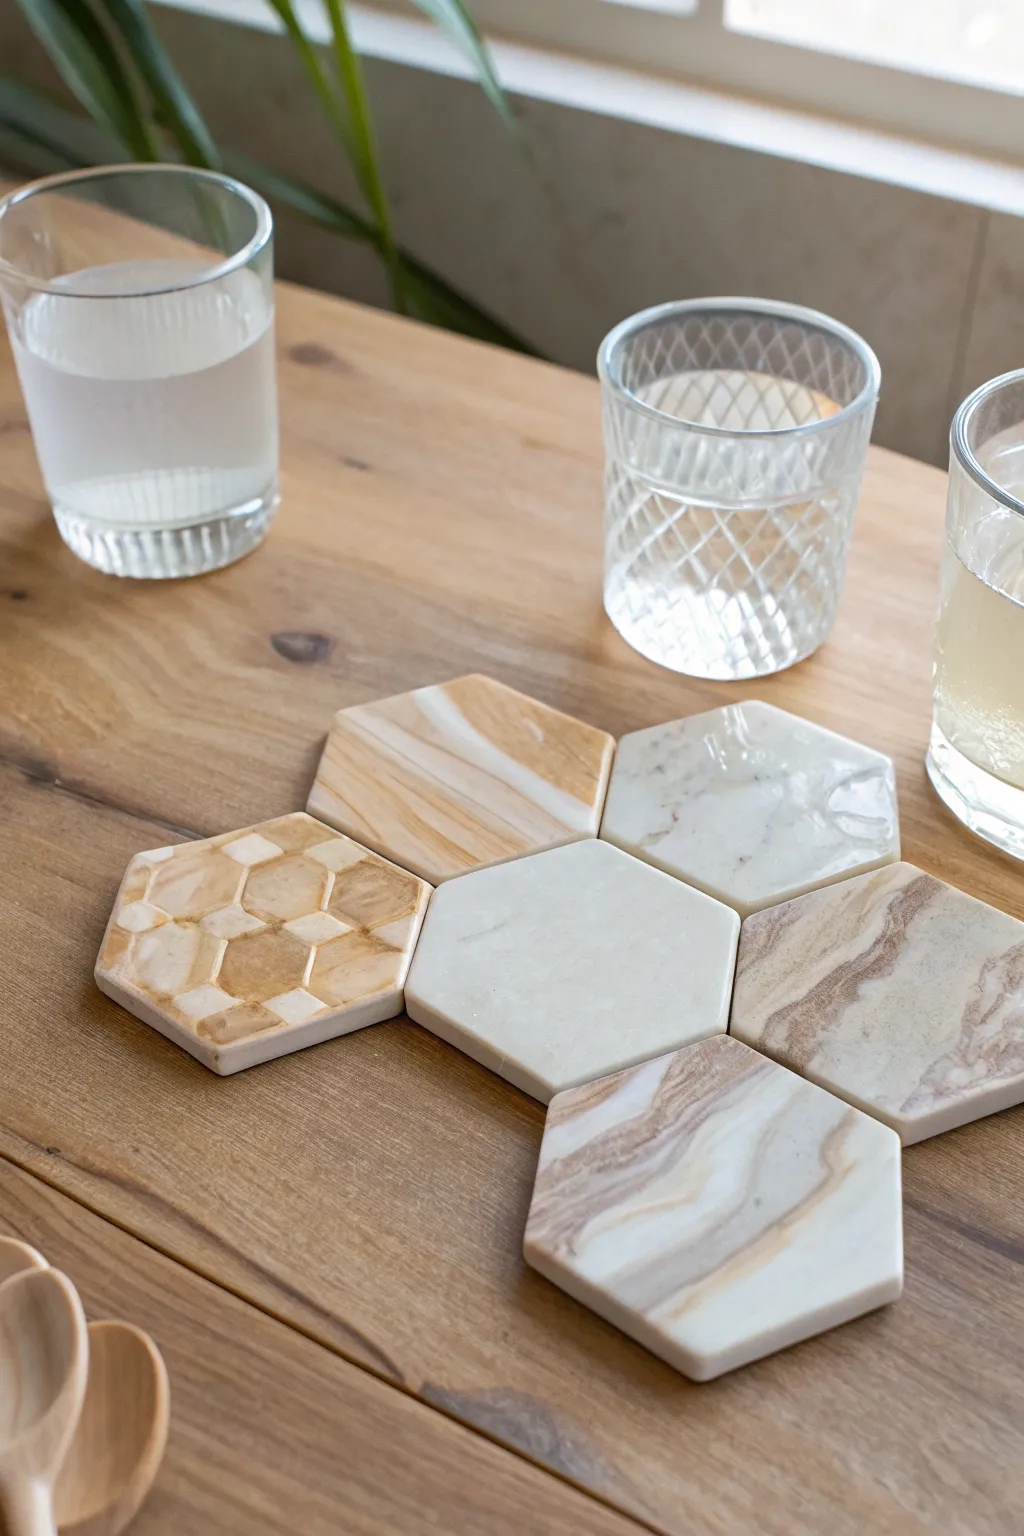
Achieve the sophisticated look of polished marble and agate without the heavy price tag using simple polymer clay techniques. These geometric coasters feature realistic stone veining and a smooth, waterproof finish perfect for your coffee table decor.
Step-by-Step Tutorial
Materials
- Polymer clay (white, translucent, beige, brown, and grey)
- Acrylic rolling pin or pasta machine
- Hexagon cookie cutter (approx. 4 inches)
- Craft blade or X-Acto knife
- Ceramic tile or baking sheet
- Parchment paper
- Wet/dry sandpaper (400, 600, 800 grits)
- UV resin or high-gloss polyurethane varnish
- UV lamp (if using resin)
- Small paintbrush
- Acrylic paint (gold or white, optional for details)
- Felt backing or cork sheet
- Strong craft glue
Step 1: Preparing the Clay Marbling
-
Condition the clay:
Start by warming up your white, translucent, beige, and accent color clays in your hands until they are soft and pliable. This conditioning step is crucial to prevent cracks later. -
Create color ropes:
Roll each color into long, thin snakes. For a realistic marble look, use mostly white and translucent clay, with thinner ropes of the darker colors like brown or grey. -
Twist and combine:
Gather your ropes into one large bundle. Twist the bundle tightly from both ends, like you are wringing out a towel, to begin the marbling process. -
Fold and roll:
Fold the twisted log in half and roll it out smoothly again. Repeat this twisting, folding, and rolling process until you see fine, natural-looking streaks of color running through the white. -
Form a block:
Squish your marbled log into a compact, rectangular block shape, ensuring the veins of color are running through the thickest part.
Air Bubble Blues
Tiny bubbles in your resin after applying? lightly pass a flame from a lighter or heat gun over the wet resin surface to pop them instantly before curing.
Step 2: Shaping and Patterning
-
Slice the slab:
Use your craft blade to slice thin sheets off your clay block. I like to vary the thickness of the veins by slicing at slight angles to reveal the most interesting patterns. -
Create the base sheet:
Lay your patterned slices onto a flat sheet of scrap clay or plain white clay that has been rolled to about 1/4 inch thick. This adds stability and saves your pretty patterned clay. -
Smooth the surface:
Use your acrylic roller to gently press the patterned slices into the base sheet until the surface is completely flat and seamless. -
Cut the hexagons:
Position your hexagon cutter over the areas with the most beautiful marbling. Press down firmly to cut out your coaster shapes. -
Honeycomb detail (Optional):
For the honeycomb-patterned coaster seen in the image, roll out a sheet of solid beige clay. Use a small hexagon cutter to stamp a pattern, or gently press a smaller cutter into the surface to create indentations before baking.
Step 3: Baking and Finishing
-
Bake the coasters:
Place your clay hexagons on a ceramic tile or parchment-lined baking sheet. Bake according to your clay manufacturer’s instructions, usually around 275°F (135°C) for 30-45 minutes. -
Cool slowly:
Allow the coasters to cool completely inside the oven with the door slightly ajar. This prevents thermal shock which could weaken the clay. -
Sand edges:
Once cool, use wet/dry sandpaper under running water to smooth out any rough edges or fingerprints. Start with 400 grit and work your way up to 800 for a satin touch. -
Apply finish:
Brush a thin, even layer of UV resin or high-gloss varnish over the top of each coaster. This mimics the shine of real polished stone and protects against moisture. -
Cure or dry:
If using UV resin, cure under a UV lamp for 2-4 minutes until hard and tack-free. If using varnish, let it air dry in a dust-free area for 24 hours. -
Attach backing:
Trace your hexagon shape onto felt or cork and cut slightly smaller than the clay piece. Glue this to the bottom of the coaster to protect your furniture from scratches.
Gilded Edges
For a luxe touch, paint the vertical edges of your finished hexagon with liquid gold leaf or a metallic paint marker to frame the faux stone design beautifully.
Now you have a stunning set of geometric coasters that look high-end and are ready to host your favorite drinks.
Organic Wavy-Edge Coasters
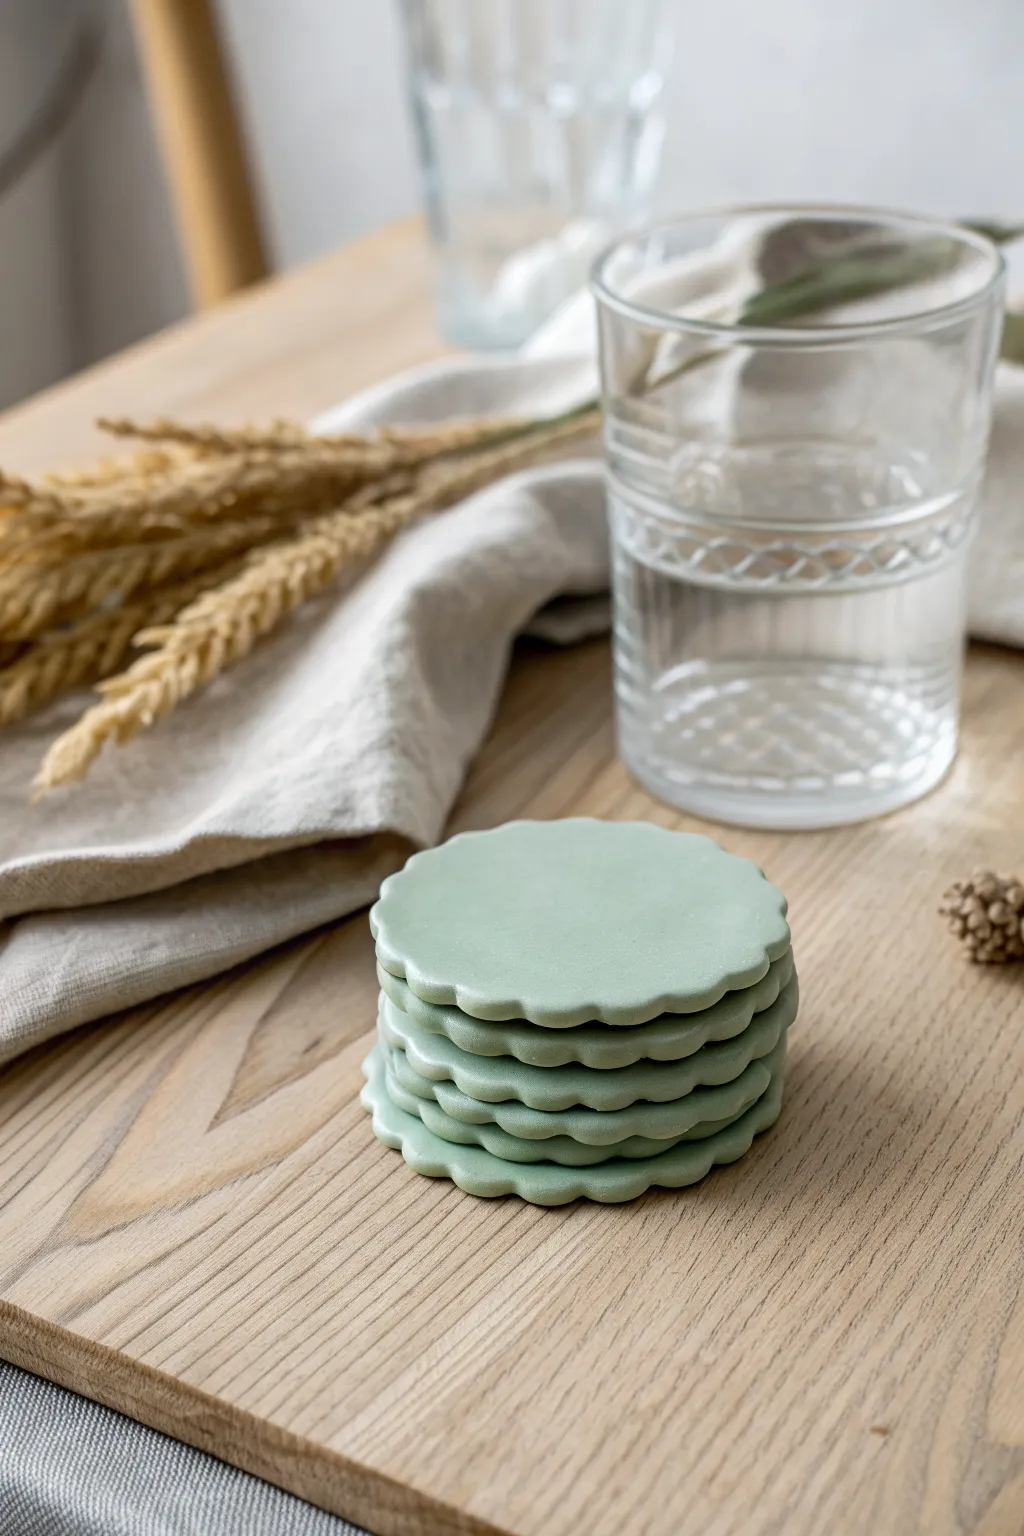
These soothing sage green coasters bring a touch of nature to your table with their soft, organic edges and matte finish. The scalloped rim evokes the gentle curves of a flower petal, creating a modern yet whimsical resting place for your favorite beverages.
Detailed Instructions
Materials
- Polymer clay (Sage green or mix white with a touch of green and brown)
- Acrylic rolling pin or pasta machine
- Round cookie cutter (approx. 3.5 – 4 inches)
- Small round cutter (approx. 0.5 inch) or a large straw
- Parchment paper or ceramic tile for baking
- Cornstarch or baby powder (as a release agent)
- Fine-grit sandpaper (400 to 1000 grit)
- Rubbing alcohol
- Cotton swabs
- Felt or cork backing sheet (optional)
- Strong craft glue (if using backing)
Step 1: Preparation and Rolling
-
Condition the Clay:
Begin by warming the polymer clay in your hands. Knead and fold it repeatedly until it becomes soft, pliable, and free of cracks. If you are mixing colors to achieve that specific sage green, do this now until the color is completely uniform. -
Prepare Your Surface:
Lay down a sheet of parchment paper or work directly on your ceramic baking tile. This prevents the clay from sticking and ensures you won’t distort the shape when moving it later. -
Dust for Release:
Lightly dust your rolling pin and the clay surface with a tiny bit of cornstarch. This step is crucial to prevent tearing during the rolling process. -
Roll the Sheet:
Roll the clay out into an even slab. Aim for a thickness of about 1/4 inch (6mm). You want these to be substantial enough to hold a glass but not clunky. A pasta machine set to a medium-thick setting works perfectly here for consistency.
Smooth Surface Secret
Before baking, lay a piece of cling film over the raw clay and gently rub over it with your finger. This acts like a burnishing tool, smoothing out tiny imperfections without adding fingerprints.
Step 2: Shaping the Scalloped Edge
-
Cut the Base Circle:
Using your large round cutter, press firmly into the clay slab to cut out the main coaster shape. Leave the excess clay in place for a moment to help support the edges while you work. -
Create the Scallops:
Take your small round cutter or the side of a large straw. Position it halfway over the edge of your clay circle and press down to ‘bite’ out a small semi-circle. Repeat this process around the entire circumference. -
Ensure Even Spacing:
I find it helpful to make my first four cuts at the 12, 3, 6, and 9 o’clock positions, then fill in the gaps between them to keep the pattern symmetrical. -
Remove Excess Clay:
Gently peel away the scrap clay from around your new scalloped shape. Save this for the next coaster. You should now have a flower-like disc. -
Soften the Edges:
The cutting process leaves sharp, harsh edges. Use your fingertip, dipped slightly in cornstarch, to gently tap and smooth the top and bottom rim of each scallop, giving it that soft, organic look seen in the photo. -
Clean the Surface:
Dip a cotton swab in a little rubbing alcohol and lightly wipe the surface of the clay. This removes fingerprints, lint, and any shiny spots.
Step 3: Baking and Finishing
-
Bake the Coasters:
Place your coasters (still on their parchment or tile) into the oven. Follow the temperature instructions on your specific brand of clay exactly. Bake for at least 45-60 minutes; longer baking yields stronger coasters. -
Cool Down:
Once the baking time is up, turn off the oven and open the door slightly. Let the coasters cool completely inside the oven to prevent thermal shock. -
Wet Sanding:
Place a sheet of wet/dry sandpaper in a shallow dish of water. Rub the edges and surface of the cooled coaster in a circular motion to achieve a buttery smooth, professional finish. -
Rinse and Dry:
Wash off any sanding residue with cool water and pat the coasters dry with a soft, lint-free cloth. -
Trace the Backing:
If you are adding a protective base, place your finished coaster onto a sheet of felt or cork. Trace the wavy outline with a pencil. -
Cut the Backing:
Cut out the backing shape, trimming slightly inside your traced line so the material won’t be visible from the top. -
Attach the Base:
Apply a thin layer of strong craft glue to the back of the clay coaster and press the felt or cork firmly in place. Let it dry under a heavy book.
Marbled Magic
Mix a tiny amount of translucent or white clay into your sage green but don’t blend fully. This creates subtle, stone-like streaks that elevate the organic feel.
Set your new coaster stack on the coffee table and enjoy the modern, serene vibe they add to your space


What Really Happens Inside the Kiln
Learn how time and temperature work together inside the kiln to transform clay into durable ceramic.
Splat-Shape Statement Coasters
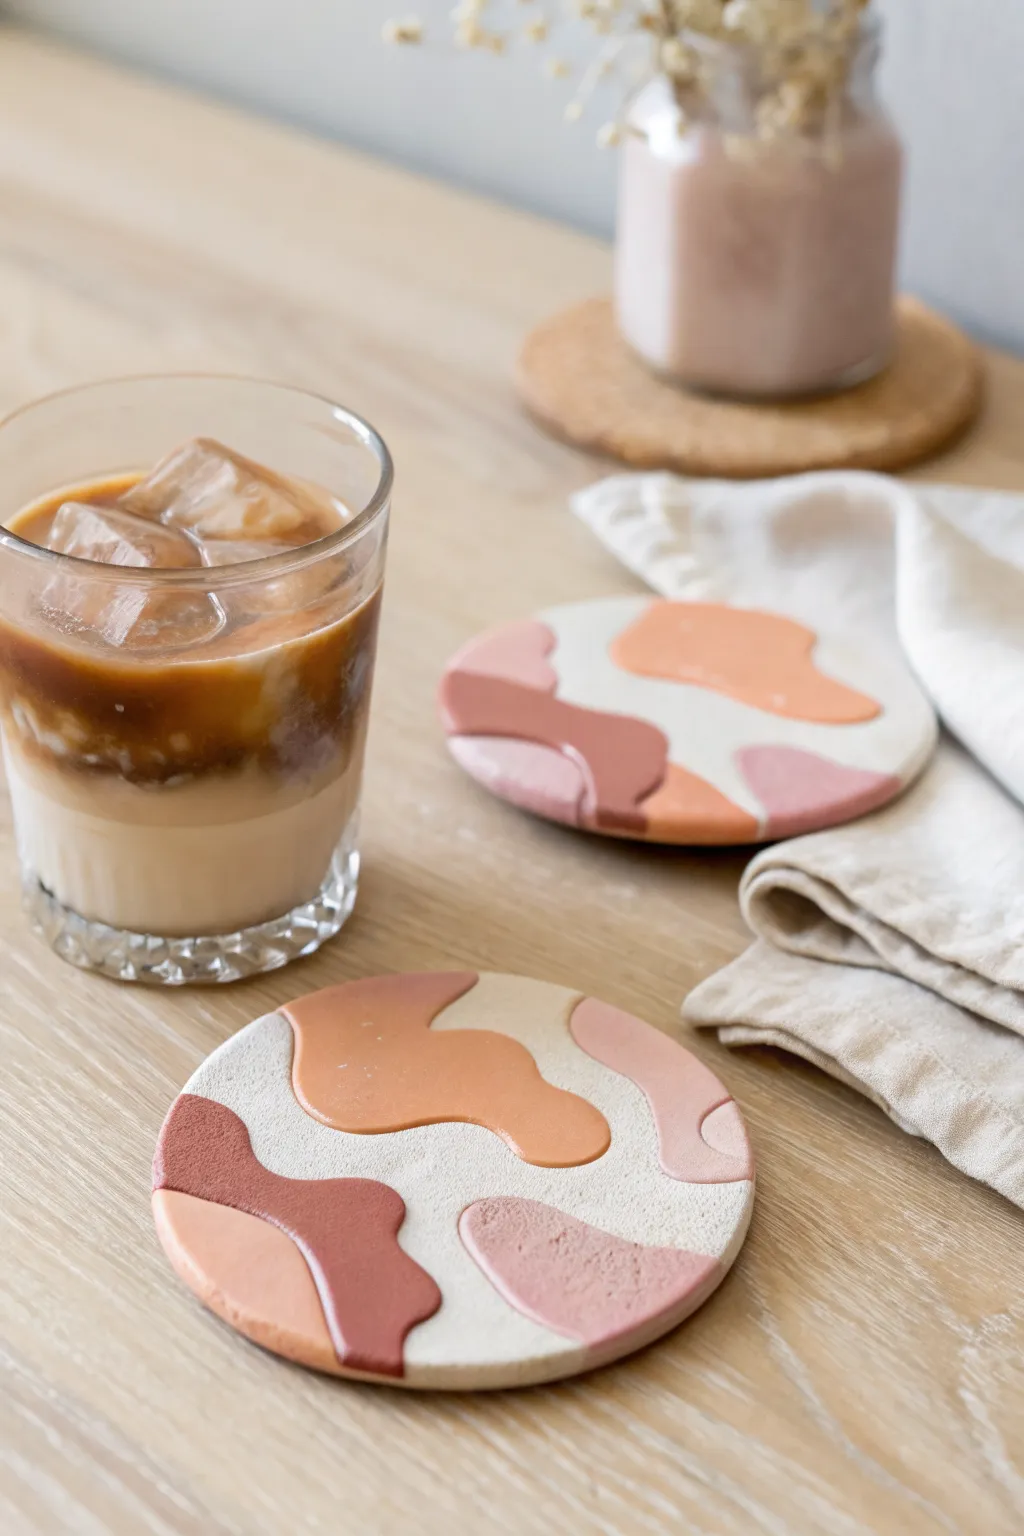
Bring a touch of modern art to your coffee table with these stunning polymer clay coasters featuring organic, flowing shapes in warm, earthy tones. The smooth, matte finish and abstract “splat” design create a sophisticated look that pairs perfectly with your morning latte.
Step-by-Step Tutorial
Materials
- Polymer clay (white, terracotta, peach, dusty pink, beige)
- Acrylic rolling pin or pasta machine
- Round cookie cutter (approx. 4 inches)
- X-acto knife or clay blade
- Parchment paper or ceramic tile
- Fine grit sandpaper (400, 600, and 1000 grit)
- Matte polymer clay varnish (optional)
- Oven and baking tray
Step 1: Preparing the Base
-
Condition the white clay:
Start by thoroughly conditioning your white polymer clay until it is soft and pliable. This ensures a crack-free base for your coaster. -
Roll the base slab:
Roll out the conditioned white clay into a sheet approximately 1/4 inch thick. You want it substantial enough to be durable but not too chunky. -
Cut the primary shape:
Use your large round cookie cutter to punch out a perfect circle from the white clay sheet. If you don’t have a cutter large enough, trace a bowl with your knife. -
Smooth the edges:
Gently run your finger around the perimeter of the circle to smooth down any rough edges left by the cutter.
Step 2: Creating the Pattern
-
Mix your palette:
Condition your colored clays—terracotta, peach, beige, and dusty pink. I like to mix a tiny bit of white into the terracotta to soften it slightly so it matches the other pastels. -
Sheet the colors:
Roll each colored clay into a very thin sheet, much thinner than your base. A pasta machine is great for this, aiming for a setting around 4 or 5. -
Cut organic shapes:
Using your X-acto knife, freehand cut random, curvy “splat” shapes from the thin colored sheets. Avoid sharp angles; think flowing, liquid blobs. -
Arrange the splats:
Gently lift the cut shapes and place them onto your white base circle. Arrange them so they look balanced, allowing some to run off the edge of the circle. -
Press gently:
Lightly tap the shapes down with your finger to adhere them to the base without distorting the circle.
Clean Lines Pro Tip
Wipe your clay blade and roller with a baby wipe or rubbing alcohol between colors. This prevents stray lint or color smears from ruining your pristine white background.
Step 3: Flattening and Finishing
-
Embed the design:
Place a sheet of parchment paper over the coaster. Use your acrylic roller to firmly roll over the top, pressing the colored shapes flush into the white base. -
Check surface level:
Peel back the paper and check that the surface is smooth and the colored clay is level with the white clay. Roll again if you can feel raised edges. -
Re-cut the circle:
The rolling process will have slightly distorted your perfect circle. Place your cutter back over the coaster and cut again to restore the crisp round edge. -
Smooth final edges:
Once again, smooth the rim of the coaster with your fingertip to remove any sharpness from the second cut. -
Bake:
Place the coasters on a ceramic tile or baking sheet lined with parchment. Bake according to your clay manufacturer’s instructions, usually 275°F (135°C) for about 30-45 minutes.
Level Up: Texture
Before baking, gently press coarse sandpaper or a stiff toothbrush onto just the colored ‘splat’ areas to give them a gritty, stone-like texture that contrasts with the smooth white base.
Step 4: Post-Bake Polish
-
Cool down:
Allow the coasters to cool completely in the oven or on a wire rack before handling them. -
Sand the surface:
Wet sand the tops of the coasters starting with 400 grit sandpaper, moving to 600 and then 1000 grit under running water. This reveals a professional, stone-like finish. -
Clean and dry:
Rinse off any milky residue from sanding and pat the coasters dry with a lint-free cloth. -
Seal (optional):
Ideally, leave them matte for that natural stone look, but if you want extra protection, apply a very thin layer of matte varnish.
Now you have a chic set of coasters ready to protect your surfaces in style
Arch And Half-Moon Coaster Set
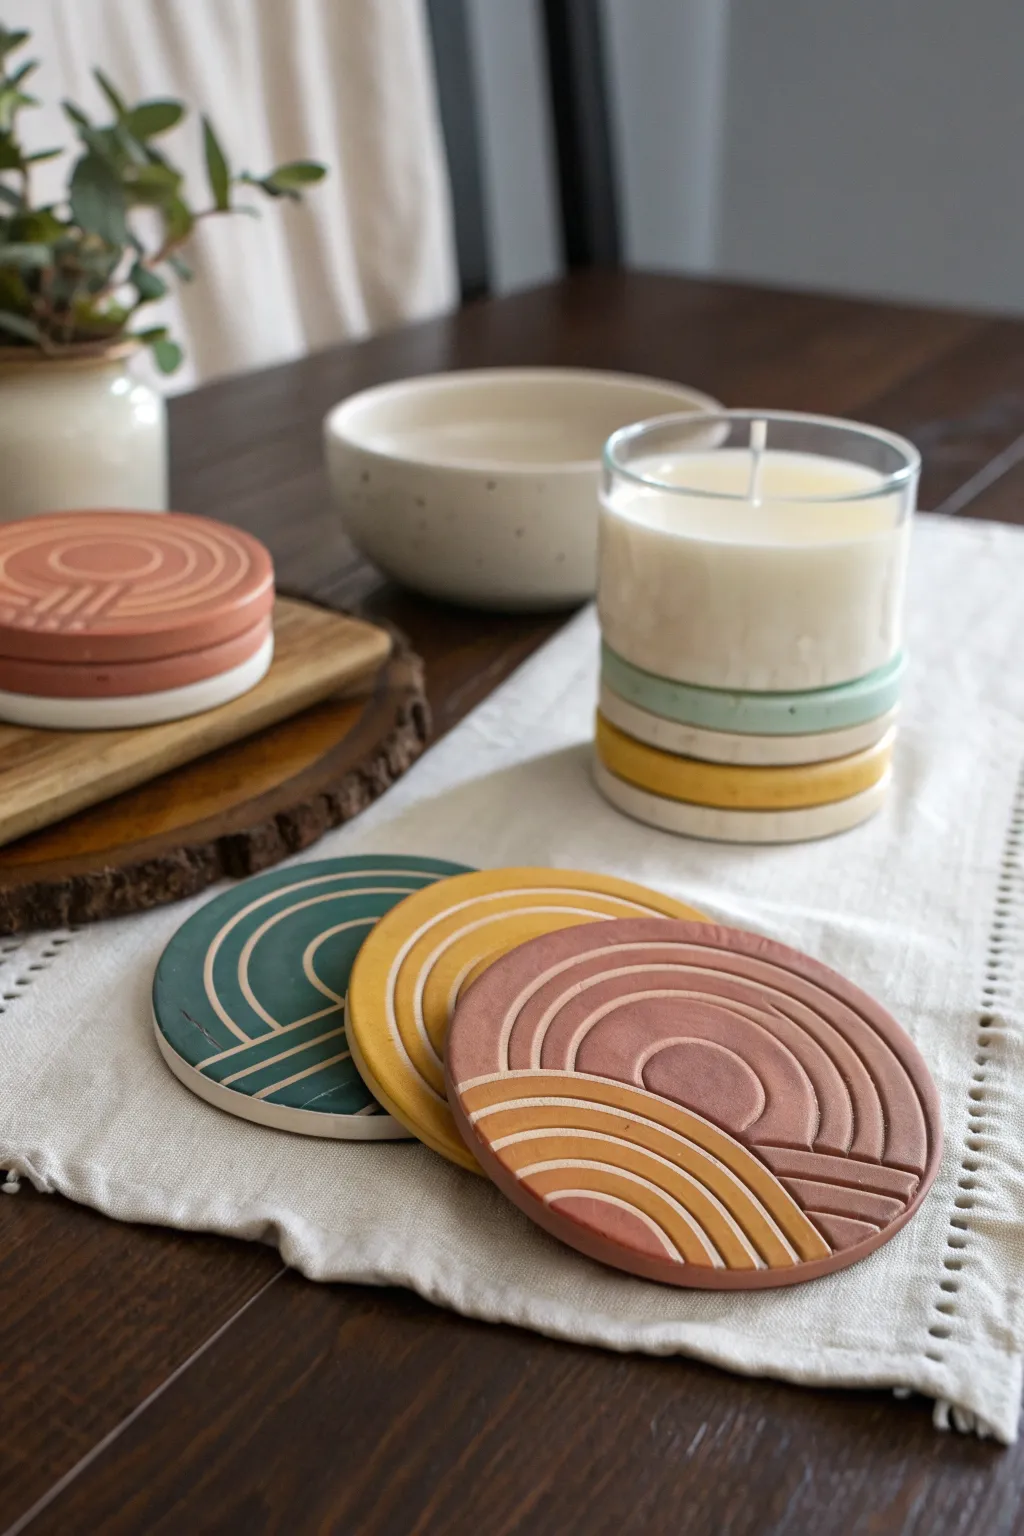
These earthy, minimalist coasters feature deeply carved arches and half-moon shapes that add a sophisticated texture to your coffee table. The matte finish and muted color palette give them a trendy, high-end ceramic look without the need for a kiln.
Step-by-Step
Materials
- Polymer clay (terracotta, mute green, mustard yellow, white)
- Acrylic rolling pin
- Large round cookie cutter (approx. 3.5 – 4 inches)
- Needle tool or linocut carving tool (small U-gouge)
- Ruler
- Compass or various sized round objects (lids, small cutters)
- Parchment paper or ceramic tile work surface
- Fine-grit sandpaper (400 and 800 grit)
- Oven for curing
- Matte varnish (optional)
Step 1: Preparation & Base Creation
-
Condition the Clay:
Start by warming the polymer clay in your hands to condition it. Knead each color separately until it is soft, pliable, and free of air bubbles or cracks. -
Roll Out the Slab:
Using your acrylic rolling pin, roll out the clay on a sheet of parchment paper. Aim for a thickness of about 1/4 inch (6mm). This thickness ensures the coaster is sturdy and heat-resistant. -
Cut the Circles:
Press your large round cookie cutter firmly into the rolled clay to create the base coaster shape. Carefully remove the excess clay from around the circle, leaving the coaster on the parchment paper to avoid distortion. -
Smooth the Edges:
Dip your finger in a tiny bit of water or baby oil and run it gently along the cut edge of the circle to smooth out any harsh lines or seams left by the cutter.
Step 2: Designing the Pattern
-
Mark the Horizon Line:
Decide where you want the split in your design to be—usually about one-third up from the bottom for that ‘sunset’ look. Lightly press a ruler into the clay to create a faint horizontal guide line. -
Create the Central Sun:
Place the point of your compass (or center a small round object) on the middle of your horizon line. Lightly trace a small semi-circle to represent the sun or the center of the arch. -
Draft the Outer Arches:
Continue using your compass or finding slightly larger lids to lightly impress concentric semi-circles radiating outward from that center point. Space them evenly, leaving about a 1/4-inch gap between each ring. -
Add Side Accents:
For the design variation shown, add linear details at the bottom corners. Use your ruler to lightly mark horizontal stripes that connect the outer arches to the design edge.
Fixing Warp
If your coaster isn’t flat after baking, reheat it briefly, then place it under a heavy book while it cools down. This weight will press it perfectly flat again.
Step 3: Carving & Finishing
-
Carve the Lines:
Using a linocut tool with a small U-gouge (or a needle tool for thinner lines), carefully carve out the clay along your traced guidelines. Apply steady pressure to remove a clean strip of clay. -
Clean the Grooves:
If the carving leaves little clay crumbs or jagged edges, gently brush them away with a soft paintbrush. You can also smooth the inside of the carved lines with a rubber-tipped clay tool. -
Bake the Coasters:
Transfer the parchment paper with the coasters onto a baking sheet. Bake according to your polymer clay package instructions—usually around 275°F (135°C) for 30-45 minutes depending on thickness. -
Cool Down:
Once baked, turn the oven off and open the door slightly, letting the coasters cool down slowly inside. This prevents thermal shock and potential cracking. -
Sand for Perfection:
After they are fully cool, wet your fine-grit sandpaper and gently sand the edges and the top surface (avoiding the grooves) to get that smooth, professional stone-like finish. -
Final Wash:
Rinse the coasters under water to remove any sanding dust. Dry them immediately with a lint-free towel. -
Optional Sealing:
If you want extra protection against stains, apply a very thin layer of matte varnish. I prefer leaving mine unsealed for a more natural, stone-like texture, but a sealer adds longevity.
Terrazzo Twist
Mix tiny chopped bits of white and black clay into your base color before rolling. This creates a speckled terrazzo effect that looks amazing with the carved arches.
Stack your finished set on the table and enjoy the modern warmth they bring to your living space

TRACK YOUR CERAMIC JOURNEY
Capture glaze tests, firing details, and creative progress—all in one simple printable. Make your projects easier to repeat and improve.
Minimal Line-Inlay Coasters
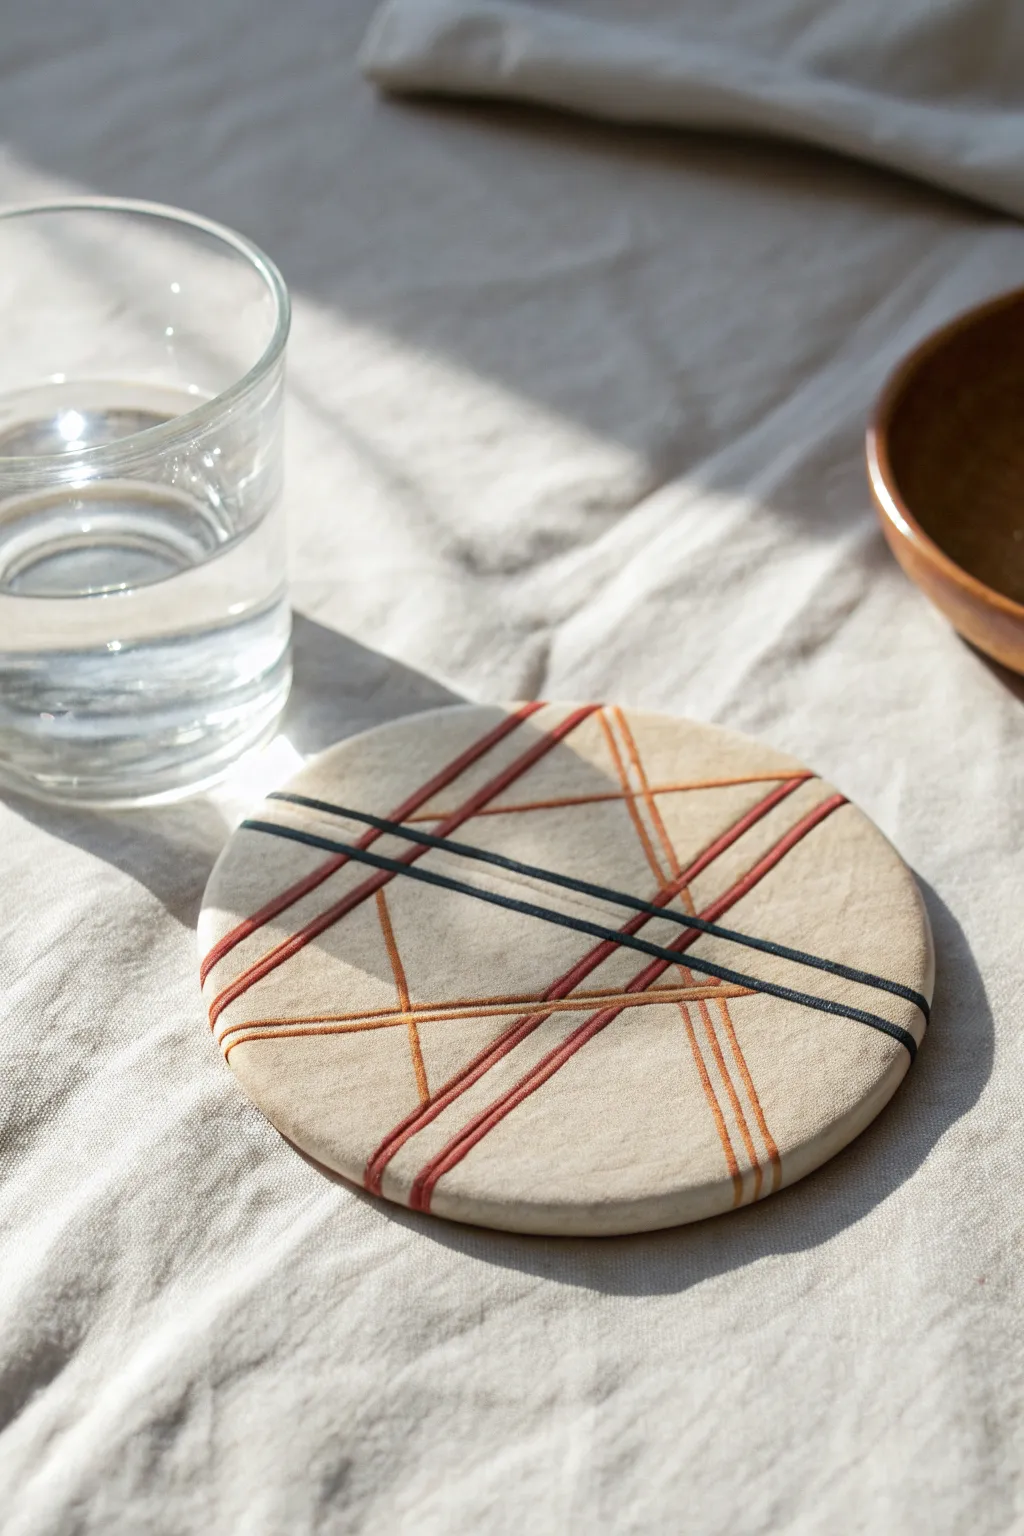
Achieve a sophisticated, designer look with these line-inlay coasters that mimic the ancient Mishima pottery technique. The smooth, earthy base provides a perfect canvas for bold, intersecting lines in terracotta, ochre, and black.
Step-by-Step
Materials
- Beige or sand-colored polymer clay (base)
- Black polymer clay
- Terracotta or burnt orange polymer clay
- Ochre or mustard yellow polymer clay
- Acrylic roller
- Large circular cookie cutter (approx. 4 inches)
- Clay knife or craft blade
- Clay extruder (optional but helpful)
- Parchment paper or ceramic tile
- Fine grit sandpaper (400, 600, 800)
- Oven
Step 1: Preparation & Base
-
Condition the base clay:
Start by thoroughly conditioning your beige clay until it is soft and pliable. This prevents cracking and ensures a smooth surface for your inlay work. -
Roll out the slab:
Roll the beige clay into an even slab, approximately 1/4 inch thick. You want these coasters to feel substantial, so don’t go too thin. -
Cut the circle:
Use your large circular cutter to punch out the coaster shape. If you don’t have a cutter, you can trace a bowl with a craft knife. -
Smooth the edges:
Gently run your finger around the rim of the circle to smooth out any sharp edges or drag marks left by the cutter.
Clean Lines Tip
Wipe your blade with a baby wipe between cuts when trimming the strings. This prevents the black clay from smearing onto the light beige base.
Step 2: Creating the Inlay Lines
-
Prepare accent colors:
Condition small amounts of your black, terracotta, and ochre clay. These need to be very soft to adhere well to the base. -
Create thin clay strings:
Roll these accent colors into very thin, uniform snakes or ‘noodles’ of clay. I find using a clay extruder with a small round disc gives the most consistent results, though hand-rolling works with patience. -
Score the pattern:
Using a needle tool or the back of a craft knife, lightly sketch your geometric intersecting lines onto the beige base. This acts as a guide for placement. -
Cut channels (optional):
For a flush inlay, verify the depth of your strings. If your strings are thick, gently press a knitting needle or tool into the beige clay along your scored lines to create a shallow channel. -
Lay the terracotta lines:
Begin placing your terracotta clay strings along the designated paths. Gently press them down so they make full contact with the base. -
Add the ochre accents:
Place the ochre/yellow strings next. Notice how the design uses parallel lines; try to keep the spacing between neighboring strings consistent. -
Place the black contrast:
Lay down the black strings last. These are the boldest visual element, so ensure they are perfectly straight and intersect the other colors cleanly. -
Trim the overhang:
Use your blade to carefully slice off the excess colored strings that hang over the edge of the coaster.
Uneven Rolling?
If your main slab isn’t level, place two stacks of playing cards or craft sticks on either side of your clay to act as depth guides for your roller.
Step 3: Finishing
-
Embed the strings:
Place a sheet of parchment paper over the coaster. Using your acrylic roller, roll overly the surface firmly. This presses the colored strings *into* the beige base until the surface is level. -
Check for gaps:
Peel back the paper and check if the clay has fused. If there are gaps between the line and the base, cover and roll again. -
Bake:
Place the coaster on a ceramic tile or baking sheet. Bake according to your clay package instructions (usually 275°F/135°C for 30 minutes). -
Cool down:
Let the coaster cool completely in the oven or on a wire rack before handling. Warm clay is fragile. -
Sand for smoothness:
Once cool, wet-sand the surface starting with 400 grit and moving to 800 grit. This reveals the crisp lines and removes any surface haze. -
Final buffing:
Rub the surface vigorously with a piece of denim or a soft cloth to give it a natural, matte sheen.
Enjoy your sleek, architectural coaster set that brings a touch of modern art to your coffee table
Color-Blocked Geometric Coasters
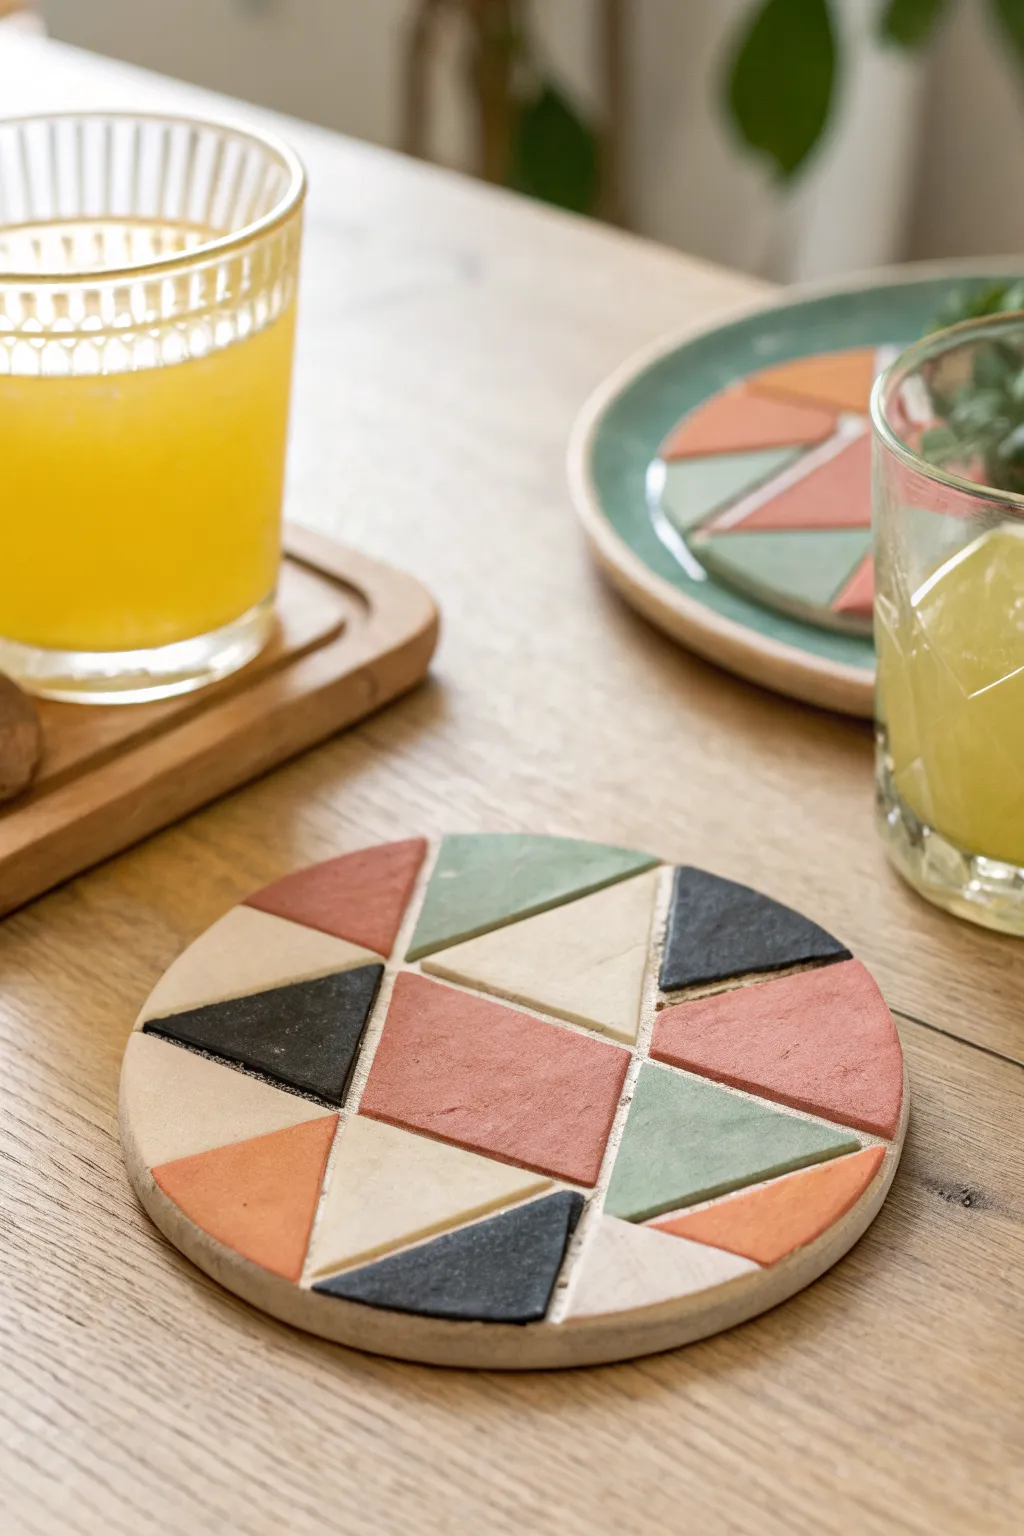
Bring a touch of modern art to your coffee table with this striking mosaic-style coaster. The interplay of earthy terracotta, sage green, deep charcoal, and cream creates a warm, sophisticated palette perfect for any living space.
Detailed Instructions
Materials
- Polymer clay in five colors: Terracotta, Sage Green, Charcoal Black, Cream/Beige, and Muted Orange
- Rolling pin or clay machine
- 4-inch round cookie cutter or a bowl to trace
- Sharp craft knife or tissue blade
- Ruler
- Parchment paper or baking tile
- Sandpaper (fine grit)
- Oven
Step 1: Prepping the Base
-
Condition the clay:
Start by kneading the cream or beige clay in your hands until it’s soft and pliable. This will form the base of your coaster, so ensure it is free of air bubbles. -
Roll out the slab:
Roll the conditioned cream clay into a smooth, even sheet about 1/4 inch thick. I find using a clay machine on a medium setting ensures a perfectly uniform thickness. -
Cut the circle:
Place your rolled sheet on a piece of parchment paper. Use your 4-inch round cutter to stamp out a perfect circle. Remove the excess clay from around the edges but leave the circle on the parchment so you don’t distort its shape.
Step 2: Creating the Geometric Tiles
-
Prepare color sheets:
Condition your remaining colors—Terracotta, Sage Green, Charcoal, and Muted Orange—and roll them out to the exact same thickness as your base. Rolling them slightly thinner is also acceptable if you want a more embedded look. -
Cut geometric strips:
Using your ruler and sharp blade, slice long, straight strips from each colored sheet. Vary the widths slightly, ranging from 1/2 inch to 1 inch wide. -
Form triangles and shapes:
Cut across your strips at angles to create a variety of triangles, trapezoids, and irregular quadrilaterals. Don’t worry about them being identical; variety is key to the mosaic look. -
Plan the central motif:
Identify a central focal point. In the example, a large terracotta diamond or trapezoid anchors the middle. Place this piece gently onto the center of your cream base circle.
Uneven Surface?
If your tiles aren’t flush, place a heavy book on top of the parchment-covered coaster before baking to flatten it.
Step 3: Assembling the Pattern
-
Work outwards:
Select contrasting colored shapes (like a charcoal triangle or a sage green wedge) and place them adjacent to your center piece. Leave a very tiny gap—about 1mm—between pieces to mimic grout lines. -
Fit the puzzle:
Continue adding shapes, turning them as needed to fit the curve of the circle. You might need to trim a piece with your blade to make it slot perfectly into a gap. -
Trim the edges:
As your pattern reaches the edge of the coaster, your shapes will hang over the side. Once the surface is covered, use your round cutter again. Align it perfectly with the original base circle and press down to trim off all the overhanging colored pieces cleanly.
Texture Play
Before baking, gently press a piece of coarse sandpaper or a rough stone onto the surface to give it a realistic stone texture.
Step 4: Finishing Touches
-
Smooth the surface:
Place a piece of parchment paper over your assembled coaster. Using a rolling pin, gently roll over the top. This embeds the colored tiles firmly into the base and ensures the surface is completely flat. -
Final edge check:
Run your finger or a smoothing tool around the rim of the coaster to soften any sharp edges created by the cutter. -
Bake:
Transfer the parchment paper with the coaster to a baking sheet. Bake according to your clay manufacturer’s instructions (typically 275°F for 15-30 minutes per 1/4 inch of thickness). -
Cool and sand:
Allow the coaster to cool completely inside the oven to prevent cracking. Once cool, lightly sand the edges with fine-grit sandpaper for a professional, smooth finish. -
Seal (Optional):
If you want extra protection against drink spills, apply a thin layer of matte polymer clay varnish.
Enjoy your stylish new coasters and the admiration of your guests when they ask where you bought them
Ombre Gradient Coasters
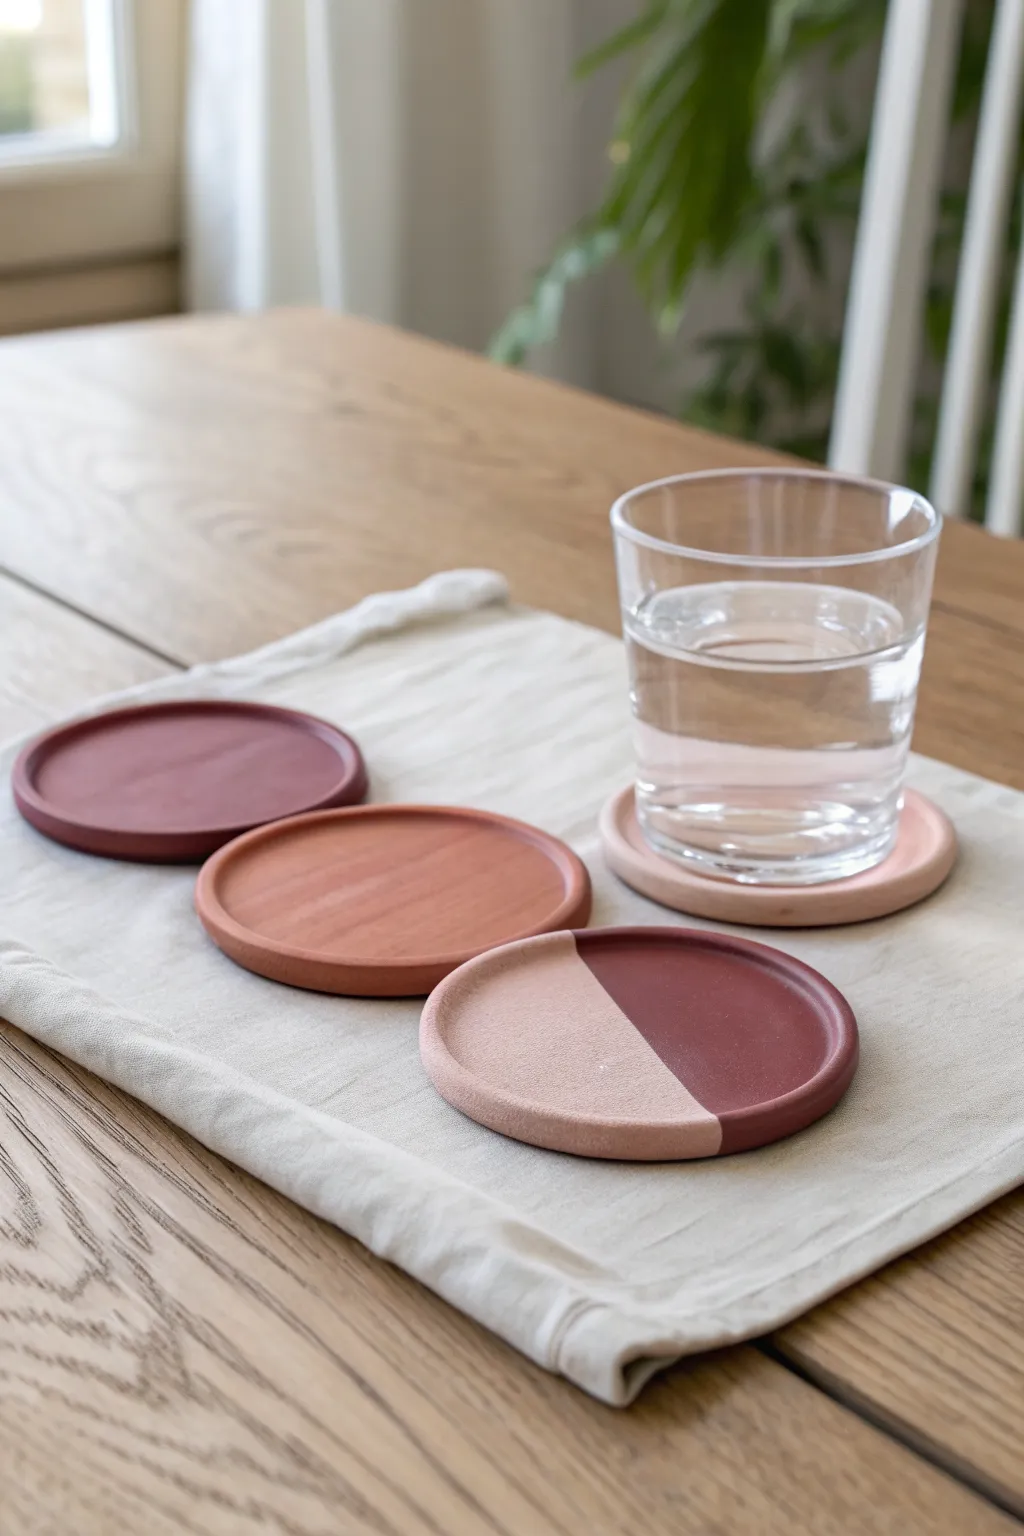
Elevate your table setting with this sophisticated set of coasters featuring warm, earthy tones ranging from deep burgundy to soft blush. The slightly raised rim design not only adds a professional finish but perfectly contains condensation from your favorite cold drinks.
Step-by-Step Guide
Materials
- Polymer clay (burgundy, terracotta, and white)
- Acrylic roller or pasta machine
- Round cookie cutter (approx. 4 inches diameter)
- Small round cutter or jar lid (approx. 3.5 inches)
- Sandpaper (400 to 1000 grit)
- Baking sheet
- Parchment paper
- Clay slicer or craft knife
- Matte finish varnish (optional)
Step 1: Color Mixing & Conditioning
-
Prepare your palette:
Begin by conditioning your polymer clay until it’s soft and pliable. You’ll need a base burgundy, a terracotta, and white. To achieve the specific tonal range in the photo, you will be mixing these to create four distinct shades. -
Mix the darkest shade:
The first color is your deep burgundy. If straight from the package it feels too bright, add a tiny dot of black or brown to deepen it. Roll this into a ball. -
Create the mid-tones:
For the second color (terracotta), mix orange clay with a bit of brown and white, or simply use a pre-mixed terracotta. For the third shade, mix equal parts of your burgundy and white to create a dusty rose color. -
Mix the lightest blush:
Finally, create the lightest shade by mixing a large amount of white with a very small amount of your terracotta or burgundy clay. This should be a very pale, creamy blush tone.
Step 2: Forming the Base Coasters
-
Roll out the sheets:
Using an acrylic roller or pasta machine on a thick setting, roll out each of your four color balls into smooth sheets. Aim for a thickness of about 1/4 inch (6mm) for durability. -
Cut the solid circles:
Take your 4-inch round cutter. Cut one solid circle from the burgundy sheet, one from the terracotta sheet, and one from the lightest blush sheet. Set aside the excess clay. -
Create the two-tone coaster:
For the split-tone coaster, take your remaining burgundy and light blush sheets. Use your craft knife to cut a straight line through both sheets. Join a burgundy half and a blush half together at the cut seam. -
Heal the seam:
Gently rub the seam with your finger or roll over it lightly with the acrylic roller to bond the two colors without distorting the straight line. I like to flip it over and smooth the back as well to ensure it won’t crack. -
Cut the two-tone circle:
Position your round cutter so the seam runs exactly down the middle (or slightly off-center for a modern look) and cut your final coaster circle.
Seamless Smoothness
Before baking, wipe the clay surface with a little baby oil or cornstarch on your finger. This removes fingerprints instantly and creates that silky, professional texture seen in the photo.
Step 3: Creating the Rim & Baking
-
Indent the center:
To create the raised rim effect seen in the photo, take your smaller cutter or a jar lid (about 0.5 inch smaller than your coaster). Center it on the raw clay circle and press down gently—you don’t want to cut through, just create an indentation. -
Refine the rim:
Use your fingers to gently smooth the inner edge of this indentation, creating a soft, sloped transition rather than a sharp cliff. This helps the rim look intentional and molded. -
Smooth the edges:
Run your finger along the outer edge of each coaster to smooth out any harsh lines left by the cutter. A little water on your finger can help smooth out fingerprints on the surface. -
Bake the coasters:
Place your coasters on a baking sheet lined with parchment paper. Bake according to your clay manufacturer’s instructions (usually 275°F/135°C for 30 minutes per 1/4 inch of thickness). -
Cool down under weight:
Once removed from the oven, immediately place a flat, heavy object (like a heavy book on top of a cutting board) over the hot coasters while they cool. This is crucial for keeping them perfectly flat.
Bubble Trouble?
If you see a trapped air bubble after rolling your sheet, pierce it gently with a needle tool and smooth the air out with your finger before cutting your circle shapes.
Step 4: Finishing Touches
-
Initial sanding:
Once fully cooled, dampen your sandpaper. Start with 400 grit to smooth out any bumps on the rim or edges. Sand in a circular motion. -
Review the two-tone seam:
Pay special attention to the seam on the two-tone coaster, sanding gently to ensure the surface feels like one continuous piece. -
Final polish:
Move up to a higher grit (800 or 1000) for a velvety smooth finish. Wipe away all dust with a damp cloth. -
Seal (optional):
The coasters in the image have a matte, natural look. If you want extra protection against stains, apply a thin layer of matte varnish, but leaving them raw is perfectly fine for polymer clay.
Now you have a stunning set of modern coasters ready to protect your furniture in style
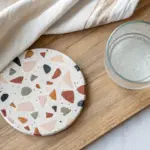
Confetti Dot Coasters
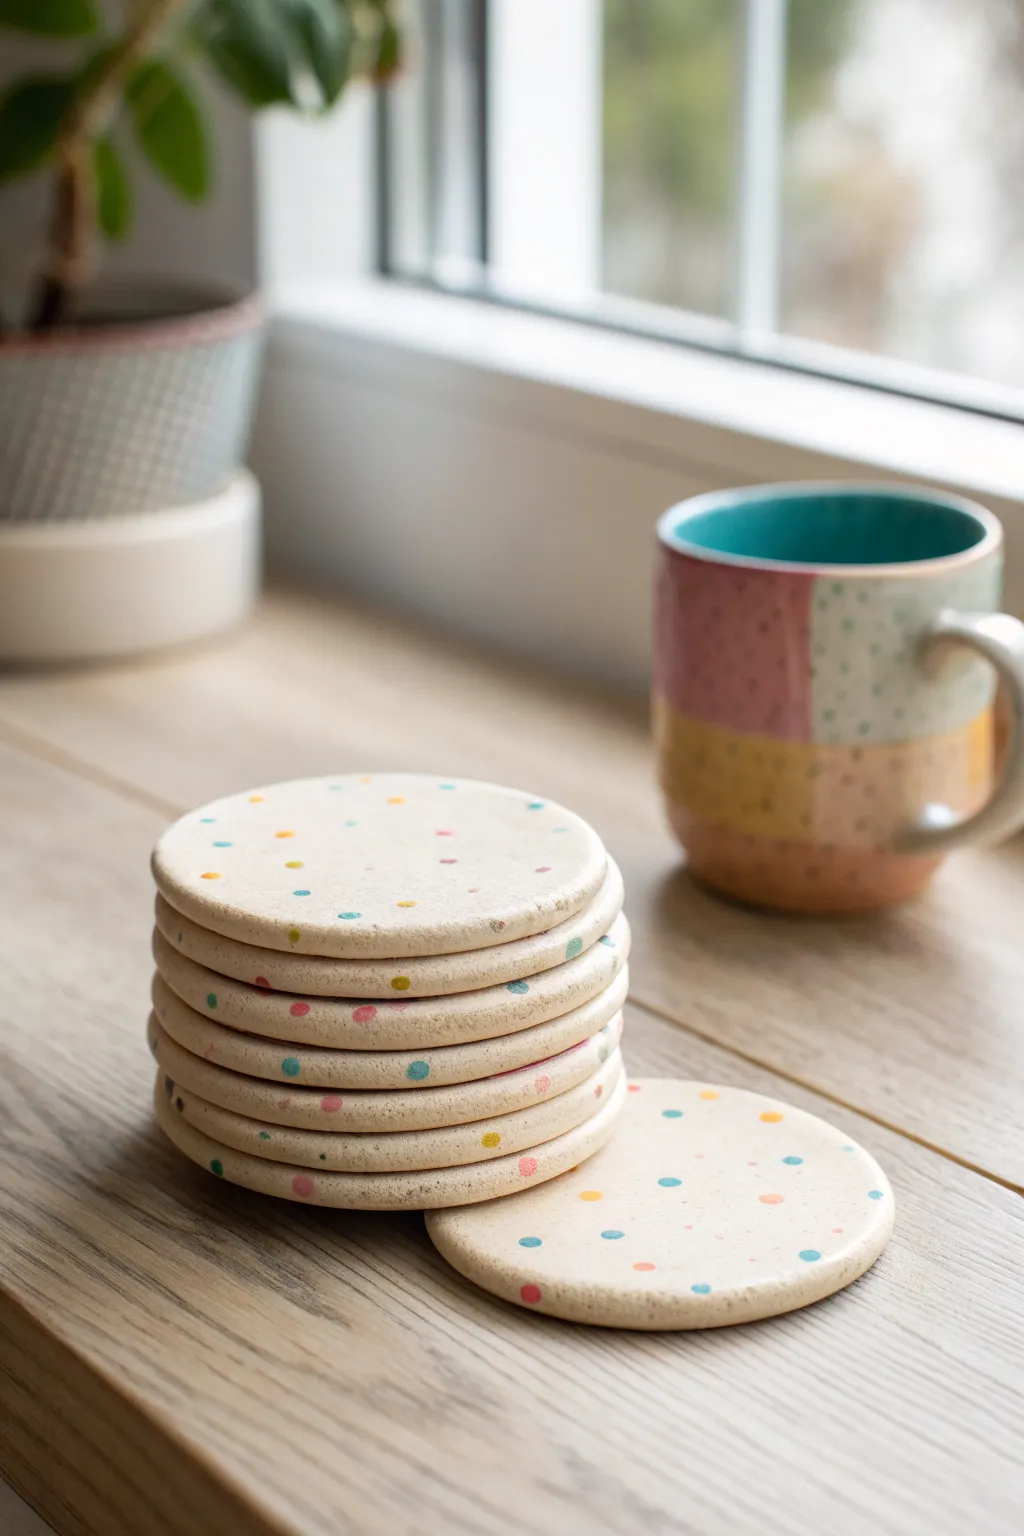
Bring a playful yet sophisticated touch to your coffee table with these confetti-style polymer clay coasters. Their creamy, stone-like base is dotted with cheerful pops of pastel color, mimicking the look of traditional terrazzo or ceramic glazing.
Step-by-Step Tutorial
Materials
- Polymer clay in ‘Granite’, ‘Stone’, or ‘Beige’ effect
- Polymer clay in assorted pastel colors (pink, blue, yellow, teal)
- Acrylic rolling pin or pasta machine
- Round cookie cutter (approx. 3.5 – 4 inches diameter)
- Parchment paper or ceramic tile for baking
- Fine grit sandpaper (400 and 800 grit)
- Gloss or matte polymer clay varnish (optional)
- Flat, smooth work surface
Step 1: Preparing the Clay Base
-
Condition the base clay:
Start by taking your stone or granite-effect polymer clay. Knead it thoroughly in your hands until it becomes soft, pliable, and warm. -
Roll out the slab:
Place the conditioned clay on a flat surface or a piece of parchment paper. Use your acrylic roller to flatten it into a consistent slab about 1/4 inch (6mm) thick. If you have a pasta machine, pass it through on a medium-thick setting. -
Check specifically for air bubbles:
Inspect the surface of your slab. If you see any air bubbles trapped under the surface, gently pierce them with a needle tool and smooth the air out with your finger.
Fixing Smudged Dots
If your colored dots smear into streaks while rolling, your clay might be too soft. Pop the slab in the fridge for 10 minutes to firm it up before rolling again.
Step 2: Creating the Confetti Pattern
-
Prepare the confetti colors:
Take tiny amounts of your pastel colored clays—pinks, blues, yellows, and teals. Roll them into very thin snakes or simply pinch off miniature fragments. -
Form tiny dots:
Roll these small fragments into tiny balls between your fingertips. Vary the sizes slightly for a natural look, but keep them generally small, around the size of a peppercorn or smaller. -
Apply the dots:
Randomly scatter these tiny colored balls onto the surface of your rolled-out stone clay slab. Press them down very lightly just so they stick, ensuring an even distribution without clustering too many of one color together. -
Embed the confetti:
Take your acrylic roller again and gently roll over the slab. This will press the colored dots flat into the base clay so they become flush with the surface, rather than sitting on top. -
Smooth the surface:
Continue rolling gently until the surface is completely smooth and level. I like to rotate the roller direction to ensure the slab doesn’t get distorted in just one way.
Step 3: Cutting and Baking
-
Cut the coaster shapes:
Position your round cookie cutter over the patterned slab to find the best arrangement of dots. Press down firmly to cut out your circle. -
Release the shape:
Gently wiggle the cutter slightly to ensure the edges are clean, then lift the cutter. Carefully peel away the excess clay from around the circle. -
Soften the edges:
Before baking, run your finger lightly around the rim of the cut circle to smooth out any sharp edges created by the cutter. This saves sanding time later. -
Transfer to baking surface:
Carefully move your raw coasters onto a ceramic tile or parchment-lined baking sheet. Ensure they are perfectly flat so they don’t warp. -
Bake the clay:
Bake in a preheated oven according to your clay manufacturer’s instructions (usually around 275°F or 130°C) for approximately 30-45 minutes. A longer bake makes the coasters stronger. -
Cool down:
Turn off the oven and let the coasters cool down completely inside or on a wire rack. Do not handle them while hot as they can be temporarily fragile.
Use A Depth Sheet
Place two stacks of playing cards or wooden slats on either side of your clay while rolling. The roller rides on these rails, ensuring a perfectly even thickness.
Step 4: Finishing Touches
-
Sand the edges:
Once cool, take your 400 grit sandpaper and gently sand the edges under water to remove any remaining roughness. Move to 800 grit for an extra smooth finish. -
Seal (Optional):
If you want a glossy ceramic look, apply a thin layer of polymer clay glaze. For a natural stone feel like the image, you can leave them matte or buff them with a soft cloth.
Stack your new set on the table and enjoy the charming, speckled pattern with your morning coffee
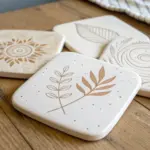
Botanical Leaf-Imprint Coasters
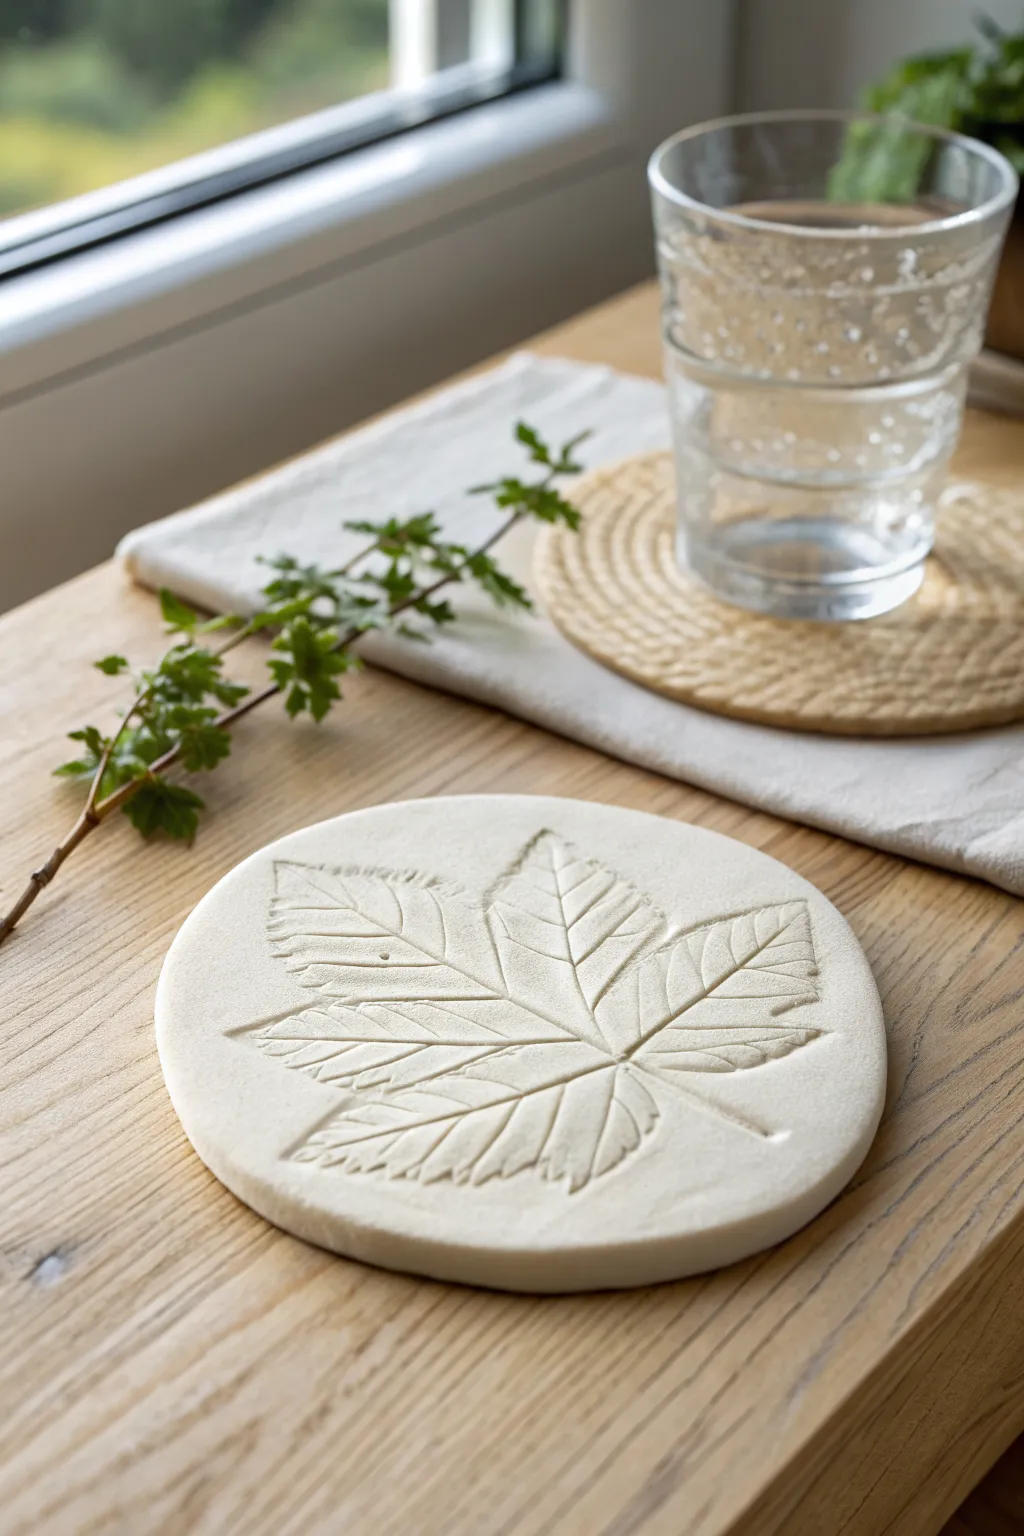
Capture the stark beauty of nature with this minimalist white clay coaster featuring a deep, realistic leaf impression. This project results in a sophisticated, matte-finish accessory that looks like high-end ceramic but shapes easily at home.
Detailed Instructions
Materials
- White or translucent white polymer clay
- Rolling pin or acrylic clay roller
- Large round cutter (approx. 4 inches) or a bowl and craft knife
- Fresh, deeply veined leaf (like chestnut, maple, or hydrangea)
- Parchment paper or ceramic tile (for baking)
- Cornstarch or baby powder (release agent)
- Fine-grit sandpaper (400 to 800 grit)
- Oven thermometer
- Matte varnish (optional)
Step 1: Preparation & Rolling
-
Clean Your Surface:
Begin by thoroughly cleaning your work surface and washing your hands. White polymer clay is notorious for picking up dust and lint, so starting clean is crucial. -
Condition the Clay:
Take a generous block of white polymer clay and knead it until it is soft and pliable. Warm clay takes impressions much better than stiff clay. -
Roll the Slab:
Roll the clay out into an even slab. Aim for a thickness of about 1/4 inch (6mm). You want it thick enough to take a deep impression without becoming flimsy. -
Smooth the Surface:
Inspect the clay slab for any air bubbles or lint. Gently smooth them out with your finger or re-roll if necessary to get a flawless canvas.
Keep it Clean
Keep a piece of scrap white clay nearby. Roll it over your hands and work surface periodically to pick up lint before toughing your project.
Step 2: Creating the Impression
-
Select Your Leaf:
Choose a fresh leaf with prominent veins on the backside. Dried leaves will crack, while fresh ones are flexible enough to be pressed deeply. -
Dust for Release:
Lightly dust the surface of the clay or the back of the leaf with a tiny bit of cornstarch. This acts as a release agent so the leaf doesn’t stick to the polymer. -
Position the Leaf:
Place the leaf vein-side down onto the center of your clay slab. Arrangement matters here, so ensure the stem and tip are aligned where you want the final pattern to be. -
Press the Design:
Using your roller, roll firimly over the leaf. Don’t be shy with pressure; you want to force the clay up into the veins to capture every detail. -
Check the Depth:
Gently lift one edge of the leaf to peek at the impression. If it looks too shallow, lay it back down and roll again with slightly more force. -
Remove the Leaf:
Carefully peel the leaf away from the clay. Do this slowly to avoid tearing the leaf or distorting the fresh clay imprint.
Step 3: Cutting & Baking
-
Cut the Shape:
Center your round cutter over the leaf impression. Press down firmly to cut the coaster shape. If you don’t have a cutter, trace around a small bowl with a craft knife. -
Refine Edges:
Before moving the piece, gently smooth the cut edges with your fingertip to remove any sharpness or burrs left by the cutter. -
Transfer to Baking Surface:
Carefully lift the clay using a blade or spatula and place it on a ceramic tile or baking sheet lined with parchment paper. -
Bake:
Bake according to your clay manufacturer’s instructions (usually 275°F/135°C for 15-30 minutes per 1/4 inch thickness). I always use an oven thermometer to prevent scorching white clay. -
Cool Down:
Allow the coaster to cool completely in the oven with the door slightly ajar. This gradual cooling helps prevent warping.
Antique Effect
After baking, rub diluted brown or grey acrylic paint into the veins and wipe away the excess on top to make the texture pop.
Step 4: Finishing Touches
-
Sand the Edges:
Once cool, use fine-grit sandpaper wet-sanding technique (dip sandpaper in water) to polish the edges until they feel perfectly smooth. -
Optional Sealing:
The image shows a very matte, natural finish. You can leave the clay raw, or apply a thin coat of ultra-matte varnish for extra protection against stains.
Place your finished coaster on your coffee table and enjoy the subtle, organic texture it brings to your space.
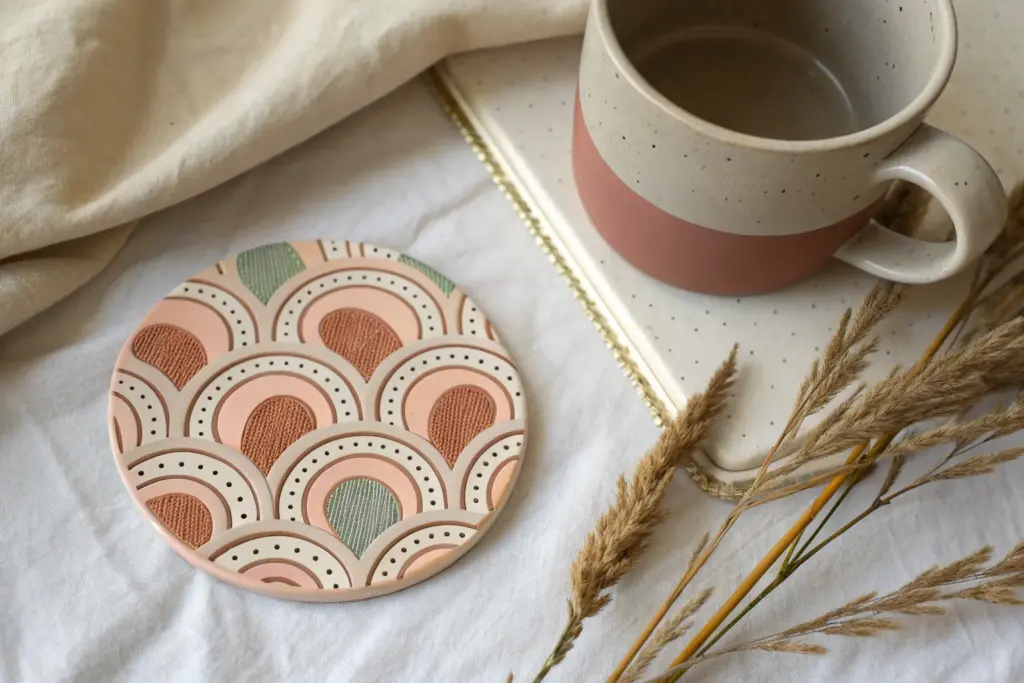
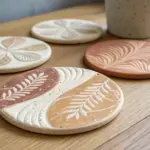
Stamped Texture Pattern Coasters
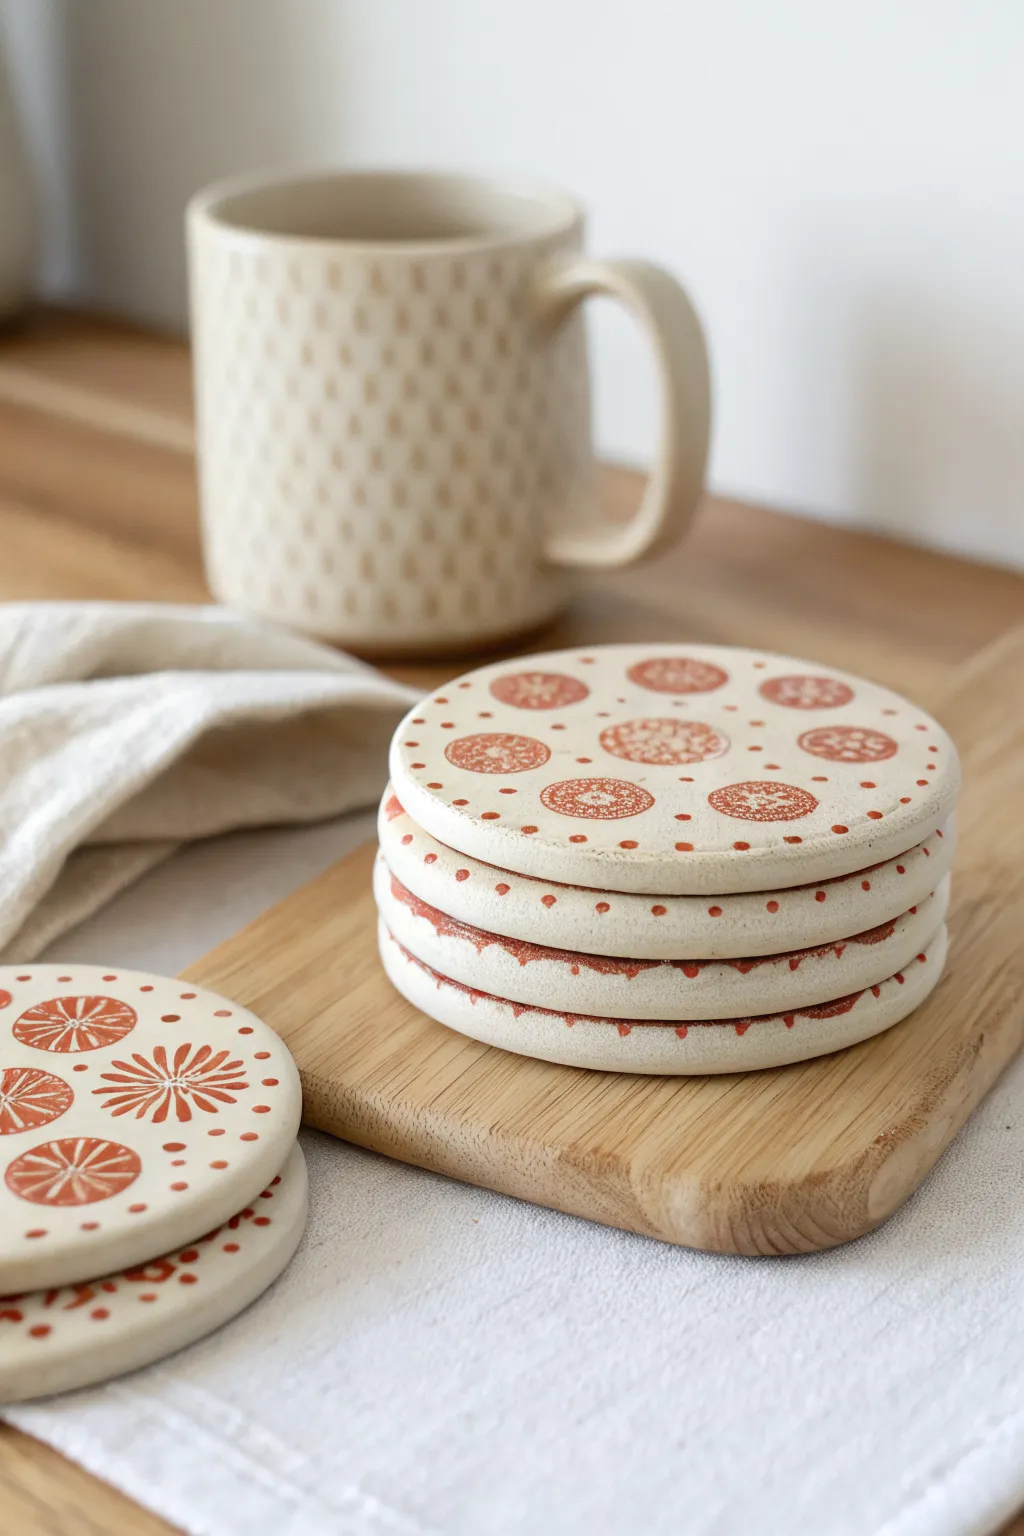
Bring a touch of artisanal pottery charm to your table with these polymer clay coasters that mimic the look of unglazed ceramic. Using simple rubber stamps and paint, you can achieve this gorgeous, folk-art inspired pattern without needing a kiln.
Step-by-Step
Materials
- Polymer clay (beige, sand, or granite color)
- Acrylic rolling pin or pasta machine
- Round clay cutter (approx. 4 inches / 10 cm)
- Rubber stamps with mandala, floral, or geometric circular motifs
- Terracotta or rust-colored acrylic paint
- Small foam pouncer or cosmetic sponge
- Detail paintbrush
- Cornstarch or baby powder (as a release agent)
- Fine grit sandpaper
- Matte water-based varnish (optional)
Step 1: Preparing the Base
-
Condition the Clay:
Begin by thoroughly kneading your chosen polymer clay until it is soft and pliable. If you want that speckled ceramic look shown in the photo, mix a tiny pinch of black pepper or craft sand into plain beige clay. -
Roll the Slab:
Roll out the clay to a consistent thickness of about 1/4 inch (6mm). Using depth guides or stacking playing cards on either side of your roller helps ensure the slab is perfectly even. -
Cut the Shapes:
Press your round cutter firmly into the clay slab to cut out your coaster circles. Twist slightly before lifting to ensure a clean cut. -
Smooth the Edges:
Dip your finger in a little bit of water or cornstarch and gently run it around the cut edge of each coaster to smooth out any sharp ridges or burrs.
Step 2: Stamping the Pattern
-
Plan Your Layout:
Before stamping, lightly place your stamps over the raw clay without pressing down to visualize the spacing. A symmetric pattern often looks best, perhaps starting with a central motif or evenly spaced outer circles. -
Prepare the Paint:
Squeeze a small amount of terracotta-colored acrylic paint onto a palette or scrap paper. You want the paint to be slightly tacky, not too runny. -
Load the Stamp:
Instead of dipping the stamp directly into the paint, use a foam pouncer or sponge to lightly dab paint onto the raised design of the rubber stamp. This prevents paint from flooding the recesses and keeps the impression crisp. -
Impression Technique:
Press the painted stamp gently but firmly onto the raw clay surface. Apply even pressure so the design transfers clearly, but don’t push so hard that you deform the coaster’s shape. -
Lift and Repeat:
Lift the stamp straight up to avoid smudging. I like to wipe the stamp clean every few impressions to prevent paint buildup. -
Fill the Surface:
Continue stamping your chosen motifs across the surface. Vary the designs if you have multiple stamps, creating a mix of larger mandalas and smaller floral circles.
Smudged Stamp Rescue
If you smudge a stamped image on raw clay, dip a Q-tip in a little rubbing alcohol or baby oil and gently wipe the paint away. Let the alcohol evaporate, then restamp.
Step 3: Adding Details & Baking
-
Add Dot Accents:
Take a small detail brush or the handle end of a paintbrush. Dip it into the terracotta paint and add small dots between the stamped motifs to fill empty space and add visual interest. -
Decorate the Edges:
For the stacked look shown in the photo, paint a thin, decorative line or series of dots around the side edge of the coaster. A scalloped line works beautifully here. -
Let Paint Dry:
Allow the acrylic paint to dry completely on the raw clay before baking. This usually takes about 10-15 minutes. -
Bake the Clay:
Place the coasters on a tile or baking sheet lined with parchment paper. Bake according to the manufacturer’s instructions for your specific brand of clay—usually around 275°F (130°C) for 30-45 minutes to ensure durability. -
Cooling Down:
Allow the coasters to cool completely in the oven with the door slightly ajar. Sudden temperature changes can make flat clay pieces warp.
Faux Ceramic Texture
Before stamping, gently roll a textured fabric (like coarse canvas or denim) over the clay slab. This subtle texture enhances that realistic, earthy pottery vibe.
Step 4: Finishing Touches
-
Light Sanding:
Once cool, check the bottom and edges. If there are any rough spots, gently wet-sand them with fine-grit sandpaper under running water. -
Sealing (Optional):
The project in the image has a lovely matte finish. If you want to protect the paint without adding shine, apply a thin coat of matte water-based varnish. However, polymer clay is durable enough on its own if you prefer the raw feel. -
Backing:
Cut a circle of cork or felt slightly smaller than the coaster and glue it to the bottom. This adds a professional finish and protects your furniture surfaces.
Stack your new set on the coffee table and enjoy the warm, handmade aesthetic they bring to your living space
Faux Speckled Stoneware Coasters
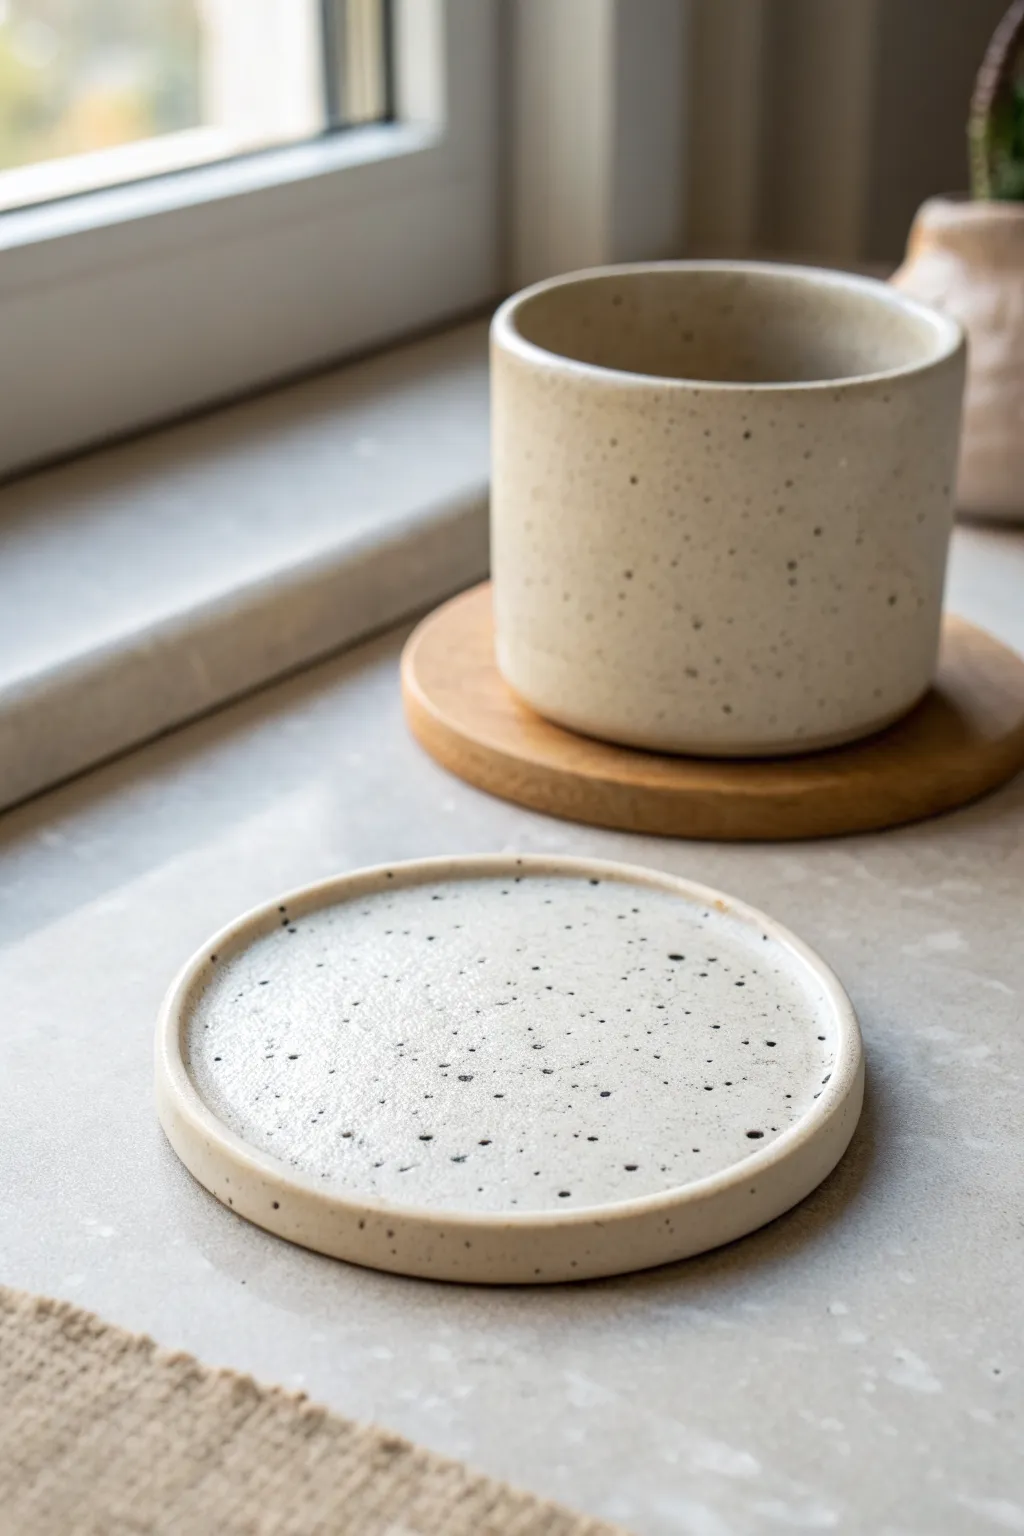
Recreate the sophisticated charm of wheel-thrown pottery without needing a kiln. These polymer clay coasters feature a gorgeous speckled cream finish and a raised lip that perfectly mimics high-end artisanal stoneware.
How-To Guide
Materials
- White or translucent polymer clay (approx. 2oz per coaster)
- Black pepper or black embossing powder
- Rolling pin or pasta machine
- Round cookie cutter (3.5 – 4 inch)
- Small bowl or jar lid (slightly smaller than cutter)
- Smoothing tool or old credit card
- Fingertip or sculpting tool
- Medium-grit sandpaper
- Gloss or satin polyurethane varnish
- Soft paintbrush
- Oven and baking sheet
- Cornstarch (optional for release)
Step 1: Preparing the Speckled Clay
-
Condition the Clay:
Start by thoroughly warming and kneading your white polymer clay until it is soft and pliable. If the clay feels too stiff, add a tiny drop of clay softener or baby oil to help. -
Add the Speckles:
Flatten the conditioned clay into a pancake shape. Sprinkle a generous pinch of coarsely ground black pepper or black embossing powder over the surface. -
Incorporate the Texture:
Fold the clay over the speckles and knead well to distribute them evenly throughout the block. I like to slice the clay and restack it a few times to ensure the ‘stoneware’ spotting looks natural and random. -
Roll Out the Sheet:
Using your rolling pin or pasta machine on a medium-thick setting (about 1/4 inch or 6mm), roll the clay into a smooth, even sheet. Ensure it’s wide enough for your chosen cutter.
Rim Separation?
If the rim separates during baking, apply a small amount of liquid polymer clay (Bake & Bond) between the coil and base next time for a stronger fuse.
Step 2: Shaping the Coaster
-
Cut the Base:
Press your large circle cutter firmly into the clay sheet to cut out your coaster base. Remove the excess clay from around the edges carefully. -
Create the Lip:
Take the excess clay you just removed and roll it into a long, thin snake (or ‘coil’) about the thickness of a pencil lead. -
Attach the Coil:
Place the clay snake around the very top perimeter of your circular base. Press it down gently so it sits flush with the edge. -
Blend the Seams:
Using a smoothing tool or your thumb, gently drag the clay from the inside of the coil down onto the base to fuse them. Repeat on the outside edge to make it seamless. -
Refine the Shape:
Moisten your finger with a little cornstarch or water and run it along the raised rim to smooth out fingerprints and create that characteristic rounded pottery edge. -
Flatten the Center:
To ensure cups sit flat and to sharpen the inner angle of the rim, gently press the flat bottom of a glass or jar lid into the center of the coaster, stopping just before the rim.
Try Colored Glazes
Mix a tiny dot of alcohol ink into your liquid varnish or resin before applying to give your coaster a subtle tint, like pale blue or sage green stoneware.
Step 3: Finishing Touches
-
Bake the Clay:
Transfer the coaster to a baking tile or parchment-lined sheet. Bake according to your clay manufacturer’s instructions, typically around 275°F (135°C) for 30 minutes per 1/4 inch of thickness. -
Cool Down:
Turn off the oven and let the coaster cool completely inside the oven or on a wire rack. Don’t rush this, as hot clay is fragile. -
Sand for Realism:
Once cool, lightly sand the edges and surface with medium-grit sandpaper. This scuffs the plastic sheen slightly and exposes more of the black speckles, enhancing the stonelike effect. -
Clean the Dust:
Wipe the coaster thoroughly with a damp cloth or wash it quickly with water to remove all sanding dust. -
Apply Glaze:
Brush on a thin, even coat of gloss or satin polymer clay varnish. This mimics the glazed look of ceramic pottery and seals the pepper inclusions. -
Final Cure:
Let the varnish dry completely according to the bottle directions before using your new stoneware-style coaster.
Place your favorite mug on your new creation and enjoy the cozy, handmade vibe it brings to your table
Mokume Gane Pattern Coasters
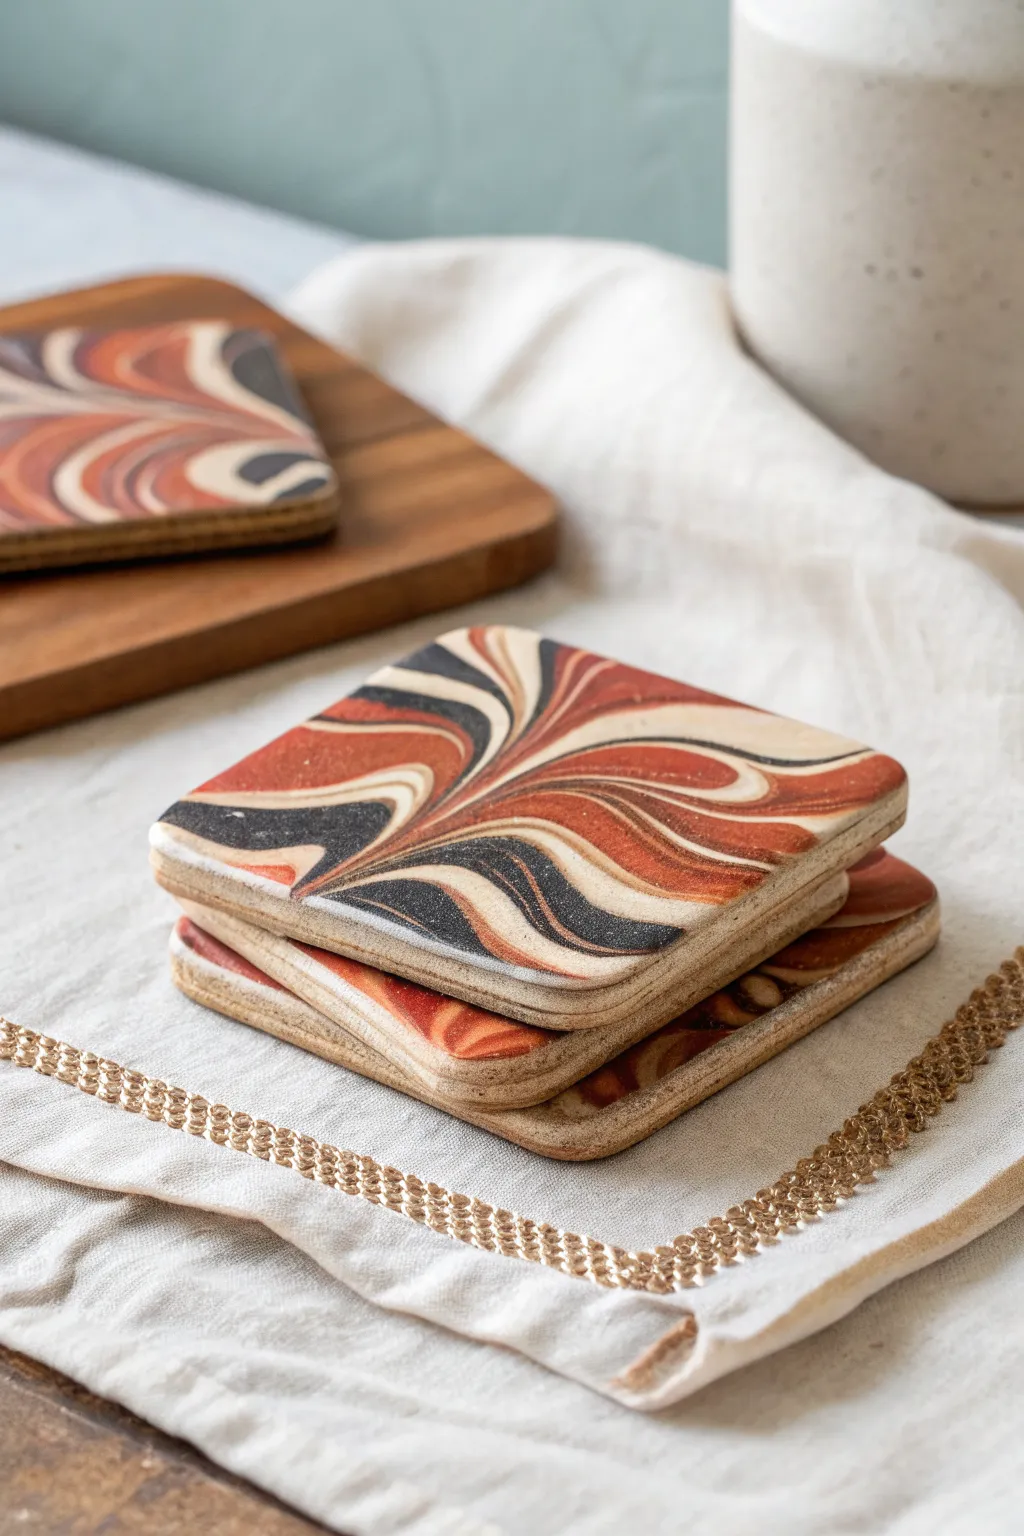
These rich, earthy coasters channel the beauty of geological layers with a sophisticated marbling effect. Using the Mokume Gane technique, you’ll create stunning, organic swirls of rust, cream, and charcoal that look far more complex than they actually are.
Step-by-Step Guide
Materials
- Polymer clay (Rust, Cream, Black, and Translucent)
- Acrylic roller or pasta machine
- Tissue blade (flexible)
- Detailed texture sheet or stamp
- Square clay cutter (approx. 3.5 inches)
- Parchment paper
- Ceramic tile for baking
- Wet/dry sandpaper (400, 600, 800 grit)
- Polyurethane varnish or resin (optional)
Step 1: Stacking the Layers
-
Condition the clay:
Begin by thoroughly conditioning each block of clay—rust, cream, black, and translucent—until it is soft and pliable. This prevents cracks later on. -
Create thin sheets:
Roll each color into a sheet of uniform thickness. If you have a pasta machine, use a medium setting; otherwise, aim for about 1.5mm thick with your roller. -
Stack the colors:
Layer the sheets on top of one another in an alternating pattern. I like to sandwich the darker colors between the cream and translucent layers to create depth. -
Compress the stack:
Gently roll over the stacked block to press the layers together firmly, ensuring there are no air bubbles trapped between them. -
Thin the stack:
Roll the entire stack thinner again. Cut the stack in half, place one half on top of the other, and roll lightly. This doubles your layer count for a finer pattern.
Step 2: Creating the Mokume Gane Pattern
-
Apply texture:
Place your texture sheet or stamp onto the clay slab. Press down firmly or roll over it to create deep impressions and distorted layers. -
Shave the surface:
This is the magic part where the pattern appears. Bend your flexible tissue blade slightly and carefully slice thin, horizontal shavings off the top of the distorted slab. Keep slicing until you reveal the beautiful concentric patterns underneath. -
Smooth the slab:
Once you are happy with the revealed pattern, use your acrylic roller to gently smooth the surface perfectly flat again so it’s level for a coaster. -
Prepare the base:
Roll out a thicker sheet of scrap clay or a solid color (about 3-4mm) to serve as a sturdy backing for your coasters. -
Attach the veneer:
Carefully place your patterned Mokume Gane slice onto the backing sheet. Roll gently to bond them completely.
Smudged Patterns?
If your pattern is smearing while shaving, chill the clay block in the fridge for 15 minutes. Firmer clay slices cleaner and preserves crisp details.
Step 3: Cutting and Finishing
-
Cut the shape:
Position your square cutter over the most interesting part of the pattern and press down firmly to cut out your coaster shape. -
Soften edges:
Use your finger to gently rub the edges and corners to round them off slightly; sharp corners can be brittle after baking. -
Bake carefully:
Place the coasters on a ceramic tile covered with parchment paper. Bake according to your clay manufacturer’s instructions, typically around 275°F (135°C) for 30-45 minutes. -
Cool it down:
Allow the coasters to cool completely inside the oven or on the counter before handling to ensure maximum strength. -
Sand for smoothness:
Under running water, sand the surface and edges starting with 400 grit, moving to 600, and finishing with 800 grit for a silky touch. -
Buff and seal:
Vigorously buff the finish with a soft denim cloth. For extra protection against moisture, you can apply a thin layer of satin varnish or resin.
Add Gold Leaf
For a luxe touch, place random bits of gold leaf between your clay layers before stacking. It adds metallic sparkle to the final swirls.
Enjoy using your elegant, handmade coasters for your morning coffee or evening tea