
If you’ve been craving polymer clay home decor projects that feel stylish but still totally doable, you’re in the right place. These ideas are the kind of pieces I love making in my studio—simple shapes, big payoff, and lots of room to make them feel like you.
Terrazzo Drink Coasters
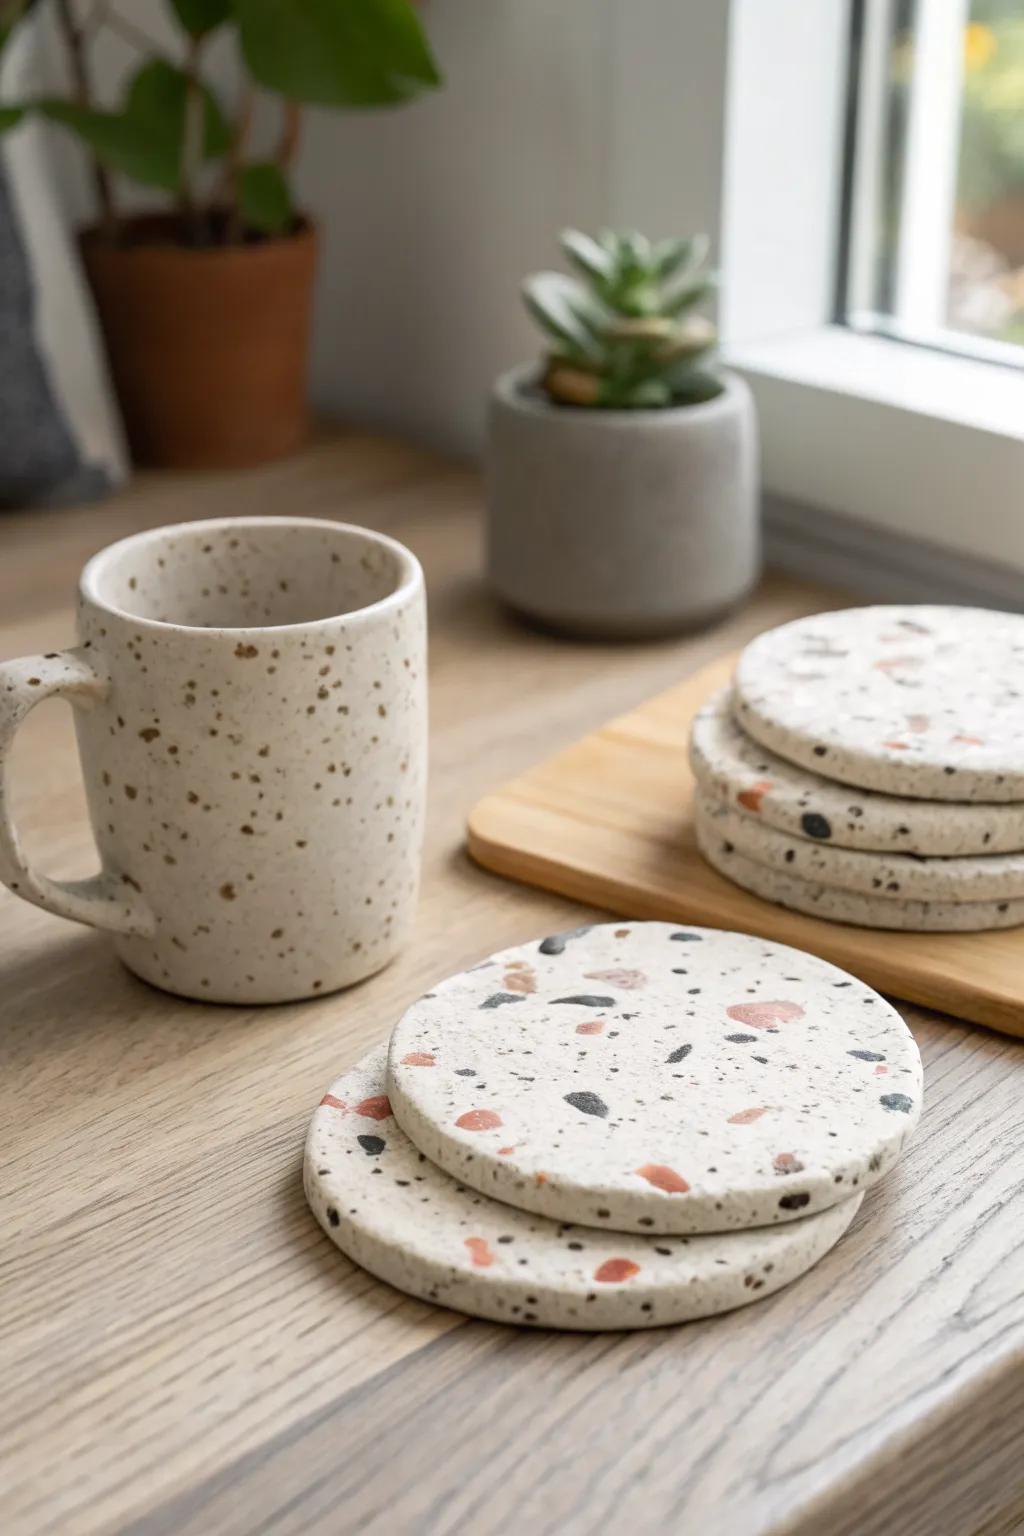
Bring the high-end look of Italian terrazzo into your living space with these surprisingly simple polymer clay coasters. Featuring a crisp white base speckled with organic fragments of rust, charcoal, and grey, this project creates a modern, durable surface perfect for your morning coffee.
How-To Guide
Materials
- White or translucent white polymer clay (large block)
- Black polymer clay
- Grey polymer clay
- Terracotta or rust-colored polymer clay
- Rolling pin or pasta machine
- Round cookie cutter (approx. 3.5 – 4 inches)
- Parchment paper or baking mat
- Craft knife or tissue blade
- Oven
- Fine-grit sandpaper (400, 800, 1000 grit)
- Gloss or matte varnish (optional)
Step 1: Prepping the Chips
-
Condition the colors:
Start by conditioning your colored clays—black, grey, and terracotta—separately until they are soft and pliable. Keep your white clay wrapped for now to avoid staining it. -
Roll thin sheets:
Roll each colored clay into a very thin sheet, roughly 1-2mm thick. You don’t need perfect shapes here, just thin, flat pieces. -
Create the fragments:
Using your craft blade, chop the colored clay sheets into tiny, irregular angular pieces. Aim for a variety of sizes, from mere specks to slightly larger chunks, to mimic real stone aggregate. -
Keep them separate:
Pile your chopped fragments into separate mounds so you can control the color distribution later. I like to keep them on a piece of scrap parchment paper so they are easy to lift.
Step 2: Forming the Base
-
Condition the white clay:
thoroughly condition your large block of white clay. Ensure your hands and work surface are impeccably clean before this step, as white clay shows every speck of dust. -
Roll the base slab:
Roll the white clay into a thick slab, approximately 1/4 inch (6mm) thick. It needs to be substantial enough to act as a functional coaster. -
Rough shaping:
If you are making multiple coasters, ensure your slab is large enough to cut out several circles, or divide the clay now into individual portions.
Clean Cuts Only
Is your clay sticking to the cutter? Dip the rim of your cookie cutter into cornstarch or water before pressing it into the clay for an effortless, non-stick release.
Step 3: Creating the Pattern
-
Sprinkle the chips:
Scatter your colored clay fragments over the white slab. Be random but mindful; avoid large clumps of a single color. -
Press them in:
Once you are happy with the arrangement, gently cover the slab with a piece of parchment paper. Use your rolling pin to press firmly, embedding the chips into the white base. -
Smooth the surface:
Roll over the parchment paper in multiple directions until the surface is completely flat and the chips are flush with the white clay. The slab will get slightly thinner and wider during this process. -
Check the underside:
Flip the slab over. If you want a double-sided terrazzo look, repeat the sprinkling and rolling process on the back. Otherwise, leave it plain white.
Depth Perception
Use translucent white clay mixed with regular white (1:1 ratio) for the base. When baked and sanded, this adds a subtle visual depth that mimics real stone much better than solid white opaque clay.
Step 4: Cutting and Baking
-
Cut the shapes:
Place your round cutter onto the slab. Press down firmly and give it a slight wiggle to ensure a clean cut through the clay. -
Remove excess:
Lift away the excess clay from around the cutter before lifting the cutter itself. This prevents the circle from warping. -
Smooth edges:
Gently run your finger around the rim of each cut circle to soften any sharp edges created by the cutter. -
Bake:
Transfer the coasters to a ceramic tile or baking sheet lined with parchment paper. Bake according to your clay manufacturer’s instructions (usually 275°F/130°C for at least 30 minutes) to ensure durability. -
Cool down:
Allow the coasters to cool completely in the oven with the door slightly ajar. This gradual cooling helps prevent cracking.
Step 5: Finishing Touches
-
Initial sanding:
Place your 400 grit wet/dry sandpaper on a flat surface and add a little water. Rub the coaster face-down in a circular motion to reveal the crisps depth of the chips. -
Refine the finish:
Repeat the sanding process with 800 and then 1000 grit sandpaper until the surface feels incredibly smooth to the touch. -
Buff or seal:
For a natural stone look, buff the surface with a heavy fabric like denim. If you prefer a glossy protectant, apply a thin layer of polyurethane varnish.
Stack your new set on the coffee table and enjoy the modern artisan vibe they add to your room


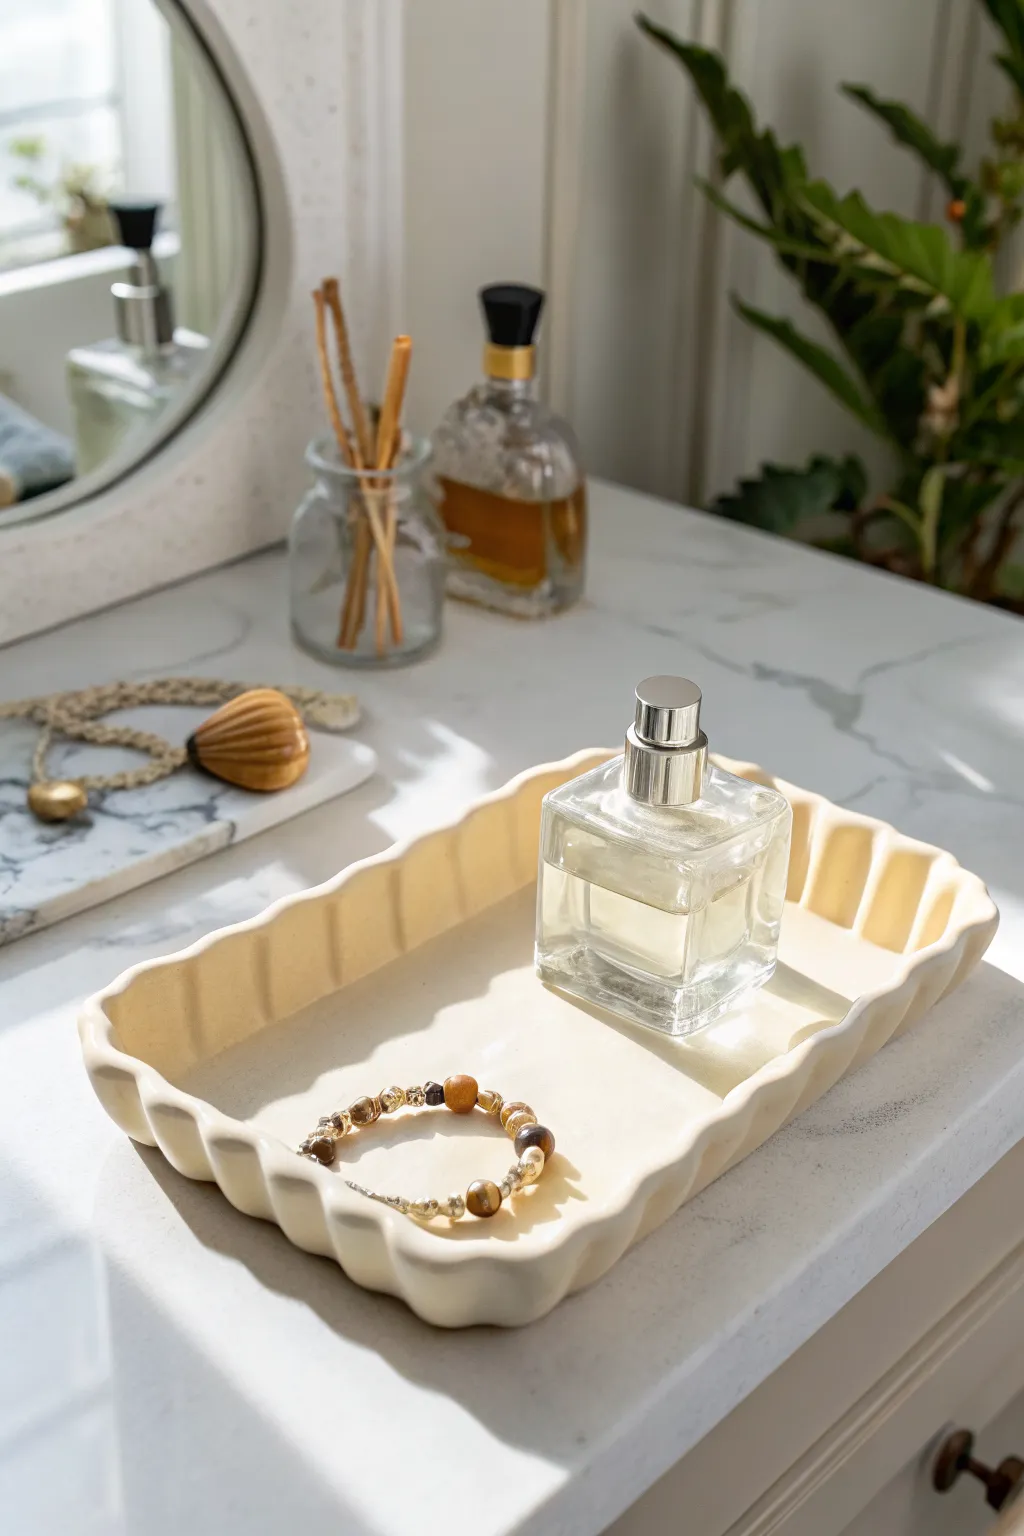
Marbled Trinket Catchall Dish
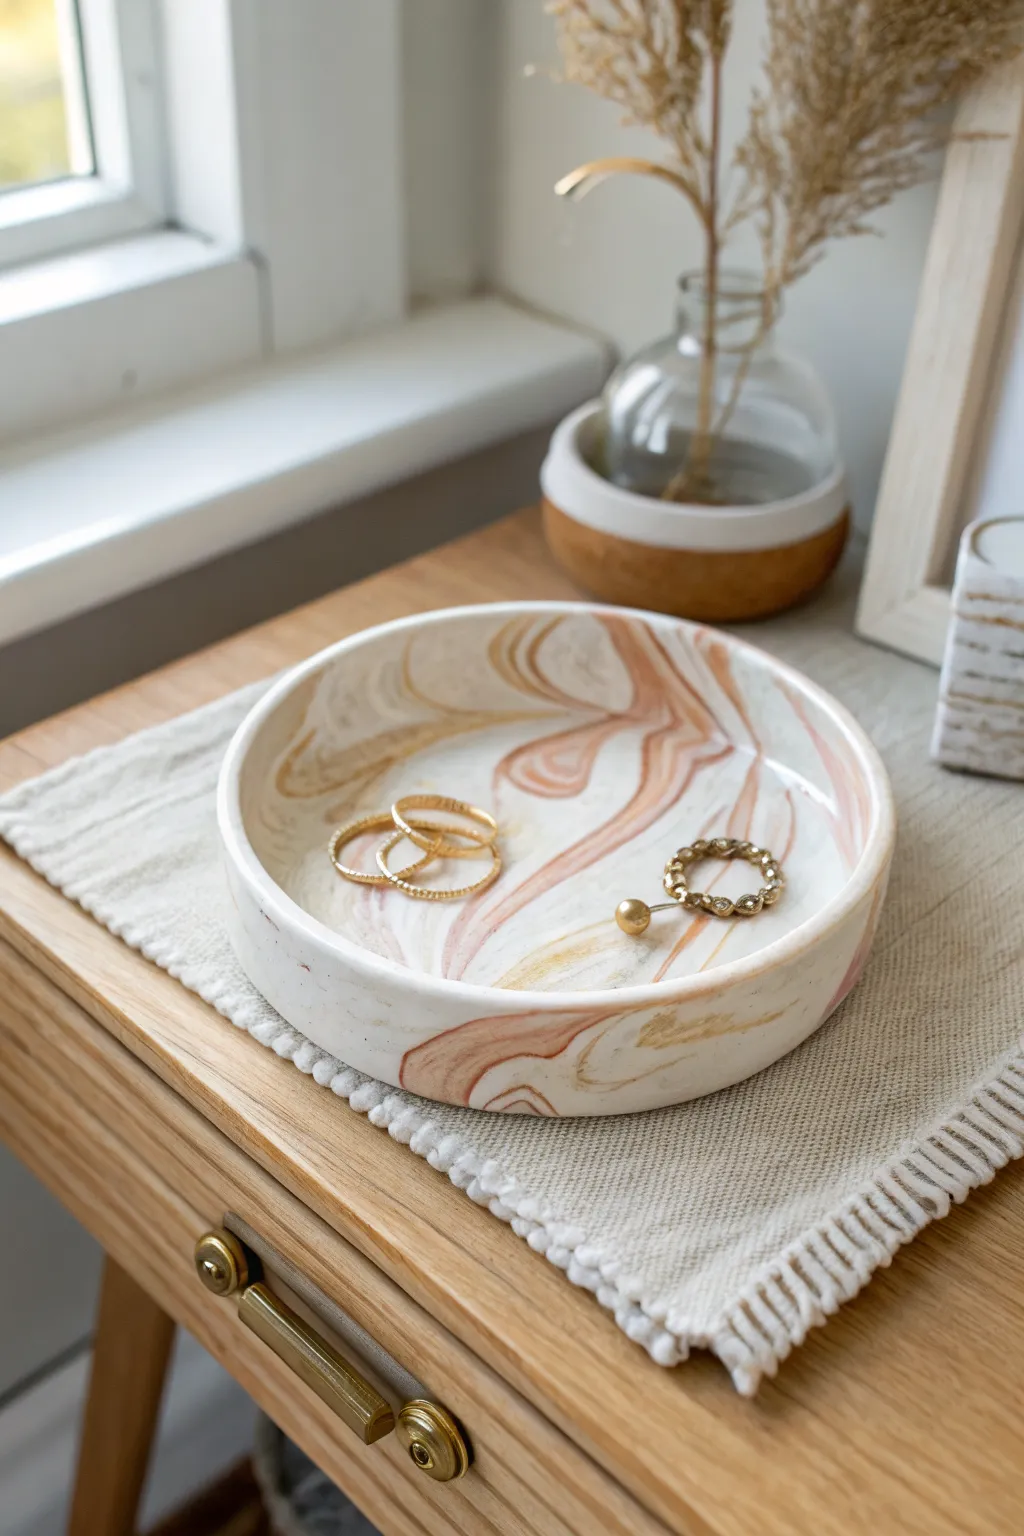
Bring a touch of sophisticated calm to your nightstand with this creamy, neutral-toned trinket dish. The swirling marble effect combines white, beige, and faint terracotta for a high-end ceramic look without the kiln.
Step-by-Step
Materials
- Polymer clay (White)
- Polymer clay (Translucent or pearl – optional)
- Polymer clay (Terracotta or peach)
- Polymer clay (Beige or light brown)
- Acrylic rolling pin
- Circle cutter (large) or a bowl to trace
- Craft knife or scalpel
- Oven-safe bowl or ramekin (for forming)
- Fine-grit sandpaper (400 to 1000 grit)
- Matte or satin polymer clay varnish
- Soft paintbrush
Step 1: Preparing the Clay
-
Condition the white base:
Start with a large block of white clay. Knead it thoroughly in your hands until it is soft, pliable, and warm. This will be the dominant color in your marble mix. -
Prep the accent colors:
Condition smaller amounts of the terracotta and beige clays. You want a ratio of about 80% white to 20% colored accents to achieve that subtle, airy look. -
Create color snakes:
Roll each color into long, thin snakes. The white snakes should be thicker, while the colored snakes should be quite thin to prevent heavy blocks of color.
Air Pocket Patrol
If you see a bubble while rolling, pierce it gently with a needle tool and smooth the air out with your finger immediately so it doesn’t bake into a bump.
Step 2: Creating the Marble Effect
-
Twist and combine:
Gather your snakes together and twist them into one large rope. Fold the rope in half and twist again. Repeat this twist-and-fold process several times. -
Check the pattern:
Stop twisting before the colors completely blend into a new muddy color. You want distinctive streaks. Roll the twisted rope into a smooth ball. -
Roll out the slab:
Place the ball on a clean surface or silicone mat. Using the acrylic roller, roll it out into a flat slab about 5mm (1/4 inch) thick. Rotate the clay frequently to keep an even circle. -
Inspect the marbling:
Look at your slab. If the marbling looks too chunky or separated, you can fold the slab over and roll it out one more time to stretch the veins of color into thinner, elegant lines.
Gilded Edges
For a luxe upgrade, paint the top rim of the fired dish with liquid gold leaf or metallic paint before sealing it with varnish.
Step 3: Shaping and Baking
-
Cut the circle:
Place your circle cutter or a bowl template onto the most attractive part of your marbled slab. Cut straight down with the cutter or trace around the bowl with a craft knife. -
Smooth the edges:
Run your finger gently along the cut edge of the clay circle to soften any sharp corners left by the blade. -
Form the sides:
To get the vertical sides seen in the photo, gently lift the edges of the clay circle upwards. You can support the walls by placing the clay inside an oven-safe bowl or ramekin that has straight sides. -
Refine the shape:
Press the clay gently against the bottom and sides of your mold to ensure it sits flat. I find using the back of a spoon helps smooth out any fingerprints inside the dish. -
Bake the dish:
Place the clay (still in or on its mold) onto a baking sheet. Bake according to the manufacturer’s instructions for your specific brand of clay—usually around 275°F (135°C) for 30 minutes. -
Cool completely:
Let the dish cool completely inside the oven or on the counter before attempting to remove it from the mold. The clay is fragile when hot.
Step 4: Finishing Touches
-
Sand for perfection:
Once cool, use wet/dry sandpaper under running water to smooth the rim and any rough patches on the surface. Start with a lower grit and finish with a high grit for a polished feel. -
Clean surface:
Wash the dish with mild soap and water to remove sanding dust. intricate marbling really pops once the residue is gone. -
Seal the piece:
Apply a thin layer of matte or satin varnish to protect the clay and give it a finished, ceramic-like sheen. Let it dry completely. -
Style and enjoy:
Place your favorite jewelry pieces inside to test the capacity and display your new handmade creation.
Now you have a chic, modern vessel to keep your rings safe and your decor on point


Organic Edge Vanity Tray
Bring a touch of modern minimalism to your dressing table with this soft, wavy-edged catchall. Its organic scalloped rim and creamy matte finish mimic the look of high-end ceramic ware without the need for a kiln.
Detailed Instructions
Materials
- Light beige or cream polymer clay (approx. 4-6 oz)
- Acrylic rolling pin or clay machine
- Rectangle clay cutter or sharp craft knife
- Cardstock or paper template (approx. 4″ x 6″)
- Glass baking dish or heat-safe ceramic tile
- Cornstarch or baby powder (for release)
- Wooden dowel or thick paintbrush handle (approx. 0.5″ diameter)
- Needle tool or toothpick
- Fine-grit sandpaper (400 and 600 grit)
- Matte polyurethane varnish (optional)
Step 1: Preparing the Base
-
Condition the clay:
Begin by thoroughly kneading your cream-colored polymer clay until it is soft, pliable, and free of air bubbles. Warm hands make this much easier. -
Roll out a slab:
Roll your clay out into a large, even slab. You want a consistent thickness of about 1/4 inch (6mm) to ensure the tray feels substantial and durable once baked. -
Cut the rectangle:
Place your paper template or rectangle cutter onto the clay slab. Use your craft knife to cut a clean, straight-sided rectangle. If using a knife, use a ruler to guide your blade for crisp lines. -
Prepare the baking surface:
Lightly dust your glass baking dish or ceramic tile with cornstarch. This crucial step prevents the clay from sticking during the shaping and baking process. -
Position the base:
Carefully transfer your rectangular clay slab onto the prepared baking surface. Smooth out any fingerprints deeply now, as they are harder to fix later.
Step 2: Creating the Scalloped Walls
-
Make the wall strip:
Roll out a second long strip of clay, maintaining the same 1/4 inch thickness. This strip needs to be long enough to go around the entire perimeter of your rectangular base, plus a little extra. -
Cut the strip width:
Trim the long strip so it is approximately 1.5 inches wide. This will determine the height of your tray walls. -
Form the waves:
This is the fun part: gently press your wooden dowel or brush handle into the strip at regular intervals to create the undulating, wavy shape. Support the back of the clay with your fingers as you press to keep the thickness even. -
Refine the scallops:
Once the general wave pattern is established, use your fingers to soften the curves. The goal is an organic, fluid look rather than sharp, mechanical zig-zags. -
Attach the walls:
Place the wavy strip on top of the edge of your rectangular base. I find it helpful to score both contact surfaces with a needle tool first to create a stronger mechanical bond. -
Blend the seams:
On the inside of the tray, use a modeling tool or your fingertip to firmly smudge the clay from the wall down onto the base, eliminating the seam entirely. -
Close the loop:
Where the two ends of the wall strip meet, cut them at a diagonal angle. Press them together and blend the seam until it disappears into one of the wavy curves. -
Final shaping:
Go around the tray one last time, adjusting the waves to ensure they stand upright and haven’t slumped inward or outward.
Don’t Rush the Bond
Use a small amount of liquid polymer clay (Bake & Bond) between the base and the walls. It acts like ‘glue’ and ensures your tray won’t separate after baking.
Step 3: Finishing Touches
-
Bake the tray:
Bake the piece according to your specific clay manufacturer’s instructions. Usually, this means around 275°F (135°C) for 30-45 minutes. Tent with foil if you’re worried about scorching the light color. -
Cool completely:
Allow the tray to cool completely in the oven with the door cracked. Rapid cooling can sometimes cause cracks in thicker pieces. -
Sand the edges:
Once cool, use wet/dry sandpaper under running water. Start with 400 grit to smooth any rough spots on the rim, then finish with 600 grit for a silky feel. -
Seal (optional):
If you want extra protection against perfume or oils, apply a thin coat of matte polyurethane varnish. Let it dry fully before use.
Speckled Stone Effect
Mix a tiny amount of black pepper or used dried coffee grounds into your cream clay before rolling. This creates a stunning faux-ceramic speckled pottery look.
Place your favorite perfume bottle in the center and admire your chic new organization piece.


Textured Planter Sleeve
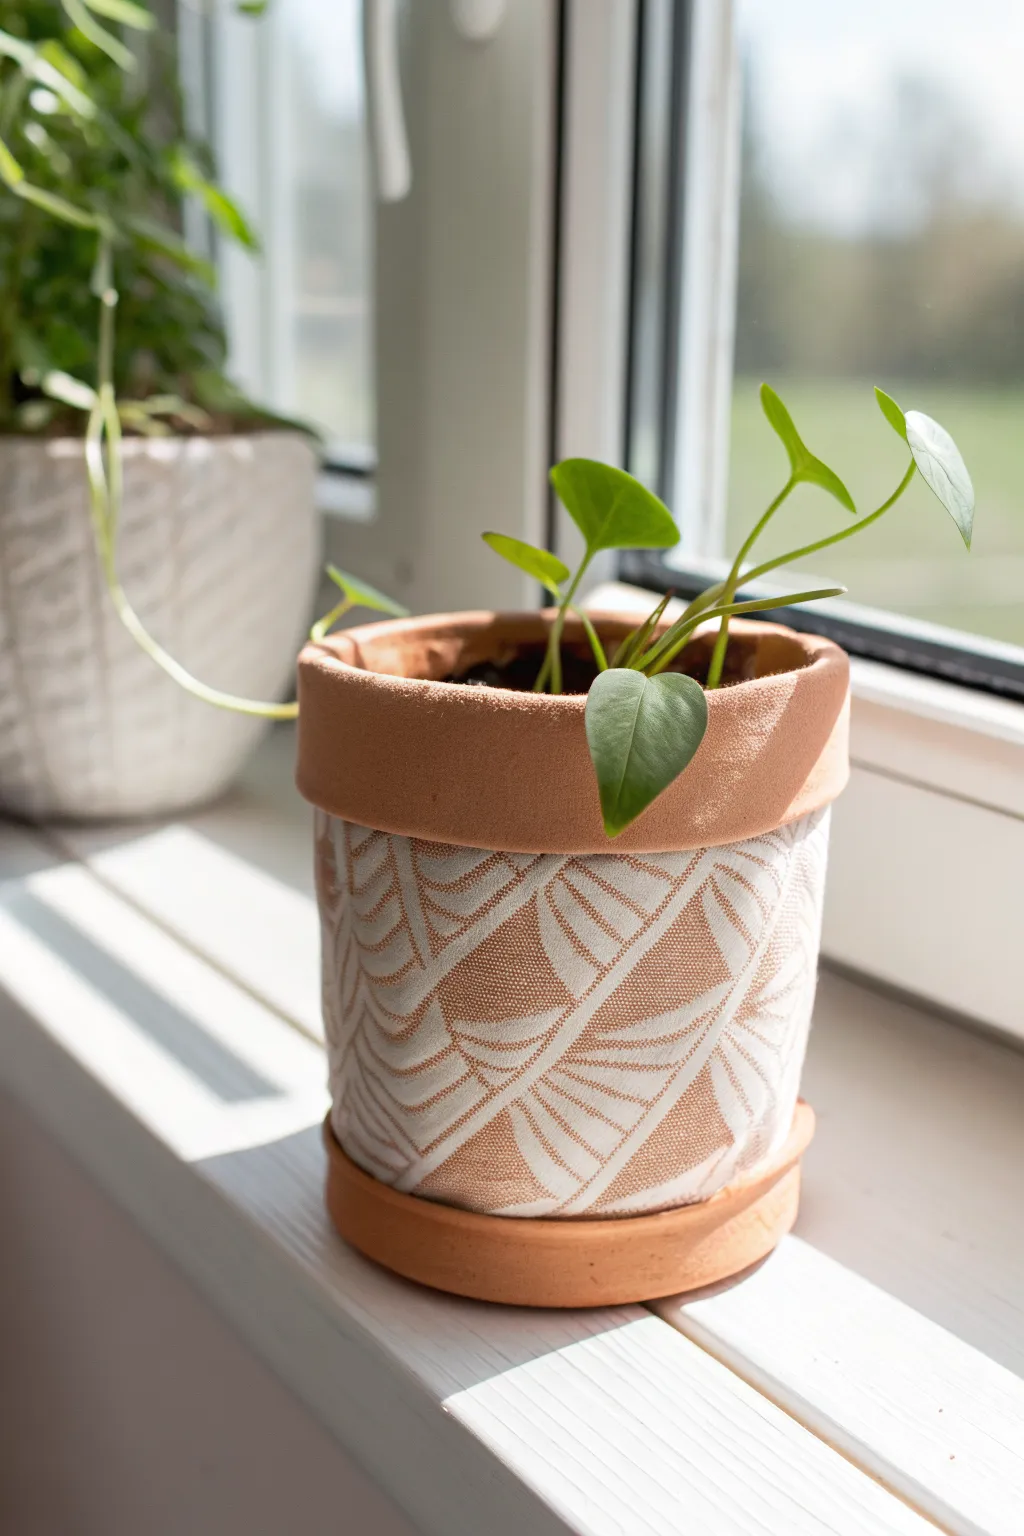
Transform a standard terracotta pot into a chic, boho-inspired statement piece with this clever polymer clay sleeve. By mimicking the look of woven fabric with a dimensional leaf pattern, you create a cozy, textured finish that perfectly complements your indoor greenery.
Detailed Instructions
Materials
- Terracotta-colored polymer clay (approx. 2-3 blocks)
- White polymer clay (approx. 1 block)
- Small cylindrical terracotta pot + saucer (clean and dry)
- Acrylic rolling pin or clay machine
- Sharp craft knife or scalpel
- Texture sheet or rubber stamp with a leaf/fan palm pattern
- Liquid polymer clay (optional, for adhesion)
- Baby wipes or smoothing tool
Step 1: Preparing the Base
-
Condition the base clay:
Start by thoroughly conditioning your terracotta-colored polymer clay until it is soft and pliable. Warm hands make this much easier. -
Roll out the slab:
Roll the clay out into a long, even rectangular sheet. It should be about 1/8 inch (3mm) thick and long enough to wrap entirely around your pot with a little overlap. -
Measure and trim:
Place your pot on its side against the clay to check the height. Trim the top and bottom edges of the clay strip so it is slightly taller than the vertical wall of the pot.
Clean Cuts
Chill your clay sheet in the fridge for 10 minutes before trimming or slicing the seam. Firmer clay distorts less when cut.
Step 2: Creating the Fabric Effect
-
Condition the white clay:
Soften your white polymer clay. To create the pattern seen in the image, we will use the ‘Sutton Slice’ technique or a simplified inlay method. -
Press white clay into texture:
Take your leaf-patterned texture sheet. Press the soft white clay deeply into the recesses of the pattern. Ensure the clay gets into every groove. -
Shave off excess:
Using your flexible blade held at a low angle, carefully shave off the excess white clay from the surface of the texture sheet. You want the white clay to remain *only* inside the deep grooves of the pattern. -
Align the base slab:
Take your terracotta clay slab and place it directly on top of the clay-filled texture sheet. Press down firmly to bond the two clays together. -
Transfer the pattern:
Flip the entire assembly over or carefully peel back the texture sheet. The white clay shaped like leaves should stick to the terracotta slab, creating a flush, inlaid pattern. -
Add fabric texture (optional):
To mimic the woven look in the photo, gently press a piece of coarse linen or canvas over the entire patterned slab, then peel it away. This removes the plastic shine and adds a realistic textile grain.
Level Up: Dyed Effect
Dust the raw clay surface lightly with white mica powder before baking to give the ‘fabric’ a soft, shimmering sheen like silk.
Step 3: Assembly and Finishing
-
Apply the sleeve:
Wrap your patterned clay slab around the terracotta pot. If you are worried about slipping, smear a thin layer of liquid polymer clay on the pot first. -
Join the seam:
Where the two ends of the clay meet, slice vertically through both layers to create a clean butt joint. Gently smudge the clay across the seam to close it, blending the pattern as best as possible. -
Fold over the rim:
Gently fold the excess clay at the top over the rim of the pot. Press it against the inside wall to secure the sleeve and create that rounded, soft edge shown in the photo. -
Clean the bottom edge:
Trim any excess clay at the very bottom so the pot sits flat. You can leave the bottom terracotta rim exposed as a design choice, or cover it completely. -
Smooth imperfections:
Check the surface for fingerprints. I find a light wipe with baby oil removes prints without damaging the fabric texture. -
Bake the project:
Place the pot with the clay on it into your oven. Bake according to the manufacturer’s instructions for the brand of clay you used (usually 275°F/130°C for 15-30 minutes). -
Cool down:
Let the pot cool completely inside the oven with the door slightly ajar to prevent cracking from sudden temperature shifts.
Once cooled, slide a saucer underneath and pot your favorite plant for an instant cozy corner upgrade

The Complete Guide to Pottery Troubleshooting
Uncover the most common ceramic mistakes—from cracking clay to failed glazes—and learn how to fix them fast.
Minimal Wall Pocket Vase
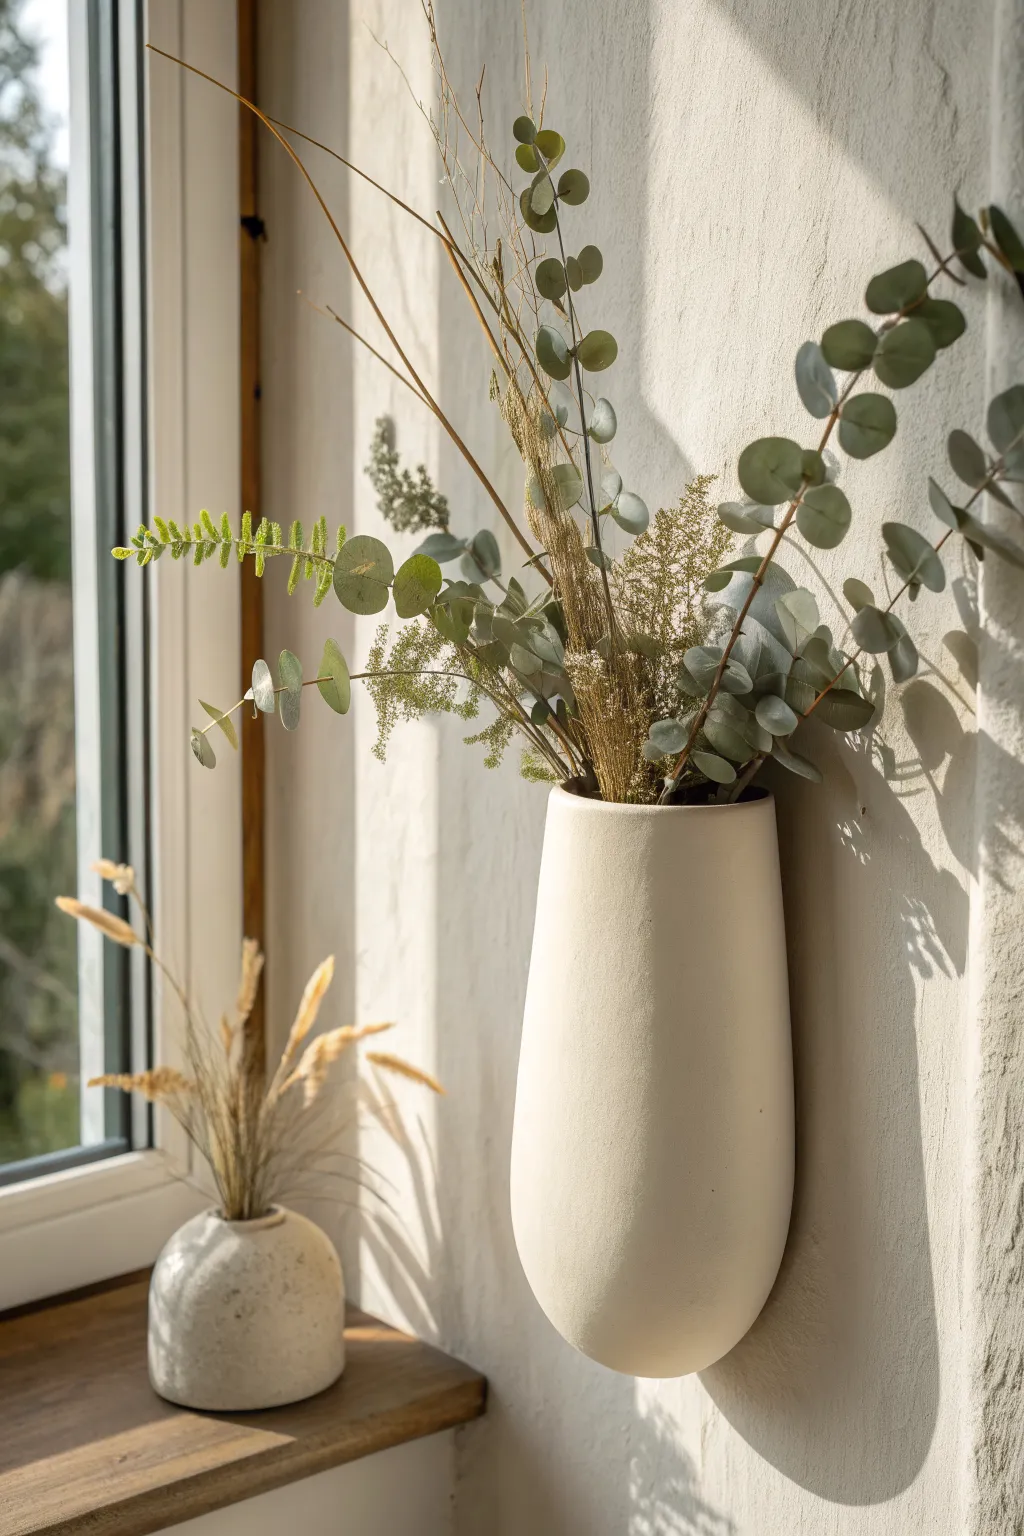
Bring a touch of organic serenity to your walls with this sleek, matte-finish wall pocket vase. Its elongated, tear-drop shape and creamy off-white texture mimic high-end ceramic stoneware, perfect for displaying dried eucalyptus or grasses without taking up shelf space.
Step-by-Step Tutorial
Materials
- White or Beige Polymer Clay (approx. 4-6 blocks depending on size)
- Liquid Polymer Clay (Translucent or White)
- Acrylic Roller or Pasta Machine
- Cardstock or Thin Cardboard (for template)
- Aluminum Foil
- Masking Tape
- Flexible Tissue Blade
- Sanding Sponge or Wet/Dry Sandpaper (400-800 grit)
- Craft Knife
- Ceramic Oven-Safe Bowl (optional, for shaping)
- Small Nail or Hook mechanism (for hanging)
Step 1: Planning and Form Construction
-
Design the silhouette:
Begin by sketching a tall, elongated ‘U’ shape on your cardstock. Aim for about 8-10 inches in height with a gently tapered bottom to match the reference image. Cut this shape out to use as your master template. -
Create the internal armature:
Crumple aluminum foil firmly into a shape similar to your template but slightly smaller (about 1/4 inch smaller on all sides). This foil core will provide the necessary volume and support for the clay. -
Flatten the back:
Since this vase hangs against a wall, press the foil shape against a hard, flat surface to ensure the back side is completely flat. Specifically, focus on flattening the top edge so it can house the pocket opening. -
Refine with tape:
Wrap the foil armature entirely in masking tape. This smooths out sharp crinkles from the foil and helps the clay adhere better during the initial shaping phase.
Step 2: Clay Conditioning and Assembly
-
Condition the clay:
Working with your polymer clay, knead it thoroughly until it is soft, pliable, and warm. I find spending extra time here prevents cracking later. -
Roll out the sheet:
Using your acrylic roller or pasta machine on a thick setting (about 3-4mm), roll out a large, even sheet of clay. It needs to be large enough to wrap around the front curve of your foil form. -
Prepare the backing slab:
Roll a second smaller sheet for the flat back panel. Lay your cardstock template onto this sheet and cut along the outline using your craft knife. Set this flat backing piece aside on a baking sheet. -
Drape the form:
Gently drape the larger clay sheet over the curved front of your masking-tape-covered foil form. Smooth it down with your fingers, ensuring no air bubbles are trapped between the clay and the tape. -
Trim the excess:
Project the curve by trimming the excess clay along the sides of the form, leaving a small seam allowance that can wrap slightly onto the flat back of the armature. -
Create the pocket depth:
Carefully slice off the top of the clay-covered form to create the opening. You want to expose the foil inside so it can be removed later. Ensure the opening is deep enough to hold stems.
Slumping Issues?
If the clay feels too soft and the arch sags before baking, pop the unfinished piece in the fridge for 20 minutes. The cold firms the clay, making it easier to handle without distortion.
Step 3: Joining and Refining
-
Apply adhesive:
Apply a thin layer of liquid polymer clay along the perimeter of your flat backing sheet where it will meet the curved front piece. -
Seal the vase:
Place the curved front piece (still containing the foil core) onto the flat backing sheet. Press the edges together firmly to create a seal. -
Blend the seams:
Using a modeling tool or your finger, drag clay across the seam line to merge the front and back pieces into one solid unit. The goal is to make the join invisible. -
Add hanging hardware:
Flip the piece over and carve a small keyhole slot into the upper back panel for hanging later, or embed a small metal loop into the clay if you prefer. -
Smooth the surface:
Before baking, use a little baby oil or clay softener on your fingertip to buff away any fingerprints or lint. The surface should look pristine and matte.
Stone Texture Trick
Before baking, gently verify the texture! Press a piece of coarse sandpaper or a dry scouring pad against the raw clay to imprint a realistic, grainy ceramic texture instantly.
Step 4: Baking and Finishing
-
First bake:
Bake the piece according to your clay package instructions (usually 275°F/130°C for 30-45 minutes). Use an oven thermometer to ensure accuracy. -
Remove the core:
Once the piece has cooled completely, use long tweezers or pliers to carefully pull out the foil and tape from the inside. This creates the hollow cavity for your dried flowers. -
Sand for texture:
To achieve that high-end stoneware look, wet sand the entire exterior. I like to start with 400 grit and finish with 800 grit to get a velvety, matte finish. -
Final wash (optional):
If you want a more textured, stone-like appearance, you can dab a very light wash of diluted beige acrylic paint over the surface and wipe it off immediately, leaving pigment only in tiny pores.
Hang your new sculptural vase near a window where the light can catch against its smooth curves and enjoy your minimalist mastery
Modern Incense Holder
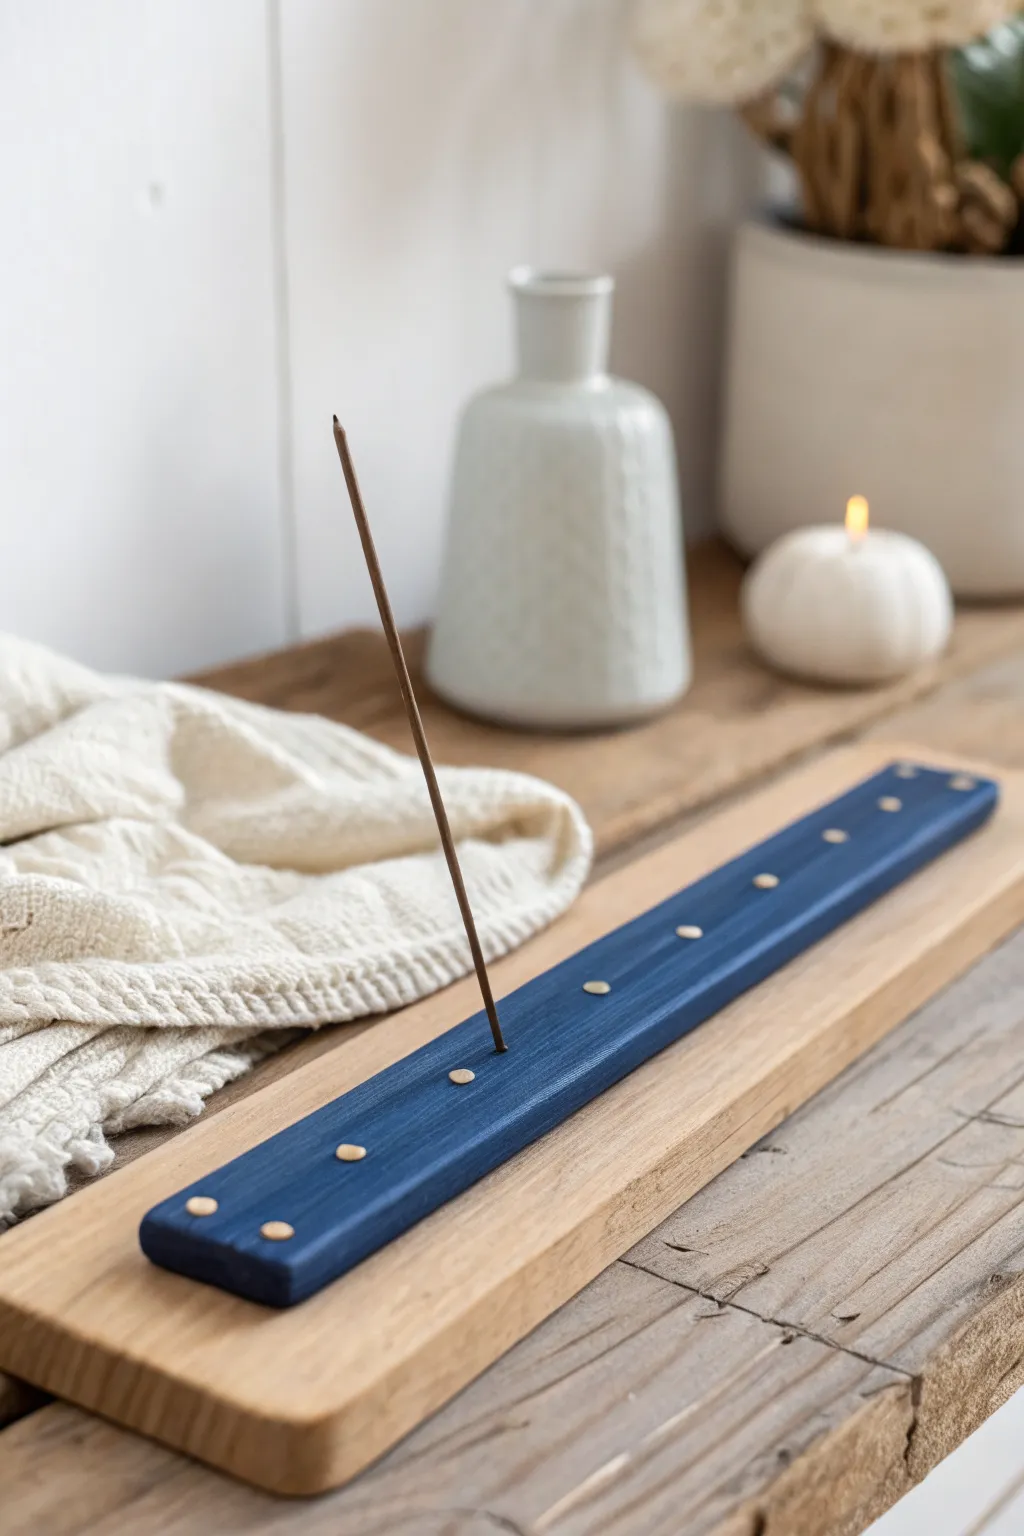
Elevate your meditation corner with this sleek, navy blue incense holder that merges industrial cool with functional design. This project uses polymer clay to create a clean, elongated form accented with metallic studs for a sophisticated finish.
Step-by-Step Tutorial
Materials
- Navy blue polymer clay (approx. 2oz)
- Fimo Soft or similar heavy-duty brand
- Rolling pin or pasta machine
- Long blade or craft knife
- Metal ruler
- Small gold or brass flat-head pins/brads (8-10 pieces)
- Sandpaper (400-800 grit)
- Acrylic block or flat tile for baking
- Incense stick for sizing
- Needle tool or toothpick
- Matte varnish (optional)
Step 1: Shaping the Base
-
Condition the clay:
Begin by thoroughly conditioning your navy blue polymer clay. Knead it in your hands until it is warm, soft, and pliable to prevent cracking later. -
Roll it out:
Using a rolling pin or pasta machine on a wide setting, roll the clay into a long, thick strip. You are aiming for a thickness of about 1/4 inch (6mm) to ensure it’s sturdy enough to hold the incense. -
Cut the strip:
Place your metal ruler along the clay to guide your cuts. Use a long sharp blade to slice a neat, long rectangle, approximately 1 inch wide by 8-10 inches long. -
Smooth the edges:
Gently run your finger along the cut edges to soften the sharpness just slightly. If there are any fingerprints, lightly buff them out with a tiny drop of baby oil. -
Create the central groove (optional):
For added dimension, you can lightly press a thin dowel or knitting needle down the center length of the strip to create a subtle channel, though a flat surface works beautifully too.
Clean Cuts Pro Tip
Chill your rolled clay in the fridge for 10 minutes before cutting. The firmer clay resists dragging under the blade, resulting in sharper, more professional edges.
Step 2: Adding Details & Baking
-
Mark the stud positions:
Using your ruler, lightly mark even intervals along the center line of your clay plank where the gold accents will go. I usually space them about an inch apart. -
Insert the accents:
Press the small gold flat-head pins or brads into the marked spots. Push them flush with the clay surface so they look like inlaid metal rivets. -
Make the incense hole:
Choose a spot near the center of the plank (or off-center if you prefer the look in the photo) for the incense stick. Use a needle tool to pierce a hole at a slight 45-degree angle. This angle ensures the ash falls onto the plank, not your table. -
Test the fit:
Before baking, gently insert the end of an actual incense stick to ensure the hole is wide enough, then remove it carefully. -
Prepare for baking:
Transfer the plank onto a ceramic tile or baking sheet lined with parchment paper. Check one last time that the strip is perfectly straight. -
Bake carefully:
Bake according to your clay manufacturer’s instructions (usually 230°F – 275°F for 15-30 minutes). Let it cool completely in the oven to prevent warping.
Level Up: Texture
Before baking, gently press a piece of heavy denim or linen onto the clay surface. This creates a subtle fabric texture that mimics the matte finish of expensive ceramic ware.
Step 3: Finishing Touches
-
Sand the edges:
Once cool, use fine-grit wet/dry sandpaper to smooth out any rough spots on the sides or corners. Use a light touch to avoid scratching the main surface. -
Wipe clean:
Wipe the piece down with a damp cloth to remove any sanding dust. -
Optional sealing:
If you want to protect the clay from ash stains, apply a thin coat of matte varnish. -
Mount (optional):
While the clay piece is lovely on its own, you can glue it to a slightly wider strip of light wood for the complete look shown in the inspiration photo.
Enjoy the calm atmosphere your new handmade creation brings to your space


What Really Happens Inside the Kiln
Learn how time and temperature work together inside the kiln to transform clay into durable ceramic.
Moon Phase Wall Garland
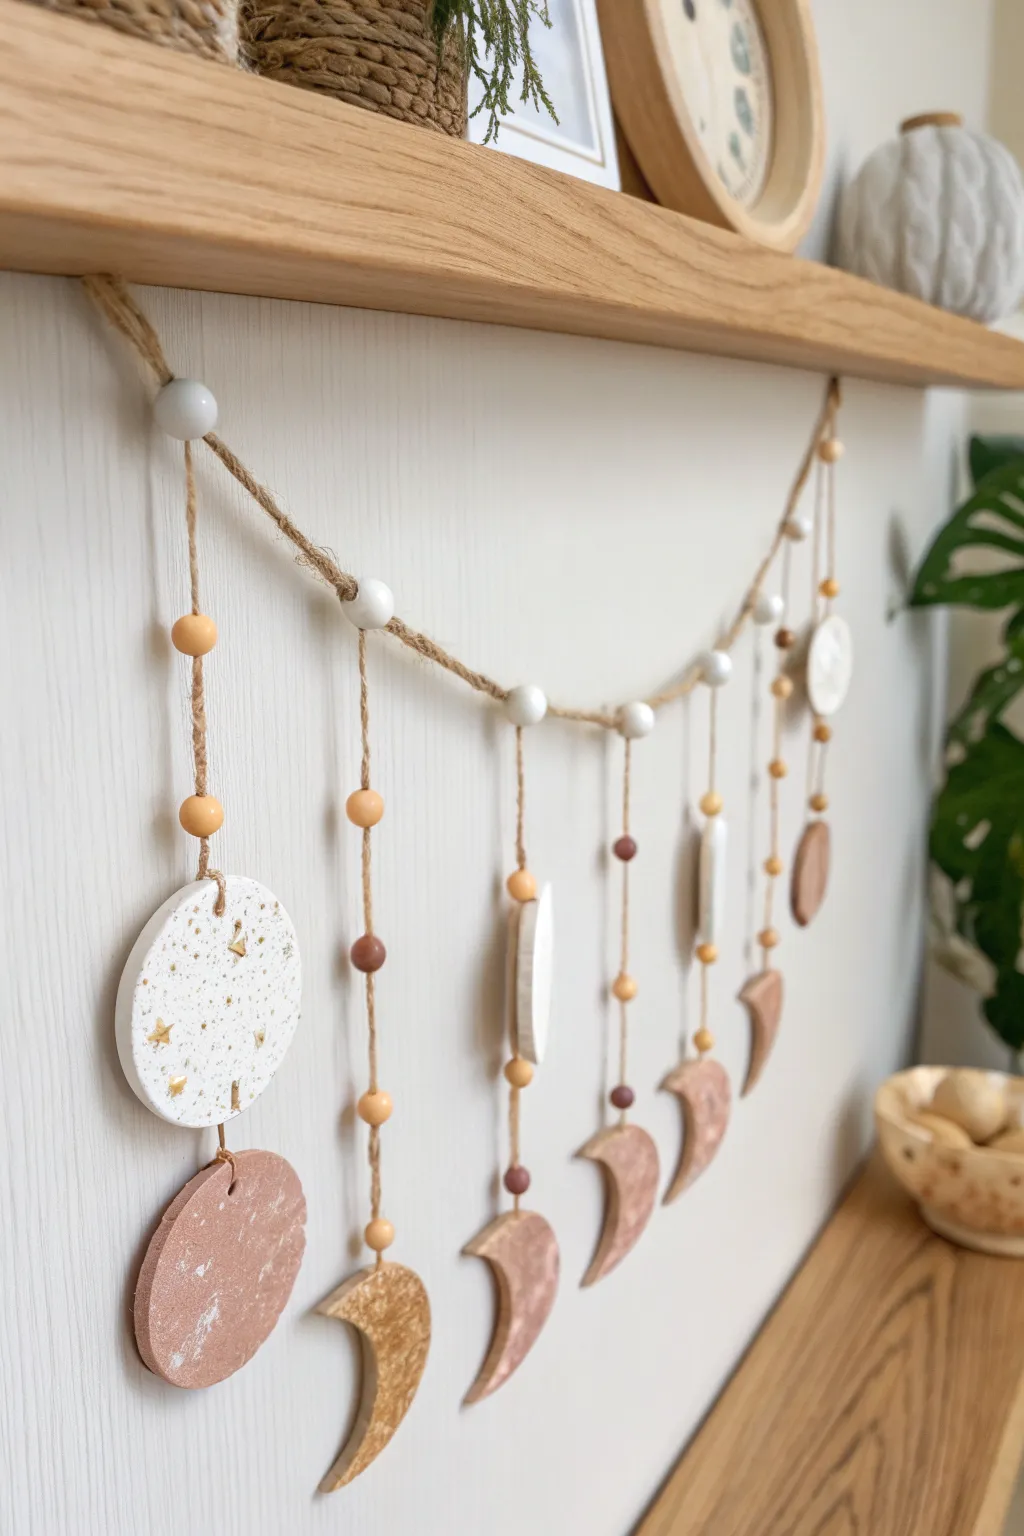
Bring celestial charm to your living space with this handmade garland featuring textured phases of the moon. Combining earthy polymer clay tones with natural twine and beads, this project adds a peaceful, bohemian touch to any blank wall.
Step-by-Step Guide
Materials
- Polymer clay (white, beige, and terracotta/brown)
- Small rolling pin or acrylic roller
- Round clay cutters (approx. 2-3 inches)
- Texture tools (sandpaper, toothbrush, or crumpled foil)
- Gold leaf flakes or gold acrylic paint
- Jute twine
- Wooden beads (various sizes, 8mm-12mm)
- Needle tool or toothpick
- Parchment paper and baking tray
- Oven
- Scissors
Step 1: Shaping the Moons
-
Conditioning the Clay:
Begin by warming your clay in your hands to condition it. You’ll want three distinct colors: a speckled white for the full moons, a terracotta brown for new moons, and a marbled beige for the crescents. -
Rolling:
Roll out your clay slabs on a flat surface to an even thickness of about 4-5mm. I like to keep them slightly thick so they hang flat against the wall without warping. -
Cutting Circles:
Use your round cutter to punch out five full circles from the beige slabs and two from the white slab. These will form the base for your phases. -
Forming Crescents:
Take the five beige circles you just cut. Use the same round cutter to bite into the side of each circle, cutting away a portion until you are left with a perfect crescent moon shape. -
Creating the Full Moon:
For the central large white circle (the Full Moon), sprinkle a tiny amount of gold leaf flakes onto the surface and gently roll over it again to embed the gold into the clay. -
Adding Texture:
Gently press a piece of coarse sandpaper or a crumpled ball of aluminum foil onto the surface of the terracotta circles to create a stone-like, cratered texture.
Stone Effects
Mix black pepper or dried rough spices into white clay to create a natural, speckled granite look instantly without buying special effect clay.
Step 2: Prepping and Baking
-
Piercing Holes:
This step is crucial before baking. Use a needle tool to poke a hole at the top and bottom of every piece, ensuring the hole is large enough for your twine to pass through later. -
Making Clay Beads:
Roll small leftover scraps of clay into tiny spheres, about the size of peas. Poke a hole through the center of each to act as custom spacers between your larger wooden beads. -
Baking:
Arrange all your moon shapes and clay beads on a baking sheet lined with parchment paper. Bake according to your specific clay brand’s instructions (usually 275°F/135°C for 15-30 minutes). -
Cooling:
Allow the pieces to cool completely inside the oven with the door slightly ajar. This gradual cooling helps prevent cracks in the clay.
Uneven Clay?
If your rolled slabs aren’t uniform, place two stacks of playing cards on either side of your clay. Rest the roller on the cards to roll a perfectly even thickness.
Step 3: Assembly
-
Cutting Drop Lines:
Cut 9 lengths of jute twine, varying the lengths from roughly 6 inches to 10 inches. The center strand should be the shortest, getting progressively longer as you move outward. -
Stringing the Drops:
Tie a knot at the bottom of a twine piece. Thread on a clay shape, followed by a sequence of wooden beads and small clay spacer beads. Repeat for all 9 moon components. -
Main Garland Line:
Cut a long piece of thick jute twine (approx. 4-5 feet) to serve as the main horizontal hanger. Tie loops at both ends for hanging. -
Attaching the Phases:
Tie the top of each vertical moon string onto the main horizontal line. Start with the Full Moon in the exact center. -
Spacing:
Work outward from the center, spacing each drop about 3-4 inches apart. Arrange them symmetrically: crescents flanking the full moon, then half moons, and finally the dark circles. -
Securing Knots:
Once you are happy with the spacing, add a dab of clear glue to the knots on the main line to prevent them from sliding out of place. -
Final Adjustments:
Hang the garland temporarily to check the balance. Trim any excess twine tails for a neat finish.
Hang your new moon phase garland high on the wall to enjoy a serene, handmade focal point.
Faux Tile Accent Squares
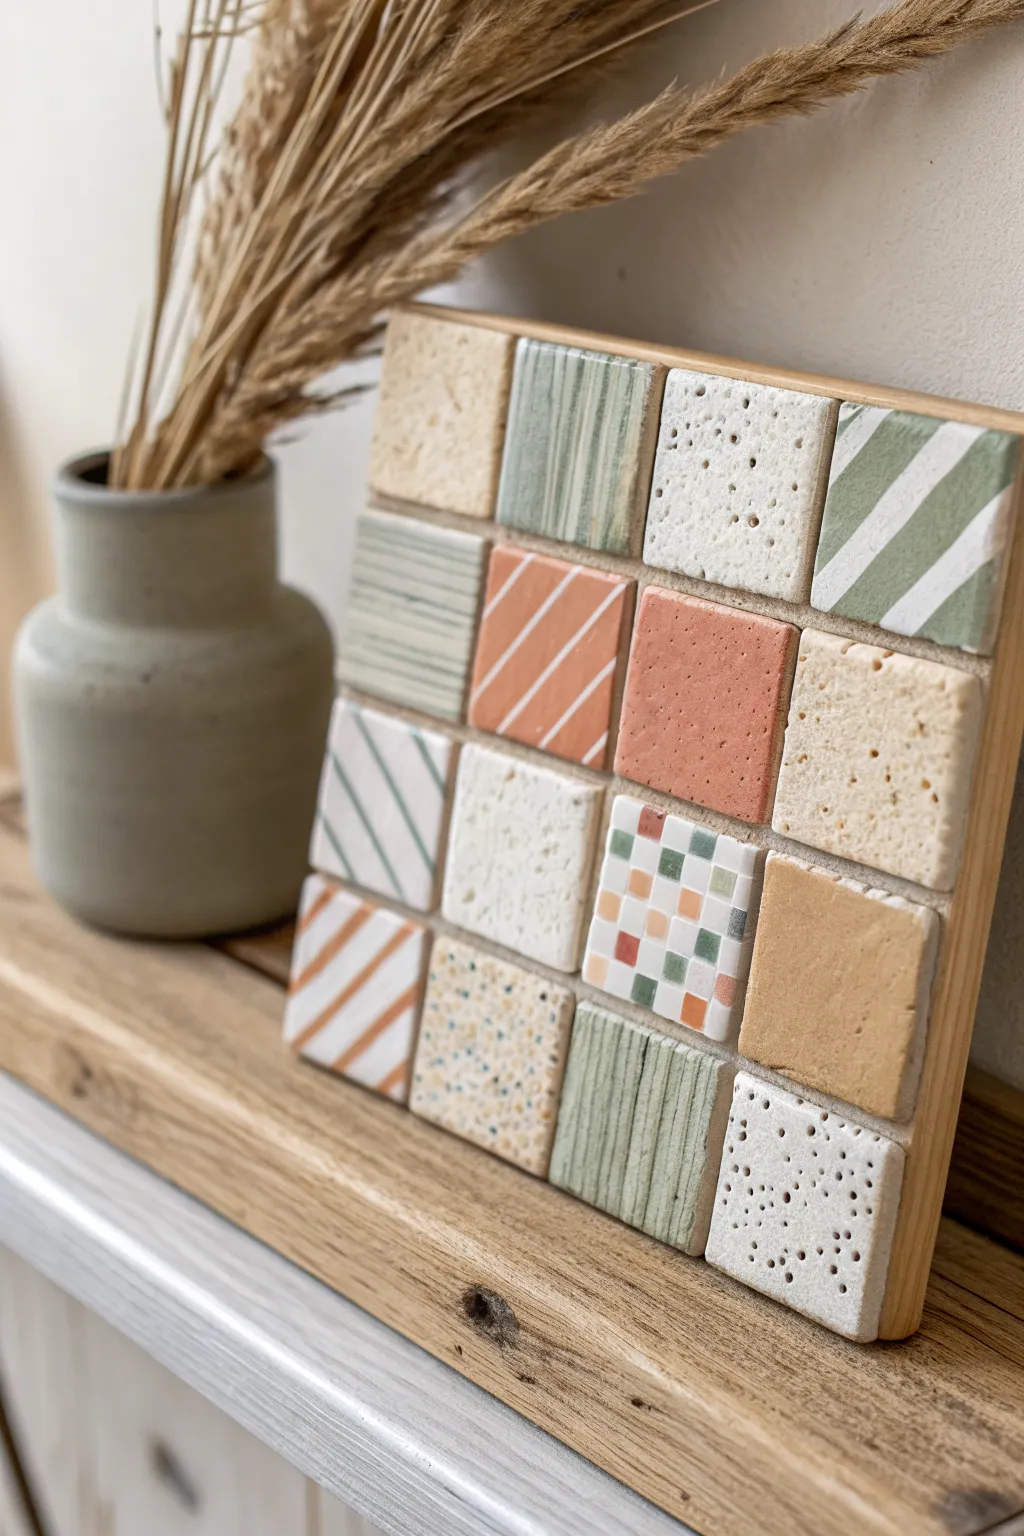
Embrace the trendy terrazzo and mosaic aesthetic with this stunning polymer clay project that mimics high-end ceramic tiles. By mixing textures—from sponge-like porous surfaces to sleek diagonal stripes—you can create a tactile, visually engaged piece that functions beautifully as a decorative accent or coaster.
Detailed Instructions
Materials
- Polymer clay in neutral, terracotta, sage green, off-white, and beige tones
- Wooden square board (approx. 6×6 inches) or deep photo frame backing
- Liquid polymer clay or strong craft glue (like E6000)
- Square clay cutter (approx. 1 inch)
- Acrylic rolling pin or pasta machine
- Texture tools: toothbrush, sandpaper, needle tool, crumpled foil
- Craft knife or scalpel
- Gloss or satin varnish (optional)
- Ruler
- Ceramic tile or glass sheet for baking
Step 1: Exploring Textures
-
Condition and Flatten:
Begin by conditioning each color of clay until soft and pliable. Roll each color out into sheets of even thickness, ideally around 3mm to 4mm. A pasta machine set to a medium setting works best for consistency. -
Create the Terrazzo Effect:
For the speckled tiles, take a sheet of white or beige clay. Chop tiny, irregular bits of rust, green, and grey clay and sprinkle then over the sheet. Roll over it gently to embed the chips, then lightly texture the surface with sandpaper for a stone-like feel. -
Simulate Travertine:
To achieve the porous look seen in the beige and white squares, grab an old toothbrush or a ball of crumpled aluminum foil. Firmly press this into your clay sheet repeatedly to create deep, organic divots and pits. -
Mimic Wood Grain:
For the green wood-look tiles, take a needle tool and drag vertical, slightly wavering lines down the length of a sage green sheet. Vary the pressure to create thicker and thinner grooves. -
Assemble the Tiny Mosaic:
The checkerboard tile is a mini slab technique. Form small square logs of different colors, stack them into a checkerboard pattern, press them together, and slice thinly. Lay this slice onto a backing sheet of clay.
Sticky Situation?
If your clay is sticking to your texture tools (like the foil or toothbrush), lightly dust the surface of the raw clay with cornstarch or apply a tiny bit of water before texturing.
Step 2: Patterning and Cutting
-
Form Diagonal Stripes:
Roll out a sheet of base color (like white) and a sheet of accent color (like terracotta or green). Cut thin, even strips from the accent sheet. -
Apply the Stripes:
Gently lay the thin strips diagonally across your base sheet. Use the acrylic roller to flatten them completely until the surface is smooth and the stripes are embedded, not raised. -
Measure Your Grid:
Before cutting, lay out your wooden backing board and measure exactly how many tiles will fit. In this photo, it’s a 4×4 grid. Calculate the required size of your squares to leave a tiny gap between them. -
Cut the Squares:
Using your square cutter (or a ruler and sharp blade), punch out your final tile shapes from the various textured sheets you’ve created. I like to cut a few extras just in case. -
Refine Edges:
Once cut, gently tap the edges of each square with your finger to soften the sharp cut marks. This makes them look more like tumbled ceramic or stone.
Make it Functional
Turn this into a functional trivet by adding small rubber feet or a cork sheet to the bottom of the wooden base. This protects your table surfaces from scratches and heat.
Step 3: Baking and Assembly
-
Bake the batch:
Arrange all your cut clay squares on a ceramic tile or baking sheet. Bake according to your brand’s specific package instructions (usually 275°F/130°C for 30 minutes). Let them cool completely. -
Dry Fit Arrangement:
Place your wooden board on a flat surface. Arrange the cooled tiles in a 4×4 grid, shuffling the colors and textures until the balance pleases your eye. Ensure no two identical textures are touching. -
Adhere the Tiles:
Lift one tile at a time, apply a dab of strong glue or liquid clay to the back, and press it firmly onto the wood. If using liquid clay, you will need to re-bake the entire piece for 15 minutes to set the bond. -
Group Grouting (Faux):
To mimic grout lines, you can mix a little scrap clay with liquid clay into a paste and pipe it between gaps, or simply leave the natural wood showing through for a cleaner, modern look as shown in the inspiration. -
Final Polish:
Optional: For the ‘striped’ or ‘mosaic’ tiles that look glazed, apply a thin coat of gloss varnish. Leave the textured ‘stone’ tiles matte for contrast.
Now you have a sophisticated accent piece that brings architectural texture right to your shelf

TRACK YOUR CERAMIC JOURNEY
Capture glaze tests, firing details, and creative progress—all in one simple printable. Make your projects easier to repeat and improve.
Sculptural Bookends
Achieve the high-end look of carved sandstone without the heavy tools using polymer clay. This minimalist, dual-arch sculpture adds organic texture and modern architectural flair to any shelf or mantel.
How-To Guide
Materials
- Beige or sand-colored polymer clay (approx. 4-5 blocks depending on size)
- Coarse black pepper or dried herbs (for speckling)
- Translucent polymer clay (optional, for depth)
- Aluminum foil
- Rolling pin or acrylic roller
- Flexible tissue blade or craft knife
- Toothbrush or stiff bristle brush
- Sandpaper (various grits)
- Oven
Step 1: Preparing the Faux Stone Clay
-
Condition the clay:
Start by thoroughly conditioning your beige polymer clay until it is soft and pliable. If you want a more natural stone translucency, mix in a small amount of translucent clay at this stage. -
Add texture agents:
To mimic the speckled look of natural stone seen in the photo, flatten your clay and sprinkle generous amounts of coarse black pepper or brown dried herbs onto it. -
Mix thoroughly:
Fold the clay over and roll it out repeatedly to distribute the speckles evenly throughout the block. You want a consistent ‘grain’ rather than clumps of pepper.
Step 2: Forming the Structures
-
Create the armatures:
Crumple aluminum foil into two distinct shapes: a large, thick arch and a smaller, squat dome shape. Compressing the foil tightly now saves clay later and makes the piece lighter. -
Sheet the clay:
Roll out your speckled clay into a thick, even sheet, approximately 1/4 inch thick. I find using guides or playing cards on either side of the roller helps keep the thickness uniform. -
Cover the small dome:
Drape the clay sheet over the smaller foil dome. Smooth it down the sides, cutting away excess at the bottom with your blade. Ensure the seams are blended invisibly. -
Cover the large arch:
Carefully wrap the larger foil arch with the clay sheet. Pay special attention to the inner curve; you may need to patch small pieces in to ensure full coverage without trapping air bubbles. -
Refine the shapes:
Use your hands and a flat surface to tap the sides and bottoms of both pieces flat. You want sharp, geometric edges that contrast with the curved tops.
Uneven Texture?
If the pepper flakes tear the clay while rolling, condition the clay further and roll slower. You can also press flakes into the surface after shaping instead of mixing them in.
Step 3: Texturing and Finishing
-
Add surface texture:
Before baking, take a stiff toothbrush or a texturing sponge and firmly press it all over the surface of both shapes. This removes fingerprints and creates a porous, stony finish. -
Deepen the pits:
For a rugged look, use a needle tool or toothpick to poke slightly larger, random holes or ‘pits’ into the surface, mimicking natural erosion. -
Bake carefully:
Bake the pieces according to your clay manufacturer’s instructions, usually around 275°F (130°C). Because these are thick shapes, bake for at least 45 minutes to an hour to ensure full curing. -
Cool down:
Let the pieces cool completely in the oven with the door cracked. This prevents thermal shock and potential cracking. -
Sand for realism:
Once cool, use medium-grit sandpaper to scuff the surface further. This exposes the pepper flakes inside and removes any plastic-like sheen. -
Assemble:
Arrange the smaller dome nestled slightly under or in front of the larger arch. You can glue them together for stability or leave them separate for interchangeable styling.
Rough It Up
After baking, apply a very diluted wash of grey or brown acrylic paint. Wipe it off immediately with a rag so it only stays in the tiny pits for an aged, weathered look.
Set your new sculpture atop a stack of flat books to create a sophisticated, gallery-worthy display
Tiny Fantasy House Shelf Sitters
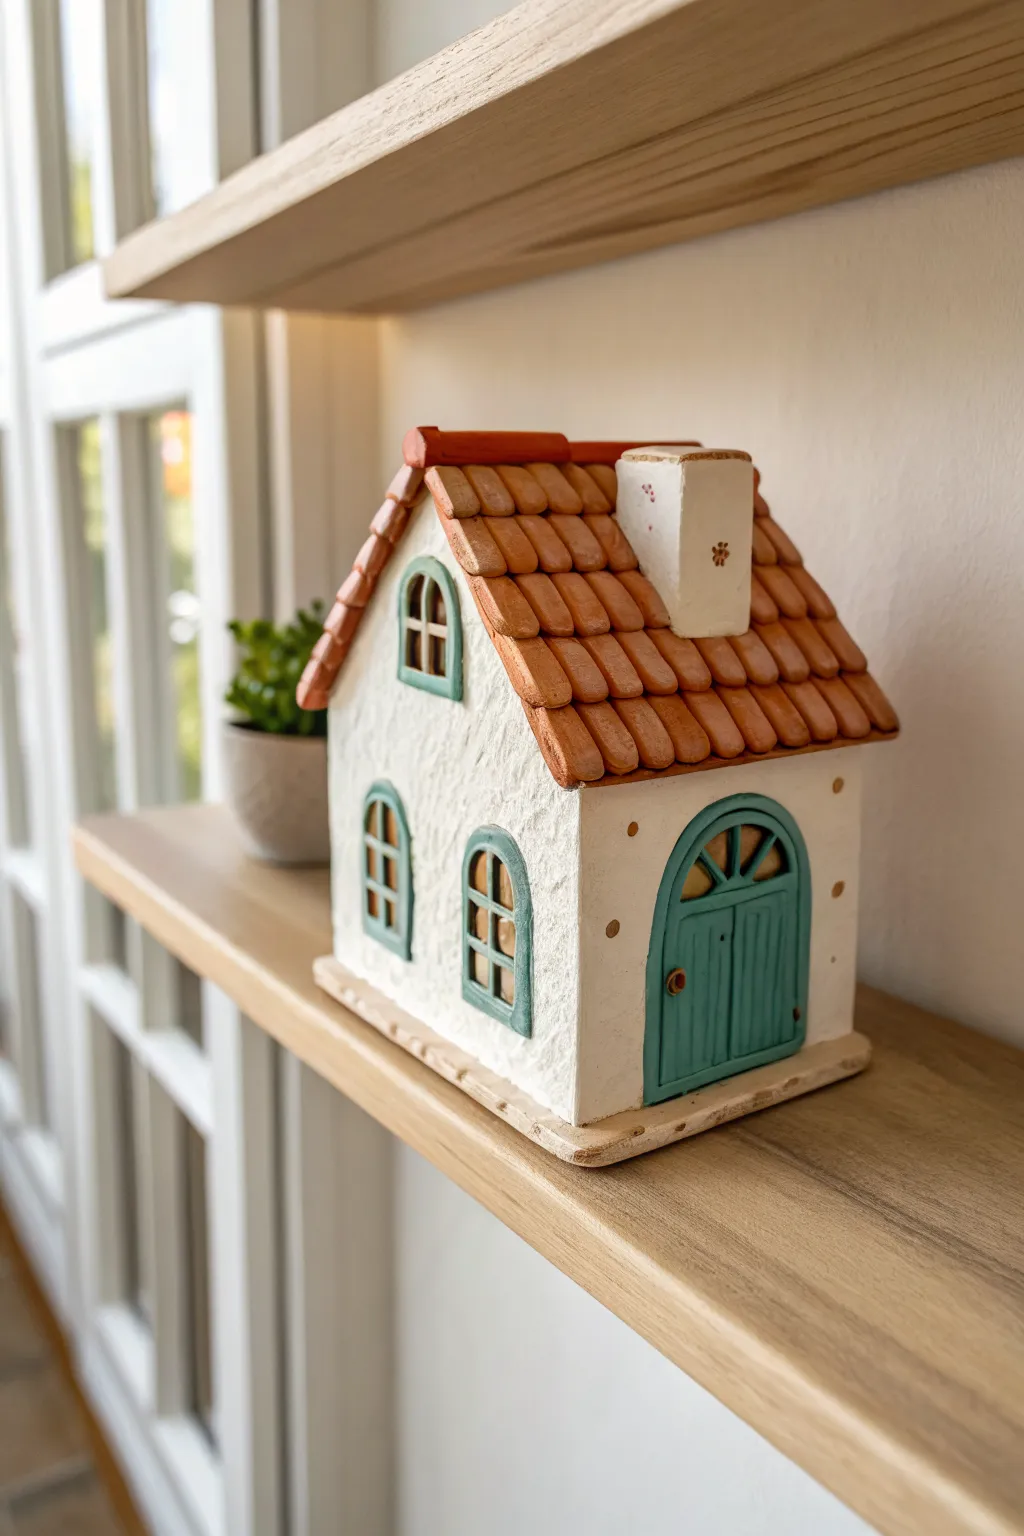
Bring a touch of storybook magic to your bookshelves with this charming miniature cottage sculpture. With its terracotta-style roof, teal arched accents, and textured stucco walls, this polymer clay project captures the cozy essence of a fairytale home.
Step-by-Step Tutorial
Materials
- Polymer clay (White, Terracotta/Burnt Orange, Teal, Beige/Light Brown)
- Aluminum foil
- Rolling pin or pasta machine
- Basic clay sculpting tools (needle tool, ball stylus)
- X-acto knife or stiff blade
- Small round cookie cutters (or caps)
- Texture tools (toothbrush or stiff bristle brush)
- Liquid polymer clay (optional)
- Matte finish varnish
- Acrylic paint (brown or black for antique wash)
Step 1: Building the Core Structure
-
Form the foil armature:
Crumple aluminum foil into a tight house shape—a rectangular prism with a triangular prism on top. Press it firmly against a hard surface to flatten the bottom so it stands independently. -
Cover with base clay:
Roll out a sheet of white polymer clay to about 1/4 inch thickness. Wrap this around your foil armature, smoothing out seams with your fingers or a clay tool until the foil is entirely hidden. -
Create the stucco texture:
Before the clay hardens or is baked, take a stiff toothbrush or a texturing sponge and dab it all over the white walls. This creates the realistic rough plaster or stucco finish seen in the reference.
Step 2: Adding Architectural Details
-
Craft the foundation:
Roll out a slab of beige clay for the base. Place your house on top and trim around it, leaving a small border. Add a subtle texture to the edge using a needle tool to mimic stone or wood. -
Cut out windows and doors:
Roll out a thin sheet of teal clay. Cut out three arched shapes: one large shape for the front door and two smaller ones for the windows. Press these gently onto the white walls. -
Add frames and trim:
Roll very thin snakes of teal clay. Outline the arches of the windows and the door to create frames. Add a centerline to the door and horizontal lines to the windows for panes. -
Install the door hardware:
Place a tiny ball of gold or orange clay on the door for a doorknob. Use a needle tool to poke a tiny hole in the center for detail. -
Construct the chimney:
Form a small rectangular block of white clay. Texture it to match the walls and attach it to the roof slope using a dab of liquid clay for a strong bond.
Roof Slumping?
If the clay roof slides down during sculpting, bake the white house base first for 15 minutes. Add the raw clay roof tiles to the hardened base for stability.
Step 3: Roofing and Finishing
-
Prepare the roof tiles:
Roll out terracotta-colored clay. You can either cut individual small rectangles or, for a faster method, cut long strips and press indentations into them to simulate separate tiles. -
Layer the shingles:
Starting at the bottom edge of the roof, overlap your clay tiles or strips, working your way up to the peak. Ensure each layer slightly covers the top of the layer below it. -
Cap the roof peak:
Roll a final strip of terracotta clay and fold it lengthwise like a tent. Place this over the very top ridge of the roof to cover the seam where the two sides meet. -
Create the chimney cap:
Add a thin square of beige clay to the top of the chimney. I like to add a tiny flower detail here using a stamp or by arranging tiny dots of clay. -
Add decorative wall dots:
Roll tiny balls of beige or light brown clay and flatten them onto the white walls around the door and corners for extra whimsical character. -
Bake the project:
Bake your cottage according to the clay manufacturer’s instructions, usually at 275°F (135°C) for 30–45 minutes depending on thickness. Let it cool completely. -
Apply an antique wash:
Mix a small amount of brown acrylic paint with water. Brush it over the entire house, getting into the crevices, and quickly wipe off the surface excess with a paper towel to highlight the textures.
Light It Up
Make the house hollow without foil and cut out the window panes completely. Place an LED tea light underneath to turn your shelf sitter into a cozy nightlight.
Once the varnish is dry, your little cottage is ready to keep watch over your favorite books