When I want a quick little happiness boost in the studio, I grab polymer clay and make something tiny and adorable. These easy cute polymer clay ideas lean hard into simple shapes, sweet little faces, and charm-sized projects that feel doable even on your first try.
Smiley Fruit Slice Charms
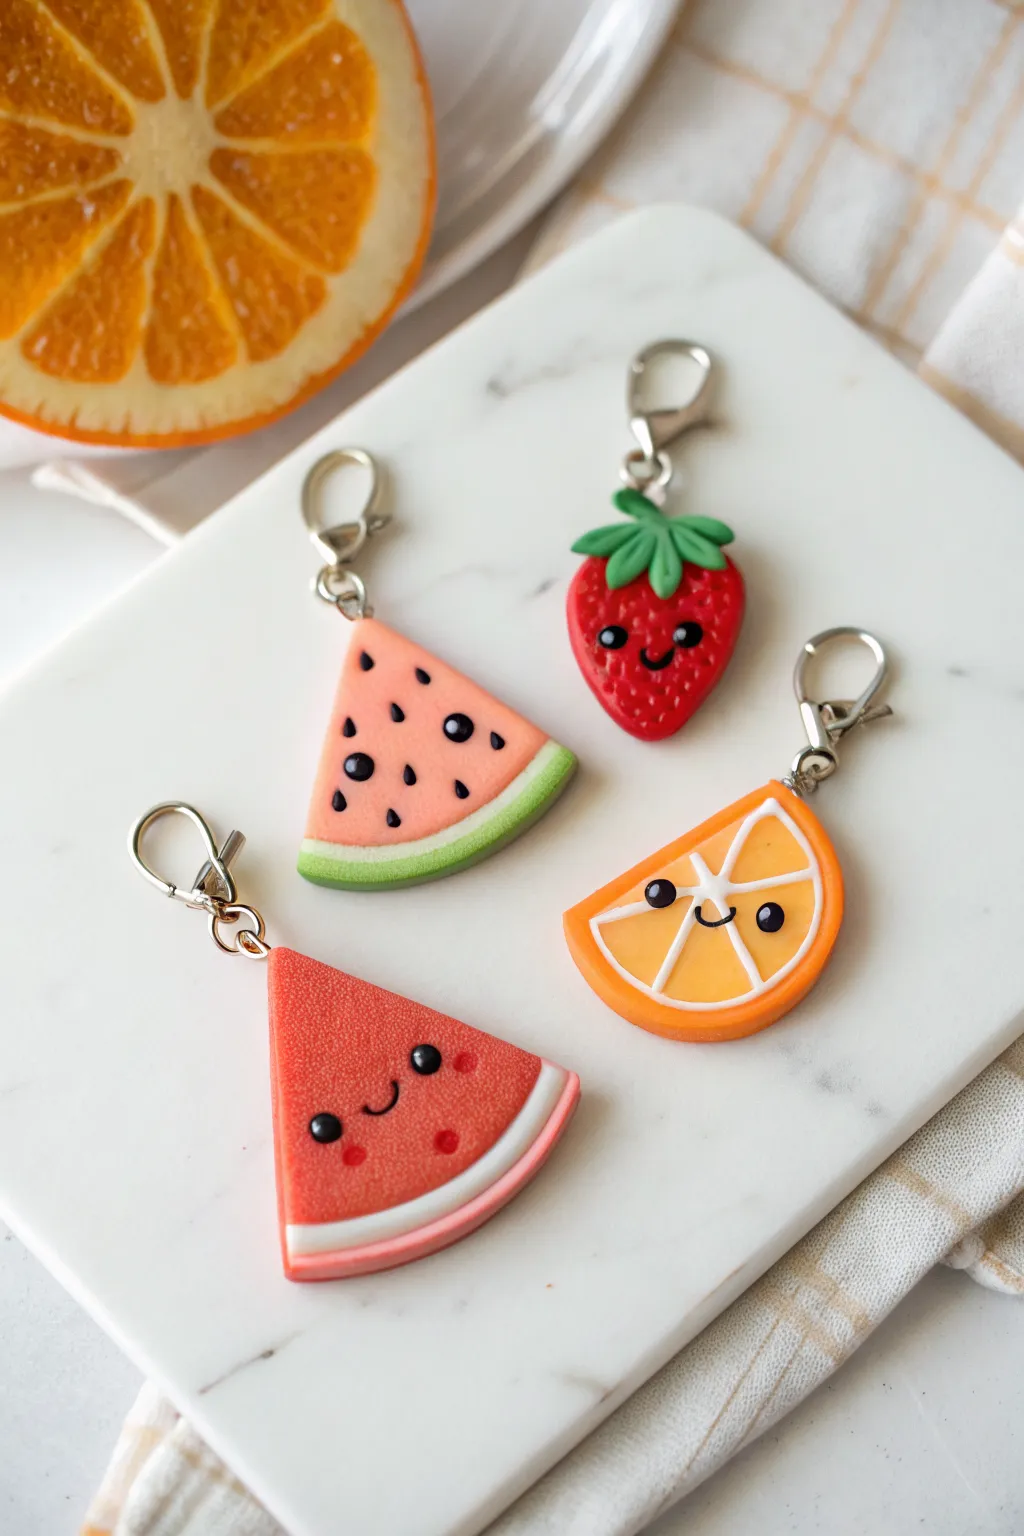
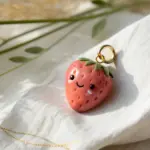
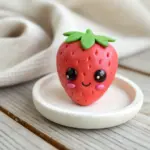
Brighten up your keyring or zipper pulls with this adorable set of smiling fruit slices made from polymer clay. These four distinct designs—strawberry, orange, and two styles of watermelon—capture a sweet, kawaii aesthetic with their simple happy faces and vibrant colors.
Step-by-Step Guide
Materials
- Polymer clay (Red, pink, orange, white, bright green, dark green, black)
- Fimo liquid or liquid polymer clay (optional for texture)
- Needle tool or toothpick
- Rolling pin or pasta machine
- Exacto knife or flexible clay blade
- Small round cutter (approx. 1.5 inches)
- Eye pins (silver or gold tone)
- Jump rings and lobster clasps
- Gloss glaze or UV resin (optional for shine)
- Oven and baking tray
Step 1: Prepping the Base Shapes
-
Condition the clay:
Begin by thoroughly conditioning your red, pink, orange, and green clays until they are soft and pliable. This prevents cracks during baking. -
Roll the watermelon centers:
For the watermelons, roll a sheet of pink clay and a sheet of red clay to about 1/4 inch thickness. Use your cutter or a knife to cut two triangles. -
Create the orange segment:
Roll a sheet of orange clay to the same thickness. Cut a circle using your round cutter, then slice it in half to create a semi-circle shape. -
Shape the strawberry:
Form a ball of red clay and gently taper one end to create a soft rounded triangle or teardrop shape. Press it slightly flat so it isn’t too bulky.
Clean Clay
Keep separate baby wipes for each color. White clay picks up lint easily; clean your hands and surface thoroughly before handling the white rind strips.
Step 2: Adding Rinds and Leaves
-
Layer the pink watermelon rind:
Roll a thin snake of white clay and flatten it against the bottom curved edge of the pink triangle. Repeat with a layer of bright green clay on top of the white for the outer rind. -
Layer the red watermelon rind:
For the red triangle, skip the white layer and attach a flattened strip of pale pink clay followed by a thin white strip to the bottom edge, creating a multi-layered effect. -
Wrap the orange slice:
Roll a very thin snake of white clay and wrap it around the curved edge of your orange semi-circle. Add a slightly thicker layer of orange clay over the white to form the skin. -
Detail the orange interior:
Roll extremely thin threads of white clay. Lay them across the surface of the orange slice in a fan pattern to mimic the segmented pith. -
Sculpt strawberry leaves:
Flatten a small piece of dark green clay. Cut out a small star shape or three teardrops joined together. Place this ‘cap’ on the wide top of the strawberry.
Face Pro-Tip
If rolling tiny black mouths is too difficult, bake the charm first with just the eyes. After baking, draw the mouth on with a fine-tip permanent marker or acrylic paint.
Step 3: Adding Faces and Details
-
Create the eyes:
Roll tiny specks of black clay into balls. Press two onto each fruit slice to create wide-set eyes. For the orange and red watermelon, keep them low on the face. -
Add the smiles:
Roll incredibly thin threads of black clay. Cut tiny sections and curve them into a ‘U’ shape. Gently press these between the eyes using your needle tool. -
Texture the surfaces:
For the strawberry, use a needle tool to poke small indentations all over the red surface for seeds. For the red watermelon, you can use a toothbrush or sandpaper to gently tap texture onto the red area. -
Add seeds:
For the pink watermelon, roll tiny teardrops of black clay and flatten them onto the pink surface as seeds. I find placing them randomly looks more natural. -
Rosy cheeks:
Use a tiny dot of pink clay or red chalk pastel dust applied with a brush to add blush marks under the eyes of the red watermelon or strawberry.
Step 4: Finishing Up
-
Insert hardware:
Trim eye pins to about half an inch. Insert them into the top center of each fruit slice. Ensure the loop is facing the direction you want the charm to hang. -
Bake:
Place the charms on a parchment-lined baking tray. Bake according to your brand of clay’s instructions (usually 275°F/135°C for 15-30 minutes). Let them cool completely. -
Secure the pin:
Once cool, gently tug the eye pin. If it’s loose, pull it out, add a dab of super glue, and reinsert it. -
Glaze (Optional):
For a glossy ‘juicy’ look, coat the fruit part (avoiding the rind if you prefer a matte look) with a polymer clay gloss glaze. -
Attach clasps:
Use pliers to open a jump ring, thread it through the eye pin loop and the lobster clasp, and close it securely.
Enjoy mixing and matching these cheerful fruity friends on your favorite bags or keychains


Chubby Cat Head Charms
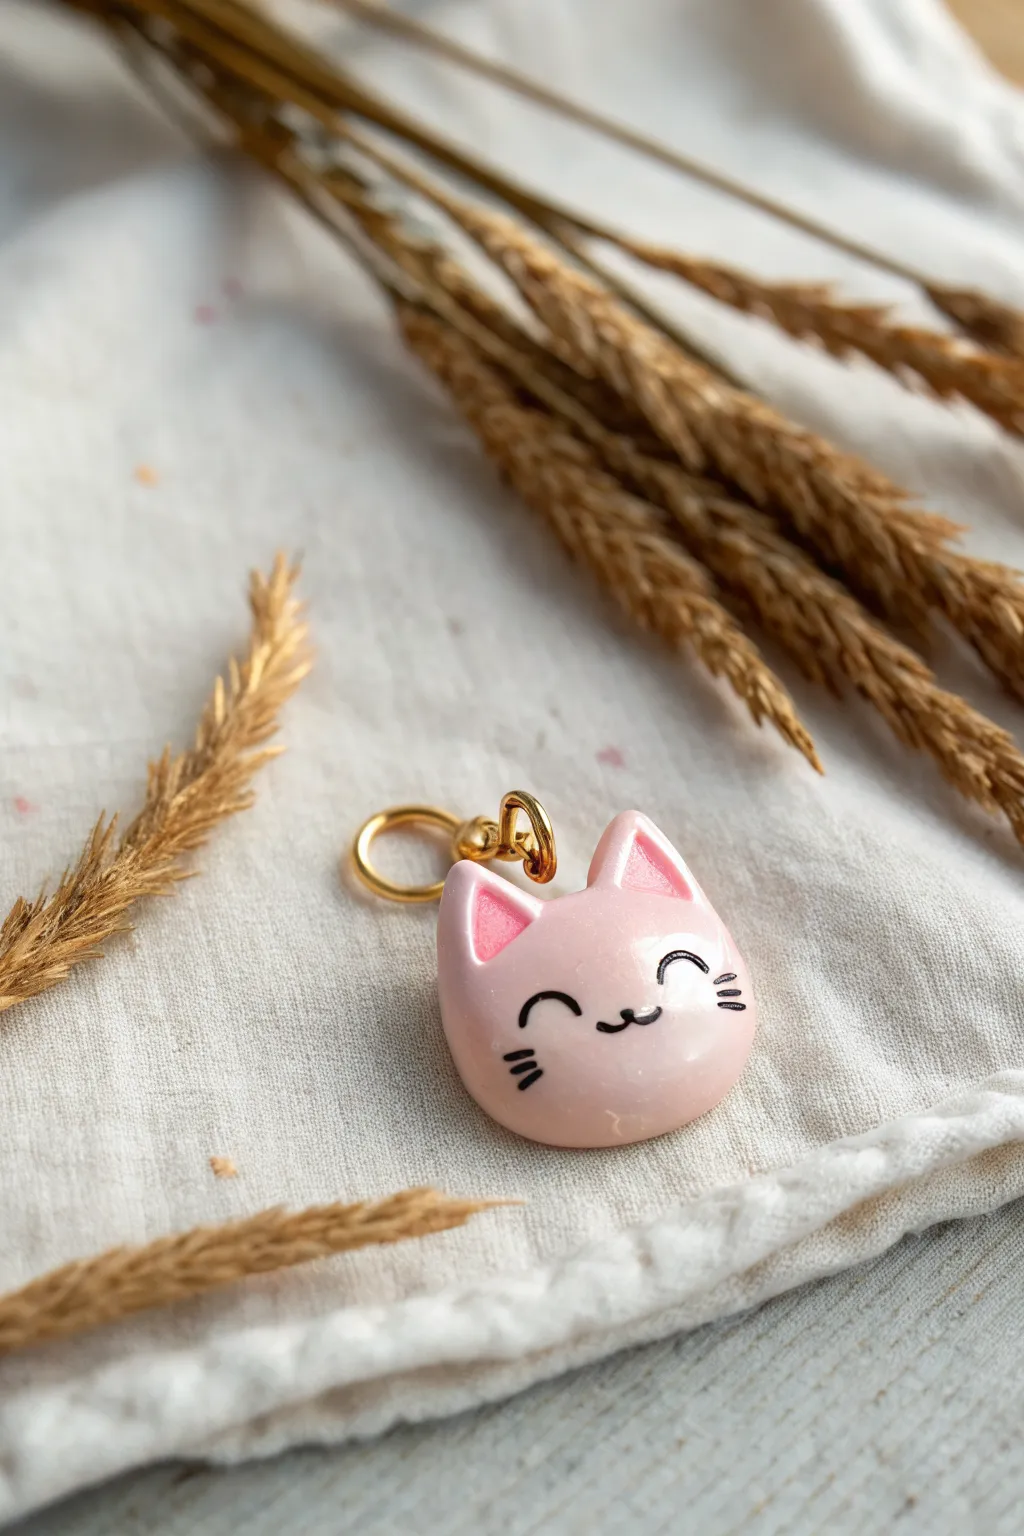
Capture pure adorability with this chubby, smiling cat head charm made from soft pink polymer clay. Its glossy finish and simple black detailing make it a perfect beginner-friendly project that looks professionally crafted.
Detailed Instructions
Materials
- Light pink polymer clay
- Translucent liquid polymer clay (optional, for adhesion)
- Black acrylic paint
- Gloss glaze or UV resin
- Gold screw eye pin
- Gold jump ring
- Fine detail paintbrush (000 size) or dotting tool
- Clay sculpting tools (needle tool, ball tool)
- Ceramic tile or baking surface
- Oven
Step 1: Shaping the Base
-
Condition the clay:
Start by kneading your light pink polymer clay until it is warm, soft, and pliable to prevent cracking during the baking process. -
Form the head shape:
Roll a small ball of clay about the size of a large grape between your palms until it is perfectly smooth and free of fingerprints. -
Flatten slightly:
Gently press the ball down onto your work surface to create a flattened dome shape, keeping the edges soft and rounded rather than sharp. -
Refine the contour:
Use your finger to subtly push the bottom edge upwards just a tiny bit, giving the face a wider, slightly squashed chubby look rather than a perfect circle.
Smoothing Tip
Before baking, brush a tiny amount of baby oil or clay softener over the surface with your finger to erase any fingerprints and dust specks.
Step 2: Detailing the Ears
-
Create ear triangles:
Take two tiny pinch-sized pieces of the same pink clay and roll them into small balls, then shape them into equilateral triangles. -
Indent the ears:
Using a small ball tool or the rounded end of a paintbrush, press gently into the center of each triangle to create the inner ear cavity. -
Add inner ear color:
Mix a tiny amount of darker pink clay or use a small bit of pink pastel dust inside the indentations to create depth, though the base pink works beautifully on its own too. -
Attach the ears:
Place the ears on top of the head, spacing them widely apart for a cute look. Use a silicone tool or your finger to blend the back seam downward so they are securely attached.
Glitter Upgrade
Mix a pinch of fine iridescent glitter into your pink clay or the final glaze layer to give your kitty a magical, sparkling finish.
Step 3: Hardware & Baking
-
Insert the eye pin:
Take your gold screw eye pin. I find dipping the tip in a tiny dot of liquid clay or Sculpey bake-and-bond helps it stay permanent after baking. -
Position the pin:
Screw the pin gently into the exact center top of the head, between the ears, ensuring the loop is facing the direction, so the charm hangs forward. -
Smooth the entry point:
If the clay displaced slightly around the screw, use a needle tool to gently push the clay back snug against the metal stem. -
Bake the piece:
Place the charm on a ceramic tile and bake according to your clay manufacturer’s instructions (usually 275°F/130°C for 15-30 minutes per 1/4 inch of thickness). -
Cool down:
Allow the piece to cool completely in the oven or on the counter before moving to the painting stage.
Step 4: Finishing Touches
-
Sketch the face:
Lightly sketch the position of the eyes and mouth with a pencil if you’re nervous about freehand painting. -
Paint the features:
Using your finest detail brush and black acrylic paint, create two upturned arcs for smiling eyes and a tiny ‘w’ shape for the mouth. -
Add whiskers:
Paint three short, horizontal lines on each cheek area for the whiskers. Keep your hand steady and use very light pressure. -
Apply glaze:
Once the paint is totally dry, coat the entire front of the charm with gloss glaze or UV resin to give it that shiny, polished look seen in the photo. -
Cure or dry glaze:
Let the glaze air dry or cure under a UV lamp until hard and tack-free. -
Add the jump ring:
Open a gold jump ring using two pliers (twist, don’t pull apart), thread it through the eye pin loop, and close it securely.
Now you have a darling little companion ready to hang on a necklace or keychain


Tiny Teddy Bear Face Studs
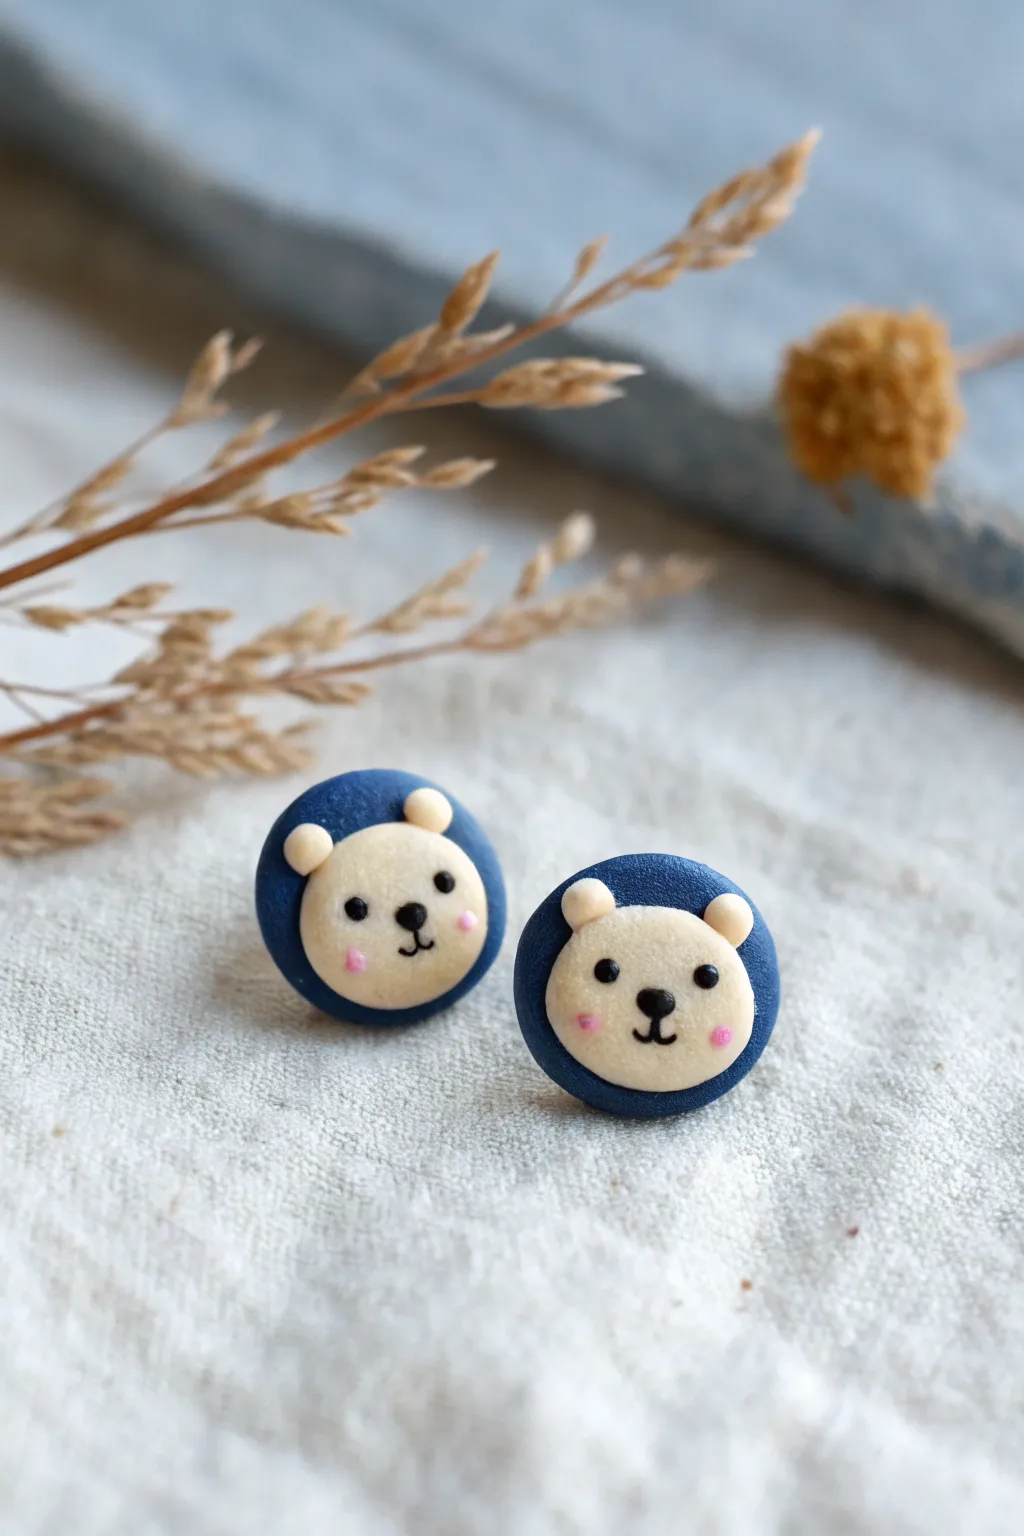
These adorable stud earrings feature a sweet bear face peeking out from a snuggly blue hood. They are small, charming, and perfect for using up scraps of clay from other projects.
Step-by-Step Tutorial
Materials
- Navy blue polymer clay
- Cream or beige polymer clay
- Black liquid polymer clay (or black acrylic paint)
- Pink soft pastel chalk (or pink blush)
- Small circle cutter (approx. 10-12mm)
- Small ball tool or dotting tool
- Needle tool or toothpick
- Earring stud posts
- Jewelry glue (E6000 or similar)
- Polymer clay glossy varnish (optional)
Step 1: Creating the Base
-
Condition the clay:
Start by thoroughly conditioning your navy blue clay until it is soft and pliable, ensuring there are no air bubbles trapped inside. -
Roll out the sheet:
Roll the blue clay into a thick sheet, roughly 3mm to 4mm thick. You want it substantial enough to hold the stud post securely. -
Cut the circles:
Use your small circle cutter to punch out two identical circles. Smooth the edges with your finger if the cutter left any rough spots. -
Create indentations:
Gently press your thumb or a large ball tool into the center of each blue circle to create a shallow depression where the face will sit.
Step 2: Forming the Bear Face
-
Make the face shape:
Take a small amount of cream clay and roll two equal-sized balls. Flatten them slightly into thick discs that fit perfectly inside the blue indentations you just made. -
Attach the face:
Press the cream discs gently into the blue bases. The cream clay should look like it is tucked inside the blue ‘hood’ rather than floating on top. -
Shape the ears:
Roll two tiny suspended balls of cream clay for each earring (four total). These should be very small, about the size of a poppy seed. -
Attach the ears:
Place the tiny balls at the top left and right of the cream face area. Use your dotting tool to gently blend the bottom seam of the ear into the face so they don’t fall off. -
Texture the hood:
To give the blue border a fabric-like or matte texture, you can gently tap it with a stiff toothbrush or sandpaper, being careful not to hit the smooth cream face.
Clean Clay Pro-Tip
Keep wet wipes nearby! Dark blue pigment transfers easily to light cream clay. wiping hands and tools between colors keeps the bear faces bright.
Step 3: Adding Details & Baking
-
Add the blush:
Scrape a little powder from your pink pastel chalk. Use a small, soft brush or a cotton swab to dab rosy cheeks onto the cream clay before baking. -
Bake the pieces:
Place your bears on a tile or parchment-lined baking sheet. Bake according to your clay manufacturer’s instructions (usually 275°F/130°C for 15-30 minutes). -
Cool down:
Allow the pieces to cool completely. Clay is fragile when hot, so patience is key here. -
Paint the eyes and nose:
Using a fine needle tool or a very small dotting tool, dip into black liquid clay or acrylic paint. Carefully dot two eyes and an oval nose. -
Draw the mouth:
With the finest point of a needle tool or a 0000 brush, draw a tiny vertical line down from the nose and curve it into a ‘w’ shape for the mouth. -
Seal the face (optional):
I prefer to add a tiny drop of UV resin or gloss varnish just over the eyes and nose to make them shine and prevent the paint from scratching off.
Level Up: Texture
Before baking, gently press a piece of denim or coarse fabric onto the blue ‘hood’ area to give it a realistic fabric texture instantly.
Step 4: Assembly
-
Prepare the back:
Turn the clay pieces over. Lightly scratch the center of the back with sandpaper to give the glue a better surface to grip. -
Glue the posts:
Apply a small dab of jewelry glue to the flat pad of the earring post and press it firmly onto the back of the clay. -
Final cure:
Let the glue cure for at least 24 hours before wearing them to ensure the bond is permanent.
Now you have a sweet pair of woodland friends to wear anytime


Mini Bee and Ladybug Friends
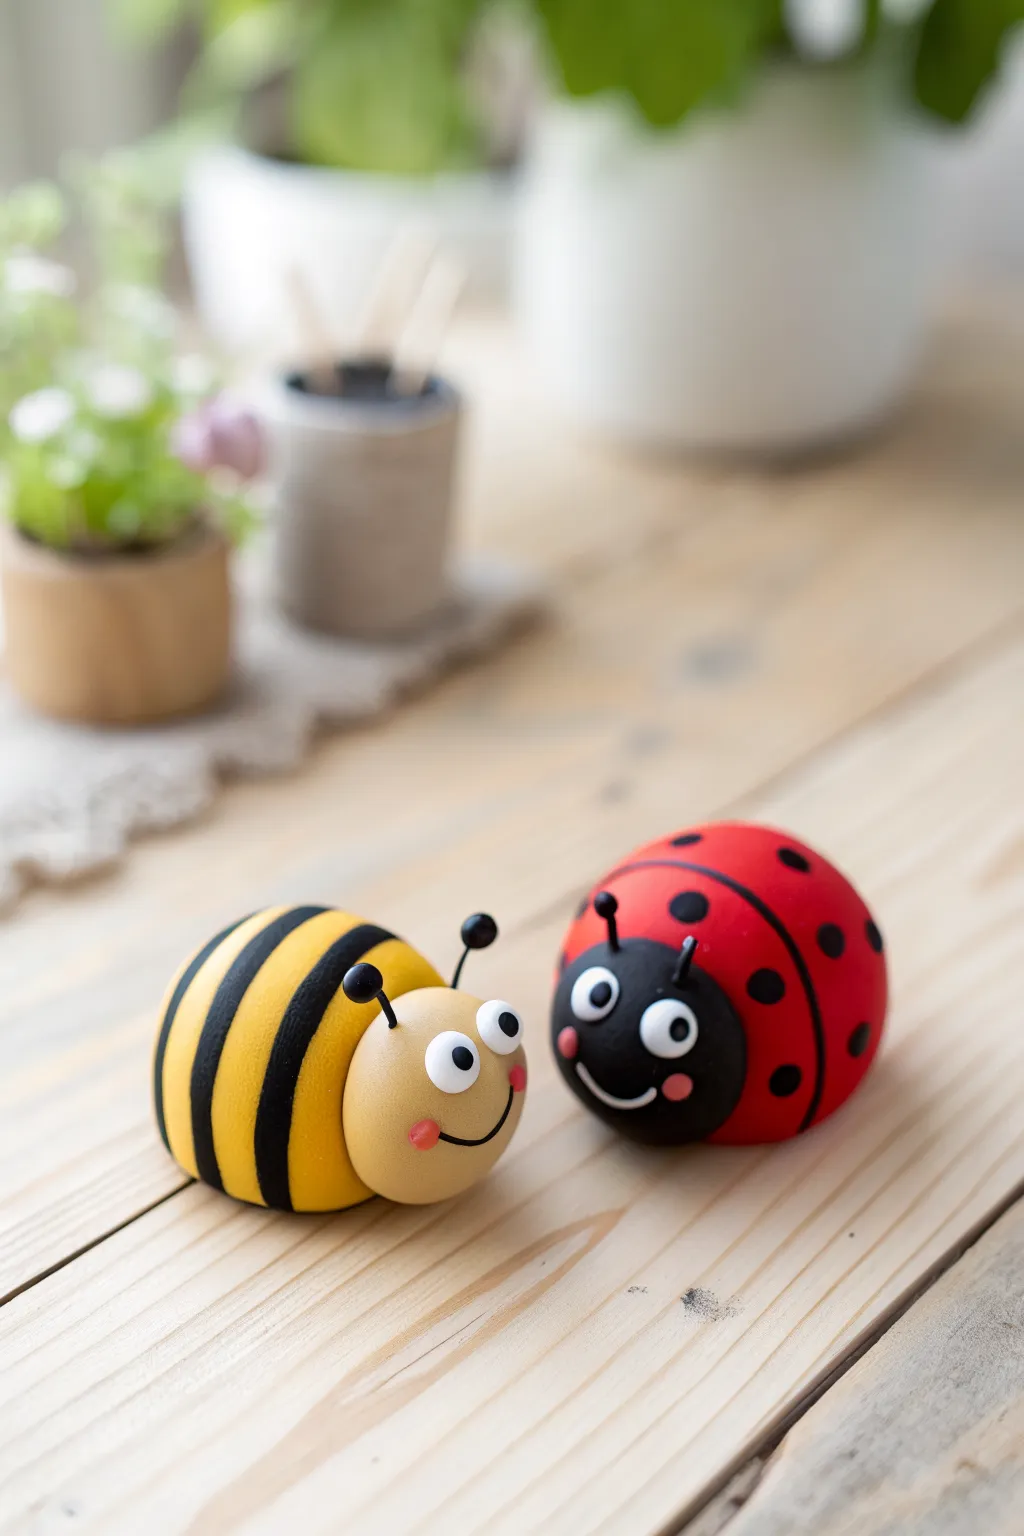
Bring your desk to life with this adorable pair of garden critters, crafted from colorful polymer clay with simple shapes. Their round bodies, happy expressions, and smooth finish make them perfect beginner-friendly sculpting projects that brighten up any space.
Step-by-Step Guide
Materials
- Polymer clay (Yellow, Red, Black, Beige/Pale Yellow, White, Pink)
- Clay carving tools or a toothpick
- Small ball stylus tool
- Rolling pin or acrylic roller
- Blade or craft knife
- Black wire or jewelry headpins (for antennae)
- Gloss glaze (optional)
Step 1: Shaping the Bee
-
Body Base:
Start by conditioning a chunk of yellow clay until it’s soft and pliable. Roll it into a smooth ball, then gently press it against your work surface to flatten the bottom into a dome shape. -
Prepare Stripes:
Roll out a thin sheet of black clay. Use your craft knife to slice several long, even strips, about 1/8 inch wide. -
Apply Stripes:
Wrap two or three black strips over the yellow body dome, spacing them out evenly to create the classic bee pattern. Smoothing them down gently with your finger ensures they bond without squishing the body shape. -
Head Creation:
Roll a smaller ball of beige or pale yellow clay for the head. Flatten the back slightly and press it firmly onto the front of the striped body so the two pieces join securely.
Step 2: Shaping the Ladybug
-
Body Base:
Similar to the bee, condition red clay and roll it into a ball. Press it down to form a red dome. -
Head and Details:
Create a black semi-circle or smaller dome and attach it to the front of the red body for the head. I like to smooth the seam where the black head meets the red body for a cleaner look. -
Wing Line:
Roll a very thin ‘snake’ of black clay. Lay it gently down the center of the red back, running from the neck to the tail, to define the wings. -
Polka Dots:
Roll several tiny balls of black clay. Flatten them into small discs and press them randomly onto the red wings.
Fingerprints everywhere?
Before baking, lightly brush your creations with baby oil or cornstarch. This helps smooth out unwanted fingerprints and dust specks.
Step 3: Adding Faces and Features
-
Making Eyes:
For both creatures, roll four tiny balls of natural white clay and flatten them onto the faces. Add even tinier black clay balls to the center of each white circle for pupils. -
Cheeky Details:
Use a minuscule amount of pink clay to create small, flat cheeks. Place one on each side of the bee’s smiling mouth area. -
Happy Grins:
Roll extremely thin threads of black clay. Curve them into ‘U’ shapes and gently press them under the eyes to create happy smiles for both friends. -
Antennae Prep:
Cut four short pieces of black wire (about half an inch long). If you have black clay left over, you can add tiny balls to the tips. -
Inserting Antennae:
Push the wire pieces into the top of the heads—two for the bee and two for the ladybug. Do this gently so you don’t distort the head shape.
Secure those eyes
If the tiny eye pieces won’t stick, use a needle tool to create a tiny indentation first, then press the clay ball into the socket.
Step 4: Baking and Finishing
-
Bake:
Place your figures on a ceramic tile or baking sheet. Bake according to your clay package instructions (usually 275°F/135°C for 15-30 minutes). -
Cool Down:
Allow the figures to cool completely inside the oven or on a wire rack before handling, as warm clay is fragile. -
Sealing:
Once cool, apply a coat of water-based gloss glaze if you want your little bugs to have a shiny, ceramic-like finish.
Now these cheerful garden companions are ready to sit on your desk and keep you company

The Complete Guide to Pottery Troubleshooting
Uncover the most common ceramic mistakes—from cracking clay to failed glazes—and learn how to fix them fast.
Avocado BFF Pair Charms
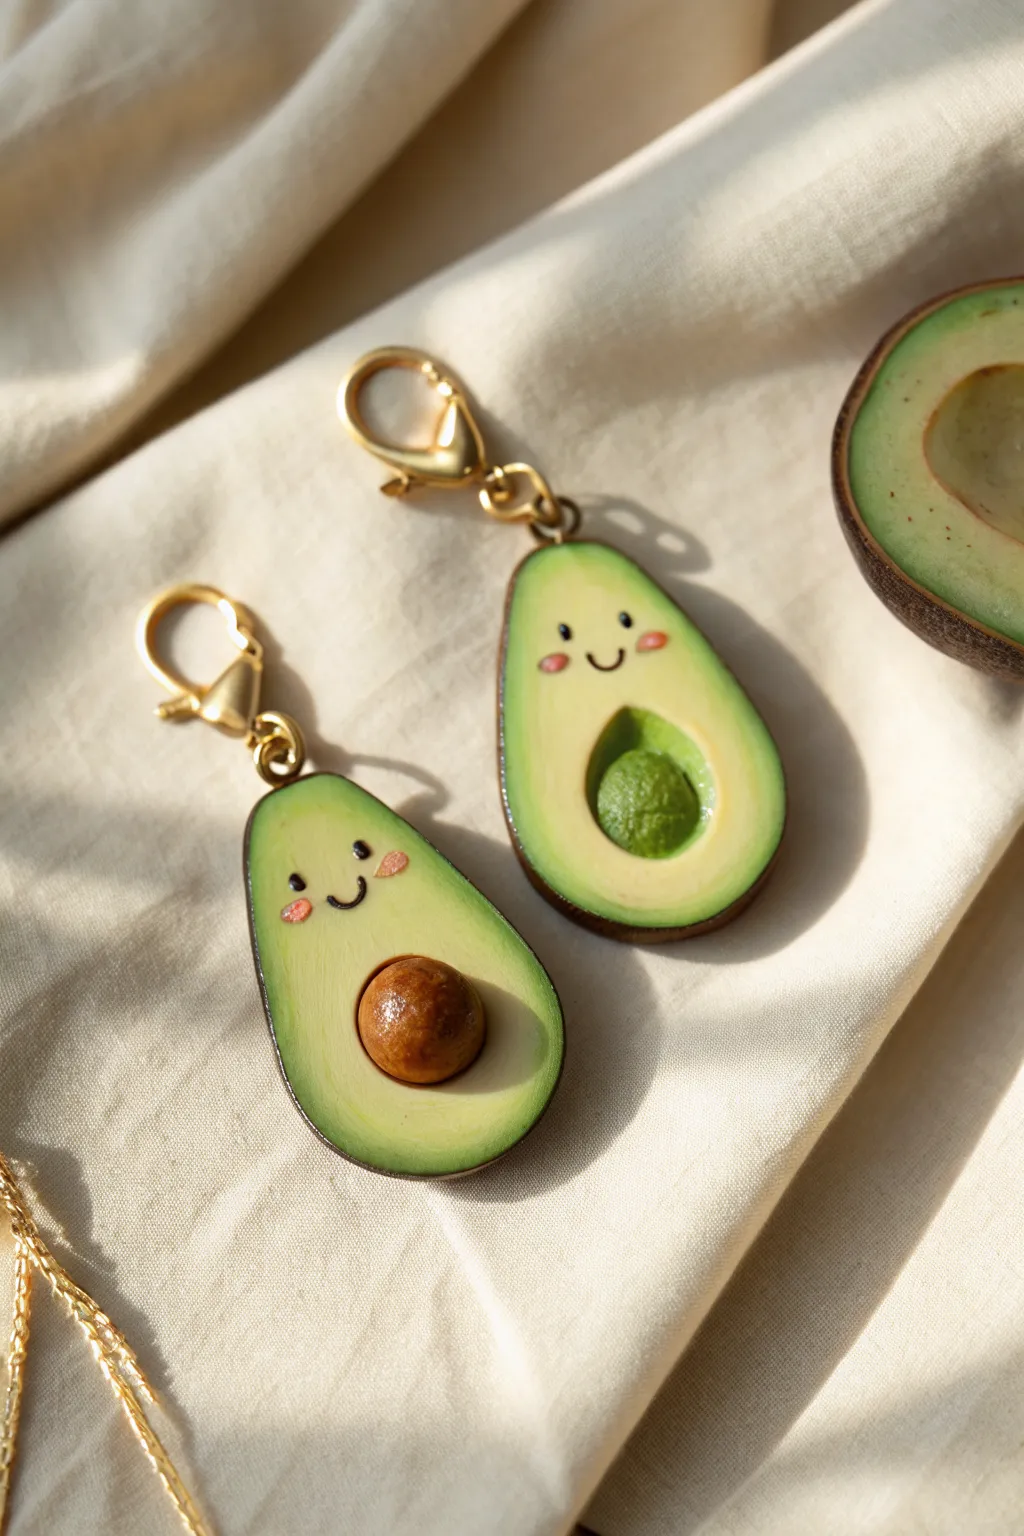
Celebrate friendship with this adorable duo of matching avocado charms—one holding the pit and the other with an empty spot waiting for it. With their sweet smiling faces and golden clasps, they make the perfect keepsake to share with your best pal.
Step-by-Step
Materials
- Polymer clay (dark green, light yellow-green, brown)
- Acrylic paint (black, pink, white)
- Detail paintbrush or dotting tool
- Ball stylus tool
- Aluminum foil (optional, for texture)
- Eye pins (gold)
- Jump rings and lobster clasps (gold)
- Gloss glaze or UV resin
- Clay roller
- Craft blade
- Fine-grit sandpaper (optional)
Step 1: Shaping the Avocado Halves
-
Mix the colors:
Start by conditioning your clay. You’ll need a custom light green for the flesh; mix white with a tiny amount of yellow and green until you get a creamy, avocado-interior shade. -
Form the base shape:
Roll two equal balls of the light green clay. Flatten them slightly and pinch the top to create the classic pear shape of an avocado. -
Add the skin:
Roll out a thin sheet of dark green clay. Wrap this strip around the edges of both light green shapes, smoothing the seam where the dark green meets the light green back so it looks like a clean peel. -
Smooth the back:
Flip the charms over. The back should be solid dark green. You can add a thin layer of dark green here to cover the light clay, smoothing the edges for a seamless finish.
Clean Edges Pro-Tip
Before baking, use a cotton swab dipped in a tiny bit of rubbing alcohol or baby oil to smooth out fingerprints and blend the dark green skin seam seamlessly.
Step 2: Creating the Pit and Void
-
Make the void:
For the ’empty’ avocado, press a large ball stylus or the back of a rounded measuring spoon into the lower center of the light green clay to create a smooth, concave indentation. -
Texture the void:
Take a tiny bit of darker green clay (or mix your green with a little brown) and press it into the bottom of that indentation to simulate the rough texture where the pit was removed. Use a toothbrush or needle tool to stipple it. -
Create the pit:
For the other half, roll a ball of brown clay that fits perfectly into the size of the indentation you made on the first charm. Press it firmly onto the lower center of the second charm. -
Add realism:
Lightly texture the brown pit by rolling a ball of aluminum foil over it. This gives it a natural, organic look rather than being perfectly smooth plastic.
Eye Pin Security
If your eye pin feels loose after baking, pull it out, add a dab of super glue (cyanoacrylate) to the stem, and slide it back into the hole for a permanent hold.
Step 3: Details and Baking
-
Insert hardware:
Gently push a gold eye pin into the top center of each avocado. If the pin is too long, trim it first with wire cutters. -
Bake the clay:
Place your charms on a ceramic tile or baking sheet lined with parchment paper. Bake according to your clay manufacturer’s instructions (usually 275°F/135°C for 15-30 minutes). -
Cool down:
Let the pieces cool completely before handling. I like to let this dry briefly in the oven with the door cracked to avoid thermal shock.
Step 4: Painting and Assembly
-
Paint the faces:
Using a very fine detail brush or a needle tip, paint two small black U-shapes for eyes and a small smile between them on the upper half of the avocado. -
Add blush:
Dip a dotting tool or the end of a toothpick into pink paint and gently dab small cheeks at the ends of the smile. -
Seal the charms:
Once the paint is fully dry, coat the entire charm (front and back) with a gloss glaze or UV resin. This protects the paint and gives the avocado that freshly-cut shine. -
Attach the clasp:
Open a jump ring using two pliers. Thread it through the eye pin loop and the loop of your lobster clasp, then close it securely.
Now you have a charming set of accessories ready to gift to your other half
Pastel Star and Moon Charms
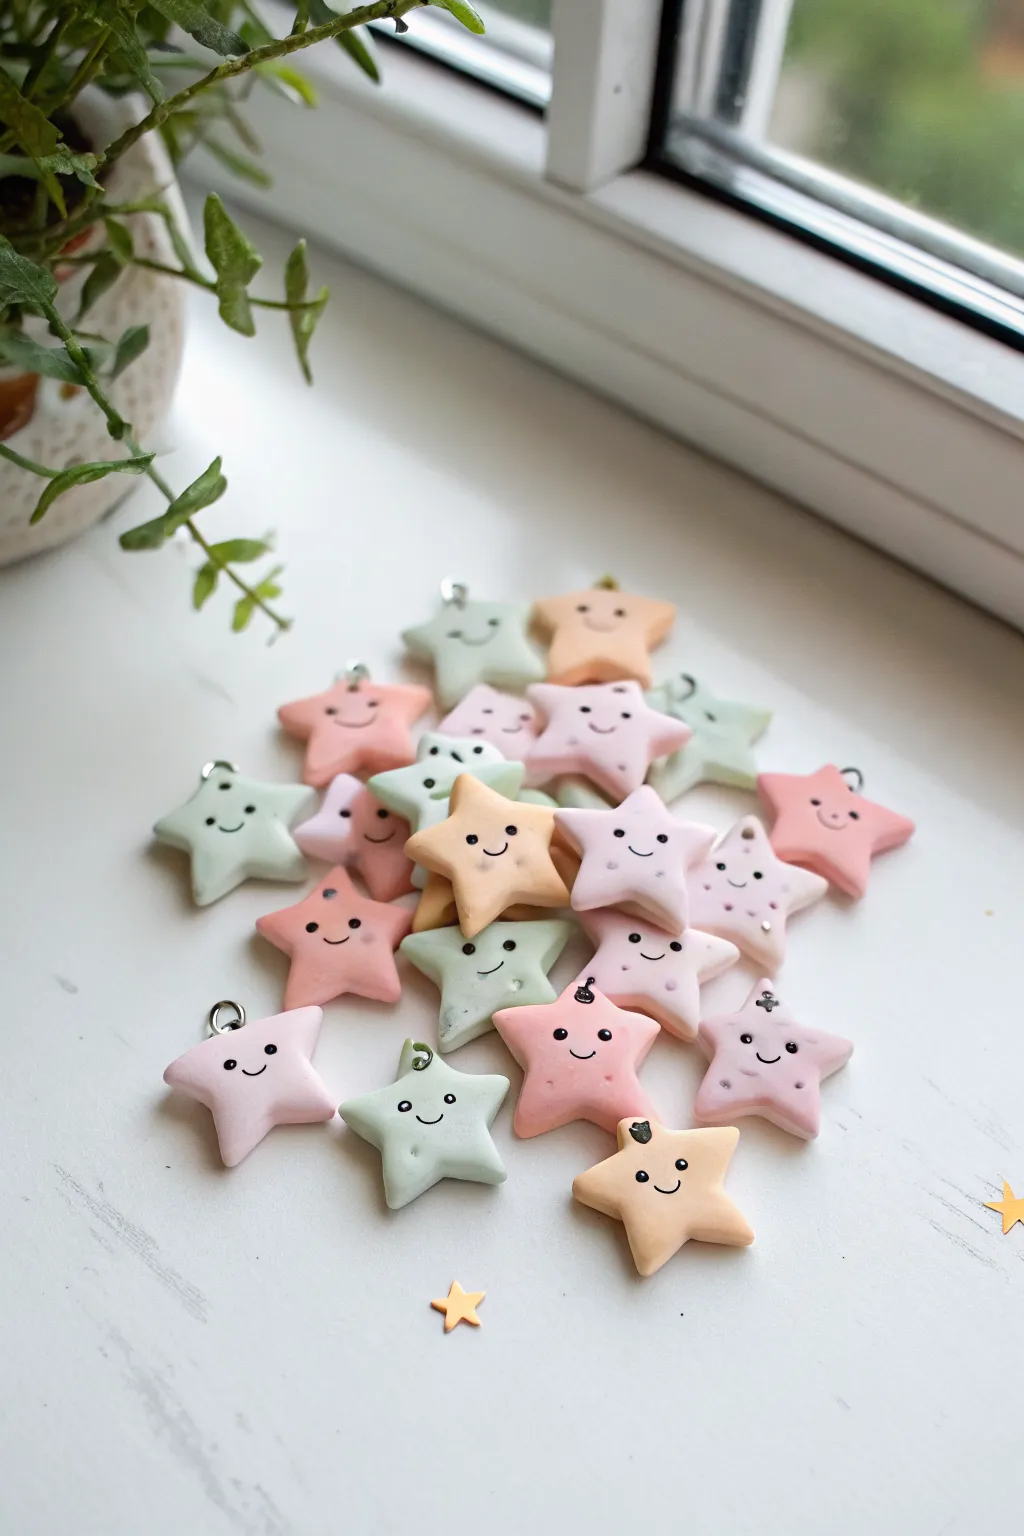
Brighten up your accessories with these adorable, candy-colored star charms that feature sweet, simple smiles. Their soft pastel hues and chubby, rounded edges make them perfect for keychains, bracelets, or phone straps.
Step-by-Step Tutorial
Materials
- Polymer clay in pastel colors (soft pink, mint green, peach, lavender)
- Small star-shaped cookie cutter (approx. 1 inch)
- Acrylic rolling pin or pasta machine
- Liquid clay (optional but helpful)
- Small metal screw eye pins or jump rings
- Needle tool or toothpick
- Fine-grit sandpaper (400-600 grit)
- Black acrylic paint
- Small dotting tool or a sewing pin
- Very fine detail paintbrush
- Glaze or polyurethane varnish (matte or satin finish)
- Baby wipes
Step 1: Shaping the Stars
-
Conditioning the Clay:
Begin by thoroughly kneading your polymer clay until it is soft and pliable. Warm hands make this easier, but ensure you wash them between colors to avoid muddying the delicate pastels. -
Rolling Out Sheets:
Roll your conditioned clay into a smooth, even sheet. Aim for a thickness of about 4-5mm (roughly 1/4 inch). You want them slightly chunky so they look cute and hold up well as charms. -
Cutting the Shapes:
Press your star cutter firmly into the clay sheet. Wiggle it slightly before lifting to ensure a clean cut. If the clay sticks to the cutter, gently push it out from the back or use a piece of plastic wrap over the clay before cutting. -
Smoothing Edges:
Once cut, the edges might be a bit sharp. Gently tap the edges with your finger to round them off, giving the star a softer, ‘puffy’ look. This is crucial for that friendly, cartoonish aesthetic. -
Adding Hardware:
If you are using screw eye pins, dip the tip into a tiny bit of liquid clay (or super glue if baking isn’t required for your glue type) and screw it into the top point of the star. Alternatively, use a needle tool to pierce a hole through the top point if you plan to use jump rings later. -
Baking:
Arrange your stars on a baking sheet lined with parchment paper or a ceramic tile. Bake according to your brand of clay’s instructions—usually around 275°F (130°C) for 15-20 minutes. Let them cool completely before handling.
Smudged Smile?
If you mess up the painted face, don’t panic. Use a toothpick or Q-tip dipped in a tiny bit of rubbing alcohol or acetone to gently wipe away the wet paint and try again.
Step 2: Bringing Them to Life
-
Sanding (Optional):
Inspect your cooled stars. If there are any fingerprints or rough spots, gently buff them away with fine-grit sandpaper under running water. -
Painting the Eyes:
Dip your smallest dotting tool (or the head of a sewing pin) into black acrylic paint. Carefully place two dots on the face area for the eyes. Keep them widely spaced for that classic ‘kawaii’ look. -
Drawing the Mouth:
Using your ultra-fine detail brush, paint a tiny, thin ‘U’ shape between and slightly below the eyes. I find resting my pinky finger on the table helps stabilize my hand for these tiny lines. -
Adding Details:
For extra character, you can add tiny eyelashes to the eyes or rosy cheeks using dry pastel powder brushed on with a Q-tip before sealing. -
Sealing:
Once the paint is fully dry, apply a thin coat of glaze or varnish. A matte finish looks soft and natural, while a gloss finish makes them look like candy. This step protects the paint from scratching off. -
Final Assembly:
After the varnish has cured, attach your jump rings to the eye pins or through the pierced holes. Your charms are now ready to be strung onto jewelry.
Celestial texture
Mix translucent glitter into your clay before rolling it out. This gives the stars a subtle, magical shimmer that catches the light without needing extra paint.
You have effectively created a handful of stars ready to brighten any day


What Really Happens Inside the Kiln
Learn how time and temperature work together inside the kiln to transform clay into durable ceramic.
Pumpkin and Ghost Mini Set
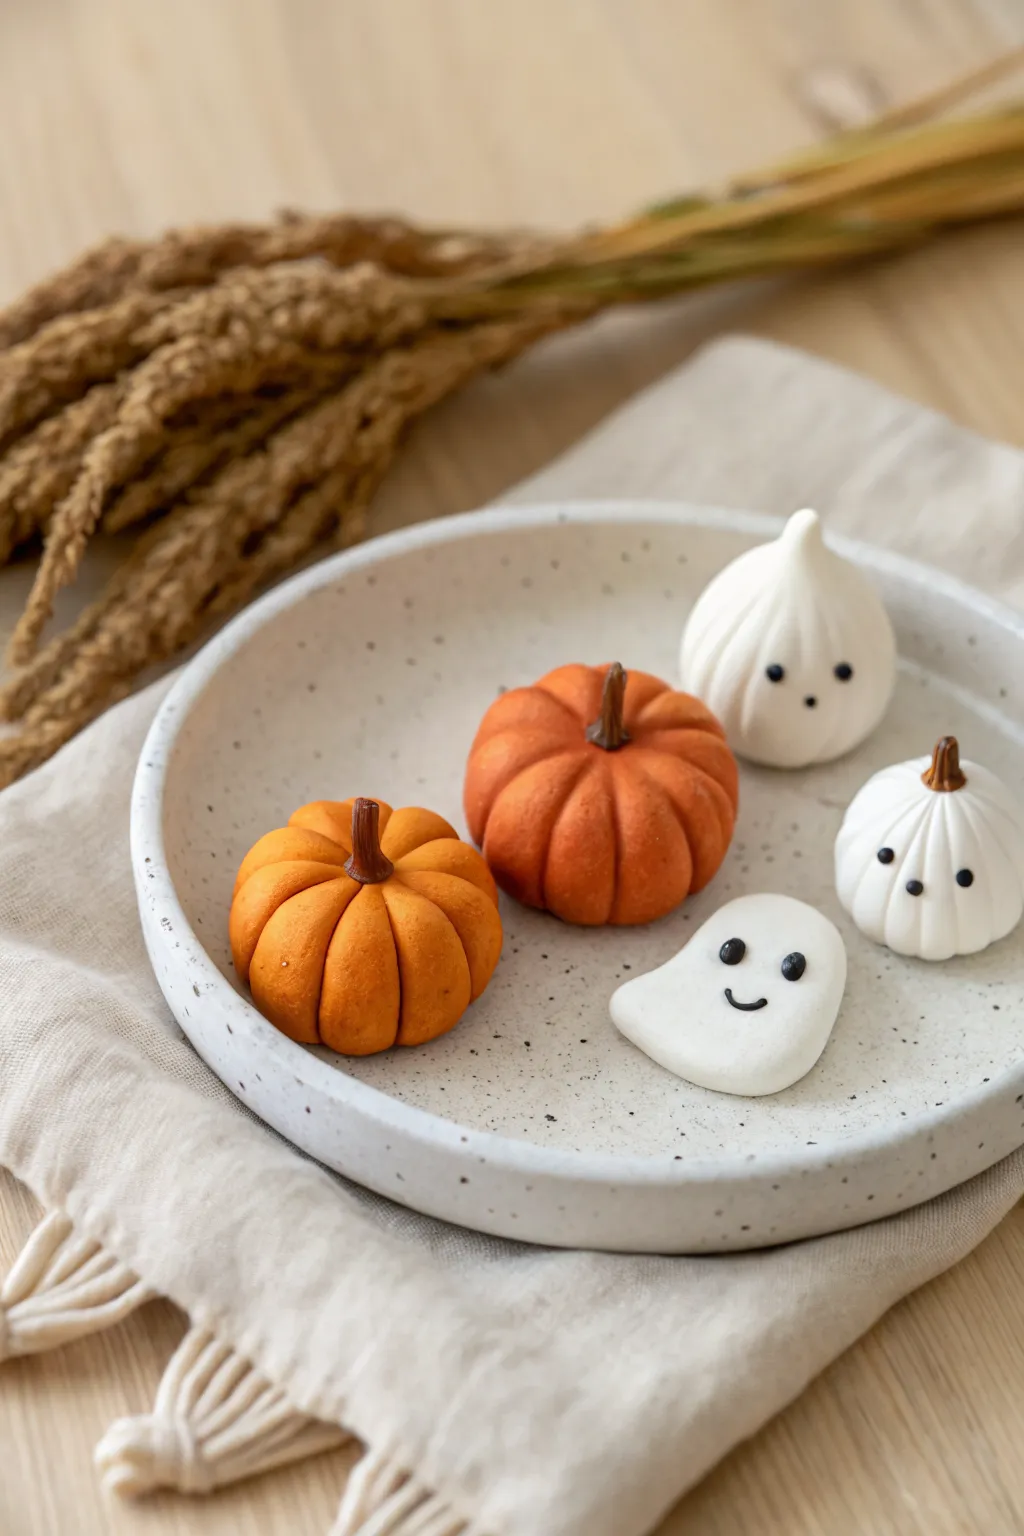
Capture the spirit of autumn with this darling set of miniature pumpkins and ghosts. Their soft matte finish and adorable expressions make them perfect for tiny seasonal displays or dollhouse decor.
Step-by-Step Tutorial
Materials
- Orange polymer clay (burnt orange shade)
- White or translucent white polymer clay
- Brown polymer clay (for stems)
- Black polymer clay (tiny amount for eyes)
- Needle tool or toothpick
- Ball stylus tool
- Soft pastel chalks (burnt sienna/orange) and a soft brush
- Silicone sculpting tool (optional)
- Baking tile or parchment paper
- Oven
Step 1: Basic Pumpkin Shapes
-
Portion the clay:
Start by conditioning your orange clay until soft. Divide it into two balls, making one slightly larger than the other to create variety in your patch. -
Form the base:
Roll the orange clay into smooth spheres. Gently press down on the top and bottom of each sphere to flatten them into a squat pumpkin shape. -
Create the segments:
Use a needle tool or toothpick to press vertical indentations all around the sides of the pumpkin. Start at the top center and press down to the bottom center, repeating until you have 6-8 segments. -
Soften the lines:
Gently rub your finger over the indented lines to soften the edges, making the segments look puffy rather than sharply cut. -
Add shading:
To give the pumpkins depth like the photo, shave a little orange or burnt sienna pastel chalk into a powder. Use a soft brush to dust this powder into the deep crevices of the segments. -
Indent the top:
Use a medium ball stylus to create a small depression in the center of the pumpkin where the stem will eventually sit.
Clean Clay Tip
White clay picks up lint instantly. I always clean my hands and tools with a baby wipe or rubbing alcohol right before switching to the white clay steps.
Step 2: Ghostly Figures
-
Shape the tall ghost:
Roll a medium ball of white clay. Pinch the top gently and pull it upward to create a teardrop or ‘Hershey’s Kiss’ shape with a refined point at the top. -
Make the pumpkin-ghost:
For the second white figure, roll a ball similar to your pumpkin size. Follow the same segmentation steps as the orange pumpkins, pressing lines around the sphere. -
Form the flat ghost:
Take a smaller amount of white clay and flatten it into a smooth, rounded organic shape, curving the bottom slightly to look like a drifting spirit. -
Add ghost stems:
Using the brown clay, roll a tiny tapered snake. Cut a small piece for the white pumpkin-ghost and press it into the center indentation.
Turn Them into Charms
Before baking, insert a small metal screw eye pin into the top of the pumpkins or ghosts. Once baked, you can attach them to earrings or a bracelet chain.
Step 3: Stems & Faces
-
Create orange pumpkin stems:
Roll slightly thicker logs of brown clay for the orange pumpkins. Texture them vertically with your needle tool to mimic wood grain. -
Attach the stems:
Press the textured brown stems firmly into the depressions you made earlier on the orange pumpkins. You can curve them slightly for character. -
Make the eyes:
Create microscopically small balls of black clay. Position two on the tall white ghost and two on the white pumpkin-ghost. Press them flat gently so they don’t protrude too much. -
Create the happy face:
For the flat ghost, add two black eyes. Then, roll a thread-thin snake of black clay and curve it into a ‘U’ shape for a smile, pressing it onto the face.
Step 4: Finishing
-
Final texture check:
Look over your pieces for fingerprints. Brush them lightly with cornstarch or baby oil if you need to smooth out imperfections before baking. -
Bake:
Place all figures on a baking tile. Bake according to your specific clay manufacturer’s instructions (usually 275°F/135°C for 15-30 minutes). -
Cool down:
Turn off the oven and let the clay cool down completely inside. This annealing process helps prevent cracks in thicker pieces like the pumpkins.
Arranging these warm, autumnal figures on a small dish brings an instant cozy vibe to your space
Smiling Succulent Pots
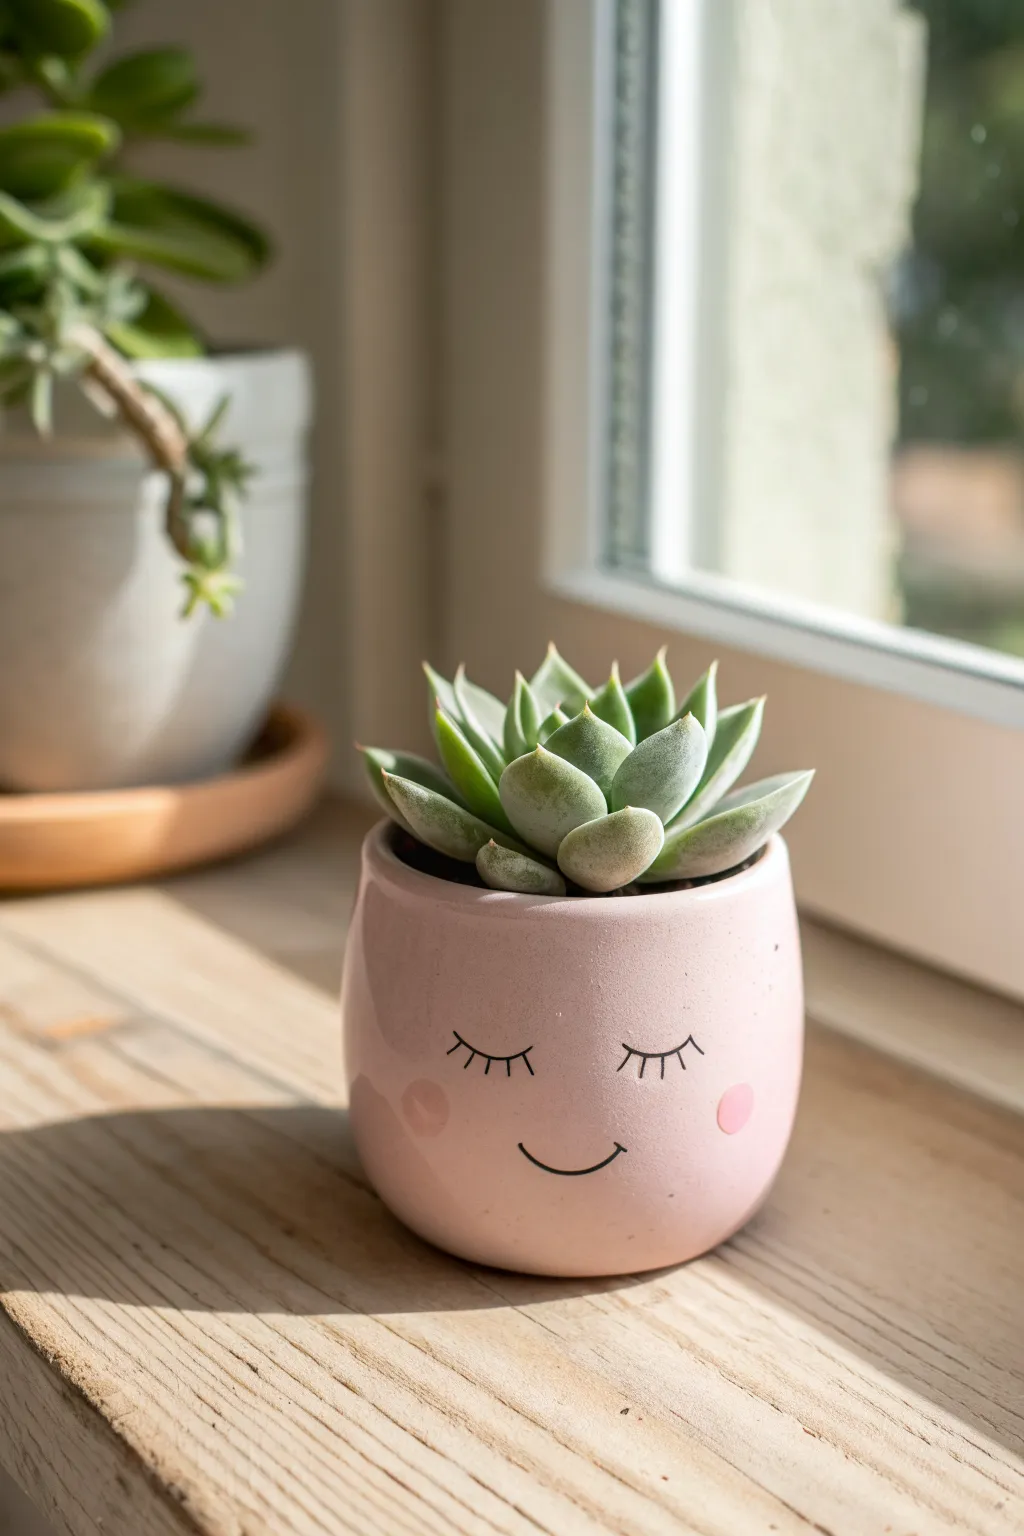
Transform a plain blob of clay into this serene, smiling face pot that looks so peaceful holding your favorite succulent. The soft pink finish and delicate sleeping eyes add a touch of whimsy to any windowsill corner.
How-To Guide
Materials
- Light pink polymer clay (about 1 block)
- Small glass or oven-safe ceramic bowl (for form)
- Black fine-point permanent marker or acrylic paint pen
- Soft pastel chalk (pink or rose)
- Small paintbrush or cotton swab
- Rolling pin or pasta machine
- Clay knife or craft blade
- Sandpaper (fine grit)
- Matte polymer clay varnish (optional)
- Oven
Step 1: Shaping the Base
-
Condition the clay:
Start by warming up your light pink polymer clay in your hands until it is soft and pliable. If the pink is too bright, you can mix in a tiny amount of white clay to achieve that soft, baby-pink hue seen in the photo. -
Roll out a slab:
Using your rolling pin or a pasta machine on a thick setting, roll the clay into an even sheet, approximately 1/4 inch thick. You want it substantial enough to hold the soil later. -
Prepare your mold:
Take your small oven-safe glass or ceramic bowl. This will act as the internal structure. If you are worried about sticking, lightly dust it with cornstarch. -
Wrap the form:
Drape the clay sheet over the bottom and sides of your overturned bowl. Gently press the clay down to conform to the bowl’s shape, ensuring there are no air bubbles trapped underneath. -
Trim the excess:
Using your craft knife, trim the clay around the rim of the bowl to create a clean, straight edge. This will be the top opening of your pot. -
Smooth the exterior:
Use your fingers or a silicone smoothing tool to blend any seams and rub out fingerprints. The surface should be perfectly smooth and rounded like an eggshell. -
Create a flat bottom:
Gently press the very bottom of the pot against your work surface to flatten it slightly. This ensures the pot will stand stable and upright without wobbling. -
Add a drainage hole:
If you plan to plant a live succulent directly inside, use a straw or a small circular cutter to punch a hole in the center of the bottom for drainage.
Step 2: Baking and Refining
-
First bake:
Place the clay-covered bowl into the oven. Bake according to the manufacturer’s instructions for your specific brand of clay (usually around 275°F/130°C for 15-30 minutes). Let it cool completely. -
Remove the mold:
Once cool, carefully wiggle and twist the inner bowl to release it from the clay shell. If it resists, popping it in the freezer for ten minutes often helps the clay contract and pop off. -
Sand the imperfections:
Use fine-grit sandpaper to gently buff the rim and any rough spots on the exterior. I always dip the sandpaper in water first to keep clay dust from flying into the air.
Smudged Ink?
If your marker smudges, dip a q-tip in rubbing alcohol and gently wipe the error away. Let the clay dry completely before trying to draw the line again.
Step 3: Adding the Face
-
Plan the placement:
Before drawing, look at the pot and decide where the front is. Visualize the eyes slightly above the halfway mark and the mouth centered below. -
Draw the eyelashes:
Using your fine-point black marker or paint pen, draw two downward-curving arcs for the closed eyelids. Add three small, vertical lashes to each arc. -
Add the smile:
Draw a small, simple ‘U’ shape between and below the eyes for the smile. Keep the line thin and delicate to match the peaceful expression. -
Prepare the rosy cheeks:
Scrape a small amount of pink pastel chalk onto a piece of paper to create a fine powder. -
Apply the blush:
Dip a cotton swab or a small dry brush into the pastel powder. Gently dab two circular spots onto the clay cheeks, just outside the smile line. -
Seal the work:
To protect the face drawing and the blush from water damage, apply a thin coat of matte varnish over the entire exterior of the pot. Let it dry fully before planting.
Level Up: Texture
Before baking, gently press a piece of lace or a textured sponge into the lower half of the pot to give it a subtle, tactile pattern.
Now you have a charming little vessel ready to be the perfect home for your favorite green succulent

TRACK YOUR CERAMIC JOURNEY
Capture glaze tests, firing details, and creative progress—all in one simple printable. Make your projects easier to repeat and improve.
Heart-Shell Sea Turtle Charm
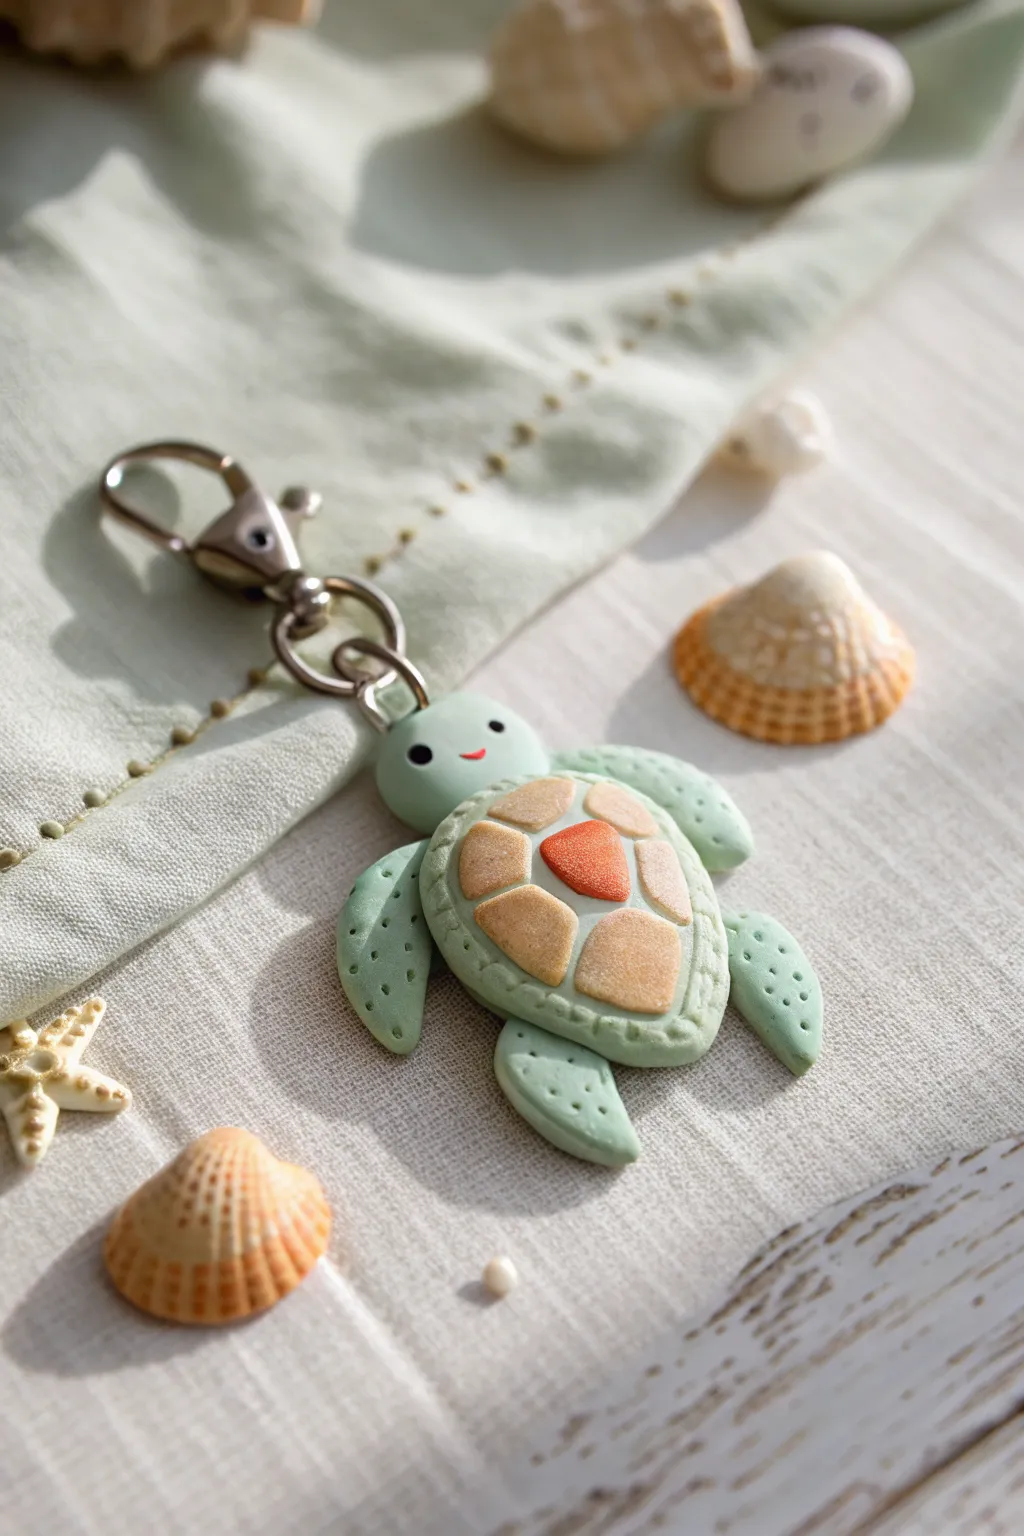
Capture the essence of the beach with this adorable sea turtle charm, featuring a unique shell design that mimics tumbled sea glass. Its soft mint green body and textured details make it a perfect accessory for your keys or beach bag.
Step-by-Step
Materials
- Polymer clay (light mint green, beige/sand, coral/orange)
- Lobster clasp keychain with jump rings
- Eye pin
- Clay sculpting tools (needle tool, small ball tool)
- Acrylic rolling pin
- Blade or craft knife
- Black acrylic paint or clay for eyes
- Gloss glaze (optional)
- Oven
Step 1: Shaping the Body
-
Create the base:
Start by conditioning the mint green clay until it is soft and pliable. Roll a medium-sized ball for the body and flatten it slightly into an oval shape. -
Form the head:
Roll a smaller ball of green clay for the head. Press it gently onto the top front of the body oval so it connects securely. -
Sculpt the flippers:
Create four teardrop shapes from the green clay: two larger ones for the front flippers and two slightly smaller ones for the back. -
Attach the limbs:
Flatten the teardrops slightly and attach them to the underside of the body. Angle the front flippers backward and the back flippers slightly outward. -
Detail the head:
Using a small ball tool, create two small indentations for the eyes. Use a needle tool to press a tiny, curved smile onto the face. -
Texture the skin:
Take a needle tool and gently poke small dots across the top surface of all four flippers to give the skin a realistic, porous texture.
Fingerprint Fix
If you notice fingerprints on your smooth clay, lightly brush the surface with a tiny amount of baby oil or cornstarch before baking to smooth them out completely.
Step 2: Designing the Shell
-
Prepare the shell base:
Roll a flat oval of mint green clay that is slightly smaller than the main body but thick enough to hold the ‘sea glass’ pieces. -
Create the shell segments:
Roll out the beige and coral clay. Cut or shape small, irregular geometric pieces that look like tumbled stones. You need one central heart-like shape in coral and about 5-6 surrounding pieces in beige. -
Texture the segments:
I like to gently press a piece of sandpaper or a toothbrush onto these colored segments to give them a grainy, sea-glass matte texture before attaching them. -
Assemble the mosaic:
Press the coral piece into the center of the shell base. Arrange the beige pieces around it in a circle, leaving small gaps between them to let the green base show through. -
Add the rim detail:
Roll a very thin snake of mint green clay. Wrap it around the perimeter of the shell where the segments end, blending it downward. -
Stitch the rim:
Use a needle tool or a blunt knife edge to press small, vertical dashed lines all around this rim, creating a stitched or ridged effect. -
Mount the shell:
Place the finished shell firmly onto the back of the turtle body. Ensure the edges meet cleanly.
Make it Sparkle
After baking, brush a coat of UV resin or glossy glaze over only the beige and coral shell segments. This makes them look like wet, polished sea glass.
Step 3: Assembly and Finishing
-
Insert hardware:
Trim an eye pin to an appropriate length (about 1cm). Dip the end in liquid clay or bake-and-bond for extra security, then insert it into the top center of the shell, near the neck. -
Add the eyes:
Roll two minuscule balls of black clay and press them into the eye sockets. Add tiny white specks for highlights if desired. -
Bake:
Bake the turtle according to your clay manufacturer’s instructions, typically at 275°F (130°C) for 15-20 minutes. -
Cool and assemble:
Allow the charm to cool completely. Once hard, use pliers to open the jump ring on your lobster clasp keychain and attach it to the eye pin loop.
With your turtle complete, you now have a charming little ocean companion to carry with you everywhere
Balloon Dog Minis
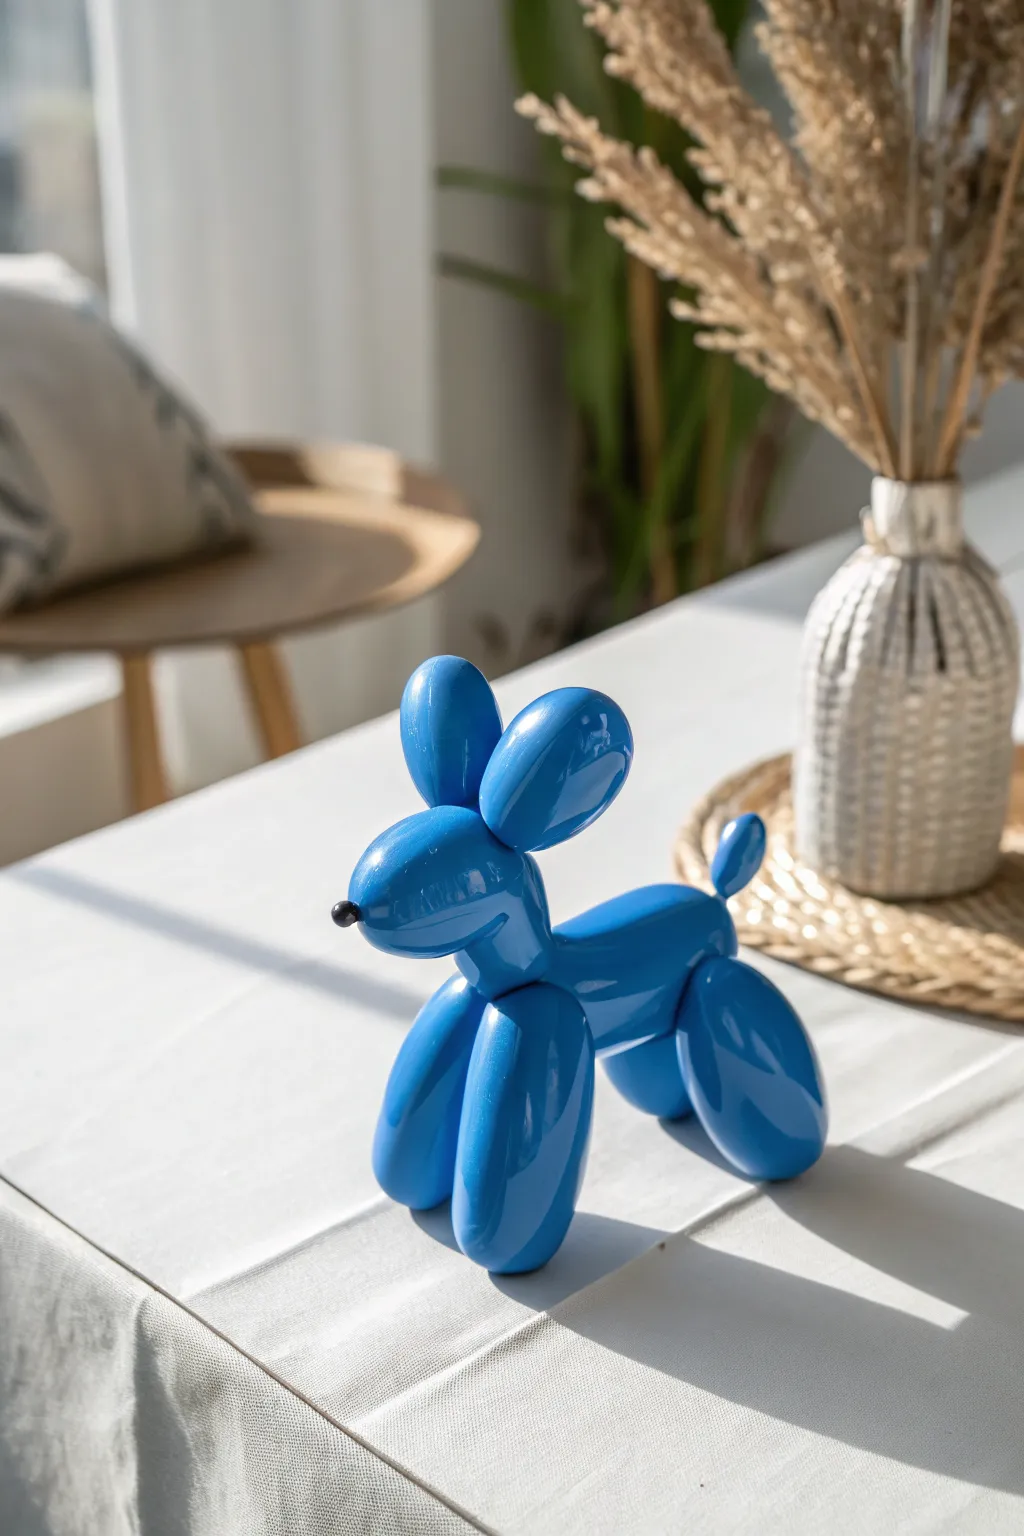
Capture the whimsical charm of a classic balloon animal without the risk of popping. This shiny blue polymer clay figurine replicates the inflated look perfectly, creating a modern pop-art piece for your home decor.
Step-by-Step Tutorial
Materials
- Bright blue polymer clay (approx. 2oz)
- Black polymer clay (tiny amount for nose)
- Blade or craft knife
- Liquid clay or Bake and Bond (optional)
- Needle tool or toothpick
- High-gloss glaze or UV resin
- Soft brush for glazing
- Oven for baking
- Sandpaper (fine grit, optional)
- Isopropyl alcohol and wipes
Step 1: Preparing the Shapes
-
Condition the Blue Clay:
Begin by thoroughly conditioning your blue polymer clay until it is soft and pliable. This is crucial for avoiding cracks later. Roll it into a smooth, consistent log about 1/2 inch thick. -
Section the Clay:
Using your blade, cut the log into segments. You will need: four equal pieces for the legs, one slightly longer piece for the body, one thick oval for the head, two tear-drop shapes for ears, and a tiny bit for the tail. -
Create the Basic Forms:
Roll each segment into a very smooth, rounded sausage shape. Taper the ends of these sausages slightly like a real inflated balloon. Smooth out any fingerprints or seams using a light touch. -
Refine the Leg Pairs:
Take two of the leg segments and press them gently together side-by-side. The clay should touch, but keep their individual rounded definition. Repeat with the second pair of legs. -
Form the Ears:
Take the two tear-drop shapes reserved for ears. Flatten them slightly but keep them plump. Press them together at the narrower ends so they fan out slightly in a V-shape.
Step 2: Assembling the Dog
-
Attach the Body:
Take the longer body segment and place it horizontally on top of your two leg pairs. Position the front legs under one end and the back legs under the other. Gently press them to adhere. -
Shape the Head:
Take your head oval. On one end, create a very slight narrowing to imply a snout. Attach the assembled ears to the top back of the head piece, blending the clay minimally at the connection point. -
Create the Neck:
Roll a small ball or short cylinder of blue clay to act as a neck joint. Place this between the front of the body and the bottom of the head. This gives the head elevation and the correct angle. -
Secure the Joints:
If your clay feels dry, create a stronger bond by adding a tiny drop of liquid clay or Bake and Bond between the pieces before pressing them together. -
Add the Tail:
Roll a tiny sausage shape for the tail. Press it onto the top rear of the body, angling it upwards for a perky look. -
Add the Nose:
Roll a extremely small ball of black clay. Press it gently onto the tip of the snout. It should look like a tiny button.
Keep it Seamless
To mimic a real balloon, avoid blending the seams where parts join completely smooth. Leave a distinct ‘crease’ where the ‘balloons’ touch to maintain the twisted effect.
Step 3: Finishing Touches
-
Smooth Imperfections:
Before baking, examine the piece closely. Lightly brush the surface with a little baby oil or use a silicone tool to smooth out any lingering fingerprints. The surface needs to be flawless for that balloon effect. -
Clean the Clay:
Wipe the surface gently with a little isopropyl alcohol on a brush or lint-free wipe to remove surface dust or lint which shows up clearly on solid colors. -
Bake the Piece:
Bake according to your clay manufacturer’s instructions (typically 275°F/135°C for 30 minutes per 1/4 inch of thickness). Propping the belly on a bit of polyester batting can prevent flat spots on the legs during baking. -
Cool Down:
Let the piece cool completely inside the oven or on the counter. Do not rush this, as warm clay is fragile. -
Apply the Glaze:
This is the most important step for realism. Apply a thick, even coat of high-gloss polyurethane varnish or UV resin. Cover every blue part to make it look like wet latex or shiny ceramic. -
Cure the Finish:
Let the varnish dry completely in a dust-free box, or cure your UV resin under a UV lamp. I find a second coat often adds that extra depth needed for the ‘inflated’ illusion.
Metallic Magic
Use metallic blue clay or brush the raw clay with blue mica powder before baking. This creates a mesmerizing anodized metal effect that shines beneath the gloss.
Place your shiny new sculpture on a shelf where it can catch the light and fool your guests.
Animal Macaron Sandwich Charms
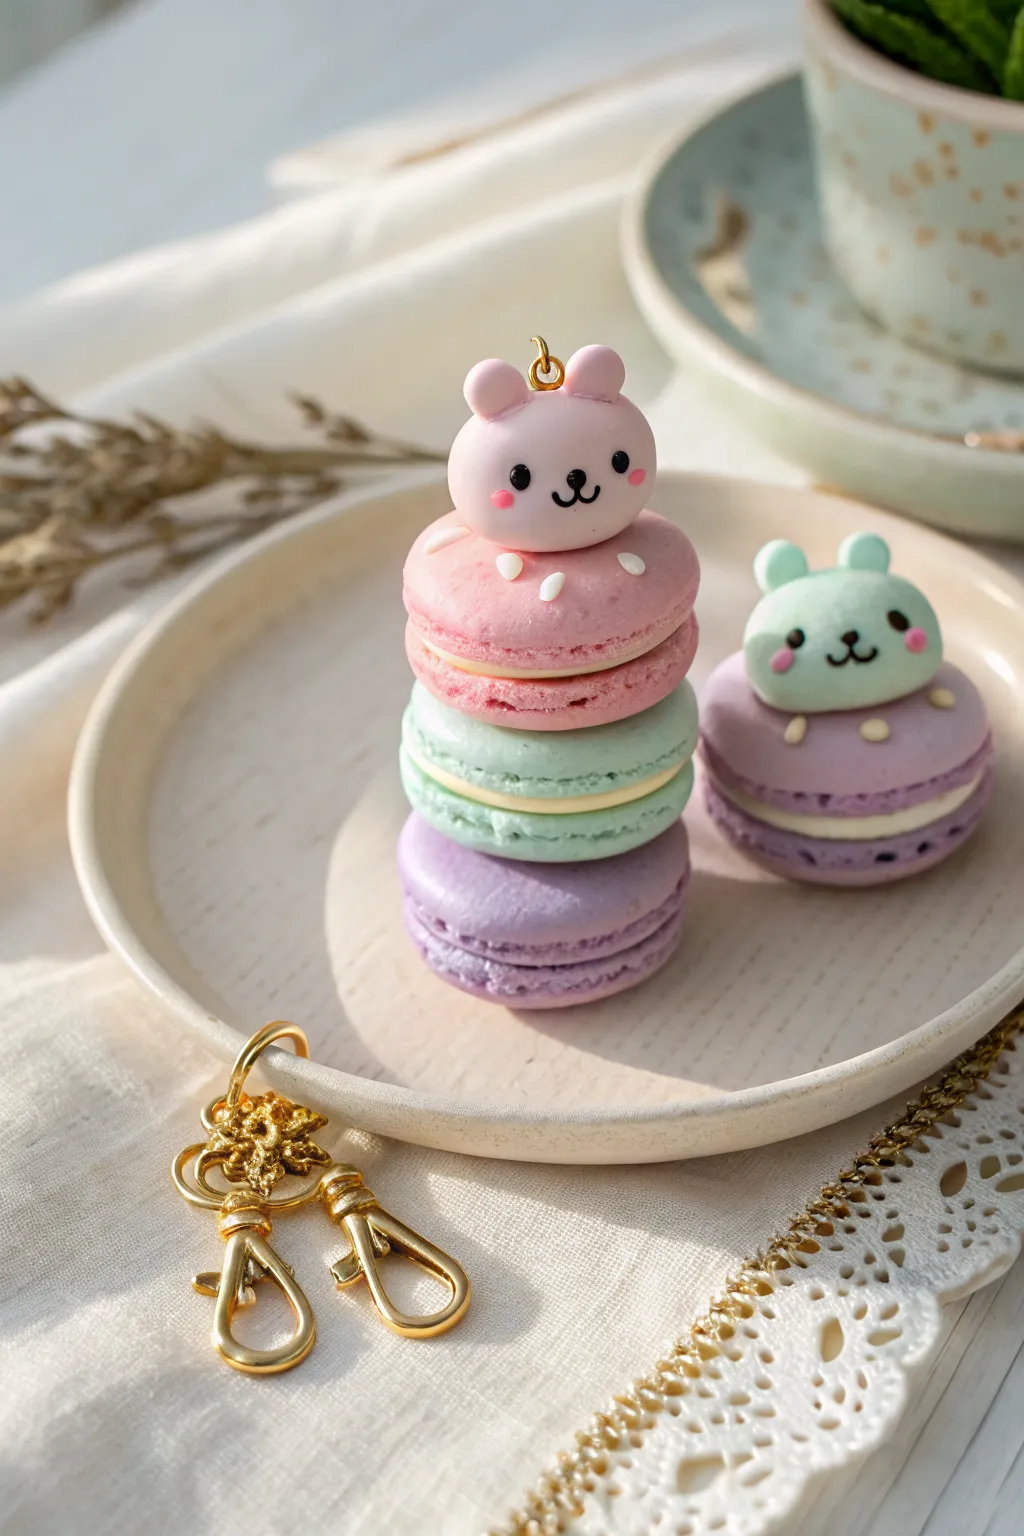
These delightful polymer clay charms combine the classic sweetness of French macarons with adorable kawaii bear faces. The pastel stacks, finished with golden hardware, make perfect bag charms or personalized keychains for friends.
Step-by-Step Guide
Materials
- Polymer clay in pastel pink, mint green, and lavender
- Polymer clay in white (for filling)
- Black and pink acrylic paint (or clay) for facial details
- Tiny gold eye pins
- Gold lobster clasp keychain findings
- Needle tool or toothpick
- Small circle cutters (approx. 1 inch)
- Dotting tool or ball stylus
- Gloss glaze or UV resin (optional)
- Oven and baking sheet
Step 1: Forming the Macaron Shells
-
Condition the clay:
Start by thoroughly conditioning your pastel pink, mint, and lavender clay until it is soft and pliable. Roll each color out into a sheet about 1/4 inch thick. -
Cut the circles:
Using your small circle cutter, punch out two circles for each macaron you intend to make. For the tall stack shown, you need two pink, two mint, and two lavender circles. -
Soften the edges:
Gently press around the top edge of each circle with your finger to round it off slightly, giving it that domed cookie look rather than a sharp cylinder. -
Create the ‘feet’:
To make the signature rough texture (macaron ‘feet’) at the base, take a needle tool or toothpick. Poke and gently drag the clay right at the bottom edge of the circle, working your way all around the circumference.
Fixing “Squished” Feet
If you accidentally squash the textured edges while handling the clay, re-texture them gently with your needle tool right before baking to keep them fluffy.
Step 2: Creating the Filling and Assembly
-
Prepare the cream:
Roll out a sheet of white clay slightly thinner than your colored shells. Cut out circles using the same cutter, or simply roll small balls and flatten them manually. -
Stack the layers:
Place a white disk between two matching colored shells. Press down gently to adhere them without squishing the texture you just created. -
Build the tower:
For the triple charm, stack the finished macarons: purple on the bottom, mint in the middle, and pink on top. I find adding a tiny dab of liquid clay between layers helps them bond permanently during baking.
Make it Scented
Mix a tiny drop of vanilla or strawberry fragrance oil into the clay during the conditioning phase. Your charms will smell as sweet as they look.
Step 3: Sculpting the Bear Toppers
-
Shape the head:
Roll a smooth, seamless ball of pink clay (for the stack) or mint clay (for the single macaron). Gently flatten the bottom so it sits flush on the top macaron shell. -
Add the ears:
Roll two tiny balls of the same clay color for ears. Press them onto the top of the head using a dotting tool to blend the seam where they connect. -
Prepare for hardware:
Before baking, insert a small gold eye pin into the center of the bear’s head. If you are making the stack, ensure the pin is long enough to go deep into the top macaron for stability. -
Add decorative sprinkles:
Roll incredibly tiny teardrop shapes from white clay. Press these onto the top macaron shell around the bear head to look like cream dollops or sprinkles.
Step 4: Details and Finishing
-
Bake the project:
Place your creations on a baking sheet lined with parchment paper. Bake according to your clay manufacturer’s specific instructions (usually 275°F for 15-30 minutes). -
Cool completely:
Let the clay cool fully before handling. It creates a stronger bond and ensures paint won’t run. -
Paint the faces:
Using a fine detail brush or a needle tool dipped in black acrylic paint, add two small eyes and a nose/mouth. Use pink paint for blush cheeks. -
Seal (Optional):
For extra durability and shine, coat the Macarons with a gloss glaze or a thin layer of UV resin once the paint is dry. -
Attach hardware:
Open the jump ring on your gold lobster clasp keychain and loop it through the eye pin on top of the bear.
Enjoy your new sweet accessories or wrap them up as a thoughtful handmade gift
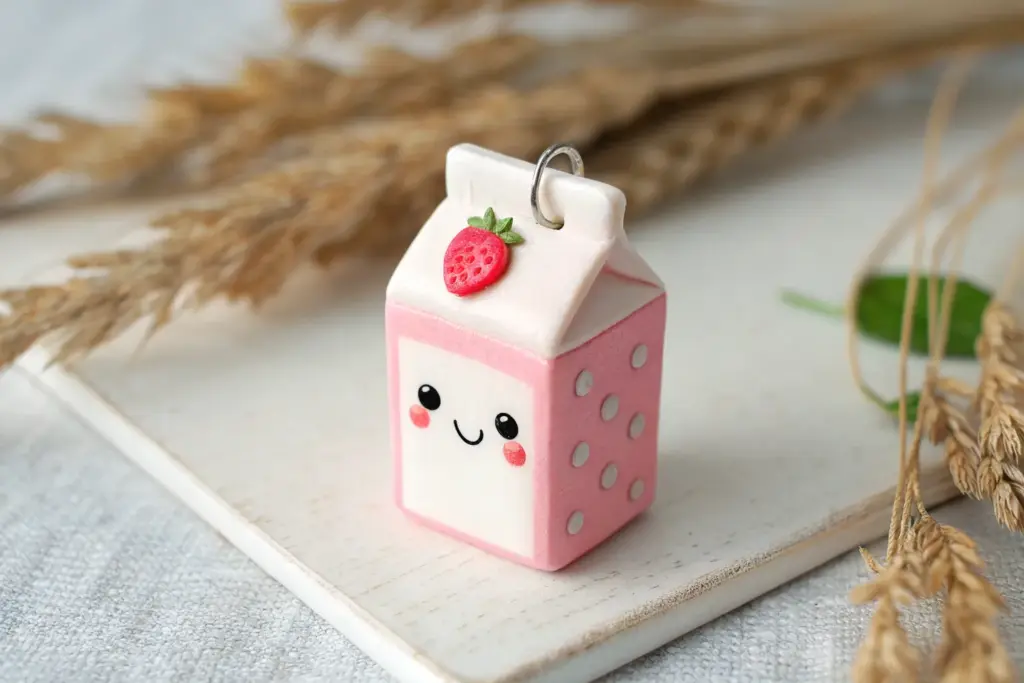
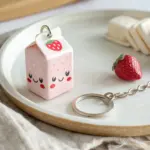
Cute Milk Carton Charms
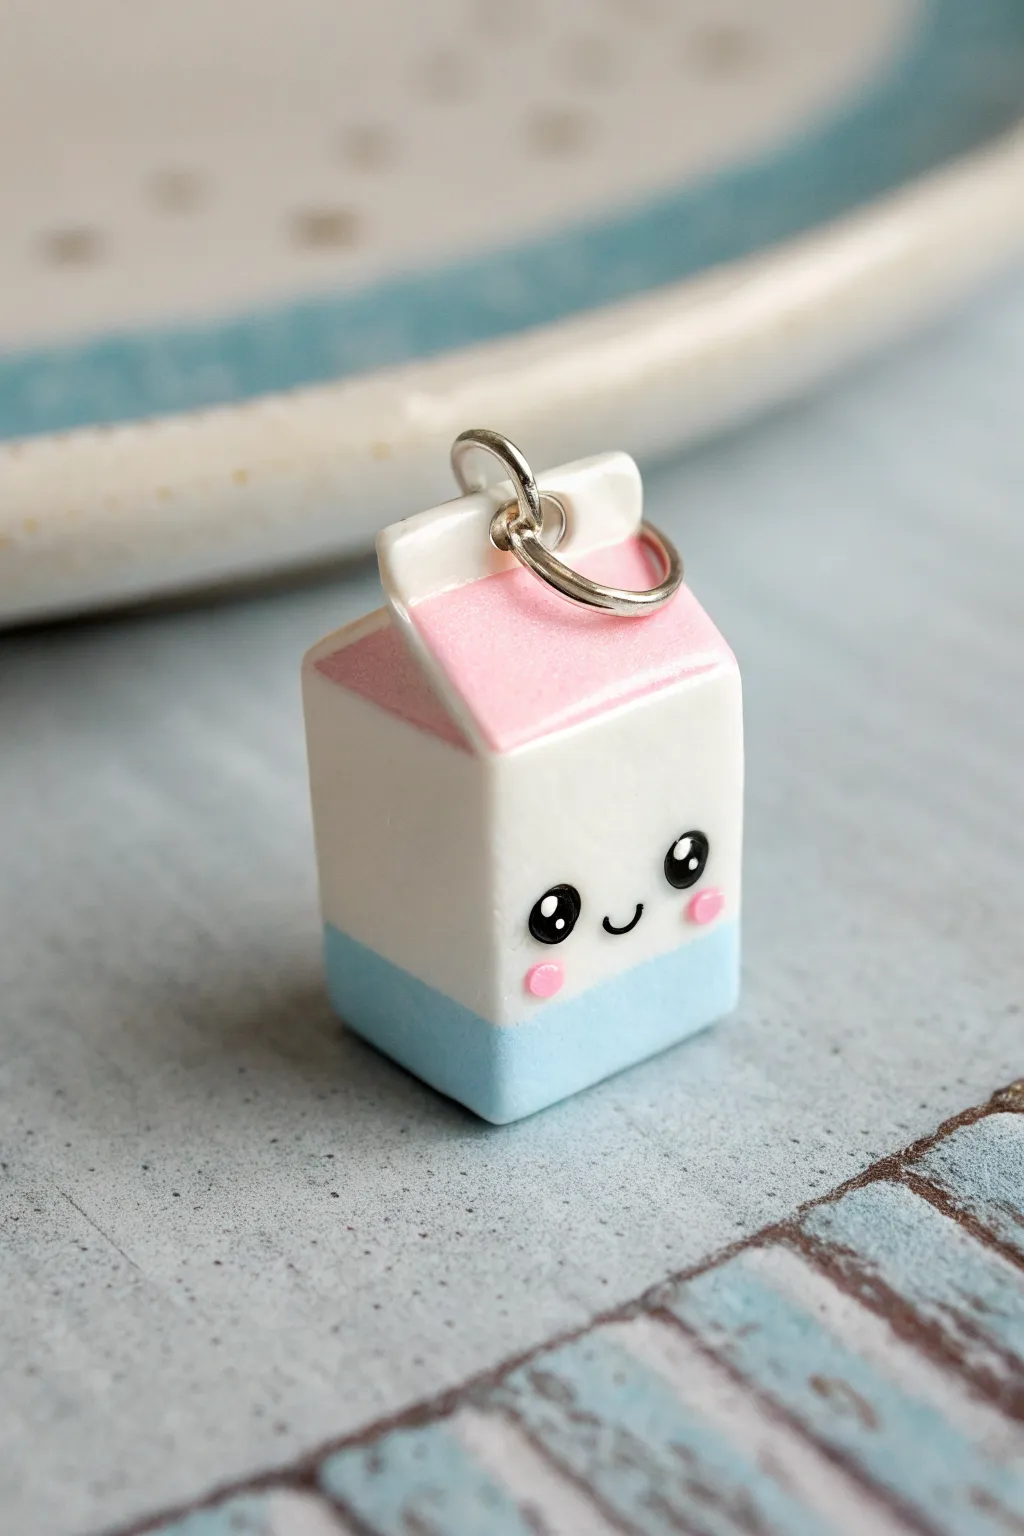
This adorable little charm transforms a mundane object into a pocket-sized friend with a sweet pastel color palette and a happy face. It’s an excellent beginner project for practicing geometric shapes and crisp layering in polymer clay.
Detailed Instructions
Materials
- White polymer clay
- Pastel pink polymer clay
- Pastel blue polymer clay
- Black polymer clay (tiny amount)
- X-Acto knife or sharp clay blade
- Acrylic rolling pin
- Small ball stylus tool
- Silver eye pin
- Jump ring
- Gloss glaze or UV resin (optional)
- Small paintbrush
Step 1: Forming the Base
-
Create the white block:
Start by conditioning a chunk of white clay until it is soft and pliable. Roll it into a smooth ball to remove any air bubbles. -
Shape the rectangle:
Use your fingers to gently press the ball into a rectangular prism shape. It should be slightly taller than it is wide, roughly the proportions of a standard milk carton. -
Sharpen the edges:
Place the rectangle on your work surface and press it down lightly. Use your clay blade to gently tap each side flat against the table to create sharper, cleaner corners. -
Create the blue stripe:
Roll out a thin sheet of pastel blue clay. Cut a strip that is exactly the same width as the bottom of your white block. -
Attach the bottom color:
Wrap the blue strip around the very bottom edge of the white rectangle. Smooth the seam at the back with your finger or a sculpting tool so it blends seamlessly.
Step 2: Sculpting the Top
-
Roll the pink sheet:
Roll out a sheet of pastel pink clay, keeping it relatively thin, about 2mm thick. -
Cut the pink rectangle:
Cut a rectangle from the pink clay that matches the width of your carton but is long enough to fold over the top. -
Create the triangular top:
Slice the very top of your white carton at a subtle angle on both sides to create a roof-like peak, or simply mold the pink clay into a triangular tent shape when you place it on top. -
Add the white seal:
Roll a small, thick strip of white clay. Place this horizontally across the peak of the pink roof to simulate the folded seal of a carton. -
Insert the eye pin:
Take your metal eye pin and carefully push the straight end down through the center of the white seal and deep into the body of the carton. If needed, trim the pin so it doesn’t poke out the bottom.
Smudged White Clay?
White clay attracts dust like a magnet. Keep a pack of baby wipes nearby to clean your hands and tools often. If you see lint before baking, remove it with a bit of rubbing alcohol or nail polish remover.
Step 3: Adding the Face
-
Make eye sockets:
Use a small ball stylus to gently indent two spots on the white section where you want the eyes to sit. This helps the clay balls stay in place. -
Place the eyes:
Roll two tiny, equal-sized balls of black clay. Press them gently into the indents you just made. -
Add cheeks:
Roll two even smaller flattened circles of pink clay. Place them just below and to the outside of the eyes for a rosy cheek effect. -
Create the smile:
Roll an incredibly thin snake of black clay. Cut a tiny U-shape segment and carefully place it between the eyes using a needle tool. -
Add eye highlights:
Using the tip of a needle or a very small dotting tool, place a minuscule spec of white clay (or white paint after baking) in the top right corner of each black eye for sparkle.
Flavor Variations
Switch up the ‘flavor’ of your milk by changing the colors! Try light brown and yellow for banana milk, brown for chocolate, or pastel green for matcha milk. You can even paint a tiny fruit icon on the side.
Step 4: Baking and Finishing
-
Bake the charm:
Bake the piece according to your clay package instructions. I usually tent a piece of foil over the top to prevent the white clay from scorching or yellowing. -
Cool down:
Let the charm cool completely before handling it. Polymer clay is still slightly soft when hot and can dent easily. -
Glaze (Optional):
For a shiny, ceramic-like finish like the photo, apply a coat of gloss glaze or UV resin. Cure it under a UV lamp if using resin. -
Attach hardware:
Once dry, open a jump ring with pliers, loop it through the eye pin, and attach it to your keychain or necklace chain.
Now you have a sweet little dairy friend to accompany you on your keys or bag
Tiny Bento Box Characters
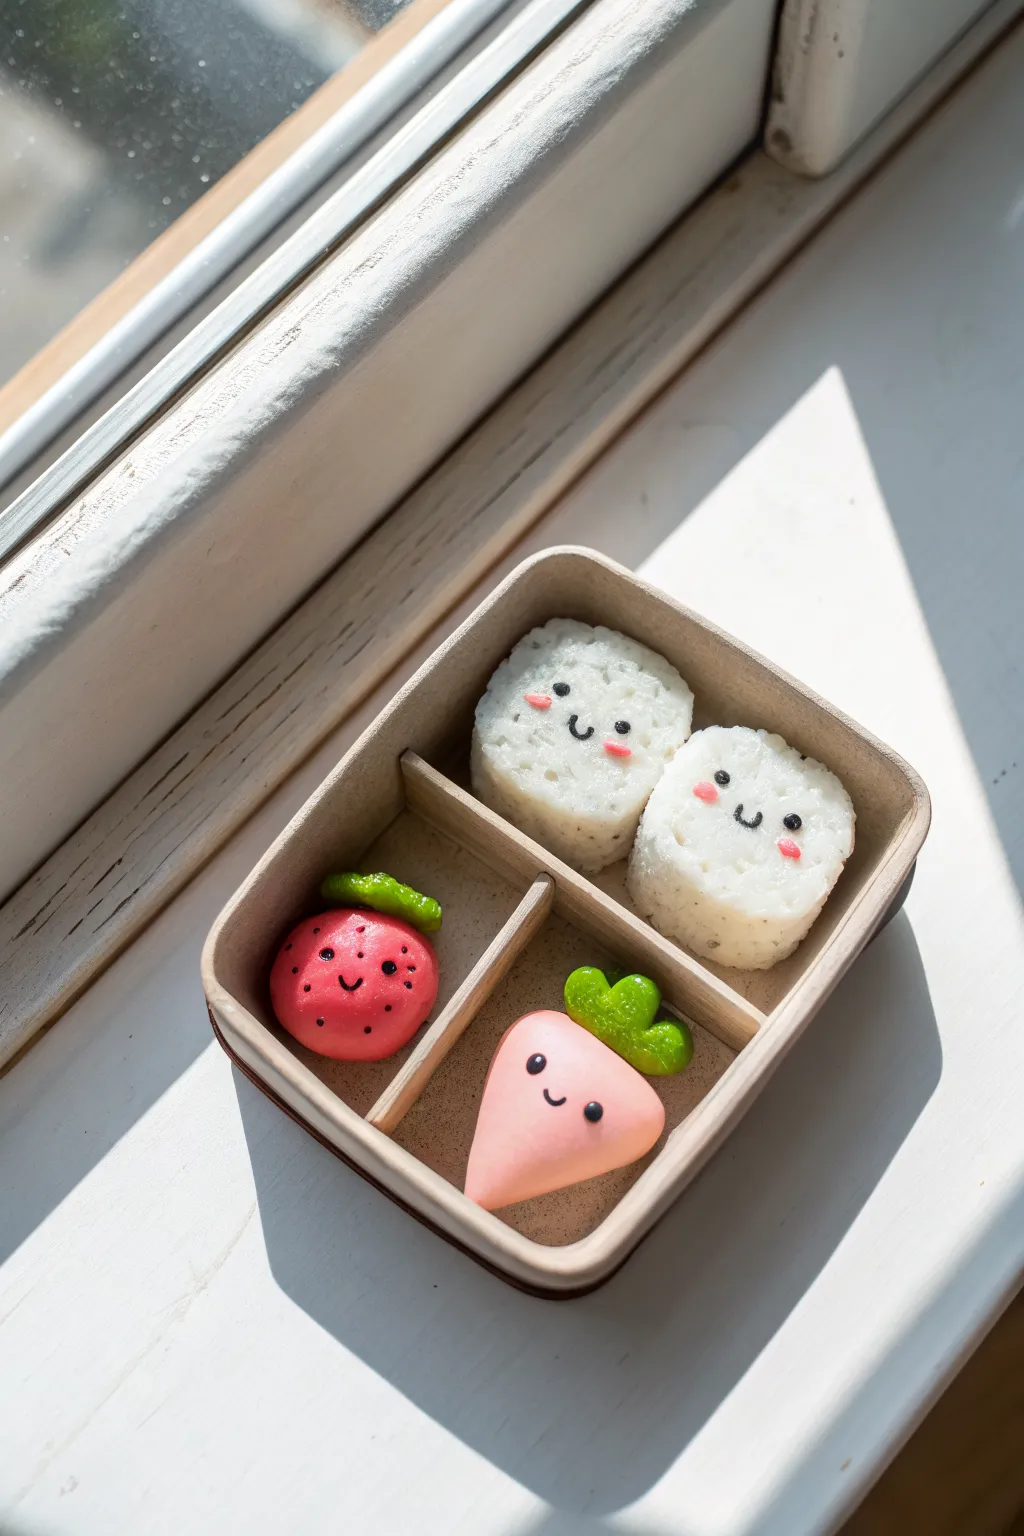
Create a delightfully tiny lunch scene with this polymer clay bento box project, perfect for dollhouses or display shelves. You’ll sculpt adorable smiling rice balls, a sweet strawberry, and a happy little carrot, all nestled inside a custom-made container.
Step-by-Step Guide
Materials
- Polymer clay (white, translucent white, red, orange, green, tan/beige)
- Black and pink acrylic paint or fine detail pens
- Dotting tools or toothpicks
- Bento box mold or square cutter (approx. 1.5 inches)
- X-acto knife or craft blade
- Old toothbrush or stiff bristle brush (for texture)
- Gloss glaze (optional)
Step 1: Making the Bento Box
-
Mix the Box Color:
Blend tan or beige clay with a small amount of white to create a soft, wood-like color for the bento container. It should look like light bamboo or unfinished wood. -
Form the Base:
Roll out a slab of your tan clay to about 3mm thickness. Cut a square or rectangle with rounded corners for the base of your box. -
Build the Walls:
Roll a long snake of the same tan clay and flatten it slightly to create a strip. Wrap this strip around the edge of your base, smoothing the seams on the outside and inside to join them securely. -
Add Dividers:
Cut smaller strips of the flattened tan clay to create the inner compartments. Place one horizontal divider about two-thirds down, and a vertical one splitting the bottom section.
Step 2: Sculpting Rice Balls (Onigiri)
-
Prepare Rice Clay:
Mix white clay with a tiny bit of translucent clay. This gives the ‘rice’ a more realistic, slightly gummy appearance rather than a flat, solid white. -
Shape the Onigiri:
Form two chubby triangles or rounded cylinders depending on your preference. The ones in the photo are rounded, almost oval cylinders with flattened tops. -
Texture the Rice:
Using an old toothbrush or a ball of crumpled aluminum foil, gently tap the surface of the clay. This creates the bumpy texture of sticky rice grains. -
Place in Box:
Gently nestle your two rice balls into the large top compartment of your bento box.
Fixing Smudges
If you smudge the tiny painted faces, don’t panic. Use a cotton swab dipped in a little rubbing alcohol or nail polish remover to gently wipe away the mistake before trying again.
Step 3: Sculpting the Fruit & Veggie
-
Form the Strawberry:
Roll a small ball of red clay and flatten it slightly into a rounded bun shape. It needs to fit snugly into the bottom-left compartment. -
Seed Details:
Use a needle tool or toothpick to poke tiny, shallow indentations all over the red surface for strawberry seeds. -
Strawberry Leaves:
Take a tiny amount of green clay, flatten it, and shape three rounded lobes. Press this onto the top of the strawberry for the leaves. -
Shape the Carrot:
Roll orange clay into a teardrop or rounded triangle shape. Flatten it slightly like you did the strawberry so it doesn’t roll away. -
Carrot Greens:
Form two tiny teardrops of green clay. Attach them to the wide end of the carrot to simulate the leafy top. -
Arrange the Foods:
Place the strawberry in the lower-left section and the carrot in the lower-right section.
Menu Variations
Swap the fillings! Try making tiny polymer clay broccoli florets, yellow tamagoyaki (egg omelet) squares, or even miniature octopus sausages to fill the small compartments.
Step 4: Finishing Details
-
Bake:
Bake the entire piece according to your clay manufacturer’s instructions (usually 275°F/135°C for 15-30 minutes). Let it cool completely. -
Paint Faces:
Using a very fine dotting tool or a toothpick dipped in black acrylic paint, add two eyes and a small ‘u’ shaped smile to each food item. -
Add Blush:
Dip a fresh toothpick into pink paint and dab tiny cheeks next to the smiles. I find that wiping most of the paint off first helps keep the blush subtle. -
Seal (Optional):
If you want a shiny finish, brush a thin layer of gloss glaze over the food items, avoiding the box itself to keep its matte wood look.
Now you have a charming miniature lunch that stays fresh forever
Swirl Candy and Lollipop Charms
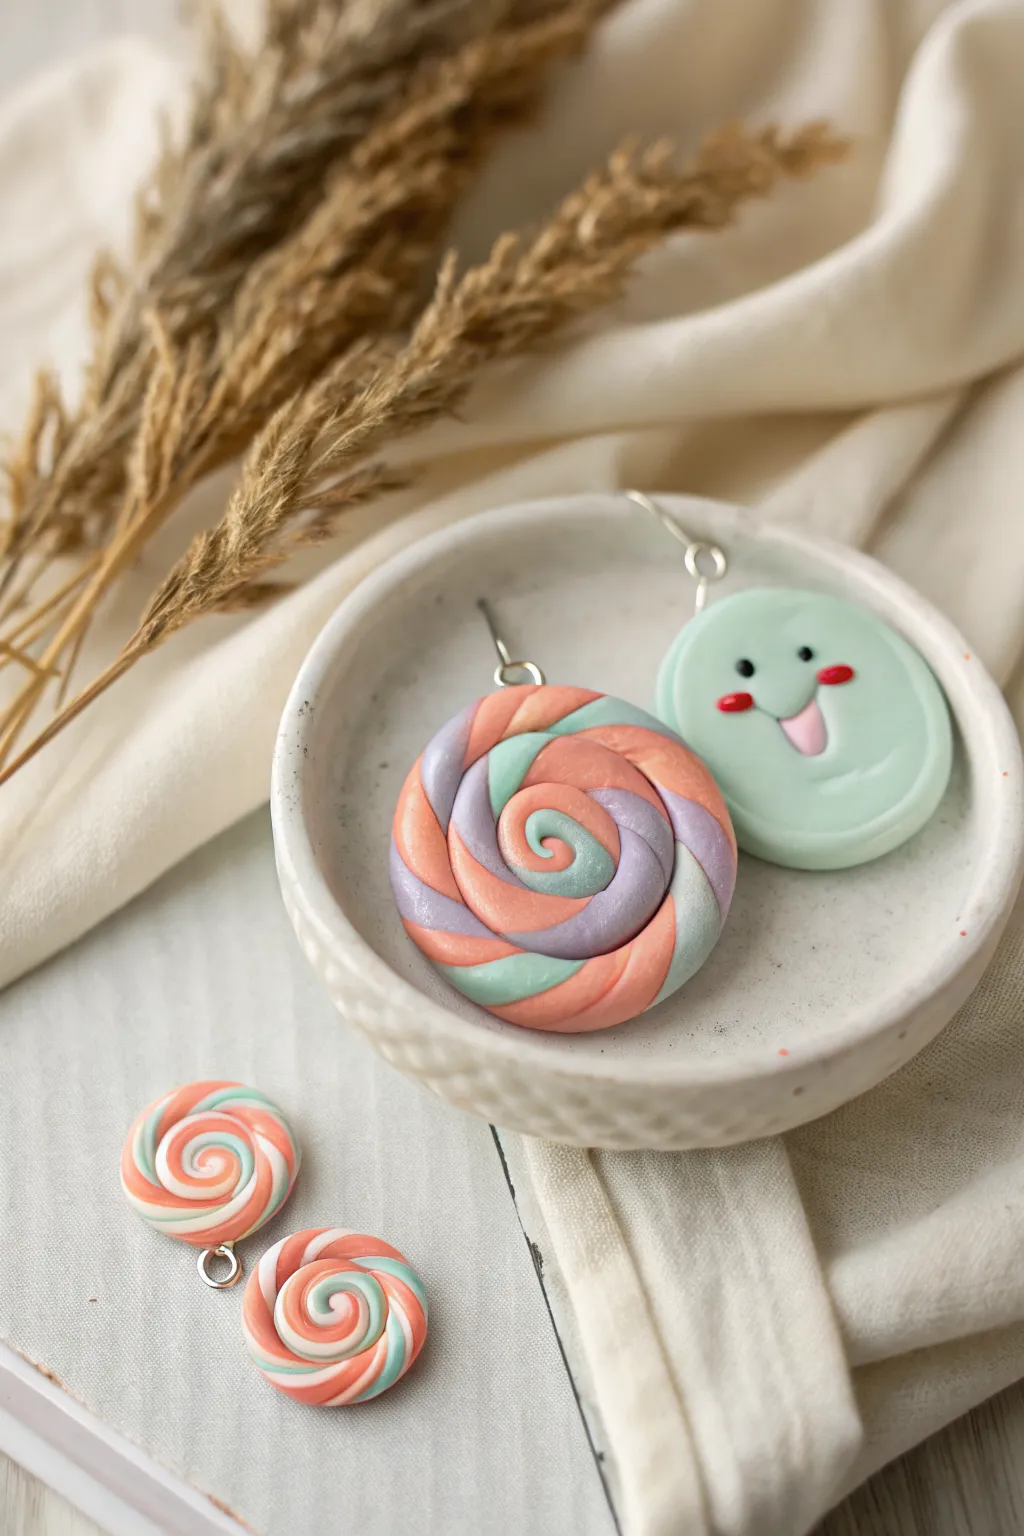
These delightful polymer clay charms bring a touch of sweetness to your jewelry collection with their soft pastel palette and playful designs. You’ll learn to make both the hypnotic multicolor lollipop swirl and the cheerful mint-green face charm shown in the speckled dish.
Detailed Instructions
Materials
- Polymer clay (peach/coral, mint teal, lavender purple, white, red)
- Small round clay cutter (approx. 1 inch)
- Eye pins or head pins
- Jump rings and earring hooks
- Rolling pin or acrylic roller
- X-acto knife or clay blade
- Ball stylus tool
- Needle tool
- Gloss glaze (optional)
- Small parchment paper square
Step 1: Creating the Lollipop Swirls
-
Prepare the Colors:
Begin by conditioning your peach, mint teal, and lavender clay. Knead each color until soft and pliable to prevent cracking later. -
Roll Snakes:
Roll a small portion of each conditioned color into a long, thin snake. Try to keep them equal in thickness, about 2-3mm in diameter. -
Twist Together:
Lay the three colored snakes side-by-side. Gently pinch the ends together, then twist them around each other to create a single, thick, twisted rope. Roll this gently on your work surface to smooth the seams. -
Form the Coil:
Starting from one end, roll the twisted rope inward onto itself like a snail shell. I like to keep the tension fairly tight so there are no gaps between the rings. -
Secure the End:
Once the circle reaches your desired size (about 1 inch), cut the excess rope at an angle and tuck the tail underneath the charm to hide the seam. -
Add Hardware:
Insert an eye pin into the top of the swirl. If the clay is soft, you can push it straight in; otherwise, twist it gently like a drill to avoid distorting the shape.
Clean Clay Pro-Tip
Keep baby wipes or rubbing alcohol nearby. Clean your hands and tools between colors (especially before switching to the mint face) to prevent darker lint transfer.
Step 2: Making the Mint Smiley Face
-
Cut the Base:
Roll out a slab of mint teal clay to about 4mm thickness. Use your round cutter to punch out a perfect circle. -
Smooth the Edges:
With your finger, gently rub the sharp edges of the circle to give it a soft, pillowy cushion look. -
Indent the Eyes:
Take a small ball stylus and press two indentations where the eyes will go. This helps seat the small black clay beads securely. -
Add the Eyes:
Roll two tiny specks of black clay into balls and press them into the eye indents. -
Create the Mouth:
Roll a tiny piece of light pink clay into a small teardrop shape for the open mouth. Press it onto the face, slightly flattening it. -
Add Cheeks:
Roll two minuscule balls of red clay. Press these onto the face just below the eyes to create rosy cheeks. -
Refine Details:
Draw a tiny curved line under the mouth using a needle tool to define the chin. -
Insert Hardware:
Just like the lollipop, insert an eye pin into the top center of the face charm.
Step 3: Baking and Assembly
-
Bake:
Place all charms on a baking sheet lined with parchment paper or a ceramic tile. Bake according to your clay manufacturer’s instructions (usually 275°F/135°C for 15-30 minutes). -
Cool Down:
Let the pieces cool completely before handling. Polymer clay is fragile when hot. -
Secure Hardware:
Once cool, gently tug the eye pin. If it’s loose, remove it, add a drop of superglue, and reinsert it. -
Attach Findings:
Use pliers to open a jump ring, slide on your charm and an earring hook, then close the ring securely.
Make Them Shine
For a ‘hard candy’ look, coat only the lollipop swirls with UV resin or a high-gloss glaze after baking. Leave the face charm matte for a soft, soft-touch finish.
Enjoy wearing these sweet treats or gifting them as a charming handmade set
Simple Face Cane Slice Beads
These cheerful beads are actually slices from a polymer clay cane, making them incredibly satisfying to create in batches. The soft gradient of peach, coral, and pink tones combined with simple smiley faces creates a nostalgic, Y2K-inspired accessory perfect for stacking.
How-To Guide
Materials
- Polymer clay (white, peach, orange, pink, black)
- Acrylic rolling pin or pasta machine
- Tissue blade or sharp craft knife
- Pointed tool or toothpick
- Elastic beading cord (0.8mm)
- Super glue or jewelry glue
- Baking tray and parchment paper
- Gloss glaze (optional)
Step 1: Building the Face Cane
-
Prepare the base color:
Choose your first skin tone—let’s start with a soft peach. Condition the clay until it’s pliable and roll it into a thick, smooth log about 1 inch in diameter and 2 inches long. -
Create the eyes:
Roll a very thin snake of black clay. Use your blade to cut two equal lengths that match the length of your peach log. -
Insert the eyes:
Using a knitting needle or a small dowel, press two parallel indentations into the top half of your peach log where you want the eyes to sit. Place the black snakes into these grooves so they sit flush. -
Form the smile:
Roll another thin snake of black clay for the mouth. Using your blade, carefully make a curved incision into the peach log below the eyes. Gently press this black snake into the cut to form a smile. -
Wrap and reduce:
Roll a thin sheet of the same peach clay and wrap it around the entire log to seal the features inside. Gently squeeze and roll the cane on your work surface to reduce its diameter to about 1cm, being careful to keep the face features undistorted. -
Slice the beads:
Once reduced, use your tissue blade to slice the cane into even discs, approximately 4-5mm thick. I like to let the cane rest in the fridge for 10 minutes before slicing to get cleaner cuts.
Distorted Faces?
If your smiley faces look squashed after reducing the cane, you likely rolled too hard. Always pull and squeeze from the center out, rather than just rolling on the table.
Step 2: Making Spacer Beads
-
Create color variations:
Repeat the cane process with different base colors like pink, orange, and white to get the variety seen in the photo, or simply mix solid colors for plain spacer beads. -
Roll spherical spacers:
Take small amounts of pink and black clay. Roll them into small, uniform spheres to act as spacers between your face beads. -
Piercing the beads:
Using a toothpick or a needle tool, carefully poke a hole through the center of every face slice and spherical spacer. Rotate the tool as you push through to avoid squishing the bead.
Glow Up
Add a coat of UV resin to just the smiley face beads after baking. This gives them a professional, domed glass-like finish that makes the features pop.
Step 3: Baking and Assembly
-
Bake carefully:
Arrangement your beads on a parchment-lined baking sheet. Bake according to your clay manufacturer’s instructions (usually 275°F/130°C for 15-30 minutes). Let them cool completely. -
Design your pattern:
Lay out your beads on a bead board or towel. Alternating between face beads, solid colored discs, and the small spherical spacers creates a nice rhythm. -
Stringing:
Cut a piece of elastic cord about 10 inches long. Thread your beads onto the cord in your desired pattern. -
Tying the knot:
Once strung, tie a surgeon’s knot (looping the elastic twice instead of once) and pull tight. Add a tiny drop of super glue specifically to the knot for security. -
Hide the knot:
If one of your beads has a slightly larger hole, try to gently tug the knot inside it to hide the connection point.
Wear your stack of happy bracelets to add a playful touch to any outfit