
When I’m craving something spooky, clay is my favorite way to make creepy-cute little oddballs that are more fun than frightening. Here are my go-to scary clay ideas—from classic monsters to delightfully weird studio experiments you’ll want to try right away.
Creepy-Cute Ghost Figurines
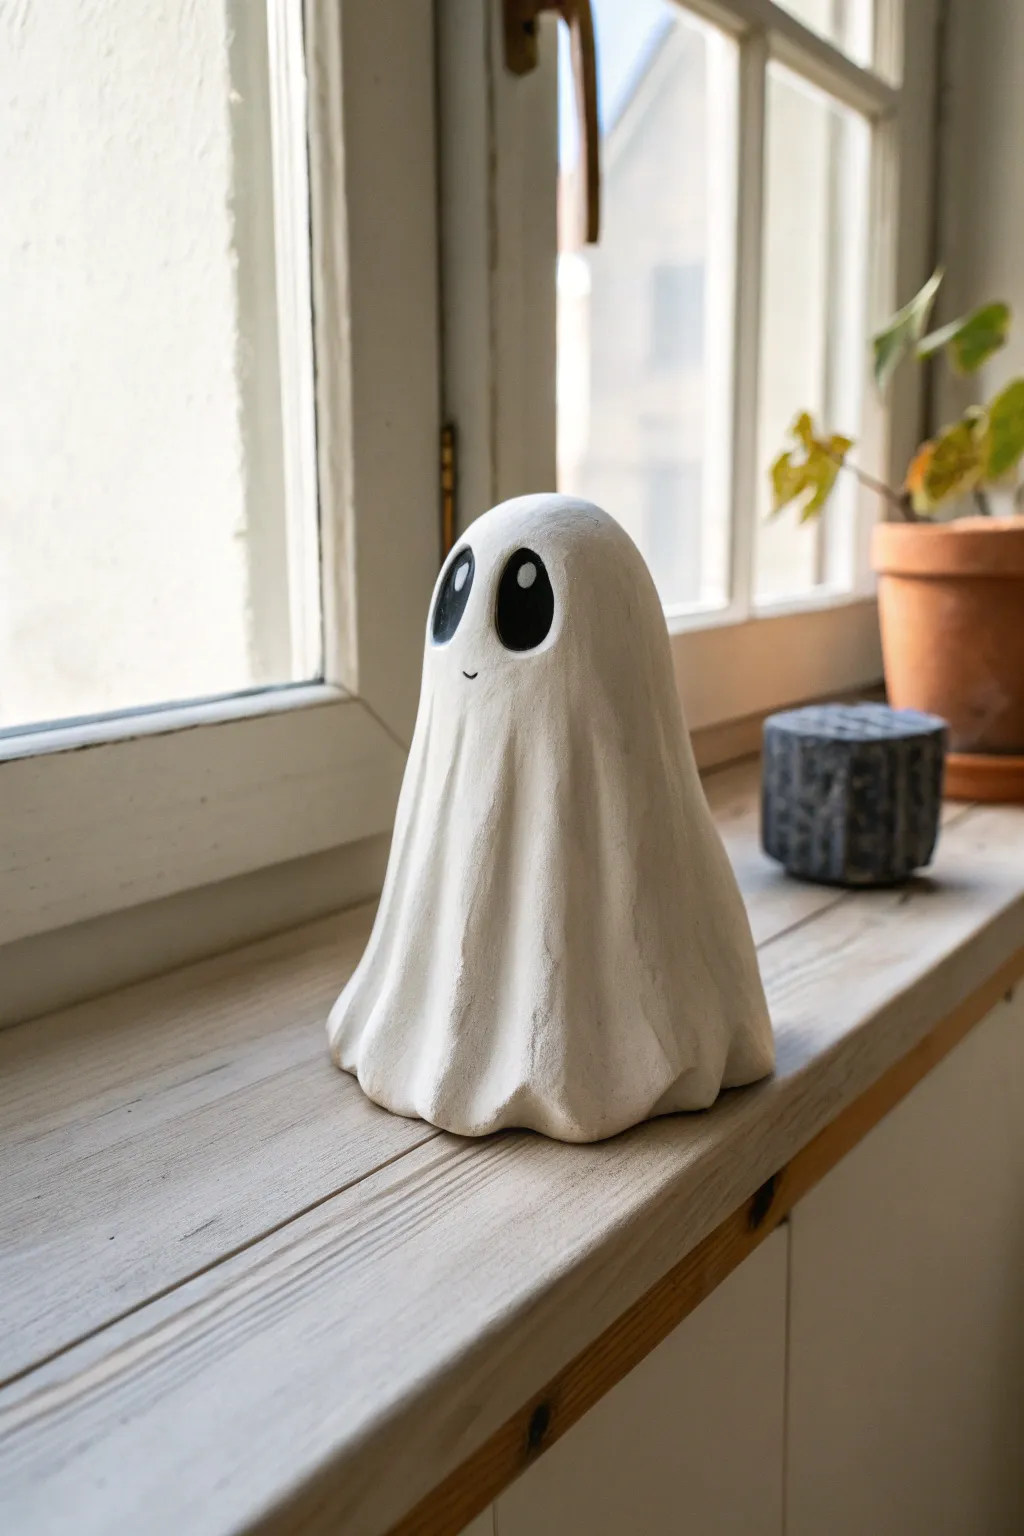
Capture the essence of a classic Halloween costume with this adorable clay ghost figurine, perfect for nestling onto a sunny windowsill. The piece features soft, realistic drapery folds and a sweet, matte-finish expression that leans firmly into “cute” rather than “spooky.”
Step-by-Step Guide
Materials
- Air-dry clay (white) or polymer clay
- Aluminum foil
- Small rolling pin
- Sculpting tools (a needle tool and a small rounded tool)
- Acrylic paint (black and white)
- Fine-grit sandpaper
- Small paintbrush
- Matte varnish or sealant
Step 1: Forming the Base Structure
-
Create the core:
Begin by scrunching a piece of aluminum foil into a tall, rounded cone shape. This will serve as the internal armature, saving clay and reducing drying time. It should be slightly smaller than the final size you want for your ghost. -
Secure the base:
Tap the bottom of your foil cone against a flat surface to ensure it stands upright without wobbling. The base needs to be stable so your ghost doesn’t tip over later. -
Prepare the clay slab:
Roll out a portion of white clay into a relatively thin, circular slab, roughly 1/4 inch thick. Aim for a diameter that is about twice the height of your foil armature.
Smooth Operator
To get perfectly soft folds without sharp creases, use a damp makeup sponge to smooth the clay while shaping the drapery.
Step 2: Draping and Sculpting
-
Drape the sheet:
Gently lift your clay circle and center it over the top of the foil cone. Allow the sides to fall naturally, just like a real fabric sheet would. -
Shape the head:
Smooth the clay over the top of the rounded foil to define the head shape. I like to gently cup my hands around the top to ensure it stays round and smooth. -
Create the folds:
Using your fingers, gently pinch and guide the excess clay at the bottom to form vertical folds. You want these to look like heavy fabric pooling at the floor. -
Refine the bottom edge:
Ensure the bottom edges of the clay touch the table surface completely. Use a sculpting tool to accentuate the deep shadows between the folds, pushing the clay in slightly where the fabric would naturally recede. -
Smooth the surface:
Dip your finger in a tiny bit of water and run it over the entire surface to remove any fingerprints or cracks. The goal is a seamless, fabric-like texture. -
Dry the sculpture:
Allow the clay to dry completely according to the package instructions. If using air-dry clay, this might take 24-48 hours given the thickness of the folds.
Glow Up
Cut a hole in the bottom of the ghost before drying and place it over an electric tea light to turn your figurine into a spooky lantern.
Step 3: Finishing Touches
-
Sand for perfection:
Once fully cured or dry, use fine-grit sandpaper to buff away any remaining roughness, paying special attention to the roundness of the head. -
Prime the surface:
Apply a coat of white acrylic paint over the entire ghost. Even if the clay is white, this provides a uniform, professional finish and covers any grayness from the foil. -
Outline the eyes:
Using a pencil, very lightly sketch two tall ovals for the eyes. Positioning them slightly far apart maximizes the cuteness factor. -
Paint the eyes:
Fill in the ovals with solid black acrylic paint. Use a steady hand and a small brush to keep the edges crisp. -
Add the catchlights:
Dip the non-brush end of a paintbrush into white paint and dot a small reflection into the upper corner of each black eye. This brings the character to life instantly. -
Adding the smile:
With the finest brush tip or a black fine-liner pen, draw a tiny, shallow U-shape between the eyes for a minimalist smile. -
Seal the piece:
Finish by applying a matte varnish over the entire sculpture. Avoid glossy finishes, as the matte look mimics the texture of cotton sheet fabric best.
Place your finished ghost near some greenery or a window to let its friendly expression greet passersby


Stitched Mini Pumpkins With Faces
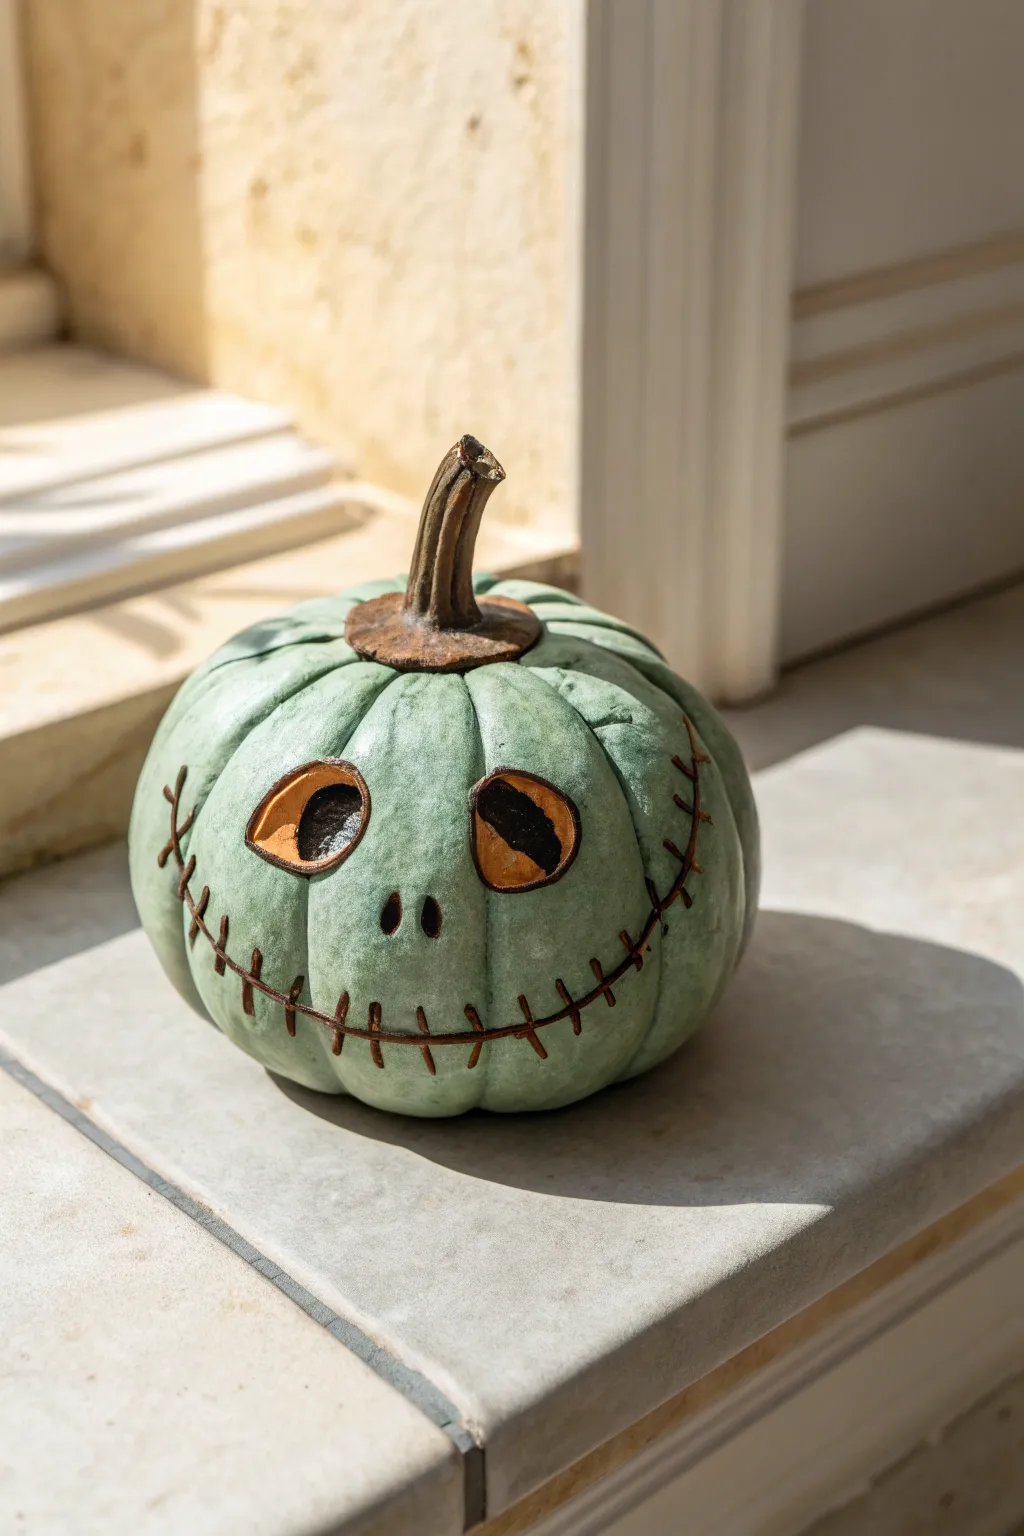
Channel a bit of spooky whimsy with this pale teal pumpkin featuring a classic stitched smile and expressive eyes. The smooth, matte finish and contrasting brown details give it a professional, high-end look perfect for a windowsill display.
Step-by-Step Guide
Materials
- Air-dry clay or polymer clay (white or light grey)
- Acrylic paints (pale teal/sage green, dark brown, burnt orange, black)
- Sculpting tools (needle tool, ball stylus)
- Aluminum foil (for the core)
- Fine grit sandpaper
- Paintbrushes (detail brush and medium flat brush)
- Matte clear coat sealer
Step 1: Forming the Base
-
Create the foil core:
Crumple a piece of aluminum foil into a tight ball, slightly flattened on the top and bottom to mimic a pumpkin shape. This saves clay and reduces drying time. -
Cover with clay:
Roll your clay into a flat sheet about 1/4 inch thick. Wrap this entirely around your foil ball, smoothing out any seams with a bit of water (for air-dry clay) or baby oil (for polymer). -
Define the ribs:
Use the side of a modeling tool or a chopstick to press vertical indentations from the top center to the bottom center, creating the segmented pumpkin ridges. -
Refine the shape:
Gently smooth the ridges with your fingers so they look organic and plump, rather than sharp geometric lines.
Step 2: Sculpting Features
-
Add the stem:
Roll a small snake of clay for the stem. Attach it to the top center, blending the base of the stem into the pumpkin body. Twist and curve the top slightly for character. -
Carve the eyes:
Using a needle tool, lightly sketch two large, slightly teardrop-shaped circles for eyes. Carve these out carefully. I like to press the clay inward within the socket to create depth rather than removing it entirely. -
Add nose holes:
Pierce two small, vertical oval holes for the nose, positioned centrally between the eyes. -
Score the mouth:
Draw a wide, sweeping grin across the lower half of the face using a needle tool. Extend it far up the sides toward the ‘cheeks’. -
Create the stitches:
Roll very thin, tiny threads of clay. Lay these vertically across the mouth line to create the ‘sewn shut’ appearance. Press them down gently to adhere.
Smooth Surface Secrets
Is your clay cracking while you work? Keep air-dry clay moist by misting it occasionally with water. For polymer clay, warm it in your hands longer before sculpting.
Step 3: Finishing and Painting
-
Dry or bake:
Follow the manufacturer instructions for your specific clay. If air drying, wait 24-48 hours until fully hard. If baking polymer, use an oven thermometer to ensure correct temperature. -
Sand imperfections:
Once solid, lightly sand the pumpkin’s surface with fine-grit sandpaper to remove fingerprints or rough texture. -
Apply base color:
Mix a pale teal or sage green paint. Apply two thin coats over the entire pumpkin body, avoiding the stem and the deep recesses of the eyes. -
Paint the stem:
Paint the stem a dark, earthy brown. Bring a little of this brown down onto the top of the pumpkin where the stem attached to create a realistic transition. -
Detail the eyes:
Inside the eye sockets, paint the back wall black. Then, paint the inner rim (the ‘flesh’ of the pumpkin) a burnt orange or mustard yellow color to make the eyes pop. -
Highlight the stitches:
Using your finest detail brush, carefully paint the thin clay stitches and the main mouth line in dark brown to mimic thread. -
Seal the work:
Finish with a coat of matte sealer to protect the paint and give the clay a smooth, ceramic-like sheen.
Stitch Stability
If the tiny clay stitches keep falling off, score the surface slightly with a needle tool and add a tiny dab of liquid clay (or water for air-dry clay) before pressing them on.
Place your stitched pumpkin near a light source to let the shadows play across its textured face


Classic Frankenstein-Inspired Mini Busts
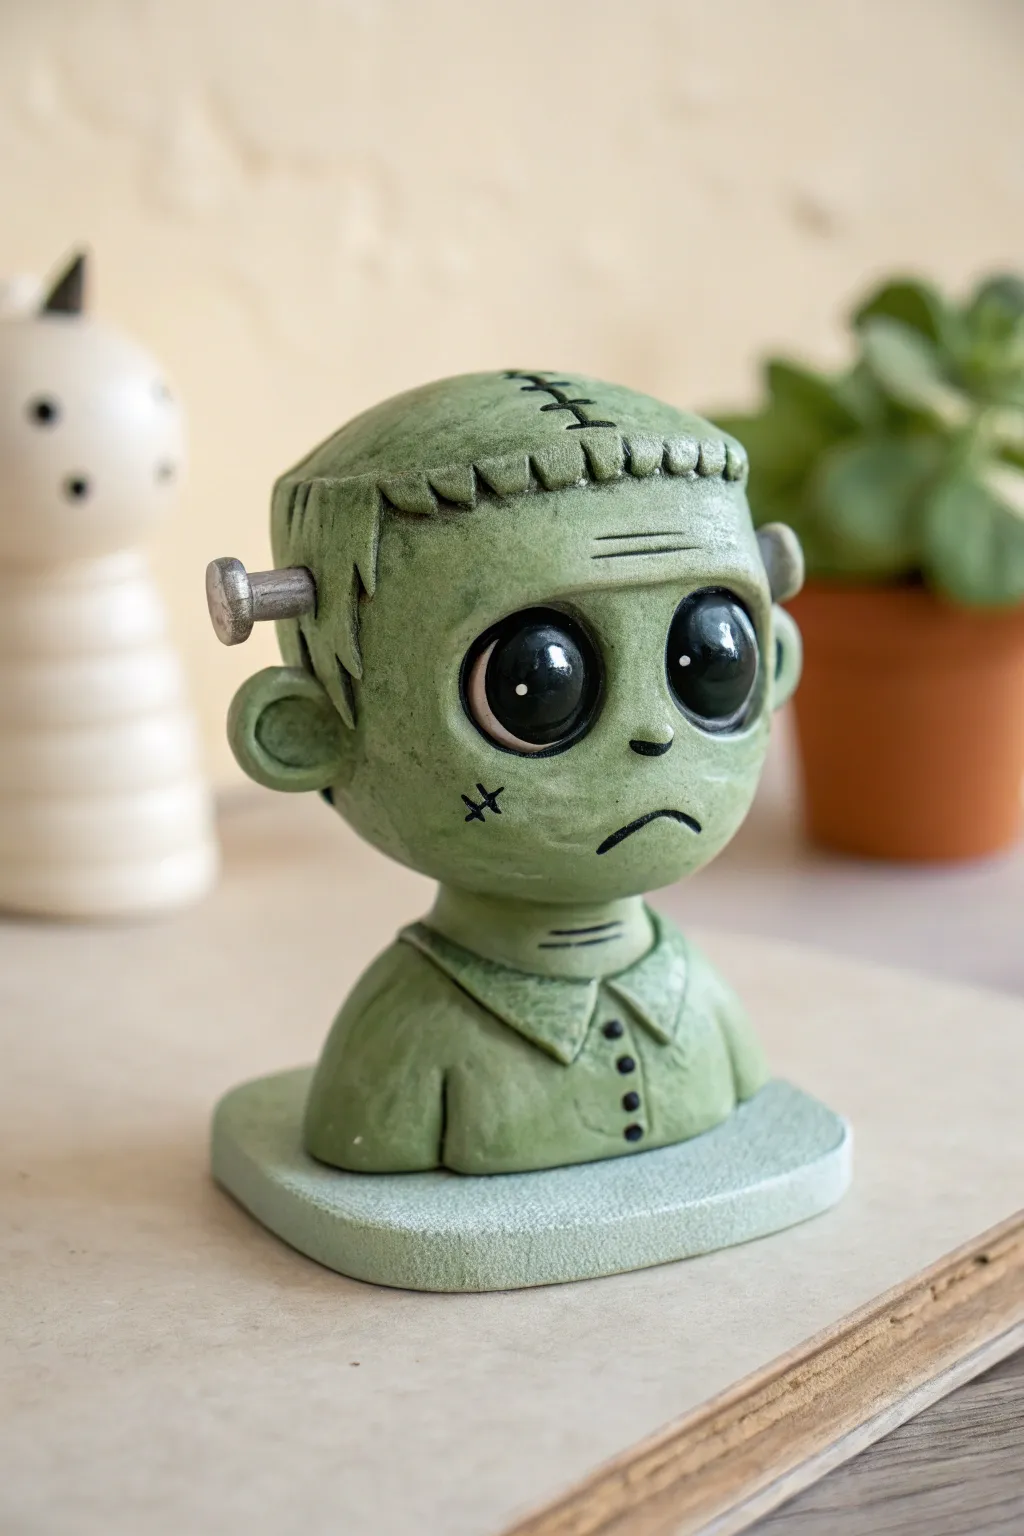
This adorable rendition of the classic movie monster features oversized, soulful eyes and a soft green finish that borders on cute rather than terrifying. It’s a charming desk companion created from polymer clay, perfect for adding a touch of spooky whimsy to your workspace.
Detailed Instructions
Materials
- Polymer clay (olive green, black, white, silver/grey)
- Aluminum foil
- Sculpting tools (needle tool, ball stylus, rubber shaper)
- Hobby knife
- Soft pastel chalks (black, dark green) for shading
- Acrylic paint (white, black)
- Fine detail paintbrush
- Gloss glaze or UV resin
- Oven for baking
Step 1: Forming the Base Structure
-
Create the foil core:
Start by crumpling a small ball of aluminum foil about the size of a golf ball for the head, creating a slightly flattened top and bottom to mimic that classic square shape. -
Cover the core:
Condition your olive green clay until pliable, then roll it into a sheet about 1/4 inch thick. Wrap this entirely around your foil ball, smoothing the seams with your fingers until you have a seamless green shape. -
Shape the head:
Press the top of the clay ball against your work surface to flatten it significantly. Gently press the sides to create a boxier, less spherical jawline. -
Add the bust torso:
Take a smaller lump of green clay and shape it into a rounded mound for the shoulders and chest. Press the head firmly onto this mound, blending the clay at the neck connection point to ensure it’s secure.
Clean Clay Tip
Keep separate baby wipes nearby. Clean your hands thoroughly after handling the black clay for the eyes before you touch the green skin again to avoid smudging.
Step 2: Sculpting Facial Features
-
Create eye sockets:
Using a large ball tool or your thumbs, press two large, deep indentations into the center of the face where the eyes will sit. Make these quite exaggerated for that ‘chibi’ look. -
Insert the eyes:
Roll two balls of black clay and press them firmly into the sockets. Flatten them slightly so they don’t bulge out too far. -
Add eyelids:
Roll two very thin snakes of green clay. Place one under each eye to create a lower lid, smoothing the bottom edge downward into the cheeks to integrate it. -
Sculpt the nose and mouth:
Add a tiny speck of green clay for the nose and blend it smooth. Use a needle tool or small blade to carve a downward-curved frown line, pressing deeper at the corners. -
Detail the brows:
Carve three horizontal worry lines into the forehead using a needle tool.
Glow Up
Use glow-in-the-dark polymer clay for the skin sections. This way, your little monster will light up when the room goes dark.
Step 3: Adding Signature Frankenstein Details
-
Add the hair fringe:
Roll a snake of green clay and flatten it. Cut a jagged pattern into one edge to look like bangs, then attach this strip across the top of the forehead, blending the top edge into the scalp. -
Create the cranial scar:
Score a long line across the very top of the flat head. Roll tiny, thin threads of black clay and lay them across the score mark perpendicularly to create stitches. -
Add the ears:
Shape two small balls of green clay into ears. Press an indentation into the center of each with a ball tool and attach them securely to the sides of the head. -
Insert neck bolts:
Using grey or silver clay, form two small T-shapes. Press these into the neck area just behind the jawline. I find creating a pilot hole with a tool first helps them stick better. -
Clothe the monster:
Roll a thin sheet of green clay and cut out two triangle shapes for the shirt collar. Place these around the neck. Add small black clay dots down the center of the chest for buttons. -
Create the base:
Form a rounded rectangular slab from light green or grey clay to serve as the display stand. Place your bust on top and press gently to adhere.
Step 4: Refining and Finishing
-
Texture the skin:
Gently tap the green skin areas with a dense sponge or stiff brush to remove fingerprints and add a porous, skin-like texture. -
Pre-bake shading:
Use a soft brush to dust black or dark green pastel powder into the eye sockets, under the chin, and inside the ears to create depth. -
Add painted details:
Paint a small ‘X’ scar on the cheek with black acrylic paint. Add tiny white reflection dots to the black eyes to bring them to life. -
Bake the project:
Bake according to your clay manufacturer’s instructions, usually around 275°F (130°C) for 30 minutes. Let it cool completely. -
Glaze the eyes:
Once cool, apply a drop of gloss glaze or UV resin specifically to the black eyes to give them a wet, glass-like shine.
Place your finished mini monster on a shelf where his woeful expression can charm anyone who walks by


Severed Finger Ring Dishes
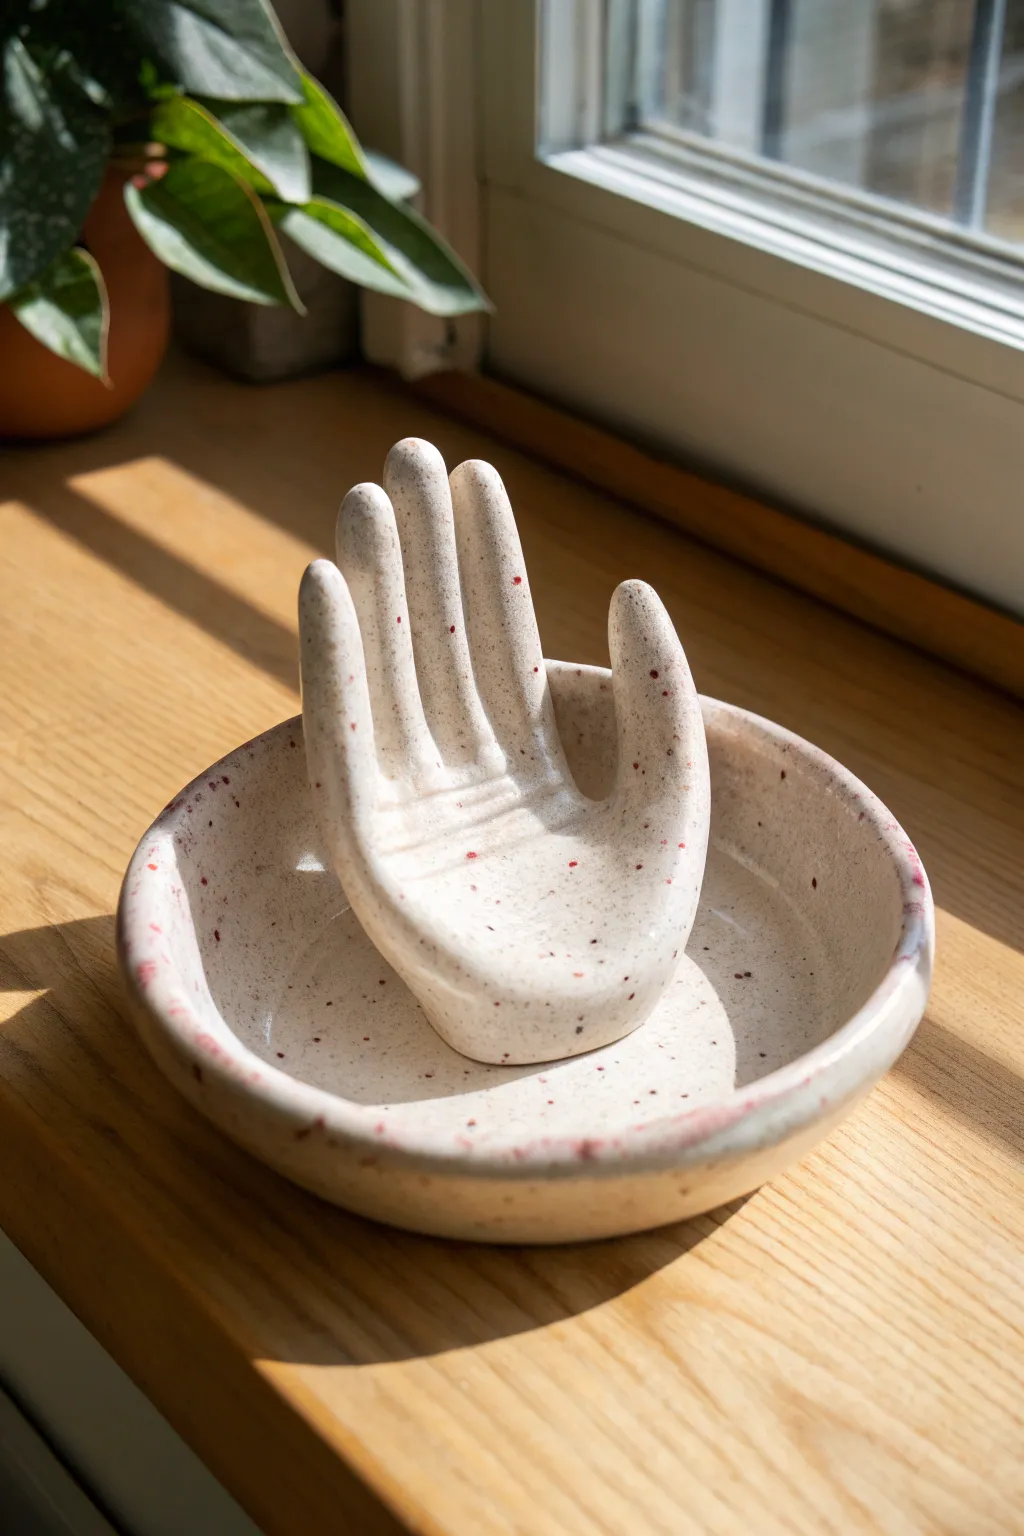
This eerie yet elegant ring dish features a sculpted hand emerging from a shallow bowl to hold your jewelry. With its speckled, bone-like finish and reddish flecks, it strikes a perfect balance between modern decor and subtle spookiness.
How-To Guide
Materials
- White polymer clay (cernit or souffle)
- Speckled clay inclusions (ground black pepper or brownish dried spice)
- Red acrylic paint
- Stiff bristled toothbrush
- Small rolling pin
- Circle cutter (approx. 4-5 inches)
- Clay sculpting tools (specifically a smoothing tool and needle tool)
- Small oven-safe bowl (for forming the dish curve)
- Wire armature or toothpicks (optional for finger strength)
- Gloss glaze or resin
- Soft paintbrush
- Sandpaper (fine grit)
Step 1: Preparing the Clay
-
Condition and Speckle:
Begin by thoroughly conditioning your white polymer clay until it is soft and pliable. To achieve that organic, stone-like texture seen in the photo, need to mix in your speckles now. -
Mixing Inclusions:
Sprinkle a pinch of ground black pepper or a dried brown spice into the clay. Knead it repeatedly to distribute the specks evenly without tinting the clay base too dark. -
Adding the ‘Blood’ Spatter Effect:
Before sculpting, we want those tiny red flecks embedded in the clay. Dip a stiff toothbrush into undiluted red acrylic paint. -
Flecking the Clay:
Hold the brush over your flattened clay and run your thumb across the bristles to flick tiny distinct droplets onto the surface. Let the paint dry completely before folding the clay to mix the red dots throughout the mass.
Step 2: Forming the Bowl Base
-
Rolling the Base:
Take about half of your clay and roll it out into a slab that is approximately 1/4 inch thick. Ensuring even thickness here is key for a stable base. -
Cutting the Circle:
Use your large circle cutter or a bowl template to cut a perfect circle from the slab. Smooth the edges with your finger to remove any sharp cut lines. -
Shaping the Curve:
Gently drape the clay circle inside your oven-safe bowl or form. Press it lightly so it takes the concave shape, creating a shallow dish. -
Creating the Rim:
Slightly thicken the rim by gently pushing the edge downward with your thumb, giving it that chunky, hand-thrown pottery look.
Anatomy Hack
Struggling with proportions? Keep your own hand in a relaxed, cupped position next to your workspace and use it as a live reference model while sculpting.
Step 3: Sculpting the Hand
-
Forming the Palm:
With the remaining clay, roll a thick cylinder and flatten one end to create the palm section. The base needs to be wide enough to adhere securely to the bowl. -
Cutting the Fingers:
Use a sharp blade to cut four slits into the top of the flattened section to separate the five fingers. Don’t splay them too wide yet. -
Refining the Digits:
Gently roll each cut section between your fingers to round them out. I find pulling them slightly lengthens them to a more realistic proportion. -
Adding Detail Lines:
Using a needle tool or a dull knife, lightly score horizontal lines across the palm and at the knuckles to mimic natural skin creases. -
Positioning the Hand:
Bend the fingers slightly forward into a gentle cupping shape. The thumb should be positioned lower and offset from the other fingers.
Drooping Fingers?
If the fingers sag during sculpting, insert short lengths of wire or toothpicks inside each finger to act as a skeletal armature, then bake as normal.
Step 4: Assembly and Finishing
-
Attaching Hand to Bowl:
Score the bottom of the wrist and the center of the bowl (which is still in the form). Apply a dab of liquid clay or bake-and-bond. -
Blending the Seam:
Press the hand firmly into the center of the bowl. Use a sculpting tool to smooth the clay from the wrist down into the bowl floor, ensuring a seamless transition so it looks like one piece. -
Final Smoothing:
Check the fingerprints! Dip your finger in a little rubbing alcohol or clay softener and gently buff away any unwanted texture or prints on the smooth surfaces. -
Baking:
Bake the piece according to your clay manufacturer’s instructions, usually around 275°F (130°C). Since the hand is thick, consider baking for 45 minutes to an hour to ensure full strength. -
Glazing:
Once cooled, apply a coat of high-gloss glaze or UV resin. This mimics the ceramic glaze look and makes those red flecks pop.
Place your creation on a windowsill to catch the light and watch how it transforms from a helpful jewelry holder into a spooky conversation piece

The Complete Guide to Pottery Troubleshooting
Uncover the most common ceramic mistakes—from cracking clay to failed glazes—and learn how to fix them fast.
Eyeball Trinket Bowls
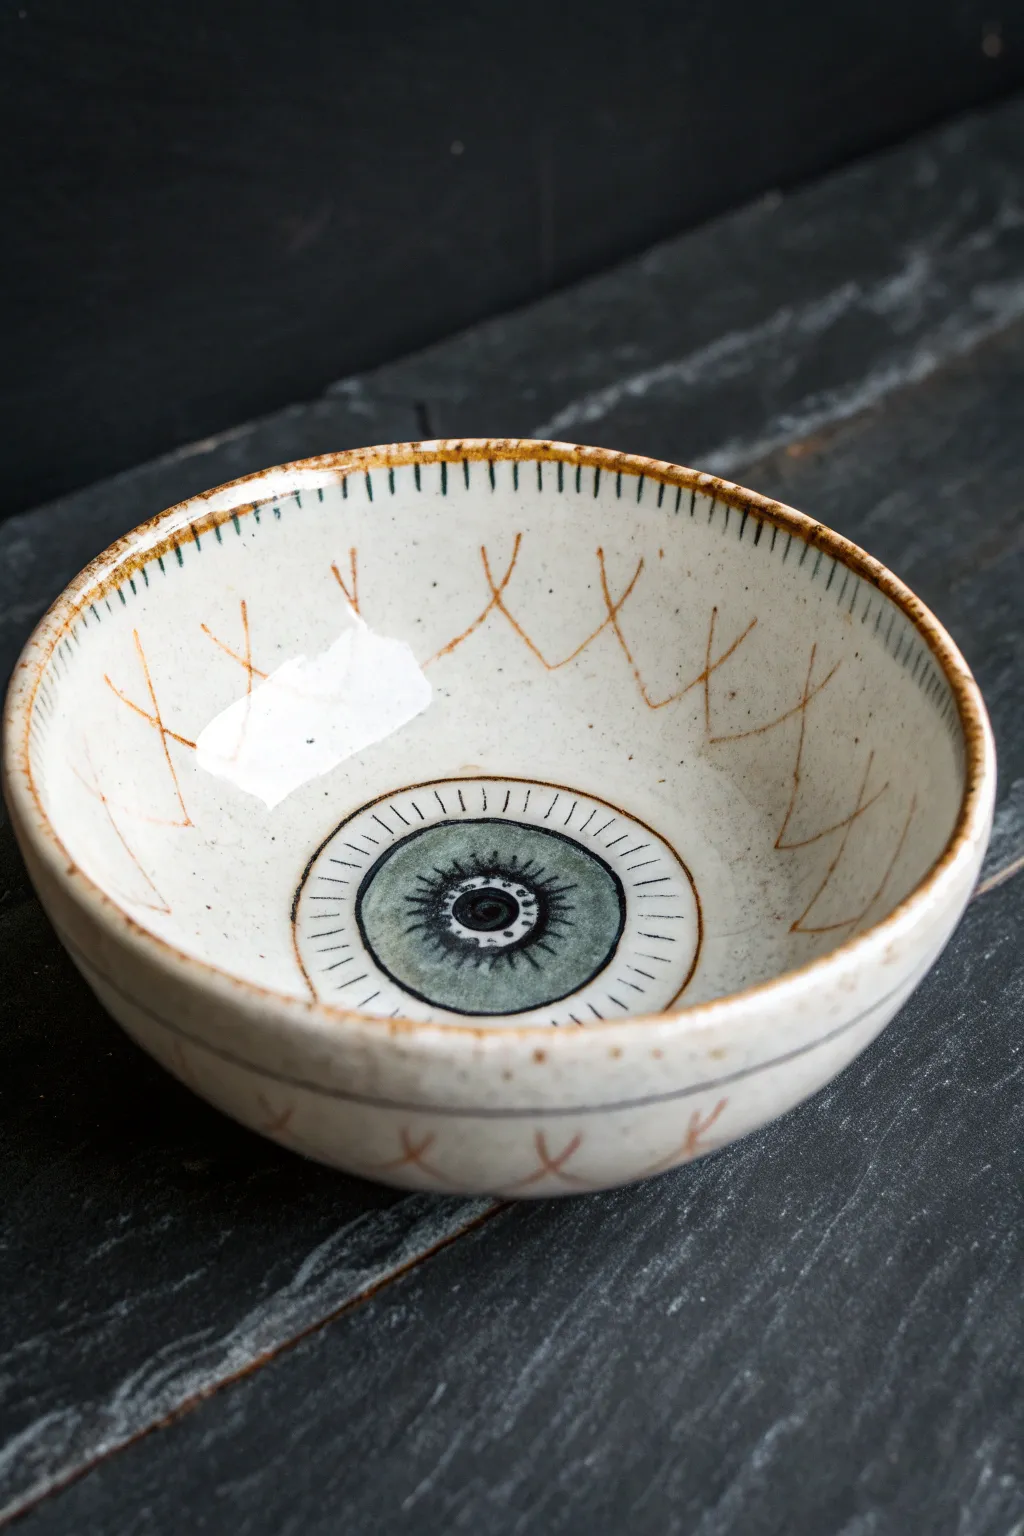
Keep watch over your jewelry or small treasures with this mystically themed trinket dish. The speckled clay body and hand-painted eye motif create a piece that feels both rustic and just a little bit spooky.
Step-by-Step Tutorial
Materials
- Speckled cone 6 clay body
- Pottery wheel (or slab roller for hand-building)
- Loop trimming tool
- Sponge
- Underglaze (Black, Teal/Sage Green, Rust Brown)
- Fine detail brush
- Clear transparent glaze
- Wax resist (optional)
- Kiln
Step 1: Forming the Bowl
-
Wedge the clay:
Start with a ball of speckled clay about the size of a large orange. Wedge it thoroughly to remove any air pockets and align the clay particles. -
Throw the basic form:
Center your clay on the wheel and open it up. Since this is a trinket bowl, you don’t need much height. Pull the walls out into a gentle, open curve rather than a steep cylinder. -
Refine the rim:
Aim for a slightly thicker, rounded rim which adds to the rustic aesthetic. Compress the rim with a sponge or chamois to prevent future cracking. -
Dry to leather hard:
Wire the bowl off the bat and let it dry slowly until it reaches a leather-hard state. It should be firm enough to handle without warping but cool to the touch. -
Trim the foot:
Place the bowl upside down on the wheel head. Use a loop tool to trim away excess weight from the bottom and crave a neat foot ring. This elevates the piece and gives it a professional finish. -
Smooth the surface:
Before painting, take a barely damp sponge and lightly wipe the interior surface. This removes any grog or rough spots that might interfere with your fine line work later.
Step 2: Painting the Eye Motif
-
Outline the iris:
Using a pencil, lightly sketch a perfect circle in the very center of the bowl’s interior. Don’t worry, the graphite will burn off in the kiln. -
Apply the iris color:
Load a wash brush with your teal or sage green underglaze. Apply 2-3 even coats inside your pencil circle, letting each coat dry matte before adding the next. -
Paint the pupil:
Once the green is dry, switch to black underglaze. Paint a solid black pupil in the center. I like to leave it slightly imperfect to give it an organic feel. -
Add iris details:
With a very fine liner brush and black underglaze, paint thin, radiating lines from the pupil outward into the green iris. Add a white highlight dot near the pupil if you want extra ‘life’ in the eye. -
Create the outer eye ring:
Paint a thin black circle around the outside of the green iris. Then, add short hash marks or lines radiating outward from this ring into the white clay area to suggest eyelashes or energy.
Smudged Lines?
If you mess up a painted line, don’t wipe it wet! Let the underglaze dry completely, then gently scratch the mistake off with a needle tool or stiff brush.
Step 3: Adding Decorative Patterns
-
Paint the side patterns:
Using a rust-brown underglaze, paint a zig-zag or ‘V’ pattern around the interior walls of the bowl. Create two rows: one closer to the rim and one closer to the bottom, letting the points of the Vs meet or overlap slightly. -
Detail the rim:
Dip your brush in the rust-brown underglaze again. Paint short, vertical hash marks all along the top rim edge. Allow unevenness in the brush strokes for character. -
Biscuit Fire:
Allow the bowl to dry completely (bone dry). Fire it to cone 04 (or your clay’s bisque temperature). -
Glazing:
Wipe the bisqued piece with a wet sponge to remove dust. Dip the entire bowl into a clear, glossy glaze to seal the clay and make the colors pop. -
Final Fire:
Wipe the bottom foot ring clean of any glaze so it doesn’t stick to the kiln shelf. Fire to cone 6 (or your clay body’s maturity temperature).
Make it Creepier
Instead of green, make the iris red or yellow. You can also drag the black pupil glaze slightly while wet to create a ‘dilated’ or distorted look.
Now you have a striking conversation piece that stares right back at you whenever you reach for your keys
Toothy Grin Magnets
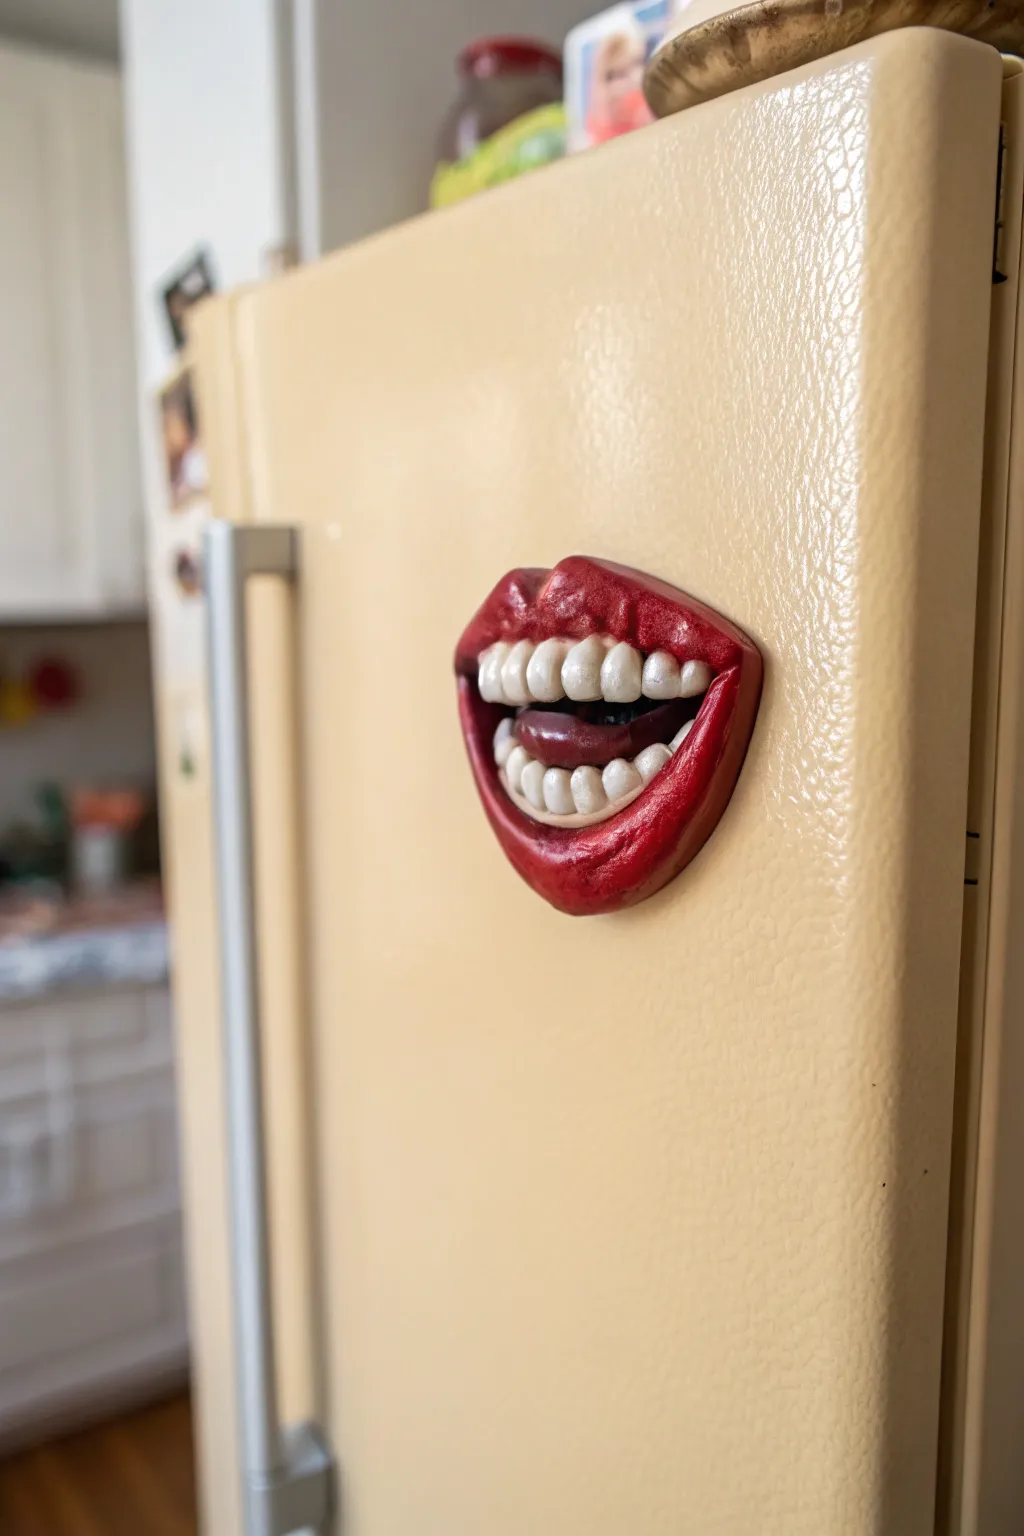
Turn your refrigerator into a conversation starter with this hyper-realistic mouth magnet. Featuring sculpted gums, individual teeth, and a glossy, wet finish, this project perfectly balances artistic skill with a touch of creeptastic flair.
Step-by-Step
Materials
- Polymer clay (white, translucent, and red)
- Sculpting tools (needle tool, ball stylus, silicone shapers)
- Acrylic paints (dark red, brown, black, yellow oxide)
- Small stiff paintbrush
- Fine detail paintbrush
- High-gloss polyurethane varnish or UV resin
- Strong neodymium magnet
- Super glue (E6000 or similar)
- Oven for baking
Step 1: Sculpting the Base and Gums
-
Mix your base color:
Start by mixing red polymer clay with a small amount of white and a tiny bit of brown to create a fleshy, realistic gum color. Don’t make it too bright; a muted tone looks more natural. -
Form the mouth shape:
Roll a walnut-sized ball of your custom mix and flatten it slightly into an oval. Press the center in with your thumb to create the oral cavity—this is where the teeth will sit. -
Create the lips:
Roll two snakes of the same clay mix, tapering the ends. Attach one to the top rim and one to the bottom rim of your oval base to form the lips. -
Refine the lip structure:
Use a silicone shaper or your fingers to blend the seams where the lips meet the base. Pinch the corners specifically to give the mouth a distinct expression, like a smirk or a wide grin. -
Detail the lips:
Take a needle tool and gently press vertical lines into the customized lips, mimicking natural skin texture. I like to vary the pressure here so some creases are deeper than others. -
Prepare the gums:
Inside the mouth cavity, build up two small ridges of the gum-colored clay where the teeth will eventually be inserted.
Step 2: Creating the Teeth
-
Mix tooth enamel color:
Combine white polymer clay with a significant amount of translucent clay. Pure white looks fake; translucent adds that necessary depth. -
Form individual teeth:
Roll tiny teardrop shapes for the teeth. Make the front two incisors slightly larger and broader, while the canines should be pointier and the molars blockier. -
Insert the top row:
Press the teeth firmly into the upper gum ridge. Start from the center front teeth and work your way out to the corners. -
Insert the bottom row:
Repeat the process for the bottom teeth. Angle them slightly inward or crookedly if you want a scarier, imperfect look. -
Secure the roots:
Use a small ball stylus to gently drag a tiny bit of the red gum clay down over the tops of the teeth. This secures them and simulates the way gums naturally hug tooth enamel. -
Add the tongue:
Form a small, flat pad of dark red clay and place it deep inside the mouth behind the bottom teeth to create a tongue. -
Bake the piece:
Bake the sculpture according to your clay manufacturer’s instructions (usually 275°F/130°C for 15-30 minutes per 1/4 inch thickness). Let it cool completely.
Pro Tip: Texturing
Before baking, lightly press a piece of coarse sandpaper against the ‘skin’ area around the lips. This creates realistic pores that look amazing once the dark wash is applied.
Step 3: Painting and Finishing
-
Apply a dark wash:
Water down brown and black acrylic paint heavily. Brush this wash over the entire piece, letting it settle into the lip cracks and the spaces between teeth. -
Wipe away excess:
Quickly wipe the high points with a paper towel or sponge. The dark paint will remain in the crevices, instantly adding depth and realism. -
Stain the teeth:
Mix a very watery yellow oxide wash. Dab this near the gum line of the teeth to simulate plaque and age. -
Highlight the lips:
Dry brush a lighter shade of red or pink very lightly over the most raised parts of the lips to make the texture pop. -
The wet look:
This is crucial: coat the lips, gums, and teeth with a high-gloss polyurethane varnish or UV resin. Do not coat the skin around the lips; the contrast between matte skin and wet mouth adds the horror factor. -
Attach the magnet:
Once the varnish is fully cured, use strong super glue to attach a neodymium magnet to the flat back of the sculpture.
Level Up: Drool Effect
Mix clear UV resin with a tiny drop of yellow ink. Use a toothpick to drag a string of it from a top canine to the bottom lip, curing it mid-drip for gross, realistic saliva.
Stick this unsettling grin on your fridge and wait for the double-takes from your guests


What Really Happens Inside the Kiln
Learn how time and temperature work together inside the kiln to transform clay into durable ceramic.
Creepy Spider and Web Wall Tiles
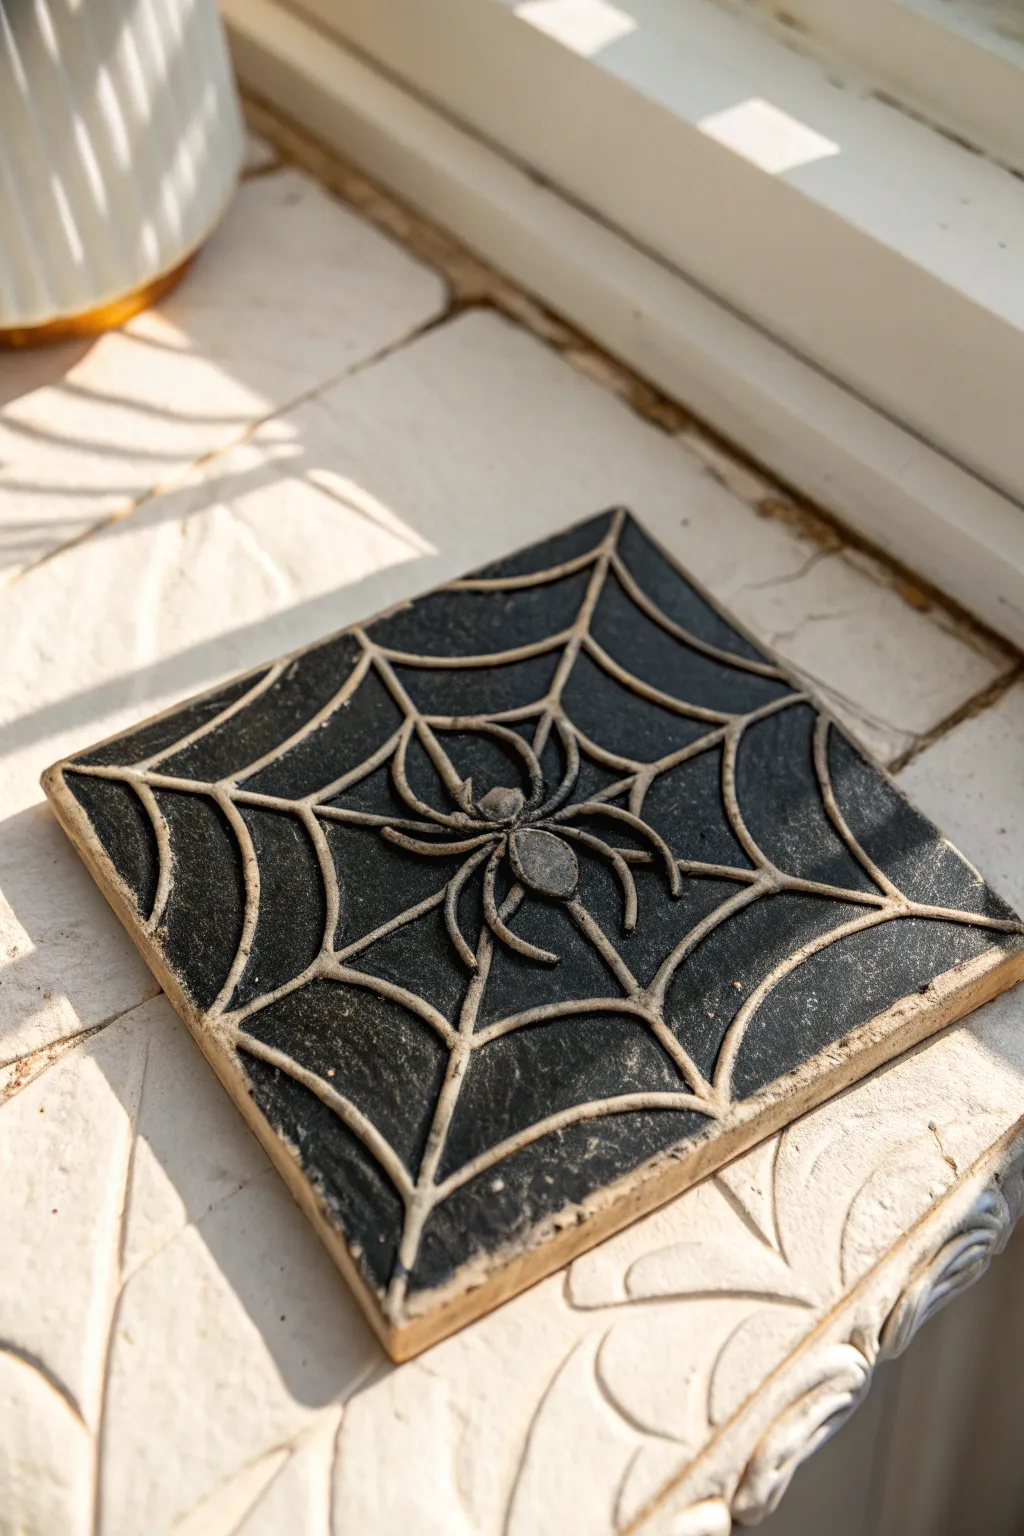
These striking ceramic tiles feature a raised spiderweb design that instantly adds a spooky, gothic touch to your decor. The high-contrast black and raw clay finish makes the intricate web and spider detail pop, creating a sophisticated yet eerie accent piece for Halloween or year-round display.
Detailed Instructions
Materials
- Polymer clay or air-dry clay (white or cream)
- Square cookie cutter or knife
- Rolling pin
- Carving tools or needle tool
- Black acrylic paint
- Small paintbrush
- Damp sponge or paper towel
- Sandpaper (fine grit)
- Matte varnish (optional)
Step 1: Shaping the Base
-
Prepare the Clay:
Start by conditioning your clay until it is soft and pliable. Roll it out into an even slab, approximately 1/4 inch thick. Aim for a consistent thickness to ensure the tile dries or bakes evenly without warping. -
Cut the Square:
Use a square cookie cutter or a sharp knife and a ruler to cut out a perfect square shape. Gently smooth the edges with your finger to remove any sharp burrs or roughness created by the cutting tool. -
Establish the Center:
Using a needle tool, lightly mark the exact center of your square. This tiny dot will be the anchor point where all your web lines will converge.
Groove Master
For cleaner lines, wait until the clay has rested and is slightly leather-hard before carving. Extremely soft clay tends to drag and create messy edges.
Step 2: Carving the Design
-
Carve Radial Lines:
Using a carving tool, gently carve straight lines radiating from the center point out to the edges of the tile. Press deeply enough to create a distinct groove, but be careful not to cut all the way through the clay. -
Connect the Web:
Connect the radial lines with curved, scalloped lines to form the webbing. Start near the center and work your way outward in concentric circles, maintaining the ‘swooping’ shape of a classic spiderweb. -
Sculpt the Spider Body:
Take a small ball of extra clay and press it onto the center of the web to form the spider’s abdomen. Add a smaller ball in front for the head section. Press the edges down firmly to blend them onto the tile surface so they adhere well. -
Add Spider Legs:
Roll eight tiny, thin snakes of clay. Attach four to each side of the spider’s body, bending them to look like jointed legs crawling across the web. Use a tool to smooth the connection points. -
Dry or Bake:
If using polymer clay, bake according to the manufacturer’s instructions. If using air-dry clay, allow the tile to dry completely for 24-48 hours until hard and white.
Glow Up
Mix glow-in-the-dark powder into your white clay before rolling it out. When you wipe back the black paint, the exposed webbing will glow eerie green in the dark.
Step 3: Finishing the Look
-
Apply Black Paint:
Coat the entire surface of the tile with black acrylic paint. Ensure you get the paint deep into all the carved grooves, corners of the spider, and recessed areas. -
Wipe Back Surface:
While the paint is still slightly tacky but mostly wet, take a damp sponge or paper towel and wipe the surface of the raised areas. You want to remove the black paint from the high points (the web lines and spider) while leaving it in the background recesses. -
Clean the Details:
Continue wiping carefully. I find it helpful to use a focused wiping motion to avoid pulling paint out of the deep grooves. The goal is to reveal the natural clay color on the raised web pattern. -
Touch Ups:
If you accidentally wiped too much paint away from a dark area, use a fine brush to re-apply black paint. Conversely, if the web looks too dark, you can gently sand the raised areas once fully dry. -
Seal (Optional):
To protect your tile, apply a coat of matte varnish. This will seal the paint and clay without making it too shiny, preserving that rustic, old-world appearance.
Display your finished tile on a shelf or use it as a coaster to bring a subtle haunt to your home
Haunted Doll Face Pendants
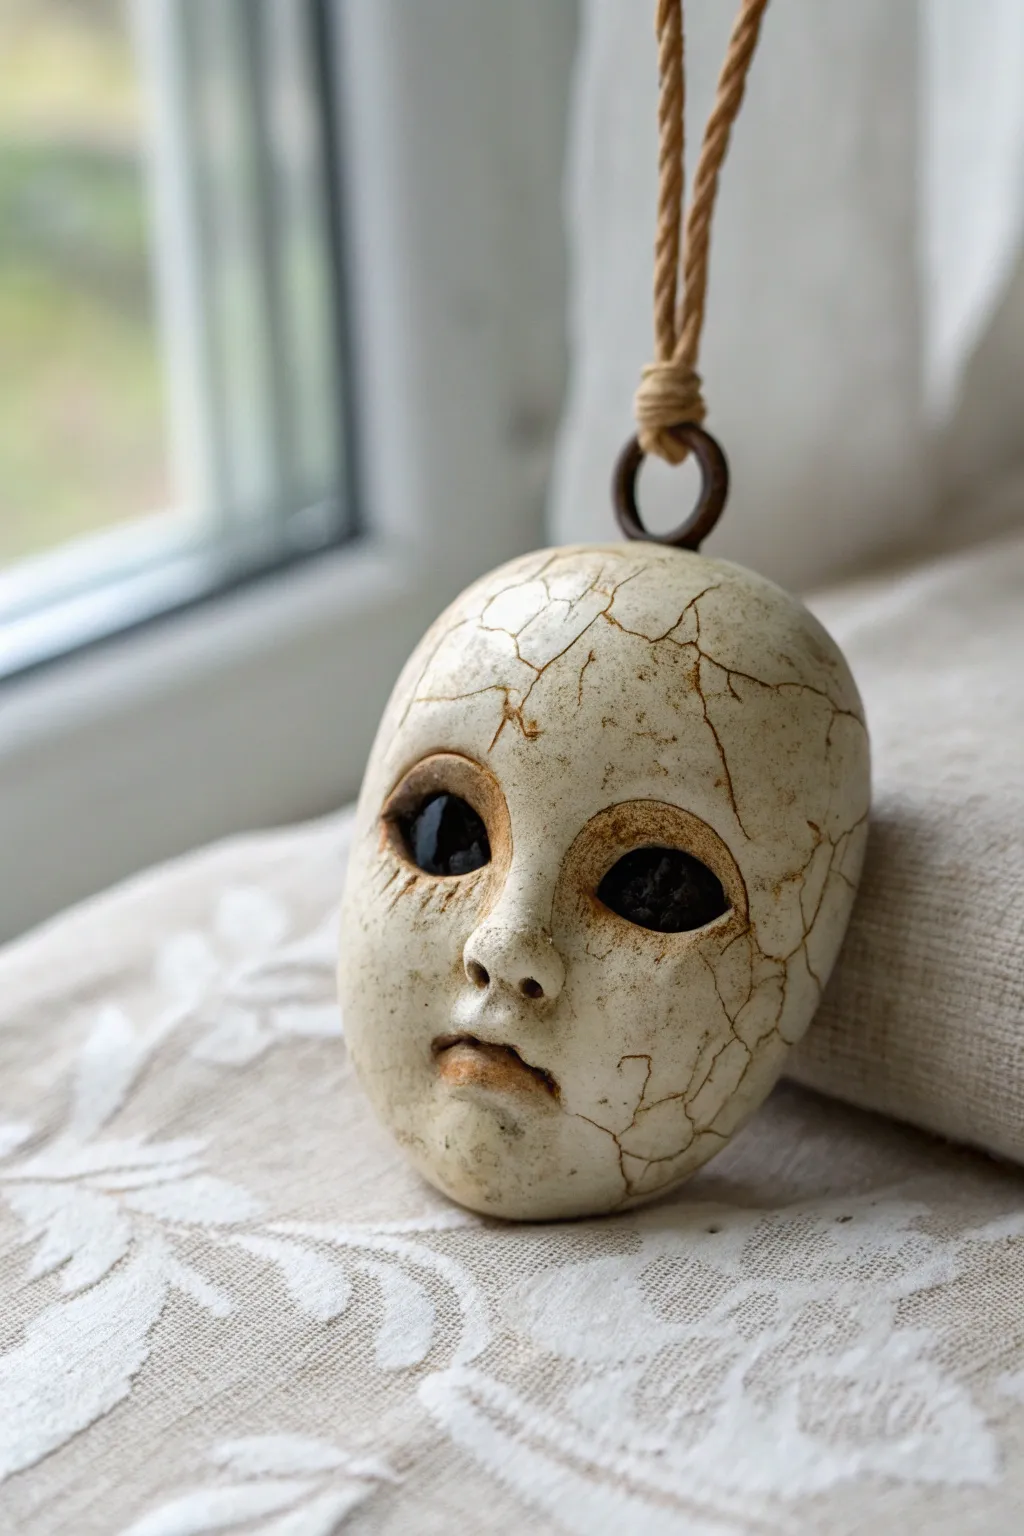
Create the illusion of an unearthed antique relic with this hauntingly beautiful polymer clay project. By combining a serene doll face mold with intentional weathering and heavy antiquing, you’ll craft a wearable piece that speaks of forgotten attics and long-lost memories.
Step-by-Step Tutorial
Materials
- White or translucent polymer clay
- Doll face silicone mold (approx. 2-3 inches)
- Metal jump ring (bronze or antique finish)
- Thick twisted rope or cord (natural fiber look)
- Brown and black acrylic paints
- Crackle medium (or crackle glaze)
- Sculpting tools (needle tool, ball stylus)
- Sandpaper (fine grit)
- Gloss varnish
- Matte varnish
- Paper towels or soft cloth
- Oven for baking clay
Step 1: Sculpting the Base
-
Condition the Clay:
Begin by conditioning your white polymer clay until it is soft and pliable. If the clay is too stark white, mix in a tiny pinch of beige or translucent clay to give it a more natural, porcelain-like bone tone. -
Mold the Face:
Press the conditioned clay firmly into your doll face silicone mold. Ensure you push into the nose and lip cavities to capture all the delicate details. Fill the mold completely, smoothing the back flat. -
Demold Carefuly:
Gently flex the mold to pop the clay face out. Check the nose and chin for any distortions; if it warped during removal, gently reshape it with your fingers while the clay is still soft. -
Attach the Hardware:
Take your metal jump ring and press it firmly into the top of the head. You want it embedded deep enough so the clay holds it, but leaves the ring open. Smooth the clay over the insertion point to secure it. -
Deepen the Features:
Use a ball stylus to press into the eye sockets. We want these to be deep, hollow voids, so don’t be afraid to push the clay back significantly to create shadowy recesses. -
Texture the Surface:
Before baking, you can lightly texture the skin if you want a rougher look, but for that smooth porcelain effect, smooth it vertically with a little bit of baby oil on your finger. -
Bake the Piece:
Bake the clay according to the manufacturer’s instructions (usually 275°F/130°C for 15-30 minutes per 1/4 inch thickness). Let the piece cool completely before moving to the painting phase.
Crackle not cracking?
If your medium doesn’t crack, the layer might be too thin or humidity too high. Try a thicker coat or assist drying with a hair dryer on low heat.
Step 2: Creating the Cracked Glaze
-
Apply Crackle Medium:
Brush a layer of crackle medium over the entire face. The thickness of this layer will determine the size of the cracks—a medium coat works best for the spiderweb effect seen in the photo. Let this dry fully. -
The Base Wash:
Mix a watery wash of brown acrylic paint. Brush this over the entire face, letting it seep into the cracks created by the medium. Quickly wipe away the excess on the high points (nose, cheeks) with a damp paper towel. -
Accenting the Cracks:
For deeper definition, take a fine liner brush with undiluted dark brown paint and manually trace some of the larger cracks to simulate major fractures in the ‘porcelain’ surface. -
Painting the Eyes:
Fill the eye sockets with pitch-black acrylic paint. You want a matte finish here to make them look like empty voids. Ensure the black paint gets into every corner of the socket. -
Adding Grime:
Using a dry brush technique with a mix of black and brown paint, gently stipple ‘dirt’ around the nose, mouth cracks, and the perimeter of the face. This simulates years of handling and dust accumulation. -
Sealing the Work:
Apply a coat of satin or matte varnish to the skin to seal the paint. I sometimes add a touch of gloss varnish just to the lips or the very tip of the nose to suggest a lingering sheen of old glaze.
Unearthed look
Glue dried moss bits into the deepest cracks or one eye socket. It adds texture and makes it look like the doll was found in the forest.
Step 3: Final Assembly
-
Prepare the Cord:
Cut a length of thick twisted rope or natural fiber cord. The rustic texture contrasts beautifully with the smooth ‘ceramic’ face. -
Create the Knot:
Thread the cord through the jump ring on the head. Loop the cord back on itself and tie a simple overhand knot or a hangman’s knot right above the ring to secure the pendant. -
Fray the Ends (Optional):
If your cord ends are visible, you can slightly fray them for a more distressed, antique appearance.
Wear your new artifact as a statement necklace or hang it in a window to catch the shadows of the evening

TRACK YOUR CERAMIC JOURNEY
Capture glaze tests, firing details, and creative progress—all in one simple printable. Make your projects easier to repeat and improve.
Bat Wing Trinket Dishes
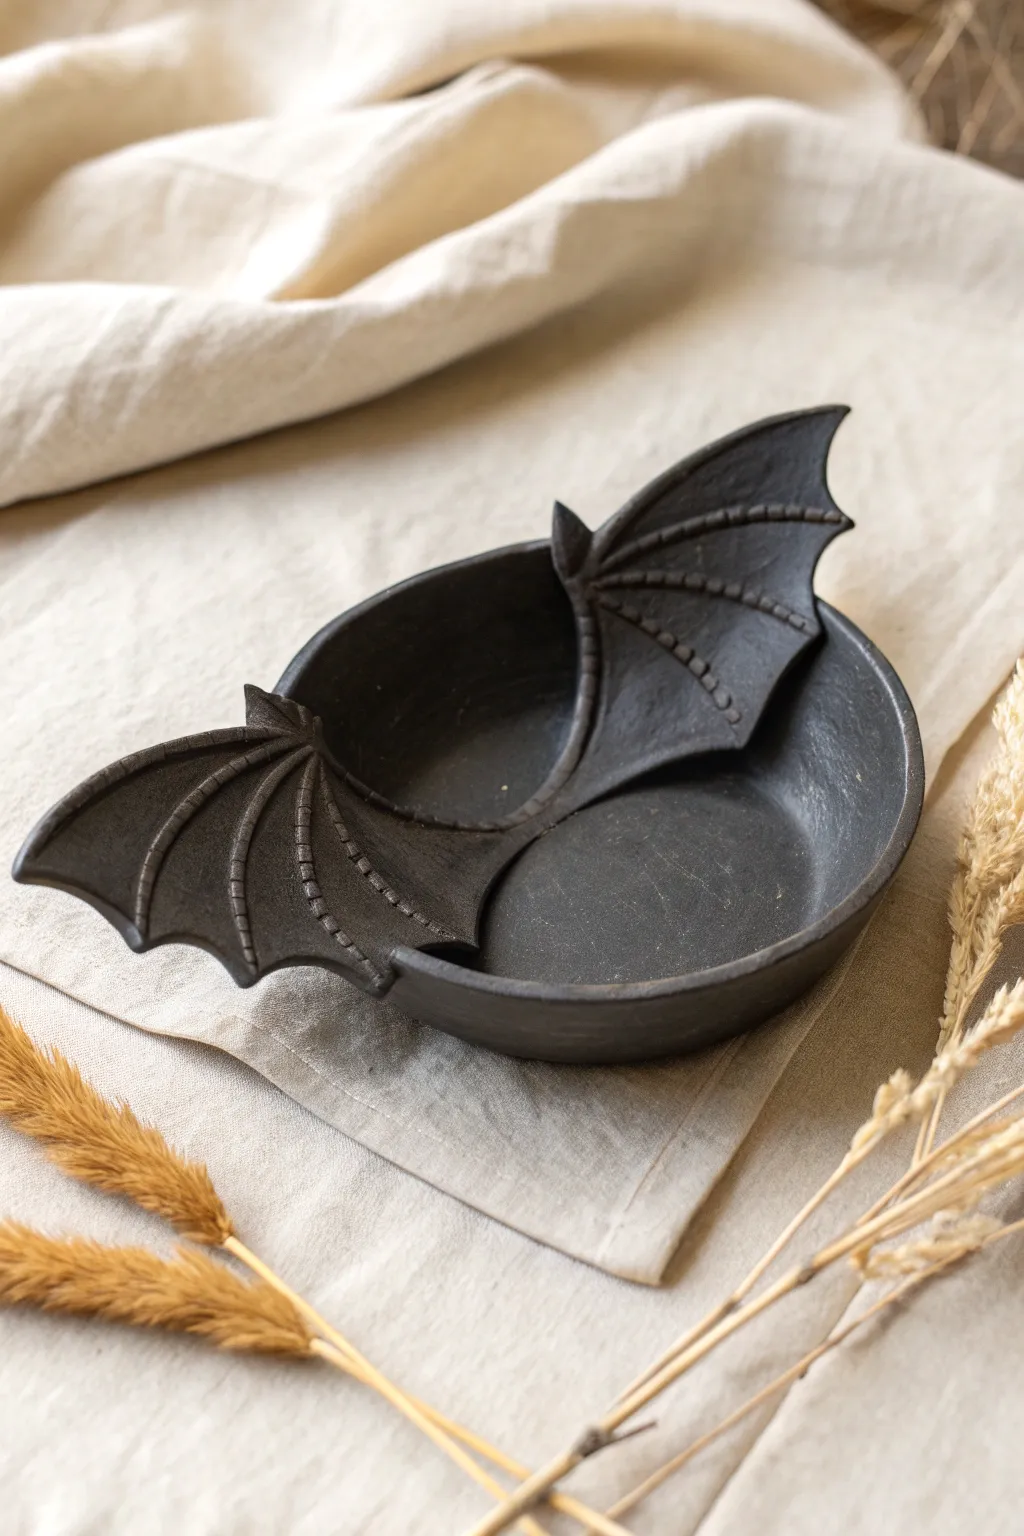
Embrace the spooky aesthetic with this elegant, matte black ceramic dish featuring detailed bat wings that form the rim. It’s the perfect size for holding jewelry, crystals, or small spell components, adding a touch of gothic charm to your vanity.
How-To Guide
Materials
- Air-dry clay (black or grey) or polymer clay
- Rolling pin
- Small bowl or sphere mold (for shaping)
- Clay carving tools (needle tool, small loop tool)
- Fettling knife or X-Acto knife
- Slip (water/clay mix) or liquid polymer clay for bonding
- Sponge
- Fine-grit sandpaper
- Matte black acrylic paint
- Matte spray varnish or sealant
Step 1: Forming the Base
-
Prepare the Clay:
Begin by conditioning your clay. Knead it thoroughly until it is soft, pliable, and free of air bubbles. Roll it out into an even slab, approximately 1/4 inch thick. I like to use guide sticks on either side of the roller to ensure the thickness is perfectly uniform. -
Cut the Basic Shape:
Using a needle tool, lightly sketch two large ovals that slightly overlap in the center. These will form the dish bowls. Once you are happy with the size, cut around the perimeter with your fettling knife. -
Shape the Bowl:
Drape your cut clay slab into a shallow bowl or over a sphere mold to establish the cupped shape. Gently press the clay against the mold to smooth out the bottom curve, ensuring the transition between the two oval ‘halves’ is seamless and reinforced.
Keep it clean
Use a wet brush to smooth clay joins instead of water on your finger. This prevents over-wetting air-dry clay, which causes cracking.
Step 2: Sculpting the Wings
-
Create Wing Templates:
On a piece of paper, sketch a bat wing shape that fits the scale of your bowl. The wing should have a prominent top claw and scalloped bottom edges. Cut this template out to use as a guide. -
Cut Out the Wings:
Roll out a fresh slab of clay, slightly thinner than the base (about 1/8 inch). Place your paper template on top and cut out two identical wing shapes using your precision knife. -
Add Dimension:
Before attaching, soften the edges of the wings with a damp sponge or your fingertip. You want them to look organic, not sharply cut. -
Attach the Wings:
Score the rim of the bowl and the back of the wing pieces where they will join. Apply a bit of slip (or liquid clay). Press the wings firmly onto the rim, shaping them so they curve inward slightly, following the contour of the bowl. -
Blend the Seams:
Use a modeling tool to smooth the clay where the wings meet the bowl. The join should be invisible, making it look like one solid piece.
Gilded Edge
After the matte black paint dries, apply a tiny amount of gold or silver wax paste (Rub ‘n Buff) just to the raised ‘bones’ of the wing for a luxe look.
Step 3: Detailing and Finishing
-
Sculpt the Finger Bones:
Roll very thin coils of clay (snakes) to represent the bat’s wing bones. You’ll need long ones for the structure and shorter ones for the ‘fingers’ radiating from the top corner. -
Apply the Bones:
Score the surface of the wings where the bones will sit. specific attention to the top edge and the radiating lines. Attach the coils using slip, pressing them down gently so they fuse but remain raised. -
Add Texture:
Using a small tool with a rounded tip or a ribbed texture tool, press small hash marks or ribbing into the raised bone coils. This gives the skeletal structure that specific segmented look seen in the reference. -
Refine the Edges:
Go over the scalloped edges of the wings one last time, pinching them slightly to thin them out and give them a sharp, defined silhouette. -
Dry Completely:
Allow the piece to dry fully. If using air-dry clay, this may take 24-48 hours. If using polymer clay, bake according to the package instructions. Keep the piece supported while drying so the wings don’t sag.
Step 4: The Dark Finish
-
Sand for Smoothness:
Once hardened, use fine-grit sandpaper to gently smooth any rough fingerprints or sharp burrs on the rim. Wipe away all dust with a slightly damp cloth. -
Base Coat:
Apply a coat of matte black acrylic paint. Cover every crevice, especially around the textured wing bones. Let this layer dry completely. -
Second Coat:
Apply a second coat of black paint to ensure opaque, solid coverage. I prefer using a soft bristle brush here to avoid streaky brush strokes. -
Dry Brushing (Optional):
To highlight the texture, you can very lightly dry brush a dark charcoal grey over the raised bones. This adds subtle depth without ruining the monochrome look. -
Seal the piece:
Finish with a matte spray varnish. This protects the paint from chipping and gives the dish that stony, unglazed pottery texture.
Place this haunting little dish on your dresser and fill it with your favorite dark treasures
Cursed Cat Figurines With Glowing Eyes
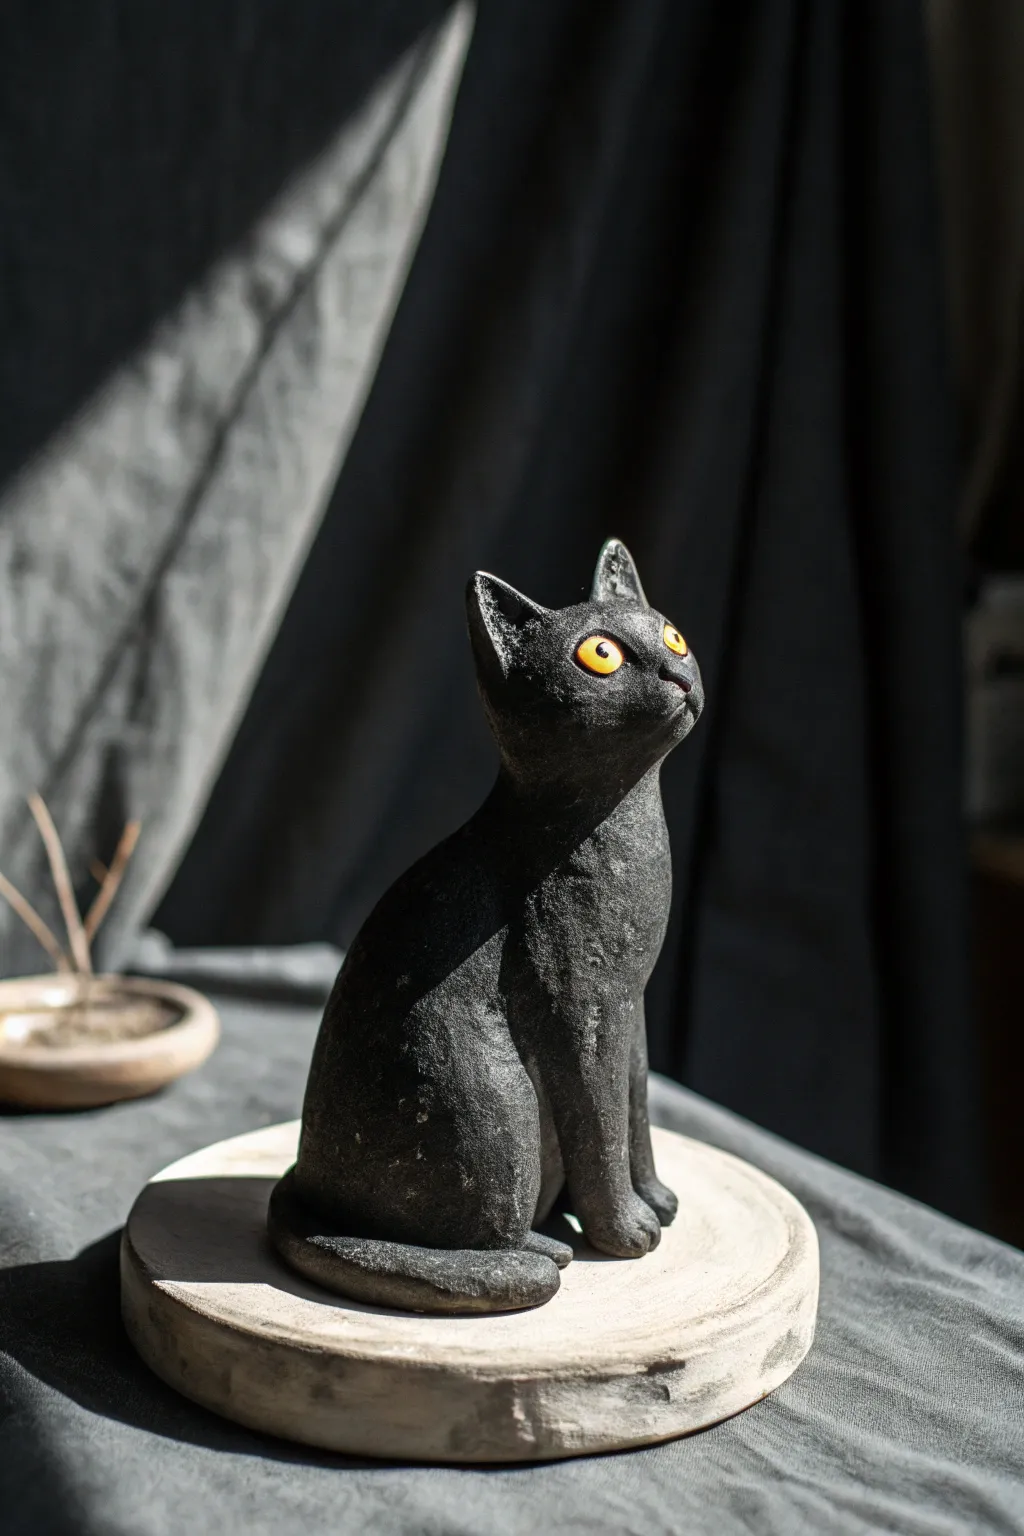
Summon a spooky familiar with this textured black clay cat figurine, featuring an unsettlingly realistic stone finish and piercing yellow eyes that seem to watch your every move. It’s perfectly sized for a bookshelf haunt or an eerie desktop companion.
Step-by-Step Tutorial
Materials
- Black polymer clay (approx. 2-3 blocks)
- Small amount of white or translucent polymer clay (for eyes)
- Round wooden or clay base (approx. 4 inches diameter)
- Glass cabochons (yellow/amber, approx. 6-8mm) or yellow acrylic paint
- Texture tools: stiff toothbrush, crumpled foil, or needle tool
- Acrylic paints: Black, Dark Grey, White
- Matte varnish spray
- Gloss varnish (brush-on)
- Armature wire (optional for neck support)
- Sculpting tools (ball styluses, blending silicone tools)
Step 1: Forming the Familiar
-
Base Structure:
Begin by conditioning your black polymer clay until it is soft and pliable. Roll a large egg shape for the body, keeping the bottom flat so it sits securely. Pull a smaller portion of clay upwards from the top of the egg to form the neck. -
Head Shaping:
Roll a separate sphere for the head, slightly smaller than the body width. If you are worried about stability, insert a short piece of armature wire into the neck and press the head onto it. Blend the seams between the head and neck until smooth. -
Sitting Posture:
To create the seated haunches, roll two thick tear-drop shapes. Press them onto the sides of the body near the bottom, blending the edges so the thighs look muscular and integrated. -
Front Legs:
Roll two cylinders for the front legs. Attach them to the front of the chest, merging the clay at the shoulders. Ensure the paws touch the work surface evenly. -
Refining the Paws:
Use a needle tool or small knife to press indentations into the ends of all four paws to create toes. I like to gently round the toes individually for a softer look. -
Ears and Tail:
Form two triangular wedges for ears and attach them high on the head. For the tail, roll a long snake of clay and wrap it around the base of the body, curving it neatly around the paws.
Step 2: Texturing and Details
-
Creating the Socket:
Using a medium-sized ball tool, press two deep sockets into the face where the eyes will go. Make these slightly larger than your intended eye size. -
Rough Texture:
This cat needs a stone-like surface. Take a stiff toothbrush or a ball of crumpled aluminum foil and firmly tap it all over the entire sculpture. Don’t be afraid to press hard; you want visible pitting and roughness. -
Eye Installation:
Press your glass cabochons into the sockets. If you are painting eyes later instead, fill the sockets with smooth balls of baked white clay or keep them as rounded mounds of black clay. -
Facial Refinements:
With a needle tool, add a tiny ‘Y’ shape for the nose and mouth. Re-texture the area around the nose carefully if your smoothing tool erased the stone effect. -
Baking:
Bake the figurine according to your clay manufacturer’s instructions (usually 275°F/130°C for 15-30 minutes per 1/4 inch thickness). Let it cool completely.
Uneven Texture?
If the foil texture looks too uniform or patterned, rotate the foil ball frequently and vary your pressure. Mix tools—use a toothbrush for fine grit and a rock for deeper dents.
Step 3: The Cursed Finish
-
Base Coat:
Paint the entire sculpture with black acrylic paint to ensure a uniform color, getting into every textured crevice. Let this dry fully. -
Stone Dry Brushing:
Dip a dry, stiff brush into dark grey paint and wipe almost all of it off on a paper towel. Lightly dust the brush over the raised textures of the cat. This highlights the ‘stone’ pitting. -
Dusty Accents:
Repeat the dry brushing step with a tiny amount of white or light grey paint, focusing only on the highest points like the ears, nose bridge, and shoulder blades. -
Painting the Eyes:
If you didn’t use glass eyes, paint the eye mounds bright yellow now. Add a thin vertical slit pupil in black. Let dry. -
Final Varnish:
Spray the body with a matte varnish to seal in the stone look. Once dry, protect the eyes (glass or painted) with a brush-on high gloss varnish to make them shine and look ‘wet’. -
Mounting:
Glue the finished cat securely to your round base. You can paint the base white or grey to contrast with the dark figure.
Glow Up
Make it truly cursed by using glow-in-the-dark paint for the eyes. Charge it under a lamp, and watch the gaze linger when you turn out the lights.
Now your unsettling little observer is ready to quietly guard your room.
Swamp Creature Mini Monsters
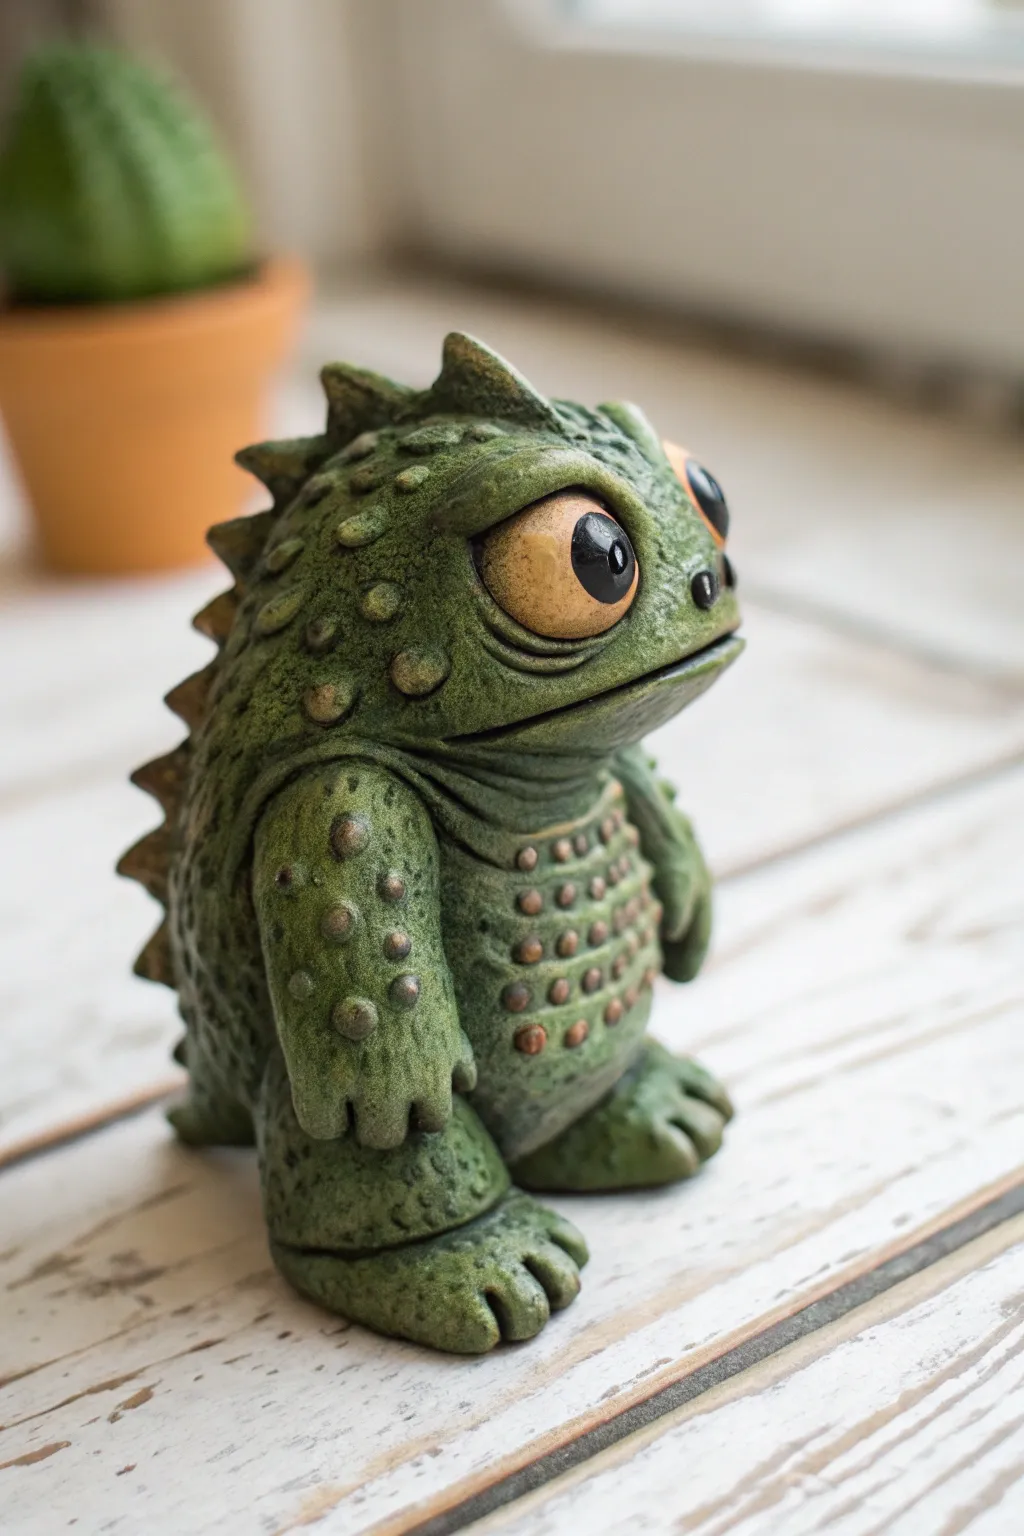
Sculpt your own deeply textured swamp monster with this polymer clay project that captures the essence of a curious reptilian creature. This guide walks you through building the basic form, adding detailed scales, and using washes to bring out its mossy green personality.
Step-by-Step Guide
Materials
- Green polymer clay (olive or forest green)
- Aluminum foil
- Sculpting tools (needle tool, ball stylus, rubber shaper)
- Glass cabochon eyes (amber/yellow)
- Black acrylic paint
- Brown acrylic paint
- Paintbrushes (fine detail and larger shader)
- Gloss varnish
- Paper towels or sponge
Step 1: Armature and Base Form
-
Core construction:
Crumple a piece of aluminum foil into an egg shape about the size of a lemon to act as the internal core. This saves clay and ensures even baking. -
Clay covering:
Condition your green polymer clay until soft, then roll it into a large sheet about 4-5mm thick. Wrap this sheet completely around your foil core, smoothing the seams until you have a solid, seamless green egg. -
Legs and stance:
Roll two thick logs of green clay for the legs. Attach them to the bottom of the body, blending the clay upwards so the transitions disappear. Flatten the bottoms so the figure stands stably on its own.
Smoother Blending
Use a tiny drop of baby oil or clay softener on your finger to smooth out fingerprints and seam lines before texturing. It acts like a polish for the raw clay.
Step 2: Sculpting the Features
-
Facial ridge:
Add a thick snake of clay horizontally across the upper third of the face to create a heavy brow ridge. Blend the edges into the main head shape. -
Installing the eyes:
Press your two amber glass eyes deep into the clay below the brow ridge. Add thin eyelids made of flattened clay strips over the top and bottom of the eyes to lock them in place. -
Mouth carving:
Use a craft knife or a needle tool to cut a wide, straight line for the mouth below the eyes. Deepen the corners to give a slight frown or neutral expression. -
Arm attachment:
Roll two tear-drop shapes for arms. Attach them to the sides of the body just below the head area, blending the shoulder connection thoroughly. -
Spinal ridge:
Pinch a ridge of clay running from the top of the head down the back. Use your fingers to pull out triangular spikes along this spine to create a dorsal fin effect.
Swamp Base
Glue your finished monster onto a wooden disk painted like muddy water. Add dried tea leaves and bits of moss around the feet for a realistic habitat effect.
Step 3: Texture and Details
-
Creating the toes:
Use a stiff blade or tool to press indentations into the ends of the feet and hands, separating them into three chunky toes and fingers each. -
Pustule texturing:
Roll many tiny balls of clay in varying sizes. Press these onto the monster’s back, stomach, and brow ridge. Flatten them slightly so they look like warts or raised scales. -
Deep skin texture:
Take a stiff-bristled toothbrush or a coarse sponge and press it firmly all over the un-spiked skin areas to create a realistic, leathery skin texture. -
Scale definition:
Use a small ball tool or needle to poke tiny dimples into the center of the ‘warts’ on the stomach area for added detail. -
Baking:
Bake the figure according to your clay manufacturer’s instructions, usually at 275°F (130°C) for about 15-30 minutes depending on thickness. Let it cool completely.
Step 4: Painting and Finishing
-
Black wash application:
Dilute black acrylic paint with water until it’s very runny. Brush this wash over the entire sculpture, making sure it gets into all the textures and cracks. -
Wiping back:
Before the black wash dries fully, wipe the surface with a damp paper towel. The black paint will stay in the recesses, highlighting the texture, while the green clay shows on the high points. -
Brown accenting:
Mix a subtle wash of brown paint and dab it selectively around the feet and lower belly to simulate swamp mud. -
Eye detailing:
If your glass eyes got messy during painting, clean them carefully with a damp Q-tip. -
Final gloss:
Once all paint is dry, apply a coat of gloss varnish specifically to the eyes and the inside of the mouth to make them look wet and alive.
Place your new swamp friend on a windowsill or shelf where he can keep a watchful eye on your room
Cracked Tombstone Name Plaques
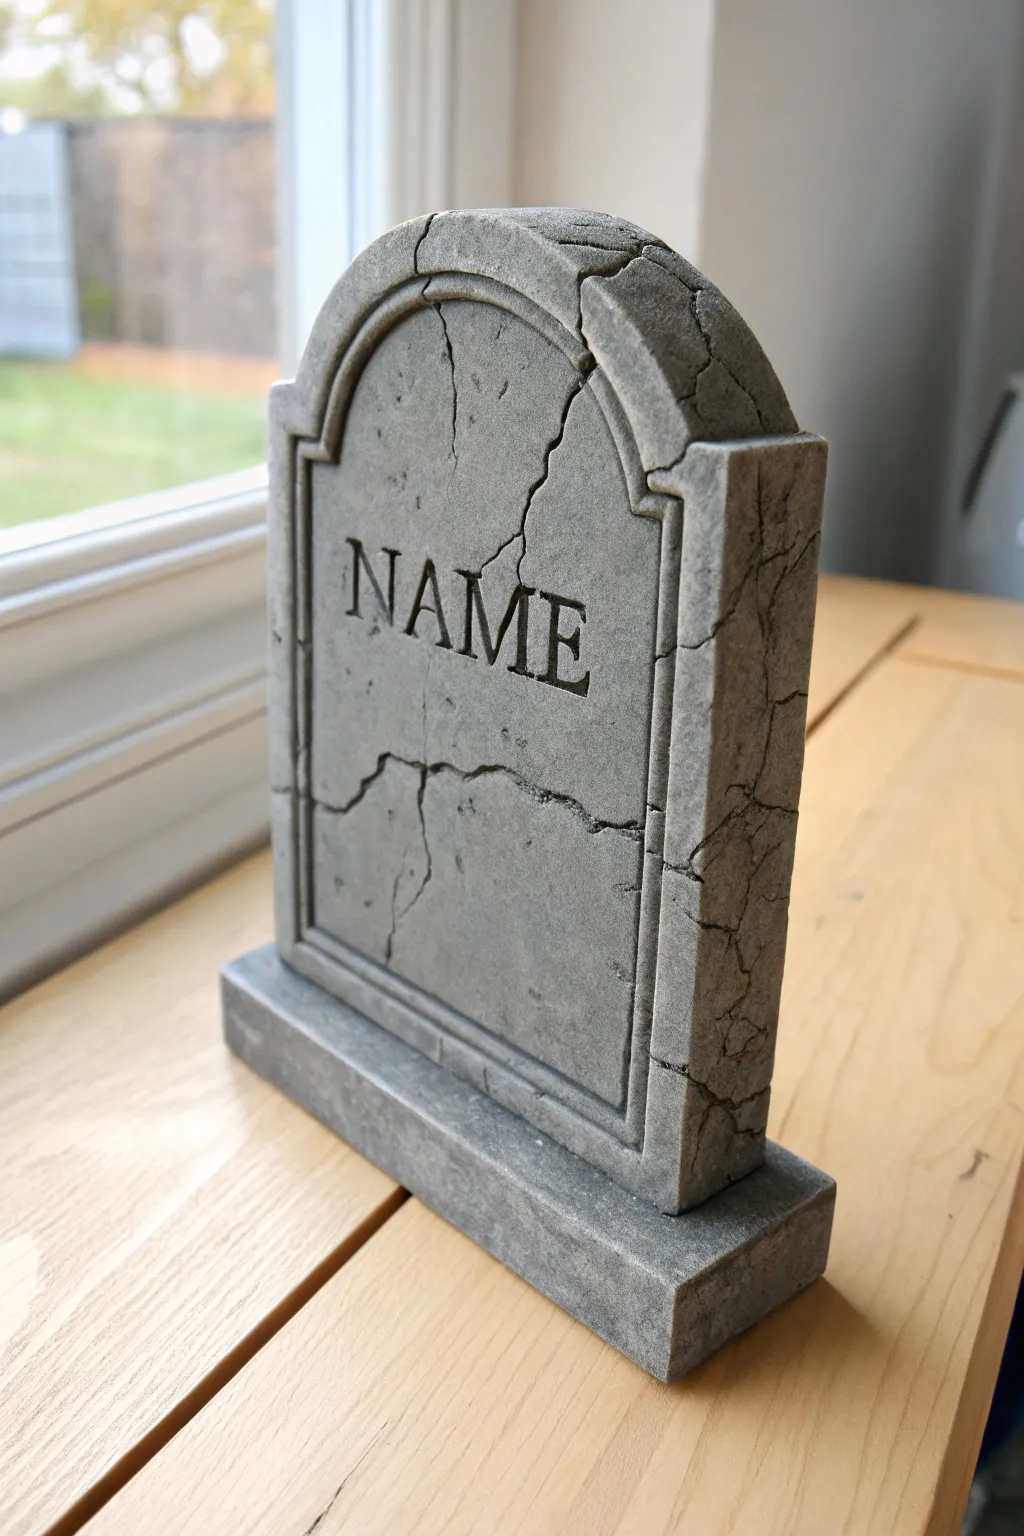
These delightfully dreary name plaques bring a touch of the cemetery to your Halloween decor or gaming table. Sculpted to resemble aged granite, the deep cracks and engraved lettering make them look like they’ve weathered centuries of storms.
Detailed Instructions
Materials
- Polymer clay (grey or granite efffect)
- Acrylic rolling pin
- Clay knife or craft blade
- Rubber alphabet stamps
- Needle tool or toothpick
- Texture sponge or aluminum foil ball
- Black acrylic paint
- Grey acrylic paint (lighter shade)
- Paper towels
- Fine grit sandpaper
- Ruler
- Cardstock (for template)
Step 1: Shaping the Stone
-
Prepare the template:
Before touching the clay, sketch a tombstone shape on cardstock—a classic arch top with straight sides works best. Cut this out to use as your guide. -
Condition the clay:
Warm up your grey polymer clay by kneading it in your hands until it becomes pliable and soft. This prevents unwanted cracking during the initial roll. -
Roll the slab:
Roll out the clay on a clean surface to a thickness of about 1/2 inch. You want this main piece to be substantial. -
Cut the primary shape:
Place your paper template onto the rolled clay. Using your craft knife, carefully trace around the template to cut out the main tombstone body. Smooth the side edges with your finger to remove sharp cutting marks. -
Create the border:
Roll out a thinner ‘snake’ of clay and flatten it slightly into a strip. Or, cut a thin strip from a rolled sheet. Carefully lay this around the front perimeter of the tombstone to create a raised border. Blend the seams slightly on the outer edge, but leave a crisp line on the inner edge. -
Form the base:
Create a separate rectangular block of clay for the plinth. It should be slightly wider and deeper than the tombstone itself. Keep the edges relatively sharp and blocky.
Depth Doctor
Make your cracks look deeper by carving a ‘V’ shape rather than a single slice. Remove that tiny sliver of clay to create a shadow-catching gap.
Step 2: Detailing and Texturing
-
Imprint the name:
Take your rubber alphabet stamps and press the desired name into the center of the tombstone. Rock them gently to ensure a deep, even impression. -
Add stone texture:
Gently press a texture sponge or a crumpled ball of aluminum foil over the entire surface of the clay—front, back, sides, and the base. This removes fingerprints and imparts a realistic granite feel. -
Carve the cracks:
Using a needle tool, carve jagged lines running from the edges inward. I like to make some cracks run through the border and even intersect with the lettering for an ancient look. Vary the depth of these lines. -
Assemble the pieces:
Press the tombstone firmly onto the center of the rectangular base. You can use a small amount of liquid polymer clay or ‘Bond’ as an adhesive if you have it, or simply blend the clay at the connection point on the bottom. -
Bake the project:
Bake the clay according to the manufacturer’s instructions (usually 275°F/135°C for 15-30 minutes depending on thickness). Let it cool completely before painting.
Step 3: The Weathering Wash
-
Apply the dark wash:
Dilute black acrylic paint with water until it’s very runny. Brush this liberally over the entire piece, ensuring it gets into the stamped letters and the cracks you carved. -
Wipe back:
Immediately wipe the high points of the surface with a paper towel. The black paint will stay trapped in the recessed letters and texture, creating instant depth. -
Dry brush highlights:
Load a dry brush with a very small amount of light grey paint. Wipe most of it off on a towel, then lightly flick the brush across the edges and raised textures to highlight the ‘stone’ grain. -
Seal the finish:
Once the paint is fully dry, apply a matte varnish to protect the paint job while maintaining that non-glossy, stony appearance.
Moss Up Your Grave
After painting, dab tiny spots of white glue in the deepest cracks and lower corners. Sprinkle fine green flocking powder or dried tea leaves to simulate moss growth.
Now you have a spooky, personalized monument that looks heavy as rock but is light as a feather
Shrunken Head Style Totems
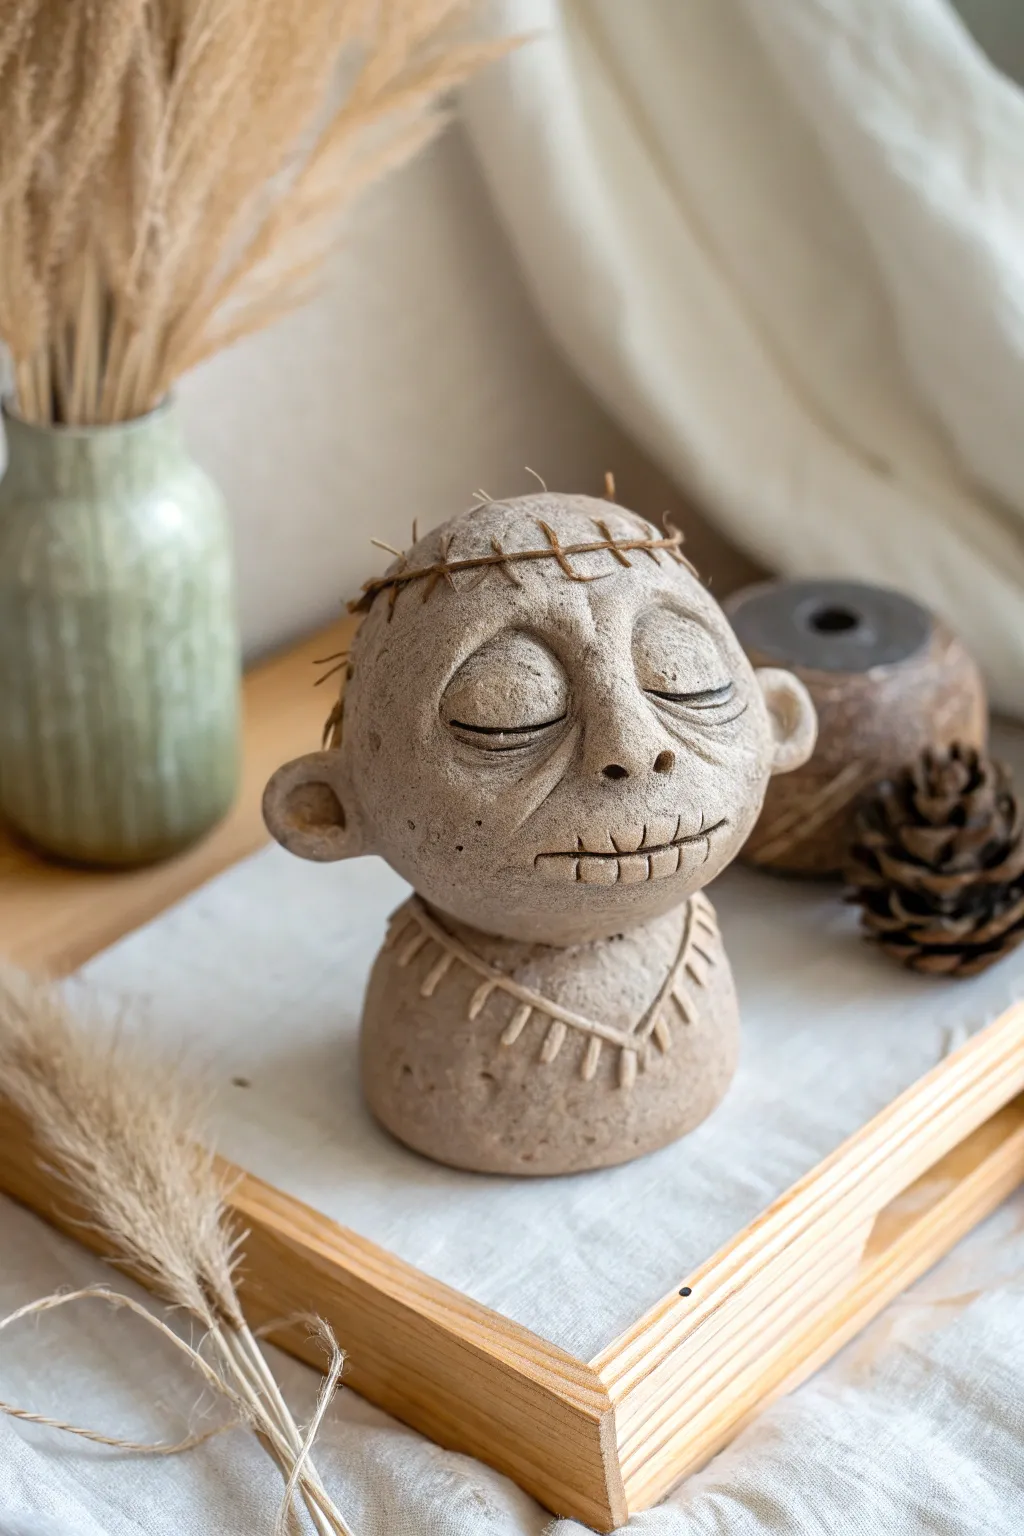
Embrace the eerie aesthetic with this stylized shrunken head sculpture, featuring a serene yet spooky expression and primitive stitched details. The finished piece has a weathered, stone-like texture that makes it perfect for a subtle Halloween display or year-round curiosities shelf.
Step-by-Step
Materials
- Air-dry clay (stone gray or natural color)
- Clay sculpting tools (needle tool, loop tool)
- Small bowl of water
- Aluminum foil
- Acrylic paints (black, brown, cream)
- Paintbrushes (flat brush and fine detail brush)
- Texture sponge or stiff bristle brush
- Paper towels
Step 1: Forming the Base Structure
-
Build the armature:
Crumple aluminum foil into a tight ball slightly smaller than a tennis ball for the head, and a smaller, flattened oval shape for the bust base. This saves clay and reduces weight. -
Cover the head:
Roll out a slab of clay about 1/4 inch thick. Wrap it completely around the foil ball, smoothing the seams together with a little water until you have a seamless sphere. -
Create the bust connection:
Cover the smaller foil base with clay in the same manner. Join the head to this base by scoring (scratching) both connecting surfaces, adding a dab of water or slip, and pressing them firmly together. -
Secure the seam:
Take a small coil of clay and wrap it around the neck joint. Blend the clay upwards into the head and downwards into the base to ensure the head won’t fall off later.
Stone Effect Secret
Mix a small amount of fine sand or used coffee grounds directly into your clay before sculpting. This gives the finished piece a gritty, ancient texture straight from the start.
Step 2: Sculpting the Features
-
Add the nose:
Roll a small pyramid of clay and attach it to the center of the face. Smooth the edges down onto the face, then use a small loop tool or your thumb to shape the nostrils and bridge. -
Form the eye sockets:
Use your thumbs to gently press indentations on either side of the nose bridge to create the eye sockets. This establishes the facial structure. -
Sculpt closed eyelids:
Roll two half-moon shapes of clay and press them into the sockets. Smooth them to look like bulging, closed eyelids. Use a needle tool to draw a horizontal crease across the center of each for the lash line. -
Attach the ears:
Form two small C-shaped ears. attach them low on the sides of the head. Use a ball tool to create the inner ear cavity, giving them a slightly oversized, cartoonish look. -
Carve the mouth:
Use a needle tool or knife to slice a wide, straight line for the mouth. Add small vertical hash marks across the line to create the signature ‘stitched lips’ appearance.
Cracking Up?
If small drying cracks appear, don’t panic. Mix a paste of clay and water (slip) and fill the cracks, or leave them be—they actually enhance the weathered artifact look.
Step 3: Adding Details and Texture
-
Create the crown stitching:
Roll a very thin ‘snake’ of clay. Drape it around the top of the head like a crown or halo. Flatten it slightly. -
Detail the stitches:
With your needle tool, press perpendicular lines over the clay snake to mimic thick, crude stitches holding the top of the head together. -
Add the necklace:
Carve a shallow ‘V’ shape into the chest area. Use a small tool to press repeating vertical dashes along this line, creating a primitive necklace relief. -
Texturize the surface:
I like to take a rough sponge or a crumpled ball of foil and gently press it all over the skin of the sculpture. This removes fingerprints and adds a weathered, organic stone feel. -
Refine the expression:
Add subtle wrinkles under the eyes and around the mouth used the needle tool to age the face.
Step 4: Finishing
-
Dry thoroughly:
Let the sculpture dry completely for 24-48 hours. Keep it away from direct heat to prevent cracking. -
Apply a wash:
Mix brown and black acrylic paint with water to create a thin wash. Brush this over the entire piece, ensuring it gets into the deep crevices of the stitches and eyes. -
Wipe back:
Immediately use a paper towel to wipe away the excess paint from the raised surfaces. The dark paint will remain in the textures, highlighting the details. -
Dry brush highlights:
Dip a dry brush into a tiny amount of cream or light grey paint. Lightly dust the nose, forehead, and cheekbones to accentuate the stone texture.
Place your little totem on a shelf and enjoy the eerie charm it adds to your space
Surreal Long-Limbed Creepers

Create an eerie yet captivating alien figure that balances unsettling surrealism with simple charm. This project combines clay sculpting with textured painting techniques to produce a pale, long-limbed creature that looks like it’s silently observing from another dimension.
How-To Guide
Materials
- Air-dry clay or polymer clay (white or grey)
- Armature wire (12-14 gauge for support)
- Aluminum foil
- Pliers and wire cutters
- Wooden sculpting tools
- Needle tool
- Sandpaper (fine and medium grit)
- Acrylic paints (Titanium White, Buff Titanium, Raw Umber, Black)
- Matte varnish
- Gloss varnish
- Wooden circular base (pre-cut or clay-made)
- Strong craft glue or epoxy
- Rough bristled brush for texture
Step 1: Building the Skeleton
-
Form the armature:
Cut a length of wire about 12 inches long. Fold it in half and twist the top loop to create a head anchor. Twist the two ends down to form a neck and spine, then separate them at the bottom to create legs. -
Attach the base:
Bend the wire feet into loops. If using a wooden base, drill two small holes and secure the foot loops into them with glue. If sculpting the base, embed the wires into a thick disc of foil. -
Bulk up the body:
Crumple aluminum foil tightly around the wire armature. Create a large, bulbous shape for the head and a slender, elongated teardrop shape for the torso. Leave the limbs wire-thin for now. -
Secure the foil:
Wrap thin masking tape or painter’s tape around the foil to keep it compressed and provide a better surface for the clay to grip.
Cracks in the Clay?
If small cracks appear during drying, mix a small amount of fresh clay with water to create a paste (slip). Fill the cracks with this paste and smooth it over.
Step 2: Sculpting the Creature
-
First clay layer:
Roll out thin sheets of clay and drape them over the head and torso. Press firmly to remove trapped air, smoothing the seams as you go. -
Sculpt the limbs:
Roll thin snakes of clay for the arms and legs. I find it helpful to start thicker at the shoulder and hip joints and taper down towards the hands and feet to emphasize that eerie, spindly look. -
Blend the joints:
Use a wooden tool or your finger dipped in water to seamlessly blend the clay from the limbs into the torso. The connection should look organic and bone-like. -
Shape the head:
Add more clay to the cranium to exaggerate its size. Smooth it into a slightly pointed chin. Use your thumbs to press deep, large indentations where the eyes will go. -
Refine the face:
Make two tiny holes for nostrils using a needle tool. Keep the mouth absent or extremely subtle to maintain the mysterious vibe. -
Create the texture:
Instead of smoothing the clay perfectly, tap the surface lightly with a rough-bristled brush or a balled-up piece of foil. This creates a pitted, organic skin texture similar to bone or dried parchment. -
Forming the base:
If you are sculpting the base, wrap the bottom platform in a thick layer of clay. Use a needle tool to carve vertical lines around the side, mimicking the bark of a tree stump. -
Dry completely:
Let the sculpture dry for at least 24-48 hours. If using air-dry clay, ensure it is hard to the touch and no longer cool before proceeding.
Glow in the Dark
Mix phosphorescent powder into your light grey paint for the skin, or use glow-in-the-dark paint for the eyes to make your creature truly spooky at night.
Step 3: Painting and Finishing
-
Base coat:
Mix a wash of Titanium White with a tiny drop of Raw Umber. Paint the entire figure, working the paint into the textured crevices. -
Dry brushing:
Once the base is dry, use a clean, dry brush with pure white paint. Lightly dust over the raised areas of the texture to highlight the ‘skin’ details. -
The eyes:
Paint the recessed eye sockets meticulously with pure Black acrylic. Apply two coats to ensure an opaque, void-like finish. -
Painting the base:
Paint the stump base with a wash of watered-down brown paint, letting it settle into the carved bark lines. Wipe away excess from the raised areas for a natural wood look. -
Varnishing:
Apply a coat of matte varnish to the body and base to protect the paint without making it shiny. This keeps the skin looking chalky and real. -
Glossy eyes:
Finally, apply a thick layer of high-gloss varnish or UV resin specifically to the black eyes. This gives them a wet, reflective quality that makes the sculpture truly come alive.
Now you have a silent observer ready to guard your windowsill