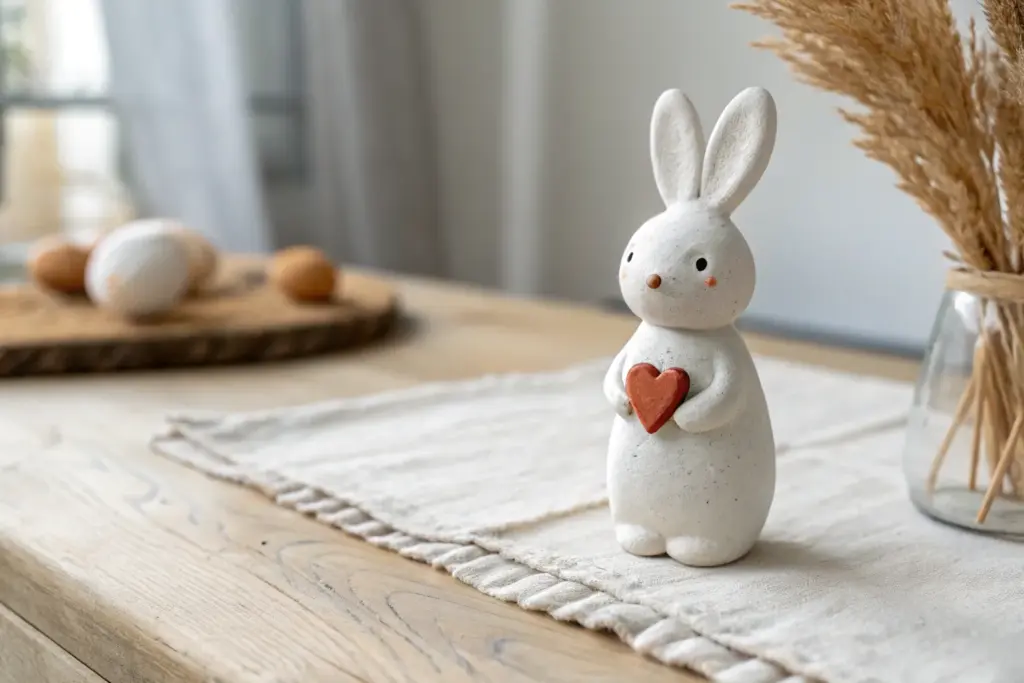
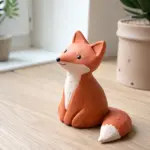
When you want fun, easy clay sculpture wins, it’s all about simple shapes you can smoosh, roll, and stack without stressing over perfect details. These sculpture ideas are my go-tos for quick, cute wins that still look display-worthy on a shelf or desk.
Cute Blob Animal Figurines
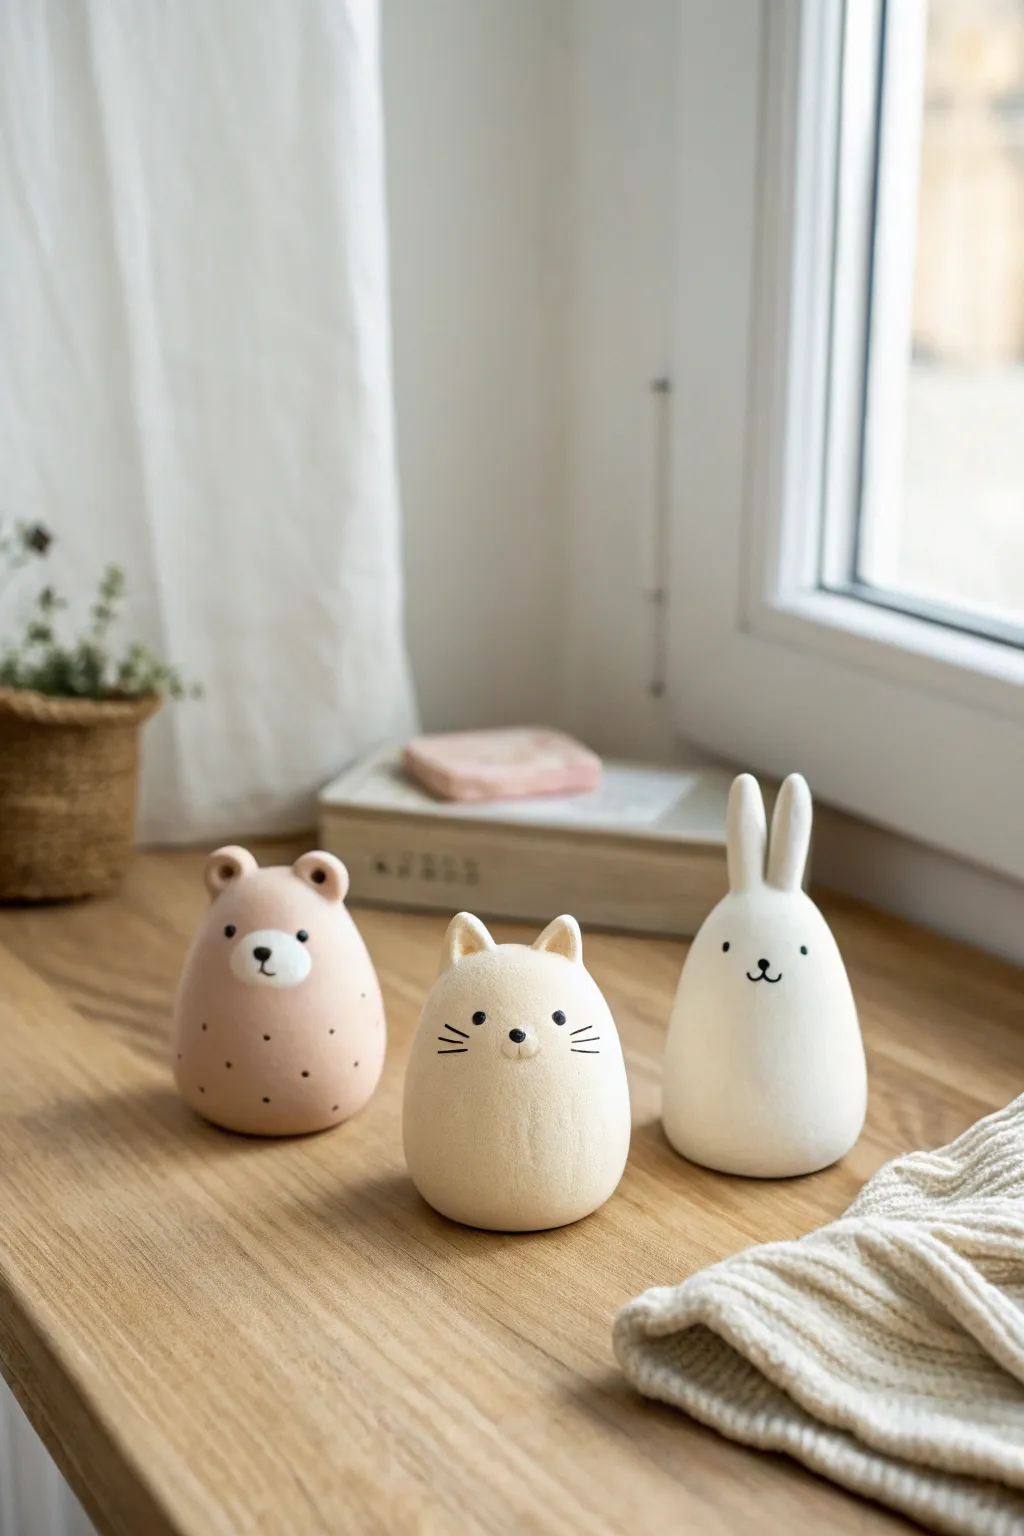
These charming, egg-shaped figurines capture the essence of a bear, cat, and rabbit with delightfully simple geometry. Perfect for beginners, this project relies on smooth, rounded forms and delicate painted details to create a serene trio of desk companions.
Step-by-Step Guide
Materials
- Air-dry clay or polymer clay (white, beige, and light pink/terracotta)
- Acrylic paints (black and white)
- Fine detail paintbrush (size 00 or 000)
- Small bowl of water
- Aluminum foil (optional, for armature)
- Smooth work surface or silicone mat
- Sanding sponge or fine-grit sandpaper (400 grit)
- Matte varnish or sealant
Step 1: Forming the Base Shapes
-
Prepare the clay bodies:
Start by conditioning your clay until it is soft and pliable. Divide the clay into three equal portions to ensure your animals will be roughly the same size. -
Shape the core:
Roll each portion of clay into a smooth ball. Slowly begin to elongate the top half slightly to create a rounded, egg-like shape that is wider at the bottom for stability. -
Flatten the base:
Gently tap the bottom of each egg shape on your work surface. This creates a flat area so the figurines stand upright without wobbling. -
Smooth the surface:
Dip your finger in a tiny amount of water (or clay softener if using polymer) and run it over the surface to erase any fingerprints or cracks. The goal is a seamless, stone-like finish.
Unwanted Cracks?
If air-dry clay cracks while drying, mix a tiny bit of fresh clay with water to make a paste (slip). Fill the cracks, smooth it over, and let it dry again.
Step 2: Sculpting Ears & Features
-
Create the rabbit ears:
For the white rabbit, roll two small, thin logs of white clay. taper the ends and press them onto the very top of the head, blending the clay downward so the seam disappears. -
Shape the bear ears:
For the pinkish bear, roll two tiny balls of clay. Press them gently onto the sides of the head near the top capable and use a rounded tool or your pinky finger to create a small indentation in each ear. -
Form the cat ears:
For the beige cat, pinch two small triangles of clay. Attach these to the top of the head, keeping them pointy and alert. Blend the base of the ears smoothly into the head. -
Add the bear’s snout:
Take a very small flattened circle of white clay and press it onto the center of the bear’s face area to create a muzzle. Smooth the edges so it looks integrated, not just stuck on. -
Add the cat’s muzzle:
Similar to the bear, add a tiny, slightly more oval piece of white clay to the cat’s face area, positioning it slightly lower than center. -
Refine and dry:
Give all three figures a final check for smoothness. If you are using air-dry clay, let them cure for 24-48 hours; for polymer clay, bake according to the package instructions.
Step 3: Painting & Finishing
-
Sand imperfections:
Once fully cured or dry, inspect your figures. If there are any rough spots, gently buff them away with fine-grit sandpaper for a professional matte look. -
Paint the simple eyes:
Using your finest brush and black acrylic paint, dot two small, wide-set eyes on the bear and cat. For the rabbit, place the eyes slightly higher up on the face. -
Detail the noses:
Paint a tiny, inverted triangle nose on the bear’s white muzzle. For the cat, paint a small black nose directly on the muzzle. The rabbit gets a simple ‘Y’ shape for a nose and mouth combo. -
Add whiskers and mouths:
With an extremely light touch, paint three thin whiskers on each cheek of the cat. Give the bear a small vertical line connecting the nose to a tiny mouth smile. -
Add decorative spots:
I prefer to add a little texture to the bear by painting tiny, random black dots across the lower body, resembling a pattern. -
Seal the work:
Finish by applying a coat of matte varnish. This protects the paint and gives the clay a uniform sheen without making it look plasticky.
Make Them Useful
Before the clay hardens, insert a strong wire spiral or alligator clip into the top of the head to turn these cute figurines into functional photo or memo holders.
Enjoy arranging your clean and modern little clay family on a windowsill or shelf


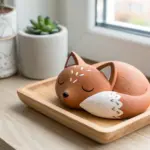
Tiny Snail Buddies
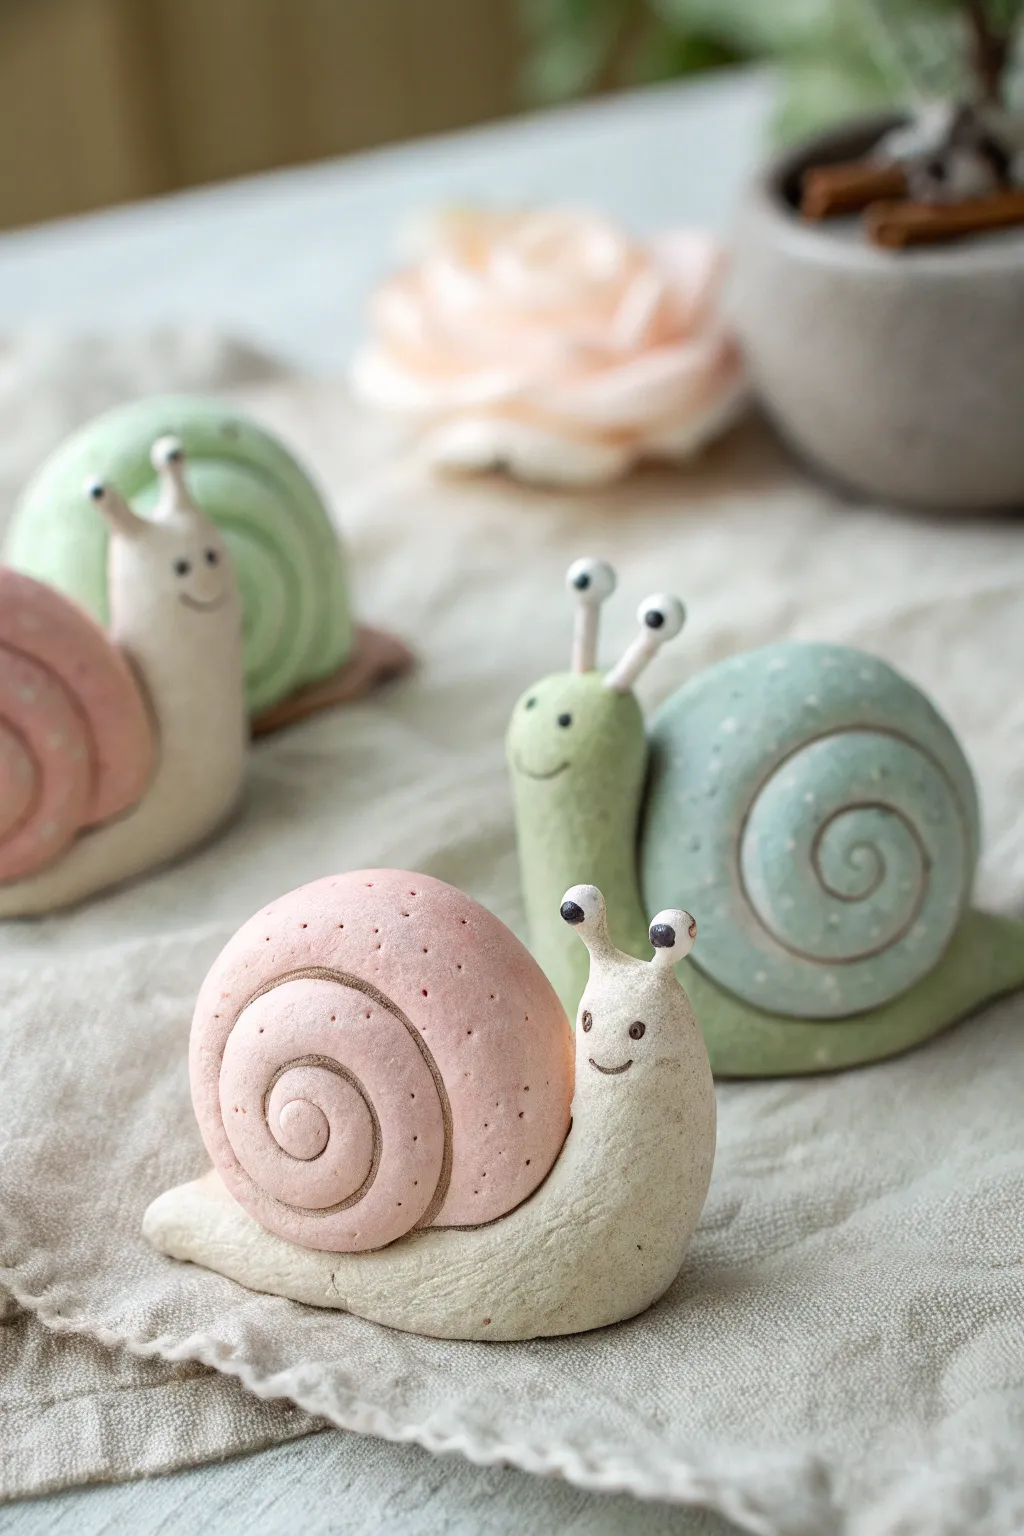
These charming little garden companions are crafted with soft, pastel-colored clay and feature a delightful textured finish that gives them an organic feel. Their spiraled shells and expressive antenna eyes make them a perfect beginner friendly sculpting project to brighten up your desk or shelf.
Step-by-Step Tutorial
Materials
- Polymer clay or air-dry clay (white, pastel pink, sage green)
- Small ball stylus tool
- Needle tool or toothpick
- Black acrylic paint or clay marker
- White acrylic paint
- Soft texture sponge or stiff bristle brush
- Wire armature (thin gauge) or toothpicks for eye stalks
- Matte varnish (optional)
Step 1: Sculpting the Bodies
-
Prepare the clay:
Start by conditioning your clay until it is soft and pliable. If you are using white clay as a base, mix in very small amounts of green or pink pigment to achieve those muted, pastel tones seen in the photo. Keep a portion as plain off-white for the bodies. -
Shape the base:
Take a walnut-sized ball of the off-white clay and roll it into a thick sausage shape. Taper one end slightly to form the tail. -
Lift the head:
On the thicker end of your roll, gently bend the clay upward to create the snail’s upright neck and head area. Smooth out any creases that form at the bend with your finger. -
Add texture:
Before the clay hardens, gently dab the entire surface of the body with a texture sponge or a stiff brush. This creates the stone-like, slightly pitted surface texture that gives these snails their character.
Step 2: Creating the Spiral Shells
-
Form the shell coil:
Roll your colored clay (pink or green) into a long, even snake about 5-6 inches long. The thickness should taper very gradually towards one end. -
Roll the spiral:
Starting from the thinnest end, tightly roll the clay snake inward upon itself to create a snail shell spiral. Keep the coils tight against each other. -
Define the spiral:
Using a needle tool or a toothpick, gently re-trace the deep groove between the coils to ensure the spiral shape is clearly defined and distinct. -
Texture the shell:
Just like the body, lightly texture the shell surface. I sometimes use a needle tool to add tiny, scattered dots for extra detail, mimicking porous ceramic. -
Attach shell to body:
Press the finished shell firmly onto the back of the snail body. If using air-dry clay, score both surfaces and add a dab of water or slip; for polymer clay, a drop of liquid clay or bake-and-bond works best.
Texturing Trick
Use a balled-up piece of aluminum foil to gently press onto the clay surface. This creates a realistic, uneven rock texture much faster than using a needle tool.
Step 3: Adding Personality
-
Construct eye stalks:
Cut two very short pieces of thin wire or toothpicks (about 1 cm) to act as internal supports. Insert them into the top of the head. -
Sculpt the eyes:
Roll thin clay around the supports to cover them, then place a small white clay ball on top of each stalk. -
Add pupils:
Using a very small dotting tool, create tiny black dots for pupils. Place them slightly askew or looking in different directions to give them a goofy, friendly expression. -
Carve the smile:
Use a needle tool or a small curved blade to press a simple, u-shaped smile into the face. Keep it small and subtle.
Make it Miniature
Try making a tiny version to sit on top of a plant pot rim! Just add a hidden wire loop underneath the body to stake it securely into the soil.
Step 4: Finishing Touches
-
Final smoothing:
Check over your sculpture for any unintended fingerprints. If you find any, either smooth them out or cover them with more texture dabs. -
Drying or baking:
Follow the instructions for your specific clay type. Bake polymer clay according to package directions, or let air-dry clay sit for 24-48 hours until fully hard. -
Optional painting:
If you used plain white clay for the whole project, now is the time to paint the shells with watered-down acrylics (pink and sage) to act as a wash, letting the color settle into the textures. -
Seal the piece:
To protect your work while maintaining the natural look, apply a coat of ultra-matte varnish. Avoid glossy finishes as they will hide the subtle texture work.
Once dry, arrange your trio of snails together on a windowsill for a whimsical display that lasts all year round


Mini Mushroom Cluster
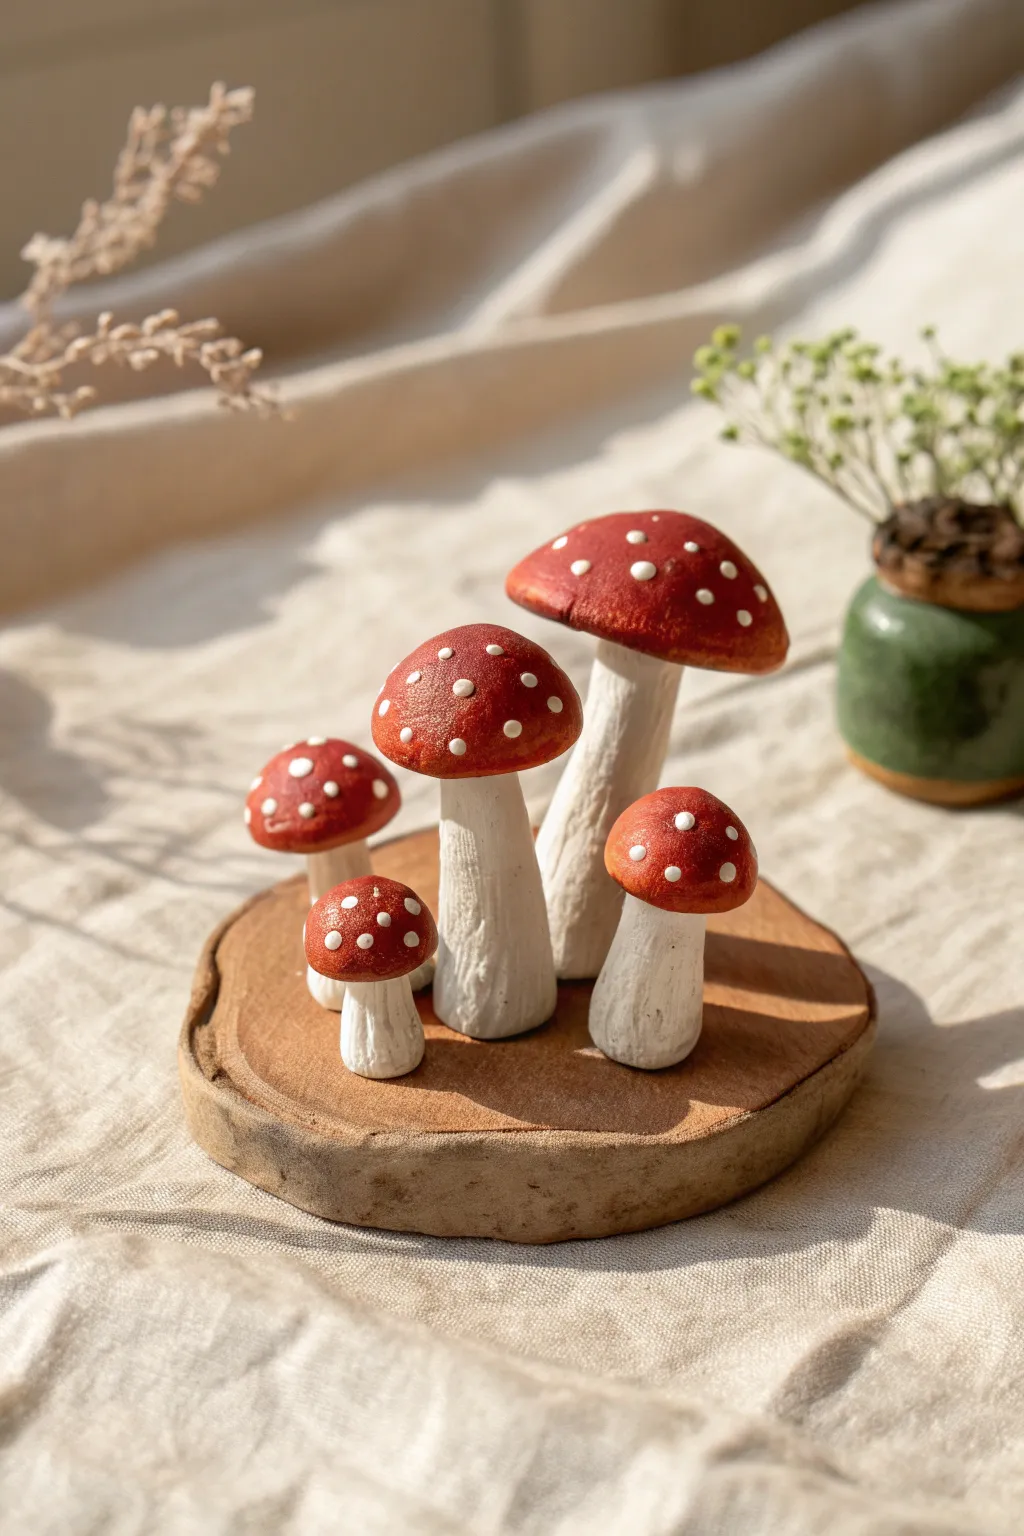
Bring a touch of the forest floor indoors with this charming clay sculpture featuring a family of five red-capped mushrooms. Arranged on a rustic wood slice, these cheerful fungi make for a perfect desk accessory or a sweet gift for nature lovers.
Step-by-Step
Materials
- Air-dry clay or polymer clay (white)
- Acrylic paints (bright red, white, raw sienna or beige)
- Small wood slice (coaster size)
- Sculpting tools or a toothpick
- Aluminum foil
- Paintbrushes (flat shader and fine detail)
- Strong craft glue or hot glue
- Matte or satin varnish (optional)
- Fine-grit sandpaper
Step 1: Sculpting the Stems
-
Prepare the foil armature:
For the largest mushroom, crinkle a small piece of aluminum foil into a cylinder shape. This saves clay and helps the stem stand upright while drying. -
Cover with clay:
Roll out a cylinder of white clay and wrap it around your foil core. Smooth the seams completely with your fingers and a little water if using air-dry clay. -
Create variation:
Sculpt four more stems of graduating sizes. Only use foil for the biggest ones; the smallest stems can be solid clay. Make sure the bottoms are flat so they stand easily. -
Add texture:
Using a scalpel tool or a toothpick, gently drag vertical lines up the stems to mimic natural fibers. I like to twist the lines slightly for a more organic look.
Step 2: Forming the Caps
-
Roll spheres:
Roll five balls of clay corresponding to the size of your stems. Flatten the bottom of each sphere slightly to create a dome shape. -
Shape the domes:
Gently pinch the edges of the domes to widen them. Keep the tops rounded and smooth. -
Connect cap to stem:
Score the top of a stem and the underside of a matching cap (scratch hatching lines). Apply a dab of water or liquid clay bond. -
Secure the pieces:
Press the cap onto the stem firmly but gently. Smooth the clay at the connection point underneath so it looks like one continuous piece, or leave a slight overhang for a different style. -
Repeat and dry:
Assemble all five mushrooms. Set them aside to dry completely according to your clay package instructions—usually 24-48 hours for air-dry kinds.
Smooth Moves
Use a drop of baby oil on your finger (for polymer) or water (for air-dry) to smooth fingerprints out of the wet clay before texturing.
Step 3: Painting and Assembly
-
Sand imperfections:
Once fully dry, lightly sand any rough fingerprints or bumps with fine-grit sandpaper. -
Base coat the stems:
Paint the stems with an off-white or very light beige. You can mix a tiny drop of raw sienna into your white paint to warm it up. -
Texture wash:
Dilute a bit of brown paint with water and brush it over the textured stems, then immediately wipe it off with a paper towel. This leaves dark color in the crevices. -
Paint the caps:
Apply two coats of bright red acrylic paint to the tops of the mushrooms, letting the first coat dry before adding the second for opacity. -
Add the dots:
Using the back end of a paintbrush or a dotting tool, dip into white paint and stamp distinct dots onto the dry red caps. Vary the sizes for a natural feel. -
Seal the work:
Apply a coat of matte or satin varnish to protect the paint. A satin finish gives the caps a nice, slight sheen. -
Prepare the base:
Clean your wood slice to ensure it is free of dust. Arrange your mushroom family on the slice without glue first to find the best composition. -
Final glue down:
Using strong craft glue, secure the base of each mushroom to the wood slice. Hold them in place for a few seconds to ensure they bond.
Mossy details
Glue dried moss or small preserved lichen clumps around the base of the stems to hide any glue residue and add realism.
Enjoy your little piece of woodland art on a shelf or desk where it can brighten your day


Simple Dinosaur Figurine
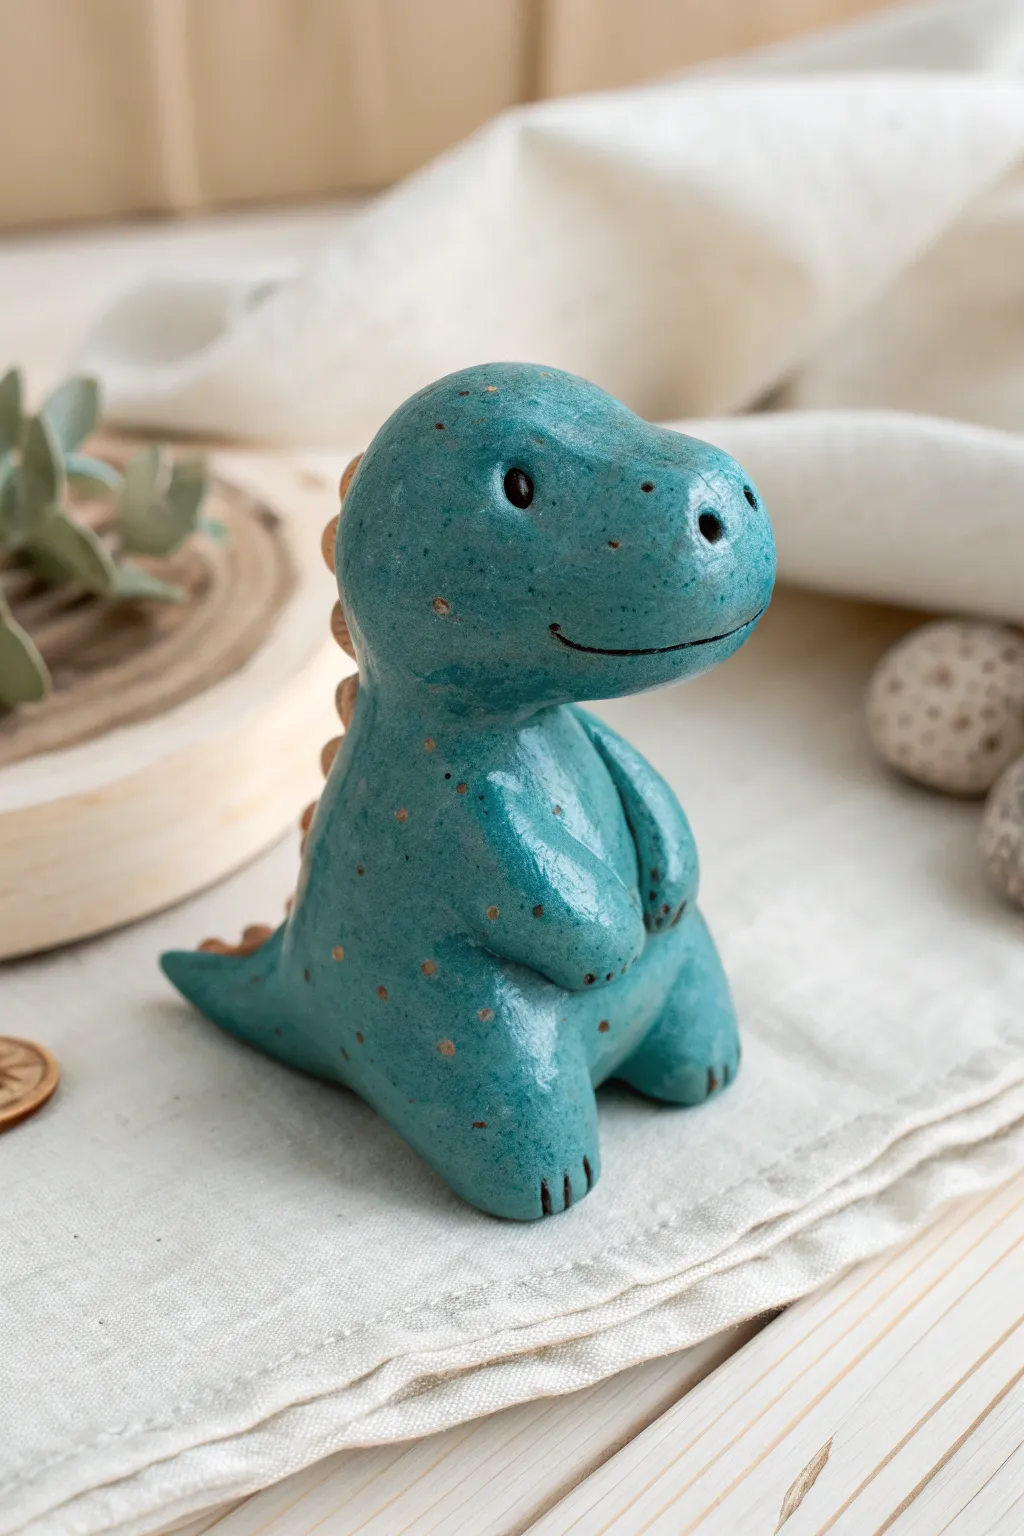
This adorable little dinosaur figurine brings a pop of prehistoric charm to any desk or shelf. Sculpted from clay and finished with a glossy, speckled teal glaze, its rounded shape and friendly smile make it a perfect beginner sculpting project.
Step-by-Step Guide
Materials
- Polymer clay (white or light grey)
- Acrylic paints (teal, brown/gold, black)
- High-gloss varnish or resin
- Sculpting tools (ball styluses, needle tool)
- Aluminum foil (for armature)
- Stiff paintbrush (for fly-specking)
- Soft paintbrush
- Oven (for baking polymer clay) or Air-dry clay equivalent
Step 1: Forming the Body
-
Create the core:
Start by crumpling a small piece of aluminum foil into a pear shape. This saves clay and keeps the figurine lightweight. The wider bottom will be the body, and the narrower top will support the head. -
Cover the armature:
Sheet out your clay to about 1/4 inch thickness. Wrap it entirely around the foil core, smoothing out any seams with your fingers until you have a seamless, solid pear shape. -
Shape the head:
Add a slightly larger ball of clay to the top of the pear shape to form the head. Blend the neck seam downwards so the head and body become one continuous unit. Gently press the front of the head to flatten the snout slightly. -
Add the tail:
Roll a cone of clay for the tail. Attach the wide end to the lower back of the body, blending the clay thoroughly so it doesn’t crack off later. Curve the tip slightly for movement. -
Form the legs:
Make two thick, short logs of clay for the legs. Attach them to the bottom front of the body. Press them flat on the bottom so the dinosaur sits stably without wobbling.
Step 2: Adding Details
-
Sculpt the arms:
Roll two small sausage shapes for the arms. Attach them high up on the chest, pressing the tops into the body and letting the little hands rest on the belly. -
Create the spine ridges:
Roll tiny balls of clay and flatten them slightly into discs or small triangles. Attach these in a row running down the back from the neck to the tail tip. I like to vary their sizes, utilizing the largest ones in the middle of the back. -
Define the face:
Use a needle tool or a small knife to carve a wide, curved smile into the snout. Use a large ball stylus to press indentations where the eyes will go. -
Refine toes and nostrils:
Use a needle tool or knife to press two or three lines into the end of each foot for toes. Poke two small holes at the end of the snout for nostrils. -
Smooth the surface:
Dip your finger in a little baby oil (if using polymer clay) or water (if using air-dry) and gently rub the entire sculpture to remove fingerprints and tool marks. A smooth surface is key for a glossy finish. -
Bake or dry:
Follow the manufacturer’s instructions for your specific clay to bake or dry the sculpture. Allow it to cool or cure completely before painting.
Wobbly Sitter?
If your dino tips over, gently tap the bottom of the raw clay figure against a table to flatten the base before baking. If it’s already baked, adhere a small felt circle to the bottom for stability.
Step 3: Painting and Finishing
-
Base coat:
Paint the entire dinosaur (except the spine ridges) with a solid coat of teal acrylic paint. You may need two thin layers for full opacity. -
Paint the spikes:
Carefully paint the ridge spikes down the back with a warm light brown or beige color. -
Add the speckles:
Mix a watery brown paint. Dip a stiff brush (like an old toothbrush or hog bristle brush) into the mix and flick the bristles with your thumb to splatter tiny brown spots all over the teal body. -
Paint facial features:
Use a fine detail brush and black paint to fill in the smile line and paint two small solid circles for the eyes. Add a tiny white dot in each eye for a highlight if you wish. -
Apply the glaze:
Once the paint is bone dry, coat the entire figurine in a high-gloss varnish or UV resin. This gives it that ceramic-like shine shown in the reference photo.
Ceramic Look Hack
To truly mimic ceramic glaze, apply three thick coats of high-gloss polyurethane varnish, letting each layer dry fully. The thick clear coat creates depth over the speckles.
Now you have a charming prehistoric companion to keep you company

The Complete Guide to Pottery Troubleshooting
Uncover the most common ceramic mistakes—from cracking clay to failed glazes—and learn how to fix them fast.
Chubby Penguin Pal
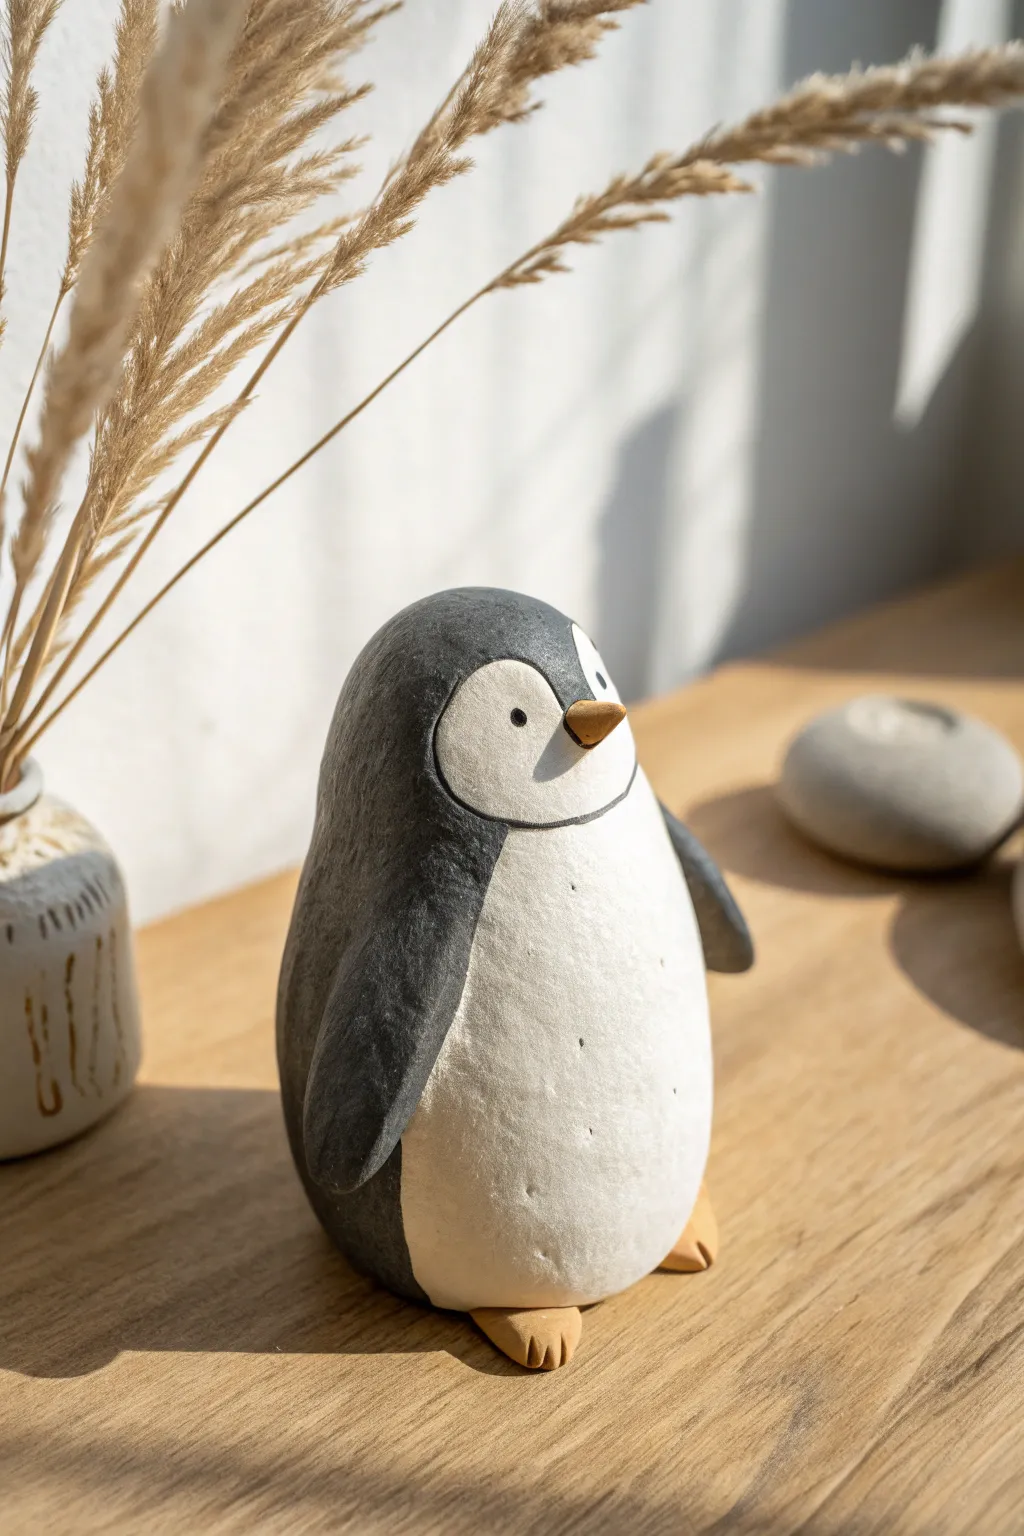
This adorable penguin sculpture captures the essence of winter charm with its smooth, round belly and earnest expression. Crafted from simple clay shapes, it’s a delightful project that combines basic sculpting techniques with a clean, minimalist finish.
How-To Guide
Materials
- Air-dry clay or polymer clay (white)
- Acrylic paints (charcoal grey, white, ochre yellow)
- Sculpting tools (needle tool, smoothing sponge)
- Small paintbrush
- Water cup (for smoothing)
- Black fine-liner pen or detail paint
Step 1: Forming the Body
-
Prepare the base:
Start with a large fist-sized ball of white clay. Roll it firmly between your palms to remove any air bubbles and cracks. -
Shape the torso:
Gently gently elongate the ball into a tall egg shape. Flatten the bottom by pressing it lightly against your work surface so the penguin stands upright securely without wobbling. -
Refine the silhouette:
Smooth the sides with slightly damp fingers to create a seamless, rounded surface. The shape should taper slightly toward the top for the head area, but keep it chubby and substantial.
Cracks while Drying?
If small fissures appear as the clay dries, mix a tiny bit of fresh clay with water to make a paste. Fill the cracks, smooth over with a finger, and let dry again.
Step 2: Adding Features
-
Create the wings:
Roll two smaller sausage shapes of clay about 2 inches long. Flatten them into elongated teardrops to form the flippers. -
Attach the flippers:
Score the sides of the body and the back of the wings with a needle tool. Add a dab of water or slip, then press the wings firmly against the sides, smoothing the top seam so they look integrated. -
Make the feet:
Form two small, flat triangles for the feet. Use a knife tool to gently indent two lines into the front of each triangle to suggest toes. -
Position the feet:
Place the feet under the front edge of the belly so they just peek out. Press the body down gently onto them to secure the bond. -
Sculpt the beak:
Roll a tiny cone of clay for the beak. Attach it to the center of the face area, keeping it slightly pointed downward for a cute profile.
Step 3: Painting and Finishing
-
Dry properly:
Allow the sculpture to dry completely according to your clay’s instructions—usually 24-48 hours for air-dry clay—before painting. -
Base coat the belly:
Paint the entire front stomach area with a creamy white paint. I like to sponge this layer on slightly for a textured, feathery look. -
Paint the dark coat:
Using a charcoal grey or soft black, paint the back, the head, and the outer sides of the wings. Carefully curb the paint around the face to create the classic rounded ‘mask’ shape around the eyes. -
Define the face line:
Use a fine liner brush or a black paint pen to draw a thin, crisp line separating the white face mask from the grey head, giving it a cartoon-like outline. -
Color the details:
Paint the beak and the sticking-out feet with a warm ochre or mustard yellow. -
Add the eyes:
Dip the back end of a paintbrush into black paint and dot two small eyes wide apart on the white face area. -
Final texture:
To mimic the stone-like texture in the photo, you can lightly stipple tiny grey speckles onto the white belly using a dry brush or an old toothbrush.
Level Up: Winter Scarf
Before the clay dries, roll out a long, thin strip of clay and drape it around the penguin’s neck. Add fringe texture to the ends for a cozy winter accessory.
Place your new chilly friend on a shelf or desk for a daily dose of cuteness
Coil-Tentacle Octopus
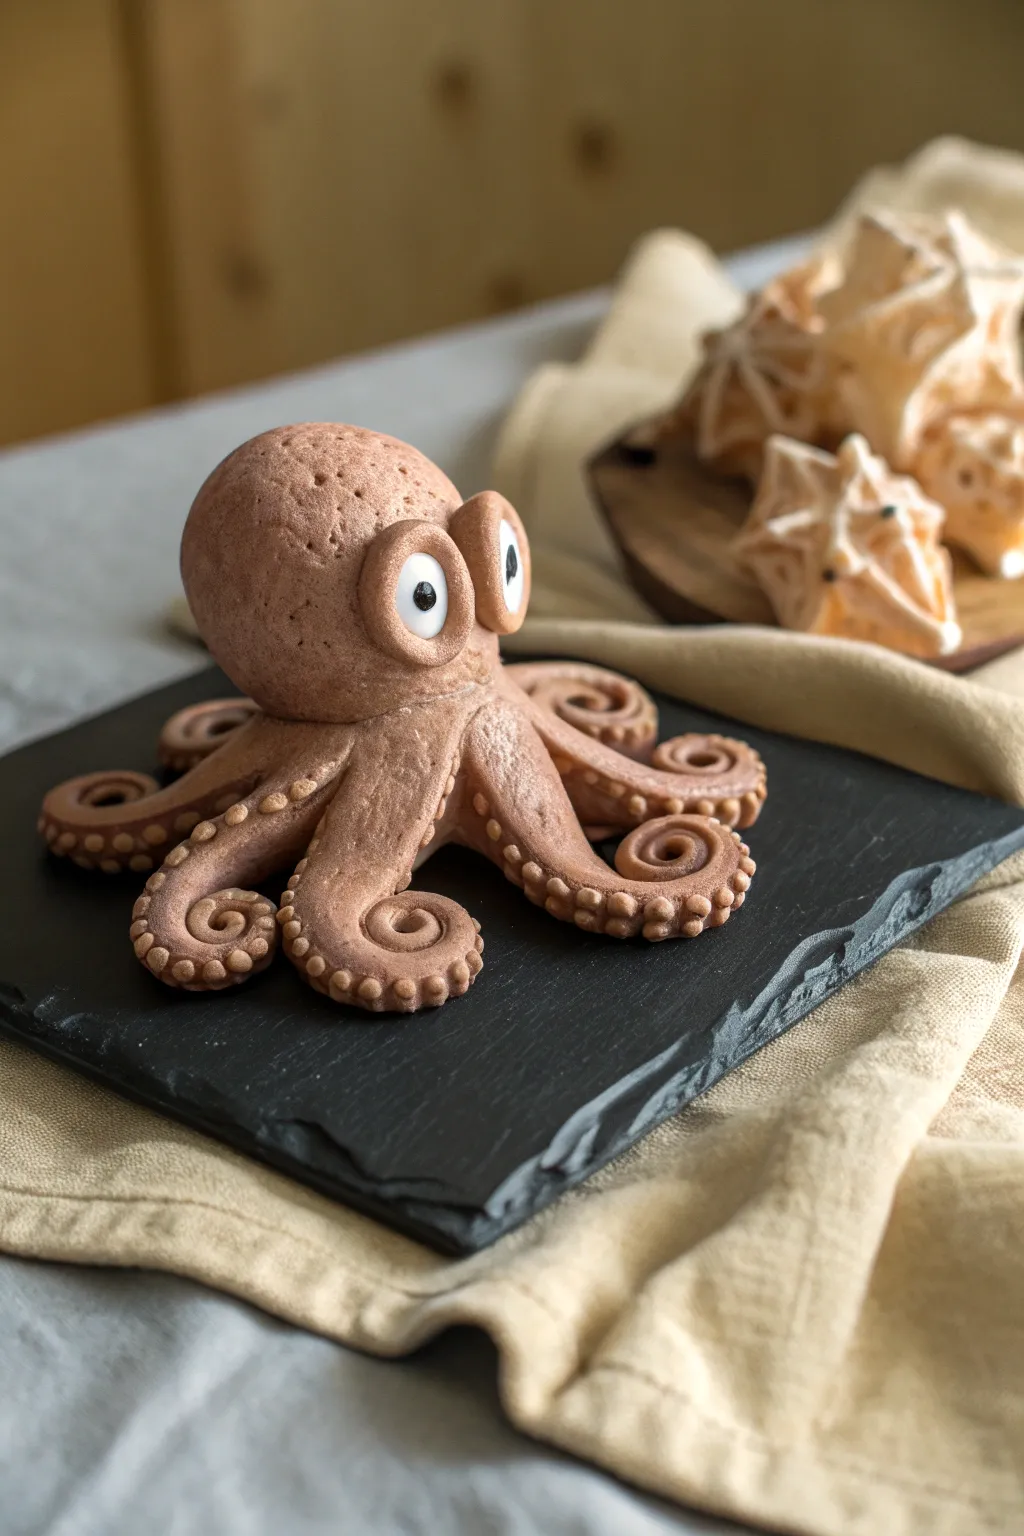
Sculpt a charming cephalopod with striking, cartoonish eyes and artistically coiled tentacles using this simple guide. The finished piece has a delightful speckled texture that gives it an earthy, organic feel perfect for display.
Step-by-Step Guide
Materials
- Light brown or tan polymer clay (optionally with speckles)
- White clay for the eyes
- Black clay for pupils
- Aluminum foil for the core
- Sculpting tools (needle tool, ball stylus)
- Rolling pin or pasta machine
- Smooth work surface
- Oven for baking
Step 1: Forming the Base
-
Create the armoring foil:
Start by crumpling a generous amount of aluminum foil into a tight ball, slightly elongated to match the octopus’s head shape. This saves clay and keeps the sculpture lightweight. -
Condition the clay:
Knead your tan clay thoroughly until it is soft and pliable. If you want the speckled look shown in the photo but only have plain clay, mix in some finely ground black pepper or dried coffee grounds. -
Cover the core:
Flatten a large sheet of your conditioned clay and wrap it smoothly around the foil ball. Roll it gently between your palms to erase any seams and ensure a uniform surface.
Step 2: Creating the Tentacles
-
Section the clay:
Divide a new lump of tan clay into eight equal portions. These will become the legs, so strive for consistency in size. -
Roll out tapered logs:
Roll each portion into a long snake or log shape that is thicker at one end (where it attaches to the body) and tapers down to a thinner point. -
Attach the first legs:
Position the thicker ends of the logs underneath the head you created earlier. Blend the clay seams upward into the base of the head using a modeling tool so they are securely attached. -
Shape the coils:
Taking one tentacle at a time, curl the tapered tip inward into a tight spiral. Arrange the legs so they radiate outward symmetrically, giving each coil a little lift for dynamism. -
Refine the pose:
Ensure the tentacles rest naturally on your work surface. I like to elevate a few slightly differently than others to make it look like he’s wiggling.
Droopy Tentacles?
If the coiled legs sag while working, prop them up with bits of balled-up paper towel or foil wedges until the clay is baked hard. This preserves the lift.
Step 3: Adding Details
-
Add suction cups:
Roll many tiny balls of tan clay. Press them gently onto the top-center ridge of each tentacle in a row, flattening them slightly. Use a small ball tool to indent the center of each disc to create the suction cup look. -
Texture the skin:
If your clay is very smooth, you can lightly tap the surface with a toothbrush or coarse sponge to mimic the porous texture seen in the reference image. -
Form the eye sockets:
Roll two medium-sized balls of tan clay and press them onto the front of the face, side-by-side but slightly spaced. Flatten the centers to create a bed for the eyeballs. -
Create the eyeballs:
Roll two balls of white clay that fit inside the sockets you just made. Press them in firmly. -
Add pupils:
Take two tiny pieces of black clay, roll them into spheres, and press them onto the center of the white eyeballs. This instantly brings the character to life. -
Make the eyelids:
Roll two more small snakes of tan clay. Flatten them and participate them over the top edge of the eyes to create heavy, expressive eyelids.
Ocean Breeze Display
Create a display base using a slate coaster or paint a wooden disc blue. Glue small real seashells around your octopus for a complete marine scene.
Step 4: Finishing
-
Final inspection:
Check for any fingerprints or unintentional marks. Smooth them out gently with a drop of baby oil on your finger if needed. -
Bake the sculpture:
Place your octopus on a baking sheet. Bake according to your specific brand of polymer clay’s instructions (usually around 275°F or 135°C for 15-30 minutes per 1/4 inch of thickness). -
Cool down:
Allow the piece to cool completely in the oven with the door slightly ajar to prevent cracking from thermal shock.
Once cooled, your quirky clay octopus is ready to guard your desk or bookshelf with his wide-eyed stare


What Really Happens Inside the Kiln
Learn how time and temperature work together inside the kiln to transform clay into durable ceramic.
Turtle Shell Trinket Box
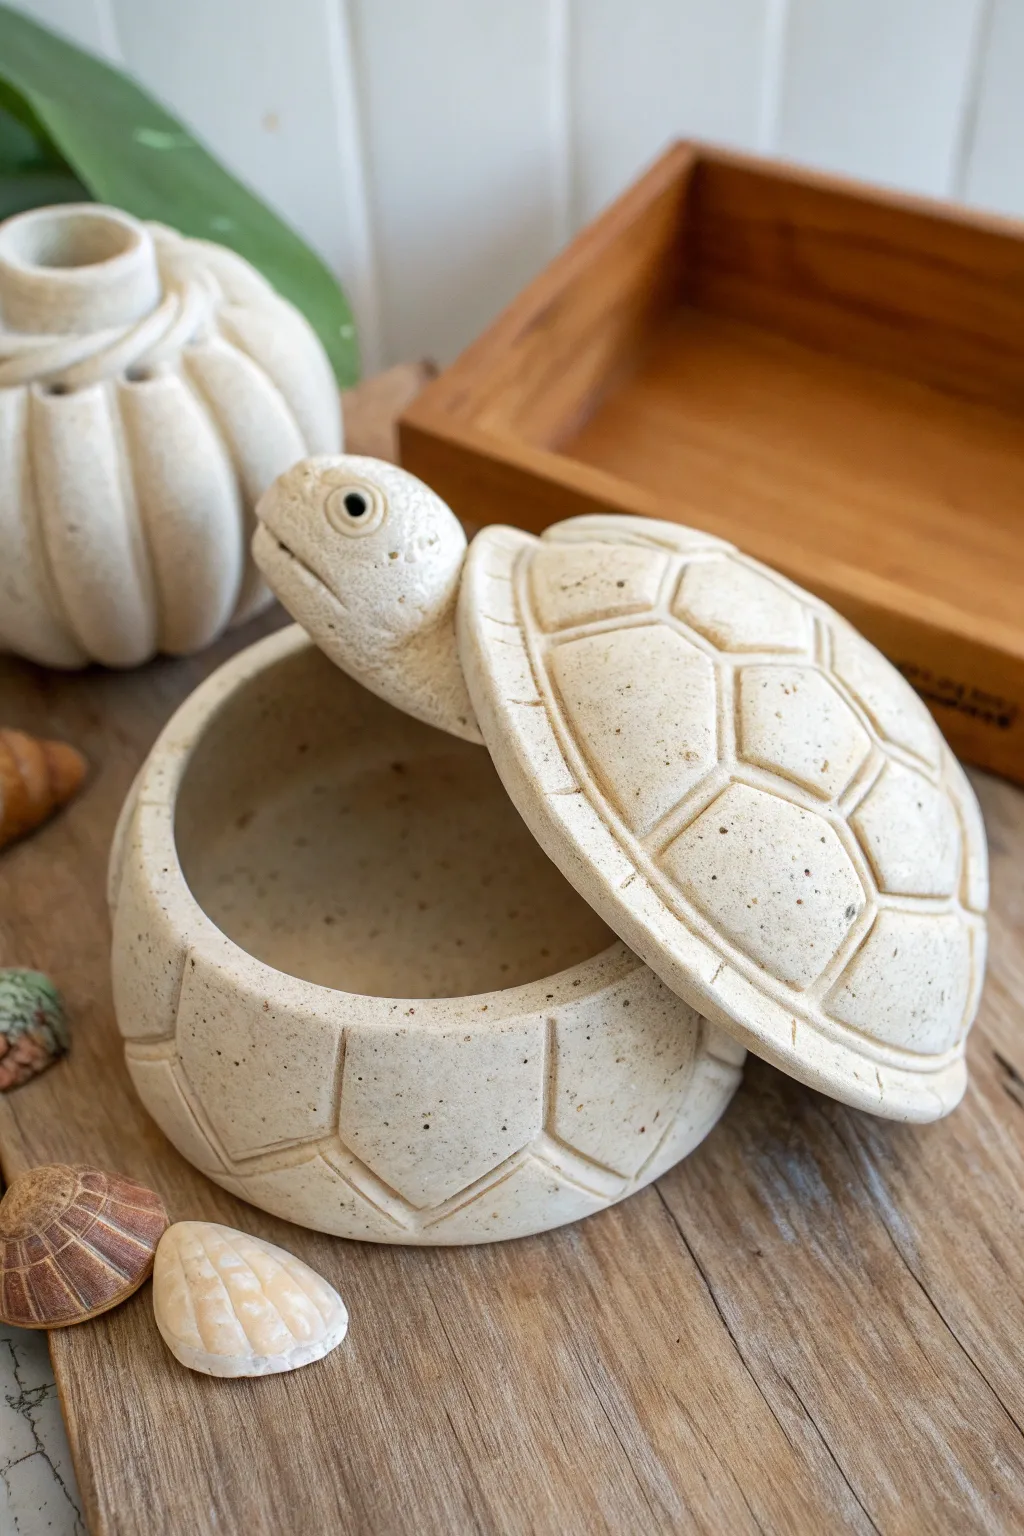
Sculpt a charming reptile companion that doubles as a secret hiding spot for your smallest keepsakes. This two-part clay project features a satisfyingly heavy lid and a speckled, stone-like texture that gives it a timeless, unearthed feel.
Step-by-Step
Materials
- Speckled cream or sandstone-patterned polymer clay (or air-dry clay)
- Circle cutter or a round bowl for tracing
- Pottery needle tool or toothpick
- Settling tools or a smooth spoon back
- Rolling pin
- Aluminum foil
- Slip and score tool (if using water-based clay)
- Small carving loop tool (optional)
- Fine-grit sandpaper
Step 1: Forming the Base
-
Prepare the clay slab:
Begin by rolling out a thick slab of your speckled clay, aiming for about 1/4 inch thickness to ensure the walls are sturdy enough to support the lid. -
Cut the base shape:
Use a circle cutter or trace around a small bowl to cut out a perfect circle for the bottom of the pot. -
Draft the walls:
Roll out a long, rectangular strip of clay with the same 1/4 inch thickness. The length should be just enough to wrap around the circumference of your base circle. -
Construct the pot:
Attach the strip to the circular base. If using water-based clay, score and slip the edges; if using polymer, blend the seams thoroughly on the inside and outside so the join is invisible. -
Smooth the form:
Gently gently press the walls outward slightly to give the bowl a rounded, organic curve rather than a straight cylinder look. Smooth the rim with your finger or a damp sponge. -
Carve the bottom shell:
Using a needle tool, lightly sketch geometric pentagons around the exterior of the bowl to mimic the underside of a tortoise shell. Once happy with the spacing, carve these lines deeper with a steady hand.
Step 2: Sculpting the Lid
-
Create the shell dome:
Roll a ball of foil into a flattened distinct semi-sphere shape. Roll out a sheet of clay and drape it over this foil form to create a hollow, lightweight dome for the lid. -
Add the rim:
Trim the excess clay at the bottom of the dome. Create a flat, wide rim around the edge that will sit flush against the top of your bottom bowl. -
Check the fit:
Before adding detail, place the lid onto the base to ensure the diameters match perfectly. I find it easiest to make adjustments now while the clay is still pliable. -
Sculpt the head:
Form a solid, thumb-sized cylinder of clay for the head. Round off the snout and attach it firmly to the inside rim of the lid, angling it upward as if the turtle is stretching its neck. -
Detail the face:
Use the needle tool to press in a simple line for the mouth and small indentations for nostrils. For the eye, press a small ring tool or the end of a straw into the side of the head, then add a tiny pupil divot in the center. -
Pattern the top shell:
Carve a central hexagon at the very top of the dome. From each point of that hexagon, radiate lines downward to create the classic turtle shell pattern, carving deep grooves for a stylized look. -
Texture the surface:
If your clay isn’t pre-speckled, you can flick a stiff toothbrush with diluted brown acrylic paint over the raw clay now to achieve that sandstone effect.
Uneven Lid?
If the lid slides off easily, add a small inner ‘lip’ or ridge of clay to the underside of the shell lid. This insert will slot inside the bowl rim, locking it securely in place like a proper jar.
Step 3: Refining and Finishing
-
Initial Surface Smoothing:
Use a soft brush or your finger with a tiny bit of oil (for polymer) or water (for air-dry) to smooth out any unintentional fingerprints or rough carving burrs. -
Cure or Dry:
Bake your polymer clay according to the package instructions, or let your air-dry piece sit for 24-48 hours until completely hardened. -
Remove the foil:
Once the lid is fully cured and cool, carefully peel away the aluminum foil from the underside. -
Sanding the rim:
Place a sheet of sandpaper on a flat surface and gently rub the bottom of the lid and the top of the bowl against it in circular motions. This ensures a tight, wobble-free closure.
Level Up: Gemstone Eyes
Instead of sculpting clay eyes, embed small black onyx beads or tiny dark pebbles into the socket before baking. This adds a realistic shine and life to your turtle’s expression.
Place your favorite small treasures inside and enjoy the friendly presence of your new stoneware-style guardian
Hand-Shaped Ring Holder
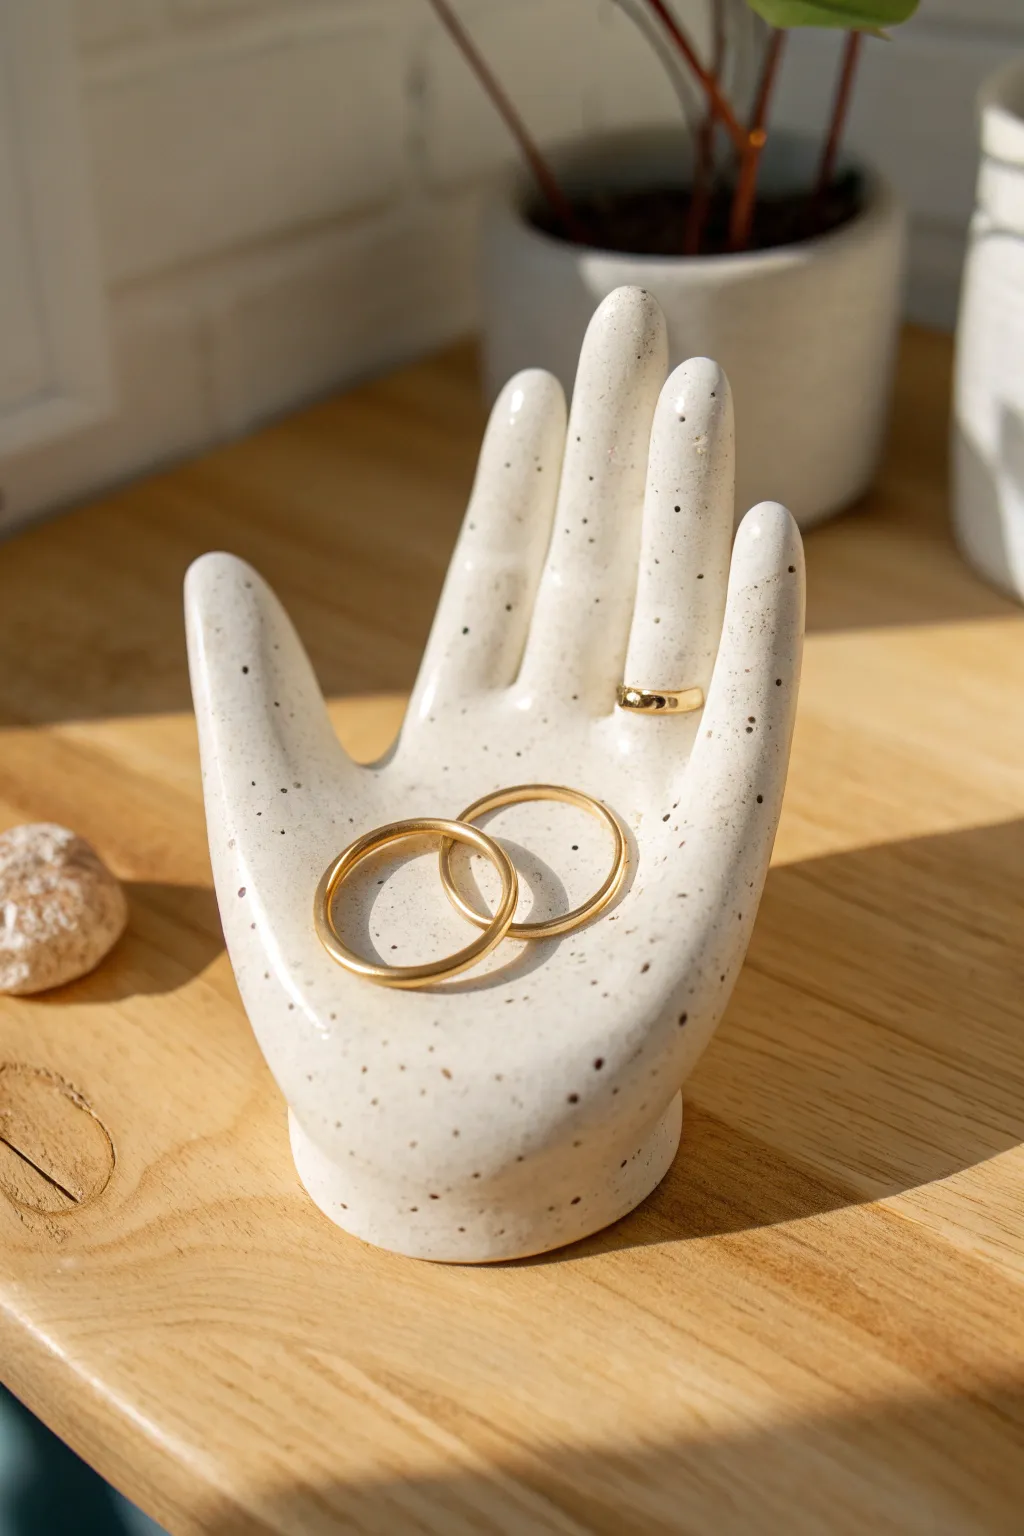
This elegant ring holder combines functional decor with sculptural beauty, featuring a gently cupped hand shape perfect for catching jewelry. The finish mimics speckled stoneware clay, giving it a modern, organic look that sits beautifully on any dresser.
Step-by-Step Tutorial
Materials
- White air-dry clay or polymer clay
- Rolling pin
- Craft knife or scalpel
- Small bowl (for shaping)
- Sandpaper (fine grit)
- Acrylic paint (creamy white)
- Brown or black acrylic paint (for speckles)
- Old toothbrush or stiff paintbrush
- High-gloss varnish or resin
- Paintbrushes
- Parchment paper
Step 1: Sculpting the Hand
-
Roll out the slab:
Begin by conditioning your clay until it is soft and pliable. Roll it out on a piece of parchment paper to an even thickness of about 1/4 inch. You want it sturdy enough to hold its shape but not too chunky. -
Trace the shape:
Place your own hand gently onto the clay slab with your fingers slightly spread. Use a needle tool or a dull pencil to lightly trace the outline of your hand, leaving a generous margin around each finger to account for smoothing later. -
Cut it out:
Using a craft knife or scalpel, carefully cut along the traced outline. Take your time around the webbing of the fingers to keep the cuts clean. -
Smooth the edges:
Dip your finger in a little water (for air-dry clay) or use smooth movements (for polymer) to round off all the sharp cut edges. Rub gently to remove any angular artifacts from the cutting process. -
Form the curve:
Lift the clay hand and drape it into a small bowl or a curved surface. You want the palm to sink slightly to create a dish shape, while the fingers curve gently upward. This ‘cupped’ position is crucial for holding rings securely. -
Refine the fingers:
While it’s in the bowl, adjust the fingers individually. Arrange them so they look natural and relaxed, ensuring they aren’t touching each other. I like to bend the ring finger slightly more to give it character. -
Create the base:
Roll a small snake of clay into a ring and attach it to the bottom of the wrist area. Blend the clay well to seamless join it; this acts as a foot so the hand stands upright and doesn’t wobble.
Smoother Edges
Use a damp paintbrush instead of your finger to smooth tight crevices between fingers while the clay is wet. It reaches spots your fingers can’t.
Step 2: Drying and Refining
-
Let it dry or bake:
If using air-dry clay, leave the hand in the bowl to dry completely for 24-48 hours. If using polymer clay, bake it in the bowl (ensure the bowl is oven-safe!) according to package instructions. -
Sand for smoothness:
Once fully cured or dry, remove the hand from the bowl. Use fine-grit sandpaper to gently smooth out any fingerprints, bumps, or rough edges, paying special attention to the fingertips. -
Wipe clean:
Use a slightly damp cloth or tack cloth to remove all sanding dust. A clean surface is essential for a smooth paint job.
Step 3: Painting and Finishing
-
Base coat:
Apply a coat of creamy white acrylic paint to the entire sculpture. You may need two or three thin layers to get full, opaque coverage. Let each layer dry completely before adding the next. -
Preparing the speckles:
Dilute a small amount of dark brown or black acrylic paint with water until it has an inky consistency. -
Splatter step:
Dip an old toothbrush or a stiff bristle brush into the diluted paint. Hold it near the sculpture and run your thumb across the bristles to flick tiny specks onto the surface. Practice on a piece of paper first to control the spray. -
Even coverage:
Rotate the hand to ensure the speckles hit all angles, including the sides of the fingers and the back of the hand. Keep the speckles relatively sparse for that modern ceramic look. -
Seal and shine:
Once the paint is bone dry, apply a high-gloss varnish. This mimics the look of fired ceramic glaze and protects your jewelry from scratching the paint. -
Second coat of varnish:
For extra durability and a glass-like finish, apply a second coat of gloss varnish, letting it cure fully according to the bottle’s instructions.
Gilded Glamour
Paint the very tips of the fingers or just the rim of the base with liquid gold leaf for a luxurious, dipped effect.
Place your favorite rings on the fingers and enjoy your handcrafted piece of functional art

TRACK YOUR CERAMIC JOURNEY
Capture glaze tests, firing details, and creative progress—all in one simple printable. Make your projects easier to repeat and improve.
Gnome Mini Figures
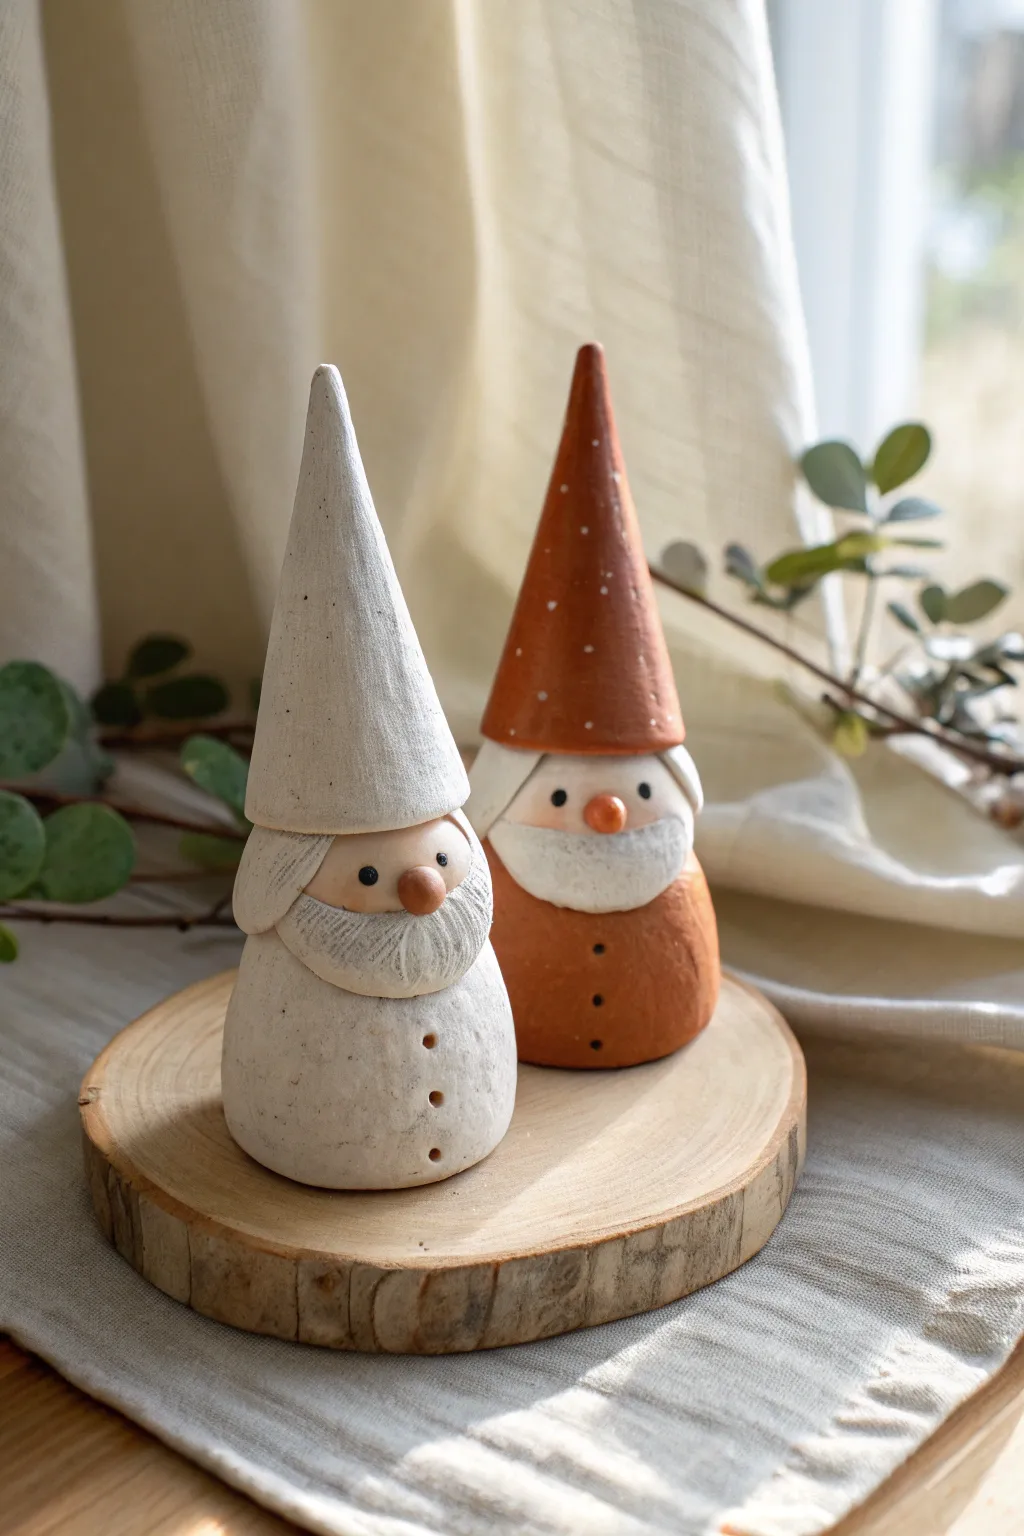
These charming, rustic gnomes rely on simple geometric shapes and raw textures to create a cozy, handcrafted look. The design features a tall conical hat that seamlessly blends with a round body, highlighted by textured beards and tiny button details.
Step-by-Step Guide
Materials
- Air-dry clay or polymer clay (white and terracotta/brown colors)
- Clay carving tools (basic set)
- Needle tool or toothpick
- Rolling pin
- Small cup of water (for smoothing)
- Sponge or textured fabric (optional key for texturing)
- Acrylic paint (black and brown for eyes/buttons)
- Fine-grit sandpaper
Step 1: Shaping the Base and Hat
-
Create the Body:
Start with a golf-ball-sized lump of clay. Roll it into a smooth ball between your palms, then gently tap the bottom on your work surface to create a flat, stable base so the gnome stands upright. -
Form the Cone:
Take a slightly larger amount of clay for the hat. Roll this into a clean, tall cone shape. The base of the cone should be just slightly wider than the top of your body sphere. -
Hollow the Hat:
Use your thumb or a modeling tool to create a concave indentation in the bottom of the cone. This will help it sit securely over the round top of the body. -
Assemble the Structure:
Score the top of the body and the inside rim of the hat with a needle tool. Apply a tiny bit of water (or slip, if using ceramic clay) and press the hat firmly onto the body. -
Clean the Seam:
Gently smooth the transition where the hat meets the body, though preserving a slight overhang creates a nice visual separation. Ensure the hat isn’t tilting unless you want a jaunty look.
Natural Texture
For that speckled, stoneware look without a kiln, mix dried tea leaves or black pepper into your white air-dry clay before sculpting.
Step 2: Adding Personality
-
Position the Nose:
Roll a very small pea-sized ball of clay. If you are making the terracotta gnome, use a contrasting lighter clay (or paint it later). Attach it right at the rim where the hat meets the body, pressing it gently so it sticks. -
Draft the Beard:
Roll a small, flat semi-circle of clay roughly the width of the face. This will be the beard. Place it directly under the nose, draping it over the rounded belly. -
Texture the Beard:
Using a needle tool, draw fine, vertical lines down the beard to simulate hair. I prefer to vary the pressure here to make the strands look more natural and less uniform. -
Back Hair Detail:
Don’t forget the back. Add a smaller flattened strip of clay around the back of the neck under the hat rim to suggest hair peeking out, texturing it similarly to the beard. -
Define the Face:
The face is simply the negative space between the hat brim and the beard. Ensure this area is smooth.
Cracking Issues?
If cracks appear while drying, create a ‘slurry’ by mixing a tiny bit of clay with water and paint it into the cracks like spackle, then smooth.
Step 3: Refining Details
-
Indent the Eyes:
Use a small ball-tip tool or the blunt end of a paintbrush to make two small, shallow indentations on either side of the nose for the eyes. -
Add Buttons:
For the body detail, use the same tool to press three small, vertical indentations down the center of the belly to mimic buttons. -
Texture the Suit:
To give the clay a rustic, matte appearance like the photo, gently dab the surface of the hat and body with a dry sponge or a piece of textured fabric. Avoid texturing the face area. -
Refine the Hat Tip:
Check the very top of the cone. You can leave it sharp or soften it slightly with your finger for a more worn look. -
Final Smoothing:
Dip your finger in water and smooth away any unintentional fingerprints or harsh angular marks, especially around the base.
Step 4: Finishing Up
-
Clay Drying:
Allow the figure to dry completely according to your clay package instructions. This usually takes 24-48 hours for air-dry clay. -
Sanding:
Once fully dry, use fine-grit sandpaper to buff out any rough spots on the surface, focusing on the bottom edge. -
Painting Details:
Use a fine-tip brush and black acrylic paint to fill in the eye indentations. Use a dark brown or burnt sienna for the buttons. -
Hat Decoration:
For the terracotta gnome, use a toothpick dipped in white paint to add tiny dots scattered across the hat and a slight whitish dry-brush effect on the beard ridges. -
Seal (Optional):
If you want to protect your work, apply a matte varnish. Avoid glossy finishes to maintain the natural, earthy aesthetic shown in the image.
Group these charming figures in pairs on a mantle or shelf for a modern, festive display
Balloon-Style Puppy Sculpture
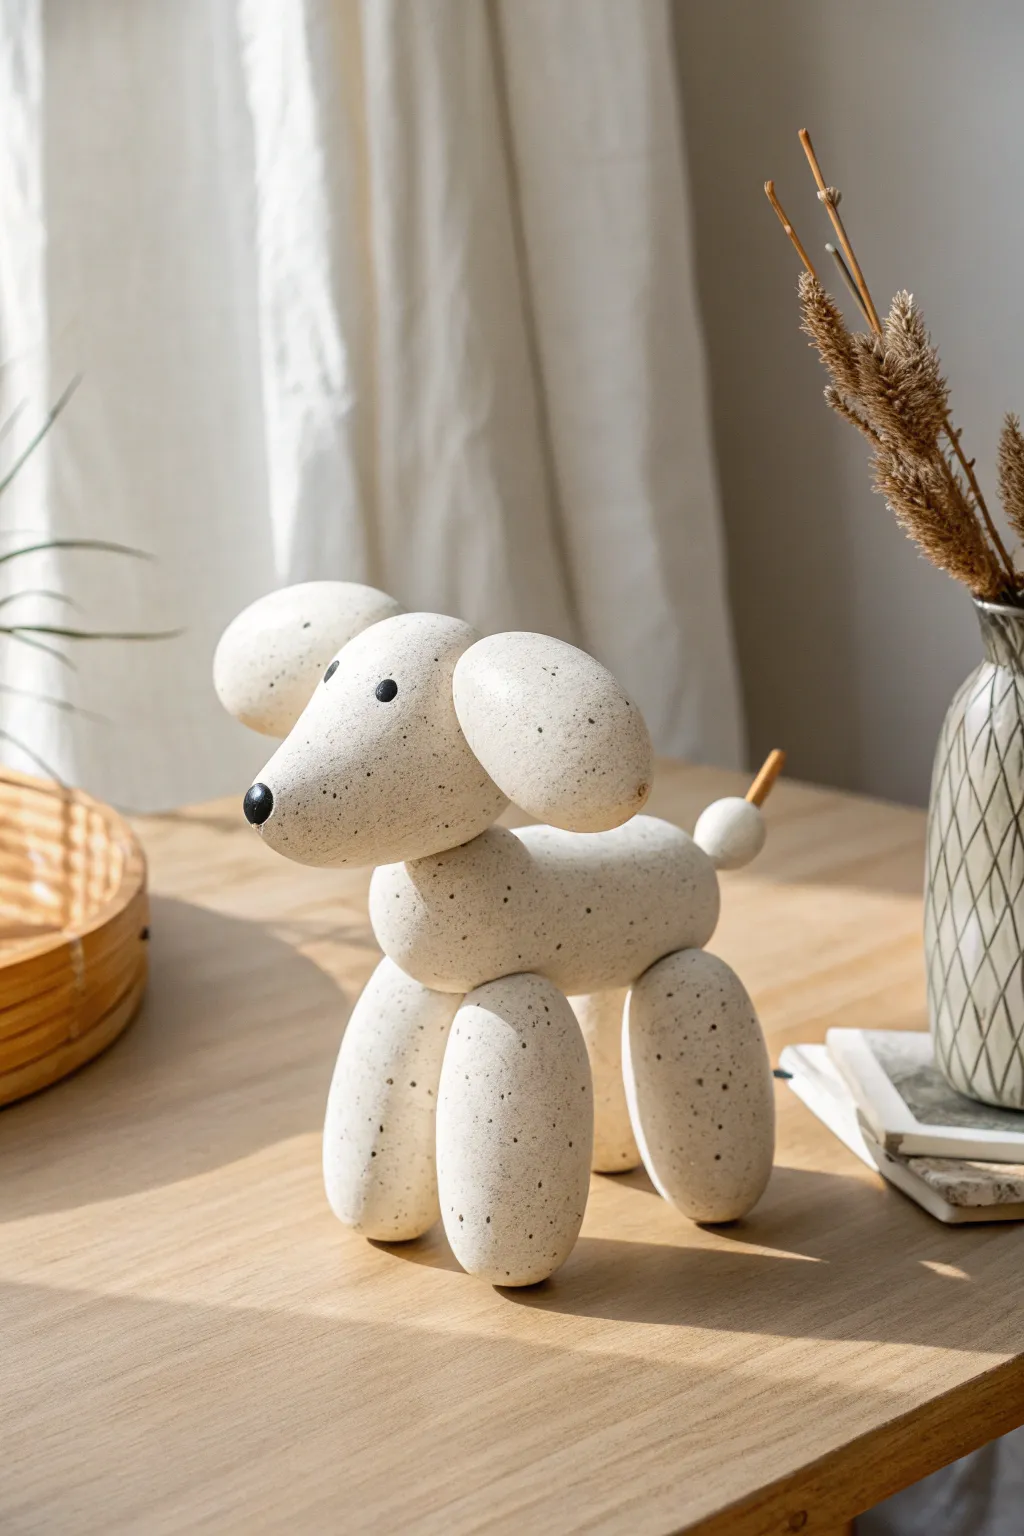
This charming sculpture plays a visual trick, mimicking the classic shape of a balloon animal but executed in a solid, speckled clay finish that resembles soapstone or terrazzo. It brings a playful yet sophisticated touch to modern decor with its soft, rounded forms and organic texture.
Step-by-Step
Materials
- Air-dry clay or polymer clay (white or cream)
- Black acrylic paint
- Old toothbrush or stiff bristle brush
- Water
- Rolling pin (optional)
- Small wooden dowel or toothpick
- Fine-grit sandpaper
- Strong craft glue or slip (if using air-dry clay)
- Matte sealant spray
Step 1: Shaping the Components
-
Prepare your workspace:
Set up a clean, flat surface. If you’re using white clay, make sure your hands and surface are free of dust or lint, as imperfections show up easily on light colors. -
Form the body:
Start with a lump of clay about the size of a lemon. Roll it into a smooth ball, then gently elongate it into a thick sausage shape to serve as the main torso. -
Create the legs:
Roll four identical balls of clay. Shape each one into a thick oval or pill shape. These will be the legs, so ensure they are sturdy enough to support the body. -
Make the head and neck:
Form a slightly larger oval for the head. For the neck, create a smaller, slightly flattened sphere that will sit between the body and the head. -
Sculpt the ears:
Roll two medium-sized egg shapes. Flatten one side of each slightly where it will attach to the head to ensure a seamless fit. -
Prepare the tail:
Roll a small sphere for the base of the tail. For the tail tip, use a small piece of a wooden dowel or shape a thin cylinder of clay to mimic the uninflated end of a balloon. -
Refine the forms:
Smooth over each piece with a slightly damp finger to remove fingerprints or cracks. The goal is perfectly smooth, inflated-looking shapes.
Core Support
For added stability, insert short lengths of toothpick or wire between the joints (like neck-to-body or leg-to-body) to act as internal armatures.
Step 2: Assembly & Finishing
-
Attach legs to body:
Score the clay (scratch cross-hatch marks) where the legs will join the body. Apply a dab of slip or liquid clay. Press the four legs firmly onto the underside of the torso. -
Balance check:
Stand the figure up on a flat surface while the clay is still workable. Adjust the leg angles slightly to ensure the dog stands stable and straight. -
Mount the neck and head:
Attach the neck sphere to the front top of the body, then mount the head oval on top of the neck, angling it slightly upward for a perky look. -
Attach ears and tail:
Fix the ears to the sides of the head. Finally, attach the small sphere and ‘tail tip’ to the rear of the sculpture. -
Add facial details:
Roll three tiny balls of black clay (or paint them later). Press one onto the tip of the snout for the nose, and two smaller ones for the eyes. -
Smooth the seams:
I like to use a silicone tool or a wet finger to gently blend the seams where parts join, strengthening the bond while keeping that ‘inflated’ separation visible. -
Dry or bake:
Follow the instructions for your specific clay. If air-drying, let it sit for 24-48 hours. If baking polymer clay, use an oven thermometer to ensure the correct temperature. -
Apply the speckle effect:
Dilute a small amount of black acrylic paint with water. Dip an old toothbrush into the mixture and run your thumb across the bristles to flick tiny specks of paint over the entire sculpture. -
Seal the sculpture:
Once the paint is fully dry, coat the sculpture with a matte sealant spray. This protects the finish and enhances the stone-like appearance.
Creative Twist
Swap the black speckles for gold leaf flakes or pastel paint splatters to give your balloon dog a chic, modern art vibe or a colorful confetti look.
Place your finished sculpture on a stack of books or a sunny shelf to enjoy your handiwork
Silly One-Eyed Monster
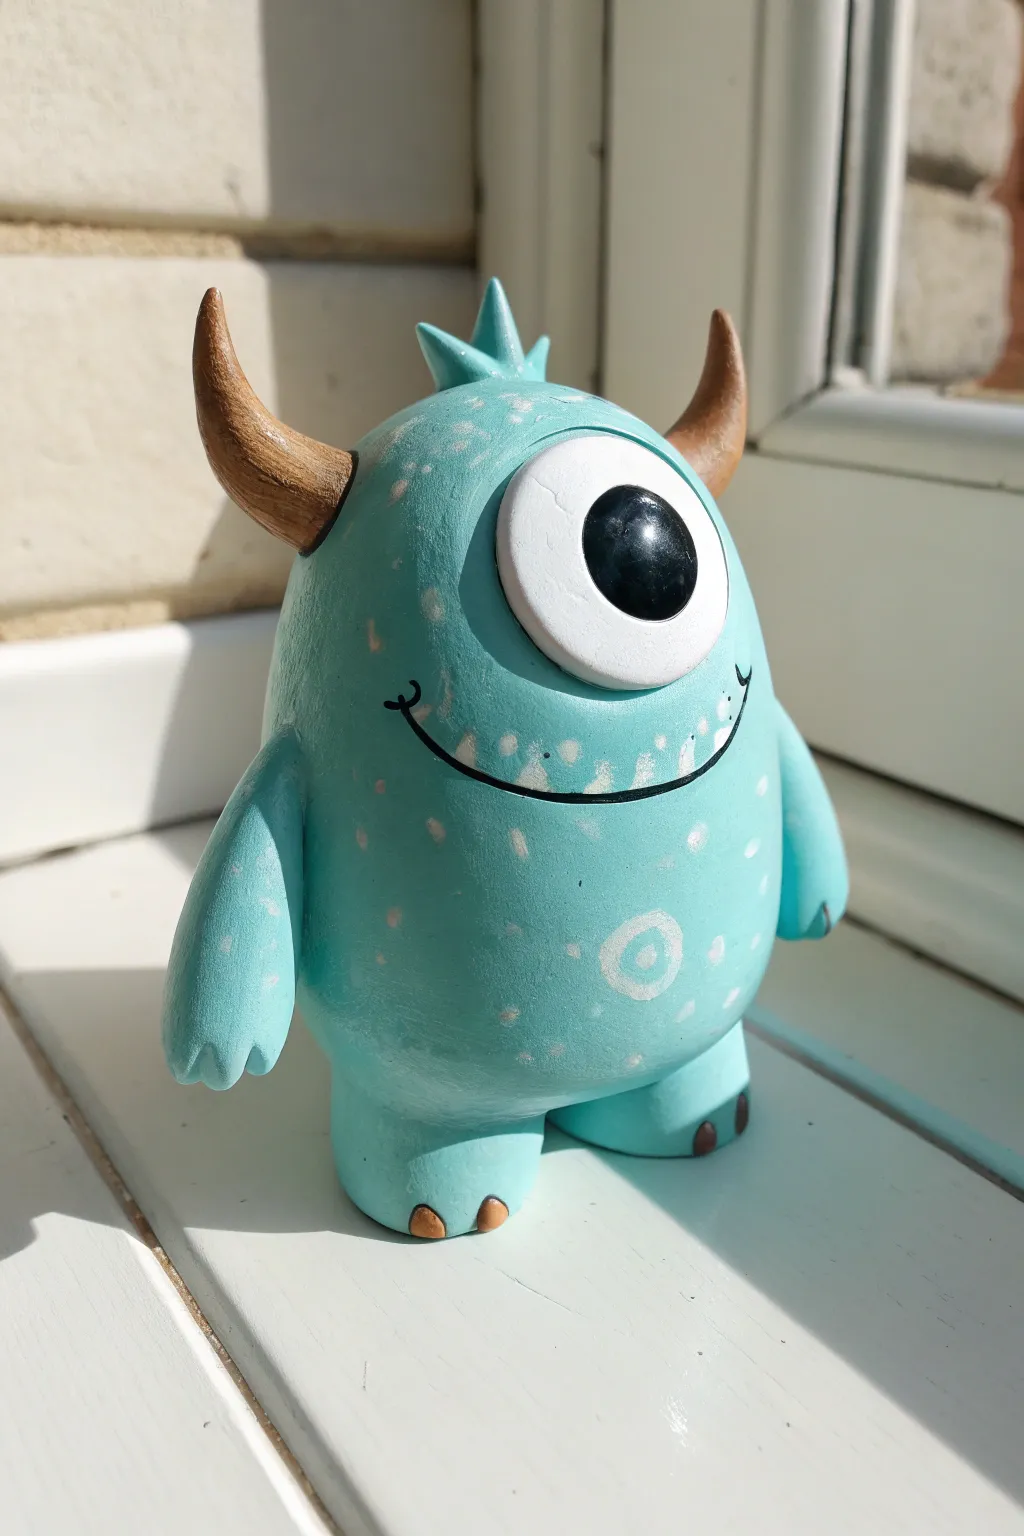
This charming, one-eyed monster sculpture brings a splash of personality to any windowsill with its bright teal body and goofy grin. Perfect for beginners, this project balances simple shapes with cute details like textured horns and speckled skin.
Step-by-Step Tutorial
Materials
- Polymer clay (Teal, White, Black, Brown)
- Aluminum foil
- Sculpting tools (needle tool, ball stylus)
- Acrylic paint (Light Blue, White)
- Fine detail paintbrush
- Gloss glaze or varnish
- Toothpicks or wire (for structural support)
- Oven (for baking according to clay package)
Step 1: Forming the Body
-
Build the armature:
Start by crumpling a piece of aluminum foil into a tight egg shape roughly 3-4 inches tall. This saves clay and keeps the sculpture lightweight while baking. -
Cover with clay:
Condition your teal polymer clay until soft, then flatten it into a large sheet. Wrap this sheet fully around your foil egg, smoothing the seams together until you have a seamless teal oval. -
Shape the legs:
Roll two short, thick logs of teal clay. Press these firmly onto the bottom of the body to create sturdy, stump-like legs so your monster stands on its own. -
Add the arms:
Create two teardrop shapes from teal clay. Attach the wider ends to the sides of the body, letting them hang down naturally, and use a dull tool or your finger to smooth the joint where clay meets clay. -
Detail the hands and feet:
Use a needle tool or small knife to gently press indentations into the ends of the arms to suggest three simple fingers. Add tiny brown clay triangles to the toes for claws. -
Scrub the surface:
To give the skin a natural, non-plastic look, I like to gently texture the entire teal surface with an old toothbrush or a stiff bristle brush.
Smooth Seams
If you struggle to smooth out fingerprints or seams on the raw clay, lightly brush the area with a tiny amount of baby oil or clay softener before baking.
Step 2: Creating the Face & Horns
-
Make the eye socket:
Press a slight indentation into the upper center of the face where the eye will sit. This helps the eyeball look integrated rather than just stuck on. -
Add the eyeball:
Roll a ball of white clay, flatten it slightly into a thick disk, and press it into the socket. Add a smaller black clay disk on top for the pupil, placing it slightly off-center for a fun expression. -
Add the pupil shine:
Place a teeny-tiny speck of white clay onto the black pupil. This catchlight brings the character to life immediately. -
Form the horns:
Roll two cones of brown clay, curving them slightly upwards. Insert a small piece of toothpick or wire into the base of each horn, then press them into the sides of the head for stability. -
Texture the horns:
Use a needle tool to scratch horizontal lines up and down the horns, creating a rigid, organic bone texture. -
Add the crest:
Create a small cluster of teal spikes or cones (2-3 spikes) and attach them to the very top center of the head, between the horns. -
Carve the mouth:
Use a needle tool or clay knife to carve a wide, U-shaped smile. Deepen the line slightly so it holds paint later, adding tiny vertical lines at the corners for cheeks.
Step 3: Finishing Touches
-
Bake the sculpture:
Place your monster on a baking sheet and bake according to your polymer clay manufacturer’s specific instructions for time and temperature. -
Cool down:
Let the piece cool completely before painting. Painting hot clay can cause the acrylics to dry too fast and clump up. -
Paint the smile:
Using a very fine brush, carefully paint the inside of the carved smile line with black acrylic paint to make it pop. -
Apply speckles:
Mix a watery light blue or white paint. Dip a toothbrush in it and flick the bristles to spray fine speckles across the body, or use a fine dotting tool to add specific spots. -
Add belly details:
Paint a faint white spiral or circle on the belly area for extra decoration, blending the edges so it looks soft. -
Seal the work:
Once the paint is fully dry, coat the eye and the horns with a gloss varnish to make them look wet and shiny, leaving the body matte.
Glow Up
Use glow-in-the-dark polymer clay for the eye and the belly spiral. Your little monster will look cute by day and act as a spooky nightlight when the sun goes down.
Place your new goofy friend on a shelf to keep watch.
Whistle Critter Sculpture
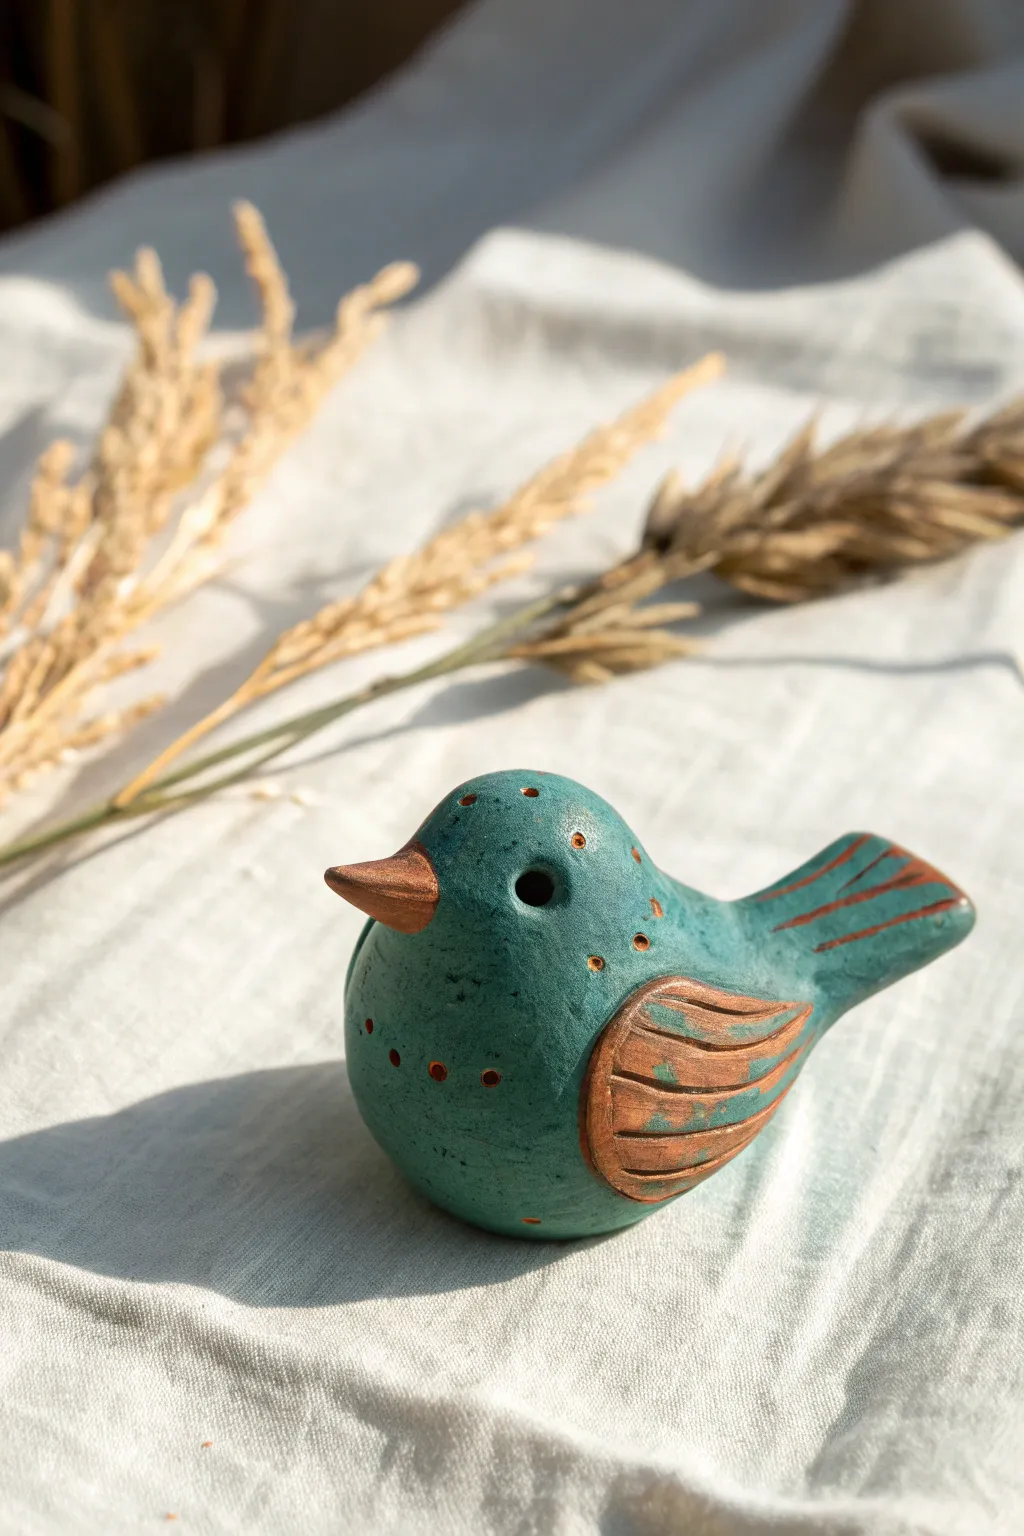
Create your own musical companion with this charming turquoise clay bird whistle, featuring rustic bronze accents. This hand-shaped critter not only looks adorable on a shelf but actually produces a clear, sweet tone when played.
Step-by-Step Tutorial
Materials
- Polymer clay (turquoise or teal)
- Small amount of scrap clay (for core, optional)
- Clay carving tools or a wooden skewer
- Popsicle stick or flat modeling tool
- Metallic bronze or copper acrylic paint
- Small paintbrush
- Sandpaper (fine grit)
- Oven (for baking polymer clay) or Kiln (if using ceramic clay)
Step 1: Shaping the Bird Body
-
Form the Base:
Start by conditioning your turquoise clay until it’s soft and pliable. Roll a lump of clay about the size of a golf ball into a smooth, seamless sphere. -
Pinch the Tail:
Gently pinch one side of the sphere and pull it outwards to form a tapered, triangular tail shape. Flatten it slightly so it angles upward. -
Create the Head:
On the opposite side from the tail, gently press and smooth the clay to define a rounded head area that flows seamlessly into the body. -
Make the Hollow Interior (Crucial for Whistles):
Carefully cut the bird in half horizontally. Hollow out both halves using a loop tool or spoon, leaving walls about 1/4 inch thick. Don’t hollow out the tail section. -
Reassemble:
Score the edges of your halves, add a tiny bit of water or slip (or liquid clay if using polymer), and press them back together. Smooth the seam completely until invisible.
Step 2: Creating the Whistle Mechanism
-
Create the Airway:
Flip the bird over. Using a flat popsicle stick, push it into the tail end towards the main hollow cavity to create a rectangular airway. -
Cut the Sound Hole:
Flip the bird right-side up. Where the airway meets the hollow body cavity, cut a small rectangular window (the fipple) with a sharp knife at a 45-degree angle. Remove the plug of clay. -
Align the Air:
This is the tricky part. Look through the tail mouthpiece; you should see the sharp edge of the window (the splitting edge). Adjust slightly until blowing gently produces a clear whistle sound.
Clear Sound Tip
The sharp 45-degree edge of the ‘window’ is vital. Keep it clean and sharp; burrs or messy clay bits here will ruin the whistle tone.
Step 3: Adding Details
-
Sculpt the Beak:
Form a small cone of turquoise clay and attach it to the face. Blend the edges into the head so it doesn’t pop off later. -
Form the Wings:
Roll two teardrop shapes of clay and flatten them. Press one onto each side of the bird’s body, blending the edges or leaving them raised for a 3D effect. -
Carve Wing Feathers:
Use a needle tool or knife to carve three or four curved lines into the wing pads to suggest feathers. -
Add Pattern Texture:
Use the end of a small straw or a needle tool to poke decorative dots. Add a row of three dots along the breast, a few on the head, and define the eyes with deeper holes.
Make it a Necklace
Before baking, poke a horizontal hole through the top of the tail section so you can thread a leather cord through and wear your whistle.
Step 4: Finishing and Decoration
-
Bake or Fire:
Bake your creation according to your clay package instructions. If using ceramic clay, let it dry slowly before bisque firing. -
Sand Smooth:
Once cool, lightly sand any rough fingerprints or sharp edges, particularly around the mouthpiece. -
Paint the Accents:
Dip a small brush into metallic bronze or copper paint. Carefully paint just the beak and the raised wing areas. -
Antiquing the Wings:
Before the wing paint dries fully, wipe the surface gently with a paper towel. This leaves the metallic color in the carved grooves while revealing some turquoise on the high points, creating a weathered look. -
Add Eye Details:
I prefer to use a fine-point tool to add a tiny drop of dark paint inside the deep eye holes to create depth. -
Seal:
Finish with a matte varnish to protect the paint, avoiding the whistle hole to keep the sound crisp.
Give a gentle blow into the tail to hear your little bird sing its first song