Whenever I’m itching to make something with personality, I reach for sculpture clay ideas that start simple and get more adventurous as my hands warm up. Here are my go-to clay sculpture projects—classic crowd-pleasers first, then the fun weird stuff I can’t stop teaching in the studio.
Pinch Pot Animal Figurines
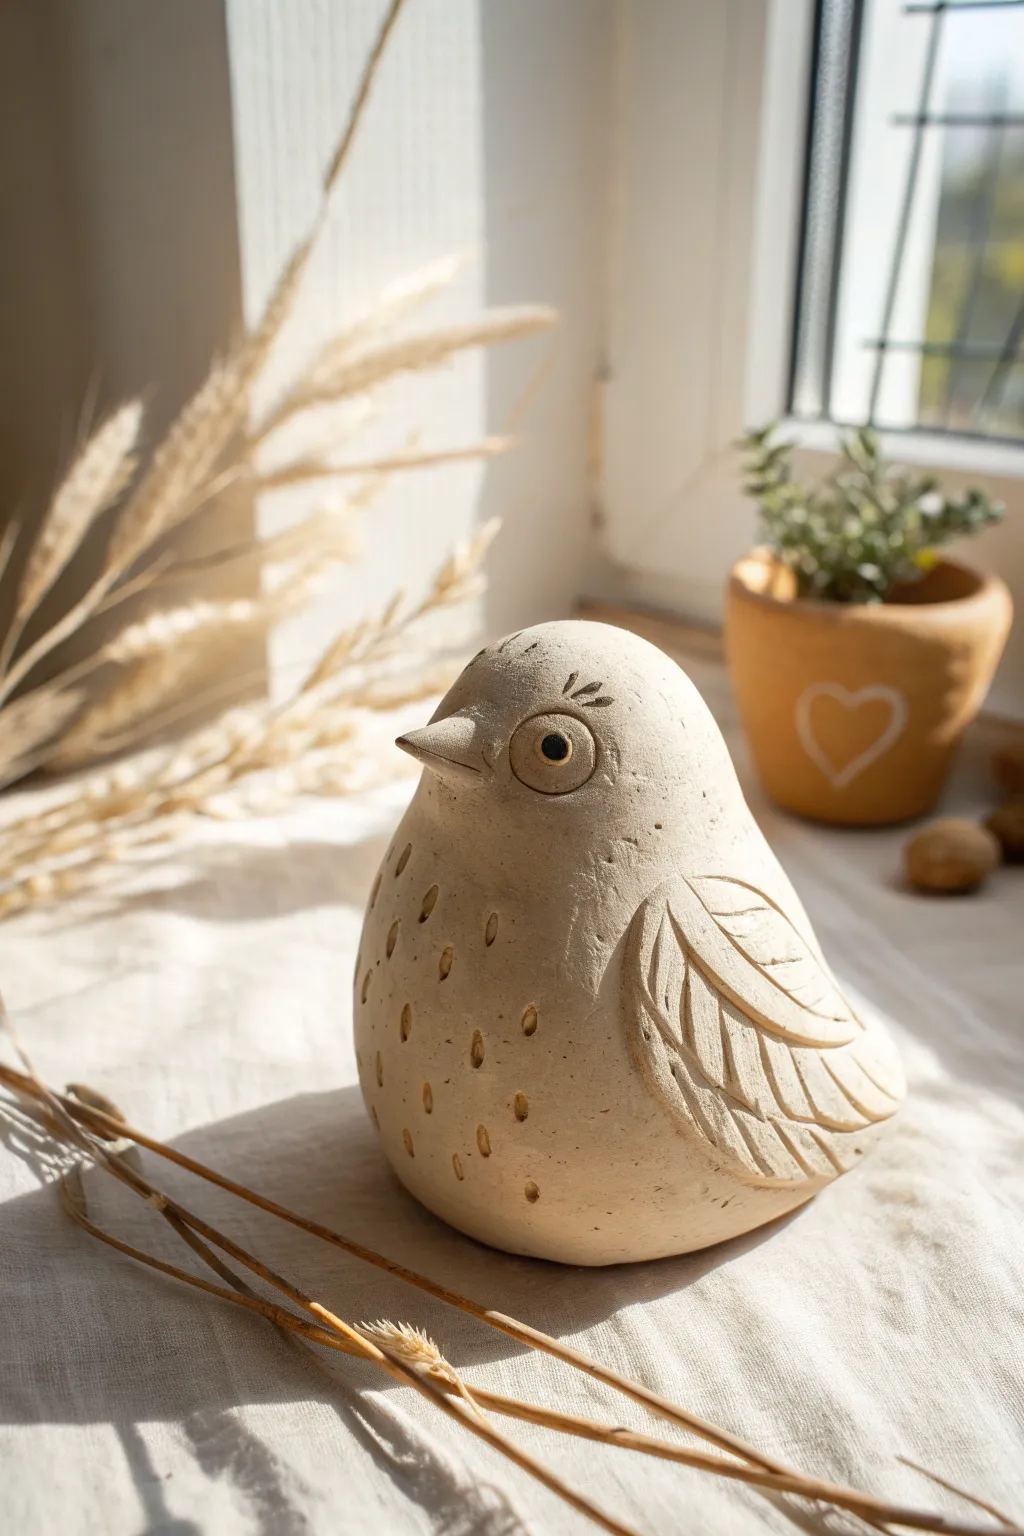
This charming, rounded bird figurine captures the simple beauty of hand-built pottery with its textured wings and inquisitive expression. Using basic pinch pot techniques and careful carving, you’ll create a stylized, nature-inspired sculpture that looks lovely on any windowsill.
Step-by-Step
Materials
- Light-colored stoneware clay (or air-dry clay)
- Needle tool or toothpick
- Loop tool or small carving tool
- Slip (clay mixed with water) and scoring tool
- Small sponge
- Wooden modeling tool
- Small rolling pin
Step 1: Forming the Body
-
Create the base:
Start with a ball of clay roughly the size of a large orange. Insert your thumb into the center and gently pinch the walls while rotating the ball to create a basic pinch pot. -
Close the form:
Instead of leaving it open like a bowl, gently collar the rim inwards until the opening closes completely, trapping air inside to support the shape. Smooth the seam thoroughly so it disappears. -
Shape the bird:
Roll the closed sphere in your hands to egg-shape it slightly. Gently tap the bottom on your work surface to create a flat base so the bird sits stably without rolling. -
Refine the surface:
Use a damp sponge or a rubber rib to smooth out any fingerprints or uneven bumps on the main body, ensuring a clean canvas for your details. -
Add the beak:
Roll a very small cone of clay for the beak. Score the attachment point on the ‘face’ area and the back of the beak, apply a dab of slip, and press firmly. Blend the clay from the beak onto the face using a wooden tool for a seamless connection.
Clean Lines
When carving the feather lines, wait until the clay is ‘leather hard’ (stiff but cool). The tools will cut cleaner lines without dragging or creating messy clay crumbs.
Step 2: Sculpting Details
-
Define the wings:
Roll out a small slab of clay, about 1/4 inch thick. Cut out two teardrop or leaf shapes for the wings. I find it helpful to hold them against the body first to check that the size feels balanced. -
Attach the wings:
Score the side of the bird body and the back of each wing piece. Apply slip and press the wings onto the sides, positioning them slightly lower than the head area. -
Blend the leading edge:
Blend only the front (top) edge of the wing into the body so it looks integrated, but leave the back and bottom edges unblended to create slight relief and depth. -
Carve wing feathers:
Using a needle tool or small carving tool, incise deep, curved lines into the added wing clay to represent feathers. Follow the curve of the wing shape for a natural flow.
Make it a Rattle
Before closing the initial pinch pot form, wrap a small ball of dried clay in paper towel and place it inside. Once fired, you’ll have a musical ceramic rattle.
Step 3: Facial Features and texture
-
Create the eyes:
Roll two tiny balls of clay and flatten them into discs. Score and slip them onto the face. Press a smaller indentation into the center of each disc to create the pupil. -
Outline the eyes:
Use a needle tool to gently scribe a circle around the eye disc, and perhaps add three small hash marks above the eye to suggest eyelashes or feathers. -
Add chest texture:
Using a small loop tool or the end of a paintbrush, press small, oval indentations into the chest area. Scatter them randomly to mimic the speckled plumage of a thrush or sparrow. -
Vent the piece:
This is crucial: locate an inconspicuous spot on the bottom of the bird and poke a small hole with a needle tool. This allows trapped air to escape during firing (or drying) so the piece doesn’t crack. -
Final smoothing:
Give the entire piece one last check. Soften any sharp burrs created during carving with a fingertip or a slightly damp brush.
Allow your bird to dry slowly under loose plastic to ensure even shrinkage before firing or painting


Coil-Built Sitting Cat Sculpture
Capture the serene essence of a feline friend with this simplified, textured clay sculpture. The warm beige finish and gentle curves give this coil-built cat a timeless, organic feel perfect for any sunny windowsill.
Step-by-Step Guide
Materials
- Stoneware clay (buff or beige with grog)
- Scoring tool or needle tool
- Slip (clay mixed with water)
- Wooden modeling tool
- Sponge
- Loop tool (for hollowing if building solid)
- Clear matte glaze (optional)
- Kiln access
Step 1: Building the Body
-
Form the Base:
Start with a ball of clay roughly the size of a grapefruit for the body. Gently roll it into a pear shape, slightly flattening the bottom so it sits securely without wobble. -
Elongate the Torso:
Using your palms, stroke the clay upward to create a smooth, elongated neck area that tapers slightly from the wider base. -
Shape the Head:
Create a separate, smaller sphere for the head. Flatten the face side slightly to prepare for the features. -
Attach the Head:
Score the top of the neck and the bottom of the head vigorously. Apply a generous dab of slip, press the pieces together, and blend the seams downward with a wooden tool until the join is invisible. -
Refine the Posture:
Before the clay stiffens, gently tilt the head upward. This slight lift gives the cat that observant, window-gazing personality.
Stone Effect
Mix a small amount of coarse grog or sand into your clay body before sculpting. When fired, this creates that beautiful speckled, tactile surface seen in the image.
Step 2: Sculpting the Features
-
Add the Ears:
Pinch two small triangles of clay. Score and slip them onto the top of the head, blending the back edges smoothly into the skull while keeping the front edges distinct. -
Define the Inner Ear:
Use the rounded end of a small tool to gently press an indentation into the front of each ear triangle to create depth. -
Carve the Eyes:
Using a needle tool or a small modeling tool, carve two crescent shapes for closed, contented eyes. Keep the lines clean and subtle. -
Sculpt the Muzzle:
Add a very small, flattened button of clay for the nose and blend it. Use a needle tool to scratch in whiskers—three distinct lines on each side works beautifully. -
Create the Front Legs:
Rather than attaching separate legs, carve relief lines into the front of the body chest area. Use a loop tool to remove a shallow layer of clay, defining the separation between the ‘legs’ and the main body mass. -
Form the Paws:
At the base of the chest, shape two small mounds for paws. Simply press vertical lines into them to suggest toes. -
Add the Tail:
Roll a tapered coil of clay. Attach it to the lower back of the sculpture, curling it upward in a gentle ‘S’ curve. Support the tail with a small prop of clay or paper towel while it dries if gravity pulls it down.
Step 3: Finishing Touches
-
Curved Leg Detail:
Carve a distinctive curved line on the side of the body representing the bent back leg (the thigh). This simple arc suggests the sitting posture without needing complex anatomy. -
Texture the Surface:
To mimic the stone-like texture in the photo, gently tap the entire surface with a stiff-bristle brush or a piece of coarse sandpaper. I like to do this when the clay is leather-hard to avoid smudging the details. -
Hollow Out (If Needed):
If your sculpture is solid and thicker than an inch, carefully slice off the bottom and hollow out the inside with a loop tool, then reattach the bottom with scoring and slip. Pierce a small unseen hole for air to escape. -
Slow Dry:
Loosely cover the cat with plastic to let it dry slowly over several days. This prevents the tail or ears from cracking. -
Firing:
Bisque fire the piece. Since the beauty is in the raw clay texture, you can choose to leave it unglazed or apply a simple matte clear glaze before the final firing.
Make it a Pair
Create a second cat slightly smaller and mirroring the pose. When placed together, have their tails curve toward each other to form a subtle heart shape.
Now place your finished feline in a sunny spot and enjoy its calm presence


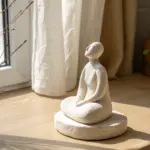
Simple Mini Human Figure Poses
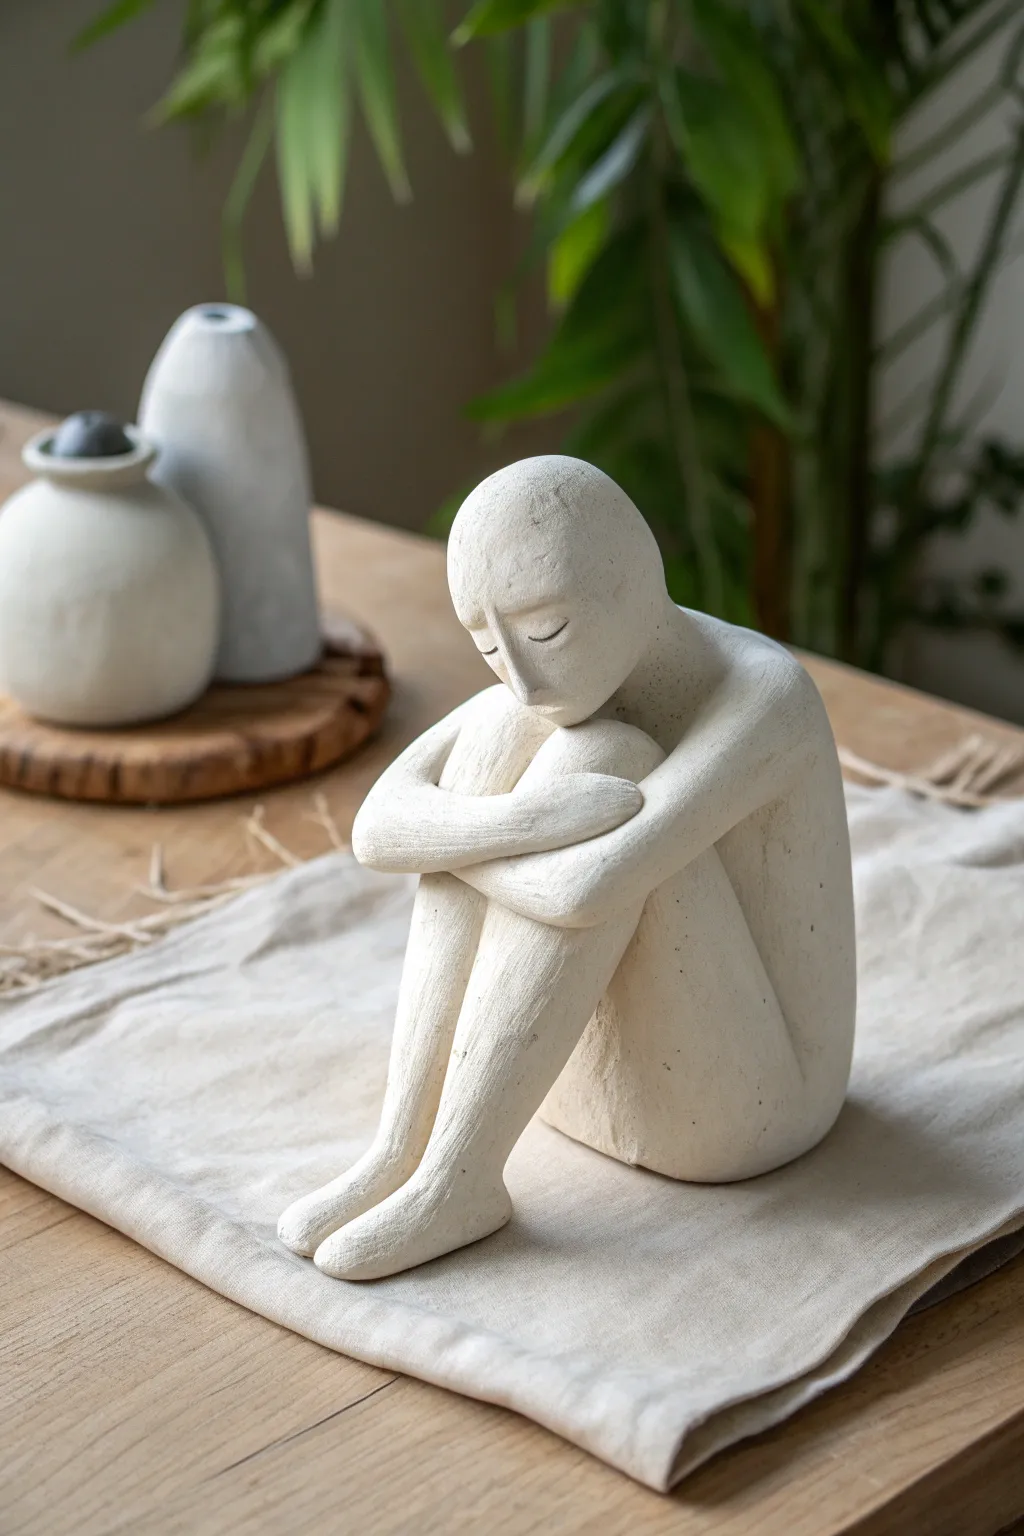
This minimalist sculpture captures a moment of quiet reflection with its smooth curves and gentle posture. The clean lines and stone-like texture make it a striking yet peaceful addition to any modern decor.
Detailed Instructions
Materials
- Air-dry clay or polymer clay (white or stone color)
- Aluminum foil (for armature core)
- Basic sculpting tools (loop tool, needle tool)
- Water and a small sponge (for smoothing)
- Fine-grit sandpaper
- Acrylic paint (matte white or cream)
- Matte varnish spray
Step 1: Building the Core
-
Shape the armature:
Crumple aluminum foil into two main shapes: a larger oval for the torso/hips and a smaller sphere for the head. Connect them securely. -
Form the base pose:
Since this figure is seated in a compact ball, add foil bulges to represent the thighs pulled up against the chest. Compacting the foil tightly now saves clay later. -
Cover with clay:
Roll out a sheet of clay to about 1/4 inch thickness. Wrap it entirely around your foil form, pressing firmly to eliminate air pockets between the foil and clay.
Step 2: Sculpting the Body
-
Define the torso:
Smooth the clay into a solid, rounded block shape for the body. The back should curve gently, like a shell. -
Add the legs:
Roll two thick coils of clay for the legs. Attach them vertically against the front of the torso, blending the seam at the hips so they look like one continuous piece. -
Shape the knees:
Ensure the tops of the legs form distinct, rounded knee caps that sit high up, nearly touching where the shoulders will be. -
Attach the feet:
Extend the clay at the bottom of the legs slightly forward to suggest feet. Keep them abstract—simple rounded points rather than detailed toes work best for this style. -
Form the arms:
Create two thinner coils for the arms. Drape them over the knees, wrapping them around the shins so they cross each other naturally.
Cracks appearing?
If you see hairline cracks while drying, fill them immediately with a watery clay slurry (‘slip’). Smooth over with a damp finger and let dry again.
Step 3: Refining the Form
-
Sculpt the head:
Refine the head shape into a smooth oval. Tilt it downward so the chin rests gently on the crossed arms or knees. -
Blend the neck:
Add a small amount of clay to connect the head to the shoulders. Blend the clay downwards to create a seamless transition, keeping the neck relatively short. -
Suggest facial features:
Use a modeling tool to gently press indentations for the eye sockets. Add a small, straight bridge for the nose. Keep the features subtle and calm; less is more here. -
Detail the eyes:
Carve two simple, closed crescent lines for the eyes. This simple detail is crucial for conveying the introspective mood. -
Smooth the surface:
Dip a sponge in water and wipe down the entire figure. Remove any fingerprints or tool marks. I find this step meditative, as you watch the rough clay turn into smooth ‘stone’.
Faux Stone Look
Mix a tiny amount of real sand or coffee grounds into your white paint. This adds gritty specks that mimic the texture of natural sandstone or limestone.
Step 4: Finishing Touches
-
Let it dry:
Allow the sculpture to dry completely. For air-dry clay, this might take 24-48 hours depending on thickness. Only proceed once it feels room temperature to the touch, not cool. -
Sand imperfections:
Once dry, use fine-grit sandpaper to gently buff away any remaining bumps or rough patches, focusing on the curve of the back and the smoothness of the face. -
Painting:
Apply a coat of matte off-white or cream acrylic paint. Dab the paint on with a sponge rather than brushing to create a bit of stone-like texture. -
Protect the piece:
Finish with a matte varnish spray to seal the paint and protect the clay without adding unnatural shine.
Now you have a serene little guardian for your bookshelf or desk


Cute Mushroom Buddy Sculptures
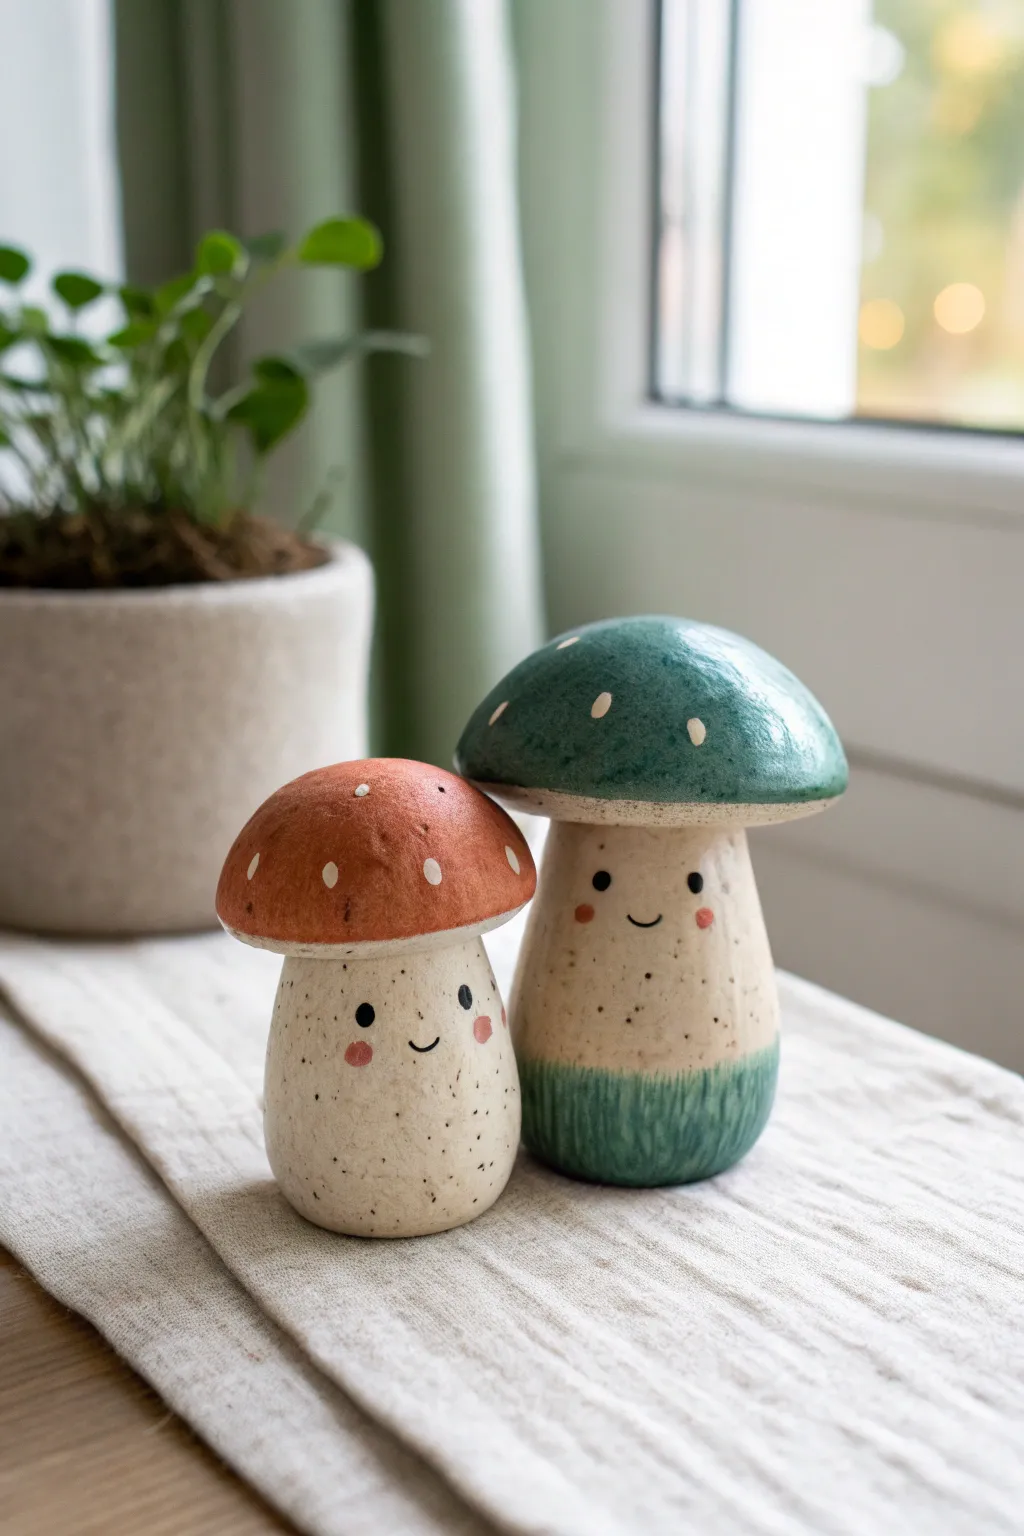
These charming ceramic mushroom figurines bring a touch of whimsy to any windowsill with their speckled clay bodies and friendly expressions. In this project, you will hand-build two distinct shapes—a stout button mushroom and a taller, slender companion—before bringing them to life with vibrant glazes.
How-To Guide
Materials
- Speckled stoneware clay (creating the spotted effect)
- Pottery wheel or simple banding wheel
- Pin tool or needle tool
- Sponge
- Scoring tool (or serrated rib)
- Slip (liquid clay)
- Terracotta-orange underglaze or glaze
- Teal-green underglaze or glaze
- Black underglaze (for eyes/mouth)
- Pink underglaze (for cheeks)
- White glaze (for dots)
- Fine detail paintbrush
- Medium wash brush
- Clear transparent glaze (optional, depending on finish desired)
Step 1: Sculpting the Stems
-
Prepare the clay:
Begin by wedging your speckled stoneware clay thoroughly to remove air bubbles. Separate the clay into two lumps, one slightly larger than the other for the varying sizes. -
Form the short stem:
Take the smaller lump and roll it into a smooth ball. Gently gently press and roll it on your work surface to create a thick, rounded cylinder that is slightly wider at the bottom for stability. -
Refine the shape:
Smooth out the surface with a damp sponge. Aim for a chubby, pebble-like quality rather than a perfect geometric cylinder. -
Form the tall stem:
With the second lump of clay, roll a taller cylinder. Pinch gently towards the top third to create a slightly narrower neck, flaring out again at the base to support the weight of the cap. -
Add texture:
If you want to emphasize the ‘grass’ area early on the tall mushroom, you can lightly texture the bottom inch with vertical strokes using a modeling tool.
Glaze Crawling?
If your white dots pull away or bead up during firing, the glaze was likely applied too thickly over the base color. Try thinner layers or wipe the base spot clean before dotting.
Step 2: Creating the Caps
-
Shape the orange cap:
Roll a new ball of clay and flatten it gently between your palms to create a thick disc. Curve the edges downward to form a dome shape that fits proportionally over the shorter stem. -
Shape the teal cap:
Create a second dome for the taller mushroom. This one can be slightly wider and flatter, resembling a classic toadstool silhouette. Smooth the edges with a damp finger so they are rounded, not sharp. -
Score and slip:
Use your scoring tool to scratch up the top of the stems and the underside of the caps. Apply a dab of slip to the scored areas. -
Assemble the parts:
Press the caps firmly onto the stems. Use a modeling tool to blend the clay slightly on the underside where they meet to ensure a strong bond, then smooth over the seam so it looks seamless. -
Drying:
Let the mushrooms dry slowly to the leather-hard stage. This is crucial before painting or firing to prevent cracks.
Step 3: Painting and Glazing
-
Bisque fire:
Once bone dry, fire the pieces in a kiln to bisque temperature (usually cone 04 or 06). If you are using air-dry clay instead, simply wait until completely dry. -
Paint the small cap:
Apply 2-3 coats of terracotta-orange glaze to the cap of the shorter mushroom. Let each coat dry slightly before adding the next to ensure opacity. -
Paint the tall cap:
Apply the teal-green glaze to the cap of the taller mushroom. Extend this specific color logic to the base of the stem as well, painting vertical strokes to mimic grass growing up the stalk. -
Add facial features:
Using a very fine detail brush and black underglaze, paint two small dots for eyes and a simple U-shape for a smile on each stem. Position them roughly in the middle of the exposed clay area. -
Apply blushing cheeks:
Dip a small round brush into pink underglaze. Dab it gently on either side of the smile to create soft, rosy cheeks. -
Detail the spots:
Using the handle end of a paintbrush or a dotting tool, dip into white glaze and press dots onto the colored caps. Vary the pressure slightly to get organic, uneven sizes. -
Final wipe:
Check the bottom of your mushrooms. Use a clean, damp sponge to wipe away any glaze from the very bottom surface so they don’t stick to the kiln shelf. -
Final firing:
Fire the pieces again to the maturation temperature of your specific clay and glaze (often cone 5 or 6 for stoneware). Wait for the kiln to cool completely before removing your new friends.
Clean Lines
For the ‘grass’ effect on the tall mushroom, use a fan brush with slightly dry bristles. Flick the brush upward from the base to create a feathery, organic transition.
Place your finished ceramic buddies near a potted plant to complete their natural habitat

The Complete Guide to Pottery Troubleshooting
Uncover the most common ceramic mistakes—from cracking clay to failed glazes—and learn how to fix them fast.
Tiny Bird on a Branch
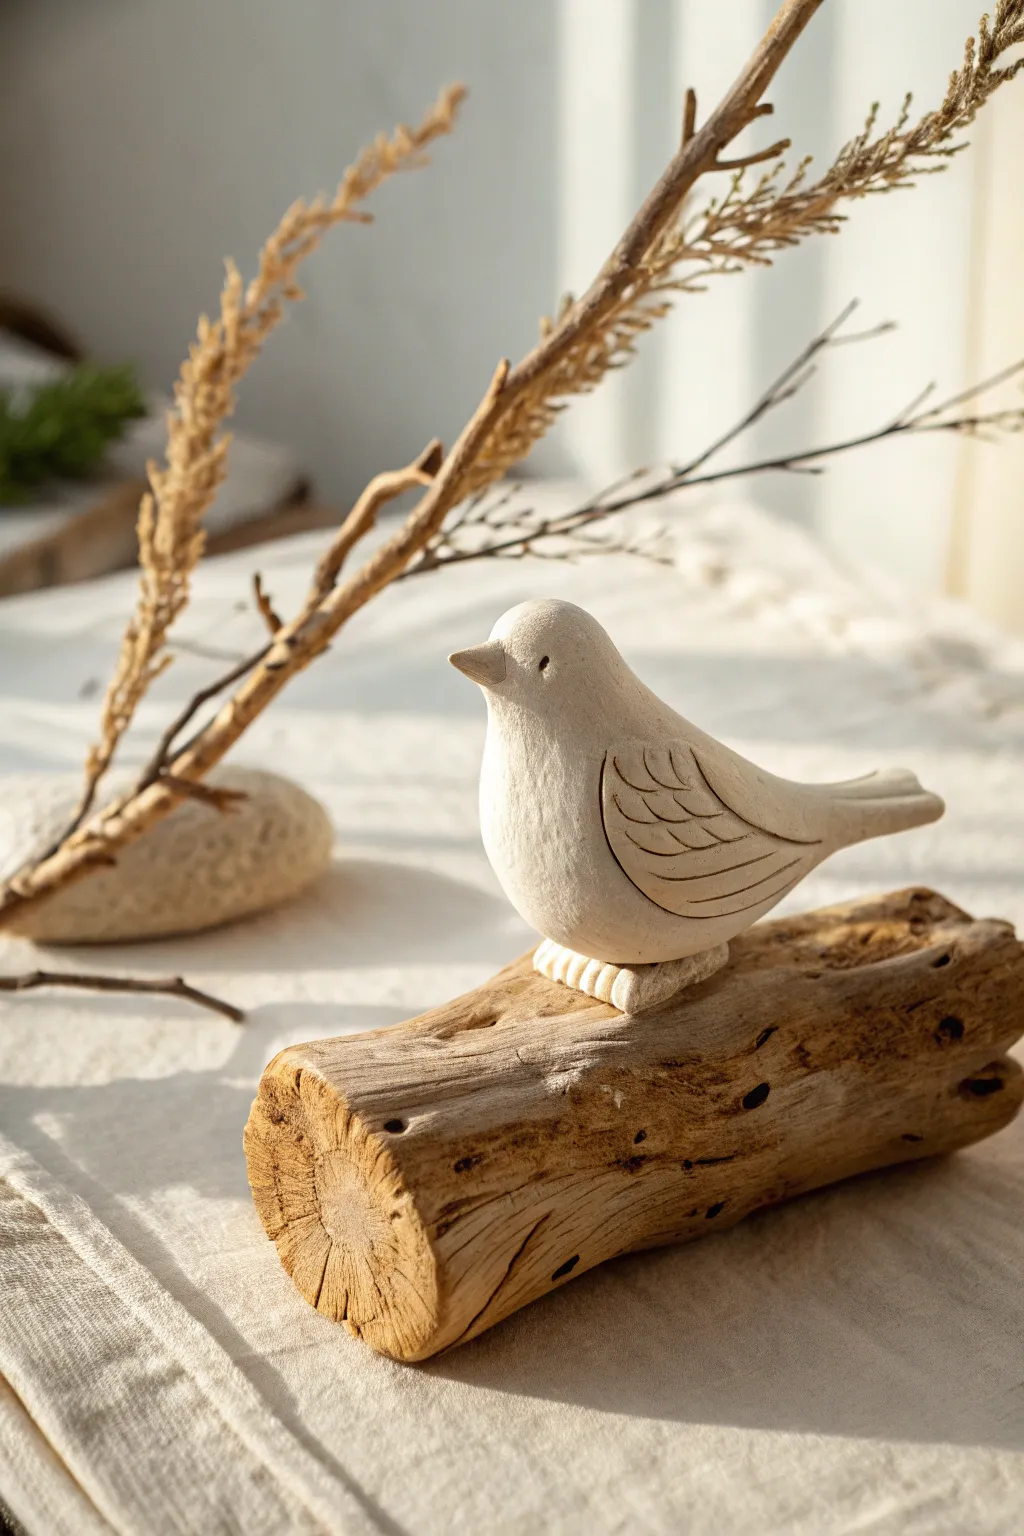
Capture the serene simplicity of nature with this rustic clay bird perched on authentic driftwood. The clean lines and unpainted finish highlight the natural texture of the clay, creating a soothing decorative piece perfect for a mantle or windowsill.
Step-by-Step Guide
Materials
- Air-dry clay (white or off-white) or polymer clay
- Small piece of driftwood or bark-textured branch (approx. 4-6 inches long)
- Modeling tools (or a toothpick and a small knife)
- Water in a small cup (for smoothing)
- Sponge or fine-grit sandpaper
- Strong craft glue (e.g., E6000) or clear epoxy
- Rolling pin (optional)
Step 1: Sculpting the Bird Body
-
Form the basic shape:
Begin by conditioning a golf-ball-sized amount of clay in your hands until it is pliable. Roll it into a smooth sphere, then gently elongate one side to create a teardrop shape. -
Define the head:
On the rounded end of the teardrop, use your thumb and forefinger to gently pinch and pull the clay upwards and slightly forward to distinguish the head from the body. You want a smooth transition, not a sharp neck. -
Shape the beak:
At the very front of the head, pinch a tiny amount of clay into a small, conical beak. Keep it short and pointed. Smooth the seam where the beak meets the face so it looks like one continuous piece. -
Refine the tail:
Flatten the tapered end of your teardrop slightly to form the tail. Curve it upwards just a fraction to give the bird a perky, alert posture. -
Smooth the surface:
Dip your finger in a little water and gently run it over the entire bird to remove fingerprints and cracks. Aim for a matte, stone-like texture.
Unstable Bird?
If the bird keeps tipping over during drying, prop the tail up with a small folded piece of paper towel or sponge to maintain the correct angle until the clay hardens.
Step 2: Adding Details
-
Create the wings:
Roll two smaller balls of clay into flat, leaf-shaped ovals for the wings. These should be roughly one-third the size of the body. Press them firmly onto the sides of the bird. -
Carve wing feathers:
Using a needle tool or toothpick, gently carve three or four curved lines into the wing clay to suggest feathers. These should mimic the curve of the wing shape. -
Detail the eyes:
Instead of painting eyes, use the end of a small paintbrush or a round tool to press a small indentation on each side of the head. This recessed look adds to the sculpture’s minimalist charm. -
Sculpt the feet:
Create a small, flat rectangle of clay to serve as the feet base. Use a knife tool to score vertical lines into the front edge, simulating toes or claws gripping a surface. -
Attach the feet:
Score the bottom of the bird and the top of the feet piece with a cross-hatch pattern. Add a dab of water (or slip if using ceramic clay) and press the bird firmly onto the feet block.
Step 3: Assembly and Finishing
-
Check the fit:
Before the clay dries, carefully place the bird onto your chosen piece of driftwood to ensure the curve of the feet matches the wood’s surface. If needed, gently press the clay onto the wood to mold the bottom shape better, then remove it for drying. -
Dry the sculpture:
Allow the clay bird to dry completely according to the package instructions. For air-dry clay, this usually takes 24-48 hours. Turn it occasionally to ensure even drying. -
Sand imperfections:
Once fully dry (and hardened), use fine-grit sandpaper or a dry sponge to buff away any remaining rough spots or fingerprints, focusing on the beak and tail edges. -
Prepare the wood:
Ensure your driftwood piece is clean and dry. Use a stiff brush to remove any loose debris or dirt from the bark. -
Final assembly:
Apply a strong craft glue to the bottom of the clay feet. Press the bird firmly onto the driftwood branch and hold it in place for a minute to set the bond.
Rustic Speckle Effect
Before drying, mix a small pinch of used coffee grounds or cracked black pepper into the white clay. This creates a natural, speckled stone texture without needing paint.
Now you have a serene little nature scene to bring a touch of calmness to your home decor
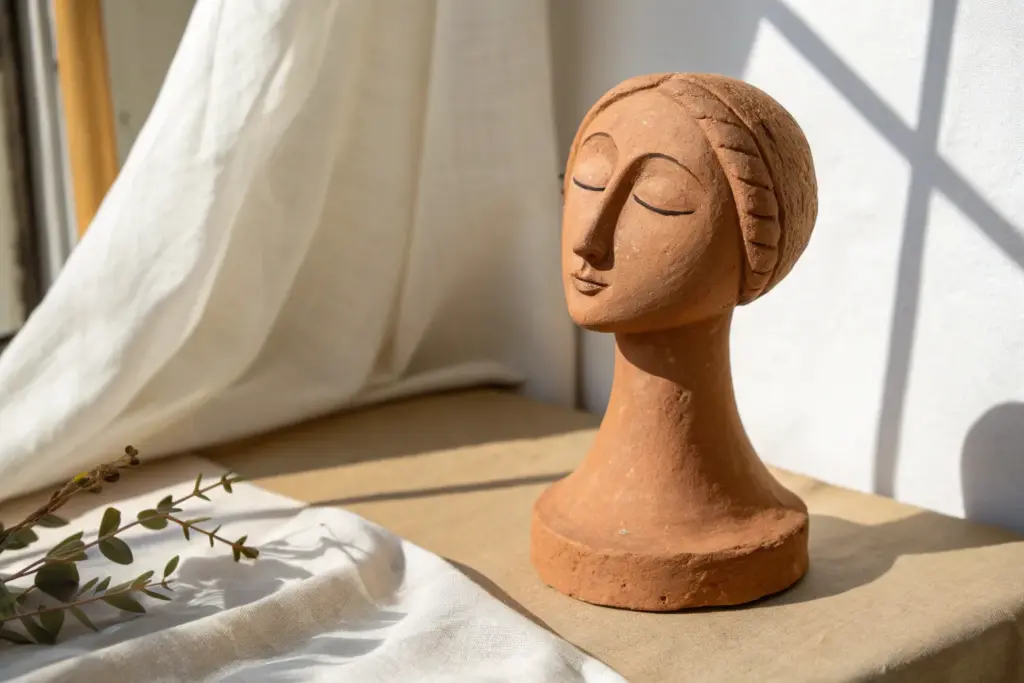
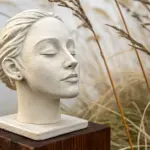
Face Planter Head Sculpture
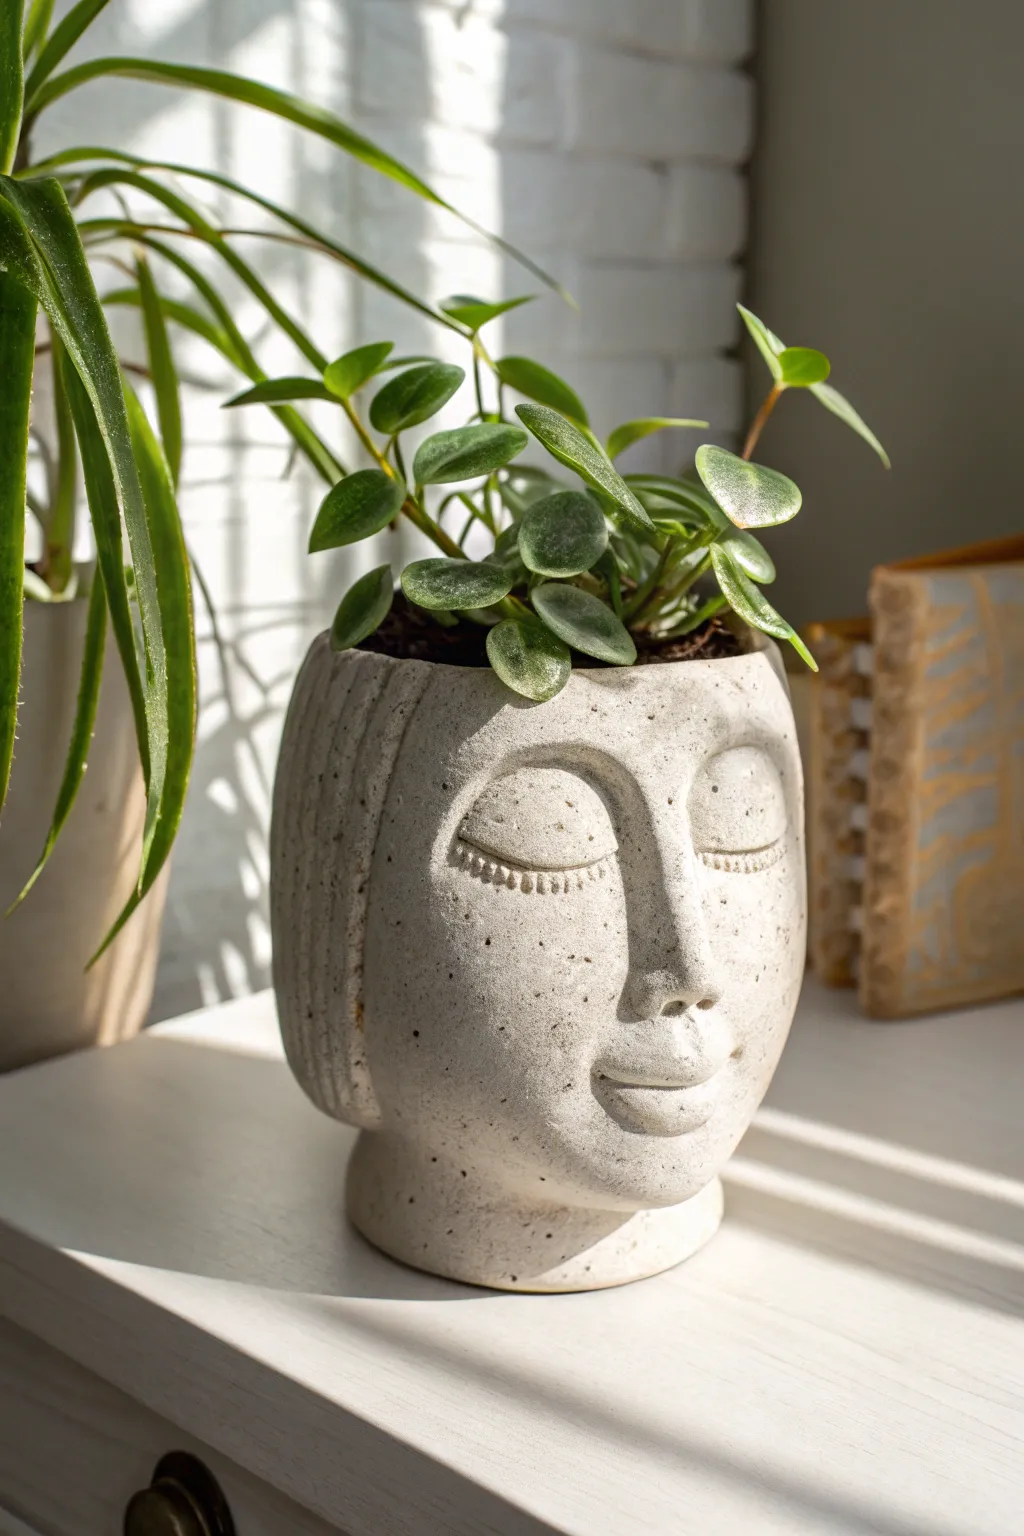
Create a calming oasis for your favorite houseplants with this stylized head planter. This project focuses on sculpting a serene, meditative expression using air-dry clay or cement modeling clay to mimic a carved stone finish.
Detailed Instructions
Materials
- Air-dry clay (stone or white color) or modeling cement
- Empty plastic container (yogurt tub or cut soda bottle) for the core
- Sculpting tools (wire loop tool, needle tool, wooden shapers)
- Foil or masking tape
- Rolling pin
- Sponge and water
- Sandpaper (medium and fine grit)
- Acrylic paint (black and cream) and stiff brush for speckling
Step 1: Building the Form
-
Prepare the core:
Select a cylindrical plastic container to serve as the internal structure and water reservoir. If it’s too tall, trim it down to your desired planter height. This internal mold stays inside the final piece. -
Bulking out the shape:
Crumple aluminum foil and tape it around the plastic container to build up the volume of a head shape. Focus on creating a rounded base for the chin and a wider section for the forehead area. -
Rolling the slab:
Roll out a large slab of clay, approximately 1/4 to 1/2 inch thick due to the weight it needs to support. Measure it to ensure it can wrap completely around your foil-covered form. -
Sheathing the form:
Carefully wrap the clay slab around the foil structure. Score the connecting edges with a needle tool, add a little water or slip, and smooth the seam together until it vanishes. -
Adding the base:
Flip the form over and add a circular slab for the neck/base. Secure it firmly to the main cylinder, blending the clay upwards to create a seamless transition.
Step 2: Sculpting the Features
-
Mapping the face:
Lightly trace a vertical center line and horizontal eye line with a needle tool to guide symmetry. Position the nose area slightly below the center. -
Forming the nose:
Add a wedge of clay for the nose. Blend the edges smoothly onto the face, shaping a long, straight bridge that merges into the forehead brow line. -
Creating the eyelids:
Roll two half-circles or ovals of clay. Press them gently onto the face for closed eyelids. I find it helpful to look at the profile view often to ensure they protrude naturally. -
Shaping the mouth:
Add a small mound for the mouth area. Use a wire tool or knife to separate the upper and lower lips, then smooth them into a gentle smile. -
Defining the lashes:
Using a small, sharp tool or a stamp, press tiny vertical lines along the bottom edge of the eyelids to create the texture of eyelashes. -
Adding the hair:
Create the hair by rolling a thick strip of clay. Attach it around the sides and back of the head, framing the face. Use a modeling tool to carve deep parallel vertical grooves for hair strands. -
Refining the texture:
Go over the entire surface with a damp sponge. This smooths out fingerprints but also helps create that slightly weathered, stone-cast look.
Stone Texture Trick
Before drying, dab the clay surface gently with a crumpled ball of aluminum foil or a coarse sponge. This creates instant realistic pores and pitting.
Step 3: Finishing Touches
-
Drying period:
Allow the sculpture to dry slowly away from direct heat. It may take 24-48 hours depending on thickness. Rotate it occasionally to ensure even drying. -
Sanding:
Once bone dry, sand any sharp edges or rough patches with medium grit sandpaper. Follow up with fine grit for a smoother finish on the cheeks and forehead. -
Base coat:
Paint the entire sculpture with an off-white or light grey acrylic paint if your clay didn’t dry to the desired stone color. -
Creating the stone effect:
Mix a small amount of black paint with water. Load a stiff brush or old toothbrush, and flick the bristles with your thumb to splatter tiny speckles over the surface. -
Sealing:
After the paint is dry, apply a matte waterproof sealant, especially inside the rim, to protect the clay from moisture when watering your plant.
Antique Wash
Apply a watered-down brown wash into the hair grooves and eye creases, then wipe the high points clean. This emphasizes the sculpted details instantly.
Now you have a tranquil piece of art ready to hold your favorite trailing plant


What Really Happens Inside the Kiln
Learn how time and temperature work together inside the kiln to transform clay into durable ceramic.
Abstract Face Totem Stack
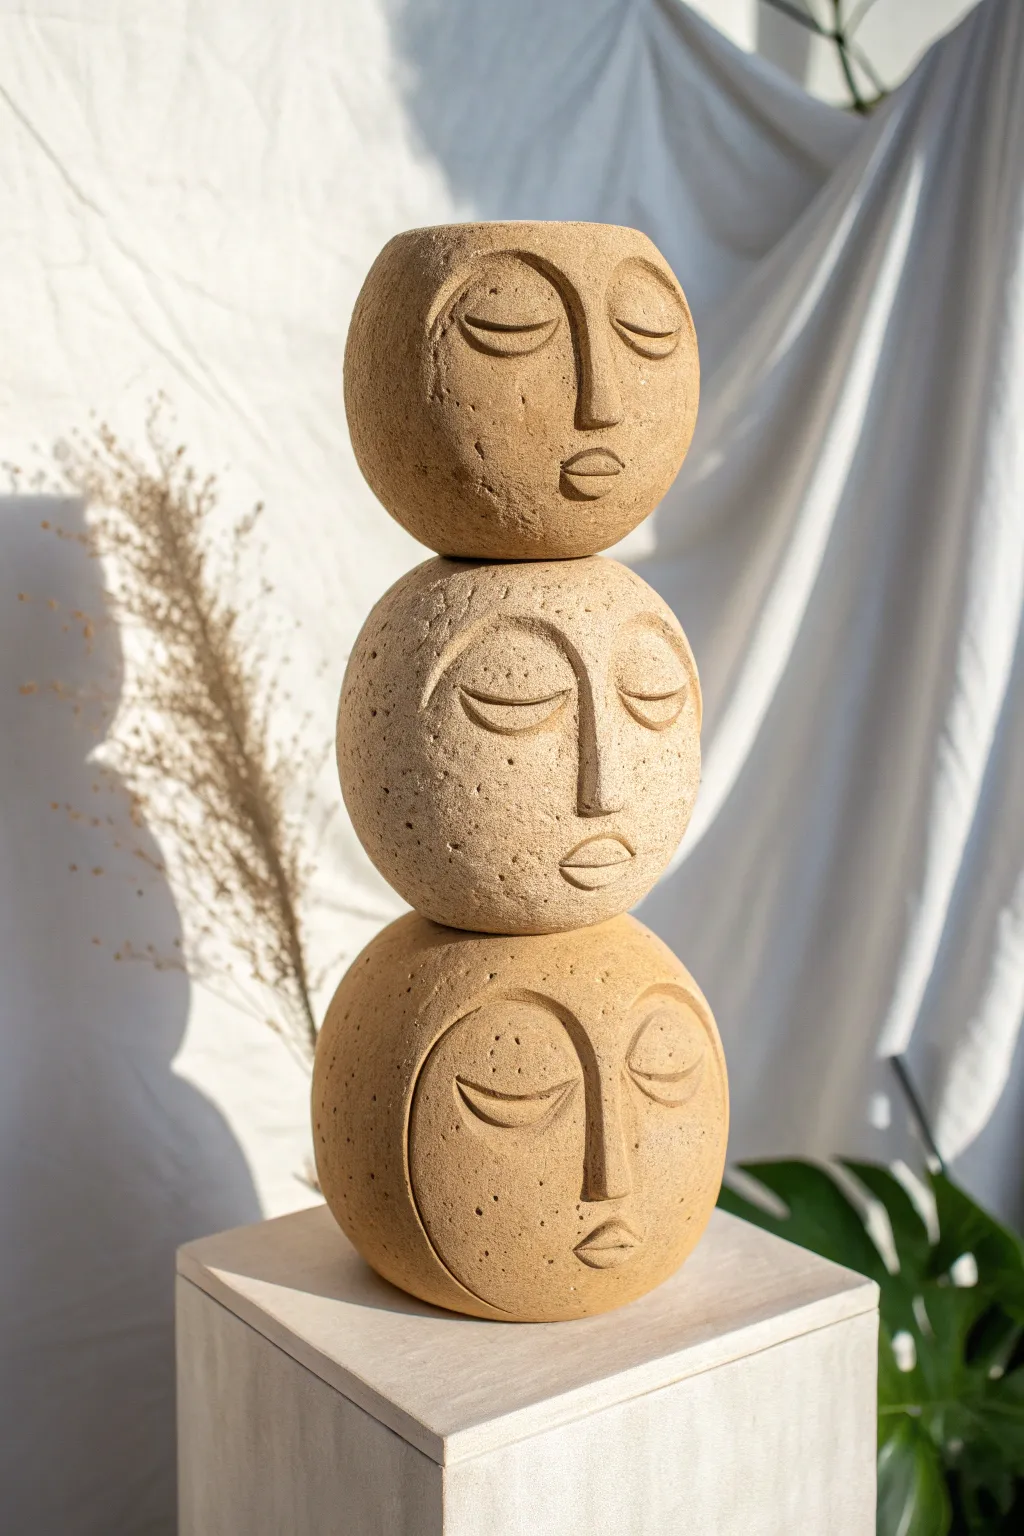
Bring a sense of calm to your space with this serene, stacked spherical sculpture inspired by modern totem art. The textured, stone-like finish and stylized faces give it an ancient yet contemporary feel perfect for shelves or garden nooks.
Step-by-Step Guide
Materials
- Air-dry clay or polymer clay (stone or terracotta color)
- Three styrofoam balls (graduated sizes or all 3-4 inch diameter)
- Sculpting tools (needle tool, loop tool, wooden rib)
- Wooden dowel (approx. 1/4 inch thick)
- Texture sponge or stiff bristle brush
- Rolling pin
- Slip (water mixed with clay scraps)
- Acrylic paints (beige, ochre, brown for speckling)
- Toothbrush (for speckling)
- Matte spray sealant
Step 1: Forming the Spheres
-
Prepare the core structure:
Begin by selecting your three styrofoam balls. If you want a uniform look, keep them the same size; for a tapered effect, vary them slightly. Pierce a hole straight through the center of each ball using your wooden dowel to ensure they will stack correctly later. -
Roll out clay sheets:
Condition your clay until pliable. Roll out sheets approximately 1/4 inch thick. You’ll need enough to fully cover each styrofoam sphere. -
Cover the spheres:
Wrap the clay sheets around each styrofoam ball. Use your thumbs to meld the seams together, smoothing the clay until the surface is seamless and round. Keep the dowel holes open by re-inserting the dowel occasionally.
Step 2: Sculpting the Faces
-
Map out facial features:
On each clay sphere, lightly trace a large arch shape where the face will reside. This creates a distinct ‘mask’ area versus the rest of the head. -
Define the face outline:
Using a needle tool or small loop tool, carve slight grooves along that arch line to separate the face plane from the rest of the rounded form. Smooth the edges inward to soften the transition. -
Build the nose:
Form a small, elongated triangular wedge of clay. Score and slip the back of it, then attach it to the center of the face area. deeply blend the edges into the face so it looks seamless, not pasted on. -
Carve the eyes:
For the serene, sleeping expression, use a loop tool or needle to carve two downward-curving crescents on either side of the nose. Keep them symmetrical. You can gently press the clay down below the line to create the illusion of a heavy eyelid. -
Shape the mouth:
Attach a very small oval of clay below the nose for the lips. Using a needle tool, press a horizontal line across the center to separate the upper and lower lip, and softly shape the cupid’s bow. -
Add surface texture:
To mimic the stone look in the photo, take a stiff bristle brush or a textured sponge and stipple the surface of the clay. Focus on the areas outside the face ‘mask’ to create contrast between the smoother features and the rougher head. -
Create the stack:
While the clay is still workable but firm enough to hold shape, slide the bottom sphere onto your wooden dowel base. Apply slip to the top of it, then slide on the middle sphere, and finally the top sphere. Press them gently together to secure.
Stone Effect Secret
Mix clean sand or used coffee grounds directly into your clay body before sculpting. This creates authentic grit and texture that painting alone can’t achieve.
Step 3: Finishing Touches
-
Refine the joins:
Check the points where the spheres touch. If there are gaps, fill them with tiny coils of clay and smooth them out so the totem looks like a single, solid unit. -
Allow to dry:
Let the sculpture dry completely. This is crucial; thick clay over styrofoam creates moisture, so let it sit in a cool, dry place for at least 48-72 hours. -
Apply base color:
If your clay isn’t already the desired stone color, paint the entire sculpture with a matte beige or sandstone acrylic paint. Let it dry. -
Add heavy texture:
Mix a slightly darker brown paint with water. Using an old toothbrush, dip it in the paint and flick the bristles with your thumb to spray tiny speckles over the totem. This recreates the natural impurities found in sandstone. -
Highlight the carvings:
I like to use a dry brush with a lighter cream color to lightly graze the raised areas—the nose bridge, eyelids, and lips—to make the features pop against the textured background. -
Seal the work:
Finish with a matte spray sealant to protect the surface and unify the sheen, giving it a true stone-carved appearance.
Botanical Crown
Leave the top of the highest sphere open (hollowed out slightly like a pot) before drying. Once finished, you can place a small succulent or air plant inside for a living art piece.
Enjoy the peaceful presence your new sculpture brings to your home decor
Beginner Bust Sculpture Study

Capture a moment of quiet contemplation with this stylized clay bust, featuring a serene expression and textured hair details. The piece combines the raw, earthy warmth of groggy clay with a striking, folksy blue geometric pattern on the base.
Detailed Instructions
Materials
- Stoneware clay (with fine grog for texture)
- Blue underglaze or ceramic slip
- Modeling tools (loop tool, wooden knife, needle tool)
- Small sponge
- Fine liner brush
- Medium round brush
- Water slip (clay slurry)
- Plastic bag for covering
- Ware board or bat
Step 1: Forming the Base Structure
-
Build the neck and shoulders:
Start with a sturdy base for the shoulders using the coil method or by shaping a solid block of clay into a gentle arch. Ensure the wall thickness is even if building hollow. -
Establish the neck:
Add a thick cylinder for the neck. It needs to be substantial enough to support the head, so avoid making it too swan-like or thin at this stage. Score and slip well to join it to the shoulders. -
Shape the head armature:
Form an egg shape for the head from a ball of clay. If working solid, plan to hollow it out later; if coiling, build the egg shape upwards from the neck, smoothing the interior walls as you go. -
Connect head to neck:
Securely attach the head to the neck, tilting it slightly downward to create a meditative posture. Smooth the clay across the joint so no seam is visible.
Preventing Neck Cracks
The neck bears the most weight. Always support the chin with a small sponge or prop while the clay is wet to prevent the head from sinking.
Step 2: Sculpting the Features
-
Map out facial proportions:
Lightly mark lines for the eyes, nose, and mouth. The eyes should be roughly halfway down the face. -
Build the nose:
Add a small wedge of clay for the nose. Blend it onto the face, refining the bridge and the nostril area to be somewhat sharp and stylized rather than hyper-realistic. -
Sculpt the closed eyes:
Carve gentle, crescent-shaped indentations for the eye sockets. Roll two small, flattened football shapes for eyelids and press them into the sockets, blending the edges so the eyes look peacefully closed. -
Refine the mouth and chin:
Define the lips with small coils, blending them into the cheeks. Keep the expression neutral or slightly somber. Ensure the chin is prominent and the jawline is clearly defined. -
Add the ears:
Attach C-shaped pieces of clay on the sides of the head, aligned with the eyes and nose. Carve simple inner ear details with a small loop tool.
Step 3: Hair and Surface Texture
-
Create the hair volume:
Add slabs of clay over the top and back of the head to form a cap-like shape for the hair, distinguishing it from the forehead. -
Carve hair strands:
Using a wooden knife tool, carve deep, sweeping grooves to represent strands of hair pulled back into a bun. The texture should look intentional and directional. -
Texture the skin:
I like to gently dab the face with a slightly damp sponge to remove tool marks, but leave a bit of the clay’s natural grittiness to give it that stone-like character. -
Hollow the form (if solid):
If you built the head solid, slice off the top of the head (the hair cap), scoop out the inside until walls are roughly 1/2 inch thick, and reattach carefully.
Crisp Underglaze Lines
For sharper blue lines, paint the underglaze on bone-dry clay (greenware). If you mess up, you can carefully scratch the error off with a needle tool.
Step 4: Decoration and Finishing
-
Outline the pattern:
On the shoulder area (the ‘dress’), lightly scratch the design. Create a neckline band, followed by vertical petal-like shapes radiating downward. -
Apply the neckline stripes:
Using the liner brush and blue underglaze, paint the thin horizontal lines around the neck and the decorative dots within the neckline band. -
Fill the geometric shapes:
Use the medium round brush to fill in the negative space between your sketched petal shapes with the blue underglaze. This creates the white leaf/petal pattern in relief against the blue background. -
Dry slowly:
Loosely cover the sculpture with plastic to let it dry very slowly over several days. This prevents cracking, especially around the neck joint. -
Bisque and glaze fire:
Fire the piece to bisque temperature. Since the decoration is underglaze, you can leave the skin matte or apply a very thin clear matte glaze before the final firing to seal it.
Once fired, this timeless bust will bring a calm, artistic presence to any shelf or mantelpiece

TRACK YOUR CERAMIC JOURNEY
Capture glaze tests, firing details, and creative progress—all in one simple printable. Make your projects easier to repeat and improve.
Expressive Mini Mask Wall Sculptures
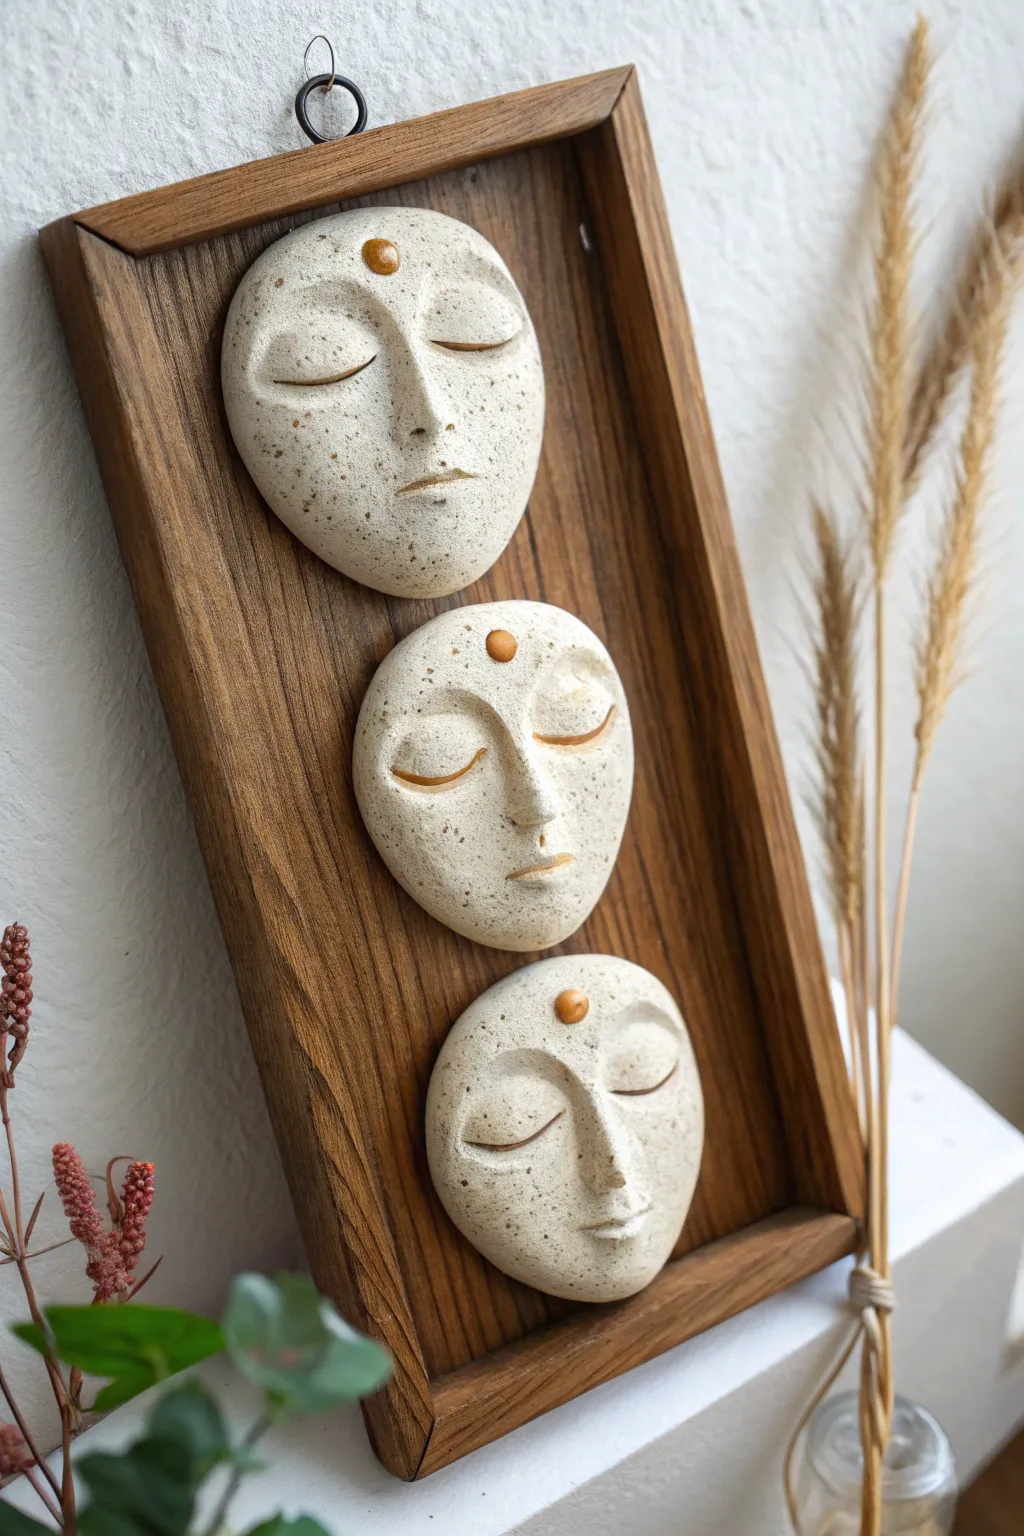
Create a calming focal point for any room with this vertical triptych of serene faces. These mini mask sculptures use simple air-dry clay techniques to mimic the look of speckled stone, mounted beautifully within a deep-set wooden frame.
Step-by-Step
Materials
- Air-dry clay (stone or white color)
- Speckled clay additive or coarse black pepper/sand
- Deep wooden frame or small wooden tray (approx 6″ x 15″)
- Rolling pin
- Modeling tools (or a spoon and knife)
- Small bowl of water
- Fine grit sandpaper
- Metallic bronze or gold acrylic paint
- Strong craft glue or epoxy
- Matte varnish spray
Step 1: Sculpting the Faces
-
Prepare the clay:
Begin by conditioning your air-dry clay. To achieve the speckled stone effect shown in the image, knead in a small amount of ‘speckled’ additive like sand or coarse black pepper if your clay is plain white. Keep kneading until the texture is evenly distributed. -
Form the base shapes:
Divide your clay into three equal portions. Roll each into a smooth ball, then gently flatten them into thick, oval shapes approximately 3-4 inches tall. They should be domed, resembling an egg cut in half lengthwise. -
Define the nose bridge:
Using your thumbs, gently press into the center of the oval to start defining the eye sockets, leaving a raised vertical strip in the middle for the nose. Smooth the clay upwards to build the bridge of the nose seamlessly from the forehead. -
Sculpt the nose:
Pinch and shape the raised center strip to form a refined nose. Use a modeling tool to carve small nostrils at the base, keeping the overall shape long and elegant for a serene look. -
Create the closed eyes:
Roll two very small, thin coils of clay for each face. Press these gently onto the eye area in a crescent shape to mimic closed eyelids. I like to blend the top edge of the coil into the face using a little water, leaving the bottom edge crisp to create a shadow line. -
Shape the lips:
For the mouth, roll a tiny separate piece of clay and attach it below the nose. Use a fine tool or knife edge to press a horizontal line across the middle, then gently shape the upper and lower lips. Keep the expression neutral and peaceful. -
Add the bindi:
Roll a tiny sphere of clay about the size of a peppercorn. Press this firmly into the center of the forehead, just above the brow line. Flatten slightly so it adheres well but remains raised. -
Smooth the surface:
Dip your finger in water and gently rub over the entire surface of the mask to remove fingerprints and harsh tool marks. The goal is a uniform, soft stone texture. -
Dry completely:
Set the three masks aside on a flat surface to dry. Depending on the thickness of your clay and humidity, this usually takes 24-48 hours. Turn them over halfway through to ensure the backs dry evenly.
Smoother Transitions
Use a soft, damp paintbrush instead of your finger to smooth tight areas like the corners of the nose and eyes. It acts like a mini mop to erase tool marks without squishing the details.
Step 2: Finishing and Assembly
-
Sand for stone texture:
Once fully dry, lightly sand the faces with fine-grit sandpaper. This will expose more of the speckles you added earlier and create a truly matte, stone-like finish. -
Paint the accents:
Using a small detail brush, paint the forehead dot with metallic bronze or gold acrylic paint. You can also dry-brush a tiny amount of this metallic paint onto the eyelids and lips to highlight the features subtly. -
Seal the clay:
Spray the masks with a matte varnish. This protects the clay and enhances the stone color without making them look glossy or plastic. -
Prepare the frame:
Detailed wooden trays work perfectly as frames. If your wood is unfinished, stain it a warm medium-oak tone to contrast with the light stone faces. Let the stain dry completely. -
Plan the layout:
Lay the frame flat and position your three masks inside vertically. Space them evenly, ensuring there is equal distance between each mask and the top/bottom edges. -
Glue in place:
Apply a generous amount of strong craft glue or epoxy to the flat back of each mask. Press them firmly into their positions within the frame. -
Final drying time:
Leave the assembly flat for several hours to allow the glue to cure fully before hanging vertically. -
Add hanging hardware:
Attach a small metal ring or sawtooth hanger to the top center of the wooden frame back for easy wall mounting.
Ancient Relic Look
For an aged effect, apply a watered-down brown paint wash over the dried clay, then wipe it off immediately. The dark pigment will settle into the crevices of the eyes and nose.
Hang your new sculptural piece in a quiet corner to bring a touch of mindfulness to your day
Relief Tile Creature Portraits
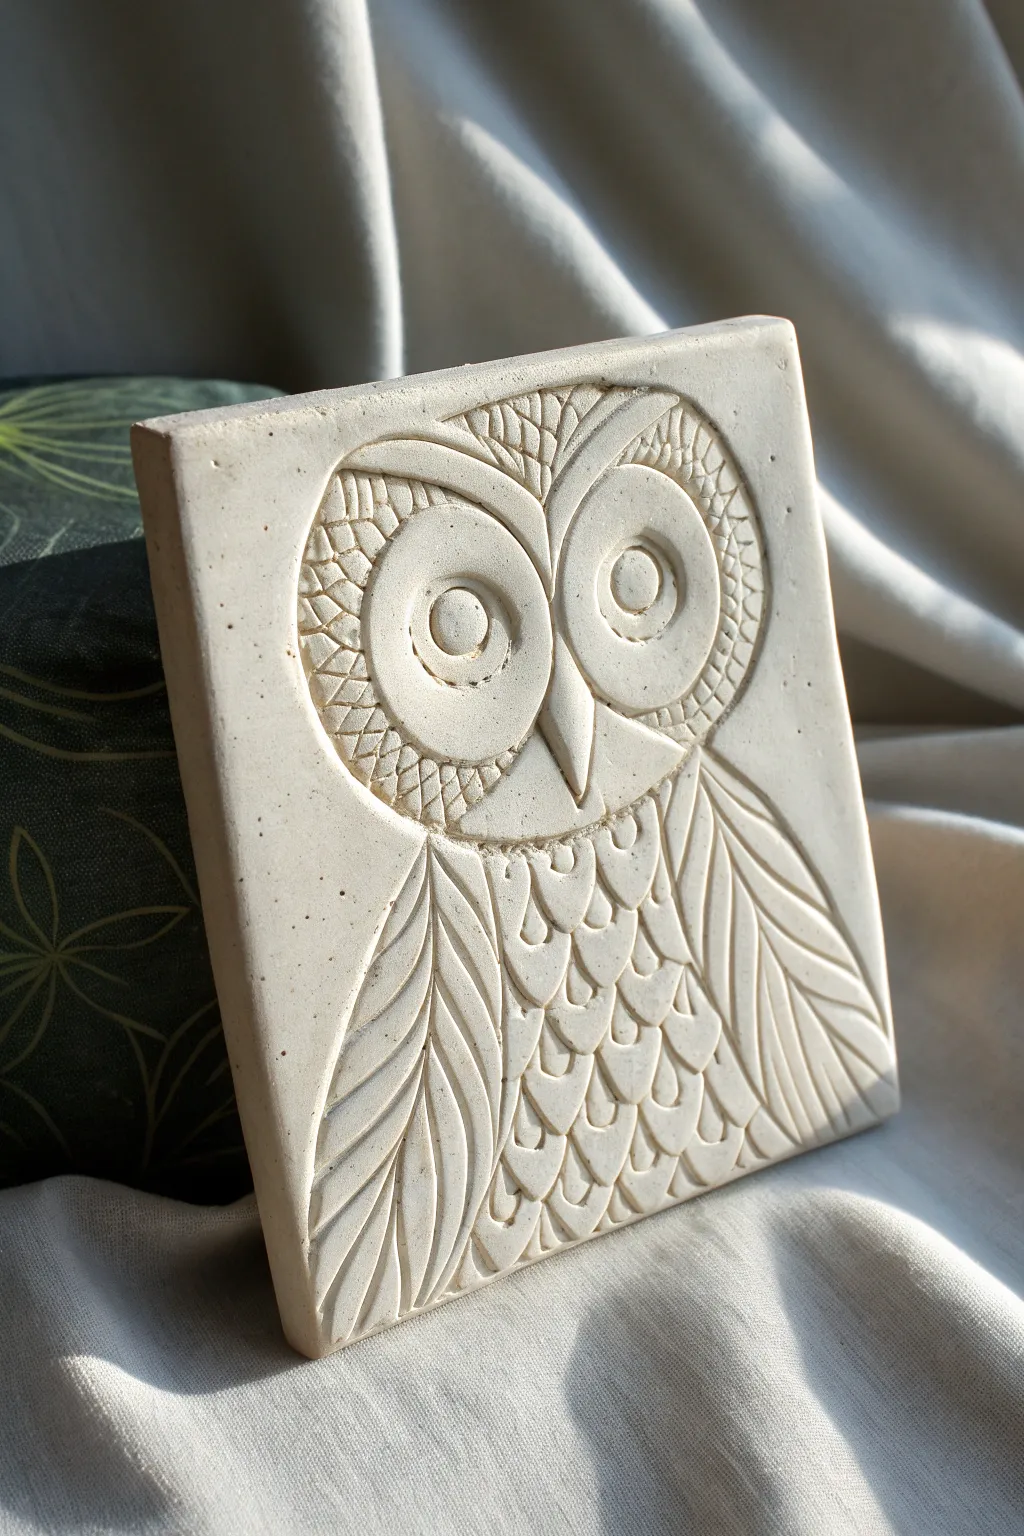
This charming bas-relief project transforms a simple slab of clay into a stylized owl portrait full of texture and character. Using basic carving techniques, you’ll create depth and definition to make the feathers and eyes pop against the smooth background.
Detailed Instructions
Materials
- Light-colored stoneware or earthenware clay (no grog or fine grog)
- Rolling pin
- Two wood guide strips (approx. 1/2 inch thick)
- Fettling knife or sharp craft knife
- Needle tool
- Loop tool (small size for carving)
- Modeling tool (curved or spoon-shaped)
- Ruler
- Sponge and water
- Canvas or heavy fabric board for working surface
Step 1: Preparing the Slab
-
Wedging and flattening:
Begin by thoroughly wedging your clay to remove any air bubbles. Pat it into a thick pancake shape on your canvas-covered work surface. -
Rolling the precise thickness:
Place your wood guide strips on either side of the clay. Roll the pin over the guides to create a perfectly even slab that is about 1/2 inch thick. -
Cutting the tile shape:
Use a ruler and your fettling knife to cut a perfect square. A 6×6 inch square works well for this level of detail. Smooth the cut edges with a damp finger to remove sharpness.
Clean Lines Trick
Wait until the clay is ‘imperfectly leather hard’ before doing final cleanup. Crumbs brush off easily when drier, avoiding the smeared look of wet clay.
Step 2: Drafting the Design
-
Sketching the outline:
Using the needle tool with very light pressure, sketch the main shapes onto the clay. Draw a large heart-shape for the face area, two large circles for eyes toward the top, and the V-shape of the beak between them. -
Adding body lines:
Lightly trace the vertical lines defining the wings on the left and right sides, and mark the central chest area where the scale-like feathers will go. -
Refining lines:
If you make a mistake, simply smooth it over with your finger and redraw. The clay is forgiving at this stage.
Step 3: Carving and Texturing
-
Defining the eyes:
Use a loop tool to dig out a shallow channel around the large outer circles of the eyes. This separates the face mask from the rest of the head. -
Texturing the face mask:
Inside the face mask but outside the actual eyeballs, impress a cross-hatching or scale pattern using a small modeling tool. This contrasts nicely with the smooth eyes. -
Sculpting the eyeballs:
Press a smaller circle tool or bottle cap into the center of the eye area to define the iris. Use a small loop tool to carve out the pupil, leaving a tiny raised dot for a highlight. -
Carving the beak:
Use the knife to cut slanted angles on the sides of the beak, making it protrude slightly. Smooth the ridge of the beak so it looks sharp but clean. -
Creating wing feathers:
For the long wing feathers, use a modeling tool to press long, curving indentations. Draw a central vein down each feather section for realism. -
Building chest feathers:
In the central chest area, press a U-shaped loop tool or the back of a spoon tool into the clay repeatedly. Layer these impressions like shingles to create the scalloped feather breast. -
Deepening outlines:
Go back over the main outlines—around the face, wings, and body—with the needle tool or knife to deepen them. This creates the dark shadows seen in the relief.
Make it Functional
Before drying, carve a small keyhole slot in the back of the tile or poke two holes in top corners for wire. Now your sculpture is ready to hang on a wall.
Step 4: Finishing Touches
-
Smoothing surfaces:
Check the smooth areas, like the forehead and the background of the tile. Use a slightly damp sponge to wipe away any clay crumbs or burrs. -
Refining edges:
Run your finger along the outer rim of the square tile one last time to ensure it is neat and uniform. -
Drying:
Place the tile on a piece of drywall or a wire rack to dry slowly. Cover it loosely with plastic for the first day to prevent warping. -
Firing:
Once bone dry, fire the piece according to your clay body’s instructions. A simple bisque fire often looks great, or you can add a clear glaze.
Once fired, the subtle shadows in these carved textures will bring your stoneware owl to life on any wall or shelf
Textured Peacock Feather Sculpture
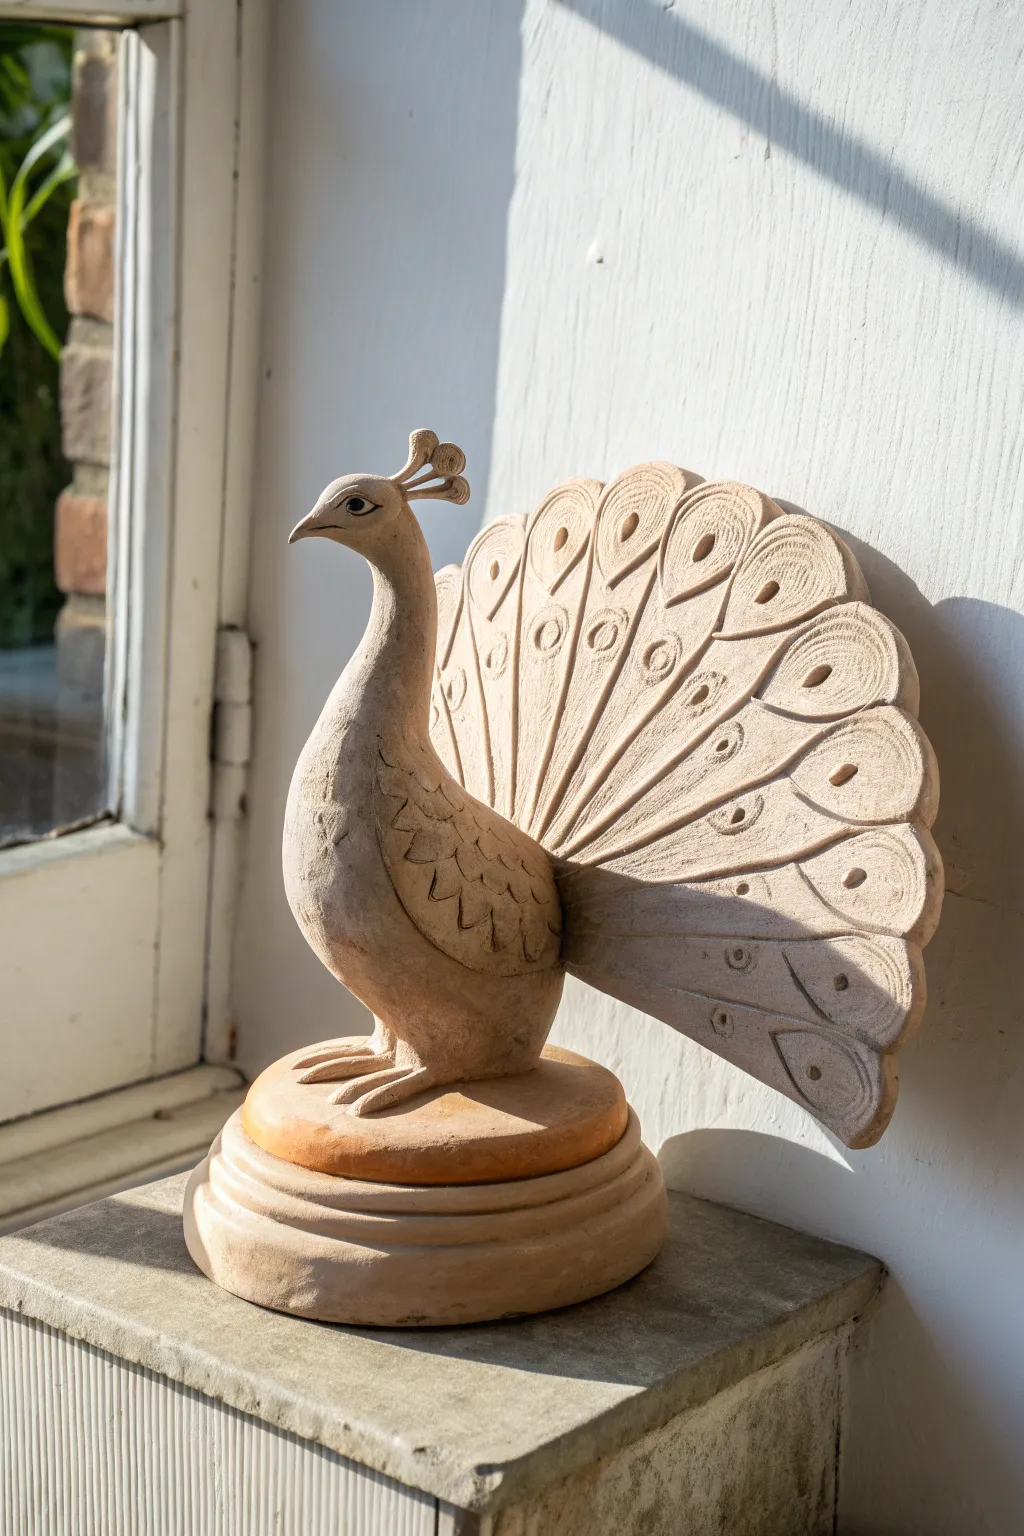
Capture the elegance of a peacock in full display with this beautifully textured clay sculpture. The natural, unglazed finish highlights the delicate incised details of the feathers and the smooth curves of the bird’s silhouette.
How-To Guide
Materials
- Air-dry clay or polymer clay (terracotta or natural beige color)
- Wooden sculpting tools
- Wire armature wire (strong gauge)
- Aluminum foil
- Needle tool or toothpick
- Rolling pin
- Loop tool
- Smooth work surface or clay mat
- Water and sponge (for smoothing)
- Round cookie cutter (optional, for base)
- Slip (clay mixed with water) for joining
Step 1: Forming the Base and Body
-
Create the heavy base:
Start by rolling a thick slab of clay into a circle, approximately 1 inch high. You can stack two discs—a larger one on the bottom and a slightly smaller, rounded one on top—to create the tiered pedestal look shown in the image. -
Build the armature:
Twist two lengths of armature wire together to form a crude shape of the peacock’s body: neck, torso, and a fan shape for the tail. Insert the bottom ends of the wire firmly into the center of your base to anchor it. -
Bulk out the core:
Wrap aluminum foil tightly around the wire armature to build volume without using solid clay. This keeps the sculpture lighter and prevents cracking. Shape the foil into a teardrop for the body and a flat fan for the tail. -
Cover with clay:
Roll out sheets of clay and drape them over your foil core. Press the clay firmly onto the form, smoothing seams with a little water as you go. Ensure the transition between the body and the tail fan is seamless and sturdy.
Tail Drooping?
If the heavy tail fan leans back while wet, prop it up with a distinct object (like a heavy book or small box) behind it until the clay firms up enough to hold its own weight.
Step 2: Sculpting the Bird
-
Refine the silhouette:
Smooth the clay to create the graceful S-curve of the peacock’s neck and the rounded chest. Add small clay sausages for the feet resting on the pedestal, blending them slightly into the base. -
Shape the head:
Pinch the top of the neck to form the head. Pull the clay gently to create a pointed beak. Make sure the head is turned slightly to the side for that classic, regal profile. -
Add the crest:
Roll tiny balls of clay and attach them to short, thin stems made of clay (reinforced with tiny wire bits if needed). Attach a cluster of three onto the back of the head to form the majestic crest. -
Define the wings:
Add a flattened teardrop shape of clay to the side of the body to represent the folded wing. Use a modeling tool to verify the edges are smooth but distinct from the main body.
Step 3: Detailing and Texturing
-
Mark the tail segments:
Using a needle tool or a dull knife, lightly score radiating lines from the base of the tail to the outer edge, dividing the fan into individual large feathers. -
Sculpt the feather eyes:
At the tip of each tail segment, press a small indentation. Inside that indentation, add a tiny flattened ball of clay or carve a teardrop shape to represent the ‘eye’ of the feather. -
Add vane texture:
I find this step meditative: use your needle tool to scratch fine, parallel diagonal lines alongside the central spine of each tail feather. This mimics the barbs of the feather structure. -
Scale the body:
Using a small U-shaped loop tool or the end of a straw cut in half, press scale-like patterns onto the wing area and the lower neck to suggest overlapping body feathers. -
Refine facial features:
Carve a deep, almond-shaped outline for the eye. Add a tiny ball of clay in the center for the pupil to give the bird expression. -
Clean up the base:
Go back to your pedestal base. Run a damp sponge around the edges to smooth any fingerprints. You can carve horizontal grooves around the rim to enhance the finished ‘statue’ appearance. -
Final smoothing:
Check the entire sculpture for rough burrs of clay. Use a barely damp brush to soften the harsh edges of your carving without erasing the texture. -
Drying:
Let the sculpture dry slowly away from direct heat to prevent cracking. If using air-dry clay, this may take 48-72 hours due to the thickness.
Crisp Carving Lines
Wait until the clay is ‘leather hard’ (firm but still cool to the touch) before adding the fine needle details. The lines will be much cleaner and won’t smudge.
Once fully dry, you can leave it natural or add a light wash of acrylics to emphasize the grooves
Mother Nature Bust With Branch Hair
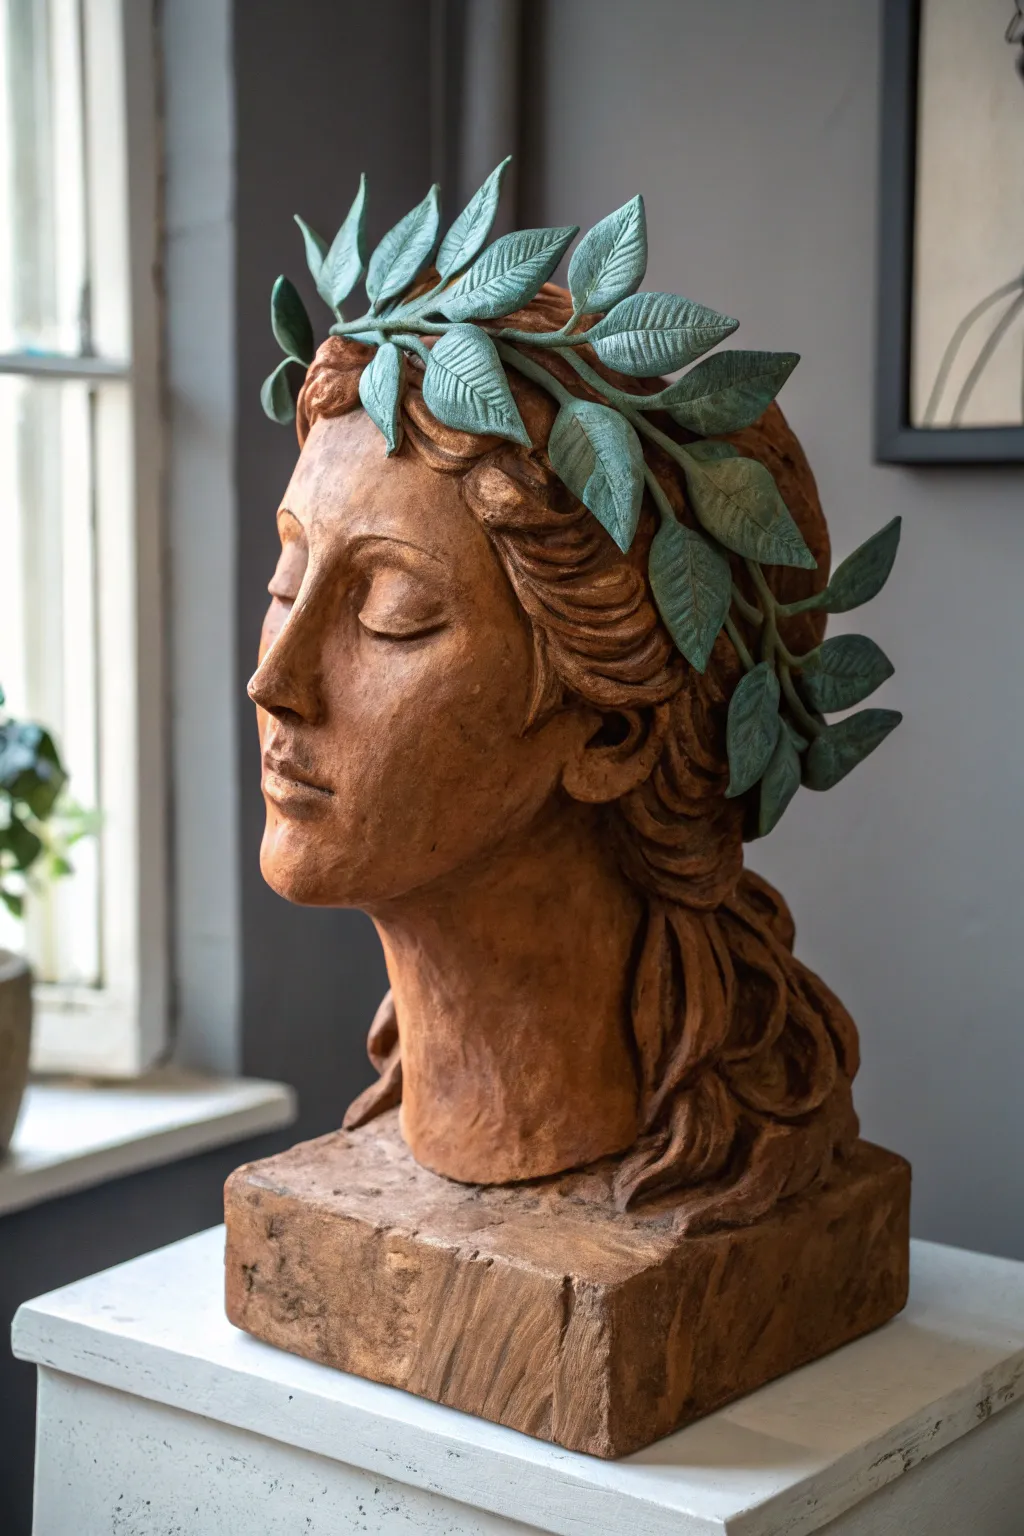
Sculpt a serene, Mother Nature-inspired bust that balances the warmth of terracotta clay with the cool, aged look of verdigris leaves. This project captures a timeless expression and adds a striking organic element to your home decor.
Step-by-Step Tutorial
Materials
- Air-dry clay (terracotta color) or earthenware clay
- Armature wire (heavy gauge)
- Aluminum foil
- Wooden base or thick cardboard (for support)
- Sculpting tools (loop tool, needle tool, wooden shapers)
- Spray bottle with water
- Acrylic paints (dark brown, oxide green, teal, metallic bronze)
- Matte varnish or sealant
- Sponge and fine paintbrushes
Step 1: Building the Foundation
-
Construct the armature:
Begin by creating a simple T-shape armature using your heavy-gauge wire attached securely to a wooden base. This will act as the spine and neck support for your bust. -
Bulk up with foil:
Crumple aluminum foil tightly around the wire to form the core shape of the head, neck, and upper shoulders. This saves clay and reduces the weight of the sculpture. -
Apply the first later of clay:
Roll your terracotta clay into flat sheets or manageable chunks. Press the clay firmly onto the foil core, covering it completely to create a smooth, blank egg-shaped canvas for the head. -
Establish the block-in:
Roughly define the facial planes. Mark the eye line halfway down the face, the nose line halfway between eyes and chin, and the mouth line one-third down from the nose.
Keep Clay Workable
Keep a spray bottle nearby. Mist your clay periodically while you work to prevent surface cracking, especially on delicate parts like the eyelids and leaf tips.
Step 2: Sculpting the Features
-
Form the nose and brow:
Add a wedge of clay for the nose and blend it seamlessly into the forehead. Carve out the eye sockets gently with a loop tool to create depth under the brow bone. -
Shape the closed eyes:
Roll two small spheres of clay and place them in the sockets, then flatten them slightly. Sculpt eyelids over them to create a peaceful, sleeping expression rather than open eyes. -
Define the mouth and chin:
Add a small mound for the mouth area. Use a wooden tool to separate the lips, keeping the corners slightly upturned or neutral for a serene look. Build up the chin to balance the profile. -
Refine the facial structure:
Smooth out the cheeks and jawline. I like to use a damp sponge here to soften any harsh tool marks, giving the skin a gentle, natural texture.
Step 3: Hair and Crown
-
Add flowing hair:
Apply snakes of clay to the back and sides of the head. Use a rake tool or a pointed wooden tool to carve deep, wavy lines that simulate thick locks of hair flowing down slightly past the neck. -
Sculpt the base:
Build up the clay at the bottom into a rough, rectangular pedestal block. Texture the sides with a stiff brush or rock to make it look like hewn stone. -
Create individual leaves:
For the crown, roll out thin slabs of clay and cut leaf shapes (imagine laurel or olive leaves). Gently score a central vein down the middle of each one. -
Assemble the wreath:
Attach the leaves one by one across the forehead and weaving into the hair. Score and slip (wet) the connecting points so they adhere strongly. Overlap them slightly for realism.
Fixing Broken Leaves
If a dry leaf snaps off, don’t panic. Use a tiny dab of strong PVA glue or superglue to reattach it, then paint over the join. It will be invisible.
Step 4: Finishing and Painting
-
Final smoothing and drying:
Do a final pass over the face to ensure it is smooth. Let the sculpture dry completely (this may take 2-4 days depending on thickness and humidity). -
Protect the terracotta:
If using air-dry clay, seal the terracotta sections with a matte varnish to preserve that natural earth tone. -
Paint the verdigris crown:
The leaves need an oxidized metal look. Base coat the leaves with a dark bronze or brown acrylic paint and let dry. -
Add the green patina:
Dry brush a mix of teal, oxide green, and a touch of white over the textured parts of the leaves. Leave the deeper recesses dark to enhance the contrast. -
Final antique wash:
Dilute a small amount of dark brown paint with water. Wash it over the entire piece—face and leaves—and quickly wipe it off with a rag. This settles into crevices, aging the piece instantly.
Place your finished bust near a window where natural light can highlight the gentle expression and texture of the leaves
Dragon Hatchling Figurine
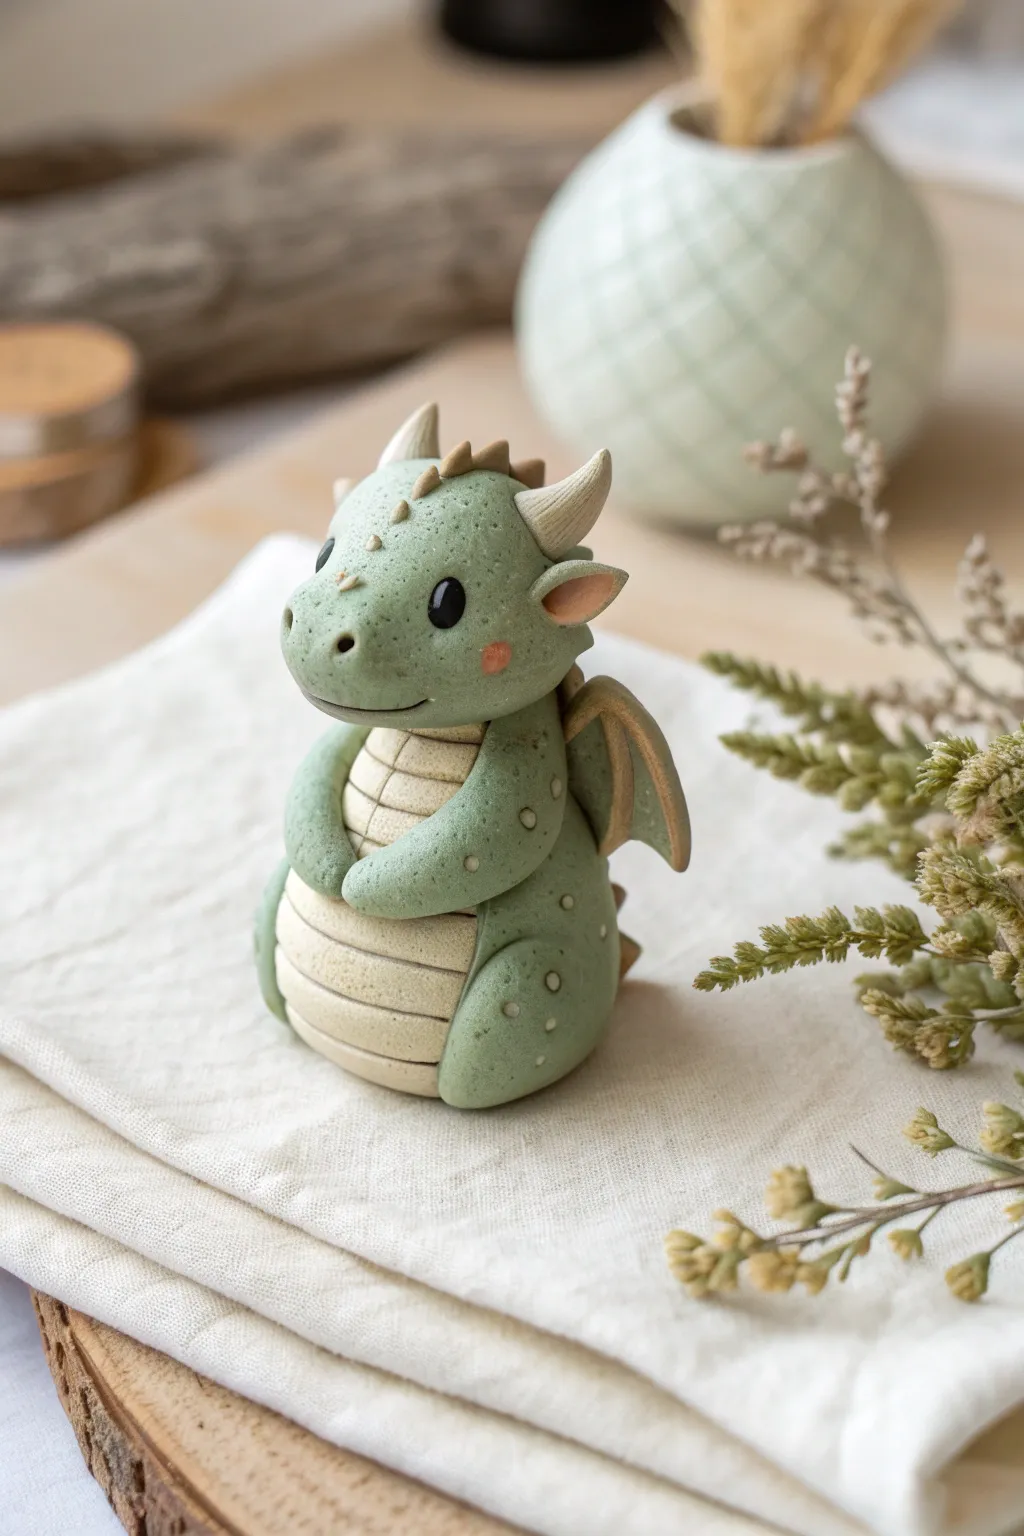
Sculpt your very own mythical companion with this adorable tutorial for a sitting dragon hatchling. The finished piece features soft, matte green scales, a textured belly, and sweet, expressive eyes perfect for a desk or shelf display.
Step-by-Step
Materials
- Polymer clay (Sage Green, Cream/Beige, White, Black, tiny bit of Pink)
- Ball stylus tools (various sizes)
- Needle tool or toothpick
- Modeling knife or scalpel
- Soft texture sponge or bristle brush
- Oven for baking (acc. to clay instructions)
- Optional: Gloss glaze for eyes
Step 1: Sculpting the Body & Head
-
Form the base:
Start by conditioning a golf-ball-sized amount of sage green clay. Roll it into a smooth, slightly flattened teardrop shape to form the main body, ensuring it sits flat and stable on your work surface. -
Add the belly panel:
Roll out a thin sheet of cream or beige clay. Cut an oval shape and press it gently onto the front of the green body. Use the side of a needle tool to impress horizontal lines across the cream clay to create a ribbed belly texture. -
Shape the head:
Roll a slightly smaller ball of sage green clay for the head. Gently press and manipulate the front to create a rounded snout area. Flatten the bottom slightly where it will attach to the body. -
Attach the head:
Place the head atop the body. Blending the clay at the back of the neck is crucial here so he doesn’t lose his head later; gently smudge the green clay downward with a modeling tool to fuse the two pieces.
Fingerprint Troubles
If you see fingerprints on your smooth clay, lightly brush the raw clay with a little baby oil or clay softener before adding the final texture.
Step 2: Facial Features & texture
-
Create the mouth and nose:
Use a needle tool or small knife to carefully carve a gentle, curved smile into the snout. Use a small ball tool to indent two nostrils right above the smile. -
Insert the eyes:
Press two deep indents into the face with a medium ball tool. Roll two small balls of black clay and press them into these sockets. Add a tiny dot of white clay to each eye for a reflective highlight. -
Add texture:
I like to use a stiff brush or a specialized texture sponge to gently tap all over the green skin (avoiding the eyes and belly). This simulates a subtle, pebbled skin texture rather than leaving it perfectly smooth. -
Rosy cheeks:
Apply a very small flattened dot of pink clay or dry pastel dust just below the eyes for a soft blush effect.
Make it Sparkle
Mix a tiny amount of mica powder or fine glitter into the green clay before sculpting to give your dragon a magical, shimmering scale effect.
Step 3: Limbs & Spikes
-
Form the legs:
Roll two thick, short logs of green clay for the legs. Press them against the sides of the body at the bottom, blending the back seams so they look integrated. Add tiny circular details using a small tube tool or straw. -
Shape the arms:
Create two smaller sausage shapes for arms. Attach them upper-mid body, curving them inward so the dragon looks like it’s holding its tummy. Blend the shoulders into the main body. -
Make the horns:
Shape two cones of cream clay. Use a craft knife to score shallow rings around them for a ridged horn texture. Attach these firmly to the top of the head. -
Creating the ears:
Form two small teardrops of green clay, flatten them, and press a smaller pink or beige teardrop inside. Pinch the bottom and attach them behind the eyes. -
Spinal ridges:
Roll several tiny balls of cream clay. Pinch them into triangles and run them in a line from the top of the head down the back of the dragon.
Step 4: Wings & Finishing
-
Wing armature:
Flatten two triangles of green clay. Add a thin ‘bone’ of cream clay along the top edge for definition. -
Attach wings:
Press the wings onto the back of the dragon. You may need to support them with a bit of foil or paper while baking so they don’t droop. -
Bake and cool:
Bake the figurine according to your specific polymer clay’s package directions. Let it cool completely before handling. -
Final touches:
Once cool, you can add a coat of gloss glaze specifically to the black eyes to make them look wet and alive.
Set your new little dragon friend on a shelf to guard your workspace
Stacked Cairn Stone Sculpture
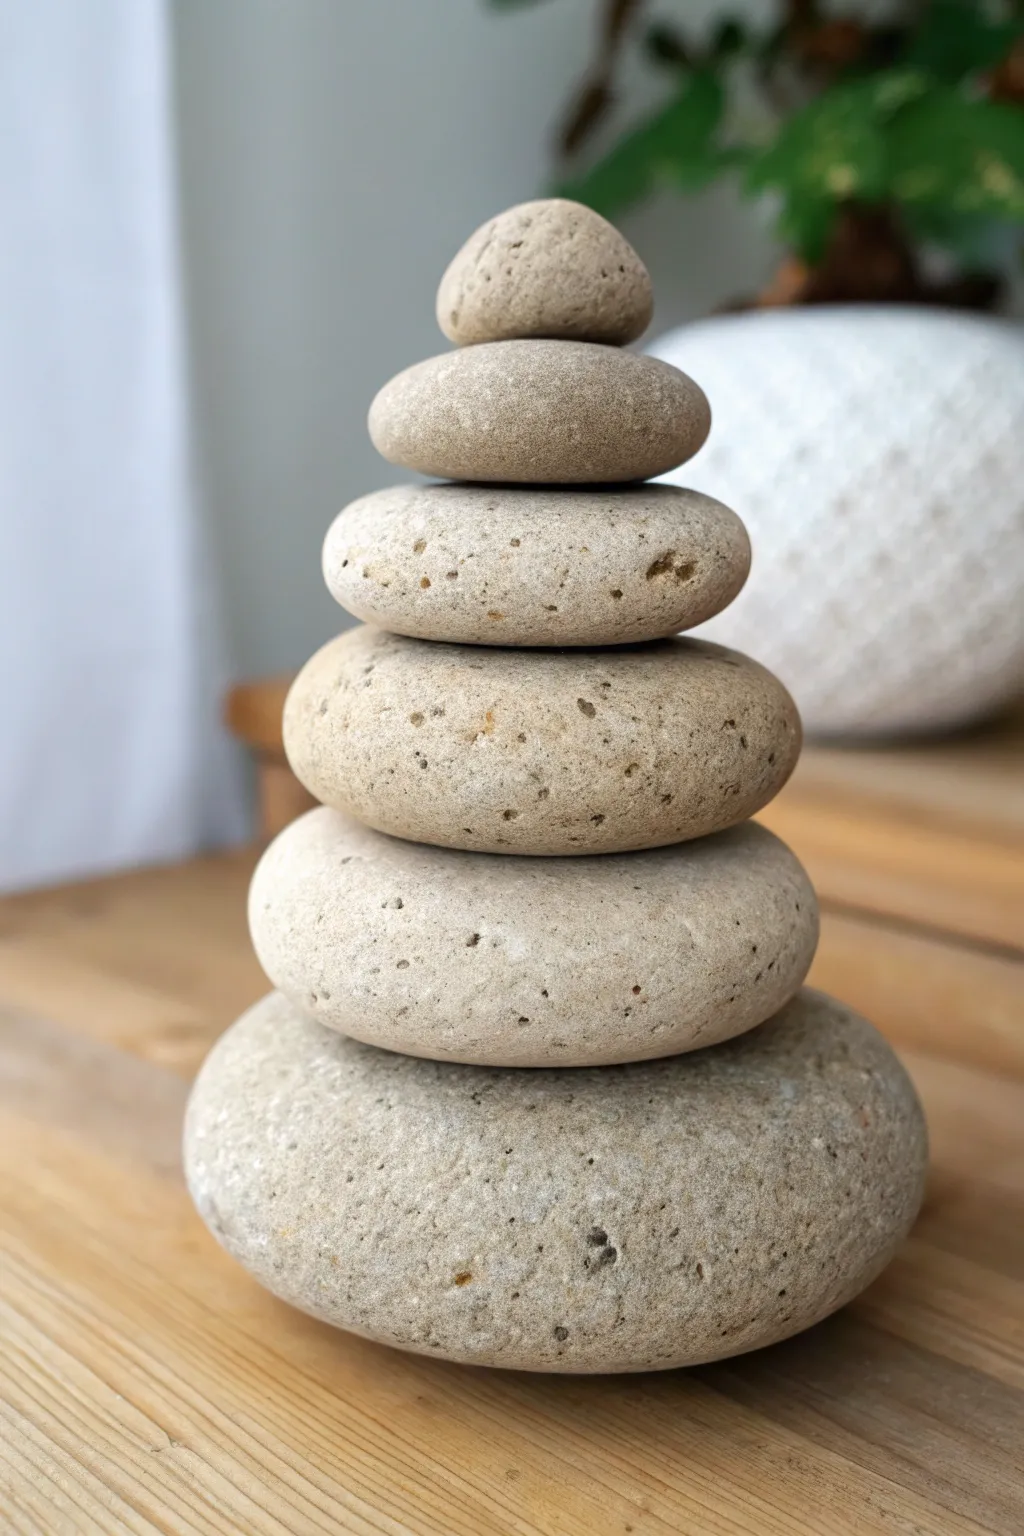
Bring the serene balance of nature indoors with this convincingly realistic stacked stone sculpture crafted entirely from clay. The textured, speckled finish mimics river rocks so perfectly that no one will guess they were hand-molded.
Step-by-Step Guide
Materials
- Air-dry clay (grey or stone color)
- Acrylic paints (various subtle stone shades: beige, grey, cream, diluted black)
- Old toothbrush or stiff bristle brush
- Real rock (for texture stamping)
- Sponge
- Clear matte varnish
- Strong craft glue or epoxy
- Sandpaper (fine grit)
Step 1: Shaping the Stones
-
Portion the clay:
Begin by separating your air-dry clay into six distinct portions. You want a clear graduation in size from largest (the base) to smallest (the top), so eyeball the amounts carefully before shaping. -
Form the base stone:
Take the largest lump of clay and roll it into a ball between your palms. Gently press it down onto your work surface to flatten it into a rough disc shape. -
Refine the edges:
Smooth out the circumference with your thumbs. River stones aren’t perfect circles, so encourage slight irregularities or oblong shapes to make it look organic. -
Create the stack:
Repeat the rolling and flattening process for the remaining five clay portions, ensuring each subsequent stone is slightly smaller than the last. Test the stack as you go to ensure the proportions look balanced. -
Texturize the surface:
Before the clay dries, take a real rock with a rough surface and gently press it into your soft clay ‘stones.’ This imbeds natural pits and grain that are hard to sculpt by hand. -
Soften the texture:
If the texture looks too harsh, lightly pat the surface with a damp sponge. This mimics the weathering process of water-worn river stones. -
Dry completely:
Separate the stones and lay them flat to dry. This creates a flat spot on the bottom of each stone which helps with stability. Allow them to dry for at least 24-48 hours depending on thickness.
Cracking Up?
If slight cracks appear as the clay air-dries, mix a tiny amount of fresh wet clay with water to make a paste (slip) and fill the gaps. Smooth over with a finger.
Step 2: Stippling and coloring
-
Base coat application:
Once fully dry, you might want to sand any sharp ridges lightly. Then, apply a base coat of a neutral stone color—a mix of beige and light grey works well—covering the entire surface of each piece. -
First speckle layer:
Load an old toothbrush with slightly watered-down dark grey paint. Run your thumb over the bristles to flick tiny speckles onto the stones. This creates the ‘granite’ look. -
Add warmth:
Repeat the speckling process with a brownish or cream color. This adds depth and makes the faux stone look remarkably authentic. -
Paint larger imperfections:
Use a fine-tip brush to paint specifically larger dots or ‘pits’ in darker colors, mimicking the natural inclusions found in sedimentary rock. -
Dry the paint:
Let all the paint layers dry completely. Avoid touching the surfaces while wet to prevent smudging your speckles.
Step 3: Assembly & Finishing
-
Test the balance:
Stack your dry, painted stones without glue first. Rotate them to find the most visually pleasing alignment and the most stable touching points. -
Glue the base:
Apply a generous dab of strong craft glue or epoxy to the center of the largest stone. Press the second-largest stone firmly on top. -
Complete the tower:
Continue gluing upwards, moving from largest to smallest. I like to let the glue set for a few minutes between each layer to prevent sliding. -
Seal the sculpture:
Apply a coat of clear matte varnish over the entire sculpture. This seals the paint and gives the clay that smooth, dry stone finish. -
Adding weight (Optional):
If your sculpture feels too light, you can glue a piece of felt to the very bottom to add friction and prevent it from sliding on smooth tables.
Pro Tip: Weight Tricks
For a heavier, more realistic feel, embed a heavy metal washer or a small real rock inside the center of your largest clay ball before shaping it.
Now you have a permanent symbol of tranquility that won’t tumble over with a bump of the table
Hollow Moon Orb With Craters
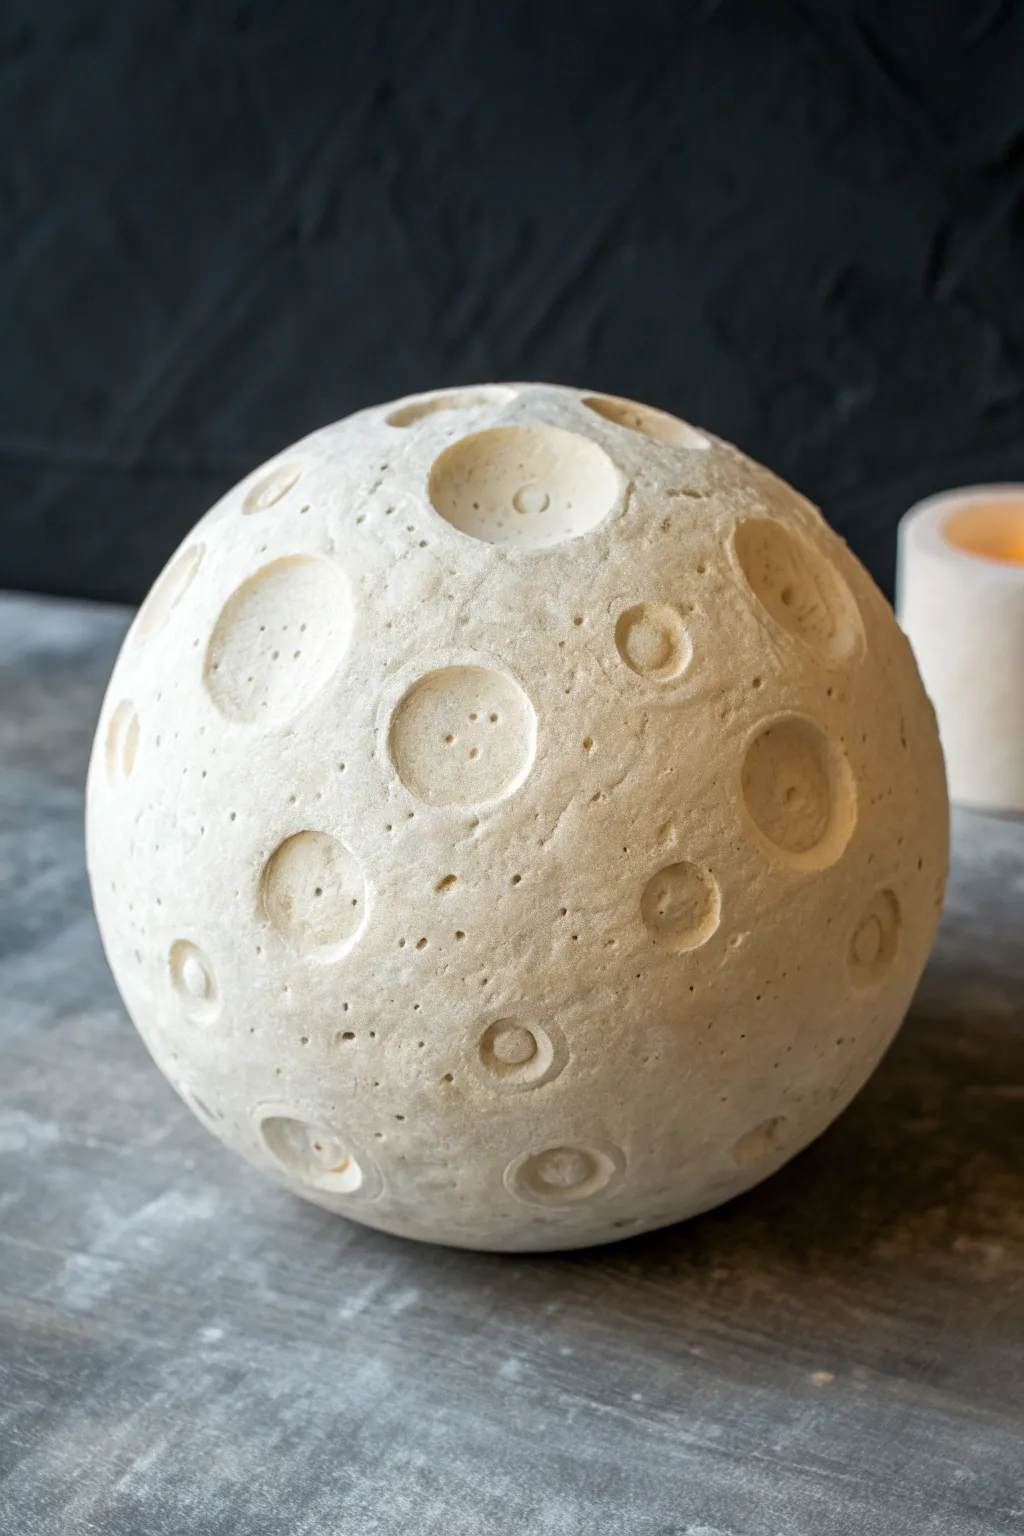
Bring the night sky into your home with this textured moon sculpture featuring deep, realistic craters and a weathered lunar surface. This hollow orb project uses basic sculpting techniques to create a sophisticated, modern décor piece that looks beautiful on any shelf.
Step-by-Step
Materials
- Air-dry clay (white or light grey) or polymer clay
- Large smooth foam ball or plastic sphere (as a mold)
- Plastic wrap
- Rolling pin
- Basic sculpting tools (loop tool, needle tool)
- Round objects of various sizes (bottle caps, cutter sets, end of markers)
- Old toothbrush or stiff bristle brush
- Texture sponge
- Fine grit sandpaper
- Matte sealant spray
Step 1: Forming the Sphere
-
Prepare the Mold:
Begin by selecting your spherical mold. A large smooth foam ball works well, but to ensure the clay releases easily later, wrap the entire sphere tightly in plastic wrap, smoothing out as many wrinkles as possible. -
Roll the Clay:
Take a substantial chunk of your air-dry clay and condition it by kneading until pliable. Roll it out into a large, even slab approximately 1/4 inch thick. You want it thick enough to carve into later, but not so heavy that it collapses. -
Cover the Sphere:
Gently drape the clay slab over your wrapped mold. Carefully press and smooth the clay down around the curve, working from the top down to avoid trapping air bubbles. -
Trim and Join:
Since you are making a full orb, you may need to cover the sphere in two halves or patch pieces together. If joining pieces, score the edges, add a little water (slip), and blend the seams thoroughly with your thumb so they disappear completely. -
Smooth the Surface:
Once the sphere is fully covered, use a little water on your fingers or a damp sponge to smooth out the entire surface. It doesn’t need to be perfect—moons are bumpy—but remove any obvious fingerprints.
Step 2: Creating the Lunar Surface
-
Initial Texturing:
Before adding craters, give the moon an overall porous texture. Take a stiff toothbrush or a coarse texture sponge and gently dab the entire surface of the damp clay to create tiny pockmarks. -
Marking Main Craters:
Select 3-5 distinct spots for your largest craters. Use a large circular cutter or a small jar lid to gently impress a ring into the clay, defining where these major features will sit. -
Scooping Material:
Using a loop tool, carefully scoop out a shallow layer of clay from inside your marked circles. You want an indentation, not a hole that goes all the way through to the mold. -
Varying Crater Sizes:
Create medium-sized craters using bottle caps or smaller circle cutters. Press them into the clay, wiggle slightly, and remove. I like to overlap a few of these with the larger craters for a natural, chaotic look. -
Creating Central Peaks:
For a realistic touch, take tiny balls of clay and broaden them slightly, then press them into the very center of your largest craters to mimic the central peaks formed by asteroid impacts. -
Detailing the Rims:
Use a modeling tool to rough up the edges of your crater rims. They shouldn’t be perfect circles; push the clay slightly outward to create a raised lip around the depressions.
Collapsing Clay?
If the sphere sags after removing the mold, stuff the inside loosely with plastic bags or newspaper. Let it dry fully in this supported state.
Step 3: Micro-Detailing and Finishing
-
Adding Micro-Impacts:
Use the back end of a paintbrush or a needle tool to poke tiny holes and dots inside the craters and scattered across the smooth plains. This variety in scale is key to the lunar look. -
Refining Texture:
Go back over the areas between craters with your toothbrush or a crumpled ball of aluminum foil. lightly rolling it over the surface to hide any tool marks and unify the texture. -
Partial Drying:
Let the clay dry until it is ‘leather hard’—stiff but still cool to the touch. This creates structural integrity for the next step. -
Removing the Mold:
Carefully cut a small, clean circle at the bottom of the sphere (this will be the base). Through this hole, gently tease out the foam ball or plastic mold. Since the clay is leather hard, it should hold its shape. -
Seal the Base:
If you distorted the opening while removing the mold, gentle reshape it into a perfect circle so the orb sits flat. Smooth the cut edges with a damp finger. -
Final Dry:
Allow the sculpture to dry completely, which may take 24-48 hours depending on humidity. Rotate it occasionally so perfectly even airflow reaches all sides. -
Sanding and Sealing:
Once bone dry, lightly sand any overly sharp peaks with fine-grit sandpaper. Finish with a coat of matte sealant spray to protect the surface while keeping that chalky, moon-rock appearance.
Moonlight Glow
Make the bottom hole slightly larger and place the finished dried orb over a battery-operated LED puck light to turn your sculpture into a glowing lunar lamp.
Place your finished lunar orb in a spot with soft side-lighting to dramatically highlight those deep textures and craters.
Mini Room Diorama Sculpture
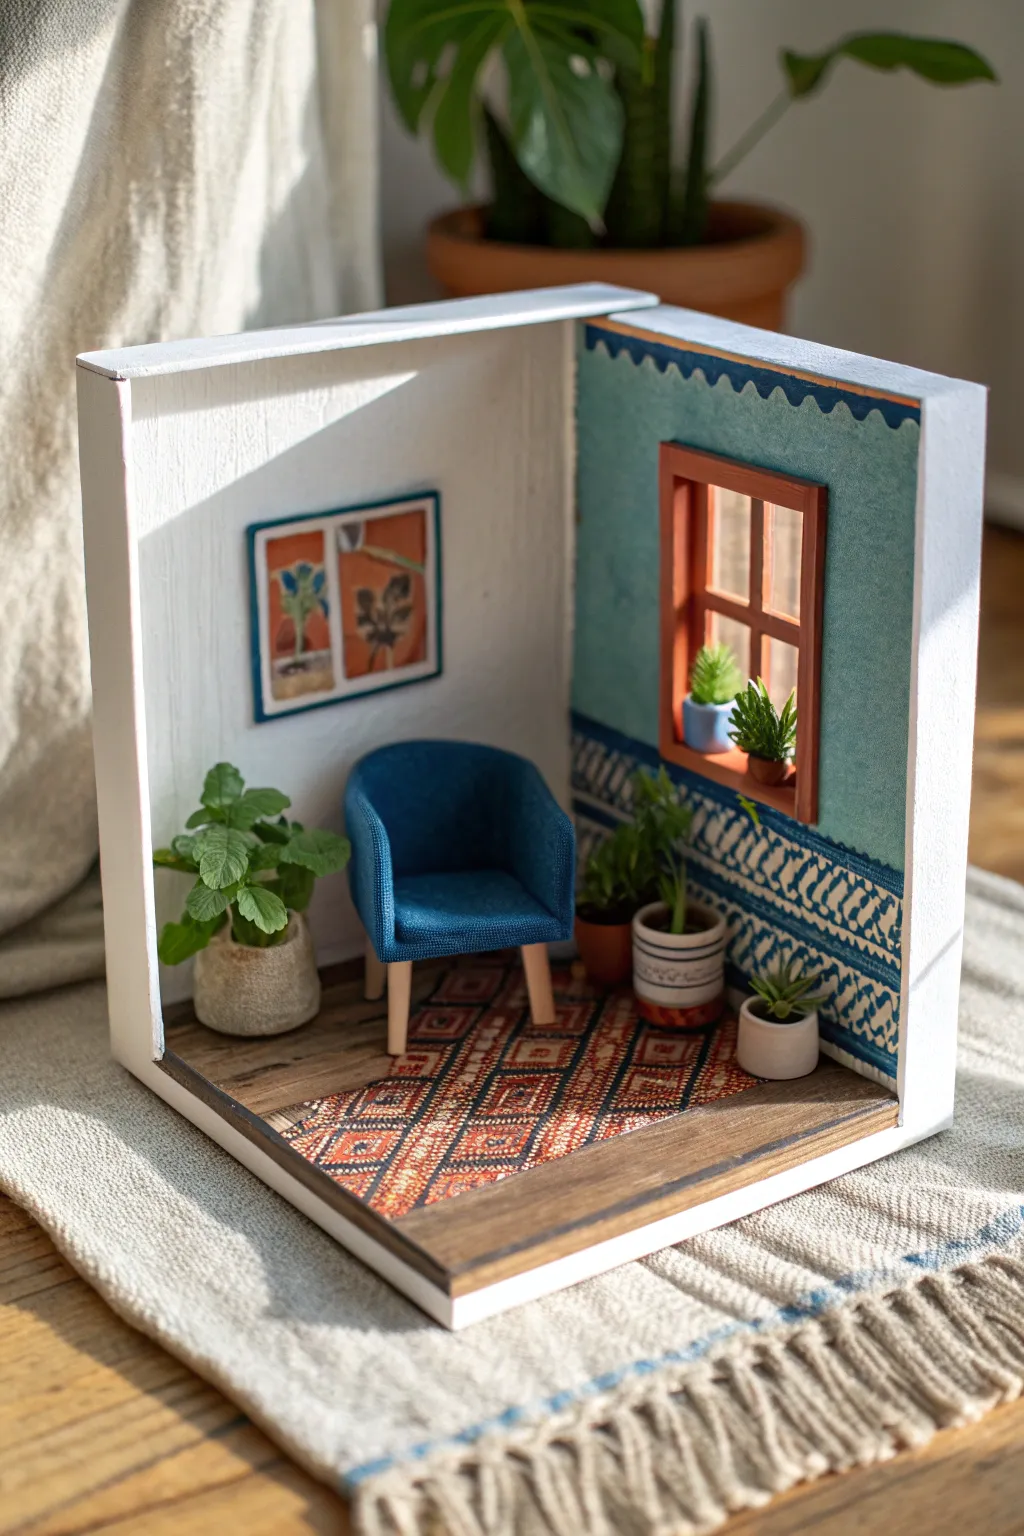
Capture the cozy essence of a sun-drenched afternoon in miniature form with this charming diorama. Featuring a textured blue accent wall, a tiny upholstered armchair, and vibrant faux plants, this project is perfect for creating a peaceful little world on your bookshelf.
Step-by-Step Guide
Materials
- White foam board or basswood sheets (for walls/floor)
- Balsa wood strips (for trim and window frame)
- Patterned fabric or printed paper (for rug)
- Blue textured fabric or felt (for armchair)
- Polymer clay (green, terracotta, white, grey)
- Acrylic paints (teal, white, burnt sienna, black)
- Wood stain or watered-down brown paint
- Cardstock or high-quality thick paper
- Tacky glue and super glue gel
- Craft knife and cutting mat
- Small paintbrushes
- Scrap cardboard (for chair structure)
Step 1: Building the Room Shell
-
Cut the base structure:
Cut two square pieces of foam board or wood for the walls and one slightly larger square for the floor. The left wall should be white, while the right wall will feature your window cut-out. -
Assemble the box:
Glue the two walls together at a 90-degree angle, then adhere them to the floor piece. Reinforce the outer seams with extra glue or masking tape for stability. -
Lay the flooring:
Cut thin strips of balsa wood to mimic floorboards. Stain them a dark walnut color, wipe off the excess, and glue them to the floor base once dry. -
Create the textured blue wall:
Paint the right-hand wall with a base of white gesso mixed with a little sand for texture. Once dry, paint the upper portion a dusty teal blue. -
Add wall details:
Hand-paint the decorative border pattern halfway down the teal wall using white and navy blue acrylics to mimic stenciled tiles or wallpaper.
Scaling Up Texture
For the white wall’s stucco look, tap a stiff bristle brush loaded with thick white paint onto the surface instead of brushing it smooth.
Step 2: Furniture and Fixtures
-
Build the window frame:
Construct a simple four-pane window frame using square dowels or balsa strips painted a warm terracotta brown. Glue this into the window opening on the blue wall. -
Shape the chair base:
Carve a block of dense foam or stack layers of cardboard to create the rounded tub-chair shape. -
Upholster the chair:
Carefully wrap the chair form in textured blue fabric. Use small dots of glue to secure the fabric underneath and in the crevices, keeping the seams hidden. -
Add chair legs:
Cut four short pieces of round dowel or toothpicks for legs. Leave them natural wood color and glue them firmly to the base of the upholstered seat. -
Weave the rug:
Cut a rectangular piece of patterned fabric that resembles a kiln rug. Fray the short edges slightly with a needle to create authentic-looking fringe.
Step 3: Sculpting Décor
-
Sculpt the pots:
Roll small balls of polymer clay to form the planters. Create a variety of styles: a textured grey pot, a simple white cylinder, and a classic terracotta pot. -
Form the plants:
Using green polymer clay, shape tiny individual leaves for the large floor plant and small spikes for the succulents. I like to dust the clay with pastels before baking for extra depth. -
Bake the clay:
Bake all clay pieces according to the package instructions (usually 275°F for 15 minutes). Let them cool completely. -
Assemble the greenery:
Glue the cooled clay leaves into their respective pots. Painting the ‘soil’ area dark brown first adds realism. -
Create the wall art:
Paint a tiny abstract or botanical scene on a small rectangle of cardstock. Frame it with thin strips of blue or black paper and mount it on the white wall.
Sticky Situation
If the fabric won’t stick to the chair curve, try using a contact cement. Apply to both surfaces, let dry until tacky, then press firmly.
Step 4: Final Assembly
-
Position the elements:
Glue the rug down at an angle for a casual look. Place the chair partially on the rug. -
Place the plants:
Arrange your potted plants. Put the tall leafy one in the corner, the succulents on the window sill, and the mid-sized plant near the wall border.
Step back and enjoy the tiny, peaceful sanctuary you have built from scratch
Sculptural Brush Holder Totem
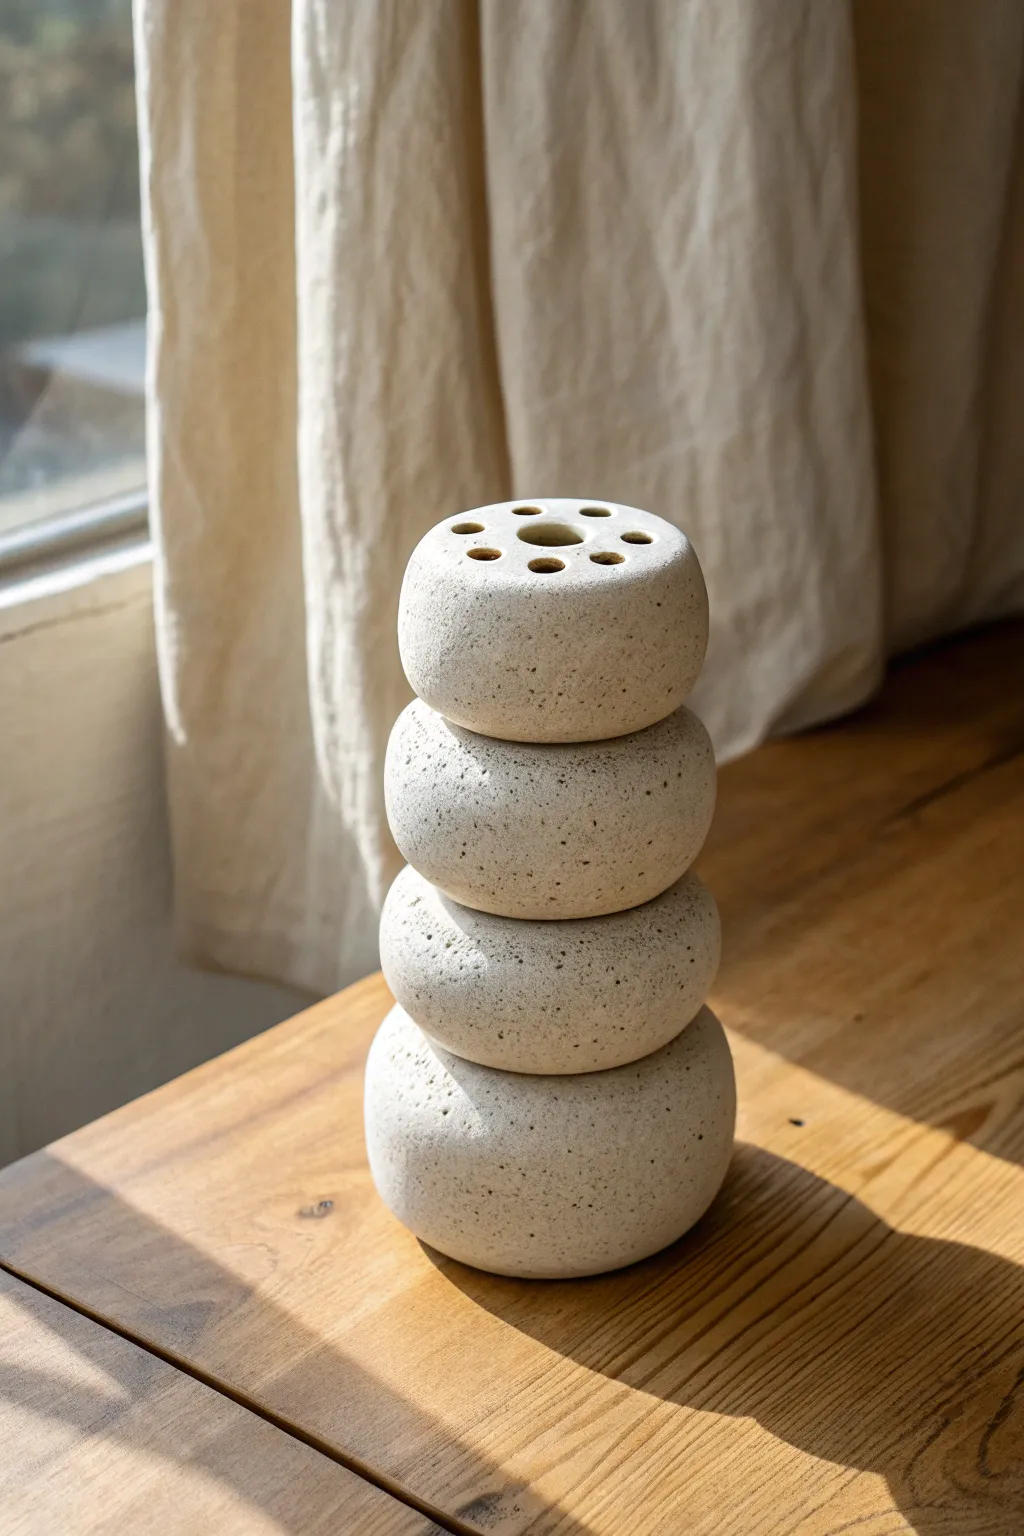
Bring a touch of organic serenity to your workspace with this stacked sculpture that doubles as a functional organizer. Mimicking the look of balanced river stones, this piece features a speckled clay body and a clever perforated top for holding your favorite brushes or dried stems.
Step-by-Step
Materials
- Speckled Stoneware Clay (e.g., Laguma or stoneware with grog)
- Rolling pin
- Needle tool
- Clay ribs (metal and rubber)
- Wooden paddle
- Scoring tool (or serrated rib)
- Slip (clay saturated with water)
- Hole cutter or drill bits (various sizes)
- Sponge
- Plastic wrap
- Kiln (or access to a firing service)
Step 1: Forming the Stones
-
Assess your clay amount:
Cut four lumps of clay. These should be roughly equal in weight, but slight variations can add to the natural look. Aim for about 300-400g per lump for a substantial desktop size. -
Create the base shapes:
Roll each lump into a smooth ball between your palms or on your work surface. Eliminate any deep creases or air pockets now, as they are harder to fix later. -
Flatten the stones:
Gently press each ball down onto your canvas or board to flatten it into a thick disc. They should look like hamburger patties or river stones, roughly 1.5 to 2 inches thick. -
Refine the profiles:
Using a wooden paddle or just your hands, gently tap the sides of the discs to round them off. You want a soft, pebble-like curvature rather than sharp, vertical cylinder walls. -
Match the stacking surfaces:
Test stack your stones to see how they fit. If they wobble too much, gently tap the top of one and the bottom of the one above it against a flat surface to create a subtle mating plane.
Crack Prevention
Thick solid clay loves to explode. Poke needle holes through the bottom stones up into the center (unseen) or hollow them out slightly from the bottom to allow steam to escape.
Step 2: Hollowing the Top
-
Select the top stone:
Choose your most visually pleasing stone for the cap. This component needs to be hollow or partially hollow to reduce weight and allow depth for the brushes. -
Pinch pot method:
Flip the top stone over and push your thumb into the center. Gently pinch outwards to hollow it out, leaving the walls fairly thick (about 1/2 inch) to match the visual weight of the solid stones below. -
Or, cut and reattach:
Alternatively, you can slice the top stone in half horizontally, hollow out the center of both halves, and score and slip them back together for a completely enclosed hollow form. -
Smooth the surface:
Use a rubber rib to smooth out any handling marks or fingerprints. The texture should look naturally weathered, but intentional.
Level Up: Texture
Before assembly, roll the clay balls over a piece of canvas or rough linen. This imitates the porous texture of sandstone and catches light beautifully.
Step 3: Assembly and Drilling
-
Score the connection points:
On the bottom three solid stones, deeply score the center of the top surfaces and the center of the bottom surfaces where they will touch. -
Apply slip:
Generously apply slip to the scored areas. It should be the consistency of thick yogurt. -
Stack and compress:
Press the stones together firmly. Give them a slight wiggle to lock the clay particles together. You can use a wooden dowel down the center for internal structure, but for a short stack like this, good scoring is usually sufficient. -
Clean up the seams:
The slip might squish out at the seams. I prefer to let this dry slightly to a leather-hard state before cleaning it up with a tool to maintain a crisp ‘stacked’ definition. -
Attach the top stone:
Score, slip, and attach the hollowed top stone to the stack. Ensure it sits level. -
Map out the holes:
Lightly mark where you want your brush holes on the top surface. A pleasing arrangement usually has a larger central hole surrounded by smaller satellites. -
Drill the holes:
Using a hole cutter or a drill bit (twisted by hand), carve out the holes. Make sure they go deep enough into the hollow cavity to support a brush handle. -
Refine the rims:
Smooth the edges of the holes with a damp sponge or a small rounded tool so they don’t chip your brushes later.
Step 4: Drying and Firing
-
Slow drying:
Because the bottom stones are thick solid clay and the top is hollow, they will dry at different rates. Tent the sculpture loosely with plastic for several days to equalize the moisture. -
Bisque fire:
Once bone dry, fire the piece to bisque temperature (usually cone 04 or 06). -
Glazing decision:
For the look in the photo, leave the raw clay unglazed on the outside to highlight the speckles. You might choose to pour a clear glaze inside the holes for functionality. -
Final firing:
Fire the piece to maturity (Cone 5, 6, or 10 depending on your clay body). Since there is no external glaze, you don’t need to worry about stilting, just ensure the bottom is clean.
Place your finished totem near a window and enjoy the play of light across its organic curves
Hanging Clay Mobile of Organic Shapes
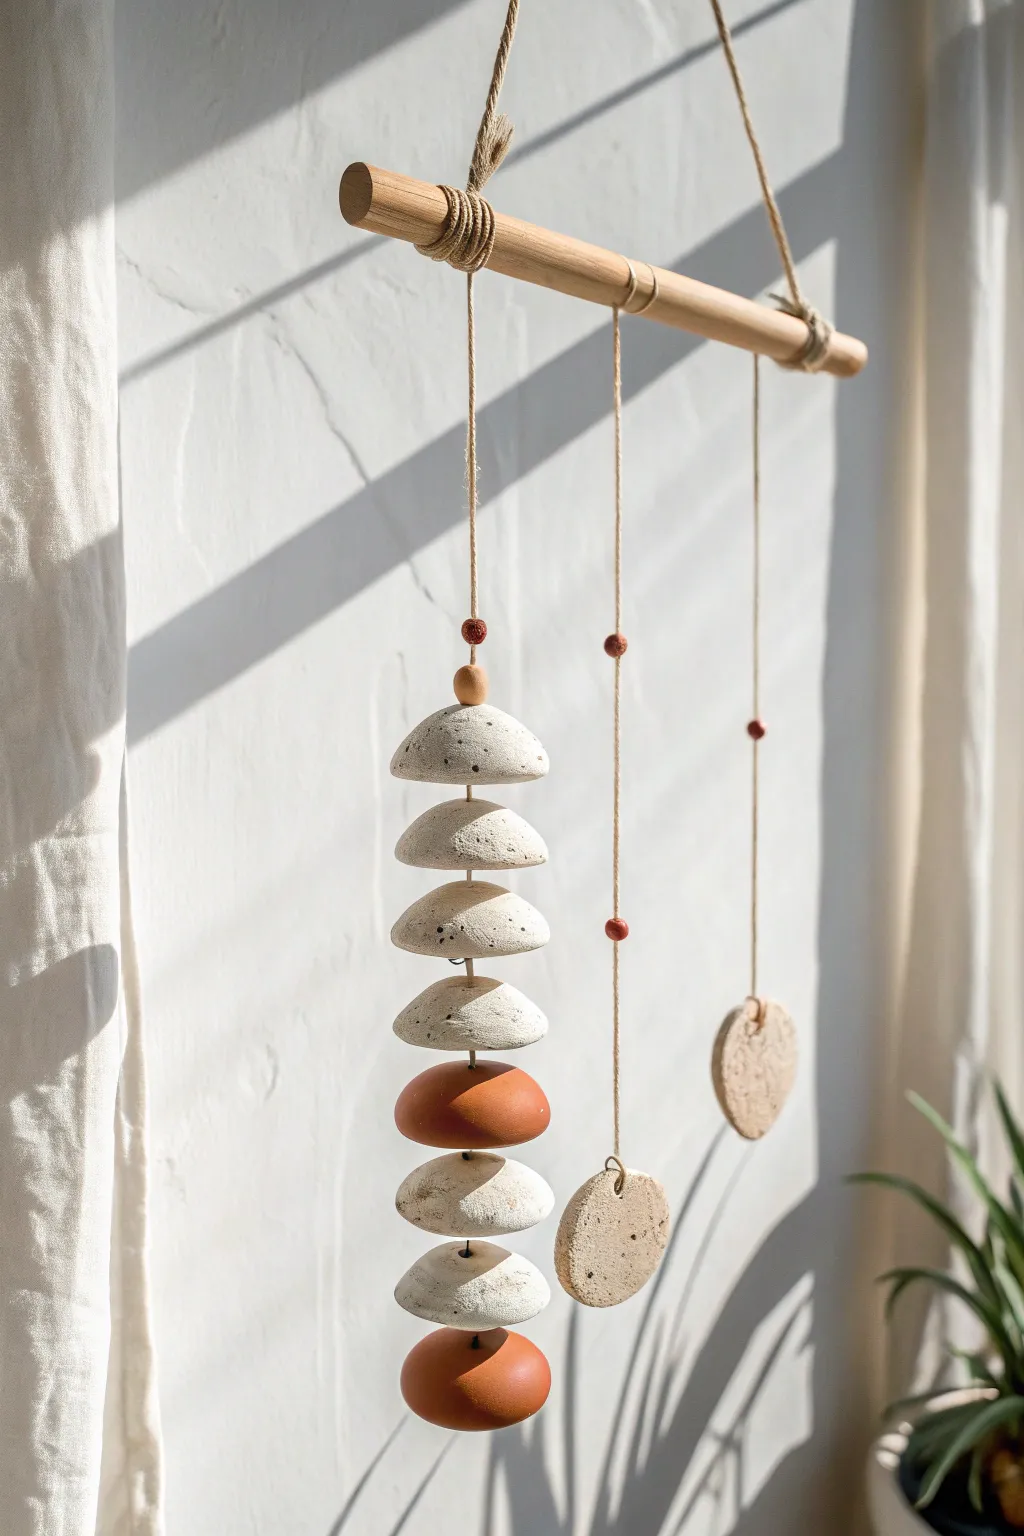
Bring earthy tranquility to your space with this stunning hanging mobile featuring stacked ceramic bells and textured discs. The combination of speckled stone-like clay and rich terracotta tones creates a warm, biophilic accent perfect for catching the morning light.
Detailed Instructions
Materials
- White speckled stoneware clay (or polymer clay with granite finish)
- Terracotta colored clay
- Wooden dowel (approx 12-15 inches long)
- Natural jute twine or hemp cord
- Rolling pin
- Circular cookie cutters (various sizes)
- Pottery needle tool or a skewer
- Small wooden beads (approx 4-6mm)
- Sponge or smoothing tool
- Sandpaper (fine grit)
- Oven or Kiln (depending on clay type)
Step 1: Sculpting the Shapes
-
Prepare the clay:
Begin by conditioning both your speckled white clay and terracotta clay until they are pliable. If using polymer clay, warm it in your hands slightly. -
Form the hemispheres:
For the central column, roll about 6-8 balls of the speckled clay and 2-3 balls of the terracotta clay. These should vary slightly in size, roughly 1.5 to 2 inches in diameter. -
Shape the bells:
Take a clay ball and press your thumb into the center, gently pinching the sides to form a curved, mushroom-cap shape. Keep the edges relatively thick for a rustic look. -
Refine the surface:
Use a damp sponge or your finger to smooth out any fingerprints on the domes. I like to leave a little surface irregularity to enhance the organic feel. -
Create the flat discs:
Roll out a portion of the speckled clay to about 1/4 inch thickness. Use a circular cutter or freehand cut two flat discs, roughly 2-3 inches in diameter. -
Add texture:
If your clay isn’t naturally speckled, you can gently press sand, dried tea leaves, or coarse black pepper into the surface of the white pieces now for that stone effect.
Step 2: Piercing and Firing
-
Create hanging holes:
Using your needle tool or skewer, poke a hole directly through the center top of every hemisphere shape. Ensure the hole is wide enough for your twine to pass through easily. -
Pierce the discs:
For the two flat discs, poke a hole near the top edge. Wiggle the tool slightly to ensure the hole is clean on both sides. -
Dry or bake:
If using air-dry or kiln-fire clay, let the pieces dry slowly to prevent cracking. If using polymer clay, bake according to the package instructions (usually 275°F for 15-30 minutes). -
Sand and finish:
Once hardened and cooled, use fine-grit sandpaper to smooth any sharp edges around the holes or rims.
Uneven Hanging?
If the mobile lists to one side, add a small, hidden weight (like a washer or extra bead) to the back of the lighter disc or slide the fulcrum point on the hanging cord.
Step 3: Assembly
-
Prepare the main dowel:
Cut a length of jute twine for the hanger. Tie it securely to both ends of your wooden dowel, leaving enough slack for it to hang comfortably. -
Start the center strand:
Cut a long piece of twine (about 3 feet). Tie a large knot at the very bottom or use a small bead to act as a stopper. -
Stack the center shapes:
Thread the shapes onto the center twine. Start with a terracotta dome (concave side down), then stack the speckled domes on top. Alternate colors as shown in the photo. -
Secure the stack:
Just above the top dome, thread a small wooden bead and tie a knot above it to keep the stack tight and secure. Leave the remaining length of twine for tying to the dowel. -
Assemble side strands:
Cut two shorter lengths of twine. Tie each flat disc to the bottom of its own string. You can add small red spacer beads a few inches up the string for visual interest. -
Attach to dowel:
Tie the central weighted strand to the middle of the dowel. Tie the two lighter disc strands to the left and right sides. -
Balance the mobile:
Horizontal balance is key. Slide the side strings along the dowel until the stick hangs perfectly level, then dab a tiny bit of glue on the knots to lock them in place.
Faux Stone Trick
Mix used coffee grounds into white polymer clay before baking. It mimics the speckled ceramic look perfectly without needing a kiln or expensive specialty clay.
Find a sunny spot near a window to hang your creation and enjoy the gentle movement