If you love bold, graphic surfaces, sgraffito designs are the sweetest way to get that ink-on-clay look with just a little scratching and a lot of personality. You’re basically drawing by carving through slip or underglaze to reveal the clay body underneath, and the contrast is so satisfying.
Classic Stripes and Bands
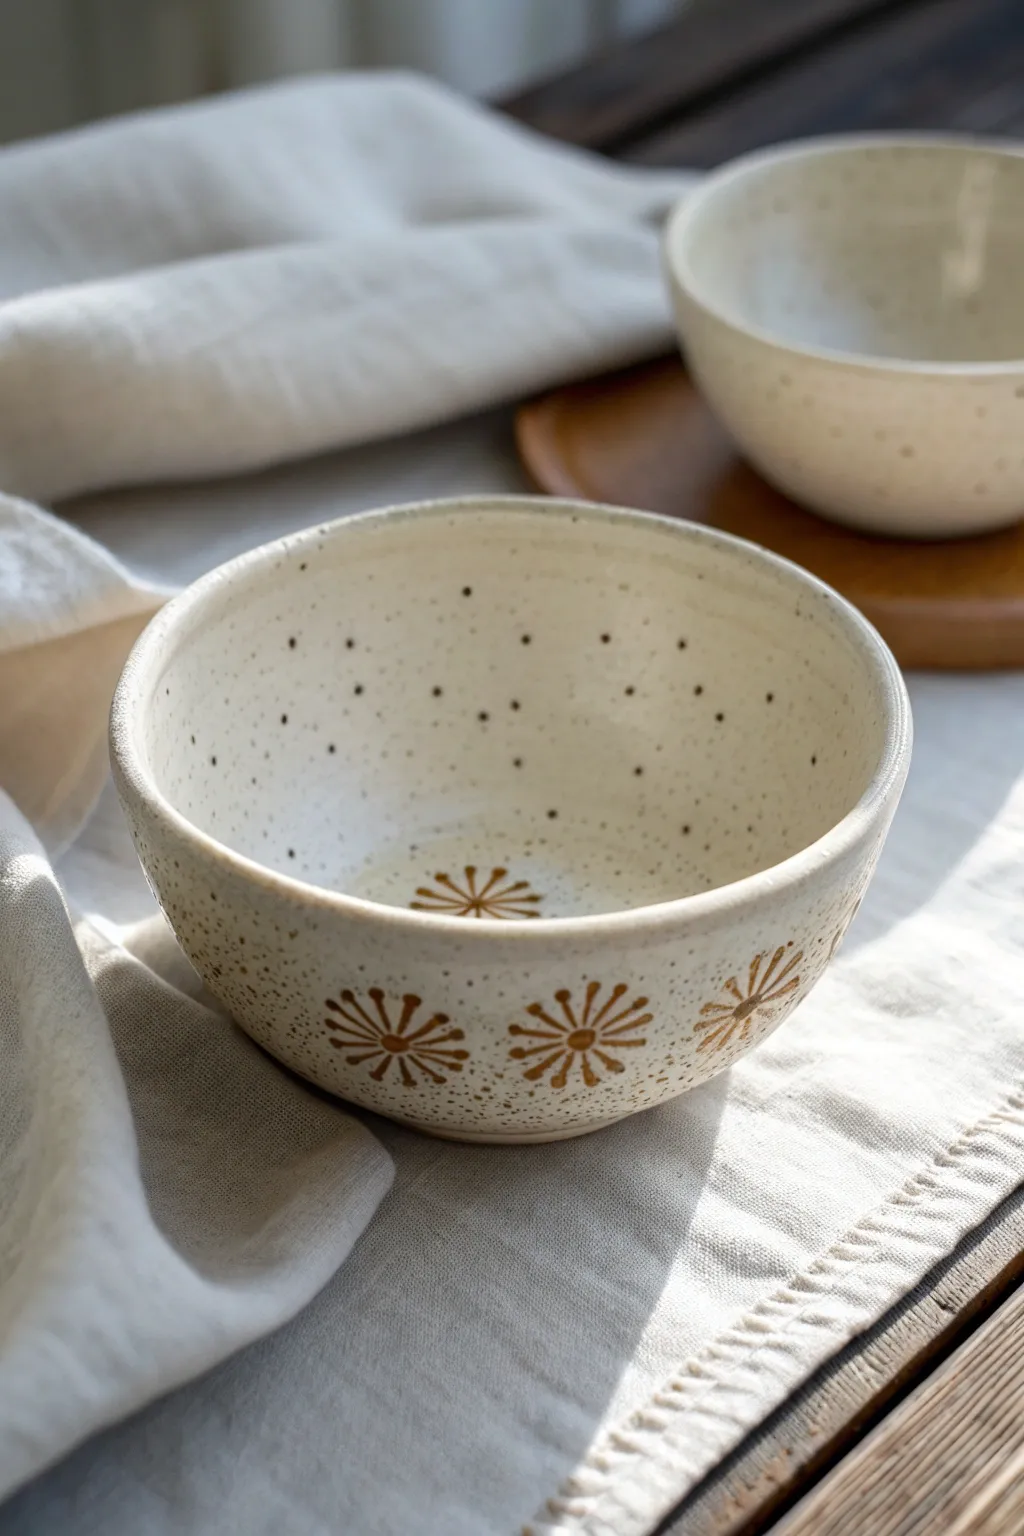
This project combines the earthy warmth of reddish-brown stoneware with the crisp contrast of white slip to create a timeless vessel. The design features a rhythmic series of horizontal bands and delicate hatched lines, resulting in a piece that feels both modern and historically rooted.
Step-by-Step Tutorial
Materials
- Leather-hard clay tumbler (red or brown stoneware)
- White underglaze or slip
- Soft fan brush or hake brush
- Pottery wheel (for banding) or banding wheel
- Pin tool or needle tool
- Loop tool (small, square or round edge)
- Damp sponge
- Clear matte or glossy glaze (for final firing)
Step 1: Preparation and Application
-
Assess the Clay State:
Ensure your thrown or hand-built tumbler is at a perfect leather-hard stage. It should be firm enough to handle without warping but still hold enough moisture to be carved smoothly. -
Clean the Surface:
Wipe the exterior gently with a slightly damp sponge to remove any dust or loose clay crumbs that might interfere with the slip adhesion. -
Apply the First Coat:
Using a soft fan brush, apply a smooth, even coat of white underglaze or slip to the exterior. I like to rotate the banding wheel slowly while holding the brush steady to avoid streaks. -
Layering for Opacity:
Allow the first coat to lose its sheen (become touch-dry), then apply a second and potentially third coat until you have a solid, opaque white surface that hides the red clay underneath. -
Dry to Leather Hard:
Let the piece rest. The slip needs to stiffen up so that it isn’t gummy when you carve, but not so dry that it chips off flakily. This usually takes about 30-60 minutes depending on humidity.
Chipping Slip?
If slip chips off in jagged flakes rather than smooth curls, your clay is too dry. Mist it lightly with water, wrap it in plastic, and wait an hour before trying again.
Step 2: Carving the Bands
-
Center on the Wheel:
Place your tumbler comfortably on a banding wheel. Centering it well is crucial for getting continuous, level horizontal lines. -
Define the Bold Bands:
Using a small loop tool, carve the two thickest bands first—one near the rim and one near the base. Hold the tool steady and spin the wheel, removing the white slip to reveal the raw clay body. -
Carve the Thin Framing Lines:
Switch to a pin tool or a very fine point carving tool. Carve two thin parallel lines just below the top bold band, and two thin parallel lines just above the bottom bold band. -
Create the Central Border:
In the middle section of the cup, carve two more thin parallel lines, spaced about half an inch apart. This will serve as the container for your hatched pattern.
Step 3: Adding Detail and Finishing
-
Hatch the Center Strip:
Within the central channel you just created, use your pin tool to scratch diagonal hatch marks. Keep the spacing tight and consistent, moving all in one direction. -
Add Secondary Hatching:
If desired, you can create a chevron effect by alternating the direction of the hatching, or keep it simple with a uni-directional slant as shown in the inspiration piece. -
Clean Up Burrs:
Once the carving is complete and the pot is bone dry, lightly brush over the surface with a stiff, dry paintbrush and careful finger rubbing to knock off any sharp clay burrs. -
Bisque Fire:
Fire the piece to bisque temperature (usually cone 04 or 06). This will set the design permanently. -
Glazing:
Dip or brush a clear glaze over the entire piece. A matte clear glaze works beautifully to enhance the tactile, earthy quality of the exposed clay, while a gloss will make the red clay pop. -
Final Firing:
Fire the piece to the maturity temperature of your clay body (e.g., cone 5/6 or cone 10) to finish the project.
Go Geometric
Swap the diagonal hatching in the center band for small dots, zig-zags, or vertical ticks to create a completely different rhythm while keeping the same classic layout.
Now you have a stunning, functional piece of pottery that highlights the beauty of simple contrast


Simple Geometric Triangles
This rustic ceramic project uses sgraffito techniques to create repeating geometric bands on a wheel-thrown or hand-built mug. By carving through a layer of earthy terracotta underglaze, you reveal the speckled cream clay beneath for a stunning contrast.
How-To Guide
Materials
- Speckled cream stoneware clay (e.g., Laguna Speckled Buff)
- Terracotta or Russet colored underglaze
- Pottery wheel or slab building tools
- Carving tool (small loop tool or sgraffito needle)
- Fettling knife
- Soft fan brush
- Clear matte glaze
- Sponge
- Banding wheel
Step 1: Forming the Base
-
Create the cylinder:
Begin by throwing a straight-sided cylinder on the potter’s wheel, aiming for about 4-5 inches in height. Alternatively, slab-build a cylinder using a 1/4 inch thick slab of speckled clay. -
Trim and refine:
Once the clay is leather hard, trim the bottom to create a neat foot ring. Use a rib tool to smooth the outer walls, ensuring a pristine surface for your carving work later. -
Pull the handle:
Pull a strap handle from a lug of clay. It should be wide enough to be comfortable but not overpowering. Curve it into a ‘C’ shape and let it stiffen slightly. -
Attach the handle:
Score and slip both the attachment points on the mug body and the handle ends. Press the handle firmly onto the mug, smoothing the seams with your thumb or a modeling tool for a seamless join.
Clean Lines Pro-Tip
Does your carving look jagged? Wait a bit longer! Sgraffito works best when the clay is a firm leather-hard—like cheddar cheese. Too soft creates burrs; too dry chips the edges.
Step 2: Applying the Underglaze
-
Clean surface:
Wipe the exterior of the mug with a slightly damp sponge to remove any dust. This helps the underglaze adhere properly without crawling. -
Apply the band:
Place your mug on a banding wheel. Using a soft fan brush, apply a broad, thick band of terracotta or russet underglaze around the middle section of the mug. -
Layering:
Apply 2-3 coats of the underglaze, letting each coat dry until it loses its sheen before adding the next. I find three thin coats usually give the most opaque, solid color for carving. -
Define the edges:
You don’t need to paint the entire mug; focus on a wide central belt that leaves about an inch of bare clay exposed at the very top rim and the bottom foot. -
Dry to leather hard:
Let the underglaze dry until the mug returns to a leather-hard state. If it gets bone dry, the clay will be too brittle to carve cleanly.
Level Up: Mishima Hybrid
Try inlaying a contrasting underglaze (like black) into the deeper horizontal grooves for a ‘Mishima’ effect before applying the clear glaze over everything.
Step 3: Carving the Sgraffito Design
-
Mark horizontal guides:
Spin the banding wheel slowly and use a needle tool to very lightly scratch two horizontal parallel lines around the center of the painted band. These will frame your central stripe pattern. -
Carve the central stripes:
Using a small loop tool, carve out the horizontal lines between your guides. Create 4-5 parallel lines, removing the orange underglaze to reveal the white clay beneath. -
Outline the top triangles:
Above the central stripes, use your needle tool to sketch a row of triangles. The base of each triangle should rest on the top horizontal line. -
Carve top triangle borders:
Go over your sketch lines with the loop tool, carving a bold, thick outline for each triangle. Ensure the lines are crisp. -
Fill inner triangles:
Inside each large triangle, carve a smaller, floating triangle. This creates a nested double-triangle effect. -
Texture the fills:
Instead of carving the inner triangle completely, use the tip of your tool to stipple or scratch away the center, leaving a rough, speckled texture inside the innermost shape. -
Repeat for the bottom:
Repeat the triangle process for the bottom section below the stripes. Flip the orientation so the triangles point upward towards the stripes. -
Clean up crumbs:
Use a soft, dry brush to gently sweep away the clay burrs and crumbs. Be careful not to smudge the dark underglaze onto the raw white clay areas.
Step 4: Finishing
-
Bisque fire:
Slowly dry the mug completely, then load it into the kiln for a bisque firing (usually Cone 04). This sets the design permanently. -
Glaze application:
Dip the entire mug into a clear matte or satin glaze. A glossy glaze works too, but a matte finish emphasizes the earthy texture of the carving. -
Final fire:
Fire the mug to maturity (Cone 5, 6, or 10 depending on your clay body). The heat will fuse the clear glaze over your carving, creating a durable, food-safe surface.
The result is a wonderfully tactile piece that feels as good in the hand as it looks on the shelf


Polka Dots and Starbursts
This charming project combines the rustic warmth of exposed stoneware with the crisp, clean look of a white speckled glaze. The playful starburst motif adds a retro touch, created using a wax resist technique to reveal the raw clay body underneath.
Detailed Instructions
Materials
- Bisque-fired speckled stoneware bowl
- Liquid wax resist
- Small round paintbrush (size 2 or 4)
- Speckled white dipping glaze (or brush-on alternative)
- Damp sponge
- Pottery tongs (if dipping)
- Kiln (cone 5/6 or per clay body specs)
Step 1: Planning and Surface Prep
-
Clean the bisque:
Start with your bisque-fired bowl. Gently wipe the entire surface with a damp sponge to remove any dust or oils from handling, which can interfere with glaze adhesion. -
Map out the exterior:
Visualize where your starbursts will go. Aim for a row of evenly spaced flowers around the lower third of the bowl’s exterior. You can lightly mark the centers with a pencil if you need a guide; the graphite will burn off in the kiln. -
Plan the interior:
Decide on the placement for the central starburst inside the bottom of the bowl. It acts as a lovely surprise when the bowl is empty.
Glaze Beading Up?
If glaze beads stick to the wax, simply wait for the surrounding glaze to dry to a chalky finish, then gently wipe the wax design with a specific damp sponge tip or a rubber rib.
Step 2: Applying Wax Resist
-
Load the brush:
Dip your small round brush into the liquid wax resist. Don’t overload it to prevent drips. I find it helpful to pour a small amount into a separate cap to keep the main bottle clean. -
Paint the exterior centers:
Paint a small circle of wax for the center of your first exterior flower. Keep the edges relatively neat. -
Add radiating petals:
Paint thin lines radiating outward from that center circle to create the petals. Leave a small gap between the center dot and the start of the petal lines for a detached look. -
Repeat the pattern:
Move around the bowl, repeating the starburst motif. Try to keep them at the same height, but slight variations add to the handmade charm. -
Paint the interior starburst:
Repeat the same flower design in the very center of the bowl’s interior. -
Add random speckles (optional):
If you want extra unglazed spots, you can dab tiny dots of wax randomly between the flowers or near the rim, though the glaze itself will provide speckles. -
Dry the wax:
Let the wax resist dry completely. It should feel firm to the touch and usually turns slightly darker or transparent depending on the brand. This usually takes 15-20 minutes.
Smoother Wax Lines
For crisp lines, dip your brush in soapy water before the wax. It helps the wax flow smoothly off the bristles and makes cleaning the brush much easier afterward.
Step 3: Glazing and Firing
-
Prepare the glaze:
Mix your speckled white glaze thoroughly. Ensure all sediment at the bottom is incorporated so you get a nice distribution of speckles. -
Check consistency:
The glaze should be the consistency of heavy cream. If it’s too thick, the wax might struggle to resist it. -
Dip the bowl:
Using pottery tongs, grip the bowl securely. In one fluid motion, submerge the entire bowl into the glaze bucket and lift it out. Hold it upside down for a moment to let excess glaze drip off. -
Wipe the resist areas:
As the glaze dries (it happens quickly on bisque), you’ll see it bead up on the waxed areas. Gently wipe these wax spots with a damp sponge or your fingertip to remove any stubborn beads of glaze. -
Clean the foot:
Use a damp sponge to completely wipe away any glaze from the foot ring of the bowl so it doesn’t stick to the kiln shelf. -
Final inspection:
Check the interior starburst to make sure the pattern is clear and free of glaze droplets. -
Fire:
Load the bowl into the kiln and fire to the temperature appropriate for your clay and glaze combination (typically Cone 5 or 6 for stoneware).
Now your bowl is ready to bring a touch of earthy elegance to your table setting


Leafy Wraparound Vines
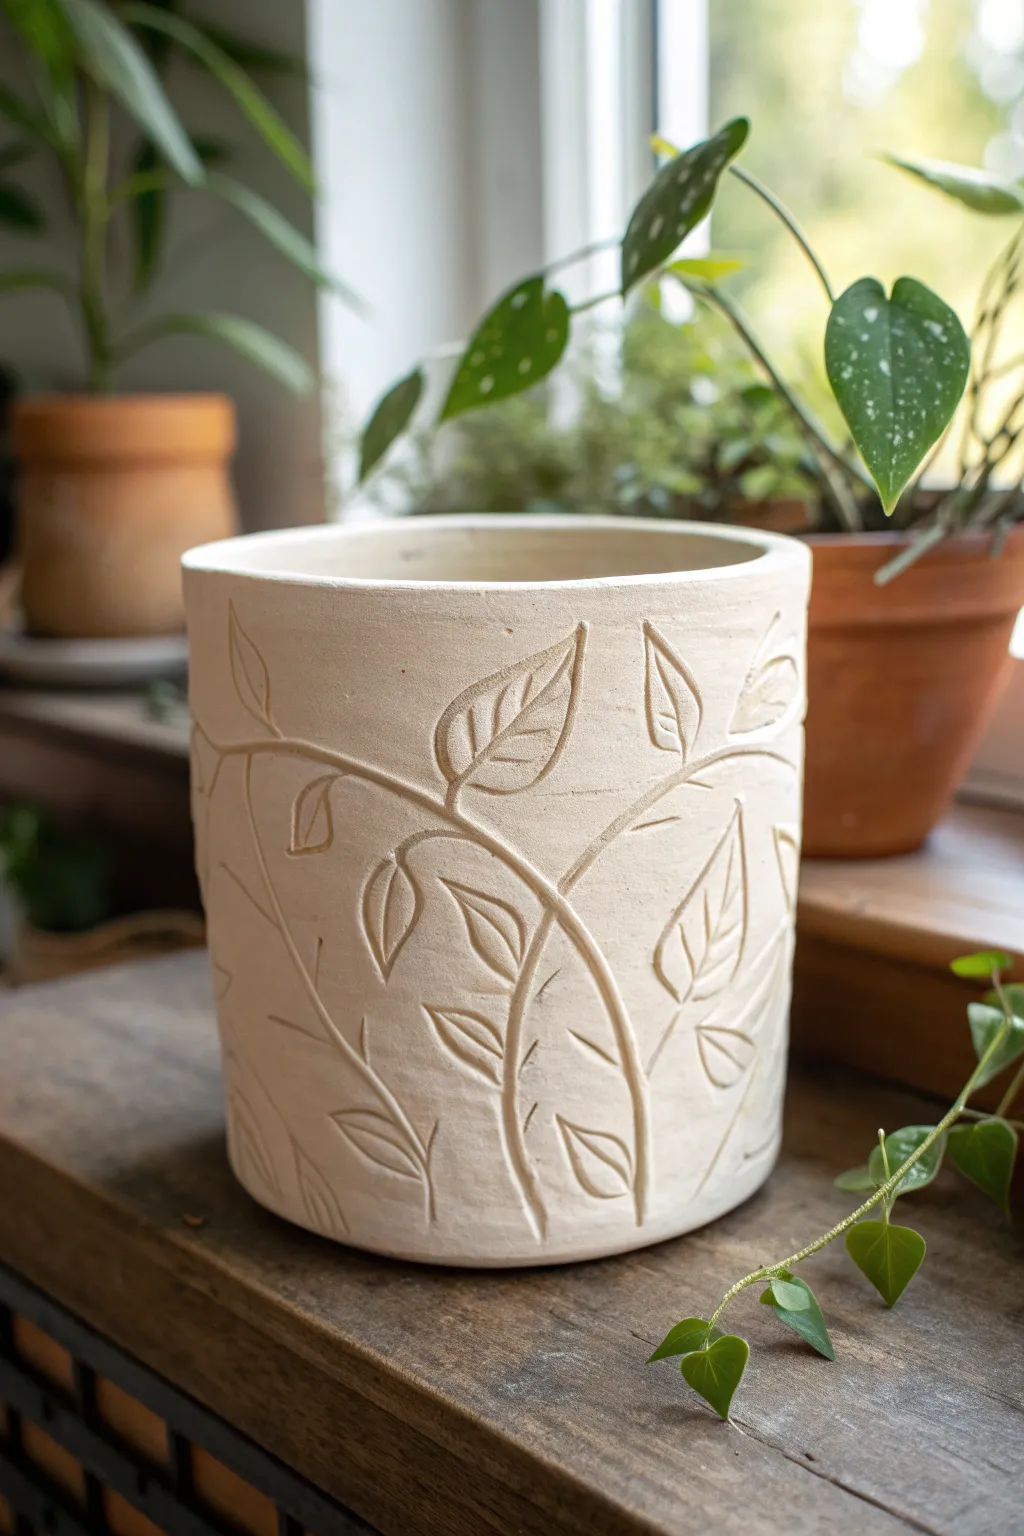
Embrace the organic beauty of nature with this hand-carved ceramic planter featuring a flowing vine motif. The design relies on deep, confident incision lines on a cream-colored clay body to create a textured, sophisticated vessel for your favorite houseplants.
Step-by-Step
Materials
- White or cream stoneware clay (e.g., B-Mix)
- Pottery wheel or slab roller
- Cylinder forming tools (ribs, sponge, wire cutter)
- Needle tool
- Loop tool or carving tool (small, U-shaped tip)
- Soft paintbrush
- Sponge
- Plastic sheet
- Clear matte glaze
Step 1: Forming the Vessel
-
Construct the cylinder:
Begin by throwing a simple, straight-sided cylinder on the wheel using about 3-4 pounds of white stoneware clay. Aim for a wall thickness of about 1/4 inch to allow depth for carving without piercing through. -
Smooth the surface:
Use a metal or rubber rib to compress the walls and remove any throwing rings. You want a perfectly smooth canvas for your vine design. -
Dry to leather hard:
Allow the pot to dry slowly under loose plastic until it reaches a sturdy ‘leather hard’ stage. The clay should be firm enough to handle without deforming but soft enough to carve easily. -
Trim the base:
Turn the pot over and trim the foot. A slight undercut at the bottom gives the pot a nice lift and professional finish.
Step 2: Sketching the Design
-
Plan the vine flow:
Lightly trace a winding, S-curve line around the circumference of the pot using a dull pencil or very light touch with a needle tool. Let the line meander up and down to create natural movement. -
Place the leaves:
Sketch outline shapes of leaves attached to your main vine. Vary the sizes and angles—some pointing up, some down—to mimic real plant growth. -
Refine the composition:
Step back and look at the pot from all sides. Ensure there aren’t any large empty voids; add smaller branching stems or filler leaves if needed.
Burrs Stuck?
Don’t pick at wet clay burrs; you’ll ruin the line quality. Wait until the pot is bone dry, then gently rub the surface with a green kitchen scouring pad to remove them cleanly.
Step 3: Carving the Motif
-
Carve the main stems:
Using a small U-shaped loop tool or a sharp carving tool, follow your initial traced line for the main vine. Press firmly to create a channel about 1-2mm deep. -
Vary line width:
For a more dynamic look, vary your pressure slightly as you carve the stems, making them thicker near the base and tapering slightly as they extend. -
Outline the leaves:
Carve the perimeter of each leaf shape. Keep your tool angle consistent to ensure clean edges and avoid ragged clay burrs. -
Add leaf details:
Switch to a finer point tool or use the very edge of your loop tool to carve the central vein inside each leaf. -
Detail the veins:
Add small, delicate lines branching from the central vein to create texture. These shallow cuts add marvelous contrast when glaze eventually breaks over them.
Add Color Depth
Before glazing, brush a dark underglaze or iron oxide wash into the carved lines and wipe back the surface with a sponge. This makes the design pop dramatically.
Step 4: Finishing and Firing
-
Clean up burrs:
Once the carving is complete, let the pot dry a bit more until the crumbs are chalky. Gently brush away the clay debris with a soft, dry paintbrush. -
Smoothing edges:
I like to dampen a sponge just slightly and lightly wipe over the carved areas. This softens any sharp edges that might be uncomfortable to touch after firing. -
Bisque fire:
Load the thoroughly dried planter into the kiln for a bisque firing to cone 04 (or your clay body’s specification). -
Glaze application:
Dip or spray the planter with a clear matte or satin glaze. A transparent glaze is crucial here so that all your carved details remain visible. -
Final firing:
Fire the piece to maturity (likely cone 5 or 6 for stoneware). The heat will seal the clay and make the planter durable and water-tight.
Place your favorite succulent or trailing ivy inside to complete the grounded, earthy look of your new vessel

The Complete Guide to Pottery Troubleshooting
Uncover the most common ceramic mistakes—from cracking clay to failed glazes—and learn how to fix them fast.
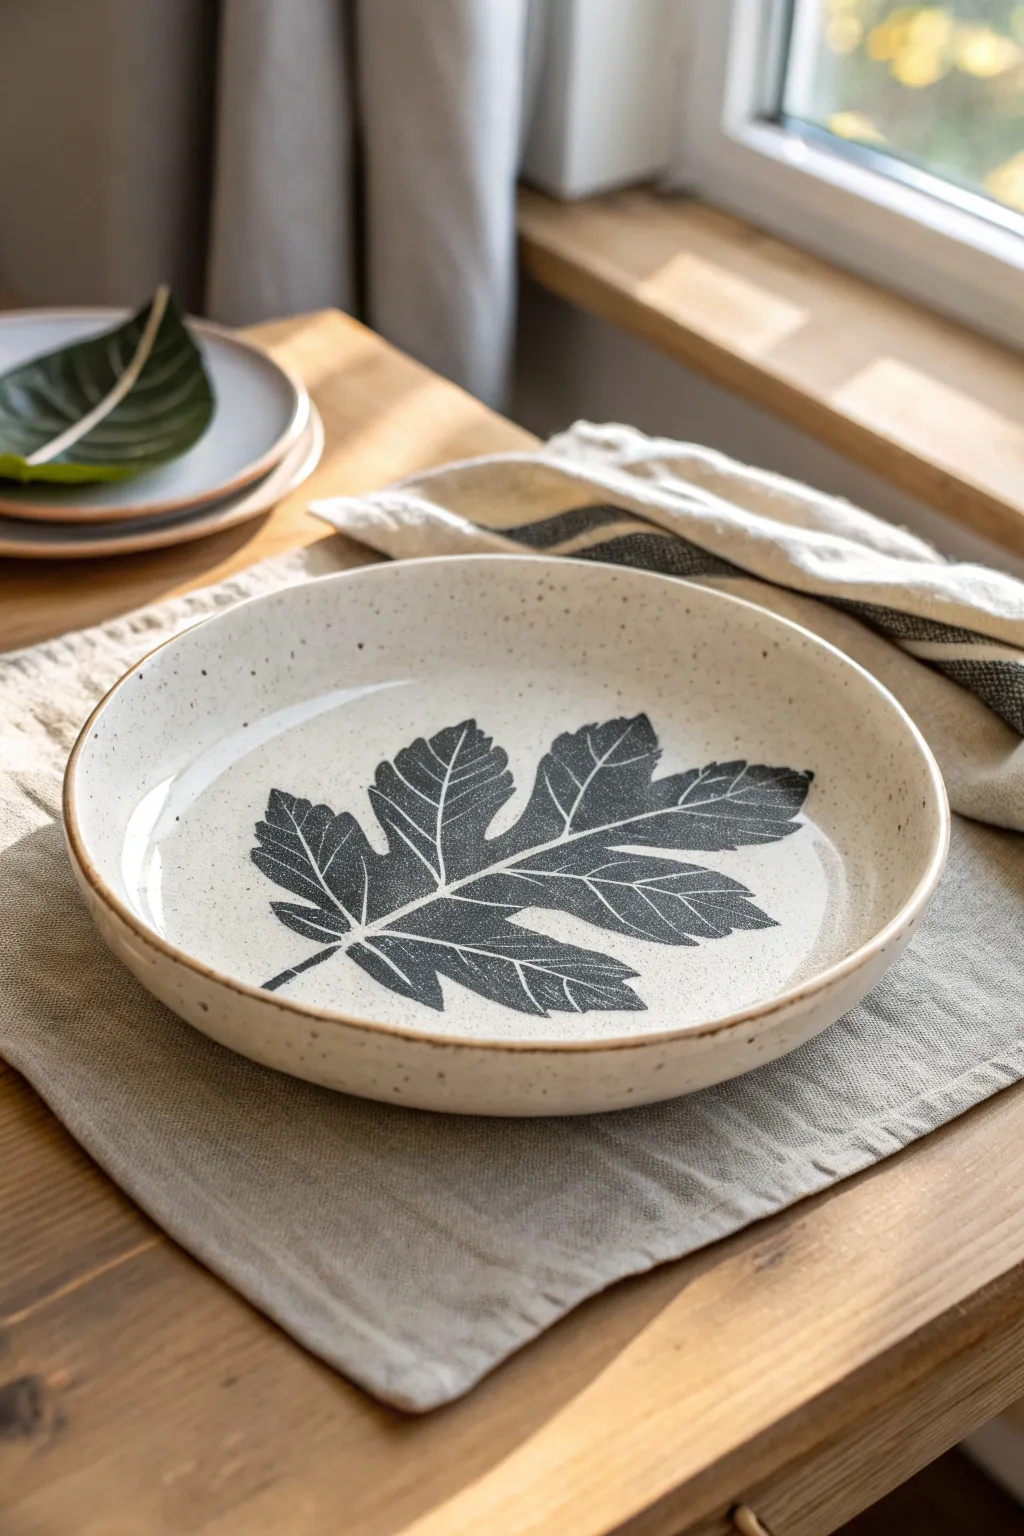
Wildflower Meadow Border
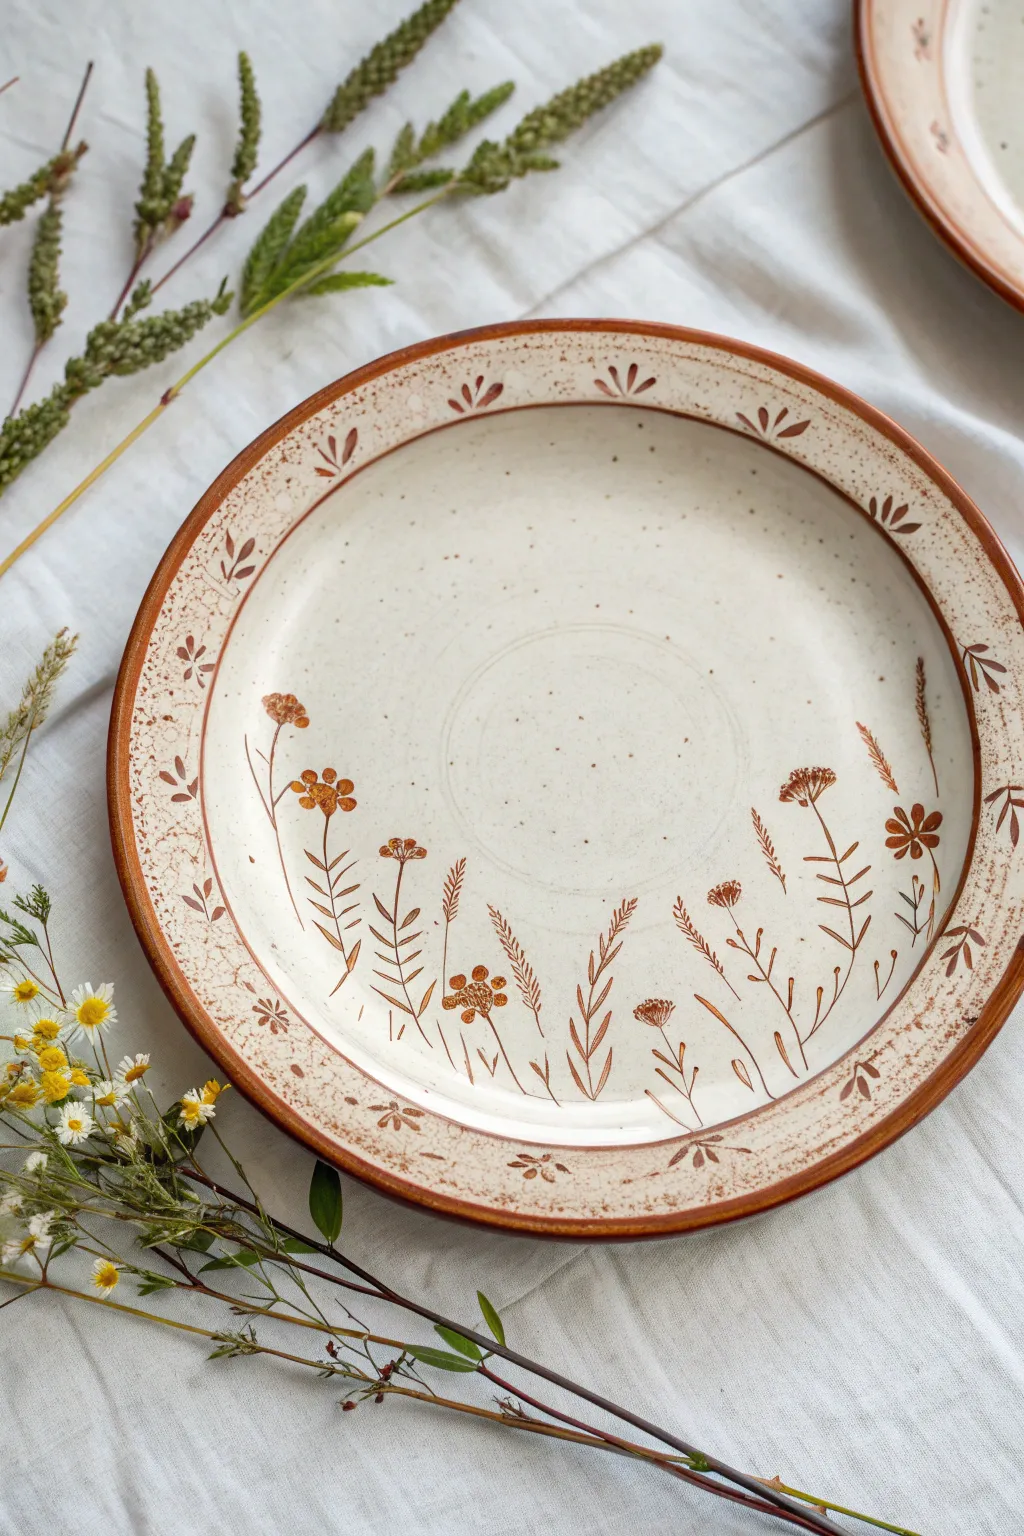
Capture the delicate beauty of a summer meadow on your pottery with this botanical plate design. Using sgraffito techniques on a warm clay body creates an earthy, organic feel perfect for farmhouse-style table settings.
How-To Guide
Materials
- Bisque-fired ceramic plate (flat rim style)
- Underglaze (Rust/Terracotta color)
- Underglaze (Cream/Off-White color)
- Clear transparent glaze (food safe)
- Needle tool or sgraffito tool
- Soft fan brush
- Detail liner brush
- Sponge
- Pencil (optional for sketching)
Step 1: Preparation and Base Coat
-
Clean surface:
Begin by wiping down your bisque-fired plate with a damp sponge to remove any dust or oils that might resist the glaze. -
Apply base underglaze:
Using a soft fan brush, apply 2-3 even coats of the Rust/Terracotta underglaze to the entire top surface of the plate, including the rim. Allow each coat to dry until it’s no longer shiny before applying the next. -
Overlay cream layer:
Once the rust layer is dry to the touch, apply 2-3 coats of Cream/Off-White underglaze over the center area and the inner part of the rim, leaving the very outer edge exposed to create that rustic brown border. -
Check density:
Ensure the cream layer is opaque enough to hide the rust color beneath, except where you want the speckled effect later. -
Let it firm up:
Let the underglaze dry to a leather-hard consistency; it shouldn’t be powdery dry, but firm enough that touching it doesn’t smudge the paint.
Clean Lines Tip
Work from the center outward to avoid resting your hand on finished carvings. If you must rest your hand, place a piece of paper over the carved area to protect it.
Step 2: Carving the Design
-
Define the borders:
Using a banding wheel if available, mark a subtle concentric circle in the center of the plate to help ground your floral arrangement, though this step relies mostly on freehand placement. -
Sketch the layout:
Lightly etch the main stems of your wildflowers into the cream underglaze with a pencil. Don’t press too hard; you just want a faint guide for your carving tools. -
Carve the stems:
Using a fine-point sgraffito tool or needle tool, gently scratch through the cream layer to reveal the rust color underneath. Draw varying heights of stems rising from the bottom edge of the well. -
Add floral heads:
Carve the flower heads. Mix shapes—try small circles for seed pods, starbursts for asters, and feathery dashes for grasses. -
Create texture details:
For the wheat-like grasses, make short, angled scratches outward from the main stem. Vary your pressure to create thick and thin lines. -
Rim decoration:
Move to the rim. Carve simple, repetitive leaf or petal motifs spaced evenly around the circumference. Keep these smaller and more geometric than the natural meadow scene. -
Speckling effect:
Dip a stiff-bristled toothbrush or a splatter brush into the Rust underglaze. Run your thumb over the bristles to flick tiny specks of color across the cream surface, mimicking a reactive glaze look.
Step 3: Finishing Touches
-
Clean up burrs:
Once the carving is completely dry, very gently brush away the clay crumbs (burrs) with a soft, dry brush. Don’t rub, or you might smear the crisp lines. -
Define outer rim:
If the outer rim line looks uneven, use a detail brush and the Rust underglaze to tidy up the edge, reinforcing that dark frame. -
Bisque fire (optional):
Depending on your clay and underglaze brand instructions, you may need a second bisque firing to set the underglaze before glazing. Check your manufacturer’s guide. -
Clear glaze application:
Dip or brush a clear, food-safe glaze over the entire plate. Ensure the coating is even to prevent cloudiness. -
Final firing:
Fire the plate in the kiln according to the clear glaze’s temperature requirements (usually cone 06, 5, or 6).
Level Up: Wax Resist
Apply wax resist over your finished flower carvings before the final clear glaze dip. This leaves the carved lines slightly matte for a stunning textural contrast.
Now you have a stunning, nature-inspired plate ready to showcase your next homemade meal
Fern Fronds and Fine Veins
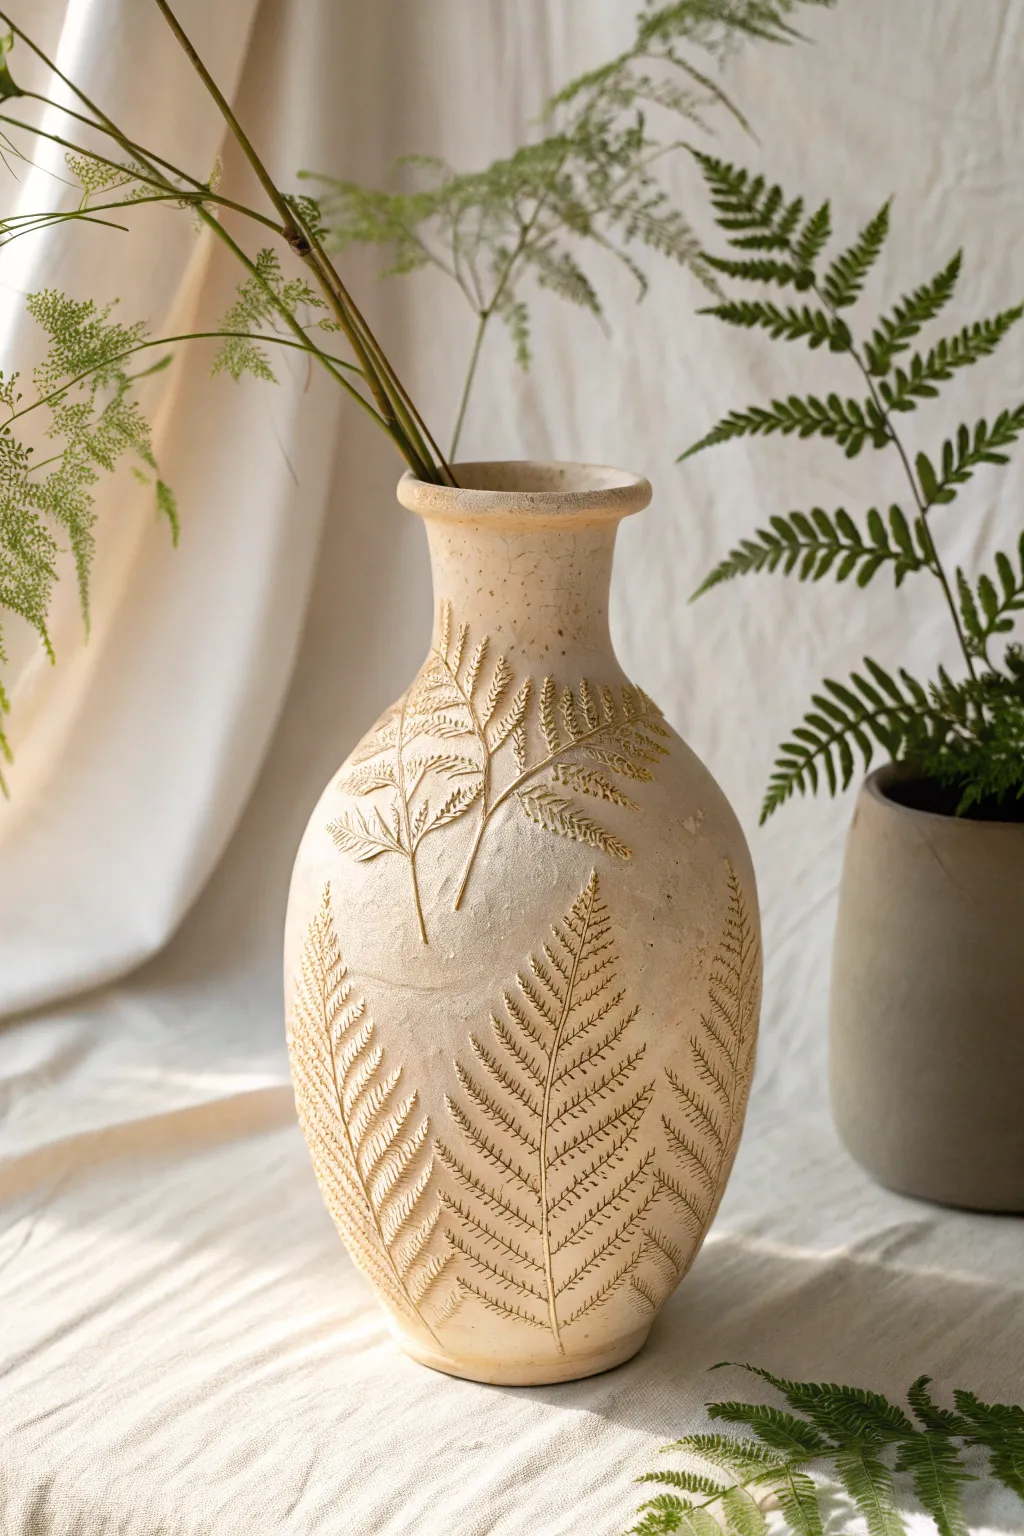
Create an elegant, nature-inspired vessel that captures the delicate beauty of fern fronds. This project combines hand-building or wheel-throwing with detailed carving techniques to achieve a fossil-like relief that feels both ancient and modern.
Step-by-Step Tutorial
Materials
- Stone-colored stoneware clay or porcelain
- Pottery wheel (optional)
- Damp sponge
- Real or artificial fern fronds (for reference or pressing)
- Needle tool
- Wire loop tool (small)
- Fine-point sgraffito tool or carving stylus
- Soft brush
- Clear matte glaze or satin white glaze
Step 1: Forming the Vessel
-
Prepare the clay:
Begin with wedged clay that has a fine grog or smooth texture. This will make carving fine fern veins much easier later on without hitting large grit particles. -
Throw or build the base:
Whether you are throwing on the wheel or coil building, aim for a classic urn shape. Create a bulbous body that tapers gracefully into a narrower neck at the top. -
Refine the rim:
Flare the rim outward slightly, giving it a flat, distinct edge. This mimics the traditional pottery silhouette seen in the example. -
Smooth the surface:
Once the form is established, use a rib tool (metal or rubber) to compress and smooth the outer wall completely. A smooth canvas is essential for the detailing phase. -
Allow to stiffen:
Let the piece dry until it reaches a firm leather-hard stage. It needs to be sturdy enough to handle pressure but soft enough to carve cleanly.
Use Fresh Leaves
If pressing real ferns, use fresh ones. Dry ferns will crumble and leave debris in the clay surface.
Step 2: Creating the Fern Design
-
Plan the layout:
Lightly sketch the main stems of your ferns using a needle tool. I like to have them curving upwards from the base, following the contour of the vase’s belly. -
Press or draw the outlines:
For the most realistic look, you can press a real fern frond gently against the leather-hard clay to leave an impression, or simply freehand the leaf shapes based on the reference. -
Carve the relief:
Using a small wire loop tool, carefully carve away the negative space around the fern leaves. You want the leaves to stand slightly raised from the background surface. -
Refine the edges:
Go back with a modeling tool to smooth the cut edges of the leaves so they look organic rather than sharp and mechanical. -
Detail the veins:
Switch to your fine-point stylus or sgraffito tool. Incise the central vein down each tiny leaflet, then add the minuscule side veins for texture. -
Add surface texture:
To enhance the organic feel, you can lightly stipple the uncarved background areas or leave them smooth depending on your preference. -
Brush away crumbs:
Throughout the process, use a soft, dry brush to sweep away clay crumbs. Don’t use a wet sponge, as this will erase your crisp details.
Step 3: Finishing and firing
-
Dry slowly:
Cover the vase loosely with plastic to ensure slow, even drying. This prevents the delicate raised areas from cracking away from the body. -
Bisque fire:
When bone dry, fire the piece to bisque temperature (usually cone 04 or 06) to prepare it for glazing. -
Apply a wash (optional):
To highlight the texture like in the photo, apply an iron oxide wash or a diluted tan underglaze, then wipe it back with a sponge so color remains only in the recesses. -
Glaze application:
Apply a thin layer of matte clear glaze or a very satin white glaze. Avoid thick, runny glazes that will fill in and obscure your fine carving work. -
Final wipe:
Wipe the foot of the vase clean to prevent it sticking to the kiln shelf. -
Glaze fire:
Fire to the maturation temperature of your chosen clay body and glaze.
Clay Too Dry?
If the clay is crumbling while carving, mist it lightly with water and wrap it in plastic for an hour to rehydrate.
Your finished vase will be a timeless piece of botanical art ready to display your favorite greenery


What Really Happens Inside the Kiln
Learn how time and temperature work together inside the kiln to transform clay into durable ceramic.
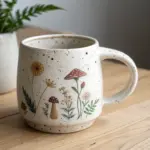
Mushrooms and Woodland Minis
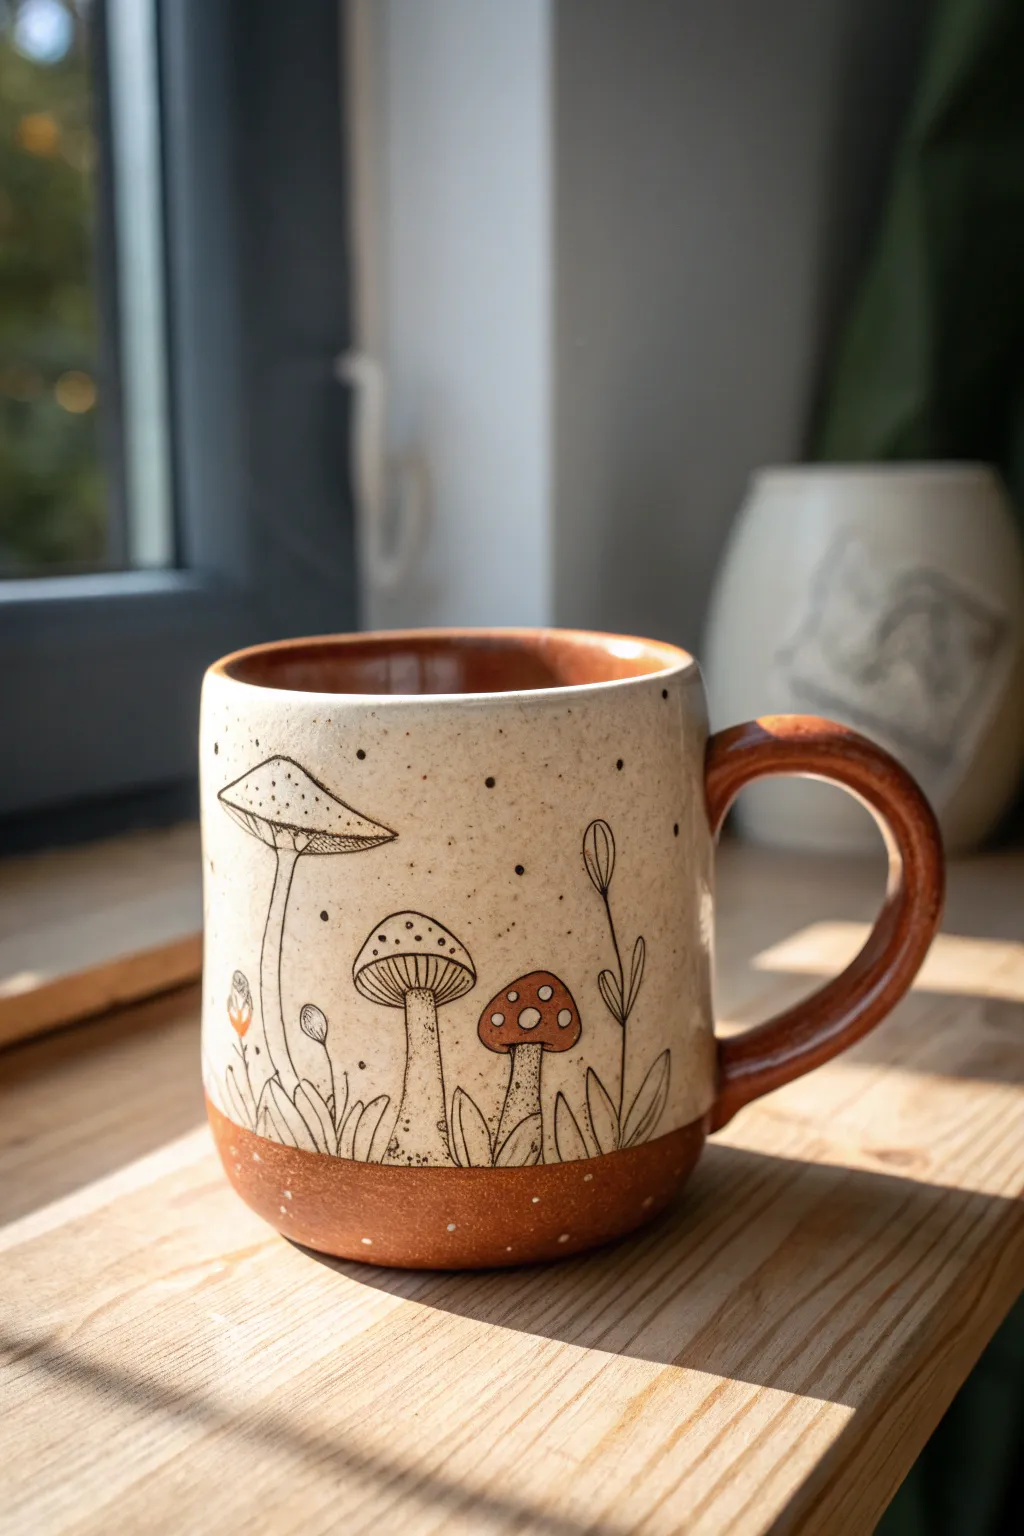
Bring the magic of the woodlands to your morning coffee with this charming ceramic mug featuring delicate mushroom illustrations. Using a combination of sgraffito carving and underglaze painting, you’ll create a rustic, earthy design on speckled clay that feels warm and handmade.
How-To Guide
Materials
- Wheel-thrown or hand-built mug (leather hard)
- Speckled buff stoneware clay
- Terra sigillata or red iron oxide slip (for the base)
- Creamy white underglaze or slip
- Jet black underglaze
- Fine-point sgraffito tool (or needle tool)
- Small detail brush
- Rusty red underglaze
- Clear transparent glaze
- Sponge
- Wax resist (optional)
Step 1: Preparation and Base Layers
-
Assess the Clay State:
Ensure your mug is at a solid leather-hard stage. It should be firm enough to handle without warping, but soft enough to carve into smoothly. -
Apply the Base Slip:
Dip the bottom third of the mug (and the handle if desired) into a terracotta-colored slip or red iron oxide wash. This creates the dark, earthy band at the bottom. Wipe away any drips with a damp sponge. -
Coat the Upper Body:
Apply 2-3 even coats of a creamy white underglaze or slip to the upper two-thirds of the mug exterior. Use a soft fan brush to minimize brushstrokes. -
Feather the Transition:
Where the white slip meets the red clay base, don’t worry about a perfect straight line. A slightly organic, wavy edge looks more natural for this woodland theme. -
Let It Set:
Allow the slip to dry until it is no longer tacky to the touch but still holds moisture. If it’s bone dry, the carving will chip rather than slice.
Chippy Lines?
If your carving lines look jagged or chipped, the clay is too dry. Mist it lightly with water, wrap it in plastic for an hour to rehydrate, and try again.
Step 2: Sketching and Sgraffito
-
Plan Your Composition:
Lightly sketch your mushroom placement using a dull pencil. The graphite will burn off in the kiln. I usually group mushrooms in clusters of three for visual balance. -
Outline the Stems:
Using a fine-point detail brush and jet black underglaze, carefully paint the outlines of your mushrooms, tall grass blades, and small sprouts. Keep the lines thin and delicate. -
Refine with Carving:
Once the black lines are semi-dry, use your needle tool or sgraffito tool to gently scratch through the black lines in specific areas to create texture, or scratch *around* them to clean up clumsy brushstrokes. -
Add Gill details:
For the open mushroom caps, use the very tip of your tool to draw vertical lines representing the gills. These should be incredibly fine vertical strokes. -
Create Texture on Stems:
Add tiny stippling dots or short dashes on the mushroom stems to give them a rough, organic texture.
Add Dimension
Instead of just painting the caps red, try layering a translucent orange over the red underglaze before the final clear coat to create depth and variation.
Step 3: Color Accents and Finishing
-
Paint the Caps:
Select one or two mushrooms to highlight. Fill in their caps with a rusty red underglaze. Being careful to stay within your black outlines keeps the design crisp. -
Add White Spots:
After the red underglaze dries, use a dotting tool or the back of a brush to apply small dots of white slip on top of the red caps for that classic toadstool look. -
Incorporate Background Speckles:
To enhance the ‘speckled egg’ look, flick a stiff toothbrush loaded with watered-down brown or black underglaze sporadically around the empty white space. -
Bisque Fire:
Place the mug in the kiln for a bisque firing (usually Cone 04 or 06) to set the clay and underglazes permanently. -
Apply Clear Glaze:
Once bisqued, dip the entire mug into a clear transparent glaze. Ensure the glaze is compatible with your clay body so it doesn’t craze. -
Wipe the Foot:
Clean the bottom of the mug and a few millimeters up the side with a wet sponge to prevent it from sticking to the kiln shelf. -
Final Firing:
Fire the mug to maturity (Cone 5, 6, or 10 depending on your clay). The clear glaze will seal your carvings and make the colors pop.
Enjoy sipping your favorite brew from your new handcrafted woodland masterpiece
Bees, Moths, and Wing Details
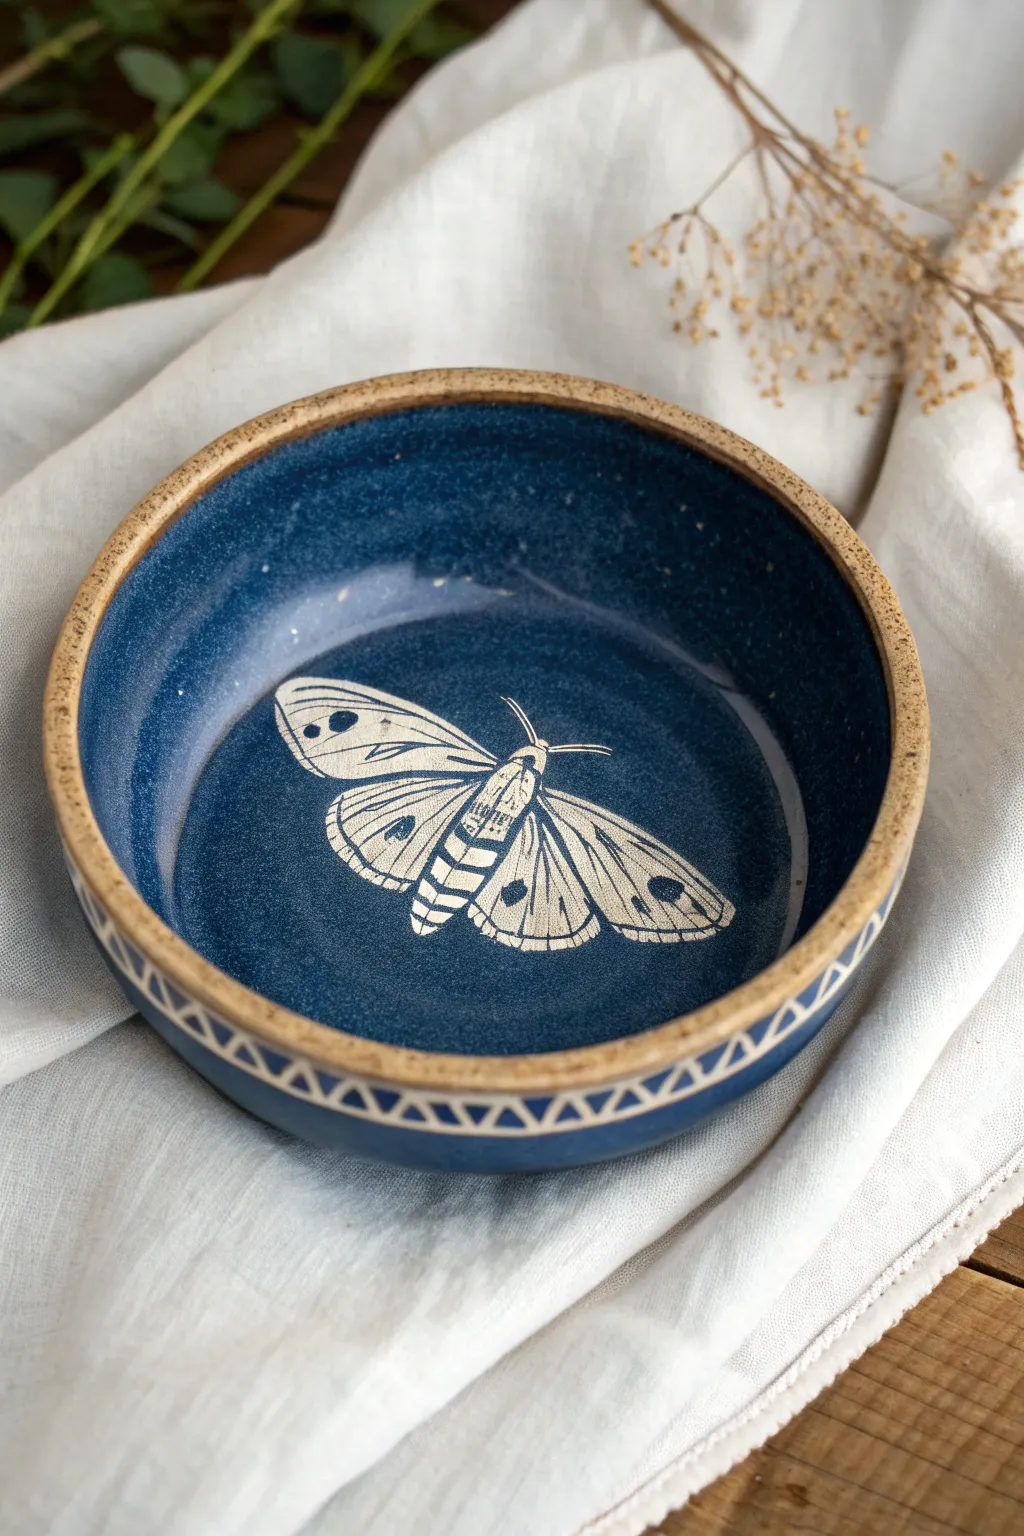
This stunning ceramic bowl features a deep celestial blue interior that perfectly contrasts with the delicate, etched lines of a resting moth. The sgraffito technique reveals the raw clay body underneath, creating striking wing details and a repeating geometric pattern along the outer rim.
Step-by-Step Guide
Materials
- Leather-hard clay bowl (trimmed and smooth)
- Deep blue underglaze (velvet or engobe)
- Small carving tool (loop tool or stylus)
- Sharp needle tool
- Soft fan brush
- Pencil / Printed moth template (optional)
- Carbon paper (optional)
- Clear transparent glaze (for firing)
- Sponge
Step 1: Preparation and Underglazing
-
Inspect the clay body:
Ensure your thrown or hand-built bowl is at the perfect leather-hard stage. It should be firm enough to hold its shape but soft enough to carve into without chipping. If it feels too dry, mist it lightly and wrap it in plastic for a few hours. -
Clean the surface:
Wipe the interior and exterior gently with a slightly damp sponge to remove any dust or grog which could interfere with a smooth underglaze application. -
Apply the first coat:
Using a soft fan brush, apply a layer of deep blue underglaze to the entire interior of the bowl. Extend this color over the rim and down the exterior wall about one inch to create a band for the exterior pattern. -
Layer for opacity:
Allow the first coat to become touch-dry, which usually takes about 10–15 minutes. Apply a second and possibly third coat, alternating brush stroke directions to ensure solid, opaque coverage without streaks. -
Clean the rim:
Once the final coat is barely dry, dampen a sponge and carefully wipe the very top edge of the rim if you want the exposed clay look shown in the reference, or leave it blue if you prefer a solid edge.
Keep it Sharp
Sgraffito tools dull quickly against clay. Sharpen your loop tools with fine sandpaper or a sharpening stone every few strokes to ensure crisp lines that don’t look ragged.
Step 2: Carving the Center Moth
-
Transfer the design:
You can lightly sketch your moth directly onto the blue underglaze with a pencil (the graphite will burn off). Alternatively, place a printed moth image over carbon paper centered in the bowl and trace the outline gently. -
Outline the wings:
Using a sharp needle tool or a fine-point sgraffito tool, scratch the main outline of the moth’s wings and body. Keep your pressure consistent to cut through the blue layer just enough to reveal the clay underneath. -
Define the body segments:
Carve horizontal bands across the moth’s abdomen. I find that leaving slightly thicker blue lines between the carved segments helps define the insect’s fuzzy texture. -
Detail the upper wings:
Carve the distinctive eye-spots on the upper wings. Instead of removing all the blue, outline a circle and leave a dot of blue in the center to create depth. -
Add wing veins:
Switch to your finest carving point. draw long, sweeping lines radiating from the body to the wingtips to represent the veins. These lines should be delicate and confident. -
Create texture:
Use tiny, short strokes or stippling near the body and wing edges to suggest the soft scales of a moth. Remove larger patches of blue on the lower wings to brighten the design. -
Clean up crumbs:
Periodically blow away the clay burrs or use a very soft, dry brush to sweep them out. Avoid rubbing the crumbs, as this can smear the blue pigment into your fresh white lines.
Step 3: Exterior Pattern and Finishing
-
Mark the exterior band:
On the outside of the bowl where you applied the blue band, use a needle tool to scratch a straight horizontal line defining the bottom edge of your pattern area. -
Carve the triangles:
Carve a repeating zigzag line between the rim and your bottom line to create a series of triangles. Carve a smaller glue triangle inside each larger one to mimic the geometric style in the photo. -
Slow drying:
Loosely cover the bowl with plastic to let it dry very slowly. Sgraffito changes the surface tension of the clay, and drying too fast can cause cracks. -
Bisque fire:
Once bone dry, bisque fire the bowl according to your clay body’s specifications (usually Cone 04 or 06). -
Glaze application:
After bisque firing, wipe the piece down to remove dust. Dip or brush a clear, transparent glaze over the entire piece to seal the design and make it food safe. -
Final firing:
Load the kiln for the final glaze firing. Ensure the foot is wiped clean of glaze so it doesn’t stick to the kiln shelf.
Fixing Mistakes
Carved too much? Don’t panic. Mix a tiny amount of the blue underglaze with a bit of clay slip to make a paste, fill the mistake, let it dry, and carve it again.
The contrast between the deep indigo and the pale clay body will make this bowl a standout piece in your collection

TRACK YOUR CERAMIC JOURNEY
Capture glaze tests, firing details, and creative progress—all in one simple printable. Make your projects easier to repeat and improve.
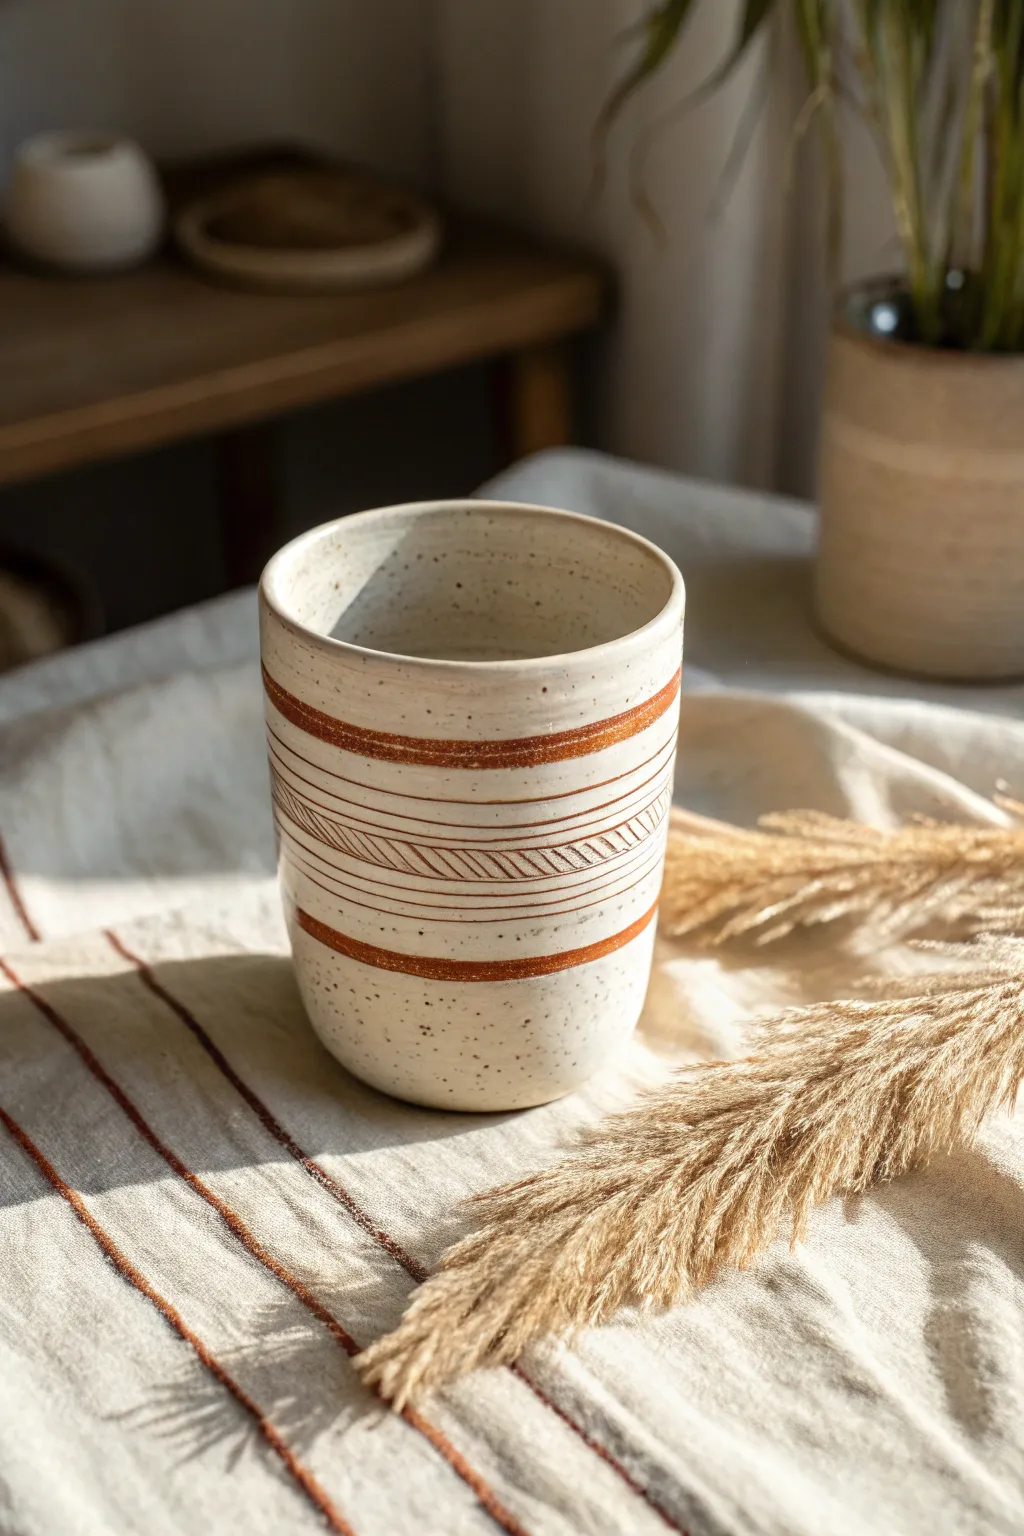
Ocean Waves and Whorls
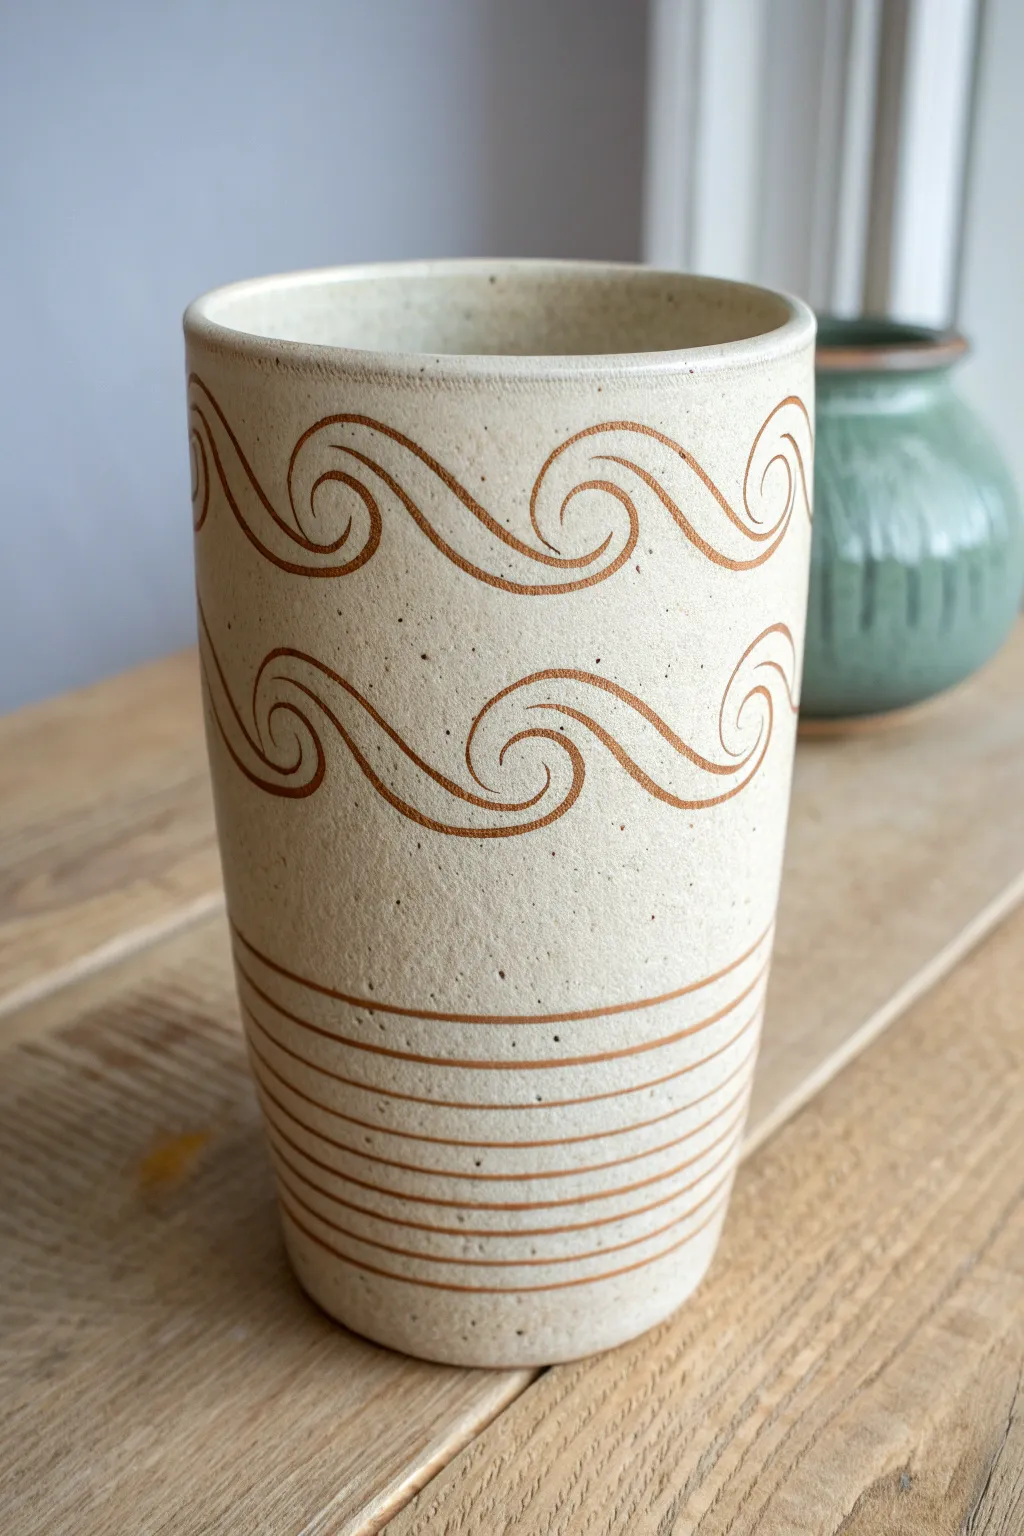
Capture the rhythmic energy of the sea with this elegant sgraffito tumbler featuring stylized ocean waves and precise banding lines. The contrast between the speckled cream slip and the rich terracotta clay body underneath creates a timeless, earthy aesthetic perfect for your favorite beverage.
Step-by-Step
Materials
- Leather-hard clay cylinder (tumbler shape)
- White or cream potting slip (or underglaze)
- Soft fan brush or wide hake brush
- Sgraffito loop tool (small size)
- Needle tool or fine point stylus
- Pottery wheel or banding wheel
- Damp sponge
- Pencil (optional)
Step 1: Preparation & Application
-
Surface Prep:
Begin with a leather-hard clay cylinder. Ensure the surface is smooth and free of grog or debris by wiping it gently with a damp sponge or a flexible rib. -
Apply the Base Coat:
Using a soft fan brush, apply a generous coat of cream-colored slip to the entire exterior of the tumbler. Aim for an even thickness. -
Layering:
Wait for the first coat to lose its sheen (become matte), then apply a second coat. I usually find two or three coats are necessary depending on the opacity of your slip. -
Drying to Leather Hard:
Allow the piece to stiffen back up to a ‘leather hard’ state. The slip should not be tacky to the touch, but the clay shouldn’t be bone dry either—it needs to carve cleanly without chipping.
Moisture is Key
If the clay gets too dry while carving, the slip will chip rather than slice. Mist the uncarved areas lightly and wrap in plastic for an hour to rehydrate.
Step 2: Drafting the Design
-
Sectioning:
Place your piece on a banding wheel. Lightly etch horizontal guidelines using a needle tool to section off where your wave bands will go versus the bottom stripes. -
Mapping the Waves:
You can lightly sketch your wave pattern with a soft pencil directly onto the slip. Don’t press hard; you just want a faint guide for the flowing S-curves and spirals. -
Spacing:
Plan to have two distinct bands of waves. The top band should have waves cresting to the right, and the middle band mirrors this rhythm, ensuring the spirals align pleasingly.
Step 3: Carving the Waves
-
Outline the Curves:
Using a small sgraffito loop tool, begin carving the main undulating line of the top wave secton. Apply consistent pressure to cut through the slip and reveal the darker clay beneath. -
Double the Lines:
Create parallel lines for each wave. Instead of one thick line, carve two thinner lines side-by-side to define the wave shape, leaving a thin strip of cream slip between them. -
Carving Spirals:
At the crest of each wave, tighten your curve into a spiral (whorl). Ensure the carving tool moves smoothly to keep the curves fluid rather than jagged. -
Repeat for Middle Section:
Move to the middle band and repeat the process. Maintain the same spacing and line weight as the top section for a cohesive look. -
Cleaning Utterances:
As you carve, little burrs of clay will accumulate. Gently blow them away or use a very soft brush to flick them off—don’t wipe them, or you might smear the design.
Oops! A Mistake?
If you carve a line incorrectly, you can patch it! Dab a small amount of slip back into the groove, let it dry, and recarve that section.
Step 4: Carving the Base Stripes
-
Centering the Wheel:
Center your tumbler on the banding wheel or pottery wheel deeply. Stability is key for straight horizontal lines. -
Carving Bands:
Hold your carving tool steady against the bottom portion of the cup while slowly rotating the wheel. Carve continuous horizontal rings. -
Varied Spacing:
Start with tightly spaced lines near the very bottom, gradually increasing the space between lines as you move upward toward the wave section. -
Final Cleanup:
Once all carving is complete, check for any rough edges or floating crumbs of clay. Carefully smooth sharp carved edges with a fingertip if needed, but be extremely gentle. -
Firing:
Bisque fire the piece, apply a clear glaze over the entire interior and exterior to seal the design, and glaze fire to the appropriate temperature for your clay body.
Enjoy the tactile satisfaction of holding your finished tumbler, feeling the carved ridges of your seascape design
Mountain-and-Moon Night Scene
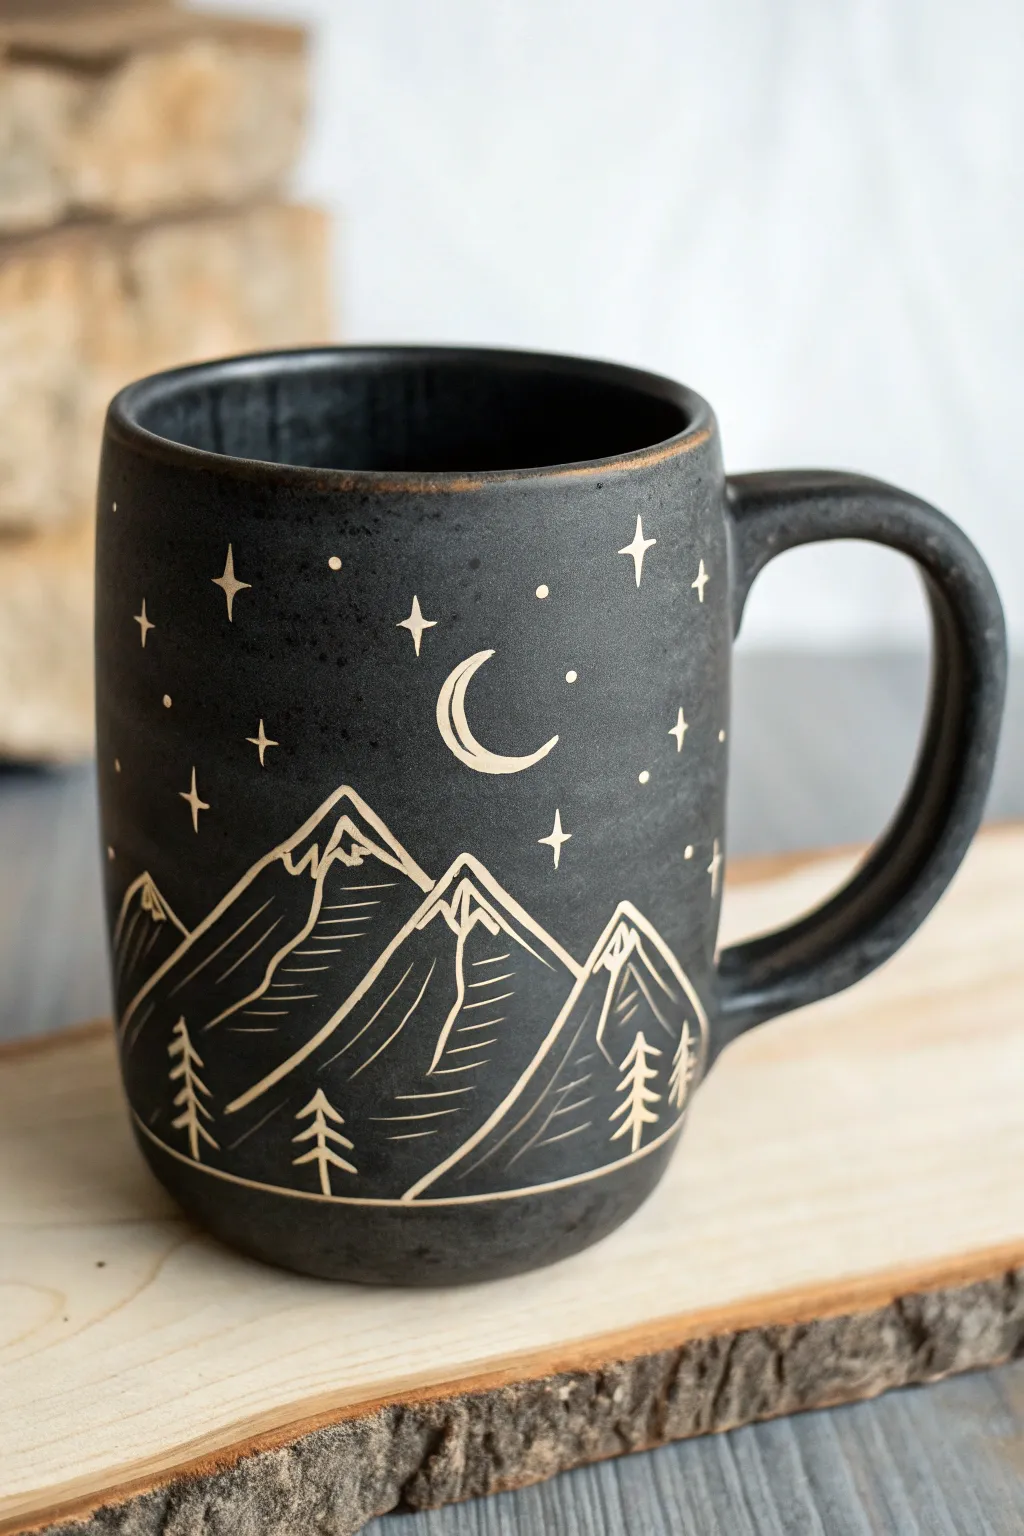
Capture the serene beauty of a mountain range under a starry sky with this striking sgraffito mug project. The technique uses high contrast to make the creamy clay body shine against a deep matte black underglaze, creating a cozy and rustic piece perfect for your morning brew.
How-To Guide
Materials
- Leather-hard cylinder mug (hand-built or wheel-thrown)
- Black underglaze (Amaco Velvet or similar)
- Wide hake brush or soft fan brush
- Sgraffito carving tool (small loop or needle tool)
- Clear transparent glaze
- Pencil (optional)
- Sponge
- Kiln access
Step 1: Preparation & Underglazing
-
Surface Check:
Ensure your mug is at the perfect leather-hard stage—sturdy enough to hold its shape but soft enough to carve easily. Run a slightly damp sponge over the surface to remove any major dust or burrs. -
Apply First Coat:
Using a soft fan brush, apply a smooth, even coat of black underglaze to the entire exterior of the mug, avoiding the very bottom if you prefer a clean foot. -
Layering Up:
Allow the first coat to dry until it’s no longer shiny. Apply a second coat in a perpendicular direction to minimize brush strokes. -
Final Coat:
Apply a third coat if your underglaze brand recommends it for full opacity. I usually do three thin layers to ensure no clay body shows through the black background later. Let the mug dry until the surface is dry to the touch but the clay is still leather-hard.
Step 2: Planning the Design
-
Sketch the Horizon:
Very lightly sketch your mountain range using a dull pencil directly onto the black underglaze. The graphite will shine slightly against the matte black, making it visible without damaging the surface. -
Placement Strategy:
Plan for three main peaks. Make the central peak slightly higher or distinct to create a focal point. Ensure the mountains wrap continuously around the mug if desired, or fade out near the handle. -
Adding Celestial Elements:
Mark the spot for your crescent moon above the central valley, and place small dots where your larger stars will go.
Clean Lines Tip
Don’t blow the clay crumbs off the pot with your breath! The moisture from your breath can make the crumbs stick. Always use a soft, dry brush to sweep them away.
Step 3: Carving the Mountains
-
Outline the Peaks:
Using your sharp sgraffito tool, carve the main outline of the mountain range first. Use confident, smooth strokes to reveal the light clay body beneath. -
Define Snow Lines:
Draw jagged, irregular lines near the tops of the peaks to create snow-capped summits. These shouldn’t be straight; wobble your hand slightly to mimic natural terrain. -
Shadow and Texture:
On the shadowed side of the mountains (the side away from your imaginary light source), carve thin, parallel diagonal lines. These hatching marks add depth and distinguish the rock face from the snow. -
Grounding Line:
Carve a single, solid horizontal line beneath the mountains to ground the scene and create a border for the bottom of the design.
Level Up: Galaxy Effect
Before carving, splatter a tiny bit of white underglaze over the black background using a toothbrush. Carve your design over it for a distant galaxy effect.
Step 4: Adding Trees & Sky
-
Carve Tree Trunks:
Carve simple vertical lines near the base of the mountains for tree trunks. -
Pine Branches:
Add downward-slanting chevron shapes or quick dashes along the trunks to create the look of pine trees. Vary their heights to keep the forest looking natural. -
The Moon:
Carve the crescent moon carefully. Outline it first, then gently scrape away the interior black underglaze to make it a solid white shape. -
Starry Night:
Carve the stars. Mix simple dots for distant stars with four-point glistening stars (a cross shape with elongated vertical lines) for the brighter ones.
Step 5: Finishing Touches
-
Cleanup:
Use a large, soft dry brush to gently sweep away all the clay crumbs (burrs) created during carving. Be careful not to smear the black underglaze into the white carved lines. -
Bisque Fire:
Let the mug dry completely to the bone-dry stage. Load it into the kiln for a bisque firing. -
Glazing:
Once bisqued, wipe the mug down with a damp sponge. Dip or brush a clear transparent glaze over the entire piece. -
Final Fire:
Fire the mug to your clay body’s maturity temperature (e.g., Cone 6). The clear glaze will seal the carving and make the black deep and glossy.
Once it comes out of the kiln, fill your new favorite mug with coffee and enjoy the view of your handcrafted mountainscape
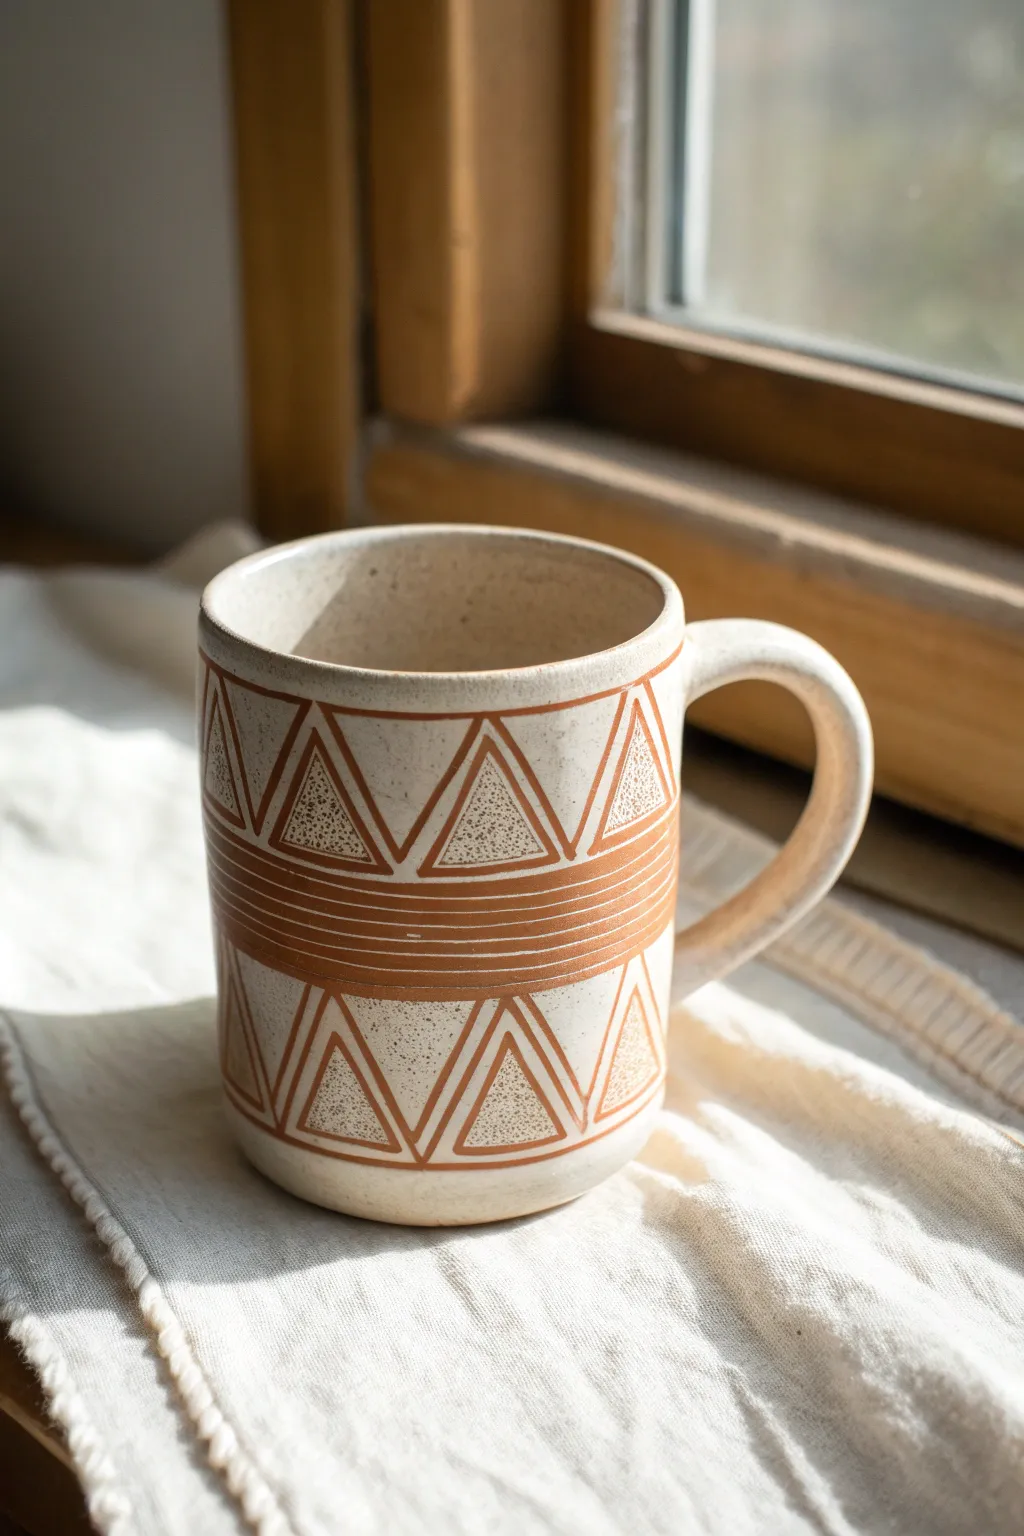
Sunburst Centers on Bowls
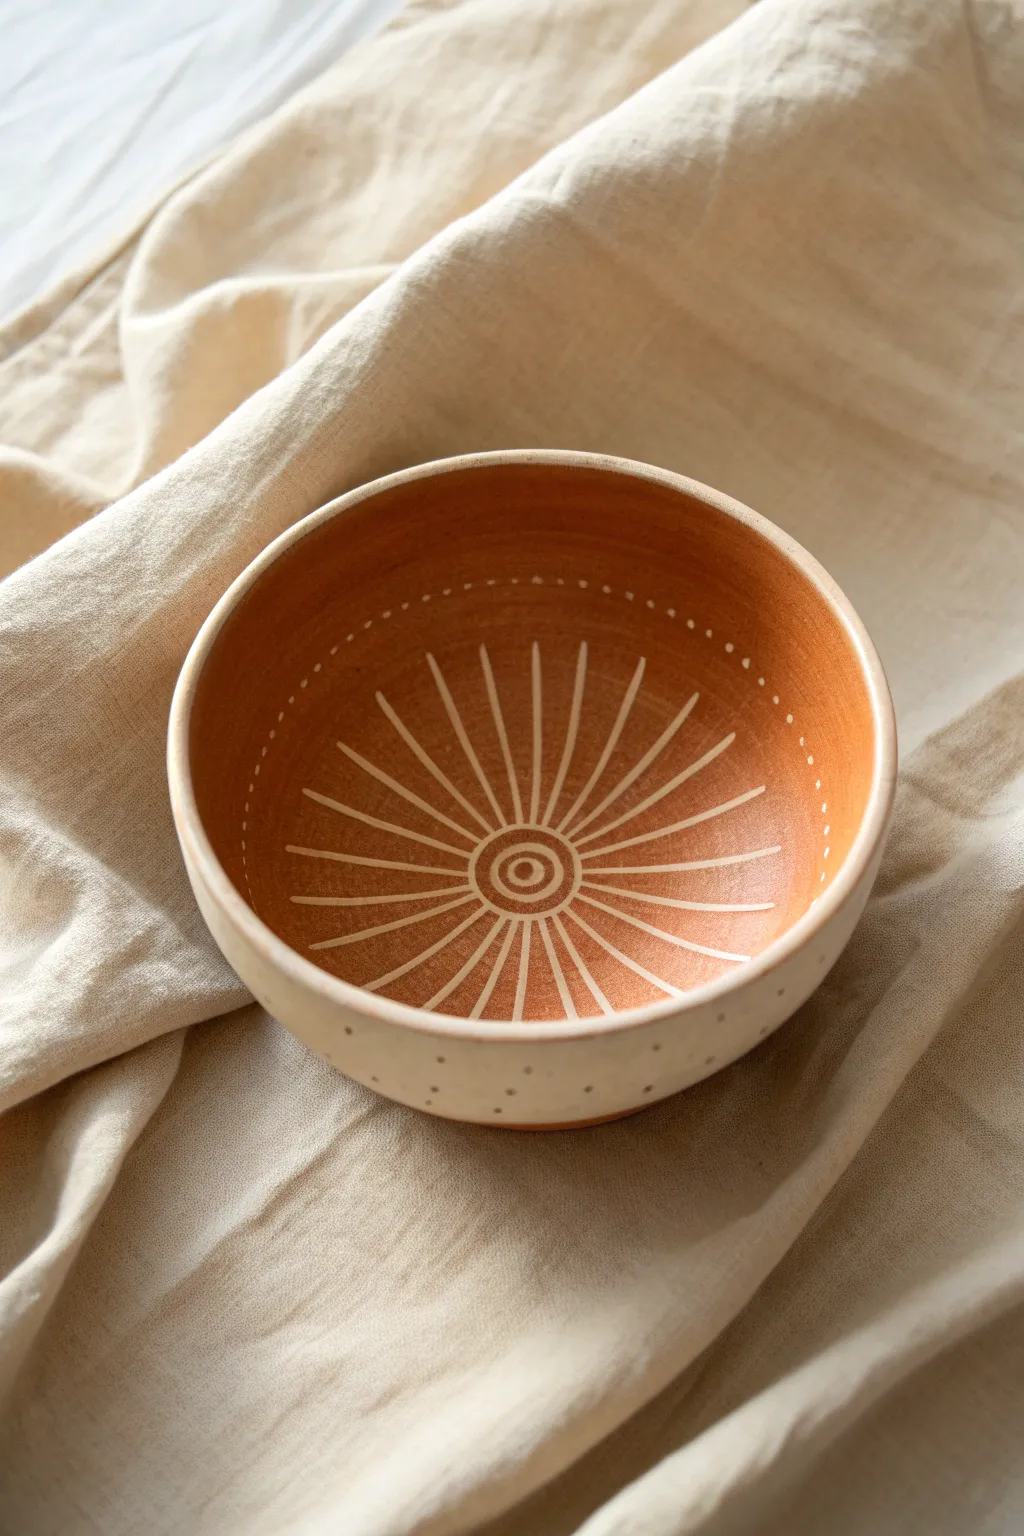
This project showcases a stunning contrast between warm terracotta tones and crisp white lines, featuring a radiating sunburst pattern that draws the eye to the center of the bowl. The technique relies on carving through layers of underglaze to reveal the clay body underneath, creating a textured and visually striking piece of functional art.
Step-by-Step Guide
Materials
- Wheel-thrown or hand-built clay bowl (leather hard)
- Terracotta or orange underglaze
- White slip or white underglaze (for exterior)
- Wide soft bristled fan brush
- Needle tool or sgraffito tool
- Loop trimming tool
- Damp sponge
- Lazy Susan or banding wheel
- Clear transparent glaze
Step 1: Preparation & Application
-
Prepare the base:
Start with a leather-hard clay bowl. I prefer using a white clay body for this specific look so the exterior remains light, but you can use any clay. Ensure the surface is smooth and free of grog by compressing it with a rib. -
Apply interior color:
Using a wide fan brush, apply 2-3 even coats of terra cotta or deep orange underglaze to the entire interior of the bowl. Allow each coat to dry until it’s no longer shiny before applying the next. -
Apply exterior color:
Carefully apply a contrasting white underglaze or slip to the exterior of the bowl. You can bring it just over the rim to create a clean lip. Let this set until the surface is dry to the touch but the clay is still leather hard. -
Check moisture levels:
The ideal stage for carving is when the underglaze feels dry but cool. If it’s too wet, the lines will be messy; too dry, and the clay will chip.
Step 2: Carving the Center
-
Find the center:
Place your bowl on a banding wheel. Spin the wheel slowly and use a needle tool to gently mark the exact center point at the bottom of the bowl. -
Carve the bullseye:
Using a small loop tool or sgraffito stylus, carve a small circle around your center point to expose the white clay beneath. Repeat this to create a second, slightly larger ring, forming a ‘bullseye’ at the very bottom. -
Establish the radius:
Carve the outermost circle for the sunburst’s center hub. This circle defines where your sun rays will originate.
Burrs be gone
Don’t flick clay crumbs away with your finger while carving! The oils from your hand can smudge the underglaze. Blow them away or use a soft, dry makeup brush.
Step 3: Drafting the Rays
-
Mark quadrants:
To keep spacing even, lightly scratch four guide marks at the 12, 3, 6, and 9 o’clock positions along the rim of the central circle and corresponding marks near the bowl’s upper rim. -
Subdivide sections:
Divide each quadrant in half visually. You don’t need to draw full lines yet, just small tick marks to help you keep your spacing consistent. -
Carve primary rays:
Using your sgraffito tool, carve long, confident lines from the central circle extending outward toward the rim. Vary the pressure slightly to make the lines taper if desired, or keep them uniform.
Level Up: Wax Resist
Paint wax resist over your carved white lines before glazing. Then apply a dark wash that settles into the texture for an antiqued look.
Step 4: Adding Details
-
Add secondary rays:
Between your primary rays, carve shorter lines that don’t quite touch the center circle. This creates density without clustering too many lines at the very bottom. -
Create the dotted border:
About an inch or two below the rim, create a ring of small dots. Press the tip of your tool gently into the underglaze, spinning the banding wheel to keep the height consistent. -
Detail the exterior:
On the outside of the bowl, pierce through the white slip/underglaze with a needle tool to create a random pattern of small dots around the base, mirroring the interior design. -
Clean up burrs:
Once the carving is complete and bone dry, use a stiff brush or a very lightly damp sponge to brush away any clay crumbs or ‘burrs’ left from the carving tools.
Step 5: Finishing
-
Bisque fire:
Load the bowl into the kiln for a bisque firing according to your clay body’s specifications (usually Cone 04 or 06). -
Glaze application:
After bisque firing, wipe the bowl with a damp sponge to remove dust. Dip or brush a clear, transparent glaze over the entire piece to seal the sgraffito work and make it food safe. -
Final Hire:
Fire the piece a second time to the glaze temperature required for your clay and glaze combination.
Now you have a beautifully textured bowl ready for morning cereal or display on a shelf
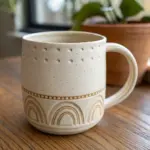
Folk-Inspired Borders and Bands
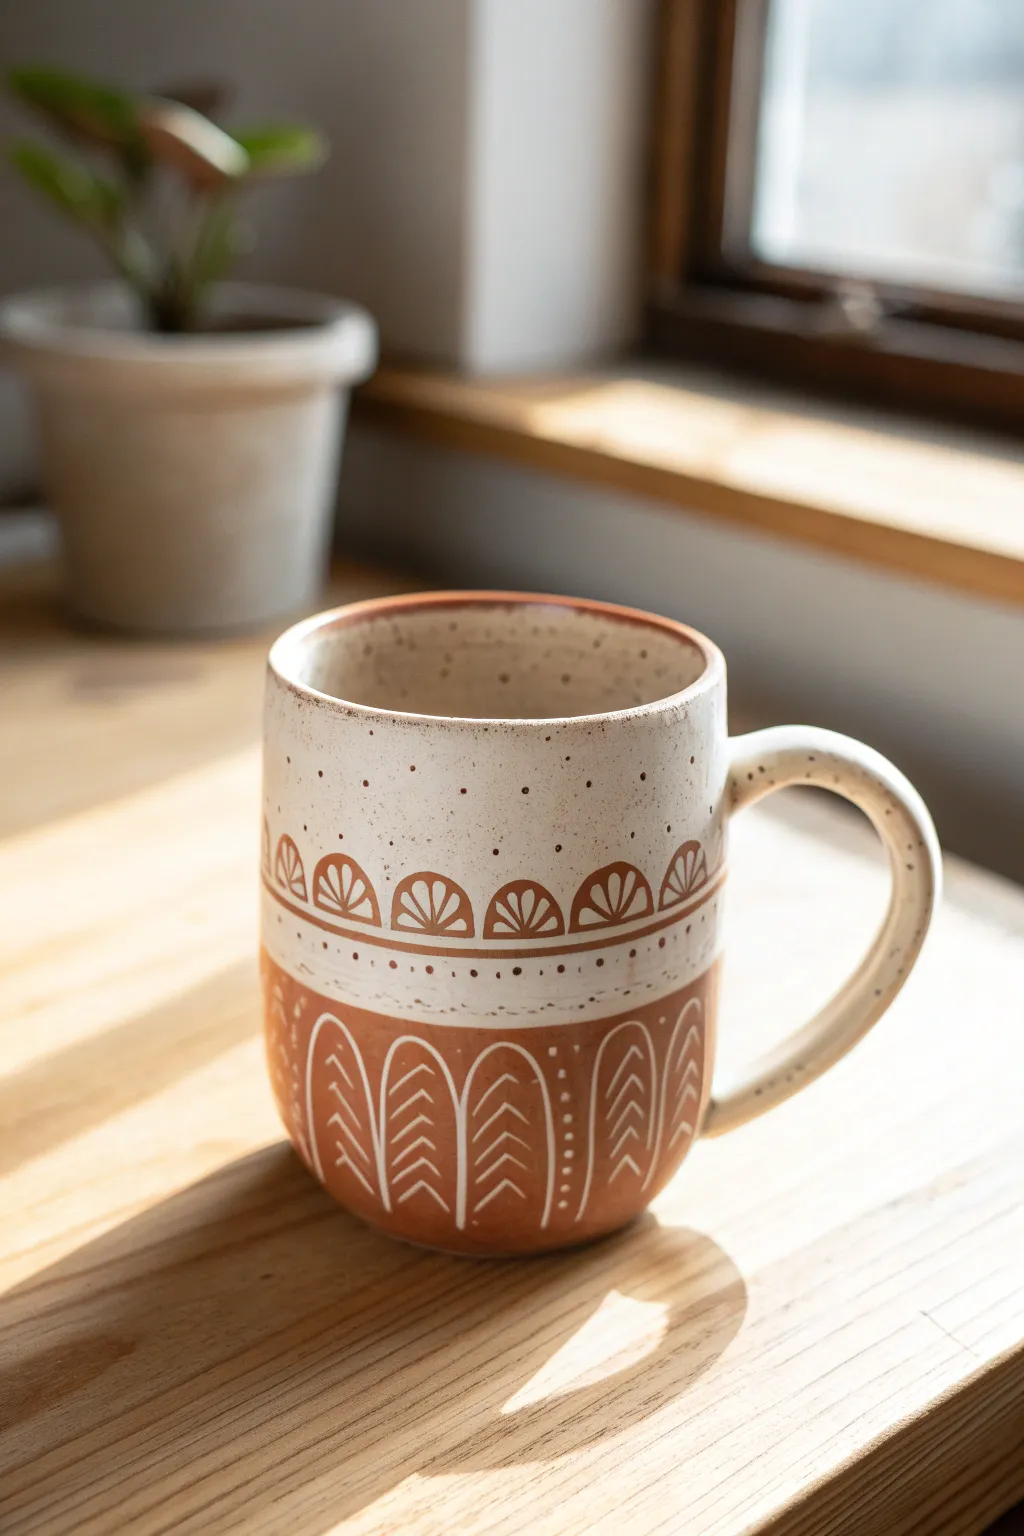
This project transforms a simple wheel-thrown or hand-built mug into a textured piece of folk art using sgraffito techniques. By carving through a creamy white slip to reveal the warm terracotta clay beneath, you’ll create contrasting bands of arches, scallops, and delicate dots.
Step-by-Step Guide
Materials
- Leather-hard clay mug (red or brown stoneware clay body)
- White or cream underglaze (or colored slip)
- Wide soft fan brush (hake brush)
- Sgraffito tool with a small loop tip
- Needle tool or sharp pencil
- Damp sponge
- Clear transparent glaze
- Kiln access
Step 1: Preparation and Slip Application
-
Assess your canvas:
Begin with your mug at a firm leather-hard stage. The clay needs to be sturdy enough to handle but soft enough to carve into without chipping. If you made the mug yourself, ensure the handle is securely attached and the rim is smooth. -
Apply the background:
Using a soft fan brush, apply 2-3 even coats of white underglaze or slip over the entire exterior surface of the mug, stopping just inside the rim. I like to let the underglaze become matte—no longer shiny—between coats to prevent dragging and streaking. -
Initial setting period:
Allow the final coat of slip to dry until it is no longer tacky to the touch. It shouldn’t be bone dry, or it will flake when you carve. Aim for a ‘chocolate bar’ consistency.
Clean Lines Tip
Work with gravity! Hold the mug upside down while carving the bottom sections. This prevents clay crumbs from falling into the damp white slip areas you want to keep pristine.
Step 2: Designing the Bands
-
Establish the horizon lines:
Place your mug on a banding wheel. Using a needle tool, lightly etch two horizontal lines around the circumference while slowly spinning the wheel. Place one line about a third of the way up from the bottom, and another line about an inch above that one. -
Define the bottom zone:
The bottom third will be the negative space section where we reveal the most clay. Using your sgraffito loop tool, carve away the white slip below your lower guideline, leaving the clay exposed. Don’t carve all the way to the foot; leave a clean edge. -
Mark the arches:
In this newly exposed clay band, switch to applying slip again. Using a very fine brush, paint a series of vertical arches (like elongated cathedral windows) evenly spaced around the base. Alternatively, you can leave the white slip intact originally and just carve the negative space around the arches, which is often easier. -
Detail the arches:
If you chose the carving method (leaving white arches): Use your small loop tool to carve vertical ‘V’ shapes or chevrons inside each white arch. This mimics a leaf or feather pattern. -
Outline the arches:
Use a needle tool or fine sgraffito tip to carve a thin line outlining each arch, creating a crisp separation between the patterned arch and the background clay.
Step 3: Upper Borders and details
-
Create the confetti band:
Between your two horizontal guidelines, the slip should remain white. Using the tip of your needle tool, gently poke small random dots through the slip to reveal tiny specks of the dark clay underneath. Keep the pressure light. -
Sketch the scallop border:
Just above the upper guideline, lightly sketch a row of semi-circles or scallops. Try to keep them uniform in size. -
Carve the scallops:
Using the loop tool, carve out the interior of each scallop shape to reveal the dark clay body. This creates a bold, dark semi-circle against the white upper mug. -
Internal scallop details:
Inside those dark carved semi-circles, use a fine slip trailer or very fine brush to add 3-4 small white lines radiating from the bottom center, like a sunburst. -
Upper specks:
On the top remaining white section near the rim, add a few sporadic speckles with your needle tool to tie the design together with the natural clay texture.
Fixing Mistakes
Carved too much? Don’t panic. Dab a tiny bit of fresh slip over the mistake, let it dry to leather hard, and carve it again. It’s like ‘white-out’ for pottery.
Step 4: Finishing Touches
-
Clean up the crumbs:
Sgraffito creates little clay ‘burrs’ or crumbs. Do not brush them off with your hand while the slip is damp, as you will smear the design. Wait until the mug is bone dry, then use a stiff, dry brush to gently sweep away debris. -
Bisque fire:
Load the mug into the kiln for a bisque firing (usually Cone 04 or 06). This will harden the clay and set the underglaze design permanently. -
Glaze application:
Once specifically cool, rinse the bisque mug quickly to remove dust. Dip the entire mug into a clear, transparent glaze. Ensure the glaze isn’t too thick, or it might cloud the intricate carving. -
Final wipe:
Wipe the foot of the mug clean with a damp sponge to prevent it from sticking to the kiln shelf. -
Glaze fire:
Fire the mug to the final temperature required by your clay and glaze combination (e.g., Cone 5, 6, or 10).
Enjoy your beautifully textured mug with your morning coffee, knowing the design is uniquely yours
Zentangle-Style Doodle Fills

This elegant ceramic project transforms a simple vessel into a textural sampler of patterns using the sgraffito technique. By dividing the surface into a grid, you can explore various geometric and organic motifs like sunbursts, leaf sprigs, and delicate stippling all on one piece.
Detailed Instructions
Materials
- Leather-hard ceramic tumbler or cup (white stoneware or porcelain works best)
- Wide, flat paintbrush
- Pencil (light graphite)
- Ruler or flexible measuring tape
- Sgraffito loop tool (small)
- Needle tool or sharp pin
- Small carving gouge
- Clear transparent glaze
- Damp sponge
Step 1: Preparation and Mapping
-
Surface Preparation:
Ensure your ceramic cup is at the perfect leather-hard stage—firm enough to handle without warping, but soft enough to carve easily. Wipe the surface gently with a barely damp sponge to smooth any imperfections. -
Determine the Grid:
Using a flexible measuring tape, measure the circumference and height of your cup. Plan out a grid system; for this design, you’ll want roughly square or slightly rectangular sections arranged in stacked rows. -
Sketch the Lines:
Lightly sketch your grid directly onto the clay body using a pencil. Don’t worry about the graphite marks; they will burn off in the kiln. These lines will serve as the boundaries for your different doodle zones. -
Carve the Boundaries:
With a needle tool or a very fine loop tool, carefully carve shallow grooves along your pencil grid lines. This physically separates the design blocks and gives the piece a patchwork quilt feel.
Clean Lines Pro-Tip
Keep a small, dry paintbrush handy while carving. Frequently dusting off the clay scraps prevents them from getting pressed back into your fresh grooves.
Step 2: Carving the Patterns
-
Rainbow Block:
Select a block for the rainbow motif. Using your needle tool, carve a set of concentric semi-circles starting from the bottom center of the block. Deepen the lines slightly to create shadow. -
Sunburst Rays:
In the adjacent section or surrounding the rainbow, carve straight lines radiating outward to fill the remaining negative space, creating a dynamic energy contrast. -
Stippled Dots:
Choose a block for texture. Instead of drawing lines, press the tip of a small round tool or the back of a drill bit into the clay to create an organized grid of raised dots or small indentations. -
Leafy Sprig:
In the next available square, lightly sketch a central vertical stem. Carve simple, pointed oval shapes branching off symmetrically to create a focused botanical element. -
Swirls and Spirals:
Fill another section with organic, freehand spirals. Vary the size of the swirls, letting them touch the borders of the grid for a seamless look. -
Cross-Hatch Textures:
For the bottom row, try a heavier texture. Carve diagonal lines in one direction, then cross them perpendicularly to create a raised diamond or pyramid pattern. -
Micro-Stippling:
Use your sharpest needle tool to prick tiny clusters of holes (stippling) in a reserved section. I find varying the density of these dots creates a lovely gradient shading effect without removing too much clay.
Level Up: Color Pop
Before carving, paint squares of different colored underglaze on the leather-hard clay. When you carve through, you’ll reveal the clay body beneath for a two-tone effect.
Step 3: Refining and Finishing
-
Clean Up Burrs:
Once all carving is complete, let the piece dry slightly until it is bone dry. Gently brush away the little clay crumbs (burrs) using a soft, dry brush. Do not use a wet sponge here, or you’ll blur your crisp lines. -
Bisque Fire:
Load the cup into the kiln for a bisque firing according to your clay body’s specifications (usually cone 04 or 06). This hardens the clay and prepares it for glazing. -
The Wash (Optional):
To highlight the carved lines, apply a dark oxide wash (like iron oxide or a dark underglaze) over the textured areas, then wipe it back with a damp sponge so the color remains only in the deep recesses. -
Clear Glaze Application:
Dip or brush a clear, transparent glaze over the entire interior and exterior of the cup. This seals the surface and makes it food-safe while letting the carving show through. -
Final Firing:
Fire the piece a second time to the maturation temperature of your clay and glaze (often cone 5 or 6 for stoneware) to finish the piece.
Enjoy using your new textured mug as a daily reminder of your creativity
Bold Negative-Space Silhouettes
This project combines the rustic charm of speckled stoneware with a striking, high-contrast botanical design. By utilizing negative space and precise carving, you’ll create a bold leaf silhouette that feels organic yet modern.
How-To Guide
Materials
- Bisque-fired stoneware bowl (speckled clay body recommended)
- Black underglaze
- Wide hake brush or soft fan brush
- Pencil
- Sgraffito loop tool (small)
- Needle tool
- Paper stencil of a fig or oak leaf
- Scissors
- Clear transparent glaze
- Damp sponge
- Running water
Step 1: Preparation and Planning
-
Surface Prep:
Begin by wiping down your bisque-fired bowl with a damp sponge. This removes any dust that could prevent the underglaze from adhering properly. -
Design Selection:
Sketch or print out a large leaf shape. Fig or oak leaves work beautifully because of their deep lobes. Choose a size that will fill almost the entire bottom of the bowl for maximum impact. -
Creating the Stencil:
Cut out your leaf shape carefully with scissors. This paper cutout will serve as your guide for spacing and placement inside the curved surface.
Chipped Edges?
If underglaze chips while carving, it’s too dry. Mist lightly with water and wait 5 mins. If it smears, it’s too wet—let it sit longer.
Step 2: Applying the Design
-
Tracing the Silhouette:
Place the paper cut-out into the center of the bowl. Hold it steady with one hand and lightly trace the outline with a pencil. The graphite will burn off in the kiln, so don’t worry about being too messy. -
Painting the Silhouette:
Using a soft fan brush, fill in the traced leaf shape with black underglaze. I like to start from the center and work outward to the edges to maintain control. -
Layering Up:
Apply a second and third coat of black underglaze, allowing the surface to become touch-dry between layers. You want a solid, opaque dark color without streaky brushstrokes. -
Initial Drying:
Let the underglaze dry until it is leather-hard to the touch. It shouldn’t be wet or tacky, but not bone dry either, as carving into bone-dry underglaze can chip.
Step 3: Carving the Details
-
Mapping the Veins:
With a needle tool, very lightly scratch the main central vein line down the middle of the leaf. This is just a guideline for your deeper carving. -
Carving the Center Line:
Switch to your small sgraffito loop tool. Carve out the central vein line, applying enough pressure to remove the black underglaze and reveal the creamy clay body underneath. -
Adding Branching Veins:
Carve the secondary veins extending from the center line into each lobe of the leaf. Keep your lines confident and flowing. -
Detailing the Edges:
Add smaller, finer tertiary veins branching off the secondary ones. These extensive details create the visual texture that makes the negative space ‘pop’. -
Clean Up:
Once carving is complete, use a soft, dry brush to gently sweep away the clay burrs and debris from the surface. Do not use water here, or you might smudge the black edges.
Add Depth
For a more organic look, sponge diluted brown underglaze on the rim before the clear glaze to mimic a vintage iron oxide patina.
Step 4: Finishing Touches
-
Bisque Firing (Optional):
If you are worried about smudging during glazing, you can do a second bisque fire now to set the underglaze. Otherwise, proceed carefully to glazing. -
Rim Detail:
If desired, run a damp sponge along the very rim of the bowl to expose the clay body, creating a natural frame for your artwork. -
Glaze Application:
Dip the entire bowl into a clear, transparent glaze. Ensure the glaze is compatible with your clay body’s firing temperature (likely Cone 5 or 6 for stoneware). -
Final Fire:
Fire the bowl in the kiln according to the clay and glaze manufacturer’s firing schedule.
Now you have a stunning, functional piece of art ready for your table or wall display
Topographic Map Contour Lines
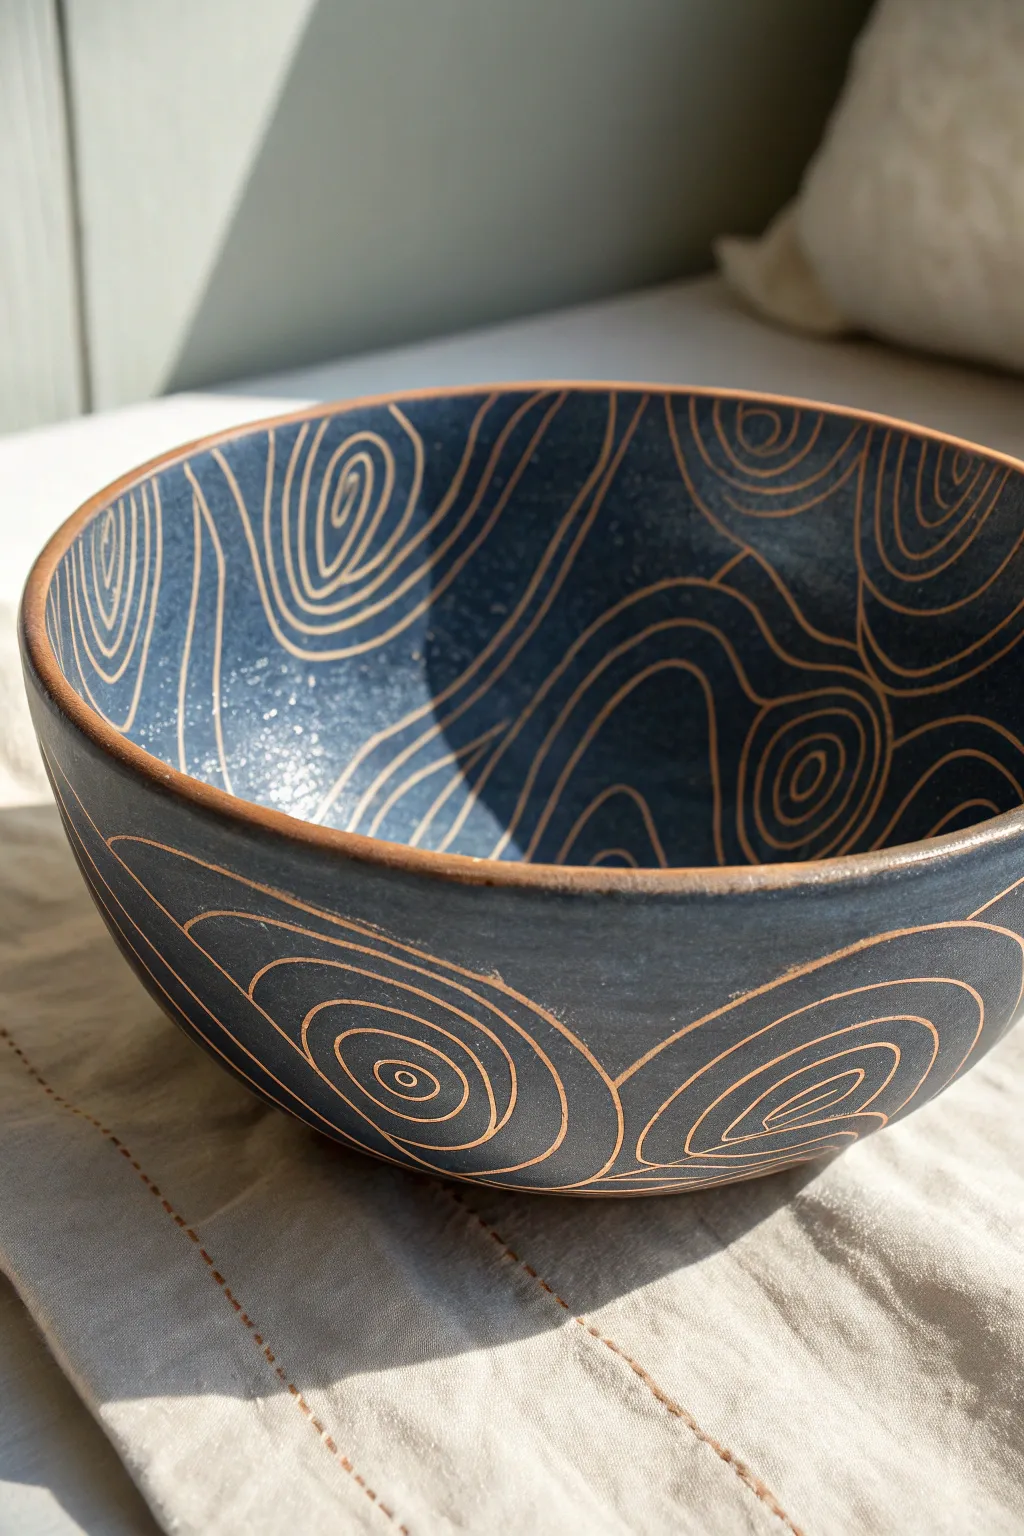
Transform a simple ceramic vessel into a geologic wonder with this topographic map-inspired design. By carving through a dark layer of slip to reveal the warm clay body beneath, you’ll create a striking, high-contrast pattern that mimics the varied elevation of natural landscapes.
Step-by-Step Guide
Materials
- Leather-hard pottery bowl (specifically red or brown stoneware clay body)
- Black or dark navy underglaze (or engobe/slip)
- Wide hake brush or fan brush
- Sgraffito loop tool (small wire loop)
- Needle tool (optional for initial sketching)
- Soft sponge
- Clear transparent glaze (for final firing)
- Dust mask (essential for carving safety)
Step 1: Preparation & Surface Application
-
Assess the Clay State:
Ensure your hand-thrown or built bowl is at a perfect leather-hard stage. It should be firm enough to hold its shape without distorting, but soft enough to carve into easily—roughly the consistency of a block of cheddar cheese. -
Clean the Surface:
Take your soft, slightly damp sponge and gently wipe down the entire surface of the bowl. This removes any dust or grog bumps that might interfere with a smooth underglaze application. -
Apply the First Layer:
Load a wide hake or fan brush with your dark underglaze. Apply a smooth, even coat to the interior of the bowl, rotating it on a banding wheel if you have one to maintain consistency. -
Coat the Exterior:
Repeat the application process on the outside of the bowl. Be mindful of the rim; decide if you want the dark color to go all the way to the edge or leave a small clay border. -
Layer and Dry:
Allow the first coat to lose its wet sheen (become satin-matte). Apply a second and possibly third coat to ensure total opacity. I typically prefer three thin layers over two thick ones to prevent peeling. -
Final Setting:
Let the piece rest until the underglaze is dry to the touch but the clay underneath is still leather hard. If the underglaze is too wet, your tool will smudge; if the clay is bone dry, it will chip.
Chipping lines?
If the clay chips jaggedly while carving, your pot is too dry. Mist it lightly with water, wrap it tightly in plastic, and let it rehydrate for a few hours before trying again.
Step 2: Carving the Topography
-
Plan the Peaks:
Visualize where the ‘peaks’ of your mountains will be. These will be the centers of your concentric circles. Don’t worry about sketching everything; this design works best with an organic, freehand approach. -
Start the Centers:
Using your small wire loop tool, gently crave a small, enclosed organic shape (like a jellybean or distorted oval) to mark the center of your first topographic elevation. -
Carve Concentric Rings:
Working outward from that center shape, carve a second line that follows the path of the first. Maintain a consistent gap between the lines, roughly equal to the thickness of the line itself. -
Vary line spacing:
As you continue outward, let the lines drift apart slightly in some areas and bunch together in others. On a real map, lines close together indicate steep terrain, and wider gaps indicate gentle slopes. -
Navigate the interior:
Move to the inside of the bowl. Create new focal points or ‘peaks’ on the interior walls. It creates a fascinating effect if the interior lines seem to vaguely correspond to the exterior carving, though they don’t need to match perfectly. -
Merge the systems:
Eventually, your concentric rings from different peaks will meet. When two systems of lines approach each other, create a ‘saddle’ shape where the lines gently curve away from the collision point, blending the two topographies. -
Rim Consideration:
When your carving lines reach the rim, let them flow over the edge naturally to connect the interior and exterior patterns, giving the illusion that the object was carved from a single block of stone. -
Clean the Crumbs:
As you carve, clay burrs and crumbs will accumulate. Do not brush them away with your hand, as this might smear the dark slip. Instead, carefully tip the bowl upside down or use a soft, dry brush to whisk them away.
Add Elevation Markers
Make it look like a real map: Occasionally break a contour line and lightly carve a tiny number into the gap, representing the ‘elevation’ height.
Step 3: Finishing Touches
-
Bisque Fire:
Once the carving is complete and the piece has slowly dried to bone-dry status, fire it to bisque temperature (usually cone 04 or 06, depending on your clay). -
Clear Glaze Application:
After the bisque fire, wipe the piece with a wet sponge to remove dust. A quick dip in a clear transparent glaze will seal the porous clay and make the sgraffito lines pop. -
Final Fire:
Fire the piece a final time to the maturity temperature of your clay body (likely cone 5/6 or cone 10).
Enjoy using your geological masterpiece to map out your next meal
Faux Lace and Doily Patterns
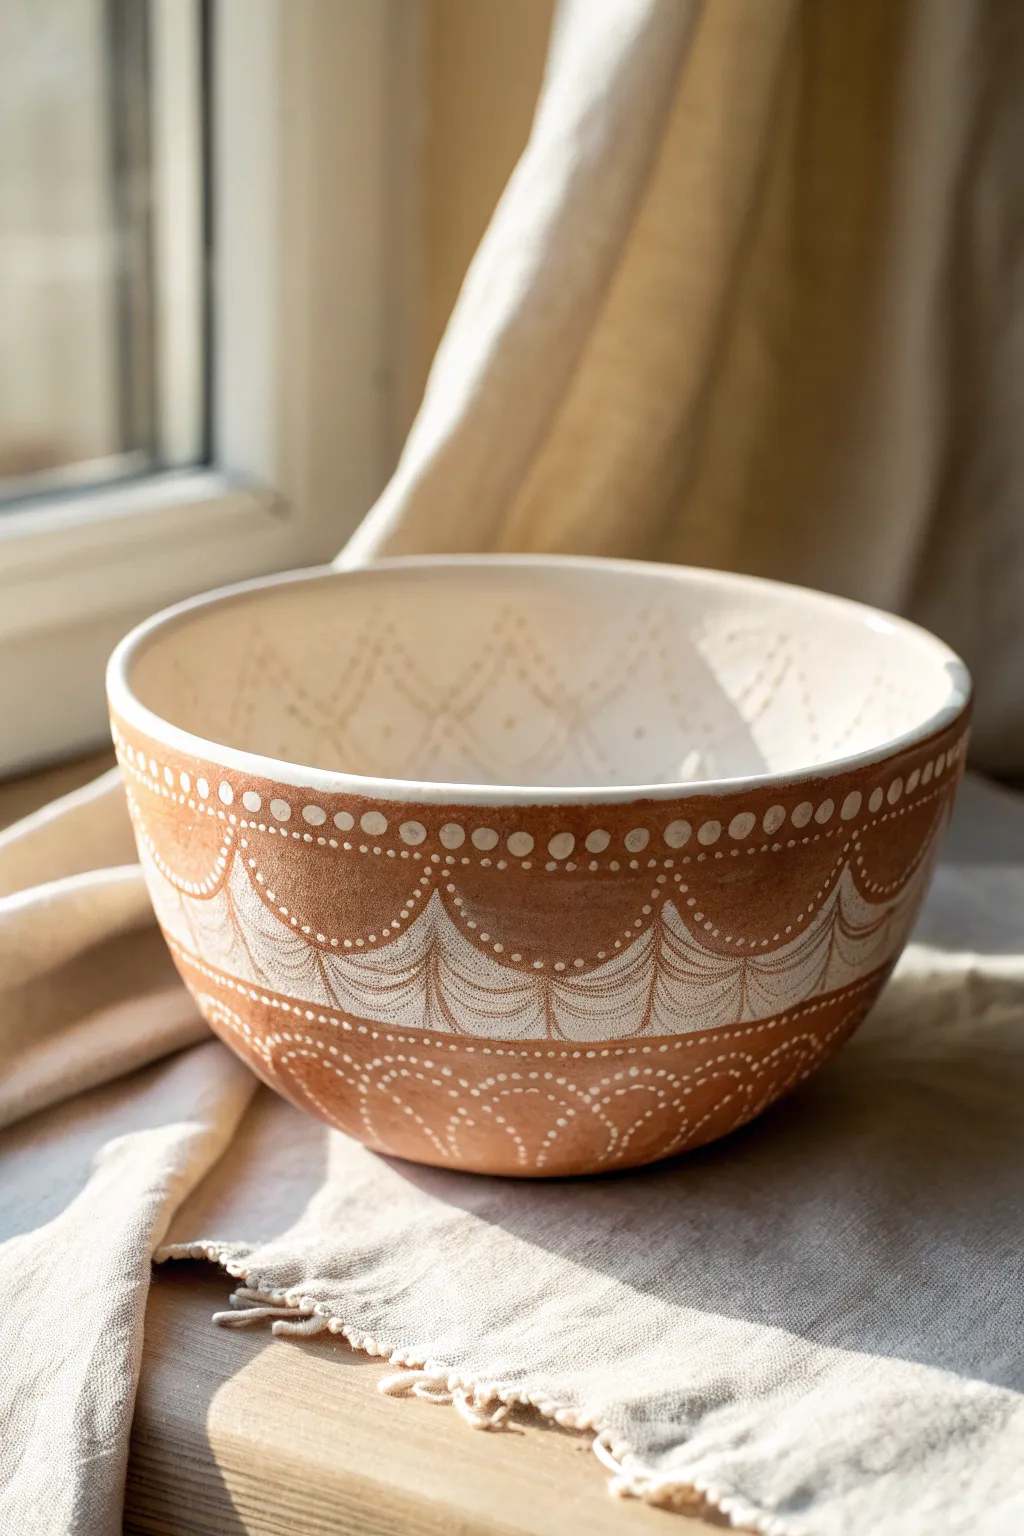
This elegant ceramic bowl features a stunning faux lace design created using the sgraffito technique, where white slip is carved away to reveal the warm terracotta clay beneath. The intricate draping patterns mimic the softness of fabric, making this a perfect centerpiece that balances rustic charm with refined detail.
Step-by-Step Tutorial
Materials
- Leather-hard pottery bowl (terracotta or red clay body)
- White underglaze or slip
- Soft fan brush or hake brush for slip application
- Sgraffito carving tool (fine loop or needle tool)
- Pencil or light marker (optional for guidelines)
- Clear transparent glaze
- Damp sponge
- Pottery wheel or banding wheel (optional but helpful)
Step 1: Preparation & Application
-
Surface Preparation:
Begin with a leather-hard bowl made of red clay. Ensure the surface is smooth and free of grog or debris by running a rubber rib over the exterior. This smooth canvas is crucial for clean carving lines later. -
Apply White Slip:
Using a soft fan brush, apply 2-3 even coats of white slip or white underglaze to the exterior of the bowl. Alternatively, create a reverse effect by starting with a white bowl and applying a terracotta-colored slip, which matches the visual style of carving white details into brown. -
Let it Set:
Allow the slip to dry until it is no longer tacky but the clay underneath is still leather hard. I usually test this by touching it lightly; if no color transfers to my finger but it feels cool, it’s ready. -
Mark Guidelines:
Lightly sketch your main horizontal dividing lines using a soft pencil. You’ll want a rim border, a central ‘draped’ section, and a lower border near the foot. The pencil marks will burn off in the kiln.
Step 2: Carving the Lace Pattern
-
Carve the Draped Arches:
Start with the central band. Using a fine carving tool, scratch in series of connecting arches or ‘swags’ that look like draped fabric. Ensure the curves are consistent in size around the circumference. -
Add Vertical Detail:
Within each draped arch, carve fine vertical lines that follow the curve of the drape. These lines should be denser at the top points of the arches and create a fanned-out effect at the bottom, mimicking the folds of lace. -
Create the Dot Border:
Above your draped arches, carve a row of small, evenly spaced circles or dots. To keep them uniform, try using a small loop tools or the back end of a drill bit to gently depress the clay before clearing the slip. -
Embellish the Rim:
Create a distinct upper border near the rim. Carve a horizontal line about an inch from the top edge, and then fill the space above it with a repeating geometric motif, like small scallops or simple vertical ticks. -
Detail the Lower Bowl:
Mirror the upper curve design on the bottom portion of the bowl. Carve a secondary row of smaller arches near the base, filling them with tiny stippled dots instead of lines for textual variety. -
Refine the Lines:
Review your work. Use your needle tool to sharpen any fuzzy edges where the slip might have chipped. The contrast between the crisp white lines and the warm clay body is what makes this design pop. -
Clean Up Burrs:
Once the carving is complete and the bowl is bone dry, gently brush away the clay crumbs (burrs) with a stiff, dry brush. Do not use water here, as it may smudge the design.
Chipped Slip?
If the slip chips off in chunks while carving, the piece is too dry. Mist it lightly with water, wrap it in plastic, and let it sit for a few hours to rehydrate before trying again.
Step 3: Finishing
-
Bisque Fire:
Load your bowl into the kiln for a bisque firing (usually Cone 04 or 06). This will harden the clay and set your design permanently. -
Apply Clear Glaze:
After the bisque firing, dip the entire bowl into a clear transparent glaze. This seals the clay and gives it a glossy finish that highlights the contrast between the slip and the clay body. -
Clean the Foot:
Wipe the bottom foot ring of the bowl with a damp sponge to remove any glaze. This prevents your artwork from fusing to the kiln shelf. -
Final Firing:
Fire the bowl a second time to the maturation temperature of your specific clay body and clear glaze (typically Cone 5 or 6 for stoneware).
Add Texture
Use a small drill bit or the head of a nail to gently stamp tiny indentations into the ‘lace’ areas before carving to give the fabric pattern a realistic, embroidered texture.
Once fired, the rich clay tones will shine through your delicate white lacework, creating a timeless piece perfect for serving or display
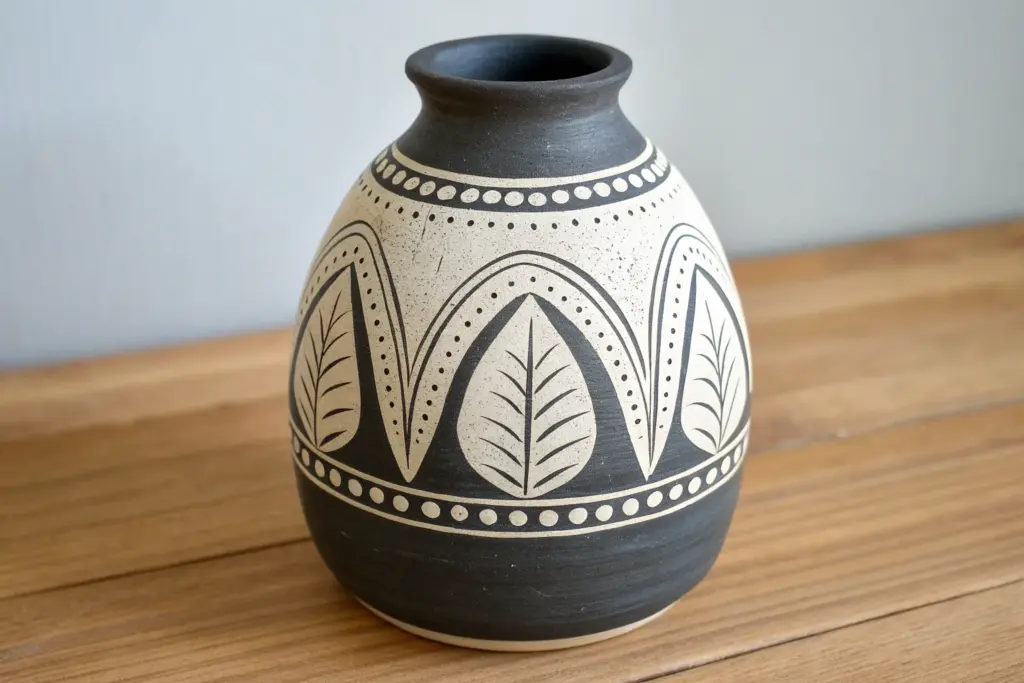
Layered Color Reveal Sgraffito
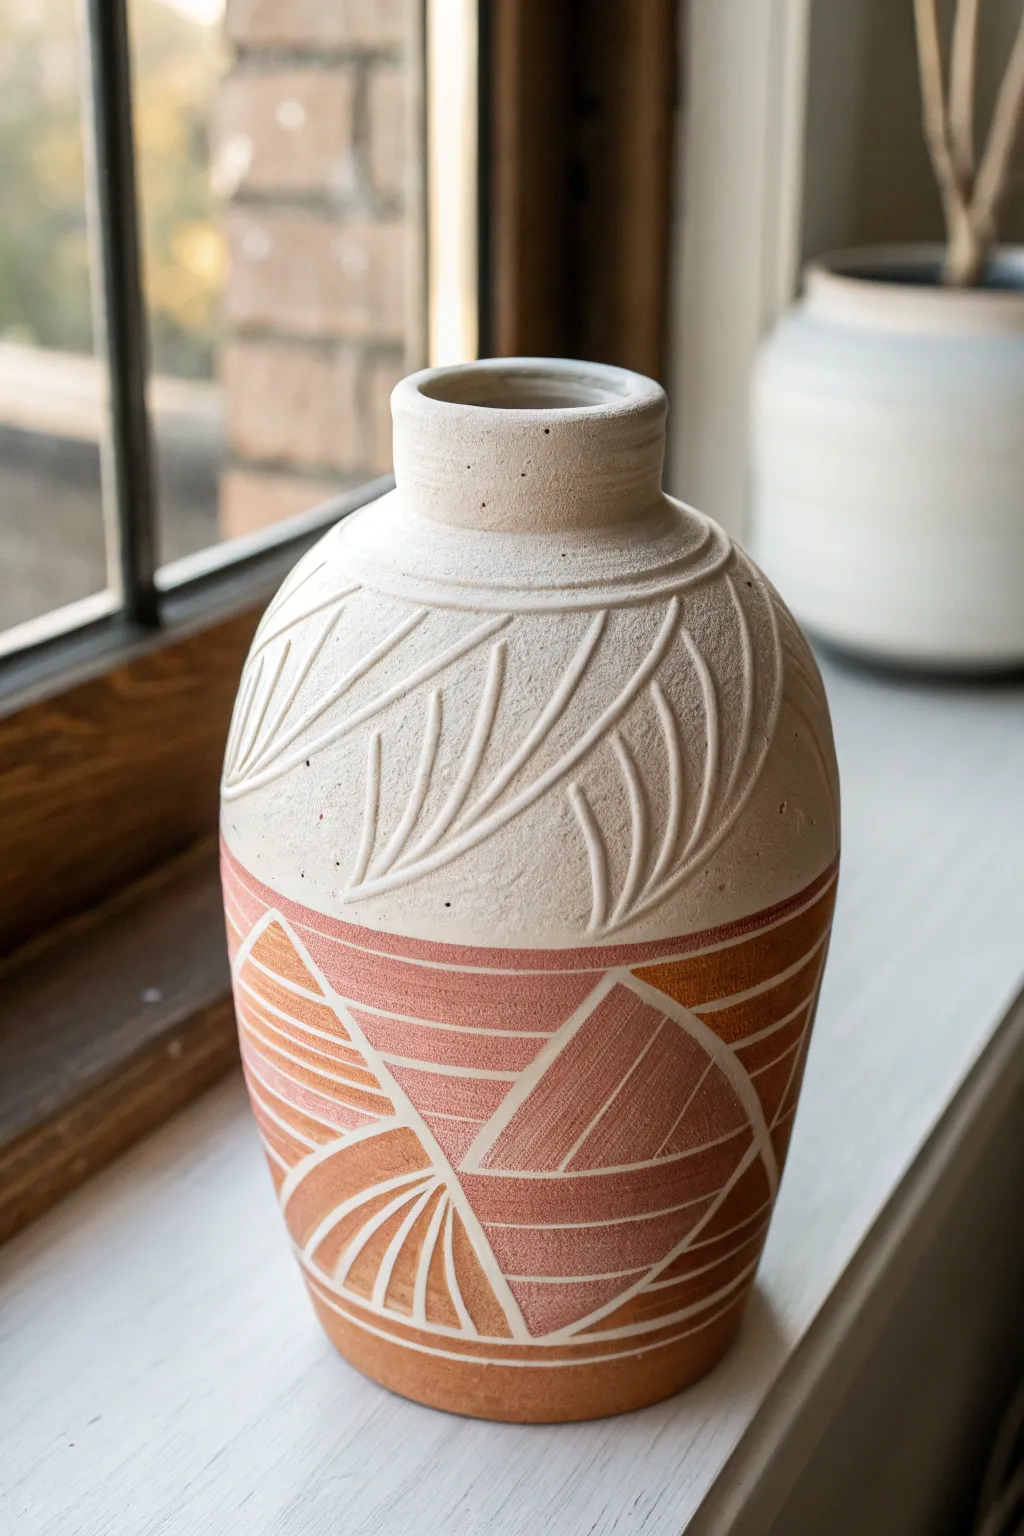
Merge earthy warmth with crisp modern design in this stunning layered sgraffito vase. By carving through a creamy white slip to reveal bands of terracotta and geometric patterns below, you’ll create a piece that feels both ancient and contemporary.
Detailed Instructions
Materials
- Leather-hard stoneware clay vessel (vase form)
- White or cream underglaze or slip
- Terracotta or rust-colored underglaze
- Soft fan brush
- Sgraffito loop tool (small)
- Needle tool
- Geometric stencil (triangle) or stiff paper
- Pencil
- Clear matte glaze
- Sponge
Step 1: Preparation and Base Layering
-
Check moisture level:
Ensure your thrown or hand-built vase is at a perfect leather-hard stage. It should be firm enough to handle without deforming, but cool to the touch and soft enough to carve easily. -
Clean the surface:
Gently wipe the exterior with a barely damp sponge to smooth out any throwing lines or imperfections that might interfere with your carving later. -
Define the zones:
Using a needle tool or pencil, lightly scribe a horizontal line around the vase roughly one-third of the way up from the bottom. This separates your detailed geometric bottom section from the organic upper section. -
Apply the bottom color:
Brush three even coats of terracotta or rust-colored underglaze onto the bottom section of the vase, letting each coat dry until the sheen disappears before applying the next. -
Coat the entire vessel:
Once the rust underglaze is dry to the touch, apply three coats of white or cream slip over the *entire* vase, covering the bare clay on top and the rust underglaze on the bottom. -
Initial drying:
Allow the vase to sit until the white slip loses its wet sheen and feels firm, but not bone dry. If it’s too wet, the clay will tear; too dry, and it will chip.
Step 2: Carving the Design
-
Map out the triangles:
Lightly sketch large, intersecting triangles on the bottom section using a pencil. The graphite will burn off, so don’t worry about being messy. -
Carve the bottom borders:
Using your small loop tool, firmly carve out the outlines of your triangles. I like to apply consistent pressure to cut through the white layer and reveal the rich terracotta color underneath. -
Fill triangles with patterns:
Inside each defined triangle, carve distinct fill patterns. Use horizontal lines for some, diagonal hatching for others, and radiating curves for the rounded sections. -
Reveal the color:
For the darker solid triangles, scrape away the white slip entirely within the shape’s border to create bold blocks of the rust color. -
Carve the dividing band:
Carve a double line at the transition point between the top and bottom sections to clearly separate the two design styles. -
Sketch upper leaves:
On the upper white section, lightly sketch flowing, fern-like leaf shapes that curve gently around the shoulder of the pot. -
Carve the organic lines:
Using the loop tool, carve the veins of the leaves. Since there is no underglaze layer here, you will be revealing the raw clay body, which offers a subtle textural contrast. -
Detail the neck:
Add a few simple horizontal rings around the neck of the vase to frame the opening. -
Cleanup:
Gently brush away the clay crumbs (burrs) with a stiff, dry brush. Be careful not to smudge the white slip.
Clean Lines
Work from the top of the vase downward. This prevents your hand from resting on and smudging the freshly carved areas below as you work.
Step 3: Finishing
-
Bisque fire:
Slowly dry the piece completely, then bisque fire it according to your clay body’s specifications (usually Cone 04). -
Glazing:
Apply a clear matte glaze to the interior for functionality. For the exterior, you can leave it unglazed to highlight the texture, or apply a very thin coat of matte clear glaze to seal it. -
Final firing:
Glaze fire the piece to maturity. The heat will fuse the layers and bring out the depth of the terracotta color against the white.
Level Up: Texture Play
Try leaving the raw clay exposed on the upper half but using a glossy clear glaze only on the bottom colored section for a dual-finish tactic.
Place your finished vase near a window where natural light can catch the ridges of your carving work.