When I’m making stoner clay pieces in my studio, I’m always chasing that sweet spot where something useful turns into a full-on vibe. Here are 18 stoner clay ideas you can totally pull off, starting with the classics and drifting into the delightfully trippy.
Mushroom Lighter Sleeve
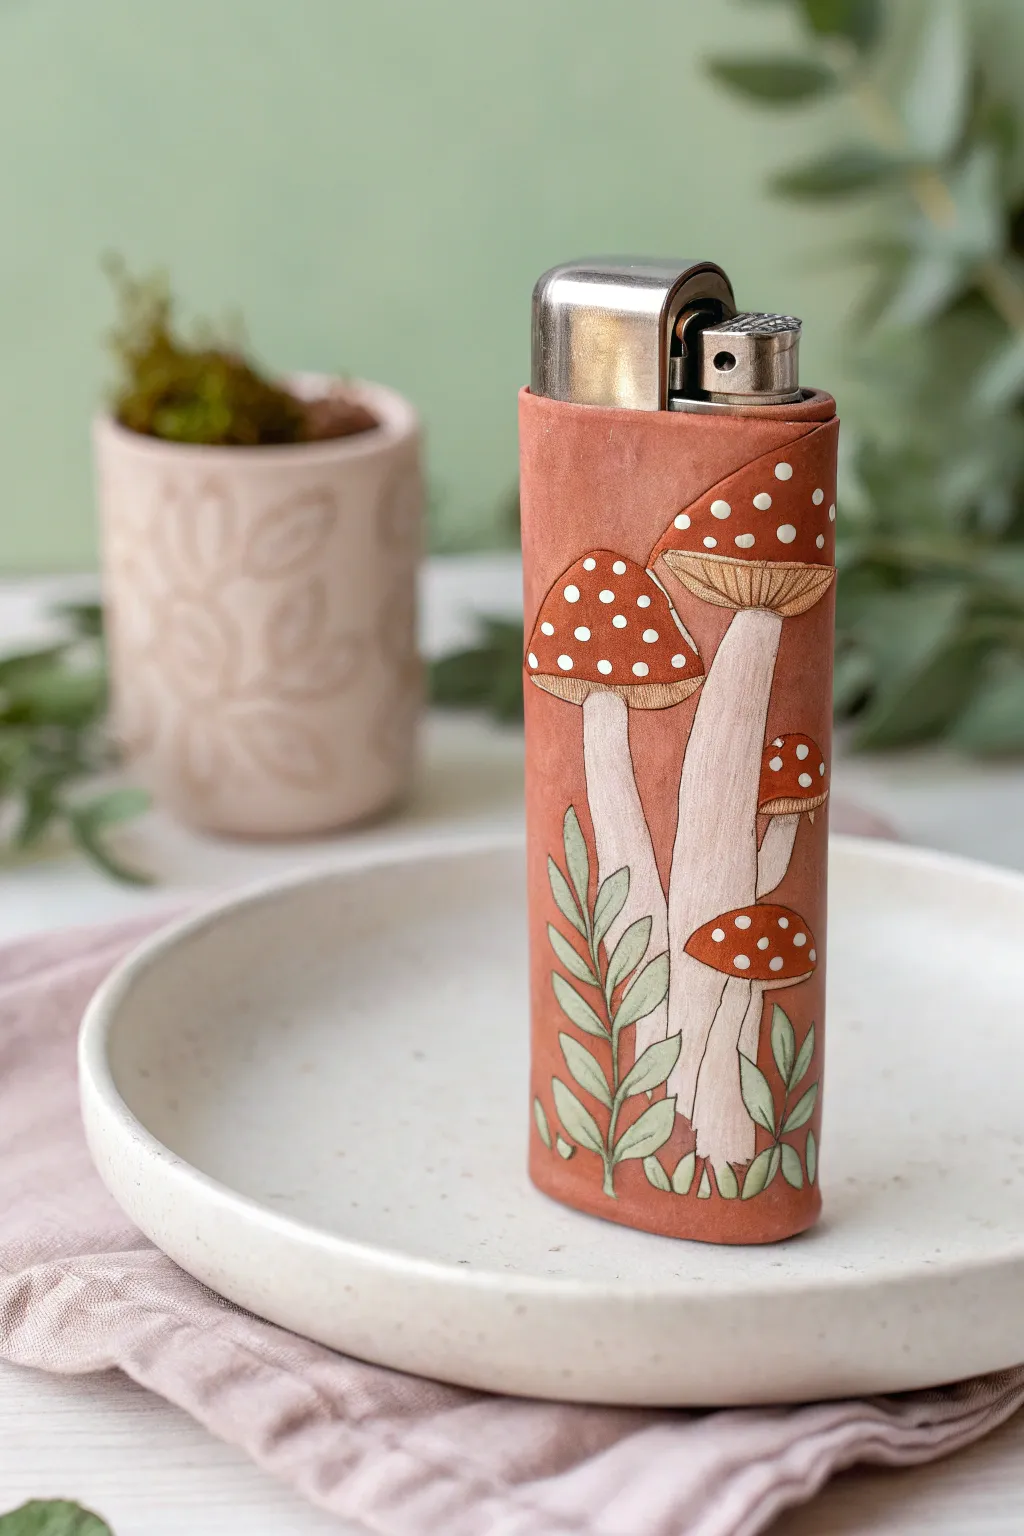
Transform a standard lighter into an enchanted forest treasure with this detailed polymer clay sleeve. Featuring sculptured fly agaric mushrooms and delicate leaves on a terra cotta background, this piece feels as natural and earthy as it looks.
Step-by-Step
Materials
- Polymer clay (terra cotta/brown, white, red, green)
- Standard BIC lighter (for sizing)
- Aluminum foil
- Rolling pin or clay machine
- X-Acto knife or clay blade
- Needle tool or toothpick
- Small ball stylus tool
- Liquid polymer clay (optional)
- Acrylic paints (optional for shading)
- Matte varnish
Step 1: Creating the Base
-
Prepare the form:
Wrap your lighter loosely in a layer of aluminum foil. This prevents the clay from sticking to the plastic lighter during baking and creates a tiny bit of wiggle room for the final fit. -
Roll the base clay:
Condition a block of terra cotta or reddish-brown polymer clay until soft. Roll it out into a flat, even sheet, approximately 2-3mm thick. You want it sturdy but not bulky. -
Measure and cut:
Lay the foil-wrapped lighter on the sheet. Cut a rectangle that is tall enough to cover the lighter body and wide enough to wrap around with a slight overlap. -
Wrap the sleeve:
Carefully wrap the clay rectangle around the foil-covered lighter. Trim the excess so the edges meet perfectly in a butt joint rather than overlapping, which keeps the thickness uniform. -
Smooth the seam:
Use your finger or a clay tool to gently blend the seam until it disappears. The heat from your hands helps smooth the clay together seamlessly. -
Shape the bottom:
Trace the bottom of the lighter onto your clay sheet and cut out the oval shape. Press this onto the bottom of your sleeve, blending the edges up into the walls to seal the bottom.
Step 2: Sculpting the Mushrooms
-
Form the stems:
Roll thin snakes of white clay for the mushroom stems. Flatten them slightly and press them onto the sleeve. I like to curve them a bit to make them look organic and growing upwards. -
Add the caps:
Shape small triangles or half-circles of red clay for the mushroom caps. Press them firmly onto the tops of the stems. Make sure you vary the sizes—one large main cap and a few smaller ones look best. -
Detail the gills:
Take a tiny bit of tan or light brown clay and flatten it into a crescent shape to fit under the red caps. Use your needle tool to etch fine vertical lines for the mushroom gills. -
Create the spots:
Roll incredibly tiny balls of white clay. Press them gently onto the red caps to create the classic fly agaric polka dots. Flatten them so they look painted on rather than raised bumps. -
Texture the stems:
Use a needle tool to scratch very light, vertical texture lines into the white stems. This mimics the fibrous nature of real mushroom stalks.
Sticky Situation
If the clay sticks to the foil after baking, soak the whole piece in water for a few minutes. This helps the foil release from the inner walls without cracking the clay.
Step 3: Adding Foliage and Firing
-
Make the leaves:
Roll small teardrop shapes from sage green clay. Flatten them and arrange them at the base of the mushrooms to create little fern-like clusters. -
Detail the veins:
Using your needle tool or knife tip, carefully impress a central vein down each leaf. This small detail adds significant realism to the foliage. -
Final inspection:
Check over the entire piece for fingerprints. Lightly brush them away with a bit of baby oil or simply smooth them with your finger before baking. -
Bake carefully:
Stand the lighter upright on a baking sheet. IMPORTANT: Remove the actual lighter before baking! Leave the foil inside to hold the shape. Bake according to your clay package instructions (usually 275°F for 15-30 mins). -
Cool and finish:
Let the sleeve cool completely before handling. Once cool, carefully remove the foil from inside. Test the fit on your lighter. -
Seal the piece:
Apply a thin coat of matte varnish over the entire exterior. This protects the clay from dirt and oils from your hands during daily use.
Glow Up
Mix glow-in-the-dark powder into the white clay for the mushroom spots. Your lighter sleeve will reveal a magical hidden feature when the lights go out.
Slide your lighter into its new home and enjoy the cottagecore vibes every time you use it


Drippy Melt Lighter Case
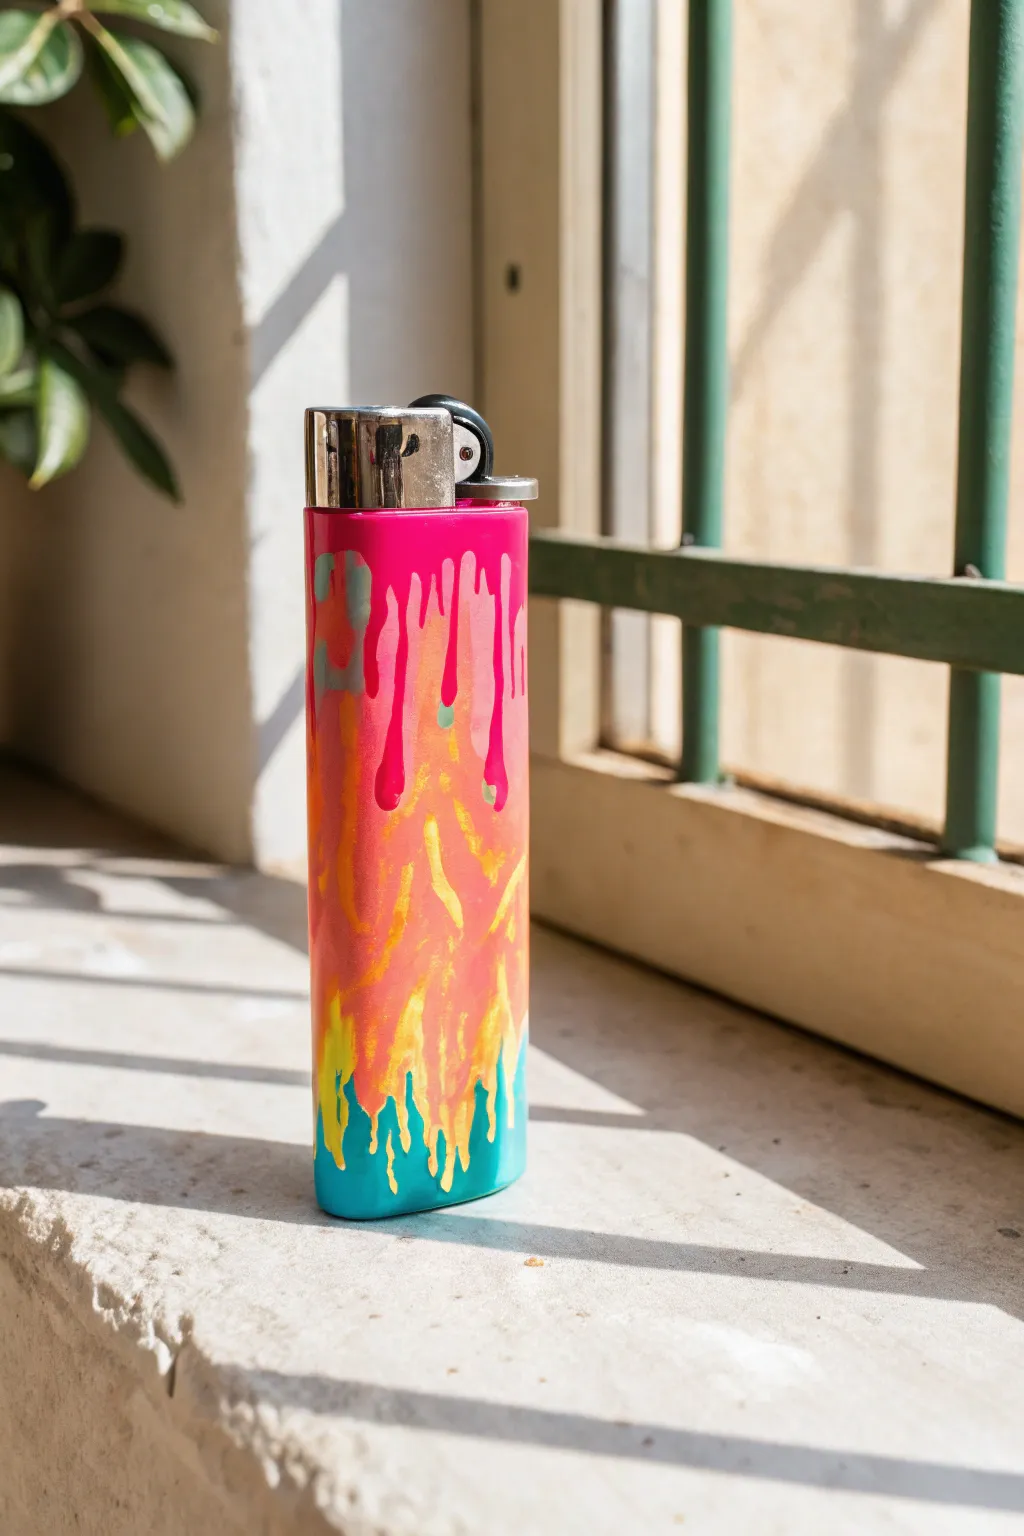
Transform a boring disposable lighter into a psychedelic accessory with this vibrant, melting gradient design. Using polymer clay and acrylics, you’ll create a durable sleeve that features tactile drips flowing into each other for a mesmerizing, handcrafted look.
How-To Guide
Materials
- Standard size lighter (Clipper style recommended)
- White or translucent polymer clay
- Rolling pin or pasta machine
- Clay sculpting tools (needle tool, small ball stylus)
- X-Acto knife or craft blade
- Acrylic paints (Hot Pink, Bright Orange, Yellow, Teal/Turquoise)
- Fine detail paintbrushes
- Gloss varnish or resin (optional but recommended for shine)
- Oven for baking
Step 1: Sculpting the Base
-
Prepare the clay sheet:
Condition your white polymer clay until it is soft and pliable. Roll it out into a thin, even sheet, roughly 2-3mm thick. It needs to be long enough to wrap around the lighter completely. -
Check the fit:
Wrap the clay sheet around your lighter to measure the size. Cut a rectangle that covers the body of the lighter, leaving the metal top exposed. Ensure the seam meets perfectly without overlapping too much. -
Secure the sleeve:
Gently press the clay onto the lighter (if baking on the lighter) or a metal form. Smooth the vertical seam with your finger or a clay tool until it disappears and the surface is seamless. -
Create the top drips:
Roll tiny snakes of clay and flatten them slightly. Arrange them starting from the top rim, extending down about a third of the way. Use your sculpting tool to create rounded, gravity-defying drip shapes at the ends. -
Sculpt the bottom drips:
Repeat the process for the bottom edge, but this time have the drips reaching upward. These should be slightly shorter and irregular, resembling splashing liquid or melting slime. -
Blend the layers:
Use a silicone tool or your finger to smooth the edges of your added ‘drips’ into the base sleeve layer. You want them to look raised and 3D, but attached firmly so they don’t snap off later. -
Refine the texture:
Go over the entire surface to remove fingerprints. If you want a super smooth finish, you can brush a tiny amount of baby oil or clay softener over the clay before baking. -
Bake the clay:
Bake the sleeve according to your clay package instructions. If the lighter is plastic, *do not* bake it inside; remove the sleeve carefully or use a metal blank. Let it cool completely before painting.
Step 2: Painting the Gradient
-
Base coat:
Apply a thin layer of white acrylic paint (gesso handles well here) to prime the surface. This ensures your neon colors will pop vividly. -
Apply the hot pink:
Start at the very top rim. Paint the raised drips and the upper section with your hot pink acrylic. Extend the color down past the drip shapes into the middle section slightly. -
Add the teal base:
Paint the bottom section and the upward-reaching drips in teal or turquoise. Bring the color up to meet the middle section, leaving a gap for the transition colors. -
Create the orange transition:
While the pink is dry (or slightly tacky for blending), paint the mid-section orange. Blend it upward into the pink to create a smooth reddish-orange transition. -
Add yellow highlights:
Mix a bright yellow into the orange near the center and towards the teal. This creates that fiery, glowing core effect seen in the reference. -
Detail the drips:
Using a fine detail brush, sharpen the edges of the drips. If the pink drips overlap the orange background, ensure the pink edge is crisp to emphasize the 3D effect. -
Add subtle splatters:
I like to take a very small amount of teal and add tiny dots or ‘splatters’ into the orange/pink section to make the melt look chaotic and organic. -
Seal the deal:
Once the paint is fully dry, coat the entire piece in a high-gloss varnish or a thin layer of UV resin to replicate that wet, shiny look.
Smooth Operator
To prevent fingerprints, lightly dust the clay with cornstarch or wear latex gloves while smoothing seams.
Glow Up
Swap standard acrylics for UV-reactive neon paints or glow-in-the-dark pigment powder for a sleeve that lights up under blacklight.
Use your new custom piece to spark conversation at your next session


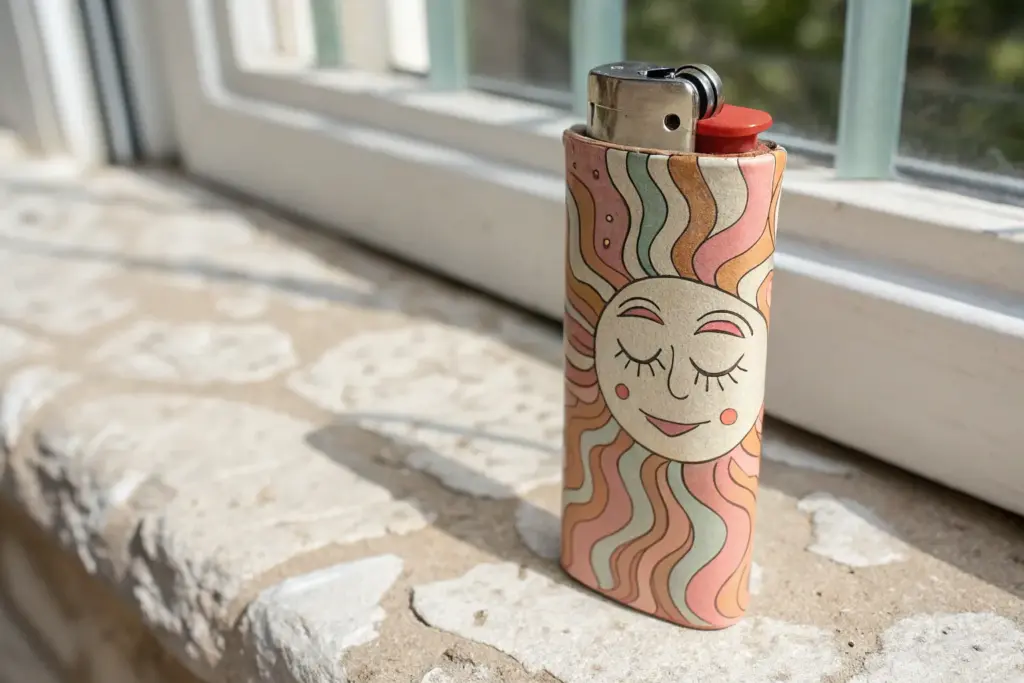
Goofy Chill-Face Ashtray
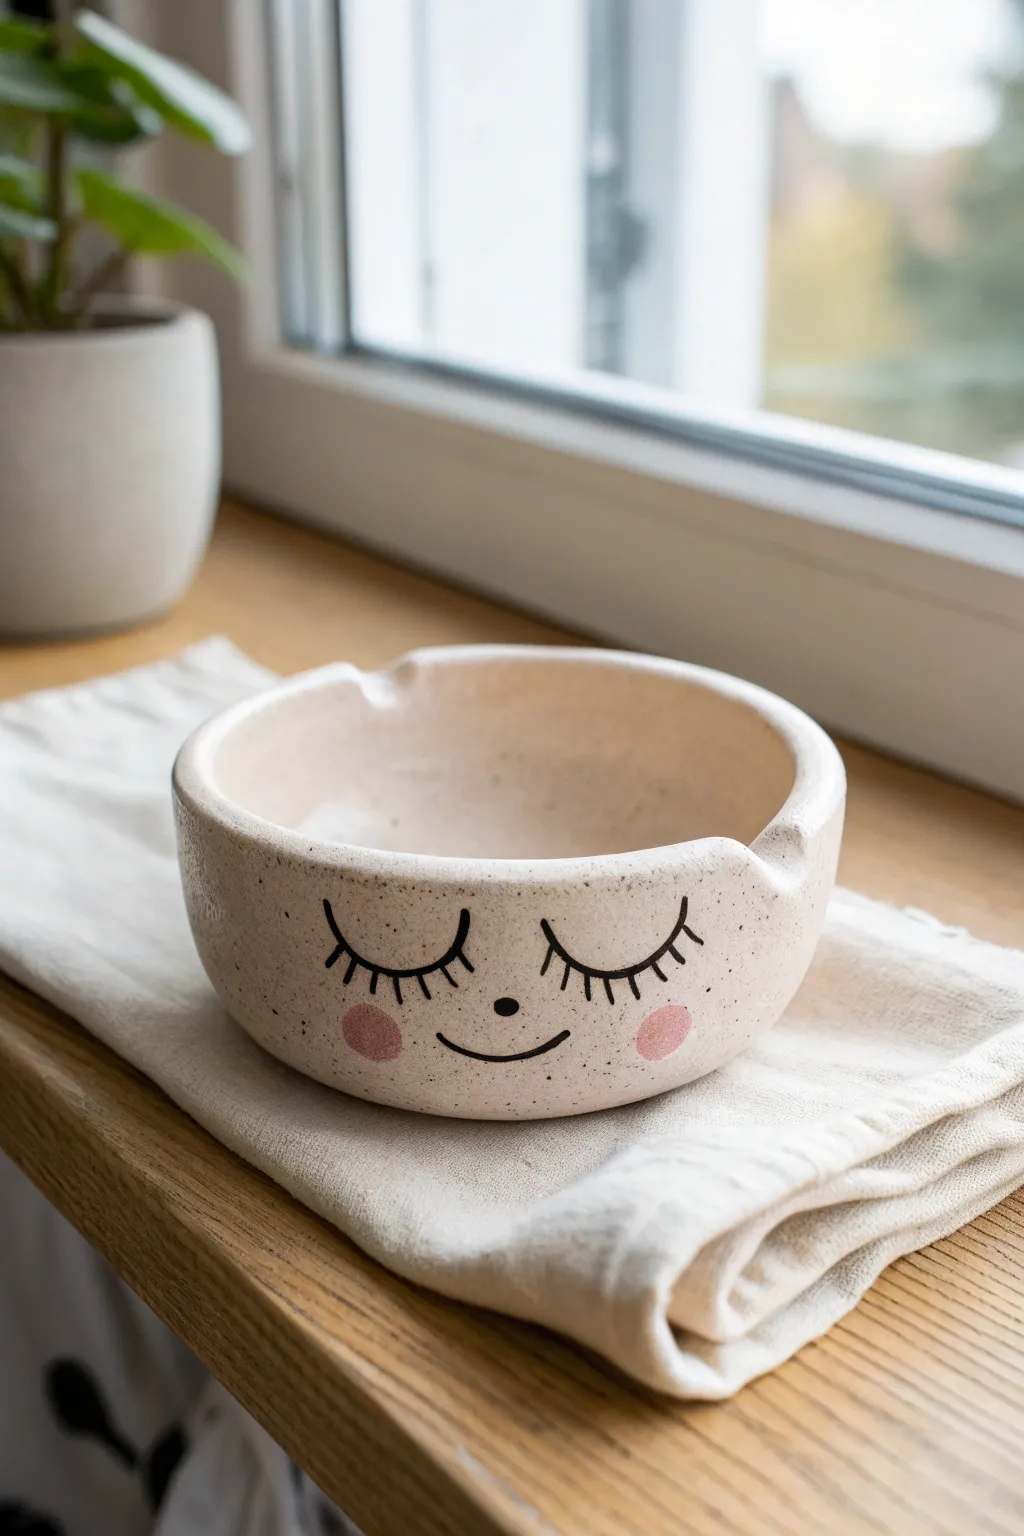
This charming, speckled ceramic ashtray features a serene, sleepy face that perfectly sets a relaxed mood. Its soft beige glaze and simple hand-painted details make it approachable for beginners while adding a touch of whimsy to your coffee table.
Detailed Instructions
Materials
- Polymer clay (white or beige granite effect)
- Acrylic rolling pin
- Circle cutter or a round bowl for tracing
- Craft knife or clay blade
- Smoothing tools or a little bit of water
- Acrylic paints (black and soft pink)
- Fine detail paintbrush (size 00 or 0)
- Gloss or matte varnish (compatible with polymer clay)
- Sandpaper 400-grit (optional)
Step 1: Faping the Base
-
Condition the Clay:
Begin by warming up your polymer clay in your hands until it is soft and malleable. If you are using a granite-effect clay, mixing it well ensures the speckles are evenly distributed. -
Roll It Out:
Use your acrylic roller to flatten the clay into a slab about 1/4 inch thick. Try to keep the thickness consistent so the finished piece feels sturdy and substantial in the hand. -
Cut the Base:
Using a large circular cutter or by placing a bowl upside down as a template, cut out a perfect circle from your slab. This will be the floor of your ashtray.
Step 2: Building the Walls
-
Create a Coil:
Roll a long snake or coil of clay. You can also roll out a long rectangular strip if you prefer a smoother, less handmade look, but a thick coil works great for these rounded walls. -
Attach the Wall:
Place the coil on top of the outer edge of your base circle. Gently press it down to adhere it to the base. -
Blend the Seams:
Use a smoothing tool or your thumb to blend the clay from the coil down onto the base, both on the inside and outside. You want the seam to disappear completely so it looks like one solid piece. -
Shape the Rim:
Gently pinch and smooth the walls upwards to get that nice, slight curve shown in the photo. Keep the height relatively low—about 1.5 to 2 inches tall. -
Smooth the Surface:
Dip your finger in a tiny bit of water (or baby oil if using polymer clay) and run it over the entire surface to remove fingerprints and bumps. I find this step crucial for getting that professional ceramic look.
Clean Lines Hack
Drawing perfect eyelashes is tricky. Practice on a scrap piece of paper first, or use a fine-tip permanent marker instead of paint for easier control.
Step 3: Adding Details & Baking
-
Create indentations:
Use the handle of a paintbrush or a thick dowel to press two indentations into the rim opposite each other. These are the classic rests for your cigarettes or joints. -
Refine the Rests:
Smooth the edges of those indentations with your finger so they are rounded and soft, rather than sharp cuts. -
Bake the Clay:
Place the piece on a baking sheet lined with parchment paper. Bake according to your specific clay package instructions (usually around 275°F/130°C for 15-30 minutes per 1/4 inch of thickness). -
Cool and Sand:
Let the piece cool completely. If there are any rough spots, gently wet-sand them with 400-grit sandpaper.
Make it Functional
If you plan to use this frequently, coat the inside bottom only with a thin layer of UV resin. It handles heat better than standard varnish.
Step 4: Painting the Face
-
Sketch the Face:
Lightly pencil in the face design first. Draw two wide, U-shaped eyes with long lashes on the sides, a tiny dot for a nose, and a small upward curved smile. -
Paint the Lines:
Using your finest detail brush and black acrylic paint, carefully trace over your pencil lines. Thin the paint slightly with a drop of water to help it flow smoothly for those delicate eyelashes. -
Add Rosy Cheeks:
Dip a round paintbrush or even a Q-tip into soft pink acrylic paint. Dab two circles on the cheeks. Keep the paint fairly opaque but not too thick. -
Seal the piece:
Once the paint is fully dry, apply 2-3 coats of a gloss or semi-gloss varnish. This protects the paint and gives the clay that shiny, ceramic-glaze finish visible in the photo.
Place your cute new creation on a windowsill to admire its peaceful vibes


Psychedelic Swirl Ashtray
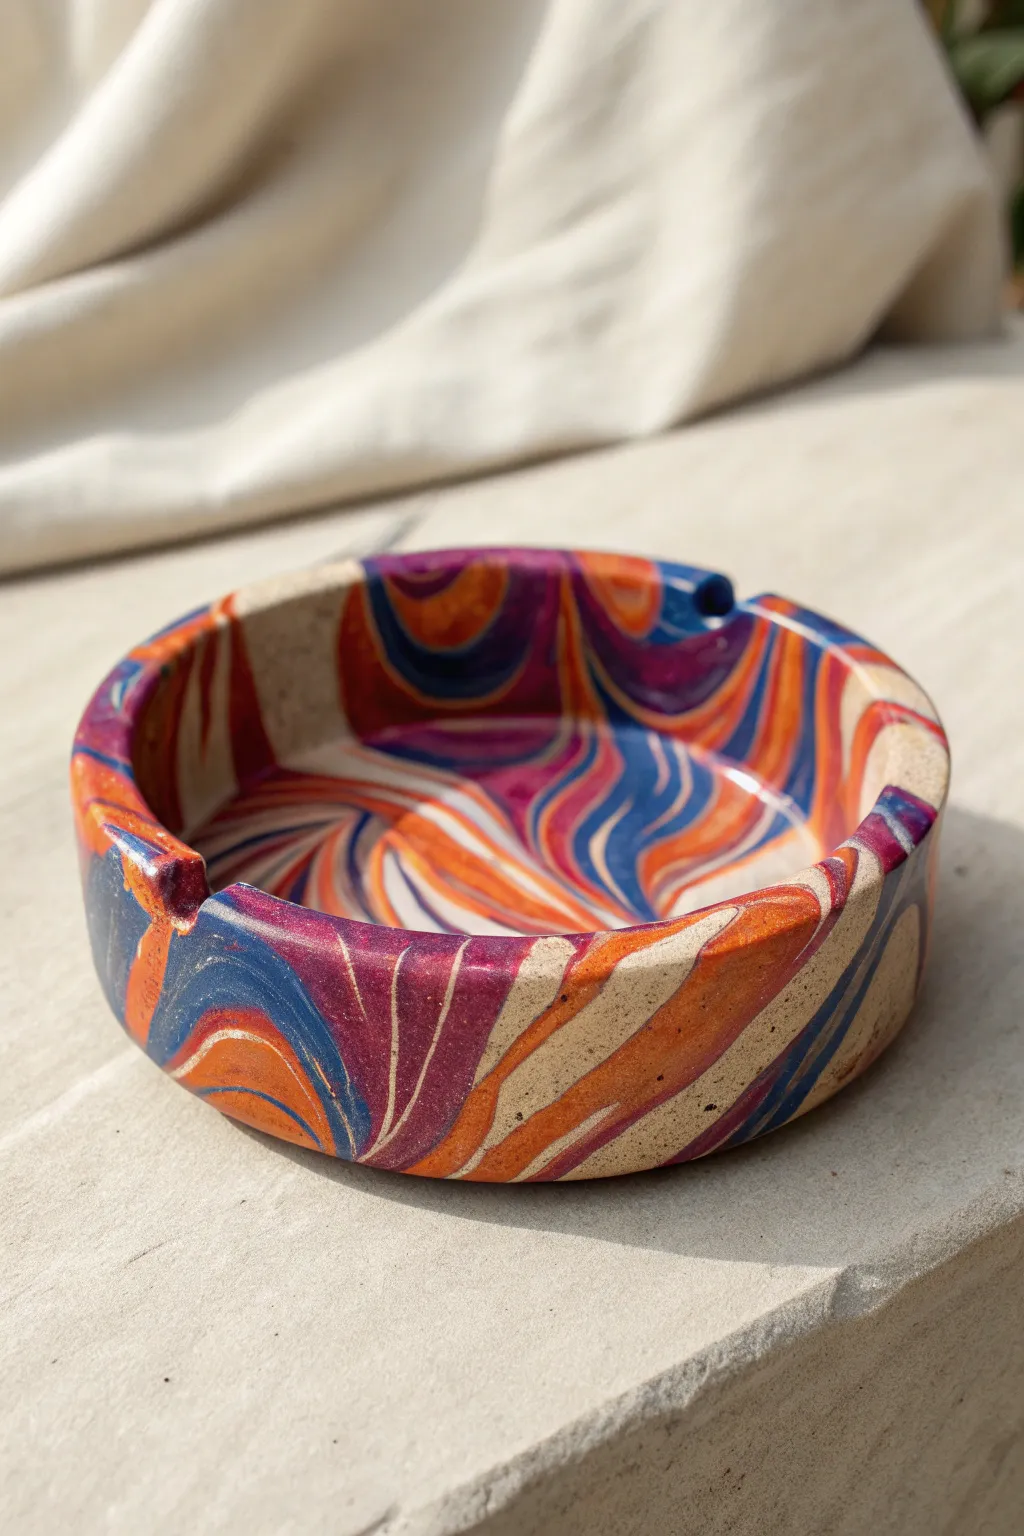
Bring some serious retro vibes to your coffee table with this mesmerizing, psychedelic ashtray. By marbling colored polymer clay together, you’ll create a unique, swirling pattern reminiscent of agate stone or vintage hydro-dipped art.
Step-by-Step Tutorial
Materials
- Polymer clay (beige/sand, orange, royal blue, deep purple)
- Acrylic rolling pin
- Circle cutter (approx. 4-5 inches depending on preference)
- Craft knife or clay blade
- Small round cutter or bottle cap (for cigarette rests)
- Oven-safe glass bowl or ceramic form (for shaping)
- Sandpaper (various grits from 400 to 1200)
- Clear polyurethane varnish or glaze (optional)
- Parchment paper
Step 1: Prepping and Mixing the Pattern
-
Condition the Clay:
Start by thoroughly kneading each color of polymer clay separately until they are soft and pliable. You’ll need about twice as much beige clay as the other bright accent colors to keep the pattern grounded. -
Create Snakes:
Roll each color into long snakes of varying thickness. Keep the beige snake quite thick, while the orange, blue, and purple snakes can be a bit thinner to act as distinct ribboning. -
bundle and Twist:
Gather all your clay snakes into a single large bundle. Twist the bundle tightly like a candy cane, holding both ends and rotating your hands in opposite directions. -
Fold and Roll:
Fold the twisted log in half and roll it out into a single log again. Repeat the twisting process. This builds the complexity of the marbling layers inside. -
Assess the Mix:
I usually stop after two or three twists because over-mixing will turn the colors muddy. You want distinct, crisp lines between the orange and blue. -
Form a Ball:
Squish your marbled log into a smooth ball, ensuring there are no trapped air bubbles in the center.
Marble Master Tip
Don’t just twist the clay; slice the log in half and re-stack it before rolling. This exposes the internal cross-section patterns on the surface immediately.
Step 2: Shaping the Ashtray
-
Roll out the Slab:
Place the ball on parchment paper and use your acrylic roller to flatten it into a thick slab, about 1/4 inch thick. Roll in different directions to stretch the swirls outward. -
Cut the Base:
Use your large circle cutter or a bowl template to cut a perfect circle from the most interesting part of your marbled slab. Save the excess trimming. -
Create the Wall Strip:
Take the excess trimmings, re-roll them into a snake, twist once, and roll out a long rectangular strip that is the same thickness as your base and long enough to wrap around the circumference. -
Construct the Rim:
Place the base circle on your work surface. Wrap the rectangular strip around the edge of the base, sitting it on top of the circle’s edge rather than around the side. -
Blend the Seams:
Using your thumb or a blending tool, firmly smooth the clay where the wall meets the base on both the inside and outside. The seam should disappear completely for structural integrity. -
Add Notches:
Use your pinky finger or a small round tool (like a marker casing) to gently press two or three indentations into the top rim for cigarette rests.
Step 3: Baking and Finishing
-
Smooth the Surface:
Before baking, give the entire piece a final check. Smooth out any fingerprints with a tiny bit of baby oil on your finger. -
Bake:
Bake according to your clay manufacturer’s instructions, typically around 275°F (135°C) for 30 minutes. Let it cool completely in the oven to prevent cracking. -
Wet Sanding:
Once cool, dip your sandpaper in water and sand the piece, starting with the roughest grit and moving to the finest. This reveals the true depth of the marbling pattern. -
Seal (Optional):
If you want a glossy, glass-like finish similar to the inspiration image, apply two thin coats of polyurethane varnish or a specific polymer clay glaze.
Level Up: Cosmic Sparkle
Mix a tiny amount of translucent or glitter polymer clay into your initial bundle. When sanded and glazed, it creates depth that looks like real quartz.
Fill your new creation and enjoy the functional art you’ve made from scratch

The Complete Guide to Pottery Troubleshooting
Uncover the most common ceramic mistakes—from cracking clay to failed glazes—and learn how to fix them fast.
Raised-Edge Rolling Tray
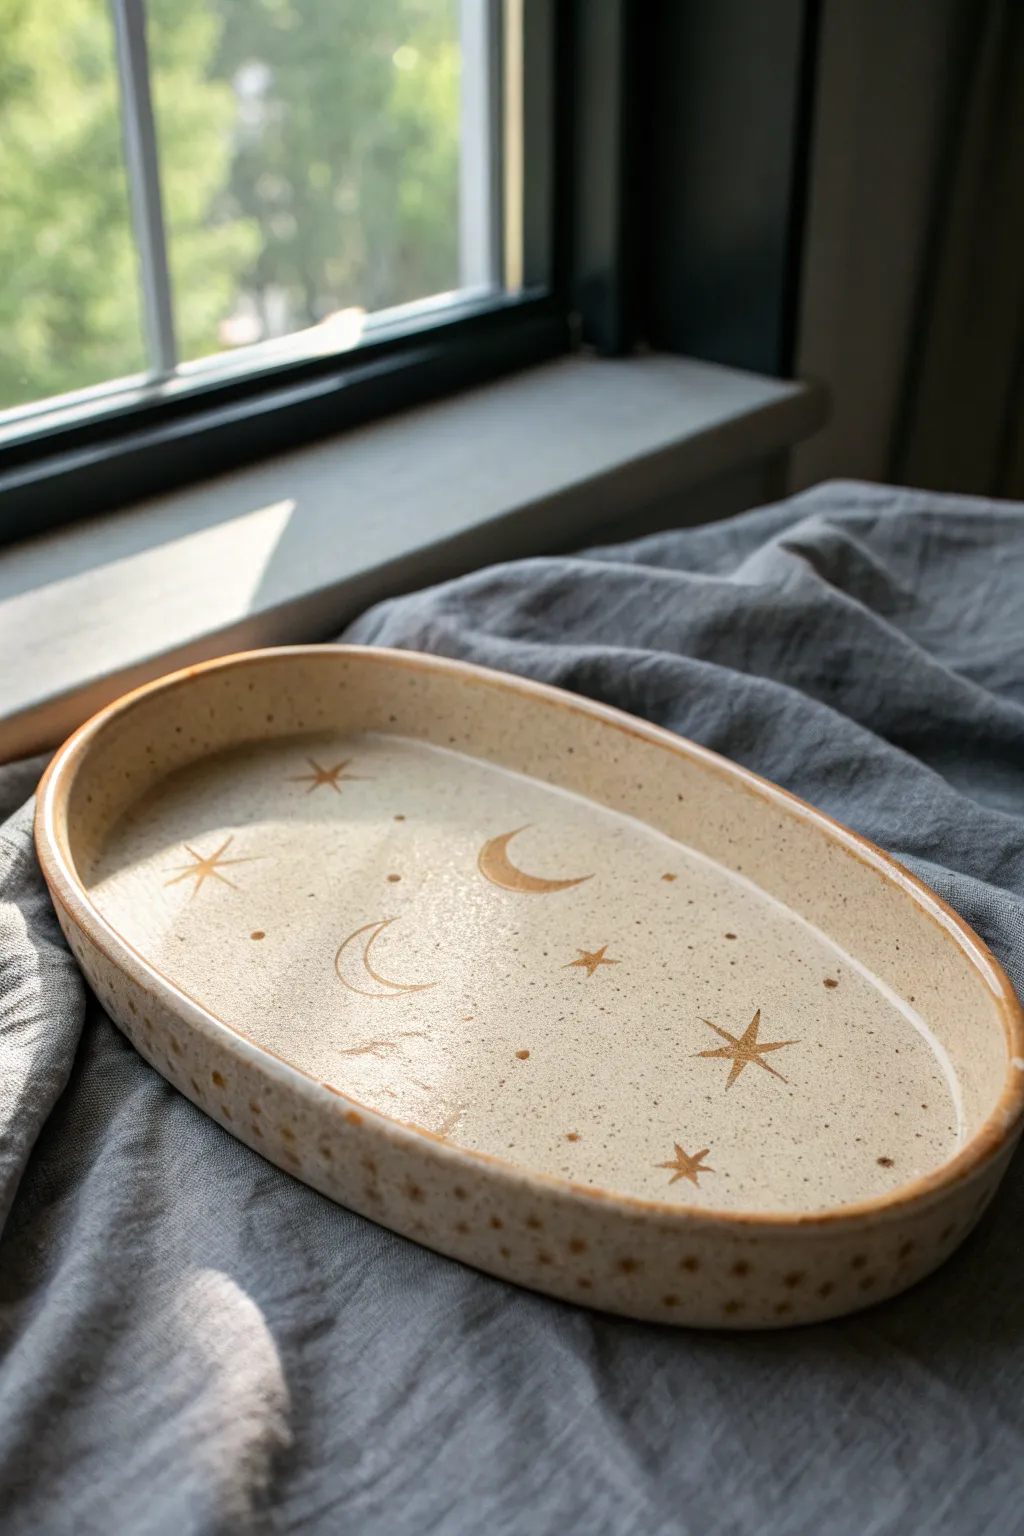
This dreamy, speckled oval tray combines functional design with celestial charm, making it perfect for your rolling rituals. With its sturdy raised edges and delicate gold luster moon and star motifs, it’s a piece you’ll want to display even when not in use.
Detailed Instructions
Materials
- Stoneware clay (preferably speckled)
- Rolling pin
- Two long wooden slats (approx. 1/4 inch thick)
- Oval paper template
- Fettling knife or needle tool
- Rib tool (wooden or rubber)
- Sponge
- Cream/White speckled glaze
- Gold luster overglaze
- Small liner brush
- Slip and scoring tool
Step 1: Forming the Base
-
Prepare your clay:
Begin by wedging your speckled stoneware clay thoroughly to remove air bubbles. This step is crucial for preventing cracks during firing. Once wedged, pat the clay into a rough oval shape to make rolling easier. -
Roll the slab:
Place your wooden guide slats on either side of the clay. Use your rolling pin to roll the clay out until the pin rests on the slats, ensuring an even quarter-inch thickness across the entire slab. -
Cut the shape:
Place your oval paper template onto the rolled slab. Using a fettling knife or needle tool held vertically, trace around the template to cut out your tray base. Remove the excess clay. -
Smooth the surface:
Take a damp sponge or a rubber rib and gently compress the surface of the oval. Smoothing it now saves time later and aligns the clay particles to prevent warping.
Step 2: Building the Rim
-
Create the coil:
Roll a long, even coil of clay, slightly thicker than a pencil. This will become the raised wall of your tray. Ensure it’s long enough to go around the entire circumference of your oval base. -
Score the edges:
Using your needle tool or a serrated kidney, rough up (score) the outer edge of your oval base where the wall will sit. Apply a generous layer of slip to the scored area. -
Attach the wall:
Place the coil onto the slipped edge. Gently press it down to adhere. Overlap the ends of the coil slightly, cut through both at an angle, and join them seamlessly. -
Blend the seams:
Use your thumb or a wooden modeling tool to smear the clay from the coil down onto the base on the inside. Repeat this on the outside, pulling the clay down to merge the coil with the slab. I find a wooden tool works best here to keep the corner crisp. -
Shape and refine:
Pinch the wall gently to shape it upwards. It should be vertical or slightly flared. Use a damp sponge to smooth the rim and the transition between the wall and the floor of the tray. -
Add exterior texture:
The example tray has subtle divots on the outside rim. Use the rounded end of a paintbrush handle to gently press indentations around the exterior vertical wall for a decorative touch.
Warped Walls?
If your oval warps while drying, place a small bag of sand or rice gently in the center of the tray during the leather-hard stage to weigh it down evenly.
Step 3: Glazing and Decoration
-
Bisque fire:
Allow your tray to dry slowly under plastic to prevent warping. Once bone dry, fire the piece to bisque temperature (usually cone 04) based on your clay body’s specifications. -
Apply base glaze:
Dip or brush your bisque-fired tray with a cream or white speckled glaze. If brushing, apply 2-3 even coats, letting each layer dry in between. Wipe the bottom clean and fire to the glaze temperature (cone 5/6). -
Paint celestial motifs:
Once the glaze firing is complete and the piece is cool, wipe the surface with alcohol to remove oils. Using a very fine liner brush and gold luster, carefully paint outlines of crescendo moons, four-point stars, and eight-point stars onto the glossy surface. -
Add detail dots:
Dip the non-brush end of your paintbrush into the gold luster and dot it around the empty spaces of the tray floor to create ‘stardust.’ You can also highlight the exterior indentations you made earlier with small dots of gold. -
Luster fire:
Place the tray back in the kiln for a third firing. This is a low-temperature firing (usually cone 018-019) specifically to set the gold luster. Ensure the kiln is well-ventilated for this step.
Level Up: Galaxy Effect
Splatter tiny droplets of thinned blue or purple underglaze onto the raw clay before the first firing to create a subtle galaxy background beneath the gold.
Enjoy using your custom celestial tray, a functional piece of art that catches the light beautifully
Mini “Herb” Trinket Jar
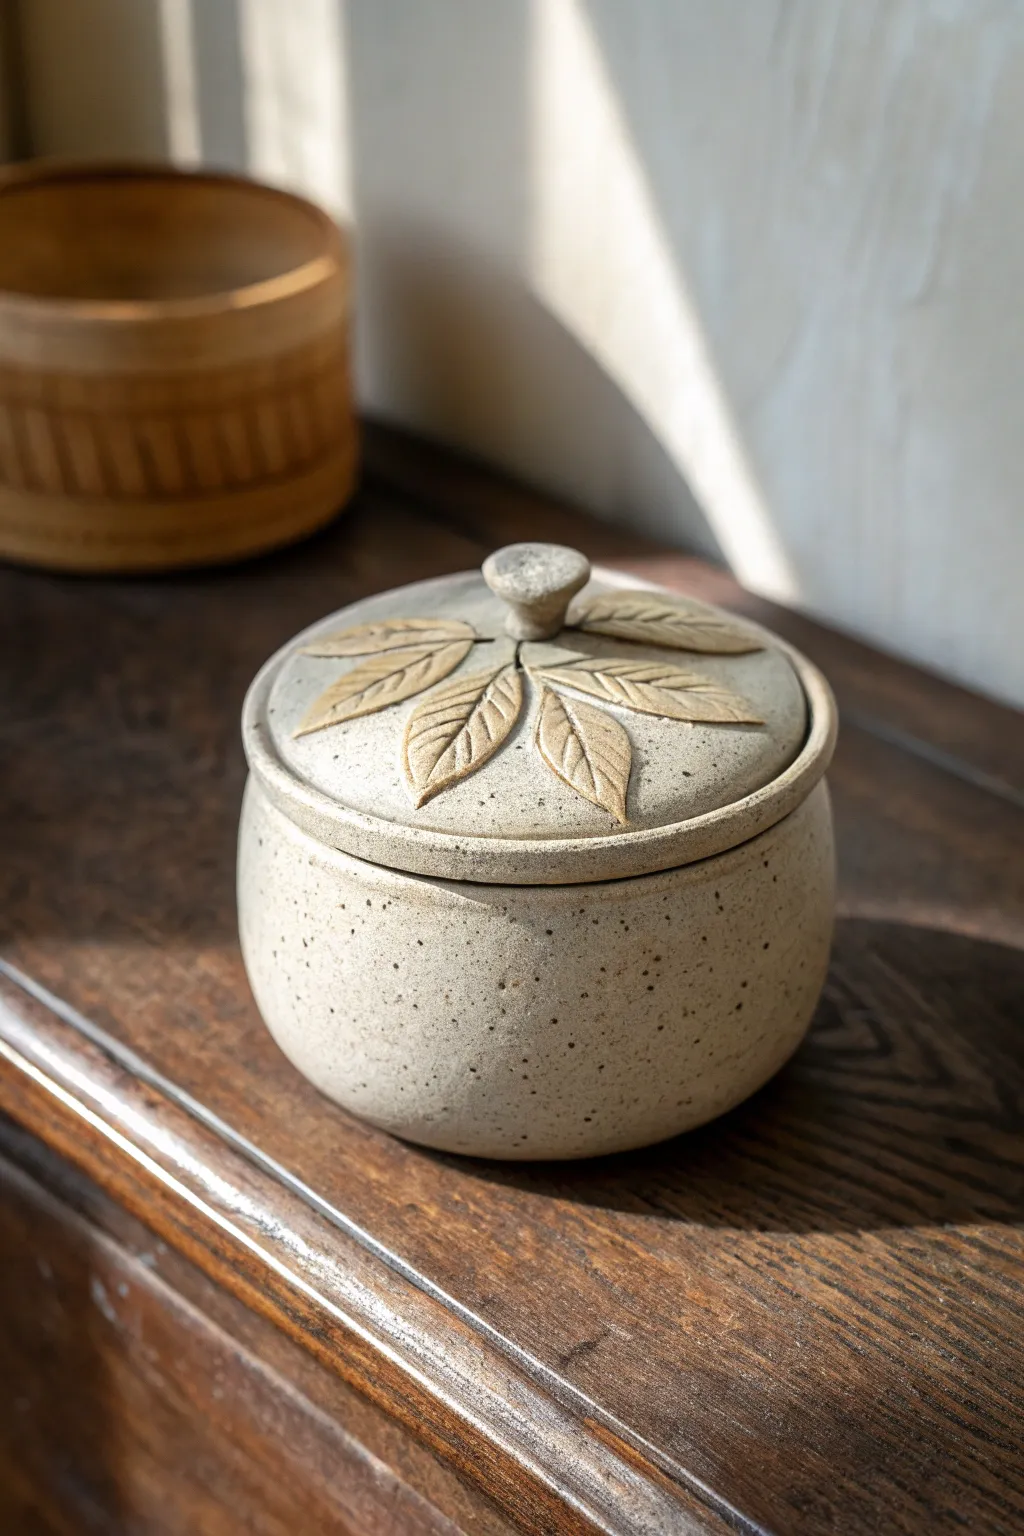
This charming, earthy trinket jar features a lovely speckled clay body and a lid adorned with raised, stylized cannabis leaves. Ideally sized for small keepsakes or herbs, its natural finish and textured details make it a subtle yet functional piece of art.
Step-by-Step Tutorial
Materials
- Speckled stoneware clay (approx. 1 lb)
- Pottery wheel (or rolling pin for hand-building)
- Rib tool (wooden or silicone)
- Needle tool
- Trimming tools
- Scoring tool (or fork)
- Slip (clay and water mixture)
- Small carving tool
- Sponge
- Clear matte glaze
Step 1: Throwing the Body
-
Center the Clay:
Start with a ball of wedged speckled clay about the size of a large orange. Secure it firmly to the center of your wheel head and work it up and down to align the clay particles. -
Open and Pull:
Open the centered clay to create the floor, leaving it slightly thicker than usual for trimming later. Pull the walls up to create a short, bulbous cylinder shape, keeping the rim slightly narrower than the belly. -
Form the Gallery:
Using a wooden rib or your fingers, shape the rim to be flat and sturdy. You’ll need to create a small inset ‘gallery’ or ledge on the inside of the rim where the lid will eventually sit. -
Refine the Shape:
Use a flexible rib on the outside to smooth the curve of the jar, ensuring a nice rounded belly. Clean up the base with a wooden tool and wire the pot off the wheel, setting it aside to firm up to leather-hard.
Lid Logic
If your lid wobbles after firing, apply a tiny dab of grinding paste to the gallery and rotate the lid back and forth to grind it into a perfect, airtight fit.
Step 2: Creating the Lid
-
Measure the Opening:
Use a caliper to measure the exact diameter of the gallery shelf inside your jar’s rim. This measurement determines the size of your lid. -
Throw the Lid:
Center a smaller lump of clay. Flatten it into a thick disc. Ensure the underside has a flange or is trimmed to fit precisely into the gallery measurement you took. -
Dome the Top:
Shape the top surface of the lid into a gentle convex dome. This curve provides a natural resting place for the leaf decorations. -
Add the Knob:
You can throw a tiny knob directly on top, or throw it separately and attach it later. For this style, a simple mushroom-cap shape works perfectly.
Add Texture
Instead of smooth leaves, use a real cannabis leaf to press a texture into your clay appliqués before attaching them for an incredibly realistic veined finish.
Step 3: Sculpting the Leaves
-
Roll Small Coils:
While the jar and lid dry, roll out very thin, small coils of fresh clay. Flatten them gently to create elongated leaf shapes ensuring they are tapered at both ends. -
Score and Slip:
Identify where you want the leaves to sit on the lid, radiating out from the center knob. Score the lid surface and back of the clay leaves, apply a dab of slip, and press them firmly into place. -
Detail the Veins:
Using a needle tool or a small carving tool, gently press a central vein down the middle of each leaf. Then, add smaller diagonal veins branching off the center. -
Refine Edges:
I prefer to use a slightly damp brush to smooth the edges of the attached leaves so they look integrated rather than just stuck on.
Step 4: Finishing and Glazing
-
Bisque Fire:
Once the piece is bone dry, fire it in the kiln to bisque temperature (usually cone 04 or 06). This makes the clay porous but durable enough for glazing. -
Wax the Contact Points:
Apply wax resist to the bottom of the jar and the contact points where the lid touches the jar gallery to prevent them from fusing together during firing. -
Apply Glaze:
Dip the jar and lid into a clear matte glaze. A clear glaze is crucial here because it allows the beautiful natural speckles of the clay body to show through. -
Wipe Back Detail:
If the glaze looks too thick over the leaves, gently sponge a little off the raised areas to ensure the carving details remain crisp. -
Glaze Fire:
Load the kiln carefully and fire to the maturity temperature of your specific clay body (typically cone 5 or 6 for stoneware).
Now you have a discreet and beautifully handcrafted jar ready for your favorite herbs


What Really Happens Inside the Kiln
Learn how time and temperature work together inside the kiln to transform clay into durable ceramic.
Mushroom Forest Incense Tray
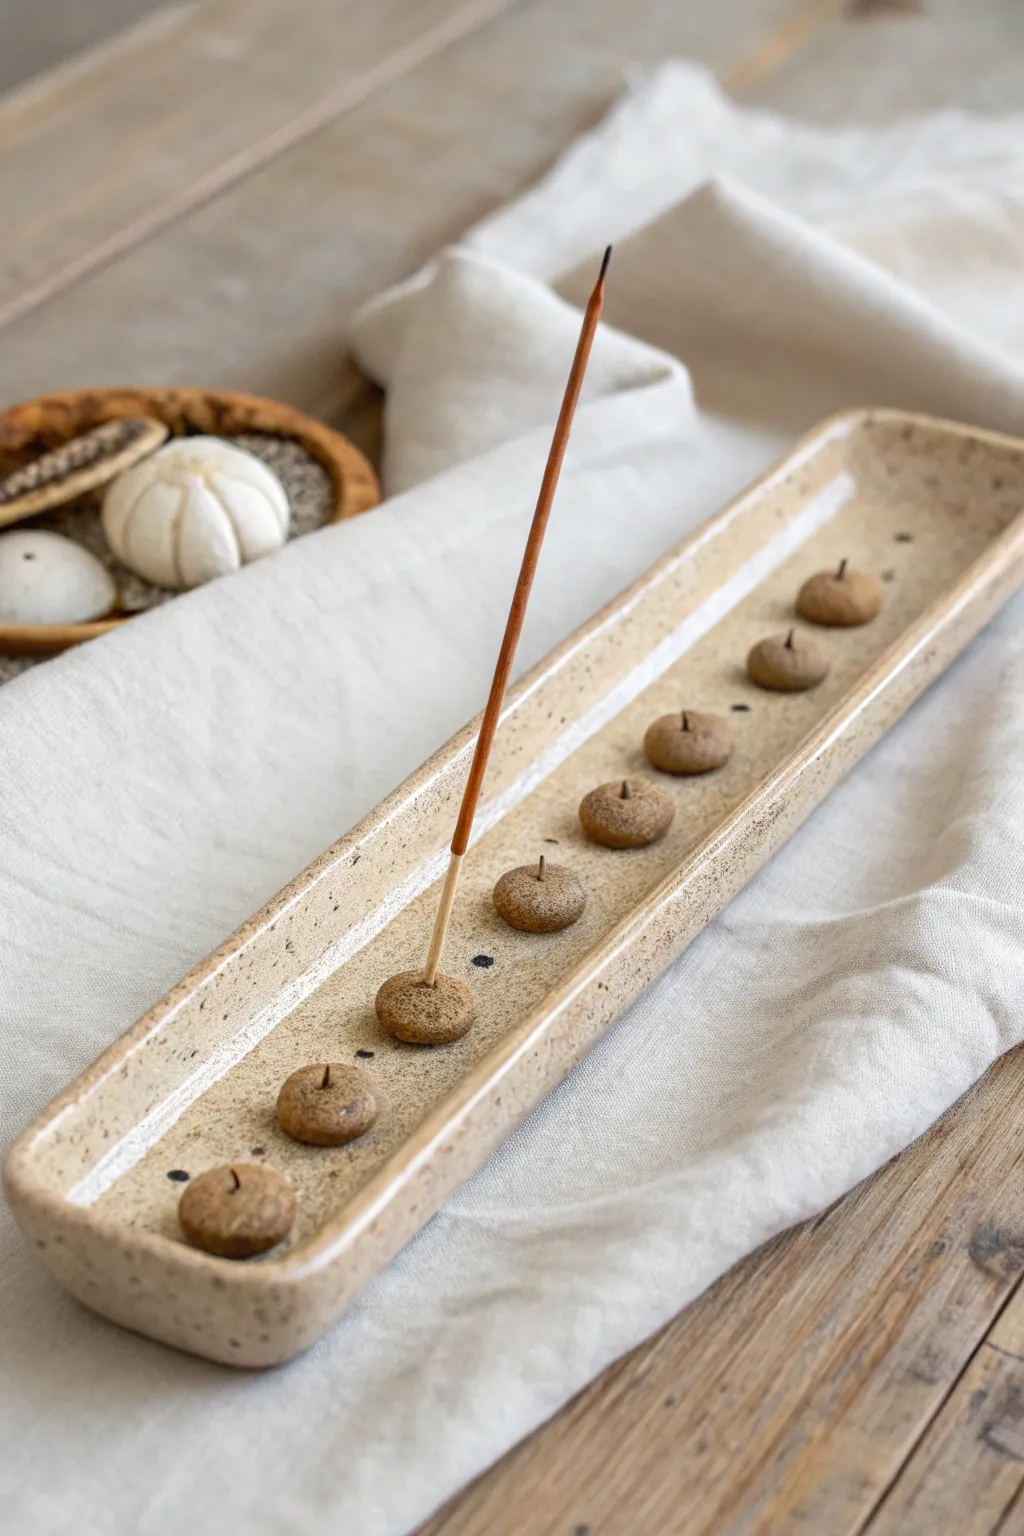
Bring a touch of woodland serenity to your space with this elongated, speckled incense holder featuring a row of tiny mushroom mounds. The minimalist design allows for a versatile burn station while the earthy stoneware aesthetic fits perfectly with cozy, natural decor.
How-To Guide
Materials
- Speckled buff stoneware clay (or polymer clay with faux speckles)
- Rolling pin
- Ruler
- Fettling knife or clay cutter
- Long rectangular template (approx. 10 x 2.5 inches)
- Small sponge
- Incense stick (for sizing)
- Needle tool
- Clear or light amber glaze (if using ceramic)
- Scoring tool or old toothbrush
- Slip (clay glue)
Step 1: Forming the Base
-
Roll the slab:
Start by wedging your clay to remove air bubbles, then roll it out into a long slab about 1/4 inch thick. Aim for an even thickness to prevent warping during drying. -
Cut the rectangle:
Lay your long rectangular template over the slab. use your fettling knife to cut a clean, straight strip. Smooth the cut edges with a damp finger to remove any sharp burrs. -
Create the walls:
Gently pinch up the edges of the rectangle all the way around to create a shallow rim. You want the wall to be about half an inch high, just enough to catch ash. -
Refine the shape:
Use a damp sponge to smooth the transition between the floor of the tray and the pinched walls. Make sure the corners are rounded and soft rather than sharp angles. -
Flatten the bottom:
Gently tap the tray on your work surface to ensure the bottom is perfectly flat and won’t rock when finished.
Warping Worries?
Long trays love to curl up at the ends. Weigh down the ends specifically with small sandbags or extra clay chunks (separated by paper) during the initial drying phase to keep it flat.
Step 2: Sculpting the Mushrooms
-
Roll small spheres:
Roll out 7 to 9 small sphere roughly the size of a large marble or a small acorn. Keep them fairly consistent in size for a uniform look. -
Flatten the bases:
Press each sphere gently onto the table to flatten the bottom, creating a dome or mound shape reminiscent of a capped mushroom. -
Check the fit:
Place the mounds loosely into the tray to check spacing. Leave roughly an inch between each one, ensuring they form a neat, straight line down the center. -
Score and slip:
Once you are happy with the arrangement, pick up one mound at a time. deeply score the bottom of the mound and the spot on the tray where it will sit. -
Attach the mounds:
Add a dab of slip to the scored areas and press the mound firmly into place. Give it a tiny wiggle to lock the clay particles together. -
Clean connections:
Use a small brush or tool to wipe away any excess slip that oozed out from under the mounds, keeping the tray floor clean.
Angle the Dangle
Poke your incense holes at slightly different angles for each ‘mushroom.’ This lets you control where the ash falls or allows you to burn multiple sticks without them touching.
Step 3: Finishing Touches
-
Pierce the holes:
While the clay is leather hard, use your needle tool to poke a hole straight down into the center of each mound. I recommend testing the hole size with an actual incense stick stem, making it slightly larger to account for shrinkage. -
Add texture:
If your clay isn’t naturally speckled, you can flick a toothbrush loaded with watered-down brown underglaze or iron oxide over the piece to create faux speckles. -
Dry slowly:
Cover the piece loosely with plastic to let it dry slowly over a few days. This long shape is prone to warping if it dries unevenly. -
Bisque fire:
Fire the piece to cone 04 (or according to your clay’s instructions) once it is bone dry. -
Glaze application:
Apply a clear or transparent glossy glaze over the entire piece. This allows the natural clay speckles to show through while making the surface easy to wipe clean of ash. -
Final fire:
Fire again to cone 5/6 (or your glaze’s maturation temperature). -
Safety check:
Once cool, check the bottom. If it rocks, sand it gently until it sits flush on the table.
Enjoy the calm atmosphere as your favorite scent wafts from your new handmade forest floor
Celestial Incense Burner Dish
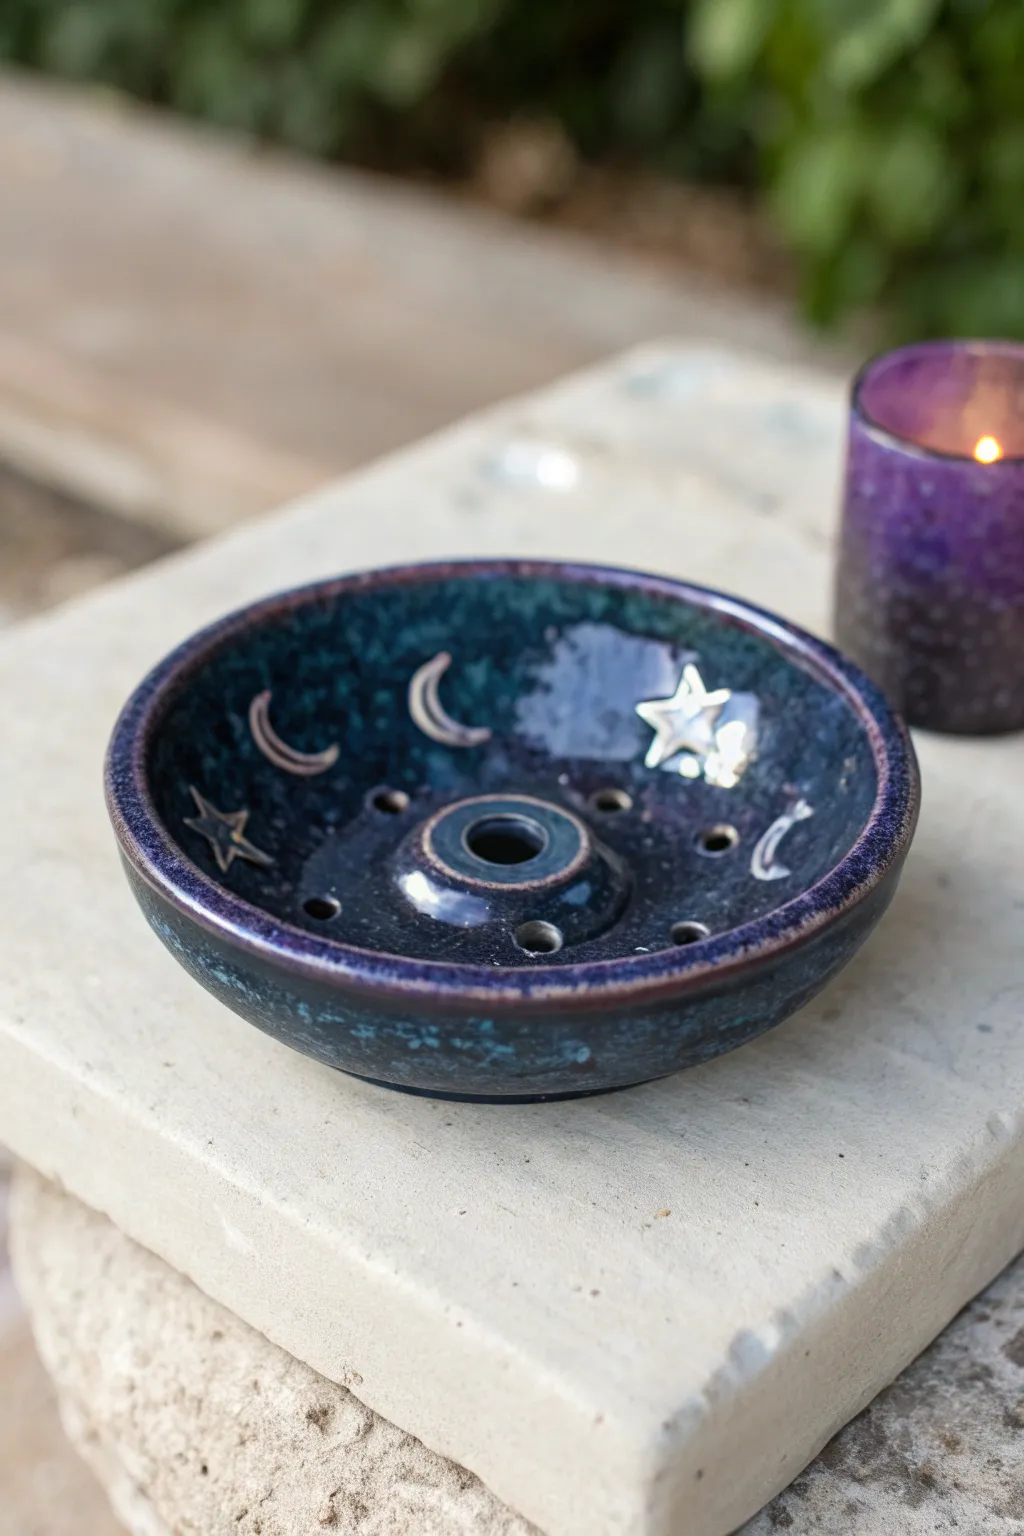
This deep celestial blue incense holder combines functionality with cosmic vibes, featuring applied moon and star motifs against a glossy, galaxy-like glaze. The central cone holder and ventilation holes make it perfect for burning stick or cone incense safely while catching all the ash.
Detailed Instructions
Materials
- Earthenware or stoneware clay body
- Rolling pin
- Small bowl (for use as a slump mold)
- Needle tool
- Slip (clay and water mixture)
- Scoring tool or serrated rib
- Small clay cutters (star and moon shapes) or x-acto knife
- Drill bit or straw (for air holes)
- Sponge
- Dark blue/teal reactive glaze (cone 04-06 generally)
- Clear glaze (optional)
- Kiln access
Step 1: Forming the Base
-
Roll the Slab:
Begin by wedging your clay to remove air bubbles, then roll out a slab to an even thickness of about 1/4 inch. Smooth the surface with a rib to compress the clay particles. -
Cut the Circle:
Find a bowl or round template that matches your desired size (around 4-5 inches diameter) and cut a circle from the slab using your needle tool. -
Slump the Form:
Gently lift your clay circle and place it inside your bowl mold. Press it down softly so it takes the curved shape of the bowl, smoothing the rim with a damp sponge so it’s rounded and pleasant to touch.
Sticky Incense Sticks?
Make the center hole slightly larger than your incense stick to account for clay shrinkage (about 10-15%) during firing. If it’s too tight later, the stick won’t fit.
Step 2: Creating the Center Component
-
Make the Holder:
Roll a small ball of clay, slightly larger than a marble, and flatten it just enough to be stable. -
Create the Incense Hole:
Use a needle tool or small drill bit to create a hole in the center of this small mound. Make it deep enough to hold an incense stick securely, but don’t pierce all the way through the bottom. -
Attach the Center:
Score the bottom of the mound and the center of your dish. Apply slip to both areas and press the mound firmly into the center of the bowl. Clean up any excess slip with a brush.
Galaxy Glaze Hack
After dipping in dark blue, flick a toothbrush loaded with white glaze over the wet surface. These tiny specks will fire into bright ‘stars’ across your dark background.
Step 3: Adding Celestial Details
-
Cut Out Shapes:
Roll a separate, thinner piece of clay (about 1/8 inch). Use small cutters or freehand cut crescent moons and stars with a knife. -
Attach Appliqués:
Score and slip the back of each star and moon. Place them randomly around the inner walls of the bowl, pressing gently to ensure a good bond without distorting their shape. -
Drill Ventilation Holes:
Using a straw or a small hole cutter, punch 5-6 small holes in a circle around the central mound. These allow airflow if you burn charcoal discs and add decorative flair. -
Smoothing and Drying:
Go over the entire piece with a slightly damp sponge to remove any sharp edges or burrs. Let the piece dry slowly under plastic to the leather-hard stage, then fully dry to bone dry.
Step 4: Glazing and Firing
-
Bisque Fire:
Fire the bone-dry piece in the kiln to bisque temperature (usually Cone 04) to prepare it for glazing. -
Apply Wax Resist:
If you want the stars and moons to remain raw clay or take a different glaze, carefully paint wax resist over them now. Otherwise, the glaze will cover them. -
Glaze Application:
Dip or brush on your dark blue reactive glaze. This type of glaze breaks beautifully over texture, meaning it will naturally highlight the edges of your raised stars and moons. -
Clean the Foot:
Wipe the bottom of the bowl completely clean with a sponge to prevent it from sticking to the kiln shelf. -
Glaze Fire:
Fire the piece again to the maturation temperature of your specific glaze. Let the kiln cool completely before opening to see your galaxy creation.
Light your favorite scent and watch the smoke drift through your personal piece of the night sky

TRACK YOUR CERAMIC JOURNEY
Capture glaze tests, firing details, and creative progress—all in one simple printable. Make your projects easier to repeat and improve.
Session Caddy Catch-All Bowl
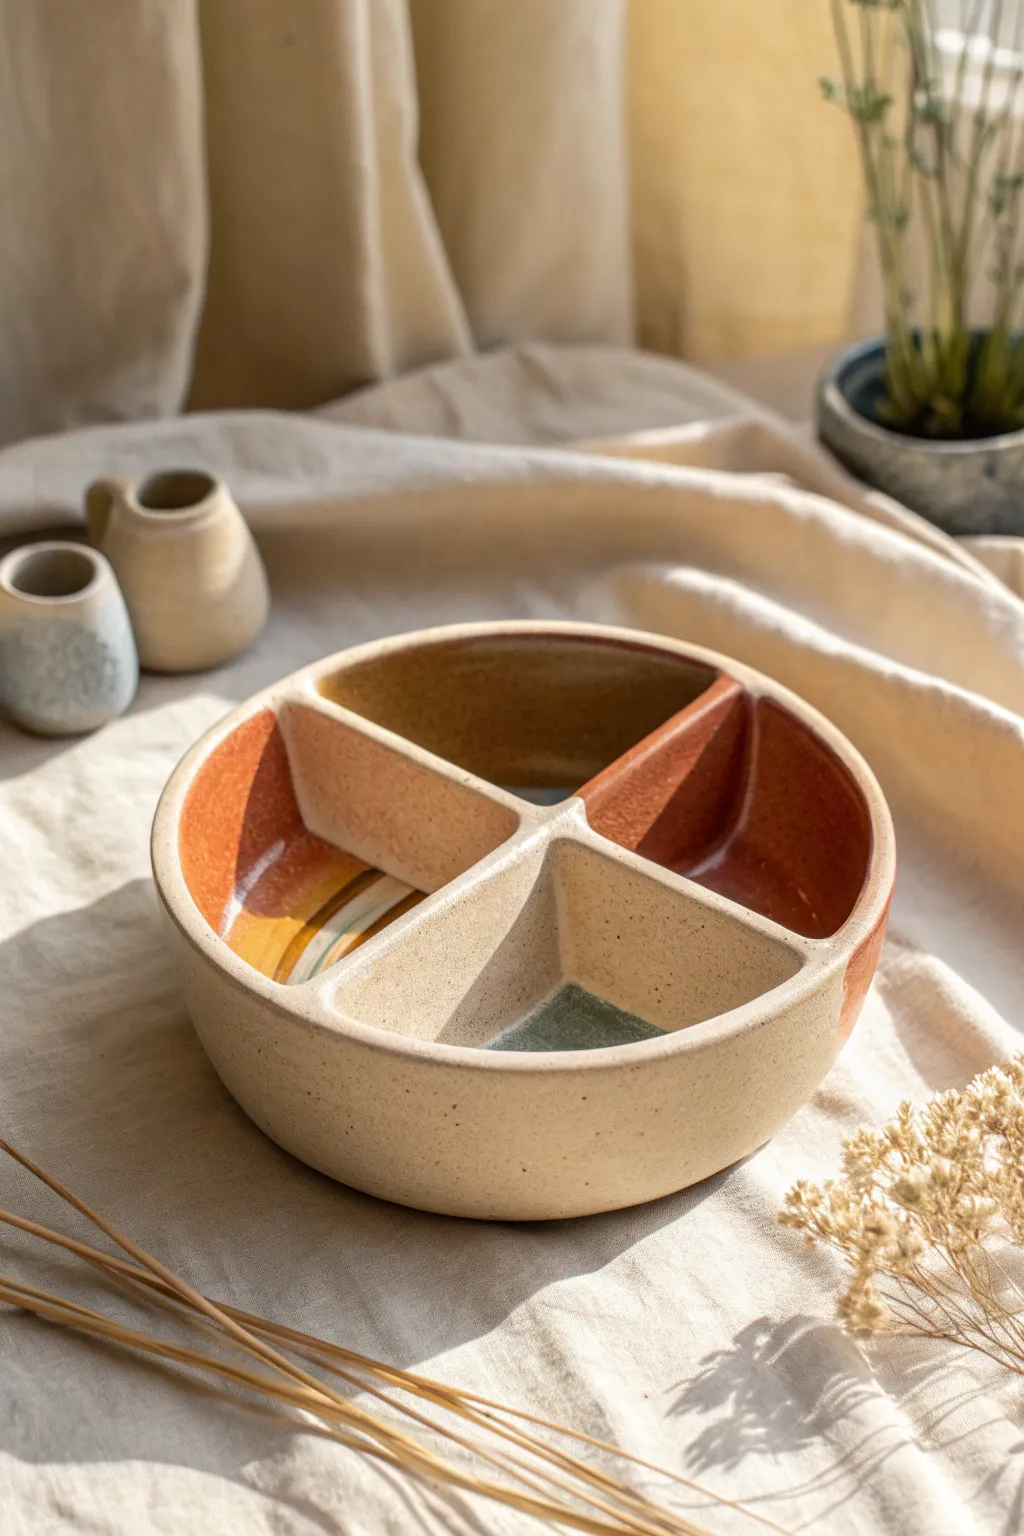
Keep your accessories organized and your session clean with this segmented catch-all bowl featuring warm, earthy glazes. Its four distinct wells are perfect for separating different strains, holding your lighter, and catching ash or stems, all wrapped in a beautifully speckled stoneware body.
How-To Guide
Materials
- Speckled buff stoneware clay (approx. 2-3 lbs)
- Potter’s wheel (or slab roller for hand-building)
- Ribs (wooden and metal)
- Needle tool
- Wire cutter
- Sponge
- Trimming tools
- Glaze brushes
- Cone 5/6 glazes: Earthy Amber, Rusty Orange, Deep Green (or similar semitransparent gloss glazes)
- Wax resist
Step 1: Throwing the Base Form
-
Center the clay:
Begin by firmly slamming your wedge of speckled clay onto the wheel head. Center it thoroughly using steady pressure, ensuring the mound is wide and low rather than tall and narrow, as we need a broad base. -
Open the floor:
Open the clay to a width of about 6-7 inches across. Leave the floor relatively thick—thicker than a standard bowl—because you will need to attach dividers later without warping the bottom. -
Pull the walls:
Pull the walls straight up to create a vertical cylinder shape, aiming for a height of about 2.5 to 3 inches. Keep the rim squared off and sturdy. -
Shape the profile:
Use a rib on the inside to gently curve the wall out just slightly, softening the vertical line, while smoothing the outside with a metal rib to reveal the beautiful grog in the clay body. -
Wire off and dry:
Clean the excess clay from the bat with a wooden tool, cut underneath with your wire, and set the bowl aside until it reaches a sturdy leather-hard stage.
Step 2: Creating the Partitions
-
Prepare slabs:
While the bowl stiffens, roll out a slab of the same clay to roughly 1/4 inch thickness. We need two strips that will fit across the diameter of your bowl. -
Cut the cross pieces:
Measure the interior diameter of your leather-hard bowl. Cut two rectangular strips: one spanning the full diameter, and two smaller pieces that will attach perpendicularly to the center. -
Test fit the dividers:
Place the long strip into the bowl to check the height—it should sit flush with or just slightly below the rim. Trim the edges to match the curve of the bowl’s interior. -
Score and slip:
Mark a line across the center of the bowl floor and up the walls where the divider will go. Score these areas thoroughly and apply slip. Do the same to the edges of your slab strip.
Cracked Dividers?
If dividers crack away from the walls during drying, you likely let the bowl get too dry before attaching. Try drying the assembled piece under plastic for slow homogenization.
Step 3: Assembly and Finishing
-
Install the main divider:
Press the long strip firmly into place. Use a small moody tool or your finger to smooth a tiny coil of clay along the seams where the divider meets the floor and walls to reinforce the join. -
Install the secondary dividers:
Repeat the scoring and slipping process for the two shorter divider pieces. Attach them perpendicular to the main strip to form a ‘plus’ sign, ensuring they meet perfectly in the center hub. -
Smooth the cross:
Carefully smooth the center intersection where the four walls meet. I find a slightly damp sponge on a stick helps reach these tight corners without dismantling the structure. -
Refine the rim:
Run a damp chamois or sponge over the entire top rim, blending the dividers into the bowl wall so it feels like one seamless unit. -
Bisque fire:
Allow the piece to dry slowly to prevent the dividers from cracking away from the walls. Once bone dry, bisque fire to Cone 04.
Pro Tip: Rounded Corners
Use a fillet tool or the back of a paintbrush to round the inside corners of the compartments. Sharp 90-degree corners are frustrating to clean ash out of later.
Step 4: Glazing
-
Wax the exterior:
Apply wax resist to the entire outer wall and the bottom of the bowl. We want the raw speckled clay to remain visible on the outside for that natural texture. -
Pour the amber section:
Pour your amber glaze into one quadrant. Pour it out quickly to coat the walls of that section, then wipe any drips off the top rim immediately. -
Brush the rust sections:
Using a soft fan brush, carefully apply the rusty orange glaze to two opposite quadrants (or adjacent ones, depending on your design preference). Apply 2-3 coats for opacity. -
Detail the final section:
For the green quadrant, I like to partially glaze just the bottom or lower wall, leaving some raw clay showing on the upper inside wall for contrast. -
Clean the dividers:
Use a damp sponge to wipe the very top edge of the cross-dividers clean, framing each color block with the natural clay body. -
Final firing:
Fire to Cone 5 or 6 (depending on your clay body). The heat will melt the glazes into pools of color while toasting the raw clay to a warm sand hue.
Once cooled, fill your new compartments with your favorite rolling supplies and enjoy the tidy setup.
Textured Fidget Worry Stone
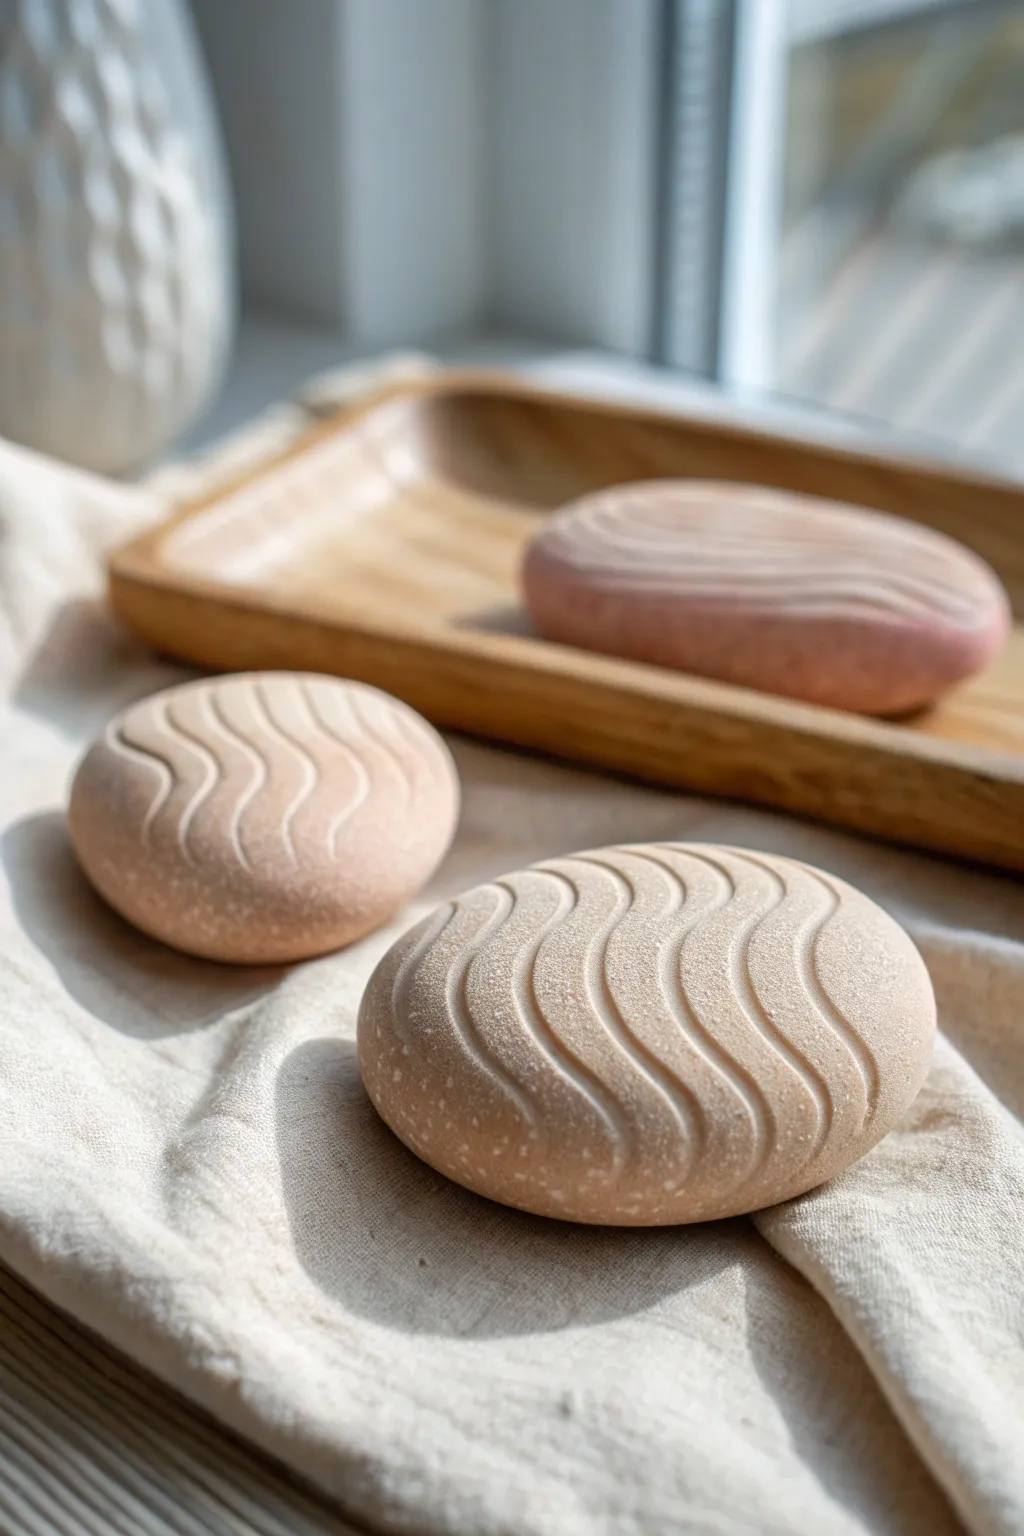
These beautifully carved fidget stones mimic the calming ripples of a zen garden, fitting perfectly in the palm of your hand. Their natural, speckled finish and rhythmic grooves offer a grounding tactile experience that is both simple to make and deeply satisfying to hold.
Step-by-Step
Materials
- Polymer clay (beige, translucent, and a touch of terracotta)
- Fine craft sand or coffee grounds
- Oval cutter (optional)
- Small loop carving tool or U-shaped gouge
- Smooth work surface (glass or tile)
- Fingertips or a smooth river stone for burnishing
- Cornstarch or baby powder (as a release agent)
- Soft brush
- Oven for baking
Step 1: Mixing the Clay Body
-
Create the base color:
Start with a block of beige polymer clay. To get that organic, stone-like warmth, mix in a very small amount of terracotta or light brown clay. Knead until the color is uniform. -
Add translucency:
Introduce a portion of translucent clay to your mix—about one part translucent to three parts colored clay. This depth prevents the stone from looking like opaque plastic. -
Incorporate speckles:
Sprinkle a teaspoon of fine craft sand or dry, used coffee grounds onto the flattened clay. Fold the clay over to trap the particles inside. -
Even distribution:
Knead the clay thoroughly again. You want the speckles to be evenly distributed throughout the batch so the texture looks natural from every angle.
Clean Cuts
Chill the shaped clay in the fridge for 15 minutes before carving. Firmer clay resists dragging and results in much sharper, cleaner groove lines.
Step 2: Shaping the Stone
-
Portion the clay:
Roll your clay into a smooth ball slightly larger than a golf ball. You want enough material to create a comfortable weight in the hand. -
Form the oval:
Gently press the ball onto your work surface and shape it into a smooth, thick oval. Aim for a thickness of about 1/2 to 3/4 inch. -
Smooth the edges:
Use your palms to round off the edges. The goal is a seamless, pebble-like shape with no sharp corners or flat vertical sides. -
Subtle dome:
Ensure the top surface has a gentle, domed curve. This curvature will make the carved grooves feel more ergonomic under your thumb. -
Remove fingerprints:
Lightly dust your fingertip with a little cornstarch and buff the surface of the clay in circular motions to remove any prints or imperfections.
Scented Stone
Mix a drop of essential oil into the baked stone’s porous bottom (if you used terracotta) for a dual-sensory calming tool.
Step 3: Carving the Ripples
-
Plan your path:
Visualize a wavy pattern flowing across the length of the stone. I find it helpful to lightly mark the center line first with a needle tool as a guide. -
First incision:
Take your small loop tool or U-shaped gouge. Starting from one edge, carve a gentle, wavy groove across the surface. Apply steady, moderate pressure to keep the depth consistent. -
Clean the cut:
Lift the tool cleanly at the end of the stroke. Remove the excess strip of clay immediately so it doesn’t get stuck back onto the stone. -
Create parallel waves:
Carve the next groove parallel to the first one, leaving a raised ridge about 2-3mm wide between them. Continue this pattern across the entire face of the stone. -
Varying the rhythm:
Don’t stress about perfect symmetry. Slight variations in the wave pattern make the stone feel more organic and hand-carved. -
Soften the ridges:
Once all grooves are cut, dip your finger in cornstarch again and very gently run it along the grooves and ridges. This softens any sharp burs created by the tool without erasing the texture.
Step 4: Finishing and Baking
-
Final inspection:
Check the underside of the stone. If it flattened too much during carving, gently cup it in your hands to restore the rounded bottom. -
Texture enhancement:
For extra grip and realism, take a clean toothbrush and tap it vertically over the uncarved areas (the sides and bottom) to add a subtle micropore texture. -
Baking:
Place your stone on a dedicated baking tile or a piece of cardstock. Bake according to your polymer clay manufacturer’s instructions, usually at 275°F (130°C) for about 30-45 minutes due to the thickness. -
Cooling down:
Allow the stone to cool completely in the oven. This slow cooling helps prevent cracks in thicker clay pieces. -
Protect the surface:
The matte finish is part of the charm, so skip the glossy varnish. If you want protection, apply a tiny amount of Renaissance wax and buff it to a soft sheen.
Enjoy the calming rhythm of your new stone as you keep it close for moments of focus.
Melted Smile Coaster Set
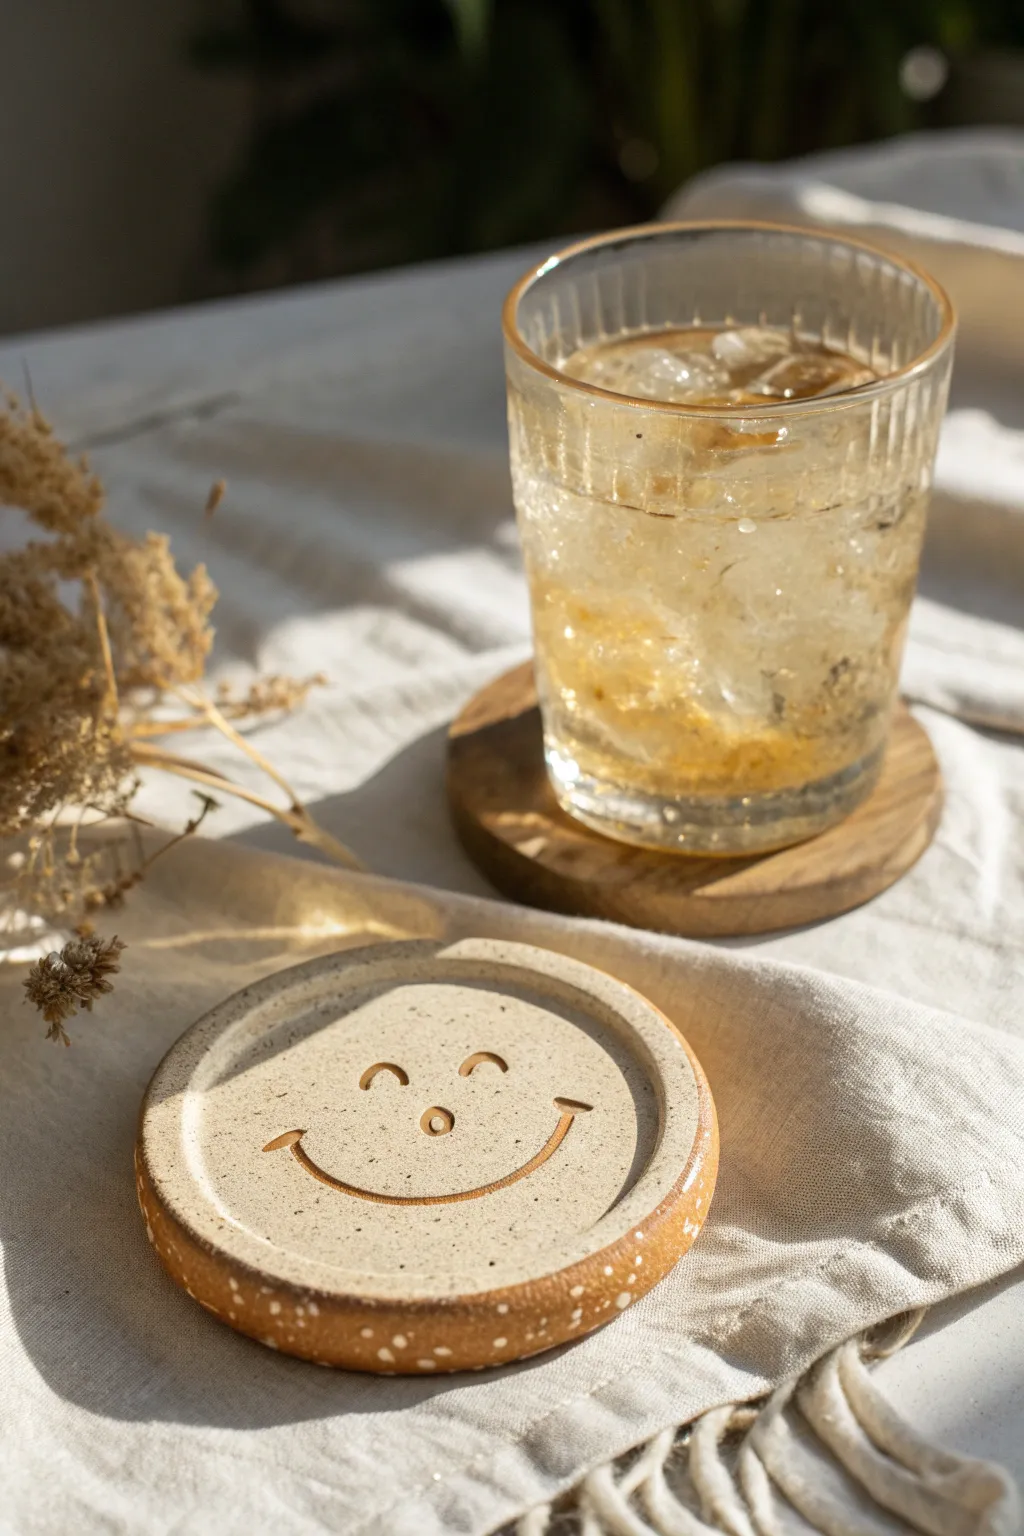
Keep hydration happy with these charming, freckled clay coasters featuring a simple, contented smile. The speckled clay body and warm brown glaze create a cozy, earthy finish that feels great under your favorite mug.
How-To Guide
Materials
- Speckled Stoneware Clay
- Rolling Pin
- Guide Sticks or Slat Boards (approx. 1/4 inch thick)
- Round Cookie Cutter or Templat (approx. 4 inches)
- Small Loop Tool or Carving Tool
- Modeling Tool or Needle Tool
- Sponge
- Honey/Caramel colored Glaze (food safe)
- Clear Glaze (optional)
- Kiln (or oven if using polymer clay equivalents)
Step 1: Shaping the Base
-
Prepare the Clay:
Begin by wedging a ball of speckled stoneware clay to remove any air bubbles. You want the clay to be pliable but firm enough to hold its shape. -
Roll the Slab:
Place the clay between two guide sticks to ensure an even thickness. Roll it out into a smooth slab, aiming for about 1/4 inch thickness throughout. -
Cut the Circle:
Press your round cookie cutter firmly into the slab to create a perfect circle. If you don’t have a cutter, trace around a lid with a needle tool and cut carefully. -
Smooth the Edges:
Gently run a damp sponge or your finger along the cut edge to soften any sharp corners left by the cutter.
Step 2: Creating the Rim
-
Define the Border:
Using a modeling tool or just your thumb, gently press down about a half-inch from the edge, creating a slight indentation that separates the center from the rim. -
Pinch the Lip:
Carefully pinch the outer edge upwards to form a raised lip. This will help catch any condensation from your glass. -
Refine the Shape:
Use a damp sponge to smooth the transition between the flat center and the raised rim so it looks organic and melted rather than sharp.
Warping Worries
To prevent the flat center from bowing upward during drying, place a small weight (like a sandbag) on the center while it dries slowly under plastic.
Step 3: Adding the Face
-
Mark the Features:
Lightly sketch the position of the eyes and smile with a needle tool first. I like to place the smile slightly lower on the circle for a cuter look. -
Carve the Smile:
Use a small carving tool to scoop out a continuous, curved line for the smile. Go deep enough to catch the glaze later, but don’t cut through the coaster. -
Carve the Eyes:
Carve two small arches for the sleepy eyes, mirroring the curve of the smile but much smaller. -
Add the Nose:
Press a small circular tool or the back of a paintbrush into the center create a tiny button nose indentation. -
Clean Up Crumbs:
Once the clay is leather hard, gently brush away any little crumbs of clay from the carving process with a soft, dry brush.
Drip Effect
Apply extra glaze on the top of the rim before firing. Gravity will pull it down slightly, creating a cool ‘melting’ effect over the edge of the coaster.
Step 4: Glazing and Finishing
-
Bisque Fire:
Let the coaster dry completely, then fire it in the kiln to bisque temperature according to your clay’s instructions. -
Wax Resist (Optional):
If you want the face details to remain raw clay color, carefully paint wax resist into the carved lines. -
Glaze the Rim:
Dip the rim or paint a honey-colored glaze specifically around the raised edge and outer wall. The speckled clay will show through beautifully. -
Glaze the Face:
Carefully fill the carved lines of the face with the same honey/caramel glaze using a fine brush. This highlights the expression. -
Fill the Center:
For the flat center area, you can either apply a thin wash of the honey glaze or use a clear matte glaze to let the natural speckles shine. -
Final Fire:
Fire the piece again to glaze temperature. Ensure the bottom is wiped clean of glaze so it doesn’t stick to the kiln shelf.
Stack them up on your coffee table for a touch of handmade happiness every time you take a sip
Five-Point Leaf Trinket Dish
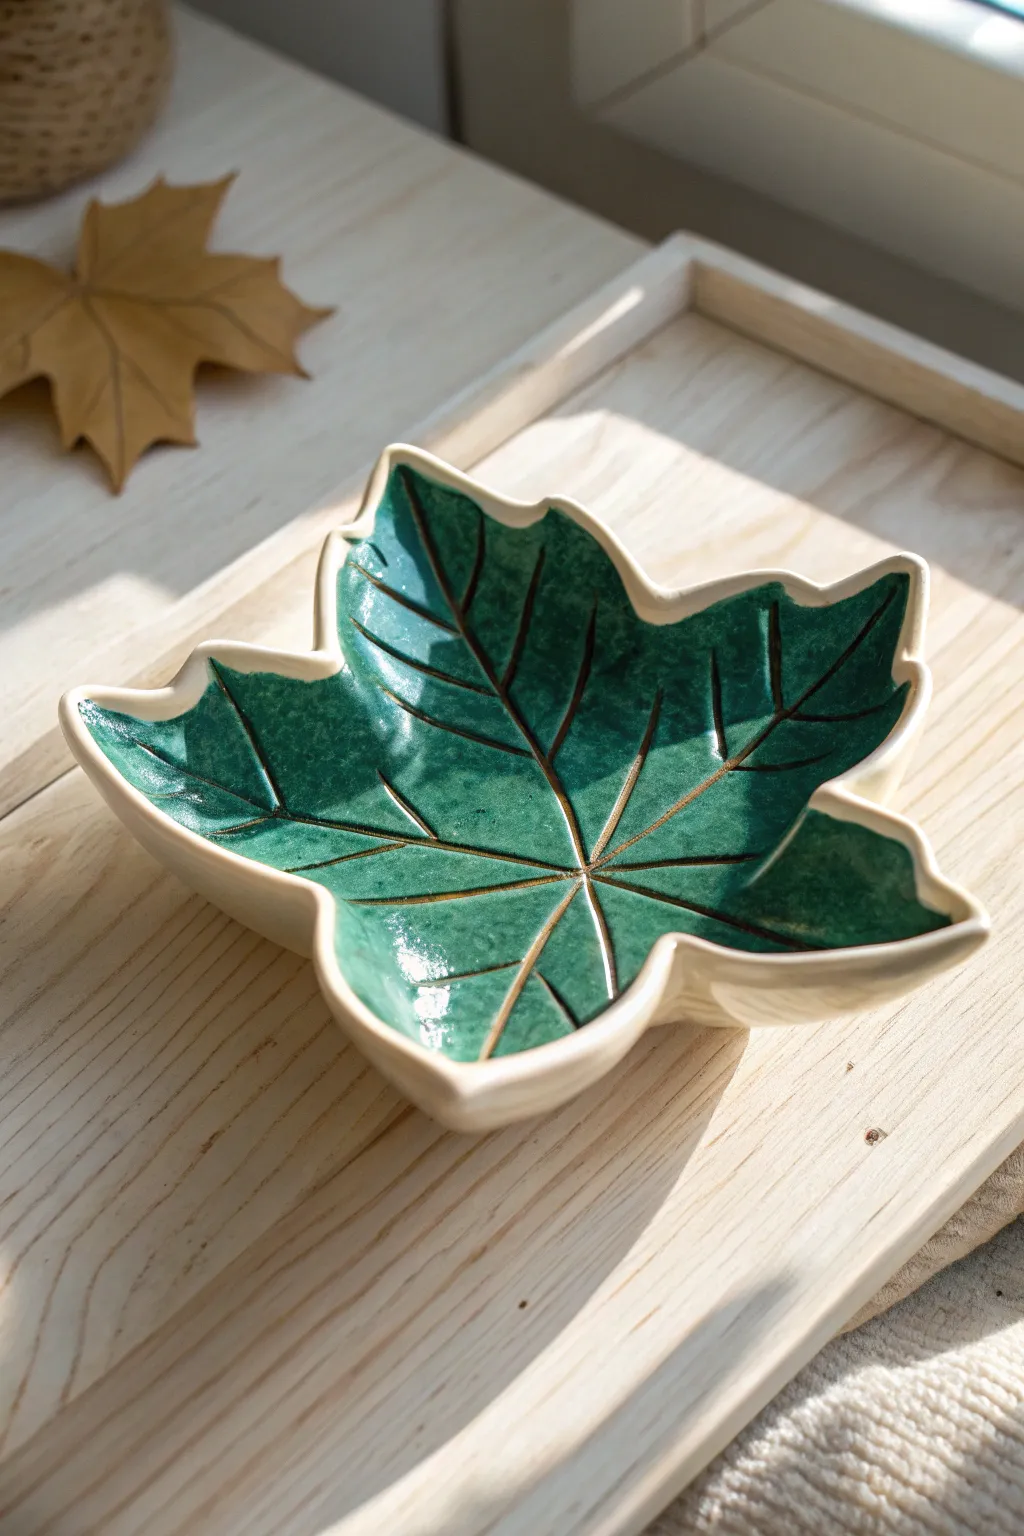
Capture the beauty of autumn foliage year-round with this stunning five-point leaf trinket dish. Its deep emerald glaze and precise veining make it an eye-catching catch-all for your favorite small treasures.
Step-by-Step Guide
Materials
- Air-dry clay or polymer clay (white or light beige)
- Real maple or sycamore leaf (or a printed template)
- Rolling pin
- X-Acto knife or clay cutting tool
- Sponge or soft brush
- Small bowl (to use as a mold)
- Carving tool or needle tool
- Sandpaper (fine grit)
- Emerald green high-gloss glaze or acrylic paint
- Clear high-gloss varnish (if using acrylics)
- Brown acrylic paint (for antiquing veins)
- Small detail brush
Step 1: Shaping the Leaf
-
Prepare your clay:
Start by conditioning your clay until it is soft and pliable. Roll it out into a smooth slab that is roughly 1/4 inch thick. Aim for an even thickness throughout to ensure uniform drying. -
Place your template:
Lay your real leaf or paper template gently onto the clay slab. If you are using a real leaf, position it vein-side down and roll over it lightly with the rolling pin to imprint the natural texture. -
Cut the outline:
Using your X-Acto knife, carefully trace around the edge of the leaf. Keep your blade vertical to get clean, sharp edges. Remove the excess clay and set it aside for future projects. -
Refine the edges:
Once the shape is cut, dip your finger in a little water (for air-dry clay) or baby oil (for polymer) and smooth out any rough cutting marks along the rim. -
Create the curvature:
Lift your clay leaf carefully and drape it inside your small bowl. Press it gently so it takes on a curved, dish-like shape. Don’t press too hard, or you might distort the leaf points.
Warped edges?
If your leaf edges curl up too much while drying, you can gently weigh down the center with a small bag of rice or sand during the initial drying phase to keep the bottom flat.
Step 2: Detailing and Veins
-
Carve the main veins:
With the clay still in the bowl, use your needle tool to carve the primary veins. Draw five main lines radiating from the stem area toward each of the five leaf points. -
Add secondary veins:
Branching off from your main lines, carve smaller, angled lines to create the intricate network of secondary veins. Press deep enough to hold glaze later, but not so deep you cut through. -
Dry or bake:
Allow the clay to dry completely (24-48 hours for air-dry) or bake it according to the manufacturer’s instructions while it’s still in the bowl to maintain the shape. -
Sand the surface:
Once fully cured and cooled, remove the leaf from the bowl. Lightly sand the edges and surface with fine-grit sandpaper to remove any sharp burrs or fingerprints.
Texture Tip
For ultra-realistic texture, gently press a piece of coarse sandpaper or a stiff fabric onto the clay surface before cutting. It mimics organic leaf skin perfectly.
Step 3: Painting and Glazing
-
Base coat the rim:
Leave the very edge of the rim unpainted or paint it a creamy beige to mimic the raw ceramic look seen in the photo. This creates a nice contrast with the dark interior. -
Apply the green base:
Paint the interior of the leaf with your deep emerald green. I find that applying two thin coats gives a richer, more uniform color than one thick coat. -
Enhance the veins:
Mix a small amount of water with brown acrylic paint to create a wash. Use a detail brush to run this dark liquid into the carved vein grooves. -
Wipe back excess:
Immediately wipe the surface gently with a damp paper towel or sponge. The brown paint will stay in the recesses of the veins, creating depth, while revealing the green on the high points. -
Final gloss coat:
Seal the entire interior with a thick layer of high-gloss varnish. This replicates the shiny, ceramic glaze finish and protects your paint job. -
Final dry:
Let the varnish cure completely in a dust-free area before using your new dish.
Now you have a perfect spot to rest your lighter or keys in style
Third-Eye Wall Tile
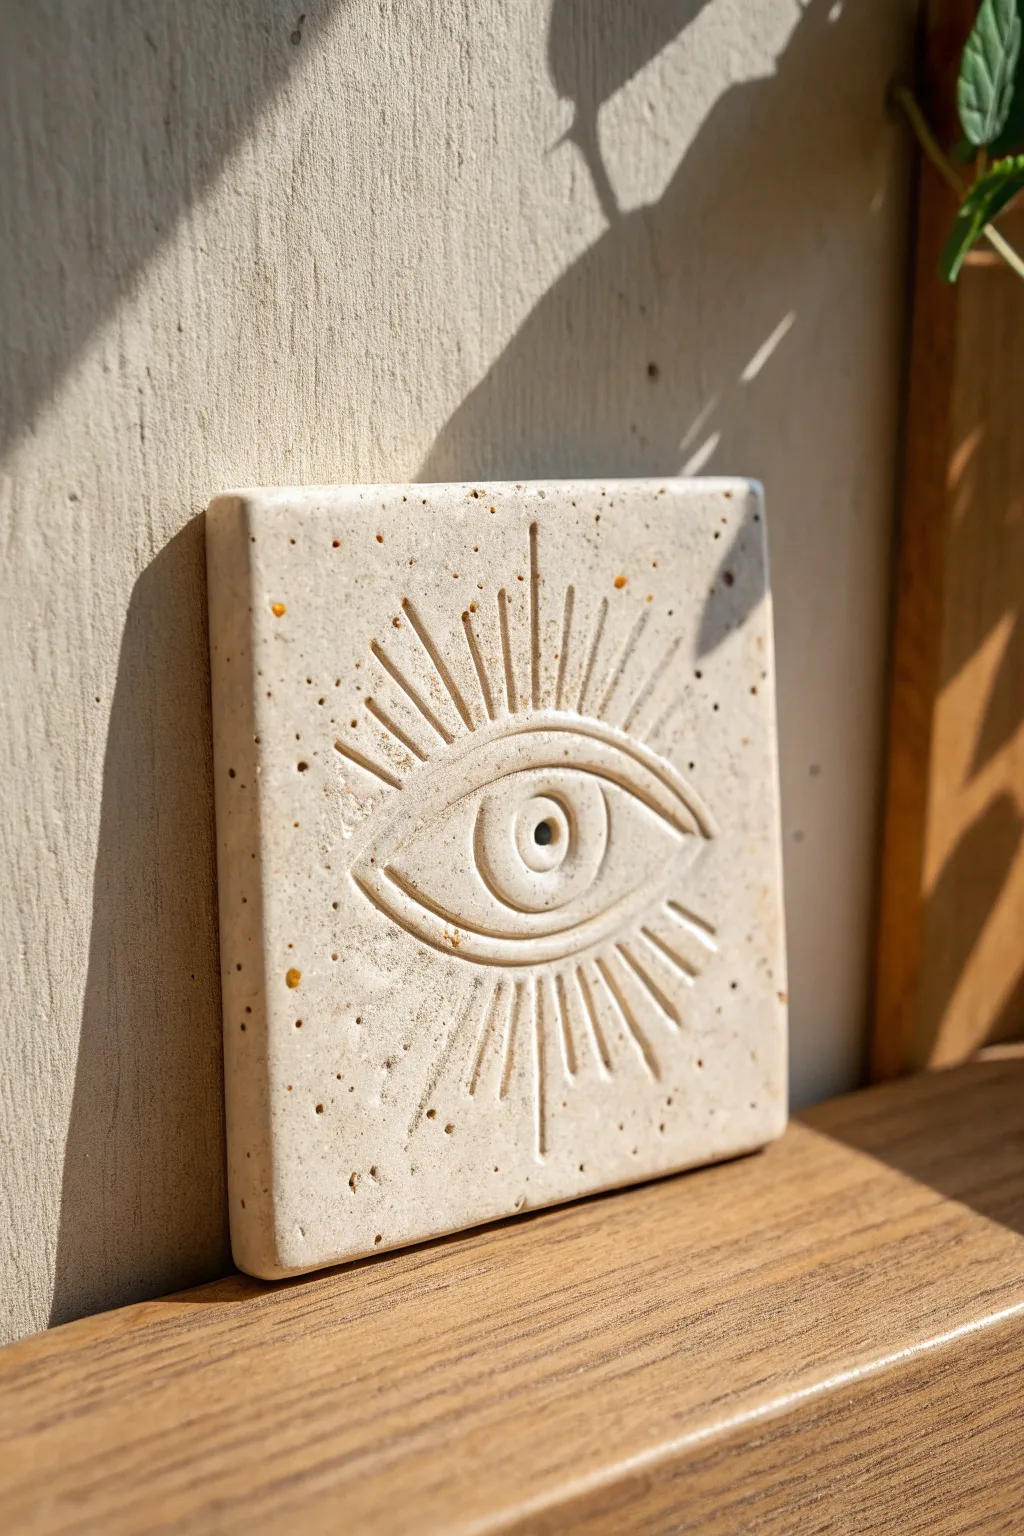
Channel inner peace with this minimalist third-eye incense holder, crafted to look like an ancient stone tablet. The speckled cream clay and deep relief carving give it a tactile, earthy quality perfect for your meditation corner.
How-To Guide
Materials
- Speckled stoneware clay (or white polymer clay with faux stone effect)
- Square clay cutter (approx. 4×4 inches) or ruler and craft knife
- Rolling pin
- Two wooden guide slats (approx. 1/4 inch thick)
- Needle tool or sharp toothpick
- Small loop carving tool or U-gouge
- Ball stylus tool (medium size)
- Smoothing sponge
- Incense stick (for sizing)
- Canvas board or work mat
Step 1: Preparation & Base
-
Prep the clay:
Begin by wedging your speckled stoneware clay thoroughly to remove air bubbles. If you are using polymer clay, condition it until it is pliable and soft. -
Roll the slab:
Place your clay between two wooden guide slats to ensure an even thickness. Roll the clay out into a smooth slab, aiming for about 1/4 inch thickness so it feels substantial. -
Cut the square:
Using a square cutter or a ruler and craft knife, cut out a perfect square tile. I find that wiping the blade with a little water helps it glide through stoneware cleanly without dragging. -
Smooth the edges:
Dip your finger or a sponge in a tiny bit of water and gently round off the sharp cut edges of the square to give it a softened, finished look.
Clean Lines Tip
Wait until the clay is ‘leather hard’ (stiff but cool) before doing the final carving. The tool will cut crisp ribbons rather than mushing the clay.
Step 2: Carving the Eye
-
Mark the center:
Lightly find the center of your tile. Use a needle tool to faintly sketch the outline of the eye shape—an almond shape with a circle inside for the iris. -
Carve the eyelids:
Use a small loop tool or U-gouge to carve deeply along the top and bottom lines of the almond shape. Remove the clay strips to create a distinct groove that separates the eye from the background. -
Define the iris:
Press a small circular cutter or bottle cap lightly into the center to define the iris, then use your carving tool to deepen the outline around this circle. -
Sculpt the pupil:
In the very center of the iris, use a smaller loop tool to hollow out a small depression for the pupil, creating depth. -
Create the incense hole:
Take an actual incense stick (or a tool of the exact same diameter) and press it vertically into the center of the pupil. Go deep enough to hold a stick securely, but try not to punch all the way through the bottom.
Level Up: Gold Accents
After firing (or baking), paint inside the carved rays or the pupil with liquid gold leaf or luster for a luxurious, mystical touch.
Step 3: Adding the Radiance
-
Mark the rays:
Lightly score guide lines radiating outward from the eye. Start with the cardinal directions (North, South, East, West) to ensure symmetry. -
Carve the main rays:
Using your U-gouge or loop tool, carve straight lines radiating outward along your guides. Make the central vertical ray the longest. -
Add shorter rays:
Between your longer rays, carve shorter, slightly thinner lines. Varying the lengths creates that dynamic ‘burst’ effect shown in the photo. -
Clean up crumbs:
Allows the clay to dry to a leather-hard state for about an hour. Then, use a soft, dry brush to sweep away any little clay crumbs or burrs created by the carving. -
Final smooth:
dampen your fingertip slightly and run it gently inside the carved grooves to smooth out any rough tool marks without losing the definition.
Step 4: Finishing
-
Drying:
Sandwich the tile between two pieces of drywall or wooden boards to let it dry slowly and evenly; this prevents the corners from curling up. -
Bisque fire:
Once bone dry, fire the piece to bisque temperature (usually cone 04) if using ceramic clay. -
Glazing or leaving bare:
To match the reference image, leave the clay unglazed to show off the raw stone texture. Alternatively, apply a clear matte glaze just to the inside of the eye for contrast. -
Final firing:
Fire the piece to maturity (cone 5/6 for stoneware). If you used polymer clay, bake according to the package instructions instead.
Place your finished tile on a shelf where the sunlight can catch the relief carving and enjoy the calm vibes
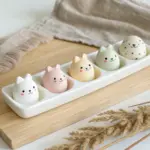
Sleepy Mushroom Buddy Figurines
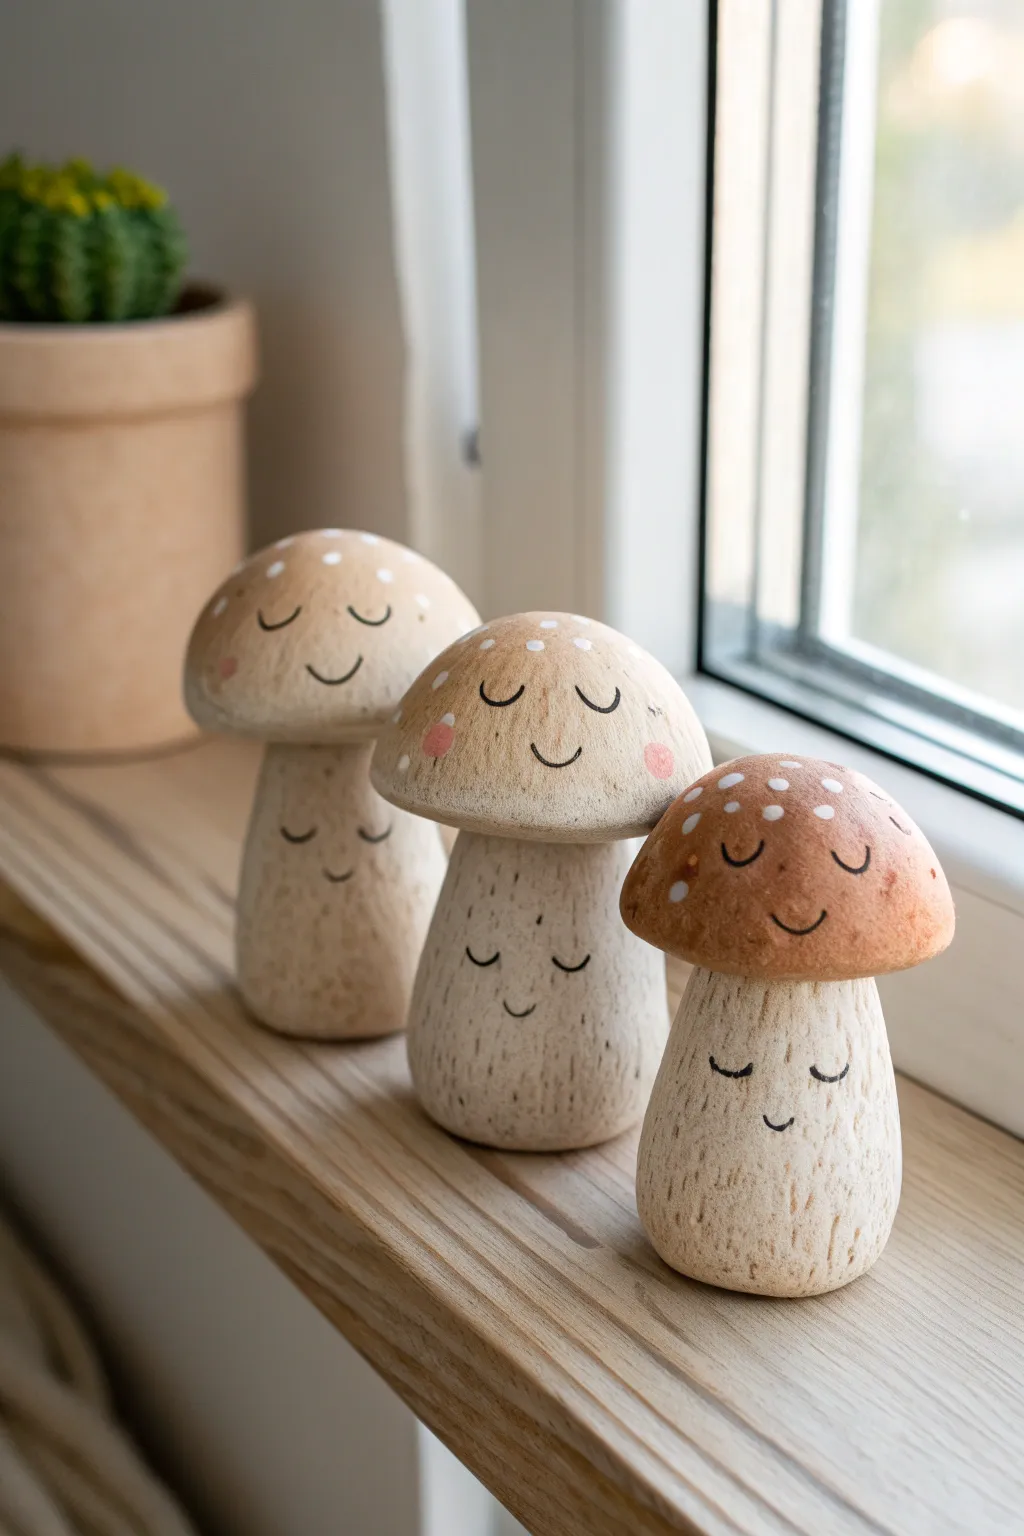
These adorable, sleepy-looking mushroom figures are the perfect low-stress desk companions, featuring calming closed-eye expressions on both their caps and stems. Crafted from polymer clay and finished with a textured, matte look, they bring a touch of whimsical tranquility to any windowsill.
Step-by-Step Guide
Materials
- Beige or tan polymer clay
- Brown polymer clay (for darker caps)
- White acrylic paint
- Fine-point black permanent marker or acrylic paint pen
- Soft pink pastel chalk or blush powder
- Small paintbrush
- Texture tool (needle tool, stiff toothbrush, or sandpaper)
- Ball stylus tool
- Oven for baking
Step 1: Shaping the Bodies
-
Form the Stems:
Start with a chunk of beige polymer clay and roll it into a thick, slightly tapered cylinder. You want a wide base for stability, tapering gently toward the top where the cap will sit. -
Round the Base:
Softly round off the bottom edges so the stem looks organic rather than like a cut pipe, but ensure it still stands flat on your work surface. -
Create the Cap:
Take a slightly larger ball of clay—either the same beige tone or mix in a tiny bit of brown for a varied look—and flatten it into a thick dome shape. -
Hollow the Cap Underside:
Use your thumb or a large ball tool to gently indent the underside of the cap, creating a curved socket that will fit snugly over the top of your stem. -
Attach Cap to Stem:
Place the cap onto the stem. Press down firmly but gently to bond the clay pieces together; you can use a little liquid clay or ‘bake and bond’ if the clay is too dry to stick on its own.
Texturing Pro Tip
For a truly organic stone-like finish, roll a ball of aluminum foil over the raw clay surface. This creates random divots instantly.
Step 2: Texturing & Details
-
Add Vertical Texture:
This step gives the mushrooms their rustic, woody look. Take a needle tool or a stiff-bristled brush and drag vertical striations down the length of the stem. -
Refine the Scratches:
Don’t make lines perfectly straight; vary the pressure so some scratches are deeper than others, mimicking natural bark or organic growth. -
Tint the Caps:
For the darker mushroom caps shown in the reference, mix a small amount of brown clay with your beige to get a deeper tan, or lightly brush brown pastel powder over the raw clay cap before baking. -
Rosy Cheeks:
Scrape a little dust from a soft pink pastel chalk. Use a soft, dry paintbrush to gently dab two circular ‘blush’ spots onto the raw clay cap where the face will go.
Step 3: Baking & Finishing
-
Bake the Clay:
Place your mushrooms on a baking sheet and bake according to your specific clay package’s instructions—usually around 275°F (135°C) for 15-30 minutes depending on thickness. -
Cool Completely:
Let the figures cool down fully before painting. Painting on hot clay can cause the paint to dry too fast or change texture. -
Draw the Faces:
Using a very fine-point black marker or paint pen, draw two downward-curved crescents for sleepy eyes on the cap. Add a tiny U-shape between them for a smile. -
The Second Face:
Don’t forget the secret second personality on the stem! Draw a matching sleepy face (eyes and smile) lower down on the stem itself. -
Add White Dots:
Dip the tip of a ball stylus or toothpick into white acrylic paint. Dot small speckles randomly over the top of the mushroom cap. -
Highlight the Cheeks:
If your pastel blush faded during baking, you can touch it up now with a tiny bit of watered-down pink acrylic paint over the cheek areas. -
Dry Brushing:
To enhance the texture on the stem, I like to lightly dry-brush a tiny amount of darker beige or grey paint over the scratches to make the detail pop.
Uneven Standing?
If your mushroom wobbles after baking, glue a small circle of felt to the bottom or lightly sand the base against flat sandpaper.
Now you have a trio of peaceful fungi friends to keep you company while you relax
Eyeball Surprise Charm
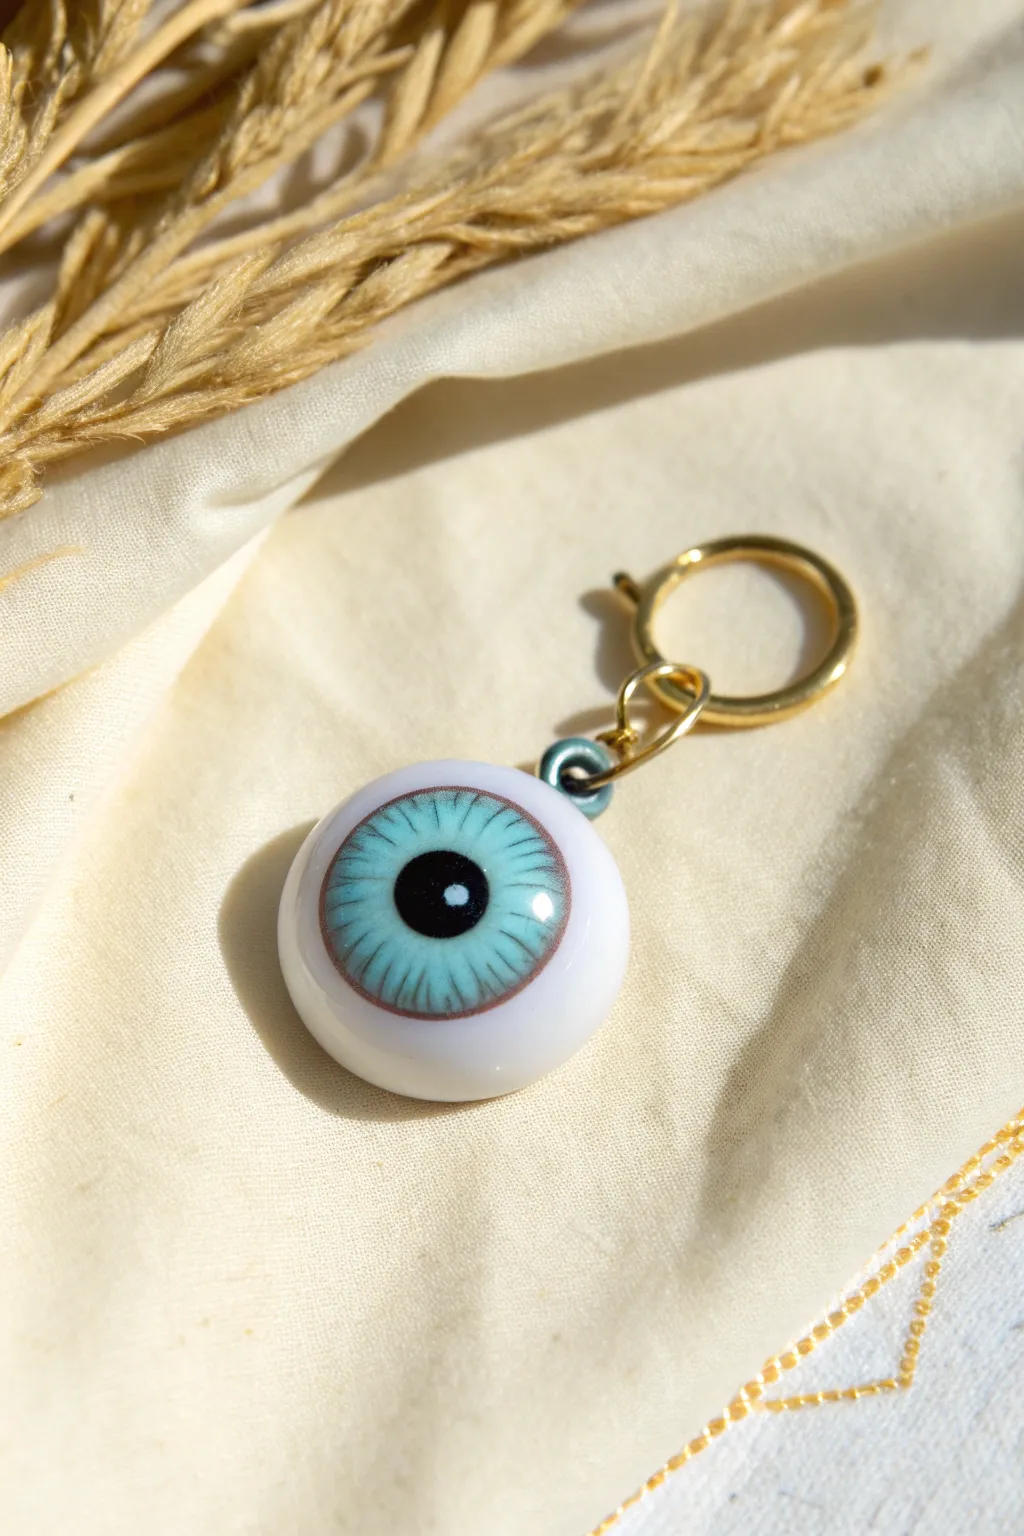
Keep an eye on your keys or bag with this strikingly realistic eyeball charm. This project combines simple sculpting with detailed painting techniques to create a quirky, glossy accessory that stares right back at you.
Step-by-Step Tutorial
Materials
- White polymer clay
- Translucent liquid clay (optional)
- Acrylic paints (Phthalo blue, black, white, burnt umber)
- Fine detail paintbrushes (size 0/0 and 000)
- UV resin or high-gloss polymer clay varnish
- UV light (if using resin)
- Small eye screw pin (gold)
- Gold jump ring
- Gold clasp mechanism
- Needle tool or toothpick
- Wet sandpaper (400 to 1000 grit)
Step 1: Sculpting the Base
-
Condition the Clay:
Begin by thoroughly conditioning your white polymer clay until it is soft and pliable. This prevents cracks from forming during the baking process. -
Form the Sphere:
Roll a piece of clay into a smooth ball, approximately 1 inch in diameter. Spend extra time ensuring there are absolutely no fingerprints or seams visible. -
Flatten Slightly:
Gently press the ball onto your work surface to create a flattened back, turning it into a cabochon shape rather than a full sphere. This helps it lay flat against a bag or keychain. -
Insert Hardware:
Take your small gold eye screw pin and carefully twist it into the top center of the eyeball shape. I like to add a tiny dab of liquid clay to the threads before inserting for extra security. -
Smooth the Connection:
Use a silicone tool or your finger to smooth any clay that may have displaced around the entry point of the screw pin. -
Bake:
Bake the clay piece according to the manufacturer’s instructions on the package. Let it cool completely before moving to the next phase.
Wobbly Lines?
If your hand shakes while painting detail lines, rest your pinky finger on the table for stability. You can also drag the paint inward toward the pupil rather than outward for better control.
Step 2: Painting the Eye
-
Mark the Center:
Using a very faint pencil mark, indicate where the center of your iris will go to ensure your eye isn’t looking sideways (unless you want it to). -
Paint the Iris Base:
Mix white with a touch of Phthalo blue to create a light blue base. Paint a perfect circle in the center of the white clay. -
Add the Pupil:
Once the blue is dry, paint a solid black circle in the dead center of the blue iris. -
Detail the Iris Lines:
Using your finest brush and a slightly darker shade of blue, paint very thin, radiating lines moving from the pupil outward toward the edge of the iris. -
Deepen the Texture:
Mix a tiny amount of black into your blue for a deep navy shade. Add shorter, sparse lines near the pupil to create depth and realism. -
Define the Edge:
Mix a wash of burnt umber (brown) with water. Carefully outline the outer rim of the iris to separate it from the white sclera. -
Add the Highlight:
This is the most crucial step for realism: place a tiny, crisp white dot overlapping both the pupil and the iris to simulate a light reflection.
Step 3: Finishing Touches
-
Seal with Resin:
Apply a generous dome of UV resin over the entire painted area and the white curve of the eye. The resin acts as the cornea and glass-like surface. -
Cure:
Place the piece under a UV light for 2-4 minutes until the surface is completely hard and tack-free. If using varnish instead, apply 2-3 coats, letting each dry fully. -
Add Metal Charm:
Create a small decorative bead connector if desired using a looped wire and a blue bead, attaching it to the gold eye screw. -
Final Assembly:
Open the gold jump ring using two pairs of pliers. Thread it through the bead connector (or directly to the eye screw) and the large clasp mechanism, then close tightly.
Pro Tip: The Cornea Effect
For ultra-realism, build the resin dome slightly higher over the iris area than the rest of the white ball. This mimics the actual anatomical bulge of a real eye’s cornea.
Clip your new eyeball charm onto your favorite jacket zipper or tote bag and enjoy the double-takes.
Psychedelic Bead Necklace
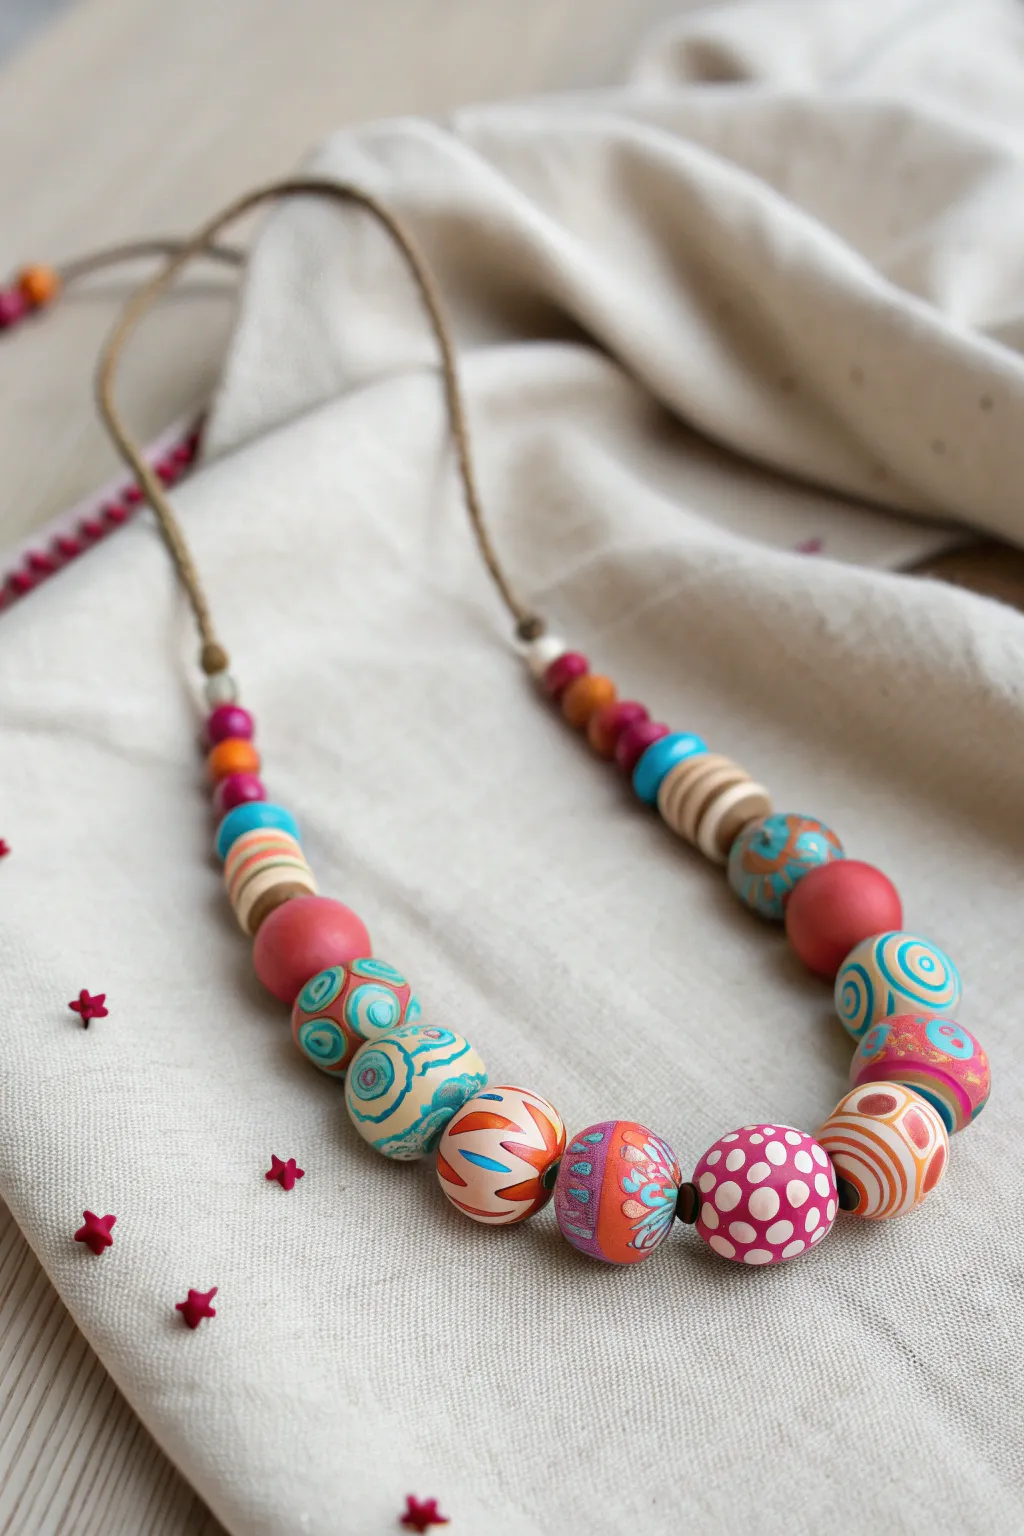
This vibrant, eclectic necklace combines polymer clay artistry with rustic charm, featuring hand-patterned beads in swirling pinks, teals, and oranges. It’s a perfect project for getting lost in the flow of color mixing and detailed beadwork.
Detailed Instructions
Materials
- Polymer clay (coral pink, bright teal, white, orange, deep magenta, light blue)
- Hemp or jute cord (natural color)
- Bead reamer or piercing tool
- Acrylic roller or pasta machine
- Tissue blade
- Wet/dry sandpaper (400-1000 grit)
- Matte or satin water-based varnish
- Small round paintbrushes
- Acrylic paints (optional, for enhancing details)
- Jewelry findings (crimp beads, jump rings, clasp – optional if doing a tie closure)
- Oven geared for polymer clay
Step 1: Creating the Solid & Marbled Beads
-
Condition the clay:
Start by warming and kneading your various clay colors until they are soft and pliable; correct conditioning prevents cracks during baking. -
Form the large focal beads:
Roll balls of solid coral pink and deep magenta clay to create the large anchor beads for the sides of the necklace; aim for about 20mm in diameter. -
Create the psychedelic swirls:
For the swirled beads, create a ‘bullseye’ cane by wrapping a log of teal clay in a sheet of white, then a sheet of dark blue. Reduce the cane by rolling it thinner. -
Apply the pattern:
Slice thin cross-sections of your bullseye cane and press them onto a ball of scrap clay, completely covering the surface. -
Smooth the surface:
Roll the patterned bead gently between your palms to smooth out the seams where the cane slices meet, ensuring a continuous swirled surface.
Smooth Roll Technique
To keep beads perfectly spherical without fingerprints, roll them under a sheet of acrylic or glass on your work surface instead of your palms.
Step 2: Specialty Bead Patterns
-
Make the spotted bead:
Form a large ball of magenta clay. Roll tiny balls of white clay and press them gently onto the surface, then roll the entire bead until the white dots are flush with the pink surface. -
Craft the striped accents:
For the orange and white striped bead, stack alternating pancakes of orange and white clay, compress them, slice vertically, and apply the striped sheet to a base bead. -
Sculpt the smaller stackers:
Create smaller disc-shaped and round beads in solid orange, teal, and magenta to use as spacers near the neckline. -
Pierce the holes:
Before baking, use a bead piercing tool to create holes in all beads. Twist the tool gently as you push through to avoid distorting the bead’s shape. -
Bake the beads:
Arrange your beads on a baking sheet or bead rack. Bake according to your brand of clay’s instructions (usually 275°F/130°C for 30-45 minutes). -
Cooling down:
Allow the beads to cool completely in the oven; removing them while hot can cause thermal shock and cracking.
Step 3: Finishing and Assembly
-
Sand for smoothness:
Once cool, use wet/dry sandpaper under running water to buff out any fingerprints or rough edges on your cured beads. -
Add painted details:
I like to use a fine brush and acrylic paint to add tiny wavy lines or extra dots to the swirled teal beads for added depth, sealing them afterwards. -
Seal the beads:
Apply a thin coat of matte or satin varnish to protect the surface and give the colors a gentle pop without making them looking plastic-shiny. -
Prepare the cord:
Cut a length of hemp or jute cord roughly 24-30 inches long, depending on your desired hanging length, leaving extra for knotting. -
String the beads:
Start threading your beads, beginning with the smaller spacers, moving to the large focal beads, and placing the spotted magenta bead in the exact center. -
Secure the ends:
Knot the cord securely at both ends of the beaded section to keep them centered, then finish the ends with a sliding knot or a metal clasp. -
Final adjustment:
Double-check that the beads sit symmetrically and the knots are tight before wearing your new creation.
Uneven Holes?
If bead holes close up during baking, use a manual hand drill or a small drill bit twisted with your fingers to re-open them cleanly after curing.
Now you have a totally unique, groovy statement piece that captures a fantastic retro aesthetic
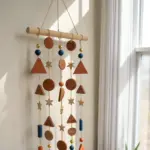
Glow-Style Nightstand Totem
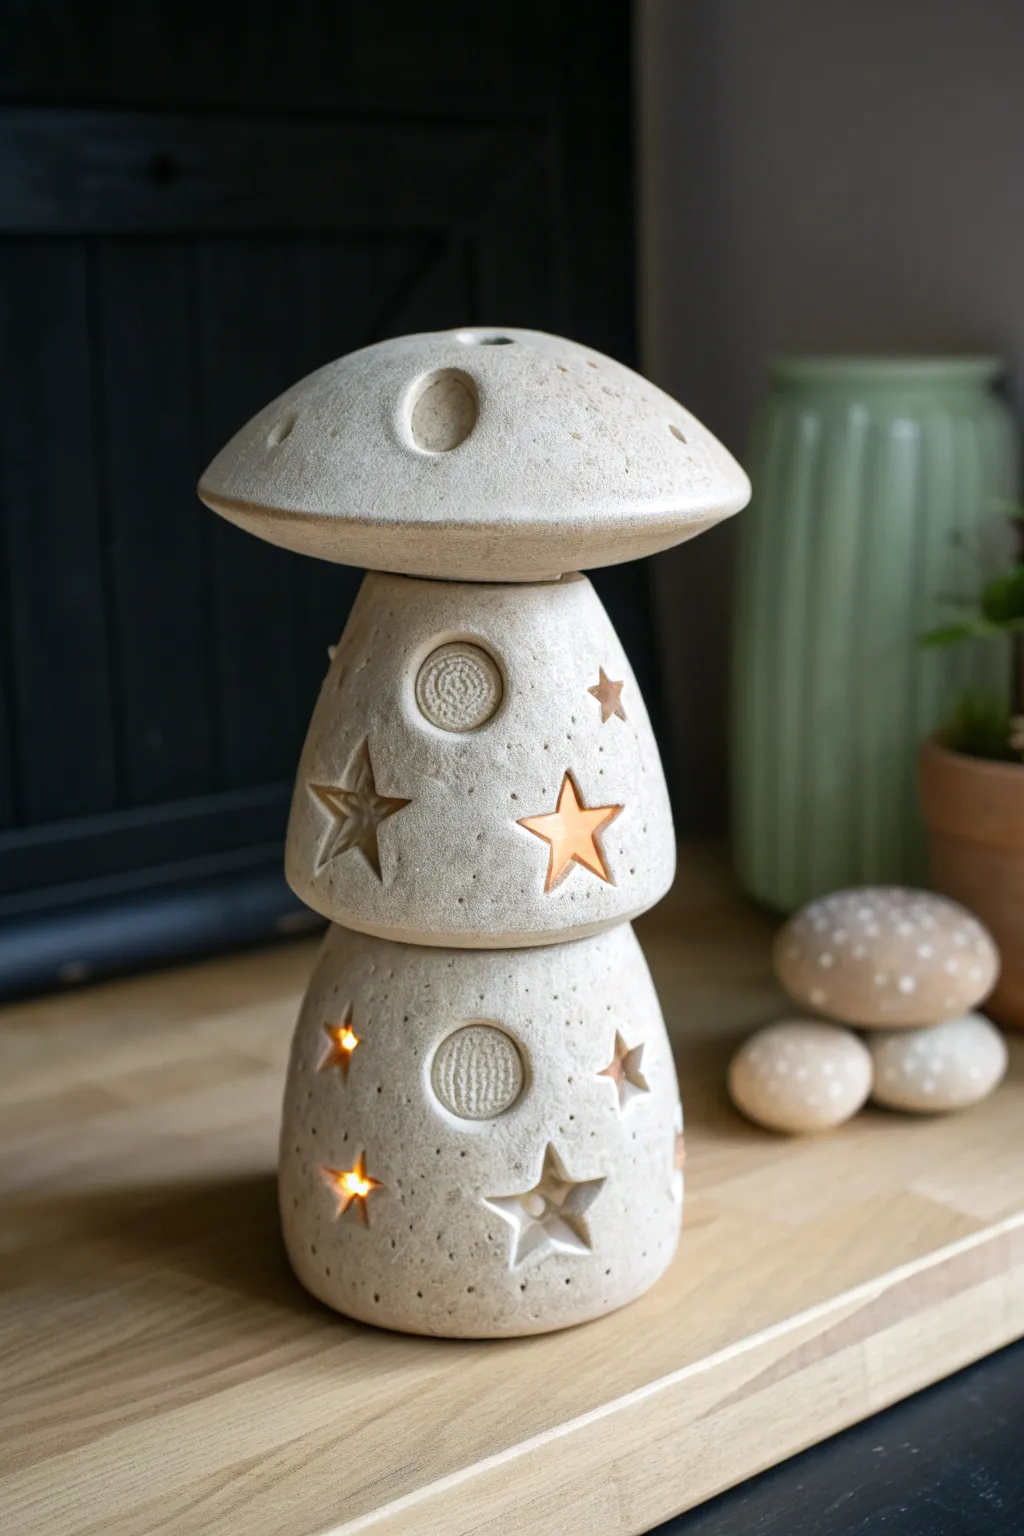
This whimsical three-tier structure combines earthy stoneware aesthetics with celestial charm, casting a warm glow through hand-carved stars and moons. The stacked mushroom design functions as a unique sculptural piece by day and a cozy nightlight by evening.
Step-by-Step
Materials
- White or speckled stoneware clay (approx. 3-4 lbs)
- Small LED tea lights or fairy lights
- Star-shaped cookie cutters (small and medium)
- Circle cutter or bottle cap
- Fettling knife
- Needle tool
- Potter’s sponge
- Rolling pin
- Slip and scoring tool
- Texture sponge or stiff brush
Step 1: Forming the Base Sections
-
Roll your slabs:
Begin by rolling out two slabs of clay to a consistent 1/4-inch thickness. You want them sturdy enough to stand but thin enough for light to pass through the cutouts. -
Cut the base rectangles:
Cut two long rectangles. The bottom section should be slightly wider and taller than the middle section to create a tapering effect. Aim for roughly 10×5 inches for the base and 9×4 inches for the middle. -
Create cylinders:
Form each rectangle into a cylinder. Score and slip the connecting edges thoroughly, then press them firmly together to create a seamless join. -
Shape the taper:
Gently gently work the clay with your hands to taper the cylinders slightly toward the top, giving them a more organic, mushroom-stem silhouette. -
Close the roofs:
Roll out two small circular slabs. Attached these to the top of each cylinder using the score and slip method, creating a flat ‘roof’ for each stem section so they can stack.
Step 2: Sculpting the Mushroom Cap
-
Pinch pot start:
Start with a ball of clay roughly the size of a large orange. Open it up using a pinch pot technique to create a wide, hollow bowl shape. -
Refine the curve:
Smooth the exterior into a gentle, domed curve. I like to flip it upside down on a board to ensure the rim is level. -
Structure the underside:
Add a small coil of clay to the underside center of the cap. This creates a locking mechanism or lip that will help the cap sit securely on the middle tier.
Warped Walls?
If your cylinders are sagging while you work, stuff them gently with crumpled newspaper. This offers internal support until the clay stiffens.
Step 3: Carving and Detailing
-
Strategic placement:
Before cutting, lightly trace where you want your stars and moons to go. Stagger them around the circumference so the light distribution is balanced. -
Cut the stars:
Use your cookie cutters to punch out the star shapes. For a cleaner look, support the clay wall from the inside with your hand while pressing the cutter. -
Create moon impressions:
Instead of cutting all the way through for the circles, press a circle cutter or bottle cap firmly into the clay without breaking the wall creates a recessed ‘moon’ effect. -
Add texture:
Using a needle tool, scratch texture into the recessed moon circles. Then, gently pat the entire exterior with a coarse sponge to give it that stone-like stippled finish. -
Poke light holes:
Use a needle tool or small drill bit to create tiny pinholes around the stars. These add extra sparkle when the light is inside. -
Smooth the edges:
Take a damp sponge and carefully soften the sharp edges of your cutouts. Sharp clay edges can be brutal after firing.
Pro Tip: Clean Cuts
When cutting stars, let the clay stiffen to ‘leather hard’ first. Cutting when too wet drags the clay; cutting when too dry creates cracks.
Step 4: Assembly and Finish
-
Dry fit:
Once leather hard, stack the pieces to ensure they fit together snugly. The cap should rest on the middle tier, and the middle tier should sit on the base. -
Dry slowly:
Loosely cover the pieces with plastic to let them dry slowly. Uneven drying can cause the cylindrical shapes to warp or crack. -
Bisque fire:
Fire the pieces to cone 04 (or your clay’s specific bisque temperature). -
Leave bare or clear coat:
For the sandy look in the photo, leave the clay unglazed on the outside. You can apply a clear matte glaze to the inside for durability. -
Final firing:
Fire again to the maturity temperature of your clay body (likely cone 5 or 6 for stoneware). -
Light it up:
Place battery-operated LED puck lights inside the bottom and middle sections, stack your pieces, and enjoy the glow.
Once assembled and lit, this tiered lantern creates a magical atmosphere perfect for any cozy corner
Mini Trippy Diorama Jar Lid

Capture a slice of a magical night sky with this whimsical diorama sealed inside a glass jar. A starry moon-rock and vibrant clay mushrooms create a tiny, self-contained universe perfect for your bookshelf or desk.
How-To Guide
Materials
- Small glass cloche or jar with a flat wooden base (or lid)
- Round, smooth river stone (medium size)
- Air-dry clay or polymer clay (white)
- Acrylic paints: dark blue, black, white, red, cream/beige
- Fine detail paintbrushes
- Faux moss or dried moss
- Strong craft glue or E6000
- Textured tool (like a toothbrush or needle tool)
- Toothpicks and aluminum foil (for armatures)
- Matte spray varnish
Step 1: Painting the Galaxy Stone
-
Prepare the canvas:
Clean your river stone thoroughly with soap and water to remove any oils or dust. Let it dry completely before starting. -
Base coat application:
Paint the entire surface of the stone with a deep, dark blue acrylic paint. You may need two coats for full opacity. -
Add depth:
While the blue is still slightly wet, I like to blend in a tiny amount of black around the edges to create a vignetted, deep-space effect. -
Paint the moon:
Using a creamy beige color and a fine brush, paint a crescent moon shape on the left side of the stone. Add subtle texture by stippling a lighter white on top. -
Starry details:
Dip a toothbrush in watered-down white paint and flick the bristles to spray tiny stars across the stone. Use a fine brush to add a few larger, distinct stars manually. -
Seal the stone:
Once the paint is fully dry, apply a matte spray varnish to protect your galaxy artwork.
Keep it Steady
If your mushrooms are top-heavy, insert a small piece of toothpick or wire into the stem and cap connection before the clay hardens for internal support.
Step 2: Sculpting the Fungi
-
Form the mushroom caps:
Roll a ball of white clay and flatten the bottom to create a dome shape for the main mushroom cap. Repeat this process to make 2-3 tiny baby mushrooms. -
Sculpt the stems:
Roll a thick cylinder of clay for the main stem. Use a needle tool to scratch vertical lines into the stem, mimicking the natural texture of a mushroom stalk. -
Assembly and drying:
Attach the cap to the stem. If using polymer clay, bake according to package instructions. If using air-dry clay, allow it to cure for 24-48 hours. -
Painting the caps:
Paint the large mushroom cap a vibrant red. Paint the smaller mushroom caps a lighter red or cream color for variety. -
Adding the spots:
Using the back end of a paintbrush dipped in white paint, dot varied sizes of spots onto the red cap. -
Stem finishing touches:
Paint the stems a cream color, using a ‘dry brush’ technique with a darker tan to highlight the textured grooves you sculpted earlier.
Step 3: Assembly the Scene
-
Prepare the base:
Take the wooden base of your cloche (or the inside of a jar lid) and apply a generous layer of craft glue. -
Moss foundation:
Press small tufts of faux moss into the glue to cover the base completely. Ensure there are no bald spots showing the wood. -
Positioning the stone:
Apply a strong dab of E6000 or heavy-duty glue to the bottom of your galaxy stone and nestle it firmly into the moss toward the back of the base. -
Planting the mushrooms:
Glue the large mushroom in the foreground, slightly off-center. Arrange the tiny mushrooms around the base of the stone and the larger mushroom. -
Final touches:
Clean the glass dome perfectly with glass cleaner to remove any fingerprints. -
Closing the world:
Carefully lower the glass dome over your creation, ensuring you don’t knock over the mushrooms, and seat it into the base groove.
Glow Up
Use glow-in-the-dark acrylic paint for the stars and mushroom spots. Under blacklight, your mini diorama will transform into a psychedelic trip.
Place your new miniature world near a window and enjoy the peaceful vibe it brings to the room