When I’m craving that carefree, sun-soaked vibe, I reach for summer clay bead bracelets—bright, lightweight, and made for stacking. Here are my favorite summer bracelet ideas that feel like beach days, pool dips, and warm nights all wrapped around your wrist.
Classic Rainbow Clay Heishi Stack
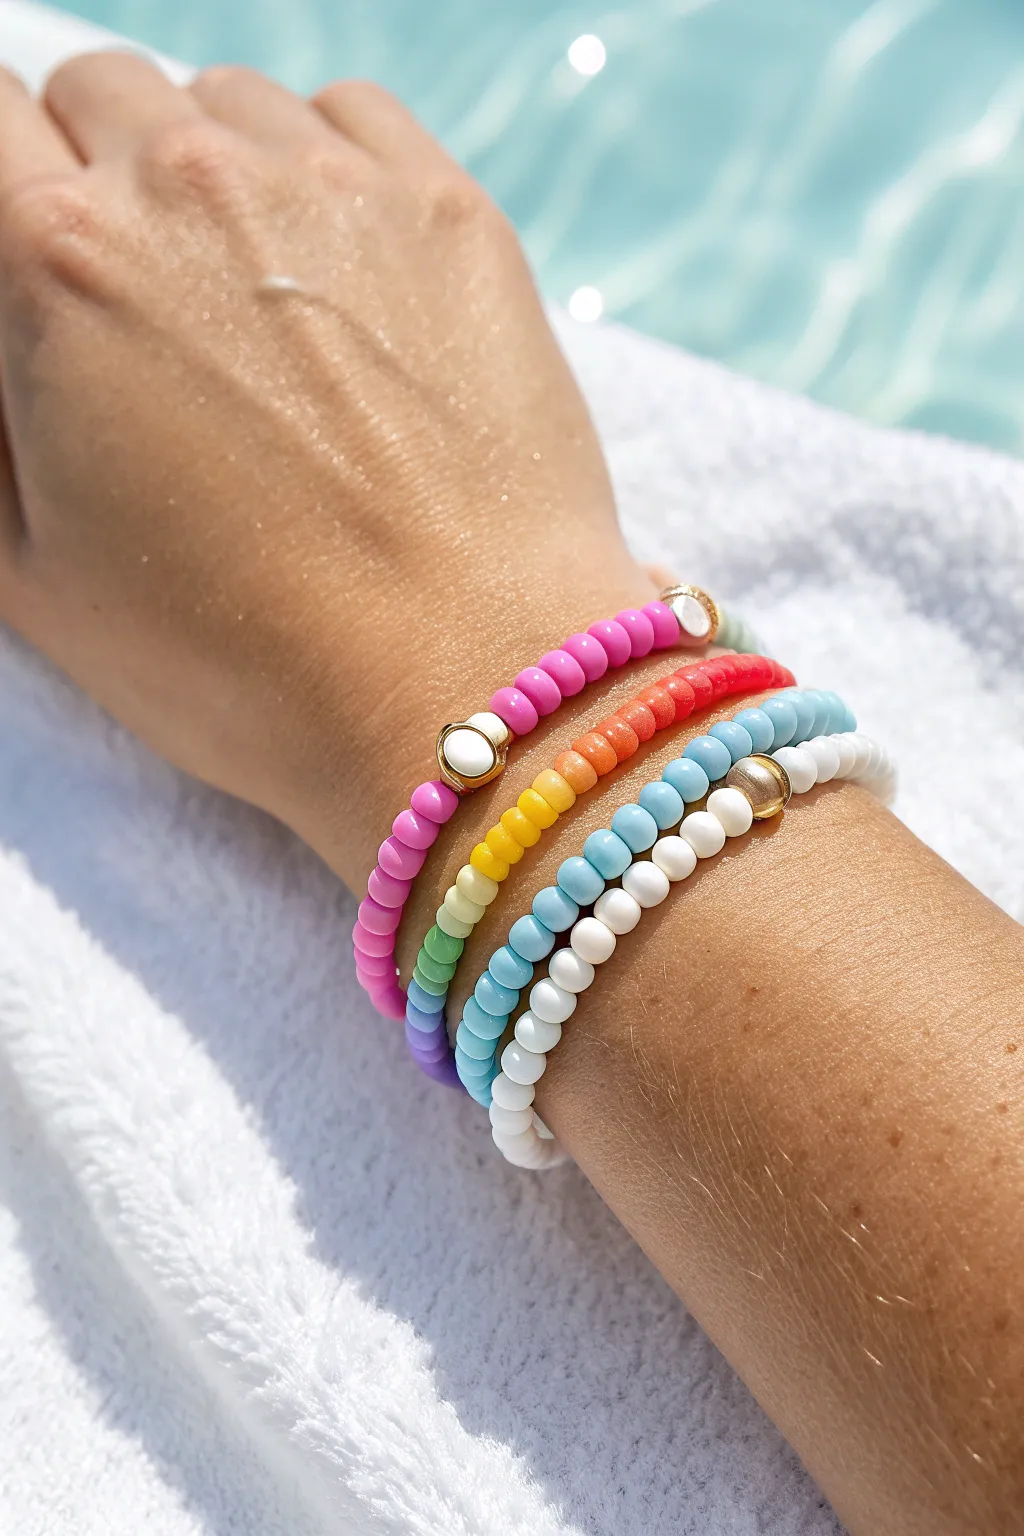
Capture the essence of summer with this vibrant four-bracelet stack that perfectly mimics a poolside rainbow. Using cheerful seed beads and heishi-style clay beads, you’ll create a layered look featuring bright pinks, a gradient rainbow, cool blues, and a classic white strand.
How-To Guide
Materials
- Hot pink opaque seed beads (approx. size 6/0)
- Rainbow mix of seed beads (orange, yellow, pastel green, lavender)
- Light blue opaque seed beads (approx. size 6/0)
- White opaque seed beads (approx. size 6/0)
- 2 Gold-tone bezel charms (white enamel center)
- 1 Large gold-filled round bead (approx. 6mm)
- Strong elastic cord (0.7mm or 0.8mm transparent)
- Jewelry glue or clear nail polish
- Scissors
Step 1: The Hot Pink Strand
-
Measure and Cut:
Cut a piece of elastic cord about 10-12 inches long. This generous length gives you plenty of room to knot it securely later without frustration. -
Start Beading:
Thread your opaque hot pink beads onto the elastic. You will need enough to cover about half of your wrist’s circumference. -
Add the Centerpiece:
Slide on one of the gold-tone bezel charms. Ensure the white enamel side is facing outward or can flip easily. -
Finish the Loop:
Continue threading hot pink beads until the strand fits comfortably around your wrist. It shouldn’t be too tight, as stackable bracelets look best with a little movement. -
Tie it Off:
Tie a surgical knot (left over right, right over left) and pull tight. Add a tiny dot of jewelry glue to the knot, let it tack up for a minute, then trim the excess cord.
Step 2: The Rainbow Gradient
-
Prepare the Cord:
Cut another 12-inch length of elastic for your second bracelet. -
Create Sections:
Instead of mixing colors randomly, block them. Thread about 1.5 inches of red/orange beads, followed by 1.5 inches of sunny yellow beads. -
Cool Down Colors:
Continue the gradient by adding a section of pastel green beads, then transition into a soft lavender or purple section to complete the rainbow arc. -
Sizing Check:
Wrap it around your wrist to check the length. If you have gaps, I prefer adding a few neutral white beads at the very back near the knot so the rainbow stays centered. -
Secure the Strand:
Knot the elastic firmly using a double or surgeon’s knot, apply glue, and trim the tails precisely once dry.
Knot Slipping?
If your slippery elastic knots won’t hold, pre-stretch the cord before beading. A surgeon’s knot (looping through twice) is your best friend here.
Step 3: The Ocean Blue Layer
-
Thread the Blues:
On a new piece of structural elastic, begin stringing your light blue opaque beads. These should be a uniform color to contrast with the rainbow strand. -
Measure Length:
Stop when the beaded section matches the length of your previous two bracelets. Uniform sizing is key for a neat stack. -
Seal the Knot:
Perform the standard knotting procedure: tie tightly, glue, wait for it to set, and snip the ends close to the knot.
Mix Up the Metals
Swap the gold accent bead for a brushed silver bead or a rose gold spacer to change the jewelry’s ‘temperature’ and match your other summer accessories.
Step 4: The White & Gold Final
-
Begin the Base:
Start this final bracelet by threading white opaque beads onto your last piece of elastic cord. -
Insert the Gold Accent:
Once you have beaded about halfway, slide on the large gold-filled round bead. This metallic pop ties the whole stack together visually. -
Complete the Circle:
Finish adding white beads until the size matches the rest of your set. -
Hide the Knot:
Tie your knot securely. If the hole of the gold bead is large enough, try to slide the knot inside it for a seamless professional finish.
Slip on your colorful new stack and enjoy the waterproof, worry-free summer vibes


Neon Mix-And-Match Summer Set
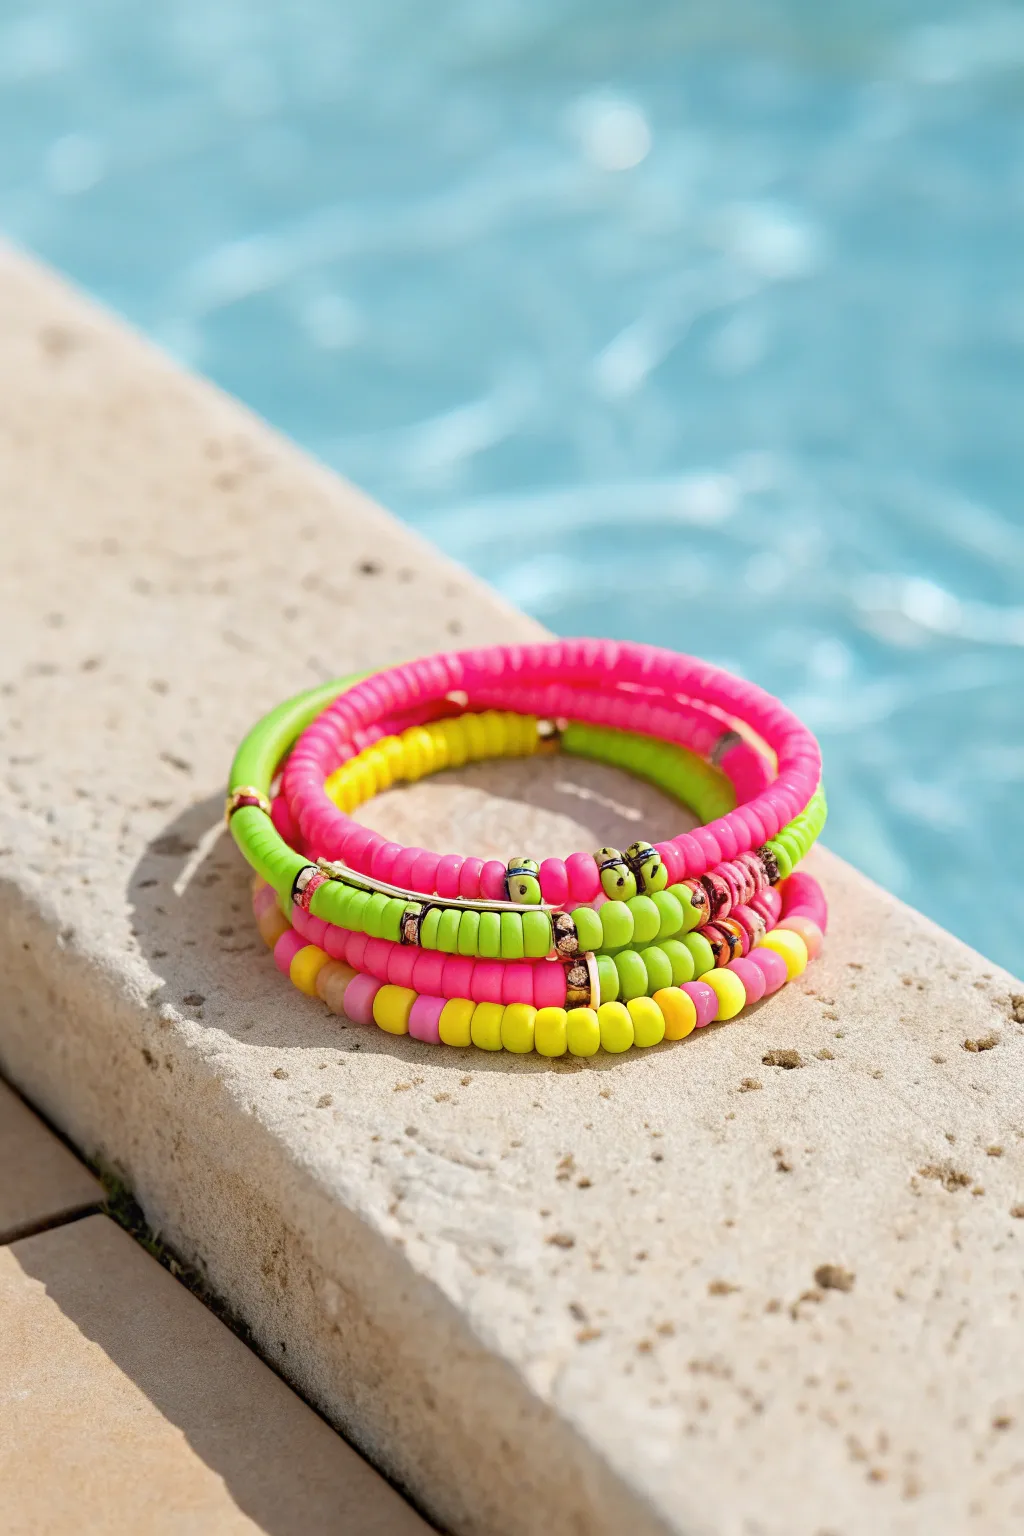
Brighten up your beach days with this vibrant stack of neon heishi bead bracelets featuring playful butterfly charms and metallic accents. This trio combines hot pink, electric lime, and sunshine yellow polymer clay discs for a waterproof accessory that screams summer fun.
Detailed Instructions
Materials
- 6mm neon pink polymer clay disc (heishi) beads
- 6mm neon lime green polymer clay disc (heishi) beads
- 6mm bright yellow polymer clay disc (heishi) beads
- Gold spacer beads (heishis or small rounds)
- Gold tube beads (slightly curved works best)
- Small butterfly accent beads (yellow/black and blue/black)
- 0.8mm clear elastic stretch cord
- Jewelry glue or clear nail polish
- Scissors
- Bead stopper or masking tape
Step 1: Planning Your Stack
-
Design the base:
Before you start stringing, lay out your three separate strands on a bead board or a towel. The goal is an asymmetrical look where solid blocks of color are interrupted by contrasting beads and charms. -
Measure your wrist:
Wrap a piece of string around your wrist to find your size, then add about half an inch for a comfortable fit. Cut three pieces of elastic cord, making sure each is at least 4 inches longer than your measurement to make tying knots easier. -
Secure the ends:
Place a bead stopper or simply a piece of masking tape on one end of each elastic strand so your colorful work doesn’t slide right off while you’re beading.
Step 2: Creating the Hot Pink Strand
-
Start strong with pink:
Begin by threading about 2 inches of the neon pink clay discs. Use a consistent direction if the beads have slight variations. -
Add a gold accent:
Slide on a single gold spacer bead to break up the color block, then continue with another inch of pink beads. -
Insert the focal point:
Thread a curved gold tube bead onto the strand. This creates a sleek, metallic focal area that sits nicely against the wrist. -
Finish the loop:
Resume stringing the neon pink discs until you reach your desired total length.
Knot Slipping?
If your elastic knots won’t hold tight, try rubbing the ends with a little beeswax or even plain bar soap before tying to add friction and grip.
Step 3: Creating the Lime & Butterfly Strand
-
Mix your greens:
For the second bracelet, start with a solid section of neon lime green beads, covering about one-third of the total length. -
Create a pattern break:
In the middle section, instead of solid green, I like to create a small pattern block: add a gold spacer, three pink beads, a gold spacer, then back to green. -
Add the fun charms:
Thread on two small butterfly beads—perhaps a yellow one and a blue one—separated by a single lime green disc so they don’t crowd each other. -
Close the circle:
Fill the rest of the strand with the remaining lime green beads, checking it against the first bracelet to ensure they are the same size.
Glow Up
Swap the standard white focal beads for glow-in-the-dark polymer clay beads. They look white in daylight but will shine neon green at night parties.
Step 4: Creating the Multi-Color Mix Strand
-
Alternate colors:
This final bracelet ties the set together. Start with a pattern of 5 pink beads, followed by 5 yellow beads. -
Incorporate spacers:
Place a gold spacer bead between every few color transitions to catch the sunlight. -
Add a touch of lime:
Introduce small sections of the lime green beads (groups of 3 or 4) sporadically to echo the second bracelet. -
Balance the look:
Continue alternating small blocks of pink, yellow, and green until the length matches the previous two strands.
Step 5: Finishing the Set
-
Pre-stretch the cord:
Gently pull tightly on the ends of your elastic for each bracelet. This ‘pre-stretching’ prevents the bracelet from sagging later after you wear it a few times. -
Tie the surgeon’s knot:
Remove the tape or stopper. Cross the ends, loop one side through twice, and pull tight. Repeat this knotting process 2-3 times for security. -
Secure with glue:
Dab a tiny drop of jewelry glue or clear nail polish onto the knots. Let this dry completely before moving it. -
Hide the knot:
Trim the excess elastic close to the knot, then gently tug the bracelet so the knot slides inside one of the larger beads or the gold tube if possible.
Slide on your new neon stack and enjoy the perfect pop of color for your poolside adventures


Sunset Ombré Clay Bead Bracelet
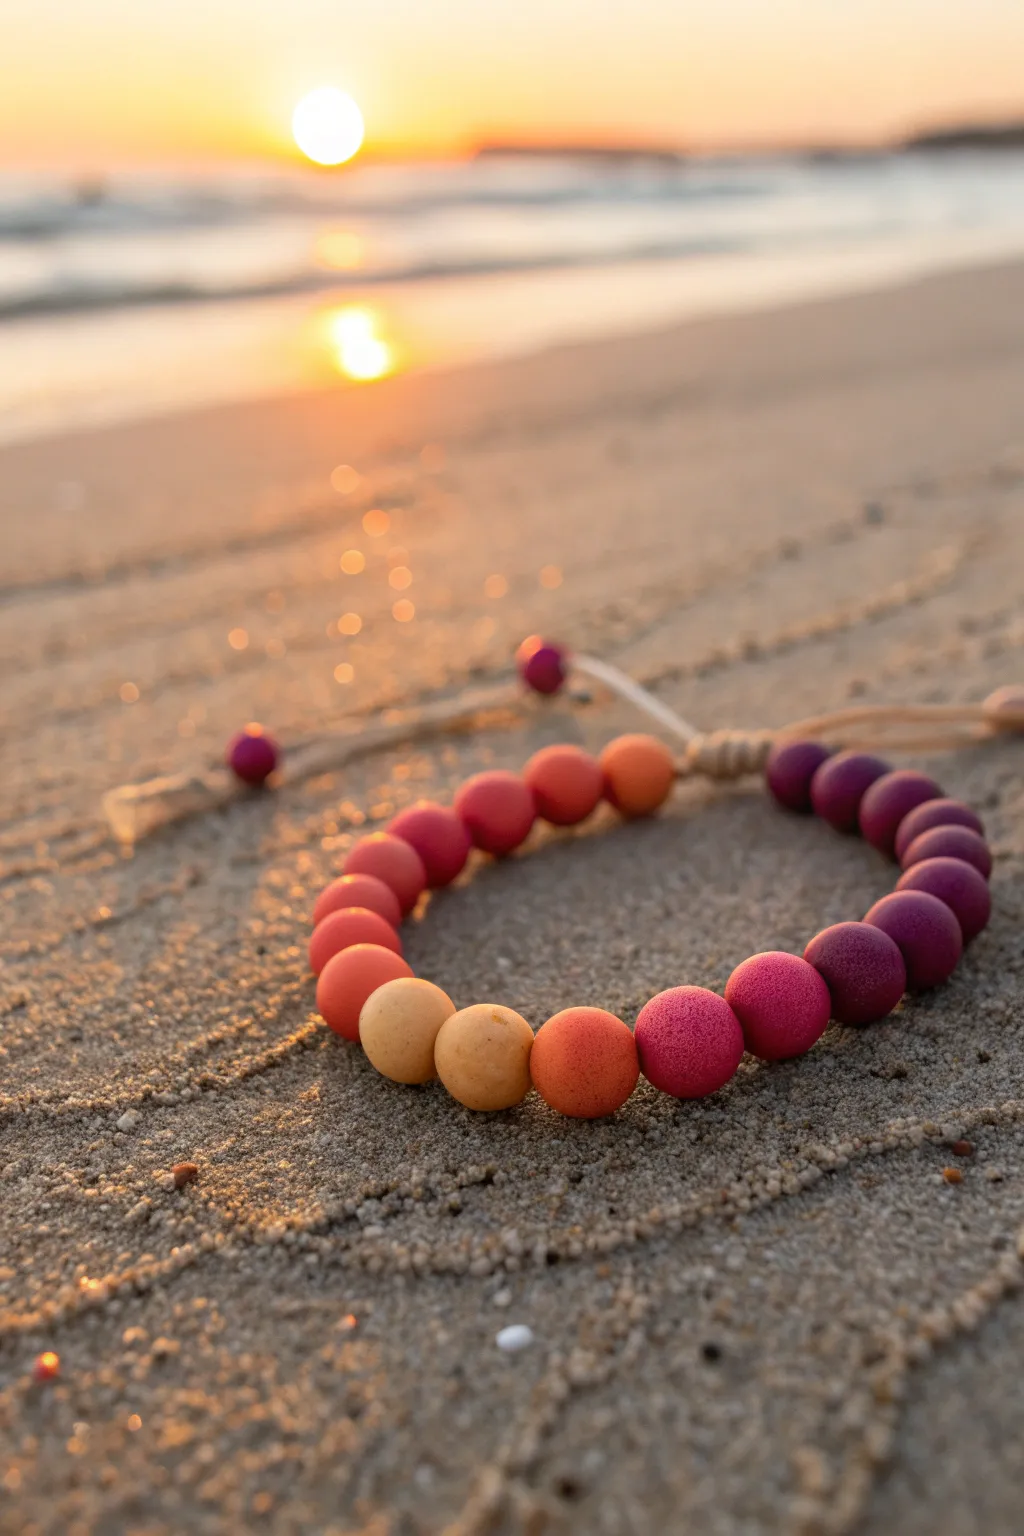
Capture the magic of a seaside sunset with this warm and inviting bracelet project. Featuring soft, matte beads that shift seamlessly from deep berries to glowing ambers, this accessory perfectly mimics twilight hues.
How-To Guide
Materials
- Matte polymer clay or acrylic beads (8mm-10mm) in gradient colors: deep purple, magenta, dark orange, peach, mustard yellow
- 1mm beige waxed cotton cord or thin hemp cord
- Scissors
- Tape or a clipboard
- Ruler
- Clear jewelry adhesive (optional)
Step 1: Preparation & Bead Layout
-
Sort your gradient:
Before restringing, lay your beads out on a flat surface or bead board to establish the ombré pattern. You want to transition from lightest to darkest smoothly. -
Define the pattern:
For this specific look, aim for a symmetrical design or a continuous loop gradient. Start with your 2-3 yellow/mustard beads, then move into peach, orange, red-orange, magenta, and finish with the deepest purple on the opposite side. -
Measure the cord:
Cut a length of waxed cord approximately 24 inches long. This generous length gives you plenty of slack for the sliding knot closure later. -
Secure one end:
Fold the cord in half to find the center, then tape one end down to your workspace or clip it into a clipboard so beads don’t slide off while you work.
Sliding Stiffness?
If the slider knot is too stiff to move, gently roll it back and forth between your fingers to soften the wax coating on the cord.
Step 2: Stringing the Ombré
-
Begin the stringing:
Thread the beads onto the cord following the layout you designed earlier. I find it easiest to start from the darkest purple end and work towards the yellow, but any order works as long as the gradient holds. -
Check the fit:
Once all beads are strung, wrap the strand around your wrist. The ends of the bead row should almost meet, leaving about a half-inch gap for the closure knots. -
Secure the beads:
Tie a simple overhand knot firmly against the first and last bead on the strand. This keeps the beads trapped in their section and prevents them from sliding around the closure area.
Texture Twist
Mix in a few lava stone beads among the clay ones; they have a similar matte look but allow you to diffuse essential oils on your wrist.
Step 3: Creating the Adjustable Closure
-
Form a circle:
Bring the two tail ends of your cord together, overlapping them so they lay parallel to each other for about 2-3 inches. -
Cut a knotting cord:
Cut a separate piece of the same waxed cord, about 10 inches long. This will be used to create the sliding macramé square knot. -
Start the square knot:
Slide the new 10-inch cord under the two overlapping tail strands. Center it so you have equal lengths on the left and right. -
Tie the first half-knot:
Take the right cord end, cross it over the center strands. Take the left cord end, place it over the right tail, under the center strands, and up through the loop on the right. Pull tight. -
Complete the square knot:
Repeat the previous step but start with the left cord end this time. This alternating pattern creates the flat square knot structure. -
Build the slider:
Continue tying alternating square knots until you have a closure section about 0.5 inches long. This should be tight enough to hold but loose enough to slide. -
Trim the slider ends:
Trim the excess lengths of the knotting cord (not the bracelet tails!) very close to the knots. You can add a tiny drop of clear glue to the cut ends to prevent fraying.
Step 4: Finishing Touches
-
Add stopper beads:
String a single matching bead (like the small purple ones seen in the image) onto the very end of each bracelet tail cord. -
Knot the ends:
Tie a secure overhand knot right after each stopper bead to keep it in place. Make sure the tails are even in length. -
Final trim:
Trim off any remaining excess cord past the final knots. Your sunset bracelet is now ready to wear.
Enjoy wearing these warm colors that carry the feeling of summer evenings into every season


Ocean Wave Blue-To-Teal Gradient
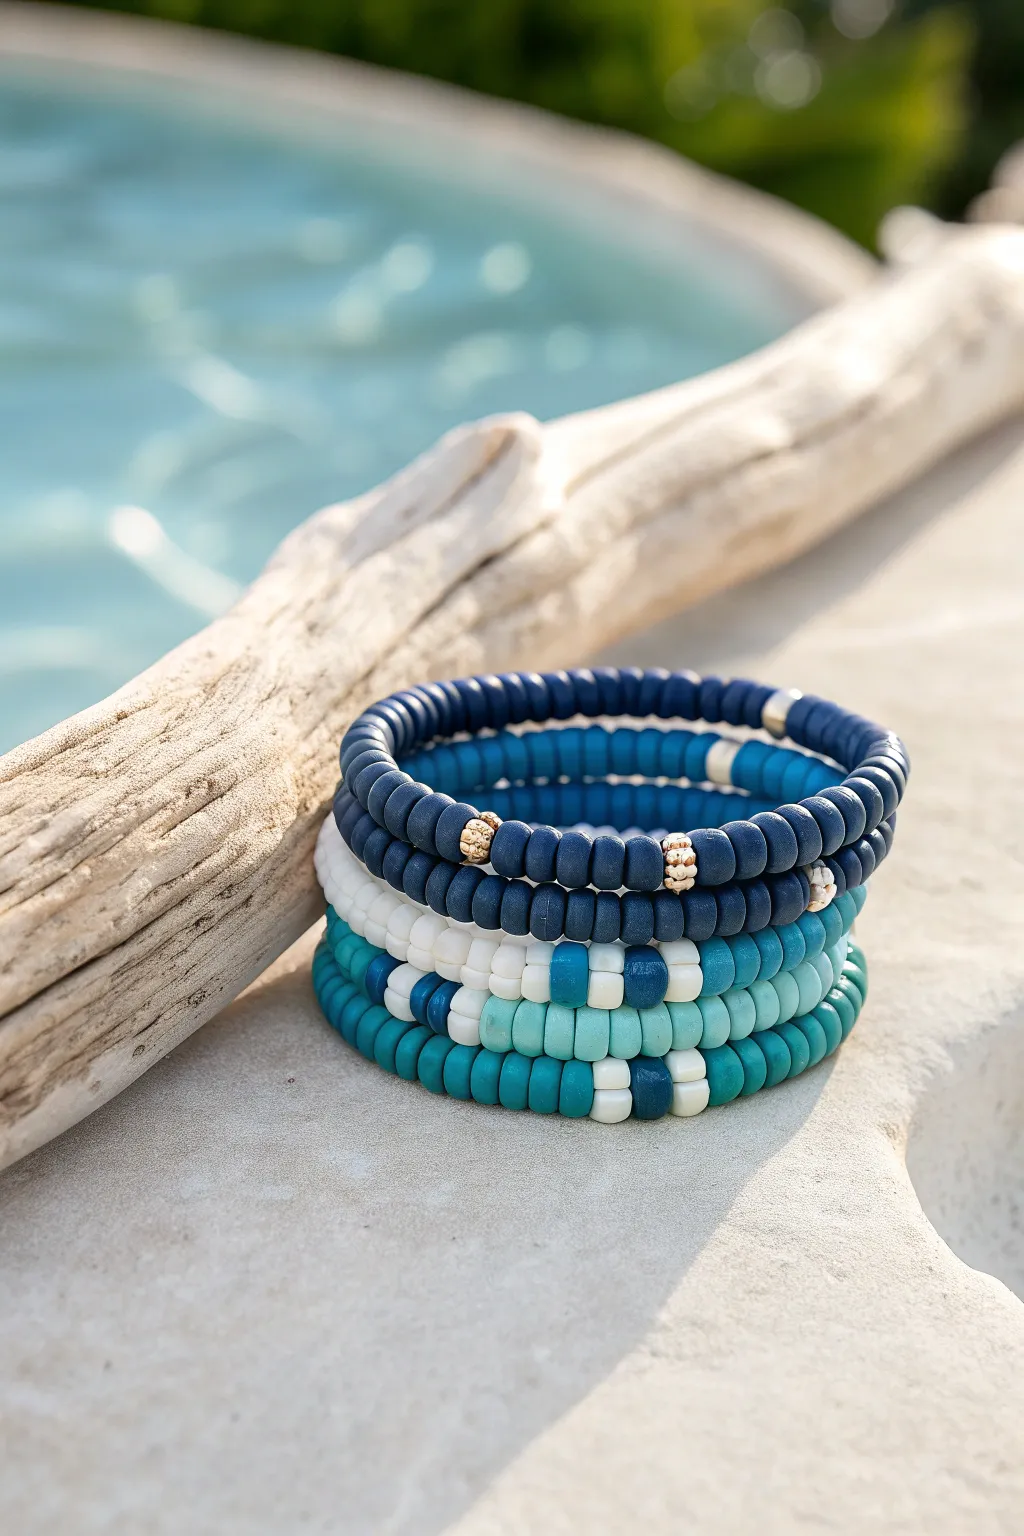
Capture the essence of crashing waves and tranquil pools with this stacked set of five clay heishi bead bracelets. Ranging from deep navy to soft turquoise and white, this gradient collection brings a refreshing ocean vibe to any summer outfit.
Step-by-Step Guide
Materials
- 6mm flat clay heishi beads (Navy Blue)
- 6mm flat clay heishi beads (Royal Blue)
- 6mm flat clay heishi beads (Turquoise/Teal)
- 6mm flat clay heishi beads (Light Aqua/Seafoam)
- 6mm flat clay heishi beads (White)
- Small gold spacer beads (textured globes)
- Small silver spacer beads (smooth discs or globes)
- 0.8mm clear elastic stretch cord
- Super glue or jewelry cement
- Scissors
Step 1: Preparation
-
Measure and Cut:
Cut five strands of elastic cord, each about 10-12 inches long. This extra length makes tying the final knots much easier than working with a short tail. -
Pre-stretch:
Gently pull on each strand of elastic several times to pre-stretch it; this prevents your bracelets from sagging or loosening immediately after you wear them.
Step 2: Creating the Solid Blue Bands
-
Start the Navy Strand:
Begin your first bracelet using primarily navy blue heishi beads. -
Add Accents:
Slide on about 2 inches of navy beads, then add a small silver spacer bead. Continue this pattern or place spacers randomly for a subtle shine. -
Second Navy Layer:
For the second bracelet, use a mix of navy and royal blue beads to create depth. -
Insert Gold Texture:
On this second dark strand, interrupt the blue beads every inch or so with a textured gold globe spacer to add warmth to the cool tones.
Knot Slipping?
If your knots slip, try using a slightly thinner elastic (0.5mm) doubled up, or roughen the cord ends slightly with sandpaper before tying for better grip.
Step 3: Designing the Mixed Gradient Strands
-
Patterning the White & Blue:
For the middle bracelet, create a segmented pattern. Thread 10-15 white beads followed by a small section of mixed blue and teal beads. -
Varying Sections:
Repeat the white and blue pattern, but vary the size of the blue sections slightly to keep the look organic. -
The Aqua Strand:
Thread the fourth bracelet entirely with light aqua or seafoam green beads for a solid pop of lighter color. -
Mixing the Teal Base:
For the final bottom bracelet, use turquoise/teal beads as your main color. -
Creating the Dash Pattern:
Create a ‘dash’ effect on this teal strand by inserting a pattern of: one white bead, one navy bead, one white bead, and then twenty teal beads.
Add a Charm
Attach a small gold seashell or starfish charm to the center white-and-blue bracelet to enhance the beachy theme without overwhelming the stack.
Step 4: Finishing Touches
-
Check sizing:
Wrap each strand around your wrist to ensure they fit comfortably without pinching. Add or remove a few beads if necessary. -
Tie the Knots:
Tie a surgeon’s knot (right over left, left over right, and loop through an extra time) for each bracelet. Pull tight to secure. -
Secure with Glue:
Place a tiny drop of super glue or jewelry cement directly onto the knot. I like to let this dry for a full minute before touching it again. -
hide the Knot:
If hole size allows, gently tug the elastic so the knotted portion slides inside one of the adjacent clay beads to hide it. -
Trim Ends:
Once fully dry, trim the excess elastic tail close to the bead, being careful not to nick the main cord.
Now you have a stunning, waterproof stack of bracelets perfect for beach days or adding coastal flair to your daily wear

The Complete Guide to Pottery Troubleshooting
Uncover the most common ceramic mistakes—from cracking clay to failed glazes—and learn how to fix them fast.
Nautical White And Blue Stripes
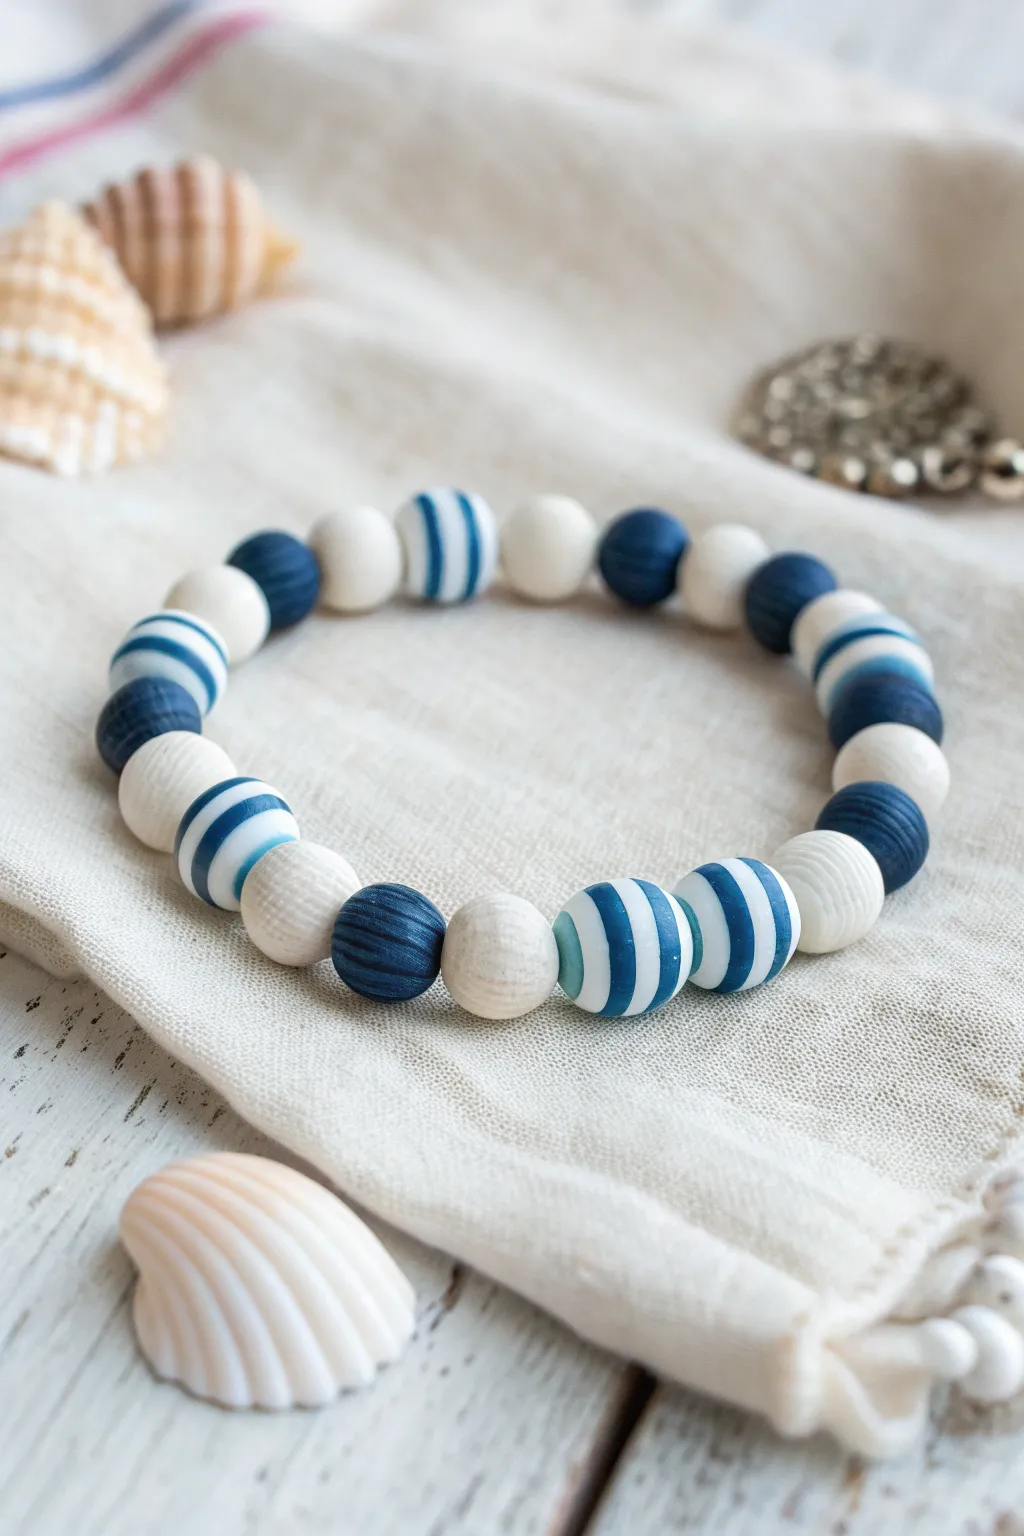
Capture the essence of a breezy day at the shore with this classic nautical-themed bracelet. Featuring a crisp pattern of solid navy, cream, and hand-striped beads, this accessory is the perfect companion for your next beach trip or sailing adventure.
Step-by-Step
Materials
- White or cream round wooden (or polymer clay) beads (approx. 10-12mm)
- Navy blue round wooden (or polymer clay) beads (approx. 10-12mm)
- Navy blue acrylic paint (if painting raw wood)
- Thin detailed paintbrush (00 or 0 size)
- Elastic stretch cord (0.8mm or 1mm)
- Beading needle (optional but helpful)
- Super glue or jewelry cement
- Scissors
- Wooden skewers & tape (for painting stripes)
Step 1: Preparing the Striped Beads
-
Mount Beads:
Begin by selecting several plain white or cream beads that will become your striped accents. Slide them onto wooden skewers, leaving space between each bead so you can access them from all angles. -
Secure the Skewer:
To make painting easier, tape the ends of the skewers to a cardboard box or a suspended surface so the beads are floating freely. This allows you to rotate the skewer while keeping your hand steady. -
Load the Brush:
Dip your fine detail brush into the navy blue acrylic paint. You want enough paint to create a solid line, but not so much that it drips. -
Paint First Stripe:
Identify the equator of the bead (the center line) and slowly rotate the skewer while holding your brush steady against the bead’s surface. This rotation technique creates a cleaner line than trying to drag the brush around the sphere. -
Add Parallel Lines:
Depending on the size of your bead, add two or four more vertical stripes running from hole to hole, crossing the equator line you just painted. The goal is a uniform, beach-ball style segmentation. -
Dry Completely:
Allow the painted beads to dry completely on the skewers. I prefer to leave them for at least an hour to ensure the paint doesn’t smudge during stringing.
Spin for Straighter Stripes
For perfect stripes, hold the paintbrush still and rotate the skewer/bead instead. This acts like a lathe and creates much steadier lines.
Step 2: Designing the Pattern
-
Measure Your Wrist:
Wrap a piece of string around your wrist to find the desired length, then add about an inch to account for the bulk of the large beads. -
Layout the Design:
On a bead board or a soft towel, arrange your beads to finalize the pattern before stringing. The pattern in the image follows a balanced sequence like: solid navy, solid white, striped, solid white, solid navy. -
Refine the Middle:
Create visual interest by clustering two striped beads near the center or alternating them with single solid color beads for variety. -
Check Bead Count:
Ensure you have enough beads laid out to match your measured length. Adding or removing a single bead at this stage is much easier than restringing later.
Step 3: Assembly
-
Prepare the Cord:
Cut a length of elastic cord about 10-12 inches long. Pre-stretch the elastic by giving it a few gentle firm tugs; this prevents the bracelet from drooping later. -
Secure One End:
Place a piece of tape or a bead stopper clip on one end of the cord so your beads don’t slide off while you work. -
String the Beads:
Thread your beads onto the elastic cord, following the pattern you laid out. If the bead holes are rough, a collapsible eye needle can help guide the cord through smoothly. -
Verify the Fit:
Once all beads are strung, carefully bring the ends together and wrap it around your wrist to check the fit. It should be snug but comfortable. -
Knot the Cord:
Tie the ends together using a surgeon’s knot (loop the right end over the left twice, then pull tight). Follow this with a standard overhand knot for extra security. -
Secure the Knot:
Apply a tiny dot of super glue or jewelry cement directly onto the knot. Let it dry for a few minutes before moving it. -
Hide the Knot:
Trim the excess cord carefully, leaving about 2mm tails. Gently tug the cord to slide the knot inside the hole of the nearest large bead to hide it.
Paint Peeling?
If acrylic peels off wooden beads, lightly sand the surface first or apply a thin layer of matte sealer before painting to help the color adhere.
Slip on your new nautical creation and enjoy the clean, summery vibes it brings to your outfit
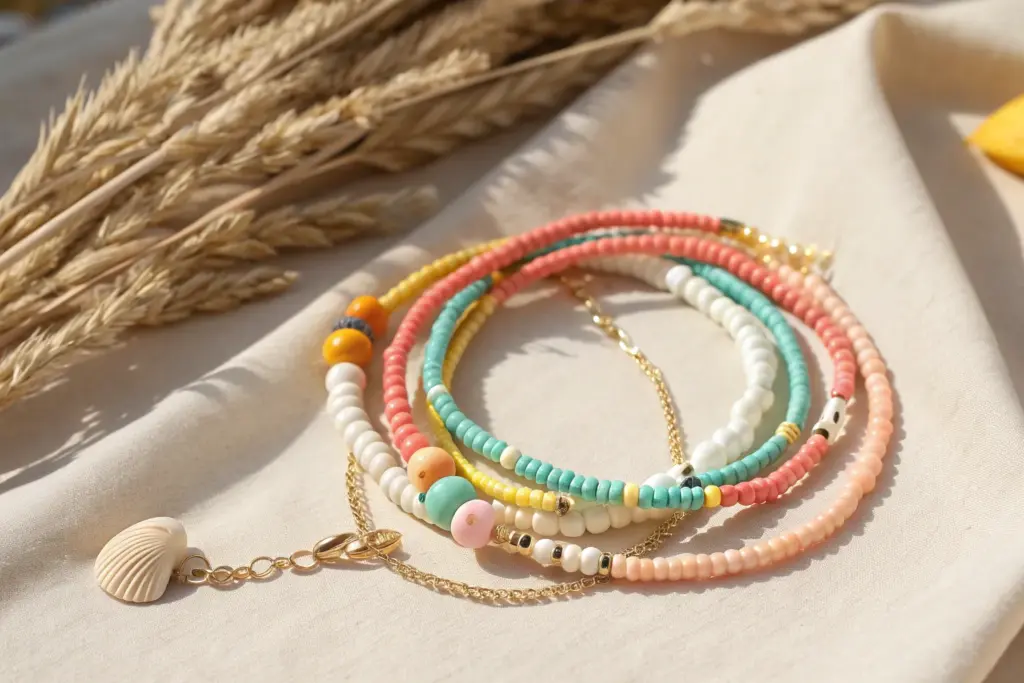
Shell Accent Beach Bracelet Stack
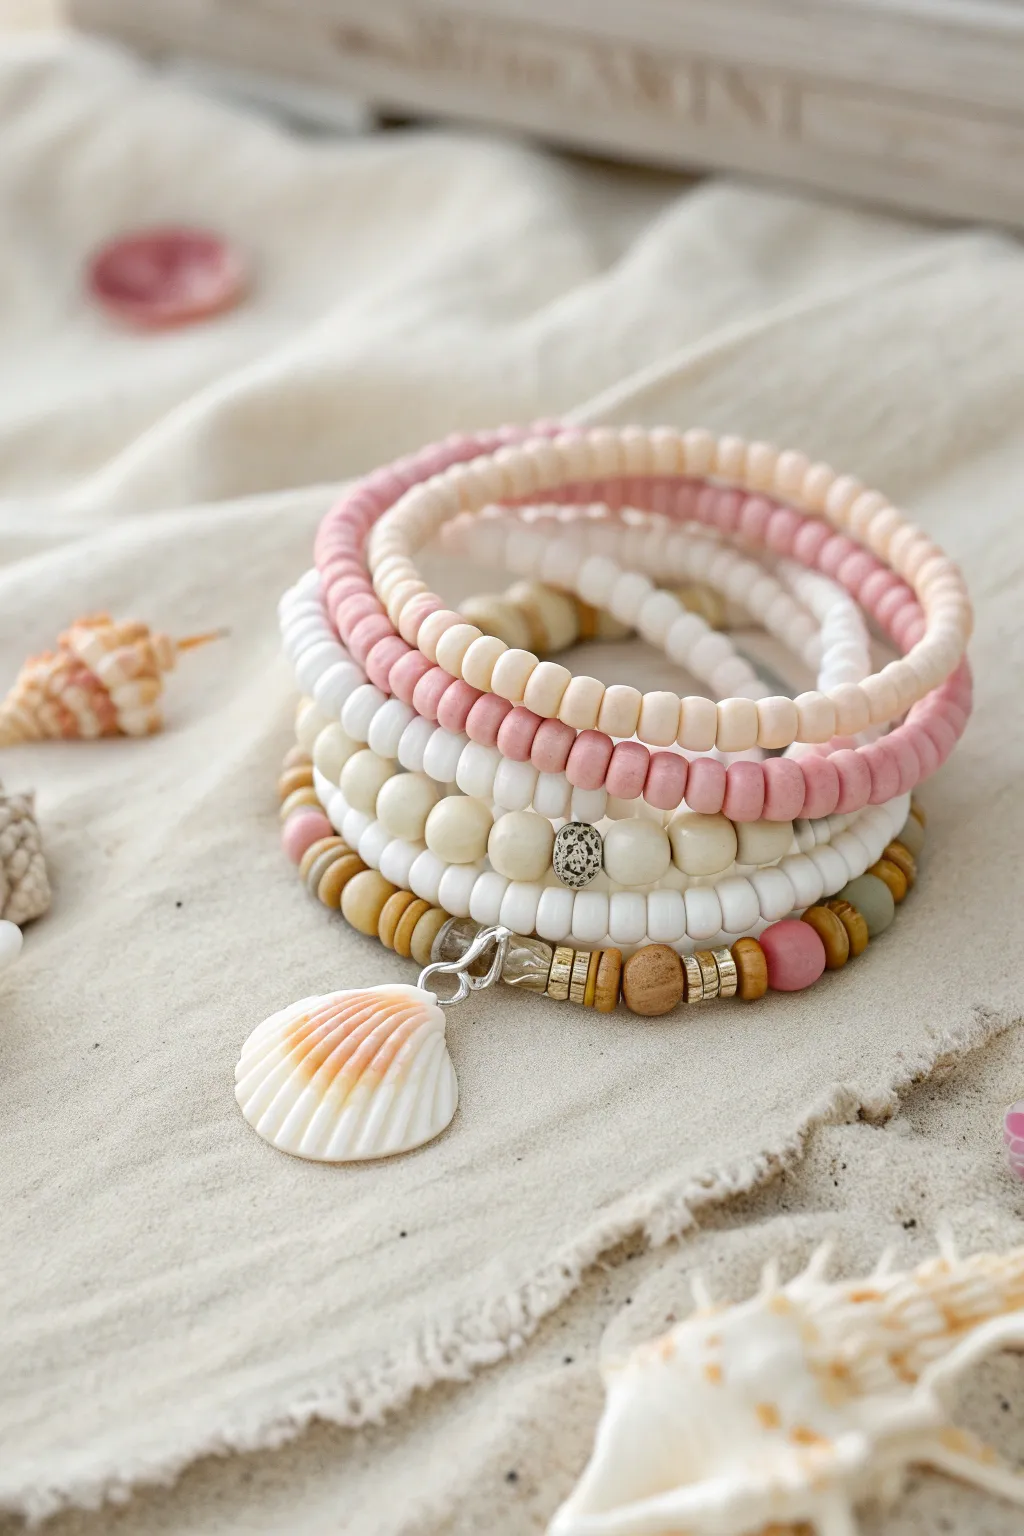
Capture the essence of a sun-soaked coastline with this dreamy stack of layered bracelets featuring soft pastels and natural textures. The combination of matte heishi discs, smooth beads, and a delicate shell charm makes this the ultimate accessory for beach days.
Step-by-Step Guide
Materials
- 6mm Heishi disk beads (light blush/peach)
- 6mm Heishi disk beads (rose pink)
- 6mm Heishi disk beads (white)
- 8mm Round wooden beads (light natural tone)
- 8mm Round gemstone beads (cream/white agate or similar)
- Silver textured rondelle spacer bead
- Small gold or brass spacer discs
- Small pink wooden or matte acrylic accent beads
- Scallop shell charm with silver connector loop
- Elastic stretch cord (0.8mm recommended)
- Jewelry glue or clear nail polish
- Scissors
Step 1: Planning the Stack
-
Measure your wrist:
Wrap a piece of string around your wrist to find your comfortable size, usually adding about half an inch to the measurement for a standard fit. Cut five strands of elastic cord, making them about 3 inches longer than your measurement to allow room for tying knots. -
Sort your palette:
Lay out your beige, blushing pink, rose, and white beads. Organizing them by shade beforehand makes the stringing process much smoother and helps you visualize the gradient effect of the stack.
Knot Security
When applying glue to the knot, keep the beads pushed slightly away. If glue gets on the beads, they might stick together and loose their fluidity.
Step 2: The Heishi Strands
-
String the blush strand:
Take your first piece of elastic and string the light blush/peach heishi beads until you reach the desired length. -
Create the rose strand:
Repeat the process for the second bracelet using he darker rose pink heishi beads. I like to double-check the length against the first strand to ensure they match perfectly. -
Create the white strand:
Make a third simple strand using only the white heishi beads. These solid color bands create the visual foundation for the stack.
Step 3: The Feature Bracelets
-
Design the textured white strand:
For the fourth bracelet, use the larger 8mm round cream/white beads. String them until you are halfway through the length. -
Add the focal bead:
Slide the silver textured rondelle bead onto the center of this strand, then continue stringing the rest of the round cream beads to finish. -
Start the mixed media strand:
For the bottom bracelet shown in the image, you’ll be mixing materials. Start by stringing about 10-12 light wood beads. -
Add metal spacers:
Intersperse small gold or brass disc spacers between groups of 3 wooden beads to add a touch of metallic shimmer. -
Incorporate color accents:
Towards one side of this strand, add 2-3 pink round accent beads to tie in the colors from the upper bracelets. -
Attach the charm:
Find the center point of this wooden bead bracelet. Thread the loop of your scallop shell charm onto the elastic so it hangs freely. -
Finish the mixed strand:
Complete the strand with remaining wood beads and spacers, ensuring the charm stays centered relative to the pattern.
Make It Golden
Swap the silver focal bead and shell charm hardware for brushed gold components to give the stack a warmer, sunset-inspired aesthetic.
Step 4: Finishing Touches
-
Pre-stretch the cord:
Before tying, give each bracelet a gentle tug. This pre-stretching prevents the elastic from sagging or loosening immediately after you wear it. -
Tie the surgeon’s knot:
Tie a surgeon’s knot for each bracelet: cross left over right, then right over left, looping the end through twice before pulling tight. -
Secure the knots:
Place a tiny drop of jewelry glue or clear nail polish on each knot. Let this dry completely before moving the beads near it. -
Hide the knot:
If hole sizes allow, gently pull the glued knot inside one of the adjacent beads to hide it. -
Trim excess cord:
Use sharp scissors to trim the excess elastic tail, being careful not to cut too close to the knot itself.
Slip on your new stack and enjoy the breezy coastal vibes every time you look at your wrist


What Really Happens Inside the Kiln
Learn how time and temperature work together inside the kiln to transform clay into durable ceramic.
Citrus Slice Colors For Summer
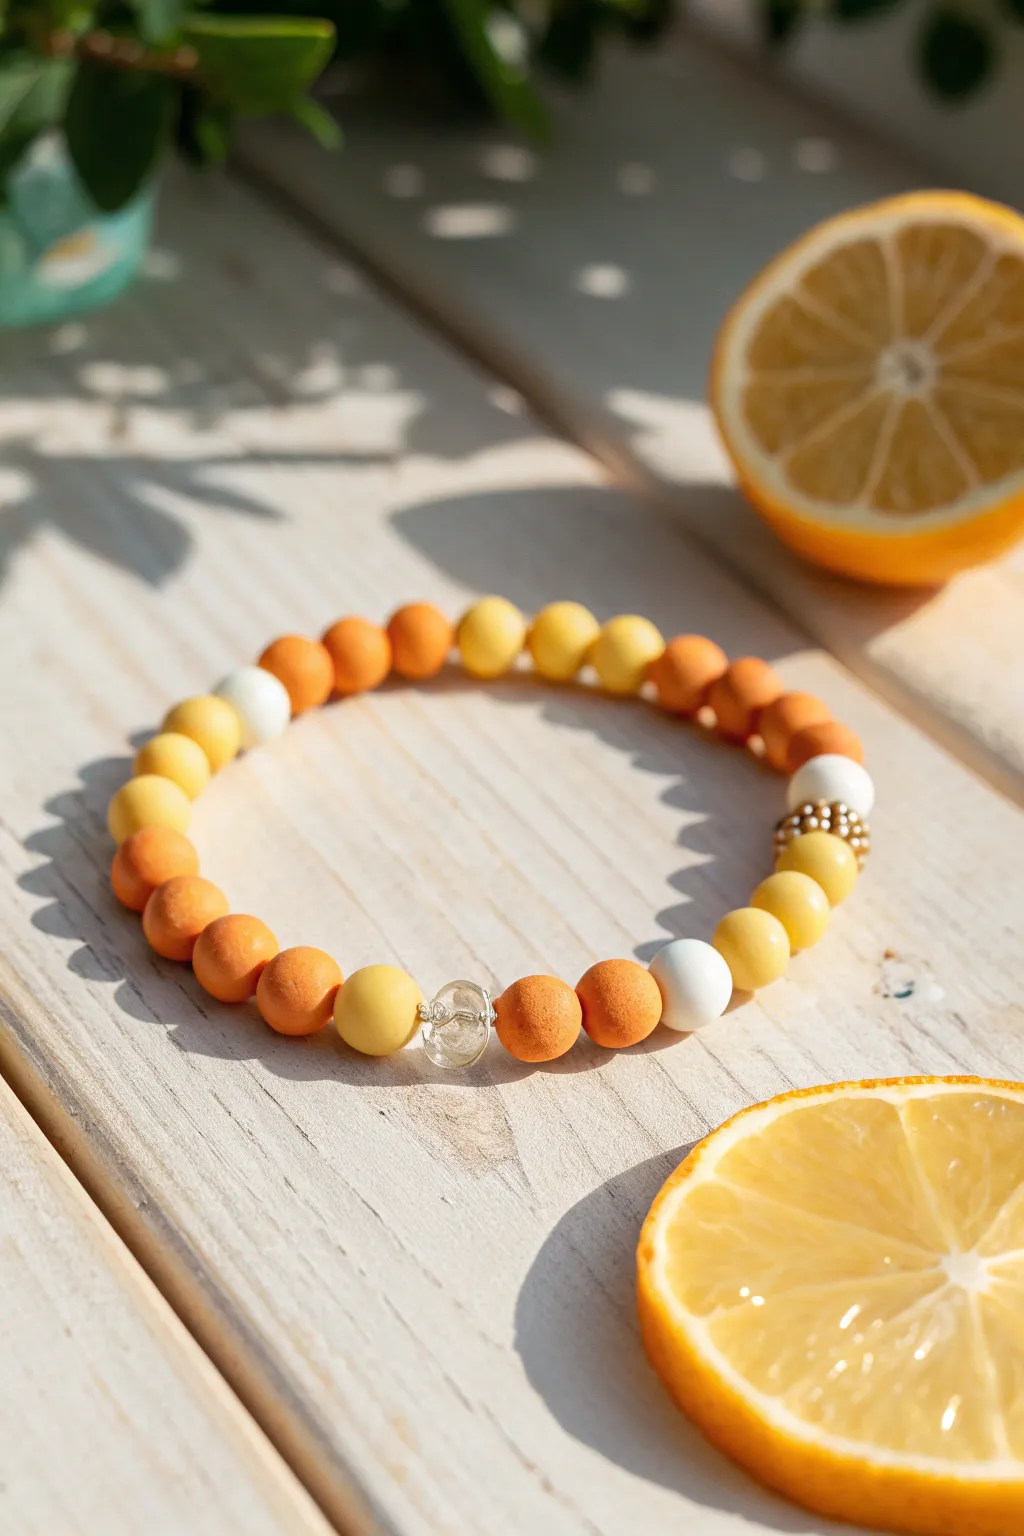
Capture the refreshing essence of a summer afternoon with this vibrant clay bead bracelet. Mimicking the gradients of lemon and orange slices, its matte finish and subtle crystal accents make it a cheerful accessory for any sunny day.
How-To Guide
Materials
- 10mm round polymer clay beads (matte orange)
- 10mm round polymer clay beads (matte yellow)
- 10mm round polymer clay beads (matte soft peach/light orange)
- 10mm round polymer clay beads (white)
- One 10mm clear quartz or faceted glass focal bead
- Small gold spacer beads (approx. 2-3mm)
- Strong elastic beading cord (0.8mm or 1mm recommended)
- Beading needle (optional, but helpful)
- Jewelry glue or clear nail polish
- Scissors
Step 1: Planning the Pattern
-
Measure your wrist:
Before you start stringing, wrap a piece of string around your wrist to find your comfortable size. Add about half an inch to this measurement to ensure the bracelet isn’t too tight. -
Lay out the beads:
Arrange your beads on a bead board or a soft towel. This prevents them from rolling away and lets you visualize the color gradient. -
Establish the focal point:
Place the single clear crystal bead in the center of your layout. This will serve as the sparkling anchor for your design. -
Create the segments:
Organize your remaining beads into color blocks. You want to group them by 3-4 beads of the same color before transitioning to the next shade, mimicking the segments of a citrus fruit.
Step 2: Stringing the Design
-
Prepare the cord:
Cut a length of elastic cord about 12 inches long. Stretching the cord pre-emptively a few times helps prevent the bracelet from loosening later. -
Secure the end:
Attach a piece of tape or a bead stopper to one end of your cord so your work doesn’t slide off while you string. -
Start with the crystal:
Thread the clear crystal bead onto the cord first. This ensures it ends up directly opposite your knot at the back. -
Begin the gradient:
On the right side of the crystal, thread one yellow bead, then followed by three deep orange beads. -
Add a contrast section:
After the orange, add a single white bead to act as a ‘pith’ separator, creating a clean break in the color. -
Build the second segment:
Now thread a sequence of golden-yellow beads. Use about 3-4 beads here to maintain consistency. -
Mirror the left side:
Go back to the other side of your crystal bead. Add the matte yellow bead, followed by a darker orange bead to start balancing the design. -
Continue the pattern:
continue adding color blocks—alternating between deep orange, peach/light orange, and yellow. Aim for an organic feel rather than perfect symmetry.
Sticky Situation
If the knot keeps slipping out of the bead hole, try widening the hole slightly with a bead reamer, or just ensure the knot is glued very tightly and trimmed flush.
Step 3: Adding Accents and Finishing
-
Insert gold spacers:
About three-quarters of the way around the bracelet, interrupt a color block by adding a stack of 4-5 small gold spacer beads. This adds a nice metallic texture. -
Complete the circle:
Finish stringing until the strand reaches your desired length. Double-check the fit by wrapping it around your wrist one last time. -
Tie the knot:
Remove the tape/stopper. Tie a surgeon’s knot (right over left, left over right, and loop through an extra time) to secure the bracelet firmly. -
Hide the knot:
Pull the knot tight. Apply a tiny dot of jewelry glue to the knot for security. Let it dry for a moment. -
Tuck and trim:
If one of your beads has a large enough hole, gently pull the knot inside it to hide your mechanics. Trim the excess cord ends carefully with sharp scissors.
Pro Tip: Matte Magic
To keep the matte clay beads looking fresh and clean, wipe them down with a tiny bit of baby oil if they start to look chalky after wearing.
Enjoy wearing your slice of sunshine and let the bright colors lift your mood all summer long
Watermelon Picnic Color Blocking
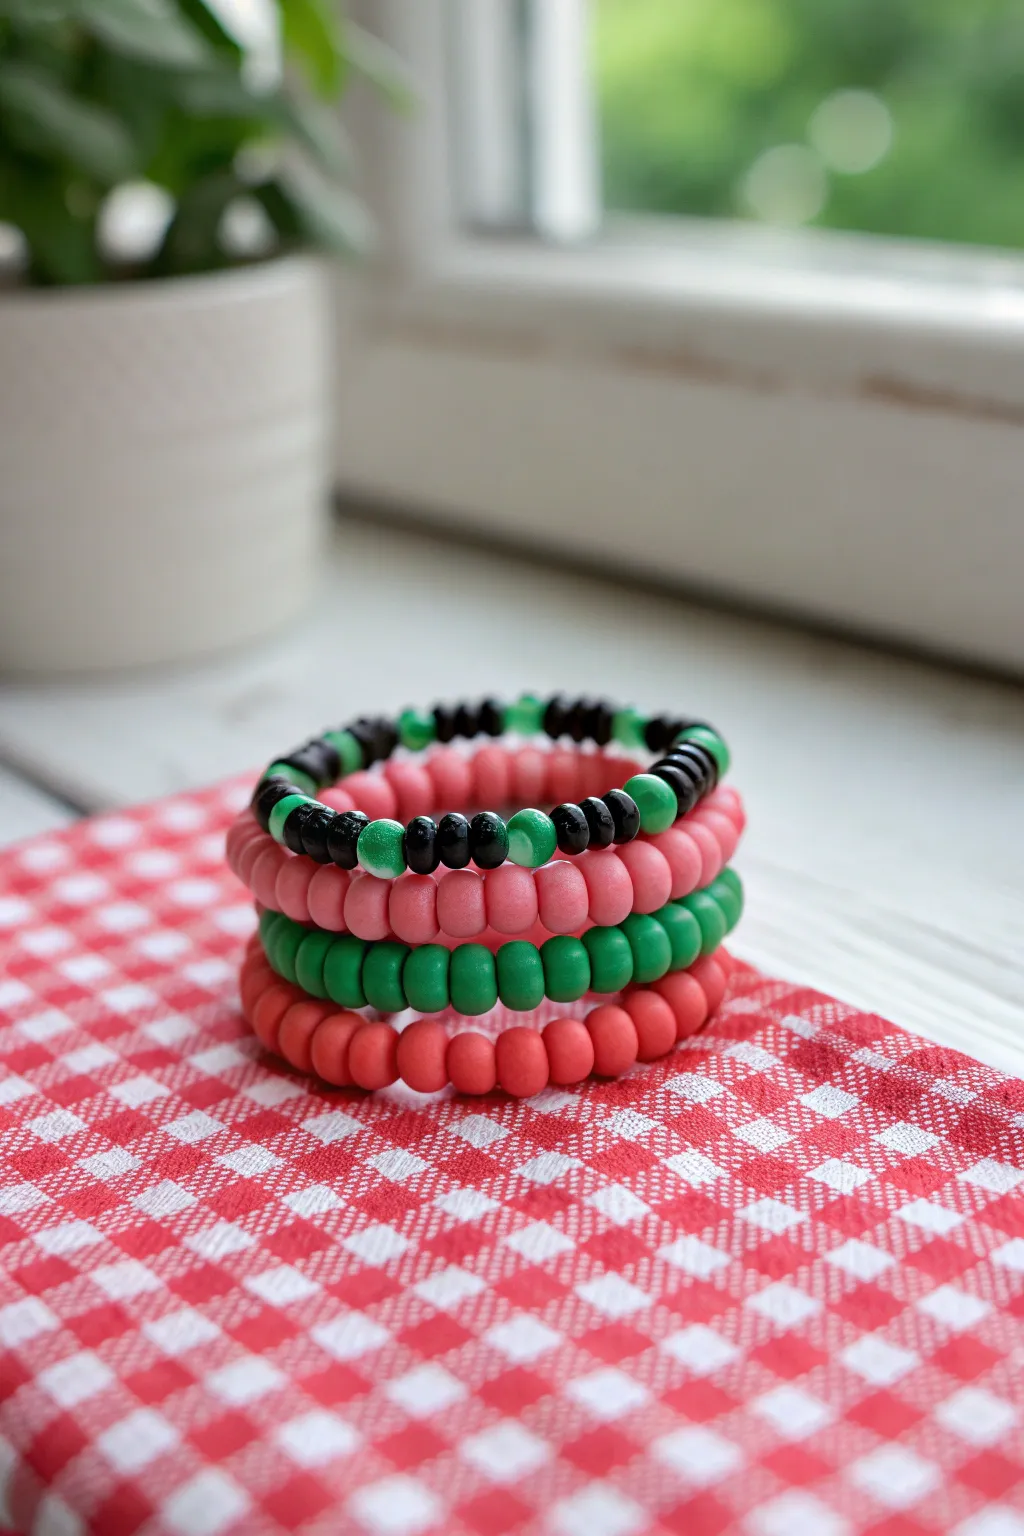
Celebrate summer with this juicy stack of clay bead bracelets inspired by watermelon slices on a picnic blanket. The combination of solid coral reds, vibrant greens, and a speckled ‘seed’ bracelet creates a refreshing color-blocked look perfect for sunny days.
Detailed Instructions
Materials
- Matte coral/watermelon pink polymer clay disc beads (heishi)
- Matte kelly green polymer clay disc beads (heishi)
- Black pony beads or large seed beads (size 6/0)
- Green marble/swirl acrylic beads (size 6mm or 8mm)
- Elastic stretch cord (0.8mm recommended)
- Super glue or jewelry cement
- Scissors
- Bead stopper or masking tape
Step 1: Preparation
-
Measure your wrist:
Wrap a piece of string around your wrist to find your size, then add about an inch for comfort. Cut four strands of elastic cord to this length, adding another 3-4 inches to each for tying knots. -
Secure the ends:
Place a bead stopper or a piece of masking tape on one end of each elastic strand to prevent beads from sliding off while you work.
Step 2: The Rind & Flesh (Solid Bracelets)
-
Start the green rind bracelet:
For the first bracelet, string purely matte kelly green clay disc beads. These represent the outer rind of the watermelon. Continue until you reach your measured wrist length. -
Create the first fruit layer:
On the second string, thread only the coral/watermelon pink clay disc beads. This soft, matte texture mimics the sweet fruit perfectly. -
Create the second fruit layer:
Repeat the previous step on the third string with more coral pink beads. Having two pink strands adds volume to the ‘fruit’ portion of your stack. -
Check the fit:
Wrap the unfinished strands around your wrist to ensure they aren’t too tight or too loose, adding or removing a few discs if necessary.
Knot Security Tip
When using smooth clay heishi beads, the knot can sometimes slip out. Add a tiny crimp bead cover over your knot for extra security and a polished metallic finish.
Step 3: The Seeds (Patterned Bracelet)
-
Begin the seed pattern:
For the top ‘seed’ bracelet, we are switching bead types. Start with two black pony beads. -
Add the accent marble:
Thread one green marble/swirl acrylic bead. This larger bead adds a nice textural contrast to the flat clay discs. -
Establish the rhythm:
Follow the marble bead with two more black pony beads. From here, you have a 2-1-2 pattern block. -
Complete the strand:
Continue this alternating pattern (2 black, 1 green marble, 2 black) until the bracelet matches the length of the solid clay ones.
Add a Charm
Make it sweeter by attaching a small gold watermelon slice charm or a tiny ant charm to the green rind bracelet for a true picnic vibe.
Step 4: Finishing the Stack
-
Pre-stretch the cord:
Before tying, give each bracelet a gentle tug to pre-stretch the elastic. This prevents the bracelet from loosening up significantly after the first wear. -
Tie the surgeon’s knot:
Remove the bead stopper and tie the two ends together using a surgeon’s knot (right over left, left over right twice). -
Secure with glue:
Apply a tiny dot of super glue or jewelry cement directly onto the knot. I find using a toothpick helps apply the glue without making a mess. -
Hide the knot:
If hole sizes permit, gently pull the knot inside one of the adjacent beads to hide it. Let the glue dry completely for at least 15 minutes. -
Trim the excess:
Once fully dry, use your scissors to snip off the excess elastic tails as close to the bead as possible without cutting the knot itself.
Slide on your new stack and enjoy the fresh summer vibes they bring to any outfit

TRACK YOUR CERAMIC JOURNEY
Capture glaze tests, firing details, and creative progress—all in one simple printable. Make your projects easier to repeat and improve.
Golden Hour Metallic Spacer Glow
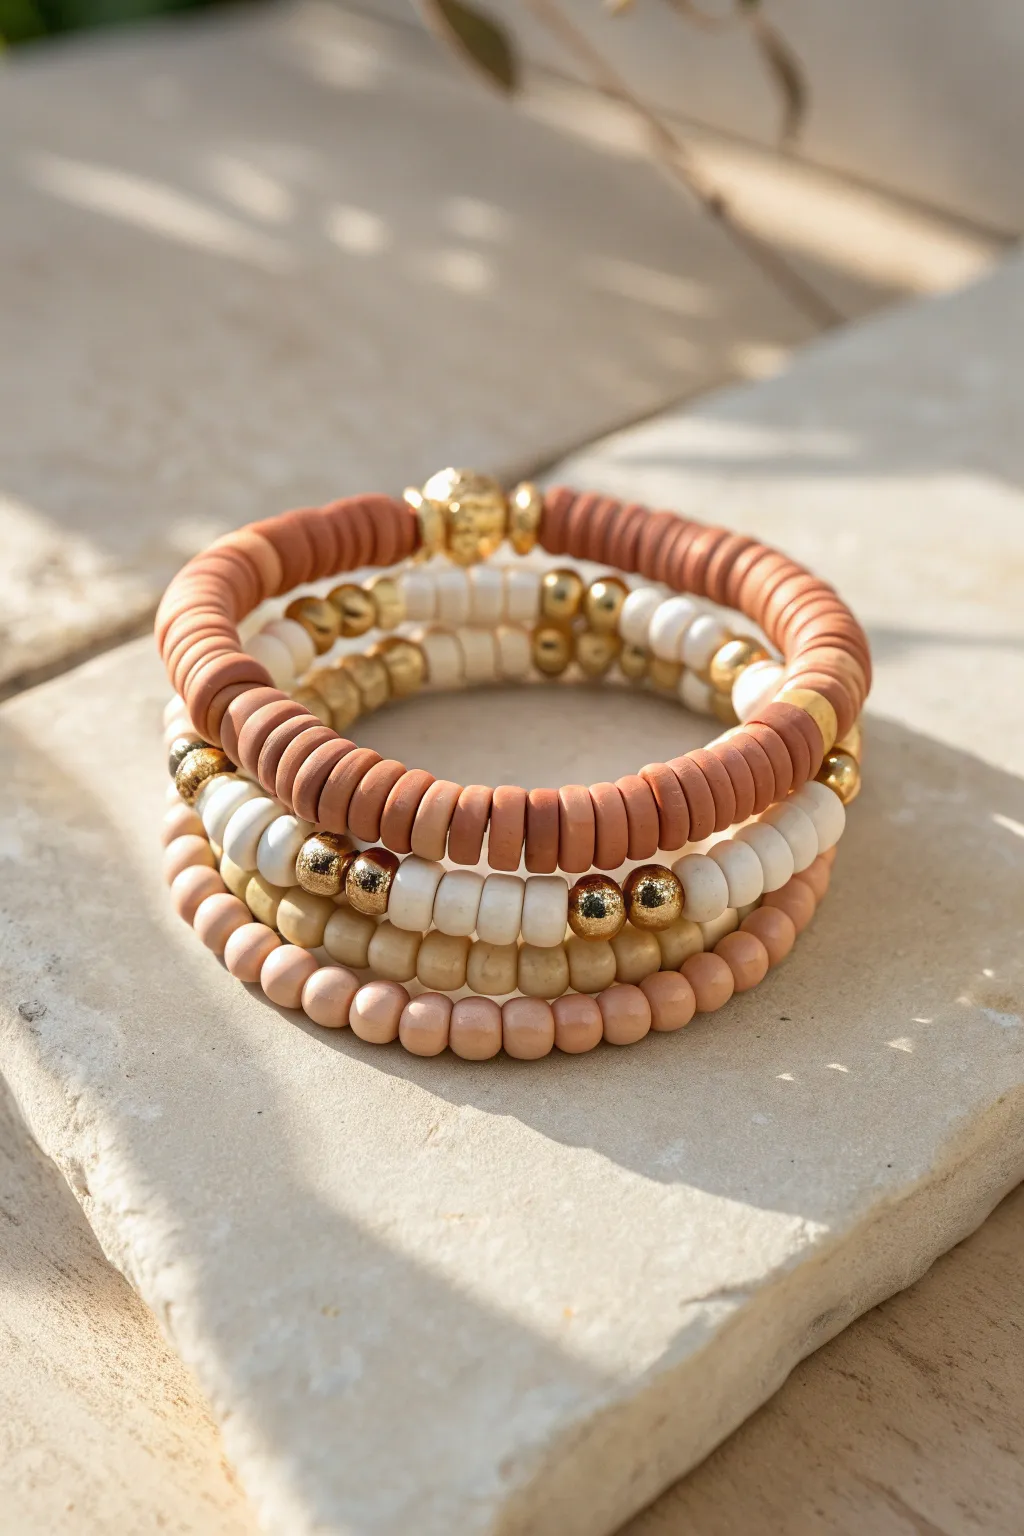
Capture the warmth of a late summer sunset with this coordinated set of four stretch bracelets. Combining matte terracotta heishi beads, creamy whites, and various gold metallic accents creates a harmonious stack that glows beautifully on the wrist.
Step-by-Step Guide
Materials
- Elastic cord (0.8mm clear stretch cord)
- Terracotta colored polymer clay heishi beads (6mm)
- Cream/off-white polymer clay heishi beads (6mm)
- Peach/nude colored round plastic or acrylic beads (4mm-6mm)
- Gold tone textured round beads (6mm and 8mm)
- Gold tone smooth round spacer beads (4mm)
- Gold tone flat disc spacer beads
- Super glue or jewelry cement
- Scissors
- Bead stopper or tape
- Measuring tape
Step 1: Preparation
-
Measure and cut:
Begin by measuring your wrist and adding about 3 inches to that length. Cut four separate strands of elastic cord to this size. -
Secure the ends:
Pre-stretch each piece of elastic slightly to prevent sagging later. Attach a bead stopper or a piece of masking tape to one end of each cord to stop beads from sliding off while you work.
Knot Slipping?
If your elastic knot feels loose, try pre-stretching the knot tight before gluing. A surgeon’s knot is best, but a double overhand knot works too if pulled very tight.
Step 2: Terracotta Disc Bracelet
-
Start the pattern:
For the top bracelet, thread approximately 3 inches of terracotta heishi beads onto the first cord. -
Add the focal point:
Slide on a small gold disc spacer, followed by a large textured gold round bead, and then another small gold disc spacer. -
Finish the strand:
Continue adding terracotta heishi beads until the bracelet reaches your desired length, typically about 7 inches total.
Step 3: White & Gold Mix
-
Create the rhythm:
On the second cord, begin a pattern using cream heishi beads and small gold round beads. Try a sequence of five cream discs followed by one gold bead. -
Vary the gold:
Occasionally swap the single gold bead for a cluster of three gold beads to add visual interest similar to the photo. -
Check sizing:
Wrap the strand around your wrist periodically to ensure the pattern ends cleanly without a partial segment.
Add a Charm
Elevate the stack by attaching a small sun or seashell charm to the gold spacer section of the terracotta bracelet using a jump ring.
Step 4: Mixed Accent Bracelet
-
Building the base:
For the third bracelet, use primarily cream heishi beads but intersperse them with distinctive metallic sections. -
Insert gold clusters:
Create focal points by threading a larger gold smooth bead, then a cream disc, then a textured gold bead. Repeat this motif two or three times around the bracelet. -
Fill the gaps:
Fill the rest of the length with solid sections of cream heishi beads to keep the look balanced.
Step 5: Peach Round Bracelet
-
Simple base:
For the bottom bracelet, use the smooth, peach-colored round beads. These provide a nice textural contrast to the flat clay discs. -
String it up:
Simply thread these round beads continuously until the strand matches the length of your other three bracelets.
Step 6: Finishing Touches
-
Tie the knots:
Remove the tape or bead stoppers. For each bracelet, bring the ends together and tie a strong surgeon’s knot (right over left, left over right). -
Secure with glue:
I always place a tiny drop of super glue or jewelry cement directly onto the knot to ensure it never slips. -
Hide the knot:
If possible, slide the knot inside the hole of a nearby large bead or gold spacer to conceal it. -
Trim excess:
Wait for the glue to dry completely, then use sharp scissors to trim the excess elastic tails close to the knot.
Slip on your new stack and enjoy the warm, golden vibes all year round
Sun And Daisy Pop Bead Accents
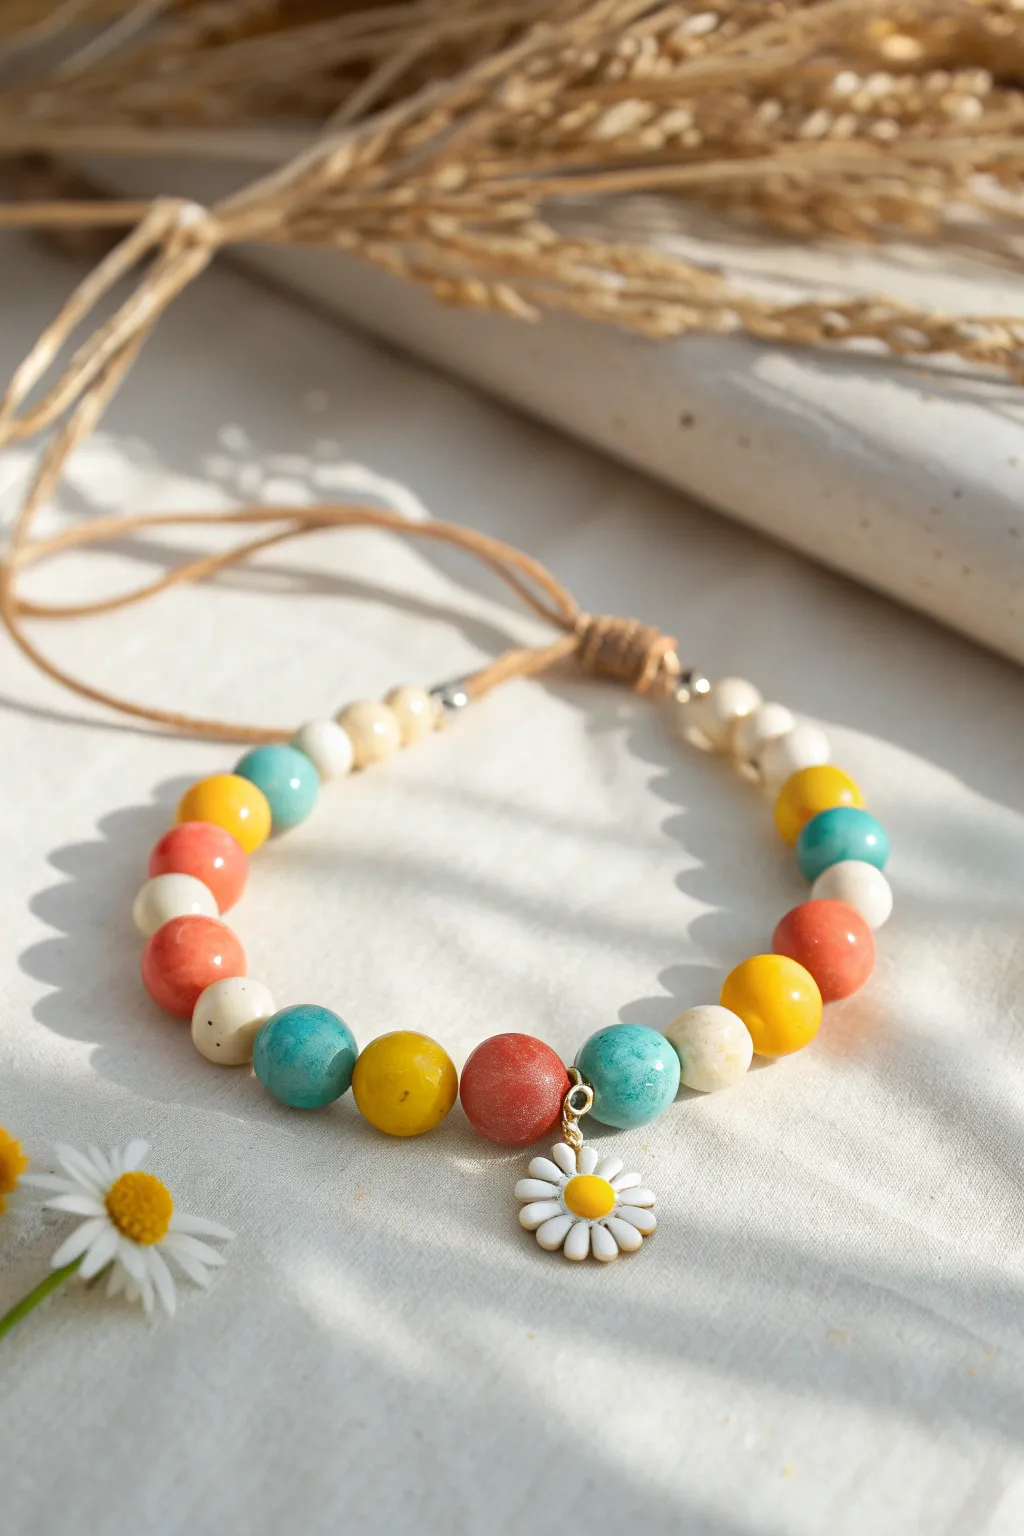
Capture the essence of a warm summer day with this delightful beaded accessory featuring rustic clay tones and a cheerful daisy focal point. The combination of vibrant reds, yellows, and turquoise creates a playful palette that pairs perfectly with the natural tan cord and gold accents.
Step-by-Step
Materials
- Round ceramic or polymer clay beads (10mm or 12mm): Red, Mustard Yellow, Turquoise, Cream/White
- Small wooden or clay spacer beads (natural/cream color)
- Tan waxed cotton cord or hemp cord (1mm – 1.5mm thickness)
- Daisy enamel charm with gold loop
- Single jump ring (gold, 4mm-6mm)
- Small gold crimp beads or metal spacer beads (optional)
- Scissors
- Jewelry pliers
- Ruler
- Tape or clipboard
Step 1: Preparing the Cord
-
Measure and cut:
Cut a length of your tan waxed cord approximately 24 inches long. This generous length allows plenty of room for knotting the adjustable closure later. -
Secure the end:
Tie a simple overhand knot about 4 inches from one end of the cord. -
Anchor your work:
Tape the cord down to your work surface just above the knot you tied, or clip it into a clipboard. This tension makes threading the beads much easier.
Step 2: Beading the Strand
-
Start the sequence:
Begin threading your beads. Start with 3 small cream-colored wooden or clay spacer beads to taper the design near the cord. -
Add metal accents:
Slide on a tiny gold metal spacer bead or crimp bead after the small cream ones for a touch of shine. -
First color block:
Thread on your main colored beads. Following the pattern in the photo, add a white bead, then a yellow bead, following with turquoise. -
Continue the pattern:
Add a red bead, then a white bead, then a red bead again. The pattern here is organic and playful, so don’t worry about perfect symmetry.
Knot Security
Add a tiny drop of clear craft glue or clear nail polish to the cut ends of your sliding knot. Let it dry completely to prevent fraying without darkening the cord.
Step 3: Adding the Focal Point
-
Approach the center:
String a white bead, then a turquoise bead, a yellow bead, and finally a red bead. This brings you to the center of the bracelet. -
Attach the charm:
Using your jewelry pliers, open the gold jump ring and slip it through the loop of the daisy charm. -
Secure the charm:
Place the jump ring onto the cord directly next to the central red bead and close the ring securely with your pliers so the charm dangles freely. -
Complete the sequence:
Mirror or continue your random pattern on the other side of the charm. Add a turquoise bead, a white bead, then a yellow bead. -
Finish the main section:
Continue adding beads—red, white, turquoise, yellow, red, white—until the beaded section wraps comfortably around your wrist (usually about 6–7 inches of beads). -
End tapering:
Finish the strand exactly how you started: add a small metal spacer bead followed by 3 small cream spacer beads.
Texture Play
Mix finishes to mimic the inspiration! Combine matte clay beads with glossy ceramic ones, or use speckled beads to give it that authentic pottery vibe.
Step 4: Creating the Adjustable Closure
-
Knot the end:
Tie an overhand knot snug against the final bead to keep everything in place. -
Form a circle:
Bring the two cord ends together so they overlap, forming a circle shape with the bracelet. -
Cut a sliding knot cord:
Cut a separate, short piece of the same tan cord, about 8 inches long. -
Tie the sliding knot:
Lay the short cord under the two overlapping bracelet ends. Create a square knot or a series of macramé knots around both bracelet cords. -
Tighten and trim:
Pull the knot tight so it holds firmly but still slides. Trim the excess tails of the knotting cord close to the knot (you can add a tiny dab of glue here for security). -
Finish the tails:
Tie a small knot at the very end of each main bracelet cord tail to prevent them from slipping through the sliding knot.
Now you have a charming, adjustable bracelet ready for sunny adventures
Pool Tile Checkerboard Pattern
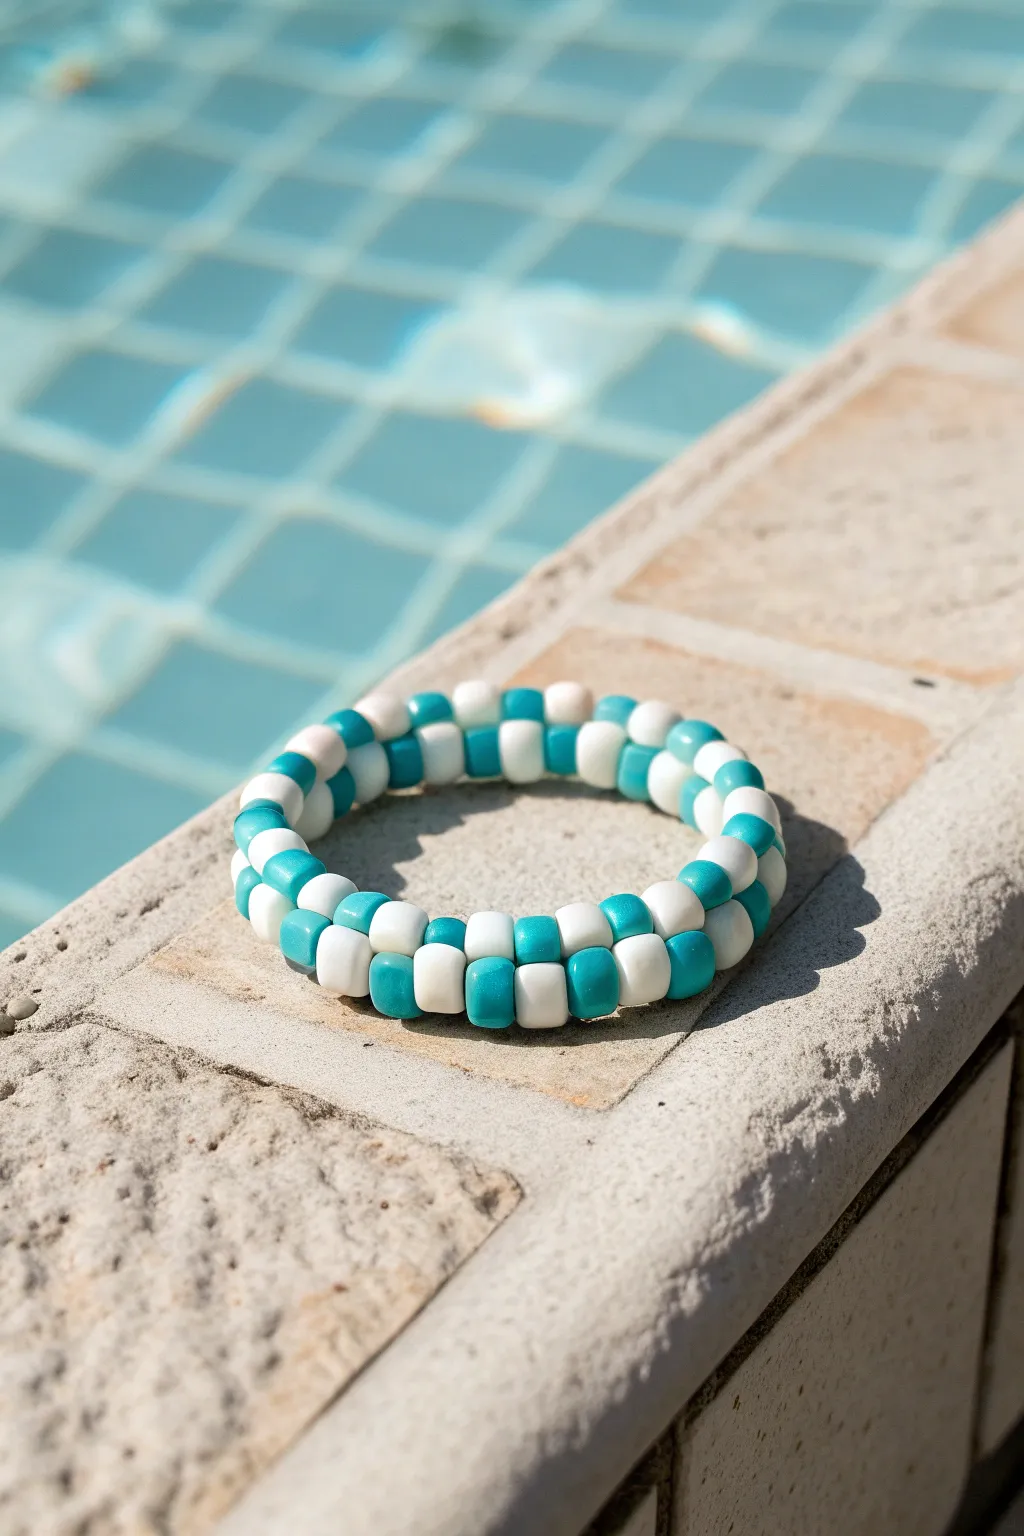
Capture the cool, refreshing vibes of a swimming pool with this geometric clay bead bracelet. The alternating teal and white square beads create a classic checkerboard pattern that mimics the tiles found at the bottom of a pool, making it the perfect accessory for splashy summer days.
How-To Guide
Materials
- Teal square heishi/clay beads (approx. 6mm or 8mm)
- White square heishi/clay beads (approx. 6mm or 8mm)
- 0.8mm clear elastic stretch cord
- Measuring tape
- Scissors
- Super glue or jewelry cement (optional)
- Bead stopper or binder clip
Step 1: Preparation & First Row
-
Measure and cut:
Begin by measuring your wrist to determine the desired length of the bracelet. Cut a piece of elastic cord that is at least double your wrist measurement plus 6 inches. This extra length is crucial for weaving the intricate two-row pattern comfortably. -
Secure the end:
Attach a bead stopper or a simple binder clip to one end of your cut cord. This prevents your hard work from sliding off as you begin the weaving process. -
String pattern A:
Start by stringing your beads in an alternating pattern: one teal square bead, followed by one white square bead. Repeat this until the strand is long enough to wrap comfortably around your wrist. -
Check the count:
Before proceeding, ensure you have an even total number of beads. This creates a seamless join later, so double-check your count now. -
Create the circle:
Bring the two ends of the cord together to form a loop. Pass the working end (the tail without the clip) back through the very first bead you strung to close the circle. Pull it snug so the beads sit flush against each other.
Loosey Goosey?
If gaps appear between the two rows, your tension is too loose. Don’t be afraid to pull the elastic quite firmly after every few beads; square beads need tension to snap into a rigid grid.
Step 2: Building the Checkerboard Walls
-
Start the second row:
This technique resembles a simplified peyote stitch. Pick up one new bead. If your first bead in the bottom row was teal, pick up a white bead for this new row to create the checkerboard contrast. -
Skip and stitch:
Skip the very next bead on the base loop and thread your cord through the following bead. Pull the cord tight. You should see your new bead sit squarely on top of the ‘skipped’ bead from the first row. -
Continue the pattern:
Pick up another bead (alternating color again). Skip the next bead on the base row, and thread through the subsequent bead. -
Maintain tension:
As you work around the circle, keep a consistent, firm tension. I find that tugging the cord gently after every two stitches helps the square beads lock into that perfect grid shape. -
Verify alignment:
Pause halfway to check your work. You should see the ‘high’ beads of the second row sitting in the gaps of the first row, creating distinct vertical columns of alternating colors. -
Complete the circuit:
Continue this ‘add one, skip one, sew through one’ rhythm until you have worked your way entirely around the bracelet loop.
Double Decker
Want a thicker cuff? Simply repeat the ‘Building the Checkerboard Walls’ phase for a third or fourth row. Just ensure you alternate colors each new row to maintain the check pattern.
Step 3: Finishing Touches
-
Step up:
When you reach the end of the round, pass your needle or cord through the very first bead you added in this second row. This ‘steps up’ the cord and locks the rows together. -
Weaving the ends:
Bring your needle/cord end so it meets your starting tail. You might need to weave through one or two adjacent beads so both cord ends exit from the same spot. -
Tie the knot:
Remove the bead stopper. Tie the two ends together using a strong surgeon’s knot (right over left, left over right, engaging the loop twice). -
Secure firmly:
Pull the knot incredibly tight. The elasticity allows you to really cinch it without breaking. Apply a tiny dot of super glue or jewelry cement to the knot for extra security. -
Hide and trim:
Once the glue is tacky or dry, trim the excess cord ends close to the knot. Gently pull the beads to slide the knot inside the nearest square bead to hide it from view.
Now slip on your new geometric cuff and enjoy the stylish, watery vibes all summer long
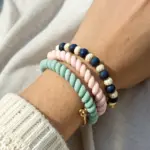
Tropical Palm Green And Hot Pink Combo
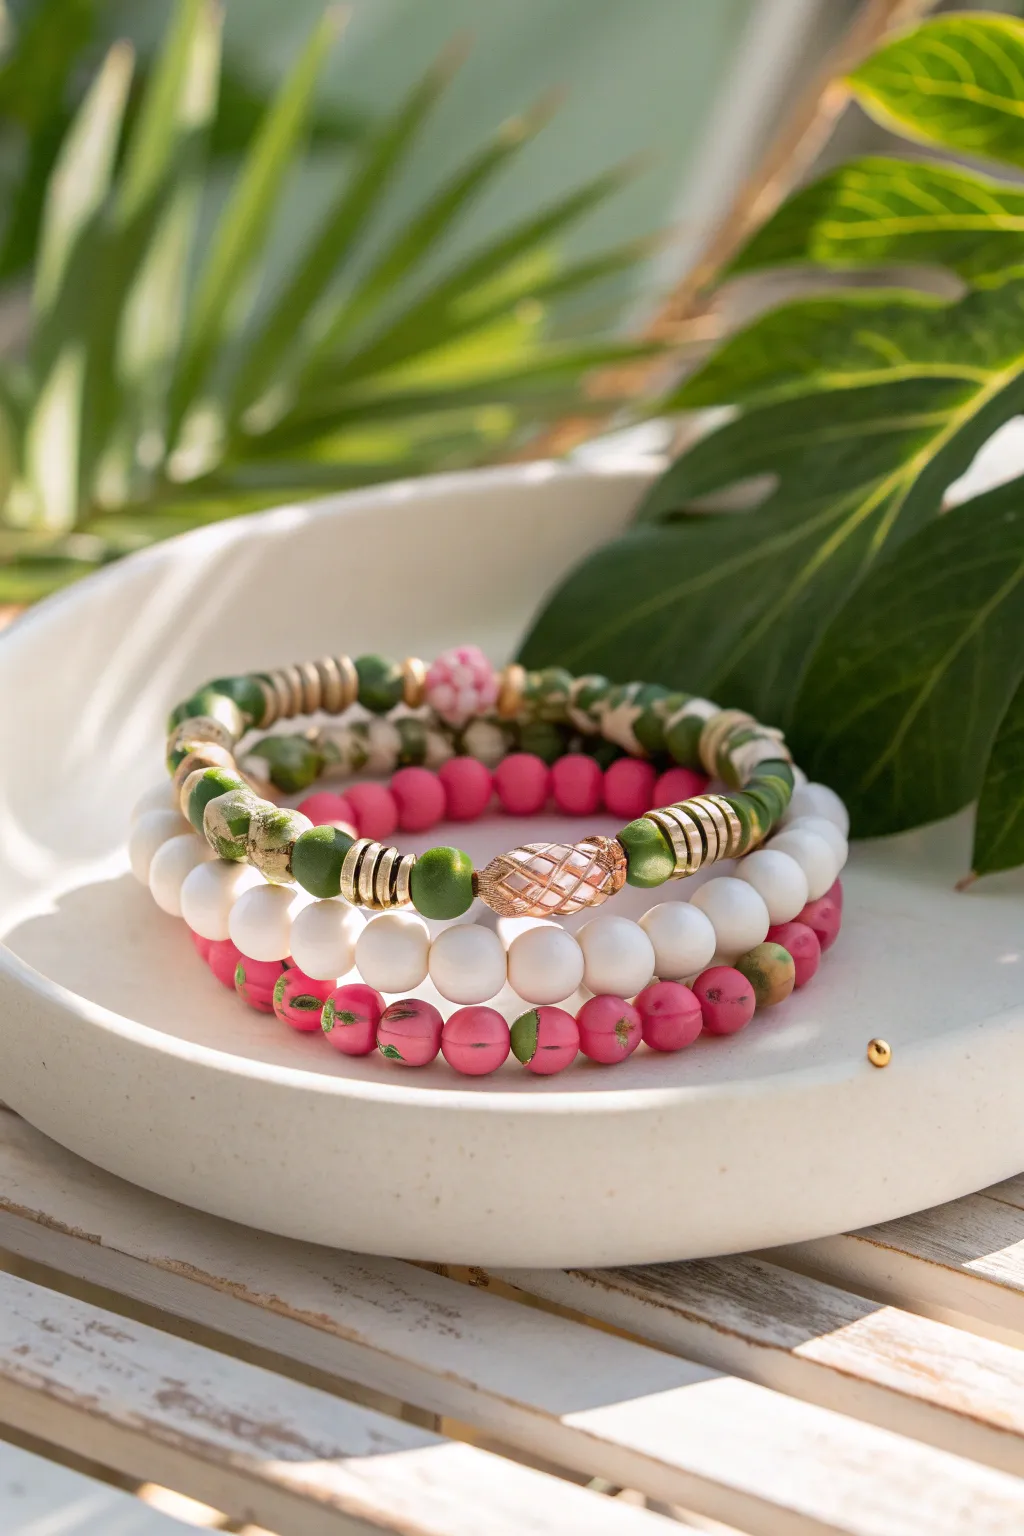
Capture the essence of a lush island getaway with this vibrant trio of elastic bracelets. Combining deep palm greens, stark whites, and pops of hot pink, this set uses a mix of textures and gold accents to create a playful, summer-ready stack.
Step-by-Step Guide
Materials
- Elastic cord (0.7mm or 0.8mm)
- White round beads (approx 8-10mm, matte or shell)
- Hot pink textured clay beads (approx 8mm with vine/leaf pattern)
- Green patterned beads (approx 8mm, palm leaf or moss agate look)
- Solid hot pink round spacer beads (6mm)
- Gold tone heishi disc spacers
- Large gold pineapple or oval focal textured bead
- Gold tone crimp covers (optional)
- Super glue or jewelry cement
- Scissors
Step 1: The White & Pink Foundation
-
Prepare the cord:
Cut a piece of elastic cord about 10-12 inches long. This gives you plenty of room to knot it later without struggling. Pre-stretch the elastic by pulling it firmly a few times to prevent it from sagging after wear. -
String the base:
Begin stringing your smooth white round beads. Thread on approximately 18-20 of them, depending on your wrist size. -
Add the color pop:
Transition to the hot pink section. Add a sequence of the textured pink beads that feature slight green or gold leaf detailing. Use about 8-10 of these to create a distinct color block. -
Close the loop:
Bring the ends together and tie a surgeon’s knot (looping the elastic through twice before pulling tight). Dab a small dot of jewelry cement on the knot, let it dry, and trim the excess cord.
Knot Hiding Trick
If the bead holes are too small to hide your knot, cover the knot with a gold crimp cover. Gently close it with pliers to make it look like a gold accent bead.
Step 2: The Solid Pink Accent
-
Start the second strand:
Cut and pre-stretch another length of elastic cord just like the first one. This layer is simpler but essential for balancing the colors. -
Create the pink run:
String on your smaller, solid hot pink spacer beads. You will need enough to cover roughly half the circumference of your wrist. -
Interject patterns:
Switch to the green patterned beads for the second half of the bracelet. This creates a dual-tone look when the bracelet spins on your wrist. -
Knot and finish:
Secure this bracelet with another tight surgeon’s knot and glue. Tuck the knot inside the hole of a larger bead if possible for a seamless finish.
Mix It Up
Swap the central gold focal bead for a real cowrie shell or a freshwater pearl to give the stack an even more organic, beach-comber vibe.
Step 3: The Green & Gold Focal Piece
-
Center the design:
For the top wow-factor bracelet, start by threading the large gold focal bead (the pineapple or textured oval) onto the center of a new piece of cord. -
Flank with solids:
Place one solid green bead on either side of the gold focal bead to frame it. -
Add gold spacers:
String 4-5 gold heishi disc spacers next to the solid green beads on both sides. This metallic texture elevates the look. -
Continue the pattern:
Continue stringing the green patterned beads. I like to interrupt the pattern every 5 beads with another small stack of 2-3 gold heishi spacers to keep the rhythm interesting. -
Incorporate pink details:
Midway through the back section, add a single textured pink bead or a small cluster of pink beads to tie this bracelet visually to the other two in the stack. -
Final sizing check:
Wrap the unfinished strand around your wrist to check the fit against the other two completed bracelets. It should sit comfortably without pinching. -
Secure the final knot:
Tie your final surgeon’s knot securely. Apply your glue, wait for it to set, and trim the ends close to the knot.
Slip on your new bracelet stack and enjoy those tropical vibes wherever you go
Handmade Swirled Tie-Dye Clay Beads
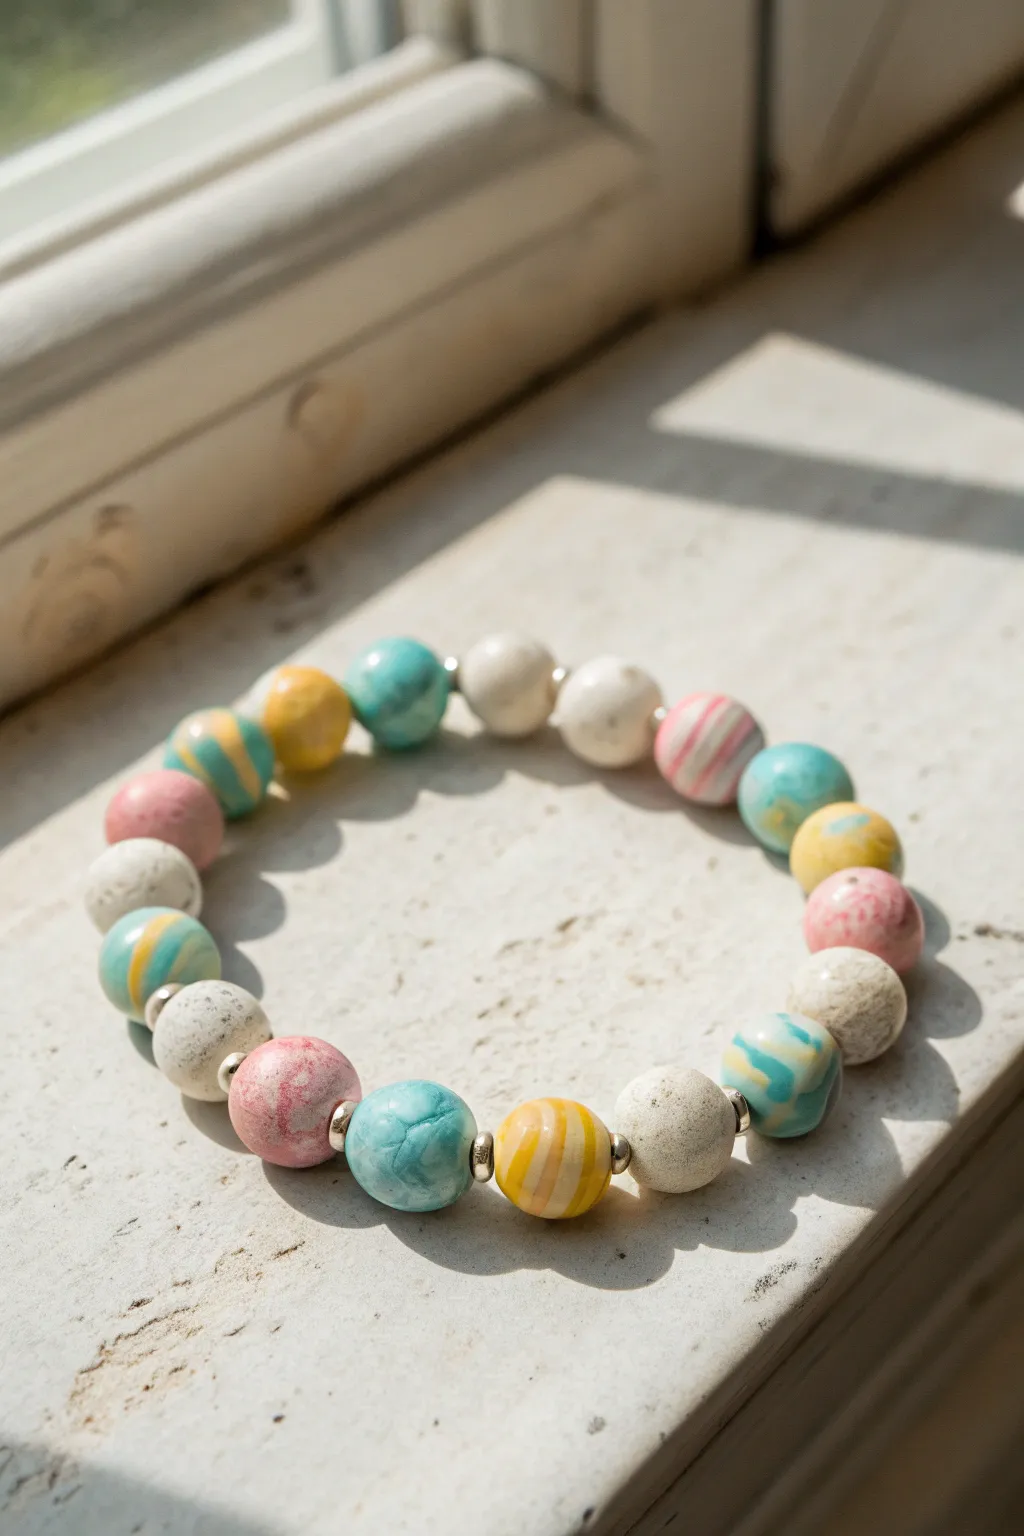
Capture the laid-back vibe of summer with this handcrafted polymer clay bracelet featuring a mix of speckled granite, soft pastel swirls, and tie-dye patterns. The smooth, round beads offer a organic, matte finish that pairs perfectly with sun-kissed skin.
Step-by-Step Tutorial
Materials
- Polymer clay (white, translucent, pastel pink, aqua blue, sunny yellow, sand/granite effect)
- Acrylic roller or pasta machine
- Bead piercing pins or toothpicks
- Elastic stretch cord (0.8mm or 1mm)
- Small silver spacer beads (approx. 3mm)
- Tissue blade or craft knife
- Baking sheet and parchment paper
- Bead rack (optional but recommended for baking)
- Wet/dry sandpaper (400, 600, 1000 grit)
- Jewelry glue (e.g., G-S Hypo Cement)
Step 1: Prepping the Clay Styles
-
Condition the Clay:
Start by warming up each color of polymer clay in your hands until it becomes soft and pliable. This conditioning step is crucial to prevent cracking later. -
Create the Granite Beads:
Take your granite-effect or sand-colored clay and roll it into a uniform log. Slice equally sized segments to ensure your plain beads are consistent in size. -
Mix the Marble Swirls:
For the watery blue beads, mix a chunk of aqua clay with a smaller amount of translucent or white. Twist them together like a candy cane, fold, and twist again. Stop before the colors fully blend to keep that distinct marbled look. -
Build the Dye Logs:
To make the striped ‘tie-dye’ beads (like the yellow and pink ones), roll thin snakes of white, yellow, and clear. Stack them, twist them gently, and roll them into a smooth log so the stripes run lengthwise.
Step 2: Forming and Piercing
-
Roll spheres:
Take your sliced segments from the various clay mixtures and roll them between your palms. Use a light, circular motion to create perfect spheres, aiming for about 10-12mm in diameter. -
Refine the surface:
Check each bead for fingerprints. If you find any, gently buff them out with your finger or roll the bead lightly on a piece of paper to smooth the surface. -
Piercing the holes:
Hold a bead gently between your thumb and forefinger. Insert your bead pin or toothpick into the center, rotating it as you push through to avoid squashing the sphere. -
Double-sided Check:
Once the pin pokes through the other side, remove it and re-insert it from the opposite direction. This ensures a clean exit hole and makes stringing much easier later.
Fixing Squashed Beads
If your beads flatten while piercing, let them rest in the fridge for 10 minutes to firm up before trying again. Rolling the pin while inserting helps ease it through.
Step 3: Baking and Finishing
-
Arranging for the Oven:
Place your beads on a parchment-lined baking sheet. I prefer using a bead rack to suspend them, which keeps them perfectly round, but laying them gently on the paper works fine too. -
Bake:
Bake the beads according to the manufacturer’s instructions on your specific package of clay. Typically, this is around 275°F (135°C) for 30-45 minutes. -
Cooling Down:
Allow the beads to cool completely in the oven with the door cracked, or remove them and let them sit for at least an hour before handling. They are fragile when hot. -
Sanding for Smoothness:
For that matte, stone-like feel shown in the photo, wet-sand each bead under running water. Start with 400 grit to remove imperfections and finish with 1000 grit for a silky touch. -
Wash and Dry:
Wash the sanded beads with a drop of dish soap to remove any clay residue or dust, then dry them thoroughly with a lint-free towel.
Matte Finish Pro Tip
Skip the glossy glaze entirely. To get the natural, beach-stone look seen here, simply buff the baked beads vigorously with a piece of denim or heavy canvas.
Step 4: Assembly
-
Plan the Design:
Lay out your beads on a bead board or towel. Alternate between the granite beads, the solid color swirls, and the striped tie-dye beads to create a balanced rhythm. -
Add Spacers:
Insert a small silver spacer bead between every 2-3 clay beads. This adds a subtle metallic shine and breaks up the chunky texture. -
String the Bracelet:
Cut a piece of elastic cord about 10 inches long. Pre-stretch it by pulling on it gently a few times; this prevents the bracelet from loosening immediately after you make it. -
Knotting:
Thread your pattern onto the cord. Tie a surgeon’s knot (right over left twice, then left over right) and pull tight. -
Secure and Hide:
Apply a tiny dot of jewelry glue to the knot. Once dry, trim the excess cord and tuck the knot inside the hole of the nearest clay bead.
Slip on your new bracelet and enjoy the custom, artistic touch it adds to your summer outfits
Glow-In-The-Dark Night Swim Stack
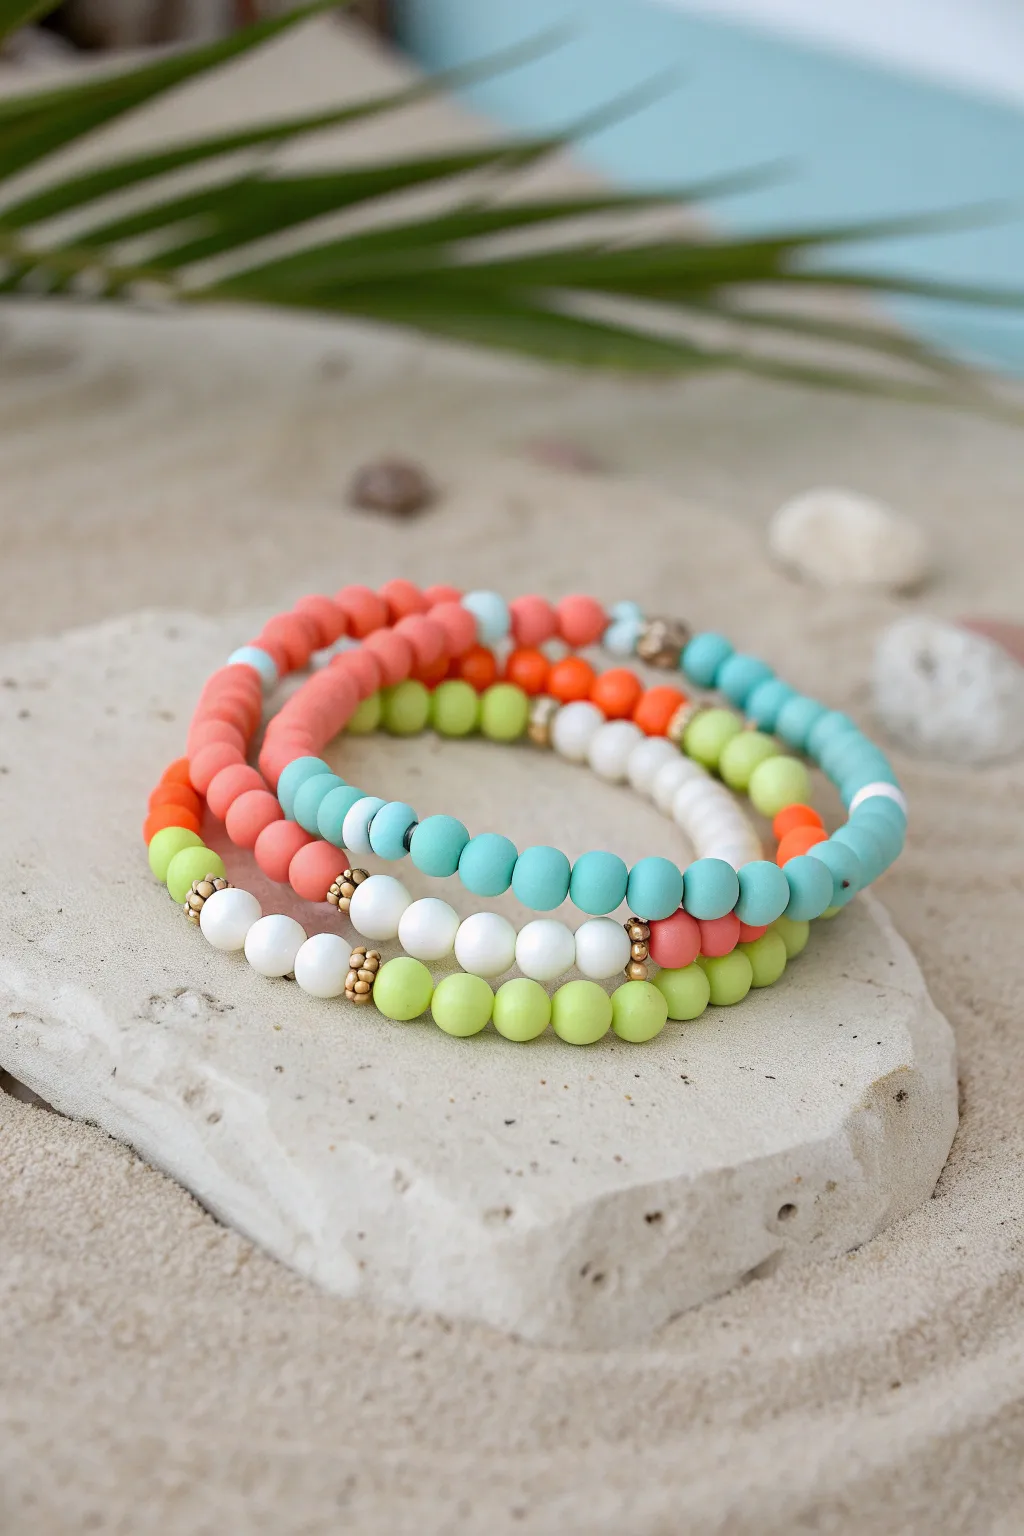
Capture the essence of a vibrant summer evening with this playful stack of polymer clay bead bracelets. Mixing matte colors like coral and turquoise with pops of lime green and white creates a beach-ready accessory perfect for starry night swims.
Detailed Instructions
Materials
- Polymer clay disc beads (Heishi beads) in: Coral/Salmon, Turquoise/Teal, Lime Green, White
- Glow-in-the-dark polymer clay disc beads (optional, for the ‘Night Swim’ effect)
- Small gold spacer beads (flower or round shape)
- Gold accent beads (small cubes or textured rounds)
- Elastic stretch cord (0.8mm clear)
- Bead stopper or masking tape
- jewelry glue (e.g., G-S Hypo Cement)
- Scissors
Step 1: Preparation
-
Measure your wrist:
Wrap a piece of string around your wrist to find your comfortable size, then add about an inch to that measurement for knotting. Cut three pieces of elastic cord to this length. -
Secure the ends:
Attach a bead stopper or simply place a piece of folded masking tape on one end of each elastic strand. This prevents your beads from sliding off while you design.
Wavy Beads?
If your clay discs look uneven or wavy on the string, try rolling the finished bracelet gently between your palms. This helps align the beads into a smooth, uniform cylinder.
Step 2: The Coral & Lime Bracelet
-
Start the coral base:
Begin threading your coral or salmon-colored clay discs onto the first strand. You can grab 4-5 discs at a time to speed up the process. -
Thread the main section:
Continue adding coral beads until you have covered about 60% of the bracelet’s length. -
Add a gold accent:
Slide on a textured gold spacer bead to mark the transition in color. -
Introduce the lime:
Switch to your bright lime green beads. Thread a solid section of about 1.5 inches. -
Finish with white accents:
Add a small gold spacer, then a small section of white beads (about 0.5 inches), followed by another gold spacer to balance the design. -
Close the loop:
Fill the remaining space with a few more coral beads until the strand fits your wrist perfectly.
Make it Shine
Incorporate UV-reactive neon beads alongside the regular clay discs. They look normal in daylight but will glow brilliantly under blacklight for true party vibes.
Step 3: The Turquoise & White Mix
-
Begin with turquoise:
On the second strand, start threading the turquoise or teal clay beads. -
Create color blocks:
Thread about 2 inches of turquoise, then slide on a gold flower spacer. -
Insert the white section:
Add a generous section of white beads; if you have glow-in-the-dark beads, this is the perfect place to use them for that ‘night swim’ vibe. -
Pattern repetition:
Cap the white section with another gold spacer, then return to threading turquoise beads for the remainder of the strand. -
Check the fit:
Wrap it around your wrist to ensure it sits comfortably alongside the first bracelet.
Step 4: The Multi-Color Accent Strand
-
Start with lime:
For the third bracelet, begin with a short segment of lime green beads. -
Add gold texture:
Use a textured gold flower spacer bead here to separate the colors distinctly. -
Transition to white:
Thread a medium section of white beads. I find that alternating the bead thickness here adds nice texture to the stack. -
Introduce coral:
Add another gold spacer, then thread a section of coral beads. -
Complete with turquoise:
Finish the strand with a section of turquoise beads, using gold spacers between any major color changes if desired.
Step 5: Finishing Touches
-
Pre-stretch the cords:
Before tying, gently pull on the ends of each bracelet. This ‘pre-stretching’ helps prevent the elastic from loosening up later as you wear it. -
Tie the knots:
Remove the bead stoppers and tie a surgical knot (left over right, right over left) separately for each bracelet. Pull tight to secure. -
Secure with glue:
Dab a tiny drop of jewelry glue onto each knot. Let this dry for at least 30 minutes to ensure maximum durability. -
Hide the knots:
Trim the excess elastic cord carefully. If possible, gently tug the knot inside the hole of a nearby bead to hide it from view.
Slide on your new stack and enjoy the splash of color on your wrist