
Unicorns are basically the perfect clay project because you can build them from simple shapes and still get that magical “wow” factor. I pulled together my favorite unicorn clay ideas that work beautifully in polymer clay or air-dry clay, whether you’re making gifts, decor, or tiny keepsakes.
Classic Chibi Unicorn Figurine
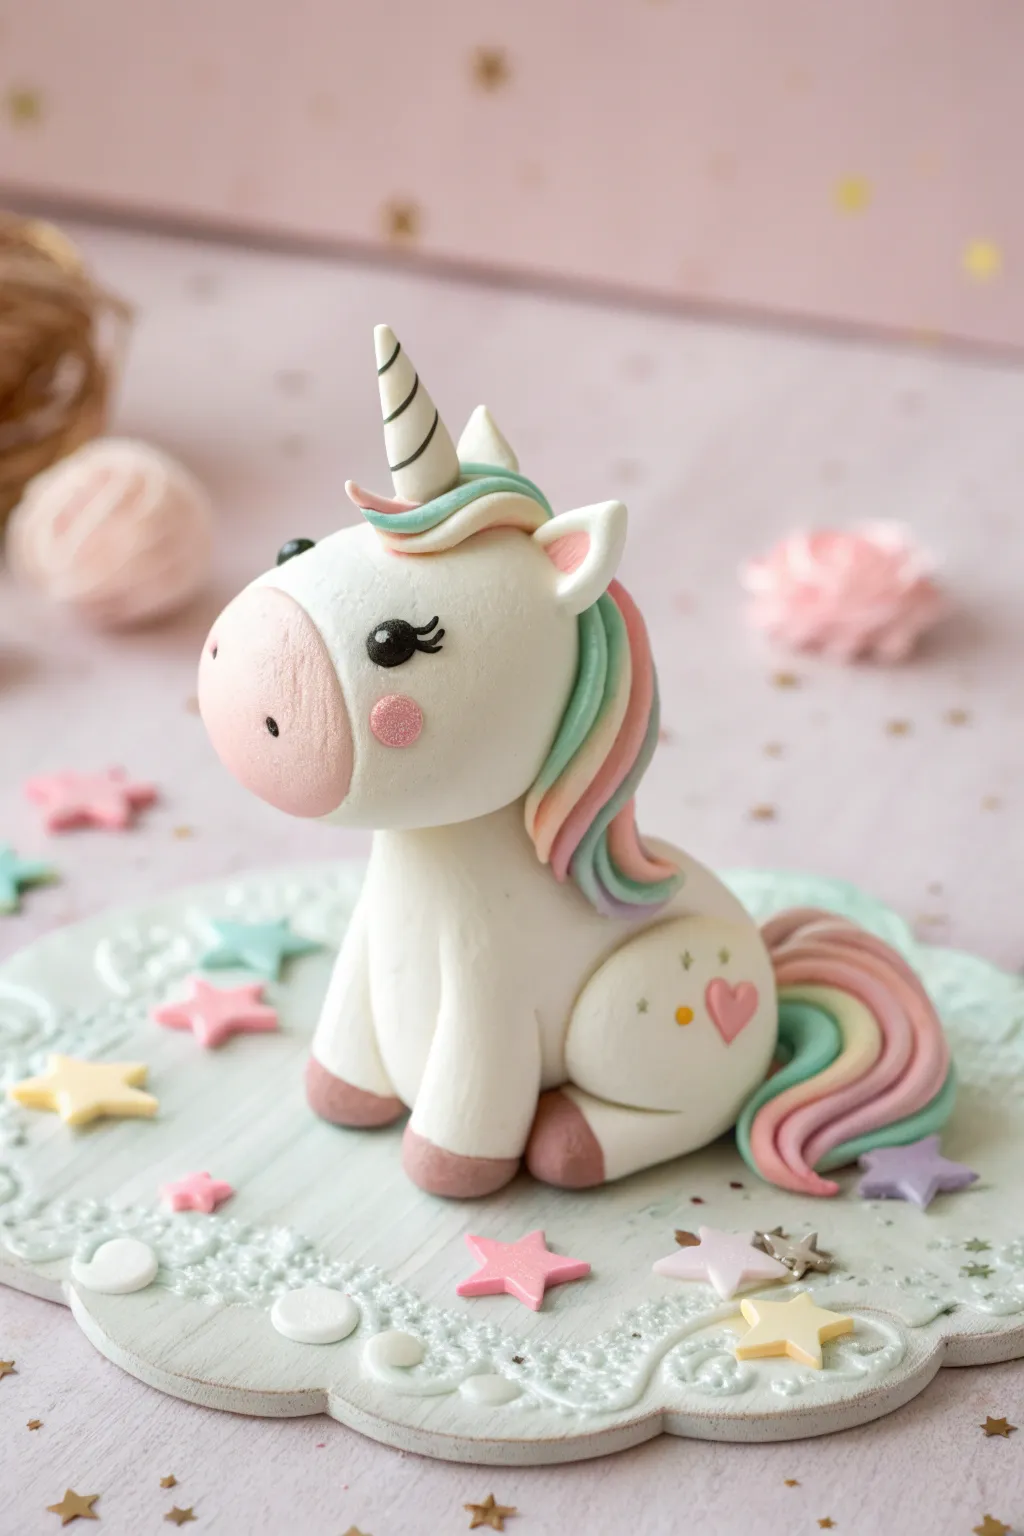
Capture the magic of childhood with this adorable chibi-style unicorn figurine, featuring soft pastel swirls and a sweet, blushing expression. This project uses smooth blending techniques to create a whimsical, rounded character perfect for cake toppers or desk companions.
Step-by-Step Guide
Materials
- White polymer clay (or fondant/gum paste)
- Pastel pink, mint green, and peach clay
- Gold acrylic paint or luster dust
- Fine-tipped paintbrush
- Black clay (tiny amount) or black acrylic paint
- Ball stylus tool
- Needle tool or toothpick
- Craft knife
- Rolling pin
- Textured impression mat (optional, for base)
- Star-shaped cutters (various small sizes)
Step 1: Shaping the Body and Legs
-
Form the Torso:
Start with a ball of white clay roughly the size of a walnut. Roll it into a smooth teardrop shape, flattening the bottom slightly so it sits upright securely. This will be the main body. -
Create the Front Legs:
Roll two identical, smaller sausages of white clay for the front legs. Taper them slightly at the top where they will attach to the body. -
Form the Hind Legs:
For the back legs, create two teardrop shapes, similar to the body but smaller. Flatten them slightly against the sides of the body to form the haunches. -
Add Hoof Details:
Take a small amount of brownish-pink clay and create four small, flat discs. Attach these to the bottom of each leg limb to create cute hooves.
Preventing Fingerprints
White clay shows every speck of dust and fingerprint! Keep baby wipes nearby to clean your hands frequently, and lightly dust your fingers with cornstarch to smooth out prints before baking.
Step 2: Sculpting the Head and Face
-
Roll the Head:
Roll a larger ball of white clay for the head—chibi style means the head should be almost as big as the body for maximum cuteness. Shape it into a rounded oval. -
Add the Muzzle:
Flatten a small piece of pale pink clay into an oval and gently press it onto the lower front of the head. Smooth the edges with your finger so it blends seamlessly into the white clay. -
Create Facial Features:
Use a ball tool to indent eye sockets. Fill these with tiny flattened discs of black clay. Add microscopic white highlights to the eyes to make them sparkle, or paint the eyes on after baking if you prefer more control. -
Lashes and Cheeks:
Roll incredibly thin threads of black clay for the eyelashes and place them carefully. Add round pink discs for blushing cheeks on either side of the muzzle. -
Attach the Horn:
Roll a tapered cone of white clay. Use a needle tool to gently press a spiral groove from the base to the tip. Attach this to the center of the forehead. -
Ears:
Shape two small triangles of white clay. Indent the centers with a smaller tool and add a tiny touch of pink inside. Pinch the bottoms and attach them to the top of the head.
Pro Tip: Eye Placement
For the cutest look, place the eyes lower on the head, aligning them with the top of the muzzle. Wide-set, low eyes serve to instantly increase the ‘chibi’ factor of your sculpture.
Step 3: Mane, Tail, and Assembly
-
Prepare Pastel Strands:
Roll out long, tapered snakes of mint green, pastel pink, and peach clay. You want them thick at one end and pointy at the other. -
Style the Mane:
Group these strands together, twisting them slightly. Drape this created ‘hair’ from behind the horn, sweeping it down one side of the neck. Curl the ends for a flowing look. -
Create the Tail:
Repeat the process with larger strands for the tail. Bundle them at the top, twist, and attach to the lower back of the body, curving it around the side so it’s visible from the front. -
Assemble the Figure:
Insert a toothpick or wire into the neck of the body for support, then gently press the head down onto it. I usually add a tiny dab of liquid clay or edible glue here to ensure a permanent bond. -
Add the Heart Cutie Mark:
Use a tiny heart cutter or hand-shape a small pink heart. Press this onto the unicorn’s flank for a signature detail.
Step 4: Base and Finishing Touches
-
Prepare the Base:
Roll out a slab of pale mint or white clay. Use a scalloped cutter to create a decorative base. If you have a lace impression mat, press it into the clay for texture. -
Decorate the Scene:
Cut out various small stars from pink, yellow, and blue clay. Scatter these around the base of the unicorn. -
Gilding the Horn:
Once the clay is cured (bake according to package instructions) or dried, carefully paint the spiral groove of the horn with gold paint or luster dust mixed with a drop of alcohol.
Place your finished unicorn on a shelf where its starry base can catch the light and add a little magic to your room
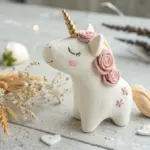
Sleeping Unicorn With Closed Eyes
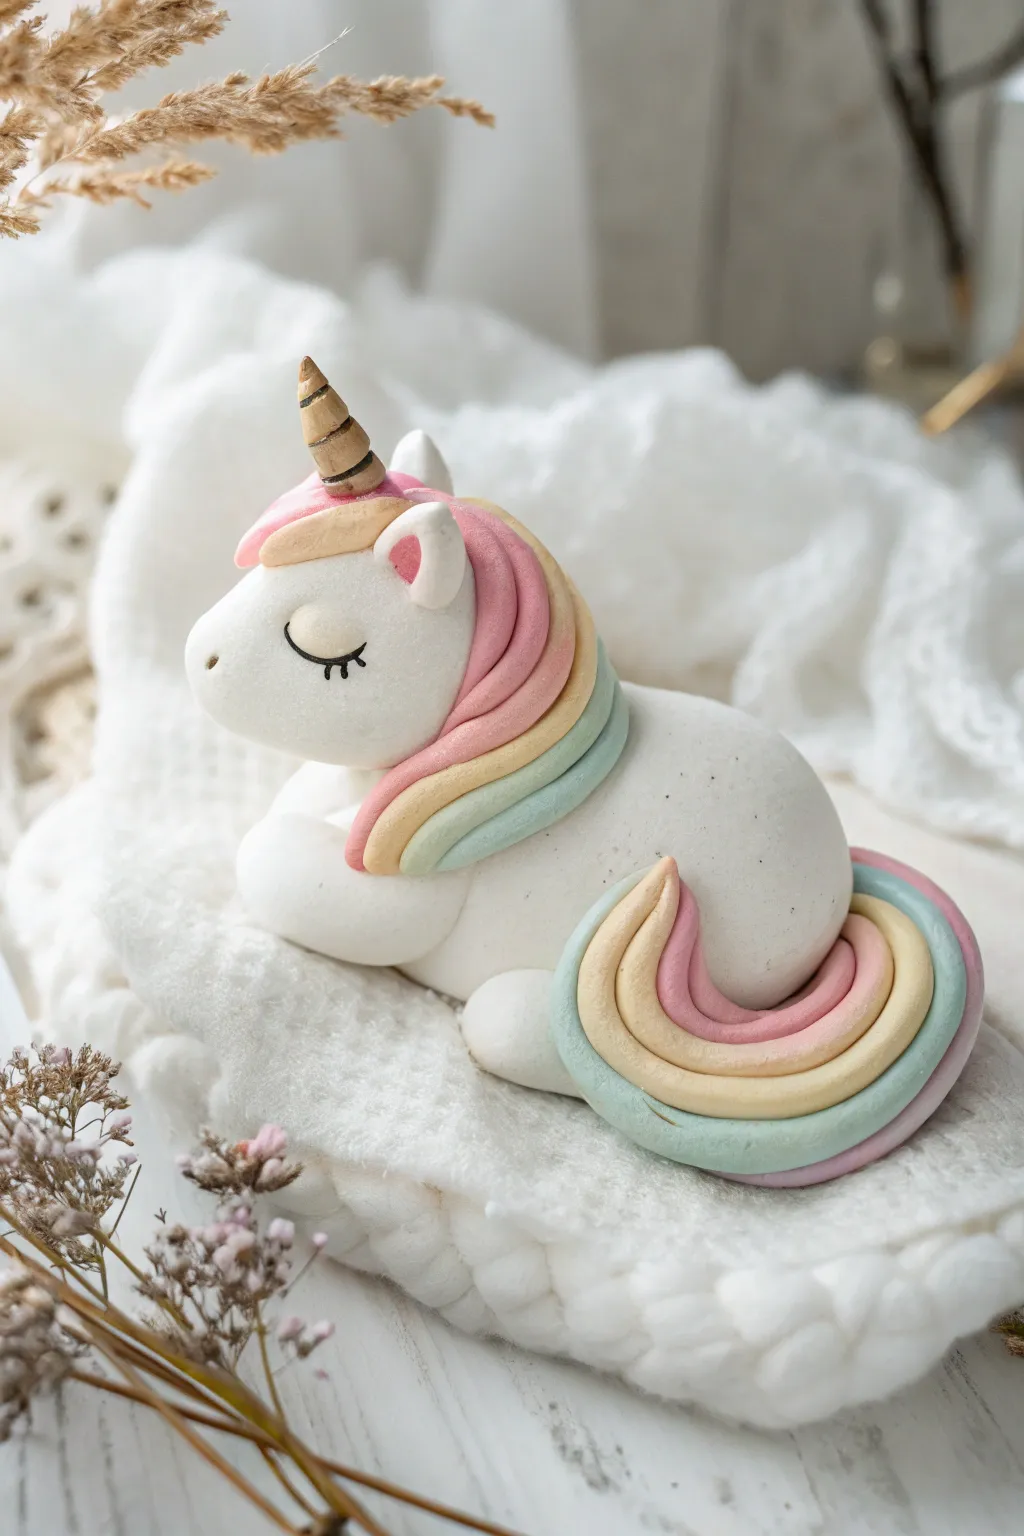
Capture the magic of dreamland with this serene sleeping unicorn sculpture. Featuring soft pastel rainbow locks and a shimmering gold horn, this sweet figurine rests peacefully on a cloud-like base, making it a perfect topper or keepsake.
Step-by-Step
Materials
- White polymer clay (or air-dry clay)
- Pastel pink, yellow, blue, and mint green clay
- Gold acrylic paint or metallic gold pigment powder
- Black acrylic paint or a fine-tip black marker
- Modeling tools (dotting tool, needle tool, smoothing tool)
- Small fine-point paintbrush
- toothpick or wire (for structural support)
- Textured white fabric or roving wool (for display base)
Step 1: Sculpting the Body and Head
-
Form the body base:
Begin with a medium-sized ball of white clay. Roll it into a smooth, slightly flattened teardrop shape to create the unicorn’s resting body. -
Shape the head:
Take a slightly smaller ball of white clay and shape it into a rounded oval. Gently press one side to define the snout area, giving it a soft, rounded profile. -
Attach head to body:
Place the head onto the larger end of the body teardrop. Blend the clay seams together underneath the neck carefully with a smoothing tool so the connection is invisible. -
Create the legs:
Roll two small sausage shapes from white clay. Round off one end of each for the hooves and tuck them under the front of the body, positioning them as if the unicorn is tucking its legs in while napping. -
Add the hind leg:
Create a rounded teardrop shape for the visible hind leg. Press it onto the side of the body near the back, blending the upper edge so it looks like part of the hip.
Step 2: Adding Magical Details
-
Sculpt the ears:
Make two tiny white triangles. Press a small indentation into the center of each with a round tool, adding a tiny speck of pink clay inside for the inner ear. Attach these to the top of the head. -
Form the horn:
Roll a thin snake of clay, tapering it at one end. Twist it around itself or carve a spiral pattern into a cone shape. Insert a small piece of toothpick or wire into the base of the horn and press it into the unicorn’s forehead. -
Paint the horn:
Carefully paint the horn with gold acrylic paint or brush it with gold pigment powder before baking if using polymer clay. -
Prepare the mane strands:
Roll out long, tapered snakes of clay in your pastel colors: pink, yellow, mint, and blue. Keep them distinct but ready to layer. -
Layer the mane:
Starting from behind the ears, drape the pastel strands over the unicorn’s neck. Curve them gently to mimic soft, flowing hair, layering the colors slightly for a voluminous look. -
Create the tail:
Group three or four new pastel snakes together at one end. Twist and curve them into a swirl shape, then attach this bundle to the rear of the unicorn, sweeping it forward alongside the body.
Clean Clay Pro Tip
White clay picks up lint easily. Keep a pack of baby wipes or rubbing alcohol nearby to clean your hands and tools before handling the white clay sections.
Step 3: Finishing Touches
-
Refine the texture:
Use a needle tool or the back of a knife to gently press hair lines into the mane and tail strands if you want extra realism, or leave them smooth for a soft look. -
Add face details:
Use a small dotting tool to create a tiny indentation for the nostril on the snout. -
Cure the clay:
Bake the figure according to your polymer clay manufacturer’s instructions, or let it air dry completely if using air-dry clay. -
Draw the eyes:
Once the sculpture is cool and hard, use a fine-tip black marker or a very fine brush with black paint to draw two U-shaped closed eyes with delicate eyelashes. -
Blush the cheeks:
I like to take a soft brush and a tiny bit of pink chalk pastel dust to gently blush the cheeks for a sweet, sleeping expression.
Glittery Level Up
Brush the pastel mane and tail with a Pearl Ex interference powder or iridescent white glitter before baking to give the unicorn a magical, shimmery finish.
Now you have a peaceful little guardian to bring a touch of magic to your shelf or desk


Unicorn Head Magnet
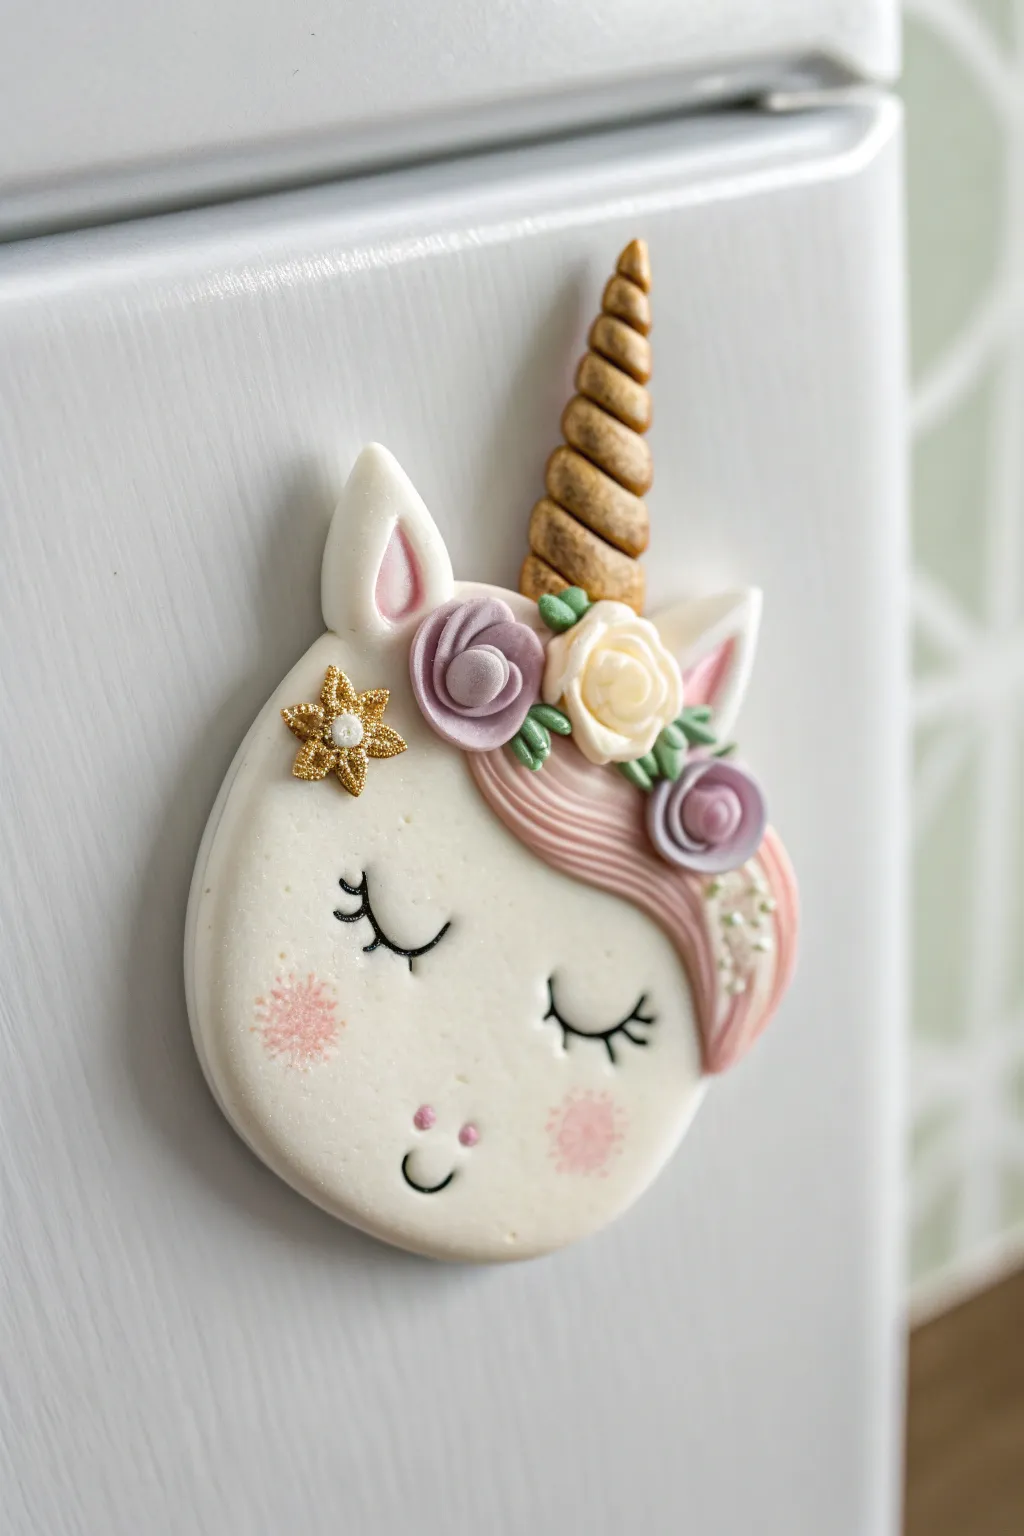
Bring a touch of magic to your refrigerator door with this adorable polymer clay unicorn magnet. Featuring soft pastel florals, a shimmering gold horn, and a sweet sleeping expression, this project is perfect for adding a little fantasy to your kitchen decor.
Step-by-Step Tutorial
Materials
- White polymer clay
- Soft pink polymer clay
- Light purple polymer clay
- Cream or pale yellow polymer clay
- Green polymer clay
- Gold acrylic paint or gold mica powder
- Black acrylic paint
- White acrylic paint (for eye highlights)
- Pink chalk pastel or blush
- Small star plunger cutter or mold
- Needle tool
- Ball stylus tool
- Small fine-tipped paintbrush
- Strong round magnet
- Super glue or E6000
- Glaze or varnish (gloss and satin)
Step 1: Shaping the Base
-
Form the head:
Start by conditioning a large ball of white polymer clay until it is soft and pliable. Flatten it gently into a thick, rounded oval shape, approximately 2-3 inches wide, keeping the edges smooth and rounded. -
Create the ears:
Roll two small cones of white clay and flatten them slightly. Press a smaller teardrop of pink clay into the center of each white cone to create the inner ear. Attach these to the top left and right sides of the head, blending the bottom seams with a clay tool. -
Sculpt the horn:
Roll a thin snake of white clay that tapers at one end. Twist two such tapered snakes together to form a spiral horn shape. Trim the base and attach it firmly to the center top of the head using a drop of liquid clay or scoring.
Sticky Fingerprints?
If you notice fingerprints on the white clay before baking, lightly brush the surface with a little baby oil or cornstarch to smooth them out without ruining the shape.
Step 2: Adding Mane and Florals
-
Lay the mane:
Roll a teardrop of soft pink clay and flatten it. Place it on the right side of the unicorn’s head, swooping down from the ear area to the cheek. Use a needle tool to drag lines through the clay, creating a hair-like texture. -
Form the rose centers:
To make the flowers, roll a tiny strip of purple clay and roll it up like a cinnamon roll. This forms the tight center bud of your rose. -
Add petals:
Flatten tiny balls of purple clay into thin discs. Press these around the center bud, overlapping them slightly to build a full bloom. Repeat this process with cream clay to make a second rose. -
Assemble the crown:
Place the purple and cream roses at the base of the horn, slightly overlapping the mane. I find it helps to use a ball tool to create a small indentation before placing the flowers so they sit securely. -
Add greenery:
Shape tiny grains of rice from green clay. Press them in tucked between the flowers and the horn to create leaves. Use a needle tool to impress a center vein on each leaf. -
Create the accent flower:
Roll a tiny purple bud for a third, smaller flower on the far right. Include a small gold star (made with a mold or cutter) on the left side of the forehead for extra sparkle.
Step 3: Details and Finishing
-
Texture the star:
If your star isn’t already textured, use the tip of a needle tool to stipple the surface, giving it a glitter-like appearance. -
Bake the piece:
Place your unicorn on a ceramic tile or baking sheet. Bake according to your clay manufacturer’s instructions (usually 275°F/130°C for 15-30 minutes). Let it cool completely. -
Gold accents:
Once cool, carefully paint the spiral horn and the star accent with metallic gold acrylic paint. You may need two thin coats for full coverage. -
Rosy cheeks:
Scrape a little pink chalk pastel into a powder. Use a soft, dry brush to gently dust pink circles onto the cheeks for a blushing effect. -
Paint the face:
Using a very fine detail brush and black acrylic paint, draw two U-shapes with lashes for the sleeping eyes. Paint a tiny smile and two small pink dots for the nose. -
Seal the piece:
Apply a gloss varnish to the eyes involved to make them shine, and a satin or matte varnish over the rest of the face to protect the chalk pastel cheeks. -
Attach magnet:
Flip the unicorn over. Apply a strong adhesive like E6000 or super glue to the back and press your round magnet firmly into the center. Let the glue cure fully before stickig it to your fridge.
Make It Sparkle
Before baking, lightly dust white mica powder or iridescent glitter over the white face area. It gives the unicorn a magical, pearlescent shimmer that catches the light.
Enjoy your magical new magnet and the charm it brings to your kitchen space


Mini Unicorn Keychain Charm
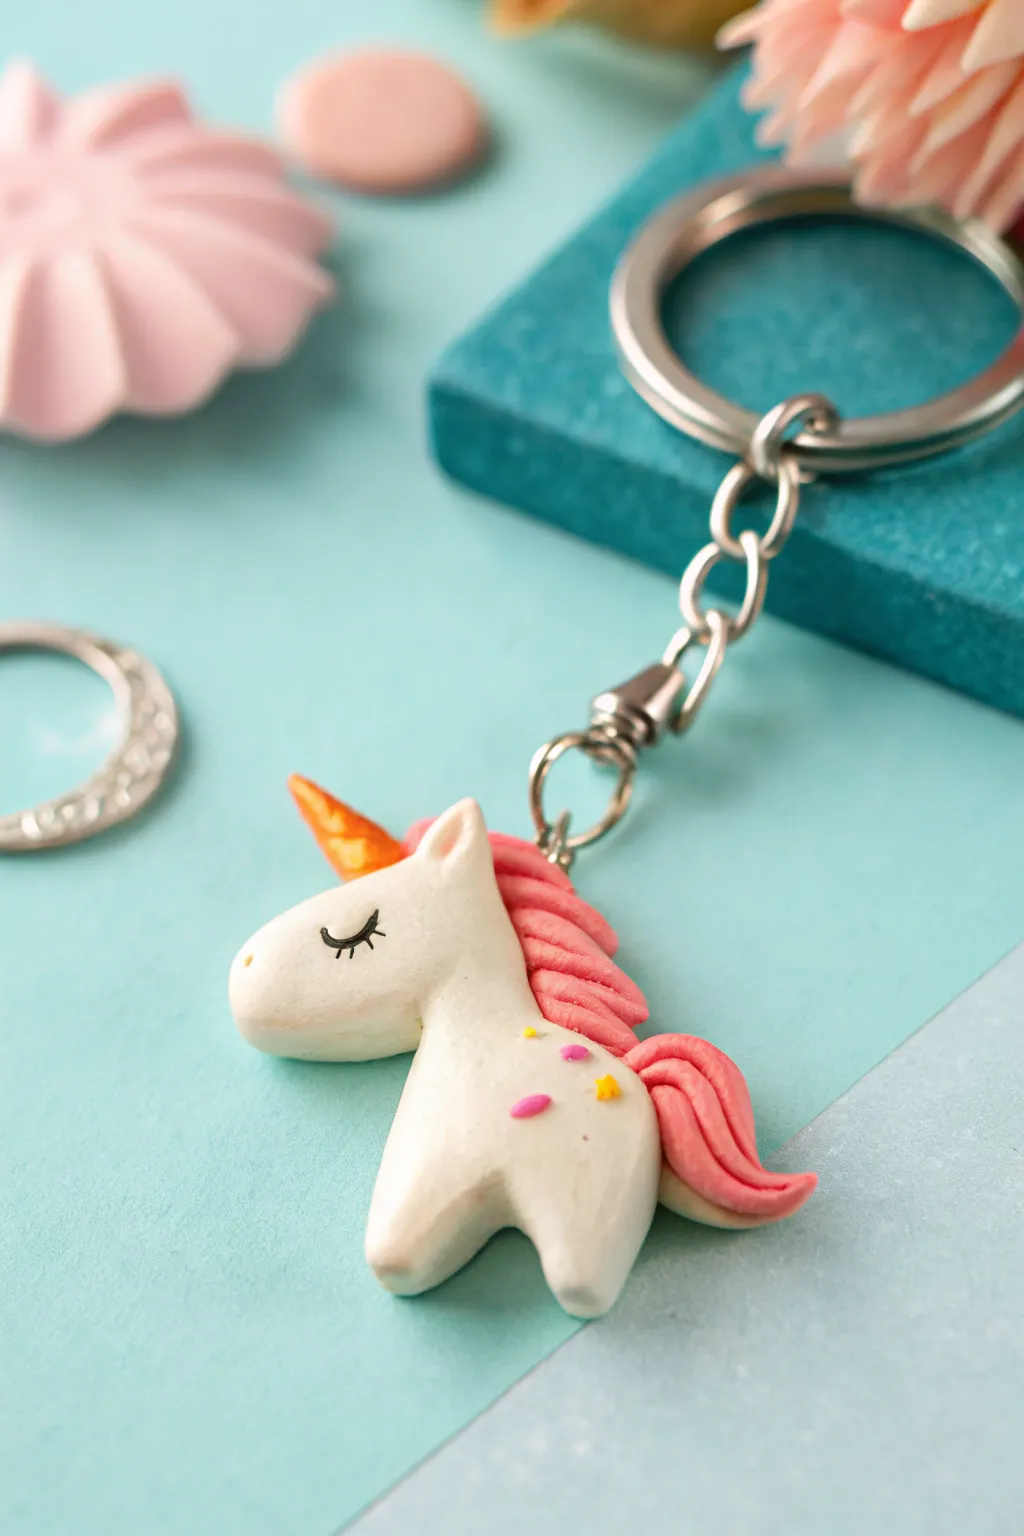
This adorable polymer clay unicorn keychain brings a sprinkle of magic to your everyday keys or backpack. With a simple sleeping expression and pastel mane, it’s a sweet project that looks like it galloped straight out of a fairy tale.
Step-by-Step
Materials
- White polymer clay
- Soft pink polymer clay
- Small amount of orange or gold polymer clay
- Tiny bits of yellow and pink clay (for sprinkles)
- Black acrylic paint
- Fine detail paintbrush
- Clay carving tools (needle tool, small ball tool)
- Eye pin or screw eye
- Jump ring and keychain hardware
- Oven for baking polymer clay
- Gloss glaze (optional)
Step 1: Sculpting the Body
-
Condition the clay:
Start by kneading a chunk of white polymer clay until it is soft, warm, and pliable to prevent cracking during the sculpting process. -
Shape the main form:
Roll the white clay into a smooth ball, then gently elongating it into a teardrop shape that is thicker at the bottom and slightly narrower at the top. -
Define the head:
Pinch the narrower end gently to form the neck, bending the very top forward to create the head shape. Smooth out the transition so the neck curves naturally into the back. -
Form the snout:
Slightly flatten and round the tip of the head area to define the horse-like muzzle. -
Create the legs:
At the wider base of the body, use a clay knife or your fingers to separate the bottom section into two short, stubby legs. Round off the ends so they look like soft hooves.
Step 2: Adding Mane and Horn
-
Make the ears:
Create two tiny triangles of white clay. Attach them to the top of the head, blending the bottom seams with a rubber shaping tool so they look seamless. -
Sculpt the horn:
Roll a very small piece of orange clay into a tapered cone. Twist it gently to give it a spiral texture, then press it onto the center of the forehead. -
Prepare the mane strands:
Roll several thin, short ropes of pink clay. Taper the ends to points. -
Attach the mane:
Layer the pink ropes down the back of the unicorn’s neck, starting from behind the ears. Overlap them slightly to create volume and texture. -
texture the hair:
Use a needle tool or knife to gently press lines into the pink mane strands, giving them the look of flowing hair. -
Add the tail:
Create a slightly larger cluster of pink clay strands for the tail. Attach this to the lower back of the body, curving the tips upward for a dynamic look.
Clean Clay Tip
Keep baby wipes handy! White clay picks up dust easily. Wipe your hands and tools before touching the white clay, especially after handling the colored mane pieces.
Step 3: Details & Assembly
-
Add sprinkles:
Take tiny pinched bits of yellow and pink clay and press them onto the unicorn’s hindquarters for a cute ‘cutie mark’ effect. -
Insert the hardware:
Trim an eye pin to an appropriate length (about half an inch). Insert it into the top of the unicorn’s back, right near where the keychain will hang best for balance. -
Bake the charm:
Place your unicorn on a baking sheet lined with parchment paper. Bake according to your specific clay brand’s instructions (usually around 275°F or 130°C for 15-30 minutes). -
Cool down:
Let the clay cool completely before handling. It needs to harden fully to become durable. -
Secure the pin:
I like to gently pull the eye pin out, add a dab of superglue to the shaft, and reinsert it for extra security. -
Paint the eye:
Using a very fine brush and black acrylic paint, carefully draw a closed eyelid with eyelashes on the side of the face. -
Attach the chain:
Open a jump ring with pliers, loop it through the eye pin and the keychain hardware, and close it securely.
Make It Sparkle
Before baking, brush a tiny amount of mica powder or pearlescent eyeshadow over the white body to give your unicorn a magical, shimmering finish.
Now your charming little companion is ready to guard your keys

The Complete Guide to Pottery Troubleshooting
Uncover the most common ceramic mistakes—from cracking clay to failed glazes—and learn how to fix them fast.
Unicorn Pendant Necklace
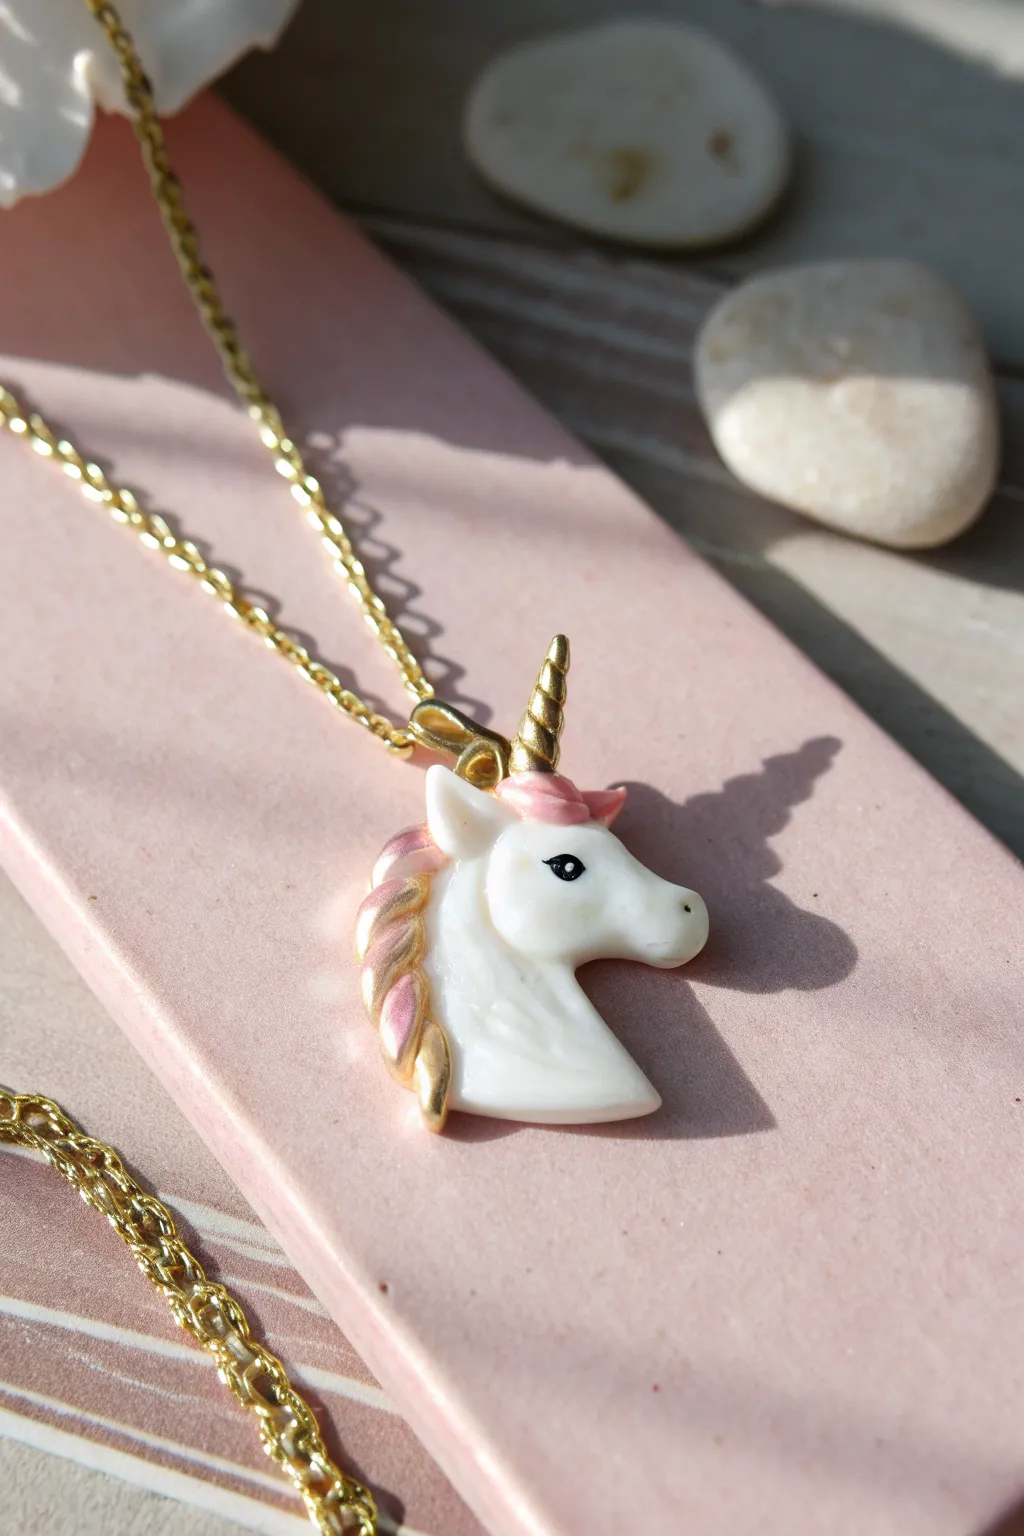
Capture magic in miniature with this elegant unicorn head pendant, featuring a pearlescent white finish and striking gold accents. This sophisticated take on a whimsical creature makes for a stunning piece of everyday jewelry.
Detailed Instructions
Materials
- White polymer clay (pearlescent or standard)
- Small amount of pink polymer clay
- Liquid gold leaf or gold guilding paint
- Glossy glaze or UV resin
- Gold jewelry bail
- Gold chain necklace
- Black acrylic paint
- Detail paintbrush (000 size)
- Needle tool or toothpick
- Clay sculpting tools
- Oven for baking
Step 1: Sculpting the Head
-
Form the base:
Start by conditioning a chunk of white clay until it is soft and pliable. Roll it into a smooth ball about the size of a large marble, then flatten it slightly into a thick oval. -
Shape the snout:
Pinch one side of the oval to elongate it, forming the unicorn’s snout. Use your fingers to smooth the transition so the head shape flows naturally from the cheek to the nose. -
Refine the profile:
Press gently into the clay to define the jawline and create a subtle indentation for the eye area. The bottom neck area should curve slightly inward. -
Add nostrils and mouth:
Using a needle tool, make a tiny dot for the nostril near the tip of the snout. Carefully press a small line underneath to suggest a mouth opening. -
Attach the ear:
Form a tiny triangle of white clay. Press it gently onto the top back of the head, blending the bottom seam with a sculpting tool.
Fixing Fingerprints
Before baking, lightly brush the raw clay with a little baby oil or rubbing alcohol to smooth out any accidental fingerprints.
Step 2: Adding Mane & Horn
-
Create the horn:
Roll a very thin snake of clay, tapering it at one end. Twist it gently to create a spiral texture, cut it to size, and attach it to the forehead just in front of the ear. -
Mix the mane color:
If you want a soft look, mix a tiny bit of white clay with your pink clay to create a pastel shade. -
Apply the mane strands:
Roll small teardrop shapes of pink clay. Arrange them behind the ear and down the back of the neck, slightly overlapping them to look like flowing hair. -
Texture the mane:
Use a needle tool to press soft grooves into the pink clay, mimicking strands of hair flowing downwards. -
Insert the hardware:
Carefully insert a jewelry bail or a small eye pin into the top of the head, between the ear and horn. Ensure it is secure. -
Bake carefully:
Place the pendant on a tile or parchment paper and bake according to your clay package instructions. Let is cool completely before painting.
Step 3: Painting & Finishing
-
Paint the eye:
Using the finest detail brush and black acrylic paint, carefully draw an almond-shaped eye with a tiny eyelash flick at the outer corner. -
Gild the horn:
Dip a brush into your liquid gold leaf and carefully paint the entire spiral horn. -
Highlight the mane:
Add touches of gold paint to the tips or ridges of the pink mane to catch the light. -
Seal the piece:
Once the paint is fully dry, coat the pendant with a glossy glaze or a thin layer of UV resin to give it a porcelain-like shine and protect the paint. -
Final assembly:
I like to wait 24 hours for glazes to fully cure before handling. Thread your gold chain through the bail to complete the necklace.
Make it Sparkle
Mix ultra-fine glitter into your white clay before sculpting for a subtle, magical shimmer that’s embedded right into the material.
Wear your new mythical accessory with pride or gift it to someone who needs a little magic
Easy Unicorn Stud Earrings
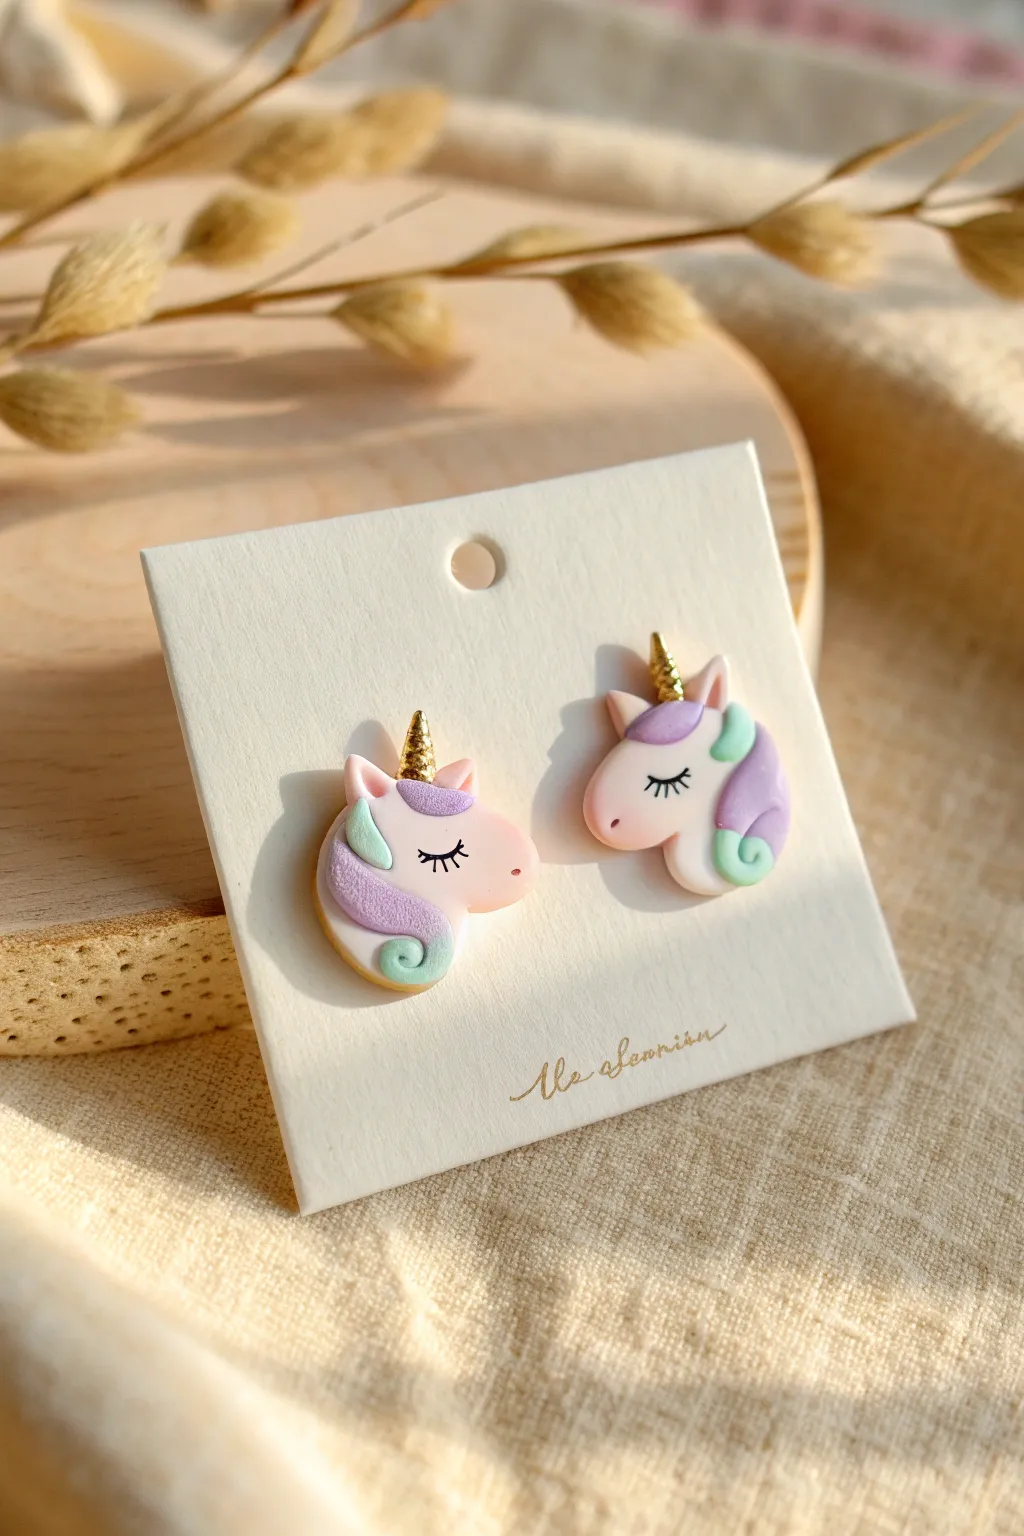
These sweet little stud earrings capture the magic of unicorns with a soft, pastel color palette and delicate gold details. Perfect for beginners, this project focuses on simple layered shapes to create an adorable accessory that feels like wearable fantasy.
Step-by-Step Guide
Materials
- Polymer clay (pale pink, lavender, mint green, white, gold or yellow)
- Black acrylic paint and a fine detail brush (or fine tip marker)
- Gold metallic paint or gold mica powder
- Rolling pin or clay machine
- Small heart-shaped cutter (optional) or X-acto knife
- Needle tool or toothpick
- Earring posts (surgical steel or sterling silver)
- Strong jewelry glue (like E6000)
- Dotting tool
- Oven for baking
Step 1: Shaping the Base
-
Condition the base clay:
Start by taking your pale pink polymer clay and kneading it in your hands until it is soft and pliable. This conditioning prevents cracks later on. -
Create the head shape:
Roll two equal-sized balls of pink clay, about the size of a blueberry. Gently flatten them into thick discs, then pinch one side slightly to form a rounded snout shape, resembling a soft guitar pick or a lopsided heart. -
Smooth the edges:
Use your finger to gently tap around the edges of your clay heads to soften any sharp angles. You want a smooth, marshmallow-like finish. -
Add the ears:
Take two tiny amounts of pink clay and roll them into small teardrops. Flatten them onto the top of the head shapes. For the inner ear, add an even smaller flattened teardrop of white clay inside the pink ones.
Clean Clay Pro-Tip
White and pastel clays pick up dust easily. Keep a pack of baby wipes or rubbing alcohol nearby to clean your hands and tools between colors to keep those pastels bright.
Step 2: Adding the Mane & Horn
-
Form the mane strands:
Roll out very thin snakes of lavender and mint green clay. Taper the ends so they come to a point. -
Apply the forelock:
Cut a small segment of the lavender snake and curb it gently. Press this onto the forehead area, just in front of the ears, creating a swooping distinct bang. -
Layer the neck mane:
Take a larger piece of the lavender clay and curve it along the back edge of the unicorn’s neck. Add a smaller swoop of mint green clay at the very bottom, curling it slightly like a wave. -
Add the accent curl:
Place a tiny curl of mint green clay near the top ear to add volume and color balance to the design. -
Create the horn:
Roll a small piece of gold clay (or yellow clay) into a thin, pointed cone coil. Twist it gently to create a spiral texture, cut it to size, and press it firmly onto the center of the forehead above the mane.
Fixing Fingerprints
If you see fingerprints on your clay before baking, lightly brush the surface with a little baby oil or cornstarch. This smooths out the texture perfectly without squishing the shape.
Step 3: Baking & Detailing
-
Bake the pieces:
Place your unicorns on a ceramic tile or baking sheet lined with parchment paper. Bake according to your clay package instructions (usually around 275°F/130°C for 15-30 minutes). -
Cool completely:
Let the clay cool down fully before attempting to paint. The clay hardens as it cools. -
Paint the horn:
If you didn’t use metallic gold clay, paint the horn carefully with gold metallic acrylic paint. I find a very small brush makes this much neater. -
Draw the sleepy eye:
Using a fine paintbrush with black acrylic paint or a very fine-tip permanent marker, draw a small ‘U’ shape for a closed eye. Add three tiny lashes flicking outward. -
Add the nostril:
Use a dotting tool or even the tip of a toothpick dipped in a darker pink paint to add a tiny dot near the snout for the nostril. -
Attach the posts:
Flip the unicorns over. Apply a small dab of strong jewelry glue to the flat pad of your earring posts and press them onto the back of the clay. Let the glue cure for at least 24 hours for maximum strength.
Enjoy wearing your mythical creations or gift them to a friend who needs a little magic in their day


What Really Happens Inside the Kiln
Learn how time and temperature work together inside the kiln to transform clay into durable ceramic.
Unicorn Ring Dish
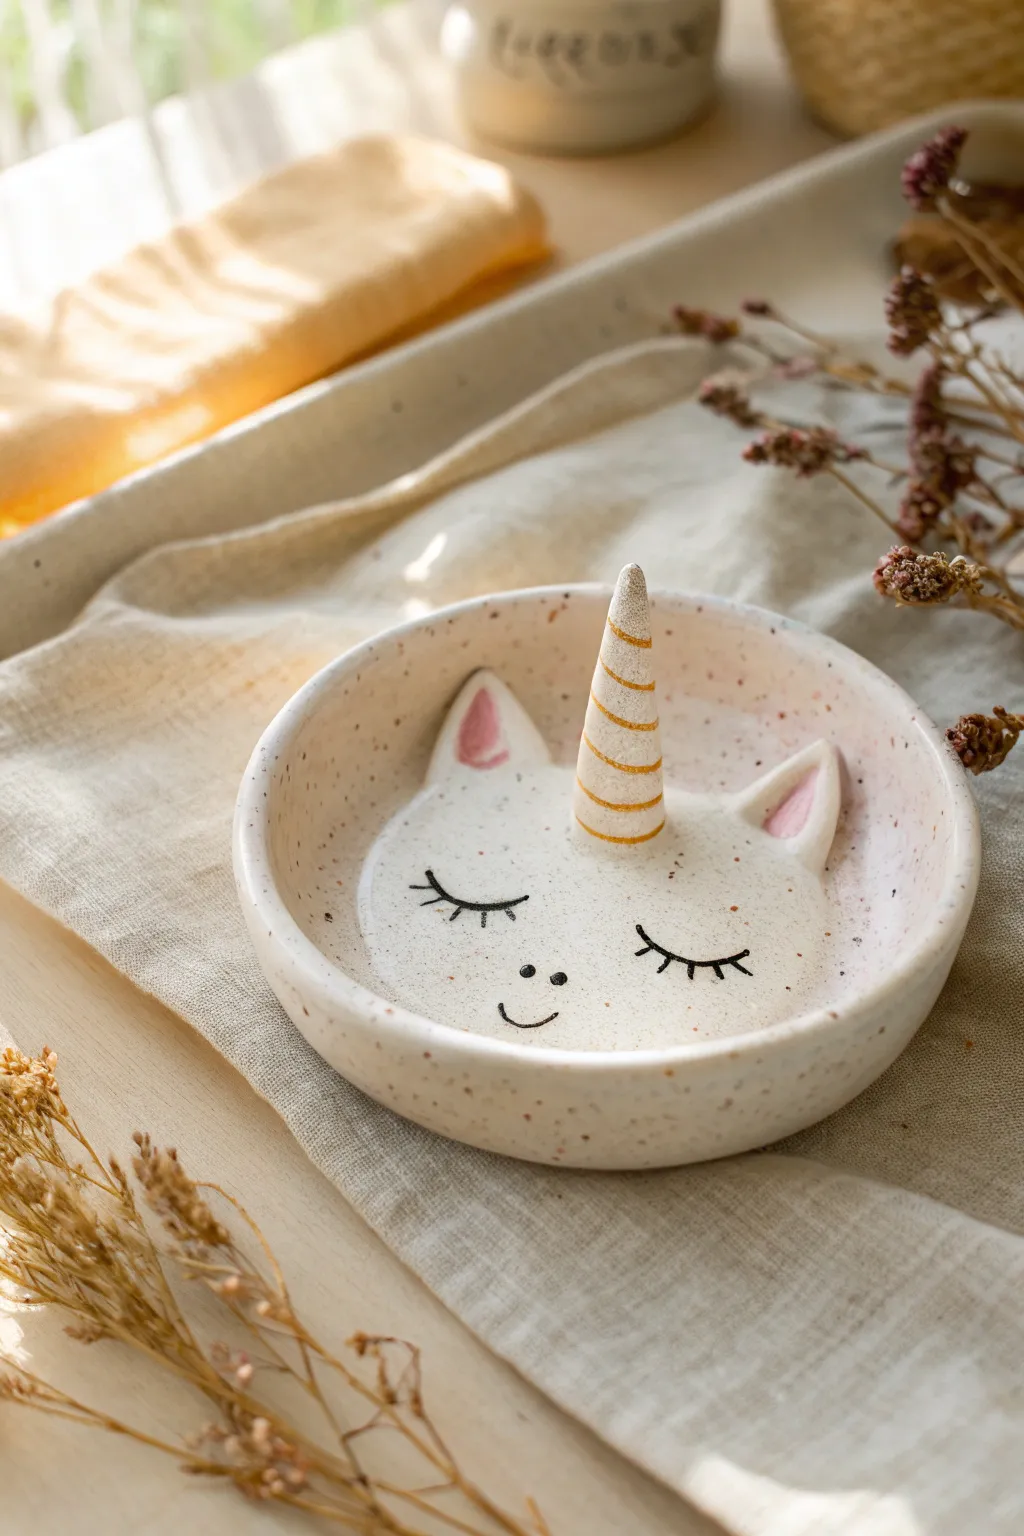
Keep your favorite jewelry safe with this enchanting unicorn ring dish, featuring a gently speckled finish and golden accents. The sleeping unicorn face emerging from the bowl creates a sweet, magical spot for your daily treasures.
Step-by-Step Tutorial
Materials
- White polymer clay (cernit or souffle) or air-dry clay
- Speckled clay mixture (or coffee grounds/black pepper to mix in)
- Acrylic rolling pin
- Round cookie cutter (approx. 4-5 inches)
- Small bowl (for shaping)
- Needle sculpting tool
- Sandpaper (fine grit)
- Acrylic paints (black, soft pink, gold)
- Fine detail paintbrush
- Glossy varnish or glaze
Step 1: Prepping the Base
-
Create the speckled effect:
If you aren’t using pre-speckled clay, start by taking a large ball of white clay and kneading in a pinch of dried coffee grounds or coarse black pepper. Fold and roll repeatedly until the specks are evenly distributed. -
Roll out the slab:
Roll your clay out on a smooth surface until it is about 1/4 inch thick. Aim for an even thickness throughout to prevent cracking during the drying process. -
Cut the circle:
Use your large round cookie cutter to punch out a perfect circle. If you don’t have a cutter, trace around a bowl with a craft knife. -
Form the shallow bowl:
Gently lift your clay circle and drape it inside a small, shallow bowl to give it a curved shape. Press it down lightly so it takes the form of the bowl without thinning the bottom too much. -
Smooth the edges:
Dip your finger in a little water (for creative clay) or baby oil (for polymer) to smooth out the rim of the dish, ensuring there are no sharp edges.
Step 2: Sculpting the Unicorn Features
-
Shape the ears:
Roll two small triangles of clay. Gently pinch the sides to curve them inward, creating a classic ear shape. Soften the bottom edges where they will attach. -
Attach the ears:
Position the ears near the top third of the bowl interior. Score the clay slightly at the attachment point and press firmly to blend the seams until they disappear. -
Create the horn:
Roll a small snake of clay that is thicker at one end and tapers to a point. Twist it gently to create the spiral texture characteristic of a unicorn horn. -
Position the horn:
Place the horn exactly in the center between the two ears. Blend the base of the horn into the bowl’s surface so it stands upright securely. -
Final smoothing:
Do one last inspection of your sculpture. Use a soft brush or fingertip to smooth any fingerprints or tool marks before the hardening phase.
Prevent Slumping
If the horn keeps drooping while baking or drying, support it with a small prop made of crumpled aluminum foil until the clay sets hard.
Step 3: Finishing Touches
-
Harden the clay:
Bake your polymer clay according to package instructions (usually 275°F for 15-30 mins) or let air-dry clay sit for 24-48 hours until fully cured. -
Sand for smoothness:
Once fully cool or dry, use fine-grit sandpaper to gently buff the rim and surface, making it feel like professional ceramic. -
Paint the inner ears:
Mix a diluted wash of soft pink acrylic paint. Carefully paint inside the triangular area of the ears, fading the edges slightly for a natural look. -
Gild the horn:
Use a metallic gold paint to color the spiral horn. I find that two thin coats give a brighter shine than one thick, gloppy coat. -
Draw the face:
Using your finest detail brush and black paint, draw two downward curving arcs with eyelashes for sleeping eyes. Add two tiny dots for nostrils and a small U-shape for a smile. -
Seal the piece:
Apply a coat of high-gloss varnish over the entire dish. This mimics the look of glazed ceramic and protects your painting from wear.
Ceramic Look Hack
Apply a UV resin coat instead of regular varnish for that ultra-thick, glass-like finish that looks exactly like kiln-fired pottery.
Place this charming dish on your nightstand to add a touch of whimsy to your bedtime routine
Rainbow Mane Trinket Tray
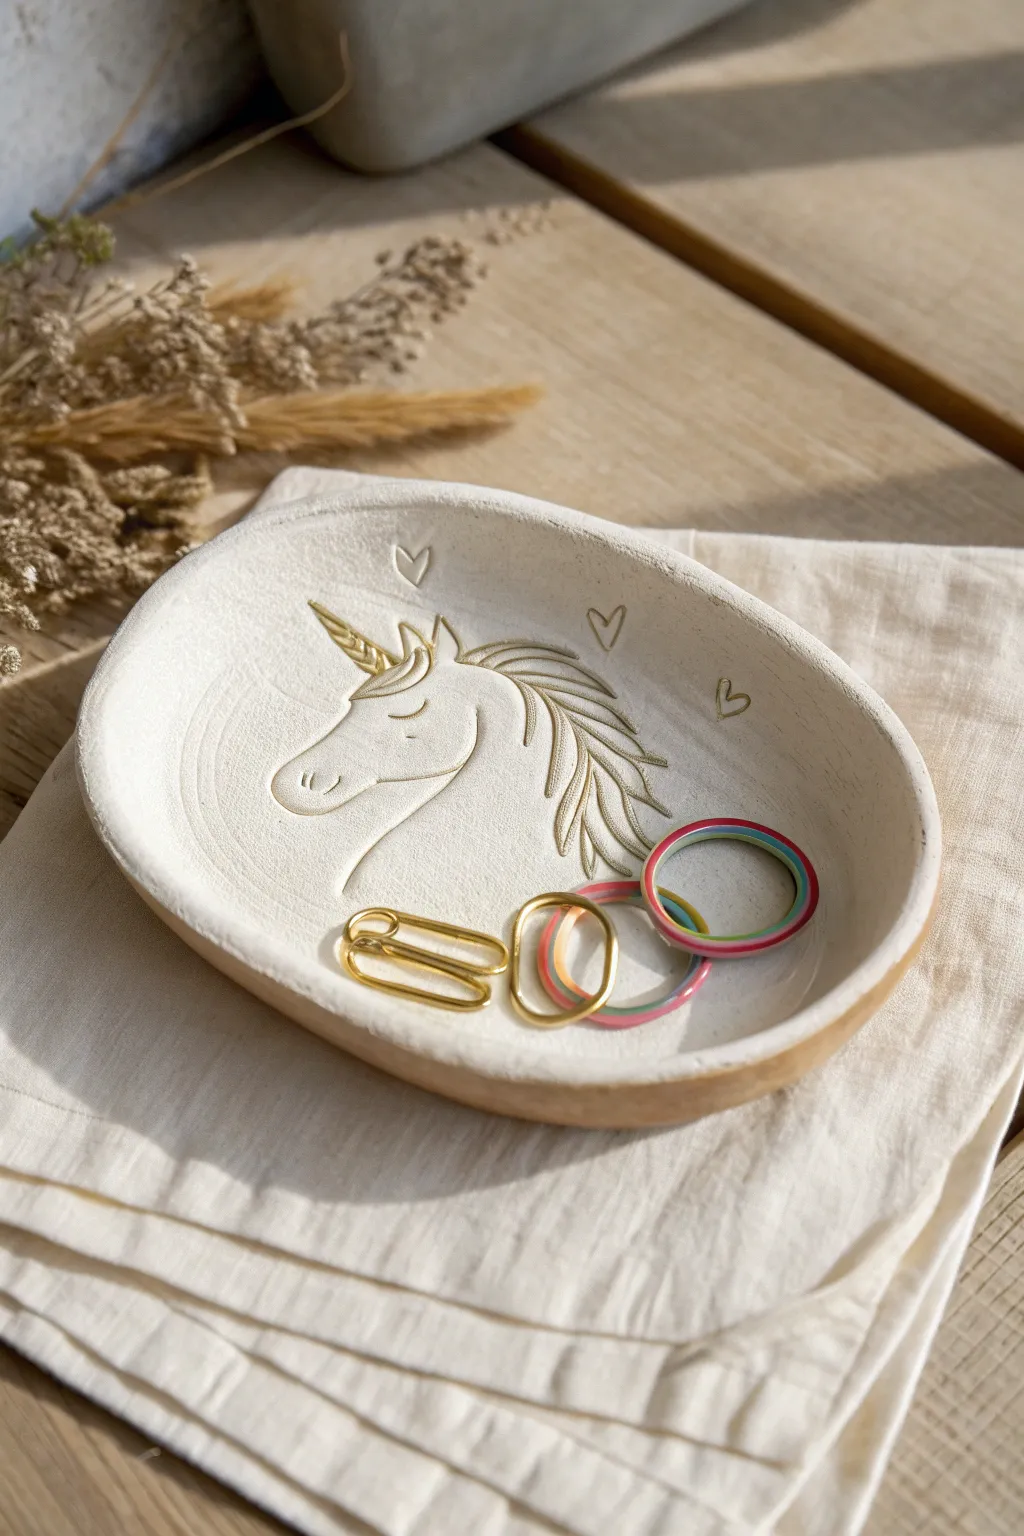
Keep your favorite rings and small treasures safe within this dreamy, handmade clay dish. Featuring a delicate unicorn profile etched into creamy white clay, this piece combines minimalist charm with a touch of golden sparkle.
How-To Guide
Materials
- White sculpting clay (air-dry, polymer, or stoneware)
- Rolling pin
- Oval cookie cutter or paper template with a craft knife
- Sponge and water
- Needle tool or very fine carving tool
- Fine-grit sandpaper
- Gold acrylic paint or liquid gilding
- Fine liner paintbrush
- Clear matte varnish (optional)
Step 1: Forming the Base
-
Prepare the slab:
Start by conditioning your clay until it is smooth and pliable. Roll it out into an even slab, approximately 1/4 inch thick. Aim for a consistent thickness to ensure even drying. -
Cut the shape:
Place your oval template or cutter onto the clay slab. Cut out the shape cleanly. If you are hand-cutting around a paper template, use a sharp craft knife held vertically to get straight edges. -
Create the walls:
Gently lift the edges of the oval upwards using your fingertips to form a shallow rim. You want the sides to curve up naturally, creating a recessed area in the center for holding jewelry. -
Smooth the surface:
Dip a small sponge or your finger into a little water and smooth out any fingerprints, cracks, or rough edges on the rolled rim. A smooth canvas is essential for the carving step.
Use a Transfer Method
Not confident drawing? Print a simple unicorn line drawing on paper, lay it on the wet clay, and trace over the lines with a stylus to indent the design effortlessly.
Step 2: Carving the Design
-
Sketch lightly:
Before committing to deep cuts, use a needle tool to very lightly scratch the unicorn’s outline into the center of the dish. Start with the snout and forehead curve, positioning it so the mane has room to flow. -
Carve the profile:
Go over your sketch lines with firmer pressure. Carve the nose, mouth, closed eye, and ear. The lines should be deep enough to catch the light but not cut through the base. -
Detail the horn:
Draw the spiral horn extending from the forehead. Add small diagonal lines inside the horn shape to create the twisted texture. -
Add the mane:
Create the mane using long, sweeping strokes that flow backward from the horn and neck. Group the strokes into overlapping sections to give the hair volume and movement. -
Embellish with hearts:
Carve three small, simple heart outlines floating above the unicorn’s head to fill the empty space and balance the composition. -
Clean up crumbs:
If the carving process created any small clay burrs or crumbs, use a soft, dry brush to gently sweep them away without smudging the design.
Step 3: Finishing Touches
-
Dry the piece:
Allow the clay to dry completely according to the manufacturer’s instructions. If using air-dry clay, turn it over occasionally to let the bottom dry evenly. -
Sand for smoothness:
Once fully cured and hard, use fine-grit sandpaper to gently smooth the rim and the outside of the dish. Focus on softening any sharp points created during the shaping phase. -
Wipe clean:
Use a slightly damp cloth to wipe away all sanding dust. The surface must be perfectly dust-free for the gold paint to adhere properly. -
Gild the details:
Dip a fine liner brush into gold acrylic paint or liquid gilding. Carefully paint inside the carved lines of the horn and the mane. I prefer to leave the face lines unpainted for a softer look, but you can highlight those too if you wish. -
Paint the hearts:
Fill in the carved heart outlines with the same gold paint, using a very steady hand. -
Seal (optional):
If you plan to use this dish near a sink or just want extra durability, apply a coat of clear matte varnish over the entire piece once the gold paint is dry.
Add a Splash of Color
Make it a true rainbow mane! Instead of just gold, paint each section of the flowing hair with different pastel watercolors before sealing for a soft, dreamy effect.
Now you have a magical spot to rest your everyday jewelry when you aren’t wearing it

TRACK YOUR CERAMIC JOURNEY
Capture glaze tests, firing details, and creative progress—all in one simple printable. Make your projects easier to repeat and improve.
Tiny Unicorn Planter Buddy

Add a touch of whimsy to your succulents with this adorable clay unicorn that peeks right out of the soil. Its smooth white finish and pastel rainbow details create a dreamy, modern look that perfectly complements small potted plants.
Detailed Instructions
Materials
- White polymer clay (approx. 2-3 oz)
- Small amounts of pastel clay (pink, yellow, mint, blue, purple)
- Small white ceramic planter (to fit the unicorn inside)
- Clay sculpting tools (needle tool, ball tool)
- Black fine-line acrylic paint or permanent marker
- Small paintbrush
- Baking sheet and foil
- Oven (for curing)
- Strong craft glue (optional)
Step 1: Sculpting the Body Base
-
Form the body:
Start by conditioning a large ball of white polymer clay until it’s soft and pliable. Roll it into a smooth egg shape, slightly flattened at the bottom so it sits stable. -
Create the head:
Roll a second, slightly smaller ball for the head. It should be roughly round but slightly flattened on the face side to create a gentle profile. -
Attach head to body:
Press the head firmly onto the narrower top of the body piece. Since this is a simple stack, I like to insert a small piece of toothpick or wire between the two parts for internal stability before smoothing the seam. -
Smooth the seams:
Using your thumb or a clay smoothing tool, blend the clay at the neck connection just slightly so it looks like one cohesive figure, though a distinct ‘neck’ groove is still cute.
Clean Clay Tip
White clay picks up lint easily! Keep a pack of baby wipes nearby to clean your hands and tools often, or wear latex gloves while sculpting.
Step 2: Adding Magical Details
-
Make the ears:
Take two tiny pea-sized balls of white clay and pinch them into triangle shapes. Use your ball tool to press a small indentation into the center of each ear. -
Add pink inner ears:
Take a tiny speck of pink clay, press it into the indentation you just made, and attach the ears to the top sides of the head. -
Craft the horn:
Roll a thin snake of yellow or gold clay, tapered at one end. Twist it gently to create a spiral texture, cut it to size, and place it right in the center of the forehead. -
Create the cheeks:
Roll two small, flat circles of pink clay. Press these gently onto the face area to act as rosy cheeks. -
Form the mane:
Roll small, tapered ‘snakes’ of your pastel colors (pink, yellow, mint, blue). Layer them slightly overlapping down the back of the head and one sweeping down the side like bangs.
Sparkle Upgrade
Before baking, lightly brush the horn and mane with pearlescent mica powder or white glitter to give your unicorn a magical, shimmering finish.
Step 3: Finishing Touches
-
Bake the clay:
Place your unicorn on a foil-lined baking sheet. Bake according to your specific brand of polymer clay’s instructions (usually 275°F for 15-30 minutes). -
Cool down:
Let the figure cool completely on the tray. The clay is fragile while hot, so don’t touch it until it’s room temperature. -
Draw the face:
Using a very fine black marker or a thin brush with black acrylic paint, carefully draw two U-shapes for closed, sleeping eyes with tiny eyelashes. -
Add the smile:
Draw a tiny, simple curve between the cheeks for a sweet smile. -
Prepare the pot:
Fill your small white planter about 3/4 full with succulent soil. -
Nestle the unicorn:
Place the hardened clay unicorn into the pot, pushing it slightly into the soil so it looks like it’s emerging from it. -
Add the plant:
Plant a small succulent rosette next to the unicorn to complete the scene.
Now you have a charming little guardian for your favorite desk plant
Unicorn Photo Holder Stand
Add a touch of magic to your desk with this charming unicorn photo holder, crafted from speckled white clay and finished with elegant gold accents. The soft pink mane and golden spiral holder make it perfect for displaying treasured polaroids or encouraging notes.
Step-by-Step Guide
Materials
- White air-dry clay or polymer clay (oven-bake)
- Small amount of pale pink clay (or pink acrylic paint)
- Gold craft wire (approx. 16 gauge)
- Needle nose pliers
- Wire cutters
- Sculpting tools (needle tool, small spatula)
- Gold acrylic paint
- Fine detail paintbrush
- Black fine-liner pen or black acrylic paint
- Old toothbrush (for speckling)
- Brown or grey acrylic paint (diluted)
- Superglue (optional)
Step 1: Sculpting the Unicorn
-
Shape the body:
Start with a medium-sized ball of white clay. Roll it into a thick sausage shape, then gently bend one end upwards to form the neck and head area. The body should remain sturdy and somewhat blocky for stability. -
Define the legs:
Instead of attaching separate legs, use a sculpting tool or knife to cut an arch out of the bottom of your body shape. Smooth the rough edges with your finger to create two distinct front and back leg sections that are flat on the bottom so it stands straight. -
Refine the head:
Pinch the raised end of your clay shape to define the unicorn’s snout. Smooth the transition from the neck to the head so it looks organic but stylized. -
Add the ears:
Roll two tiny triangles of white clay. Attach them to the top of the head using a little water (for air-dry) or liquid clay (for polymer) to bond them securely. Press the centers slightly with a round tool to give them depth. -
Create the horn:
Roll a small, thin cone of clay. Twist it gently to create a spiral texture, then attach it securely to the forehead, right between the ears. -
Form the mane:
Using pale pink clay, roll a small snake and flatten it slightly. drape it over the neck, starting from behind the ears. -
Texture the hair:
Use a needle tool or knife to press deep grooves into the pink mane, imitating strands of flowing hair. Curve the lines to give it movement. -
Add the tail:
Make a larger teardrop shape with the pink clay for the tail. Attach it to the rear of the body, curving it upward and outward. Add similar hair texture lines to match the mane.
Step 2: Wire Mechanism & Details
-
Create the spiral holder:
Cut a length of gold wire about 6-8 inches long. Using needle nose pliers, clamp the very end and begin bending the wire into a tight flat spiral, like a lollipop. Make 3 or 4 loops. -
Straighten the stem:
Once your spiral is the desired size, bend the remaining straight wire down at a 90-degree angle so it sits directly below the center of the spiral. -
Insert the wire:
While the clay is still soft, carefully push the straight end of the wire into the center of the unicorn’s back. Depending on your clay type, you might want to bake it with the wire inside, or make the hole now and glue the wire in after drying. -
Drying or baking:
Follow the specific instructions for your clay choice. If using air-dry clay, let it sit for 24-48 hours. If using polymer, bake according to the package temperature and time.
Wire Wobble Fix
If the wire holder keeps tipping or spinning inside the clay hole, add a dab of two-part epoxy glue instead of superglue. It fills the gaps better and creates a rock-solid bond once cured.
Step 3: Finishing Touches
-
Speckle effect:
Once dry and cool, create the stone effect. Dilute a tiny drop of brown or grey paint with water. Dip an old toothbrush into the mix and flick the bristles with your thumb to spray fine specks across the white body of the unicorn. -
Paint the horn:
Use a fine brush and metallic gold acrylic paint to carefully coat the twisted horn. Two thin coats are usually better than one thick one for a smooth metallic finish. -
Draw the eyes:
Using a very fine black marker or a detail brush with black paint, draw a simple closed eyelid with dainty eyelashes on each side of the face. -
Secure the wire:
If you removed the wire for baking or drying, add a drop of superglue to the end of the wire stem and re-insert it into the hole on the unicorn’s back.
Smoother Clay
Is your clay showing fingerprints? Before drying or baking, brush the surface lightly with a little bit of water (for air-dry clay) or baby oil (for polymer clay) to melt away imperfections.
Place your favorite photo or a daily affirmation in the spiral clip and enjoy your magical creation
Unicorn Ornament With Hanging Loop
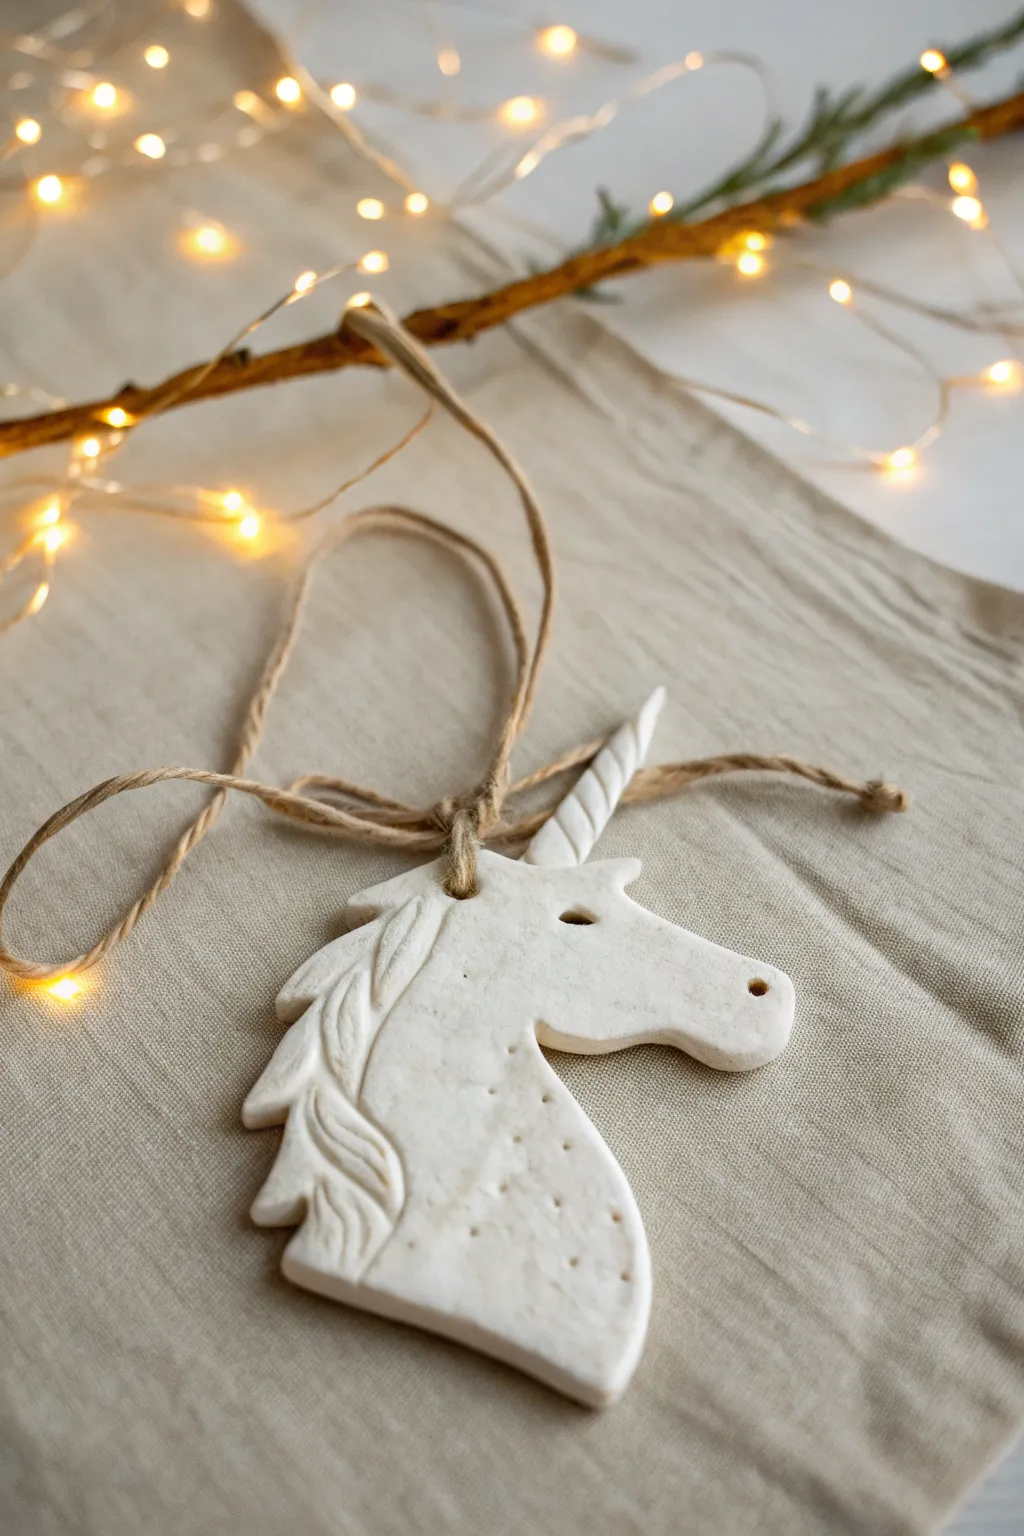
This elegant and minimalist ornament captures the magic of a unicorn in pure white clay. With its spiraled horn and delicately carved mane, it hangs from a rustic twine loop to create a charming addition to any holiday tree or nursery décor.
Detailed Instructions
Materials
- White polymer clay or air-dry clay (smooth finish)
- Rolling pin
- Parchment paper or silicone mat
- Unicorn head cookie cutter (or a cardstock template and craft knife)
- Needle tool or toothpick
- Small round tool (or the end of a paintbrush)
- Drinking straw (for hanging hole)
- Fine-grit sandpaper (optional)
- Jute twine or brown string
- Clear acrylic sealant (matte or satin)
Step 1: Shaping the Base
-
Prepare your workspace:
Lay down parchment paper or a silicone mat on a flat surface to prevent the clay from sticking. This ensures the back of your ornament remains smooth. -
Condition the clay:
Take a handful of white clay and knead it thoroughly in your hands until it becomes soft, pliable, and free of cracks. Warm hands help this process go faster. -
Roll it out:
Use your rolling pin to flatten the clay to an even thickness of about 1/4 inch (6mm). Avoid rolling it too thin, as you want the ornament to feel substantial and durable. -
Cut the shape:
Press your unicorn head cookie cutter firmly into the clay. If you are using a template, place the paper shape gently on the clay and trace around it carefully with a craft knife. -
Smooth the edges:
Dip your finger in a little water (for air-dry clay) or baby oil (for polymer) and run it gently along the cut edges to soften any sharp corners left by the cutter.
Clean Cuts
dip your cookie cutter in cornstarch or flour before pressing it into the clay. This acts as a release agent and prevents the clay from sticking to the cutter.
Step 2: Adding Details
-
Create the horn texture:
Using a needle tool or a toothpick, press diagonal lines across the horn area. Start from the bottom of the horn and work your way up to create the spiraled appearance. -
Define the mane:
To sculpt the flowing hair, use your needle tool to carve deep, sweeping curves along the mane section. Vary the length of the lines to make the hair look natural and wind-swept. -
Layer the mane texture:
Go back over your initial mane lines and add smaller, shallower strokes in between the main curves. This adds depth and makes the relief carving pop. -
Create the eye:
Use the blunt end of a small paintbrush or a dedicated small round tool to press a single, small indentation for the eye. Make it deep enough to be visible but not all the way through. -
Add the nostril:
Near the tip of the snout, pierce a tiny hole straight through or press a small dot to simulate the nostril. -
Texture the neck:
Using your needle tool, gently poke a pattern of tiny dots on the lower neck area. Space them out randomly for a subtle, speckled texture that contrasts with the smooth face.
Step 3: Finishing Up
-
Make the hanging hole:
Use a drinking straw to punch a clean hole at the top of the mane, near the center of gravity so the unicorn hangs straight. -
Dry or bake:
If using polymer clay, bake according to the package instructions (usually around 275°F/135°C). For air-dry clay, leave it flat in a cool, dry place for 24-48 hours, flipping occasionally. -
Sand imperfections:
Once fully cured or dried, inspect the edges. I find that a quick pass with fine-grit sandpaper really elevates the final look by removing any tiny burrs. -
Seal the piece:
Apply a thin coat of matte or satin clear acrylic sealant to protect the clay from moisture and dust, giving it a finished, professional sheen. -
Attach the twine:
Cut a length of jute twine, fold it in half, and thread the loop end through the hole from front to back. Pull the loose ends through the loop to secure it with a lark’s head knot. -
Tie it off:
Knot the top ends of the twine together to create the hanging loop, trimming any excess fuzz for a neat presentation.
Gold Dust Magic
Once dry, lightly brush the horn or the raised edges of the mane with liquid gold leaf or metallic wax to add a touch of sparkle and definition.
Hang your magical creation near a light so the subtle textures cast gentle shadows
Unicorn Wall Hanging Tiles
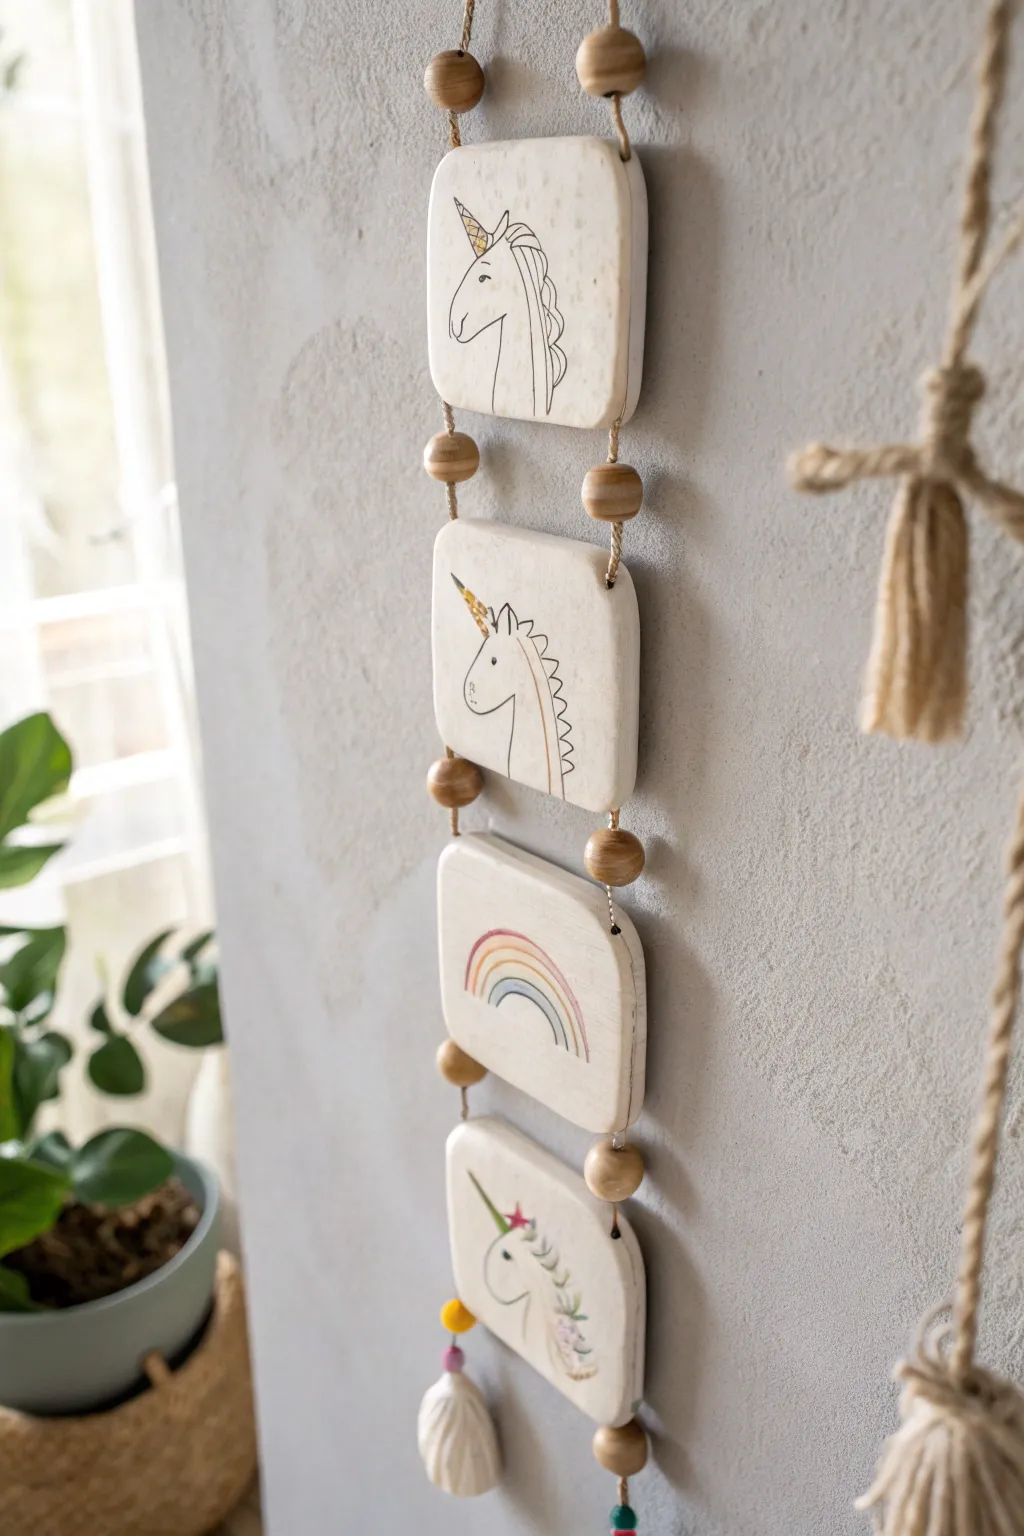
This whimsical wall hanging combines the rustic charm of air-dry clay with delicate, minimalist line art to create a sweet decor piece perfect for a nursery or bedroom. With its neutral tones and wooden bead accents, it offers a sophisticated take on the magical unicorn theme that fits seamlessly into modern interiors.
Step-by-Step Tutorial
Materials
- White air-dry clay (smooth texture)
- Rolling pin
- Square cookie cutter (approx. 3-4 inches) or knife and ruler
- Straw or cocktail stick (for holes)
- Fine-grit sandpaper
- Black fine-tip paint pen or pigment liner (water-resistant)
- Gold paint pen (fine tip)
- Watercolor paints (pastel pink, teal, yellow)
- Small round paintbrush
- Jute twine or hemp cord
- Wooden beads (natural finish, approx. 12mm)
- Yarn (cream and colors) for tassels
- Acrylic sealer spray (matte finish)
Step 1: Sculpting the Tiles
-
Roll and flatten:
Begin by kneading a large handful of air-dry clay to warm it up. Roll it out on a smooth surface until it is an even thickness, approximately 1/4 inch thick. If you notice any air bubbles, pop them gently and smooth the surface. -
Cut the shapes:
Using your square cutter or a knife and ruler, cut out four identical squares. Gently soften the sharp corners with a wet finger to achieve the rounded, stone-like look seen in the photo. -
Create connection points:
Before the clay hardens, you need to create holes for the twine. Using a straw or a cocktail stick, poke a hole through the top corners of each square and the bottom corners of the top three squares. Ensure the holes go vertically through the thickness of the clay, or simply front-to-back near the edges depending on your preference; here, the string seems to run behind or through the side edges. -
Dry thoroughly:
Place your four squares on a wire rack or a sheet of parchment paper. Let them dry for 24-48 hours. I find flipping them halfway through the drying process helps keep them perfectly flat. -
Sand for smoothness:
Once fully cured and hard, take your fine-grit sandpaper and gently buff the edges and surface. You want a smooth canvas for your drawing, removing any rough texture left by the cutter.
Smooth Surface Secret
Use a slightly damp sponge to wipe the clay before drying. This ‘burnishes’ the surface, removing fingerprints and making the clay look like smooth ceramic.
Step 2: Adding the Art
-
Sketch the designs:
Lightly sketch your designs in pencil first. For the top tile, draw a unicorn profile facing left with a flowing mane. For the second, a simpler unicorn profile facing left. The third gets a minimal rainbow arch. The bottom tile features a unicorn with a flower crown. -
Ink the outlines:
Trace over your pencil lines with a black fine-tip paint pen. Keep your hand steady and use fluid motions for the unicorn manes to give them movement. -
Add gold accents:
Using the gold paint pen, carefully fill in the unicorn horns. This metallic touch adds a bit of magic without overwhelming the neutral palette. -
Paint soft details:
Dilute your watercolors significantly to keep the colors sheer. Add a wash of pink to the rainbow and the flower crown on the bottom tile. Add a touch of teal to the rainbow arches. -
Seal the artwork:
Allow the ink and paint to dry completely. Spray a light coat of matte acrylic sealer over the tiles to protect the clay and prevent the ink from smudging over time.
Step 3: Assembly
-
Prepare the cord:
Cut two long lengths of jute twine, roughly double the desired finished length of the hanging. -
Thread the first tile:
Start at the top. Fold your twine in half to create a hanging loop. Thread the two loose ends through the top holes of the first tile. -
Add spacers:
Slide a wooden bead onto each string immediately after the tile. These beads act as decorative spacers between the clay sections. -
Connect the series:
Continue threading through the subsequent tiles, adding a wooden bead on both the left and right strings between every single tile. -
Secure the bottom:
After the final unicorn tile, thread a final wooden bead on each side and tie a sturdy double knot to secure the stack. -
Create the tassel:
Wrap yarn around your hand about 20 times. Slide it off, tie it near the top to create a head, and cut the bottom loops. Tie this tassel to the bottom center of the hanging, adding a few extra colored beads or pompoms if you like the look in the bottom of the photo.
Stamp It Texture
Before drying, gently press a piece of lace or a textured leaf into the back of your tiles. It’s a hidden detail that makes the piece feel extra special when handled.
Hang your new creation near a window where the natural light can catch the subtle gold accents