Valentine’s Day bracelets are one of my favorite quick clay projects because you get big, giftable impact without a complicated build. Here are my go-to clay bracelet ideas that lean hard into hearts, sweet messages, and that dreamy red-pink-white palette.
Classic Red, Pink, and White Heishi Stack
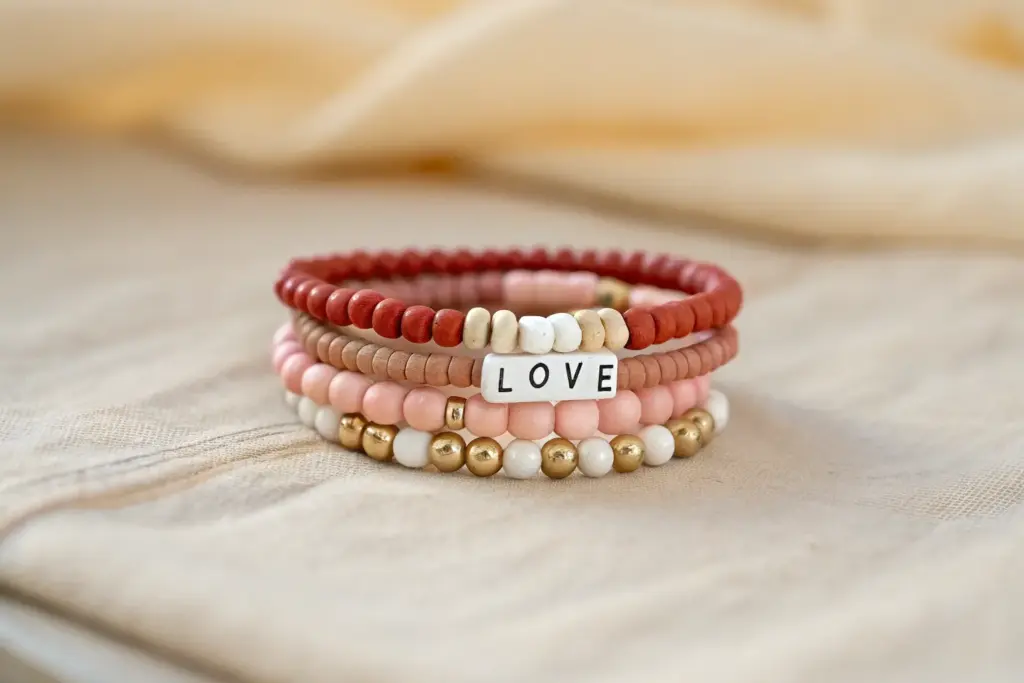
Embrace the classic romance of Valentine’s Day with this stunning six-piece bracelet stack. Featuring a mix of matte polymer clay beads in varying shades of pink and red, accented with gold spacers, this collection offers a chic and sophisticated way to wear the holiday’s signature colors.
Step-by-Step Tutorial
Materials
- Polymer clay heishi beads (6mm or 8mm): dark red, blush pink, white, soft pink, mauve
- Gold spherical spacer beads (4mm)
- Gold disc spacer beads
- Strong elastic cord (0.8mm clear)
- Beading needle (optional but helpful)
- Super glue or jewelry cement
- Scissors
- Beading board or measuring tape
- Binder clip or masking tape
Step 1: Planning and Preparation
-
Measure your wrist:
Before stringing, wrap a flexible measuring tape around your wrist. Add about 0.5 inches to this measurement for a comfortable fit that isn’t too tight. -
Prepare the cord:
Cut six lengths of elastic cord, each about 10-12 inches long. Having extra length makes tying the final knots much easier. Pre-stretch the elastic by pulling it firmly a few times to prevent the bracelets from stretching out later. -
Secure the ends:
Place a binder clip or a piece of masking tape on one end of each cord. This simple trick prevents your beads from sliding off while you design your patterns.
Pro Tip: Seamless Fit
Make the gold bracelet slightly smaller (1-2 beads fewer) than the clay ones. Because the metal beads are harder, they sit closer to the skin.
Step 2: Creating the Gold Accent Bracelet
-
String the gold beads:
Start with the topmost bracelet in the stack. Thread roughly 25-30 small gold spherical beads onto the cord. -
Add a focal point:
To break up the pattern, add a single flat gold disc spacer every 10 spherical beads if you want subtle texture, or keep it entirely spherical for a classic look as shown in top tier. -
Check the length:
Wrap the strand around your wrist to verify the fit. Add or remove a few gold spheres until it sits comfortably.
Troubleshooting: Puckering
If your bracelet twists or puckers when laid flat, the elastic knot is too tight. Tie it snugly enough to touch, but don’t over-stretch the cord while knotting.
Step 3: Design the Gradient Heishi Strands
-
The Dark Red Strand:
For the second bracelet, use dark red or burgundy polymer clay beads. String them continuously until you reach your desired length. -
The Mixed Pink Strand:
For the third bracelet, create an alternating pattern. String one blush pink bead, followed by one white bead, and repeat. This breaks up the solid blocks of color in the stack. -
The Textured Mauve Strand:
The fourth bracelet features thinner, disc-like heishi beads. Use a mauve or dusty rose color. Because these discs are thinner, you will need significantly more of them to cover the same length. -
The White Strand:
Create the fifth bracelet using solid white polymer beads. I find that this bright white layer really makes the surrounding pinks pop. -
The Soft Pink Strand:
Finish the set with the bottom bracelet, using a uniform string of soft bubblegum pink clay beads.
Step 4: Finishing the Set
-
Tie the surgeon’s knot:
Remove the binder clip. Cross the two ends of the elastic, loop one end through twice, and pull tight. Repeat this process to create a secure surgeon’s knot. -
Apply adhesive:
Place a tiny dot of super glue or jewelry cement directly onto the knot. Be careful not to get glue on the surrounding beads, as it can discolor the clay. -
Hide the knot:
While the glue is still slightly tacky but not wet, slide the nearest bead over the knot to conceal it inside the hole. -
Trim excess cord:
Once the glue is fully dry (wait at least 15 minutes), use sharp scissors to trim the excess elastic tails as close to the bead as possible without cutting the knot. -
Repeat for all strands:
Follow the same tying and gluing process for all six bracelets to complete your stack.
Now you have a gorgeous, coordinated stack ready to elevate your Valentine’s Day outfit


XOXO Message Bracelet With Gold Spacers
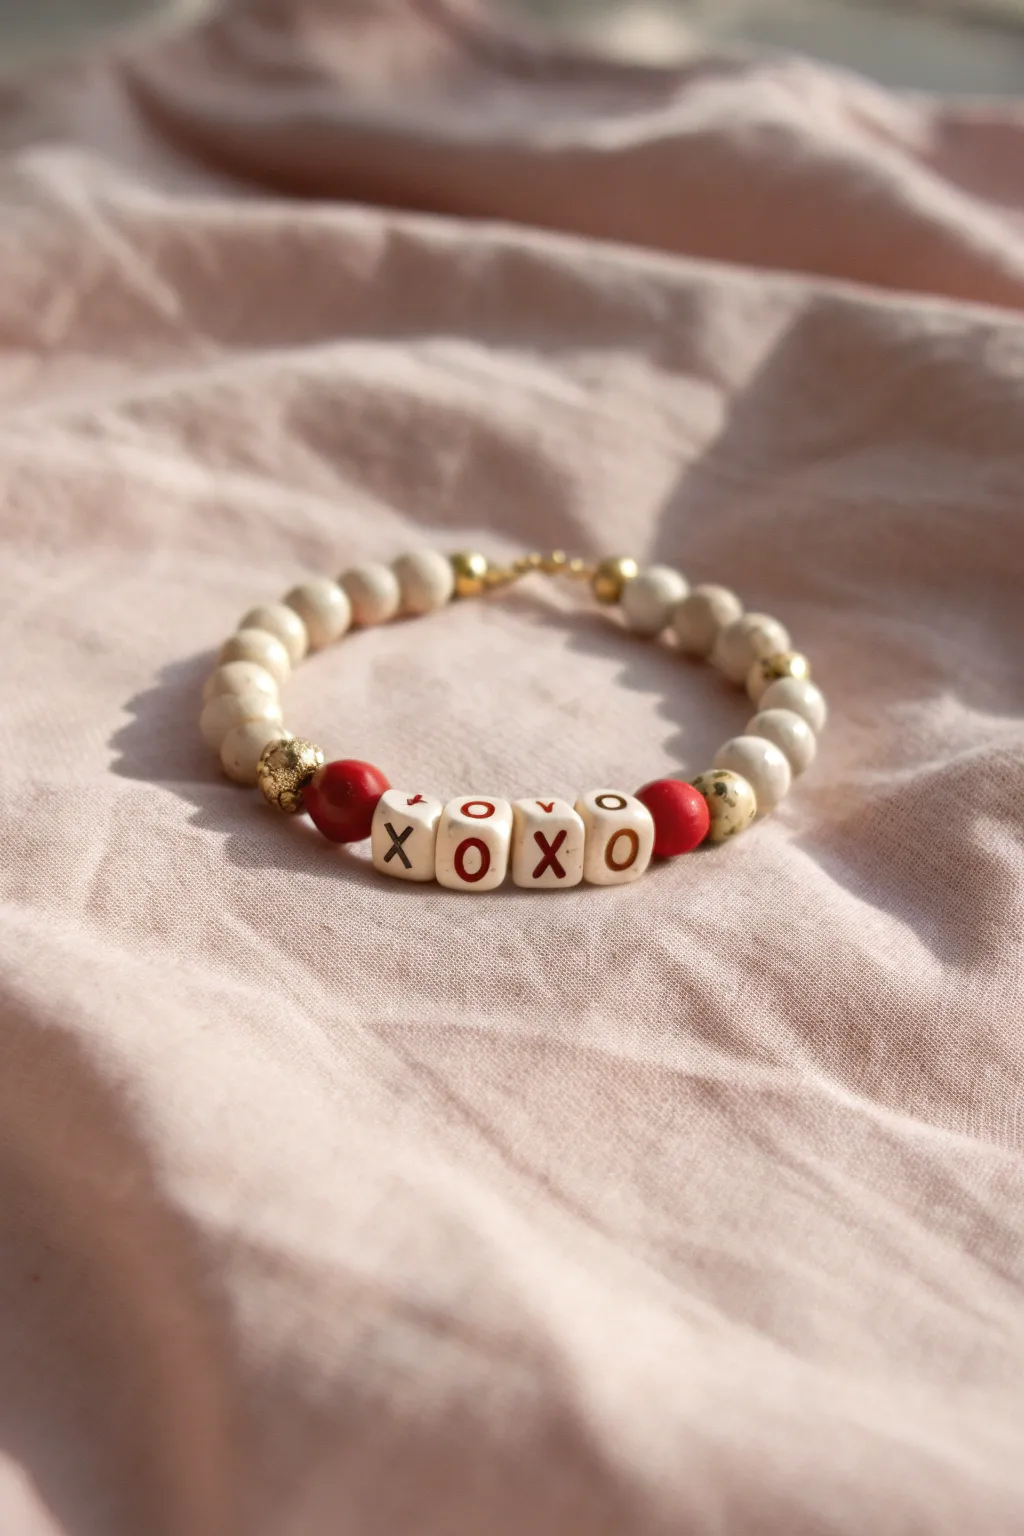
Express affection with this charming XOXO bracelet that pairs creamy neutrals with pops of classic Valentine’s red. The combination of alphabet cubes and elegant gold accents makes for a piece that is both playful and sophisticated enough for everyday wear.
Step-by-Step Tutorial
Materials
- Stretch cord (0.7mm or 0.8mm)
- Cream or off-white round beads (8mm or 10mm, likely gemstone or wood)
- Square alphabet beads (white with red/brown lettering: ‘X’ and ‘O’)
- Red round accent beads (same size as cream beads)
- Gold tone spacer beads (faceted or round)
- Dalmatian jasper or speckled accent bead (optional)
- Gold crimp bead cover (optional for hiding knot)
- Jewelry glue or clear nail polish
- Scissors
Step 1: Planning and Preparation
-
Measure your wrist:
Wrap a flexible measuring tape around your wrist to find your size. Add about half an inch to this measurement to ensure the bracelet fits comfortably without being too tight. -
Pre-stretch the cord:
Cut a piece of stretch cord about 10-12 inches long. Give it a few gentle tugs before you start beading; this pre-stretching helps prevent the bracelet from loosening up after you make it. -
Design the centerpiece:
Lay out your alphabet beads to spell ‘XOXO’. This will check that you have the correct letters and that the spacing looks right before you start threading. -
Secure the end:
Place a piece of tape or a bead stopper on one end of your cord so your beads don’t slide off while you work.
Loose Fit?
If the alphabet cubes spin too much and flip upside down, try using a slightly thicker diameter stretch cord (0.8mm or 1.0mm) to create more friction inside the bead holes.
Step 2: Stringing the Design
-
Start the center sequence:
Begin by threading the first ‘X’ alphabet bead onto the cord. -
Add the first ‘O’:
Slide on an ‘O’ bead next to the ‘X’. -
Complete the message:
Add the final ‘X’ followed by the last ‘O’ to complete the central motif. -
Frame with red:
Add one red accent round bead to the left side of your message, and one red accent bead to the right side. -
Insert gold spacers:
Thread a gold spacer bead next to each of the red beads. These metallic touches add a lovely shine and separate the colors. -
Add the speckled accent:
On the right side, add your speckled or Dalmatian jasper bead if you are using one, followed by another gold spacer.
Step 3: Completing the Loop
-
Fill the remaining space:
Start threading the cream-colored round beads onto both ends of the cord. It works best to alternate sides to keep the ‘XOXO’ message centered. -
Add texture with gold:
Every five or six cream beads, insert a gold spacer bead to break up the pattern and add visual interest around the wrist. -
Check the fit:
Wrap the unfinished strand around your wrist. The ends should touch comfortably. Add or remove cream beads until the sizing is perfect.
Level Up
Swap the red beads for rose quartz or pink jade for a softer look, or use polymer clay heart beads between the ‘X’ and ‘O’ letters for extra romance.
Step 4: Finishing Up
-
Tie the knot:
Remove the tape or bead stopper. Tie a surgeon’s knot (loop left over right twice, then right over left once) and pull it tight. -
Secure with glue:
Dab a tiny drop of jewelry glue or clear nail polish directly onto the knot. I prefer to let this dry for a minute before trimming the excess cord. -
Hide the knot:
If one of your beads has a large enough hole, gently tug the cord so the knot slides inside the bead, hiding it from view. -
Final trim:
Once the glue is fully set, trim the excess cord ends close to the knot using sharp scissors.
Enjoy wearing your lovely new accessory or gift it to someone special to brighten their day


Alternating Stripes With Tiny Heart Accents
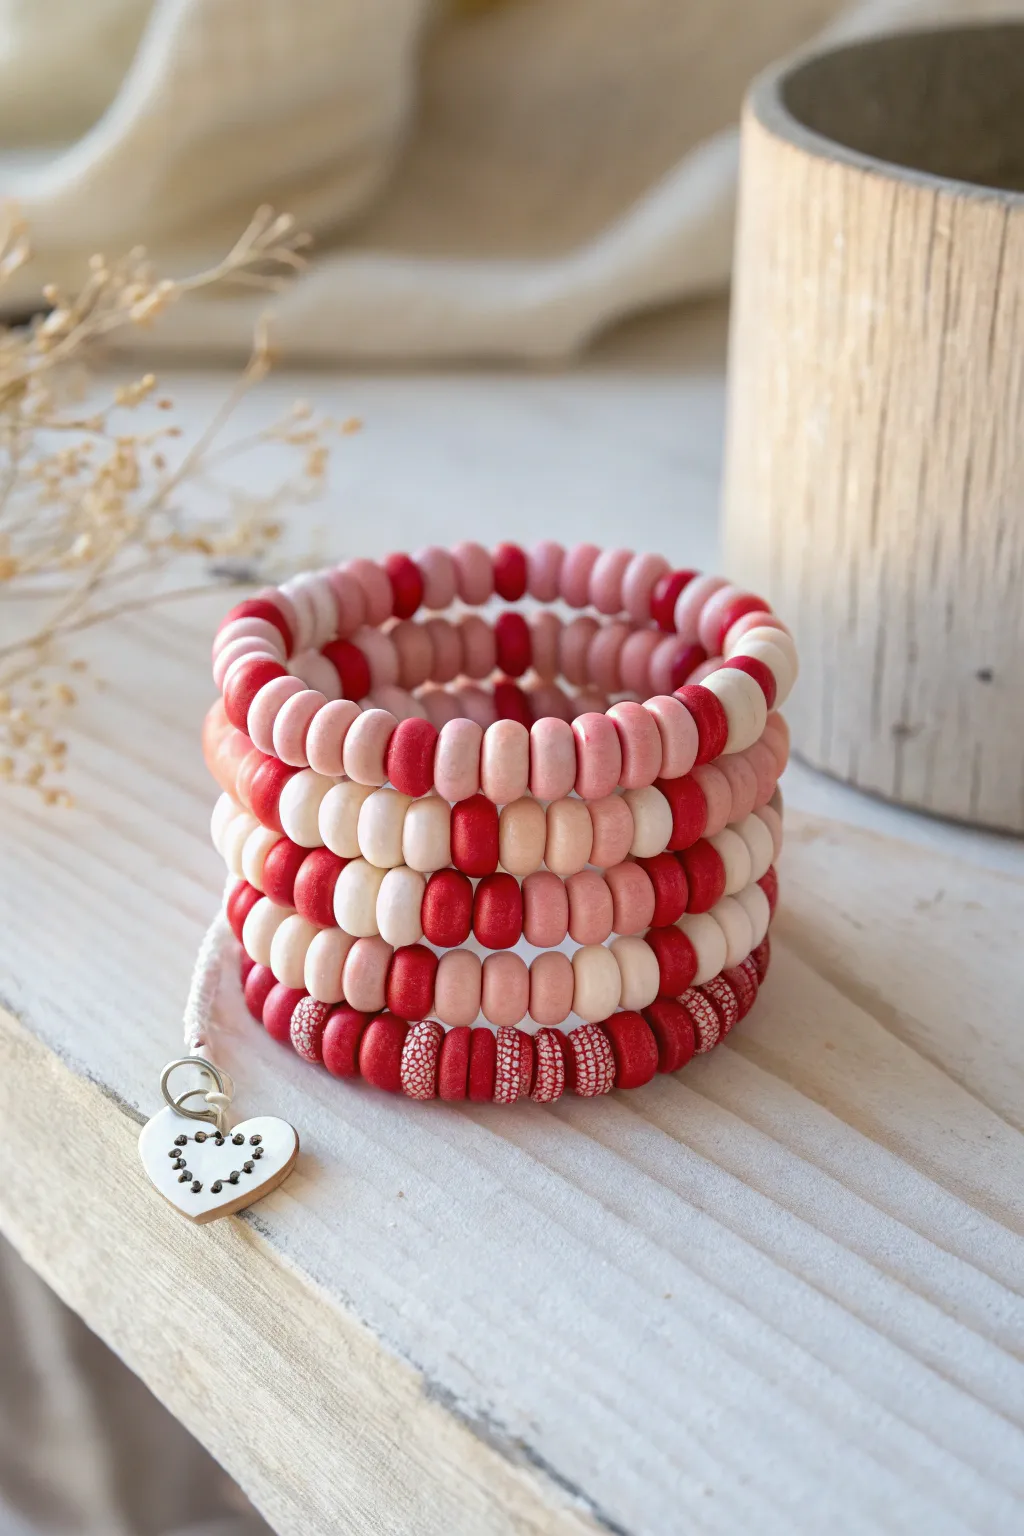
Embrace the spirit of Valentine’s Day with this chic stack of memory wire bracelets featuring custom polymer clay beads. The alternating palettes of soft pinks, vivid reds, and creamy whites create a lovely gradient effect, finished perfectly with a stamped heart charm.
Step-by-Step Guide
Materials
- Polymer clay (white, red, light pink, dusty rose)
- Acrylic rolling pin or pasta machine
- Round clay cutters (approx. 4mm – 6mm)
- Needle tool or bead piercing pins
- Texture sheet or gritty sandpaper (for patterned beads)
- White acrylic paint (optional for patterns)
- Memory wire coils (bracelet size)
- Wire cutters (specifically for memory wire)
- Round nose pliers
- Small heart charm blank (metal or wood)
- Metal letter stamps or heart punch
- Jump ring
Step 1: Creating the Clay Heishi Beads
-
Condition and Mix:
Begin by conditioning your polymer clay until it is soft and pliable. To achieve the gradient look seen in the photo, mix your red and white clays in varying ratios to create at least three distinct shades of pink alongside your pure red and white blocks. -
Roll Out Sheets:
Roll each color out into a slab of consistent thickness, aiming for about 3mm to 4mm. A pasta machine is best for uniformity, but a rolling pin with depth guides works well too. -
Create Patterned Texture:
For the special textured red beads on the bottom tier, press a coarse texture sheet or a piece of gritty sandpaper firmly onto a slab of red clay before cutting. This creates the speckled recesses we’ll highlight later. -
Cut the Discs:
Using your small round cutter, punch out as many discs as possible from each color sheet. For accuracy, dipping the cutter in cornstarch occasionally helps prevent the clay from sticking inside. -
Pierce the Centers:
Use a needle tool to poke a hole directly in the center of each disc. I prefer to do this while the bead is still on the work surface to avoid distorting the shape, gently twisting the tool as it goes through. -
Bake the Beads:
Arrange your beads on a baking sheet lined with parchment paper. Bake according to your brand of clay’s instructions (usually around 275°F or 130°C for 15-30 minutes). Let them cool completely.
Sticky Situation?
If clay sticks inside your cutter, place a piece of plastic wrap over the clay before cutting. This prevents sticking and creates a nice domed edge.
Step 2: Highlighting and Assembly
-
Highlight the Texture:
Once the textured red beads are cool, brush a small amount of white acrylic paint over the surface. Before it dries, quickly wipe the top with a damp cloth, leaving white paint trapped only in the textured crevices to create the speckled effect. -
Prep the Memory Wire:
Cut a length of memory wire that corresponds to the number of wraps you want. The example shows roughly 5-6 full loops. Always use heavy-duty cutters made for memory wire to avoid damaging your standard tools. -
Start the Loop:
Using round nose pliers, turn a tight loop at one end of the memory wire wire. This acts as a stopper so beads don’t slide off while you work. -
Plan the Stringing Pattern:
Plan your color transitions. The image features distinct sections: a row of mostly red/white texture, transitioning into alternating pinks and creams. Sorting your beads into piles beforehand speeds this up significantly. -
String the Beads:
Thread the beads onto the wire. For the striped look, alternate colors in small groups (e.g., three pink, three white) or string entire solid sections that span half a loop. -
Check the Fit:
Continuously push the beads down to ensure they are snug against each other without gaps, but not so tight that the coil becomes stiff. -
Finish the Wire:
Once the wire is full, leave about 1cm of exposed wire at the end. Use your round nose pliers to create a final closing loop to secure the beads.
Step 3: Adding the Charm
-
Prepare the Charm:
Take your small heart blank. If it isn’t pre-decorated, use metal stamps to imprint a smaller heart or initials onto the surface. You can darken the impression with a permanent marker or acrylic paint for contrast. -
Attach the Charm:
Open a jump ring by twisting it sideways with two pairs of pliers. Thread it through the loop on the charm and one of the end loops on your memory wire bracelet. -
Secure and Wear:
Close the jump ring securely so there is no gap. Give the bracelet a gentle shake to ensure the charm hangs freely, and your project is complete.
Level Up Your Stack
Add variation by interspersing metallic gold or silver spacer beads between the clay sections for a touch of elegance.
Now you have a stunning, durable accessory ready to wear or gift to someone special


Single Heart Focal Bracelet
This charming bracelet features a single, striking red heart nestled among rustic white clay beads and gleaming gold accents. Its adjustable design and natural textures make it a heartfelt gift or a lovely addition to your own jewelry collection.
How-To Guide
Materials
- Red polymer clay
- White or cream polymer clay
- Gold polymer clay (or gold-plated spacer beads)
- Gold-plated decorative spacer beads (ribbed or textured)
- Small heart-shaped cutter (approx. 10-12mm)
- Round cutter or bead roller (for the white beads)
- Beading wire or strong jewelry elastic
- Gold crimp beads and covers
- Gold jump rings
- Gold lobster clasp and extender chain
- Needle tool or bead piercing pins
- Sandpaper (fine grit)
- Gloss glaze (optional, for the heart)
- Raw sienna acrylic paint (optional, for distressing)
Step 1: Sculpting the Beads
-
Condition the Clay:
Start by thoroughly conditioning your white polymer clay until it is soft and pliable. Roll it into a long, even log or snake about the thickness of a pencil. -
Cut the White Segments:
Slice the white log into equal segments. These don’t need to be perfectly identical, as a slight variation adds to the organic look, but aim for roughly 4-5mm wide pieces. -
Shape the Discs:
Roll each white segment into a ball, then gently press down to flatten it into a thick disc shape, similar to a rondelle bead. You’ll need about 40-50 of these depending on your wrist size. -
Create the Heart Focal:
Condition a small amount of deep red clay. Roll it out to about 3mm thickness and use your small heart cutter to punch out the shape. Smooth the sharp edges with your fingertip. -
Add the Hole:
Using a needle tool, carefully pierce a horizontal hole directly through the side of the heart so it will sit flat on the wrist. Do the same for all your white disc beads. -
Optional Distressing:
To achieve the rustic look seen in the photo, you can lightly texture the white beads with coarser sandpaper before baking, or plan to apply an antique wash after baking. -
Bake the Components:
Arrange all your clay pieces on a tile or baking sheet covered with parchment paper. Bake according to the manufacturer’s instructions for your specific brand of clay.
Pro Tip: Better Holes
When piercing the holes, twist the needle tool as you push through rather than just shoving it. This prevents the clay from squishing out of shape.
Step 2: Finishing and Assembly
-
Antique the White Beads (Optional):
If you want that weathered wood look, mix a tiny drop of raw sienna acrylic paint with water. Brush it over the baked white beads and immediately wipe most of it off with a paper towel, leaving pigment only in the crevices. -
Seal the Bead (Optional):
I sometimes like to add a touch of satin or matte varnish to the red heart to give it a slight sheen and protect the finish, but leaving it matte is also beautiful. -
Prepare the Wire:
Cut a length of beading wire about 10 inches long. Secure one end with a crimp bead and attach a jump ring that holds one half of your clasp or extender chain. -
Start Beading Pattern:
Begin stringing your beads. Thread on approximately 6-8 white discs. -
Add First Gold Accent:
Slide on a gold decorative spacer bead—these add a nice break in the pattern and elevate the design. -
Continue the Pattern:
Add another section of 6-8 white discs, followed by another gold spacer. -
The Center Focal:
Thread on more white discs until you reach the center point. Place a smooth gold spacer bead, then your red heart, and immediately follow it with another smooth gold spacer to frame the heart perfectly. -
Mirror the Design:
Complete the second half of the bracelet by mirroring your pattern: white discs, gold spacer, white discs, gold spacer, and ending with white discs. -
Secure the End:
Finish the bracelet by threading a crimp bead onto the wire, looping through the jump ring for the other clasp end, and passing the wire back through the crimp bead. -
Final Crimp:
Use crimping pliers to flatten the crimp bead securely. Trim the excess wire and cover the crimps with crimp covers for a polished, professional look.
Level Up: Pattern Play
Swap the solid red heart for a marbled clay technique using pinks and whites, or stamp an initial into the heart before baking for customization.
Now you have a handcrafted piece of jewelry ready to wear or gift to someone special

The Complete Guide to Pottery Troubleshooting
Uncover the most common ceramic mistakes—from cracking clay to failed glazes—and learn how to fix them fast.
Gold-Kissed Valentine Bracelet Stack
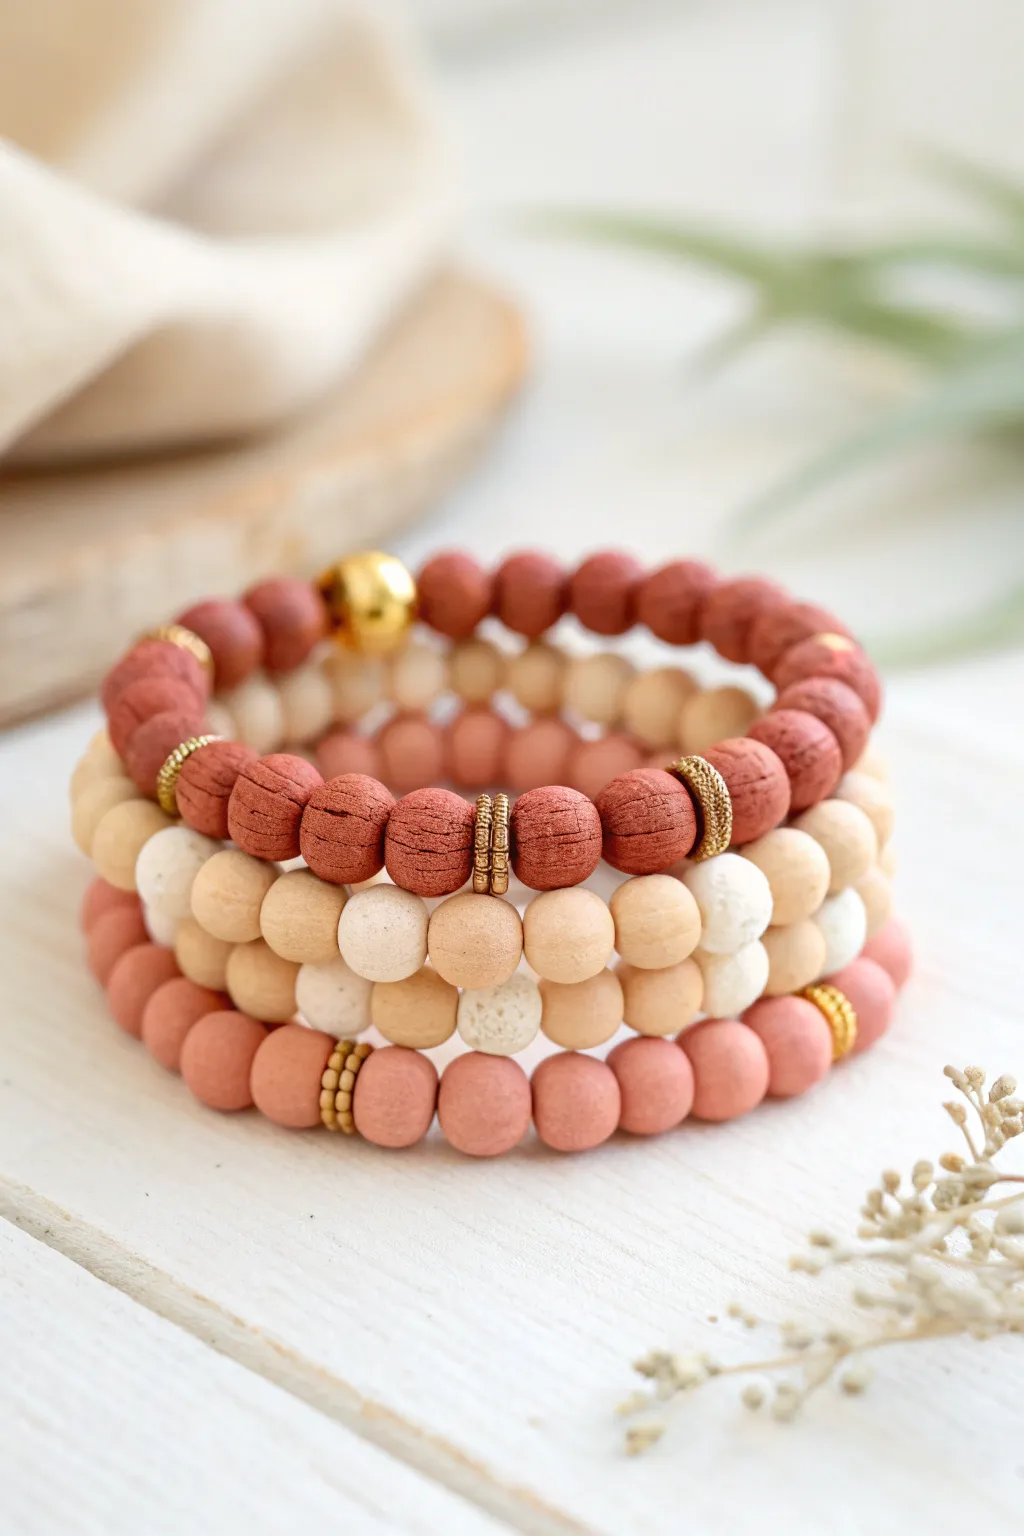
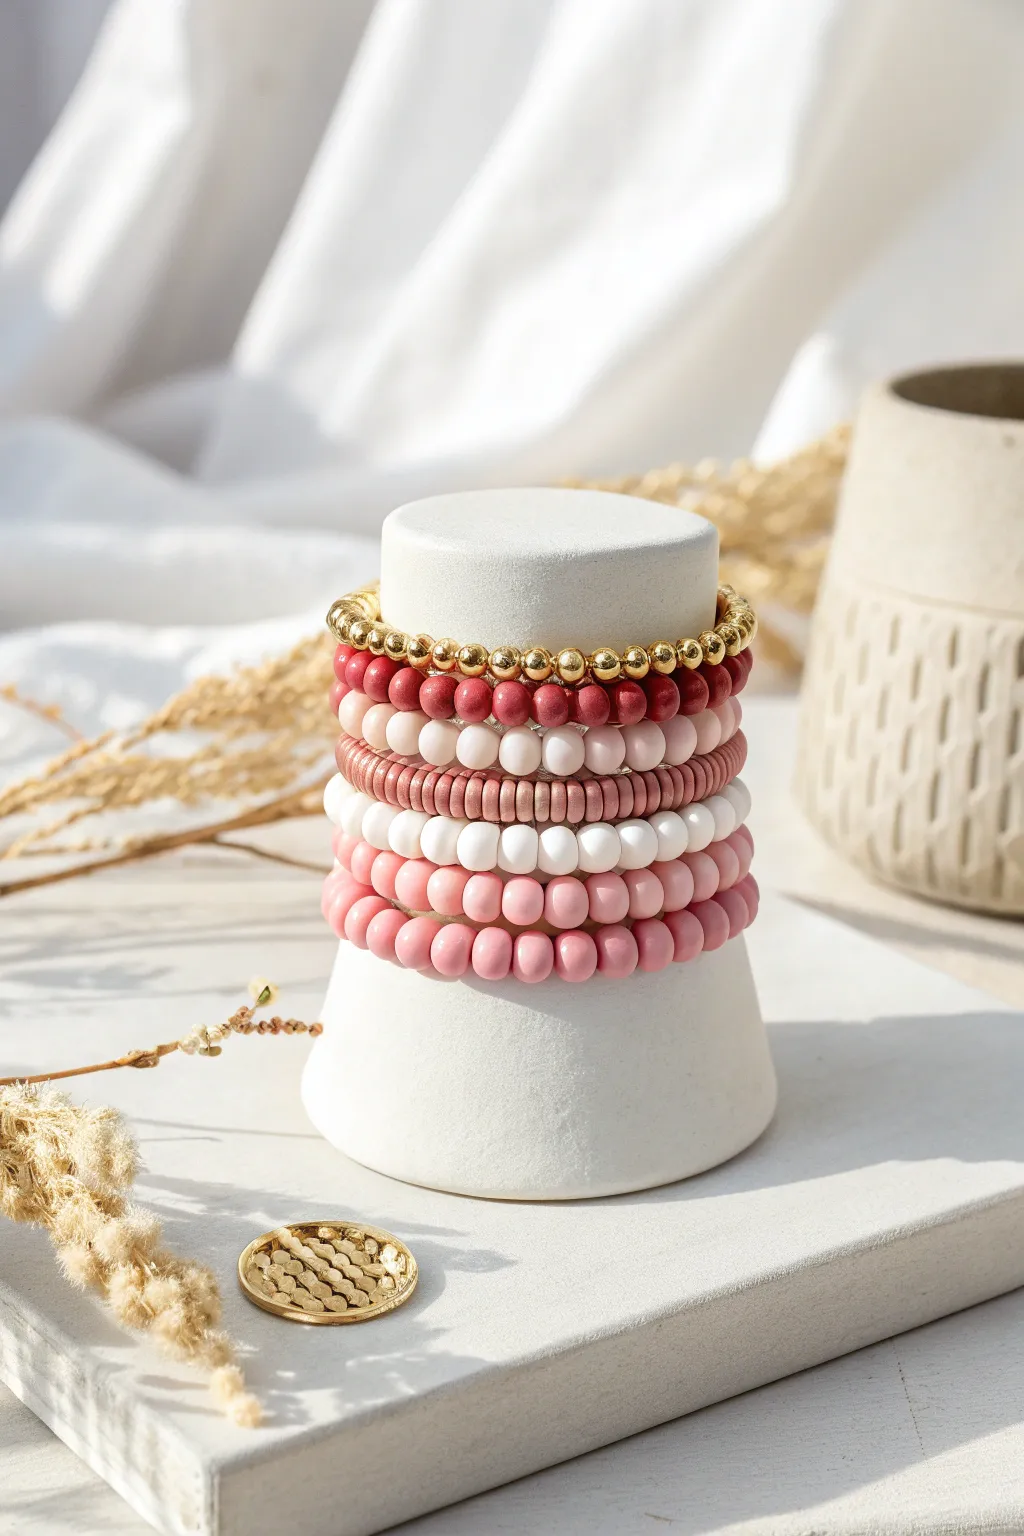
This elegant stack of three bracelets combines deeply textured clay beads in romantic terracotta, blush, and cream tones with luxurious gold spacers. The earthy textures balance the metallic shine, resulting in a sophisticated accessory perfect for Valentine’s Day or everyday wear.
Step-by-Step Guide
Materials
- Polymer clay (terracotta/brick red, blush pink, and cream/white colors)
- Sandpaper or a rough-textured stone/rock (for texturing)
- Needle tool or toothpick
- Elastic beading cord (0.8mm or 1mm)
- Gold tone heishi spacer beads (assorted patterns)
- Gold tone crimp beads or decorative metal tube beads
- Gold focal bead (large, round)
- Super glue (gel formula recommended)
- Clay bead roller (optional but helpful)
- Oven and baking sheet
Step 1: Creating the Clay Beads
-
Condition the Clay:
Start by thoroughly kneading your three blocks of polymer clay—terracotta, blush, and cream—until they are soft and pliable. This conditioning step prevents cracking later on. -
Measure Uniform Portions:
Roll each color into a long snake of even thickness. Slice the snakes into equal-sized segments to ensure your beads will be consistent in size. -
Roll Spheres:
Take each segment and roll it between your palms to form a smooth, perfect sphere. I like to do all of one color at a time to keep a good rhythm. -
Apply Heavy Texture:
To achieve the rustic, stone-like look seen in the photo, roll each sphere gently over a piece of coarse sandpaper or a clean, rough stone. Press just hard enough to imprint the texture without deforming the ball. -
Pierce the Beads:
Hold a textured bead gently and carefully push a needle tool or toothpick through the center to create the hole. Twist the tool as you remove it to keep the hole clean. -
Re-shape if Needed:
If handling the bead distorted its shape, lightly pat it back into a roubd form, being careful not to smooth out your beautiful texture. -
Create Accent Beads:
For the cream strand, select a few beads to texture even more heavily (mimicking lava stone) by poking them repeatedly with a stiff brush or the tip of your needle tool. -
Bake the Beads:
Arrange the beads on a baking sheet lined with paper. Bake according to your clay manufacturer’s instructions (usually around 275°F/135°C for 15-30 minutes). Let them cool completely.
Natural Texture Hack
Instead of sandpaper, roll your raw clay beads in a small bowl of coarse sea salt or large-grain sugar. Press gently, then rinse the crystals away under water after the beads are baked and cooled.
Step 2: Assembling the Stack
-
Measure the Cord:
Cut three lengths of elastic cord, making each about 10-12 inches long. This gives you plenty of extra room for tying knots comfortably. -
Pre-stretch the Elastic:
Give each piece of cord a few firm tugs. Pre-stretching prevents the bracelets from sagging or loosening after the first time you wear them. -
Secure the End:
Place a piece of tape or a bead stopper on one end of your first cord to stop beads from sliding off while you work. -
String the Terracotta Strand:
Thread the dark terracotta beads onto the first cord. Interspace them with gold textured disc spacers. In the photo, spacers are placed approximately every 5-6 beads. -
Add the Focal Bead:
For the top bracelet, thread on the large gold focal bead. Ensure it sits centrally or off-center depending on your preference. -
Check the Size:
Wrap the strand around your wrist to check the fit. It should be snug but comfortable. Add or remove clay beads as necessary. -
Tie the Knot:
Tie a surgeon’s knot (right over left, left over right, and loop through an extra time). Pull the elastic tight so the knot is secure. -
Secure with Glue:
Apply a tiny dot of gel super glue to the knot. Let it dry for a few seconds before trimming the excess tail ends close to the knot. -
String the Middle Strand:
For the middle bracelet, use a mix of the cream and light beige beads. This strand in the image is simpler, using fewer spacers for a cleaner look. -
String the Blush Strand:
Create the final bottom bracelet using the blush pink beads. Add small clusters of gold disc spacers (stacks of 3-4 discs) for visual interest. -
Final Assembly:
Tie off and glue the remaining two bracelets using the same method as the first. Hide the knots inside the hole of a neighboring bead if possible.
Essential Oil Diffuser
Leave the unfinished wood or heavily textured clay beads unsealed. You can add a drop of rose or lavender essential oil to these porous beads to turn your bracelet stack into a wearable diffuser.
Enjoy wearing your handcrafted stack that radiates warmth and elegance
Hot Pink Pop Bracelet With White Breaks
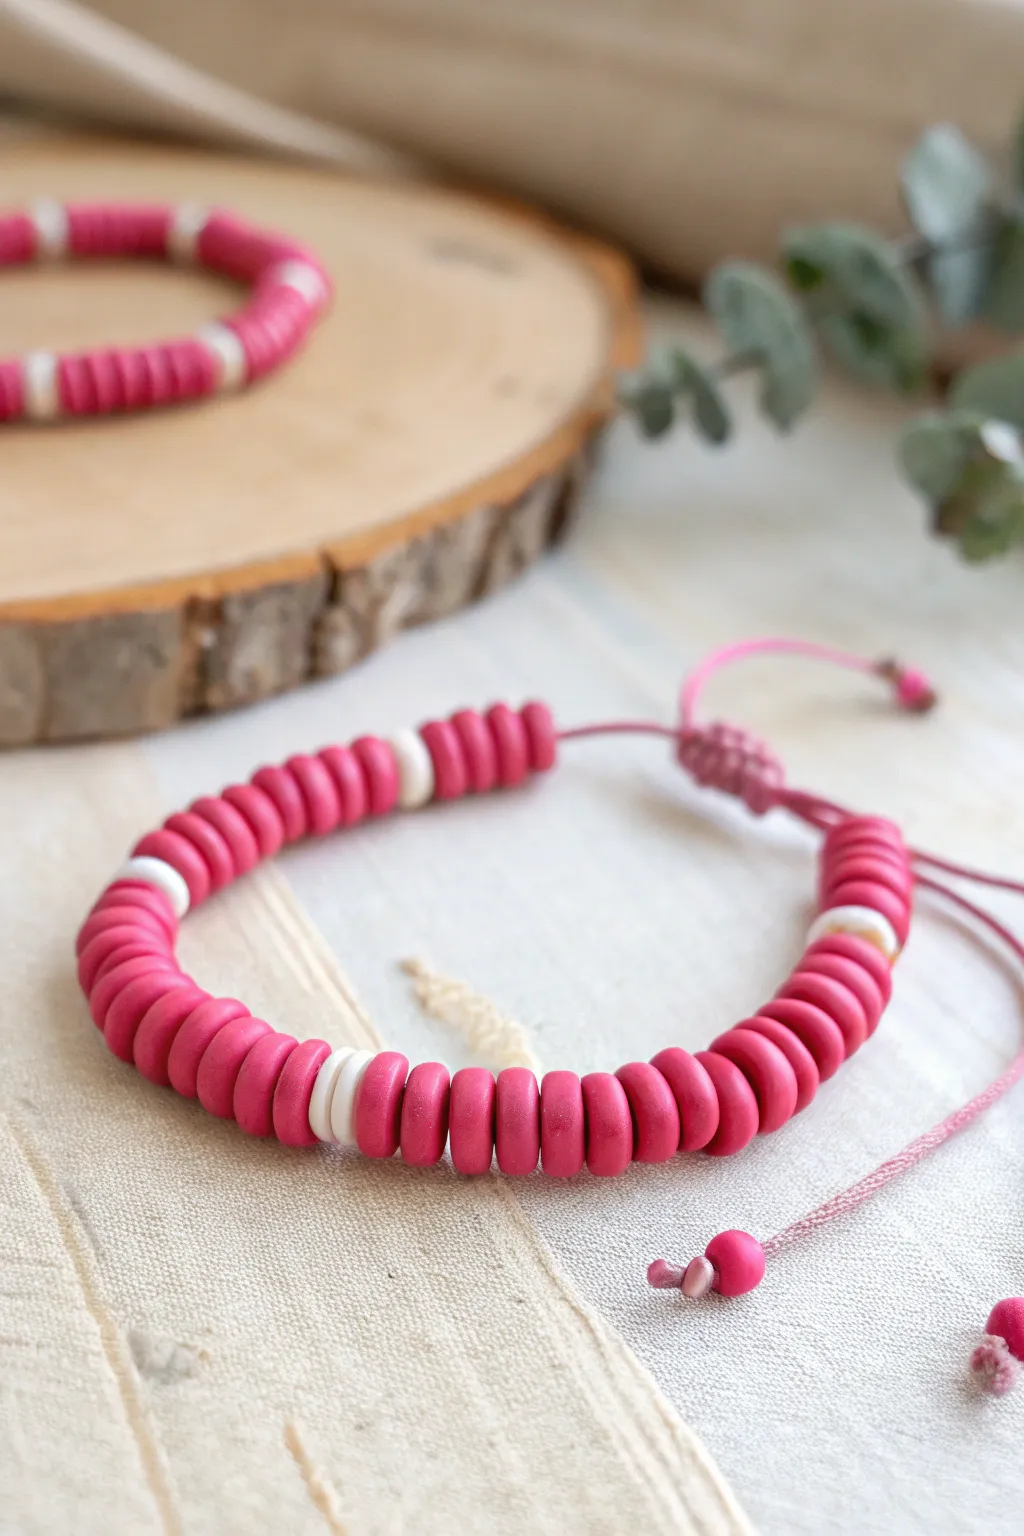
Bring a burst of energy to your wrist with this vibrant hot pink disc bead bracelet, punctuated by crisp white accents. It features an adjustable sliding knot closure for a perfect, comfy fit.
How-To Guide
Materials
- Hot pink polymer clay (2 oz block)
- White or cream polymer clay (1 oz block)
- Acrylic clay roller
- Small round clay cutter (8-10mm diameter)
- Needle tool, toothpick, or bead reamer
- Baking sheet with parchment paper
- Pink satin cord or waxed nylon cord (1mm)
- Super glue or jewelry glue
- Scissors
Step 1: Forming the Clay Discs
-
Condition the pink clay:
Start by kneading the hot pink polymer clay in your hands until it is soft, pliable, and free of cracks. -
Roll the pink slab:
Using your acrylic roller, flatten the pink clay into an even sheet. Aim for a thickness of about 3mm to 4mm—you want these discs to be chunky, similar to Heishi beads but thicker. -
Repeat for white clay:
Clean your roller first to avoid color transfer, then condition and roll out the white clay to the exact same thickness as the pink sheet. -
Cut the shapes:
Use your small round cutter to punch out approximately 40-50 pink circles and 6-8 white circles. The exact number depends on your wrist size. -
Pierce the center holes:
Gently hold a clay circle without squishing it, and use your needle tool or toothpick to poke a hole directly in the center. Give the tool a little wiggle to ensure the hole is wide enough for your cord. -
Smooth the edges:
I like to take a moment here to gently tap down any rough edges created by the piercing tool so the finished bead looks professional and smooth. -
Bake the beads:
Arrange all your pierced discs on a parchment-lined baking sheet. Bake according to your clay manufacturer’s instructions (usually 275°F/135°C for 15-30 minutes). -
Cool down:
Allow the beads to cool completely on the tray before handling them to prevent warping.
Step 2: Stringing the Design
-
Prepare the cord:
Cut a piece of pink cord approximately 12-14 inches long. This gives you plenty of room for the beads and the sliding knot tails. -
Stiffen the cord end:
If your cord is fraying, dab a tiny bit of glue on the tip or melt it quickly with a lighter (if synthetic) to make threading easier. -
Start the pattern:
Thread on a section of hot pink beads. Aim for a block of about 10-12 pink discs to start. -
Add the white break:
Slide on two white discs. This white ‘break’ creates the signature pop in the design. -
Continue the pattern:
Repeat the pattern—block of pink, then two white discs—until you have reached your desired length. Standard bracelets usually need 3 or 4 of these segments. -
Center the beads:
Slide all the beads to the center of the cord so you have equal lengths of excess cord on both sides.
Smooth Operator
To remove fingerprints before baking, gently brush the raw clay beads with a tiny amount of cornstarch or baby powder.
Step 3: Creating the Adjustable Closure
-
Tie end knots:
Tie a simple overhand knot snugly against the first and last bead of your strand to keep the beads in place. -
Form the loop shape:
Bring the two cord ends together so they overlap and run parallel to each other, forming a circle. -
Cut a macramé cord:
Cut a separate piece of pink cord, about 6-8 inches long. This will form the sliding knot mechanism. -
Tie the square knots:
Using the new short piece, tie a series of 3 or 4 square macramé knots around the overlapping main cords. Pull these tight enough to hold, but loose enough to slide. -
Trim and glue:
Trim the excess tails of the sliding knot cord very close to the knot. Apply a tiny drop of super glue to the cut ends to secure them (be careful not to glue the sliding cord itself). -
Finish the tails:
Add one leftover pink bead to the very end of each main tail cord and tie a knot to prevent the cord from slipping through the closure.
Hole Sizing Woes
If the bead holes shrank during baking and the cord won’t fit, use a small hand drill or a round file to widen the channel gently.
Now you have a striking accessory ready to wear or gift for Valentine’s Day


What Really Happens Inside the Kiln
Learn how time and temperature work together inside the kiln to transform clay into durable ceramic.
Ombre Pink Gradient Heishi Bracelet
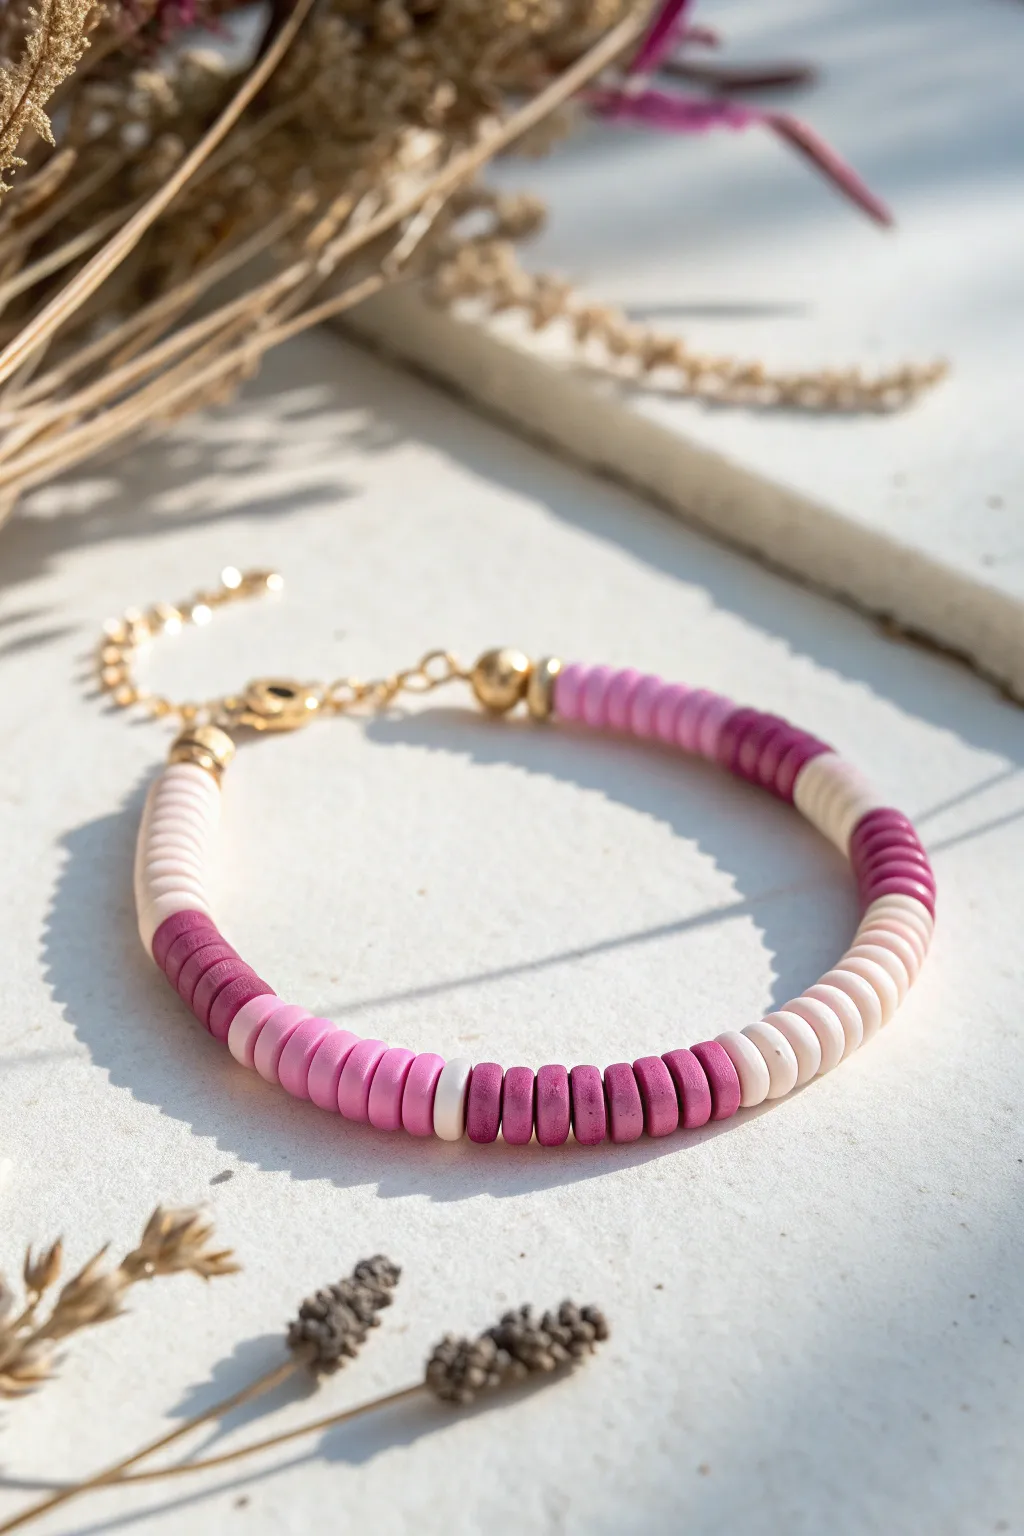
This elegant bracelet features a sophisticated ombre-inspired color block design using flat Heishi beads. The segments alternate between deep magenta, vibrant bubblegum pink, soft rose, and creamy white for a romantic Valentine’s Day look.
Step-by-Step
Materials
- Polymer clay Heishi beads (disc beads) in four colors: Dark Magenta, Medium Pink, Light Pink, and Cream/White
- Gold tone crimp beads (2mm)
- Small gold tone round spacer beads (3mm)
- Gold tone jump rings (4mm and 6mm)
- Gold tone lobster clasp
- Gold tone extender chain
- Flexible beading wire (e.g., 7-strand or 19-strand nylon coated)
- Wire cutters
- Flat nose pliers
- Crimping pliers
Step 1: Preparation
-
Measure your wrist:
Before cutting any wire, measure your wrist and add about an inch to account for the clasp and some slack. A standard bracelet length is often around 6.5 to 7 inches. -
Cut the wire:
Using your wire cutters, snip a length of beading wire approximately 10 inches long. The extra length prevents beads from sliding off while you work and makes finishing easier. -
Secure one end:
Thread a crimp bead onto one end of the wire, followed by a jump ring. Loop the wire back through the crimp bead to create a small loop holding the jump ring. -
Crimp the loop:
Use your crimping pliers to flatten the crimp bead securely. I prefer to give the wire a gentle tug to ensure it won’t slip out. -
Add a wire guard (optional):
If you have wire guards, you can use one here for a more professional finish, though looping directly through the jump ring works perfectly well for this casual style. -
Start with gold:
Thread on one gold crimp cover (optional) or just slide a 3mm gold round spacer bead over the tail of the wire to hide it.
Seamless Transitions
To make color changes look smoother, sandwich a single gold spacer bead between color blocks. It adds a tiny bit of separation and sparkle.
Step 2: Beading the Pattern
-
First color segment: Cream:
Begin stringing your cream-colored Heishi beads. Add about 10-12 beads to create a block approximately 0.5 to 0.75 inches long. -
Second color segment: Dark Magenta:
Switch to your darkest color, the deep magenta. String roughly 8-10 beads. Notice the slight asymmetry in segment lengths in the photo; this gives it an organic feel. -
Third color segment: Medium Pink:
Next, add a section of the medium bubblegum pink beads. Aim for a similar length to your first cream section, about 10-12 beads. -
Fourth color segment: Light Pink:
Thread on your lightest pink color. This section looks slightly shorter in the design, perhaps 6-8 beads, creating a rhythmic variation. -
Repeat the pattern:
Continue this sequence—Cream, Magenta, Medium Pink, Light Pink—until you reach nearly your desired length. Check the fit against your wrist as you go. -
Create a focal point:
For the bracelet shown, the pattern breaks occasionally. Feel free to place two dark sections closer together separated by a thin strip of cream (just 2 beads) to mimic the specific design in the image.
Step 3: Finishing Touches
-
End with golden accents:
Once the beaded portion is the correct length, slide on a final 3mm gold spacer bead. -
Prepare the final crimp:
Thread a crimp bead onto the wire end, followed by the loop of your jump ring that is attached to the extender chain. -
Secure the end:
Pass the wire back down through the crimp bead and through the first gold spacer and a few Heishi beads. Pull the wire tight so there are no gaps, but not so tight that the bracelet becomes stiff. -
Final crimp:
Use your crimping pliers to flatten the final crimp bead securely. Trim the excess wire tail close to the beads with flush cutters. -
Attach hardware:
Open the jump ring on the starting end using flat nose pliers (twist sideways, don’t pull apart) and attach your lobster clasp. Close the jump ring securely. -
Check the chain:
Ensure your extender chain is attached securely to the other end. The little dangle at the end of the chain adds a charming final detail.
Personalized Charms
Add a tiny gold heart charm to the extender chain or midway through the bracelet for an extra touch of Valentine’s romance.
Enjoy wearing your chic, custom-colored stackable bracelet
Red-and-White Speckled “Strawberries and Cream” Mix
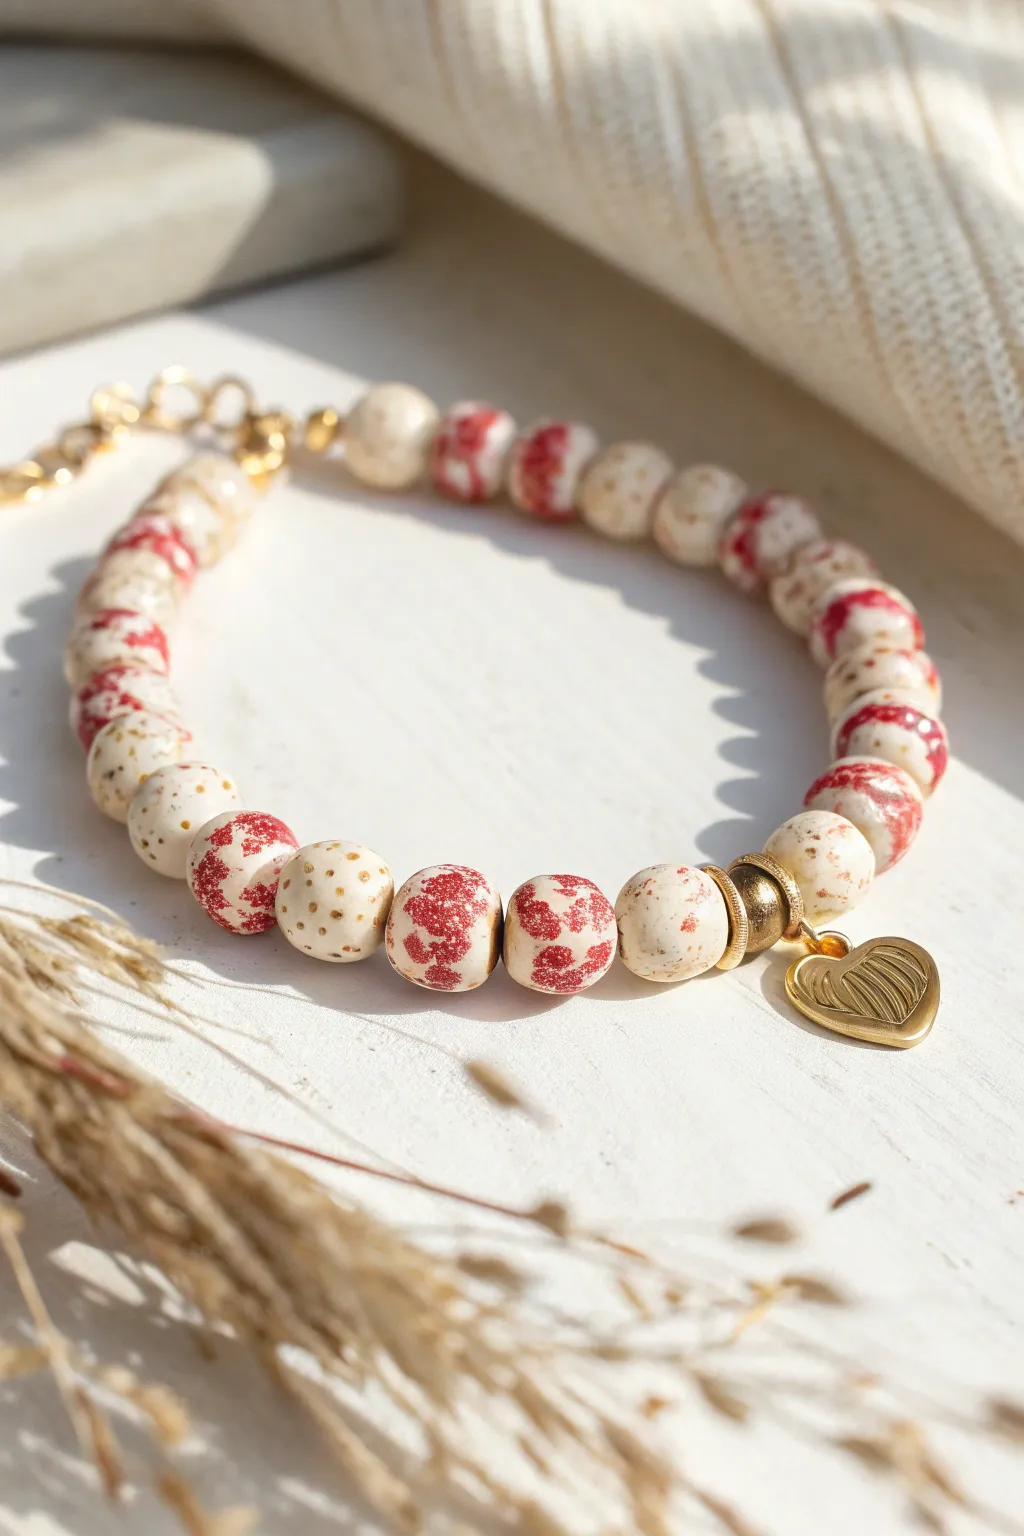
Capture the sweetness of Valentine’s Day with this charming polymer clay bracelet featuring a mix of speckled red and cream beads alongside rustic gold accents. The organic, hand-rolled texture gives it an artisanal feel, while the golden heart charm adds a perfect romantic finish.
How-To Guide
Materials
- Polymer clay (cream or off-white)
- Acrylic paint (bright red and metallic gold)
- Gold jewelry wire (20 or 22 gauge) or eye pins
- Gold jump rings (4mm and 6mm)
- Gold lobster clasp
- Gold chain extender
- Gold heart charm
- Small gold space beads and larger accent beads
- Stiff bristled toothbrush or coarse paintbrush
- Toothpicks or a bead piercing tool
- Round nose pliers
- Wire cutters
- Glaze or varnish (optional)
Step 1: Creating the Clay Base
-
Condition the clay:
Start by warming the cream polymer clay in your hands, kneading it thoroughly until it is soft, pliable, and free of any air bubbles. -
Portion the beads:
Roll the clay into a long snake of even thickness. Using a blade, slice the snake into equal-sized segments to ensure your beads will be roughly the same size. -
Roll into spheres:
Take each segment and roll it between your palms to form smooth spheres. Don’t worry about machine-perfect roundness; a slightly organic shape adds to the handmade charm. -
Pierce the holes:
Gently twist a toothpick or piercing tool through the center of each bead. I find twisting while pushing prevents the bead from squishing out of shape. -
Bake the beads:
Check your clay package instructions for baking times and temperatures (usually around 275°F/135°C for 15-30 minutes). Bake the beads on a dedicated sheet and let them cool completely.
Clean Hole Technique
To avoid distorting the beads, pierce the hole halfway through, then flip the bead and pierce from the other side until the holes meet in the middle.
Step 2: Adding the Speckles
-
Prepare the red paint:
Squeeze a small amount of bright red acrylic paint onto a palette. You want the consistency to be fluid but not watery. -
Apply red speckles:
Dip the tips of a stiff toothbrush or coarse brush into the paint. Using your thumb, flick the bristles to splatter fine red dots onto about half of your cooled beads to create the ‘strawberry’ look. -
Create gold accents:
For the remaining cream beads, use a fine-point tool or toothpick dipped in metallic gold paint to dab small, deliberate dots or flecks onto the surface. -
Let it dry:
Allow the paint to dry fully. If you want extra durability, apply a thin coat of matte or satin varnish over the beads once the paint is set.
Mix & Match Sets
Make extra beads to create matching earrings! Create hoops using the remaining red speckled beads and simple studs with the gold-dotted ones.
Step 3: Assembly
-
Begin the wire work:
Cut a segment of jewelry wire or use a pre-made eye pin. Create a simple loop on one end using your round nose pliers if working from plain wire. -
Thread the beads:
String your beads onto the wire, alternating between the red-speckled ‘strawberry’ beads and the gold-dotted ‘cream’ beads mixed with plain cream ones. -
Add metal spacers:
Intermittently place small gold spacer beads between the clay beads to break up the texture and add a little shine. -
Secure the end:
Once you have reached your desired length, trim the excess wire, leaving about 1cm. Use your round nose pliers to roll this end into a secure loop. -
Attach the clasp:
Open a jump ring, slide on the lobster clasp, and attach it to one of your end loops. Close the jump ring securely. -
Add the extender:
On the opposite end loop, attach a short length of gold chain using another jump ring. This acts as an extender for adjustable sizing. -
Place the focal charm:
This design features a focal point near the clasp. Thread a larger gold accent bead onto the end of the wire before closing the loop, or attach it separately. -
Hang the heart:
Using a small jump ring, attach the gold heart charm right next to the large gold accent bead or directly onto the extender chain loop for a dangling effect.
Now you have a sweet, romantic accessory ready to wear or gift to someone special

TRACK YOUR CERAMIC JOURNEY
Capture glaze tests, firing details, and creative progress—all in one simple printable. Make your projects easier to repeat and improve.
Mini Heart Beads Scattered Like Confetti
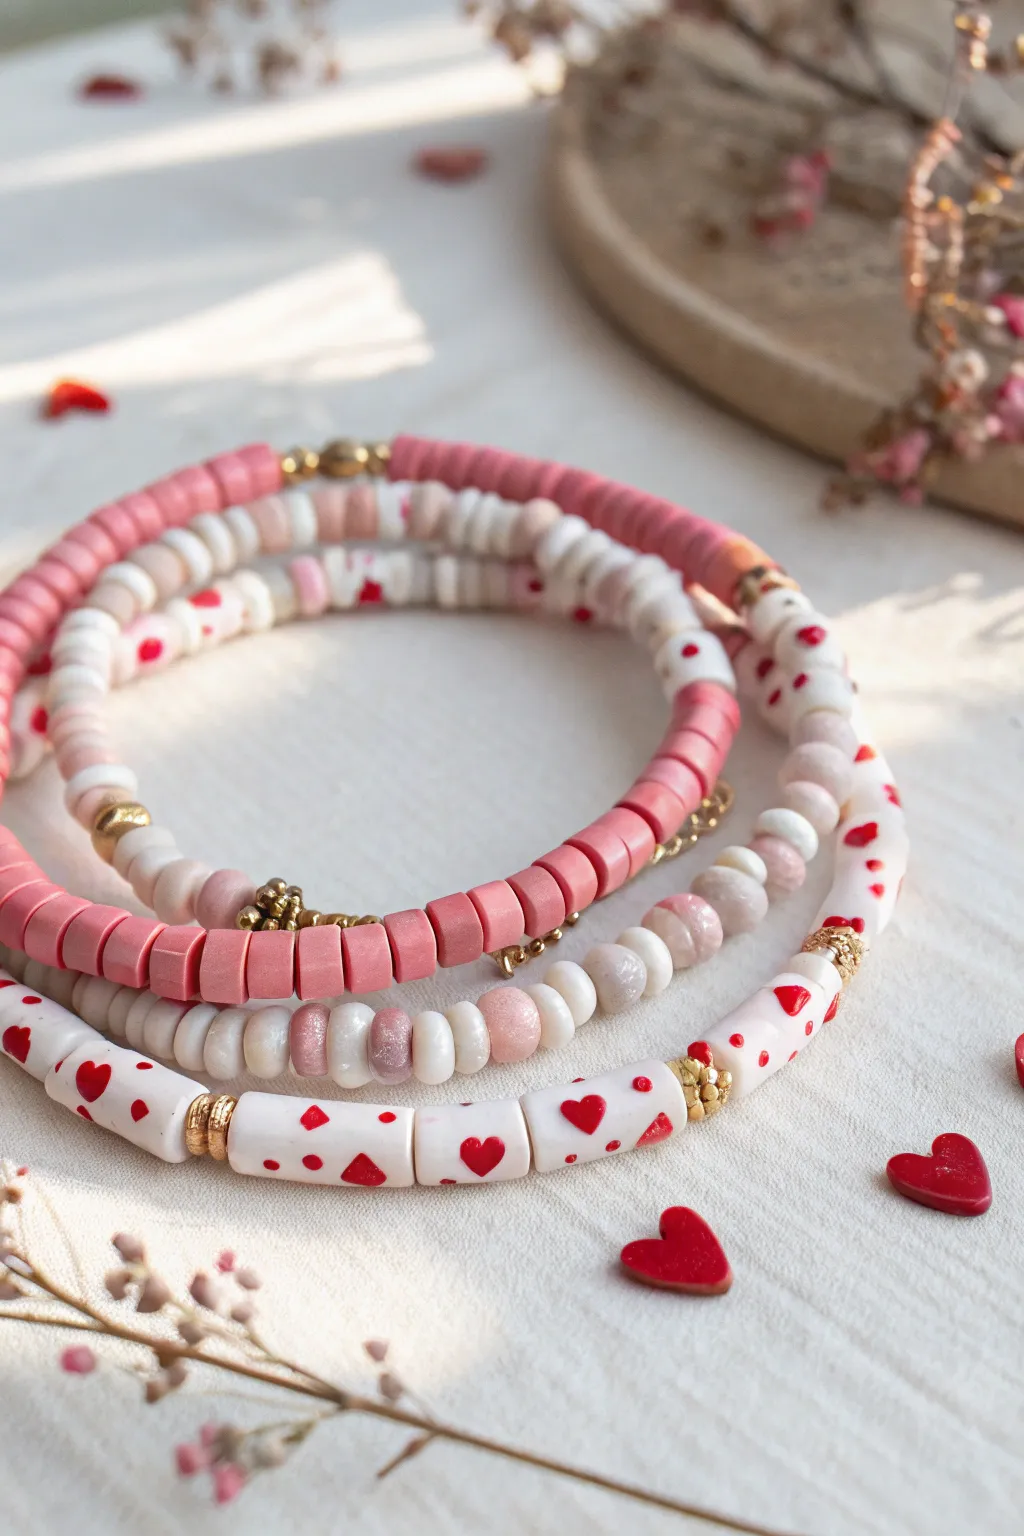
Celebrate love with this charming trio of polymer clay bracelets, featuring a delightful mix of textures and patterns. The star of the show consists of white clay beads adorned with tiny red hearts, perfectly complemented by solid pink heishi discs and pearlescent round accents. It’s a sweet, romantic accessory set that looks just as good worn singly as it does stacked together.
How-To Guide
Materials
- Polymer clay in White, Bright Red, and Dusty Pink
- Pearlescent or shimmer effect polymer clay (optional)
- Small round bead roller (optional but helpful)
- Clay extruder with disc adapter (for heishi beads)
- Strong elastic cord (0.8mm recommended)
- Jewelry glue (e.g., E6000 or GS Hypo Cement)
- Gold spacer beads (heishi flat style and textured spacers)
- Small crimp beads
- Sharp tissue blade or X-Acto knife
- Acrylic rolling pin
- Fine detail paintbrush
- Red acrylic paint
- Gloss glaze or resin (for sealing)
- Beading needle
- Oven for baking clay
Step 1: Crafting the Heart-Patterned Beads
-
Roll the base cane:
Begin by conditioning the white polymer clay until it is soft and pliable. Roll it into a smooth, even snake or log that is approximately 6-8mm in diameter, depending on how chunky you want your final beads. -
Cut the bead segments:
Using your sharp tissue blade, slice the white log into equal segments. For the look in the photo, aim for tube-like cuts about 6-8mm long, rather than thin discs. -
Shape the beads:
Gently roll each cut segment between your fingers to smooth any sharp edges from the blade, maintaining a cylindrical ‘tube’ shape. Use a piercing tool or thick needle to create a hole through the center of each bead. -
Paint the hearts:
Once you have your blank white beads, you have two options. You can bake them first and paint later, but I prefer to paint the tiny hearts on raw clay carefully with red acrylic paint using the finest brush you own. Randomly scatter the hearts and add tiny dot accents for a ‘confetti’ look. -
Bake the batch:
Place your heart beads on a baking sheet or tile. Bake according to your clay package instructions (usually 275°F for 15-30 minutes). Let them cool completely. -
Seal the design:
To protect the delicate heart painting, apply a thin coat of gloss glaze or UV resin to each white bead. This adds that professional shine visible in the photo.
Step 2: Creating the Solid Pink & Pearl Beads
-
Make the pink heishi beads:
Condition your dusty pink clay. Roll it into a thin sheet (about 2-3mm thick). Use a small circular cutter (or a straw) to punch out many small discs. Pierce the center of each disc. -
Form the pearl accents:
Using pearlescent or mixed white/pink clay, roll small amounts into spheres. You can use a bead roller for uniformity or hand-roll them for an organic feel. Pierce holes in the center of these as well. -
Bake remaining beads:
Bake your pink discs and pearl rounds following the same temperature guidelines as before. Allow them to cool fully before handling.
Clean Lines Pro-Tip
If painting tiny hearts feels too shaky, use a toothpick dipped in paint instead of a brush. The stiff point gives you more control for creating the “v” shape of the heart.
Step 3: Assembly and Finishing
-
Plan the layout:
Lay out your three distinct strands on a bead board or towel. One strand should be exclusively the pink heishi discs. The second should be a mix of pearl rounds and pink accents. The third is your confetti heart strand. -
Add gold spacers:
Intersperse gold spacer beads throughout your designs. Notice how the heart strand uses gold textured spacers between every few white beads to break up the pattern and add luxury. -
String the beads:
Cut a length of elastic cord (about 10 inches to be safe). Pre-stretch the cord by pulling it firmly a few times; this prevents the bracelet from stretching out later. Thread your first design onto the cord. -
Tie the knot:
Once strung, tie a surgeon’s knot (right over left, left over right, and loop through twice). Pull the knot very tight. -
Secure the knot:
Apply a tiny dot of jewelry glue to the knot. If the hole of a neighboring bead is large enough, gently pull the knot inside to hide it. -
Repeat for the stack:
Repeat the stringing and tying process for the remaining two bracelets to complete your stack.
Level Up Your Stack
Add a personalized touch by incorporating letter beads into the pink strand to spell out ‘LOVE’ or a name, blending the handmade clay look with classic friendship bracelet vibes.
Wear your new heart-filled stack proudly or gift it to someone special to brighten their day
Sweetheart Checkerboard Pattern Bracelet
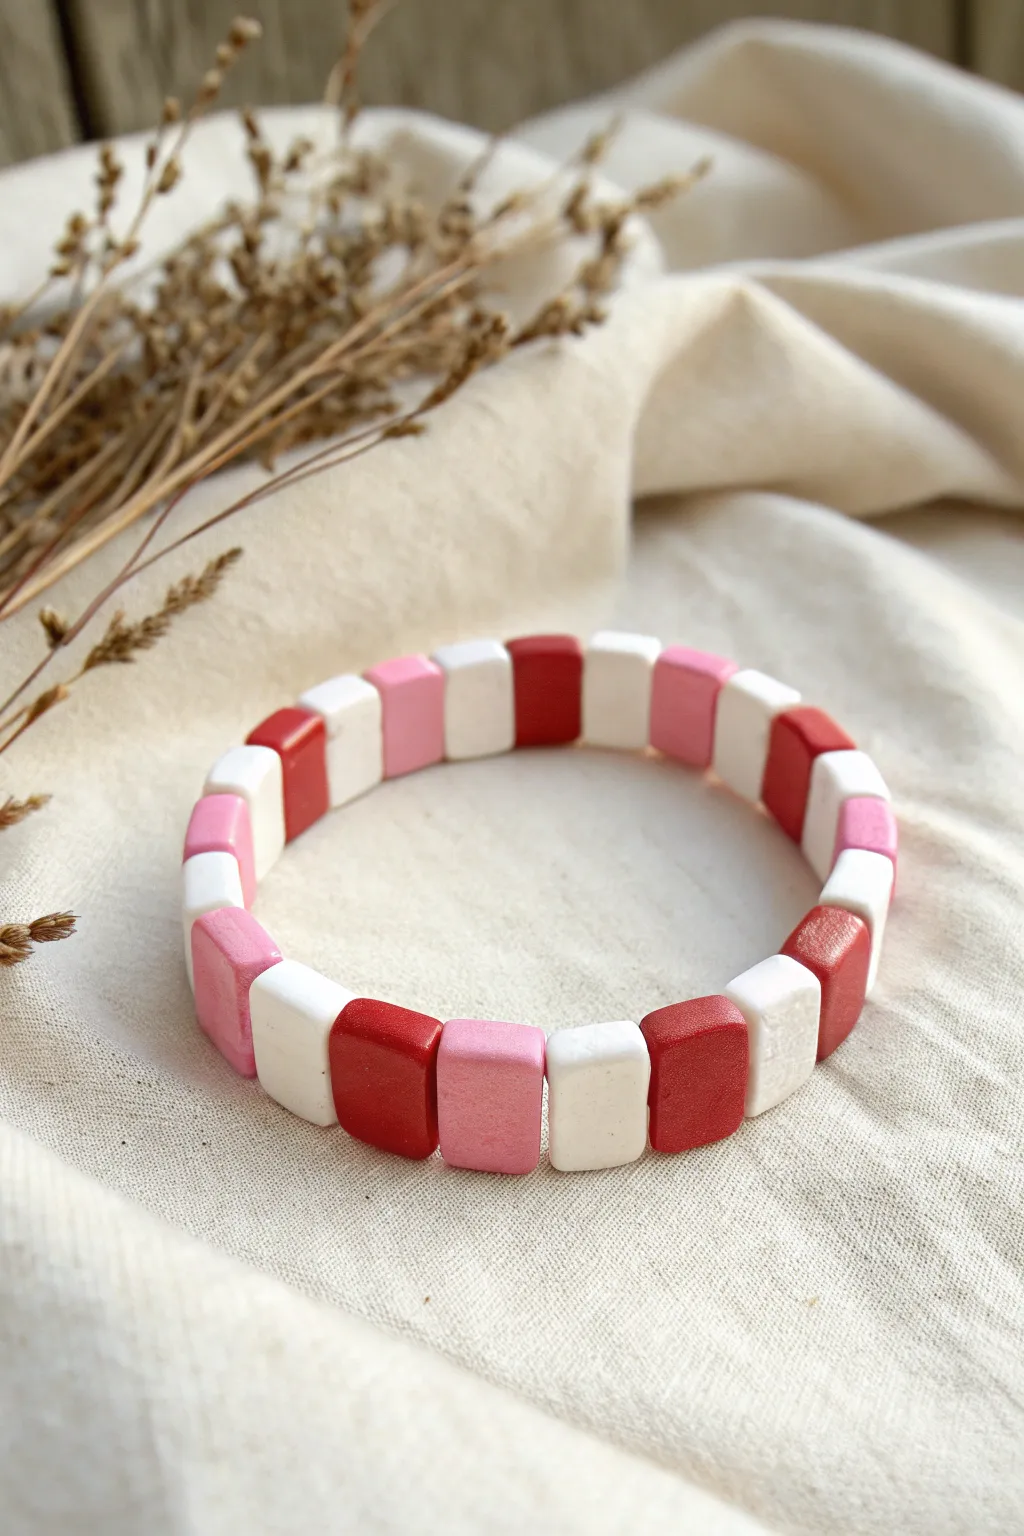
This charming bracelet features a minimalist checkerboard-style pattern using handmade square clay beads in a classic Valentine’s Day palette. The smooth, matte finish of the clay gives it a modern, sophisticated look that is surprisingly simple to achieve.
Detailed Instructions
Materials
- Polymer clay in three colors: White, Soft Pink, and Deep Red
- Tissue blade or sharp clay slicer
- Acrylic rolling pin or pasta machine
- A small square cutter (approx. 10mm) OR a ruler and blade
- A bead needle or a thin metal skewer (toothpick creates holes that are too large)
- Strong elastic cord (0.8mm or 1mm)
- Super glue or jewelry knot glue
- Cornstarch (optional, to prevent sticking)
- Baking sheet and parchment paper
- Fine-grit sandpaper (400-600 grit)
Step 1: Preparing the Clay
-
Condition the Clay:
Begin by thoroughly kneading each color of polymer clay separately until it is soft and pliable. Warm clay is essential for avoiding cracks later. -
Roll Out Sheets:
Roll each color into a slab of even thickness. Aim for about 3mm to 4mm thick. Using a pasta machine on a medium setting ensures they are all perfectly uniform, but a rolling pin with guide rings works well too. -
Smooth the Surface:
Check for any air bubbles or fingerprints. Gently run your roller over the surface one last time to ensure it is perfectly flat.
Squashed Squares?
If piercing the hole deforms your squares, try refrigerating the cut clay pieces for 10 minutes before piercing. The firmer clay holds its shape better against the needle pressure.
Step 2: Shaping the Beads
-
Cut the First Strip:
Use your tissue blade to cut a long, straight strip from each color sheet. The width of the strip will determine the height of your bead, so match this to the width of your intended square (approx. 10mm). -
Slice into Squares:
Cut across the strips to create individual squares. If you have a small square cutter, you can stamp them out directly, but I find slicing strips creates cleaner, sharper edges for this geometric look. -
Refine the Shapes:
Gently tap the sides of each square with your finger or the flat side of the blade to sharpen the corners if they became slightly rounded during cutting. -
Pierce the Holes:
This is the most crucial step. Using a bead pin or thin skewer, carefully pierce a hole through the center of the side of the bead (horizontally). Rotate the skewer as you push to avoid squashing the square shape. -
Double-Check Alignment:
Ensure the hole goes straight through to the other side without poking out the front or back faces. It helps to inspect the bead from above while piercing. -
Make Extras:
Always create about 5-10 more beads than you think you need in each color, just in case some break during drilling or baking.
Level Up: Texture
Before cutting your squares, gently press a fabric or sandpaper sheet onto the clay slab. This adds a subtle, stone-like texture that makes the matte finish look even more high-end.
Step 3: Baking and Finishing
-
Arrange for Baking:
Place the beads on a parchment-lined baking sheet. Spread them out so they aren’t touching. -
Bake:
Bake according to your specific brand’s package instructions (usually around 275°F/135°C for 15-30 minutes). Do not bump up the temperature to speed it up, as this can scorch the white clay. -
Cool Down:
Let the beads cool completely on the tray before handling. They are fragile when warm. -
Sand the Edges:
Once cool, lightly sand the sides and corners of the beads under running water with fine-grit sandpaper to remove any fingerprints or sharp cutting burrs.
Step 4: Assembly
-
Plan the Pattern:
Lay your beads out on a table or bead board. The pattern shown uses a repeating sequence: White, Deep Red, White, Pink. Adjust the sequence until the length fits comfortably around your wrist. -
String the Beads:
Cut a piece of elastic cord about 10 inches long. Thread your beads onto the elastic in your chosen order. -
Pre-stretch the Cord:
Before tying, give the elastic a gentle tug to pre-stretch it. This prevents the bracelet from loosening up the first time you wear it. -
Knot Securely:
Tie a surgeon’s knot (right over left, left over right twice). Pull it tight so the beads bundle closely together. -
Glue and Trim:
Add a tiny drop of super glue to the knot. Let it dry for a minute, then trim the excess cord ends closely. If the hole allows, gently pull the knot inside one of the adjacent beads to hide it.
Enjoy wearing your custom-fit bracelet or stacking it with gold bangles for a stylish Valentine’s look
Cupid Arrow-Inspired Stripe Bracelet
This romantic bracelet captures the essence of Valentine’s Day with its deep burgundy, soft pink, and white palette accented by touches of gold. The focal point is a charming gold heart dangle, making it a sweet accessory for date night or a thoughtful handmade gift.
How-To Guide
Materials
- Polymer clay in deep burgundy, white, and dusty pink
- Gold polymer clay or metallic gold beads (spacer discs)
- Gold finish heart charm
- Gold jump rings (4mm and 6mm)
- Gold crimp beads
- Gold lobster clasp and extension chain
- Flexible beading wire (gold or clear)
- Acrylic rolling pin or pasta machine
- Sharp tissue blade
- Needle tool or toothpick
- Baking sheet and parchment paper
- Jewelry pliers (round nose and flat nose)
- Wire cutters
- Gloss glaze (optional)
Step 1: Creating the Clay Beads
-
Condition the Clay:
Begin by conditioning each color of polymer clay—burgundy, white, and pink—separately in your hands until they are soft and pliable. This ensures your beads won’t crack during baking. -
Roll Snakes:
Roll each color into a long, even snake or log. Aim for a thickness of about 4-5mm depending on how chunky you want your beads. -
Add Texture:
For the textured burgundy beads visible in the design, gently roll the clay log over a piece of sandpaper or use a texture sponge to create subtle surface dimples. -
Slice the Discs:
Using your sharp tissue blade, slice the logs into small discs. Vary the thickness slightly; the burgundy beads look best cut into thicker, short cylinders, while the gold spacer beads (if making from clay) should be thinner discs. -
Create Holes:
Use a needle tool or toothpick to pierce a hole through the center of each bead. I find twisting the tool gently as you push through helps keep the bead round. -
Bake the Beads:
Arrrange your beads on a parchment-lined baking sheet. Bake according to the manufacturer’s instructions for your specific brand of clay—usually around 275°F (135°C) for 15-30 minutes. -
Cool Down:
Allow the beads to cool completely before handling. They harden fully as they return to room temperature.
Smooth Edges
If your baked clay discs have rough edges from slicing, gently rub them on denim fabric or very fine-grit sandpaper to smooth them before stringing.
Step 2: Assembling the Bracelet
-
Prepare the Wire:
Cut a length of beading wire approximately 9-10 inches long. This gives you plenty of room to work with the clasp ends. -
Secure the First End:
Thread a crimp bead onto one end of the wire, followed by a jump ring attached to your lobster clasp. Loop the wire back through the crimp bead. -
Crimp:
Use your flat nose pliers to flatten the crimp bead securely, locking the clasp in place. Trim the excess short tail of wire. -
Begin the Pattern:
Start threading your beads. Begin with a repeating segment of burgundy cylinders, white rounds, and gold spacers. Refer to the image to mimic the specific alternating rhythm. -
Design the Focal Point:
As you reach the center, switch to larger dusty pink round beads flanked by grouped gold disc spacers. This visual shift draws the eye to the middle. -
Add the Charm:
In the very center, thread a gold jump ring (with the heart charm pre-attached) onto the wire just like a bead. Flank this charm with white beads to make the gold pop. -
Finish the Pattern:
Continue beading the second half of the bracelet, mirroring the pattern you created on the first half for symmetry. -
Check Length:
Wrap the strand around your wrist to check the fit. Add or remove a few spacer beads at the end if necessary. -
Close the Loop:
Thread a final crimp bead and the jump ring for your extension chain onto the wire. Loop the wire back through the crimp bead and pull tight against the beads (but not too stiff). -
Final Trim:
Flatten the final crimp bead securely with your pliers. Trim the excess wire flush with the crimp bead to finish.
Add a Little Sparkle
Mix a tiny pinch of gold mica powder or glitter into the white clay before rolling it out to give the neutral beads a subtle, pearlescent shimmer.
Now you have a stunning, heartfelt accessory ready to wear or gift to someone special
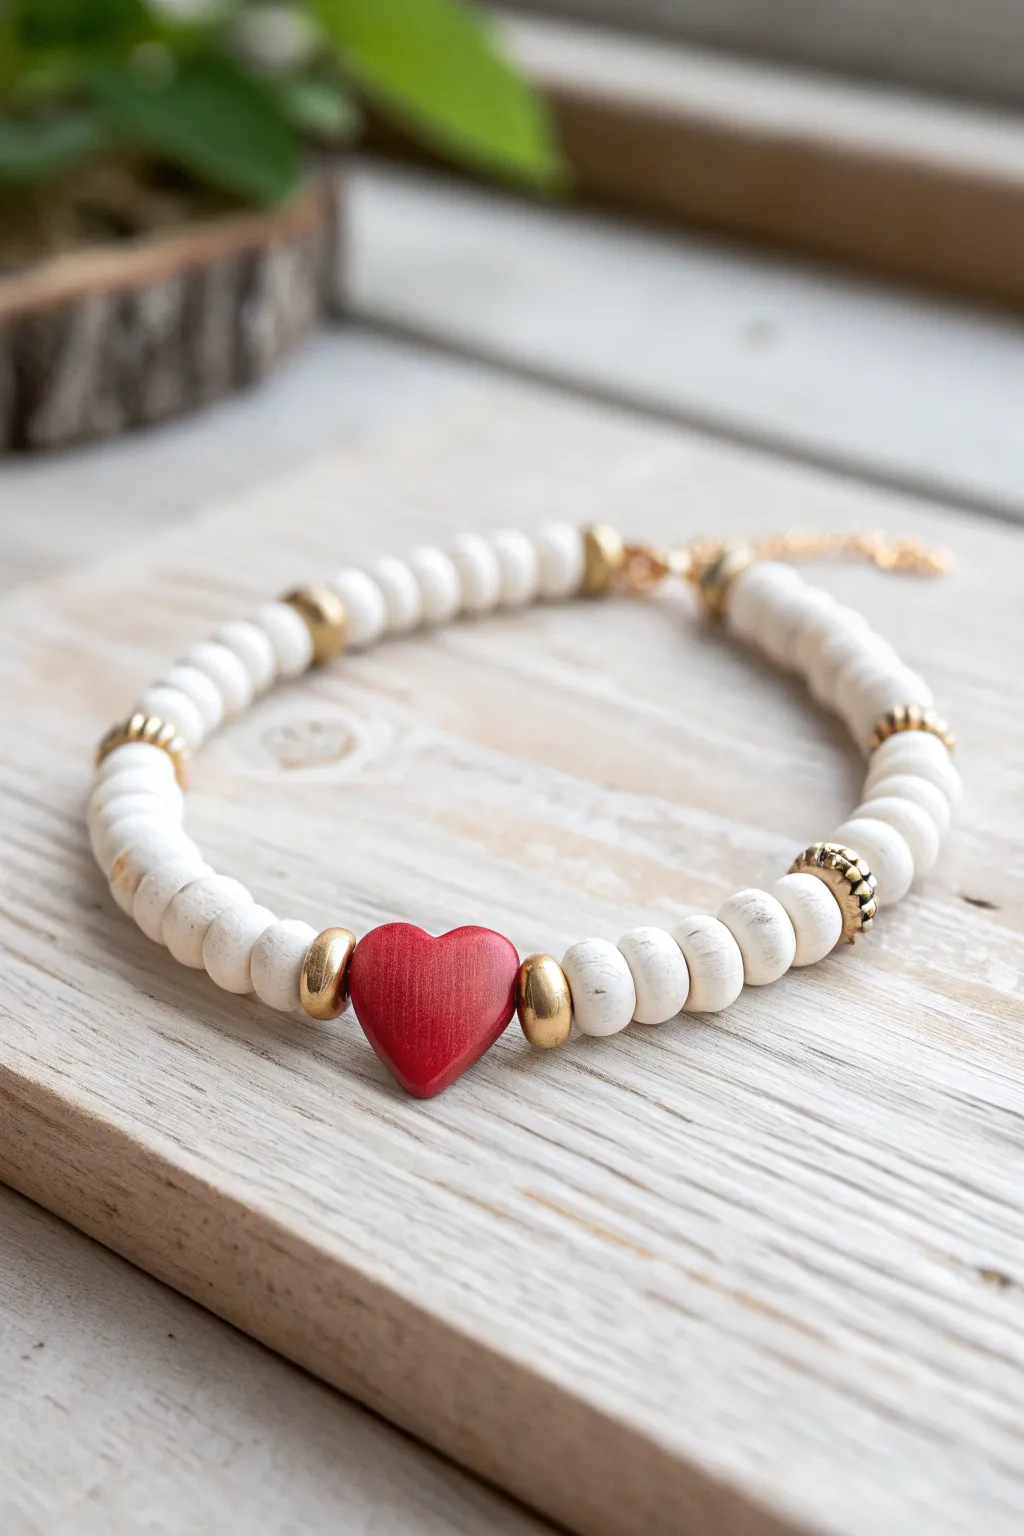
Half-and-Half Split Valentine Bracelet
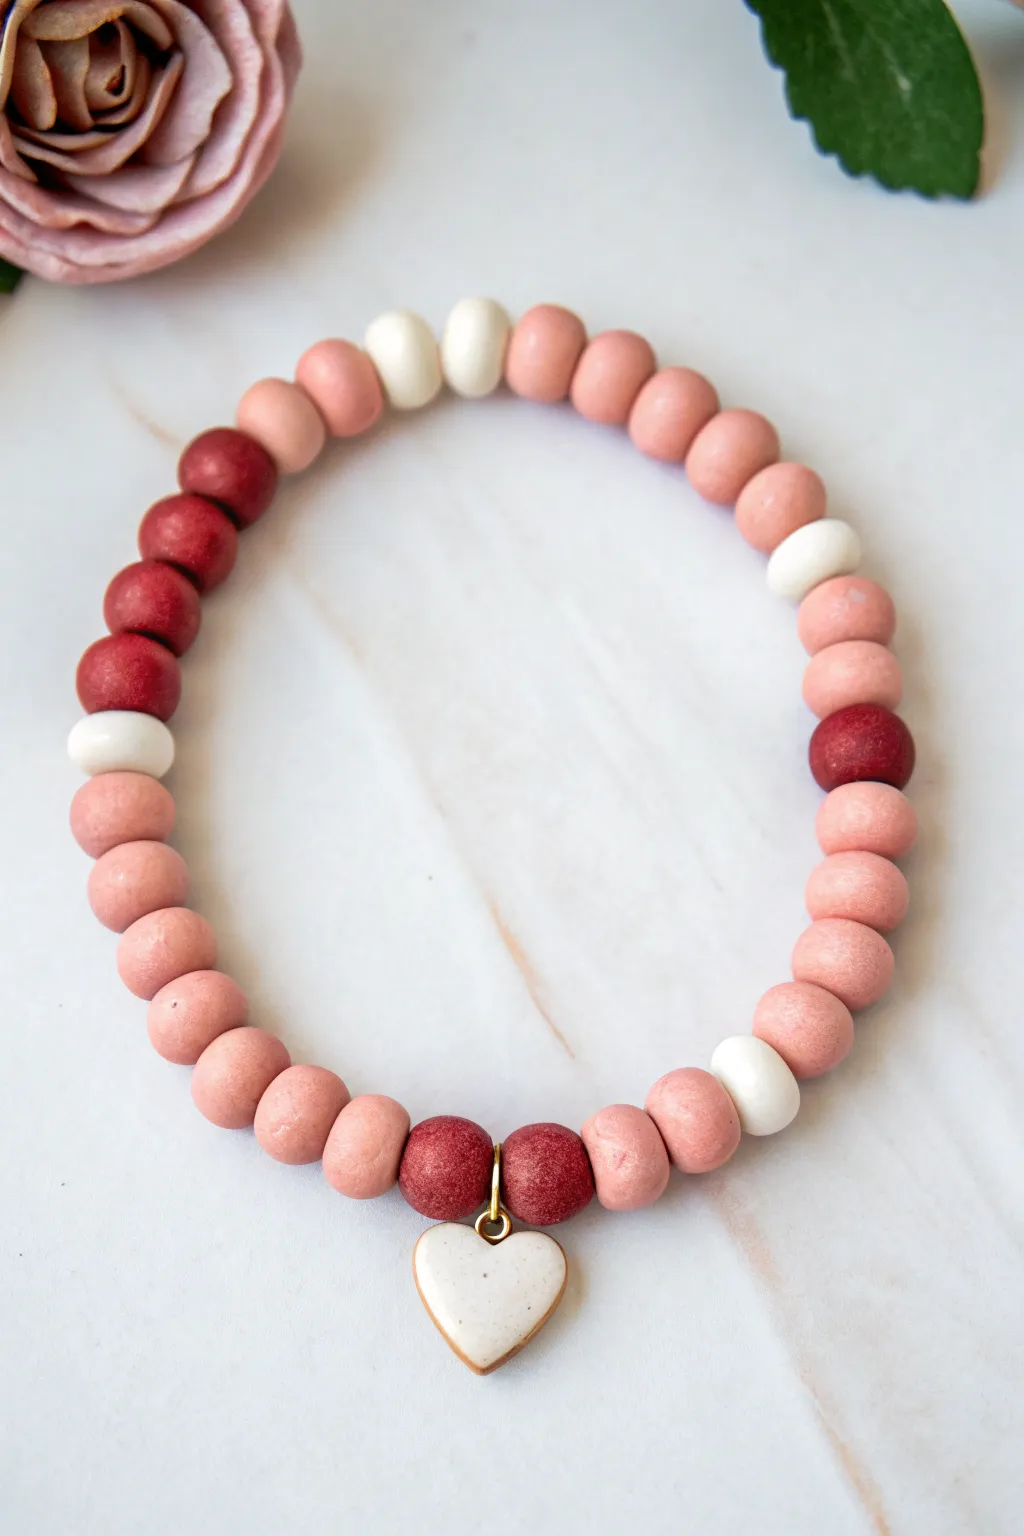
This charming bracelet features a playful half-and-half color block design that balances deep reds with soft blushes. Centered with a sweet ceramic heart charm, it’s a perfect subtle nod to Valentine’s Day that can be worn all year round.
Detailed Instructions
Materials
- Polymer clay in deep red (burgundy), medium pink, light pink, and white
- Gold heart charm with a white enamel center
- Small gold jump ring (4-6mm)
- Strong elastic cord (0.8mm or 1mm)
- Bead roller tool (optional but helpful for consistent sizing)
- Super glue or jewelry cement
- Toothpicks or a bead piercing pin
- Oven for baking
- Baking sheet with parchment paper
- Scissors
Step 1: Creating the Clay Beads
-
Prepare the colors:
Condition your polymer clay by kneading each color separately until soft and pliable. You will need four distinct colors: a deep burgundy red, a medium rose pink, a pale blush pink, and pure white. -
Portion the clay:
Pinch off small pieces of clay to form the beads. Aim for pieces that are roughly the size of a pea. Keeping the portions consistent now will ensure your finished bracelet looks uniform. -
Roll the beads:
Roll each piece of clay between your palms or use a bead roller to create smooth, round spheres. You’ll need roughly 10-12 medium pink/blush beads, 6-8 deep red beads, and 4 white beads. -
Pierce the holes:
Gently insert a toothpick or bead piercing pin through the center of each sphere. Use a twisting motion to avoid squashing the round shape. Make sure the hole is wide enough for your elastic cord to pass through easily. -
Bake the beads:
Arrange the pierced beads on a parchment-lined baking sheet. Bake them according to the temperature and time instructions on your specific brand of polymer clay (usually around 275°F/135°C for 15-30 minutes). -
Cool down:
Once baked, remove the tray from the oven and let the beads cool completely before handling them. They will harden as they cool.
Uneven Bead Holes?
If your bead holes shrank during baking, use a small hand drill or a bead reamer to widen them carefully without cracking the baked clay.
Step 2: Pattern and Assembly
-
Cut the cord:
Cut a length of elastic cord about 10-12 inches long. This gives you plenty of extra room for tying knots without struggling. -
Pre-stretch the elastic:
Give the cord a few firm tugs. This pre-stretches the material so your bracelet won’t sag or loosen up after the first few wears. -
Start the center sequence:
Thread two deep red beads onto the middle of the cord. Between these two beads, slide on the gold jump ring attached to your heart charm so it hangs directly in the center. -
Build the right side:
On the right side of the red center beads, thread on roughly 6-7 beads of the medium pink shade. Use a mix of slightly lighter and darker pinks if you have them for texture. -
Add accent beads:
After the pink section, add one white bead followed by a single deep red bead to create a visual break. -
Build the left side:
Repeat the process on the left side of the charm: thread 6-7 medium pink beads, followed by one white accent bead. -
Finish the back:
Complete the circle by adding one section of deep red beads (about 4-5 beads) and two white accent beads near the back to balance the design. -
Check the fit:
Wrap the strand around your wrist to check the size. Add or remove a bead from the back section if it feels too tight or too loose. -
Tie the knot:
Tie a standard square knot (right over left, left over right). Pull the elastic tight so the knot is secure and the beads sit snugly against each other. -
Secure with glue:
Place a tiny dab of super glue or jewelry cement directly onto the knot. I find using a toothpick to apply the glue helps avoid getting it on the beads. -
Hide the knot:
Before the glue fully dries, gently pull the knot inside the hole of the nearest bead to hide it. -
Trim excess:
Once the glue is completely dry, snip off the excess elastic cord tails close to the bead.
Smoother Bead Finish
For a pro finish, lightly sand your baked beads with fine-grit sandpaper under running water to remove any fingerprints before stringing.
Now you have a lovely handmade accessory ready to stack or gift just in time for the holiday
Galentine’s Matching Bestie Bracelets
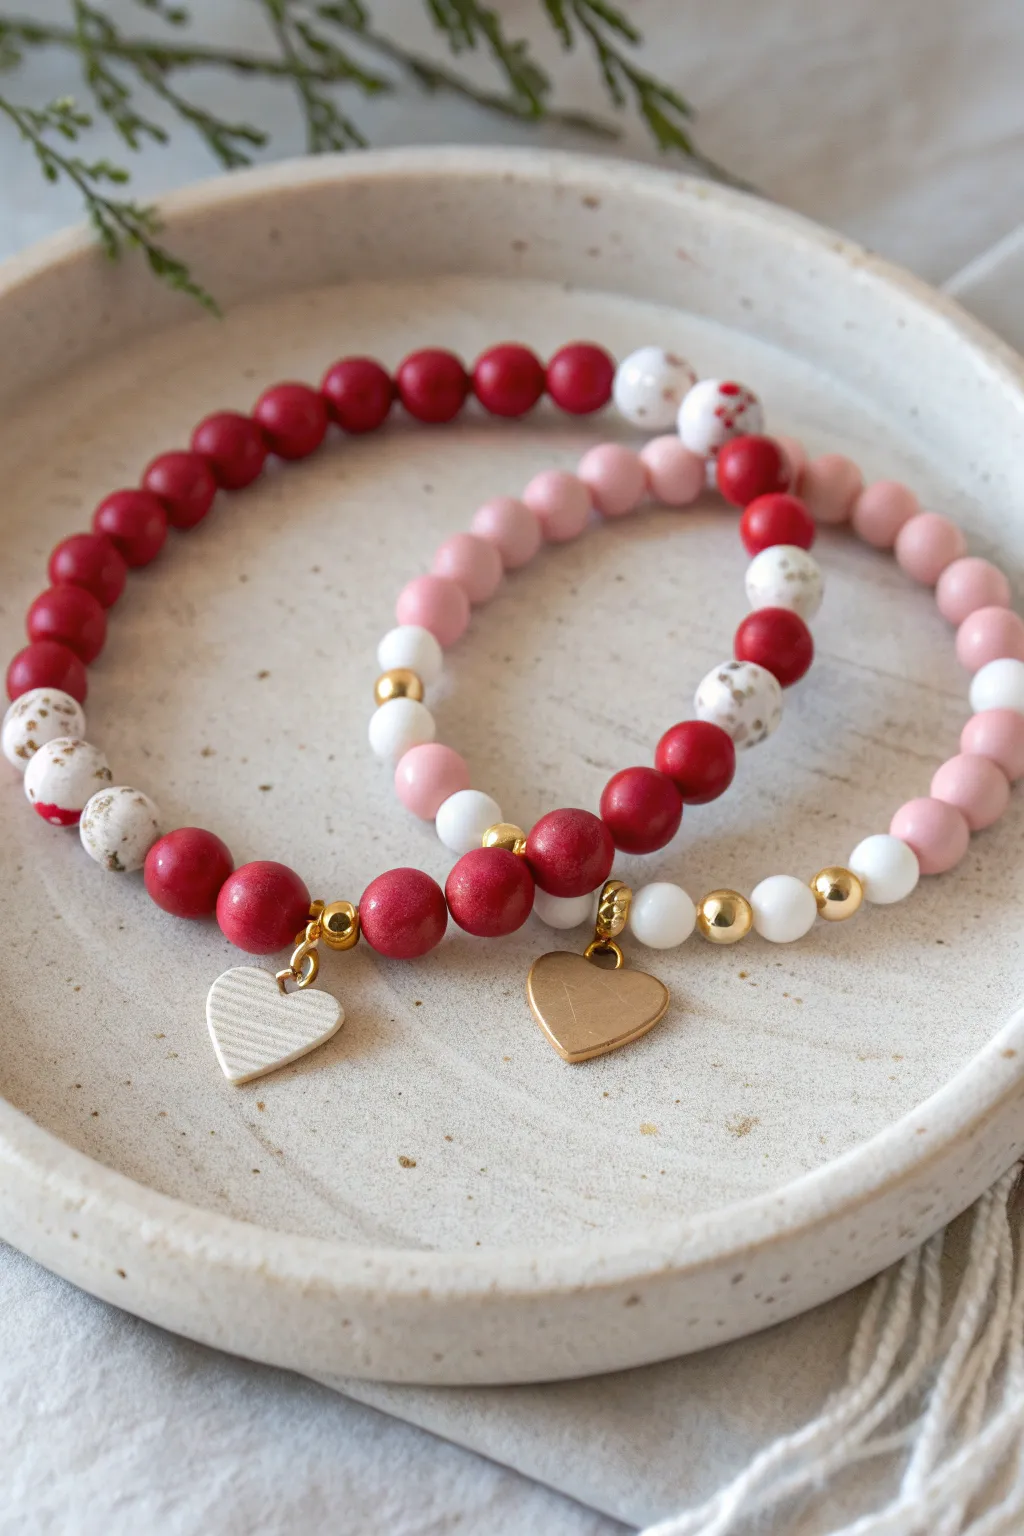
These charming matching bracelets feature polymer clay beads in romantic shades of red, pink, and white, accented with delicate gold touches. Finished with sweet heart charms, they make the perfect handmade gift to celebrate friendship or love.
Step-by-Step Tutorial
Materials
- Polymer clay beads (6mm or 8mm) in deep red, soft pink, and white
- Specialty beads: White with gold speckles, white with red speckles, red with gold speckles
- Gold spherical spacer beads (3mm or 4mm)
- Small heart charms (one white/striped, one gold)
- Gold jump rings
- Elastic stretch cord (0.8mm recommended)
- Jewelry adhesive or clear nail polish
- Scissors
Step 1: Planning & Design
-
Measure your wrist:
Wrap a piece of string around your wrist to find the desired length. Add about 0.5 inches to this measurement for a comfortable fit, then cut a piece of elastic cord about 3-4 inches longer than that total length to give yourself room to tie knots. -
Pre-stretch the cord:
Hold both ends of your cut elastic cord and give it a few firm (but gentle) tugs. This pre-stretching helps prevent the bracelet from loosening up immediately after you wear it for the first time. -
Layout the Red Bracelet pattern:
For the primarily red bracelet, arrange your beads on a bead board or soft cloth. Start with a solid block of deep red beads (approx. 10-12 beads). Then, transition into a pattern using white-with-gold-speckles beads and solid reds. -
Add accent details:
Plan the focal point where the charm will hang. Using three deep red beads, place two small gold spacer beads between them to frame the center bead. This creates a distinct section for attaching your white heart charm later. -
Layout the Pink Bracelet pattern:
For the pink ‘bestie’ version, lay out a long section of soft pink beads. Create a variegated look on the opposite side by alternating white beads, red beads, and speckled white beads to add visual interest. -
Create the gold focal point:
Design the center of the pink bracelet by placing two gold spacer beads flanking a single red bead or white bead, or simply place them next to each other to anchor the gold heart charm. I find placing spacers directly next to the charm loop protects the clay beads.
Step 2: Assembly
-
Start stringing:
Begin threading your beads onto the elastic cord. Using a bead stopper or simply taping one end of the cord to your table can save you from the heartbreak of dropped beads. -
Double-check the length:
Once all beads are strung, carefully wrap the strand around your wrist to check the fit. It should sit comfortably without pinching or gaps. Add or remove a bead or two if necessary. -
Attach the charms:
Open a gold jump ring using two pairs of pliers (twist the ring open sideways, don’t pull it apart). Slide on your heart charm. -
Secure the charm to the bracelet:
Locate the focal section you designed with the gold spacers. Loop the jump ring around the elastic cord between the designated spacer beads and close the jump ring securely.
Knot Security Tip
Use a flexible jewelry glue like G-S Hypo Cement. Unlike super glue, it stays slightly flexible when dry, preventing the elastic from becoming brittle and snapping.
Step 3: Finishing
-
Tie the initial knot:
Bring both ends of the elastic together. Tie a simple overhand knot, pulling it tight against the beads so there is no slack. -
Secure with a surgeon’s knot:
Follow up with a surgeon’s knot: cross the threads, loop one end through the circle twice instead of once, and pull tight. This extra loop adds significant security similar to a professional finish. -
Apply adhesive:
Place a tiny drop of jewelry glue or clear nail polish directly onto the knot. Let this dry completely before moving it; this prevents the slick elastic from untying itself. -
Hide the knot:
Once the glue is dry, trim the excess cord ends close to the knot (but not too close!). Gently pull the bracelet so the knot slides inside the hole of a neighboring bead to hide it from view.
Make It Personal
Swap out the solid heart charms for initial letter charms or add tiny gold alphabet beads to spell out ‘BFF’ or ‘LOVE’ within the bead sequence.
Now you have a beautiful set of custom bracelets ready to wear or share with your favorite person
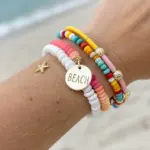
Personalized Initial Bracelet With a Heart Divider
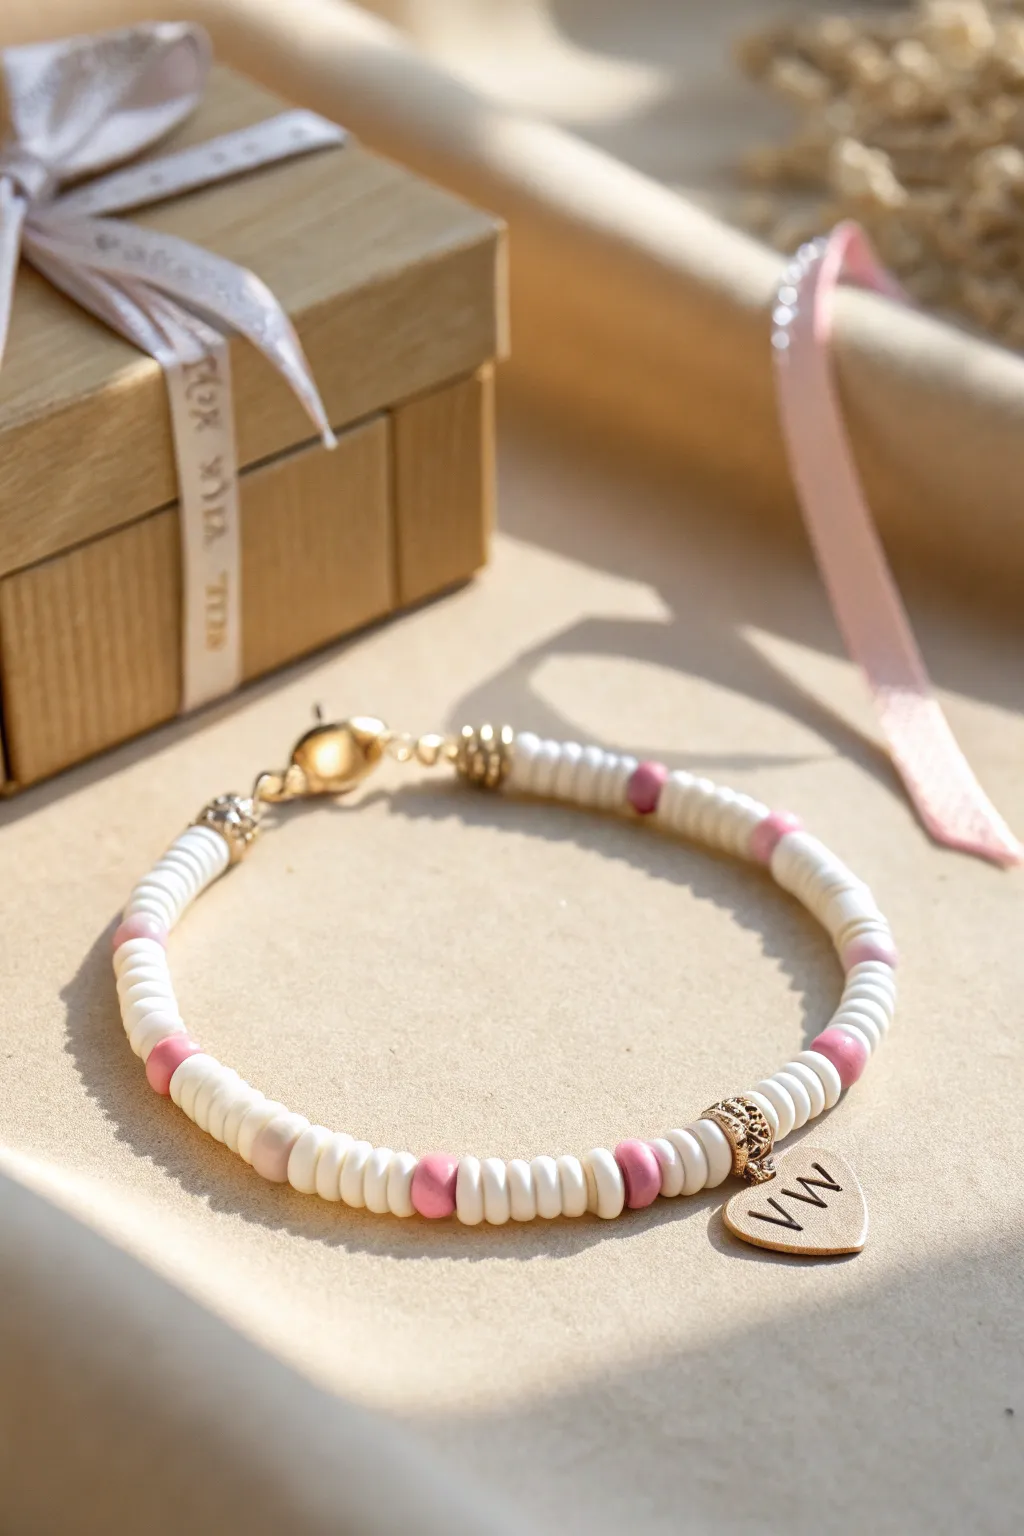
This elegant bracelet balances playful pink and white clay heishi beads with the sophisticated touch of gold hardware. A hammered heart charm bearing stamped initials serves as the romantic focal point, making it a perfect customized gift for Valentine’s Day.
How-To Guide
Materials
- White polymer clay heishi beads (6mm)
- Pink polymer clay heishi beads (6mm or 4mm round)
- Gold-plated hammered heart charm blank
- Metal alphabet stamps (uppercase)
- Black enamel marker or acrylic paint
- Gold ornate spacer beads or bead caps (approx. 4-6mm)
- Gold crimp beads
- Gold jump ring (jump ring opener optional)
- Gold lobster claw clasp
- Clear elastic beading cord (.8mm) or beading wire
- Jewelry pliers (flat nose and cutters)
- Hammer and steel bench block
Step 1: Stamping the Charm
-
Prepare the workspace:
Place your steel bench block on a sturdy, flat surface. Remove any protective film from your gold heart charm blank and tape it securely to the block using masking tape to prevent it from jumping when struck. -
Align the letters:
Select your desired initial stamps (e.g., ‘V’ and ‘W’). Hold the first stamp vertically over the charm, double-checking that the letter is facing the correct direction. -
Strike the stamp:
Give the top of the stamp a firm, confident strike with your hammer. Do not double-bounce the hammer, as this creates a ‘ghost’ image. Repeat for the second initial. -
Darken the impressions:
Use a black enamel marker or a bit of black acrylic paint to fill in the stamped grooves. Wipe away the excess immediately with a paper towel, leaving the dark color only inside the letters for contrast.
Step 2: Stringing the Design
-
Measure the cord:
Cut a piece of beading wire or elastic cord about 9 inches long. This gives you plenty of extra room to work with the ends. -
Secure the first end:
If using beading wire, thread a crimp bead and one half of the clasp onto the wire. Loop the wire back through the crimp bead and use flat nose pliers to flatten the crimp securely. -
Start with gold accents:
Thread on one gold ornate spacer bead immediately after the clasp to give the closure a professional finish. -
Begin the white section:
String approximately 10 to 12 white heishi beads. I like to check the length against my wrist periodically to ensure the proportions feel right. -
Add the first pink accent:
Add a single pink bead. In the example, these pink beads are slightly rounder than the flat white discs, adding a nice textural variation. -
Create the pattern:
Repeat the pattern of stringing sections of white heishi beads separated by single pink beads until you reach the center point of the bracelet. -
Assemble the focal point:
Slide on a gold ornate spacer bead, followed by the heart charm (attached via its jump ring), and then a second gold ornate spacer bead to frame the charm symmetrically. -
Finish the beadwork:
Continue your pattern—sections of white beads separated by single pink beads—down the other side until the bracelet reaches the desired length. -
End with symmetry:
Finish the strand with one final gold ornate spacer bead to mirror the beginning.
Stamp Straight Every Time
Place a piece of masking tape horizontally across the charm as a guide. Rest the bottom of your stamp against the tape edge to ensure your letters are perfectly aligned.
Step 3: Final Assembly
-
Attach the closure:
Thread a crimp bead and the jump ring (or the other half of the clasp) onto the wire. -
Loop and tighten:
Feed the wire tail back through the crimp bead and through the last few beads on your strand. Pull the wire until the loop is small but allows the clasp to move freely. -
Secure the crimp:
Use your flat nose pliers to flatten the final crimp bead tightly. -
Trim excess wire:
Using your wire cutters, trim the excess wire tail as close to the beads as possible without cutting your main strand. -
Inspect the charm:
Ensure the jump ring holding the heart charm is fully closed. If there is a gap, use two pairs of pliers to twist it shut so the charm doesn’t slip off.
Uneven Bead Tension?
If the bracelet feels stiff, your crimping is too tight. Leave a tiny bit of slack (about 1-2mm) of exposed wire before crimping to allow the beads to drape naturally.
Slip this personalized beauty onto your wrist or wrap it up in a box like the one shown for a heartfelt gift.