When I’m in a grunge clay mood, I’m chasing texture, grime, and that perfectly “found object” vibe—not anything too neat or precious. These ideas are all about dark palettes, distressed surfaces, and edgy little details that make your clay pieces feel raw and lived-in.
Blackwashed Star Pendants
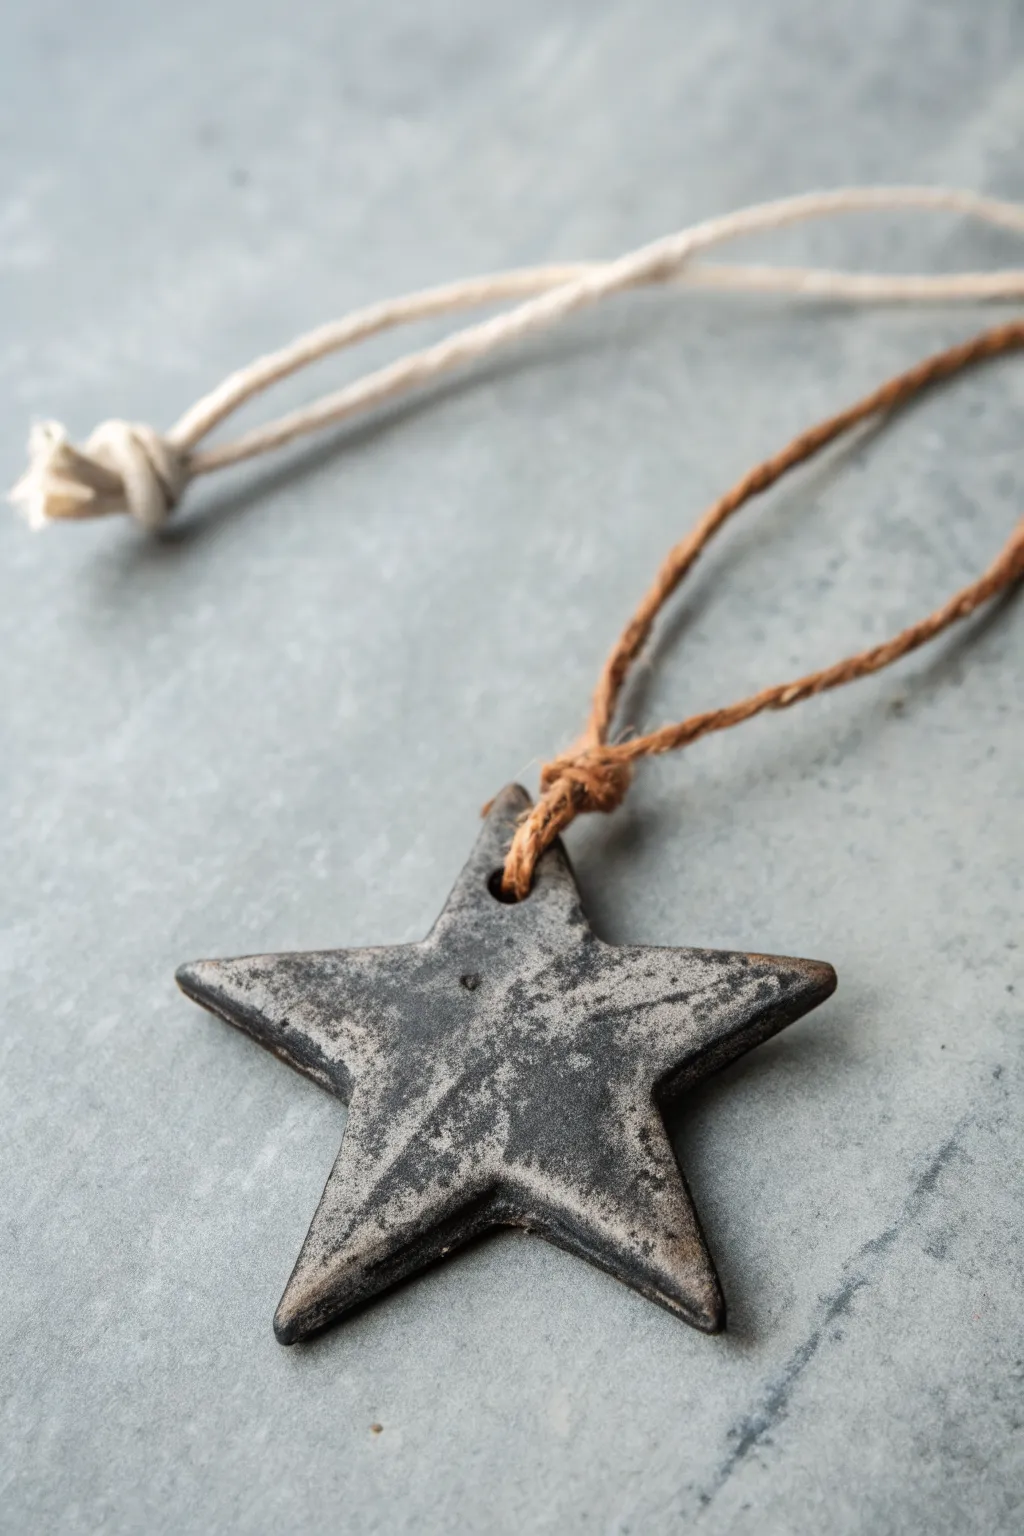
Embrace the beauty of imperfection with these tactile star pendants featuring a moody, distressed finish. The blackwashed effect settles into every nook and cranny, creating a timeless, weathered look perfect for holiday décor or year-round grunge aesthetics.
Step-by-Step
Materials
- Air-dry clay (grey or white preferred)
- Star-shaped cookie cutter
- Rolling pin
- Parchment paper or canvas mat
- Sanding sponge (medium grit)
- Black acrylic paint
- Paper towels or cotton rags
- Small paintbrush
- Straw or toothpick (for hole punching)
- Natural jute twine or hemp cord
- Matte varnish (optional)
Step 1: Shaping the Base
-
Condition the clay:
Begin by taking a handful of air-dry clay and kneading it in your hands to warm it up. This conditioning process helps prevent cracks later on. -
Roll out the slab:
Place your clay on a piece of parchment paper or a canvas mat. Roll it out to a thickness of about 1/4 inch (6mm). Avoid going too thin, as we want the pendant to have a substantial, sturdy feel. -
Cut the shape:
Press your star-shaped cookie cutter firmly into the clay. Give it a tiny wiggle before lifting it up to ensure clean edges. -
Add texture:
Before the clay hardens, use your fingers to gently soften and taper the edges of the star from the center outwards. This creates that slightly domed, handmade look rather than a flat, factory-made cutout. -
Create the hole:
Use a straw to punch a hole in one of the star’s points. Position it far enough from the edge so the clay won’t break under the weight of the twine. -
Dry completely:
Set the stars aside on a flat surface to air dry. This typically takes 24-48 hours depending on humidity. Flip them over halfway through to ensure even drying.
Paint won’t wipe off?
If your acrylic paint dries too fast and won’t wipe away cleanly, slightly dampen your rag with water. This reactivates the top layer, allowing you to lift the pigment.
Step 2: Distressing and Finishing
-
Sand the surface:
Once bone dry, take a medium-grit sanding sponge and vigorously sand the surface. Focus on the edges and raised areas to create varied texture. -
Create the wash:
Mix a small amount of black acrylic paint with water. You want a very watery consistency, similar to ink or strong coffee, rather than thick paint. -
Apply the base coat:
Generously brush the watered-down black paint over the entire star. I usually work quickly here so the paint doesn’t dry before the next step. -
Wipe back:
Immediately use a crumpled paper towel or rag to wipe the wet paint off the surface. The black pigment will remain in the textures and pores, while the raised areas will reveal the lighter clay underneath. -
Layering nuance:
If the contrast feels too stark, dab a tiny amount of almost-dry black paint onto a sponge and lightly pat specific areas to add more grunge. -
Dry the paint:
Let the paint dry completely. Because it’s a wash, this should only take about 15-20 minutes. -
Optional sealing:
For longevity, you can apply a coat of matte varnish. Avoid glossy finishes if you want to maintain that raw, organic appearance. -
Stringing:
Cut a length of natural jute twine or hemp cord. Fold it in half and thread the loop through the hole in the star. -
Knotting:
Pass the loose ends of the twine through the loop and pull tight to secure it with a lark’s head knot. -
Final connection:
Tie the two loose ends of the twine together in a simple overhand knot to create the hanging loop.
Level Up: Metallic hint
After the blackwash dries, encourage a vintage metal look by dry-brushing the tiniest amount of bronze or copper paint just on the very tips of the star points.
Hang your finished stars on a branch or use them as unique gift tags for a personalized touch


Spiral Swirl Earrings With Grit
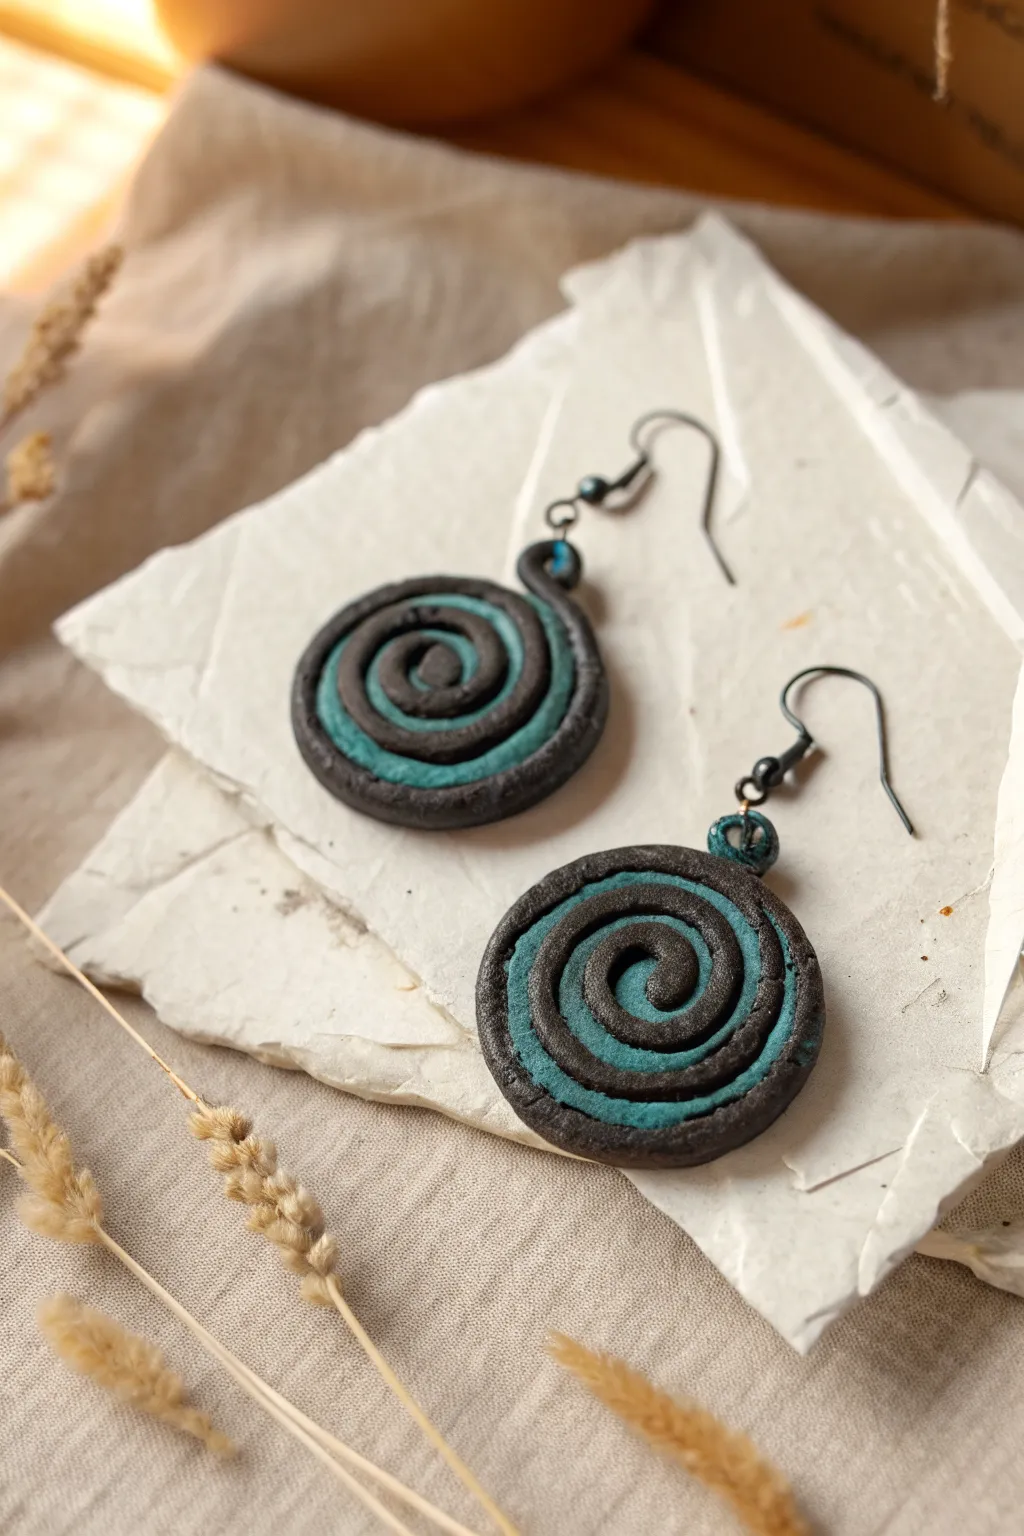
These spiral earrings combine a raw, earthen texture with a striking pop of teal to create a perfect grunge aesthetic. The organic finish and imperfect coil give them a handmade, ancient artifact vibe that pairs beautifully with casual wear.
Detailed Instructions
Materials
- Black polymer clay
- Teal or turquoise polymer clay
- Coarse salt or sandpaper (for texturing)
- Clay roller or pasta machine
- Sharp clay blade
- Small round cutter (optional)
- Eye pins (black or gunmetal finish)
- Earring hooks (black or gunmetal finish)
- Needle tool or toothpick
- Needle-nose pliers
- Oven for baking
Step 1: Creating the Clay Cane
-
Condition the Clay:
Start by kneading both the black and teal clay separately until they are soft, warm, and pliable. This prevents cracking later on. -
Roll Out Sheets:
Flatten the black clay into a sheet about 3mm thick. Do the same for the teal clay, making it slightly thinner than the black layer. -
Layer the Colors:
Place the teal sheet directly on top of the black sheet. Use your roller to gently press them together so they adhere without trapping air bubbles. -
Trim the Edges:
Use your sharp blade to cut the layered stack into a clean rectangle. This ensures your spiral starts and ends neatly. -
Start the Roll:
Begin rolling the clay stack from one short edge, rolling it up tightly like a jelly roll or sleeping bag. Keep the pressure even. -
Compress and Reduce:
Gently roll the resulting log back and forth on your work surface to elongated it slightly and ensure the layers are bonded tight.
Clean Cuts Only
Chill your clay log in the fridge for 20 minutes before slicing. Cold clay is much firmer, ensuring your spiral pattern doesn’t get squashed or distorted.
Step 2: Shaping and Texturing
-
Slice the Discs:
Using your sharp blade, cut two slices from the log, each about 4-5mm thick. These will be your earring bases. -
Refine the Shape:
Gently press the sides of the discs to ensure they are round. If the spiral separated slightly, press the coils back together gently. -
Check the Back:
Inspect the back of each disc. If necessary, smooth out the seams where the coil creates ridges, or leave it rough for extra grunge appeal. -
Add Texture:
To achieve that gritty look, lightly press coarse salt onto the surface or tap the clay gently with a piece of rough sandpaper. I prefer using an old toothbrush for a subtle stipple effect. -
Create the Connector Bead:
Take a very small scrap of the mixed clay or just black clay, roll a tiny ball, and press it onto the top edge of the main spiral disc to act as the connector point. -
Details on the Connector:
You can add a tiny speck of teal to this connector bead to tie the design together visually.
Fixing Smudges
If black clay smudges onto the teal areas while working, use a Q-tip dipped in rubbing alcohol or nail polish remover to gently wipe the surface clean before baking.
Step 3: Assembly and Baking
-
Pierce the Clay:
Insert an eye pin through the small connector bead at the top, pushing it deep enough into the main spiral for stability. -
Secure the Pin:
If the pin feels loose, you can add a drop of liquid clay or bake-and-bond to the shaft before inserting it. -
Bake the Pieces:
Place the earrings on a ceramic tile or baking sheet. Bake according to your polymer clay package instructions (usually around 275°F/135°C for 15-30 minutes). -
Cool Down:
Allow the earrings to cool completely inside the oven or on the tray. The clay hardens fully only after cooling. -
Attach Hardware:
Use pliers to open the loop on your earring hook. Slide it onto the eye pin loop extending from the clay. -
Close the Loop:
Twist the earring hook loop closed securely. Double-check that all connections are tight before wearing.
Enjoy wearing these distinctively edgy earrings or gift them to a friend who loves unique accessories


Chunky Distressed Signet Rings
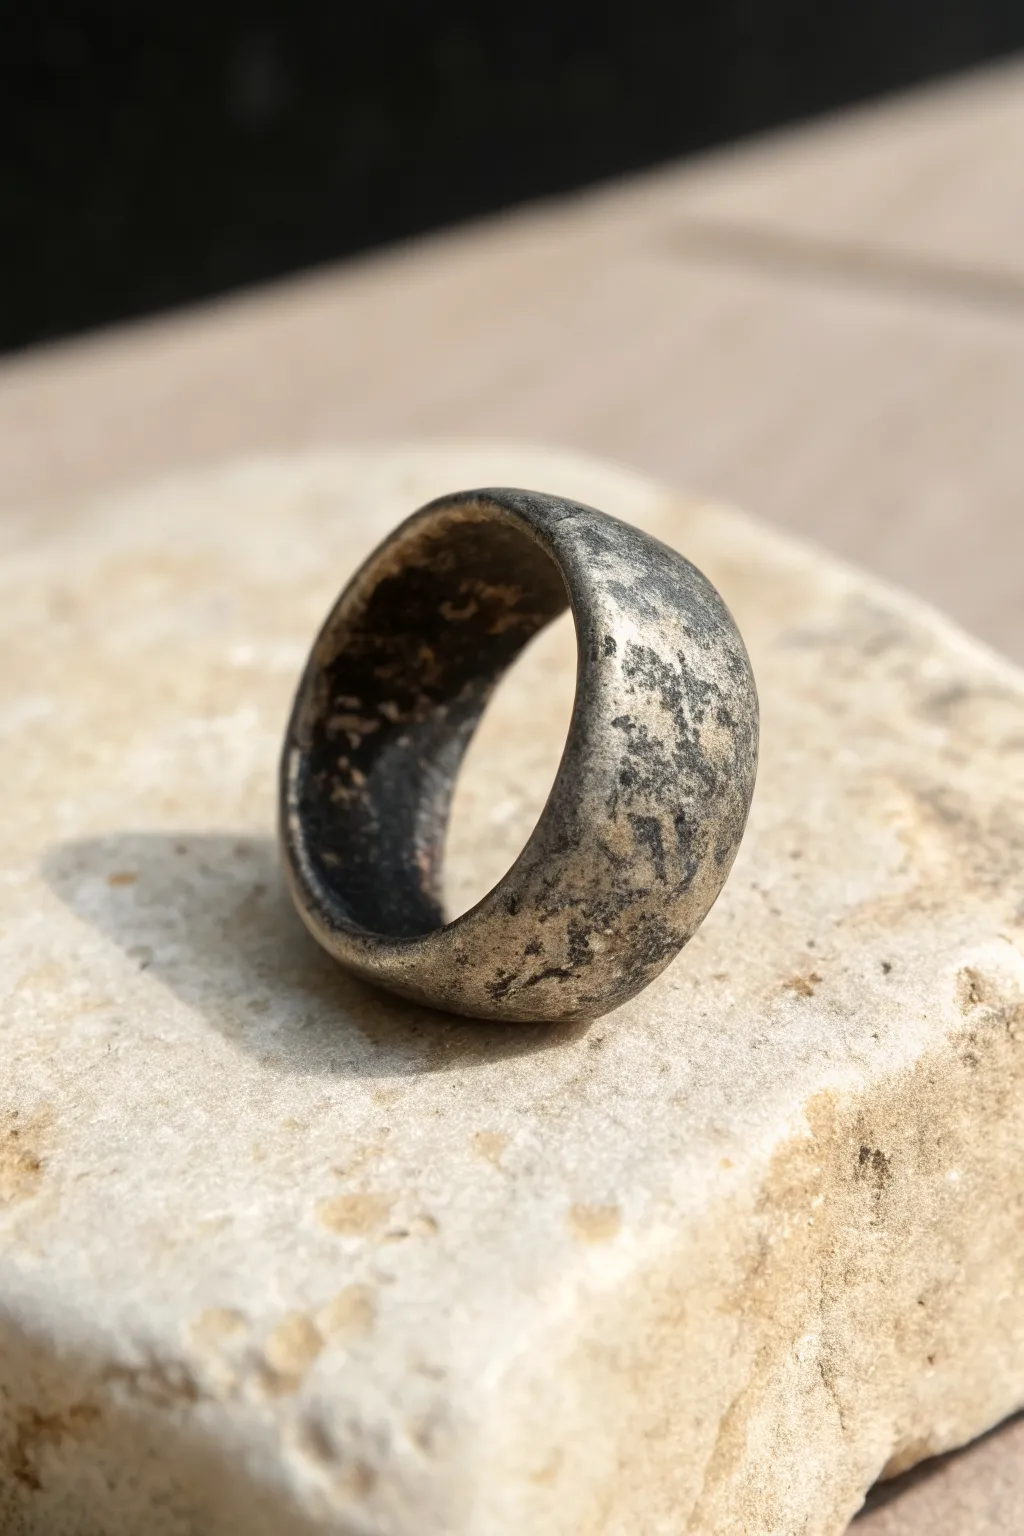
Capture the essence of an ancient, dug-up artifact with this rugged clay project. By combining polymer clay with strategic distressing techniques, you’ll create a chunky band that mimics the look of heavily oxidized silver or iron.
Step-by-Step
Materials
- Silver or grey metallic polymer clay
- Black acrylic paint
- Small paintbrush
- Paper towels or cotton rags
- Coarse sandpaper (80-100 grit)
- Fine sandpaper (400 grit)
- Needle tool or toothpick
- Rolling pin or pasta machine
- Ring mandrel (metal or DIY paper tube)
- Clay blade
- Oven for baking
Step 1: Shaping the Base
-
Condition the clay:
Start by warming the metallic grey polymer clay in your hands. Knead it thoroughly until it is pliable and soft, ensuring there are no air bubbles trapped inside. -
Form a thick snake:
Roll the conditioned clay into a thick log or cylinder. For that chunky signet look, aim for a diameter of about 3/4 of an inch, though you can adjust this based on your preference. -
Flatten deeply:
Using a roller, flatten the log into a thick strip. You want considerable bulk here, roughly 4-5mm thick, to give the ring its heavy, industrial feel. -
Trim edges:
Use your clay blade to trim the long edges of the strip. Don’t worry about making them perfectly straight; a little waviness adds to the hand-forged aesthetic. -
Size the band:
Wrap the strip around your ring mandrel at the desired size mark. Cut the excess clay where the ends meet, leaving just a tiny bit of overlap for joining.
Paint Won’t Stick?
If the acrylic paint beads up on the baked clay, lightly sand the surface first to tackle the glossy finish, or mix a tiny drop of dish soap into your paint.
Step 2: Texturing and Baking
-
Seam the ends:
Press the cut ends together firmly on the mandrel. Use a modeling tool or your fingertip to smudge the clay across the seam until it disappears completely. -
Rough initial texture:
While the clay is still on the mandrel, take a piece of coarse sandpaper. Press it firmly against the surface of the ring to imprint a grainy, pitted texture. -
Add deep scratches:
Use a needle tool to drag random, deep scratches across the surface. Focus on the edges and the ‘face’ of the ring to simulate wear and tear from years of use. -
Soften the edges:
Gently tap the edges of the ring with your finger or a flat tool to round them slightly. We want the ring to look worn down, not freshly cut. -
Bake the form:
Bake the ring according to the clay manufacturer’s instructions (usually 275°F/135°C for 15-30 minutes). Let it cool completely before removing it from the mandrel.
Ancient Artifact
Mix a tiny amount of teal or rusty orange paint into your black wash. This simulates copper oxidation (verdigris) or iron rust for an even older look.
Step 3: The Antiquing Process
-
Apply the wash:
Coat the entire cooled ring with a generous layer of black acrylic paint. I like to really work the paint into all the scratches and pitted areas we created earlier. -
Wait briefly:
Let the paint sit for about 30 to 60 seconds. You want it to start setting slightly but not dry completely. -
Wipe back:
Using a slightly damp paper towel or rag, wipe away the surface paint. The black should remain trapped in the deep textures, while the metallic clay shines through on the high points. -
Second pass (optional):
If you want a grungier look, repeat the paint and wipe process, focusing heavily on the inside of the band and the deep crevices. -
Distress with sanding:
Once the paint is fully dry, take your fine-grit sandpaper and lightly buff the high points of the ring. This removes any paint film and brings back the brightness of the faux metal. -
Final heavy scarring:
For that ultimate beaten metal look, take a coarse rock or concrete block and rub the finished ring against it vigorously to create fresh, realistic scuffs.
slip on your new rugged accessory and enjoy the weight of your handcrafted antiquity


Ceramic-Effect Grunge Beads
These perfectly imperfect beads mimic the raw, textured appeal of aged ceramic or weathered stone without the need for a kiln. Using polymer clay and a unique texturing technique, you’ll create an earthy, distinctively grunge accessory that feels ancient and modern all at once.
Step-by-Step
Materials
- Polymer clay (white, beige, sage green, terracotta)
- Coarse black pepper or dried coffee grounds
- Sandpaper (coarse grit and fine grit)
- Acrylic paints (brown, black, antique white)
- Baking soda
- Bead piercing pins or toothpicks
- Small paintbrush or sponge
- Oven for baking
- Paper towels
- Sealant (matte varnish, optional)
Step 1: Preparing the Clay Base
-
Condition and Mix:
Start by conditioning your polymer clay blocks until they are soft and pliable. You want a mix of natural tones, so create custom shades by mixing white with small amounts of beige, sage green, or terracotta until you have a palette that mimics natural stone. -
Add Texture Elements:
To get that speckled, organic look right from the start, flatten your clay and sprinkle coarse black pepper or dried coffee grounds onto it. Fold the clay over and knead it until the specks are distributed evenly throughout the material. -
Forming the Beads:
Pinch off small, equal-sized portions of the clay. Roll each piece between your palms to create round spheres. Don’t worry about making them perfectly spherical; a little irregularity adds to the hand-rolled ceramic feel. -
Creating the Holes:
Carefully pierce each bead with a bead pin or toothpick. Twist the pin gently as you push through to avoid squashing the bead’s shape. I like to pierce from one side halfway, then switch to the other side to meet in the middle for a cleaner hole.
Uneven Color?
If your paint wash stains the clay too heavily, try wiping the bead with a baby wipe instead of water. The slight alcohol content lifts acrylic paint better from polymer surfaces.
Step 2: Texturing and Baking
-
Roughing the Surface:
Before baking, roll your unbaked beads gently over coarse grit sandpaper or a textured fabric. This imitates the pitted surface of raw ceramic. -
Baking Soda Treatment:
For a chalkier, more matte texture, you can lightly dust the raw beads in baking soda. Brush off the excess so just a fine film remains in the crevices. -
Baking:
Arrange your beads on a baking sheet or bead rack. Bake according to your clay manufacturer’s instructions—usually around 275°F (135°C) for 30 minutes. Let them cool completely before handling.
Ancient Artifact Look
Mix baking soda directly into your acrylic paint wash. When it dries, it creates a crusty, oxidative effect that looks like calcification on ancient pottery.
Step 3: The Grunge Finish
-
Applying the Wash:
Mix a small amount of brown or black acrylic paint with water to create a thin, runny wash. Paint this liberally over the cooled beads, ensuring it gets into every pit and texture mark you created earlier. -
Wiping Back:
Immediately after applying the wash, use a damp paper towel to wipe the surface paint away. The dark pigment will stay trapped in the texturing and pepper specks, instantly aging the bead. -
Adding Dimension:
If the beads look too dark, you can dry-brush a tiny amount of antique white or lighter beige over the raised areas. This highlights the texture and mimics the look of worn stone. -
Sanding for Feel:
Once the paint is dry, lightly sand the beads again with fine-grit sandpaper. This removes any rough paint ridges and gives the beads a smooth, worn-in feeling typical of old rosaries or worry beads. -
Final Sealing:
The grunge look often benefits from a matte finish. Apply a very thin coat of matte varnish to protect the paint without adding unnatural shine, or leave them raw if you prefer the stony texture. -
Stringing:
String your finished beads onto your cord of choice, perhaps knotting between them to prevent rubbing and to enhance the rustic aesthetic.
Now you have a set of beads that look like they were unearthed from an archaeological dig rather than your oven

The Complete Guide to Pottery Troubleshooting
Uncover the most common ceramic mistakes—from cracking clay to failed glazes—and learn how to fix them fast.
Crackle-Look Trinket Dish
Achieve the striking, sophisticated look of Japanese Raku pottery without needing a specialized kiln. This project uses air-dry clay and a clever painting technique to create a beautiful, high-contrast crackle finish perfect for holding your favorite rings.
Detailed Instructions
Materials
- White air-dry clay
- Rolling pin
- Small bowl (to use as a mold)
- Sandpaper (fine grit)
- White acrylic paint
- Clear crackle medium
- Black acrylic paint or India ink
- High-gloss varnish
- Soft paintbrushes
- Sponge
- Craft knife
- Water
Step 1: Shaping the Base
-
Condition the Clay:
Begin by taking a handful of white air-dry clay and kneading it in your hands until it becomes warm and pliable. This prevents cracks from forming during the initial rolling process. -
Roll it Out:
Roll the clay into a smooth slab about 1/4 inch thick. Try to keep the thickness consistent. -
Cut the Circle:
Place your small bowl upside down on the clay to use as a template. Use your craft knife to trace around the rim, cutting out a perfect circle. -
Form the Dish:
Gently lift your clay circle and press it inside your mold bowl. Smooth it down with your fingers so it takes the curve of the bowl, but don’t press so hard that it gets stuck. -
Smooth the Edges:
Dip your finger in a little water and run it along the rim of the clay to smooth out any rough cutting marks. I like to round the lip slightly for a more finished ceramic look. -
Let it Dry:
Allow the clay to dry completely inside the bowl mold. This usually takes 24-48 hours depending on humidity. Don’t rush this step. -
Sand and Refine:
Once bone dry, pop the dish out of the mold. Use fine-grit sandpaper to gently smooth any bumps on the surface or rough spots on the rim.
Step 2: Creating the Crackle
-
Base Coat:
Paint the inside of the dish with a solid coat of white acrylic paint. Let it dry completely. -
Apply Crackle Medium:
Brush a generous, even layer of clear crackle medium over the white paint. The thickness of this layer will determine the size of your cracks. -
Wait for Tac-Dry:
Let the medium dry until it is tacky to the touch but not fully hardened. Follow the specific instructions on your bottle for the best timing. -
Top Coat Application:
Apply another coat of white acrylic paint gently over the tacky medium. Be careful not to overwork it—brush it on with single strokes and leave it alone. -
Watch it Crack:
As the top layer of paint dries, the medium underneath will cause it to shrink and separate, revealing the fissures. Let this dry fully.
Muddy cracks?
If the black paint is staining the white areas too much, your white base coat might not have been fully dry or sealed. Try a quick spray sealer before the black wash.
Step 3: Enhancing the cracks
-
Apply the Contrast:
Dilute some black acrylic paint with water or use India ink. Brush this dark wash over the entire crackled surface, ensuring it seeps deep into every crevice. -
Wipe Back:
Before the black paint dries completely, take a slightly damp sponge or paper towel and wipe the surface gently. You want to remove the black from the white ‘islands’ but leave it trapped in the cracks. -
Repeat if Necessary:
If the cracks aren’t dark enough, repeat the wash and wipe process until you have that sharp, defined Raku look. -
Seal the Deal:
Once you are happy with the contrast and the dish is totally dry, apply two coats of high-gloss varnish. This mimics the glassy shine of fired ceramic glaze and protects your work.
Go metallic
For a kintsugi-inspired variation, use liquid gold leaf or metallic gold paint instead of black ink to fill the cracks, creating distinct, precious veins.
Place your delicate new dish on a bedside table to add an organic, artisanal touch to your decor
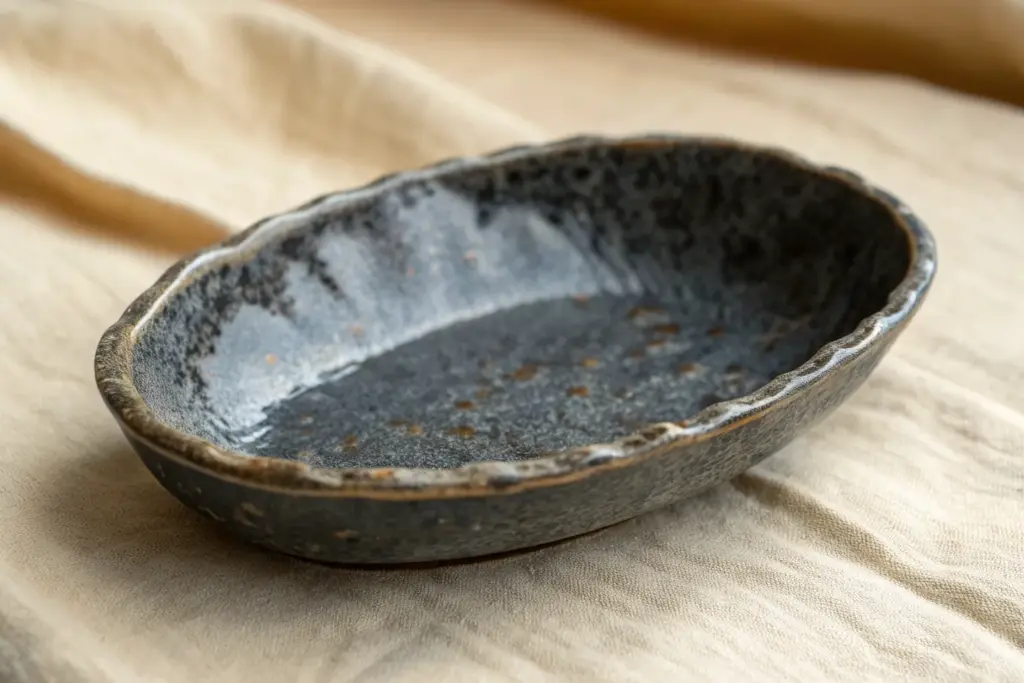
Teeth-Edge Mini Bowl
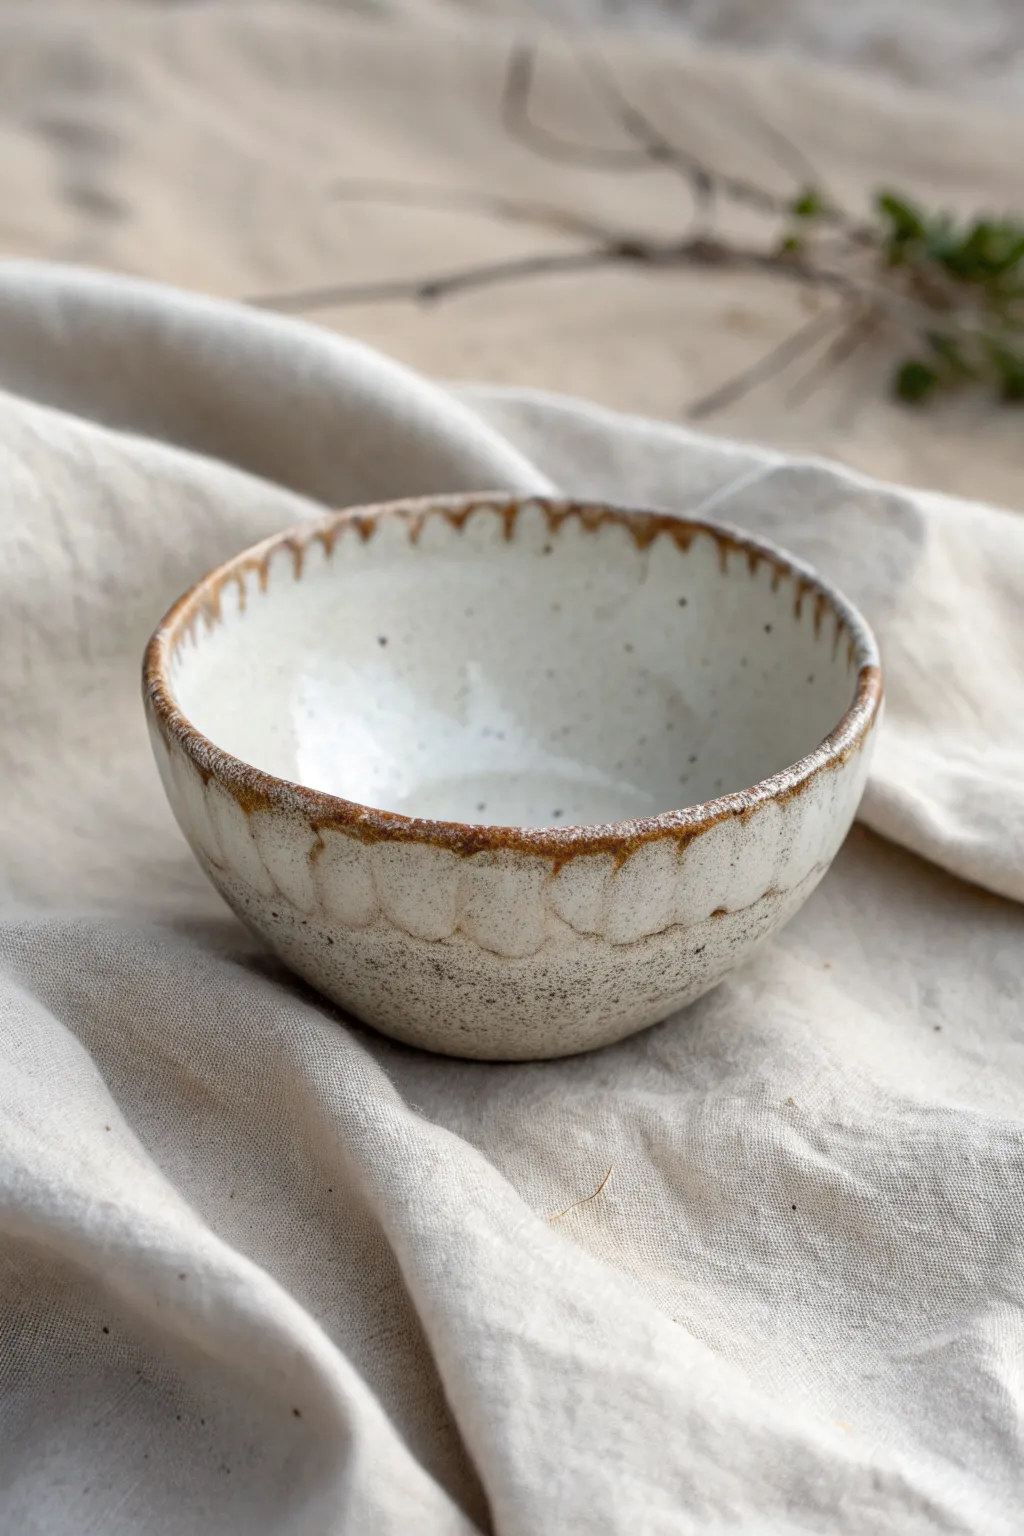
Embrace the beauty of imperfections with this charming, grunge-inspired mini bowl. Featuring a creamy speckled glaze and a distinctive jagged rim that reveals the raw clay beneath, this piece balances organic warmth with an edgy finish.
Step-by-Step Guide
Materials
- Speckled stoneware clay (buff or light grey)
- Pottery wheel
- Throwing tools (sponge, needle tool, rib)
- Small carving tool or X-Acto knife
- Wire cutter
- Loop tool for trimming
- White or cream matte glaze
- Oxide wash (optional, for deeper contrast)
- Kiln
- Wax resist
Step 1: Throwing the Form
-
Wedge the clay:
Begin by thoroughly wedging about 1 lb of speckled stoneware clay to remove air bubbles and ensure a consistent texture. -
Center specifically:
Center the clay on the wheel, keeping the mound relatively low and wide to support a bowl shape. -
Open the clay:
Press into the center to open the clay, pulling outwards gently until you have a curved interior floor. -
Pull the walls:
Pull the clay walls upward and slightly outward, aiming for a rounded, hemispherical shape rather than a v-shape. -
Shape the curve:
Use a kidney rib on the inside of the bowl while supporting the outside with your hand to create a smooth, continuous curve from the floor to the rim. -
Refine the rim:
Ensure the rim is slightly thicker than usual to accommodate the carving later, then use a chamois to smooth it. -
Cut off:
Run a wire cutter underneath the pot and carefully transfer it to a ware board to dry to leather-hard.
Rim Contrast Trick
To enhance the ‘grunge’ look, lightly brush iron oxide or a darker stain onto the raw clay of the rim after wiping back the glaze.
Step 2: Carving & Trimming
-
Trim the foot:
Once leather-hard, center the bowl upside down on the wheel and trim the base to create a clean, rounded foot ring that matches the bowl’s curve. -
Mark the rim:
Turn the bowl right side up. Using a needle tool, lightly mark the intervals where your ‘teeth’ will go along the rim. -
Carve the teeth:
Use a small carving tool or sharp knife to cut small, downward-facing semi-circles or triangles out of the rim, creating a jagged, sawtooth edge. -
Carve the exterior texture:
Extend these cuts slightly down the exterior wall, carving shallow scallops or flutes that fade as they move toward the middle of the bowl. -
Soften the edges:
Dip a sponge in water and gently wipe over the carved rim to soften any sharp burrs without losing the definition of the teeth. -
Bisque fire:
Allow the bowl to dry completely to the bone-dry stage, then load it into the kiln for a bisque firing (typically Cone 04 or 06).
Glaze Running Too Much?
If your glaze runs too far down the raw clay, sponge it back further from the edge before firing, or choose a steeper firing schedule.
Step 3: Glazing & Finishing
-
Wax the foot:
Apply wax resist to the foot ring and any other areas you want to remain completely bare. -
Glaze the interior:
Pour a creamy white or matte oatmeal glaze inside the bowl, swirl it to coat the entire interior, and pour out the excess. -
Glaze the exterior rim:
Dip just the top rim of the bowl into the glaze, allowing it to cover the carved teeth and flow slightly into the exterior fluting. -
Wipe back:
I prefer to use a damp sponge to wipe the glaze off the high points of the carved rim teeth, exposing the speckled clay body beneath for contrast. -
Create the break:
Ensure the glaze on the exterior is uneven, allowing it to pool naturally in the carved recesses while leaving the lower half of the bowl unglazed and raw. -
Final fire:
Load the glazed bowl into the kiln for the final glaze firing (often Cone 5 or 6 depending on your clay vertical).
This little bowl is now ready to hold trinkets or snacks with its unique earthy charm


What Really Happens Inside the Kiln
Learn how time and temperature work together inside the kiln to transform clay into durable ceramic.
Scratched Heart Locket Charm
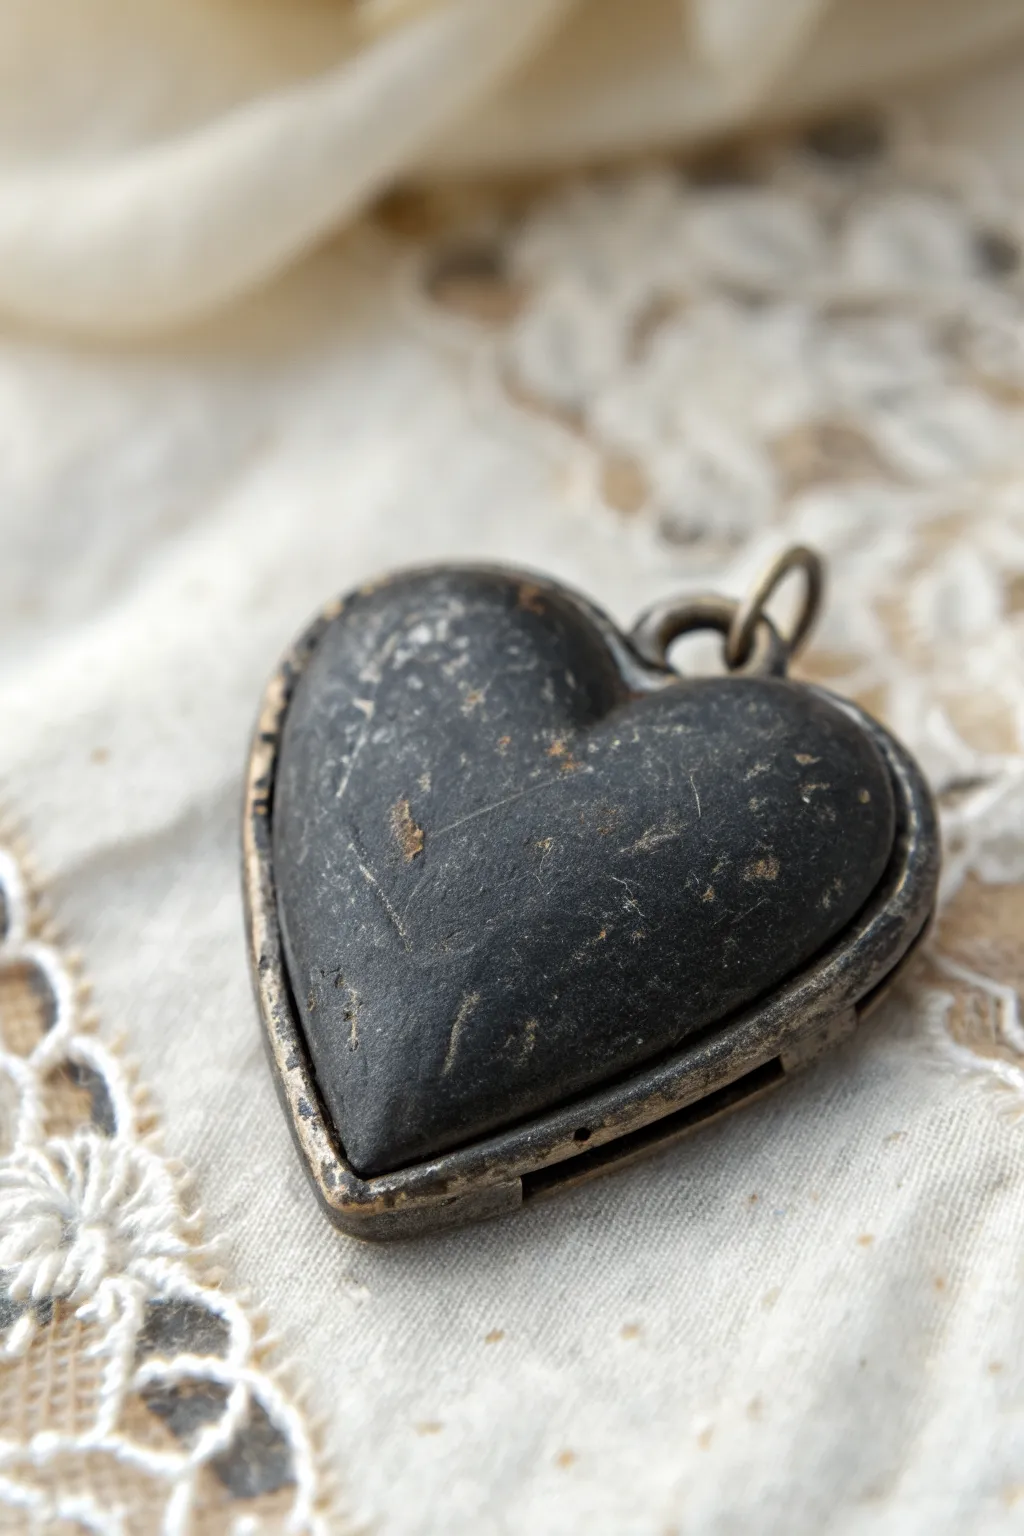
Recreate the mood of a forgotten Victorian treasure with this faux-stone polymer clay pendant. By simulating the look of scratched slate or basalt set in distressed metal, you’ll achieve a hauntingly beautiful vintage aesthetic.
Detailed Instructions
Materials
- Black polymer clay (firm consistency)
- Translucent polymer clay
- Heart-shaped metal bezel or open-back frame (bronze or antique brass finish)
- Needle tool or stiff wire brush
- Coarse sandpaper (80 or 100 grit)
- Acrylic paints (burnt umber, raw sienna, ivory)
- Matte varnish or glazing medium
- Oven for curing clay
- Wet wipes or paper towel
- Pasta machine or acrylic roller
- Cyanoacrylate glue (super glue)
Step 1: Preparing the Faux Stone
-
Mix the clay base:
Begin by conditioning your black polymer clay until it is pliable but firm. To give it a more realistic stone depth, mix in a very small amount (about 5%) of translucent clay. This prevents the black from looking like simple plastic. -
Roll the slab:
Flatten the conditioned clay using an acrylic roller or pasta machine on a medium-thick setting. You want the sheet to be slightly thicker than the rim of your metal heart bezel, so it can dome upwards. -
Fit the bezel:
Press your metal heart bezel firmly into the clay slab to act as a cutter. Don’t remove the clay from the inside; instead, trim away the excess clay from the outside of the frame with a craft knife. -
Shape the dome:
Gently push the clay from the back of the bezel so it rises slightly above the front rim. Use your thumb to smooth and round this protruding clay into a gentle, puffy dome shape. -
Secure the fit:
Check the edges where the clay meets the metal. If there are gaps, gently nudge the clay to flush it against the bezel walls. I find a silicone shaping tool works best for these tiny adjustments.
Clay Shrinkage Fix
If the clay shrinks forming a visible gap with the bezel, fill the crack with a mix of black paint and baking soda for a gritty, textured ‘cement’ repair.
Step 2: Adding Texture and Age
-
Initial distressing:
Before baking, take a coarse sandpaper sheet and press it lightly onto the domed surface of the raw clay to create a subtle, all-over pitted texture. -
Create deep scratches:
Use a needle tool or a stiff wire brush to drag distinct scratches across the surface. Make these directional and random, mimicking decades of wear and tear. -
Bake the piece:
Place the clay-filled bezel on a tile or baking sheet. Bake according to the manufacturer’s instructions for your specific brand of clay—usually around 275°F (135°C) for 30 minutes. -
Cool down:
Allow the piece to cool completely inside the oven or on a wire rack. The clay must be fully hardened before you apply the finish. -
Secure the stone:
If the clay shrunk slightly and popped out of the bezel during cooling, add a drop of super glue to the inside rim of the metal frame and press the clay heart back into place.
Step 3: The Grunge Finish
-
Apply the dirt wash:
Mix a watery wash using burnt umber and raw sienna acrylic paints. Brush this liberally over the entire heart, ensuring it seeps into every scratch and sandpaper pit. -
Wipe back:
Immediately wipe the surface with a paper towel or slightly damp cloth. You want to remove the paint from the high points while leaving the ‘dirt’ trapped in the crevices. -
Highlight the scratches:
For the distinct white/grey scratches seen in slate, take a tiny amount of ivory paint on a dry brush. Lightly drag it across the deepest scratches to highlight the abrasion. -
Scuff the clay:
Once the paint is dry, gently sand the high points of the cured clay again with fine sandpaper. This removes the plastic sheen and reveals the pure black clay underneath the paint wash. -
Matte sealant:
Apply a very thin coat of matte varnish. Avoid glossy finishes, as the goal is a dry, stony appearance. -
Detail the metal:
If your metal bezel looks too new, dab a little black acrylic paint into the decorative grooves of the metal and wipe it off to simulate tarnish.
Add a Crackle Effect
Before baking, brush a thin layer of PVA glue on the raw clay. Let it dry, then stretch the clay slightly to create natural surface fissures.
Wear your new antique charm on a long chain to show off its mysterious, time-worn character
Verdigris Patina Pendants
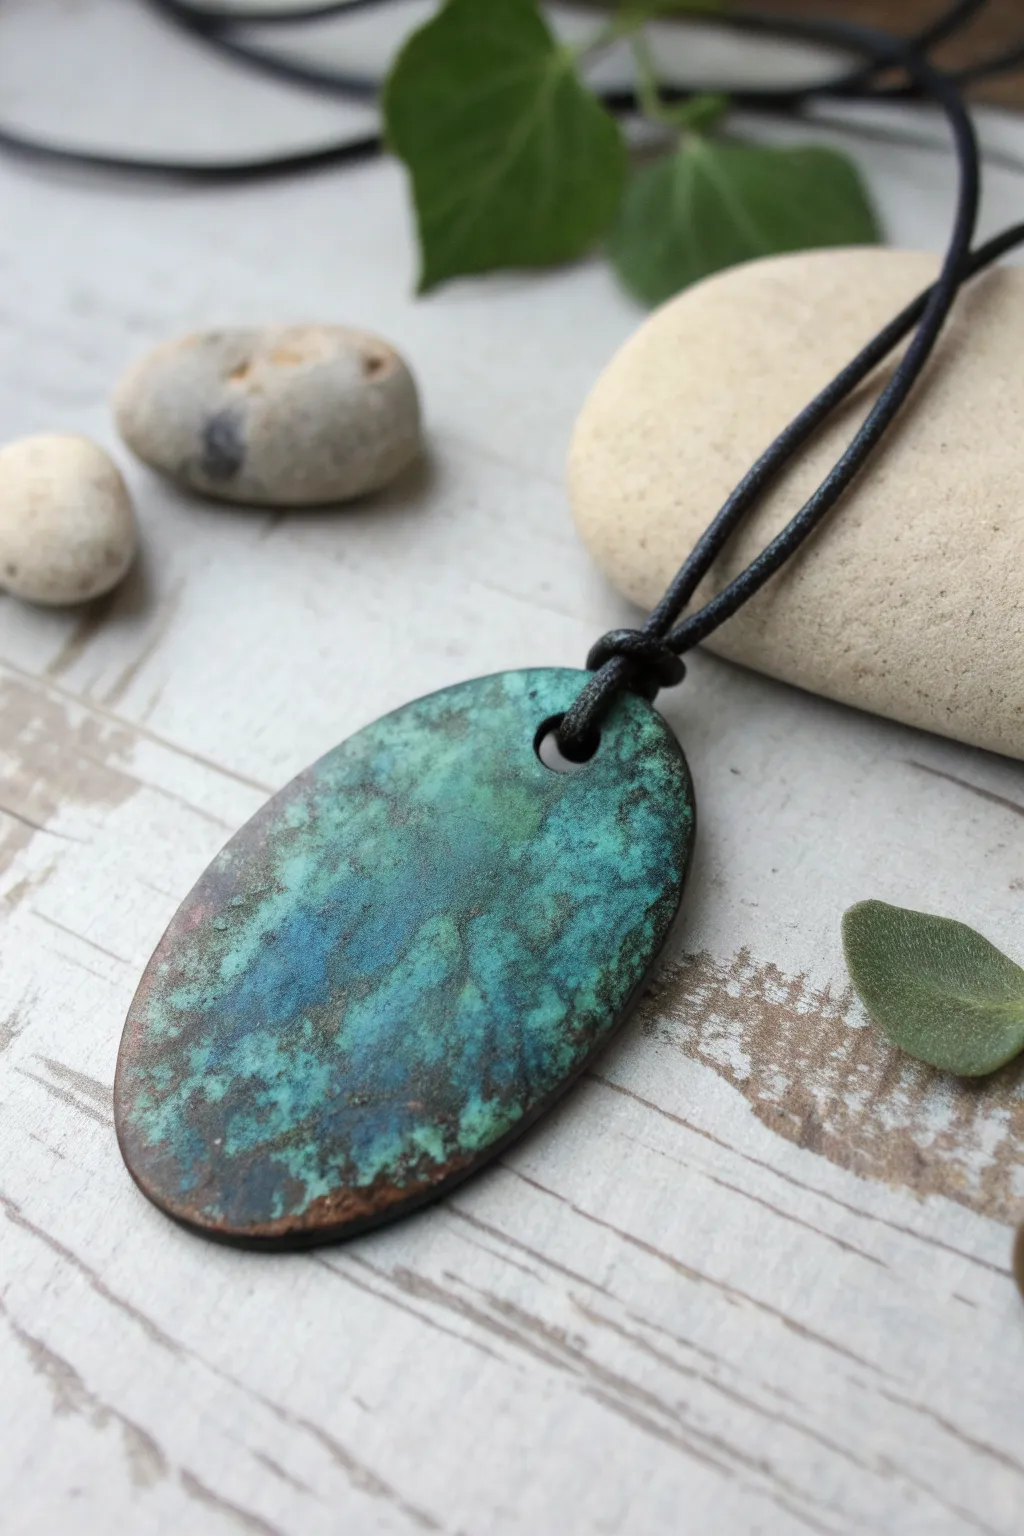
Capture the timeless beauty of aged copper with this simple polymer clay project. By layering metallic powders and acrylic tints, you can create a convincing weathered artifact that looks like it was just unearthed.
Detailed Instructions
Materials
- Black polymer clay (half block)
- Acrylic roller
- Oval shape cutter (approx. 2 inches long)
- Small circle cutter or straw (for bail hole)
- Copper metallic mica powder
- Acrylic paints: Turquoise, Phthalo Green, White, and Burnt Umber
- Small sea sponge or rough sponge piece
- Stiff bristle paintbrush
- Sandpaper (400 and 800 grit)
- Matte or satin varnish
- Black leather cord or waxed cotton cord
Step 1: Sculpting the Base
-
Conditioning the clay:
Start by thoroughly conditioning your black polymer clay until it is soft and pliable. Warm clay prevents cracking later. -
Rolling out:
Roll the clay into a sheet approximately 3mm to 4mm thick. You want it substantial enough to feel like a metal object but not too heavy. -
Texturing the surface:
Before cutting, gently press sandpaper or a piece of crumpled aluminum foil onto the clay surface to give it a fine, pitted texture. This helps the paint grip better later. -
Cutting the shape:
Use your oval cutter to punch out the main pendant shape. If you don’t have a cutter, you can trace a template and cut carefully with a craft knife. -
Creating the bail hole:
Near the top edge, punch a neat hole using the small circle cutter or a straw. Make sure it’s centered and not too close to the very edge to ensure durability. -
Smoothing edges:
Gently rub your finger along the cut edges to soften them slightly. Metal objects rarely have razor-sharp sides, so a little rounding adds realism.
Too Much Green?
If you applied too much paint and lost the copper shine, let the paint dry fully, then lightly dry-brush a tiny bit more copper mica powder or gold paint over the raised areas.
Step 2: Creating the Faux Metal Effect
-
Applying the metallic base:
Dip your finger or a soft brush into the copper mica powder. Rub it thoroughly over the entire surface of the unbaked clay, covering the top, sides, and inside the hole. -
Baking the piece:
Place the pendant on a tile or baking sheet and bake according to your specific brand of clay’s instructions (usually 275°F/130°C for 30-45 minutes). Allow it to cool completely. -
Mixing the verdigris color:
On a palette, mix a small amount of turquoise paint with a tiny dot of white and phthalo green. You want a bright, oxidized copper color. -
Sponging the first layer:
Dampen your sea sponge slightly, then dip into the paint mixture. Dab off the excess on a paper towel until the sponge is almost dry. -
Applying the patina:
Gently pounce the sponge over the pendant. Let the paint settle into the textured pits you created earlier, but leave some copper showing through on the high points. -
Adding depth:
While the first layer is still slightly tacky, mix a darker green using the phthalo green and a touch of burnt umber. Stipple this randomly in patches to simulate different stages of oxidation. -
Distressing the finish:
Once the paint is dry to the touch, take a damp paper towel or wet wipe and gently wipe across the surface. This removes paint from the highest spots, revealing the copper mica back underneath.
Step 3: Finishing Touches
-
Adding grime:
Create a very watery wash of burnt umber acrylic paint. Brush this over the entire piece and immediately wipe it away. The dark brown will stay in the deepest crevices, adding an ancient, grungy look. -
Sealing the work:
Once all paint is completely dry, apply a thin coat of matte or satin varnish to protect the surface without making it look unnaturally glossy. -
Stringing the pendant:
Cut a length of black leather or waxed cotton cord. Fold it in half and push the loop through the pendant hole from front to back. -
Securing the knot:
Pass the loose ends of the cord through the loop and pull tight to create a lark’s head knot right at the top of the pendant.
Go Ancient
For an even older look, sprinkle coarse salt or embossing powder onto the wet paint. Brush it off once dry to leave tiny craters that mimic heavily corroded metal.
Now you have a stunning, ancient-looking artifact ready to wear

TRACK YOUR CERAMIC JOURNEY
Capture glaze tests, firing details, and creative progress—all in one simple printable. Make your projects easier to repeat and improve.
Grungy Skull Mini Planter
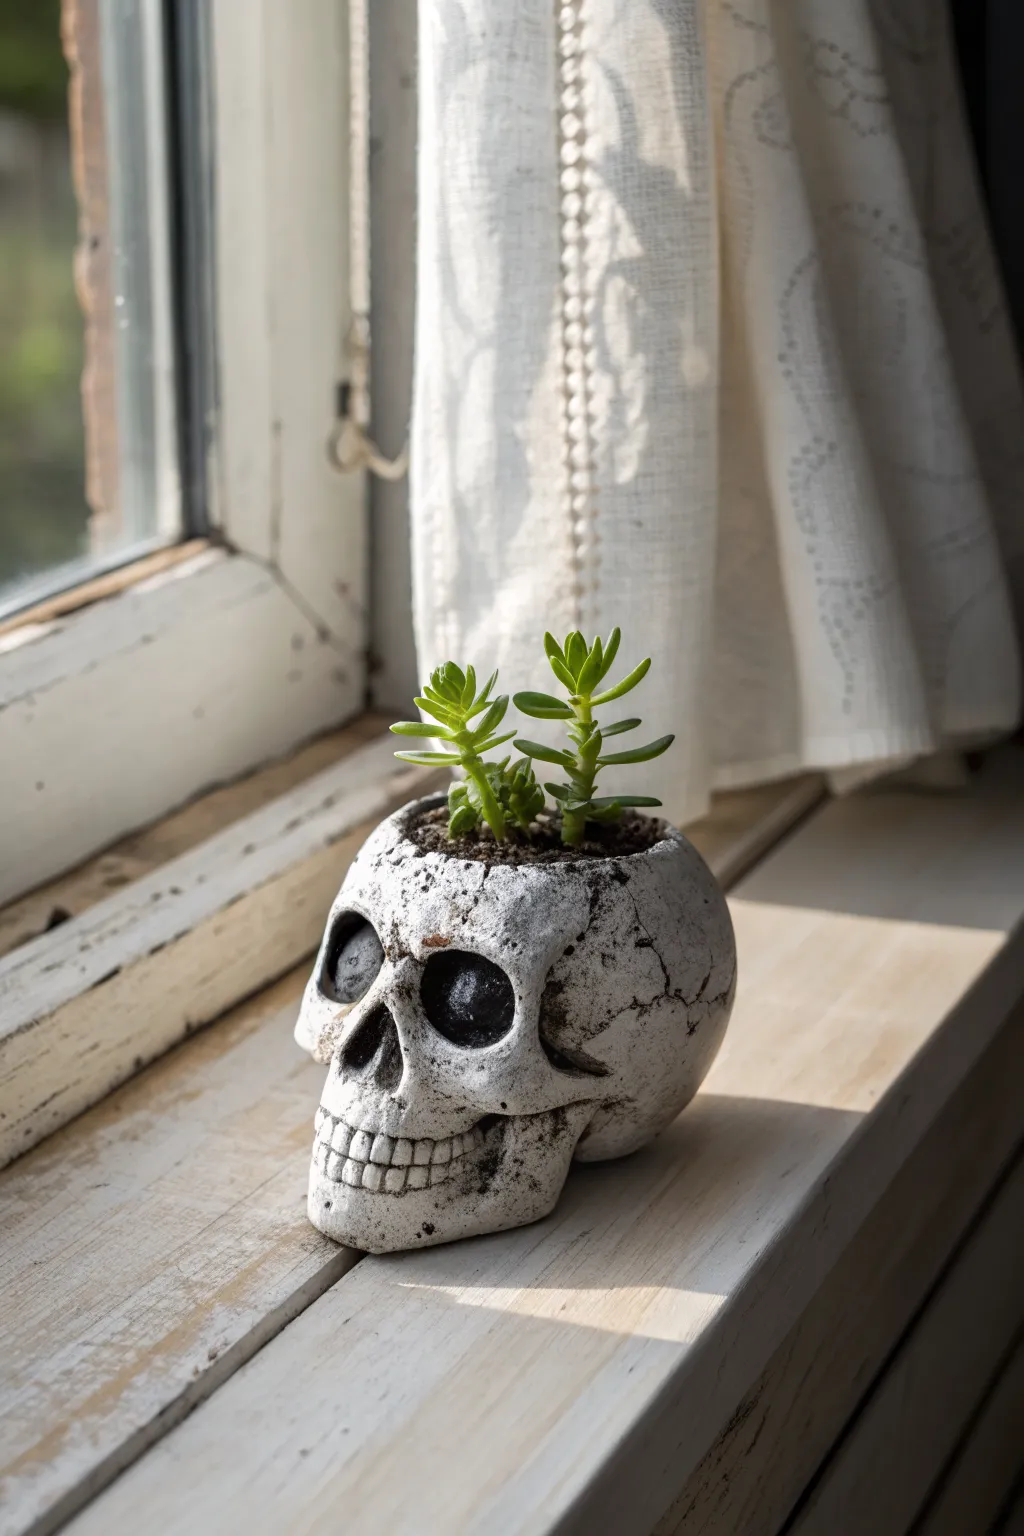
Embrace the beauty of decay with this hauntingly stylish skull planter that blends spooky aesthetics with vibrant life. Created from air-dry clay and finished with a weathered grunge effect, it makes the perfect moody home for your favorite succulents.
How-To Guide
Materials
- White air-dry clay (approximately 1 lb)
- Clay sculpting tools (needle tool, loop tool)
- Small bowl of water
- Aluminum foil
- Acrylic paints (black, dark brown, burnt umber)
- Paper towels or sponge
- Paintbrush (flat shader and fine liner)
- Matte varnish or sealant
- Small succulent cuttings
- Potting soil
Step 1: Basic Form Sculpting
-
Core Structure:
Begin by crumpling a ball of aluminum foil into a rough egg shape, slightly flattened on the bottom. This saves clay and keeps the planter lightweight. -
Clay Covering:
Roll out a slab of white air-dry clay to about 1/4 inch thickness. Wrap this slab entirely around your foil core, smoothing the seams with a little water until you have a seamless egg shape. -
Defining the Cranium:
Press the top half of the shape into a dome. Pinch the lower half slightly to define where the jaw and cheekbones will sit. -
Creating the Interior:
Slice off the very top crown of the skull with a clay wire or knife to create the opening. Dig out the aluminum foil core carefully from the inside, leaving a hollow clay shell.
Fixing Big Cracks
If large unwanted cracks appear during drying, create a ‘slurry’ paste by mixing dry clay bits with white glue and water. Fill the cracks, smooth over, and let dry again.
Step 2: Adding Facial Features
-
Eye Sockets:
Use your thumbs to deeply press two large, hollow sockets into the front of the face. They shouldn’t be perfect circles; give them a slight downward slant for a more menacing look. -
Nasal Cavity:
Between and slightly below the eyes, carve an upside-down heart shape or triangle for the nose cavity. Soften the edges with a wet finger. -
Cheekbones:
Add small snakes of clay along the bottom edge of the eye sockets, blending them downwards to create prominent, protruding cheekbones. -
Jaw and Chin:
Shape the chin to be slightly squared off. Use a modeling tool to carve slight indentations on the side where the jaw connects to the skull.
Mossy Overgrowth
Glue patches of dried preservation moss or faux flocking powder into the cracks and eye sockets for a skull that looks like it’s been lost in the forest for decades.
Step 3: Detaling the Teeth
-
Mouth Plate:
Score a horizontal area where the teeth will go. Add a small rectangular strip of clay here if the face feels too flat. -
Carving Teeth:
Using a needle tool or fine knife, carve vertical lines to separate individual teeth. Then, carve a horizontal line across the middle to separate top from bottom teeth. -
Refining Shape:
Round off the corners of each tooth individually. I like to make a few slightly crooked or missing to enhance the antique feel. -
Cracks and Texture:
Before the clay dries, use a needle tool to etch fine cracks radiating from the eyes or temples. Texture the surface lightly with an old toothbrush for a pitted bone affect. -
Drying:
Let the sculpture dry completely for 24-48 hours. Keep it away from direct heat to prevent accidental cracking.
Step 4: Grunge Painting
-
The Dark Wash:
Mix a small amount of black and dark brown acrylic paint with plenty of water to create a runny wash. -
Application:
Paint the entire skull with this dark wash, ensuring it gets into every crack, tooth gap, and the deep eye sockets. -
Wiping Back:
Ideally before the paint dries, use a damp paper towel or sponge to wipe the surface. This removes paint from the high points (making them white again) but leaves dark shadows in the crevices. -
Deepening Shadows:
Use undiluted black paint to darken the very back of the eye sockets and the nasal cavity for depth. -
Final Staining:
Dab a tiny bit of burnt umber on a sponge and blot it randomly around the jawline and temples to simulate aged, dirty bone.
Step 5: Planting
-
Sealing:
Apply a coat of matte varnish to the inside and outside to protect the clay from moisture. -
Adding Life:
Fill the cavity with a small amount of potting soil and tuck in your succulent cuttings.
Place your finished eerie artifact on a sunny windowsill where the shadows can play across its weathered features
Tattoo-Style Flower Tiles
These striking coasters combine the rustic, chipped edges of slate or dark clay with the precise, high-contrast lines of traditional tattoo flash. The stark white design against the matte black background creates a bold, grungy aesthetic perfect for adding edge to your coffee table.
Step-by-Step Tutorial
Materials
- Black slate coasters (square, approx. 4×4 inches) or black polymer clay
- White acrylic paint or specialized stone paint
- Fine-grit sandpaper (optional)
- Graphite transfer paper
- Pencil
- Ultra-fine lining brush (size 00 or 000)
- Small round brush (size 1)
- White chalk marker or gel pen (for drafting)
- Matte spray varnish or sealer
- Printed sunflower or floral stencil design
- Masking tape
Step 1: Preparation & Transfer
-
Surface Prep:
Begin by cleaning your slate tiles thoroughly with soap and water to remove any dust or quarry residue. Let them dry completely, ensuring no moisture remains in the crevices. -
Evaluate the Texture:
Run your fingers over the slate surface. If it feels excessively jagged, lightly sand the main drawing area with fine-grit sandpaper just enough so your brush won’t skip, but keep the rustic edges intact. -
Position the Design:
Cut out your printed floral design. Tape it securely to the center of the coaster using a small piece of masking tape at the top to act as a hinge. -
Insert Transfer Paper:
Slide a piece of graphite transfer paper under the design, dark side down facing the slate. -
Trace the Lines:
Using a sharp pencil, trace over your design with firm pressure. Focus on the main outlines of the petals and the center circle. You don’t need to trace every shading hatch mark yet. -
Reveal the Canvas:
Lift the paper to check your transfer. You should see a faint grey guideline on the dark stone. If it’s too faint, you can freehand re-trace it lightly with a white chalk pencil.
Paint Won’t Stick?
If acrylic peels off the slate, the surface may be too oily or polished. Wipe the tile with rubbing alcohol before painting to remove oils and create a ‘tackier’ base.
Step 2: Painting the Design
-
Outline Work:
Load your ultra-fine lining brush with slightly thinned white acrylic paint. It should be the consistency of heavy cream to flow smoothly over the stone texture. -
Define the Center:
Start from the center of the flower. carefully paint the two concentric circles. Add the small interior details—the crescent moons or face-like shapes inside the innermost circle. -
Petal Perimeters:
Paint the outer edges of the main petals. Keep your hand steady and try to make the lines taper slightly at the pointed tips for that sharp tattoo look. -
Adding the Second Layer:
Go over the petals a second time if the first layer looks translucent. The white needs to be opaque and punchy against the black. -
Inner Petal Details:
Draw the secondary, smaller petals that peek out from behind the main ones. These lines can be slightly thinner to suggest depth. -
Hatching Technique:
This step defines the style. Using the very tip of your 000 brush, flick quick, short lines from the base of each petal outward. This mimics the ‘whip shading’ technique used in tattoos. -
Detailing the Leaves:
Add the small leaves or flourishes between the petals. Apply the same hatching technique to shade one half of each leaf, creating contrast.
Add an Aged Look
After painting, lightly sand the dried white design with high-grit sandpaper to distress it. This makes the tattoo art look worn and vintage, matching the grunge vibe.
Step 3: Finishing Touches
-
Clean Up:
If you made any mistakes or stray marks, use a damp Q-tip or a toothpick to gently scrape away the wet acrylic before it sets. -
Final Dry:
Allow the paint to cure for at least 24 hours. The slate is porous, so I usually give it extra time to ensure adhesion. -
Sealing:
Move to a well-ventilated area and spray the tiles with a matte varnish. This locks in the design and protects it from coffee cup condensation. -
Protecting Surfaces:
Once dry, flip the coasters over and attach small felt or cork pads to the four corners to prevent them from scratching your table.
Stack your new set of coasters and enjoy the rugged artistic flair they bring to your living space
Drippy “Tar” Candle Holder
Embrace the moody beauty of urban decay with this textured candle holder that looks like it was pulled from an abandoned factory. The dripping “tar” glaze contrasts perfectly against the rough, concrete-like clay body for a striking centerpiece.
Detailed Instructions
Materials
- Stone-effect polymer clay or air-dry clay (concrete gray)
- Black gloss glaze or black liquid clay/liquid sculpey
- Rolling pin
- Cylindrical mold (a sturdy can or PVC pipe works well)
- Parchment paper
- Aluminum foil for texturing
- Cutting blade or craft knife
- Sandpaper (medium grit)
- Pillar candle for sizing
- Heat gun (if using liquid clay)
Step 1: Sculpting the Base
-
Prepare the workspace:
Lay down a sheet of parchment paper to protect your table and ensure your clay doesn’t stick. If you are using a can as your form, wrap the can in parchment paper as well so the clay slides off easily later. -
Roll out the slab:
Condition your stone-effect clay until it is pliable. Roll it out into a long, rectangular slab. Aim for a thickness of about 1/4 inch to ensure the walls are sturdy enough to support a heavy pillar candle. -
Measure and cut:
Using your chosen cylindrical form as a guide, measure the length needed to wrap around it completely. Trim the clay slab into a neat rectangle using your craft knife. -
Form the cylinder:
Wrap the clay slab around your parchment-covered form. Bring the two ends together and gently press them to join. Use a clay tool or your finger to smooth the seam until it disappears. -
Create the base:
Roll a smaller piece of clay for the bottom. Place your wrapped cylinder on top of this piece and cut around the perimeter. Press and blend the bottom circle into the cylinder walls to create a sealed cup shapes. -
Distress the surface:
Crumple a ball of aluminum foil and roll it firmly over the entire exterior surface. This creates that pitted, concrete-like texture. Don’t be afraid to press hard in random spots for a weathered look. -
Level the rim:
Inspect the top rim of the holder. It doesn’t need to be perfectly smooth, but it should be relatively level. You can slice off any major uneven peaks with your blade. -
Initial dry or cure:
If using polymer clay, bake the base according to package directions (usually around 275°F/135°C). If using air-dry clay, let it dry completely for 24-48 hours until hard.
Gravity does the work
For natural-looking drips, tilt the cylinder slightly while applying the ‘tar’ medium. Let it run down freely before setting it upright to stop the flow.
Step 2: Adding the Grunge Drips
-
Prepare the ‘tar’:
You need a thick, viscous black medium. If using polymer clay, mix black liquid clay with a tiny bit of solid black clay to thicken it. If using air-dry clay, mix heavy body black acrylic paint with a gloss medium. -
Apply the rim coat:
Using a tool or a squeeze bottle, apply a thick layer of your black mixture to the very top flat rim of the cured cylinder. It should be thick enough to pool slightly. -
Start the drips:
Gently push the pooled black liquid over the edge of the rim. Let gravity do most of the work here. You want the drips to travel down the sides naturally. -
Vary the lengths:
Guide some drips further down the cylinder than others. I like to add a little extra material to the bottom of the long drips to create that heavy, teardrop shape at the end. -
Thicken the texture:
The drips shouldn’t look like thin paint; they should look like thick tar. Go back and layer more material over the initial drips to build up a 3D relief profile. -
Final cure or dry:
If using liquid polymer clay, bake the project again to set the drips. Usually, 15-20 minutes is sufficient. For acrylic mediums, just let it dry flat until the glaze is hard and glossy. -
Check the finish:
Once fully set, verify that the black drips are glossy and the gray base is matte. If the drips dull down, brush a coat of high-gloss varnish strictly over the black areas to make them look wet.
Grime it up
Dilute some brown or dark green acrylic paint with water. Wash it over the gray stone areas and wipe off the excess for an aged, mossy effect.
Place a deep red or charcoal candle inside to complete this wonderfully gothic aesthetic
Eye-Studded Secret Box
Keep your secrets guarded by a watchful gaze with this mystical, eye-studded ceramic box. The piece features a tactile, carved texture and a gritty, ancient finish that feels unearthed from a bygone era.
Step-by-Step
Materials
- White speckled stoneware clay (or polymer clay with faux stone effect)
- Round cookie cutters (various sizes)
- Needle tool
- Loop carving tool
- Rolling pin
- Canvas work surface
- Black underglaze (or acrylic paint if not firing)
- Sponge
- Small stiff paintbrush
- Scoring tool (or fork)
- Slip (clay and water mixture)
Step 1: Building the Form
-
Prepare the slab:
Begin by wedging your clay to remove air bubbles, then roll it out into a consistent slab about 1/4 inch thick on your canvas. -
Cut the base:
Use your larger round cutter or trace a circle template to cut the base of your box. -
Form the walls:
Cut a long rectangular strip from your slab. Measure the circumference of your base circle to ensure the strip is long enough to wrap around it completely. -
Attach the wall:
Score the edge of the base and the bottom edge of the wall strip. Apply slip to both scored areas. -
Join the seam:
Wrap the wall around the base, pressing firmly. Cut the excess strip at an angle (bevel cut) where the ends meet, score and slip the ends, then blend the seam smooth with your fingers or a rib tool. -
Create the lid:
Cut another circle slightly larger than your box base. Add a smaller ring of clay to the underside of this lid so it sits securely inside the box rim without sliding off. -
Round the edges:
Smooth the sharp corners of the lid and the box rim with a damp sponge for a soft, weathered look.
Cracking Seams?
If the wall seam cracks while drying, fill it with ‘paper clay’ (clay mixed with toilet paper pulp) and smooth it over. It bonds better to dry clay.
Step 2: Sculpting the Eyes
-
Center eye placement:
Roll a small coil of clay and form it into an almond shape. Score and slip it onto the direct center of the lid. -
Define the center eye:
Roll a tiny ball of clay for the pupil and press it into the almond shape. Use a needle tool to carve the eyelids and iris details. -
Add lid accents:
Create small, flat discs of clay and attach them in a ring around the central eye. Use your small loop tool to carve a circle into each disc. -
Map the wall eyes:
Lightly sketch eye shapes onto the side of the box using a needle tool to plan your spacing. A staggered brick pattern works beautifully here. -
Carve the pattern:
Using a loop tool or sharp needle, carve the outline of the eyes directly into the clay wall. Dig slightly deeper for the pupils to create relief. -
Refine the carving:
Go back over your carvings to smooth any clay burrs. I prefer using a slightly damp brush to soften the carved lines without erasing them.
Step 3: Finishing the Surface
-
Dry to leather hard:
Let the piece dry until it’s firm but not bone dry. This is the perfect stage for the final texture work. -
Apply the wash:
Paint black underglaze (or diluted acrylic if using air-dry clay) into all the carved lines and crevices. -
Wipe back:
Using a damp sponge, wipe away the surface paint. The dark color will remain in the carved eyes and natural clay textures, highlighting the design. -
Add speckles:
If your clay isn’t naturally speckled, flick a toothbrush loaded with watered-down brown or black paint lightly over the surface. -
Final drying:
Allow the piece to dry completely before firing or sealing, depending on your clay type.
Gilded Gaze
After the final firing or sealing, paint just the pupils of the eyes with gold leaf or metallic gold paint to make them catch the light.
Now you have a mysterious vessel ready to hold your smallest treasures
Twisted Anatomy Desk Sculpture
Capturing the essence of carved stone, this infinity-style sculpture features deep striations and a weathered grey finish that feels ancient yet modern. The twisted form creates a mesmerizing visual anchor for any desk, proving that simple shapes can have profound elegance.
Step-by-Step Tutorial
Materials
- Air-dry clay or polymer clay (grey or granite effect preferable)
- Strong wire armature wire (12-14 gauge)
- Aluminum foil
- Pliers
- Sculpting loop tools (various sizes)
- Needle tool
- Rectangular wooden or stone base (or clay to make one)
- Acrylic paints (dark grey, light grey, white, raw umber)
- Stiff bristle brush
- Texture sponge
- Strong adhesive (E6000 or epoxy)
Step 1: Building the Core
-
Form the armature:
Cut a length of heavy-gauge wire approximately 18 inches long. Bend it into a figure-8 shape, twisting the center crossing point to secure it. Ensure the loops are open and organic, not perfectly circular. -
Secure the base:
Leave two long tails of wire at the bottom of the figure-8. Twist these tails together to form a mounting post that will eventually go into your base. -
Bulk up the form:
Crumple aluminum foil firmly around the wire loops. You want to build up the thickness of the infinity shape, creating a snake-like core that is about 1 inch thick. Compress the foil tightly so the clay won’t slide around later. -
Initial clay layer:
Roll your clay into flat sheets or flattened snakes. Wrap these around the foil armature, smoothing the seams together with a bit of water or slip. Aim for a consistent thickness of roughly 1/4 inch over the foil.
Step 2: Sculpting the Flow
-
Establish the twist:
Using your thumb and water, smooth the clay into a continuous loop. Pay special attention to the center cross-over point; the clay should look like it flows naturally over and under itself. -
Carve the interior slopes:
Use a large loop tool to refine the inner curves of the loops. You want the inner edges to be smooth and concave, sweeping upward towards the outer ridges. -
Refine the silhouette:
Look at the sculpture from all angles. Shave off excess clay to ensure the curves are graceful and not lumpy. The shape should feel balanced, top to bottom. -
Map the ridges:
With a needle tool, lightly sketch the direction of the striations. They should follow the length of the twist, spiraling around the form rather than just going straight up and down.
Fixing Cracks
If cracks appear while drying, don’t panic. Mix a small amount of fresh clay with water to make a paste (slip) and fill the cracks, then sand smooth once dry.
Step 3: Texturing and Finishing
-
Carve the deep grooves:
Using a U-shaped loop tool, carve out the main channels following your guide lines. Press firmly to create depth; these shadows are what define the ‘carved stone’ look. -
Create fine texture:
Between your deep grooves, use a finer tool or a stiff comb to add smaller scratches. I find this creates a more realistic geological look than just having smooth clay between the big ridges. -
Soften edges:
Take a slightly damp sponge and gently wipe over the ridges. You don’t want to erase the texture, but you want to knock down any sharp clay burrs so it looks weathered. -
Base preparation:
If making a clay base, form a rough rectangular block heavily textured to look like quarried slate. If using wood or real stone, drill a hole in the center to accept the wire armature tails. -
Dry completely:
Allow the sculpture to dry fully. For air-dry clay of this thickness, this may take 48-72 hours. Flip it occasionally if possible to ensure even airflow.
Granite Speckle
To add a granite effect, load an old toothbrush with thinned black paint and flick the bristles to splatter tiny dots over the finished grey paint job.
Step 4: Painting the Stone Effect
-
Base coat:
Paint the entire sculpture, including the deep crevices, with a dark slate grey mixed with a touch of raw umber. This dark base is crucial for the shadows. -
Dry brush mid-tones:
Load a stiff brush with a medium cool grey paint, then wipe almost all of it off on a paper towel. Lightly brush across the grain of your carving, catching only the raised areas. -
Highlight ridges:
Repeat the dry-brushing process with a very light grey or off-white. Use an extremely light touch here, hitting only the very highest points of the ridges to simulate wear. -
Final assembly:
Apply strong adhesive to the wire tails and the bottom of the sculpture. Insert into your base and hold firmly until the glue grabs. Touch up the join with a little paint or textured clay if needed.
Place your sculpture near a window where natural light can play across the textured ridges you created
Dystopian Relic Totem Minis
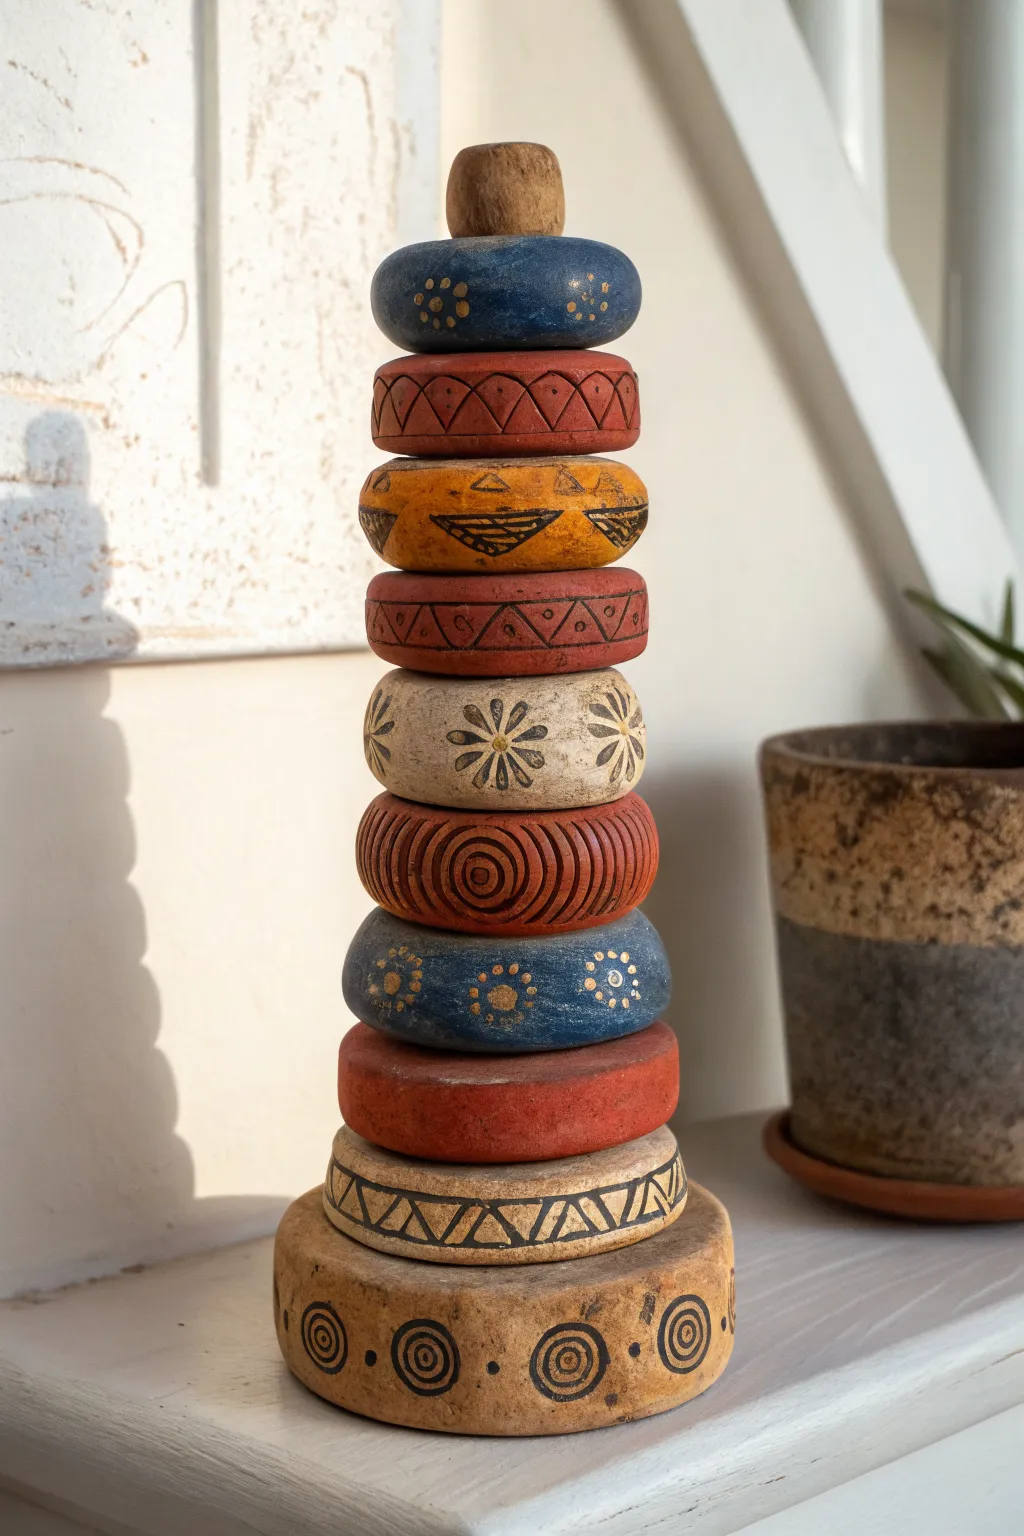
Channel the energy of a dystopian future with this beautifully weathered stacking totem that looks like it was unearthed from an ancient civilization. Using air-dry clay and clever painting techniques to create a faux-stone finish, you’ll sculpt and decorate individual discs that come together to form a striking, sculptural art piece.
Step-by-Step Guide
Materials
- Air-dry clay (stone or white color preferred)
- Acrylic paints (terracotta, navy blue, ochre yellow, antique white, black)
- Small rolling pin
- Circle cutters or varying size lids (approx. 1.5″ to 4″ diameter)
- Sculpting need tool or toothpick
- Small ball stylus tool
- Water cup and sponge
- Fine grit sandpaper
- Matte sealant spray or varnish
- Rough bristled texture brush or old toothbrush
Step 1: Forming the Discs
-
Condition the Clay:
Begin by kneading a large chunk of air-dry clay until it is warm and pliable. This prevents cracks later on. -
Roll the Slabs:
Roll out the clay to a thick, consistent slab, approximately 3/4-inch thick. You want these to have some chunky weight to them. -
Cut Graduated Circles:
Using circle cutters or various jar lids, cut out about 10 circles in graduated sizes. You’ll need a large base, tapering up to a tiny top piece. -
Shape the Edges:
Use your fingers and a damp sponge to smooth the sharp cut edges of each disc. Gently round them off so they look like worn river stones rather than sharp cylinders. -
Create the Top Cap:
For the very top piece, hand-roll a small, tapered cylinder shape rather than a flat disc, giving the totem a finishing finial.
Step 2: Carving and Texturing
-
Carve Geometric Bands:
While the clay is still damp but firm (leather hard), use a needle tool to carve zigzag patterns around the circumference of the largest base disc. -
Add Spiral Stamps:
On the base disc, use a small carving loop or the end of a marker cap to impress spiral symbols into the side walls. -
Pattern Variety:
Work your way up the stack, giving each disc a unique identity. For the mid-sized discs, try carving simple daisy-like flower bursts or concentric circles. -
Triangle Motifs:
On the ochre and orange discs, use your needle tool to scratch in bands of triangles. I like to fill some triangles with horizontal lines for added contrast. -
Dotted Details:
Take a small ball stylus and press groupings of five dots (like a flower) into the clay intended for the blue discs. This creates a recessed texture that will catch paint beautifully. -
Final Surface Prep:
Before drying, gently tap the surface of all discs with an old toothbrush or a crumpled ball of foil to remove smooth fingerprints and add a stone-like texture. -
Dry Thoroughly:
Allow all pieces to dry completely for 24-48 hours. Turn them occasionally to ensure even drying.
Uneven Stacking?
If discs wobble, the drying process might have warped the bottoms. Rub the bottom of each dry disc against a sheet of sandpaper placed on a flat table to level them out perfectly.
Step 3: The Grunge Finish
-
Base Coating:
Paint each disc in solid matte colors: terracotta red, deep navy, mustard yellow, and antique cream. You don’t need to be perfect; slight patchiness adds to the aged look. -
Highlighting Carvings:
Once the base coat is dry, mix a black acrylic wash (paint thinned with water). Paint it into the carved grooves of the cream and ochre discs. -
Wiping Back:
Quickly wipe the surface with a damp paper towel. The black paint will stay trapped in the heavy carving lines, making the patterns pop. -
Adding Gold Accents:
For the blue and terracotta discs, use a dull gold or light ochre paint. Carefully paint inside the stamped dots and floral centers using a fine detail brush. -
Distressing:
Use fine grit sandpaper to lightly sand the edges and raised surfaces of the painted discs. This reveals a bit of the raw clay underneath, simulating wear. -
Dry Brushing:
Dip a dry, stiff brush into a tiny amount of light beige paint. Offload most of it on a towel, then lightly dust the textured surfaces to highlight the ‘stone’ texture. -
Seal and Stack:
Spray with a matte fixative to protect the finish. Once dry, stack your totem from largest to smallest, using a dab of strong glue between layers if you want a permanent sculpture.
Ancient Moss
Mix glue with a pinch of green flocking powder or dried tea leaves. Dab this into the deepest crevices of the bottom two discs to simulate centuries of moss growth.
Enjoy displaying your ancient-looking artifact on a shelf where it can catch the light and show off those weathered textures