If you’ve ever wanted to turn a face into a tiny sculpture, art clay masks are the sweetest playground. Here are my favorite clay mask ideas—from classic expressions to wilder, artsy twists you can absolutely make with a little patience and a good sense of play.
Expressive Emotion Mask
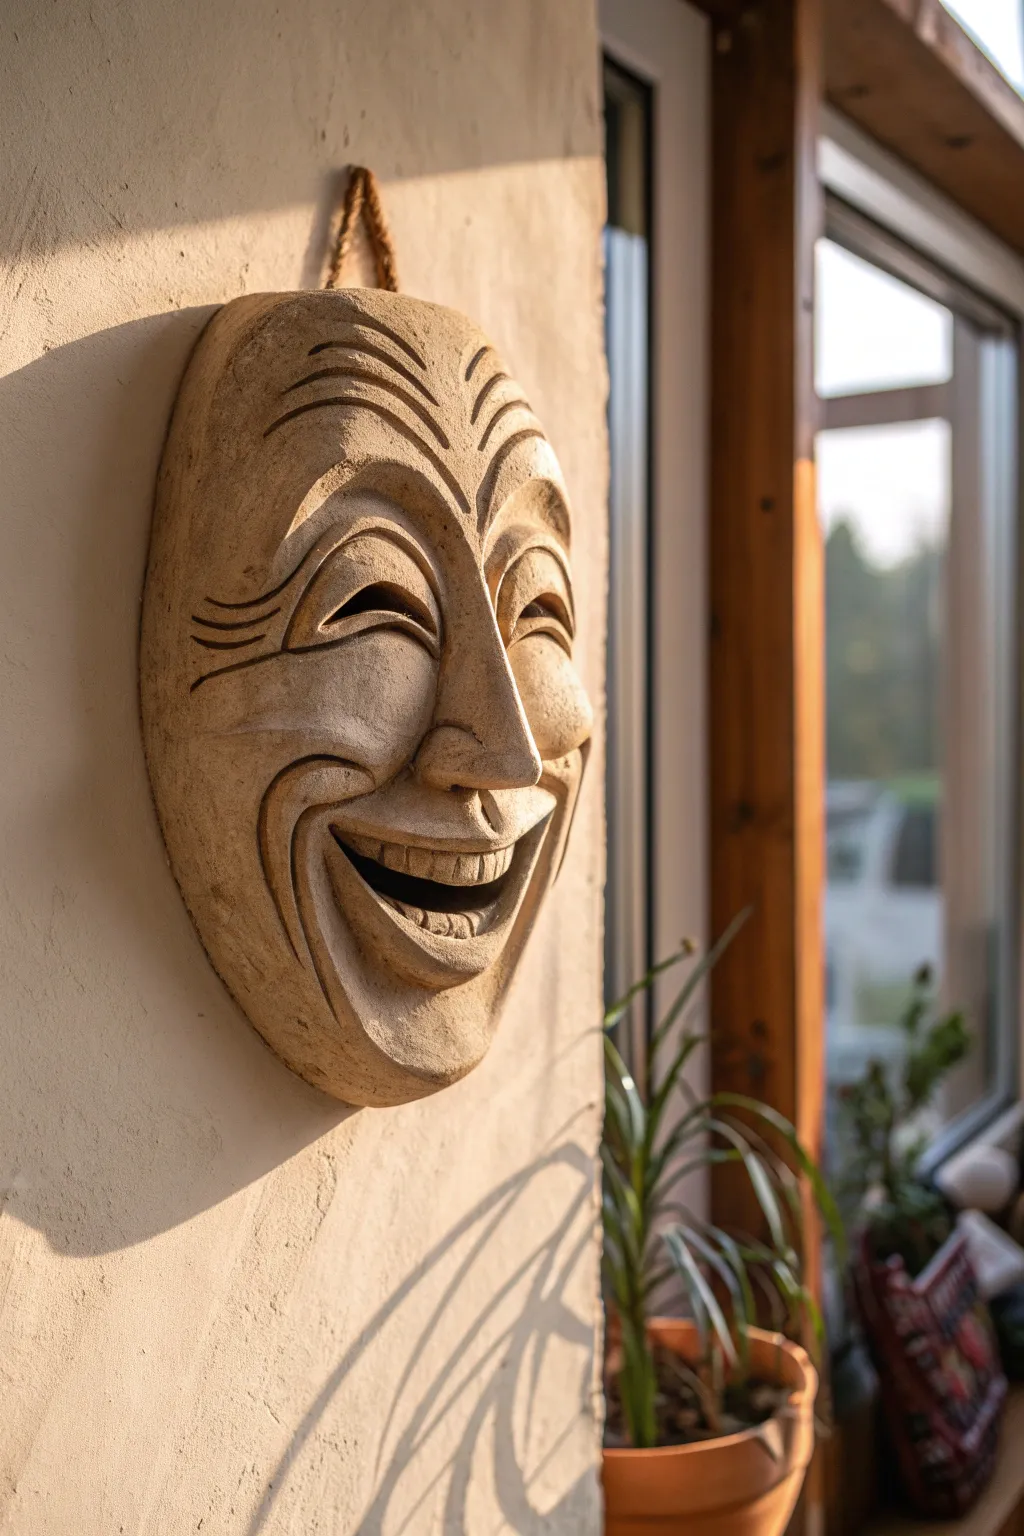
Capture the contagious spirit of joy with this deeply textured, expressive wall mask. Modeled from coarse clay to mimic the weathered look of ancient stone, this piece features bold, laughing lines and a warm, natural finish that catches the light beautifully.
How-To Guide
Materials
- Stoneware clay (groggy or sandy texture preferred)
- Clay carving tools (loop tool, needle tool)
- Wooden modeling tools
- Rolling pin
- Canvas or plastic mat (for rolling)
- Newspaper or aluminum foil (for armature)
- Spray bottle with water
- Sponge
- Natural sponge (sea sponge) for texture
- Hemp rope or twine for hanging
- Kiln (or air-dry clay alternative if no kiln access)
Step 1: Forming the Base Structure
-
Prepare the armature:
Begin by crumpling newspaper or aluminum foil into a loose oval dome shape directly strictly on your work surface. This will support the curve of the mask while you work on it so it doesn’t collapse flat. -
Roll the slab:
Roll out a slab of your chosen clay to approximately 1/2 inch thickness. It needs to be thick enough to support deep carving but thin enough to dry evenly. -
Drape and shape:
Gently lift the clay slab and drape it over your newspaper mound. Smooth the edges downward to create the oval face shape, trimming away excess clay at the bottom and sides with a needle tool. -
Smooth the surface:
Use a damp sponge to wipe away canvas marks and smooth the main surface. I like to keep the texture slightly rough here to enhance the organic, stone-like feel later.
Step 2: Sculpting the Features
-
Build the nose bridge:
Add a wedge of clay to the center for the nose. Score and slip the attachment area thoroughly, then blend the edges into the face so no seams are visible. -
Define the cheeks:
Add extra clay to the cheek areas to build volume. Since this is a laughing face, the cheeks should be high and prominent, pushing upwards toward the eyes. -
Carve the eye sockets:
Using your thumbs or a large loop tool, press deeply into the clay above the cheeks to form the eye sockets. The deep relief is crucial for the dramatic shadows seen in the finished piece. -
Sculpt the smiling eyes:
Roll two small coils and place them in the sockets for eyelids. Blend the top edge upward and the bottom edge downward to create a squinting, crescent-moon eye shape typical of intense laughter. -
Create the mouth cavity:
Carve out a wide, crescent-shaped area for the open mouth. Don’t cut all the way through the mask; simply remove material to create a deep recess.
Stone Texture Trick
Add about 10% sand or grog to your clay body before sculpting. When you wipe the finished greenware with a wet sponge, the grit is revealed, looking distinctively like carved stone.
Step 3: Adding Expressive Details
-
Form the teeth:
Roll a small strip of clay and press it into the upper part of the mouth cavity. Use a knife or needle tool to vertically mark the individual teeth, keeping them slightly irregular for character. -
Sculpt the lower lip:
Add a coil below the open mouth to form the lower lip. Blend it into the chin, ensuring the chin itself juts out slightly to balance the nose. -
Carve the laugh lines:
This is the most important step for expression. Use a rounded wooden tool to carve deep, sweeping channels starting from the nose wings, curving around the mouth, and down to the jawline. -
Add forehead wrinkles:
Carve arched lines across the forehead. These should mirror the curve of the eyebrows to emphasize the lifted, joyous expression. -
Detail the eyes:
Add ‘crow’s feet’ wrinkles at the outer corners of the eyes. These radiating lines reinforce the squeezing action of the face.
Preventing Flatness
If the mask starts to slump flat while working, prop up the sides with extra crumpled newspaper. Let it firm up to a ‘leather hard’ state on the support molds before removing them.
Step 4: Finishing and Texturing
-
Refine the surface:
Go over the entire mask with a slightly damp sea sponge. Dab rather than wipe; this creates a pitted, sandy texture that mimics sandstone. -
Create rigging holes:
Before the clay dries, use a hole punch or straw to create two holes at the very top of the forehead or near the temples for the hanging rope. -
Slow drying:
Loosely cover the mask with plastic to let it dry very slowly over several days. Slow drying prevents the nose or thick cheek areas from cracking. -
Bisque fire:
Once bone dry, bisque fire the mask according to your clay body’s specifications. -
Staining (Optional):
To enhance the ‘stone’ look, wash the fired piece with an iron oxide substitute or a diluted brown underglaze, then wipe it back so the color only stays in the crevices. -
Final assembly:
Thread a rustic hemp rope through the holes and knot it securely. The rough twine complements the earthy texture of the mask perfectly.
Hang your joyous creation in a spot where the sun can rake across the texture, bringing the laughter to life

Comedy and Tragedy Mask Pair
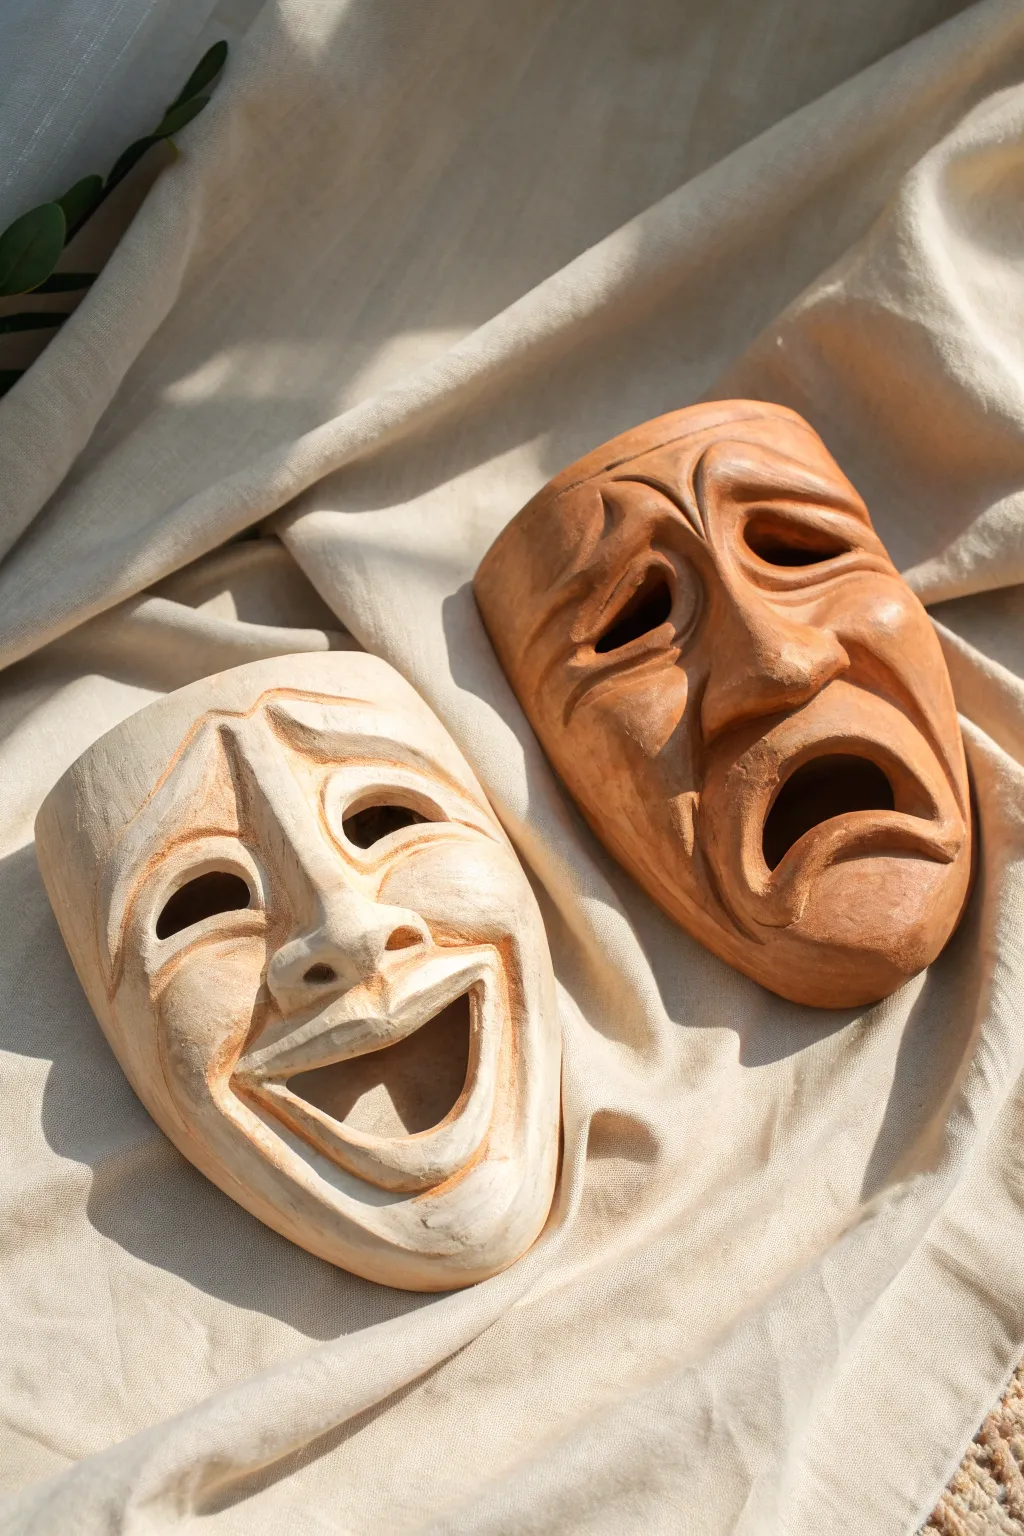
Recreate the iconic symbols of Greek theater with this pair of expressive clay masks. One in warm terracotta and the other in a pale cream finish, these handcrafted pieces capture the timeless duality of joy and sorrow with bold, sculptural features.
Step-by-Step Guide
Materials
- Terracotta air-dry clay or kiln-fire clay
- Cream/white air-dry clay or kiln-fire clay
- Clay modeling tools (loop tool, needle tool, wooden rib)
- Small sponge
- Water bowl
- Rolling pin
- Paper towels or newspaper
- Plastic wrap
- Canvas or cloth mat for rolling
Step 1: Forming the Base
-
Prepare your workspace:
Lay down your canvas mat to prevent sticking. Since you are making two masks, prepare two balls of clay—one terracotta and one white—each roughly the size of a large grapefruit. -
Roll out the slabs:
Flatten each clay ball into an oval slab about 1/2 inch thick using your rolling pin. These ovals should be slightly larger than the size of a human face. -
Create a volume support:
To give the masks their curved, face-like shape, crumple a large amount of newspaper into a mound and cover it with plastic wrap. Carefully drape your first clay slab over this mound, smoothing it gently so it holds a convex curve. -
Shape the perimeter:
Trim the edges of your clay slab into a clean oval shape using a needle tool, removing excess clay. Lightly smooth the cut edges with a damp sponge.
Seamless Blending
When adding features like the nose or brow, use the back of a spoon to blend the added clay into the base slab. This eliminates seams and creates smooth organic transitions.
Step 2: Sculpting the Comedy Mask
-
Mark the features:
On the white clay mask, lightly trace positions for the eyes, nose, and mouth with a needle tool. For the comedy mask, aim for arched eyebrows and a wide, upward-curving smile. -
Build up the nose:
Roll a coil of clay and attach it to the center for the nose. Score and slip the contact areas to ensure a strong bond, then blend the clay outwards seamlessly into the cheeks. -
Carve the eyes:
Cut out crescent or almond shapes for the eyes. Use a modeling tool to press deep indentations above the eyes to create lifted, joyful brows. -
Sculpt the smile:
Add coils of clay to the cheek area to build volume, making the face look full and laughing. Carve a deep, wide, open mouth, smoothing the interior edges. Add curved lines around the mouth corners to emphasize the smile.
Antique Patina
After drying, dilute a dark brown acrylic paint with water and wash it over the masks. Wipe it off quickly with a rag so the dark color stays only in the deep crevices.
Step 3: Sculpting the Tragedy Mask
-
Set the expression:
On the terracotta slab, trace downward-slanting eyes and a gaping, downturned mouth. The eyebrows should pull upward in the center of the forehead to express anguish. -
Form the brow ridge:
Add clay to the forehead area, building a heavy, furrowed brow. Deepen the vertical lines between the eyebrows using a wooden rib tool to create tension. -
Carve the mouth:
Cut out a downturned, bean-shaped mouth opening. I find it helpful to slightly flare the bottom lip outward to exaggerate the pout. -
Define the sorrow:
Use a loop tool to hollow out the cheeks slightly, creating a gaunt appearance compared to the comedy mask. Etch deep, dragging lines from the nose down past the mouth corners.
Step 4: Refining and Drying
-
Smooth the surfaces:
Take a slightly damp sponge and run it over both masks to soften any harsh tool marks, giving the skin a smooth, finished texture. -
Add texture detail:
If desired, create a subtle, roughly brushed texture on the hair or forehead areas using a stiff bristle brush to make the masks look like aged artifacts. -
Slow drying:
Leave the masks on their newspaper supports. Cover them loosely with plastic to dry slowly over several days; this prevents warping or cracking. -
Final touches:
Once fully dry (and fired if using kiln clay), you can lightly sand any rough edges. If using air-dry clay, seal the finished pieces with a matte varnish to protect the surface.
Display your dramatic duo together on a wall or shelf to capture the full spectrum of theatrical emotion


Classic Half-Face Masquerade Mask
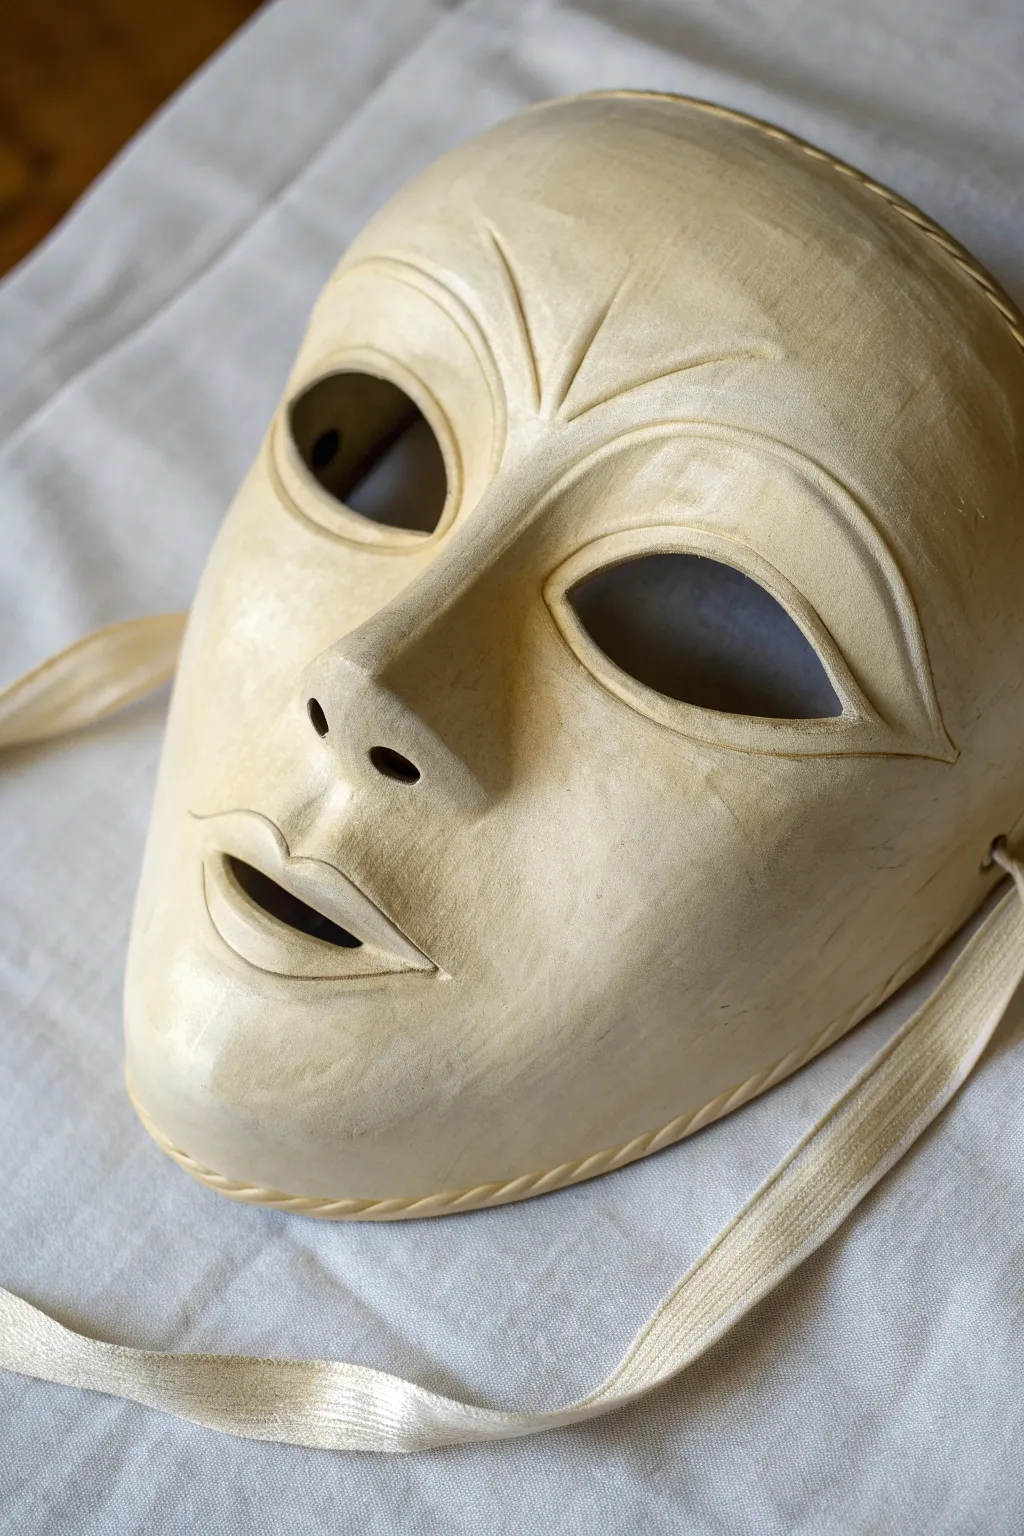
This elegant, bone-colored mask captures the mystery of classic masquerade balls with its smooth curves and distinct, sculpted facial features. Whether for decoration or costume, you will learn to sculpt a full-face piece that boasts a smooth, antique finish and durable ribbon ties.
Detailed Instructions
Materials
- White specialized air-dry clay (lightweight or paper clay recommended)
- Plastic face mold or mannequin head form
- Rolling pin
- Sculpting tool set (needle tool, loop tool, smoothing rib)
- Small bowl of water
- Fine-grit sandpaper (220 and 400 grit)
- Ivory or cream acrylic paint
- Matte or satin clear sealant spray
- Two lengths of cream ribbon (approx. 18 inches each)
- Sponge or soft paintbrush
- Clear craft glue or epoxy
- Plastic wrap
Step 1: Base Construction
-
Prepare the workspace:
Cover your form (plastic face mold or mannequin head) tightly with plastic wrap to prevent sticking. This ensures you can remove the mask easily later. -
Roll the slab:
Roll out a slab of your air-dry clay to a uniform thickness of about 1/4 inch. It needs to be large enough to drape over the entire face form. -
Drape and form:
Gently lift the clay slab and lay it over the plastic-covered form. Press it down softly to conform to the underlying shape, starting from the nose and working outward to avoid air pockets. -
Trim the excess:
Using a needle tool or knife, trim the excess clay around the perimeter of the face, leaving a generous edge that you can refine later. Smooth the cut edges with a damp finger.
Step 2: Sculpting the Features
-
Define the eyes:
Locate the eye sockets on your form. Carefully cut out almond-shaped eye holes. Smooth the inner rims of the eyes with water so they aren’t sharp against the skin. -
Build the nose:
The nose needs more prominence. Add a small snake of clay down the bridge of the nose and smooth it seamlessly into the base slab to build height and structure. -
Sculpt the brow ridge:
Roll two thin coils of clay. Place them above the eye openings to create the arched brow ridges seen in the reference. Blend the bottom edge of the coil into the forehead, but keep the top edge slightly defined for that classical relief look. -
Create the decorative fan:
Between the eyebrows, trace a radiating fan pattern with a needle tool. You can build this up slightly with very thin slips of clay if you want a raised effect, or simply carve the lines for a subtle look. -
Form the lips:
Cut a small horizontal slit for the mouth. Roll tiny oval pieces of clay for the upper and lower lips, attach them around the slit using a bit of water (slip), and blend the outer edges. Create the ‘cupid’s bow’ shape on the top lip. -
Add the perimeter cord:
Roll a long, thin snake of clay. Twist it gently to look like a rope, or keep it smooth, and attach it along the very outer rim of the mask to create a finished border.
Cracking Clay?
If small cracks appear during drying, don’t panic. Mix a small amount of fresh clay with water to make a paste and fill the cracks, then sand smooth once dry.
Step 3: Finishing and Assembly
-
Punch ribbon holes:
While the clay is still wet, use a straw or a round tool to poke a hole on each side of the mask, roughly at temple level, for the ribbons. -
Slow drying:
I prefer to let this dry very slowly away from direct heat to prevent cracking. Leave it on the form for the first 24 hours, then carefully remove it to let the inside dry. -
Sand until smooth:
Once bone dry, sand the entire surface. Start with 220 grit to remove bumps, then switch to 400 grit for that polished, porcelain-like smoothness seen in the photo. -
Apply the base color:
Dilute your ivory or cream acrylic paint slightly with water. Apply a thin wash over the mask. This acts like a stain, enhancing the ‘bone’ look without looking like plastic. -
Antiquing (Optional):
If straight cream looks too new, mix a tiny drop of brown paint into water and brush it into the crevices (nose sides, eye rims), then wipe away the excess immediately with a cloth. -
Seal the piece:
Spray the mask with two light coats of matte or satin sealant. This protects the clay from moisture and gives the surface a unified sheen. -
Attach the ribbons:
Thread your cream ribbons through the side holes from the front to the back. Knot them securely on the inside, adding a dab of glue to the knot for extra security.
Gilded Edges
Rub a tiny amount of gold wax or acrylic gold paint along the raised brow lines and the twisted border rope for a subtle, regal highlight.
Hang your finished mask on a wall or wear it to your next event to showcase your sculpting handiwork


Ornate Carnival-Inspired Mask
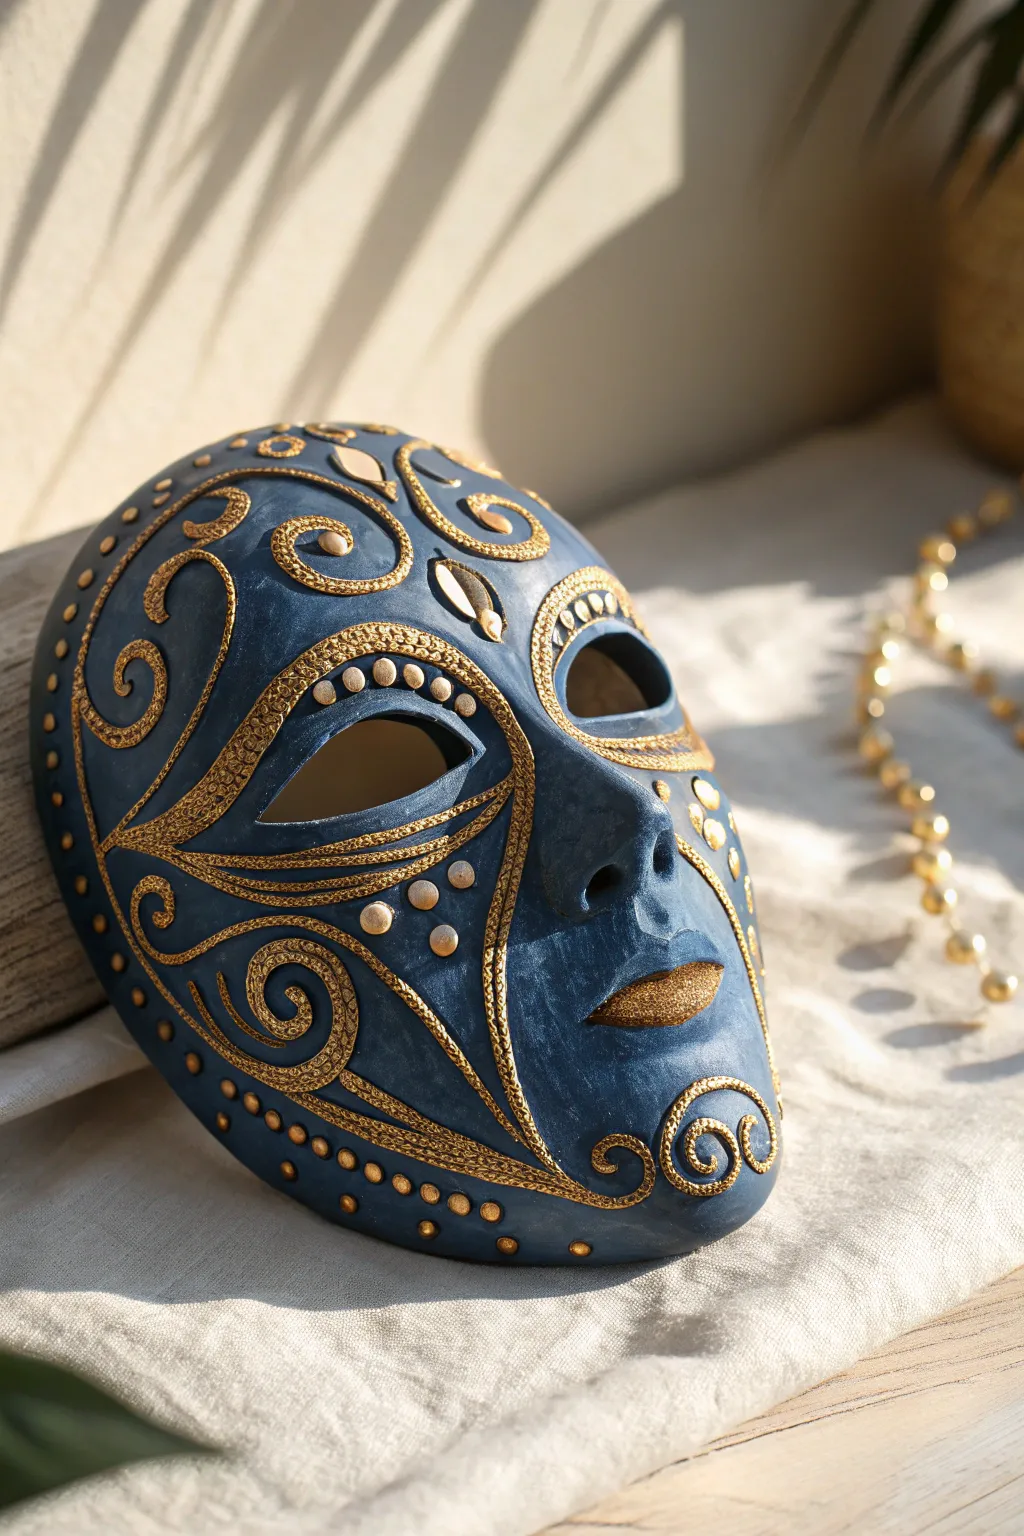
Transport yourself to a Venetian carnival with this stunning deep blue mask, featuring intricate raised relief patterns shimmering in gold. The combination of matte navy texture and metallic filigree creates a sophisticated, antique aesthetic perfect for display.
Step-by-Step Guide
Materials
- Air-dry clay or polymer clay (plenty for a face-sized slab)
- Standard face mold or plastic mask form to shape the clay
- Clay sculpting tools (needle tool, small ball stylus)
- Rolling pin
- Sandpaper (fine grit)
- Deep navy blue acrylic paint (matte finish)
- Metallic gold acrylic paint or gilding wax
- Puffy paint or 3D fabric paint (for raised details)
- Detail brushes (sizes 0 and 00)
- Gloss or satin varnish (optional for lips)
- Gold beading or tiny gold adhesive gems (optional)
Step 1: Sculpting the Base
-
Roll out the slab:
Begin by rolling your clay into a smooth, even slab approximately 1/4 inch thick. Ensure it’s large enough to cover your mask form completely. -
Form the shape:
Gently drape the clay slab over your face mold. Press the clay firmly against the contours, paying special attention to the nose bridge and the eye sockets to define the features. -
Cut the eyes and trim:
Using a craft knife or needle tool, carefully cut out the almond-shaped eye holes. Trim the excess clay around the perimeter to create a clean oval face shape. -
Refine the surface:
Smooth out any fingerprints or bumps with a little water on your finger or a damp sponge. Let the clay dry completely according to the package instructions—this usually takes 24-48 hours for air-dry clay. -
Sand for smoothness:
Once fully cured, gently sand the mask with fine-grit sandpaper to ensure a perfect, stone-like surface. Wipe away all dust with a damp cloth.
Fixing Smudges
If gold paint accidentally gets on the blue background, wait for it to dry completely, then carefully paint over the mistake with your navy base color.
Step 2: Creating the Relief
-
Draft the design:
Lightly sketch your scrollwork pattern onto the dried clay with a pencil. Focus on swirls at the cheeks, forehead, and chin, using the image as a reference guide. -
Apply raised details:
To get that specific raised effect without endless sculpting, trace your pencil lines with 3D puffy paint or use a clay extruder to make very thin snakes of clay. I find puffy paint offers cleaner lines for beginners. -
Add texture dots:
Use the tip of the puffy paint bottle or small balls of clay to create the dotted textures along the eye lines and within the larger scrolls. -
Let the relief dry:
Allow your raised designs to harden completely before moving on to the painting phase. This ensures the texture remains crisp.
Step 3: Painting and Gilding
-
Base coat application:
Paint the entire mask, including the raised details, with the deep navy blue acrylic paint. You may need two coats to achieve that rich, opaque coverage. -
Highlighting with gold:
Once the blue is bone-dry, take a small detail brush or your finger with a tiny amount of gold gilding wax. Gently rub or brush over ONLY the raised 3D lines. -
Lining the eyes:
Use a precision brush to paint the raised borders around the eyes with opaque gold paint. Add tiny vertical strokes within the eye borders to mimic lash-like texturing. -
Painting the lips:
Paint the lips entirely in gold. For a luscious effect, outline the cupid’s bow sharply and fill in the center with a stippling motion for texture. -
Golden accents:
Add gold dots to the decorative points on the forehead and cheeks. Using the back of a paintbrush dipped in gold paint creates perfectly round dots. -
Edge detailing:
Carefully run a line of gold dots along the lower jawline perimeter of the mask to frame the face.
Add Real Sparkle
Instead of painted dots, press tiny flat-backed Swarovski crystals or gold shimmer beads into the clay before it dries for genuine light reflection.
Display your finished masterpiece on a velvet cloth or mount it in a shadow box to admire the sophisticated craftsmanship

The Complete Guide to Pottery Troubleshooting
Uncover the most common ceramic mistakes—from cracking clay to failed glazes—and learn how to fix them fast.
Leaf-and-Vine Forest Spirit Mask
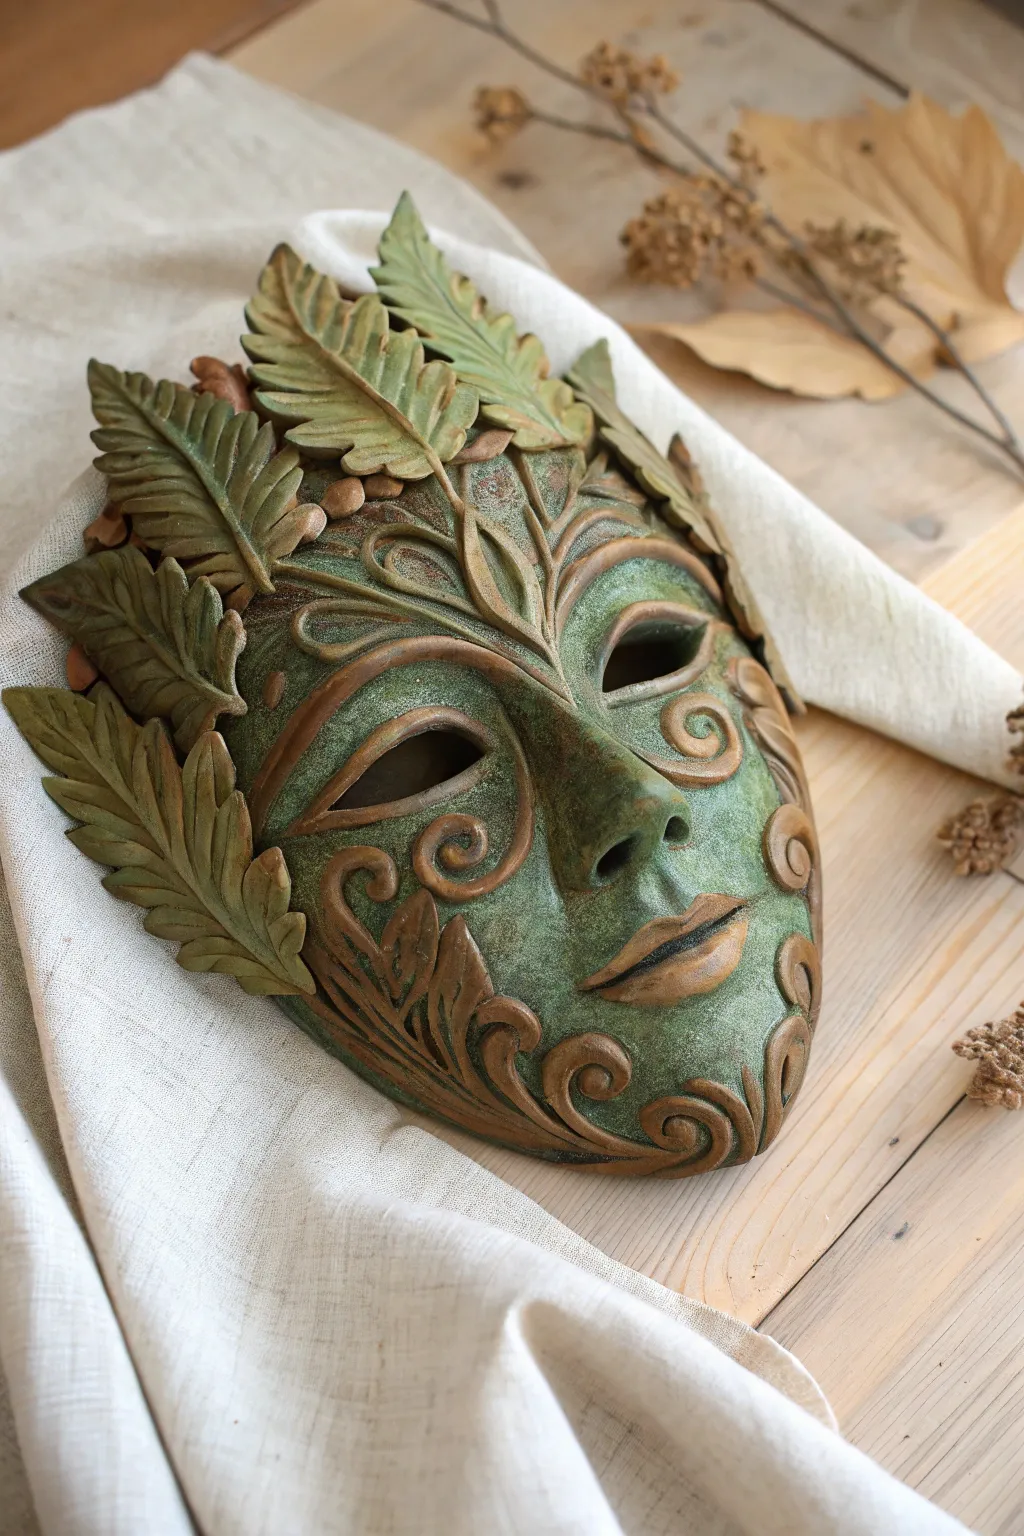
Capture the ancient mystique of the woods with this stunning Green Man-inspired mask, featuring elaborate relief vines and sculpted foliage. The finish mimics aged oxidized bronze, blending earthy greens and bronzes for an artifact that looks centuries old.
Detailed Instructions
Materials
- Air-dry clay (like DAS or creative paper clay)
- Plastic face mask form (as a base)
- Plastic wrap
- Sculpting tools (needle tool, ball stylus, rubber shaper)
- Rolling pin
- Water spray bottle
- Leaf vein texture mat or real leaves (optional)
- Acrylic paints: Dark Green, Forest Green, Bronze/Metallic Gold, Raw Umber, Black
- Paintbrushes (stiff bristle brushes for dry brushing)
- Sea sponge
- Matte spray varnish
Step 1: Building the Foundation
-
Prepare the base:
Cover your plastic mask form tightly with plastic wrap to prevent the clay from sticking permanently. Lightly mist the plastic with water or use a tiny bit of oil as a release agent. -
Apply the base layer:
Roll out a slab of clay to about 1/4 inch thickness. Carefully drape this over the mask form, pressing gently to conform to the nose, eye sockets, and mouth contours without tearing the clay. -
Define the features:
Trim the excess clay from the edges using a craft knife. Use a damp sponge to smooth out fingerprints and refine the shape of the nose and brow line. Cut out the eye holes neatly, smoothing the inner edges with a wet finger.
Natural Texture
Press real fern leaves or deeply veined sturdy leaves into the wet clay to create instant, realistic fossil-like impressions before attaching.
Step 2: Sculpting the Details
-
Create the vine swirls:
Roll long, thin snakes of clay. Coil them into spiral shapes on your work surface first to test the design. Apply a small amount of clay slip (water and clay mix) to the cheek and chin areas, then press your coils onto the mask. -
Refine the relief work:
Use a rubber shaping tool to blend the edges of the vines into the face, making them look like raised relief carving rather than just stuck-on worms. Add depth by carving small lines or dots into the negative space between swirls. -
Form the leaves:
Hand-shape individual teardrop pieces of clay for the foliage crown. Flatten them slightly and use a needle tool to carve a central vein and branching veins into each leaf. I find varying the sizes creates a more organic look. -
Attach the foliage:
Score the clay on the upper left forehead and top of the mask. Apply slip and layer your leaves, starting from the outer edge and working inward. Overlap them slightly to create volume and shadow. -
Blend interfaces:
Where the leaves meet the forehead, use a modeling tool to merge the stems into the central vine design so the transition feels purposeful and seamless. -
Final texture check:
Before the clay dries, gently stipple the smooth skin areas with a stiff brush or crumpled foil to give it a porous, stone-like texture. Let the mask dry completely on the form for at least 24-48 hours.
Step 3: The Antiqued Finish
-
Base coat:
Once bone dry, paint the entire mask with a mix of Dark Green and a touch of Black. Ensure you get paint into every deep crevice, vine curl, and texture pit. This shadow layer is crucial. -
Middle tones:
Sponge on a Forest Green color, focusing on the raised areas but leaving the dark base coat visible in the recesses. Use a dabbing motion to build up an uneven, mottled surface. -
Dry brushing bronze:
Load a stiff brush with Metallic Bronze paint and wipe almost all of it off on a paper towel. Lightly sweep the brush over the raised vines, leaf tips, and nose bridge. This ‘gilding’ makes the details pop. -
Warm accents:
Add a very subtle wash of watered-down Raw Umber to the lower leaves and deep corners of the eyes to mimic earthy dirt accumulation. -
Highlighting:
Mix a tiny bit of light green with white and dry brush just the very highest points of the face (cheekbones, brow) to simulate worn oxidation. -
Seal the work:
Finish with two light coats of matte spray varnish to protect the paint job and unify the sheen without making it look glossy and plastic.
Cracking Clay?
If small cracks appear during drying, smooth a paste of clay and water (slip) into the fissures, let dry, and sand lightly before painting.
Hang your finished spirit mask on a wall or nestle it on a bookshelf to bring a touch of woodland magic to your home
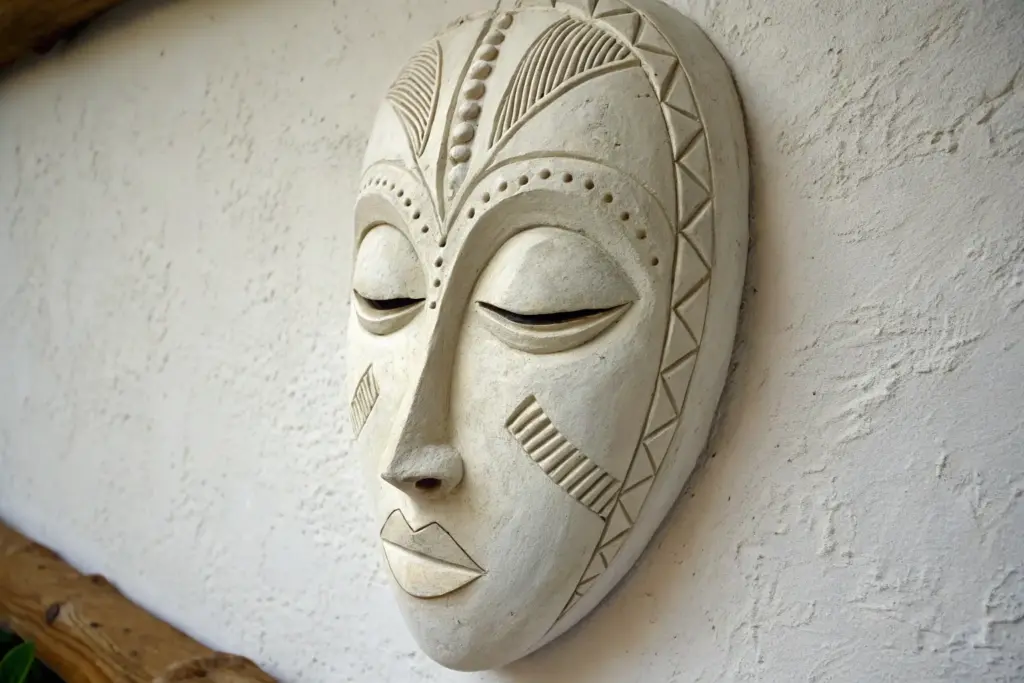
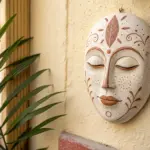
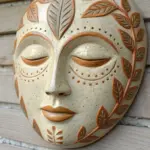
Flower Halo Face Mask
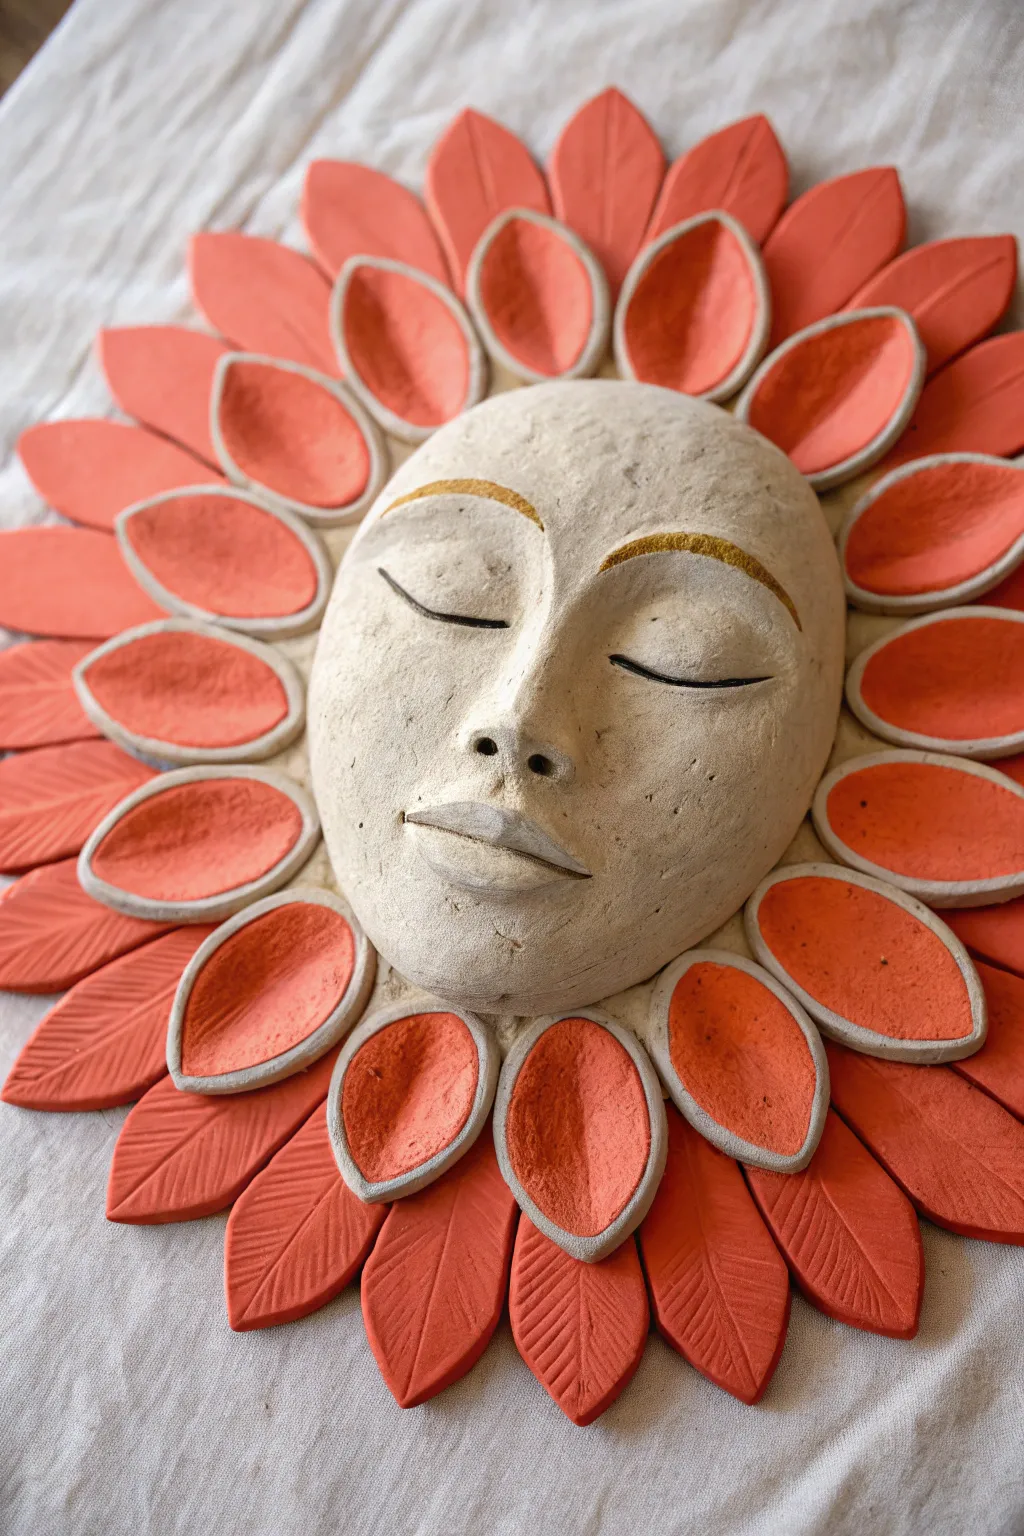
This serene ceramic wall hanging features a gentle sleeping face surrounded by a vibrant halo of double-layered petals. The contrast between the smooth, pale stoneware of the face and the textured, orange-red petals creates a warm, sun-like radiance.
How-To Guide
Materials
- Light colored stoneware clay (off-white or buff)
- Red iron oxide wash or orange underglaze
- Gold luster or gold acrylic paint
- Pottery tools (needle tool, rib, sponge)
- Small carving tool for veins
- Newspaper or half-sphere mold for shaping
- Slip and score tool
- Rolling pin
- Small paintbrush
- Clear matte glaze (optional)
Step 1: Sculpting the Serene Face
-
Form the base slab:
Begin by rolling out a smooth slab of your light-colored clay to about 1/2 inch in thickness. Drape this over a hump mold or a ball of newspaper covered in plastic to create a gentle convex curve for the face. -
Build facial features:
Add small coils of clay to build up the nose bridge, brow ridge, and lips. Smooth these additions seamlessly into the base slab using your fingers and a wet sponge. -
Refine the eyes:
Use a modeling tool to carefully carve the line of the closed eyelids. Create a gentle curve that mimics sleeping eyes, ensuring the eyelids look slightly raised. -
Add texture and nostrils:
Poke two small holes for nostrils and smooth the edges. To give the skin a natural, earthy texture, lightly pounce a stiff-bristled brush or rock over the cheek areas. -
Define the lips:
Sculpt the lips to be full and slightly parted. Use a fine tool to create the center line, ensuring the corners turn up just slightly for a peaceful expression.
Smooth Seams
When attaching petals, use a designated ‘slip brush’ to get into tight crevices. Smoothing the back connections ensures the rays won’t crack off during firing.
Step 2: Creating the Floral Petals
-
Cut the inner petals:
Roll out another slab of clay, slightly thinner than the face. Use a leaf-shaped cutter or a needle tool to cut out roughly 12-14 medium-sized teardrop shapes. -
Shape the inner ring:
Take each teardrop shape and gently pinch the edges upward to create a cupped, spoon-like form. I like to smooth the rim with a damp sponge so no sharp edges remain. -
Attach inner petals:
Score and slip the back of the face mask’s rim. Attach the cupped petals around the entire circumference, overlapping them slightly if needed to create a full collar. -
Cut outer leaves:
Cut a second set of petals, this time larger and more elongated than the first set. These will form the outer sun rays. -
Texture the leaves:
Use a needle tool or small knife to carve a central vein and branching veins into each of these larger outer petals. -
Assemble the outer layer:
Score and slip these larger leaves onto the back of the first ring of petals. Position them so they peek out from the gaps between the inner petals. -
Dry properly:
Cover the entire piece loosely with plastic so the intricate petals dry at the same rate as the thicker face. Let it dry slowly for several days until bone dry.
Step 3: Color and Finishing
-
Initial bisque fire:
Once bone dry, fire the piece to bisque temperature (usually Cone 04) to prepare it for decoration. -
Apply petal color:
Paint the inside of the cupped petals and the entirety of the outer leaves with a vibrant orange underglaze or a red iron oxide wash. Wipe back the edges of the cupped petals with a sponge to reveal the white clay rim. -
Detail the face:
Leave the skin raw or apply a very diluted wash for an antique look. Carefully paint the eyebrows with gold luster (for a third firing) or gold acrylic (if not re-firing). -
Darken the lashes:
Use a fine liner brush and black underglaze or diluted dark oxide to paint the single thin line of the eyelashes. -
Final fire or creeping:
If you used ceramic glazes and gold luster, fire the piece according to manufacturer instructions. If using cold finishes like acrylics, seal the piece with a matte varnish.
Varied Texture
Try pressing real leaves into the outer clay petals before attaching them to get authentic organic veins instead of carving them by hand.
Hang this radiant sculpture in a space that needs a touch of calm warmth and watch how the shadows play across the petals


What Really Happens Inside the Kiln
Learn how time and temperature work together inside the kiln to transform clay into durable ceramic.
Sun and Moon Split Mask
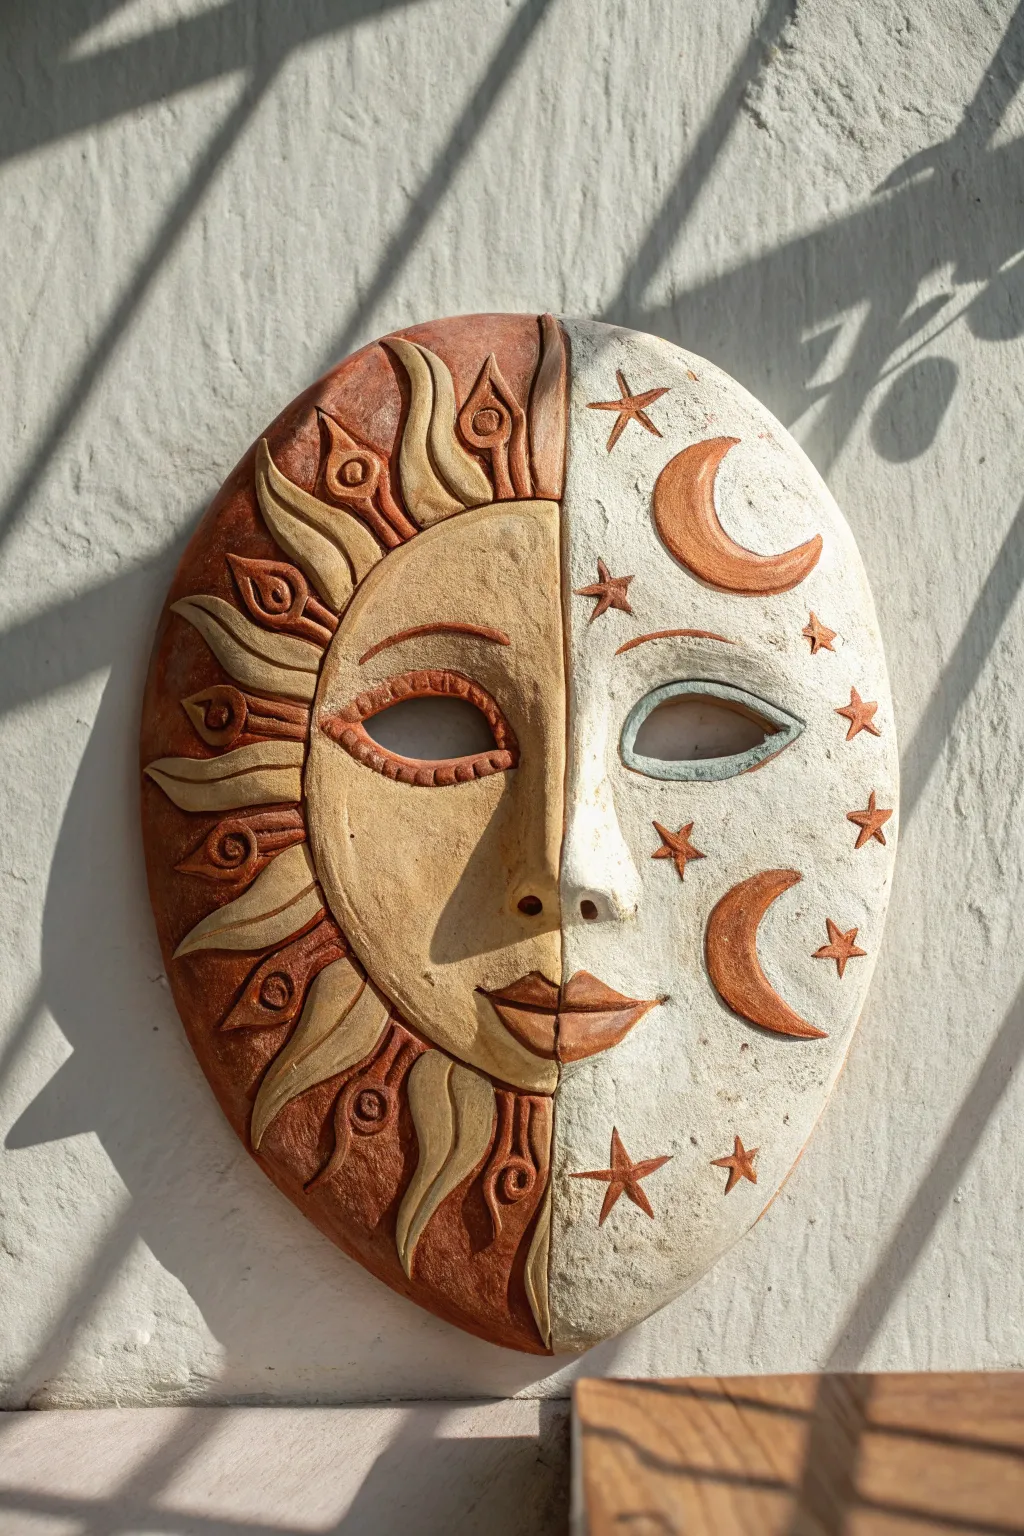
This striking wall relief captures the harmony of opposites, blending warm terracotta sun rays with a cool, textured lunar surface. The split-face design creates a mystical focal point perfect for garden walls or bohemian interiors.
Step-by-Step Guide
Materials
- Air-dry clay (terra cotta color) or polymer clay
- Self-hardening white clay (or white acrylic paint if using one clay type)
- Clay sculpting tools (needle tool, loop tool, smoothing rib)
- Rolling pin
- Cardstock or paper for templates
- Craft knife
- Water and sponge (for smoothing)
- Acrylic paints (terracotta, antique white, light blue, gold/bronze)
- Fine grit sandpaper
- Clear matte or satin varnish
Step 1: Forming the Base
-
Prepare the template:
Draw an oval face shape on cardstock, approximately 8-10 inches tall. Draw a vertical line down the exact center to split the design into the sun and moon halves. Cut out the full oval shape to use as your guide. -
Roll the slab:
Roll out a slab of clay to an even thickness of about 1/2 inch. Place your paper template on top and trace around it with a needle tool, then cut out the oval base using a craft knife. -
Define the divide:
Lightly score a line down the center of the mask. This vertical axis is crucial as it separates the two distinct aesthetic styles. -
Build the nose bridge:
Form a wedge of clay for the nose. Attach it securely to the center line using the score-and-slip method (scratching both surfaces and adding water/slurry). Blend the edges seamlessly into the cheeks so the nose looks like it emerges naturally from the face.
Smooth Operator
Use a slightly damp sponge to smooth fingerprints before the clay dries. For the sharpest sun rays, refine the edges with a craft knife once the clay is leather-hard.
Step 2: Sculpting the Features
-
Create the eyes:
Roll two small balls of clay and flatten them into almond shapes. Position one on each side of the nose. Use a modeling tool to hollow out the center, creating the open eye sockets seen in the reference. -
Add the eyelids:
Roll thin coils of clay to outline the eye sockets, creating upper and lower lids. Blend the outer edges into the face while keeping the inner edge crisp against the eye opening. -
Form the lips:
Add a small flattened oval below the nose for the mouth. Use a needle tool to slice horizontally for the opening, then sculpt the upper and lower lip shapes. The sun side has a slight smile, while the moon side is more serene. -
Sculpt the sun cheek:
On the left (sun) side, add a thin layer of extra clay to the cheek area to give it slightly more volume and roundness compared to the flatter moon side.
Step 3: Detailing the Hemispheres
-
Carve the sun rays:
On the left (sun) side, roll several tapered coils to act as sun rays. Arrange them radiating from the face towards the edge. Alternately create straight spikes and wavy flame-like shapes. -
Refine sun textures:
Use a small loop tool to carve details into the rays. Add teardrop shapes or concentric circles within some rays for that decorative, folk-art look shown in the image. -
Texture the moon side:
Before adding details to the right (moon) side, dab the surface with a crumpled piece of foil or a stiff brush to create a cratered, stone-like texture. -
Add celestial symbols:
Cut small, flat crescent moon shapes and stars from a thin sheet of clay. Attach these to the right side of the face using slip, pressing them firmly so they bond with the textured base. -
Pierce mounting holes:
If you plan to hang this, carefully poke two holes near the temples or create a loop on the back while the clay is still wet.
Celestial Sparkle
Embed small glass beads or mirror mosaic pieces into the center of the stars on the moon side before the clay dries for a magical, light-catching effect.
Step 4: Finishing and Painting
-
Slow drying:
Allow the mask to dry slowly away from direct heat to prevent cracking. This usually takes 24-48 hours depending on humidity. -
Base painting:
Paint the entire left side (sun) with a warm terracotta or rust-orange acrylic. Paint the entire right side (moon) with an antique white or cream color. -
Detailing the sun:
Use a darker brown wash (watered-down paint) on the sun side, letting it settle into the carved crevices of the rays to make the details pop. Wipe away excess from the high points. -
Detailing the moon:
Paint the crescent moons and stars on the right side with a copper or bronze metallic paint. Carefully paint the rim of the moon-side eye with a soft blue-grey to differentiate it. -
Final coat:
Once the paint is fully cured, seal the entire piece with a matte or satin varnish to protect the finish and unify the sheen.
Now your celestial mask is ready to bring a touch of cosmic mystery to your space.
Animal Feature Hybrid Mask
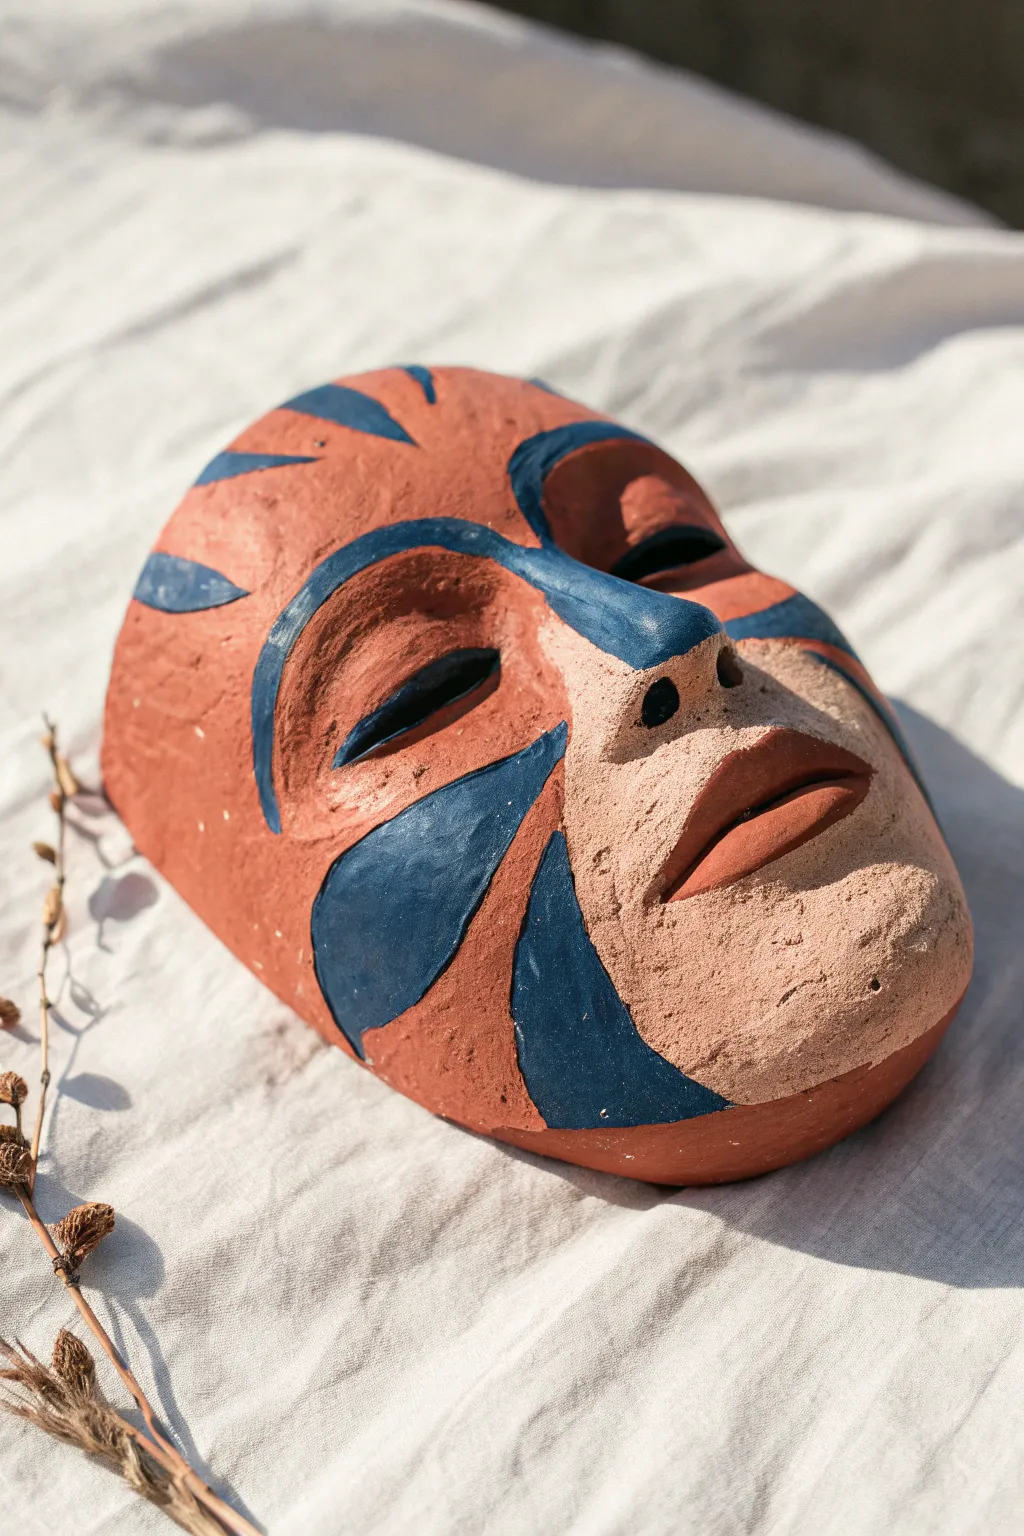
Embrace a fusion of human expression and wild instinct with this striking clay mask project. Using earthy terracotta tones and bold teal markings, you’ll sculpt a face that feels like an ancient artifact unearthed from a mysterious civilization.
Step-by-Step
Materials
- Terracotta-colored air-dry clay or earthenware clay
- Basic sculpting tools (loop tool, needle tool, wooden rib)
- Small sponge
- Water cup
- Rolling pin
- Face armature or crumpled aluminum foil base
- Acrylic paint (dark teal or petrol blue)
- Fine grit sandpaper
- Medium round paintbrush
- Detail brush
Step 1: Forming the Base
-
Prepare your armature:
Start by creating a support for your mask. You can use a plastic face mold covered in plastic wrap, or create a mound from crumpled aluminum foil that roughly mimics the curve of a human face. -
Roll out the slab:
Roll your terracotta clay into a slab approximately 1/4 to 1/3 inch thick. It needs to be sturdy enough to hold its shape but not so heavy that it cracks easily. -
Drape and shape:
Gently drape the clay slab over your armature. Smooth it down with your hands to conform to the underlying curve, trimming away huge excess edges but keeping an oval face shape. -
Establish facial structure:
Using your thumbs, press gently into the clay to locate where the eye sockets will be. Build up material for the nose bridge by adding a small wedge of clay and blending the edges seamlessly.
Smooth Seams
When adding clay for the nose or lips, cross-hatch (score) both surfaces with a needle tool and add a drop of water (slip) before joining for a permanent bond.
Step 2: Sculpting Features
-
Refine the noise:
Sculpt the nose to have a broad, slightly animalistic quality. Use a modeling tool handle or your pinky finger to press deep indentations for the nostrils, angling them slightly outward. -
Cut the eyes:
Instead of round human eyes, use a needle tool to cut stylized, almond-shaped slits. Smooth the cut edges with a damp finger so they don’t look sharp or jagged. -
Build the brow:
Add small coils of clay above the eye slits to create a prominent brow ridge. Blend this clay downwards into the bridge of the nose and upwards into the forehead for a continuous flow. -
Form the mouth:
Roll a small coil and attach it below the nose to form the upper lip. Repeat for the lower lip. I find it helpful to shape the lips slightly thicker than usual, as this adds to the mask’s expressive character. -
Detail the lips:
Use a wooden tool to create the separation line between the lips. Press down slightly at the corners of the mouth to give a neutral or slightly serious expression. -
Surface texture:
Use a damp sponge to smooth the overall surface, but don’t polish it too perfectly. The goal is a slightly rough, stone-like texture that shows the ‘tooth’ of the clay.
Step 3: Painting and Finishing
-
Allow to dry:
Let the mask dry completely. If using air-dry clay, this may take 24-48 hours depending on humidity. The clay should lighten in color and feel room temperature to the touch. -
Sand lightly:
Once bone dry, take fine-grit sandpaper and very gently knock down any sharp burrs or unwanted varying heights, particularly around the edge of the mask. -
Sketch the markings:
Using a pencil, very lightly sketch the placement of the tiger-stripe markings. Plan for large swoops under the eyes and jagged stripes on the forehead and temples. -
Paint the eye markings:
Load a round brush with dark teal acrylic paint. Paint the large, curved shapes beneath the eyes, swooping outward toward the cheeks. -
Add forehead stripes:
Paint the vertical stripes on the forehead. Make the lines organic and varying in thickness—thicker at the base and tapering to a point. -
Detail the brows:
Carefully paint along the ridge of the brow and down the side of the nose bridge, connecting these lines to your other markings to frame the eyes dramatically. -
Finishing touches:
Use a smaller detail brush to sharpen the tips of your painted stripes. Leave the rest of the terracotta clay bare to contrast with the matte paint.
Ancient Patina
Dilute some dark brown paint with water and wash it over the whole dried mask, then immediately wipe it off with a rag. The dark color will stay in the textured recesses.
Display your finished mask on a stand or hang it on the wall to add a touch of primitive elegance to your space

TRACK YOUR CERAMIC JOURNEY
Capture glaze tests, firing details, and creative progress—all in one simple printable. Make your projects easier to repeat and improve.
Horned Fantasy Creature Mask
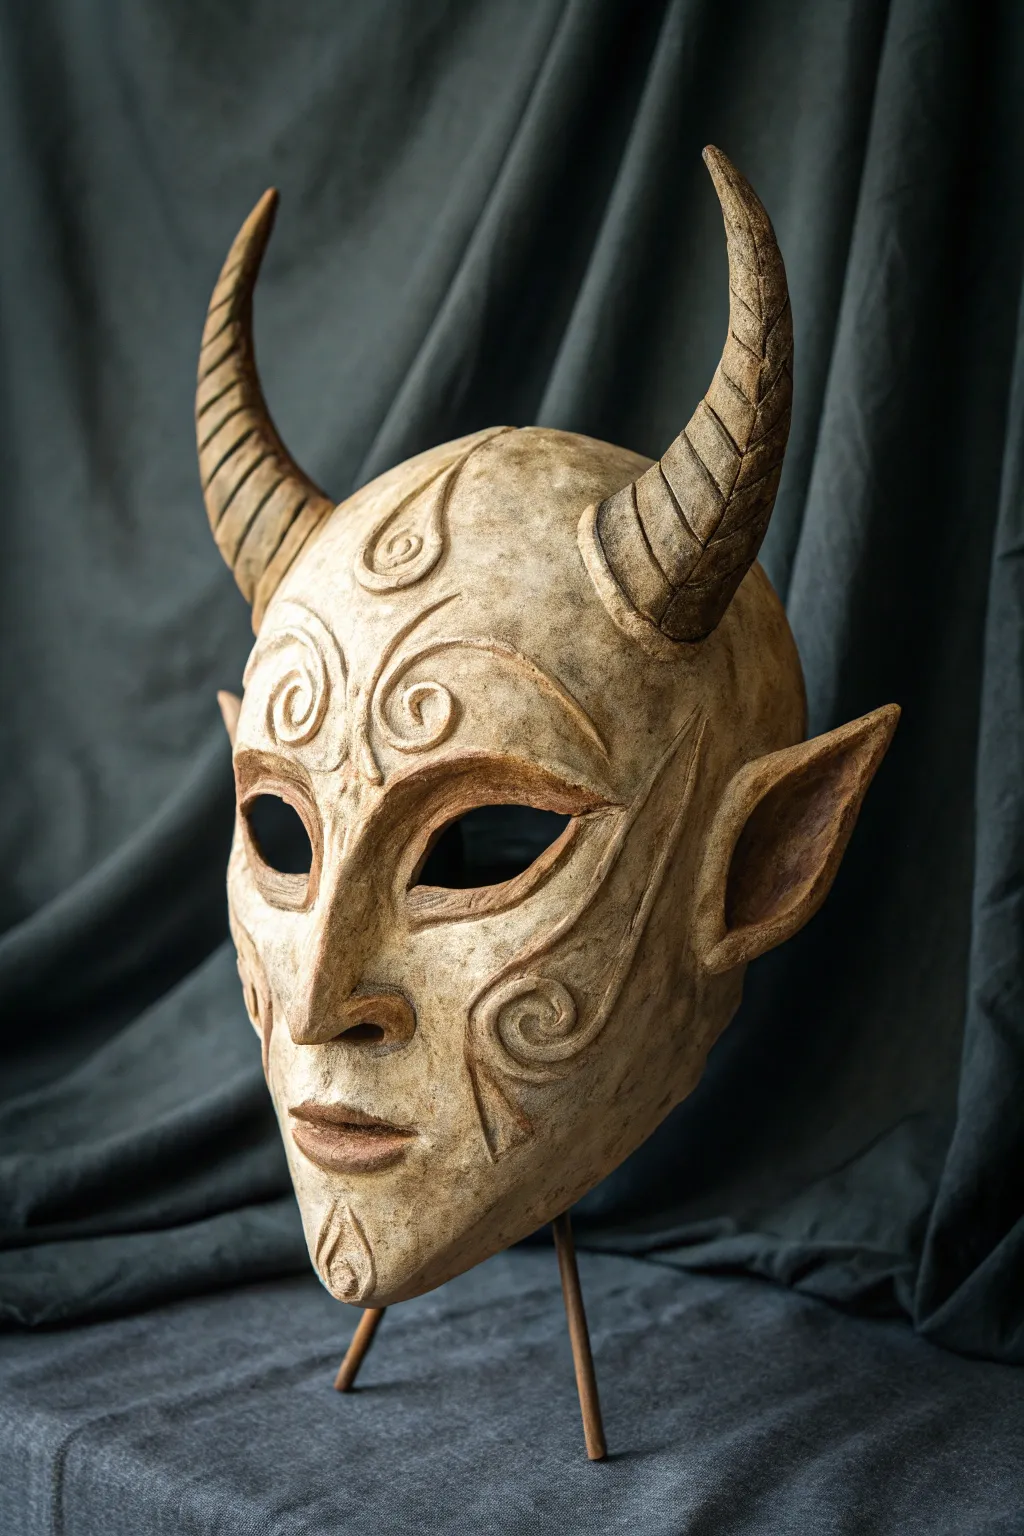
Channel the mystique of old-world folklore with this striking horned fantasy mask, featuring elegant spiral reliefs and distinct pointed ears. The finished piece boasts a weathered, bone-like texture that makes it look like an artifact unearthed from a magical forest.
How-To Guide
Materials
- High-quality air-dry clay (or polymer clay based on preference)
- Plastic face mask mold or amateur sculpting armature
- Aluminum foil
- Masking tape
- Sculpting tools (needle tool, loop tool, ball styluses)
- Water spray bottle
- Sponge
- Acrylic paints (bone white, raw umber, burnt sienna, black)
- Matte varnish or sealant
- Paintbrushes (various sizes including a stiff bristle brush)
- Fine-grit sandpaper
Step 1: Armature and Base Structure
-
Prepare the base form:
Begin with a plastic face mask mold as your foundation. If you want a custom fit, you can build up areas with aluminum foil tape to adjust the brow or chin shape before applying clay. -
Construct the horns and ears:
Create the core shapes for the horns and pointed ears using tightly crunched aluminum foil. Shape the horns into curved, tapered points and the ears into elven triangles. Tape these securely onto the mask base with masking tape. -
Apply the initial clay layer:
Roll out a slab of clay to about 1/4 inch thickness. Lay this over the face portion of the mask, pressing it gently to adhere to the base form. Smooth out any air bubbles with wet fingers. -
Cover the appendages:
Add clay over the foil horns and ears. I find it easiest to use small flattened snakes of clay, wrapping them around the horns and smoothing the seams together to create a unified surface.
Clay Shrinkage Tip
Air-dry clay shrinks slightly when drying. Sculpt the mask slightly larger than your face to ensure it still fits comfortably after the moisture evaporates.
Step 2: Sculpting the Features
-
Refine the facial structure:
Build up the brow ridge, cheekbones, and nose bridge by adding extra clay. Use your thumbs to blend these additions seamlessly into the base layer, creating deep eye sockets and a prominent, angular nose. -
Carve the eyes:
Using a craft knife or needle tool, carefully cut out the eye holes. Smooth the raw edges with a damp sponge or your finger to ensure comfortable wearability later. -
Sculpt the mouth and chin:
Add a small strip of clay for the lips, sculpting a neutral, stoic expression. Refine the chin into a slightly pointed shape to balance the horns. -
Detail the horns:
Using a loop tool or knife, carve horizontal ridges up the length of the horns to mimic the growth rings found on goat or ram horns. Keep the texture rough and organic.
Make it Mossy
Glue small patches of dried craft moss or lichen into the crevices of the horns and ears to make the character look like a forest spirit.
Step 3: Detailing and Texture
-
Draft the relief patterns:
Lightly sketch your spiral designs onto the forehead, cheeks, and chin using a needle tool. Symmetrical swirls work best for this fantasy aesthetic. -
Create the raised spirals:
Roll very thin, worm-like coils of clay. Carefully lay them over your sketched lines. Use a small blending tool or a rubber shaper to blend the edges of the coils onto the face so they look like raised carvings rather than stuck-on worms. -
Add surface texture:
Once the main features are set, take a stiff bristle brush or a crumpled ball of foil and gently tap it all over the ‘skin’ of the mask to create a porous, bone-like stone texture. -
Refine the ear connection:
Ensure the ears transition smoothly into the side of the head. Add a small ridge of clay at the base of the ear to suggest cartilage. -
Drying:
Allow the mask to dry completely. For air-dry clay, this could take 24-48 hours depending on thickness. Keep it away from direct heat to prevent cracking.
Step 4: Painting and Finishing
-
Sanding:
Once fully dry, lightly sand any unintentionally sharp peaks or rough spots, particularly around the eye holes and mask edges. -
Base coat:
Apply a solid base coat of bone white or pale cream acrylic paint. Cover the entire mask, including the horns and deep crevices. -
Apply an antiquing wash:
Mix raw umber and a touch of black with plenty of water. Brush this dark wash over the entire mask, ensuring it gets into the spiral reliefs and horn ridges. -
Wipe back:
While the wash is still wet, use a damp sponge or rag to wipe the paint off the high points. The dark paint will remain in the textures and recesses, instantly creating depth and age. -
Dry styling:
Using a very dry brush with a lighter cream color, lightly dust the raised edges of the spirals and the tips of the horns to highlight the sculpting work. -
Seal the work:
Finish with a matte spray varnish to protect the paint job and give the mask a unified, non-glossy finish suitable for an ancient artifact.
Now you have a stunning, ancient-looking artifact ready for display or your next costume event
Grotesque Grin and Teeth Mask
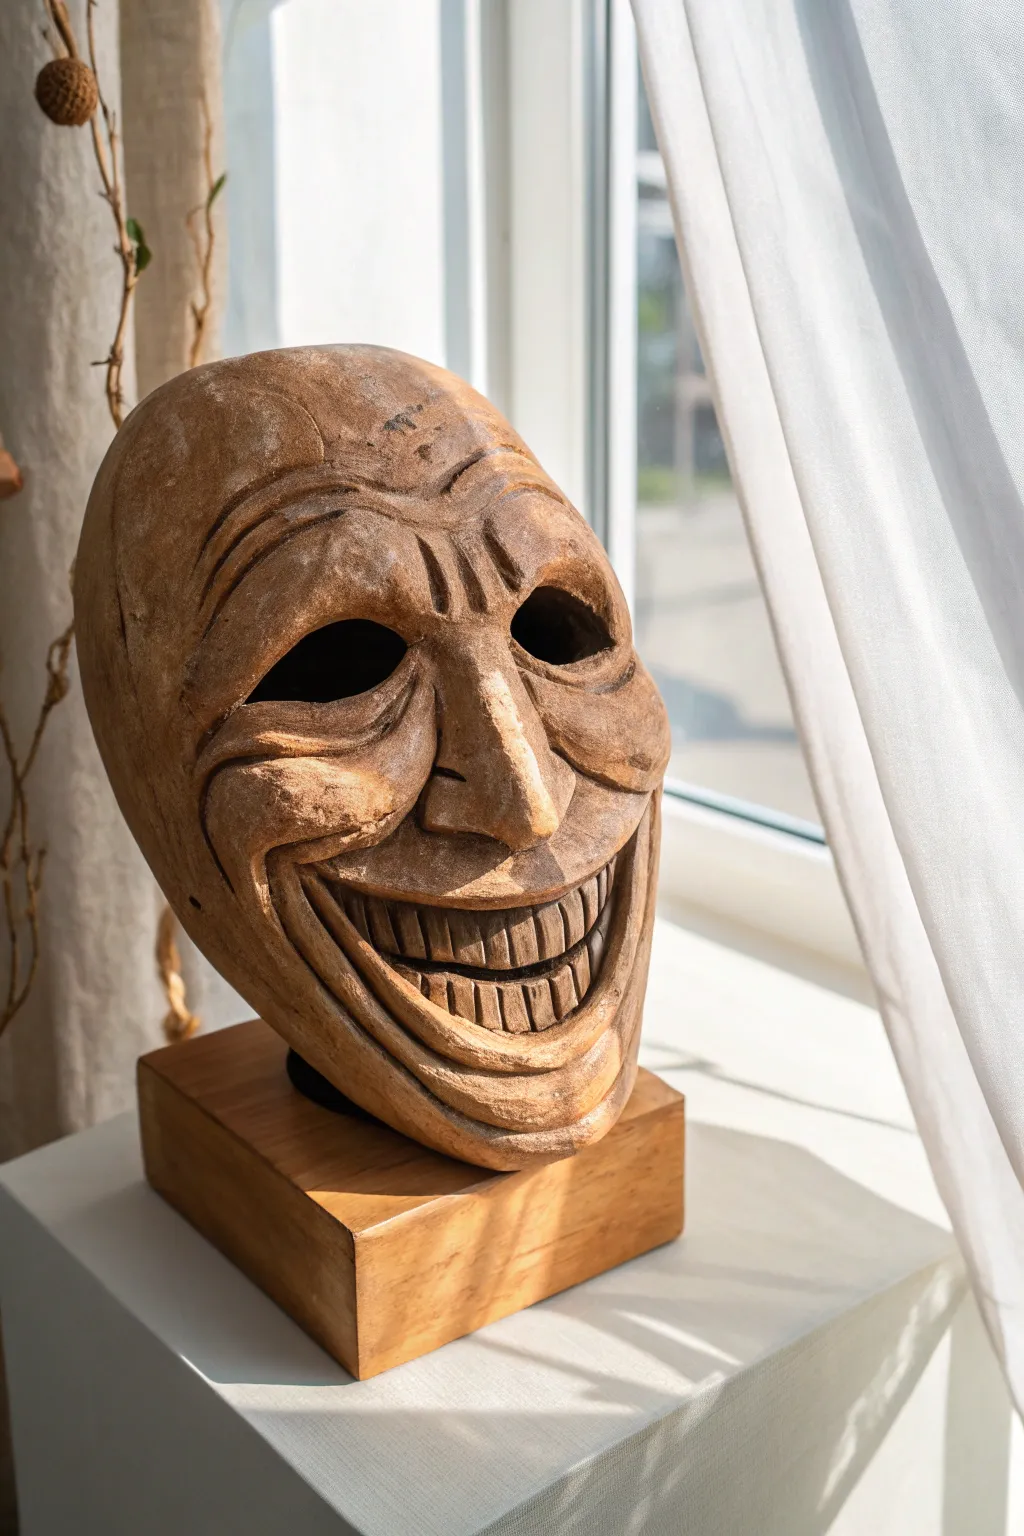
Capture the spirit of ancient theater with this grotesque mask featuring exaggerated laugh lines and a prominent, toothy grin. Using clay texturing techniques to mimic aged, carved wood, you’ll create a striking display piece that feels like a rediscovered artifact.
Step-by-Step Guide
Materials
- Air-dry clay (stone or wood color preferred)
- Plastic face mask form (as a base)
- Sculpting tools (particularly loop tools and needle tools)
- Acrylic paints (raw umber, burnt sienna, dusty beige, black)
- Heavy body matte varnish
- Stiff bristle brush (for texturing)
- Soft synthetic brush (for painting)
- Sponge
- Creating block or wooden base for display
Step 1: Building the Base Structure
-
Prepare the armature:
Begin by covering your plastic mask form with a thin layer of petroleum jelly or plastic wrap to ensure easy release later. -
Apply the base layer:
Roll out a slab of air-dry clay about 1/4 inch thick. draping it over the mask form. Press it gently to conform to the basic facial contours, smoothing out any accidental air pockets. -
Build up the brow:
Add thick coils of clay across the forehead to create the prominent, furrowed brow ridge. Blend the edges seamlessly into the skull cap using your thumbs. -
Form the cheeks and nose:
Layer additional clay on the cheekbones to create volume. Sculpt a long, prominent nose shape, ensuring it bridges smoothly from the brow ridge down to the upper lip area.
Step 2: Sculpting the Grotesque Features
-
Carve the eye sockets:
Use a large loop tool to dig out deep, shadowy eye sockets. They should be almond-shaped but slanted downwards at the outer corners to enhance the manic expression. -
Shape the exaggerated grin:
Carve a wide, U-shaped mouth that stretches almost vertically up the cheeks. Create deep folds (nasolabial folds) running from the nose wings around the corners of the mouth. -
Insert the teeth:
Instead of carving teeth out of a solid block, roll small, rectangular pellets of clay. Press them individually into the mouth cavity, creating a full upper and lower row. Make them large and blocky. -
Detail the teeth:
Define the separation between teeth with a needle tool. Slightly round the corners of each tooth to make them look worn, not pristine.
Repairing Cracks
If the clay shrinks and cracks while drying, don’t panic. Mix a small amount of fresh clay with water to create a paste (slip) and fill the cracks, then sand smooth once dry.
Step 3: Texturing and Finishing
-
Create wood grain texture:
Before the clay hardens, drag a stiff bristle brush or a wire texture tool vertically across the entire face. Follow the contours of the muscles to simulate wood grain direction. -
Add deep cracks:
Use a needle tool or knife to carve erratic, deep fissures, particularly on the forehead and cheeks, mimicking aged, splitting wood. -
Drying:
Allow the mask to dry completely. This is crucial for air-dry clay and may take 24-48 hours depending on thickness. Flip it occasionally if possible. -
Base coat painting:
Paint the entire mask with a solid coat of raw umber acrylic. Ensure you get the paint into every deep crack and between the teeth. -
Dry brushing usually works best:
Dip a dry, stiff brush into a mixture of burnt sienna and beige. Wipe most of the paint off on a paper towel, then lightly brush over the raised surfaces to catch the texture. -
Deepening shadows:
Apply a watered-down black or dark brown wash into the eye sockets, the mouth interior (between teeth), and the deepest wrinkles. Wipe away excess from the high points with a damp sponge. -
Highlighting the grain:
Do a final, very light dry brush with a dusty beige or off-white color on the brow ridges, nose bridge, and chin to make the ‘wood’ texture pop. -
Mounting:
Once sealed with a matte varnish, mount the finished mask onto a simple wooden block stand to complete the museum-piece aesthetic.
Aged Patina
Rub a little bit of dark furniture wax over the finished dried paint. Buff it slightly with a cloth to give the mask a subtle sheen and a convincing antique wooden feel.
Step back and admire the wonderfully uncanny expression of your faux-wood creation
Music-Themed Face Mask
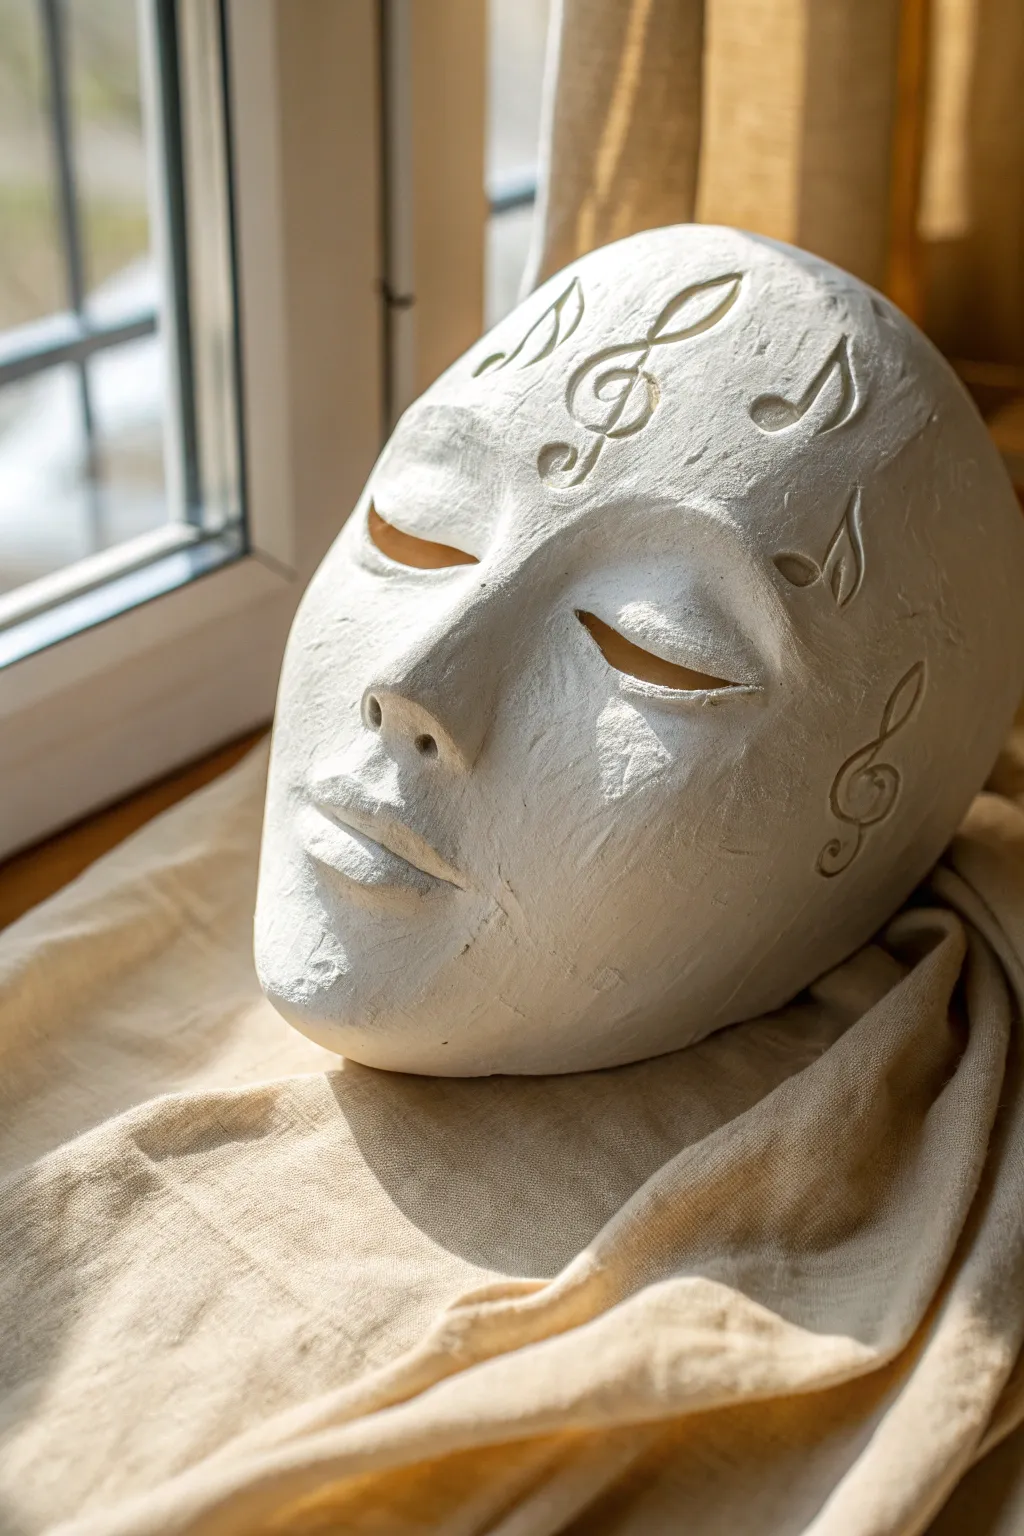
This serene, music-themed face mask serves as a beautiful decorative piece or a unique base for a costume. Featuring elegant treble clefs and musical notes carved directly into the white clay surface, the finished artwork has a classic, sculptural feel that catches the light beautifully.
Step-by-Step
Materials
- Plastic face mask mold (or a generic plastic mask form)
- Air-dry clay (white) or paper clay
- rolling pin
- Clay sculpting tools (needle tool, loop tool)
- Small bowl of water
- Sponge
- Fine-grit sandpaper (220 grit)
- Petroleum jelly or plastic wrap (release agent)
- Craft knife
- Soft cloth for smoothing
Step 1: Forming the Base
-
Prepare the mold:
Begin by cleaning your plastic mask form. Apply a very thin layer of petroleum jelly over the entire surface to ensure the clay releases easily later. Alternatively, you can drape a layer of thin plastic wrap over the form, smoothing out as many wrinkles as possible. -
Roll the clay:
Take a large chunk of air-dry clay and knead it until it’s pliable. Roll it out on a flat surface to an even thickness of about 1/4 inch (6mm). You want it thick enough to carve into, but thin enough to drape well. -
Drape the clay:
Gently lift your clay sheet and lay it over the mask form. Start pressing it down from the center (the nose area) outwards to avoid trapping air bubbles. Use your thumbs to gently press the clay into the contours of the eyes, nose, and lips. -
Trim the excess:
Using a craft knife or a needle tool, trim away the excess clay around the perimeter of the mask. Don’t worry about a perfect edge yet; just get the general face shape established. -
Cut out the eyes:
While the clay is still soft, carefully trace the eye shapes from the mold underneath. Use your craft knife to cut out the eye holes creating the almond shapes seen in the reference. Smooth the cut inner edges with a wet finger. -
Smooth the surface:
Dip your sponge or fingers into a little water and gently glide them over the entire surface of the mask. You want to erase any fingerprints and create a smooth canvas for your carving. I find a slightly damp sponge works best for achieving that unified texture.
Clean Lines Tip
If your carving tools are dragging the clay, let the mask dry for about 30-60 minutes until it’s ‘leather hard’ before carving the details.
Step 2: Carving the Melody
-
Plan the placement:
Before carving, lightly sketch your musical notes onto the soft clay with a needle tool. Place a large treble clef on the forehead, slightly off-center for visual interest. Add smaller notes—like eighth notes or beamed sixteenth notes—around the cheeks and temples. -
Carve the treble clef:
Using a small loop tool or a V-gouge tool, carefully carve out the lines of your main treble clef. You want to remove a strip of clay to create a recessed groove rather than just scratching a line. Vary the depth slightly to mimic the thick-and-thin look of calligraphy. -
Add floating notes:
Move to the smaller notes you sketched. Carve out the note heads as small ovals and connect them with stems. For the beamed notes (the ones connected by a bar), carve distinct, parallel lines. -
Refine the edges:
Go back over your carved grooves. If the carving tool pushed up little ridges of clay (burrs) along the edges of the notes, gently smooth them down with a damp brush or fingertip to keep the look clean. -
Texturize slightly:
The reference mask has a lovely, organic feel that isn’t perfectly polished. You can achieve this by lightly dabbing the un-carved areas with a crumpled paper towel or a dry sponge to give it a subtle, stone-like texture.
Level Up: Antique Look
For an aged effect, brush watered-down brown acrylic into the carved notes, then immediately wipe the surface clean, leaving dark joy only in the grooves.
Step 3: Finishing Touches
-
Initial drying phase:
Leave the mask on the mold for at least 24 hours. If you remove it too soon, the shape might warp. Keep it away from direct heat sources to prevent cracking. -
Remove from mold:
Once the outer surface feels firm and dry, carefully pop the clay mask off the plastic form. The inside will likely still be damp. Let the mask dry completely on a wire rack for another 24 to 48 hours. -
Sand the flaws:
When the mask is bone dry, take your fine-grit sandpaper and gently sand the outer rim to smooth any sharp edges left from trimming. You can also lightly sand the surface if there are unwanted bumps, but be careful not to erase your subtle texture. -
Dust and clean:
Wipe the mask with a dry, soft cloth or a large fluffy brush to remove all sanding dust, especially from inside the carved musical notes.
Display your musical masterpiece near a window or mount it on a wall to let the shadows play across the carved notes
Cracked Porcelain Finish Mask
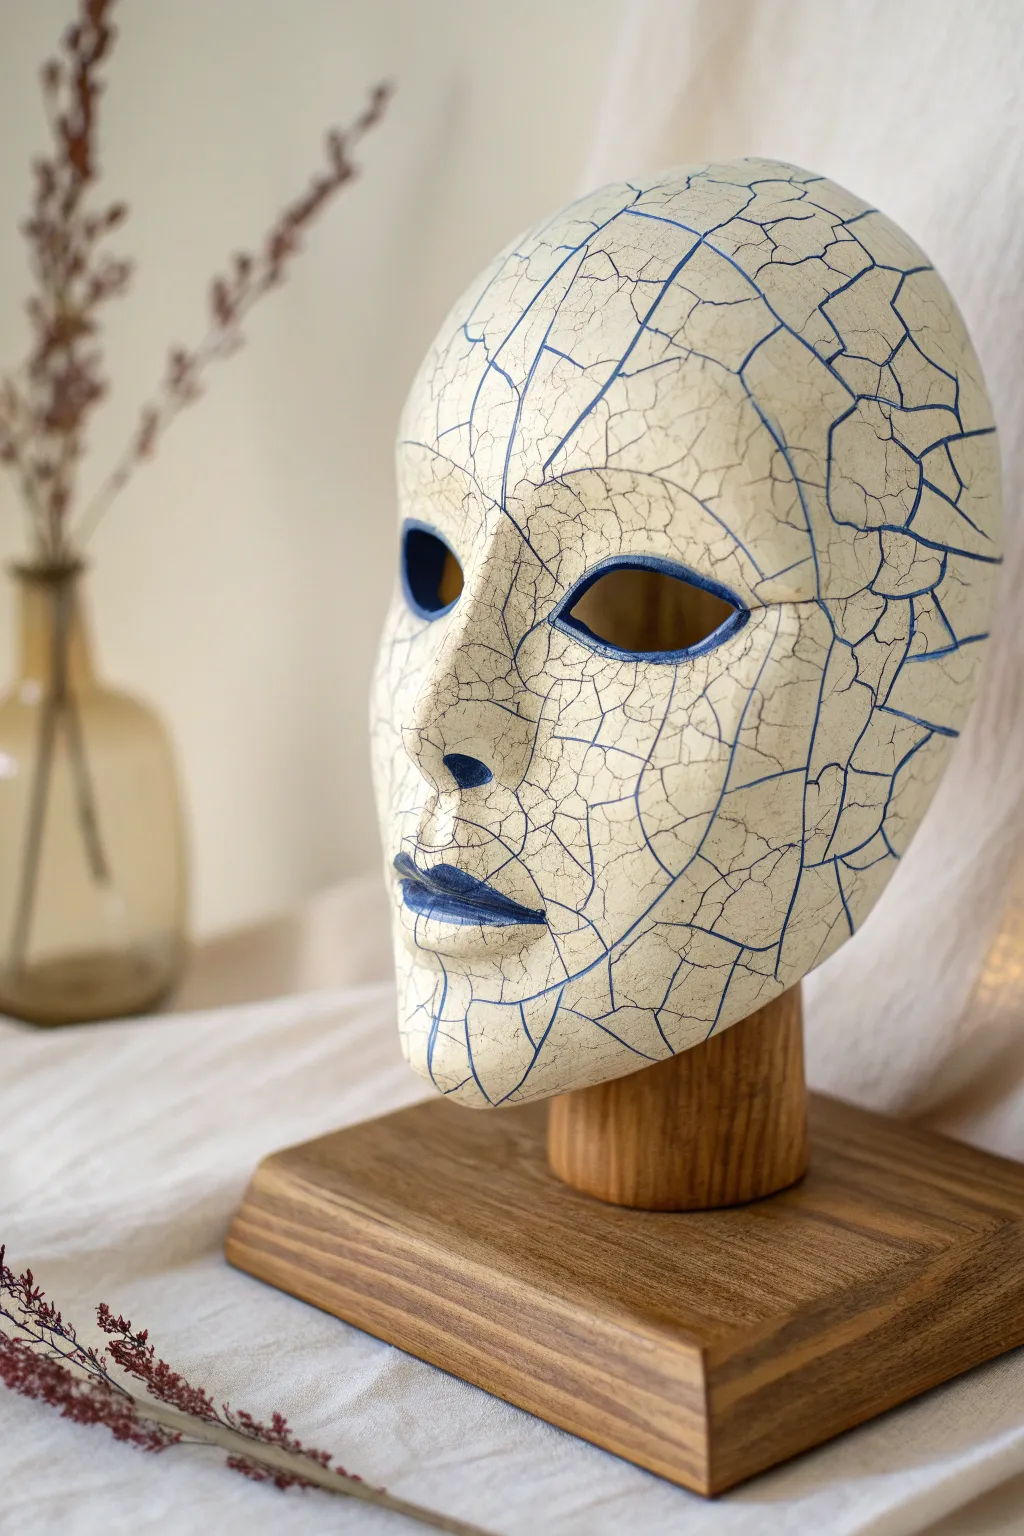
Transform a simple clay or paper mache base into an arresting piece of faux-porcelain art featuring intricate, map-like fissures. This project mimics the beauty of aged ceramics with deep blue accents, creating a hauntingly elegant display piece.
Step-by-Step Guide
Materials
- Plastic face mask form (for molding)
- Air-dry clay (white) or paper clay
- Rolling pin
- Modeling tools (or a butter knife)
- Fine-grit sandpaper (220-400 grit)
- White acrylic paint or gesso
- Cobalt blue fluid acrylic paint or ink
- Fine detail brush (size 0 or 00)
- Flat shader brush
- Matte or satin varnish
- Palette
- Cup of water
- Paper towels
Step 1: Sculpting the Base
-
Prepare the clay slab:
Begin by rolling out your air-dry clay to a consistent thickness of about 1/4 inch. If the clay is sticky, you can roll it out on a piece of parchment paper or plastic wrap to make lifting it easier. -
Mold over the form:
Drape the clay slab over your plastic face mask form. Gently press the clay down to conform to the features, ensuring you capture the bridge of the nose and the curve of the cheeks without piercing the clay. -
Cut the openings:
Using a craft knife or a sharp sculpting tool, carefully cut out the eye holes. Smooth the raw edges with a wet finger to ensure they are rounded and look like fired ceramic rather than cut dough. -
Refine the edges:
Trim the excess clay around the perimeter of the face. Aim for a clean, symmetrical jawline and forehead line. Smooth this outer edge with a damp sponge or your finger. -
Create the texture canvas:
Before the clay dries, check for any unwanted fingerprints. Use a little water to slick the surface completely smooth, as we want a perfect porcelain look before adding the fake cracks. -
Dry thoroughly:
Set the mask aside to dry. Depending on humidity and thickness, this can take 24 to 48 hours. I find that flipping the mask gently halfway through drying helps the inside harden evenly.
Step 2: Finishing the Surface
-
Sand for porcelain smoothness:
Once fully rigid, sand the entire mask with fine-grit sandpaper. Focus on removing any small bumps or rough patches until the surface feels like smooth bisqueware. -
Prime the surface:
Apply two coats of white acrylic paint or gesso. This ensures the mask is bright white and seals the clay, making the painting steps cleaner. -
Pencil the cracks:
Using a very light touch with a pencil, map out your crack pattern. Start with larger ‘primary’ fissures running vertically, then add smaller perpendicular branching cracks to fill the negative space. -
Carve the fissures:
Use a needle tool or a sharp scribe to gently carve along your pencil lines. You don’t need to cut deep; just scratch the surface enough so the paint has a channel to settle into.
Clean Lines Only
If your blue paint stains the white surface while wiping, immediately paint over the smudge with titanium white. A clean eraser can also remove pencil marks before varnishing.
Step 3: Painting the Details
-
Paint the eye rims:
Dip a flat shader brush into cobalt blue acrylic paint. Carefully paint the inner rim of the eye sockets, creating a bold outline that defines the gaze. -
Paint the lips:
Fill in the lips with the same cobalt blue. Keep the edges crisp to maintain that statuesque appearance. -
Flood the cracks:
Mix a small amount of water or flow medium into your blue paint to make it inky. using your fine detail brush, paint inside the carved crack lines. -
Wipe the excess:
If you paint outside the lines, quickly wipe the surface with a barely damp paper towel. The paint will stay in the recessed scratch but wipe off the high points, enhancing the cracked effect. -
Seal the work:
Allow the blue paint to dry completely. Finish the piece with a coat of spray matte or satin varnish to protect the finish and unify the sheen. -
Mount for display:
Once the varnish is dry, the mask can be placed on a wooden dowel stand or hung on a wall to complete the gallery look.
Use a Wash
Instead of painting every tiny crack individually, apply a diluted blue wash over the scribed area and wipe the surface clean. The pigment stays trapped in the grooves automatically.
Now you have a striking, antique-style mask that captures the fragile beauty of broken porcelain.
Aged Stone Texture Mask

Bring the mystery of an archaeological dig into your home with this faux-stone mask sculpture. By using air-dry clay and clever texturing techniques, you can achieve the pitted, weathered look of centuries-old concrete or limestone without the heavy weight.
Step-by-Step Tutorial
Materials
- Air-dry clay (stone or grey color preferred, white works too)
- Plastic face mask form (as a base)
- Aluminum foil
- Water spray bottle
- Sculpting tools (loop tool, needle tool)
- Stiff bristle brush (e.g., old toothbrush)
- Course sandpaper or a real stone
- Acrylic paints (grey, burnt umber, black, cream)
- Matte sealant spray
Step 1: Forming the Base
-
Prepare the armature:
Begin with a plastic face mask form. To give the mask more volume and that distinctly classical, sturdy look, bulk up the nose, brow ridge, and chin areas by taping down crumpled aluminum foil. This saves clay and reduces drying time. -
Roll out the clay:
Roll your air-dry clay into a sheet approximately 1/4 inch thick. If the clay feels too dry, mist it lightly with water. Carefully drape this sheet over your prepared foil and plastic armature. -
Establish facial features:
Press the clay firmly onto the form to adhere it. Use your thumbs to define the eye sockets deeply. Cut out the eye holes with a knife tool, making them slightly larger than you think you need, as the clay might shrink. -
Sculpt the nose and mouth:
Add extra clay to build up a strong, straight nose and full lips. Unlike a realistic face, you want these features to feel slightly stylized and statue-like, so keep the edges distinct.
Cracking Up?
If large cracks appear while drying, fill them with a mix of fresh clay and white glue (paste consistency). Once dry, sand it down and re-texture.
Step 2: Texturing and Distressing
-
Initial roughing:
While the clay is still soft, take a stiff bristle brush or an old toothbrush and aggressively stipple the entire surface. This removes fingerprints and creates a porous stone foundation. -
Create deep pitting:
To mimic ancient weathering, use a needle tool or a small pebble to press deeper divots and uneven holes into the cheeks, forehead, and chin. I find that grouping these imperfections makes them look more natural. -
Refine the edges:
The edges of the mask shouldn’t be perfect. Tear away small bits of clay or press them inwards to create a chipped, uneven perimeter that suggests the piece was broken off a wall or larger statue. -
Dry partially:
Let the mask dry until it is leather-hard (usually 2-4 hours). This stiffness allows for surface scratching without deforming the main shape.
Step 3: Painting the Stone Finish
-
Full drying:
Allow the clay to dry completely, which can take 24-48 hours depending on thickness. It should be light grey or white and hard to the touch. -
Base coat:
If you used while clay, paint the entire mask a flat, medium grey. If you used stone-colored clay, you can skip this step or add a light wash of cream acrylic to create depth. -
Sponging texture:
Mix a lighter grey (almost white) and dab it gently over the high points—the nose bridge, brow, and chin—using a natural sea sponge. This highlights the texture created earlier. -
Aging the crevices:
Dilute burnt umber paint with water to create a thin wash. Run this fluid into the deep recesses: the corners of the eyes, the line of the mouth, the nostrils, and the textured pits. -
Wiping back:
Before the brown wash dries, wipe the surface gently with a damp paper towel. This leaves the ‘dirt’ only in the cracks, simulating centuries of grime accumulation. -
Adding rust tones:
For that specific oxidized look seen in the photo, dry brush a very small amount of reddish-orange or raw sienna paint near the eyebrows and scattered randomly on the cheeks. -
Speckling:
Load a toothbrush with diluted black paint. Run your thumb over the bristles to flick tiny specks of paint across the mask. This mimics the mineral inclusions found in real granite or concrete. -
Final matte seal:
Once all paint is bone dry, spray the mask with a matte varnish. It is crucial to use matte, as any gloss will ruin the stone illusion.
Mossy Ruins
Glue patches of dried green moss or dabs of green flocking powder into the deepest crevices to make the mask look like it was found in a jungle temple.
Hang your new artifact on a textured wall to complete the illusion of an ancient discovery
Sgraffito Pattern Mask
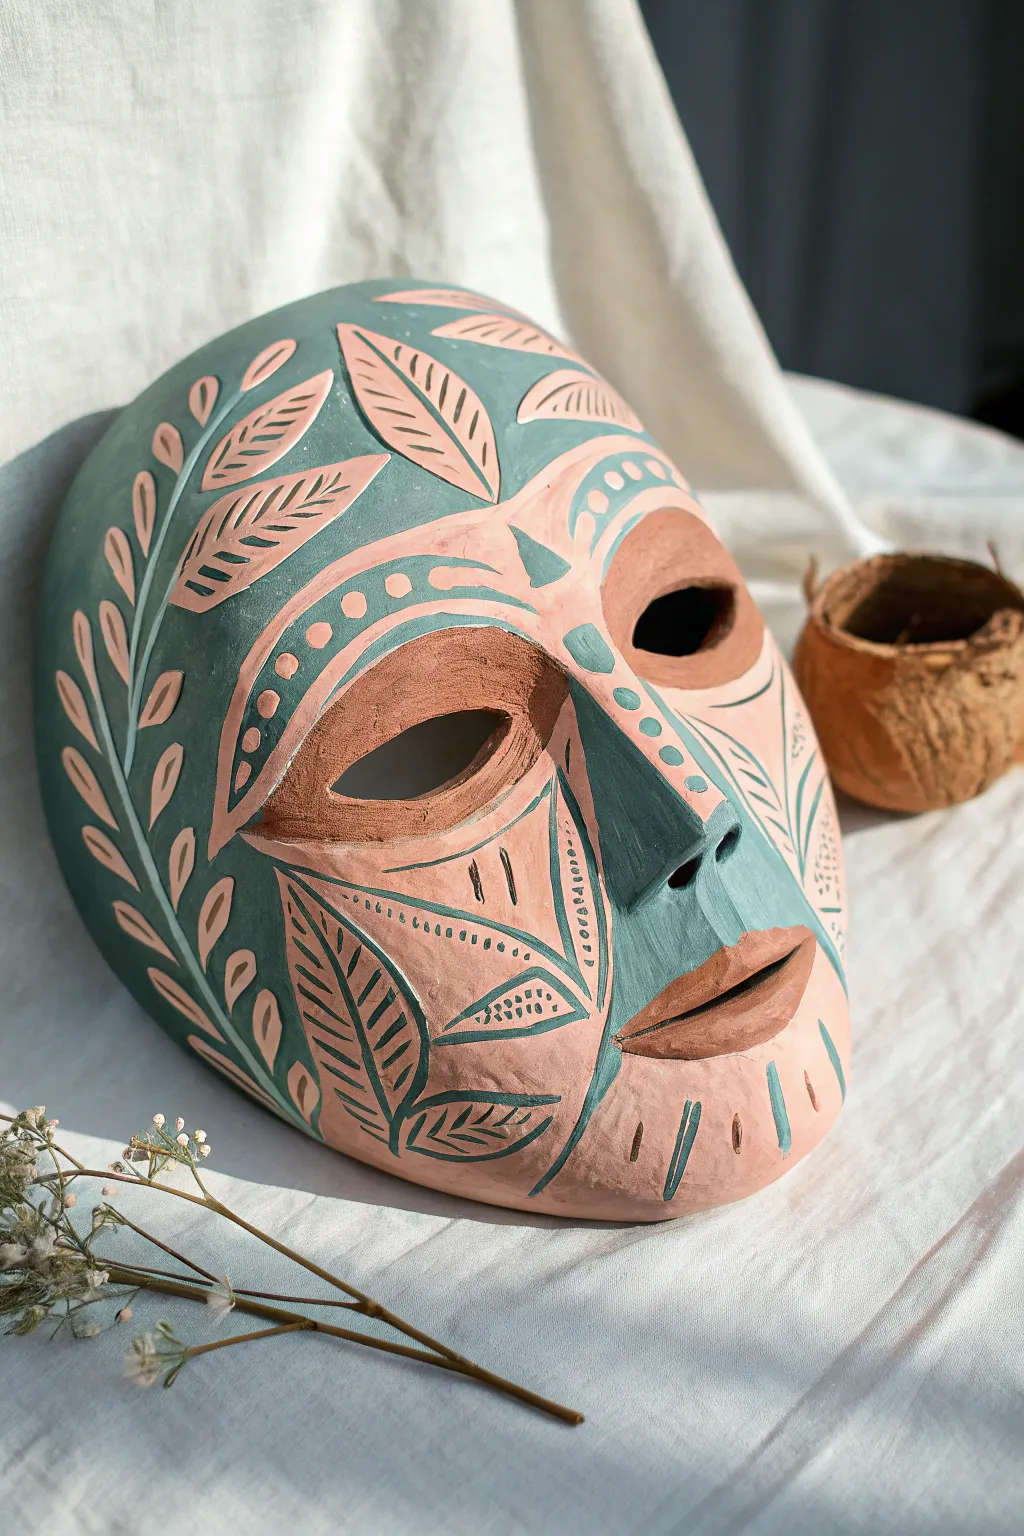
Embrace the ancient art of sgraffito with this stunning decorative mask, featuring earthy terra cotta tones revealed beneath a layer of matte teal slip. The stylized leaf motifs and geometric dot work create a mesmerizing, nature-inspired piece perfect for wall display.
Step-by-Step
Materials
- Terra cotta stoneware clay (or polymer clay in terra cotta color)
- Teal or sage green underglaze (or matte acrylic paint if not firing)
- Canvas mat or rolling surface
- Rolling pin
- Mask mold (plaster, plastic, or crumpled newspaper/foil form)
- Carving tools (loop tool, needle tool)
- Sponge
- Soft bristle brush
- Clay knife or fettling knife
- Rib tool (smooth wood or rubber)
Step 1: Sculpting the Base
-
Roll the slab:
Begin by wedging your terra cotta clay to remove air bubbles, then roll it out into an even slab about 1/4 inch thick. A consistent thickness prevents cracking during drying. -
Form the mask shape:
Drape your clay slab over your mask mold. If you don’t have a professional mold, a crumpled ball of newspaper covered in foil works well to create the convex curve of a face. -
Refine the perimeter:
Use your fettling knife to trim the excess clay around the edges, creating a smooth oval face shape. Soften the cut edges with a damp sponge so they aren’t sharp. -
Build facial features:
Add a wedge of clay for the nose bridge and blend it seamlessly onto the main surface using scoring and slipping. Build up the brow ridge slightly for definition. -
Carve the openings:
Carefully cut out two almond shapes for the eyes. Smooth the inner edges of the eye holes with a damp finger immediately to keep the look organic. -
Form the mouth:
Attach a small coil for the lips, shaping them into a subtle pout. I like to score this area well to ensure the lips don’t pop off during drying. -
Leather hard drying:
Allow the mask to dry to a ‘leather hard’ state. The clay should be firm and cool to the touch but no longer flexible. This is crucial for clean carving later.
Lines look messy?
If your carving tools are dragging or tearing the clay rather than cutting cleanly, the clay is too wet. Wait another hour for it to stiffen up.
Step 2: Applying Color & Sgraffito
-
Apply the underglaze:
Paint 2-3 even coats of teal underglaze over the entire mask surface, letting each coat dry until matte before adding the next. Do not paint the inside of the eye sockets or the lips; leave those raw terra cotta. -
Initial carving: The brow:
Using a loop tool, carve two arcing lines above the eyes to frame the face. Remove the teal layer to reveal the clay underneath. -
Dot details:
Inside the brow arches, use a tool with a rounded tip to gently scrape away small circles, creating a rows of terra cotta dots contrasting against the teal. -
Leaf motif outline:
On the forehead and cheeks, lightly sketch large leaf shapes using a needle tool. Focus on organic placement—some pointing up, some angled down. -
Carving the leaves:
Carve out the interior of the leaf shapes, removing the teal background but leaving a central teal spine in each leaf for visual interest. -
Adding leaf veins:
Switch to a fine point tool and scratch diagonal lines inside the leaves to represent veins. This texture adds beautiful depth to the design. -
Geometric chin accents:
On the chin area, carve vertical lines and dashes radiating downward. Keep these strokes confident and somewhat loose. -
Cheek triangles:
Define the cheekbones by carving triangular sections that point toward the nose. Fill these triangles with rows of tiny stippled dots. -
Final cleanup:
Use a soft, dry brush to sweep away all the little clay crumbs created by carving. Do not use water here, or you might smudge the underglaze. -
Firing or finishing:
If using ceramic clay, bisque fire the piece now, then apply a clear matte glaze if desired and fire again. If using polymer clay, bake according to package instructions.
Pro Tip: Depth Control
Vary your carving pressure. Deep gouges create shadows, while light scratches just reveal color. Combining both makes the design pop.
Once fired or cured, this expressive mask brings a serene, earthy presence to any room
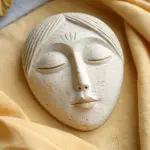
Fabric-Imprint Texture Mask
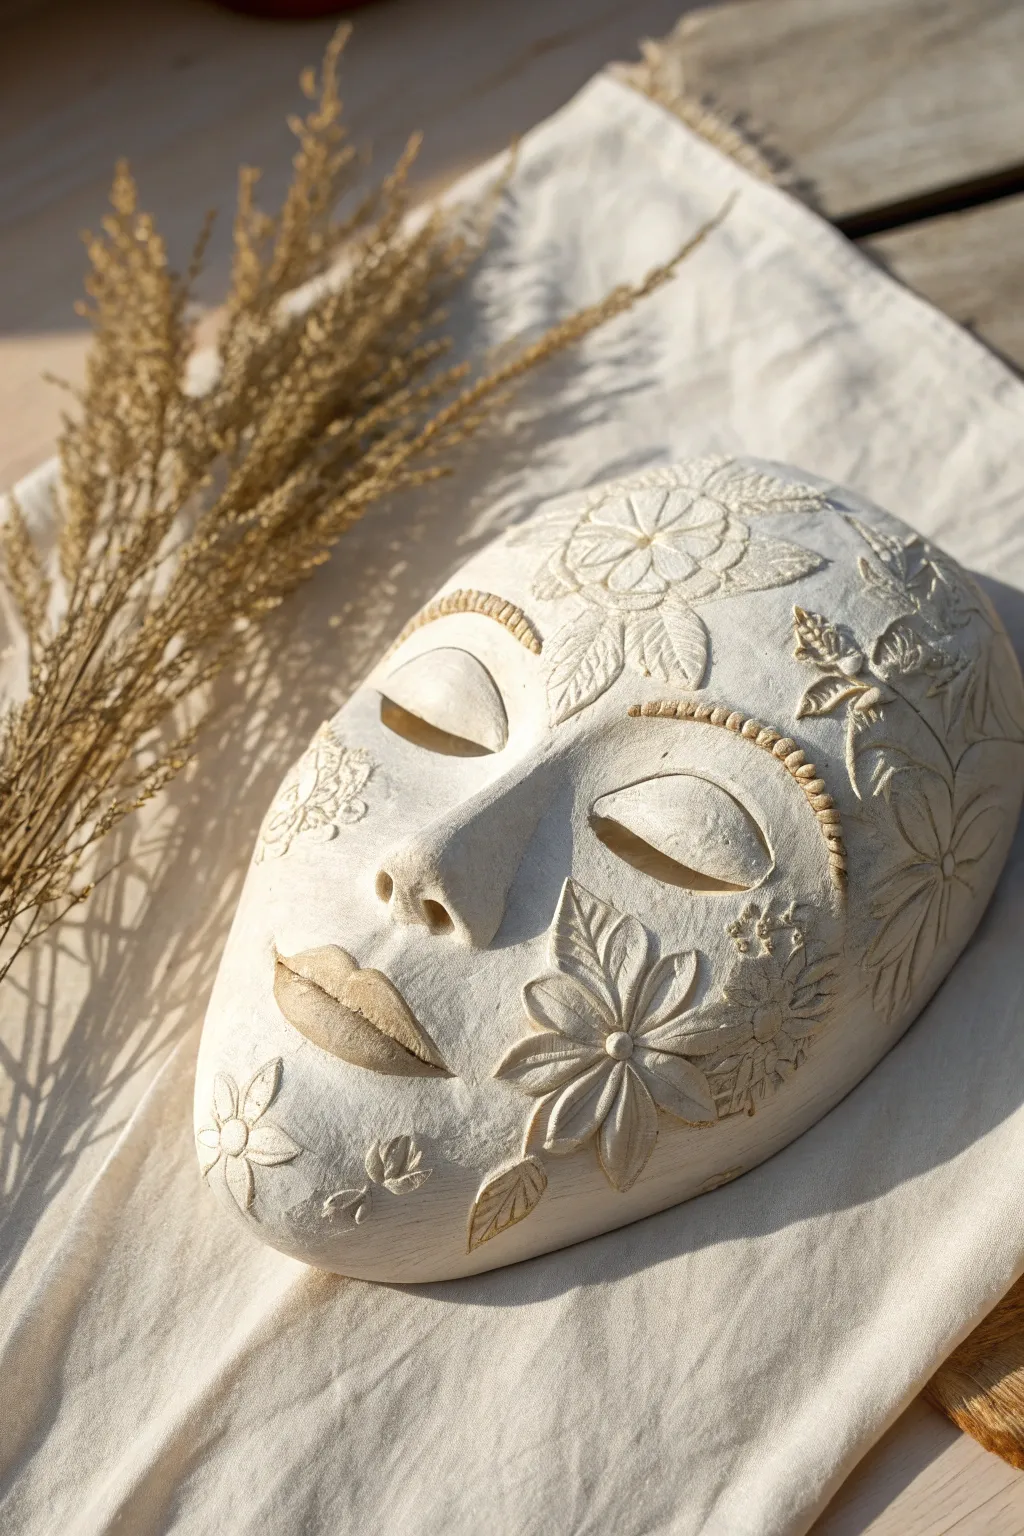
Capture the serenity of nature with this elegant air-dry clay mask, featuring delicate floral appliqués and textured details that mimic embroidery. The finished piece has a soft, matte stone-like quality perfect for wall decor or an artistic centerpiece.
Step-by-Step Guide
Materials
- White smooth air-dry clay (approx. 500g-1kg)
- Plastic face mold or mannequin head
- Plastic wrap (cling film)
- Clay sculpting tools (needle tool, ball stylus, loop tool)
- Small rolling pin
- Parchment paper or non-stick mat
- Slip (clay mixed with water)
- Soft paintbrush
- Fine-grit sandpaper
- Matte varnish or sealant (optional)
- Small bowl of water
- Sponge
Step 1: Forming the Base
-
Prepare the mold:
Cover your plastic face mold or mannequin head securely with plastic wrap. This ensures the clay won’t stick and makes removal much easier later on. -
Roll the slab:
On a non-stick surface, roll out a large slab of white air-dry clay. Aim for an even thickness of about 1/4 inch (6mm) to ensure structural integrity without being too heavy. -
Drape the clay:
Gently lift your clay slab and drape it over the prepared mold. Use your palms to smooth it down, starting from the nose and working outward to the edges to remove air pockets. -
Define the features:
Using your fingers and a damp sponge, gently press the clay into the contours of the mold, paying special attention to the nose, eye sockets, and mouth area. -
Trim the edges:
Use a needle tool or craft knife to cut away the excess clay around the perimeter of the mask, creating a clean oval shape.
Step 2: Sculpting the Details
-
Refine the eyes and lips:
For the closed eyelids, smooth the clay over the eye socket area. You can add a thin, crescent-shaped coil of clay to the lower part of the eyelid line to simulate depth. -
Sculpt the lips:
Add small amounts of clay to build up the lips if the base layer is too thin. Use a modeling tool to define the cupid’s bow and the separation line between the lips. -
Create the eyebrows:
Roll two very thin snakes of clay. Attach them to the brow ridge using a little slip. Use a needle tool to press short, vertical hatching lines into the coil to mimic hair texture.
Clean Joins
Use a damp paintbrush to smooth the ‘seams’ where your flowers attach to the face. This makes the appliqués look carved from the mask rather than just stuck on.
Step 3: Creating Floral Appliqués
-
Make the flower petals:
Roll out a fresh, thinner piece of clay. Cut small teardrop shapes for petals. Use a modeling tool to press a central vein or texture into each petal. -
Attach the main flower:
I like to start with the largest flower on the forehead. Score the mask surface lightly, apply slip, and press the petals down in a circular arrangement. Add a small flattened ball for the center and texture it with a needle tool. -
Add leaves and vines:
Cut leaf shapes and roll thin vines. Arrange them flowing down the sides of the mask. Score and slip every piece before attaching to ensure they don’t pop off during drying. -
Imprint textures:
For some of the background texture, you can press a piece of lace or textured fabric gently into the flat areas of the clay to create a subtle contrast with the smooth 3D flowers. -
Detail the flowers:
Use a sharp tool to carve fine lines inside the petals and leaves, giving them a realistic, etched look similar to the reference image.
Antique Effect
Once dry, apply a diluted brown acrylic wash over the texture. Before it dries, wipe most of it away with a damp cloth. The dark paint will stay in the crevices.
Step 4: Finishing Touches
-
Slow drying:
Leave the mask on the mold until it is leather hard (keeps its shape but still cool to touch). Then, very carefully remove it from the mold and remove the plastic wrap. -
Full cure:
Set the mask on a soft surface, like a crumpled towel, to support its curve while it dries completely. This usually takes 24-48 hours depending on humidity. -
Sanding:
Once fully dry and chalky white, use fine-grit sandpaper to gently smooth any rough edges on the perimeter or unwanted bumps on the face. -
Seal (Optional):
To preserve the matte, raw look, leave it as is or apply a very thin coat of matte varnish. If you want a slight sheen on the lips or eyes, you can spot-varnish those areas.
Display your botanical creation in a shadow box or hang it to bring a calm, artistic presence to your room
Geometric Faceted Mask
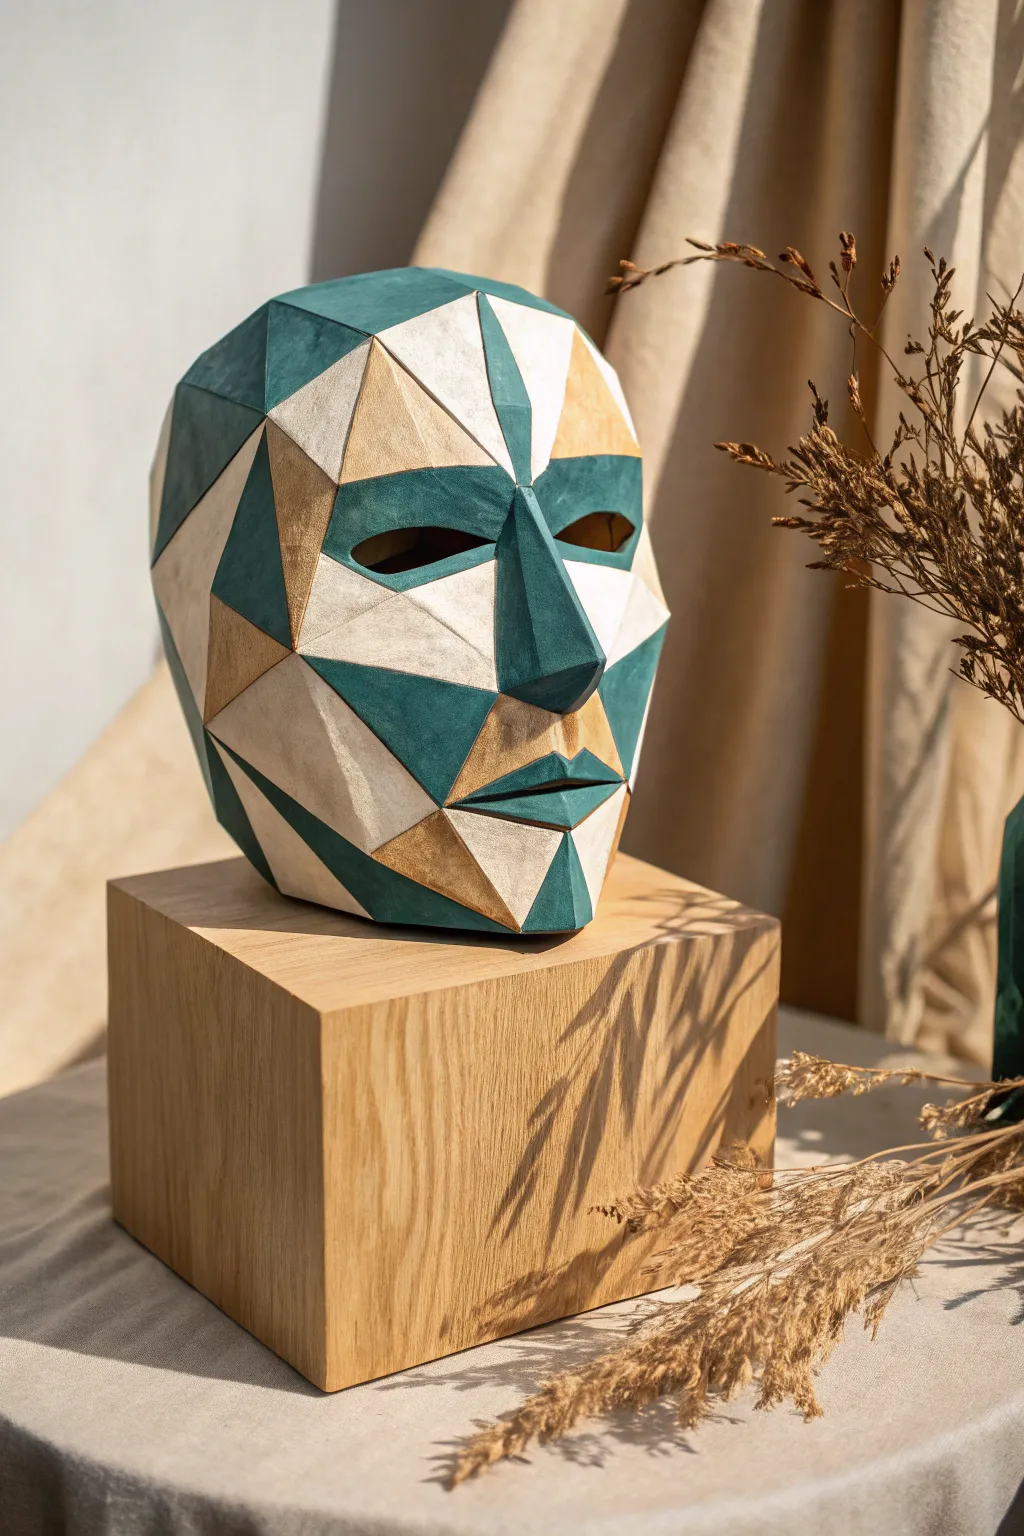
Capture the striking modern aesthetic of low-poly 3D modeling with this handcrafted clay mask. By assembling triangular planes of teal, cream, and gold, you’ll build a sophisticated, faceted sculpture that plays beautifully with light and shadow.
How-To Guide
Materials
- Air-dry clay or polymer clay (white base)
- Cardstock or thick paper (for the template)
- Rolling pin
- Precision craft knife (X-Acto)
- Ruler
- Acrylic paints (Teal/Dark Green, Cream/Off-White, Metallic Gold)
- Fine grit sandpaper
- Mod Podge or matte varnish
- Mask form or a balloon (as a base support)
- Clay sculpting tools (specifically a flat edge)
- Strong craft glue or slip (if building in pieces)
Step 1: Preparation & Templating
-
Create the low-poly template:
Begin by searching for a ‘low poly face mask papercraft template’ online to use as a guide. Print this onto cardstock, cut out the individual triangular shapes, and number them so you know where they fit together later. -
Prepare the workspace:
Lay down parchment paper to prevent sticking. Prepare your base form—a plastic mask form works best for accuracy, but a sturdy balloon blown up to head size can work in a pinch.
Cracked Seams?
If seams crack during drying, fill gaps with a paste of clay and white glue. Smooth it with a damp finger, let dry, and sand flat.
Step 2: Cutting and Sculpting
-
Roll out the clay:
Roll your clay out to a consistent thickness of about 1/4 inch (6mm). Using guide sticks on either side of your rolling pin helps ensure the slab is perfectly even. -
Trace the facets:
Place your cardstock templates onto the clay slab. Using your precision knife and a ruler, carefully cut out each geometric triangle. Cut a few extras of varying sizes just in case gaps appear during assembly. -
Bevel the edges:
This is crucial for the sharp, faceted look: use your knife or a flat sculpting tool to slightly angle (bevel) the edges of each clay triangle inward. This allows them to fit together snugly while maintaining sharp peaks. -
Begin assembly on the form:
Starting from the nose and working outward, place the clay triangles onto your mask form. Use a small amount of slip (clay mixed with water) or liquid clay to key the edges together. -
Build the nose bridge:
Pay special attention to the nose. You’ll need longer, thinner triangles here. Ensure the central ridge is sharp and straight, as this anchors the face’s symmetry. -
Form the eyes and mouth:
Leave negative space for the eye holes. For the lips, construct them using smaller, distinct triangles to mimic the upper and lower lip planes without smoothing them into curves. -
Smooth the seams inside:
While maintaining the sharp ridges on the outside, gently smooth the seams on the *interior* side of the mask where possible to strengthen the bond. If you can’t reach the back, carefully reinforce the front seams without losing the sharp definition.
Shadow Play
Mix a tiny drop of grey into your cream paint for triangles on the ‘shadow side’ of the face to exaggerate the 3D depth effect.
Step 3: Refining & Painting
-
Dry thoroughly:
Let the mask dry completely. Depending on the thickness and humidity, air-dry clay might take 24-48 hours. Don’t rush this, or cracks may form. -
Sand for sharpness:
Once bone dry, use fine-grit sandpaper to refine the flat surfaces of the triangles. Wrap the sandpaper around a small wood block to keep the planes perfectly flat and the edges crisp. -
Plan the color map:
Refer to the photo or design your own pattern. The goal is random distribution, but try to balance the teal, cream, and gold so no single color dominates one area too heavily. -
Paint the base colors:
Using a flat shader brush, paint the assigned triangles with the cream and teal acrylics. I find applying two thin coats gives a much smoother finish than one thick globs layer. -
Apply the gold accents:
Paint the remaining triangles with metallic gold paint. Be very precise at the edges; clean lines where the colors meet are essential for convincing the eye that these are separate facets. -
Seal the work:
Finish with a coat of matte varnish or Mod Podge. A matte finish looks more high-end and paper-like than gloss, preserving the modern architectural feel.
Now step back and admire how simple geometry transforms into a captivating piece of modern sculpture
Swirling Deconstructed Face Mask
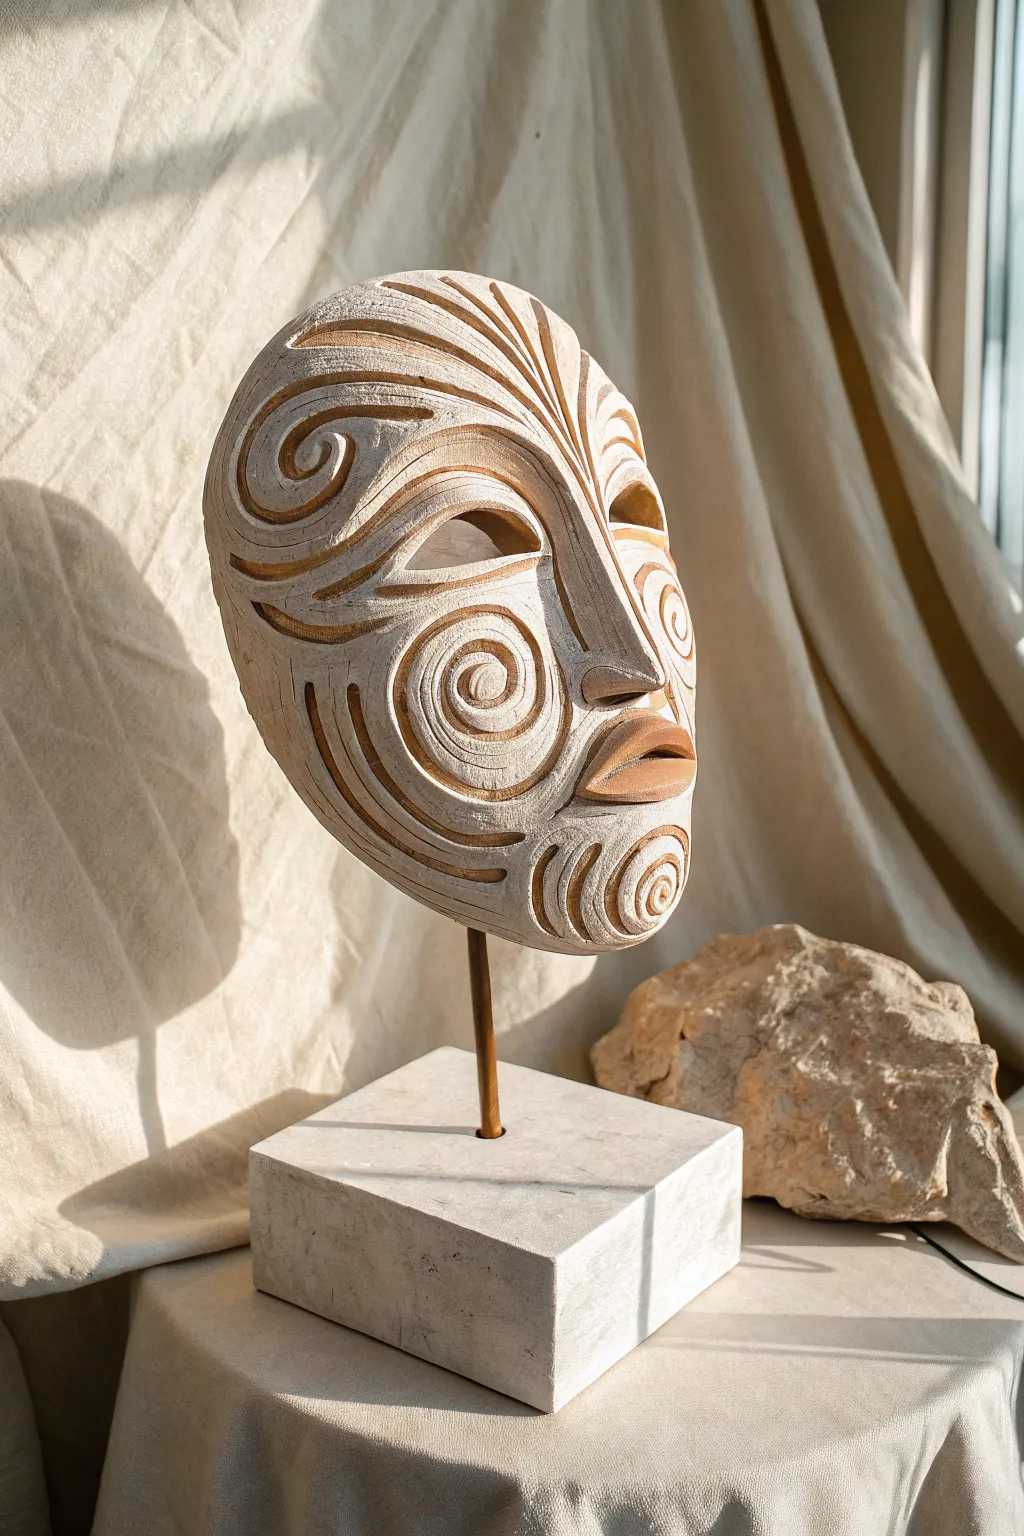
This captivating sculptural mask combines precise carving with organic flow, using deep relief techniques to create striking shadows and movement. The contrast between the rough, white-washed surface and the warm terracotta clay beneath gives the piece an ancient yet modern aesthetic.
Step-by-Step Guide
Materials
- Terracotta or stoneware clay (with grog for strength)
- Wooden modeling tools
- Wire clay cutter
- Looping tools (various sizes for carving)
- Needle tool
- White oxide wash, slip, or white acrylic paint
- Matte spray sealant
- Metal mounting rod
- Stone or wooden block base
- Drill with masonry or wood bit
- Two-part epoxy glue
- Plastic bag and spray bottle (for drying)
Step 1: Sculpting the Base Form
-
Prepare the clay:
Begin by wedging your terracotta clay thoroughly to remove air bubbles. This is crucial for a sculpture of this thickness to prevent cracking during firing or drying. -
Form the basic shape:
Shape the clay into a large, solid oval, resembling the volume of a human head but slightly flattened like a mask. Ensure the back is relatively flat or slightly concave if you want to reduce weight. -
Establish facial landmarks:
Using your thumbs, press firmly to mark the eye sockets. Build up a wedge of clay for the nose bridge and add volume for the lips and chin. -
Refine the features:
Smooth the clay to create distinct planes for the nose and brow. The features should be stylized rather than hyper-realistic; focus on strong, simple geometry. -
Create the mounting hole:
While the clay is leather hard but still workable, insert a tool the same diameter as your metal rod into the bottom of the chin neck area. Twist gently to create a clean hole for mounting later.
Clean Cuts Pro Tip
Wait until the clay is ‘leather hard’ (stiff but cool) before carving deep grooves. If the clay is too wet, the tool will drag and tear rather than slice cleanly.
Step 2: Carving the Design
-
Map out the swirls:
With a needle tool, lightly sketch the flowing lines onto the surface. Start from the cheeks and forehead, radiating outward. Aim for asymmetry or symmetry depending on your preference, but keep the lines organic. -
Begin relief carving:
Using a loop tool, carefully carve out the clay following your sketched lines. You want deep grooves—about 1/4 to 1/2 inch deep—to create that dramatic shadow effect. -
Detail the eyes and spirals:
Carve deep spirals on the cheeks and chin. Pay special attention to the eyes; carve out the negative space around the eyelids to make them pop. -
Refine edges:
Go back over your cuts with a damp sponge or finger to smooth any sharp, crumbly edges, but leave the texture inside the grooves rough for contrast. -
Dry slowly:
Cover the piece loosely with plastic. I like to let this dry very slowly over several days to ensure the thick parts and thin carved parts shrink at the same rate.
Step 3: Finishing and Mounting
-
Fire or cure the clay:
If using kiln-fire clay, bisque fire the piece to cone 04. If using air-dry clay, ensure it is bone dry (no cool touch) before proceeding. -
Apply the surface treatment:
Brush a white oxide wash or thinned white acrylic paint over the entire surface. Let it sit for a moment so it settles into the texture. -
Wipe back for contrast:
Take a damp sponge and firmly wipe the surface. You want to remove most of the white from the high points to reveal the raw clay color, leaving the white in the recesses and texture. -
Enhance the grooves:
If the grooves got too much white paint in them, carefully paint them with a terracotta or dark brown wash to re-establish depth. -
Seal the work:
Once all paint or washes are dry, spray the entire mask with a clear matte sealant to protect the finish without making it shiny. -
Prepare the base:
Drill a hole into the center of your stone or wood block that matches the diameter of your metal rod. -
Assemble the stand:
Secure the metal rod into the base using strong two-part epoxy. Ensure it stands perfectly vertical while curing. -
Mount the sculpture:
Apply epoxy to the top inch of the metal rod and slide the mask onto it. Support the mask until the glue sets firmly.
Level Up: Gold Leaf
For a museum-quality touch, apply gold leaf to just the inner curves of the spirals. The metallic shine will catch the light and contrast beautifully with the raw clay.
Now step back and admire how the light plays across the carved contours of your modern artifact
Wall Relief Mask With Hanging Holes
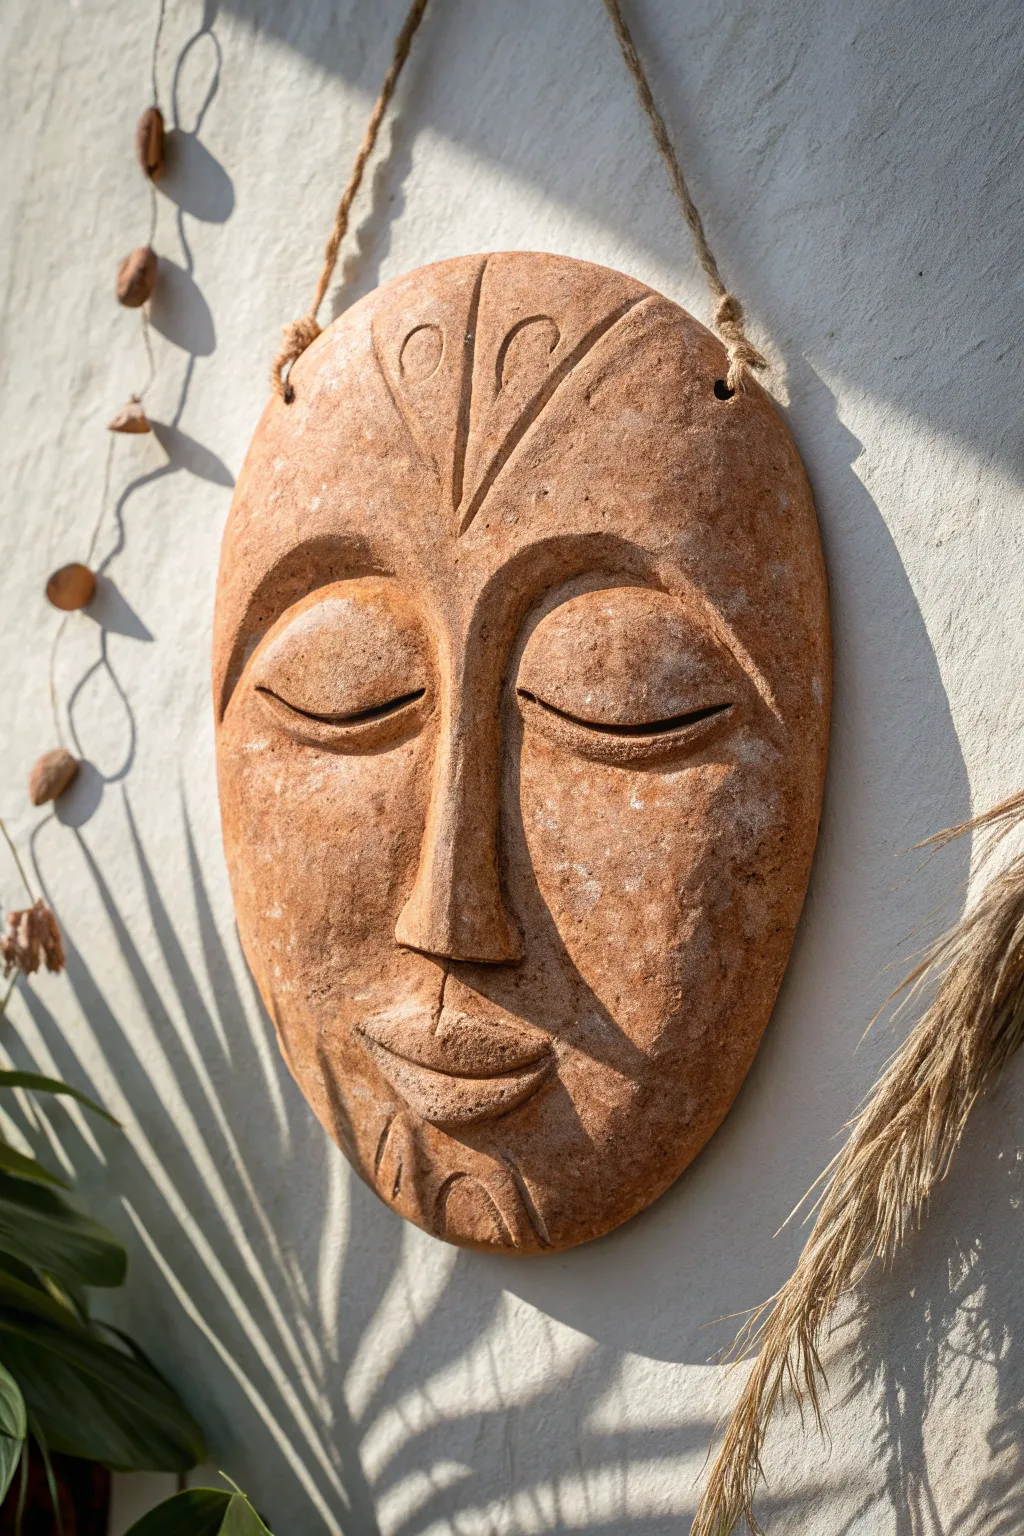
This striking wall relief captures the essence of tranquility with its elongated features and warm, earthy tones. The project mimics the look of ancient fired pottery using accessible air-dry clay, creating a soulful piece of decor perfect for a garden nook or sunroom wall.
Step-by-Step
Materials
- Air-dry clay (terracotta color preferred, or white)
- Rolling pin
- Newsprint or plastic wrap
- Clay carving tools (needle tool, loop tool, wire cutter)
- Bowl of water and sponge
- Flimsy plastic bag or thin canvas (for texture)
- Jute twine or rustic hemp rope
- Clear matte sealant spray
- Sandpaper (fine grit)
- Acrylic paints (burnt sienna, burnt umber, white) – if using white clay
Step 1: Shaping the Base
-
Prepare your workspace:
Cover your surface with canvas or a heavy cloth to prevent sticking. Knead a large chunk of air-dry clay until it is warm and pliable. -
Create the main slab:
Roll out the clay into an oval shape about 3/4-inch thick. You want it substantial enough to hold the carved details but not so heavy it cracks easily while drying. -
Form the contour:
Gently press the slab over a curved surface, like a large bowl covered in plastic wrap, or simply use balled-up newspaper underneath the center to give the mask a convex, face-like curve. It shouldn’t be flat. -
Outline the face shape:
Use a needle tool or knife to refine the oval outline, tapering it slightly at the chin to mimic the elongated shape in the reference photo. Smooth the cut edges with a damp sponge.
Fixing Cracks
If hairline cracks appear while drying, mix a small amount of clay with water to make a paste (slip). Fill the cracks, smooth over, and let dry again.
Step 2: Sculpting the Features
-
Build the nose bridge:
Roll a coil of clay and attach it vertically down the center of the face. Score and slip the area (scratching the surface and adding water) to ensure a strong bond. -
Refine the nose shape:
Smooth the coil into the face, building up a prominent, straight nose bridge that flares slightly at the nostrils. The transition from nose to brow should be seamless. -
Add the brows:
Add extra clay above the eyes to create a heavy, serene brow line. Blend this clay downward into the nose bridge and outward toward the temples. -
Create the eyelids:
Form two large, half-moon shapes from clay slabs for the eyelids. Attach them securely beneath the brow ridge. They should bulge outward significantly to look like closed eyes. -
Carve the eye details:
Using a fine modeling tool, press a distinct curved line across the center of each eyelid mound to create the ‘closed eye’ slit. Deepen the corners for shadow. -
Sculpt the lips:
Add a small oval of clay below the nose for the mouth. Use a wire tool or knife to slice through the center horizontally, then gently press the clay above and below the cut to form the upper and lower lips.
Faux Finish Trick
To mimic the dusty terracotta look, dust the wet clay with a little real cocoa powder or paprika before drying. It stains the clay naturally.
Step 3: Texturing and Finishing
-
Carve forehead symbols:
Using a V-gouge or needle tool, carve the geometric designs into the forehead. Start with a central vertical line, then curve two lines outward like leaves or decorative branches. -
Add chin details:
Repeat a similar carving process on the chin, adding small, rugged vertical strokes or curves to balance the design on the forehead. -
Create surface texture:
To get that weathered stone look, gently pat the entire surface with a crumpled plastic bag or a coarse sponge. This removes the ‘perfect’ smoothness of fresh clay. -
Make the hanging holes:
Use a straw or a large drill bit to poke two holes near the top temples. Ensure they are evenly spaced and not too close to the edge to prevent tearing. -
Dry the mask:
Let the mask dry slowly away from direct heat for 24-48 hours. I stick to this slow rule religiously to prevent warping. -
Sand and distress:
Once fully cured, lightly sand any sharp burrs. For an aged look, you can dry-brush a tiny amount of white paint over the high points to simulate mineral deposits. -
Final assembly:
Seal the mask with a matte spray to protect it from humidity. Thread your rustic jute twine through the holes and knot securely on the front side.
Hang your timeless creation in a spot where the changing daylight can highlight the relief shadows
Two-Faced Split Profile Mask
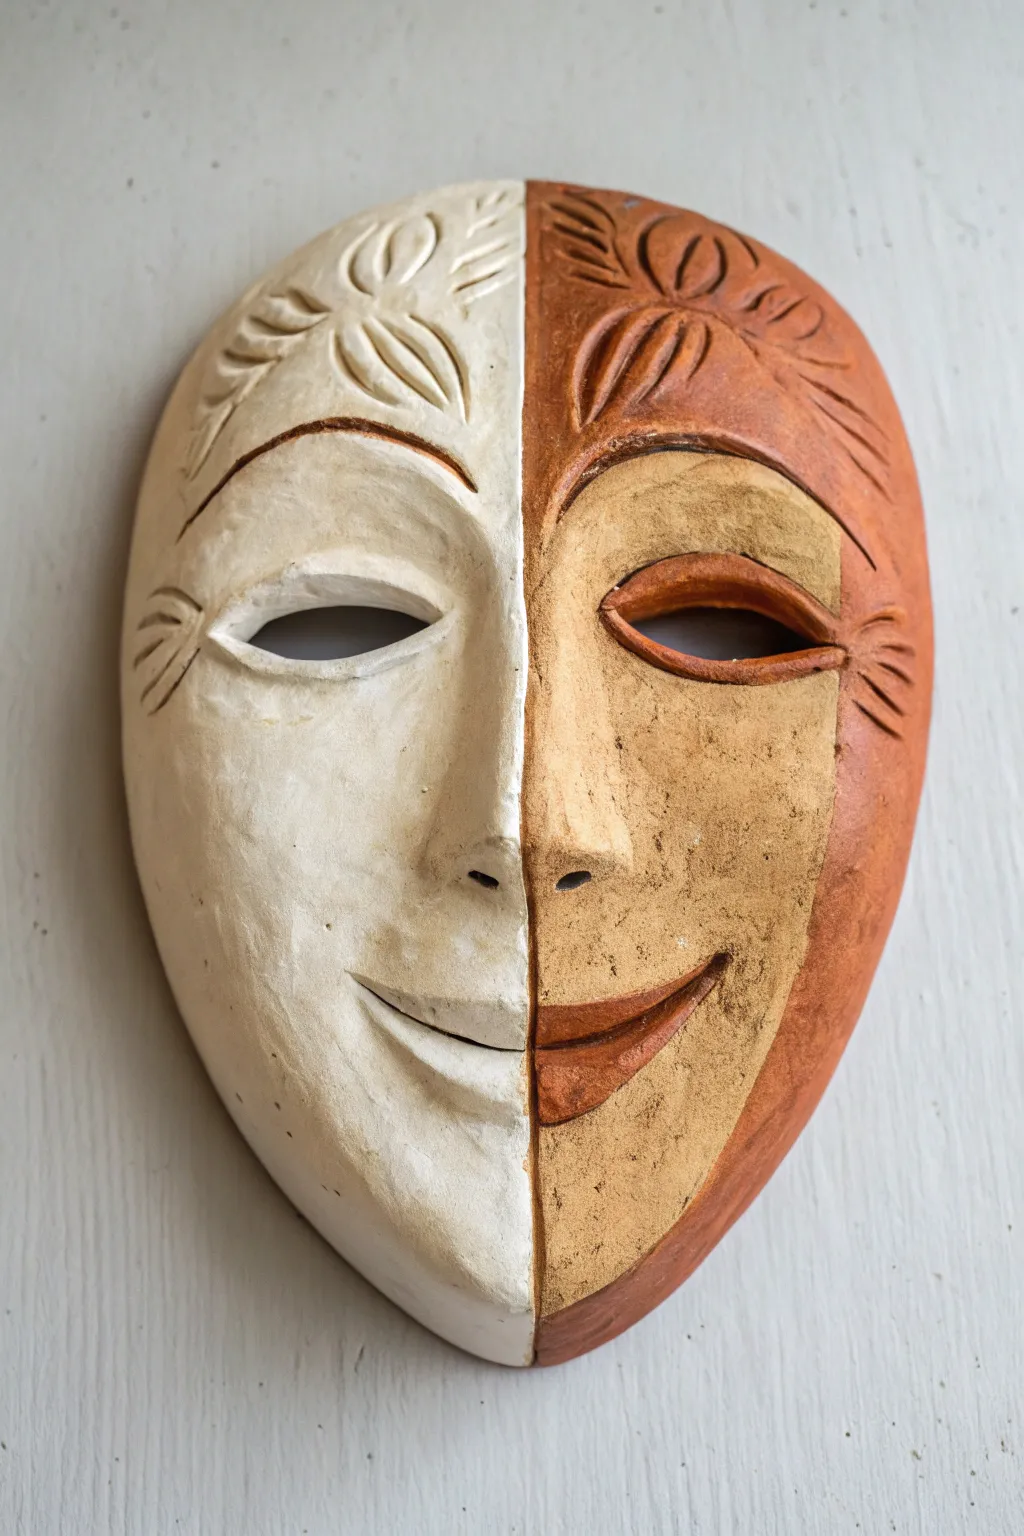
This striking ceramic mask features a dual-personality design split right down the center, contrasting a smooth, pale sculpted face with a textured, earthy profile. It’s a wonderful project for practicing symmetry in sculpture while exploring how different clay stains and glazes can create depth.
How-To Guide
Materials
- Earthenware or stoneware clay (white or light body)
- Clay carving tools (needle tool, loop tool)
- Small sponge
- Rolling pin
- Plaster face mold (or newspaper form)
- White matte glaze or underglaze
- Terracotta or red iron oxide wash
- Yellow ochre underglaze or stain
- Clear matte glaze (optional)
- Kiln for firing
Step 1: Sculpting the Base Form
-
Roll the Slab:
Begin by rolling out a slab of clay to a consistent thickness of about 1/4 inch. Smooth it out with a rib tool to remove any canvas texture. -
Form the Face:
Drape the slab over a plaster face mold or a makeshift form created from crumpled newspaper covered in masking tape. Gently press the clay to capture the contours of the nose, brow, and cheeks. -
Trim the Outline:
Cut the outer oval shape of the mask. Smooth the edges with a damp sponge so they are rounded and finished, not sharp. -
Define the Features:
Using your thumb and modeling tools, reinforce the bridge of the nose, the eyelids, and the lips. The goal is a classic, serene expression. -
Cut the Eyes:
Carefully slice out almond-shaped openings for the eyes. Bevel the inner edges slightly so the mask doesn’t look too thick around the sockets.
Step 2: Adding Texture and Detail
-
Mark the Center Line:
Lightly score a vertical line directly down the center of the forehead, nose, lips, and chin to separate the two halves. -
Carve the Left Side:
On the left forehead, use a small loop tool to carve stylized, leafy branch patterns. Add small etched lines at the corner of the left eye for detail. -
Texture the Right Side:
On the right side, mirror the carving pattern on the forehead but press slightly harder for deeper relief. Carve similar lines near the right eye and create a distinct outline for the lips. -
Define the Color Blocking:
Lightly incise a curved line on the right side of the face. This line should run from the inner brow, under the eye, and down the cheek, creating a separation for the two earth tones later. -
Dry and Bisque Fire:
Allow the mask to dry slowly under plastic to prevent warping. Once bone dry, bisque fire it in your kiln to the appropriate cone for your clay body.
Uneven Drying?
If the clay warps while drying, place a small bag of sand or rice gently on the center of the mask while it’s in the leather-hard stage to weigh it down evenly.
Step 3: Glazing and Finishing
-
Apply the White Base:
Paint the entire left half of the mask with 2-3 coats of white matte glaze or underglaze. Be careful to stay exactly on your center line. -
Paint the Ochre Section:
On the right side, fill in the inner face area—around the eye and cheek—with a yellow ochre or sandy-colored underglaze. I find a stiff brush helps work the pigment into the clay texture. -
Add Terracotta Accents:
Apply a terracotta-colored underglaze or red iron oxide wash to the outer rim of the right side, the forehead carving, and the lips. -
Enhance the Lips:
Ensure the lips on the right side are painted with the darker terracotta tone to emphasize the smile. -
Wipe Back Texture:
gently wipe the textured areas on the right side with a damp sponge. This leaves the darker color in the recesses while revealing the clay texture on the high points. -
Final Fire:
Glaze fire the piece. Since the finish should be matte and earthy, you likely won’t need a clear glossy topcoat unless you want extra durability.
Go Metallic
For a more theatrical look, apply gold leaf to the dividing center line after the final firing. This creates a Kintsugi-style separation between the two halves.
Hang your finished dual-tone mask on a well-lit wall to let the shadows play across the textured carvings