I love how air dry clay turns into the sweetest little Christmas decorations with just a few simple tools and a bit of imagination. These ideas are meant to feel doable and fun, so you can make a whole set in an afternoon and enjoy that handmade holiday vibe all season long.
Classic Cookie-Cutter Ornaments
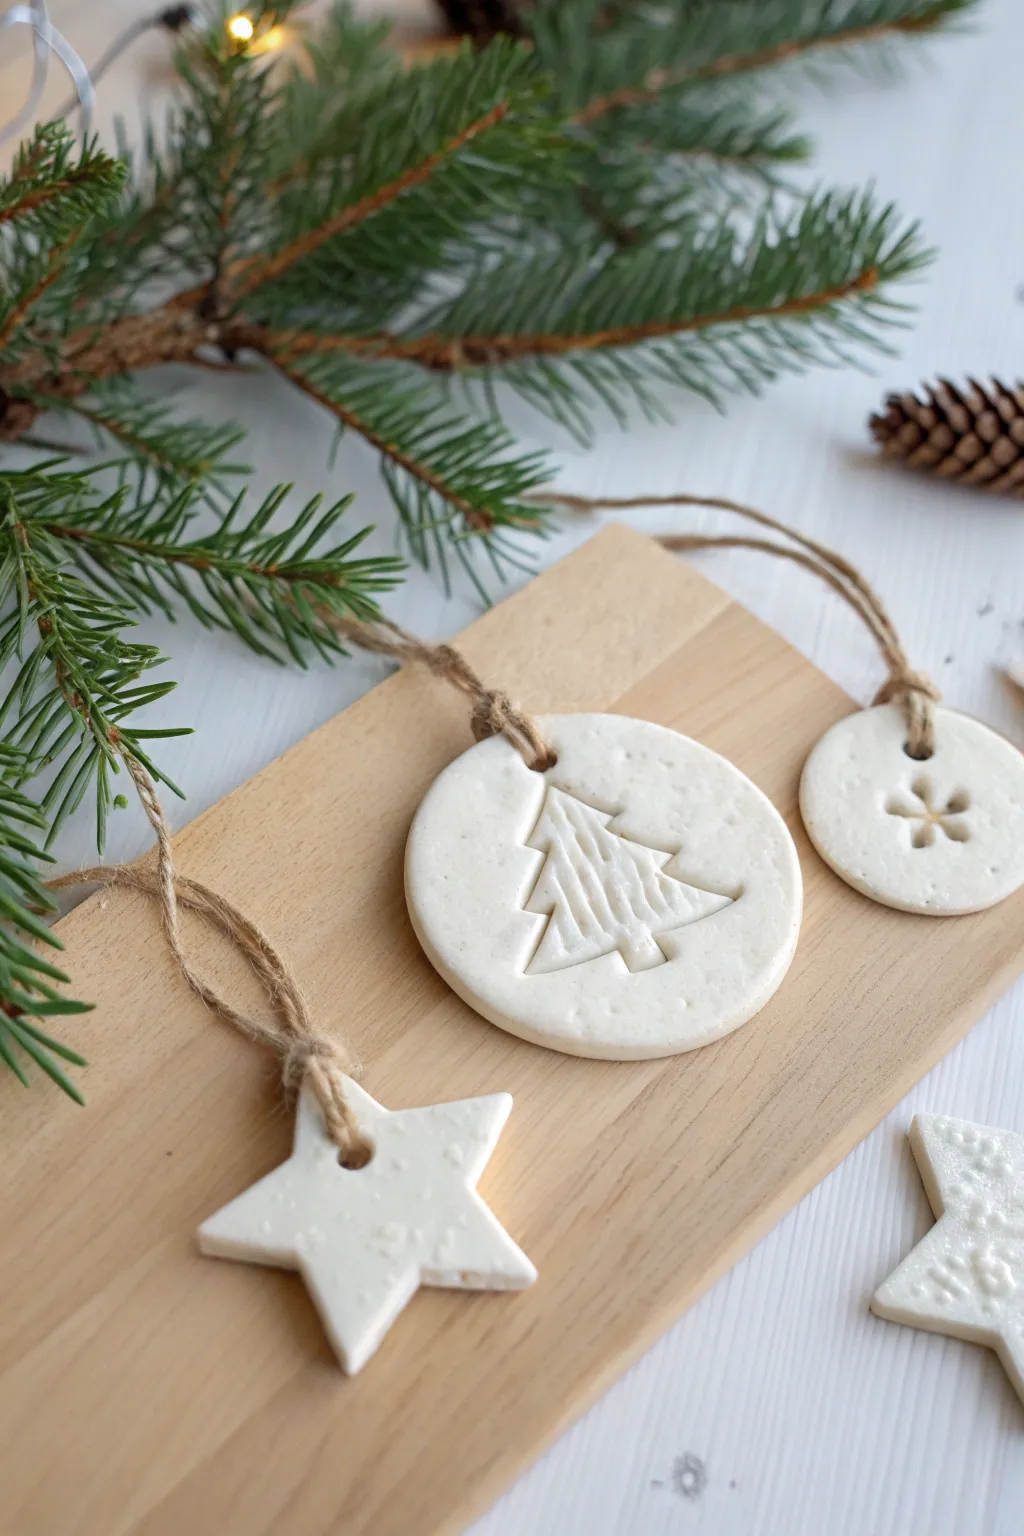
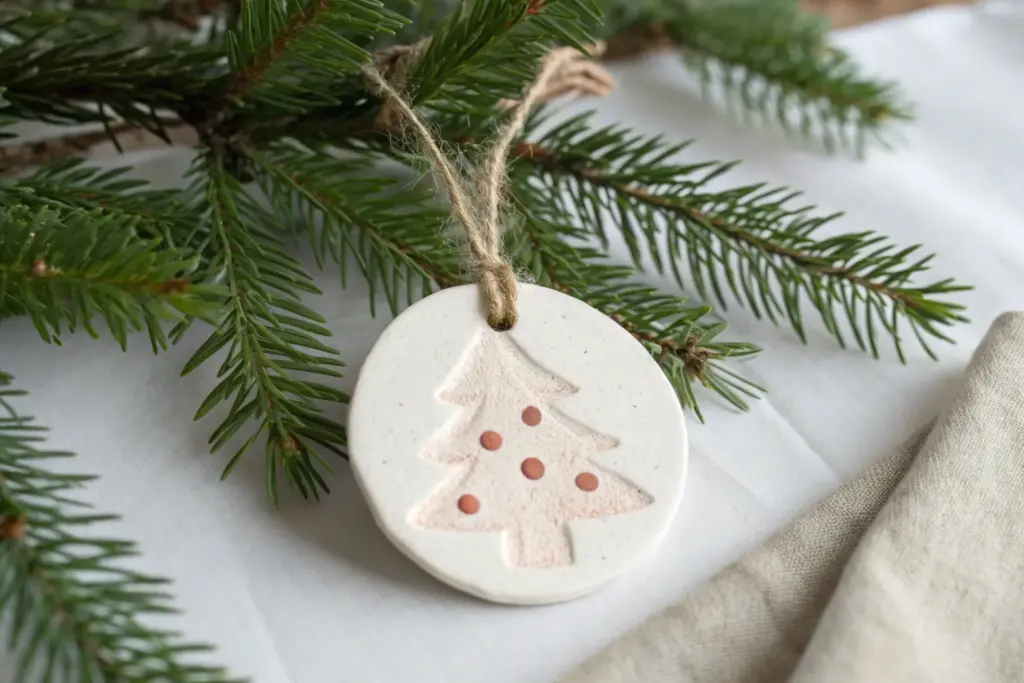
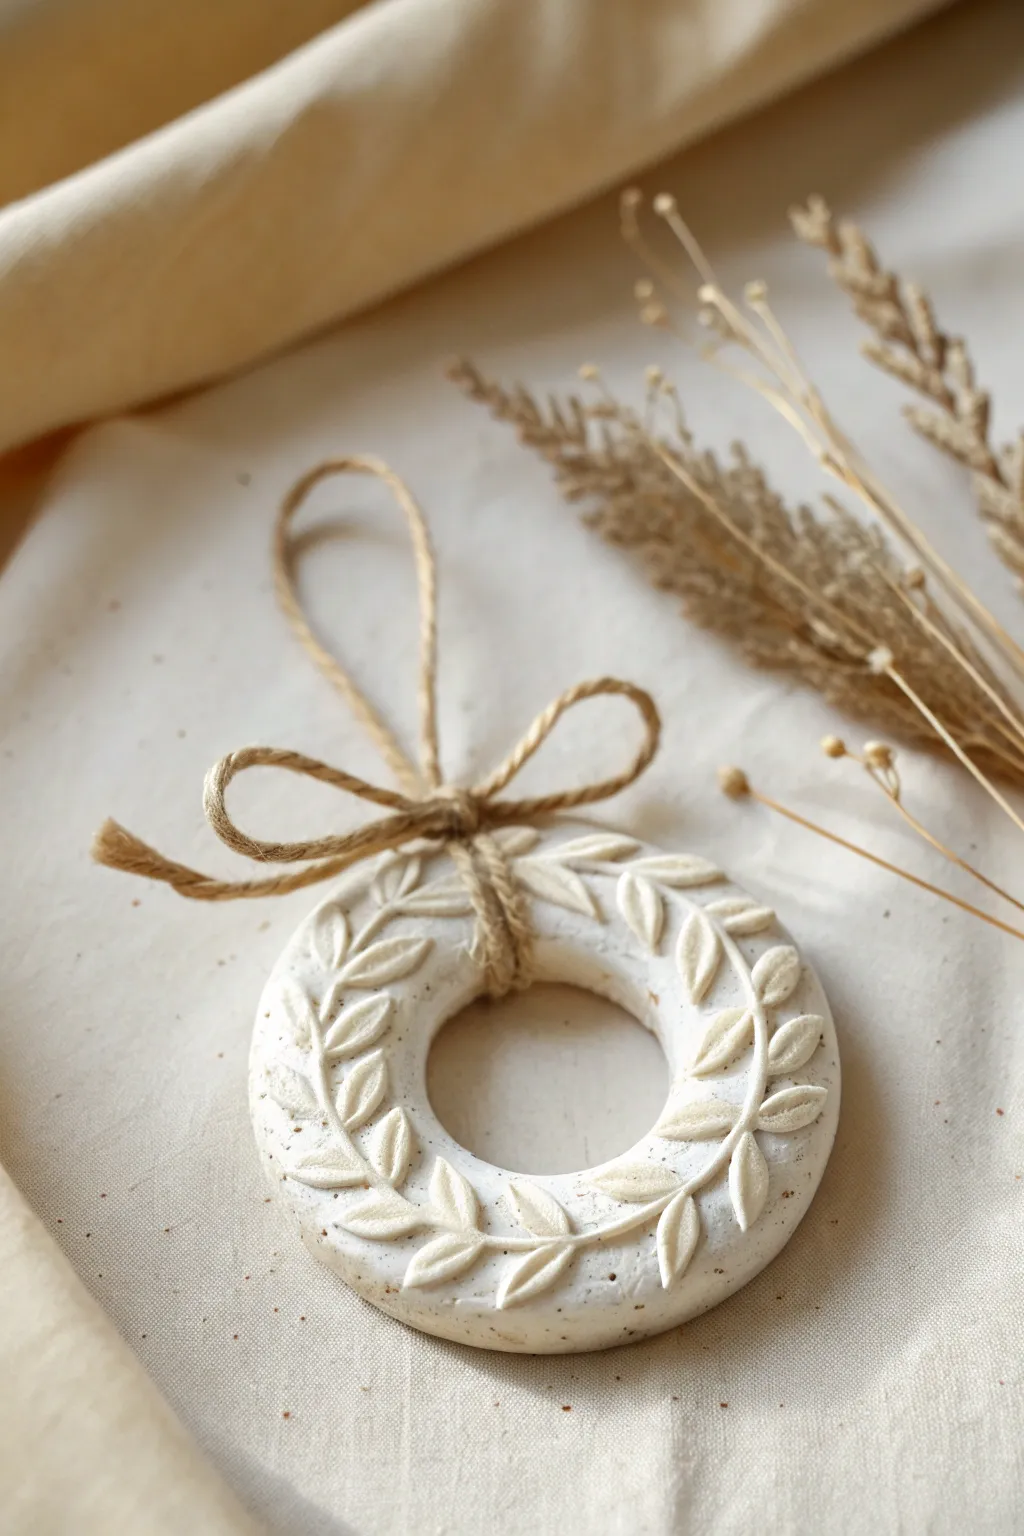
Embrace the minimalism of Scandinavian design with these bright white clay ornaments featuring subtle, embossed textures. The contrast between the pristine clay and the rustic jute twine creates a cozy, natural look perfect for any Christmas tree.
How-To Guide
Materials
- White air-dry clay (e.g., DAS or Crayola)
- Rolling pin
- Parchment paper or silicone mat
- Cookie cutters (Star, Circle)
- Embossing stamps or smaller cookie cutters (Tree, Snowflake)
- Drinking straw or skewer
- Jute twine
- Fine-grit sandpaper (optional)
- Clear matte sealant (optional)
Step 1: Preparation and Rolling
-
Workspace setup:
Lay down a piece of parchment paper or a silicone mat. This prevents the clay from sticking to your table and picks up less lint than a bare surface. -
Condition the clay:
Take a handful of white air-dry clay and knead it gently in your hands for about a minute. This warms it up and makes it pliable, reducing the chance of surface cracks. -
Roll it out:
Place your clay ball on the parchment and flatten it slightly with your palm. Use your rolling pin to roll it into an even slab. -
Check thickness:
Aim for a uniform thickness of about 4mm to 5mm. If it’s too thin, the ornaments might curl or break; too thick, and they get heavy.
Step 2: Cutting and Embossing
-
Cut the base shapes:
Press your main cookie cutters firmly into the clay. Create a mix of simple circles and sharp 5-point stars. -
Clean cuts:
Give the cutter a tiny wiggle before lifting it up to ensure clean separation from the clay slab. -
Emboss the tree:
For the circular ornament, take a small Christmas tree cutter or stamp. Press it gently into the center of the circle, but do not push all the way through—you just want an impression. -
Add texture:
If your stamp doesn’t have internal texture, I sometimes use a needle tool to gently scratch vertical grain lines inside the tree impression to mimic bark. -
Stamp simple accents:
Use a snowflake stamp or a small asterisk tool to press a simple snowflake design into the smaller clay circles. -
Create hanging holes:
Use a drinking straw to punch a neat hole near the top of every ornament. A straw creates a cleaner hole than a skewer, removing the little plug of clay effortlessly. -
Smooth the edges:
Dip your finger in a tiny bit of water and run it along the cut edges of your shapes to smooth down any roughness left by the cutter.
Fixing Curled Edges
If edges begin to curl up while drying, place a lightweight book on top of the ornaments (with parchment in between) for the final few hours of drying.
Step 3: Drying and Finishing
-
Initial drying:
Leave the ornaments on the parchment paper in a safe spot away from direct heat sources, which can cause cracking. -
Flip them over:
After about 12 hours, flip the ornaments over carefully. This exposes the damp underside to the air and helps keep them flat. -
Wait for full cure:
Let them dry for another 24 to 48 hours until the clay feels room temperature to the touch (damp clay feels cold) and looks chalky white. -
Sand imperfections:
If there are any rough spots on the edges, lightly sand them away with fine-grit sandpaper for a professional finish. -
Seal (optional):
To protect against moisture, you can brush on a coat of matte varnish, though the raw matte finish looks very authentic. -
Cut the twine:
Cut lengths of jute twine, roughly 20cm long each. -
Loop and secure:
Thread the twine through the hole, bringing the two ends together. Tie a simple knot at the base near the ornament or at the ends to form a loop.
Add Winter sparkle
Before drying, gently press rock salt or clear glitter into the wet clay surface of the stars to mimic the icy texture of fresh snow.
Hang these charming handmade pieces on your tree or use them as unique gift tags for your holiday wrapping.


Evergreen Imprint Ornaments
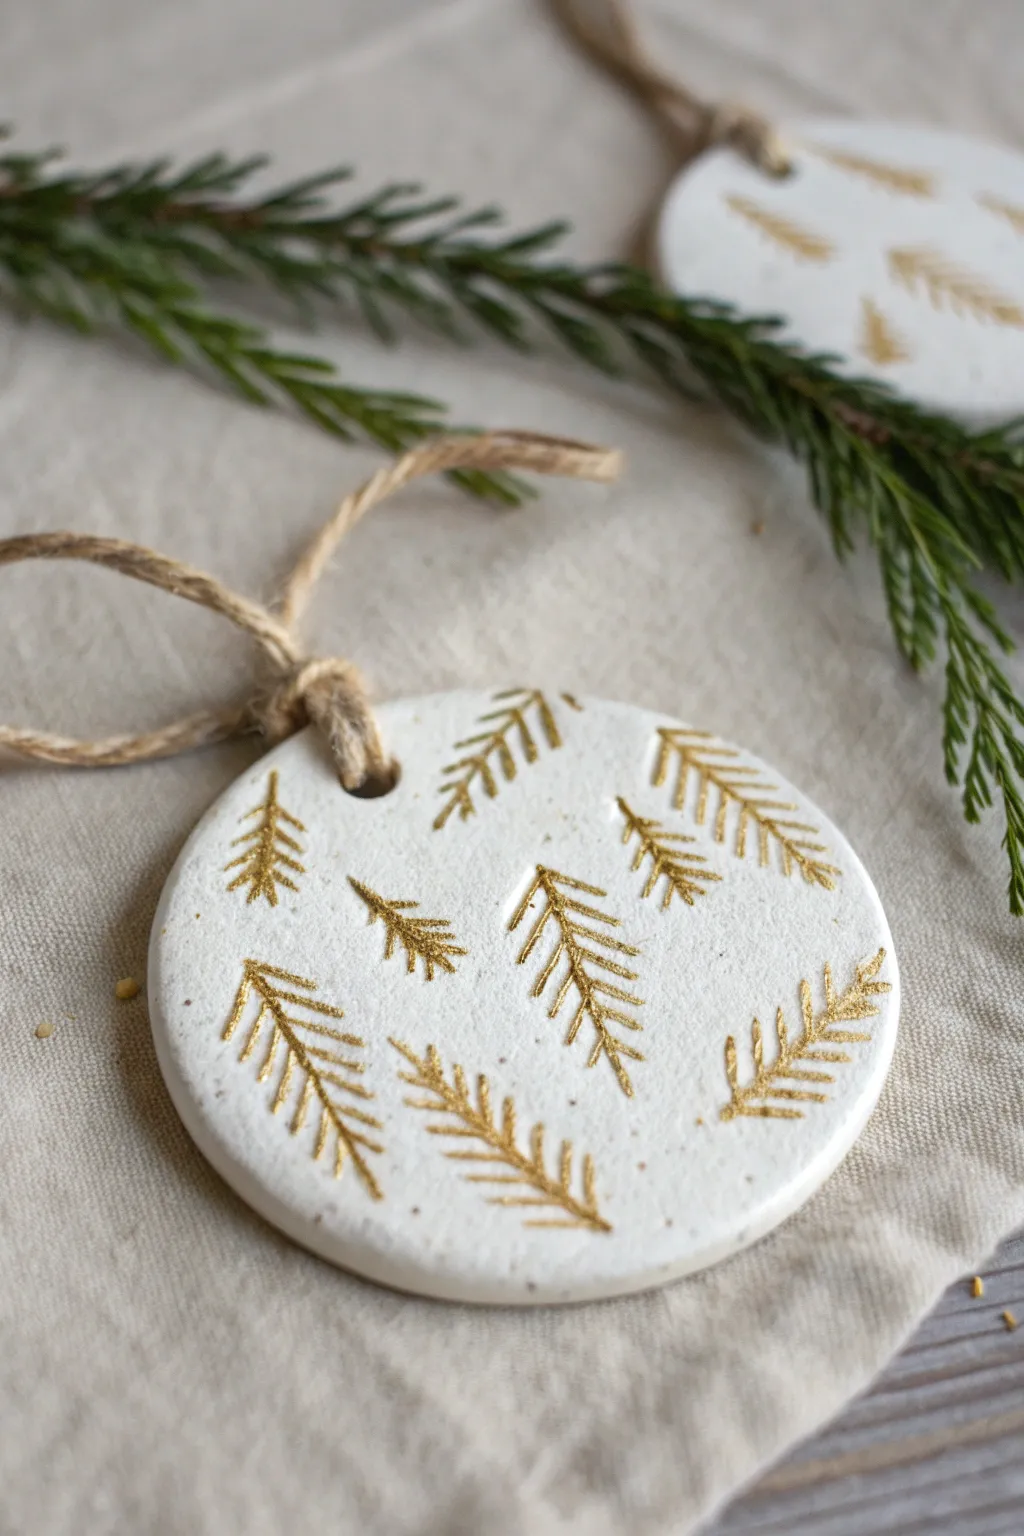
Capture the delicate beauty of winter greenery with these elegant white clay ornaments featuring stamped pine details. The shimmering gold paint highlights the natural textures, creating a sophisticated yet rustic addition to your holiday decor.
Detailed Instructions
Materials
- White air-dry clay (or salt dough)
- Small rolling pin
- Circle cookie cutter or glass
- Fresh evergreen clippings (pine or cedar)
- Gold acrylic paint or gold leaf pen
- Fine-point paintbrush
- Straw or skewer (for creating the hole)
- Jute twine or ribbon
- Parchment paper
- Sandpaper (fine grit)
Step 1: Shaping the Clay Base
-
Prepare your workspace:
Lay down a sheet of parchment paper to protect your table and prevent the clay from sticking. Knead a handful of air-dry clay until it is soft, pliable, and free of cracks. -
Roll it out:
Using your rolling pin, flatten the clay to an even thickness of about 1/4 inch (6mm). Try to keep the surface smooth and level so the ornaments dry flat. -
Cut the circles:
Press your circle cookie cutter firmly into the rolled clay. If you don’t have a cutter, the rim of a drinking glass works perfectly. Lift away the excess clay around the circles. -
Smooth the edges:
Dip your finger in a tiny bit of water and run it gently around the cut edge of each circle to smooth out any roughness or jagged bits left by the cutter.
Fixing Curled Edges
If your clay starts curling up as it dries, place a heavy book on top of them (with parchment paper in between) once they are semi-dry to flatten them back out.
Step 2: Creating the Impressions
-
Select your greenery:
Break off small sprigs of your evergreen clippings. Look for pieces with distinct needles that will leave a clear impression. -
Press designs:
Arrange the sprigs on the clay circles in a pleasing pattern. I like to scatter them randomly for a natural, falling-needle look. -
Secure the imprint:
Gently roll over the greenery with your rolling pin just once to press the needles deep into the clay without distorting the circle’s shape. -
Reveal the texture:
Carefully peel back the greenery to reveal the detailed imprint left behind. Use tweezers if any tiny bits of pine get stuck in the clay. -
Add a hanging hole:
Use a straw or a skewer to punch a hole near the top of the ornament. Make sure it’s not too close to the edge to prevent cracking later.
Level Up: Scented Clay
Mix a few drops of pine or cinnamon essential oil directly into the clay while kneading. Your ornaments will smell like a winter forest for weeks.
Step 3: Drying and Refining
-
Let them dry:
Place the ornaments on a clean sheet of parchment paper in a cool, dry place. Let them air dry for 24-48 hours, flipping them over halfway through to ensure even drying. -
Sand for smoothness:
Once fully hard and white, check the edges again. If they feel sharp, gently sand them with fine-grit sandpaper for a professional finish. -
Clean the surface:
Wipe away any clay dust with a dry cloth or soft brush to ensure the paint adheres properly.
Step 4: Gilding and Hanging
-
Prepare your paint:
Squeeze a small amount of gold acrylic paint onto a palette or scrap paper. You want a metallic finish that catches the light. -
Paint the impressions:
Using a very fine-point brush, carefully paint inside the indented needle marks. The goal is to fill the textured grooves with gold while keeping the raised surface white. -
Wipe excess paint:
If you accidentally get gold paint outside the lines, quickly wipe the surface with a barely damp cloth. This leaves the gold only in the deep recesses. -
Allow paint to set:
Let the paint dry completely, which usually takes about 15-20 minutes depending on the thickness of the application. -
Attach the twine:
Cut a length of jute twine, thread it through the hole, and tie a loop. A rustic knot at the base looks charming and matches the natural aesthetic.
These sophisticated ornaments are now ready to hang on your tree or be used as beautiful personalized gift tags


Snowflake Texture Stamps
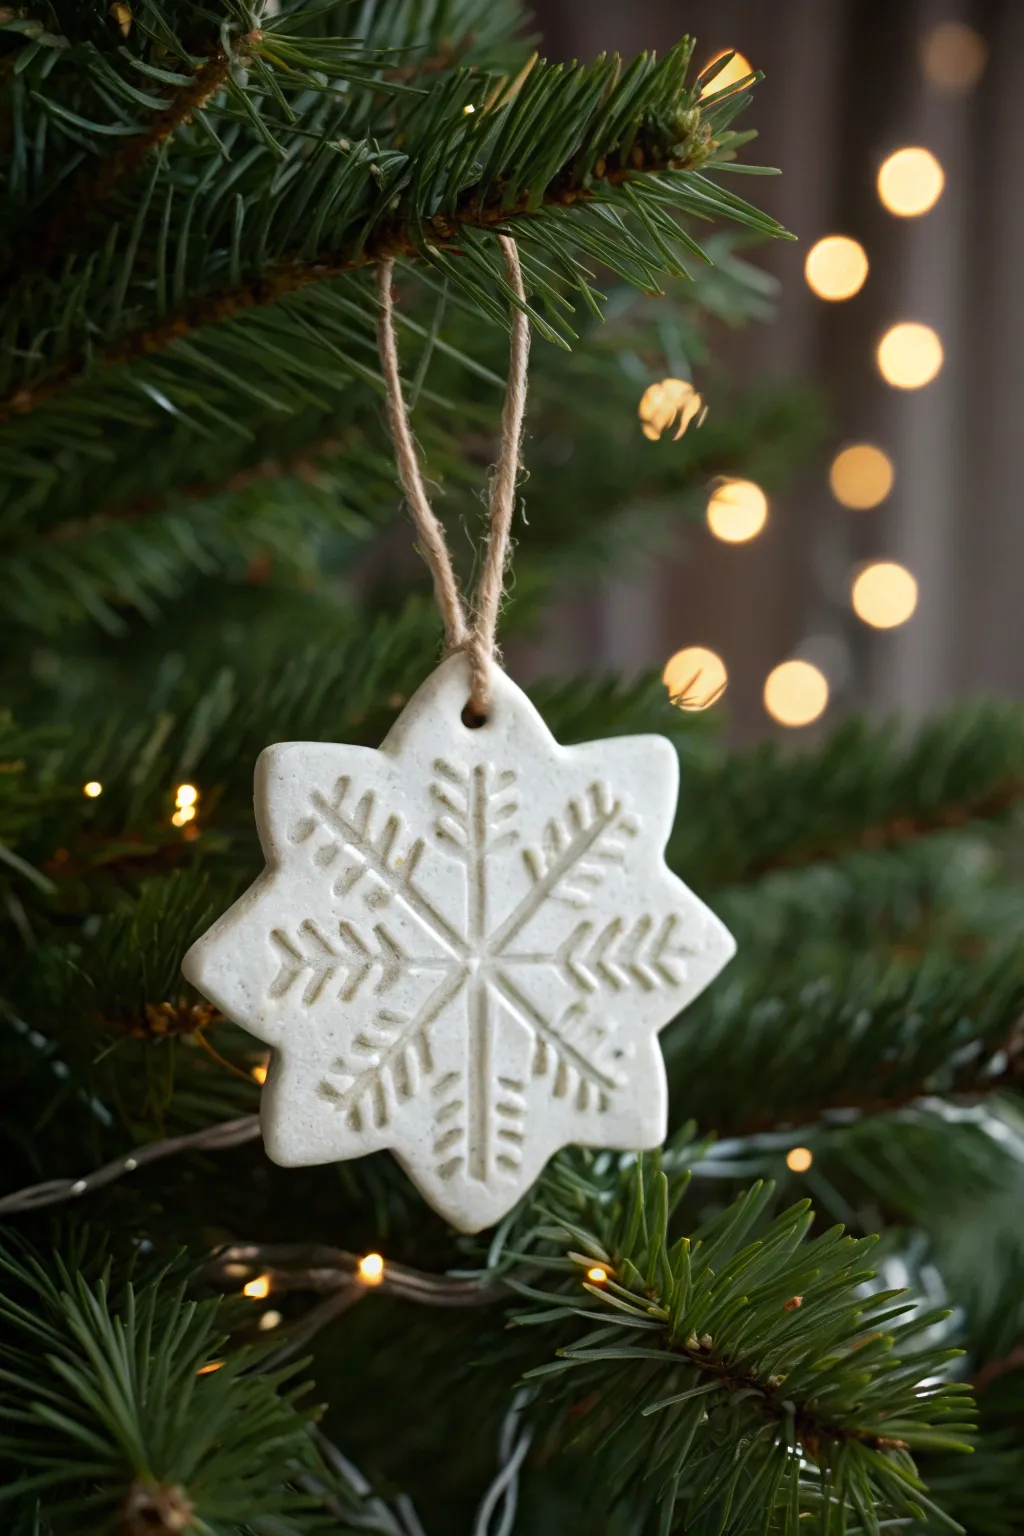
Capture the delicate beauty of winter inside your home with these stamped clay snowflake ornaments. Their crisp white finish and rustic jute hanger create a charming contrast against the deep green of a Christmas tree.
Step-by-Step
Materials
- White classic air-dry clay
- Rolling pin
- Star-shaped cookie cutter (approx. 2-3 inches)
- Snowflake texture stamp or embossing tool
- Jute twine or rustic string
- Straw or cocktail stick (for the hole)
- Fine grit sandpaper
- Baking parchment or wax paper
- Clear matte varnish (optional)
Step 1: Preparation and Rolling
-
Prepare your surface:
Lay down a sheet of baking parchment or wax paper on a flat work surface. This prevents the clay from sticking and makes it easier to peel off later. -
Condition the clay:
Take a handful of air-dry clay and knead it in your hands for a minute or two until it is soft, pliable, and free of cracks. -
Roll it out:
Using your rolling pin, roll the clay out evenly. Aim for a thickness of about 1/4 inch (5-6mm). If it’s too thin, the ornament will be fragile; too thick, and it will be heavy. -
Check for smoothness:
Lightly run your finger over the surface to ensure it is smooth. If you see any air bubbles, gently pop them and smooth the area over.
Clean Stamp Trick
Dust your snowflake stamp lightly with cornstarch or baby powder before pressing into the clay. This acts as a release agent and ensures the clay doesn’t stick in the tiny grooves.
Step 2: Stamping and Cutting
-
Stamp the design:
Press your snowflake stamp firmly into the center of the rolled clay. Use even pressure to ensure all the delicate lines of the snowflake imprint clearly. -
Reveal the pattern:
Gently lift the stamp straight up to avoid smudging the design. You should have a crisp, indented snowflake pattern. -
Position the cutter:
Center your star-shaped cookie cutter over the stamped snowflake design. Make sure the snowflake is aligned nicely in the middle of the star points. -
Cut the shape:
Press the cutter straight down through the clay. Give it a tiny wiggle to ensure a clean cut, then lift the cutter away. -
Remove excess clay:
Peel away the excess clay from around the star shape. You can ball this up to reuse for the next ornament. -
Create a hanging hole:
Using a straw or a cocktail stick, punch a small hole near the top point of the star. Make sure it’s not too close to the edge to prevent tearing. -
Smooth the edges:
Dip your finger in a tiny bit of water and gently run it along the cut edges of the star to smooth out any roughness left by the cutter.
Step 3: Drying and Finishing
-
Initial drying:
Leave the ornament on the parchment paper to dry flat. Place it in a safe spot away from direct heat sources which can cause cracking. -
Flip for even drying:
After about 12 hours, or when the top feels dry to the touch, gently flip the ornament over so the bottom can dry evenly. -
Wait for full cure:
Allow the clay to dry completely for another 24-48 hours. The clay will turn a bright, chalky white when fully cured. -
Sanding imperfections:
Once fully dry, take a piece of fine-grit sandpaper and very gently sand the edges if there are any remaining rough spots. Be careful not to sand over your stamped design. -
Seal the clay (Optional):
For longevity, brush a thin coat of clear matte varnish over the ornament. This protects the white clay from dust without making it too shiny. -
Add the hanger:
Cut a length of jute twine, about 6-8 inches long. Thread one end through the hole you created earlier. -
Secure the loop:
Bring the ends of the twine together and tie a secure overhead knot. Trim any excess string if necessary to keep it tidy.
Warping Fix
If the edges of your star curl up while drying, simply place a light book on top of them (once they are partially dry but not wet) to gently press them back flat.
Hang your new snowflake on a sturdy branch and enjoy the handmade touch it brings to your holiday decor


Minimalist Star Garland
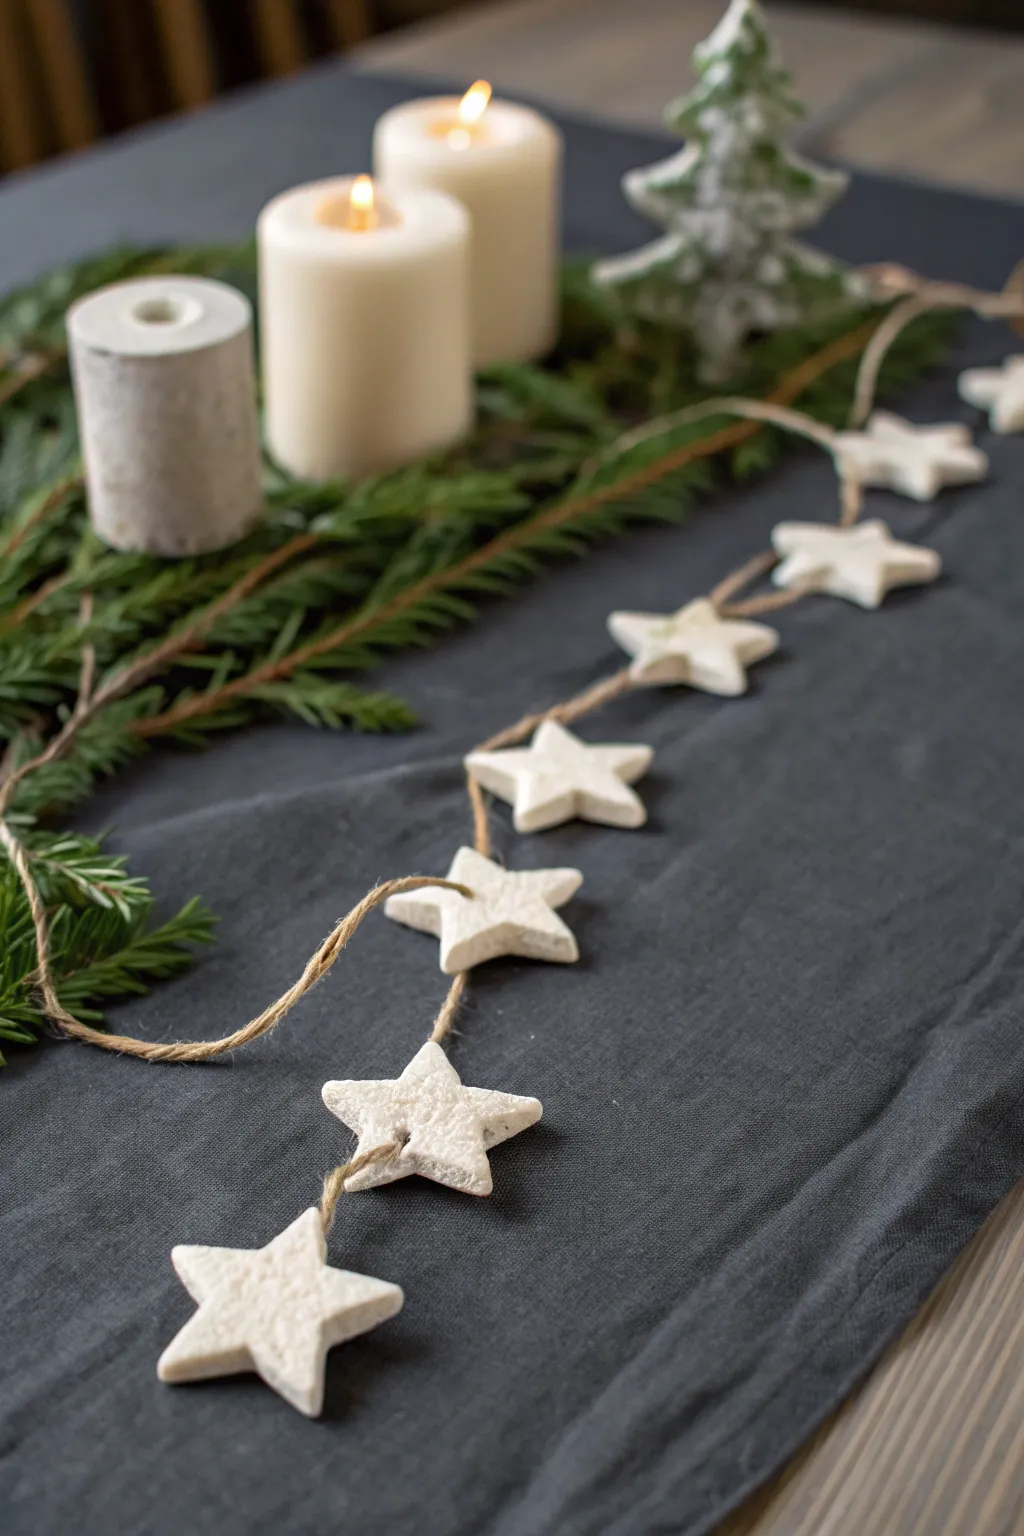
Bring a touch of Scandinavian simplicity to your holiday decor with this charming garland made from air-dry clay. The textured white stars strung on rustic jute twine create a cozy, minimalist look perfect for draping across a dining table or mantelpiece.
How-To Guide
Materials
- White air-dry clay
- Jute twine or hemp cord
- Rolling pin
- Star-shaped cookie cutter (approx. 2-3 inches)
- Small straw or skewer (for making holes)
- Parchment paper or non-stick craft mat
- Fine-grit sandpaper
- Large eyed needle (tapestry needle)
- Bowl of water (for smoothing)
- Textured fabric or placemat (optional for surface texture)
Step 1: Shaping the Stars
-
Prepare your workspace:
Lay down your parchment paper or non-stick mat to protect your table and prevent the clay from sticking. Tape the corners down if the paper tends to roll up. -
Condition the clay:
Take a generous chunk of air-dry clay from the package. Knead it in your hands for a minute or two until it becomes warm, soft, and pliable without any cracks. -
Roll the slab:
Using your rolling pin, flatten the clay to a consistent thickness of about 1/4 inch (6mm). Aim for a uniform thickness so all your stars dry at the same rate. -
Add texture (optional):
Looking at the image, the stars have a delightful, slightly rough stone-like texture. You can achieve this by gently pressing a piece of coarse linen or a textured sponge onto the surface of the clay before cutting. -
Cut out shapes:
Press your star-shaped cookie cutter firmly into the clay. Wiggle it slightly to ensure a clean cut, then lift it away. Repeat until you have as many stars as you need for your desired garland length. -
Release the stars:
Carefully peel the excess clay away from around the stars first, then gently lift the stars off the work surface. If they are sticking, slide a thin spatula underneath. -
Smooth the edges:
Dip your finger in a little bit of water and run it along the cut edges of each star to smooth out any roughness or jagged bits left by the cutter.
Cracking Up?
If you see small cracks forming while the clay dries, mix a tiny amount of fresh clay with water to make a paste and fill the cracks. Smooth it over with a damp finger.
Step 2: Drilling and Drying
-
Create lacing holes:
To recreate the specific look in the photo, you need two holes per star so they sit flat against the string. Use a straw or skewer to punch two horizontal holes through the center of the star, spaced about half an inch apart. -
Check hole size:
Make sure the holes are wide enough to accommodate your jute twine. Clay shrinks slightly as it dries, so I always make the holes just a tiny bit larger than I think they need to be. -
Let them dry:
Place all your stars on a flat surface lined with clean parchment paper. Let them air dry for 24 to 48 hours, flipping them over halfway through to ensure even drying on both sides. -
Sand for perfection:
Once the stars are bone dry and turn a chalky white, check for any sharp edges. Use a piece of fine-grit sandpaper to gently buff away any imperfections on the sides.
Step 3: Assembly
-
Measure the twine:
Unspool your jute twine and measure accurately for where you plan to display the garland. Add an extra foot or two to account for the draping and tying loops at the ends. -
Thread the needle:
Thread one end of the twine through your large-eyed tapestry needle. This makes the stringing process much faster than trying to push frayed twine through the clay holes. -
String the first star:
Pass the needle down through the first hole of a star and up through the second hole. This ‘sewing’ motion ensures the star lies flat effectively against the table or wall. -
Position the stars:
Continue threading all your stars. Once they are all on the twine, space them out evenly. A gap of about 3 to 4 inches between star tips usually creates a balanced look. -
Secure the placement:
The friction of the jute is usually enough to hold light clay stars in place. However, if they slide too much, you can tie a small, discreet knot behind each hole on the back of the star. -
Create end loops:
Tie a simple loop knot at both ends of the twine. This allows you to easily hang the garland or simply finishes the look neatly if laid flat on a table runner.
Add Some Sparkle
For a festive twist, brush a thin layer of PVA glue over the dried stars and sprinkle with clear or silver glitter before stringing. It mimics the look of frost.
Now you have a timeless, handmade decoration ready to warm up your home for the season

The Complete Guide to Pottery Troubleshooting
Uncover the most common ceramic mistakes—from cracking clay to failed glazes—and learn how to fix them fast.
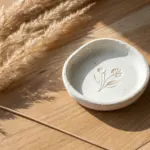
Personalized Name and Year Tags
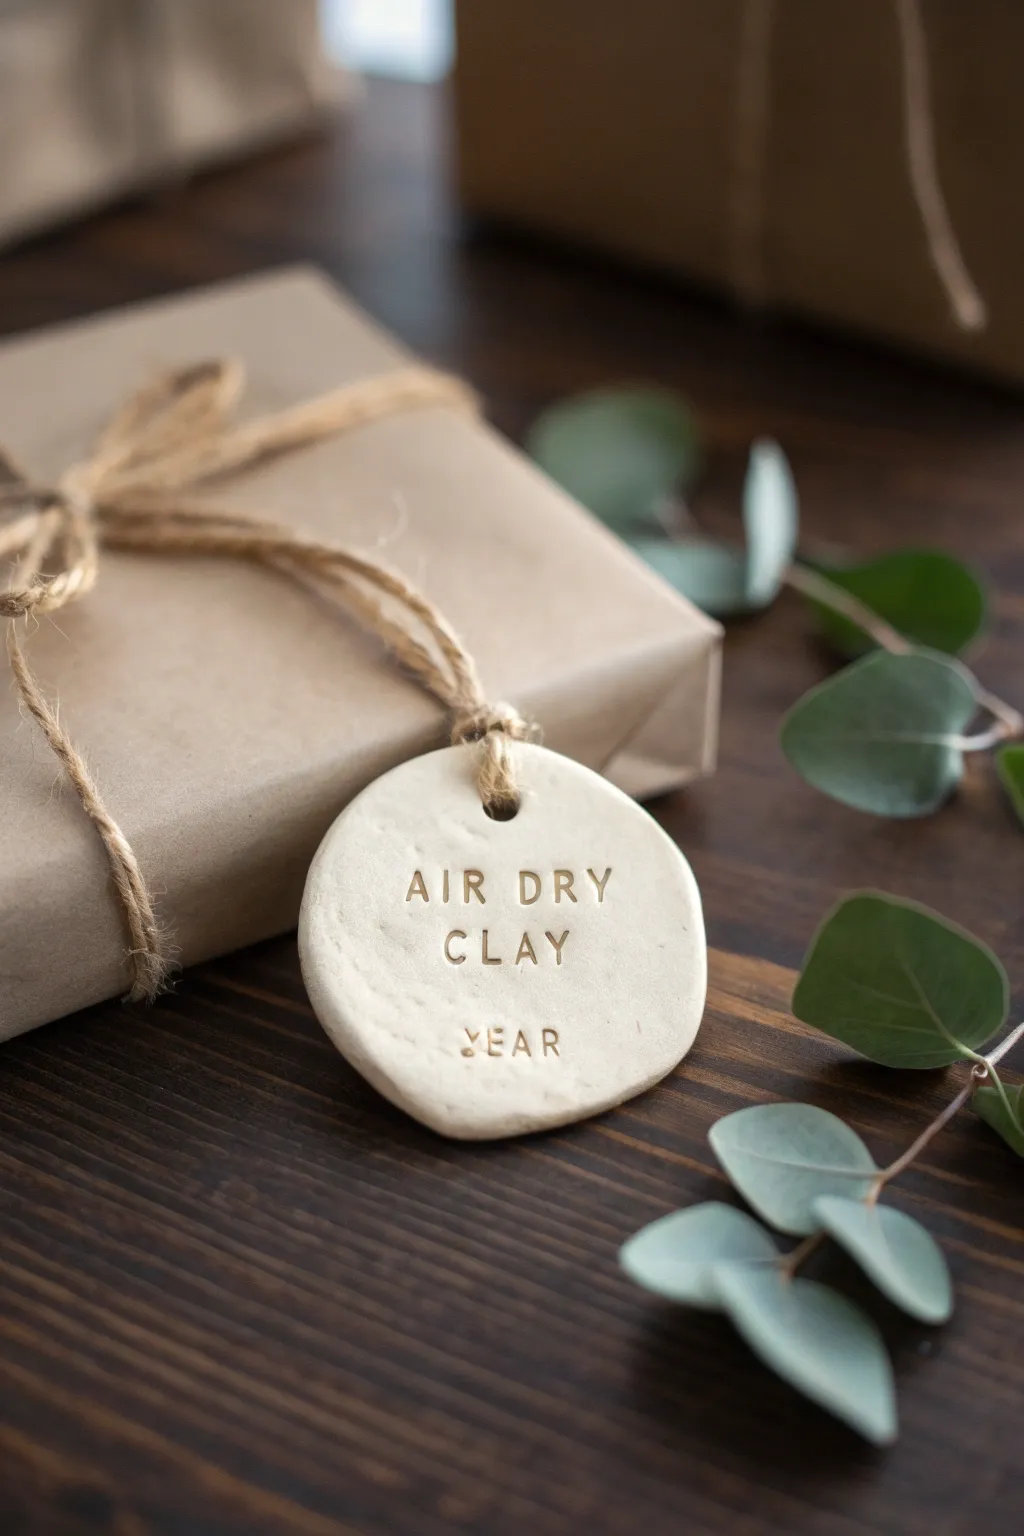
These charming, personalized gift tags add a wonderfully organic touch to any present. Made from simple white air-dry clay and stamped with custom messages, they offer a minimalist aesthetic that pairs perfectly with brown kraft paper and natural greenery.
Step-by-Step Guide
Materials
- White air-dry clay
- Rolling pin or smooth glass jar
- Circular cookie cutter or a drinking glass (approx. 2-3 inches dia.)
- Alphabet stamp set (small serif font work best)
- Parchment paper or baking mat
- Jute twine
- Straw, skewer, or toothpick (for creating the hole)
- Fine-grit sandpaper (optional)
- Small bowl of water
Step 1: Preparing the Clay Base
-
Condition the clay:
Begin by grabbing a chunk of air-dry clay about the size of a golf ball. Knead it in your warm hands for a minute or two until it feels pliable and smooth, working out any initial cracks. -
Roll it out:
Place your conditioned clay onto a sheet of parchment paper. Using a rolling pin, flatten the clay to an even thickness of about 1/4 inch (approximately 5-6mm). You don’t want it too thin, or it might crack when drying. -
Cut the shape:
Press a round cookie cutter or the rim of a standard drinking glass firmly into the clay. Give it a tiny wiggle to separate the shape, then carefully peel away the excess clay from the outside. -
Soften the edges:
Dip your finger into a small bowl of water and gently run it along the cut edge of the circle. This smooths out any sharp ridges left by the cutter, giving the tag that soft, organic look seen in the photo.
Step 2: Adding the Details
-
Create the hanging hole:
Near the top edge of your circle, use a straw or a skewer to punch a clean hole. Ensure it is at least 1/4 inch away from the very edge so the clay remains strong enough to hold the string. -
Plan your text:
It’s helpful to lay out your alphabet stamps on the table first to check the spacing. For this specific look, center the primary phrase (like ‘AIR DRY CLAY’) in the middle and the secondary text (like ‘YEAR’) near the bottom. -
Stamping the first line:
Start with the middle word of your phrase to ensure it ends up centered. Press the stamp firmly into the clay, rocking it ever so slightly to get a deep impression without cutting through. -
Complete the phrase:
Work outwards from the center word to finish your main phrase. I prefer leaving a generous amount of negative space around the text to keep the design feeling airy and modern. -
Add the year:
Stamp the year centered horizontally near the bottom curve of the circle. -
Check for imperfections:
Look closely at the surface. If your nails left any accidental dents while stamping, gently smooth them out with a tiny bit of water on your finger, being careful not to erase your letters.
Cracking Up?
If you notice small surface cracks appearing as the clay dries, mix a tiny bit of fresh clay with water to make a paste and smooth it into the cracks with your finger.
Step 3: Drying and Finishing
-
Let it dry:
Leave the tag on the parchment paper in a safe, dry spot. Let it air dry for 24-48 hours. Flip the tag over halfway through the drying process to prevent it from curling upwards at the edges. -
Sanding (Optional):
Once fully cured and hard, inspect the edges. If there are any rough spots, lightly buff them with fine-grit sandpaper for a professional finish. -
Prepare the twine:
Cut a length of jute twine, roughly 12 inches long. This natural fiber complements the matte white clay perfectly. -
Thread the tag:
Fold the twine in half to create a loop. Push the folded loop through the hole in your clay tag from front to back. -
Secure the loop:
Pull the two loose ends of the twine through the loop you just pushed through, tightening it gently against the top of the tag to create a lark’s head knot. -
Wrap the gift:
Wrap your gift in simple brown kraft paper. Wind the loose ends of your twine around the package and tie a simple bow to secure the tag in place.
Gilded Glamour
For a festive upgrade, use a small detail brush to paint inside the stamped letters with gold liquid gilding or acrylic paint once the clay is fully dry.
Now you have a timeless, handcrafted keepsake attached to your gift that the recipient can double as an ornament later
Handwritten Message Ornaments
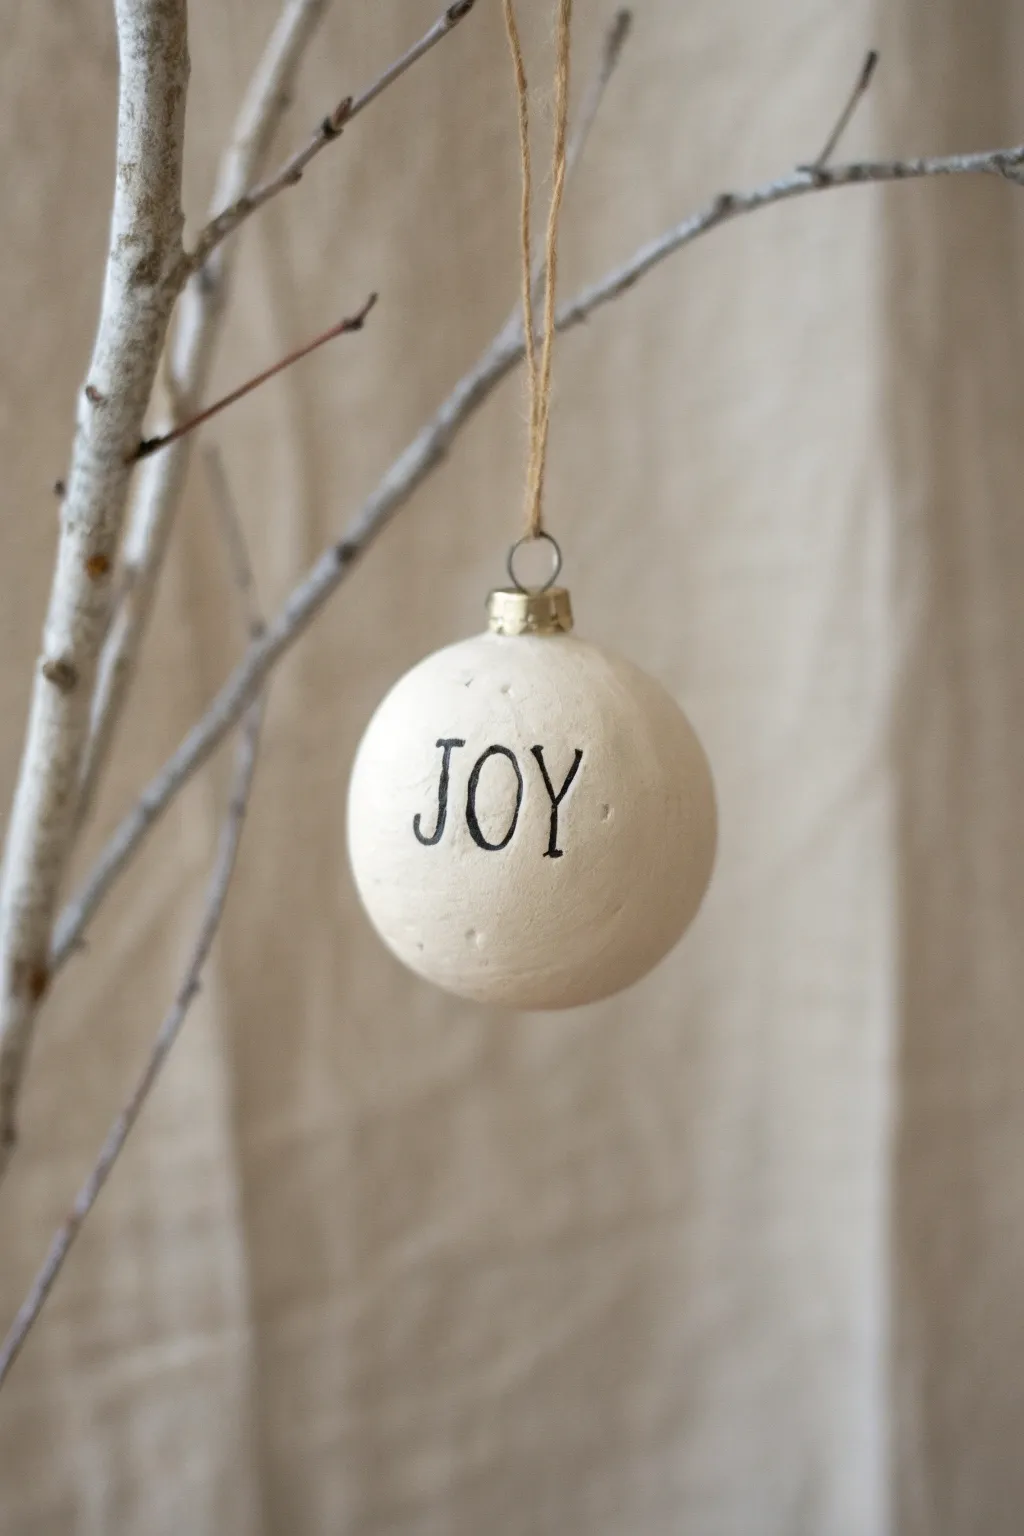
Embrace the beauty of simplicity with this charming, handmade ornament that features an endearing, slightly imperfect finish. Using air dry clay and a few basic tools, you can craft a personalized message bauble that adds a minimalist, heartfelt touch to your holiday décor.
Step-by-Step Tutorial
Materials
- White air dry clay
- Rolling pin
- Styrofoam ball (approx. 2-3 inches diameter)
- Black fine-tip permanent marker or black acrylic paint with a detail brush
- Gold craft paint (optional)
- Metal ornament cap with wire loop (salvaged from an old ornament or bought new)
- Jute twine or string for hanging
- Craft knife or sculpting tool
- Fine-grit sandpaper
- Bowl of water
- Parchment paper or non-stick mat
Step 1: Shaping the Clay Base
-
Prepare your workspace:
Lay down parchment paper or a non-stick mat to protect your table and prevent the clay from sticking. -
Condition the clay:
Take a handful of white air dry clay and knead it well until it is soft, pliable, and free of cracks. -
Roll out a slab:
Using a rolling pin, flatten the clay into a sheet approximately 1/4 inch thick. Aim for an even thickness throughout. -
Cover the form:
Place your styrofoam ball in the center of the clay sheet. Gently wrap the clay around the ball, stretching it slightly to cover the surface completely. -
Trim excess clay:
Where the clay meets at the top, pinch the excess together and trim it away with a craft knife. You want the seams to meet as flush as possible. -
Smooth the surface:
Dip your fingers into a little water and gently rub the entire surface of the ball. Work the seams together until they disappear and the ball is mostly smooth, though a little texture adds character. -
Create the hanger hole:
At the very top of the sphere, press the neck of your metal ornament cap gently into the wet clay to create an indentation where it will sit later. -
Initial drying phase:
Set the ball on a piece of parchment paper to dry. Rotating it every few hours prevents flat spots from forming on the bottom.
Cracking Up?
If small cracks appear as the clay dries, don’t panic. Mix a tiny bit of fresh clay with water to make a paste and smooth it into the cracks with your finger.
Step 2: Refining and Decorating
-
Sand for perfection:
Once the clay is fully dry (this can take 24-48 hours depending on humidity), take fine-grit sandpaper and lightly sand any rough bumps or fingerprints. -
Dust it off:
Wipe the ornament with a dry cloth or paper towel to remove all clay dust before you start decorating. -
Plan your lettering:
I find it helpful to lightly sketch the word ‘JOY’—or your chosen word—onto the center of the ball with a pencil first to ensure it’s centered. -
Letter the message:
Carefully trace over your pencil lines using a black fine-tip permanent marker. Use a serif style for the letters to match the classic look in the photo. -
Add character marks:
If you want that vintage, stone-like appearance, you can use the needle tool to add tiny pockmarks or indentations randomly around the surface.
Make it Sparkle
For a festive twist, brush a thin layer of watered-down PVA glue over the dried ball and sprinkle with ultra-fine clear glitter for a frosted snow effect.
Step 3: Finishing Assembly
-
Prepare the cap:
If your metal ornament cap isn’t gold already, brush a quick layer of gold craft paint onto it and let it dry. -
Attach the cap:
Place a dab of strong craft glue inside the indentation you made earlier at the top of the ornament. -
Secure the hardware:
Press the metal cap firmly onto the glue spot. The prongs should grip slightly into the dry clay. -
Add the hanger:
Cut a length of jute twine, thread it through the wire loop on the cap, and knot the ends together to create a rustic hanging loop. -
Final check:
Let the glue set completely before hanging the ornament to ensure the cap is secure.
Enjoy hanging this timeless piece on your tree or gifting it as a thoughtful keepsake


What Really Happens Inside the Kiln
Learn how time and temperature work together inside the kiln to transform clay into durable ceramic.
Holly Berry Relief Medallions
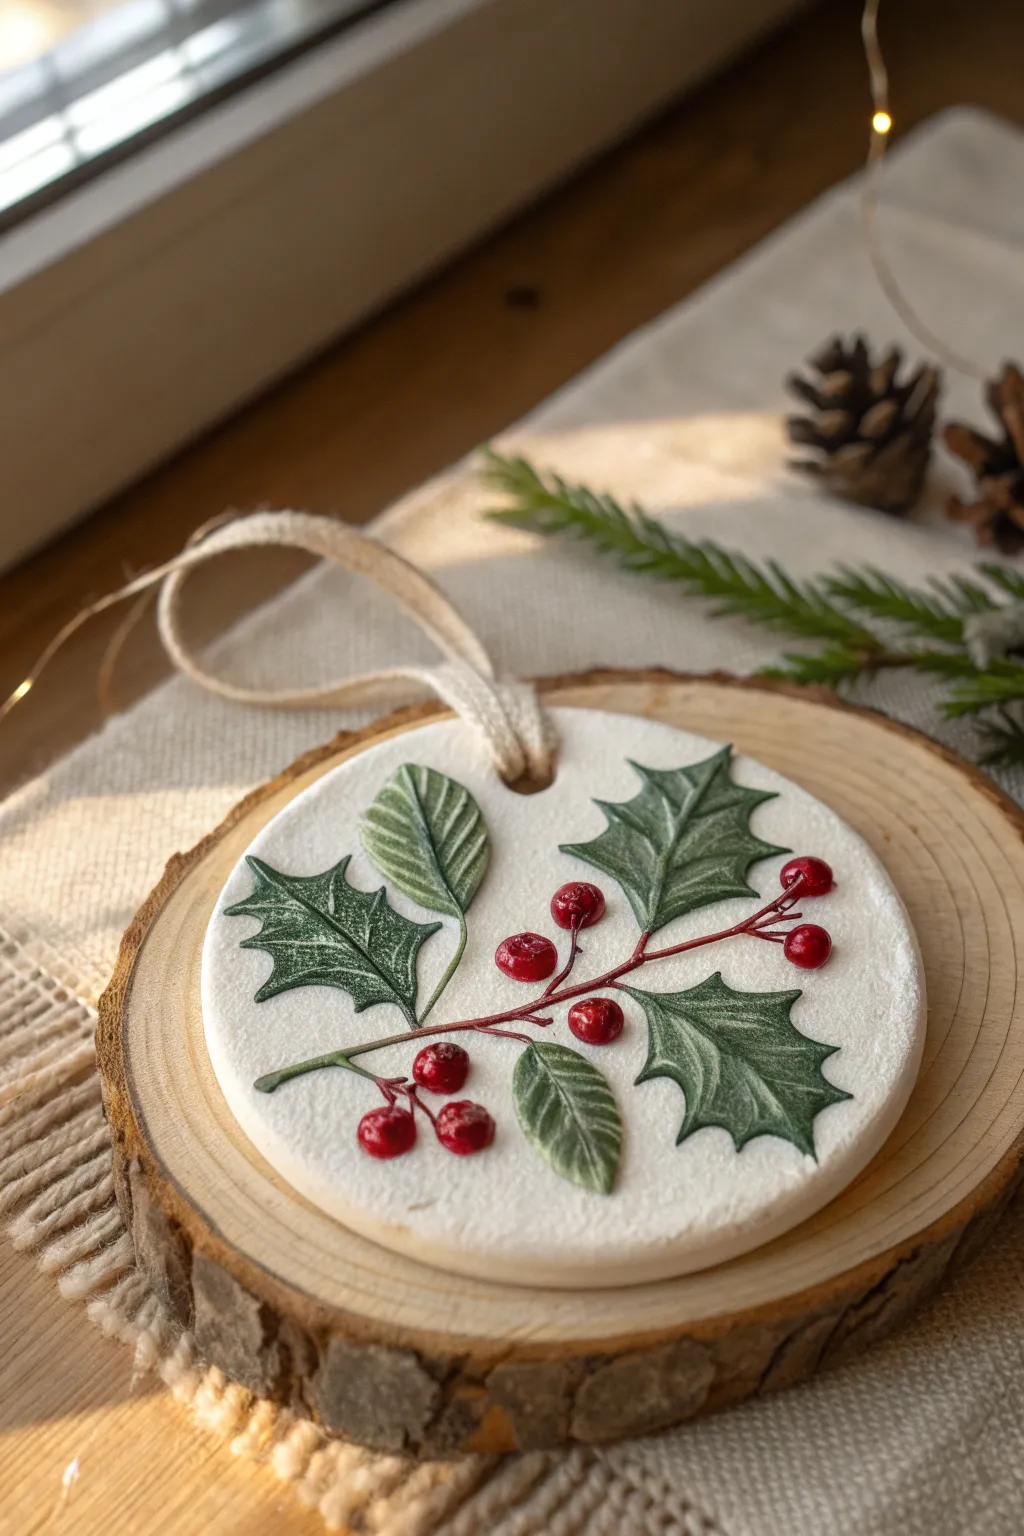
Capture the quiet beauty of winter foliage with this elegant relief-style ornament. The raised holly leaves and bright red berries sit atop a textured white clay base, creating a sophisticated dimensional effect that mimics vintage ceramic tiles.
Step-by-Step Guide
Materials
- White air dry clay
- Rolling pin
- Circle cookie cutter (approx. 3-4 inches)
- Sculoting tools (needle tool, small ball stylus)
- Acrylic paints: Dark Green, Sage Green, Bright Red, Deep Red, Brown
- Fine detail paintbrushes (size 0 and 00)
- Matte varnish or sealant
- Natural twine or ribbon
- Small disk of wood or cardboard (optional, for drying support)
- Water and a small sponge
Step 1: Base Preparation
-
Condition the clay:
Begin by taking a handful of white air dry clay and kneading it thoroughly in your hands until it becomes warm and pliable. This prevents cracks later on. -
Roll out the slab:
On a clean, non-stick surface, roll the clay out to an even thickness of about 1/4 inch (6mm). Aim for a smooth surface without air bubbles. -
Texture the surface (optional):
For that slightly snowy, organic look seen in the photo, you can gently dab the surface with a coarse sponge or a crumpled piece of foil before cutting. -
Cut the circle:
Use your circle cutter to punch out a clean round shape. Before moving it, dip a straw or a small tube into water and punch a hole near the top edge for hanging. -
Smooth the edges:
Dip your finger in a little water and gently run it around the circumference of the circle to soften any sharp ridges left by the cutter.
Step 2: Sculpting the Relief
-
Sketch the design:
Very lightly etch your branch pattern onto the clay using a needle tool. Draw a central curved stem with branching points for leaves and berry clusters. -
Form the leaves:
Create small teardrop shapes from fresh clay. Flatten them slightly between your fingers, then press them onto your sketched guide marks. Use a tiny dab of water as ‘glue’ to adhere them. -
Carve leaf details:
With the needle tool, press indentations into the leaf edges to create the characteristic spiky holly shape. Then, carve a central vein and delicate side veins into each leaf. -
Add the stem:
Roll extremely thin snakes of clay for the stems. Lay them over your sketched lines, connecting the leaves together. Press them down gently to bond them to the base. -
Create the berries:
Roll tiny balls of clay for the berries. Arrange them in clusters of two or three at the junctions of the leaves and stems. Press them down firmly so they don’t pop off later. -
Refine the surface:
Use a small, damp brush to smooth out any fingerprints on the raised elements, blending the edges of the stems slightly into the background. -
Dry completely:
Place the medallion on a flat surface or a wire rack. Let it dry for at least 24-48 hours, flipping it occasionally to ensure even drying and prevent warping.
Clean Edges Pro Tip
Keep a small bowl of water nearby. If your clay leaves have jagged edges after cutting or shaping, a wet paintbrush acts like an eraser to smooth them perfectly.
Step 3: Painting & Finishing
-
Base coat the leaves:
Once bone dry, paint the holly leaves with a dark forest green. I prefer to keep the paint consistency slightly thin so the texture of the clay shows through. -
Add leaf highlights:
Dry brush a lighter sage green over the raised veins and edges of the leaves. This emphasizes the relief sculpture and adds realistic depth. -
Paint the stems:
Use a fine liner brush to paint the stems brown. If you have a steady hand, add a touch of red to the stem junctions for botanical accuracy. -
Color the berries:
Paint the berries a bright, vibrant red. You might need two coats here to get full opacity. -
Shade the berries:
Add a tiny dot of deep red or brown to the bottom of each berry for shadow, and a tiny spec of white or pale pink on top for a highlight. -
Seal the piece:
Apply a coat of matte varnish over the painted areas to protect them. You can leave the white background raw for a stone-like texture, or seal it all for durability. -
Add the hanger:
Thread a piece of natural twine or soft ribbon through the hole you made earlier and tie it in a loop.
Warping Woes?
If the edges of your medallion curl up while drying, place a lightweight book on top of it (sandwiched between parchment paper) once it is partially dry but still cool to the touch.
Hang this charming handcrafted piece on your tree or use it as a luxurious gift tag to make your presents extra special this year.
Black-and-White Pattern Ornaments
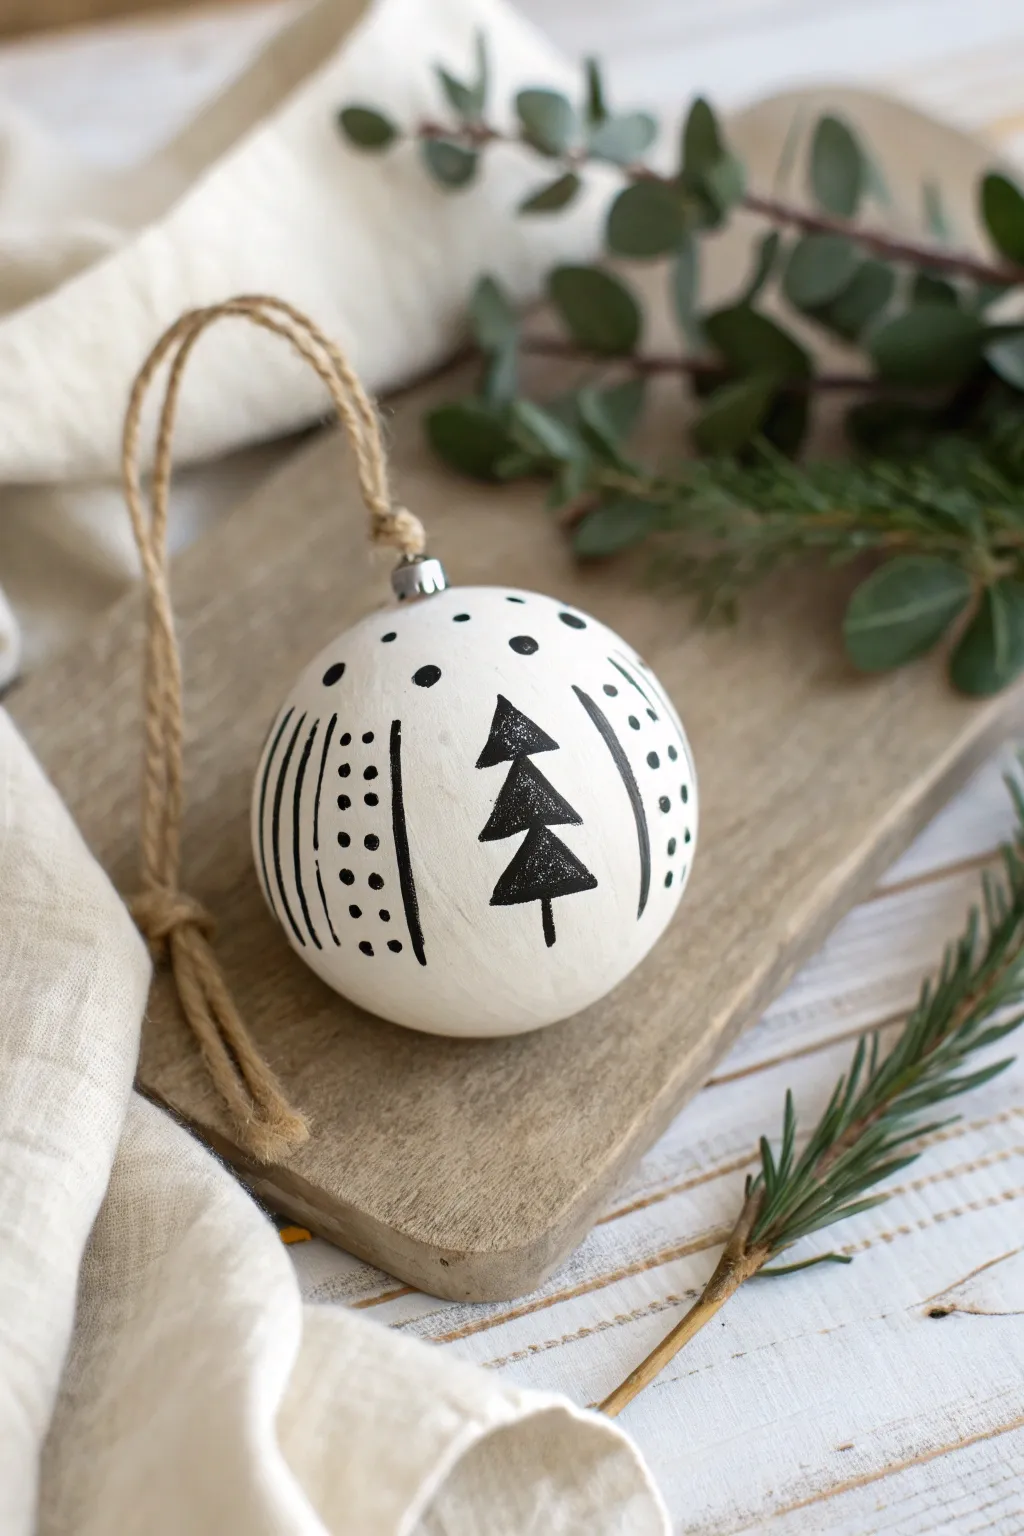
Bring a touch of modern Scandinavian charm to your tree with these minimalist black-and-white ornaments. Using air dry clay to create a smooth, matte finish provides the perfect canvas for crisp, hand-painted geometric designs.
Step-by-Step Tutorial
Materials
- White smooth air dry clay
- Clear spherical plastic bauble (fillable or plain)
- Black acrylic paint or a fine-tip black paint pen
- Rolling pin
- Fine-grit sandpaper (optional)
- Small silver bauble caps (or reuse old ones)
- Jute twine or rustic string
- Water and a small sponge
- High-gloss or matte varnish (optional)
Step 1: Forming the Clay Base
-
Prepare the clay:
Begin by kneading a handful of white air dry clay until it is warm, pliable, and free of cracks. If it feels too dry, dip your fingers in a tiny bit of water. -
Roll it out:
Roll the clay flat on a clean surface until it is approximately 3-4mm thick. You want it thin enough to not be heavy, but thick enough to manipulate. -
Measure the coverage:
Place your plastic bauble in the center of the clay to estimate if you have enough material to wrap around it fully. -
Wrap the bauble:
Gently lift the clay and drape it over the plastic sphere. Slowly smooth the clay down the sides, working out any trapped air bubbles as you go. -
Trim the excess:
Once the sphere covers the majority of the plastic, gather the excess clay at the top (where the cap will go) and trim it away with a craft knife or scissors. -
Smooth the seams:
Use a damp sponge or your wet fingertip to blend all the seams and smooth out the surface texture. I like to spend extra time here to ensure the surface is perfectly round. -
Create the hanger hole:
While the clay is still wet, carefully press the metal cap into the top to ensure it fits, or simply shape the clay neck to accommodate the cap later. Remove the cap for drying. -
Let it dry:
Set the covered bauble aside to dry completely. This usually takes 24-48 hours. Rotate it occasionally so the bottom dries evenly.
Smooth Operator
To get a porcelain-like finish without endless sanding, dip your finger in water and smooth the clay constantly while wrapping the plastic form.
Step 2: Designing and Finishing
-
Sand for perfection:
Once fully dry, lightly buff the surface with fine-grit sandpaper if you notice any fingerprints or bumps. Wipe away the dust with a dry cloth. -
Plan your design:
Visualize the quadrants of your ornament. In the image, we see alternating panels of trees and geometric patterns. -
Paint the dividers:
Using your black paint pen or a thin brush, draw vertical lines to divide the bauble into sections. You can group these as double or triple lines for visual interest. -
Add the focal point:
In the open white space between your vertical lines, carefully paint a stylized Christmas tree. Start with a small triangle for the top and stack two larger triangles below it. -
Detail the tree:
Add a simple vertical line for the trunk at the bottom of the tree. -
Fill with pattern:
In the adjacent sections, add rows of small black dots or dashes running vertically between your divider lines. -
Add top accents:
Paint a few scattered dots near the top neck of the ornament to connect the different design sections. -
Seal the work:
Allow the paint to dry completely. If you want to protect the design, apply a thin coat of matte varnish. -
Attach the hardware:
Place the silver cap back onto the top of the ornament. You may need a dab of strong glue if the clay shrunk slightly during drying. -
String it up:
Thread a length of jute twine through the cap loop and tie it securely to finish the rustic look.
Cracks Appearing?
Small cracks happen as clay shrinks. Mix a tiny bit of fresh clay with water to make a paste (slip) and fill the cracks, then smooth over.
Hang your new creation on a sturdy branch where its bold pattern can really stand out

TRACK YOUR CERAMIC JOURNEY
Capture glaze tests, firing details, and creative progress—all in one simple printable. Make your projects easier to repeat and improve.
Fingerprint Light Tree Keepsakes
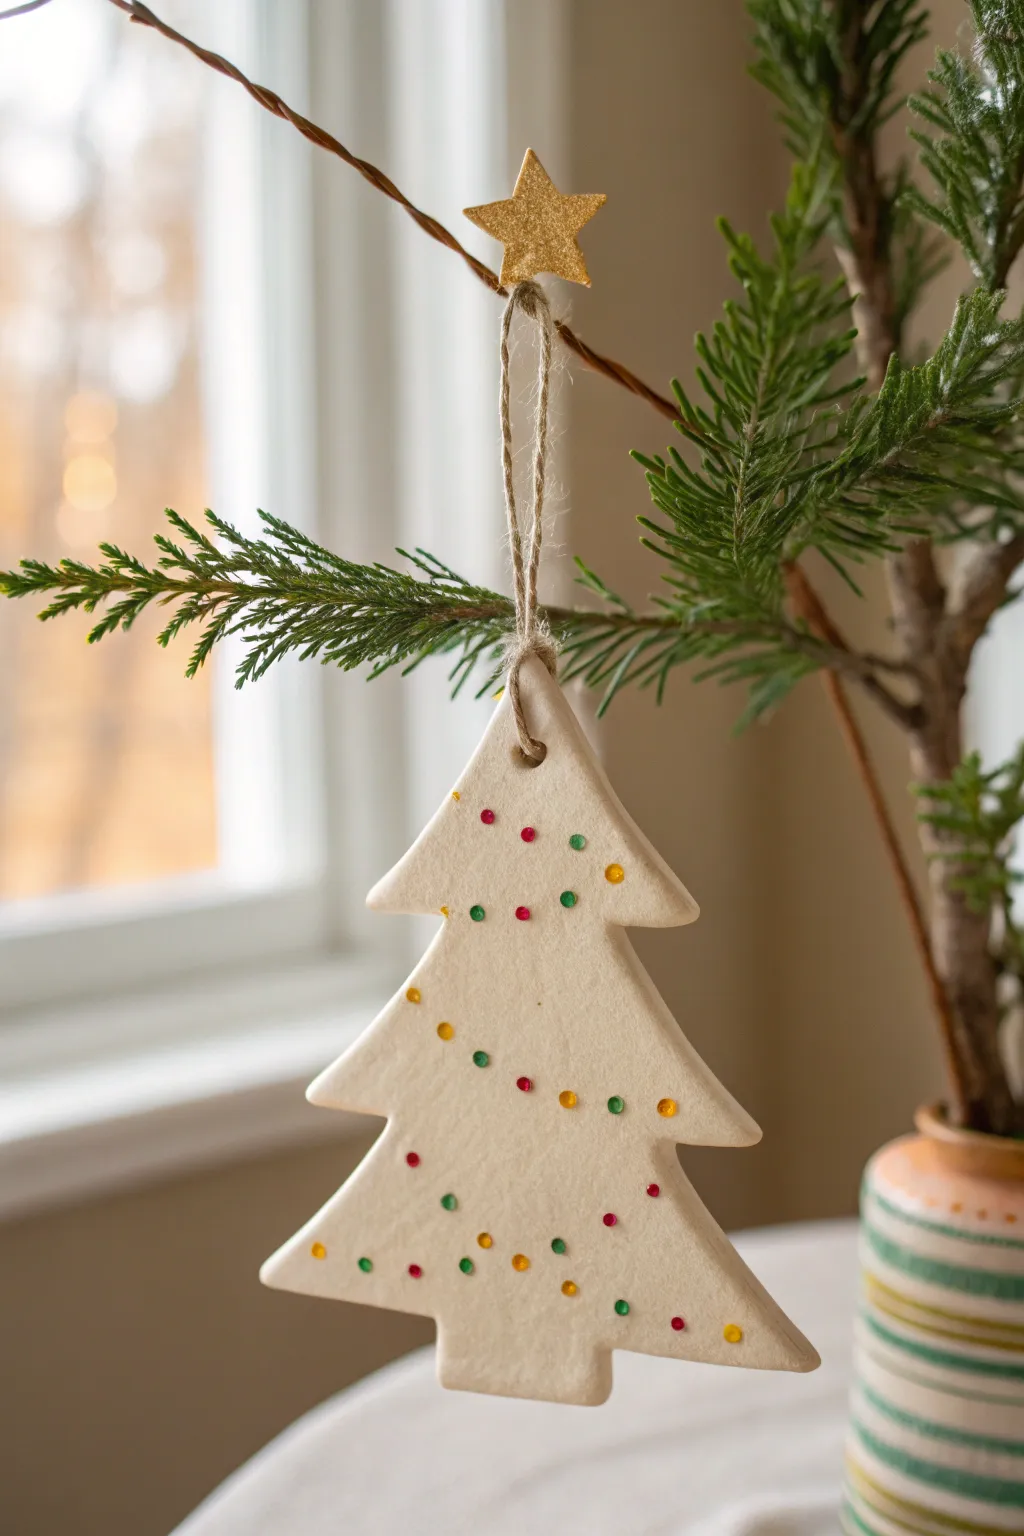
This charming, minimalist ornament captures the magic of holiday lights with delicate, colorful dots pressed into clean white clay. It is a simple yet elegant project that adds a handmade touch to your tree without feeling cluttered.
Step-by-Step Guide
Materials
- White air-dry clay
- Christmas tree cookie cutter (approx. 4 inches)
- Small rolling pin
- Parchment paper or non-stick mat
- Small round piping tip or straw (for the hanging hole)
- Set of fine-tip acrylic paint pens or a small dotting tool with acrylic paints (red, green, yellow/gold)
- Clear matte or satin varnish (optional)
- Jute twine or hemp cord
- Gold glitter cardstock or foam (for the star)
- Strong craft glue
- Fine grit sanding sponge
Step 1: Shaping the Base
-
Prepare your workspace:
Lay down a sheet of parchment paper or a silicone mat. This prevents the clay from sticking and ensures the back of your ornament remains smooth. -
Condition the clay:
Take a handful of white air-dry clay and knead it gently in your hands until it becomes pliable and warm. This helps prevent cracks from forming later. -
Roll it out:
Using your rolling pin, roll the clay out to an even thickness of about 1/4 inch. If you want a uniform look, place two wooden rulers on either side of the clay as depth guides. -
Cut the shape:
Press your Christmas tree cookie cutter firmly into the clay. Give it a tiny wiggle to ensure it cuts all the way through, then lift it away. Peel away the excess clay from the edges. -
Smooth the edges:
Dip your finger in a little bit of water and gently run it along the cut edges of the tree to smooth out any roughness or jagged bits left by the cutter. -
Add the hanging hole:
Use a straw or the small end of a piping tip to punch a clean hole at the very top of the tree shape. Make sure it’s not too close to the edge to prevent breaking later.
Clean Edges Trick
If your clay drags when lifting the cutter, let the clay sit on the mat for 10 minutes after rolling but before cutting. Slightly drier clay cuts cleaner than fresh, wet clay.
Step 2: Decoration & Assembly
-
Let it dry completely:
Place the clay tree on a flat surface to dry. Typical air-dry clay takes 24-48 hours. I find flipping it over halfway through the drying process helps keep it perfectly flat. -
Sand for perfection:
Once fully hard, inspect the edges. If there are any stray rough spots, lightly buff them away with a fine-grit sanding sponge. -
Plan your light placement:
Visualize a garland draping around the tree. You want the dots to look somewhat random but follow a loose, swooping diagonal pattern. -
Apply the ornaments:
Using fine-tip acrylic paint pens or a dotting tool dipped in paint, carefully press small dots onto the surface. Alternate colors like red, green, and golden yellow to mimic Christmas lights. -
Add variance:
Keep the dots small and delicate. You can make some slightly larger than others for visual interest, but maintain the minimalist aesthetic. -
Seal the clay:
To protect your work, apply a thin coat of clear matte or satin varnish over the entire front of the tree. This seals the clay and makes the colors pop. -
Create the star:
Cut a very small star shape out of gold glitter cardstock or foam. It should be proportional to the top of your clay tree. -
Attach the twine:
Cut a length of jute twine, thread it through the hole you made earlier, and tie a secure knot to create a loop. -
Finish with the star:
Thread the twine through the hole first, then use a dab of strong craft glue to attach the gold star directly onto the twine right above the clay tree, as shown in the photo.
Make it Sparkle
For a festive twist, while the colored paint dots are still wet, sprinkle a tiny pinch of super-fine iridescent glitter over them to make the ‘lights’ actually twinkle.
Hang your new creation on a sturdy branch where the lights can catch the subtle colors
Mini Wreath Ring Ornaments
Capture the delicate beauty of nature with this elegant mini wreath ornament, featuring a continuous laurel leaf pattern sculpted in relief. The speckled white clay and rustic twine bow create a timeless, minimalist aesthetic perfect for any holiday theme.
Detailed Instructions
Materials
- White air-dry clay (preferably a stone or granite effect, or plain white)
- Small rolling pin
- Circle cookie cutters (two sizes: approx. 3-inch and 1.5-inch)
- Needle sculpting tool or toothpick
- Small ball stylus tool
- Fine-grit sandpaper
- Jute twine
- Small cup of water
- Parchment paper or silicone mat
- Ground dried tea leaves or pepper (optional, for speckling)
Step 1: Forming the Base
-
Preparation:
Begin by conditioning your clay. Knead a palm-sized amount until it is pliable and smooth. If you are using plain white clay and want the speckled look from the photo, knead in a small pinch of ground dried tea leaves or black pepper. -
Rolling:
Roll out the clay on your parchment paper or silicone mat to a uniform thickness of about 1/4 inch (6mm). Avoid going too thin, as the ring shape needs structural integrity. -
Cutting the Outer Ring:
Use the larger circle cutter to stamp out the main disc shape. Press down firmly and give it a little wiggle to ensure a clean cut through the clay. -
Cutting the Inner Ring:
Center the smaller circle cutter perfectly inside the first circle and press down to remove the middle. You should now have a neat donut shape. -
Smoothing Edges:
Dip your finger in a tiny bit of water and run it gently around the cut edges (both inner and outer) to soften any sharpness or loose clay burrs.
Pro Tip: Seamless Leaves
Instead of adding separate clay pieces for leaves, try carving the leaf shapes directly into the base ring using a linocut carving tool for a ‘negative space’ relief effect.
Step 2: Sculpting the Foliage
-
Scribing the Vine:
Using your needle tool, very lightly sketch a shallow wavy line that travels all the way around the ring surface. This will act as the stem guide for your leaves. -
Creating Leaf Shapes:
Take tiny pinches of fresh clay and roll them into small rice-grain shapes. You will need about 20-25 of these depending on your ring size. -
Attaching Leaves:
Working in pairs, press the rice-grain shapes onto the ring along your guide line. One leaf should point outward towards the edge, and one inward towards the center hole. -
Securing the Clay:
To ensure they stick well, I always use a tiny dab of water or slip (water mixed with clay) on the back of each leaf before placing it down. -
Adding Veins:
Once all leaves are placed, take your needle tool and gently press a central vein line into each leaf. This pressure also helps fuse the leaf securely to the base ring. -
Connecting the Stems:
Roll a very thin ‘snake’ of clay and lay it over the center where the leaves meet to create the raised stem. Alternatively, use your needle tool to sculpt a connecting line between the leaf pairs. -
Drying:
Place the wreath on a flat surface to dry for 24-48 hours. Turn it over halfway through the drying process to prevent curling.
Level Up: Metallic Accent
After the clay is fully dry, use a fine detail brush to paint just the raised veins of the leaves with liquid gold leaf or metallic watercolor for a luxurious finish.
Step 3: Finishing Touches
-
Sanding:
Once completely bone dry, use fine-grit sandpaper to gently smooth the back and outer edges of the ornament. -
Preparing the Twine:
Cut a length of jute twine approximately 12 inches long. Fold it in half to create a loop. -
Tying the Loop:
Pass the folded loop end around the top of the wreath ring. Pull the loose ends through the loop (creating a lark’s head knot) and tighten it gently against the clay. -
Creating the Bow:
With the remaining loose ends of the twine hanging down the front, tie a simple shoelace bow securely against the knot on the wreath. -
Trimming:
Trim the tails of the bow to your desired length. Tie the top ends of the twine together to form the hanger.
Hang your beautiful wreath on the tree and enjoy the natural charm it adds to your holiday decor
Gingerbread-Inspired Clay Cookies
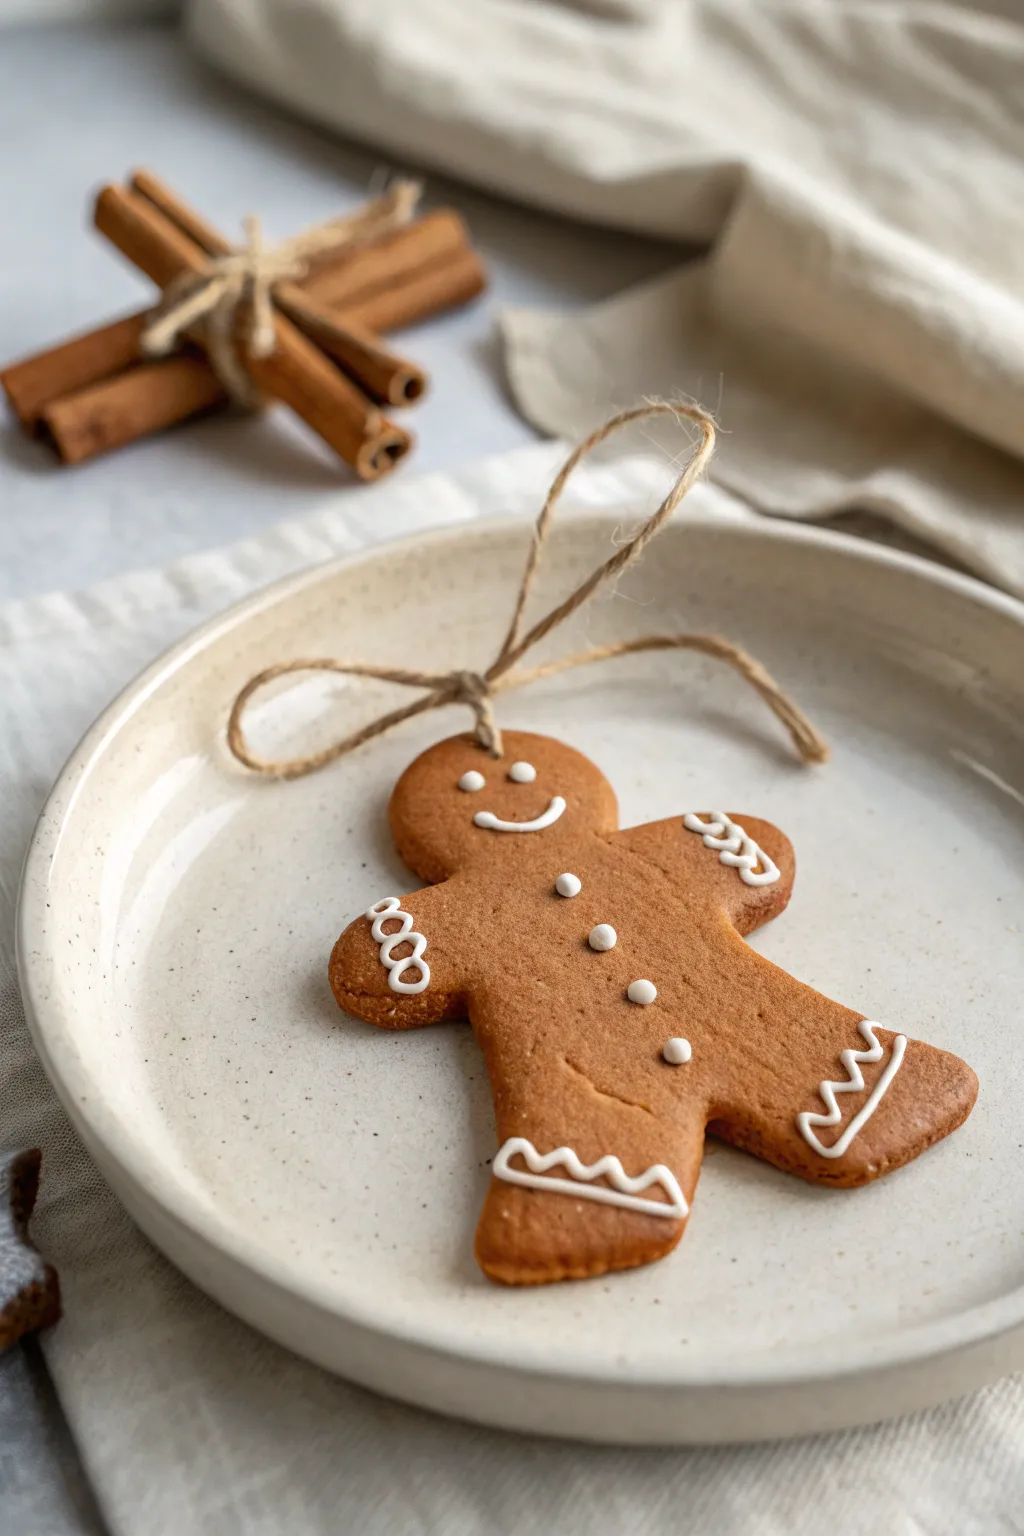
Bring the warmth of holiday baking to your tree without turning on the oven by crafting these adorable faux-gingerbread ornaments. Using air-dry clay tinted to perfection, you’ll create lasting decorations that look good enough to eat.
Step-by-Step Tutorial
Materials
- Air-dry clay (white)
- Acrylic paint (burnt umber, burnt sienna, or cinnamon brown)
- Puffy paint (white) or white heavy-body acrylic paint with a fine liner brush
- Rolling pin
- Gingerbread man cookie cutter
- Plastic straw (or cocktail stick)
- Jute twine or rustic string
- Parchment paper or silicone mat
- Fine-grit sandpaper (optional)
- Matte varnish or sealant
Step 1: Creating the Dough
-
Mix the Clay Color:
Start with a ball of white air-dry clay approximately the size of an orange. Add a generous dollop of burnt umber acrylic paint directly into the center of the clay ball. -
Knead Thoroughly:
Fold the clay over the paint and knead continuously. Wear gloves to keep your hands clean if you prefer. Keep kneading until the color is completely uniform and resembles a rich gingerbread brown. If it’s too pale, add a touch more brown paint. -
Roll it Out:
Place the colored clay on a piece of parchment paper or a silicone mat to prevent sticking. Use your rolling pin to flatten the clay to an even thickness, roughly 1/4 inch (about 5-6mm). -
Cut the Shapes:
Press your gingerbread man cookie cutter firmly into the rolled clay. Wiggle it slightly to ensure a clean cut, then carefully lift the cutter away. -
Smooth the Edges:
Peel away the excess scrap clay. Dip your finger in a tiny bit of water and gently run it along the rough edges of the cutout to smooth any ragged bits left by the cutter.
Real Spice Trick
Mix actual ground cinnamon and ginger spices directly into your clay while kneading. It adds a speckled texture and a faint, authentic scent.
Step 2: Adding Texture and Drying
-
Create the Hanger Hole:
Before the clay dries, take a plastic straw and press it firmly near the top of the head to create a centralized hole for the string. A drinking straw creates a perfect, clean circle. -
Add Subtle Texture:
This is a key detail: gently press a piece of real sandpaper or a textured fabric onto the surface of the wet clay and lift immediately. This mimics the slightly porous texture of a real baked cookie. -
Let it Dry:
Move the parchment paper with the gingerbread men to a flat, safe surface. Allow them to air dry completely. This usually takes 24-48 hours depending on humidity. Flip them over halfway through the drying process to prevent curling. -
Sand Imperfections:
Once fully hard, check the edges again. If there are any sharp points, give them a very light sanding with fine-grit sandpaper.
Cookie Crumb Effect
Before the matte varnish dries, sprinkle a tiny pinch of white glitter or clear embossing powder to mimic the look of sugar crystals.
Step 3: Decorating
-
Pipe the Icing:
Using white puffy paint (often called 3D fabric paint), carefully draw on the classic gingerbread details. Start with a simple curved smile and two dots for eyes. -
Add Buttons:
Place three small dots vertically down the center of the torso to represent buttons. -
Detail the Limbs:
Draw zig-zag ‘squiggles’ across the wrists and ankles. I find that bracing my elbow on the table helps keep my hand steady for these finer lines. -
Seal the Cookie:
Once the white paint is completely dry (give it a few hours), apply a coat of matte varnish over the entire ornament. A matte finish looks more like a real cookie than a glossy one. -
String it Up:
Cut a length of jute twine or rustic string, roughly 8 inches long. -
Secure the Loop:
Thread the twine through the hole in the head. Tie the ends together in a simple overhand knot or a bow, depending on the look you prefer.
Step 4: Optional Scenting
-
Add Scents:
For an extra sensory touch, you can rub a drop of cinnamon or clove essential oil onto the back (unpainted side) of the ornament.
Hang these charming creations on your tree or use them as unique gift tags for your holiday presents
Tiny 3D Snowmen Figures
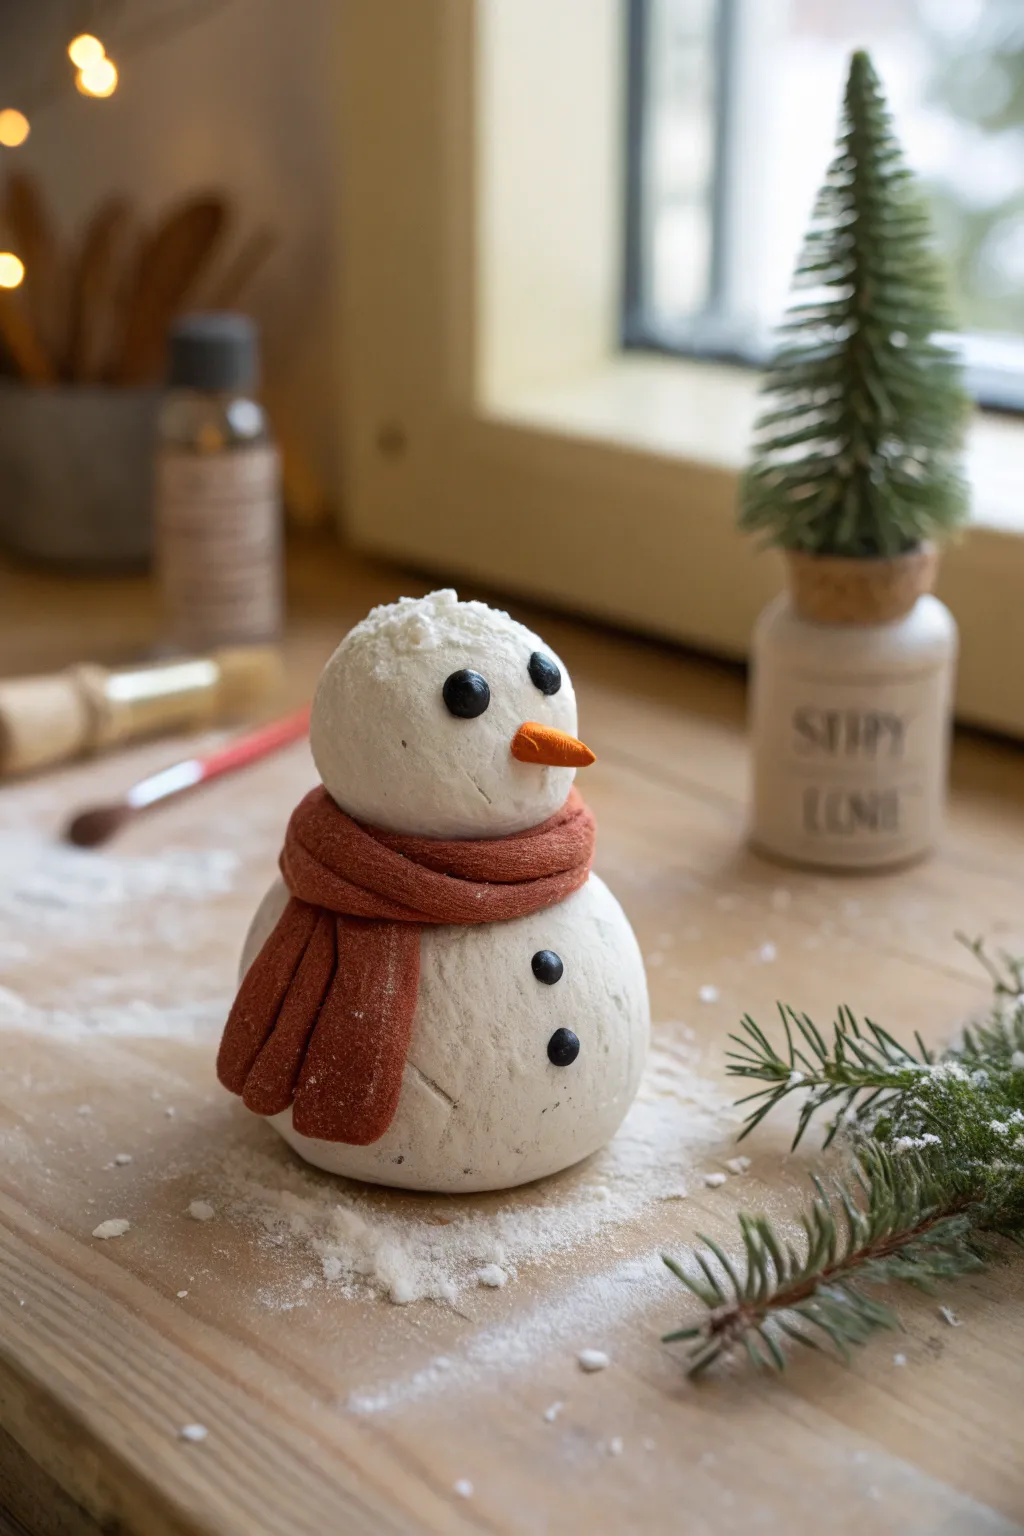
This adorable miniature snowman brings a frosty touch to your holiday decor without any of the melting. With its snowy texture and cozy terracotta-colored scarf, this little figure is perfect for nestling onto a window ledge or adding to a festive centerpiece.
Detailed Instructions
Materials
- White air dry clay
- Small amount of terracotta or reddish-brown clay (or acrylic paint)
- Black clay (or black beads/paint)
- Orange clay (or orange paint)
- Clay sculpting tools (or a toothpick)
- White crafting powder or cornstarch (for dusting)
- Water (for joining)
- Small soft brush
Step 1: Forming the Body
-
Roll the base:
Start by taking a chunk of white air dry clay, roughly the size of a golf ball. Roll it between your palms until you have a smooth, round sphere. This will be the snowman’s body. -
Flatten the bottom:
Gently press the sphere onto your work surface to create a flat base so your snowman stands upright without rolling away. -
Create the head:
Roll a second, slightly smaller ball of white clay. This should be about two-thirds the size of the body to keep the proportions cute and chubby. -
Dust for texture:
Before joining, lightly roll both white spheres in a bit of white crafting powder or cornstarch. This gives the surface a frosty, matte texture rather than a shiny smooth finish. -
Join the pieces:
Dab a tiny drop of water on top of the body sphere and press the head firmly onto it. You can gently twist them together slightly to strengthen the bond.
Step 2: Dressing Him Up
-
Prepare the scarf clay:
Take a small amount of terracotta or reddish-brown clay. Roll it into a long, thin snake, about the thickness of a shoelace. -
Flatten the scarf:
I like to gently press the clay snake flat with my finger or a rolling pin so it looks more like fabric ribbon. -
Wrap the neck:
Wrap the flattened strip around the snowman’s neck where the two white spheres meet. Cross the ends over each other at the front, slightly off-center. -
Add texture to the scarf:
Using a needle tool or toothpick, gently scratch linear lines along the length of the scarf to simulate a knit wool texture. -
Create the scarf tails:
Add two short, flattened rectangular pieces of the red clay hanging down from the crossed section to mimic the ends of the scarf.
Cracking Clay?
If you see cracks forming as it dries, mix a tiny bit of fresh clay with water to make a paste and smooth it over the fissure with your finger.
Step 3: Adding the Face & Details
-
Make the eyes:
Roll two tiny specks of black clay into balls. Press them gently into the upper sphere to create the eyes. If you don’t have black clay, you can press small indentations now and paint them later. -
Sculpt the nose:
Take a pinch of orange clay and roll it into a tiny cone shape. Press the wider end into the center of the face, just below the eyes. -
Add buttons:
Roll two more small black balls, slightly larger than the eyes. Press these in a vertical line down the center of the snowman’s bottom sphere. -
Frost trim:
Take a soft brush and lightly dust the top of the head and the shoulders of the scarf with a little more white powder or cornstarch to make it look like fresh snowfall. -
Final texture check:
Inspect the white body areas. If they look too smooth from handling, gently tap them with an old toothbrush or stiff brush to bring back that snowy, rough texture. -
Dry completely:
Let your snowman sit undisturbed in a dry, room-temperature spot for at least 24 hours. The thicker parts of the body may take up to 48 hours to fully cure.
Snowy Sparkle
For a magical finish, mix clear glitter into your cornstarch dusting powder. It will catch the light just like real snow crystals.
Once fully dry, you have a charming, rustic winter friend ready to brighten up your shelf
Scandi Mushroom Tree Ornaments
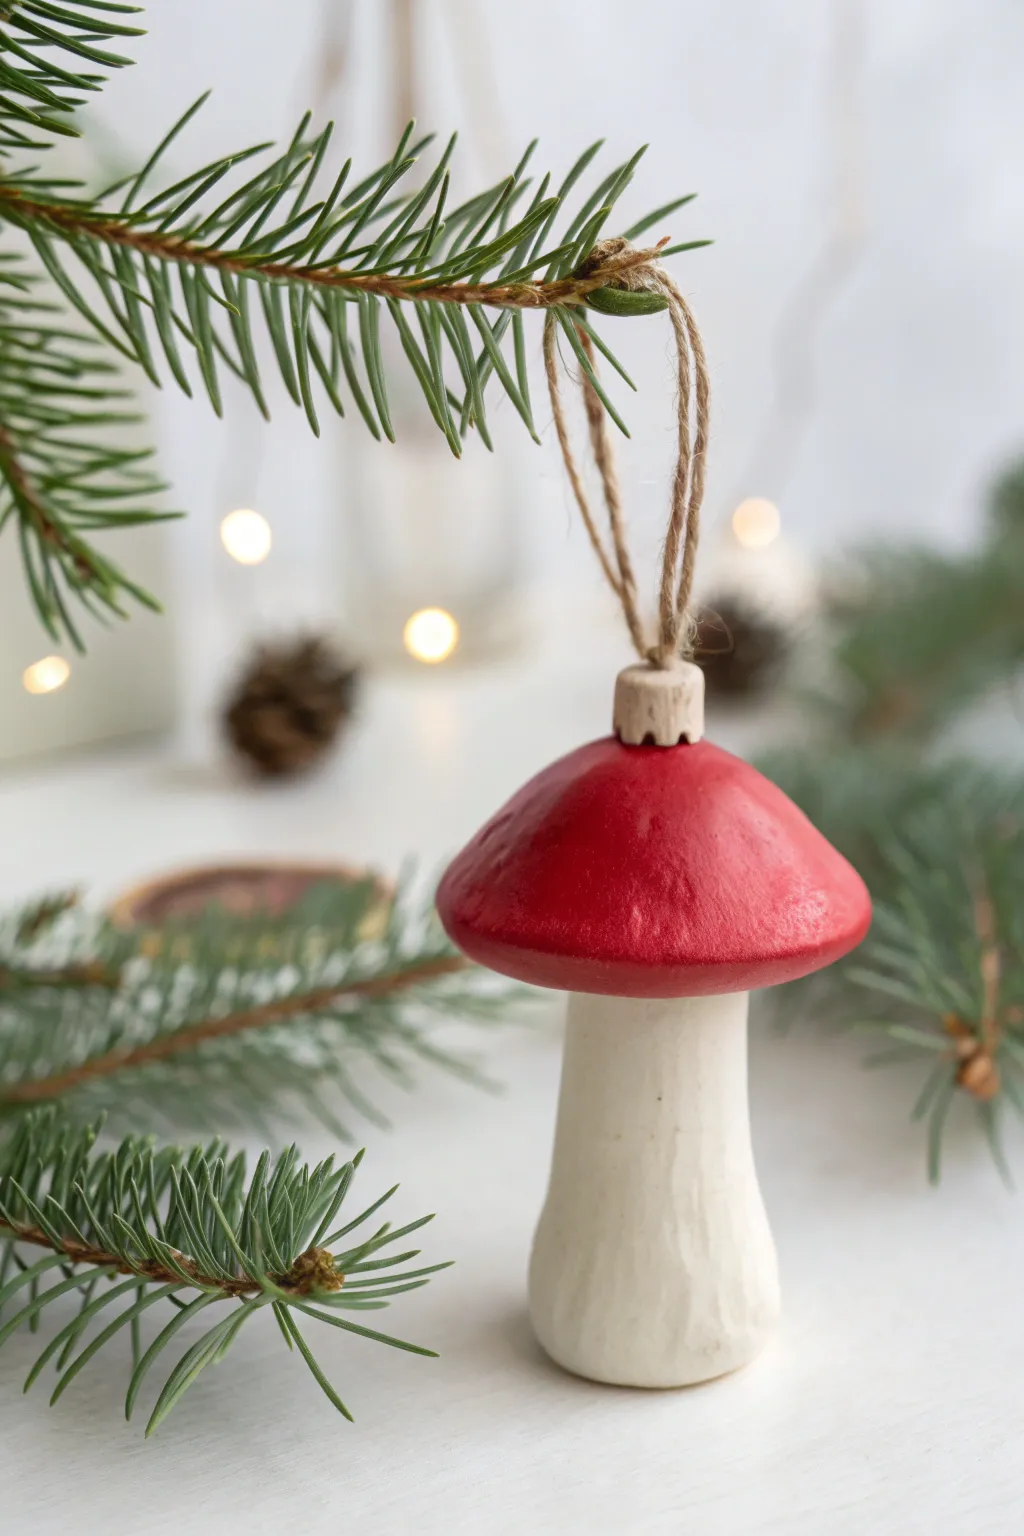
Bring a touch of Nordic charm to your tree with these delightful mushroom ornaments that mimic the look of hand-carved wood. With their simple silhouette and classic red-and-white palette, they offer a timeless, cozy aesthetic perfect for a traditional holiday theme.
How-To Guide
Materials
- Air dry clay (white or terracotta)
- Aluminum foil
- Rolling pin
- Pottery needle tool or craft knife
- Sculpting tool with a textured edge (optional)
- Acrylic paint (Deep Red, Cream/Off-White, Raw Umber)
- Paintbrushes (flat shader and fine liner)
- Jute twine
- Screw eye pins (small)
- Fine-grit sandpaper
- Matte varnish or sealant
Step 1: Sculpting the Base
-
Create the armature:
Start by scrunching a small piece of aluminum foil into a shape resembling a mushroom stem and cap. This core keeps the ornament lightweight and saves clay. Aim for a stem that widens slightly at the bottom and a cap that is rounded but not perfectly spherical. -
Cover the stem:
Roll out a slab of clay to about 1/4 inch thickness. Wrap the clay around the foil stem, smoothing the seam with a little water on your finger. Extend the clay slightly beyond the foil at the base to create a solid foundation. -
Shape the cap:
Take a separate ball of clay, slightly flatten it, and drape it over the foil cap armature. Gently press and mold it until it covers the foil completely, smoothing the underside where it will join the stem. -
Join the pieces:
Score the top of the stem and the underside of the cap with a needle tool—scratching up the surface creates ‘tooth’ for the bond. Add a dab of water or slip (clay mixed with water) and press the cap firmly onto the stem. -
Refine the shape:
Using your fingers, blend the clay at the join slightly, though a distinct separation line is fine for this style. Ensure the stem has that charming, slightly chunky look rather than being a perfect cylinder.
Crack Control
If you see small cracks forming as the clay shrinks around the foil, smooth a small amount of fresh clay paste (water + clay) into the crack and let it dry again.
Step 2: Adding Texture and Hardware
-
Faux-carved texture:
This is the secret to the wooden look shown in the photo. Instead of smoothing the clay perfectly, use a flat sculpting tool or even the back of a knife to gently shave or press vertical facets into the stem. You want it to look whittled, not polished. -
Cap detailing:
Repeat a milder version of this faceting on the red cap area. It should look somewhat smooth but still retain slight irregularities that catch the light, mimicking hand-carved wood. -
Add the hanger:
While the clay is still wet, dip the threads of a small screw eye pin into white glue or liquid clay. Press it firmly into the very center of the mushroom cap. Smooth any displaced clay around the hardware. -
Create the wooden cap detail:
To mimic the specific look in the photo where the hanger emerges from a ‘wooden’ plug, sculpt a tiny, square-ish distinct ring of clay around the eye pin. Use a needle tool to scratch vertical lines into this small ring to simulate wood grain. -
Drying time:
Place your mushroom upright to dry. Because of the foil core, it should dry relatively evenly, but give it at least 24-48 hours depending on humidity. Rotate it occasionally so all sides get air exposure.
Step 3: Painting and Finishing
-
Base coat:
Once fully dry, you can lightly sand any sharp spikes, but leave the ‘carved’ texture alone. Paint the stem and the small top ‘plug’ with a coat of Cream or Off-White acrylic paint. Do not use bright white; we want a natural, aged look. -
Painting the cap:
Apply a rich Deep Red acrylic to the mushroom cap. Use a flat brush to follow the contours. You may need two coats for opaque coverage, but let the first coat dry completely before adding the second. -
Antiquing the stem:
To enhance the carved texture, mix a washing of water and a tiny drop of Raw Umber paint. Brush this distinct wash over the cream stem and immediately wipe it back with a paper towel. The brown will settle into the crevices, highlighting the faux-whittling. -
Highlighting the top:
Paint the tiny clay ring around the eye hook with a light beige or watered-down brown to look like natural, unpainted wood, contrasting with the red cap. -
Sealing:
Protect your work with a matte varnish. I find a glossy finish ruins the rustic illusion, so stick to matte or satin to keep it looking like painted wood. -
Stringing:
Cut a length of natural jute twine. Thread it through the eye pin and tie a simple overhand knot at the top to create a rustic loop for hanging.
Flecked Paint Effect
For extra realism, splatter the red cap with minute specks of white or brown paint using an old toothbrush to mimic natural imperfections found in wild mushrooms.
Hang your charming new fungi on the tree and enjoy the woodland atmosphere they create
Painted Winter Bird Medallions
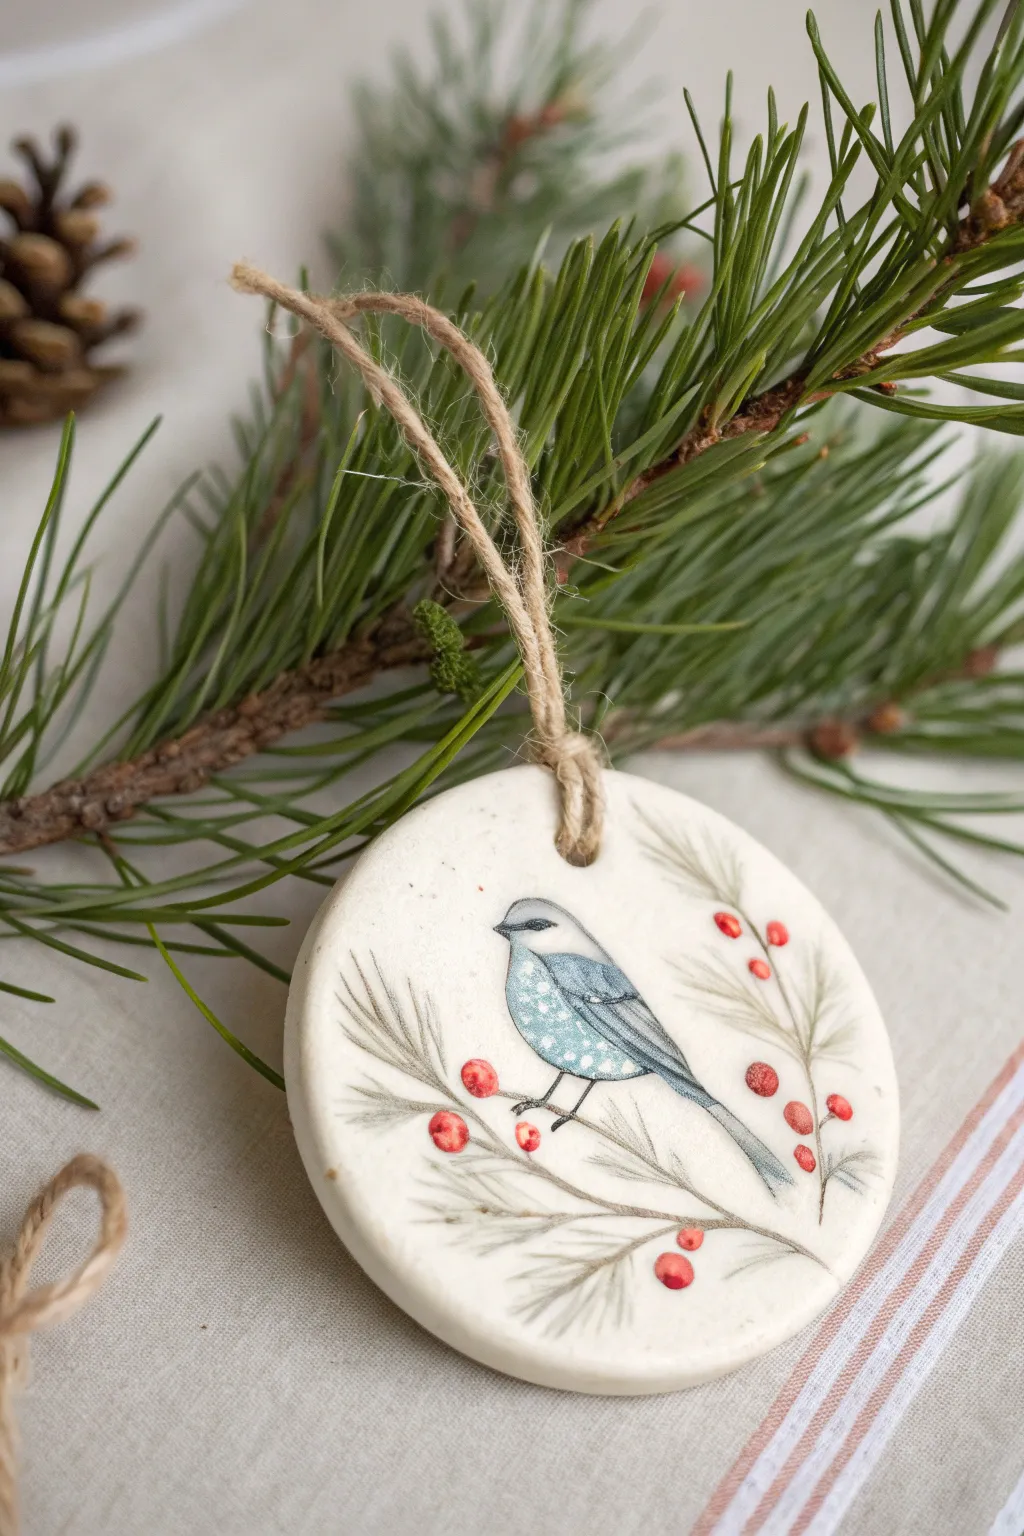
Capture the delicate beauty of a frosty morning with these hand-painted air dry clay ornaments. Featuring a charming blue-grey bird perched among pine branches and bright red berries, this project combines simple pottery techniques with illustrative painting for a timeless holiday decoration.
Step-by-Step Tutorial
Materials
- White air dry clay
- Rolling pin
- Round cookie cutter (approx. 3 inches)
- Small straw or cocktail stick (for the hole)
- Fine grit sandpaper
- Acrylic paints (White, Payne’s Grey, Light Blue, Sap Green, Deep Red)
- Fine detail brushes (sizes 00 and 1)
- Matte spray varnish or sealant
- Jute twine or rustic string
- Pencil (optional)
Step 1: Shaping the Clay Canvas
-
Roll and Cut:
Begin by wedging your white air dry clay to remove air bubbles, then roll it out to an even thickness of about 1/4 inch. Use your round cookie cutter to punch out a clean circle. -
Create the Hanging Hole:
While the clay is still wet, use a straw or a cocktail stick to create a small hole near the top edge. Ensure it’s centered and wide enough for your twine to pass through later. -
Smooth the Edges:
Dip your finger in a little water and gently run it around the circumference of the circle to smooth down any rough clay burrs or sharp edges left by the cutter. -
Dry Completely:
Place the medallion on a flat surface lined with parchment paper. Let it air dry for 24-48 hours, flipping it occasionally to prevent warping. The clay should be bone dry and turn a bright white. -
Sand for Smoothness:
Once fully dry, lightly sand the surface with fine-grit sandpaper. This creates a beautifully smooth ‘canvas’ for your painting and removes any remaining unevenness.
Fixing Warped Clay
If your circle dries slightly curved, don’t panic. You can gently sand the back flat or simply embrace the curve, as it adds organic character to the handmade ornament.
Step 2: Painting the Scene
-
Sketch the Outline:
Using a very light touch with a pencil, sketch the basic oval shape of the bird’s body in the center, tilting slightly upward. Add a long tail extending down and lines for the surrounding branches. -
Base Color for the Bird:
Mix a soft, pale blue using white and a tiny dot of light blue. Paint the breast and belly of the bird with this mix, fading it into white towards the center for a rounded effect. -
Detailing the Wings and Tail:
Use a darker grey-blue mix for the wing feathers and the long tail. With your smallest brush (size 00), paint the wing structure using thin, layered strokes to suggest feathers rather than a solid block of color. -
Adding the Face Mask:
Paint the characteristic dark marking over the bird’s eye and beak using a dark grey ( Payne’s Grey works beautifully here as pure black can be too harsh). Add a tiny white dot for the eye highlight once dry. -
Stippling Texture:
To give the bird a fluffy winter appearance, stipple tiny white dots over the blue breast area. This mimics the texture of downy feathers. -
Painting Pine Needles:
Mix a watery grey-green. Using swift, flicking motions with your liner brush, paint delicate pine needles extending from the main branch lines. Keep the paint translucent to maintain that illustrative, watercolor-style look.
Step 3: Final Flourishes
-
Adding Berries:
Dip a small round brush or the end of a toothpick into deep red paint. Dot clusters of berries along the branches. Vary the sizes slightly for a natural look. -
Berry Highlights:
Once the red paint is tacky but not fully dry, add a minuscule dot of white or light pink to the top left of each berry to create a shine and 3D volume. -
Refining the Branch:
Use a diluted brown or grey to paint the thin woody stem the bird is perching on. I find that keeping this line broken and sketchy adds to the artistic charm. -
Sealing the Artwork:
Allow the paint to cure completely (at least an hour). Spray the entire medallion with a matte varnish. This protects the paint from scratching and seals the porous clay. -
Stringing:
Cut a 6-inch length of jute twine. Thread it through the hole you made earlier and tie a secure knot at the top to create a loop for hanging.
Add Subtle Sparkle
While the varnish is wet, sprinkle ultra-fine iridescent glitter over the pine needles and berries to mimic the glisten of fresh snow or frost.
Now your beautiful winter bird medallion is ready to be gifted or hung on the tree, bringing a touch of nature indoors
Cutout Lantern and Tealight Houses
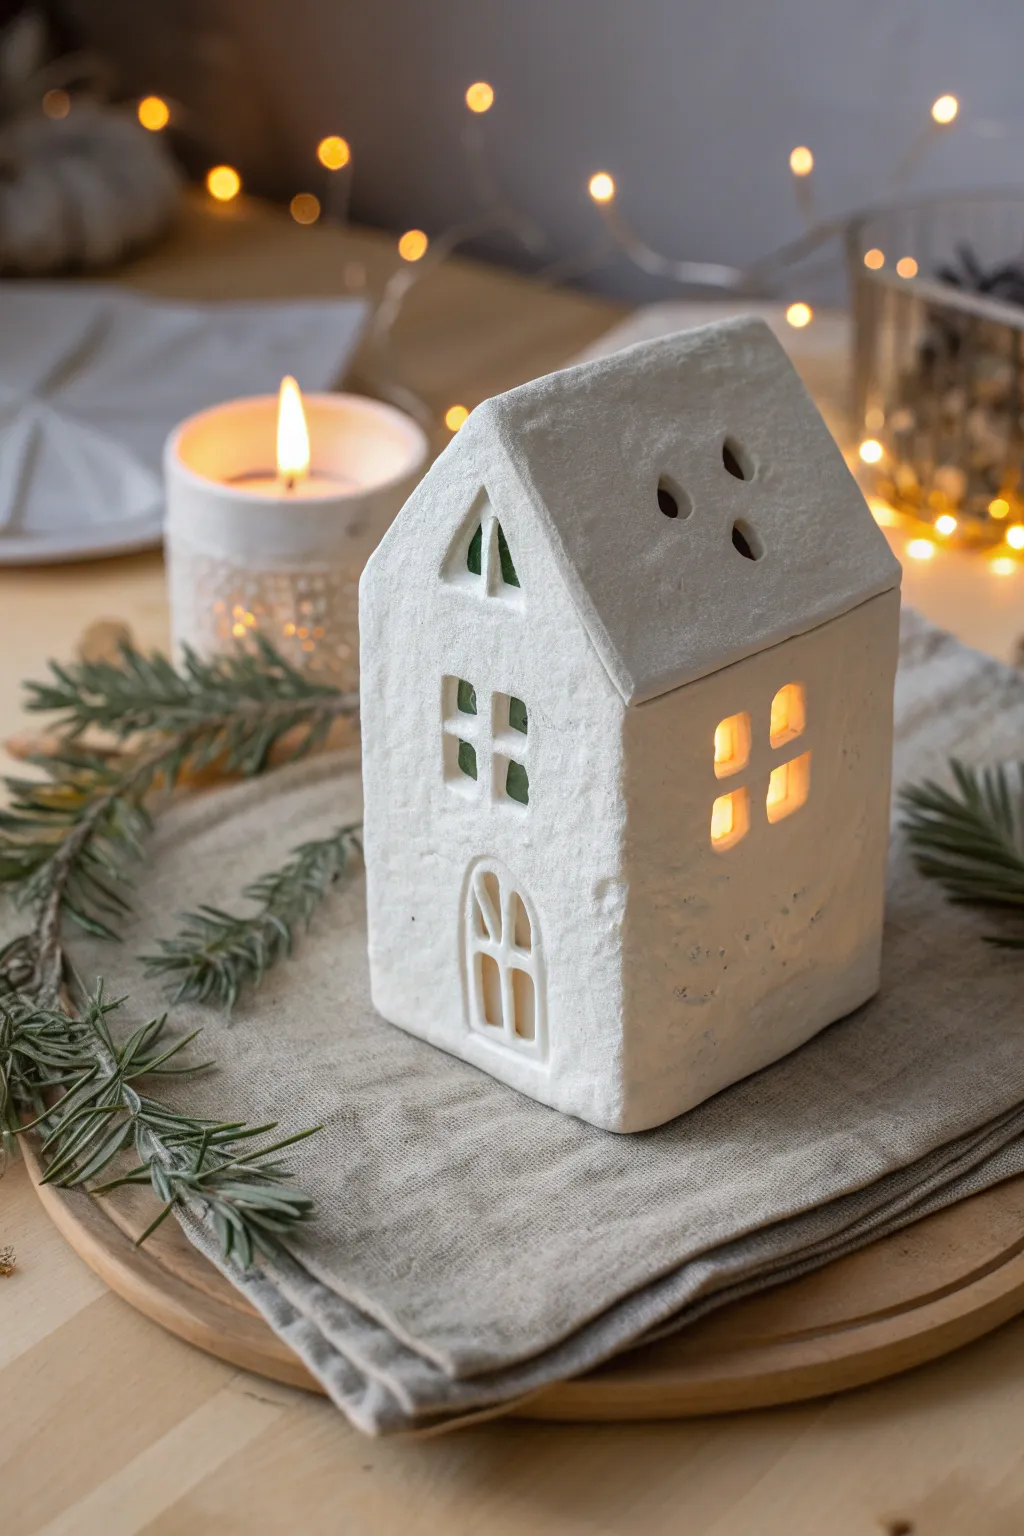
Bring the cozy glow of a winter village into your home with this charming textured lantern house. Made from simple air dry clay, its rustic finish and warm cutout windows create a magical holiday ambiance.
How-To Guide
Materials
- White smooth air dry clay
- Rolling pin
- Sharp craft knife or scalpel
- Ruler
- Small square and arch shaped cutters (optional)
- Small circular piping tip (for roof vents)
- Parchment paper
- Slip (clay mixed with water)
- Modeling tool or old toothbrush (for scoring)
- Fine grit sandpaper
- Battery-operated tealight
Step 1: Planning and Cutting
-
Roll the slab:
Begin by rolling out a substantial chunk of white air dry clay on parchment paper. You want an even thickness of about 1/4 inch (6mm) to ensure the walls are sturdy enough to stand upright. -
Create templates:
Sketch a simple house design on paper first to use as a guide. You will need two identical pentagon shapes for the front and back (a square base with a triangle top) and two rectangles for the side walls. Don’t forget two rectangular roof panels that are slightly wider than the house. -
Cut the shapes:
Lay your paper templates onto the clay slab. Using a sharp craft knife and a ruler for straight edges, carefully cut out all four wall pieces and the two roof panels. -
Design the windows:
Before assembling, cut out the windows while the clay is flat. On the front panel, cut two square upper windows and an arched doorway. On one side panel, cut a four-pane window grid. I like to use small square cutters for consistency, but freehand cutting adds rustic charm. -
Add roof details:
On one of the roof panels, use a small circular piping tip or a straw to punch out three small vent holes in a triangle formation near the peak. -
Texture the surface:
To achieve the snowy, stucco-like texture seen in the photo, gently dab the surface of your wet clay pieces with a crumpled ball of aluminum foil or a textured sponge.
Step 2: Assembly
-
Dry to leather hard:
Let the flat pieces dry for about an hour until they are ‘leather hard’—firm enough to stand up without slumping, but soft enough to join. -
Score and slip:
Score (scratch) the edges where the walls will meet using a needle tool or toothbrush. Apply a generous amount of slip (watery clay paste) to these scratched areas. -
Build the walls:
Press the side walls against the front and back panels to form a box. Use your fingers or a modeling tool to smooth the seams on the inside and outside, blending the clay so the joints disappear. -
Check angles:
Gently square up the structure to ensure it isn’t leaning. If the clay is still too soft, you can lightly prop the walls with crumpled paper towels inside. -
Attach the roof:
Score and slip the top angled edges of the front and back panels. Place your two roof rectangles on top, ensuring they meet at the peak and overhang slightly. -
Seal the peak:
Running a thin coil of clay along the very top ridge where the roof panels meet can help seal the gap. Smooth this down with a little water for a seamless look.
Cracks in the facade?
If hairline cracks appear while drying, mix a small amount of fresh clay with water to make a thick paste. Fill the crack, smooth it over with a wet finger, and let it dry again.
Step 3: Refining and Finish
-
Clean the windows:
Go back over your window cutouts with a damp brush or tool to clean up any rough clay burrs or sharp edges created during handling. -
Air dry completely:
Allow the house to dry slowly for 24-48 hours. Keep it away from direct heat sources to prevent warping or cracking. -
Light sanding:
Once fully bone dry, use fine-grit sandpaper to gently smooth the bottom edge so the house sits flat, and soften any sharp corners on the roof. -
Light it up:
Place a battery-operated LED tealight inside (never use a real flame with air dry clay) to see the warm glow spill through your new cottage windows.
Make it a Village
Vary the heights and window placements to create a whole street. Try adding a chimney with a small clay rectangle or pressing dried rosemary into the wet clay for a botanical imprint.
Enjoy the peaceful atmosphere your handcrafted village brings to your festive evenings
Cinnamon-Scented Clay Hanging Décor
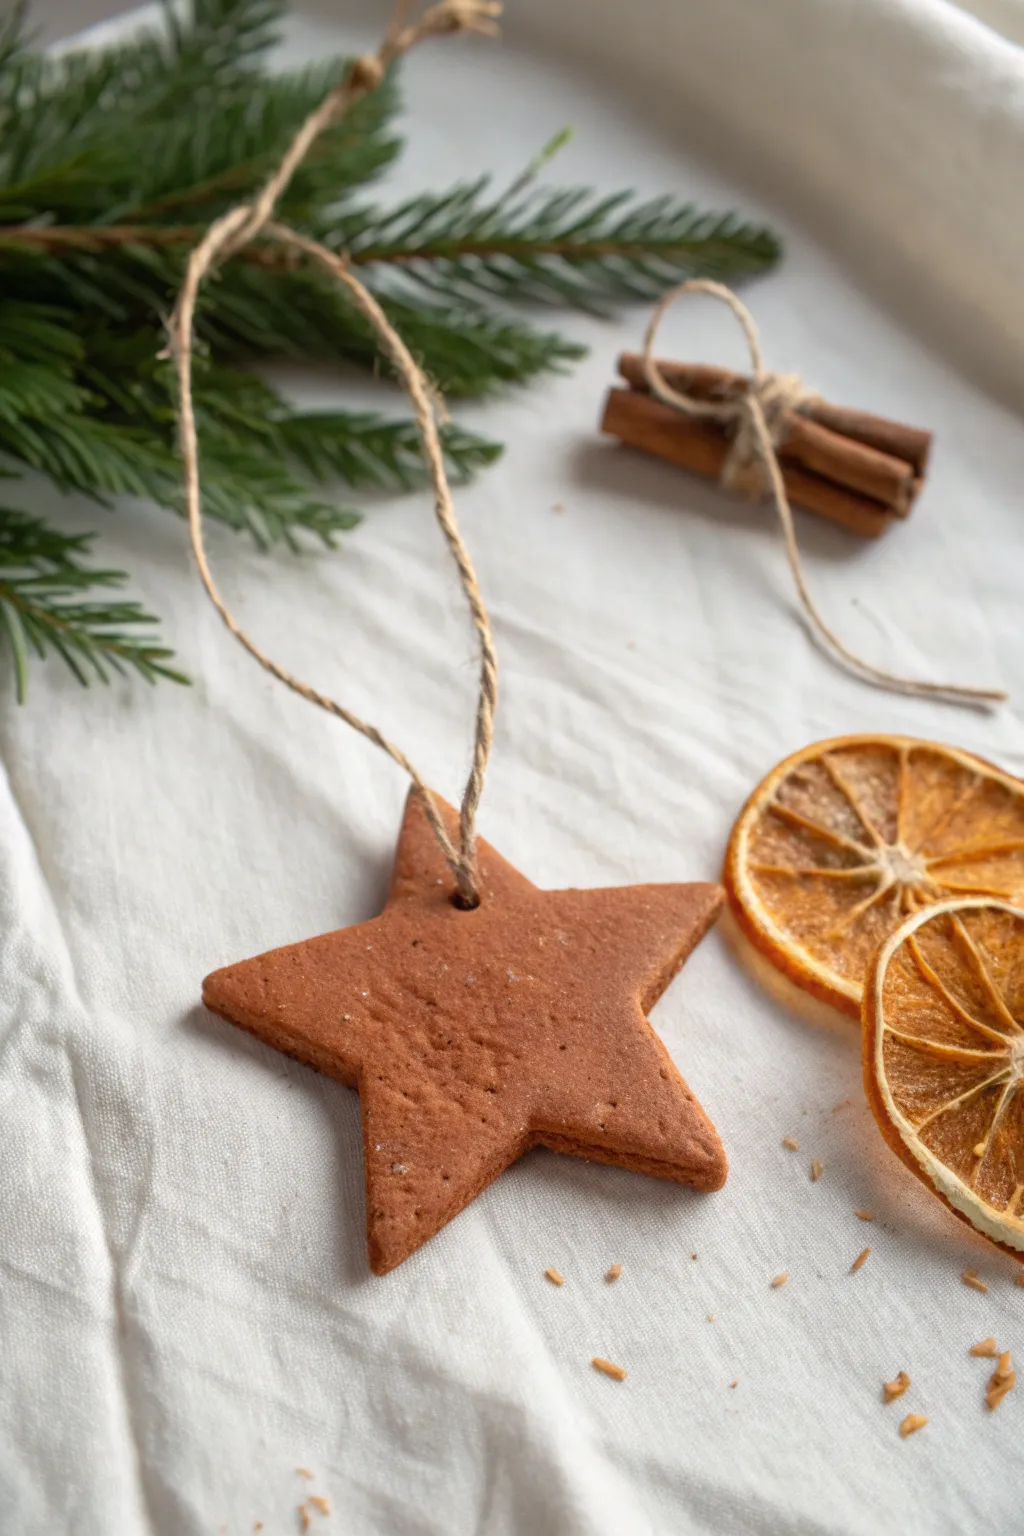
Evoke the cozy warmth of holiday baking without the calories with these charming, rustic star ornaments. Crafted to look and smell exactly like real gingerbread cookies, they add a timeless, fragrant touch to your tree or festive garlands.
Detailed Instructions
Materials
- Air dry clay (terracotta color or white)
- Brown acrylic paint (if using white clay)
- Ground cinnamon (plenty of it)
- PVA glue or Mod Podge (optional)
- Star-shaped cookie cutter
- Rolling pin
- Parchment paper or non-stick mat
- Jute twine or natural hemp cord
- A drinking straw or toothpick
- Fine-grit sandpaper (optional)
- Scissors
Step 1: Preparing the Scented Dough
-
Condition the clay:
Begin by taking a handful of air dry clay. If you are using white clay, knead in a generous amount of brown acrylic paint until you achieve a rich, cookie-dough color. If using terracotta clay, simply knead it until soft and pliable. -
Add the fragrance:
Flatten your clay slightly and pour a heap of ground cinnamon into the center. Fold the clay over and knead the spice thoroughly into the mixture. -
Adjust the texture:
Continue kneading until the cinnamon is evenly distributed. The powder acts a bit like flour, so if the clay feels too dry or crumbly, add a tiny drop of water or PVA glue to bring back the elasticity. -
Check the scent:
Give it a sniff test. I like to add enough cinnamon so that the clay not only smells potent but also takes on a speckled, textured look just like baked gingerbread.
Aromatic Boost
Mix a small amount of ground cloves or nutmeg in with the cinnamon for a more complex, spicy holiday scent.
Step 2: Shaping and cutting
-
Set up your workspace:
Place a sheet of parchment paper on your work surface to prevent sticking. This makes it much easier to peel the stars off later without warping their shape. -
Roll out the slab:
Use your rolling pin to flatten the clay. Aim for a thickness of about 1/4 inch (approx. 5-6mm). You want them thick enough to be sturdy but thin enough not to weigh down a branch. -
Cut the shapes:
Press your star-shaped cookie cutter deeply into the clay slab. Give it a little wiggle to ensure clean edges before lifting it out. -
Release the stars:
Gently remove the excess clay from around your cut shapes. If a star is stuck inside the cutter, gently push it out from the corners using a soft tool. -
Smooth the edges:
Dip your finger in a little water and run it lightly along the cut edges of the star to smooth down any roughness or jagged bits left by the cutter.
Make it ‘Iced’
Use bright white dimensional fabric paint or puffy paint to pipe designs onto the dry stars, mimicking royal icing decoration.
Step 3: Finishing touches
-
Create the hanging hole:
Take a drinking straw or a toothpick and press a hole near the top point of the star. Make sure the hole is not too close to the edge to prevent tearing later. -
Add texture (optional):
For an even more realistic cookie look, you can gently tap the surface with a clean toothbrush or the back of a sponge to give it a baked texture. -
Let it dry:
Leave the stars on the parchment paper to air dry. This typically takes 24-48 hours depending on humidity. Flip them over halfway through the drying process to ensure the back dries evenly. -
Sand imperfections:
Once fully dry, if there are any sharp edges or uneven spots, very lightly buff them away with fine-grit sandpaper. -
Measure the twine:
Cut a piece of jute twine or hemp cord, approximately 8-10 inches long. -
Thread the loop:
Push one end of the twine through the hole in the star. Bring the ends together and tie a simple overhand knot near the very top to create a hanging loop. -
Final arrangement:
Adjust the knot so it sits cleanly, and give the star a final buff with a dry cloth to remove any sanding dust.
Now you have a set of decorations that look good enough to eat and bring a wonderful, spicy aroma to your home