When I need a handmade present that feels grown-up and genuinely useful, I reach for air dry clay. These adult gift ideas lean modern and functional, with simple shapes and elevated finishes that look right at home on a nightstand, desk, or coffee table.
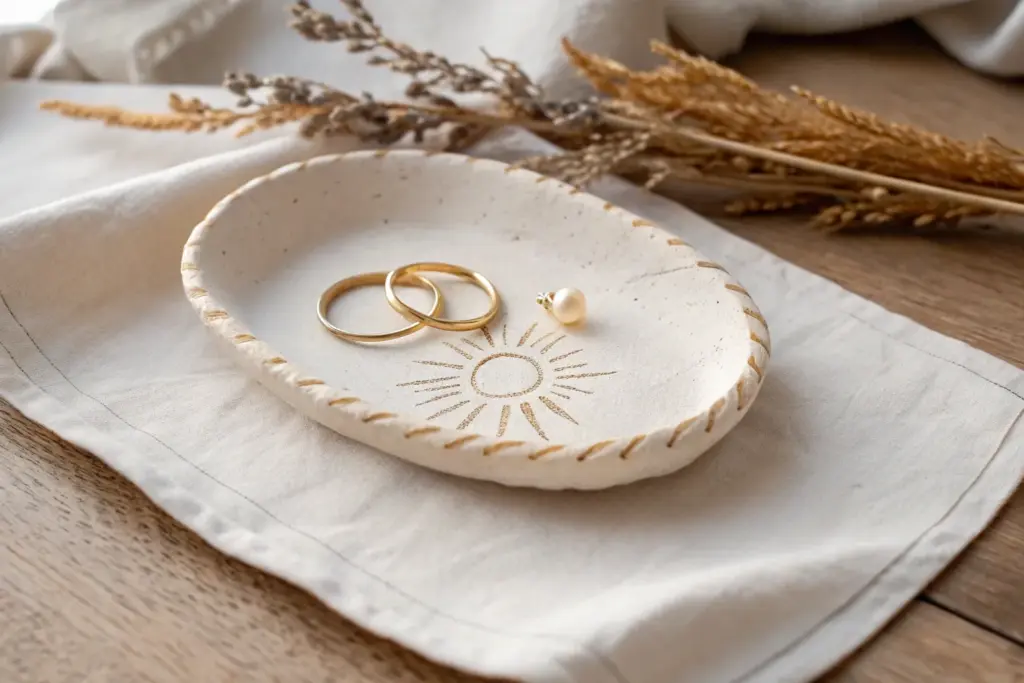
Minimalist Ring Dish
Elevate your vanity with this sophisticated yet simple ring dish that mimics the look of high-end splatter-ware ceramics. The subtle speckled texture combined with a luxurious gold leaf edge creates a modern minimalist piece perfect for holding your everyday jewelry.
Step-by-Step
Materials
- White air dry clay
- Rolling pin
- Round cookie cutter or bowl (approx. 4-inch diameter)
- Small bowl (for shaping)
- Sandpaper (fine grit)
- Acrylic paint (black or dark brown)
- Old toothbrush
- Gold leaf paint or liquid gilding
- Small flat paintbrush
- Gloss varnish or clear sealant
- Water and sponge
- Knife or clay tool
Step 1: Shaping the Base
-
Condition the clay:
Begin by taking a handful of white air dry clay and kneading it in your hands until it becomes warm, soft, and pliable. This prevents cracks later. -
Roll it out:
Place the clay on a clean, flat surface. Use your rolling pin to flatten it into an even sheet, aiming for a consistent thickness of about 1/4 inch. -
Cut the circle:
Press your round cookie cutter or an upside-down bowl firmly into the clay to cut out a perfect circle. Remove the excess clay from around the shape. -
Smooth the edges:
Dip your finger in a little water and run it along the cut edge of the clay circle to smooth out any roughness or loose bits. -
Create the lip:
Instead of curving the whole dish, we want a distinct vertical rim. Take a long, thin snake of clay or cut a strip from your remaining clay sheet. -
Attach the rim:
Score (scratch) the outer edge of your base circle and the bottom of your clay strip. Apply a tiny bit of water as glue, then press the strip onto the edge of the base to form a wall. -
Blend the seams:
Use a clay tool or your finger to blend the clay strip into the base on both the inside and outside until the seam disappears completely. -
Refine the shape:
Gently press the walls to ensure they stand straight up creating a shallow cylinder shape, rather than a curved bowl. Smooth everything with a damp sponge. -
Let it dry:
Set the dish aside in a cool, dry place. Allow it to air dry completely for 24-48 hours, flipping it occasionally to ensure even drying.
Use Water Sparingly
When smoothing clay, keep your finger just barely damp. Too much water can make the clay disintegrate or cause cracking as it dries and shrinks.
Step 2: Adding the Finish
-
Sand for smoothness:
Once fully dry and hard, use fine-grit sandpaper to gently sand away any fingerprints or bumps, paying special attention to the top rim to get it perfectly flat. -
Prepare the speckle:
Dilute a very small amount of black or dark brown acrylic paint with water until it is quite runny. -
Apply the speckles:
Dip an old toothbrush into the watered-down paint. Hold it over the dish and run your thumb across the bristles to flick tiny specks onto the white surface. I like to practice on paper first to control the splatter size. -
Dry the paint:
Allow the speckled paint to dry completely; since the dots are small, this should only take about 10-15 minutes. -
Seal the piece:
Apply a coat of gloss varnish or clear sealant over the entire dish to protect the clay and give it that ceramic-like shine. Let this layer dry. -
Paint the rim:
Dip a small flat paintbrush into your gold leaf paint or liquid gilding. Carefully paint the top edge of the rim. -
Extend the gold:
Bring the gold paint slightly down the outer edge of the rim to create a visible band of gold when viewed from the side. -
Final cure:
Let the gold paint dry according to the manufacturer’s instructions before using the dish for your jewelry.
Marbled Option
Knead grey and white clay together loosely before rolling to create a stone marble effect instead of painting speckles.
Now you have a chic resting place for your favorite rings that looks like it came straight from a boutique


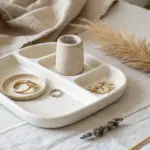
Jewelry Catch-All Tray
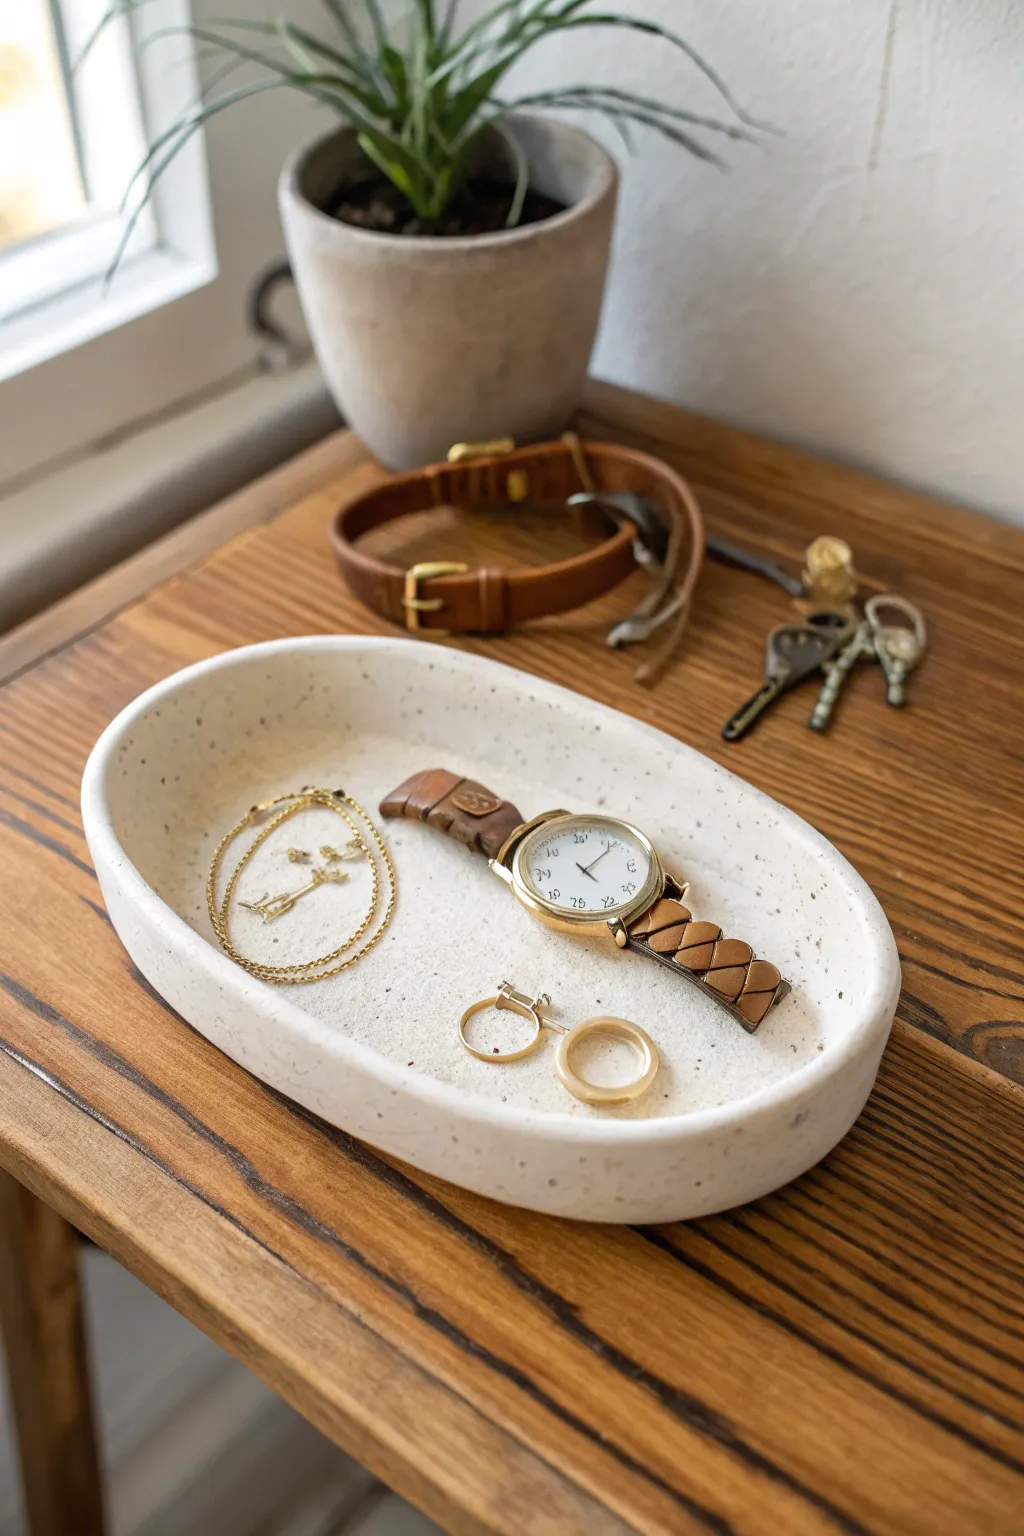
This elegant catch-all tray perfectly mimics the high-end look of stone or terrazzo without the hefty price tag or heavy weight. Its elongated oval shape and subtle speckling make it a sophisticated spot to corral your daily essentials like watches and rings.
Step-by-Step Tutorial
Materials
- White air dry clay (approx. 500g)
- Black pepper or dried tea leaves (for the speckled effect)
- Acrylic rolling pin
- Sharp craft knife or clay slicing tool
- Small bowl of water
- Fine-grit sandpaper (220-400 grit)
- Matte or satin clay varnish/sealant
- Soft paintbrush
- Wax paper or canvas mat (work surface)
- Template (paper oval cutout, optional)
Step 1: Prepping the Clay Body
-
Condition the clay:
Begin by taking a generous chunk of white air dry clay and kneading it in your hands to warm it up. This conditioning process prevents cracks later on. -
Add the texture:
Flatten your clay slightly and sprinkle a pinch of ground black pepper or dried loose-leaf tea onto the surface. Fold the clay over itself to trap the particles. -
Distribute the speckles:
Knead the clay thoroughly for a minute or two. You want those speckles to be distributed evenly throughout the entire lump, not just sitting on top. -
Roll it out:
Place your clay on a piece of wax paper or a canvas mat. Using your rolling pin, roll the clay out to an even thickness of about 1/4 inch. I find using guide sticks on either side helps keep the thickness uniform.
Natural Speckle Hack
Don’t have pepper handy? Used coffee grounds work beautifully too! Just make sure they are completely dry before mixing them in to avoid mold issues inside the clay.
Step 2: Shaping the Tray
-
Cut the base:
Use a paper template or simply freehand an elongated oval shape with your craft knife. Make the cuts clean and vertical to avoid slanted edges. -
Create the walls:
Roll out a long, thin snake of clay from your leftovers. Flatten this snake gently with the rolling pin to create a long, flat ribbon about 1/2 inch to 3/4 inch tall. -
Score and slip:
Take your craft knife and make tiny cross-hatch scratches (scoring) all along the perimeter of your oval base. Do the same to the bottom edge of your clay ribbon. Dab a little water (slip) on the scored areas. -
Attach the wall:
Gently press the ribbon onto the edge of the base, wrapping it all the way around. Cut off any excess length where the ends meet and blend the seam together with your finger. -
Reinforce the interior:
Use a modeling tool or your finger dipped in water to smooth the inside seam where the wall meets the floor. This strengthens the bond and creates that seamless, stone-carved look. -
Smooth the exterior:
Repeat the blending process on the outside seam. Make sure the transition from the base to the wall is invisible.
Step 3: Refining and Finishing
-
Level the rim:
Check the top edge of your tray wall. If it’s uneven, carefully trim it with your knife or gently tap it down with a flat object to level it out. -
Initial slow drying:
Cover the tray loosely with plastic wrap for the first 12 hours. This slows down moisture loss and drastically reduces warping. -
Full dry:
Remove the plastic and let the piece dry completely in a cool, dry place for 24-48 hours. The clay will turn stark white when fully bone dry. -
Sand for smoothness:
Once fully dry, take your fine-grit sandpaper and gently sand the rim and any rough spots on the walls. This creates that professional, high-end finish. -
Dust off:
Wipe the entire tray with a slightly damp cloth or a dry brush to remove all the clay dust created by sanding. -
Seal the piece:
Apply a coat of matte or satin varnish to the top and sides. This seals the porous clay and protects the speckled inclusions. -
Second coat:
Let the first coat dry according to the bottle’s instructions, then apply a second thin coat for durability. -
Don’t forget the bottom:
Flip the tray over and seal the bottom as well to prevent moisture from entering from underneath.
Fixing Cracks
If small cracks appear as it dries, make a ‘slurry’ paste by mixing a tiny bit of fresh clay with water. Fill the crack, smooth it over, and let it dry again.
Now you have a chic, minimalist organizer ready to hold your favorite jewelry pieces on your nightstand


Stamped Coaster Set
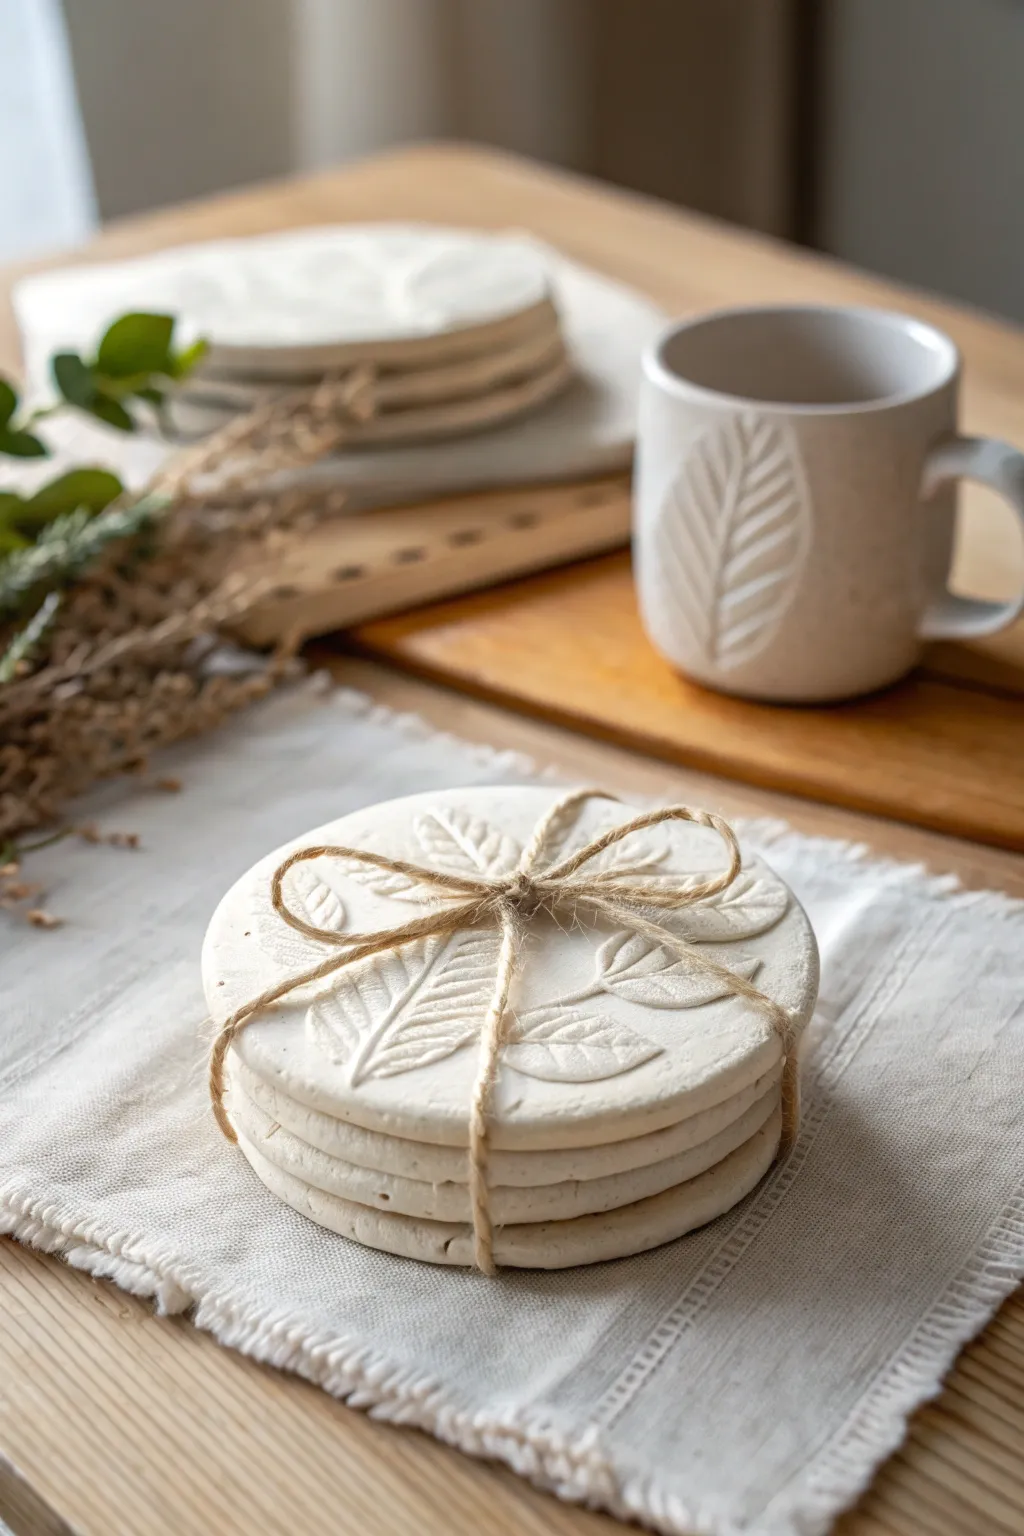
Bring the outdoors in with this elegant set of nature-inspired coasters, featuring delicate raised leaf patterns on a smooth, creamy clay base. Tied together with rustic twine, this handmade stack makes a thoughtful housewarming gift that looks effortlessly high-end.
Detailed Instructions
Materials
- White or cream air-dry clay (approx. 500g)
- Rolling pin
- Parchment paper or canvas mat
- Round cookie cutter (approx. 4 inches diameter) or a bowl to trace
- Botanical stamps or actual sturdy leaves (fern, eucalyptus, or sage)
- Fine-grit sandpaper (220-400 grit)
- Small bowl of water
- Sponge
- Matte acrylic sealant or varnish (water-resistant)
- Jute twine for packaging
Step 1: Shaping the Clay
-
Prepare your workspace:
Lay down a sheet of parchment paper or a canvas mat to prevent the clay from sticking to your table. Take a large handful of air-dry clay and knead it briefly until it feels pliable and warms up slightly in your hands. -
Roll out the slab:
Place the clay on your mat and use the rolling pin to flatten it into an even sheet. Aim for a consistent thickness of about 1/4 inch (6mm)—too thin and they may crack, too thick and they will take ages to dry. -
Cut the circles:
Using your round cookie cutter or by tracing around a small bowl with a knife, cut out four circular shapes. Lift away the excess clay scraps, ball them up, and store them in an airtight bag so they don’t dry out while you work. -
Smooth the edges:
Dip your finger into a small bowl of water and gently run it along the cut edge of each coaster. This smooths out any harsh cutting lines or burrs before the clay hardens.
Step 2: Creating the Design
-
Position your botanical element:
Take your chosen stamp or a real leaf (vein side down) and place it gently onto the center of a wet clay circle. You can angle them slightly differently on each coaster for a more organic look. -
Press the impression:
If using a stamp, press down firmly and evenly, rocking slightly to ensure the entire design transfers. If using a real leaf, gently roll over it once with your rolling pin to embed the veins into the clay surface. -
Clean up the design:
Carefully peel back the leaf or lift the stamp straight up. Inspect the impression; if there are any tiny jagged bits of clay interfering with the leaf pattern, smooth them delicately with a damp paintbrush. -
Repeat for the set:
Apply the same technique to the remaining three coasters. I like to vary the placement slightly on one or top to make the set look curated rather than mass-produced.
Stamp Clarity Tip
If your stamp is sticking to the wet clay, lightly dust the stamp surface with cornstarch or baby powder before pressing it down for a clean release.
Step 3: Drying and Refining
-
Initial drying phase:
Place the coasters on a flat surface in a cool, dry area away from direct sunlight. To prevent warping, place a light book or a flat board on top of them once they are leather-hard (after about 4-6 hours). -
Flip and continue drying:
Flip the coasters over every 12 hours to ensure both sides dry evenly. Allow them to dry completely for at least 24 to 48 hours, depending on the humidity in your room. -
Sand for smoothness:
Once bone dry, take your fine-grit sandpaper and gently sand the edges and the flat surfaces. Focus on the rim to make sure it feels soft to the touch, removing any sharpness. -
Dust off:
Wipe the coasters thoroughly with a slightly damp sponge or cloth to remove all fine clay dust. This step is crucial for ensuring the sealant adheres properly.
Antique Effect
Mix a tiny drop of brown acrylic paint with water and brush it into the leaf grooves, then verify it off quickly with a cloth to highlight the textures.
Step 4: Sealing and Finishing
-
Apply the first coat:
Using a soft brush, apply a thin, even layer of matte acrylic varnish or waterproof sealant over the top and sides. Brush in one direction to minimize stroke marks. -
Seal the bottom:
Once the top is touch-dry, flip them over and seal the bottom. Sealing both sides is essential to prevent moisture from warping the clay over time. -
Add a second coat:
For extra durability against condensation from cold drinks, apply a second coat of sealant to the top surface. Let the coasters cure fully according to your varnish instructions (usually 24 hours). -
Package the gift:
Stack the four finished coasters neatly on top of one another. Cut a long length of jute twine and wrap it around the stack, tying it in a simple bow on top to replicate the rustic presentation in the photo.
Wrap this charming set in tissue paper and you have a handmade gift ready for any occasion


Modern Candle Holder
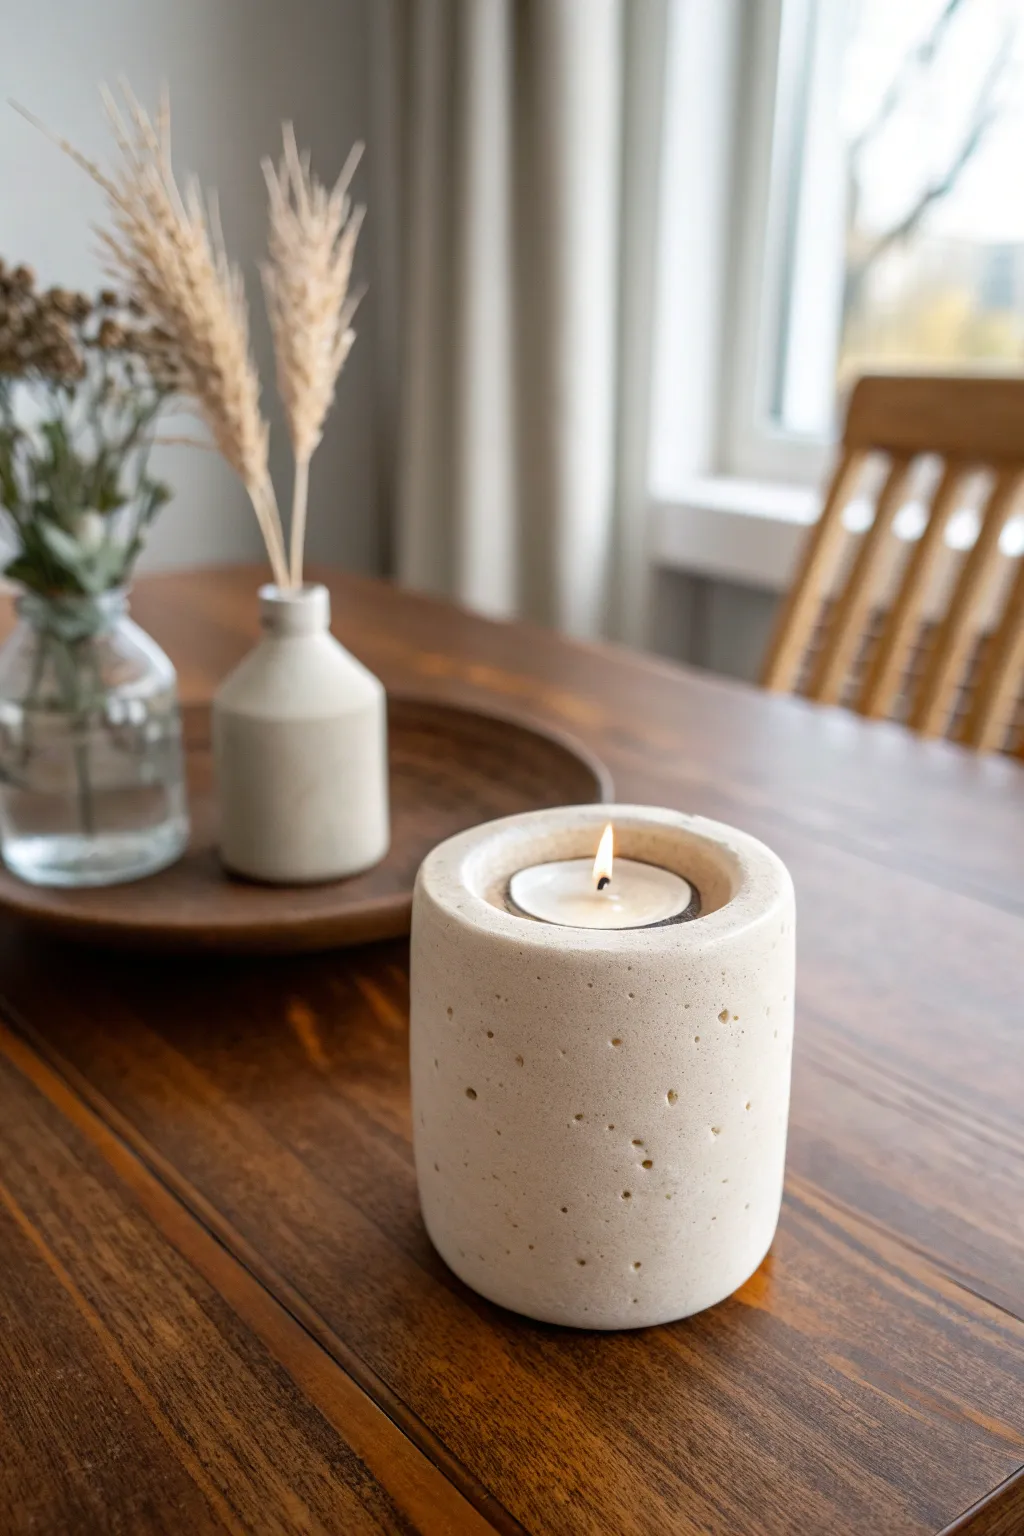
Achieve the high-end look of travertine or cast concrete without the weight using simple air-dry clay. This modern, cylindrical candle holder features a unique pitted texture that adds organic warmth and minimalist style to any table setting.
Detailed Instructions
Materials
- Air-dry clay (white or cream)
- Rolling pin
- Sharp craft knife
- Ruler
- Small circular cookie cutter (slightly larger than a tealight)
- Tealight candle (for sizing)
- Coarse sandpaper (60-80 grit)
- Toothbrush or stiff bristle brush
- Course sea salt or small rocky grit
- Water and sponge
- Acrylic sealer (matte)
Step 1: Forming the Base
-
Condition the clay:
Start by kneading a large block of air-dry clay until it is smooth, pliable, and free of cracks. If it feels too dry, mist it lightly with water. -
Roll out a slab:
Roll the clay out onto a flat surface to a thickness of about 3/4 inch. You want a substantial thickness to give the holder visual weight and stability. -
Cut the cylinder strip:
Using a ruler and craft knife, cut a long, rectangular strip. The height determines the candle holder’s height (roughly 3-4 inches), and the length should be enough to wrap around your desired diameter with a slight overlap. -
Create the cylinder:
Carefully curl the clay strip into a standing cylinder shape. Overlap the ends slightly. -
Join the seam:
Score the overlapping areas with your knife (cross-hatching scratches), apply a little water or slip, and press the ends together firmly. -
Smooth the exterior:
Use your fingers and a wet sponge to blend the seam on both the inside and outside until it disappears completely. The cylinder should look seamless.
Step 2: Creating the Candle Well
-
Prepare the top piece:
Roll out a second, smaller slab of clay to about 1/2 inch thick. -
Cut the top disc:
Use the cylinder you just made as a ‘cookie cutter’ to stamp out a circle from this new slab that perfectly matches the top diameter. -
Cut the candle hole:
Take your small circular cutter (or use a knife to trace around a loose tealight) and cut a hole directly in the center of this disc. Ensure a standard tealight fits comfortably inside. -
Attach the top:
Score and wet the top rim of your cylinder and the underside of your donut-shaped disc. Press the disc onto the cylinder to close off the top, leaving the center hole open. -
Blend the edges:
Smooth the clay where the top disc meets the cylinder walls. I like to use the back of a spoon here to round the edge gently for a softer, organic look. -
Construct the internal shelf:
Cut a small circle of clay to fit inside the cylinder. Drop it in from the bottom or press it up from underneath so it sits just below size of the hole, creating a floor for the candle to rest on. Secure it by smoothing the clay from the underside.
Salty Secret
For deeper, jagged pits, use rock salt instead of table salt. The larger crystals dissolve or pick out easily, leaving perfect faux-travertine holes.
Step 3: Texturing and Finishing
-
Apply the texture:
While the clay is still damp, take your coarse sea salt or grit and press it randomly into the exterior walls. Push some deeper than others to mimic natural stone pores. -
Stipple the surface:
Use a toothbrush or stiff brush to tap firmly all over the clay surface. This removes fingerprints and adds a fine, concrete-like grain. -
Let it dry completely:
Allow the piece to slow-dry for 24-48 hours away from direct heat to prevent cracking. Turning it occasionally helps it dry evenly. -
Enhance the texture:
Once fully dry, use a stiff tool or brush to pick out the sea salt crystals you embedded earlier. This leaves behind realistic little craters and pits. -
Sand for stone effect:
Gently sand the exterior with coarse sandpaper. You aren’t trying to make it smooth; you want to scratch it slightly to enhance the matte, stony appearance. -
Seal the piece:
Finish with a matte acrylic sealer to protect the clay. Avoid gloss finishes if you want to maintain the raw concrete aesthetic.
Color Wash
Mix a tiny drop of brown or grey paint into lots of water. Brush this wash over the dry clay and wipe it off immediately to darken the pits only.
Place a tealight in your new creation and enjoy the cozy, modern vibe it brings to your space

The Complete Guide to Pottery Troubleshooting
Uncover the most common ceramic mistakes—from cracking clay to failed glazes—and learn how to fix them fast.
Mini Bud Vase

Bring a touch of organic minimalism to your windowsill with this faux-stone bud vase. Using simple air-dry clay and a clever painting technique, you’ll create a vessel that looks like expensive speckled ceramic.
Step-by-Step Guide
Materials
- White air-dry clay (approx. 300g)
- Small bowl of water
- Rolling pin
- Sponge
- Pottery tool set (or butter knife and needle)
- Sandpaper (fine grit)
- Acrylic paints: Cream/Off-White, Black, Brown
- Old toothbrush
- Matte spray varnish or sealant
- Dried grasses or bunny tails for styling
Step 1: Shaping the Base
-
Prepare the Clay:
Cut off a chunk of air-dry clay roughly the size of a tennis ball. Knead it in your hands for a minute to warm it up and ensure it’s pliable and free of air bubbles. -
Form a Sphere:
Roll the clay between your palms or on a table surface to create a smooth, solid ball. Aim for a symmetrical sphere, but don’t worry about perfection; organic shapes have charm. -
Open the Form:
Holding the ball in one hand, gently press your thumb into the center of the top to create an opening. Push down until you are about a half-inch from the bottom. -
Pinch Pot Method:
Slowly pinch the clay walls between your thumb and fingers, rotating the ball as you go. Gently push the walls outward to expand the belly of the vase while keeping the opening relatively small. -
Smooth the Surface:
Dip your finger in water and smooth out any cracks that form on the exterior. Keep the wall thickness even—about a quarter-inch thick is ideal for stability.
Step 2: Creating the Neck
-
Roll a Coil:
Take a small leftover piece of clay and roll it into a thick coil or snake, roughly the thickness of your pinky finger. -
Attach the Coil:
Score (scratch hatch marks) around the opening of your sphere and on one side of the coil. Add a dab of water to the scored areas and press the coil onto the rim to form the neck. -
Blend the Seams:
Use a modeling tool or your finger to smooth the clay from the coil down onto the sphere, blending the two pieces until the seam disappears completely. -
Refine the Rim:
Gently flare the top of the coil outward slightly to create a delicate lip. Smooth the rim with a wet sponge for a professional finish. -
Final Shaping:
Tap the bottom of the vase gently on the table to create a small flat base so it stands securely. Give the whole piece a final smoothing with a damp sponge. -
Drying Time:
Set the vase aside to dry completely. This usually takes 24-48 hours depending on humidity. Rotate it occasionally so the bottom dries evenly.
Cracks Appearing?
If small cracks appear while drying, mix a tiny bit of clay with water to make a ‘slip’ paste. Fill the cracks, smooth over, and let dry again.
Step 3: Faux Stone Finish
-
Sanding:
Once fully dry and hard, use fine-grit sandpaper to buff away any bumps or fingerprints. Wipe away the dust with a slightly damp cloth. -
Base Coat:
Mix a creamy off-white acrylic paint. Apply two even coats to the entire vase, letting the first coat dry before adding the second. -
Prepare the Speckle:
Dilute a small amount of black or dark brown acrylic paint with water until it’s very runny, almost like ink. -
Splatter Technique:
Dip an old toothbrush into the watered-down paint. Hold the brush near the vase and run your thumb across the bristles to flick tiny specks of paint onto the surface. -
Layering Depth:
I like to repeat the splatter process with a slightly lighter grey or brown for added dimension. Go sparser with this second color. -
Seal the Deal:
Allow the paint to dry completely. Finish by spraying the vase with a matte varnish to protect the paint and give it that non-glossy, stone-like texture.
Make It Waterproof
Air dry clay isn’t water-safe! To use fresh flowers instead of dried ones, insert a small glass test tube or pill bottle inside to hold the water.
Now you have a charming, rustic accent piece ready for your favorite dried botanicals
Succulent Planter With Texture
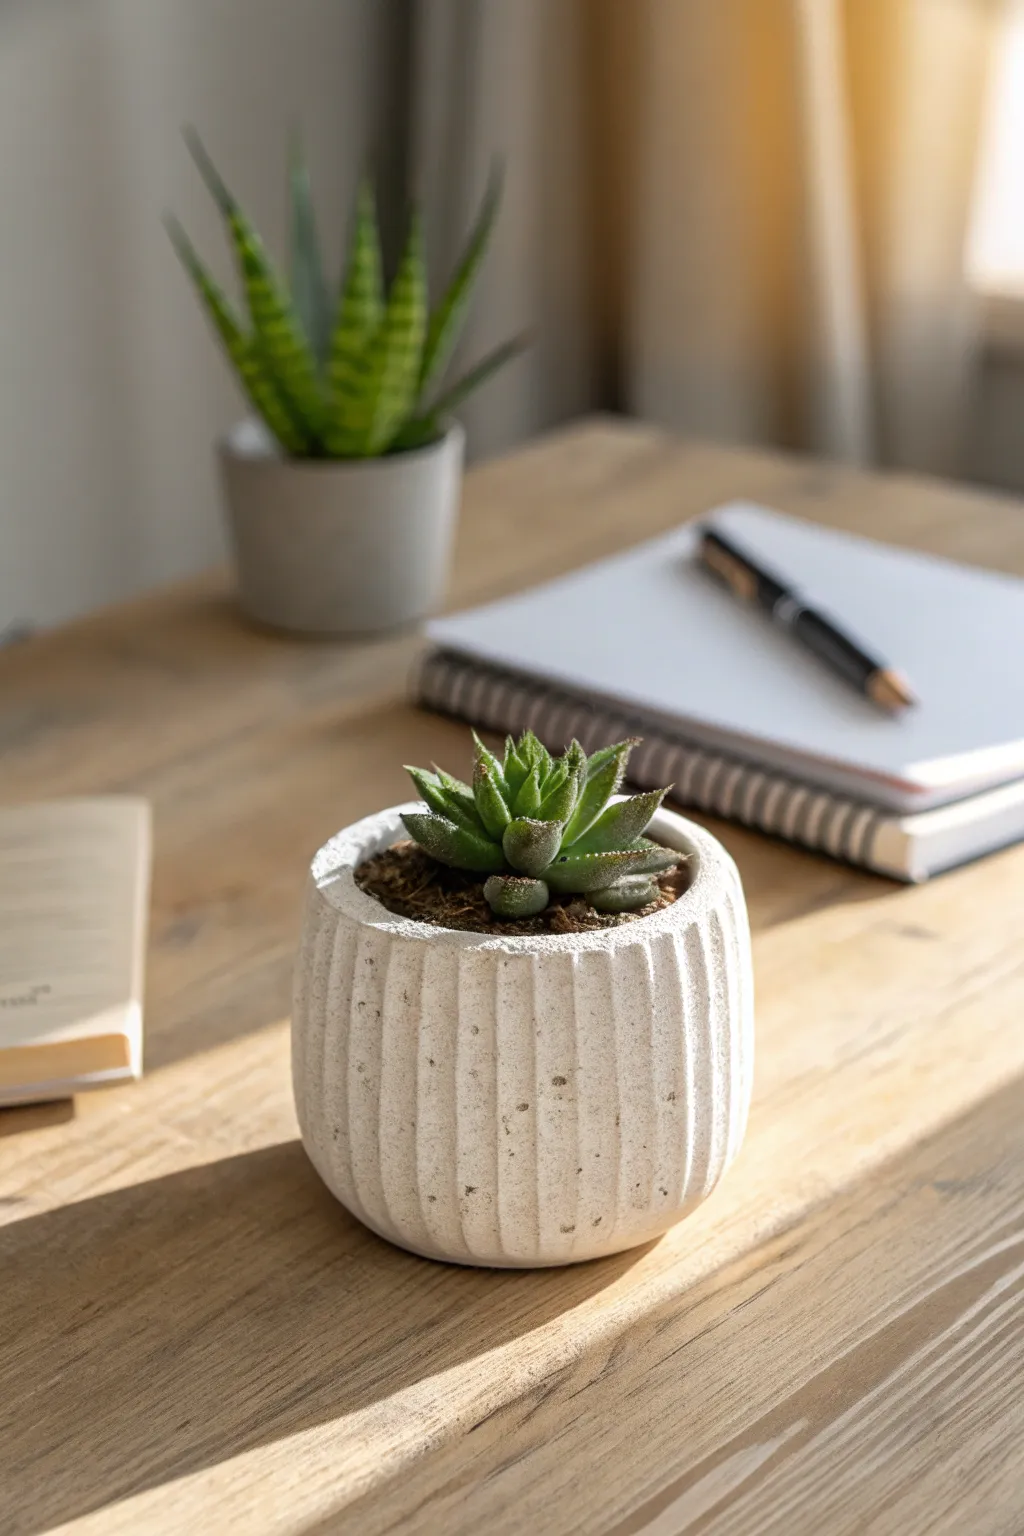
Create a sophisticated, minimalist home for your favorite succulent with this fluted air dry clay pot. The vertical ridges add lovely shadows and tactile interest, making it look far more expensive than a simple handmade vessel.
Step-by-Step
Materials
- White air dry clay (approx. 500g)
- Rolling pin
- Empty can or jar (to use as a mold)
- Clay knife or craft knife
- Carving tool (loop tool or ribbons tool)
- Small cup of water
- Sponge
- Sandpaper (fine grit)
- Clear acrylic sealant (matte finish)
- Parchment paper
Step 1: Forming the Base
-
Preparation:
Begin by covering your workspace with parchment paper to prevent sticking. Unwrap your air dry clay and knead it well in your hands until it feels warm and pliable, eliminating any air bubbles. -
Roll the slab:
Use your rolling pin to flatten the clay into a long, rectangular slab. Aim for a thickness of about 1/4 inch (6mm). Ensure the slab is consistent so the pot walls are sturdy. -
Cut to size:
Measure the circumference and height of your chosen mold (the empty can or jar). Cut the clay slab into a rectangle that is slightly longer than the circumference and just a bit taller than your desired pot height. -
Create the base:
Roll out a separate, smaller circle of clay for the bottom of the pot. Place your can on the clay and trace around it, cutting out a circle that matches the diameter of your mold.
Step 2: Building the Cylinder
-
Wrap the mold:
Wrap your rectangular slab around the empty can. You may want to wrap the can in parchment paper first so the clay slides off easily later. -
Join the seam:
Where the two ends of the clay meet, score both edges with your knife (make little cross-hatch scratches). Dab a little water on the scratches and press the edges together firmly to create a seal. -
Smooth the joint:
Use your fingers or a smoothing tool to blend the seam until it disappears completely. The wall should look continuous. -
Attach the bottom:
Score the bottom edge of your cylinder and the outer edge of your circular base. Add water, press them together, and smooth the clay upwards from the base to the wall to secure the bond. -
Remove the mold:
Carefully slide the can or jar out of the clay cylinder. If the clay feels too soft, let it sit for 20-30 minutes to firm up slightly before removing the support.
Cracks while rolling?
If the edges of your slab are cracking as you roll, your clay is likely too dry. Dip your fingers in water and knead it back into the clay before starting over.
Step 3: Adding Texture & Finishing
-
Mark the guides:
Using a ruler, verify that the top rim is level. If needed, trim slightly with your craft knife. You can lightly mark vertical lines around the pot if you want perfectly spaced ridges, or just eyeball it for an organic look. -
Carve the fluting:
Take a loop tool or a U-shaped carving tool. Start from the bottom of the pot and drag the tool upwards to the rim in a straight vertical line to create a groove. I find it easiest to pull the tool toward my body for better control. -
Repeat the pattern:
Continue carving these vertical grooves all the way around the pot, leaving a small raised strip between each groove. Try to keep the pressure consistent so the depth remains the same. -
Refine the rim:
Once carved, run a slightly damp sponge around the top rim to soften any sharp edges created by the carving tool. -
Dry slowly:
Place the pot in a cool, dry spot away from direct sunlight. Let it dry for at least 24-48 hours. Turning it upside down halfway through can help the bottom dry evenly. -
Sand imperfections:
Once fully bone dry, use fine-grit sandpaper to gently smooth out any rough burs inside the carved grooves or along the rim. -
Seal the pot:
Apply 2-3 coats of matte acrylic sealant inside and out. This step is crucial because air dry clay is not waterproof. Let each coat dry completely before adding the next. -
Planting:
Since air dry clay isn’t 100% waterproof even with sealer, use a plastic nursery pot liner inside, or plant succulents that need very little water.
Make it Waterproof
For a truly waterproof planter, swap the acrylic sealant for a two-part epoxy resin. Coat the inside thoroughly to prevent moisture from degrading the clay over time.
Now you have a stunning, textured vessel ready to gift or keep for your own desk


What Really Happens Inside the Kiln
Learn how time and temperature work together inside the kiln to transform clay into durable ceramic.
Earring Stand or Peg Board
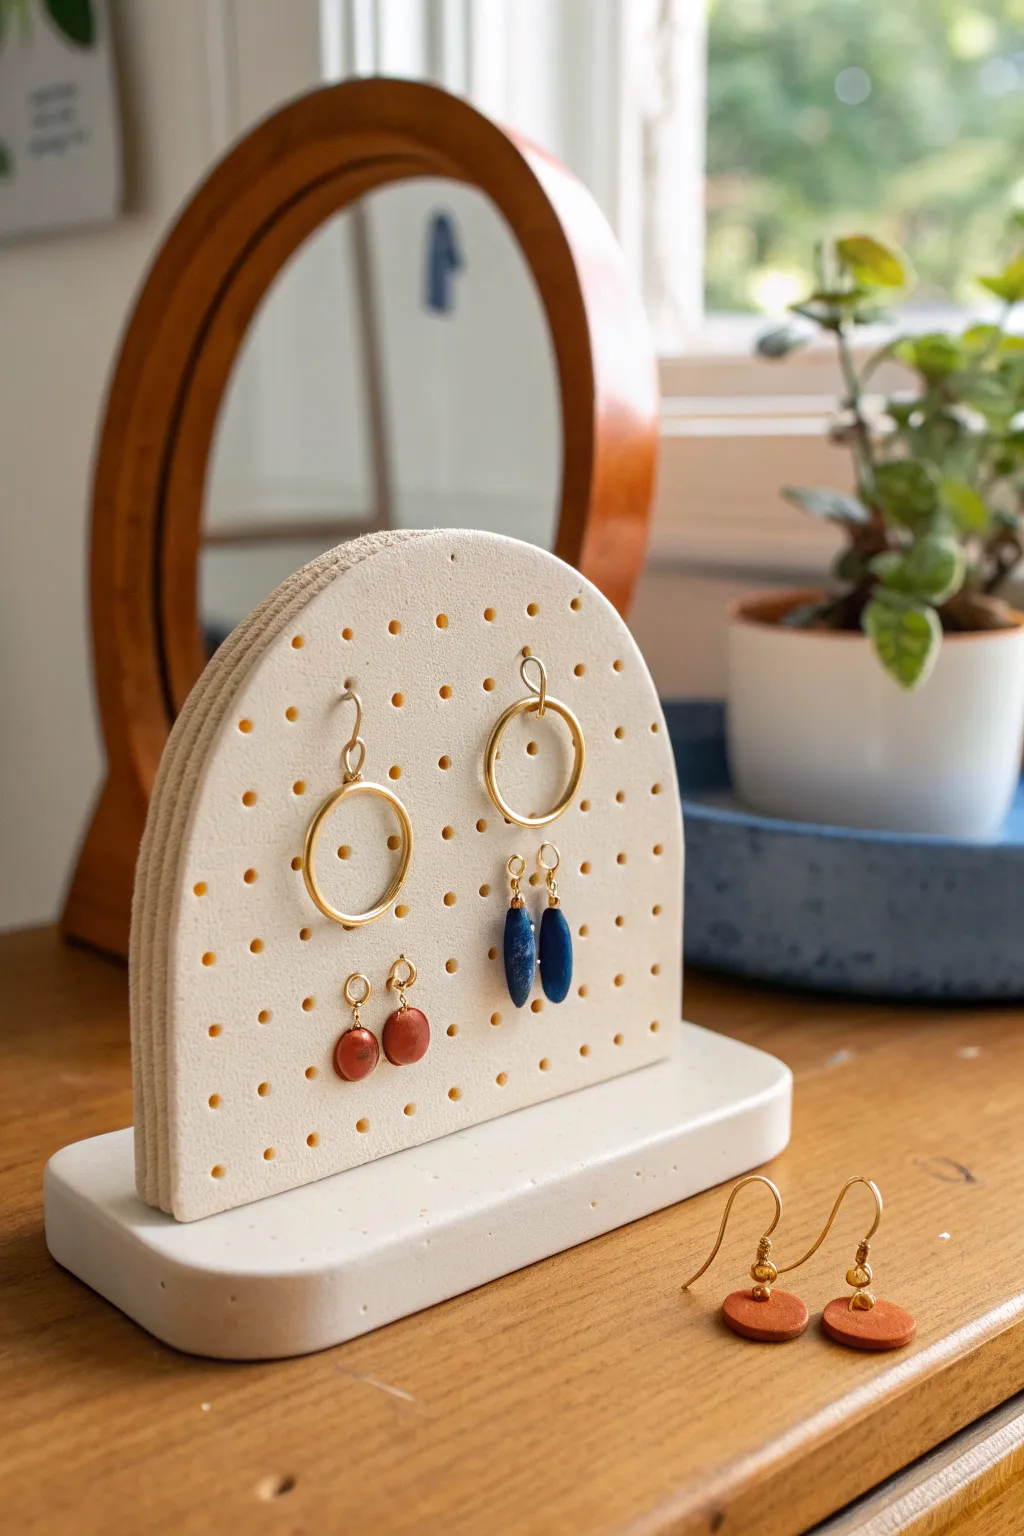
This minimalist earring stand combines modern arch shapes with practical functionality, creating a stylish home for your favorite dangles and studs. With its speckled stone texture and sturdy pegboard design, it looks like a high-end boutique display but is surprisingly simple to craft at home using air dry clay.
Step-by-Step Guide
Materials
- White air dry clay (approx. 500g)
- Rolling pin
- Parchment paper or silicone mat
- Craft knife or clay blade
- Ruler
- Small circular cookie cutter or jar lid (approx. 4-5 inches diameter)
- Wooden skewer or toothpick (for poking holes)
- Water in a small cup
- Fine grit sandpaper
- Acrylic sealant or matte varnish (optional)
- Super glue or heavy-duty craft glue
Step 1: Shaping the Components
-
Roll the Base Slab:
Begin by conditioning your clay, kneading it until it is soft and pliable. Roll out a slab that is roughly 1/2 inch thick on your parchment paper. You want this base piece to be heavy enough to support the vertical stand. -
Cut the Base Rectangle:
Using your ruler and craft knife, cut a clean rectangle from the slab. A size of about 6 inches by 2.5 inches works well for stability. Smooth the cut edges with a finger dipped lightly in water. -
Roll the Vertical Slab:
Roll out a second slab of clay for the upright arch. This can be slightly thinner than the base, perhaps 1/4 to 3/8 inch thick, to keep it lightweight. -
Cut the Arch Shape:
Cut a rectangle roughly 5 inches wide and 4 inches tall. To create the arch, place your circular cutter or jar lid at the top center of this rectangle and trace or cut around the upper curve. Use your knife to trim the straight sides down to meet the curve seamlessly. -
Refine the Arch:
Run your wet fingertip along the entire perimeter of the arch to round off any sharp edges and smooth out cutting marks.
Warping Woes?
If your flat pieces start curling up while drying, place a lightweight book on top of them (use parchment paper in between!) once they seem ‘leather hard’ to force them to dry flat.
Step 2: Creating the Grid
-
Mark the Grid Points:
To ensure your earring holes are evenly spaced, lay your ruler gently across the arch’s surface. Lightly mark small indentations every 0.5 inches horizontally and vertically, creating a grid pattern. -
Pierce the Holes:
Using a wooden skewer, poke holes straight through the clay at each marked point. I like to twist the skewer gently as I push through to prevent the clay from dragging or deforming. -
Clean Up the Back:
Flip the arch over. You’ll likely see small raised bumps where the skewer exited. Smooth these back down with your finger or a flat tool so the back is as neat as the front. -
Re-pierce for Clarity:
Poke the skewer through the holes one more time from the front to ensure they are completely open and uniform diameter.
Create a Speckled Look
Mix black pepper, dried tea leaves, or sand into the white clay before rolling it out. This creates a trendy Faux-stone ceramic effect.
Step 3: Assembly and Finishing
-
Dry the Pieces:
Lay both the base rectangle and the perforated arch flat on parchment paper. Let them dry for at least 24-48 hours. Flip them occasionally to ensure even drying and prevent warping. -
Sand for Smoothness:
Once fully bone dry, take your fine-grit sandpaper and gently sand the edges and flat surfaces. This removes any fingerprints or uneven textures left during sculpting. -
Clear Dust:
Wipe both pieces down with a slightly damp cloth or a dry paintbrush to remove all sanding dust before gluing. -
Position the Arch:
Identify the center of your rectangular base. Apply a strong line of super glue or heavy-duty craft glue along the bottom straight edge of the arch piece. -
Glue and Hold:
Press the arch firmly onto the center line of the base. You may need to prop it up with small objects (like spice jars) on either side to hold it perfectly vertical while the glue sets. -
Seal (Optional):
If you want extra durability or a specific sheen, brush on a coat of matte varnish. This helps protect the white clay from getting dirty over time.
Once dry and assembled, this structural piece becomes a beautiful vanity sculpture ready to organize your jewelry collection
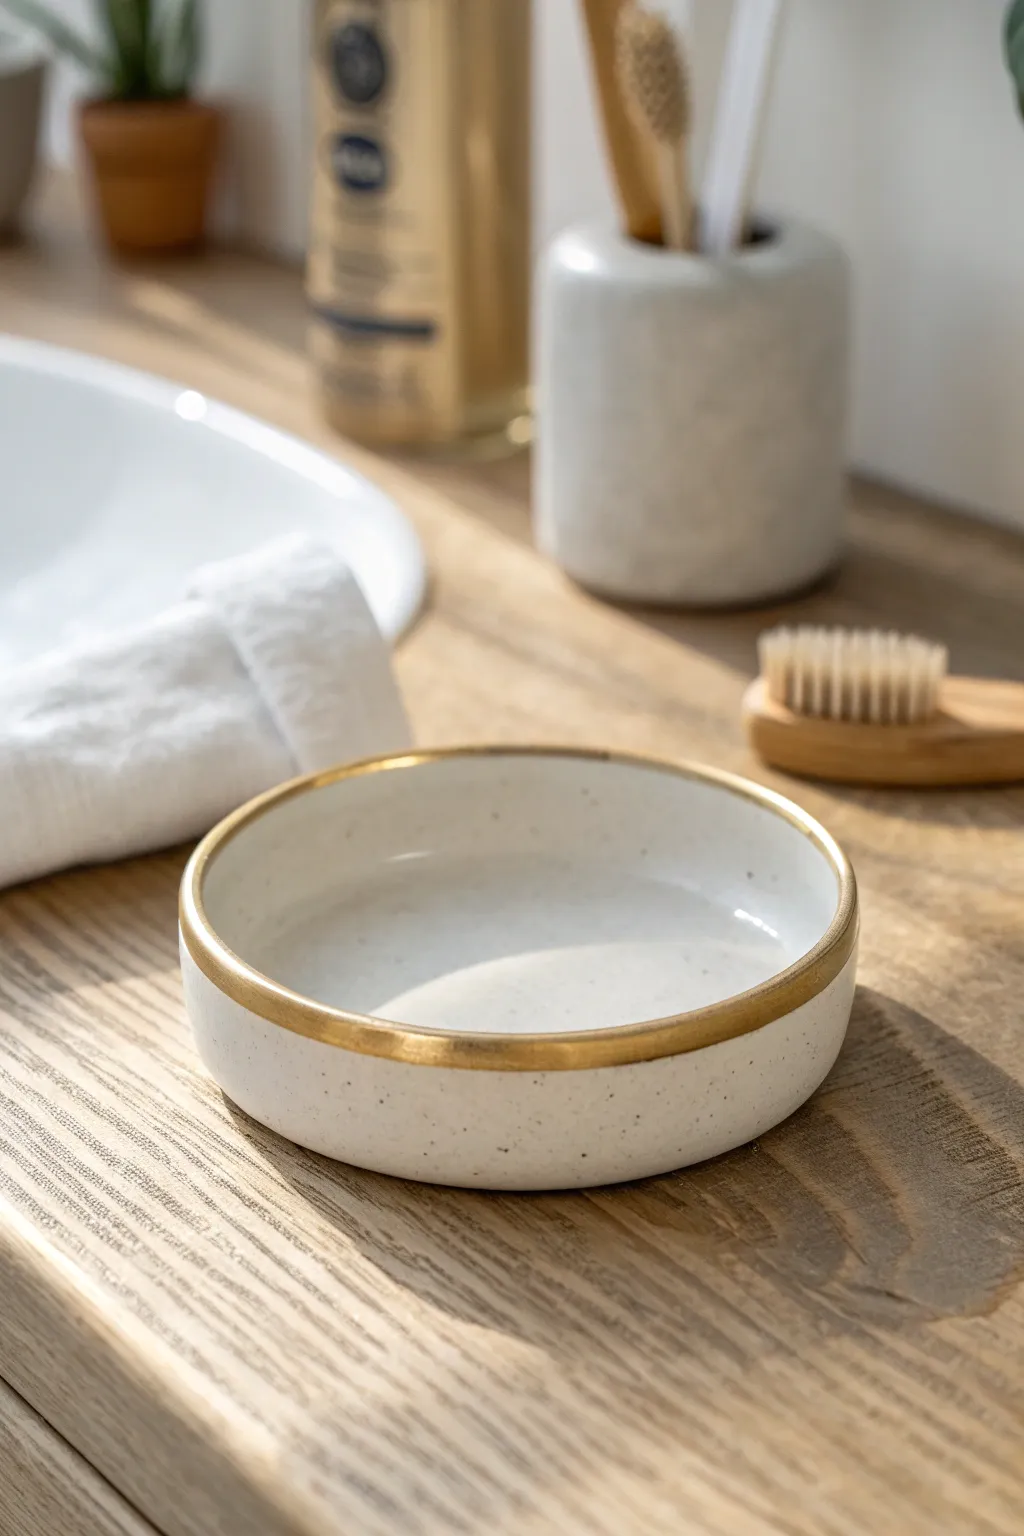
Marbled Trinket Bowl
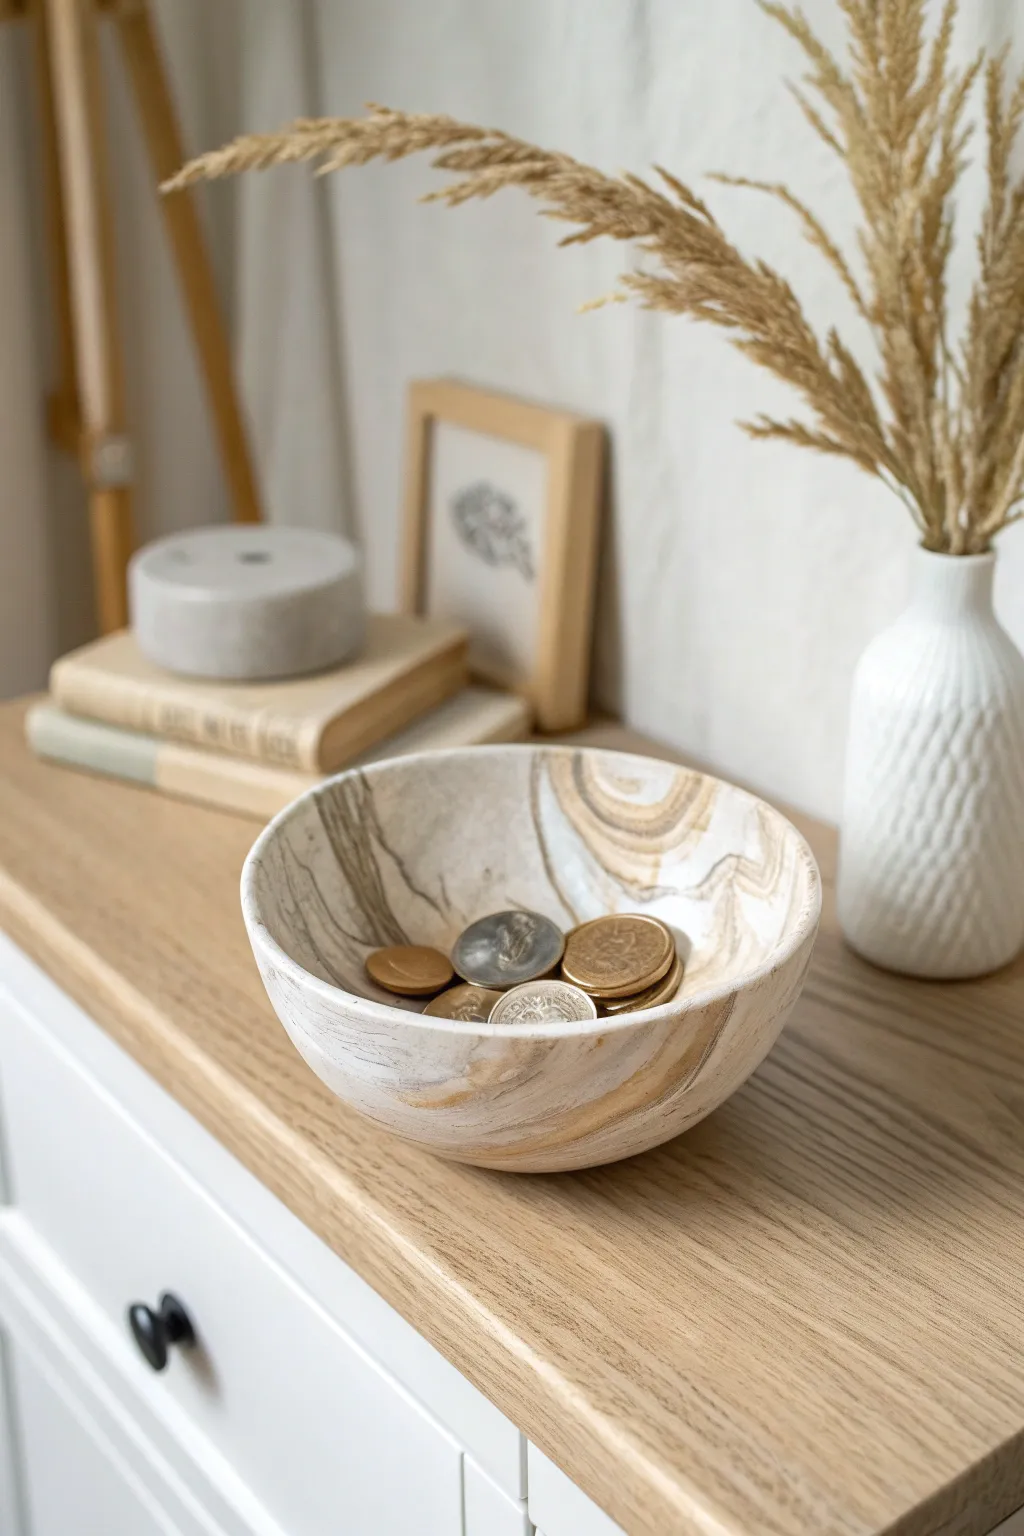
Achieve a sophisticated, high-end look with surprisingly simple techniques using this marbling method. The resulting bowl features gentle swirls of white, beige, and soft browns, perfect for holding keys, coins, or delicate jewelry on a dresser.
Detailed Instructions
Materials
- White or natural air dry clay
- Acrylic paints (brown, gold, and beige)
- Rolling pin
- Smooth bowl (to use as a mold)
- Craft knife or clay cutting tool
- Plastic wrap or cling film
- Fine-grit sandpaper (200-400 grit)
- Gloss or matte varnish (sealant)
- Small paintbrush
- Water and sponge
Step 1: Preparing the Pattern
-
Portion the clay:
Cut a large chunk of white white air dry clay, roughly the size of a grapefruit. Divide this into one large ball and three smaller balls. -
Tint the small portions:
Take the smaller balls of clay and flatten them slightly. Add a drop of brown paint to one, beige to the second, and a metallic gold or darker brown to the third. -
Knead the color in:
Fold and knead each small ball individually until the paint is fully incorporated and the color is solid. Wash your hands between colors to keep the tones pure. -
Create clay snakes:
Roll all four balls of clay (the large white one and the three colored ones) into long, snake-like ropes of varying thicknesses. -
Twist them together:
Gather the strands together and twist them into one large rope. Fold this rope in half and twist it again.
Marble Master Tip
Don’t over-knead the combined ropes! Stop twisting while the colors are still distinct strips. If you mix too much, the colors will blend into a single muddy brown rather than distinct swirls.
Step 2: Shaping the Bowl
-
Roll out the marble:
Ball up your twisted rope and place it on a clean surface. Using a rolling pin, roll the clay out to about 1/4 inch thickness. You should see the beautiful marbled pattern emerge. -
Cut the circle:
Find a circular template (like a cereal bowl or a lid) that is slightly larger than your intended final size. Place it over the nicest section of your marbling and cut around it with a craft knife. -
Prepare the mold:
Take a smooth bowl from your kitchen to use as a mold. I find covering the bottom of the bowl with plastic wrap ensures the clay never sticks and releases easily. -
Form the shape:
Gently drape your clay circle over the bottom of the upturned bowl (or nest it inside if you want the pattern on the interior). Press it gently so it takes the curve of the mold. -
Smooth the edges:
Dip your finger in a little water and run it along the rim of the clay to smooth out any sharp cuts or roughness from the knife.
Step 3: Finishing Touches
-
Allow to dry:
Let the bowl sit on the mold for at least 24 hours. Once the outside feels hard, gently remove it from the mold and flip it over securely to let the ‘bottom’ (now inside) dry for another 12-24 hours. -
Sand for perfection:
Once fully cured and bone dry, use fine-grit sandpaper to gently buff the edges and any bumps on the surface. Wipe away the dust with a barely damp sponge. -
Apply sealant:
Using a soft brush, apply a coat of matte or satin varnish to protect the clay from moisture and dirt. -
Dry the varnish:
Let the first coat dry completely according to the bottle instructions. Add a second coat if you want extra durability. -
Final cure:
Allow the finished piece to cure for a full day before placing heavy items like coins inside to ensure the finish doesn’t dent.
Cracks Appearing?
Tiny cracks while drying are normal with air dry clay. Mix a tiny bit of fresh white clay with water to make a paste (slip) and fill the cracks, then sand smooth once dry.
Now you have a stylish, functional piece of decor that looks far more expensive than the materials used to make it

TRACK YOUR CERAMIC JOURNEY
Capture glaze tests, firing details, and creative progress—all in one simple printable. Make your projects easier to repeat and improve.
Geometric Clay Earrings
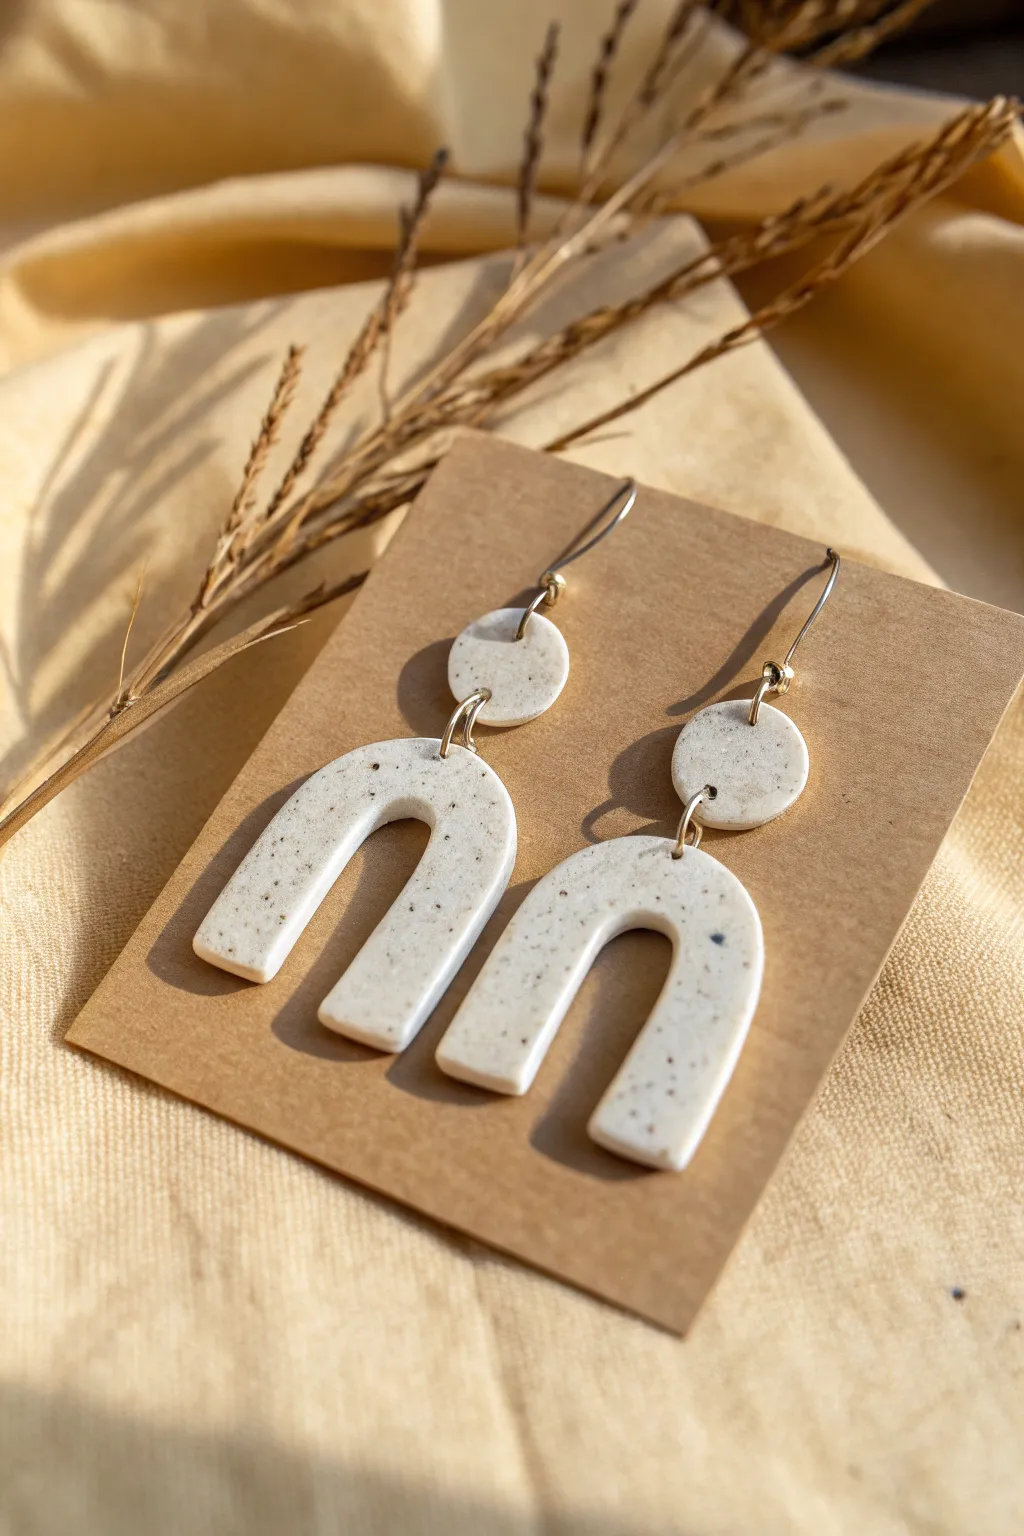
Capture the organic elegance of natural stone without the weight using speckled air-dry clay. These minimalist geometric arches feature a lovely faux-granite finish perfect for elevating everyday outfits.
How-To Guide
Materials
- White air-dry clay
- Dried espresso grounds or black pepper
- Rolling pin
- U-shaped clay cutter (approx. 1.5 inch wide)
- Small circle cutter (approx. 0.5 inch diameter)
- Sandpaper (fine grit)
- Hand drill or needle tool
- Glossy varnish or sealant
- 4 jump rings (gold or silver)
- 2 earring hooks
- Jewelry pliers
Step 1: Preparing the Faux-Stone Clay
-
Condition the clay:
Start by taking a medium-sized lump of fresh white air-dry clay. Knead it thoroughly in your hands to warm it up and ensure it is pliable and free of cracks. -
Add texture:
Sprinkle a small pinch of dried espresso grounds or coarse black pepper onto your work surface. These simple kitchen ingredients mimic the look of granite perfectly. -
Incorporate the speckles:
Press the clay into the grounds and fold it over itself repeatedly. Continue kneading until the dark specks are evenly distributed throughout the white clay. -
Roll out the slab:
Place the clay on a smooth surface or silicone mat. Use a rolling pin to flatten it into an even sheet, aiming for a consistent thickness of about 3-4mm.
Clean Cuts Pro-Tip
Place a piece of cling wrap over the clay before using your cutters. This creates a soft, domed pillow effect on the edges, minimizing the need for sanding later.
Step 2: Cutting and Refining Shapes
-
Cut the arches:
Press your U-shaped cutter firmly into the clay slab. Wiggle it slightly to ensure a clean separation from the surrounding clay, then lift. Cut two identical arch shapes. -
Cut the studs:
Using the small circle cutter, punch out two round discs. These will serve as the connector pieces between the hook and the main arch. -
Smooth the edges:
Dip your finger in a tiny bit of water and gently run it along the cut edges of all four pieces to soften any sharpness or stray bits of clay. -
Create holes:
While the clay is still wet, use a needle tool to pierce a hole at the top center of each arch and at both the top and bottom of the circular discs. Make sure the holes are large enough for your jump rings.
Step 3: Finishing and Assembly
-
Allow to dry:
Place your clay pieces on a clean, flat surface away from direct heat. Let them air dry completely for at least 24-48 hours until they are hard and lighter in color. -
Sand for perfection:
Once fully dry, take a piece of fine-grit sandpaper and gently buff the edges and surface. This removes any fingerprints and makes the faux-stone texture look incredibly professional. -
Seal the surface:
Apply a thin coat of glossy varnish or sealant to the front and back of each piece. This protects the clay from moisture and gives the speckles a nice pop. -
Connect the pieces:
Using jewelry pliers, twist open a jump ring. Loop it through the top of the arch and the bottom hole of a circular disc, then close the ring securely. -
Attach the hardware:
Open a second jump ring (or the loop of your earring wire if it opens) and attach the earring hook to the top hole of the circular disc. -
Repeat for the second earring:
Repeat the assembly process for the matching earring ensuring the front sides are facing the correct direction.
Level Up: Gold Leaf
After the clay dries but before sealing, apply tiny flakes of gold leaf to the corners. The metallic glimmer contrasts beautifully with the matte stone look.
Now you have a chic, lightweight accessory that looks like it came straight from a boutique
Photo or Card Holder
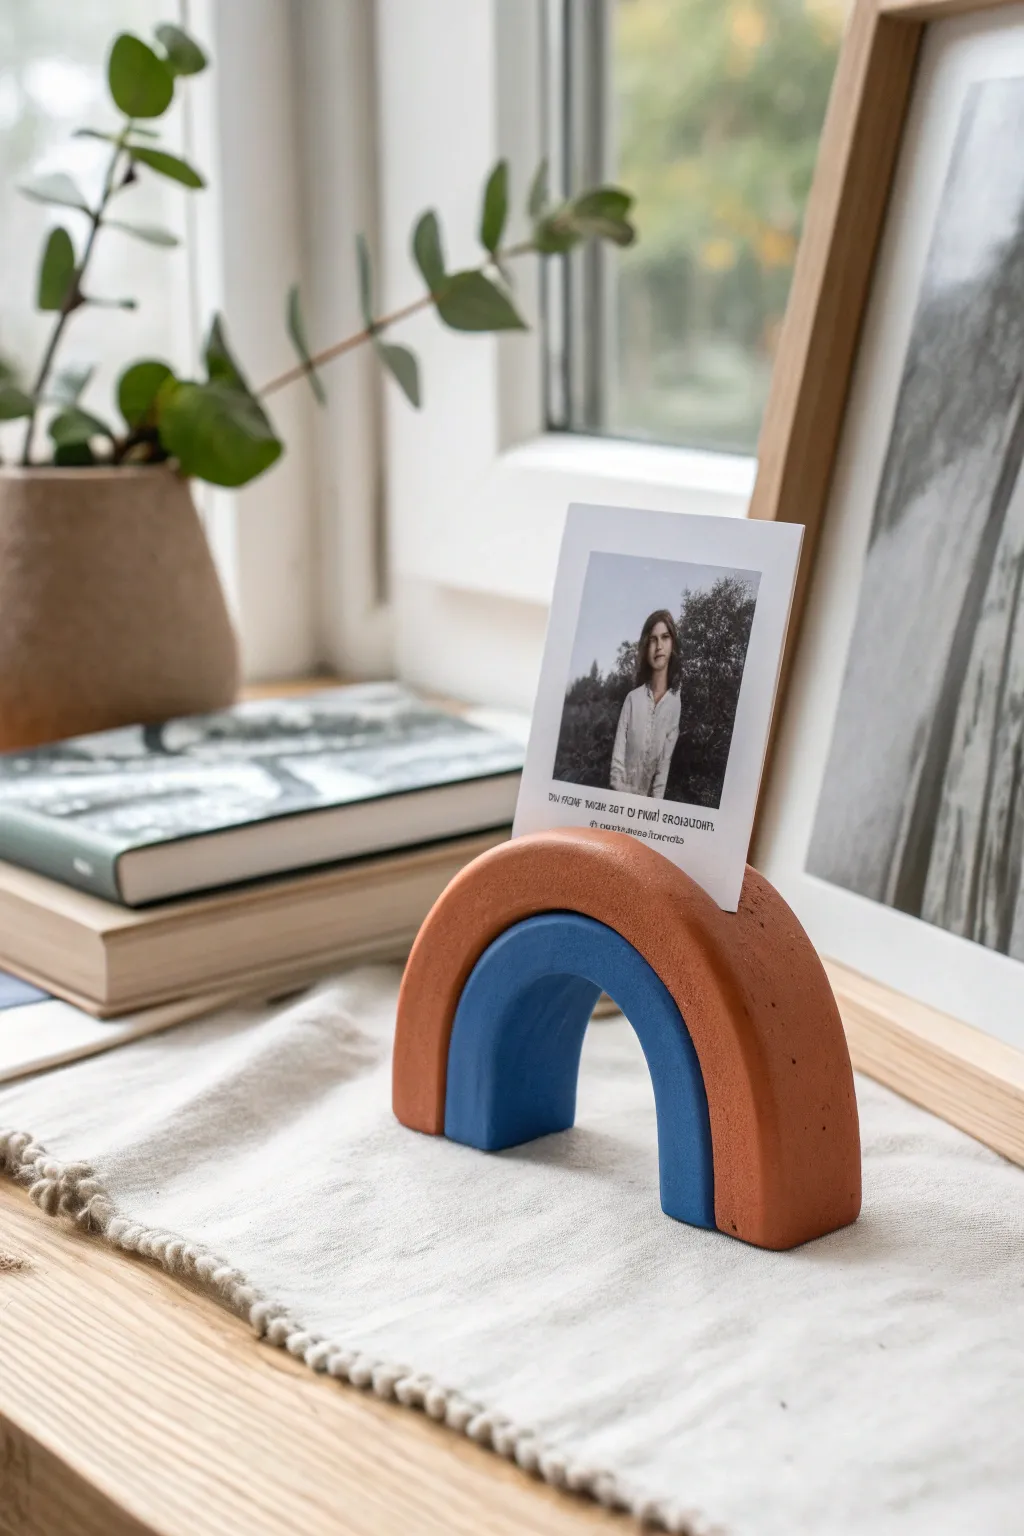
This minimalist, modern photo holder combines earthy terracotta and deep blue tones in a simple arch design that adds a sculptural touch to any desk or shelf. It’s a functional piece of art that securely displays your favorite polaroids or postcards without needing a bulky frame.
Step-by-Step Tutorial
Materials
- Air dry clay (white or terracotta colored)
- Acrylic paints (terracotta/burnt orange and deep navy blue)
- Rolling pin
- Craft knife or clay slicer
- Ruler
- Fine-grit sandpaper (220-400 grit)
- Small bowl of water
- Paintbrushes (flat shader and detail brush)
- Matte varnish or sealant
- Parchment paper or silicone mat
Step 1: Shaping the Arches
-
Condition the clay:
Begin by taking a generous amount of air dry clay and kneading it in your hands until it’s warm, soft, and pliable. If the clay feels too dry or cracks, dip your fingers in a tiny bit of water and work it in. -
Roll the first coil:
Roll the clay into a long, thick sausage shape on your work surface. Use the palms of your hands to apply even pressure, rolling back and forth until you have a cylinder about 1 inch thick. -
Form the outer arch:
Cut a segment of the cylinder long enough to form the large outer arch (roughly 6-7 inches). Bend it gently into a U-shape. Stand it up on its ends to ensure it sits flat and adjust the curvature until it looks symmetrical. -
Flatten the faces:
I like to gently press a flat object (like a hardcover book or acrylic block) against the front and back of the arch to slightly flatten the rounded sides. This creates that modern, blocky aesthetic seen in the photo. -
Create the inner arch:
Roll a second cylinder of clay, matching the thickness of the first. Cut a shorter segment and bend it into a smaller U-shape that fits snugly inside the negative space of your first arch. -
Test the fit:
Place the smaller arch inside the larger one to ensure they nest perfectly. They shouldn’t be touching yet, just separate pieces that look good together. Trim the legs of the inner arch so they stand flush with the outer arch. -
Create the card slot:
Take the larger outer arch. Using your craft knife or a thin ruler, carefully press a straight indentation into the very top center of the arch. This slit needs to be deep enough to hold a photo (about 1/2 inch) but not so deep clearly through the clay.
Use A Spacer
To keep the card slot perfectly open while drying, insert a thick piece of cardstock or a folded index card wrapped in plastic wrap into the slit. Remove it when the clay is leather-hard.
Step 2: Refining and Joining
-
Smooth the surfaces:
Dip your finger in water and gently smooth out any cracks, fingerprints, or uneven textures on both arches. Pay special attention to the cut ends where the arches stand. -
Dry the pieces:
Place both arches on parchment paper to dry. Rotate them every few hours to ensure even drying. Let them dry completely, which usually takes 24-48 hours depending on thickness and humidity. -
Sand for perfection:
Once fully bone dry, use fine-grit sandpaper to buff away any remaining bumps. Sand the bottoms specifically so they sit perfectly flat on a table without wobbling. -
Glue the assembly:
Apply a strong crafting glue or specialized clay glue to the sides of the inner arch where it will touch the outer arch. Press them together firmly and wipe away any excess glue immediately.
Cracks While Drying?
If hairline cracks appear as the clay shrinks, mix a tiny bit of fresh clay with water to make a paste (slip). Fill the cracks with this paste, let dry, and sand smooth before painting.
Step 3: Painting and Finishing
-
Mix your colors:
Prepare your palette. For the outer arch, mix burnt orange with a touch of brown and white to achieve that muted terracotta look. For the inner arch, use a navy blue mixed with a tiny bit of black for depth. -
Paint the inner arch:
Carefully paint the smaller inner arch with your blue mixture. Use a smaller detail brush to get crisp lines where the two arches meet so you don’t smudge blue onto the outer ring. -
Paint the outer arch:
Paint the larger arch with your terracotta color. Apply 2-3 thin coats for the most opaque, matte finish, letting the paint dry fully between layers. -
Protect the slot:
Be careful not to let too much paint pool in the card slot on top, as this creates lumps that might bend your photos later. -
Seal the piece:
Finish with a coat of matte varnish. This seals the porous clay and protects the paint from chipping while maintaining that trendy, non-shiny ceramic look.
Now you have a stylish, handmade display ready to showcase your favorite memories
Desk Organizer Trio
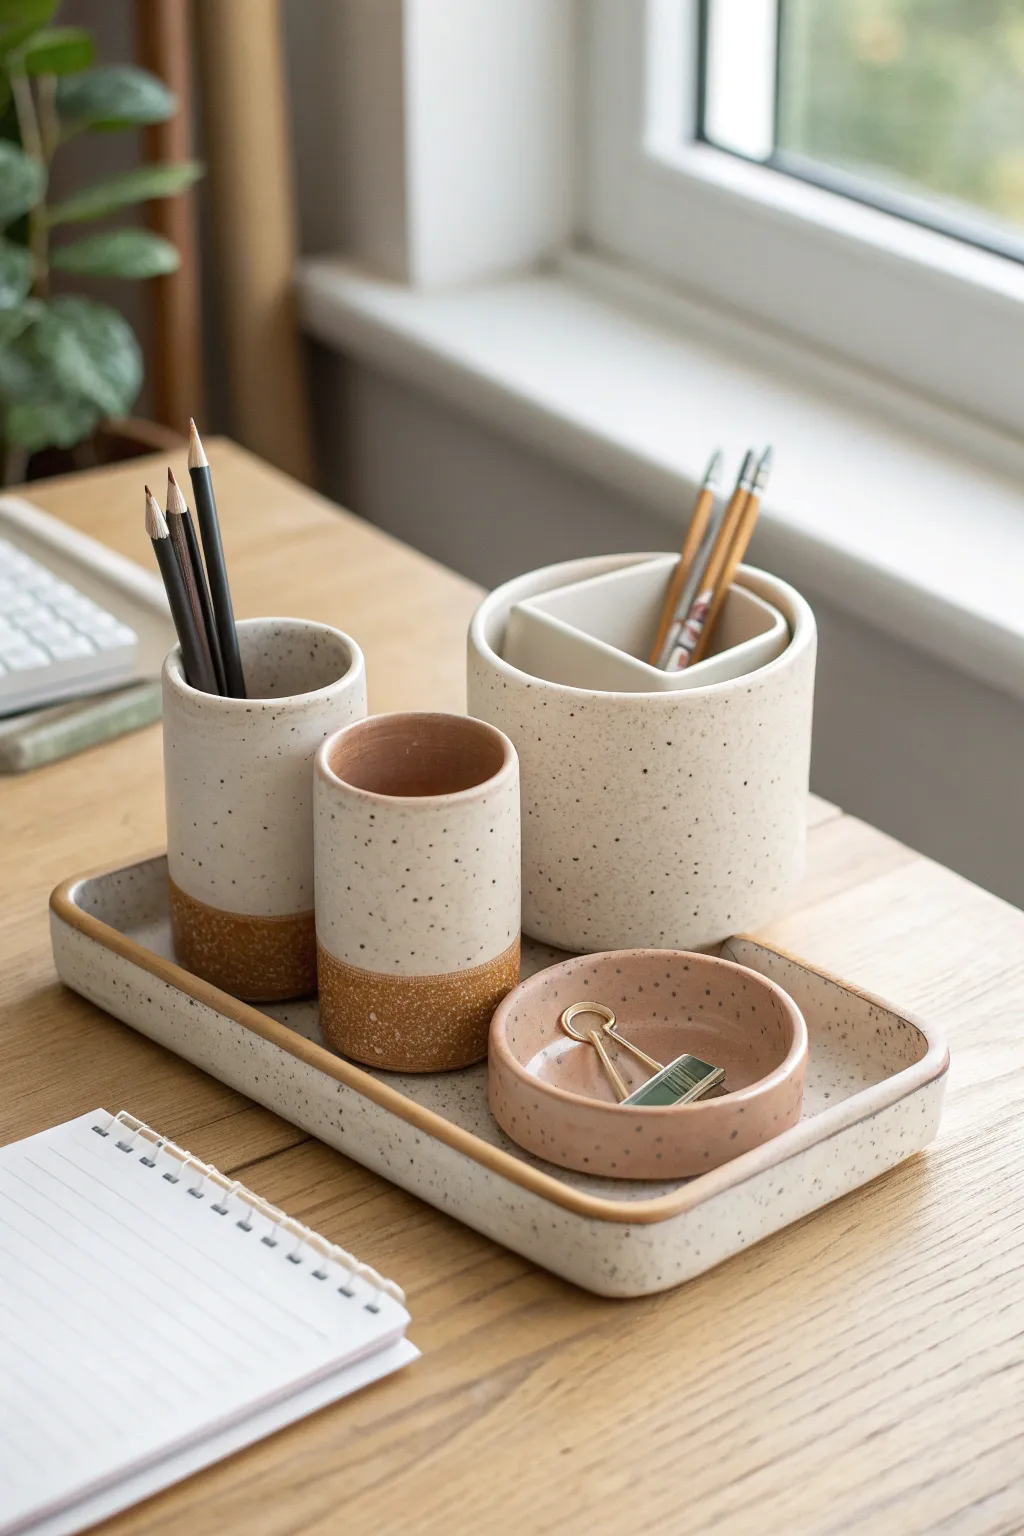
Elevate your workspace with this chic set of matching desk organizers featuring a speckled, stone-like finish and warm terracotta accents. This project includes a large tray, three distinct cups, and a small dish, creating a cohesive and functional vignette for your stationery essentials.
How-To Guide
Materials
- White air-dry clay (approx 2 kg)
- Acrylic rolling pin
- Circle cutters (various sizes)
- Craft knife or scalpel
- Clay slip (water and clay mixture)
- Sandpaper (fine and medium grit)
- Acrylic paints: Cream/Off-white, Terracotta/Burnt Sienna, Black
- Old toothbrush (for speckling)
- Flat paintbrush
- Matte varnish or sealant
- Ruler
- Sponge
Step 1: Creating the Tray Base
-
Roll out the slab:
Begin by conditioning a large chunk of clay until pliable, then roll it out to a consistent 1/4 inch thickness. Aim for a rectangular shape slightly larger than your desired finished tray size. -
Cut the base:
Use a ruler and craft knife to cut a clean rectangle for the tray base, rounding the four corners gently with your knife or a small round cutter for a softer look. -
Form the rim:
Roll a long snake of clay and flatten it into a strip about 1/2 inch wide. Carefully attach this strip around the perimeter of the base using the score and slip method—scratching both surfaces and applying a bit of clay water before pressing them together. -
Smooth the seams:
Blend the clay from the rim down into the base on both the inside and outside to ensure a seamless connection. I like to use a slightly damp sponge to smooth out any fingerprints or tool marks at this stage.
Step 2: Shaping the Organizers
-
Cut cylinder bases:
Roll out more clay and cut three circular bases of different diameters: one small (approx 2 inches), one medium (2.5 inches), and one large (3.5 inches). -
Construct the walls:
Measure the circumference of each base circle. Roll out slabs and cut rectangular strips to match these lengths, varying the heights—make the smallest cup the shortest, and the widest cup the tallest. -
Assemble cylinders:
Wrap the rectangular strips around their corresponding bases. Score and slip the vertical seam where the wall ends meet, as well as the bottom seam connecting the wall to the base. -
Smooth and refine:
Use a modeling tool or your finger to smooth the seams inside and out. Ensure the rims are level; if they are uneven, trim them gently with your craft knife. -
Form the small dish:
For the circular paperclip dish, shape a small ball of clay into a flat disc and pinch the edges upwards to create a shallow lip, smoothing the sides for a consistent curve. -
Internal divider (Optional):
For the largest cup, you can create a ‘cup-within-a-cup’ or a straight divider wall by attaching a smaller slab inside before the clay dries, perfect for separating pens from scissors.
Seamless Seams
Use a teaspoon of vinegar in your slip mixture. The acid helps break down the clay particles, creating a super strong ‘glue’ for joining pieces.
Step 3: Finishing and Decoration
-
Slow drying:
Place all pieces on a flat surface away from direct sunlight to dry for 24-48 hours. Turn them occasionally to prevent warping. -
Sanding:
Once bone dry, sand all surfaces with medium grit sandpaper to remove imperfections, followed by fine grit for a buttery smooth finish. Wipe away dust with a slightly damp cloth. -
Base coat:
Paint the entire exterior and interior of all pieces with a cream or off-white acrylic paint. You may need two coats for full opacity. -
Color blocking:
For the two-toned cups, use masking tape to create a crisp line around the bottom third. Paint the lower section with a terracotta or burnt sienna shade to mimic exposed earthenware. -
Speckling effect:
Dilute a small amount of black acrylic paint with water. Dip an old toothbrush into the mixture and run your thumb across the bristles to flick tiny specks of paint onto the pieces, rotating them for even coverage. -
Varnish:
Protect your work with a coat of matte varnish. This seals the paint and gives the clay a durable, professional finish that resists minor scratches.
Textured Touch
Mix dried coffee grounds or sand into your clay before rolling it out to create real texture instead of just painting the speckles on.
Arrange your beautiful new set on your desk and enjoy the calm organization it brings to your workday
Salt Cellar and Tiny Spoon
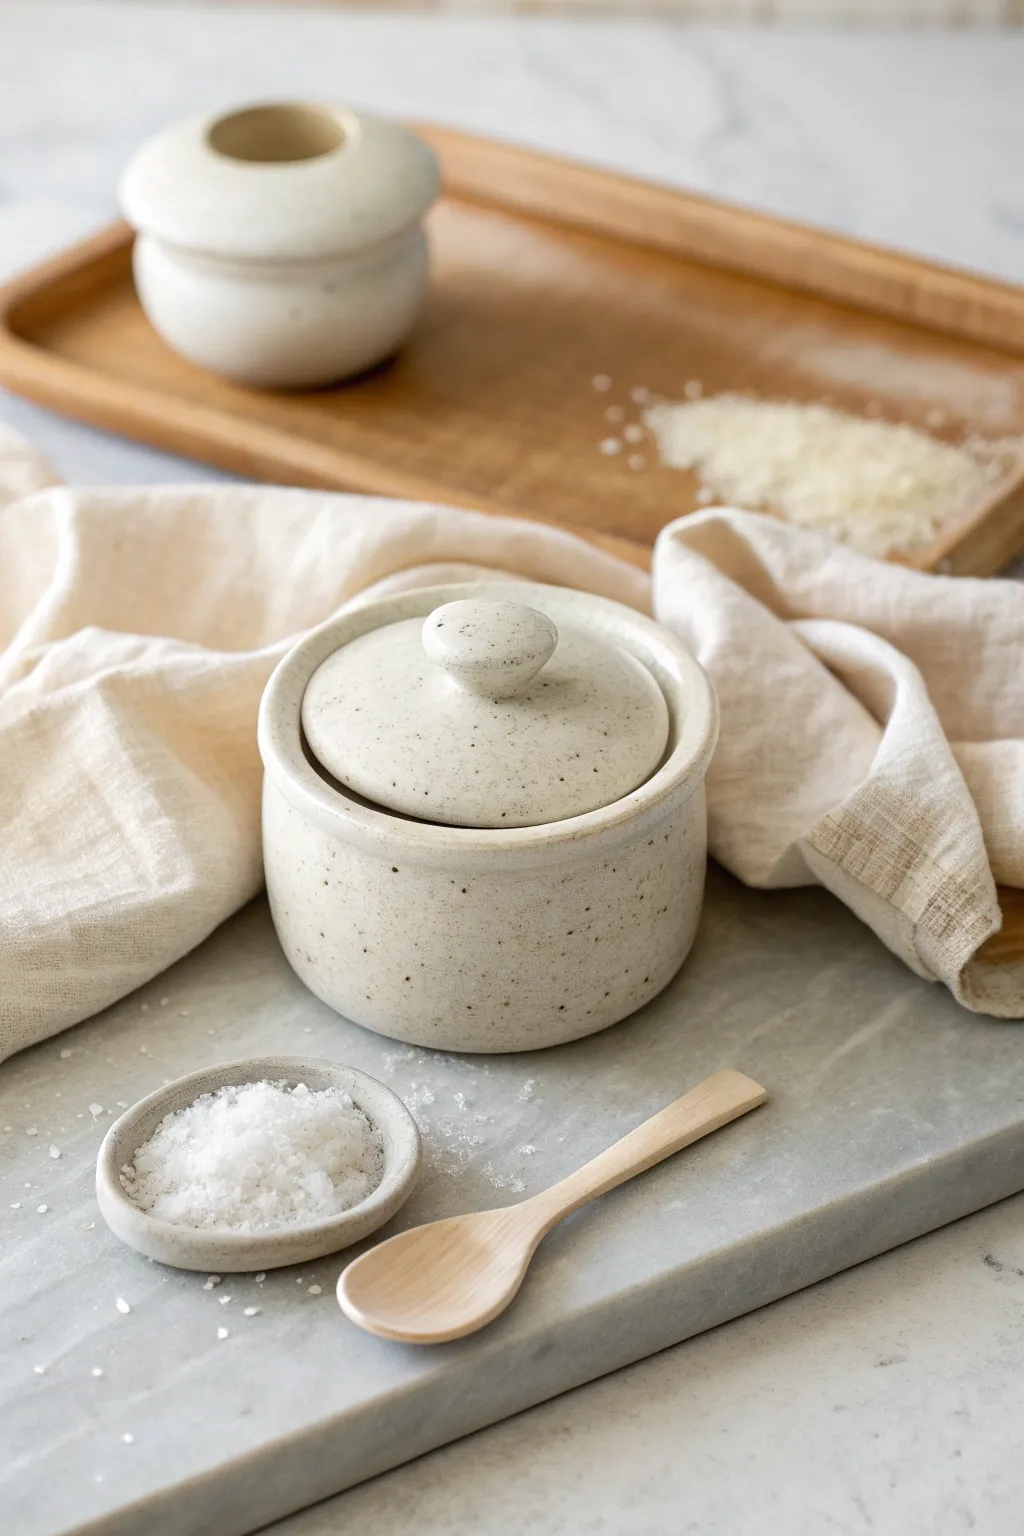
Elevate your kitchen counter with this minimalist, speckled salt cellar and adorable matching spoon. The subtle faux-ceramic finish gives it a high-end pottery look without needing a kiln, making it a perfect handmade gift for the home chef.
Step-by-Step Tutorial
Materials
- White air-dry clay
- Rolling pin
- Craft knife
- Small bowl (for water)
- Small wooden spoon (for template)
- Sandpaper (fine grit)
- Acrylic paints (cream/off-white, brown, black)
- Old toothbrush
- Glossy varnish or sealant (food-safe if possible, though dry food only is recommended)
- Sponge or large brush
- Needle tool or toothpick
Step 1: Forming the Cellar Base
-
Prep your clay:
Start by conditioning a large ball of air-dry clay in your hands until it is pliable and smooth. You want a ball roughly the size of a tennis ball for the main pot. -
Create the pinch pot:
Push your thumb deep into the center of the ball, stopping about a half-inch from the bottom. Begin pinching the clay between your thumb and fingers, rotating it as you go to thin out the walls. -
Shape the walls:
Continue pinching upwards to create a cylindrical shape rather than a bowl shape. Aim for a consistent wall thickness of about 1/4 inch so it dries evenly. -
Flatten the bottom:
Gently tap the base of the pot onto your work surface to create a flat, stable bottom. Check that the rim is relatively level. -
Refine the rim:
Use a little water on your fingertip to smooth the top edge. You want a slightly rounded, thick rim for that pottery aesthetic perfectly captured in the photo. -
Smooth the surface:
Dip a sponge in a tiny bit of water and wipe down the exterior and interior walls to remove fingerprints and cracks.
Cracks happen
If small cracks appear while drying, mix a tiny bit of clay with water to make a paste (slip) and fill them in. Smooth over with a finger and let dry again before painting.
Step 2: Making the Lid & Spoon
-
Measure the lid:
Roll out a slab of clay about 1/4 inch thick. Place your pot upside down on the clay and trace a circle slightly larger than the opening. -
Cut and shape the lid:
Cut out the circle with your craft knife. Smooth the edges with water, slightly curving the top surface so it looks domed rather than perfectly flat. -
Add the inner lip:
Roll a small coil of clay. Flip the lid over and attach the coil in a circle that will fit *inside* the pot’s rim. Blend the clay well to secure it; this keeps the lid from sliding off. -
Attach the knob:
Roll a small ball of clay for the handle. Score both the center of the lid and the bottom of the ball, add a dab of water (slip), and press firmly to attach. Smooth the connection point. -
Sculpt the tiny spoon:
Roll a small snake of clay. Flatten one end with your thumb to make the scoop and gently pinch the handle to refine the shape. Use a real small spoon as a reference if you need to. -
Indent the spoon:
Press your pinky finger or a rounded tool into the flattened end to create the bowl of the spoon.
Smoother Stone Look
For an even more realistic stone texture, sand your finished dried piece with a slightly wet sponge instead of sandpaper before you paint it.
Step 3: Refining and Finishing
-
Let it dry completely:
Allow all pieces to air dry for 24-48 hours. I find flipping the pieces occasionally helps them dry evenly without warping. -
Sand for smoothness:
Once bone dry, use fine-grit sandpaper to buff away any uneven bumps or sharp edges, particularly around the rim and the spoon handle. -
Apply the base coat:
Mix a warm cream or off-white acrylic paint. Apply two coats to the entire cellar, lid, and spoon, letting the paint dry between layers. -
Create the speckles:
Mix a watery brown or black paint. Dip an old toothbrush into it, then run your thumb across the bristles to flick tiny specks of paint onto the pieces. Practice on paper first to control the spray. -
Seal the deal:
Once the paint is fully dry, apply a coat of glossy varnish. This mimics the glazed look of the ceramic jar in the photo and protects the paint. -
Final cure:
Let the varnish cure for the time recommended on the bottle before filling your new cellar with coarse sea salt.
Place your beautiful new set on a wooden tray or by the stove for a touch of handmade charm
Moon Phase Wall Hanging
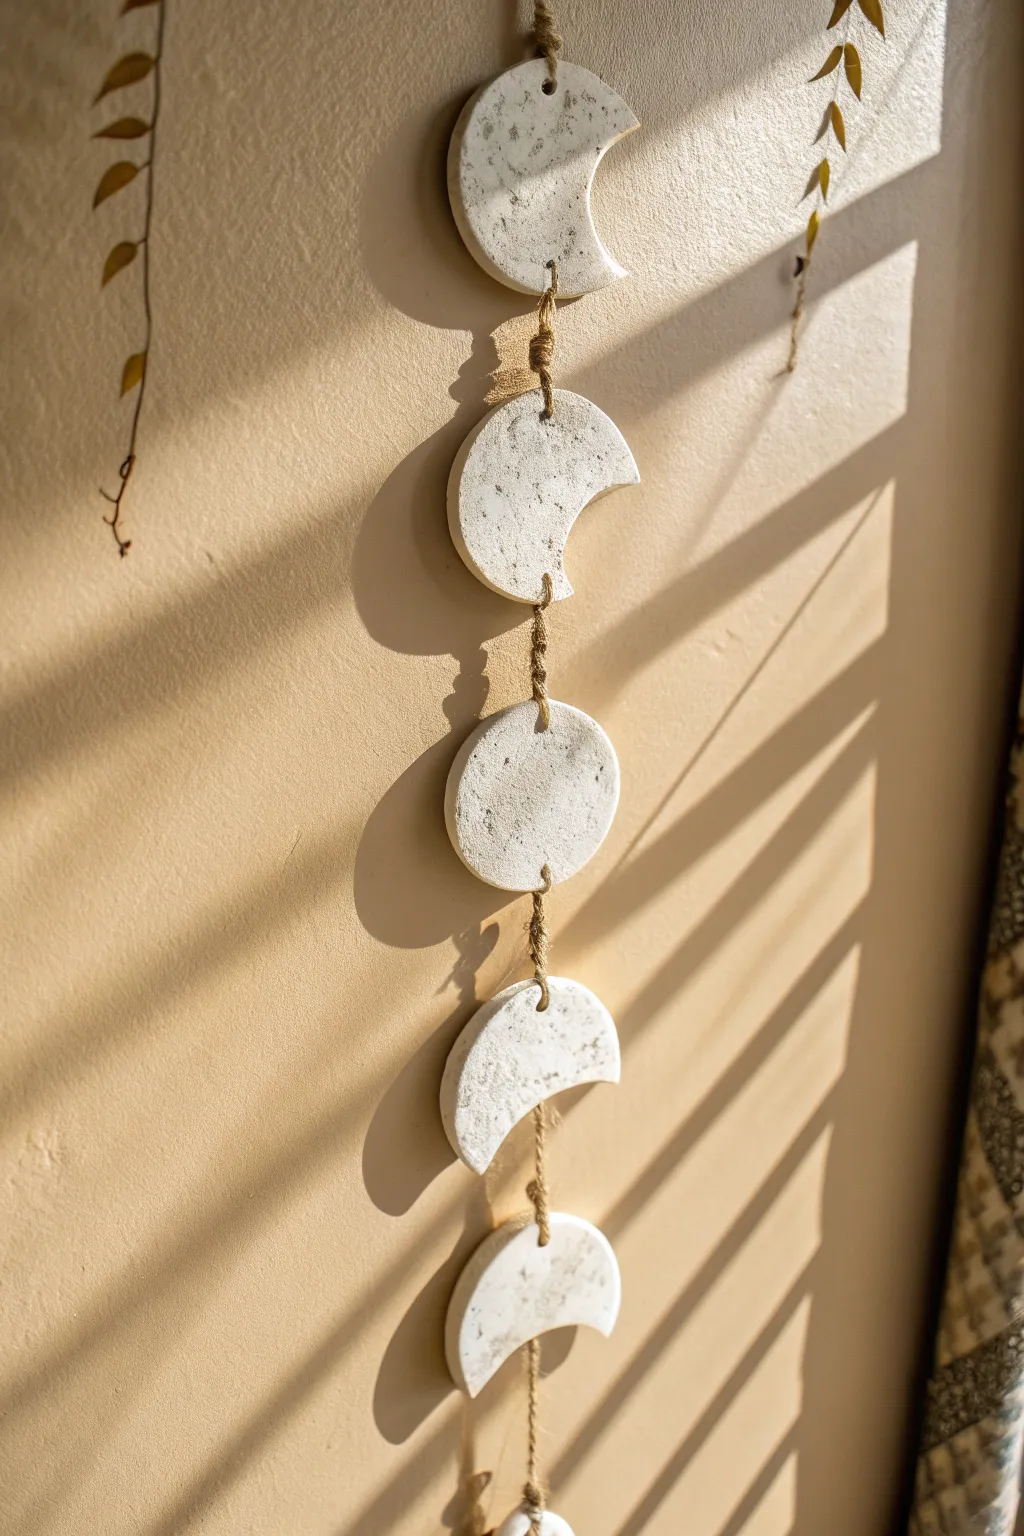
Brighten up any cozy corner with this celestial wall hanging that captures the serene beauty of the lunar cycle. Made with speckled air-dry clay and natural jute twine, this vertical garland adds a perfect touch of modern bohemian texture to your decor.
How-To Guide
Materials
- White air-dry clay
- Rolling pin
- Cylindrical cutter (e.g., a cookie cutter or a glass rim) approx. 3-inch diameter
- Smaller cylindrical cutter (for creating the crescent curves)
- Straw or skewer (for piercing holes)
- Black pepper or dried coffee grounds (optional, for speckled effect)
- Fine-grit sandpaper
- Jute twine or hemp cord
- Scissors
- Small bowl of water
- Acrylic sealer (matte finish)
Step 1: Preparing the Clay
-
Condition the Clay:
Begin by kneading a large handful of air-dry clay until it is soft and pliable. If you want to replicate the speckled stone look from the photo, knead in a pinch of black pepper or dried coffee grounds at this stage. -
Roll It Out:
Place the clay on a smooth surface or a silicone mat. Use a rolling pin to flatten the clay to an even thickness of about 1/4 inch. Try to keep the thickness consistent so all your moons dry at the same rate and hang evenly.
Keep it Flat
To prevent curling while drying, place a lightweight book or board on top of the clay pieces once they are ‘leather hard’ (dry to touch but cool).
Step 2: Cutting the Phases
-
Cut the Full Moon:
Using your main 3-inch circular cutter, press firmly into the clay to cut out five perfect circles. These will be the base for all your shapes. -
Keep One Circle Whole:
Set one of these circles aside untouched; this will be your central Full Moon piece. -
Create the Gibbous Moons:
Take two of the circles. use the same large cutter to trim off a small, thin sliver from one side of each circle. This creates the slightly convex shape of the gibbous phases. -
Create the Crescent Moons:
Take the remaining two circles. Use your smaller cutter (or offset the large cutter significantly) to cut a deep curve out of the circle, leaving a classic ‘C’ shape. Make sure the ‘horns’ of the crescent aren’t too thin, or they might snap later. -
Smooth the Edges:
Dip your finger in a little bit of water and run it along the cut edges of each shape to smooth out any roughness or jagged bits left by the cutter.
Step 3: Detailing and Drying
-
Add Texture:
For that rustic, cratered look, lightly tap the surface of the moist clay with a toothbrush or crumple a bit of aluminum foil and press it gently onto the faces. I like to do this sparingly so it looks natural. -
Pierce Hanging Holes:
Using a straw or skewer, poke a hole at the top and bottom of every piece, *except* for the bottom-most crescent, which only needs a top hole. Ensure the holes are vertically aligned so the garland hangs straight. -
Let Them Dry:
Lay the pieces flat on a board or drying rack. Allow them to dry completely for 24-48 hours. Turn them over halfway through the process to prevent curling. -
Sand and Finish:
Once bone dry, use fine-grit sandpaper to gently refine any sharp edges. If you want extra durability, apply a coat of matte acrylic sealer to both sides.
Holes Too Small?
If your twine won’t unexpected fit through the dried clay holes, don’t force it. Use a small hand drill or a twisting motion with a sharp craft knife to widen them carefully.
Step 4: Assembly
-
Cut the Twine:
Cut a long piece of jute twine, roughly 4 feet long, or several shorter pieces if you prefer tying them individually between moons. -
Start at the Top:
Tie a loop at one end of your twine for hanging. Thread the twine through the top hole of the first crescent moon. -
Knot the First Piece:
Tie a double knot in the twine right at the top hole to secure the moon in place, then thread it down the back and out through the bottom hole. -
Space and Secure:
Leave about 1.5 to 2 inches of slack in the twine before tying a knot where the next moon (the gibbous) will sit. Thread the next moon on, resting it on this knot. -
Repeat Down the Line:
Continue this threading and knotting process: Top Crescent -> Top Gibbous -> Full Moon -> Bottom Gibbous -> Bottom Crescent. Ensure the curves of the moons face the correct direction to mimic the lunar cycle. -
Trim Excess:
After securing the final bottom crescent, tie a secure double knot underneath the bottom hole and trim any excess twine.
Hang your new moon phase garland near a window to let the shadows play across the textured surface throughout the day
Personalized House Ornament Keepsake
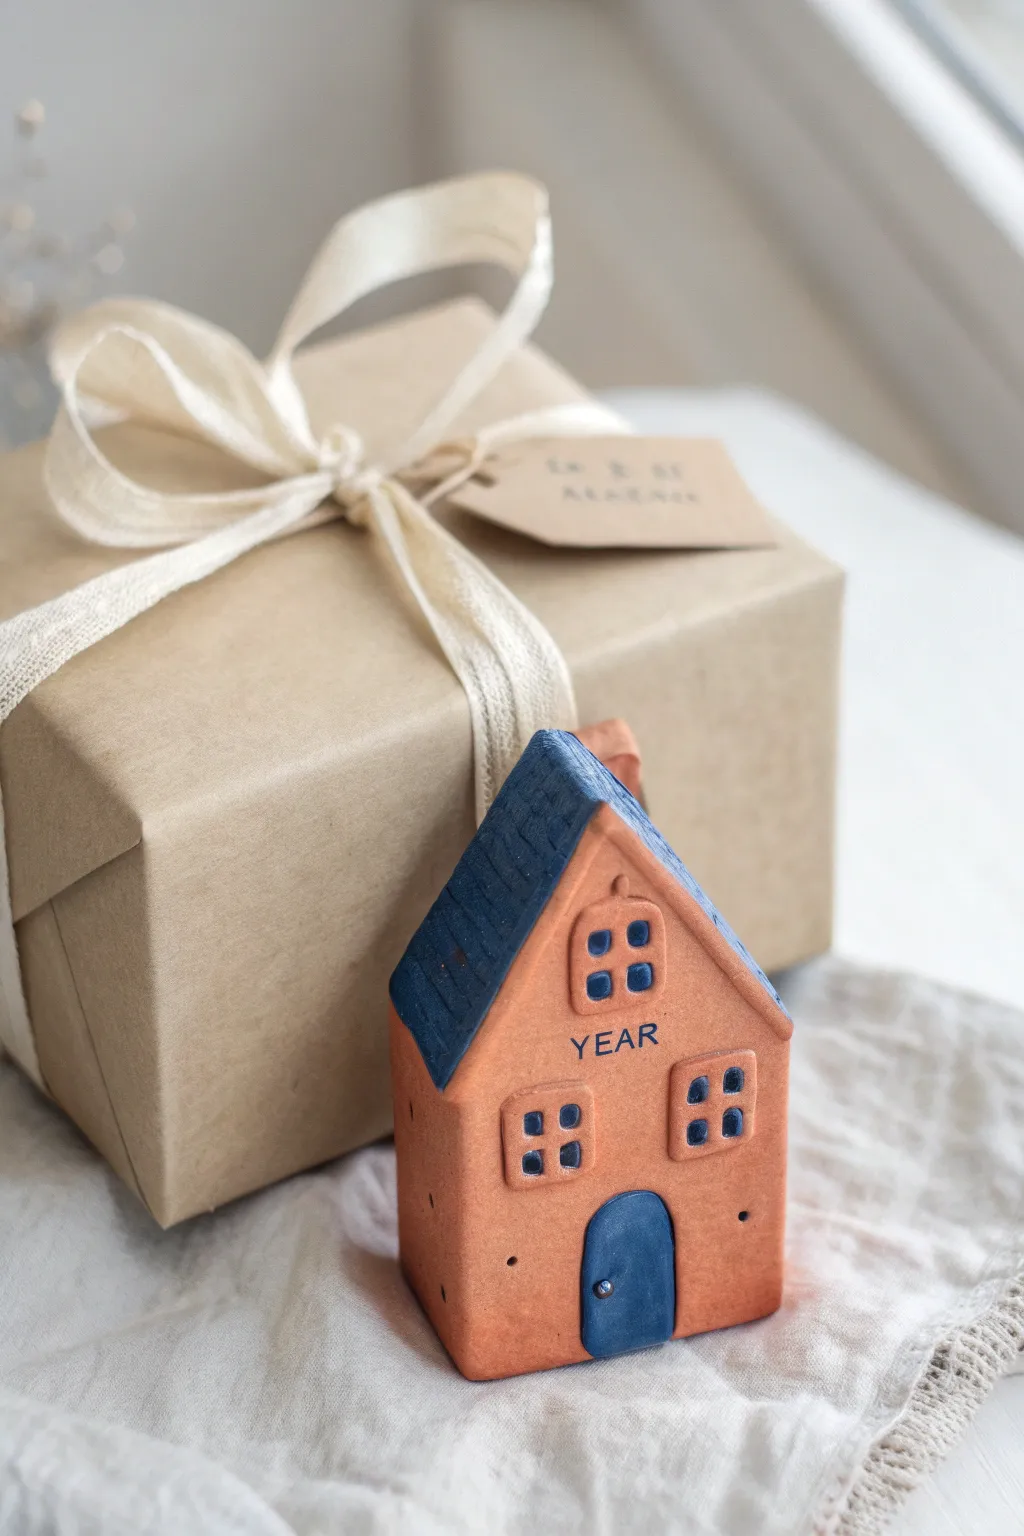
Create a charming, rustic keepsake with this miniature air-dry clay house, featuring a textured terracotta finish and navy blue accents. It makes for a heartfelt, personalized gift to commemorate a new home or a special year.
Step-by-Step Guide
Materials
- Air dry clay (terracotta color)
- Rolling pin
- Sharp craft knife or X-Acto knife
- Ruler
- Small alphabet stamps
- Acrylic paint (navy blue)
- Fine detail paintbrush
- Small sculpting tools or cocktail stick
- Fine grit sandpaper
- Water and sponge for smoothing
- Matte varnish (optional)
Step 1: Planning and Shaping the Base
-
Roll the clay:
Start by conditioning your terracotta-colored air dry clay until it is soft and pliable. Roll it out on a smooth surface to an even thickness of about 1/4 inch (6mm) to ensure the walls are sturdy enough to stand. -
Cut the facade:
Using a ruler and a sharp craft knife, cut out the front shape of the house. You want a distinct pentagon shape: a square base (approx. 2.5 inches wide) topped with a triangle for the roof pitch. -
Create the depth:
Cut a long rectangular strip of clay with the same 1/4 inch thickness. This will be wrapped behind the front facade to create the 3D box shape of the house. Alternatively, you can cut separate side, back, and bottom panels and join them. -
Assemble the structure:
Score the edges where the clay pieces will join—making little cross-hatch marks—and apply a dab of water (slip) to act as glue. Press the sides onto the back of the front facade, smoothing the seams together with a modeling tool or your finger so they become invisible.
Clean Lettering
If you don’t have stamps, use a needle tool to ‘write’ in the clay, then fill the groves with watered-down paint. Wipe the surface immediately to leave color only in the grooves.
Step 2: Adding Architectural Details
-
Define the roof:
Roll a thinner slab of clay for the roof. Cut two rectangular pieces that are slightly wider than the house depth to create an overhang. Attach these to the sloped top of your structure using the score-and-slip method. -
Texture the roof:
Once the roof panels are secure, use a sculpting tool or knife to gently press horizontal lines across the roof pieces, mimicking the look of shingles or slat roofing without cutting all the way through. -
Create the windows:
Roll out a very thin piece of clay and cut three small squares (two for the bottom floor, one for the attic). Gently press these onto the house facade. -
Window panes:
Use the tip of a small knife or a cocktail stick to press a cross or grid pattern into each window square to define the panes. -
Add the door:
Fashion a small arch shape from a leftover piece of clay. Attach this to the bottom center of the facade to serve as the front door. Add a tiny ball of clay for the doorknob.
Step 3: Personalization and Finishing
-
Stamp the text:
While the clay is still damp but firm, gently press your alphabet stamps into the space between the attic window and the first floor windows. In the example, the word ‘YEAR’ is used, followed by specific numbers, but you can customize this completely. -
Add texture dots:
Use a needle tool or toothpick to poke small, decorative ventilation holes along the lower sides of the house for a bit of extra rustic character. -
Slow drying process:
Set the house on a wire rack to dry. I find it helps to rotate it occasionally so all sides dry evenly. This usually takes 24-48 hours depending on humidity. -
Sand imperfections:
Once absolutely bone dry, use fine-grit sandpaper to smooth any rough edges on the corners or roof overhangs. -
Paint the accents:
Using a fine detail brush and navy blue acrylic paint, carefully paint the roof, the window panes, the door, and fill in the stamped letters. You may need a slightly watered-down wash for the letters to get the paint into the deep recesses. -
Clean up paint lines:
If you get blue paint on the terracotta walls, wait for it to dry and then gently sand it off to reveal the clean clay underneath. -
Seal:
To protect your keepsake, apply a thin coat of matte varnish over the entire piece.
Preventing Cracks
If you see tiny cracks forming while drying, smooth a tiny amount of fresh wet clay slip into the gap with your finger right away, rather than waiting for it to fully dry.
Wrap this charming little house in a kraft paper box tied with a ribbon for the ultimate handcrafted presentation