Air dry clay is one of my favorite mediums for making cute, giftable pieces that people actually want to buy. If you’re trying to build a little lineup of sellable air dry clay products, these ideas are all about being repeatable, shippable, and easy to batch.
Air Dry Clay Earrings in Batchable Shapes
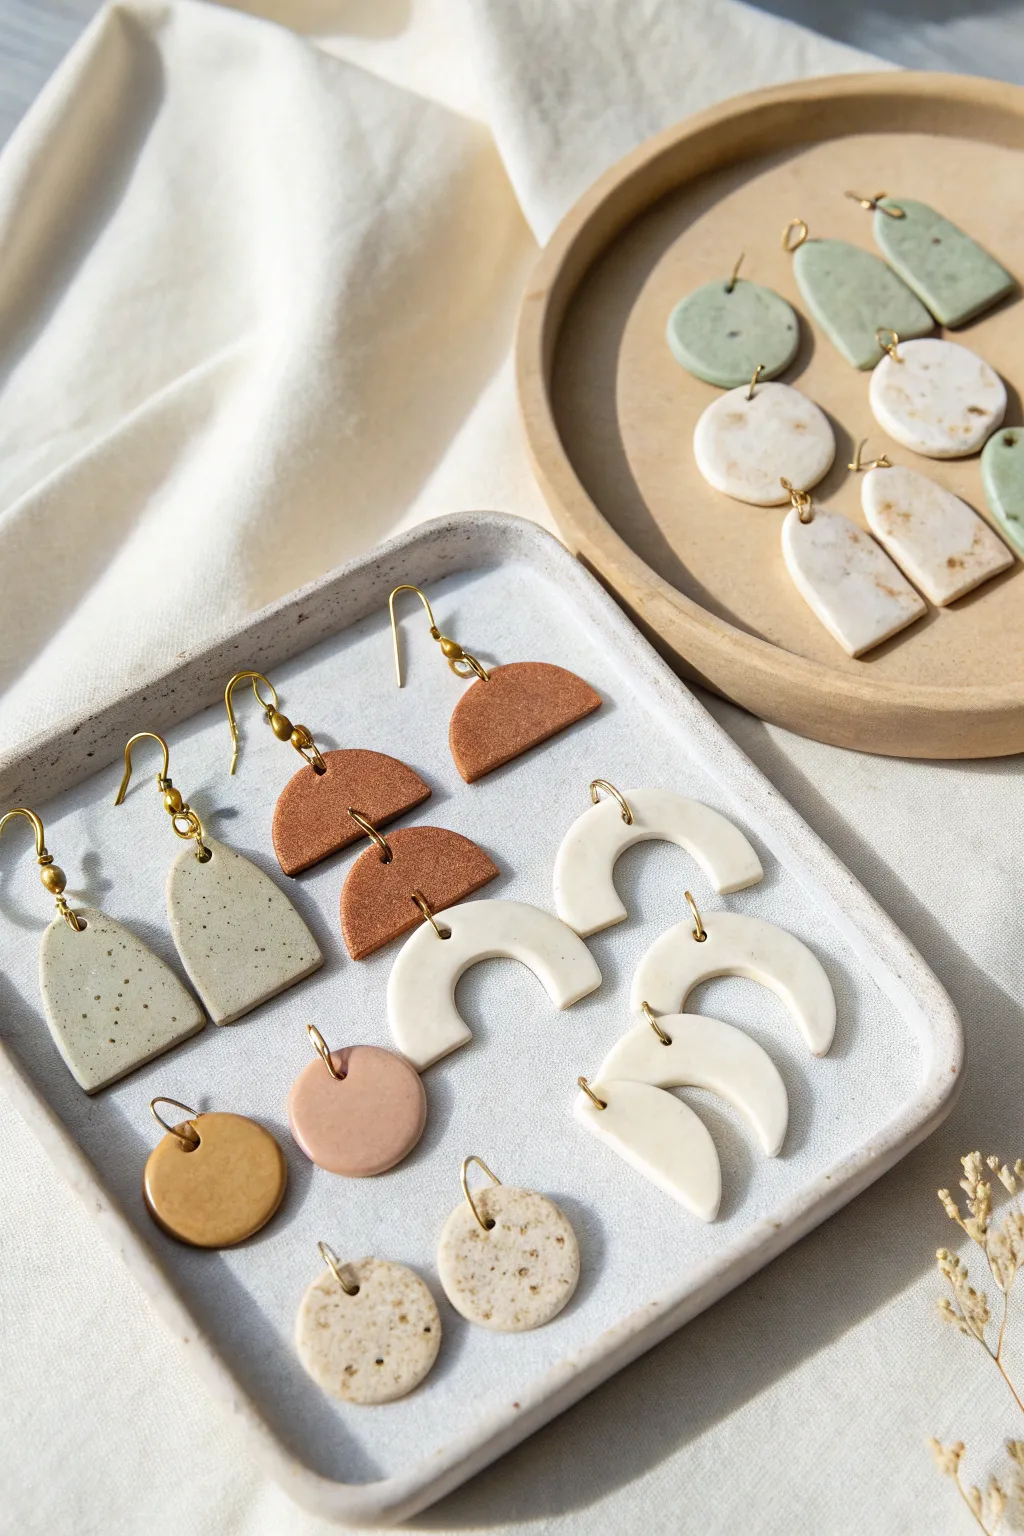
Create a sophisticated collection of matte-finish clay earrings featuring geometric arches, half-circles, and textured discs. These lightweight accessories blend neutral earth tones like terracotta, warm beige, and speckled cream for a boutique-ready look.
Detailed Instructions
Materials
- Air dry clay (white or pre-colored)
- Acrylic paint (burnt sienna, beige, white, black, gold)
- Small rolling pin
- Parchment paper or silicone mat
- Clay cutters (arches, circles of various sizes)
- Craft knife or X-Acto blade
- Clay roller or pasta machine (optional for uniform thickness)
- Toothpick or small drill bit
- Fine-grit sandpaper (400-600 grit)
- Jewelry pliers (round and flat nose)
- Jump rings (gold finish, 6-8mm)
- Earring hooks (gold finish, fish hook style)
- Small stiff-bristled brush or toothbrush
- Gloss varnish or sealant (optional)
Step 1: Preparing the Clay
-
Color Mixing:
If using white clay, separate it into three batches. Knead a small amount of acrylic paint into each batch to create your base colors: a deep terracotta, a soft beige, and a creamy off-white. -
Adding Speckles:
To achieve the stone-like speckled effect seen in the cream and grey pairs, sprinkle ground black pepper or dried tea leaves into the white clay and knead until distributed evenly. -
Rolling Out:
Place your clay on parchment paper. Use a rolling pin to flatten the clay to an even thickness of about 3mm—playing cards stacked on either side of the clay can act as depth guides. -
Texturing (Optional):
For the textured circular studs, lightly tap a stiff-bristled brush or sandpaper over the wet clay surface to create a pitted, organic texture before cutting.
Step 2: Cutting and Shaping
-
Cutting Arches:
Press your U-shaped cutter firmly into the rolled clay. If you don’t have a specific cutter, use a circle cutter and then use a smaller circle cutter to remove the inner section create the arch. -
Creating Half-Circles:
For the terracotta geometric pairs, cut a full circle and then slice it precisely in half using your craft knife to create two semi-circles. -
Forming Studs:
Cut small circles (approx 10-12mm) for the top components of the dangling earrings or for standalone studs. -
Refining Edges:
Dip your finger in a little water and gently smooth the cut edges of each shape to remove any jagged bits or drag marks from the cutters. -
Piercing Holes:
Using a toothpick or a needle tool, poke holes where the jump rings will go. Place holes close to the edge but leave at least 2mm of clay buffer to prevent breakage.
Clean Cuts Pro Tip
Before pressing your cutter into the clay, dip the cutter into cornstarch or water. This acts as a release agent and prevents the clay from sticking inside the mold.
Step 3: Drying and Refining
-
Drying Phase:
Lay all pieces flat on clean parchment paper. Let them dry for 24-48 hours, flipping them over halfway through to ensure even drying and prevent curling. -
Sanding:
Once fully cured, use fine-grit sandpaper to smooth the edges and faces of the clay pieces. I prefer to do this step wet (if the clay allows) or wear a mask to avoid inhaling dust. -
Cleaning:
Wipe all pieces with a slightly damp cloth or baby wipe to remove any sanding dust before assembly.
Level Up: Gold Leaf
Apply flecks of gold leaf to the wet clay before rolling one last time. This embeds the gold into the surface for a luxe, high-end terrazzo finish.
Step 4: Assembly
-
Opening Jump Rings:
Hold a jump ring with two pairs of pliers. Twist one hand away from you and one toward you to open the ring sideways (never pull it apart outwards). -
Connecting Pieces:
Slide the open jump ring through the hole of a bottom component (like the large arch) and then through the corresponding top component (like a small circle stud). -
Closing Rings:
Twist the jump ring back into place using the same motion until the ends meet perfectly flush. -
Attaching Hooks for Danglers:
For the arch earrings, open the loop on the bottom of the fish hook wire and slide it onto the clay shape/jump ring assembly, then close securely. -
Attaching Posts (Alternative):
For the top studs, use strong jewelry glue (like E6000) to attach flat-back earring posts to the back of the small circles. Let the glue set for 24 hours. -
Final Coat:
If desired, apply a very thin layer of matte varnish to seal the clay and protect it from moisture, though leaving it raw maintains that trendy stone look.
Package your beautiful new collection on cardstock cards to get them ready for your next craft fair or online shop update


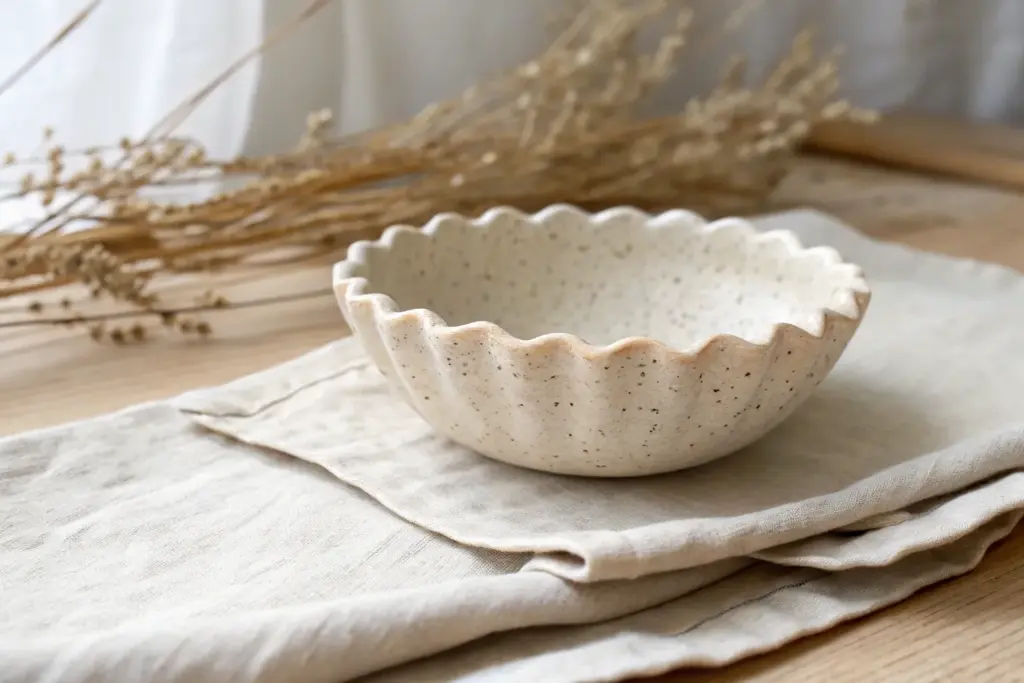
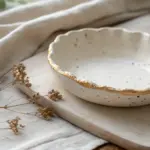
Trinket Dishes for Rings and Keys
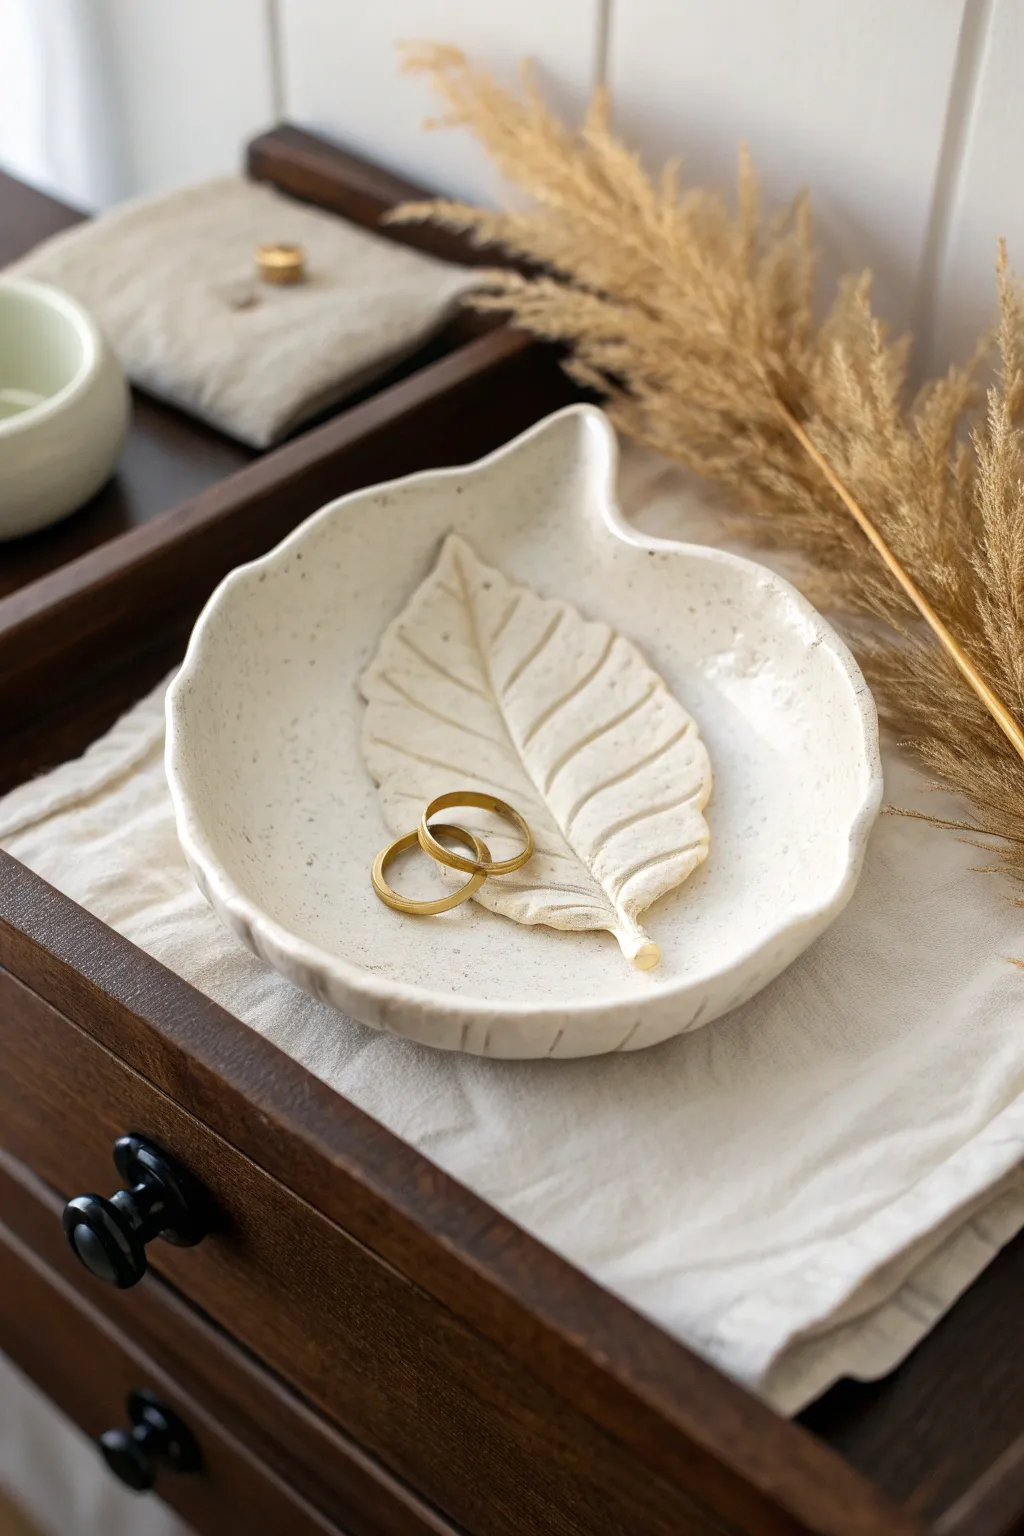
Embrace the beauty of nature with this delicate, speckled jewelry holder. Featuring a dual-layer leaf design with a subtle, organic texture, this piece combines rustic charm with elegant functionality for holding your favorite rings.
Step-by-Step Tutorial
Materials
- White air-dry clay (approx. 200g)
- Small rolling pin
- Real or artificial leaf with prominent veins (medium size)
- Craft knife or scalpel tool
- Small bowl (for shaping)
- Sandpaper (fine grit)
- Acrylic paint (cream/off-white)
- Brown acrylic paint (for speckles)
- Old toothbrush or stiff paintbrush
- Gloss or satin varnish/sealant
- Small cup of water
- Smooth work surface or mat
Step 1: Creating the Base Shape
-
Prepare the Clay:
Begin by kneading a ball of white air-dry clay until it is soft, pliable, and free of cracks. If it feels too dry, add a tiny drop of water. -
Roll the Slab:
Roll the clay out onto your smooth surface to a consistent thickness of about 1/4 inch (6mm). Ensure the surface is even. -
Position the Template:
Place your chosen leaf (real or artificial) onto the rolled slab. I find pressing it down gently with my palm helps it stick slightly before cutting. -
Cut the Leaf Shape:
Using a craft knife, carefully trace around the outer edge of the leaf. Keep your blade vertical to ensure a clean, straight edge. -
Form the Rim:
Remove the excess clay. Gently use your fingers and a little water to smooth the cut edges, softening any sharpness. -
Shape the Dish:
Lift the clay leaf carefully and place it into a shallow bowl. Gently press the center down so the edges curve upward, mimicking the natural curl of a dried leaf.
Vein Definition Tip
If your leaf doesn’t have deep veins, draw over the veins on the back of the leaf with a dull pencil before pressing it into the clay.
Step 2: Adding the Inner Detail
-
Roll the Inner Layer:
Roll out a second, smaller piece of clay, slightly thinner than the first (about 3-4mm). -
Create the Impression:
Place the same leaf (or a slightly smaller one) vein-side down onto this new clay piece. Roll over it firmly with the rolling pin to imprint the veins deeply. -
Cut the Inner Leaf:
Cut out this second leaf shape, following the outline of the impression you just made. -
Attach the Layers:
Score the back of the small leaf and the center of the large leaf (inside the bowl) with a craft knife. Dab a little water or slip on the scored areas. -
Secure and Smooth:
Press the smaller leaf firmly into the center of the larger one. Smooth the edges of the inner leaf down slightly so it looks integrated, not just stuck on top. -
Final Shaping:
Refine the curved shape in the bowl again if the handling distorted it. Ensure the stem detail is slightly raised. -
Drying Time:
Allow the dish to dry completely in the bowl for 24-48 hours. Rotate it occasionally to ensure even airflow.
Step 3: Finishing and Painting
-
Sand Imperfections:
Once fully dry and hard, use fine-grit sandpaper to smooth any rough edges on the rim or the underside. -
Base Coat:
Paint the entire dish with a creamy off-white acrylic paint. You may need two coats for full opacity. -
Highlight the Texture:
Mix a very watery wash of light beige paint. Brush it into the vein impressions and immediately wipe the surface with a paper towel, leaving the darker color only in the deep grooves. -
Create the Speckles:
Dilute a small amount of dark brown paint with water. Dip an old toothbrush into it. -
Splatter Technique:
Hold the toothbrush over the dish and run your thumb across the bristles to flick tiny specks of paint onto the surface. Practice on paper first to control the spray. -
Seal the Piece:
Finish by applying a coat of gloss or satin varnish to protect the clay and give it a polished, ceramic-like sheen.
Warping Woes?
If the clay curls too much while drying, place a small bag of rice or beans in the center of the dish to weigh it down gently.
Now your nature-inspired dish is ready to organize your treasures on a bedside table or vanity


Personalized Name Keychains

These charming, personalized keychains feature a stamped initial on a textured terracotta-colored clay disc, finished with a matching tassel and gold hardware. Their rustic yet polished look makes them a perfect, profitable item for your next craft fair.
Step-by-Step
Materials
- Air dry clay (terracotta or reddish-brown color)
- Small oval clay cutter (approx. 1.5 – 2 inches)
- Acrylic rolling pin
- Alphabet stamp set (serif font preferred)
- Small straw or cocktail stick (for the hole)
- Gold keyring with chain
- Gold jump rings (approx. 6mm – 8mm)
- Embroidery floss (matching terracotta/rust color)
- Gold embroidery thread or thin gold wire
- Sheet of cardstock or piece of cardboard
- Sandpaper (fine grit)
- Glossy varnish or sealant (optional)
- Jewelry pliers (flat nose and round nose)
- Scissors
Step 1: Shaping the Clay Base
-
Condition the clay:
Begin by pinching off a small amount of your terracotta-colored air dry clay. Knead it in your hands for a minute until it feels soft, pliable, and free of any cracks. -
Roll it out:
Using an acrylic rolling pin, flatten the clay to a uniform thickness of about 3mm to 4mm. I find that using depth guides or two stacks of playing cards on either side helps keep it perfectly even. -
Cut the shape:
Press your oval cutter firmly into the rolled clay. Give it a tiny wiggle before lifting to ensure a clean cut, then gently remove the excess clay from around the shape. -
Smooth the edges:
Dip your finger in a tiny bit of water and run it gently around the perimeter of the oval to smooth out any sharp edges or burrs left by the cutter. -
Create the hanging hole:
Use a small straw or a cocktail stick to pierce a hole near the top center of the oval. Make sure the hole isn’t too close to the edge—leave at least 3mm of clay margin for strength. -
Add surface texture:
For that rustic, stone-like look seen in the photo, gently tap the surface of the clay with a stiff-bristled toothbrush or a crumpled ball of aluminum foil. This adds subtle pitting and dimension.
Pro Tip: Darker Letters
To make the initial pop, dip your stamp in brown acrylic paint before pressing, or carefully paint inside the dried impression with a fine brush later.
Step 2: Stamping and Drying
-
Align your stamp:
Practice stamping on a scrap piece of clay first to gauge how much pressure you need. Then, hold your chosen letter stamp directly over the center of the oval. -
Press the initial:
Press the stamp firmly and evenly into the clay. Lift it straight up to avoid dragging the clay and distorting the letter impression. -
Let it dry completely:
Place the clay piece on a clean, flat surface to dry. Depending on humidity, this usually takes 24-48 hours. Carefully flip the piece halfway through the dry time to prevent warping. -
Sand for perfection:
Once fully cured and hard, check the edges again. If there are any rough spots, lightly buff them away with fine-grit sandpaper for a professional finish. -
Seal (Optional):
Depending on the brand of clay, you might want to apply a thin coat of matte or satin varnish to protect the piece from moisture, though leaving it raw maintains the matte, earthy aesthetic.
Troubleshooting: Warping
If your clay curls up while drying, place a lightweight book on top of it once it’s semi-dry (leather hard) to force it to dry perfectly flat.
Step 3: Making the Tassel
-
Wrap the thread:
Cut a piece of strong cardstock about 2 inches wide. Wrap your terracotta embroidery floss around this card roughly 20-30 times until you have a nice, full bundle. -
Secure the top:
Slide a separate piece of floss or a jump ring under the loops at one end of the card and tie it tightly. This will be the top loop of your tassel. -
Cut the loops:
Slide the bundle off the card and use sharp scissors to cut through the loops at the bottom end, creating the fringe. -
Bind the neck:
Take your gold embroidery thread (or thin gold wire) and wrap it tightly around the ‘neck’ of the tassel, about 1/4 inch from the top. Tie it off securely and trim the ends or tuck them inside. -
Trim the fringe:
Comb through the strands with your fingers, then trim the bottom straight across so the tassel looks neat and uniform.
Step 4: Assembly
-
Attach the clay piece:
Open a gold jump ring using your two pliers (twist the ring open, don’t pull apart). Thread it through the hole in your clay intial and attach it to the main keyring chain. Close the ring securely. -
Attach the tassel:
Open another jump ring and thread it through the top loop of any jump ring already on the tassel. Connect this to the same spot on the keyring chain where the clay piece is attached. -
Final check:
Give everything a little shake to ensure the jump rings are fully closed and the components hang freely without tangling.
Now you have a stylish, personalized accessory ready to package up or gift directly to a friend


Coaster Sets With Texture and Patterns
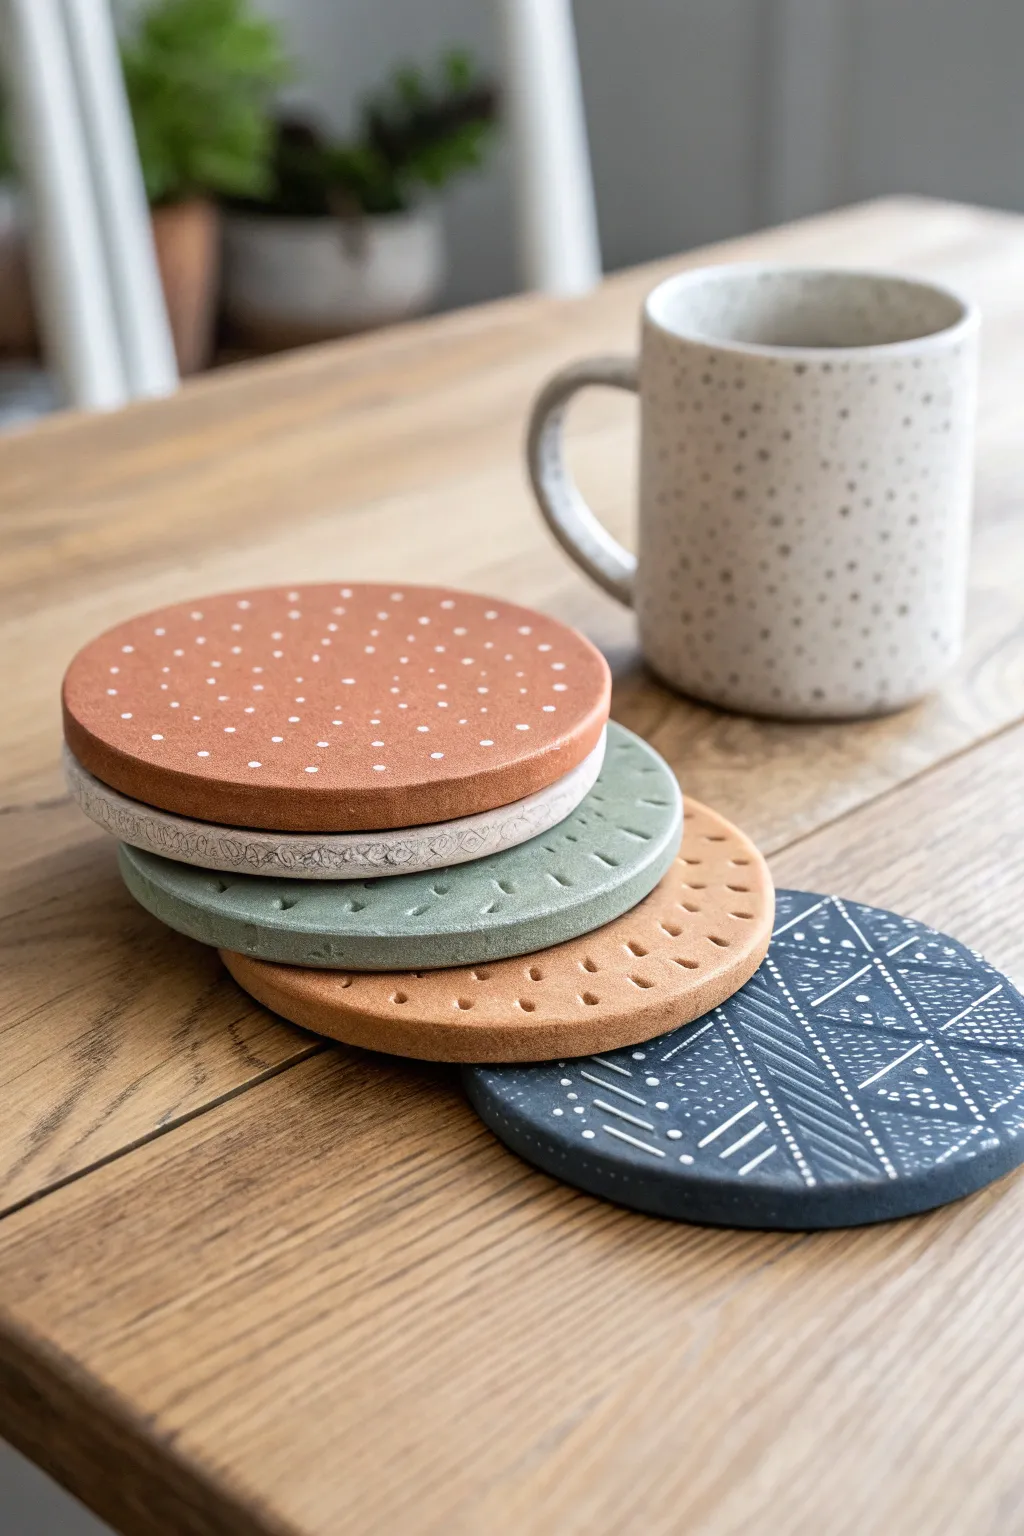
These chic, stackable coasters combine earthy terracotta tones with modern geometric patterns for a high-end boutique look. Using simple household tools to create texture, you’ll craft a durable and stylish set that’s perfect for gifting or selling.
Step-by-Step Tutorial
Materials
- Air dry clay (white and terracotta/brown)
- Acrylic paints (terracotta, sage green, sandy beige, navy blue, white)
- Round cookie cutter (approx. 4 inches) or a jar lid
- Rolling pin
- Two wooden guide sticks (1/4 inch thick) or playing cards
- Sandpaper (fine grit)
- Pottery wire or dental floss
- Stylus tool, toothpick, or empty ballpoint pen
- Plastic wrap/cling film
- Mod Podge or waterproof varnish/sealer
- Felt backing (optional)
Step 1: Shaping the Base
-
Prepare the workspace:
Lay down a non-stick mat or piece of parchment paper to protect your surface. Knead your air dry clay until it feels soft and pliable, ensuring there are no air bubbles trapped inside. -
Roll out the clay:
Place your clay ball between two wooden guide sticks. I find this simple trick guarantees every coaster is exactly the same thickness. Roll the clay flat until the rolling pin rests on the guides. -
Cut the circles:
Press your round cutter firmly into the clay. If you don’t have a cutter, place a jar lid on top and trace around it with a craft knife. -
Smooth the edges:
Dip your finger in a tiny bit of water and run it along the cut edges of the clay circles to round off any sharp corners or jagged bits.
Keep it Crumb-Free
When sanding air dry clay, do it outside or wear a mask. Wipe the dust away with a slightly damp cloth or baby wipe before painting to ensure a smooth finish.
Step 2: Adding Texture & Drying
-
Create the stippled texture:
For the terracotta and beige coasters, take a stylus tool or a blunt toothpick. Gently press small, random indentations across the entire surface to create a dispersed dot pattern. -
Create the linear dashes:
For the green coaster, use a small flat-head screwdriver or modeling tool to press short, radiating dash marks in a circle pattern. -
Create the geometric pattern:
For the navy coaster, use a needle tool to lightly scratch or press lines. Draw geometric triangles and populate them with rows of dots or parallel lines. -
Slow drying process:
Move the coasters to a wire rack. Place a light book on top of them (with parchment paper in between) for the first 12 hours to prevent curling as they dry. -
Full cure time:
Let the coasters dry completely for 24-48 hours. They should feel light and room temperature to the touch, not cool. -
Sanding:
Once fully dry, lightly sand the edges and flat surfaces with fine-grit sandpaper to achieve a professional, smooth finish.
Fixing the Curl
If your coaster dries warped, dampen the concave side slightly with a sponge, then place it under a heavy stack of books overnight to flatten it back out.
Step 3: Painting & Sealing
-
Base coat application:
Apply your base colors. Paint the top coaster terracotta, the second beige, the third sage green, the fourth sandy brown, and the bottom one navy blue. You may need two coats for opaque coverage. -
Highlighting textures:
For the top terracotta coaster, dip a fine detail brush or a toothpick into white paint. Carefully fill each little indentation with a dot of white. -
Painting the geometric lines:
For the navy coaster, use a very fine liner brush and white paint to trace over your etched geometric lines, making the pattern pop against the dark background. -
Adding texture wash:
For the beige and green coasters, mix a tiny bit of dark grey paint with water to make a thin wash. Brush it over the textures and immediately wipe the surface with a paper towel, leaving pigment only in the crevices. -
Sealing against moisture:
Since these are coasters, waterproofing is vital. Apply 2-3 coats of a high-quality waterproof varnish or dishwasher-safe Mod Podge, allowing full drying time between coats. -
Finishing touches:
Glue a circle of felt or small cork pads to the bottom of each coaster to protect your furniture surfaces from scratches.
Stack your finished set on a coffee table to instantly add a touch of handmade artisan charm to your decor

What Really Happens Inside the Kiln
Learn how time and temperature work together inside the kiln to transform clay into durable ceramic.
Mini Succulent Planters That Ship Well

Create this trendy, minimalist succulent pot that features a beautiful textural contrast between a smooth, painted top and a raw, earthy base. Its compact cylinder shape makes it sturdy enough to ship, while the clean two-tone design appeals to modern plant lovers everywhere.
Step-by-Step Guide
Materials
- Air dry clay (white or light grey)
- Rolling pin
- Craft knife or clay cutter
- Cylindrical mold (like a small glass jar or cardboard tube)
- Sponge and small bowl of water
- Sandpaper (medium and fine grit)
- Acrylic paint (creamy white or speckled ceramic effect)
- Paintbrush (soft bristle flat)
- Painters tape or masking tape
- Matte spray varnish (sealant)
Step 1: Shaping the Vessel
-
Condition the clay:
Begin by taking a generous handful of air dry clay and kneading it in your hands until it is warm, pliable, and free of air bubbles. -
Roll the base:
Roll out a slab of clay to about 1/4 inch thickness. Place your cylindrical mold on the clay and trace around the bottom with your craft knife to create a circular base. -
Create the walls:
Roll out a long rectangular strip of clay, also 1/4 inch thick. Ensuring the thickness is uniform is key for structural integrity. -
Size the strip:
Wrap the strip around your mold to measure the length, cutting off absolute excess but leaving a slight overlap for joining. -
Score and slip:
Use a needle tool or knife to scratch cross-hatch marks (scoring) on the edge of the circular base and the bottom edge of your strip. Dab a little water (slip) on these rough areas. -
Attach the wall:
Wrap the rectangular strip around the base disc. Gently press the scored edges together to bond them. -
Close the side seam:
Where the wall ends meet, score and slip the vertical seam. Blend the clay together using your thumb or a modeling tool until the line disappears. -
Drainage hole:
Since succulents hate sitting in water, use a straw or small tool to punch a drainage hole in the center of the bottom.
Shipping Success Tip
Make the walls slightly thicker (around 1/4 inch) than usual. Thin clay is fragile, but a chunky, robust wall survives shipping much better.
Step 2: Refining and Drying
-
Smooth the surface:
Dip your finger or a slightly damp sponge into water and run it over the entire outside surface to remove fingerprints and bumps. I like to pay special attention to the rim, slightly rounding it for a softer look. -
Initial dry:
Let the pot dry slowly away from direct heat for 24-48 hours. Rotate it occasionally so it dries evenly without warping. -
Sanding:
Once bone dry, use medium grit sandpaper to smooth out any major imperfections, then switch to fine grit for a silky finish. Wipe away all dust.
Step 3: Decorating the Two-Tone Look
-
Tape the line:
Apply a strip of painter’s tape horizontally around the pot, slightly below the halfway mark. Press the tape edge down firmly to prevent paint bleeding. -
Paint the top:
Apply your creamy white acrylic paint to the area above the tape, covering the exterior wall and the inner rim. -
Add speckles (optional):
To mimic the ceramic glaze look in the photo, you can flick a tiny amount of watered-down black or brown paint onto the white section using an old toothbrush. -
Remove tape:
While the paint is still slightly tacky (not fully dry), carefully peel off the tape to reveal a crisp line between the painted top and the raw clay bottom. -
Create the raw texture:
To enhance the bottom section’s earthy look as seen in the photo, you can lightly scuff it with coarse sandpaper or dab it with a dry, stiff brush to create subtle horizontal striations. -
Seal the pot:
Apply a matte spray varnish to the entire piece, inside and out. This protects the raw clay from moisture when you eventually water your succulent.
Level Up: Faux Glaze
For a high-end look, use a high-gloss varnish ONLY on the white painted section and leave the bottom matte. It creates a realistic glazed ceramic effect.
Now you have a stylish, boutique-worthy planter ready to house a cute Echeveria
Ring Cones and Ring Holders
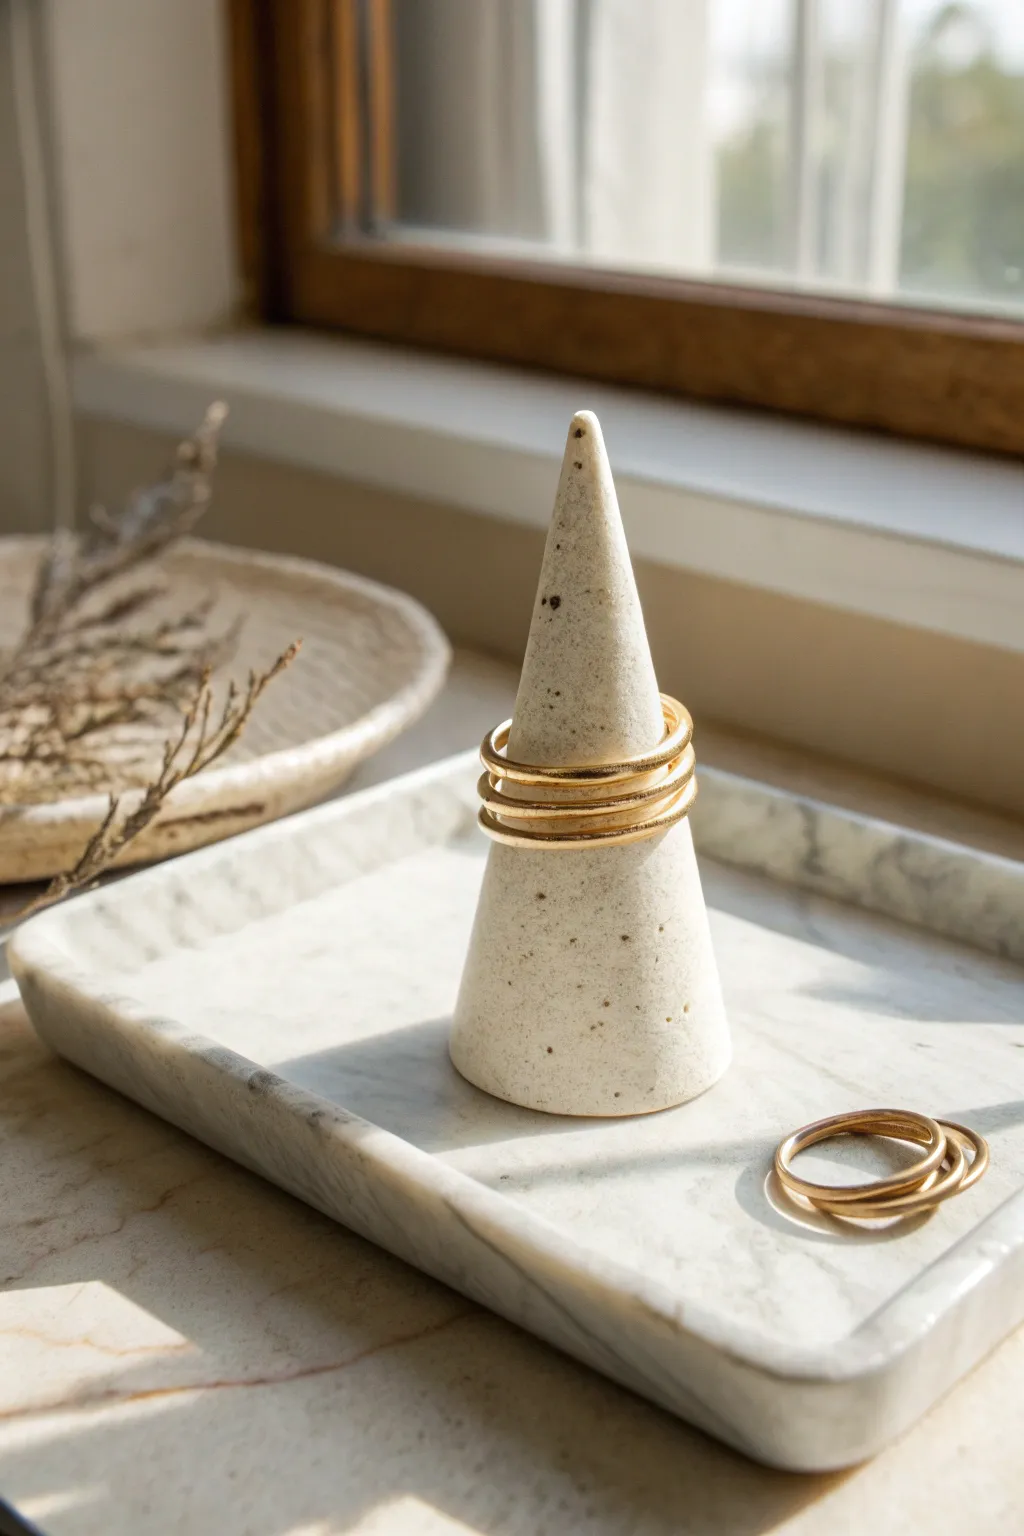
Simple yet undeniably elegant, this minimalist ring cone mimics the look of high-end speckled stoneware without needing a kiln. Its clean, geometric shape and faux-ceramic finish make it a perfect, trendy item for your online shop or craft fair booth.
Detailed Instructions
Materials
- White air dry clay
- Rolling pin
- Craft knife or clay cutter
- Fine sandpaper (220-400 grit)
- Small bowl of water
- Used coffee grounds or black pepper (for speckling)
- Clear matte varnish or sealant
- Soft paintbrush
Step 1: Preparing the Clay
-
Condition the clay:
Start by taking a golf-ball-sized amount of white air dry clay. Knead it in your hands for a minute or two until it feels warm, pliable, and free of cracks. -
Add the speckles:
Flatten the clay slightly and sprinkle a small pinch of dried used coffee grounds or cracked black pepper into the center. These will create that faux-stone speckled effect. -
Incorporate the texture:
Fold the clay over the grounds and knead thoroughly again. You want the specks distributed evenly throughout the entire ball for a consistent pattern. -
Form a ball:
Roll the speckled clay between your palms to create a smooth, tight sphere. Ensure there are no major seams or air pockets visible.
Pro Tip: Seamless Base
To get a perfectly flat bottom, gently drag the base of your wet clay cone across a piece of sandpaper before it dries. This creates friction and levels it instantly.
Step 2: Shaping the Cone
-
Start the tapered shape:
Place the ball on your work surface. Using the flat of your palm, begin rolling the clay back and forth while applying slightly more pressure to one side of the ball. -
Refine the cone:
Continue rolling until a cone shape emerges. You want a distinct point at the top and a wider base at the bottom. Aim for a height of about 3 to 4 inches. -
Flatten the base:
Pick up the cone and gently tap the wide bottom against your table to flatten it. Stand it up to check that it sits perfectly vertical and doesn’t lean. -
Smooth the surface:
Dip your finger in a little water and run it over the clay to smooth out any fingerprints or uneven ridges. The smoother it is now, the less sanding you’ll do later. -
Check proportionality:
I always slide a ring onto the cone at this stage to test the fit. If the cone is too wide, roll it longer; if it’s too skinny, gently compress it downwards. -
Final drying adjustments:
Give the base a final tap to ensure stability. Place the cone in a safe, dry area away from direct heat.
Step 3: Finishing Touches
-
Let it dry completely:
Allow the cone to air dry for 24 to 48 hours. The clay will turn from a greyish off-white to a stark, chalky white when fully dry. -
Sand for imperfections:
Take your fine-grit sandpaper -
Refine the tip:
Pay special attention to the very tip of the cone, gently rounding it off so it isn’t dangerously sharp or prone to chipping. -
Clean off dust:
Wipe the cone down with a slightly damp cloth or a dry soft brush to remove all the sanding dust before sealing. -
Apply the first coat:
Using a soft brush, apply a thin, even layer of clear matte varnish. This seals the clay and protects the organic speckles. -
Seal the bottom:
Once the sides are dry to the touch, flip the cone over and seal the bottom base to prevent moisture absorption from surfaces. -
Final cure:
Let the varnish cure according to the manufacturer’s instructions before placing any jewelry on the finished piece.
Troubleshooting: Cracking
If small cracks appear while drying, don’t panic. Make a paste of clay and water (slip) to fill the crack, let it dry, and then sand it smooth.
Display your favorite rings on your new modern holder and enjoy the organized simplicity it brings to your space


The Complete Guide to Pottery Troubleshooting
Uncover the most common ceramic mistakes—from cracking clay to failed glazes—and learn how to fix them fast.
Cute Fridge Magnets in Tiny Series
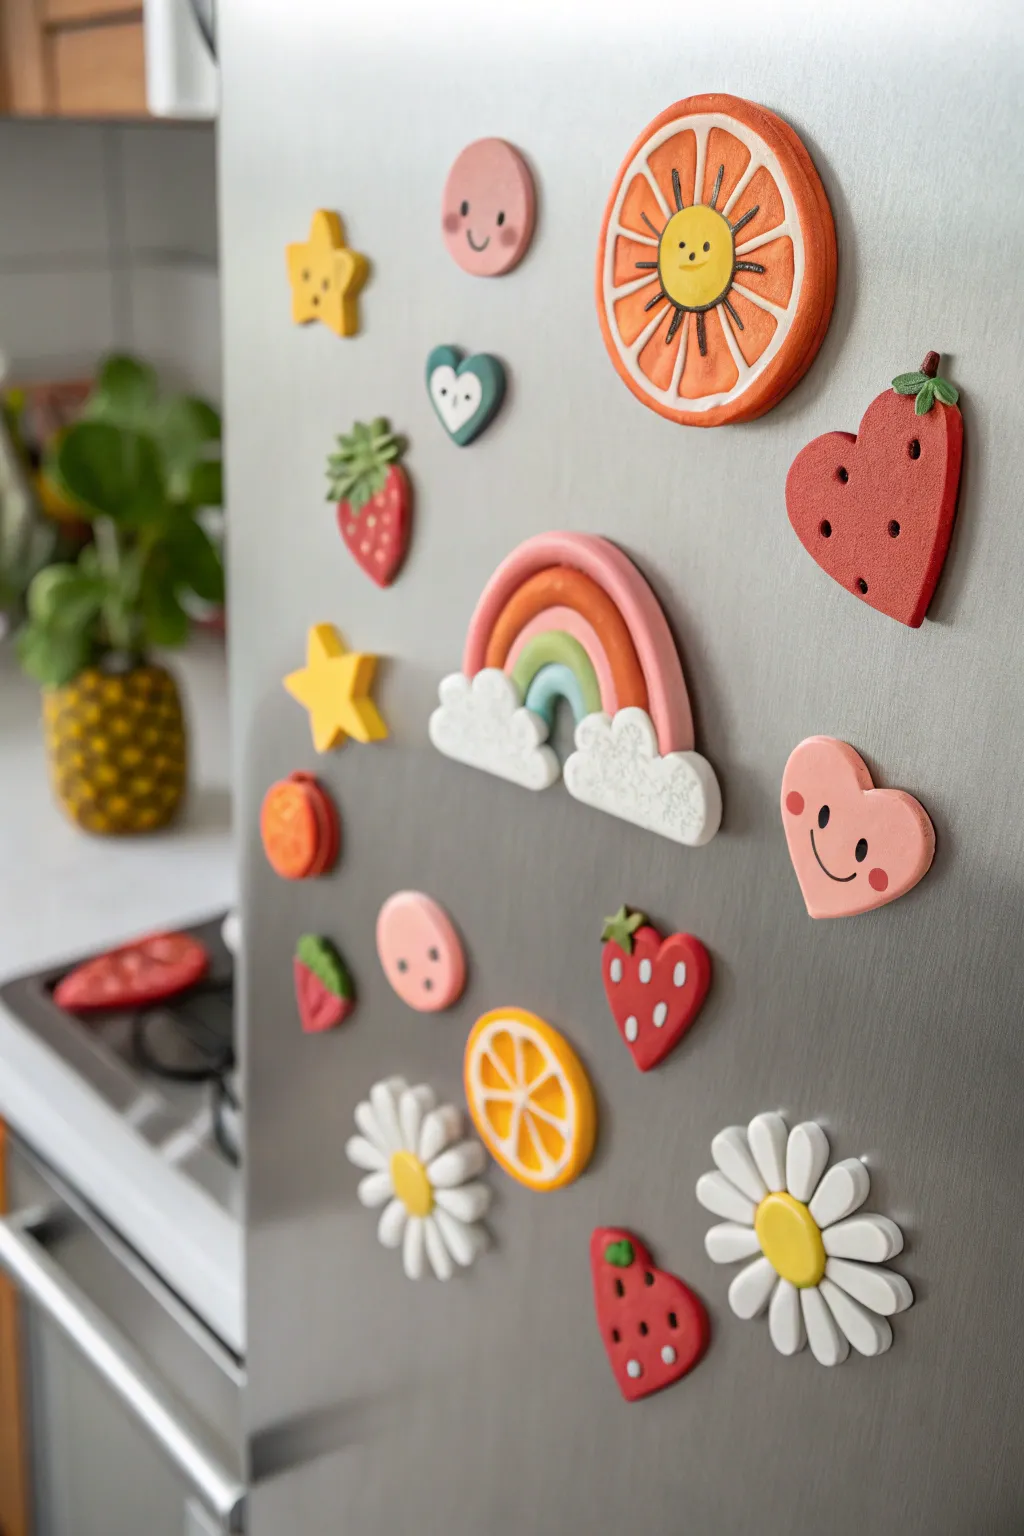
Brighten up any magnetic surface with this collection of kawaii-inspired magnets crafted from air dry clay. From cheerful citrus slices to smiley clouds, these tiny treasures feature a smooth, matte finish that makes them perfect for gifts or market stalls.
Step-by-Step
Materials
- White air dry clay
- Acrylic paints (pastel pink, bright red, orange, yellow, green, white, black)
- Small rolling pin
- Clay modeling tools (ball tool, needle tool)
- Exacto knife or clay cutter
- Small round magnets
- Superglue or heavy-duty craft glue
- Fine grit sandpaper
- Matte varnish (optional)
- Small paintbrushes
Step 1: Shaping the Clay Base
-
Condition the clay:
Start by taking a chunk of air dry clay and kneading it in your hands until it becomes warm, soft, and pliable. This prevents cracks later on. -
Roll it out:
Roll the clay onto a smooth, non-stick surface to a thickness of about 1/4 inch (6mm). You want them thick enough to be sturdy but light enough for a small magnet. -
Cut the rainbow shape:
For the rainbow, use a knife to cut a wide arch shape. Don’t worry about the individual stripes yet; you are just creating the backing shape. -
Form the clouds:
Roll two small balls of clay, flatten them slightly, and press them onto the bottom ends of your arch. Use a tool to texture them or scallop the edges for a fluffy look. -
Create the fruit slices:
Use a small circular cutter or a jar lid to stamp out perfect circles for the orange and lemon slices. Smooth the edges with a bit of water on your finger. -
Sculpt strawberries and hearts:
Hand-mold tear-drop shapes for strawberries and classic heart shapes. For the strawberry tops, attach tiny flattened leaves made from small bits of clay. -
Make the daisies:
Roll 7-8 small teardrop shapes for petals and arrange them in a circle. Press a small ball of clay into the center to bind them together. -
Dry completely:
Place all your shapes on a drying rack or parchment paper. Let them dry for 24-48 hours, flipping them halfway through to ensure even drying.
Step 2: Painting and Details
-
Sand for smoothness:
Once bone dry, gently sand any rough edges or fingerprints with fine-grit sandpaper until the surface is buttery smooth. -
Base coats:
Paint the fruit circles solid orange or yellow. Paint the strawberries red or pink. Apply white to the daisies. You may need two coats for opaque coverage. -
Paint the rainbow stripes:
On your arch shape, carefully paint curved stripes in pink, orange, yellow, and green. I find using a flat-edged brush helps keep the lines crisp. -
Add fruit segments:
For the citrus slices, mix a lighter version of your base color (or use white). Paint triangle segments inside the circle, leaving thin lines of the dark base color visible as the ‘pith’ and rind. -
Draw seeds:
Use a fine-point detail brush or a toothpick dipped in paint to add tiny seeds to the strawberries and orange slices. -
Add kawaii faces:
Using a very fine tool or black paint pen, add tiny wide-set eyes and small smiles to the fruit centers, clouds, and hearts to bring them to life. -
Seal the work:
Once the paint is fully dry, apply a coat of matte varnish. This protects the paint from chipping and gives it a professional finished look. -
Attach the magnets:
Flip the pieces over. Apply a drop of strong superglue to the back and press a round magnet firmly into place. Let the glue cure completely.
Sticky Situation
If your magnets keep sliding down the fridge, the clay shape is too heavy. Try weighing your dry clay piece and buying magnets rated for double that weight.
Smoother Surfaces
Dip your finger in water and smooth the raw clay edges before drying. This reduces the amount of sanding you’ll need to do later.
Now your fridge has a splash of color and personality ready to hold up your important notes
Modern Candle Holders for Tapers
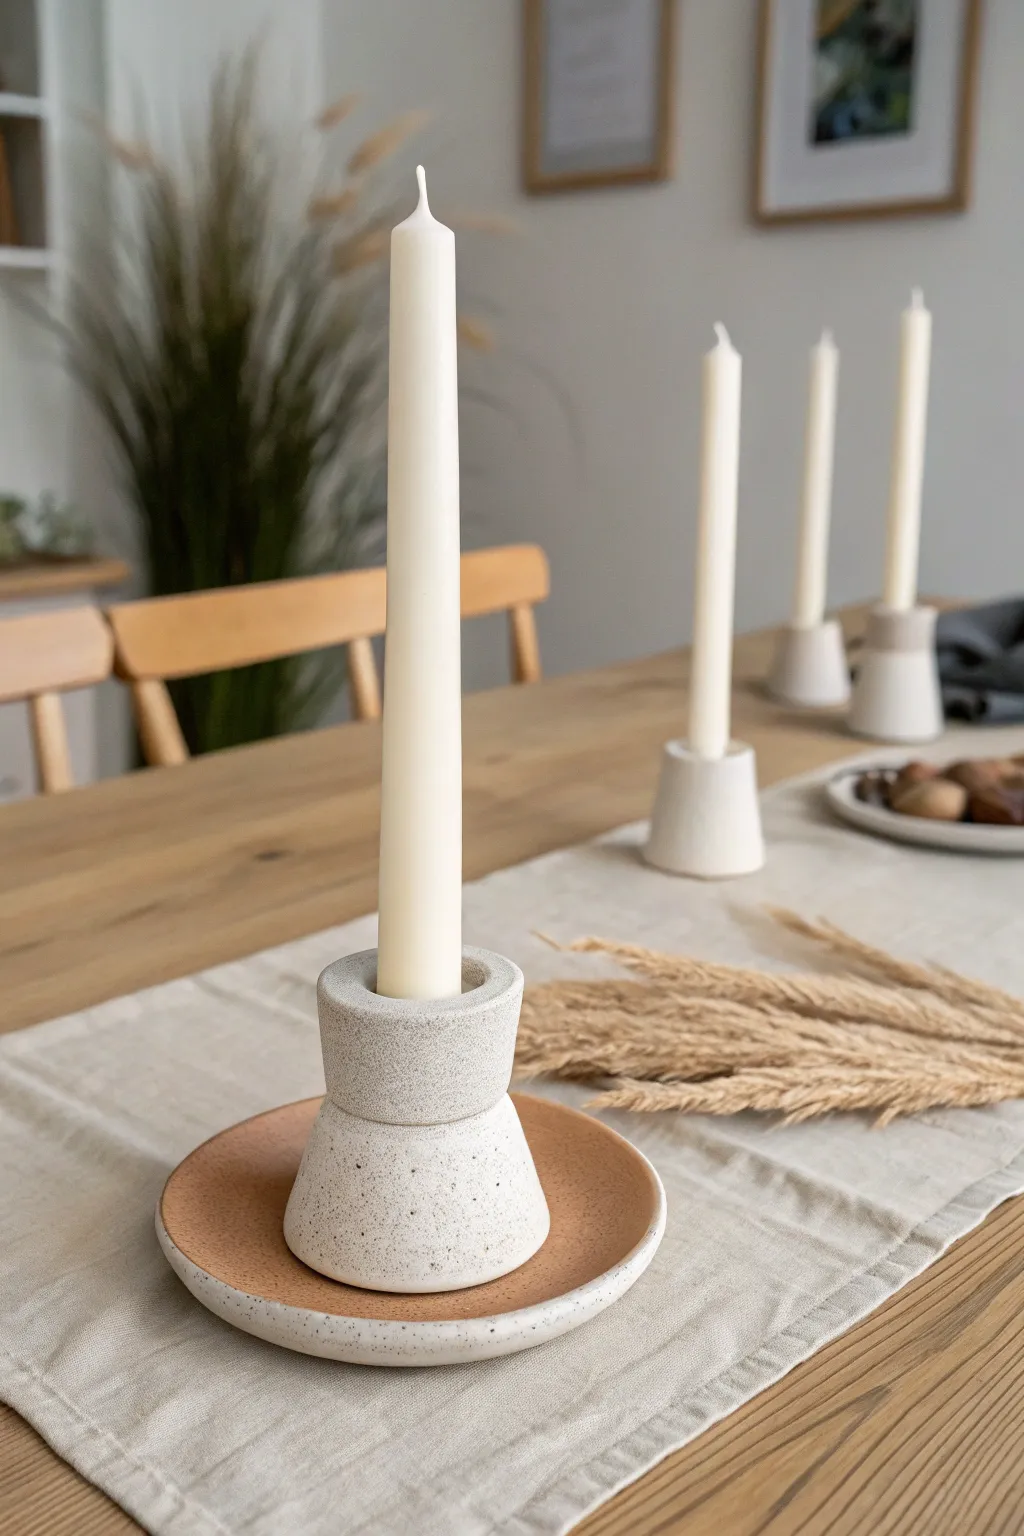
Embrace the sleek simplicity of modern design with this geometric taper candle holder. Featuring a subtle speckled finish and a modular, stacked appearance, this project combines functionality with the high-end look of artisanal ceramics.
Detailed Instructions
Materials
- White air dry clay
- Rolling pin
- Clay knife or craft blade
- Small circular cookie cutters (two sizes)
- Small bowl or saucer (as a mold)
- Sanding sponge (fine grit)
- Acrylic paint (terracotta or warm brown)
- Old toothbrush
- Black acrylic paint (watered down)
- Sealant or varnish (matte finish)
- Water and slip (clay and water mix)
- Taper candle (for sizing)
Step 1: Forming the Base Dish
-
Roll the Base Slab:
Begin by conditioning a chunk of white air dry clay until it’s pliable. Roll it out into an even slab, approximately 1/4 inch thick so it has enough weight to be stable. -
Cut the Circle:
Using a large circular cutter or by tracing around a bowl, cut out a clean circle about 5-6 inches in diameter. This will act as the catchment tray for any wax drips. -
Shape the Rim:
Gently lift the edges of your clay circle. I like to press the clay into a shallow bowl or saucer to help it hold a slight curve while it firms up. -
Smooth the Edges:
Dip your finger in a little water and run it along the rim of the dish to remove any roughness or sharp edges created by the cutting tool.
Weighted Stability
Add a small metal washer inside the bottom cone before attaching it to the dish. This hidden weight prevents the holder from tipping over when tall candles are added.
Step 2: Building the Central Holder
-
Create the Bottom Cone:
Take a new ball of clay and shape it into a truncated cone—wider at the bottom and slightly narrower at the top. It should be about 1.5 inches tall. -
Create the Top Collar:
Form a second, smaller cylinder or slightly tapered shape that will sit fast on top of the first cone. This piece needs to be visually distinct, creating that ‘stacked’ architectural look. -
Size the Hole:
Press a standard taper candle deeply into the center of the top collar piece to create the perfect socket. Wiggle it slightly to ensure the fit isn’t too tight, as clay shrinks when drying. -
Join the Stack:
Score (scratch) the top of the bottom cone and the bottom of the top collar. Add a dab of clay slip and press them firmly together. -
Blend the Seams:
Using a modeling tool or your thumb, very gently blend the clay where the two pieces meet just enough to secure them, but keep the definition of the two distinct shapes visible. -
Attach to Base:
Score the center of your drying dish and the bottom of your stacked holder. Apply slip and press the holder firmly into the center of the dish.
Gilded Edge Upgrade
Elevate the look by painting just the very rim of the dish with gold leaf paint. This adds a moment of luxury that contrasts beautifully with the raw, speckled clay vibe.
Step 3: Finishing and Painting
-
Dry Completely:
Allow the entire structure to dry for at least 24-48 hours. Turn it occasionally if possible to let air reach the bottom of the dish. -
Sand for Smoothness:
Once bone dry, use a fine-grit sanding sponge to go over the entire piece. Focus on the rims and the join lines to get that professional, manufactured look. -
Paint the Interior:
Mix a warm terracotta or brown acrylic paint. Carefully paint only the interior surface of the bottom dish, leaving the rim and the central ‘stacked’ holder the natural white of the clay. -
Create the Speckle:
Dilute a tiny drop of black paint with water. Dip an old toothbrush into this mixture and run your thumb across the bristles to flick tiny specks over the white parts of the holder. -
Simulate Stone Texture:
For added realism, you can also add a few flicks of grey or tan paint using the same toothbrush technique. This mimics the look of stoneware clay. -
Seal the piece:
Apply a coat of matte varnish or sealant over the entire piece to protect the paint and the clay from moisture and dust.
Place your finished holder on a linen runner for a cozy, sophisticated centerpiece

TRACK YOUR CERAMIC JOURNEY
Capture glaze tests, firing details, and creative progress—all in one simple printable. Make your projects easier to repeat and improve.
Tiny Bud Vases for Single Stems
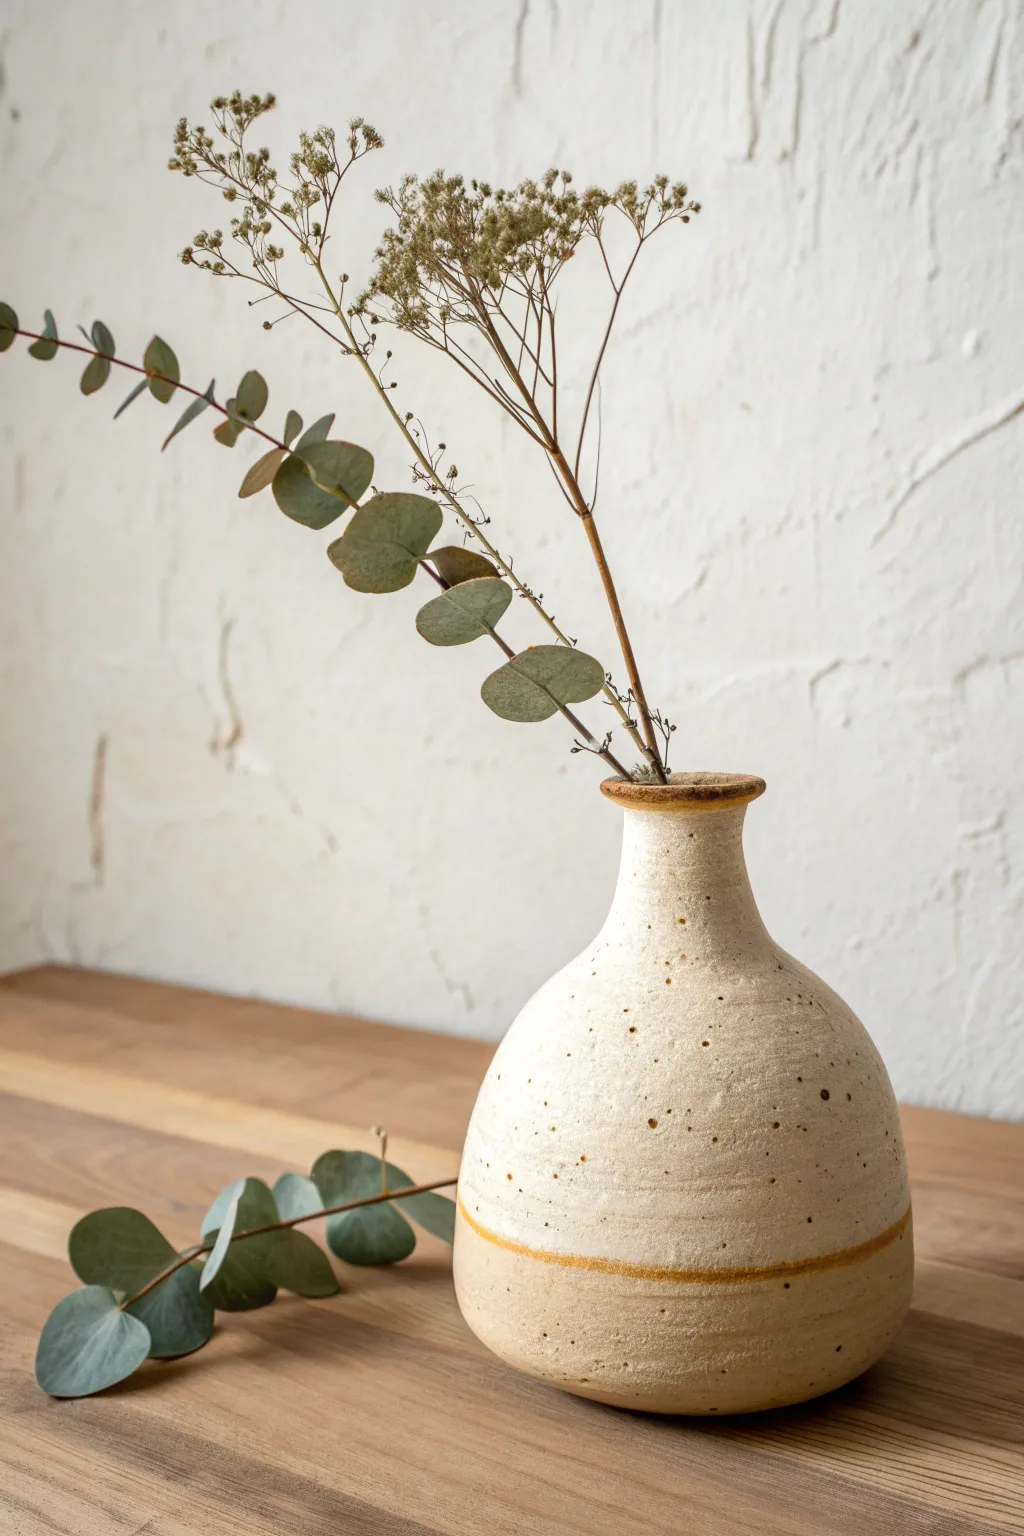
You don’t need a kiln to achieve that organic, speckled stoneware aesthetic. This charming bud vase mimics wheel-thrown pottery with its bulbous base and narrow neck, finished with a clever paint technique to create faux clay speckles.
Step-by-Step Tutorial
Materials
- White air-dry clay (approx. 500g)
- Small rolling pin
- Clay cutting tool or knife
- Sponge
- Water
- Fine grit sandpaper (220-400 grit)
- Acrylic paints: Cream/Off-white, Burnt Sienna, Raw Umber
- Old toothbrush or stiff bristle brush
- Soft synthetic paintbrush
- Matte or satin varnish/sealant
- Dried botanicals for display
Step 1: Fomring the Base
-
Prepare the pinch pot:
Start by conditioning a ball of air-dry clay about the size of a tennis ball. Knead it in your hands until it is pliable and crack-free, then smooth it back into a perfect sphere. -
Open the center:
Hold the ball in your palm and gently press your thumb into the center, stopping about half an inch from the bottom to ensure a sturdy base. -
Pinch the walls:
Rotate the ball slowly while rhythmically pinching the clay between your thumb and fingers. Work your way from the bottom up to thin out the walls evenly. -
Shape the bulb:
As you pinch, gently push the walls outward from the inside to create a rounded, bulbous shape. Keep the opening at the top somewhat narrowed rather than wide open. -
Smooth the exterior:
Dip your finger or a sponge in a tiny bit of water and smooth out any deep fingerprints or cracks on the outside surface.
Uneven Drying?
If your vase cracks while drying, it likely dried too fast. Next time, confusingly, cover it loosely with a plastic bag for the first 24 hours to slow the process down.
Step 2: Adding the Neck
-
Roll a coil:
Take a separate small piece of clay and roll it into a thick “snake” or coil on your work surface. Flatten it slightly so it becomes a rectangular strip, wide enough to form a neck. -
Attach the neck:
Place this strip on top of your pinch pot opening to form a cylinder. Score (scratch) both touching surfaces and add a dab of water to act as glue, then press them firmly together. -
Blend the seams:
Use a modeling tool or your finger to drag clay across the seam where the neck meets the body. Smoothing this transition is crucial for structural integrity. -
Flare the rim:
Gently pinch and press the very top edge of the neck outward to create a slight flare. This mimics the look of a wheel-thrown vessel. -
Refine the shape:
Take a step back and look at your vase’s profile. Adjust any lopsided areas by gently patting the clay. I often use a barely damp sponge here to get that final smoothness before drying. -
Add texture lines:
For that handmade pottery vibe, hold a damp sponge against the vase while slowly rotating it. This leaves subtle horizontal striations that look like throwing lines.
Waterproof Hack
Air dry clay isn’t watertight! To hold fresh flowers, insert a small glass test tube or pill bottle inside the neck before the clay dries to create a hidden waterproof liner.
Step 3: Finishing & Painting
-
Dry completely:
Let the vase dry for 24-48 hours. Turn it occasionally so the bottom dries evenly. It is ready when the clay is uniform in color and feels room temperature, not cool to the touch. -
Sand smooth:
Use fine grit sandpaper to gently buff away any sharp ridges or rough patches. Be gentle around the rim, as dried clay can be brittle. -
Base coat:
Mix a warm cream color using white and a tiny drop of brown or yellow ochre. Apply two even coats over the entire vase, letting the paint dry fully between layers. -
Create the stripe:
Mix a watery wash of Burnt Sienna or Ochre paint. Using a small brush, paint a thin, organic band around the lower third of the vase and rim. Keep the line slightly imperfect for a rustic feel. -
Splatter technique:
Dilute Raw Umber paint with a little water. Dip an old toothbrush into this mixture. Hold it near the vase and run your thumb across the bristles to flick tiny speckles onto the surface. -
Control the speckles:
Rotate the vase to ensure even coverage. If you get a blob that’s too big, quickly dab it with a paper towel. The goal is random, fine dustings of color. -
Seal the piece:
Once all paint is bone dry, apply a coat of matte or satin varnish. This protects the finish and deepens the colors slightly.
Place a few stems of dried eucalyptus or baby’s breath inside for a minimalist, earthy display
Simple Incense Holders With Clean Lines
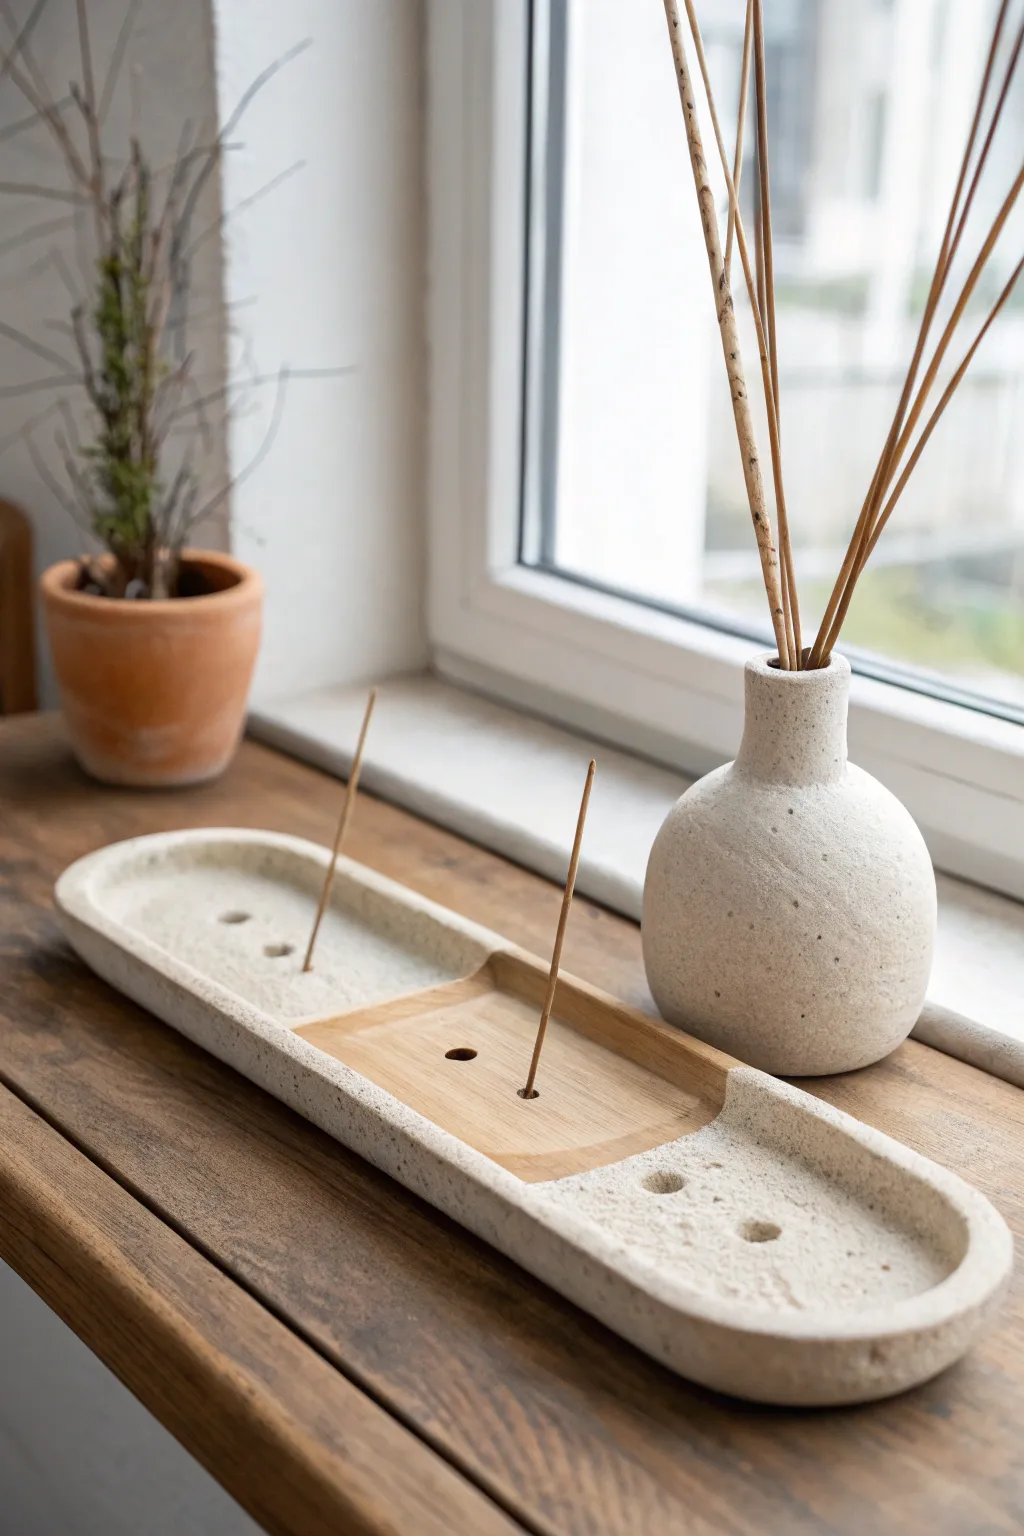
This elegant incense holder combines the raw, stone-like texture of speckled clay with the warmth of natural wood for a truly modern aesthetic. Its elongated oval shape and recessed tray design make it perfect for catching ash while serving as a stunning centerpiece for your meditation space.
Step-by-Step
Materials
- White or stone-effect air dry clay
- Small rectangular piece of thin wood veneer or balsa wood (approx. 3mm thick)
- Rolling pin
- Craft knife or scalpel
- Sandpaper (fine and medium grit)
- Small drill bit or needle tool
- Wood glue or strong craft adhesive
- Matte varnish or sealant
- Ruler
- Bowl of water
- Sponge
Step 1: Shaping the Base
-
Prepare the clay:
Begin by conditioning your clay, kneading it until it is pliable and smooth. If you are using plain white clay and want the speckled look shown, I like to mix in a small amount of coarse black pepper or dry coffee grounds at this stage for that faux-stone effect. -
Roll the slab:
Roll the clay out into a long, thick slab, aiming for a consistent thickness of about 1.5 to 2 centimeters. You want it substantial enough to look like carved stone. -
Cut the oval shape:
Create a paper template for your long oval shape first to ensure symmetry. Place the template on the clay slab and cut around it using a sharp craft knife. Smooth the cut edges with a damp finger immediately. -
Create the recess:
Gently press your thumbs into the center of the oval, leaving a rim of about 0.5cm all around the edge. Work the clay outwards and downwards to create a shallow basin, keeping the bottom relatively flat.
Fixing Cracks
If tiny cracks appear while drying, don’t panic. Mix a small amount of fresh clay with water to make a paste (slip) and fill the cracks. Sand smooth once dry.
Step 2: Integrating the Wood
-
Cut the wood insert:
Cut your thin wood piece into a small rectangle that fits proportionally in the center of your oval. Sand the edges of the wood so they are smooth. -
Mark the placement:
Place the wood rectangle into the center of the clay recess. Lightly trace around it with a needle tool to mark its position. -
Carve the seat:
Remove the wood and carefully carve out a deeper recess within your traced lines. You want the wood to sit flush with or slightly below the clay surface, not on top of it. Test the fit frequently. -
Details and drying:
While the clay is still soft, use a needle tool or the end of an incense stick to poke holes into the clay base on either side of where the wood will sit. Make sure the holes go deep enough to hold a stick securely but do not go all the way through the bottom. -
Slow drying:
Set the clay aside to dry. To prevent warping, place a light weight (like a small book on parchment paper) on the flat sections if possible, and let it dry slowly away from direct heat for 24-48 hours.
Level Up: Texture
Before drying, gently press a piece of coarse sandpaper or a real stone against the exterior clay walls to give the ‘stone’ a realistic, pitted texture.
Step 3: Finishing Touches
-
Sanding the form:
Once bone dry, sand the entire piece. Start with medium grit to refine the outer curve and rim, then switch to fine grit for a smooth, stone-like finish. Wipe away all dust with a slightly damp sponge. -
Prepare the wood hole:
Drill a small hole in the center of your wood rectangle using a small drill bit that matches the size of your incense sticks. -
Attach the wood:
Apply a strong wood glue or craft adhesive to the back of the wood piece and press it firmly into the carved recess in the clay. Wipe away any excess glue immediately. -
Drill the final holes:
If your clay holes shrank too much during drying, carefully re-drill them or widen them by hand with a twist of a drill bit. -
Seal:
Apply a coat of matte varnish to the clay parts to protect it from ash and moisture. You can leave the wood raw for contrast or seal it as well.
Once the varnish has cured, your sculptural incense holder is ready to bring a sense of calm to your home
Essential Oil Diffuser Stones as Gift Sets
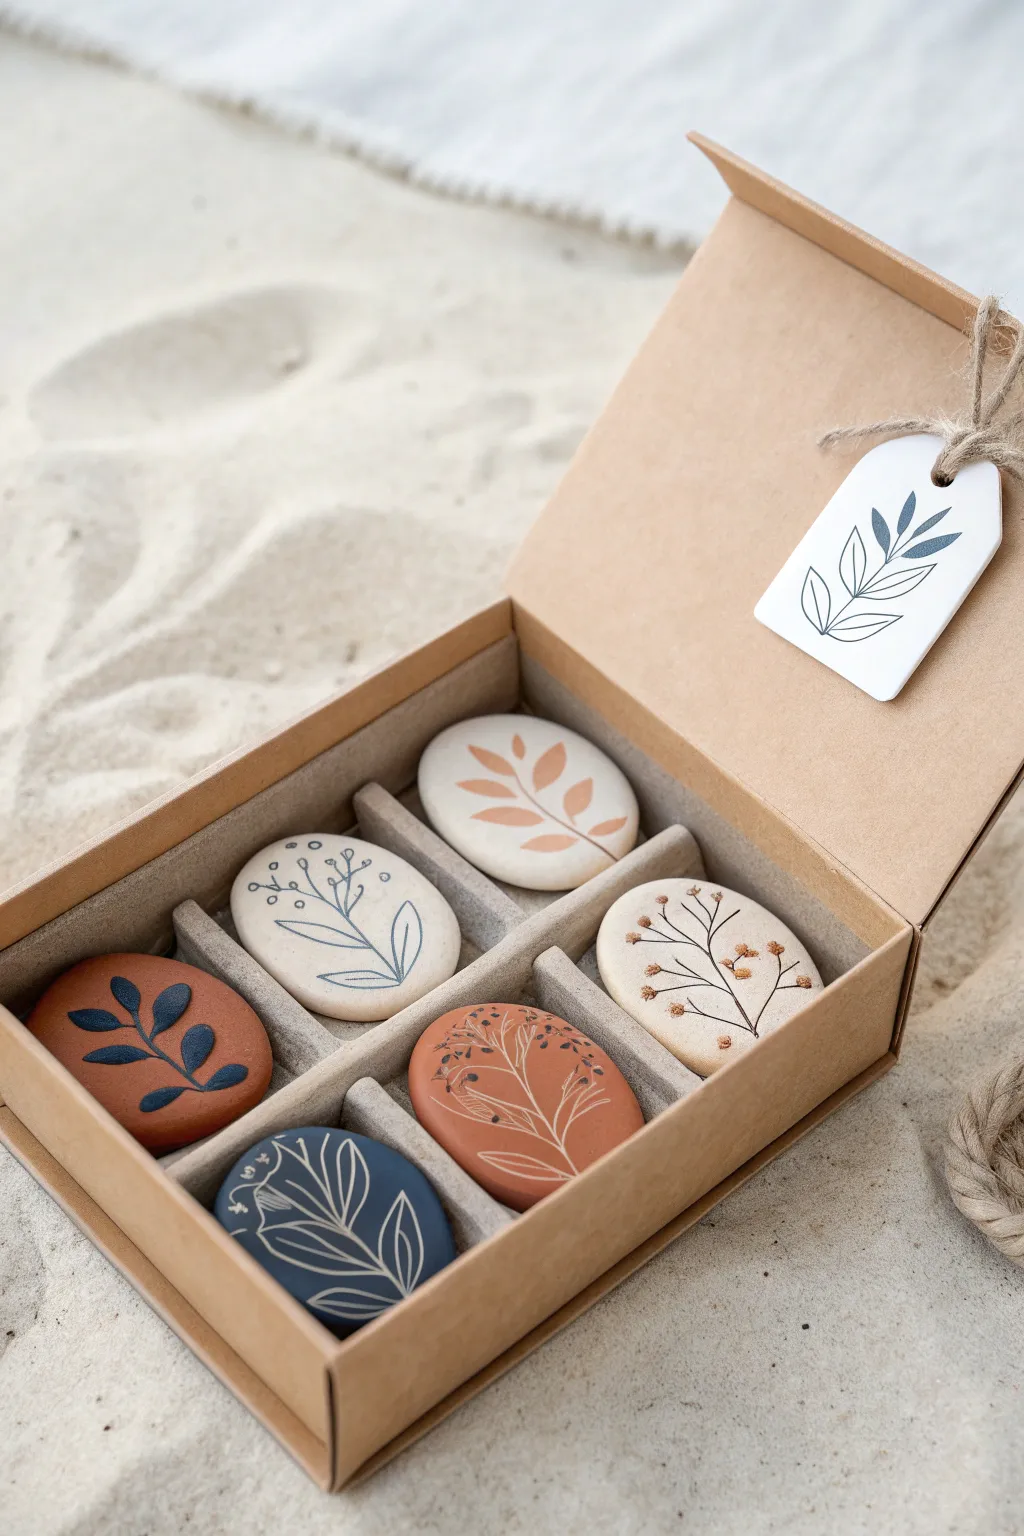
These elegant, palm-sized stones serve as both minimalist decor and natural air fresheners. Crafted from air-dry clay and adorned with delicate botanical line art, this gift set combines earthy aesthetics with olfactory function.
Detailed Instructions
Materials
- White air-dry clay
- Terracotta air-dry clay (or brown pigment)
- Dark blue acrylic paint
- Rolling pin
- Oval cookie cutter (or a template and craft knife)
- Fine-grit sandpaper
- Super fine tip paint pen (black, white, and dark blue)
- Fine detail paintbrush
- Water bowl and sponge
- Cardboard gift box with partitions
- Cardstock for tags
- Jute twine
Step 1: Shaping the Stones
-
Condition the clay:
Start by taking chunks of your white and terracotta air-dry clay. Knead them separately in your hands until they are soft, warm, and pliable. If the clay feels dry, dip your fingers in water and work it in. -
Color mixing (optional):
To achieve the dark blue stone seen in the set, take a portion of white clay and knead in a generous amount of dark blue acrylic paint. Fold the clay repeatedly until the color is solid and uniform. Wear gloves to keep your hands clean. -
Roll out the slab:
Roll your clay out on a smooth work surface to a thickness of about 1/4 to 1/2 inch. You want them substantial enough to absorb oil but not too heavy. -
Cut the shapes:
Use an oval cookie cutter to punch out your shapes. If you don’t have a cutter, trace an oval onto paper, cut it out, place it on the clay, and trace around it with a craft knife. -
Smooth the edges:
Dip your finger in a little water and gently run it around the cut edges of each stone to round them off. This removes the sharp ‘cookie cutter’ look and makes them look like natural river stones. -
Initial Drying:
Place the stones on a wire rack or a piece of parchment paper. Let them dry for 24-48 hours. I like to flip them over halfway through the drying process to ensure the bottoms dry evenly and don’t curl.
Step 2: Refining and Decorating
-
Sand for smoothness:
Once fully dry and hard, take your fine-grit sandpaper and lightly buff the surface and edges. The goal is a matte, silky finish that feels good to hold. -
Dust off residue:
Wipe the stones down with a slightly damp cloth or a dry brush to remove all white clay dust before you start drawing. -
Paint the terracotta stones style:
For the terracotta-colored stones, use a dark blue paint pen or a fine liner brush with dark acrylic paint. Draw a single, flowing stem with simple, leafy branches. -
Detail the white stones:
On the white stones, vary your designs. Use a black fineliner for crisp twigs. For the softer look seen in the image, use a fine brush with thinned beige or brown paint to create leafy sprigs that look almost like watercolor. -
Create the blue contrast:
For the dark blue stone, switch to a white paint pen. The high contrast is striking, so choose a bold design like a large, singular leaf frame. -
Add delicate accents:
On the white stone with the branch, use a tiny dotting tool or the tip of a toothpick to add small brown ‘berries’ or dots to the ends of the drawn twigs for texture.
Uneven Surfaces?
If your clay dries with small cracks or divots, mix a tiny bit of fresh clay paste (clay + water) and fill the gaps. Let dry, then sand smooth.
Step 3: Packaging the Set
-
Seal the artwork only:
Since these are diffuser stones, you want the clay to remain porous to absorb oil. However, to protect your drawing, you can apply a tiny amount of matte varnish just over the painted lines, leaving the background raw. -
Prepare the tag:
Cut a tag shape from white cardstock. Replicate one of your simple leaf designs onto the tag using the same pens you used on the stones to tie the theme together. -
Assemble the box:
Place the stones into the partitioned gift box. Ensure they fit snugly so they don’t rattle against each other. If needed, add a little shredded paper or felt at the bottom for cushioning. -
Final touches:
Punch a hole in your tag, thread a piece of rustic jute twine through it, and tie it to the box closure or handle.
Diffusing Pro-Tip
Advise customers to apply essential oils to the back of the stone. This prevents the oil from potentially discoloring the artwork on the front.
This sophisticated set is ready to bring a calming scent and a touch of nature to any home
Wall Hanging Charms in Boho Shapes
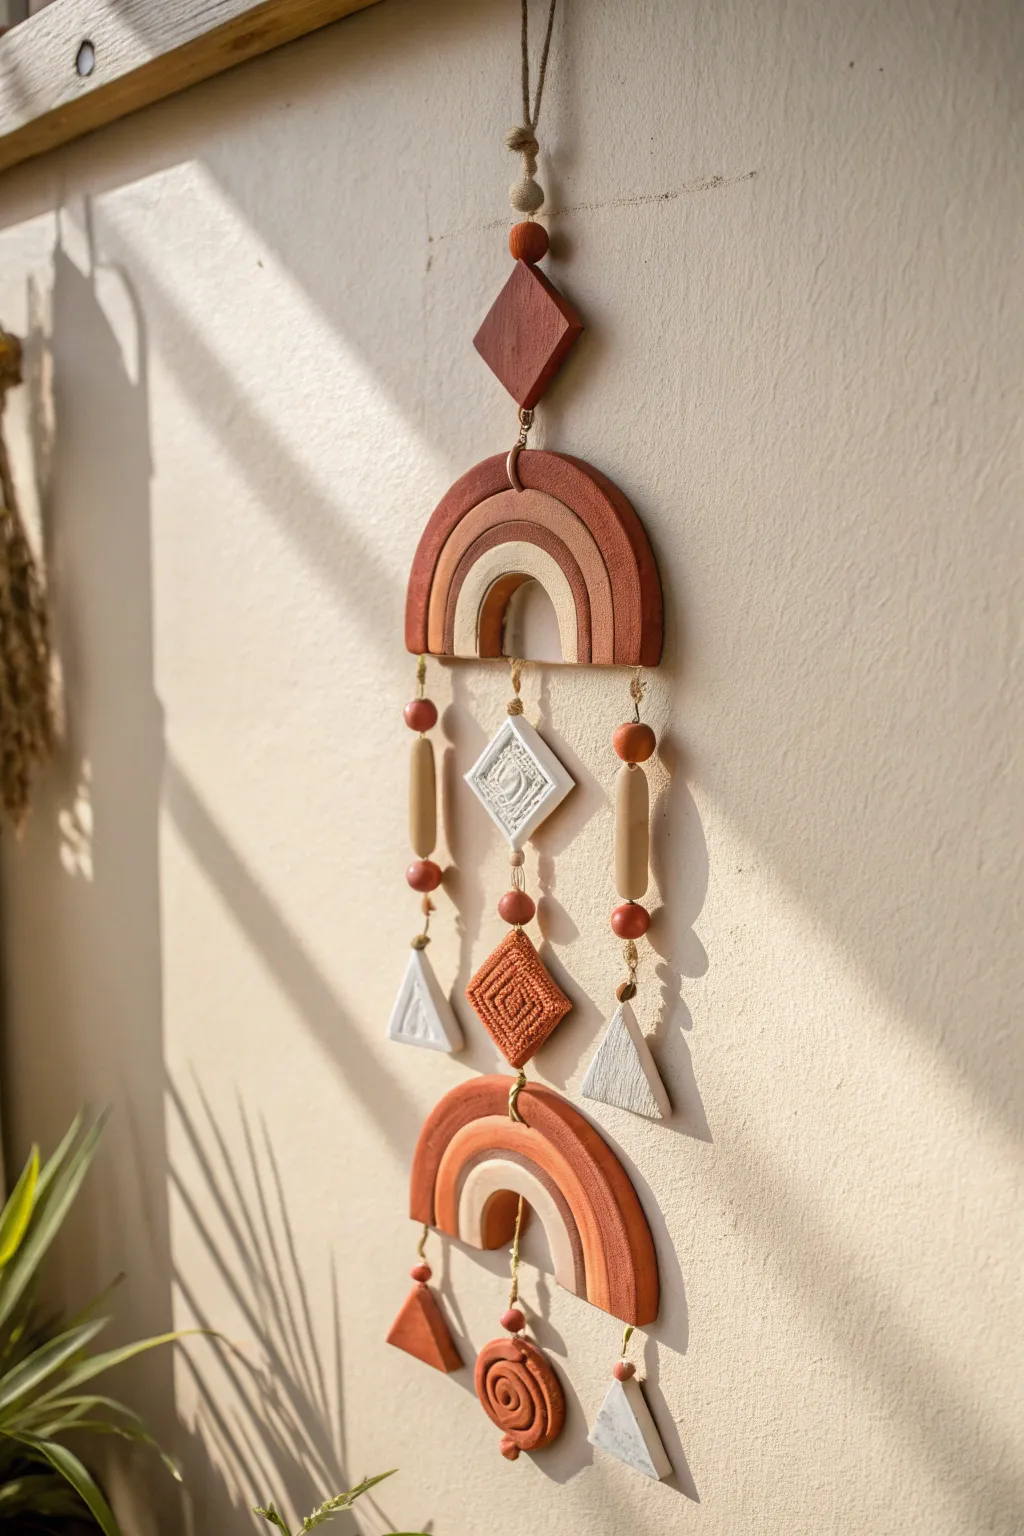
This multi-tiered wall hanging combines the warmth of terracotta tones with clean, geometric shapes for a stunning piece of modern bohemian decor. With its arched rainbows and textured charms, it brings an earthy, artisanal vibe to any room.
Step-by-Step
Materials
- Air dry clay (white or pre-colored terracotta)
- Acrylic paints (terracotta, burnt sienna, cream/off-white)
- Rolling pin
- Clay knife or craft knife
- Needle tool or toothpick
- Circle cutters (various sizes) or jar lids
- Texturing tools (combs, stamps, or rough fabric)
- Jute twine or thin hemp cord
- Wooden beads (assorted sizes)
- Fine-grit sandpaper
- Matte varnish or sealant
Step 1: Creating the Arches & Diamonds
-
Roll out the clay:
Start by rolling out a large slab of air dry clay to an even thickness of about 1/4 inch. If you are using white clay, you will paint it later; if using terracotta clay, the color is already set. -
Cut the rainbow arches:
To form the two main rainbow shapes, use nesting circle cutters or trace around jar lids of different sizes. You need large semi-circles for the outer bands and smaller ones for the inner bands. Cut them out cleanly with your craft knife. -
Assemble the rainbows:
Place a smaller arch inside a larger one to ensure they fit. You don’t need to glue them together side-by-side; they will hang independently or be connected by string. Make two full sets of these rainbow arches. -
Cut geometric charms:
From the remaining slab, cut out two large diamonds, several smaller triangles, and a few small circular discs. Use a ruler to keep your straight edges sharp and precise. -
Add texture:
While the clay is still soft, press patterns into specific pieces. For the central diamond and the bottom spiral charm, use a needle tool to scratch in lines or a stamp to create an embossed relief. -
Create holes for hanging:
This is crucial: before drying, use a straw or needle tool to poke holes at the top and bottom of every piece that needs to connect. The large rainbow arches need holes at their apex and at the bottom of their legs.
Warping Woes?
If clay edges curl up while drying, gently weigh them down with a heavy book over parchment paper once the clay is ‘leather hard’ but not fully dry.
Step 2: Drying & Painting
-
Let it dry completely:
Lay all your pieces flat on a piece of parchment paper. Let them dry for 24-48 hours, flipping them occasionally to prevent warping. -
Sand the edges:
Once solid, gently sand any rough edges or burrs with fine-grit sandpaper for a professional, smooth finish. -
Mix your palette:
Prepare your acrylic paints. You want a gradient of earth tones: a deep burnt orange, a lighter terracotta, and a soft cream. I often mix a little brown into my orange to ground the color. -
Paint the pieces:
Paint the outer rainbow arches in the darkest terracotta shade. Paint the inner arches and some geometric charms in the lighter terracotta or cream. Leave some white if you want a high-contrast look. -
Seal the work:
Apply a coat of matte varnish to all pieces. This protects the paint and gives the clay a finished, durable surface.
Level Up: Scented Clay
Add a few drops of essential oil to the clay before rolling, or onto the unpainted back of the finished spiral charm, to make it a passive diffuser.
Step 3: Assembly
-
Prepare the twine:
Cut several lengths of jute twine. You will need a main vertical line and several shorter connecting pieces. -
Connect the top section:
Tie a loop for hanging at the very top. Thread a small bead, then the top diamond shape, followed by another knot to hold it in place. -
Attach the first rainbow:
Tie the top diamond to the top center of the largest rainbow arch. Hang the smaller inner arch independently inside it using a separate piece of string if desired, or simpler, string them so they nestle together. -
String the middle charms:
From the bottom of the first rainbow, drop three lines of twine. Thread beads and the long, tube-like clay beads (you can make these or wrap clay around a straw) onto the strings. -
Attach the central diamond:
On the center string, attach the textured diamond charm. Add beads above and below to secure it. -
Add the bottom rainbow:
Connect the strings from the middle charms to the top of the second, lower rainbow arch set. Ensure the length is balanced so it hangs straight. -
Finish with final charms:
From the bottom of the second rainbow, add final short distinct strings with triangles and the spiral disc to create a weighted, finished look.
Hang your new mobile near a window where natural light can highlight the beautiful shadows and earthy textures
Wavy Mirror Frames With Organic Edges
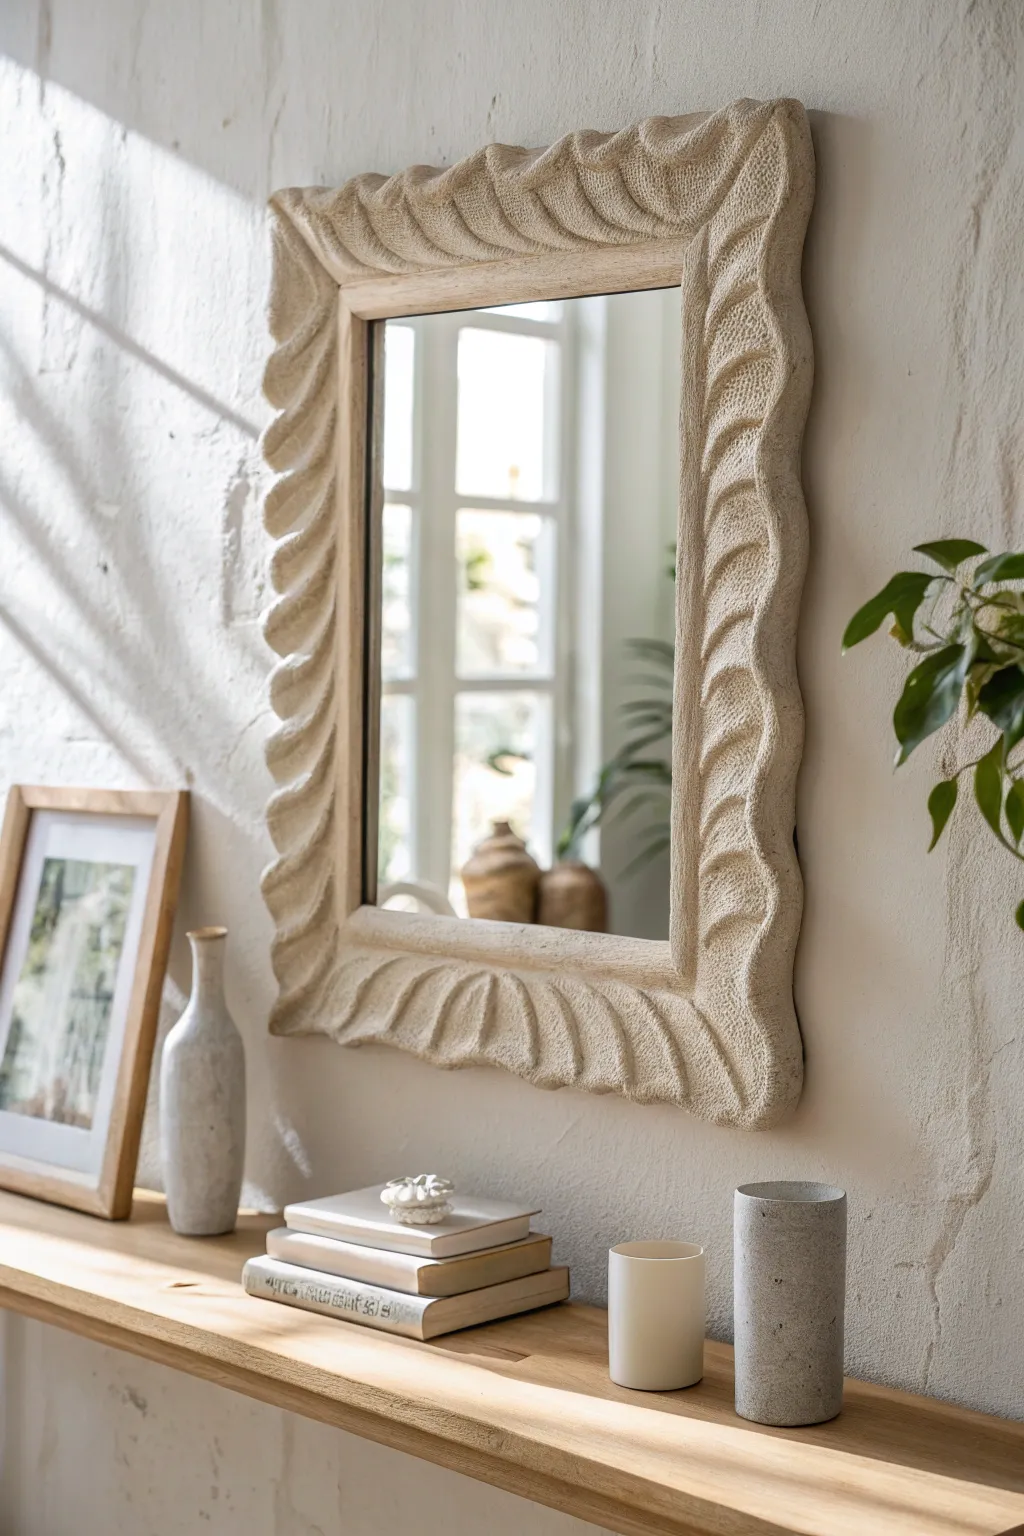
Transform a plain, inexpensive mirror into a high-end sculptural piece that mimics carved limestone or travertine. This project uses air-dry clay to create a rhythmic, wavy border with a distinctively gritty texture that adds organic warmth to any room.
Detailed Instructions
Materials
- Rectangular mirror (plain with flat frame or frameless)
- White or terracotta air-dry clay (approx. 2-3kg depending on size)
- Strong craft adhesive (like E6000) or construction adhesive
- Rolling pin
- Sculpting tools (loop tool and needle tool)
- Coarse texture sponge or crumpled aluminum foil
- Old toothbrush
- Sandpaper (medium grit)
- Cream or off-white acrylic paint
- Matte spray sealant
- Bowl of water
Step 1: Base Preparation
-
Clean the surface:
Wipe down the border of your mirror thoroughly with rubbing alcohol to remove dust and oils, ensuring the adhesive and clay will stick properly. -
Apply adhesive base:
If you are working on a smooth plastic or metal frame, scuff it with sandpaper first. Then, apply a thin, jagged layer of strong adhesive around the rim to give the clay a better grip.
Step 2: Sculpting the Waves
-
Roll out coils:
Create several thick, long snakes of clay, roughly 1.5 inches in diameter. I find keeping them slightly uneven helps the organic look later. -
Attach the coils:
Press the clay coils firmly onto the mirror border. Smoosh the clay down so it covers the existing frame entirely, blending the seams between joined coils with a little water. -
Flatten and shape:
Gently flatten the top of the clay so it is relatively level but still has bulk. Use your fingers to push the outer and inner edges into a rough rectangular shape. -
Mark the intervals:
Using a ruler or just your eye, lightly mark spacing every 2–3 inches along the clay border where the peaks of the waves will go. -
Carve the diagonal flow:
Use a modeling tool or your thumb to press into the clay at an angle, dragging from the inner edge to the outer edge to create deep, diagonal grooves. -
Refine the scallops:
Build up the ridges between your grooves by adding small bits of clay if needed. Pinch the outer edge to create the distinct scalloped silhouette seen in the photo. -
Blend the surface:
Smooth out harsh tool marks with a damp sponge, but don’t over-polish; the shape should feel hand-carved, not manufactured.
Preventing Warp
Clay shrinking can pull away from the mirror. Score the frame deeply before applying clay, and drape a damp cloth over the project to slow drying time dramatically.
Step 3: Texturing and Finishing
-
Create the stone grain:
This is the secret sauce: take a ball of crumpled aluminum foil or a coarse sea sponge and press it firmly all over the wet clay to create a pitted, stone-like surface. -
Add fine detail:
Uses an old toothbrush to stipple the surface, adding tinier pores and taking away any slickness from the clay. -
Refine the edges:
Run a damp finger along the very inner rim where the clay meets the mirror glass to ensure a clean, sharp line before it dries. -
Dry slowly:
Let the mirror dry flat in a cool area away from direct sun. This heavy application may take 48–72 hours to cure completely. -
Patch cracks:
Air-dry clay shrinks, so if cracks appear at the joints, fill them with a slip made of wet clay and water, then re-texture that spot. -
Paint application:
Mix a cream or barely-there beige acrylic paint. Dab it on with a dry brush rather than painting solidly, which highlights the texture. -
Seal the work:
Finish with two light coats of matte spray sealant to protect the clay from moisture and dust without making it shiny.
Faux-Stone Hack
Mix a handful of sand or used coffee grounds directly into your clay before sculpting. It creates authentic, deep texture that paint alone can’t replicate.
Hang your new sculptural mirror in a well-lit spot to let the shadows play across the textured waves
Stackable Desk Organizer Trays
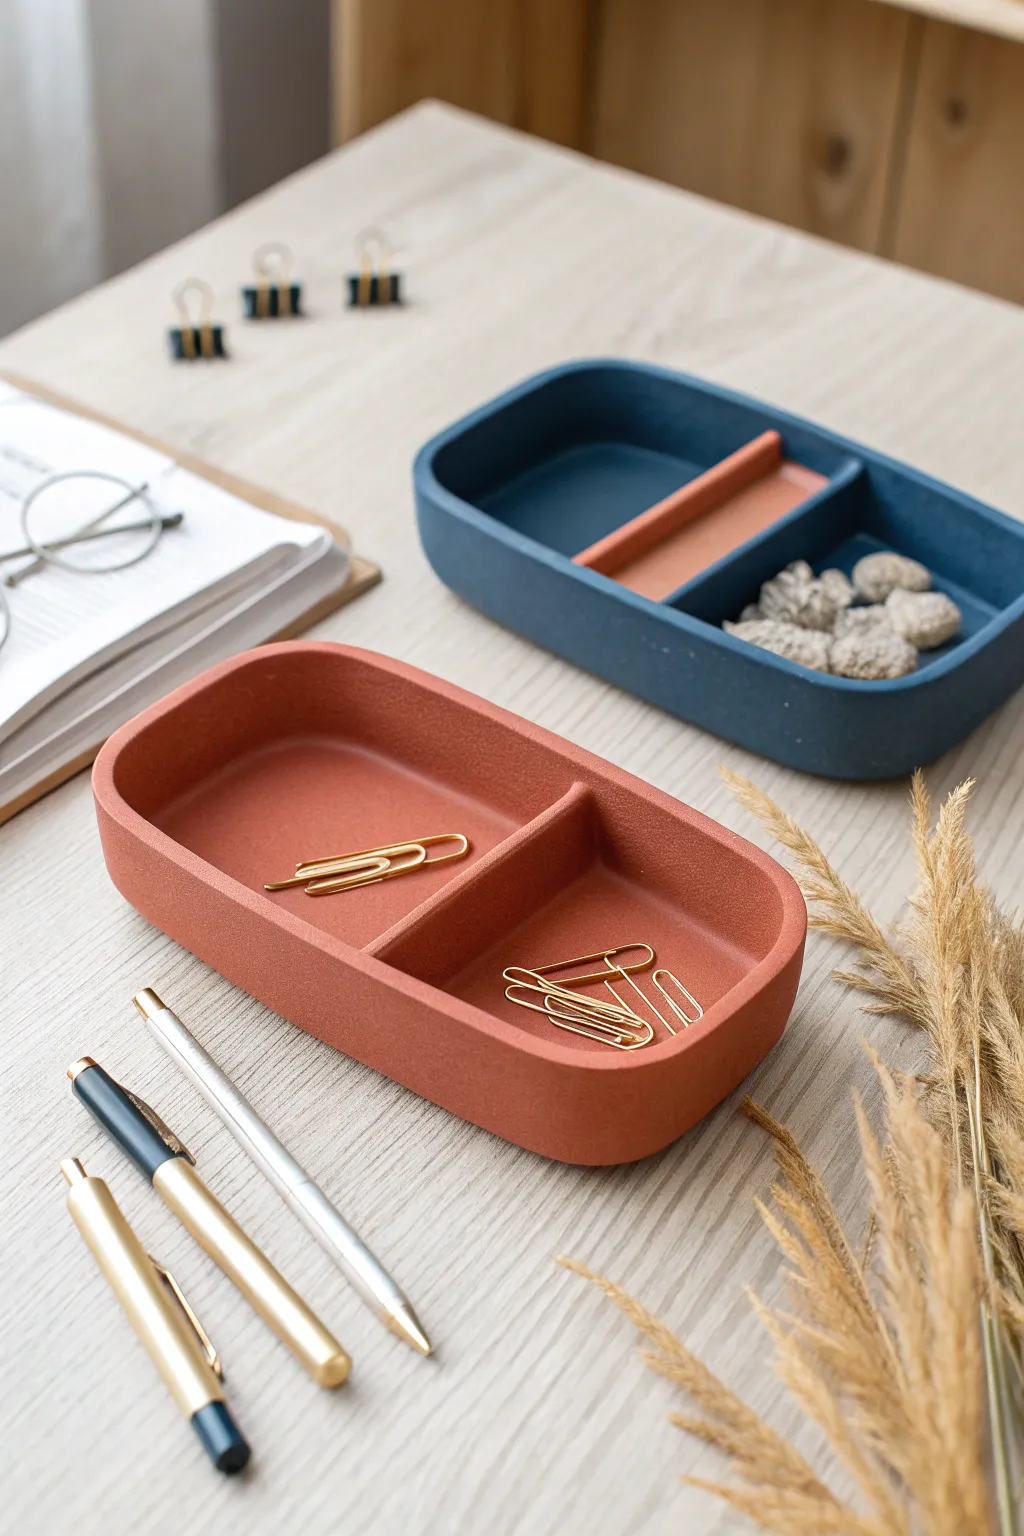
These sleek, dual-compartment organizers bring a touch of warm minimalism to your workspace with their matte finish and soft rounded edges. Whether you stack them or scatter them across your desk, they are perfect for corralling paperclips, erasers, and other small essentials.
Step-by-Step Tutorial
Materials
- Air dry clay (terracotta and blue colored, or white to paint later)
- Rolling pin
- Two long wooden slats or thickness guides (approx. 5mm)
- Sharp clay knife or X-Acto blade
- Ruler
- Small bowl of water
- Sandpaper (fine grit)
- Rectangular template (cardstock or cardboard)
- Sponge
- Acrylic sealer (matte)
Step 1: Prepping and Cutting
-
Prepare your template:
Cut a rectangle from sturdy cardstock to serve as your base template. Aim for about 6 inches by 3 inches with rounded corners to match the tray shape perfectly. -
Roll out the slab:
Knead your air dry clay until pliable. Place it between your two thickness guides and roll it out into a smooth, even slab. The guides ensure the entire piece is a uniform 5mm thickness. -
Cut the base:
Place your cardstock template onto the clay slab. Use your sharp knife to trace around the edge, cutting out the rounded rectangular base. Lift the excess clay away and set aside. -
Cut the walls and divider:
From the remaining slab, cut long strips for the outer walls and a shorter strip for the central divider. Ensure these strips are all the exact same height—about 1 inch is ideal for a shallow tray.
Smooth Operator
Use a damp sponge to smooth the clay before it dries. It saves hours of sanding time later and gives a professional, ceramic-like finish instantly.
Step 2: Assembly
-
Score the edges:
Take your needle tool or knife and gently scratch cross-hatch marks (scoring) along the outer perimeter of your base where the walls will attach. Do the same to the bottom edge of your wall strips. -
Apply slip:
Dab a small amount of water or liquid clay (slip) onto the scored areas. This acts as the glue that bonds the pieces together strongly. -
Attach the outer wall:
Carefully place the long wall strip around the perimeter of the base. If your strip isn’t long enough to go all the way around, use two pieces and join them at the seams. I like to cut the ends at a 45-degree angle for a cleaner join. -
Blend the seams:
Using a modeling tool or your fingers, smooth the clay where the wall meets the base, both on the inside and outside. The seam should disappear completely so it looks like one solid piece. -
Insert the divider:
Measure the exact width of the tray’s interior at the center point. Trim your divider strip to fit snugly. Score and slip the contact points, then press the divider into place. -
Smooth the divider:
Blend the seams where the divider meets the walls and the floor of the tray. Use a slightly damp brush to reach into tight corners if your fingers don’t fit. -
Round the rim:
Dip your finger in a little water and run it along the top rim of the walls and divider to soften the sharp cut edges, creating that smooth, rounded look seen in the photo.
Make Them Stackable
Create a small ‘lip’ or indentation on the bottom of the upper tray that matches the rim of the lower tray so they lock into place securely when stacked.
Step 3: Finishing Touches
-
Initial drying:
Let the tray dry slowly away from direct sunlight or heat sources to prevent cracking. This usually takes 24-48 hours depending on humidity. -
Sanding:
Once fully dry, use fine-grit sandpaper to buff out any fingerprints, bumps, or uneven edges. Focus on the rim to ensure it feels nice to the touch. -
Seal or paint:
If you used colored clay, apply a matte acrylic sealer to protect the surface while keeping the natural look. If you used white clay, paint it with matte acrylics in terracotta or deep blue, let dry, and then seal.
Enjoy the organized calm your new custom trays bring to your daily workflow
Handmade Drawer Knobs for Easy Upgrades
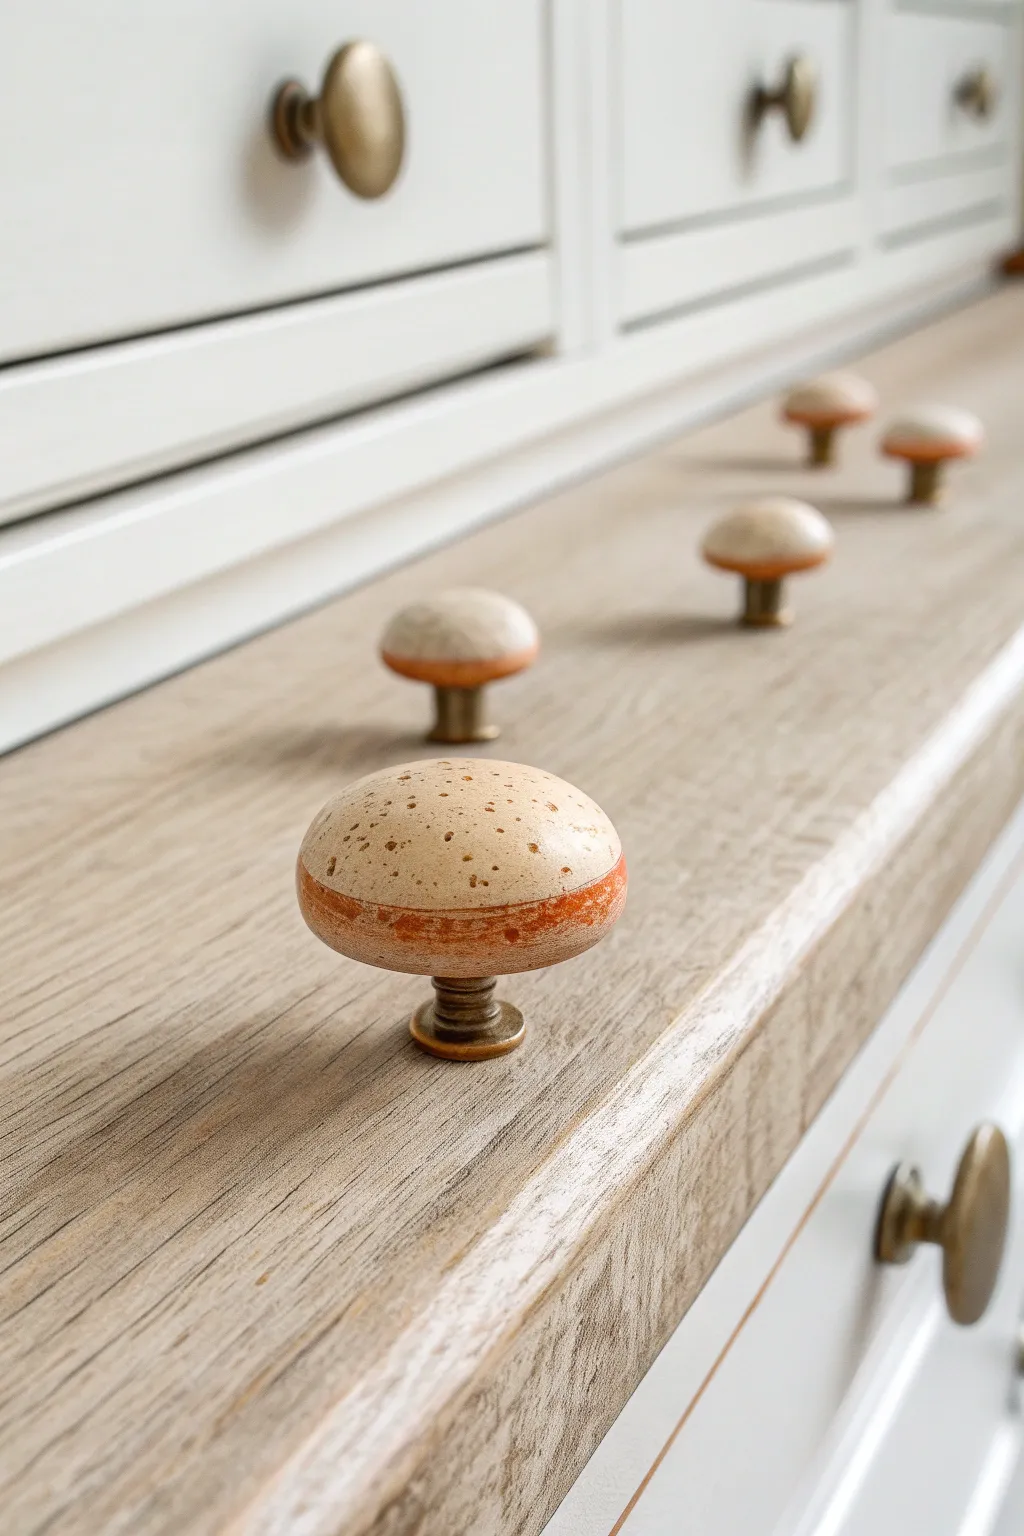
Transform boring furniture into a conversation piece with these charming, mushroom-inspired drawer pulls. Featuring an organic, speckled cream texture and a distressed terracotta base, they add a perfect touch of earthy warmth to any dresser or cabinet.
How-To Guide
Materials
- Air dry clay (white or natural stone color)
- Small wooden drawer knobs (mushroom shape) or knob hardware blanks
- Super glue or strong craft adhesive
- Acrylic paint (Cream/Off-White and Burnt Orange/Terracotta)
- Old toothbrush
- Soft paintbrush
- Sponge or paper towel
- Fine-grit sandpaper
- Matte or satin varnish
- Spray gloss (optional)
- Dark brown acrylic paint (diluted) or brown ink
Step 1: Shaping the Clay Cap
-
Prepare the hardware base:
Begin with simple wooden knobs or metal knob blanks as your core. If using wood, lightly sand the surface first to help the clay adhere better. -
Condition the clay:
Take a walnut-sized ball of white air dry clay and knead it well until it is pliable and smooth. Rolling it in your palms helps remove cracks. -
Form the mushroom cap:
Apply a small dot of strong glue to the top of your knob hardware. Press the clay ball onto the hardware, flattening slightly and molding it over the top to create a smooth, domed mushroom shape. -
Refine the edges:
Ensure the clay extends slightly over the edge of the hardware to create that classic mushroom overhang. Dip your finger in water to smooth out any fingerprints or join lines. -
Let it cure:
Allow the knobs to dry completely. This takes about 24-48 hours depending on humidity; turn them occasionally so all sides dry evenly.
Step 2: Sanding and Base Coat
-
Sand for smoothness:
Once fully dry, use fine-grit sandpaper to gently buff out any imperfections or bumps on the clay surface, creating a satin-smooth finish. -
Wipe clean:
Use a barely damp cloth or dry brush to remove all the clay dust before you start painting. -
Apply the main color:
Paint the entire mushroom cap with your cream or off-white acrylic paint. You may need two thin coats for full coverage. -
Create the terracotta accent:
Load a brush with burnt orange or terracotta paint. Carefully paint a thick band around the bottom edge of the mushroom cap. -
Distress the band:
While the orange paint is still tacky, use a damp sponge or paper towel to dab at the edges, softening the line where it meets the cream color for a faded, organic look.
Water Smoothing Hack
Keep a small bowl of water nearby while shaping. If the clay starts to crack while stretching over the knob base, a wet finger instantly heals fissures.
Step 3: Adding Texture and Speckles
-
Prepare the splatter mix:
Dilute a small drop of dark brown acrylic paint with water until it has an inky consistency. -
Load the toothbrush:
Dip an old toothbrush into this watery brown mixture. -
Test the spray:
Before spraying your knob, run your thumb over the bristles to test the spray pattern on a piece of scrap paper. You want fine mists, not giant blobs. -
Speckle the surface:
Hold the toothbrush about 6 inches away from the knob and flick the bristles to spray tiny brown speckles across the top. This mimics the natural texture of stone or ceramic. -
Optional texture wash:
If you want an even more aged look, you can wipe a very watery wash of brown paint over the cream area and immediately wipe it off, leaving pigment only in tiny pores. -
Seal for durability:
Since these will be handled frequently, sealing is crucial. Apply 2-3 coats of matte or satin varnish, allowing proper drying time between each layer. -
Final assembly:
If you used a separate screw mechanism, attach your new distinctive knobs to your drawer front once the varnish is rock hard.
Go Metallic
For a luxe twist, swap the terracotta paint band for gold leaf or metallic copper paint to make the edges shimmer against the matte stone texture.
Enjoy the instant character these custom knobs bring to your refurbished furniture
Stamped Plant Markers for Herb Gardens
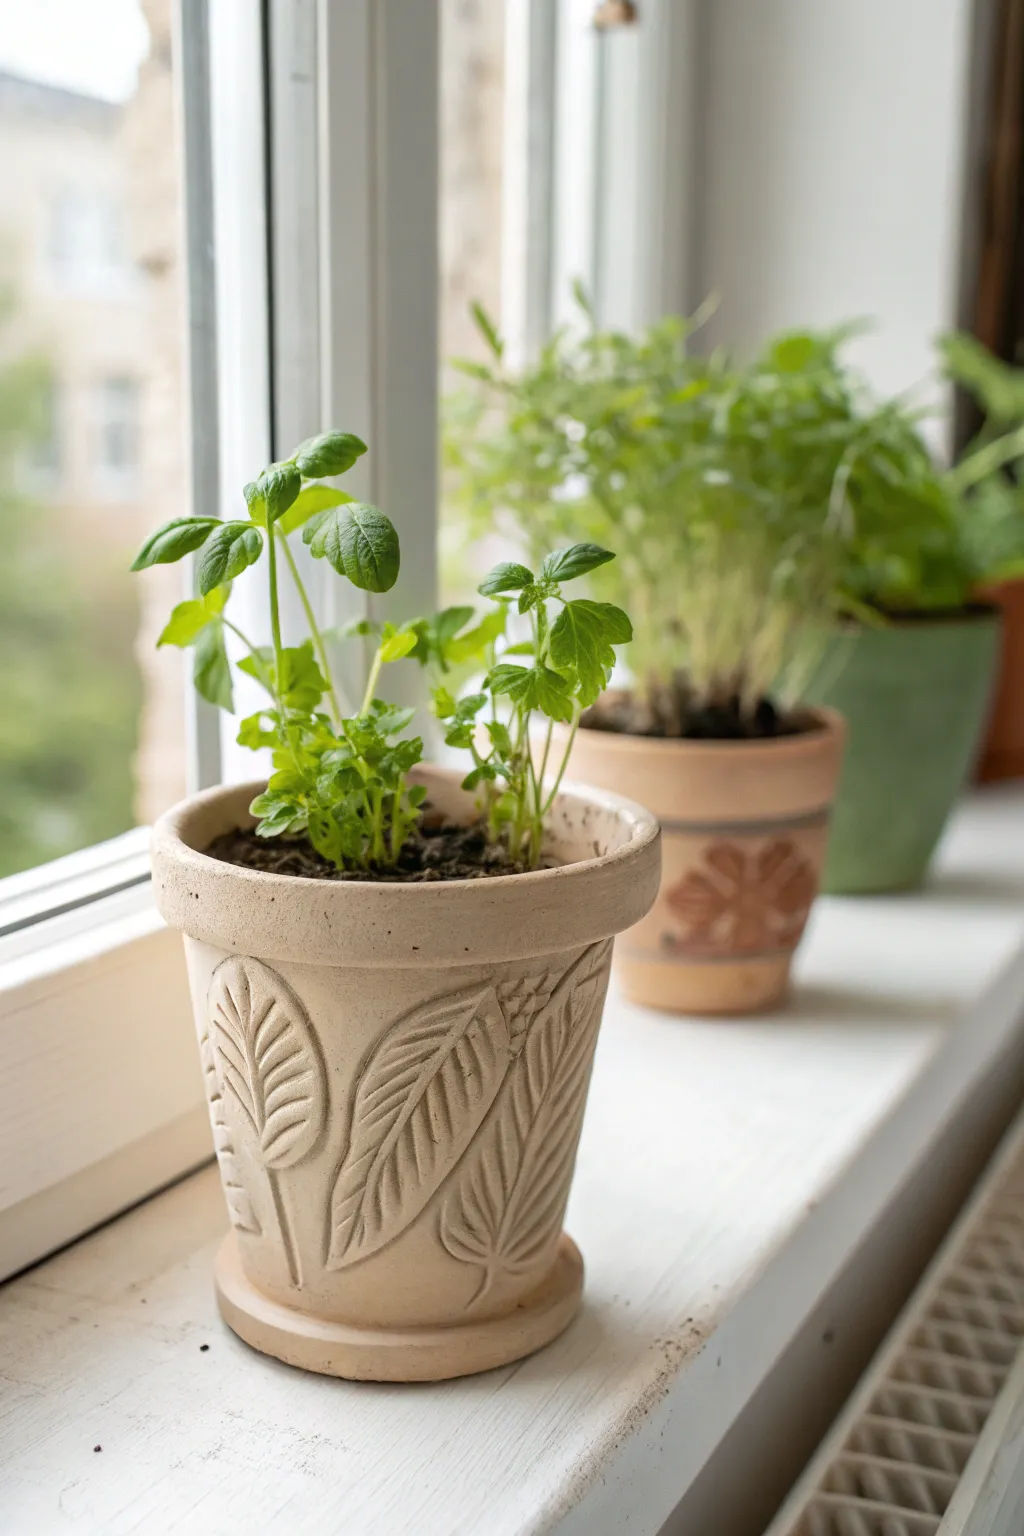
Transform a plain terra cotta pot into a botanical work of art using air dry clay and simple sculpting techniques. This project creates a beautiful, dimensional leaf design that wraps elegantly around your herb garden containers, giving them a rustic, handcrafted feel.
Detailed Instructions
Materials
- Small terra cotta pot (clean and dry)
- Air dry clay (white or light beige)
- Rolling pin
- Leaf-shaped cookie cutters or a sharp craft knife
- Modeling tools (or a toothpick)
- Small bowl of water
- Sponge or brush for slip
- Clear acrylic sealant (matte or satin finish)
- Fine grit sandpaper
Step 1: Preparing the Base
-
Clean the pot:
Begin by thoroughly wiping down your terra cotta pot with a damp cloth to remove any dust or oils. Let it dry completely so the clay adheres properly surface. -
Condition the clay:
Take a handful of air dry clay and knead it in your hands until it becomes warm, soft, and pliable. If the clay feels too dry, dip your fingers in water and work the moisture in. -
Roll out a sheet:
On a clean, flat surface, roll out a portion of your clay to a thickness of about 1/4 inch. You want it thick enough to hold texture but not so heavy that it will slide off the pot.
Step 2: Creating the Leaves
-
Cut leaf shapes:
Use leaf-shaped cutters to stamp out several basic leaf forms from your clay sheet. I usually cut about 5-6 leaves for a small pot to ensure I have enough to play with. -
Sculpt freehand (optional):
If you don’t have cutters, use a craft knife to cut out elongated oval shapes with pointed ends. These don’t need to be perfect; natural variation adds character. -
Add vein details:
Using a modeling tool or a dull knife, gently press a central vein line down the middle of each leaf. Then, score smaller diagonal veins branching out from the center to create realistic texture. -
Create stems:
Roll very thin coils of clay to act as the stems. These should be slightly longer than needed so you can trim them later during assembly.
Crack Fixes
If hairline cracks appear while drying, mix a tiny bit of fresh clay with water to make a thick paste. Fill the cracks, smooth with a damp finger, and let dry again.
Step 3: Attaching the Design
-
Make clay slip:
Mix a small amount of clay with water until it forms a creamy paste. This ‘slip’ acts as the glue for your project. -
Score the pot:
Rough up the area on the pot where you plan to place the first leaf using a toothpick or wire brush tool. This scratching helps the clay grip the ceramic surface. -
Apply the first leaf:
Brush a little slip onto the scored area and the back of your clay leaf. Press the leaf firmly onto the pot, smoothing the edges slightly to blend it if desired, or keeping them crisp for a relief look. -
Arrange the pattern:
Continue adding leaves around the pot. I like to angle them slightly differently—some tilting left, some right—to mimic how foliage naturally grows. -
Attach stems:
Apply slip to your thin clay coils and place them connecting the leaves, running them down toward the base of the design. Gently press them to bond with the pot surface.
Antique Finish
Dilute brown acrylic paint with water and brush it over the dried clay. Wipe it back immediately with a cloth, leaving darkness in the recesses for an aged look.
Step 4: Refining and Finishing
-
Smooth the seams:
Dip your finger or a soft brush in water and smooth out any fingerprints or rough edges on your leaves. Be careful not to erase the vein textures you created earlier. -
Add rim details:
If you want a unified look, add a thin band of clay around the rim of the pot or gently texture the existing clay near the rim to frame your design. -
Slow drying:
Let the pot dry slowly away from direct sunlight or heat sources for at least 24-48 hours. Drying too fast can cause the clay to crack or pop off the terra cotta. -
Sand for smoothness:
Once fully dry and hard, use fine-grit sandpaper to gently buff away any sharp peaks or rough spots on the clay surface. -
Seal the work:
Apply two coats of a clear acrylic sealant (matte looks most natural) over the entire clay design and pot exterior. This protects the clay from moisture when you water your plants.
Now your custom planter is ready to be filled with soil and your favorite aromatic herbs
Seasonal Ornament Sets People Collect
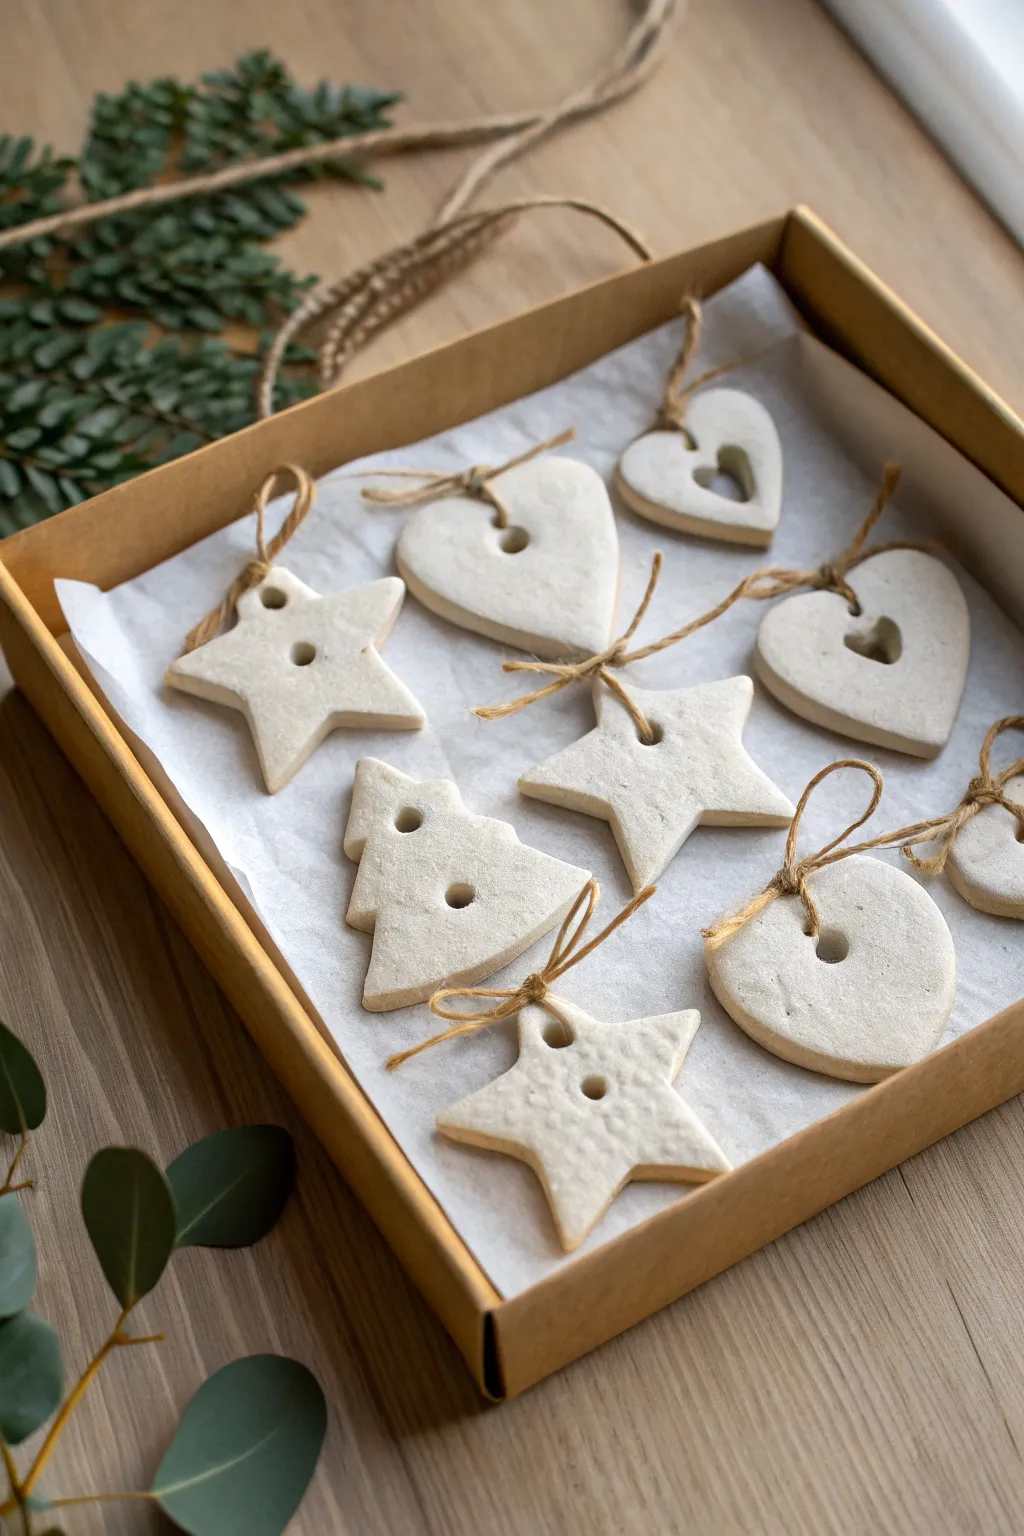
These charming, Scandinavian-inspired ornaments offer a minimalist aesthetic that fits perfectly into any holiday decor theme. Their raw white finish and natural jute ties create a timeless, handcrafted look that buyers love to collect year after year.
Step-by-Step
Materials
- White smooth air-dry clay
- Rolling pin
- Parchment paper or non-stick mat
- Cookie cutters (stars, hearts, tree, circle)
- Straw or small circular tool
- Fine-grit sandpaper (400 grit)
- Natural jute twine
- Scissors
Step 1: Prepping and Cutting
-
Condition the clay:
Begin by kneading a handful of air-dry clay until it is warm, pliable, and free of any air pocket bubbles. -
Roll it out:
Place the clay between two sheets of parchment paper or directly on a silicone mat. Roll it out to an even thickness of about 1/4 inch (6mm). Keeping the thickness consistent ensures they won’t crack during drying. -
Cut the shapes:
Press your chosen cookie cutters firmly into the clay. For this set, aim for a mix of classic stars, simple hearts, circles, and Christmas trees. -
Create hanging holes:
While the clay is still wet, use a straw or a small circular tool to punch a hole near the top of each shape. Ensure the hole is at least 3-4mm wide so the twine can pass through later. -
Add detail holes (optional):
For the heart shapes, you can punch a larger central hole or a smaller heart cutout in the middle for visual interest, just like in the reference photo. -
Smooth the edges:
Dip your finger in a tiny bit of water and gently run it along the cut edges of your shapes to smooth out any ragged bits left by the cutter.
Step 2: Drying and Refining
-
Initial drying phase:
Lay the ornaments flat on a clean sheet of parchment paper in a safe, dry area away from direct heat sources. -
Flip regularly:
To prevent curling, flip the ornaments over every 4-6 hours during the first day. This allows moisture to evaporate evenly from both sides. -
Wait for full cure:
Let the pieces dry completely for 24-48 hours. The clay will turn a stark, chalky white and feel hard to the touch when fully ready. -
Sanding:
Once bone dry, take your fine-grit sandpaper and gently sand the edges and surface. This removes any final imperfections and gives the clay that professional, soft-matte finish. -
Dust off debris:
Wipe each ornament with a dry, soft cloth or use a clean paintbrush to remove all sanding dust.
Smooth Surface Secret
Use a rolling pin with guide rings or place two wooden rulers on either side of your clay while rolling. This guarantees perfectly even thickness across all your ornaments.
Step 3: Assembly and Packaging
-
Cut the twine:
Cut lengths of natural jute twine, approximately 8-10 inches (20-25cm) long for each ornament. -
Thread the loop:
Fold a piece of twine in half and push the looped end through the hole in the ornament from back to front. -
Secure the knot:
Pull the loose ends of the twine through the loop and tighten gently to create a cow hitch knot, or simply tie a standard knot at the top if you prefer a different hanging style. -
Tie the bow (optional):
For a rustic touch seen in the image, you can tie a small separate bow or knot close to the base of the ornament hole. -
Final presentation:
Arrange the finished set in a kraft paper box lined with white tissue paper to mimic the earthy display shown in the inspiration photo.
Fixing Cracks
If hairline cracks appear while drying, mix a tiny amount of fresh clay with water to make a paste (slip). Fill the crack, smooth it over, and let it dry again.
Your beautiful, eco-friendly ornament set is now ready to be gifted or listed in your shop
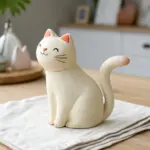
Tiny Mini Figurine Collections for Niche Buyers
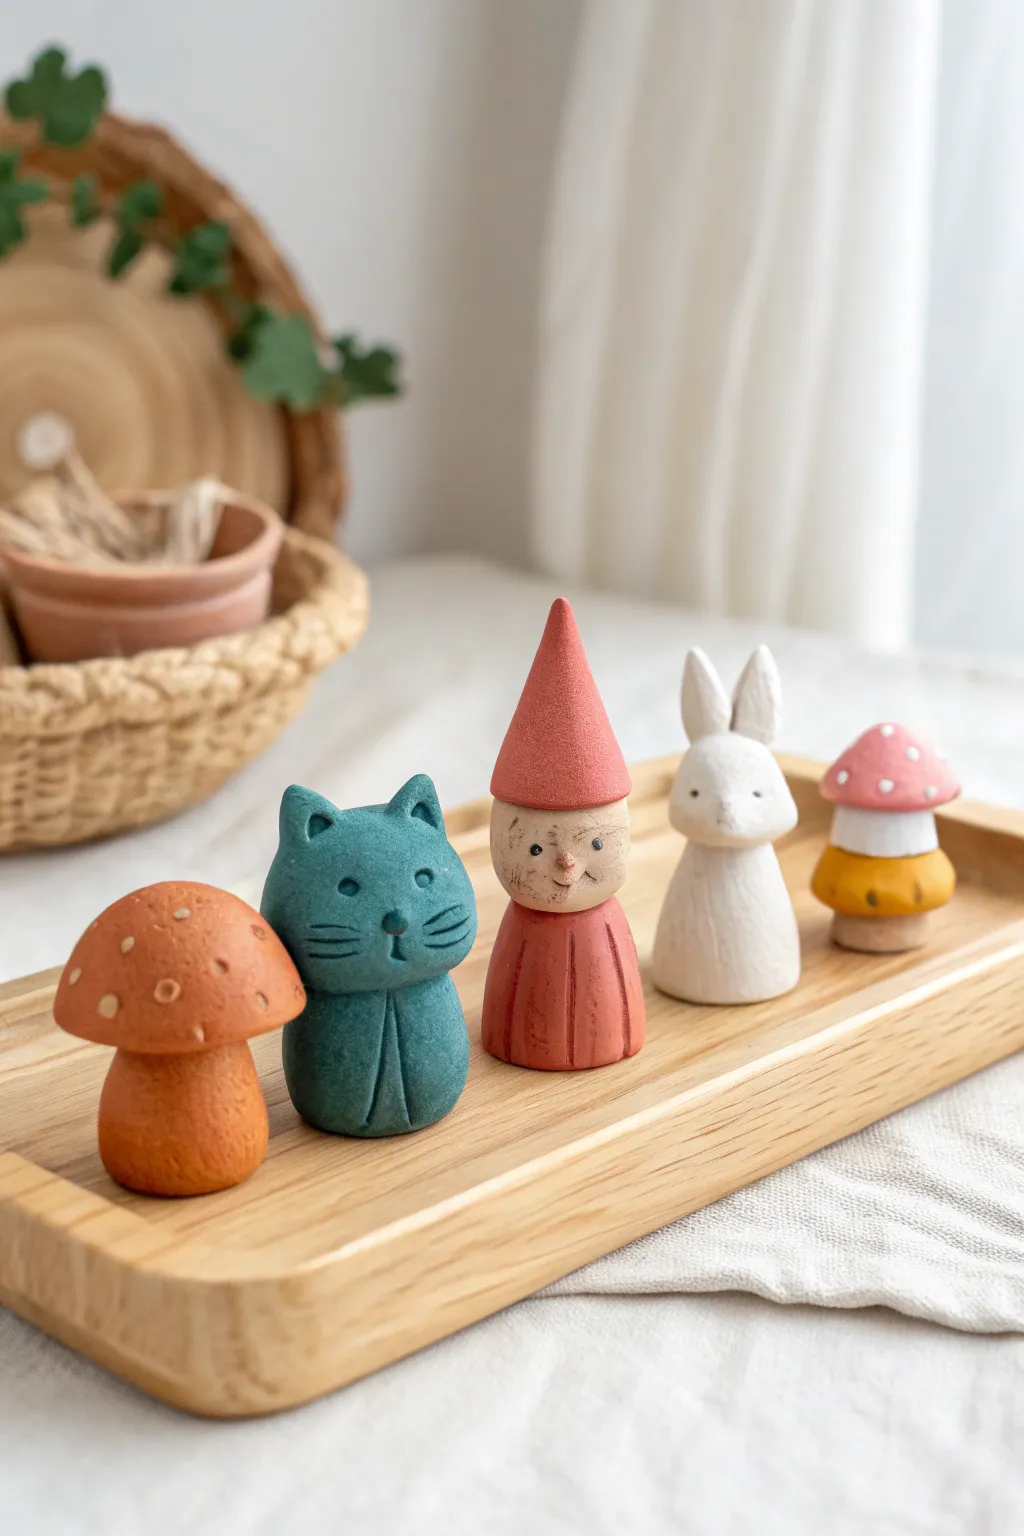
Create a charming collection of miniature forest dwellers that feel like they’ve walked right out of a fairy tale. These smooth, distinctively shaped figures—a mushroom, cat, gnome, rabbit, and toadstool—feature a matte, earthy texture that buyers will adore for nature tables or shelf decor.
Step-by-Step Tutorial
Materials
- High-quality air dry clay (stone or earth tone preferred)
- Acrylic paints (burnt orange, teal blue, terracotta red, white, mustard yellow, dark grey)
- Fine grit sandpaper (220 and 400 grit)
- Clear matte varnish or sealant
- Sculpting tools (needle tool, small ball stylus)
- Small cup of water
- Fine detail paintbrush
- Smooth rolling pin (optional)
Step 1: Sculpting the Shapes
-
Core Prep:
Begin by conditioning five balls of clay, roughly the size of a walnut each. Knead them thoroughly until there are no cracks, adding a tiny drop of water if the clay feels too stiff. -
Classic Mushroom:
Take the first ball and shape a thick, cylindrical stem with a rounded bottom. Create a separate smooth cap by flattening a sphere into a dome shape. Join the cap to the stem using a little water and blending the clay underneath the rim for a seamless connection. -
Teal Cat Form:
Roll a smooth, slightly tapered cylinder for the cat’s body. Pinch the top gently to suggest ears, keeping them rounded rather than sharp. Use your thumb to smooth the “face” area flat so it’s ready for carved details later. -
The Gnome’s Base:
Form a bell-shaped body that is wider at the bottom and slightly narrower at the shoulders. Roll a separate small ball for the head and attach it firmly. For the hat, roll a cone shape, hollow the base slightly with your thumb, and press it securely onto the head. -
Minimalist Rabbit:
Create a simple, elongated teardrop shape for the body. Roll a smaller sphere for the head. Shape two long, flattened ovals for ears and attach them upright to the top of the head using slip (water mixed with clay) to ensure they don’t fall off. -
Double-Stack Toadstool:
Sculpt a short stem, then create two separate, distinct cap shapes—one wider and flatter for the bottom tier, and a smaller dome for the top. Stack them: stem, wide cap, a tiny connector cylinder, and finally the top dome. -
Carving Details:
While the clay appears dry but is still “leather hard,” gently use the needle tool. For the cat, incise deep, deliberate lines for the whiskers, nose, and leg indents. For the gnome, carve vertical lines on the robe to simulate fabric folds.
Step 2: Refining and Color
-
Low-Temp Drying:
Let the figures dry completely for 24-48 hours. I find turning them upside down halfway through helps the bottoms dry evenly without warping. -
Sanding for Texture:
Once bone dry, sand the entire surface of each figure. Start with 220 grit to remove fingerprints, then finish with 400 grit for that ultra-smooth, almost ceramic feel seen in the photo. -
Base Coating:
Paint the first mushroom entirely in burnt orange. Paint the cat body in a deep teal blue. For the gnome, paint the robe and hat terracotta red, leaving the face natural clay color. -
Painting the Rabbit and Stack:
Coat the rabbit in clean matte white. For the stacked toadstool, paint the bottom cap mustard yellow and the top cap a soft pink, leaving the connecting stem pieces white or natural. -
Adding Personality:
Using your finest brush, add the tiny dots: beige circles on the orange mushroom and white specks on the pink toadstool cap. Keep them slightly irregular for an organic look. -
Facial Features:
Mix a tiny amount of watery dark grey paint. Carefully paint simplistic eyes and a nose on the rabbit and gnome. For the cat, trace inside the carved whisker and eye grooves to emphasize the shadows. -
Gnome Wash:
To give the gnome that vintage, slightly weathered look, use a very watery brown wash over the unpainted face area, then quickly dab most of it off with a paper towel, leaving pigment only in the crevices. -
Protective Seal:
Finish with two thin coats of matte varnish. This is crucial—it protects the paint from chipping but maintains that soft, velvety appearance that makes these figures so tactile.
Cracks Appearing?
If hairline cracks appear while drying, mix a slurry of clay dust and white glue. Rub this paste into the cracks, let dry, and sand smooth before painting.
Weightier Feel
Embed a small pebble or metal washer inside the base of each figure during the sculpting phase to give them a satisfying weight and prevent tipping.
Arrange your finished woodland collection on a simple wooden tray to showcase their harmony and charm